

Page 1
cBot™ 2 System Guide
For Research Use Only. Not for use in diagnostic procedures.
ILLUMINA PROPRIETARY
Material # 20004364
Document # 15065681 v01
January 2016
Customize a short end-to-end workow guide with the Custom Protocol Selector
support.illumina.com/custom-protocol-selector.html
Page 2

This document and its contents are proprietary to Illumina, Inc. and its affiliates ("Illumina"), and are intended solely for the
contractual use of its customer in connection with the use of the product(s) described herein and for no other purpose. This
document and its contents shall not be used or distributed for any other purpose and/or otherwise communicated, disclosed,
or reproduced in any way whatsoever without the prior written consent of Illumina. Illumina does not convey any license
under its patent, trademark, copyright, or common-law rights nor similar rights of any third parties by this document.
The instructions in this document must be strictly and explicitly followed by qualified and properly trained personnel in order
to ensure the proper and safe use of the product(s) described herein. All of the contents of this document must be fully read
and understood prior to using such product(s).
FAILURE TO COMPLETELY READ AND EXPLICITLY FOLLOW ALL OF THE INSTRUCTIONS CONTAINED HEREIN
MAY RESULT IN DAMAGE TO THE PRODUCT(S), INJURY TO PERSONS, INCLUDING TO USERS OR OTHERS, AND
DAMAGE TO OTHER PROPERTY.
ILLUMINA DOES NOT ASSUME ANY LIABILITY ARISING OUT OF THE IMPROPER USE OF THE PRODUCT(S)
DESCRIBED HEREIN (INCLUDING PARTS THEREOF OR SOFTWARE).
© 2016 Illumina, Inc. All rights reserved.
Illumina, 24sure, BaseSpace, BeadArray, BlueFish, BlueFuse, BlueGnome, cBot, CSPro, CytoChip, DesignStudio,
Epicentre, ForenSeq, Genetic Energy, GenomeStudio, GoldenGate, HiScan, HiSeq, HiSeq X, Infinium, iScan, iSelect,
MiniSeq, MiSeq, MiSeqDx, MiSeq FGx, NeoPrep, NextBio, Nextera, NextSeq, Powered by Illumina, SureMDA,
TruGenome, TruSeq, TruSight, Understand Your Genome, UYG, VeraCode, verifi, VeriSeq, the pumpkin orange color,
and the streaming bases design are trademarks of Illumina, Inc. and/or its affiliate(s) in the U.S. and/or other countries. All
other names, logos, and other trademarks are the property of their respective owners.
ii
Material # 20004364
Document # 15065681 v01
Page 3

Revision History
Document
Material # 20004364
Document # 15065681
v01
Part # 15065681 Rev. A
Date
January
2016
July
2015
Description of Change
Updated software descriptions to cBot software v3.0, which supports
the HiSeq 3000/4000 SR ClusterKit.
Added the following information:
• Recipe and clustering duration for the HiSeq 3000/4000 SR flow
cell.
• PhiX and library volumes to the PhiX spike-in procedure for
libraries clustered on a HiSeq 3000/4000 flow cell.
• Recommendation for annual preventive maintenance service.
Updated instructions for unloading run components to include flow
cell storage options.
Moved troubleshooting information to Appendix A.
Simplified software descriptions at the beginning of the guide.
Listed the cBot System Configuration Guide (document #
1000000005301) in Additional Resources.
Initial release.
cBot 2 System Guide
iii
Page 4

iv
Material # 20004364
Document # 15065681 v01
Page 5

Table of Contents
Revision History iii
Table of Contents v
Chapter 1 Overview 1
Introduction 2
Additional Resources 3
cBot 2 Components 4
Illumina Consumables 7
cBot Reagent Plates 9
Chapter 2 Getting Started 11
Start the cBot 2 12
Version Compatibility of Run Components 13
User-Supplied Consumables 15
Chapter 3 Preparing Reagents 17
Introduction 18
HiSeq X Flow Cell 19
HiSeq 3000/4000 Flow Cell 23
HiSeq High Output Flow Cell 27
HiSeq Rapid Flow Cell 28
Chapter 4 Clustering With Sample Tracking 29
Introduction 30
Clustering With Sample Tracking Workflow 31
Perform a Pre-Run Wash 32
Load Consumables 33
Load the Manifold 35
Select a Protocol 37
Scan Consumables 38
Perform a Pre-Run Check 39
Monitor the Run 40
Unload Run Components 41
Perform a Post-Run Wash 43
Confirm Reagent Delivery (Optional) 44
Chapter 5 Clustering Without Sample Tracking 45
Introduction 46
Clustering Without Sample Tracking Workflow 47
Perform a Pre-Run Wash 48
Select a Protocol 49
Load Consumables 50
Perform a Pre-Run Check 54
Monitor the Run 55
Unload Run Components 56
Perform a Post-Run Wash 58
Confirm Reagent Delivery (Optional) 59
Chapter 6 Maintenance 61
cBot 2 System Guide
Perform Periodic Maintenance 62
v
Page 6

Perform a Monthly Maintenance Wash 63
Change the Adapter Plate 65
Upgrade the Software 67
Upgrade Recipes 68
Shut Down the cBot 2 69
Appendix A Troubleshooting 71
Pause or Abort a Run 72
Troubleshoot Flow Check Failure 73
Troubleshoot Run Problems 75
Reset the External Barcode Scanner 76
Edit Protocols 77
Index 79
Technical Assistance 83
vi
Material # 20004364
Document # 15065681 v01
Page 7

Chapter 1 Overview
Overview
Introduction 2
Additional Resources 3
cBot 2 Components 4
Illumina Consumables 7
cBot Reagent Plates 9
Chapter 1
cBot 2 System Guide
1
Page 8
Overview
Introduction
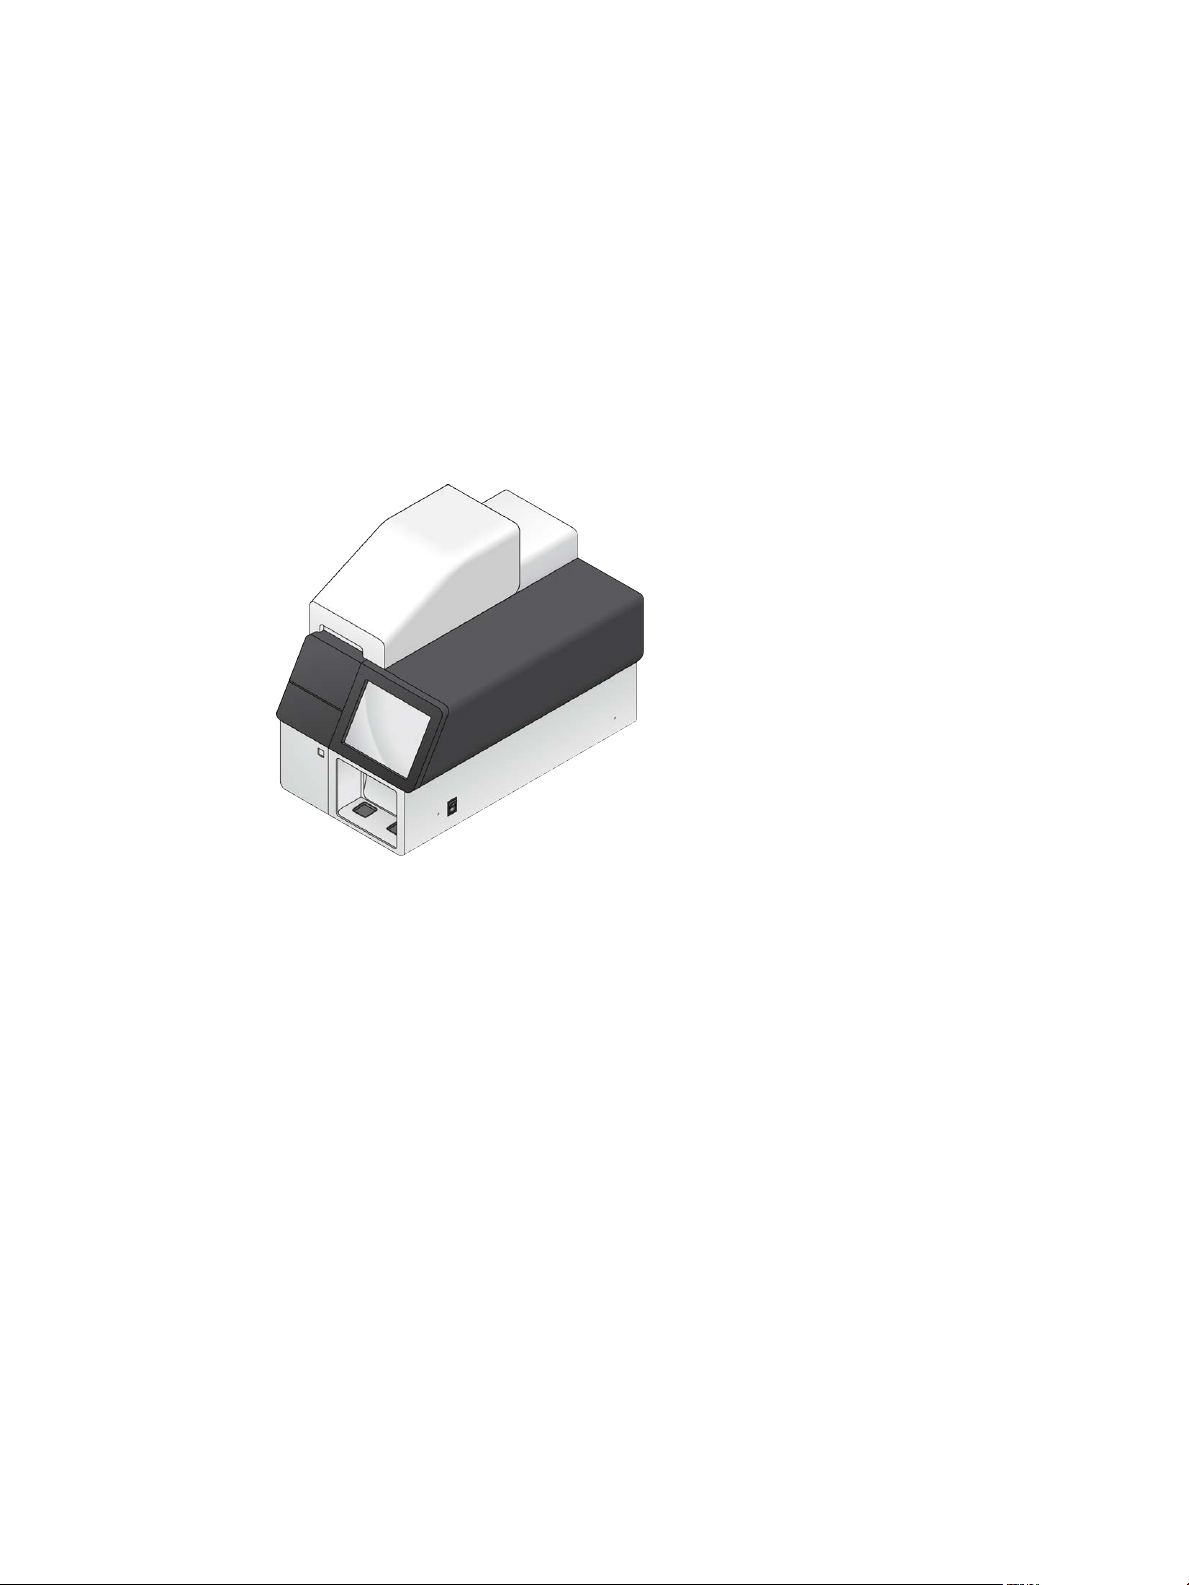
The cBot 2 uses amplification to create hundreds of millions of single-molecule DNA
templates simultaneously.
The cBot software dispenses reagents and controls reaction times, flow rates, and
temperatures. Setup and operation are performed on-instrument from the software interface
using the touch screen monitor. On-instrument barcode readers record the reagents, flow
cell, and template used for each experiment.
A positive sample tracking option provides internal barcode scanning for enhanced control
of libraries to be sequenced on the HiSeq. Consumables are loaded and the instrument lid
is closed. Internal scanners then record the IDof the reagent plate, flow cell, and 8-tube
strip.
Figure 1 cBot 2
Several cluster kits are available for use on the cBot. Use a kit that is compatible with the
sequencing instrument and type of sequencing run to be performed. For a list of available
kits, see Illumina Consumables on page 7.
Workflow Differences for Illumina SeqLab
If you are using the cBot 2 as a component of Illumina SeqLab, your workflow differs from
the workflow described in this guide. Differences introduced by Clarity LIMS X Edition
affect all steps from library prep through sequencing. Visit the Illumina SeqLab support
page on the Illumina website to generate a custom workflow guide for your experiment.
2
Material # 20004364
Document # 15065681 v01
Page 9

Additional Resources
The following documentation is available for download from the Illumina website.
Resource Description
Additional Resources
cBot System Site Prep Guide
(document # 15053710)
cBot 2 System Safety and
Compliance Guide (document #
15065643)
HiSeq and GAIIx Systems
Denature and Dilute Libraries
Guide (document # 15050107)
Visit the cBot 2 support page on the Illumina website for access to documentation, software
downloads, online training, and frequently asked questions.
Provides specifications for laboratory space, electrical
requirements, and environmental considerations and
instructions for configuring the instrument.
Provides information about instrument labeling, compliance
certifications, and safety considerations.
Provides instructions for denaturing and diluting prepared
libraries before sequencing, and preparing a PhiX control. This
step applies to most library types and flow cells.
cBot 2 System Guide
3
Page 10
Overview
cBot 2 Components
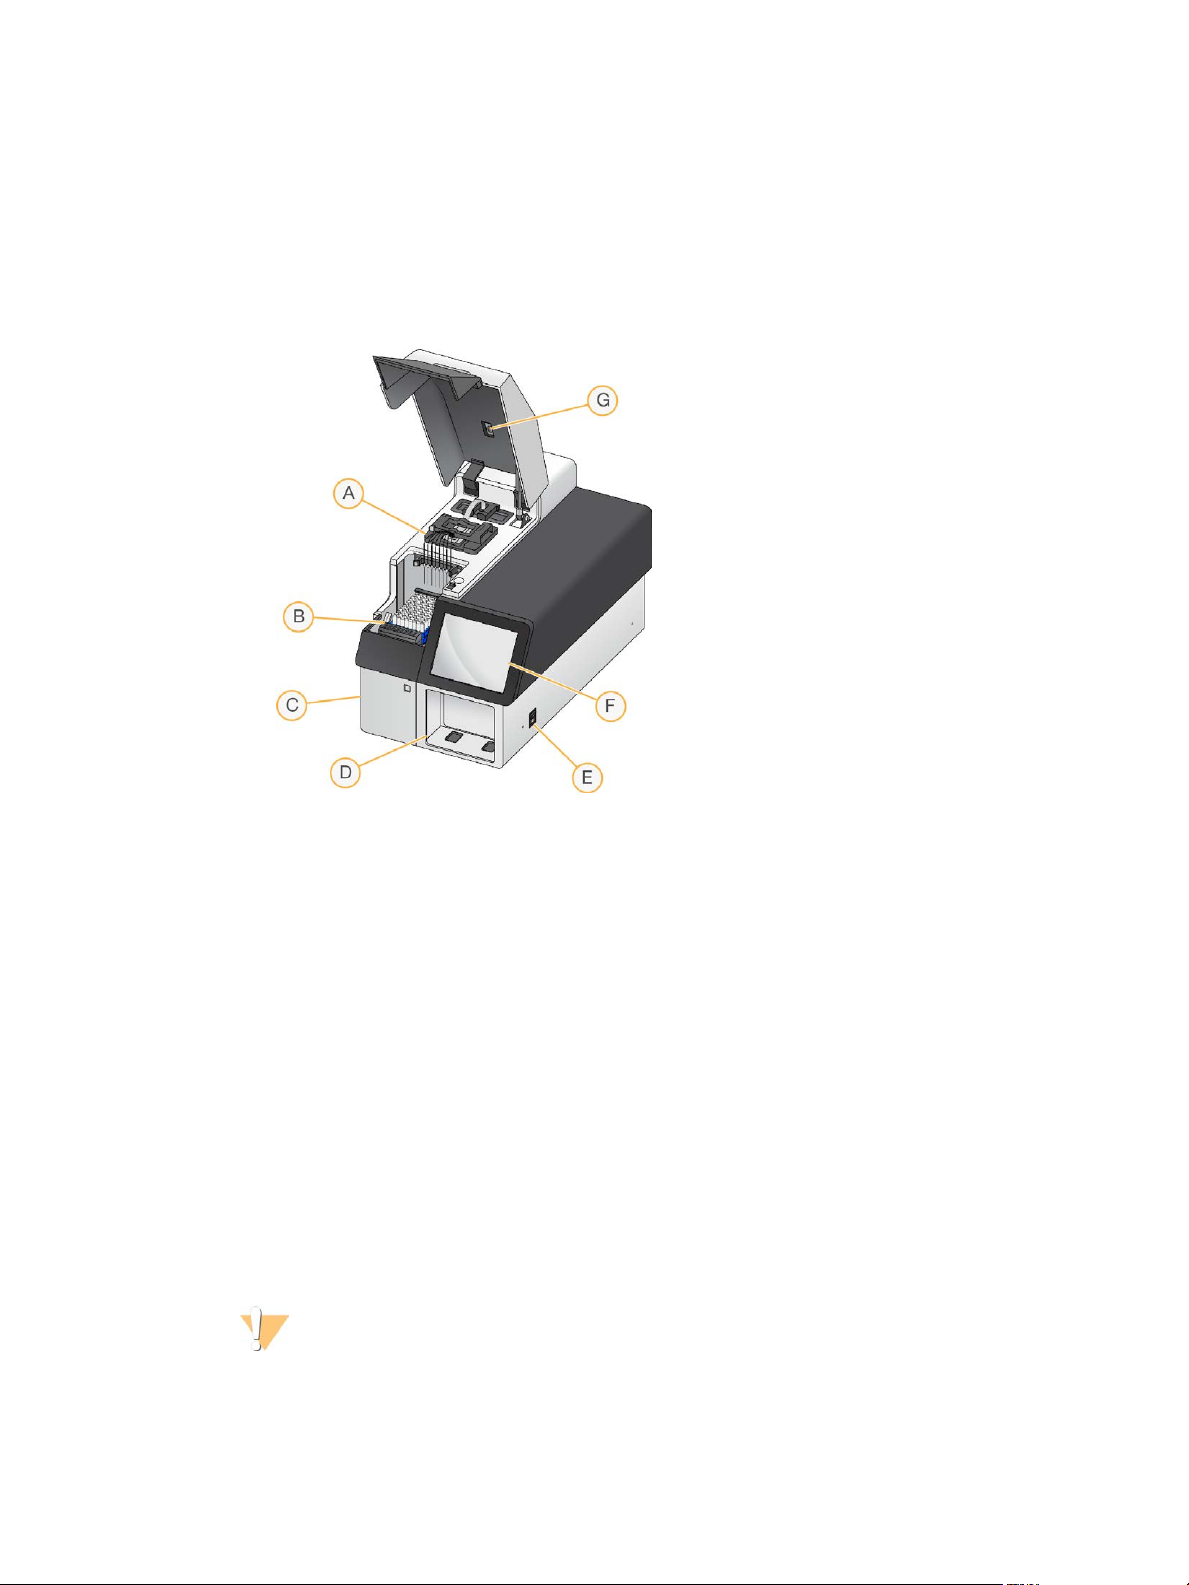
The cBot 2 uses sensors to detect the presence of run components, and provides prompts
when a component is missing or installed incorrectly. The thermal stage and reagent stage
are located under the instrument lid. A magnetic switch keeps the lid closed, and a sensor
detects when it is opened. For safety, the software prompts you to close the lid before
proceeding with the run.
Figure 2 cBot 2 Components
A Thermal stage—Holds the flow cell and controls the flow cell temperature throughout the
B Reagent stage—Holds the cBot reagent plate, library templates, and specialty primers. For
C Waste bottle compartment—Holds a sensor-controlled waste bottle that collects spent
D External barcode scanner—Records the unique ID of the reagent plate and flow cell used
E Power switch—Turns on the instrument. The start button, located to the left of the waste
F Touch screen monitor—Provides on-instrument run setup and visual status of the cluster
G Flow cell barcode scanner—Records the unique ID of the flow cell used with each sample
Thermal Stage
The thermal stage holds the flow cell and manifold, which is seated over the flow cell. The
flow cell clamp locks the flow cell and manifold into place.
run.
runs with sample tracking, a barcode scanner located behind the reagent stage records the ID
of the reagent plate and the 8-tube strip containing template.
reagents.
with each run that does not include sample tracking.
bottle compartment, starts the instrument software.
generation process.
tracked run.
WARNING
Do not touch the aluminum thermal block on the thermal stage. The heater poses a serious
burn hazard during operation. For more safety information, see the cBot 2 System Safety and
Compliance Guide (document # 15065643).
4
Material # 20004364
Document # 15065681 v01
Page 11
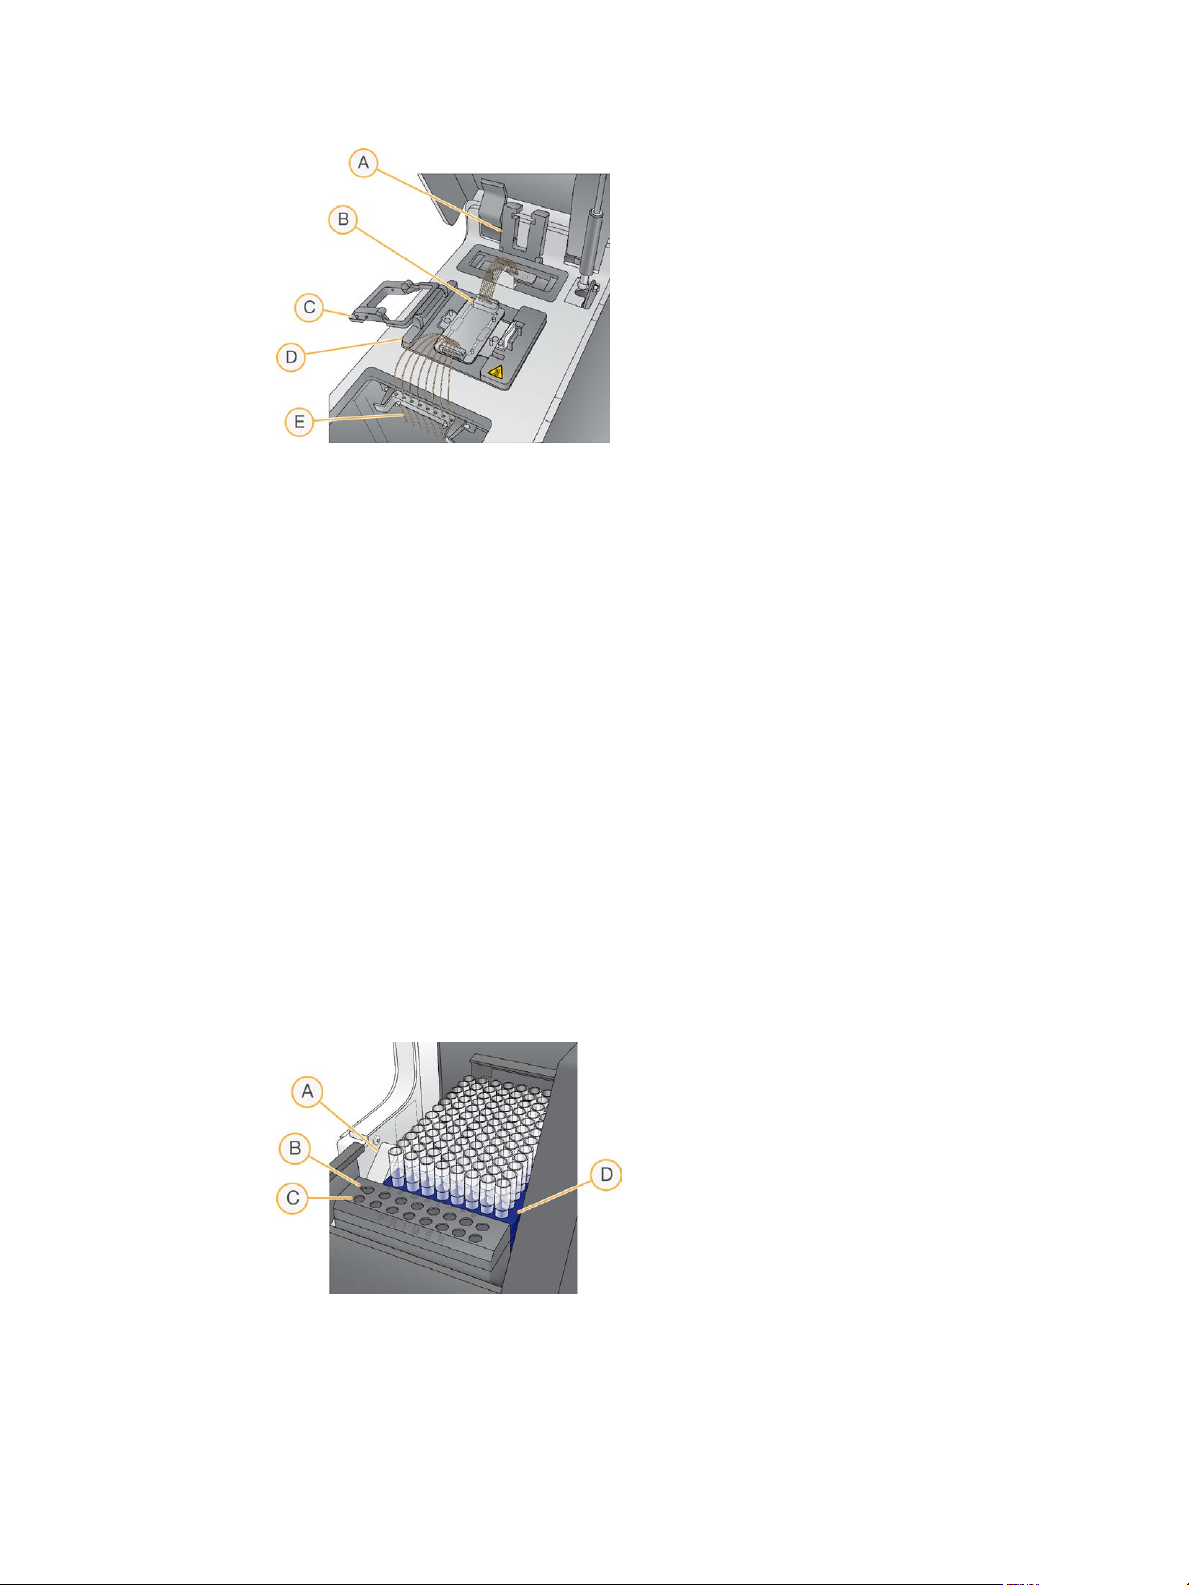
Figure 3 Thermal Stage
A Output clamp
B Flow cell adapter plate and manifold
C Flow cell clamp
D Thermal stage
E Sipper comb
The manifold is a single-use component that delivers reagents from the reagent plate to the
flow cell. The sippers on the sipper comb pierce the foil-sealed reagent tubes seated in the
reagent plate. The outlet end of the manifold transfers waste to the waste container. The
outlet clamp locks the outlet end of the manifold in place.
cBot 2 Components
Flow Cell Adapter Plates
The cBot performs cluster generation on GAIIx and HiSeq flow cells. When switching flow
cell types, change the adapter plate on the flow cell stage. For details, see Change the Adapter
Plate on page 65.
Reagent Stage
The reagent stage holds the cBot reagent plate. The reagent plate is locked into position by
the reagent plate lever. Two 8-tube strip holders in front of the reagent plate hold prepared
library template and additional primers. The left side of the template row is keyed to ensure
the correct orientation of the 8-tube strip used with the sample tracking workflow.
Figure 4 cBot 2 Reagent Stage
A Reagent plate lever
B Template row
C Primer row
D cBot reagent plate
cBot 2 System Guide
5
Page 12
Overview
cBot Software
The cBot software interface provides prompts for setting up the instrument and monitoring
clustering progress. During a cluster generation run, the following screens are used: Start
screen, Run Setup screens, and the Run Status screen.
Use the software interface to configure positive sample tracking, input requirements, wash
preferences, email notifications, and remote monitoring.
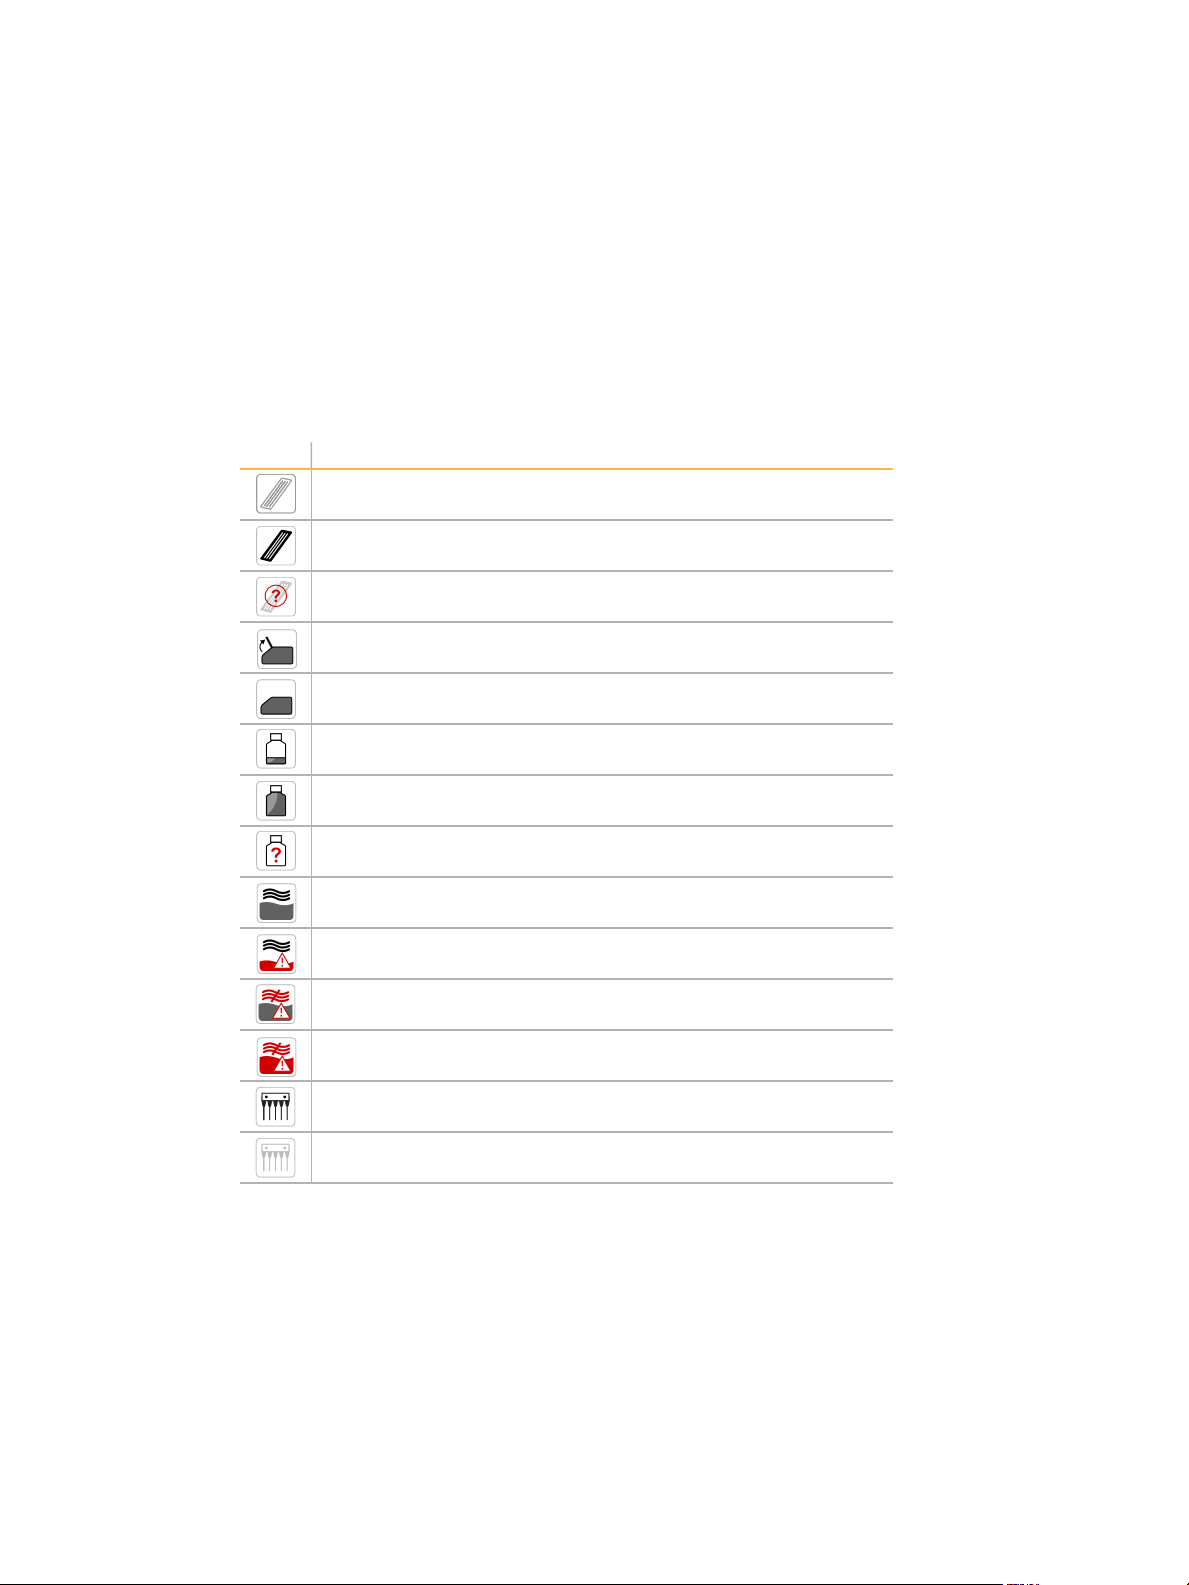
Sensor Status Icons
Displayed at the bottom of the screen, sensor status icons indicate whether a component is
properly installed and ready for the run.
Icon Indication
GAIIx flow cell adapter plate installed.
HiSeq flow cell adapter plate installed.
Flow cell adapter plate type unknown.
Instrument lid is open.
Instrument lid is closed.
Waste bottle is present and ready for use.
Waste bottle is full.
Waste bottle is missing.
Coolant is flowing and coolant level is good.
Warning: Coolant is flowing, but coolant level is low.
Error: Coolant is not flowing, but coolant level is good.
Error: Coolant is not flowing and coolant level is low.
Manifold is loaded and sipper comb is secure.
Manifold is missing or sipper comb is not secure.
Configuration
Use the software interface to configure positive sample tracking, system settings, input
requirements, and wash preferences. Using a network connection, you can enable remote
monitoring, email alerts, and LIMS support. Configuration settings can be modified as
needed before the start of each run.
For configuration instructions, see the cBot System Configuration Guide (document #
1000000005301).
6
Material # 20004364
Document # 15065681 v01
Page 13
Illumina Consumables
cBot reagents are provided in a reagent plate that loads directly onto the instrument after
thawing. cBot reagent plates are provided in the following Illumina kits.
Descriptions of kit contents and other kit documentation is available on the cBot 2 support
page on the Illumina website. For reagent preparation instructions, see Preparing Reagents
on page 17.
Cluster Kits for the HiSeq
Each kit contains a HiSeq flow cell, a flow cell-specific manifold, and the required reagents
for clustering the flow cell on the cBot.
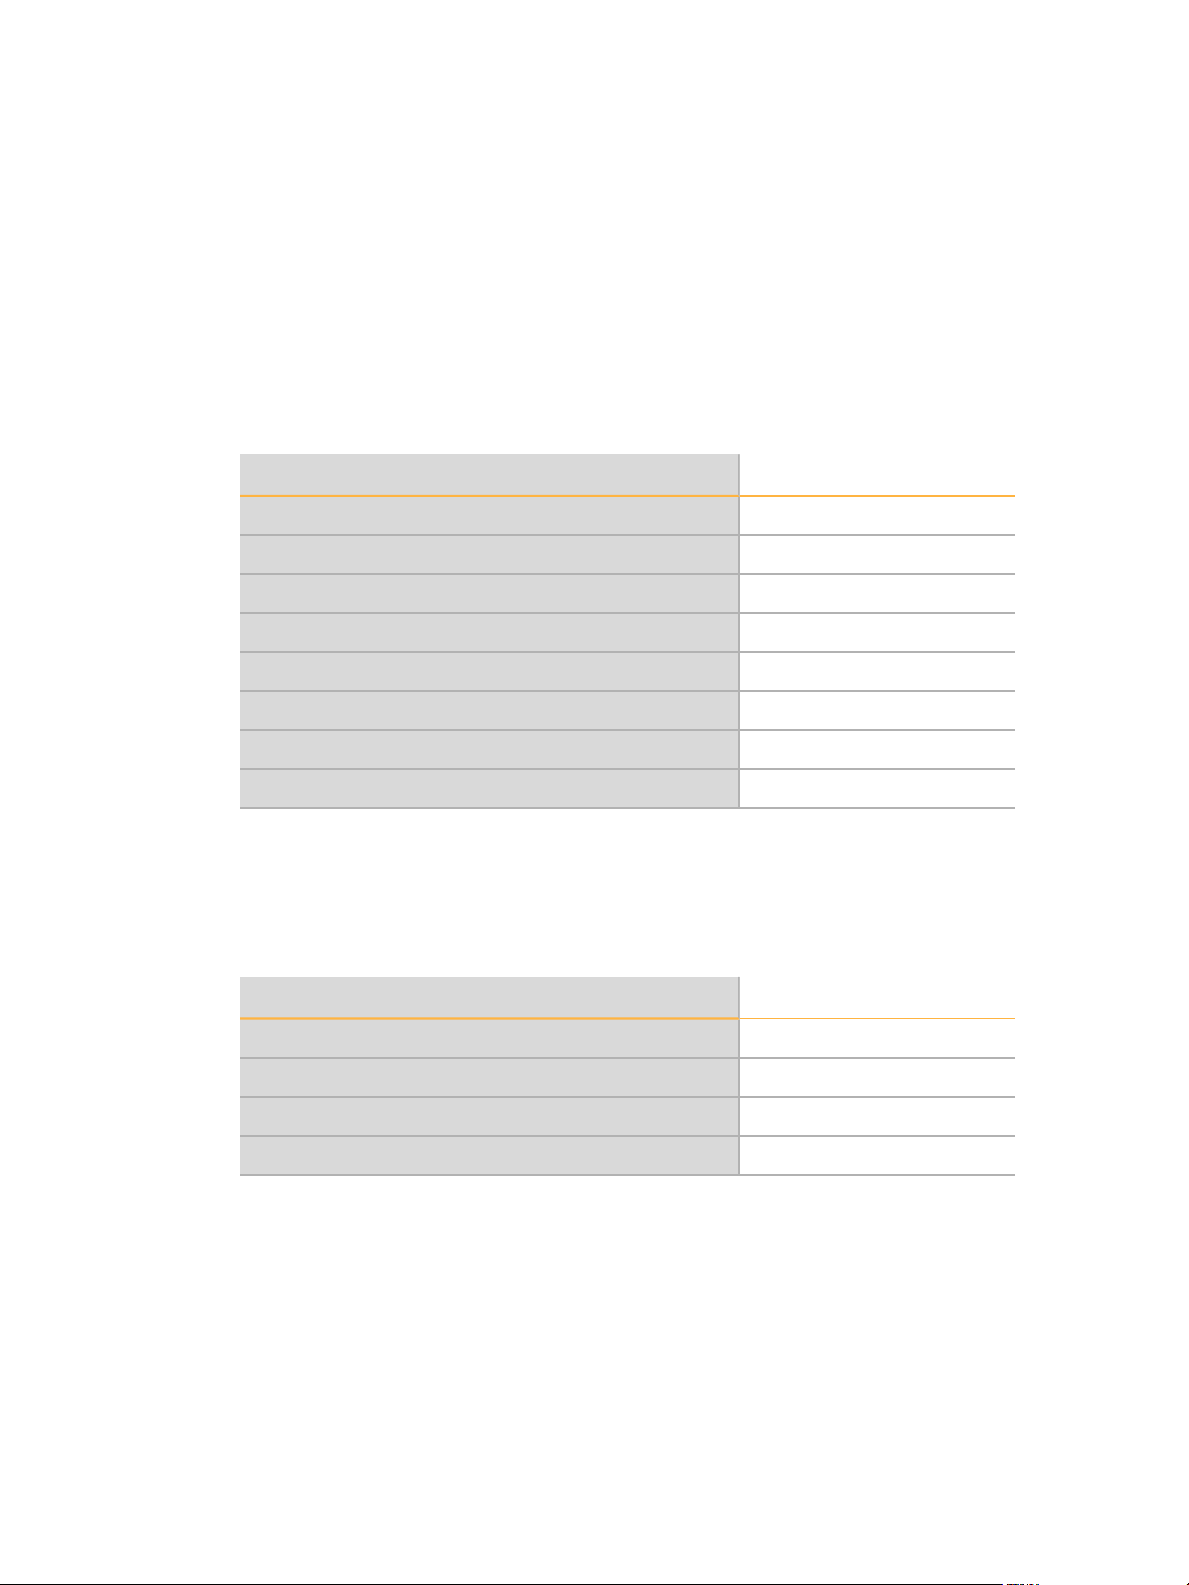
Kit Name Kit Catalog #
HiSeq 3000/4000SR Cluster Kit Catalog # GD-410-1001
HiSeq 3000/4000PE Cluster Kit Catalog # PE-410-1001
HiSeq SRCluster Kit v4 Catalog # GD-401-4001
HiSeq PECluster Kit v4 Catalog # PE-401-4001
TruSeq SR Cluster Kit v3 - HS Catalog # GD-401-3001
Illumina Consumables
TruSeq PECluster Kit v3 - HS Catalog # PE-401-3001
HiSeq Rapid Duo cBot Sample Loading Kit Catalog # CT-403-2001
TruSeq Rapid Duo cBot Sample Loading Kit Catalog # CT-402-4001
Cluster Kits for the HiSeq X
Each kit contains multiple HiSeq X flow cells, flow cell-specific manifolds, and the required
reagents for clustering each flow cell on the cBot. Single-pack kits contain consumables for
clustering 2 flow cells and 10-pack kits contain consumables for clustering 20 flow cells.
Kit Name Kit Catalog #
HiSeq X Ten Reagent Kit v2.5 Catalog # FC-501-2501
HiSeq X Ten Reagent Kit v2.5 (10 pack) Catalog # FC-501-2521
HiSeq X Five Reagent Kit v2.5 Catalog # FC-502-2501
HiSeq X Five Reagent Kit v2.5 (10 pack) Catalog # FC-502-2102
Cluster Kits for the GAIIx
Each kit contains a GA flow cell, a flow cell-specific manifold, and the required reagents for
clustering 1 flow cell on the cBot. For a description of kit contents and reagent preparation
instructions, see the kit documentation.
cBot 2 System Guide
7
Page 14
Overview
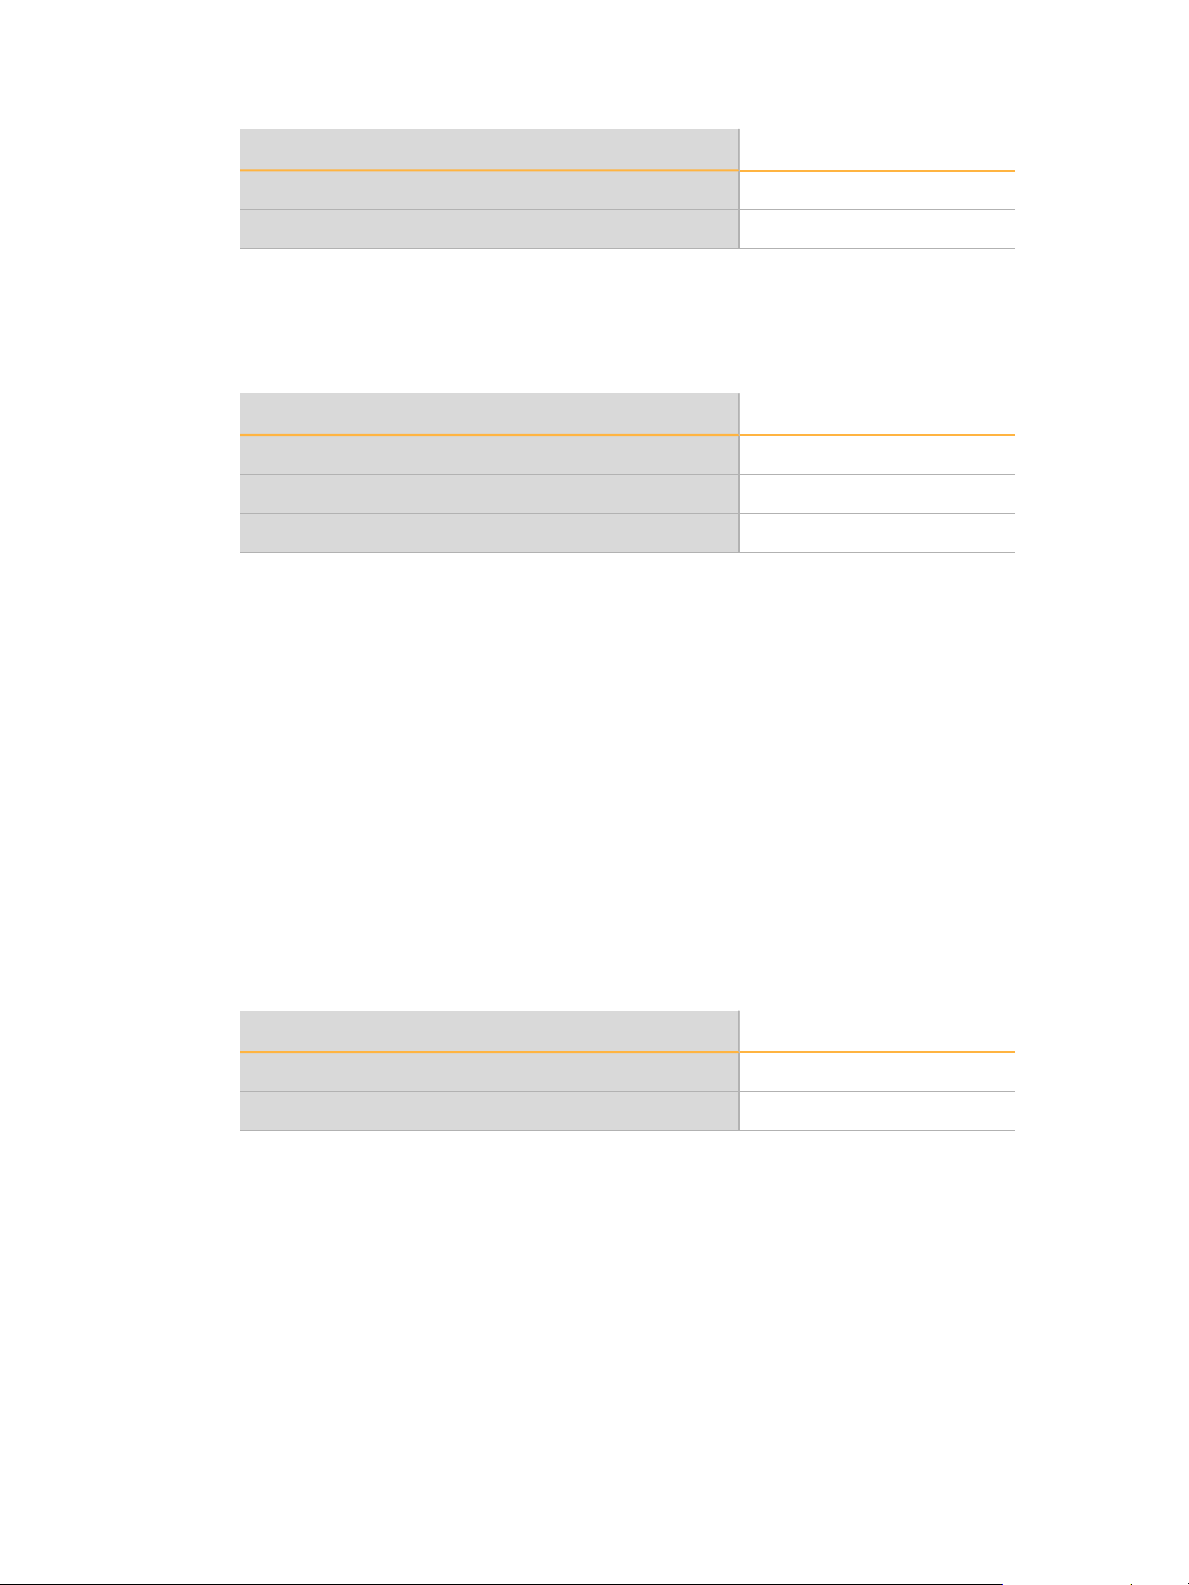
Kit Name Kit Catalog #
TruSeq PECluster Kit v2 - GA (cBot) Catalog # PE-300-2001
TruSeq SR Cluster Kit v2 - GA (cBot) Catalog # GD-300-2001
Rehybridization Kits
Use a cBot rehybridization kit to perform Read 1 primer rehybridization for run recovery or
after extended flow cell storage.
Kit Name Catalog #
HiSeq X cBot Multi-Primer Rehybridization Kit v2 Catalog # GD-305-2001
HiSeq 3000/4000 cBot Multi-Primer Rehybridization Kit Catalog # GD-310-1001
TruSeq v2 cBot Multi-Primer Rehybridization Kit Catalog # GD-304-2001
For more information, see the rehybridization guide for your flow cell:
} HiSeq X—Read 1 Primer Rehybridization on a HiSeq X Flow Cell (document # 15053711)
} HiSeq 3000/4000—Read 1 Primer Rehybridization on a HiSeq 3000/4000 Flow Cell
(document # 15058794)
} TruSeq v3 or TruSeq v2 (GAIIx)—Read 1 Primer Rehybridization on a TruSeq v3 or TruSeq
v2 Flow Cell (document # 15018149)
Read 1 Sequencing Primer for Nextera Libraries
The Read 1 sequencing primer (HP6) provided in the following kits is not compatible with
Nextera libraries:
} TruSeq Cluster Kit v3 - HS
} TruSeq Cluster Kit v2 - GA
If you are sequencing Nextera libraries, use the Read 1 sequencing primer (HP10),
regardless of the type of run you are performing. HP10 is provided in the TruSeq Dual
Index Sequencing Primer Box.
Kit Name Catalog #
TruSeq Dual Index Sequencing Primer Box, Single Read Catalog # FC-121-1003
TruSeq Dual Index Sequencing Primer Box, Paired End Catalog # PE-121-1003
All other cBot kits include HP10, which is compatible with TruSeq and Nextera libraries.
8
Material # 20004364
Document # 15065681 v01
Page 15
cBot Reagent Plates
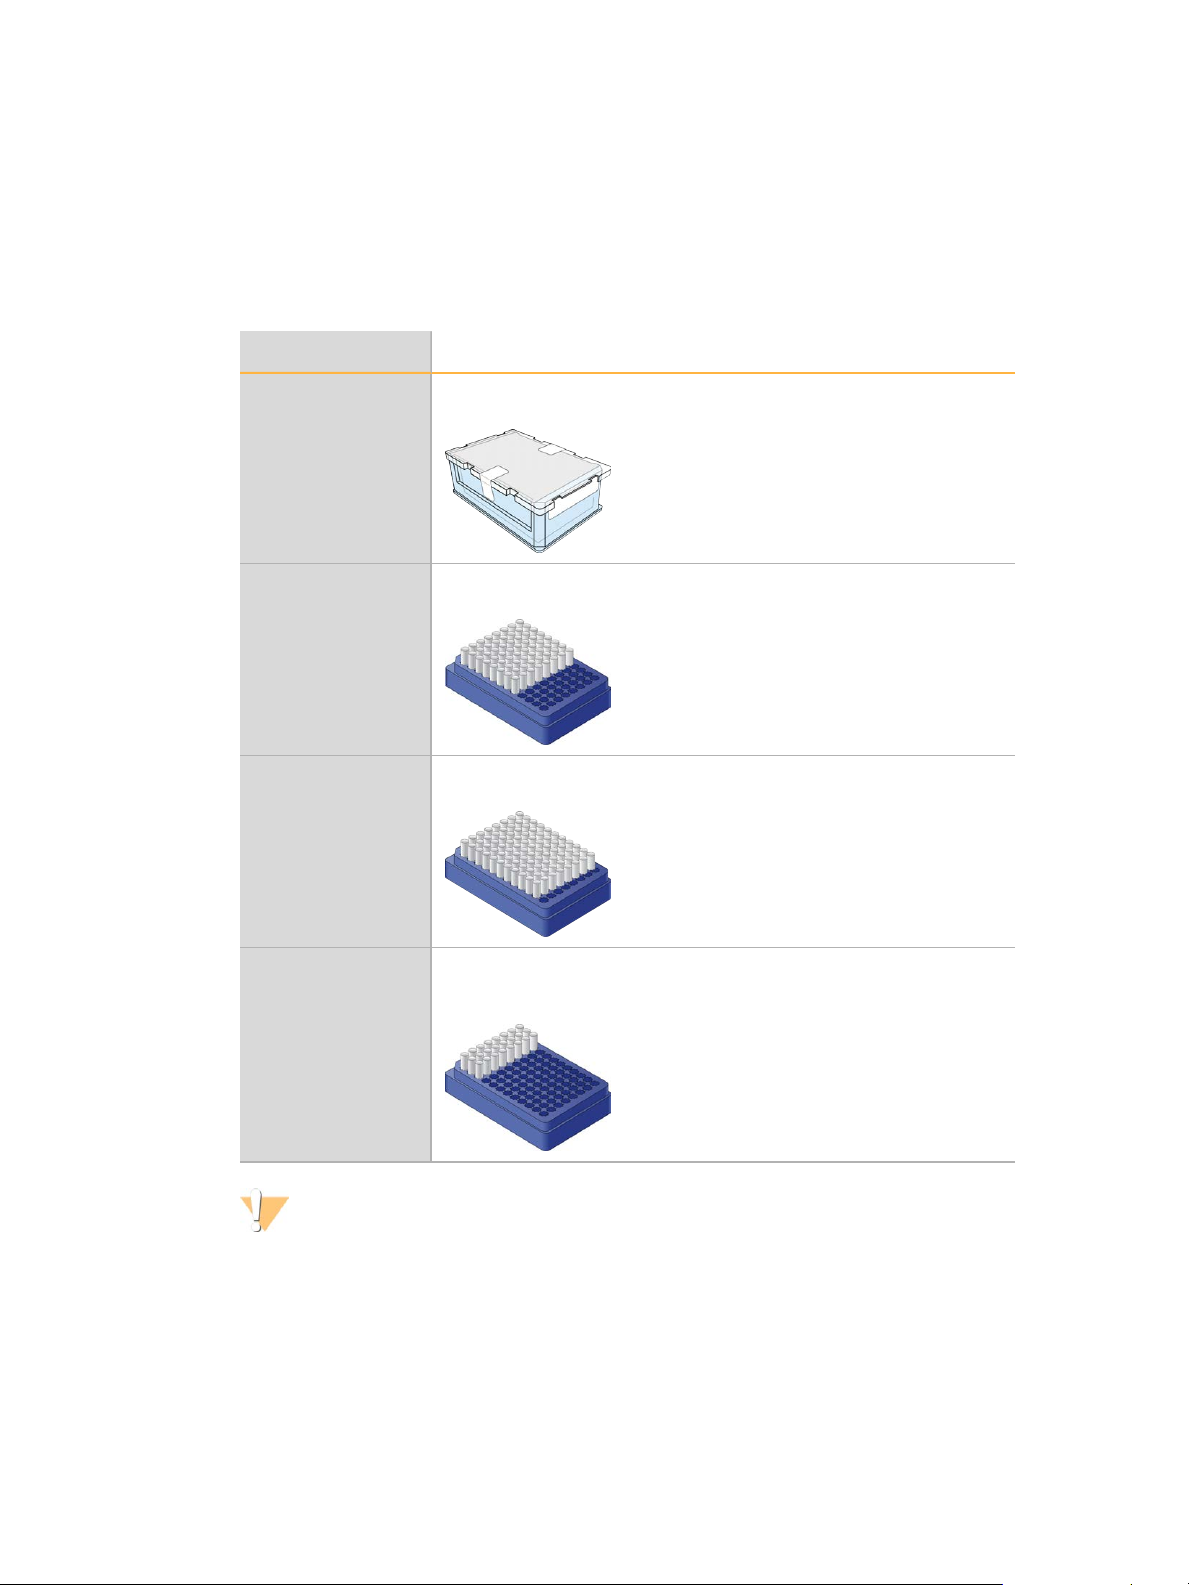
The configuration of the reagent plate differs between kit types, including the number of
rows that contain reagent.
Each 8-tube strip is labeled with the reagent name followed by a number. The number
indicates the row that it occupies on the reagent plate. If an 8-tube strip becomes dislodged,
use the row number on the label to return the tube strip to the appropriate position.
Flow Cell Type Reagent Plate Description
cBot Reagent Plates
HiSeq X and
HiSeq 3000/4000
HiSeq High Output
(HiSeq v4)
HiSeq High Output
(TruSeq v3)
HiSeq Rapid Contains 3 rows of foil-sealed 8-tube strips filled with template
Contains 12 rows with 8 deep wells each. Each reagent occupies a full
row of 8 wells. Not all rows contain reagent.
Contains 8 rows of foil-sealed 8-tube strips filled with cluster
generation reagents. Rows9 through 12 are empty.
Contains 11 rows of foil-sealed 8-tube strips filled with cluster
generation reagents. Row 12 is empty.
hybridization and first extension reagents. Rows 4 through 12 are
empty.
cBot 2 System Guide
WARNING
Except for the HiSeq rapid reagent plate, these sets of reagents contain formamide, an
aliphatic amide that is a probable reproductive toxin. Personal injury can occur through
inhalation, ingestion, skin contact, and eye contact. Dispose of containers and any unused
contents in accordance with the governmental safety standards for your region. For more
information, see the SDS for this kit at support.illumina.com/sds.html.
9
Page 16

10
Material # 20004364
Document # 15065681 v01
Page 17

Chapter 2 Getting Started
Getting Started
Start the cBot 2 12
Version Compatibility of Run Components 13
User-Supplied Consumables 15
Chapter 2
cBot 2 System Guide
11
Page 18
Getting Started
Start the cBot 2
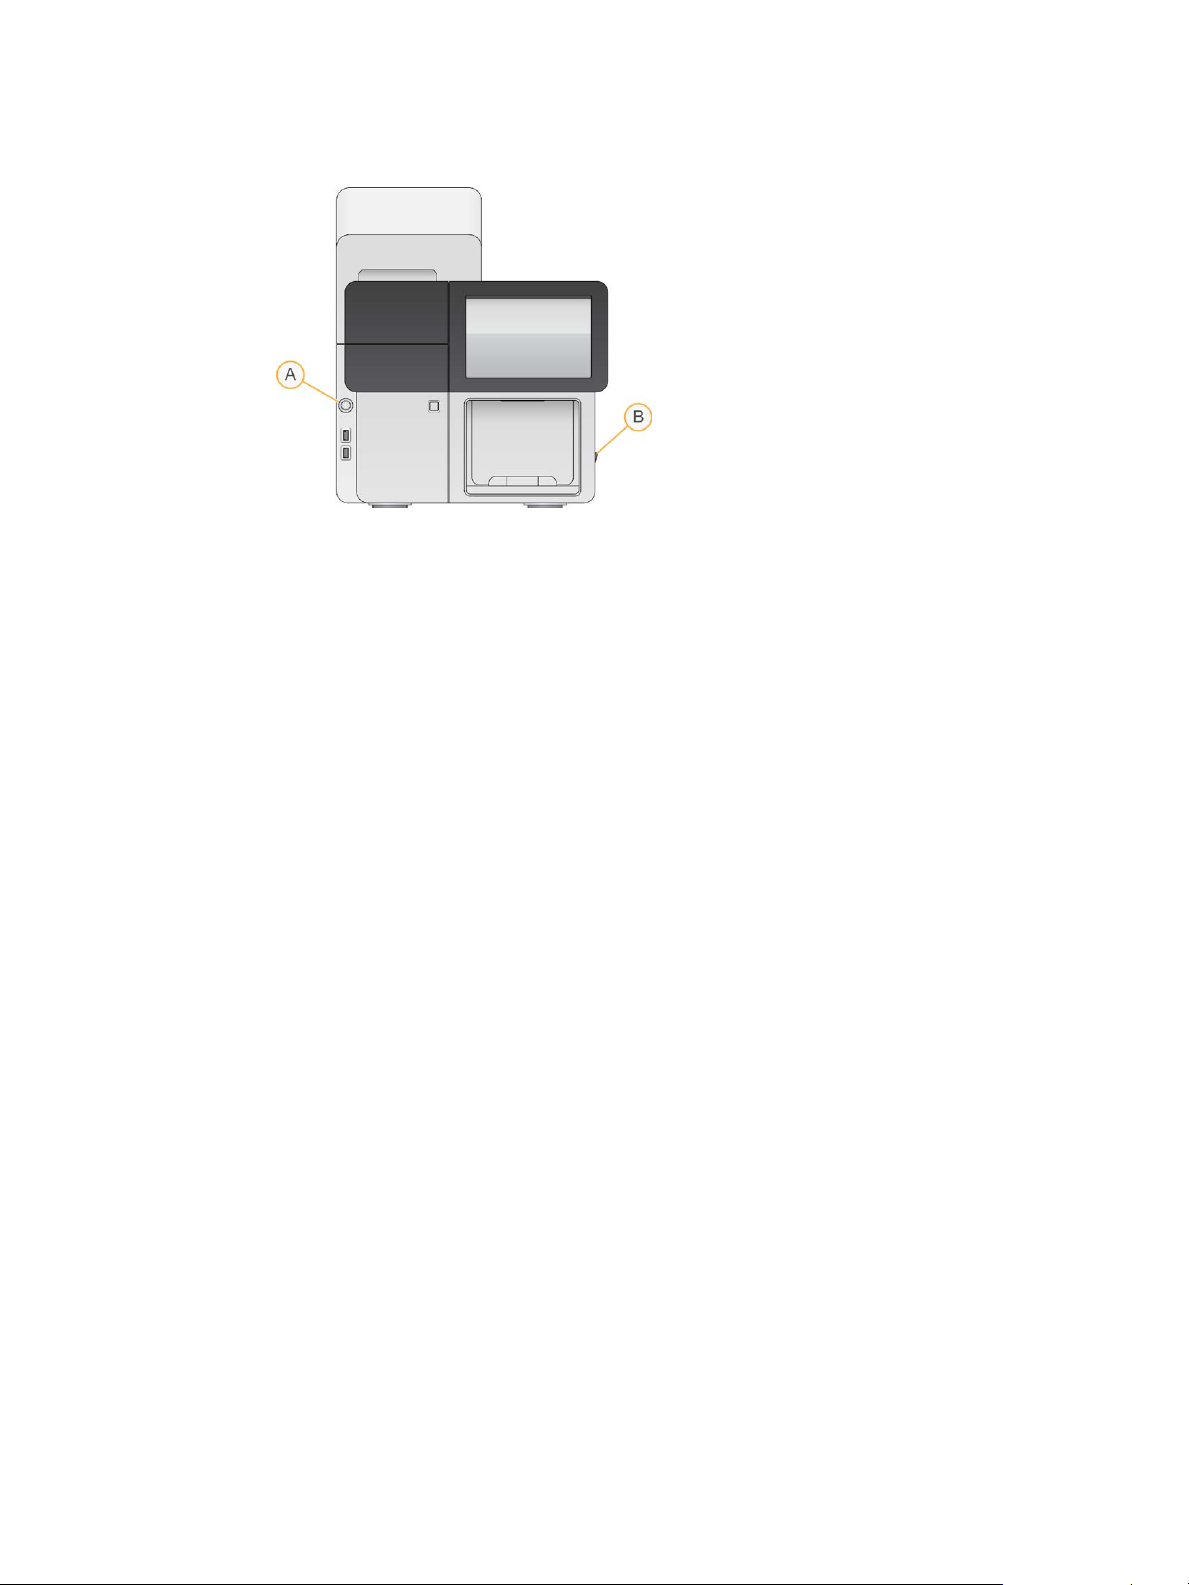
A Start button
B Power switch
1 Switch the power switch on the right side of the instrument to the ONposition.
2 Press the start button to the left of the waste bottle compartment to start the software.
When the start-up routine is complete, the Start screen appears.
12
Material # 20004364
Document # 15065681 v01
Page 19
Version Compatibility of Run Components
For best performance and results, always use compatible versions of cBot software and kits.
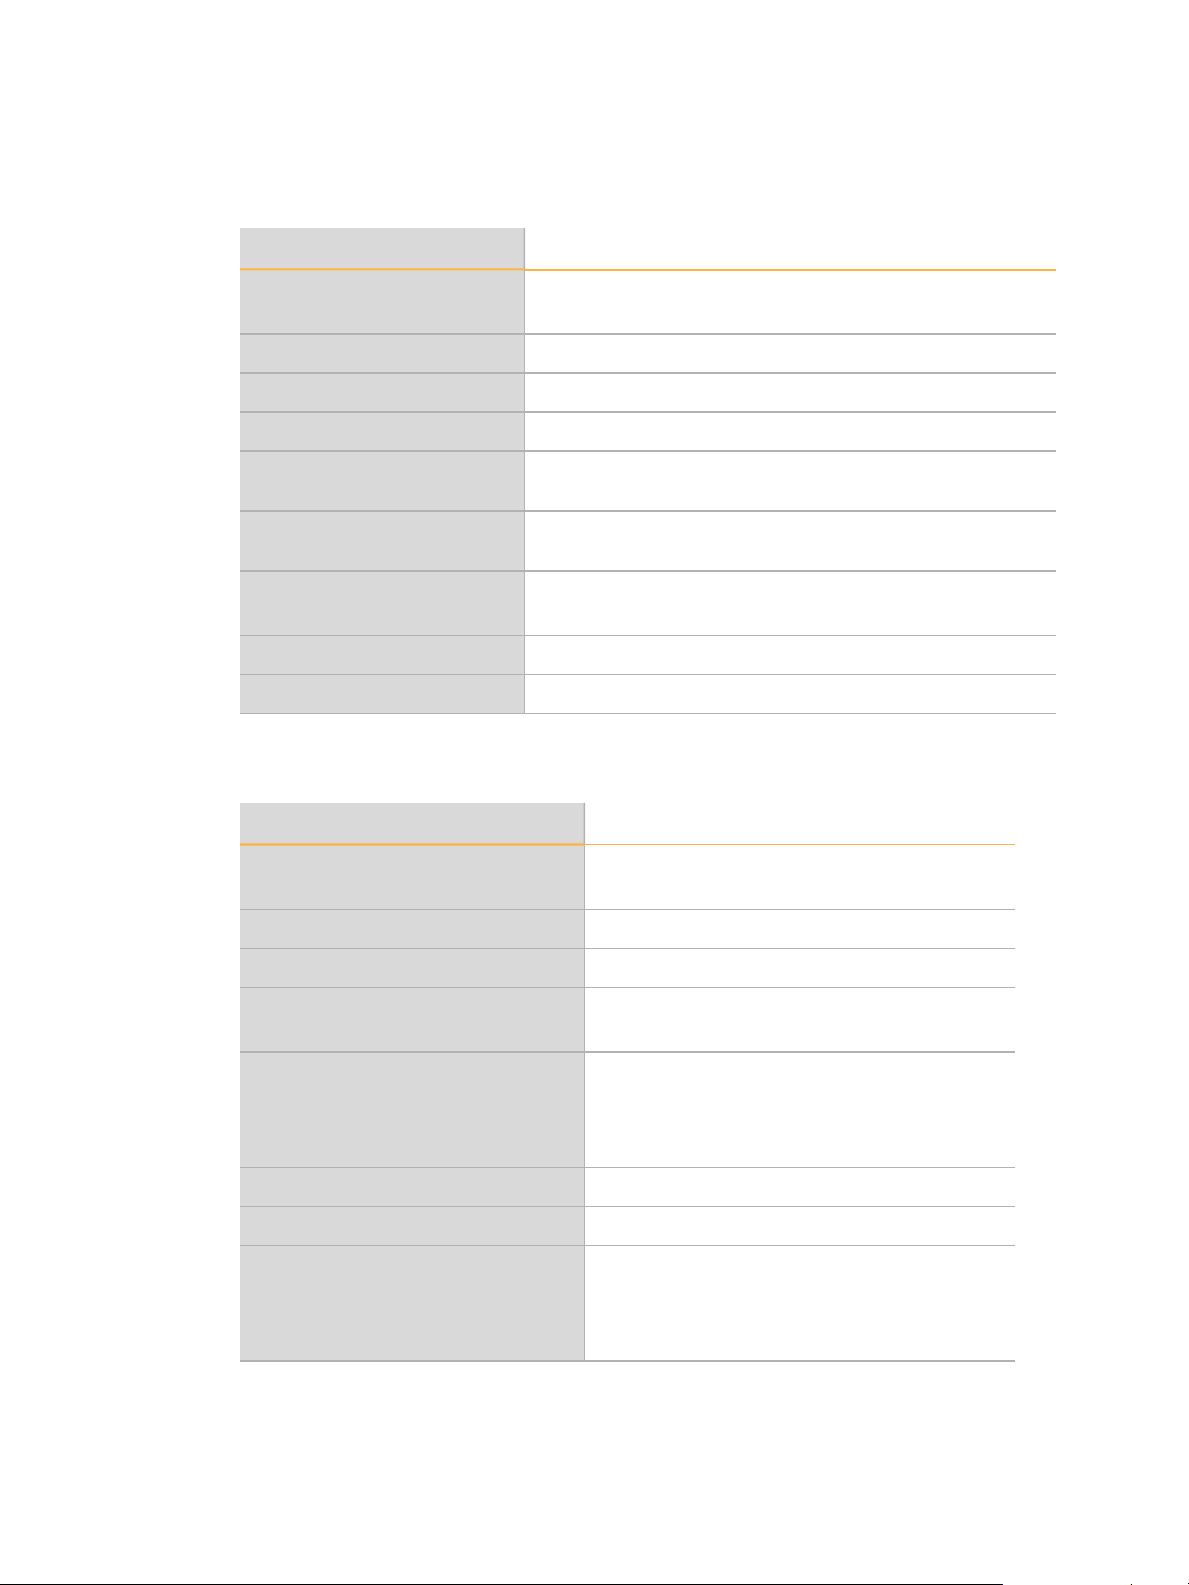
Kit Version Recipe Version Software Version
HiSeq 3000/4000 Cluster Kit Version 1.0 recipes cBot v3.0.46, or later (SR kit)
cBot v2.0.34, or later (PE kit)
HiSeq X Ten Reagent Kit v2.5 Version 2.0 recipes cBot v2.0.29, or later
HiSeq X Five Reagent Kit v2.5 Version 2.0 recipes cBot v2.0.29, or later
HiSeq Cluster Kit v4 Version 9.0 recipes cBot v2.0.16, or later
Version Compatibility of Run Components
HiSeq Rapid Duo cBot Sample
Loading Kit
TruSeq Rapid Duo cBot Sample
Loading Kit
TruSeq Dual Index Sequencing
Primer Box
TruSeq Cluster Kit v3 - HS Version 8.0 recipes cBot v1.4, or later
TruSeq Cluster Kit v2 - GA Version 7.0 recipes cBot v1.3, or later
cBot Recipes and Flow Cell Types
Flow Cell Primary Recipe Name
HiSeq 3000/4000 Patterned Flow Cell HiSeq_3000_4000_SR_HD_Exclusion_Amp_v1.0
HiSeq X Ten v2.5 Patterned Flow Cell HiSeq_X_HD_Exclusion_Amp_v2.0
HiSeq X Five v2.5 Patterned Flow Cell HiSeq_X_HD_Exclusion_Amp_v2.0
HiSeq v4 Flow Cell SR_HiSeq_Cluster_Kit_v4_cBot_recipe_v9.0
Version R recipes cBot v1.5, or later
Version R recipes cBot v1.5, or later
Version 8.0 recipes (HiSeq)
Version 7.0 recipes (GA)
HiSeq_3000_4000_HD_Exclusion_Amp_v1.0
PE_HiSeq_Cluster_Kit_v4_cBot_recipe_v9.0
cBot v1.4.36, or later
TruSeq v3 Flow Cell SR_Amp_Lin_Block_TubeStripHyb_v8.0
HiSeq Rapid v2 Flow Cell RR_TemplateHyb_FirstExt_vR¹
TruSeq Rapid Flow Cell RR_TemplateHyb_FirstExt_vR¹
GAIIx v2 Flow Cell SR_Amp_Lin_Block_TubeStripHyb_v7.0²
¹ Used only with the Rapid Duo kits.
cBot 2 System Guide
PE_Amp_Lin_Block_TubeStripHyb_v8.0
SR_Amp_Lin_Block_Hyb_v8.0
PE_Amp_Lin_Block_Hyb_v8.0
PE_Amp_Lin_Block_TubeStripHyb_v7.0²
SR_Amp_Lin_Block_Hyb_v7.0²
PE_Amp_Lin_Block_Hyb_v7.0²
13
Page 20

Getting Started
² To access v7 recipes, navigate to C:\Illumina\cBot\bin\Recipes\Hidden on the instrument
drive. Copy recipes to C:\Illumina\cBot\bin\Recipes.
14
Material # 20004364
Document # 15065681 v01
Page 21

User-Supplied Consumables
The following user-supplied consumables are used for preparation of clustering reagents
provided in the HiSeq X and HiSeq 3000/4000 kits. Make sure that you use the appropriate
8-tube strip for your workflow.
The HiSeq X and HiSeq 3000/4000 kits introduce a denaturation step before clustering on
the cBot 2. Using these kits, libraries are denatured in the 8-tube strip before adding the
ExAmp reaction mix.
Component Supplier Purpose
1 N NaOH General lab supplier Use for library denaturation.
User-Supplied Consumables
200 mM Tris-HCl,
pH 8.0
Laboratory-grade
water
8-tube strips with
barcode labels, 0.2ml
8-tube strips, 0.2 ml Fisher Scientific,
8-cap strip, flat Fisher Scientific,
Microcentrifuge
tube, 1.5ml
*or equivalent
General lab supplier Use for library denaturation after diluting to
Millipore or
General lab supplier
Illumina, catalog #
20002011
catalog # AB-0264
catalog # AB-0784
VWR,
catalog #20170-038*
0.1 N NaOH.
Use for library denaturation.
Use for the ExAmp reaction and library mix on
the cBot (clustering with sample tracking
workflow).
Use for the ExAmp reaction and library mix on
the cBot (clustering without sample tracking
workflow).
Use to cap the unlabeled 8-tube strips when
not loaded onto the cBot.
Use for preparation of the ExAmp Reaction
master mix.
cBot 2 System Guide
15
Page 22

16
Material # 20004364
Document # 15065681 v01
Page 23

Chapter 3 Preparing Reagents
Preparing Reagents
Introduction 18
HiSeq X Flow Cell 19
HiSeq 3000/4000 Flow Cell 23
HiSeq High Output Flow Cell 27
HiSeq Rapid Flow Cell 28
Chapter 3
cBot 2 System Guide
17
Page 24

Introduction
Reagent preparation instructions depend on the reagent kit that you are using. Instructions
are organized by flow cell type and include HiSeq X, HiSeq 3000/4000, HiSeq high output,
and HiSeq rapid. For instructions on preparing reagents for a GAIIx flow cell, see the guide
for your cluster kit:
} TruSeq PECluster Kit v2 Reagent Preparation Guide (part # 15019437)
} TruSeq SRCluster Kit v2 Reagent Preparation Guide (part # 15019436)
After preparing clustering reagents, you are ready to load them onto the cBot when
prompted by the software.
Preparing Reagents
Best Practices
} Wear a fresh pair of gloves when preparing clustering reagents.
} Do not remove the protective clear plastic lid on the reagent plate until you are ready to
load reagents onto the cBot. Never puncture the foil seals.
} Hold reagent plates that contain 8-tube strips by the plate base to avoid dislodging
reagent tubes. Make sure that the tubes are securely seated in the reagent plate before
and after vortexing or inverting. Loose tubes can damage the cBot manifold.
} For cluster generation on a HiSeq X or HiSeq 3000/4000 flow cell, always prepare
freshly diluted NaOH for denaturing libraries. This step is essential to the denaturation
process. To prevent small pipetting errors, prepare at least 1 ml of freshly diluted 0.1 N
NaOH.
18
Material # 20004364
Document # 15065681 v01
Page 25
HiSeq X Flow Cell
Prepare the HiSeq X patterned flow cell, then prepare clustering reagents. To prepare
clustering reagents, thaw the cBot reagent plate and prepare the ExAmp master mix.
If you are using the 10-pack kit, prepare 4 flow cells and thaw 4 cBot reagent plates. Make
sure that 4 cBot instruments are available. Reagents cannot be stored after preparation.
NOTE
The reagent preparation instructions described in this guide do not apply to the automated
workflow used for Illumina SeqLab. For Illumina SeqLab workflow instructions, see
support.illumina.com/custom-protocol-selector.html.
About Reagents
} ExAmp reagents are viscous, especially EPX2 and EPX3. Aspirate and dispense
reagents slowly to ensure accurate pipetting.
} EPX3 does not move when inverted due to viscosity.
} Never vortex ExAmp reagents, and do not refreeze after thawing.
} The ExAmp master mix can be cloudy, which is normal. If the solution separates into a
cloudy portion and a transparent portion, slowly pipette to mix.
Prepare the Flow Cell
HiSeq X Flow Cell
1 Remove a new flow cell package from 2°C to 8°C storage.
2 Set the flow cell package aside at room temperature for at least 30 minutes.
NOTE
If the foil packaging is intact, the flow cell can remain at room temperature up to 12
hours. You can return the packaged flow cell to 2°C to 8°C storage for later use 1 time
only. Avoid repeated cooling and warming of the flow cell.
3 Put on a new pair of powder-free gloves.
4 Peel open the foil package from the end with the angled seal. Use the flow cell within 4
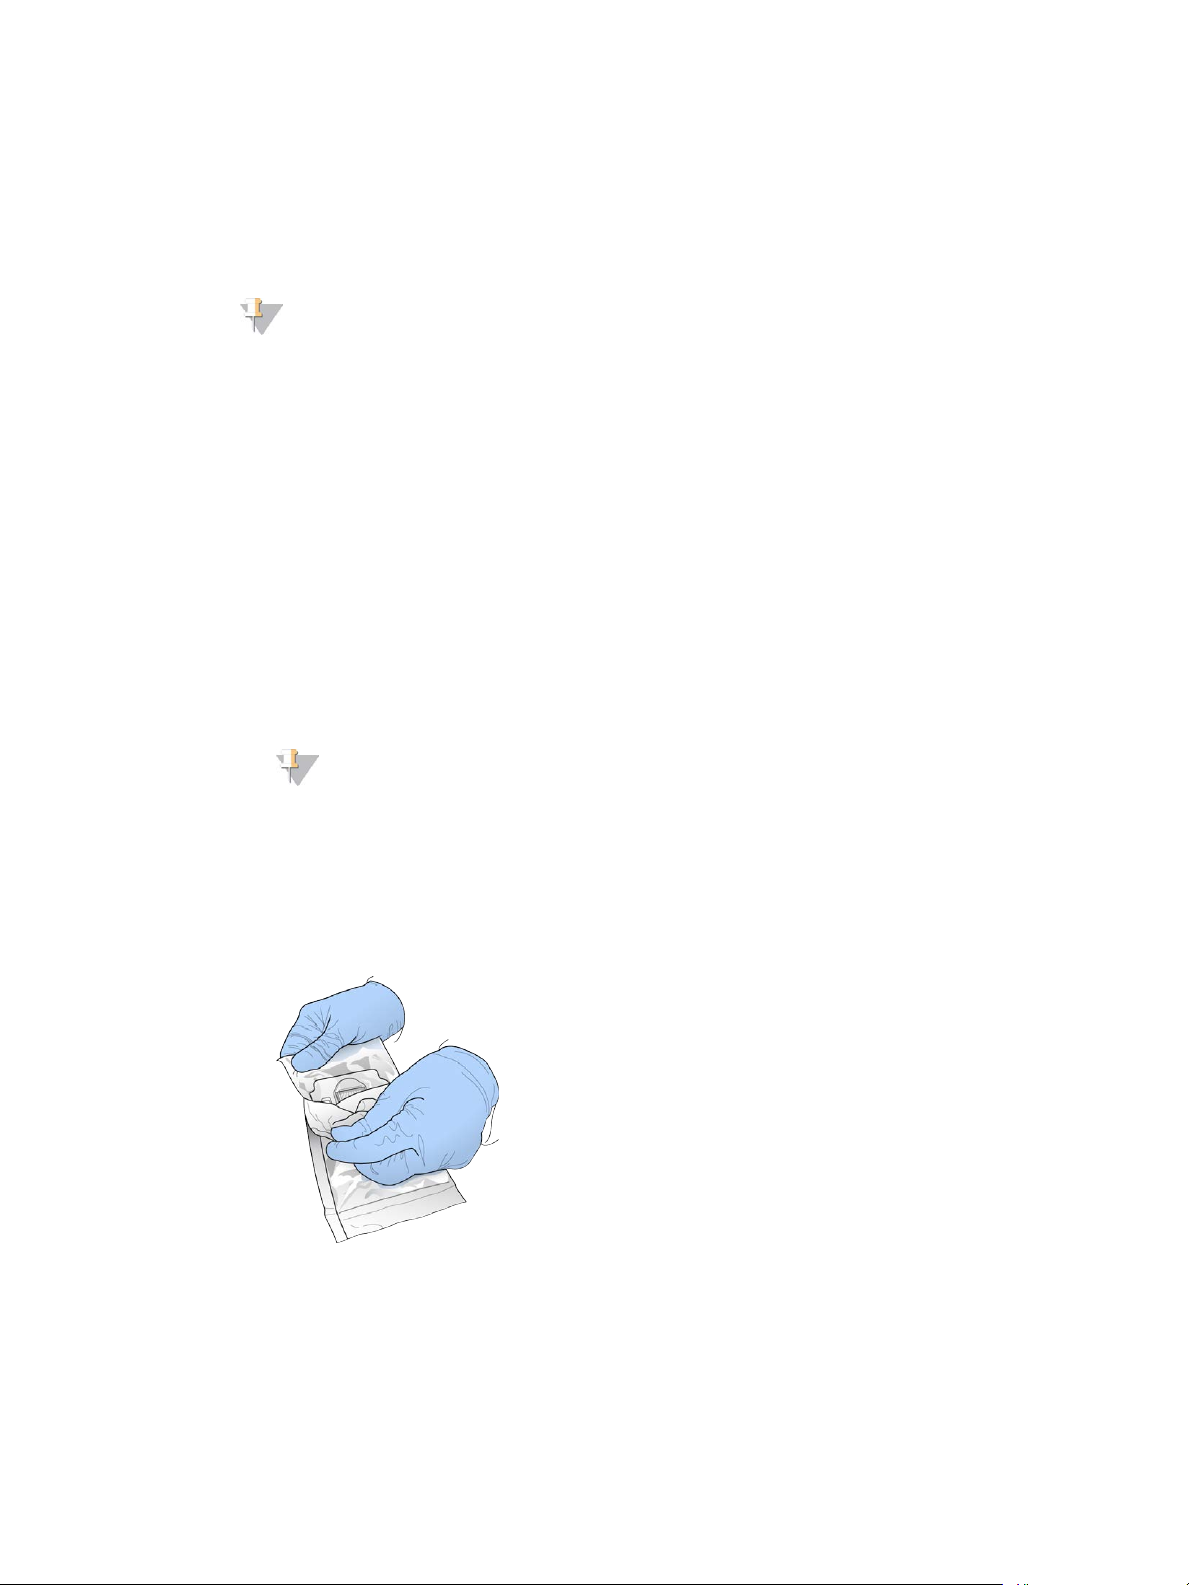
hours of opening the foil package.
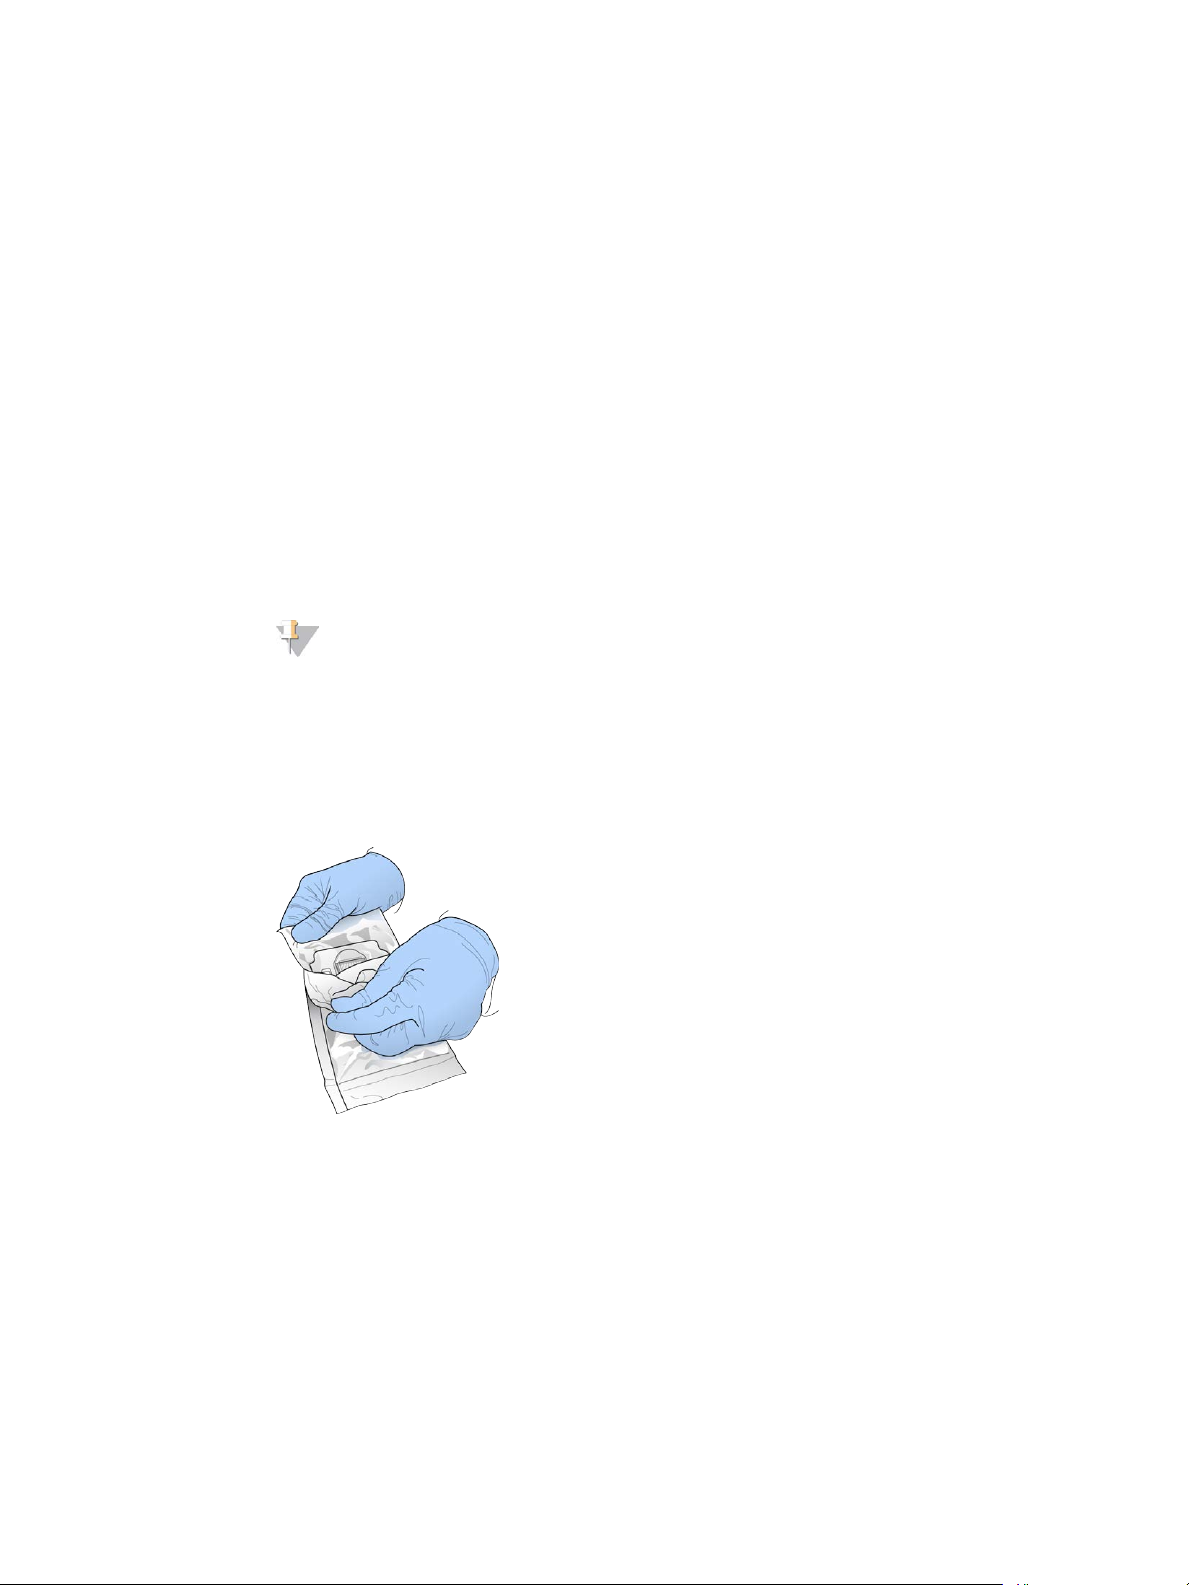
Figure 5 Open Flow Cell Package
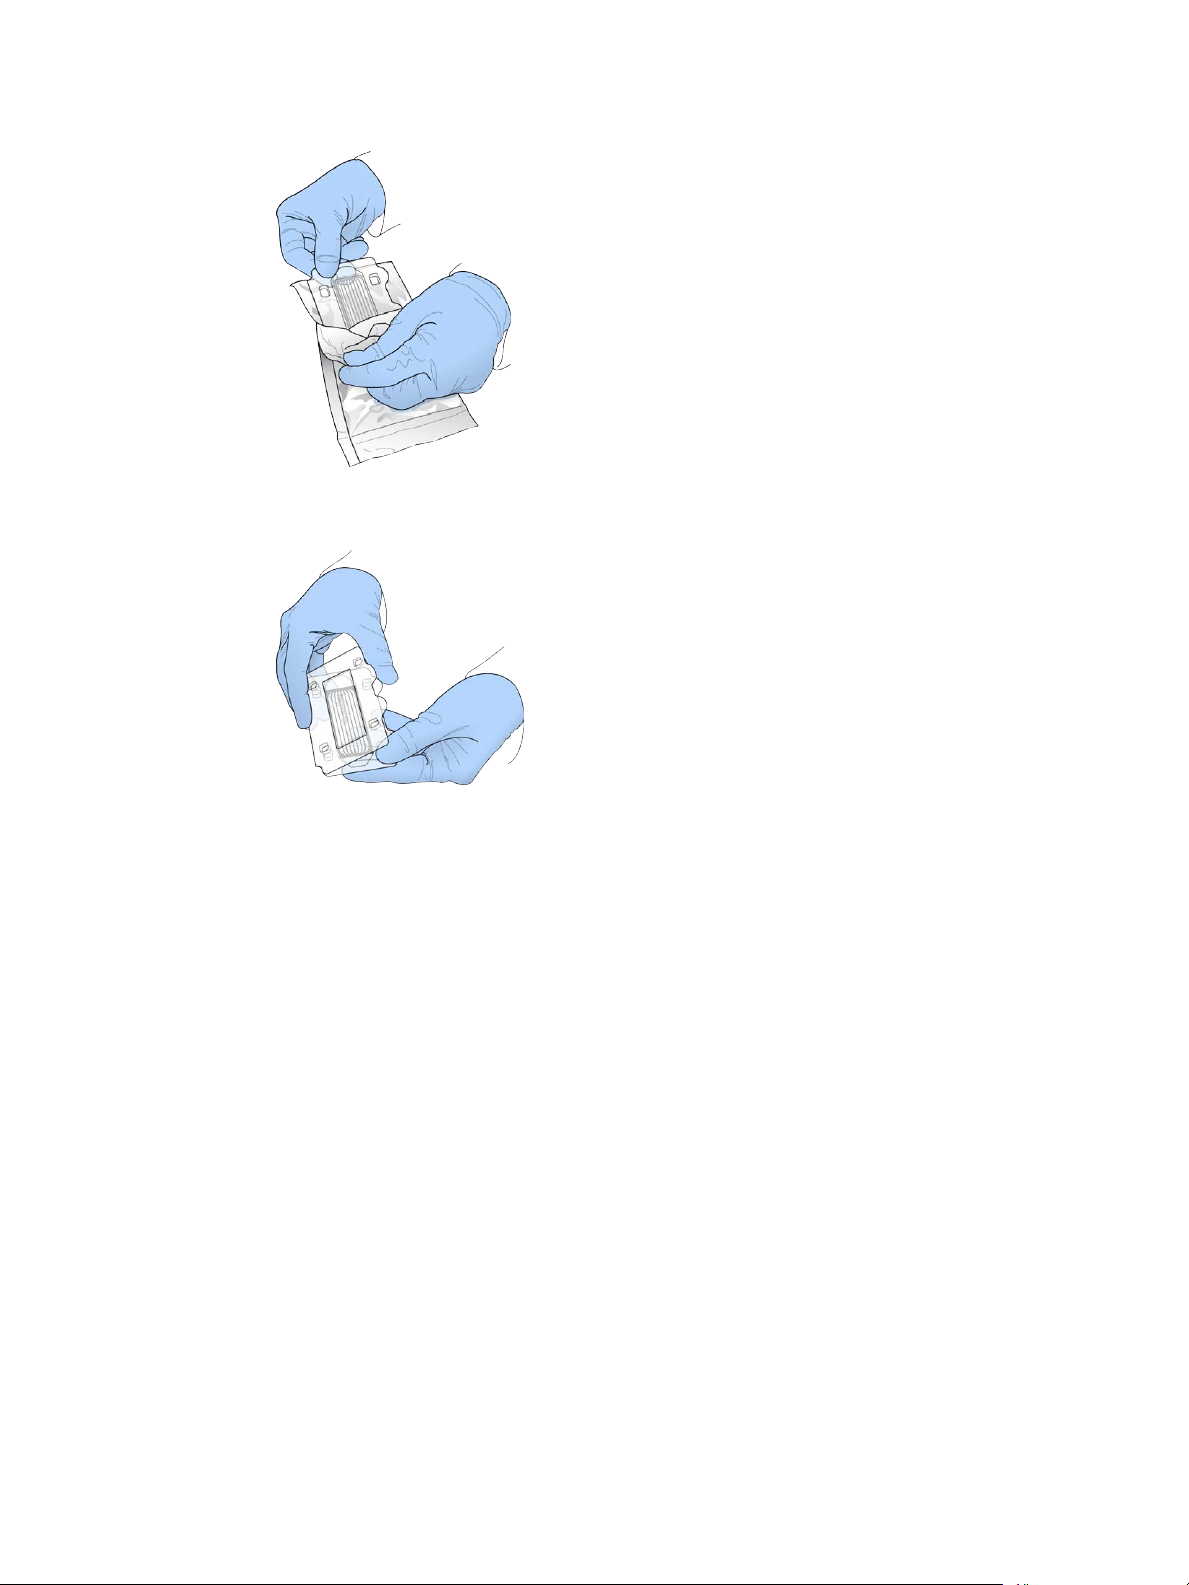
5 Remove the clamshell package from the foil packaging.
cBot 2 System Guide
19
Page 26
Preparing Reagents
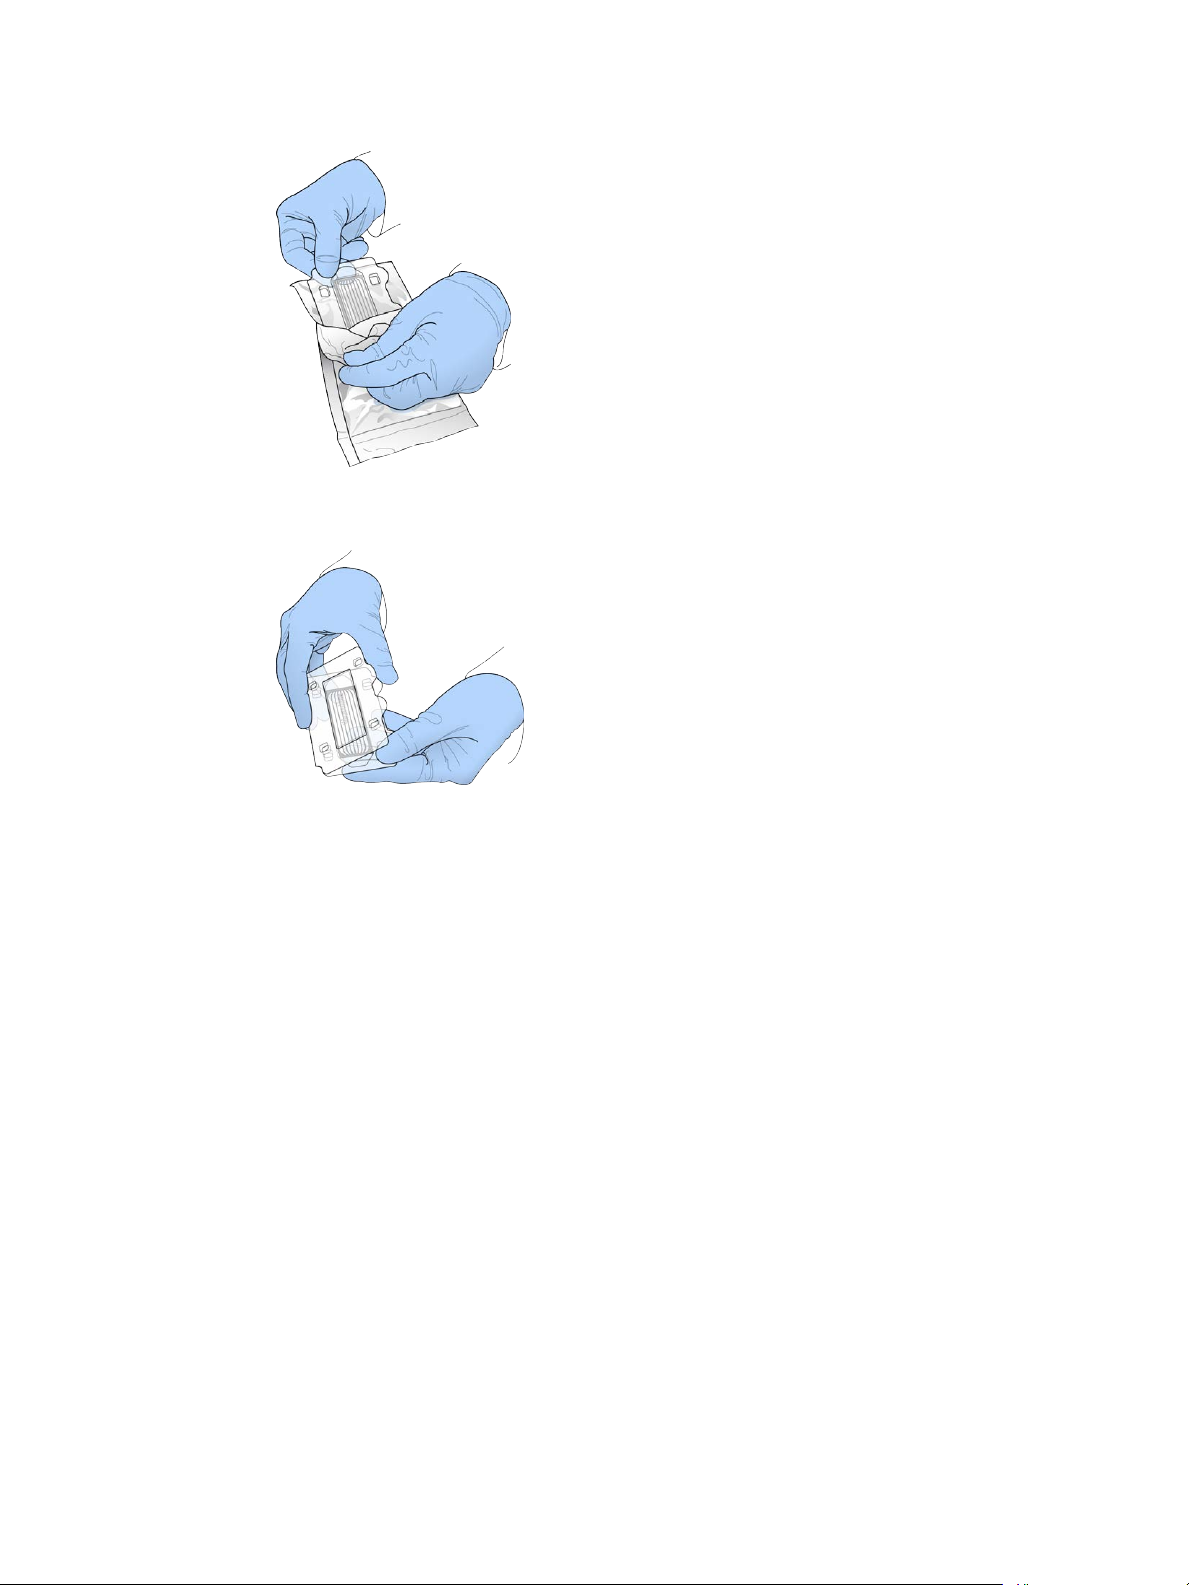
Figure 6 Remove From Foil Packaging
6 Open the clamshell package and remove the flow cell.
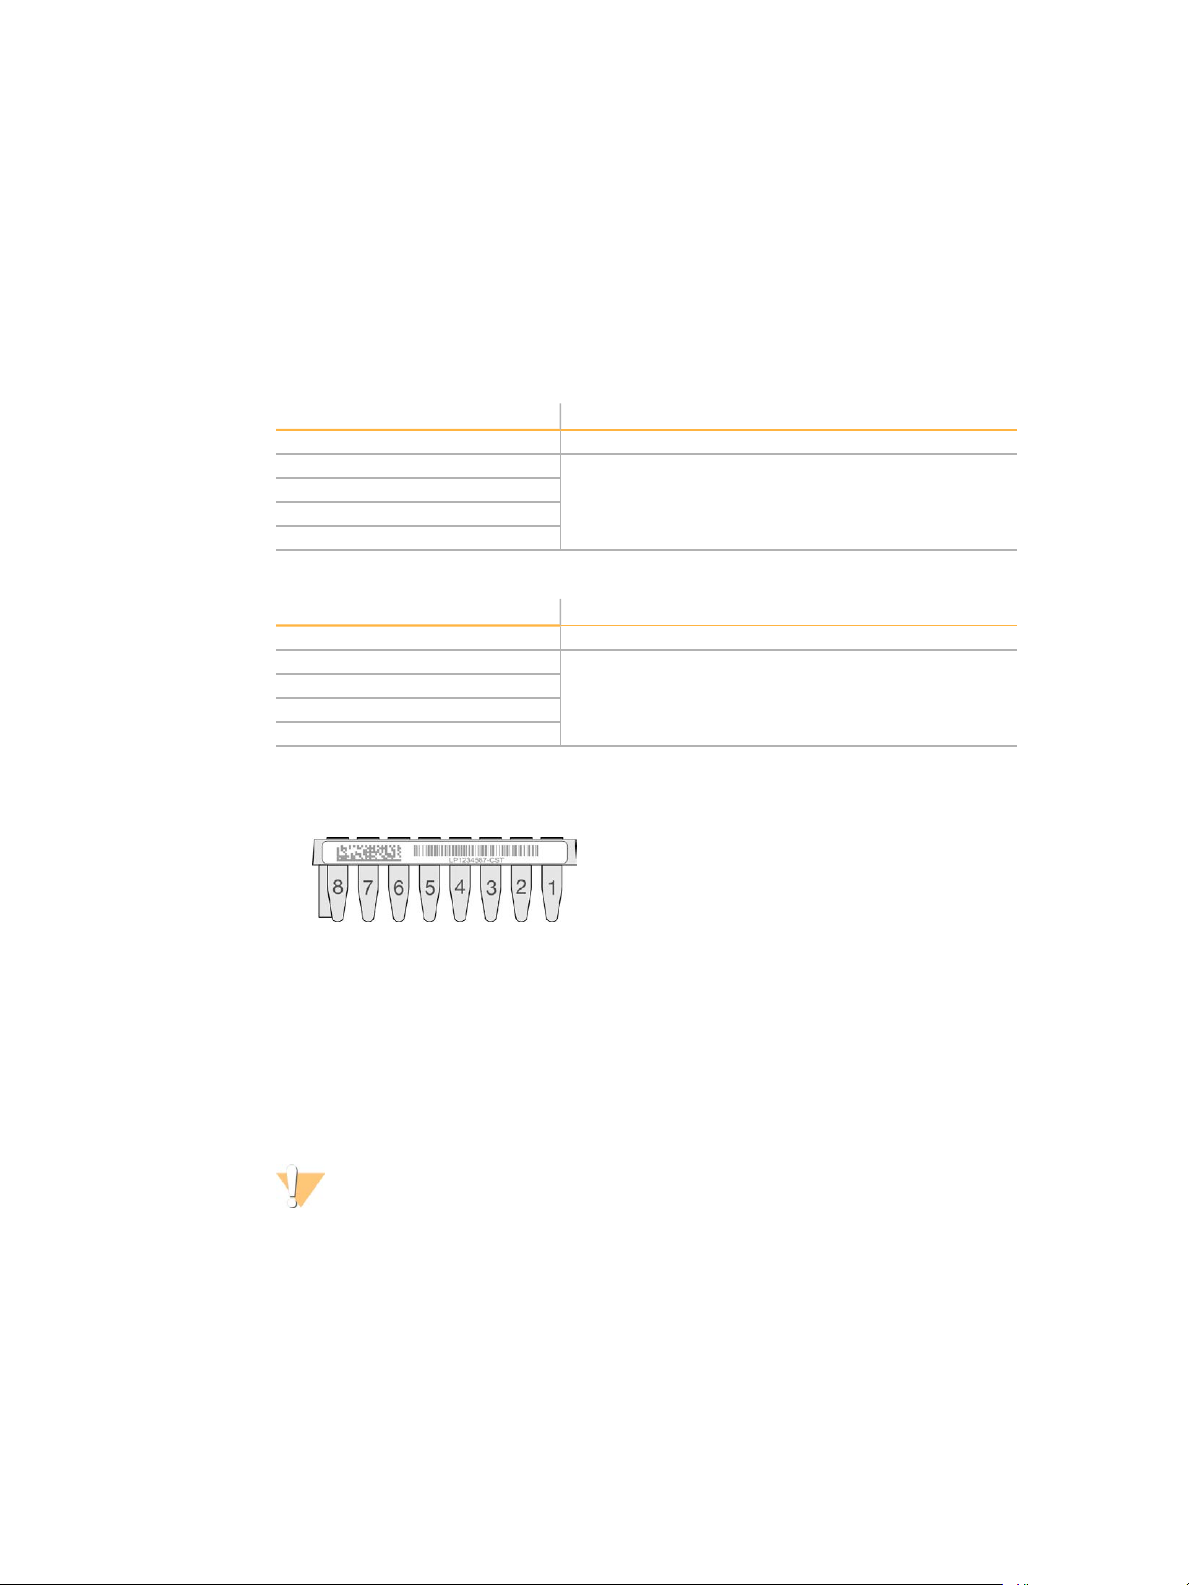
Figure 7 Remove Flow Cell From Clamshell Package
7 Clean the flow cell with a lint-free alcohol wipe. Dry with a lint-free tissue.
8 Set aside at room temperature.
Thaw the cBot Reagent Plate
1 Remove the cBot reagent plate from -25°C to -15°C storage.
2 Thaw in a room temperature water bath for 60minutes.
Thaw EPX1, EPX2, EPX3, and RSB
1 Remove 1 tube each of thefollowing reagents from -25°C to -15°C storage.
} Single-pack kit—EPX1, EPX2, EPX3, and RSB. Each tube contains enough reagent for
1 flow cell.
} 10-pack kit—EPX1M, EPX2M, EPX3M, and RSB. Each tube contains enough reagent
for 4 flow cells.
2 Thaw at room temperature for 10 minutes.
3 Set aside on ice.
Prepare a Fresh Dilution of NaOH
1 Combine the following volumes in a microcentrifuge tube to prepare 1 ml of
0.1NNaOH:
20
Material # 20004364
Document # 15065681 v01
Page 27

} Laboratory-grade water (900µl)
} Stock 1N NaOH (100µl)
2 Invert to mix.
Denature Libraries and Add Optional PhiX Control
The library loading concentration depends on the libraries to be sequenced. The following
instructions apply to either TruSeq Nano DNA(350 bp) or TruSeq DNAPCR-Free (350 bp)
libraries. Dilute to a concentration appropriate for the library type.
} A DNAloading concentration that is too high causes reduced %PF.
} A DNA loading concentration that is too low causes reduced %PF and a high
percentage of duplicates that negatively affect depth of coverage.
Repeat the following instructions for each flow cell to be sequenced.
1 Dilute the library or pooled libraries to the appropriate concentration:
} TruSeq Nano DNA libraries—Dilute to 2–3nM in RSB.
} TruSeq DNA PCR-Free libraries—Dilute to 1–2nM in RSB.
2 [Optional] Spike in 1% nondenatured Illumina PhiX control to nondenatured libraries:
} TruSeq Nano DNA libraries—Add 0.5µl 2–3nM PhiX to 50µl 2–3nM library.
} TruSeq DNA PCR-Free libraries—Add 0.5µl 1–2nM PhiX to 50µl 1–2nM library.
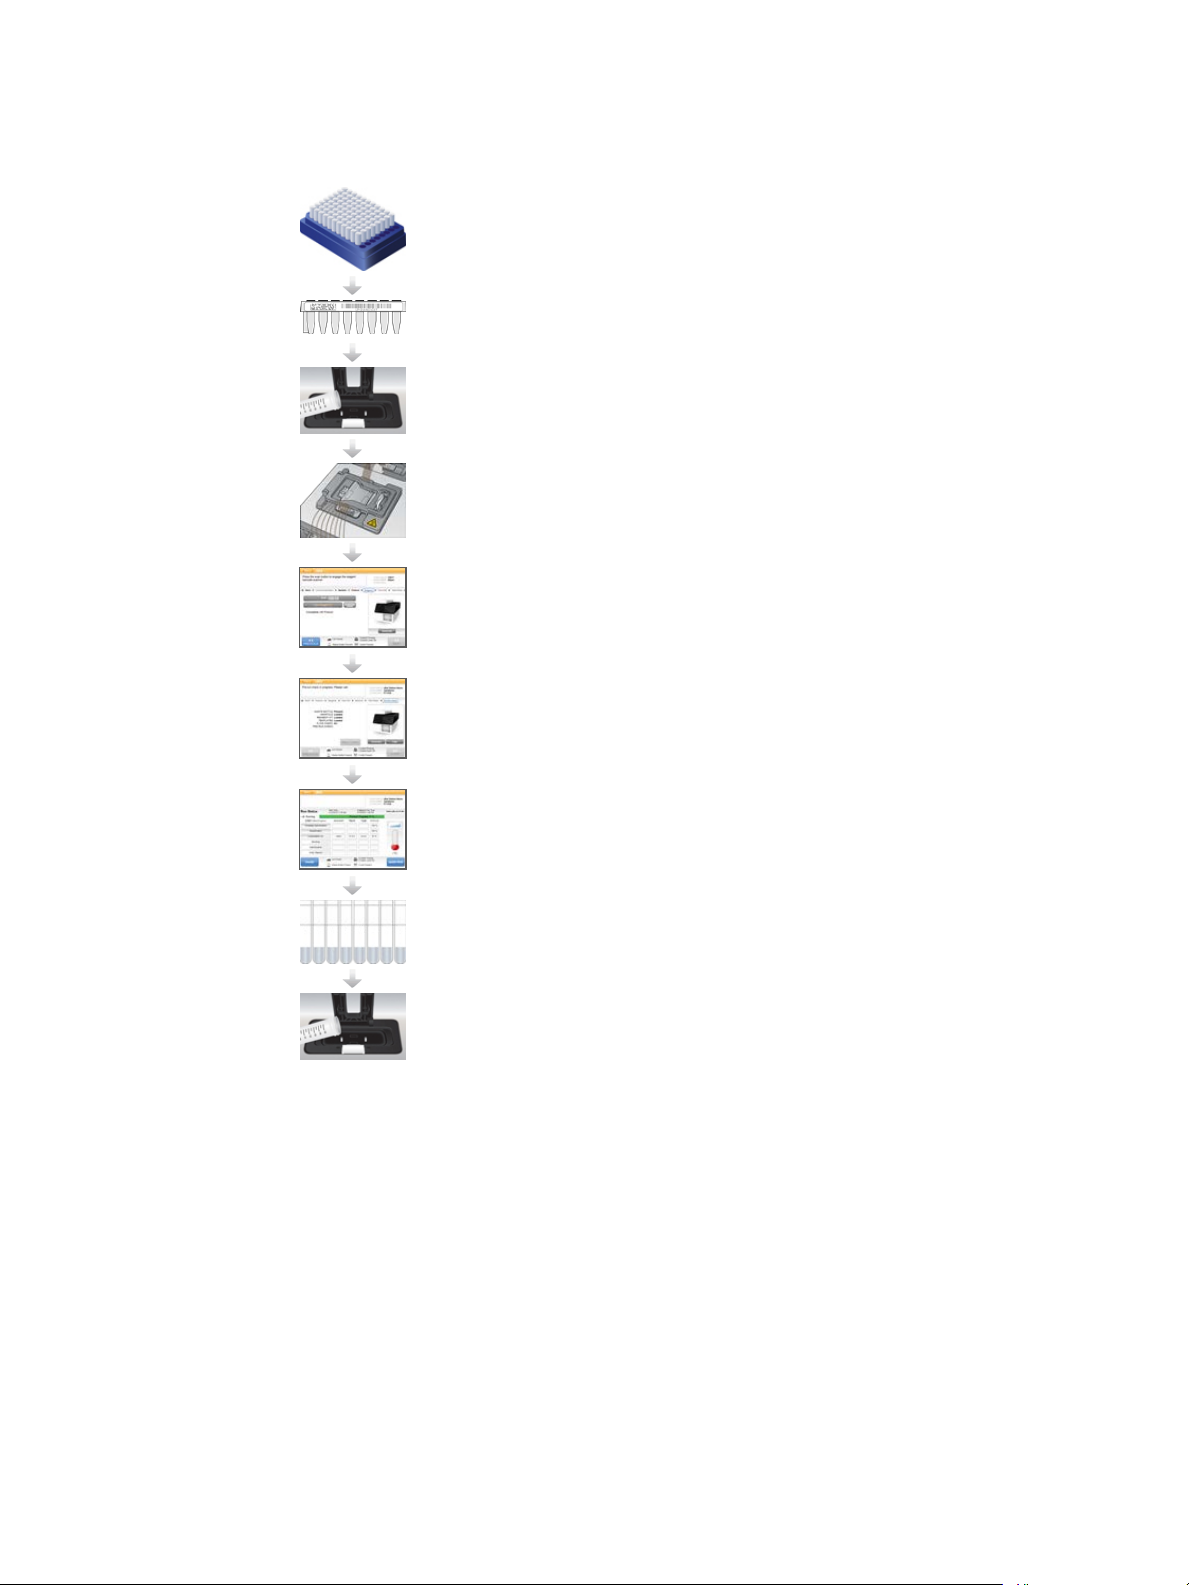
3 Number the tubes of an 8-tube strip:
} For clustering with sample tracking—From the key end, label the tubes #8 through
#1.
HiSeq X Flow Cell
} For clustering without sample tracking—Label the tubes #1 through #8. When
preparing 4 flow cells, consider adding another designator on the 8-tube strip for
proper tracking.
4 Denature the library in the 8-tube strip as follows:
a Add 5 µl nondenatured library to the bottom of each well.
b Add 5 µl freshly diluted 0.1 N NaOH. Slowly pipette to mix.
c Incubate at room temperature for 8 minutes.
d Add 5 µl 200 mM Tris-HCl pH 8.0. Slowly pipette to mix.
5 Set aside on ice until you are ready to add the ExAmp master mix.
CAUTION
Prepare and add the ExAmp master mix within 30 minutes.
Prepare the cBot Reagent Plate
1 Invert to mix.
2 Vortex to dislodge trapped air bubbles.
3 Tap on a hard surface to collect reagent droplets. Alternatively, pulse centrifuge.
4 Set aside on ice.
cBot 2 System Guide
21
Page 28

Preparing Reagents
Prepare the ExAmp Reaction
Prepare the ExAmp reaction master mix immediately before use. Follow the appropriate
instructions for the number of flow cells you are preparing.
ExAmp Reaction for 1 Flow Cell (Single-Pack Kit)
1 Invert EPX1 and EPX2 to mix.
2 Briefly centrifuge EPX1, EPX2, and EPX3.
3 Prepare the ExAmp master mix in a 1.5 ml tube as follows.
a Add 210 µl EPX1.
b Add 30 µl EPX2. Slowly pipette to mix.
c Add 110 µl EPX3. Slowly pipette to mix. Make sure that the bottom of the tube is
free of bubbles.
4 Add 35 µl master mix to the bottom of each well of the 8-tube strip. Slowly pipette to
mix. Change tips between samples.
5 Briefly centrifuge, and then set aside on ice until you are ready to load the cBot.
CAUTION
Load the 8-tube strip onto the cBot within 15minutes.
ExAmp Reaction for 4 Flow Cells (10-Pack Kit)
1 Invert EPX1M and EPX2M to mix.
2 Briefly centrifuge EPX1M, EPX2M, and EPX3M.
3 Add the following volumes to a 1.5 ml tube in the order listed:
a Add 756 µl EPX1M.
b Add 108 µl EPX2M. Slowly pipette to mix.
c Add 396 µl EPX3M. Slowly pipette to mix. Make sure that the bottom of the tube is
free of bubbles.
4 Add 35 µl of the master mix into the bottom of each well of the 8-tube strips. Slowly
pipette to mix. Change tips between samples.
5 Briefly centrifuge the 8-tube strip, and then set aside on ice until you are ready to load
the cBot.
CAUTION
Load the ExAmp master mix and library solution onto the cBot within 15minutes.
22
Material # 20004364
Document # 15065681 v01
Page 29
HiSeq 3000/4000 Flow Cell
Prepare the HiSeq 3000/4000 patterned flow cell, then prepare clustering reagents. To
prepare clustering reagents, thaw the cBot reagent plate and prepare the ExAmp reaction
master mix.
About Reagents
} ExAmp reagents are viscous, especially EPX2 and EPX3. Aspirate and dispense
reagents slowly to ensure accurate pipetting.
} EPX3 does not move when inverted due to viscosity.
} Never vortex ExAmp reagents, and do not refreeze after thawing.
} The ExAmp master mix can be cloudy, which is normal. If the solution separates into a
cloudy portion and a transparent portion, slowly pipette to mix.
Prepare the Flow Cell
1 Remove a new flow cell package from 2°C to 8°C storage.
2 Set the flow cell package aside at room temperature for at least 30 minutes.
NOTE
If the foil packaging is intact, the flow cell can remain at room temperature up to 12
hours. You can return the packaged flow cell to 2°C to 8°C storage for later use 1 time
only. Avoid repeated cooling and warming of the flow cell.
HiSeq 3000/4000 Flow Cell
3 Put on a new pair of powder-free gloves.
4 Peel open the foil package from the end with the angled seal. Use the flow cell within 4
hours of opening the foil package.
Figure 8 Open Flow Cell Package
5 Remove the clamshell package from the foil packaging.
cBot 2 System Guide
23
Page 30
Preparing Reagents
Figure 9 Remove From Foil Packaging
6 Open the clamshell package and remove the flow cell.
Figure 10 Remove Flow Cell From Clamshell Package
7 Clean the flow cell with a lint-free alcohol wipe. Dry with a lint-free tissue.
8 Set aside at room temperature.
Thaw the cBot Reagent Plate
1 Remove the cBot reagent plate from -25°C to -15°C storage.
2 Place the reagent plate in a room temperature water bath for 60minutes.
Thaw EPX1, EPX2, EPX3, and RSB
1 Remove EPX1, EPX2, EPX3, and RSB from -25°C to -15°C storage.
2 Thaw at room temperature for 10 minutes.
3 Set aside on ice.
Prepare a Fresh Dilution of NaOH
1 Combine the following volumes in a microcentrifuge tube to prepare 1 ml of
0.1NNaOH:
} Laboratory-grade water (900µl)
} Stock 1N NaOH (100µl)
2 Invert to mix.
24
Material # 20004364
Document # 15065681 v01
Page 31
Denature Libraries and Add Optional PhiX Control
The library loading concentration depends on the libraries to be sequenced. The following
instructions apply to supported Illumina libraries and assume an insert size typical for the
associated library type. Make sure that you dilute to a concentration appropriate for the
library type.
} A DNAloading concentration that is too high causes reduced %PF.
} A DNA loading concentration that is too low causes reduced %PF and a high
percentage of duplicates that negatively affect depth of coverage.
1 Dilute the library or pooled libraries to the appropriate concentration.
Library Type Dilution
TruSeq DNAPCR-Free Dilute to 1–2nM in RSB.
TruSeq Nano DNA Dilute to 2–3nM in RSB.
Nextera Rapid Capture Exome
TruSeq Stranded Total RNA
TruSeq Stranded mRNA
2 [Optional] Spike-in 1% nondenatured Illumina PhiX control to nondenatured libraries.
Library Type Spike-In
TruSeq DNAPCR-Free Add 5 µl 100–200 pM PhiX to 45 µl 1–2 nM library.
TruSeq Nano DNA Add 5 µl 200–300 pM PhiX to 45 µl 2–3 nM library.
Nextera Rapid Capture Exome
TruSeq Stranded Total RNA
TruSeq Stranded mRNA
HiSeq 3000/4000 Flow Cell
3 Number the tubes of an 8-tube strip:
} For clustering with sample tracking—From the key end, label the tubes #8 through
#1.
} For clustering without sample tracking—Label the tubes #1 through #8.
4 Denature the library in the 8-tube strip as follows:
a Add 5 µl nondenatured library into the bottom of each well.
b Add 5 µl freshly diluted 0.1 N NaOH. Slowly pipette to mix.
c Incubate at room temperature for 8 minutes.
d Add 5 µl 200 mM Tris-HCl pH 8.0. Slowly pipette to mix.
5 Set aside on ice until you are ready to add the ExAmp master mix.
CAUTION
Prepare and add the ExAmp master mix within 30 minutes.
Prepare the cBot Reagent Plate
1 Invert to mix.
2 Vortex to dislodge trapped air bubbles.
3 Tap on a hard surface to collect reagent droplets. Alternatively, pulse centrifuge.
4 Set aside on ice.
cBot 2 System Guide
25
Page 32

Preparing Reagents
Prepare the ExAmp Reaction
Prepare the ExAmp reaction master mix immediately before use.
1 Invert EPX1 and EPX2 to mix.
2 Briefly centrifuge EPX1, EPX2, and EPX3.
3 Prepare the ExAmp master mix in a 1.5 ml tube as follows.
a Add 210 µl EPX1.
b Add 30 µl EPX2. Slowly pipette to mix.
c Add 110 µl EPX3. Slowly pipette to mix. Make sure that the bottom of the tube is
free of bubbles.
4 Add 35 µl master mix to the bottom of each well of the 8-tube strip. Slowly pipette to
mix. Change tips between samples.
5 Cap the tubes and briefly centrifuge.
6 Set aside on ice until you are ready to load the cBot.
CAUTION
Load the 8-tube strip onto the cBot within 15minutes.
26
Material # 20004364
Document # 15065681 v01
Page 33

HiSeq High Output Flow Cell
To prepare reagents, thaw and inspect the reagent plate. The reagent plate takes
approximately 60 minutes to thaw using a room temperature water bath. Alternatively, you
can thaw reagents at 2°C to 8°C overnight, not to exceed 16hours.
About Reagents
} When vortexing or inverting the cBot reagent plate, keep a hand on top of the tubes.
Thaw the cBot Reagent Plate
1 Remove the cBot reagent plate from -25°C to -15°C storage.
2 Make sure that the tube strips are securely seated in the plate.
3 Thaw in a room temperature water bath for 60minutes.
Prepare the cBot Reagent Plate
1 Invert the cBot plate to mix reagents.
2 Vortex to dislodge trapped air bubbles.
3 Tap on a hard surface to collect reagent droplets at the bottom of the tubes.
Alternatively, pulse centrifuge.
HiSeq High Output Flow Cell
4 Make sure that the tubes are free of air bubbles, securely seated, and ordered as
numbered.
5 Promptly proceed to setting up the cBot.
6 If you are sequencing Nextera libraries on a TruSeq v3 flow cell, proceed to Prepare
HP10 (TruSeq v3) before setting up the cBot.
Prepare HP10 (TruSeq v3)
Prepare HP10 for use on the cBot only when using Nextera libraries on a TruSeq v3 flow
cell. HP10 is also compatible with other Illumina library types.
1 Remove HP10 from -25°C to -15°C storage.
2 Thaw in a beaker of room temperature deionized water for 20 minutes.
3 Add 150 µl HP10 to each tube of an 8-tube strip.
4 Set aside on ice.
5 Promptly proceed to setting up the cBot.
cBot 2 System Guide
27
Page 34

HiSeq Rapid Flow Cell
To prepare reagents, thaw and inspect the reagent plate. The reagent plate takes
approximately 30 minutes to thaw using a room temperature water bath. Alternatively, you
can thaw reagents at 2°C to 8°C overnight, not to exceed 16hours.
About Reagents
} When vortexing or inverting the cBot reagent plate, keep a hand on top of the tubes.
Thaw the cBot Reagent Plate
Preparing Reagents
1 Remove the cBot reagent plate from -25°C to -15°C storage.
2 Make sure that the tube strips are securely seated in the plate.
3 Thaw in a room temperature water bath for 60minutes.
Prepare the cBot Reagent Plate
1 Invert the cBot reagent plate to mix reagents.
2 Vortex to dislodge trapped air bubbles.
3 Tap on a hard surface to collect reagent droplets at the bottom of the tubes.
Alternatively, pulse centrifuge.
4 Inspect to make sure that the tubes are free of air bubbles, securely seated, and ordered
as numbered on the label.
5 Promptly proceed to setting up the cBot.
28
Material # 20004364
Document # 15065681 v01
Page 35

Chapter 4 Clustering With Sample Tracking
Clustering With Sample
Tracking
Introduction 30
Clustering With Sample Tracking Workflow 31
Perform a Pre-Run Wash 32
Load Consumables 33
Load the Manifold 35
Select a Protocol 37
Scan Consumables 38
Perform a Pre-Run Check 39
Monitor the Run 40
Unload Run Components 41
Perform a Post-Run Wash 43
Confirm Reagent Delivery (Optional) 44
Chapter 4
cBot 2 System Guide
29
Page 36

Clustering With Sample Tracking
Introduction
Clustering with sample tracking is possible for all HiSeq flow cells except TruSeq Rapid
(v1). All clustering steps are performed on the cBot except preparing libraries for
sequencing and preparing reagents. Clustering steps for a HiSeq Rapid v2 flow cell consist
only of template hybridization and first extension. The remaining steps are performed on
the HiSeq.
Setting up the cBot for cluster generation with sample tracking includes steps to load run
components, select a protocol, and scan consumables. Internal scanners record required
input, such as reagent ID and flow cell ID, after consumables are loaded and the
instrument lid is closed. Manual input and system input are shown on the screen, if
necessary.
For information on configuring your cBot for sample tracking, see the cBot System
Configuration Guide (part # 1000000005301).
Library Prep
Before setting up the cBot for cluster generation, prepare libraries for sequencing. The
process differs depending on library type and flow cell type.
} Most libraries on TruSeq flow cells and HiSeq flow cells require a denaturation and
dilution step. For more information, see HiSeq and GAIIx Systems Denature and Dilute
Libraries Guide (document # 15050107).
} The denaturation protocol differs for HiSeq X and HiSeq 3000/4000 patterned flow cells.
Denature libraries for use with these flow cell types only as described in the reagent
preparation instructions for your flow cell type. For more information, see Preparing
Reagents on page 17.
30
Material # 20004364
Document # 15065681 v01
Page 37
Clustering With Sample Tracking Workflow
Prepare the reagent plate and flow cell. See Preparing Reagents on page 17.
Prepare libraries for sequencing and load libraries into a barcode labeled
8-tube strip.
Perform a pre-run wash.
Load consumables and the cBot manifold, and close the instrument lid.
Select a protocol and scan consumables.
Clustering With Sample Tracking Workflow
Select Pre-Run Check to initiate the automated pre-run check.
Select Start. Monitor run progress from the Run Status screen.
[Optional] Unload run components and confirm reagent delivery.
Perform a post-run wash.
cBot 2 System Guide
31
Page 38
Perform a Pre-Run Wash
A wash is recommended before clustering on the cBot.
1 Select User Name.
2 Using the onscreen keyboard, type your name and then select Enter.
3 Select Start.
4 If the Manifold removed checkbox is not selected on the Wash screen, remove the
manifold.
5 Raise the instrument lid by lifting from the cutout on the front of the lid.
6 Fill the wash reservoir with about 12ml deionized water.
7 Close the instrument lid.
8 Select the Reservoir filled with water checkbox.
9 Select Wash.
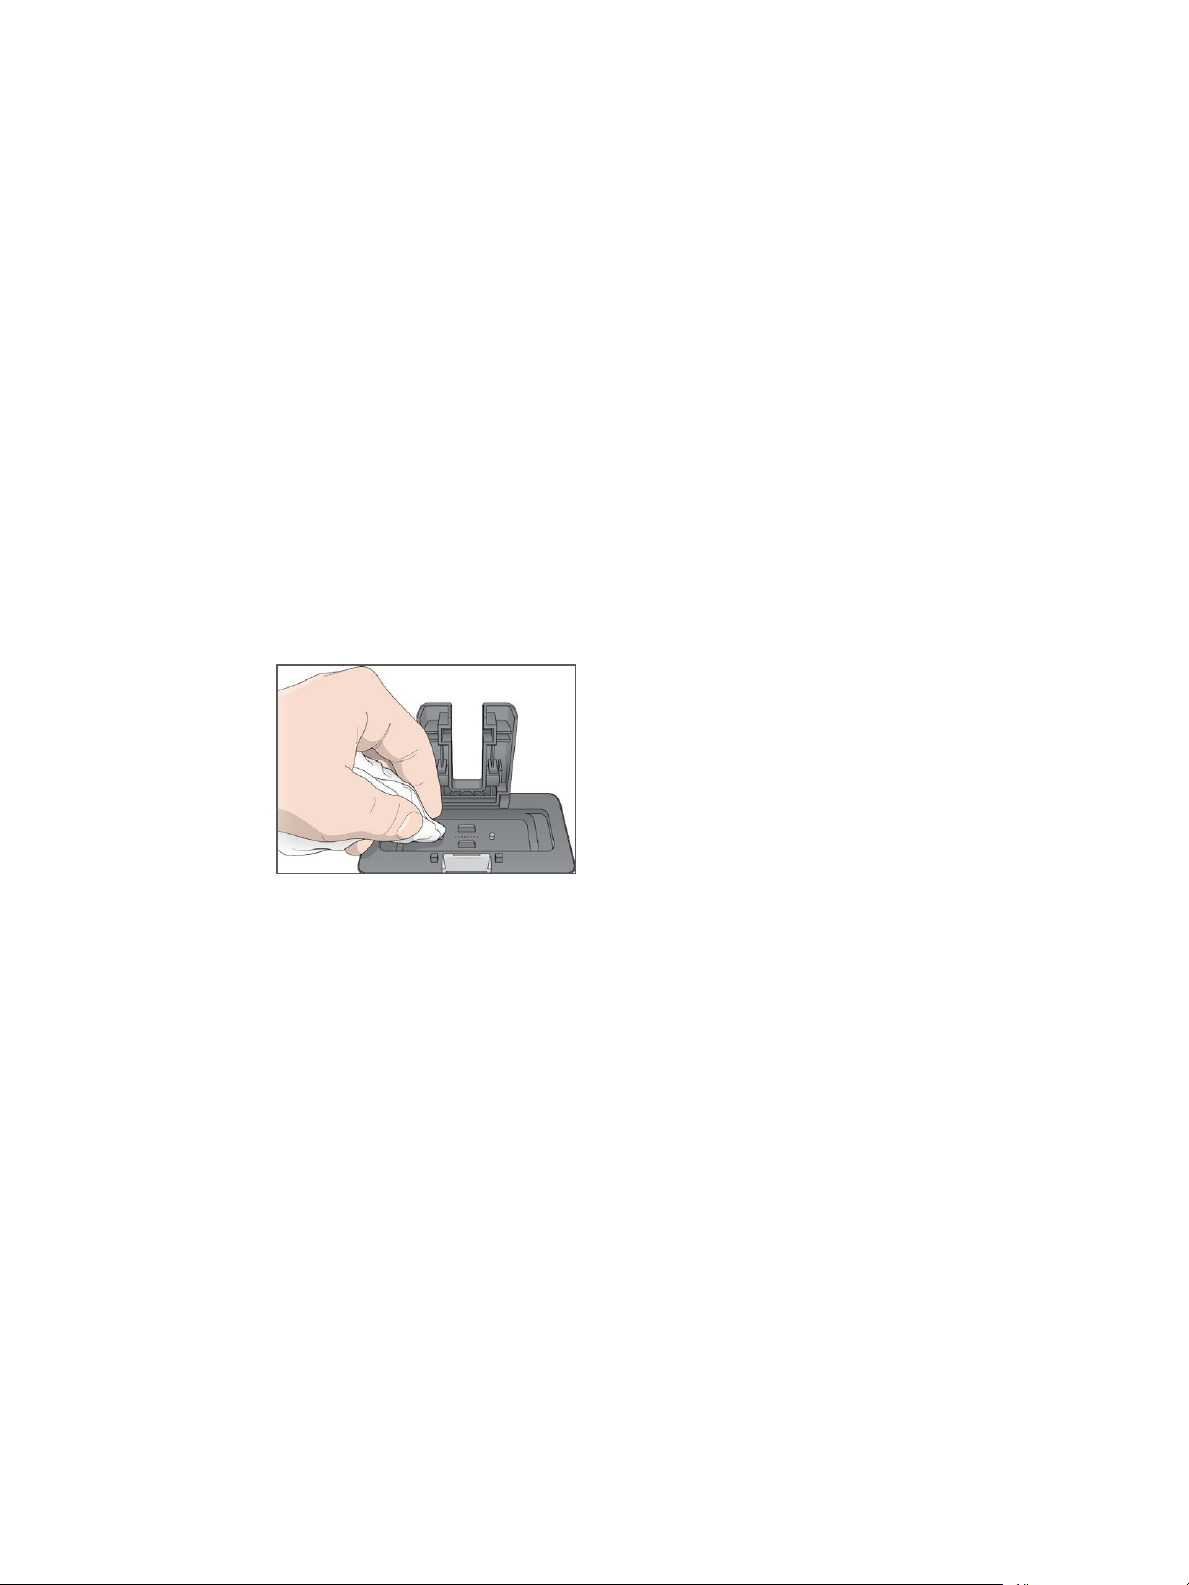
10 After the wash is finished, blot excess water from the wash reservoir with a low-lint
tissue.
Clustering With Sample Tracking
Figure 11 Dry the Wash Reservoir
11 Select the Wash reservoir dry checkbox.
12 Select Next.
32
Material # 20004364
Document # 15065681 v01
Page 39
Load Consumables
From the Load Consumables screen, use the following instructions to load the cBot reagent
plate, flow cell, and barcode labeled 8-tube strip containing prepared libraries. Depending
on the selected protocol, the software prompts you to load an 8-tube strip of additional
primers.
Load the Reagent Plate
1 Remove the clear plastic lid from the cBot reagent plate.
2 Raise the instrument lid by lifting from the cutout on the front of the lid.
3 [For TruSeq v3 reagents] Remove the red foil seal:
a Hold each end of the tube strip in row 10 and peel the red foil from the 8-tube strip.
Discard the foil appropriately.
b Select the onscreen checkbox to indicate that the seal is removed.
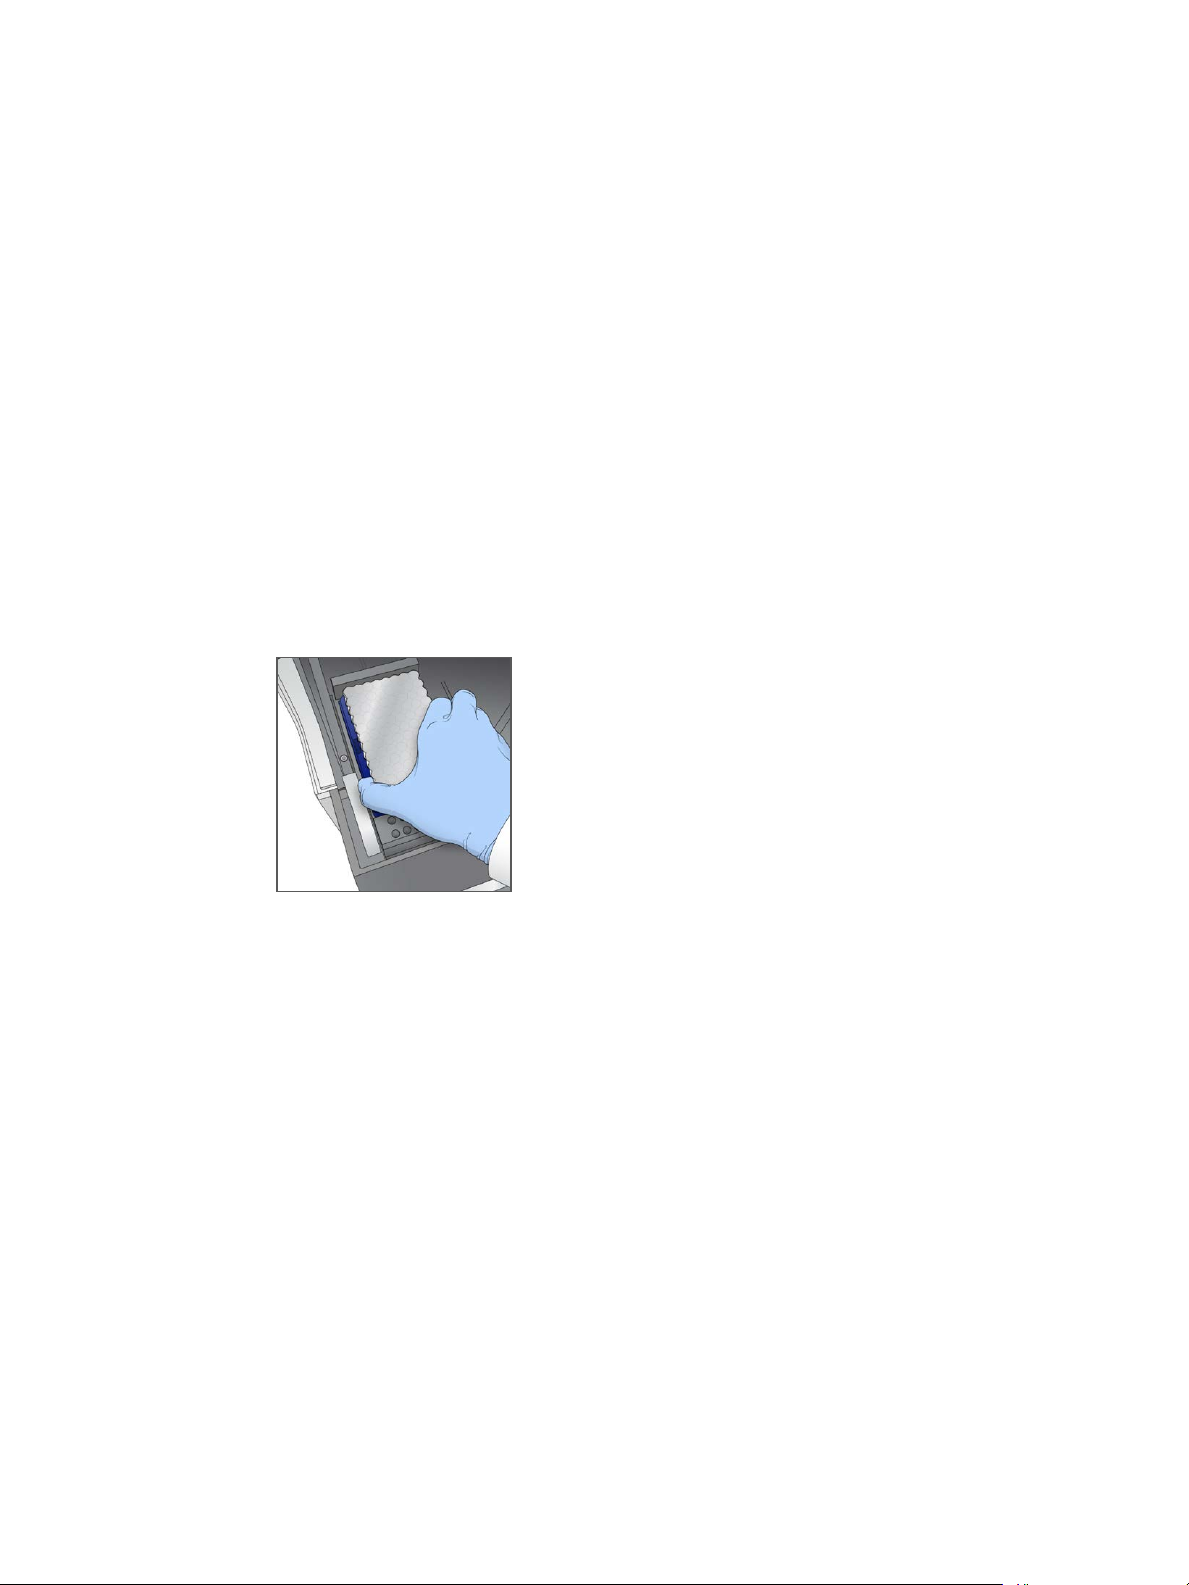
4 Pull the reagent plate lever toward you and place the reagent plate onto the reagent
stage with the barcode label facing the back of the instrument.
Figure 12 Position the Reagent Plate
Load Consumables
5 Release the lever to secure the reagent plate.
Load the Flow Cell
1 Lift the flow cell clamp.
2 Wash the adapter plate on the thermal stage with a small amount of deionized water,
and then dry with a lint-free tissue. Do not allow fluids to drip inside the instrument.
3 Remove the flow cell from storage:
} All flow cells except HiSeq X and HiSeq 3000/4000—Remove the flow cell from the
storage tube using plastic forceps. Rinse with deionized water and then dry with a
lens cleaning tissue using a sweeping motion. Save the tube and buffer for later
storage.
} HiSeq X and HiSeq 3000/4000 flow cells—The patterned flow cell is ready to use
after flow cell preparation.
4 Position the flow cell on the thermal stage with flow cell port holes facing upward.
Lane 1 is on the right side with the keyed corner.
cBot 2 System Guide
33
Page 40
Clustering With Sample Tracking
Load Templates
1 Load the 8-tube strip containing libraries into the template row of the tube strip holder.
Make sure that it is securely seated.
2 Proceed as follows.
} If you are using additional primers, proceed to Load Primers.
} If you are not using additional primers, select the Consumables Loaded checkbox
and proceed to Load the Manifold on page 35.
Load Primers
The Load Primers screen appears for workflows that allow custom primers or that require
additional primers. Sequencing Nextera libraries on a TruSeq v3 flow cell requires that you
load an 8-tube strip containing HP10.
1 Load the 8-tube strip containing primers into the primer row of the tube strip holder.
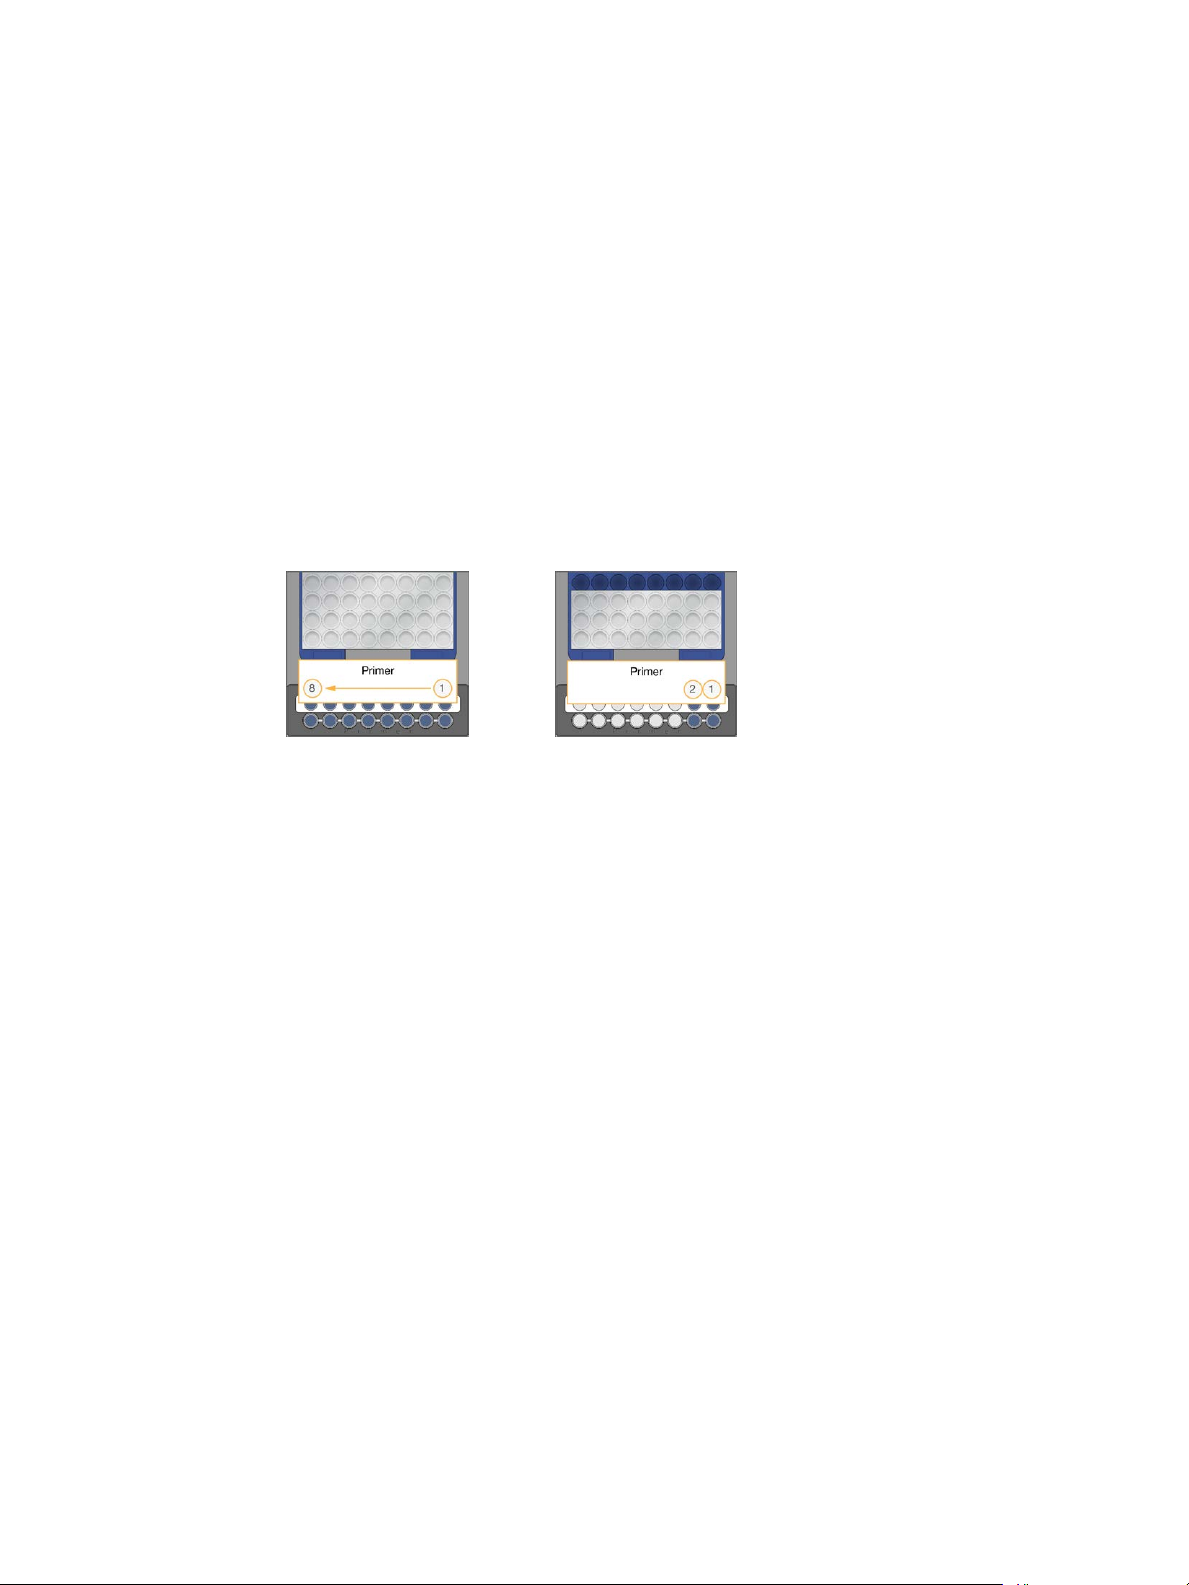
Tubes are numbered right to left to align with the lane orientation of the flow cell.
HiSeq X, HiSeq 3000/4000,
HiSeq v4, and TruSeq v3
(HiSeq)
2 Select the ConsumablesLoaded checkbox.
3 Select Next.
HiSeq Rapid v2
34
Material # 20004364
Document # 15065681 v01
Page 41
Load the Manifold
From the Manifold screen, load the manifold from the same cluster kit as the flow cell.
1 Inspect the sippers on the sipper comb for damage. Make sure that the black rubber
gaskets are evenly seated.
2 Position the manifold over the flow cell with the sipper comb pointing toward the front
of the cBot.
3 Align the manifold with the guide pins on the thermal stage and seat the manifold
over the flow cell. Seat evenly to form a tight seal.
4 Select the Manifold seated over flow cell checkbox.
5 Close the flow cell clamp to secure the manifold.
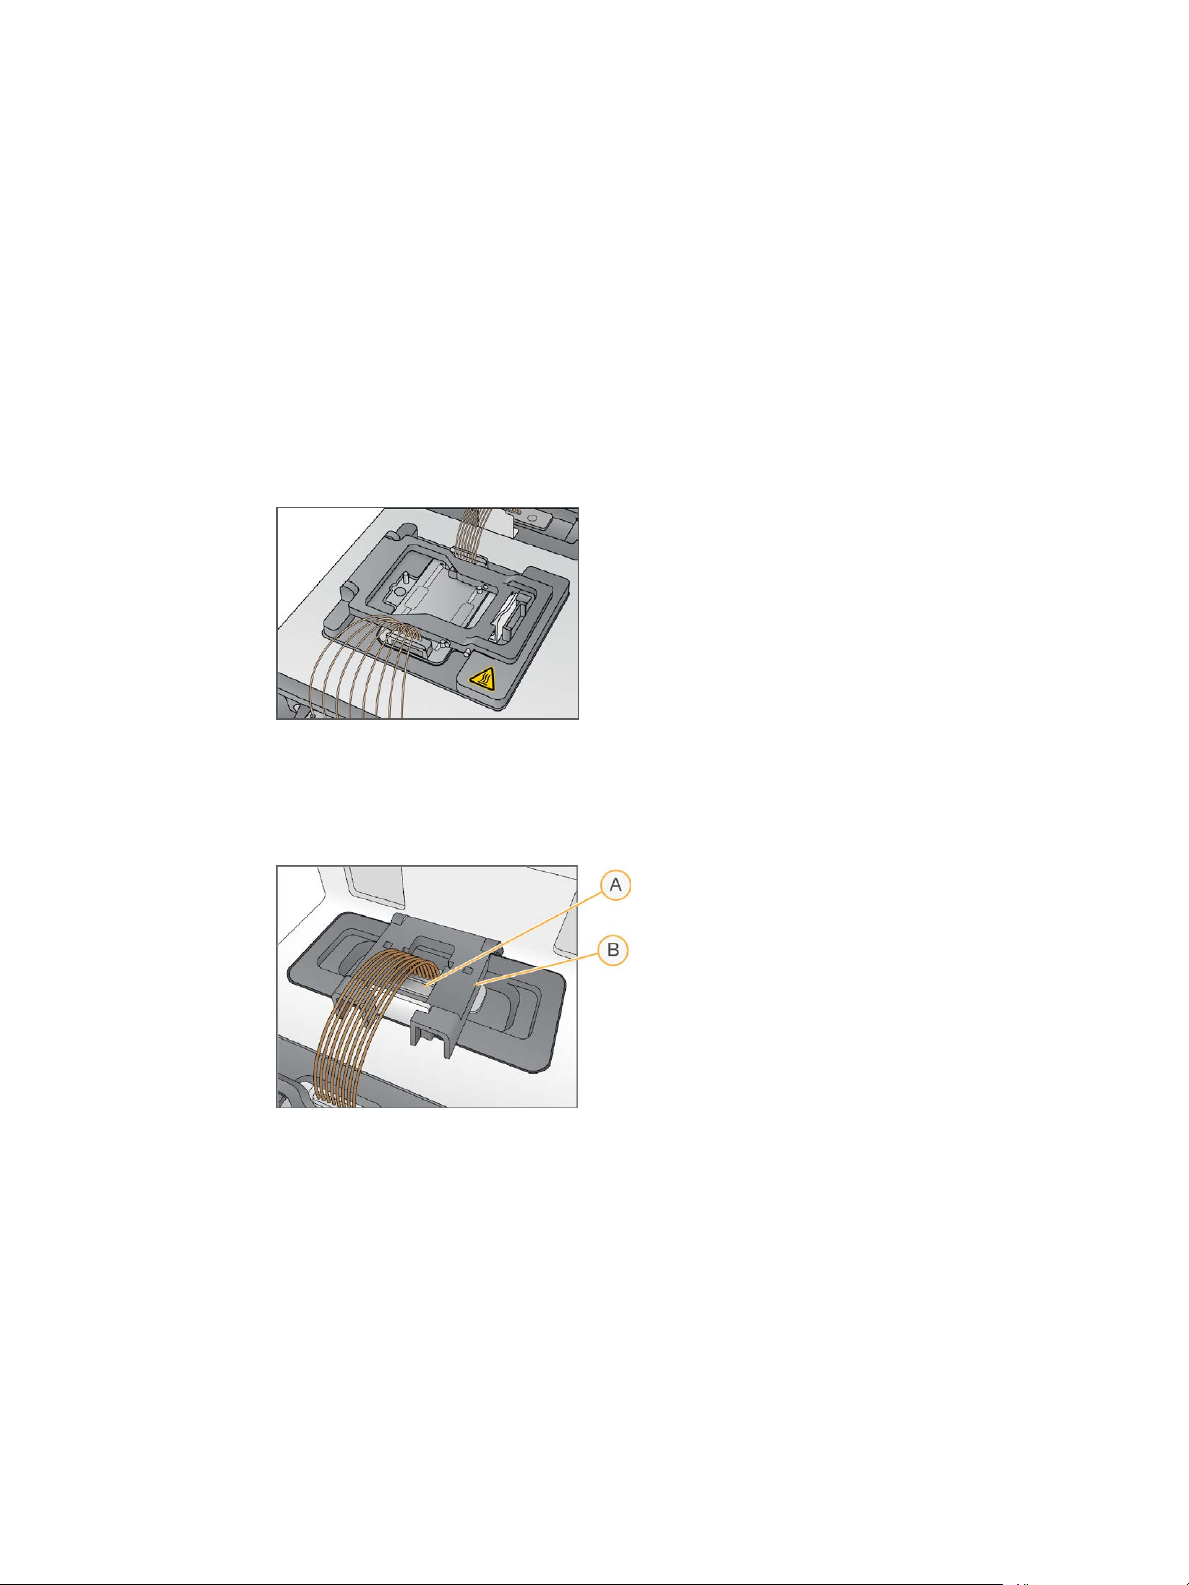
Figure 13 Close the Flow Cell Clamp
Load the Manifold
6 Select the Flow cell clamp closed checkbox.
7 Connect the outlet end of the manifold to the outlet port in the wash reservoir. Make
sure that the outlet is evenly seated.
Figure 14 Secure Outlet End
A Outlet Port
B Output Clamp
8 Snap the outlet clamp closed to secure the outlet end of the manifold.
9 Select the Outlet clamp closed checkbox.
10 Align the sipper comb with the 2 metal guide pins on the front of the thermal stage.
cBot 2 System Guide
35
Page 42
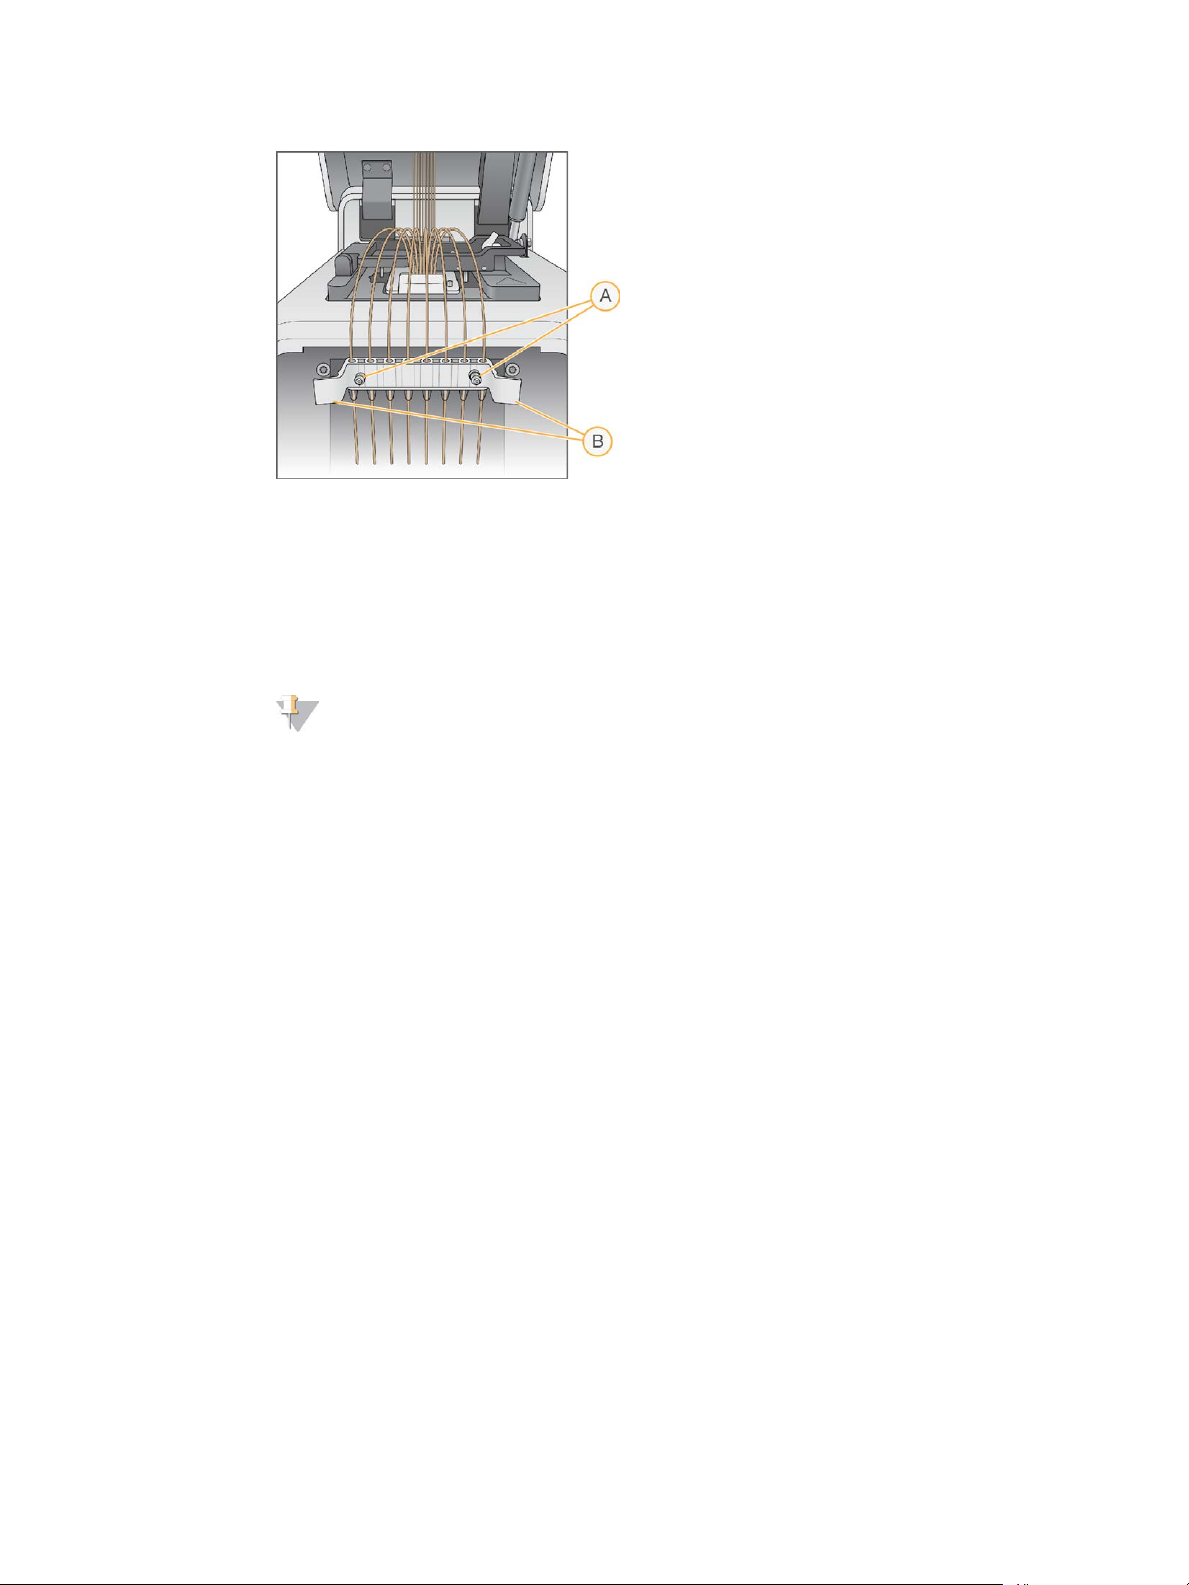
Clustering With Sample Tracking
Figure 15 Secure the Sipper Comb
A Metal Guide Pins
B Plastic Tabs
11 Snap the sipper comb into place using the plastic tabs on either side of the comb.
12 Make sure that the sippers are straight and perpendicular to the reagent plate, and that
the Sipper comb in place checkbox is selected.
13 Close the instrument lid and select Next.
NOTE
Do not reopen the lid unless prompted by the software. If the lid is opened, each
consumable must be rescanned and validated during the pre-run check. A validation
failure during the pre-run check requires cancelation of the run.
36
Material # 20004364
Document # 15065681 v01
Page 43

Select a Protocol
1 Select Experiment Name.
2 Using the onscreen keyboard, type your experiment name and then select Enter.
3 Select the appropriate recipe for your experiment from the list of protocols. Scroll
through to see all available protocols.
4 Select Next.
Select a Protocol
cBot 2 System Guide
37
Page 44

Clustering With Sample Tracking
Scan Consumables
Internal barcode scanners scan and record all consumable IDs. The software guides you
through each scan in a series of screens, starting at the Reagents screen. When a scan is
successful, the consumable ID appears on the screen.
1 Select Scan and then Next at each of the following screens:
} Reagents—Records the reagent kit ID.
} Flow Cell—Records the flow cell ID.
} Tube Strips—Records the library template ID.
2 If you are using custom or additional primers, record the primer name as follows.
a Select Enter Primer Name on the Primers screen.
b Using the onscreen keyboard, type the primer name and then select Enter.
3 Select Pre Check.
Scanning Errors
If a scan fails, perform the following steps.
1 Open the instrument lid and remove the consumable with an indicated error.
2 Wipe the barcode with a lint-free cleaning tissue.
3 Reload the consumable and close the lid.
4 Select Scan to repeat the scan.
5 If the scan fails 2 more times, proceed with steps 6 through 8. Otherwise, proceed with
run setup.
6 Open the instrument lid and remove the consumable.
7 Select Scan to activate the external barcode scanner, and then scan the consumable
barcode. Alternatively, select the keyboard icon, type the ID, and select Enter.
An audible beep indicates a successful scan and the IDappears on the screen.
NOTE
Positive sample tracking occurs only for consumables scanned internally. When you use
the external barcode scanner or onscreen keyboard to record a consumable ID, sample
tracking ceases for that consumable.
8 Reload the consumable and close the lid to proceed with run setup.
38
Material # 20004364
Document # 15065681 v01
Page 45

Perform a Pre-Run Check
The pre-run check reads the instrument sensors to detect the correct installation of run
components, and then performs a flow check using bubble sensors to detect air in the tubes.
If the lid was opened after the Manifold screen, the pre-run check also rescans consumables
and verifies that the consumable IDs match the initial scan.
The pre-run check takes approximately 3 minutes.
1 After successful completion of the pre-run check, select Start.
The Run Status screen opens and the run begins.
Run Component Errors
If the pre-run check fails due to errors related to run components or the lid being opened,
perform the following steps:
1 Check any run component with an indicated error to make sure that it is present and
loaded correctly.
2 Select Rerun Check to repeat the check.
3 If the check continues to fail, select Cancel Run to end the run and set up a new one.
Perform a Pre-Run Check
Flow Check Failure
Flow check failure might be the result of an improperly loaded flow cell, a faulty manifold,
or a clog in the lines. Before bypassing the flow check, see Troubleshoot Flow Check Failure on
page 73.
cBot 2 System Guide
39
Page 46
Clustering With Sample Tracking
Monitor the Run
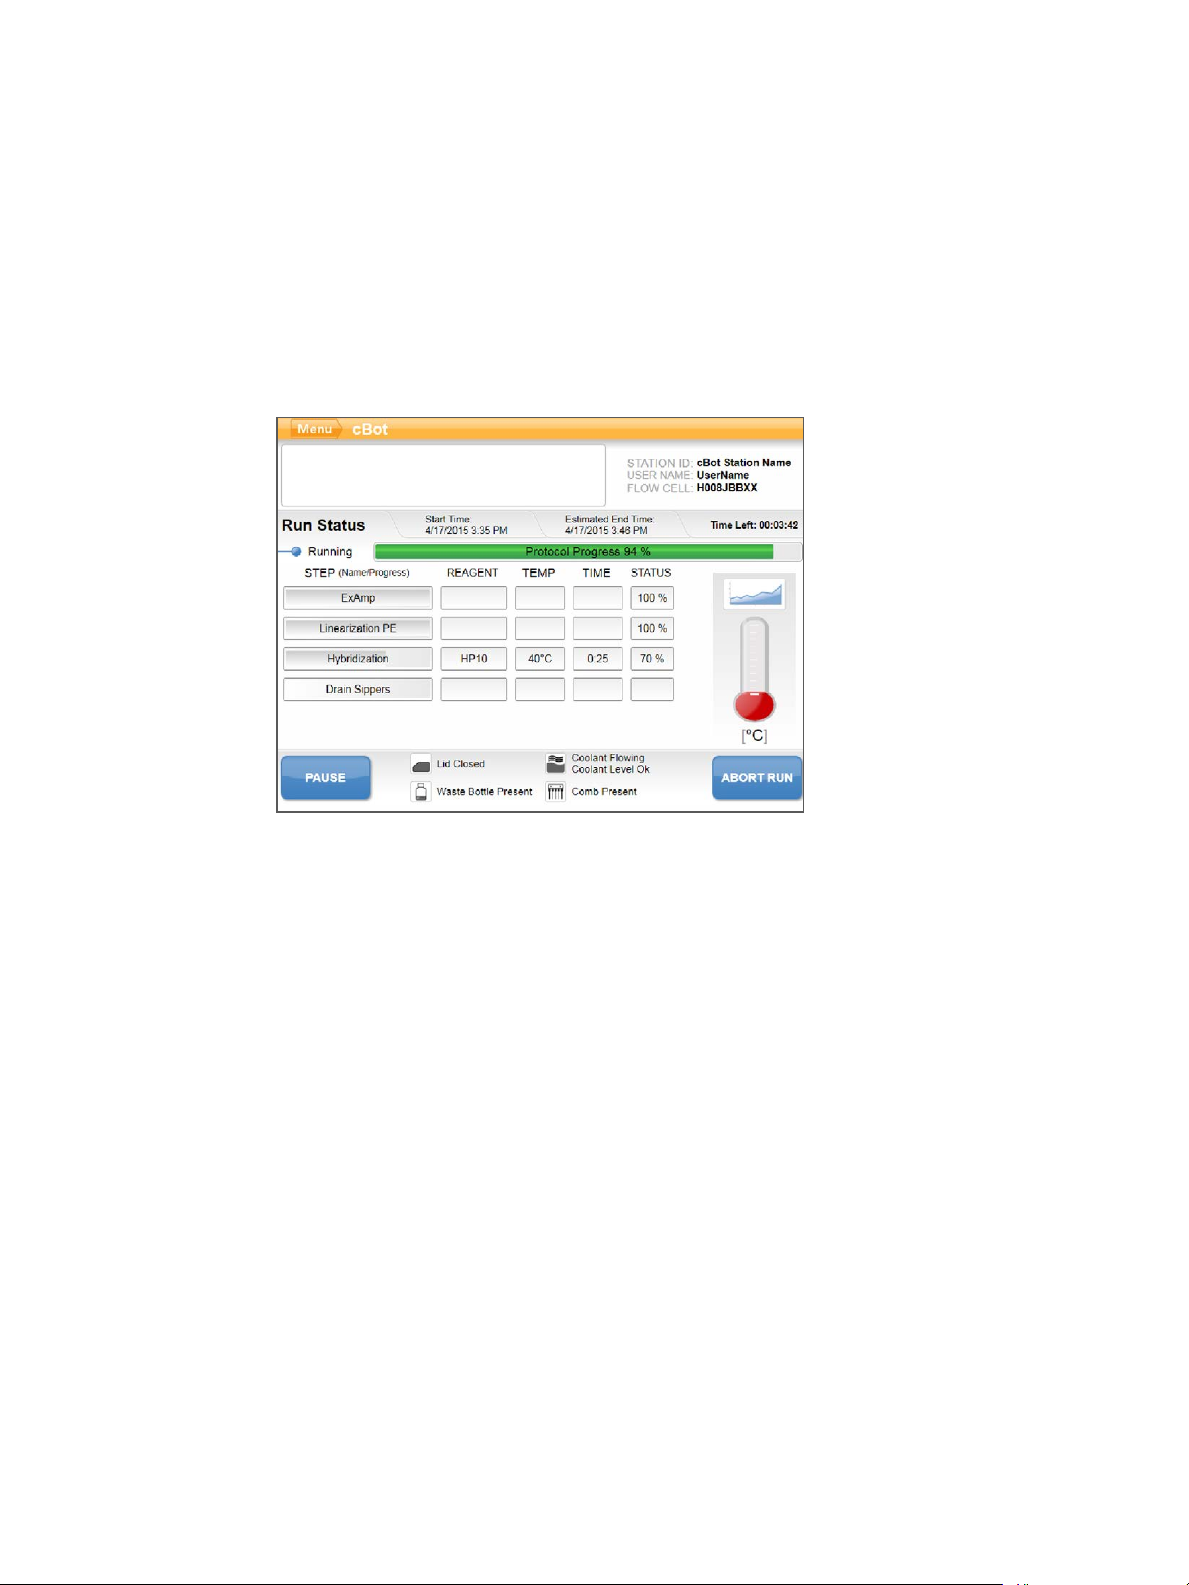
1 Use the Run Status screen to monitor the run in progress.
The Run Status screen provides the run status and the following details:
} Start date and time, end date and time, and time remaining
} Cluster generation protocol steps with status bar for each step
} Reagent currently in use
} Current temperature (°C)
} Status of the command in the current step
Figure 16 Run Status Screen
2 Wait for the run to complete:
} HiSeq v4, HiSeq 3000/4000 PE, or HiSeq X—Allow approximately 3hours.
} HiSeq 3000/4000 SR—Allow approximately 4 hours.
} HiSeq Rapid v2—Allow approximately 1 hour.
} TruSeq v3—Allow approximately 5hours.
3 After the run is complete, you can leave the flow cell on the instrument overnight.
Otherwise, proceed to unloading run components.
The cBot 2 holds the flow cell at 20°C.
Run Data Report
The run data report provides a summary of the run in progress. It lists the following
information:
} Protocol name
} Flow cell ID
} Reagent ID
} Template name
} Start time and finish time
You can view the report at any time during the run. Select Menu and then select Run Data.
At the end of the run, the run data report automatically opens to alert you that the run is
complete.
40
Material # 20004364
Document # 15065681 v01
Page 47
Unload Run Components
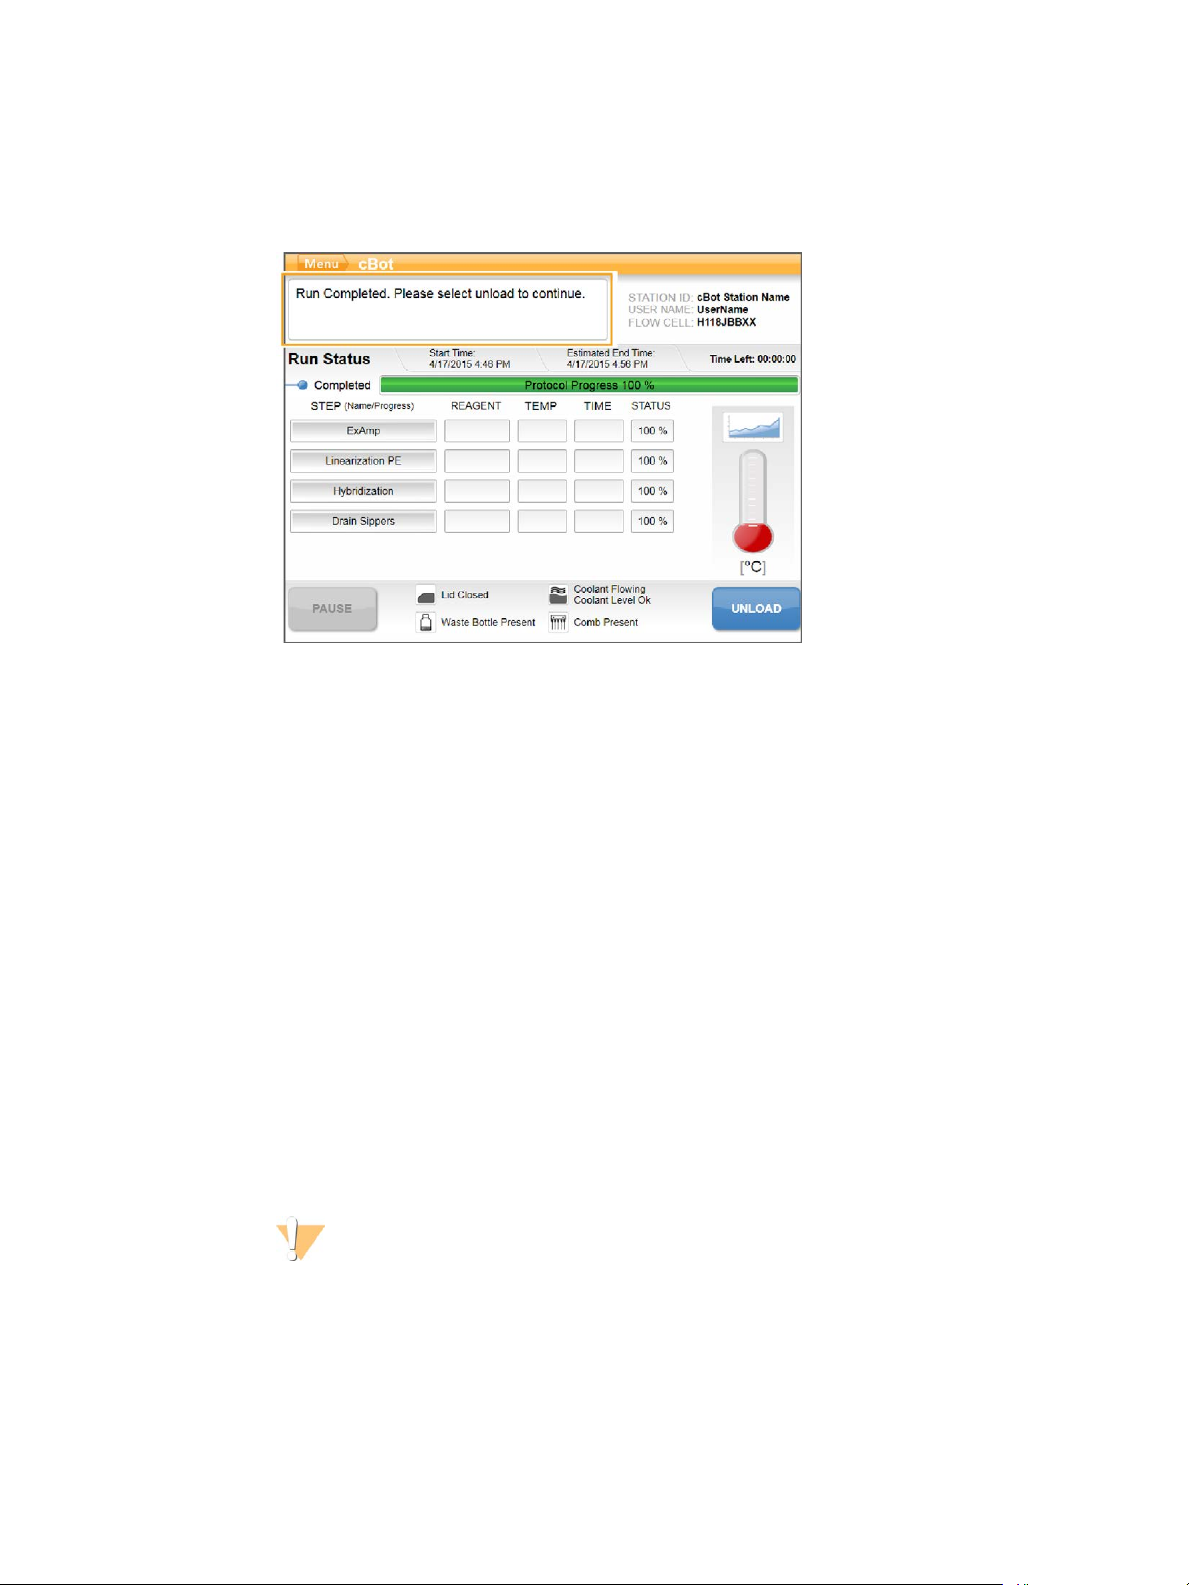
1 When the run is complete, select Unload to proceed.
Figure 17 Run Complete, Unload Components
2 Raise the instrument lid.
Unload Run Components
3 Release the outlet clamp securing the outlet end of the manifold.
4 Disconnect the outlet end of the manifold from the outlet port in the wash reservoir.
5 Remove the sipper comb from the metal guide pins using the plastic tabs on either side
of the sipper comb.
6 Release the flow cell clamp.
7 Remove the manifold. Make sure that the flow cell remains on the thermal stage.
8 Lift the flow cell from the thermal stage.
9 Store the flow cell as appropriate:
} TruSeq v2, TruSeq v3, and HiSeq v4 flow cells—Store in storage buffer in the flow
cell tube at 2°C to 8°C. The flow cell is stable after primer hybridization up to
10days when properly stored in the flow cell tube.
} HiSeq and TruSeq Rapid flow cells—Perform the sequencing run on the same day
as library loading.
} HiSeq X and HiSeq 3000/4000 flow cells—Store in storage buffer up to 48 hours at
2°C to 8°C.
10 Pull the reagent plate lever toward you to release the reagent plate. Remove the reagent
plate from the reagent stage.
WARNING
This set of reagents contains formamide, an aliphatic amide that is a probable
reproductive toxin. Personal injury can occur through inhalation, ingestion, skin
contact, and eye contact. Wear protective equipment, including eye protection,
gloves, and laboratory coat. Handle used reagents as chemical waste and discard in
accordance with the governmental safety standards for your region. For
environmental, health, and safety information, see the SDS for this kit at
support.illumina.com/sds.html.
11 Remove the 8-tube strip containing libraries.
cBot 2 System Guide
41
Page 48

Clustering With Sample Tracking
12 Remove the 8-tube strip containing additional primers, if applicable.
13 Select the checkbox to indicate that you have unloaded the reagents, templates, and
primers.
14 Choose a wash option:
} Select Wash to proceed to the post-run wash.
} Select Exit to bypass the post-run wash, if the bypass option is available.
42
Material # 20004364
Document # 15065681 v01
Page 49

Perform a Post-Run Wash
1 Wash the plate on the thermal stage with deionized water to remove any salts. Dry
with a lint-free cleaning tissue.
2 Fill the wash reservoir with approximately 12ml deionized water and close the
instrument lid.
3 Select the checkbox to indicate that water is present, and then select Wash.
4 When the wash is complete, blot any excess water remaining in the wash reservoir.
Avoid the outlet ports to prevent fibers from entering the holes.
5 Select the checkbox to indicate that the wash reservoir is dry, and then select Exit.
The Start screen opens and your cBot 2 is ready for another run.
Perform a Post-Run Wash
cBot 2 System Guide
43
Page 50
Confirm Reagent Delivery (Optional)
You can confirm delivery of individual reagents from the reagent plate provided in any kit
except HiSeq X and HiSeq 3000/4000.
1 Inspect the foil-sealed tops of each tube strip to make sure that each seal was pierced.
2 Release each tube strip from the base of the reagent plate as follows.
a Grasp the reagent plate firmly, with finger tips under the base.
b Gently press upward on the center tubes of the tube strip.
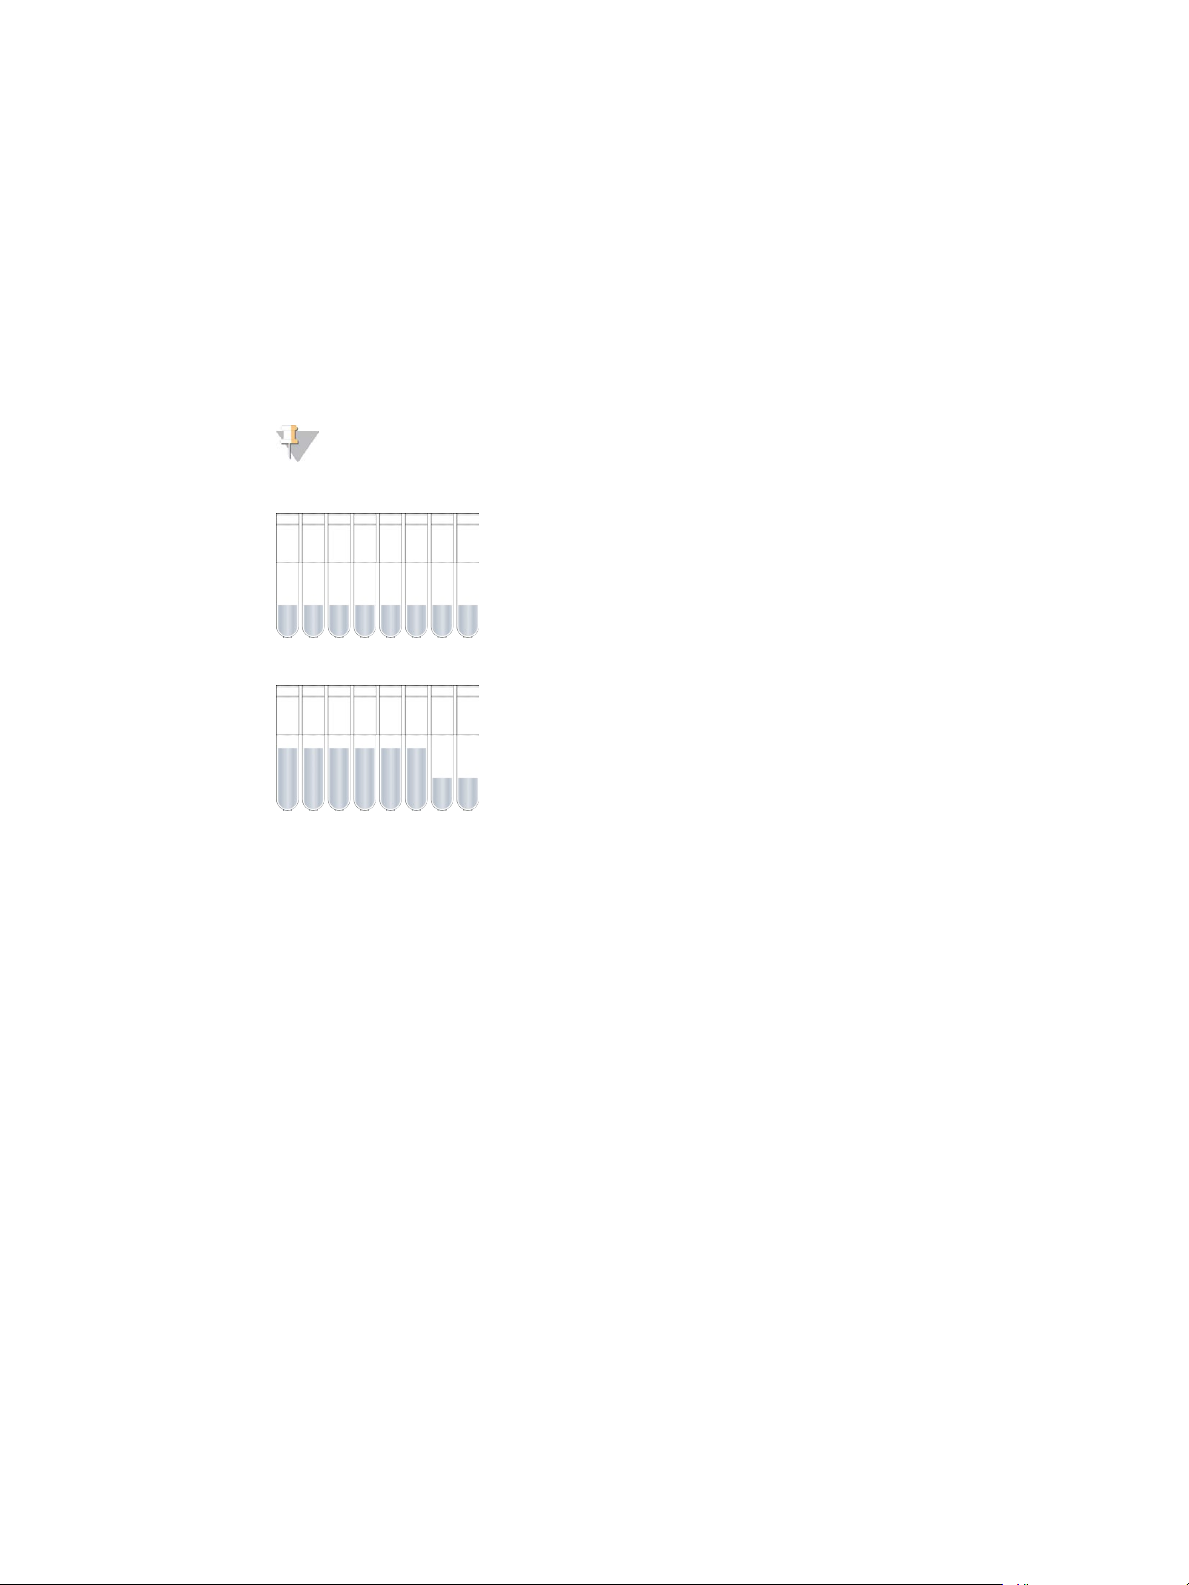
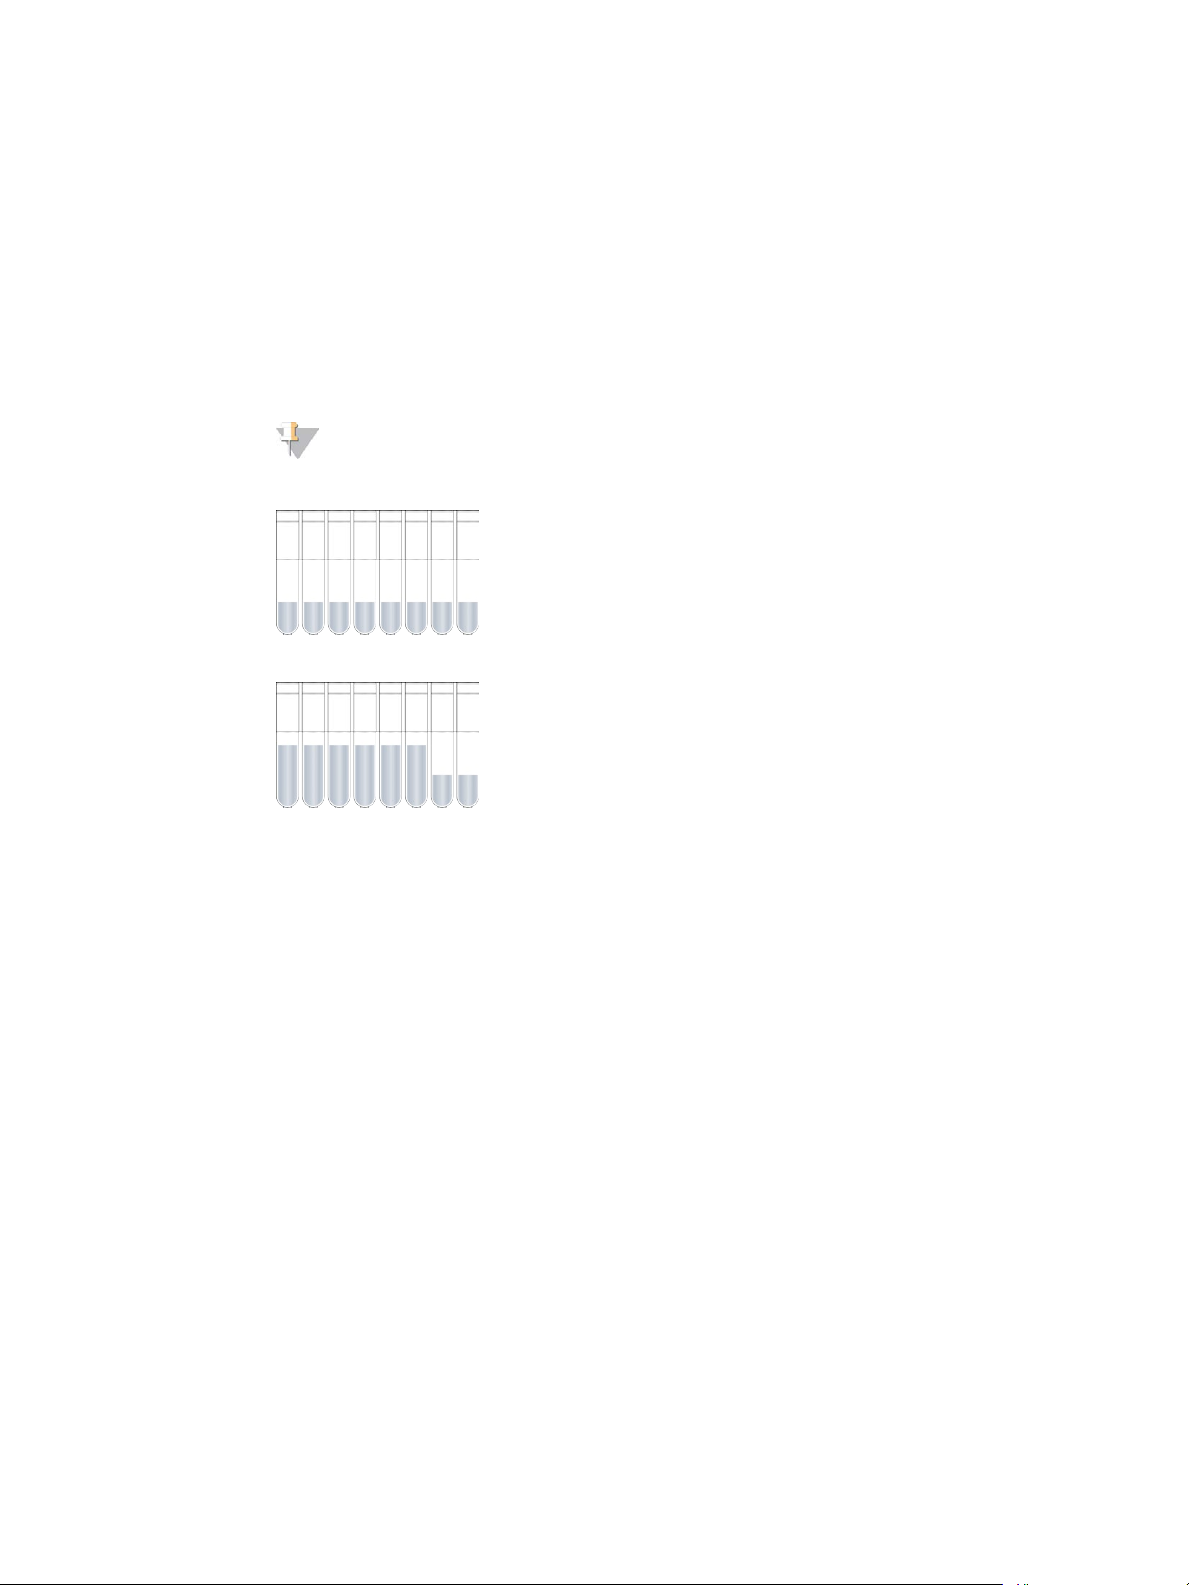
3 Inspect each tube to confirm that a similar volume remains in each tube.
NOTE
Small differences are normal.
Figure 18 Example of Successful Reagent Delivery (8-Lane Flow Cell)
Clustering With Sample Tracking
Figure 19 Example of Successful Reagent Delivery (2-Lane Flow Cell)
4 If reagent delivery was not successful and the foil seals on the reagent tubes are
pierced, contact Illumina Technical Support.
5 Inspect the 8-tube strip containing library template.
6 If you used additional primers with your run, inspect the 8-tube strip containing
primers.
44
Material # 20004364
Document # 15065681 v01
Page 51

Chapter 5 Clustering Without Sample Tracking
Clustering Without Sample
Tracking
Introduction 46
Clustering Without Sample Tracking Workflow 47
Perform a Pre-Run Wash 48
Select a Protocol 49
Load Consumables 50
Perform a Pre-Run Check 54
Monitor the Run 55
Unload Run Components 56
Perform a Post-Run Wash 58
Confirm Reagent Delivery (Optional) 59
Chapter 5
cBot 2 System Guide
45
Page 52

Introduction
All clustering steps are performed on the cBot except for preparing libraries for sequencing
and preparing the cBot reagent plate. Clustering steps for a rapid flow cell consist only of
template hybridization and first extension. The remaining steps are performed on the
sequencing instrument.
Setting up the cBot for cluster generation without sample tracking includes selecting a
protocol and then loading consumables. All consumables are scanned using the external
barcode scanner or entered manually.
Library Prep
Before setting up the cBot for cluster generation, prepare libraries for sequencing. The
process differs depending on library type and flow cell type.
} Most libraries on TruSeq flow cells and HiSeq flow cells require a denaturation and
dilution step. For more information, see HiSeq and GAIIx Systems Denature and Dilute
Libraries Guide (document # 15050107).
} The denaturation protocol differs for HiSeq X and HiSeq 3000/4000 patterned flow cells.
Denature libraries for use with these flow cell types only as described in the reagent
preparation instructions for your flow cell type. For more information, see Preparing
Reagents on page 17.
Clustering Without Sample Tracking
46
Material # 20004364
Document # 15065681 v01
Page 53
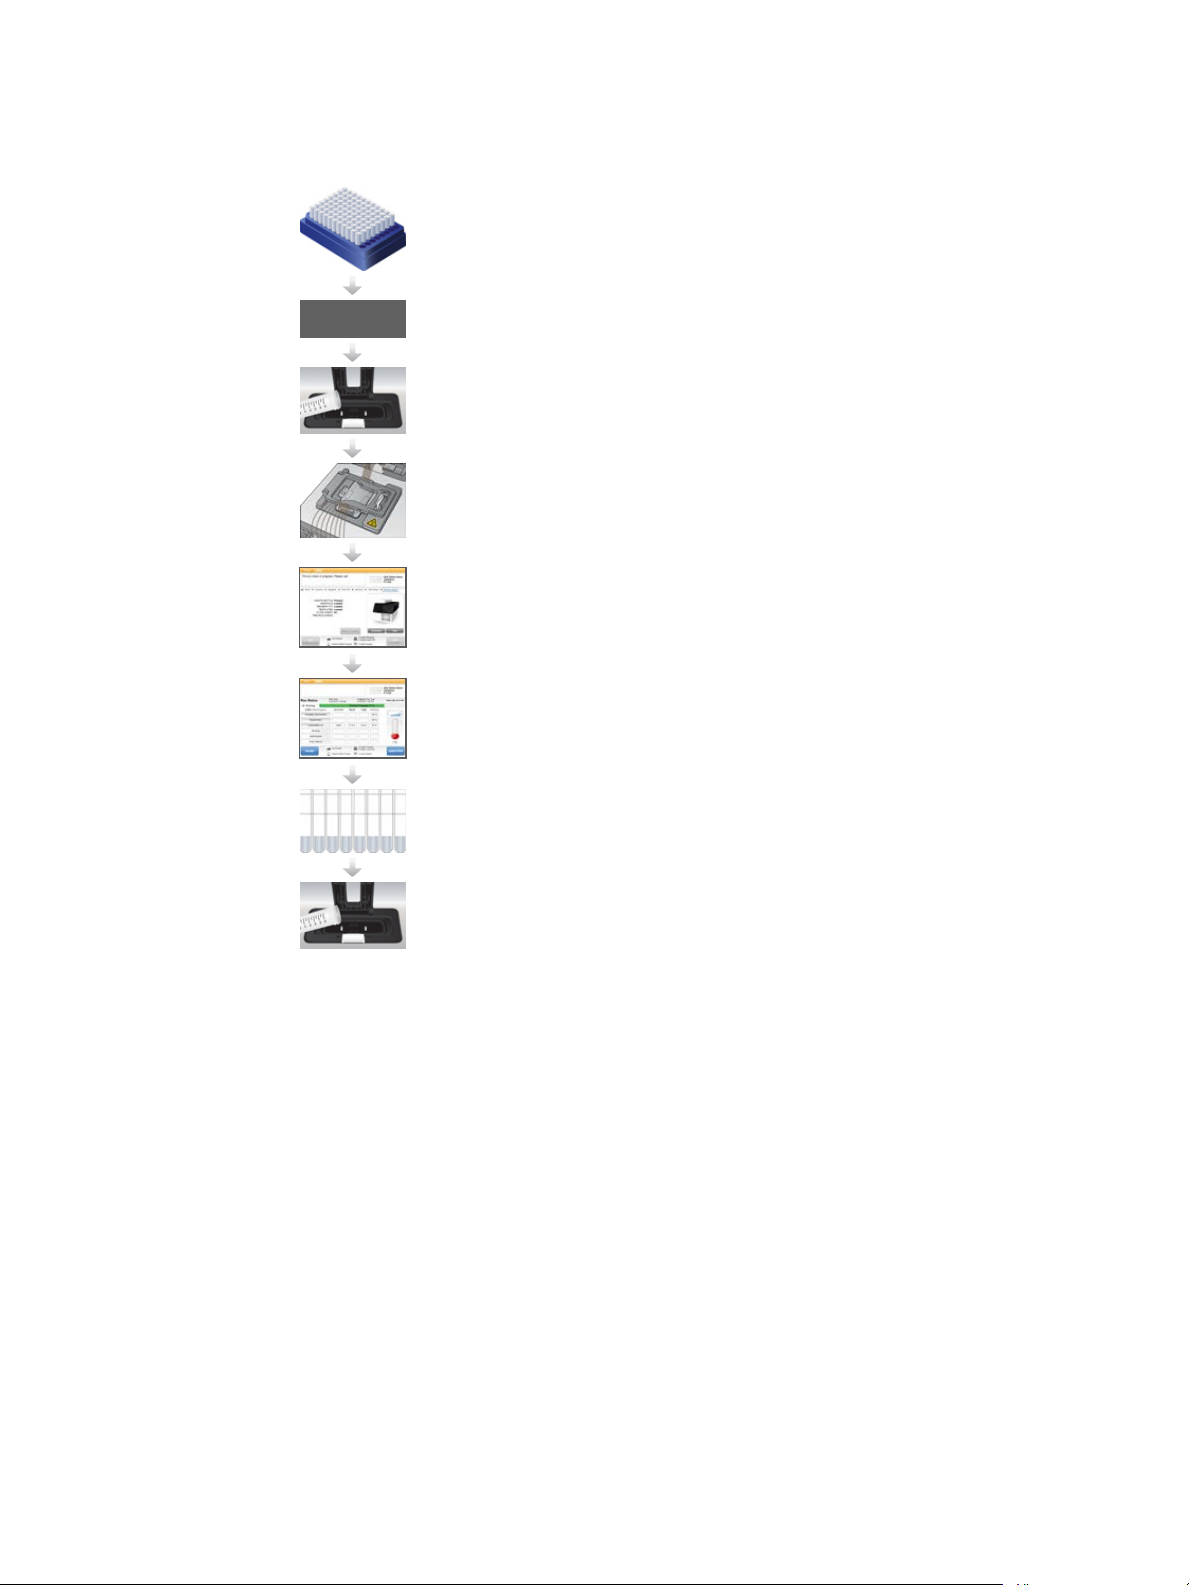
Clustering Without Sample Tracking Workflow
Prepare the reagent plate and flow cell. See Preparing Reagents on page 17.
Prepare libraries for sequencing and load libraries into an 8-tube strip.
Perform a pre-run wash.
Select a protocol, scan and load consumables, and load tube strips
containing prepared libraries.
Select Pre-Run Check to initiate the automated pre-run check.
Clustering Without Sample Tracking Workflow
Select Start. Monitor run progress from the Run Status screen.
Unload run components and confirm reagent delivery.
Perform a post-run wash.
cBot 2 System Guide
47
Page 54
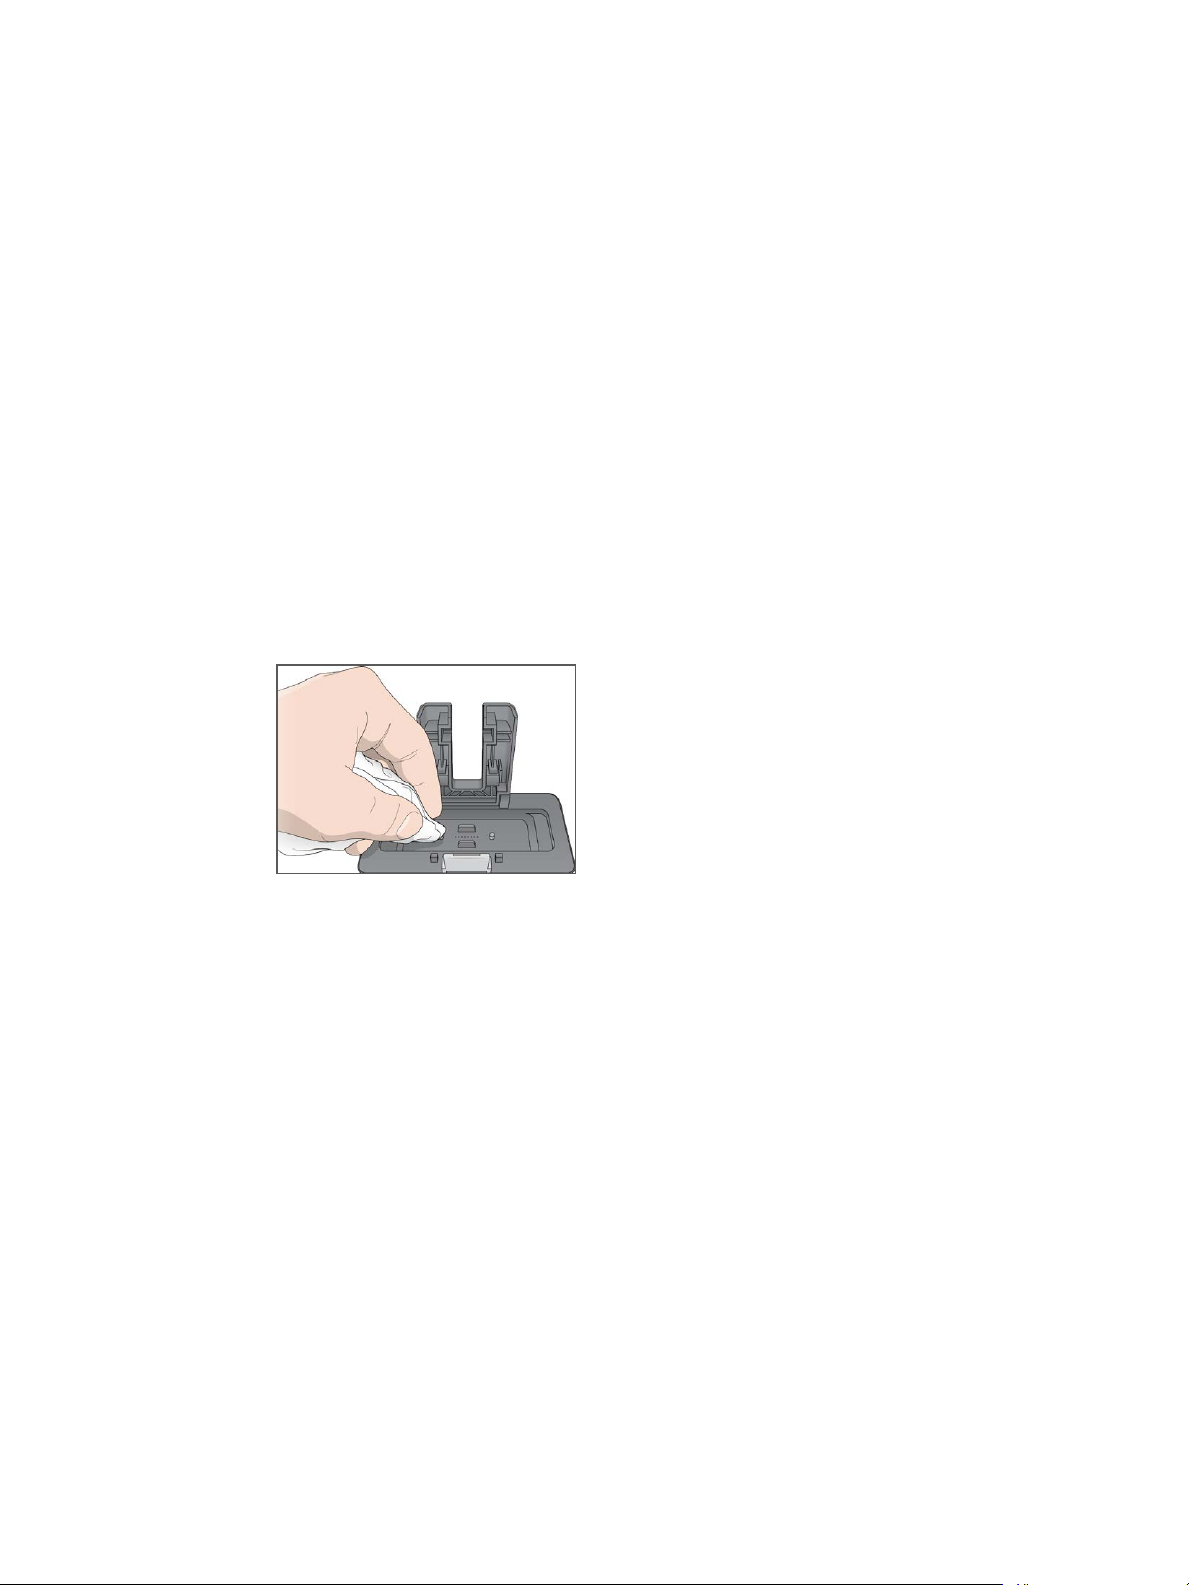
Perform a Pre-Run Wash
A wash is recommended before clustering on the cBot.
1 Select User Name.
2 Using the onscreen keyboard, type your name and then select Enter.
3 Select Start.
4 If the Manifold removed checkbox is not selected on the Wash screen, remove the
manifold.
5 Raise the instrument lid by lifting from the cutout on the front of the lid.
6 Fill the wash reservoir with about 12ml deionized water.
7 Close the instrument lid.
8 Select the Reservoir filled with water checkbox.
9 Select Wash.
10 After the wash is finished, blot excess water from the wash reservoir with a low-lint
tissue.
Figure 20 Dry the Wash Reservoir
Clustering Without Sample Tracking
11 Select the Wash reservoir dry checkbox.
12 Select Next.
48
Material # 20004364
Document # 15065681 v01
Page 55

Select a Protocol
1 Select Experiment Name.
2 Using the onscreen keyboard, type your experiment name and then select Enter.
3 Select the appropriate recipe for your experiment from the list of protocols. Scroll
through to see all available protocols.
4 Select Next.
Select a Protocol
cBot 2 System Guide
49
Page 56
Clustering Without Sample Tracking
Load Consumables
The software guides you through the steps to load the cBot reagent plate, flow cell, cBot
manifold, and the 8-tube strip containing prepared libraries. Depending on the clustering
protocol selected, the software prompts you to load an 8-tube strip of additional primers.
Load the Reagent Plate
1 Remove the clear plastic lid from the cBot reagent plate.
2 Select Scan Reagent ID to activate the external barcode scanner.
3 Raise the instrument lid by lifting from the cutout on the front of the lid.
4 [For TruSeq v3 and TruSeq v2 reagents] Remove the red foil seal:
a Hold each end of the tube strip in row 10 and peel the red foil from the 8-tube strip.
Discard the foil appropriately.
b Select the onscreen checkbox to indicate that the seal is removed.
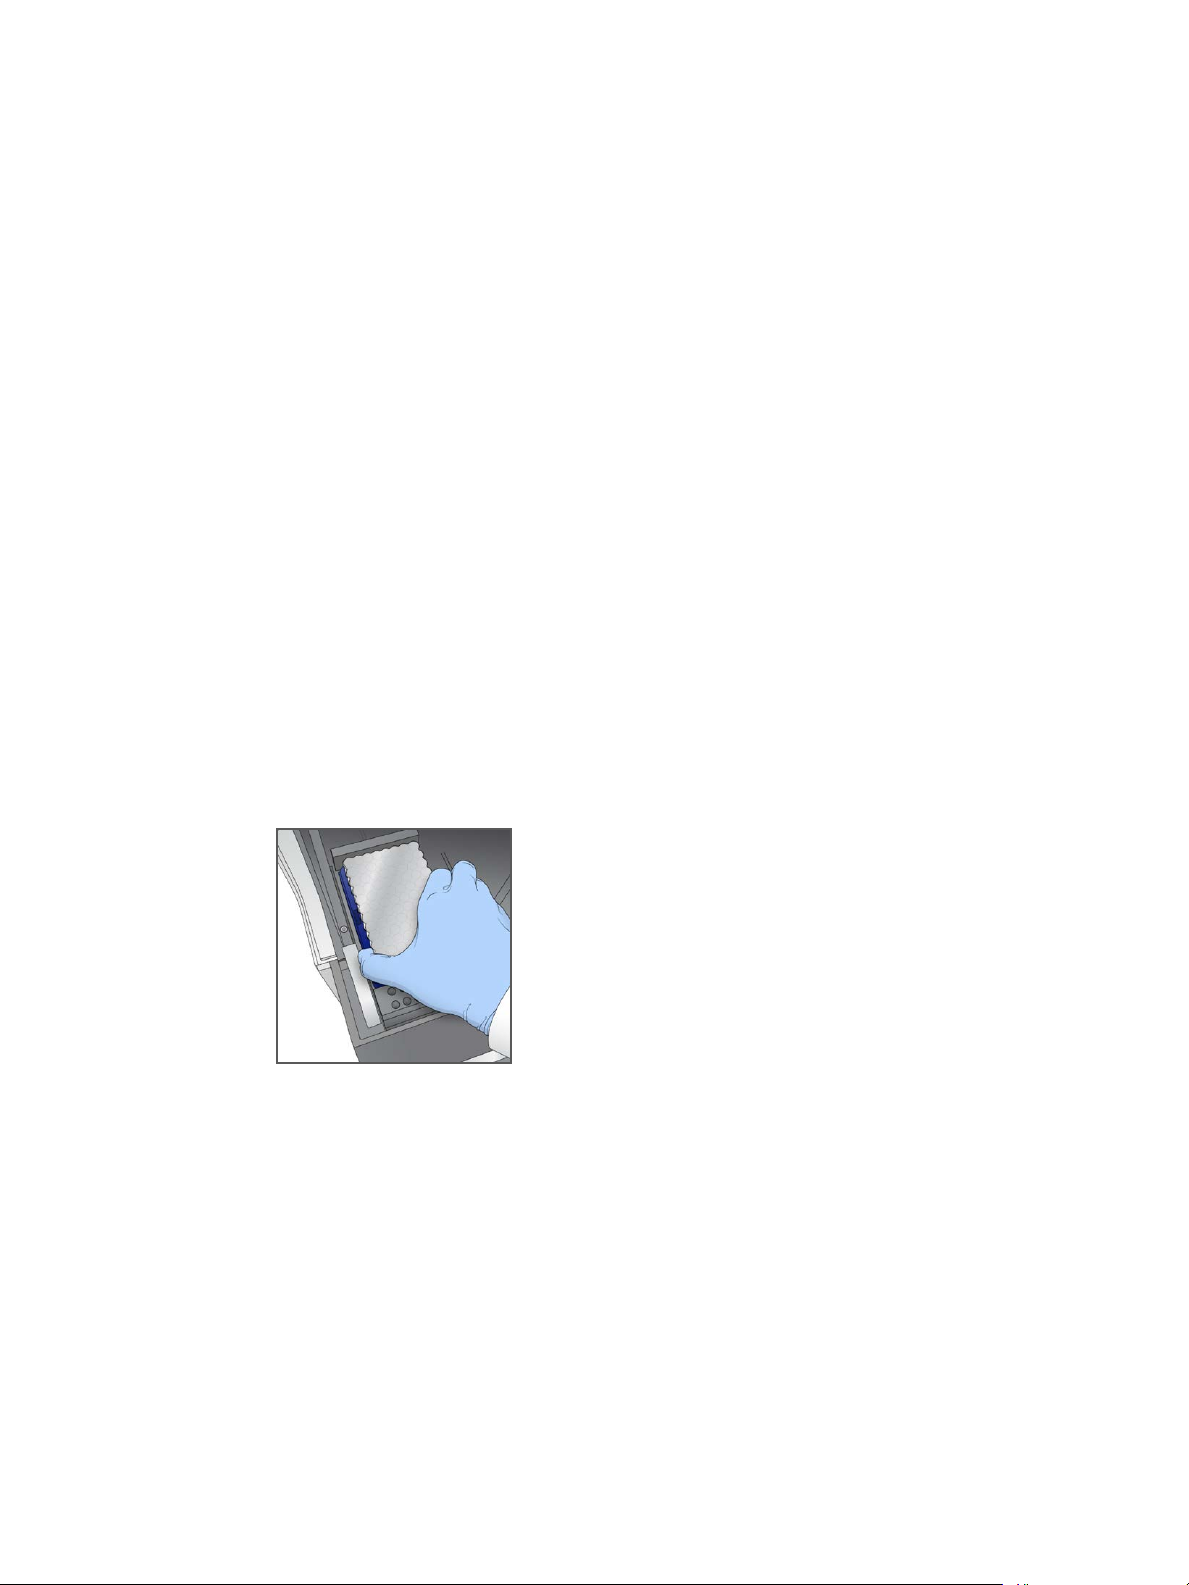
5 Pull the reagent plate lever toward you and place the reagent plate onto the reagent
stage:
} All reagent plates except HiSeq X and HiSeq 3000/4000—Position with row 1
directly behind the tube strip holders. The beveled corner of the plate is positioned in
the front-right corner.
} HiSeq X and HiSeq 3000/4000 reagent plates—Position with the barcode label
facing toward the back of the instrument. The beveled corners of the plate are
positioned directly behind the tube strip holders.
Figure 21 Position the Reagent Plate
6 Release the lever to secure the reagent plate.
7 Select the onscreen checkbox to indicate that the reagent plate is loaded, and then select
Next.
Load the Flow Cell
1 Lift the flow cell clamp.
2 Wash the adapter plate on the thermal stage with a small amount of deionized water,
and wipe dry with a lint-free cleaning tissue.
3 Remove the flow cell from storage:
50
Material # 20004364
Document # 15065681 v01
Page 57
} All flow cells except HiSeq X and HiSeq 3000/4000—Remove the flow cell from the
storage tube using plastic forceps. Rinse the flow cell with deionized water and
gently dry with a lens cleaning tissue. Save the tube and buffer for later storage.
} HiSeq X and HiSeq 3000/4000 flow cells—The patterned flow cell is ready to use
after flow cell preparation.
4 Select Scan Flow Cell ID to activate the external barcode scanner.
5 To scan the flow cell ID, hold the labeled flow cell package or tube close to the scanner
tray with the barcode positioned toward the instrument.
6 Position the flow cell on the thermal stage with flow cell port holes facing upward.
} HiSeq and HiSeq X flow cells—Lane1 is on the right side with the keyed corner.
} GAIIx flow cells—Lane 8 is on the right side with the barcode ID.
7 Select the checkbox to indicate that the flow cell is loaded, and then select Next.
Load the Manifold
Use the manifold from the same cluster kit as the flow cell.
1 Inspect the sippers on the sipper comb for damage. Make sure that the black rubber
gaskets are evenly seated.
2 Position the manifold over the flow cell with the sipper comb pointing toward the front
of the cBot.
Load Consumables
3 Align the manifold with the guide pins on the thermal stage and seat the manifold
over the flow cell. Seat evenly to form a tight seal.
4 Select the Manifold seated over flow cell checkbox.
5 Close the flow cell clamp to secure the manifold.
Figure 22 Close the Flow Cell Clamp
6 Select the Flow cell clamp closed checkbox.
7 Connect the outlet end of the manifold to the outlet port in the wash reservoir. Make
sure that the outlet is evenly seated.
cBot 2 System Guide
51
Page 58
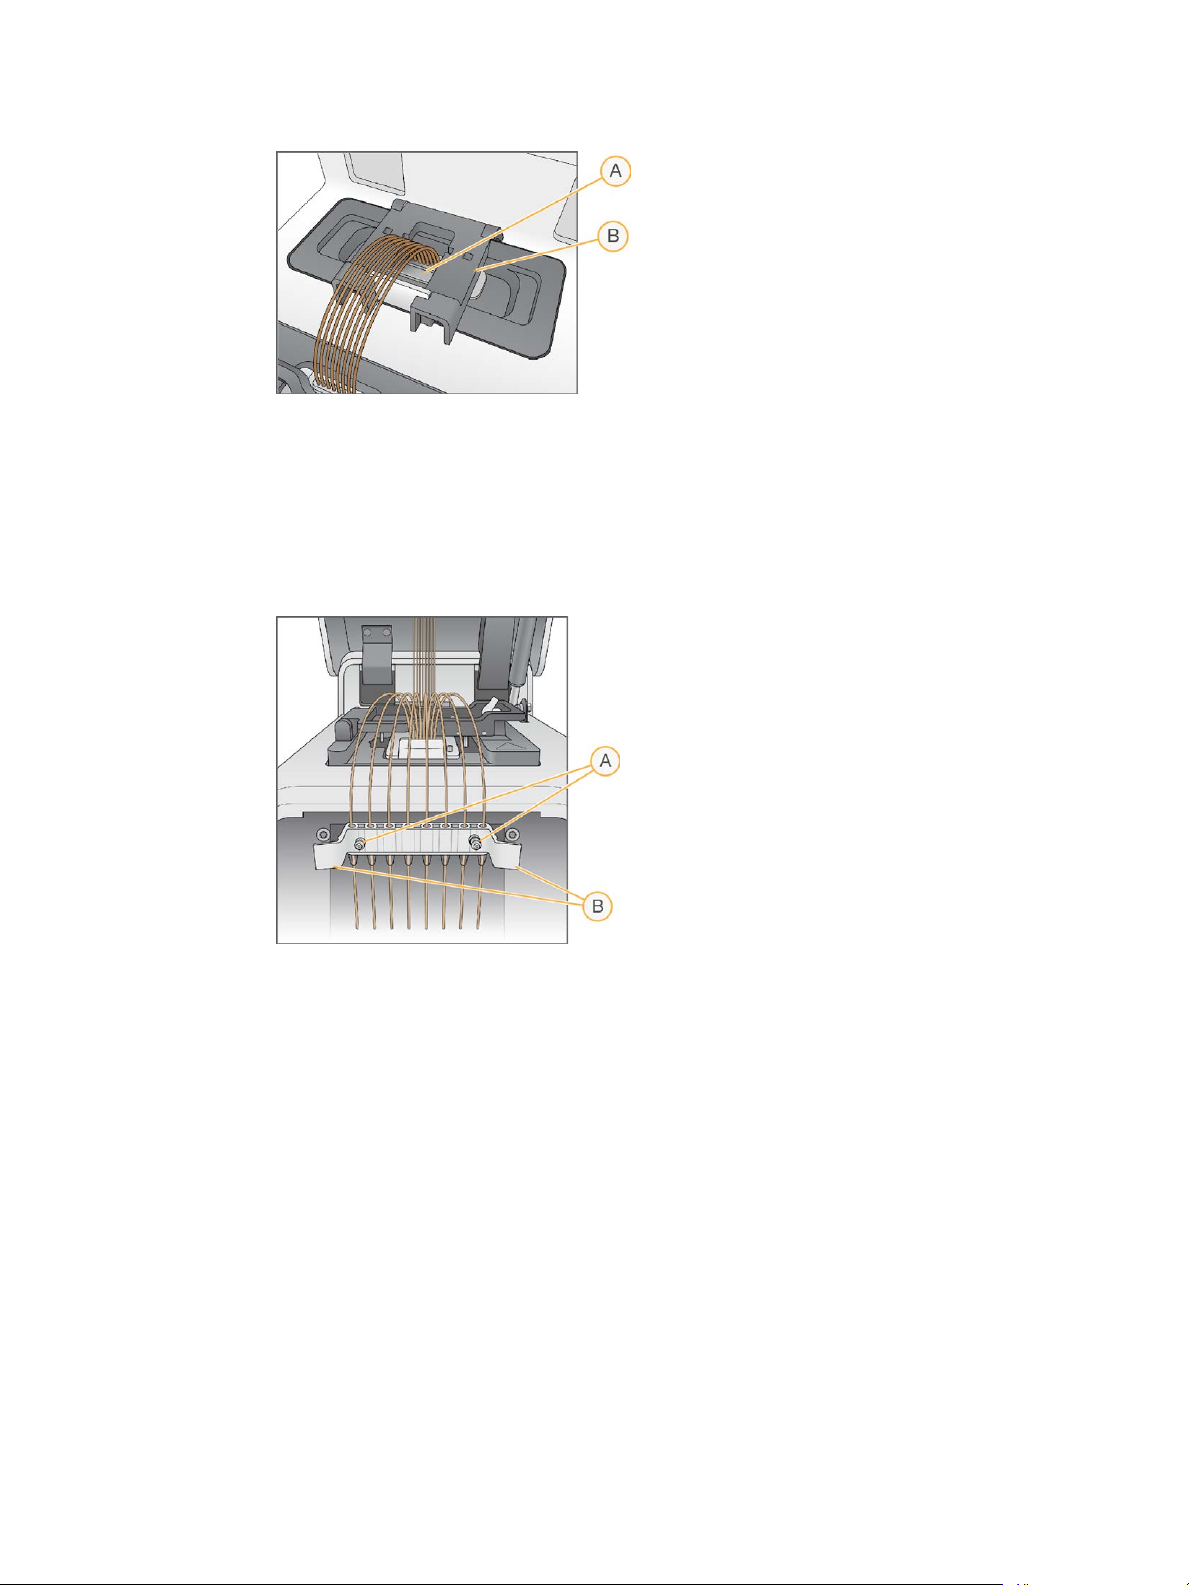
Figure 23 Secure Outlet End
A Outlet port
B Output clamp
8 Snap the outlet clamp closed to secure the outlet end of the manifold.
9 Select the Outlet clamp closed checkbox.
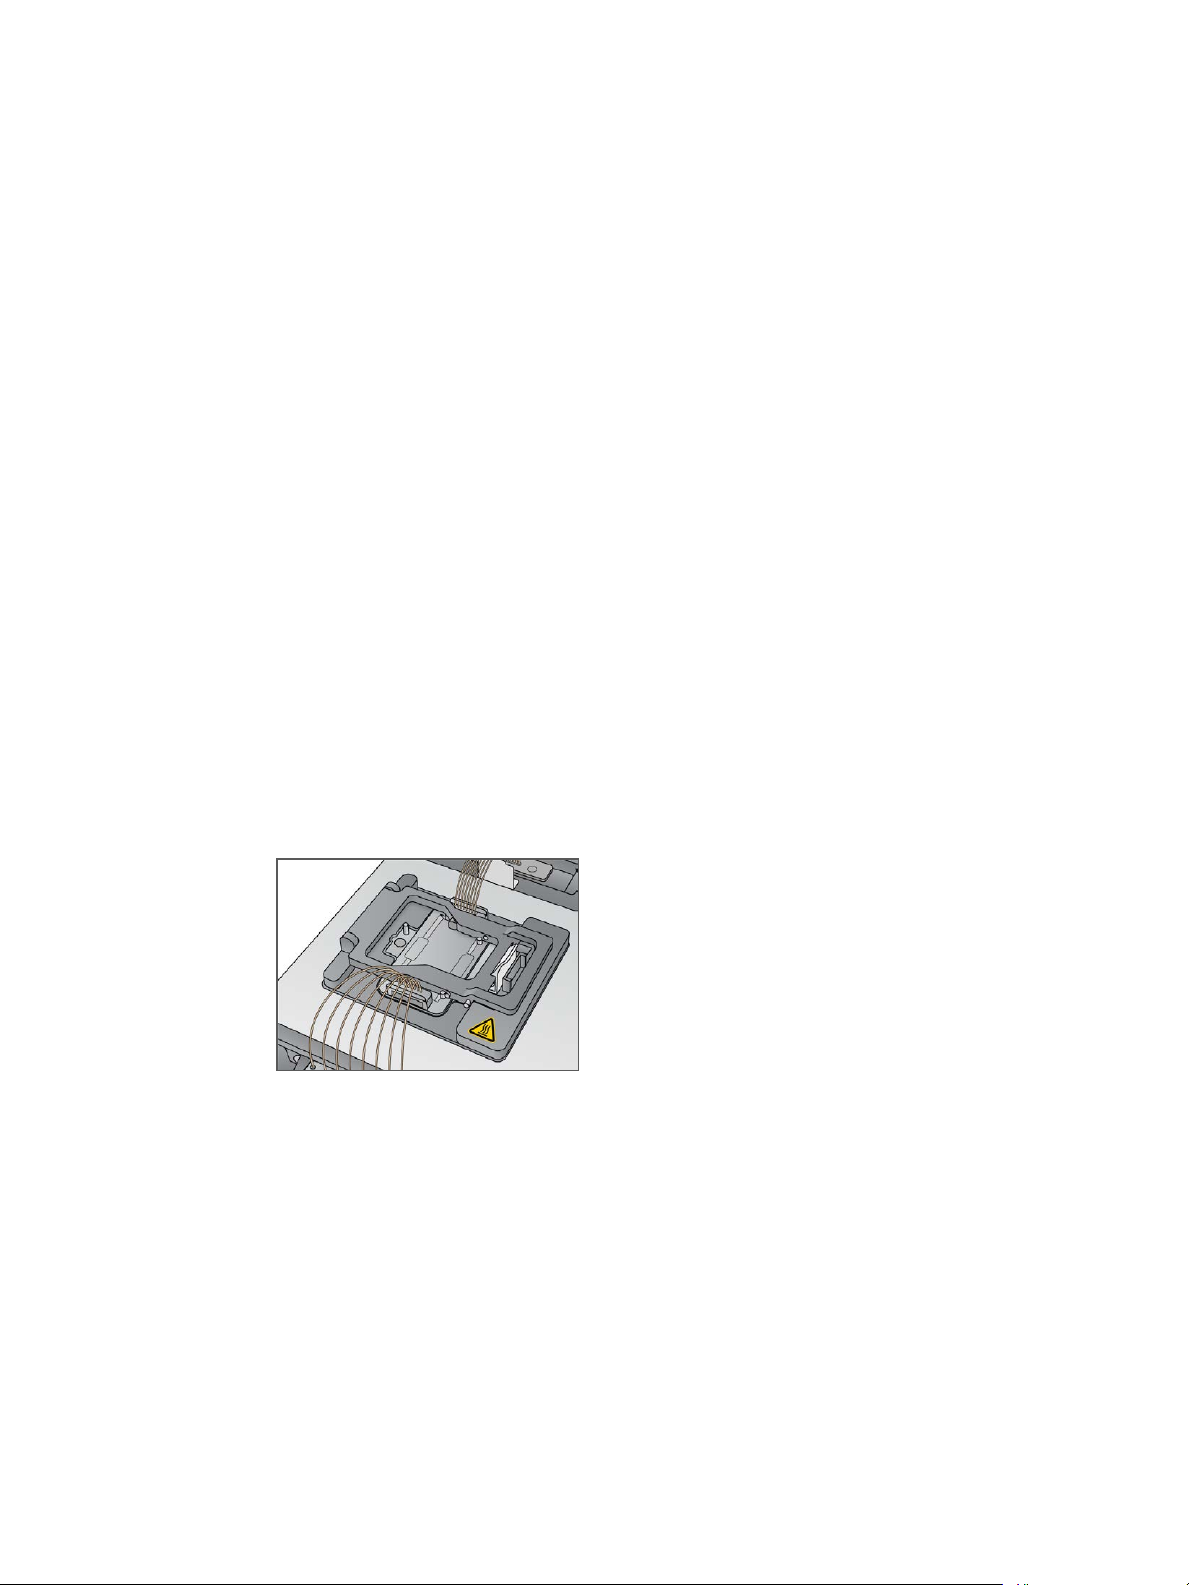
10 Align the sipper comb with the 2 metal guide pins on the front of the thermal stage.
Figure 24 Secure the Sipper Comb
Clustering Without Sample Tracking
A Metal guide pins
B Plastic tabs
11 Snap the sipper comb into place using the plastic tabs on either side of the comb.
12 Make sure that the sippers are straight and perpendicular to the reagent plate, and that
the Sipper comb in place checkbox is selected.
13 Select the Sipper comb in place checkbox, and then select Next.
Load Templates
1 Select Enter Template Name.
2 Using the onscreen keyboard, type the template ID and then select Enter.
52
3 Load the 8-tube strip containing prepared libraries into the template row.
4 Select the checkbox to indicate that templates are loaded.
5 If you are using additional primers, proceed to Load Primers. Otherwise, close the cBot
lid and select Next to proceed to Perform a Pre-Run Check on page 54.
Material # 20004364
Document # 15065681 v01
Page 59
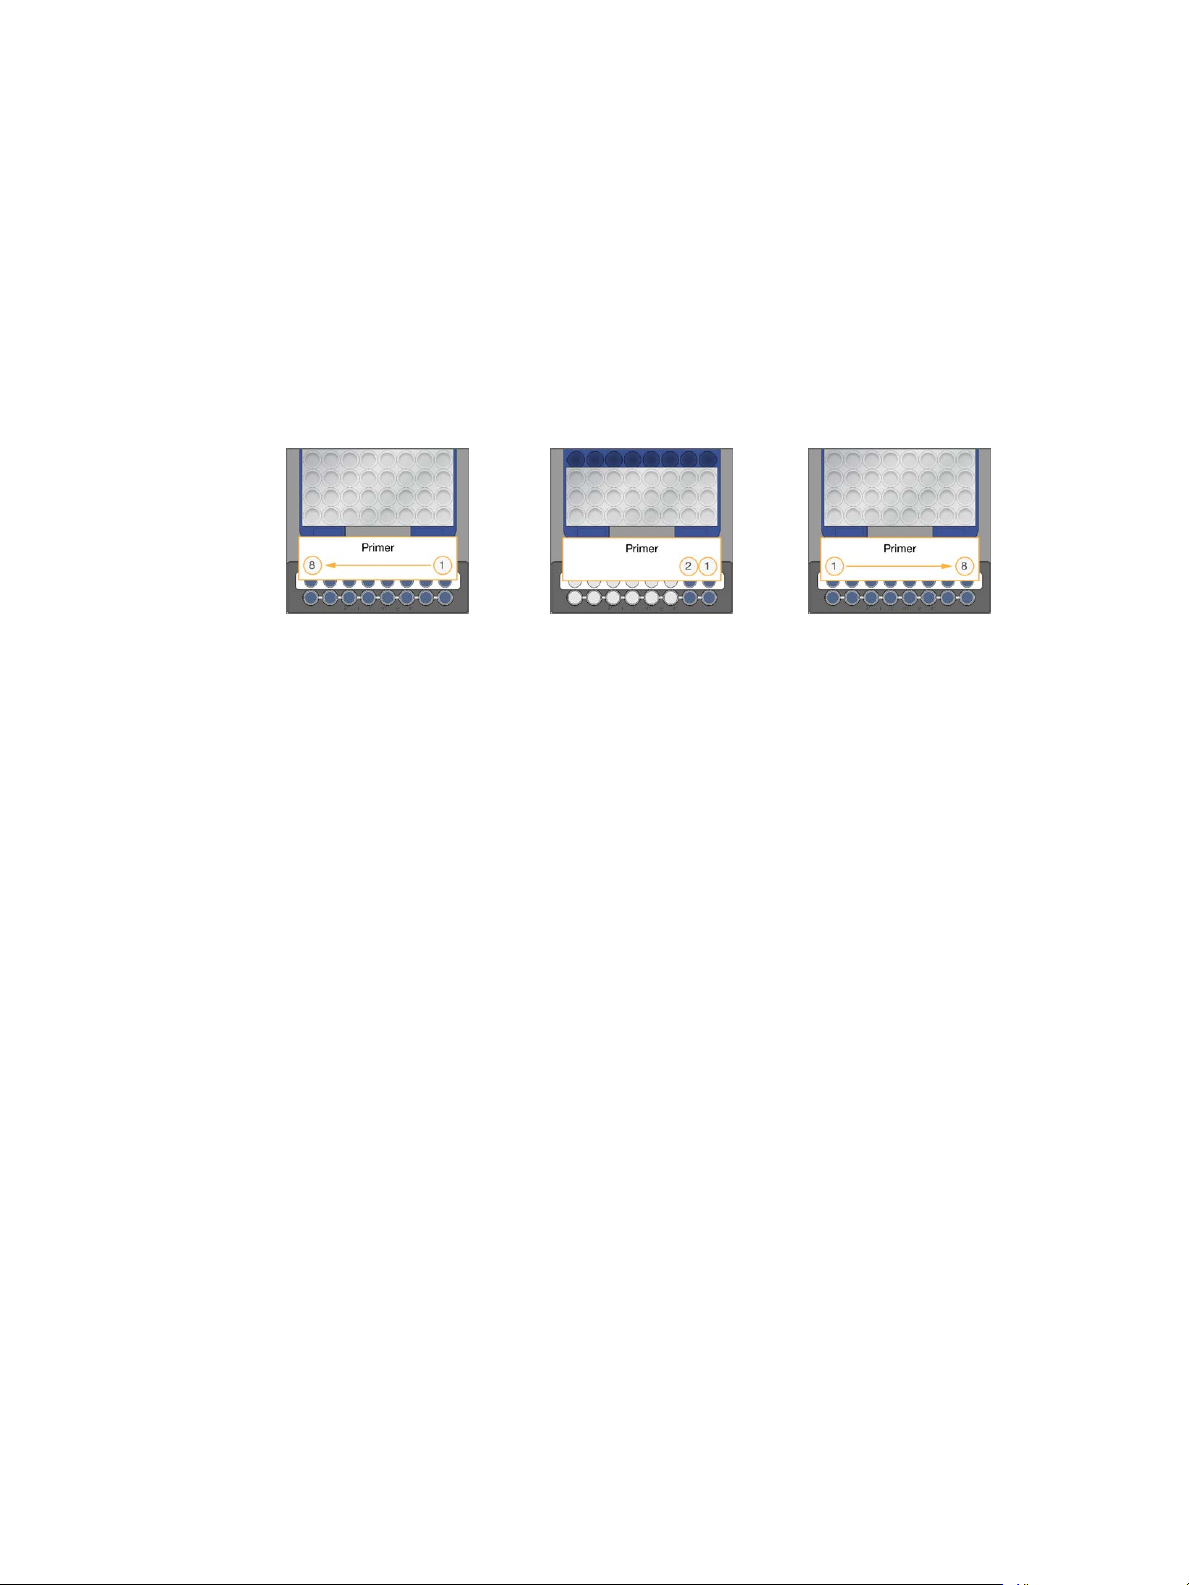
Load Primers
The Load Primers screen appears for workflows that allow custom primers or require
additional primers. Sequencing Nextera libraries on a TruSeq v3 or TruSeq v2 flow cell
requires that you load an 8-tube strip containing HP10.
1 Select Enter Primer Name.
2 Using the onscreen keyboard, type the primer name, and then select Enter.
3 Load the 8-tube strip containing primers into the primer row. Make sure that the order
of numbered tubes aligns with the lane orientation of the flow cell:
} HiSeq and HiSeq X flow cells—Tubes are numbered right to left.
} GAIIx flow cells—Tubes are numbered left to right.
Load Consumables
HiSeq X, HiSeq 3000/4000,
HiSeq v4, and
TruSeq v3 (HiSeq)
4 Select the checkbox to indicate that primers are loaded and close the instrument lid.
5 Select Next.
HiSeq Rapid v2, TruSeq
Rapid (HiSeq)
TruSeq v2 (GAIIx)
cBot 2 System Guide
53
Page 60

Clustering Without Sample Tracking
Perform a Pre-Run Check
The pre-run check reads the instrument sensors to detect the correct installation of run
components, and then performs a flow check using bubble sensors to detect air in the tubes.
The pre-run check takes approximately 3 minutes.
1 After successful completion of the pre-run check, select Start.
The Run Status screen opens and the run begins.
Run Component Errors
If the pre-run check fails due to errors related to run components, perform the following
steps:
1 Check any run component with an indicated error to make sure that it is present and
loaded correctly.
2 Select Rerun Check to repeat the sensor check.
3 If the check continues to fail, select Cancel Run to end the run and set up a new one.
Flow Check Failure
Flow check failure might be the result of an improperly loaded flow cell, a faulty manifold,
or a clog in the lines. Before bypassing the flow check, see Troubleshoot Flow Check Failure on
page 73.
54
Material # 20004364
Document # 15065681 v01
Page 61
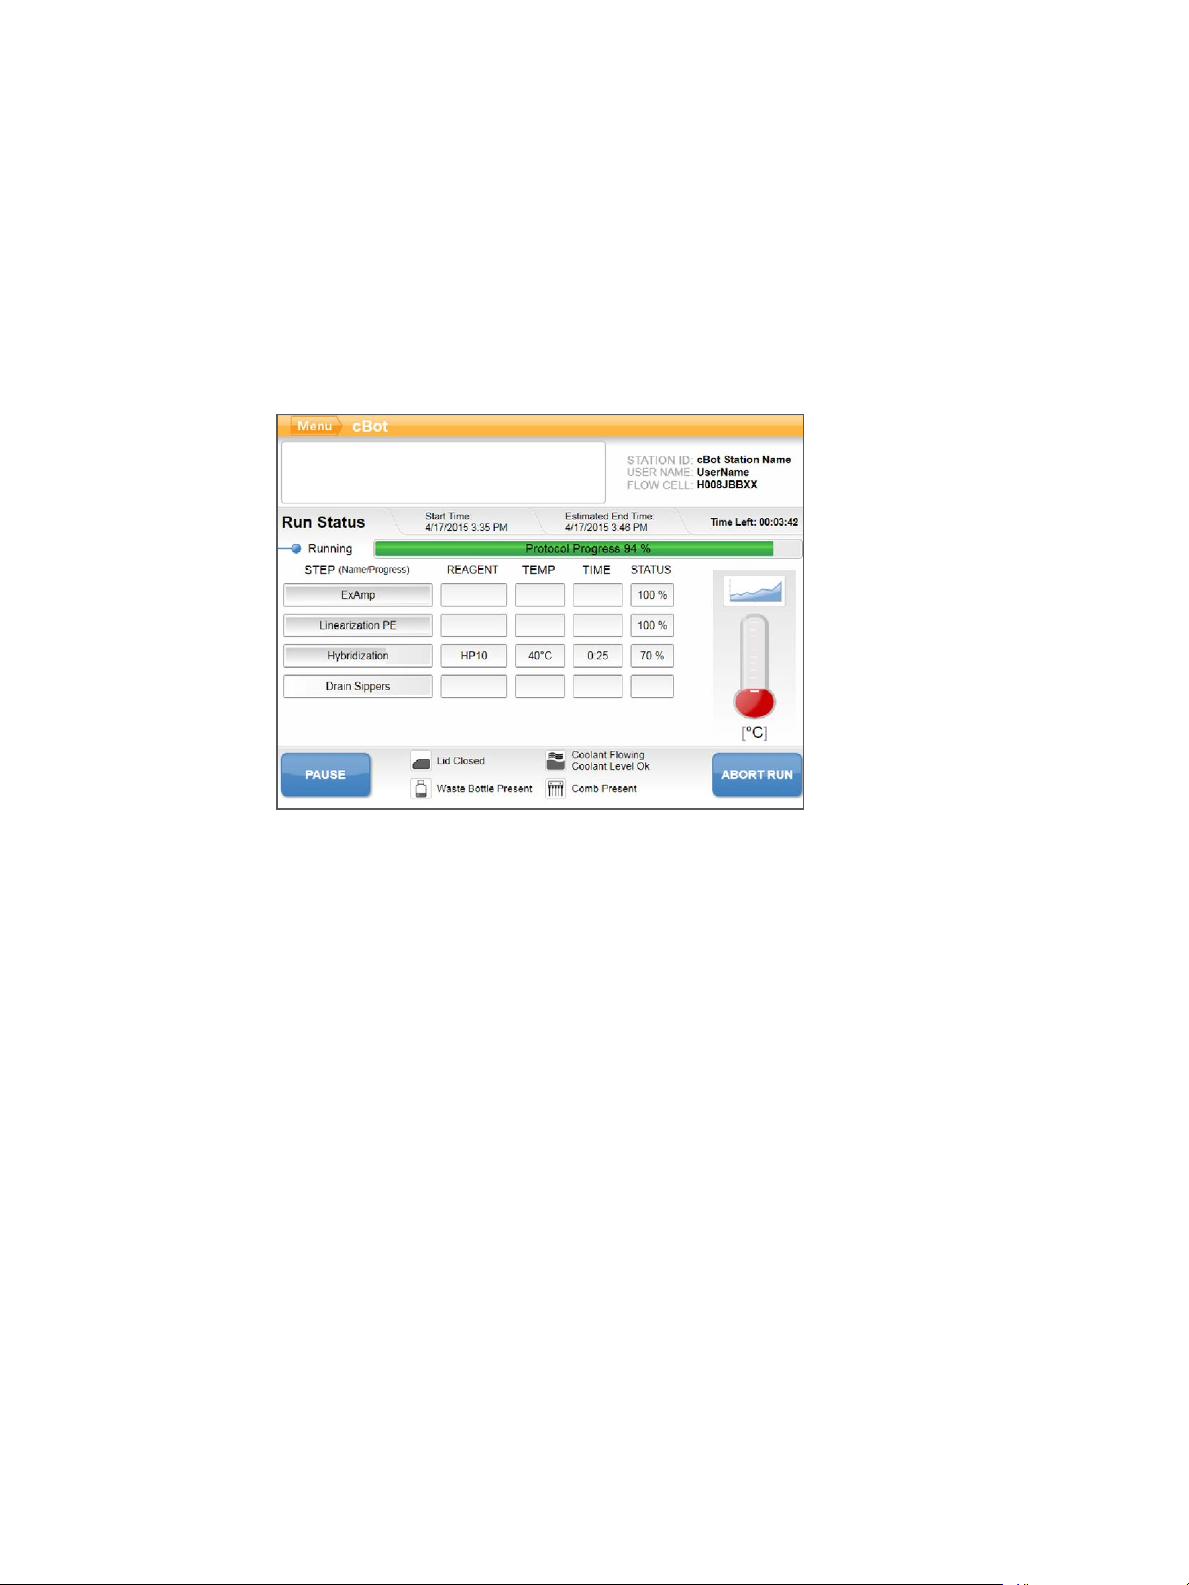
Monitor the Run
1 Use the Run Status screen to monitor the run in progress.
The Run Status screen provides the run status and the following details:
} Start date and time, end date and time, and time remaining
} Cluster generation protocol steps with status bar for each step
} Reagent currently in use
} Current temperature (°C)
} Status of the command in the current step
Figure 25 Run Status Screen
Monitor the Run
2 Wait for the run to complete:
} HiSeq v4, HiSeq 3000/4000 PE, or HiSeq X—Allow approximately 3hours.
} HiSeq 3000/4000 SR—Allow approximately 4 hours.
} HiSeq Rapid v2 or TruSeq Rapid—Allow approximately 1 hour.
} TruSeq v2 or TruSeq v3—Allow approximately 5hours.
3 After the run is complete, you can leave the flow cell on the instrument overnight.
Otherwise, proceed to unloading run components.
The cBot 2 holds the flow cell at 20°C.
Run Data Report
The run data report provides a summary of the run in progress. It lists the following
information:
} Protocol name
} Flow cell ID
} Reagent ID
} Template name
} Start time and finish time
You can view the report at any time during the run. Select Menu and then select Run Data.
At the end of the run, the run data report automatically opens to alert you that the run is
complete.
cBot 2 System Guide
55
Page 62
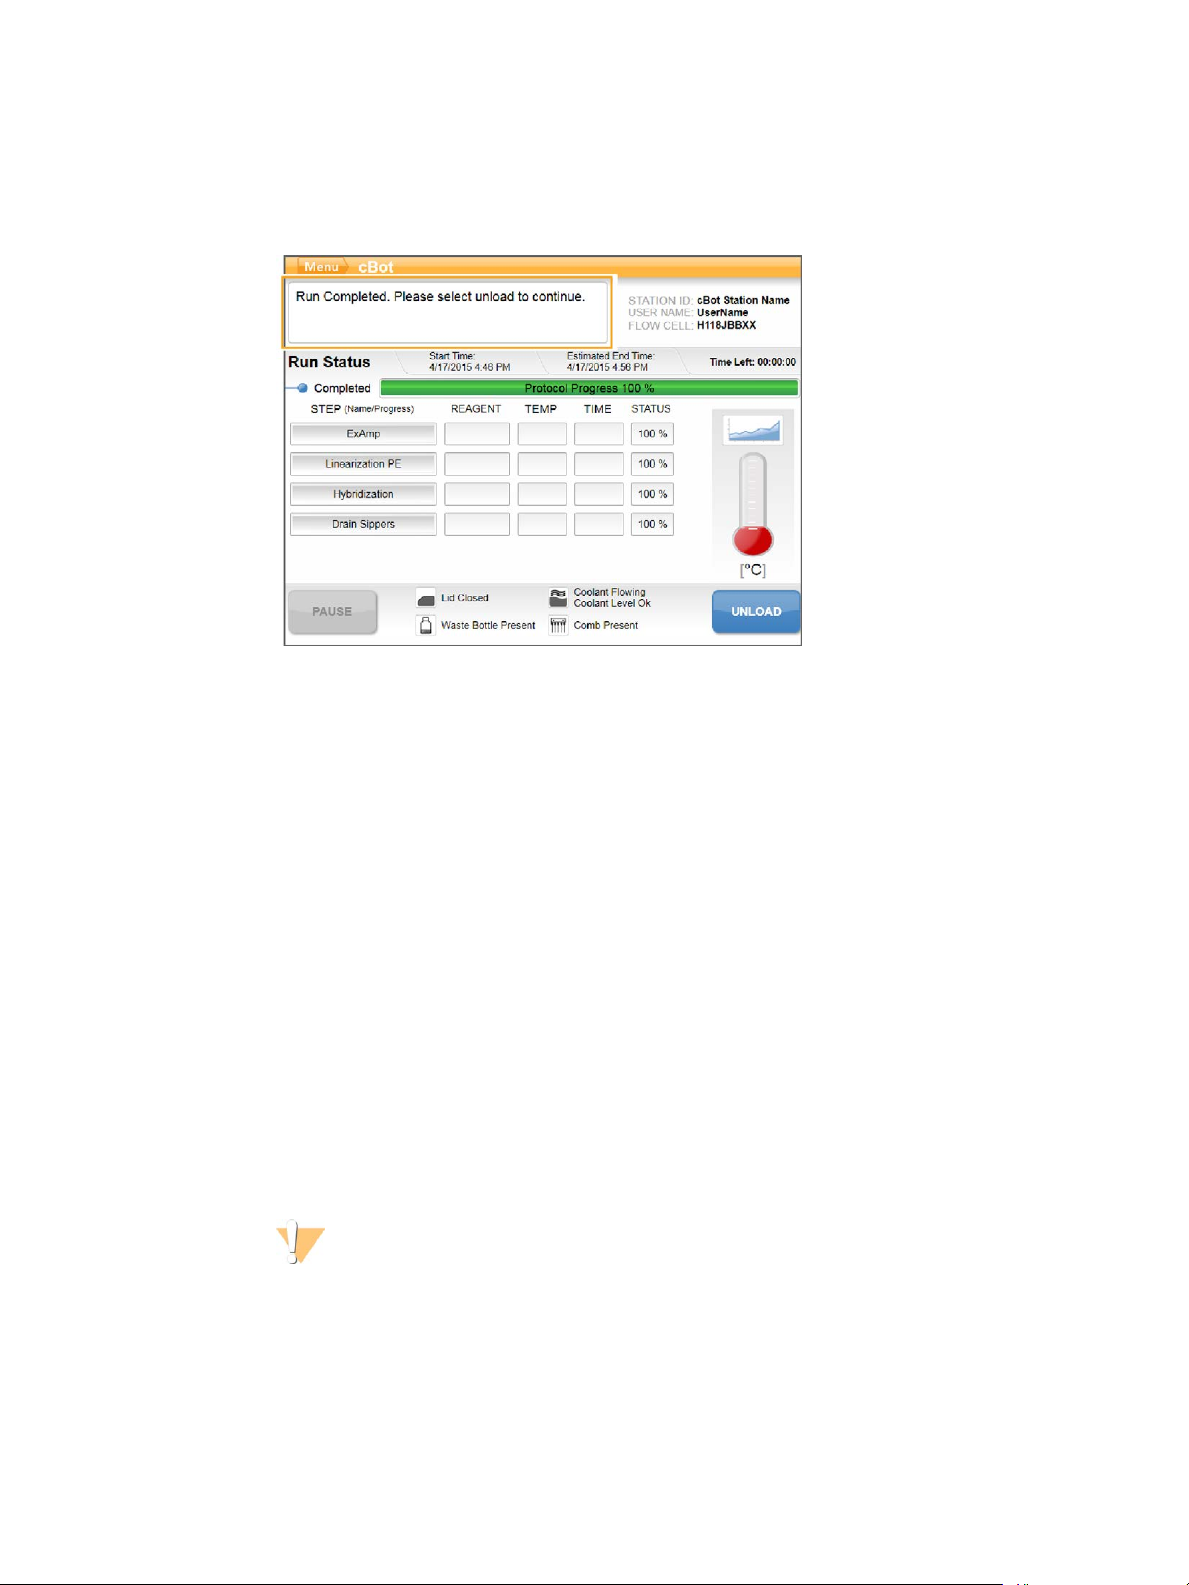
Unload Run Components
1 When the run is complete, select Unload to proceed.
Figure 26 Run Complete, Unload Components
2 Raise the instrument lid.
Clustering Without Sample Tracking
3 Release the outlet clamp securing the outlet end of the manifold.
4 Disconnect the outlet end of the manifold from the outlet port in the wash reservoir.
5 Remove the sipper comb from the metal guide pins using the plastic tabs on either side
of the sipper comb.
6 Release the flow cell clamp.
7 Remove the manifold. Make sure that the flow cell remains on the thermal stage.
8 Lift the flow cell from the thermal stage.
9 Store the flow cell as appropriate:
} TruSeq v2, TruSeq v3, and HiSeq v4 flow cells—Store in storage buffer in the flow
cell tube at 2°C to 8°C. The flow cell is stable after primer hybridization up to
10days when properly stored in the flow cell tube.
} HiSeq and TruSeq Rapid flow cells—Perform the sequencing run on the same day
as library loading.
} HiSeq X and HiSeq 3000/4000 flow cells—Store in storage buffer up to 48 hours at
2°C to 8°C.
10 Pull the reagent plate lever toward you to release the reagent plate. Remove the reagent
plate from the reagent stage.
WARNING
This set of reagents contains formamide, an aliphatic amide that is a probable
reproductive toxin. Personal injury can occur through inhalation, ingestion, skin
contact, and eye contact. Wear protective equipment, including eye protection,
gloves, and laboratory coat. Handle used reagents as chemical waste and discard in
accordance with the governmental safety standards for your region. For
environmental, health, and safety information, see the SDS for this kit at
support.illumina.com/sds.html.
56
11 Remove the 8-tube strip containing libraries.
Material # 20004364
Document # 15065681 v01
Page 63

12 Remove the 8-tube strip containing additional primers, if applicable.
13 Select the checkbox to indicate that you have unloaded the reagents, templates, and
primers.
14 Choose a wash option:
} Select Wash to proceed to the post-run wash.
} Select Exit to bypass the post-run wash, if the bypass option is available.
Unload Run Components
cBot 2 System Guide
57
Page 64

Perform a Post-Run Wash
1 Wash the plate on the thermal stage with deionized water to remove any salts. Dry
with a lint-free cleaning tissue.
2 Fill the wash reservoir with approximately 12ml deionized water and close the
instrument lid.
3 Select the checkbox to indicate that water is present, and then select Wash.
4 When the wash is complete, blot any excess water remaining in the wash reservoir.
Avoid the outlet ports to prevent fibers from entering the holes.
5 Select the checkbox to indicate that the wash reservoir is dry, and then select Exit.
The Start screen opens and your cBot 2 is ready for another run.
Clustering Without Sample Tracking
58
Material # 20004364
Document # 15065681 v01
Page 65
Confirm Reagent Delivery (Optional)
You can confirm delivery of individual reagents from the reagent plate provided in any kit
except HiSeq X and HiSeq 3000/4000.
1 Inspect the foil-sealed tops of each tube strip to make sure that each seal was pierced.
2 Release each tube strip from the base of the reagent plate as follows.
a Grasp the reagent plate firmly, with finger tips under the base.
b Gently press upward on the center tubes of the tube strip.
3 Inspect each tube to confirm that a similar volume remains in each tube.
NOTE
Small differences are normal.
Figure 27 Example of Successful Reagent Delivery (8-Lane Flow Cell)
Figure 28 Example of Successful Reagent Delivery (2-Lane Flow Cell)
Confirm Reagent Delivery (Optional)
4 If reagent delivery was not successful and the foil seals on the reagent tubes are
pierced, contact Illumina Technical Support.
5 Inspect the 8-tube strip containing library template.
6 If you used additional primers with your run, inspect the 8-tube strip containing
primers.
cBot 2 System Guide
59
Page 66

60
Material # 20004364
Document # 15065681 v01
Page 67

Chapter 6 Maintenance
Maintenance
Perform Periodic Maintenance 62
Perform a Monthly Maintenance Wash 63
Change the Adapter Plate 65
Upgrade the Software 67
Upgrade Recipes 68
Shut Down the cBot 2 69
Chapter 6
cBot 2 System Guide
61
Page 68

Maintenance
Perform Periodic Maintenance
Perform the basic maintenance steps described in this section to ensure optimal
performance.
Maintenance Frequency Description
Instrument wash Between each
run and if the
instrument is idle
for more than a
day.
Empty waste
bottle
Clean surfaces One time per
Clean external
and flow cell
barcode scanner
windows
Maintenance
Wash
Check coolant
level
Between each
run.
week.
One time per
week.
One time per
month.
Every 3 months. Make sure that the green coolant is visible through the
Always perform an instrument wash after each run to
clear salts and enzymes from the instrument hardware
and to prevent clogs.
If the instrument has been idle for more than 24hours,
a pre-run wash is recommended. For more
information, see Perform a Pre-Run Wash on page 48.
To make sure that your run is not interrupted, empty
the waste bottle between runs.
Use deionized water and a lint-free cleaning tissue to
clean the surface of the thermal stage and the reagent
stage. Clean the surface of the template and primer
tube strip holders.
Use deionized water and a lint-free cleaning tissue to
clean the external and flow cell barcode scanner
windows.
Use 5% DECON (or 100mM NaOH) to remove traces
of reagents from internal cBot components and inhibit
the growth of microorganisms. For more information,
see Perform a Monthly Maintenance Wash on page 63.
coolant window on the rear panel of the instrument. If
necessary, use a mirror to view the coolant window.
If the coolant is low, use a wide coin or standard
screwdriver to remove the coolant reservoir cap, and
fill the reservoir to just below the reservoir cap.
Use only Illumina coolant (part#1003709). If you need
additional coolant, contact your Illumina FAS or FSE.
Preventive Maintenance
Illumina recommends that you schedule a preventive maintenance service each year. If you
are not under a service contract, contact your Territory Account Manager or Illumina
Technical Support to arrange for a billable preventive maintenance service.
62
Material # 20004364
Document # 15065681 v01
Page 69

Perform a Monthly Maintenance Wash
Perform a monthly maintenance wash using 5% DECON to remove traces of reagents from
internal cBot components and inhibit microbial growth. If DECON is not available,
substitute 100mM NaOH.
The maintenance wash requires approximately 10 minutes of hands-on time and consists
of 4 wash steps: a water wash, a DECON or NaOH wash, and 2 more water washes.
Water Wash
1 Confirm that all run components are removed.
2 From the Start screen, select Menu and then Manual Commands to open the Manual
Commands screen.
3 Select Commands to open the Commands tab.
4 Fill the wash reservoir with approximately 12ml deionized water.
5 Select Wash.
6 After the wash is complete, blot excess water from the wash reservoir with a low-lint
tissue. Avoid the outlet ports to prevent fibers from entering the holes.
Perform a Monthly Maintenance Wash
DECON (or NaOH) Wash
1 Fill the wash reservoir with 10ml 5% DECON or 100mM NaOH.
2 Select Wash.
3 After the wash is complete, put on a new pair of gloves.
4 Blot the 5% DECON remaining in the wash reservoir with a low-lint tissue. Avoid the
outlet ports.
CAUTION
DECON is highly alkaline.
5 Immediately proceed to the water wash to prevent DECON from drying and clogging
the wash reservoir holes.
Water Wash (First Rinse)
1 Fill the wash reservoir with approximately 12ml deionized water.
2 Select Wash.
3 After the wash is complete, blot water remaining in the wash reservoir with a low-lint
tissue. Avoid the outlet ports.
Water Wash (Final Rinse)
1 Fill the wash reservoir with approximately 12ml deionized water.
2 Select Wash.
3 After the wash is finished, blot water remaining in the wash reservoir with a low-lint
tissue. Avoid the outlet ports.
cBot 2 System Guide
63
Page 70

Maintenance
4 Close the instrument lid.
5 Empty the waste bottle.
Your cBot is ready for the next cluster generation run.
64
Material # 20004364
Document # 15065681 v01
Page 71
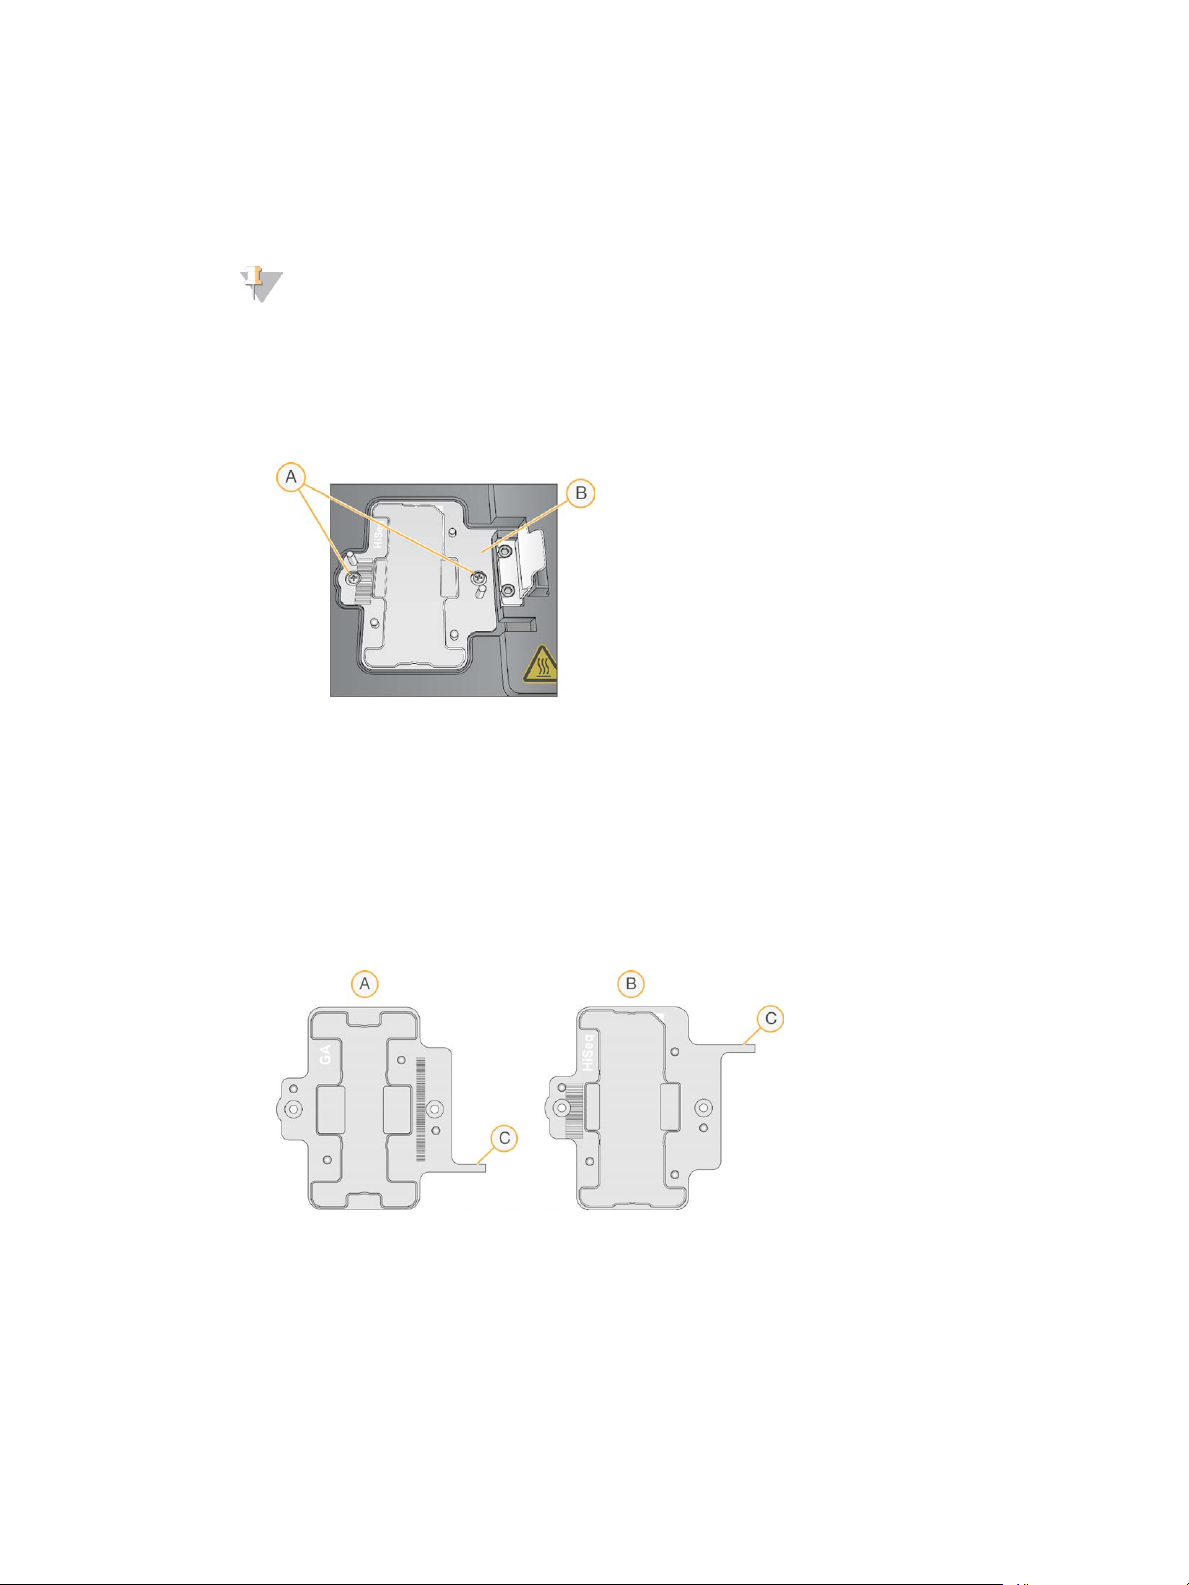
Change the Adapter Plate
You can use a HiSeq flow cell or a GAIIx flow cell on the cBot. Each flow cell type requires
that a specific adapter plate is installed. Icons on the Start screen indicate which adapter
plate is installed.
NOTE
The cBot is shipped with the HiSeq adapter plate installed.
1 Open the instrument lid by gently lifting from the cutout on the front of the lid.
2 Lift the flow cell clamp.
3 Loosen the 2 captive Phillips head screws securing the adapter plate.
Figure 29 Flow Cell Adapter Plate
Change the Adapter Plate
A Captive screws
B Adapter plate
4 Lift the existing adapter plate from the thermal stage and set aside.
5 If salts are present on the thermal stage, wipe with a lint-free cleaning tissue slightly
moistened with water.
6 Position the new adapter plate on the thermal stage. Align the sensor arm with the
corresponding slot on the right side of the thermal stage.
Figure 30 Sensor Arm Location
A GAIIx adapter plate
B HiSeq adapter plate
C Adapter plate sensor arm
7 Tighten the 2 screws to secure the adapter plate. For optimal heat transfer, make sure
that the adapter plate is sitting flat and the screws are tightened evenly.
cBot 2 System Guide
65
Page 72

Maintenance
8 Wipe the installed adapter plate with a lint-free cleaning tissue moistened with water.
Dry with a clean tissue.
66
Material # 20004364
Document # 15065681 v01
Page 73
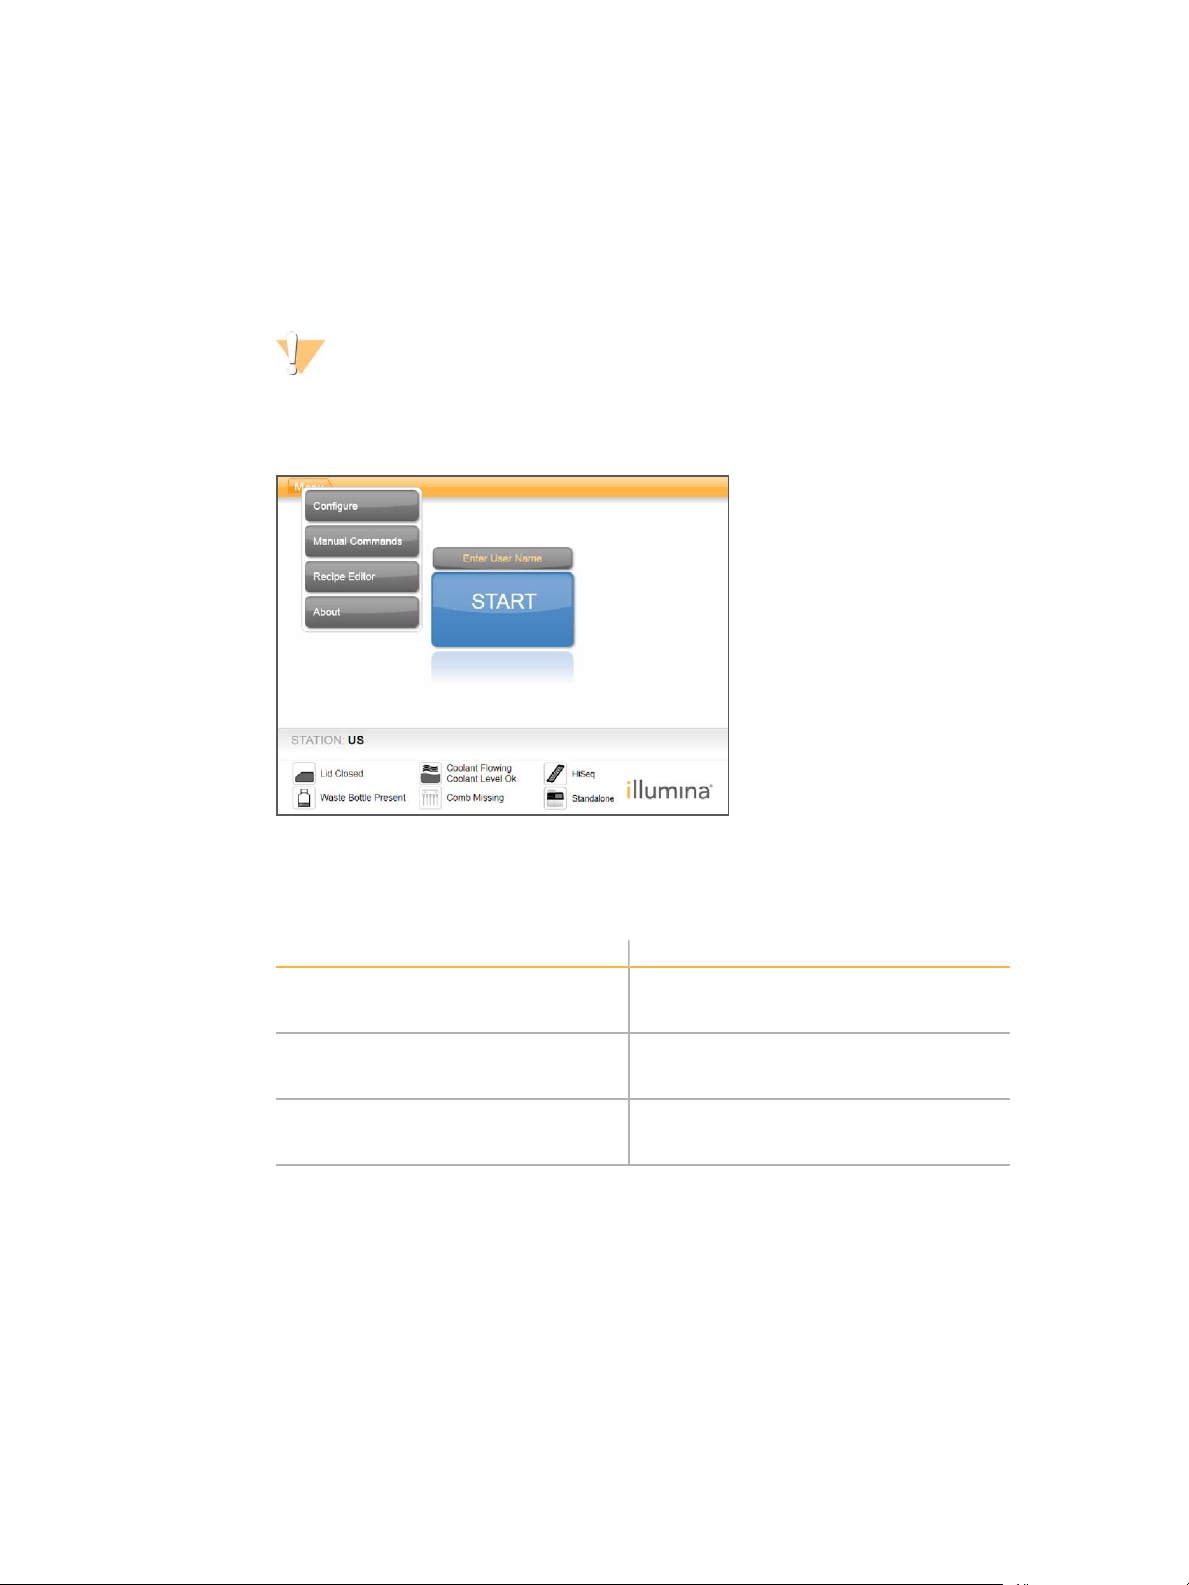
Upgrade the Software
Using cBot software v1.3, or later, you can upgrade instrument software using a USB flash
drive.
1 Insert the USB flash drive containing the new software version installer (for example,
cBotSetupX86_1.3.1.0.exe) into either of the USB ports on the front of the instrument.
The installer must reside in the root directory of the USB flash drive, not in a folder.
CAUTION
Leave the USB drive in the USB slot during the upgrade process. Do not interact with the
instrument during the upgrade.
2 Select Menu in the upper-left corner of the Start screen, and then select Configure.
Figure 31 Start Screen Menu
Upgrade the Software
3 Use the onscreen keyboard to type the default password, admin, and then select Enter.
4 Select Menu, and then select Upgrade.
5 A dialog box opens with a message about the software version:
Message Action
The software installer version is greater
than the version currently installed on the
cBot
cBot cannot find a valid software installer You can either insert a valid cBot upgrade
The software installer version is equal or
lower than the version currently installed
on the cBot
6 When the upgrade is complete and the instrument is restarting, remove the USBflash
drive.
7 If a BOOTMGRerror appears, attach a keyboard and mouse to the cBot and press
Ctrl+Alt+Del to restart the instrument.
Select OK to proceed with the installation of
the newer version.
and select OK to try again, or Cancel to
abort the upgrade.
Select Cancel to abort the upgrade, or OK to
proceed with installation of a previous
version.
cBot 2 System Guide
67
Page 74
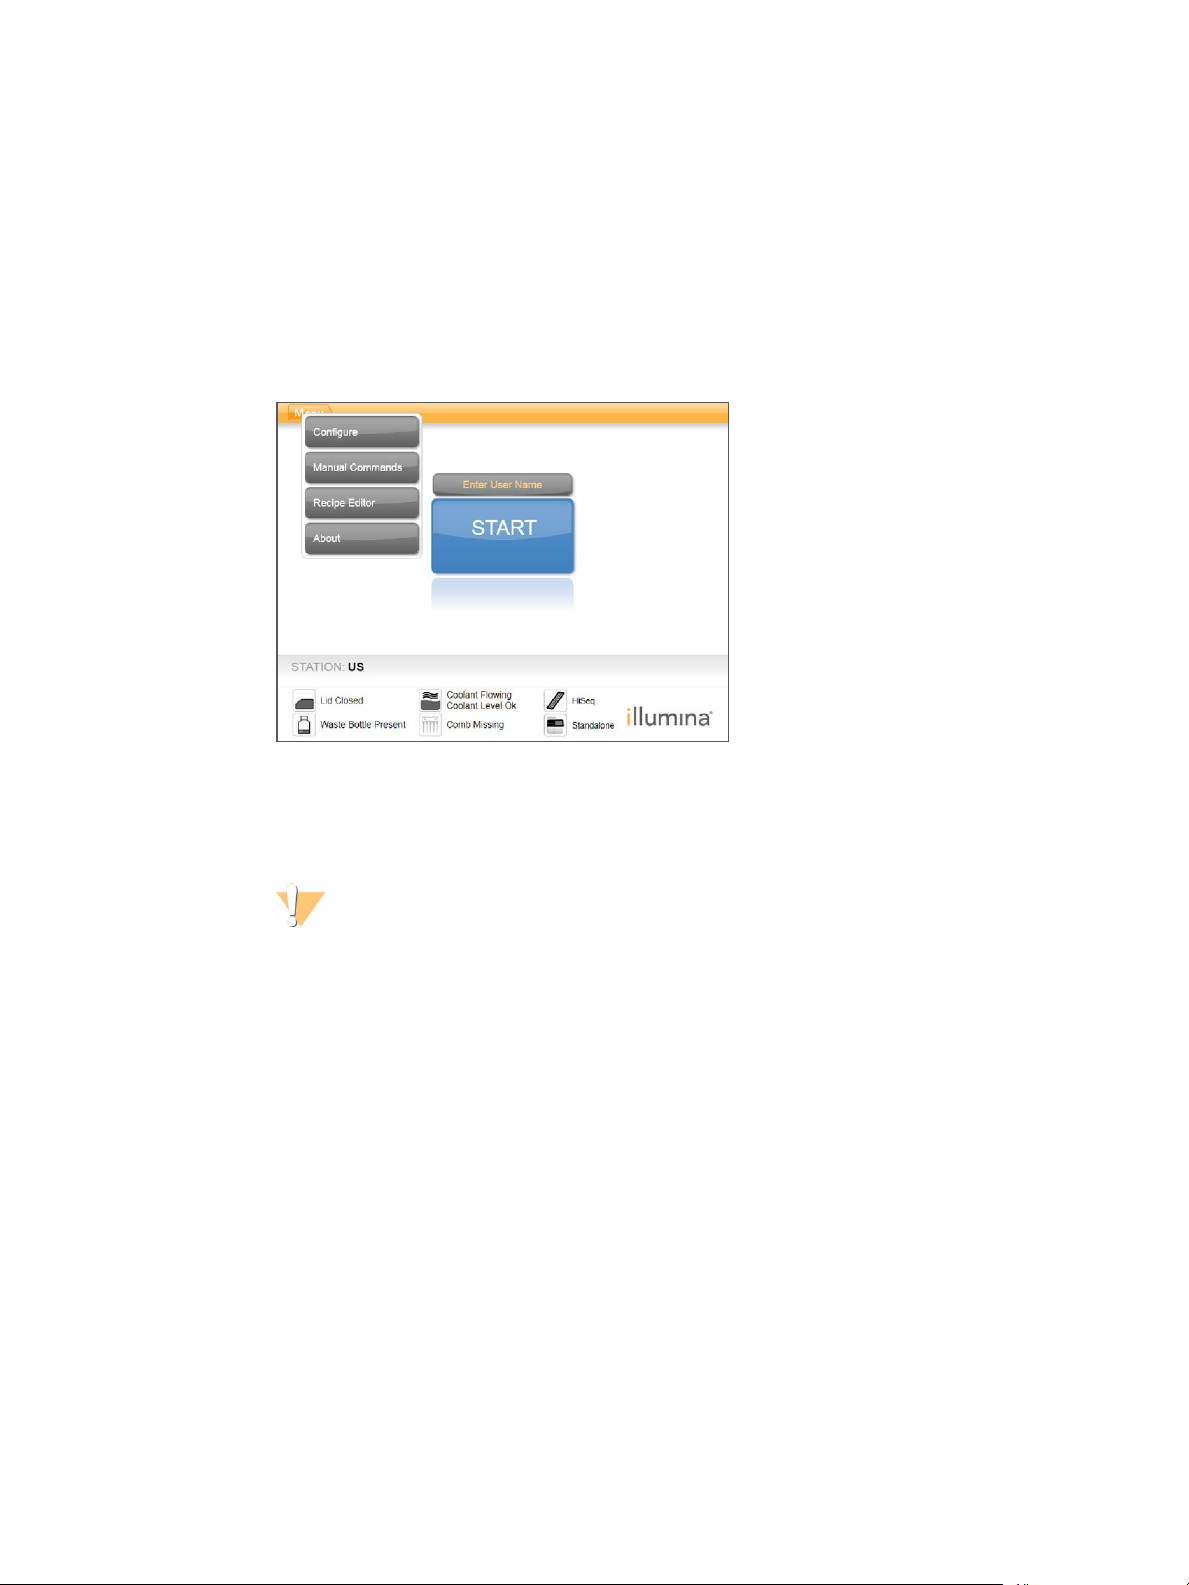
Maintenance
Upgrade Recipes
Upgrade recipe versions independently of software upgrades using a USB flash drive
containing the recipe installer.
1 Insert the USB flash drive containing the new recipe installer into either of the USB
ports on the front of the instrument.
The installer must reside in the root directory of the USB flash drive, not in a folder.
2 Select Menu in the upper-left corner of the Start screen, and then select Configure.
Figure 32 Start Screen Menu
3 Use the onscreen keyboard to type the default password, admin, and then select Enter.
4 Select Menu, and then select Upgrade Recipes.
When the upgrade is complete, the cBot restarts automatically. The restart process takes
about 10 minutes.
CAUTION
Leave the USB drive in the USB slot during the upgrade process. Do not interact with the
instrument during the upgrade.
5 When the restart is complete and the login screen opens, remove the USB flash drive.
68
Material # 20004364
Document # 15065681 v01
Page 75
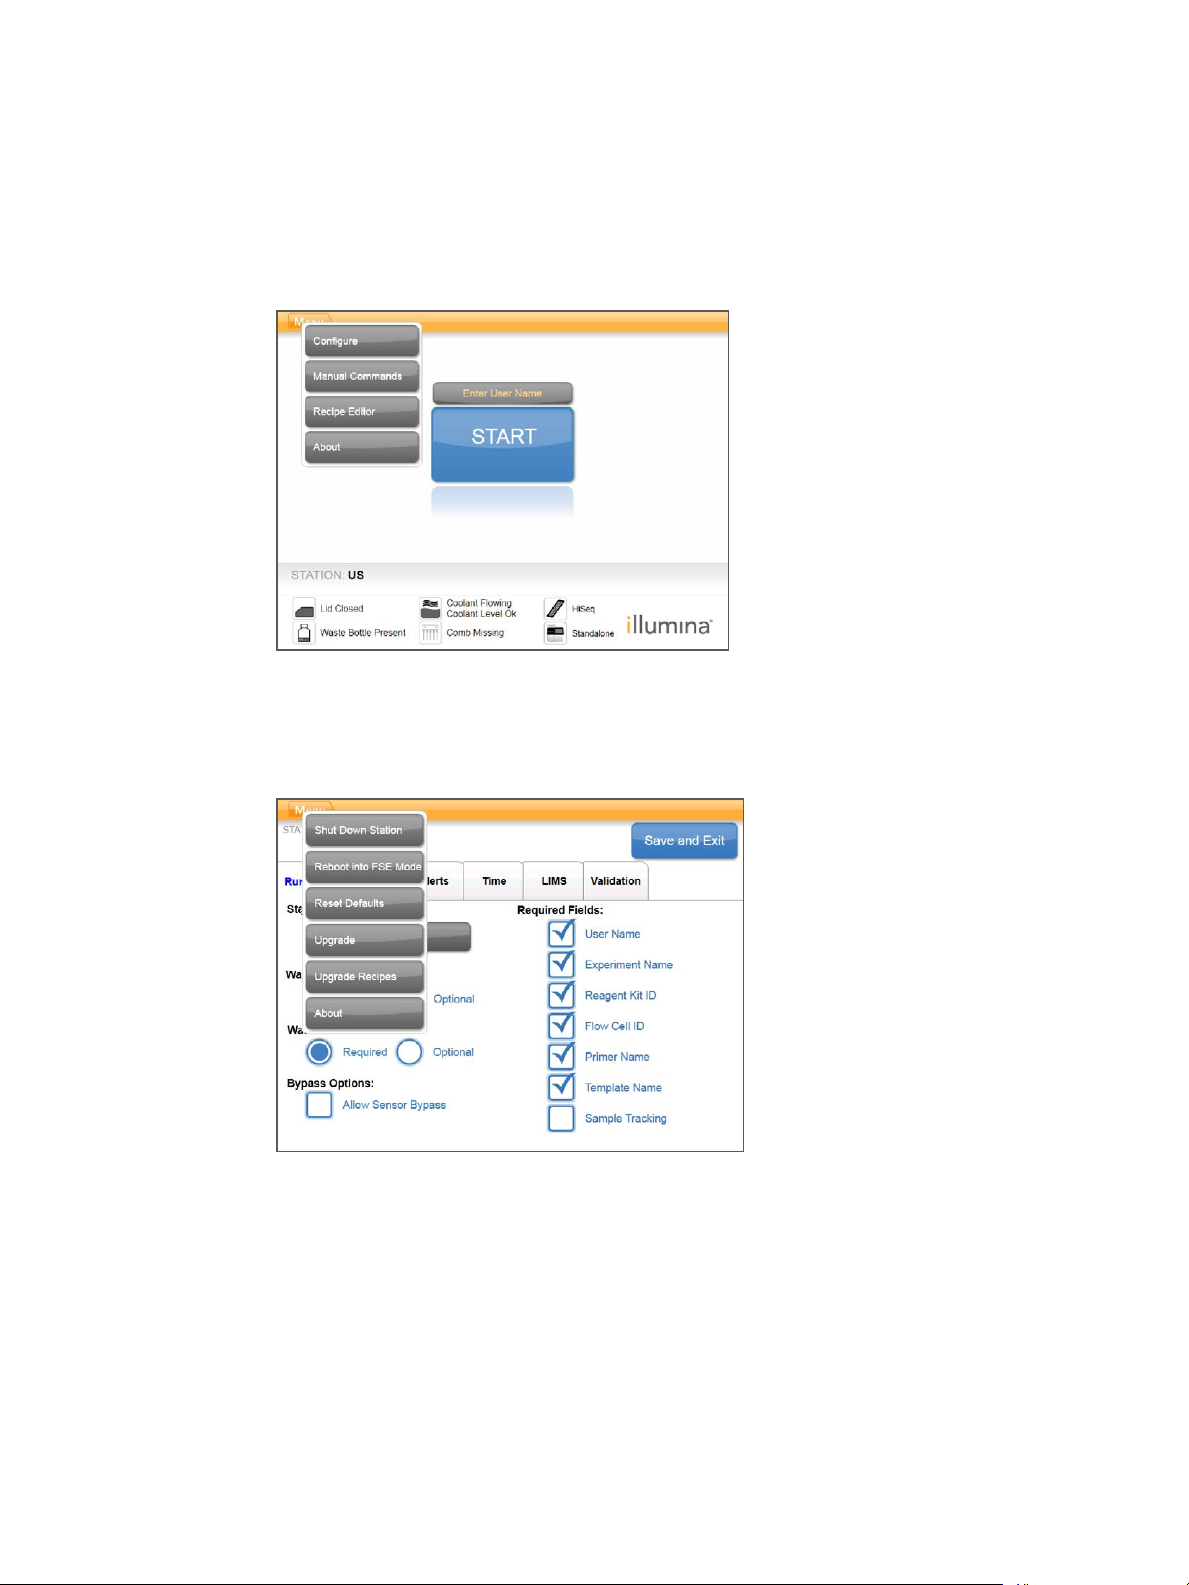
Shut Down the cBot 2
The cBot 2 is designed to run in an idle state from the Start screen, so shutting it down
between runs is not necessary.
1 Select Menu in the upper-left corner of the Start screen, and then select Configure.
Figure 33 Start Screen Menu
Shut Down the cBot 2
2 Use the onscreen keyboard to type the default password, admin, and then select Enter.
3 From the Configuration screen, select Menu and then select Shut Down Station.
The cBot software shuts down.
Figure 34 Shut Down Station
4 After the software shuts down, switch the power switch to the OFF position.
Reboot in FSE Mode
The option to reboot in FSE Mode is for use by a trained Illumina Field Application
Scientist (FAS) or Field Service Engineer (FSE) to update software or service the instrument.
cBot 2 System Guide
69
Page 76

70
Material # 20004364
Document # 15065681 v01
Page 77

Appendix A Troubleshooting
Troubleshooting
Pause or Abort a Run 72
Troubleshoot Flow Check Failure 73
Troubleshoot Run Problems 75
Reset the External Barcode Scanner 76
Edit Protocols 77
Appendix A
cBot 2 System Guide
71
Page 78

Troubleshooting
Pause or Abort a Run
Use commands on the Run Status screen to pause or abort a run.
} Pause—Completes the current command in the protocol, and then pauses the run.
Allow a few minutes before the run pauses. When the run is paused, the sippers lift
from the reagent tubes, the reagent stage returns the home position, and the Pause
button changes to the Resume button.
} When the run is active, select Pause to pause the run.
} When the run is paused, select Resume to resume the run.
} Abort Run—Ends the run without the option of resuming. Select Unload to unload run
components.
72
Material # 20004364
Document # 15065681 v01
Page 79

Troubleshoot Flow Check Failure
Perform the following procedure to troubleshoot flow check failure. Do not select the option
to bypass flow check until you have completed this procedure to determine the following
conditions:
} The flow cell is properly positioned on the instrument.
} The manifold and hardware are working properly.
NOTE
Bypassing the flow check can result in unsuccessful clustering of some lanes.
Because different flow cell types use different flow checks, make sure that you use the
correct recipe, manifold, and flow cell combination.
1 Make sure that you have enough HT1 in row 1 of the reagent plate, and replenish as
needed.
2 Note which lanes failed the flow check. This information is provided on the top-left
corner of the interface screen.
} If all 8 lanes failed, the flow cell is probably loaded improperly. Remove the
manifold and confirm that the flow cell holes are facing upward, and the flow cell
orientation is correct.
} If only some lanes failed, the flow cell might not be seated. Remove the manifold,
reseat the flow cell, and then reinstall the manifold.
Troubleshoot Flow Check Failure
3 Select Rerun Check to repeat the flow check a second time.
4 If the flow check fails a second time, note which lanes failed the flow check, and do 1
of the following:
} If all 8 lanes failed, you probably have a faulty manifold. Replace it with a new
manifold.
} If different lanes failed, you probably do not have a faulty manifold. Inspect the
volumes of HT1 in row 1 to make sure that the tubes contain equal volumes.
5 Select Rerun Check to repeat the flow check for a third time.
} If this flow check fails after replacing the manifold, go to step 6.
} If this check fails and you did not need to replace the manifold, go to step 7.
6 If the flow check fails a third time after replacing the manifold, you might have a clog
in the hardware.
a Inspect the volumes of HT1 in row 1 to make sure that the tubes contain equal
volumes. Higher volumes in the tubes that correspond to lanes with repeated flow
check failure indicate a hardware clog.
b Unload the run components and perform a maintenance wash.
c After the wash, turn off the instrument using the power switch. After a few
seconds, turn on the power switch and then press the start button to restart the
software. Power cycling the instrument resets the allowable number of pre-run
check attempts.
d Follow the software prompts to reload run components and set up your run.
7 If the flow check fails a third time, you can safely bypass the flow check:
a Select Bypass Flow Check to proceed with the run.
b After the run, check reagent delivery from all tubes.
cBot 2 System Guide
73
Page 80
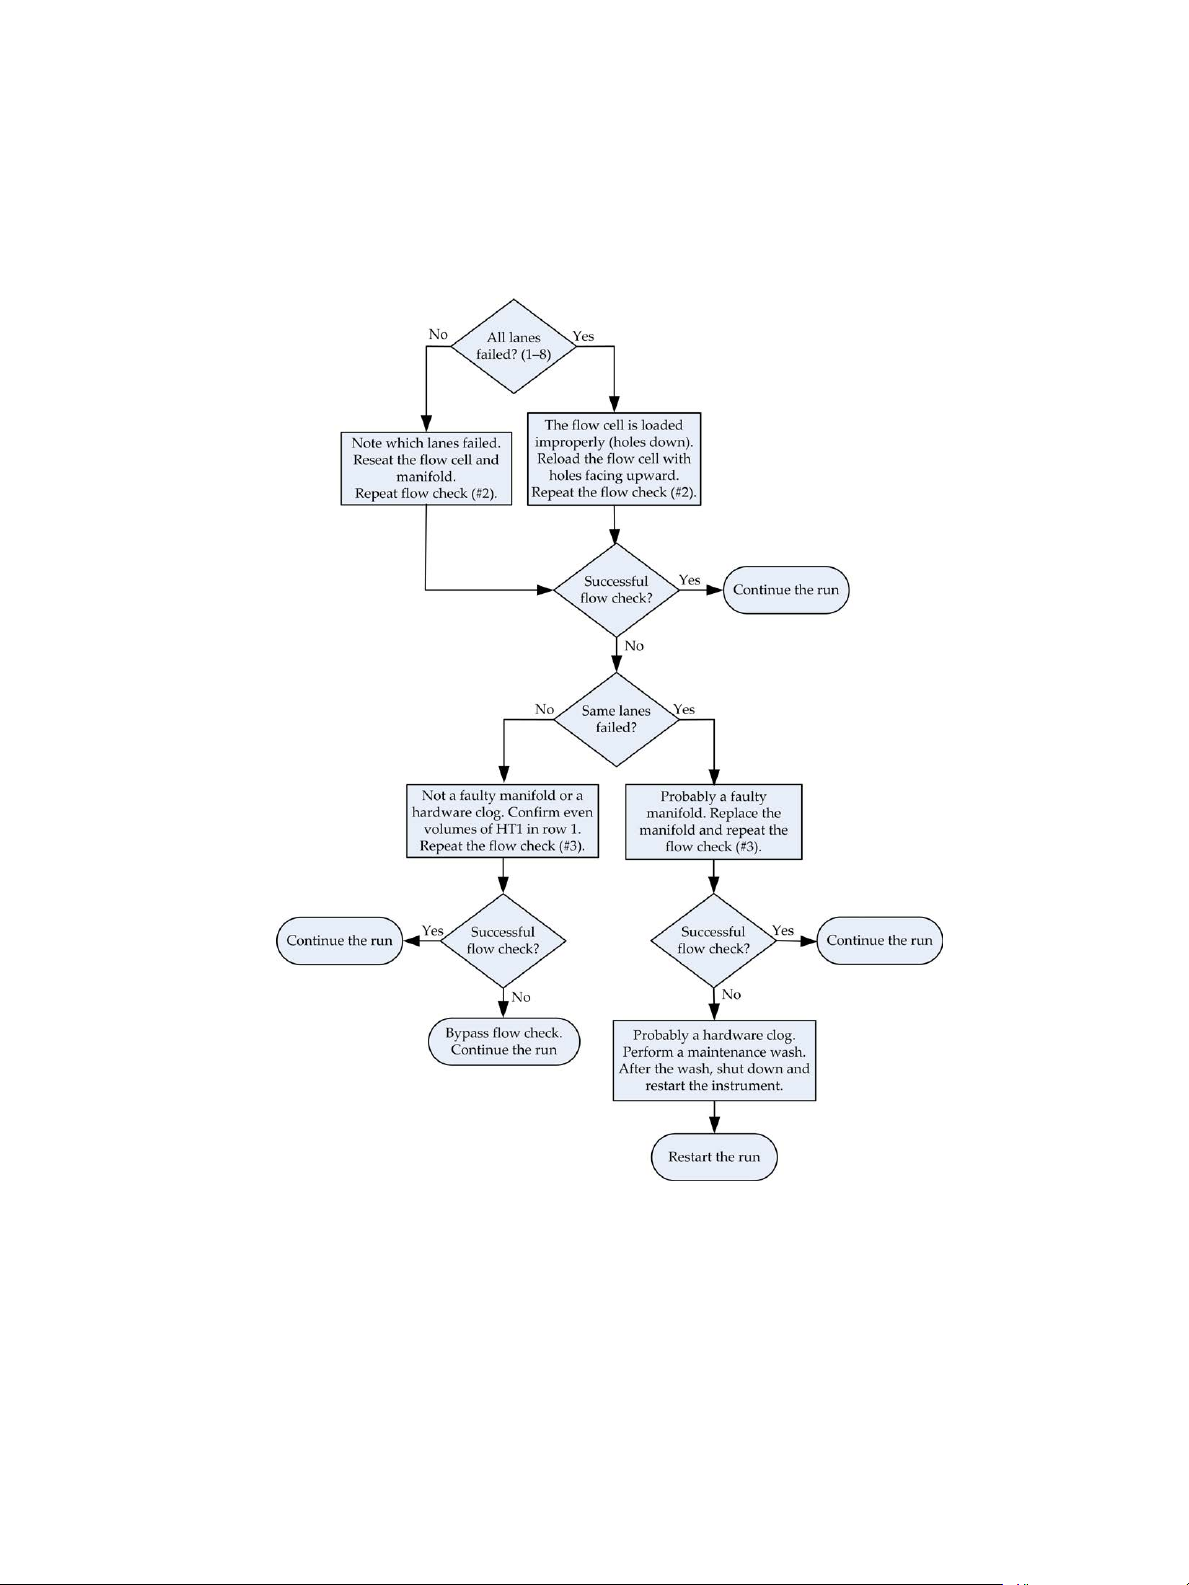
Troubleshooting
Troubleshooting Flowchart
The following flowchart illustrates the troubleshooting procedure. Steps to repeat the flow
check include a number to indicate how many of the allowed flow checks have been
performed at that point in the procedure.
Figure 35 Troubleshooting Flowchart
74
Material # 20004364
Document # 15065681 v01
Page 81

Troubleshoot Run Problems
Use the following table to troubleshoot problems encountered during a cluster generation
run.
Problem Possible Cause Action
Temperature out of range Often indicates that the cBot did
not reach the set temperature in
the expected time. Can also
indicate a potential control
board failure.
Coolant is flowing and
coolant level is low
Coolant is not flowing and
coolant level is low
Coolant is not flowing and
coolant level is not low
Instrument is in a locked
state
Coolant has slowly evaporated
to a low level.
Coolant level might be too low
to generate flow.
Potential coolant pump failure. Email Illumina Technical
Potential software error. Email Illumina Technical
Troubleshoot Run Problems
Email Illumina Technical
Support.
Add Illumina coolant
(part#1003709) to the coolant
reservoir.
Add Illumina coolant
(part#1003709) to the coolant
reservoir.
Support.
Support.
cBot 2 System Guide
75
Page 82
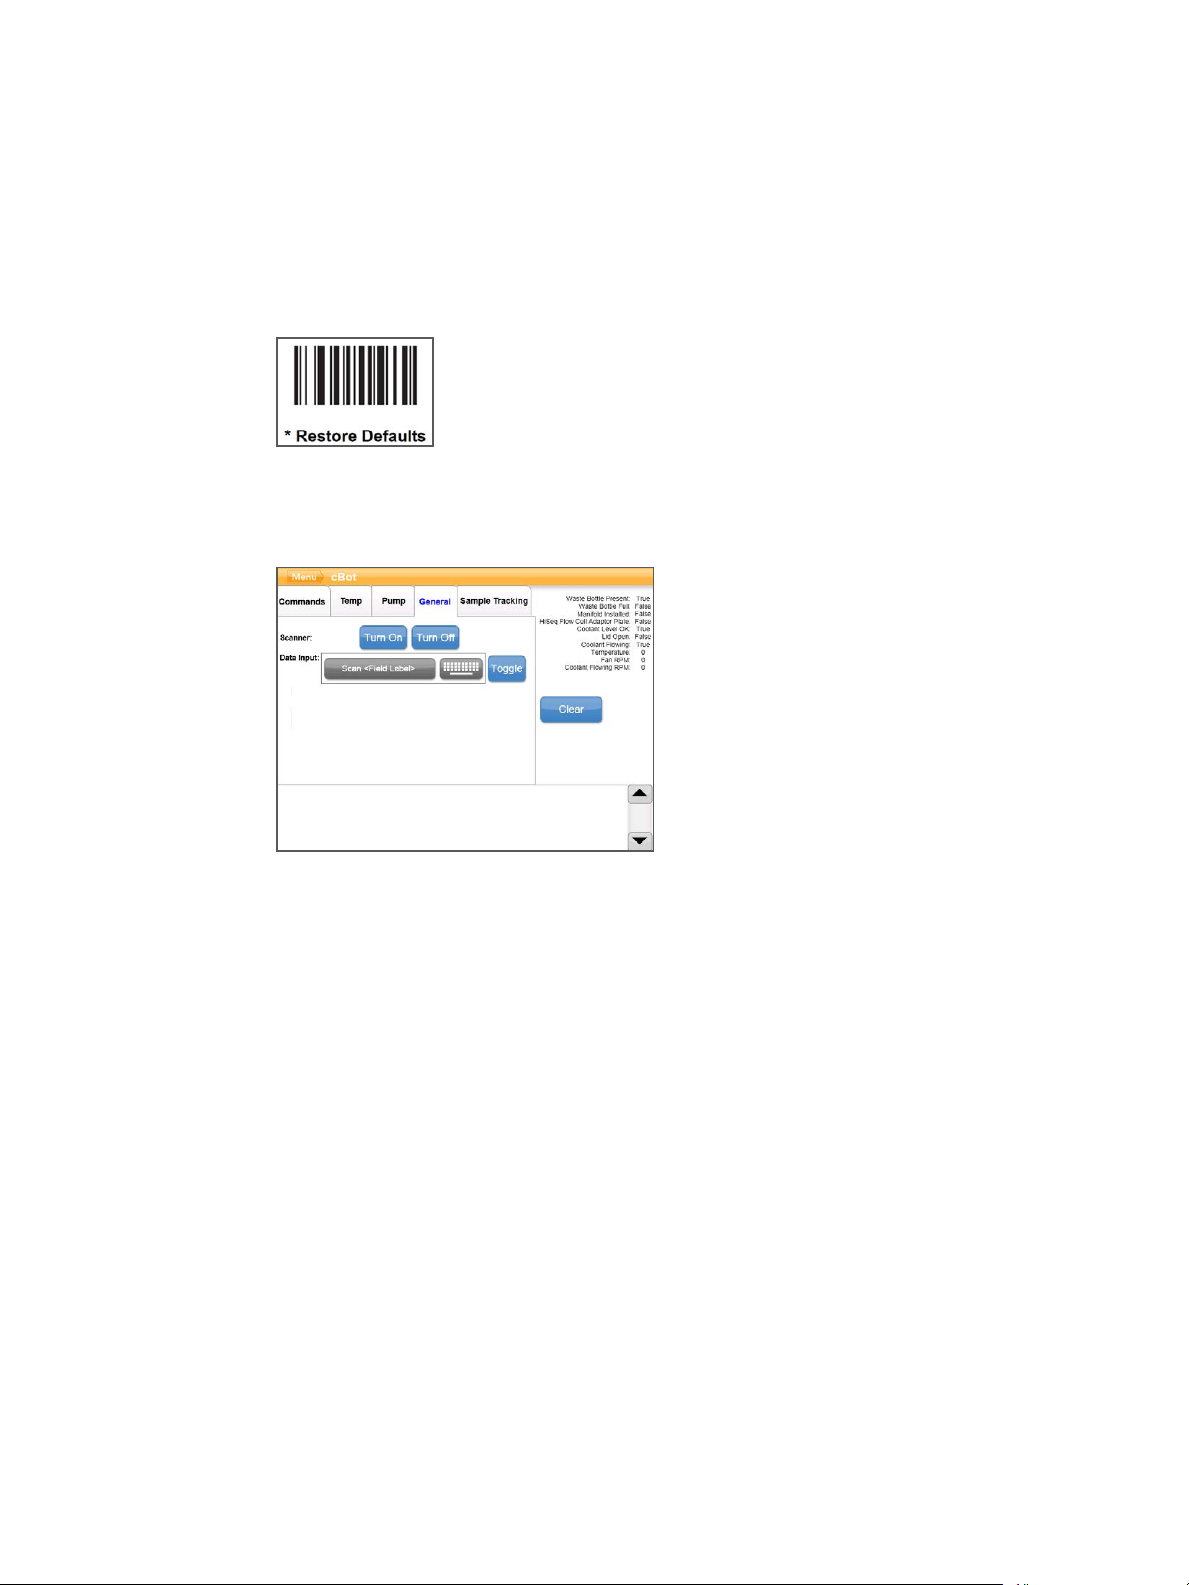
Troubleshooting
Reset the External Barcode Scanner
The external barcode scanner is ready for use when you receive your cBot. If the scanner is
reset to an incorrect configuration, use the following instructions to restore it to the default
configuration.
1 Print the barcode.
Figure 36 Restore Defaults Barcode
2 From the start screen, select Menu and then Manual Commands.
3 Select the General tab to access the barcode reader manual control inputs.
Figure 37 Manual Commands, General Tab
4 Select Turn Off and then select Turn On to activate the barcode scanner.
The laser line is visible on the scanner plate under the LCD screen.
5 Place the barcode under the external barcode scanner.
6 Select Turn Off, and then Turn On to scan the barcode.
A beep indicates a successful scan.
76
Material # 20004364
Document # 15065681 v01
Page 83
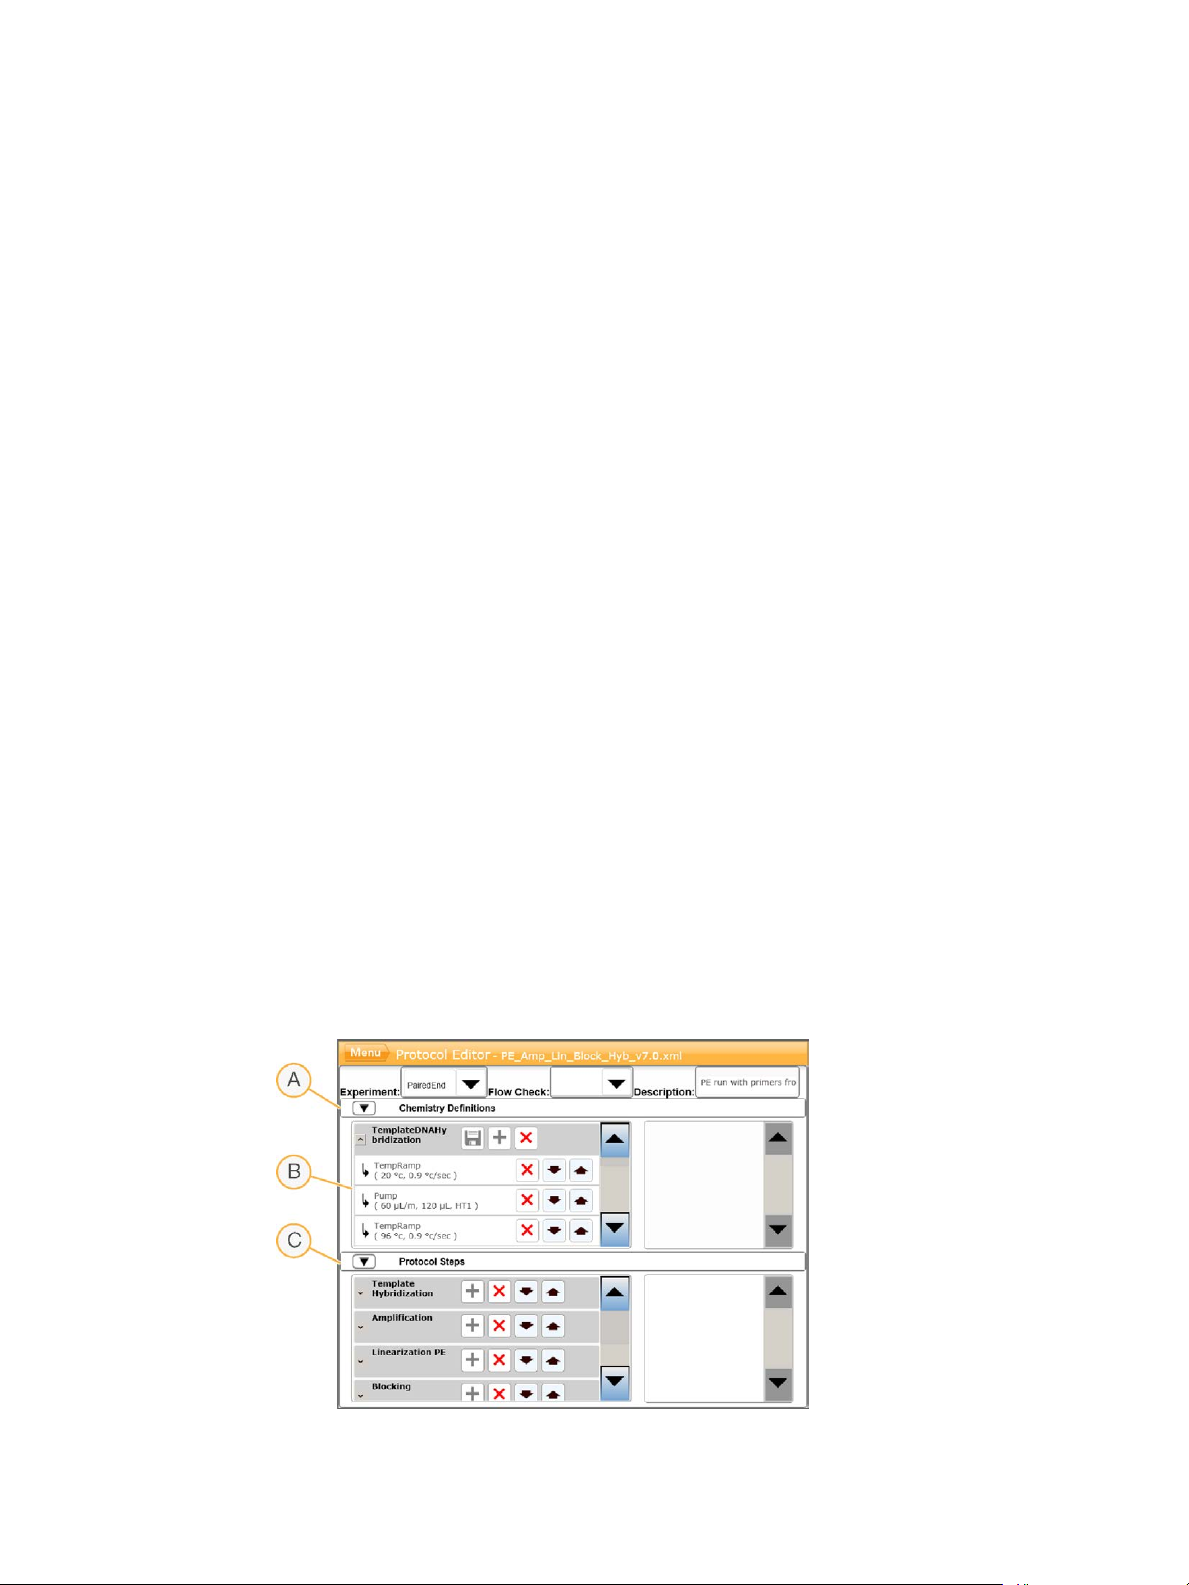
Edit Protocols
Use the Protocol Editor to edit protocols to fit your needs. You might want to repeat steps in
a protocol, or change the number of amplification cycles in the chemistry section.
Each protocol consists of 2 main sections:
} Chemistry section—Contains instructions for pumping reagents, temperature changes,
and wait durations. This section appears in the upper portion of the Protocol Editor
screen.
} Protocol section—Contains a series of steps made up of chemistry definitions. This
section appears in the lower portion of the Protocol Editor screen.
If you edit an existing protocol, make sure to rename your protocol.
Protocol Editor
1 From the Start screen, select Menu, and then select Protocol Editor.
2 From the Protocol Editor, select Menu, and then select the appropriate command:
} Open—Opens an existing protocol.
} Select Load from Library—Loads an existing chemistry definition or protocol step
stored in the cBot library.
} Select New Chemistry Definition or New Protocol Step—Creates a definition or step
and stores it in the cBot library.
Edit Protocols
3 Use the down arrow to the left of the step to expand the commands in the step. Use the
up arrow to collapse the commands.
4 To edit a step in a chemistry definition, highlight the step.
Selections to change the pump, temperature ramp, or wait commands appear in the
right-hand panel.
5 To edit a step in the protocol, highlight the step.
Selections to change to the number of cycles for the selected chemistry definition appear
in the right-hand panel.
6 Use the Protocol Editor icons to the right of the step name to rearrange, delete, or copy
steps and commands.
Figure 38 Protocol Editor, Expanded Steps
cBot 2 System Guide
77
Page 84
A Chemistry section
B Expanded chemistry section
C Protocol section
Protocol Editor Icons
Troubleshooting
Icon
Description
Moves the highlighted step below the following step in the protocol.
Moves the highlighted step above the preceding step in the protocol.
Deletes the highlighted step.
Repeats the highlighted step.
Saves your changes to the protocol library.
78
Material # 20004364
Document # 15065681 v01
Page 85

Index
Index
5
5% DECON 63
8
8-tube strip removal 44, 59
A
activating external scanner 38
adapter plates 65
washing 33, 50
B
barcode scanner, external
cleaning 62
resetting 76
barcode scanning error 38
best practices
reagent preparation 18
bypass flow check 73
C
cBot reagent plates 9
chemistry protocols 77
Clarity LIMS X Edition 2
clustering reagents
preparing 18
components 4
configuration 6
configuration, help 30
configuring sample tracking 30
consumables
unloading 41, 56
version compatibility 13
consumables, user-supplied
reagent preparation 15
coolant
level 62
coolant part number 75
coolant problems 75
customer support 83
D
DECON 63
DECON substitute 63
delivered volumes 44, 59
denaturing 30, 46
denaturing libraries 21, 25
diluting 30, 46
documentation 3, 83
E
ending a run 72
error messages 75
ExAmp master mix 26
ExAmp reaction
preparing, 1 flow cell 22
preparing, 4 flow cells 22
ExAmp reagents
about 19, 23
preparing 26
preparing, 1 flow cell 22
preparing, 4 flow cells 22
thawing 20, 24
external barcode scanner
cleaning 62
resetting 76
F
flow cell
barcode scanning 38
cleaning 19, 23
compatible recipes 13
packaging 19, 23
preparation 19, 23
flow cell storage 33, 41, 50, 56
flow cells
adapter plates 65
positioning 33, 51
preparing for loading 33, 50
sample tracking compatibility 30
flow check 54
troubleshooting failure 73
flow check failure
troubleshooting 74
flow check failures 75
foil not pierced 44, 59
FSE mode 69
H
help
documentation 3
help, technical 83
HP10, preparing 27
I
icons
sensor status 6
idle state 69
Illumina SeqLab 2
K
kit documentation 7
L
libraries
denaturing 21, 25
diluting 21, 25
loading 34, 52
loading concentration 21, 25
loading libraries 34
cBot 2 System Guide
79
Page 86

Index
M
maintenance 43, 58, 63
periodic care 62
maintenance wash duration 63
maintenance, preventive 62
manifold
outlet clamp 35, 52
sipper comb 4, 35, 52
manifold problems 75
manifolds 35, 51
Manual Commands 63
N
NaOH 63
O
overview
clustering workflow 47
sample tracking workflow 31
P
part numbers
coolant 75
PhiX
adding 21, 25
spike-in % 21, 25
positioning flow cells 33, 51
post-run procedures 41, 56
post-run wash 62
pre-run check
errors 54
performing 54
pre-run check failure 39
pre-run wash 62
preventive maintenance 62
primer
name, entering 38
primers
custom 53
loading 53
name, entering 53
tube strip orientation 53
protocol
selecting 37, 49
Protocol Editor 77
icons 78
protocols, editing 77
R
reagent delivery, unsuccessful 44, 59
reagent plate 5
configurations 9
preparing 21, 25
thawing 20, 24, 27-28
reagent plate, high output
preparing 27
reagent plate, rapid
preparing 28
reagent plates
positioning 33, 50
reagent preparation
best practices 18
reagent stage 5
reagents
barcode scanning 38
reagents, preparing
GAIIx flow cell 18
high output 27
HiSeq 3000/4000 23
HiSeq X flow cell 19
rapid 28
recipes
list of 13
upgrading 68
red foil seal 33, 50
removing 8-tube strips 44, 59
rerunning sensor checks 39
resuming a run 72
run
starting 54
run component errors 54
run data report 40, 55
run requirements
configuring 6
run summary 40, 55
S
salts, removing 43, 58
sample tracking
about 2
configuring 30
flow cell compatibility 30
scanners 4
scanning failure 38
seal, red foil 33, 50
seals not pierced 44, 59
sensor status icons 6
sensors 4
servicing 69
shutting down 69
software
upgrading 67
version compatibility 13
software errors 75
stopping a run 72
storing flow cells 41, 56
system status 6
T
technical assistance 83
temperature out of range 75
temperature range 75
template row 34
templates
loading 52
thawing reagent plate 20, 24
thermal stage 4
washing 43, 58
troubleshooting
flow check failure 73
turning off 69
U
user-supplied consumables
reagent preparation 15
80
Material # 20004364
Document # 15065681 v01
Page 87

V
version compatibility
consumables 13
software 13
W
wash reservoir 32, 48
washes 32, 48
frequency 62
washing
adapter plates 33, 50
washing the instrument 43, 58
waste bottle 62
Index
cBot 2 System Guide
81
Page 88

Index
82
Material # 20004364
Document # 15065681 v01
Page 89

Technical Assistance
For technical assistance, contact Illumina Technical Support.
Table 1 Illumina General Contact Information
Website
www.illumina.com
Technical Assistance
Email
Table 2 Illumina Customer Support Telephone Numbers
Region Contact Number Region Contact Number
North America 1.800.809.4566 Japan 0800.111.5011
Australia 1.800.775.688 Netherlands 0800.0223859
Austria 0800.296575 New Zealand 0800.451.650
Belgium 0800.81102 Norway 800.16836
China 400.635.9898 Singapore 1.800.579.2745
Denmark 80882346 Spain 900.812168
Finland 0800.918363 Sweden 020790181
France 0800.911850 Switzerland 0800.563118
Germany 0800.180.8994 Taiwan 00806651752
Hong Kong 800960230 United Kingdom 0800.917.0041
Ireland 1.800.812949 Other countries +44.1799.534000
Italy 800.874909
Safety data sheets (SDSs)—Available on the Illumina website at
support.illumina.com/sds.html.
Product documentation—Available for download in PDF from the Illumina website. Go
to support.illumina.com, select a product, then select Documentation & Literature.
cBot 2 System Guide
83
Page 90

Illumina
5200 Illumina Way
San Diego, California 92122 U.S.A.
+1.800.809.ILMN (4566)
+1.858.202.4566 (outside North America)
[email protected]
www.illumina.com
 Loading...