

Page 1
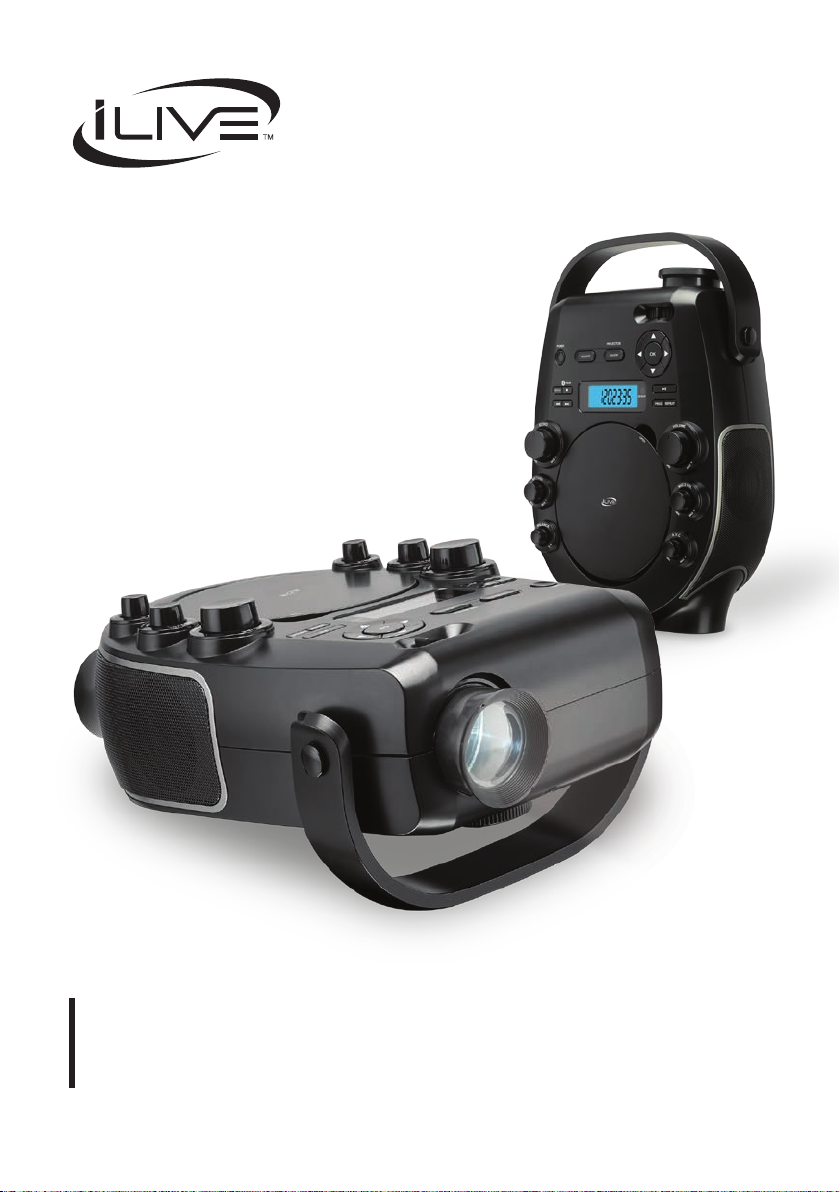
Party Projector · Karaoke · Movie · Music System
User’s Guide for Model IJP557 v1905-01
For the most up-to-date version of this User’s Guide, go to www.iliveelectronics.com
Page 2

Safety Instructions & Warnings
Important Safety Instructions
• Read these Instructions.
• Keep these Instructions.
• Heed all Warnings.
• Follow all instructions.
• Do not use this apparatus near water.
• Clean only with a dry cloth.
• Do not block any ventilation openings. Install in accordance
with the manufacturer’s instructions.
• Do not install near any heat sources such as radiators, heat
registers, stoves, or other apparatus (including ampliers)
that produce heat.
• Do not defeat the safety purpose of the polarized or
grounding - type plug. A polarized plug has two blades with
one wider than the other. A grounding type plug has two
blades and a third grounding prong. The wide blade or the
third prong are provided for your safety. When the provided
plug does not t into your outlet, consult an electrician for
replacement of the obsolete outlet.
• Protect the power cord from being walked on or pinched
particularly at plugs, convenience receptacles, and the point
where they exit from the apparatus.
• Only use attachments/accessories specied by the
manufacturer.
• Unplug this apparatus during lightning storms or when
unused for long periods of time.
• Refer all servicing to qualied service personnel. Servicing
is required when the apparatus has been damaged in any
way, such as power-supply cord or plug is damaged, liquid
has been spilled or objects have fallen into the apparatus,
the apparatus has been exposed to rain or moisture, does not
operate normally, or has been dropped.
• Use only with a cart, stand, tripod, bracket,
or table specied by the manufacturer, or
sold with the apparatus. When a cart is
used, use caution when moving the cart/
apparatus combination to avoid injury
from tip-over.
FCC Warnings
Warning: Changes or modications to this unit not expressly
approved by the party responsible for compliance could void the
user’s authority to operate the equipment.
NOTE: This equipment has been tested and found to comply
with the limits for a Class B digital device, pursuant to Part
15 of the FCC Rules. These limits are designed to provide
reasonable protection against harmful interference in a
residential installation. This equipment generates, uses, and can
radiate radio frequency energy and, if not installed and used in
accordance with the instructions, may cause harmful interference
to radio communications. However, there is no guarantee that
interference will not occur in a particular installation. If this
equipment does cause harmful interference to radio or television
reception, which can be determined by turning the equipment off
and on, the user is encouraged to try to correct the interference
by one or more of the following measures:
• Reorient or relocate the receiving antenna.
• Increase the separation between the equipment and receiver.
• Connect the equipment into an outlet on a circuit different
from that to which the receiver is connected.
• Consult the dealer or an experienced radio/TV technician
for help.
2
Page 3
Battery Warnings
• WARNING: Do not ingest battery, Chemical Burn Hazard.
• If the remote control supplied with this product contains a
coin/button cell battery and the coin/button cell battery is
swallowed, it can cause severe internal burns in just 2 hours
and can lead to death.
• Keep new and used batteries away from children. If the
battery compartment does not close securely, stop using the
product and keep it away from children.
• If you think batteries might have been swallowed or
placed inside any part of the body, seek immediate medical
attention.
• CAUTION: Danger of explosion if battery is incorrectly
replaced. Replace only with the same or equivalent type.
• WARNING: There is a danger of explosion if you attempt
to charge standard Alkaline batteries in the unit. Only use
rechargeable NiMH batteries.
• Battery shall not be exposed to excessive heat such as
sunshine, re, or the like.
• Do not mix old and new batteries.
• Completely replace all old batteries with new ones.
• Do not mix alkaline, standard (carbon-zinc), or rechargeable
(ni-cad, ni-mh, etc) batteries.
• Batteries should be recycled or disposed of as per state and
local guidelines.
Additional Warnings and Precautions
• Do not look directly into the projector light.
• CAUTION: TO PREVENT ELECTRIC SHOCK, MATCH
WIDE BLADE OF PLUG TO WIDE SLOT, FULLY
INSERT.
• Mains plug is used as disconnect device and it should remain
readily operable during intended use. In order to disconnect
the apparatus from the mains completely, the mains plug
should be disconnected from the mains socket outlet
completely.
• CAUTION: Use of controls or adjustments or performance
of procedures other than those specied may result in
hazardous radiation exposure.
• WARNING: Changes or modications to this unit not
expressly approved by the party responsible for compliance
could void the user’s authority to operate the equipment.
• WARNING: Use of this unit near uorescent lighting may
cause interference regarding use of the remote. If the unit is
displaying erratic behavior move away from any uorescent
lighting, as it may be the cause.
• WARNING: Shock hazard - Do Not Open.
• Caution and marking information is located at the rear or
bottom of the apparatus.
• WARNING: To reduce the risk of re or electric shock,
do not expose this apparatus to rain, moisture, dripping, or
splashing.
• Objects lled with liquids, such as vases, shall not be placed
on the apparatus.
• This product meets and complies with all Federal regulations.
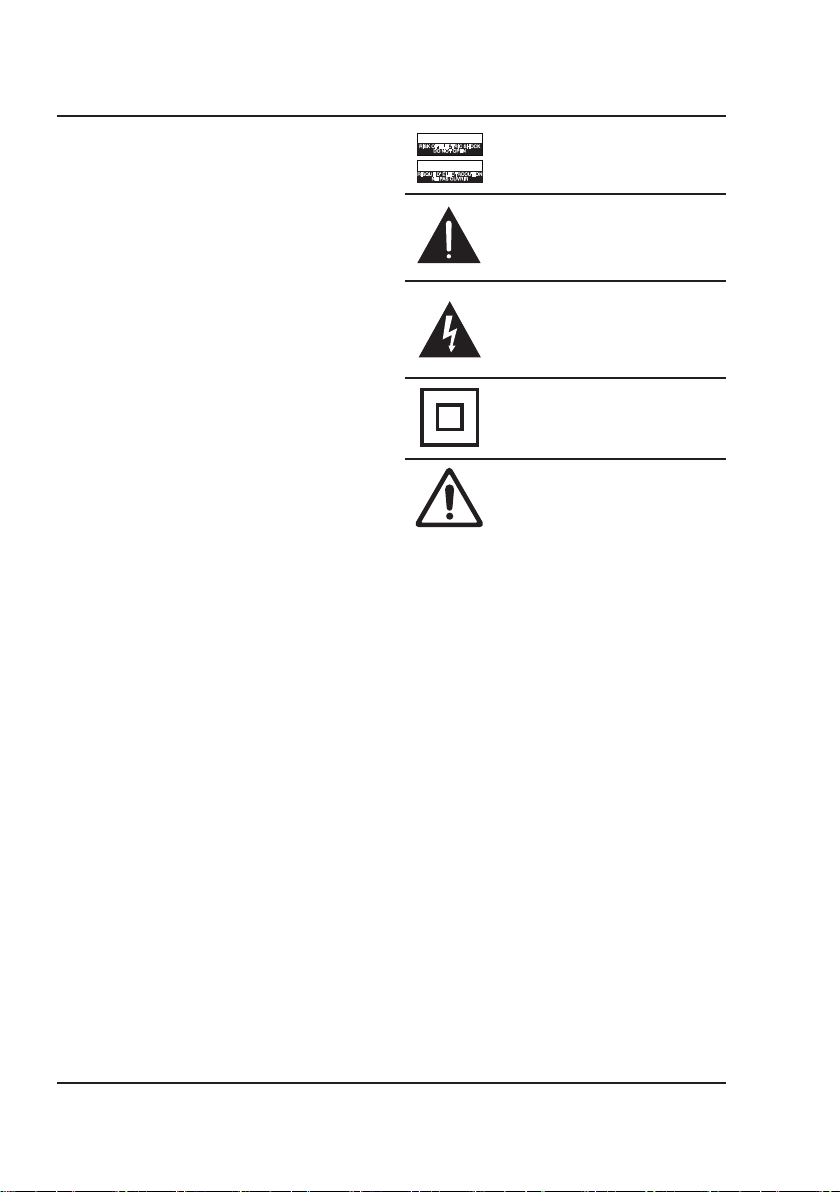
CAUTION
RISK OF ELECTRIC SHOCK
DO NOT OPEN
ATTENTION
RISQUE D' ÉLECTROCUTION
NE PAS OUVRIR
WARNING: To reduce the risk of electric
shock, do not remove cover (or back). No
user-serviceable parts inside. Refer servicing
to qualied service personnel.
The exclamation point within an equilateral
triangle is intended to alert the user to
the presence of important operating and
maintenance (servicing) instructions in the
literature accompanying the appliance.
The lightning ash with arrowhead symbol,
within an equilateral triangle, is intended to
alert the user to the presence of un-insulated
“dangerous voltage” within the product’s
enclosure that may be of sufcient magnitude
to constitute a risk of electric shock to persons.
This symbol indicates that this product
incorporates double insulation between
hazardous mains voltage and user accessible
parts.
WARNING: This product can expose you to
chemicals including lead, which is known to
the State of California to cause cancer. For
more information go to: www.P65Warnings.
ca.gov
3
Page 4

Table of Contents
Setup . . . . . . . . . . . . . . . . . . . . . . . . . . . . . . . . . . . . . . . . . . . . . . . . . . . . . . . . . . . . . . . . . . . . . . . . . . . . . . . . . . . . . . . . . . . . . . . 5
Features
Includes
Power
Remote Battery
Overview . . . . . . . . . . . . . . . . . . . . . . . . . . . . . . . . . . . . . . . . . . . . . . . . . . . . . . . . . . . . . . . . . . . . . . . . . . . . . . . . . . . . . . . . . . . 6
Rear & Top Views
Remote
Projector Setup . . . . . . . . . . . . . . . . . . . . . . . . . . . . . . . . . . . . . . . . . . . . . . . . . . . . . . . . . . . . . . . . . . . . . . . . . . . . . . . . . . . . . 9
Playing Media from Other Devices . . . . . . . . . . . . . . . . . . . . . . . . . . . . . . . . . . . . . . . . . . . . . . . . . . . . . . . . . . . . . . . . . . . 10
Playing Media from a Connected USB Storage Device
Playing Media Through an HDMI Connection
Pairing to a Bluetooth Device and Playing Audio Wirelessly
Playing Audio Through the 3.5mm Audio Line Input
Sending Media to Other Devices . . . . . . . . . . . . . . . . . . . . . . . . . . . . . . . . . . . . . . . . . . . . . . . . . . . . . . . . . . . . . . . . . . . . . 13
Playing Media on an External Television
DVD . . . . . . . . . . . . . . . . . . . . . . . . . . . . . . . . . . . . . . . . . . . . . . . . . . . . . . . . . . . . . . . . . . . . . . . . . . . . . . . . . . . . . . . . . . . . . . . 14
Loading and Playing a DVD
Programming a DVD
CD, CD+G & Karaoke . . . . . . . . . . . . . . . . . . . . . . . . . . . . . . . . . . . . . . . . . . . . . . . . . . . . . . . . . . . . . . . . . . . . . . . . . . . . . . . . 15
CD vs. CD+G
Loading and Playing a CD or CD+G
Programming a CD, CD+G
Automatic Voice Control
Customer Support . . . . . . . . . . . . . . . . . . . . . . . . . . . . . . . . . . . . . . . . . . . . . . . . . . . . . . . . . . . . . . . . . . . . . . . . . . . . . . . . . . 16
Contact Information
Warranty
International Support
4
Page 5
Setup
Features
• Bluetooth Wireless - range 60 ft.
• CD/CD+G/DVD player
• USB port - supports MP4, AVI, and MPEG 1,2 files
• Composite video output
• RCA stereo audio outputs
• Line In (3.5mm audio line input)
• HDMI input
• Built-in speakers
• DC power input - requires AC/DC power adapter
(included)
Includes
• Remote control with CR2025 battery pre-installed
• 1 microphone
• AC/DC power adapter
Power
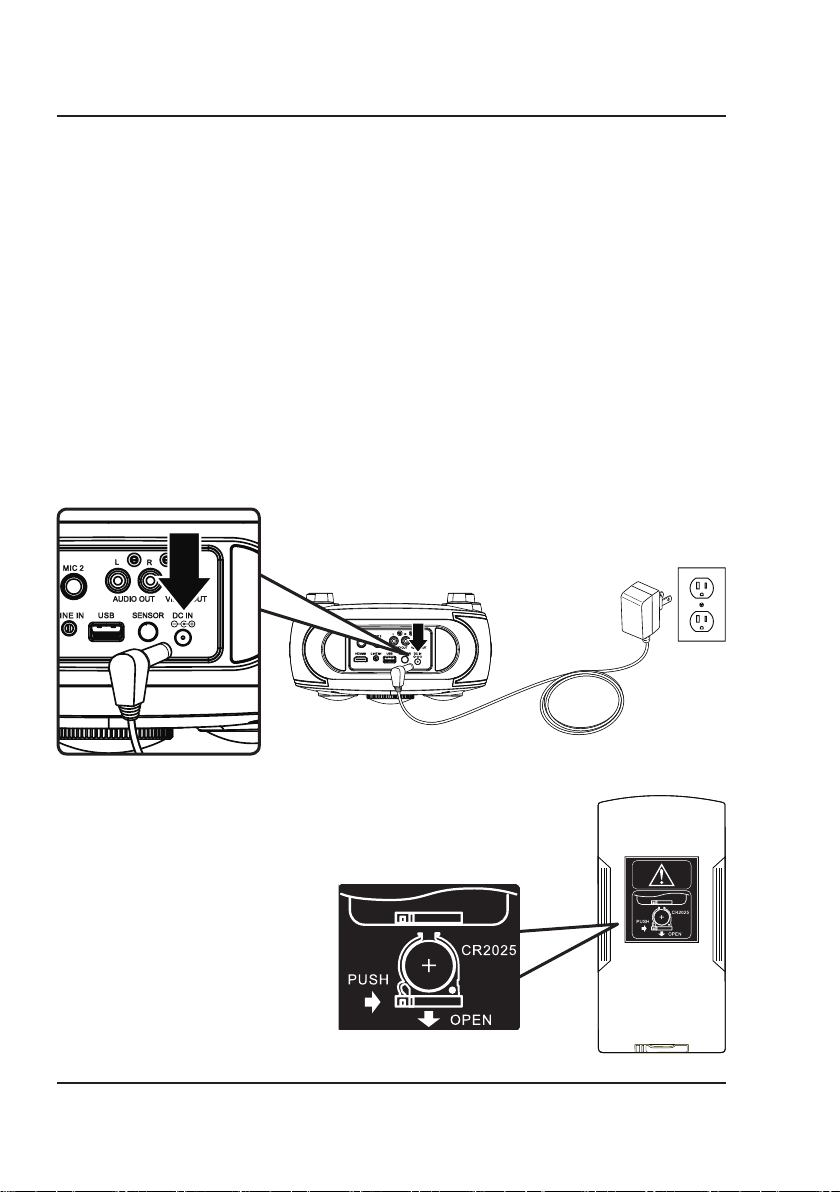
Plug the AC/DC power adapter (included) into a standard wall outlet and the
DC power input on the top of the unit. After connecting power, please allow
approximately 5 seconds to pass before powering the unit ON.
Remote Battery
Requires 1 CR2025 button-cell/coin type battery
(pre-installed). Follow diagram on the underside of the
remote for battery replacement.
5
Page 6
Overview
Rear & Top Views
10
12
13
15
16
18
1
3
5
6
8
2
4
7
9
11
14
7
17
19
20
21
23
20
22
6
Page 7

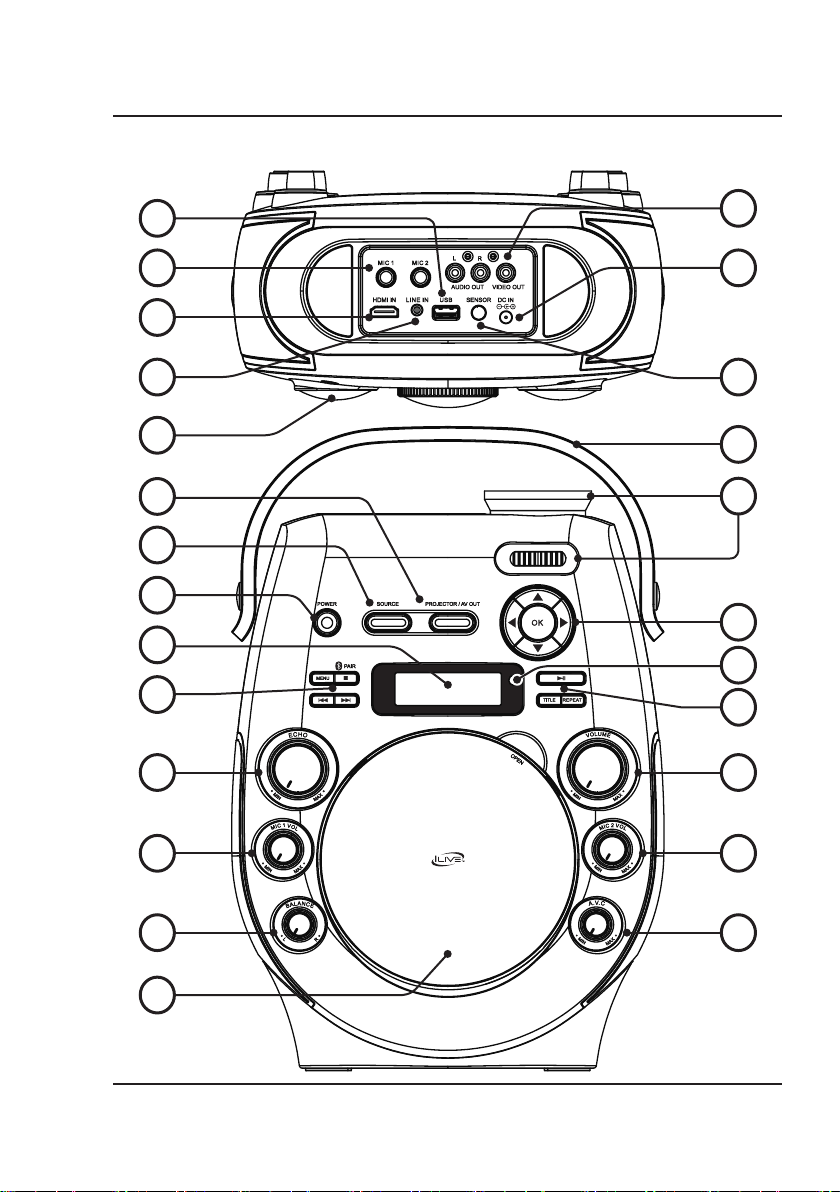
1. USB Port
2. Audio/Video Outputs
3. Microphone Inputs
4. DC Power Port
5. HDMI Input
6. Line In (3.5mm audio input)
7. Remote Sensor
8. Rubber Feet
Rotate forward foot for height adjustment.
9. Carry Handle
10. Projector / AV Out
Press to play media through the projector lens or
the AV Outputs.
11. Projector Lens / Tilt Angle Adjustment
12. Source
Press to switch between Bluetooth, Line In, HDMI,
CD/DVD, and USB modes.
13. Power
Press to power ON or OFF.
14. Arrows / OK
Press arrow buttons for menu navigation.
Press OK to confirm selections.
15. Display
16. Menu / Stop / Pair / Skip
Press to access DVD menus.
Press to stop audio or video (USB, CD, DVD,
Bluetooth Modes).
Press and hold to pair to a Bluetooth device.
Press to skip tracks or chapters.
17. Play / Pause / Title / Repeat
Press to play/pause audio or video (USB, CD, DVD,
Bluetooth Modes).
Press to access title menu on a loaded DVD, press
again to play DVD from beginning.
Press to repeat audio or video.
18. Echo
Turn to adjust echo effect.
19. Master Volume
Turn to adjust volume of the built-in speakers.
20. Microphone 1 & 2 Volume
Turn to adjust microphone volume.
21. Balance L / R
Turn to adjust left/right balance.
22. Automatic Voice Control
Turn to adjust AVC effect.
23. CD/DVD Player & Disco Door
Pull upwards at "Open" to open the disc door and
load a disc.
7
Page 8
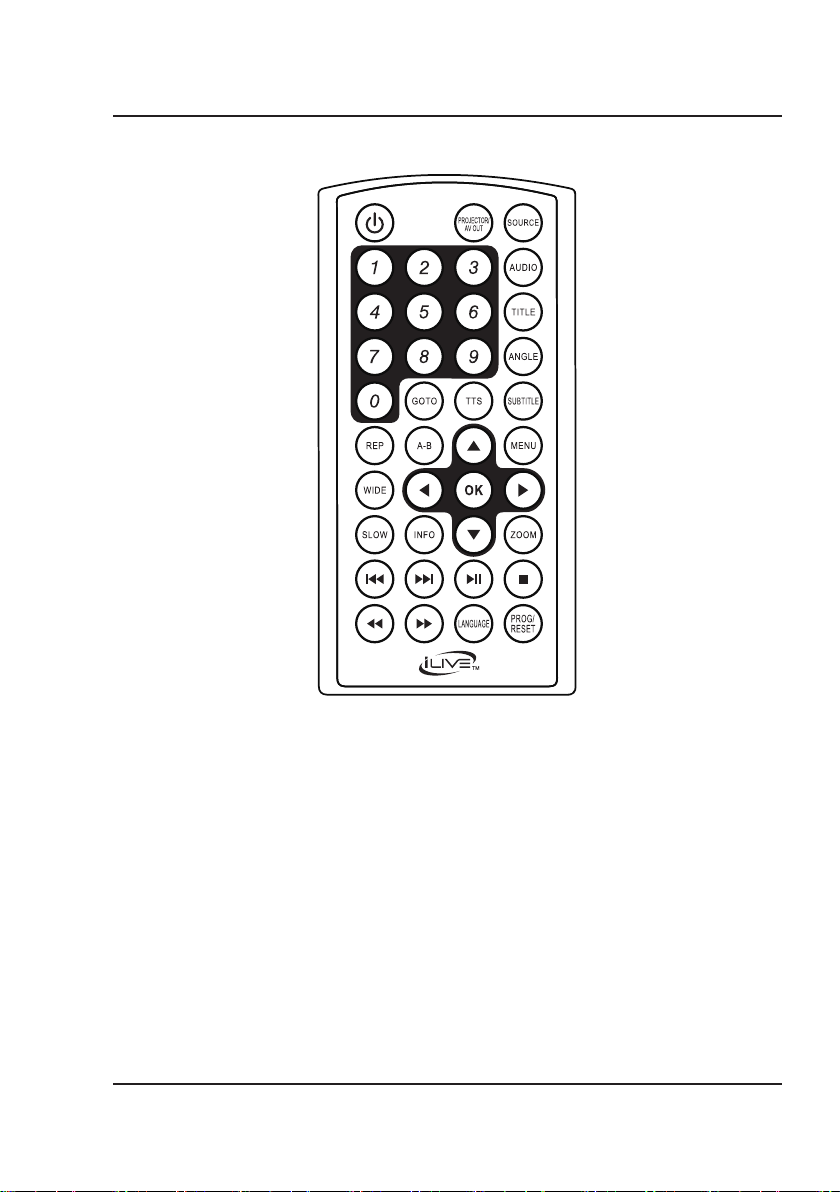
Overview
Remote
Press to power ON or OFF.
Use to enter channel
On a loaded CD/DVD,
press to quickly go to a
specific track or chapter.
Use the Arrow/OK buttons to
enter and confirm your selection.
Press to repeat the current
Create a repeating loop on
a CD, DVD, or media file.
Press to set A point (start), press
again to set B point (end).
Press a third time to cancel.
Press to switch between
4:3 LB, 4:3 PS, and 16:9.
Press to select slow
motion play speed.
Press to view chapter and
track info on a loaded DVD.
Skip Back/Forward
Press to skip between
Press to search through an
individual chapter or track
(does not apply to CD+Gs).
Power
Number Keypad
or track numbers.
Go To
Rep (Repeat)
selection or track.
Wide
Slow
Info
chapters or tracks.
Reverse/Fast Fwd
A-B
Projector / AV Out
Press to play from the projector
or AV Outputs. Selecting AV Out
will power OFF the projector lens.
Source
Press and use the Arrow/Enter
buttons to select the source.
Audio
For DVD play, press to adjust
audio settings for the DVD,
including Voice Description and
DVD commentary (if available).
Title
Press to access the title
menu on a loaded DVD.
Press again to play DVD
from the beginning.
Angle
Press to view alternate angles
on supported DVDs.
TTS (Voice Guide)
Press to turn Talk-to-Text
ON or OFF (intended for
visually impaired users).
TTS announces menus
and remote functions.
Subtitle
Press to turn subtitles ON or OFF.
Menu (DVD)
Press to access DVD menus.
Arrows / OK
Press to navigate and make
selections in on screen menus.
Zoom
Press to zoom in or out
on a loaded DVD.
Play/Pause
Press to play or pause an
individual chapter or track.
Stop
Press to stop an individual
chapter or track during play.
Language
Press to switch audio between
English, French, and Spanish.
Prog / Reset
Press to program a loaded
disc to play titles, chapters, or
tracks in a specified order.
Press and hold to reset the unit
to default settings. The unit will
power OFF, defaults are restored
when next powered ON.
8
Page 9
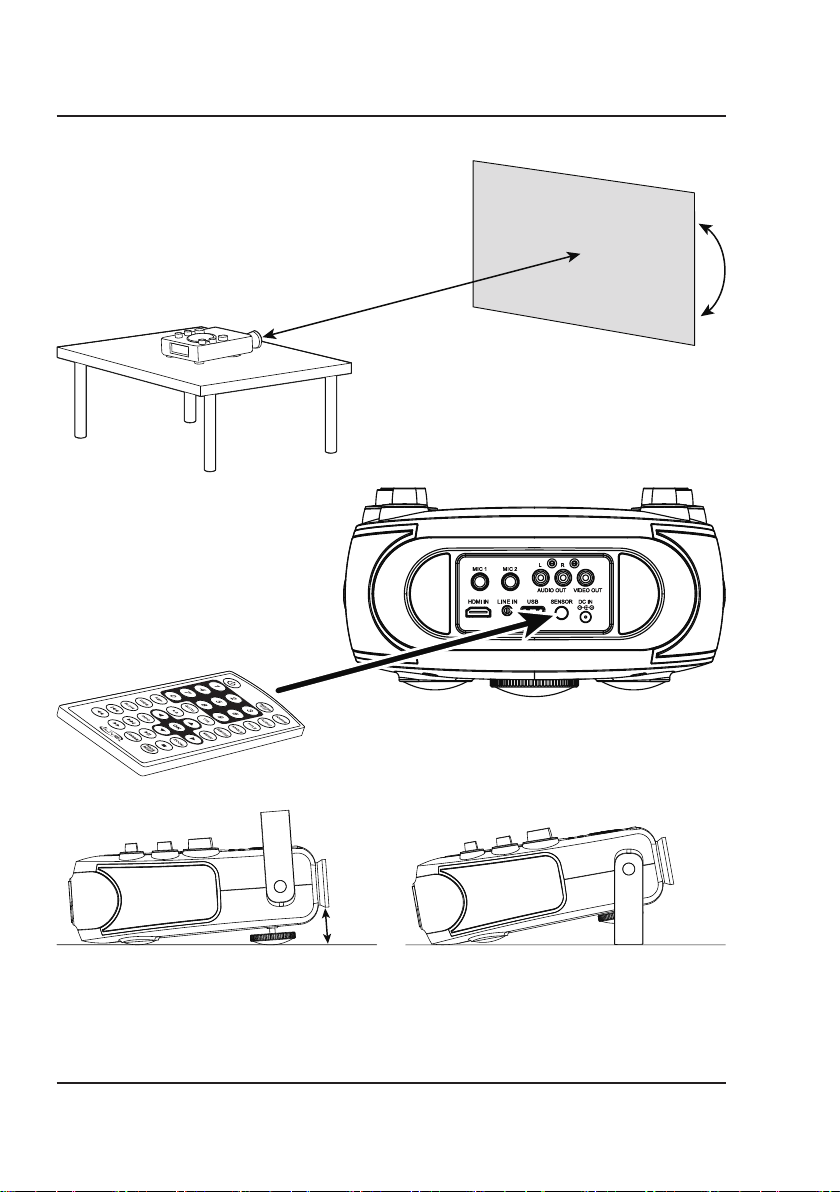
Projector Setup
For best results, place the projector in a dark room or
other dimly lit area.
Projecting onto a smooth, white or lightly colored
surface will provide the best picture resolution.
Projector Distance:
3-16 ft (1-5 m)
Adjust the Lens Tilt Angle to best fit
your viewing surface and angle.
Be sure to aim the remote at the sensor
on the rear of the projector.
Rotate forward foot to fine tune height. Use carry handle as stand.
9
Page 10
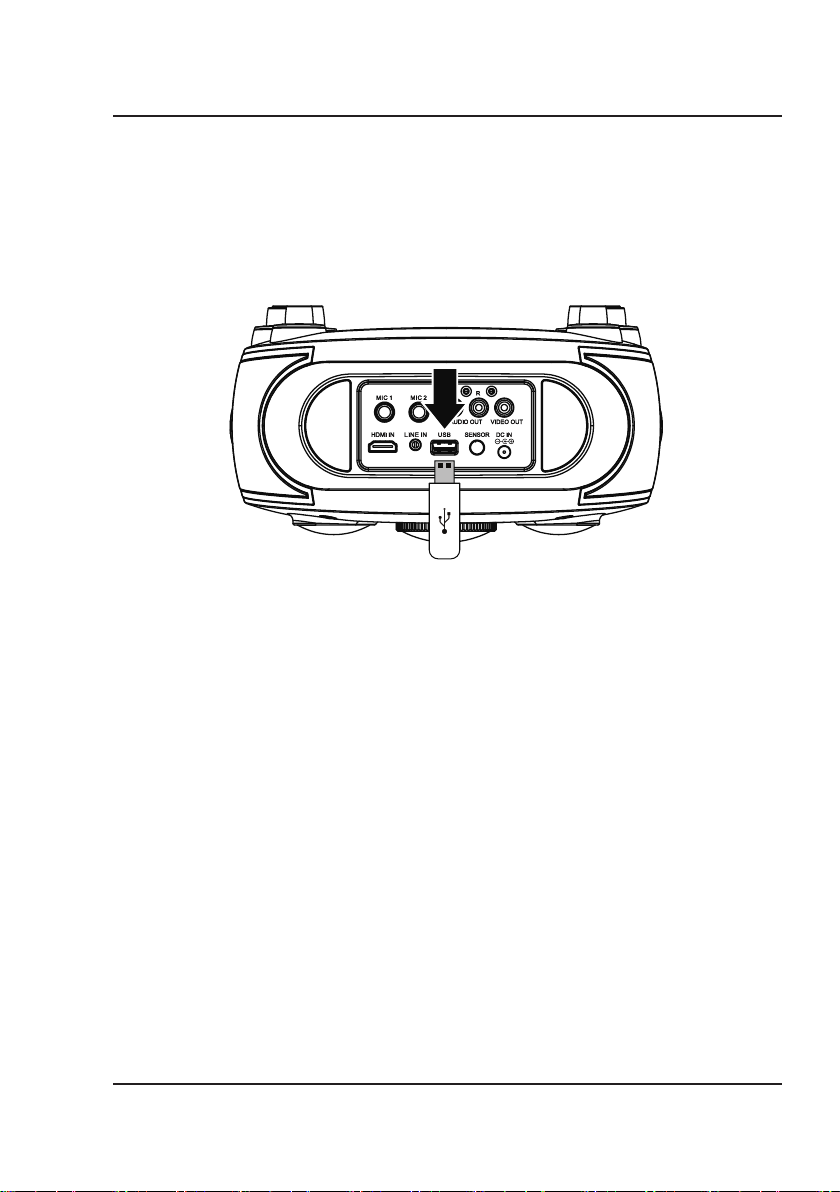
Playing Media from Other Devices
Playing Media from a Connected USB Storage Device
Supports USB drives up to 32GB.
1. Load a USB drive into the USB Port on the rear of the projector.
2. Press the Projector/AV Out button on the projector to turn the lens ON.
3. Set the Source to USB Mode.
4. Use the Arrow/OK buttons to select and play content from the connected USB thumb drive.
10
Page 11
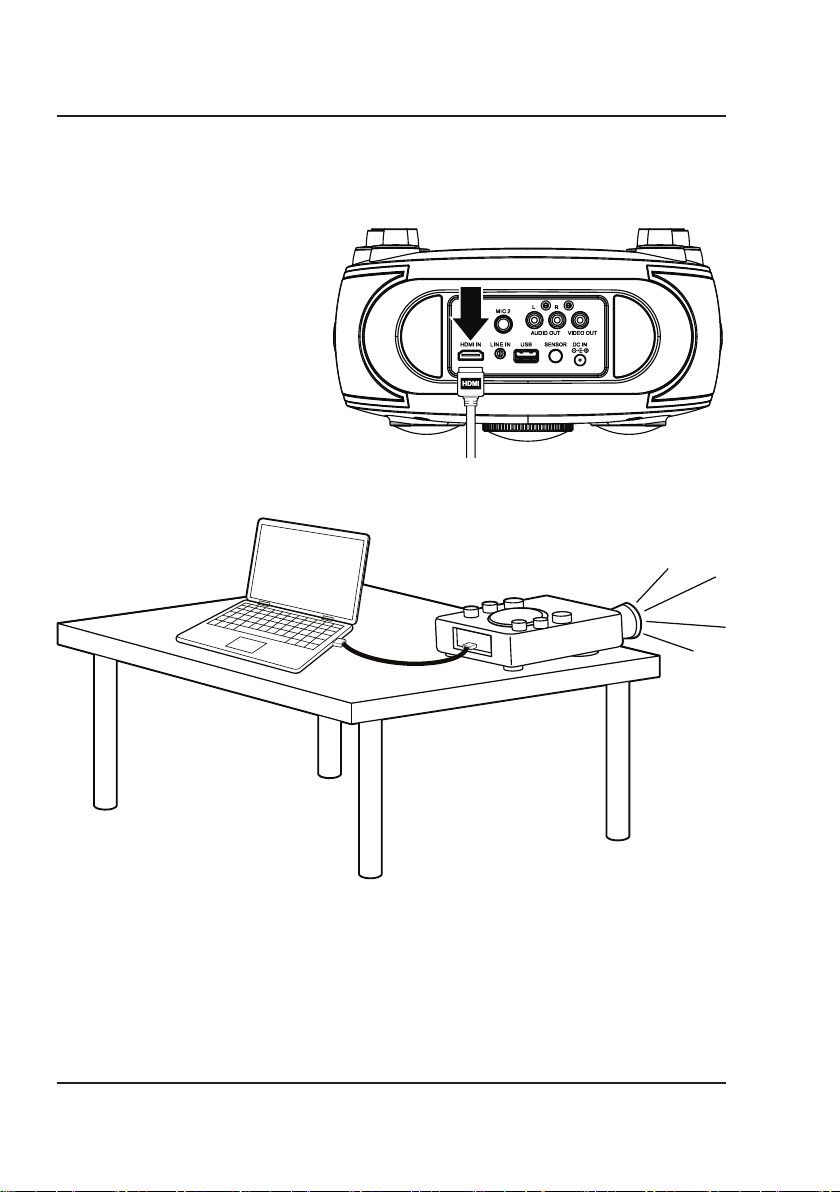
Playing Media Through an HDMI Connection
HDMI offers superior sound and picture quality, and is the easiest way to play media from a laptop, gaming console, or
other device with an HDMI output.
Requires a HDMI cable (not included) and a device with an HDMI output.
1. Using an HDMI cable, connect the HDMI
input on the projector to the HDMI
output on your external media player,
streaming, or gaming device.
2. Press the Projector/AV Out button on
the projector to turn the lens ON.
3. Set the Source to HDMI and use the
controls on the connected device to
select and play media through the
projector. Use the projector's controls to
adjust the volume level.
11
Page 12
Playing Media from Other Devices
Pairing to a Bluetooth Device and Playing Audio Wirelessly
After initial pairing to a Bluetooth device, the unit will stay paired unless unpaired manually by the user, or erased due
to a reset of the device. If your device should become unpaired or you find it is unable to connect, repeat these steps.
1. Set the Source to Bluetooth Mode, indicated by "bt" and a slowly flashing blue light on the display.
2. Press and hold the Pair button until the pairing indicator begins flashing quickly. When pairing, remain within 3
feet of the unit.
3. From your smartphone or other Bluetooth device, access Bluetooth Settings and search for nearby devices.
Select IJP557 when it is discovered.
4. When successfully paired, a chime will sound and the pairing indicator will change to solid blue. Audio played
from the connected device should now be heard through the speaker. Use the controls on the connected
Bluetooth device to select and begin playing audio.
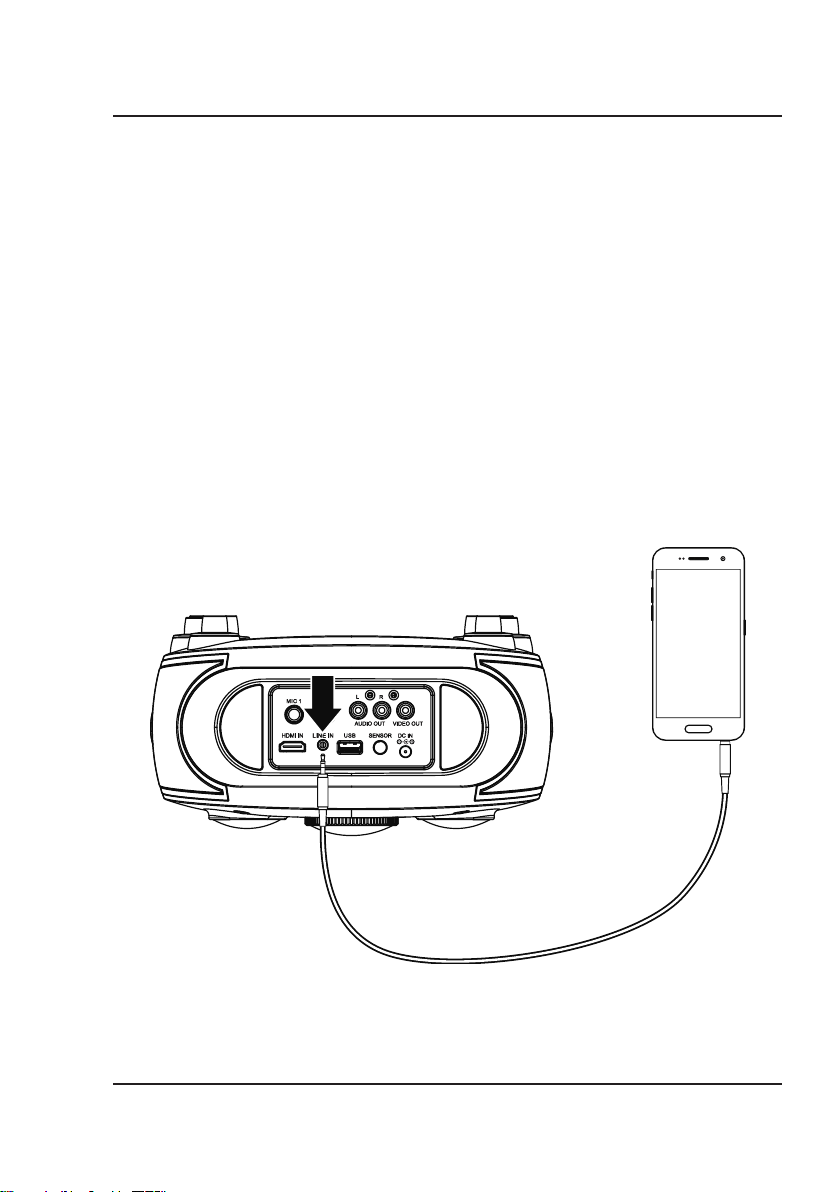
Playing Audio Through the 3.5mm Audio Line Input
Requires a 3.5 mm audio input cable (not included).
1. Plug a 3.5 mm audio input cable into the Line In on the rear of the projector and the headphone jack on a
smartphone or other audio source.
2. Set the Source to Line In Mode and use the controls on your connected audio device to select and play audio.
3. Audio played through the connected device should now be heard through the projector's speakers.
12
Page 13
Sending Media to Other Devices
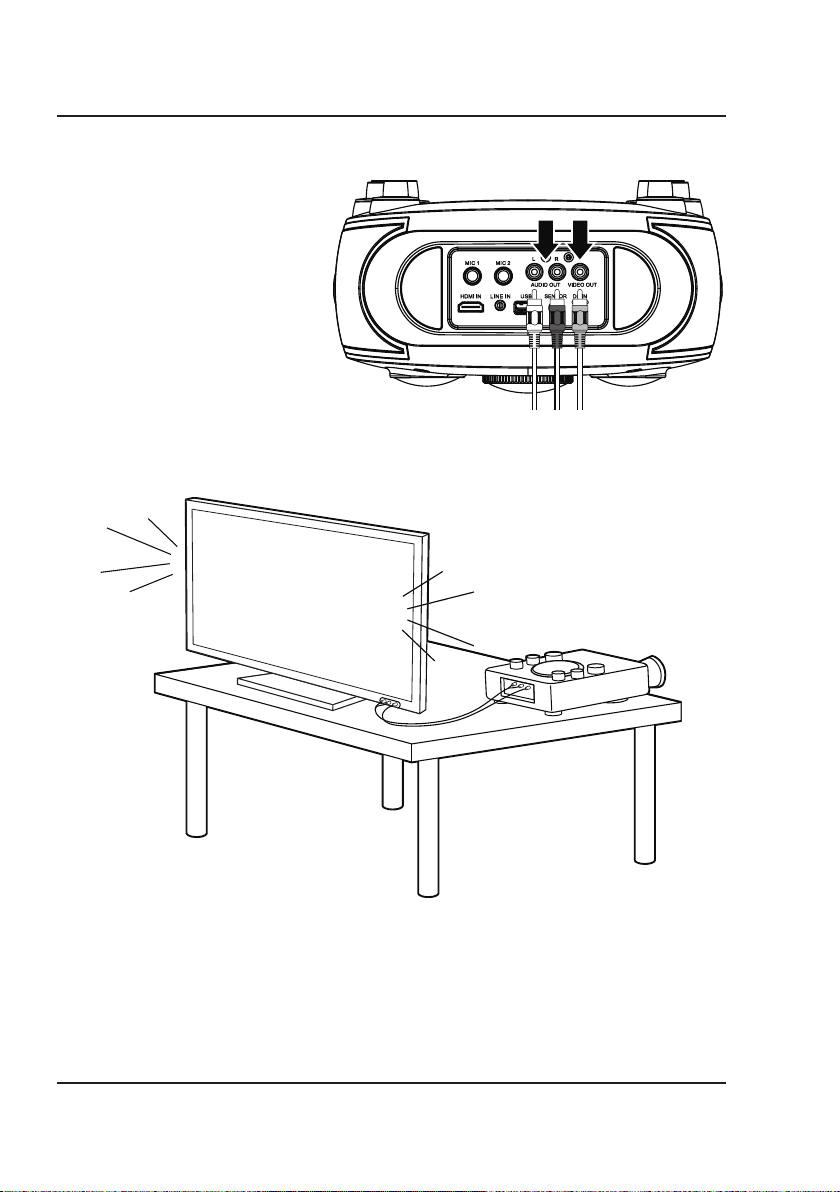
Playing Media on an External Television
Requires RCA Composite AV cables (red/white/yellow, not included).
1. Press the Projector/AV Out button on
the projector to turn off the lens and
play from the AV Outputs.
2. Using RCA Composite cables, connect
the Audio/Video Outputs on the rear of
the projector to the corresponding RCA
Audio/Video Inputs on a television or
other external system. Be sure to correctly
match the red/white/yellow plugs on the
RCA cables to their sockets.
3. Set the television's input source to the
connected output from the projector.
4. Audio and video played from the
projector will now be sent to the connected television. Use the controls on the projector and remote to select
and play media. Use the controls on the television to adjust volume.
Connect Projector AV
Outputs to TV's AV Inputs
(if equipped).
NOTE: The projector's audio output sends a fixed
audio volume level to any connected device.
To adjust the volume you must change it from the
connected device. Adjusting the volume of the
projector will have no effect.
13
Page 14

DVD
Loading and Playing a DVD
1. With the unit powered ON, set the Source to DVD Mode.
2. Open the disc door and load a DVD into the projector, label side facing up.
3. Close the disc door. The unit will automatically detect the disc and start playing. Use the remote for play
controls, menu navigation, and device options.
Programming a DVD
Note: The procedure for programming CDs, CD+Gs, and DVDs is the same.
1. Press the Prog button on the remote.
2. Use the Arrow/OK buttons to select and add tracks to the program. Up to 16 tracks may be added.
3. When you are ready to play, use the Arrow/OK buttons to select the "Play" symbol in the menu.
4. Press the Prog button at any time to exit and cancel a program.
14
Page 15

CD, CD+G & Karaoke
CD vs. CD+G
CD+Gs (CD+Graphics) are CDs that are specially formatted for use with karaoke machines. In addition to
the audio tracks, they contain graphics and text for lyrics that will appear while the CD is playing. The unit will
automatically detect the type of disc to be played.
Loading and Playing a CD or CD+G
Note: This unit is not compatible with MP3 CDs.
1. With the unit powered ON, set the Source to DVD Mode.
2. Open the disc door and load a CD/CD+G into the projector, label side facing up.
3. Close the disc door. The unit will automatically detect the disc and start playing.
4. Use the remote to navigate and make selections within the disc menu.
For Use as a Karaoke Machine
5. The projector will display video and song lyrics from the disc. Plug a microphone (1 included) into the Mic 1 or 2
inputs and use the controls on the unit to adjust microphone volume and effects.
Programming a CD, CD+G
Note: The procedure for programming CDs, CD+Gs, and DVDs is the same.
1. Press the Prog button on the remote.
2. Use the Arrow/OK buttons to select and add tracks to the program. Up to 16 tracks may be added.
3. When you are ready to play, use the Arrow/OK buttons to select the "Play" symbol in the menu.
4. Press the Prog button at any time to exit and cancel a program.
Automatic Voice Control
Automatic Voice Control allows the projector to compensate for irregularities in microphone voice input.
It also serves to blend or separate the user’s voice from the recorded vocals on an audio track. Turn the AVC dial to
adjust the Automatic Voice Control effect.
NOTE: AVC only works when someone is actively singing into the microphone.
To manually adjust voice control, use the Echo and Balance knobs on the front of the unit.
15
Page 16

Customer Support
Sustain for Tomorrow
Contact Information
Website: www.iLiveElectronics.com
Email Support: [email protected]
Email Parts: [email protected]
Phone Support: 1-888-999-4215
Warranty
For Warranty Information and the most up-to-date version of this User’s
Guide, go to:
www.iLiveElectronics.com
International Support
To download this User’s Guide in English, Spanish, and French, or to get answers
to frequently asked questions, visit the support section at:
www.iLiveElectronics.com
Para descargar este Manual del Usuario en inglés, español y francés, o para obtener respuestas a preguntas frecuentes,
visite la sección de apoyo en: www.iLiveElectronics.com
Pour télécharger ce guide de l’utilisateur en anglais, espagnol ou français, ou pour obtenir des réponses à des
questions fréquemment posées, consultez la rubrique d’assistance sur: www.iLiveElectronics.com
Copyright © 2017 Digital Products International (DPI, Inc.) All other trademarks appearing herein are the property of
their respective owners. Specifications are subject to change without notice.
Made
Green
Protect for Today
16
 Loading...