

Page 1
The Advanced Digital Microphone System
for Acoustic Guitar
USER MANUAL
Page 2

Contents
Table of Contents
Contents 2
English 3
iRig Acoustic Stage 3
Register your iRig Acoustic Stage 3
Installation and setup 4
Cancel feedback button 10
Tone button 11
Instrument calibration 12
Calibration process 12
Phase switch 14
AUX IN 15
Low battery indications 15
Specifications 16
Warranty 16
Support and more info 16
中文 17
iRig Acoustic Stage 17
注册您的iRig Acoustic Stage 17
安装和设置 18
取消反馈按钮 23
音色按钮 24
乐器校准 24
校准处理 25
相位切换 27
AUX输入 28
电池电量不足提示 28
规格参数 29
保修 29
支持和更多信息 29
Regulatory 30
2
Page 3
English
iRig Acoustic Stage
Thank you for purchasing iRig Acoustic Stage.
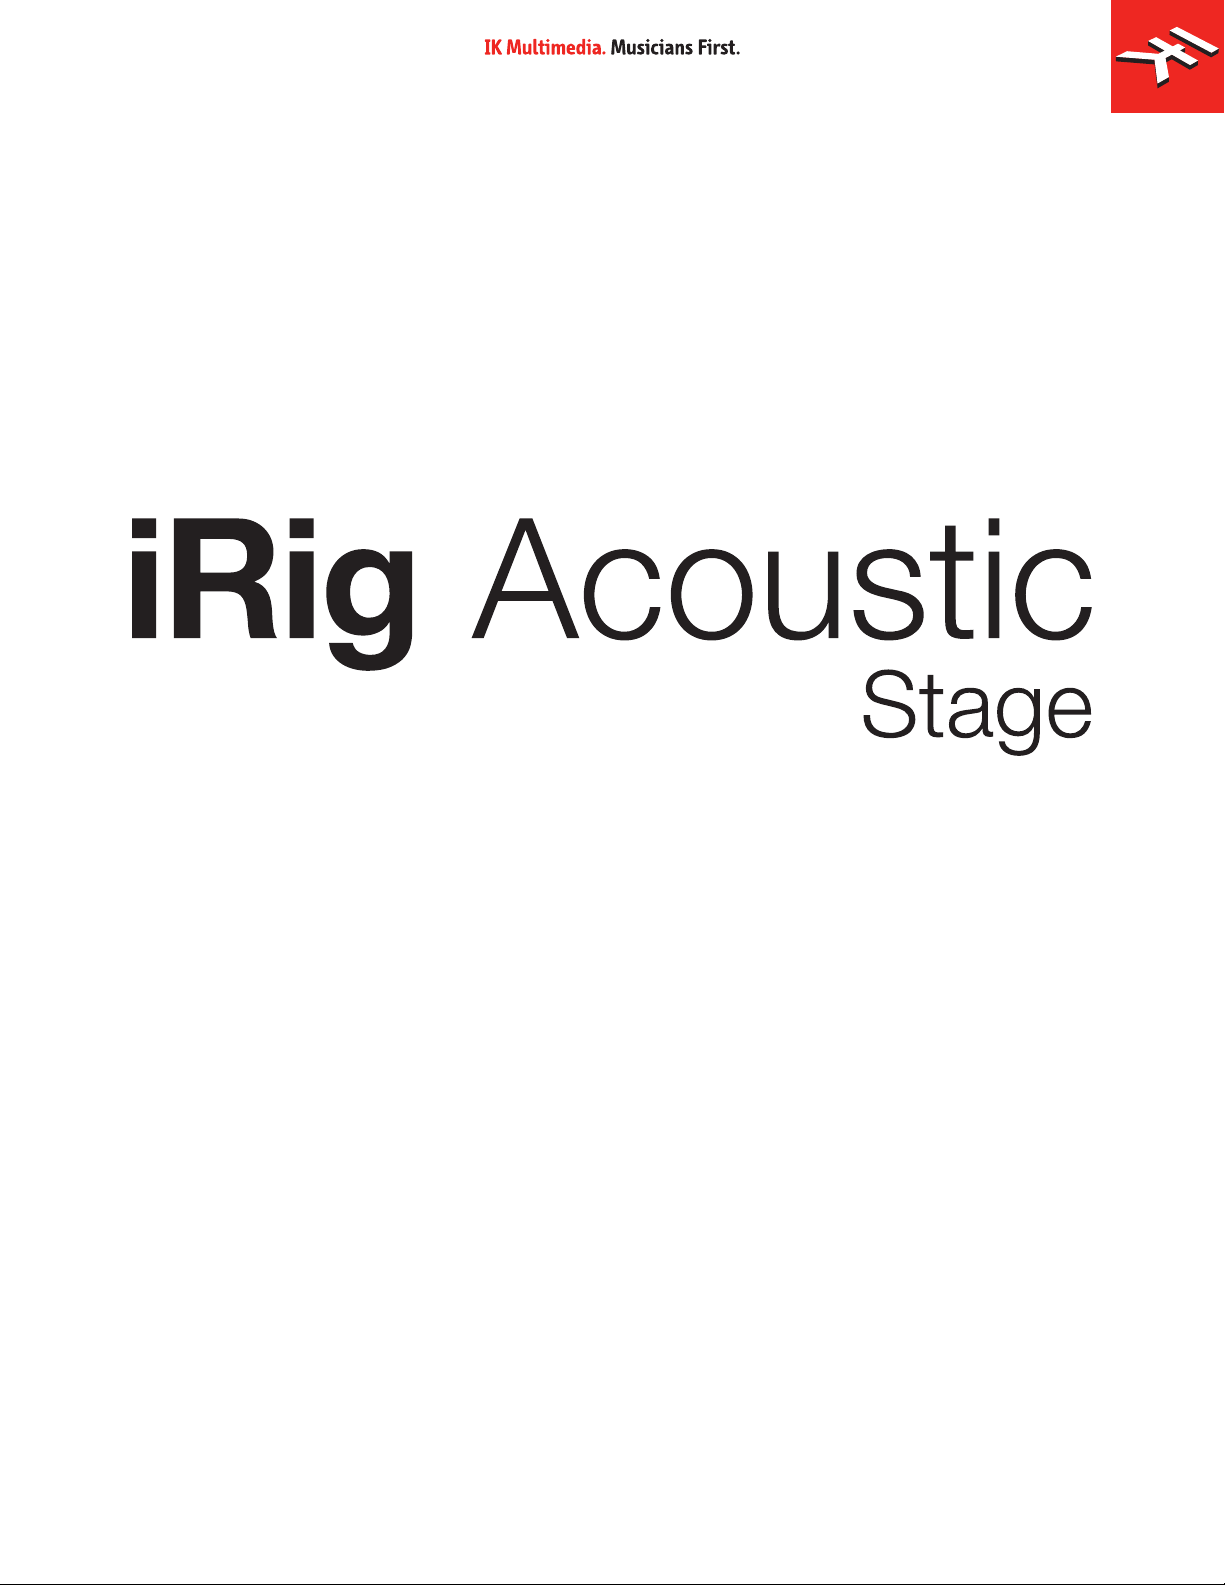
Your package contains:
• iRig Acoustic Stage
• 2xAA batteries
• iRig Acoustic microphone
• Belt clip
• Pouch
• Quick Start Guide
• Registration Card
iRig Acoustic Stage is a revolutionary digital microphone system for Acoustic Guitar, both with steel and nylon
strings.
We all know that the best possible sound when recording an acoustic guitar is the one you get with a classic
studio microphone in a well sounding studio, with a great preamp and proper positioning, and we all know how
compromised the sound of a typical stock or after-market piezo pickup system is.
The typical under-saddle piezo pickup system takes all the air and acoustic qualities from the instrument out of
the picture. All the subtle nuances and harmonics of a great acoustic instrument are normally lost with bridgemounted pickup systems.
The main functionality of iRig Acoustic Stage is to make your guitar sound exactly as if it was captured with
a classic recording studio setup with a very simple clip-on microphone that can be applied in seconds to any
instrument.
The synergy between the microphone, the preamp and DSP unit creates an incredible natural-sounding tone
for any acoustic instrument. It features 3 tone presets — natural, warm and bright — for both steel string
and nylon string instruments. And while, when compared to piezo pickups, iRig Acoustic Stage makes any
instrument sound dramatically better right out of the box, you can also calibrate the system to precisely fit the
sonic signature of your instrument and playing style allowing it to draw out the full acoustic potential of your
instrument.
Register your iRig Acoustic Stage
By registering, you can access technical support, activate your warranty and receive free JamPoints™ which will
be added to your account. JamPoints™ allow you to obtain discounts on future IK purchases! Registering also
keeps you informed of all the latest software updates and IK products.
Register at: www.ikmultimedia.com/registration
3
Page 4
English
Installation and setup
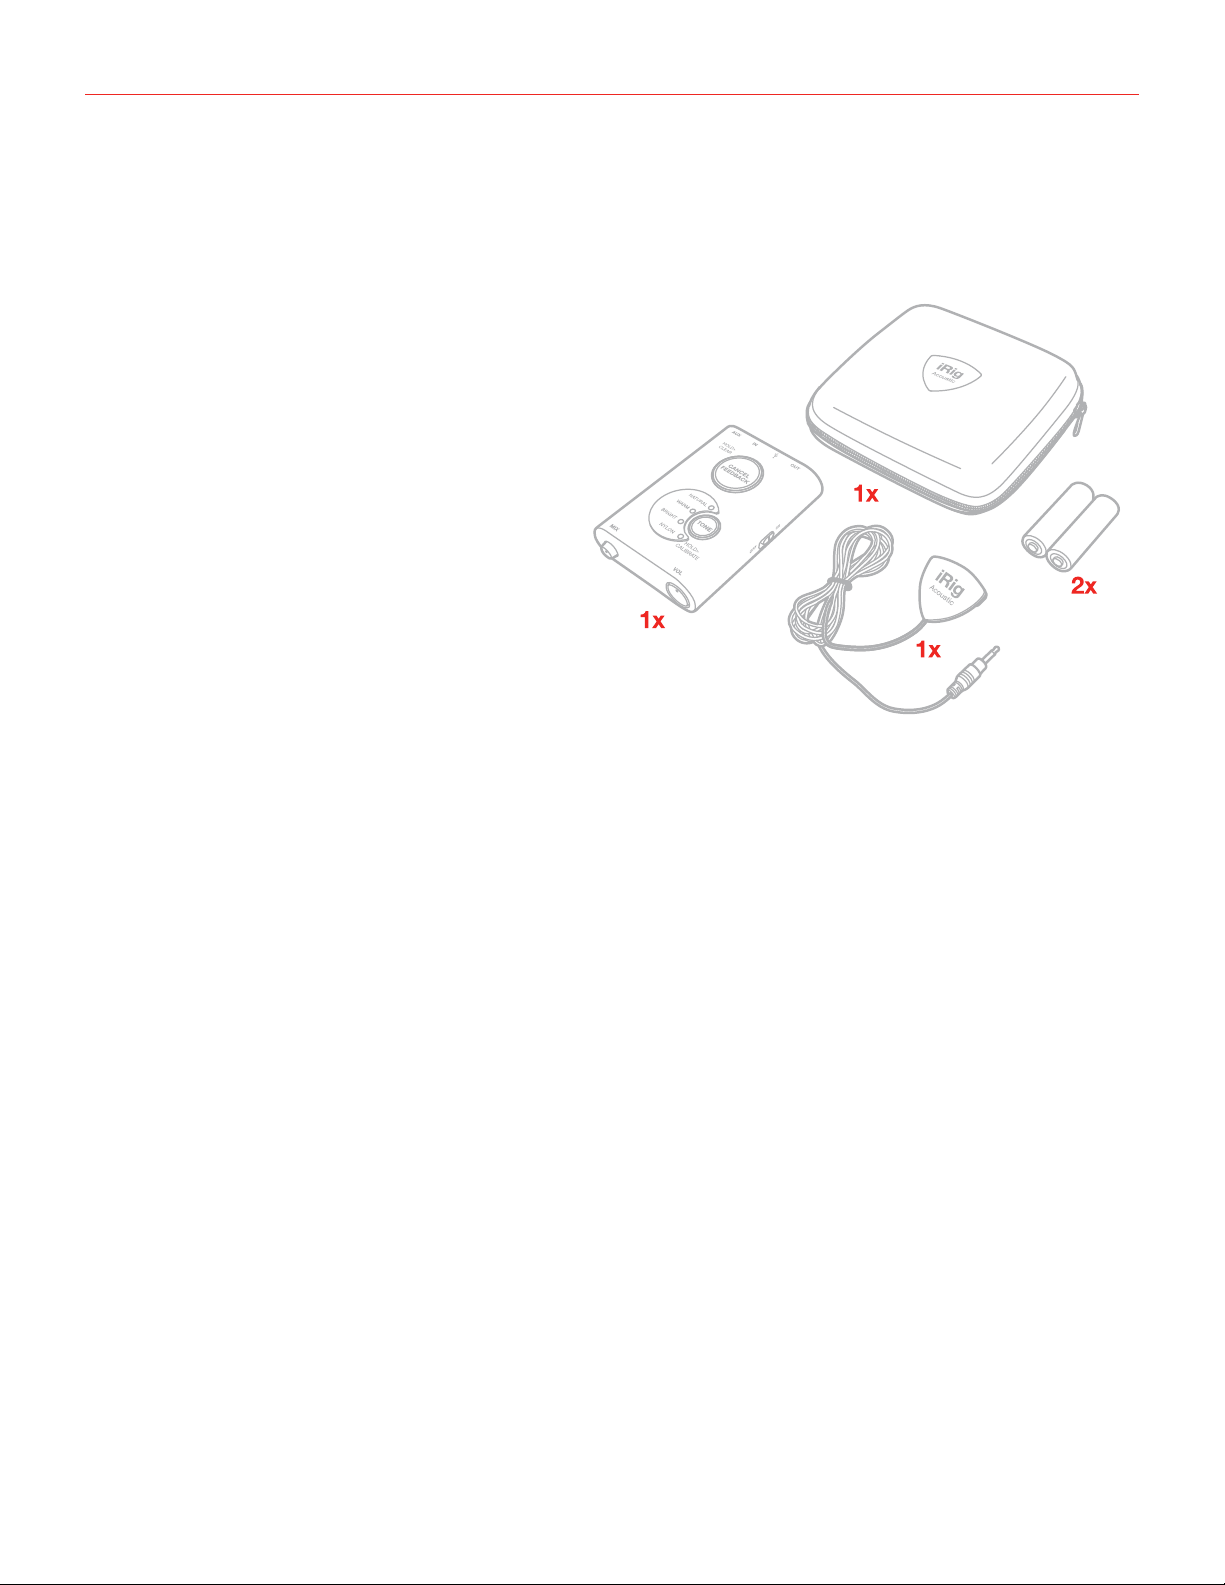
1. Insert the provided batteries in the battery compartment. You can use both Alkaline or Ni-MH rechargeable
batteries. High energy Ni-MH will last at least 18 hours. Tip: If you play frequently, a good suggestion is to
have 2 sets of rechargeable AAs, one in use and the other on charge and swap them every 2-3 gigs.
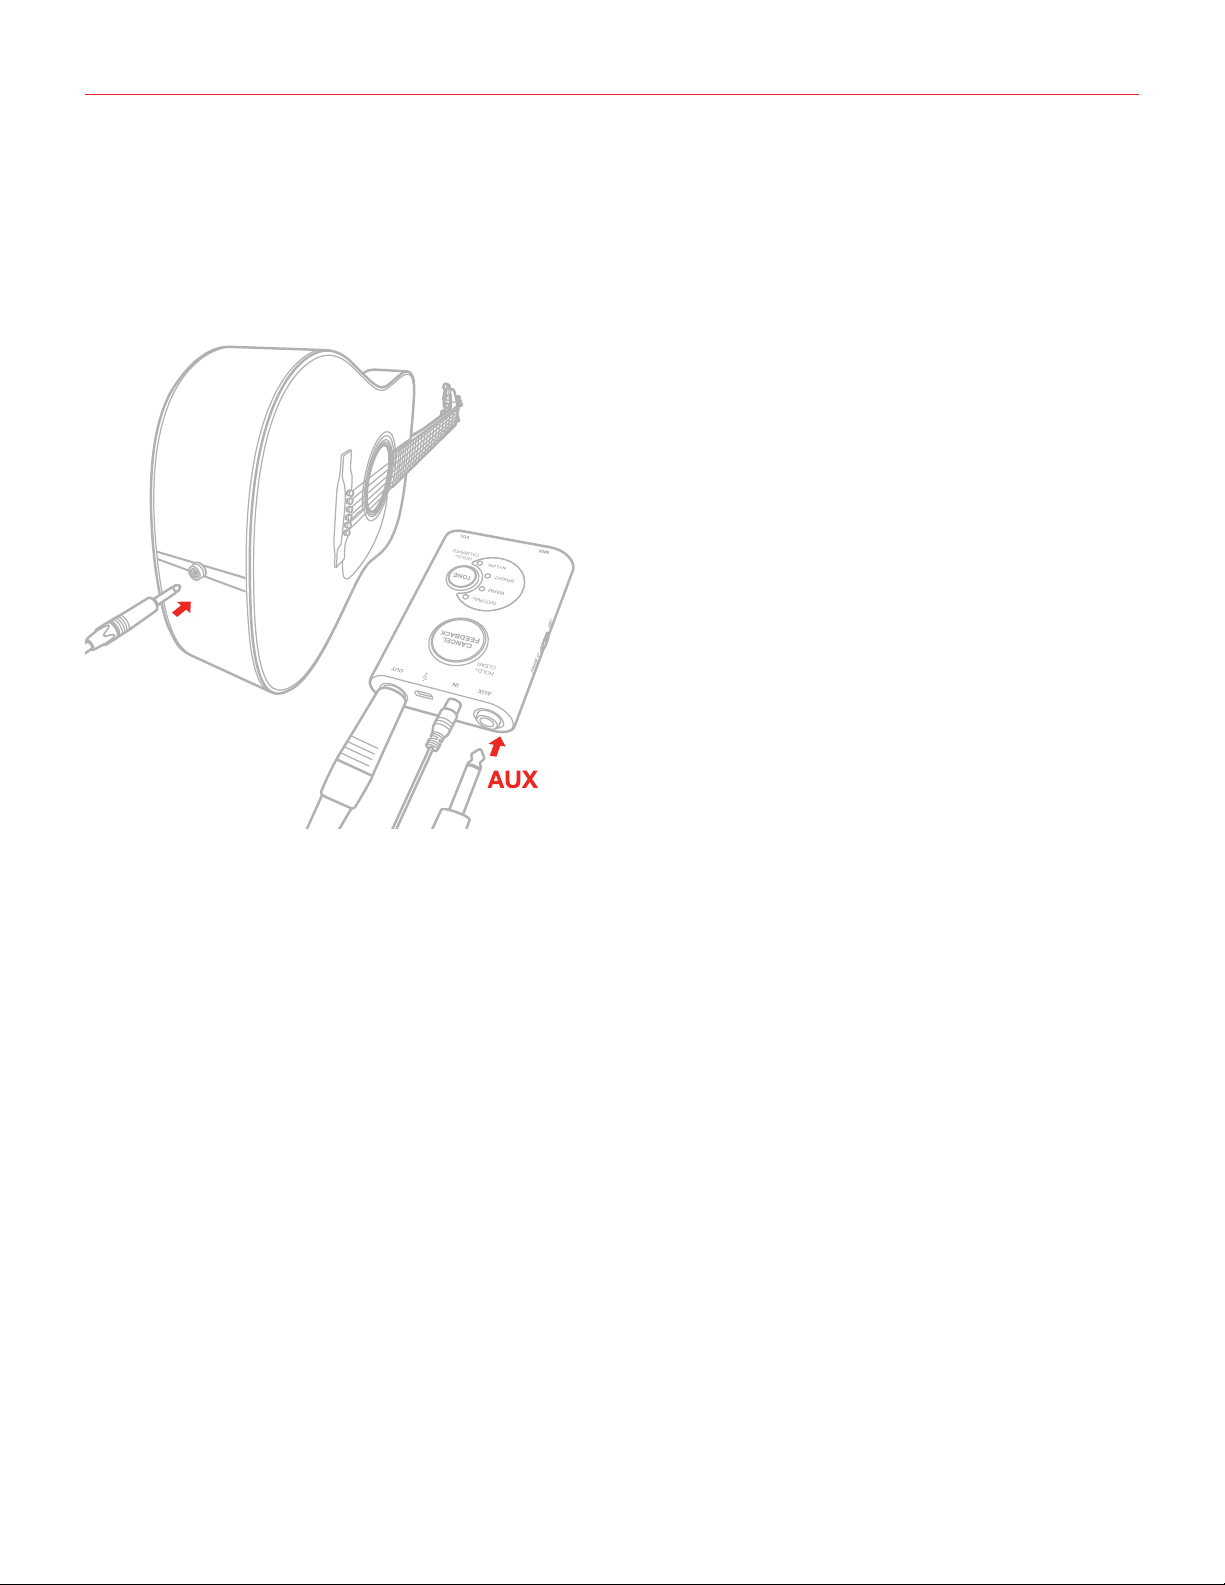
2. Connect the iRig Acoustic microphone.
3. Fix the microphone to your instrument. If the soundboard of your instrument is very thin the iRig Acoustic
microphone may not stay perfectly steady during use. To solve this you can add one or more layers of
adhesive tape inside the iRig Acoustic microphone slot to make it a perfect fit for your instrument.
4
Page 5
English
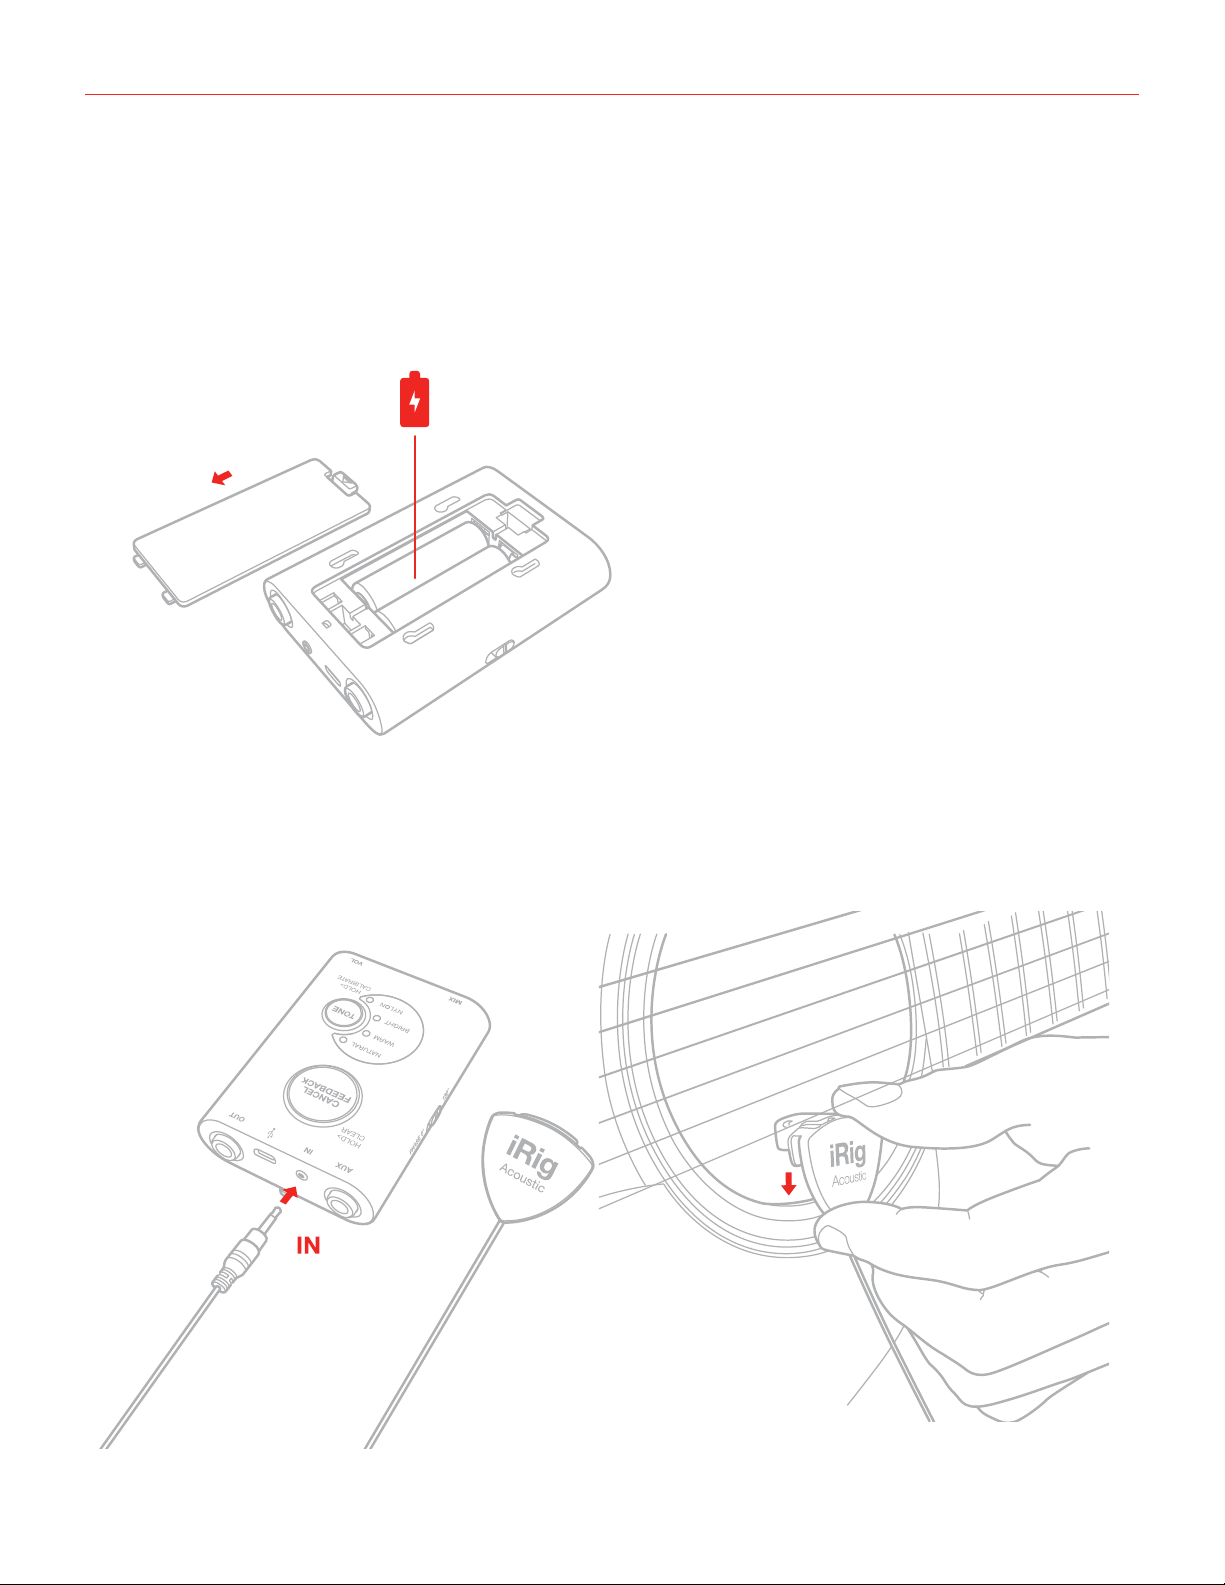
4. Connect the iRig Acoustic Stage output to the PA mixer or to an acoustic guitar amplifier, as you would do
with a normal acoustic-electric guitar.
5. Turn ON the unit. Tip: Always turn down the channel volume on the mixer or the volume of the amp before
turning ON or OFF iRig Acoustic Stage!
5
Page 6
English
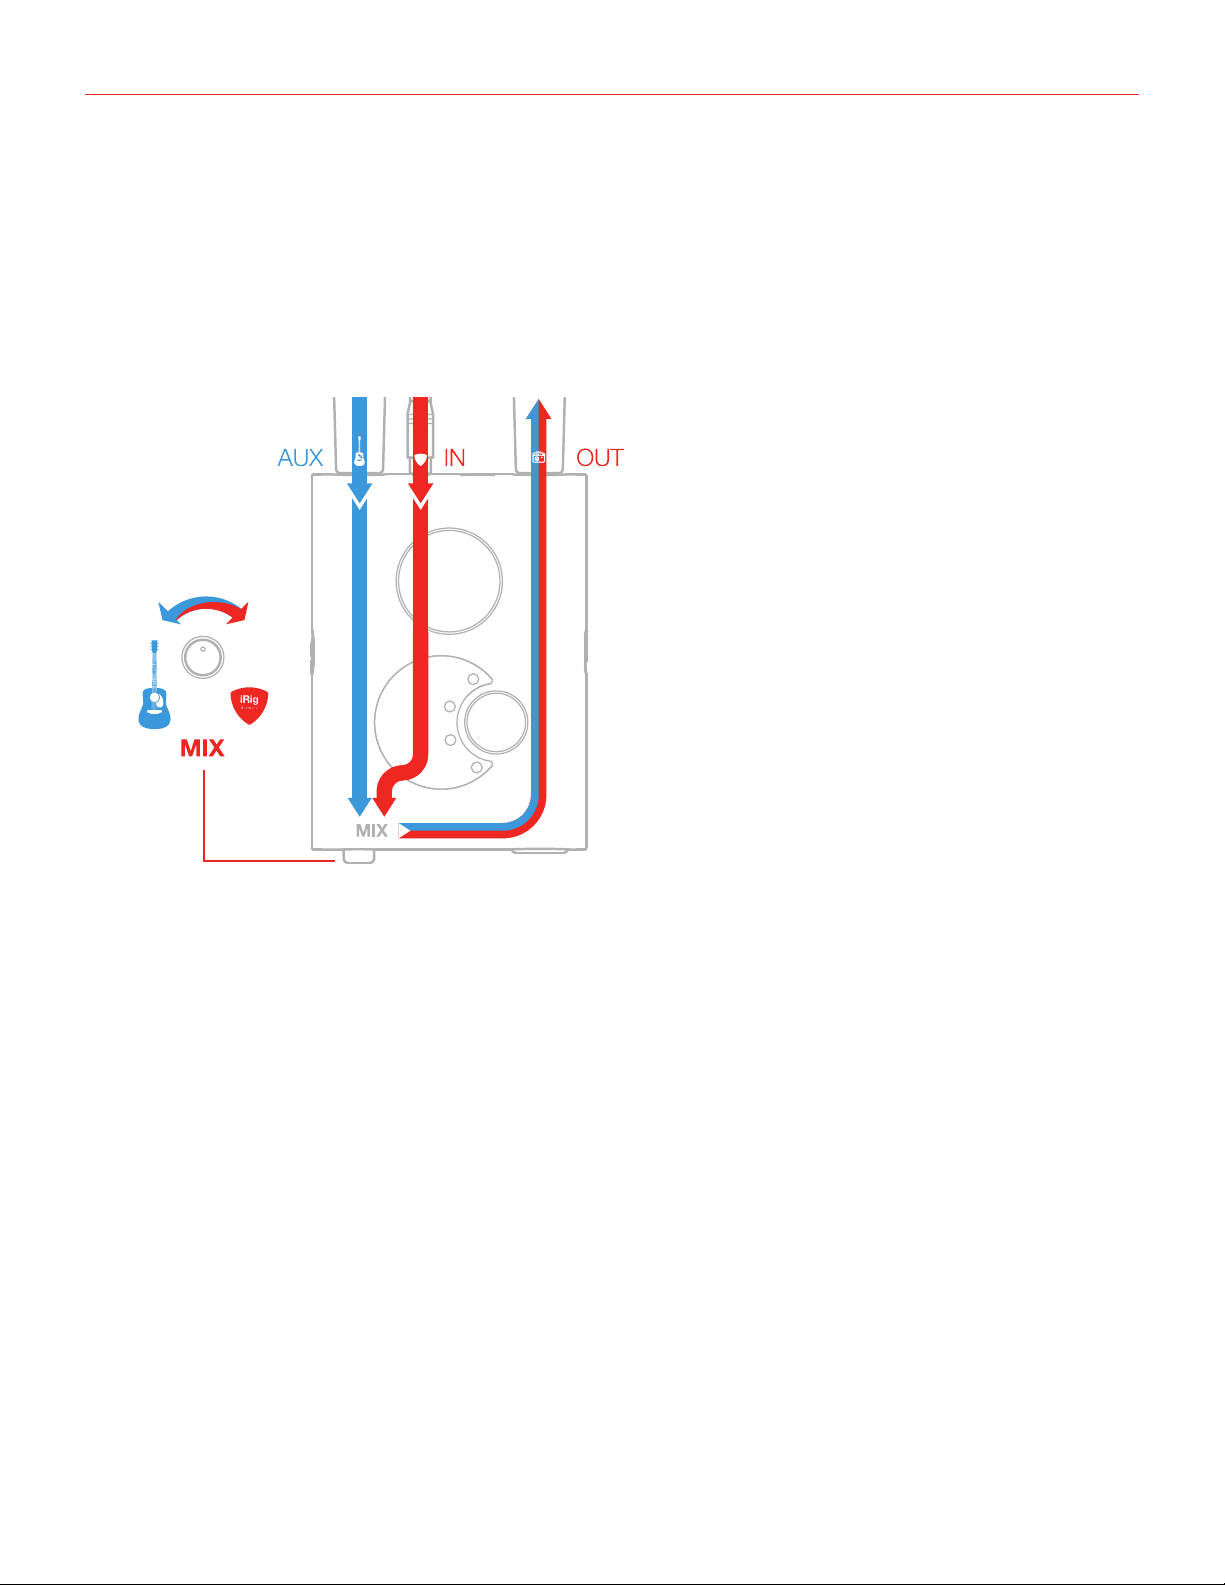
6. While you can immediately start using your iRig Acoustic Stage with great results, if your instrument already
features an onboard undersaddle piezo pickup system you can also connect its output to iRig Acoustic
Stage. This will give more flexibility to your tone, allowing you to mix the iRig Acoustic microphone and the
guitar built-in pickup system.
6
Page 7
English
7. When recording the guitar in the studio or performing live on acoustic sets, best results will be obtained by
using the iRig Acoustic Stage microphone only. This is obtained by just leaving the AUX input disconnected,
or by rotating the MIX control completely clockwise. When performing live with loud sets and, depending on
the type of sound you’re after, it might be useful mixing-in a portion of the guitar’s built-in piezo pickup. This
will make the system less feedback sensitive and will add some definition and punch from the piezo pickup
that can be desirable in certain cases. This is obtained by setting the MIX control to 50% as a starting point
and experimenting with other mix levels to find the best spot.
7
Page 8
English
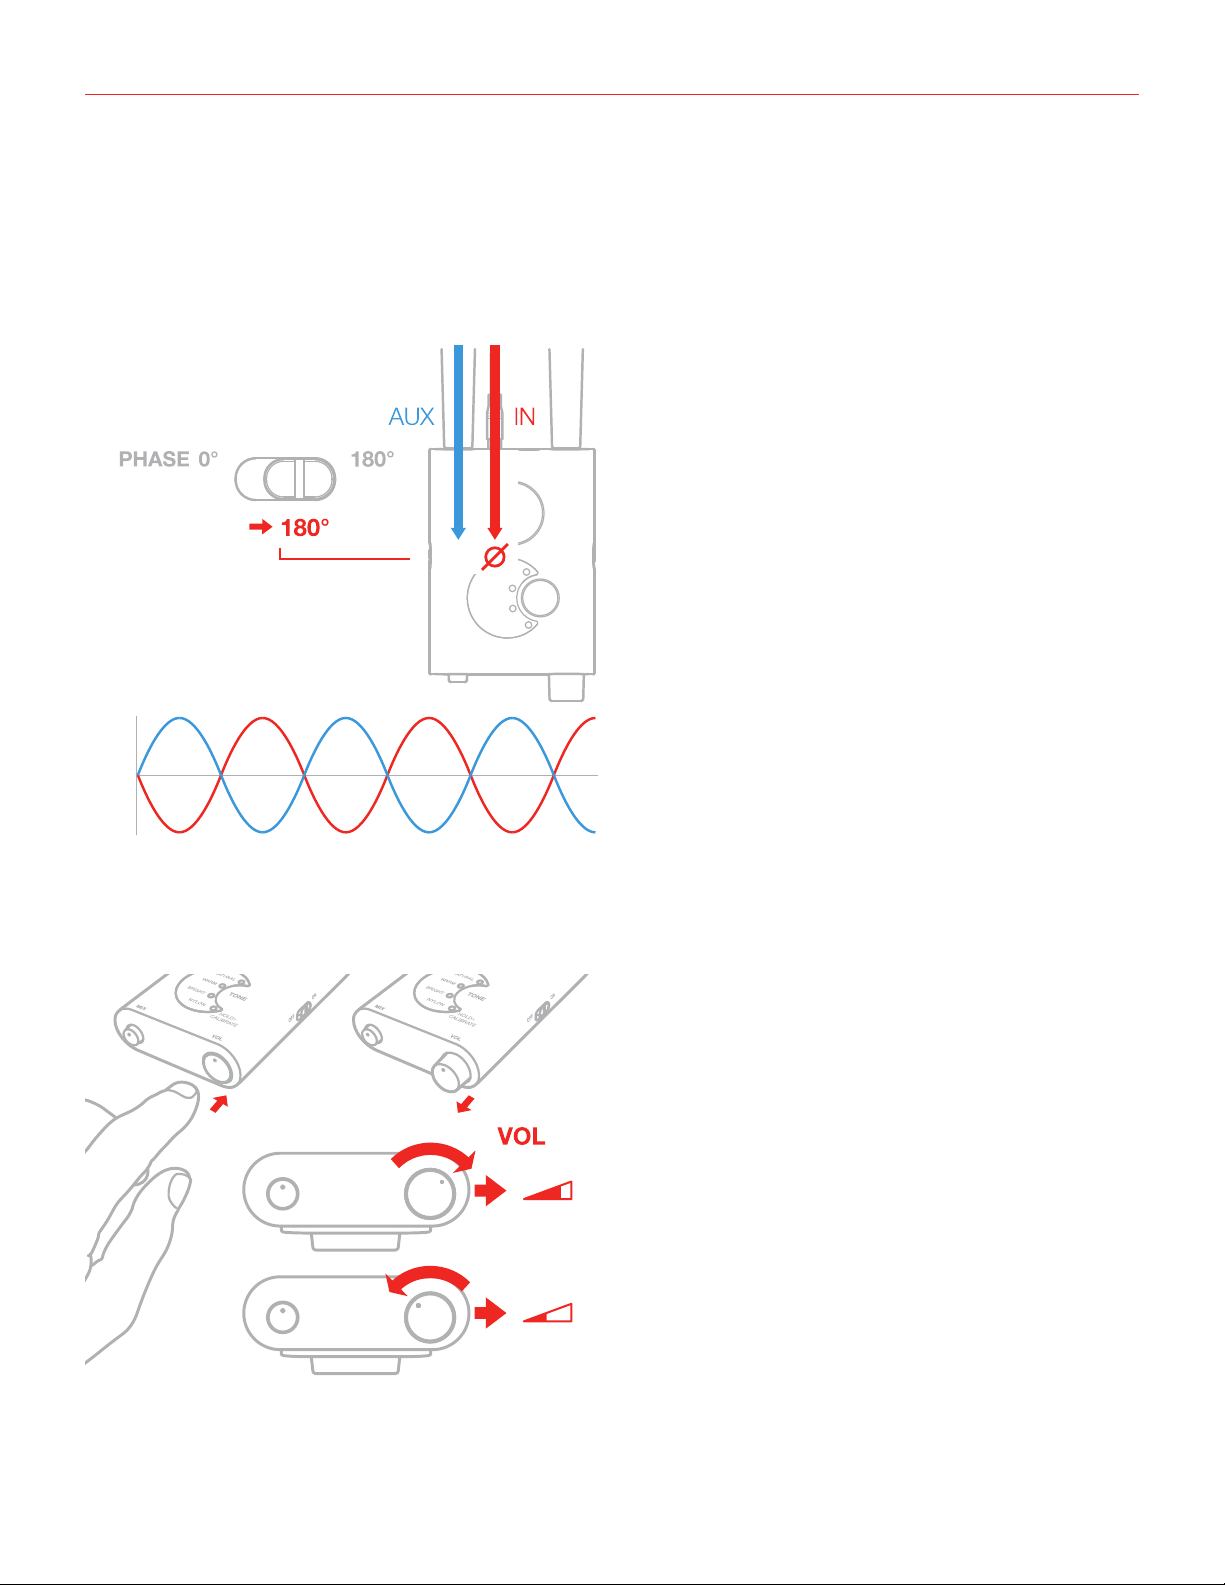
8. When mixing the guitar’s on-board pickup system with iRig Acoustic using the MIX control, always start
by setting this switch to the 0° position. On certain guitars you might get a fuller and more natural sound
by flipping the phase of the AUX input by setting this switch to the 180° position. When no AUX input is
connected this switch reverses the phase of the iRig Acoustic Stage output, and it can be useful when
playing in front of loud stage monitors to experiment with both positions to find the one that gives less
feedback and a more solid tone.
9. Use the volume knob to adjust the overall output signal. This control can also be used to turn the guitar
down between songs as it is easy to operate even if you can’t see the unit. Tip: Always keep a bit of margin
when playing so that you can always quickly turn it up if you would need to. Also remember to push the
control in, once you set the volume as preferred, to avoid accidental movements of the volume control.
8
Page 9
English
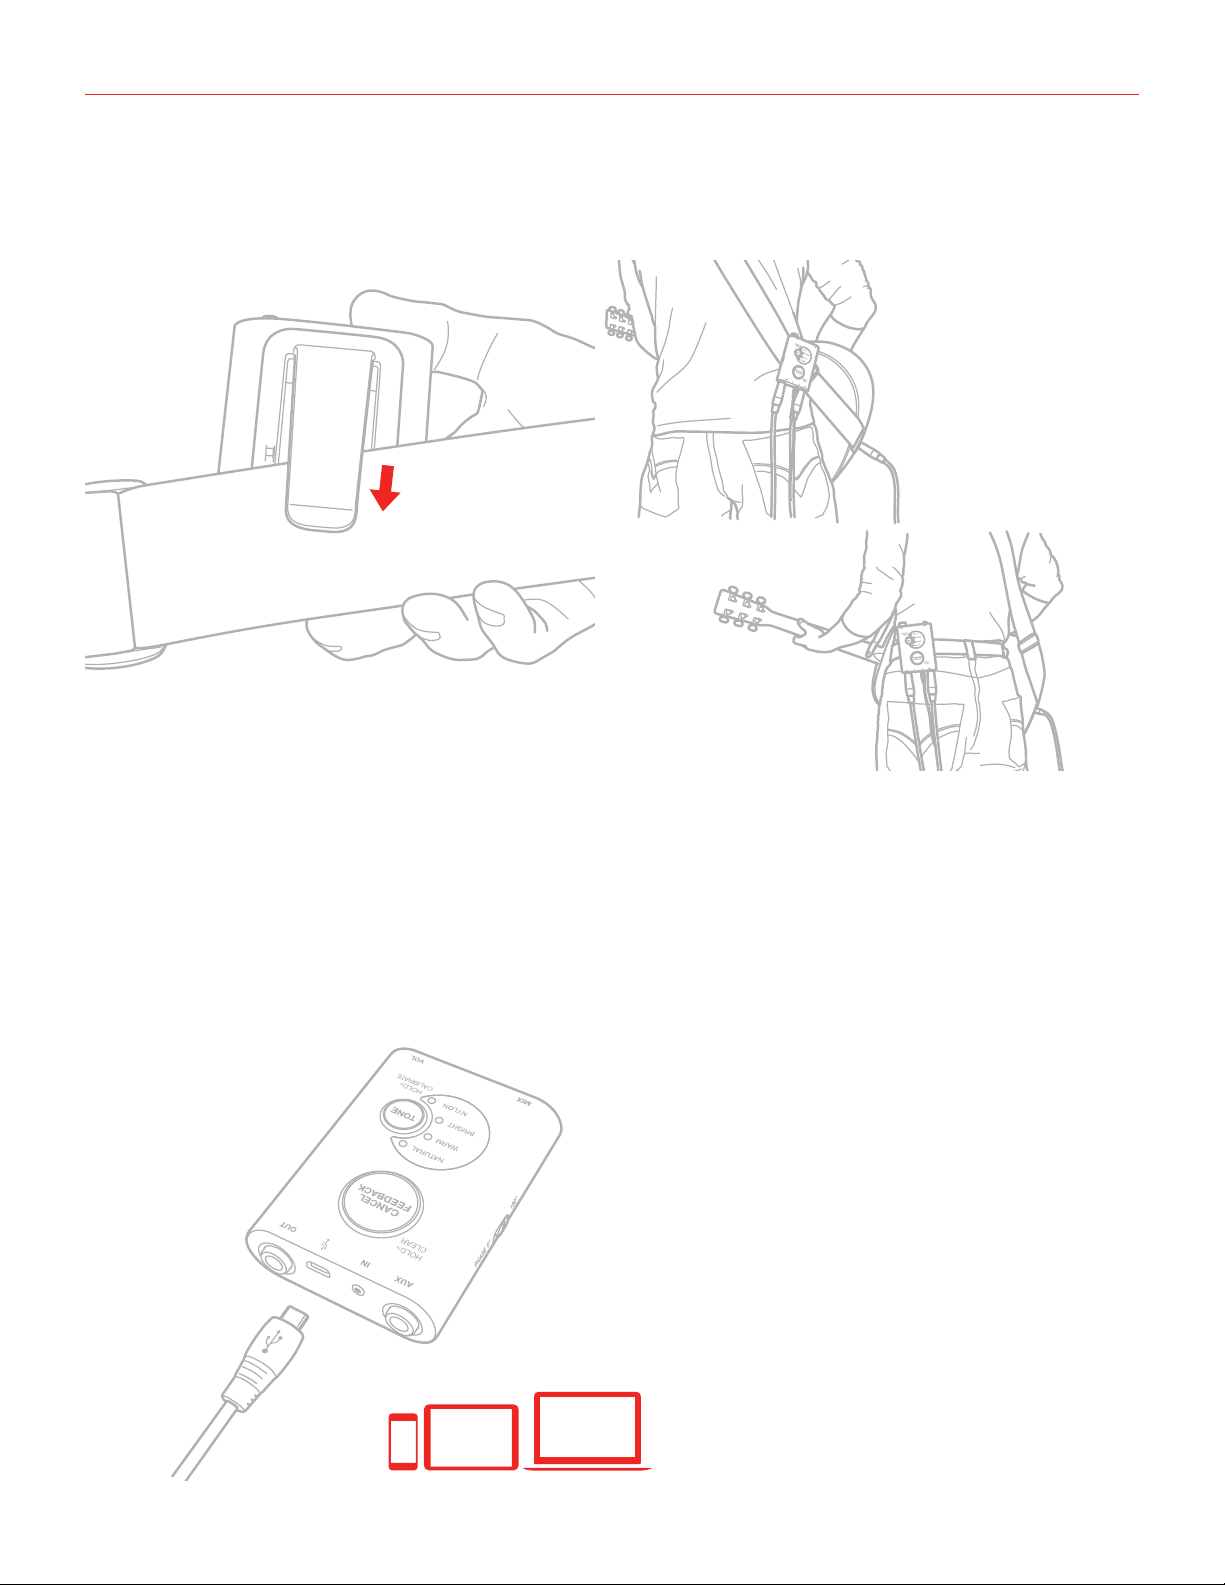
10. Use the belt clip to attach the iRig Acoustic Stage to your belt or your instrument’s shoulder strap.
11. iRig Acoustic Stage can also be used as a digital recording interface for computers. Just plug the USB
Digital Audio Output to any computer equipped with recording software (for example Apple’s Garage
Band) and you’ll be ready to record the guitar with a pristine full digital path. This will ensure professional
quality recording results with a minimal effort and ultra quick setup. You can connect iRig Acoustic Stage
to: Mac computers, Windows based computers, iOS devices (using a Camera Connection Kit accessory)
and Android devices (using an OTG cable, not included). To connect iRig Acoustic Stage to a computer for
recording you need a Micro USB to USB type A cable (not included). When connecting iRig Acoustic Stage
to a computer using the USB port, iRig Acoustic Stage will be powered by the USB port. For this reason you
don’t need batteries installed when using iRig Acoustic Stage this way.
9
Page 10

English
Cancel feedback button
In case of a feedback tap the “CANCEL FEEDBACK” button and the troublesome frequency is instantly notched
out of the mix, thus eliminating feedback without sacrificing tone quality. This feature set individuals notch filters
(up to 10) for multiple feedback frequencies.
1. Press this button while a feedback occurs. Available filter storage locations are: “10”. When a filter is stored
the button will flash one time red. If no filter is stored no flash will occur.
2. Reached the maximum filters storage available, the next press of the button will cause the button to blink
four times.
3. To reset all the filters stored, keep the cancel feedback button pressed for at least 2 sec. The button will turn
off.
Tip 1:
A good practice to be “feedback safe” while performing is to follow these steps:
- while setting the sound for the gig just raise the iRig Acoustic Stage channel volume (slowly) up to when the
system starts to feedback. Then, while the feedback is starting to sound as a steady note, press the CANCEL
FEEDBACK button. The feedback will disappear.
- you can then increase the volume even further and “cancel” another feedback frequency that may appear.
- put the volume level down back to the normal level you will use for the gig.
Tip 2:
When playing onstage acoustic instruments it may happen that some low notes start resonating too much with
the monitor speakers or with the PA system when played.
This is particularly annoying while playing.
iRig Acoustic Stage allows you to solve this problem this way:
- play the “critical” note and while the note is resonating press the CANCEL FEEDBACK button.
This will attenuate the note to make it level with the others and no longer a critical spot.
10
Page 11

English
Tone button
Press TONE multiple times to select the tone you prefer.
• “NATURAL” provides a balanced tone typical of a large diaphragm microphone placed at the golden spot
when making studio recordings.
• “WARM” provides a smoother tone, useful when NATURAL tends to sound a bit too harsh or edgy
• “BRIGHT” gives a brighter tone, useful to have it cutting thought the mix in complex live setups
All the three settings apply to both steel and nylon strung instruments. Nylon will toggle ON or OFF every time
the presets are cycled.
Make sure NYLON is ON on nylon strung instruments (yes, including Ukuleles!).
Each press of the TONE button will select different preset, cycling this way: NATURAL -> WARM -> BRIGHT ->
NYLON (on) - > NATURAL -> WARM -> BRIGHT -> NYLON (off) - > NATURAL......
11
Page 12

English
Instrument calibration
The calibration process improves the overall response of the presets by tailoring them to the specific response
of your instrument. By default this button’s LED is red to indicate no user calibration has been performed yet,
and the factory calibration is loaded. This factory calibration has been created to make virtually every instrument
sound natural and balanced. You can use the factory calibration (TONE button RED) on steel strings guitars
of any kind, nylon strings guitars of any kind, acoustic basses, ukuleles and so on. The sound will always be
balanced and natural thanks to the proprietary digital processing system iRig Acoustic Stage performs. If you
are playing Steel stringed guitars and would like to make the iRig Acoustic Stage processing specifically tailored
for your instrument, you should perform the Instrument Calibration process.
(see notes below).
In the table below are listed the typical situations when it is useful to perform the instrument calibration:
Instrument TYPE CALIBRATION
Steel strings - Dreadnought Optional, will improve every instrument even if Factory
Calibration already sounds great.
Steel strings - Jumbo, Parlor, “001”, and other styles
different from Dreadnought
Nylon strings - any type Normally not useful. Factory Calibration sounds great
Non-guitar instruments like: Ukuleles, Acoustic
Basses, Mandolins, etc..
Optional, can be effective, but, depending on the
instrument, can also “flatten out” some peculiar
aspect of the guitar tone. Since results depends on
the instrument, it should be experimented with.
on Nylon instruments, can anyway be experimented.
Not advisable. Will make the instrument sound
unnatural. Factory calibration sounds great on these
instruments.
Calibration process
As soon as a calibration has been successfully completed the button will turn green.
To start the calibration the iRig Acoustic microphone must be connected:
1. Keep pressed the Tone button for at least 2sec (after 2 sec begins the calibration process).
2. The four presets LEDs will start to blink along with the TONE LED
12
Page 13

English
3. Proceed playing 6 strings clusters in semitones steps on your guitar. Try playing these clusters using the
same dynamics you will be averagely using when playing. If you play too soft during calibration, the system
will probably deliver a too bright response. If you play very hard the system will produce a too soft response.
We suggest checking the online tutorial videos to see how calibration clusters should be played. Tip: The
fact that the calibration end results depends on how you play the calibration clusters is actually something
very useful once you get used to it because it allows to have specific calibration for your instrument just
changing the way you play during calibration. This is going to be fun once it will be familiar because it will
open up the possibility to create very specific and personal tones with your instrument!
4. To confirm the calibration press the TONE button. The TONE button LED turn GREEN to indicate the
calibration has been saved.
13
Page 14

English
5. To abort the calibration press the FEEDBACK CANCEL button. iRig Acoustic Stage will return to the
previous state.
6. To return to the factory default calibration: start the calibration as per point (1) above then, while the
calibration process is going on, press the Tone button for at least 2 sec.
NOTE 1: the calibration process has a time out of “60” seconds. After this time the process automatically ends.
NOTE 2: the calibration can start only if the microphone is connected.
Phase switch
The phase flip switch (0°-180°) works pre-mix. When both the MEMS and the Piezo are connected the phase
switch acts on the MEMS signal. When only the MEMS is connected it act on the MEMS signal. When only the
Piezo is connected it act on the Piezo signal.
14
Page 15

English
AUX IN
Most acoustic guitars used for live performance includes a piezo pickup in the bridge.
This is of course very useful to amplify the instrument but we all know the sound of the piezo pickup does not
actually represent the true tone of the guitar when played acoustically.
With iRig Acoustic Stage AUX IN you can connect the output of your guitar to this input and mix the stock guitar
pickup output with the iRig Acoustic microphone tone.
This will allow to keep using the powerful and reliable output of the piezo pickup onstage in feedback-critical
situations, with just a touch of the iRig Acoustic microphone mixed in to make it sounding way more acoustic
and rich.
Use the MIX control to balance the tone between the Piezo pickup (fully CCW) and the iRig Acoustic
microphone (fully CW).
When using both the AUX and iRig Acoustic sources make sure to experiment with the PHASE switch on the
left side of the iRig Acoustic Stage to make sure you set it on the position where the two sound sources mixes
together the way you prefer.
Low battery indications
When the battery level approach to be low, all the (turned ON) LEDs will fast blink every “2” sec. When the
battery is at a very low level the audio out is muted and the LED continuously blinks.
15
Page 16

English
Specifications
COMMON
Microphone type: high performance MEMS element, soft rubber elastic enclosure
Conversion: 32-bit A/D, 32-bit D/A
Sampling Rate: 48 kHz
Power: Battery powered (2xAA)
Battery Life: approximately 12 hours of continuous usage with alkaline batteries and 15 hours with rechargeable
high quality Ni-MH AA cells (2000 mAh and up)
Frequency response: 30 Hz to 20 kHz
Signal to noise ratio: 101 dB(A)
MICROPHONE INPUT
Connector: female 2,5mm TS Jack
AUX INPUT
Connector: unbalanced, TS 1/4” Jack. Tip: signal / Shield: ground
AUX Input Impedance: 1MOhms
LINE OUTPUT
Connector: unbalanced, TS 1/4” Jack. Tip: signal / Shield: ground
Line Output Impedance: 50Ohms (can drive long cables without any loss)
OTHER I/O
USB: 1x Micro-USB B type. USB class compliant audio output (48kHz/24bit)
Warranty
Please visit:
www.ikmultimedia.com/warranty
for the complete warranty policy.
Support and more info
www.ikmultimedia.com/support
www.irigacousticstage.com
16
Page 17

中文
iRig Acoustic Stage
感谢您购买iRig Acoustic Stage. 您的包装内含有:
• iRig Acoustic Stage
• 2节AA电池
• iRig Acoustic麦克风
• 腰带夹
• 包袋
• 快速开始指南
• 注册卡
iRig Acoustic Stage是一个为原声吉他打造的革命性数字麦克风系统,钢弦和尼龙弦吉他都适合。 我们都知
道,录制一把原声吉他最好的声音就是在一个好的传声录音棚用一个经典录音棚麦克风,好的前置放大器并要在
合适的位置上,并且我们都知道典型装备或二级市场的压电拾音器系统的声音多么平衡
典型的下琴枕下压电拾音器系统消耗了所有空气和乐器的声音品质。琴桥下安装拾音器系统通常让所有的细微和
原声乐器的谐波都消失了。
iRig Acoustic Stage的主要功能是让您的吉他声音听起来准确,如同被一个经典录音棚设置录制,使用一个非
常简单的夹式麦克风,可以在几秒钟内安装在任何一个乐器上。
麦克风、前置放大器和DSP单元之间的协同作用给原声乐器带来了令人难以置信的自然音色。它具有3种音色预
置——自然、温暖、明亮——钢弦和尼龙弦乐器都可用。而且,相比于压电拾音器,iRig Acoustic Stage使任
何乐器声音听起来都更好,也可以校准系统来准确地贴合乐器和演奏风格的声音,使其绘制出乐器完整的原声潜
质。
注册您的iRig Acoustic Stage
通过注册,您可以访问技术支持,激活您的保修,收到免费的JamPointsTM,它将被添加到您的账
户。JamPointsTM让您可以在以后购买IK产品上获得折扣优惠!注册还让您及时了解IK最新软件更新和产品动
态。
Register at: www.ikmultimedia.com/registration
注册地址:www.ikmultimedia.com/registration
17
Page 18

中文
安装和设置
1. 在电池盒中装入提供的电池。还可以使用碱性或镍氢可充电电池。高能量镍氢电池可续航至少18个小
时。Tip:如果您常常弹奏,最好有2套可充电AA电池,使用其中一套的同时可以给另外一套充电,方便随时更
换。
2. 连接iRig Acoustic麦克风。
3. 调整麦克风适应您的乐器。如果乐器的音板很薄,那么使用过程中iRig Acoustic麦克风就无法保持稳定不晃
动。要解决这个问题,您可以在iRig Acoustic麦克风的内部插槽中贴上一层或多层胶带,使其完美适合您的乐
器。
18
Page 19

中文
4. 连接iRig Acoustic Stage输出到PA混音台或原声吉他放大器,和平常连接电箱吉他一样。
5.启动iRig Acoustic Stage。Tip:ON或OFF iRig Acoustic Stage前要调低混频器通道音量或放大器音量!
19
Page 20

中文
6. 您可以立即开始使用iRig Acoustic Stage,并会获得很好的结果,如果您的乐器上已经有板载下弦枕下压电
拾音器系统,也可以连接它的输出到iRig Acoustic Stage。这可在音色上带来更多的灵活性,允许您混合使用
iRig Acoustic麦克风和吉他内置拾音器系统。
7. 在录音棚录制吉他或在原声设置上现场演出时,只有使用iRig Acoustic Stage麦克风才能获得最佳结果。这
在AUX输入断开连接或完全顺时针旋转MIX控制时可获得。当用响亮的设置现场表演,依据声音类型,它可能
在混合吉他内置压电拾音器的一部分有用。这可以使得系统减少反馈敏感度,并添加一些压电拾音器的定义和冲
头,在某些情况下可取。这通过设置MIX控制以50%作为一个起始点并尝试其他混音水平找到最佳点。
20
Page 21

中文
8. 使用MIX控制混合吉他的板载拾音器系统和iRig Acoustic,要将设置开关调到0°的位置再开始。在一些吉他
上,通过设置开关到180°位置轻弹AUX输入相位,可能获得更加完整、更加自然的声音。当AUX输入断开连
接这个开关保留iRig Acoustic Stage输出相位,在大舞台监听前演奏是有用的,试试两个位置找到那个有较少
反馈和更坚实音色的位置。
9. 使用音量旋钮调节总体输出信号。这个控制也可用来在歌曲间调低吉他音量,即使看不见单元也能轻松操
作。Tip:弹奏时总保持一定的余量,这样就可在需要的时候快速调高。一旦设置音量作为首选,还要记得把控
件推入,以避免意外的触碰音量控件。
21
Page 22

中文
10. 使用腰带夹将iRig Acoustic Stage夹到腰带或乐器肩带上。
11. iRig Acoustic Stage也可用作电脑的数字录音接口。只需插入USB数字音频输出到任何装有录音软件(如
苹果的GarageBand)的电脑,就可以用原始的全数字路径录制吉他了。这将确保最小努力和超快设置的专业
品质的录音结果。可以连接iRig Acoustic Stage到: Mac电脑,Windows系统电脑,iOS设备(使用一个相机
连接套件配件)和安卓设备(使用OTG线材,需另外购买)。要连接iRig Acoustic Stage到电脑来录音,你
需要一个Micro USB to USB type A线材(需另外购买)。当使用USB端口连接iRig Acoustic Stage到电脑
时,USB端口会给iRig Acoustic Stage充电。这样使用iRig Acoustic Stage时不需要安装电池。
22
Page 23

中文
取消反馈按钮
在出现反馈的情况下点击“CANCEL FEEDBACK”(取消反馈)按钮,恼人的频率会立即消失,从而消除反
馈,而不会损坏音质。这种功能设置单个消除滤波器(多达10个)适用多种反馈频率。
1. 反馈发生时按这个按钮。可用的滤波器保存位置是:“10个”。滤波器保存了按钮会闪红色光一次。没有保
存按钮不会闪光。
2. 当达到最大滤波器保存量,再按一下按钮按钮会闪烁四次。
3. 要重置所有已保存的滤波器,需持续按住反馈按钮至少2秒钟。按钮则会关闭。
Tip 1:
练习表演时的“反馈安全”请遵照以下步骤:
- 设置装备的音量只要提高iRig Acoustic Stage通道音量(慢慢地)到系统出现反馈。然后,在反馈听起来在
一个平稳的音符上时,按下CANCEL FEEDBACK(取消反馈)按钮。反馈即会消失。
- 然后可以进一步加大音量,再“取消”另一个可能出现的反馈频率。
- 将音量调回平时使用的水平。
Tip 2:
在舞台上演奏原声乐器时,可能出现一些低音在演奏时和监听扬声器或PA系统共鸣太多的情况。
这在演奏时出现尤为恼人。
iRig Acoustic Stage让您可以用下面的方式解决这个问题:
- 弹奏“尖锐的”音符,当音符出现共鸣时按下CANCEL FEEDBACK(取消反馈)按钮。这可以衰减这个音
符,使其和其他音符在一个水平,不再尖锐。
23
Page 24

中文
音色按钮
多次按下TONE(音色)按钮,选择一个你喜欢的音色。
“NATURAL”(自然)提供了一个平衡的音色,典型的在录音棚录音时放置在黄金点的大光圈麦克风。
“WARM”(温暖)提供了更加平稳的音色,当自然音色听起来有点太粗糙或尖锐时,这个就很适用。
“BRIGHT”(明亮)提供更加明亮的音色,可用在复杂的现场设置中切割混音。
这三种设置都适用钢弦和尼龙弦乐器。Nylon(尼龙)将在每次预置循环切换时打开或关闭。
在使用尼龙弦乐器时确保NYLON(尼龙)是开着的(当然,包括尤克里里!)
每次按下TONE(音色)按钮都可选择不同的预置,像这样循环:NATURAL(自然) -> WARM(温暖) ->
BRIGHT(明亮) -> NYLON (on)(尼龙-开启) - > NATURAL(自然) -> WARM(温暖) -> BRIGHT(明
亮) -> NYLON (off)(尼龙-关闭) - > NATURAL(自然)......
乐器校准
校准处理通过调整乐器的具体响应提高预置的整体响应。默认情况下LED灯是红色的,表明用户校准尚未执行,
出厂校准已加载。出厂校准的设计是要使几乎每个乐器都听起来自然而平衡。您可以使用出厂校准(音色按钮
是红色)校准任何类型的钢弦吉他、尼龙弦吉他、原声贝斯、尤克里里等等。声音总是平衡而自然的,这得益于
iRig Acoustic Stage执行的专有数字处理系统。如果您使用的是钢弦吉他,并想使用iRig Acoustic Stage处理
特别调整适用于您的乐器,那么您应该执行乐器校准处理。 (见下面记录)。
下面的表格中列出了几种可执行乐器校准的典型情况:
24
Page 25

中文
乐器类型 校准
钢弦琴 可选,会提升每个乐器,尽管出厂校准已经听起来
很棒。
钢弦琴 - Jumbo, Parlor, “001”, 以及其他不
同于 Dreadnought的类型
尼龙弦琴 – 任何类型 通常不用。出厂校准在尼龙弦乐器上听起来很棒,
非吉他乐器如:尤克里里,原声贝斯,曼陀林等 不建议使用。会使乐器听起来不自然。出厂标准在
可选,有效,但取决于乐器,也可以“拉平”一些
特殊方面的吉他音色。由于结果取决于乐器,可以
进行尝试。
但可以进行尝试。
这些乐器上听起来已经不错。
校准处理
校准完成后按钮会变成绿色。开始校准前需连接iRig Acoustic麦克风:
1. 持续按住TONE(音色)按钮至少2秒(2秒后开始校准过程)。
2. 四个预置LED灯会随着TONE(音色)LED闪烁。
25
Page 26

中文
3. 在吉他上的每品大横按6根弦弹奏。每品都弹,按平时弹奏的力度。如果在校准过程中弹奏太轻柔,系统可能
会输送一个太亮的响应。如果弹奏很用力系统则会产生一个太弱的响应。我们建议您观看在线教程视频,看看如
何弹奏校准横按。Tip: 事实上校准的结果取决于如何弹奏校准横按,一旦习惯了会发现它实际上非常有用,因为
它允许对乐器有具体的校准,只要在校准过程中改变弹奏方法。熟悉了以后会觉得很有意思,因为它能够让您用
您的乐器创建非常具体而个人的音色!
4. 确认校准请按TONE(音色)按钮。TONE(音色)按钮LED变成绿色则表示校准已被保存。
26
Page 27

中文
5. 中止校准请按FEEDBACK CANCEL(取消反馈)按钮。iRig Acoustic Stage会回到这之前的状态。
6. 返回出厂默认校准:开始校准为每点(1)以上,然后当校准正在进行时,按住TONE(音色)按钮至少2
秒。
NOTE 1:校准过程时间为“60”秒。时间到后校准自动结束。
NOTE 2:校准只有在连接了麦克风后才能开始。
相位切换
相位翻转开关(0°-180°)工作预混。当MEMS和Piezo都连接时,相位开关作用于MEMS信号。只有MEMS连
接时作用于MEMS信号。只有Piezo连接时作用于Piezo信号。
27
Page 28

中文
AUX输入
多数用于现场表演的原声吉他上都有一个琴桥下压电拾音器。
这当然在放大乐器方面非常有用,但我们都知道当弹奏原声时,压电拾音器的声音不能够实际表现出吉他的真实
音色。
有了iRig Acoustic Stage的AUX输入您可以连接吉他输出到这个输入,混合吉他拾音器输出和iRig Acoustic麦
克风音色。
这将允许继续使用强大而可靠的压电拾音器输出,在舞台上反馈苛刻的情况下,只需触碰混合的iRig Acoustic
麦克风就能让声音听起来更原声和丰富。
使用MIX控制来平衡压电拾音器(全CCW)和iRig Acoustic麦克风(全CW)之间的音色。
当同时使用AUX和iRig Acoustic声源确保PHASE(相位)开关在iRig Acoustic Stage左侧,确保将它设置在
两个声源混合最好的位置。
电池电量不足提示
当电池电量低的时候,所有(开启的)LED显示灯会每2秒快速闪烁。当电池电量很低的时候,音频输出会静
音,LED显示灯持续闪烁。
28
Page 29

中文
规格参数
常见参数
麦克风类型: 高性能MEMS元件,软橡胶弹性外壳
转换: 32-bit A/D, 32-bit D/A
采样率: 48 kHz
供电: 电池供电(2xAA)
电池续航能力: 碱性电池可连续使用约12小时,可充电优质镍氢AA电池可连续使用15小时(2000 mAh及以上)
频率响应: 30 Hz到20 kHz
信噪比: 101 dB(A)
麦克风输入
连接器: 插座2,5mm TS 插头
AUX输入
连接器: 不平衡, TS 1/4” 插头。Tip: 信号/屏蔽: 接地
AUX输入阻抗: 1MOhms
线性输出
连接器: 不平衡, TS 1/4” 插头。Tip: 信号/屏蔽:接地
线性输出阻抗: 50Ohms (可以驱动长线材,没有任何损失)
其他输入/输出
USB: 1x Micro-USB B type. USB类兼容的音频输出(48kHz/24bit)
保修
请访问:
www.ikmultimedia.com/warranty
了解完整的保修政策
支持和更多信息
www.ikmultimedia.com/support
www.irigacousticstage.com
29
Page 30

Regulatory
iRig® Acoustic Stage, AmpliTube®, VocaLive™, SampleTank®, iGrand Piano™ are trademarks or registered trademarks property of IK Multimedia Srl. All other product names and images, trademarks
and artists names are the property of their respective owners, which are in no way associated or afliated with IK Multimedia. iPad, iPhone, iPod touch, Mac, Mac logo and GarageBand are trademarks
of Apple Computer, Inc., registered in the U.S. and other countries. Bluetooth is a trademark of Bluetooth SIG, Inc., registered in the U.S. and other countries. App Store is a service mark of Apple Inc.
2017/05/15
30
 Loading...