

Page 1
R
C
D
O
PE
N
R
C
D
R
C
D
I
N
D
P
L
S
I
N
U.
S
.
A
.
U
N
L
O
C
K
R
C
D
I
N
D
P
L
S
I
N
U
.
S
.
A
.
U
N
L
O
C
K
O
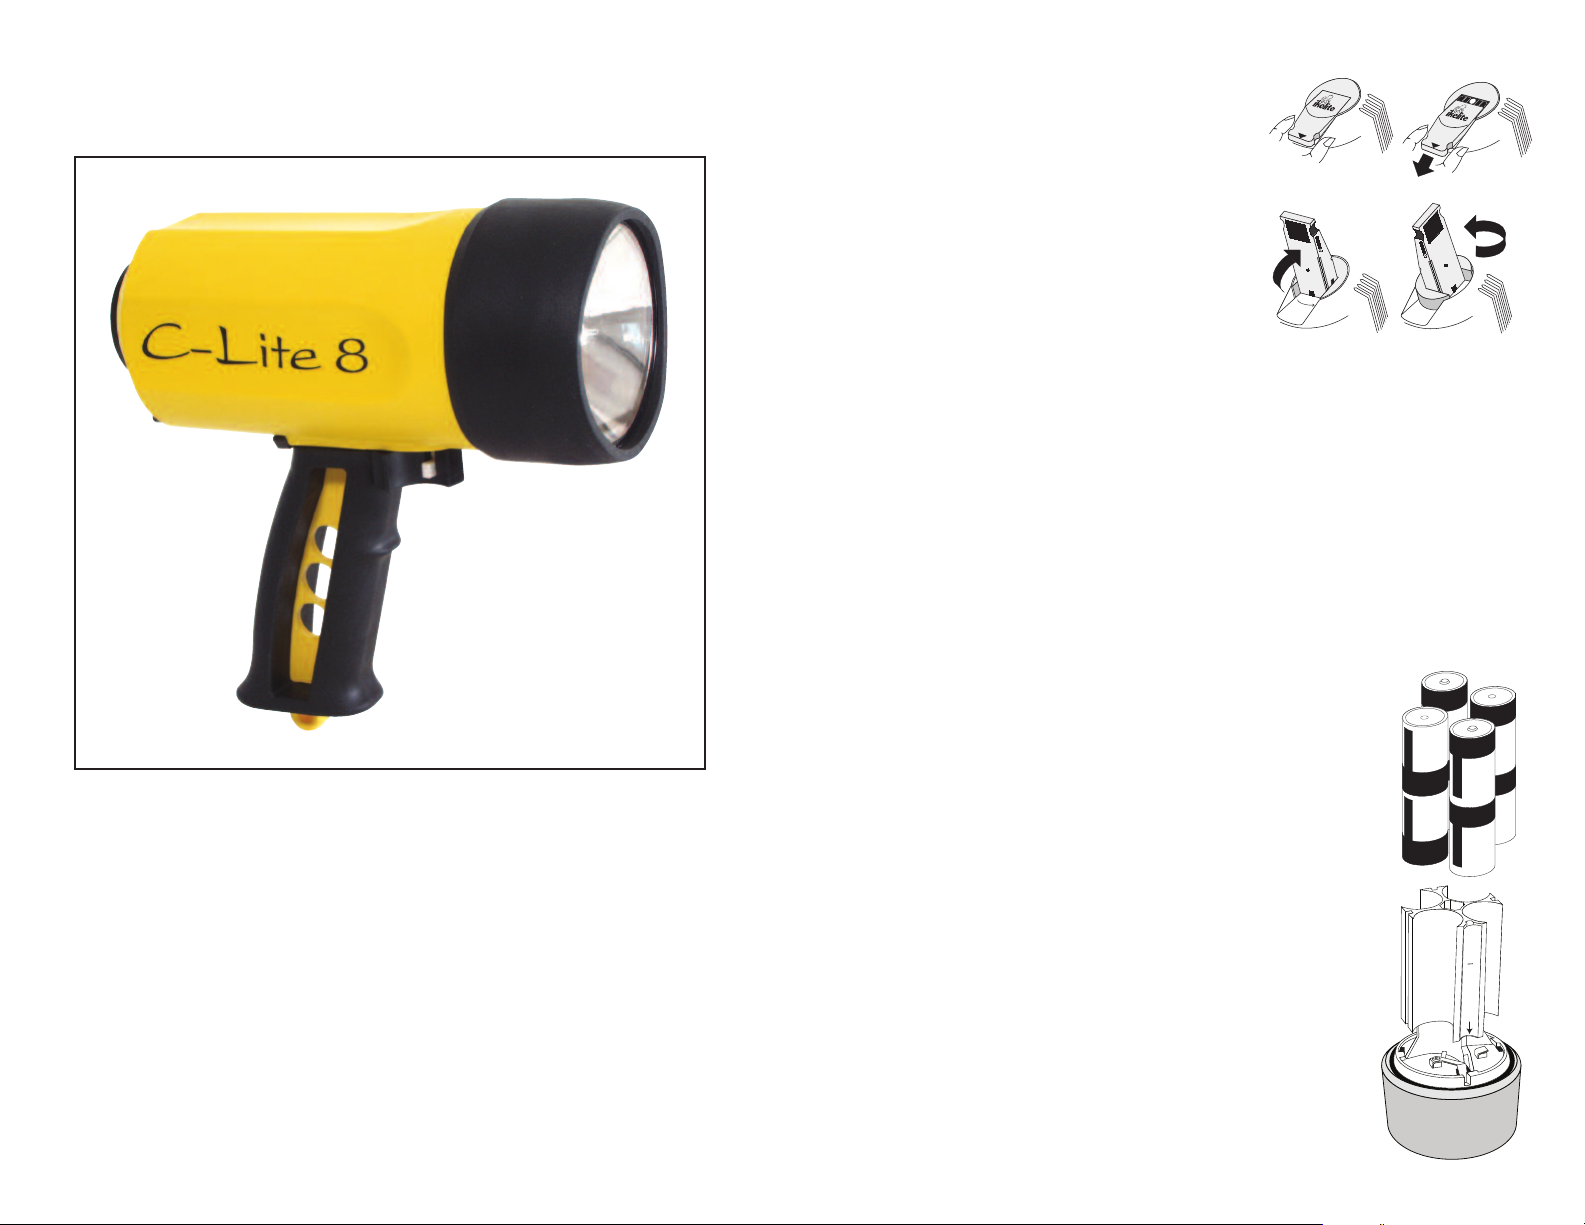
PENING THE LITE
Pull Out
F
lip Up Rotate
ENERGIZER
ENERGIZER
+
+
ENERGIZER
-
-
ENERGIZER
ENERGIZER
+
ENERGIZER
ENERGIZER
-
-
ENERGIZER
+
H
A
N
D
L
E
S
W
I
T
C
H
&
S
L
O
T
The Ikelite C-Lite 8 features our super intense 10V-quartz halogen lamp producing
an incredibly bright penetrating medium spot beam with good peripheral coverage.
8 C-cell alkaline batteries provide 14W initial intensity and 3.5 hours of high intensity
light. Rubber coated pistol grip handle featured for comfortable exploration night or day.
The rear clamp design assures easy opening and dependable resealing. Virtually
indestructible casing. Rubber shroud protects the front lens while blocking side
reflections. Large rotating switch and sliding lock afford easy operation even when
wearing a bulky glove. Nickel-plated brass contacts boost the electrical efficiency and
corrosion resistance. Waterproof to 90m (300 feet).
IIKKEELLIITTEE CC--LLIITTEE 88
##11224400 CC--LLIITTEE 88
NNoottee::
Please read all instructions before using this product.
OOPPEENNIINNGG TTHHEE LLIIGGHHTT____________________________________________________________________________________________________________________
The unique flip-lock lever makes opening and closing
incredibly easy and dependable.
Simply extend the locking lever, flip it up, and rotate.
The internal spring automatically pushes open the light for
easy bulb or battery replacement. Flip the locking lever
down and the C-Lite 8 seals with ease and confidence.
• Place light face down on flat surface.
• Pull out on the locking lever.
• Flip the lever up.
• Rotate the lever counter-clockwise 90° and the internal
spring automatically pushes open the light.
• Lift the body off of the front. The batteries remain
housed in the holder.
OO--RRIINNGG______________________________________________________________________________________________________________________________________________
Keep the o-ring and sealing surfaces clean. DO NOT stretch the o-ring when cleaning. It is not
necessary to lubricate the o-ring. Never use spray lubricant because it will crack the plastic.
Place the clean o-ring on the inner recess of the front head assembly.
Do not dent or damage the front edge of the lite body as the o-ring seals against this surface.
CCLLOOSSIINNGG TTHHEE LLIITTEE__________________________________________________________________________________________________________________________
• Make sure the on/off switch has been rotated left to the off position.
• Place the front lens face down on a flat surface. Check that the o-ring and sealing surfaces are
clean and undamaged; make sure the o-ring is positioned properly on the inner recess of the front.
• Place locking lever in the open position (pull out, flip up, and rotate lever).
• Align the handle on the body with the handle reference on the battery holder. Lower the body
over the batteries. Proper alignment of the body with the front is extremely important to avoid
possible damage to the internal components.
• To seal the light, simply reverse the opening sequence. Press down
slightly on the body and rotate the lever clockwise. Push the lever down
and slide the lever in to the locked position.
OONN//OOFFFF SSWWIITTCCHH____________________________________________________________________________________
The large rotating switch with sliding lock is easily operated with one
hand. Unlock the switch by sliding the white-colored lock down. Rotate
the switch fully to the right to turn ON the light.
Rotate the switch to the left to turn the light OFF. To lock the switch,
slide the white lock upward towards the light body. Lock the switch when
the light is not in use. Never look into the face of the lite because of its
blinding intensity.
BBAATTTTEERRYY IINNSSTTAALLLLAATTIIOONN____________________________________________________________________
Accepts eight C-cell batteries, alkaline or ni-cad. Alkaline batteries
provide 14W initial intensity and 3.5 hours of high intensity light.
Consumer ni-cads reduce intensity and burn time.
• Note the polarity markings at the base of the battery holder assembly.
• Follow the polarity markings when installing two batteries in each
of the four columns. Make sure that both batteries in each column have
the same polarity direction.
• For best performance, we recommend Energizer® alkaline batteries.
22
Page 2
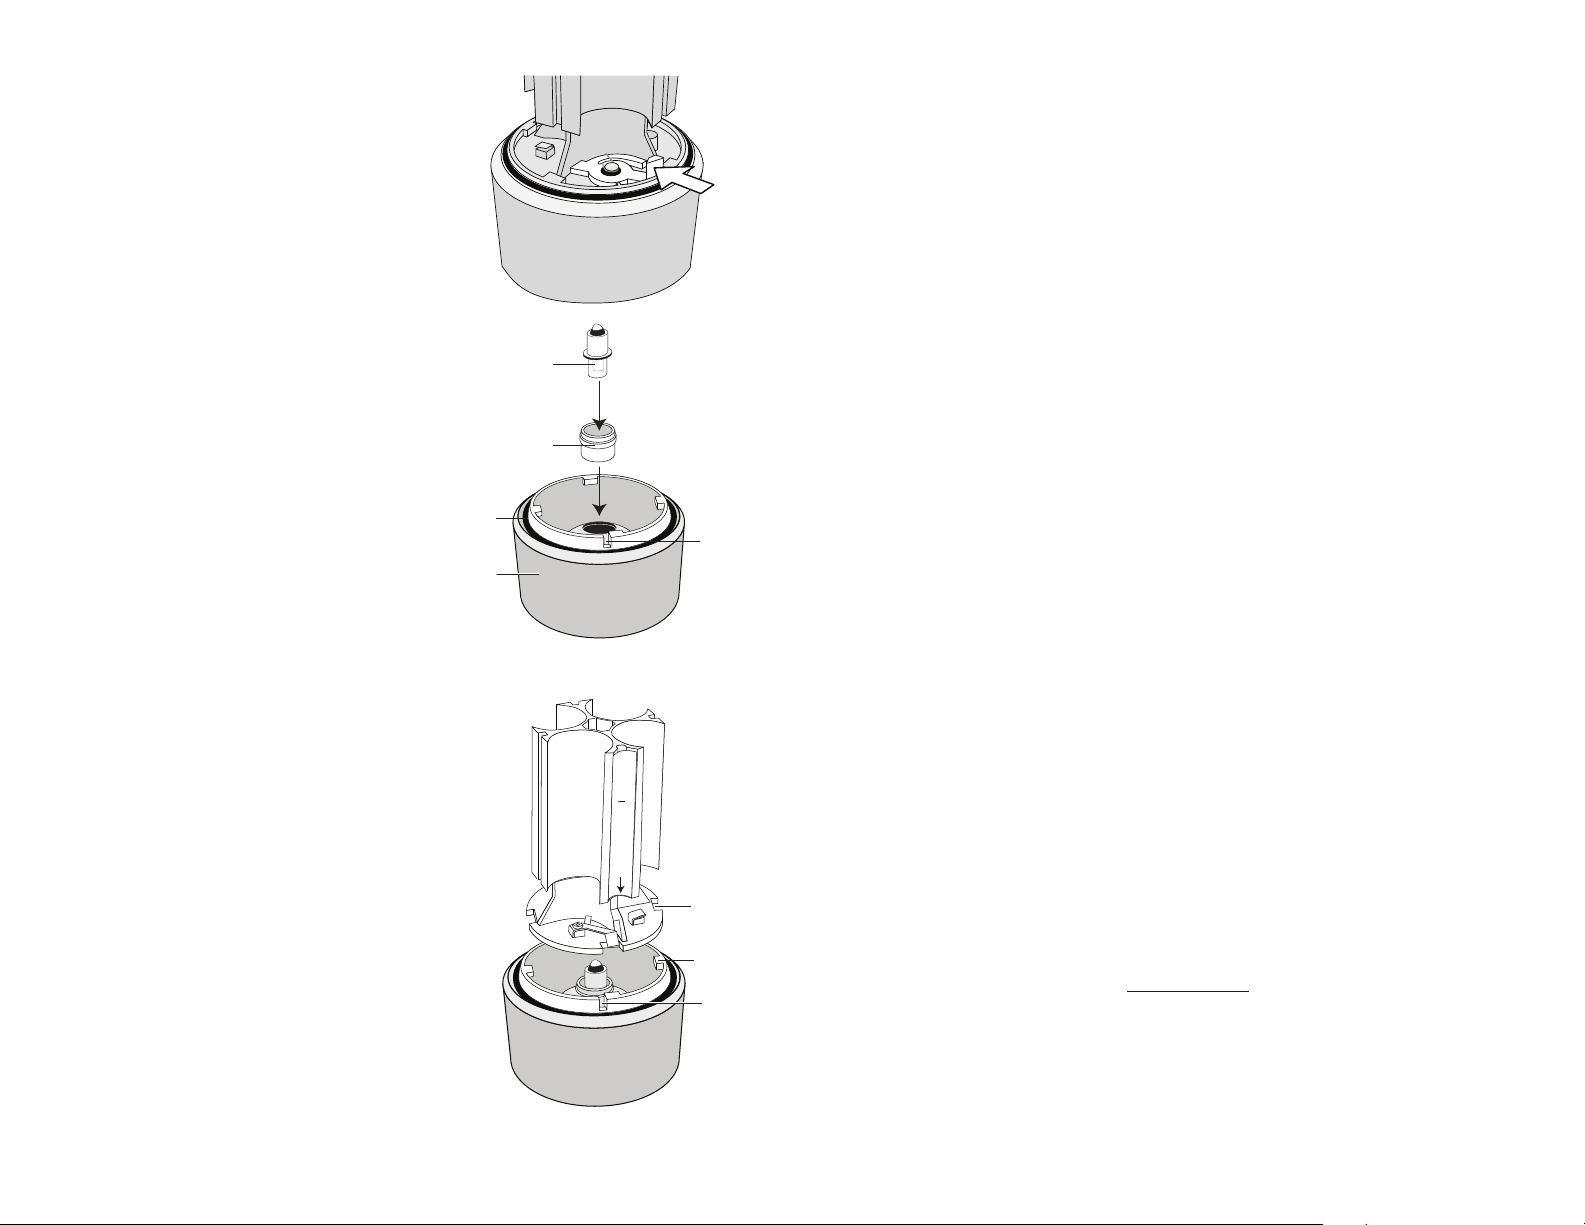
BBUULLBB ##00004422..5588 RREEPPLLAACCEEMMEENNTT____________________________________________________________________________________________________
O'ring
Bulb
Rubber
Shroud
Heat
Sink
Slot
H
A
N
D
L
E
S
W
I
T
C
H
&
S
L
O
T
Tab Guide
Tab
Slot
To access the bulb compartment, the battery holder
must be removed from the front lens assembly.
Depress the white-color release tab to unlock the
battery holder, and then rotate the battery holder
counter-clockwise slightly. A spring then pushes the
battery holder away from the front lens.
Make sure the bulb is cool. Tilt the front lens assembly
up to allow the bulb and heat sink (bulb holder) to drop
from the rear of the reflector. Place the new bulb IKE 8
CELL #0042.58 inside the heat sink (bulb holder) and
insert into the reflector opening.
In an emergency, use a common PR-size bulb
approximating 10V in place of the high-intensity
bulb #0042.58.
RREEMMOOUUNNTT BBAATTTTEERRYY HHOOLLDDEERR______________________________________________________________________________________________________
After replacing the bulb, snap the battery holder to
the front lens assembly as follows:
• On the battery holder, note the "HANDLE / SWITCH
& SLOT" reference on the side opposite from the white
release tab.
• Align the "HANDLE / SWITCH & SLOT" reference on
the battery holder with the open slot on the front lens
assembly.
• The tab guides on the battery holder must align with
the tabs on the front lens assembly.
• Press the battery holder into the front lens assembly,
and rotate the battery holder clockwise slightly to lock
the holder in place. The white release tab should then
lock the battery holder in place on the front lens
assembly.
33
MMAAIINNTTEENNAANNCCEE________________________________________________________________________________________________________________________________
1. We suggest storage of your lite with the locking lever OPEN to allow any potential hydrogen/air
mixture to escape.
2. The front edge of the lite body and the inner recess in the front assembly are the sealing
surfaces. DO NOT allow these surfaces to become damaged.
3. Keep the o-ring and sealing surfaces clean. DO NOT stretch the o-ring when cleaning. It is not
necessary to lubricate the o-ring. Never use spray lubricant because it will cause cracking of the
plastics.
4. Occasionally clean the metal contacts for a better connection.
5. The front head assembly has been factory sealed; DO NOT disassemble.
CCAAUUTTIIOONN____________________________________________________________________________________________________________________________________________
DO NOT use batteries that have been wet; batteries from a flooded lite should be discarded.
Water could create an internal short circuit at some later date causing a potential explosion. The
normal evolution of all batteries is emitting hydrogen gas. This gas must be absorbed or allowed to
escape to prevent ignition of the entrapped hydrogen/air mixture. We suggest storage of your lite
open to allow any hydrogen/air mixture to escape. A hydrogen absorber has been concealed inside
this lite and should NOT be removed. In case the lite floods, glue a new hydrogen absorber to the
back of the reflector and replace the batteries.
RREEPPLLAACCEEMMEENNTT PPAARRTTSS____________________________________________________________________________________________________________________
0042.58 C-Lite 8 BULB, IKE 8 CELL 10.4V halogen
0124 Main seal o-ring
0522 Rubber shroud
0836.32 Heat sink (bulb holder)
0910 Hydrogen absorber
9040.01 Battery holder assembly
9040.21 Front clear lens assembly with reflector and o-ring
LLIIMMIITTEEDD WWAARRRRAANNTTYY______________________________________________________________________________________________________________________
All Ikelite products are warranted against any manufacturing defects for a period of one year
from the date of purchase. Defective products should be returned prepaid to Ikelite. Ikelite will,
at its discretion, repair or replace such products, and will return to customer prepaid. All other
claims, of any nature, including but not limited to bulb failure are not covered. Except as mentioned above, no other warranty expressed or implied, applies to this Ikelite product.
IIKKEELLIITTEE UUNNDDEERRWWAATTEERR SSYYSSTTEEMMSS
50 West 33rd Street
PO Box 88100
Indianapolis, IN 46208 USA
317-923-4523
wwwwww..iikkeelliittee..ccoomm
Email ikelite@ikelite.com
1240-04-0707
 Loading...