

Page 1

Thank you for Choosing IKEA® Appliances.
DISHWASHER USER INSTRUCTIONS
Thank you for Choosing IKEA® Appliances.
We hold our company to the highest quality standards and it is important to us that you have a positive experience owning a IKEA®
product.
For your convenience, we have provided an easy to follow User Instruction Book. These instructions include a “Troubleshooting” section
to help you through any problems you may encounter.
Have your complete model and serial number ready. You can nd your model and serial number on the label located near the door on
the right-hand or left-hand side of the dishwasher interior.
For warranty concerns, do not take the appliance back to the store. Please contact us in U.S.A. or Canada at 1-866-664-2449.
This product features a Limited Warranty - See the “Warranty” section for complete details. IKEA® appliances carry a 5-year warranty
(excludes LAGAN family - see warranty for coverage details).
NOTE: Proof of Purchase is required to obtain warranty service.
TABLE OF CONTENTS
IKEA MAJOR APPLIANCE WARRANTY ....................................2
ASSISTANCE OR SERVICE ........................................................3
DISHWASHER SAFETY ..............................................................3
WHAT’S NEW IN YOUR DISHWASHER .....................................5
QUICK STEP ...............................................................................6
DISHWASHER USE .....................................................................7
CYCLE AND OPTION DESCRIPTIONS......................................9
FILTRATION SYSTEM ...............................................................11
DISHWASHER CARE ................................................................13
TROUBLESHOOTING ............................................................... 14
W11212416C
1
Page 2

IKEA Major Appliance Warranty
How long is the IKEA limited warranty valid?
This limited warranty is valid for ve years from the date of purchase, when this major appliance is operated and maintained according to
instructions attached to or furnished with the product, unless the appliance is named LAGAN in which case this limited warranty is valid
for two years from the date of purchase. This limited warranty is valid only in the United States or Canada and applies only when the major
appliance is used in the country in which it was purchased. Proof of original purchase date is required to obtain service under this limited
warranty.
Which appliances are not covered by the IKEA ve (5) year limited warranty?
For major appliances named “LAGAN,” this limited warranty is valid for two years from the date of purchase.
Who will execute the service?
This limited warranty is provided by Whirlpool Corporation or Whirlpool Canada LP (hereafter “Whirlpool”). Service must be provided by
a Whirlpool designated service company.
What does this limited warranty cover?
The limited warranty will pay for factory specied parts and repair labor to correct defects in materials or workmanship that existed when
the major appliance was purchased. The exceptions are specied under the headline “What is not covered under this limited warranty?”.
What will be done to correct the problem?
The designated service company will examine the product and decide, at its sole discretion, if it is covered under this limited warranty.
If considered covered, the designated service company will then repair the defect. Your sole and exclusive remedy under this limited
warranty shall be product repair as provided herein.
What is not covered under this limited warranty?
■ Service calls to correct the installation of your major appliance, to instruct you on how to use your major appliance, to replace or
repair house fuses, or to correct house wiring or plumbing.
■ Service calls to repair or replace appliance light bulbs, air lters or water lters. Consumable parts are excluded from warranty
coverage.
■ Replacement parts or repair labor if this major appliance is used for other than normal, single-family household use or when it is
used in a manner that is inconsistent to published user or operator instructions and/or installation instructions.
■ Damage resulting from accident, alteration, misuse, abuse, re, ood, acts of God, improper installation, installation not in
accordance with electrical or plumbing codes, or use of consumables or cleaning products not approved for use.
■ Cosmetic damage, including scratches, dents, chips or other damage to the nish of your major appliance, unless such damage
results from defects in materials or workmanship and is reported within 30 days from the date of purchase.
■ Any food loss or medicine loss due to refrigerator or freezer product failures.
■ Pick up and delivery. This major appliance is intended to be repaired in your home.
■ Repairs to parts or systems resulting from unauthorized modications made to the appliance.
■ Expenses for travel and transportation for product service if your major appliance is located in a remote area where service by an
authorized servicer is not available.
■ The removal and reinstallation of your major appliance if it is installed in an inaccessible location or is not installed in accordance
with published installation instructions.
■ Replacement parts or repair labor on major appliances with original model/serial numbers that have been removed, altered or cannot
be easily determined.
The cost of repair or replacement under these excluded circumstances shall be borne by the customer.
Disclaimer of Implied Warranties
IMPLIED WARRANTIES, INCLUDING ANY IMPLIED WARRANTY OF MERCHANTABILITY OR IMPLIED WARRANTY OF FITNESS FOR A
PARTICULAR PURPOSE, ARE LIMITED TO FIVE YEARS (TWO YEARS FOR MAJOR APPLIANCES NAMED “LAGAN”) OR THE
SHORTEST
PERIOD ALLOWED BY LAW. Some states and provinces do not allow limitations on the duration of implied warranties of merchantability
or tness, so this limitation may not apply to you. This warranty gives you specic legal rights, and you also may have other rights that
vary from state to state or province to province.
Limitation of Remedies; Exclusion of Incidental and Consequential Damages
YOUR SOLE AND EXCLUSIVE REMEDY UNDER THIS LIMITED WARRANTY SHALL BE PRODUCT REPAIR AS PROVIDED HEREIN.
WHIRLPOOL SHALL NOT BE LIABLE FOR INCIDENTAL OR CONSEQUENTIAL DAMAGES. Some states and provinces do not allow the
exclusion or limitation of incidental or consequential damages, so these limitations and exclusions may not apply to you. This warranty
gives you specic legal rights, and you also may have other rights that vary from state to state or province to province.
How to reach us if you need our service
If outside the 50 United States and Canada, contact your authorized IKEA retailer to determine if another warranty applies.
2
01/17
Page 3

Assistance or Service
If you do not have access to the Internet and you need assistance using your product or you would like to schedule service, you may
contact IKEA at the number below.
Have your complete model number ready. You can nd your model and serial number on the label located near the door on the
right-hand or left-hand side of the dishwasher interior.
For assistance or service in the U.S.A. or Canada, call 1-866-664-2449.
If you need further assistance, you can write to IKEA with any questions or concerns at the address below:
In the U.S.A.:
Whirlpool Brand Home Appliances
Customer Experience Center
553 Benson Road
Benton Harbor, MI 49022-2692
Please include a daytime phone number in your correspondence.
Please keep this User Instructions and model number information for future reference.
In Canada:
Whirlpool Brand Home Appliances
Customer Experience Centre
200 - 6750 Century Ave.
Mississauga, Ontario L5N 0B7
Dishwasher Safety
Your safety and the safety of others are very important.
We have provided many important safety messages in this manual and on your appliance. Always read and obey all safety
messages.
This is the safety alert symbol.
This symbol alerts you to potential hazards that can kill or hurt you and others.
All safety messages will follow the safety alert symbol and either the word “DANGER” or “WARNING.”
These words mean:
You can be killed or seriously injured if you don't immediately
DANGER
WARNING
All safety messages will tell you what the potential hazard is, tell you how to reduce the chance of injury, and tell you what can
happen if the instructions are not followed.
follow instructions.
You
can be killed or seriously injured if you don't
instructions.
follow
IMPORTANT SAFETY INSTRUCTIONS
WARNING: When using the dishwasher, follow basic precautions, including the following:
Read all instructions before using the dishwasher.
Use the dishwasher only for its intended function.
Use only detergents or rinse agents recommended for use in
a dishwasher, and keep them out of the reach of children.
When loading items to be washed:
1) Locate sharp items so that they are not likely to damage
the door seal; and
2) Load sharp knives with the handles up to reduce the risk
of cut-type injuries.
Do not wash plastic items unless they are marked
“dishwasher safe” or the equivalent. For plastic items not so
marked, check the manufacturer's recommendations.
Do not touch the heating element during or immediately after
use.
Do not operate the dishwasher unless all enclosure panels
are properly in place.
Do not tamper with controls.
Do not abuse, sit on, or stand on the door, lid, or dish racks
of the dishwasher.
To reduce the risk of injury, do not allow children to play in
or on the dishwasher.
Under certain conditions, hydrogen gas may be produced in
a hot water system that has not been used for two weeks or
more. HYDROGEN GAS IS EXPLOSIVE. If the hot water
system has not been used for such a period, before using
the dishwasher turn on all hot water faucets and let the
water flow from each for several minutes. This will release
any accumulated hydrogen gas. As the gas is flammable,
do not smoke or use an open flame during this time.
Remove the door or lid to the washing compartment
when removing an old dishwasher from service or
discarding it.
SAVE THESE INSTRUCTIONS
3
Page 4
GROUNDING INSTRUCTIONS
For a grounded, cord-connected dishwasher:
The dishwasher must be grounded. In the event of a
malfunction or breakdown, grounding will reduce the risk of
electric shock by providing a path of least resistance for
electric current. The dishwasher is equipped with a cord
having an equipment-grounding conductor and a grounding
plug. The plug must be plugged into an appropriate outlet
that is installed and grounded in accordance with all local
codes and ordinances.
WARNING: Improper connection of the equipment-
grounding conductor can result in a risk of electric shock.
SAVE THESE INSTRUCTIONS
Do not use dishwasher until completely installed.
Do not push down on open door.
Doing so can result in serious injury or cuts.
Check with a qualified electrician or service representative
if you are in doubt whether the dishwasher is properly
grounded. Do not modify the plug provided with the
dishwasher; if it will not fit the outlet, have a proper outlet
installed by a qualified electrician.
For a permanently connected dishwasher:
The dishwasher must be connected to a grounded metal,
permanent wiring system, or an equipment-grounding
conductor must be run with the circuit conductors and
connected to the equipment-grounding terminal or lead on
the dishwasher.
WARNING
Tip Over Hazard
State of California Proposition 65 Warnings:
WARNING: This product contains one or more chemicals known to the State of California to cause cancer.
WARNING: This product contains one or more chemicals known to the State of California to cause birth defects or other
reproductive harm.
4
Page 5
What’s New in Your Dishwasher
P
U
S
H
W
D
O
N
U
&
T
R
N
L
O
C
K
U
N
L
O
C
K
Energy
Congratulations on purchasing your water and energy efcient dishwasher! This dishwasher cleans by spraying
the dishes with water and pauses to allow the detergent to soak into and release the soils on the dishes. The
cycles are longer due to the soak and pauses for exceptional cleaning. Several models contain an optical water
sensor. The optical water sensor is used to determine the optimum water and energy consumption for great
cleaning performance. Efcient dishwashers run longer to save water and energy, just as driving a car slower
saves on gas. The rst cycle using the sensor will run longer to calibrate the optical sensor.
Performance
Rinse Aid
Using rinse aid will optimize your drying and wash performance.
This dishwasher is specically designed to be used with rinse aid
for improved drying performance and controlling buildup of hard
water deposits. Energy efcient dishwashers use less water and
energy, so they depend on the water “sheeting” action of rinse aid
for total optimal performance.
Detergent
The United States and Canada have passed a restriction limiting
the amount of phosphorus (phosphates) in the household
dishwasher detergents. Major manufacturers have
reformulated their dishwasher detergent for this change in
detergents as another step in eco-conscious awareness. With
these recent changes, it is recommended to use tablets and
packs for convenience and improved performance.
Filtration System
Your dishwasher has the latest technology in dishwasher ltration.
This triple ltration system minimizes sound and optimizes water
and energy conservation while providing optimal cleaning
performance. Maintenance of your lters regularly will sustain
peak cleaning performance. We suggest you clean both your
upper and lower lters and rinse them under running water at
least once a month.
5
Page 6
Quick Step
L
O
C
K
U
N
L
O
C
K
P
U
S
H
D
O
W
N
&
T
U
R
N
Prepare and load
dishwasher.
1
Spin the spray
arms. They
should turn
freely.
Add detergent and rinse aid.
2
Select a cycle and option (cycles and options
3
vary by model).
Start dishwasher.
4
For models with controls on top of the door,
select wash cycle, option, and press
START/RESUME before closing the door.
Push door rmly closed within 4 seconds of
pressing START/RESUME. The door latches automatically.
For models with front controls, select the wash cycle,
options, and press START/RESUME or press
START/RESUME to repeat the same cycle and options as in
the previous wash cycle.
Unload and
5
clean the lter.
See “Recommended
Time Interval to Clean
Your Filter” in the
“Filtration System”
section for the
recommended
cleaning schedule.
6
Page 7

Dishwasher Use
STEP 1
Prepare and Load the Dishwasher
IMPORTANT: Remove leftover food, bones, toothpicks, and
other hard items from the dishes. Remove labels from containers
before washing.
10-place setting upper rack 10-place setting lower rack
■ When loading silverware, always place sharp
items pointing down. Mix other items
pointing up and some pointing down.
Easy-to-Remove Third Level Rack
If additional space is needed in the upper rack, the third level rack
can easily be removed.
To remove, fully extend rack until it stops. Then, open the track
stops on each side and slide the rack out to remove. Low prole
items such as serving utensils and silverware may be loaded on
the third level rack.
12 -place load – upper rack
■ Make sure when the dishwasher door is closed no items
12-place load – lower rack
are blocking detergent dispenser.
■ Items should be loaded with soiled surfaces facing down and
inward to the spray as shown. This will improve cleaning and
drying results.
■ Avoid overlapping items, like bowls or plates that may trap
food.
■ Place plastics, small plates, and glasses in upper rack. Wash
only items marked “dishwasher safe.”
■ To avoid thumping/clattering noises during operation:
Load dishes so they do not touch one another. Make
sure lightweight load items are secured in racks.
■ Check that nothing blocks the upper or lower spray arms.
Items in rack can block the
spray arms.
A. Track stop B. Track
Premium Adjustable 2-Position Top Rack
You can raise or lower the top rack to t tall items in either the
top or bottom rack. Adjusters are located on each side of the top
rack.
To raise the rack:
Press both rack adjuster thumb levers and lift the rack until it is in
the up position and level.
To lower the rack:
Press both rack adjuster thumb levers and slide the rack to its
down position and level.
NOTE: The top rack must be level.
7
Page 8

STEP 2
6
5
4
3
2
-
-
-
max
fill
1
-
-
-
-
-
-
-
-
-
-
-
-
STEP 3
Add Detergent
Hinged lid style
Premeasured Detergents
High-quality premeasured tablets and packs are recommended for
improved performance.
Quality tablets and packs have been proven better than powder,
liquid, or gel detergents at reducing lming on dishes. Using tablets
and packs over time will start to reduce or eliminate white lm.
They are suitable for all hardness and soil levels. Also, by using
a rinse aid, you can minimize repeat buildup of white lm (not all
packs and tablets contain rinse aid). Always place premeasured
detergents in main compartment and close the lid.
NOTE: Follow instructions on the package when using other
dishwasher detergent types.
■ Use automatic dishwasher detergent only. Add detergent
just before starting a cycle.
■ Fresh automatic dishwasher detergent results in better
cleaning. Store tightly closed detergent container in a cool
dry place.
Powders and Gels
Water
Hardness
Soft
(0-4 grains
per U.S.
gallon)
Medium
(5-9 grains
per U.S.
gallon)
Hard
(10-14 grains
per U.S.
gallon)
*The prewash compartment is on top of the sliding door of
the dispenser.
**A full main wash compartment contains 2 Tbsp (30 ml).
IMPORTANT: Extremely hard water mineral deposits (15 grains
per U.S. gallon or more) can cause damage to your dishwasher
and make it difcult to achieve good results. A water softener is
recommended to avoid damage and achieve good results. You
may bring your water samples to Sears to check hardness level.
NOTE: Follow instructions on the package when using other
dishwasher detergent types.
8
Soil Level Prewash
Compartment*
Compartment
Light None “Soft” ll line
Normal None “Soft” ll line
Heavy Full “Soft” ll line
Light None “Soft” ll line
Normal Full Full**
Heavy Full Full**
Light Full Full**
Normal Full Full**
Heavy Full Full**
Main Wash
Add Rinse Aid
Hinged lid style
USE RINSE AID FOR
BETTER DRYING
Lock
Refill
Full
Add
IMPORTANT: Your dishwasher is designed to use rinse aid.
The use of rinse aid greatly improves drying by allowing water to
drain from the dishes after the nal rinse. Rinse aid also keeps
water from forming droplets that can dry as spots or streaks.
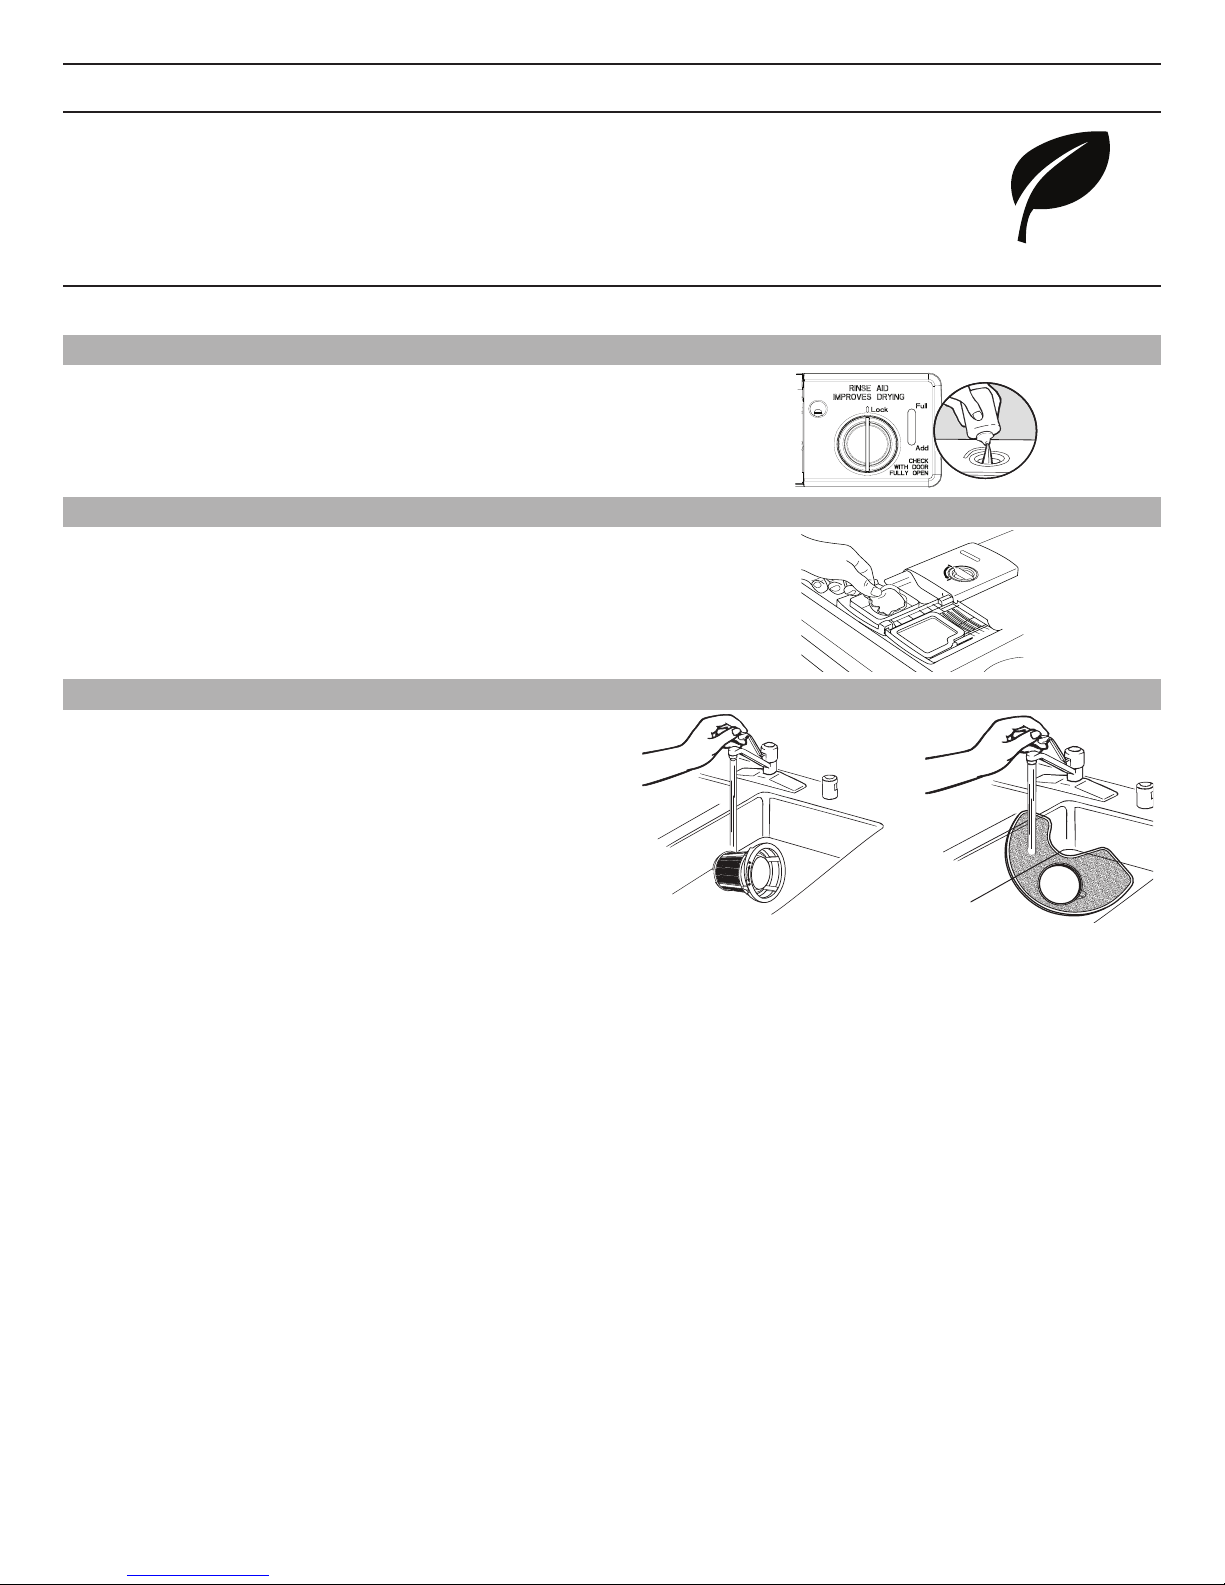
Filling the dispenser
The dispenser holds 5 oz (150 mL) of rinse
aid. Under most conditions, this will last
one to three months.
Full
Add
NOTE: Indicator reads correct ll level
when door is completely opened.
Add rinse aid to hinged lid
Lock
style dispenser by twisting
the dispenser cap ¼ turn
clockwise to open and lift
off. Pour rinse aid into the
opening until the indicator
level is at “Full.” Replace the
dispenser cap and turn to
“Lock.” Make sure cap is
fully locked.
¼ turn clockwise to lock
-
6
5
-
4
-
fill
max
-
-
-
-
3
2
1
-
-
-
-
-
-
-
Rinse Aid Setting
Your rinse aid dispenser is adjustable. For most water conditions,
the factory setting will give good results. If you have hard water
and notice calcium buildup on your dishwasher, you may want to
try a higher setting. If you notice foam in your dishwasher, use a
lower setting.
To adjust the setting:
Turn the arrow adjuster to a higher number to increase the
amount of rinse aid.
Page 9
STEP 4
STEP 5
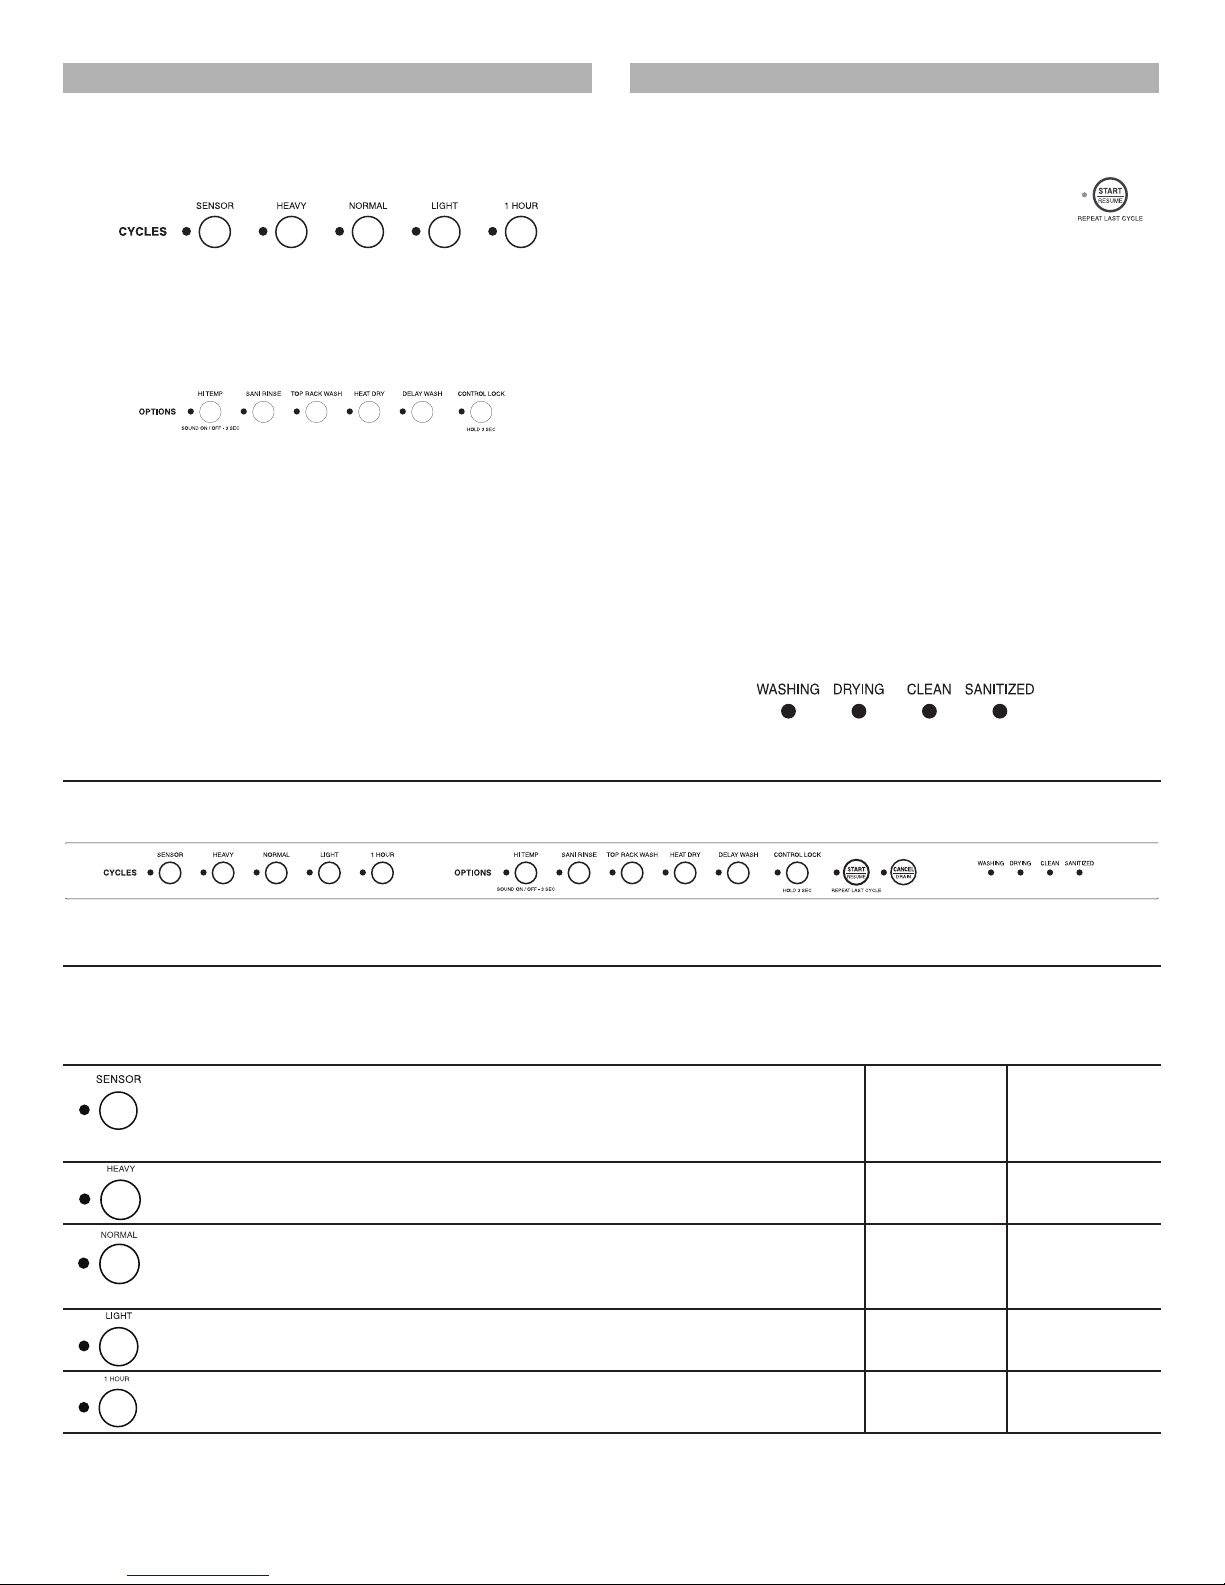
Select a Cycle (cycles vary by model)
Press and hold the desired cycle button until the corresponding
light is on. See “Cycle and Option Descriptions” charts in the
following section.
NOTE: Heavier cycles and options affect cycle length. Some
cycles and options will take up to 3¹⁄2 hours to complete.
Select Options (varies by model)
You can customize your cycles by pressing the options desired.
Start or Resume a Cycle
■ If needed, run hot water at the sink nearest your dishwasher
until the water is hot. Turn off water.
■ If the START/RESUME button is located on top of
door, push door rmly closed within 4 seconds of
pressing START/RESUME. If door is not closed
within 4 seconds, the Start button LED will ash, an
audible tone will be heard, and cycle will not start.
IMPORTANT: If anyone opens the door (such as, for adding a
dish, even during the Delay Hours option), the START/RESUME
button must be pressed each time.
■ If your START/RESUME button is located on front of door,
push door rmly closed. The door latches automatically.
Select the wash cycle, options and press START/RESUME or
press START/RESUME to repeat the same cycle and options
as in previous wash cycle.
■ You can add an item at the beginning of the cycle. Open the
door slowly and add the item. Press the START/RESUME
keypad and close the door rmly within 4 seconds. If the door
has been open more than 4 seconds the LED will ash, a tone
will sound and the dishwasher will not resume unless you
press START/RESUME again.
■ The Clean indicator glows when the cycle is nished.
Sanitized glows when Sani Rinse option is selected and
sanitization levels occur.
CYCLE SELECTIONS
This cycle senses the load size, soil amount, and toughness of soil, to adjust the cycle
for improved cleaning, using only the amount of water and energy needed. The Sensor
cycle is automatically selected if you rst press the START/RESUME button.*
Use for hard-to-clean, heavily soiled pots, pans, casseroles, and tableware. 2:20 to 3:30 8.4
This cycle is recommended for daily, regular, or typical use to completely wash
and dry a full load of normally soiled dishes. This dishwasher’s government energy
certications were based on the Normal cycle with only the Heat Dry option selected.**
Use for lightly soiled items or china and crystal. Includes a heated drying option. 1:45 to 3:30 2.7 to 7.9
For fast results, 1 Hour wash will clean dishes using slightly more water and energy.
Select the Heat Dry option to provide best dry performance.
Cycle and Option Descriptions
CYCLES ESTIMATED
WATER USAGE
WASH TIME
W/O OPTIONS
GALLONS
(LITERS)
2:30 to 3:30 3.8 to 7.7
(14.4 to 29.3)
(31.7)
1:50 to 3:30 2.7 to 7.9
(10.4 to 30.0)
(10.4 to 30.0)
1:00 6.2
(23.5)
*The government energy certications are not based on this cycle. See the Normal cycle description for the government energy
certication cycle. Using the Sensor cycle may increase your energy usage.
**No other washing and drying temperature options were selected, and the dishwasher was not subjected to truncated testing. Rinse aid
was not used, and there was no detergent used in the prewash.
9
Page 10

OPTION SELECTIONS
OPTIONS CAN BE
Raises main wash temperature to improve cleaning for
loads containing tough, baked-on food.
Sanitizes dishes and glassware in accordance with NSF
International NSF/ANSI Standard 184 for Residential
Dishwashers. Certied residential dishwashers are not
intended for licensed food establishments. Only sanitizing
cycles have been designed to meet the requirements of
the NSF/ANSI 184 performance standard for soil removal
and for sanitization efcacy. There is no intention, either
directly or indirectly, that all cycles on a NSF/ANSI 184
certied dishwasher meet the NSF/ANSI 184 performance
standard for soil removal and for sanitization efcacy.
At end of the cycle, the “Sanitized” indicator will glow. If
your load did not properly sanitize, the indicator will ash
at the end of the cycle. This can happen if the cycle is
interrupted, or if the water does not reach the required
temperature. The light goes off when you open and close
the door or
press CANCEL.
Can be selected with any cycle for washing a small load of
dishes in the top rack.
SELECTED
WITH
Sensor
Heavy
Normal
Sensor
Heavy
Normal
Available
with any
cycle
WHAT IT DOES ADDED
TIME TO
CYCLE
Raises the main
0:00 to 0:40 0 to 3.0
wash temperature
to 130°F (54°C).
Raises the main
0:00 to 2:20 1.2 to 6.2
wash temperature
to 140°F (60°C)
and the nal rinse
temperature to
156°F (69°C).
Saves up to
0:20
ADDED
WATER
GALLONS
(LITERS)
(0 to 11.2)
(4.8 to 23.3)
0
Dries dishes with heat. This option, with the use of rinse
aid, will provides better drying performance. Plastic items
are less likely to deform when loaded in the top rack. Use
Heat Dry for optimum dry performance. Turn the Heat Dry
option off for air dry.
Delays the start of the cycle for 4 hours.
To delay the start:
1. Select a wash cycle and options.
2. Press DELAY WASH.
3. Press START/RESUME to begin 4 hour delay.
NOTE: If the door is opened (such as to add a dish), the
START/RESUME button must be pressed to resume the
delay countdown.
Any cycle Uses heating
element to speed
drying times.
Heat Dry option
defaults to On
when any cycle is
selected, except
for 1 Hour and
Rinse Only.
Available
with any
cycle
Delays the start
of a cycle for a
maximum of
4 hours.
0:10 to 0:50 0
10
Page 11
CONTROLS AND CYCLE STATUS
CONTROL PURPOSE COMMENTS
Use the Control Lock option to avoid unintended use of the dishwasher between cycles. When the Lock
indicator is lit, all buttons are disabled. The dishwasher door can still be opened/closed while the controls are
locked.
Press to start or resume a
wash cycle.
If the door is opened during a cycle or the power is interrupted, the
START/RESUME LED ashes. The cycle will not resume until the
START/RESUME keypad is pressed and the door is closed.
NOTE: Push door rmly closed within 4 seconds of pressing
START/RESUME or the dishwasher will not start. If door is not closed within
4 seconds the START/RESUME LED will ash and an audible tone will sound
when the door is closed.
To cancel a wash cycle after it
has been started.
Press to cancel a wash cycle. then, close the door rmly. The dishwasher
starts a 2-minute drain (if needed). Let the dishwasher drain completely.
To follow progress of
your dishwasher cycle.
If you select the Sani Rinse option, when the cycle is nished, the
“Sanitized” indicator glows.
If your dishwasher did not properly sanitize your dishes, the light ashes
at the end of the cycle. This can happen if the cycle is interrupted or water
could not be heated to required temperature.
The light goes off when you open and close door or press CANCEL.
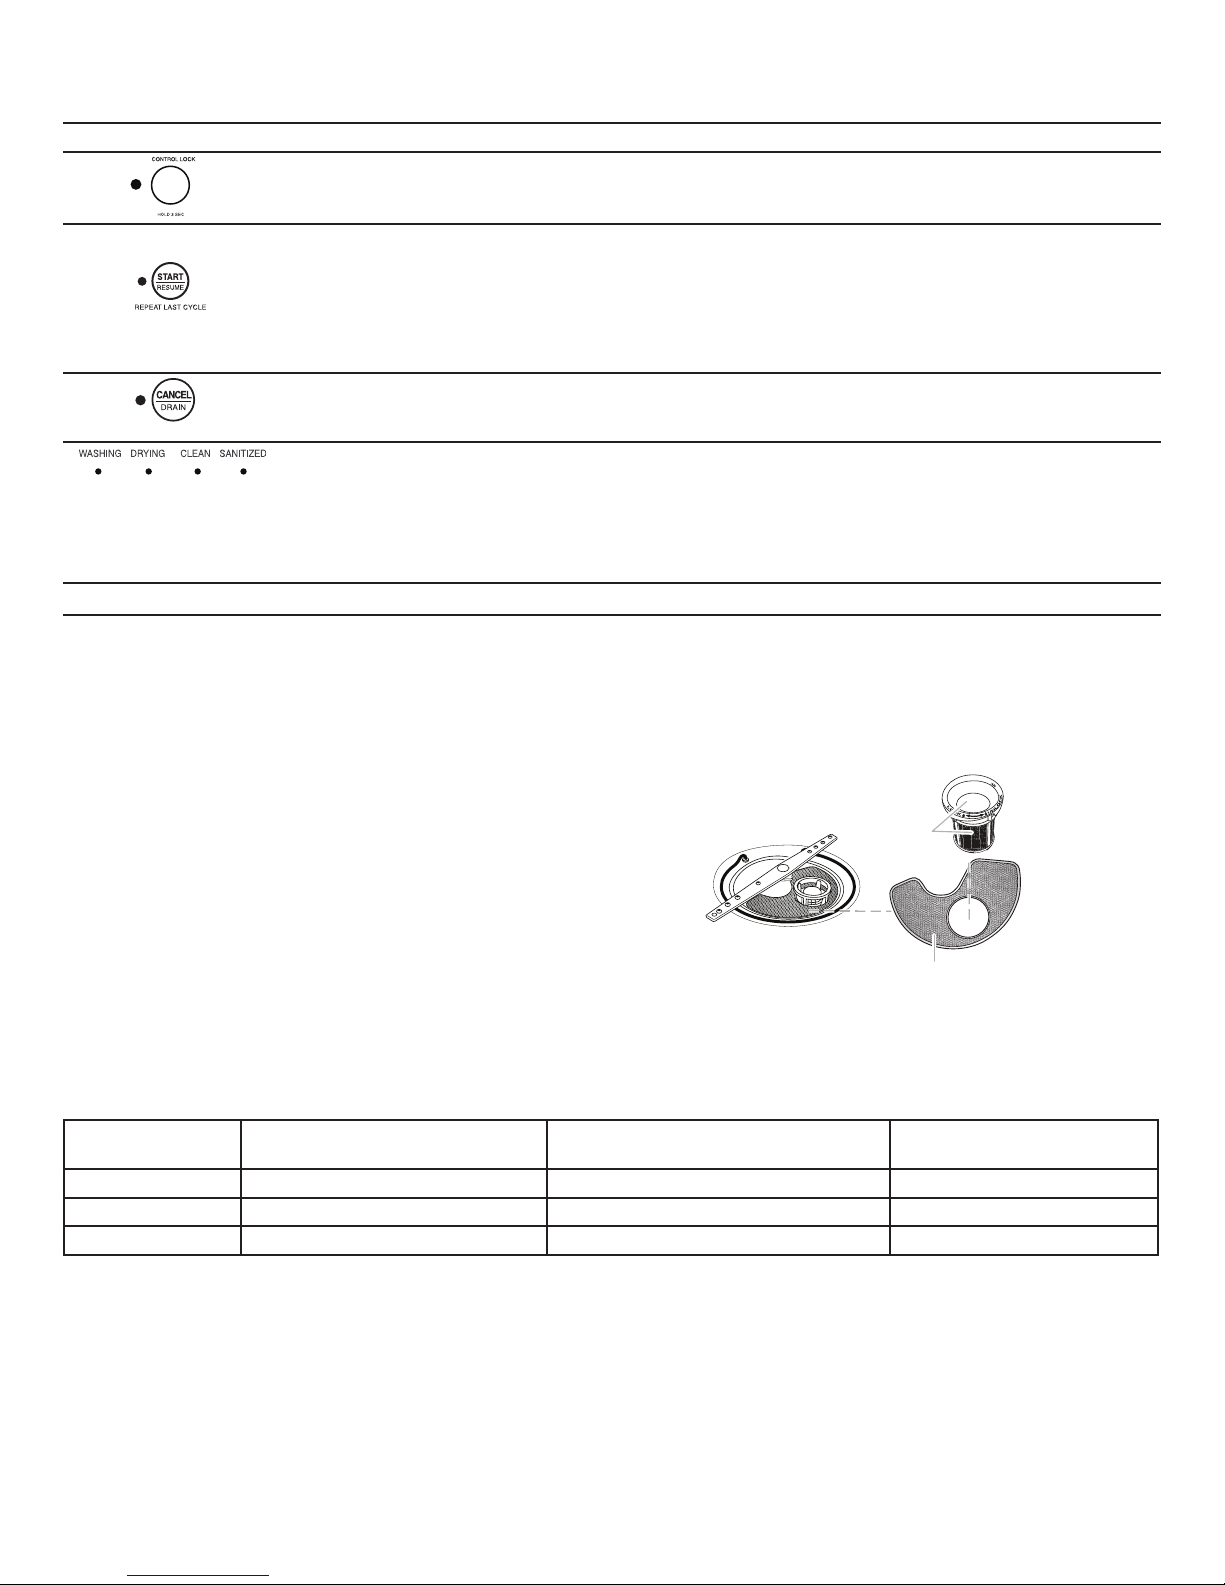
Filtration System
Your dishwasher has the latest technology in dishwasher ltration. This triple ltration system minimizes sound and optimizes water
and energy conservation while providing superior cleaning performance. Throughout the life of your dishwasher, the lter will require
maintenance to sustain peak cleaning performance.
The triple lter system consists of 2 parts, an upper lter
assembly and a lower lter.
■ The upper lter assembly keeps oversized items and foreign
objects, along with very ne food particles, out of the pump.
■ The lower lter keeps food from being recirculated onto your
dishwasher.
The lters may need to be cleaned when:
■ Visible objects or soils are on the upper lter assembly.
■ There is degradation in cleaning performance (that is, soils
still present on dishes).
■ Dishes feel gritty to the touch.
It is very easy to remove and maintain the lters. The chart below
shows the recommended cleaning frequency.
Upper filter
assembly
Lower filter
RECOMMENDED TIME INTERVAL TO CLEAN YOUR FILTER
Number of Loads
If you only scrape before loading* If you scrape and rinse before loading If you wash before loading
Per Week
8-12 Every two months Every four months Once per year
4-7 Every four months Once per year Once per year
1-3 Twice per year Once per year Once per year
*Manufacturer’s recommendation: This practice will conserve the water and energy that you would have used to prepare your dishes.
This will also save you time and effort.
Very Hard Water
If you have hard water (above 15 grains), clean your lter at least
once per month. Building up of white residue on your dishwasher
indicates hard water. For tips on removing spots and stains, see
the “Troubleshooting” section.
11
Page 12

Filter Removal Instructions
P
U
S
H
W
D
O
N
U
&
T
R
N
L
O
C
K
U
N
L
O
C
K
L
O
C
K
U
N
L
O
C
K
P
U
S
H
D
O
W
N
&
T
U
R
N
1. Turn the upper lter assembly
¼ turn counterclockwise and
lift out.
2. Separate the upper lter
assembly by gently pulling apart.
3. Clean the lters as shown.
K
P
L
U
S
O
C
U
H
D
O
W
N
&
T
U
R
N
L
O
C
N
K
Cleaning Instructions
IMPORTANT: Do not use wire brush, scouring pad, etc., as they
may damage the lters.
Rinse lter under running water until most soils are removed. If
you have hard-to-remove soils or calcium deposits from hard
water, a soft brush may be required.
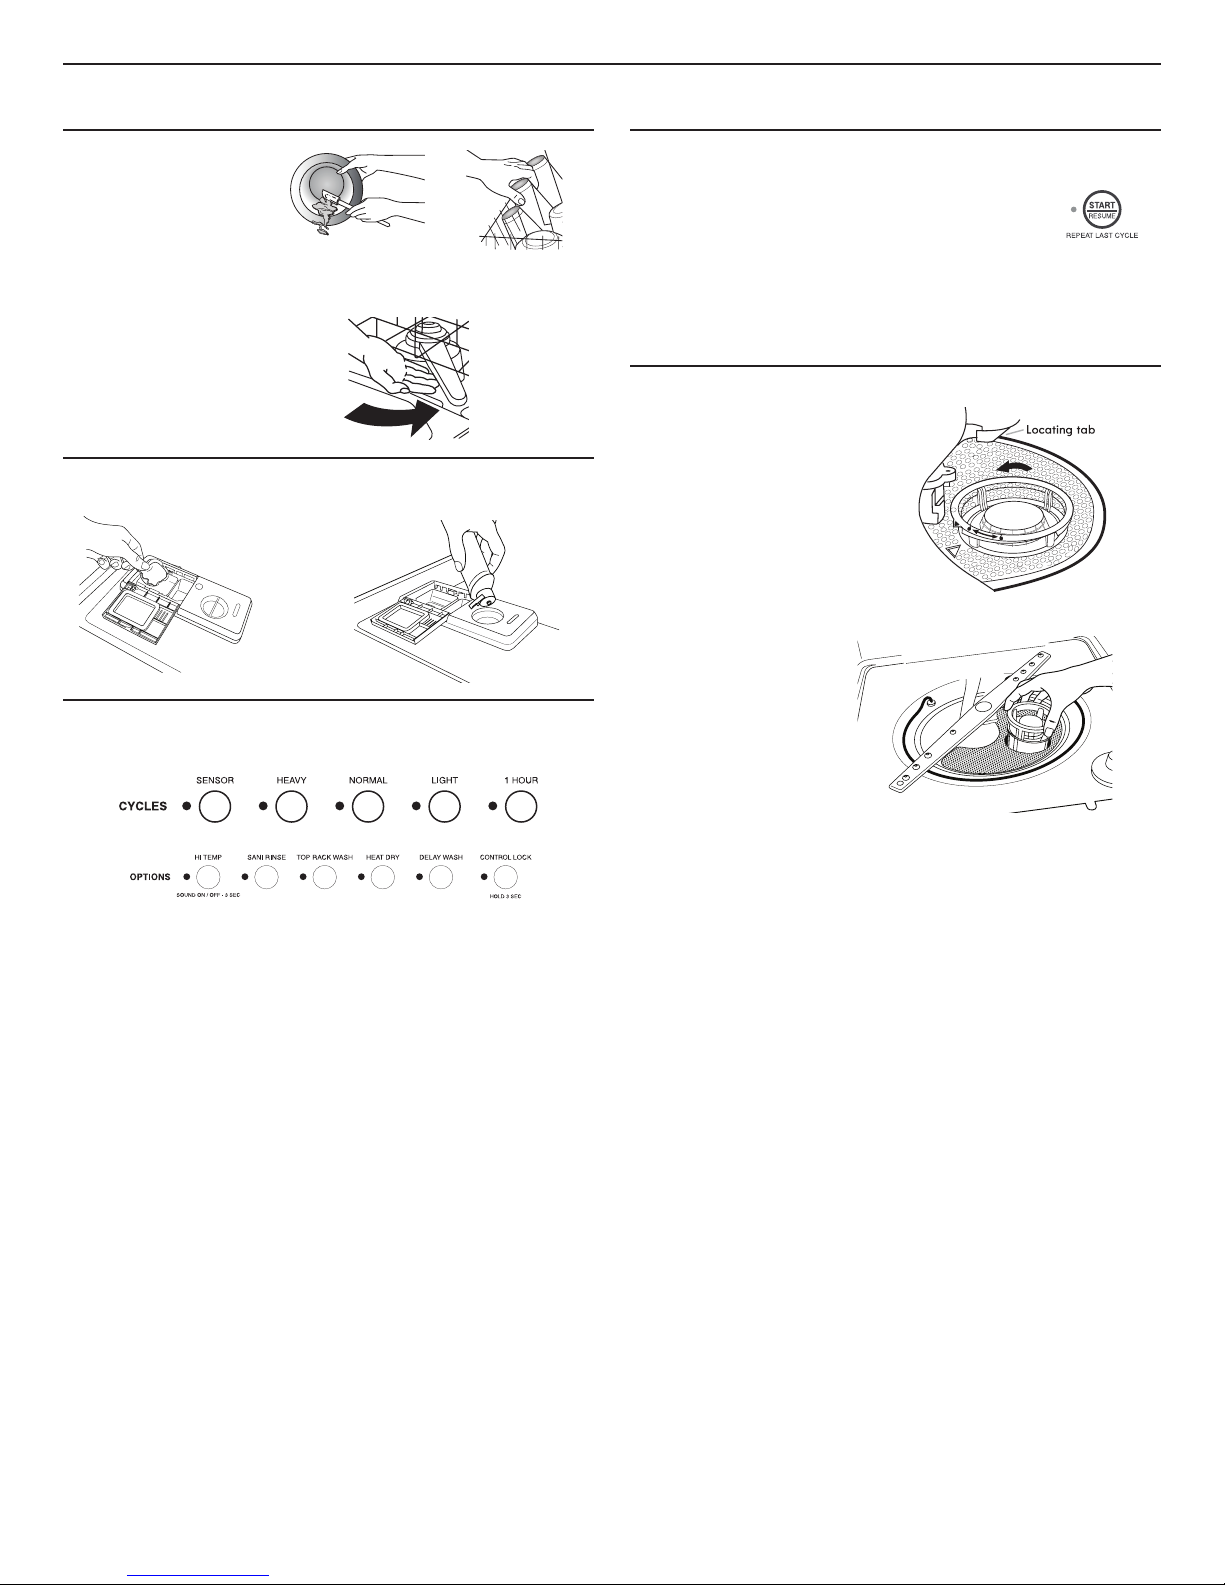
Filter Reinstallation Instructions
1. Noting the previous
illustrations, place the
lower lter under the
locating tabs in the bottom
of the dishwasher so the
round opening for the
upper lter
assembly lines up with the
round opening in the bottom
of the tub.
2. Insert the upper lter
assembly into the circular
opening in the lower lter
3. Slowly rotate the lter
clockwise until it drops into
place.Continue to rotate
until the lter is locked into
place. If the lter is not fully
seated (still turns freely),
continue to turn the lter
clockwise until it drops and
locks into place.
NOTE: The upper lter assembly
arrow does not have to align with
the arrow in the lower lter as long
as the lter is locked.
IMPORTANT: To avoid damage to dishwasher, do not operate
your dishwasher without the lters properly installed. Be sure the
lower lter is securely in place and the upper lter assembly is
locked into place. If the upper lter assembly turns freely, it is not
locked into place.
To replace upper lter assembly
Cleaning the exterior
Clean the exterior of the dishwasher with a soft, damp cloth and
mild detergent. If your dishwasher has a stainless steel exterior, a
stainless steel cleaner is recommended - Stainless Steel Cleaner
and Polish Part Number 31464.
Cleaning the interior
Clean the interior of the dishwasher with a paste of powdered
dishwasher detergent and water, or use liquid dishwasher
detergent on a damp sponge to clean the cooled-down interior.
A white vinegar rinse may remove white spots and lm. Vinegar is
an acid, and using it too often could damage your dishwasher.
Put 2 cups (500 mL) white vinegar in a glass or dishwasher-safe
2 cup capacity measuring cup on the bottom rack (do not pour).
Run the dishwasher through a complete washing cycle using
an air-dry or an energy-saving dry option. Do not use detergent.
Vinegar will mix with the wash water.
Dishwasher Maintenance Procedure
Removal of Hard Water/Filming: Recommended use of a
monthly maintenance product such as affresh®† Dishwasher
Cleaner Part Number W10282479.
■ Load your dishwasher (preferably with dishes affected by
lming/hard water).
■ Place tablet in main wash compartment of detergent
dispenser.
■ Select cycle/option best for heavily soiled dishes and start
dishwasher.
†affresh® is a registered trademark of Whirlpool, U.S.A. Used with permission.
12
Dishwasher Care
CLEANING THE DISHWASHER
NOTE: Using a premeasured detergent tablet or pack for regular
daily use is recommended.
To Reduce Risk of Property Damage During Vacation
or Extended Time Without Use
■ When you will not be using the dishwasher during the
summer months, turn off the water and power supply to the
dishwasher.
■ Make sure the water supply lines are protected against
freezing conditions. Ice formations in the supply lines
can increase water pressure and cause damage to your
dishwasher or home. Damage from freezing is not covered by
the warranty.
■ When storing your dishwasher in the winter, avoid water
damage by having your dishwasher winterized by authorized
service personnel.
Drain air gap
If you have a drain air gap,
check and clean it if the
dishwasher isn’t draining
well.
Page 13

Troubleshooting
First try the solutions suggested here or visit our website and reference FAQs (Frequently Asked Questions)
to possibly avoid the cost of a service call.
In the U.S.A., www.ikea.com In Canada, www.ikea.com
DISHWASHER IS NOT OPERATING PROPERLY
PROBLEM POSSIBLE CAUSES AND/OR SOLUTIONS
Dishwasher does not
run or stops during a
cycle
The Clean light is
ashing
Dishwasher will not ll Is the overll protection oat able to move up and down freely? Press down to release.
Is the door closed tightly and latched?
Is the right cycle selected?
Is there power to the dishwasher? Has a household fuse blown or has a circuit breaker tripped? Replace
the fuse or reset the circuit breaker. If the problem continues, call an electrician. Has the motor stopped
due to an overload? The motor automatically resets itself within a few minutes. If it does
not restart, call for service.
Is the water shut-off valve (if installed) turned on?
It is normal for certain cycles to repeatedly pause for several seconds during the main wash.
Call for service.
Dishwasher seems to
run too long
Water remains in the
dishwasher
Detergent remains in
the covered section of
the dispenser
White residue on the
front of the access
panel
Odor in the dishwasher Are dishes washed only every 2 or 3 days? Run a rinse cycle once or twice a day until you have a full load.
Condensation on the
kitchen counter
(built-in models)
The dishwasher can run up to 3¹⁄2 hours depending on soil level, water temperature, cycles, and options.
Is the water supplied to the dishwasher hot enough? The dishwasher runs longer while heating water.
Is the dishwasher cycle time within the cycle times? See cycle selections wash times. A delay
automatically occurs in some wash and rinse cycles until the water reaches the proper temperature.
This dishwasher is equipped with an optical sensor wash that detects water temperature, soil, and
detergent amount. Wash cycles are adjusted based on what is sensed.
IMPORTANT: The very rst wash cycle after installation in your home will be adjusted to include an
additional 2 rinses. This cycle must not be interrupted for proper sensor adjustment. If this adjustment
cycle is canceled or stopped before the Clean light comes on at the end of the cycle, the next wash cycle
will repeat this sensor adjustment.
Is the cycle complete?
Is the cycle complete?
Is the detergent lump free? Replace detergent if necessary.
Is the dispenser door blocked by dishes or cookware when the dishwasher door is closed?
Was too much detergent used?
Is the brand of detergent making excess foam? Try a different
brand to reduce foaming and eliminate buildup.
Does the dishwasher have a new plastic smell? Run a vinegar rinse as described in “Dishwasher Care.”
Is the dishwasher aligned with the countertop? Moisture from the vent in the dishwasher console can form
on the counter. Refer to the Installation Instructions for more information
DISHES DO NOT DRY COMPLETELY
Dishes do not dry
completely
Dishes are not dry Did you load your dishwasher to allow proper water drainage?
Did you use a rinse aid? Your dishwasher is designed to use rinse aid for good drying performance.
Without rinse aid, your dishes and dishwasher interior will have excessive moisture. The Heat Dry option
will not perform as well without rinse aid.
Do not overload. Use a liquid rinse aid to speed drying.
Are the plastics wet? Plastics often need towel drying.
Is the rinse aid dispenser empty?
Did you use an air-dry or energy-saving dry option? Use a heated drying option for dryer dishes.
PROBLEM POSSIBLE CAUSES AND/OR SOLUTIONS
Excess moisture on
racks and dishwasher
interior
Check the rinse aid indicator to see that there is rinse aid in the dispenser.
13
Page 14

SPOTS AND STAINS ON DISHES
Spotting and lming on
dishes
Silica lm or etching
(silica lm is a milky,
rainbow-colored
deposit; etching is a
cloudy lm)
White spots on
cookware with nonstick
nish
Brown stains on dishes
and dishwasher interior
Black or gray marks on
dishes
Orange stains on plastic
dishes or dishwasher
interior
Is your water hard or is there a high mineral content in your water? Conditioning the nal rinse water with
a liquid rinse aid helps eliminate spotting and lming. Keep the rinse aid dispenser lled. Always use a
high-temp option. If your water hardness is 13 grains or above, it is strongly recommended that you install
a home water softener. If you do not wish to drink softened water, have the softener installed onto your hot
water supply.
Is the water temperature too low? For best dishwashing results, water should be 120°F (49°C) as it enters
the dishwasher.
Did you use the correct amount of effective detergent? Use recommended dishwasher detergents only.
Do not use less than 1 tbs (15 g) per load. Detergent must be fresh to be effective. Heavy soil and/or hard
water generally require extra detergent.
Is the home water pressure high enough for proper dishwasher lling? Home water pressure should be 20
to 120 psi (138 to 828 kPa) for proper dishwasher ll. If you have questions about your water pressure, call
a licensed, qualied plumber.
NOTE: To remove spots and lm from glassware, remove all silverware and metal items and see
“Dishwasher Maintenance Procedure” in the “Dishwasher Care” section.
Sometimes there is a water/chemical reaction with certain types of glassware. This is usually caused by
some combination of soft or softened water, alkaline washing solutions, insufcient rinsing, overloading
the dishwasher, and the heat of drying. It might not be possible to avoid the problem, except by handwashing.
To slow this process, use a minimum amount of detergent but not less than 1 tbs (15 g) per load. Use
a liquid rinse aid and underload the dishwasher to allow thorough rinsing. Silica lm and etching are
permanent and cannot be removed. Do not use heated drying.
Has the dishwasher detergent removed cookware seasoning?
Reseason cookware after washing it in the dishwasher.
Does your water have high iron content? Rewash dishes using 1-3 tsp (5-15 mL) of citric acid crystals
added to the covered section of the detergent dispenser. Do not use detergent.
Follow with a Normal wash cycle with detergent. If treatment is needed more often than every other month,
the installation of an iron removal unit is suggested.
Are aluminum items rubbing dishes during washing?
Disposable aluminum items can break down in the dishwasher and cause marking. Hand wash these
items.
Remove aluminum markings by using a mild abrasive cleaner
Are large amounts of tomato-based foods on dishes placed in the dishwasher? It may be necessary to
use a stain removal product to remove stains from your dishwasher. Stains will not affect dishwasher
performance.
NOISES
Grinding, grating,
crunching, or buzzing
sounds
A hard object has entered the wash module (on some models).
When the object is ground up, the sound should stop. If the noise persists after a complete cycle, call for
service.
DISHES ARE NOT COMPLETELY CLEAN
Food soil left on the
dishes
14
Is the dishwasher loaded correctly?
Did you choose the cycle that describes the most difcult soil in your dishwasher? If you have some
items with heavier soils, use a heavier cycle. Is the water temperature too low? For best dishwashing
results, water should be 120°F (49°C) as it enters the dishwasher. Did you use the correct amount of fresh
detergent? Use recommended dishwasher detergents only. Do not use less than 1 tbs (15 g) per load.
Detergent must be fresh to be effective. Heavy soil and/or hard water generally require extra detergent.
Is detergent caked in dispenser? Use fresh detergent only. Do not allow detergent to sit for several hours
in a wet dispenser. Clean dispenser when caked detergent is present.
Is the pump or spray arm clogged by labels from bottles and cans?
Is the home water pressure high enough for proper dishwasher lling? Home water pressure should be 20
to 120 psi (138 to 828 kPa) for proper dishwasher ll. If you have questions about your water pressure, call
a licensed, qualied plumber.
Are high suds slowing the wash arm? Do not use soap or laundry detergents. Use recommended
dishwasher detergents only.
Page 15

DISHES ARE DAMAGED DURING A CYCLE
PROBLEM POSSIBLE CAUSES AND/OR SOLUTIONS
Chipping of dishes Did you load the dishwasher properly? Load the dishes and glasses so they are stable and do not strike
together from washing action. Minimize chipping by moving the rack in and out slowly.
NOTE: Antiques, feather-edged crystal, and similar types of china and glassware might be too delicate for
automatic dishwashing. Wash by hand.
15
Page 16

INSTRUCTIONS D’UTILISATION
DU LAVE-VAISSELLE
Merci d’avoir choisi les appareils électroménagers IKEA®.
Notre compagnie respecte les meilleures normes de qualité et nous attachons une grande importance à ce que l’acquisition d’un produit
IKEA® constitue pour vous une expérience positive.
Pour votre commodité, nous vous fournissons un manuel d’instructions facile à utiliser. Ces instructions comprennent une section
“Dépannage” pour vous aider à surmonter tout problème que vous pourriez rencontrer.
Préparez vos numéros de modèle et de série complets. Vous trouverez les numéros de modèle et de série sur l’étiquette située près de
la porte sur le côté droit ou gauche de l’intérieur du lave-vaisselle.
Pour toute question concernant l’application de la garantie, ne pas rapporter l’appareil au magasin. Veuillez nous contacter aux É.-U.
ouau Canada au 1866664-2449.
Ce produit est couvert par une garantie limitée – Consultez la section “Garantie” pour des détails complets. Les appareils IKEA® sont
couverts par une garantie de 5 ans (hormis les appareils de la série LAGAN – voir la garantie pour des détails concernant les modalités
de garantie).
REMARQUE: Une preuve d’achat est obligatoire pour obtenir l’application de la garantie.
TABLE DES MATIÈRES
GARANTIE DES GROS APPAREILS MÉNAGERS IKEA .........18
ASSISTANCE OU SERVICE ......................................................19
SÉCURITÉ DU LAVE-VAISSELLE ............................................ 19
QUOI DE NEUF DANS VOTRE LAVE-VAISSELLE .................. 21
ÉTAPES RAPIDES ..................................................................... 22
UTILISATION DU LAVE-VAISSELLE ........................................ 23
DESCRIPTION DES PROGRAMMES ET OPTIONS ................ 26
SYSTÈME DE FILTRATION .......................................................29
ENTRETIEN DU LAVE-VAISSELLE .......................................... 30
DÉPANNAGE .............................................................................31
W11212416C
16
Page 17

Garantie des gros appareils ménagers IKEA
Pendant combien de temps la garantie limitée IKEA est-elle valide?
Cette garantie limitée est valide pendant cinq ans à compter de la date d’achat lorsque ce gros appareil ménager a été utilisé et entretenu
conformément aux instructions jointes au produit ou fournies avec celui-ci, sauf si l’appareil porte le nom LAGAN, auquel cas cette garantie
limitée est valide pendant deux ans à compter de la date d’achat. Cette garantie limitée est valide uniquement aux États-Unis ou au Canada et
s’applique exclusivement lorsque le gros appareil ménager est utilisé dans le pays où il a été acheté. Une preuve de la date d’achat initial est
exigée pour obtenir un dépannage dans le cadre de la présente garantie limitée.
Quels sont les gros appareils ménagers non couverts par la garantie limitée IKEA de cinq (5) ans?
Pour les gros appareils ménagers portant le nom “LAGAN”, cette garantie limitée est valide pendant deux ans à compter de la date d’achat.
Qui effectuera l’entretien ou la réparation?
Cette garantie limitée est fournie par Whirlpool Corporation ou Whirlpool Canada LP (ci-après désignées “Whirlpool”). L’entretien doit
être effectué par une entreprise de service désignée par Whirlpool.
Que couvre cette garantie limitée?
La garantie limitée paiera pour les pièces spéciées par l’usine et la main-d’œuvre pour corriger les vices de matériaux ou de fabrication qui
existaient déjà lorsque ce gros appareil ménager a été acheté. Les exceptions gurent sous le titre “Quels sont les éléments non couverts
par cette garantie limitée?”.
Quelles mesures seront prises pour corriger le problème?
La compagnie de service désignée examinera le produit et décidera, à sa seule discrétion, si ce produit est couvert par cette garantie
limitée ou non. S’il est considéré comme couvert, la compagnie de service désignée corrigera le défaut. Le seul et exclusif recours du
client dans le cadre de la présente garantie limitée consiste en la réparation du produit comme mentionné dans la présente.
Quels sont les éléments non couverts par cette garantie limitée?
■ Les visites de service pour rectier l’installation du gros appareil ménager, montrer à l’utilisateur comment utiliser le gros appareil
ménager, remplacer ou réparer des fusibles du domicile ou rectier le câblage ou la plomberie du domicile.
■ Les interventions de dépannage pour réparer ou remplacer les ampoules électriques, les ltres à air ou les ltres à eau de l’appareil.
Les pièces consomptibles ne sont pas couvertes par la garantie.
■ Les pièces de rechange ou la main-d’œuvre, lorsque ce gros appareil ménager est utilisé à des ns autres que l’usage domestique
unifamilial normal ou lorsque les instructions d’installation, de fonctionnement ou d’utilisation fournies ne sont pas respectées.
■ Les dommages imputables aux: accident, modication, usage impropre ou abusif, incendie, inondation, catastrophe naturelle,
mauvaise installation ou installation non conforme aux codes d’électricité ou de plomberie ou l’utilisation de pièces consomptibles
ou de produits de nettoyage dont l’utilisation n’est pas approuvée.
■ Les défauts d’apparence, notamment les éraures, traces de choc, ssures ou tout autre dommage subi par le ni du gros appareil
ménager, à moins que ces dommages ne résultent de vices de matériaux ou de fabrication et ne soient signalés dans les 30 jours
quisuivent la date d’achat.
■ Toute perte d’aliments ou de médicaments due à une défaillance du réfrigérateur ou du congélateur.
■ Enlèvement et livraison. Ce gros appareil ménager est conçu pour être réparé au domicile.
■ Les réparations aux pièces ou systèmes résultant d’une modication non autorisée faite à l’appareil.
■ Les frais de déplacement et de transport pour une intervention sur un produit si le gros appareil ménager est situé dans une région
éloignée où un service d’entretien autorisé n’est pas disponible.
■ L’enlèvement et la réinstallation du gros appareil ménager si celui-ci est installé dans un endroit inaccessible ou n’est pas installé
conformément aux instructions d’installation fournies.
■ Les pièces de rechange ou la main-d’œuvre pour les gros appareils ménagers dont les numéros de modèle/de série ont été enlevés,
modiés ou ne peuvent pas être facilement identiés.
Le coût d’une réparation ou d’un remplacement dans le cadre de ces circonstances exclues est à la charge du client.
Clause d’exonération de responsabilité au titre des garanties implicites
LES GARANTIES IMPLICITES, Y COMPRIS LES GARANTIES APPLICABLES DE QUALITÉ MARCHANDE OU D’APTITUDE À UN USAGE
PARTICULIER, SONT LIMITÉES À CINQ ANS (À DEUX ANS POUR LES GROS APPAREILS MÉNAGERS PORTANT LE NOM “LAGAN”) OU À
LA PLUS COURTE PÉRIODE AUTORISÉE PAR LA LOI. Certains États et certaines provinces ne permettent pas de limitation sur la durée
des garanties implicites de qualité marchande ou d’aptitude à un usage particulier, de sorte que la limitation ci-dessus peut ne pas être
applicable dans votre cas. Cette garantie vous confère des droits juridiques spéciques et vous pouvez également jouir d’autres droits
qui peuvent varier d’une juridiction à l’autre.
Limitation des recours; exclusion des dommages fortuits et indirects
VOTRE SEUL ET EXCLUSIF RECOURS DANS LE CADRE DE LA PRÉSENTE GARANTIE LIMITÉE CONSISTE EN LA RÉPARATION
PRÉVUE CI-DESSUS. WHIRLPOOL NE SERA PAS TENUE RESPONSABLE DES DOMMAGES DIRECTS OU INDIRECTS. Certains États
et certaines provinces ne permettent pas l’exclusion ou la limitation des dommages fortuits ou indirects de sorte que ces limitations et
exclusions peuvent ne pas être applicables dans votre cas. Cette garantie vous confère des droits juridiques spéciques et vous pouvez
également jouir d’autres droits qui peuvent varier d’une juridiction à l’autre.
Comment nous contacter si vous avez besoin d’une intervention d’entretien ou de réparation
Si vous résidez à l’extérieur des 50 États des États-Unis et du Canada, contactez votre marchand IKEA autorisé pour déterminer si
uneautre garantie s’applique.
17
01/17
Page 18

Assistance ou service
Si vous n’avez pas accès à Internet et que vous avez besoin d’aide pour l’utilisation de votre produit ou si vous voulez prendre rendezvous pour une visite de service, vous pouvez contacter IKEA au numéro ci-dessous.
Vous devez disposer du numéro de modèle complet. Vous trouverez les numéros de modèle et de série sur l’étiquette située près de la
porte sur le côté droit ou gauche de l’intérieur du lave-vaisselle.
Pour de l’aide ou un dépannage aux États-Unis ou au Canada, composez le 1866664-2449.
Si vous avez besoin de plus d’assistance, vous pouvez écrire à IKEA en soumettant vos questions ou problèmes àl’adresse ci-dessous:
Aux États-Unis:
Whirlpool Brand Home Appliances
Customer eXperience Center
553 Benson Road
Benton Harbor, MI 49022-2692
Veuillez indiquer dans votre correspondance un numéro de téléphone où l’on peut vous joindre dans la journée.
Veuillez conserver les Instructions d’utilisation et le numéro de modèle pour référence ultérieure.
Au Canada:
Whirlpool Brand Home Appliances
Customer eXperience Centre
200 – 6750 Century Ave.
Mississauga, Ontario L5N 0B7
Sécurité du lave-vaisselle
Votre sécurité et celle des autres est très importante.
Nous donnons de nombreux messages de sécurité importants dans ce manuel et sur votre appareil ménager. Assurez-vous de
toujours lire tous les messages de sécurité et de vous y conformer.
Voici le symbole d’alerte de sécurité.
Ce symbole d’alerte de sécurité vous signale les dangers potentiels de décès et de blessures graves à vous
et à d’autres.
Tous les messages de sécurité suivront le symbole d’alerte de sécurité et le mot “DANGER” ou
“AVERTISSEMENT”. Ces mots signifient :
Risque possible de décès ou de blessure grave si vous ne
DANGER
AVERTISSEMENT
Tous les messages de sécurité vous diront quel est le danger potentiel et vous disent comment réduire le risque de blessure et
ce qui peut se produire en cas de non-respect des instructions.
suivez pas immédiatement les instructions.
Risque possible de décès ou de blessure grave si vous
ne suivez pas les instructions.
IMPORTANTES INSTRUCTIONS DE SÉCURITÉ
AVERTISSEMENT :
Lire toutes les instructions avant d’utiliser le lave-vaisselle.
Utiliser le lave-vaisselle uniquement pour laver de la vaisselle.
Utiliser seulement des détergents et agents de rinçage
recommandés pour les lave-vaisselle. Garder ces produits
hors de la portée des enfants.
Lors du chargement d’articles à laver :
1) Placer les articles coupants pour qu’ils ne risquent pas
d’endommager le joint de la porte; et
2) Placer les couteaux poignée vers le haut pour réduire
les risques de blessure.
Ne pas laver d’articles en plastique, sauf s’il est indiqué
“lavable au lave-vaisselle” ou une mention équivalente. Pour
les articles en plastique qui ne sont pas ainsi identifiés,
vérifier les recommandations du fabricant.
Ne pas toucher les éléments chauffants pendant ou
immédiatement après l’utilisation.
Ne pas mettre en marche le lave-vaisselle si un panneau
de l’enceinte n’est pas correctement installé.
Lors de l’utilisation de ce lave-vaisselle, il convient d’observer certaines précautions fondamentales,
dont :
Ne pas effectuer d’intervention non autorisée sur les
commandes.
Ne pas abuser de, s’asseoir sur ou se mettre debout sur la
porte, le couvercle ou les paniers à vaisselle du lave-vaisselle.
Pour réduire les risques de blessure, ne pas laisser les
enfants jouer dans ou près du lave-vaisselle.
Dans certaines conditions, un système d’eau chaude qui
n’a pas été utilisé depuis 2 semaines ou plus peut produire
de l’hydrogène. L’HYDROGÈNE EST UN GAZ EXPLOSIF. Si
le système d’eau chaude est resté inutilisé pendant une
telle période, ouvrir tous les robinets d’eau chaude et laisser
l’eau s’en écouler pendant plusieurs minutes avant d’utiliser
le lave-vaisselle. Ceci libérera toute accumulation
d’hydrogène. Le gaz est inflammable : ne pas fumer ou
utiliser une flamme nue durant cette période.
Enlever la porte ou le couvercle du compartiment de
lavage lorsqu’on cesse d’utiliser un vieux lave-vaisselle
ou qu’on le jette.
CONSERVER CES INSTRUCTIONS
18
Page 19

INSTRUCTIONS DE LIAISON À LA TERRE
Pour un lave-vaisselle avec liaison à la terre et cordon
d’alimentation :
Ce lave-vaisselle doit être relié à la terre En cas d’anomalie
de fonctionnement ou de panne, la liaison à la terre réduira
le risque de décharge électrique en offrant au courant
électrique un itinéraire d’évacuation de moindre résistance.
Le lave-vaisselle est doté d’un cordon électrique
comportant un conducteur de mise à la terre d’équipement
et une fiche de branchement de liaison à la terre. La fiche
doit être branchée à une prise de courant appropriée, bien
installée et reliée à la terre conformément à tous les codes
et règlements locaux.
AVERTISSEMENT : Un raccordement inapproprié du
conducteur de mise à la terre de l’équipement peut causer
un risque de décharge électrique.
CONSERVER CES INSTRUCTIONS
AVERTISSEMENT
Ne pas utiliser le lave-vaisselle avant qu’il ne soit complètement installé.
Ne pas appuyer sur la porte ouverte.
Le non-respect de cette instruction peut causer des blessures ou des coupures graves.
Vérifier avec un électricien ou un représentant de service
qualifié en cas de doute quant à la qualité de la liaison à la
terre du lave-vaisselle. Ne pas modifier la fiche fournie
avec ce lave-vaisselle; si elle ne correspond pas à la prise
de sortie, faire installer une prise appropriée par un
électricien qualifié.
Pour un lave-vaisselle branché en permanence :
Le lave-vaisselle doit être raccordé à un système de
câblage permanent en métal relié à la terre; si ce n’est pas
le cas, un conducteur de mise à la terre d’équipement doit
être en fonction avec les conducteurs de circuit et
raccordés à la borne de mise à la terre d’équipement ou la
borne sur le lave-vaisselle.
Risque de basculement
Avertissements de la proposition 65 de l'État de Californie :
AVERTISSEMENT : Ce produit contient au moins un produit chimique connu par l’État de Californie pour être à l’origine de
cancers.
AVERTISSEMENT : Ce produit contient au moins un produit chimique connu par l’État de Californie pour être à l’origine de
malformations et autres déficiences de naissance.
19
Page 20

Quoi de neuf dans votre lave-vaisselle
P
U
S
H
W
D
O
N
U
&
T
R
N
L
O
C
K
U
N
L
O
C
K
Énergie
Félicitations pour l’achat de votre lave-vaisselle éconergique à faible consommation d’eau! Pour nettoyer les
articles, ce lave-vaisselle asperge la vaisselle d’eau, puis fait une pause pour permettre au détergent d’imprégner
et de dissoudre les saletés. Les périodes de trempage et de pause prolongent la durée des programmes pour un
nettoyageexceptionnel. Plusieurs modèles comportent un capteur optique d’eau. Le capteur optique d’eau détermine
le niveau de consommation d’eau et d’énergie optimal pour un meilleur nettoyage. Les lave-vaisselle éconergiques
fonctionnent plus longtemps pour économiser de l’eau et de l’énergie, tout comme une vitesse de conduite réduite
permet d’économiser du carburant. Le calibrage du capteur optique entraînera l’allongement du premier programme qui l’utilise.
Performance
Agent de rinçage
Utiliser un agent de rinçage pour une performance de lavage et de
séchage optimale. An d’améliorer la performance de séchage et
de limiter l’accumulation de dépôts d’eau dure, ce lave-vaisselle
est spéciquement conçu pour être utilisé avec un agent de
rinçage. Les lave-vaisselle éconergiques consomment moins
d’eauet d’énergie. Ils dépendent donc de l’effet “nappe d’eau”
d’un agent de rinçage pour une performance optimale.
Détergent
Les États-Unis et le Canada ont voté une restriction limitant la
quantité de phosphore (phosphates) présent dans les détergents
domestiques pour lave-vaisselle. Suite à ce changement concernant
les détergents, les plus gros fabricants ont reformulé leurs détergents
pour lave-vaisselle, améliorant ainsi la conscience environnementale.
En raison de ces récents changements, il est recommandé d’utiliser
des pastilles et sachets pour lave-vaisselle pour un plus grand
confort d’utilisation et une meilleure performance.
Système de ltration
Ce lave-vaisselle est équipé de la plus récente technologie en
matière de ltration. Ce système de triple ltration réduit le niveau
sonore et optimise le niveau de consommation d’eau et d’énergie
tout en permettant un nettoyage optimal. Pour une performance
denettoyage optimale, entretenir régulièrement les ltres.
Noussuggérons à l’utilisateur de nettoyer les ltres supérieur
etinférieur et de rincer le système sous le robinet au moins
unefoispar mois.
20
Page 21

Étapes rapides
Préparer et charger
1
le lave-vaisselle.
Faire tournoyer les bras
d’aspersion. Ils doivent
pouvoir tourner librement.
Ajouter du détergent et de l’agent de rinçage.
2
Sélectionner un programme ou une option
3
(lesprogrammes et options varient selon le modèle).
Mettre en marche le lave-vaisselle.
4
Pour les modèles dont les commandes se
trouvent au sommet de la porte, sélectionner
le programme de lavage et l’option, puis
appuyer sur START/RESUME (mise en marche/
reprise) avant de fermer la porte. Bienfermer
la porte dans un délai de 4secondes après avoir appuyé sur
START/RESUME (mise en marche/reprise). Le verrou de la
porte s’engage automatiquement. Pourles modèles avec
commandes à l’avant, sélectionner le programme de lavage
et les options souhaités puis appuyer sur START/RESUME
(miseen marche/reprise) ou appuyer sur START/RESUME
(mise en marche/reprise) pour répéter les mêmes programme
etoptions que pour le programme de lavage précédent.
Retirer le ltre et
5
lenettoyer.
Voir le point “Intervalle
recommandé pour le
nettoyage du ltre” dans
lasection “Système de
ltration de l’eau” pour
connaître la fréquence de
nettoyage recommandée.
L
O
D
H
O
S
W
U
N
P
&
T
U
R
N
C
K
K
C
U
O
L
N
21
Page 22

Utilisation du lave-vaisselle
ÉTAPE1
Préparation et chargement du lave-vaisselle
IMPORTANT: Enlever de la vaisselle les restes alimentaires,
os, cure-dents et autres articles durs. Enlever les étiquettes des
récipients avant de les laver.
Disposition pour 10 couverts –
panier supérieur
Disposition pour 10 couverts –
panier inférieur
■ Pour le chargement des couverts, les articles pointus doivent
toujours être orientés vers le bas. Orienter certains articles
vers le haut et d’autres vers le bas
lorsqu’on les place ensemble.
Panier du troisième niveau facile
à retirer (sur certains modèles)
S’il faut plus d’espace au panier supérieur, le panier du troisième
niveau peut être retiré facilement.
Pour le retirer, faire coulisser le panier complètement jusqu’à ce
qu’il s’arrête. Ensuite, ouvrir les butées du panier sur chaque
côté et soulever pour le retirer.
Les petits articles comme les ustensiles de service et les couverts
peuvent être placés dans le panier du troisième niveau.
Disposition pour 12 couverts –
panier supérieur
■ Vérier qu’aucun article ne bloque le distributeur de détergent
Disposition pour 12 couverts –
panier inférieur
lorsque la porte du lave-vaisselle est fermée.
■ Charger dans le panier les articles en orientant la surface sale
vers l’intérieur et vers le bras d’aspersion, comme illustré.
Ceci améliorera les résultats de nettoyage et de séchage.
■ Éviter le chevauchement d’articles comme les bols ou
assiettes pouvant retenir les aliments.
■ Placer les articles de plastique, les petites assiettes et les
verres dans le panier supérieur. Laver uniquement les articles
expressément “lavables au lave-vaisselle”.
■ Pour éviter les bruits sourds ou les cliquetis durant le
fonctionnement, charger la vaisselle de façon à ce que les
articles ne se touchent pas. S’assurer que les articles légers
sont bien retenus dans les paniers.
■ S’assurer que rien n’entrave le mouvement des bras
d’aspersion inférieur ou supérieur.
Les articles du panier
peuvent entraver les bras
d’aspersion.
A. Butée B. Coulisse
Panier supérieur de luxe réglable à 2 positions
Il est possible d’élever ou d’abaisser le panier supérieur pour
charger de grands articles dans le panier supérieur ou inférieur.
Des régleurs sont situés de chaque côté du panier supérieur.
Pour lever le panier :
Appuyer sur les deux régleurs du panier et soulever le panier
jusqu’à ce qu’il soit en position haute et d’aplomb.
Pour abaisser le panier :
Appuyer sur les deux régleurs du panier et faire glisser le panier
jusqu’à sa position basse et d’aplomb.
REMARQUE : Le panier supérieur doit être de niveau.
22
Page 23

Ajout de détergent
Lock
Style avec couvercle mobile
ÉTAPE2
*Le compartiment de prélavage est situé sur le dessus de la por-
te coulissante du distributeur.
**Un compartiment de lavage principal rempli contient 2 cuillerées
à soupe (30ml).
IMPORTANT: Les dépôts minéraux provenant d’une eau très dure
(au moins 15 grains par gallon américain) peuvent endommager le
lave-vaisselle et rendre un bon nettoyage difcile. On recommande
l’emploi d’un adoucisseur d’eau pour éviter tout dommage et obtenir
de bons résultats. Vous pouvez apporter des échantillons d’eau chez
Sears pour contrôler le degré de dureté de l’eau du domicile.
REMARQUE: Lors de l’utilisation d’un autre type de détergent,
procéder conformément aux instructions indiquées sur l’emballage.
ÉTAPE3
Ajout d’agent de rinçage
Style avec couvercle mobile
Détergents prémesurés
Pour de meilleurs résultats, utiliser des pastilles et des sachets
prémesurés de qualité supérieure.
Il est prouvé que les pastilles ou sachets de qualité réduisent
plus efcacement la formation de pellicule sur la vaisselle que
les détergents liquides, en poudre ou en gel. Grâce à l’utilisation
régulière de pastilles et sachets, la pellicule blanche commencera
à diminuer ou à disparaître. Ces formats conviennent parfaitement,
peu importe la dureté de l’eau et le niveau de saleté. L’utilisationd’un
agent de rinçage peut aussi contribuer à réduire la formation de
pellicule blanche (les pastilles et sachets ne contiennent pas tous un
agent de rinçage). Toujours placer les détergents prémesurés dans le
compartiment principal et fermer le couvercle.
REMARQUE: Lors de l’utilisation d’un autre type de détergent,
procéder conformément aux instructions indiquées sur l’emballage.
■ Utiliser uniquement du détergent pour lave-vaisselle
automatique. Verser le détergent juste avant de démarrer
unprogramme.
■ Pour de meilleurs résultats de lavage, il est recommandé
d’utiliser un détergent à lave-vaisselle automatique frais.
Conserver le récipient du détergent bien fermé dans un lieu
sec et frais.
Produits sous forme de poudre et de gel
Dureté de
l’eau
Eau douce
(0 à 4 grains
par gallon
américain)
Moyenne
(5 à 9 grains
par gallon
américain)
Eau dure
(10 à 14 grains
par gallon
américain)
Niveau
de saleté
Compartiment
de prélavage*
Compartiment
de lavage
principal
Léger Aucun Ligne de
remplissage min.
Normal Aucun Ligne de
remplissage min.
Très sale Remplir à sa
pleine capacité
Ligne de
remplissage min.
Léger Aucun Ligne de
remplissage min.
Normal Remplir à sa
pleine capacité
Très sale Remplir à sa
pleine capacité
Léger Remplir à sa
pleine capacité
Normal Remplir à sa
pleine capacité
Très sale Remplir à sa
pleine capacité
Remplir à sa
pleine capacité**
Remplir à sa
pleine capacité**
Remplir à sa
pleine capacité**
Remplir à sa
pleine capacité**
Remplir à sa
pleine capacité**
USE RINSE AID FOR
BETTER DRYING
Lock
Refill
Full
Add
IMPORTANT: Votre lave-vaisselle est conçu pour utiliser un
agent de rinçage. L’utilisation d’agents de rinçage améliore
nettement le séchage en permettant à l’eau de s’écouler de la
vaisselle après le rinçage nal. Un agent de rinçage empêche
aussi l’eau de former des gouttelettes qui peuvent laisser des
taches ou des coulées en séchant.
Remplissage du distributeur
La capacité du distributeur d’agent de rinçage est de 5oz
(150ml). Dans la plupart des cas, cette quantité devrait
durerenviron un à trois mois.
Full
Add
REMARQUE: L’indicateur indiquera le niveau de
remplissagecorrect lorsque la porte est complètement ouverte.
-
6
5
-
4
-
fill
max
-
-
-
-
3
2
1
-
-
-
-
-
-
-
¼ de tour dans le sens
horaire pour verrouiller
Ajouter de l’agent de rinçage au distributeur avec couvercle
mobile en tournant le bouchon du distributeur de ¼ dans le
sens horaire pour l’ouvrir et le retirer. Verser l’agent de rinçage
dans l’ouverture jusqu’à ce que l’indicateur soit sur “Full” (plein).
Remettre en place le bouchon du distributeur et le tourner jusqu’à
ce qu’il soit sur “Lock” (verrouillage). S’assurer que le bouchon
est bien verrouillé.
23
Page 24

Réglage de la quantité d’agent de rinçage
6
5
4
3
2
-
-
-
max
fill
1
-
-
-
-
-
-
-
-
-
-
-
-
Le distributeur d’agent de rinçage est réglable. Pour la plupart des
types d’eau, le réglage effectué à l’usine donne de bons résultats.
Si l’eau utilisée est dure et si l’on observe des dépôts calcaires sur
la vaisselle, essayer un réglage plus élevé. Si l’on remarque de la
mousse dans le lave-vaisselle, utiliser un réglage inférieur.
Modication du réglage:
Tourner le régleur à èche sur un chiffre plus élevé pour ajouter
davantage d’agent de rinçage.
ÉTAPE4
Sélectionner un programme (les programmes varient
selon les modèles)
Appuyer sans relâcher sur le bouton de programme souhaité
jusqu’à ce que le témoin lumineux correspondant s’allume.
Voirles tableaux “Descriptions des programmes et des options”
dans la section qui suit.
■ Si le bouton START/RESUME (mise en marche/reprise) se
trouve à l’avant de la porte, bien fermer la porte. Le verrou
de la porte s’engage automatiquement. Sélectionner le
programme de lavage et les options souhaités, puis appuyer
sur START/RESUME (mise en marche/reprise) ou appuyer
sur START/RESUME (mise en marche/reprise) pour répéter
les mêmes programme et options que pour leprogramme
delavage précédent.
■ On peut ajouter un article avant le début du programme.
Ouvrir la porte doucement et ajouter l’article. Appuyer sur la
touche START/RESUME (mise en marche/reprise) et fermer la
porte fermement dans les 4 secondes qui suivent. Si la porte
est ouverte pendant plus de 4 secondes, la DEL clignotera,
un signal sonore retentira et le lave-vaisselle ne se remettra
pas en marche à moins qu’on appuie de nouveau sur START/
RESUME (mise en marche/reprise).
■ Le témoin lumineux Clean (propre) s’allume lorsque le
programme est terminé. Sanitized (assaini) s’allume
lorsquel’option Sani Rinse (rinçage avec assainissement)
estsélectionnée et que l’assainissement est en cours.
REMARQUE: Les programmes plus intenses et les options
modient la durée du programme. L’exécution de certains
programmes et options prendra jusqu’à 3h30.
Sélectionner des options (varient selon le modèle)
Il est possible de personnaliser les programmes en appuyant
surles options désirées.
ÉTAPE5
Démarrer ou reprendre un programme
■ Au besoin, laisser couler l’eau du robinet le plus proche du
lave-vaisselle jusqu’à ce qu’elle soit chaude. Fermer le robinet.
■ Si le bouton START/RESUME (mise en marche/reprise)
se trouve sur le dessus de la porte, bien fermer
la porte dans les 4 secondes après avoir appuyé
sur la touche START/RESUME
(miseen marche/reprise). Si l’on ne ferme
pas la porte dans les 4secondes qui suivent,
la DEL du bouton de mise en marche clignote,
un signal sonore retentitet le programme ne démarre pas.
IMPORTANT: Si l’on ouvre la porte (par exemple pour ajouter
unplat, même pendant le fonctionnement de l’option Delay
Hours [mise en marche différée de plusieurs heures]), il faudra
appuyer sur le bouton START/RESUME (mise en marche/reprise)
chaquefois.
24
Page 25

SÉLECTION DES PROGRAMMES
Description des programmes et options
PROGRAMMES DURÉE DE
LAVAGE
ESTIMÉE
SANS OPTIONS
Ce programme détecte la taille de la charge, la quantité et le degré de saleté pour
adapter le programme à ces paramètres et garantir un nettoyage amélioré en
utilisant uniquement la quantité d’eau et d’énergie nécessaire. Le programme avec
capteur est automatiquement sélectionné lorsqu’on appuie sur le bouton START/
RESUME (mise en marche/reprise) en premier.
Utiliser ce programme pour les casseroles, les poêles, les cocottes et la vaisselle
ordinaire difciles à nettoyer et très sales.
Ce programme est recommandé lors d’une utilisation quotidienne ou régulière pour
laver et sécher une pleine charge de vaisselle normalement sale. La certication
énergétique gouvernementale de ce lave-vaisselle est basée sur le programme
normal avec seulement l’option Heat Dry (séchage avec chaleur).**
Utiliser ce programme pour les articles légèrement sales ou pour la porcelaine et
lecristal. Comprend une option de séchage avec chaleur.
Pour des résultats rapides, le lavage en 1 heure nettoie la vaisselle en utilisant
légèrement plus d’eau et d’énergie. Sélectionner l’option de séchage avec chaleur
pour une performance de séchage optimale.
* La certication énergétique gouvernementale est basée sur ce programme. Consulter la description du programme normal pour utiliser
la certication énergétique gouvernementale. Utiliser le programme avec capteur peut augmenter la consommation d’énergie.
**Aucune autre option de température de lavage et de séchage n’a été sélectionnée, et les évaluations n’ont pas été tronquées.
Aucunagent de rinçage ni détergent n’a été utilisé pendant le prélavage.
2:30 à 3:30 3,8 à 7,7
2h20 à 3h30 8,4
1:50 à 3:30 2,7 à 7,9
1:45 à 3:30 2,7 à 7,9
1:00 6,2
CONSOMMATION
D’EAU EN
GALLONS
(LITRES)
(14,4 à 29,3)
(31,7)
(10,4 à 30,0)
(10,4 à 30,0)
(23,5)
25
Page 26

SÉLECTION D’OPTIONS
OPTIONS PEUT ÊTRE
Augmente la température du lavage
principal pour améliorer le nettoyage
des charges comportant des résidus
alimentaires cuits ou très adhérents.
Assainit la vaisselle et la verrerie
conformément à la norme
internationaleNSF/ANSI184 pour
lave-vaisselle à usage domestique.
Les lave-vaisselle à usage domestique
certiés ne sont pas destinés aux
établissements de restauration
agréés. Seuls les programmes
d’assainissement ont été conçus pour
répondre aux exigences de la norme
NSF/ANSI184 pour l’élimination
de la saleté et l’efcacité de
l’assainissement. Tous les programmes
d’un lave-vaisselle homologué NSF/
ANSI184 n’ont pas été conçus dans
l’objectif direct ou indirect de répondre
aux exigences de la norme NSF/
ANSI184 pour l’élimination de la saleté
et l’efcacité de l’assainissement.
À la n du programme, le témoin
d’assainissement s’allume. Si la charge
n’est pas bien assainie, letémoin
clignote à la n du programme.
Cette situation peut se produire si le
programme a été interrompu ou si
l’eau n’a pas atteint la température
requise. Le voyant s’éteint lorsqu’on
ouvre et ferme la porte ou que l’on
appuie sur CANCEL (annulation).
Peut être sélectionné avec n’importe
quel programme pour nettoyer une
petite quantité de vaisselle dans le
panier supérieur.
Sèche la vaisselle à l’air chaud.
Cette option, associée à un agent
de rinçage, offrira un meilleur
rendement de séchage. Les articles
en plastique sont moins susceptibles
de se déformer si on les place
dans le panier à vaisselle supérieur.
UtilisezHeat Dry (séchage avec
chaleur) pour une performance de
séchage optimale. Pour faire sécher
les articles à l’air, désactiver l’option
Heat Dry (séchage avec chaleur).
SÉLECTIONNÉ
AVEC
Capteur
Très sale
Normal
Capteur
Très sale
Normal
Disponible
pour tous les
programmes
Tous les
programmes
DESCRIPTION DURÉE
SUPPLÉMENTAIRE
DU PROGRAMME
Augmente la
0:00 à 0:40 0 à 3,0
température du lavage
principal en la portant
à 130°F (54°C).
Augmente la
0:00 à 2:20 1,2 à 6,2
température du
lavage principal en
la portant à 140°F
(60°C) et celle
du rinçage nal à
156°F (69°C).
Sauve jusqu’à 0:20 0
Utilise l’élément
0:10 à 0:50 0
chauffant pour
accélérer la durée
de séchage.
L’optionHeat
Dry (séchage
avec chaleur) est
activée par défaut
lorsqu’un programme
est sélectionné
(n’importe quel
programme sauf
1Hour Wash
[lavageen 1 heure]
etRinse Only
[rinçageseulement]).
GALLONS D’EAU
SUPPLÉMENTAIRES
(LITRES)
(0 à 11,2)
(4,8 à 23,3)
26
Page 27

Diffère le démarrage d’un programme
jusqu’à 4 heures.
Pour différer la mise en marche:
1. Choisir un programme de lavage
Disponible
pour tous les
programmes
Diffère le démarrage
d’un programme
jusqu’à
4 heures.
etdes options.
2. Appuyer sur DELAY WASH
(lavagedifféré).
3. Appuyer sur START/RESUME
(miseen marche/reprise) pour lancer
la mise en marche du lavage différé
de 4 heures.
REMARQUE: Si la porte est ouverte
(pour ajouter un plat, par exemple),
il faut de nouveau appuyer sur le
bouton START/RESUME (mise en
marche/reprise) pour que le compte
àrebours reprenne.
STATUT DES COMMANDES ET PROGRAMMES
COMMANDE FONCTION COMMENTAIRES
Activer le verrouillage des commandes pour prévenir l’utilisation non intentionnelle du lave-vaisselle entre les
programmes. Lorsque le témoin lumineux Lock (verrouillage) est allumé, tous les boutons sont désactivés.
Ilreste possible d’ouvrir/de fermer la porte du lave-vaisselle lorsque les commandes sont verrouillées.
Appuyer sur cette touche
pour démarrer ou poursuivre
un programme de lavage.
Si l’on ouvre la porte durant un programme ou si une panne de courant
se produit, la DEL START/RESUME (mise en marche/reprise) clignote.
Leprogramme ne reprend pas avant que l’on ait appuyé sur le bouton
START/RESUME (mise en marche/reprise) et que la porte ait été fermée.
REMARQUE: Bien fermer la porte dans un délai de 4 secondes après
avoir appuyé sur START/RESUME (mise en marche/reprise), sinon le lavevaisselle ne démarre pas. Si l’on ne ferme pas la porte dans les 4 secondes
qui suivent, la DEL START/RESUME (mise en marche/reprise) clignote et un
signal sonore retentit lorsquela porte est fermée.
Pour annuler un programme
de lavage après son
démarrage
Appuyer sur ce bouton pour annuler un programme de lavage, puis fermer
laporte fermement. Le lave-vaisselle commence une vidange de 2 minutes
(au besoin). Laisser le lave-vaisselle évacuer l’eau complètement.
Pour suivre l’évolution d’un
programme de lavage.
Lorsque l’on sélectionne l’option Sani-Rinse (rinçage avec assainissement),
le témoin Sanitized (assainissement) s’allume dès que le programme est
terminé.
Si le lave-vaisselle n’a pas bien assaini la vaisselle, le témoin clignote à la n
du programme. Ceci peut se produire si le programme a été interrompu ou
si l’eau n’a pas pu être sufsamment chauffée pour atteindre la température
requise.
Le témoin s’éteint lorsqu’on ouvre et ferme la porte ou que l’on appuie sur
CANCEL (annulation).
27
Page 28

Système de filtration
Ce lave-vaisselle est équipé de la plus récente technologie en matière de ltration. Ce système de triple ltration réduit le niveau sonore
et optimise la consommation d’eau et d’énergie tout en offrant une performance de nettoyage supérieure. Le ltre doit être entretenu
tout au long de la durée de vie du lave-vaisselle pour pouvoir continuer à fonctionner au mieux de sa performance.
Le système de triple ltre comporte 2 parties, un ltre supérieur
et un ltre inférieur.
■ Le ltre supérieur permet de tenir des articles
surdimensionnés ou des objets étrangers, ainsi que
lesparticules très nes à l’écart de la pompe.
■ Le ltre inférieur empêche les aliments de se redéposer
dansle lave-vaisselle.
Les ltres devront peut-être être nettoyés lorsque:
■ Des objets ou saletés sont visibles sur le ltre supérieur.
■ La performance de nettoyage se dégrade (c.-à-d. présence
desaletés sur les plats).
■ Les plats sont rugueux au toucher.
Il est très facile de retirer et d’entretenir les ltres. Le tableau
ci-dessous indique la fréquence de nettoyage recommandée.
INTERVALLES RECOMMANDÉS POUR LE NETTOYAGE DU FILTRE
Nombre de charges
par semaine
Si vous vous contentez de gratter
les plats avant le chargement*
Si vous grattez et rincez les plats
avant le chargement
8-12 Tous les deux mois Tous les quatre mois Une fois par an
4-7 Tous les quatre mois Une fois par an Une fois par an
1-3 Deux fois par an Une fois par an Une fois par an
Filtre
supérieur
Filtre inférieur
Si vous lavez la vaisselle
avant le chargement
*Conseil du fabricant: Ceci permet d’économiser l’eau et l’énergie utilisées pour la préparation des plats. Cela épargne également du
temps et des efforts.
Eau très dure
Si l’eau du domicile est très dure (au-delà de 15 grains), nettoyer
le ltre au moins une fois par mois. L’accumulation de résidus
blancs dans le lave-vaisselle est le signe d’une eau dure.
Pour des conseils sur l’élimination des taches, voir la section
“Dépannage”.
Instructions de retrait du ltre
1. Tourner le ltre supérieur
d’un quart de tour dans
le sens antihoraire et le
soulever.
2. Séparer le ltre supérieur
en le détachant avec
précaution.
3. Nettoyer les ltres
commeindiqué.
L
O
C
K
Retrait du ltre supérieur
D
H
O
S
W
U
N
P
&
T
U
R
N
K
C
U
O
L
N
Instructions de nettoyage
IMPORTANT: Ne pas utiliser de brosse métallique, de tampon
àrécurer, ou d’objets similaires, car ils peuvent endommager
lesltres.
Rincer le ltre sous l’eau courante jusqu’à ce que la plupart
des saletés soient éliminées. Si l’on remarque la présence de
saletés ou de dépôts de calcaire causés par l’eau dure difciles
àéliminer, l’emploi d’une brosse douce sera peut-être nécessaire.
L
O
C
K
P
U
S
H
D
O
W
N
&
T
U
U
R
N
N
L
O
C
K
28
Page 29

Instructions de réinstallation du ltre
1. En s’aidant des illustrations
précédentes, placer le ltre
inférieur sous les onglets
de positionnement situés
au fond du lave-vaisselle
de sorte que l’ouverture
circulaire du ltre supérieur
soit alignée avec l’ouverture
circulaire du fond de la cuve.
2. Insérer le ltre supérieur
dans l’ouverture circulaire
du ltre inférieur.
L
O
C
K
Réinstallation du ltre supérieur
3. Faire pivoter lentement le ltre dans le sens horaire jusqu’à
ce qu’il s’insère dans le logement. Continuer à faire pivoter
le ltre jusqu’à ce qu’il s’emboîte. Si le ltre n’est pas
complètement installé (continue de tourner librement),
continuer à tourner le ltre dans le sens horaire jusqu’à
cequ’il s’insère dans le logement et s’emboîte.
REMARQUE: Du moment que le ltre est bien emboîté,
il n’est pas nécessaire que la èche du ltre supérieur soit
alignée avec celle du ltre inférieur.
IMPORTANT: An d’éviter d’endommager le lave-vaisselle,
nepas le faire fonctionner si les ltres ne sont pas correctement
installés. S’assurer que le ltre inférieur est bien en place et que
le ltre supérieur est bien emboîté. Si le ltre supérieur tourne
librement, cela signie qu’il n’est pas bien emboîté.
D
H
O
S
W
U
N
P
&
T
U
R
N
K
C
U
O
L
N
Entretien du lave-vaisselle
NETTOYAGE DU LAVE-VAISSELLE
Nettoyage de l’extérieur
Nettoyer l’extérieur du lave-vaisselle avec un chiffon doux et
humide et un détergent doux. Si le lave-vaisselle est en acier
inoxydable, un nettoyant pour acier inoxydable est recommandé –
nettoyant et poli pour acier inoxydable numéro31464.
Nettoyage de l’intérieur
Nettoyer l’intérieur du lave-vaisselle à l’aide d’une pâte de
détergent pour lave-vaisselle en poudre et de l’eau ou en utilisant
un détergent liquide pour lave-vaisselle sur une éponge humide
pour nettoyer l’intérieur une fois refroidi. Un rinçage avec du
vinaigre blanc peut éliminer les taches blanches et lms de la
vaisselle. Le vinaigre est un acide et son utilisation trop fréquente
pourrait endommager le lave-vaisselle. Verser 2 tasses (500ml) de
vinaigre blanc dans un verre ou une tasse à mesurer d’une capacité
de 2 tasses lavable au lave-vaisselle dans le panier inférieur
(nepasverser dans le fond du lave-vaisselle). Faireexécuter au
lave-vaisselle un programme de lavage complet avec séchage
à l’air ou une option de séchage économique. Nepas utiliser
dedétergent. Le vinaigre se mélangera à l’eau de lavage.
Procédure d’entretien du lave-vaisselle
Élimination des résidus d’eau dure/de la pellicule: Utilisation
mensuelle recommandée d’un produit d’entretien tel le nettoyant
pour lave-vaisselle affresh®† – numéro de pièceW10282479.
■ Charger le lave-vaisselle (de préférence avec la vaisselle
recouverte d’une pellicule ou précédemment lavée avec
uneeau dure).
■ Placer une pastille dans le compartiment de lavage principal
du distributeur de détergent.
■ Sélectionner le programme/l’option le/la mieux adapté(e) à
une vaisselle très sale et mettre en marche le lave-vaisselle.
REMARQUE: L’utilisation d’une pastille ou d’un sachet de
détergent prémesuré est recommandée pour un usage quotidien
ordinaire.
†affresh® est une marque déposée de Whirlpool, É.-U. Utilisée sous autorisation.
29
Pour réduire le risque de dommages matériels durant
les vacances ou une période d’inutilisation prolongée
■ Si l’on n’utilise pas le lave-vaisselle pendant l’été, couper
l’arrivée d’eau et l’alimentation électrique du lave-vaisselle.
■ S’assurer que les tuyaux d’alimentation en eau sont protégés
contre le gel. La formation de glace dans les canalisations
d’arrivée d’eau peut entraîner une élévation de la pression
en eau et endommager le lave-vaisselle ou le domicile.
La garantie de l’appareil ne couvre pas les dommages
imputables au gel.
■ Lors du remisage du lave-vaisselle pendant l’hiver, éviter tout
dommage lié à l’eau en faisant hivériser le lave-vaisselle par
un fournisseur de services agréé.
Dispositif de brise-siphon
Inspecter et nettoyer le
dispositif anti-refoulement,
le cas échéant, si le lavevaisselle ne se vidange
pascorrectement.
Page 30

Dépannage
Essayez d’abord les solutions suggérées ici ou consulter notre site Web et la FAQ (Foire aux questions)
pourtenter d’éviter le coût d’une visite de service.
Aux États-Unis, www.ikea.com Au Canada, www.ikea.com
LE LAVE-VAISSELLE NE FONCTIONNE PAS CORRECTEMENT
PROBLÈME CAUSES OU SOLUTIONS POSSIBLES
Le lave-vaisselle ne
fonctionne pas ou
s’arrête au cours d’un
programme
Le témoin lumineux
“Clean” (propre) clignote
Le lave-vaisselle ne se
remplit pas
La porte est-elle bien fermée et enclenchée?
A-t-on sélectionné le bon programme?
Le lave-vaisselle est-il alimenté par le courant électrique? Un fusible est-il grillé ou un disjoncteur s’estil déclenché? Remplacer le fusible ou réenclencher le disjoncteur. Si le problème persiste, appeler un
électricien. Le moteur s’est-il arrêté par suite d’une surcharge? Le moteur se réactive automatiquement
après quelques minutes. S’il ne se remet pas en marche, contacter le service de dépannage.
Le robinet d’arrêt (le cas échéant) est-il ouvert?
Il est normal pour certains programmes de faire des pauses répétées pendant quelques secondes lors du
lavage principal.
Appeler pour demander une intervention de dépannage.
Le dispositif de protection contre le débordement peut-il monter et descendre librement?
Appuyer pour le libérer.
La durée d’exécution du
programme semble être
trop longue
Résidus d’eau dans
lelave-vaisselle
Résidus de détergent
dans la section
avec couvercle
dudistributeur
Apparition d’un résidu
blanc à l’avant du
panneau d’accès
Odeur dans le lavevaisselle
Condensation sur le
comptoir de la cuisine
(modèles encastrés)
Le lave-vaisselle peut fonctionner jusqu’à 3 heures 30 minutes selon le degré de saleté, la température de
l’eau, les programmes et les options.
L’eau alimentant le lave-vaisselle est-elle sufsamment chaude? Le lave-vaisselle fonctionne plus
longtemps durant le chauffage de l’eau.
La durée du programme du lave-vaisselle est-elle conforme aux durées de programme indiquées? Voir les
sélections de durées de lavage de programmes. Une période d’attente s’ajoute automatiquement dans
certains programmes de lavage et de rinçage jusqu’à ce que l’eau atteigne la température appropriée.
Ce lave-vaisselle est équipé d’un capteur optique qui détecte la température de l’eau, le degré de saleté
etla quantité de détergent. Les programmes de lavage sont réglés sur la base de ce qui est détecté.
IMPORTANT: Le tout premier programme de lavage suivant l’installation à votre domicile sera réglé pour
comporter 2 rinçages supplémentaires. Pour un réglage correct du capteur, ce programme ne doit pas être
interrompu. Si ce programme de réglage est annulé ou arrêté avant l’allumage du témoin Clean (propre) à
la n du programme, le programme de lavage suivant répétera l’opération de réglage du capteur.
Le programme est-il terminé?
Le programme est-il terminé?
Le détergent est-il libre d’agglomérations? Remplacer le détergent au besoin.
La porte du distributeur est-elle bloquée par des plats ou ustensiles de cuisson lorsque la porte du lave-
vaisselle est fermée?
A-t-on utilisé une quantité excessive de détergent?
La marque de détergent utilisée produit-elle trop de mousse? Essayer une marque de détergent différente
pour réduire le volume de mousse et éliminer l’accumulation.
La vaisselle est-elle lavée seulement tous les 2 ou 3jours? Exécuter un programme de rinçage une ou
deux fois par jour jusqu’à ce qu’une charge complète soit accumulée. Une odeur de plastique neuf est-elle
apparente dans le lave-vaisselle? Effectuer un rinçage au vinaigre comme décrit dans la section “Entretien
du lave-vaisselle”.
Le lave-vaisselle est-il aligné avec le dessus du comptoir? L’humidité sortant de l’évent de la console
du lave-vaisselle peut se former sur le comptoir. Voir les instructions d’installation pour plus de
renseignements.
30
Page 31

LA VAISSELLE N’EST PAS COMPLÈTEMENT SÈCHE
La vaisselle n’est pas
complètement sèche
La vaisselle n’est pas
sèche
Avez-vous utilisé un agent de rinçage? Ce lave-vaisselle est conçu pour utiliser un agent de rinçage an
d’obtenir un séchage satisfaisant. Sans agent de rinçage, la vaisselle et l’intérieur du lave-vaisselle seront trop
humides. L’option de séchage avec chaleur ne fonctionnera pas de manière optimale sans agent de rinçage.
Le lave-vaisselle a-t-il été chargé de manière à permettre une vidange correcte de l’eau?
Ne pas charger excessivement. Utiliser un agent de rinçage liquide pour accélérer le séchage.
Les articles en plastique sont-ils humides? Les articles en plastique doivent souvent être séchés avec
untorchon.
Le distributeur d’agent de rinçage est-il vide?
A-t-on utilisé un séchage à l’air ou une option de séchage économique? Utiliser une option de séchage
avec chauffage pour une vaisselle plus sèche.
PROBLÈME CAUSES OU SOLUTIONS POSSIBLES
Humidité excessive sur
les paniers et à l’intérieur
du lave-vaisselle
Contrôler le témoin d’agent de rinçage pour voir s’il y a de l’agent de rinçage dans le distributeur.
PRÉSENCE DE TACHES SUR LA VAISSELLE
Taches et lms sur la
vaisselle
Film de silice ou
attaque (le lm de
silice est un dépôt
blanc irisé; l’attaque
produit l’apparence
d’unlmtranslucide)
Taches blanches sur les
ustensiles de cuisson à
revêtement antiadhésif
Taches marron sur la
vaisselle et les surfaces
internes du lave-vaisselle
Marques noires ou
grises sur la vaisselle
Taches orange sur les
articles de plastique ou
les surfaces internes du
lave-vaisselle
L’eau est-elle dure ou contient-elle une concentration élevée de minéraux? Le conditionnement de l’eau de
rinçage nale avec un agent de rinçage liquide favorise l’élimination des taches et lms. Veiller à ce que le
distributeur d’agent de rinçage soit rempli. Toujours utiliser une option de température élevée. Si la dureté
de l’eau de votre domicile est de 13grains ou plus, il est fortement recommandé d’installer un adoucisseur
d’eau à votre domicile. Si vous ne souhaitez pas boire d’eau adoucie, faites installer un adoucisseur d’eau
sur votre alimentation en eau chaude.
La température de l’eau est-elle trop basse? Pour obtenir de meilleurs résultats de lavage, l’eau doit être
à120°F (49°C) à son entrée dans le lave-vaisselle.
A-t-on utilisé la bonne quantité de détergent frais? Utiliser uniquement les détergents recommandés pour
lave-vaisselle. Ne pas employer moins de 1cuillerée à soupe (15g) par charge. Pour qu’il soit efcace,
il faut que le détergent soit frais. Une vaisselle très sale ou une eau dure nécessitent généralement un
supplément de détergent.
La pression d’eau du domicile est-elle sufsamment élevée pour un remplissage convenable du lavevaisselle? La pression d’eau du domicile devrait être de 20 à 120lb/p2 (138 à 828kPa). Pour toute
question au sujet de la pression de l’eau, faire appel à un plombier qualié agréé.
REMARQUE: Pour éliminer les taches et lms sur la vaisselle, retirer tous les couverts et articles métalliques
et consulter la “Procédure d’entretien du lave-vaisselle” de la section “Entretien du lave-vaisselle”.
Il y a parfois une réaction chimique de l’eau avec certains types de verres. Ceci est habituellement causé
par certaines combinaisons d’eau douce ou adoucie, à une solution de lavage alcaline, à un rinçage
insufsant, à un chargement excessif du lave-vaisselle ou à la chaleur de séchage. Il peut être nécessaire
de laver manuellement ces articles pour éviter le problème.
Pour ralentir ce processus, utiliser la quantité minimale de détergent, mais pas moins de 1cuillerée à
soupe (15g) par charge. Utiliser un agent de rinçage liquide et ne pas trop charger le lave-vaisselle pour
permettre un rinçage à fond. Il n’est pas possible d’éliminer le lm de silice ou l’effet de l’attaque chimique
qui demeurent en permanence. Ne pas utiliser un séchage avec chaleur.
Le détergent du lave-vaisselle a-t-il éliminé la patine?
Générer une nouvelle patine après le lavage au lave-vaisselle.
L’eau comporte-t-elle une concentration de fer élevée? Laver de nouveau la vaisselle après avoir versé
entre 1cuillerée à thé et 1cuillerée à soupe (5 à 15ml) de cristaux d’acide citrique dans la section fermée
du distributeur de détergent. Ne pas utiliser de détergent.
Exécuter ensuite un programme de lavage normal avec détergent. Si l’on doit appliquer ce traitement plus
d’une fois tous les deux mois, l’installation d’un appareil d’élimination du fer est suggérée.
Des articles en aluminium frottent-ils contre la vaisselle durant le lavage?
Les articles en aluminium jetables peuvent se briser dans le lave-vaisselle et causer des marques.
Laverces articles à la main.
Pour éliminer les marques d’aluminium, employer un produit de nettoyage moyennement abrasif.
Place-t-on dans le lave-vaisselle de la vaisselle sur laquelle il y a une quantité considérable de résidus
alimentaires à base de tomates? Il peut être nécessaire d’utiliser un produit d’élimination des taches pour
éliminer les taches du lave-vaisselle. Les taches n’affectent pas la performance du lave-vaisselle.
31
Page 32

BRUITS
Émission de bruits
de broyage ou de
bourdonnement
Un objet dur a pénétré dans le module de lavage (sur certains modèles).
Le bruit devrait cesser une fois que l’objet sera broyé. Si le bruit persiste après la n d’un programme,
faire un appel de service.
LA VAISSELLE N’EST PAS COMPLÈTEMENT NETTOYÉE
Résidus de produits
alimentaires sur la
vaisselle
La vaisselle est-elle chargée correctement?
Avez-vous choisi le programme adapté à la vaisselle la plus sale? Si certains articles sont très sales,
utiliser un programme plus intensif. La température de l’eau est-elle trop basse? Pour obtenir de
meilleurs résultats de lavage, l’eau doit être à 120 °F (49 °C) à son entrée dans le lave-vaisselle.
A-t-onutilisé la bonne quantité de détergent frais? Utiliser uniquement les détergents recommandés
pour lave-vaisselle. Ne pas employer moins de 1cuillerée à soupe (15g) par charge. Pour qu’il
soit efcace, il faut que le détergent soit frais. Une vaisselle très sale ou une eau dure nécessitent
généralement un supplément de détergent.
Y a-t-il des grumeaux de détergent dans le distributeur? Utiliser uniquement un détergent frais. Nepas
laisser le détergent pendant plusieurs heures dans un distributeur humide. Nettoyer le distributeur
lorsqu’il s’y trouve des grumeaux de détergent.
La pompe ou le bras d’aspersion sont-ils obstrués par des étiquettes de bouteilles et de cannettes?
La pression d’eau du domicile est-elle sufsamment élevée pour un remplissage convenable du lave-
vaisselle? La pression d’eau du domicile devrait être de 20 à 120lb/p2 (138 à 828kPa). Pour toute
question au sujet de la pression de l’eau, faire appel à un plombier qualié agréé.
Une accumulation de mousse ralentit-elle la pale de lavage? Ne pas utiliser de savon ou de détergent
àlessive. Utiliser uniquement les détergents recommandés pour lave-vaisselle.
LA VAISSELLE EST ENDOMMAGÉE AU COURS D’UN PROGRAMME
PROBLÈME CAUSES OU SOLUTIONS POSSIBLES
Écaillage de la vaisselle A-t-on chargé le lave-vaisselle correctement? Charger la vaisselle et les verres de telle manière
qu’ils soient stables et qu’ils ne s’entrechoquent pas lors du lavage. Réduire l’écaillage en déplaçant
lentement les paniers.
REMARQUE: Les antiquités, le cristal très mince et certains types de faïence et de verre peuvent être
trop délicats pour le lavage automatique. Laver à la main.
32
Page 33

INSTRUCCIONES PARA EL USUARIO
DE LA LAVAVAJILLAS
Le agradecemos por su elección de los electrodomésticos IKEA®.
Nuestra compañía mantiene las reglas más estrictas de calidad, y para nosotros es importante que usted tenga una experiencia positiva
como propietario de un producto IKEA®.
Hemos provisto para su conveniencia un Manual de instrucciones para el usuario fácil de seguir. Estas instrucciones incluyen una
sección de “Solución de problemas” para ayudarlo a enfrentar cualquier problema que usted pueda tener.
Tenga listo su número completo de modelo y de serie. Puede encontrar su número de modelo y de serie en la etiqueta ubicada cerca
dela puerta, al lado derecho o izquierdo del interior de la lavavajillas.
Si tiene dudas acerca de la garantía, no devuelva el aparato a la tienda. Póngase en contacto con nosotros en los EE.UU. o en Canadá
al 1-866-664-2449.
Este producto tiene una garantía limitada - Consulte la sección “Garantía” para obtener todos los detalles. Los aparatos IKEA® tienen
una garantía de 5 años (excluyendo los de la familia LAGAN, consulte la garantía para ver los detalles acerca de la cobertura).
NOTA: Se requiere el comprobante de compra para obtener servicio bajo la garantía.
ÍNDICE
GARANTÍA DE LOS ELECTRODOMÉSTICOS
PRINCIPALES DE IKEA ............................................................35
AYUDA O SERVICIO TÉCNICO ................................................36
SEGURIDAD DE LA LAVAVAJILLAS ........................................36
NOVEDADES DE SU LAVAVAJILLAS.......................................38
PASOS RÁPIDOS ......................................................................39
USO DE LA LAVAVAJILLAS ......................................................40
DESCRIPCIONES DE CICLOS Y OPCIONES..........................43
SISTEMA DE FILTRACIÓN ....................................................... 45
CUIDADO DE LA LAVAVAJILLAS ............................................46
SOLUCIÓN DE PROBLEMAS ...................................................47
W11212416C
33
Page 34

Garantía de los electrodomésticos principales de IKEA
¿Durante cuánto tiempo es válida la garantía limitada de IKEA?
Esta garantía limitada es válida durante cinco años a partir de la fecha de compra, siempre y cuando este electrodoméstico principal haya
sido operado y mantenido según las instrucciones adjuntas o provistas con el producto, a menos que sea un aparato de nombre LAGAN,
en cuyo caso la garantía limitada será válida durante un año a partir de la fecha de compra. Esta garantía limitada es válida solamente
en EstadosUnidos o en Canadá y se aplica solamente cuando el electrodoméstico principal se use en el país en el que se ha comprado.
Serequiere una prueba de la fecha de compra original para obtener servicio bajo esta garantía limitada.
¿Qué electrodomésticos no están cubiertos bajo la garantía limitada de IKEA de cinco (5) años?
Para los electrodomésticos principales cuyo nombre sea “LAGAN”, esta garantía es válida durante dos años a partir de la fecha de compra.
¿Quién estará a cargo de llevar a cabo el servicio?
Esta garantía limitada es provista por Whirlpool Corporation o Whirlpool Canada LP (en lo sucesivo denominada “Whirlpool”). El servicio
deberá ser suministrado por una compañía de servicio designada por Whirlpool.
¿Qué es lo que cubre esta garantía limitada?
La garantía limitada pagará por piezas especicadas de fábrica y trabajo de reparación, para corregir defectos en los materiales o en la mano de
obra existentes en el momento de la compra del electrodoméstico principal. Las excepciones se especican bajo el título “¿Qué es lo que
no está cubierto bajo esta garantía limitada?”.
¿Qué se hará para corregir el problema?
La compañía designada de servicio examinará el producto y decidirá, a su exclusiva discreción, si está cubierto bajo esta garantía limitada.
Si considera que está cubierto, la compañía designada de servicio reparará el defecto. Su único y exclusivo recurso según los términos
de esta garantía limitada será el de reparar el producto según se estipula en la presente.
¿Qué es lo que no está cubierto bajo esta garantía limitada?
■ Visitas de servicio técnico para corregir la instalación de su electrodoméstico principal, para enseñarle a usar su electrodoméstico
principal, para cambiar o reparar fusibles domésticos o para corregir la instalación eléctrica o de la tubería de la casa.
■ Visitas de servicio técnico para reparar o reemplazar focos para electrodomésticos, ltros de aire o ltros de agua. Las piezas de
consumo están excluidas de la cobertura de la garantía.
■ Piezas de repuesto o mano de obra si este electrodoméstico principal se usa de un modo diferente al doméstico normal de una familia,
o cuando se use de un modo contrario a las instrucciones publicadas para el usuario u operador y/o las instrucciones de instalación.
■ Daños causados por accidente, alteración, uso indebido, abuso, incendio, inundación, actos fortuitos, instalación incorrecta,
instalación que no esté de acuerdo con los códigos eléctricos o de plomería, o el empleo de artículos de consumo o productos
delimpieza no aprobados para ser usados.
■ Daños estéticos, incluyendo rayaduras, abolladuras, desportilladuras u otro daño al acabado de su electrodoméstico principal,
amenos que el mismo sea debido a defectos en los materiales o la mano de obra y se informe en un lapso de 30 días a partir
delafecha de compra.
■ Cualquier pérdida de comida o de medicamentos debida a fallas del refrigerador o del congelador.
■ Recogida y entrega. Este electrodoméstico principal se ha destinado para ser reparado en su hogar.
■ Reparaciones de piezas o sistemas como resultado de modicaciones no autorizadas que se hayan efectuado en el electrodoméstico.
■ Gastos de viaje y transporte para obtener servicio para el producto, si su electrodoméstico principal está ubicado en un lugar
remoto en el cual no haya disponible un técnico de servicio autorizado.
■ La remoción y reinstalación de su electrodoméstico principal, si estuviera instalado en un lugar inaccesible o si no estuviera
instalado de conformidad con las instrucciones de instalación publicadas.
■ Piezas de repuesto o mano de obra en electrodomésticos principales con números de modelo/serie originales que se hayan
removido, alterado o que no puedan ser identicados con facilidad.
El costo de la reparación o del reemplazo bajo estas circunstancias de exclusión correrá por cuenta del cliente.
Exclusión de garantías implícitas
LAS GARANTÍAS IMPLÍCITAS, INCLUYENDO CUALQUIER GARANTÍA IMPLÍCITA DE COMERCIABILIDAD O GARANTÍA IMPLÍCITA DE
CAPACIDAD PARA UN PROPÓSITO PARTICULAR, SERÁN LIMITADAS A CINCO AÑOS (DOS AÑOS PARA LOS ELECTRODOMÉSTICOS
PRINCIPALES DE NOMBRE “LAGAN”) O AL PERÍODO MÁS CORTO PERMITIDO POR LEY. Algunos estados y provincias no permiten la
limitación de la duración de las garantías implícitas de comerciabilidad o capacidad, de modo que la limitación antes indicada quizá no le
corresponda. Esta garantía le otorga derechos legales especícos y es posible que usted tenga también otros derechos que varían de un
estado a otro o de una provincia a otra.
Limitación de recursos; exclusión de daños incidentales y consecuentes
SU ÚNICO Y EXCLUSIVO RECURSO SEGÚN LOS TÉRMINOS DE ESTA GARANTÍA LIMITADA SERÁ EL DE REPARAR EL PRODUCTO
SEGÚN SE ESTIPULA EN LA PRESENTE. WHIRLPOOL NO SE RESPONSABILIZARÁ POR DAÑOS INCIDENTALES O CONSECUENTES.
Algunos estados y provincias no permiten la exclusión o limitación de daños incidentales o consecuentes, de modo que estas limitaciones
y exclusiones quizás no le correspondan. Esta garantía le otorga derechos legales especícos y es posible que usted tenga también otros
derechos que varían de un estado a otro o de una provincia a otra.
Cómo puede ponerse en contacto con nosotros si necesita nuestro servicio
Si usted se encuentra fuera de los cincuenta Estados Unidos y Canadá, póngase en contacto con su vendedor autorizado
deIKEAparadeterminar si corresponde otra garantía.
01/17
34
Page 35

Ayuda o servicio técnico
Si usted no tiene acceso a internet y necesita ayuda al usar su producto, o si quisiera hacer una cita para obtener servicio, puede
ponerse en contacto con IKEA, en el número que se indica a continuación.
Tenga listo su número de modelo completo. Puede encontrar su número de modelo y de serie en la etiqueta ubicada cerca de la puerta,
al lado derecho o izquierdo del interior de la lavavajillas.
Para obtener ayuda o servicio técnico en EE.UU. o en Canadá, llame al 1-866-664-2449.
Si necesita asistencia adicional, puede escribir a IKEA con sus preguntas o dudas a la dirección que aparece a continuación:
En Estados Unidos:
Whirlpool Brand Home Appliances
Customer Experience Center
553 Benson Road
Benton Harbor, MI 49022-2692
Incluya en su correspondencia un número de teléfono en el que se le pueda localizar durante el día.
Guarde estas Instrucciones para el usuario y la información con el número de modelo, para referencia futura.
En Canadá:
Whirlpool Brand Home Appliances
Customer Experience Centre
200 - 6750 Century Ave.
Mississauga, Ontario L5N 0B7
Seguridad de la lavavajillas
Su seguridad y la seguridad de los demás es muy importante.
Hemos incluido muchos mensajes importantes de seguridad en este manual y en su electrodoméstico. Lea y obedezca siempre
todos los mensajes de seguridad.
Este es el símbolo de alerta de seguridad.
Este símbolo le llama la atención sobre peligros potenciales que pueden ocasionar la muerte o una lesión a
usted y a los demás.
Todos los mensajes de seguridad irán a continuación del símbolo de advertencia de seguridad y de la palabra
“PELIGRO” o “ADVERTENCIA”. Estas palabras significan:
PELIGRO
ADVERTENCIA
Todos los mensajes de seguridad le dirán el peligro potencial, le dirán cómo reducir las posibilidades de sufrir una lesión y lo que
puede suceder si no se siguen las instrucciones.
Si no sigue las instrucciones de inmediato, usted puede
morir o sufrir una lesión grave.
Si no sigue las instrucciones, usted puede morir o sufrir
una lesión grave.
INSTRUCCIONES IMPORTANTES DE SEGURIDAD
ADVERTENCIA: Cuando use la lavavajillas, tome medidas de precaución básicas, como las siguientes:
Lea todas las instrucciones antes de usar la lavavajillas.
Use la lavavajillas solamente para la función para la que fue
diseñada.
Use solo detergentes o agentes de enjuague recomendados
para uso en una lavavajillas y manténgalos lejos del alcance
de los niños.
Cuando cargue elementos para lavar:
1) Coloque los elementos afilados de tal manera que no
dañen el sello de la puerta; y
2) Coloque los cuchillos afilados con los mangos hacia
arriba para reducir el riesgo de sufrir cortes.
No lave elementos de plástico a menos que lleven un aviso
de “seguro para lavavajillas” o equivalente. Si tales
elementos de plástico no tienen ese aviso, consulte las
recomendaciones del fabricante.
No toque el elemento calefactor durante ni inmediatamente
después del uso.
No haga funcionar la lavavajillas a menos que todos los
paneles de la carcasa estén colocados debidamente en su
lugar.
No trate de forzar los controles.
No someta a abuso, se siente ni se pare sobre la puerta, la
tapa o las canastas de platos de la lavavajillas.
Para reducir el riesgo de lesiones, no permita que los niños
jueguen dentro ni sobre la lavavajillas.
En ciertas condiciones, puede generarse gas hidrógeno en
un sistema de agua caliente que no se ha usado por un
período de dos semanas o más. EL GAS HIDRÓGENO ES
EXPLOSIVO. Si no se ha usado el agua caliente durante
dicho período, antes de usar la lavavajillas, abra todos los
grifos de agua caliente y deje que corra el agua por varios
minutos. Esto liberará todo el gas hidrógeno que se haya
acumulado. Debido a la inflamabilidad de dicho gas, no
fume ni use una llama abierta durante este lapso.
Quite la puerta o la tapa del compartimiento de lavado
cuando retire de servicio una lavavajillas vieja o la
descarte.
GUARDE ESTAS INSTRUCCIONES
35
Page 36

INSTRUCCIONES DE PUESTA A TIERRA
Para la conexión de una lavavajillas mediante cable
eléctrico conectado a tierra:
La lavavajillas debe tener conexión a tierra. En el caso de
funcionamiento defectuoso o avería, la conexión a tierra
reducirá el riesgo de choque eléctrico al proporcionar una
vía de menor resistencia para la corriente eléctrica. La
lavavajillas está equipada con un cable que cuenta con un
conductor para la conexión a tierra del equipo y un enchufe
de conexión a tierra. El enchufe debe conectarse en un
tomacorriente apropiado, debidamente instalado y
conectado a tierra de acuerdo con todos los códigos y las
ordenanzas locales.
ADVERTENCIA: La conexión incorrecta del conductor de
conexión a tierra del equipo puede dar como resultado el
riesgo de un choque eléctrico.
GUARDE ESTAS INSTRUCCIONES
No use la lavavajillas antes de estar completamente instalada.
No se apoye en la puerta abierta.
No seguir estas instrucciones puede ocasionar heridas serias o cortaduras.
Si no está seguro de que la conexión a tierra de la
lavavajillas sea la adecuada, consulte a un electricista o
a un representante de servicio técnico competente. No
modifique el enchufe provisto con la lavavajillas; si no
encaja en el tomacorriente, consulte a un electricista
competente para instalar un tomacorriente adecuado.
Para una lavavajillas conectada permanentemente:
Esta lavavajillas debe estar conectada a un sistema de
cableado de metal permanente, conectado a tierra, o se
debe tender un conducto para la conexión a tierra del
equipo con los conductores de circuito y conectado a la
terminal de tierra del equipo o al conductor de suministro
de la lavavajillas.
PRECAUCIÓN
Peligro de vuelco
Advertencias de la Proposición 65 del estado de California:
ADVERTENCIA: Este producto contiene una o más sustancias químicas identificadas por el estado de California como
causantes de cáncer.
ADVERTENCIA: Este producto contiene una o más sustancias químicas identificadas por el estado de California como
causantes de defectos congénitos o algún otro tipo de daños en la función reproductora.
36
Page 37

Novedades de su lavavajillas
P
U
S
H
W
D
O
N
U
&
T
R
N
L
O
C
K
U
N
L
O
C
K
Energía
¡Felicitaciones por haber comprado la lavavajillas con bajo consumo de agua y energía! Esta lavavajillas limpia
rociando la vajilla con agua y hace pausas para permitir que el detergente remoje la vajilla y aoje la suciedad de
los platos. Para obtener una limpieza excepcional, los ciclos se hacen más largos debido al remojo y las pausas.
Variosmodelos tienen un sensor óptico de agua. El sensor óptico de agua se usa para determinar el consumo
óptimo de agua y energía para un desempeño de limpieza ideal. Las lavavajillas ecientes funcionan por más tiempo
para ahorrar agua y energía, de la misma manera que ahorra gasolina cuando conduce un automóvil más despacio.
El primer ciclo con sensor durará más tiempo para calibrar el sensor óptico.
Desempeño
Agente de enjuague
El uso del agente de enjuague hará óptimo el desempeño de lavado
y secado. Esta lavavajillas ha sido diseñada especícamente para
usarse en conjunción con agente de enjuague, para obtener un
mejor desempeño de secado y controlar la acumulación de
depósitos de agua dura. Las lavavajillas con bajo consumo de
energía usan menos agua y energía, de modo que dependen de
laacción de desplazamiento del agua por obra del agente de
enjuague para asegurar un óptimo desempeño de secado.
Detergente
Estados Unidos y Canadá han aprobado una restricción que limita
la cantidad de fósforo (fosfatos) en los detergentes para lavavajillas
domésticas. Los principales fabricantes han reformulado su
detergente para lavavajillas de acuerdo a este cambio, un paso
más en la conciencia ecológica. Con estos cambios recientes,
serecomienda usar pastillas y paquetes por conveniencia y
paramejorar el desempeño.
Sistema de ltración
Su lavavajillas cuenta con lo último en tecnología de ltración para
lavavajillas. El sistema de ltración triple minimiza los sonidos y
optimiza el ahorro de agua y energía mientras proporciona una
limpieza óptima. El mantenimiento periódico de los ltros hará
posible un rendimiento superior de limpieza. Le sugerimos limpiar
el ltro superior e inferior y enjuagarlos bajo agua del grifo por
lomenos una vez al mes.
37
Page 38

Pasos rápidos
Prepare y cargue
la lavavajillas.
1
Haga girar los
brazos rociadores.
Deben girar libremente.
Agregue detergente y agente de enjuague.
2
Seleccione un ciclo y una opción (los ciclos y las
3
opciones varían según el modelo).
Ponga la lavavajillas en marcha.
4
Para los modelos con controles en la parte
superior de la puerta, seleccione el ciclo de
lavado, la opción y presione START/RESUME
(Inicio/Reanudar) antes de cerrar la puerta.
Empuje la puerta y ciérrela con rmeza en
menos de 4 segundos de haber presionado START/RESUME
(Inicio/Reanudar). La puerta se traba automáticamente.
Paramodelos con control delantero, seleccione el ciclo
y lasopciones de lavado deseados y presione START/
RESUME (Inicio/Reanudar) o bien presione START/RESUME
(Inicio/Reanudar) para repetir el mismo ciclo y opciones que
en el ciclo anterior de lavado.
Saque el ltro ylímpielo.
5
Consulte “Intervalos
recomendados para la limpieza
del ltro” en la sección
“Sistema de ltración” para
ver el programa de limpieza
recomendado.
D
H
O
S
W
U
N
P
&
T
U
R
L
O
C
K
N
K
C
U
O
L
N
38
Page 39

Uso de la lavavajillas
PASO 1
Prepare y cargue la lavavajillas
IMPORTANTE: Quite de los platos los restos de alimentos,
huesos, palillos y otros elementos duros. Retire las etiquetas de
los recipientes antes de lavarlos.
Canasta superior con carga
para 10 puestos
Canasta inferior con carga
para 10 puestos
■ Cuando cargue la canastilla para utensilios, coloque siempre
los artículos losos apuntando hacia abajo. Mezcle otros
artículos con la punta hacia arriba y
algunos con la punta hacia abajo.
Canasta de tercer nivel fácil de retirar (el algunos modelos)
Si se requiere espacio adicional en la canasta superior, es posible
retirar fácilmente la canasta del tercer nivel.
Para retirar, extienda completamente el estante hasta que se
detenga. Luego, abra los topes de la guía a cada lado y levante
para retirar.
Es posible cargar artículos con bajo perl, como utensilios de
servicio y cubiertos en la canasta del tercer nivel.
Carga para 12 puestos –
canasta superior
■ Asegúrese de que cuando la puerta de la lavavajillas esté
Carga para 12 puestos –
canasta inferior
cerrada, no haya artículos bloqueando el depósito de detergente.
■ Los artículos deberán cargarse con las supercies sucias
mirando hacia abajo y hacia adentro, hacia el rociador,
comose muestra. Esto optimizará los resultados de la
limpieza y el secado.
■ Evite superponer los artículos como tazones o platos que
pueden atrapar la comida.
■ Coloque los plásticos, los platos pequeños y los vasos en la
canasta superior. Lave solo artículos marcados como “aptos
para lavavajillas”.
■ Para evitar ruidos de golpes o estrepitosos durante el
funcionamiento:
Coloque los platos de manera que no se toquen entre sí.
Asegúrese de que los objetos livianos estén rmes en las
canastas.
■ Verique que no haya nada que bloquee los brazos rociadores
superior o inferior.
A. Tope de la guía B. Guía
Parrilla superior regulable de calidad superior de 2 posiciones
Se puede subir o bajar la parrilla superior para acomodar artículos
más altos tanto en la parrilla superior como en la inferior. Los
ajustadores se encuentran a cada lado de la parrilla superior.
Para levantar la canasta:
Presione las dos palanquillas reguladoras de la canasta y levante
la canasta hasta que quede en la posición alta y nivelada.
Para bajar la canasta:
Presione las dos palanquillas reguladoras de la canasta y deslice
la canasta hasta que quede en la posición baja y nivelada.
NOTA: la canasta superior debe estar nivelada.
Los artículos que están en
la canasta pueden bloquear
los brazos rociadores.
39
Page 40

PASO 2
Agregue detergente
Tapa con bisagra
Detergentes previamente medidos
Se recomienda usar pastillas y paquetes previamente medidos de
alta calidad para mejorar el rendimiento.
Está comprobado que las pastillas y los paquetes de alta calidad
son más ecaces que los detergentes en polvo, líquidos o en gel
para reducir las películas residuales en la vajilla. Al usar pastillas
y paquetes, con el tiempo las películas blancas comenzarán
a reducirse o a eliminarse. Son apropiados para todos los
niveles de dureza y de suciedad. Además, al usar un agente de
enjuague puede minimizar la acumulación repetida de película
blanca (notodos los paquetes y las pastillas contienen agente
de enjuague). Coloque siempre los detergentes previamente
medidosen el compartimiento principal y cierre la tapa.
NOTA: siga las instrucciones del paquete cuando use otros
tiposde detergente para lavavajillas.
■ Use únicamente detergentes para lavavajillas automáticas.
Agregue el detergente justo antes de comenzar el ciclo.
■ El detergente para lavavajillas automáticas produce mejores
resultados cuando está fresco. Guarde el detergente bien
cerrado en un lugar fresco y seco.
Polvos y geles
Dureza
delagua
Blanda
(0-4 granos
por galón
deEE.UU.)
Medio
(5-9 granos
por galón
deEE.UU.)
Dura
(10-14 granos
por galón de
EE.UU.)
*El compartimiento de prelavado está en la parte superior de
lapuerta deslizante del depósito.
**Un compartimiento de lavado principal lleno contiene
2cucharas soperas (30 ml).
IMPORTANTE: Los residuos minerales del agua extremadamente
dura (15 granos por galón de EE.UU. o más) pueden dañar su
lavavajillas y hacer difícil que se obtengan buenos resultados.
Se recomienda usar un ablandador de agua para evitar daños
yobtener buenos resultados. Puede traer sus muestras de agua
aSears para vericar el nivel de dureza.
NOTA: siga las instrucciones del paquete cuando use otros tipos
de detergente para lavavajillas.
Nivel de
suciedad
(Soil
Compartimiento
de prelavado*
Compartimiento
de lavado
principal
Level)
Liviano Ninguna Línea de llenado
“Soft”
Normal
(Normal)
Ninguna Línea de llenado
“Soft”
Intensa Lleno Línea de llenado
“Soft”
Liviano Ninguna Línea de llenado
“Soft”
Normal
Lleno Lleno**
(Normal)
Intensa Lleno Lleno**
Liviano Lleno Lleno**
Normal
Lleno Lleno**
(Normal)
Intensa Lleno Lleno**
PASO 3
Agregue el agente de enjuague
Tapa con bisagra
USE RINSE AID FOR
BETTER DRYING
Lock
Refill
Full
Add
IMPORTANTE: Su lavavajillas está diseñada para usar un agente de
enjuague. El uso de agentes de enjuague mejora en gran medida el
secado, al permitir que el agua se escurra de la vajilla después del
último enjuague. Los agentes de enjuague también evitan que el
agua forme gotitas que pueden secarse como manchas o rayas.
Llenado del depósito
El depósito tiene capacidad para 5 onzas (150 ml) de agente de
enjuague. En condiciones usuales, esta cantidad durará de uno
atres meses.
Full
Add
NOTA: El indicador mostrará el nivel de llenado correcto cuando
se abra completamente la puerta.
40
Page 41

Para agregar agente de enjuague
6
5
4
3
2
-
-
-
max
fill
1
-
-
-
-
-
-
-
-
-
-
-
-
Lock
al depósito con tapa con bisagra,
gire la tapa del depósito ¼ de
vuelta en sentido horario para
abrir y levantar la tapa. Vierta el
agente de enjuague en la abertura
hasta que el nivel indicador esté
en “Full” (Lleno). Vuelva a colocar
-
6
5
-
4
-
fill
max
-
-
-
-
3
2
1
-
-
-
-
-
-
-
la tapa del depósito y gírela hasta
“Lock” (Bloquear). Asegúrese de
que la tapa esté completamente
bloqueada.
¼ de vuelta en sentido
horario para bloquear
Ajuste de nivel del agente de enjuague
El depósito del agente de enjuague es regulable. Para casi todos
los tipos de agua, la selección de fábrica dará buenos resultados.
Si tiene agua dura y nota que se acumula calcio en la lavavajillas,
puede probar con un ajuste más alto. Si nota espuma en la
lavavajillas, use un ajuste más bajo.
Para regular el ajuste:
Gire el regulador con la echa hasta un número más alto para
aumentar la cantidad de agente de enjuague.
PASO 4
Seleccione un ciclo (los ciclos varían según el modelo)
Presione y sostenga el botón del ciclo deseado hasta
que se encienda la luz correspondiente. Vea las tablas de
“Descripcionesde ciclos y opciones” en la sección siguiente.
PASO 5
Inicio o reanudación de un ciclo
■ Si es necesario, deje correr agua caliente el fregadero que
esté más cerca de su lavavajillas hasta que el agua salga
caliente. Cierre el suministro de agua.
■ Si el botón START/RESUME (Inicio/Reanudar)
está ubicado sobre la puerta, empuje la
puerta rmemente para cerrarla en menos
de4segundos después de haber presionado
START/RESUME (Inicio/Reanudar). Si la puerta
no se ha cerrado dentro de los 4 segundos, el
LED del botón Start (Inicio) destellará, se oirá un tono audible
y el ciclo no comenzará.
IMPORTANTE: Si alguien abre la puerta (como puede ser para
agregar un plato, aun durante la opción de Delay Hours – Horas
de retraso), deberá presionarse el botón de START/RESUME
(Inicio/Reanudar) cada vez.
■ Si el botón START/RESUME (Inicio/Reanudar) está ubicado en
la parte frontal de la puerta, empuje la puerta rmemente para
cerrarla. La puerta se traba automáticamente. Seleccione el
ciclo y las opciones de lavado deseados y presione START/
RESUME (Inicio/Reanudar) o bien presione START/RESUME
(Inicio/Reanudar) para repetir el mismo ciclo y opciones que
en el ciclo anterior de lavado.
■ Usted puede agregar un artículo al comienzo del ciclo.
Abralentamente la puerta y agregue el artículo. Presione la
tecla START/RESUME (Inicio/Reanudar) y cierre rmemente la
puerta en menos de 4 segundos. Si la puerta ha estado abierta
por más de 4 segundos, el LED destellará, se emitirá un tono
y la lavavajillas no continuará con el ciclo hasta que presione
nuevamente el botón START/RESUME (Inicio/Reanudar).
■ El indicador de Clean (Limpio) se ilumina cuando se ha
terminado el ciclo. La luz de Sanitized (Higienizado) se
iluminacuando se selecciona la opción de Sani Rinse
(Enjuague sanitario) y ocurren niveles de higienización.
NOTA: Los ciclos y las opciones más intensos afectarán la
duración del ciclo. Algunos ciclos y opciones demorarán hasta
3½ horas en completarse.
Seleccione las opciones (varían según el modelo)
Para personalizar sus ciclos, presione las opciones deseadas.
41
Page 42

Descripciones de ciclos y opciones
CYCLE SELECTIONS (Selecciones de ciclo)
CICLOS TIEMPO DE
LAVADO
ESTIMADO
ENPANTALLA
SIN OPCIONES
Este ciclo detecta el tamaño de la carga, la cantidad de suciedad y su resistencia para
regular el ciclo para una limpieza mejorada, utilizando solamente la cantidad de agua
y de energía necesarias. El ciclo Sensor (Sensor) se selecciona automáticamente si
primero se presiona el botón START/RESUME (Inicio/Reanudar).*
Use este ciclo para ollas, sartenes, cacerolas y vajilla muy sucias que sean difíciles
delavar.
Este ciclo se recomienda para uso diario, regular o típico para lavar y secar totalmente
una carga completa de vajilla con suciedad normal. Los certicados de consumo de
energía del gobierno de esta lavavajillas se basaron en el ciclo Normal (Normal) con
laopción Heat Dry (Secado con calor) seleccionada únicamente.**
Use este ciclo para artículos con suciedad ligera o porcelana y cristalería. Incluye una
opción de secado con calor.
Para obtener resultados rápidos, 1 Hour wash (Lavado de 1 hora) lavará los platos
usando un poco más de agua y energía. Seleccione la opción Heat Dry (Secado con
calor) para obtener un óptimo rendimiento del secado.
*Los certicados de consumo de energía del gobierno no se basan en este ciclo. Vea la descripción del ciclo Normal (Normal) para el
ciclo con certicados de consumo de energía del gobierno. El uso del ciclo Sensor (Sensor) puede aumentar el consumo de energía.
** Ninguna otra opción de temperatura de lavado y secado se seleccionó y se realizaron pruebas truncadas a la lavavajillas. No se usó
agente de enjuague y no se usó detergente en el prelavado.
2:30 a 3:30 3,8 a 7,7
2:20 a 3:30 8,4
1:50 a 3:30 2,7 a 7,9
1:45 a 3:30 2,7 a 7,9
1:00 6,2
USO DE AGUA
EN GALONES
(LITROS)
(14,4 a 29,3)
(31,7)
(10,4 a 30,0)
(10,4 a 30,0)
(23,5)
SELECCIONES DE OPCIONES
Eleva la temperatura del lavado principal para
mejorar la limpieza con cargas que contienen
suciedad intensa de restos quemados adheridos.
Higieniza sus platos y su cristalería según la norma
184 de NSF International NSF/ANSI para lavavajillas
domésticas. Las lavavajillas domésticas certicadas
no han sido diseñadas para establecimientos
con licencia para alimentos. Solo los ciclos de
higienización fueron diseñados para cumplir los
requisitos del estándar de rendimiento NSF/ANSI
184 para eliminación de la suciedad y ecacia de
la higienización. No existe la intención, de forma
directa o indirecta, de que todos los ciclos de
una lavavajillas con certicación NSF/ANSI 184
cumplan el estándar de rendimiento NSF/ANSI
184 para eliminación de la suciedad y ecacia de
higienización.
Al nal del ciclo se encenderá el indicador
“sanitized” (higienizado). Si su carga no se higienizó
adecuadamente, el indicador destellará al término
del ciclo. Esto puede ocurrir si se interrumpe el
ciclo, osi el agua no pudo alcanzar la temperatura
requerida. Laluz se apaga cuando usted abre y
cierra la puerta oPresiona CANCEL (Anulación).
OPCIONES SE PUEDE
SELECCIONAR
CON
Sensor
Intensa
Normal (Normal)
Sensor
Intensa
Normal (Normal)
LO QUE HACE TIEMPO
Aumenta la
temperatura del
lavado principal
a 130 °F (54 °C).
Aumenta la
temperatura del
lavado principal
a 140 °F (60 °C)
y el enjuague
nal a 156 °F (69
°C).
AGREGADO
AL CICLO
0:00 a 0:40 0 a 3,0
0:00 a 2:20 1,2 a 6,2
AGUA
AGREGADA
EN GALONES
(LITROS)
(0 a 11,2)
(4,8 a 23,3)
42
Page 43

OPCIONES SE PUEDE
Se puede usar con cualquier ciclo para lavar una
carga pequeña de platos en la canasta superior.
SELECCIONAR
CON
Disponible con
cualquier ciclo
LO QUE HACE TIEMPO
AGREGADO
AL CICLO
Ahorra
hasta 0:20
AGUA
AGREGADA
EN GALONES
(LITROS)
0
Seca los platos con calor. Esta opción, junto con
el uso de agente de enjuague, produce un mejor
rendimiento del secado. Es menos probable que los
artículos de plástico se deformen si los carga en la
canasta superior. Use Heat Dry (Secado con calor)
para un rendimiento óptimo del secado. Apague la
opción Heat Dry para un secado al aire.
Retrasa el inicio de un ciclo en 4 horas.
Para retrasar el inicio:
1. Seleccione un ciclo y opciones de lavado.
2. Oprima DELAY WASH (Lavado con retraso).
3. Presione START/RESUME (Inicio/Reanudar) para
comenzar con retraso de 4 horas.
NOTA: Si se abre la puerta (como para agregar un
plato), deberá presionarse el botón START/RESUME
(Inicio/Reanudar) para reanudar la cuenta regresiva
delretraso.
Todo ciclo Usa el elemento
calentador
para acelerar
los tiempos
de secado.
Laopción Heat
Dry se enciende
de manera
predeterminada
cuando se
selecciona
cualquier ciclo,
excepto para
1 Hour Wash
(Lavado de una
hora) y Rinse Only
(Solo enjuague).
Disponible con
cualquier ciclo
Retrasa el inicio
del ciclo por un
máximo de
4 horas.
0:10 a 0:50 0
CONTROLES Y ESTADO DE LOS CICLOS
CONTROL OBJETIVO COMENTARIOS
Use la opción Control Lock para evitar el uso no intencional de la lavavajillas entre un ciclo y otro.
Cuandoelindicador de bloqueo está encendido, todos los botones están desactivados. La puerta de
lalavavajillas puede abrirse y cerrarse mientras los controles están bloqueados.
Presione para iniciar o
reanudar un ciclo de lavado.
Si se abre la puerta durante un ciclo, o si se interrumpe el suministro de
energía, destellará el LED de START/RESUME (Inicio/Reanudar). El ciclo
no se reanudará hasta que se presione la tecla START/RESUME (Inicio/
Reanudar) y se cierre la puerta.
NOTA: Empuje la puerta para que se cierre rmemente en 4 segundos
después de oprimir START/RESUME (Inicio/Reanudar), de lo contrario
la lavavajillas no comenzará a funcionar. Si la puerta no se ha cerrado
en menos de 4 segundos, el LED de START/RESUME (Inicio/Reanudar)
destellará y se emitirá un tono audible cuando la puerta se cierre.
Para cancelar un ciclo de
lavado después de que ha
comenzado.
Para segur el progreso del
ciclo de la lavavajillas.
Presione para cancelar un ciclo de lavado. Luego, cierre la puerta de manera
rme. La lavavajillas comienza un desagüe de 2 minutos (si es necesario).
Deje que la lavavajillas complete el desagüe.
Si se selecciona la opción Sani Rinse (Enjuague sanitario), cuando el ciclo
haya nalizado, la luz indicadora de Sanitized (Higienizado) se ilumina.
Si la lavavajillas no higienizó los platos adecuadamente, la luz destella al
término del ciclo. Esto puede ocurrir si se interrumpe el ciclo o si el agua
nose pudo calentar a la temperatura requerida.
La luz se apaga cuando se abre y cierra la puerta o se presiona CANCEL
(Cancelar).
43
Page 44

Sistema de filtración
Su lavavajillas cuenta con lo último en tecnología de ltración para lavavajillas. El sistema de ltración triple minimiza los sonidos y
optimiza el ahorro de agua y energía mientras proporciona una limpieza superior. Durante la vida útil de su lavavajillas, el ltro necesitará
mantenimiento para conservar el rendimiento óptimo de limpieza.
El sistema de tres ltros consiste de 2 piezas, un ensamblaje de
ltro superior y un ltro inferior.
■ El ensamblaje de ltro superior mantiene los artículos muy
grandes y los objetos extraños, junto con las partículas muy
pequeñas de comida, fuera de la bomba.
■ El ltro inferior evita que la comida recircule en su lavavajillas.
Es posible que sea necesario limpiar los ltros cuando:
■ Haya objetos visibles o suciedad en el ensamblaje del ltro
superior.
■ Baje la calidad del rendimiento de limpieza (es decir, que
losplatos sigan sucios).
■ Los platos se sienten arenosos al tacto.
Es muy fácil quitar los ltros y darles mantenimiento. La tabla
siguiente muestra la frecuencia recomendada de limpieza.
INTERVALOS RECOMENDADOS PARA LA LIMPIEZA DEL FILTRO
Cantidad de cargas
por semana
8-12 Cada dos meses Cada cuatro meses Una vez por año
4-7 Cada cuatro meses Una vez por año Una vez por año
1-3 Dos veces por año Una vez por año Una vez por año
Si solamente raspa la comida
antes de cargar*
Si usted raspa la comida y enjuaga
antes de cargar
Si usted lava antes de cargar
*Recomendación del fabricante: Esta práctica ahorrará el agua y la energía que usted habría usado para preparar la vajilla. También le
permitirá ahorrar tiempo y esfuerzo.
Agua muy dura
Si tiene agua dura (más de 15 granos), limpie el ltro al menos una
vez por mes. La acumulación de restos blancos en su lavavajillas
indica que el agua es dura. Vea la sección “Solución de problemas”
para consultar los consejos para quitar las manchas.
Instrucciones para quitar los ltros
1. Gire el ensamblaje del
ltro superior ¼ de vuelta
hacia la izquierda, levante
ysáquelo.
2. Separe el ensamblaje
delltro superior jalándolo
suavemente para separarlo.
3. Limpie los ltros como
semuestra.
L
O
C
K
Para quitar el ensamblaje del
ltro superior
D
H
O
S
W
U
N
P
&
T
U
R
N
K
C
U
O
L
N
Instrucciones de limpieza
IMPORTANTE: No use un cepillo de alambre, estropajo, etc.,
yaque pueden dañar los ltros.
Enjuague el ltro debajo del agua corriente hasta haber quitado la
mayor parte de la suciedad. En caso de suciedad difícil de sacar
o de depósitos de calcio a causa del agua dura, es posible que
deba usar un cepillo suave.
L
O
C
K
P
U
S
H
D
O
W
N
&
T
U
U
R
N
N
L
O
C
K
44
Page 45

Instrucciones para reinstalar los ltros
1. Consulte las ilustraciones
anteriores y coloque el
ltro inferior debajo de las
lengüetas de ubicación en
el fondo de la lavavajillas
para que la abertura redonda
para el ensamblaje del ltro
superior esté alineada con la
abertura redonda en el fondo
de la tina.
2. Inserte el ensamblaje del
ltro superior dentro de la
abertura circular en el ltro
inferior
L
O
C
K
Para volver a colocar el
ensamblaje del ltro superior
3. Gire el ltro suavemente en sentido horario hasta que se
ajuste. Continúe girando hasta que quede sujeto de manera
rme. Si el ltro no encaja completamente (sigue girando
libremente), continúe girando el ltro hacia la derecha hasta
que caiga y quede trabado en su lugar.
NOTA: No es necesario que la echa del ensamblaje del ltro
superior esté alineada con la echa en el ltro inferior siempre
y cuando el ltro quede trabado.
IMPORTANTE: Para evitar dañar la lavavajillas, no la ponga
en marcha sin que los ltros estén adecuadamente instalados.
Asegúrese de que el ltro inferior esté seguro en su lugar y que
el ensamblaje del ltro superior esté trabado en su lugar. Si el
ensamblaje del ltro superior gira libremente, no está trabado
ensu lugar.
D
H
O
S
W
U
N
P
&
T
U
R
N
K
C
U
O
L
N
Cuidado de la lavavajillas
LIMPIEZA DE LA LAVAVAJILLAS
Limpieza externa
Limpie el exterior de la lavavajillas con un paño suave y húmedo
y detergente suave. Si el exterior de la lavavajillas es de acero
inoxidable, se recomienda el uso de un limpiador para acero
inoxidable - Limpiador de acero inoxidable, pieza N° 31464.
Limpieza interior
Limpie el interior de la lavavajillas con una pasta de detergente
en polvo para lavavajillas y agua, o use detergente líquido para
lavavajillas sobre una esponja húmeda para limpiar el interior
después de que éste se enfríe. Un enjuague con vinagre blanco
puede quitar las manchas blancas y películas. El vinagre
es un ácido y su uso frecuente podría dañar la lavavajillas.
Ponga2tazas (500 mL) de vinagre blanco en una taza medidora
de vidrio (con capacidad para dos tazas) o de otro material
seguro para lavavajillas en la canasta inferior (noverter).
Hagafuncionar la lavavajillas por un ciclo completo con una
opción de secado al aire o un secado que ahorre energía.
Nousedetergente. El vinagre se mezclará con el agua del lavado.
Procedimiento para el mantenimiento de
lalavavajillas
Remoción de agua dura/películas: Se recomienda usar un
producto de mantenimiento para uso mensual, como puede ser
ellimpiador para lavavajillas affresh®†, pieza número W10282479.
■ Cargue la lavavajillas (preferentemente con la vajilla que esté
afectada por películas o agua dura).
■ Coloque la tableta en el compartimiento de lavado principal
del depósito de detergente.
■ Seleccione el ciclo o la opción que sean los mejores para la
vajilla con suciedad profunda y ponga la lavavajillas en marcha.
NOTA: Se recomienda usar un detergente medido previamente en
tableta o en paquete para el uso común diario.
Para reducir el riesgo de daños a la propiedad durante
vacaciones o tiempo prolongado sin usar
■ Cuando no vaya a usar la lavavajillas durante los meses de
verano, cierre el suministro de agua y de electricidad a la
lavavajillas.
■ Asegúrese de que las líneas de suministro de agua estén
protegidas contra congelamiento. La formación de hielo en
las líneas de suministro puede aumentar la presión del agua
y dañar la lavavajillas o la casa. Los daños ocasionados por
congelamiento no están cubiertos por la garantía.
■ Cuando guarde la lavavajillas en el invierno, evite daños por el
agua y haga que personal de servicio autorizado acondicione
la lavavajillas para el invierno.
Purga de aire del desagüe
Si tiene una purga de aire
de desagüe, verifíquela y
límpiela si la lavavajillas
noestá desaguando bien.
†®affresh es una marca registrada de Whirlpool, U.S.A. Se usa con autorización.
45
Page 46

Solución de problemas
Pruebe primero las soluciones sugeridas aquí o visite nuestro sitio de internet y consulte
“Preguntasquesehacen con frecuencia”, para evitar posiblemente el costo de una visita de servicio técnico.
En EE.UU., www.ikea.com En Canadá, www.ikea.com
LA LAVAVAJILLAS NO ESTÁ FUNCIONANDO CORRECTAMENTE
PROBLEMA POSIBLES CAUSAS Y/O SOLUCIONES
La lavavajillas no
funciona o se detiene
durante un ciclo
Está destellando la luz
de limpio
La lavavajillas no se
llena
¿Se ha cerrado y trabado bien la puerta?
¿Se ha seleccionado el ciclo correcto?
¿Hay suministro eléctrico para la lavavajillas? ¿Hay un fusible de la casa fundido o se disparó un
cortacircuitos? Reemplace el fusible o reinicie el cortacircuitos. Si el problema continúa, llame a un
electricista. ¿Se ha detenido el motor debido a una sobrecarga? El motor se reactiva automáticamente
enunos minutos. Si no lo hace, llame al servicio técnico.
¿Está abierta la válvula de cierre del agua (si ha sido instalada)?
Es normal que en ciertos ciclos hayan pausas repetidamente durante varios segundos durante el lavado
principal.
Llame para solicitar servicio técnico.
¿Puede el otador de protección de sobrellenado moverse hacia arriba o hacia abajo
libremente? Presione hacia abajo para liberarlo.
La lavavajillas pasa
mucho tiempo en
marcha
Queda agua en la
lavavajillas
Queda detergente en
la sección con tapa
deldepósito
Residuos blancos
aparecen en la parte
frontal del panel de
acceso
Olor en la lavavajillas ¿Se lavan los platos sólo cada 2 ó 3 días? Páselos por un ciclo de enjuague una vez o dos veces por día
La lavavajillas puede funcionar por hasta 3¹⁄2 horas, según el nivel de suciedad, la temperatura del agua,
los ciclos y las opciones.
¿El agua que ingresa a la lavavajillas está lo sucientemente caliente? La lavavajillas toma más tiempo
cuando calienta el agua.
¿Coincide el tiempo de los ciclos de la lavavajillas con los tiempos de los ciclos jados? Vea las
selecciones de tiempo de lavado de los ciclos. En algunos ciclos de lavado y enjuague hay un retraso
automático hasta que el agua alcance la temperatura apropiada.
Esta lavavajillas está equipada con un lavado de sensor óptico que detecta la temperatura del agua,
lasuciedad y la cantidad de detergente. Los ciclos de lavado están ajustados basado en lo que se detecta.
IMPORTANTE: El primer ciclo de lavado después de la instalación en su casa se ajustará para
incluir 2enjuagues adicionales. Este ciclo no debe ser interrumpido para que el sensor se ajuste
adecuadamente. Si este ciclo de ajuste se cancela o detiene antes de que se encienda la luz de
Clean(Limpio) al nal del ciclo, el próximo ciclo de lavado repetirá este ajuste del sensor.
¿Se ha terminado el ciclo?
¿Se ha terminado el ciclo?
¿El detergente no forma grumos? Cambie el detergente si fuera necesario.
Cuando se cierra la puerta de la lavavajillas, ¿se bloquea la puerta del depósito con la vajilla o los utensilios?
¿Se usó demasiado detergente?
¿Es la marca de detergente lo que causa espuma en exceso? Pruebe una marca diferente para reducir la
espuma y eliminar la acumulación.
hasta que usted acumule una carga completa. ¿Tiene la lavavajillas un olor a plástico nuevo? Haga un
enjuague con vinagre como se describe en “Cuidado de la lavavajillas”.
Condensación en el
mostrador de la cocina
(en modelos
empotrados)
¿Está la lavavajillas alineada con el mostrador? La humedad proveniente del oricio de ventilación en la
consola de la lavavajillas puede formarse en el mostrador. Consulte las Instrucciones de instalación para
obtener más información
46
Page 47

LOS PLATOS NO QUEDAN BIEN SECOS
Los platos no quedan
bien secos
Los platos no están
secos
¿Ha usado un agente de enjuague? Para obtener un buen secado, su lavavajillas ha sido diseñada para
usar un agente de enjuague. Si no usa agente de enjuague, los platos y el interior de la lavavajillas tendrán
exceso de humedad. La opción de Heat Dry (Secado con calor) no funcionará tan bien sin usar el agente
de enjuague.
¿Se cargó la lavavajillas de manera que permita el escurrido apropiado del agua?
No la sobrecargue. Use un agente de enjuague líquido para acelerar el secado.
¿Están mojados los objetos de plástico? Los objetos de plástico a menudo necesitan un secado con toalla.
¿Está vacío el depósito del agente de enjuague?
¿Se usó una opción de secado al aire o un secado que ahorra energía? Use una opción de secado
caliente para obtener platos más secos.
PROBLEMA POSIBLES CAUSAS Y/O SOLUCIONES
Humedad excesiva
enlas canastas y en el
interior de la lavavajillas
Fíjese en el indicador del agente de enjuague para ver si hay agente de enjuague en el depósito.
MANCHAS EN LOS PLATOS
Manchas y formación
de películas en los
platos
Película de sílice o
corrosión (la película
de sílice es un depósito
blanco e iridiscente;
la corrosión es una
película turbia)
Manchas blancas en las
cacerolas con acabado
antiadherente
Manchas de color café
en los platos y en el
interior de la lavavajillas
Marcas negras o grises
en los platos
Manchas anaranjadas
en los platos de plástico
o en el interior de la
lavavajillas
¿Es el agua dura o tiene un alto contenido de minerales? El acondicionar el agua del enjuague nal con un
agente de enjuague ayuda a eliminar las manchas y la formación de películas. Mantenga el depósito del
agente de enjuague lleno. Use siempre una opción con temperatura alta. Si la dureza del agua de su casa
es de 13 granos o mayor, se recomienda que instale un ablandador doméstico de agua. Si no desea tomar
agua ablandada, haga que el ablandador de agua se instale en el suministro de agua caliente.
¿Está la temperatura del agua demasiado baja? Para obtener resultados óptimos con la lavavajillas,
elagua debe estar a 120°F (49°C) cuando entra en la lavavajillas.
¿Usó usted la cantidad correcta de detergente ecaz? Use sólo detergentes recomendados para
lavavajillas. No use menos de 1 cda (15 g) por carga. El detergente debe estar fresco para ser ecaz.
Lasuciedad profunda y/o el agua dura por lo general requieren detergente adicional.
¿Está la presión del agua de la casa lo sucientemente alta para lograr un llenado adecuado de la
lavavajillas? La presión del agua de la casa debe ser de 20 a 120 lb/pulg² (138 a 828 kPa) para obtener un
llenado apropiado de la lavavajillas. Si tiene preguntas acerca de la presión del agua, llame a un plomero
competente matriculado.
NOTA: Para quitar las manchas y películas de los objetos de cristal, saque todos los cubiertos y artículos
de metal y consulte “Procedimiento de mantenimiento de la lavavajillas” en la sección “Cuidado de la
lavavajillas”.
A veces se produce una reacción química al agua con ciertos tipos de objetos de cristal. Por lo general
se debe a una combinación de agua suave o agua ablandada, soluciones alcalinas para lavar, enjuague
insuciente, sobrecarga de la lavavajillas y el calor del secado. Evitar este problema no sería posible,
excepto lavando a mano.
Para hacer el proceso más lento, use una mínima cantidad de detergente pero no menos de 1 cda
(15g) por carga. Use un agente de enjuague líquido y reduzca la carga de la lavavajillas para permitir un
enjuague a fondo. Las películas de sílice y la corrosión son permanentes y no se pueden eliminar. No use
el secado caliente.
¿Ha quitado el detergente de la lavavajillas el curado de las cacerolas?
Vuelva a curarlos luego de lavarlas en la lavavajillas.
¿Tiene el agua un alto contenido de hierro? Vuelva a lavar los platos usando 1-3 cucharaditas (5-15mL) de
cristales de ácido cítrico agregados en la sección con tapa del depósito del detergente. No use detergente.
A continuación use el ciclo de lavado Normal con detergente. Si el tratamiento llega a ser necesario más
de una vez cada dos meses, se sugiere la instalación de una unidad de eliminación de hierro.
¿Hay objetos de aluminio que rozan los platos durante el lavado?
Los objetos de aluminio desechables pueden romperse en la lavavajillas y rayar los demás artículos.
Laveestos objetos a mano.
Quite las marcas de aluminio usando un producto de limpieza abrasivo suave
¿Se han colocado grandes cantidades de platos con restos de comida a base de tomate en la lavavajillas?
Tal vez sea necesario usar un producto quitamanchas para quitar las manchas de su lavavajillas.
Lasmanchas no afectarán el rendimiento de la lavavajillas.
47
Page 48

RUIDOS
Se escuchan chirridos,
crujidos o zumbidos
Un objeto duro se ha introducido en el módulo de lavado (en algunos modelos).
El sonido deberá cesar una vez que el objeto haya sido pulverizado. Si el ruido continúa después de un
ciclo completo, llame al servicio técnico.
LOS PLATOS NO ESTÁN COMPLETAMENTE LIMPIOS
Residuos de alimentos
en los platos
¿Se ha cargado la lavavajillas correctamente?
¿Ha elegido el ciclo que describe la suciedad más rebelde en su lavavajillas? Si tiene algunos artículos
con suciedad profunda, use un ciclo más intenso. ¿Está la temperatura del agua demasiado baja?
Paraobtener resultados óptimos con la lavavajillas, el agua debe estar a 120°F (49°C) cuando entra en
lalavavajillas. ¿Usó usted la cantidad correcta de detergente fresco? Use sólo detergentes recomendados
para lavavajillas. No use menos de 1 cda (15 g) por carga. El detergente debe estar fresco para ser ecaz.
La suciedad profunda y/o el agua dura por lo general requieren detergente adicional.
¿Está el detergente endurecido en el depósito? Use sólo detergente fresco. No permita que el detergente
permanezca por varias horas en un depósito húmedo. Limpie el depósito cuando haya detergente
endurecido.
¿Está la bomba o el brazo rociador obstruido por las etiquetas de botellas y latas?
¿Está la presión del agua de la casa lo sucientemente alta para lograr un llenado adecuado de la
lavavajillas? La presión del agua de la casa debe ser de 20 a 120 lb/pulg² (138 a 828 kPa) para obtener un
llenado apropiado de la lavavajillas. Si tiene preguntas acerca de la presión del agua, llame a un plomero
competente matriculado.
¿Está el exceso de espuma reduciendo la velocidad del brazo rociador? No use jabón o detergentes para
lavar ropa. Use sólo detergentes recomendados para lavavajillas.
LOS PLATOS SE DAÑAN DURANTE EL CICLO
PROBLEMA POSIBLES CAUSAS Y/O SOLUCIONES
Platos despostillados ¿Se cargó la lavavajillas adecuadamente? Coloque los platos y vasos de manera que estén estables y no
se choquen entre sí por la acción del lavado. El sacar y meter las canastas despacio reduce la posibilidad
de despostillado.
NOTA: Algunos objetos de cristal antiguo, con cantos biselados y objetos similares de porcelana y cristal
podrían ser demasiado delicados para lavarse en la lavavajillas automática. Lávelos a mano.
W11212416C
©2018.
All rights reserved.
Tous droits réservés.
Todos los derechos reservados.
®
IKEA is a registered trademark of Inter-Ikea Systems B.V.
®
IKEA est une marque déposée de Inter-Ikea Systems B.V.
®
IKEA es una marca registrada de Inter-Ikea Systems B.V.
02/18
 Loading...