

Page 1

SKINANDE
AU
Page 2

Page 3

ENGLISH
4
Page 4
ENGLISH
Contents
4
Safety information 4
Safety instructions 5
Product description 7
Control panel 7
Programmes 8
Options 9
Settings 10
Before first use 11
Subject to change without notice.
Daily use 11
Hints and tips 13
Care and cleaning 14
Troubleshooting 16
Technical information 18
ENVIRONMENT CONCERNS 18
IKEA GUARANTEE 18
Safety information
Before the installation and use of the appliance, carefully read
the supplied instructions. The manufacturer is not responsible if
an incorrect installation and use causes injuries and damages.
Always keep the instructions with the appliance for future
reference.
Children and vulnerable people safety
• This appliance can be used by children aged from 8 years
and above and persons with reduced physical, sensory or
mental capabilities or lack of experience and knowledge if
they have been given supervision or instruction concerning
use of the appliance in a safe way and understand the
hazards involved.
• Do not let children play with the appliance.
• Keep all detergents away from children.
• Keep children and pets away from the appliance door when
it is open.
• Cleaning and user maintenance shall not be made by
children without supervision.
Page 5

ENGLISH 5
General Safety
• This appliance is intended to be used in household and
similar applications such as:
– farm houses; staff kitchen areas in shops, offices and other
working environments;
– by clients in hotels, motels, bed & breakfast and other
residential type environments.
• Do not change the specification of this appliance.
• The operating water pressure (minimum and maximum) must
be between 0.5 (0.05) / 8 (0.8) bar (Mpa)
• Obey the maximum number of 12 place settings.
• If the supply cord is damaged, it must be replaced by the
manufacturer, its Authorised Service Centre or similarly
qualified persons in order to avoid a hazard.
• Put knives and cutlery with sharp points in the cutlery basket
with the points down or in a horizontal position.
• Do not keep the appliance door open without supervision to
prevent to fall on it.
• Before maintenance, deactivate the appliance and
disconnect the mains plug from the mains socket.
• Do not use water spray and steam to clean the appliance.
• The ventilation openings in the base (if applicable) must not
be obstructed by a carpet.
• The appliance is to be connected to the water mains using
the new supplied hose-sets. Old hose sets must not be
reused.
Safety instructions
Installation
• Remove all the packaging.
• Do not install or use a damaged
appliance.
• Do not install or use the appliance where
the temperature is less than 0 °C.
• Obey the installation instruction supplied
with the appliance.
• Make sure that the appliance is installed
below and adjacent to safe structures.
Page 6
A
B
ENGLISH
6
Electrical connection
Warning! Risk of fire and
electrical shock.
• The appliance must be earthed.
• Make sure that the electrical information
on the rating plate agrees with the
power supply. If not, contact an
electrician.
• Always use a correctly installed
shockproof socket.
• Do not use multi-plug adapters and
extension cables.
• Make sure not to cause damage to the
mains plug and to the mains cable.
Should the mains cable need to be
replaced, this must be carried out by our
Authorised Service Centre.
• Connect the mains plug to the mains
socket only at the end of the installation.
Make sure that there is access to the
mains plug after the installation.
• Do not pull the mains cable to disconnect
the appliance. Always pull the mains
plug.
• This appliance complies with the E.E.C.
Directives.
• Only for UK and Ireland. The appliance
has a 13 amp mains plug. If it is
necessary to change the fuse in the
mains plug, use fuse: 13 amp ASTA (BS
1362).
Water connection
• Make sure not to cause damage to the
water hoses.
• Before you connect the appliance to new
pipes or pipes not used for a long time,
let the water flow until it is clean.
• The first time you use the appliance,
make sure that there is no leakage.
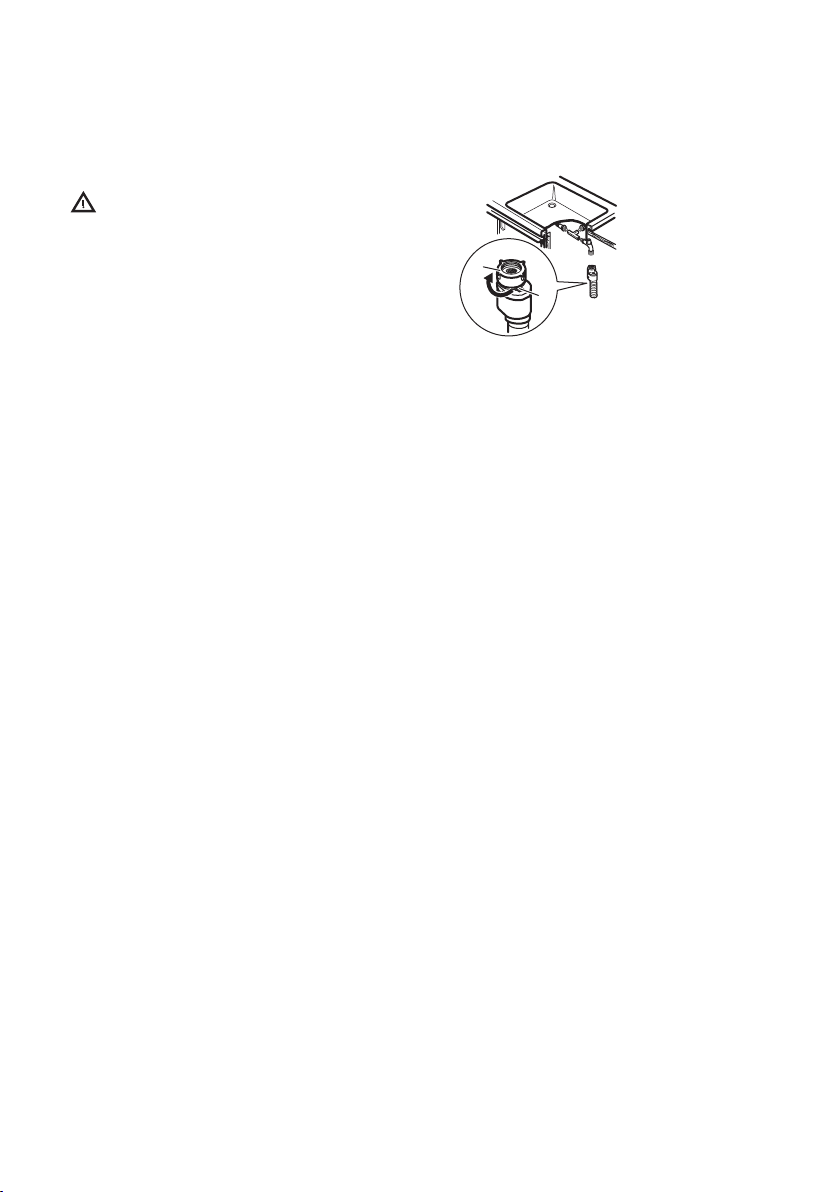
• The water inlet hose has a safety valve
that prevents the hose to loosen. To
disconnect the hose, press the lever (B)
and turn the fastener (A) clockwise.
• The water inlet hose has an external
transparent sheath. If the hose is
damaged, the water in the hose
becomes dark.
• If the water inlet hose is damaged,
immediately disconnect the mains plug
from the mains socket. Contact the
Authorised Service Centre to replace the
water inlet hose.
Use
• Do not sit or stand on the open door.
• Dishwasher detergents are dangerous.
Obey the safety instructions on the
detergent packaging.
• Do not drink and play with the water in
the appliance.
• Do not remove the dishes from the
appliance until the programme is
completed. There can be detergent on
the dishes.
• The appliance can release hot steam if
you open the door while a programme
operates.
• Do not put flammable products or items
that are wet with flammable products in,
near or on the appliance.
Service
• Contact the Authorised Service Centre to
repair the appliance. We recommend
only the use of original spare parts.
• When you contact the Authorised Service
Centre, ensure that you have the
following information that is available on
the rating plate.
Model :
PNC :
Page 7
7
6
5
4
1
3
2
1 2 4 53
ENGLISH 7
Serial Number :
Disposal
Warning! Risk of injury or
suffocation.
Product description
Beam-on-Floor
The Beam-on-Floor is a light that shows on
the kitchen floor below the appliance door.
• When the programme starts, a red light
comes on and stays on for all the
duration of the programme.
• When the programme is completed, a
green light comes on.
• Disconnect the appliance from the mains
supply.
• Cut off the mains cable and discard it.
• Remove the door catch to prevent
children and pets to get closed in the
appliance.
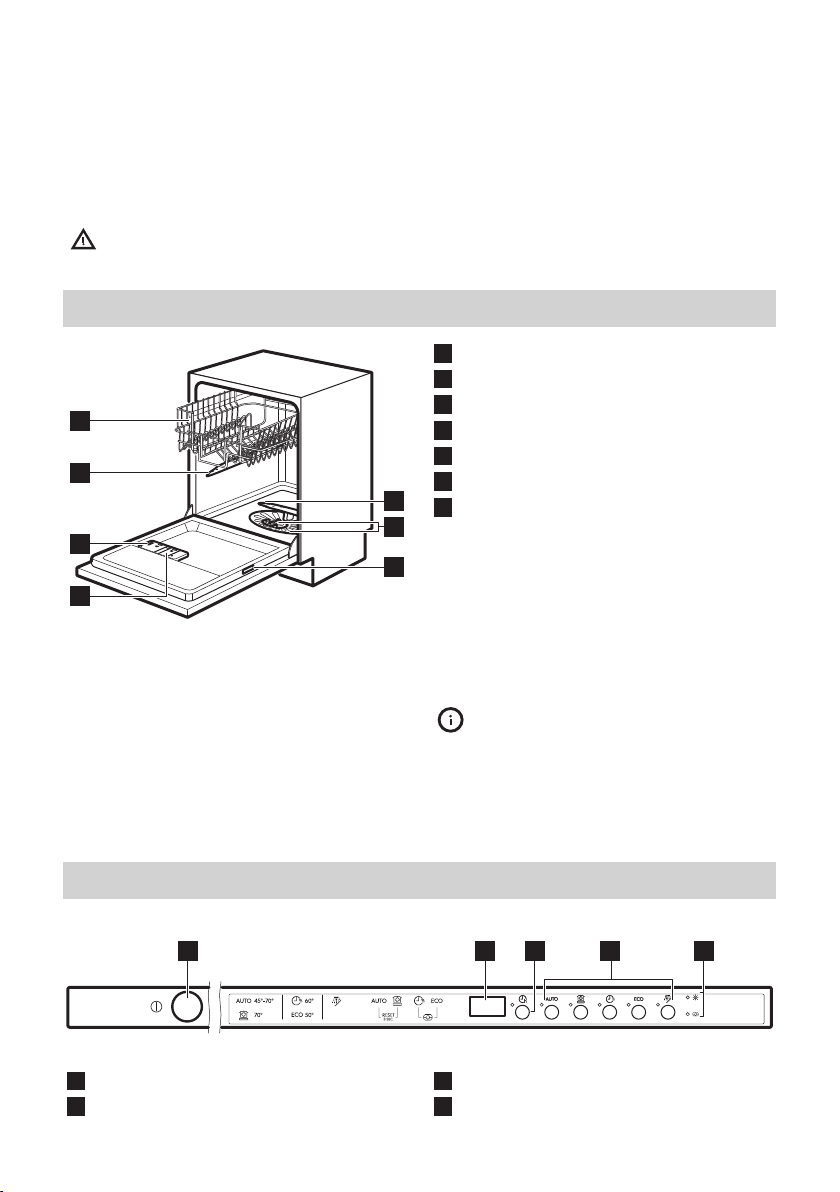
Lower spray arm
1
Filters
2
Rating plate
3
Rinse aid dispenser
4
Detergent dispenser
5
Upper spray arm
6
Upper basket
7
• When the appliance has a malfunction,
the red light flashes.
The Beam-on-Floor goes off
when the appliance is
deactivated.
Control panel
1
2
On/off button
Display
Delay button
3
Programme buttons
4
Page 8
ENGLISH 8
Indicators
5
Indicators
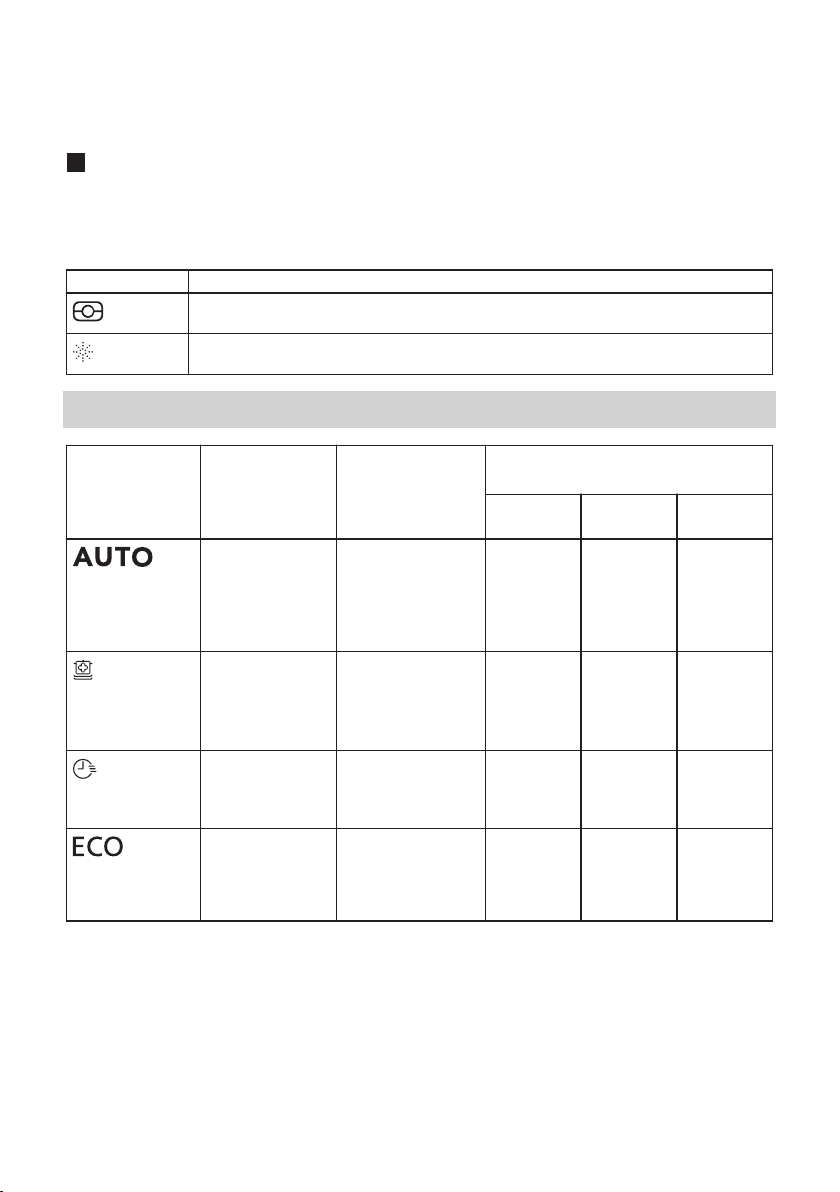
Indicator Description
Multitab indicator.
Rinse aid indicator. It is always off while the programme operates.
Programmes
Programme Degree of soil
Type of load
All
2)
Crockery, cutlery, pots and
pans
3)
Heavy soil
Crockery, cutlery, pots and
pans
4)
Fresh soil
Crockery and
cutlery
5)
Normal soil
Crockery and
cutlery
Programme pha-
ses
• Prewash
• Wash from 45
°C to 70 °C
• Rinses
• Dry
• Prewash
• Wash 70 °C
• Rinses
• Dry
• Wash 60 °C or
65 °C
• Rinses
• Prewash
• Wash 50 °C
• Rinses
• Dry
Consumption values
1)
Duration
(min)
Energy
(kWh)
Water
(l)
40 - 150 0.6 - 1.4 7 - 12
140 - 160 1.3 - 1.5 13 - 15
30 0.9 9
128 0.75 10.3
Page 9
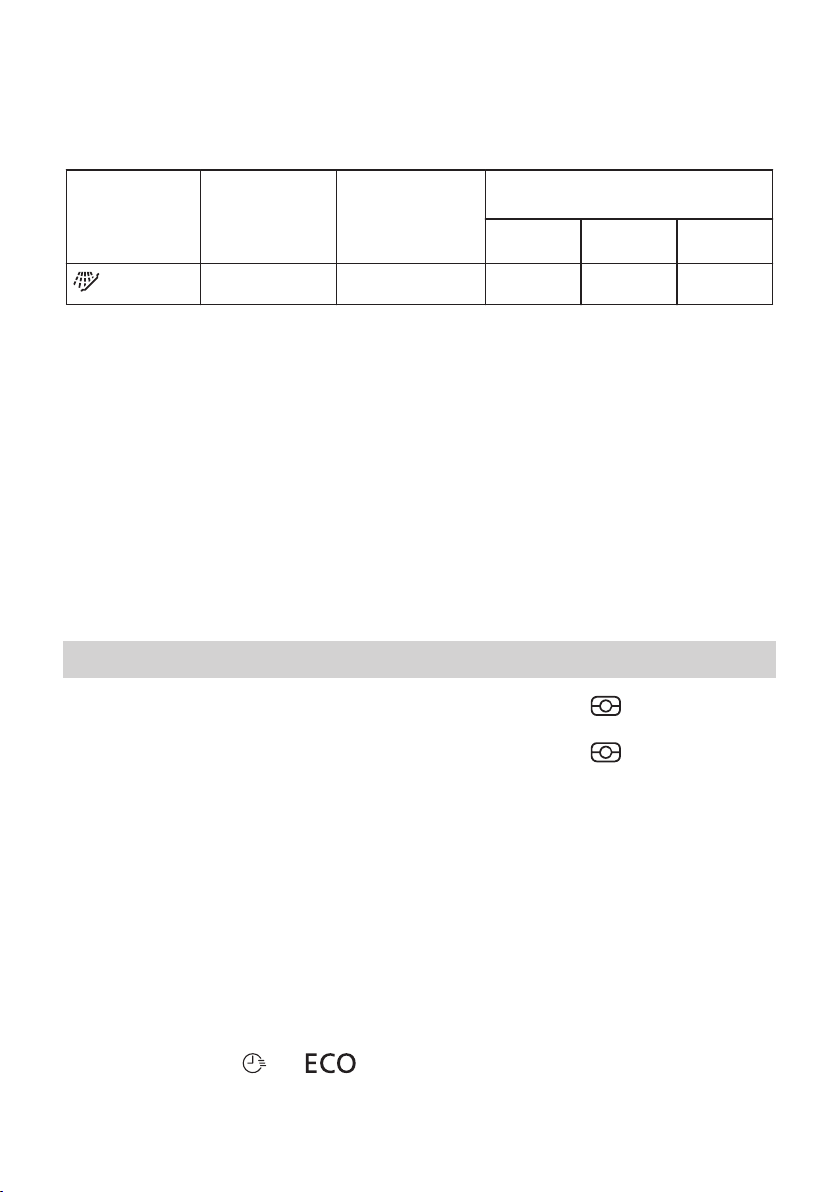
ENGLISH 9
Programme Degree of soil
Type of load
6)
1)
The pressure and the temperature of the water, the variations of the mains supply, the options and the quantity of
dishes can change the values.
2)
The appliance senses the degree of soil and the quantity of items in the baskets, it automatically adjusts the tem-
perature and the quantity of the water, the energy consumption and the programme duration.
3)
Programme with prolonged rinsing time in high temperature for extra hygienic wash-up. Ideal for baby bottles or
when a family member is ill.
4)
With this programme you can wash a load with fresh soil. It gives good washing results in a short time.
5)
With this programme you have the most efficient use of water and energy consumption for crockery and cutlery with
normal soil. (This is the standard programme for test institutes).
6)
Use this programme to quickly rinse the dishes. this prevents the remaining food to bond on the dishes and bad
odours to come out from the appliance. Do not use detergent with this programme.
All
Information for test institutes
For all the necessary information for test
Programme pha-
ses
• Prewash
Write down the product number (PNC) that
is on the rating plate.
Consumption values
1)
Duration
(min)
Energy
(kWh)
14 0.1 4
Water
(l)
performance, send an email to:
Options
Multitab
Activate this option when you use multitablets that integrate the rinse aid and
detergent functions. They can also contain
other cleaning or rinsing agents.
With the use of this option the programme
duration is prolonged to increase the
cleaning and drying results with the use of
multi-tablets.
You do not need to activate the option
Multitab every time you start a programme.
Once you have activated the option it will
remain active.
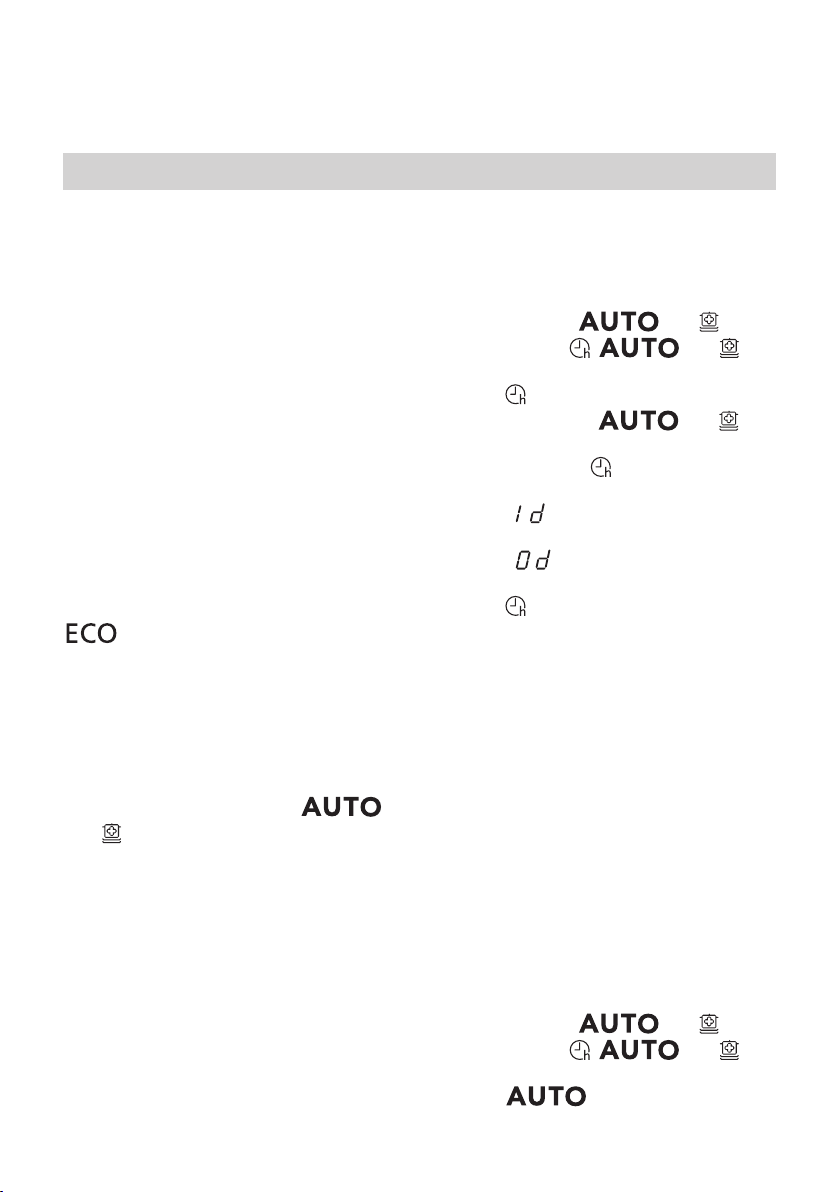
How to activate Multitab
Press at the same time and .
• The indicator comes on = option
activated.
• The indicator goes off = option
deactivated.
What to do if you want to stop using multitablets
Before you start to use detergent and rinse
aid separately do the following procedure.
1. Make sure that the rinse aid container is
full.
2. Start the shortest programme with a
rinsing phase. Do not add detergent
and do not load the baskets.
3. When the programme is completed,
adjust the released quantity of rinse aid.
Page 10
ENGLISH
Settings
10
Programme selection mode and user mode
When the appliance is in programme
selection mode it is possible to set a
programme and to enter the user mode.
In user mode, the following settings can
be changed:
• The activation or the deactivation of the
acoustic signal for end of programme.
• The deactivation of the rinse aid
dispenser when you want to use the
Multitab option without rinse aid.
These settings will be saved until you
change them again.
How to set the programme selection mode
The appliance is in programme selection
mode when the programme indicator
is on and the display shows the
programme duration.
When you activate the appliance, usually it
is in programme selection mode. However,
if this does not happen, you can set the
programme selection mode in the following
way:
Press and hold simultaneously
and until the appliance is in programme
selection mode.
How to deactivate the rinse aid dispenser
The appliance must be in programme
selection mode.
1. To enter the user mode, press and hold
simultaneously and until
the indicators
start to flash and the display is blank.
2. Press .
• The indicators and go
off.
• The indicator continues to flash.
• The display shows the current setting.
–
activated.
–
deactivated.
3. Press
4. Press the on/off button to confirm the
setting.
Acoustic signals
The acoustic signals operate when the
appliance has a malfunction and it is not
possible to deactivate them.
There is also an acoustic signal that
operates when the programme is
completed. By default, this acoustic signal is
on, but it is possible to deactivate it.
to change the setting.
, and
= rinse aid dispenser
= rinse aid dispenser
Use of rinse aid and multi-tablets
When you activate the option Multitab, the
rinse aid dispenser continues to release
rinse aid. However you can deactivate the
rinse aid dispenser. In this case the drying
results may not be satisfactory.
With the rinse aid dispenser deactivated,
the rinse aid indicator is always off.
How to deactivate the acoustic signal for the end of programme
The appliance must be in programme
selection mode.
1. To enter the user mode press and hold
simultaneously
the indicators , and
start to flash and the display is blank.
2. Press .
and until
Page 11
+
-
M
A
X
M
A
X
+
4
3
2
1
-
ENGLISH 11
• The indicator and go off.
• The indicator continues to
flash.
• The display shows the current setting:
= Acoustic signal on.
–
Before first use
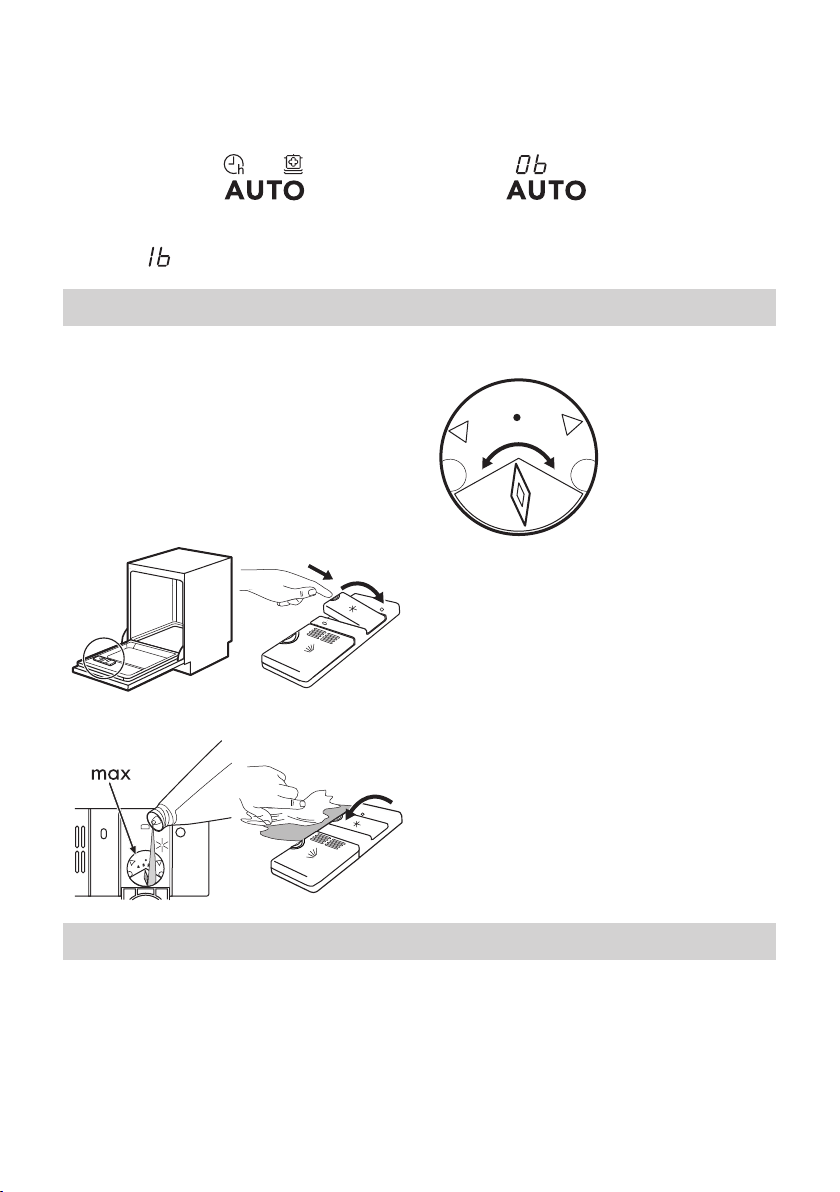
1. Fill the rinse aid dispenser.
2. Open the water tap.
3. Start a program to remove any
processing residuals that can still be
inside the appliance. Do not use
detergent and do not load the baskets.
Filling the rinse aid dispenser
1 2
3
4
– = Acoustic signal off.
3. Press to change the setting.
4. Press the on/off button to confirm the
setting.
5
To adjust the
released quantity of
rinse aid, turn the
selector between
position 1 (lowest
quantity) and
position 4 (highest
quantity).
Daily use
1. Open the water tap.
2. Press the on/off button to activate the
appliance.
Make sure that the appliance is in
programme selection mode.
• If the rinse aid indicator is on, fill the
rinse aid dispenser.
3. Load the baskets.
4. Add the detergent. If you use multitablets, activate the option Multitab.
5. Set and start the correct programme for
the type of load and the degree of soil.
Page 12
A
B
ENGLISH
12
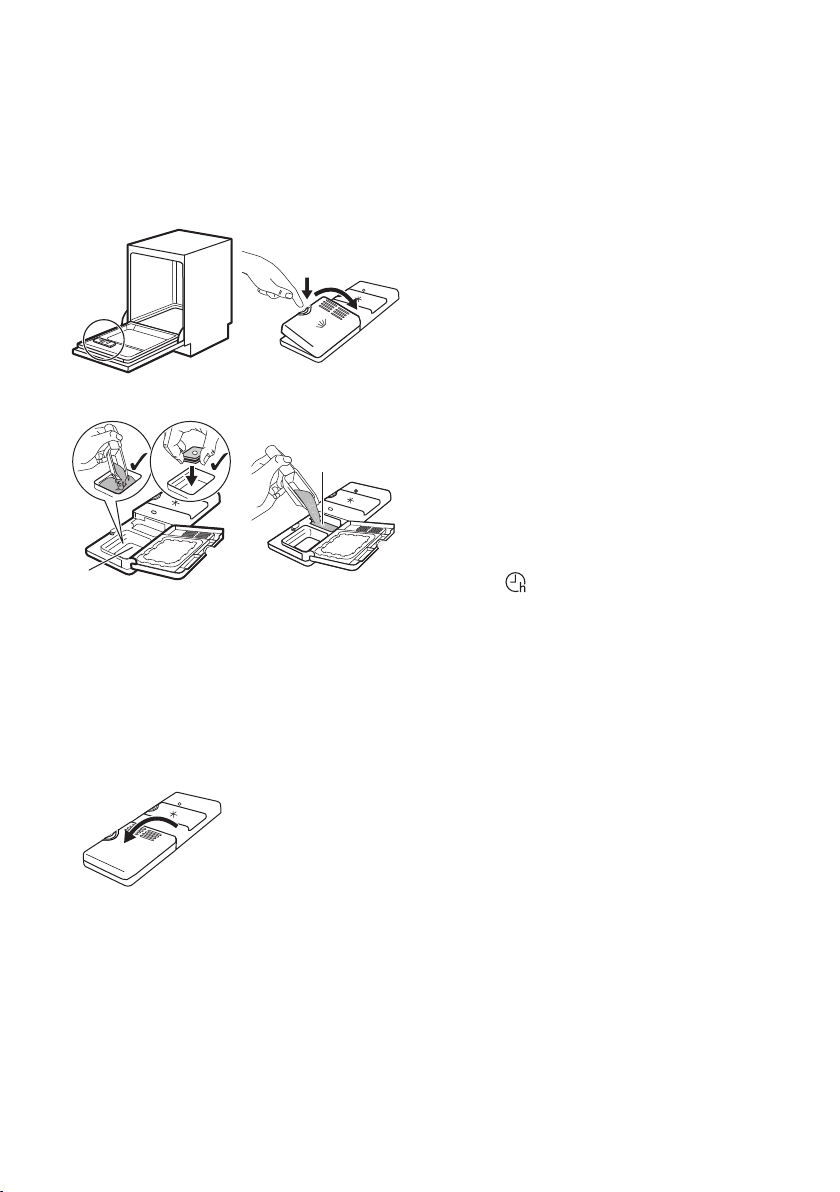
Using the detergent
1 2
3
Put the detergent or
the multi-tablet in
compartment (A).
5
4
If the programme
has a prewash
phase, put a small
quantity of
detergent in
compartment (B).
• 5 minutes after the completion of the
programme.
• After 5 minutes if the programme has not
started.
Starting a programme
1. Keep the appliance door ajar.
2. Press the on/off button to activate the
appliance. Make sure that the
appliance is in programme selection
mode.
3. Press the button related to the
programme you want to start.
The display shows the programme duration.
4. Set the applicable options.
5. Close the appliance door to start the
programme.
Starting a programme with delay start
1. Set a programme.
2. Press
shows the delay time you want to set
(from 1 to 24 hours).
The delay indicator comes on.
3. Close the appliance door to start the
countdown.
While a countdown is running it is possible
to increase the delay time but not to change
the selection of the programme and
options.
When the countdown is completed, the
programme starts.
repeatedly until the display
Opening the door while the appliance operates
If you open the door while a programme is
running, the appliance stops. When you
Setting and starting a programme
The Auto Off function
This function decreases energy consumption
by automatically deactivating the
appliance when it is not operating.
The function comes into operation:
close the door, the appliance continues from
the point of interruption.
Page 13
ENGLISH 13
Cancelling the delay start while the countdown operates
When you cancel the delay start you have
to set the programme and options again.
Press and hold simultaneously
and until the appliance is in programme
selection mode.
Cancelling the programme
Press and hold simultaneously
and until the appliance is in programme
selection mode.
Make sure that there is detergent in the
detergent dispenser before you start a new
programme.
End of the programme
When the programme is completed the
display shows 0:00 .
Hints and tips
General
The following hints will ensure optimal
cleaning and drying results in daily use and
also help to protect the environment.
• Remove larger residues of food from the
dishes into the waste bin.
• Do not pre-rinse dishes by hand. When
needed, use the prewash programme (if
available) or select a programme with a
prewash phase.
• Always use the whole space of the
baskets.
• When loading the appliance, make sure
that the dishes can be completely
reached and washed by the water
released from the spray arm nozzles.
Make sure that items do not touch or
cover each other.
• You can use dishwasher detergent and
rinse aid separately or you can use the
1. Press the on/off button or wait for the
Auto Off function to automatically
deactivate the appliance.
2. Close the water tap.
For the better drying results keep
the appliance door ajar for some
minutes before you remove the
dishes. Let the dishes cool down
before you remove them form the
appliance. Hot dishes are easily
damaged.
multi-tablets. Follow the instructions
written on the packaging.
• Select the programme according to the
type of load and degree of soil. With the
ECO programme you have the most
efficient use of water and energy
consumption for crockery and cutlery
with normal soil.
Using rinse aid and detergent
• Only use rinse aid and detergent for
dishwasher. Other products can cause
damage to the appliance.
• The rinse aid helps, during the last
rinsing phase, to dry the dishes without
streaks and stains.
• If you use multi-tablets you can select the
Multitab option (if available). This option
improves the cleaning and drying results
with the use of multi-tablets.
Page 14
ENGLISH 14
• Detergent tablets do not fully dissolve
with short programmes. To prevent
detergent residues on the tableware, we
recommend that you use the tablets with
long programmes.
• Do not use more than the correct
quantity of detergent. Refer to the
instructions on the detergent packaging.
Loading the baskets
Refer to the supplied leaflet with
examples of the load of the
baskets.
• Only use the appliance to wash items
that are dishwasher-safe.
• Do not put in the appliance items made
of wood, horn, aluminium, pewter and
copper.
• Do not put in the appliance items that
can absorb water (sponges, household
cloths).
• Remove remaining food from the items.
• Soak items with remaining burned food
in water.
• Put hollow items (cups, glasses and pans)
with the opening down.
• Make sure that cutlery and dishes do not
bond together. Mix spoons with other
cutlery.
• Make sure that glasses do not touch
other glasses.
• Put small items in the cutlery basket.
• Put light items in the upper basket. Make
sure that the items do not move.
• Make sure that the spray arm can move
freely before you start a programme.
Before starting a programme
Make sure that:
• The filters are clean and correctly
installed.
• The spray arms are not clogged.
• There is dishwasher rinse aid (unless you
use multi- tablets).
• The position of the items in the baskets is
correct.
• The programme is applicable for the
type of load and for the degree of soil.
• The correct quantity of detergent is used.
Unloading the baskets
1. Let the tableware cool down before you
remove it from the appliance. Hot items
can be easily damaged.
2. First remove items from the lower
basket, then from the upper basket.
At the end of the programme
water can still remain on the
sides and on the door of the
appliance.
Care and cleaning
Warning! Before maintenance,
deactivate the appliance and
disconnect the mains plug from
the main socket.
Dirty filters and clogged spay
arms decrease the washing
results. Make a check regularly
and, if necessary, clean them.
Page 15
C
B
A
D
A
B
ENGLISH 15
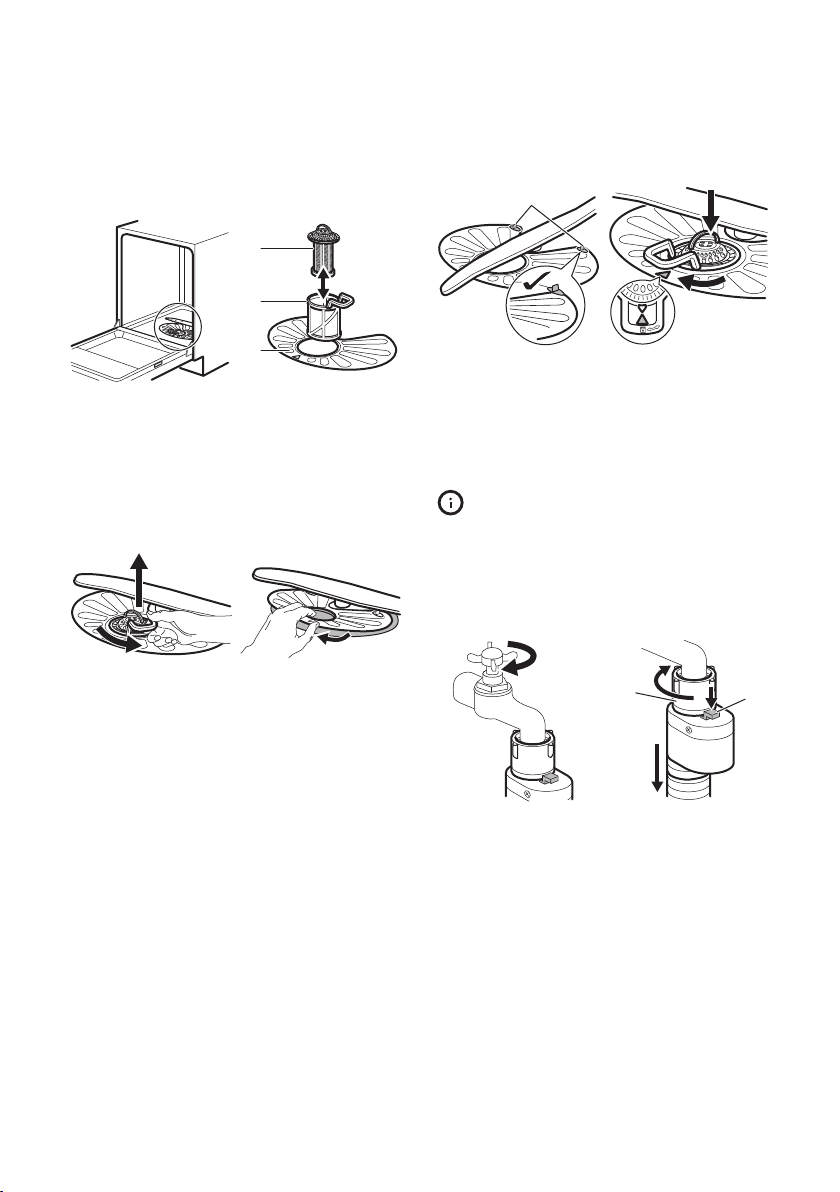
Cleaning the filters
1
Make sure that
there are no
residues of food or
soil in or around the
edge of the sump.
3
To remove filters (B)
and (C) turn the
handle
counterclockwise
and remove. Pull
apart filter (B) and
(C). Wash the filters
with water.
2
4
Remove filter (A).
Wash the filter with
water.
5
Put the flat filter (A)
back in place. Make
sure that it is
correctly positioned
under the 2 guides
(D).
An incorrect position of the filters
can cause bad washing results
and damage to the appliance
Cleaning the filter of the inlet hose
1
Close the water tap.
6
Assemble filters (B)
and (C). Put them
into position in filter
(A). Turn the handle
clockwise until it
locks.
2
Disconnect the hose.
Press the lever B
and turn the
fastener A
clockwise.
Page 16
ENGLISH 16
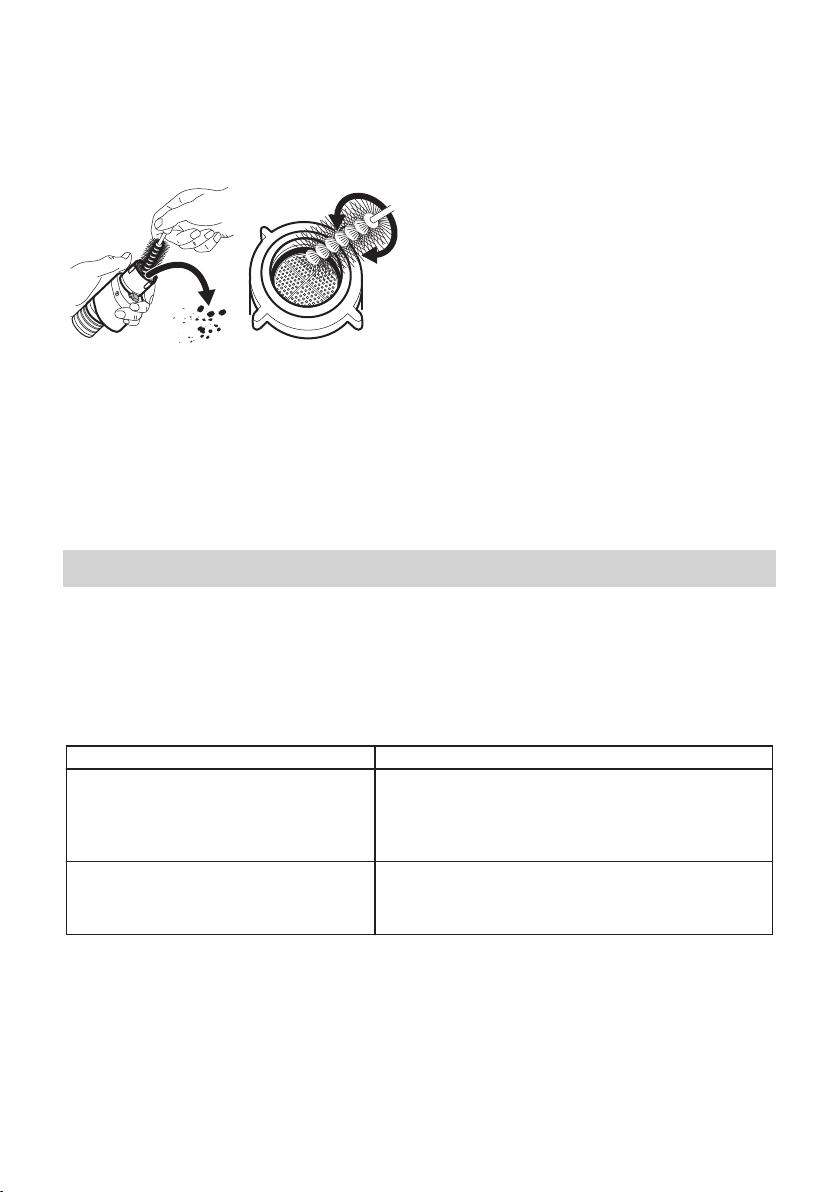
3
Clean the filter of
the inlet hose.
Cleaning the spray arms
Do not remove the spray arms. If the holes
in the spray arms are clogged, remove
remaining parts of soil with a thin pointed
object.
4
Troubleshooting
If the appliance does not start or it stops
during operation, before you contact an
Authorised Service Centre, check if you can
solve the problem by yourself with the help
of the information in the table.
External cleaning
• Clean the appliance with a moist soft
cloth.
• Only use neutral detergents.
• Do not use abrasive products, abrasive
cleaning pads or solvents.
Internal cleaning
• Carefully clean the appliance, including
the rubber gasket of the door, with a soft
moist cloth.
• If you regularly use short duration
programmes, these can leave deposits of
grease and limescale inside the
appliance. To prevent this, we
recommend to run long duration
programmes at least 2 times per month.
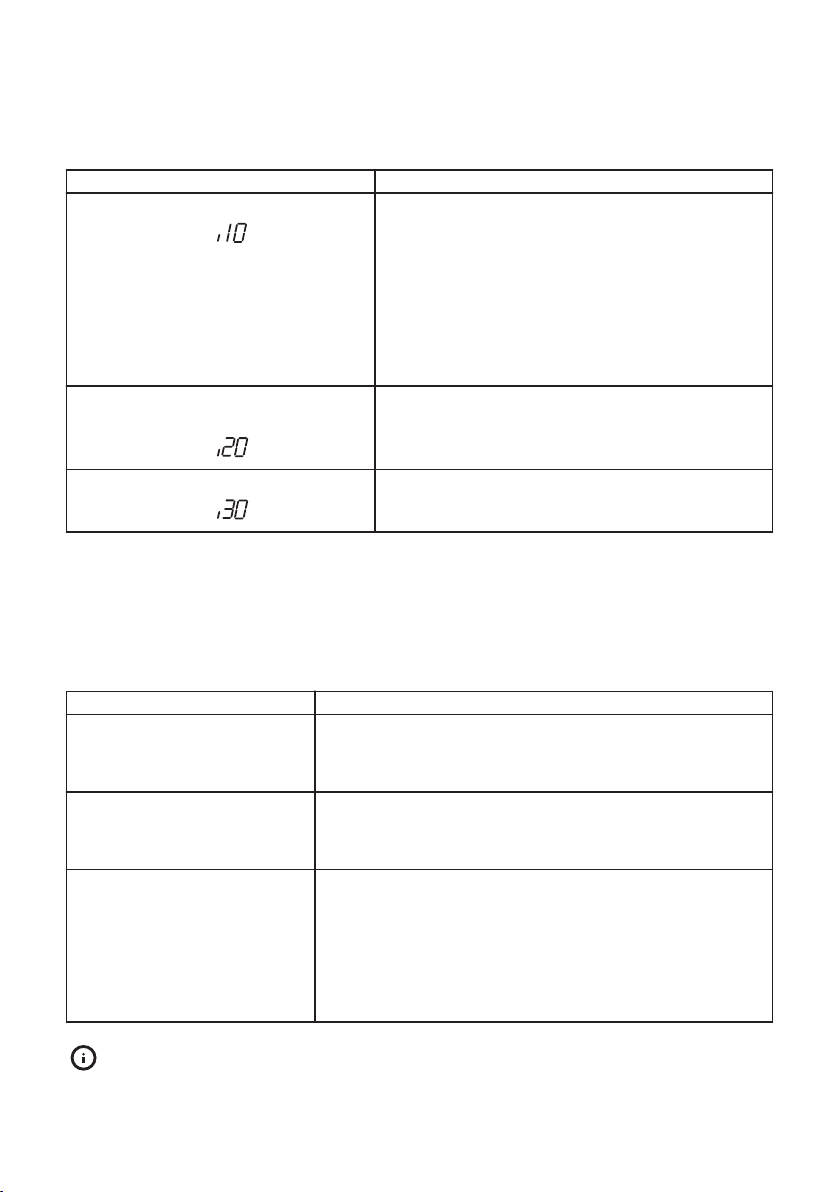
With some problems, the display shows
an alarm code.
Problem and alarm code Possible solution
You cannot activate the appliance.
The programme does not start.
• Make sure that the mains plug is connected to
the mains socket.
• Make sure that there is no damaged fuse in
the fuse box.
• Make sure that the appliance door is closed.
• If the delay start is set, cancel the setting or
wait for the end of the countdown.
Page 17
ENGLISH 17
Problem and alarm code Possible solution
The appliance does not fill with water.
The display shows .
The appliance does not drain the water.
The display shows .
The anti-flood device is on.
The display shows .
• Make sure that the water tap is open.
• Make sure that the pressure of the water supply is not too low. For this information, contact
your local water authority.
• Make sure that the water tap is not clogged.
• Make sure that the filter in the inlet hose is not
clogged. Clean the filter.
• Make sure that the inlet hose has no kinks or
bends.
• Make sure that the sink spigot is not clogged.
• Make sure that the drain hose has no kinks or
bends.
• Close the water tap and contact an Authorised
Service Centre.
Once you have checked the appliance,
deactivate and activate the appliance. If
the problem occurs again, contact an
Authorised Service Centre.
The washing and drying results are not satisfactory
Problem Possible solution
There are whitish streaks or
bluish layers on glasses and
dishes.
There are stains and dry water drops on glasses and
dishes.
The dishes are wet.
Refer to "Hints and tips" for
other possible causes.
• The release quantity of rinse aid is too much. Adjust
the rinse aid selector to a lower position.
• The quantity of detergent is too much.
• The released quantity of rinse aid is not sufficient. Adjust the rinse aid selector to a higher position.
• The quality of the rinse aid can be the cause.
• The programme does not have a drying phase or has
a drying phase with low temperature.
• The rinse aid dispenser is empty.
• The quality of the rinse aid can be the cause.
• The quality of the multi-tablets can be the cause. Try a
different brand or activate the rinse aid dispenser and
use rinse aid and multi-tablets together.
For alarm codes not described in the table,
contact an Authorised Service Centre.
Page 18
ENGLISH 18
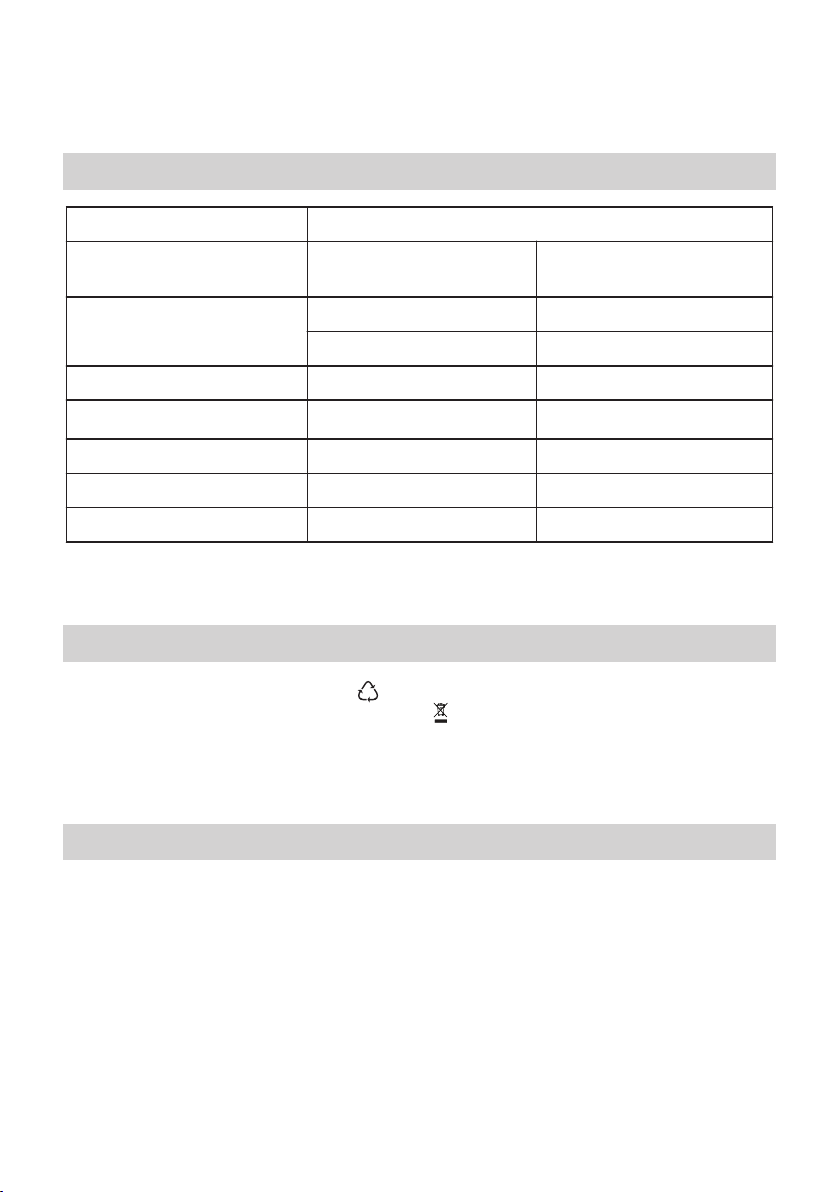
Technical information
Product denomination Fully integrated dishwasher
Dimensions Width / height / depth
596 / 818-898 / 555
(mm)
Electrical connection
1)
Voltage (V) 220 - 240
Frequency (Hz) 50
Water supply pressure Min. / max. bar (MPa) 0.5 (0.05) / 8 (0.8)
Water supply
Cold water or hot water
2)
max 60 °C
Capacity Place settings 12
Power consumption Left-on mode (W) 5.0
Power consumption Off-mode (W) 0.10
1)
Refer to the rating plate for other values.
2)
If the hot water comes from alternative source of energy, (e.g. solar panels, aeolian energy), use the hot water sup-
ply to decrease energy consumption.
ENVIRONMENT CONCERNS
Recycle the materials with the symbol .
Put the packaging in applicable containers
to recycle it. Help protect the environment
and human health and to recycle waste of
electrical and electronic appliances. Do not
dispose appliances marked with the symbol
with the household waste. Return the
product to your local recycling facility or
contact your municipal office.
IKEA GUARANTEE
How long is the IKEA guarantee valid?
This guarantee is valid for five (5) years
from the original date of purchase of Your
appliance at IKEA Pty Ltd, ABN
84006270757 or at Cebas Pty Ltd, ABN 15
009 156 003 (Both Trading as IKEA) unless
the appliance is named LAGAN in which
case two (2) years of guarantee apply. The
original sales receipt is required as proof of
purchase. If service work is carried out
under guarantee, this will not extend the
guarantee period for the appliance.
Which appliances are not covered by the
IKEA five (5) years guarantee?
The range of appliances named LAGAN .
Who will execute the service?
IKEA service provider will provide the service through its own service operations or
Page 19
ENGLISH
19
authorized service partner network. Contact
IKEA for further information.
If you encounter any trouble with the
appliance and wish to register a service call
or make a claim, please refer to
www.ikea.com.au for your local store after
sales customer service center phone
number, online email and opening times.
The principal address and contact details in
Australia are:
For Queensland, New South Wales, and
Victorian customers please contact:
IKEA Pty Ltd
IKEA Pty Ltd
IKEA Service Office
L1 Clock Tower, 630 Princes Highway
Tempe, NSW 2044
Contact - IKEA Customer Service at
www.IKEA.com.au
For Western Australian and South
Australian customers please contact:
Cebas Pty Ltd
8c Sunray Drive, Innaloo WA 6018
Australia
Contact - IKEA Customer Service at
www.IKEA.com.au
What does this guarantee cover?
The guarantee covers faults of the appliance, which have been caused by faulty
construction or material faults from the date
of purchase from IKEA. This guarantee applies to domestic use only. The products
have been designed and tested for
domestic purposes only and this guarantee
does not cover damage arising from use of
the Product in a commercial environment.
The exceptions are specified under the
headline "What is not covered under this
guarantee?" Within the guarantee period,
the costs to remedy the fault e.g. repairs,
parts, labour and travel will be covered,
provided that the appliance is accessible
for repair without special expenditure.
Replaced parts become the property of
IKEA.
The guarantee exists only if the appliance
complies and is installed in accordance
with:
• The technical specifications.
• The Assembly Instructions and user
manual Safety Information.
IKEA's guarantee is subject to Australian
Consumer Law - see Schedule 2 to
Competition and Consumer Act, 2010. This
guarantee is in addition to (and does not
exclude, restrict or modify in any way) any
non-excludable statutory warranties in
Australia.
What will IKEA do to correct the problem?
IKEA appointed service provider will examine the product and decide, at its sole discretion, if it is covered under this guarantee.
They will notify you as to whether your
claim is covered under this guarantee. If
your claim is approved, the IKEA service
provider or its authorized service partner,
will then, at its sole discretion, either repair
the defective product or replace it with the
same or a comparable product.
What is not covered under this
guarantee?
• Normal wear and tear.
• Deliberate or negligent damage, dam-
age caused by failure to observe operating instructions, incorrect installation or
by connection to the wrong voltage, damage caused by chemical or electro-chemical reaction, rust, corrosion or water
damage including but not limited to dam-
Page 20

ENGLISH
20
age caused by excessive lime in the water supply, damage caused by abnormal
environmental conditions.
• Consumable parts including batteries
and lamps.
• Non-functional and decorative parts
which do not affect normal use of the appliance, including any scratches and possible colour differences.
• Accidental damage caused by foreign
objects including insect or vermin
infestation or substances and cleaning or
unblocking of filters, drainage systems or
soap drawers.
• Damage to the following parts: ceramic
glass, accessories, crockery and cutlery
baskets, feed and drainage pipes, seals,
lamps and lamp covers, screens, knobs,
casings and parts of casings. Unless such
damages can be proved to have been
caused by production faults.
• Cases where no fault could be found during a technician's visit.
• Repairs not carried out by our appointed
service providers and/or an authorized
service contractual partner or where
non-original parts have been used.
• Repairs caused by installation which is
faulty or not according to specification.
• The use of the appliance in a non-domestic environment i.e. professional use.
• Transportation damages. If a customer
transports the product to their home or
other address, IKEA is not liable for any
damage that may occur during transport.
However, if IKEA delivers the product to
the customer's delivery address, then
damage to the product that occurs
during this delivery will be covered by
this guarantee.
• Cost for carrying out the initial
installation of the IKEA appliance.
However, if an IKEA service provider or
its authorized service partner repairs or
replaces the appliance under the terms
of this guarantee, the service provider or
its authorized service partner will re-
install the repaired appliance or install
the replacement, if necessary.
• The appliance's serial number or
warranty seal has been removed or
defaced.
How country law applies
Our goods come with guarantees that
cannot be excluded under the Australian
Consumer Law (ACL). You are entitled to a
replacement or refund for a major failure
and compensation for any other reasonably
foreseeable loss or damage.
You are also entitled to have the goods
repaired or replaced if the goods fail to be
of acceptable quality and the failure does
not amount to a major failure.
This guarantee is not intended in any way
to limit or exclude such rights and remedies
that you may have under law.
You can find out more information about
the Australian Consumer Law on the ACCC
website: www.accc.gov.au
Area of validity
This IKEA guarantee applies only to
products purchased and installed in
AUSTRALIA .
What you must do to make a claim under
the guarantee:
To make a claim under the guarantee
contact IKEA after sales customer service
center at the above address, the IKEA
catalogue or refer to
your local store customer service phone
number, online email and opening times.
Please describe the problem that you are
facing with the appliance in detail along
with your product article number (8 digit
code) and date of purchase at the time of
call registration.
www.ikea.com.au for
Page 21
ENGLISH 21
Please do not hesitate to contact the
dedicated after sales customer service
center for IKEA appliances to:
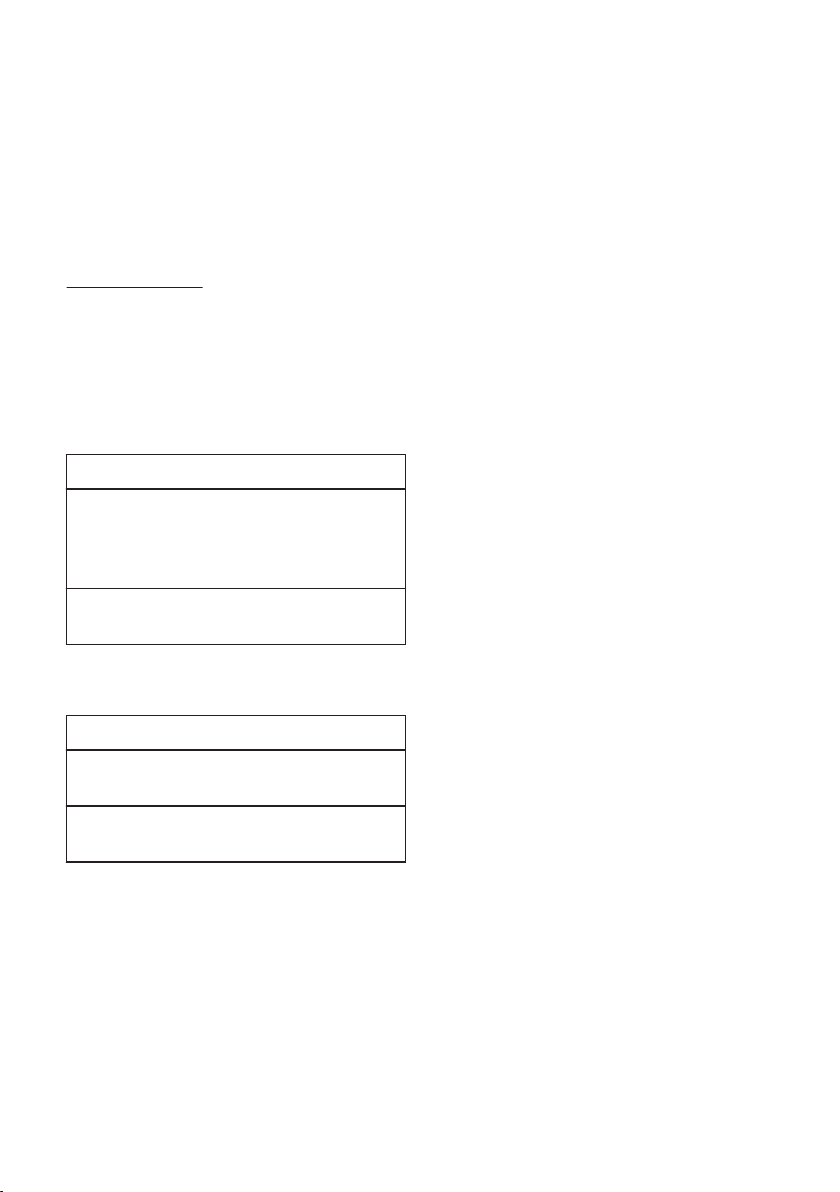
1. Make a service request under this guarantee;
2. Ask for clarification on installation of the
IKEA appliance in the dedicated IKEA
kitchen furniture.
3. Ask for clarification on user manual contents and specifications of the IKEA appliance.
To ensure that we provide you with the best
assistance, please read carefully the Assembly Instructions and/or the User Manual
section of this booklet before contacting us.
How to reach us if you need our service
The IKEA after sales customer service centre
will assist you on the phone with basic
trouble shooting for your appliance at the
time of service call request. Please refer to
the IKEA catalogue or
www.ikea.com.au
and select your local store for local store
phone numbers and opening times.
SAVE THE SALES RECEIPT!
Kindly keep all these details and
original invoice of purchase
handy during the service
technician's visit to enable him to
carry out the job.
It is your proof of purchase and
required for the guarantee to
apply. Note that the receipt
reports also the IKEA article
name and number (8 digit code)
for each of the appliances you
have purchased.
Please describe the problem that
you are facing with the
appliance in detail along
with your product article number
( 8 digit code ) and date of
purchase at the time of call
registration .
*
Page 22

ENGLISH 22
Page 23

ENGLISH 23
Page 24

100003590-A-272015
21552
© Inter IKEA Systems B.V. 2015
AA-1402782-2
 Loading...