

Page 1

RENLIG
FWM8
GB
DE
Page 2

Page 3

ENGLISH 4
DEUTSCH 28
Page 4

ENGLISH
Contents
4
Safety information 4
Safety instructions 5
Product description 7
Control panel 8
Before first use 10
Settings 11
Daily Use 11
Programmes 14
Subject to change without notice.
Consumption values 17
Hints and tips 18
Care and cleaning 19
Troubleshooting 21
Technical Data 24
ENVIRONMENT CONCERNS 25
IKEA GUARANTEE 25
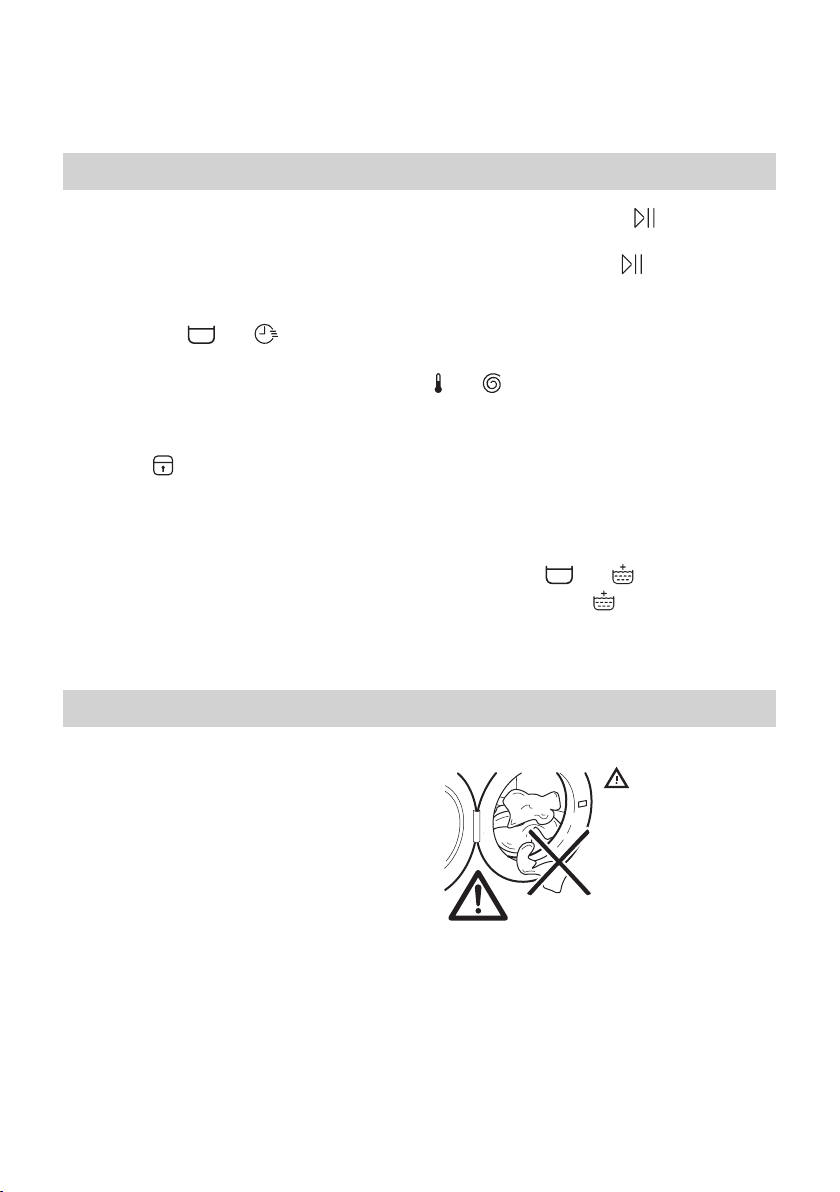
Safety information
Before the installation and use of the appliance, carefully read
the supplied instructions. The manufacturer is not responsible if
an incorrect installation and use causes injuries and damages.
Always keep the instructions with the appliance for future
reference.
Children and vulnerable people safety
• This appliance can be used by children aged from 8 years
and above and persons with reduced physical, sensory or
mental capabilities or lack of experience and knowledge if
they have been given supervision or instruction concerning
use of the appliance in a safe way and understand the
hazards involved.
• Do not let children play with the appliance.
• Children of less than 3 years should be kept away unless
continuously supervised.
• Keep all packaging away from children.
• Keep all detergents away from children.
• Keep children and pets away from the appliance door when
it is open.
• If the appliance has a child safety device, we recommend you
activate it.
Page 5

ENGLISH 5
• Cleaning and user maintenance shall not be made by
children without supervision.
General Safety
• Do not change the specification of this appliance.
• Obey the maximum load volume of 8 kg (refer to the
“Programme chart” chapter).
• The operating water pressure (minimum and maximum) must
be between 0,5 bar (0,05 MPa) and 8 bar (0,8 MPa).
• The ventilation openings in the base (if applicable) must not
be obstructed by a carpet.
• The appliance is to be connected to the water mains using
the new supplied hose-sets. Old hose sets must not be
reused.
• If the supply cord is damaged, it must be replaced by the
manufacturer, its Authorised Service Centre or similarly
qualified persons in order to avoid a hazard.
• Before maintenance, deactivate the appliance and
disconnect the mains plug from the mains socket.
• Do not use water spray and steam to clean the appliance.
• Clean the appliance with a moist soft cloth. Only use neutral
detergents. Do not use abrasive products, abrasive cleaning
pads, solvents or metal objects.
Safety instructions
Installation
• Remove all the packaging and the transit
bolts.
• Keep the transit bolts. When you move
the appliance again you must block the
drum.
• Always be careful when you move the
appliance because it is heavy. Always
wear safety gloves.
• Do not install or use a damaged
appliance.
• Obey the installation instruction supplied
with the appliance.
• Do not install or use the appliance where
the temperature is less than 0 °C or
where it is exposed to the weather.
• Make sure that the floor where you
install the appliance is flat, stable, heat
resistant and clean.
• Make sure that there is air circulation
between the appliance and the floor.
Page 6

ENGLISH
6
• Adjust the feet to have the necessary
space between the appliance and the
carpet.
• Do not install the appliance where the
appliance door can not be fully opened.
Electrical connection
• The appliance must be earthed.
• Always use a correctly installed
shockproof socket.
• Make sure that the electrical information
on the rating plate agrees with the
power supply. If not, contact an
electrician.
• Do not use multi-plug adapters and
extension cables.
• Make sure not to cause damage to the
mains plug and to the mains cable.
Should the mains cable need to be
replaced, this must be carried out by our
Authorised Service Centre.
• Connect the mains plug to the mains
socket only at the end of the installation.
Make sure that there is access to the
mains plug after the installation.
• Do not touch the mains cable or the
mains plug with wet hands.
• Do not pull the mains cable to disconnect
the appliance. Always pull the mains
plug.
• Only for UK and Ireland: The appliance
has a 13 amp mains plug. If it is
necessary to change the fuse in the
mains plug, use a 13 amp ASTA (BS
1362) fuse.
• This appliance complies with the E.E.C.
Directives.
Water connection
• Make sure not to cause damage to the
water hoses.
• Before you connect the appliance to new
pipes or pipes not used for a long time,
let the water flow until it is clean.
• The first time you use the appliance,
make sure that there is no leakage.
Use
Warning! Risk of injury, electrical
shock, fire, burns or damage to
the appliance.
• Use this appliance in a household only.
• Obey the safety instructions on the
detergent packaging.
• Do not put flammable products or items
that are wet with flammable products in,
near or on the appliance.
• Make sure that you remove all metal
objects from the laundry.
• Do not put a container to collect possible
water leakage under the appliance.
Contact the Authorised Service Centre to
ensure which accessories can be used.
• Do not touch the glass of the door while
a programme operates. The glass can be
hot.
Service
• To repair the appliance contact an
Authorised Service Centre.
• Use original spare parts only.
Disposal
Warning! Risk of injury or
suffocation.
• Disconnect the appliance from the mains
supply.
• Cut off the mains cable and discard it.
• Remove the door catch to prevent
children and pets to get closed in the
appliance.
Page 7
1 2 3
5
6
4
ENGLISH 7
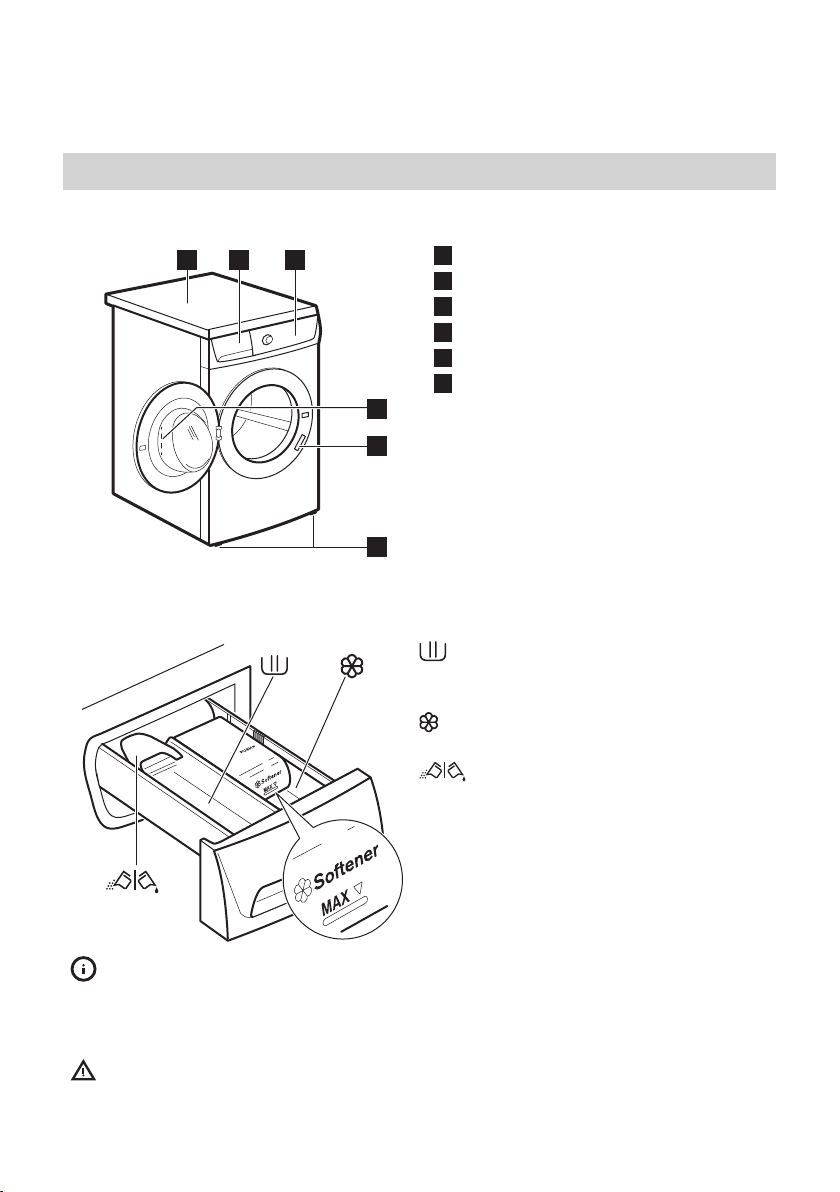
Product description
Appliance overview
Worktop
1
Detergent dispenser
2
Control panel
3
Door handle
4
Rating plate
5
Feet for the appliance level
6
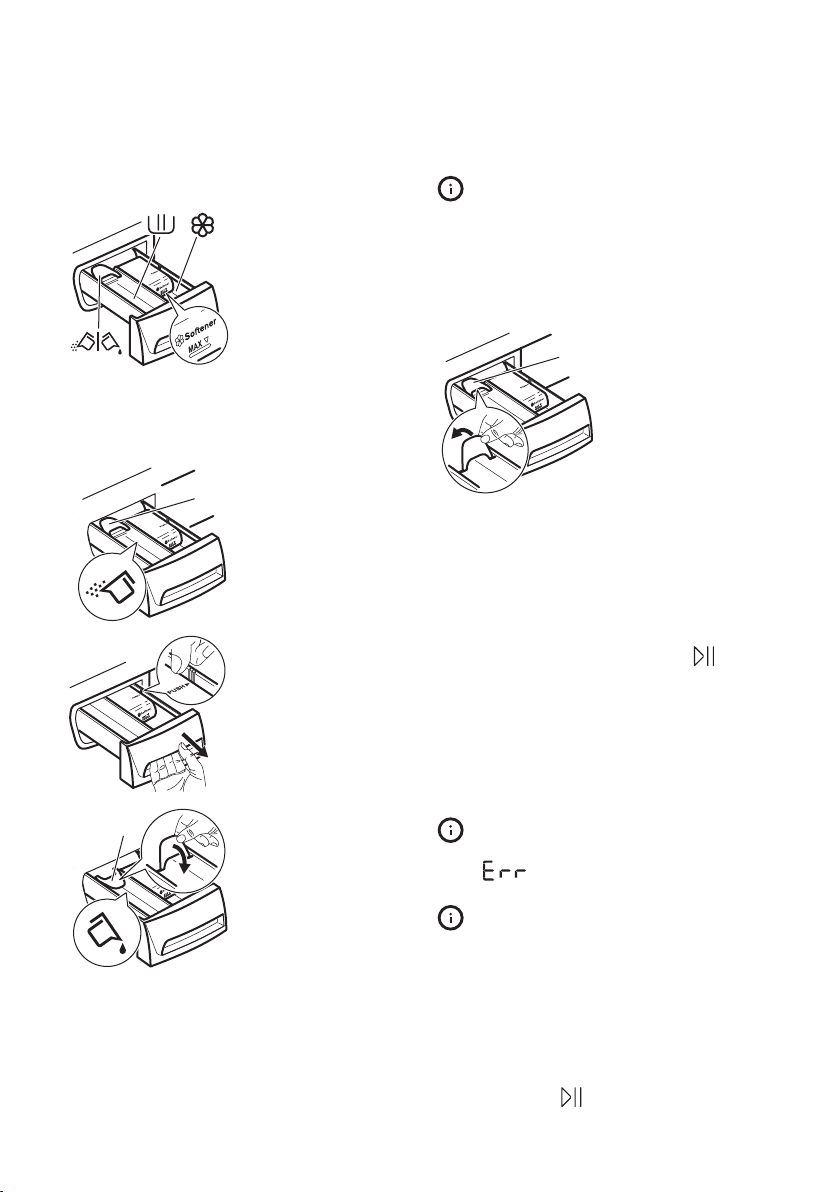
Detergent dispenser drawer
Detergent compartment for washing
phase. If you use liquid detergent, put it
immediately before you start the programme.
Compartment for liquid additives (fabric
softener, starch).
Flap for powder or liquid detergent.
Follow the product manufacturer’s recommendations on quantities to use and do
not ever exceed the MAX mark in the detergent dispenser drawer. Any fabric
softener or starching additives must be poured into the compartment before
starting the wash programme.
Caution! If you wish to carry out the prewash, pour the detergent among
washing items into the drum.
Page 8
90°
60°
40°
1400
900
700
30°
21
5678910
43
ENGLISH 8
Caution! Depending on the type detergent you use (powder of liquid), ensure
that the flap, placed in the main wash compartment, is in the desired position.
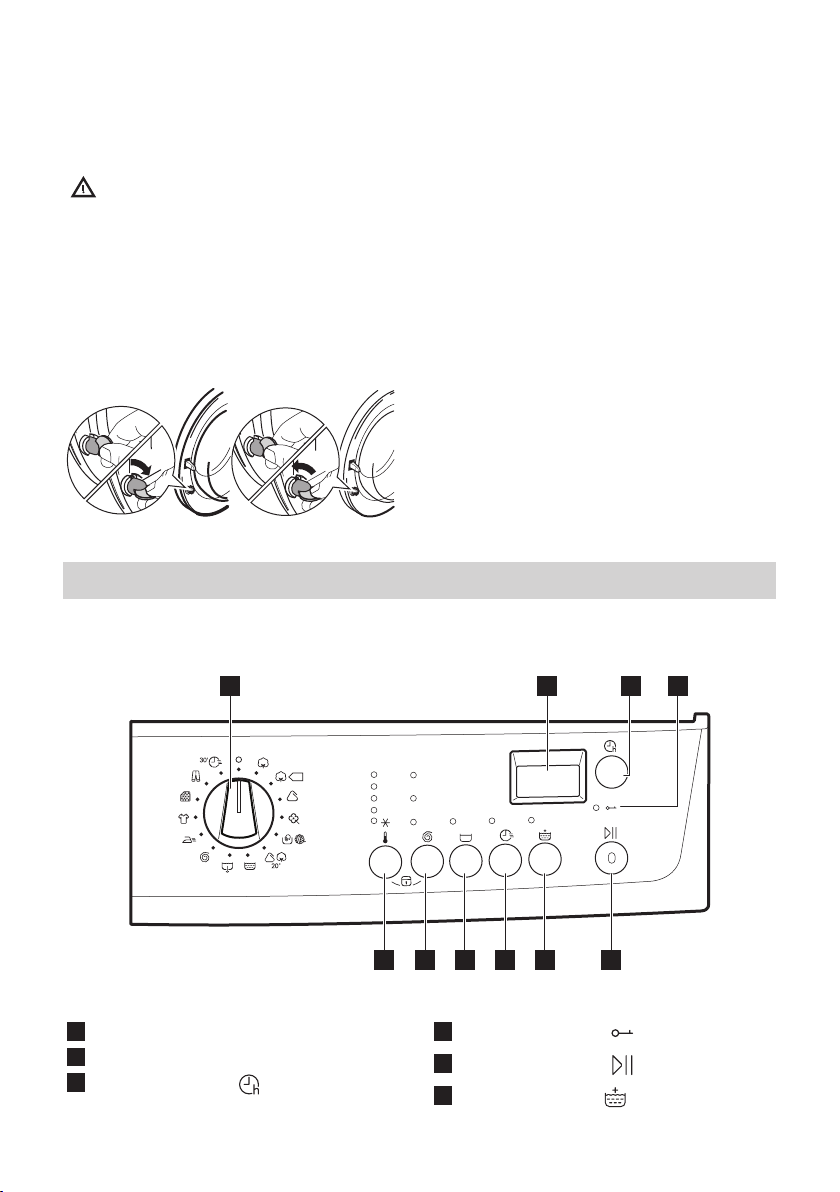
Child safety device
This appliance incorporates a special feature to prevent children and pets becoming
trapped inside the drum.
Make sure that children or pets do not climb into the drum. Please check into the drum
before using it.
To activate this device, rotate the button
clockwise (without pressing it) inside the door
until the groove is horizontal. If necessary use
a coin.
To disable this device and restore the
possibility of closing the door, rotate the
button anticlockwise until the groove is
vertical.
Control panel
Control panel description
Programme knob
1
Display
2
3
Delay Start button
4
Door lock indicator
5
Start/Pause button
6
Extra Rinse button
Page 9
CA B
ENGLISH 9
7
Super Quick button
8
Rinse Hold button
9
Spin reduction
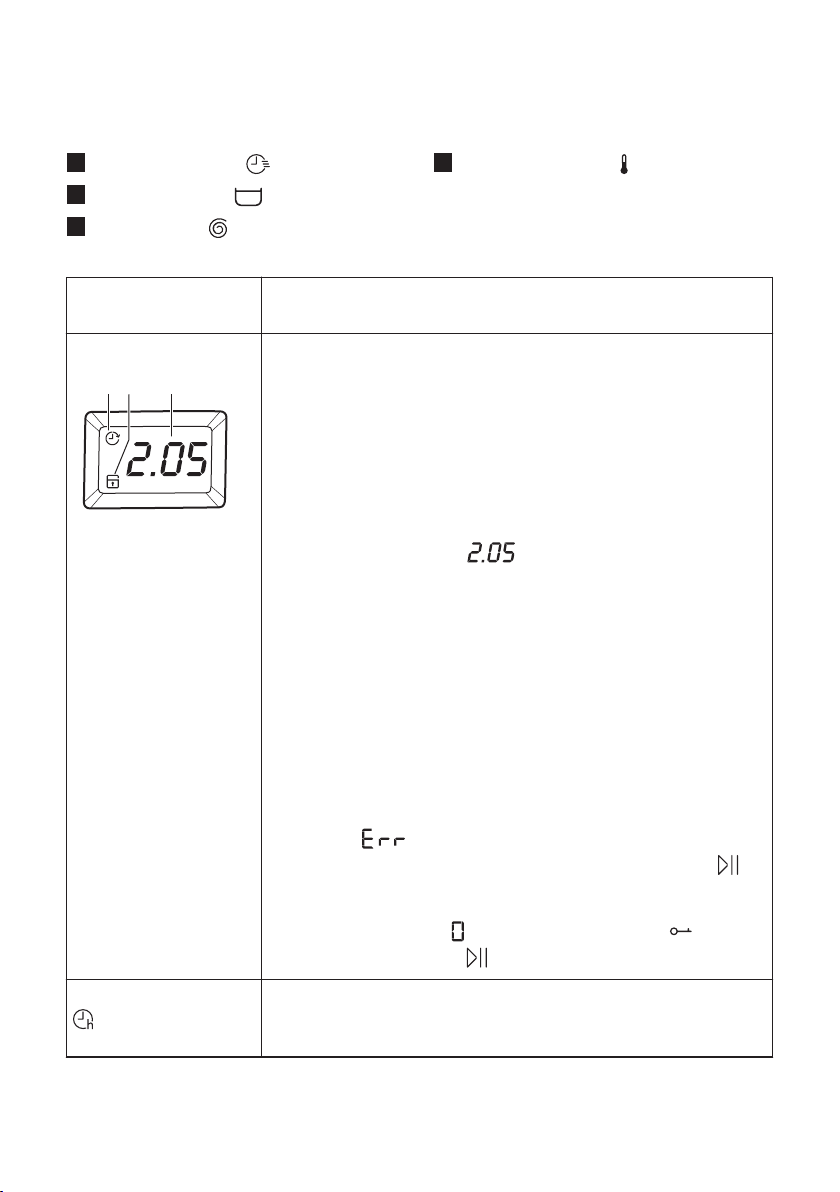
Programme knob It allows you to switch the appliance On/Off and/or to select a
programme.
Display
Delay Start button The programme can be delayed from 30 min - 60 min - 90min, 2
The display shows the following information:
• A - Delay Start indicator
The indicator comes on the display when the related option is
set.
• B - Child safety lock
This device permits you to leave the appliance unattended
during it's functioning.
• C – Digit:
– Duration of the selected programme. After selecting a
programme, the duration is displayed in hours and minutes (for example ). The duration is calculated au-
tomatically on the basis of the maximum recommended
load for each type of fabric. After the programme has
started, the time remaining is updated every minute.
– Delayed start. The selected delay appears on the display
for a few seconds, then the duration of the selected programme is displayed again. The delay time value decreases by one unit every hour and then, when 1 hour remains, every minute.
– Alarm codes. In the event of operating problems, some
alarm codes can be displayed, for example (see paragraph «Troubleshooting»).
– Incorrect option selection. If an option which is not com-
patible with the set wash programme is selected, the message is displayed at the bottom of the display for a
few seconds. The integrated red indicator of button
start flashing.
– End of programme. When the programme has finished
the flashing zero is displayed, the indicator and the
indicator of button go out. The door can be opened.
hours and then by 1 hour up to a maximum of 20 hours by
means of this button.
10
Temperature button
Page 10
ENGLISH 10
Door lock indicator This indicator illuminates when the programme starts and indi-
cates if the door can be opened:
• indicator on: the door cannot be opened. The appliance is
working or has stopped with water left in the tub.
• indicator off: the door can be opened. The programme is finished or the water has been emptied out.
• indicator blinking: the door is opening in a few minutes.
Start/Pause button This button allows you to start or to interrupt the selected wash-
ing programme.
Extra Rinse button This appliance is designed for saving energy. If it necessary to
rinse the laundry using an extra quantity of water (extra rinse),
select this option. Some additional rinses will be performed. This
option is recommended for people who are allergic to detergents, and in areas where the water is very soft.
Super Quick button By pressing this button, the appliance performs a short cycle for
lightly soiled items or for laundry which needs only freshening
up. We recommend you to reduce the fabric loading. The relevant indicator illuminates.
Rinse Hold button Set this option to prevent the laundry creases. The drum turns
regularly to prevent the laundry creases.
There is a water in the drum when the programme is
completed. The door stays locked. You must drain the
water to unlock the door. To drain the water refer to
«At the end of the programme».
Spin reduction button By pressing this button you can change the spin speed of the se-
lected programme.
The relevant indicator illuminates.
Temperature button By selecting a programme, the appliance proposes automatical-
ly a default temperature. This button allows you to increase or
decrease the washing temperature. If you select position, the
appliance will perform a washing with cold water.
The relevant indicator illuminates.
Before first use
1. Ensure that the electrical and water
connections comply with the installation
instructions.
2. Remove any material from the drum.
Page 11
ENGLISH 11
Settings
Acoustic signals
The appliance is provided with an acoustic
device, which sounds in the following cases:
• at the end of the cycle;
• if there is a fault.
By pressing the and buttons
simultaneously for about 6 seconds, the
acoustic signal is deactivated (except if
there is a fault). By pressing these 2 buttons
again, the acoustic signal is reactivated.
Child Lock
This device permits you to leave the
appliance unattended so you do not need
to worry that children might be injured by
or cause damage to the appliance. This
function remains enabled also when the
appliance is not working.
There are two different ways to set this
option:
Daily Use
Loading the laundry
Open the water tap. Connect the mains
plug to the mains socket.
1. Pull the door handle to open the
appliance door.
2. Put the laundry in the drum, one item at
a time.
3. Shake the items before you put them in
the appliance.
Make sure not to put too much laundry in
the drum. Refer to max. loads indicated in
"Programme chart".
4. Close the door.
• Before pressing button : it will be
impossible to start the appliance.
• After pressing button : it will be
impossible to change any other
programme or option.
To enable or disable this option press
simultaneously for about 6 seconds buttons
and until on the display, the icon
appears or disappears.
Permanent Extra Rinse
With this option you can permanently have
an extra rinse when you set a new
programme.
• To activate/deactivate this option touch
the buttons
until the indicator
There is a risk of water leakage or damage
to the laundry.
and at the same time
comes on/goes off.
Caution!
Make sure
that no
laundry
stays
between
the seal
and the
door.
Page 12
A
B
A
ENGLISH
Using detergent and additives
Liquid or powder detergent
12
1. Measure out the
detergent and the
fabric conditioner.
2. Put the detergent
and the fabric
conditioner into
the
compartments.
3. Carefully close the
detergent drawer.
The default position
of the flap is A
(powder detergent).
To use liquid
detergent:
1. Remove the
drawer. Push the
drawer edge in the
place with the arrow
(PUSH) to remove the
drawer easily.
2. Adjust the flap in
position B.
3. Put back the
drawer in the recess.
When you use the liquid
detergent:
• Do not use gelatinous or thick
liquid detergents.
• Do not put more liquid then
120 ml.
• Do not set the delay start.
When the flap is in
position B and you
want to use powder
detergent:
1. Remove the
drawer.
2. Adjust the flap in
position A.
3. Put back the
drawer in the
recess.
Setting a programme
1. Turn the programme knob to switch the
appliance on and set the programme:
The indicator of the button
•
flashes.
• The display shows the programme
duration.
2. If necessary, change the temperature
and the spin speed or add available
options. When you activate an option,
the indicator of the set option comes on.
If you set something incorrect, the
display shows the message
.
For the description of each wash
cycle, the compatibility among
the washing programmes and
the options, consult the chapter
«Programmes».
Starting a programme without the delay start
Press the button .
Page 13
ENGLISH
13
• The indicator of the button stops
to flash and stays on.
• The programme starts, the door
locks, the indicator is on.
• The programme time decreases with
steps of one minute.
The drain pump can operate for
a short time at the beginning of
the washing cycle.
Starting a programme with the delay start option
1. Press the button again and again
until the display shows the delay you
want to set. The delay start indicator
comes on.
2. Press the button :
• The door is locked and the indicator
is on.
• The appliance starts the countdown.
• When the countdown is completed,
the programme starts automatically.
You can cancel or change the set
of the option before you press
the button . After pressing the
button
the option.
To cancel the option:
a. Press the button to set the
appliance to pause. The indicator of
button flashes.
b. Press the button
shows .
Press the button again to start
the programme immediately.
Interrupting a programme and changing the options
You can change only some options before
they operate.
you can only cancel
until the display
1.
Press the button .
The indicator flashes.
2. Change the options.
3. Press the button again.
The programme continues.
Cancelling a running programme
1. Turn the programme knob to position
to cancel the programme and to
deactivate the appliance.
2. Turn the programme knob again to
activate the appliance. Now, you can
set a new washing programme.
Before starting the new
programme the appliance could
drain the water. In this case,
make sure that the detergent is
still in the detergent
compartment, if not fill the
detergent again.
Opening the door
While a programme or the operates, the
appliance door is locked. The indicator
is on.
Caution! If the temperature and
level of the water in the drum are
too high and the drum still
rotates, you cannot open the
door.
To open the door during the first minutes of
the cycle or when the operates:
1. Press the button to pause the
appliance.
2. Wait until the indicator goes off.
3. You can open the door.
4. Close the door and touch the button
again. The programme (or the )
continues.
Page 14
ENGLISH 14
At the end of the programme
• The appliance stops automatically.
• The acoustic signal operates (if it is
activated).
• In the display comes on.
• The indicator of the button goes off.
• The door lock indicator goes off.
Turn the programme knob to position
to deactivate the appliance.
• You can open the door.
• Remove the laundry from the appliance.
Make sure that the drum is empty.
• Close the water tap.
• Keep the door and the detergent drawer
ajar, to prevent the mildew and odours.
The washing programme is completed,
but there is water in the drum:
• The drum turns regularly to prevent the
creases in the laundry.
• The indicator
to drain the water.
• The door lock indicator is on. The
indicator of button is off. The door
stays locked.
• You must drain the water to open the
door.
stays on to remind you
Draining the water:
1. To drain the water.
• Set a or a programme.
• Press the button
drains the water and spins.
2. When the programme is completed and
the door lock indicator goes off, you
can open the door.
3. Turn the programme knob to the
position to deactivate the appliance.
Stand by
Some minutes after the end of the washing
programme, if you do not deactivate the
appliance, the energy saving status
activates. The energy saving status
decreases the energy consumption when
the appliance is on the standby:
• All indicators go off.
• The indicator of the button
slowly.
Press one of the buttons to deactivate the
energy saving status.
. The appliance
flashes
Programmes
Programme Chart
Please always refer to the care label symbol of your garment and select the
washing programme based on what it says.
Programme
Temperature
range
COTTONS
90° - 60° - 40° -
30° - (Cold)
Maximum load
Maximum spin
speed
8 kg
1400 rpm
Programme description
(Type of load and soil level)
White cotton and coloured cotton. Normal soil and
light soil.
Page 15
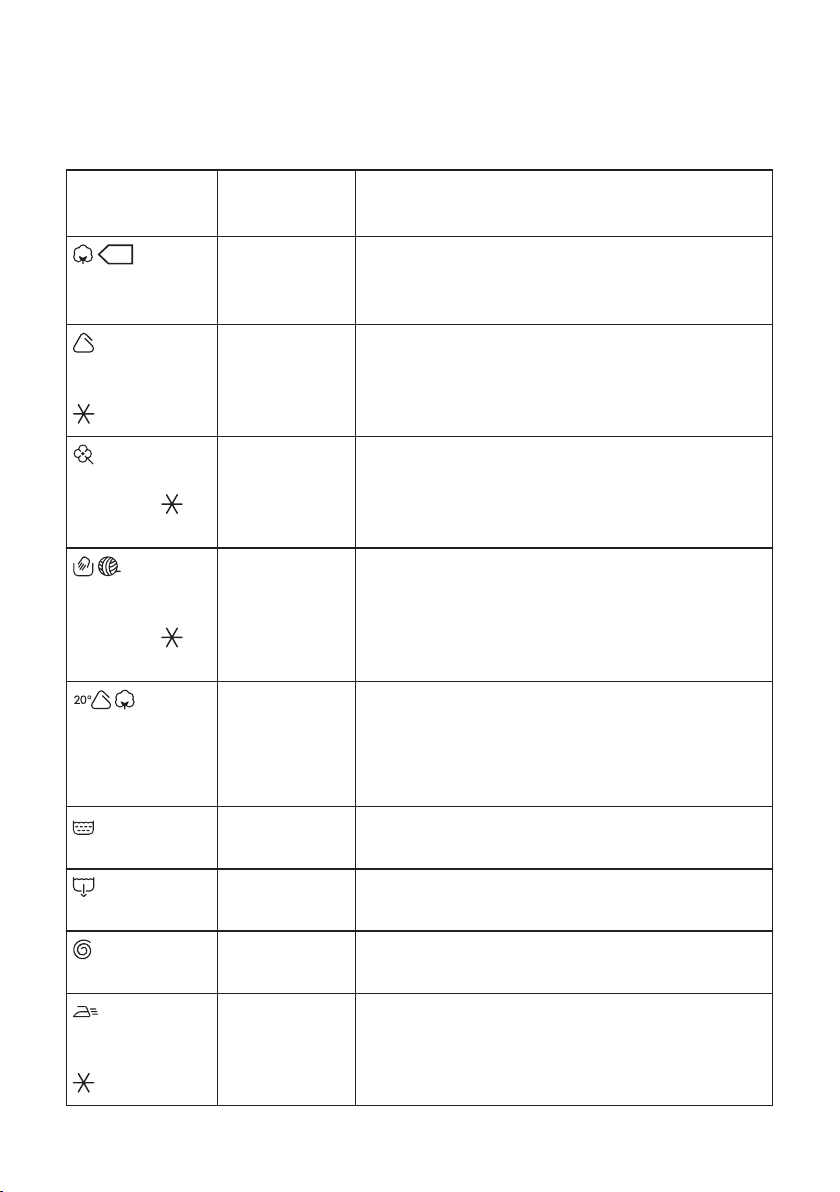
ENGLISH 15
Programme
Temperature
range
COTTONS ECO
60°C - 40°C
SYNTHETICS
60° - 40° - 30° -
(Cold)
DELICATES
40° - 30° -
(Cold)
HANDWASHWOOL
40° - 30° (Cold)
MIX 20°
20°C
Maximum load
Maximum spin
speed
8 kg
1400 rpm
1)
3 kg
900 rpm
3 kg
700 rpm
2 kg
900 rpm
2 kg
900 rpm
Programme description
(Type of load and soil level)
White cotton and colour-fast cotton. Normal soil.
The energy consumption decreases and the time of
the washing programme is extended.
Synthetic items or mixed fabric items. Normal soil.
Delicate fabrics as acrylics, viscose, polyester
items. Normal soil.
Machine washable wool, hand washable wool
and delicate fabrics with «hand washing» care
2)
symbol.
Special programme for cotton, synthetic and mixed
fabrics with light soil. Set this programme to decrease the energy consumption. Make sure that the
detergent is for low temperature in order to have
good washing results3).
RINSE
DRAIN
SPIN
EASY IRON
60° - 40° - 30° -
(Cold)
8 kg
1400 rpm
To rinse and spin the laundry. All fabrics.
4)
8 kg To drain the water in the drum. All fabrics.
8 kg
1400 rpm
1 kg
900 rpm
To spin the laundry and to drain the water in the
drum. All fabrics.
Synthetic items to be gentle washed. Normal and
light soil.
5)
Page 16
ENGLISH 16
Programme
Temperature
range
REFRESH 20 MIN
Maximum load
Maximum spin
speed
1 kg
900 rpm
Programme description
(Type of load and soil level)
Synthetic and delicate items. Light soil items or
items to refresh.
30°C
DUVETS
3 kg
700 rpm
Special programme for one synthetic blanket, du-
vet, bedspread and so on.
40°C - 30°C
JEANS
3 kg
900 rpm
Items in denim and jersey. Also for dark coloured
items.
60° - 40° - 30° -
(Cold)
MINIPROG-
3 kg
700 rpm
A short cycle for synthetics and delicate items with
light soil level or for items to freshen up.
RAMME
30°C
Position to turn the appliance off or/and reset a programme.
ON/OFF
1)
Standard programmes for the Energy Label consumption values. According to regulation 1061/2010, these programmes are respectively the «Standard 60°C cotton programme» and the «Standard 40°C cotton programme». They
are the most efficient programmes in terms of combined energy and water consumption for washing normally soiled
cotton laundry.
The water temperature of the washing phase may differ from the temperature declared for the selected
programme.
2)
During this cycle the drum rotates slowly to ensure a gentle washing. It can seem that the drum doesn't rotate or
doesn't rotate properly. Consider this as a normal functioning of the appliance.
3)
The appliance performs the short heating phase if the water temperature is below 20°C. The appliance can show
the temperature setting as “cold”.
4)
The default spin speed is 700 rpm.
5)
To reduce the creases of the laundry, this cycle regulates the water temperature and performs a soft wash and spin
phase. The appliance adds some rinses.
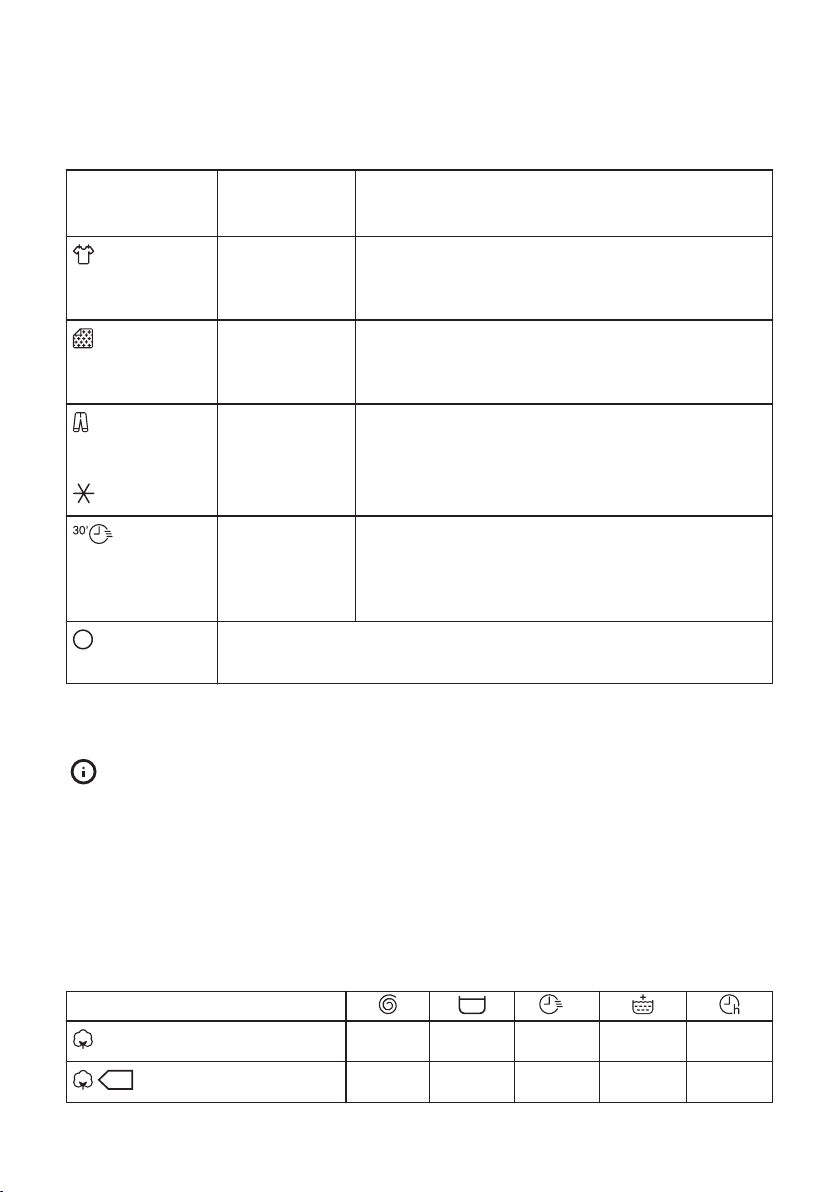
Programme options compatibility
Programme
1)
■ ■ ■ ■ ■
■ ■ ■ ■
Page 17
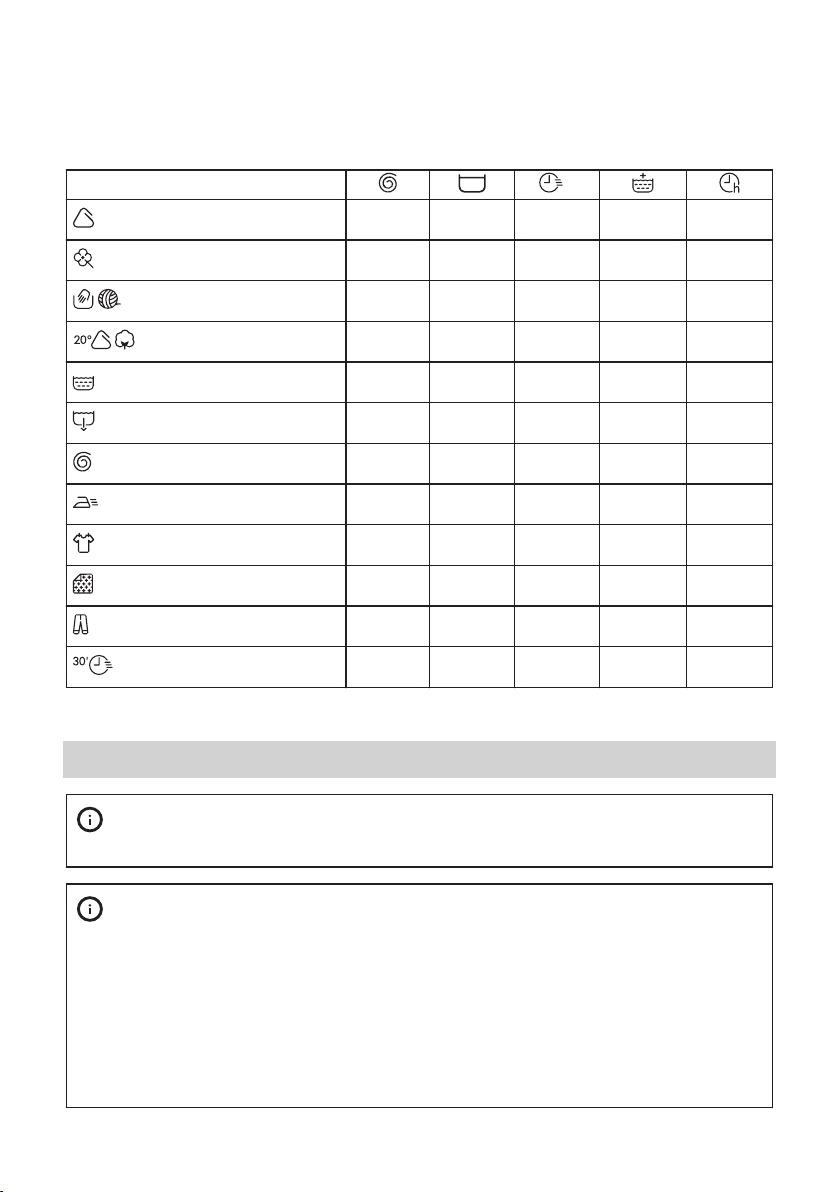
ENGLISH 17
Programme
1)
■ ■ ■ ■ ■
■ ■ ■ ■
■ ■ ■
■ ■ ■ ■
■ ■ ■ ■
■
■ ■
■ ■ ■ ■
■ ■
■
■ ■ ■
■
1)
When you set this option, we recommend that you decrease the quantity of the laundry. It is possible to keep the full
load but the washing results can be unsatisfactory. Recommended load: cotton: 4 kg, synthetics and delicates: 1,5 kg.
Consumption values
The data of this table are approximate. Different causes can change the data:
the quantity and type of laundry, the water and ambient temperature.
At programme start the display shows the duration programme for the maximum load capacity.
During the washing phase the programme duration is automatically calculated
and can be greatly reduced if the laundry load is lower than the maximum load
capacity (e.g. Cotton 60°C, maximum load capacity 8 kg, the programme duration exceeds 2 hours; real load 1 kg, the programme duration don’t reach 1
hour).
When the appliance is calculating the real programme duration a dot blinks in
the display.
Page 18
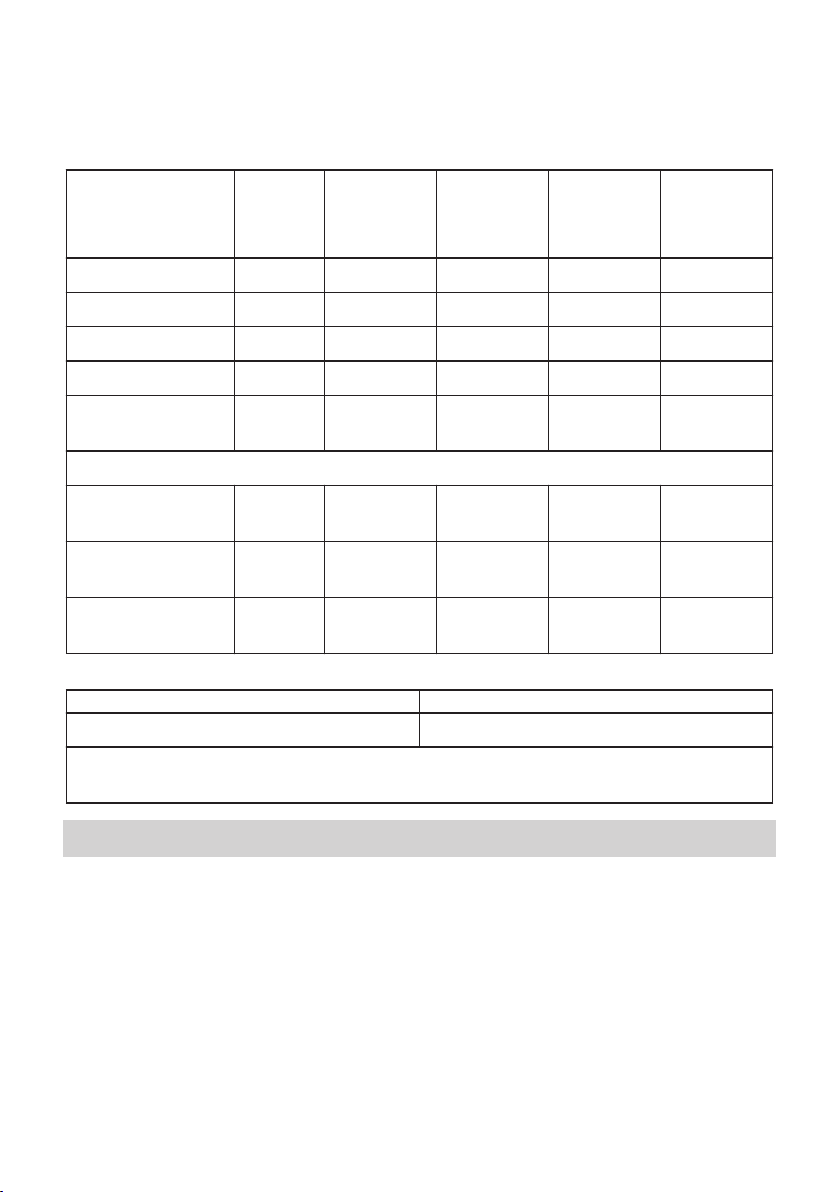
ENGLISH 18
Programmes Load (kg) Energy con-
sumption
(kWh)
Cottons 60 °C 8 1,35 70 159 52
Cottons 40 °C 8 0,87 69 158 52
Synthetics 40 °C 3 0,60 56 103 35
Delicates 40 °C 3 0,55 59 81 35
Wool/Handwash
30 °C
Standard cotton programmes
Standard 60 °C cotton
Standard 60 °C cotton
Standard 40 °C cotton
1)
At the end of spin phase.
Off Mode (W) Left On Mode (W)
2 0,30 53 57 30
8 0,96 52 244 52
4 0,73 40 210 52
4 0,62 41 196 52
0.48 0.48
Water con-
sumption (li-
tre)
Approximate
programme
duration (mi-
nutes)
Remaining
moisture
(%)
1)
The information given in the chart above are in compliance with the EU Commission regulation 1015/2010 implementing directive 2009/125/EC.
Hints and tips
The laundry load
• Divide the laundry in: white, coloured,
synthetics, delicates and wool.
• Obey the washing instructions that are
on the laundry care labels.
• Do not wash together white and
coloured items.
• Some coloured items can discolour with
the first wash. We recommend that you
wash them separately for the first times.
• Button up pillowcases, close zippers,
hooks and poppers. Tie up belts.
• Empty the pockets and unfold the items.
• Turn inside out multilayered fabrics, wool
and items with painted illustrations.
• Remove hard stains.
• Wash with a special detergent heavy soil
stains.
• Be careful with the curtains. Remove the
hooks or put the curtains in a washing
bag or pillowcase.
• Do not wash in the appliance laundry
without hems or with cuts. Use a washing
Page 19

ENGLISH 19
bag to wash small and/or delicate items
(e.g. underwired bras, belts, tights, etc. ).
• A very small load can cause balance
problems with the spin phase. If this
occurs, adjust manually the items in the
tub and start the spin phase again.
Stubborn stains
For some stains, water and detergent is not
sufficient.
We recommend that you remove these
stains before you put the items in the
appliance.
Special stain removers are available. Use
the special stain remover that is applicable
to the type of stain and fabric.
Detergents and additives
• Only use detergents and additives
specially made for washing machines:
– powder detergents for all types of
fabric,
– powder detergents for delicate
fabrics (40 °C max) and woollens,
– liquid detergents, preferably for low
temperature wash programmes (60
°C max) for all types of fabric, or
special for woollens only.
• Do not mix different types of detergents.
• To help the environment, do not use
more than the correct quantity of
detergent.
• Obey the instructions that you find on the
on packaging of these products.
• Use the correct products for the type and
colour of the fabric, the programme
temperature and the level of soil.
• If your appliance has not the detergent
dispenser with the flap device, add the
liquid detergents with a dosing ball
(supplied by the detergent's
manufacturer).
Ecological hints
• Set a programme without the prewash
phase to wash laundry with normal soil.
• Always start a washing programme with
the maximum load of laundry.
• If necessary, use a stain remover when
you set a programme with a low
temperature.
• To use the correct quantity of the
detergent, check the water hardness of
your domestic system
Water hardness
If the water hardness in your area is high or
moderate, we recommend that you use a
water softener for washing machines. In
areas where the water hardness is soft it is
not necessary to use a water softener.
To know the water hardness in your area,
contact your local water authority.
Use the correct quantity of the water
softener. Obey the instructions that you find
on the packaging of the product.
Care and cleaning
Warning! Refer to Safety
chapters.
External cleaning
Clean the appliance only with soap and
warm water. Fully dry all the surfaces.
Caution! Do not use alcohol,
solvents or chemical products.
Descaling
If the water hardness in your area is high or
moderate, we recommend that you use a
Page 20

ENGLISH
20
water descaling product for washing
machines.
Regularly examine the drum to prevent
limescale and rust particles.
To remove rust particles use only special
products for washing machine. Do this
separately from the laundry wash.
Always obey the instructions that
you find on the packaging of the
product.
Maintenance wash
With the low temperature programmes it is
possible that some detergent stays in the
drum. Make regularly a maintenance wash.
To do this:
• Remove the laundry from the drum.
• Set the cotton programme with the
highest temperature with a small
quantity of detergent.
Door seal
Regularly examine
the seal and remove
all objects from the
inner part.
• Remove the
drawer.
• To aid cleaning,
the top part of the
additive
compartment
should be
removed.
• Clean all the
removed parts of
the dispenser
drawer under a
tap to remove any
traces of
accumulated
powder.
• Use the brush to
clean the recess,
ensuring that
upper and lower
part of it is well
cleaned.
Cleaning the detergent dispenser
The washing powder and additive
dispenser drawer should be cleaned
regularly.
• After having
cleaned the
dispenser and the
drawer recess,
replace it.
Cleaning the inlet filter and the filter valve
If the appliance takes long to fill with water
or doesn't fill, the starting button indicator
flashes in red. Check if the water inlet filter
Page 21

1
2
3
45°
20°
ENGLISH 21
and the valve filter are blocked (see
chapter "Troubleshooting" for more details).
Proceed as follows:
• Turn off the water
tap.
• Unscrew the hose
from the tap.
• Clean the filter in
the hose with a stiff
brush.
• Screw the hose back onto the tap. Make
sure the connection is tight.
• Unscrew the hose
from the machine.
• Keep a rag
nearby because
some water may
flow.
• Clean the filter in
the valve with a
stiff brush or with
the piece of cloth.
• Screw the hose
back to the
machine and make
sure the
connection is tight.
• Turn on the water
tap.
Frost precautions
If the appliance is installed in an area
where the temperature can be less than 0
°C, remove the remaining water from the
inlet hose and the drain pump.
Do this procedure also when you
want to do the emergency drain.
1. Disconnect the mains plug from the
mains socket.
2. Remove the water inlet hose.
3. Remove the drain hose from the rear
support and unhook it from sink or
spigot.
4. Put the ends of the drain and inlet hose
in a container. Let the water flow out of
the hoses.
5. When no more water flows, install the
inlet hose and the drain hose again.
Caution! Make sure that the
temperature is more than 0 °C
before you use the appliance
again. The manufacturer is not
responsible for damages caused
by low temperatures.
Troubleshooting
Warning! Refer to Safety
chapters.
Introduction
The start of the appliance does not occur or
it stops during operation.
Page 22

ENGLISH 22
First try to find a solution to the problem
(refer to the table). If not, contact the
Authorised Service Centre.
With some problems, the acoustic signals
operate and the display shows an alarm
code:
• - The appliance does not fill with
water properly.
•
Possible failures
- The appliance does not drain the
water.
Problem Possible solution
The programme does not
start.
The appliance does not
fill with water properly.
The appliance does not
drain the water.
• Make sure that the mains plug is connected to the mains
socket.
• Make sure that the appliance door is closed.
• Make sure that there is not a damaged fuse in the fuse box.
• Make sure that the Start/Pause has been pressed.
• If the delay start is set, cancel the setting or wait for the end
of countdown.
• Deactivate the Child Lock function if it is on (if available).
• Make sure that the water tap is open.
• Make sure that the pressure of the water supply is not too
low. For this information, contact your local water authority.
• Make sure that the water tap is not clogged.
• Make sure that the filter of the inlet hose and the filter of the
valve are not clogged. Refer to “Care and cleaning”.
• Make sure that the inlet hose has no kinks or bends.
• Make sure that the connection of the water inlet hose is correct.
• Make sure that the drain hose is in the correct position. The
hose may be too low.
• Make sure that the sink spigot is not clogged.
• Make sure that the drain hose has no kinks or bends.
• Make sure that the connection of the drain hose is correct.
• Set the drain programme if you set a programme without
drain phase.
• Set the drain programme if you set an option which ends
with water in the drum.
• If above mentioned solutions do not help, contact the Authorised Service Centre (as the filter of the drain pump may
be clogged).
• - The appliance door is open or
not closed correctly. Please check the
door!
• - The mains supply is unstable.
Wait until the mains supply is stable.
Warning! Deactivate the
appliance before you do the
checks.
Page 23

ENGLISH 23
Problem Possible solution
The spin phase does not
operate or the washing
cycle lasts longer than
usually.
There is water on the
floor.
You cannot open the appliance door.
The appliance makes an
unusual noise.
The cycle is shorter than
the time displayed.
• Set the spin programme.
• Adjust manually the items in the tub and start the spin
phase again. This problem may be caused by balance
problems.
• If above mentioned solutions do not help, contact the Authorised Service Centre (as the filter of the drain pump may
be clogged).
• Make sure that the couplings of the water hoses are tight
and there is not water leakages.
• Make sure that the inlet hose and/or the drain hose have
no damages.
• Make sure you use the correct detergent and the correct
quantity of it.
• Make sure that the washing programme is finished.
• Set the drain or the spin programme if there is water in the
drum.
• Make sure the levelling of the appliance is correct. Refer to
'Installation Instruction'.
• Make sure that the packaging and/or the transit bolts are
removed. Refer to 'Installation Instruction'.
• Add more laundry in the drum. The load may be too small.
The appliance calculates a new time according to the laundry
load. See the ‘Consumption Values’ chapter.
The cycle is longer than
the time displayed.
The washing results are
not satisfactory.
You cannot set an option.
After the check, activate the appliance. The
programme continues from the point of
interruption.
If the problem occurs again, contact the
Authorised Service Centre.
An unbalanced laundry load increases the duration time. This
is a normal behaviour of the appliance.
• Increase the detergent quantity or use a different detergent.
• Use special products to remove the stubborn stains before
you wash the laundry.
• Make sure that you set the correct temperature.
• Decrease the laundry load.
• Make sure that you press only the wanted button(s).
If the display shows other alarm codes.
Deactivate and activate the appliance. If
the problem continues, contact the Service.
Service
We recommend the use of original spare
parts. After the check, switch on the
Page 24

21552
© Inter IKEA Systems B.V. 1999
Made In Italy
000.000.00
ENGLISH 24
appliance and press the button to
you write the data here:
restart the programme.
If the problem remains, contact your
Authorised Service Centre.
Model description
(MOD): .....................
Product number (PNC): ...........................
Serial number (S.N.): ...............................
The necessary data for the service centre is
on the rating plate. We recommend that
Technical Data
Dimension Width/ Height/ Depth/
Total depth
Electrical connection Voltage
Overall power
Fuse
Frequency
Level of protection against ingress of solid particles
and moisture ensured by the protective cover, except where the low voltage equipment has no protection against moisture
600 mm/ 850 mm/ 559 mm/ 578
mm
230 V
2200 W
10 A
50 Hz
IPX4
Water supply pressure Minimum
Maximum
Water supply
1)
0,5 bar (0,05 MPa)
8 bar (0,8 MPa)
Cold water
Maximum Load Cotton 8 kg
Energy Efficiency Class A+++
Spin Speed Maximum 1400 rpm
Washing class A
Spinning class B
Washing noise 58 dB(A)
Spinning noise 78 dB(A)
Page 25

ENGLISH 25
Average annual energy consumption
Average annual water consumption
1)
Connect the water inlet hose to a water tap with a 3/4'' thread.
2)
The data is based on the Standard Cotton programmes for test institutes assuming 200 cycles per a year.
2)
2)
190 kWh
9999 litres
Information on the electrical connection, voltage and overall power is given on
the rating plate, on the inner edge of the appliance door.
ENVIRONMENT CONCERNS
Recycle the materials with the symbol .
Put the packaging in applicable containers
to recycle it. Help protect the environment
and human health and to recycle waste of
electrical and electronic appliances. Do not
dispose appliances marked with the symbol
with the household waste. Return the
product to your local recycling facility or
contact your municipal office.
IKEA GUARANTEE
How long is the IKEA guarantee valid?
This guarantee is valid for five (5) years
from the original date of purchase of Your
appliance at IKEA, unless the appliance is
named LAGAN in which case two (2) years
of guarantee apply. The original sales
receipt is required as proof of purchase. If
service work is carried out under guarantee,
this will not extend the guarantee period for
the appliance,
Which appliances are not covered by the
IKEA five (5) years guarantee?
The range of appliances named LAGAN
and all appliances purchased in IKEA
before 1st of August 2007
Who will execute the service?
IKEA service provider will provide the
service through its own service operations
or authorized service partner network.
What does this guarantee cover?
The guarantee covers faults of the
appliance, which have been caused by
faulty construction or material faults from
the date of purchase from IKEA. This
guarantee applies to domestic use only. The
exceptions are specified under the headline
“What is not covered under this
guarantee?” Within the guarantee period,
the costs to remedy the fault e.g. repairs,
parts, labour and travel will be covered,
provided that the appliance is accessible
for repair without special expenditure. On
these conditions the EU guidelines (Nr.
99/44/EG) and the respective local
regulations are applicable. Replaced parts
become the property of IKEA.
What will IKEA do to correct the problem?
IKEA appointed service provider will
examine the product and decide, at its sole
Page 26

ENGLISH
26
discretion, if it is covered under this
guarantee. If considered covered, IKEA
service provider or its authorized service
partner through its own service operations,
will then, at its sole discretion, either repair
the defective product or replace it with the
same or a comparable product.
What is not covered under this
guarantee?
• Normal wear and tear.
• Deliberate or negligent damage,
damage caused by failure to observe
operating instructions, incorrect
installation or by connection to the
wrong voltage, damage caused by
chemical or electro-chemical reaction,
rust, corrosion or water damage
including but not limited to damage
caused by excessive lime in the water
supply, damage caused by abnormal
environmental conditions.
• Consumable parts including batteries
and lamps.
• Non-functional and decorative parts
which do not affect normal use of the
appliance, including any scratches and
possible color differences.
• Accidental damage caused by foreign
objects or substances and cleaning or
unblocking of filters, drainage systems or
soap drawers.
• Damage to the following parts: ceramic
glass, accessories, crockery and cutlery
baskets, feed and drainage pipes, seals,
lamps and lamp covers, screens, knobs,
casings and parts of casings. Unless such
damages can be proved to have been
caused by production faults.
• Cases where no fault could be found
during a technician’s visit.
• Repairs not carried out by our appointed
service providers and/or an authorized
service contractual partner or where
non-original parts have been used.
• Repairs caused by installation which is
faulty or not according to specification.
• The use of the appliance in a nondomestic environment i.e. professional
use.
• Transportation damages. If a customer
transports the product to their home or
other address, IKEA is not liable for any
damage that may occur during transport.
However, if IKEA delivers the product to
the customer's delivery address, then
damage to the product that occurs
during this delivery will be covered by
this guarantee.
• Cost for carrying out the initial
installation of the IKEA appliance.
However, if an IKEA service provider or
its authorized service partner repairs or
replaces the appliance under the terms
of this guarantee, the service provider or
its authorized service partner will reinstall the repaired appliance or install
the replacement, if necessary.
This restriction do not apply to fault-free
work carried out by a qualified specialist
using our original parts in order to adapt
the appliance to the technical safety
specifications of another EU country.
How country law applies
The IKEA guarantee gives You specific legal
rights, which covers or exceed local
demands. However these conditions do not
limit in any way consumer rights described
in the local legislation
Area of validity
For appliances which are purchased in one
EU country and taken to another EU
country, the services will be provided in the
framework of the guarantee conditions
normal in the new country. An obligation to
carry out services in the framework of the
guarantee exists only if the appliance
complies and is installed in accordance
with:
• the technical specifications of the country
in which the guarantee claim is made;
Page 27

ENGLISH
27
• the Assembly Instructions and User
Manual Safety Information;
The dedicated After Sales Service for
IKEA appliances:
Please do not hesitate to contact IKEA After
Sales Service to:
1. make a service request under this
guarantee;
2. ask for clarification on installation of the
IKEA appliance in the dedicated IKEA
kitchen furniture. The service won’t
provide clarifications related to:
• the overall IKEA kitchen installation;
• connections to electricity (if machine
comes without plug and cable), to
water and to gas since they have to
be executed by an authorized
service engineer.
3. ask for clarification on user manual
contents and specifications of the IKEA
appliance.
To ensure that we provide you with the best
assistance, please read carefully the
Assembly Instructions and/or the User
Manual section of this booklet before
contacting us.
How to reach us if You need our service
In order to provide You with a
quicker service, we recommend
that You use the specific phone
numbers listed at the end of this
manual. Always refer to the
numbers listed in the booklet of
the specific appliance You need
an assistance for. Before calling
us, assure that You have to hand
the IKEA article number (8 digit
code) for the appliance of which
you need our assistance.
SAVE THE SALES RECEIPT! It is
Your proof of purchase and
required for the guarantee to
apply. Note that the receipt
reports also the IKEA article
name and number (8 digit code)
for each of the appliances you
have purchased.
Do You need extra help?
For any additional questions not related to
After Sales of your appliances, please
contact our nearest IKEA store call centre.
We recommend you read the appliance
documentation carefully before contacting
us.
Please refer to the last page of this manual
for the full list of IKEA appointed contacts
and relative national phone numbers.
Page 28

DEUTSCH
28
Inhaltsverzeichnis
Sicherheitsinformationen 28
Sicherheitsanweisungen 30
Gerätebeschreibung 31
Bedienfeld 33
Vor der ersten Inbetriebnahme 36
Einstellungen 36
Täglicher Gebrauch 36
Programme 40
Änderungen vorbehalten.
Verbrauchswerte 43
Tipps und Hinweise 44
Reinigung und Pflege 46
Fehlersuche 48
Technische Daten 51
UMWELTTIPPS 52
IKEA Garantie 52
Sicherheitsinformationen
Lesen Sie vor der Montage und dem Gebrauch des Geräts
zuerst die Gebrauchsanleitung. Der Hersteller übernimmt keine
Verantwortung für Verletzungen und Beschädigungen durch
unsachgemäße Montage. Bewahren Sie die
Gebrauchsanleitung griffbereit auf.
Sicherheit von Kindern und schutzbedürftigen Personen
• Das Gerät kann von Kindern ab 8 Jahren und Personen mit
eingeschränkten physischen, sensorischen oder geistigen
Fähigkeiten oder mit mangelnder Erfahrung und/oder
mangelndem Wissen nur dann verwendet werden, wenn sie
durch eine für ihre Sicherheit zuständige Person beaufsichtigt
werden oder in die sichere Verwendung des Geräts
eingewiesen wurden und die mit dem Gerät verbundenen
Gefahren verstanden haben.
• Kinder dürfen nicht mit dem Gerät spielen.
• Halten Sie Kinder unter 3 Jahren vom Gerät fern, wenn sie
nicht ständig beaufsichtigt werden.
• Alle Verpackungsmaterialien von Kindern fernhalten.
• Alle Reinigungsmittel von Kindern fernhalten.
• Halten Sie Kinder und Haustiere vom geöffneten Gerät fern.
Page 29

DEUTSCH
• Falls Ihr Gerät mit einer Kindersicherung ausgestattet ist,
29
empfehlen wir, diese einzuschalten.
• Wartung oder Reinigung des Geräts dürfen nicht von Kindern
ohne Aufsicht erfolgen.
Allgemeine Sicherheit
• Nehmen Sie keine technischen Änderungen am Gerät vor.
• Beachten Sie die maximale Beladungsmenge von 8 kg (siehe
Kapitel „Programmtabelle“).
• Der Betriebswasserdruck (Mindest- und Höchstdruck) muss
zwischen 0,5 bar (0,05 MPa) und 8 bar (0,8 MPa) liegen.
• Die Lüftungsöffnungen im Gerätesockel (falls vorhanden)
dürfen nicht von einem Teppichboden blockiert werden.
• Das Gerät muss mit den mitgelieferten neuen Schläuchen an
die Wasserversorgung angeschlossen werden. Alte Schläuche
dürfen nicht wieder verwendet werden.
• Wenn das Netzkabel beschädigt ist, muss es vom Hersteller,
seinem autorisierten Kundenservice oder einer
gleichermaßen qualifizierten Person ausgetauscht werden,
um Gefahrenquellen zu vermeiden.
• Schalten Sie das Gerät immer aus und ziehen Sie den
Netzstecker aus der Steckdose, bevor Reinigungsarbeiten
durchgeführt werden.
• Reinigen Sie das Gerät nicht mit einem Wasser- oder
Dampfstrahl.
• Reinigen Sie das Gerät mit einem weichen, feuchten Tuch.
Verwenden Sie ausschließlich Neutralreiniger. Benutzen Sie
keine Scheuermittel, scheuernde Reinigungsschwämmchen,
Lösungsmittel oder Metallgegenstände.
Page 30

DEUTSCH
30
Sicherheitsanweisungen
Montage
• Entfernen Sie die
Verpackungsmaterialien und die
Transportschrauben.
• Bewahren Sie die Transportschrauben
auf. Wenn Sie das Gerät umsetzen,
müssen Sie die Trommel blockieren.
• Seien Sie beim Umsetzen des Geräts
vorsichtig, denn es ist schwer. Tragen Sie
stets Sicherheitshandschuhe.
• Stellen Sie ein beschädigtes Gerät nicht
auf und benutzen Sie es nicht.
• Halten Sie sich an die mitgelieferte
Montageanleitung.
• Stellen Sie das Gerät nicht an einem Ort
auf, an dem die Temperatur unter 0 °C
absinken kann oder an dem es
Witterungseinflüssen frei ausgesetzt ist.
• Stellen Sie sicher, dass der Boden, auf
dem das Gerät aufgestellt wird, eben,
hitzebeständig und sauber ist.
• Stellen Sie sicher, dass die Luft zwischen
Gerät und Boden zirkulieren kann.
• Stellen Sie die Füße so ein, dass der
dazu erforderliche Abstand zwischen
Gerät und Boden vorhanden ist.
• Stellen Sie das Gerät nicht an einem Ort
auf, an dem die Tür nicht vollständig
geöffnet werden kann.
Elektrischer Anschluss
• Das Gerät muss geerdet sein.
• Schließen Sie das Gerät nur an eine
ordnungsgemäß installierte
Schutzkontaktsteckdose an.
• Stellen Sie sicher, dass die elektrischen
Daten auf dem Typenschild den Daten
Ihrer Stromversorgung entsprechen.
Wenden Sie sich andernfalls an eine
Elektrofachkraft.
• Verwenden Sie keine
Mehrfachsteckdosen oder
Verlängerungskabel.
• Achten Sie darauf, Netzstecker und
Netzkabel nicht zu beschädigen. Falls
das Netzkabel des Geräts ersetzt
werden muss, lassen Sie diese Arbeit
durch unseren autorisierten
Kundendienst durchführen.
• Stecken Sie den Netzstecker erst nach
Abschluss der Montage in die Steckdose.
Stellen Sie sicher, dass der Netzstecker
nach der Montage noch zugänglich ist.
• Fassen Sie das Netzkabel oder den
Netzstecker nicht mit nassen Händen an.
• Ziehen Sie nicht am Netzkabel, wenn Sie
das Gerät von der Stromversorgung
trennen möchten. Ziehen Sie stets am
Netzstecker.
• Nur für GB und Irland: Das Gerät besitzt
einen Netzstecker mit einer 13 A
Sicherung. Muss die Sicherung im
Netzstecker ausgetauscht werden,
setzen Sie eine 13 A Sicherung des Typs
ASTA (BS 1362) ein.
• Das Gerät entspricht den EWGRichtlinien.
Wasseranschluss
• Achten Sie darauf, die Wasserschläuche
nicht zu beschädigen.
• Bevor Sie neue oder lange Zeit nicht
benutzte Schläuche an das Gerät
anschließen, lassen Sie Wasser durch die
Schläuche fließen, bis es sauber austritt.
• Achten Sie darauf, dass beim ersten
Gebrauch des Geräts keine
Undichtheiten vorhanden sind.
Verwendung
WARNUNG! Verletzungs-,
Stromschlag-, Brand-,
Verbrennungsgefahr sowie Risiko
von Schäden am Gerät.
• Das Gerät ist ausschließlich für die
Verwendung im Haushalt vorgesehen.
• Beachten Sie die Sicherheitsanweisungen
auf der Waschmittelverpackung.
Page 31

1 2 3
5
6
4
DEUTSCH 31
• Platzieren Sie keine entflammbaren
Produkte oder Gegenstände, die mit
entflammbaren Produkten benetzt sind,
im Gerät, auf dem Gerät oder in der
Nähe des Geräts.
• Achten Sie darauf, dass alle
Metallobjekte aus der Wäsche entfernt
wurden.
• Stellen Sie keinen Behälter zum
Auffangen möglicher Wasserlecks unter
das Gerät. Wenden Sie sich an den
autorisierten Kundendienst, wenn Sie
Fragen zur Verwendung möglicher
Zubehörteile haben.
• Berühren Sie während des Betriebs nicht
das Türglas. Das Glas kann sehr heiß
sein.
Service
• Wenden Sie sich zur Reparatur des
Geräts an einen autorisierten
Kundendienst.
Gerätebeschreibung
Geräteübersicht
• Verwenden Sie ausschließlich
Originalersatzteile.
Entsorgung
WARNUNG! Verletzungs- und
Erstickungsgefahr.
• Trennen Sie das Gerät von der
Stromversorgung.
• Schneiden Sie das Netzkabel ab, und
entsorgen Sie es.
• Entfernen Sie das Türschloss, um zu
verhindern, dass sich Kinder oder
Haustiere in dem Gerät einschliessen.
Arbeitsplatte
1
Waschmittelschublade
2
Bedienfeld
3
Türgriff
4
Typenschild
5
Schraubfüße zum Ausrichten des Geräts
6
Page 32

DEUTSCH 32
Waschmittelschublade
Waschmittelfach für die Hauptwäsche.
Wenn Sie Flüssigwaschmittel verwenden,
muss dieses direkt vor dem Start des
Programms eingefüllt werden.
Fach für flüssige Pflegemittel (Weichspüler,
Stärke).
Klappe für Waschpulver oder
Flüssigwaschmittel.
Befolgen Sie die Mengenempfehlungen des Waschmittelherstellers und
überschreiten Sie nicht die MAX-Markierung in der Waschmittelschublade.
Weichspüler oder Stärkezusätze müssen in das Fach gefüllt werden, bevor das
Waschprogramm gestartet wird.
ACHTUNG! Falls Sie eine Vorwäsche durchführen möchten, geben Sie das
Waschmittel mit den zu waschenden Textilien in die Trommel.
ACHTUNG! Achten Sie darauf, dass sich die Klappe im Hauptfach der
Waschmittelschublade je nach dem benutzten Waschmitteltyp (Waschpulver
oder Flüssigwaschmittel) in der richtigen Position befindet.
Kindersicherung
Dieses Gerät hat eine spezielle Funktion, um zu vermeiden, dass Kinder oder Kleintiere in
der Trommel eingeschlossen werden.
Stellen Sie sicher, dass Kinder oder Kleintiere nicht in die Trommel klettern. Bitte überprüfen
Sie das Innere der Trommel, bevor Sie diese verwenden.
Zum Einschalten der Kindersicherung drehen
Sie den Knopf in der Tür (ohne Druck) nach
rechts, bis sich die Kerbe in horizontaler
Position befindet. Falls nötig, benutzen Sie
hierzu eine Münze.
Um diese Funktion auszuschalten und die Tür
wieder schließen zu können, drehen Sie den
Knopf gegen den Uhrzeigersinn, bis die
Kerbe wieder in vertikaler Position ist.
Page 33

90°
60°
40°
1400
900
700
30°
21
5678910
43
DEUTSCH 33
Bedienfeld
Bedienfeldbeschreibung
Programmwahlschalter
1
Display
2
3
Taste Zeitvorwahl
4
Anzeige Türverriegelung
5
Taste Start/Pause
6
Taste Extra Spülen
7
Taste Extra Kurz
8
Taste Spülstopp
9
Drehzahlreduzierung
10
Taste Temperatur
Programmwahlschalter Ermöglicht die Wahl eines Programms und/oder das Ein- und
Ausschalten des Geräts.
Page 34

CA B
DEUTSCH 34
Display
Taste Zeitvorwahl Mit dieser Taste kann der Start des Waschprogramms um 30
Das Display zeigt folgende Informationen:
• A - Zeitvorwahl-Anzeige
Das Symbol erscheint im Display, wenn die zugehörige Option eingestellt ist.
• B - Kindersicherung
Ihr Gerät ist mit einer Kindersicherung versehen, die Ihnen
gestattet, das Gerät bei Betrieb unbeaufsichtigt zu lassen.
• C - Zahl:
– Dauer des gewählten Programms. Nach der Auswahl
eines Programms wird dessen Dauer in Stunden und Minuten angezeigt (z. B. ). Die Dauer wird automa-
tisch aufgrund der maximal empfohlenen Beladung für
jede Wäscheart errechnet. Nach dem Programmstart wird
die verbleibende Zeit im Minutentakt aktualisiert.
– Zeitvorwahl. Im Display erscheint die ausgewählte Zeit-
vorwahl einige Sekunden lang, dann wird wieder die Dauer des ausgewählten Programms angezeigt. Die Anzeige der Zeit bis zum Programmstart reduziert sich stundenweise, und innerhalb der letzten Stunde im Minutentakt.
– Alarmcodes. Bei einer Funktionsstörung kann das Gerät
verschiedene Alarmcodes ausgeben, zum Beispiel (weitere Informationen dazu finden Sie unter „Fehlersuche“).
– Falsche Optionswahl. Falls eine Option nicht mit dem aus-
gewählten Waschprogramm kombinierbar ist, wird die
Meldung einige Sekunden lang unten im Display
angezeigt. Die integrierte rote Kontrolllampe der Taste
blinkt.
– Programmende. Nach Abschluss des Programms blinkt die
Null im Display und die Anzeige und die Kontrolllampe der Taste erlöschen. Die Tür kann geöffnet wer-
den.
Min. - 60 Min. - 90 Min., 2 Stunden und dann in Schritten von je
1 Stunde bis zu einem Maximum von 20 Stunden verzögert werden.
Page 35

DEUTSCH 35
Anzeige Türverriegelung
Taste Start/Pause Mit dieser Taste starten oder unterbrechen Sie das gewünschte
Taste Extra Spülen Dieses Gerät ist so konstruiert, dass es Energie spart. Sollte es er-
Taste Extra Kurz Drücken Sie diese Taste, führt das Gerät einen kurzen Wasch-
Taste Spülstopp Wählen Sie diese Option, um Knitterfalten zu vermeiden. Die
Diese Anzeige leuchtet auf, wenn das Programm startet, und
zeigt an, wenn die Tür geöffnet werden kann.
• Anzeige ein: die Tür kann nicht geöffnet werden. Das Gerät
arbeitet noch, oder es steht noch Wasser in der Trommel.
• Anzeige aus: die Tür kann geöffnet werden. Das Programm ist
beendet bzw. das Wasser wurde abgepumpt.
• Anzeige blinkt: die Tür wird in einigen Minuten entriegelt und
kann geöffnet werden.
Waschprogramm.
forderlich sein, die Wäsche mit einer zusätzlichen Wassermenge
zu spülen (Extra Spülen), wählen Sie diese Option. Bei Auswahl
dieser Option werden einige zusätzliche Spülgänge durchgeführt. Dies ist zu empfehlen in Gebieten mit besonders weichem
Wasser und für Menschen mit allergischen Reaktionen auf
Waschmittel.
gang für leicht verschmutzte Wäsche oder für Wäsche, die nur
aufgefrischt werden muss, aus. Wir empfehlen Ihnen, die Beladung der Maschine zu reduzieren. Die entsprechende Kontrolllampe leuchtet auf.
Trommel dreht sich regelmäßig, um Knitterfalten in der Wäsche
zu vermeiden.
Am Programmende befindet sich noch Wasser in der
Trommel. Die Tür bleibt verriegelt. Sie müssen das
Wasser abpumpen, um die Tür entriegeln zu können.
Zum Abpumpen des Wassers siehe „Am Programmende“.
Taste Drehzahlreduzierung
Taste Temperatur Nach der Auswahl eines Programms schlägt das Gerät automa-
Durch Drücken dieser Taste können Sie die Schleuderdrehzahl
des ausgewählten Programms ändern.
Die entsprechende Kontrolllampe leuchtet auf.
tisch eine Standardtemperatur vor. Mit dieser Taste können Sie
die Waschtemperatur erhöhen oder senken. In Position führt
das Gerät einen Waschgang mit kaltem Wasser durch.
Die entsprechende Kontrolllampe leuchtet auf.
Page 36

DEUTSCH 36
Vor der ersten Inbetriebnahme
1. Achten Sie darauf, dass der elektrische
Anschluss und der Wasseranschluss der
Montageanleitung entsprechen.
Einstellungen
Signaltöne
Das Gerät gibt in folgenden Fällen ein
akustisches Signal aus:
• am Ende des Programms
• wenn eine Betriebsstörung vorliegt.
Wenn Sie die Tasten und etwa 6
Sekunden lang gleichzeitig drücken, wird
das akustische Signal ausgeschaltet (mit
Ausnahme von Betriebsstörungen). Das
akustische Signal wird wieder eingeschaltet,
wenn Sie die beiden Tasten erneut drücken.
Kindersicherung
Diese Vorrichtung ermöglicht es Ihnen, das
Gerät unbeaufsichtigt stehen zu lassen,
ohne Sorge haben zu müssen, dass sich
Kinder verletzen oder das Gerät
beschädigen könnten. Diese Funktion bleibt
auch nach dem Abschalten des Geräts
aktiv.
Sie kann auf zwei verschiedene Arten
eingestellt werden:
2. Nehmen Sie alle Gegenstände aus der
Trommel.
• Vor dem Drücken der Taste : Es ist
nicht möglich, das Gerät zu starten.
• Nach dem Drücken der Taste : Es ist
nicht mehr möglich, ein Programm oder
eine Option zu ändern.
Zum Ein- bzw. Ausschalten dieser Option
drücken Sie gleichzeitig für etwa 6
Sekunden die Tasten und , bis das
Symbol im Display erscheint oder erlischt.
Extra Spülen dauerhaft einschalten
Wenn Sie diese Option wählen, ist bei jeder
neuen Programmauswahl die Funktion Extra
Spülen eingeschaltet.
• Berühren Sie zum Ein-/Ausschalten
dieser Option die Tasten
gleichzeitig, bis die Kontrolllampe
leuchtet/erlischt.
and
Täglicher Gebrauch
Einfüllen der Wäsche
Öffnen Sie den Wasserhahn. Stecken Sie
den Netzstecker in die Netzsteckdose.
1. Öffnen Sie die Tür, indem Sie den
Türgriff ziehen.
2. Geben Sie jedes Wäschestück einzeln in
die Trommel.
3. Schütteln Sie jedes Wäschestück leicht
aus, bevor Sie es in das Gerät legen.
Achten Sie darauf, nicht zu viel Wäsche
einzufüllen. Die maximale Beladung finden
Sie in der „Programmtabelle“.
4. Schließen Sie die Tür.
Page 37

A
B
A
DEUTSCH 37
ACHTUNG!
Vergewissern
Sie sich, dass
keine
Wäschestücke
zwischen
Dichtung und
Tür
eingeklemmt
sind.
Ansonsten besteht das Risiko eines
Wasseraustritts oder die Wäsche kann
beschädigt werden.
Gebrauch von Wasch- und Pflegemitteln
1. Messen Sie
Waschmittel und
Weichspüler ab.
2. Füllen Sie das
Waschmittel und
den Weichspüler
in die
entsprechenden
Fächer.
3. Schließen Sie die
Waschmittelschub
lade vorsichtig.
Flüssigwaschmittel oder Waschpulver
Die Klappe ist
standardmäßig auf
die Position A
(Pulverwaschmittel)
eingestellt.
Für
Flüssigwaschmittel:
1. Ziehen Sie die
Schublade heraus.
Drücken Sie die
Kante der Schublade
beim Pfeilsymbol
(PUSH), um sie zu
entfernen.
2. Stellen Sie die
Klappe in die Position
B.
3. Schieben Sie die
Waschmittelschublad
e wieder in die
Aufnahme ein.
Bei Verwendung von
Flüssigwaschmitteln:
• Verwenden Sie keine
Gelwaschmittel oder
Flüssigwaschmittel mit dicker
Konsistenz.
• Füllen Sie nicht mehr als 120
ml ein.
• Stellen Sie nicht die
Zeitvorwahl ein.
Befindet sich die
Klappe in der Position
B, und Sie möchten
Pulverwaschmittel
verwenden:
1. Ziehen Sie die
Schublade heraus.
2. Stellen Sie die
Klappe in die
Position A.
3. Schieben Sie die
Waschmittelschub
lade wieder in die
Aufnahme ein.
Page 38

DEUTSCH
38
Einstellen eines Programms
1. Schalten Sie das Gerät durch Drehen
des Programmwahlschalters ein und
wählen Sie das Programm:
• Die Kontrolllampe der Taste
blinkt.
• Im Display wird die Programmdauer
angezeigt.
2. Ändern Sie ggf. die Temperatur und
Schleuderdrehzahl oder fügen Sie zur
Auswahl stehende Optionen hinzu. Die
Kontrolllampe der gewählten Option
leuchtet auf, sobald die Option
eingeschaltet wird.
Wenn Sie einen Fehler machen,
erscheint im Display die Meldung
.
Die Beschreibung eines jeden
Waschzyklus und der
Kompatibilität unter den
Waschprogrammen und den
Optionen finden Sie im Kapitel
„Programme“.
Starten eines Programms ohne Zeitvorwahl
Drücken Sie die Taste .
• Die Kontrolllampe der Taste
auf zu blinken und leuchtet konstant.
• Das Programm startet, die Tür wird
verriegelt und die Anzeige
leuchtet.
• Die Programmdauer wird in Schritten
von 1 Minute heruntergezählt.
Die Ablaufpumpe kann sich zu
Beginn des Waschgangs eine
kurze Zeit einschalten.
Starten eines Programms mit Zeitvorwahl
1. Drücken Sie die Taste wiederholt, bis
das Display die gewünschte Zeitvorwahl
hört
anzeigt. Die Kontrolllampe der
Zeitvorwahl leuchtet auf.
2. Drücken Sie die Taste :
• Die Tür lässt sich nicht öffnen und die
Anzeige leuchtet.
• Das Gerät zählt die Zeit herunter.
• Nach Ablauf der Zeitvorwahl startet
das Programm automatisch.
Sie können die Einstellung der
Option noch vor Drücken der
Taste löschen oder ändern.
Nachdem Sie die Taste
gedrückt haben, können Sie nur
die Option abbrechen.
Abbrechen der Option :
a. Drücken Sie die Taste , um das
Gerät in den Pausenmodus zu
schalten. Die Kontrolllampe der
Taste blinkt.
b. Drücken Sie die Taste , bis im
Display erscheint.
Drücken Sie Taste erneut, um das
Programm sofort zu starten.
Unterbrechen eines Programms und Ändern der Optionen
Einige Optionen können nur geändert
werden, bevor sie durchgeführt werden.
1. Drücken Sie die Taste .
Die Kontrolllampe blinkt.
2. Ändern Sie die Optionen.
3. Drücken Sie die Taste
Das Programm wird fortgesetzt.
Abbrechen eines laufenden Programms
1. Drehen Sie den Programmwahlschalter
auf die Position , um das Programm
abzubrechen und das Gerät
auszuschalten.
2. Drehen Sie den Programmwahlschalter
erneut, um das Gerät einzuschalten.
erneut.
Page 39

DEUTSCH
39
Anschließend können Sie ein neues
Waschprogramm einstellen.
Vor dem Start des neuen
Programms pumpt das Gerät
möglicherweise Wasser ab.
Prüfen Sie in diesem Fall, ob sich
noch Waschmittel im Fach
befindet. Füllen Sie andernfalls
Waschmittel ein.
Öffnen der Tür
Während ein Programm oder aktiv ist, ist
die Tür verriegelt. Die Anzeige leuchtet.
ACHTUNG! Wenn die
Wassertemperatur und der
Wasserstand in der Trommel zu
hoch sind, und die Trommel sich
noch dreht, lässt sich die Tür nicht
öffnen.
Öffnen der Tür in den ersten Minuten des
Waschgangs oder wenn aktiv ist:
1. Drücken Sie die Taste , um das Gerät
in den Pausenmodus zu schalten.
2. Warten Sie, bis die Anzeige
3. Die Tür lässt sich jetzt öffnen.
4. Schließen Sie die Tür und berühren Sie
die Taste
(bzw. ) läuft weiter.
Am Programmende
• Das Gerät wird automatisch
ausgeschaltet.
• Falls Signaltöne aktiviert sind, ertönt ein
Signalton.
• Im Display erscheint .
• Die Kontrolllampe der Taste erlischt.
• Die Türverriegelungsanzeige erlischt.
Drehen Sie den Programmwahlschalter
auf die Position , um das Gerät
auszuschalten.
erneut. Das Programm
erlischt.
• Die Tür lässt sich jetzt öffnen.
• Nehmen Sie die Wäsche aus dem Gerät.
Vergewissern Sie sich, dass die Trommel
leer ist.
• Schließen Sie den Wasserhahn.
• Lassen Sie die Tür und die
Waschmittelschublade offen, damit sich
kein Schimmel und keine unangenehmen
Gerüche bilden.
Das Waschprogramm ist beendet, aber es
steht Wasser in der Trommel:
• Die Trommel dreht sich regelmäßig, um
Knitterfalten in der Wäsche zu
vermeiden.
• Die Kontrolllampe
daran zu erinnern, das Wasser
abzupumpen.
• Die Türverriegelungsanzeige leuchtet.
Die Kontrolllampe der Taste erlischt.
Die Tür bleibt verriegelt.
• Sie müssen das Wasser abpumpen, um
die Tür öffnen zu können.
Abpumpen des Wassers:
1. Abpumpen des Wassers.
• Wählen Sie ein oder ein
Programm.
• Drücken Sie die Taste
pumpt das Wasser ab und
schleudert.
2. Wenn das Programm beendet ist und
die Türverriegelungsanzeige erlischt,
können Sie die Tür öffnen.
3. Drehen Sie den Programmwahlschalter
auf die Position
auszuschalten.
Stand-by
Wenn Sie das Gerät nicht ausschalten, wird
einige Minuten nach dem Programmende
der Energiesparmodus aktiviert. Im
Energiesparmodus wird der
Energieverbrauch verringert, während sich
das Gerät im Stand-by-Modus befindet:
• Alle Kontrolllampen erlöschen.
leuchtet, um Sie
. Das Gerät
, um das Gerät
Page 40

DEUTSCH 40
• Die Kontrolllampe der Taste blinkt
langsam.
Drücken Sie eine beliebige Taste, um den
Energiesparmodus auszuschalten.
Programme
Programmübersicht
Beachten Sie immer die Pflegesymbole Ihres Wäschestücks und wählen Sie das
entsprechende Waschprogramm.
Programm
Temperaturber-
eich
BAUMWOLLE
90° - 60° - 40° -
30° - (Kalt)
BAUMWOLLE
1)
ECO
60 °C - 40 °C
PFLEGELEICHT
60° - 40° - 30° -
(Kalt)
Maximale Bela-
dung
Maximale
Schleuderdreh-
zahl
8 kg
1400 U/min
8 kg
1400 U/min
3 kg
900 U/min
Programmbeschreibung
(Beladung und Verschmutzungsgrad)
Weiße und bunte Baumwollwäsche. Normal und
leicht verschmutzt.
Weiße und farbechte Baumwollwäsche. Normal
verschmutzt. Der Energieverbrauch verringert sich
und die Dauer des Waschprogramms wird verlängert.
Pflegeleichtes oder Mischgewebe. Normal verschmutzt.
FEINWÄSCHE
40° - 30° -
(Kalt)
HANDWÄSCHE/
WOLLE
40° - 30° (Kalt)
3 kg
700 U/min
2 kg
900 U/min
Feinwäsche aus Acryl, Viskose, Polyester. Normal
verschmutzt.
Waschmaschinenfeste Wolle, handwaschbare
Wolle und Feinwäsche mit dem „Handwäsche“-
Pflegesymbol.
2)
Page 41

DEUTSCH 41
Programm
Temperaturber-
eich
MIX 20°
20 °C
SPÜLEN
ABPUMPEN
SCHLEUDERN
LEICHTBÜGELN
60° - 40° - 30° -
(Kalt)
AUFFRISCHEN 20
MIN
30 °C
Maximale Bela-
dung
Programmbeschreibung
(Beladung und Verschmutzungsgrad)
Maximale
Schleuderdreh-
zahl
2 kg
900 U/min
Spezialprogramm für leicht verschmutzte Baumwollwäsche, Synthetik- oder Mischgewebe. Dieses Programm hilft den Energieverbrauch zu senken. Verwenden Sie ein Waschmittel für niedrige Tempera-
turen, um ein gutes Waschergebnis zu erzielen3).
8 kg
1400 U/min
Spülen und Schleudern der Wäsche. Alle Gewe-
4)
bearten.
8 kg Abpumpen des in der Trommel verbliebenen Wass-
ers. Alle Gewebearten.
8 kg
1400 U/min
1 kg
900 U/min
1 kg
900 U/min
Schleudern der Wäsche und Abpumpen des in der
Trommel verbliebenen Wassers. Alle Gewebearten.
Pflegeleichte Textilien, die sanft gewaschen werden sollen. Normal und leicht verschmutzt.
5)
Pflegeleichte und Feinwäsche. Leicht verschmutzte
oder aufzufrischende Wäschestücke.
DAUNEN
40 °C - 30 °C
JEANS
60° - 40° - 30° -
(Kalt)
3 kg
700 U/min
3 kg
900 U/min
Spezialprogramm für eine Decke, Bettdecke, Ta-
gesdecke usw.
Textilien aus Jeansstoff und Jersey. Auch für dun-
kle Wäschestücke.
Page 42

DEUTSCH 42
Programm
Temperaturber-
eich
Maximale Bela-
dung
Maximale
Programmbeschreibung
(Beladung und Verschmutzungsgrad)
Schleuderdreh-
zahl
MINIPROGRAMM
3 kg
700 U/min
Ein kurzer Waschgang für Teile aus Synthetik oder
Feinwäsche, die leicht verschmutzt sind, oder aufzufrischende Wäschestücke.
30 °C
Position zum Ausschalten des Geräts und/oder Abbrechen eines Pro-
EIN/AUS
1)
Standardprogramme für die auf dem Energie-Label angegebenen Verbrauchswerte. Diese Programme sind
gemäß Verordnung 1061/2010 die Standardprogramme „Baumwolle 60 °C“ bzw. „Baumwolle 40 °C“. Hinsichtlich
des Energie- und Wasserverbrauchs für das Waschen normal verschmutzter Baumwollwäsche sind dies die effizientesten Programme.
Die Wassertemperatur in der Waschphase kann von der für das ausgewählte Programm angegebenen
Temperatur abweichen.
2)
Während dieses Programms dreht sich die Trommel langsam, um einen schonenden Waschgang zu gewährleisten.
Die Trommel scheint sich nicht oder nicht ordnungsgemäß zu drehen. Dies ist eine normale Funktion des Geräts.
3)
. Das Gerät führt eine kurze Heizphase aus, wenn die Wassertemperatur unter 20 °C beträgt. Das Gerät zeigt möglicherweise die Temperatureinstellung „Kalt“ an.
4)
Die Standardschleuderdrehzahl beträgt 700 U/min.
5)
Um Knitterfalten in der Wäsche zu reduzieren, reguliert dieser Waschgang die Wassertemperatur und führt einen
schonenden Wasch- und Schleudergang aus. Das Gerät führt zusätzliche Spülgänge aus.
gramms.
Mögliche Programmkombinationen
Programm
1)
■ ■ ■ ■ ■
■ ■ ■ ■
■ ■ ■ ■ ■
■ ■ ■ ■
■ ■ ■
■ ■ ■ ■
■ ■ ■ ■
Page 43

DEUTSCH 43
Programm
1)
■
■ ■
■ ■ ■ ■
■ ■
■
■ ■ ■
■
1)
Wenn Sie diese Option wählen, empfehlen wir Ihnen, die Wäschemenge zu verringern. Eine volle Beladung ist zwar
möglich, aber das Waschergebnis ist dann möglicherweise nicht zufriedenstellend. Empfohlene Füllmenge: Baumwolle:
4 kg, pflegeleichte und Feinwäsche: 1,5 kg.
Verbrauchswerte
Bei den in dieser Tabelle angegebenen Werten handelt es sich um Richtwerte.
Folgende Faktoren können diese Werte verändern: Die Wäscheart und menge, die Wasser- und Raumtemperatur.
Am Programmstart zeigt das Display die Programmdauer für die maximale Beladung an.
Während der Waschphase wird die Programmdauer automatisch berechnet
und verringert sich möglicherweise beträchtlich, wenn die Wäsche weniger
wiegt als die maximal zulässige Beladung. Zum Beispiel beträgt die maximale
Beladung bei Baumwolle 60 °C 8 kg und die Programmdauer überschreitet 2
Stunden. Wiegt die tatsächliche Beladung 1 kg, verringert sich die Programmdauer auf unter 1 Stunde.
Während das Gerät die tatsächliche Programmdauer berechnet, blinkt ein
Punkt im Display.
Programme Beladung
(kg)
Energiever-
brauch (kWh)
Wasserver-
brauch (Liter)
Ungefähre
Programm-
Restfeuchte
(%)
dauer (in Mi-
nuten)
Baumwolle 60 °C 8 1,35 70 159 52
1)
Page 44

DEUTSCH 44
Programme Beladung
(kg)
Baumwolle 40 °C 8 0,87 69 158 52
Pflegeleicht 40 °C 3 0,60 56 103 35
Feinwäsche 40 °C 3 0,55 59 81 35
Wolle/Handwäsche
30 °C
Standardprogramme Baumwolle
Standardprogramm
Baumwolle 60 °C
Standardprogramm
Baumwolle 60 °C
Standardprogramm
Baumwolle 40 °C
1)
Am Ende der Schleuderphase.
Aus-Zustand (W) Ein-Zustand (W)
0.48 0.48
Die in der Tabelle oben enthaltenen Informationen erfüllen die Verordnung (EG)
1015/2010 der Kommission zur Durchführung der Richtlinie EG/2009/125.
Energiever-
brauch (kWh)
2 0,30 53 57 30
8 0,96 52 244 52
4 0,73 40 210 52
4 0,62 41 196 52
Wasserver-
brauch (Liter)
Ungefähre
Programm-
dauer (in Mi-
nuten)
Restfeuchte
(%)
1)
Tipps und Hinweise
Beladung
• Teilen Sie die Wäsche auf, in:
Kochwäsche, Buntwäsche, Synthetik,
Feinwäsche und Wolle.
• Halten Sie sich an die Anweisungen auf
den Kleidungsetiketten.
• Waschen Sie weiße und bunte Wäsche
nicht zusammen.
• Manche farbigen Textilien können beim
ersten Waschen färben. Wir empfehlen,
sie deshalb die ersten Male separat zu
waschen.
• Knöpfen Sie Kopfkissen zu und schließen
Sie Reißverschlüsse, Haken und
Druckknöpfe. Schließen Sie Gürtel.
• Leeren Sie die Taschen und falten Sie die
Wäscheteile auseinander.
• Wenden Sie mehrlagige Textilien, Wolle
und bedruckte Wäschestücke vor dem
Waschen.
• Entfernen Sie hartnäckige Flecken.
• Waschen Sie stark verschmutzte Bereiche
mit einem speziellen Waschmittel.
• Seien Sie vorsichtig mit Gardinen.
Entfernen Sie die Haken, oder stecken
Page 45

DEUTSCH
45
Sie die Gardinen in einen Beutel oder
Kopfkissenbezug.
• Waschen Sie keine ungesäumten
Wäschestücke und Wäschestücke mit
Schnitten im Stoff in der Maschine.
Waschen Sie kleine und/oder
empfindliche Wäschestücke, wie BügelBHs, Gürtel, Strumpfhosen usw., in einem
Wäschenetz.
• Eine sehr geringe Beladung kann in der
Schleuderphase Probleme verursachen.
Verteilen Sie die Wäschestücke in
diesem Fall mit der Hand neu und
starten Sie die Schleuderphase erneut.
Hartnäckige Flecken
Für manche Flecken sind Wasser und
Waschmittel nicht ausreichend.
Wir empfehlen, diese Flecken zu entfernen,
bevor Sie die entsprechenden Textilien in
das Gerät geben.
Spezial-Fleckentferner sind im Handel
erhältlich. Verwenden Sie einen SpezialFleckentferner, der für den jeweiligen
Fleckentyp und Gewebetyp geeignet ist.
Wasch- und Pflegemittel
• Verwenden Sie nur speziell für
Waschmaschinen bestimmte Wasch- und
Pflegemittel.
– Waschpulver für alle Gewebearten,
– Waschpulver für Feinwäsche
(höchstens 40 °C) und Wolle,
– Flüssigwaschmittel, vorzugsweise für
Programme mit niedrigen
Temperaturen (max. 60 °C) für alle
Gewebearten oder nur speziell für
Wolle.
• Mischen Sie nicht verschiedene
Waschmittel.
• Verwenden Sie der Umwelt zuliebe nicht
mehr als die angegebene
Waschmittelmenge.
• Halten Sie sich an die Anweisungen auf
der Verpackung dieser Produkte.
• Verwenden Sie die korrekten Produkte
für Art und Farbe des Gewebes,
Programmtemperatur und
Verschmutzungsgrad.
• Ist Ihr Gerät nicht mit einer Klappe in der
Waschmittelschublade ausgerüstet,
geben Sie das Flüssigwaschmittel in eine
Dosierkugel (vom Hersteller des
Waschmittels).
Umwelttipps
• Stellen Sie zum Waschen normal
verschmutzter Wäsche ein Programm
ohne Vorwäsche ein.
• Waschen Sie immer mit der
angegebenen maximalen Beladung.
• Benutzen Sie ggf. einen Fleckentferner,
wenn Sie ein Programm mit niedriger
Temperatur auswählen.
• Erkundigen Sie sich nach der
Wasserhärte Ihres Hausanschlusses, um
die richtige Waschmittelmenge
verwenden zu können.
Wasserhärte
Wenn die Wasserhärte Ihres
Leitungswassers hoch oder mittel ist,
empfehlen wir die Verwendung eines
Enthärters für Waschmaschinen. In
Gegenden mit weichem Wasser ist die
Zugabe eines Enthärters nicht erforderlich.
Wenden Sie sich an Ihr örtliches
Wasserversorgungsunternehmen, um die
Wasserhärte in Ihrem Gebiet zu erfahren.
Verwenden Sie die richtige Menge
Wasserenthärter. Halten Sie sich an die
Anweisungen auf der Verpackung des
Produkts.
Page 46

DEUTSCH 46
Reinigung und Pflege
WARNUNG! Siehe Kapitel
Sicherheitshinweise.
Reinigen der Außenseiten
Reinigen Sie das Gerät nur mit warmem
Wasser und mit etwas Spülmittel. Reiben Sie
alle Oberflächen sorgfältig trocken.
ACHTUNG! Verwenden Sie
keinen Alkohol, keine
Lösungsmittel und keine
Chemikalien.
Entkalken
Wenn die Wasserhärte Ihres
Leitungswassers hoch oder mittel ist,
empfehlen wir die Verwendung eines
Entkalkers für Waschmaschinen.
Überprüfen Sie regelmäßig, dass sich kein
Kalk und keine Rostpartikel in der Trommel
absetzen.
Verwenden Sie zur Entfernung von Rost nur
Spezialprodukte für Waschmaschinen.
Führen Sie die Entkalkung nicht gleichzeitig
mit einer Wäsche durch.
Halten Sie sich immer an die
Anweisungen auf der
Verpackung des Produkts.
Waschgang zur Pflege der Maschine
Bei Waschprogrammen mit niedrigen
Temperaturen kann etwas Waschmittel in
der Trommel zurückbleiben. Führen Sie
regelmäßig einen Waschgang zur Pflege
der Maschine durch:
• Nehmen Sie die Wäsche aus der
Trommel.
• Starten Sie ein Programm für Koch-/
Buntwäsche mit der maximalen
Temperatur und einer kleinen Menge
Waschmittel.
Türdichtung
Überprüfen Sie die
Türdichtung
regelmäßig und
entfernen Sie ggf.
darin verfangene
Gegenstände.
Reinigen der Waschmittelschublade
Die Schublade für Waschpulver und
Pflegemittel muss regelmäßig gereinigt
werden.
• Ziehen Sie die
Schublade heraus.
• Um die Reinigung
zu vereinfachen,
können Sie den
oberen Teil des
Pflegemittelfachs
abnehmen.
• Reinigen Sie alle
entfernten Teile
der
Waschmittelschubl
ade unter
fließendem
Wasser, um alle
Spuren von
angesammeltem
Pulver zu
entfernen.
Page 47

1
2
3
45°
20°
DEUTSCH
47
• Verwenden Sie
eine Bürste zur
Reinigung der
Schubladenaufnah
me und stellen Sie
sicher, dass die
Unter- und
Oberseite gut
gereinigt sind.
• Setzen Sie nach
der Reinigung der
Waschmittelschubl
ade und
Schubladenaufnah
me die Schublade
wieder ein.
Reinigen des Zulauffilters und Ventilfilters
Wenn das Wasser zu lange in das Gerät
oder gar nicht einläuft, blinkt die
Kontrolllampe der Starttaste rot. Prüfen Sie,
ob der Wasserzulauffilter oder der
Ventilfilter verstopft sind (weitere
Einzelheiten finden Sie im Kapitel
„Fehlersuche“).
Gehen Sie hierzu folgendermaßen vor:
• Schließen Sie den
Wasserhahn.
• Schrauben Sie den
Schlauch vom
Wasserhahn ab.
• Reinigen Sie den
Filter im Schlauch
mit einer harten
Bürste.
• Schrauben Sie den Schlauch wieder an
den Wasserhahn an. Vergewissern Sie
sich, dass er fest angeschlossen ist.
• Schrauben Sie den
Schlauch vom
Gerät ab.
• Halten Sie ein Tuch
bereit, da
möglicherweise
etwas Wasser
herausfließt.
• Reinigen Sie den
Filter im Ventil mit
einer harten Bürste
oder einem Stück
Stoff.
• Schrauben Sie den
Schlauch wieder
an das Gerät an
und achten Sie
darauf, dass er
fest angeschlossen
ist.
• Drehen Sie den
Wasserhahn auf.
Frostschutzmaßnahmen
Falls das Gerät in einem Bereich installiert
ist, in dem die Temperatur unter 0 °C sinken
kann, entfernen Sie das im Zulaufschlauch
und in der Ablaufpumpe verbliebene
Wasser.
Führen Sie diese Schritte auch
aus, wenn Sie eine
Notentleerung durchführen
müssen.
1. Ziehen Sie den Netzstecker aus der
Netzsteckdose.
2. Entfernen Sie den
Wasserzulaufschlauch.
3. Entfernen Sie den Ablaufschlauch aus
der Halterung auf der Rückseite des
Page 48

DEUTSCH 48
Geräts und haken Sie ihn aus dem
Waschbecken oder Siphon aus.
4. Stecken Sie die Enden des Ablauf- und
Zulaufschlauchs in einen Behälter.
Lassen Sie das Wasser aus den
Schläuchen fließen.
Fehlersuche
WARNUNG! Siehe Kapitel
Sicherheitshinweise.
Einleitung
Das Gerät startet nicht oder stoppt
während des Betriebs.
Versuchen Sie zunächst selbst eine Lösung
für das Problem zu finden (siehe Tabelle).
Wenn Sie keine Lösung finden, wenden Sie
sich an den autorisierten Kundendienst.
Bei einigen Problemen ertönt ein
Signalton und im Display wird ein
Alarmcode angezeigt:
5. Wenn kein Wasser mehr fließt, bringen
Sie den Ablauf- und Zulaufschlauch
wieder an.
ACHTUNG! Stellen Sie sicher,
dass die Temperatur über 0 °C
liegt, bevor Sie das Gerät wieder
einschalten. Der Hersteller ist
nicht für Schäden verantwortlich,
die auf zu niedrige
Temperaturen zurückzuführen
sind.
• - Der Wassereinlauf in das Gerät
funktioniert nicht ordnungsgemäß.
• - Das Gerät pumpt das Wasser
nicht ab.
•
• - Die Netzspannung ist nicht
- Die Gerätetür steht offen oder ist
nicht richtig geschlossen. Überprüfen Sie
bitte die Tür!
konstant. Warten Sie, bis die
Netzspannung wieder konstant ist.
WARNUNG! Schalten Sie das
Gerät aus, bevor Sie die
Überprüfungen vornehmen.
Page 49

DEUTSCH 49
Mögliche Fehler
Problem Mögliche Abhilfe
Das Programm startet
nicht.
Der Wassereinlauf in das
Gerät funktioniert nicht
ordnungsgemäß.
Das Gerät pumpt das
Wasser nicht ab.
• Vergewissern Sie sich, dass der Netzstecker in die Netzsteckdose eingesteckt ist.
• Vergewissern Sie sich, dass die Tür geschlossen ist.
• Vergewissern Sie sich, dass im Sicherungskasten keine Sicherung ausgelöst hat.
• Überzeugen Sie sich, dass Start/Pause gedrückt wurde.
• Wenn die Zeitvorwahl eingestellt ist, brechen Sie die Zeitvorwahl ab oder warten Sie, bis sie abgelaufen ist.
• Schalten Sie die Kindersicherung (wenn vorhanden) aus,
falls sie eingeschaltet ist.
• Vergewissern Sie sich, dass der Wasserzulauf geöffnet ist.
• Vergewissern Sie sich, dass der Wasserdruck der Wasserversorgung nicht zu niedrig ist. Diese Information erhalten
Sie von Ihrem Wasserversorger.
• Vergewissern Sie sich, dass der Wasserzulauf nicht verstopft
ist.
• Überzeugen Sie sich, dass der Filter des Zulaufschlauchs
und der Filter des Ventils nicht verstopft sind. Siehe „Reinigung und Pflege“.
• Vergewissern Sie sich, dass der Zulaufschlauch nicht geknickt oder zu stark gekrümmt ist.
• Vergewissern Sie sich, dass der Wasserzulaufschlauch ordnungsgemäß angebracht ist.
• Vergewissern Sie sich, dass sich der Ablaufschlauch in der
richtigen Höhe befindet. Der Schlauch ist möglicherweise zu
niedrig positioniert.
• Vergewissern Sie sich, dass der Siphon nicht verstopft ist.
• Vergewissern Sie sich, dass der Ablaufschlauch nicht geknickt oder zu stark gekrümmt ist.
• Vergewissern Sie sich, dass der Wasserablaufschlauch ordnungsgemäß angebracht ist.
• Haben Sie ein Programm ohne Abpumpphase gewählt,
stellen Sie das Abpumpprogramm ein.
• Haben Sie ein Programm mit Spülstopp gewählt, stellen Sie
das Abpumpprogramm ein.
• Können Sie den Fehler nicht mit den oben beschriebenen
Maßnahmen beheben, wenden Sie sich an den autorisierten
Kundendienst, da der Filter der Ablaufpumpe verstopft sein
könnte.
Page 50

DEUTSCH 50
Problem Mögliche Abhilfe
Das Gerät schleudert
nicht oder das Waschprogramm dauert länger
als gewöhnlich.
Es befindet sich Wasser
auf dem Boden.
Die Tür des Geräts lässt
sich nicht öffnen.
Das Gerät macht ungewöhnliche Geräusche.
Das Programm ist kürzer
als die angezeigte Zeit.
• Stellen Sie das Schleuderprogramm ein.
• Verteilen Sie die Wäschestücke mit der Hand neu und starten Sie die Schleuderphase erneut. Das Problem kann durch
eine Unwucht verursacht worden sein.
• Können Sie den Fehler nicht mit den oben beschriebenen
Maßnahmen beheben, wenden Sie sich an den autorisierten
Kundendienst, da der Filter der Ablaufpumpe verstopft sein
könnte.
• Vergewissern Sie sich, dass alle Wasseranschlüsse vollkommen dicht sind, damit kein Wasser austreten kann.
• Vergewissern Sie sich, dass der Wasserzulauf- und ablaufschlauch nicht beschädigt sind.
• Verwenden Sie ein geeignetes Waschmittel in der richtigen
Menge.
• Vergewissern Sie sich, dass das Waschprogramm beendet
ist.
• Stellen Sie das Abpump- oder Schleuderprogramm ein,
wenn sich noch Wasser in der Trommel befindet.
• Stellen Sie sicher, dass das Gerät richtig ausgerichtet ist.
Siehe hierzu „Montage“.
• Überzeugen Sie sich, dass das Verpackungsmaterial und/
oder die Transportsicherungen entfernt wurden. Siehe hierzu „Montage“.
• Füllen Sie mehr Wäsche ein. Die Beladung ist möglicherweise zu gering.
Das Gerät berechnet eine neue Programmdauer entsprechend
der Beladung. Siehe Abschnitt „Verbrauchswerte“.
Das Programm ist länger
als die angezeigte Zeit.
Die Waschergebnisse
sind nicht zufriedenstellend.
Sie können keine Option
einstellen.
Wenn die Wäsche ungleich in der Trommel verteilt ist, verlängert sich die Programmdauer. Dies ist ein normales Verhalten
des Geräts.
• Erhöhen Sie die Waschmittelmenge oder benutzen Sie ein
anderes Waschmittel.
• Entfernen Sie vor dem Waschgang hartnäckige Flecken mit
einem Spezialprodukt.
• Achten Sie darauf, die richtige Temperatur einzustellen.
• Verringern Sie die Beladung.
• Achten Sie darauf, dass Sie nur die gewünschten Tasten
drücken.
Page 51

21552
© Inter IKEA Systems B.V. 1999
Made In Italy
000.000.00
DEUTSCH 51
Schalten Sie das Gerät nach der
Überprüfung wieder ein. Das Programm
wird an der Stelle fortgesetzt, an der es
unterbrochen wurde.
Tritt das Problem erneut auf, wenden Sie
sich an den autorisierten Kundendienst.
Wenn im Display andere Alarmcodes
angezeigt werden. Schalten Sie das Gerät
aus und wieder ein. Tritt das Problem
erneut auf, wenden Sie sich an den
Kundendienst.
Service
Bitte verwenden Sie ausschließlich OriginalErsatzteile. Schalten Sie nach der
Überprüfung das Gerät ein und drücken Sie
die Taste
für den Neustart des
Programms.
Tritt das Problem weiterhin auf, wenden Sie
sich an den autorisierten Kundendienst.
Technische Daten
Abmessungen Breite/Höhe/Tiefe/
Gesamttiefe
Modellbeschreibung
(MOD): .....................
Produkt-Nummer (PNC): ...........................
Seriennummer (S.N.): ...............................
Die vom Kundendienst benötigten Daten
finden Sie auf dem Typenschild. Wir
empfehlen die Angaben hier zu notieren:
600 mm/850 mm/559 mm/578 mm
Elektrischer Anschluss Spannung
Gesamtleistung
Sicherung
Frequenz
Die Schutzverkleidung gewährleistet einen Schutz
230 V
2200 W
10 A
50 Hz
IPX4
gegen das Eindringen von festen Fremdkörpern und
Spritzwasser (Feuchtigkeit), außer an den Stellen,
an denen das Niederspannungsgerät keinen Schutz
gegen Feuchtigkeit besitzt
Wasserdruck Mindestwert
Höchstwert
1)
Wasseranschluss
Maximale Beladung Baumwolle 8 kg
0,5 bar (0,05 MPa)
8 bar (0,8 MPa)
Kaltwasser
Page 52

DEUTSCH 52
Energieeffizienzklasse A+++
Schleuderdrehzahl Höchstwert 1400 U/min
Waschwirkungsklasse A
Schleuderwirkungsklasse B
Waschgeräusch 58 dB (A)
Schleudergeräusch 78 dB (A)
Durchschnittlicher jährlicher Stromverbrauch
2)
Durchschnittlicher jährlicher Wasserverbrauch
1)
Schließen Sie den Zulaufschlauch an einen Wasserhahn mit einem 3/4"-Außengewinde an.
2)
Die Daten basieren auf den standardmäßigen Baumwoll-Programmen für Prüfinstitute mit angenommenen 200
Waschgängen pro Jahr.
Die Daten der elektrischen Anschlusswerte, Spannung und Gesamtleistung befinden sich auf dem Typenschild innen an der Gerätetür.
2)
190 kWh
9999 Liter
UMWELTTIPPS
Recyceln Sie Materialien mit dem Symbol
. Entsorgen Sie die Verpackung in den
entsprechenden Recyclingbehältern.
Recyceln Sie zum Umwelt- und
Gesundheitsschutz elektrische und
elektronische Geräte. Entsorgen Sie Geräte
IKEA Garantie
Wie lang ist die IKEA Garantie gültig?
Diese Garantie ist für (5) fünf Jahre gültig
ab dem Originalkaufdatum Ihres Gerätes
bei IKEA; sollte das Gerät die Bezeichnung
"LAGAN" tragen, gilt die Garantie in
diesem Fall nur (2) zwei Jahre. Als
Kaufnachweis ist der Originalkassenbon
oder die Originalrechnung erforderlich.
Werden im Rahmen der Garantie Arbeiten
mit diesem Symbol nicht mit dem
Hausmüll. Bringen Sie das Gerät zu Ihrer
örtlichen Sammelstelle oder wenden Sie sich
an Ihr Gemeindeamt.
ausgeführt, so verlängert sich dadurch die
Garantiezeit weder für das Gerät noch für
die neuen Teile.
Welche Geräte sind nicht durch die IKEA
(5) Fünfjahresgarantie abgedeckt?
Die Geräte-Serie LAGAN und alle Geräte,
die vor dem 1. August 2007 bei IKEA
gekauft wurden.
Page 53

DEUTSCH
53
Wer übernimmt den Kundendienst?
Der IKEA Kundendienst wird diesen Service
über seinen eigenen Kundendienst oder
über ein autorisiertes Partner-Netzwerk
durchführen lassen.
Was deckt die Garantie ab?
Die Garantie deckt Material- und
Produktionfehler ab. Sie gilt ab dem Datum,
an dem das Elektrogerät bei IKEA gekauft
wurde. Diese Garantie gilt nur für private
Haushalte. Die Ausnahmen sind unter der
Rubrik “Was ist nicht durch diese Garantie
abgedeckt?” beschrieben. Innerhalb des
Garantiezeitraums werden die Kosten zur
Behebung eines Fehlers wie Reparaturen,
Ersatzteile, Arbeitszeit und Fahrtkosten
abgedeckt, vorausgesetzt, dass das Gerät
ohne besonderen Kostenaufwand für die
Reparatur zugänglich ist und dass der
Fehler direkt auf einen Konstruktionsfehler
oder einen Materialfehler zurückgeht, der
durch die Garantie abgedeckt ist. Bei
diesen Bedingungen gelten die EURichtlinien (Nr. 99/44/EG) und die
entsprechenden gesetzlichen Vorschriften.
Teile, die ersetzt wurden, gehen in das
Eigentum von IKEA über.
Was wird IKEA zur Lösung des Problems
tun?
IKEA hat Kundendienste, die das Produkt
untersuchen und eigenständig entscheiden,
ob das Problem durch die Garantie
abgedeckt ist oder nicht. Wenn entschieden
wird, dass der Fall unter die Garantie fällt,
repariert der IKEA Kundendienst oder ein
autorisierter Service-Partner über seinen
eigenen Service eigenständig das defekte
Produkt, oder sie ersetzen es durch ein
gleiches oder durch ein gleichwertiges
Produkt.
Was ist nicht durch diese Garantie
abgedeckt?
• Der normale Verschleiß.
• Bewusste oder durch Fahrlässigkeit
entstandene Schäden, die durch eine
Missachtung der Bedienungsanweisung,
eine unsachgemäße Installation oder
durch den Anschluss an eine falsche
Spannung, sowie Schäden, die durch
eine chemische oder elektrochemische
Reaktion (Rost, Korrosion oder
Wasserschäden eingeschlossen - aber
nicht darauf beschränkt) - Schäden, die
durch übermäßigen Kalk in der
Wasserzuleitung entstanden sind, und
Schäden, die durch ungewöhnliche
Umweltbedingungen entstanden sind.
• Verbrauchsgüter wie Batterien und
Lampen.
• Nicht-funktionale und dekorative Teile,
die den normalen Betrieb des Gerätes
nicht beeinträchtigen, einschließlich
Kratzer und möglicher Farbunterschiede.
• Versehentliche Beschädigung durch
Fremdobjekte der Substanzen und
Reinigung oder Loslösen von Filtern,
Drainagesystemen oder
Reinigungsmittel-Schubladen.
• Beschädigung folgender Teile:
Glaskeramik, Zubehör, Geschirr und
Besteckkörbe, Zuleitungen und
Drainageschläuche-/rohre, Lampen und
Lampenabdeckungen, Knöpfe/
Wählschalter, Gehäuse und Teile des
Gehäuses; es sei denn, es kann
nachgewiesen werden, dass diese
Schäden durch Produktionsfehler
verursacht wurden.
• Fälle, in denen bei einem Besuch des
Kundendienstes kein Fehler gefunden
werden konnte.
• Reparaturen, die nicht durch unser
autorisiertes Kundendienstpersonal und/
oder das autorisierte
Kundendienstpersonal unserer
Vertragspartner ausgeführt wurden,
oder Fälle, in denen keine Originalteile
verwendet wurden.
Page 54

DEUTSCH
54
• Reparaturen, die durch fehlerhafte und
nicht gemäß der Anleitung durchgeführte
Installation verursacht wurden.
• Die Nutzung des Gerätes in einer
professionellen Art und Weise, d.h. nicht
im privaten Haushalt.
• Transportschäden. Wenn ein Kunde das
Produkt nach Hause oder an eine
andere Adresse transportiert, haftet
IKEA nicht für Schäden, die während
dieses Transports entstehen. Liefert IKEA
das Produkt an die Lieferadresse des
Kunden aus, dann sind Schäden, die
während der Auslieferung des Produktes
entstehen, von der Garantie abgedeckt.
• Die Kosten zur Durchführung der
Erstinstallation des IKEA Gerätes. Falls
der IKEA Kundendienst oder sein
autorisierter Service-Partner das Gerät
als Garantiefall instandsetzt oder ersetzt,
installiert der Kundendienst oder sein
autorisierter Service-Partner bei Bedarf
das Gerät auch wieder oder er installiert
das Ersatzgerät.
Diese Einschränkung gilt nicht für fehlerfreie
Arbeiten, die von qualifiziertem
Fachpersonal durchgeführt wurden, um das
Gerät an den technischen
Sicherheitsstandard eines anderen EULandes anzupassen.
Wie gilt die geltende Gesetzgebung des
Landes
Die IKEA Garantie gibt Ihnen spezielle
gesetzliche Rechte, die alle lokalen
gesetzlichen Anforderungen abdecken oder
übertreffen, die einer Änderung von Land
zu Land unterworfen sind.
Gültigkeitsbereich
Für Geräte, die in einem EU-Land gekauft
und in ein anderes EU-Land mitgenommen
werden, stehen die Kundendienstleistungen
im Rahmen der Garantiebedingungen
bereit, die im neuen Land gültig sind. Eine
Verpflichtung, Dienstleistungen im Rahmen
der Garantie auszuführen, besteht nur
dann, wenn:
• das Gerät den technischen
Spezifikationen des Landes, in dem der
Garantieanspruch gemacht wird,
entspricht, und es in Übereinstimmung
mit diesen technischen Spezifikationen
des Landes installiert wurde;
• das Gerät in Übereinstimmung mit den
Montageanleitungen und den
Sicherheitsinformationen im
Benutzerhandbuch installiert wurde und
diesen Anleitungen und Informationen
entspricht.
Der spezielle Kundendienst (Service) für
IKEA Geräte:
Bitte zögern Sie nicht, den speziellen IKEA
Kundendienst (Service) zu kontaktieren für:
1. einen Anspruch unter dieser Garantie;
2. die Bitte um Klärung von Fragen zur
Installation des IKEA Gerätes im
speziellen IKEA Küchenmöbel. Der
Kundendienst kann keine Fragen
beantworten zu:
• der gesamten IKEA
Kücheninstallation;
• Anschlüsse an die Elektrik (falls das
Gerät ohne Netzkabel und Stecker
kommt), Anschlüsse an Wasser und
Gas, da diese Arbeiten von einem
autorisierten Kundendiensttechniker
ausgeführt werden müssen.
3. die Bitte um Klärung von Fragen zu
Inhalten des Benutzerhandbuchs und zu
Spezifikationen des IKEA Geräts.
Um sicherzustellen, dass wir Sie stets
optimal unterstützen, lesen Sie bitte die
Montageanleitung und/oder den
Bedienungsanleitungsabschnitt dieser
Broschüre durch, bevor Sie sich an uns
wenden.
Wie können Sie uns erreichen, wenn Sie
uns benötigen?
Page 55

DEUTSCH
Auf der letzten Seite dieser Broschüre
finden Sie eine vollständige Liste mit
offiziellen IKEA Kundendienststellen und
den jeweiligen nationalen Telefonnummern.
55
Damit Sie bei Fragen rasch die
zuständige Stelle erreichen,
empfehlen wir Ihnen, die am
Ende dieser Broschüre
aufgelisteten speziellen
Telefonnummern zu benutzen.
Beziehen Sie sich bitte stets auf
die Telefonnummern, die in der
Broschüre zu dem jeweiligen
Gerät aufgelistet sind, zu dem
Sie Fragen haben. Bevor Sie uns
anrufen, sollten Sie die IKEAArtikelnummer (den 8-stelligen
Zifferncode) Ihres Gerätes zur
Hand haben.
BITTE BEWAHREN SIE DEN
KAUFBELEG AUF! Er ist Ihr
Kaufnachweis und für einen
Garantieanspruch unerlässlich.
Bitte beachten Sie, dass auf
diesem Kaufbeleg auch die IKEA
Artikelbezeichnung und die
Nummer (der 8-stellige
Zifferncode) für jedes der
Geräte, die Sie gekauft haben,
vermerkt sind.
Benötigen Sie zusätzlich Hilfe?
Für alle weiteren Fragen, die sich nicht auf
den Kundendienst Ihres Gerätes beziehen,
wenden Sie sich bitte an das Call Center
der nächsten IKEA-Einrichtung. Wir
empfehlen Ihnen, die Dokumentation des
Geräts sorgfältig durchzulesen, bevor Sie
uns kontaktieren.
Page 56

emit gninepOeeF llaCrebmun enohPyrtnuoC
België
070 246016
Binnenlandse gesprekskosten 8 tot 20 Weekdagen
eniames nE .02 à 8 xuanoitan sleppa sed firaT euqigleB
България
00359888164080
0035924274080
Такса за повикване от страната От 9 до 18 ч в работни дни
Česká republika 246 019721 Cena za místní hovor 8 až 20 v pracovních dnech
Danmark 70 15 09 09 Landstakst
man. - fre. 09.00 - 20.00
lør. 09.00 - 16.00
1 søndag pr. måned, normalt første
søndag i måneden
Deutschland
+49 1806 33 45
32*
* 0,20 €/Verbindung aus dem Festnetz
max. 0,60 €/Verbindung
aus dem Mobilfunknetz
8 bis 20 Werktage
Ελλάδα 211 176 8276 Υπεραστική κλήση 8 έως 20 κατά τις εργάσιμες ημέρες
España 91 1875537 Tarifa de llamadas nacionales De 8 a 20 en días laborables
France 0170 36 02 05 Tarif des appels nationaux 9 à 21. En semaine
Hrvatska 00385 1 6323 339 Trošak poziva 27 lipa po minuti
radnim danom od ponedjeljka
do petka od 08:00 do 16:00
Ireland 0 14845915 National call rate 8 till 20 Weekdays
Ísland 5880503 Innanlandsgjald fyrir síma 9 til 18. Virka daga
Italia 02 00620818
Tariffa applicata
alle chiamate nazionali
dalle 8 alle 20 nei giorni feriali
Κυπρος 22 030 529 Υπεραστική κλήση 8 έως 20 κατά τις εργάσιμες ημέρες
Lietuva 5 230 06 99 Nacionalinių pokalbių tarifai
Pr. - Ketv.: 8:00 - 12:00, 12:45 - 17:00
Pnkt.: 8:00 - 12:00, 12:45 - 15:45
Magyarország 061 998 0549 Belföldi díjszabás Hétköznap 8 és 10 óra között
Nederland
0900 235 45 32
en/of
0900 BEL IKEA
15 cent/min., starttarief 4.54 cent
en gebruikelijke belkosten
ma - vr 08.00 - 20.00,
zat 09.00 - 20.00
(zondag gesloten)
regadeku 02 lit 8 dnalnni tskaT 25022 518 egroN
Österreich 0810 300486 max. 10 Cent/min. Mo - Fr 8.00 - 20.00 Uhr
Polska 012 297 8787 Stawka wg taryfy krajowej Od 8 do 20 w dni robocze
Portugal 211557985 Chamada Nacional
9 às 21. Dias de Semana
*excepto feriados
România 021 211 08 88 Tarif apel naţional 8 - 20 în zilele lucrătoare
Россия 8 495 6662929 Действующие телефонные тарифы
с 8 до 20 по рабочим дням
Время московское
Schweiz
031 5500 324
Tarif für Anrufe im Bundesgebiet 8 bis 20 Werktage
eniames nE .02 à 8 xuanoitan sleppa sed firaT essiuS
Svizzera
Tariffa applicata
alle chiamate nazionali
dalle 8 alle 20 nei giorni feriali
Slovensko (02) 3300 2554 Cena vnútroštátneho hovoru 8 až 20 v pracovných dňoch
Suomi 030 6005203
Lankapuhelinverkosta
0,0835 €/puhelu + 0,032 €/min
Matkapuhelinverkosta 0,192 €/min
arkipäivisin 8.00 - 20.00
Sverige 0775 700 500 lokalsamtal (lokal taxa)
mån-fre 8.30 - 20.00
lör-sön 9.30 - 18.00
Türkiye 212 244 0769 Ulusal arama ücreti Hafta içi saat 09:00’dan 18:00’a kadar
Україна 044 586 2078 Міжміськи дзвінки платні 9 - 21 В робочі дні
United Kingdom 020 3347 0044 National call rate 9 till 21. Weekdays
moc.aeki.wwwajinevolS
moc.aeki.wwwајибрС
56
*
Page 57

57
Page 58

58
Page 59

59
Page 60

192964410-A-102015
21552
© Inter IKEA Systems B.V. 2015
AA-1621820-1
 Loading...