

Ikea BEMOTA 903.893.36 User Manual
GB
BEMOTA
DE
FR
IT

ENGLISH 4
DEUTSCH 17
FRANÇAIS 30
ITALIANO 49
Please refer to the last
page of this manual for the
full list of IKEA appointed
Authorized Service Centre
and relative national phone
number
Konsultieren Sie die letzte
Seite dieser Bedienungsanleitung, auf der die vollständige
Liste der nationalen autorisierten IKEA Kundendienststellen mit den entsprechenden Telefonnummern
aufgelistet ist.
Consultez la dernière page de
ce manuel contenant la liste
complète des services Aprèsvente agréés IKEA avec les
numéros de téléphone nationaux correspondants.
Consultare l’ultima pagina
di questo manuale dove è
riportato l’elenco completo
dei Centri Assistenza IKEA
Autorizzati con i relativi numeri telefonici nazionali.
ENGLISH
Contents
4
Safety information 4
Product description 8
Care and cleaning 9
What to do if... 11
Technical data 12
Energy efficiency 13
Environment concerns 14
IKEA GUARANTEE 14
Safety information
For your safety and correct operation of the appliance,
read this manual carefully before installation and use.
Always keep these instructions with the appliance even if
you move or sell it. Users must fully know the operation
and safety features of the appliance.
The wire connection has to be done by specialized
technician.
• The manufacturer will not be held liable for any
damages resulting from incorrect or improper
installation.
• The minimum safety distance between the cooker top
and the extractor hood is: for electrical hob 500mm and
for gas hob 500mm.
• If the instructions for installation for the gas hob specify
a greater distance, this must be respected.
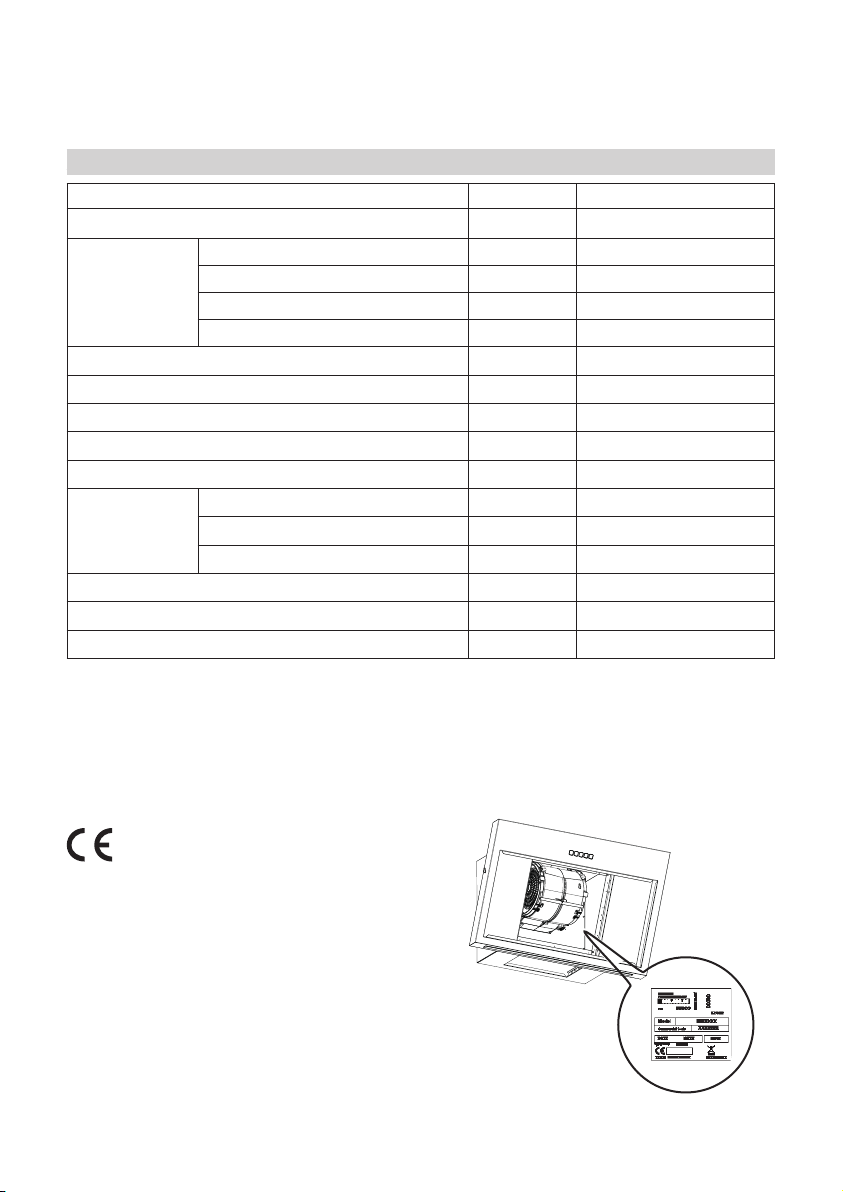
• Check that the mains voltage corresponds to that
indicated on the rating plate fixed to the inside of the
hood.
• Means for disconnection must be incorporated in the
fixed wiring in accordance with the wiring rules.
• For Class I appliances, check that the domestic power
supply guarantees adequate earthing.
• Connect the extractor to the exhaust flue through a pipe
of minimum diameter 120 mm. The route of the flue
must be as short as possible.
ENGLISH
• Do not connect the extractor hood to exhaust ducts
carrying combustion fumes (boilers, fireplaces, etc.).
• If the extractor is used in conjunction with non-electrical
appliances (e.g. gas burning appliances), a sufficient
degree of aeration must be guaranteed in the room in
order to prevent the backflow of exhaust gas. When
the cooker hood is used in conjunction with appliances
supplied with energy other than electric, the negative
pressure in the room must not exceed 0,04 mbar to
prevent fumes being drawn back into the room by the
cooker hood.
• The air must not be discharged into a flue that is used
for exhausting fumes from appliances burning gas or
other fuels.
• If the supply cord is damaged, it must be replaced from
the manufacturer or its service agent.
• Connect the plug to a socket complying with current
regulations, located in an accessible place.
• With regards to the technical and safety measures to
be adopted for fume discharging it is importat to closely
follow the regulations provided by the local authorities.
5
WARNING: Before installing the Hood, remove the
protective films.
• Use only screws and small parts in support of the hood.
WARNING: Failure to install the screws or fixing
device in accordance with these instructions may
result in electrical hazards.
• Connect the hood to the power net by using a bipolar
switch having a contact gap of at least 3 mm.
• Do not look directly at the light through optical devices
(binoculars, magnifying glasses…).
• Do not flambè under the range hood; risk of fire.
• This appliance can be used by children aged from 8
ENGLISH
years and above and persons with reduced physical,
sensory or mental capabilities or lack of experience
and knowledge if they have been given supervision or
instruction concerning use of the appliance in a safe way
and understand the hazards involved. Children shall not
play with the appliance. Cleaning and user maintenance
shall not be made by children without supervision.
• Children should be supervised to ensure that they do
not play with the appliance.
• The appliance is not to be used by persons (including
children) with reduced physical, sensory or mental
capabilities, or lack of experience and knowledge, unless
they have been given supervision or instruction
Accessible parts may become hot when used with
cooking appliances.
• Clean and/or replace the Filters after the specified time
period (Fire hazard).
• There shall be adequate ventilation of the room when
the range hood is used at the same time as appliances
burning gas or other fuels (not applicable to appliances
that only discharge the air back into the room)
6

ENGLISH
min 471 mm
max 861 mm
min 471 mm
max 861 mm
7
Use
• Switch off or unplug the appliance
from the mains supply before
carrying out any maintenance work.
• The top of the hood must not to be
used as a shelf.
• The extractor hood has been
designed exclusively for domestic
use to eliminate kitchen smells.
• Never use the hood for purposes
other than for which it has been
designed.
• Never leave high naked flames
under the hood when it is in
operation.
• Adjust the flame intensity to direct
it onto the bottom of the pan only,
making sure that it does not engulf
the sides.
Deep fat fryers must be continuously
monitored during use: overheated oil
can burst into flames.
Installation modes
The hood has been designed to be
installed and used either as a “Exhaust
mode”, or as a “Recirculation mode”.
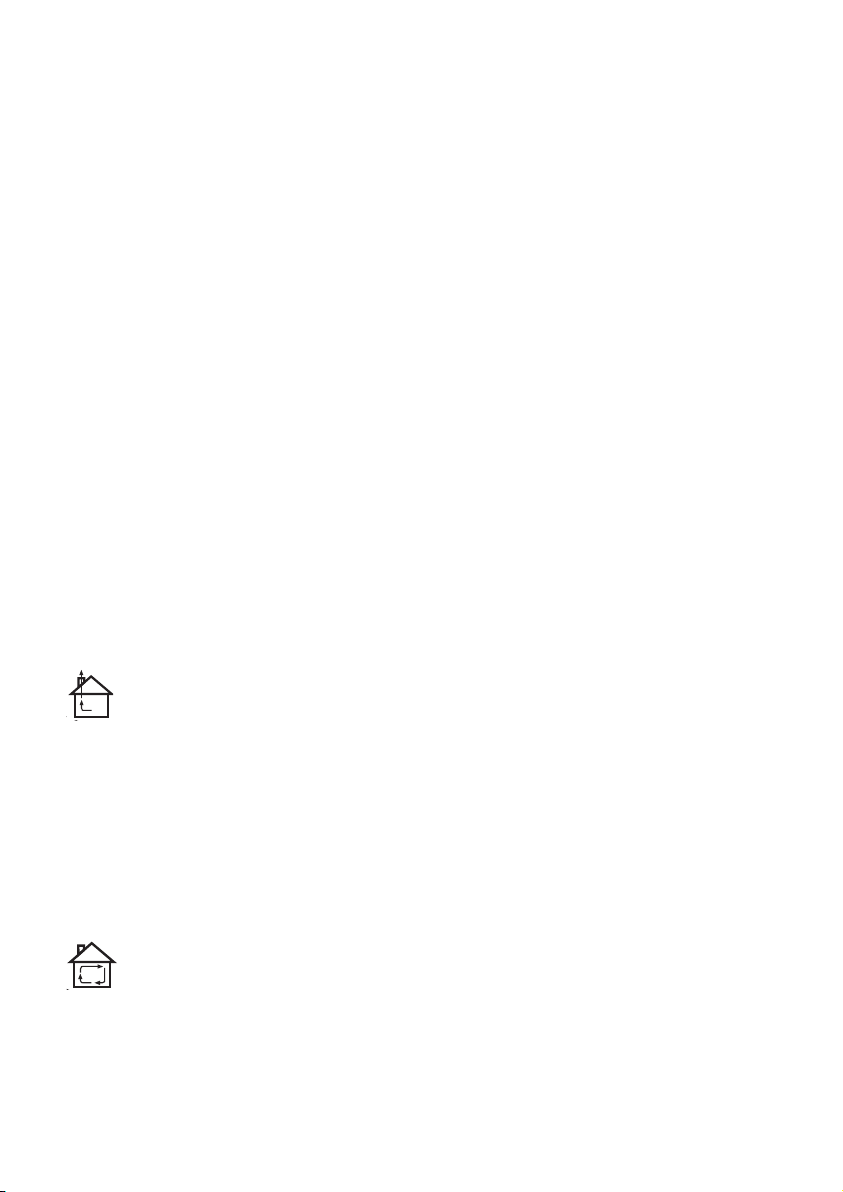
Exhaust mode (see symbol
in installation booklet)
Cooking steam is sucked and
channelled outside the house through
a discharge duct (not supplied), fitted
to the hood steam outlet.
Ensure that the discharge duct is
correctly fitted to the air outlet, unit
using an appropriate connection
system.
Recirculation mode (see
symbol in installation booklet)
The air is filtered through one or more
the charcoal filters, and then resent
into room.
Important: Ensure appropriate air
circulation around the hood.
Important: If the hood is supplied
without charcoal filters and installed
on recirculation mode, these must be
fitted before the hood can be used.
Filters are available in shops.
The hood should be installed away
from particularly dirty areas, windows,
doors and heat sources.
The accessories for wall fixing are
not included because wall made of
different materials require different
types of fixing accessories. Use fixing
systems suitable for the walls of your
home and the weight of the appliance.
For more details, contact a specialized
dealer.
Keep this booklet for future
consultation.
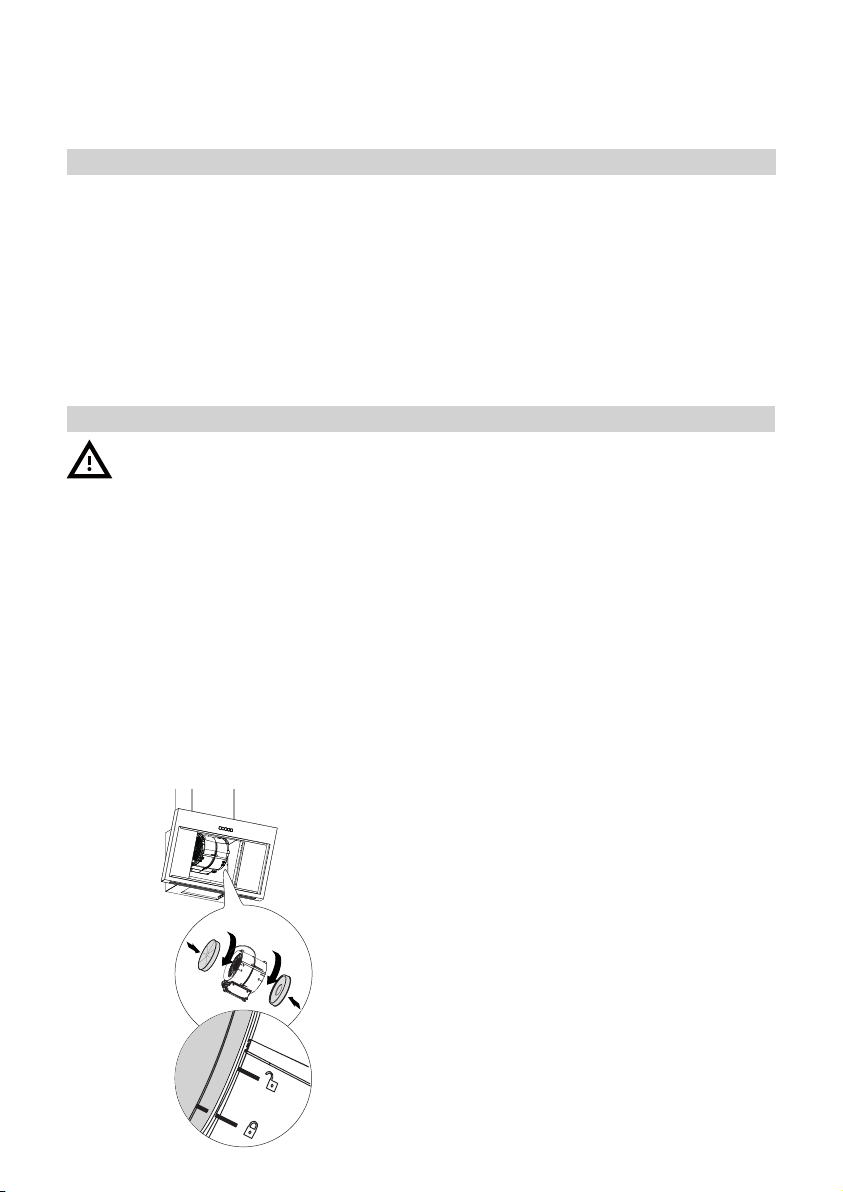
Filter Alarm
The Allarm for grease filter is Active
on the Hood as default, for the Reset
check control panel.
The Allarm for long life charcoal filter
can be Actived as per procedure on
Control Panel.
When the filter alarm is activated, the
following messages will appear over
time:
Grease filter alarm must be cleaned:
“A” key flashes once per second. For
maintenance see paragraph Care and
cleaning.
Long Life charcoal filter alarm must
be cleaned: “A” key flashes twice
per second. For maintenance see
paragraph Care and cleaning.
Once the filters have been regenerated
reset the alarm signal (see paragraph
Control Panel).
ENGLISH
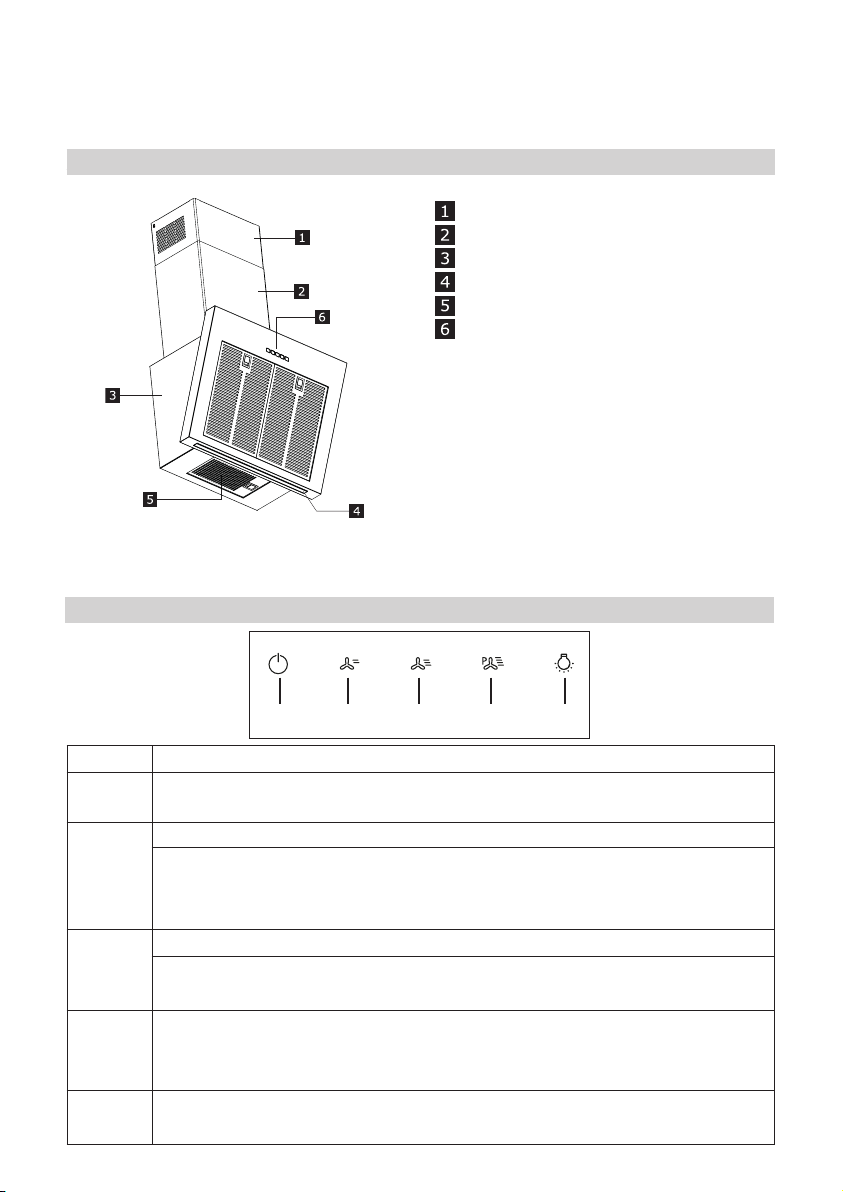
Product description
Control Panel
8
Upper chimney
Lower chimney
Hood body
LED Lighting
Grease filter
Control panel
BUTTON FUNCTION
A =
Speed
B =
Speed
C =
Speed
D =
Speed
E =
Light
Turn the motor on/off at speed one. Turn off each speed.
Turn the motor on at speed two / Activate charcoal lter alarm
Pres and hold the button for approximately 2 seconds, with all the loads turned off (Motor+Lights),
to turn the Activated Charcoal Filter alarm on. LED (A) ashes twice to conrm.
To Deactivated Charcoal Filter alarm off, press the button again and hold for at least 2 seconds.The
relevant LED ashes once (A). Only for recirculation mode. (please refer to page 7)
Turn the Motor on at speed three / Reset alarm grease and charcoal lter saturation
Pres and hold the button for approximately 2 seconds, with all the loads turned off
(Motor+Lights), to reset the grease and charcoal lter saturation alarm. LED (A) ashes
three times.
Turn the motor on at Booster speed.
This speed is timed to run for 6 minutes. At the end of this time, the system returns automatically
to the speed that was set before. If it is activated with the motor turned off, it will switch to OFF at
the end of the time. To deactivate it, press button D or press button A
Pres briey: Turn the lighting system on and off at maximum intensity.
Pres and hold to change the lighting intensity up or down.
A B C D E
ENGLISH
9
General hints
• Switch ON the hood at minimum speed when you start cooking and keep it running for few minutes after cooking is finished.
• Increase the speed only in case of large amount of smoke and vapour and use
boost speed(s) only in extreme situations.
• Replace the charcoal filter(s) when necessary to maintain a good odour reduction
efficiency.
• Clean the grease filter(s) when necessary to maintain a good grease filter efficiency.
• Use the maximum diameter of the ducting system indicated in this manual to
optimize efficiency and minimize noise.
Care and cleaning
Switch off or unplug the appliance
from the mains supply before carrying
out any maintenance work.
IMPORTANT Clean the hood using a
damp cloth and a neutral liquid detergent.
Long Life Charcoal Filter
The anti-odour lter can be washed
and regenerated every 3-4 months (or
more frequently if the hood is subject
to intensive use), up to a Max. of 8
regeneration cycles (in case of particularly intensive use it is recommended
that you do not exceed 5 cycles).
Regeneration procedure:
• Wash in the dishwasher at a MAX
temperature of 70° or hand wash
in hot water without using abrasive
sponges (do not use detergents!).
• Dry in the oven at a MAX
temperature of 70° for 2 hours (it
is recommended to read carefully
the user manual and the assembly
instruction of the oven of your own).
ENGLISH
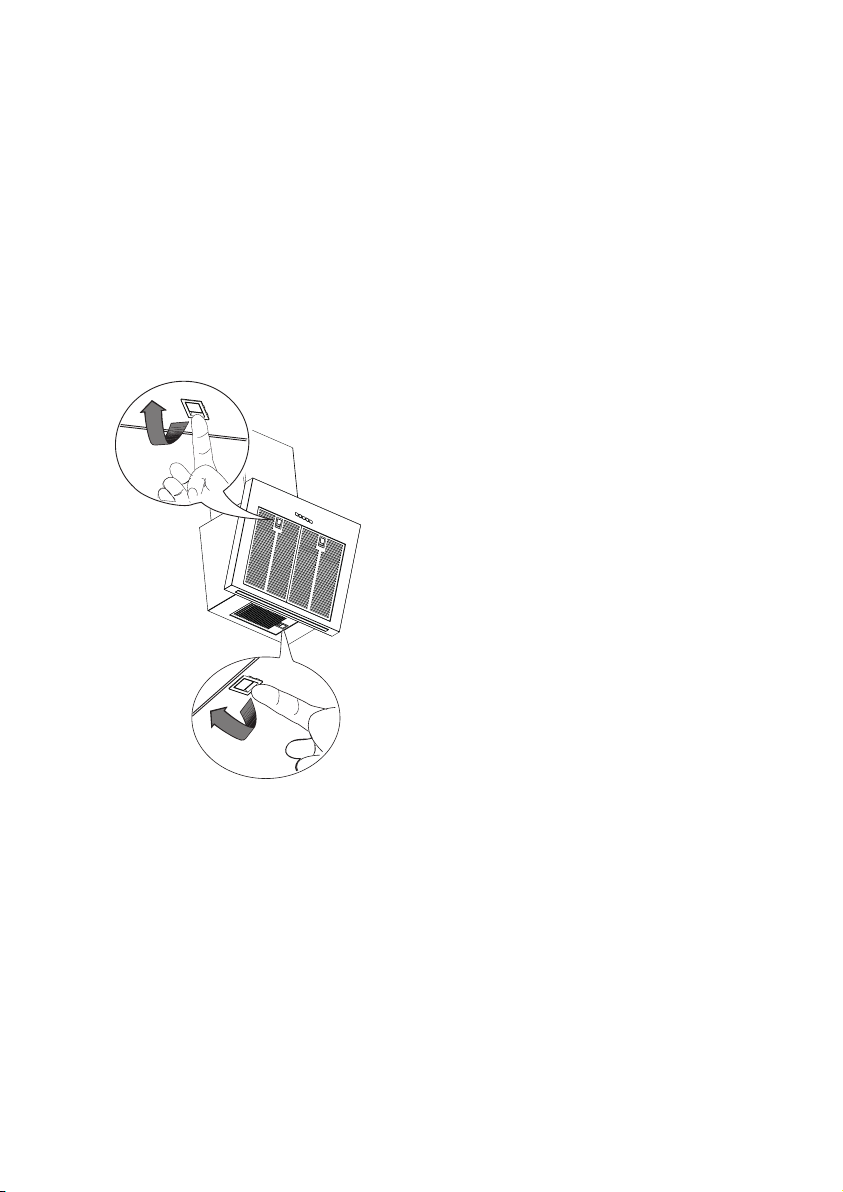
Grease Filters
Clean or replace the filters continuously
according to below time intervals, to
maintain good performance of the hood
and to prevent a potential fire hazard,
caused by excessive grease build-up.
The grease filters must be cleaned
every 2 months of operation, or more
frequently for particularly heavy usage,
and can be washed in a dishwasher.
10
Replacing the lamps
For Replacement please contact an
Authorized Service Center.
ENGLISH
What to do if...
11
If there is a fault, first try to find a
solution to the problem yourself. If you
cannot find a solution to the problem
yourself, contact an authorized service
center.
If you operated the appliance
wrongly, or the installation was not
carried out according to the Assembly
instructions, the visit from the Authorized Service Centre technician may not
take place free of charge, even during
the warranty period.
PROBLEM POSSIBLE CAUSE SOLUTION
Appliance not stable
Appliance is not in horizontal
position
Performance in terms of oil
capture are not satisfying
Appliance does not work
The light does not work The LED is broken
Noise of hood is higher than
customer expectation.
The appliance is not correctly
installed
The appliance is not correctly
installed
Oil and grease on metal lters or
charcoal lters.
The appliance is not correctly
connected
Air outlet diameter in the wall is
too small, causing a pressure drop
and an increase in motor speed.
Product is installed in recirculation
mode.
More than one bend in the ventilation duct.
Follow the Installation instruction
enclosed to the appliance.
Follow the Installation instruction
enclosed to the appliance.
Follow the cleaning frequency of
lters as described in the user
manual
Verify that the main cable is con-
nected to the motor group or the
plug is connected to the socket
For replacement, contact the Authorized Service Centre.
Follow the Installation instruction
enclosed to the appliance.
Product in recirculation mode(and
using a charcoal lter) will generate
an higher noise than a product in
extration mode.
If the exhaust system in the building has multiple bend in or a long
distance, this can increase the noise
of the product.
Before contacting the Authorized Service Centre:
Switch the appliance on again to see if the problem has disappeared. If not, switch
it off again and repeat the operation after an hour.
If your appliance still does not work properly after carrying out the checks listed in
the troubleshooting guide and switching the appliance on again, contact the Authorized Service Centre, clearly explaining the problem and specifying:
• the type of fault;
• the model;
• the type and serial number of the appliance (given on the rating plate).
ENGLISH
Technical Data
Unit Value
Product Type Wall mounted hood
Width mm 698
Dimensions
Airow max* - Exhaust m3/h 380
Noise max* - Exhaust dBA 60
Airow max* - Recirculating m3/h 365
Noise max* - Recirculating dBA 78
Total Power W 276
Lamps info
Installation minimum height - gas hob mm 500
Installation minimum height - elec hob mm 500
Net Weight Kg 16,5
Depth mm 381
Exhaust Height min/max mm 815/1065
Recirculating Height min/max mm 912/1185
Type LED BAR
Number & Power 1 x 6W
Socket N/A
12
* Maximum speed (boost excluded).
This appliance has been designed,
manufactured and marketed in
compliance with the E.E.C. Directives.
The technical information is situated in
the rating plate on the internal side of
the appliance.
ENGLISH
Energy efficiency
Product Information according to EU
n°66/2014
Model identier
Annual Energy Consumption kWh/a 34,8
Time increase factor 0,6
Fluid Dynamic Efciency
Energy Efciency Index 36,6
Measured air ow rate at best efciency point m3/h 410
Measured air pressure at best efciency point Pa 459
Maximum air ow m3/h 700
Measured electric power input at best efciency
point
Nominal power of the lighting system W 6,0
Average illumination of the lighting system on the
cooking surface
Measured power consumption in standby mode
Measured power consumption off mode
Sound power level at maximum speed (boost excluded)
Unit Value
BEMOTA
903.893.36
37,6
W 139,0
lux 350
W N/A
W 0,49
dBA 60
13
Normative references:
EN/IEC 61591
EN/IEC 60704-1
EN/IEC 60704-2-13
EN/IEC 60704-3
EN 50564
Energy saving
The appliance contains features which
help you save energy during everyday
cooking.
ENGLISH
Environment concerns
14
Maintenance
• The symbol on the product or on
its packaging indicates that this product may not be treated as household
waste. Instead it shall be handed
over to the applicable collection point
for the recycling of electrical and
electronic equipment. By ensuring
this product is disposed of correctly,
you will help prevent potential negative consequences for the environment and human health, which could
otherwise be caused by inappropriate
waste handling of this product.
IKEA GUARANTEE
How long is the IKEA guarantee
valid?
This guarantee is valid for five (5) years
from the original date of purchase of
Your appliance at IKEA. The original
sales receipt is required as proof of
purchase. If service work is carried out
under guarantee, this will not extend
the guarantee period for the appliance.
Who will execute the service?
IKEA service provider will provide the
service through its own service operations or authorized service partner
network.
What does this guarantee cover?
The guarantee covers faults of the appliance, which have been caused by
faulty construction or material faults
from the date of purchase from IKEA.
This guarantee applies to domestic use
only. The exceptions are specified under
the headline “What is not covered under
this guarantee?” Within the guarantee
period, the costs to remedy the fault
For more detailed information about
recycling of this product, please
contact your local city office, your
household waste disposal service or
the shop where you purchased the
product.
Packaging materials
The materials with the symbol are
recyclable. Dispose the packaging in
suitable collection containers to recycle
it.
e.g. repairs, parts, labour and travel will
be covered, provided that the appliance
is accessible for repair without special
expenditure. On these conditions the EU
guidelines (Nr. 99/44/EG) and the respective local regulations are applicable.
Replaced parts become the property of
IKEA.
What will lKEA do to correct the
problem?
IKEA appointed service provider will
examine the product and decide, at its
sole discretion, if it is covered under this
guarantee. If considered covered, IKEA
service provider or its authorized service
partner through its own service operations, will then, at its sole discretion,
either repair the defective product or
replace it with the same or a comparable product.
What is not covered under this
guarantee?
• Normal wear and tear.

ENGLISH
15
• Deliberate or negligent damage,
damage caused by failure to observe
operating instructions, incorrect
installation or by connection to the
wrong voltage, damage caused by
chemical or electro-chemical reaction, rust, corrosion or water damage
including but not limited to damage
caused by excessive lime in the water
supply, damage caused by abnormal
environmental conditions.
• Consumable parts including batteries
and lamps.
• Non-functional and decorative parts
which do not affect normal use of the
appliance, including any scratches
and possible color differences.
• Accidental damage caused by foreign
objects or substances and cleaning or unblocking of filters, drainage
systems or soap drawers.
• Damage to the following parts:
ceramic glass, accessories, crockery
and cutlery baskets, feed and drainage pipes, seals, lamps and lamp
covers, screens, knobs, casings and
parts of casings. Unless such damages can be proved to have been
caused by production faults.
• Cases where no fault could be found
during a technician’s visit.
• Repairs not carried out by our appointed service providers and/or an
authorized service contractual partner or where non-original parts have
been used.
• Repairs caused by installation which
is faulty or not according to specification.
• The use of the appliance in a nondomestic environment i.e. professional use.
• Transportation damages. If a customer transports the product to their
home or other address, IKEA is not
liable for any damage that may occur
during transport. However, if IKEA
delivers the product to the customer’s delivery address, then damage
to the product that occurs during
this delivery will be covered by this
guarantee.
• Cost for carrying out the initial installation of the IKEA appliance. However, if an IKEA service provider or
its authorized service partner repairs
or replaces the appliance under the
terms of this guarantee, the service
provider or its authorized service
partner will re-install the repaired
appliance or install the replacement,
if necessary.
This restriction do not apply to fault-free
work carried out by a qualified specialist
using our original parts in order to adapt
the appliance to the technical safety
specifications of another EU country.
How country law applies
The IKEA guarantee gives You specific
legal rights, which covers or exceed local
demands. However these conditions do
not limit in any way consumer rights
described in the local legislation
Area of validity
For appliances which are purchased in
one EU country and taken to another
EU country, the services will be provided in the framework of the guarantee
conditions normal in the new country.
An obligation to carry out services in the
framework of the guarantee exists only
if the appliance complies and is installed
in accordance with:
• the technical specifications of the
country in which the guarantee claim
is made;
• the Assembly Instructions and User
Manual Safety Information;
ENGLISH
16
The dedicated After Sales Service
for IKEA appliances:
Please do not hesitate to contact IKEA
After Sales Service to:
1. make a service request under this
guarantee;
2. ask for clarification on installation of
the IKEA appliance in the dedicated
IKEA kitchen furniture. The service
won’t provide clarifications related to:
- the overall IKEA kitchen installation;
- connections to electricity (if machine
comes without plug and cable), to
water and to gas since they have to
be executed by an authorized service
engineer.
3. ask for clarification on user manual
contents and specifications of the IKEA
appliance.
To ensure that we provide you with the
best assistance, please read carefully
the Assembly Instructions and/or the
User Manual section of this booklet
before contacting us.
How to reach us if You need our
service
IKEA article number (8 digit code) for
the appliance of which you need our
assistance.
Important! SAVE THE SALES RECEIPT! It is Your proof of purchase and
required for the guarantee to apply.
Note that the receipt reports also the
IKEA article name and number (8 digit
code) for each of the appliances you
have purchased.
Do You need extra help?
For any additional questions not related
to After Sales of your appliances. Please
contact our nearest IKEA store call centre. We recommend you read the appliance documentation carefully before
contacting us.
Please refer to the last page of this
manual for the full list of IKEA appointed
contacts and relative national phone
numbers.
Important! In order to provide You
with a quicker service, we recommend
that You use the specific phone numbers listed at the end of this manual.
Always refer to the numbers listed in
the booklet of the specific appliance You
need an assistance for. Before calling
us, assure that You have to hand the
DEUTSCH
Inhalt
17
Sicherheitsinformationen 17
Produktbeschreibung 21
Reinigung und Wartung 22
Was tun wenn... 24
Technische Daten 25
Energieeffizienz 26
Umweltaspekte 27
IKEA-GARANTIE 27
Sicherheitsinformationen
Zu Ihrer eigenen Sicherheit und für die korrekte Funktion
des Gerätes lesen Sie bitte diese Betriebsanleitung
aufmerksam durch, bevor Sie das Gerät installieren und
benutzen. Verwahren Sie die Bedienungsanleitung stets
zusammen mit dem Gerät, auch wenn Sie dieses an Dritte
weitergeben oder übertragen. Es ist wichtig, dass der Benutzer
alle Betriebs- und Sicherheitsmerkmale des Gerätes kennt.
Die Kabel müssen von einem zuständigen Fachmann
angeschlossen werden.
• Der Hersteller haftet nicht für etwaige Schäden, die durch
eine fehlerhafte Installation oder einen ungeeigneten
Gebrauch entstehen könnten.
• Der minimale Sicherheitsabstand zwischen Kochfeld und
Abzugshaube beträgt: für Elektro-Kochfelder 500 mm und
für Gas-Kochfelder 500 mm.
• Sollten die Installationsanweisungen des gasbetriebenen
Kochfelds einen größeren Abstand als oben angegeben
vorsehen, ist dies zu berücksichtigen.
• Sicherstellen, dass die Netzspannung der auf dem
Typenschild angegebenen Spannung entspricht. Das
Typenschild ist im Inneren der Haube angebracht.
• Trennvorrichtungen müssen in der festen Anlage gemäß
Normen über Verkabelungssysteme installiert werden.
• Für Geräte der Klasse I sicherstellen, dass das
Versorgungsnetz des Gebäudes korrekt geerdet ist.
• Die Abzugshaube an den Schornstein mit einem Rohr mit
DEUTSCH
Mindestdurchmesser von 120 mm anschließen. Der Verlauf
des Rauchabzugs muss so kurz wie möglich sein.
• Die Abzugshaube darf nicht an einen Schacht angeschlossen
werden, in den Rauchgase abgeleitet werden (z. B. von
Heizkesseln, Kaminen, usw.).
• Falls die Abzugshaube mit Geräten verwendet wird, die nicht
elektrisch betrieben sind (z.B. Gasgeräte), muss im Raum
für eine ausreichende Belüftung gesorgt werden, damit der
Rückfluss der Abgase verhindert wird. Wird die Abzugshaube
zusammen mit nicht elektrisch betriebenen Geräten
eingesetzt, darf der Unterdruck im Raum 0,04 mbar nicht
überschreiten, damit die Abgase nicht wieder angesaugt
werden.
• Die Luft darf nicht durch einen Kanal abgelassen werden, der
als Rauchabzug für Gasgeräte oder Geräte verwendet wird,
die mit anderen Brennstoffen betrieben werden.
• Wenn das Gerätekabel beschädigt ist, muss es vom
Hersteller oder von einem Kundendiensttechniker ersetzt
werden.
• Den Stecker in eine den einschlägigen Vorschriften
entsprechende zugängliche Steckdose stecken.
• Was die technischen und sicherheitsrelevanten Maßnahmen
für den Rauchabzug betrifft, sind die Vorgaben der örtlichen
Behörden streng einzuhalten.
18
WARNUNG: Bevor die Haube installiert wird, die
Schutzfolien abziehen.
• Nur für die Abzugshaube geeignete Schrauben und Kleinteile
verwenden.
WARNUNG: Die mangelnde Verwendung von Schrauben
und Befestigungselementen gemäß der vorliegenden
Anleitung kann zu Stromschlaggefahr führen.
• Die Haube an das Stromnetz mithilfe eines zweipoligen
Schalters mit einem Kontaktabstand von mindestens 3 mm
anschließen.
DEUTSCH
• Nicht direkt mit optischen Instrumenten (Fernglas, Lupe,
usw.) in das Licht schauen.
• Auf keinen Fall unter der Haube flambieren: Dabei könnte
ein Brand entstehen.
• Dieses Gerät darf von Kindern ab 8 Jahren und von
Personen mit beschränkten geistigen, physischen oder
sensorischen Fähigkeiten oder mangels Erfahrung und/
oder mangels Wissen benutzt werden, vorausgesetzt, sie
werden aufmerksam beaufsichtigt oder über den sicheren
Gebrauch des Geräts und die damit verbundenen Gefahren
eingewiesen. Sicherstellen, dass Kinder nicht mit dem
Gerät spielen. Vom Benutzer auszuführende Reinigungsund Wartungsarbeiten dürfen nicht von Kindern ausgeführt
werden, sofern sie nicht dabei beaufsichtigt werden.
• Kinder müssen beaufsichtigt werden, damit sichergestellt
wird, dass sie nicht am Gerät spielen.
• Dieses Gerät darf nicht von Personen (einschließlich Kindern)
mit beschränkten geistigen, physischen oder sensorischen
Fähigkeiten oder mangels Erfahrung und/oder mangels
Wissen benutzt werden, außer sie werden aufmerksam
beaufsichtigt und eingewiesen.
19
Die frei zugänglichen Teile können während des Kochens
mit Kochgeräten sehr heiß werden.
• Die Filter sind nach den angegebenen Intervallen zu reinigen
und/oder zu ersetzen (Brandgefahr).
• Wenn die Abzugshaube gleichzeitig mit Geräten verwendet
wird, die Gas oder andere Brennstoffe benutzen, muss im
Raum eine ausreichende Belüftung vorhanden sein (gilt nicht
für Geräte, die nur Luft in den Raum ablassen)
DEUTSCH
min 471 mm
max 861 mm
min 471 mm
max 861 mm
20
Gebrauch
• Vor Reinigungs- oder Wartungsarbeiten
am Gerät muss dieses ausgeschaltet
und spannungslos gemacht werden.
• Keine Gegenstände auf der
Abzugshaube abstellen.
• Die Abzugshaube wurde ausschließlich
dazu entwickelt, um im Haushalt
Küchendünste zu beseitigen.
• Die Haube niemals für andere Zwecke
verwenden, als die für welche sie
entwickelt worden ist.
• Unter der eingeschalteten Haube keine
offenen hohen Flammen benutzen.
• Die Flamme so regulieren, dass
sie nicht über den Umfang des
Kochgeschirrs hinausragt.
Fritteusen müssen während des
Gebrauchs ständig überwacht werden:
Überhitztes Öl könnte sich entzünden.
Installationsanleitung
Die Abzugshaube ist für „Abluftbetrieb“
oder „Umluftbetrieb“ entwickelt worden.
Abluftbetrieb (siehe das Symbol
in der Installationsanleitung)
Die Kochdämpfe werden abgesaugt
und über ein am Auslass der Haube
installiertes Abzugsrohr (nicht mitgeliefert)
nach außen geleitet.
Sicherstellen, dass das Abzugsrohr richtig
am Luftauslass installiert ist und ein
geeignetes Anschlusssystem verwendet
wurde.
Umluftbetrieb (siehe das
Symbol in der Installationsanleitung)
Die Luft wird durch einen oder mehrere
Filter gefiltert und dann wieder in den
Raum zurück gefördert.
Wichtig: Sicherstellen, dass die Luft um
die Haube herum richtig zirkuliert.
Wichtig: Wenn die Haube ohne
Aktivkohlefilter geliefert wurde,
müssen die Filter bestellt und vor der
Inbetriebnahme des Gerätes montiert
werden. Die Filter sind im Handel
erhältlich.
Die Abzugshaube muss fern von stark
verschmutzten Bereichen, Fenstern, Türen
und Wärmequellen installiert werden.
Die Befestigungselemente sind nicht
in der Lieferung enthalten, weil sie je
nach Beschaffenheit der Wand variieren.
Verwenden Sie für die Wände Ihrer
Wohnung und das Gewicht des Gerätes
geeignete Befestigungssysteme. Für
weitere Informationen wenden Sie sich an
einen Fachhändler.
Die vorliegende Bedienungsanleitung
für späteres Nachschlagen sorgfältig
aufbewahren.
Filteralarm.
Der Alarm für den Fettfilter ist
standardmässig auf der Haube aktiv.
Für das „Reset“ prüfen Sie bitte den
Bedienfeld.
Der Alarm für den Long Life Kohlefilter
wird laut des Verfahrens beim Bedienfeld
aktiviert.
Wenn der Filteralarm aktiviert wird,
erscheinen je nach Umständen die
folgenden Meldungen:
Alarm – Fettfilter reinigen: Die Taste „A“
blinkt ein Mal pro Sekunde. Zur Wartung,
siehe Absatz Wartung und Reinigung.
Alarm – Geruchsfilter reinigen: Die Taste
„A“ blinkt zwei Mal pro Sekunde. Zur
Wartung, siehe Absatz Wartung und
Reinigung.
Nachdem die Filter regeneriert worden
sind, das Alarmsignal zurücksetzen (siehe
Absatz Bedienleiste).
 Loading...