

Page 1

GB
BEJUBLAD
HYLLAD
DE
Page 2

Page 3

ENGLISH 4
DEUTSCH 24
Page 4

ENGLISH 4
Contents
Safety information 4
Safety instructions 5
Installation 7
Product description 8
Before first use 8
Daily use 9
Clock functions 11
Using the accessories 12
Subject to change without notice.
Additional functions 13
Helpful hints and tips 14
Care and cleaning 15
What to do if… 18
Technical data 20
Environment concerns 21
IKEA GUARANTEE 21
Safety information
Before the installation and use of the appliance, carefully read
the supplied instructions. The manufacturer is not responsible if
an incorrect installation and use causes injuries and damages.
Always keep the instructions with the appliance for future reference.
Children and vulnerable people safety
Warning! Risk of suffocation, injury or permanent disability.
• This appliance can be used by children aged from 8 years
and above and persons with reduced physical, sensory or
mental capabilities or lack of experience and knowledge if
they are supervised by an adult or a person who is responsible for their safety.
• Do not let children play with the appliance.
• Keep all packaging away from children.
• Keep children and pets away from the appliance when it operates or when it cools down. Accessible parts are hot.
• If the appliance has a child safety device, we recommend
that you activate it.
• Cleaning and user maintenance shall not be made by children without supervision.
Page 5
ENGLISH 5
General Safety
• Internally the appliance becomes hot when in operation. Do
not touch the heating elements that are in the appliance. Always use oven gloves to remove or put in accessories or
ovenware.
• Do not use a steam cleaner to clean the appliance.
• Before maintenance cut the power supply.
• Do not use harsh abrasive cleaners or sharp metal scrapers
to clean the glass door since they can scratch the surface,
which may result in shattering of the glass.
• Excess spillage must be removed before the pyrolytic cleaning. Remove all parts from the oven.
• Only use the core temperature sensor recommended for this
appliance.
• To remove the shelf supports first pull the front of the shelf
support and then the rear end away from the side walls. Install the shelf supports in the opposite sequence.
Safety instructions
Installation
Warning! Only a qualified person must
install this appliance.
• Remove all the packaging.
• Do not install or use a damaged appli-
ance.
• Obey the installation instruction supplied
with the appliance.
•Always be careful when you move the
appliance because it is heavy. Always
wear safety gloves.
• Do not pull the appliance by the handle.
• Make sure that the appliance is installed
below and adjacent safe structures.
• The sides of the appliance must stay ad-
jacent to appliances or to units with the
same height.
Electrical connection
Warning! Risk of fire and electrical
shock.
• All electrical connections should be made
by a qualified electrician.
• The appliance must be earthed.
• Make sure that the electrical information
on the rating plate agrees with the power
supply. If not, contact an electrician.
• Always use a correctly installed shockproof socket.
• Do not use multi-plug adapters and extension cables.
• Make sure not to cause damage to the
mains plug and to the mains cable. Contact the Service or an electrician to
change a damaged mains cable.
• Do not let mains cables to come in touch
with the appliance door, specially when
the door is hot.
Page 6

ENGLISH 6
• The shock protection of live and insulated
parts must be fastened in such a way that
it cannot be removed without tools.
• Connect the mains plug to the mains
socket only at the end of the installation.
Make sure that there is access to the
mains plug after the installation.
• If the mains socket is loose, do not connect the mains plug.
• Do not pull the mains cable to disconnect
the appliance. Always pull the mains
plug.
• Use only correct isolation devices: line
protecting cut-outs, fuses (screw type
fuses removed from the holder), earth
leakage trips and contactors.
• The electrical installation must have an
isolation device which lets you disconnect
the appliance from the mains at all poles.
The isolation device must have a contact
opening width of minimum 3 mm.
• This appliance complies with the E.E.C.
Directives
• Fully close the appliance door, before
you connect the mains plug to the mains
socket.
Use
Warning! Risk of injury, burns or
electric shock or explosion.
• Use this appliance in a household environment.
• Do not change the specification of this
appliance.
• Make sure that the ventilation openings
are not blocked.
• Do not let the appliance stay unattended
during operation.
• Deactivate the appliance after each use.
• Be careful, when you open the appliance
door while the appliance is in operation.
Hot air can release.
• Do not operate the appliance with wet
hands or when it has contact with water.
• Do not apply pressure on the open door.
• Do not use the appliance as a work surface or as a storage surface.
• Always keep the appliance door closed
when the appliance is in operation.
• Open the appliance door carefully. The
use of ingredients with alcohol can cause
a mixture of alcohol and air.
• Do not let sparks or open flames to come
in contact with the appliance when you
open the door.
• Do not put flammable products or items
that are wet with flammable products in,
near or on the appliance.
Warning! Risk of damage to the
appliance.
• To prevent damage or discoloration to
the enamel:
– do not put ovenware or other objects in
the appliance directly on the bottom.
– do not put aluminium foil directly on the
bottom of the appliance.
– do not put water directly into the hot
appliance.
– do not keep moist dishes and food in
the appliance after you finish the cooking.
– be careful when you remove or install
the accessories.
• Discoloration of the enamel has no effect
on the performance of the appliance. It is
not a defect in the sense of the warranty
law.
• Use a deep pan for moist cakes. Fruit juices cause stains that can be permanent.
Care and Cleaning
Warning! Risk of injury, fire or damage
to the appliance.
• Before maintenance, deactivate the appliance and disconnect the mains plug
from the mains socket.
• Make sure the appliance is cold. There is
the risk that the glass panels can break.
• Replace immediately the door glass panels when they are damaged. Contact the
Service.
• Be careful when you remove the door
from the appliance. The door is heavy!
• Clean regularly the appliance to prevent
the deterioration of the surface material.
• Remaining fat or food in the appliance
can cause fire.
Page 7
ENGLISH 7
• If you use an oven spray, obey the safety
instructions on the packaging.
Pyrolytic cleaning
Warning! Risk of fire and burns.
• Before carrying out a Pyrolitic self-cleaning function or the First Use function
please remove from the oven cavity:
– Any excess food residues, oil or grease
spills / deposits.
– Any removable objects (including
shelves, side rails etc., provided with
the product) particularly any non-stick
pots, pans, trays, utensils etc.
• Read carefully all the instructions for Pyrolytic cleaning.
• Keep children away from the appliance
while the Pyrolytic cleaning is in operation. The appliance becomes very hot.
• Pyrolitic cleaning is a high temperature
operation that can release fumes from
cooking residues and construction materials, as such consumers are strongly advised to:
– Provide good ventilation during and
after each Pyrolytic cleaning.
– Provide good ventilation during and
after the first use at maximum temperature operation.
– Remove any pets (especially birds)
from the vicinity of the appliance location during and after the Pyrolytic
cleaning and first use maximum temperature operation to a well ventilated
area.
• Unlike all humans, some birds and reptiles can be extremely sensitive to potential fumes emitted during the cleaning
process of all Pyrolytic Ovens.
• Small pets can also be highly sensitive to
the localized temperature changes in the
vicinity of all Pyrolytic Ovens when the
Pyrolytic self cleaning program is in operation.
• Non-stick surfaces on pots, pans, trays,
utensils etc., can be damaged by the high
temperature Pyrolytic cleaning operation
of all Pyrolytic Ovens and can be also a
source for low level harmful fumes.
• Fumes released from all Pyrolytic Ovens /
Cooking Residues as described are not
harmful to humans, including infants or
persons with medical conditions.
Internal light
• The type of light bulb or halogen lamp
used for this appliance, is only for household appliances. Do not use it for house
lighting.
Warning! Risk of electrical shock.
• Before replacing the lamp, disconnect the
appliance from the power supply.
• Only use lamps with the same specifications.
Disposal
Warning! Risk of injury or suffocation.
• Disconnect the appliance from the mains
supply.
• Cut off the mains cable and discard it.
• Remove the door catch to prevent children and pets to get closed in the appliance.
Installation
Warning! Refer to the Safety chapters.
Refer to the Assembly Instructions for
the installation.
Electrical installation
Warning! Only a qualified person must
do the electrical installation.
Page 8
ENGLISH 8
The manufacturer is not responsible if
you do not follow the safety precau-
tions from the chapter "Safety Information".
This appliance is only supplied with a main
cable.
Cable
Cable types applicable for installation or
replacement: H07 RN-F, H05 RN-F, H05
RRF, H05 VV-F, H05 V2V2-F (T90), H05 BBF.
For the section of the cable refer to the total
power (on the rating plate) and to the table:
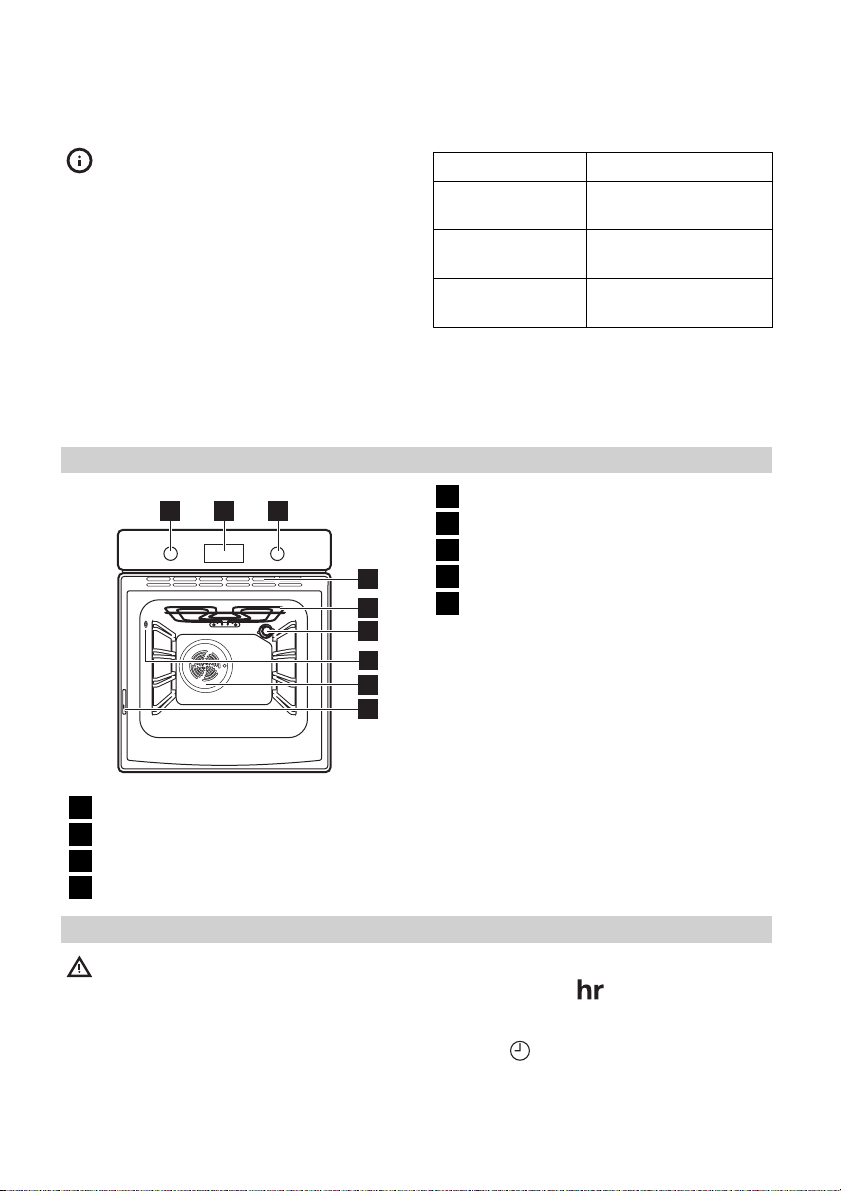
Product description
2
1
Knob for the oven functions
1
Electronic programmer
2
Knob for the temperature
3
Ventilation openings
4
3
4
5
6
7
8
9
Total power Section of the cable
maximum 1380W3 x 0.75 mm²
maximum 2300W3 x 1 mm²
maximum 3680W3 x 1.5 mm²
The earth cord (green / yellow cable) must
be 2 cm longer than phase and neutral cables (blue and brown cables).
Grill
5
Oven lamp
6
Socket for the core temperature sensor
7
Fan
8
Rating plate
9
Oven accessories
• Wire shelf x 1
For cookware, cake tins, roasts.
• Baking tray x 1
For cakes and biscuits.
• Grill- / Roasting pan x 1
To bake and roast or as pan to collect
fat.
• Core temperature sensor x 1
To measure how far the food is cooked.
• Telescopic runners x 2 sets
For shelves and trays.
Before first use
Warning! Refer to the Safety chapters.
Initial cleaning
• Remove all accessories and removable
shelf supports (if applicable).
• Clean the appliance before first use.
Important! Refer to the chapter "Care and
cleaning".
Setting the time of day
The display shows
and 12:00. 12 flash-
es.
1. Press + or - to set the correct hour.
2.
Press
to confirm. This is necessary
only when you first set the time. Afterwards, the new time value is saved automatically after five seconds.
Page 9
ENGLISH 9
The display shows and the set
hour. 00 flashes.
3. Press + or - to set the correct minutes.
4.
Press
only when you first set the time. Afterwards, the new time value is saved automatically after five seconds.
The display shows the new time.
Changing the time of day
Press
for the time of day
To set the new time, follow the procedure
given in "Setting the time of day".
Preheating
Preheat the empty appliance to burn off the
remaining grease.
1.
Set the function
temperature.
2. Let the appliance operate for one hour.
3.
Set the function
temperature.
4. Let the appliance operate for ten minutes.
5.
Set the function
temperature.
6. Let the appliance operate for ten minutes.
to confirm. This is necessary
You can change the time of day only if
the appliance is off.
again and again until the indicator
flashes in the display.
and the maximum
and the maximum
and the maximum
Accessories can become hotter than usual.
The appliance can emit an odour and
smoke. This is normal. Make sure that the
airflow is sufficient.
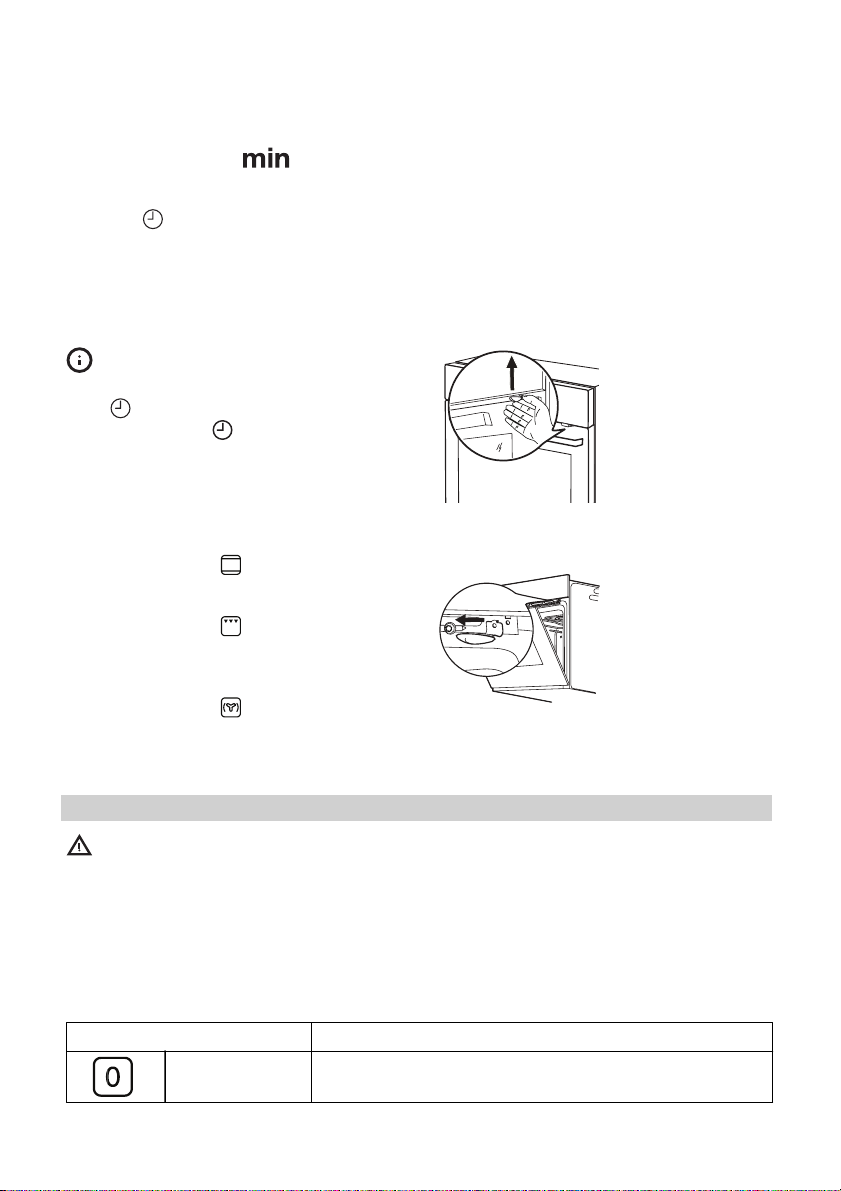
Mechanical child lock
The appliance has the child lock installed
and activated. It is below the control panel
on the right side.
To open the oven
door with the child
lock installed, pull
the child lock handle up as shown in
the picture.
Close the oven door
without pulling the
child lock.
To remove the child
lock, open the oven
door and remove
the child lock with
the torx key. The
torx key is in the
oven fitting bag.
Daily use
Warning! Refer to the Safety chapters.
Activating and deactivating the appliance
1. Turn the knob for the oven functions
clockwise to an oven function.
2. Turn the knob for the temperature to set
the temperature. The display shows the
set temperature.
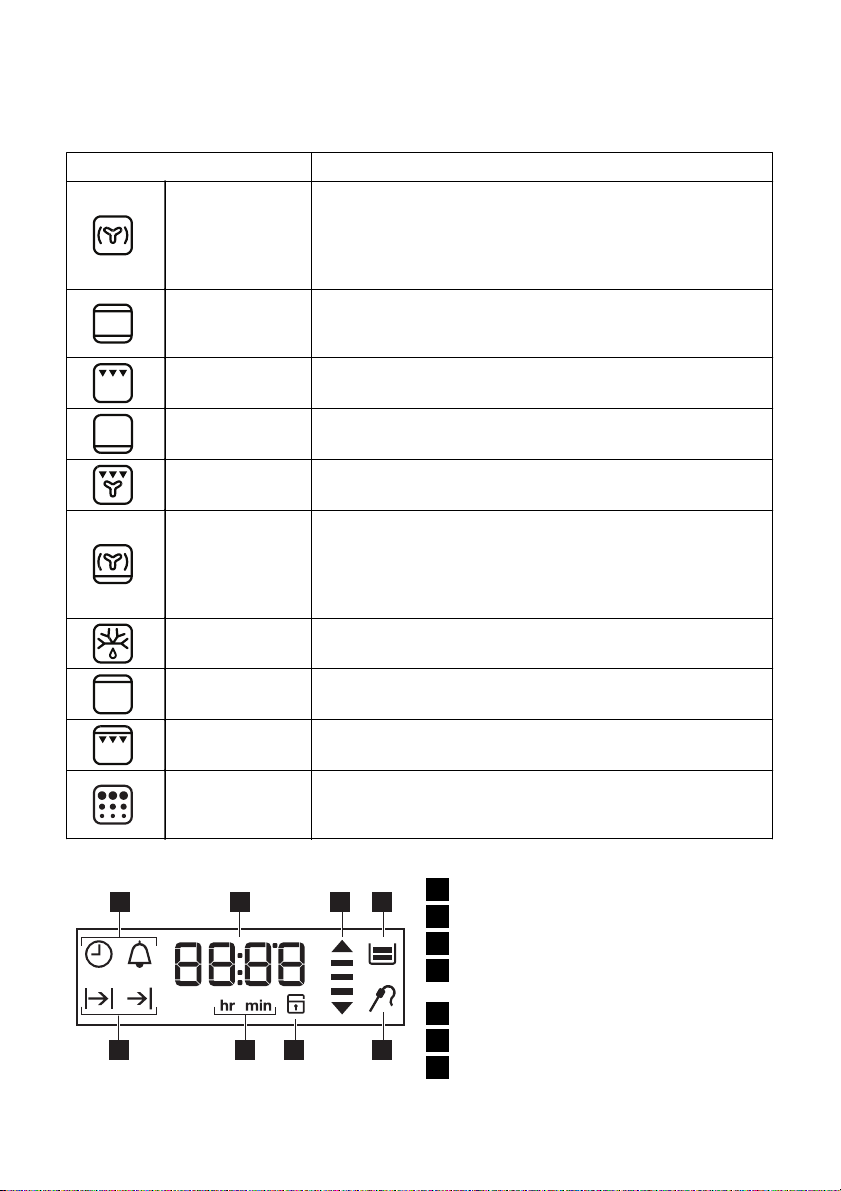
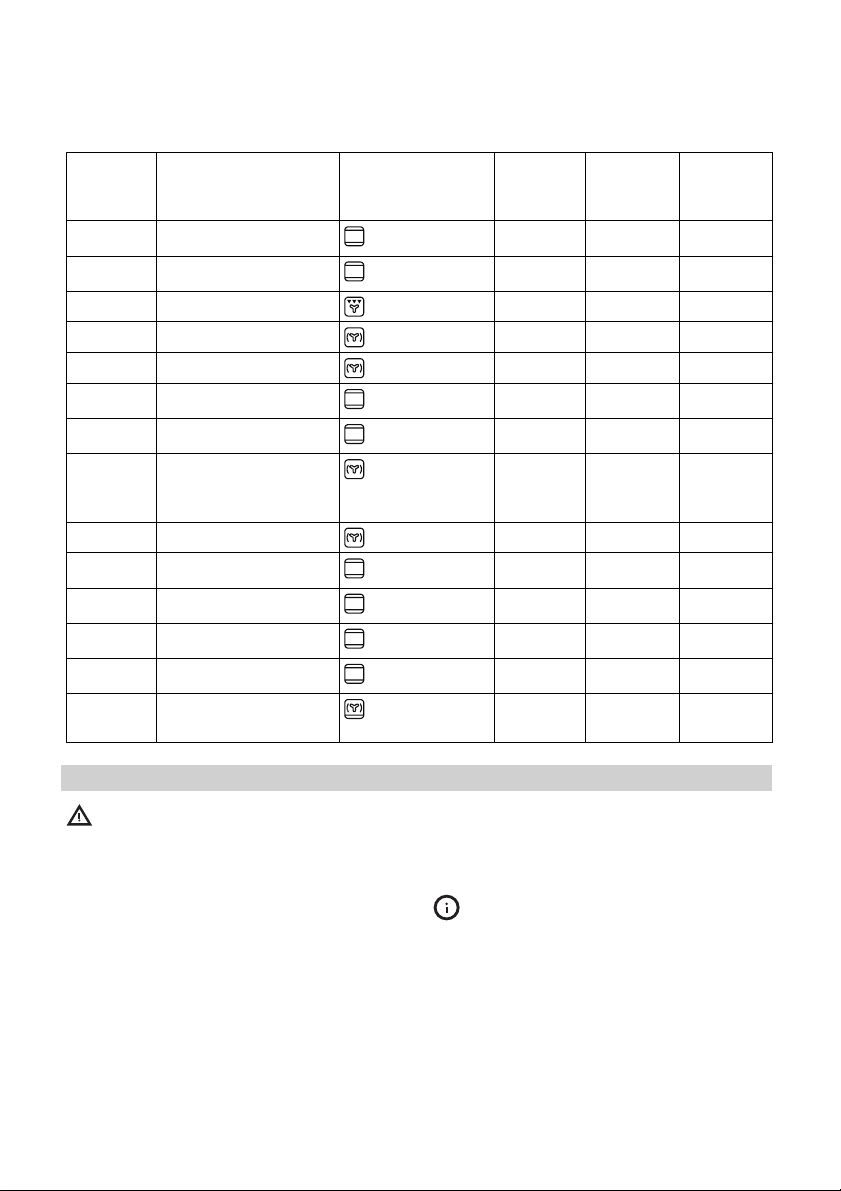
Oven functions
Oven function Application
Off position The appliance is off.
3. To deactivate the appliance, turn the
knob for the oven functions to the off
position.
Page 10
ENGLISH 10
Oven function Application
To bake on the maximum temperature on three oven lev-
Forced Air Cook-
ing
Conventional
(Top and Bottom
Heat)
Grilling To grill flat food in the middle of the grill, and to toast.
els at the same time. When you use this function, decrease
the oven temperature by 20 - 40 °C from the standard
temperatures you use for Conventional Cooking. Also to
dry food.
To bake and roast on one oven level.
Display
Bottom Heat
Grilling with Fan
Bread and Pizza
Baking
Defrost
Top Heat To finish cooked dishes.
Fast Grilling To grill flat food in large quantities, and to toast.
Pyrolysis To clean the oven. The high temperature burns off the re-
17 2 3
To bake cakes with crispy or crusty bottoms, and to preserve food.
To roast larger joints of meat or poultry on one level. Also
to gratinate, and to brown.
To bake food on one oven level for a more intensive
browning and a crispy bottom. When you use this function, decrease the oven temperature by 20 - 40 °C from
the standard temperatures you use for Conventional
Cooking.
To defrost frozen food. The knob for the temperature must
be in the off position.
sidual dirt. You can then remove it with a cloth when the
appliance is cold.
Time and temperature
1
Heat-up and residual heat indicator
2
Water tank (selected models only)
3
Core temperature sensor (selected
4
models only)
Door lock (selected models only)
5
Hours / minutes
6
4567
Clock functions
7
Page 11
ENGLISH 11
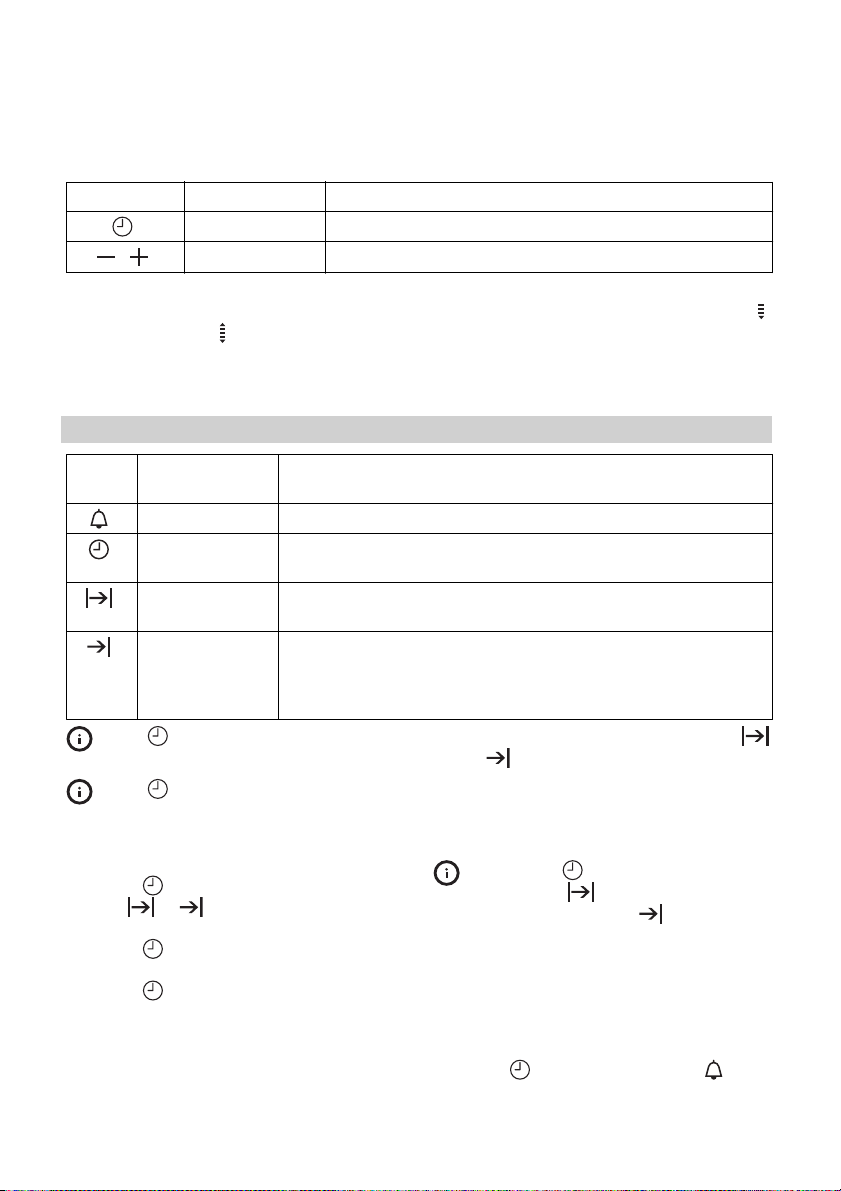
Buttons
Button Function Description
Clock To set a clock function.
,
Heat-up and residual heat indicator
When you activate an oven function, the
bars in the display
The bars show that the oven temperature
increases or decreases.
Minus, plus To set the time.
come on one by one.
When you deactivate the appliance, the
display shows the residual heat indicator
if the temperature in the oven is more than
40 °C. Turn the temperature knob left or
right to show the oven temperature on the
display.
Clock functions
Sym-
bol
Press again and again to change
the clock function.
Press
clock functions, or wait 5 seconds for
the setting to be confirmed automatically.
Setting the Duration or End function
1.
Press
bol
2. Press + or - to set the minutes.
3.
Press
4. Press + or - to set the hour.
5.
Press
Function Description
Minute Minder To set a countdown time.
Time of day To set, change or check the time of day. Refer to "Setting the
time of day".
Duration To set how long the appliance must operate. First set an oven
function before you set this function.
End To set when the appliance must be deactivated. First set an
oven function before you set this function. You can use Duration and End at the same time (Time Delay) to set the time
when the appliance must be activated and then deactivated.
to confirm the settings of the
again and again until the sym-
or flashes in the display.
to confirm.
to confirm.
6.
When the set time ends, the symbol
or and the set time flash. The acoustic signal sounds for two minutes. The
appliance deactivates. Press a button
or open the appliance door to stop the
signal.
If you press
for Duration
switches to setting the End
Setting the Minute Minder
Used to set a countdown time. The maximum time you can set is 2 hours 30 minutes.
This function has no effect on the operation
of the oven. You can set the Minute Minder
at any time, also if the appliance is off.
1.
Press
00 flash in the display.
while setting the time
, the appliance
function.
again and again until and
Page 12
ENGLISH 12
2. Press + or - to set the Minute Minder. At
first the time is calculated in minutes
and seconds. When the time you set is
longer than 60 minutes, the symbol
comes on in the display. The appliance
then calculates the time in hours and
minutes.
3. The Minute Minder starts automatically
after five seconds.
4. When the set time ends, the acoustic
signal sounds for two minutes. 00:00
flash in the display. Press a but-
and
ton to stop the signal.
Using the accessories
Warning! Refer to the Safety chapters.
Core temperature sensor
The core temperature sensor measures the
core temperature of the meat. When the
meat is at the set temperature, the appliance deactivates.
There are two temperatures to be set:
• The oven temperature.
• The core temperature. Refer to the values
in the table.
Recommended core temperatures
50 °C Rare
60 °C Medium
70 °C Well done
Important! Only use the core temperature
sensor supplied with the appliance, or
genuine replacement parts.
1. Set the oven function and the oven temperature.
2. Put the tip of the core temperature sensor into the centre of the meat.
3. Put the plug of the core temperature
sensor into the socket on the side wall
of the oven.
If you set the Minute Minder when the
Duration
ates, the symbol
Count Up Timer
Use the Count Up Timer to monitor how
long the oven operates.
Press
shows time without clock symbols.
tion operates.
4.
5.
6. Make sure that the core temperature
7. When the meat is at the set core tem-
8. Remove the plug of the core tempera-
again and again until the display
You cannot use the Count Up Timer
when the Duration
The display shows the symbol of the
core temperature sensor
default core temperature. When you
use the core temperature sensor for the
first time, the default core temperature
is 60 °C.
While
for the temperature to change the default core temperature.
Press
ture setting, or wait 10 seconds for it to
be saved automatically. The new default core temperature is displayed during the next use of the core temperature sensor.
sensor stays in the meat and in the
socket during the cooking.
perature, the symbol for the core temperature sensor
temperature flash. An acoustic signal
sounds for two minutes. The appliance
deactivates automatically. Press a button to stop the signal.
ture sensor from the socket . Remove
the meat from the appliance.
The Duration and End do not operate
with the core temperature sensor.
or End function oper-
comes on in the display.
or End func-
and the
flashes, you can use the knob
to save the new core tempera-
and the default core
Page 13
ENGLISH 13
You can change the core temperature at
any time during the cooking:
1.
Press
– Four times - the display shows the set
– Five times - the display shows the
– Six times - the display shows the set
2. Use the knob for the temperature to
change the temperature.
Telescopic runners
Installing the telescopic runners
You can put the telescopic runners on each
level.
Make sure that the two telescopic runners
are on the same level.
The stop element (A) that is at one end of
the telescopic runner must point up.
1
:
core temperature which changes every 10 seconds to the current core
temperature.
current oven temperature which
changes every 10 seconds to the set
oven temperature.
oven temperature.
2
Using telescopic runners
With telescopic runners you can put in and
remove the shelves more easily.
1
Pull out the right
and left hand telescopic runners.
You can also use the telescopic runners
with the trays or pans supplied with the
appliance (refer to “Product description”).
Make sure you push back the telescopic
runners fully in the appliance before you
close the oven door.
A
Caution! Do not clean the telescopic
runners in the dishwasher. Do not
lubricate the telescopic runners.
2
°C
Put the wire shelf on
the telescopic runners and carefully
push them into the
appliance.
°C
Additional functions
Child Lock
When the Child Lock is on, you cannot operate the oven. This is to make sure that
children do not accidentally activate the
appliance.
Activating and deactivating the Child
Lock function:
1. Do not set an oven function.
2.
Press and hold
time for two seconds.
and + at the same
3.
An acoustic signal sounds. SAFE and
come on or go out in the display (when
you activate or deactivate the Child
Lock).
If the oven has the Pyrolytic cleaning
function, the door is locked.
SAFE and
you turn a knob or press a button.
come on in the display when
Page 14
ENGLISH 14
Automatic switch-off
For safety reasons the appliance deactivates after some time:
• If an oven function operates.
• If you do not change the oven tempera-
ture.
Oven temperature Switch-off time
30 - 115 °C 12,5 h
120 - 195 °C 8.5 h
200 - 245 °C 5.5 h
250 °C 3.0 h
After an automatic switch-off, press a button to activate the appliance again.
Important! The automatic switch-off works
with all oven functions, except Duration, End
and Core Temperature Sensor.
Helpful hints and tips
• The appliance has four shelf levels. Count
the shelf levels from the bottom of the appliance floor.
• The appliance has a special system which
circulates the air and constantly recycles
the steam. With this system you can cook
in a steamy environment and keep the
food soft inside and crusty outside. It decreases the cooking time and energy
consumption to a minimum.
• Moisture can condense in the appliance
or on the door glass panels. This is normal. Always stand back from the appliance when you open the appliance door
while cooking. To decrease the condensation, operate the appliance for 10 minutes before cooking.
• Clean the moisture after each use of the
appliance.
• Do not put the objects directly on the appliance floor and do not put aluminium
foil on the components when you cook.
This can change the baking results and
cause damage to the enamel.
Baking cakes
• Do not open the oven door before 3/4 of
the set cooking time is up.
Cooling fan
When the appliance operates, the cooling
fan activates automatically to keep the surfaces of the appliance cool. If you deactivate the appliance, the cooling fan continues to operate until the temperature in the
appliance cools down.
Safety thermostat
Incorrect operation of the appliance or defective components can cause dangerous
overheating. To prevent this, the oven has a
safety thermostat which interrupts the power supply. The oven activates again automatically when the temperature drops.
• If you use two baking trays at the same
time, keep one empty level between
them.
Cooking meat and fish
• Use a deep pan for very fatty food to
prevent the oven from stains that can be
permanent.
• Leave the meat for approximately 15 minutes before carving so that the juice
does not seep out.
• To prevent too much smoke in the oven
during roasting, add some water into the
deep pan. To prevent the smoke condensation, add water each time after it dries
up.
Cooking times
Cooking times depend on the type of food,
its consistency, and volume.
Initially, monitor the performance when you
cook. Find the best settings (heat setting,
cooking time, etc.) for your cookware, recipes and quantities when you use this appliance.
Page 15
ENGLISH 15
Weight
(kg)
1Pork / lamb
1 Veal / Beef
1,2 Chicken/Rabbit
1,5 Duck
3Goose
4Turkey
1Fish
1 Stuffed Pepperoni
Instant cakes
1Pies
Biscuits
2 Lasagne
1White Bread
1Pizza
Food Oven Function Level Oven
Tomatos / Roasted
Potatos
temperature (°C)
2 180 100 - 110
2 190 70 - 100
2 200 70 - 80
1 160 120 - 150
1 160 150 - 200
1 180 210 - 240
2 190 30 - 40
2 190 50 - 70
2 160 45 - 55
2 160 80 - 100
3 140 25 - 35
2 180 45 - 60
2 190 50 - 60
1 190 —
200
Cooking
Time
(min)
20 - 30
Care and cleaning
Warning! Refer to the Safety chapters.
• Clean the front of the appliance with a
soft cloth with warm water and a cleaning agent.
• To clean metal surfaces use a usual
cleaning agent.
• Clean the oven interior after each use.
Then you can remove dirt more easily
and it does not burn on.
• Clean stubborn dirt with a special oven
cleaner.
• Clean all oven accessories after each use
and let them dry. Use a soft cloth with
warm water and a cleaning agent.
• If you have nonstick accessories, do not
clean them using aggressive agents,
sharp-edged objects or a dishwasher. It
can destroy nonstick coating.
Stainless steel or aluminium appliances:
Clean the oven door with a wet sponge only. Dry it with a soft cloth.
Do not use steel wool, acids or abrasive
materials, as they can cause damage to the
oven surface. Clean the oven control panel
with the same precautions.
Page 16

ENGLISH 16
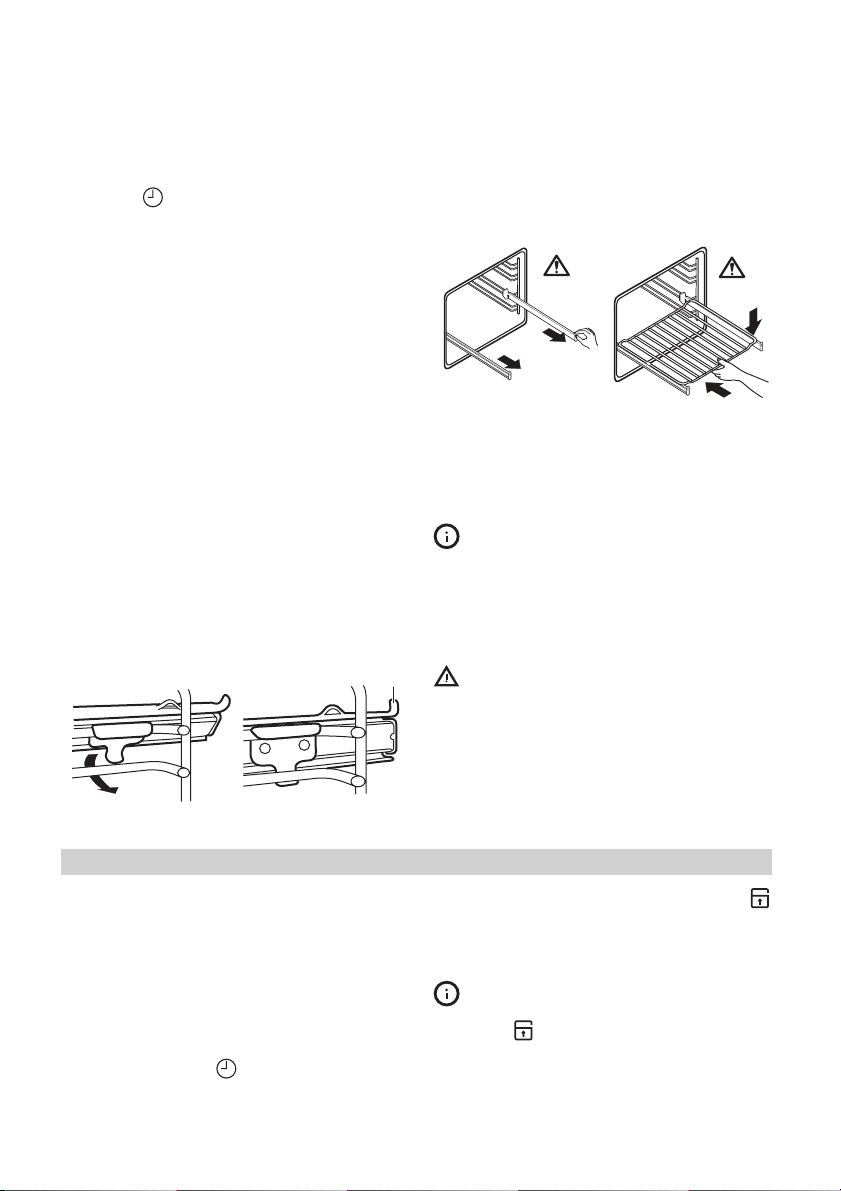
Shelf supports
You can remove the shelf supports to clean
the side walls.
Removing the shelf supports
1
Pull the front of the
shelf support away
from the side wall.
Installing the shelf supports
Install the shelf supports in the opposite sequence.
The rounded ends of the shelf supports
must point to the front.
Pyrolysis
Warning! The appliance becomes very
hot. There is a risk of burns.
Caution! If a hob is installed with the
appliance, do not use it at the same
times as the Pyrolysis function. It can cause
damage to the appliance.
1. Remove the removable shelf supports (if
applicable) and accessories from the
appliance. Refer to "Removing the shelf
supports".
Caution! Do not let the removable
shelf supports stay in the appliance
during the cleaning procedure. There is a
risk of damage.
2. Remove the worst dirt manually.
3. Fully close the oven door.
The cleaning procedure cannot start if
you do not close the oven door.
4. Set the function Pyrolysis. Refer to
"Oven functions".
2
2
1
Pull the rear end of
the shelf support
away from the side
wall and remove it.
5.
When the display shows P1, press
start the procedure. You can use the
End function to delay the start of the
cleaning.
Pyrolytic procedure takes 2 hours.
Do not open the door before the
abort the procedure. To prevent risk of
burns when the oven reaches a certain temperature the door automatically locks. The
display shows the symbol
oven cools down, the door automatically
unlocks.
tions to the off position.
When Pyrolysis is completed, the display
shows the time of day. The oven door stays
locked. When the appliance is cool again,
an acoustic signal sounds and the door unlocks.
Cleaning reminder
To remind you that Pyrolysis is necessary,
PYR flashes in the display for 10 seconds
after each activation and deactivation of
the appliance.
The cleaning reminder goes off the
display:
• After the end of the Pyrolysis function
•If you press + and - at the same time
Oven lamp
electrical shock.
Before you change the oven lamp:
• Deactivate the oven.
• Remove the fuses in the fuse box or deac-
procedure completes. This will
. When the
To stop Pyrolysis before it is completed, turn the knob for the oven func-
During the Pyrolysis the oven lamp is
off.
while PYR flashes in the display.
Warning! Be careful when you change
the oven lamp. There is a risk of
tivate the circuit breaker.
to
Page 17

ENGLISH 17
Put a cloth on the bottom of the oven
to prevent damage to the oven light
and glass cover.
Always hold the halogen lamp with a cloth
to prevent grease residue from burning on
the lamp.
1. Turn the glass cover counterclockwise to
remove it.
2. Clean the glass cover.
3. Replace the oven light bulb with a 40
watt, 230V (50Hz), 350 °C heat resistant oven light bulb (Connection type:
G9).
4. Install the glass cover.
Cleaning the oven door
The oven door has four glass panels. You
can remove the oven door and the internal
glass panels to clean them.
The oven door can close if you try to
remove the glass panels before you remove the oven door.
Removing the oven door and the glass
panels
1
3
Close the oven door
to the first opening
position (halfway).
Then pull forward
and remove the
door from its seat.
5
Release the locking
system to remove
the glass panels.
7
4
Put the door on a
soft cloth on a stable surface.
6
90°
Turn the two fasteners by 90° and remove them from
their seats.
Open the door fully.2Lift and turn the lev-
ers on the two hinges.
2
1
Carefully lift (step 1)
and remove (step 2)
the glass panels
one by one. Start
from the top panel.
Clean the glass panels with water and
soap. Dry the glass panels carefully.
Page 18

ENGLISH 18
Installing the door and the glass panels
When the cleaning is completed, install the
glass panels and the oven door. Do the
above steps in the opposite sequence.
Make sure that you put the glass panels (1,
2 and 3) back in the correct sequence. The
middle panel (2) has a decorative frame.
The screen-printing zone must face the inner side of the door. Make sure that after
the installation the surface of the glass panel frame (2) on the screen-printing zones is
not rough when you touch it.
3
2
1
What to do if…
Warning! Refer to the Safety chapters.
Make sure that you install the top panel in
the seats correctly.
Problem Possible cause Remedy
The oven does not heat up. The appliance is deactiva-
ted.
The oven does not heat up. The clock is not set. Set the clock. Refer to "Set-
The oven does not heat up. The necessary settings are
not set.
The oven does not heat up. The automatic switch-off is
on.
The oven does not heat up. The Child Lock is on. Refer to "Deactivating the
The oven does not heat up. The fuse in the fuse box is
released.
Activate the appliance.
ting the time of day".
Make sure that the settings
are correct.
Refer to "Automatic switch-
off".
Child Lock".
Do a check of the fuse. If the
fuse is released more than
one time, contact a qualified
electrician.
Page 19

ENGLISH 19
Problem Possible cause Remedy
The oven lamp does not operate.
The Pyrolysis does not start.
The display shows C1.
The Pyrolysis does not start.
The display shows C2.
The Pyrolysis does not start.
The display shows C3.
The display shows F102. The door is not fully closed
The oven does not heat up.
The display shows Demo.
The oven lamp is defective. Replace the oven lamp.
The shelf supports are not
removed.
The Pyrolysis or Defrost
function is set when the plug
of the core temperature sensor is in the socket.
The door is not fully closed
or the door lock is defective.
or the door lock is defective.
The demo mode is activated.
Remove the shelf supports.
Remove the plug of the core
temperature sensor from the
socket.
Fully close the door.
1. Fully close the door.
2. Deactivate the appliance with the house
fuse or the safety switch
in the fuse box and activate it again.
3. If the display shows
F102 again, contact the
service centre.
1. Deactivate the appliance.
2. Press and hold the button +.
3. When an acoustic signal
sounds, turn the knob
for the oven functions to
the first function. Demo
flashes in the display.
4. Turn the knob for the
oven functions to the off
position.
5. Release the button +.
6. Turn the knob for the
temperature clockwise
three times. The acoustic
signal sounds three
times. The demo mode
is deactivated.
Page 20

ENGLISH 20
Problem Possible cause Remedy
The display shows an error
code.
Steam and condensation
collect on the food and in
the oven.
If you cannot find a solution to the problem
yourself, contact your dealer or the service
centre.
We recommend that you write the data here:
Model (MOD.) .........................................
Product number (PNC) .........................................
Serial number (S.N.) .........................................
There is an electronic fault. 1. Deactivate the appli-
You left the dish in the oven
for too long.
The necessary data for the service centre is
on the rating plate. The rating plate is on
the front frame of the appliance cavity. Do
not remove the rating plate from the appliance cavity.
ance with the house
fuse or the safety switch
in the fuse box and activate it again.
2. If the display shows the
error code again, contact the service centre.
Do not keep the dishes in
the oven for longer than 15
- 20 minutes after the cook-
ing ends.
Technical data
Dimensions (internal) Width
Height
Depth
Usable volumes 57 l
Area of baking tray 1140 cm²
Top heating element 800 W
Bottom heating element 1000 W
Grill 1650 W
Fan 2000 W
Total rating 2515 W
Voltage 230 V
Frequency 50 Hz
Number of functions 10
437
328
401
Page 21

ENGLISH 21
Energy Consumption with a standard
load, Conventional (Top and Bottom
Heat)
Energy Consumption with a standard
load, Forced Air Cooking
0.79 kWh
0.78 kWh
Environment concerns
The symbol on the product or on its
packaging indicates that this product may
not be treated as household waste. Instead
it should be taken to the appropriate
collection point for the recycling of electrical
and electronic equipment. By ensuring this
product is disposed of correctly, you will
help prevent potential negative
consequences for the environment and
human health, which could otherwise be
caused by inappropriate waste handling of
this product. For more detailed information
IKEA GUARANTEE
How long is the IKEA guarantee valid?
This guarantee is valid for five (5) years
from the original date of purchase of Your
appliance at IKEA, unless the appliance is
named LAGAN in which case two (2) years
of guarantee apply. The original sales receipt is required as proof of purchase. If
service work is carried out under guarantee,
this will not extend the guarantee period for
the appliance,
Which appliances are not covered by the
IKEA five (5) years guarantee?
The range of appliances named LAGAN
and all appliances purchased in IKEA before 1st of August 2007
Who will execute the service?
IKEA service provider will provide the service through its own service operations or
authorized service partner network.
about recycling of this product, please
contact your local council, your household
waste disposal service or the shop where
you purchased the product.
Packaging material
The packaging material is environmentallyfriendly and recyclable. Plastic parts are
marked with international abbreviations
such as PE, PS, etc. Dispose of the packaging material in the containers provided for
this purpose at your local waste management facility.
What does this guarantee cover?
The guarantee covers faults of the appliance, which have been caused by faulty
construction or material faults from the date
of purchase from IKEA. This guarantee applies to domestic use only. The exceptions
are specified under the headline “What is
not covered under this guarantee?” Within
the guarantee period, the costs to remedy
the fault e.g. repairs, parts, labour and travel will be covered, provided that the appliance is accessible for repair without special
expenditure. On these conditions the EU
guidelines (Nr. 99/44/EG) and the respective local regulations are applicable. Replaced parts become the property of IKEA.
Page 22

ENGLISH 22
What will IKEA do to correct the problem?
IKEA appointed service provider will examine the product and decide, at its sole discretion, if it is covered under this guarantee.
If considered covered, IKEA service provider
or its authorized service partner through its
own service operations, will then, at its sole
discretion, either repair the defective product or replace it with the same or a comparable product.
What is not covered under this
guarantee?
• Normal wear and tear.
• Deliberate or negligent damage, damage caused by failure to observe operating instructions, incorrect installation or by
connection to the wrong voltage, damage caused by chemical or electro-chemical reaction, rust, corrosion or water
damage including but not limited to damage caused by excessive lime in the water supply, damage caused by abnormal
environmental conditions.
• Consumable parts including batteries
and lamps.
• Non-functional and decorative parts
which do not affect normal use of the appliance, including any scratches and possible color differences.
• Accidental damage caused by foreign
objects or substances and cleaning or unblocking of filters, drainage systems or
soap drawers.
• Damage to the following parts: ceramic
glass, accessories, crockery and cutlery
baskets, feed and drainage pipes, seals,
lamps and lamp covers, screens, knobs,
casings and parts of casings. Unless such
damages can be proved to have been
caused by production faults.
• Cases where no fault could be found during a technician’s visit.
• Repairs not carried out by our appointed
service providers and/or an authorized
service contractual partner or where nonoriginal parts have been used.
• Repairs caused by installation which is
faulty or not according to specification.
• The use of the appliance in a non-domestic environment i.e. professional use.
• Transportation damages. If a customer
transports the product to their home or
other address, IKEA is not liable for any
damage that may occur during transport.
However, if IKEA delivers the product to
the customer's delivery address, then
damage to the product that occurs during
this delivery will be covered by this guarantee.
• Cost for carrying out the initial installation
of the IKEA appliance. However, if an
IKEA service provider or its authorized
service partner repairs or replaces the
appliance under the terms of this guarantee, the service provider or its authorized
service partner will re-install the repaired
appliance or install the replacement, if
necessary.
This restriction do not apply to fault-free
work carried out by a qualified specialist
using our original parts in order to adapt
the appliance to the technical safety specifications of another EU country.
How country law applies
The IKEA guarantee gives You specific legal
rights, which covers or exceed local demands. However these conditions do not
limit in any way consumer rights described
in the local legislation
Area of validity
For appliances which are purchased in one
EU country and taken to another EU country, the services will be provided in the
framework of the guarantee conditions normal in the new country. An obligation to
carry out services in the framework of the
guarantee exists only if the appliance complies and is installed in accordance with:
• the technical specifications of the country
in which the guarantee claim is made;
• the Assembly Instructions and User Manual Safety Information;
The dedicated After Sales Service for
IKEA appliances:
Please do not hesitate to contact IKEA After
Sales Service to:
Page 23

ENGLISH 23
1. make a service request under this guarantee;
2. ask for clarification on installation of the
IKEA appliance in the dedicated IKEA
kitchen furniture. The service won’t provide clarifications related to:
– the overall IKEA kitchen installation;
– connections to electricity (if machine
comes without plug and cable), to
water and to gas since they have to
be executed by an authorized service engineer.
3. ask for clarification on user manual contents and specifications of the IKEA appliance.
To ensure that we provide you with the best
assistance, please read carefully the Assembly Instructions and/or the User Manual
section of this booklet before contacting us.
How to reach us if You need our service
Please refer to the last page of this manual
for the full list of IKEA appointed contacts
and relative national phone numbers.
Important! In order to provide You with a
quicker service, we recommend that You
use the specific phone numbers listed at the
end of this manual. Always refer to the
numbers listed in the booklet of the specific
appliance You need an assistance for.
Before calling us, assure that You have to
hand the IKEA article number (8 digit code)
for the appliance of which you need our
assistance.
Important! SAVE THE SALES RECEIPT! It is
Your proof of purchase and required for the
guarantee to apply. Note that the receipt
reports also the IKEA article name and
number (8 digit code) for each of the
appliances you have purchased.
Do You need extra help?
For any additional questions not related to
After Sales of your appliances, please contact our nearest IKEA store call centre. We
recommend you read the appliance documentation carefully before contacting us.
Page 24

DEUTSCH 24
Inhalt
Sicherheitsinformationen 24
Sicherheitshinweise 25
Montage 28
Gerätebeschreibung 29
Vor der ersten Inbetriebnahme 29
Täglicher Gebrauch 30
Uhrfunktionen 32
Verwendung des Zubehörs 33
Änderungen vorbehalten.
Zusatzfunktionen 35
Praktische Tipps und Hinweise 35
Reinigung und Pflege 37
Was tun, wenn … 40
Technische Daten 43
Umwelttipps 43
IKEA Garantie 43
Sicherheitsinformationen
Lesen Sie vor der Montage und Verwendung des Geräts sorgfältig die mitgelieferte Anleitung. Der Hersteller haftet nicht für
Verletzungen oder Schäden, die durch eine fehlerhafte Montage entstehen. Bewahren Sie die Anleitung zum Nachschlagen
auf.
Sicherheit von Kindern und schutzbedürftigen Personen
Warnung! Es besteht Erstickungsgefahr, das Risiko von
Verletzungen oder permanenten Behinderungen.
• Dieses Gerät kann dann von Kindern ab 8 Jahren, von Per-
sonen mit eingeschränkten körperlichen, sensorischen oder
geistigen Fähigkeiten sowie von Personen ohne bisherige Erfahrung im Umgang mit solchen Geräten bedient werden,
wenn sie dabei von einer Person, die für ihre Sicherheit verantwortlich ist, beaufsichtigt werden.
• Kinder dürfen nicht mit dem Gerät spielen.
• Halten Sie das Verpackungsmaterial von Kindern fern.
• Halten Sie Kinder und Haustiere vom Gerät fern, wenn es in
Betrieb oder in der Abkühlphase ist. Berührbare Teile sind
heiss.
• Falls Ihr Gerät mit einer Kindersicherung ausgestattet ist,
empfehlen wir, diese einzuschalten.
• Reinigung und Wartung des Geräts darf nicht von Kindern
ohne Aufsicht erfolgen.
Page 25

DEUTSCH 25
Allgemeine Sicherheit
• Während des Betriebs wird das Geräteinnere heiss. Berüh-
ren Sie nicht die Heizelemente im Gerät. Verwenden Sie zum
Anfassen des Zubehörs und der Töpfe wärmeisolierende
Handschuhe.
• Benutzen Sie zum Reinigen des Geräts keinen Dampfreiniger.
• Unterbrechen Sie vor Wartungsarbeiten die Stromversor-
gung.
• Benutzen Sie keine Scheuermittel oder Metallschwämmchen
zum Reinigen der Ofenglastür; sie können die Glasfläche verkratzen und zum Zersplittern der Scheibe führen.
• Vor der pyrolytischen Reinigung müssen verschüttete Flüssig-
keiten entfernt werden. Bitte gesamtes Zubehör aus dem
Ofen entfernen.
• Verwenden Sie ausschließlich den für dieses Gerät empfohle-
nen KT Sensor.
• Ziehen Sie die Einhängegitter erst vorne und dann hinten von
der Seitenwand weg und nehmen Sie sie heraus. Führen Sie
zum Einsetzen der Einhängegitter die obigen Schritte in umgekehrter Reihenfolge durch.
Sicherheitshinweise
Montage
Warnung! Nur eine qualifizierte
Fachkraft darf den elektrischen
Anschluss des Geräts vornehmen.
• Entfernen Sie das gesamte Verpackungs-
material.
• Stellen Sie ein beschädigtes Gerät nicht
auf und benutzen Sie es nicht.
• Halten Sie sich an die mitgelieferte Mon-
tageanleitung.
• Seien Sie beim Umsetzen des Geräts vor-
sichtig, denn es ist schwer. Tragen Sie
stets Sicherheitshandschuhe.
• Ziehen Sie das Gerät nicht am Türgriff.
• Stellen Sie sicher, dass das Gerät unterhalb von bzw. zwischen sicheren Konstruktionen montiert wird.
• Die Seiten des Geräts dürfen nur an Geräte oder Einheiten in gleicher Höhe angrenzen.
Elektrischer Anschluss
Warnung! Brand- und
Stromschlaggefahr.
• Alle elektrischen Anschlüsse sind von einem geprüften Elektriker vorzunehmen.
• Das Gerät muss geerdet sein.
Page 26

DEUTSCH 26
• Stellen Sie sicher, dass die elektrischen
Daten auf dem Typenschild den Daten
Ihrer Stromversorgung entsprechen.
Wenden Sie sich andernfalls an eine
Elektrofachkraft.
• Das Gerät darf ausschließlich an eine
ordnungsgemäß installierte Schutzkontaktsteckdose angeschlossen werden.
• Verwenden Sie keine Mehrfachsteckdosen oder Verlängerungskabel.
• Achten Sie darauf, Netzstecker und Netzkabel nicht zu beschädigen. Wenden Sie
sich zum Austausch des beschädigten
Netzkabels an den Kundendienst oder
einen Elektriker.
• Achten Sie darauf, dass das Netzkabel
die Gerätetür nicht berührt, insbesondere
wenn die Tür heiß ist.
• Alle Teile, die gegen direktes Berühren
schützen sowie die isolierten Teile müssen
so befestigt werden, dass sie nicht ohne
Werkzeug entfernt werden können.
• Stecken Sie den Netzstecker erst nach
Abschluss der Montage in die Steckdose.
Stellen Sie sicher, dass der Netzstecker
nach der Montage noch zugänglich ist.
• Falls die Steckdose lose ist, schließen Sie
den Netzstecker nicht an.
• Ziehen Sie nicht am Netzkabel, um das
Gerät von der Spannungsversorgung zu
trennen. Ziehen Sie dazu immer direkt am
Netzstecker.
• Verwenden Sie nur geeignete Trennvorrichtungen: Überlastschalter, Sicherungen
(Schraubsicherungen müssen aus dem
Halter entfernt werden können), Fehlerstromschutzschalter und Schütze.
• Die elektrische Installation muss eine
Trenneinrichtung aufweisen, mit der Sie
das Gerät allpolig von der Stromversorgung trennen können. Die Trenneinrichtung muss mit einer Kontaktöffnungsbreite von mindestens 3 mm ausgeführt sein.
• Das Gerät entspricht den EC-Richtlinien.
• Schließen Sie die Gerätetür ganz, bevor
Sie den Netzstecker in die Steckdose stecken.
Gebrauch
Warnung! Es besteht Verletzungs-,
Verbrennungs-, Stromschlag- oder
Explosionsgefahr.
• Das Gerät ist für die Verwendung im
Haushalt vorgesehen.
• Nehmen Sie keine technischen Änderungen am Gerät vor.
• Die Lüftungsöffnungen dürfen nicht abgedeckt werden.
• Lassen Sie das Gerät bei Betrieb nicht
unbeaufsichtigt.
• Das Gerät nach jedem Gebrauch ausschalten.
• Gehen Sie beim Öffnen der Tür vorsichtig
vor, wenn das Gerät in Betrieb ist. Es
kann heiße Luft austreten.
• Bedienen Sie das Gerät nicht mit feuchten
oder nassen Händen oder wenn es mit
Wasser in Kontakt gekommen ist.
• Üben Sie keinen Druck auf die geöffnete
Gerätetür aus.
• Benutzen Sie das Gerät nicht als Arbeitsoder Abstellfläche.
• Halten Sie die Tür immer geschlossen,
wenn das Gerät in Betrieb ist.
• Öffnen Sie die Gerätetür vorsichtig. Bei
der Verwendung von Zutaten, die Alkohol enthalten, kann ein Alkohol-Luftgemisch entstehen.
• Achten Sie beim Öffnen der Tür darauf,
dass keine Funken oder offenen Flammen
in das Geräts gelangen.
• Platzieren Sie keine entflammbaren Produkte oder Gegenstände, die mit entflammbaren Produkten benetzt sind, im
Gerät, auf dem Gerät oder in der Nähe
des Geräts.
Warnung! Das Gerät könnte
beschädigt werden.
• Um Beschädigungen oder Verfärbungen
der Emailbeschichtung zu vermeiden:
– Stellen Sie feuerfestes Geschirr oder andere Gegenstände nicht direkt auf den
Boden des Gerätes.
– Legen Sie keine Alufolie direkt auf den
Boden des Geräts.
Page 27

DEUTSCH 27
– Stellen Sie kein Wasser in das heiße
Gerät.
– Lassen Sie nach dem Abschalten des
Geräts kein feuchtes Geschirr oder feuchte Speisen im Backofeninnenraum stehen.
– Gehen Sie beim Herausnehmen oder
Einsetzen der Innenausstattung sorgfältig
vor.
• Verfärbungen der Emailbeschichtung haben keine Auswirkung auf die Leistung
des Geräts. Sie stellen keinen Mangel im
Sinne des Gewährleistungsrechtes dar.
• Verwenden Sie für feuchte Kuchen das
tiefe Blech. Fruchtsäfte können bleibende
Flecken verursachen.
Reinigung und Pflege
Warnung! Risiko von Verletzungen,
Brand oder Beschädigungen am
Gerät.
• Schalten Sie vor Reinigungsarbeiten immer das Gerät aus und ziehen Sie den
Netzstecker aus der Steckdose.
• Vergewissern Sie sich, dass das Gerät
abgekühlt ist. Zusätzlich besteht die Gefahr, dass die Glasscheiben brechen.
• Ersetzen Sie die Glasscheiben der Tür
umgehend, wenn sie beschädigt sind.
Wenden Sie sich hierzu an den Kundendienst.
• Gehen Sie beim Aushängen der Tür vorsichtig vor. Die Tür ist schwer!
• Reinigen Sie das Gerät regelmäßig, um
eine Abnutzung des Oberflächenmaterials zu verhindern.
• Fett- oder Speisereste im Gerät können
einen Brand verursachen.
• Falls Sie ein Backofenspray verwenden,
befolgen Sie bitte unbedingt die Anweisungen auf der Verpackung.
Pyrolytische Reinigung
Warnung! Verbrennungsgefahr!
• Entfernen Sie vor der pyrolytischen
Selbstreinigung oder der ersten Inbetriebnahme aus dem Ofeninnenraum:
– alle Lebensmittelrückstände, Öl- oder
Fettablagerungen.
– alle zum Gerät dazugehörigen heraus-
nehmbaren Teile (Einschubgitter, Einhängegitter) sowie Töpfe, Pfannen,
Bleche und Utensilien mit Antihaftbeschichtung etc.
• Lesen Sie die Anleitung zur pyrolytischen
Reinigung sorgfältig durch.
• Halten Sie Kinder während der pyrolytischen Reinigung vom Gerät fern. Das Gerät wird sehr heiß.
• Die pyrolytische Reinigung erfolgt bei
sehr hoher Temperatur und kann Dämpfe
von Lebensmittelrückständen und Gerätematerialen freisetzen. Beachten Sie unbedingt Folgendes:
– Sorgen Sie während und nach der py-
rolytischen Reinigung für eine gute Belüftung.
– Sorgen Sie während des ersten Ge-
brauchs bei Verwendung der Höchsttemperatur für eine gute Belüftung.
– Halten Sie während und nach der py-
rolytischen Reinigung Tiere (besonders
Vögel) vom Gerät fern und stellen Sie
die Höchsttemperatur erst ein, wenn
der Bereich ausreichend gelüftet ist.
• Im Gegensatz zu Menschen können einige Vögel und Reptilien sehr empfindlich
auf die während des Reinigungsvorgangs
freigesetzten Dämpfe der Pyrolyse-Backöfen reagieren.
• Kleine Tiere reagieren auch während des
laufenden Reinigungsprogramms empfindlich auf die lokalen Temperaturschwankungen in der Nähe von PyrolyseBacköfen.
• Antihaftbeschichtungen auf Töpfen, Pfannen, Blechen und Kochutensilien usw.
können durch die hohen Temperaturen
während der Pyrolyse beschädigt werden und geringfügige Mengen an schädlichen Dämpfen freisetzen.
• Diese von den Pyrolyse-Backöfen/Speiseresten freigesetzten Dämpfe sind ungefährlich für Menschen einschließlich Kinder oder Personen mit Beschwerden.
Page 28

DEUTSCH 28
Innenbeleuchtung
• Die Leuchtmittel in diesem Gerät sind nur
für Haushaltsgeräte geeignet. Benutzen
Sie sie nicht für die Raumbeleuchtung.
Warnung! Stromschlaggefahr.
• Trennen Sie das Gerät von der Stromversorgung, bevor Sie die Lampe austauschen.
• Verwenden Sie dazu eine Lampe mit der
gleichen Leistung.
Entsorgung
Warnung! Verletzungs- und
Erstickungsgefahr.
Montage
Warnung! Siehe Sicherheitshinweise.
Beachten Sie bei der Installation die
Montageanleitung.
Elektroanschluss
Warnung! Der elektrische Anschluss
muss von einer qualifizierten Fachkraft
vorgenommen werden.
Der Hersteller haftet nicht für Schäden,
die aufgrund der Nichtbeachtung der
Sicherheitsvorkehrungen des Kapitels „Sicherheitshinweise“ entstehen.
Das Gerät wird nur mit einem Netzkabel
geliefert.
Netzkabel
Einsetzbare Kabeltypen für Einbau oder
Austausch: H07 RN-F, H05 RN-F, H05 RRF,
H05 VV-F, H05 V2V2-F (T90), H05 BB-F.
• Trennen Sie das Gerät von der Stromversorgung.
• Schneiden Sie das Netzkabel ab und entsorgen Sie es.
• Entfernen Sie das Türschloss, um zu verhindern, dass sich Kinder oder Haustiere
in dem Gerät einschließen.
Näheres zum Kabelquerschnitt siehe Gesamtleistung (auf dem Typenschild) und in
der Tabelle:
Gesamtleistung Kabelquerschnitt
maximal 1380 W 3 x 0,75 mm²
maximal 2300 W 3 x 1 mm²
maximal 3680 W 3 x 1,5 mm²
Die Erdleitung (gelb/grünes Kabel) muss 2
cm länger sein als die Phasenleitung und
der Nullleiter (blaues und braunes Kabel).
Page 29

DEUTSCH 29
Gerätebeschreibung
Rost
2
1
3
4
5
6
7
8
9
5
Backofenlampe
6
Buchse für den KT Sensor
7
Gebläse
8
Typenschild
9
Backofenzubehör
• Gitterrost x 1
Für Kochgeschirr, Kuchenformen, Braten.
• Kuchenblech x 1
Für Kuchen und Plätzchen.
• Kuchenblech hochrandig x 1
Zum Backen und Braten oder zum Auffangen von abtropfendem Fett.
Backofen-Einstellknopf
1
Elektronischer Programmspeicher
2
Temperaturwahlknopf
3
Lüftungsöffnungen
4
• KT Sensor x 1
Zum Messen des Garzustands.
• Teleskopauszüge x 2 Set
Für Roste und Backbleche.
Vor der ersten Inbetriebnahme
Warnung! Siehe Sicherheitshinweise.
Erste Reinigung
• Entfernen Sie alle Zubehörteile und die
herausnehmbaren Einhängegitter (falls
vorhanden).
• Reinigen Sie das Gerät vor der ersten Inbetriebnahme.
Wichtig! Siehe Kapitel „Reinigung und
Pflege“.
Einstellen der Tageszeit
Im Display erscheint
und 12:00 12
blinkt.
1. Drücken Sie + oder -, um die gewünsch-
te Stunde einzustellen.
2.
bestätigen. Dies ist nur bei der
Mit
ersten Einstellung der Uhrzeit erforderlich. Danach wird die neue Zeit automatisch nach fünf Sekunden gespeichert.
Im Display wird
und die einge-
stellte Stunde angezeigt. 00 blinkt.
3. Drücken Sie + oder -, um die gewünsch-
ten Minuten einzustellen.
4.
bestätigen. Dies ist nur bei der
Mit
ersten Einstellung der Uhrzeit erforderlich. Danach wird die neue Zeit automatisch nach fünf Sekunden gespeichert.
Das Display zeigt die neue Uhrzeit an.
Ändern der Uhrzeit
Sie können die Uhrzeit nur ändern,
wenn das Gerät ausgeschaltet ist.
Drücken Sie
anzeige
wiederholt, bis die Uhrzeit-
im Display blinkt. Gehen Sie
zum Einstellen der Uhrzeit wie unter „Einstellen der Tageszeit“ beschrieben vor.
Vorheizen
Heizen Sie das leere Gerät vor, um Fettreste zu verbrennen.
1.
Stellen Sie die Funktion
und die
Höchsttemperatur ein.
Page 30

DEUTSCH 30
2. Lassen Sie das Gerät eine Stunde lang
eingeschaltet.
3.
Stellen Sie die Funktion
Höchsttemperatur ein.
4. Lassen Sie das Gerät zehn Minuten
lang eingeschaltet.
5.
Stellen Sie die Funktion
Höchsttemperatur ein.
6. Lassen Sie das Gerät zehn Minuten
lang eingeschaltet.
Das Zubehör kann heißer werden als bei
normalem Gebrauch. Das Gerät kann Geruch und Rauch verströmen. Das ist normal.
Sorgen Sie für eine ausreichende Belüftung.
Mechanische Kindersicherung
Das Gerät hat eine eingebaute Kindersicherung und sie ist eingeschaltet. Sie befindet sich rechts unterhalb des Bedienfelds.
und die
und die
Zum Öffnen der
Backofen-Tür mit
aktivierter Kindersicherung ziehen Sie
den Griff der Kindersicherung wie in
der Abbildung gezeigt nach oben.
Schliessen Sie dann
die Backofentür, ohne an der Kindersicherung zu ziehen.
Zum Entfernen der
Kindersicherung,
öffnen Sie die Backofentür und entfernen Sie die Kindersicherung mit einem
Torxschlüssel. Der
Torxschlüssel befindet sich in der Einsparung.
Täglicher Gebrauch
Warnung! Siehe Sicherheitshinweise.
Ein- und Ausschalten des Geräts
1. Drehen Sie den Backofen-Einstellknopf
im Uhrzeigersinn auf die gewünschte
Backofenfunktion.
Backofenfunktionen
Backofenfunktion Anwendung
Stellung „Aus“ Das Gerät ist ausgeschaltet.
2. Drehen Sie den Temperaturwahlknopf
auf die gewünschte Temperatur. Im Display wird die eingestellte Temperatur
eingeblendet.
3. Zum Ausschalten des Geräts drehen Sie
den Backofen-Einstellknopf auf „Aus“.
Page 31

DEUTSCH 31
Backofenfunktion Anwendung
Zum Backen mit der Höchsttemperatur auf drei Ebenen
Umluft
Ober-/Unterhit-
ze
Grill
Unterhitze
Umluftgrillen
Brot und Pizza
Backen
Auftauen
gleichzeitig. Stellen Sie die Backofentemperatur bei Verwendung dieser Funktion um 20-40 °C niedriger ein als
die Standardtemperatur, die Sie bei Ober-/Unterhitze
verwenden. Auch zum Dörren von Lebensmitteln.
Zum Backen und Braten auf einer Ebene.
Zum Grillen flacher Lebensmittel in der Mitte des Rostes
und zum Toasten.
Zum Backen von Kuchen mit krossen Böden und zum Einkochen von Lebensmitteln.
Zum Braten von grösseren Fleischstücken oder Geflügel
auf einer Ebene. Auch zum Gratinieren und Überbacken.
Zum Backen auf einer Ebene für Gerichte mit einer intensiveren Bräunung und einem knusprigen Boden. Stellen
Sie die Backofentemperatur bei Verwendung dieser Funktion um 20 - 40 °C niedriger ein als die Standardtemperatur, die Sie bei Ober-/Unterhitze verwenden.
Zum Auftauen von Tiefkühlgerichten. Der Temperaturwahlschalter muss in der Stellung „Aus“ stehen.
Oberhitze Zum Bräunen bereits fertiger Gerichte.
Grillstufe 2
Pyrolyse Zur Reinigung des Backofens. Durch die hohe Temperatur
Zum Grillen flacher Lebensmittel in grösseren Mengen
und zum Toasten.
werden Brat- und Backrückstände zu Asche verbrannt. Sie
können sie dann, nachdem der Backofen abgekühlt ist,
mit einem Tuch entfernen.
Page 32

DEUTSCH 32
Display
Uhrzeit oder Temperatur
17 2 3
Tasten
Taste Funktion Beschreibung
Uhr Einstellen einer Uhrfunktion.
,
Aufheiz- und Restwärmeanzeige
Wenn Sie eine Backofenfunktion einschalten, leuchten die Balken
nacheinander auf. Mit den Balken wird der
Anstieg bzw. das Fallen der Backofentemperatur gekennzeichnet.
Minus, Plus Einstellen der Zeit.
im Display
1
Aufheiz- und Restwärmeanzeige
2
Wassertank (nur bei ausgewählten Mo-
3
dellen)
Speisenthermometer (nur ausgewählte
4
Modelle)
Türverriegelung (nur ausgewählte Mo-
5
4567
delle)
Stunden/Minuten
6
Uhrfunktionen
7
Wenn Sie das Gerät ausschalten, zeigt das
Display die Restwärme
Temperatur im Backofen über 40 °C liegt.
Drehen Sie den Temperaturwahlknopf nach
links oder rechts, um die Backofentemperatur im Display anzuzeigen.
an, wenn die
Uhrfunktionen
Sym-
bol
Drücken Sie zum Ändern der Uhrfunktion wiederholt die Taste
Funktion Beschreibung
Kurzzeit-We-
cker
Tageszeit Einstellen, Ändern oder Abfragen der Tageszeit. Siehe „Ein-
Dauer Einstellen der Betriebsdauer. Stellen Sie zunächst die ge-
Ende Einstellen der Abschaltzeit für das Gerät. Stellen Sie zunächst
Einstellen einer Countdownzeit.
stellen der Tageszeit“.
wünschte Ofenfunktion ein, bevor Sie Einstellungen für diese
Funktion vornehmen.
die gewünschte Ofenfunktion ein, bevor Sie Einstellungen für
diese Funktion vornehmen. Mit den Funktionen „Dauer“ und
„Ende“ (Zeitverzögerung) können Sie festlegen, wann das Gerät ein- und ausgeschaltet werden soll.
.
Drücken Sie , um Ihre Einstellungen
für die Uhrfunktionen zu bestätigen,
Page 33

DEUTSCH 33
oder warten Sie 5 Sekunden, bis die Einstellungen automatisch bestätigt werden.
Einstellen von Dauer oder Ende
1.
Drücken Sie die Taste
bis im Display das Symbol
blinkt.
2. Drücken Sie + oder -, um die Minuten
einzustellen.
3.
4. Drücken Sie + oder -, um die Stunde
5.
6. Nach Ablauf der eingestellten Zeit blin-
drücken, wechselt das Gerät zur Einstellung
der Funktion Ende
Einstellen des Kurzzeitweckers
Zum Einstellen einer Countdownzeit. Die
einstellbare Höchstzeit beträgt 2 Stunden
30 Minuten. Diese Funktion wirkt sich nicht
auf den Betrieb des Backofens aus. Sie können den Kurzzeit-Wecker jederzeit einstellen, auch wenn das Gerät ausgeschaltet ist.
bestätigen.
Mit
einzustellen.
bestätigen.
Mit
ken das Symbol
eingestellte Zeit. Es ertönt für zwei Minuten ein Signal. Das Gerät schaltet
sich aus. Schalten Sie den Signalton
durch Drücken einer beliebigen Taste
oder durch Öffnen der Backofentür aus.
Wenn Sie die Taste
Einstellung der Funktion Dauer
wiederholt,
oder
oder und die
während der
.
1.
Drücken Sie wiederholt auf
und 00 im Display blinken.
2. Stellen Sie den Kurzzeitwecker mit der
Taste + oder - ein. Beim ersten Einstellen werden die Minuten und Sekunden
berechnet. Ist die eingestellte Zeit länger als 60 Minuten, wird im Display das
Symbol
rechnet jetzt die Zeit in Stunden und
Minuten.
3. Der Kurzzeitwecker wird nach fünf Sekunden automatisch eingeschaltet.
4. Nach Ablauf der Zeit ertönt zwei Minuten lang ein Signalton. 00:00 und
blinken im Display. Drücken Sie eine
beliebige Taste, um den Signalton abzustellen.
Wenn Sie den Kurzzeitwecker bei ein-
geschalteten Funktionen „Dauer“
oder „Ende“ einstellen, leuchtet im Display das Symbol
Garzeitmesser
Mit dem Garzeitmesser kann die Betriebsdauer des Backofens überwacht werden.
wiederholt drücken, bis das Display die
Zeit ohne Uhr-Symbol anzeigt.
Der Garzeitmesser kann nicht verwen-
det werden, wenn die Funktionen
„Dauer“
sind.
angezeigt. Das Gerät be-
auf.
oder „Ende“ eingeschaltet
, bis
Verwendung des Zubehörs
Warnung! Siehe Sicherheitshinweise.
Kerntemperatursensor
Der Kerntemperatursensor misst die Kerntemperatur im Inneren des Fleisches. Das
Gerät wird ausgeschaltet, sobald das
Fleisch die eingestellte Temperatur erreicht
hat.
Zwei Temperaturen sind einzustellen:
• Die Backofentemperatur.
• Die Kerntemperatur. Richtwerte finden
Sie in der folgenden Tabelle.
Empfohlene Kerntemperatureinstellungen
50 °C Englisch
60 °C Medium
70 °C Durch
Wichtig! Verwenden Sie nur den
mitgelieferten Kerntemperatursensor oder
ein Originalersatzteil.
1. Stellen Sie die Backofenfunktion und
Temperatur ein.
Page 34

DEUTSCH 34
2. Führen Sie die Spitze des Kerntemperatursensors mittig in das vorbereitete
Fleischstück ein.
3. Stecken Sie den Stecker des Kerntemperatursensors in die Buchse am vorderen Rahmen des Backofens.
Das Display zeigt das Symbol des
Kernstemperatursensors
Standardkerntemperatur an. Benutzen
Sie den Kerntemperatursensor zum ersten Mal, zeigt das Display 60 °C als
Standardkerntemperatur an.
4.
Wenn
dardkerntemperatur durch Drehen des
Temperaturwahlknopfes ändern.
5.
Drücken Sie
peratur zu speichern, oder warten Sie
10 Sekunden, bis die Einstellung automatisch gespeichert wird. Die neue
Standardkerntemperatur wird bei der
nächsten Verwendung des Kerntemperatursensors angezeigt.
6. Der Kerntemperatursensor muss während des Garvorgangs im Fleisch und
der Stecker in der Buchse bleiben.
7. Sobald das Fleischstück die eingestellte
Kerntemperatur erreicht hat, blinken
die Symbole für den Kerntemperatur-
sensor
ratur. Es ertönt für zwei Minuten ein
Signal. Das Gerät wird automatisch
ausgeschaltet. Drücken Sie eine beliebige Taste, um den Signalton abzustellen.
8. Ziehen Sie den Stecker des Kerntemperatursensors aus der Buchse. Nehmen
Sie das Fleischstück aus dem Gerät.
Bei Verwendung des Kerntemperatursensors können die Funktionen Dauer
und Ende nicht eingestellt werden.
Sie können die Kerntemperatur jederzeit
während des Garvorgangs ändern:
1.
Drücken Sie „
– Viermal - Das Display zeigt alle 10
blinkt, können Sie die Stan-
, um die neue Kerntem-
und die Standardkerntempe-
“:
Sekunden abwechselnd die eingestellte und die aktuelle Kerntemperatur an.
und die
– Fünfmal - Das Display zeigt alle 10
Sekunden abwechselnd die aktuelle
und die eingestellte Backofentemperatur an.
– Sechsmal - Das Display zeigt die ein-
gestellte Backofentemperatur an.
2. Um die Temperatur zu ändern, drehen
Sie den Temperaturwahlknopf.
Teleskopauszüge
Einsetzen der Teleskopauszüge
Sie können die Teleskopauszüge in jede
Einsatzebene einsetzen.
Vergewissern Sie sich, dass die Teleskopauszüge auf beiden Seiten in dieselbe
Ebene eingesetzt sind.
Das Anschlagstück (A), das sich an einem
Ende des Teleskopauszugs befindet, muss
nach oben weisen.
1
Verwendung der Teleskopauszüge
Die Teleskopauszüge erleichtern das Einsetzen und Herausnehmen der Roste.
1
Ziehen Sie den
rechten und den linken Teleskopauszug
heraus.
2
2
°C
Setzen Sie den
Kombirost auf die
Teleskopauszüge
und schieben Sie
diese vorsichtig in
das Gerät.
A
°C
Page 35

DEUTSCH 35
Sie können die Teleskopauszüge auch
zusammen mit den mitgelieferten
Backblechen und Töpfen verwenden (siehe
„Gerätebeschreibung“).
Achten Sie darauf, die Teleskopauszüge
ganz in das Gerät zu schieben, bevor Sie
die Backofentür schliessen.
Zusatzfunktionen
Kindersicherung
Wenn die Kindersicherung aktiviert ist, kann
der Backofen nicht bedient werden. Damit
wird sichergestellt, dass Kinder das Gerät
nicht versehentlich einschalten.
Ein- und Ausschalten der
Kindersicherung:
1. Stellen Sie keine Backofenfunktion ein.
2.
Halten Sie die Tasten
zeitig 2 Sekunden lang gedrückt.
3.
Es ertönt ein Signalton. SAFE und
leuchten bzw. erlöschen im Display (je
nachdem, ob Sie die Kindersicherung
ein- oder ausschalten).
Die Tür ist verriegelt, wenn der Back-
ofen über eine pyrolytische Reinigung
verfügt.
SAFE und
einen Knopf drehen oder eine Taste drücken.
Abschaltautomatik
Das Gerät wird aus Sicherheitsgründen
nach einiger Zeit automatisch ausgeschaltet, wenn:
• Eine Backofenfunktion eingestellt ist.
• Sie die Backofentemperatur nicht ändern.
Backofentempera-
leuchten im Display, wenn Sie
tur
30 - 115 °C 12,5 Std.
und + gleich-
Abschaltzeit
Vorsicht! Reinigen Sie die
Teleskopauszüge nicht im
Geschirrspüler. Ölen oder fetten Sie die
Teleskopauszüge nicht.
Backofentempera-
tur
120 - 195 °C 8.5 Std.
200 - 245 °C 5.5 Std.
250 °C 3.0 Std.
Drücken Sie eine beliebige Taste, um das
Gerät nach der Abschaltautomatik wieder
einzuschalten.
Wichtig! Die Abschaltautomatik kann mit
allen Backofenfunktionen außer „Dauer“,
„Ende“ und „KT Sensor“ verwendet werden.
Kühlventilator
Wenn das Gerät in Betrieb ist, wird automatisch das Kühlgebläse eingeschaltet, um
die Geräteflächen zu kühlen. Nach dem Abschalten des Geräts läuft das Kühlgebläse
weiter, bis das Gerät abgekühlt ist.
Sicherheits-Thermostat
Ein unsachgemäßer Gebrauch des Geräts
oder defekte Bauteile können zu einer gefährlichen Überhitzung führen. Um dies zu
verhindern, ist der Backofen mit einem Sicherheitsthermostat ausgestattet, der die
Stromzufuhr unterbrechen kann. Die Wiedereinschaltung erfolgt automatisch bei einen Temperaturabfall.
Abschaltzeit
Praktische Tipps und Hinweise
• Das Gerät hat vier Einschubebenen. Die
Einschubebenen werden vom Boden des
Backofens aus gezählt.
• Das Gerät hat ein exklusives Umluft- und
Dampfsystem, das die Luft umwälzt und
den Dampf wieder aufbereitet. Das Ga-
Page 36

DEUTSCH 36
ren mit Dampf macht Ihre Speisen innen
weich und außen knusprig. Gardauer und
Energieverbrauch werden dabei auf ein
Minimum reduziert.
• Es kann sich Feuchtigkeit im Gerät oder
an den Glastüren niederschlagen. Das ist
normal. Stehen Sie beim Öffnen der Tür
während des Betriebs stets in sicherer
Entfernung zum Gerät. Um die Kondensation zu reduzieren, heizen Sie vor dem
Garen den Backofen immer 10 Minuten
vor.
• Nach jedem Gebrauch des Geräts die
Feuchtigkeit abwischen.
• Stellen Sie keine Gegenstände direkt auf
den Backofenboden und bedecken Sie
das Kochgeschirr nicht mit Alu-Folie. Dies
könnte das Garergebnis beeinträchtigen
und die Emailbeschichtung beschädigen.
Backen von Kuchen
• Die Backofentür nicht öffnen, bevor 3/4
der Backzeit abgelaufen ist
• Wenn Sie zwei Backbleche gleichzeitig
nutzen, lassen Sie eine Ebene dazwischen
frei.
Gewicht
(kg)
1Schwein/Lamm
Gargut Backofenfunkti-onStufe Back-
Garen von Fleisch und Fisch
• Setzen Sie beim Garen von Speisen mit
hohem Fettgehalt eine Brat- und Fettpfanne ein, damit keine dauerhaften Flecken im Backofen verbleiben.
• Das Fleisch vor dem Anschneiden mindestens 15 Minuten ruhen lassen, damit
der Fleischsaft nicht ausläuft.
• Um Rauchentwicklung beim Braten zu
vermindern, geben Sie etwas Wasser in
die Brat- und Fettpfanne. Um Kondensierung des Rauchs zu vermeiden, Wasser
zugeben, wenn die Brat- und Fettpfanne
ausgetrocknet ist.
Garzeiten
Die Garzeiten hängen von der Art des Garguts, seiner Konsistenz und der Menge ab.
Achten Sie beim Garen anfangs immer auf
das Gargut. Finden Sie selbst die besten
Einstellungen (Garstufe, Garzeit, usw.) für
Kochgeschirr, Rezepte und Mengen bei der
Verwendung dieses Geräts heraus.
ofentemperatur
(°C)
2 180 100 - 110
Garzeit
(Min.)
1Kalb/Rind
1,2 Hähnchen/Hasen-
braten
1,5 Ente
3Gans
4Pute
1Fisch
1 Gefüllte Paprika oder
Tomaten/Ofenkartof-
feln
Fertigkuchen
2 190 70 - 100
2 200 70 - 80
1 160 120 - 150
1 160 150 - 200
1 180 210 - 240
2 190 30 - 40
2 190 50 - 70
2 160 45 - 55
Page 37

DEUTSCH 37
Gewicht
(kg)
1 Pasteten, Kuchen
Bisquitboden
2 Lasagne
1Weissbrot
1Pizza
Gargut Backofenfunkti-onStufe Back-
usw.
Reinigung und Pflege
Warnung! Siehe Sicherheitshinweise.
• Feuchten Sie ein weiches Tuch mit warmem Wasser und etwas Reinigungsmittel
an, und reinigen Sie damit die Vorderseite des Geräts.
• Reinigen Sie die Metalloberflächen mit
einem handelsüblichen Reinigungsmittel.
• Reinigen Sie den Innenraum des Backofens nach jedem Gebrauch. So lassen
sich Verschmutzungen leichter entfernen
und es kann nichts einbrennen.
• Entfernen Sie hartnäckige Verschmutzungen mit speziellen Backofenreinigern.
• Reinigen Sie alle Zubehörteile nach jedem Gebrauch und lassen Sie sie trocknen. Feuchten Sie ein weiches Tuch mit
warmem Wasser und etwas Spülmittel
an.
• Zubehörteile mit Antihaftbeschichtung
dürfen nicht mit aggressiven Reinigungsmitteln, scharfkantigen Gegenständen
oder im Geschirrspüler gereinigt werden.
Die Antihaftbeschichtung kann dadurch
zerstört werden.
Geräte mit Edelstahl- oder Aluminiumfront:
Reinigen Sie die Backofentür nur mit einem
nassen Schwamm und trocknen Sie sie mit
einem weichen Tuch ab.
ofentemperatur
(°C)
2 160 80 - 100
3 140 25 - 35
2 180 45 - 60
2 190 50 - 60
1 190 —
Verwenden Sie keine Stahlwolle, Säuren
oder Scheuermittel, da diese die Oberflächen beschädigen können. Reinigen Sie das
Bedienfeld auf gleiche Weise.
Einschubschienen
Die Einschubschienen können zur Reinigung
der Seitenwände entfernt werden.
Entfernen von Einschubschienen
1
Ziehen Sie die Einschubschiene vorne
von der Seitenwand
weg.
Einsetzen der Einschubschienen
Führen Sie zum Einsetzen der Einschubschienen die oben aufgeführten Schritte in
umgekehrter Reihenfolge durch.
200
2
Ziehen Sie die Einschubschiene hinten
von der Seitenwand
weg und nehmen
Sie sie heraus.
Garzeit
(Min.)
20 - 30
2
1
Page 38

DEUTSCH 38
Die abgerundeten Enden der Einschubschienen müssen nach vorn zei-
gen.
Pyrolyse
Warnung! Das Gerät wird sehr heiß. Es
besteht Verbrennungsgefahr.
Vorsicht! Falls das Gerät ein Kochfeld
besitzt, nehmen Sie dieses während
der Pyrolyse nicht in Betrieb. Andernfalls
kann das Gerät beschädigt werden.
1. Nehmen Sie die herausnehmbaren Ein-
hängegitter (falls vorhanden) und das
Zubehör aus dem Gerät. Siehe „Entfernen der Einhängegitter“.
Vorsicht! Lassen Sie die
herausnehmbaren Einhängegitter
während der Reinigung nicht im Backofen.
Gefahr von Schäden.
2. Entfernen Sie grobe Rückstände von
Hand.
3. Schließen Sie die Backofentür vollstän-
dig.
Die Reinigung startet nicht, wenn Sie
die Backofentür nicht schließen.
4. Aktivieren Sie die Pyrolyse-Funktion.
Weiteres hierzu finden Sie unter „Ofenfunktionen“.
5. Wenn das Display P1 anzeigt, drücken
, um den Vorgang zu starten. Sie
Sie
können den Beginn der Reinigung mit
der Funktion „Ende“ verzögern.
Die Pyrolysereinigung dauert 2 Stun-
den.
Öffnen Sie erst nach Abschluss des
Vorgangs die Backofentür, da sonst
der Vorgang abgebrochen wird. Um Verbrennungen zu verhindern, wird die Backofen-Tür automatisch verriegelt, wenn der
Backofen eine bestimmte Temperatur er-
reicht hat. Das Display zeigt das Symbol
an. Wenn der Backofen abkühlt, wird die
Tür automatisch entriegelt.
Zum Ausschalten der Pyrolyse vor de-
ren eigentlichem Ende, drehen Sie den
Backofen-Einstellknopf auf die Position
„Aus“.
Nach Abschluss der pyrolytischen Reinigung
zeigt das Display die Tageszeit an. Die
Backofentür bleibt verriegelt. Sobald das
Gerät abgekühlt ist, ertönt ein akustisches
Signal und die Backofentür wird entriegelt.
Während der Pyrolyse ist die Lampe
ausgeschaltet.
Reinigen Erinnerungsfunktion
Durch ein 10 Sekunden langes Blinken von
PYR im Display nach jedem Ein- und Ausschalten des Geräts werden Sie auf die
Notwendigkeit einer Pyrolysereinigung hingewiesen.
Die Erinnerungsfunktion erlischt im
Display, wenn:
• Die Pyrolyse beendet ist
•Sie + und - gleichzeitig drücken, während
PYR im Display blinkt.
Backofenlampe
Warnung! Gehen Sie beim
Austauschen der Backofenlampe
sorgsam vor. Es besteht die Gefahr eines
elektrischen Schlags.
Bevor Sie die Backofenlampe
austauschen:
• Schalten Sie den Backofen aus.
• Entfernen Sie die Sicherungen aus dem
Sicherungskasten, oder schalten Sie den
Schutzschalter aus.
Legen Sie ein Tuch auf den Backofen-
boden, um die Lampe und das Glas zu
schützen.
Halogenlampen immer mit einem Tuch anfassen, um ein Einbrennen von Fett (Fingerabdrücke) zu vermeiden.
1. Drehen Sie die Glasabdeckung gegen
den Uhrzeigersinn und nehmen Sie sie
ab.
2. Reinigen Sie die Glasabdeckung.
Page 39

DEUTSCH 39
3. Tauschen Sie die Lampe für die Innenbeleuchtung des Backofens gegen eine
neue, bis 350 °C hitzebeständige Backofenlampe (40 Watt, 230 V, 50 Hz) aus
(Fassung: G9).
4. Bringen Sie die Glasabdeckung wieder
an.
Reinigen der Backofentür
Die Backofentür ist mit vier Glasscheiben
ausgestattet. Die Backofentür und die inneren Glasscheiben können zur Reinigung herausgenommen werden.
Versuchen Sie nicht, die Glasscheiben
herauszunehmen, solange die Backofentür noch am Gerät montiert ist: Die Tür
kann zuklappen.
Abnehmen der Backofentür und
Herausnehmen der Glasscheiben
1
Öffnen Sie die Tür
vollständig.
2
Heben Sie die Hebel an den beiden
Scharnieren an und
klappen Sie sie
nach vorn.
3
Schließen Sie die
Backofentür bis zur
ersten Raststellung
(halb). Anschließend ziehen Sie sie
nach vorn aus der
Halterung heraus.
5
Lösen Sie das Verriegelungssystem,
um die Glasscheiben zu entfernen.
4
Legen Sie die Tür
auf ein weiches
Tuch auf einer stabilen Fläche.
6
90°
Drehen Sie die zwei
Befestigungselemente um 90° und
nehmen Sie sie aus
der Halterung.
Page 40

DEUTSCH 40
7
2
1
Heben Sie eine
Glasscheibe nach
der anderen vorsichtig an (Schritt 1)
und entfernen Sie
sie (Schritt 2). Beginnen Sie mit der
obersten Glasscheibe.
Reinigen Sie die Glasscheiben mit Wasser
und Spülmittel. Trocknen Sie die Glasscheiben sorgfältig ab.
Einbauen der Backofentür und der
Glasscheiben
Nach der Reinigung müssen die Backofentür
und die Glasscheiben wieder eingebaut
werden. Führen Sie die oben aufgeführten
Schritte in umgekehrter Reihenfolge durch.
Achten Sie darauf, die Glasscheiben (1, 2
und 3) in der richtigen Reihenfolge einzusetzen. Die mittlere Scheibe (2) hat einen Dekorrahmen. Der bedruckte Bereich muss zur
Innenseite der Tür zeigen. Vergewissern Sie
sich nach der Montage, dass sich der Glasscheibenrahmen (2) an den bedruckten Zonen nicht rau anfühlt.
3
2
1
Achten Sie darauf, dass Sie die oberste
Glasscheibe ordnungsgemäß in die Aufnahmen einsetzen.
Was tun, wenn …
Warnung! Siehe Sicherheitshinweise.
Problem Mögliche Ursache Abhilfe
Der Backofen heizt nicht. Das Gerät ist ausgeschaltet. Schalten Sie das Gerät ein.
Der Backofen heizt nicht. Die Uhr ist nicht eingestellt. Stellen Sie die Uhrzeit ein.
Siehe „Einstellen der Tageszeit“.
Page 41

DEUTSCH 41
Problem Mögliche Ursache Abhilfe
Der Backofen heizt nicht. Die erforderlichen Einstel-
Der Backofen heizt nicht. Die Abschaltautomatik ist
Der Backofen heizt nicht. Die Kindersicherung ist ein-
Der Backofen heizt nicht. Die Sicherung im Siche-
Die Backofenlampe leuchtet
nicht.
Die Pyrolyse startet nicht. Im
Display erscheint C1.
Die Pyrolyse startet nicht. Im
Display erscheint C2.
Die Pyrolyse startet nicht. Im
Display erscheint C3.
Im Display erscheint F102. Die Tür ist nicht richtig ge-
lungen wurden nicht vorgenommen.
eingeschaltet.
geschaltet.
rungskasten hat ausgelöst.
Die Backofenlampe ist defekt.
Die Einschubschienen wurden nicht herausgenommen.
Die Funktion Pyrolyse oder
Auftauen wird eingestellt,
wenn sich der Stecker des
KT Sensors in der Buchse
befindet.
Die Tür ist nicht richtig geschlossen oder die Türverriegelung ist defekt.
schlossen oder die Türverriegelung ist defekt.
Vergewissern Sie sich, dass
die Einstellungen richtig
sind.
Siehe „Abschaltautomatik“.
Siehe hierzu „Ausschalten
der Kindersicherung“.
Prüfen Sie die Sicherung.
Falls die Sicherung öfter als
einmal auslöst, wenden Sie
sich an eine Elektrofachkraft.
Ersetzen Sie die Backofenlampe.
Entfernen Sie die Einschubschienen.
Ziehen Sie den Stecker des
KT Sensors aus der Buchse.
Schliessen Sie die Tür vollständig.
1. Schliessen Sie die Tür
vollständig.
2. Schalten Sie das Gerät
über die Haussicherung
oder den Schutzschalter
im Sicherungskasten aus
und wieder ein.
3. Zeigt das Display erneut F102, wenden Sie
sich an den Kundendienst.
Page 42

DEUTSCH 42
Problem Mögliche Ursache Abhilfe
Der Backofen heizt nicht. Im
Display erscheint Demo.
Im Display erscheint ein
Fehlercode.
Dampf und Kondenswasser
schlagen sich auf Speisen
und im Backofen nieder.
Wenn Sie das Problem nicht selbst lösen
können, wenden Sie sich an Ihren Fachhändler oder an den Kundendienst.
Wir empfehlen, hier folgende Daten zu notieren:
Modell (MOD.) .........................................
Produktnummer (PNC) .........................................
Seriennummer (S.N.) .........................................
Der Demo-Modus ist eingeschaltet.
Ein Elektronikfehler ist aufgetreten.
Die Speisen standen zu lange im Backofen.
Die vom Kundendienst benötigten Daten
finden Sie auf dem Typenschild. Das Typenschild befindet sich am Frontrahmen des
Garraums. Entfernen Sie nicht das Typenschild vom Garraum.
1. Schalten Sie das Gerät
aus.
2. Halten Sie die Taste +
gedrückt.
3. Wenn ein Signal ertönt,
drehen Sie den Backofen-Einstellknopf auf
die erste Funktion. De-
mo blinkt im Display.
4. Drehen Sie den Backofen-Einstellknopf in Position „Aus“.
5. Lassen Sie die Taste +
los.
6. Drehen Sie den Temperaturwahlknopf dreimal
im Uhrzeigersinn. Ein
Signalton ertönt dreimal. Der Demo-Betrieb
ist ausgeschaltet.
1. Schalten Sie das Gerät
über die Haussicherung
oder den Schutzschalter
im Sicherungskasten aus
und wieder ein.
2. Wenn der Fehlercode
immer noch angezeigt
wird, wenden Sie sich
an den Kundendienst.
Speisen nach Beendigung
des Gar- oder Backvorgangs nicht länger als 15 20 Minuten im Backofen lassen.
Page 43

DEUTSCH 43
Technische Daten
Abmessungen (innen) Breite
Nutzvolumen 57 Liter
Grösse des Kuchenblechs 1140 cm²
Heizelement für Oberhitze 800 W
Heizelement für Unterhitze 1000 W
Rost 1650 W
Gebläse 2000 W
Gesamtleistung 2515 W
Spannung 230 V
Frequenz 50 Hz
Anzahl der Funktionen 10
Energieverbrauch bei Standardbela-
dung und Ober- und Unterhitze
Leistungsaufnahme bei Standardbela-
dung und Umluft
Höhe
Tiefe
0.79 kWh
0.78 kWh
Umwelttipps
Das Symbol auf dem Produkt oder seiner
Verpackung weist darauf hin, dass dieses
Produkt nicht als normaler Haushaltsabfall
zu behandeln ist, sondern an einem
Sammelpunkt für das Recycling von
elektrischen und elektronischen Geräten
abgegeben werden muss. Durch Ihren
Beitrag zum korrekten Entsorgen dieses
Produkts schützen Sie die Umwelt und die
Gesundheit Ihrer Mitmenschen. Umwelt und
Gesundheit werden durch falsches
Entsorgen gefährdet. Weitere
Informationen über das Recycling dieses
Produkts erhalten Sie von Ihrer Gemeinde,
Ihrer Müllabfuhr oder dem Geschäft, in dem
Sie das Produkt gekauft haben.
Verpackungsmaterial
Das Verpackungsmaterial ist umweltfreundlich und wieder verwertbar. Kunststoffteile
sind mit internationalen Abkürzungen wie
PE, PS usw. gekennzeichnet. Entsorgen Sie
das Verpackungsmaterial in den dafür vorgesehenen Behältern der kommunalen Entsorgungsstellen.
437
328
401
IKEA Garantie
Wie lang ist die IKEA Garantie gültig?
Diese Garantie ist für (5) fünf Jahre gültig
ab dem Originalkaufdatum Ihres Gerätes
bei IKEA; sollte das Gerät die Bezeichnung
"LAGAN" tragen, gilt die Garantie in die-
Page 44

DEUTSCH 44
sem Fall nur (2) zwei Jahre. Als Kaufnachweis ist der Originalkassenbon oder die
Originalrechnung erforderlich. Werden im
Rahmen der Garantie Arbeiten ausgeführt,
so verlängert sich dadurch die Garantiezeit
weder für das Gerät noch für die neuen Teile.
Welche Geräte sind nicht durch die IKEA
(5) Fünfjahresgarantie abgedeckt?
Die Geräte-Serie LAGAN und alle Geräte,
die vor dem 1. August 2007 bei IKEA gekauft wurden.
Wer übernimmt den Kundendienst?
Der IKEA Kundendienst wird diesen Service
über seinen eigenen Kundendienst oder
über ein autorisiertes Partner-Netzwerk
durchführen lassen.
Was deckt die Garantie ab?
Die Garantie deckt Material- und Produktionfehler ab. Sie gilt ab dem Datum, an dem
das Elektrogerät bei IKEA gekauft wurde.
Diese Garantie gilt nur für private Haushalte. Die Ausnahmen sind unter der Rubrik “
Was ist nicht durch diese Garantie abgedeckt?” beschrieben. Innerhalb des Garantiezeitraums werden die Kosten zur Behebung eines Fehlers wie Reparaturen, Ersatzteile, Arbeitszeit und Fahrtkosten abgedeckt, vorausgesetzt, dass das Gerät ohne
besonderen Kostenaufwand für die Reparatur zugänglich ist und dass der Fehler direkt auf einen Konstruktionsfehler oder einen Materialfehler zurückgeht, der durch
die Garantie abgedeckt ist. Bei diesen Bedingungen gelten die EU-Richtlinien (Nr.
99/44/EG) und die entsprechenden gesetzlichen Vorschriften. Teile, die ersetzt
wurden, gehen in das Eigentum von IKEA
über.
Was wird IKEA zur Lösung des Problems
tun?
IKEA hat Kundendienste, die das Produkt
untersuchen und eigenständig entscheiden,
ob das Problem durch die Garantie abgedeckt ist oder nicht. Wenn entschieden wird,
dass der Fall unter die Garantie fällt, repariert der IKEA Kundendienst oder ein autorisierter Service-Partner über seinen eigenen
Service eigenständig das defekte Produkt,
oder sie ersetzen es durch ein gleiches oder
durch ein gleichwertiges Produkt.
Was ist nicht durch diese Garantie
abgedeckt?
• Der normale Verschleiß.
• Bewusste oder durch Fahrlässigkeit entstandene Schäden, die durch eine Missachtung der Bedienungsanweisung, eine
unsachgemäße Installation oder durch
den Anschluss an eine falsche Spannung,
sowie Schäden, die durch eine chemische
oder elektrochemische Reaktion (Rost,
Korrosion oder Wasserschäden eingeschlossen - aber nicht darauf beschränkt)
- Schäden, die durch übermäßigen Kalk
in der Wasserzuleitung entstanden sind,
und Schäden, die durch ungewöhnliche
Umweltbedingungen entstanden sind.
• Verbrauchsgüter wie Batterien und Lampen.
• Nicht-funktionale und dekorative Teile,
die den normalen Betrieb des Gerätes
nicht beeinträchtigen, einschließlich Kratzer und möglicher Farbunterschiede.
• Versehentliche Beschädigung durch
Fremdobjekte der Substanzen und Reinigung oder Loslösen von Filtern, Drainagesystemen oder ReinigungsmittelSchubladen.
• Beschädigung folgender Teile: Glaskeramik, Zubehör, Geschirr und Besteckkörbe,
Zuleitungen und Drainageschläuche-/
rohre, Lampen und Lampenabdeckungen, Knöpfe/Wählschalter, Gehäuse und
Teile des Gehäuses; es sei denn, es kann
nachgewiesen werden, dass diese Schäden durch Produktionsfehler verursacht
wurden.
Page 45

DEUTSCH 45
• Fälle, in denen bei einem Besuch des
Kundendienstes kein Fehler gefunden
werden konnte.
• Reparaturen, die nicht durch unser autorisiertes Kundendienstpersonal und/oder
das autorisierte Kundendienstpersonal
unserer Vertragspartner ausgeführt wurden, oder Fälle, in denen keine Originalteile verwendet wurden.
• Reparaturen, die durch fehlerhafte und
nicht gemäß der Anleitung durchgeführte
Installation verursacht wurden.
• Die Nutzung des Gerätes in einer professionellen Art und Weise, d.h. nicht im privaten Haushalt.
• Transportschäden. Wenn ein Kunde das
Produkt nach Hause oder an eine andere
Adresse transportiert, haftet IKEA nicht
für Schäden, die während dieses Transports entstehen. Liefert IKEA das Produkt
an die Lieferadresse des Kunden aus,
dann sind Schäden, die während der
Auslieferung des Produktes entstehen,
von der Garantie abgedeckt.
• Die Kosten zur Durchführung der Erstinstallation des IKEA Gerätes. Falls der
IKEA Kundendienst oder sein autorisierter
Service-Partner das Gerät als Garantiefall instandsetzt oder ersetzt, installiert
der Kundendienst oder sein autorisierter
Service-Partner bei Bedarf das Gerät
auch wieder oder er installiert das Ersatzgerät.
Diese Einschränkung gilt nicht für fehlerfreie
Arbeiten, die von qualifiziertem Fachpersonal durchgeführt wurden, um das Gerät an
den technischen Sicherheitsstandard eines
anderen EU-Landes anzupassen.
Wie gilt die geltende Gesetzgebung des
Landes
Die IKEA Garantie gibt Ihnen spezielle gesetzliche Rechte, die alle lokalen gesetzlichen Anforderungen abdecken oder übertreffen, die einer Änderung von Land zu
Land unterworfen sind.
Gültigkeitsbereich
Für Geräte, die in einem EU-Land gekauft
und in ein anderes EU-Land mitgenommen
werden, stehen die Kundendienstleistungen
im Rahmen der Garantiebedingungen bereit, die im neuen Land gültig sind. Eine
Verpflichtung, Dienstleistungen im Rahmen
der Garantie auszuführen, besteht nur
dann, wenn:
• das Gerät den technischen Spezifikationen des Landes, in dem der Garantieanspruch gemacht wird, entspricht, und es in
Übereinstimmung mit diesen technischen
Spezifikationen des Landes installiert
wurde;
• das Gerät in Übereinstimmung mit den
Montageanleitungen und den Sicherheitsinformationen im Benutzerhandbuch
installiert wurde und diesen Anleitungen
und Informationen entspricht.
Der spezielle Kundendienst (Service) für
IKEA Geräte:
Bitte zögern Sie nicht, den speziellen IKEA
Kundendienst (Service) zu kontaktieren für:
1. einen Anspruch unter dieser Garantie;
2. die Bitte um Klärung von Fragen zur In-
stallation des IKEA Gerätes im speziellen IKEA Küchenmöbel. Der Kundendienst kann keine Fragen beantworten
zu:
– der gesamten IKEA Kücheninstallati-
on;
– Anschlüsse an die Elektrik (falls das
Gerät ohne Netzkabel und Stecker
kommt), Anschlüsse an Wasser und
Gas, da diese Arbeiten von einem
autorisierten Kundendiensttechniker
ausgeführt werden müssen.
3. die Bitte um Klärung von Fragen zu In-
halten des Benutzerhandbuchs und zu
Spezifikationen des IKEA Geräts.
Um sicherzustellen, dass wir Sie stets optimal unterstützen, lesen Sie bitte die Montageanleitung und/oder den Bedienungsanleitungsabschnitt dieser Broschüre durch,
bevor Sie sich an uns wenden.
Page 46

DEUTSCH 46
Wie können Sie uns erreichen, wenn Sie
uns benötigen?
Auf der letzten Seite dieser Broschüre finden Sie eine vollständige Liste mit offiziellen
IKEA Kundendienststellen und den jeweiligen nationalen Telefonnummern.
Wichtig! Damit Sie bei Fragen rasch die
zuständige Stelle erreichen, empfehlen wir
Ihnen, die am Ende dieser Broschüre
aufgelisteten speziellen Telefonnummern zu
benutzen. Beziehen Sie sich bitte stets auf
die Telefonnummern, die in der Broschüre
zu dem jeweiligen Gerät aufgelistet sind, zu
dem Sie Fragen haben. Bevor Sie uns
anrufen, sollten Sie die IKEA-Artikelnummer
(den 8-stelligen Zifferncode) Ihres Gerätes
zur Hand haben.
Wichtig! BITTE BEWAHREN SIE DEN
KAUFBELEG AUF! Er ist Ihr Kaufnachweis
und für einen Garantieanspruch
unerlässlich. Bitte beachten Sie, dass auf
diesem Kaufbeleg auch die IKEA
Artikelbezeichnung und die Nummer (der 8stellige Zifferncode) für jedes der Geräte,
die Sie gekauft haben, vermerkt sind.
Benötigen Sie zusätzlich Hilfe?
Für alle weiteren Fragen, die sich nicht auf
den Kundendienst Ihres Gerätes beziehen,
wenden Sie sich bitte an das Call Center
der nächsten IKEA-Einrichtung. Wir empfehlen Ihnen, die Dokumentation des Geräts
sorgfältig durchzulesen, bevor Sie uns kontaktieren.
Page 47

Country Phone number Call Fee Opening time
België
Belgique Tarif des appels nationaux 8 à 20. En semaine
България 00359 888 16 40 8 Такса за повикване от страната От 9 до 18 ч в работни дни
Česká republika 246 019721 Cena za místní hovor 8 až 20 v pracovních dnech
Danmark 70 15 09 09 Landstakst
Deutschland 01803-334532
Ελλάδα 211 176 8276 Υπεραστική κλήση 8 έως 20 κατά τις εργάσιμες ημέρες
España 91 1875537 Tarifa de llamadas nacionales De 8 a 20 en días laborables
France 0170 36 02 05 Tarif des appels nationaux 9 à 21. En semaine
Hrvatska 01 63 23 338 Lokalna cijena poziva pon. - pet. 8:00 - 16:00
Ireland 0 14845915 National call rate 8 till 20 Weekdays
Ísland 5880503 Innanlandsgjald fyrir síma 9 til 18. Virka daga
Italia 02 00620818
Κυπρος 22 030 529 Υπεραστική κλήση 8 έως 20 κατά τις εργάσιμες ημέρες
Lietuva 5 230 06 99 Nacionalinių pokalbių tarifai
Magyarország 061 998 0549 Belföldi díjszabás Hétköznap 8 és 10 óra között
Nederland
Norge 815 22052 Takst innland 8 til 20 ukedager
Österreich 0810 300486 zum Ortstarif 8 bis 20 Werktage
Polska 012 297 8787 Stawka wg taryfy krajowej Od 8 do 20 w dni robocze
Portugal 211557985 Chamada Nacional
România 021 211 08 88 Tarif apel naţional 8 - 20 în zilele lucrătoare
Россия 8 495 6662929 Действующие телефонные тарифы
Schweiz
Suisse Tarif des appels nationaux 8 à 20. En semaine
Svizzera
Slovensko (02) 3300 2554 Cena vnútroštátneho hovoru 8 až 20 v pracovných dňoch
Suomi 030 600 5203
Sverige 0775 700 500 lokalsamtal (lokal taxa)
Türkiye 212 244 0769 Ulusal arama ücreti Hafta içi saat 09:00’dan 18:00’a kadar
Україна 044 586 2078 Міжміськи дзвінки платні 9 - 21 В робочі дні
United Kingdom 020 3347 0044 National call rate 9 till 21. Weekdays
070 246 016
0900 235 45 32
and/or
0900 BEL IKEA
031 5500 324
Binnenlandse gesprekskosten 8 tot 20 Weekdagen
man.-fre. 09.00-20.00
lør. 09.00-16.00
1 søndag pr. måned, normalt første
søndag i måneden
(0,09 € / Min.*)
* aus dem Festnetzder DTAG;
Mobilfunkpreise abweichend
Tariffa applicata
alle chiamate nazionali
0,10 EUR/min (niet lokaal)Incl. BTW
Tarif für Anrufe im Bundesgebiet 8 bis 20 Werktage
Tariffa applicata
alle chiamate nazionali
Lankapuhelinverkosta
0,0835€/puhelu+0,032€/min
Matkapuhelinverkosta 0,192€/min
8 bis 20 Werktage
dalle 8 alle 20 nei giorni feriali
Pr. - Ketv.: 8:00 - 12:00, 12:45 - 17:00
Pnkt.: 8:00 - 12:00, 12:45 - 15:45
ma-vr 9.00-21.00
zat 9.00-20.00
zon 9.00-18.00
9 às 21. Dias de Semana
*excepto feriados
с 8 до 20 по рабочим дням
Время московское
dalle 8 alle 20 nei giorni feriali
arkipäivisin 8.00-20.00
mån-fre 8.30-20.00
lör-sön 9.30-18.00
47
Page 48

892954111-D-052013
© Inter IKEA Systems B.V. 2008 AA-720134-1
 Loading...