

Page 1
iP4 IB - US English
Booklet style - 12 pages
Size: 102 x 150 mm
Mat’l: 128gsm matte finish paper
Color: Black text on white background
Nov 8, 2011 (updated the battery drawing)
WARRANTY
Page 2

WELCOME
Thank you for choosing the iHome iP4 Boombox featuring SRS TruBass
This user guide will get you up and running quickly and provide helpful
hints to maximize enjoyment. For more information about this and other
iHome products, please visit www.ihomeaudio.com
GETTING STARTED
This unit can be operated using the included AC adaptor or with 6 “D”
batteries for portable use (not included).
For AC operation, place unit on a stable surface. Plug the power
adaptor into the AC jack on back of the unit and the other end into a wall
socket. The unit will charge docked iPhone or iPod while connected to
AC power.
Page 3
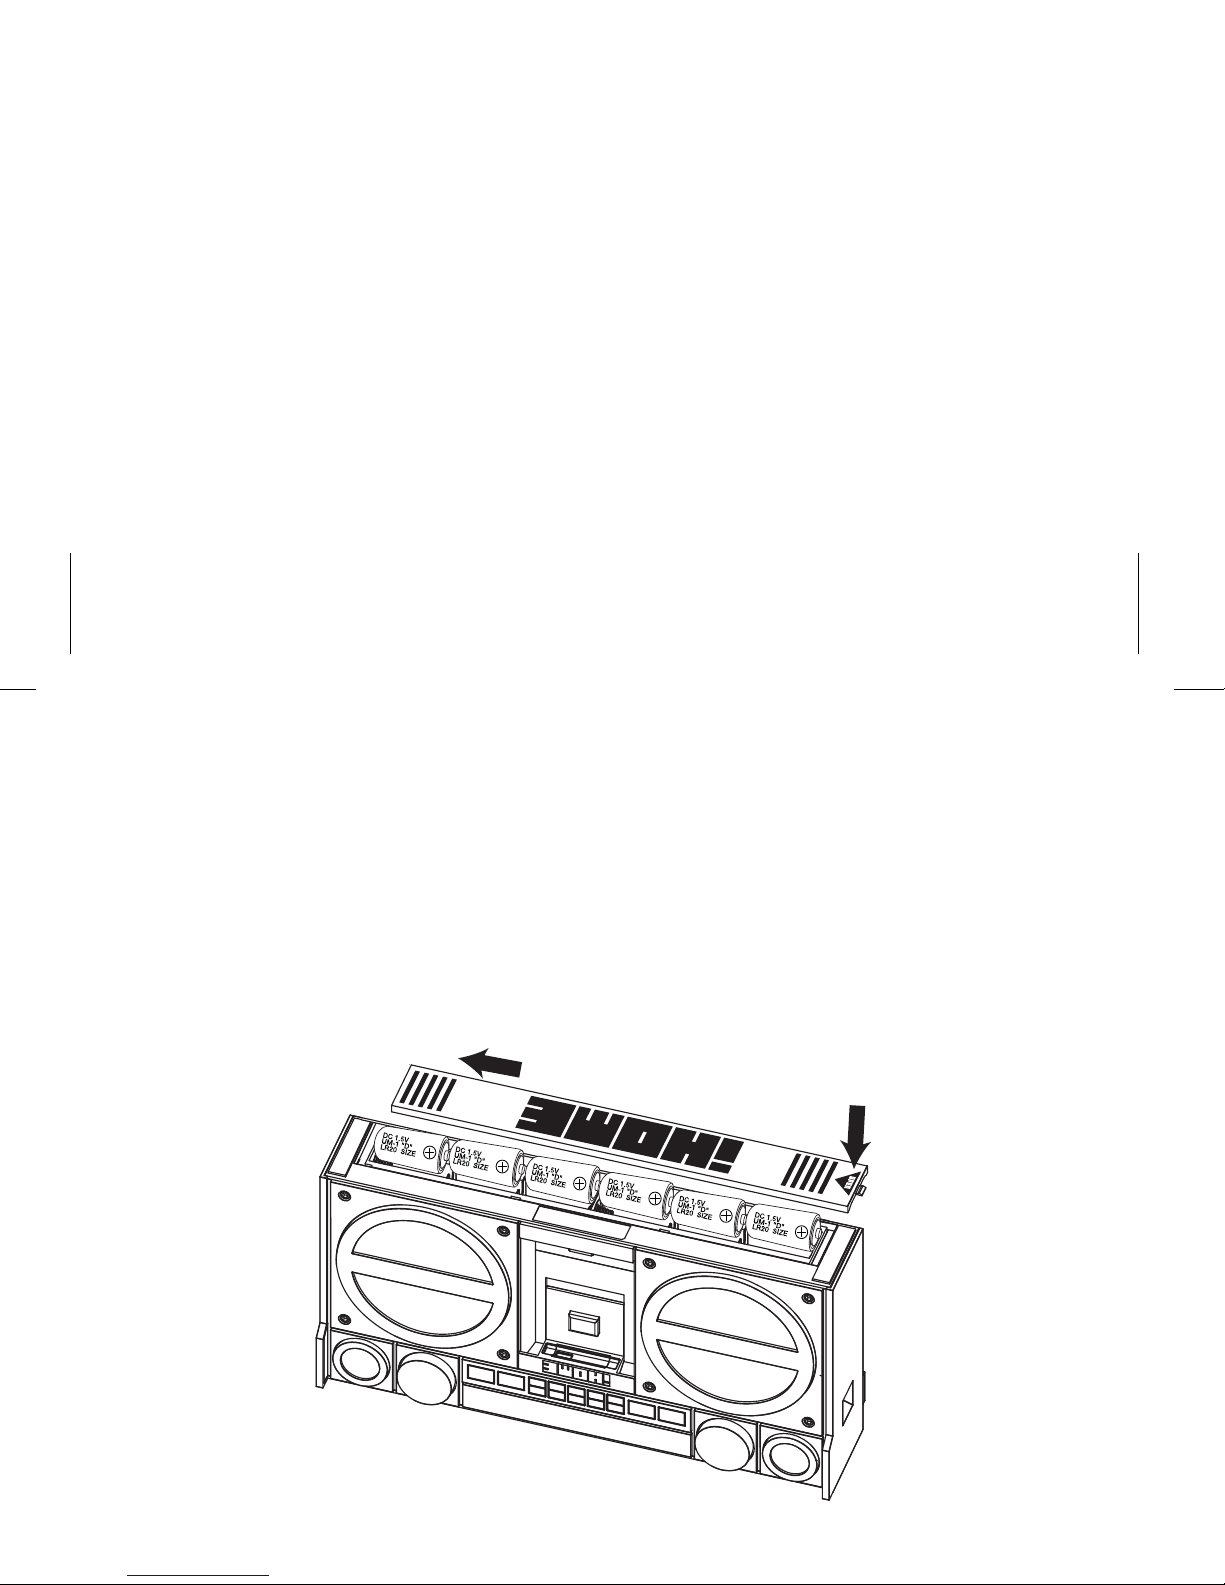
For battery operation, place unit upside down to access the battery
compartment. Press down directly on arrow with thumb and slide the
battery compartment cover to release it. If replacing existing batteries,
remove and dispose of properly. Insert 6 fresh “D” alkaline batteries with
polarity (+ or –) as shown. Replace battery compartment door.
Note: unit will not charge iPod/iPhone while operating on batteries.
Installing and adjusting the carry strap
USA-Nov 11, 2011
Page 4
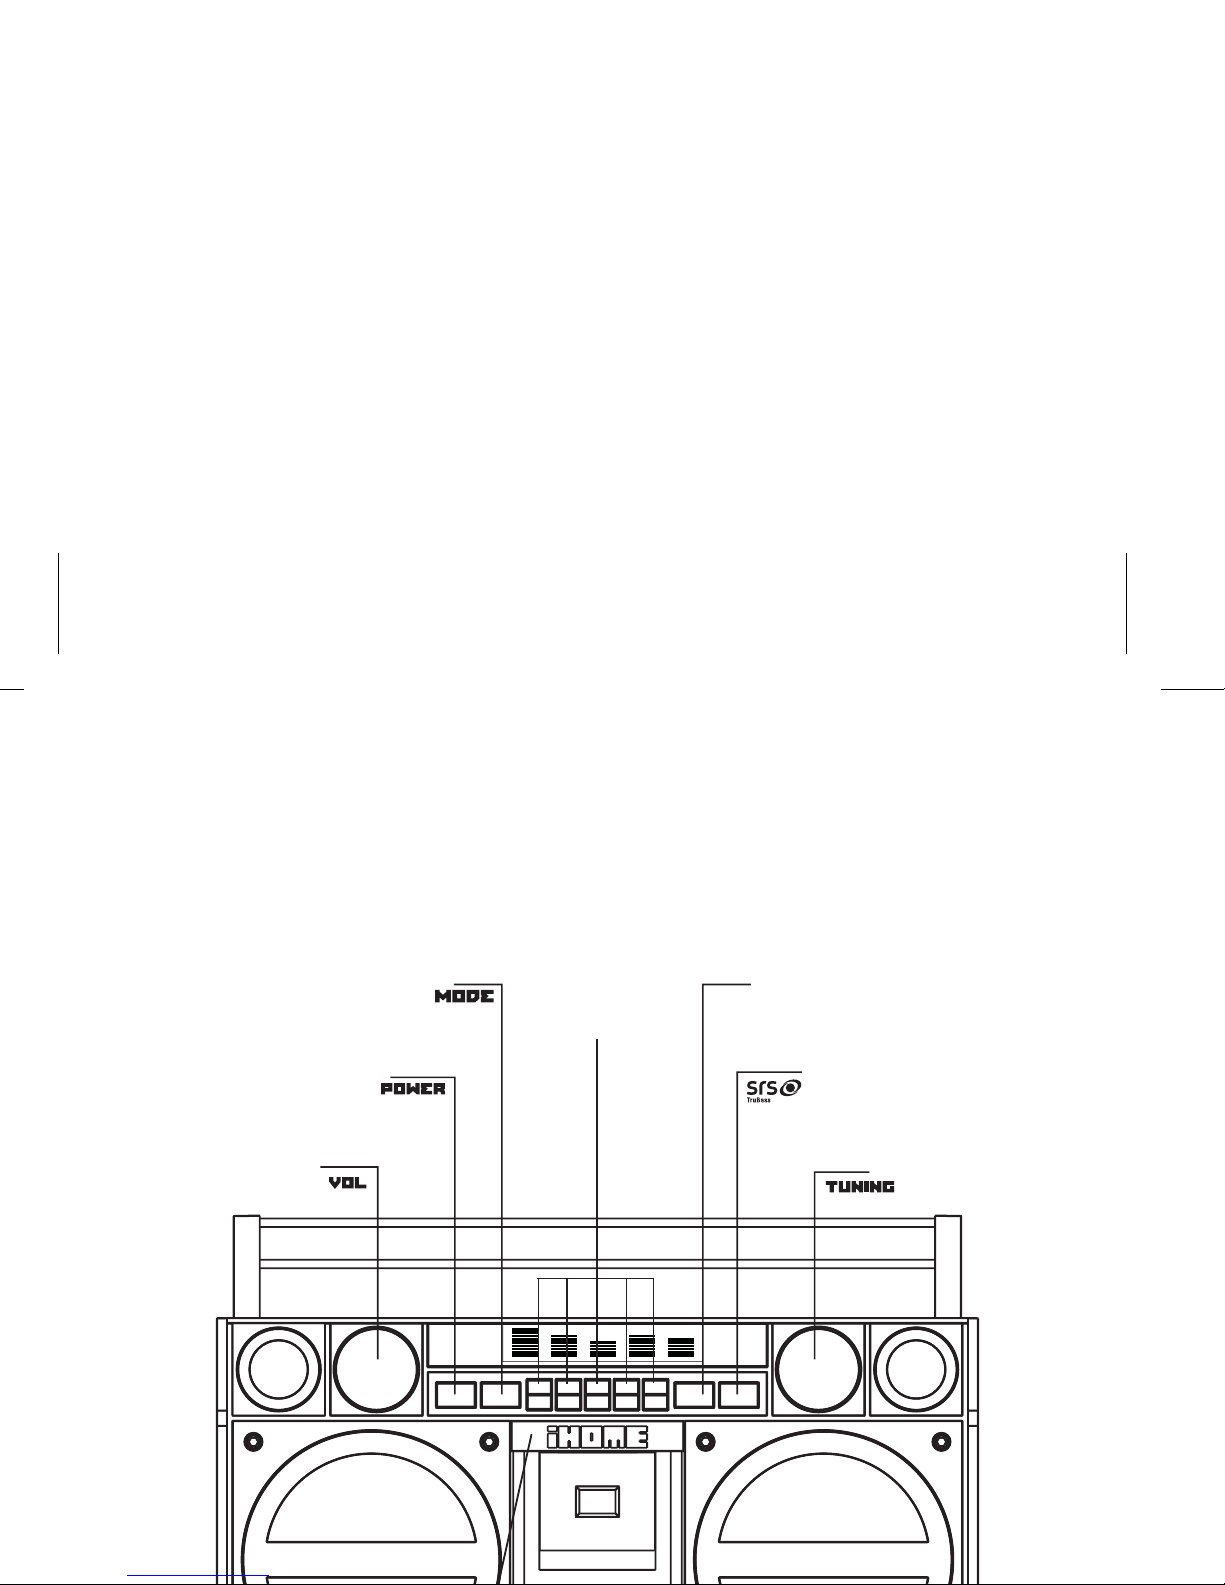
MAIN CONTROLS
Power Button:
Turn unit on/off
Play/pause Button:
Press to play or
pause iPod
FM Radio Tuning Knob:
Turn to select FM radio
station; in iPod mode, dims
display
Graphic Equalizer
Buttons:
Press the top of
a button to increase,
or the bottom of a
button to reduce
amount
of each frequency.
Volume knob:
Turn to adjust
volume level
Turn SRS TruBass
audio enhancement on/off
Mode Button:
Press to switch between FM
radio and iPod modes
Page 5
iPHONE & iPOD
Docking & Charging your iPhone or iPod
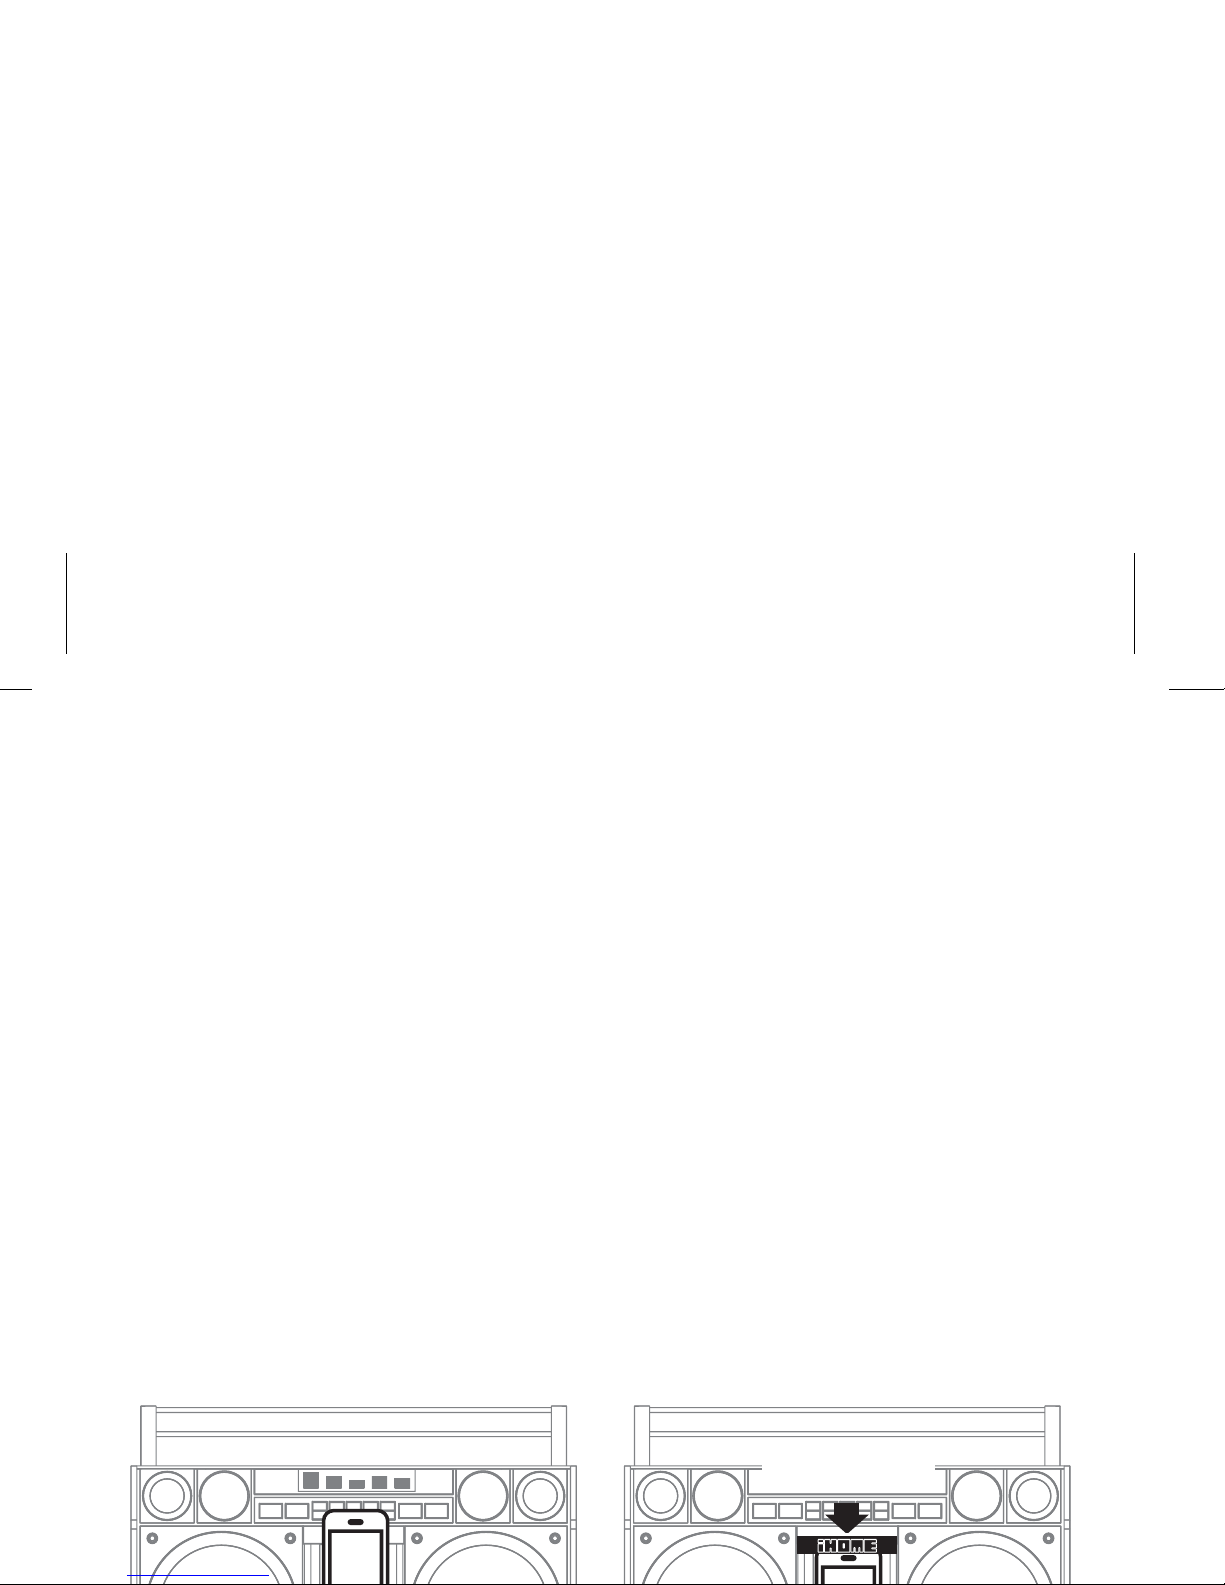
Make sure your iPod/iPhone’s firmware is up to date via iTunes before
use. Remove your iPod/iPhone from case or skin before docking. If
necessary, first slide the Docking Retention Bar upwards, then carefully
dock your iPod/iPhone onto the dock. Slide the Docking Retention Bar
down to secure your iPhone/iPod. (Smaller iPod models such as iPod nano
do not require the retention bar.) When unit is connected to power with the
AC adaptor, your iPhone or iPod will charge while docked. It will not
charge when operating on batteries.
Push down
Page 6

USING LINE-IN
LINE-IN JACK
Connect one end of a standard stereo 3.5mm audio cable (not included)
into the line-in jack on the back of the unit and the other into the
headphone or output jack of your audio device. Press the Power Button
on the unit to turn it on. Press and release the Mode Button as needed
to access iPod mode. Turn the aux device on and press play. Adjust
volume on your audio device and the unit as needed. Do not play a
line-in audio device and a docked iPhone or iPod at the same time or
you will hear both sources.
FM RADIO
Press and release the Mode Button as needed to access FM Radio
mode. Turn the FM Radio Tuner Knob to tune in the desired station.
Page 7
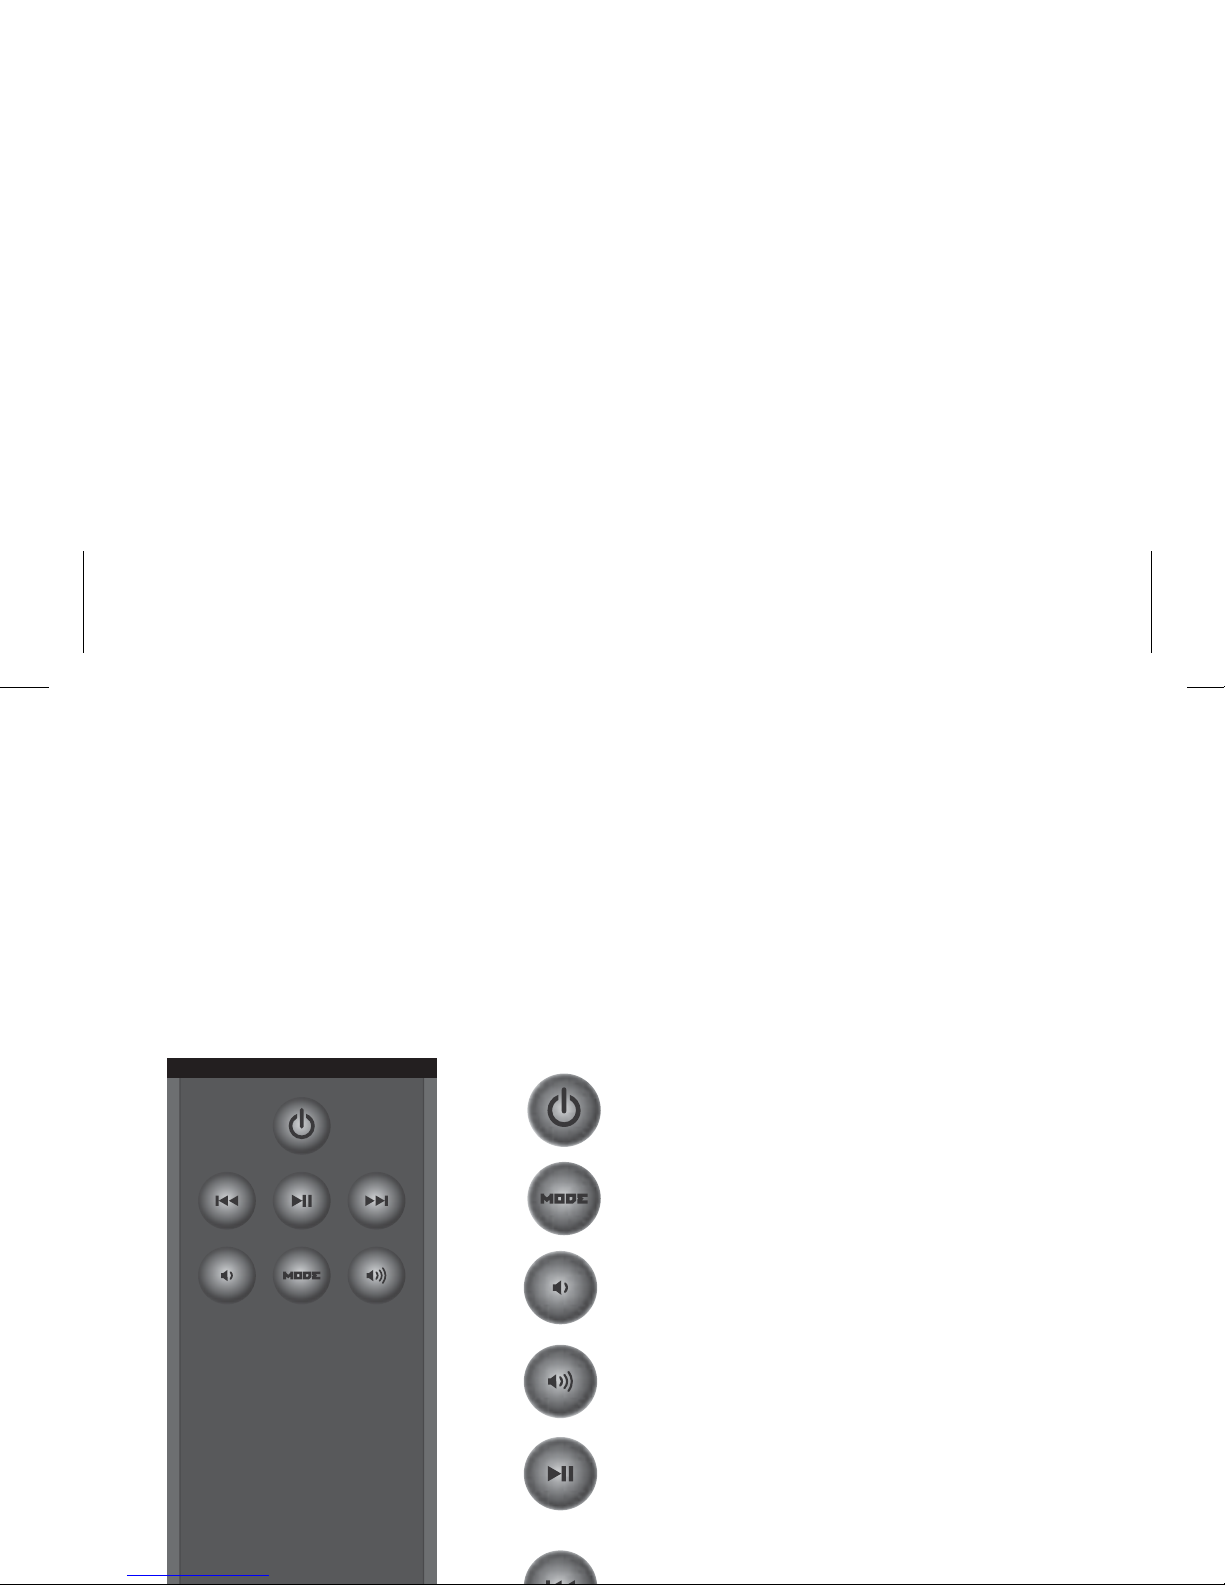
THE REMOTE CONTROL
The unit comes with a magnetized remote control which fits into a slot
on the top of the unit. The remote comes with one CR2032 battery
already installed. Remove the battery tab to use the remote.
Play/Pause Button
• Switches iPhone or iPod in dock
between Play and Pause modes
Power Button
• Turns unit ON or OFF.
Lower/Raise Volume
• Raises or lowers volume
of the unit
Mode Button
• Cycle through modes:
iPod and FM radio
Page 8
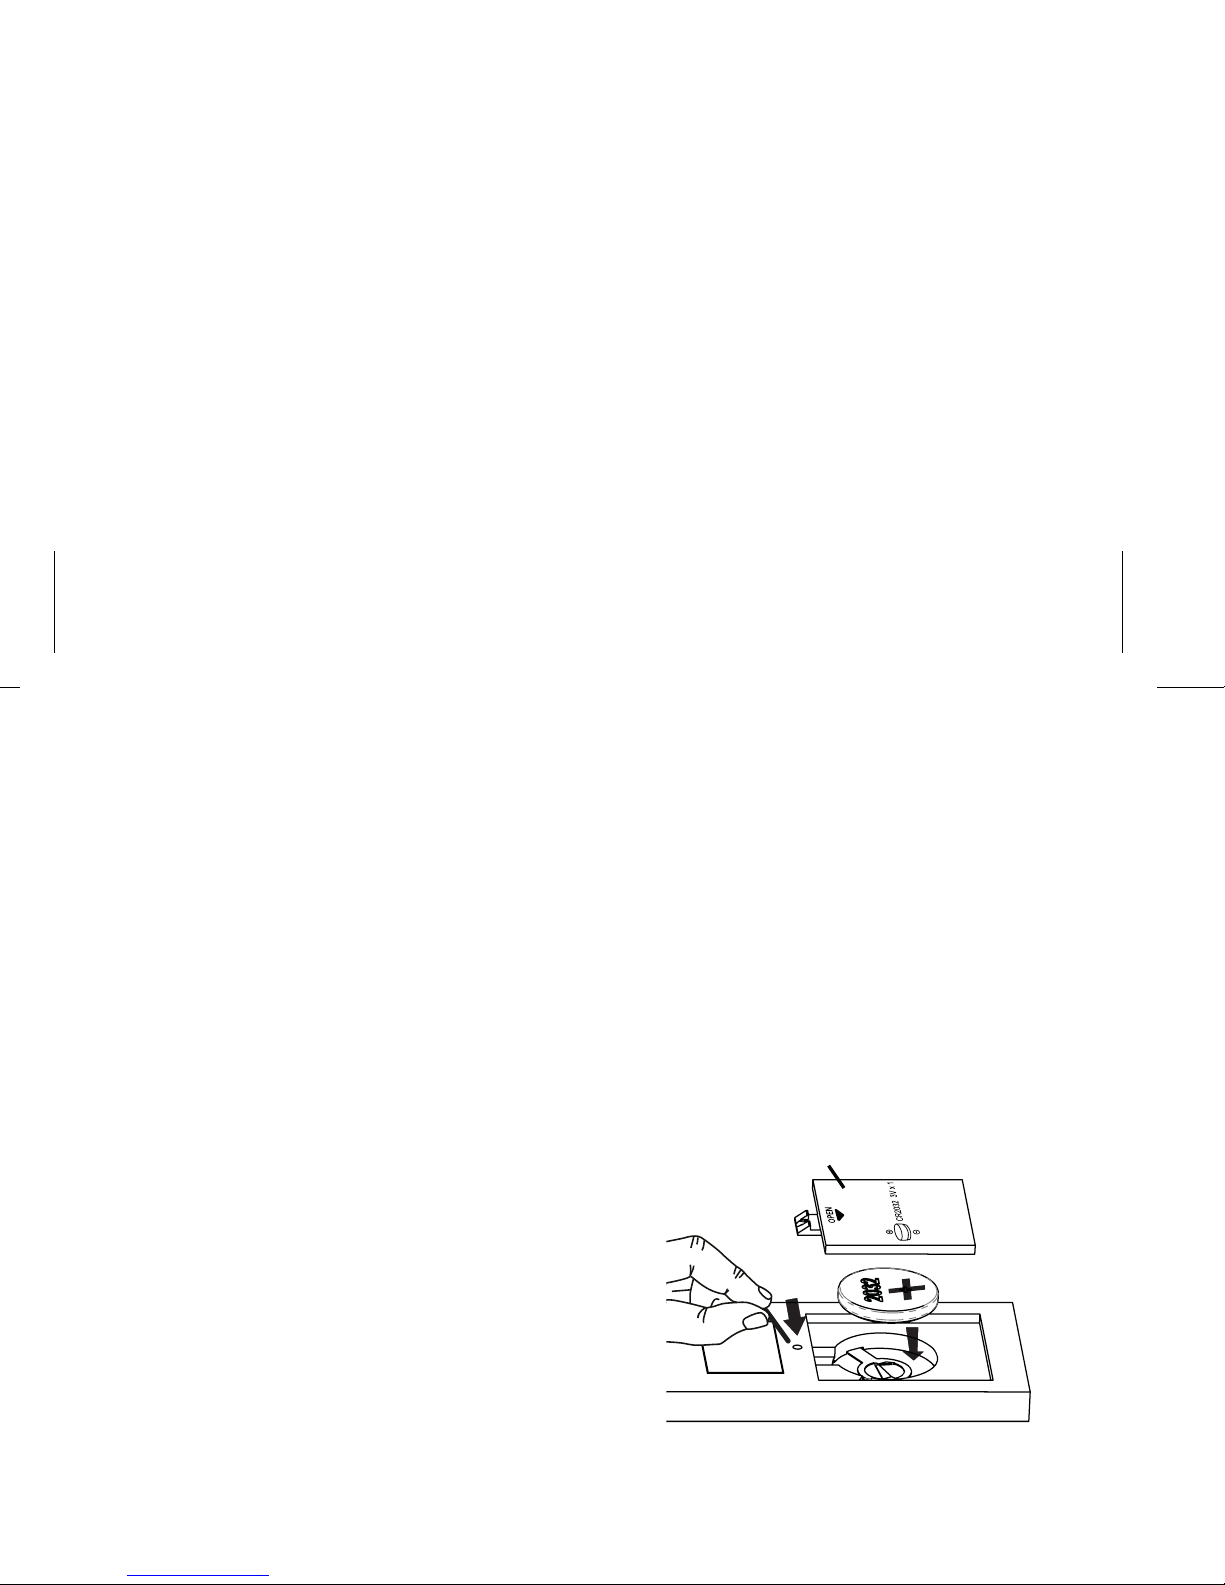
THE REMOTE CONTROL - CONTINUED
When the range of the remote seems reduced or if it ceases to work
properly, it’s time to replace the battery.
1. Press point of a pin or paperclip
firmly into the hole by the battery
compartment cover on the rear
of the remote control to release
the cover.
2. Slide battery compartment cover
off (remove old battery if
replacing).
3. Place new CR2032 in battery
well as shown (make sure + side
is facing up).
4. Replace battery compartment
cover.
Battery compartment
cover
Page 9

TROUBLESHOOTING
Symptom Possible reason Solution
Unit won’t
turn on
Unit won’t
respond
iPhone/iPod
does not
respond to
AC adaptor isn't plugged
into a working wall socket
or not plugged into the
power jack on back of the
unit
Unit may require a reset
iPhone/iPod is not docked
properly
iPhone/iPod is not docked
properly
Plug the AC adaptor into a working
wall socket and plug the connector
into the supply jack on the unit
If unit is plugged in and doesn't
respond, try resetting the unit by
following these steps:
a) remove iPhone/iPod from dock
b) unplug unit from power source
c) wait 3 minutes, then resume use
Remove your iPhone/iPod from the
dock and check for obstruction on the
connectors in the dock and on your
iPhone/iPod. Then reseat it in the
dock.
Page 10

TROUBLESHOOTING
Symptom Possible reason Solution
No sound
Sound
distorted
iPod/iPhone
doesn’t charge
up
Volume is too low
Volume is too high
Sound source is distorted
SRS TruBass is on and/or
EQ settings are set too high
iPhone/iPod is locked up/
frozen
iPhone/iPod battery has
problem
iPhone/iPod is not docked
Turn volume up
Turn volume down
If the iPhone/iPod original sound file
(MP3) is old or of poor quality , distortion
and noise are easily noticed with
high-power speakers. Try upgrading file
from a trusted source such as iTunes.
Turn SRS T ruBass off if necessary.
Lower EQ settings, especially the lower
frequencies
Please make sure your iPhone/iPod is
working properly before docking into the
unit. Please refer to your iPhone/iPod
manual for details.
Remove your iPhone/iPod from the
Page 11

IMPORTANT SAFETY TIPS
When used in the directed manner, this unit has been designed and manufactured to ensure your
personal safety. However, improper use can result in potential electrical shock or fire hazards.
Please read all safety and operating instructions carefully before installation and use, and keep
these instructions handy for future reference. Take special note of all warnings listed in these
instructions and on the unit.
1. Water and Moisture – The unit should not be used near water. For example: near a bathtub,
washbowl, kitchen sink, laundry tub, swimming pool or in a wet basement.
2. Ventilation – The unit should be situated so that its location or position does not interfere with
its proper ventilation. For example, it should not be situated on a bed, sofa, rug or similar
surface that may block ventilation openings. Also, it should not be placed in a built-in
installation, such as a bookcase or cabinet, which may impede the flow of air through the
ventilation openings.
3. Heat – The unit should be situated away from heat sources such as radiators, heat registers,
stoves or other appliances (including amplifiers) that produce heat.
4. Power Sources – The unit should be connected to a power supply only of the type described
in the operating instructions or as marked on the appliance.
5. Power-Cable Protection – Power supply cables should be routed so that they are not likely to
be walked on or pinched by items placed upon or against them. It is always best to have a
clear area from where the cable exits the unit to where it is plugged into an AC socket.
6. Cleaning – The unit should be cleaned only as recommended. See the Maintenance section
of this manual for cleaning instructions.
7. Objects and Liquid Entry – Care should be taken so that objects do not fall and liquids are
not spilled into any openings or vents located on the product.
8. Attachments – Do not use attachments not recommended by the product manufacturer.
9. Lightning and Power Surge Protection – Unplug the unit from the wall socket and disconnect
the antenna or cable system during a lightning storm or when it is left unattended and
unused for long periods of time. This will prevent damage to the product due to lightning and
Page 12

A GUIDE TO PRODUCT SAFETY
This device complies with Part 15 of the FCC Rules. Operation is subject to the following two
conditions: (1) This device may not cause harmful interference, and (2) this device must accept
any interference received, including interference that may cause undesired operation.
This equipment complies with the limits for a Class B digital device as specified in Part 15 of FCC
Rules. These limits provide reasonable protection against radio and TV interference in a
residential area.
However, your equipment might cause TV or radio interference even when it is operating properly.
To eliminate interference you can try one or more of the following corrective measures:
• Reorient or relocate the receiving antenna.
• Increase the distance between the equipment and the radio or TV.
• Use outlets on different electrical circuits for the equipment and the radio or TV.
• Consult your dealer or an experienced radio/television technician if the problem still exists.
Modifying or tampering with your system’s internal components can cause a malfunction and
might invalidate the system’s warranty and void your FCC authorization to operate it.
This Class B digital apparatus complies with Canadian ICES-003.
Cet appareil numérique de la classe B est conforme à la norme NMB-003 du Canada.
WARNING: Lithium batteries can explode or cause burns if disassembled, shorted, recharged,
exposed to water, fire, or high temperatures. Do not place loose batteries in a pocket, purse, or
other container containing metal objects, mix with used or other battery types, or store with
hazardous or combustible materials. Store in cool, dry, ventilated area. Follow applicable laws
and regulations for transport and disposal.
Page 13

LIMITED 1 YEAR WARRANTY
iHome Products, a division of SDI Technologies Inc. (hereafter referred to as SDI Technologies),
warrants this product to be free from defects in workmanship and materials, under normal use
and conditions, for a period of 1 Year from the date of original purchase.
Should this product fail to function in a satisfactory manner, it is best to first return it to the store
where it was originally purchased. Should this fail to resolve the matter and service still be
required by reason of any defect or malfunction during the warranty period, SDI Technologies will
repair or, at its discretion, replace this product without charge (except for a $30.00 charge for
handling, packing, return UPS/postage, and insurance). This decision is subject to verification of
the defect or malfunction upon delivery of this product to the Factory Service Center listed below.
The product must include proof of purchase, including date of purchase. The fee for service
without proof of purchase is $75.00.
Before returning this product for service, please first replace the batteries (if applicable) with fresh
ones, as exhausted or defective batteries are the most common cause of problems encountered.
If service is still required:
1.Remove the batteries (if applicable) and pack the unit in a well padded, heavy corrugated box.
2.Enclose a photocopy of your sales receipt, credit card statement, or other proof of the date of
purchase, if within the warranty period.
3.Enclose a check or money order payable to the order of SDI Technologies, for the sum of
$30.00 ($75.00 without proof of purchase).
4.Send the unit prepaid and insured, to the Factory Service Center listed below.
Consumer Repair Department
SDI Technologies Inc.
1330 Goodyear Dr.
El Paso, TX 79936-6420
Disclaimer of Warranty
 Loading...