


Install . . . . . . . . . . . . . . . . . . . . . . . .Page 2
Installation . . . . . . . . . . . . . . . . . . . .Page 3
Instalar . . . . . . . . . . . . . . . . . . . . . . .Page 4
Installation . . . . . . . . . . . . . . . . . . . .Page 5
Installazione . . . . . . . . . . . . . . . . . . .Page 6
Instalar . . . . . . . . . . . . . . . . . . . . . . .Page 7
Installatie . . . . . . . . . . . . . . . . . . . . .Page 8
User Guide
Congratulations on your iGo® power purchase! Universally compatible with today’s most popular brands, the iGo everywhere power solution allows you to power and charge from any standard wall or in-car outlet. Lose the clutter of all those model-specific chargers and power your mobile phone, Bluetooth® headset, smartphone/PDA, MP3 player,portable gaming device, GPS device and more from this convenient power solution (iGo chargers and power tips sold separately).
Specifications: |
Package Contents |
|||
AC Unit |
|
• |
AC unit |
|
Input Voltage: |
100-240 VAC |
• |
EU and UK plugs |
|
Dimensions |
82.55 x 50.80 x 25.40mm |
• |
Retractable cable |
|
In-car Unit |
|
• In-car unit |
||
|
• |
Travel organizer |
||
Input Voltage: |
11.0-16.5 VDC |
|||
• |
User Guide |
|||
Dimensions: |
92.20 x 25.40 x 25.40mm |
|||
|
|
|||
Retractable Cable |
|
|
||
Case Dimensions: 55.10 x 66.04 x 23.62mm |
|
|
||
Cord Length: |
1.52m |
|
|
|
|
www.iGo.com |
|||
© 2002-2008 Mobility Electronics, Inc. Mobility Electronics and iGo are registered trademarks and one charger. all your gadgets. simply switch the tip is a trademark of Mobility Electronics, Inc. All other brand names and logos are trademarks of their respective owners. Specifications are subject to change without notice. Protected under one or more of the following patents: 5,347,211; 6,064,177; 6,643,158; 6,650,560; 6,700,808; 6,751,109; 6,775,163; 6,791,853; 6,920,056; 6,937,490, 6,976,885 and 7,153,169. Other United States and foreign patents pending. Made in China. P/N 8040406-01 Rev. A.

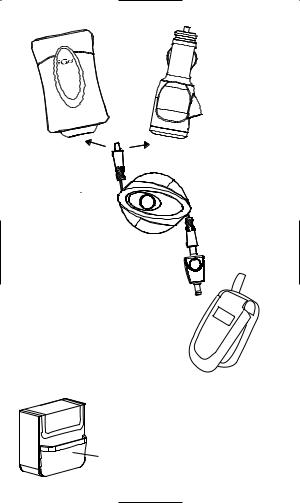
Install
AC unit
In-car unit
(light grey end of cable)
|
|
|
|
Note: |
|
Retractable |
|
Pull cable from |
|
|
|
both sides. |
||
|
cable |
|
|
|
1. |
Connect the retractable |
|
|
|
|
light grey cable end to |
(black end |
||
|
either the AC or in-car |
|||
|
of cable) |
|
||
|
unit. |
|
|
|
|
|
|
|
|
2. |
Plug the retractable |
|
|
|
|
black cable end to |
|
|
|
|
the appropriate iGo |
|
|
|
|
power tip. |
|
|
|
3. You can now connect to |
|
|
||
|
the device you wish |
|
|
|
|
to charge. |
|
|
Caution: Hold one end |
|
|
|
|
|
|
|
Travel organizer |
of the cable while |
|
|
|
retracting. Do not let |
||
|
|
included |
||
|
|
cable retract freely. |
||
|
|
|
|
|
|
|
|
|
Cable may jam on reel |
|
|
Pockets for |
or whip back and forth |
|
|
|
power tips and |
and cause injury. |
|
|
|
retractable |
|
|
2 |
cable |
|
Installation
Bloc |
|
|
d'alimentation |
Bloc |
|
en CA |
||
d'alimentation |
||
|
||
|
en CC |
(extrémité gris clair du
cordon)
Cordon 

 rétractable
1. Connectez l'extrémité gris clair du cordon
rétractable au bloc d'alimentation en CA ou en CC
2. Branchez l'extrémité noire du cordon rétractable au tip d'alimentation iGo approprié
3. Vous pouvez maintenant connecter l'appareil à recharger
Kit de voyage inclus
Pochettes pour les tips d'alimentation et le cordon rétractable
Remarque :
Tirez sur le câble des deux côtés.
(extrémité noire du cordon)
Précaution: Tenez la prise lors de la rétractation du cordon. Guidez le cordon lors de sa rétractation. Le cordon peut se bloquer sur le dévidoir.Il peut également vous blesser s’il génère des mouvements rapides
incontrôlés. 3
 Loading...