

Page 1
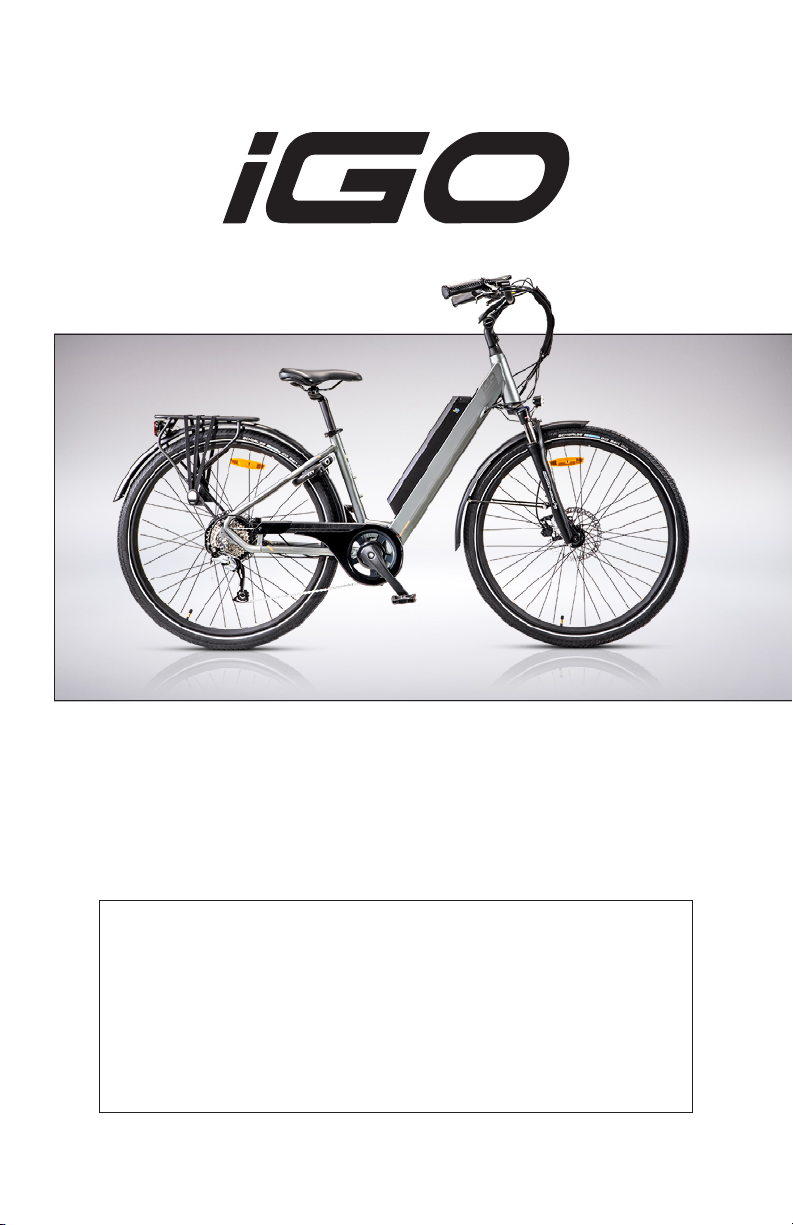
ERÖ
USER MANUAL
PLEASE READ THIS MANUAL BEFORE OPERATING
AND WATCH
THE FULL ASSEMBLY
INSTRUCTIONAL VIDEO AT:
www.iGOelectric.com/buildmyero
Page 2
IF YOU HAVE ANY ISSUES WITH YOUR BIKE PLEASE
DO NOT RETURN TO PLACE OF PURCHASE
PLEASE CALL
iGO Customer Service / Technical Support Toll-Free Number
1 866 996 6686
Mon - Fri 9:00 am - 5:00 pm EST
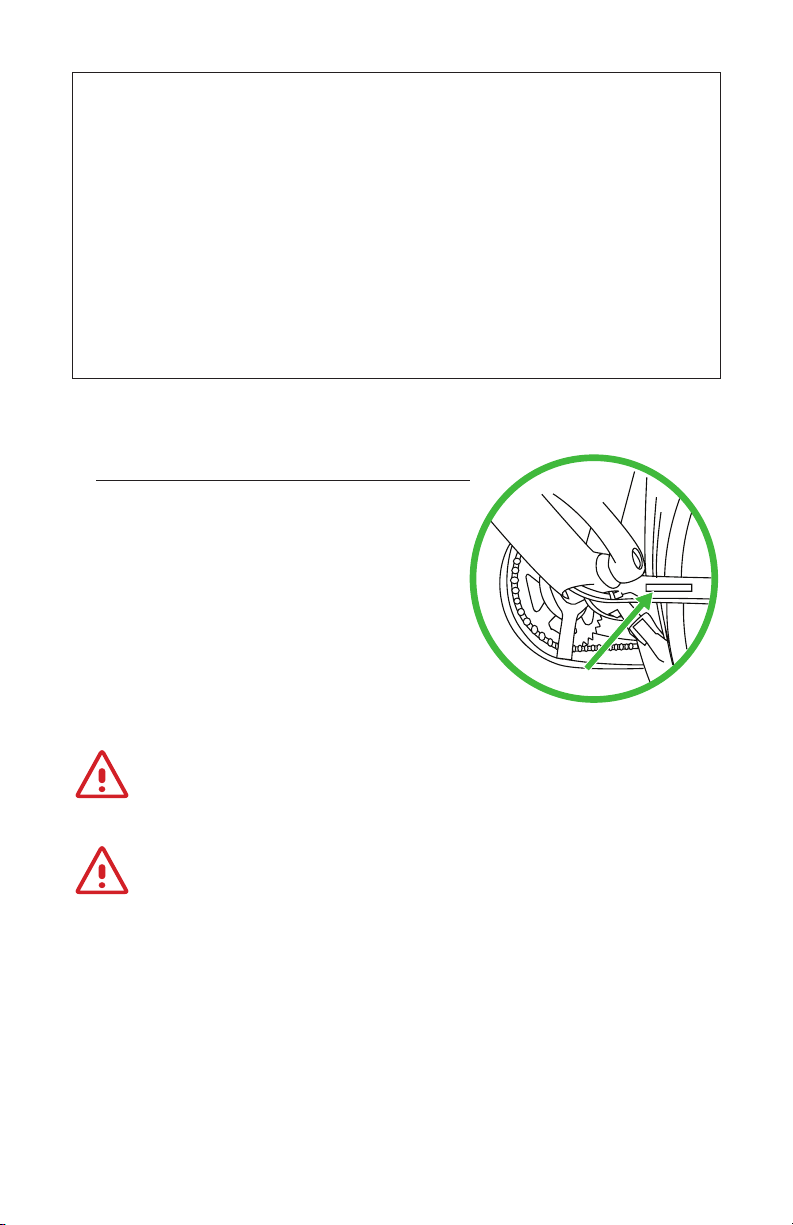
FRAME NUMBER / VIN NUMBER
The frame number is located on the
left side of the frame, down below the
bottom bracket, under the barcode.
You will need the frame number of
the ebike in order to register your
ebike for warranty purposes.
ATTENTION! Your ebike may differ from
the illustrations in this manual.
iGO highly recommends having the ebike assembled
and adjusted by a professional bicycle technician.
Note:
iGO Electric reserves the right to make changes without
notice to design(s) and / prices listed in this manual.
This manual has be compiled with great care. iGO can not be
held responsible for any inaccuracies whatsoever.
2 www.iGOelectric.com
Page 3

CONGRATULATIONS !
You are the proud owner of an iGO electric ebike.
We have taken great steps to create an incredible product
and hope you enjoy riding it as much as we did creating it.
With the help of our electric bike your riding experiences
will be extremely pleasurable and memorable and
hope you will explore many new surroundings.
The ebike is equipped with electronic pedal assistance
which guarantees a Completely new way of cycling.
Whether you use the ebike for commuting, shopping or just a leisurely
ride, you will do so comfortably and condently on your new iGO.
Chances are that you have not previously owned an electric
bike with pedal assistance. For that reason iGO has compiled
a comprehensive user guide for you. iGO encourages you
to read through it carefully before riding your new ebike
to obtain a full understanding of your bikes features.
For more information, please visit our website at www.igoelectric.com.
We wish you many happy rides with your new ebike.
Sincerely,
T: 1 866 996 6686
@: [email protected]
ADDRESS: 1340, 55th Ave.
LACHINE, QC
CANADA
H3T 3J8
3www.iGOelectric.com
Page 4

TABLE OF CONTENTS
DISPLAY & FUNCTIONS
BUTTONS
INFORMATION ON THE SCREEN
CONTROLS
SETTINGS MENU
ERROR CODES
PEDAL ASSISTANCE
WHAT IS PEDAL ASSISTANCE?
TURNING PEDAL ASSISTANCE ON/OFF
DERAILLEUR FUNCTIONS
MORE INFORMATION ON PEDAL ASSISTANCE
BATTERY & CHARGING
BATTERY RANGE
DISCONNECTING AND REMOVING THE BATTERY
CHARGING THE BATTERY
USING THE BATTERY AS A POWER SOURCE
WHAT YOU SHOULD KNOW ABOUT YOUR BATTERY
HOW TO STORE YOUR BATTERY DURING NON USE
6
6
7
8
10
11
12
12
12
12
13
14
14
15
16
16
18
19
ADJUSTING YOUR EBIKE
FRONT LED LIGHT INSTALLATION
INSTALLING YOUR STEM
ADJUSTING STEM ANGLE & HANDLEBAR POSITION
ADJUSTING YOUR SEAT HEIGHT
ADJUSTING YOUR SADDLE POSITION
GEARS
TIRE PRESSURE
4 www.iGOelectric.com
20
20
20
21
22
22
23
23
Page 5

BRAKE MAINTENANCE FOR TEKTRO AURIGA HYDRAULIC DISC BRAKE
24
ALIGNMENT OF THE CALIPER
CHANGING BRAKE PADS TEKTRO PART # E10.11
MAINTENANCE
SERVICING
GENERAL MAINTENANCE
CLEANING
PARTS
PARTS LIST
WARRANTY INFORMATION
WARRANTY
WARRANTY LIMITATIONS
WARRANTY TERMS
WARRANTY CARD
24
25
26
26
26
27
28
28
30
30
30
31
33
PLEASE READ IMPORTANT BATTERY STORAGE
INFORMATION ON PAGE 19
IMPROPER STORAGE OF YOUR BATTERY COULD RESULT
IN TOTAL BATTERY FAILURE
5www.iGOelectric.com
Page 6
DISPLAY & FUNCTIONS
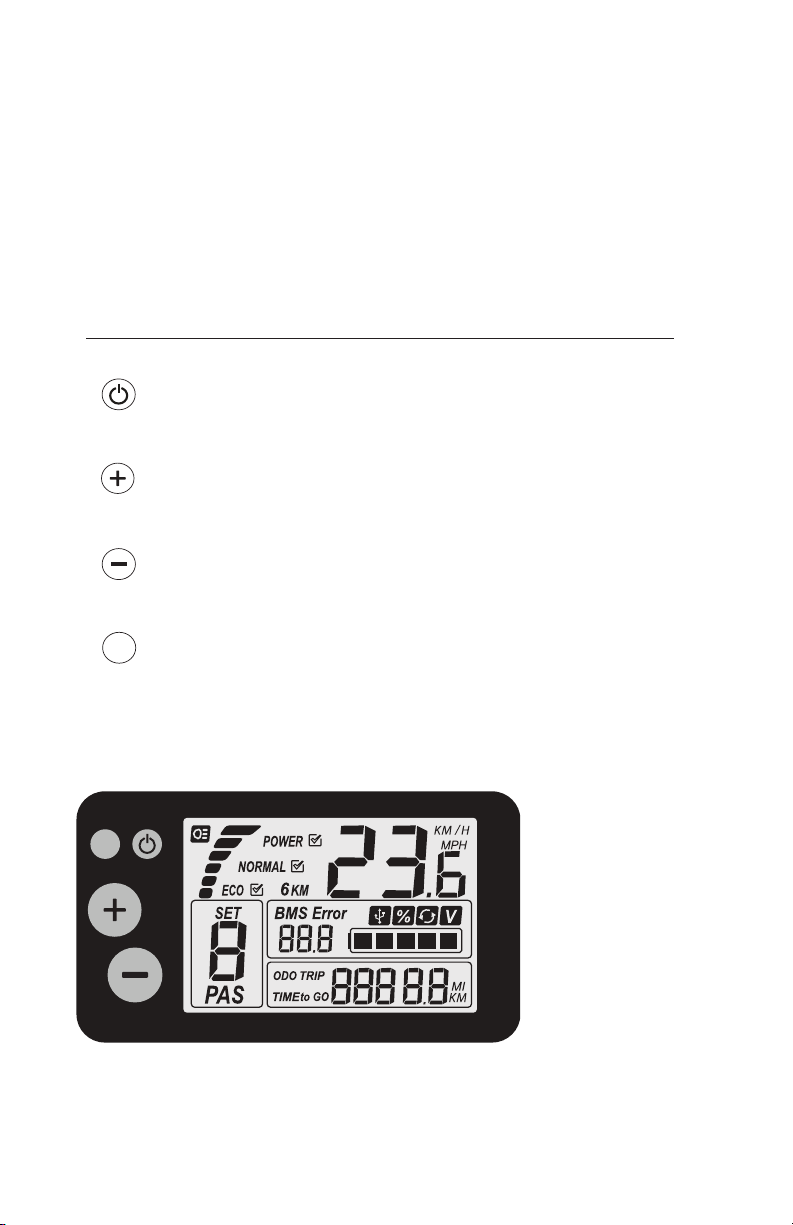
The battery must be in the ebike for the display to function.
Make sure that the battery is locked into the battery rack.
It is not necessary to keep the key in the lock while riding
Turn the power on by pressing the ‘ON/OFF’ Button for 2 seconds.
BUTTONS
‘ON/OFF’ : Powers ebike ON/OFF, Turns on lights when held
‘PLUS’ : Pedal assist level up, Walk assist when held
‘MINUS’ : Pedal assist level down
SET
SET
Electric system display and control unit
‘SET’ : Scroll through display options, Settings Menu when held
6 www.iGOelectric.com
Page 7
DISPLAY & FUNCTIONS
INFORMATION ON THE SCREEN
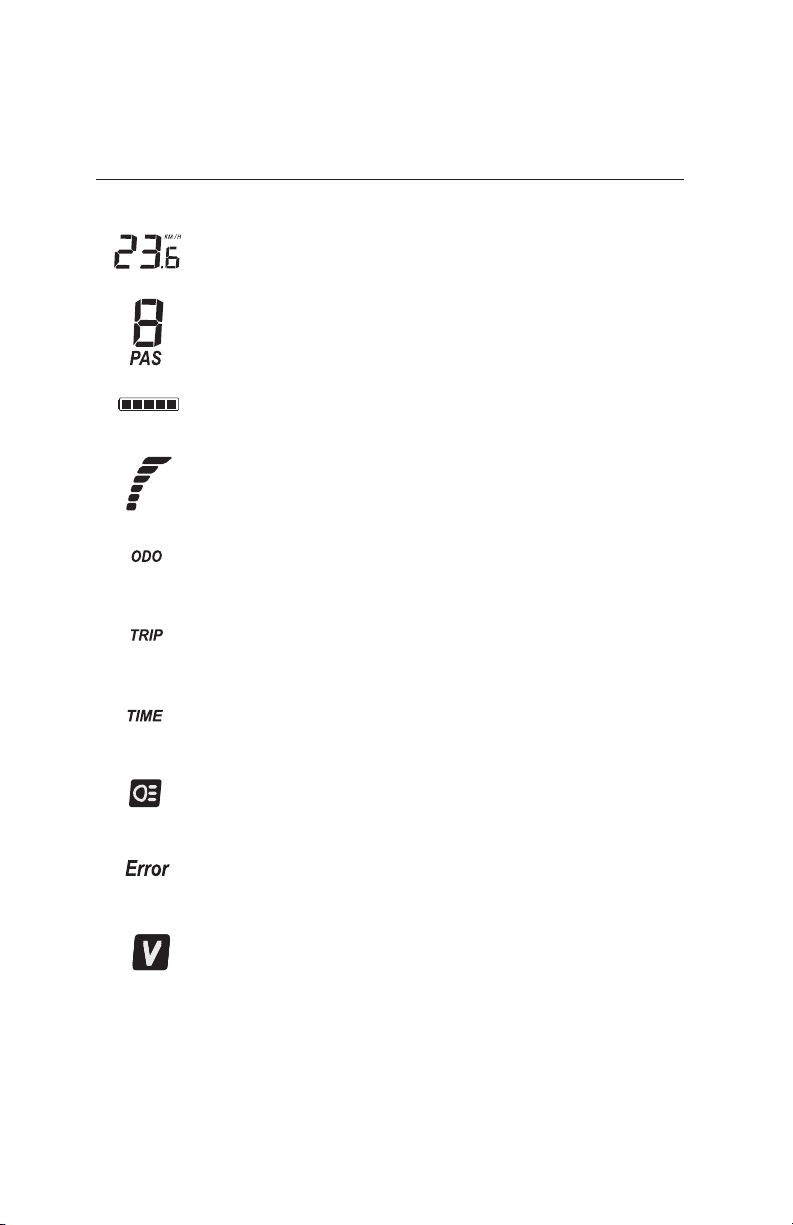
SPEED
(km/h or mph)
ASSISTANCE LEVEL
(0 - 8) Mode 0 = No assistance
BATTERY INDICATOR
5 Bars = Full Battery
ENERGY CONSUMPTION INDICATOR
Full bars = High battery consumption = Less range
ODOMETER
Total distance traveled
TRIP ODOMETER
Distance traveled since last reset
TIMER
Time since ebike was last turned on
LIGHT INDICATOR
Appears when lighting system is turned on
FAILURE
See page. 9 for error code descriptions
VOLTAGE
Indicates the level of current from the battery
7www.iGOelectric.com
Page 8

DISPLAY & FUNCTIONS
CONTROLS
Turning the ebike ON/OFF
Press and hold the 'ON/OFF' Button for 2 seconds to turn the electric system
on or off. The control panel can only be used when the battery is connected
to the ebike and key switched to the 'on' position. If the system is not used
for a duration of 5 minutes, it will shut itself off to conserve battery.
Selecting the display options
Press the ‘SET’ button to switch between the different trip functions
of the display. (Odometer, Trip distance, Timer, etc.)
Adjusting the pedal assistance levels
Use the ‘PLUS’ and ‘MINUS’ buttons to select the different levels
of pedal assistance. (0 - 8)
Power level 8 gives the strongest assistance from the motor.
In power level 0 the motor does not provide any pedal assistance or
throttle but you will still be able to use the functions of the display.
NOTE: The battery will run out of power quicker when
using a higher level of pedal assistance.
Throttle
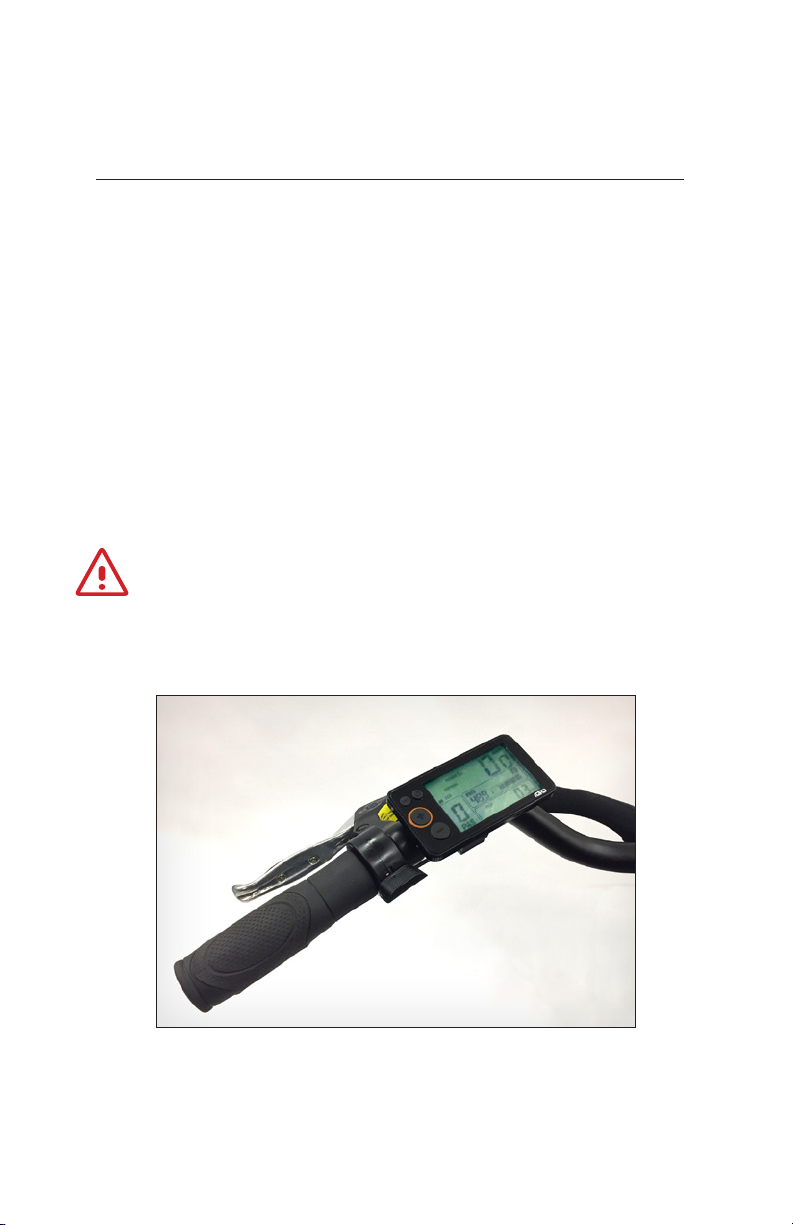
Your bike is equipped with an on demand throttle on the left grip.
The throttle can only be used within pedal assist levels 1 though 8.
Level 0 is for conventional non electric riding.
Regardless of the power assist level you select the throttle
is capable of taking you to top speed.
You can use the throttle along with the pedal assist or on its own.
YOU MUST ALWAYS WEAR AN APPROVED BICYCLE HELMET
WHEN RIDING AN ELECTRIC BIKE.
8 www.iGOelectric.com
Page 9
DISPLAY & FUNCTIONS
CONTROLS (Cont’d)
Lighting
With the ebike’s power on , tap the ‘ON/OFF’ button once to turn on the lighting system.
This will turn on the backlight for the display, as well as the front and rear lights.
Tapping the power button once again will turn the lighting system off.
NOTE: The lighting system is powered through the ebikes lithium battery pack
USB Connection
The USB Connection on the display is currently non functional
and is reserved for future development.
ATTENTION! DO NOT TEXT WHILE RIDING.
Control unit and throttle located on left handlebar
9www.iGOelectric.com
Page 10

DISPLAY & FUNCTIONS
SETTINGS MENU
By holding the ‘SET’ button for 3 seconds you will enter the Settings Menu.
The Settings Menu will allow you to change certain features of your ebike.
Once in the Settings menu the word ‘SET’ will begin to ash, pressing the ‘SET’
button will allow you to switch between the different settings. The ‘PLUS’ and
‘MINUS’ buttons will allow you to change the values of those settings.
Holding the ‘SET’ button again for 2 seconds will conrm the settings
to exit the Settings Menu.
Set 1: Reseting the Trip Odometer
Tap the ‘ MINUS’ button once to reset the Trip Odometer to ‘0’
Set 2: No Function
Set 3: Setting the Tire-Size
Having the correct tire-size set into the system is very important. It will
ensure that the data being displayed on the screen is accurate.
On the side of every tire you can nd the tire-size.
Default Tire-Size of your ebike:
28 inch - 40-622 - Circumference: 2205 mm
Set 4: Choosing km/h or mph
Depending on your location, you will want to have the information
on the screen displayed in the proper unit.
Pressing the ‘PLUS’ or ‘MINUS’ buttons while in this mode will allow you to
switch between having the information displayed in kilometers or miles.
10 www.iGOelectric.com
Page 11

DISPLAY & FUNCTIONS
ERROR CODES
It is possible for a system error to occur.
When this happens, the display will show an error-code which will allow you or your
dealer to easily and properly diagnose an error in the electrical system of your ebike.
Error 1: Problem with the 3-phase control from the electronic controller
Error 2: Problem with the throttle connection
Error 3: Motor 3-phase wire is loose or defective
Error 4: Motor Hall Sensor signal malfunction (malfunction in motor or cable)
Error 5: Malfunction in brake sensor (signal)
Error 6: Battery voltage is too low
Error 7: Motor is stalled
Error 8: Malfunction in the electronic controller (signal)
Error 9: Malfunction in the display (signal)
If error persists contact iGO Technical Support
iGO TECHNICAL SUPPORT (phone lines open Mon-Fri 9:00 am - 5:00 pm EST)
tel:1 866 996 6686 email: [email protected]
11www.iGOelectric.com
Page 12

PEDAL ASSISTANCE
WHAT IS PEDAL ASSISTANCE?
The bike is equipped with 8 levels of electronic pedal assistance.
As you pedal, the motor will assist you and enhance your pedaling effort. This will allow
you to pedal much further and faster but use much less energy and effort. It is also a
great feature when climbing a hill, as the motor will help to make any climb easy.
TURNING PEDAL ASSISTANCE ON AND OFF
When you turn on the power to the display, the pedal assistance will
automatically be set to level 0. By using the ‘PLUS’ and ‘MINUS’ buttons, you
can increase or decrease the level of assistance. You can turn off the assistance
completely by pressing the ‘MINUS’ button until the level of assistance is
at level “0”. This will allow you to use the lights and functions of the display,
but ride the bicycle without any pedal assistance from the motor.
Pedal assist levels 1-5 are meant to be used more on at roads or paths, the higher
levels (5-8) are more powerful and meant for hills, slopes, or heavy circumstances.
If you prefer to ride slowly, it would be more comfortable for you to ride in a lower
power level. If you prefer to ride faster, then you should increase the power level.
DERAILLEUR FUNCTIONS
Your bike is equipped with a Shimano Acera 9 speed derailleur.
Please choose the proper gear to match the riding terrain.
The use of a proper gear along with pedal assisted or conventional
power will enhance your riding experience
We recommend checking your derailleurs functions at least once a month.
If you are not capable of adjusting the derailleur your local bike store can help.
12 www.iGOelectric.com
Page 13
PEDAL ASSISTANCE
SAFETY PRECAUTIONS WHILE USING THE
PEDAL ASSIST & ON DEMAND THROTTLE
• Since the motor is assisting you, you will easily reach higher speeds
than you might be used to. We recommend that you ride the bike in
a minimal trafc area at rst to become more comfortable with it.
• The operation of the pedal assistance depends on the speed
at which the pedals are rotated and your cycling speed.
• The electric motor speed is limited to a speed of 32 Km/h (20 mph).
This means that as you reach this speed electrical assistance
stops and returns when speed returns to 32km/h ( 20 mph )
• The level of pedal assistance will affect the battery range.
Battery range is dependent on many factors which are
measured under average conditions. It is dependent on, but
not limited to, rider weight, speed, elevation, tire pressure,
wind, start-stop frequency, and outside temperature.
ATTENTION! Remember that acceleration will be much quicker
with pedal assistance.
ATTENTION! Make sure to turn off the power when walking
next to, mounting, or dismounting the bike.
ATTENTION! Hold both brakes when stationary.
YOU MUST ALWAYS WEAR AN APPROVED BICYCLE HELMET
WHEN RIDING AN ELECTRIC BIKE.
13www.iGOelectric.com
Page 14

BATTERY & CHARGING
BATTERY RANGE
How far can I travel on my electric bike?
The total distance you can travel on your electric bike is not an easy amount to
specify. The range depends on many different factors including, but not limited to:
• Total Weight (weight of the bike + rider + cargo)
• Resistance (wind, tire pressure, speed, road conditions and altitude)
• Outside Temperature
• The level of pedal assistance and throttle usage
• The condition of the battery
(battery capacity decreases as the battery ages)
Battery Capacity
Batteries are often compared based on capacity - Amp hours (Ah).
However, a comparison based on capacity alone does not properly depict a battery since
the performance of a battery pack is also based on battery voltage (V). The best way to
compare battery performance is by looking at the amount of energy that can be used in
watt-hours (Wh). Wh take into account both the capacity of the battery, as well as the
average voltage during discharge. Simply put, the higher the V/Ah, the higher Wh range!
Wh calculation ex: 48 V x 14.5 Ah = 696 Wh
8
7
6
5
4
3
2
PEDAL ASSISTANCE LEVEL
1
RANGE
14 www.iGOelectric.com
Page 15
BATTERY & CHARGING
DISCONNECTING & REMOVING THE BATTERY
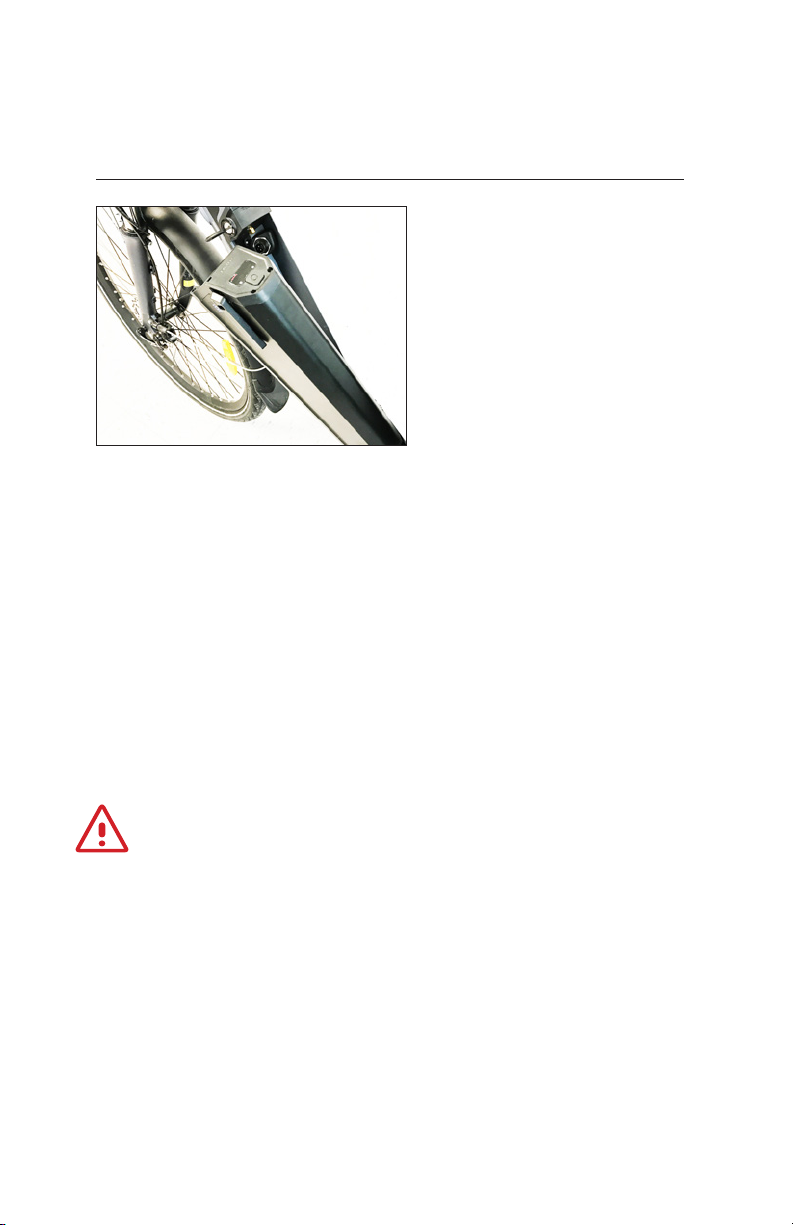
On the top-left side of your
battery is the battery lock.
This lets you lock/unlock the
battery pack of the bike.
To Lock:
Insert the bottom of the battery into its receptacle on an angle as shown
while pushing the top of the battery into the lock. (Turn key to unlock
position to facilitate the entry of the battery into the receptacle)
To Unlock:
Insert the key into the lock and turn 1/4 turn clockwise. Use the side handle on
the left top side of the battery to help pull it out of the battery receptacle.
ATTENTION! Remove the key after installing the battery to
prevent any form of loss or theft to the key or the battery.
15www.iGOelectric.com
Page 16
BATTERY & CHARGING
CHARGING THE BATTERY
The battery can be charged both on and off of the bike.
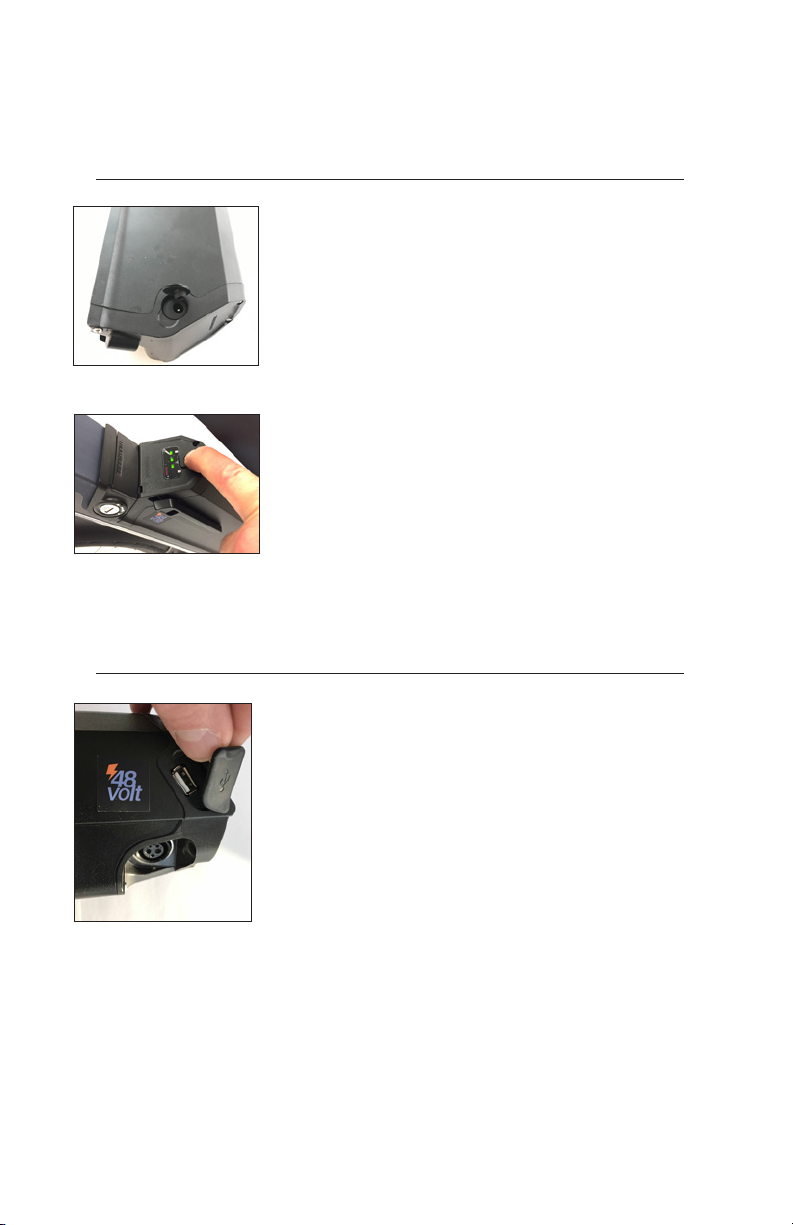
Please identify your charging port (gure 16.1).
First plug the chargers male plug into the battery,
then plug the chargers 110 volt plug into your wall
outlet. (Do not use an extension for 110 volt.)
The indicator on the charger will light green for a few seconds
Fig. 16.1
Unplug the charger from the wall rst,
If the battery is not mounted to the bike you can always
Fig. 16.2
and if a charge is necessary, the LED will turn red. The battery
is fully charged when the battery indicator LED becomes green.
and then from the battery.
check the battery level as seen in gure 16.2.
USING THE BATTERY AS A POWER SOURCE
The battery pack comes equipped with its own USB connection.
This allows it to be used as an external power source which
can be used to charge a smartphone, laptop, or other
device that can be charged through a USB connection.
Locate your USB port - gure 16.3
To use the USB connection, just lift the
rubber cap with the USB sign on it.
Fig. 16.3
16 www.iGOelectric.com
Page 17

BATTERY & CHARGING
ATTENTION! Make sure to only charge the
battery in a dry, well ventilated area.
ATTENTION! Unplug the charger when the battery
is fully charged, or when charger is not in use.
ATTENTION! The battery will sustain permanent damage if not
used for a long period of time (ex: Winter storage). SEE PAGE 19
Make sure to charge the battery once a month during this time.
ATTENTION! When the battery is completely depleted you
must charge it immediately. If the cells are left depleted for a
long period of time, they may become irreparably damaged.
17www.iGOelectric.com
Page 18

BATTERY & CHARGING
WHAT YOU SHOULD KNOW ABOUT YOUR BATTERY
• DO NOT connect the positive terminal of the
battery to the negative terminal.
• The battery is sealed and therefore is rain resistant,
however, DO NOT expose your battery to water.
• The battery should be recycled properly at the end of its life.
• The performance of the battery will decrease at low temperatures.*
• Under ideal conditions, the battery pack can be recharged
approximately 750 times. The performance will slowly
decrease over time and eventually will need to be replaced.
• DO NOT expose your battery to high temperatures.
(>50°C), such as direct sunlight)
• Problems: remove the battery from the bike and consult your dealer.
• For long term storage see storage info page 19.
• Use ONLY the supplied charger.
* The action mentioned is optimal at temperatures of approx. +/- 25°C. The guideline
is that the capacity will decrease by 1% at every 1°C of temperature drop.
ATTENTION! Please recycle your battery to an
authorized recycling company in your area.
18 www.iGOelectric.com
Page 19

BATTERY & CHARGING
IMPORTANT BATTERY STORAGE INFORMATION
When not using your bike for periods exceeding
one month please charge as follows:
1. Before storage make sure that the battery is not charged
more than 50% so that it will except a periodic charge.
(You cannot periodically charge a fully charged battery)
2. Once every month you must attach the supplied battery
charger and charge for a period of no more than 15 minutes.
3. Continue this procedure once a month until more frequent riding.
This process will make sure that your battery does not stay
at a specic rate of charge for long periods of time.
19www.iGOelectric.com
Page 20
ADJUSTING YOUR ERGOFIT EBIKE
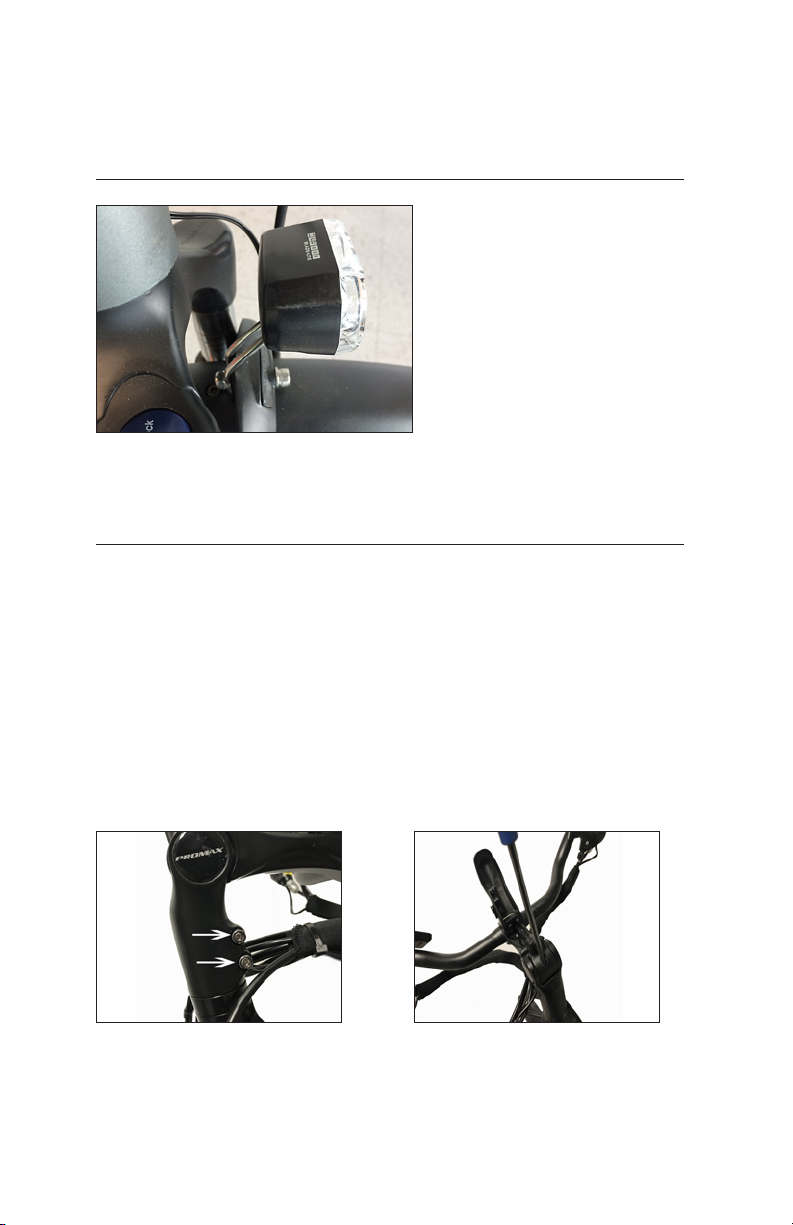
FRONT LED LIGHT INSTALLATION
Identify the light bracket
mounting bolt and nut.
Assemble as seen in gure 20.1
using a 4mm allen key.
Make sure that the light bracket is in
same position before attaching to light.
Fig. 20.1
INSTALLING YOUR STEM
Before inserting stem onto fork tube please loosen 2 side
screws using a 4mm allen key gure 20.2
Slide the stem lock on the left side down to unlock and lift lever. Figure 21.4, 21.5
Push stem down to its lowest position and insert the 5mm allen
key into stem as show in gure 20.3 and tighten.
Push down onto the lever to its original down position untill it locks back into place.
Check to make sure that handlebars are centered to front wheel
and tighten 2 stem side screws using 4mm allen key.
Fig. 20.3Fig. 20.2
20 www.iGOelectric.com
Page 21
ADJUSTING YOUR ERGOFIT EBIKE
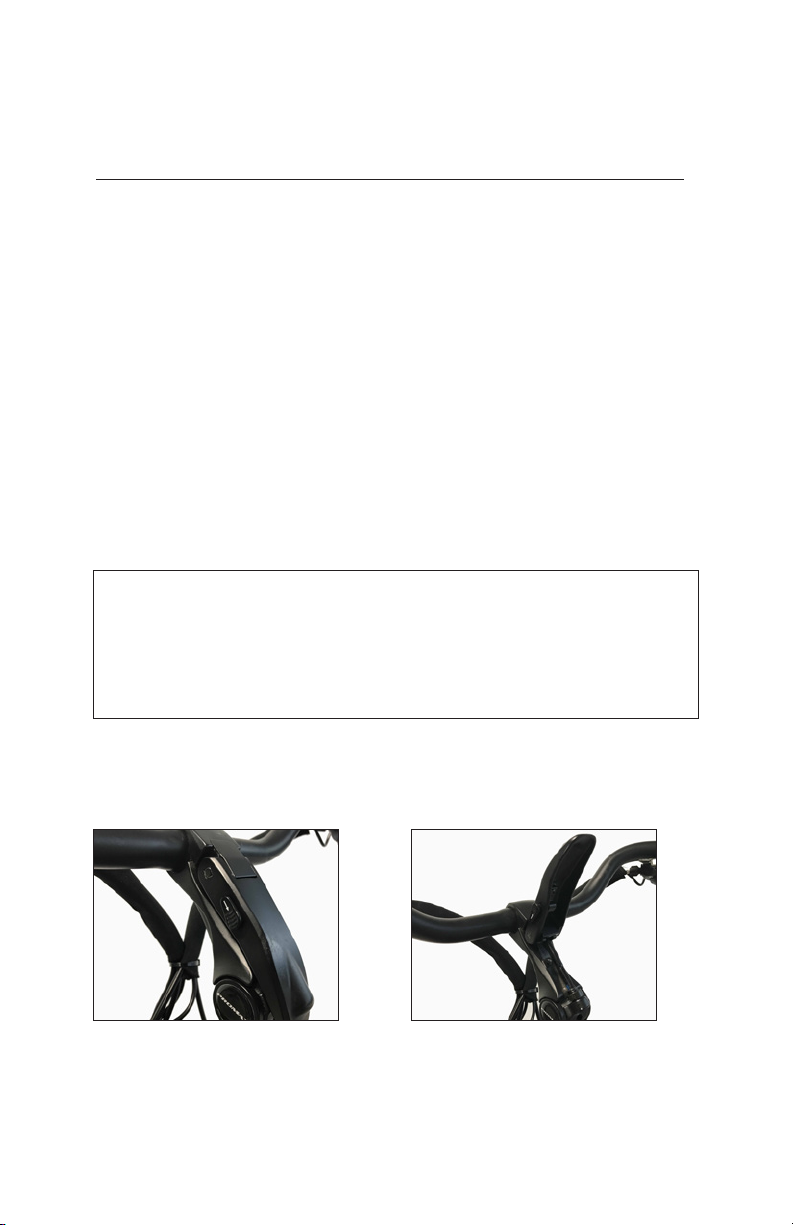
ADJUSTING STEM ANGLE & HANDLEBAR POSITION
Once installed the stem on you ERÖ requires no tools to adjust creating
an extremely comfortable and ergonomic riding position.
To adjust the stem slide the lock button on the left side of the stem down as
shown in gure 21.4. Lift the lever up as far as it will go as in gure 21.5.
Place both hands on the grips of the handlebar and manipulate handlebars
to your most comfortable position . You will be able to lift and lower, change
the angle, and move toward or away. Adjust to an angle that is comfortable
to you - your forearms should be in line with the brake levers.
Once you have the correct position push lever back down to its original position.
As you return stem adjustment arm to its position you will here a small click
of the lock which will insure that this position is now locked into place.
For detailed assembly and installation guides
watch the full instructional video at:
www.iGOelectric.com/buildmyero
Fig.21.5Fig. 21.4
21www.iGOelectric.com
Page 22
ADJUSTING YOUR ERGOFIT EBIKE
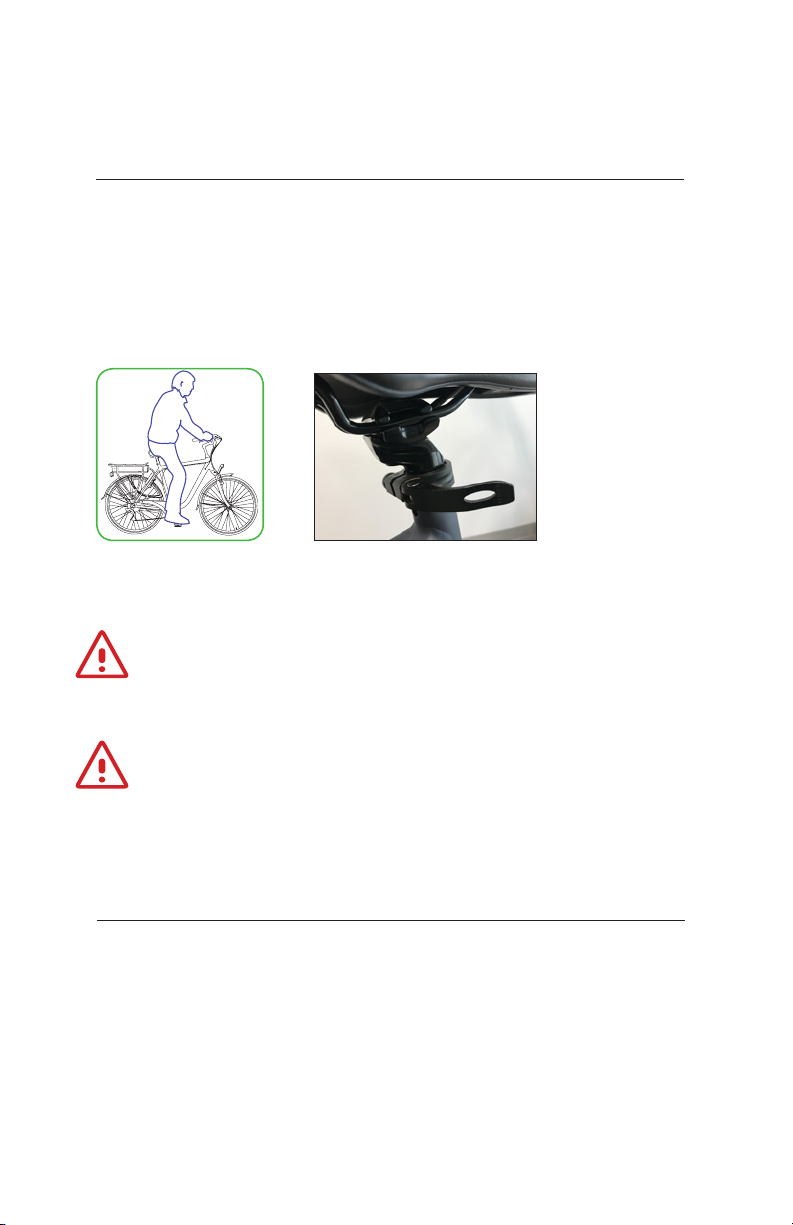
ADJUSTING YOUR SEAT HEIGHT
Your seat height should be adjusted properly to ensure you get the most
comfortable ride possible. The seat height is properly adjusted when your knee has
a slight bend when sitting on the saddle with your foot on the pedal at its lowest
position (gure 22.1). The seat height can be adjusted by loosening the lever on
the seat tube clamp gure 22.2. Make sure to retighten after adjustment.
Fig. 22.2Fig. 22.1
ATTENTION! Ensure that the safety marks for max. height written
on the seat post are not visible when retightening the hex bolt.
ATTENTION! If you can put your feet at on the
ground while seated, your seat height is too low.
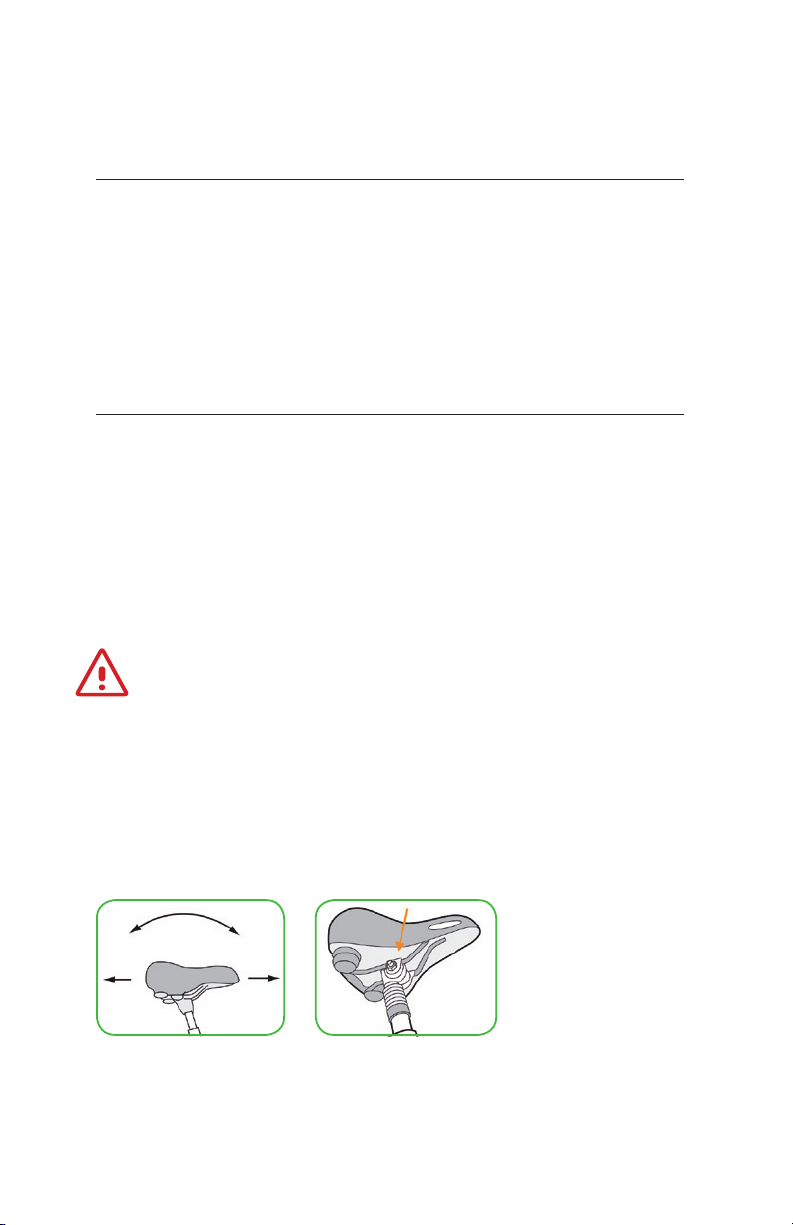
ADJUSTING YOUR SADDLE POSITION
You can tilt the saddle to change the seating angle, as well as, slide it backward or forward
(gure 23.3). To adjust the saddle, loosen the nut located on the underside of the saddle
with a wrench (gure 23.4). You will be able to move the saddle around to suit your
preferred riding style. When you are done adjusting, make sure to retighten the nut.
22 www.iGOelectric.com
Page 23
ADJUSTING YOUR ERGOFIT EBIKE
GEARS
Your eBike comes equipped with a Shimano Acera 9 speed drivetrain. The trigger shifter
mounted to your right handle will allow you to change gears. It is important that you
only change gears while cycling as the chain must be in motion to properly shift gears.
To shift up a gear, pull the trigger closest to your index nger.
To shift down a gear, push the trigger closest to your thumb.
TIRE PRESSURE
The tire pressure will affect the range and comfort of your bike.
iGO recommends that you always keep your tires at the designated pressure
to ensure the best ride. The recommended tire pressure is listed on the
sidewall of the tire. The tire pressure is measure in P.S.I. (Pounds / Square Inch).
Make sure to use a tire pressure gauge when pumping
your tires to ll the proper amount of air.
ATTENTION! Riding on deated / soft tires will
severely reduce the range of the battery.
Fig. 23.4Fig. 23.3
23www.iGOelectric.com
Page 24

BRAKE MAINTENANCE FOR TEKTRO
AURIGA HYDRAULIC DISC BRAKE
A video tips can be seen at: https://youtu.be/z2Uqi80Y67Y
If you pull the brake lever and the pads don’t stop your bike, you probably
have air in your brake line. Unless you have bled brakes before we
strongly suggest this be done by a professional bike mechanic.
ALIGNMENT OF THE CALIPER
• Using a 5mm allen key loosen 5mm brake caliper
mounting bolts but do not remove (gure 25.1).
• Squeeze brake lever associated to the brake
you are adjusting and hold tight.
• Re Tighten the 2 bolts one at a time in 3 steps increments.
Tighten 1/3 then tighten the next bolt 1/3 and return
to original bolt alternating until both are tight.
• Look into the gap between the brake pads and rotor.
Rotor should be in center between pads.
• If rotor is too close to one side simply loosen only one caliper
mounting bolt and slightly push on caliper until rotor is in center.
• Spin rim again and if rotor is still in need of center alignment
loosen opposite caliper mounting bolt and repeat step 5.
• Repeat until centered.
• If you are having difculty aligning we suggest the
use of a disc brake pad & rotor alignment tool.
24 www.iGOelectric.com
Page 25
BRAKE MAINTENANCE FOR TEKTRO
AURIGA HYDRAULIC DISC BRAKE
CHANGING BRAKE PADS TEKTRO PART # E10.11
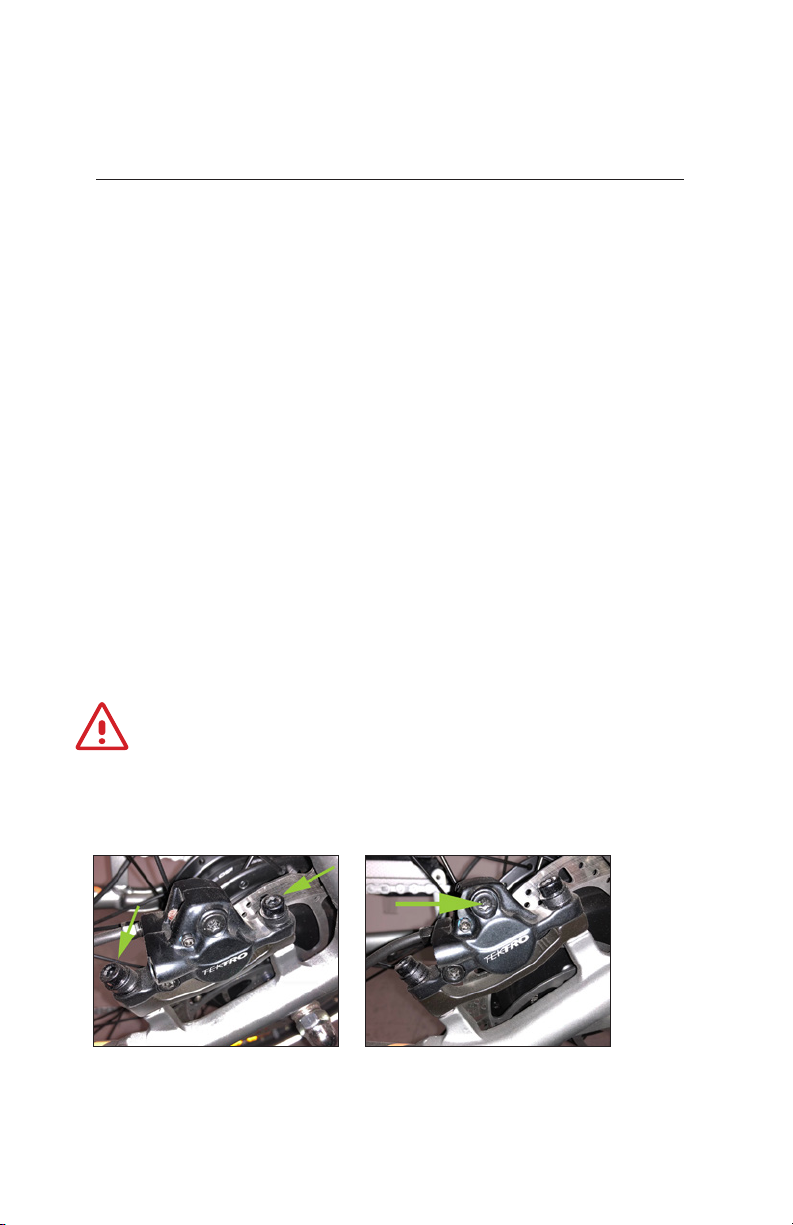
• Using a 5mm allen key remove caliper mounting
bolts & remove caliper (gure 25.1).
• Choose a mid-size at head screw driver and
wipe blade with rubbing alcohol.
• Insert at head between brake pads & push
pads to the outside position.
• Using a 5 mm allen key loosen the pad
mounting bolt as shown in gure 25.2.
• Remove pads holder and replace with only
genuine Tektro brake pads Part # E10.11.
• Insert holder with new pads and tighten pad mounting bolt.
• Mount caliper and align by following instructions.
• Check alignment of caliper and if needed follow
instructions above on brake caliper alignment.
CAUTION! Only use mineral oil, do not use DOT oil.
Fig. 25.1 Fig. 25.2
25www.iGOelectric.com
Page 26

MAINTENANCE
SERVICING
Servicing your bike is very important. You can avoid unnecessary
damage by servicing your bike regularly.
In the paragraphs to follow, there are some simple tips you can follow
at home to keep the bike running at top performance.
GENERAL MAINTENANCE
• If caught in the rain ensure bike and electrical components
are wiped dry, remove battery and allow to dry over night
• Check brake wear every month and adjust
• Check tire pressure regularly
• Lubricate the chain occasionally
• Have your bike adjusted every 3 months by
a professional bicycle technician
BEFORE EVERY RIDE
• Make sure battery is charged and locked into position
• Check tire pressure
• Check brakes for proper braking
• Always wear an approved bicycle helmet
26 www.iGOelectric.com
Page 27
MAINTENANCE
CLEANING
Regular cleaning of your ebike will prolong its life and reduce
the appearance of rust and corrosion build up.
REMOVE THE BATTERY BEFORE CLEANING and use brushes and wet
sponges to remove dirt. Finish by drying with paper cloths / towel.
(Use of a mild soap solution, degreaser, chain lube and a chain
cleaning device are recommended for a thorough cleaning.)
When cleaning the ebike do not submerge parts or let water accumulate by the
battery or electrics as prolonged exposure to water may damage these components.
ATTENTION! DO NOT USE A HOSE OR PRESSURE WASHER TO
SPRAY THE BIKE. THIS WILL RESULT IN IRREPARABLE WATER
DAMAGE AND WILL VOID YOUR WARRANTY!
27www.iGOelectric.com
Page 28

PARTS
PARTS LIST
PART NO. PART DESCRIPTION PRICE - $(CAD)
P222 SADDLE BLACK 29.95
P095 SEAT POST BLACK 24.95
P096 SEAT POST CLAMP BLACK 10.95
P223 SUNTOUR SUSPENSION FORK BLACK 129.95
P224 REAR CARGO RACK 89.95
P225 REAR CARGO RACK BOLT 1.95
P101 REAR CARGO RACK SIDE SUPPORT BOLT 1.95
P226 BUNGEE 3 COLOR 8.95
P227 FRONT FENDER 14.95
P023 FRONT FENDER TOP MOUNT BOLT 6.95
P024 FRONT FENDER TOP MOUNT WASHER 1.95
P025 FRONT FENDER TOP MOUNT NUT 1.95
P021 FRONT FERNDER TO FORK BOLT 1.95
P022 FRONT FENDER TO FORK WASHER 1.95
P228 REAR FENDER 14.95
P229 REAR FENDER TOP CENTER BOLT 1.95
P230 REAR FENDER BOTTOM BOLT 2.95
P033 FRONT LED DUAL BEAM LIGHT 39.95
P231 FRONT LIGHT MOUNTING BRACKET 1.95
P038 FRONT /REAR LIGHT CONNECTOR 1.95
P039 REAR LIGHT 17.95
P113 REAR LIGHT MOUNTING NUT 1.95
P114 HANDLEBAR BLACK 18.95
P044 LOOM FRONT CABLE ORGANIZER 7.95
P232 GRIP SET BLACK LEATHER 12.95
P116 PROMAX TOOLESS STEM 69.95
P117 STEM SPACER BLACK 4.95
P233 LEFT TEXTRO AURIGA BRAKE LEVER 29.95
P234 RIGHT TEXTRO AURIGA BRAKE LEVER 29.95
P235 FRONT BRAKE CABLE 12.95
P236 REAR BRAKE CABLE 16.95
P237 TEKTRO HYDRAULIC BRAKE CALIPER FRONT/REAR 39.95
P055 BRAKE CALIPER MOUNTING BOLT 1.95
P217 BRAKE ROTOR 180MM 12.95
P057 BRAKE ROTOR BOLTS 2.95
P239 SHIMANO TRIGGER SHIFTER WITH CABLE 9 SPD 29.95
P240 SHIMANO ACERA 9 SPD DERAILLEUR 36.95
P120 DERAILLEUR HANGER 8.95
P121 DERAILLEUR HANGER BOLT 1.95
P241 SCHWALBE BIG BEN TIRE 700 X 48 29.95
P242 TIRE TUBE 700C X 48 8.95
28 www.iGOelectric.com
Page 29
PARTS
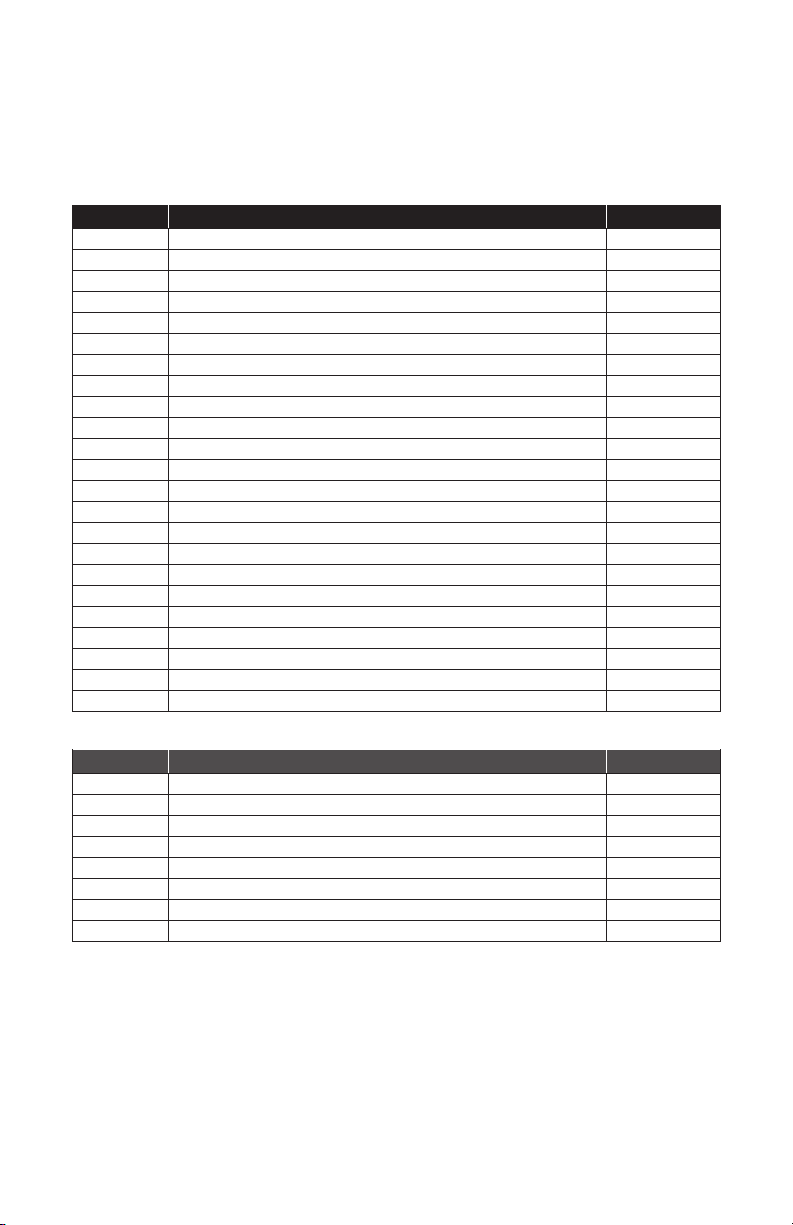
PART NO. PART DESCRIPTION PRICE - $(CAD)
P124 FRONT RIM 700C BLACK 49.95
P125 FRONT RIM QUICK SQUEWER BLACK 12.95
P126 REAR RIM 700C BLACK 49.95
P065 REAR WHEEL CAP NUT 4.95
P066 REAR WHEEL FLAT WASHER 1.95
P067 REAR WHEEL SPECIAL WASHER 3.95
P068 REFELCTOR AMBER 6.95
P127 BOTTOM BRACKET SET 29.95
P243 CASSETTE 9 SPEED SHIMANO HYPER GLIDE 24.95
P128 LEFT PEDAL ARM 12.95
P129 RIGHT PEDAL ARM 12.95
P075 PEDAL ARM BOLT 6.95
P130 FRONT CHAIN RING 24.95
P218 PEDAL SET 16.95
P077 CHAIN GUARD BLACK 24.95
P219 CHAIN GUARD MOUNTIONG BOLT BLACK 1.95
P079 CHAIN KMC 28.95
P131 KICK STAND BLACK 26.95
P081 KICKSTAND BOLT 4.95
P082 KICKSTAND FLAT WASHER 1.95
P083 KICKSTAND LOCK WASHER 1.95
P084 WATER BOTTLE CAGE BOLT 1.95
P085 TOOL SET 18.95
PART NO. ELECTRICAL PRICE - $(CAD)
PDIS48EL LCD DISPLAY 48 VOLT 89.95
PBATT48145 BATTERY SAMSUNG 48 VOLT 14.5 AH 949.00
P132 BATTERY LOCK & KEY SET 18.95
PCON48EL CONTROLLER 48 VOLT 99.95
PMOT48EL 500 WATT GEAR MOTOR 399.95
P220 THROTTLE THUMB 24.95
P221 SPEED SENSOR 24.95
PCHA48 BATTERY CHARGER 110/220 VOLT 89.95
ALL PRICES ARE SUBJECT TO CHANGE WITHOUT PRIOR NOTICE
29www.iGOelectric.com
Page 30

WARRANTY INFORMATION
WARRANTY
iGO Electric warrants to the original retail purchaser (”You”), that the iGO product
for which this warranty has been issued is free from defects in material and
workmanship for the time detailed below, from the date of original retail purchase.
This warranty is not transferable to a subsequent purchaser. iGO’s sole obligation
under this warranty is to repair or replace the product, at iGO’s option.
You have a 24 month warranty on the frame of the bike and electrical
components. The battery has a 18 month warranty.
There is a 30 day warranty on any manufacturers defects. Not
including any wear and tear parts (See P.25, Article 2, Sec.2.5).
Certain warranty conditions may apply, contact your dealer if you have any questions.
WARRANTY LIMITATIONS
The duration of any implied warranty or condition, of merchantability, tness for
a particular purpose, or otherwise, on this product shall be limited to the duration
of the express warranty set forth above. In no event shall iGO be liable for any loss,
inconvenience or damage, whether direct, incidental, consequential or otherwise,
resulting from a breach of any express or implied warranty or condition, of
merchantability, tness for a particular purpose, or otherwise with respect to this
product, except as set forth herein. This warranty gives you specic legal rights,
and you may also have other rights, which may vary, from location to location.
This warranty will be interpreted pursuant to the laws of Canada. The original
English version/meaning of this warranty controls over all translations and iGO
is not responsible for any errors in translation of this warranty or any product
instructions. This warranty is not intended to confer any additional legal,
jurisdictional, or warranty rights to you other that those set forth herein or
required by law. If any portion of this warranty is held to be invalid or unenforceable
for any reason, such nding will not invalidate any other provision.
30 www.iGOelectric.com
Page 31

WARRANTY INFORMATION
WARRANTY TERMS
Article 1: Guarantee.
1.1 iGO Electric guarantees that the iGO product you have purchased
is free from material and/or workmanship faults.
1.2 If, during the warranty period the product proves to be defective due to faulty materials or
workmanship, iGO or an iGO Dealer may charge for labor or parts at its own discretion.
The defective products or parts will be replaced using new or refurbished products or parts.
1.3 This warranty applies within the warranty period, and upon presentation of the original
invoice or sales receipt (indicating date of purchase, model name, and dealer) together with the
defective product. iGO or iGO Dealers may refuse free warranty service if these documents are
submitted incomplete or illegible. This warranty is void if the model name or serial number has
been altered, deleted, removed, or made illegible. Battery warranty is void if case is opened.
1.4 The guarantee may be invoked by the rst owner of the iGO product only.
1.5 This warranty does not cover transportation costs or risks associated with
the transport of your product to and from iGO or your iGO Dealer.
1.6 The warranty is void in accordance with Articles 3.1 and 3.2.
Certain restrictions apply in regards to batteries and some electronic
parts. Such restrictions are reected in Article 6.1 and 6.2.
Article 2: Warranty
2.1 You can only make a warranty claim , if you have lled out the warranty card
and retained the original proof of purchase. The warranty card is located on the last
page of this manual. The warranty period begins on the date of purchase.
2.2 iGO bike frames are guaranteed by design and/or material defects for 24 months.
2.3 All electronic parts, such as electronic controller, control panel, motor, throttle, and
pedal assist sensor, are subject to a 24 month warranty if properly maintained.
2.4 The battery is subject to a 18 month warranty if properly maintained.
2.5 On parts that are subject to wear and tear, such as tires, chain, chainring,
freewheels, sprockets, cables, and brake pads, there is no warranty on these
items,unless there are construction and/or material defects.
Article 3: Warranty Exclusions
3.1 If the following cases occur, then the warranty is void.
a. Incorrect and/or improper use of the iGO product.
b. The iGO product is not maintained in accordance with the guidelines mentioned in this manual.
c. Technical repairs have not been performed properly.
d. Third party components do not match the technical specications
of the bike or were improperly installed.
e. If proof of ownership, proof that the bike has been checked and adjusted properly prior
to the customers receival of the product, is not present or signed by the seller.
f. The product has been damaged by water either by excess rainfall, submersing
in water, or washing with a garden hose or pressure washer.
3.2 iGO Electric is free of any liabilities in regards to (parts of) the bike being damaged as a result of:
a. Improper adjustment of the handlebar, stem, saddle, seatpost, gears,
brakes, quick release axles of the wheels, and spoke tension.
b. Not replacing worn out parts such as, brake/derailleur cables, brake pads, tires, chains and sprockets.
c. Incorrect or insufcient lubrication of moving parts.
d. Climatic inuences such as rust.
e. Any damages occurring during shipment of the product (such
claims must be presented directly to the shipper)
31www.iGOelectric.com
Page 32

WARRANTY INFORMATION
WARRANTY TERMS (Cont’d)
Article 4: Warranty Parts
4.1 During the warranty period, all parts of which iGO has determined of
material and/or construction defect, shall be replaced free of charge to the
owner. Any costs of (dis)assembly are the responsibility of the owner.
4.2 The owner is responsible for any cost of transport for the iGO Product and/or
parts to and from iGO, unless the product or part is still eligible for warranty.
4.3 If a particular component is eligible for warranty and the original is no
longer available, iGO will provide an equivalent alternative.
Article 5: Transport of Warranty Products.
5.1 If it is determined by iGO that a bike/part is to be returned to iGO, it must be done in it’s
original packaging. If the original packaging is not available, an equivalent package must be used
to ensure the product is well protected from any damages it may incur during transport.
All original contents such as: keys, charger, battery must be included in the package.
5.2 iGO is not responsible for any damages or loss occurring during shipment of the
product, such claims must be presented directly to the shipper by the owner.
Article 6: Additional Warranty
6.1 Warranty on electronic parts:
Electric motor : 24 months, Charger : 24 months, Controller : 24 months, Control Panel : 24 months.
6.2 Additional provisions for the battery/battery pack:
a. iGO Li-ion battery/battery pack has a warranty period of 18 months.
b. Normal wear/decrease in battery capacity is not covered under warranty. The battery will
naturally lose capacity over time. Batteries that are left unused/discharged for extended
period of time and have become irreparably damaged, are not covered under warranty..
Article 7: Warranty Claims
7.1 Claims under this warranty will only be processed after the iGO Dealer from
whom the product was purchased, has inspected the defective bike/part. Proof
of purchase and ownership must be present at the time of inspection.
Article 8: Warranty Area
8.1 The warranty area is limited to the United States and Canada.
Article 9: Legal Requirements
9.1 In accordance with North American legislation, the vehicle is described
as a bicycle because it complies with the following rules:
• Electronic motor will only assist up to 32 km/h or 20 mph.
• The maximum power output of the motor is under 500W (750W for the U.S.)
• Pedals are permanently afxed to the bike.
• Front and Rear brake handle is equipped with an electronic cut-off switch
for the motor power when equipped with an on demand throttle
Article 10: Liabilities
10.1 Although iGO Electric accepts a warranty claim, it does not automatically
mean that iGO Electric accepts any liability of any damage suffered.
The Liability of iGO Electric never extends further than is described in this warranty.
Any liability of iGO Electric for consequential damage, is excluded.
32 www.iGOelectric.com
Page 33

WARRANTY INFORMATION
WARRANTY CARD
Please ll out this form and mail it to iGO so that we can register your serial
number in our system. Also, retain your receipt as proof of purchase.
iGO Electric
Attn: Warranty Card
1340, 55th Ave.
Lachine, QC
H8T 3J8
FULL NAME:
DATE OF BIRTH:
ADDRESS:
ADDRESS:
POSTAL/ZIP CODE:
CITY:
COUNTRY:
PHONE #:
E-MAIL ADDRESS:
BIKE MODEL:
VIN / FRAME NUMBER:
DATE OF PURCHASE:
DEALER NAME:
33www.iGOelectric.com
Page 34

34 www.iGOelectric.com
Page 35

NOTES
35www.iGOelectric.com
Page 36

 Loading...