

Igo ERÖ User Manual
ERÖ
USER MANUAL
PLEASE READ THIS MANUAL BEFORE OPERATING
AND WATCH
THE FULL ASSEMBLY
INSTRUCTIONAL VIDEO AT:
www.iGOelectric.com/buildmyero
IF YOU HAVE ANY ISSUES WITH YOUR BIKE PLEASE
DO NOT RETURN TO PLACE OF PURCHASE
PLEASE CALL
iGO Customer Service / Technical Support Toll-Free Number
1 866 996 6686
Mon - Fri 9:00 am - 5:00 pm EST
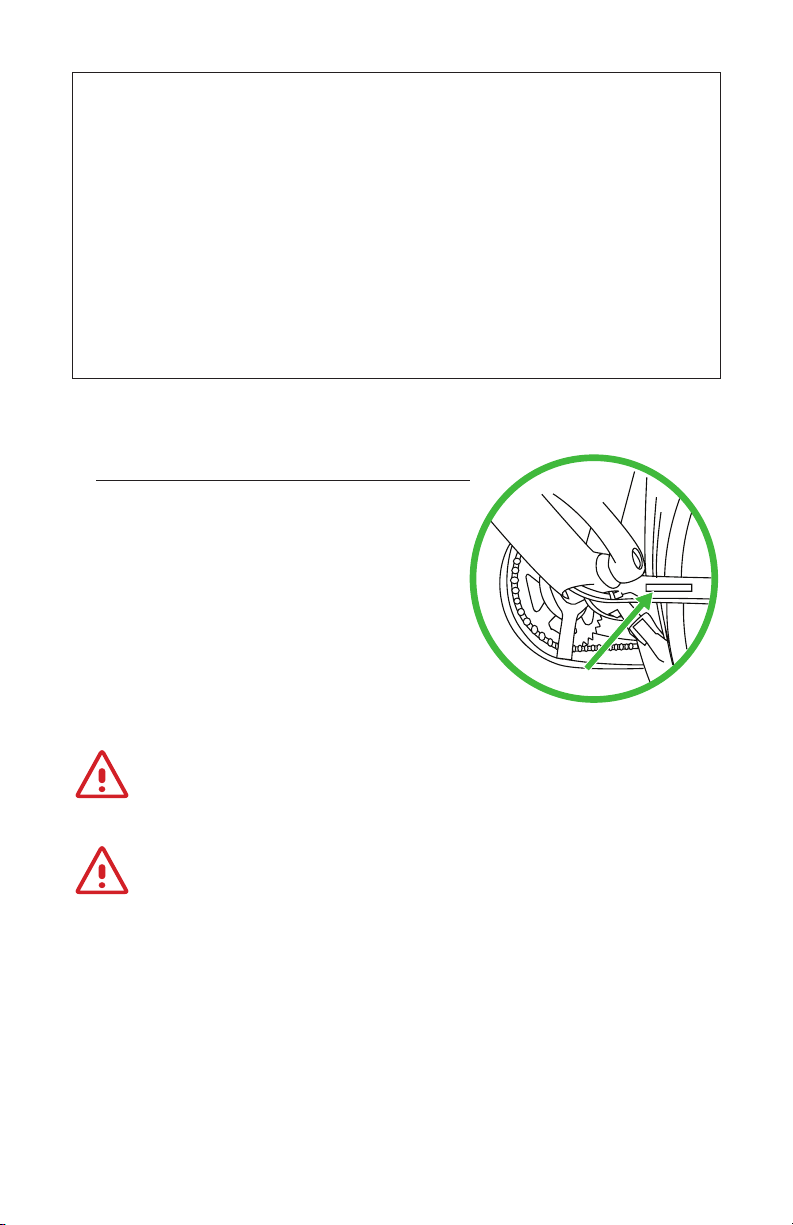
FRAME NUMBER / VIN NUMBER
The frame number is located on the
left side of the frame, down below the
bottom bracket, under the barcode.
You will need the frame number of
the ebike in order to register your
ebike for warranty purposes.
ATTENTION! Your ebike may differ from
the illustrations in this manual.
iGO highly recommends having the ebike assembled
and adjusted by a professional bicycle technician.
Note:
iGO Electric reserves the right to make changes without
notice to design(s) and / prices listed in this manual.
This manual has be compiled with great care. iGO can not be
held responsible for any inaccuracies whatsoever.
2 www.iGOelectric.com

CONGRATULATIONS !
You are the proud owner of an iGO electric ebike.
We have taken great steps to create an incredible product
and hope you enjoy riding it as much as we did creating it.
With the help of our electric bike your riding experiences
will be extremely pleasurable and memorable and
hope you will explore many new surroundings.
The ebike is equipped with electronic pedal assistance
which guarantees a Completely new way of cycling.
Whether you use the ebike for commuting, shopping or just a leisurely
ride, you will do so comfortably and condently on your new iGO.
Chances are that you have not previously owned an electric
bike with pedal assistance. For that reason iGO has compiled
a comprehensive user guide for you. iGO encourages you
to read through it carefully before riding your new ebike
to obtain a full understanding of your bikes features.
For more information, please visit our website at www.igoelectric.com.
We wish you many happy rides with your new ebike.
Sincerely,
T: 1 866 996 6686
@: support@iGOelectric.com
ADDRESS: 1340, 55th Ave.
LACHINE, QC
CANADA
H3T 3J8
3www.iGOelectric.com

TABLE OF CONTENTS
DISPLAY & FUNCTIONS
BUTTONS
INFORMATION ON THE SCREEN
CONTROLS
SETTINGS MENU
ERROR CODES
PEDAL ASSISTANCE
WHAT IS PEDAL ASSISTANCE?
TURNING PEDAL ASSISTANCE ON/OFF
DERAILLEUR FUNCTIONS
MORE INFORMATION ON PEDAL ASSISTANCE
BATTERY & CHARGING
BATTERY RANGE
DISCONNECTING AND REMOVING THE BATTERY
CHARGING THE BATTERY
USING THE BATTERY AS A POWER SOURCE
WHAT YOU SHOULD KNOW ABOUT YOUR BATTERY
HOW TO STORE YOUR BATTERY DURING NON USE
6
6
7
8
10
11
12
12
12
12
13
14
14
15
16
16
18
19
ADJUSTING YOUR EBIKE
FRONT LED LIGHT INSTALLATION
INSTALLING YOUR STEM
ADJUSTING STEM ANGLE & HANDLEBAR POSITION
ADJUSTING YOUR SEAT HEIGHT
ADJUSTING YOUR SADDLE POSITION
GEARS
TIRE PRESSURE
4 www.iGOelectric.com
20
20
20
21
22
22
23
23

BRAKE MAINTENANCE FOR TEKTRO AURIGA HYDRAULIC DISC BRAKE
24
ALIGNMENT OF THE CALIPER
CHANGING BRAKE PADS TEKTRO PART # E10.11
MAINTENANCE
SERVICING
GENERAL MAINTENANCE
CLEANING
PARTS
PARTS LIST
WARRANTY INFORMATION
WARRANTY
WARRANTY LIMITATIONS
WARRANTY TERMS
WARRANTY CARD
24
25
26
26
26
27
28
28
30
30
30
31
33
PLEASE READ IMPORTANT BATTERY STORAGE
INFORMATION ON PAGE 19
IMPROPER STORAGE OF YOUR BATTERY COULD RESULT
IN TOTAL BATTERY FAILURE
5www.iGOelectric.com
DISPLAY & FUNCTIONS
The battery must be in the ebike for the display to function.
Make sure that the battery is locked into the battery rack.
It is not necessary to keep the key in the lock while riding
Turn the power on by pressing the ‘ON/OFF’ Button for 2 seconds.
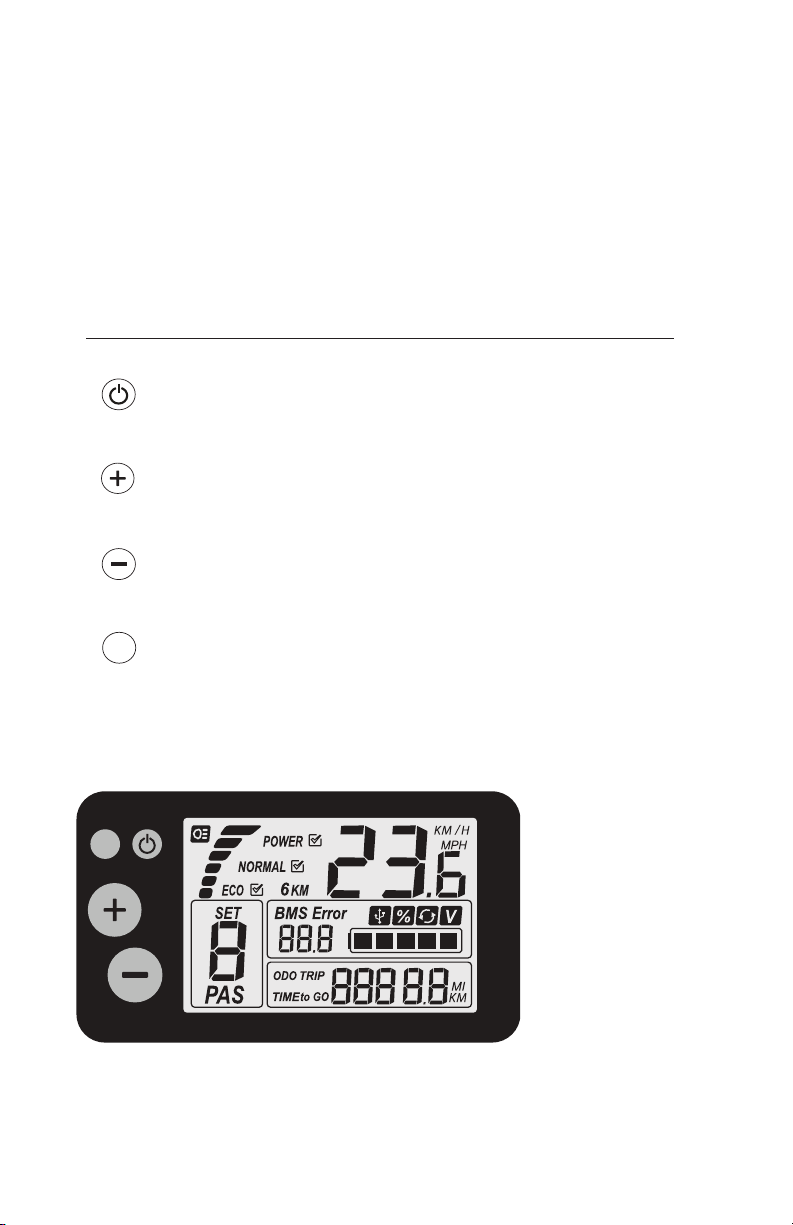
BUTTONS
‘ON/OFF’ : Powers ebike ON/OFF, Turns on lights when held
‘PLUS’ : Pedal assist level up, Walk assist when held
‘MINUS’ : Pedal assist level down
SET
SET
Electric system display and control unit
‘SET’ : Scroll through display options, Settings Menu when held
6 www.iGOelectric.com
DISPLAY & FUNCTIONS
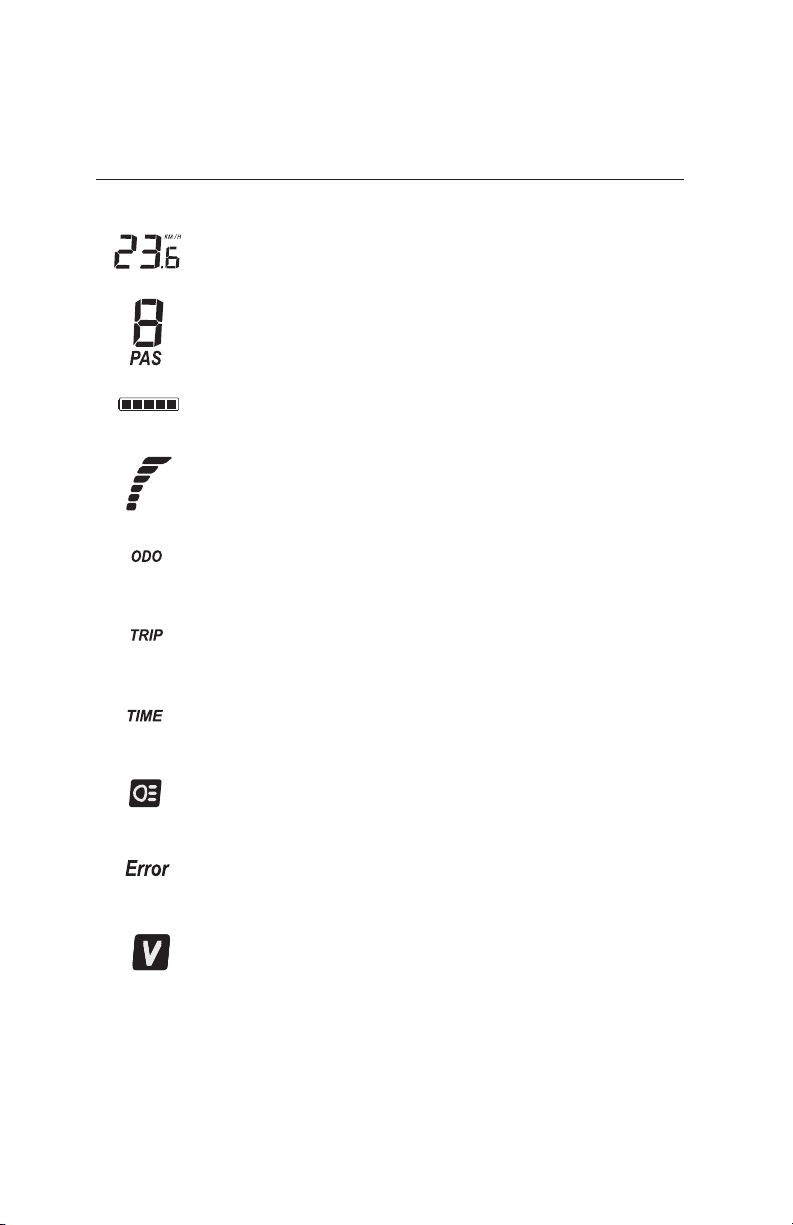
INFORMATION ON THE SCREEN
SPEED
(km/h or mph)
ASSISTANCE LEVEL
(0 - 8) Mode 0 = No assistance
BATTERY INDICATOR
5 Bars = Full Battery
ENERGY CONSUMPTION INDICATOR
Full bars = High battery consumption = Less range
ODOMETER
Total distance traveled
TRIP ODOMETER
Distance traveled since last reset
TIMER
Time since ebike was last turned on
LIGHT INDICATOR
Appears when lighting system is turned on
FAILURE
See page. 9 for error code descriptions
VOLTAGE
Indicates the level of current from the battery
7www.iGOelectric.com

DISPLAY & FUNCTIONS
CONTROLS
Turning the ebike ON/OFF
Press and hold the 'ON/OFF' Button for 2 seconds to turn the electric system
on or off. The control panel can only be used when the battery is connected
to the ebike and key switched to the 'on' position. If the system is not used
for a duration of 5 minutes, it will shut itself off to conserve battery.
Selecting the display options
Press the ‘SET’ button to switch between the different trip functions
of the display. (Odometer, Trip distance, Timer, etc.)
Adjusting the pedal assistance levels
Use the ‘PLUS’ and ‘MINUS’ buttons to select the different levels
of pedal assistance. (0 - 8)
Power level 8 gives the strongest assistance from the motor.
In power level 0 the motor does not provide any pedal assistance or
throttle but you will still be able to use the functions of the display.
NOTE: The battery will run out of power quicker when
using a higher level of pedal assistance.
Throttle
Your bike is equipped with an on demand throttle on the left grip.
The throttle can only be used within pedal assist levels 1 though 8.
Level 0 is for conventional non electric riding.
Regardless of the power assist level you select the throttle
is capable of taking you to top speed.
You can use the throttle along with the pedal assist or on its own.
YOU MUST ALWAYS WEAR AN APPROVED BICYCLE HELMET
WHEN RIDING AN ELECTRIC BIKE.
8 www.iGOelectric.com

DISPLAY & FUNCTIONS
CONTROLS (Cont’d)
Lighting
With the ebike’s power on , tap the ‘ON/OFF’ button once to turn on the lighting system.
This will turn on the backlight for the display, as well as the front and rear lights.
Tapping the power button once again will turn the lighting system off.
NOTE: The lighting system is powered through the ebikes lithium battery pack
USB Connection
The USB Connection on the display is currently non functional
and is reserved for future development.
ATTENTION! DO NOT TEXT WHILE RIDING.
Control unit and throttle located on left handlebar
9www.iGOelectric.com

DISPLAY & FUNCTIONS
SETTINGS MENU
By holding the ‘SET’ button for 3 seconds you will enter the Settings Menu.
The Settings Menu will allow you to change certain features of your ebike.
Once in the Settings menu the word ‘SET’ will begin to ash, pressing the ‘SET’
button will allow you to switch between the different settings. The ‘PLUS’ and
‘MINUS’ buttons will allow you to change the values of those settings.
Holding the ‘SET’ button again for 2 seconds will conrm the settings
to exit the Settings Menu.
Set 1: Reseting the Trip Odometer
Tap the ‘ MINUS’ button once to reset the Trip Odometer to ‘0’
Set 2: No Function
Set 3: Setting the Tire-Size
Having the correct tire-size set into the system is very important. It will
ensure that the data being displayed on the screen is accurate.
On the side of every tire you can nd the tire-size.
Default Tire-Size of your ebike:
28 inch - 40-622 - Circumference: 2205 mm
Set 4: Choosing km/h or mph
Depending on your location, you will want to have the information
on the screen displayed in the proper unit.
Pressing the ‘PLUS’ or ‘MINUS’ buttons while in this mode will allow you to
switch between having the information displayed in kilometers or miles.
10 www.iGOelectric.com
DISPLAY & FUNCTIONS
ERROR CODES
It is possible for a system error to occur.
When this happens, the display will show an error-code which will allow you or your
dealer to easily and properly diagnose an error in the electrical system of your ebike.
Error 1: Problem with the 3-phase control from the electronic controller
Error 2: Problem with the throttle connection
Error 3: Motor 3-phase wire is loose or defective
Error 4: Motor Hall Sensor signal malfunction (malfunction in motor or cable)
Error 5: Malfunction in brake sensor (signal)
Error 6: Battery voltage is too low
Error 7: Motor is stalled
Error 8: Malfunction in the electronic controller (signal)
Error 9: Malfunction in the display (signal)
If error persists contact iGO Technical Support
iGO TECHNICAL SUPPORT (phone lines open Mon-Fri 9:00 am - 5:00 pm EST)
tel:1 866 996 6686 email: support@iGOelectric.com
11www.iGOelectric.com
 Loading...