

Page 1

Installers &
User guide
Deadbolt 2S.
Version 0.3 12/18
1
Page 2

Welcome!
This guide will get you up and running with your igloohome
Deadbolt 2S. In the meantime, you should follow igloohome on
Facebook and Youtube!
Visit our YoutubeLike us on Facebook
As our igloohome app is frequently updated, there may be changes to this manual.
Please refer to our website igloohome.co/support for the latest version of the manual.
Page 3

Table of Contents
What’s Included 3
Specifications 4
Installation Guide
Requirements 5
Prepare Door for Installation 6
Prepare Lock for Installation 7
Installation Instructions 9
Test Lock 13
Prepare the Door Frame 14
User Guide
Lock Anatomy 15
Features 16
Unlocking and Locking 18
App Onboarding 19
Managing Access in App 20
Lock Tutorial 21
Lock Behaviour 22
Airbnb Connect 23
Troubleshooting 24
Page 4
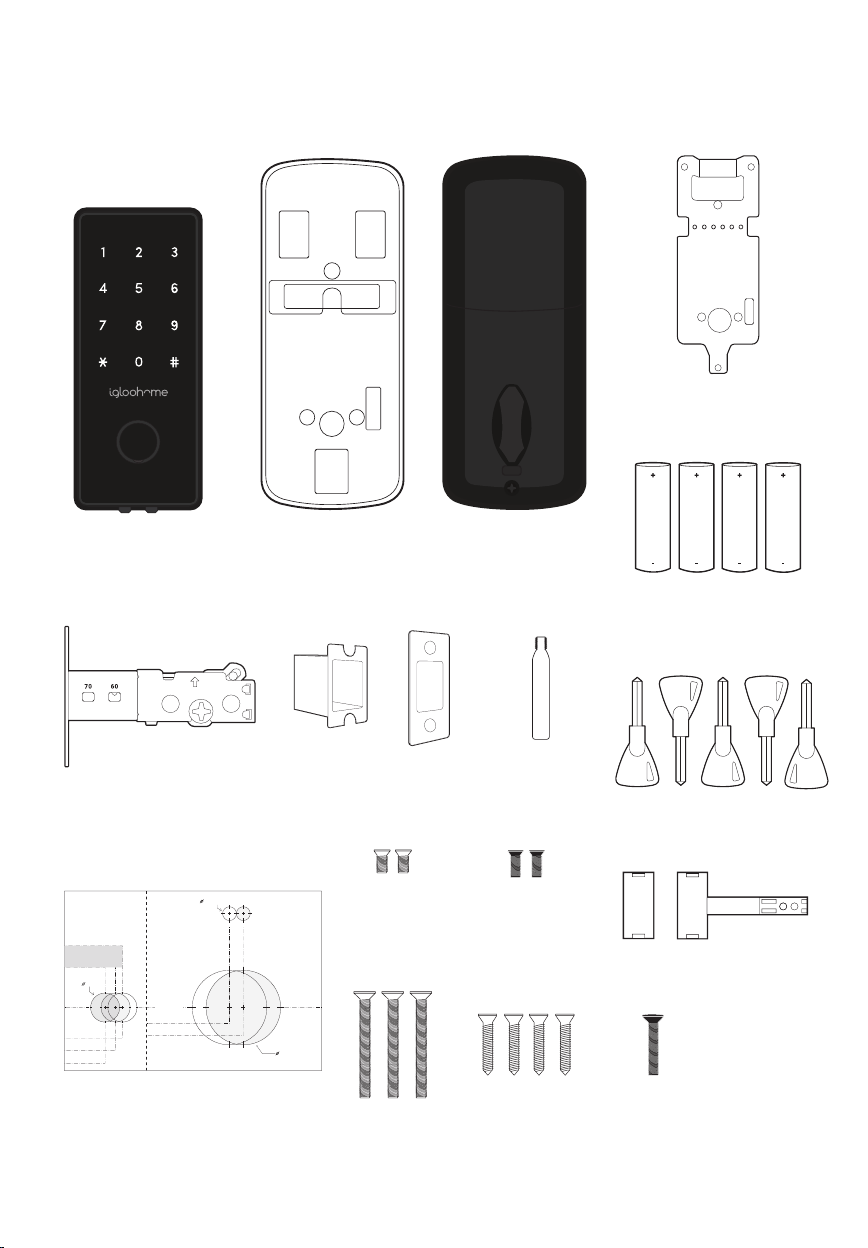
What’s Included
Back Plate
Front Assembly
& Rubber Gasket
Bolt Assembly
Edge of the door
Drill a 25mm (1”) hole at the center
of door edge based on your
Door Thickness measurements
25mm
Door Thickness
Drill for:
35mm (1-3/8”)
Drill for:
45mm (1-3/4”)
Drill for:
60mm (2-3/8”)
Fold this line
Face of the door
Centerline
Drill for:
60mm (2-3/8”) backset
Drill for:
70mm (2-3/4”) backset
Drill Sheet 43mm (1-11/16”)
10mm (Optional)
Drill for: Drill for:
Back Assembly
Rubber Gasket
Strike Plate Housing &
Strike Plate
70mm (2-3/4”) backset60mm (2-3/8”) backset
Version 0.2 03/18
Drill Sheet
54mm
5mm (13/64”)
Bolt Screw x2
Bolt Screw x3
Back Assembly
Screw Holder
8mm (5/16”)
Bolt Screw x2
15mm (19/32”)
Wood Screw x4
AA Alkaline Batteries x4
Keys x5
Door Sensor & Magnet
20mm (25/32”)
Bolt Screw
4
Page 5
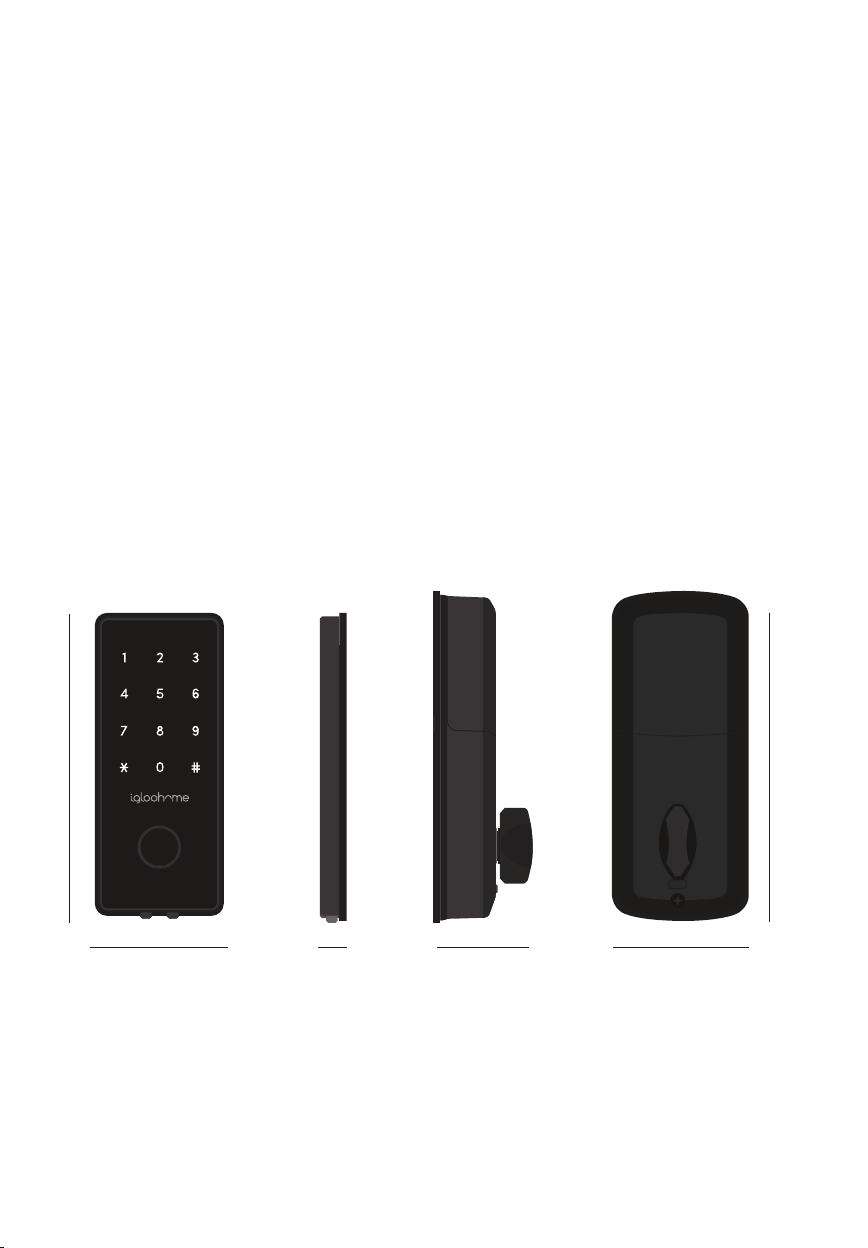
Specifications
Model igloohome Smart Deadbolt 2S
Material Zinc Alloy, ABS
Current Rating (Standby) ~30uA
Current Rating (Active) ~200mA
Batteries 4 x AA Alkaline
Battery Life Up to 9 months
Unlock Mechanism Bluetooth, PIN code, Physical Keys, Thumbturn
Front BackSide
145mm (5-11/16”)
60mm (2-23/64”) 11mm (7/16”) 51mm (2-1/64”) 64.5mm (2-35/64”)
* DO NOT USE: Heavy Duty, Eveready, GP, or rechargeable batteries. Duracell & Energizer alkaline batteries
recommended. Please note that using better batteries will improve the performance and lifespan of the lock.
160mm (6-19/64”)
5
Page 6
Installation Guide
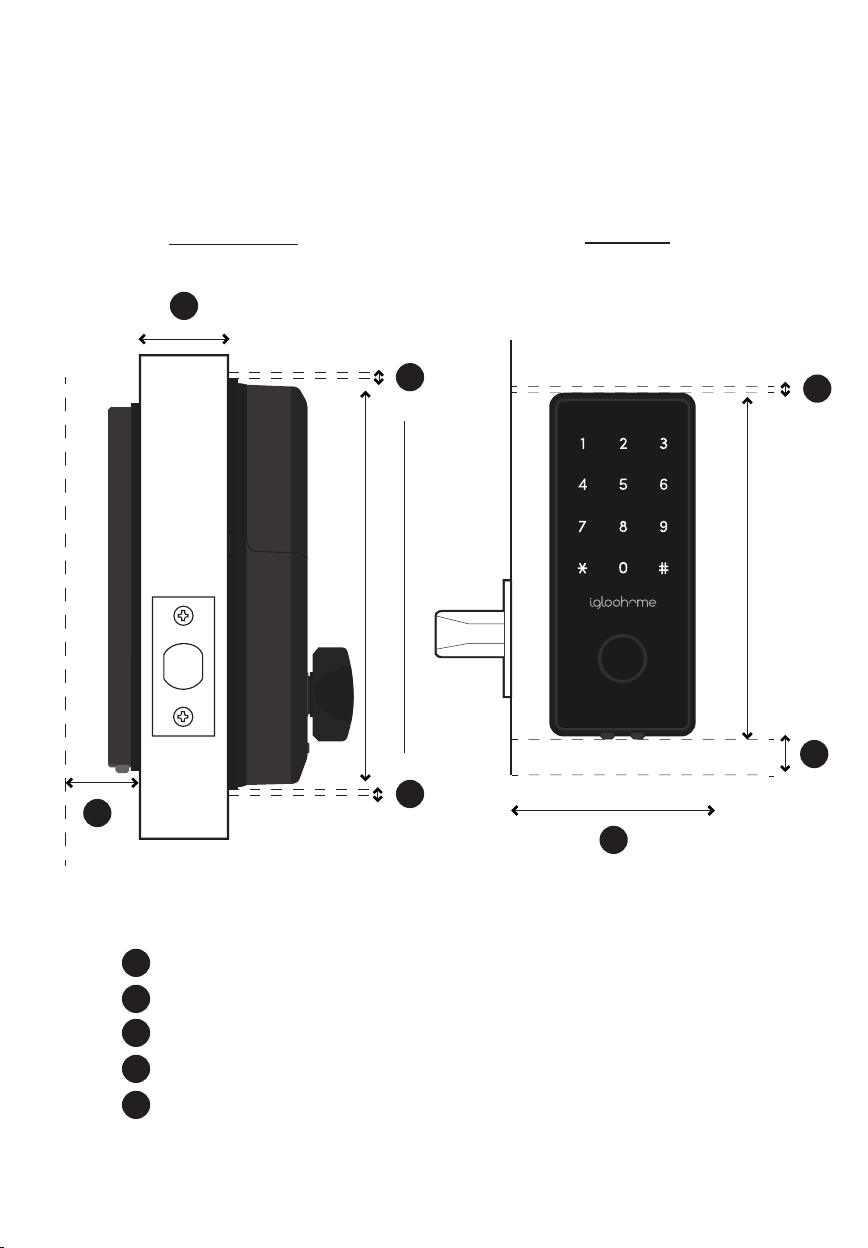
Requirements
Door Thickness
Clearance
a
b
160mm (6-19/64”)
b
144.5mm (5-11/16”)
e
b
c
d
Measurements
35mm (1-3/8”) to 60mm (2-3/8”)
a
10mm (25/64”)
b
c
20mm (25/32”)
>110mm (4-21/64”) for 60mm (2-3/8”) / >120mm (4-23/32”) for 70mm (2-3/4”) backset
d
e
50mm (2”)
6
Page 7
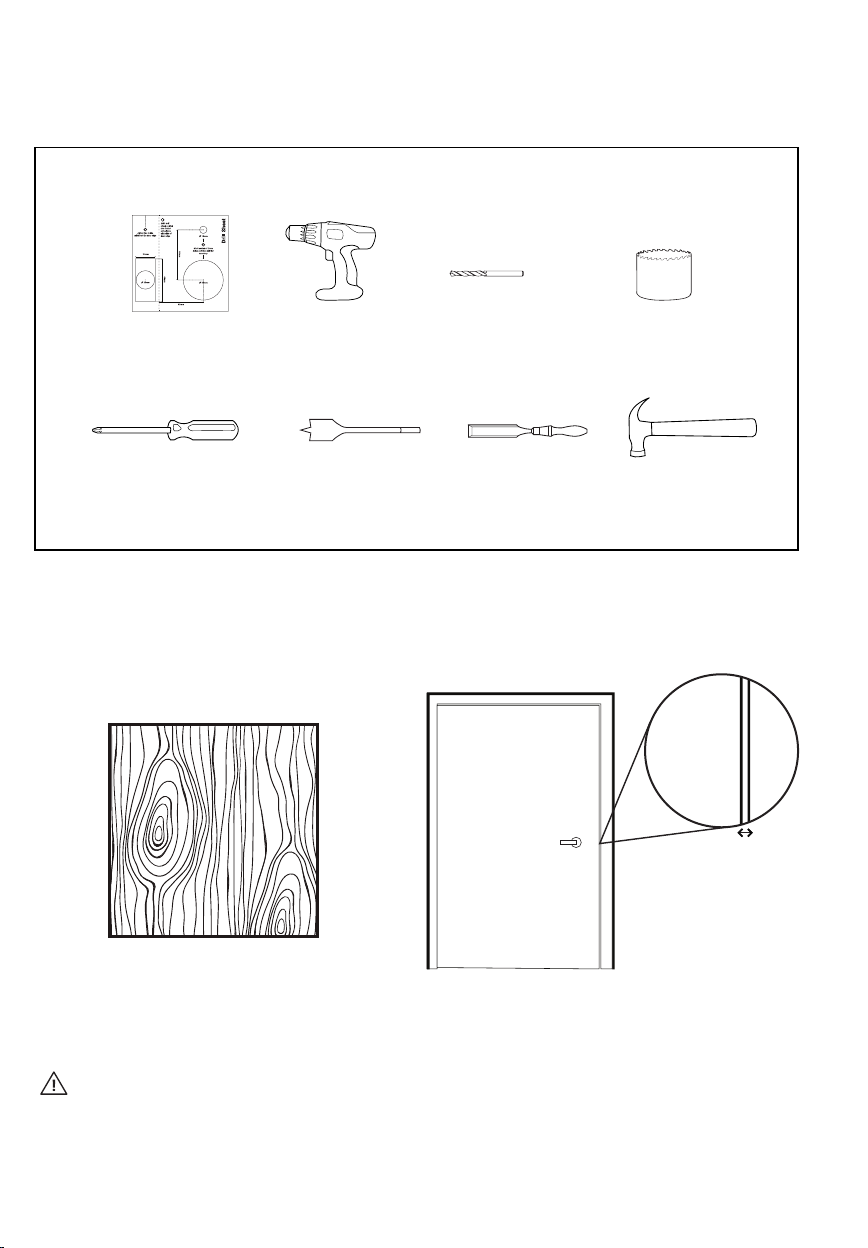
Prepare Door for Installation
Items needed:
#2 Phillips Screw Driver
Recommended
Door and door frame material : Wood
DrillDrill Sheet 10mm (25/64”)
25mm (1”)
Spade Bit
Drill Bit
20mm (25/32”)
Chisel
Recommended
Gap between door and door frame: <3mm (1/8”)
54mm (2-1/8”)
Hole Saw
Hammer
Please ensure that there is an existing handle on your door for push - pull access.
Not for: metal gates, glass doors or sliding doors.
If you are unsure if your door is suitable, send us web links to your door pictures to info@igloohome.co
7
Page 8
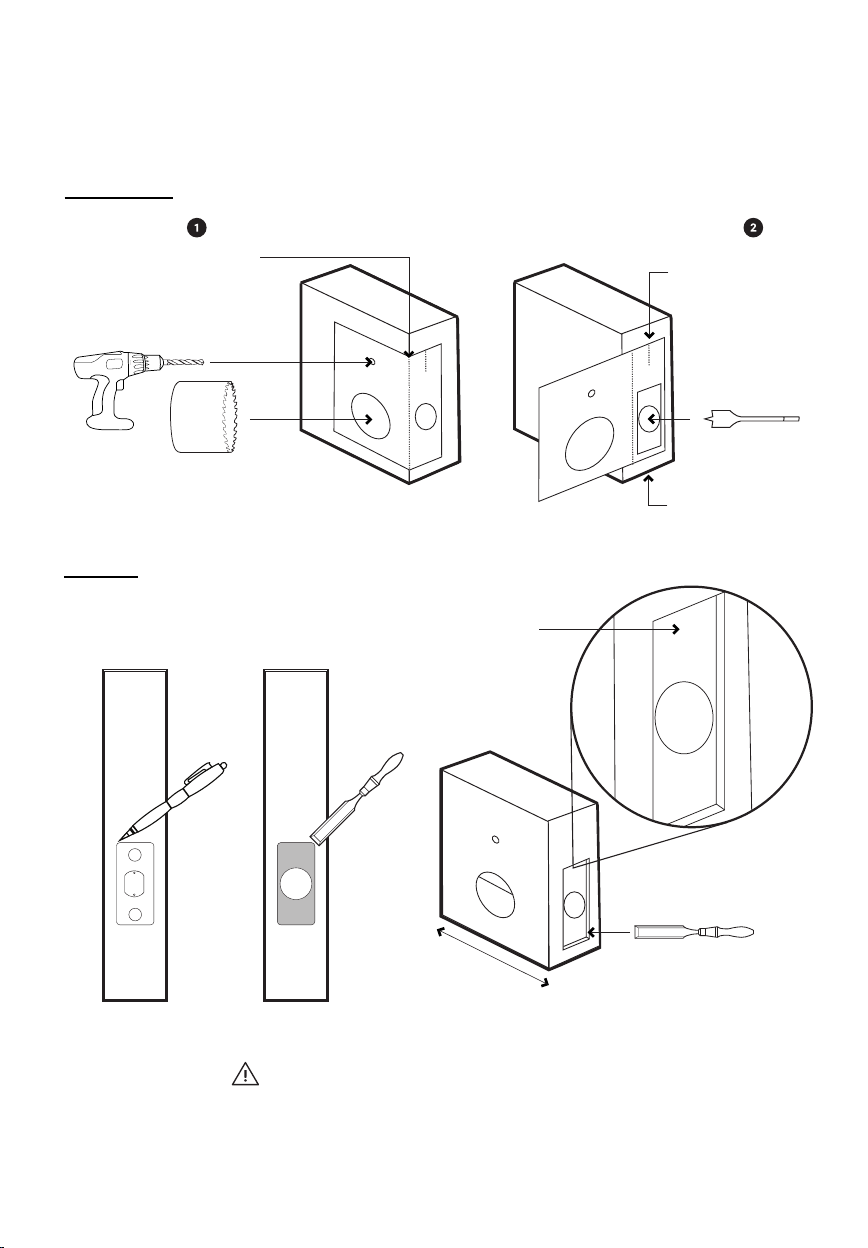
How to use the Drill Sheet
Drilling (Door)
Chiselling
Fold here
before drilling
holes for side
54mm (2-1/8”)
Hole Saw
Put the bolt tongue in &
chisel around the edge
Make sure this is
aligned to the centre
of door edge
25mm (1”)
Spade Bit
Door edge
Depth:
4.5mm (11/64”)
or until bolt
assembly plate
is flush against
door
20mm
(25/32”)
Chisel
20mm (25/32”)
Chisel
Mark the center of the holes and then drill for accuracy.
8
Page 9
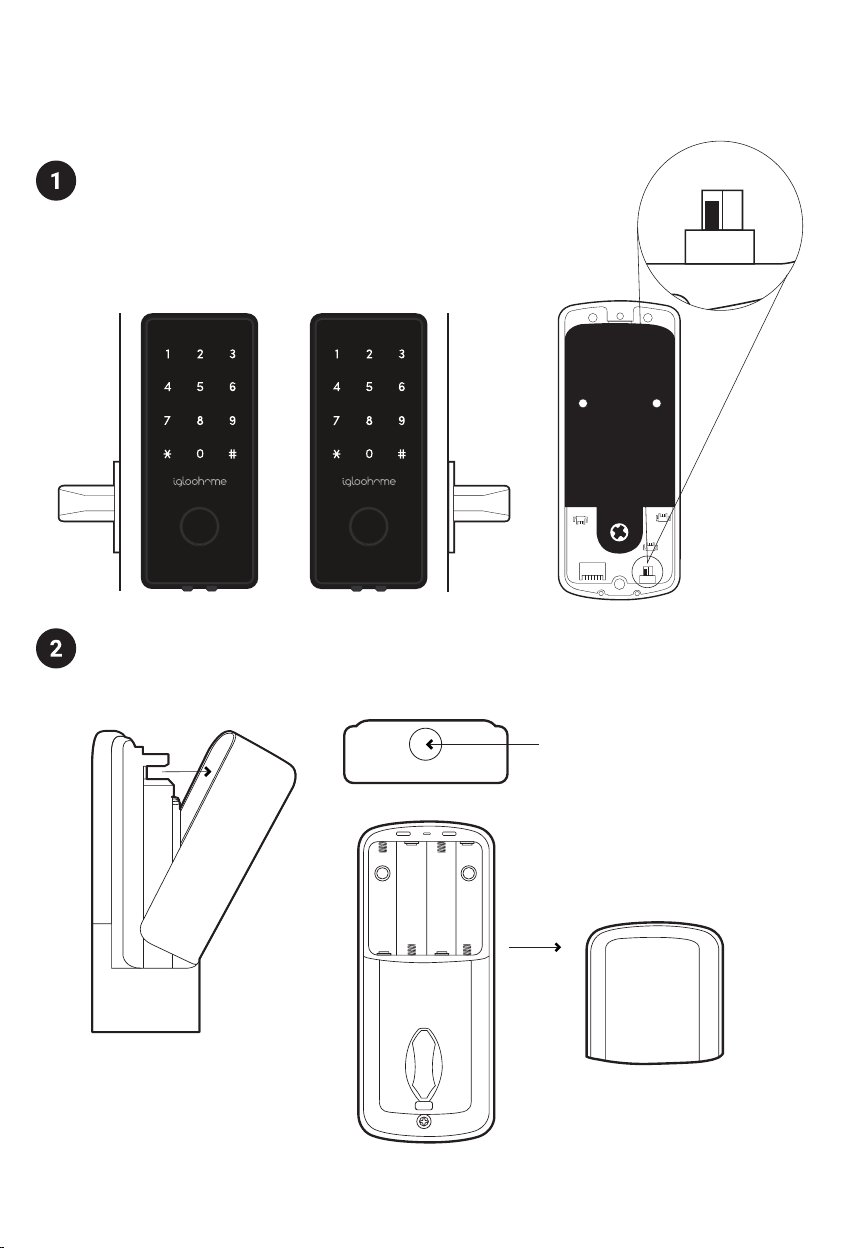
Prepare Lock For Installation
L R
Set Back Assembly for Left / Right Installation
Left Installation
Set the toggle to ‘L’ for
left-side installation.
Right Installation
Set the toggle to ‘R’ for
right-side installation.
Remove Battery Cover from the Back Assembly
Top View of Battery Cover
R
L
Press the button on the
top of the battery cover,
and pull outwards.
9
Page 10

Installation Instructions
Measure
If you are replacing your current deadbolt lock, industry standards are 60mm (2-3/8”) or 70mm
(2-3/4”) backset. To determine which backset length you should use, so measure the distance (x)
between the center of 54mm (2-1/8”) hole to door edge.
X
54mm
(2-1/8”)
Hole
Prepare bolt assembly based on the distance (x)
Bolt ships with bolt assembly in 60mm (2-3/8”) position. If required, twist the bolt and pull to
extend (simultaneously) to 70mm (2-3/4”) backset position.
Twist upwards
Twist downwards
Pull
10
to lock backset position
Page 11

Insert bolt and front assembly into door edge
The ‘+ ‘ hole on the backset should be in the middle of the hole.
c
c
Screws
Screw Holder
15mm (19/32”)
Please ensure that tailpiece is in vertical position.
Measure and cute the tailpiece if necessary
After inserting the tailpiece, measure the distance of protrusion from the door.
Door thickness (mm) No. of notch to cut
60 0
55 1
45 2
40 3
35 4
Notch
The recommended tailpiece
protrusion from the door is 15mm.
11
Page 12

Secure the Front Assembly using the Back Plate.
To do this, place the Back Plate (ensuring the correct side placement).
d
Screws
43mm (1-11/16”)
d
5
Door Sensor Installation
Follow this orientation
Adjust the position of the door sensor according to the door handling (left or right installation).
Use the 2 x 5 (13/64) mm screws to secure the door sensor to the back plate.
Right InstallationLeft Installation
Do not overtighten the screws
e
e
e
e
d
d
12
Screws
e
5mm (13/64”)
Page 13

6
Fit in the Rubber Gasket
Insert the front assembly cable through the rectangular hole on the rubber gasket.
The hole should be on the right side of the rubber gasket.
Assembly Cable
Door Sensor Cable
goes through the
arched hole on the
Rubber Gasket
Right InstallationLeft Installation
13
Page 14

7
Connect Assembly Cable
Connect the sensor cable to the Back Assembly then connect the assembly cable from
the Front assembly through the 54mm hole to the Back Assembly. Ensure that the wire is
installed properly and securely.
Door Sensor
Cable
Assembly
Cable
Fit Back Assembly to the Door Tailpiece
8
Ensure thumbturn position is turned to ‘unlock’ position.
Left Installation Right Installation
Thumbturn
is in vertical
position
LR
Thumbturn is
in horizontal
position
14
Page 15

9
Secure the Back Assembly
Do not overtighten the screws
Screws
8mm (5/16”)
20mm (25/32”)
Insert 4 AA Alkaline Batteries and push the battery case lid
10
inwards to close
Side View
15
Page 16

Test Lock
Place hand over your lock to activate touchpad and hold # to lock.
Yes No
Does your bolt lock?
Congrats!
Your lock is correctly installed.
Proceed to next steps.
Still experiencing issues?
Go to igloohome.co/support for more help
16
Yes
Left-Right toggle
incorrectly set
Troubleshoot: Try Setting the
left-right toggle on your back
assembly to the correct side.
(See Pg. 10)
Bummer!
Does the bolt lock and unlock
when you turn the thumbturn?
No
Tailpiece and/or thumbturn
incorrectly set
Troubleshoot: Dissemble lock
and install it again.
Page 17

Prepare the Door Frame
Ensure to align the lock to the door frame
and mark it down.
Door
Frame
25mm (1”)
Spade Bit
Same height
Mark & Drill Hole
Mark out where the bolt tongue locks then
drill a corresponding hole on door frame.
Chisel to fit the strike plate in as well.
20mm (25/32”)
Chisel
26mm
(1-1/32”)
58mm
(2-9/32”)
Secure strike plate housing and strike plate using 2x 25mm (1”) wood screws.
1mm
(11/64”)
17
Page 18

User Guide
Lock Anatomy
Outer Body
Battery Cover
Release
Touch Screen
Keypad
Battery Cover
18
Key hole Cover
(Remove cover
to access
physical key
unlock)
9V Jumpstart
Thumbturn
Privacy
Lockout Button
Page 19

Features
PIN / Bluetooth Unlock
Lock
Bluetooth Master Key
The igloohome Smart Deadbolt 2S
unlocks with Bluetooth via the app.
Bluetooth Guest Key
Bluetooth keys based on duration can
be generated and shared with guests.
Timer Re-lock
After successfully unlocking, the
igloohome Deadbolt 2S will re-lock
after a period of time (between 5 to 120
seconds). The owner sets this function.
Manual Locking
Hold the ‘#’ key for 2 seconds to lock
the igloohome Deadbolt 2S.
Master PIN Code
The igloohome Smart Deadbolt 2S
unlocks with a permanent Master PIN
Code.
User PIN Code
The mobile app can generate user
PIN codes, with validity duration from
One-Time, Permanent, or a Duration
based on Date-time.
Sensor Re-lock (Recommended Accessory)
The Sensor detects when the door is
closed and locks automatically.
19
Page 20

Features
Security / Alarms
Battery
Security Lockout Mode
After 5 consecutive unsuccessful
attempts at entering a PIN code,
the igloohome Smart Deadbolt 2S
will be unresponsive for 5 minutes.
Physical key and Bluetooth Unlock
can be used to unlock in this state.
Privacy Lockout Mode
Activate this from indoors to prevent
entry from outsiders. Physical key can
be used to unlock in this state.
Decoy PIN Code
A total of 16 decoy digits including PIN
code can be entered to prevent the
PIN code from being exposed.
Activity Logs
Entry via PIN codes and Bluetooth Key
will be logged in the app.
Bluetooth key access logs are updated
in real-time and PIN code access logs
are updated when the owner uses a
bluetooth key or update logs.
Tamper Alarm
The lock will sound if intruders try to
pry the lock from the door.
20
Emergency Jump-Start
If battery power is drained, an
external 9 Volt battery can be used
to provide emergency power. The 2
contact points of the battery must be
aligned with the 2 contact points on
the Deadbolt 2S.
Page 21

Unlocking & Locking
PIN Code /
Decoy PIN Code
Thumbturn
Physical Key
Unlocking
Sensor Re-Lock
(Recommended Accessory)
igloohome App
Bluetooth
Basic Unlock
Main Door
22
PIN Code
Key in your PIN code and press ‘#’
Bluetooth Basic Unlock
On your app, click on the Bluetooth
Unlock button and tap on your lock
Thumbturn
Use thumbturn at the back of lock
Locking
‘#’ Key
Press and hold ‘#’
Timer Re-Lock
Refer to page 24
Sensor Re-Lock (Recommended Accessory)
Automatic locking after door closes
Bluetooth Guest Key
Refer to page 23
Physical Key
Use the physical key to unlock the door
Physical Key
Use the physical key to lock the door
Thumbturn
Use thumbturn at the back of lock
21
Page 22

App Onboarding
Test Factory PIN Unlock
In the factory mode (before pairing), the PIN to unlock is * 1234567890 #
2
Register as a Lock User
a) Download igloohome from App store / Play store.
b) Create an account and login.
3
Pairing
a) Select [Add new igloohome lock]
Note: For exitisting users with other paired locks, go to
[Configuration], select [Manage Locks] followed
by the [Add] icon.
a) Select [igloohome Deadbolt 2S]
b) Place your palm over keypad to wake device up
22
c) Press [Next] and select the lock to pair with
4
Setting Master PIN code
Before proceeding, turn on your Bluetooth and ensure that you are within Bluetooth
range of the lock.
Go to [Access] and customize your [Master PIN] by editing it.
Page 23

Managing Access in App
Creating PIN codes
PIN codes can be generated on the app under [Access], create [New Key] and choose
either One-Time, Permanent or Duration PIN.
Pin codes will expire if its not use within its activation period. Refer to the table below.
PIN Type Use PIN within*
One-Time PIN 6 hrs of generation
Permanent PIN 24hrs of generation
Duration PIN 24hrs from the start time
2
Bluetooth Guest Key
Bluetooth Guest Key can be shared with other users for mobile access. It allows your guests
to unlock the igloohome smart lock via Bluetooth.
There are 3 steps to using a Shared Bluetooth Key
1. Under [Access], create [New Key] and choose [Bluetooth Key] under
[Access Type]. Proceed to share the key after it is created.
2. Guest receives the Bluetooth Key by one of these methods:
• Clicking the URL given and follow the instructions.
• Scanning the QR code under [Visits].
3. Guest can now use the Bluetooth Key under [Visits] whenever he is within
range of the lock.
Notes:
• The owner can revoke the Bluetooth Key in App.
• Bluetooth Key must be accepted within 1 hour generation before it expires.
Resetting PIN codes
3
Ensure that Bluetooth is switched on, and you are within Bluetooth range of the lock.
Go to Home > Select Lock Name > [Settings] > Reset Pins
Lock will reset all codes, except for Master PIN, and all PIN codes previously generated are no
longer valid.
23
Page 24

Lock Tutorial
Edit PIN codes
Once PIN code is generated, user must key the generated code onto the Deadbolt 2S keypad
followed by # to activate the code before proceeding. To change the PIN, enter:
Press * > Key 1 0 and tap # > Current PIN and tap # > New 4 - 9 digit PIN and tap # > New
4 - 9 digit PIN and tap #
Current PIN Code 1234 5678
New PIN Code 010101
On Keypad Press * > Key 1 0 # > 1234 5678 # > 010101 # > 010101 #
Notes:
• Editing of codes can also be done in app
• PINs must be used once before it can be edited.
2
Enabling & Disabling Timer Re-Lock*
To Enable * 2 1 # <Master PIN> # <Duration between 5-120 seconds> #
24
To Disable * 2 0 # <Master PIN> #
Note: By default, Timer Re-lock is disabled.
3
9V Jumpstart Feature
Step 1 - Touch and hold the battery contacts against the 9V jumpstart pin on the lock and
you will hear a series of beeps
Step 2 - While holding the 9V battery to the jumpstart, key in your PIN code on the keypad
followed by ‘#’ to unlock
Page 25

Lock Behaviour
Security Lockout Mode
After 5 consecutive unsuccessful attempts at entering a PIN code, the igloohome Samrt
Deadbolt 2S will be unresponsive for 5 minutes.
Note: Physical key and Bluetooth Unlock can be used to unlock in this mode.
Privacy Lockout Mode
2
Privacy Lockout Mode prevents others from using PIN code and Bluetooth Key to unlock
when you are inside the property.
Note: Physical key can be used to unlock in this mode.
To activate Privacy Lockout Mode, press and hold Privacy Lockout button until the lock
sound o.
Audio Indications:
• Long beep when activated.
• 2 quick beeps when disabled.
Sensor Re-lock
Activated by
Disable By
Behaviour
Duration
Security Lockout Mode
5 consecutive invalid PIN codes
Wait for 5 Minutes
Bluetooth Unlock
Keypad is flickering on touch
Unresponsive for 5 minutes
Privacy Lockout Mode
Privacy Lockout button
Privacy Lockout Button
Physical Key
Thumbturn
Keypad does not light up
Unresponsive until Privacy Lockout
Mode is disabled
25
Page 26

Airbnb Connect
7
8
Airbnb Connect
Airbnb Connect automates the generation of PIN codes for your Airbnb guests based on
their approved reservations. It costs USD$4.99 per month, but is currently on free trial.
Here are the steps to activate Airbnb Connect
Step 1: Connect to your Airbnb
Under [Account Settings], select [Connect with Airbnb]
Step 2: Connect to Airbnb listings
Under [Reservations], click the [Add] icon to select a home to connect to.
Select Airbnb Listing and PIN Time to associate.
Note:
• Emails with PIN code will be sent to the guest between 1 to 48 hours before
check-in time (configurable).
• PINs will only be valid between the check-in and check-out times.
Step 3: Change Check-in and Check-out time
Under [Configuration], select [Manage Homes] followed by the listing to view or edit its
details.
Notes:
• If the access mail has not been sent, changing your check-in/check-out time via the app
modifies the start and end time of the PIN codes to be shared with your guest.
• If the access mail has been sent, changing these details will only aect the next
reservation.
• Changing these details on the igloohome app does not update the check-in/check-out
time on the listing on the Airbnb website.
26
2
Disconnect Airbnb
Should you prefer to generate PIN codes for your guests manually, you may disconnect your
Airbnb listing from the igloohome home listing with the steps below.
1. Under [Reservations], disconnect all the listings (if any).
2. Under [Account Settings], select [Disconnect with Airbnb].
Should you wish to completely disconnect your Airbnb account from your igloohome account,
make sure that all your Airbnb listings have been disconnected in the above step, then go to:
Airbnb Host Website > Connected Apps > Select igloohome to disconnect
Page 27

Troubleshoot
Pairing is unsuccessful
• Try with a dierent mobile device, using the
same username and password
• Update your phone’s Operating system to the
latest version
• Restart the Bluetooth and internet connection on
your mobile device
• Restart igloohome app on your mobile device
• Switch to a new set of batteries
Keypad does not light up
• Use a 9V battery to jumpstart and switch to a
new set of batteries
• Check if the Deadbolt 2S is in Privacy Lockout
Mode
Keypad is flickering
• The Deadbolt 2S is low in battery. Switch to a
new set of batteries
Lock is not working when
battery level is not 100%
• Do a Bluetooth Key unlock to refresh the
battery level on the app
• Battery level shown in the app may not
be accurate
• Use Alkaline batteries only
• Do not use: Heavy Duty, Eveready, GP, or
rechargeable batteries
* Using high quality batteries will improve the
performance and lifespan of the lock
Bluetooth Key is not working
• Restart the Bluetooth and internet connection on
your mobile device
• Check on the timezone of the home listing against
your phone time
• Check if the Bluetooth Key is expired. It must be
accepted within 1 hour of generation
• Update your igloohome app to the latest version
• Switch to a new set of batteries
Generated PIN codes do not work
• Make sure that the generated PIN codes are
activated within the given hours
• Do a Bluetooth Unlock to refresh the app
• PIN codes may have been customised or expired
Changing Batteries
• To open the battery compartment, press the
button on the top of the battery cover and tilt the
cover downwards to open
• Replace all four batteries
Re-lock is not working
• Check battery level of the lock
• Make sure you have enabled timer re-lock
Keypad lights up on touch only
• Check if the Deadbolt 2S is in security lockout
mode
• Refer to Lock Tutorial - Step 4
27
Page 28

For enquiries go to:
28
igloohome.co/support
 Loading...