

Page 1

3.0 cu. ft.
Upright Freezer
User Manual
FRF300
Page 2

NOTE: If the freezer has been placed in a horizontal or tilted position for any
period of time wait 24 hours before plugging the unit in.
1. Use this appliance only for its intended purpose as described in
this use and care guide.
2. This freezer must be properly installed in accordance with the
installation instructions before it is used. See grounding
instructions in the installation section.
3. Never unplug your freezer by pulling on the power cord. Always
grasp the plug firmly and pull straight out from the outlet.
4. Repair or replace immediately, all electric service cords that have
become frayed or otherwise damaged. Do not use a cord that
shows cracks or abrasion damage along its length, the plug or the
connector end.
5. Unplug your freezer before cleaning or before making any repairs.
6. Do not use any electrical device or any sharp instrument in
defrosting your freezer.
7. If your old freezer is not being used, we recommend that you
remove the doors. This will reduce the possibility of danger to
children.
8.
WARNING:
After your freezer is in operation, do not touch the
cold surfaces in the freezer compartment, particularly when
hands are damp or wet. Skin may adhere to these extremely cold
surfaces.
9. Do not refreeze foods, which have been thawed completely. The
United States Department of Agriculture in Home and Garden
Bulletin No. 69 reads: “…You may safely refreeze frozen foods that
Read all of the instructions before using this appliance. When using this
appliance, always exercise basic safety precautions, including the following:
WARNING
1
IMPORTANT SAFETY INSTRUCTIONS
Page 3

Risk of child entrapment. Before you throw away your old
refrigerator or freezer, take off the doors. Leave the shelves in
place so that children may not easily climb inside.
DANGER
2
IMPORTANT SAFETY INSTRUCTIONS
have thawed if they still contain ice crystals or if they are still
cold-below 40˚F”.
“…Thawed ground meats, poultry, or fish that have any off-odor
or off-color should not be refrozen and should not be eaten.
Thawed ice cream should be discarded. If the odor or color of
any food is poor or questionable, discard it. The food may be
dangerous to eat.”
“…Even partial thawing and re-freezing reduce the eating quality
of foods, particularly fruits, vegetables, and prepared foods. The
eating quality of red meats is affected less than that of many
other foods. Use refrozen foods as soon as possible, to save as
much of its eating quality as you can.
10. This freezer should not be recessed or built-in an enclosed
cabinet. It is designed for freestanding installation only.
11. Do not ope
rate your freezer in the presence of explosive fumes.
SAVE THESE INSTRUCTIONS
HOUSEHOLD USE ONLY
PRODUCT REGISTRATION
Thank you for purchasing our
product. This easy-to-use manual will
guide you in getting the best use of
your product.
Remember to record the model and
serial numbers. They are on a label
inside of the unit.
Model number
Serial number
Date of purchase
Page 4
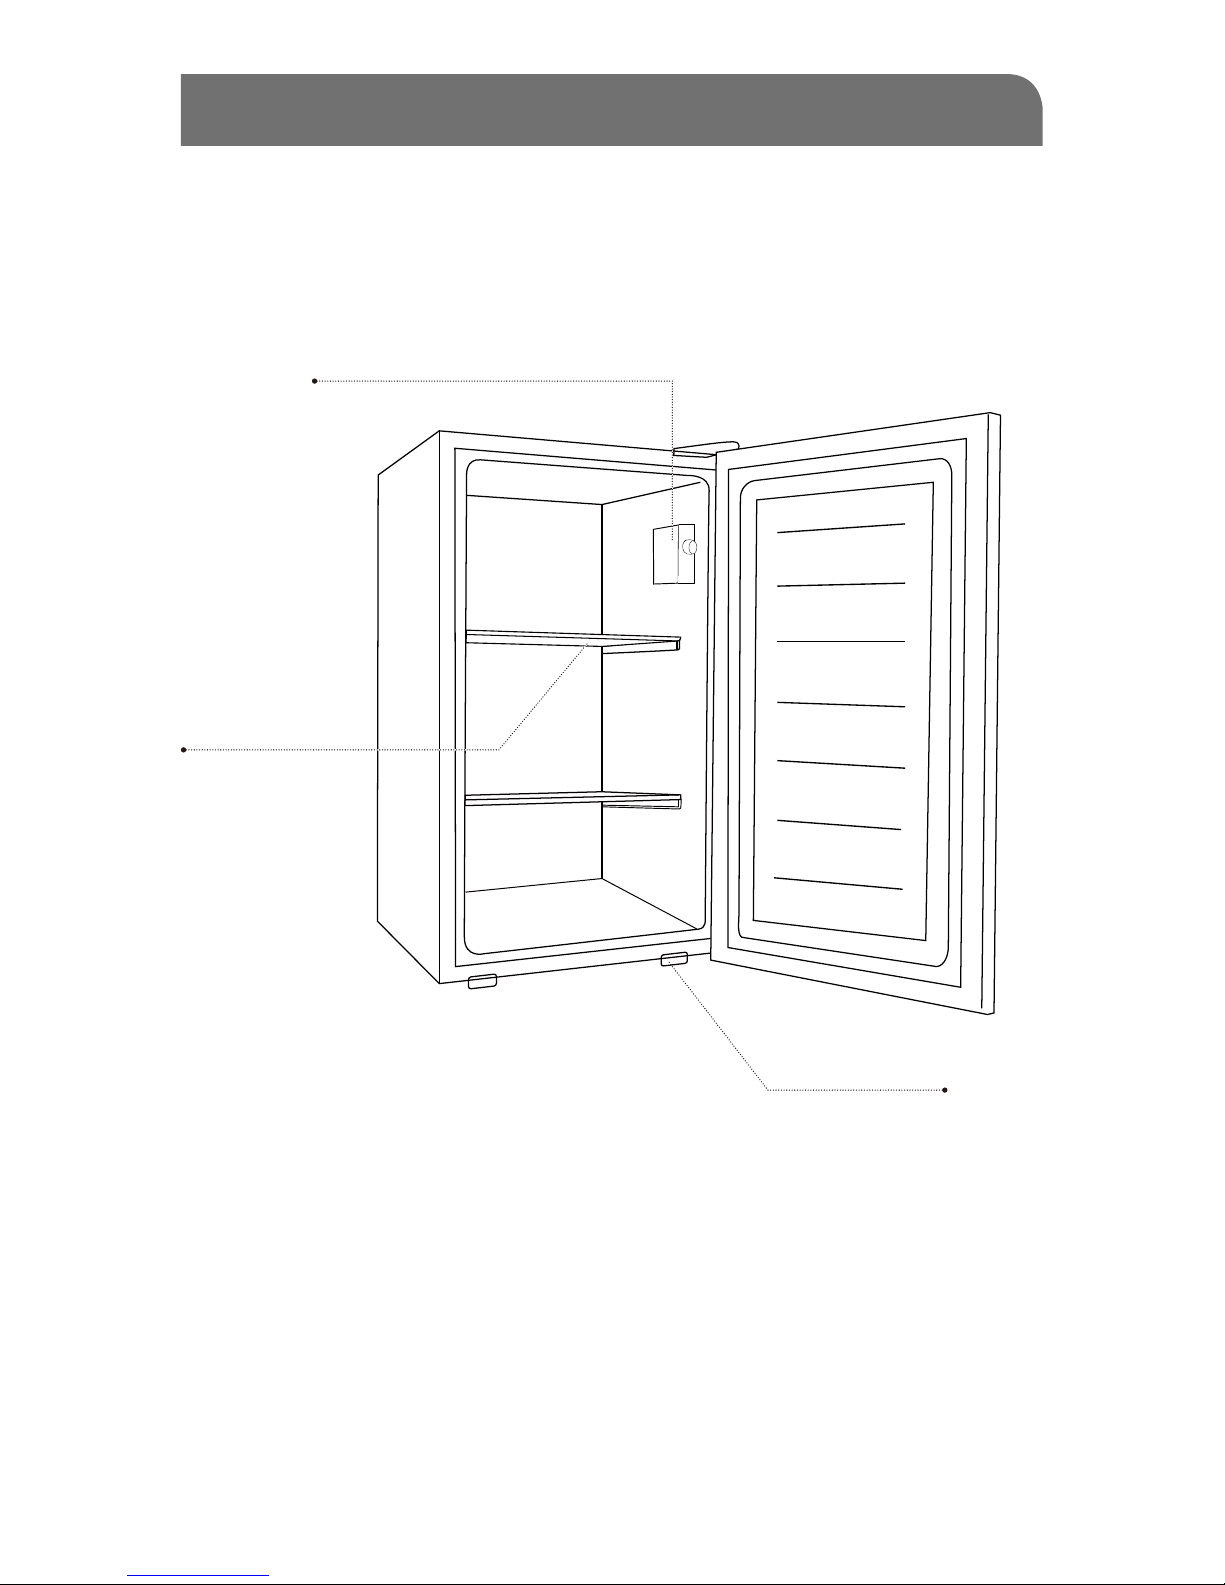
PARTS & FEATURES
3
Adjustable Temperature Control
Full Width Fixed
Shelves (2)
Leveling Legs
Page 5

4
INSTALLING YOUR FREEZER
UNPACKING YOUR FREEZER
1. Remove all packaging material. This includes the foam base and all adhesive
tape holding the freezer accessories inside and
outside.
2. Inspect and remove any remains of packing, tape or printed
materials before powering on the freezer.
ADJUSTING YOUR FREEZER
• Your freezer is designed for freestanding installation only. It should not be
recessed or built-in.
• Place the freezer on a surface strong enough to support it fully loaded.
• When moving the freezer, never tilt it more than a 45-degree angle.
This could damage the compressor and the sealed system.
• If the freezer is tilted let it stand in an upright position for at least 24 hours
prior to plugging in. This is to allow the refrigerant to settle.
PROPER AIR CIRCULATION
• To assure your freezer works at the maximum efficiency it was designed for,
you should install it in a location where there is proper air circulation, plumbing
and electrical connections.
• The following are recommended clearances around the freezer:
Sides……………4” (102mm)
Back..................4” (102mm)
Top....................4” (102mm)
Page 6

INSTALLING YOUR FREEZER CONT.
5
ELECTRICAL REQUIREMENT
• Make sure there is a suitable power Outlet (115 volts, 15 amps
outlet) with proper grounding to power the freezer.
• Avoid the use of three plug adapters or cutting off the third grounding in order to
accommodate a two plug outlet. This is a dangerous
practice since it provides no effective grounding for the freezer and may result in
shock hazard.
USE OF EXTENSION CORD
• Avoid the use of an extension cord because of potential safety hazards under
certain conditions. If it is necessary to use an extension cord, use only a 3-wire
extension cord that has a 3-blade grounding plug and a 3-slot outlet that will
accept the plug. The marked rating of the extension cord must be equal to or
greater than the electrical rating of the appliance. DO NOT USE EXTENSION
CORD LONGER THAN 12 FT.
INSTALL LIMITATIONS
• Do not install your freezer in any location not properly insulated or heated e.g.
garage etc. Your freezer was not designed to operate in temperature settings
below 55˚ Fahrenheit.
• Select a suitable location for the freezer on a hard even
surface away from direct sunlight or heat source e.g. radiators,
baseboard heaters, cooking appliances etc. Any floor unevenness should be
corrected.
ELECTRICAL REQUIREMENT - SHOCK HAZARD
WARNING
WARNING
USE OF EXTENSION CORDS- POTENTIAL SAFETY HAZARD
Page 7

6
FREEZER FEATURES AND USE
OPERATING YOUR FREEZER
• Once the freezer is in its proper place, plug it in an electrical outlet
having 115 volts and 15 amps.
• Set the temperature, on the temperature control knob. “1” being the warmest
and “7” being the coldest. Initially set the temperature on “4”. Place food inside
the freezer. After using the freezer for 24 hours set the freezer to your desired
setting.
• In case you unplug your freezer or experience an electrical outage, allow 5
minutes before plugging it back in.
GENERAL FEATURES
Adjustable temperature dial:
Your freezer will automatically maintain the temperature level you select. The
temperature control dial has 7 settings plus OFF. “1” is the warmest, “7” is the
coldest. Turning the dial to OFF stops cooling the freezer. Set the dial to “4” and
allow 24 hour
s to pass before adjusting the temperature to your needs.
NOTE: If the freezer has been placed in a horizontal or tilted position for any period
of time wait 24 hours before plugging the unit in.
NORMAL OPERATING SOUNDS YOU MAY HEAR
• Boiling water, gurgling sounds or slight vibrations that are the result of the
refrigerant circulating through the cooling coils.
• The thermostat control will click when it cycles on and off.
Control Panel
Varies by Model
Page 8

FREEZER FEATURES AND USE CONT.
7
DEFROSTING
• For most efficient operation and minimum energy consumption, defrost
whenever the frost becomes 1/4” thick. Never use a sharp or
metallic instrument to remove the frost, as it may damage the cooling coils.
(A punctured coil will void the warranty). Use only a plastic scraper. Do not use
boiling water as it may damage the unit.
• Remove frozen food from the freezer and place it in a cooler to
protect the food.
• Turn the temperature control to OFF position and unplug the unit. Defrosting
usually takes a few hours. To defrost faster keep the freezer door open.
DEFROST DRAIN
Place a narrow defrost pan (not included) in front of the freezer, gently slide the
defrost drain outward. Water that has accumulated at the bottom of the freezer
during defrosting will drain into the pan.
NOTE: Monitor the defrost pan to avoid overflow.
• When defrosting is complete, wipe the interior of the freezer with a soft cloth.
Plug in power cord back into the electrical outlet.
• Reset the temperature control to the desired setting.
• Return the food into the freezer.
Page 9

8
FREEZER FEATURES AND USE CONT.
LEVELING YOUR FREEZER
• Your freezer has two leveling legs which are located in the front bottom
corners of your freezer. After properly placing your freezer in its final
position, you can level your freezer.
• Leveling legs can be adjusted by turning them counterclockwise to raise your
freezer or by turning them clockwise to lower your freezer. The freezer door
will close easier when leveling legs are extended.
DOOR ALIGNMENT
1. Remove the top hinge cover using a flat
head screw driver. Gently lift from the
rear of the hinge and slide forward.
2. Lossen the top hinge screws using a Phillips
head screwdriver.
3. Adjust the door or put a spacer in between
and then tighten the screws.
4. Replace the top hinge cover by aligning
the rear of the cover with the rear of the
hinge. Press firm
ly on the front of the cover
until it snaps in place.
Page 10

FREEZER FEATURES AND USE CONT.
9
FOOD STORAGE INFORMATION
Frozen Food:
• Wipe containers before storing to avoid needless spills.
• Hot food should be allowed to cool before storing in the freezer. This will prevent
unnecessary energy use.
• When storing meats, keep in the original packaging or rewrap as necessary.
• Proper freezer storage requires correct packaging. All foods must be in packages,
which do not allow the flow of air or moisture in, or out. Improper storage will
result in odor and taste transfer and will result in the drying out of the improperly
packaged food.
• Follow package or container instructions for proper storage.
• Packaging Recommendations:
Plastic containers with air tight lids
Heavy duty aluminum foil
Plastic wrap made from saran film
Self-sealing plastic bags
• Do
not refreeze defrosted/thawed foods.
• It is recommended that the freezing date be marked on the
packaging.
These are some suggestions for safe storage:
• TV Dinners 3 - 4 Months
• Fresh Shrimp, scallops, crawfish 3 - 6 Months
• Hamburger & stew meats 3 - 4 Months
• Ground Turkey, veal, pork 3 - 4 Months
• Chops 4 - 6 Months
• Steaks 6 - 12 Months
• Chicken or turkey, whole 1 year
For detailed storage chart visit FDA website:
www.cfsan.fda.gov/~dms/fttstore.html
Page 11

10
PROPER FREEZER CARE AND CLEANING
CLEANING AND MAINTENANCE
GENERAL:
• Prepare a cleaning solution of 3-4 tablespoons of
baking soda mixed with warm water. Use sponge or soft cloth, dampened with
the cleaning solution, to wipe down your freezer.
• Rinse with clean warm water and dry with a soft cloth.
• Do not use harsh chemicals, abrasives, ammonia, chlorine bleach,concentrated
detergents, solvents or metal scouring pads. SOME of these chemicals may
dissolve, damage and/or discolor your freezer.
DOOR GASKETS:
• Clean door gaskets every three months according to general instructions.
Gaskets must be kept clean and pliable to assure a proper seal.
• Petroleum jelly applied lightly on the hinge side of gaskets will keep the gasket
pliable and assure a good seal.
WARNING
To avoid electric shock always unplug your freezer before cleaning.
Ignoring this warning may result in death or injury.
CAUTION
Before using cleaning products, always read and follow manufacturer’s
instructions and warnings to avoid personal injury or product damage.
Page 12

PROPER FREEZER CARE AND CLEANING CONT.
11
POWER INTERRUPTIONS
• Occasionally there may be power interruptions due to thunderstorms or
other causes. Remove the power cord from AC outlet when a power outage
occurs. When power has been restored, replug power cord to AC outlet.
If outage is for a prolonged period, inspect and discard spoiled or thawed
food in freezer. Clean freezer before reusing.
VACATION AND MOVING CARE
• For long vacations or absences, empty food from freezer, move the
temperature DIAL to the OFF position and clean the door gaskets according
to “General cleaning” section. Prop doors open, so air can circulate inside.
When moving always move the freezer vertically. Do not move with the unit
lying down. Possible damage to the sealed system could occur.
WARNING
If outage is for a prolonged period, inspect and discard spoiled
or thawed food in freezer. Clean freezer before reusing.
Page 13

12
TROUBLESHOOTING
FREEZER DOES NOT OPERATE:
• Check if thermostat control is not in the “OFF” position.
• Check if freezer is plugged in.
• Check if there is power at the ac outlet, by checking the
circuit breaker.
• Wait for 30-40 minutes to see whether freezer will start. Compressor cycle
must be complete to operate.
FOOD TEMPERATURE APPEARS TOO WARM:
• Frequent door openings.
• Allow time for recently added warm food to reach
freezer temperature.
• Check gaskets for proper seal.
• Clean condenser coils (for models with exposed condenser coils).
• Adjust temperature control to colder setting.
FOOD TEMPERATURE IS TOO COLD:
• If temperature control setting is too cold, adjust to a warmer setting
and allow several hours for temperature to adjust.
COMPRESSOR RUNS TOO FREQUENTLY:
• This may be normal to maintain constant temperature during
high temperature and humid days.
• Doors may have been opened frequently or for an extended
period of time.
• Check gasket for proper seal.
• Check to see if doors are completely closed.
• Check freezer compartment for blockage from
frozen food packages, containers, etc.
FREEZER HAS AN ODOR:
• Interior needs cleaning.
• Foods improperly wrapped or sealed are giving off odors.
Page 14

3.0 pi. cu.
Congélateur Vertical
Guide de l’Utilisateur
FRF300
Page 15

REMARQUE:
Si le congelatuer a été placé en position horizontale ou en
position inclinée, que ce soit pour longtemps ou non, attendez
24 heures avant de brancher l’appareil.
1. Utilisez cet appareil uniquement pour l’usage auquel il est destine comme
indique dans ce manuel d’utilisation et d’entretien
2. Cet appareil doit etre installe proprement et conformement aux instructions
d’installation avant d’etre utilise . Consultez les instructions de mise a terre dans
la section d’installation.
3. Ne debranchez jamais votre congelateur / refrigerateur convertible en tirant sur
le cordon d’alimentation . Saisissez la fiche fermement et tirez tout droit de la
prise murale.
4. Reparez ou remplacez immediatement , toutes les cordes electriques qui
sont devenues frangees ou autrement endommagees .N’utilisez pas un cable
representant des craquelures ou des abrasions a la longueur du cordon, de la
fiche ou de l’extremite du connecteur.
5. Debranchez votre congelateur / refrigerateur
avant de le nettoyer ou avant de
le reparer.
6. N’utilisez aucun dispositif electrique ou aucun instrument aigu pour degriver
votre congelateur / refrigerateur convertible.
7. Si vous n’utilisez plus votre congelateur /refrigerateur convertible, nous vous
recommandons de retirer les portes. Cela reduira les risques d’accident aux
enfants.
8. ATTENTION: Apres avoir mis en marche votre congelateur / refrigerateur , ne
touchez pas aux surfaces froides specialement si vos mains sont mouillees ou
humides. La peau peut adherer aux surfaces extremement froides.
9. Ne congelez pas de nouveau la nourritue qui a ete degelee completement . Le
service des Etats Unis d’Agriculture dans le bulletin de Maison et Jardin N0 69
lisent “……Vous pouvez sans risque congeler de nouveau la nourriture degelee
si elle contient des cristaux de glace ou si la temperature est restee froide au
dessous de 40ºF.
Lire l’ensemble des instructions avant d’utiliser l’appareil. Lors de
l’utilisation de cet appa
reil, prendre toutes les mesures de
sécurité de base, y compris les suivantes:
ATTENTION
1
CONSIGNES GÉNÉRALES DE SECURITÉ
Page 16

Risque d’occlusion d’enfant. Avant que vous jetiez votre vieux
réfrigérateur ou congélateur, enlevez les portes. Laissez les
étagères en place de sorte que les enfants ne puissent pas
facilement s’élever à l’intérieur.
DANGER
2
CONSIGNES GÉNÉRALES DE SECURITÉ
“La viande hachee, le volaille,ou le poisson degeles, qui ont n’importe quelle odeur
ou couleur ne doivent pas etre congeles de nouveau ou manges. La glace degelee
doit etre jetee . Si l’odeur ou la couleur de n’importe quelle nourriture est incertaine,
jetez la. Il peut etre dan geureux de manger cette nourriture.
“Meme une decongelation partiale et recongelation peuvent reduire la qualitee
de la nourriture, particulierement, les fuits, les vegetables et les plats prepares en
avance. La qualitee de la viande rouge est moins affectee que celle que d’autres
nourritures. Utilisez la nourriture qui a ete recongelee au plus tot possible pour
garder sa qualite.
10. Ce congelateur ne doit pas etre encastre ou incorpore dans un placard enclos . Il
est concu pour une installation sans encastrement.
11. N’operez pas votre unite en presence des fumees explosives.
VEUILLEZ CONSERVER CES
INSTRUCTIONS
PRODUCT REGISTRATION
Nous vous remercions d’avoir choisi
ce produit. Ce guide d’utilisation
facile d’emploi permet une utilisation
optimum du Produit.
Ne pas oublier de prendre note du
numéro de modèleet de série. Ils sont
inscrits sur une plaquette apposée sur à
l’intérieur de Produit.
Numéro de modèle
Numéro de série
Date d’achat
Page 17

PIÉCES ET CARACTÉRISTIQUES
Contrôle de la température ajustable
Des tablettes
largeur (2)
3
Pattes ajustables
pour la mise à niveau
Page 18

4
INSTALLER LE CONGÉLATUER
DÉBALLER LE CONGÉLATUER
1. Retirez tout le matériau d’emballage y compris la base en mousse et le ruban
adhésif retenant les accessoires du congélateur à l’intérieur et à l’extérieur.
2. Examinez et retirez tous les restes de l’emballage, de la bande ou des
matériaux imprimés avant d’actionner sur le congélateur.
RÉGLER LE CONGÉLATUER
• Ce congélateur a été conçu en tant qu’appareil autostable. Il ne doit pas être
encastré ni être placé en retrait dans une niche ou un renfoncement.
• Placez le congélateur sur un sol suffisamment résistant et
capable de le soutenir lorsque ce dernier est complètement rempli.
• Lorsque vous déplacez le congélateur, veillez à ne jamais le pencher plus de
45º. En effet, vous risquez d’endommager le compresseur et le dispositif
scellé.
• Si le congélateur a été penché, laissez-le debout (en position verticale)
pendant au moins 24 heures avant de le brancher afin qu’il revienne à son état
de fonctionnement normal.
ASSURER UNE BONNE CIRCULATION DE L’AIR
• Afin de vous assurer que le congélateur fonctionne à plein rendement,
installez-le dans un endroit largement ventilé et où il existe des prises pour le
raccordement électrique et la plomberie.
• Les dimensions suivantes
sont les distances recommandées autour du
congélateur.
Côtés...........4 po. (102 mm)
Derrière.......4 po. (102 mm)
Dessus.........Ne pas bloquer
Page 19

INSTALLER LE CONGÉLATUER
5
INSTALLATION ÉLECTRIQUE
• Assurez-vous qu’il existe une prise murale adéquate (prise électrique 115 volts,
15 ampères) avec mise à la masse afin d’alimenter le congélateur.
• Ne pas utiliser de fiche à trois broches et ne pas couper la troisième broche
(broche de mise à la masse) afin de brancher la fiche sur une prise à deux broches.
Ceci est très dangereux car ce système n’offre aucune mise à la masse au
congélateur et vous risquez de vous électrocuter.
RESTRICTIONS POUR L’INSTALLATION
• Eviter l’usage d’une rallonge à cause des dangers de sûreté potentiels sous les
certaines conditions. S’il est nécessaire utiliser une rallonge, utilise seulement un
à 3 fils qui a un 3-mettre à terre et un 3-slot qui acceptera le bouchon. L’évaluer
marqué de la rallonge doit être égal à ou plus grand que l’évaluer électrique de
l’appareil. N’UTILISEZ PAS DE RALLONGES D’UNE LONGUEUR SUPÉRIEURE À 12
PIEDS/3,65 MÈTRES.
L’USAGE DE RALLONGES
• Ne pas installer le congélateur dans un endroit non chauffé et ne
présentant aucune isolation (par ex: garage, etc.). Ce congélateur
n’a pas été
conçu afin de fonctionner à une température inférieure à 55˚F (12˚C).
• Choisissez un endroit adéquat présentant une surface dure à l’écart des rayons
du soleil et de toute source de température telles que radiateurs, radiateurs de
plinthe, appareils de cuisson, etc. Corrigez toute inégalité du sol.
EXIGENCES ÉLECTRIQUES – RISQUE DE
CHOC ÉLECTRIQUEELECTRICAL REQUIREMENT
ATTENTION
UTILISATION DE RALLONGES – RISQUE DE DANGER POTENTIEL
ATTENTION
Page 20

6
CARACTÉRISTIQUES DU CONGÉLATUER ET UTILISATION
UTILISER LE CONGÉLATEUR
• Après avoir placé le congélateur, branchez-le sur une prise électrique murale de
115 volts, 15 ampères.
• Réglez la température grâce au bouton de réglage. “1” est le réglage le moins
froid, et “7” est le réglage le plus froid. Pour commencer, réglez le congélateur sur
“4”. Placez les aliments à l’intérieur du congélateur. Après 24 heures d’utilisation,
réglez le congélateur sur le réglage désiré.
• Si vous débranchez le congélateur ou en cas de coupure de courant, attendez 5
minutes avant de rebrancher le congélateur.
CARACTÉRISTIQUES GÉNÉRALES
Bouton de réglage de température:
Le congélateur demeurera automatiquement à la température que vous avez
sélectionnée. La commande de température comporte 7 positions de réglage ainsi
que la position “OFF” (arrêt). “1” est le réglage le moins froid, “7” est le réglage le
plus froid. Réglez le bouton sur “OFF” afin d’arrêter le processus de
refroidissement. Réglez le bouton sur “4” et comptez 24 heures avant de régler le
bouton sur la température désirée.
(Remarque: Si le congélateur a été placé à l’horizontale ou a été penché pour une
durée quelconque, comptez 24 heures avant de rebrancher le congélateur).
BRUITS DE FONCTIONNEMENT LORS D’UNE EXPLOITATION NORMALE
• Les éléments de refroidissement tubulaires (serpentins refroidisseurs)
font des bruits d’ébullition, des gargouillements et provoquent
de légères vibrations.
• La commande du thermostat émettra un déclic lorsque qu’elle s’allume et s’éteint.
Panneau de configuration
varie selon le modèle
Page 21

CARACTÉRISTIQUES DU CONGÉLATUER ET UTILISATION
7
DÉGIVRAGE ET ÉVACUATION DE L’EAU
• Pour un fonctionnement des plus efficaces et pour une consommation d’énergie
minime décongelez quand le givre atteint une épaisseur de 1/4” soit 0,6 cm.
N’utilisez jamais un instrument aiguisé ou métallique pour retirer le givre car cela
peut endommager les bobines de refroidissement. (Une bobine perforée rend
la garantie caduque). Utilisez uniquement le grattoir en plastique. N’utilisez pas
d’eau bouillante car cela peut endommager l’appareil.
• Retirez les aliments surgelés du congélateur et placez-les dans une glacière pour
protéger les aliments.
• Tournez le bouton de la température et mettez-le sur la position OFF position et
débranchez l’appareil. Retirez le bouchon de vidange à l’intérieur du congélateur.
La décongélation dure habituellement plusieurs heures. Pour un dégivrage plus
rapide laissez la porte du congélateur ouverte.
DRAIN DE DÉGIVRAGE
Placez un contenant étroit (non inclus) devant le congélateur, puis, faites glisser
doucement le drain de décongélation vers l’extérieur. L’eau accumulée dans le
fond du congélateur pendant le dégel coulera dans votre contenant.
Note: Contrôlez le conteneur afin qu’il n’y ait pas de débordements.
• Lorsque la vidange est terminée, essuyez l’intérieur du congélateur avec un
chiffon doux. Remettez le cordon d’alimentation dans la prise électrique.
• Réglez de nouveau la température au réglage désiré.
• Remettez la nourriture dans le congélateur.
Page 22

8
CARACTÉRISTIQUES DU CONGÉLATUER ET UTILISATION
METTRE VOTRE CONGÉLATEUR AU NIVEAU
• Votre congélateur à deux pattes de mise à niveau situées aux coins avant
inférieurs de votre congélateur. Après avoir placé votre congélateur en
position définitive, vous pouvez le mettre au niveau.
• Les pattes de mise à niveau peuvent être ajustées en les tournant dans le
sens antihoraire pour élever votre congélateur, ou dans le sens horaire pour
l’abaisser. La porte du congélateur se refermera plus facilement lorsque les
pattes sont allongées.
L’ALIGNEMENT DE LA PORTE
1. Retirez le couvercle du gond supérieur
à l’aide d’un tournevis plat. Soulevez-le
doucement de l’arrière du gond et
glissez-le vers l’avant.
2. Desserrez les vis du gond supérieur
à l’aide d’un tournevis étoile.
3. Ajustez la porte ou y mettre une entretoise
et resserrez les vis.
4. Replacez
le couvercle du gond en alignant
l’arrière du couvercle avec l’arrière du gond.
Appuyez fermement sur l’avant du couvercle
jusqu’à ce qu’il s’enclenche.
Page 23

CARACTÉRISTIQUES DU CONGÉLATUER ET UTILISATION
9
ALIMENTS CONGELÉS ET SURGELÉS:
• Essuyez tout contenant avant de le ranger afin d’éviter tout déversement
accidentel.
• Attendez que les aliments chauds aient refroidis avant de les ranger dans le
congélateur. Vous ferez ainsi des économies d’énergie.
• Lorsque vous placez de la viande dans le congélateur, conservez-la dans son
emballage d’origine si possible, ou enveloppez-la à nouveau si nécessaire.
• Les aliments placés au congélateur doivent avoir été correctement emballés.
Les aliments doivent être dans des emballages ne permettant pas le passage de
l’air ni de l’humidité. Tout aliment mal emballé risque d’avoir une odeur et un goût
pouvant entraîner son assèchement.
• Suivez les instructions de l’emballage ou du contenant avant de placer les
aliments au congélateur.
• Recommandations pour l’emballage:
Contenants en plastique avec couvercle hermétique
Papier d’aluminium résistant
Film plastique
Sacs à fermeture hermétique
• Ne pas recongeler des aliments ayant été décongelés.
• Il est recommandé d’indiquer la date de congélation sur l’emballage.
Voici quelques suggestions pour un stockage en toute sécurité:
• Plats surgelés 3 - 4 mois
• Crevettes fraîches
, coquilles
Saint-Jacques, écrevisses 3 - 6 mois
• Hamburger & viande à braiser 3 - 4 mois
• Dinde hachée, veau, porc 3 - 4 mois
• Côtes 4 - 6 mois
• Steaks 6 - 12 mois
• Poulet ou dinde, entier 1 an
Pour un tableau de stockage détaillé visitez le site internet de la FDA:
www.cfsan.fda.gov/~dms/fttstore.html
Page 24

10
ENTRETIEN ET NETTOYAGE DU CONGÉLATUER
NETTOYAGE ET MAINTENANCE
NETTOYAGE GÉNÉRAL:
• Préparez une solution de nettoyage à base de 3 ou 4 cuillères à soupe de
bicarbonate de soude mélangées avec de l’eau tiède. Utilisez une éponge ou un
chiffon trempé dans la solution afin d’essuyer le congélateur.
• Rincez avec de l’eau propre et séchez avec un chiffon.
• Ne pas utiliser de produits chimiques abrasifs puissants, de l’ammoniac, de l’eau
de javel ou de la lessive au chlore, des détergents concentrés, des solvants et des
tampons récureurs. CERTAINS de ces produits chimiques risque de dissoudre,
d’endommager et de décolorer le congélateur.
LES JOINTS DE PORTE:
• Nettoyez les joints de porte tous les trois mois en suivants les instructions de
nettoyage générales. Les joints doivent demeurer propres et souples afin qu’ils
demeurent hermétiques.
• Appliquez une petite quantité de pétrolatum sur les joints côté charnière afin
qu’ils demeurent souples et assurent l’étanchéité du congélateur.
Avant d’utiliser des produits de nettoyage, veuillez toujours lire et suivre
attentivement les instructions du fabricant ainsi que les avertissements afin
d’éviter toute blessure et ne pas endommager le congélateur.
ATTENTION
Pour éviter tout risque d’électrocution, veillez à toujours débrancher le
congélateur avant de le nettoyer. Ne pas respecter cette mise en garde risque
d’entraîner des blessures graves voir la mort.
AVERTISSEMENT
Page 25

ENTRETIEN ET NETTOYAGE DU CONGÉLATUER
11
COUPURES DE COURANT
En cas de coupure de courant suite à un orage ou toute autre raison, débranchez
le cordon électrique de la prise CA. Une fois le courant revenu, rebranchez le
cordon d’alimentation à la prise CA. Si la coupure de courant est sensée durer
longtemps, inspectez puis jetez la nourriture avariée du congélateur. Nettoyez le
congélateur avant de le réutiliser.
ENTRETIEN LORS DES VACANCES OU D’UN DÉMÉNAGEMENT
Videz le congélateur avant de partir en vacances. Réglez le bouton de
température sur “OFF” (arrêt) et nettoyez les joints de portes suivant les
instructions de la section “Nettoyage général”. Faites levier afin que les portes
demeurent ouvertes et que l’air puissent circuler à l’intérieur. Si vous déménagez,
transportez le congélateur verticalement. Ne pas transporter le congélateur à
l’horizontale. En effet, vous risquez d’endommager le dispositif scellé.
Si la coupure de courant dure pour une période prolongée, inspectez et
jetez les aliments avariés ou décongelés qui sont dans le congélateur.
Nettoyez le congélateur avant de le réutiliser.
ATTENTION
Page 26

12
GUIDE DE DÉPANNAGE
LE CONGÉLATEUR NE FONCTIONNE PAS:
• Vérifiez que la commande du thermostat n’est pas sur “OFF”.
• Vérifiez que le cordon électrique du congélateur est branché.
• Assurez-vous que la prise murale CA est alimentée en
vérifiant le disjoncteur.
• Patientez 30 à 40 minutes afin de vous assurer que le
congélateur fonctionne. Le compresseur doit effectuer un
cycle complet avant que le congélateur fonctionne à plein rendement.
LA TEMPÉRATURE DES ALIMENTS N’EST PAS ASSEZ FROIDE:
• La porte est ouverte trop souvent.
• Comptez suffisamment de temps afin que les aliments venant
juste d’être placés au congélateur puissent atteindre
la température de congélation.
• Vérifiez que les joints assurent l’étanchéité du congélateur.
• Réglez la commande de température sur un réglage plus froid.
LA TEMPÉRATURE DES ALIMENTS EST TROP FROIDE:
• Si la température est trop froide, placez la commande
de température sur un réglage moins froid et patientez
plusieurs heures avant que la température remonte.
LE COMPRESSOR SE MET EN MARCHE TROP FRÉQUEMMENT:
• Ceci est probablement normal afin de maintenir une
température constante lorsqu’il fait chaud et humide.
• La porte a sans doute été ouverte trop fréquemment ou trop longtemps.
• Vérifiez que le joint assure l’étanchéité du congélateur.
• Vérifiez que la porte est complètement fermée.
• Vérifiez l’intérieur du congélateur afin de vous assurer qu’il n’y a pas
d’aliments ou de contenants gênant la fermeture du congélateur.
LE CONGÉLATEUR A UNE ODEUR:
• L’intérieur a besoin d’être nettoyé.
• Les aliments ayant été mal emballés laissent échapper une odeur.
 Loading...