

Page 1
Package List
Features
AfoBot
Smart artificial assistant for all
Quick Installation Guide (English)
Version 1.00
8” projected capacitive touch screen supports 10-point touch
Rotatable 5-megapixel auto-focus camera
Support voice activation and voice control
SDK for AfoBot is available to develop a variety of applications or software
Support QNAP apps for file management, NAS management, entertainment,
communication and live streaming, etc.
Built-in 802.11a/b/g/n wireless connection
Sleek and compact design
1 x AfoBot assistant robot
1 x Power adapter
1 x QIG (Quick Installation Guide)
Page 2
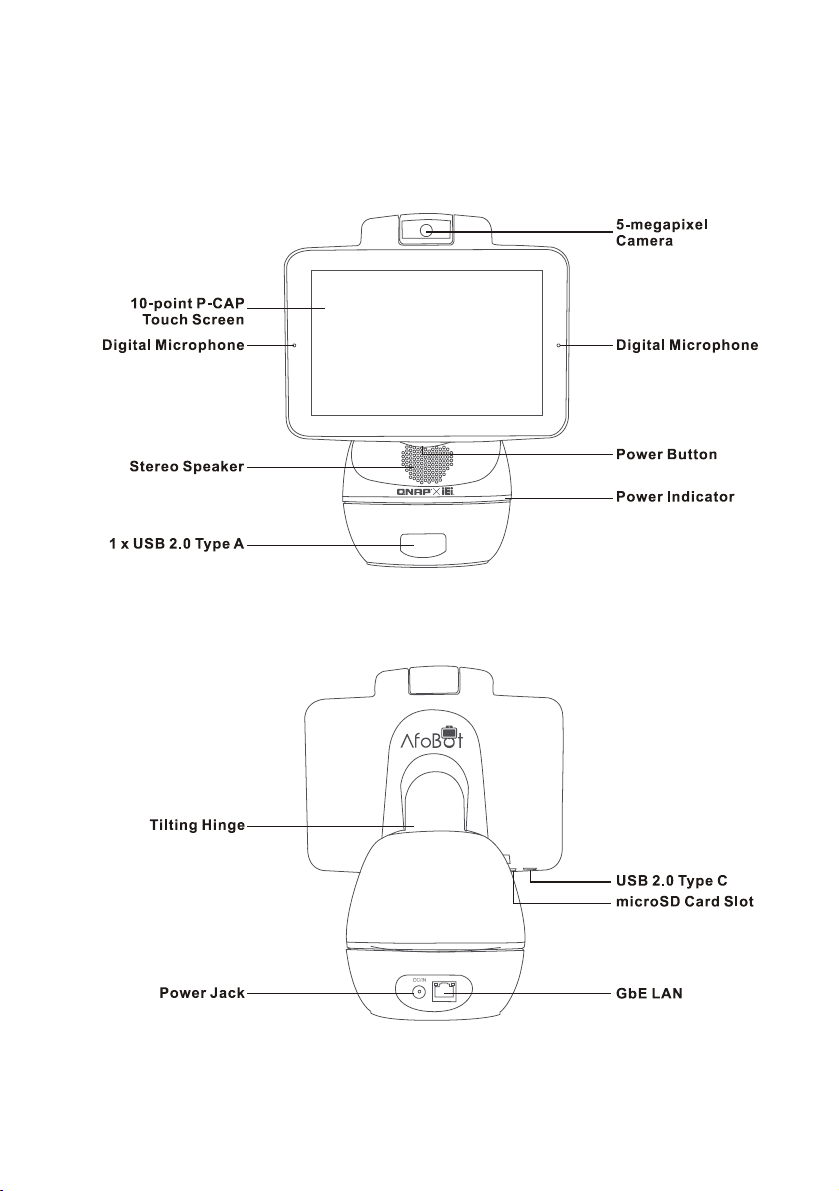
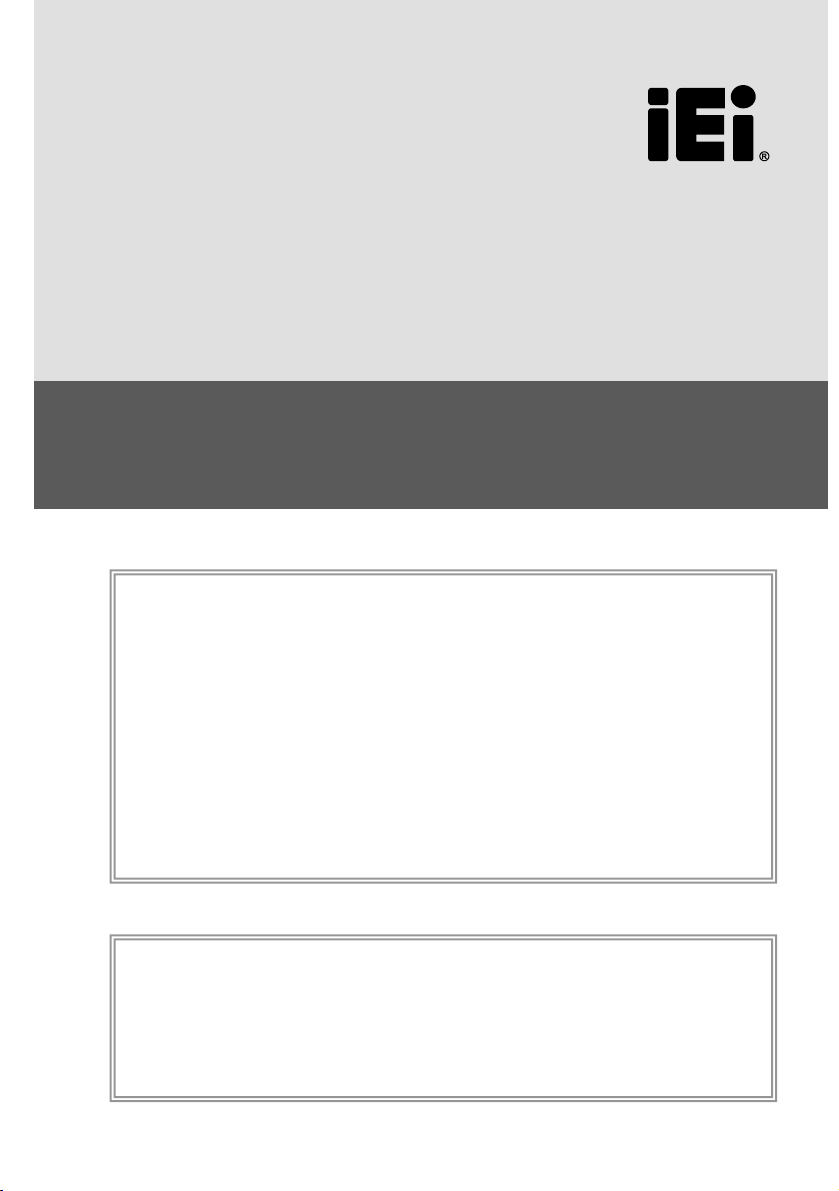
Knowing your AfoBot
AfoBot is an assistant robot which offers users an open, flexible and affordable way to develop
innovative devices with state-of-the-art components. The diagram below provides an overview of
the AfoBot.
1
Page 3

Getting Started
Charging your AfoBot
Charge your AfoBot before your first use. To charge AfoBot, follow the steps below:
Step 1: Connect the supplied power adapter to the power jack on the rear of AfoBot
Step 2: Connect a power cord to the power adapter. Plug the power cord into any standard
power outlet.
Step 3: Charge your AfoBot for 8 hours before use.
-------------------------------------------------------------------------------------------------------------------------------
Warning!
– Use only the adapter and power cord approved for this system. Use of another type of adapter
may risk fire or explosion;
– Do not apply voltage levels that exceed the specified voltage range. Doing so may cause fire
and/or an electrical shock. Use a power cord that matches the voltage of the power outlet, which
has been approved and complies with the safety standard of your particular country;
– replacement of a battery with an incorrect type that can defeat a safeguard;
– disposal of a battery into fire or a hot oven, or mechanically crushing or cutting of a battery,
that can result in an explosion;
– leaving a battery in an extremely high temperature surrounding environment that can result in
an explosion or the leakage of flammable liquid or gas;
– a battery subjected to extremely low air pressure that may result in an explosion or the
leakage of flammable liquid or gas.
-------------------------------------------------------------------------------------------------------------------------------
2
Page 4

Turning AfoBot on
To turn AfoBot on, long press the power button that lies under the center of the screen for 3~6
seconds until the power indicator turns blue.
Switching AfoBot to sleep mode
When not in use, you can turn off the display and switch the AfoBot to sleep mode to save power.
To switch to sleep mode, short press the power button that lies under the center of the screen.
The power indicator will then turn to green.
Turning AfoBot off
To turn AfoBot off, long press the power button for a few seconds until the power-off menu
appears on the screen. Tap Power off to turn off AfoBot or tap Reboot to restart the system.
Install microSD Card
Locate the microSD card slot. Insert a microSD card into the slot with the gold contacts facing
out. Push the microSD card into the slot until it clicks in place.
To remove the microSD card, push the card to release it.
3
Page 5

Specifications
Display
8” TFT LCD with 1280 x 800 Full HD
Processor
8-core Cortex-A53 SoC
Touch Screen
Projected capacitive touch screen with 10-point multi-touch
Memory
On-board 2 GB LPDDR3
Graphics
4K*2K H.264/H.265, 4K*2K@60Hz
On-board 32 GB eMMC
1 x microSD card slot
Wi-Fi 802.11a/b/g/n dual band
Wi-Fi access point
AC Input: 100 V ~ 240 V AC, 50/60 Hz
DC Output: 12 V, 2.5 A, 30 W
Body: 360° horizontal pan (motorized)
Panel: 33° tilt (manual)
1 x USB 2.0 Type-C
Camera
5-megapixel camera, F2.0
2 x Digital microphone
Host: Android 6.0
Color
Pantone white and pantone 312C
Size
271 mm x 213 mm x 136 mm
Weight
1.7 kg
Certificate
CE, FCC Class B and BSMI
Storage
Wireless Connectivity
Power Adapter
Motion
I/O Interface
Audio
Operating System
Wi-Fi Direct for Miracast
Bluetooth 4.0
Camera: 100° tilt (motorized)
1 x USB 2.0 Type-A
1 x GbE LAN
5W 4Ω stereo reflective speaker
Echo cancelling, noise reduction and auto gain control
Client: Android or iOS
Dimensions (Unit: mm)
4
Page 6

This equipment has been tested and found to comply with specifications for CE marking. If the user modifies
Federal Communication Commission Interference Statement
The label on the product indicates this product conforms to European (EU) Restriction of Hazardous
According to the requirement of the WEEE legislation the following user information is provided to customers
city office, your household waste disposal service or the shop where you purchased the product.
Safety Instructions
Warning! Read the user manual before connecting the system to the power source.
Warning! To prevent the system from overheating, do not operate it in an area that exceeds the
maximum operating temperature described in the user manual.
Warning! Ultimate disposal of this product should be handled according to all national laws and
regulations.
IEI Support URL
http://new.ieiworld.com/tw/online_support_form
Compliance
and/or installs other devices in the equipment, the CE conformity declaration may no longer apply.
This device complies with Part 15 of the FCC Rules. Operation is subject to the following two conditions: (1)
This device may not cause harmful interference, and (2) this device must accept any interference received,
including interference that may cause undesired operation.
This equipment has been tested and found to comply with the limits for a Class B digital device, pursuant to
Part 15 of the FCC Rules. These limits are designed to provide reasonable protection against harmful
interference in a residential installation. This equipment generates, uses and can radiate radio frequency
energy and, if not installed and used in accordance with the instructions, may cause harmful interference to
radio communications. However, there is no guarantee that interference will not occur in a particular
installation. If this equipment does cause harmful interference to radio or television reception, which can be
determined by turning the equipment off and on, the user is encouraged to try to correct the interference by
one of the following measures:
-Reorient or relocate the receiving antenna.
-Increase the separation between the equipment and receiver.
-Connect the equipment into an outlet on a circuit different from that to which the receiver is connected.
-Consult the dealer or an experienced radio/TV technician for help.
FCC Caution: Any changes or modifications not expressly approved by the party responsible for compliance
could void the user's authority to operate this equipment.
This transmitter must not be co-located or operating in conjunction with any other antenna or transmitter.
This device meets all the other requirements specified in Part 15E, Section 15.407 of the FCC Rules.
Radiation Exposure Statement
This equipment complies with FCC radiation exposure limits set forth for an uncontrolled environment. This
equipment should be installed and operated with minimum distance 20cm between the radiator & your body.
Note: The country code selection is for non-US model only and is not available to all US model. Per FCC
regulation, all WiFi product marketed in US must fixed to US operation channels only.
Substances (RoHS) that set maximum concentration limits on hazardous materials used in electrical and
electronic equipment.
for all branded IEI Electronics products subject to the WEEE directive.
This symbol on the product or on its packaging indicates that this product must not be disposed of with your
other household waste. Instead, it is your responsibility to dispose of your waste equipment by handing it
over to a designated collection point for the recycling of waste electrical and electronic equipment. The
separate collection and recycling of your waste equipment at the time of disposal will help to conserve natural
resources and ensure that it is recycled in a manner that protects human health and the environment. For
more information about where you can drop o- your waste equipment for recycling, please contact your local
 Loading...