


 Loading...
SMART Series
SMART-51S, SMART-51D, SMART-51L
User Manual
1
Copyright Notice
Users must respect the copyright laws applicable in their country. This manual must not be photocopied, translated, reproduced or transmitted in whole or in part for any reason and by the means that might be, albeit electronic or mechanical, without the express, written authorization of the company IDP card printer.
All information contained herein may be subject to modification without prior notice.
IDP card printer accepts no liability for any possible errors herein, nor for any accidental damage or damage caused through the dissemination or the use of this manual.
Trademarks
SMART-51 is a trademark and IDP is a registered trademark of IDP card printer. Windows is registered trademarks of Microsoft Corp. All other trademarks or registered trademarks are marks of their respective holders. SMART-51 Design is a trademark of IDP.
Return Materials Authorization
In order to make a warranty claim you must contact an IDP Reseller. You will be responsible for packaging the printer for shipment and the costs of shipping and insurance of the printer from the point of use of the printer to the IDP Reseller. The IDP Reseller will bear the costs of shipping and insuring the printer from the repair location to the address from which the printer was shipped.
Before returning any equipment for in-warranty or out-of warranty repair, contact an IDP Reseller or an IDP Service Center for a Return Materials Authorization (RMA) number. Repack the equipment in the original packing material and mark the RMA number clearly on the outside of the box. For more information about RMA or IDP warranty statements, refer to the Warranty booklet on the quick install guide.
2
Table of Contents
1. |
Introduction................................................................................................................... |
10 |
1.1 |
Printer outside features ...................................................................................................... |
10 |
1.2 |
Printer inside features ........................................................................................................ |
13 |
1.3 |
Ribbon cartridge features................................................................................................... |
15 |
1.4 |
Display and Buttons ............................................................................................................ |
16 |
2. Printer installation............................................................................................................. |
17 |
|
2.1. |
Connecting a power and a USB cable.............................................................................. |
17 |
2.2. |
Fitting the ribbon.................................................................................................................. |
19 |
2.3. |
Fitting a laminating film ...................................................................................................... |
22 |
2.4. |
Loading the cards ................................................................................................................ |
23 |
2.5. |
The withdrawal of printed cards. ...................................................................................... |
25 |
2.6. |
Rear Stacker (Option).......................................................................................................... |
26 |
2.7. |
Driver installation (Windows 7 / 8 / 10) ............................................................................ |
27 |
3. Driver configuration.......................................................................................................... |
31 |
|
3.1. |
Printer Properties................................................................................................................. |
31 |
3.2. |
Advanced Options................................................................................................................ |
34 |
3.3. |
Other settings ....................................................................................................................... |
37 |
4. Utilities ................................................................................................................................ |
40 |
|
4.1. |
Card Printer Config .............................................................................................................. |
40 |
4.2. |
Network configuration......................................................................................................... |
52 |
4.3. |
Card Printer Test .................................................................................................................. |
61 |
4.4. |
Firmware update................................................................................................................... |
68 |
3
5. |
Optional device driver installation................................................................................. |
70 |
|
|
5.1. |
Contact smartcard reader................................................................................................... |
70 |
|
5.2. |
Contactless smartcard reader ........................................................................................... |
73 |
6. |
Troubleshooting................................................................................................................ |
76 |
|
|
6.1. |
Error Message....................................................................................................................... |
76 |
|
6.2. |
Cleaning the printer ............................................................................................................. |
80 |
|
6.3 TPH (Thermal Print Head) replacement............................................................................. |
84 |
|
|
6.4. |
Card movement .................................................................................................................... |
86 |
|
6.5. |
Printing quality...................................................................................................................... |
87 |
|
6.6. |
Magnetic stripe encoding ................................................................................................... |
89 |
|
6.7. |
General operation................................................................................................................. |
90 |
7. |
Specification ...................................................................................................................... |
92 |
|
4
Table of Figures
Figure 1 SMART-51 front features.................................................................................................................. |
10 |
Figure 2 SMART-51 rear features.................................................................................................................... |
11 |
Figure 3 SMART-51S (Standard) ..................................................................................................................... |
12 |
Figure 4 SMART-51D (Dual) ............................................................................................................................... |
12 |
Figure 5 SMART-51L (Laminator) ................................................................................................................... |
12 |
Figure 6 SMART-51 Inside features............................................................................................................... |
13 |
Figure 7 Ribbon cartridge features................................................................................................................ |
15 |
Figure 8 SMART-51 Display and Buttons................................................................................................... |
16 |
Figure 9 SMART-51S Connection of power and USB cable ............................................................. |
17 |
Figure 10 SMART-51D Connection of power and USB cable........................................................... |
17 |
Figure 11 SMART-51L Connection of powers and USB cable - 1.................................................. |
18 |
Figure 12 SMART-51L Connection of powers and USB cable - 2.................................................. |
18 |
Figure 13 Top Cover open .................................................................................................................................. |
19 |
Figure 14 Take out the ribbon cartridge................................................................................................... |
19 |
Figure 15 Loading the ribbon 1........................................................................................................................ |
20 |
Figure 16 Loading the ribbon 2........................................................................................................................ |
20 |
Figure 17 Installing the cleaning roller ........................................................................................................ |
20 |
Figure 18 Peeling the protective wrapper .................................................................................................. |
21 |
Figure 19 Installing the ribbon cartridge .................................................................................................... |
21 |
Figure 20 Close Top Cover................................................................................................................................. |
21 |
Figure 21 Take out the film cartridge............................................................................................................ |
22 |
Figure 22 Loading the laminating film.......................................................................................................... |
22 |
Figure 23 Installing the film cartridge........................................................................................................... |
22 |
Figure 24 Adjusting the card thickness lever .......................................................................................... |
23 |
Figure 25 Preparing the card 1......................................................................................................................... |
23 |
Figure 26 Preparing the card 2......................................................................................................................... |
23 |
5 |
|
Figure 27 Loading the cards 1.......................................................................................................................... |
24 |
Figure 28 Loading the cards 2.......................................................................................................................... |
24 |
Figure 29 Loading the cards 3.......................................................................................................................... |
24 |
Figure 30 Loading the cards 4.......................................................................................................................... |
24 |
Figure 31 SMART-51 Withdrawal a card...................................................................................................... |
25 |
Figure 32 SMART-51 Dividing a stacker...................................................................................................... |
25 |
Figure 33 SMART-51S installation of Rear Stacker............................................................................... |
26 |
Figure 34 SMART-51D installation of Rear Stacker .............................................................................. |
26 |
Figure 35 SMART-51L installation of Rear Stacker............................................................................... |
26 |
Figure 36 Install Win7 driver 1.......................................................................................................................... |
27 |
Figure 37 Install Win7 driver 2.......................................................................................................................... |
27 |
Figure 38 Install Win7 driver 3.......................................................................................................................... |
27 |
Figure 39 Install Win7 driver 6.......................................................................................................................... |
28 |
Figure 40 Install Win7 driver 8.......................................................................................................................... |
28 |
Figure 41 Install Win7 driver 9.......................................................................................................................... |
28 |
Figure 42 Install Win7 driver 10 ....................................................................................................................... |
28 |
Figure 43 Install Win7 driver 11 ....................................................................................................................... |
29 |
Figure 44 Install Win7 driver 12 ....................................................................................................................... |
29 |
Figure 45 Install Win7 driver 13 ....................................................................................................................... |
29 |
Figure 46 Install Win7 driver 14 ....................................................................................................................... |
30 |
Figure 47 Install Win7 driver 15 ....................................................................................................................... |
30 |
Figure 48 Printer properties............................................................................................................................... |
31 |
Figure 49 Layout...................................................................................................................................................... |
31 |
Figure 50 Input / Output....................................................................................................................................... |
32 |
Figure 51 Printing.................................................................................................................................................... |
32 |
Figure 52 Laminating............................................................................................................................................. |
33 |
Figure 53 Encoding ................................................................................................................................................ |
34 |
6
Figure 54 Printer sharing..................................................................................................................................... |
37 |
Figure 55 Ports ......................................................................................................................................................... |
37 |
Figure 56 Advanced ............................................................................................................................................... |
38 |
Figure 57 Color Management............................................................................................................................ |
38 |
Figure 58 Security................................................................................................................................................... |
39 |
Figure 59 Service..................................................................................................................................................... |
39 |
Figure 60 CardPrinterConfig Log-in.............................................................................................................. |
40 |
Figure 61 CardPrinterConfig start .................................................................................................................. |
40 |
Figure 62 CardPrinterConfig – Card Printer Basic Setup .................................................................. |
41 |
Figure 63 Color density........................................................................................................................................ |
43 |
Figure 64 Resin Black density.......................................................................................................................... |
43 |
Figure 65 Overlay density................................................................................................................................... |
44 |
Figure 66 CardPrinterConfig – Card Printer Advanced Setup......................................................... |
45 |
Figure 67 CardPrinterConfig – Flipper Setup........................................................................................... |
48 |
Figure 68 CardPrinterConfig – Laminator Basic Setup....................................................................... |
49 |
Figure 69 CardPrinterConfig – Laminator Advanced Setup............................................................. |
50 |
Figure 70 Rear view of SMART-51 printer 1 .............................................................................................. |
52 |
Figure 71 Rear view of SMART-51 printer 2 .............................................................................................. |
52 |
Figure 72 Running the NetAdmin ................................................................................................................... |
53 |
Figure 73 Network printer is not found........................................................................................................ |
53 |
Figure 74 Connecting to USB port ................................................................................................................. |
54 |
Figure 75 NetAdmin Log-in ................................................................................................................................ |
54 |
Figure 76 USB port state ..................................................................................................................................... |
55 |
Figure 77 Rebooting the network module.................................................................................................. |
55 |
Figure 78 Reset to default................................................................................................................................... |
56 |
Figure 79 Upgrading the firmware 1.............................................................................................................. |
56 |
Figure 80 Upgrading the firmware 2.............................................................................................................. |
57 |
7
Figure 81 Upgrading the firmware 3.............................................................................................................. |
57 |
Figure 82 Dynamic IP configuration.............................................................................................................. |
58 |
Figure 83 Static IP configuration .................................................................................................................... |
58 |
Figure 84 Network service configuration ................................................................................................... |
59 |
Figure 85 OCP configuration............................................................................................................................. |
59 |
Figure 86 Network user configuration.......................................................................................................... |
60 |
Figure 87 CardPrinterTest................................................................................................................................... |
61 |
Figure 88 Magnetic stripe encoding.............................................................................................................. |
64 |
Figure 89 Contact smartcard encoding....................................................................................................... |
66 |
Figure 90 Contactless smartcard encoding.............................................................................................. |
67 |
Figure 91 run CardPrinterFirmware............................................................................................................... |
68 |
Figure 92 Select Firmware.................................................................................................................................. |
68 |
Figure 93 Update Firmware................................................................................................................................ |
69 |
Figure 94 Contact smartcard reader driver installation...................................................................... |
70 |
Figure 95 License agreement............................................................................................................................ |
71 |
Figure 96 Installing the contact smartcard reader driver................................................................... |
71 |
Figure 97 Completing the smartcard reader driver installation...................................................... |
72 |
Figure 98 Found New Hardware Wizard...................................................................................................... |
73 |
Figure 99 Installation method selection...................................................................................................... |
74 |
Figure 100 Driver location .................................................................................................................................. |
74 |
Figure 101 Completing the driver installation.......................................................................................... |
75 |
Figure 102 Exclusive cleaning card for SMART-51 printer ............................................................... |
80 |
Figure 103 Printer cleaning start..................................................................................................................... |
80 |
Figure 104 Printer cleaning Step 1................................................................................................................. |
81 |
Figure 105 Printer cleaning Step 2................................................................................................................. |
81 |
Figure 106 Printer cleaning Step 3................................................................................................................. |
82 |
Figure 107 Printer cleaning Step 4................................................................................................................. |
82 |
8
Figure 108 Printer cleaning Step 5................................................................................................................. |
83 |
Figure 109 Printer cleaning Step 6................................................................................................................. |
83 |
Figure 110 Thermal Print Head......................................................................................................................... |
84 |
Figure 111 Print head setup............................................................................................................................... |
84 |
Figure 112 Print head replacement................................................................................................................ |
85 |
Figure 113 Print head angle............................................................................................................................... |
86 |
Figure 114 Printing quality trouble 1............................................................................................................. |
87 |
Figure 115 Printing quality trouble 2............................................................................................................. |
88 |
Figure 116 Printing quality trouble 3............................................................................................................. |
88 |
Figure 117 Printing quality trouble 4............................................................................................................. |
88 |
Figure 118 Printing quality trouble 5............................................................................................................. |
89 |
9

1.Introduction
1.1Printer outside features
For the user’s convenience, SMART-51 status can be seen through LCD with LED and the printer can be controlled by two LED buttons. It takes a power via the 24V adaptor provided with the printer. Using USB and Network port, it is communicated with the user’s PC
The following shows the outside functional features found on the printer.
|
|
|
|
|
|
Top cover open button |
|
|
|
|
|
||
|
|
|
|
|||
|
|
|
External contactless |
|||
|
|
|
|
|||
|
|
|
|
|
Smartcard encoding |
|
|
|
|
|
|
position
Fan
Input hopper
LED buttons
LCD show the process status
Figure 1 SMART-51 front features
10
Backside card outlet
Stacker fixing Hole
Power switch
24V power connector
Network port
In case there is no network option, it is closed.
USB port
Figure 2 SMART-51 rear features
11

There are three models in SMART-51 card printer series such as SMART-51S, SMART-51D, SMART-51L.
SMART-51S (Figure.3) is the standard card printer. It can be printed in single side with the encoding. This manual is prepared based on SMART-51S.
SMART-51D (Figure.4) has a flipper which can enable to print in both sides. SMART-51D can print the both side of the card with the encoding.
SMART-51L (Figure.5) produces long-life cards for ID and access control with customizable security features and ability to print smart cards. To cater to expanding requirement in card security, SMART-51L’s DLW(Direct to Laminating in a Wink) technology provides the most stable & fast laminating solutions.
Figure 3 SMART-51S (Standard) |
Figure 4 SMART-51D (Dual) |
|
|
Figure 5 SMART-51L (Laminator)
12

1.2 Printer inside features
In SMART printer, the ribbon is installed by a ribbon cartridge which can be used semipermanently. The following shows the inside functional features found on your SMART-51 printer.
Figure 6 SMART-51 Inside features
Output hopper(Stacker)
Collect the printed card and/or encoded cards. Maximum 40 cards are loaded and the extra printed/encoded card is passed out. It can be withdrawed when pulling forward.
Input hopper
Load the cards for printing. Maximum 100 cards are loaded when cover is closed; Maximum 200 cards are loaded when the cover is opened.
Card thickness control lever
Adjust the cards thickness.
Ribbon cartridge
Install the ribbon and the disposable cleaning roller.
13
Thermal Print Head
This enables the cards to be printed.
(Caution!: This is very hot after printing. Do not contact the surface of the Thermal Print Head with fingers or a sharp metal object to avoid degrading print quality or damaging printer head permanently.)
14
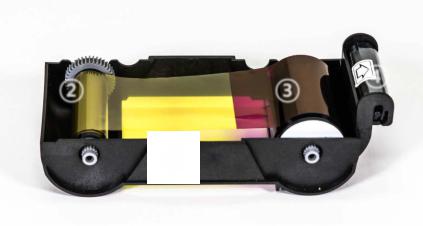
1.3 Ribbon cartridge features
SMART-51 printer uses the same ribbon cartridge as a SMART-50’s.
(However, the ribbon for SMART-51 is incompatible with SMART-50’s. The color of gear part of the ribbon for SMART-51 is gray.)
Ribbon cartridge
|
|
|
|
|
|
|
|
||
|
|
|
||
|
|
|
|
|
Take up parts
Supply parts
Figure 7 Ribbon cartridge features
Ribbon cartridge
-. Install a ribbon and a disposable cleaning roller provided with the ribbon.
-. This semi-permanent ribbon cartridge is a component of the printer. Printer does not operate if it is broken or damaged. In this case, please contact printer reseller.
Take up & Supply parts
-. Ribbon is wrapped to the supply parts as the Picture. It should be installed as the Figure.7
Disposable cleaning roller
-. It removes dust on the surface of card to improve print quality before the card is printed.
It should be changed together with the ribbon.
-. After installing the disposable cleaning roller to the ribbon cartridge, peel off the protective film.
-. It is provided with the ribbon.
15

1.4 Display and Buttons
Control panel of Printer consists of 2 lines LCD and 2 buttons. The 2 buttons have the functions as shown in the Figure 8.
Two Line LCD
Left |
Right |
Button |
Button |
Figure 8 SMART-51 Display and Buttons
The status of SMART-51 is ‘Initializing’ when boot up. It is changed to ‘System Ready’ if the printer is fine. It is change to ‘Printing’ when the printer is working. In case of sensing an error, it is changed to ‘Error’ status. Whenever the top cover is opened, the operation is stopped and the status is ‘Top Cover Open’.
The functions of the button under each status are as below table.
|
Status |
Left Button |
Right Button |
|
|
|
|
|
Initializing |
N/A |
N/A |
|
|
|
|
|
|
Ribbon Type/Balance |
Sleep |
|
|
|
|
|
|
Laminating Film Type/ Balance |
Initializing |
|
|
|
|
|
|
User Printed Counts |
|
|
|
|
|
|
System Ready |
Network IP Address |
|
|
|
|
|
|
|
Subnet |
|
|
|
|
|
|
|
Gateway |
|
|
|
|
|
|
|
Network MAC Address |
|
|
|
|
|
|
|
Pulling out the card |
|
|
|
|
|
|
Printing |
N/A |
N/A |
|
|
|
|
|
Error |
Retry |
Cancel |
|
|
|
|
|
Top Cover Open |
Move to backward a card |
Move to forward a card |
|
|
|
|
|
|
Cleaning Mode (when both buttons |
are pushed) |
|
|
|
|
16
2.Printer installation
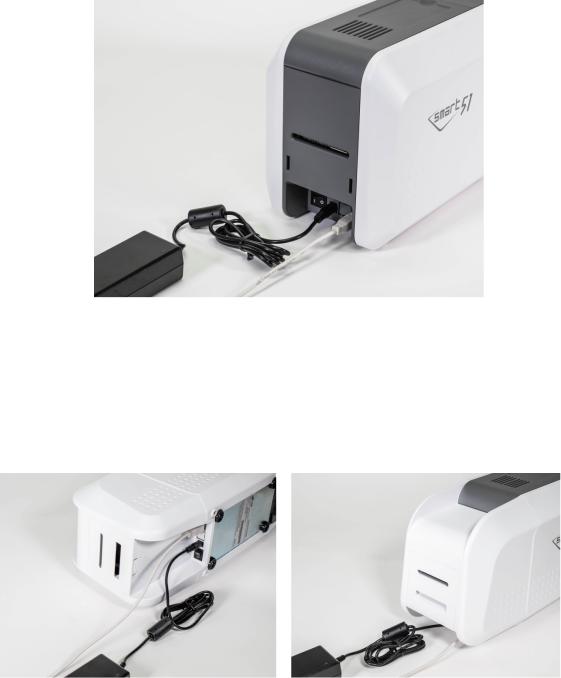
2.1.Connecting a power and a USB cable
(1)SMART-51S
Connect the power and USB cable as the below picture. Please refer to the ‘Network Configuration’ if you use the LAN connection.
Figure 9 SMART-51S Connection of power and USB cable
(2)SMART-51D
Connect the power and USB cable after turning the printer on its side as the below picture. Please refer to the ‘Network Configuration’ if you use the LAN connection.
Figure 10 SMART-51D Connection of power and USB cable
17

(3)SMART-51L
SMART-51L needs two power cables. Connect powers and USB cable after turning the printer on its side as the below picture. Please refer to the ‘Network Configuration’ if you use the LAN connection.
SMART-51L has two power switches so please turn on both switches.
Figure 11 SMART-51L Connection of powers and USB cable - 1
Figure 12 SMART-51L Connection of powers and USB cable - 2
18
2.2. Fitting the ribbon
Before printing, prepare the related items such as a card, a ribbon and a cleaning roller. In this section we invite you to know the proper method of installing the ribbon and the cleaning roller into the printer.
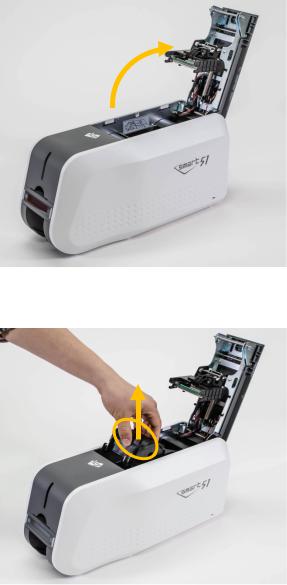
(1)Turn off the printer
(2)Open the printer top cover by pressing the top cover open button.
Figure 13 Top Cover open
(3) Take out the ribbon cartridge.
Figure 14 Take out the ribbon cartridge
19
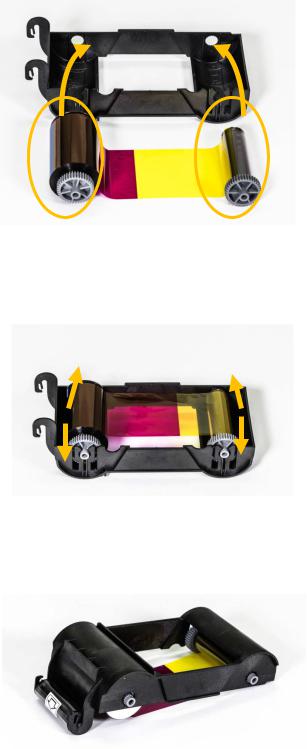
(4) Install a ribbon into the ribbon cartridge as the right picture.
Figure 15 Loading the ribbon 1
(5) Insert the supply side of the ribbon
to no.1 hole and press the opposite (no.2). Insert the take-up side of the
ribbon same method to no.3 and no.4. After inserting, tighten the ribbon.
(Caution! If the ribbon is not tightened, a rolling up error might be happened.)
Figure 16 Loading the ribbon 2
(6) Install the disposable cleaning roller to the ribbon cartridge.
Figure 17 Installing the cleaning roller
20
(7) Peel the protective wrapper from the cleaning roller.
After removing the protective wrapper, the cleaning roller should be kept clean from fingerprints, dust and foreign substances to avoid contamination because it is adhesive.
(Caution! Do not use without peeling off the protective wrapper because the cleaning roller cannot perform its function.)
(8) Install the ribbon cartridge into the printer after installing the ribbon with a cleaning roller to the cartridge.
Figure 18 Peeling the protective wrapper
Figure 19 Installing the ribbon cartridge
(9) Close the top cover
(If it is not closed properly, check the installation state of the ribbon cartridge.)
Figure 20 Close Top Cover
21

2.3. Fitting a laminating film
In case of installation of the laminator, please fit a laminating film as below.
(1) Open the laminator cover by pressing the laminator cover open button. Take out the film cartridge.
(Caution: Laminator head is possible to be HOT. Do not touch it.)
Figure 21 Take out the film cartridge
(2) Insert the laminating film in the same way of ribbon.
(Caution! If the film is not tightened, a rolling up error might be happened.)
Figure 22 Loading the laminating film
(3) Install the film cartridge into the laminator and close the laminator cover.
Figure 23 Installing the film cartridge
22
2.4. Loading the cards
This section shows how to load the plastic cards.
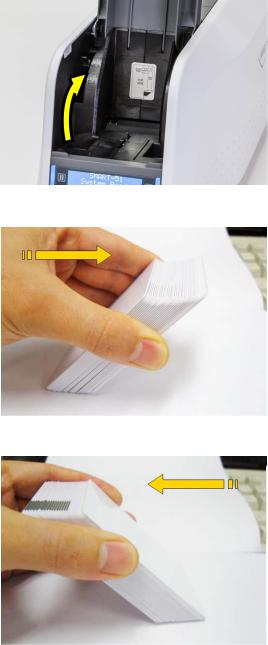
(1) Open the input hopper cover.
Adjust the card thickness with the card thickness control lever.
(Caution! If the adjustment is not correct, it will make some error. Use the type of cards in the specification of this manual. Always keep the card surface clean state.)
Figure 24 Adjusting the card thickness lever
(2) To separate cards from each other, push a stack of cards back and forth to an angle about 45 degrees vertically.
(Static charge makes cards stuck with significant adhesive force. These cards must be physically separated from each other before inserted into the feeder. If not separated, feeding or printing problems may occur.)
Figure 25 Preparing the card 1
Figure 26 Preparing the card 2
23
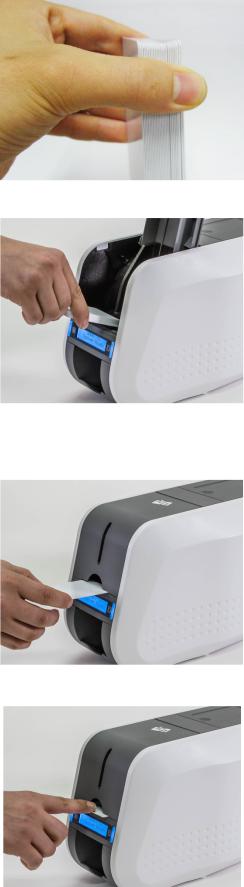
(3)Stand the stack of cards vertically after separating
(4)Load the cards on the input hopper properly and close the hopper cover.
(5)When insert each one card, insert the card to the end as left picture
Figure 27 Loading the cards 1
Figure 28 Loading the cards 2
Figure 29 Loading the cards 3
Figure 30 Loading the cards 4
24

2.5. The withdrawal of printed cards.
Printed cards are passed out to the stacker of front bottom side of SMART printer.
Figure 31 SMART-51 Withdrawal a card
SMART-51’s stacker can be divided as following image. so you can withdraw the printed cards easily.
Figure 32 SMART-51 Dividing a stacker
25

2.6. Rear Stacker (Option)
SMART-51 can install a rear stacker for option at the back of the printer. In case of SMART51S and SMART-51L, please install into the slots at the backside. In case of SMART-51D, please open the back cover of the printer and install it.
After that, set the value of ‘Card Out’ to ‘Back’ in the CardPrinterConfig Program.
Figure 33 SMART-51S installation of Rear Stacker
Figure 34 SMART-51D installation of Rear Stacker
Figure 35 SMART-51L installation of Rear Stacker
26
2.7. Driver installation (Windows 7 / 8 / 10)
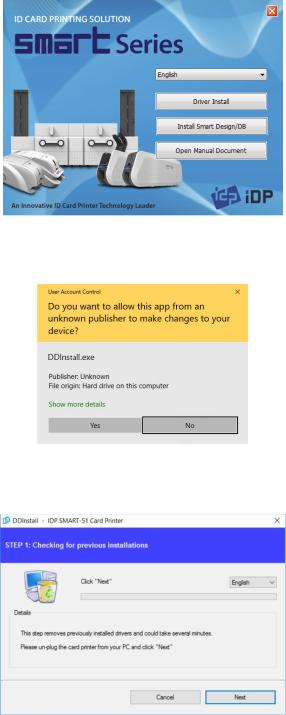
(1) Please insert the installation CD.
Please choose language and click “Driver Install”.
Figure 36 Install Win7 driver 1
(2) When “User Account Control” window is opened, click “Yes”
Figure 37 Install Win7 driver 2
(3) STEP 1:
Please turn off printer if it is connected to PC. Please click “Next”.
When you click “Next”, older driver will be removed automatically.
This process will take several minutes to remove older driver.
You can select the languages by selecting the combo box as shown on the left picture.
Figure 38 Install Win7 driver 3
27

(4) STEP 2:
When you click “Next”, the driver installation will be ready.
(5) STEP 3: - USB
Please click “Next” if printer is connected to USB only.
If you want to install the driver for a printer connected to network, please select the “TCP/IP Network port” and select the proper printer as step (7).
(6) Please turn on the printer
(Network cable is not supplied. Please ask network administrator for more questions.)
(7) STEP 3: - Network
Please select the printer that you want to install in the list and click “OK”.
(If no printer comes out on the window, please check the connection.)
Figure 39 Install Win7 driver 6
Figure 40 Install Win7 driver 8
Figure 41 Install Win7 driver 9
Figure 42 Install Win7 driver 10
28
Loading...