

SMART Series
SMART-30S, SMART-30R,
SMART-50S, SMART-50D, SMART-50L
User Manual
X

Copyright Notice
Users must respect the copyright laws applicable in their country. This manual must not be
photocopied, translated, reproduced or transmitted in whole or in part for any reason and by
the means that might be, albeit electronic or mechanical, without the express, written
authorization of the co mpany IDP card printer.
All information contained herein may be subject to modification without prior notice.
IDP card printer accepts no liability for any possible errors herein, nor for any accidental
damage or damage caused through the dissemination or the use of this manual.
Trademarks
SMART-50 is a trademark and IDP is a registered trademark of IDP card printer . Windows is
registered trademarks of Microsoft Corp. All other trademarks or registered trademarks are
marks of their respective holders. SMART-50 Design is a trademark of IDP.
Return Materials Authorization
In order to make a warranty claim you must contact an IDP Reseller. You will be responsible
for packaging the printer for shipment and the costs of shipping and insurance of the printer
from the point of use of the printer to the IDP Reseller. The IDP Reseller will bear the costs of
shipping and insuring the printer from the repair location to the address from which the printer
was shipped.
Before returning any equipment for in-warranty or out-of warranty repair, contact an IDP
Reseller or an IDP Service Center for a Return Materials Authorization (RMA) number.
Repack the equipment in the original packing material and mark the RMA number clearly on
the outside of the box. For more information about RMA or IDP warranty statements, refer to
the Warranty booklet on the quick install guide.
Y

Table of Contents
1. IntroductionUUUUUUUUUUUUUUUUUUUUUUUUUUUUUUUUUUUUUUUUUUUUUUUUUUUUUUUUUUUUUUUUUUUUUUUU ^
1.1 Printer outside features UUUUUUUUUUUUUUUUUUUUUUUUUUUUUUUUUUUUUUUUUUUUUUUUUUUUUUUUUUUUUUUUUUUUUUUUU ^
1.1.1 SMART-30 outside feature. UUUUUUUUUUUUUUUUUUUUUUUUUUUUUUUUUUUUUUUUUUUUUUUUUUUUUUUUUUUUUUUUUUUU ^
1.1.2 SMART-50 outside feature. UUUUUUUUUUUUUUUUUUUUUUUUUUUUUUUUUUUUUUUUUUUUUUUUUUUUUUUUUUUUUUUUUUUU _
1.2 Printer inside featuresUUUUUUUUUUUUUUUUUUUUUUUUUUUUUUUUUUUUUUUUUUUUUUUUUUUUUUUUUUUUUUUUUUUUUUUUUUUUUUUU XW
1.2.1 SMART-30 inside feature. UUUUUUUUUUUUUUUUUUUUUUUUUUUUUUUUUUUUUUUUUUUUUUUUUUUUUUUUUUUUUUUUUUU XW
1.2.2 SMART-50 inside feature. UUUUUUUUUUUUUUUUUUUUUUUUUUUUUUUUUUUUUUUUUUUUUUUUUUUUUUUUUUUUUUUUUUU XX
1.3 Ribbon cartridge featuresUUUUUUUUUUUUUUUUUUUUUUUUUUUUUUUUUUUUUUUUUUUUUUUUUUUUUUUUUUUUUUUUUUUUUUUUUUU XY
1.4 LCD panel display & button operationUUUUUUUUUUUUUUUUUUUUUUUUUUUUUUUUUUUUUUUUUUUUUUUUUUUUUUUU XZ
2. Printer installationUUUUUUUUUUUUUUUUUUUUUUUUUUUUUUUUUUUUUUUUUUUUUUUUUUUUUUUUUUUUUU X^
2.1. Fitting the ribbonUUUUUUUUUUUUUUUUUUUUUUUUUUUUUUUUUUUUUUUUUUUUUUUUUUUUUUUUUUUUUUUUUUUUUUUUUUUUUUUUUUUUUUU X^
2.2. Loading the cardsUUUUUUUUUUUUUUUUUUUUUUUUUUUUUUUUUUUUUUUUUUUUUUUUUUUUUUUUUUUUUUUUUUUUUUUUUUUUUUUUUUUUUU YW
2.3. The withdrawal of printed cards. UUUUUUUUUUUUUUUUUUUUUUUUUUUUUUUUUUUUUUUUUUUUUUUUUUUUUUUUUUUUUUU YY
2.4. Driver installation (Windows XP, 2000, 2003)UUUUUUUUUUUUUUUUUUUUUUUUUUUUUUUUUUUUUUUUUUUUU YZ
2.5. Driver installation (Windows Vista, 7, 8)UUUUUUUUUUUUUUUUUUUUUUUUUUUUUUUUUUUUUUUUUUUUUUUUUUUU ZW
2.5. Network configurationUUUUUUUUUUUUUUUUUUUUUUUUUUUUUUUUUUUUUUUUUUUUUUUUUUUUUUUUUUUUUUUUUUUUUUUUUUUUUUU Z]
3. Driver configurationUUUUUUUUUUUUUUUUUUUUUUUUUUUUUUUUUUUUUUUUUUUUUUUUUUUUUUUUUUU [\
3.1. Checking printer propertiesUUUUUUUUUUUUUUUUUUUUUUUUUUUUUUUUUUUUUUUUUUUUUUUUUUUUUUUUUUUUUUUUUUUUUUU [\
3.2. Changing printer propertiesUUUUUUUUUUUUUUUUUUUUUUUUUUUUUUUUUUUUUUUUUUUUUUUUUUUUUUUUUUUUUUUUUUUUUU [\
3.3. Other settingsUUUUUUUUUUUUUUUUUUUUUUUUUUUUUUUUUUUUUUUUUUUUUUUUUUUUUUUUUUUUUUUUUUUUUUUUUUUUUUUUUUUUUUUUUUUU \W
4. Utilities UUUUUUUUUUUUUUUUUUUUUUUUUUUUUUUUUUUUUUUUUUUUUUUUUUUUUUUUUUUUUUUUUUUUUUUUUUUUUUU \Z
4.1. Card Printer SetupUUUUUUUUUUUUUUUUUUUUUUUUUUUUUUUUUUUUUUUUUUUUUUUUUUUUUUUUUUUUUUUUUUUUUUUUUUUUUUUUUUUUU \Z
4.2. Card Printer Test UUUUUUUUUUUUUUUUUUUUUUUUUUUUUUUUUUUUUUUUUUUUUUUUUUUUUUUUUUUUUUUUUUUUUUUUUUUUUUUUUUUUUUU ]Z
4.3. Firmware upgrade UUUUUUUUUUUUUUUUUUUUUUUUUUUUUUUUUUUUUUUUUUUUUUUUUUUUUUUUUUUUUUUUUUUUUUUUUUUUUUUUUUUUU ]`
5. Optional device driver installationUUUUUUUUUUUUUUUUUUUUUUUUUUUUUUUUUUUUU ^Y
5.1. Contact smartcard readerUUUUUUUUUUUUUUUUUUUUUUUUUUUUUUUUUUUUUUUUUUUUUUUUUUUUUUUUUUUUUUUUUUUUUUUUUU ^Y
6. TroubleshootingUUUUUUUUUUUUUUUUUUUUUUUUUUUUUUUUUUUUUUUUUUUUUUUUUUUUUUUUUUUUUUUUU ^^
6.1. Cleaning the printerUUUUUUUUUUUUUUUUUUUUUUUUUUUUUUUUUUUUUUUUUUUUUUUUUUUUUUUUUUUUUUUUUUUUUUUUUUUUUUUUUUU ^^
6.2 TPH (Thermal Print Head) replacement UUUUUUUUUUUUUUUUUUUUUUUUUUUUUUUUUUUUUUUUUUUUUUUUUUUUUU _X
6.3. Card movementUUUUUUUUUUUUUUUUUUUUUUUUUUUUUUUUUUUUUUUUUUUUUUUUUUUUUUUUUUUUUUUUUUUUUUUUUUUUUUUUUUUUUUUUU _Y
6.4. Printing qualityUUUUUUUUUUUUUUUUUUUUUUUUUUUUUUUUUUUUUUUUUUUUUUUUUUUUUUUUUUUUUUUUUUUUUUUUUUUUUUUUUUUUUUUUUU _Z
6.5. Magnetic stripe encodingUUUUUUUUUUUUUUUUUUUUUUUUUUUUUUUUUUUUUUUUUUUUUUUUUUUUUUUUUUUUUUUUUUUUUUUUUU _[
6.6. General operationUUUUUUUUUUUUUUUUUUUUUUUUUUUUUUUUUUUUUUUUUUUUUUUUUUUUUUUUUUUUUUUUUUUUUUUUUUUUUUUUUUUUUU _[
7. Printer specificationUUUUUUUUUUUUUUUUUUUUUUUUUUUUUUUUUUUUUUUUUUUUUUUUUUUUUUUUUUU _]
Z

Table of Pictures
Pic.1 SMART-30 front featuresUUUUUUUUUUUUUUUUUUUUUUUUUUUUUUUUUUUUUUUUUUUUUUUUUUUUUUUUUUUUUUUUUUUUUUUUUUUUUUUUUUUUUUUUUUUU ^
Pic.2 SMART-30backfeaturesUUUUUU
Pic.3 SMART-50 front featuresUUUUUUUUUUUUU
Pic.4 SMART-50 rear featuresUUUUUUUUUUUUUUUUUUUU
Pic.5 SMART-50SUUUUUUUUUUUUUUUUUUUUUUUUUU
Pic.6 SMART-50DUUUUUUUUUUUUU
Pic.7 SMART-50L
Pic.8 SMART-30 Inside featuresUUUUUUUUUUUUUUUUUUUUUUUUUUUUUUUUUUUUUUUUUUUUUUUUUUUUUUUUUUUUUUUUUUUUUUUUUUUUUUUUUUUUUUUU
Pic.9 SMART-50 Inside featuresUUUUUUUUUUUUUUUUUUUUUUUUUUUUUUUUUUUUUUUUUUUUUUUUUUUUUUUUUUUUUUUUUUUUUUUUUUUUUUUUUUUUUUUU XX
Pic.10 Ribbon cartridge featuresUUUUUUU
Pic.11 Top Cover openUUUUUUUUUUUUUUUUUUU
Pic.12 Take out the ribbon cartridgeUUUUUUUUUUUUUUU
Pic.13 Loading the ribbon 1UUUUUUUUUUUUUUUUUUUUUUUUUUUUUUUU
Pic.14 Loading the ribbon 2UUUUUUUUUUUUUUUUUUUUUUUUUUUUUUUUUUUU
Pic.15 Installing the cleaning roller UUUUUUUUUUUUUUUUUUUUUUUUUUUUUUUUUUUUUUUU
Pic.16 Peeling the protective wrapperUUUUUUUUUUUUUUUUUUUUUUUUUUUUUUUUUUUUUUUUUUUUUUUUUUUUUUUU
Pic.17 Installing the ribbon cartridgeUUUUUUUUUUUUUUUUUUUUUUUUUUUUUUUUUUUUUUUUUUUUUUUUUUUUUUUUUUUUUUUUUUUUUUUUUUUU
Pic.18 Close Top Cover UUUUUUUUUUUUUUUUUUUUUUUUUUUUUUUUUUUUUUUUUUUUUUUUUUUUUUUUUUUUUUUUUUUUUUUUUUUUUUUUUUUUUUUUUUUUUU
Pic.19 Adjusting the card thickness lever UUUUUUUUUUUUUUUUUUUUUUUUUUUUUUUUUUUUUUUUUUUUUUUUUUUUUUUUUUUUUUUUUUUUUUUU YW
Pic.20 Preparing the card 1 UUUUUUUUUUUUUUUUU
Pic.21 Preparing the card 2 UUUUUUUUUUUUUUUUUUUUU
Pic.22 Loading the cards 1UUUUUUUUUUUUUUUUUUUUUUUUU
Pic.23 Loading the cards 2UUUUUUUUUUUUUUUUUUUUUUUUUUUU
Pic.24 Loading the cards 3UUUUUUUUUUUUUUUUUUUUUUUUUUUUUUU
Pic.25 Loading the cards 4UUUUUUUUUUUUUUUUUUUUUUUUUUUUUUUUUU
Pic.25 SMART-30 Stacker UUUUUUUUUUUUUUUUUUUUUUUUUUUUUUUUUUUUU
Pic.25 SMART-50 Stacker UUUUUUUUUUUUUUUUUUUUUUUUUUUUUUUUUUUUUU
Pic.26 Install XP printer driver 1 UUUUUUUUUUUUUUUUUUUUUUUUUUUUUUUUUUUUUUU
Pic.27 Install XP printer driver 2 UUUUUUUUUUUUUUUUUUUUUUUUUUUUUUUUUUUUUUUUUUUUUUUUUU
Pic.28 Install XP printer driver 3 UUUUUUUUUUUUUUUUUUUUUUUUUUUUUUUUUUUUUUUUUUUUUUUUUUUUUUUUUUUUU
Pic.29 Install XP print driver 4 UUUUUUUUUUUUUUUUUUUUUUUUUUUUUUUUUUUUUUUUUUUUUUUUUUUUUUUUUUUUUUUUUUUUUUUU
Pic.30 Install XP print driver 5 UUUUUUUUUUUUUUUUUUUUUUUUUUUUUUUUUUUUUUUUUUUUUUUUUUUUUUUUUUUUUUUUUUUUUUUUUUUUUUUU
Pic.31 Install XP print driver 6 UUUUUUUUUUUUUUUUUUUUUUUUUUUUUUUUUUUUUUUUUUUUUUUUUUUUUUUUUUUUUUUUUUUUUUUUUUUUUUUUUUUUUUUU
Pic.32 Install XP printer driver 7 UUUUUUUUUUUUUUUUUUUUUUUUUUUUUUUUUUUUUUUUUUUUUUUUUUUUUUUUUUUUUUUUUUUUUUUUUUUUUUUUUUUUUUU Y[
Pic.33 Install XP printer driver 8 UUUUUU
Pic.34 Install XP printer driver 9 UUUUUUUUUUUUUUUUU
Pic.35 Install XP printer driver 10 UUUUUUUUUUUUUUUUUUUUUUUUUUUU
Pic.36 Install XP printer driver 11 UUUUUUUUUUUUUUUUUUUUUUUUUUUUUUUUUUUUUUUUU
Pic.37 Install XP printer driver 12 UUUUUUUUUUUUUUUUUUUUUUUUUUUUUUUUUUUUUUUUUUUUUUUUUUUUUU
Pic.38 Install XP printer driver 13 UUUUUUUUUUUUUUUUUUUUUUUUUUUUUUUUUUUUUUUUUUUUUUUUUUUUUUUUUUUUUUUUUUU
Pic.39 Install XP printer driver 14 UUUUUUUUUUUUUUUUUUUUUUUUUUUUUUUUUUUUUUUUUUUUUUUUUUUUUUUUUUUUUUUUUUUUUUUUUUUUUUUU
Pic.40 Install XP printer driver 15 UUUUUUUUUUUUUUUUUUUUUUUUUUUUUUUUUUUUUUUUUUUUUUUUUUUUUUUUUUUUUUUUUUUUUUUUUUUUUUUUUUUUU Y]
Pic.41 Install XP printer driver 16 UUUUU
Pic.42 Install XP printer driver 17 UUUUUUUUUUUUUUUUUU
Pic.43 Install XP printer driver 18 UUUUUUUUUUUUUUUUUUUUUUUUUUUUUUU
Pic.44 Install XP printer driver 19 UUUUUUUUUUUUUUUUUUUUUUUUUUUUUUUUUUUUUUUUUUUU
Pic.45 Install XP printer driver 20 UUUUUUUUUUUUUUUUUUUUUUUUUUUUUUUUUUUUUUUUUUUUUUUUUUUUUUUUU
Pic.46 Install XP printer driver 21 UUUUUUUUUUUUUUUUUUUUUUUUUUUUUUUUUUUUUUUUUUUUUUUUUUUUUUUUUUUUUUUUUUUUUU
Pic.47 Install XP printer driver 22 UUUUUUUUUUUUUUUUUUUUUUUUUUUUUUUUUUUUUUUUUUUUUUUUUUUUUUUUUUUUUUUUUUUUUUUUUUUUUUUUUUU
Pic.48 Install XP printer driver 23 UUUUUUUUUUUUUUUUUUUUUUUUUUUUUUUUUUUUUUUUUUUUUUUUUUUUUUUUUUUUUUUUUUUUUUUUUUUUUUUUUUUUU Y`
UUUUUUUUUUUUUUUUUUUUUUUUUUUUUUUUUUUUUUUUUUUUUUUUUUUUUUUUUUUUUUUUUUUUUUUUUUUUUUUUUUUUUUUUUUUUUUUUUUUUUUUUUUUUUUUU `
UUUUUUUUUUUUUUUUUUUUUUUUUUUUUUUUUUUUUUUUUUUUUUUUUUUUUUUUUUUUUUUUUUUUUUUUUUUUUUUUUUUUUUUUUUUUUUUUUUU `
UUUUUUUUUUUUUUUUUUUUUUUUUUUUUUUUUUUUUUUUUUUUUUUUUUUUUUUUUUUUUUUUUUUUUUUUUUUUUUUUUUUUUU ^
UUUUUUUUUUUUUUUUUUUUUUUUUUUUUUUUUUUUUUUUUUUUUUUUUUUUUUUUUUUUUUUUUUUUUUUUUUUUUUU _
UUUUUUUUUUUUUUUUUUUUUUUUUUUUUUUUUUUUUUUUUUUUUUUUUUUUUUUUUUUUUUUUUUUUUUUUU _
UUUUUUUUUUUUUUUUUUUUUUUUUUUUUUUUUUUUUUUUUUUUUUUUUUUUUUUUUUUUUUUUUUUUUUUUUUUUUUUUUUUUUU `
XW
UUUUUUUUUUUUUUUUUUUUUUUUUUUUUUUUUUUUUUUUUUUUUUUUUUUUUUUUUUUUUUUUUUUUUUUUUUUUUUU XY
UUUUUUUUUUUUUUUUUUUUUUUUUUUUUUUUUUUUUUUUUUUUUUUUUUUUUUUUUUUUUUUUUUUUUUUUUUUUUUUUUUU X^
UUUUUUUUUUUUUUUUUUUUUUUUUUUUUUUUUUUUUUUUUUUUUUUUUUUUUUUUUUUUUUUUUU X^
UUUUUUUUUUUUUUUUUUUUUUUUUUUUUUUUUUUUUUUUUUUUUUUUUUUUUUUUUUUUUU X_
UUUUUUUUUUUUUUUUUUUUUUUUUUUUUUUUUUUUUUUUUUUUUUUUUUUUUUUUUU X_
UUUUUUUUUUUUUUUUUUUUUUUUUUUUUUUUUUUUUUUUUU X_
UUUUUUUUUUUUUUUUUUUUUU X_
UUUU X`
UUUUUU X`
UUUUUUUUUUUUUUUUUUUUUUUUUUUUUUUUUUUUUUUUUUUUUUUUUUUUUUUUUUUUUUUUUUUUUUUUUUUUU YW
UUUUUUUUUUUUUUUUUUUUUUUUUUUUUUUUUUUUUUUUUUUUUUUUUUUUUUUUUUUUUUUUUUUUUUUUU YW
UUUUUUUUUUUUUUUUUUUUUUUUUUUUUUUUUUUUUUUUUUUUUUUUUUUUUUUUUUUUUUUUUUUUUU YX
UUUUUUUUUUUUUUUUUUUUUUUUUUUUUUUUUUUUUUUUUUUUUUUUUUUUUUUUUUUUUUUUUUU YX
UUUUUUUUUUUUUUUUUUUUUUUUUUUUUUUUUUUUUUUUUUUUUUUUUUUUUUUUUUUUUUUU YX
UUUUUUUUUUUUUUUUUUUUUUUUUUUUUUUUUUUUUUUUUUUUUUUUUUUUUUUUUUUUU YX
UUUUUUUUUUUUUUUUUUUUUUUUUUUUUUUUUUUUUUUUUUUUUUUUUUUUUUUUUUUU YY
UUUUUUUUUUUUUUUUUUUUUUUUUUUUUUUUUUUUUUUUUUUUUUUUUUUUUUUUUUU YY
UUUUUUUUUUUUUUUUUUUUUUUUUUUUUUUUUUUUUUUUUUUUUUUU YZ
UUUUUUUUUUUUUUUUUUUUUUUUUUUUUUUUUUUUU YZ
UUUUUUUUUUUUUUUUUUUUUUUUUU YZ
UUUUUUUUUUUUUUUUUU YZ
UUUUUUUUUU Y[
UU Y[
UUUUUUUUUUUUUUUUUUUUUUUUUUUUUUUUUUUUUUUUUUUUUUUUUUUUUUUUUUUUUUUUUUUUUUUUUUUUUUUUU Y[
UUUUUUUUUUUUUUUUUUUUUUUUUUUUUUUUUUUUUUUUUUUUUUUUUUUUUUUUUUUUUUUUUUUUUU Y\
UUUUUUUUUUUUUUUUUUUUUUUUUUUUUUUUUUUUUUUUUUUUUUUUUUUUUUUUU Y\
UUUUUUUUUUUUUUUUUUUUUUUUUUUUUUUUUUUUUUUUUUUU Y\
UUUUUUUUUUUUUUUUUUUUUUUUUUUUUUU Y]
UUUUUUUUUUUUUUUUUU Y]
UUUUU Y]
UUUUUUUUUUUUUUUUUUUUUUUUUUUUUUUUUUUUUUUUUUUUUUUUUUUUUUUUUUUUUUUUUUUUUUUUUUUUUUUU Y^
UUUUUUUUUUUUUUUUUUUUUUUUUUUUUUUUUUUUUUUUUUUUUUUUUUUUUUUUUUUUUUUUUUU Y^
UUUUUUUUUUUUUUUUUUUUUUUUUUUUUUUUUUUUUUUUUUUUUUUUUUUUUU Y^
UUUUUUUUUUUUUUUUUUUUUUUUUUUUUUUUUUUUUUUUU Y_
UUUUUUUUUUUUUUUUUUUUUUUUUUUU Y_
UUUUUUUUUUUUUUU Y_
UU Y_
[

Pic.49 Install XP printer driver 24 UUUUUUUUUUUUUUUUUUUUUUUUUUUUUUUUUUUUUUUUUUUUUUUUUUUUUUUUUUUUUUUUUUUUUUUUUUUUUUUUUUUUU Y`
Pic.50 Install XP printer driver 25 UUUUUUUUUUUU
Pic.51 Install Win7 driver 1 UUUUUUUUUUUUUUUUUUUUUUUUU
Pic.52 Install Win7 driver 2 UUUUUUUUUUUUUUUUUUUUUUUUUUUU
Pic.53 Install Win7 driver 3 UUUUUUUUUUUUUUUUUUUUUUUUUUUUUUU
Pic.54 Install Win7 driver 4 UUUUUUUUUUUUUUUUUUUUUUUUUUUUUUUUUU
Pic.55 Install Win7 driver 5 UUUUUUUUUUUUUUUUUUUUUUUUUUUUUUUUUUUUU
Pic.56 Install Win7 driver 6 UUUUUUUUUUUUUUUUUUUUUUUUUUUUUUUUUUUUUUUU
Pic.57 Install Win7 driver 7 UUUUUUUUUUUUUUUUUUUUUUUUUUUUUUUUUUUUUUUUUUU
Pic.58 Install Win7 driver 8 UUUUUUUUUUUUUUUUUUUUUUUUUUUUUUUUUUUUUUUUUUUUUU
Pic.59 Install Win7 driver 9 UUUUUUUUUUUUUUUUUUUUUUUUUUUUUUUUUUUUUUUUUUUUUUUUU
Pic.60 Install Win7 driver 10 UUUUUUUUUUUUUUUUUUUUUUUUUUUUUUUUUUUUUUUUUUUUUUUUUUUU
Pic.61 Install Win7 driver 11 UUUUUUUUUUUUUUUUUUUUUUUUUUUUUUUUUUUUUUUUUUUUUUUUUUUUUUUUU
Pic.62 Install Win7 driver 12 UUUUUUUUUUUUUUUUUUUUUUUUUUUUUUUUUUUUUUUUUUUUUUUUUUUUUUUUUUUUUU
Pic.63 Install Win7 driver 13 UUUUUUUUUUUUUUUUUUUUUUUUUUUUUUUUUUUUUUUUUUUUUUUUUUUUUUUUUUUUUUUUUUU
Pic.64 Install Win7 driver 14 UUUUUUUUUUUUUUUUUUUUUUUUUUUUUUUUUUUUUUUUUUUUUUUUUUUUUUUUUUUUUUUUUUUUUUUU
Pic.65 Install Win7 driver 15 UUUUUUUUUUUUUUUUUUUUUUUUUUUUUUUUUUUUUUUUUUUUUUUUUUUUUUUUUUUUUUUUUUUUUUUUUUUUU
Pic.66 Install Win7 driver 16 UUUUUUUUUUUUUUUUUUUUUUUUUUUUUUUUUUUUUUUUUUUUUUUUUUUUUUUUUUUUUUUUUUUUUUUUUUUUUUUUUU
Pic.67 Install Win7 driver 17 UUUUUUUUUUUUUUUUUUUUUUUUUUUUUUUUUUUUUUUUUUUUUUUUUUUUUUUUUUUUUUUUUUUUUUUUUUUUUUUUUUUUUUU
Pic.68 Install Win7 driver 18 UUUUUUUUUUUUUUUUUUUUUUUUUUUUUUUUUUUUUUUUUUUUUUUUUUUUUUUUUUUUUUUUUUUUUUUUUUUUUUUUUUUUUUUUUUUU
Pic.69 Install Win7 driver 19 UUUUUUUUUUUUUUUUUUUUUUUUUUUUUUUUUUUUUUUUUUUUUUUUUUUUUUUUUUUUUUUUUUUUUUUUUUUUUUUUUUUUUUUUUUUUU Z[
Pic.70 Install Win7 driver 20 U
Pic.71 Install Win7 driver 21 UUUUUU
Pic.72 Install Win7 driver 22 UUUUUUUUUUU
Pic.73 Install Win7 driver 23 UUUUUUUUUUUUUUUU
Pic.74 Rear view of SMART-50 printer 1 UUUUUUUUUUUUUUUUUUUUU
Pic.75 Rear view of SMART-50 printer 2 UUUUUUUUUUUUUUUUUUUUUUUUUUUUUUUUUUUUUUUUUUUU
Pic.76 Running the NetAdmin UUUUUUUUUUUUUUUUUUUUUUUUUUUUUUUUUUUUUUUUUUUUUUUUUUUUUUUUUUUUUUUUUUU
Pic.77 Network printer is not foundUUUUUUUUUUUUUUUUUUUUUUUUUUUUUUUUUUUUUUUUUUUUUUUUUUUUUUUUUUUUUUUUUUUUUUUUUUU
Pic.78 Connecting to USB portUUUUUUUUUUUUUUUUUUUUUUUUUUUUUUUUUUUUUUUUUUUUUUUUUUUUUUUUUUUUUUUUUUUUUUUUUUUUUUUUUUUUUUUUU Z_
Pic.79 NetAdmin Log-inUUUUUUUUUUUUUUUUUUUUUUUUUUUUUUUUUUUUUUUUUUUUUUUUUUUUUUUUUUUUUUUUUUUUUUUUUUUUUUUUUUUUUUUUUUUUUUUUUUUU Z_
Pic.80 Dynamic IP configuration UUUUUUUUUUUUUUUUUUUUUUUUUUUUUUUUUUUUUUUUUUUUUUUUUUUUUUUUUUUUUUUUUUUUUUUUUUUUUUUUUUUUUU Z`
Pic.81 Static IP configuration UUUUUUUUU
Pic.82 Network service configurationUUUUUUUUUUUUUUUU
Pic.83 OCP configuration UUUUUUUUUUUUUUUUUUUUUUUUUUUUUUUUUUU
Pic.84 Network user configuration UUUUUUUUUUUUUUUUUUUUUUUUUUUUUUUUUUUU
Pic.85 USB port state UUUUUUUUUUUUUUUUUUUUUUUUUUUUUUUUUUUUUUUUUUUUUUUUUUU
Pic.86 Rebooting the network moduleUUUUUUUUUUUUUUUUUUUUUUUUUUUUUUUUUUUUUUUUUUUUUU
Pic.87 Reset to defaultUUUUUUUUUUUUUUUUUUUUUUUUUUUUUUUUUUUUUUUUUUUUUUUUUUUUUUUUUUUUUUUUUU
Pic.88 Upgrading the firmware 1 UUUUUUUUUUUUUUUUUUUUUUUUUUUUUUUUUUUUUUUUUUUUUUUUUUUUUUUUUUUUUU
Pic.89 Upgrading the firmware 2 UUUUUUUUUUUUUUUUUUUUUUUUUUUUUUUUUUUUUUUUUUUUUUUUUUUUUUUUUUUUUUUUUUUUUUUUUU
Pic.90 Upgrading the firmware 3 UUUUUUUUUUUUUUUUUUUUUUUUUUUUUUUUUUUUUUUUUUUUUUUUUUUUUUUUUUUUUUUUUUUUUUUUUUUUUUUUUUUUUU
Pic.91 Printer properties 1UUUUUUUUUUUUUUUUUUUUUUUUUUUUUUUUUUUUUUUUUUUUUUUUUUUUUUUUUUUUUUUUUUUUUUUUUUUUUUUUUUUUUUUUUUUUUUUU [\
Pic.92 Printer properties 2UUUUUUUUUUUUUUUUUUUUUUUUUUUUUUUUUUUUUUUUUUUUUUUUUUUUUUUUUUUUUUUUUUUUUUUUUUUUUUUUUUUUUUUUUUUUUUUU [\
Pic.93 LayoutU
Pic.94 Advanced Setup UUUUUUUUUUUUUUUUUUUUUUUUUUUUUUUUUUUUUUUUUUUUUUUUUUUUUUUUUUUUUUUUUUUUUUUUUUUUUUUUUUUU
Pic.95 Paper / Ribbon / PrintingUUUUUUUUUUUUUUUUUUUUUUUUUUUUUUUUUUUUUUUUUUUUUUUUUUUUUUUUUUUUUUUUUUUUUUUUUUUUUUUUUU
Pic.96 Side / Media UUUUUUUUUUUUUUUUUUUUUUUUUUUUUUUUUUUUUUUUUUUUUUUUUUUUUUUUUUUUUUUUUUUUUUUUUUUUUUUUUUUUUUUUUUUU
Pic.97 Laminator UUUUUUUUUUUUUUUUUUUUUUUUUUUUUUUUUUUUUUUUUUUUUUUUUUUUUUUUUUUUUUUUUUUUUUUUUUUUUUUUUUU
Pic.98 Printer sharingUUUUUUUUUUUUUUUUUUUUUUUUUUUUUUUUUUUUUUUUUUUUUUUUUUUUUUUUUUUUUUUUUUUUUUU
Pic.99 PortsUUUUUUUUUUUUUUUUUUUUUUUUUUUUUUUUUUUUUUUUUUUUUUUUUUUUUUUUUUUUUUUUUU
Pic.100 AdvancedUUUUUUUUUUUUUUUUUUUUUUUUUUUUUUUUUUUUUUUUUUUUUU
Pic.101 Color ManagementUUUUUUUUUUUUUUUUUUUUUUUUUUUUUUUUUUU
Pic.102 ServiceUUUUUUUUUUUUUUUUUUUUUUUUUUUUUUUUUUUUUU
Pic.103 LaminatorUUUUUUUUUUUUUUUUUUUUUUU
UUUUUUUUUUUUUUUUUUUUUUUUUUUUUUUUUUUUUUUUUUUUUUUUUUUUUUUUUUUUUUUUUUUUUUUUUUUUUUUUUUUUUUUUUUUUUUUUUUUUUUUUUUUUUUUUUUU []
UUUUUUUUUUUUUUUUUUUUUUUUUUUUUUUUUUUUUUUUUUUUUUUUUUUUUUUUUUUUUUUUUUUUUUUUUUUUUUUUUUUUUUUUUUUU Z\
UUUUUUUUUUUUUUUUUUUUUUUUUUUUUUUUUUUUUUUUUUUUUUUUUUUUUUUUUUUUUUUUUUUUUUUUUUUUUUUUUUUUUUU Z\
UUUUUUUUUUUUUUUUUUUUUUUUUUUUUUUUUUUUUUUUUUUUUUUUUUUUUUUUUUUUUUUUUUUUUUUUUUUUUUUUUUUUUU \Y
UUUUUUUUUUUUUUUUUUUUUUUUUUUUUUUUUUUUUUUUUUUUUUUUUUUUUUUUUUUUUUUUUUUUUUUUU Y`
UUUUUUUUUUUUUUUUUUUUUUUUUUUUUUUUUUUUUUUUUUUUUUUUUUUUUUUUUUUUUUUUUUUUUU ZW
UUUUUUUUUUUUUUUUUUUUUUUUUUUUUUUUUUUUUUUUUUUUUUUUUUUUUUUUUUUUUUUUUUU ZW
UUUUUUUUUUUUUUUUUUUUUUUUUUUUUUUUUUUUUUUUUUUUUUUUUUUUUUUUUUUUUUUU ZW
UUUUUUUUUUUUUUUUUUUUUUUUUUUUUUUUUUUUUUUUUUUUUUUUUUUUUUUUUUUUU ZW
UUUUUUUUUUUUUUUUUUUUUUUUUUUUUUUUUUUUUUUUUUUUUUUUUUUUUUUUUU ZX
UUUUUUUUUUUUUUUUUUUUUUUUUUUUUUUUUUUUUUUUUUUUUUUUUUUUUUU ZX
UUUUUUUUUUUUUUUUUUUUUUUUUUUUUUUUUUUUUUUUUUUUUUUUUUUU ZX
UUUUUUUUUUUUUUUUUUUUUUUUUUUUUUUUUUUUUUUUUUUUUUUUU ZX
UUUUUUUUUUUUUUUUUUUUUUUUUUUUUUUUUUUUUUUUUUUUUU ZY
UUUUUUUUUUUUUUUUUUUUUUUUUUUUUUUUUUUUUUUUU ZY
UUUUUUUUUUUUUUUUUUUUUUUUUUUUUUUUUUUU ZY
UUUUUUUUUUUUUUUUUUUUUUUUUUUUUUU ZY
UUUUUUUUUUUUUUUUUUUUUUUUUU ZZ
UUUUUUUUUUUUUUUUUUUUU ZZ
UUUUUUUUUUUUUUUU ZZ
UUUUUUUUUUU Z[
UUUUUU Z[
U Z[
UUUUUUUUUUUUUUUUUUUUUUUUUUUUUUUUUUUUUUUUUUUUUUUUUUUUUUUUUUUUUUUUUUUUUUUUUUUUUUUUUU Z\
UUUUUUUUUUUUUUUUUUUUUUUUUUUUUUUUUUUUUUUUUUUUUUUUUUUUUUUUUUUUUUUUUUUUUUUUUUUUU Z\
UUUUUUUUUUUUUUUUUUUUUUUUUUUUUUUUUUUUUUUUUUUUUUUUUUUUUU Z]
UUUUUUUUUUUUUUUUUUUUUUUUUUUUUUU Z]
UUUUUUUUUUUUUUUUUUUUUUU Z^
UUUUUUU Z^
UUUUUUUUUUUUUUUUUUUUUUUUUUUUUUUUUUUUUUUUUUUUUUUUUUUUUUUUUUUUUUUUUUUUUUUUUUUUUUUUUU Z`
UUUUUUUUUUUUUUUUUUUUUUUUUUUUUUUUUUUUUUUUUUUUUUUUUUUUUUUUUUUUUUU [W
UUUUUUUUUUUUUUUUUUUUUUUUUUUUUUUUUUUUUUUUUUUUUUUUUUUUUUUUUUUUUU [W
UUUUUUUUUUUUUUUUUUUUUUUUUUUUUUUUUUUUUUUUUUUUUUU [X
UUUUUUUUUUUUUUUUUUUUUUUUUUUUUUUUUUUUUUUUUUUUUUUUUUUU [X
UUUUUUUUUUUUUUUUUUUUUUUUUUUUUUUU [Y
UUUUUUUUUUUUUUUUUUUUUUUUUUUUUUUUUUUU [Y
UUUUUUUUUUUUUUUUUUUUUUUU [Z
UUUUUUUUUUUU [Z
[[
UUUUUUUUUUUUUUUU [^
UUUUUU [_
UUUUUUUUUUUUUUU [`
UUUUUUUUUUUUUUUUUUUUUUUUUUU [`
UUUUUUUUUUUUUUUUUUUUUUUUUUUUUUUU \W
UUUUUUUUUUUUUUUUUUUUUUUUUUUUUUUUUUUUUUUUUUUUUUUUUUUU \W
UUUUUUUUUUUUUUUUUUUUUUUUUUUUUUUUUUUUUUUUUUUUUUUUUUUUUUUUUUUUUUU \X
UUUUUUUUUUUUUUUUUUUUUUUUUUUUUUUUUUUUUUUUUUUUUUUUUUUUUUUUUUUU \X
UUUUUUUUUUUUUUUUUUUUUUUUUUUUUUUUUUUUUUUUUUUUUUUUUUUUUUUUUUUUUUUUUUUUUUUUUUU \X
\

Pic.104 CardPrinterSetup Log-inUUUUUUUUUUUUUUUUUUUUUUUUUUUUUUUUUUUUUUUUUUUUUUUUUUUUUUUUUUUUUUUUUUUUUUUUUUUUUUUUUUUUUU \Z
Pic.105 CardPrinterSetup start UUUUUUUUUUU
Pic.106 CardPrinterSetup – Card Printer Basic Setup UUUUUUUUUUUUUUUUUUUU
Pic.107 SMART-30 R density UUUUUUUUUUUUUUUUUUUUUUUUUUUUUUUUUUUUUUUUUUUUUUUUUUUUUUUUUUUUUUUU
Pic.108 Color density UUUUUUUUUUUUUUUUUUUUUUUUUUUUUUUUUUUUUUUUUUUUUUUUUUUUUUUUUUUUUUUUUUUUUU
Pic.109 Resin Black density UUUUUUUUUUUUUUUUUUUUUUUUUUUUUUUUUUUUUUUUUUUUUUUUUUUUUUUUUUUUUUUUU
Pic.110 Overlay density UUUUUUUUUUUUUUUUUUUUUUUUUUUUUUUUUUUUUUUUUUUUUUUUUUUUUUUUUUUUUUUUUUUUUU
Pic.111 CardPrinterSetup – Card Printer Advanced SetupUUUUUUUUUUUUUUUUUUUUUUUUUUUUUUUUUUUUUUUUUUUUUUUU \_
Pic.112 CardPrinterSetup – Laminator Basic Setup UUUUUUUUUUUUUUUUUUUUUUUUUUUUUUUUUUUUUUUUUUUUUUUUUUUUUUUUU ]W
Pic.113 CardPrinterSetup – Laminator Advanced SetupUUUUUUUUUUUUUUUUUUUUUUUUUUUUUUUUUUUUUUUUUUUUUUUUUUU ]X
Pic.114 CardPrinterTestUUUU
Pic.115 Magnetic stripe encodingUU
Pic.116 Contact smartcard encodingUUUUUUUUUUUUUUU
Pic.117 Contactless smartcard encoding UUUUUUUUUUUUUUUUUUUUUUUUUUUUUUUUU
Pic.118 Upgrading printer firmware UUUUUUUUUUUUUUUUUUUUUUUUUUUUUUUUUUUUUUUUUUUUUUUUUUUUUUUUUU
Pic.119 Ready for firm-ware upgradeUUUUUUUUUUUUUUUUUUUUUUUUUUUUUUUUUUUUUUUUUUUUUUUUUUUUUUUUUUUUUUUUUUUUUUUUUU
Pic.120 Firm-ware manual upgrade UUUUUUUUUUUUUUUUUUUUUUUUUUUUUUUUUUUUUUUUUUUUUUUUUUUUUUUUUUUUUUUUUUUUUUUUUUUUUUUUUU ^W
Pic.121 Ready for laminator firm-ware upgrade UUUUUUU
Pic.122 Firm-ware manual upgrade UUUUUUUUUUUUUUUUUUUUUUUUUUUUUUUUUUUUUUUUUU
Pic.123 Contact smartcard reader driver installation UUUUUUUUUUUUUUUUUUUUUUUUUUUUUUUUUUUUUUUUUUUUUUUUUUUUUUU ^Y
Pic.124 License agreement
Pic.125 Installing the contact smartcard reader driver UUU
Pic.126 Completing the smartcard reader driver installationUUUUUUUUUUUUUUUUUUUUUUUUUUUUUUUUUUUUUUUUUUUU ^[
Pic.127 Found New Hardw are WizardU
Pic.128 Installation method selectionUUUUUUUUUUUUUUUUUUUU
Pic.129 Driver location UUUUUUUUUUUUUUUUUUUUUUUUUUUUUUUUUUUUUUU
Pic.130 Completing the driver installationUUUUUUUUUUUUUUUUUUUUUUUUUUUUUUUUUUUU
Pic.131 Exclusive cleaning card for SMART-50 printerUUUUUUUUUUUUUUUUUUUUUUUUUUUUUUUUUUUUUUUUUUUUUUUUUUUUU ^^
Pic.132 Printer cleaning start UUUUUU
Pic.133 Printer cleaning Step 1UUUUUUUUUUUUU
Pic.134 Printer cleaning Step 2UUUUUUUUUUUUUUUUUUUUUU
Pic.135 Printer cleaning Step 3UUUUUUUUUUUUUUUUUUUUUUUUUUUUUUU
Pic.136 Printer cleaning Step 4UUUUUUUUUUUUUUUUUUUUUUUUUUUUUUUUUUUUUUUU
Pic.137 Printer cleaning Step 5UUUUUUUUUUUUUUUUUUUUUUUUUUUUUUUUUUUUUUUUUUUUUUUUU
Pic.138 Printer cleaning Step 6UUUUUUUUUUUUUUUUUUUUUUUUUUUUUUUUUUUUUUUUUUUUUUUUUUUUUUUUUU
Pic.139 Thermal Print Head UUUUUUUUUUUUUUUUUUUUUUUUUUUUUUUUUUUUUUUUUUUUUUUUUUUUUUUUUUUUUUUUUUU
Pic.140 Print head setupUUUUUUUUUUUUUUUUUUUUUUUUUUUUUUUUUUUUUUUUUUUUUUUUUUUUUUUUUUUUUUUUUUUUUUU
Pic.141 Print head replacementUUUUUUUUUUUUUUUUUUUUUUUUUUUUUUUUUUUUUUUUUUUUUUUUUUUUUUUUUUUUUUUUUUUUUU
Pic.142 Print head angleUUUUUUUUUUUUUUUUUUUUUUUUUUUUUUUUUUUUUUUUUUUUUUUUUUUUUUUUUUUUUUUUUUUUUUUUUUUUUUUU
Pic.142 Printing quality trouble 1 UUUUUUUUUUUUUUUUUUUUUUUUUUUUUUUUUUUUUUUUUUUUUUUUUUUUUUUUUUUUUUUUUUUUUUUUUUUUUUU
Pic.143 Printing quality trouble 2 UUUUUUUUUUUUUUUUUUUUUUUUUUUUUUUUUUUUUUUUUUUUUUUUUUUUUUUUUUUUUUUUUUUUUUUUUUUUUUUUUUUUU _Z
Pic.144 Printing quality trouble 3 UUUU
Pic.145 Printing quality trouble 4 UUUUUUUUUUUUUUUUU
Pic.146 Printing quality trouble 5 UUUUUUUUUUUUUUUUUUUUUUUUUUUUUU
Pic.148 Printer Specification 1UUUUUUUUUUUUUUUUUUUUUUUUUUUUUUUUUUUUUUUUUUU
Pic.149 Printer Specification 2UUUUUUUUUUUUUUUUUUUUUUUUUUUUUUUUUUUUUUUUUUUUUUUUUUU
Pic.150 Printer Specification 3UUUUUUUUUUUUUUUUUUUUUUUUUUUUUUUUUUUUUUUUUUUUUUUUUUUUUUUUUUU
UUUUUUUUUUUUUUUUUUUUUUUUUUUUUUUUUUUUUUUUUUUUUUUUUUUUUUUUUUUUUUUUUUUUUUUUUUUUUUUUUUUUUUUUUUUUUUUU ]Z
UUUUUUUUUUUUUUUUUUUUUUUUUUUUUUUUUUUUUUUUUUUUUUUUUUUUUUUUUUUUUUUUUUUUUUUUUUUUUUUUUUUUUUUUUUUUUUU ^Z
UUUUUUUUUUUUUUUUUUUUUUUUUUUUUUUUUUUUUUUUUUUUUUUUUUUUUUUUUUUUUUUUUUUUUUUUUUUUUU \Z
UUUUUUUUUUUUUUUUUUUUUUUUUUUUUUUUUU \[
UUUUUUUUUUUUUUUUUUUUUUUUUUUU \\
UUUUUUUUUUUUUUUUUUUUUUUUUUUUUUUUU \]
UUUUUUUUUUUUUUUUUUUUUUUUUUUU \]
UUUUUUUUUUUUUUUUUUUUUUUUUUUUUU \]
UUUUUUUUUUUUUUUUUUUUUUUUUUUUUUUUUUUUUUUUUUUUUUUUUUUUUUUUUUUUUUUUUUUUUUUUUUUUUUUUUUU ]\
UUUUUUUUUUUUUUUUUUUUUUUUUUUUUUUUUUUUUUUUUUUUUUUUUUUUUUUUUUUUUUUUU ]]
UUUUUUUUUUUUUUUUUUUUUUUUUUUUUUUUUUUUUUUU ]^
UUUUUUUUUUUUUUUUUUUUUUUU ]`
UUUUUU ^W
UUUUUUUUUUUUUUUUUUUUUUUUUUUUUUUUUUUUUUUUUUUUUUUUUUUUUUUU ^X
UUUUUUUUUUUUUUUUUUUUUUUUUUUUUUUUUUUUUUUU ^X
UUUUUUUUUUUUUUUUUUUUUUUUUUUUUUUUUUUUUUUUUUUUUUUUUU ^Z
UUUUUUUUUUUUUUUUUUUUUUUUUUUUUUUUUUUUUUUUUUUUUUUUUUUUUUUUUUUUUUUUUUUUUUUUUUUUUU ^\
UUUUUUUUUUUUUUUUUUUUUUUUUUUUUUUUUUUUUUUUUUUUUUUUUUUUUUUUUUU ^\
UUUUUUUUUUUUUUUUUUUUUUUUUUUUUUUUUUUUUUUUUUUUUUUUUUUUUUUUUUUUUU ^]
UUUUUUUUUUUUUUUUUUUUUUUUUUUUUUUUUUUU ^]
UUUUUUUUUUUUUUUUUUUUUUUUUUUUUUUUUUUUUUUUUUUUUUUUUUUUUUUUUUUUUUUUUUUUUUUUUUUUUUUUUUUUU ^^
UUUUUUUUUUUUUUUUUUUUUUUUUUUUUUUUUUUUUUUUUUUUUUUUUUUUUUUUUUUUUUUUUUUUUUUUUUUU ^_
UUUUUUUUUUUUUUUUUUUUUUUUUUUUUUUUUUUUUUUUUUUUUUUUUUUUUUUUUUUUUUUUUUU ^_
UUUUUUUUUUUUUUUUUUUUUUUUUUUUUUUUUUUUUUUUUUUUUUUUUUUUUUUUUU ^`
UUUUUUUUUUUUUUUUUUUUUUUUUUUUUUUUUUUUUUUUUUUUUUUUU ^`
UUUUUUUUUUUUUUUUUUUUUUUUUUUUUUUUUUUUUUUU _W
UUUUUUUUUUUUUUUUUUUUUUUUUUUUUUU _W
UUUUUUUUUUUUUUUUUUUUUUUUUUU _X
UUUUUUUUUUUUUUUUUUUUUUUUUUUU _X
UUUUUUUUUUUUUUUUUU _Y
UUUUUUUUUUUUUUUUUUU _Y
UUUUUU _Z
UUUUUUUUUUUUUUUUUUUUUUUUUUUUUUUUUUUUUUUUUUUUUUUUUUUUUUUUUUUUUUUUUUUUUUUUUUUUUUUUU _Z
UUUUUUUUUUUUUUUUUUUUUUUUUUUUUUUUUUUUUUUUUUUUUUUUUUUUUUUUUUUUUUUUUUUU _[
UUUUUUUUUUUUUUUUUUUUUUUUUUUUUUUUUUUUUUUUUUUUUUUUUUUUUUU _[
UUUUUUUUUUUUUUUUUUUUUUUUUUUUUUUUUUUUUUUUUUUUUUU _]
UUUUUUUUUUUUUUUUUUUUUUUUUUUUUUUUUUUUUUU _^
UUUUUUUUUUUUUUUUUUUUUUUUUUUUUUU __
]
1. Introduction
1.1 Printer outside features
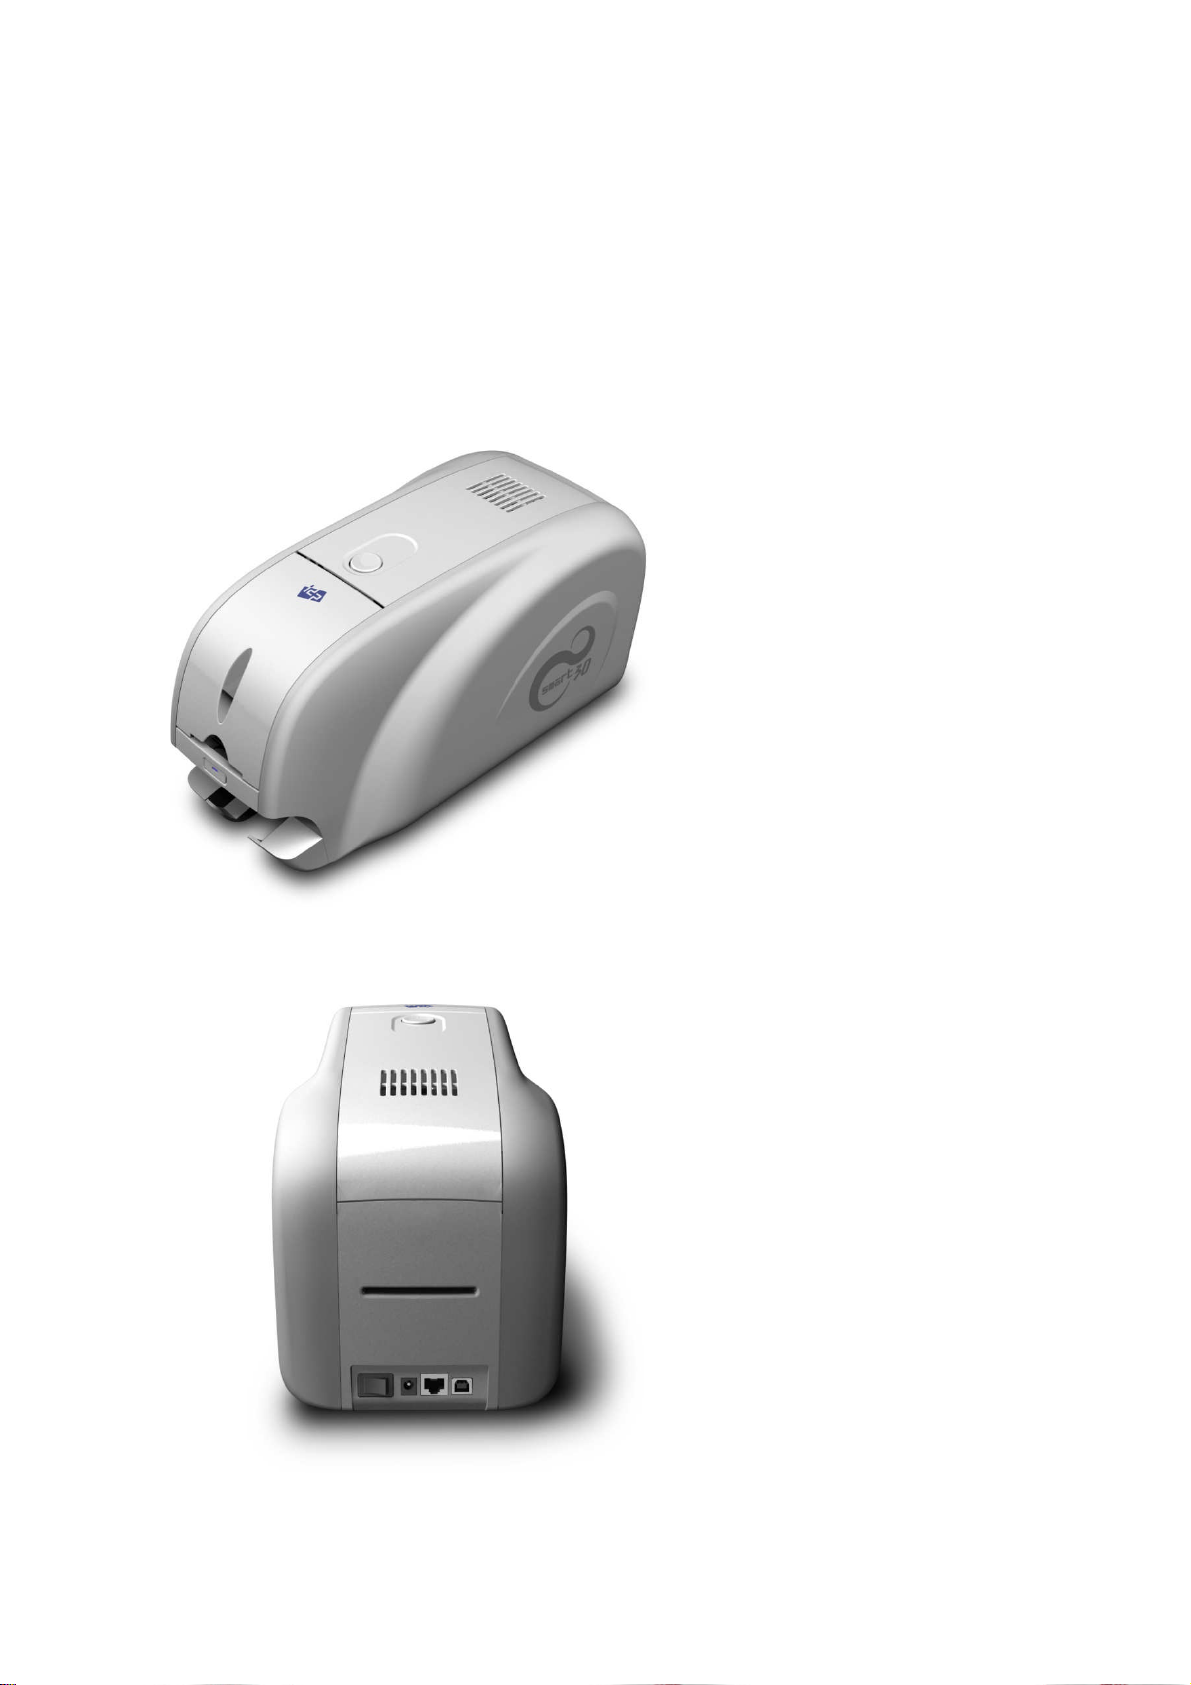
1.1.1 SMART-30 outside feature.
For the user’s convenience, SMART-30 status can be seen through LED and the printer can be
controlled by a button. It takes a power via the 24V adaptor provided with the printer. Using USB
and Network port, it is communicated with the user’s PC
The following shows the outside functional features found on the printer.
¥
¤
¦
¢
£
Pic.1 SMART-30 front features
ྙ Top cover open button
ྚ External contactless
Smartcard encoding
position
ྛ Input hopper
ྜ LED buttons
ྜྷ Dividing Stacker
ྙ Backside card outlet
¨
§
©ª
«
Pic.2 SMART-30 back features
^
ྚ Power switch
ྛ 24V power connector
ྜ Network port
In case there is no
network option, it is
closed.
ྜྷ USB port
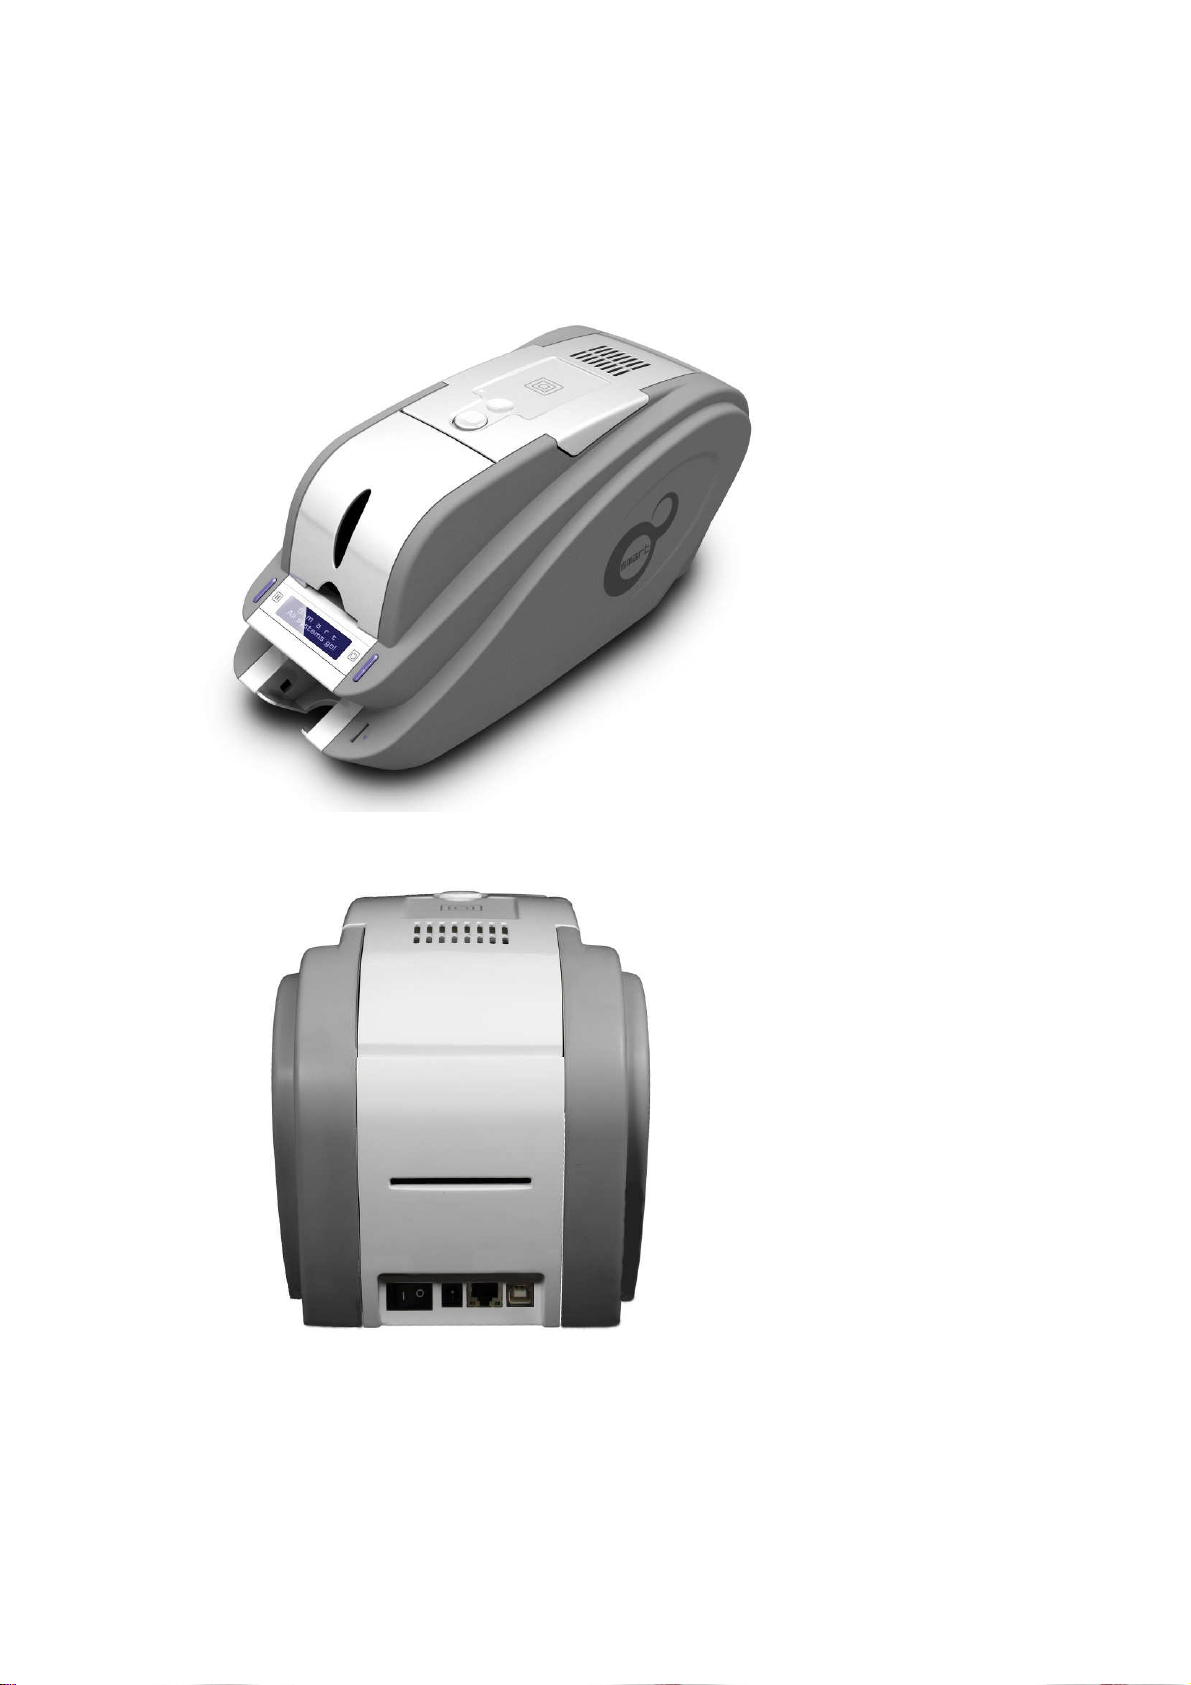
1.1.2 SMART-50 outside feature.
For the user’s convenience, SMART-50 status can be seen through LCD with LED and the printer
can be controlled by two LED buttons. It takes a power via the 24V adaptor provided with the
printer. Using USB and Network port, it is communicated with the user’s PC
The following shows the outside functional features found on the printer.
¤
£
ྙ Top cover open button
¦
§
¥
¨
¢
Pic.3 SMART-50 front features
ྚ External contactless
Smartcard encoding
position
ྛ Fan
ྜ Input hopper
ྜྷ LED buttons
ྞ LCD show the process
status
ྟ Internal SIM reader
ྞ Backside card outlet
©
ª«¬
Pic.4 SMART-50 rear features
ྟ Power switch
ྠ 24V power connector
ྡ Network port
In case there is no
network option, it is
closed.
ྡྷ USB port
_
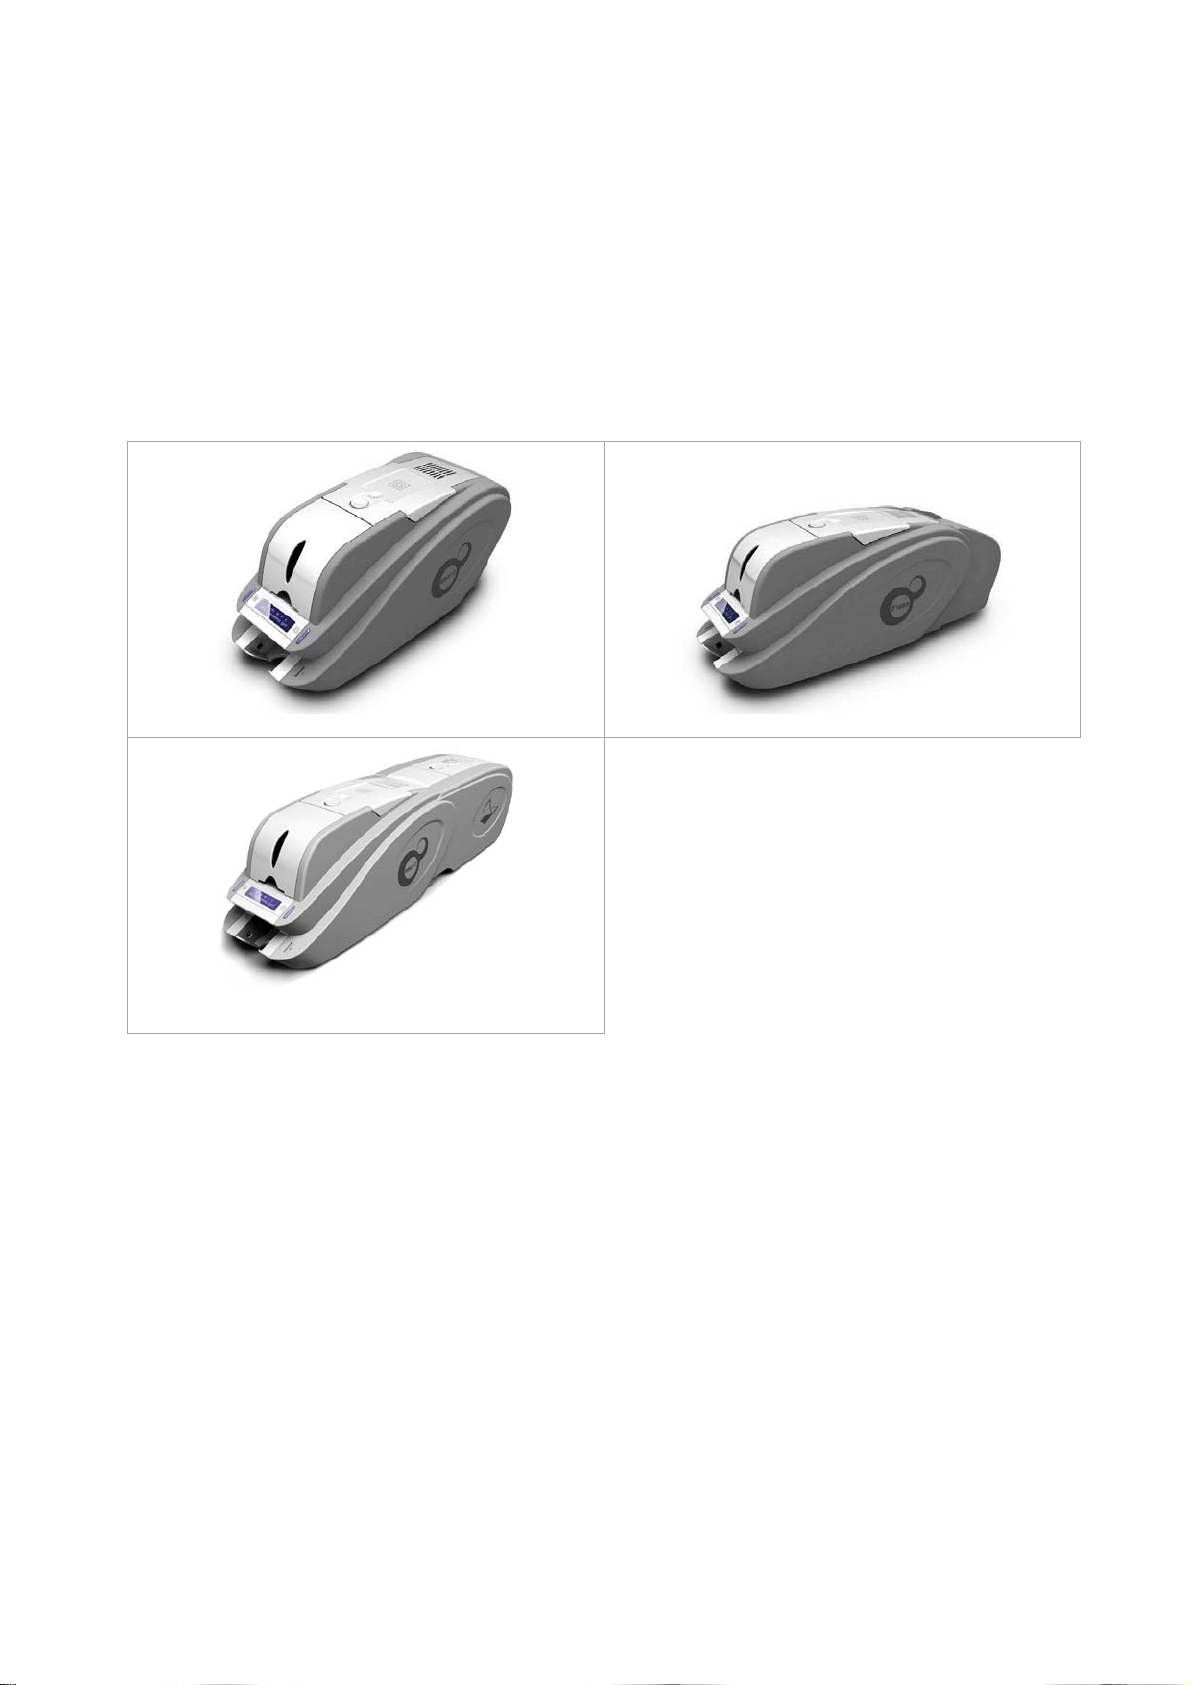
There are five models in SMART-50 card printer series such as SMART-50S, SMART-50D, SMART50L.
SMART-50S (Pic.5) is the standard card printer. It can be printed in single side with the encoding. This
manual is prepared based on SMART-50S.
SMART-50D (Pic.6) have a flipper which can enable to print in both side. SMART-50D can print the both
side of the card with the encoding.
SMART-50L (Pic.7) produces long-life cards for ID and access control with customizable security features
and ability to print smart cards. To cater to expanding requirement in card security , SMART-50L’s
DLW(Direct to Laminating in a Wink) technology provides the most stable & fast laminating solutions.
Pic.5 SMART-50S Pic.6 SMART-50D
Pic.7 SMART-50L
`
1.2 Printer inside features
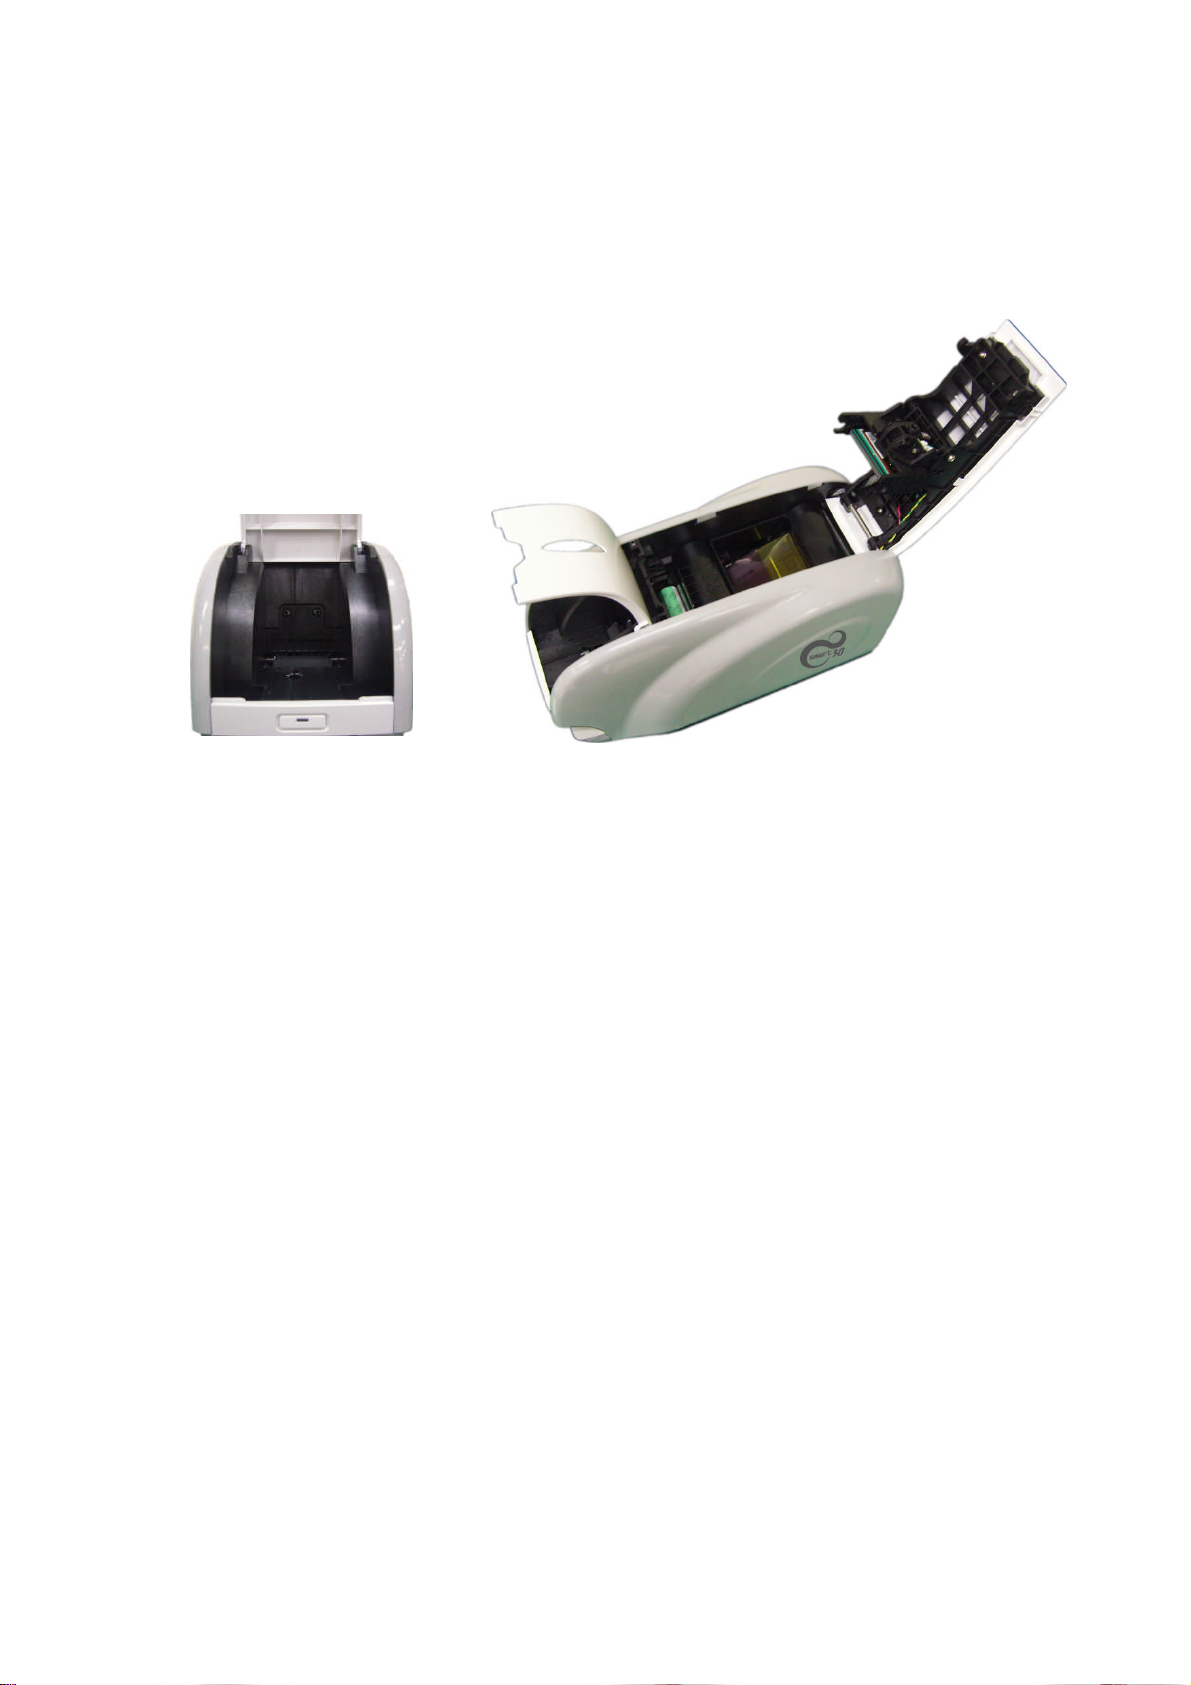
1.2.1 SMART-30 inside feature.
In SMART-30 printer, the ribbon is installed by a ribbon cartridge which can be used
semipermanently. The following shows the inside functional features found on your SMART-30
printer.
¦
¥
¤
£
¢
Pic.8 SMART-30 Inside features
ྙ Output hopper(Stacker)
Collect the printed card and/or encoded cards.
ྚ Input hopper
Load the cards for printing.
ྛ Card thickness control lever
Adjust the cards thickness.
ྜ Ribbon cartridge
Install the ribbon and the disposable cleaning roller.
ྜྷ Thermal Print Head
This enables the cards to be printed.
(Caution
with fingers or a sharp metal object to avoid degrading print quality or damaging printer head
permanently.)
!: This is very hot after printing. Do not contact the surface of the Thermal Print Head
XW
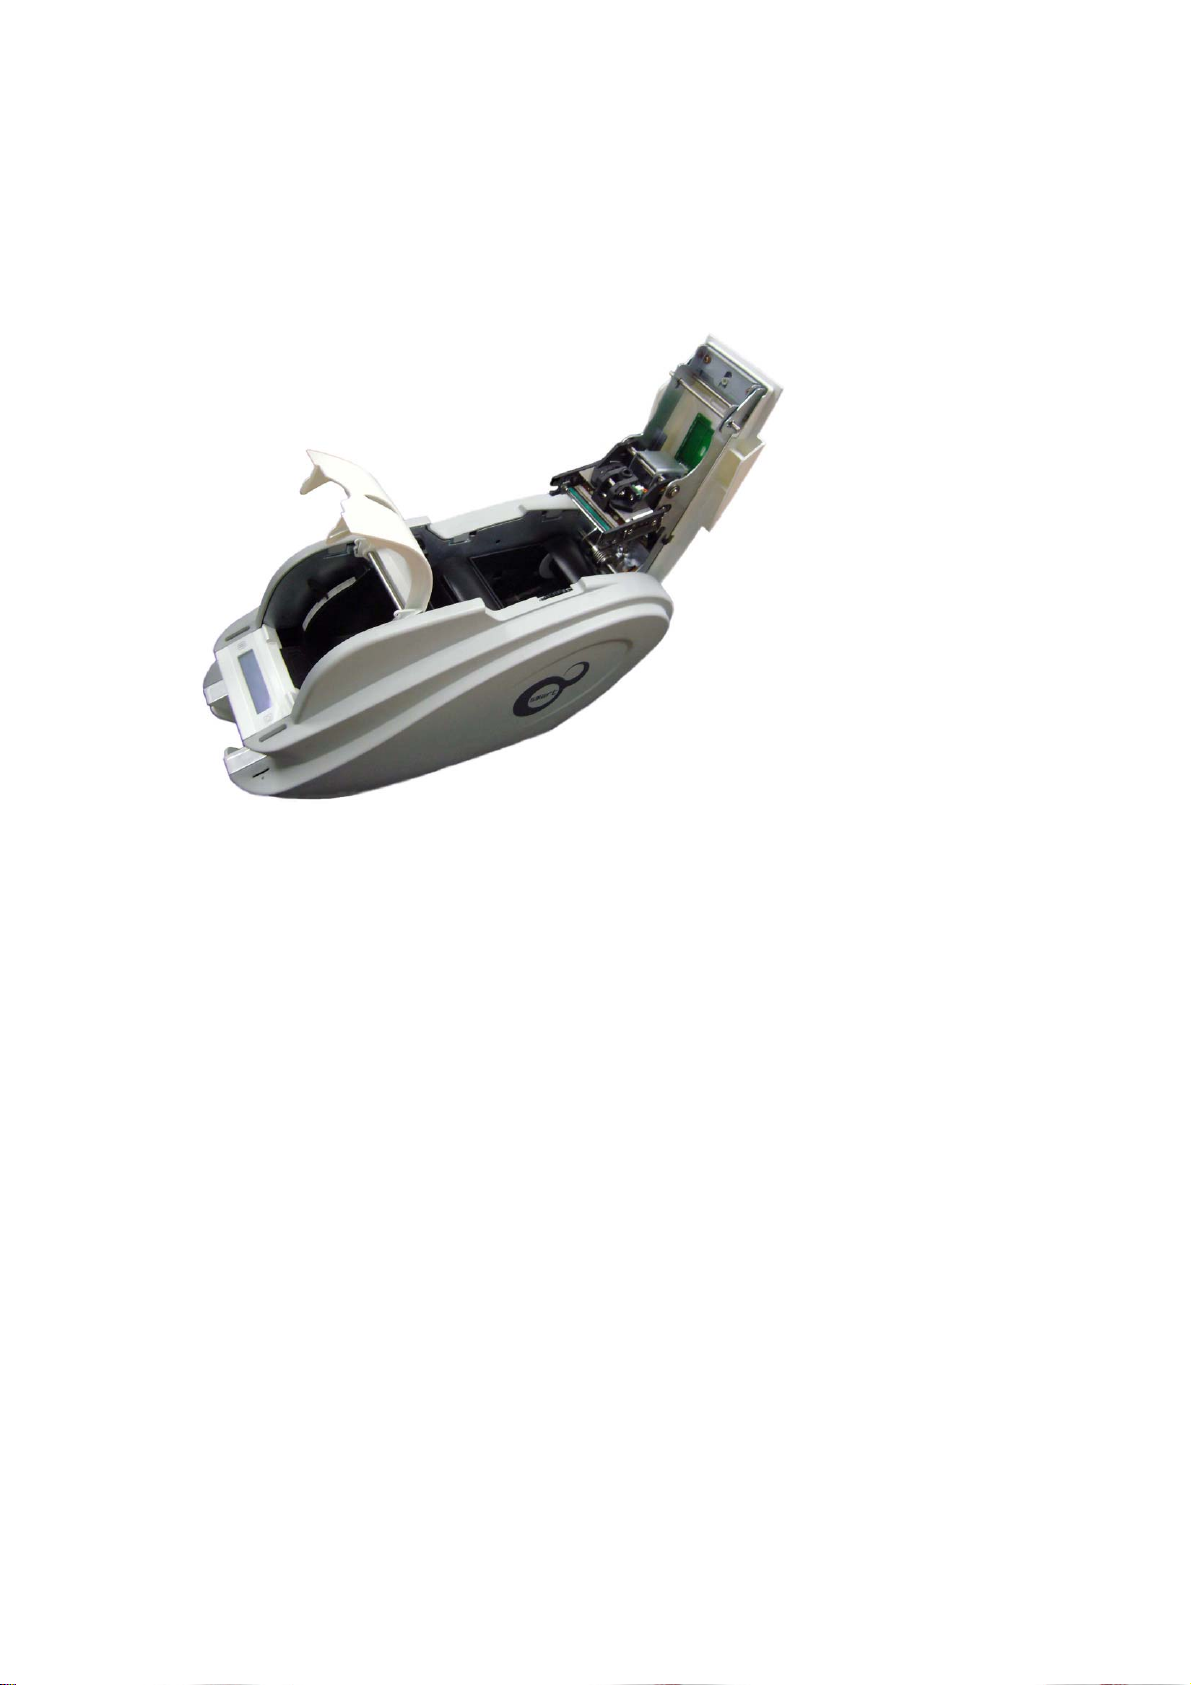
1.2.2 SMART-50 inside feature.
In SMART-50 printer, the ribbon is installed by a ribbon cartridge which can be used
semipermanently. The following shows the inside functional features found on your SMART-50
printer.
¦
¤¥
£
¢
Pic.9 SMART-50 Inside features
ྚ Output hopper(Stacker)
Collect the printed card and/or encoded cards.
ྚ Input hopper
Load the cards for printing.
§
ྙ Output hopper
ྚ Input hopper
ྛ Card thickness
control lever
ྜ Ribbon cartridge
ྜྷ Thermal Print Head
ྞ External contactless
encoder
ྛ Card thickness control lever
Adjust the cards thickness.
ྜ Ribbon cartridge
Install the ribbon and the disposable cleaning roller.
ྜྷ Thermal Print Head
This enables the cards to be printed.
(Caution
with fingers or a sharp metal object to avoid degrading print quality or damaging printer head
permanently.)
ྞ External contactless encoder
Contactless smartcard encoder.
!: This is very hot after printing. Do not contact the surface of the Thermal Print Head
XX

1.3 Ribbon cartridge features
ྙ Ribbon cartridge
¥
£¤
ྚ Take up parts
ྛ Supply parts
¢
Pic.10 Ribbon cartridge features
ྙ Ribbon cartridge
-. Install a ribbon and a disposable cleaning roller provided with the ribbon.
-. In the case of SMART-30 R model, a ribbon is not used, and a disposable cleaning
roller is only installed and used.
-. This semi-permanent ribbon cartridge is a component of the printer. Printer does not operate
if it is broken or damaged. In this case, please contact printer reseller.
ྚ ྛ Take up & Supply parts
-. Ribbon is wrapped to the supply parts as the Pic. 10. It should be installed as the Pic.10.
ྜ Disposable cleaning roller
-. It removes dust on the surface of card to improve print quality before the card is printed.
It should be changed together with the ribbon.
-. After installing the disposable cleaning roller to the ribbon cartridge, peel off the protective
film.
-. It is provided with the ribbon.
-. In the case of SMART-30 R model, you have to purchase the disposable cleaning roller
from the reseller.
ྜ Disposable cleaning
roller
XY

1.4 LCD panel display & button operation
SMART-50 printer can show the real-time process status to user. SMART-30’s status is displayed in windows tray.
No LCD Display
1
2
3
Ver X.XX…
Initialize…
INIT Error xx
<Replay Replay>
Smart
Auto Ribbon Set
LED Button
Left Right Left Right
On On Initializing Initializing with the indication of SMART-50 firmware version
Blinking Blinking Repeat Repeat Error during initializing
On On Automatic ribbon setting
State Description
Showing error no. in case of failure of normal initializing while
SMART-50 is initialized. (Refer to page13). Press any keys for reinitializing process.
It optimizes the ribbon position setting automatically in case of the
replacement of color ribbon(YMCKO or YMCKOK).
4
5
6
7
8
9
10
11
Auto Ribbon Set
Fail!!!!
Auto Ribbon Set
Color=xxx(xxx)
SMART
System Ready
Wait.. 1”C
Temperature=xxx
Smart
Unlock Please..
Smart
Verify your PC
Ribbon Balance
Type / Remains
SMART
Printing!
Blinking Blinking
Blinking Blinking
Installed
On On
Blinking Blinking
On On Printer is locked
On On PC is not authenticated
On On Card out
On On Printing Under printing.
ribbon
information
Soft power
ON/OFF
Fail to optimize the
ribbon setting
Fail to optimize the
ribbon setting and
display the ribbon’s color
value
Standby
Printer’s operating
temperature is under
1
Display the ribbon type
and remains
Display these messages when the auto ribbon setting is failed and
it shows the ribbon detecting level.
Printer is ready for printing and you can check the installed ribbon
information by pressing the left button. Printer turns off by pressing
the right button. Printer turns on by pressing the right button when it
turns off.
Shown it when printer’s operating temperature falls down under
1. Normal operating temperature is 15~35.
Physical key option is active using the CardPrinterSetup utility and
it shows the locked state. Unable to print.
Authentication option is active using the CardPrinterSetup utility.
When use the printer with an unauthenticated PC, it is shown.
Printer is not working.
Display the installed ribbon’s type and the remains. It can be shown
by pressing the left LED button on the system ready mode.
XZ

No LCD Display
12
13
14
15
SMART
Mag R/W
Spool Error!
<-Any Key Push->
Print Error xx
<Replay Cancel>
Top Cover Open
<-Card Moving ->
LED Button
Left Right Left Right
On On
Blinking Blinking
Blinking Blinking Repeat
Blinking Blinking
Cancel &
Initialize
Move a
card to the
back side
Cancel &
Initialize
Cancel &
Initialize
Moveacard
to the front
side
State Description
Reading or writing the
Magnetic stripe
Printingdataisnot
transmitted properly
Error in printing or
moving a card
Top cover open
Magnetic encoder is reading or writing the magnetic stripe
information.
Shown it when error occurs in a printing data transmission. Press
any keys to delete the spooled data and to return the ready state.
Error in the printing or the transmission. Retry by pressing the left
button or cancel the command by pressing the right button.
Top cover is open. The card in the printer can be moved by
pressing the left or right LED button. If press both buttons at the
same time, the print head will be up and down. (Flipper will be flip
over if it is installed)
16
17
18
19
20
21
22
Check Please..
Ribbon Not Found
Check Please..
Check Please..
TPH Not Found
Print Error xx
Top Cover Open
Card Out Error
<Replay Cancel>
Board Test Mode
Ribbon Zero
SMART
Download...
Wait
Blinking Blinking
Blinking Blinking
Blinking Blinking
Blinking Blinking
Blinking Blinking Repeat
On On Firmware downloading
Ribbon
redetecting
Ribbon
redetecting
Ribbon
redetecting
Ribbon
redetecting
Cancel &
Initialize
There is no ribbon in the
printer or fail to detect
The installed ribbon has
run out
Thermal Print head is not
installed
Fail to move the card out
(Check the card in the
printer)
Fail to move the card out
(Check the card in the
printer)
Test mode state
Table1 Status display
Fail to detect the ribbon. Check the ribbon installed state. If there
is no ribbon, install the ribbon. If there is a ribbon, pull out it and
install again. Press the left or right button to redetect the ribbon.
It is displayed when the installed ribbon is all used up. Replace
with new ribbon. Press the left or right button to redetect the
ribbon.
Thermal Print Head is not installed or there is a misconnection of
the cable. Open the top cover to check the print head installed
state or turn off the printer and check the cable connecting state.
The card in the printer will be come out when the initialization o r
top cover close. If it is not come out, this message will be
displayed. Remove the card and close the top cover.
After an error occurs in printing, the error card is not come out
even though "Replay" or "Cancel" button is pressed.
The printer is downloading the firmware. Do not turn off the power
until it is rebooting. It takes about 20 seconds.
Test mode which can test the sensors or motors of the printer.
User can set the LED status.
X[

Description of printer error code
Error code Description
0 Card in error
1 Card move center error
2 Card out error
3 Card move magnetic error
4 Card move contact encoder error
5 Card move contactless encoder error
6 Card move error from the printer to the flipper
7 Card move error form the flipper to the printer
8 Print head up error
9 Print head down error
10 IC Contactor up
11 IC Contactor down
12 Flipper top error
13 Flipper bottom error
14 Error in printing
15 Magnetic stripe read/write error
16 Ribbon search error
17 Ribbon move error
18 No print head installed
19 Print head overheating
20 No ribbon
21 Printing data error
22 Card back out error
23 Magnetic data erasing error
24 Printer password is not correct
25 Magnetic stripe track 1 read error
26 Magnetic stripe track 2 read error
27 Magnetic stripe track 3 read error
28 Printer locked state
29 Printer spool full state
30 No defined
31 No defined
X\

Description of laminator error code
Error code Description
0 Laminator head up error
2 Laminator head down error
4 Laminator card in error
6 Laminator card move error
8 Laminator card front out error
9 Laminator card rear out error
10 Flipper error
13 Error while laminating
15 Laminator initializing error
16 Laminator film zero error
17 Laminator film search error
31 No laminating film
X]
2. Printer installation
2.1. Fitting the ribbon
Before printing, prepare the related items such as a card, a ribbon and a cleaning roller. In this
section we invite you to know the proper method of installing the ribbon and the cleaning roller
into the printer. In the case of SMRT RW model, the ribbon is no needed so skip 2.1.4 and
2.1.5 process.
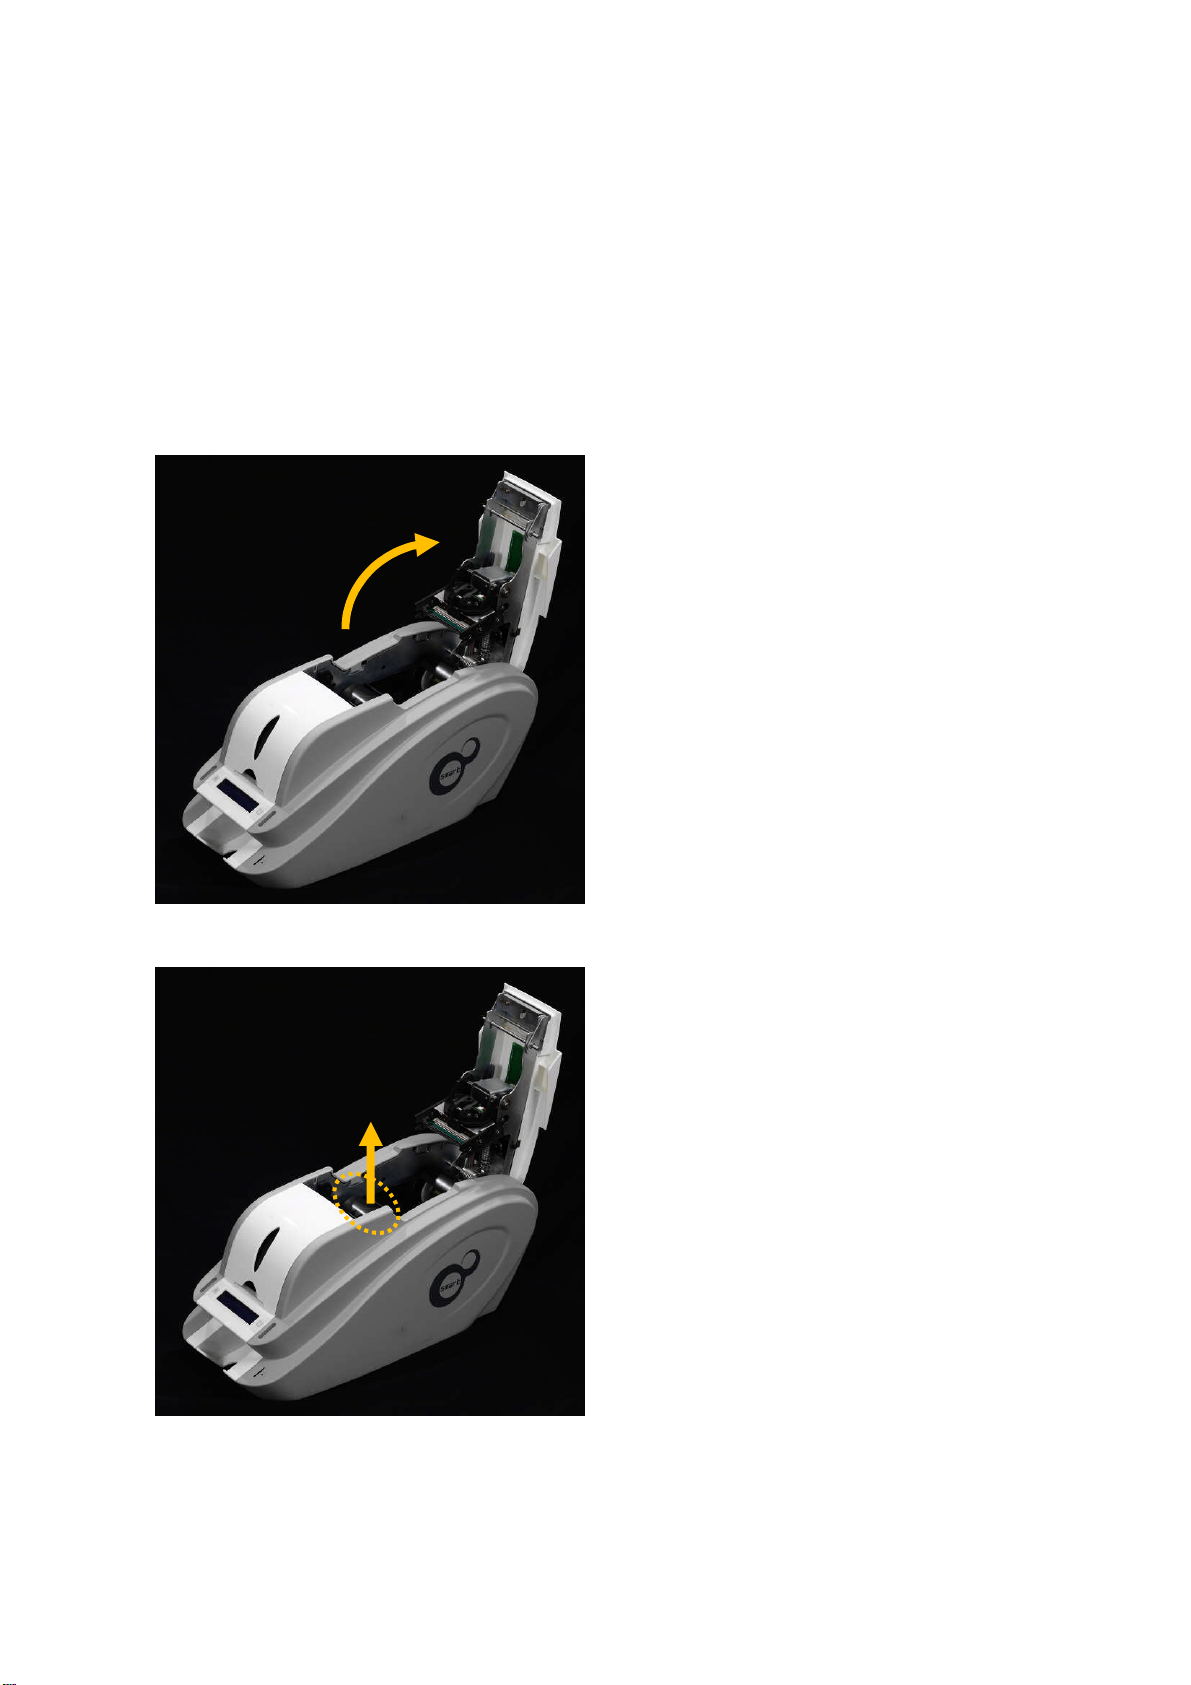
2.1.1. Turn off the printer
2.1.2. Open the printer top cover by
pressing the top cover open
button.
Pic.11 Top Cover open
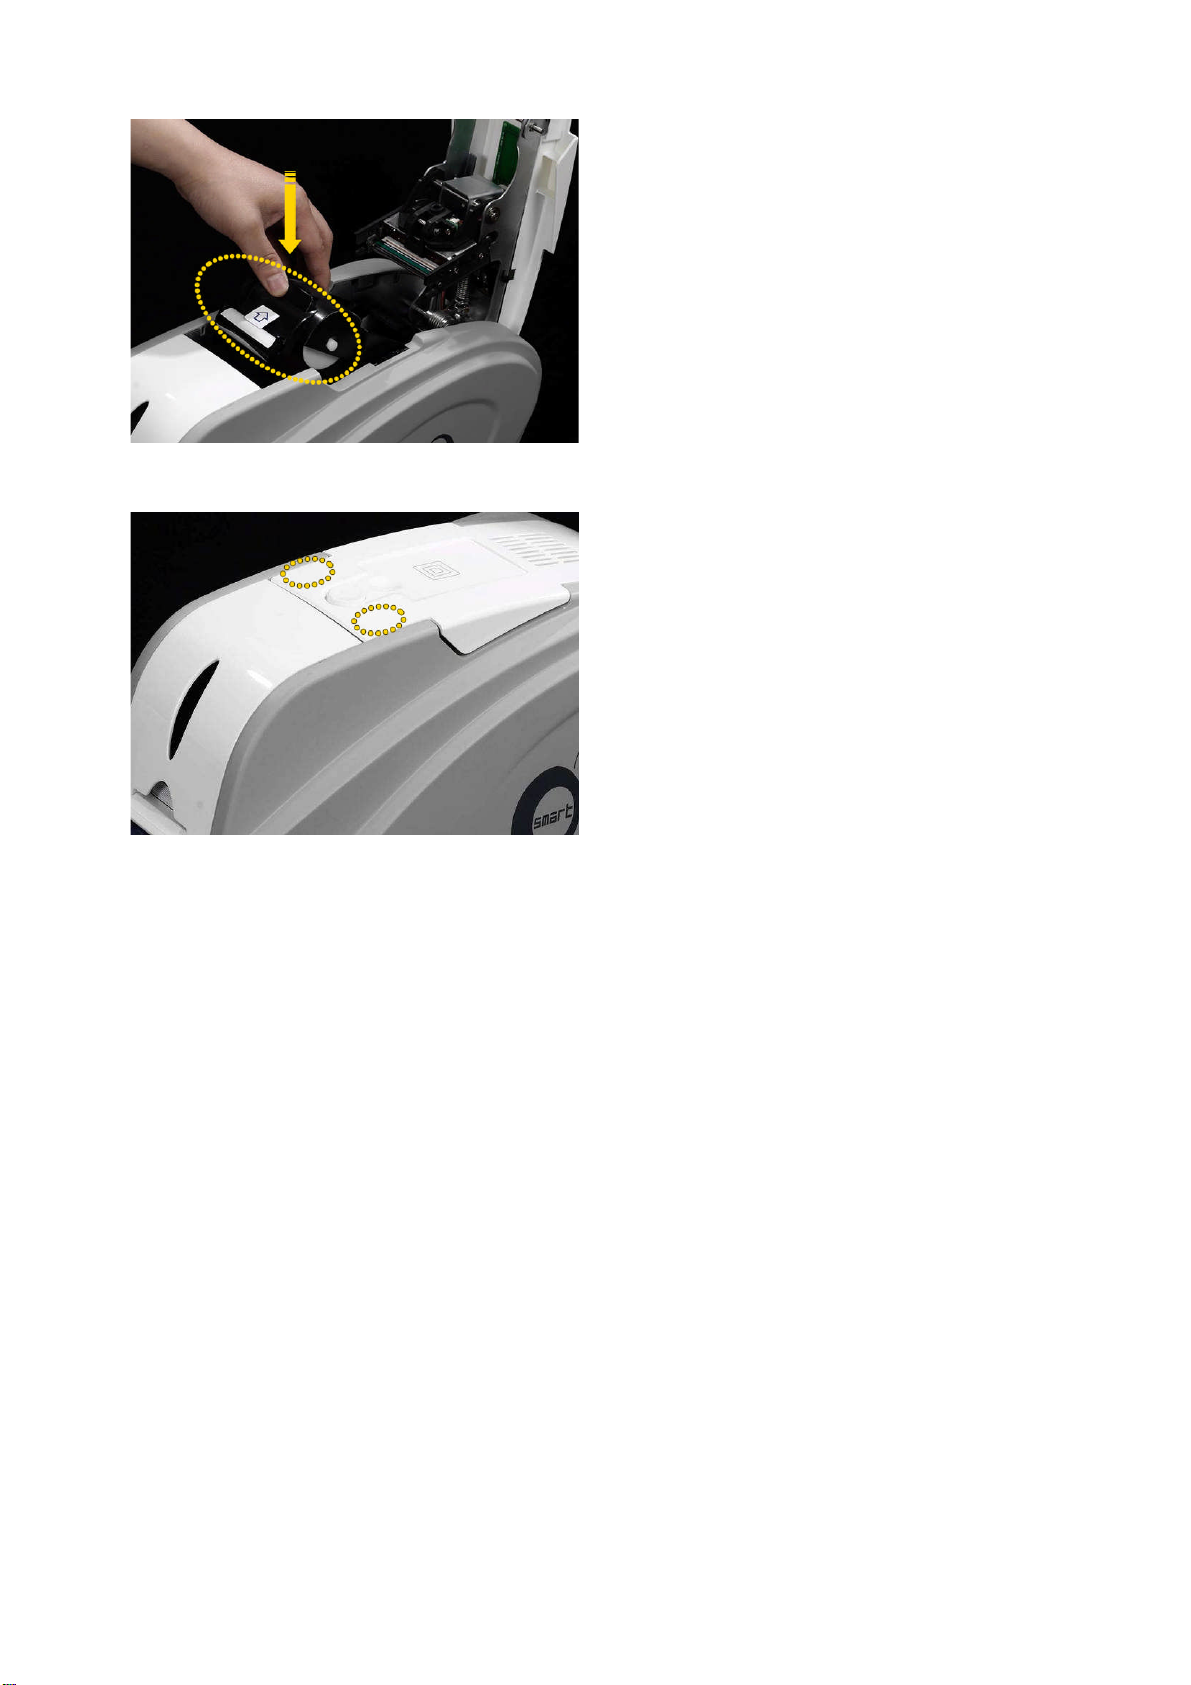
Pic.12 Take out the ribbon cartridge
2.1.3. Take out the ribbon cartridge.
X^
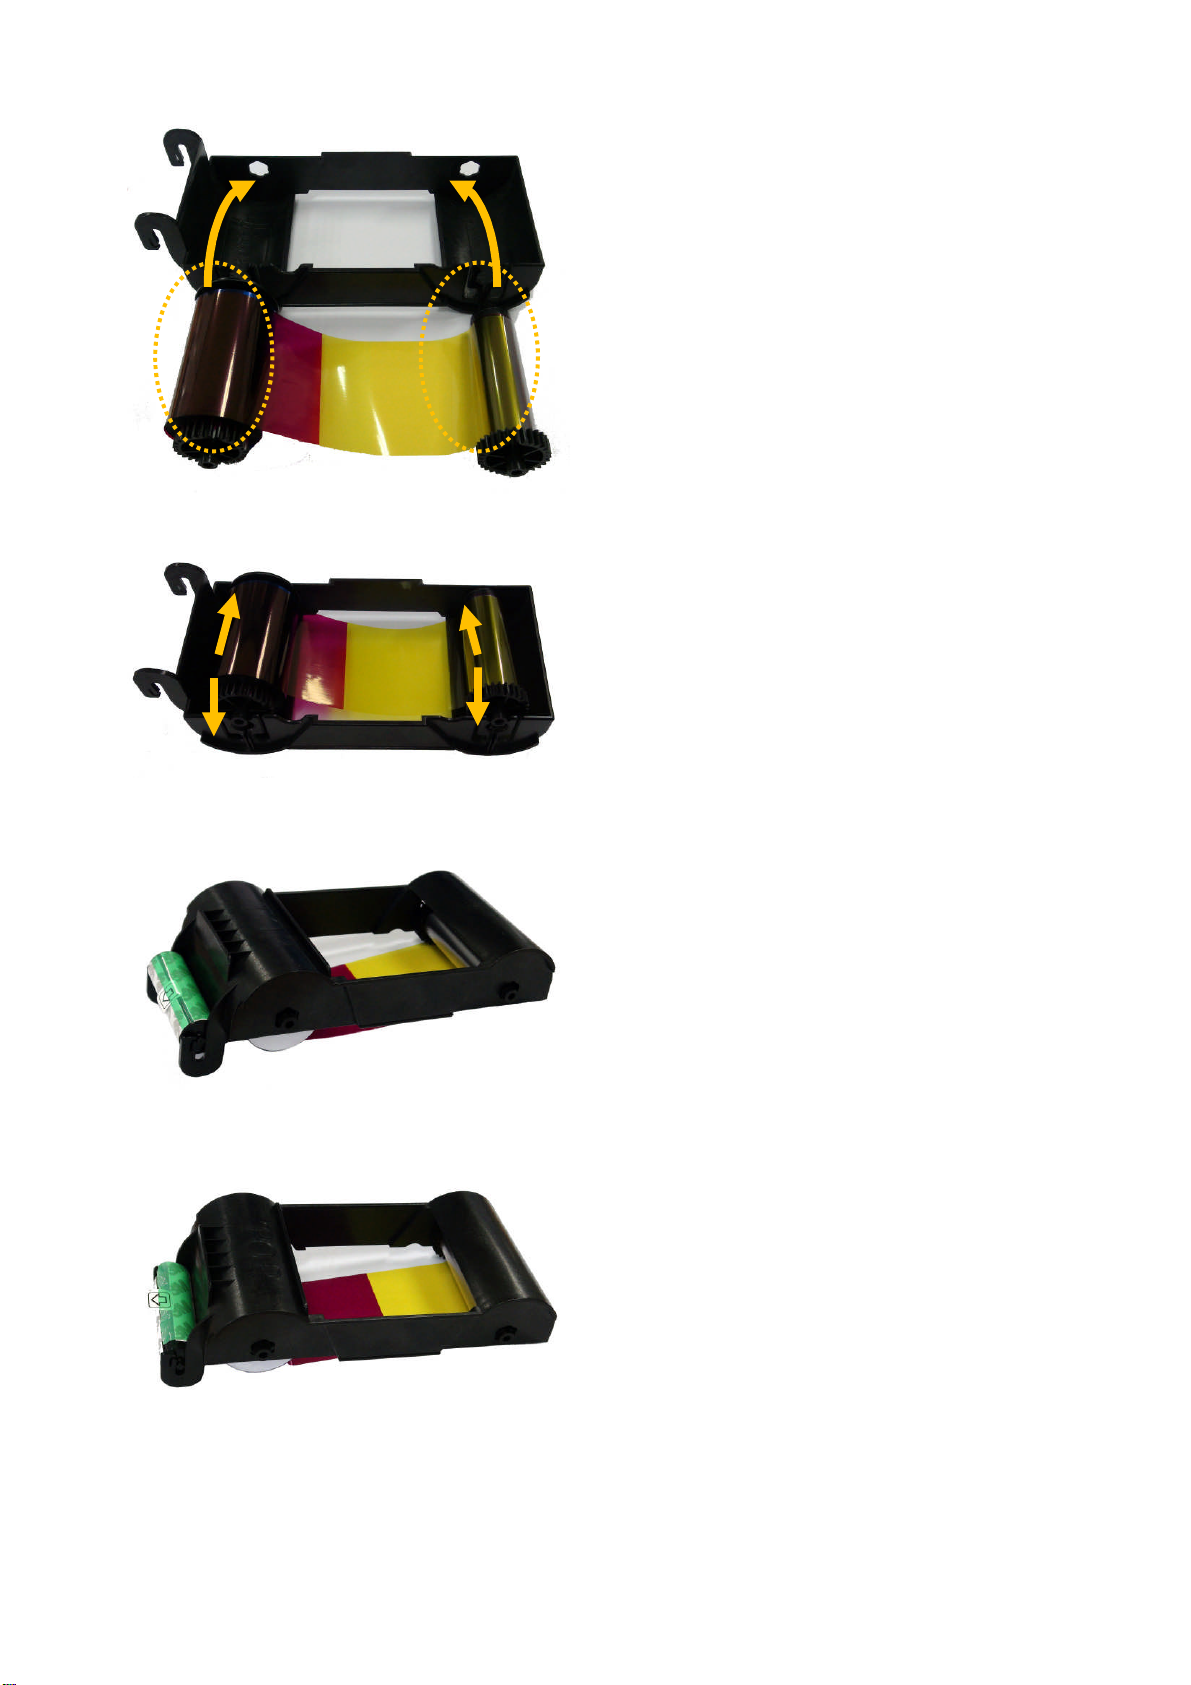
Pic.13 Loading the ribbon 1
Install a
bon into the ribbon
2.1.4.
rib
cartridge as left Pic. 13.
ཛ
ཛྷ
Pic.14 Loading the ribbon 2
Pic.15 Installing the cleaning roller
ཝ
ཞ
2.1.5. Insert the supply side of the ribbon
to no.1 hole and press the opposite
(no.2). Insert the take-up side of the
ribbon same method to no.3 and
no.4. After inserting, tighten the
ribbon.
(Caution! If the ribbon is not tightened, a
rolling up error might be happened.)
2.1.6. Install the disposable cleaning
roller to the ribbon cartridge.
Pic.16 Peeling the protective wrapper
2.1.7. Peel the protective wrapper from
the cleaning roller.
After removing the protective wrapper, the
cleaning roller should be kept clean from
fingerprints, dust and foreign substances to
avoid contamination because it is adhesive.
(Caution! Do not use without peeling off the
protective wrapper because the cleaning
roller cannot perform its function.)
X_
Pic.17 Installing the ribbon cartridge
r
2.1.8. Install the ribbon cartridge into the
printer after installing the ribbon
with a cleaning roller to the
cartridge.
2.1.9. Close the top cove
(If it is not closed properly, check the installation
state of the ribbon cartridge.)
Pic.18 Close Top Cover
X`
2.2. Loading the cards
This section shows how to load the plastic cards.
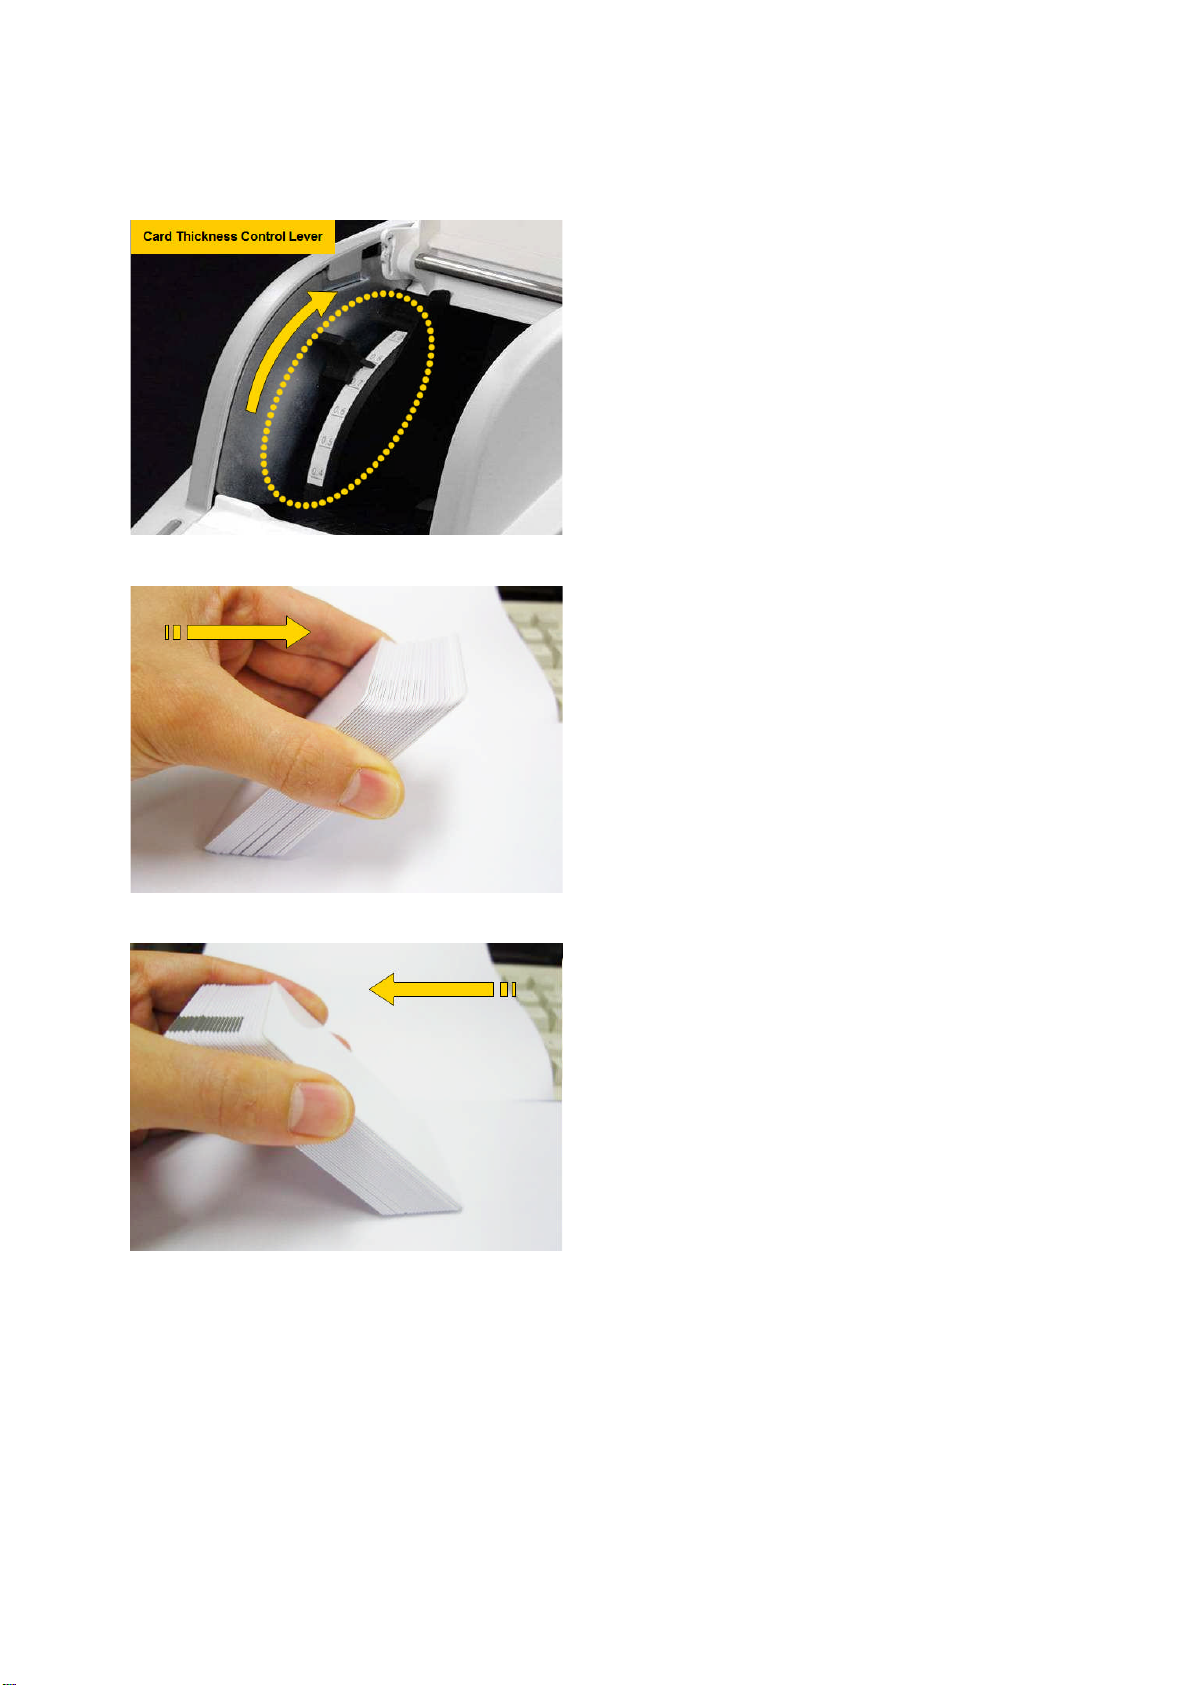
Pic.19 Adjusting the card thickness lever
2.2.1. Open the input hoppercover.
2.2.2. Adjust the card thickness with the
card thickness control lever.
(Caution! If the adjustment is not correct, it will
make some error. Use the type of cards in the
specification of this manual. Always keep the
card surface clean state.)
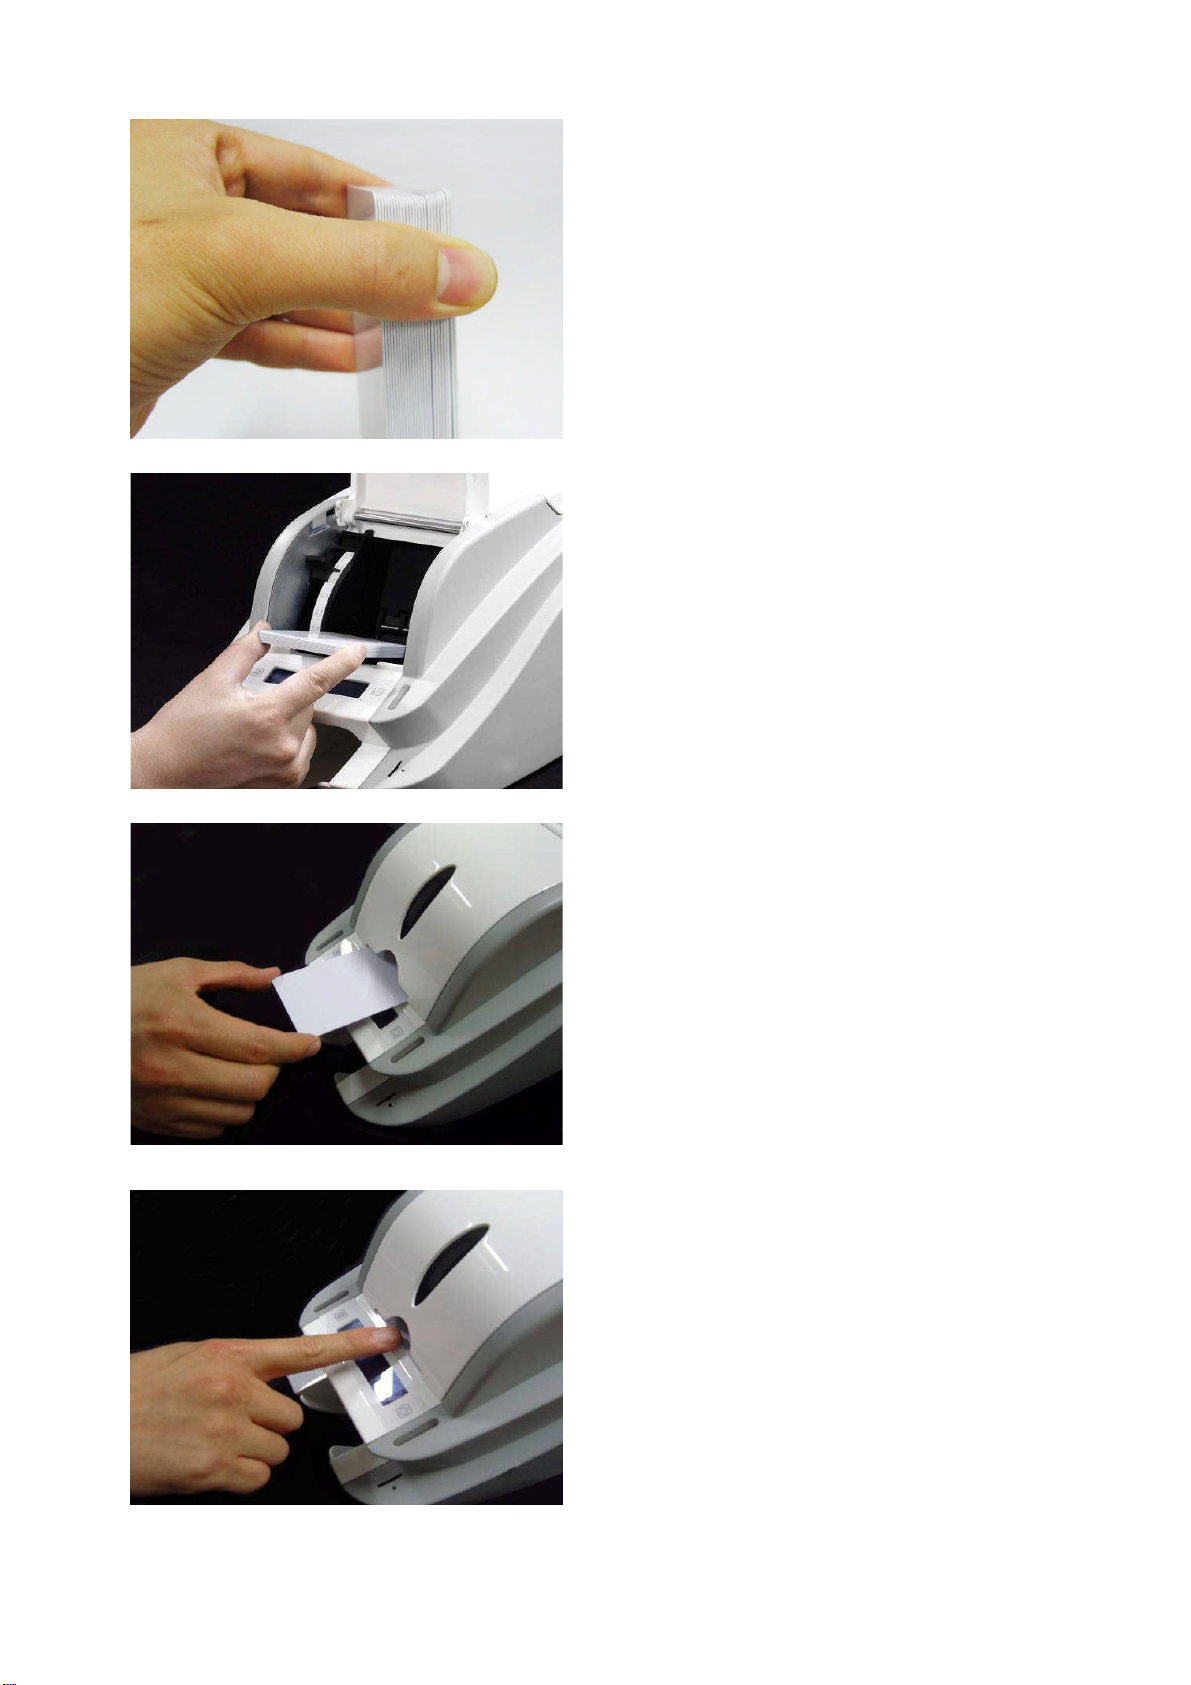
2.2.4. To separate cards from each other,
push a stack of c ards back and
forth to an angle about 45 degrees
vertically.
(Static charge makes cards stuck with
significant adhesive force. These cards must be
physically separated from each other before
inserted into the feeder. If not separated,
feeding or printing problems may occur.)
Pic.20 Preparing the card 1
Pic.21 Preparing the card 2
YW
Pic.22 Loading the cards 1
r
r
2.2.5. Stand the stack of cards vertically
after separating.
2.2.6. Load the cards on the input hoppe
properly and close the hoppe
cover.
Pic.23 Loading the cards 2
Pic.24 Loading the cards 3
2.2.7. When insert each one card, insert
the card to the end as the Pic. 24
and 25.
Pic.25 Loading the cards 4
YX

2.3. The withdrawal of printed cards.
Printed cards are passed out to the stacker of rear bottom side of SMART printer. SMART-30’s stacker
can be divided as following image.
Pic.26 SMART-30 Stacker
SMART-50’s stacker sticks out of the device so you can withdraw the printed
cards easily.
Pic.27 SMART-50 Stacker
YY

2.4. Driver installation (Windows XP, 2000, 2003)
STEP 1:
f
2.4.1. Insert the installation CD provided
with the printer.
2.4.2. Choose the language and click
“Driver Install”.
Pic.28 Install XP printer driver 1
2.4.3.
If the printer is connected to the PC
and turned on, turn off the power o
the printer.
Click “Next”. The existing installed
printer driver will be removed.
Pic.29 Install XP printer driver 2
Pic.30 Install XP printer driver 3
If the printer driver is already installed, it will
be removed automatically but it may take
times.
Choose the language as shown on the Pic.29
and 27.
Pic.31 Install XP print driver 4
YZ
Pic.32 Install XP print driver 5
.4.
r
2.4
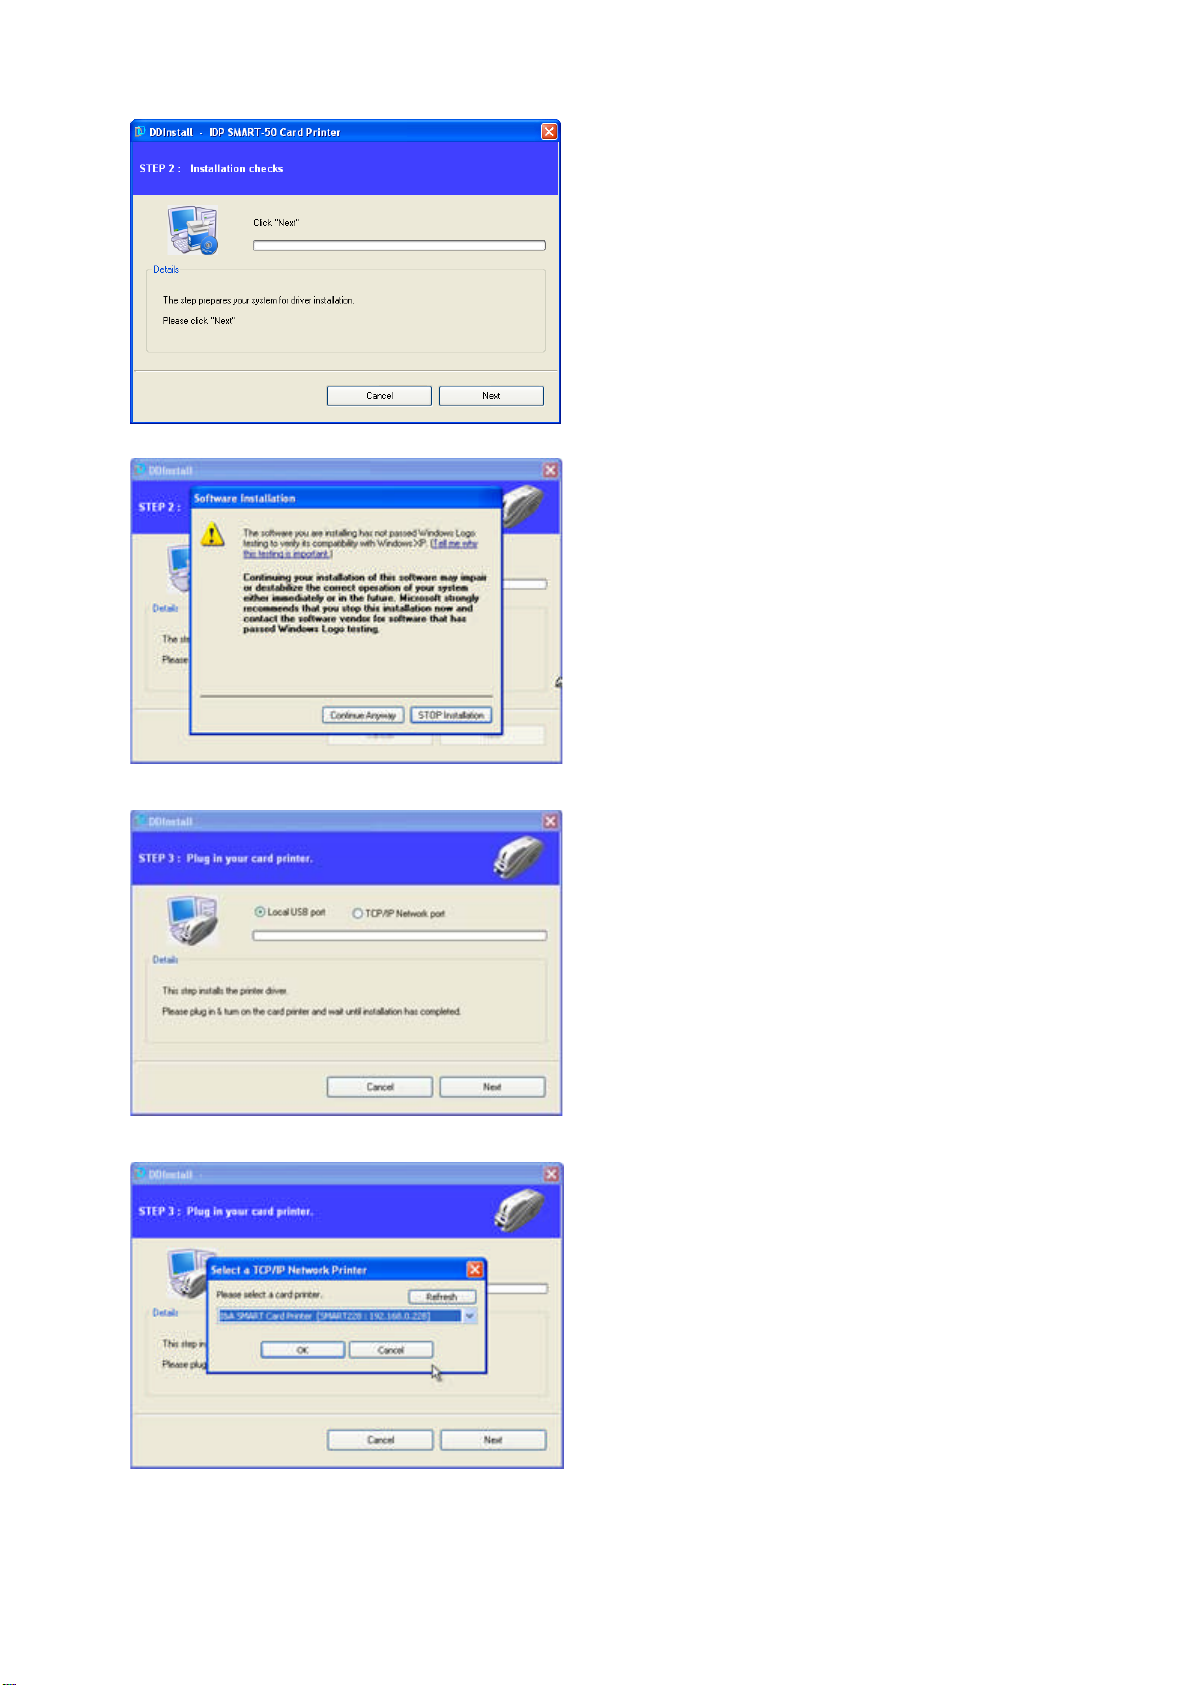
STEP 2:
Click “Next” to ready the
installation of the printer driver.
2.4.5. If there is a pop-up window for the
software installation, click
“Continue Anyway”.
Pic.33 Install XP print driver 6
Pic.34 Install XP printer driver 7
2.4.6. STEP 3:
Click “Next” to use USB port.
Click “TCP/IP Network port” to use
the printer as network printer and
choose the printer as shown on the
Pic.34.
(If there is no information on the window fo
the network printer list, it means that the
printer is not connected to the network. Check
“2.5 Network Printer” section.)
Pic.35 Install XP printer driver 8
Y[
Pic.36 Install XP printer driver 9
Please c
2.4.7. Please connect a power supplyto
the printer.
(For the network printer, refer to “2.5 Network
Printer” section.)
Pic.37 Install XP printer driver 10
2.4.8.
onnect USB cable provided
with the printer to PC and the
printer.
(For the network printer, refer to “2.5 Network
Printer” section.)
2.4.9. Turn on the printer to boot up it.
Pic.38 Install XP printer driver 11
Y\
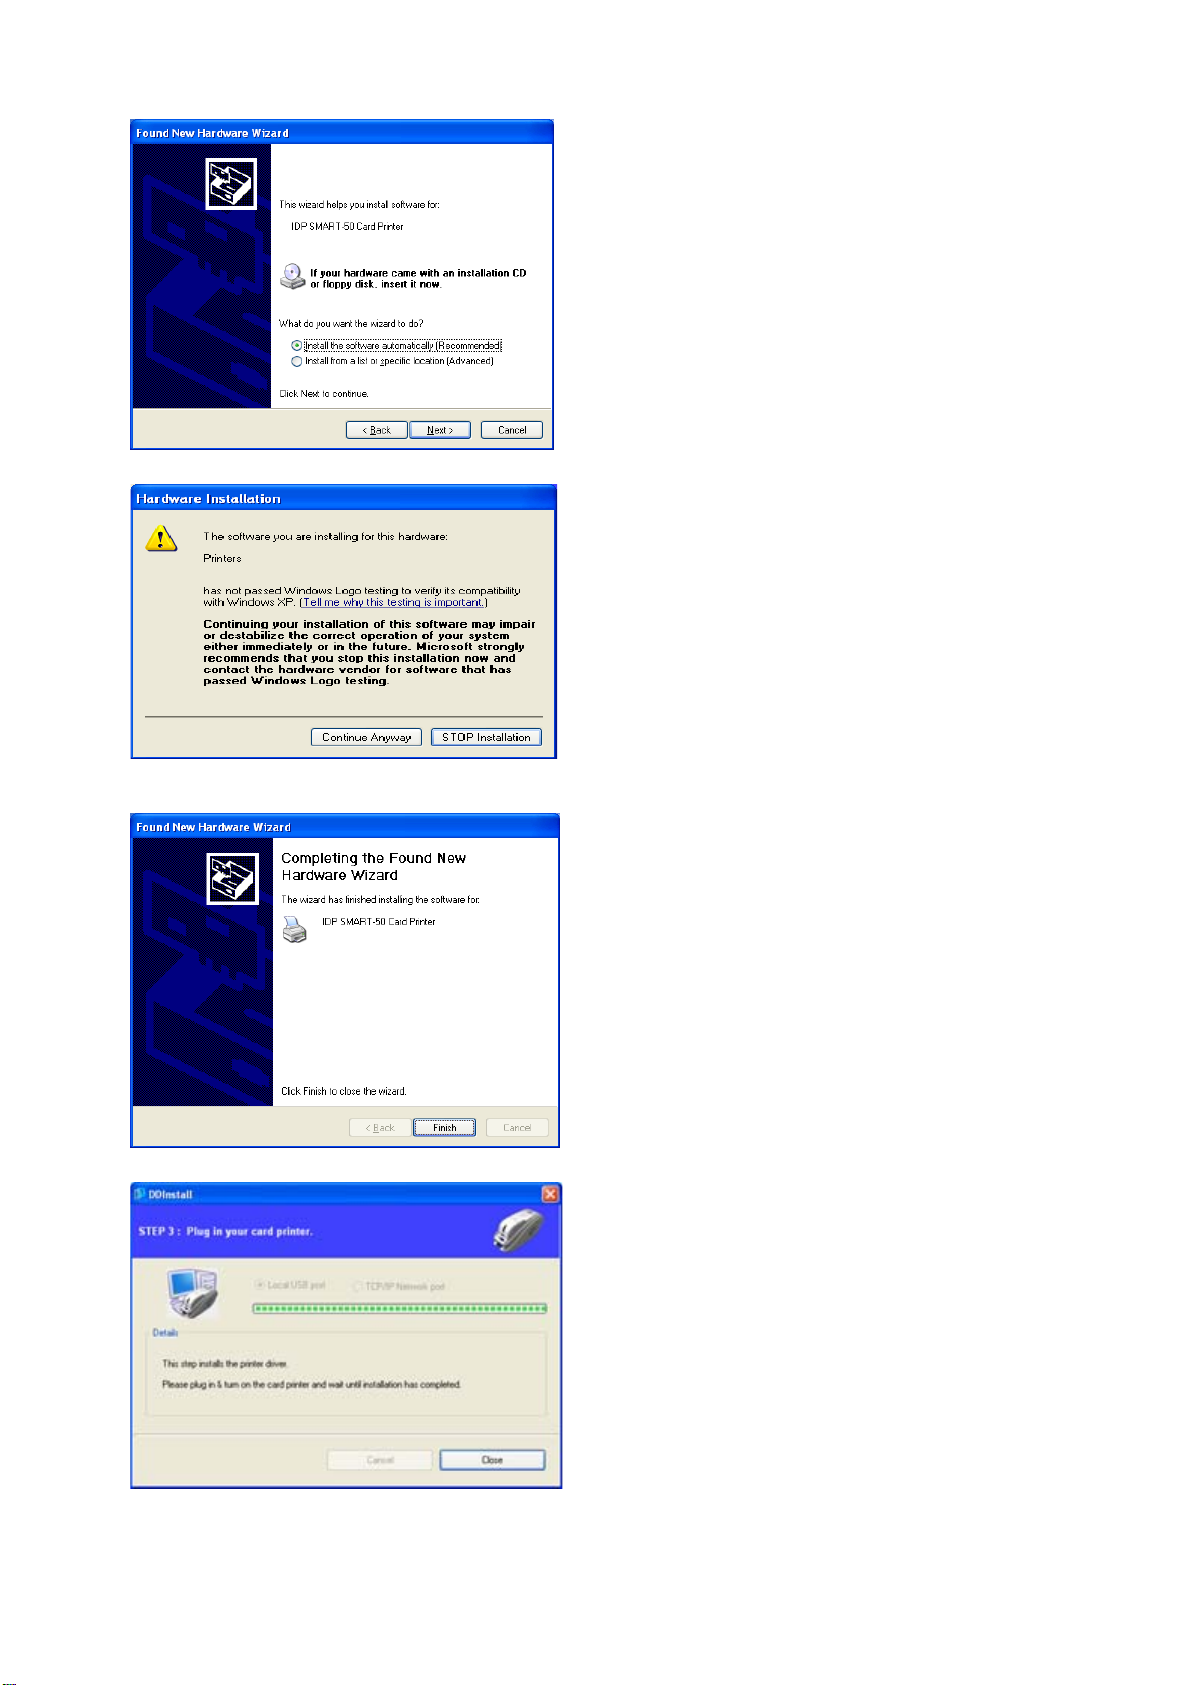
Pic.39 Install XP printer driver 12
Select
2.4.10.
“Install the software
automatically (Recommended)”and
click “Next”.
2.4.11. Click “Continue Anyway” in
Software Installation window.
Pic.40 Install XP printer driver 13
Pic.41 Install XP printer driver 14
2.4.12. Click “Finish” in Completing the
Found New Hardware Wizard
window.
2.4.13.When the printer driver installation
is completed. Click “Close”.
Pic.42 Install XP printer driver 15
Y]
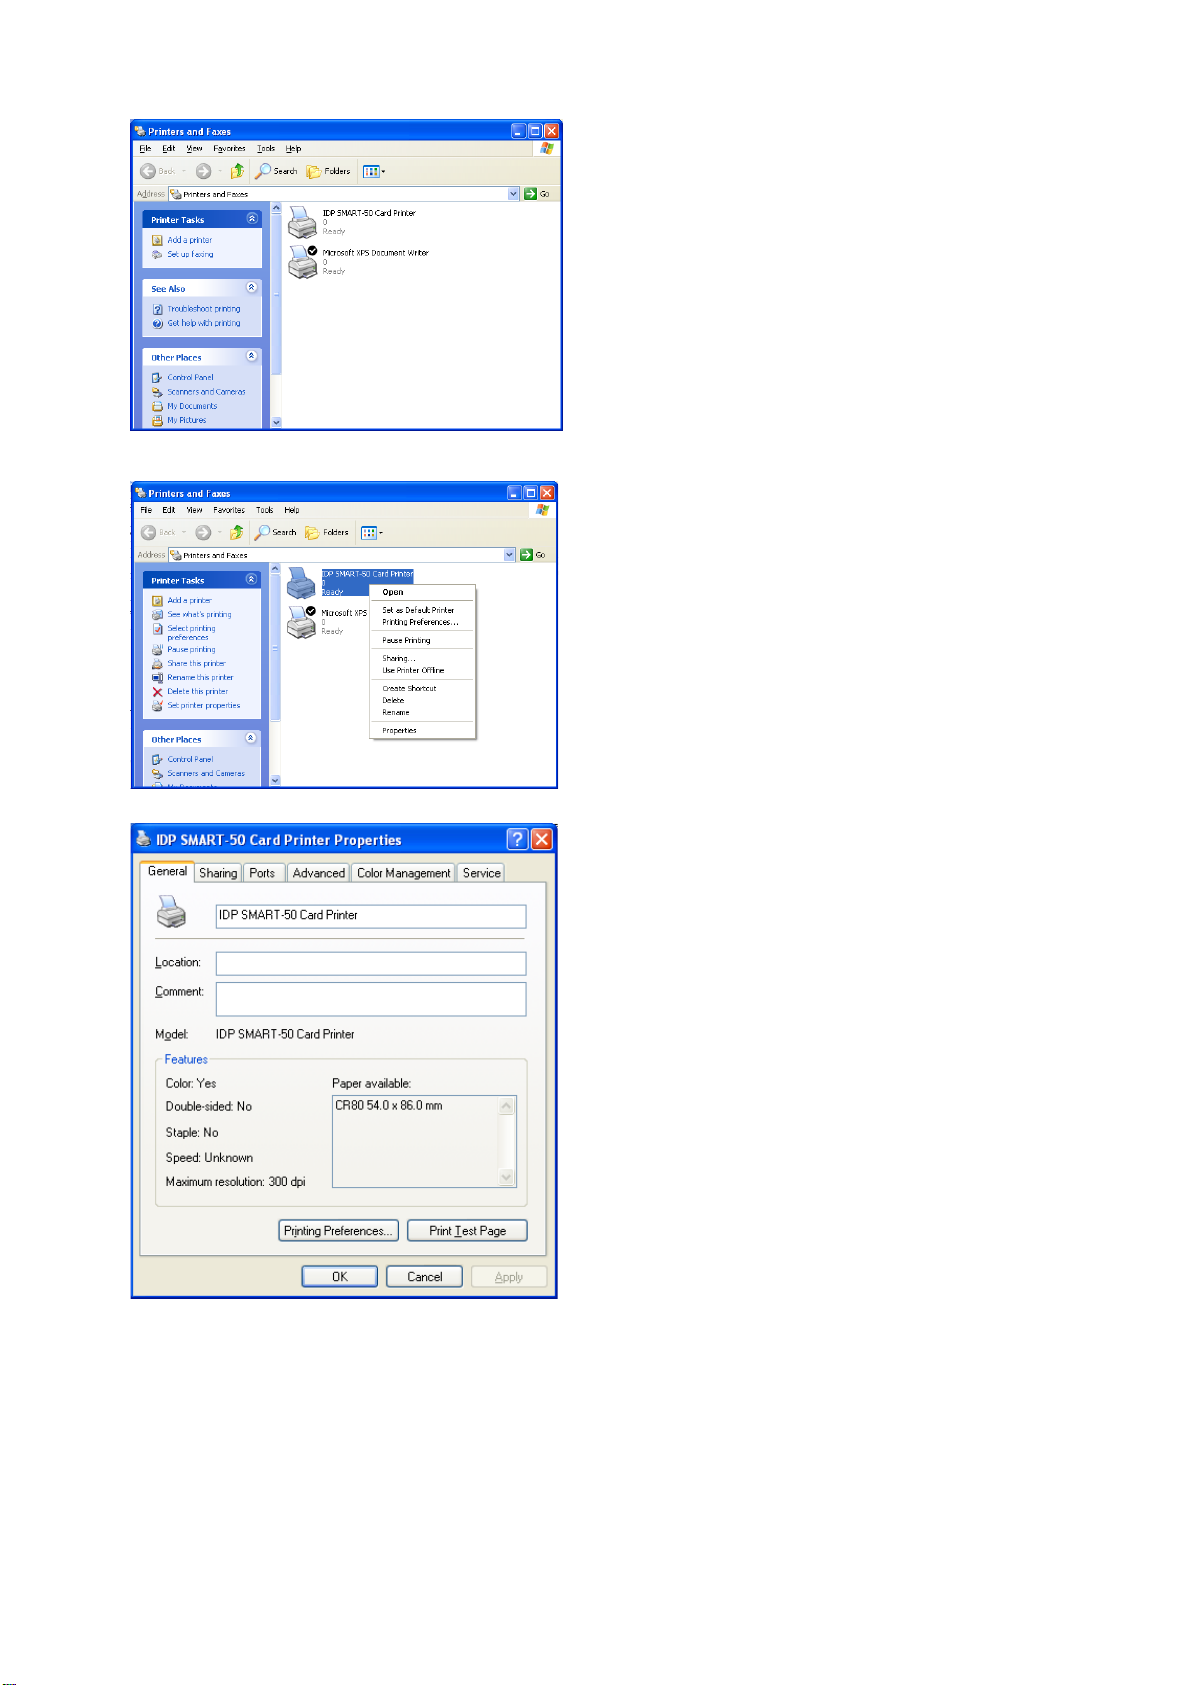
Pic.43 Install XP printer driver 16
Check “
2.4.14.
IDP SMART-50 Card
Printer” is generated in Printers
and Faxes window.
2.4.15. After selecting the icon of “IDP
SMART-50 Card Printer”, click the
right mouse button and select the
“Properties”.
Pic.44 Install XP printer driver 17
Pic.45 Install XP printer driver 18
2.4.16.Select “General” tap and click
“Print Test Page” button on the IDP
SMART-50 Card Printer Properties
window.
Y^

Pic.46 Install XP printer driver 19
r
r
InstallShield W izard”
2.4.17. Printer will start the printing and
there will be the window which asks
the printing success. If the printing
is normal, click the “OK”
(If the printing is abnormal or the printer erro
is occurred, remove the problem refer to
“Trouble Shooting” section and execute test
printing again.)
2.4.18. Please install “Smart Application”
program after installing the printe
driver.
Pic.47 Install XP printer driver 20
Pic.48 Install XP printer driver 21
2.4.19. Click “Next” on the “Smart
Applications window.
2.4.20. Select “I accept the terms of the
license agreement” and click
“Next”.
Pic.49 Install XP printer driver 22
Y_

Pic.50 Install XP printer driver 23
2.4.21. Choose the destination location
and click “Next”.
2.4.22. Click “Install” to begin the
installation.
Pic.51 Install XP printer driver 24
Pic.52 Install XP printer driver 25
2.4.23. Smart Design/DB program is
installed successfully.
Y`

2.5. Driver installation (Windows Vista, 7, 8)
.3.
STEP 1:
r
2.5.1. Please insert the installation CD.
2.5.2. Please choose language and click
“Driver Install”.
Pic.53 Install Win7 driver 1
Pic.54 Install Win7 driver 2
Pic.55 Install Win7 driver 3
2.5
2.5.4.
When “User Account Control”
window is opened, click “Yes”
Please turn off printer if it is
connected to PC. Please click
“Next”.
When you click “Next”, older drive
will be removed automatically.
This process will take several minutes to
remove older driver.
You can select the languages by selecting the
combo box as shown on the Pic.55.
Pic.56 Install Win7 driver 4
ZW

Pic.57 Install Win7 driver 5
.5.
r
r
.7.
r
Pic.58 Install Win7 driver 6
2.5
STEP 2:
When you click “Next”, the drive
installation will be ready.
2.5.6. Please click “Install this drive
software anyway” in case
“Windows Security” window comes
out.
Pic.59 Install Win7 driver 7
2.5
STEP 3:
Please click “Next” if printer is
connected to USB only.
If you want to install the driver for a
printer connected to network,
please select the “TCP/IP Network
port” and select the proper printe
as shown on the Pic.60.
(If no printer comes out on the window, please
check the connection. Please refer “2.5
Network Printer Setup”.)
Pic.60 Install Win7 driver 8
ZX

Pic.61 Install Win7 driver 9
Pic.62 Install Win7 driver 10
2.5.8. Please connect a power supply to
the printer.
(If your printer is for network, please refer “2.5
Network Configuration”.)
2.5.9. Please connect USB cable to the
printer.
(If your printer is for network, please refer “2.5
Network Configuration”.)
Pic.63 Install Win7 driver 11
Pic.64 Install Win7 driver 12
2.5.10. Please turn on the printer.
ZY

Pic.65 Install Win7 driver 13
2.5.11. When driver installation is
completed, please click “Close”.
2.5.12. Please open “Devices and
Printers” from “Hardware and
Sound”. Please check if “IDP
SMART-50 Card Printer” is created.
Pic.66 Install Win7 driver 14
Pic.67 Install Win7 driver 15
2.5.13. Please click the right mouse button
after cursor is placed on “IDP
SMART-50 Card Printer” icon. Click
“Printer properties”.
ZZ

Pic.68 Install Win7 driver 16
.14. Please select
f
2.5
“general” tab and
click “Printer test page” in “IDP
SMART-50 Card Printer Properties”
window.
2.5.15. Please check test card if it is
printed properly and click “Close” i
a card is printed properly.
(If card is not printed or error comes out,
please refer “Trouble Shooting”.)
Pic.69 Install Win7 driver 17
Pic.70 Install Win7 driver 18
2.5.16. Please install “Smart Design/DB”
by clicking “Smart Design/DB
Installation”.
2.5.17. Please click “Next” when “Smart
Application Install Shield Wizard”
comes out.
Pic.71 Install Win7 driver 19
Z[

Pic.72 Install Win7 driver 20
f
r
Finish
2.5.18. Please agree “Iaccept the terms o
the license agreement” and click
“Next”.
2.5.19. Please select directory fo
program installation and click
“Next”.
Pic.73 Install Win7 driver 21
Pic.74 Install Win7 driver 22
2.5.20. Please click “Installation”.
2.5.21. Please click “
”.
Pic.75 Install Win7 driver 23
Z\

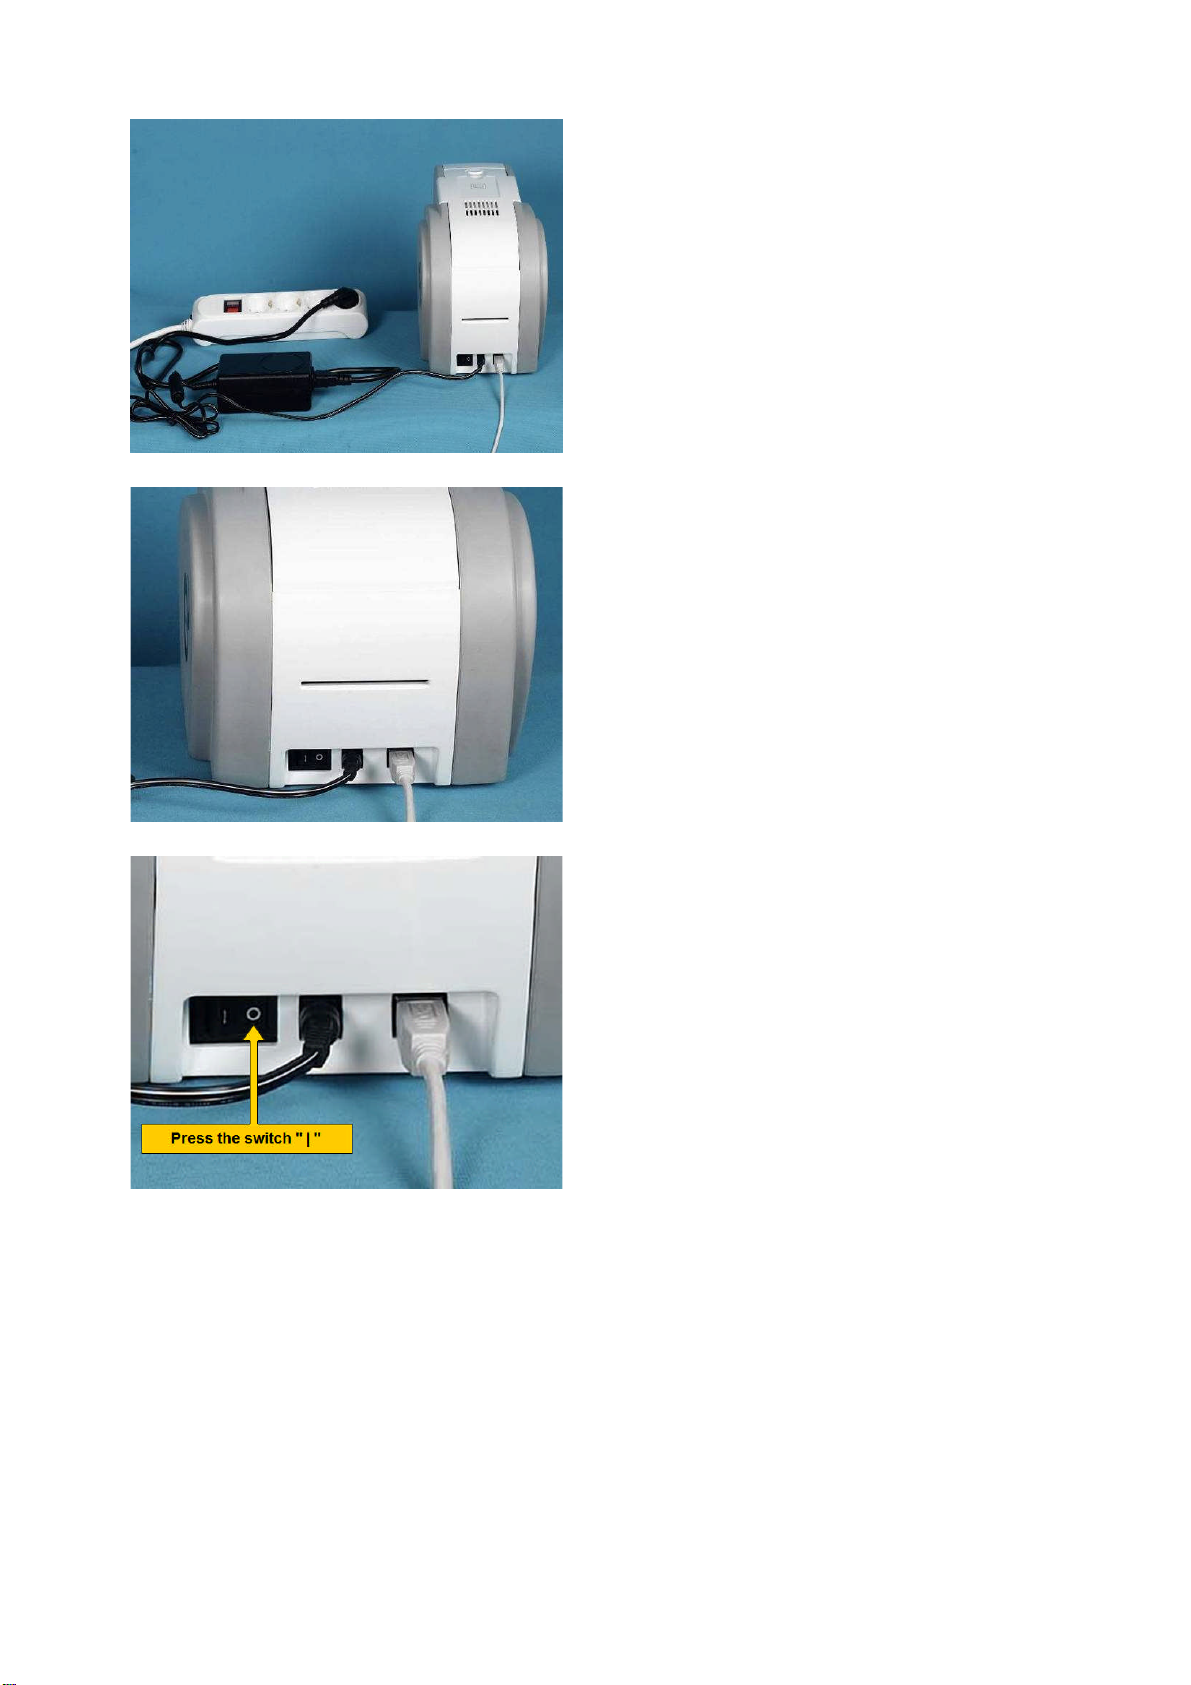
2.5. Network configuration
ct network
2.5.1 Connecting network port
¢£¤¥
The printer which installed with
network option has a port for network
connection as shown in the Pic.76 - ྛ.
ྙ Power Switch
ྚ Power Supply Connector
ྛ Network Port
ྜ USB Port
Pic.76 Rear view of SMART-50 printer 1
Please conne
to a printer.
(Network cable is not supplied. Please ask
network administrator for more questions.)
cable (RJ45)
Pic.77 Rear view of SMART-50 printer 2
Z]

2.5.2 Network configuration
r
DHCP (Dynamic Host Configuration Protocol) which automatically assigns IP address to the SMART-50
network printer on the same network is default for IP configuration. If you don’t have DHCP server, you
need to set static IP.
Please run NetAdmin.exe in the SMART-50 installation CD to set or change network configuration.
NetAdmin is run as the Pic74 afte
¢
turning on SMART-50 network printer.
£
¤
¥
ྙ Printer Connection Status
Searches local network, finds and shows
available network printer.
ྚ Network Module Management
Searches connected encoder on network
module. Reboots, Resets network module.
Firmware upgrade available
ྛ PrinterConfiguration
Sets detailed system configuration.
ྜ Network Information
Shows firmware version of network module
Pic.78 Running the NetAdmin
When no printer is connected to
network, there is no printer shown on
the box.
Pic.79 Network printer is not found
Please click “Refresh”. If no printer shown, please
check as below,
1. Please check the printer is turned on.
2. Please check network cable is connected to
network hub and works properly (LED lamp
blinking).
3. Please check if there is DHCP server in the
local network. When DHCP server is not in
your local network, you need to set Static IP.
4. If Static IP is used, please check the IP
configuration. If another device uses same IP
address, it doesn't work.
Z^

Pic.80 Connecting to USB port
If you are unable to find printer in local
network, please connect printer by
USB. You can setup network by USB.
When you click Refresh, you can find a printer
connected by USB as shown in the Pic.80.
z You don’t need to install device driver for
network configuration by USB. Please ignore
messages related to device installation.
z You can change values of “System
Management” only when you connect a printer
by USB. Please connect a printer by network to
use all of the functions of Netadmin.exe.
Please select a proper printer and click
“connect”. Please enter password and
click “OK”.
Pic.81 NetAdmin Log-in
Default password is “admin”.
Z_

Pic.82 Dynamic IP configuration
Static
If you setup network automatically,
please choose DHCP.
z Please select DHCP and click “Set
Configuration”.
z “DHCP”isdefaultforSMART-50printer.
z DHCP server should be in local network to use
DHCP function.
z Static IP is recommended. DHCP server
assigns IP address automatically but this IP
address is temporary, so the IP address may be
changed. In this case, the network error may
occur in connecting to SMART-50 network
printer.
Pic.83 Static IP configuration
Please select “
” for Static IP
configuration.
z Please enter values for “IP”, “Network Mask”,
and “Gateway”. Click “Set Configuration”.
z Please check IP address properly which does
not conflict with other devices.
z IfyouarenotawareofstaticIP,pleaseask
network administrator for Static IP.
z We recommend using Static IP because it is
more stable for using SMART-50 network
printer.
Z`

Pic.84 Network service configuration
f
r
You can change Service Configuration.
z SMART-50 network printer provides 3 kinds o
service (change “USB Spool”, “Network Spool”
and “Network SDK”). You can select and
change the service according to the need.
z In “Network SDK”, you can control the printer
and print a card well, and the printer supports
SSL (Secure Sockets Layer) and User
Authentication for security.
z Please use default and ask technician fo
details.
v j w U
Pic.85 OCP configuration
z {
vz
z j ˈ| vjwˉ
z ˈ | { l ˉ
U m S
zzs | hU
z w
UU
[W

Pic.86 Network user configuration
r
2.5.3 Network module management
You can add, change, delete User and
change its password.
z “admin” is administrator and you can’t delete
this account. Please don’t forget password fo
“admin”
z “Get User”: shows available users
z “Add User”: makes new user
z “Del User”: deletes selected user
z “Change Password”: changes password
Pic.87 USB port state
“USB port state” shows USB device
status connected on network module.
z Network module has 4 USB ports.
z Network module supports PC/SC. When you
install the encoders that support PC/SC on
network module, you can recognize the status
of encoders.
[X

Pic.88 Rebooting the network module
“Reboot
module” reboots network
module.
z Please click “Yes” when pop-up window comes
out for reboot.
z It takes 1 minute to reboot.
z Please click “Refresh” after reboot. When
proper printer shown, please connect printer by
clicking “Connect”.
“Reset to default” resets to default and
reboot network module.
Pic.89 Reset to default
z Please click “Yes” when pop-up window comes
out for reset.
z It takes 1 minute to reboot.
z Please click “Refresh” after reboot. When
proper printer shown, please connect printer by
clicking “Connect”.
[Y

Pic.90 Upgrading the firmware 1
“Upgrade firmware” enables to
upgrade firmware of network module.
z Youcanchooseafirmwarefile.
z Warning box will be shown during firmware
upgrade for network module.
z It is recommended not to do other work during
firmware upgrade for system reliability.
z Please do not turn off a printer until the
upgrade is completed.
Pic.91 Upgrading the firmware 2
[Z

Pic.92 Upgrading the firmware 3
z When firmware upgrade is completed, pop-up
comes out for reboot. Please click “Yes”.
z It takes 1 minute to reboot.
z Please click “Refresh” after reboot. When
proper printer shown, please connect printer by
clicking “Connect”.
[[

3. Driver configuration
3.1. Checking printer properties
To check printer properties, you need to open printer driver. Please open “Drivers
and Printers” and right-click “IDP SMART-50 Card Printer”. Click “Properties”. For
Windows 7 or 8, please click “Printer Properties”.
When you click “Printer Properties” as like
Pic.88, a device driver of “IDP SMART-50
Card Printer” is shown.
Pic.93 Printer properties 1
3.2. Changing printer properties
In the general tab shown as Pic.94, you can check the printer model and
specifications.
3.2.1. Printing Preferences
Please click “Printing Preferences” shown on the
bottom of Pic.95.
There are 3 tabs of “Layout”, “Paper/Ribbon /Quality”
and “Side/Media”.
(You can set the options for printing shown on
Pic.95.)
Pic.94 Printer properties 2
[\

Pic.95 Layout
3.2.1.1. Layout
- Y ou can select either horizontal or vertical printing
direction. To apply your selection, click “OK”.
[]

3.2.1.2. Advanced setup
r
Reset Default Values: Reset to default.
Color Correction: You can correct gamma fo
colors. You need to use CardPrinterSetup to adjust
color densities.
Resin Black (K) Processing: Set criteria for resin
black processing.
Text: to set density criteria for extracting black
objects
Dot: to set density criteria for extracting black dots
Threshold: to set density criteria on dithering
Dithering Degree: to set sharpness on dithering
Extra Controls :
Edge Size: to set not printed area in case of not
using Edge-To-Edge
Eject Card: tosetifejectacardafterprinting
Erase Density : to set erase density for
SMART-30 R Erase
Sharpening: to calibrate image sharpened
Flip Front: to set printed direction of image on
front side.
Flip Back: to set printed direction of image on
back side.
Pic.96 Advanced Setup
Magnetic Strip Encoding Method: to set magnetic
stripe encoding method for each track
Normal: to encode on LoCo Card forwards
Reverse: to encode on LoCo Card backwards
Bit: to encode on LoCo Card in Bit
HiCo Normal: to encode on HiCo Card forwards
HiCo Reverse: to encode on HiCo Card
backwards
HiCo Bit: to encode on HiCo Card in Bit
Magnetic Card Flip R/W: to set back side image
printing when magnetic encoding
Manual Magnetic Stripe encoding: to put in data on
magnetic stripe manually
Not Use: not to use magnetic stripe encoding
Encoding and Printing: to print after magnetic
stripe encoding
Encoding or Laminating only: encoding
magnetic or laminating. without printing
[^

Pic.97 Paper / Ribbon / Printing
z Supply Tray
Supply
Please select “CR-80” because SMART -50 has 1 input hopper.
Tray
Please select “Auto” because SMART-50 supports CR80 cards only.
z Ribbon
Ribbon
It shows the type of installed ribbon. You don’t need to select this option as SMART-50
recognizes ribbon automatically with RF Tag.
Resin
You can set the method to extract resin black when you use design programs. (If you use
Smart Design, you don’t need to select this option.) It will be set automatically.
Black Objects: to extract resin black automatically for text, line, box, circle, binary images,
etc.
Black Texts: to extract resin black for text only
Black Dots: to extract resin black for all of black
Not Use: not to extract resin black
Split
You can set the both sides (Front:YMCO, Back:K) to save color ribbon(YMCKO, HYMCKO,
BYMCKO).It is only activated while printing both sides option is set.
3.2.1.3. Paper / Ribbon / Printing
z Printing
Mode
Set printing mode
Standard: Default print mode. Prints all area of priniting
Partial: Partial print mode. It is printed partially for the print area only. Printing speed can
be faster than standard mode.
Speed
Set printing speed and quality.
Standard: Default print mode and best quality setting option of printing
High: Fast print mode. This option can be used with only K and KO ribbo. Printing quality
might be lower than Standard.
Color
You can select color or black&white print. (“Color” option is available only with color ribbon.)
Dither
There are 3 possible selections, Threshold, Random, and Diffusion Dither. It is performed
with K and KO ribbon only. (Please select “Diffusion Dither” for high quality.)
[_

Pic.98 Side / Media
50 to 50. The number is
3.2.1.4. Side/Media
To set printing side and printing mask.
- Print Side
You can select one side printing or both sides printing
(It is possible only when you have a flipper.)
- Front / Back
You can use a predefined mask or user defined mask
(white card, smartcard, Magnetic stripe card, etc.) on
front or back side.
You can define a mask. User defined mask uses
BITMAP file (1012 X 636 pixels).
Blue (RGB(0,0,255)): Print and Overlay
Pink (RGB(255,0,255)): Print only
Black (RGB(0,0,0)): Print, Overlay and Florescent
3.2.1.5. Laminator
This tap will be created only when SMART-50L printer
is connected to PC. In the case of normal SMART-50
Printer, this tap will be not displayed.
To set Laminator printing options.
- Laminator Side
You can select not use, top side, bottom side and
both sides printing
Pic.99 Laminator
- Overlay
You can select whether overlay prints or not.
Default setting is no overlay when laminating and we
recommend to use the default value.
- Position
You can set Laminating start position of width and the
values can be set from 1/300 inch.
- Temperature
You can set Laminating temperature and the values
canbesetfrom100 to 180.
- Laminating Only
You can skip printing and do laminating only by
setting a value in
Printer setup - Print preferences - Advanced Setup Encoding and Laminating - Set the value as
“Encoding and Laminating Only”
[`

3.3. Other settings
Pic.100 Printer sharing
3.3.1. Sharing
You can share a printer with Sharing tab via Network.
Default is “Not sharing”
3.3.2. Ports
Port tab shows which port is connected with SMART-
50. SMART-50 has connection with USB Virtual
printer port as Pic.101 because SMART-50 uses USB
connected to PC.
(Caution! This port is selected automatically . It is
recommended to maintain default.)
Pic.101 Ports
\W

Pic.102 Advanced
3.3.3.
f
Advanced
It is available for Working Time setting, Priority order,
Spool print etc. in “Advanced” tab. “Advanced” setting
follows MS Windows standard. If you want to change
the setting, please refer to the Window manual.
(It is recommended to maintain default.)
3.3.4. Color Management
In “Color management” tab, you can select color
management profile fit to the printer.
SMART-50 uses color profile to express optimal color.
The driver selects color profile automatically to fit
each ribbon.
(It is recommended to maintain default.)
Pic.103 Color Management
Pic.104 Service
3.3.5. Service
You can recognize printer serial, printer ID, driver
version, firmware version, type of ribbon & balance
and printer’s status.
You can print the “technical support sheet” on a card
to check printer’s setup value.
To clean printer, please insert a cleaning card in a
hopper and click “Clean Printer”. For further details,
please refer “6.1. Cleaning Printer”.
Please refer “4.2.6 Printer Status” for numbers o
“Printer Status” and “Printer error”
\X

Pic.105 Laminator
r
3.3.6. Laminato
This tap will be shown only when SMART-50L printer
is connected to PC. You can recognize laminator
film’s type, balance, laminator’s version, serial
number status.
\Y

4. Utilities
4.1. Card Printer Setup
SMART-50 is produced with optimized setting. You need to adjust setting value if required or spare parts
are replaced using CardPrinterSetup in our Installation CD. You can adjust following settings with
CardPrinterSetup.
4.1.1. Run CardPrinterSetup
Passwordinputwindowisdisplayedwhenyourun
this program. If you input the correct password, the
recorded setup value will be shown and you can
change values. The password is saved to SMART-50
printer. If you use another PC with same printer,
previous password is required to run this program.
(Default password is none. Please press OK if you
have not set password.)
Pic.106 CardPrinterSetup Log-in
Pic.107 CardPrinterSetup start
When you are successful to log-in, you can set values
shown as Pic.107.
\Z

4.1.2. Card Printer
4.1.2.1. Basic Setup
ᐭ
ᐯ
ᐰ
ᐱ
ᐴ
ᐲ
ᐳ
ᐮ
ᐵ
ᐶ
Pic.108 CardPrinterSetup – Card Printer Basic Setup
ྙ To show connected printers
Device: You can select a printer using pull-down menu. “IDP SMART-50 Card Printer” is a
name of printer. “SMART228” is printer ID, “USB001” is connected port.
ྚ To set administrator password and user password.
Change Root PW: To set administrator (root) password. This password is used to verify
user authority for CardPrinterSetup and User Authentication. Also it is required for User
password management. (Please set password for security use.)
Change User PW: To set user password for User Authentication.
ྛ Click “Card Printer” tap.(If laminator is installed, you can setup laminator setting value by
“Laminator” tap.
ྜ To show firmware version, serial number of printer and serial number, resistor & type of print
head.
ྜྷ To show print area. It shows
exaggeratingly for user convenience.
\[

ྞ To set print area. Please set it properly to print on an entire card because SMART-50 is a
direct thermal card printer. When you click “ྟ Print”, a card is printed as like “ྜ example”.
Please set values properly that all circles of each corner are printed and blank spaces are
0.4mm ~ 0.5mm in the top and the bottom of a card. Please set values by following order.
XStartPosition:Please set right and left properly by adjusting X position.
YStartPosition:Please set the start position of printed example image and blank space in
the top is 0.4mm ~ 0.5mm.
YEndPosition:Please set the end position of printed example image and blank space in
the bottom is 0.4mm ~ 0.5mm. It is recommended to set bigger value for “Y scale” than
default.
YScale:Please set to show circles in the bottom.
ྟ To set density. SMART-50 enables to set different density for each color, resin black and
overlay. So, please set each density for high quality. Please optimize the quality by
adjusting each value. To optimize, you repeatedly adjust the density and print a Calibration
card and check the print state until you get the optimum.
If your printer is SMART-30 R model, please do not install ribbon. You can set density
with Rewritable cards. Please adjust total density only.
Total Density: To set all of the density (Color, Black and Overlay) at one time.
If your printer is SMART-30 R model, when the density is too strong, you will have
darker background color. (Background color may vary depending on card type.)
When density is proper, texts and images are printed clearly and there is no
background color. When density is too low, texts and images are printed dull.
Pic.109 SMART-30 R density
YMC Density: To set color density. Please maximize YMC density as you can, which
enables to express range of color and vivid images. If it is too strong, green or red marks
are appeared. If it is too weak, the print quality will be dull. (Please refer Pic.109.)
\\

Pic.110 Color density
Black Density: To set resin black density. In Pic.111, barcode is printed to express density .
When density is too strong, barcode is printed too thick. When density is too weak, barcode
is too thin. Please adjust resin black density to express clear barcode. Please refer
following pictures.
Pic.111 Resin Black density
Overlay Density: To set overlay density. Please set it when overlay is printed on surface
regularly. If it is too strong, it is hazy and marks are appeared. If it is too weak, overlay panel
is not printed edge areas. You can check it with printed card under the light.
Pic.112 Overlay density
ྠ To print calibration card.
ྡ To show advanced Setup.
(It is recommended not to set advanced setup.)
ྡྷ To load or save values.
Get Config.: to get values from current printer
\]

Set Config. : to set values to current printer
Load from File: to load values from file
Save to File : to save values to file
Load Default : to load default. Please adjust values again after load default.
Close : to close CardPrinterSetup
\^

4.1.2.2. Advanced Setup
You can set more values.
ᐭ
ᐮ
ᐯ
ᐰ
ᐱ
ᐲ
Pic.113 CardPrinterSetup – Card Printer Advanced Setup
ྙ You can set Printer ID, PC serial, Print head and Magnetic encryption key.
Change Printer ID: When SMART-50 is used by SDK, you can set unique ID for SMART-50
printer regardless of whether it is connected by USB or what IP address is. It is useful to
connect and use several printers. Default is “SMART-50”.
Set PC Serial: One of security function. You can use a printer with specific PC.
It is activated when you click “Set PC Serial” after “PC Authentication”ofྞ is ticked and
rebooted. At that time, the specific information of used PC is saved to SMART-50 printer.
Change Head: When you replace thermal print head, you must change head information for
optimal quality. Please change head serial number, resistor and type of head in the Change
Head Dialog window after click “Change Head”.
Set Mag. Encrypt Key: One of security function. When you use SDK, you can encrypt
magnetic stripe encoding data transmitted by USB. You can define and save the encryption key
to SMART-50 using “Set Mag. Encrypt Key”.
ྚ To show how many cards are issued with SMART-50 printer. “Total Issue Count” is the number
of issued cards from factory shipment, “User Issue Count” is the number of issued cards from
replacing head. When you replace a head, please initialize the number by ticking “Reset User
Issue Count”.
ྛ To show color and motor management. SMART-50 recognizes ribbon color automatically and
controls motor by ribbon remaining. “Yellow Level”, “Magenta Level”, “Cyan Level”, “Black Level”
are default value for ribbon and user does not change values. “RMP+”, “RMP-“, “RMM+”, “RMM“ are necessary variables to control ribbon motor. Please do not change values for them as it
affects card quality.
ྜ SMART-50D is made by attaching a flipper in SMART-50, so you need to adjust it to be tuned in
the horizontal. “Rotate Top” is a value when the card of top side is in line. “Rotate Bottom” is a
valuewhencardofbottomsideisinline.Pleaseclick“AutoRotatorSet”whenerrorisoccurred
during a card moved to or from a flipper.
\_

ྜྷ Please refer as below for other values.
Reserved: Not used
Warming Up Display: If you use SMART-30 R, LED buttons are blinked during print head is
warming up. You can adjust the timing of LED blinking by adjusting values of “Warming Up
Display”. It becomes faster as the value is smaller.
Mag. Write Mode: You can order the way how to encode magnetic stripe.
“L:A, H:I”: encodes 3 tracks at once for LoCo card and encodes at twice by dividing 1,3 and 2
track for HiCo cards.
Magnetic Space: The distance of magnetic stripe when you encode.
SBS Only: Please enable it when you issue cards with software programed by SDK. This option
disables printer device driver.
Board Type: to choose they type of mainboard. Please do not change it.
Security: There are several ways to set a security function for SMART-50.
PC Authentication: You can use a printer with specific PC. It is activated when you click “Set
PC Serial”.
Physical Key: You can set this option when physical key is installed.
User/Root Authentication: You can set passwords for User and Administrator.
Use USB Serial: When SMART-50 is connected to USB, it transmits the USB serial number to
PC. Default is the same number used by all SMART-50. Please set this option when you use
multiple SMART-50 printers connected to 1 PC via USB. It enables unique serial numbers for
each USB.
Ribbon Position: To set the ribbon position on card. Please set it default.
Warming Up Temp.: To control the temperature of warming up before printing. For SMART-30
R,youneedtowarmupprintheadtoprinthighquality.Werecommendwarmingupto50
degrees.
Card Out Delay: To set timing of hopper motor for ejecting card. Please set it default.
Card Out: to set the way to eject cards.
Error Card Out: to set the way to eject error cards.
DCL Mode: When you use SDK and print cards with DCL mode, you don’t need to install printer
device driver.
Dump Mode: It records log data.
\`

4.1.3. Laminator
4.1.3.1. Basic Setup
ᐭ
ᐮ
ᐯ
ᐰ
ᐱ
ᐳ
Pic.114 CardPrinterSetup – Laminator Basic Setup
ྙ The combo box shows connected printers
ྚ Click Laminator Tap.
ᐲ
ྛ It shows the information of installed laminator such as firm-ware version, serial number.
If you click “Change Serial No.” button, you can change serial number.
ྜ The fields show laminator film’s type, balance, code and laminator code.
Film Type : It shows installed film’s type and vendor code.
Film Remain : It shows installed film’s total number and balance.
Laminator Code : It shows Laminator’s code, vendor and local code.
Film Code : It shows installed film code, vendor and local code.
ྜྷ You can change the values according to the installed film type.
]W

Heater Temperature : It is for laminating temperature.
Laminating PPS : Laminating speed.
Laminating Move Pulse : The distance of laminating movement.
Separation with Card : After laminating and removing film, the value changes the
distance of card movement
Separation with Film : After laminating and removing film, the value changes the
Distance of film movement.
Lami. Start Card Pos : The value is for laminating start position.
Torque Laminating Max : Maximum torque of motor while laminating.
Torque Laminating Min : Minimum torque of motor while laminating.
Laminating with Pulse : The value is for change laminating width.
Film Attribution : It changes film attribution.
ྞ It shows “Advanced Setup” window.
ྟ “Save” or “Load” the values.
Get Config : Read the values from connected printer.
Set Config. : Set the values to connected printer.
Load from File : Load the values from saved file.
Save to File : Save the values into a file.
Close : Close the program.
4.1.3.2. Advanced Setup
ᐭ
ᐮ
ᐯ
Pic.115 CardPrinterSetup – Laminator Advanced Setup
ྙ It shows total laminating count.
]X

ྚ The values are for setting motor torque of film movement.
TorqueMove Max : Change Maximum motor torque
TorqueMove Min : Change Minimum motor torque
ྛ The values are for setting motor torque of laminating.
You can set the values of each section.
ྜ You can set “Head” temperature of laminating.
You can set the values of each section.
ྜྷ Rotator position
]Y

4.2. Card Printer Test
Basically Card Printer use standard printer device so you can be used same as general paper printer.
In the case of magnetic stripe, contact, contactless encoder option, you will need to install appropriate
driver and operate individually. Encoding operation will be controlled by “CARD PRINTER SDK”. You
can test all feature of printer by Card printer Test. Card Printer Test program is developed by using
“SMART Printer SDK”
4.2.1. CardPrinterTest
When CardPrinterTest is run, all function can be tested individually.
ᐭ
ᐮ
ᐯ
ᐰ
ᐱ ᐲ
ᐳ
Pic.116 CardPrinterTest
ྙ Select Printer: select printer to test. In the Pic.116, “IDP SMART-50 Card Printer” is the
Printer name, SMART228 is the Printer ID, and USB001 is the connected port.
ྚ Control : To execute each step to test
ྛ Print: Print test with CSD file which is designed by Smart Design program.
ྜ Batch Start: Repeat selected encoding test by “ྜྷ Encoding”
ྜྷ Encoding: Encode Magnetic Stripe, Contact Card, Contactless Card
ྞ Printer Status: Check printer status.
ྟ Message: Description of status by log.
]Z

4.2.2 Select printer and control
When you execute CardPrinterTest, it will search connected printers by USB and Network
automatically and SMART-50 printer connected to USB has higher priority. Other printers could be
selected by pull-down menu. You can test all function with connected printer.
. Control is consisted by SBS(Step by Step), Move, Rotate, Etc. section and you can control printer by
each step.
z SBS
SBS is to operate SMART-50 printer in SBS(Step-By-Step) mode which you can control the
printer using commands. In SBS mode, after printing data transmission, printing a card will be
run only by clicking “DoPrint”. It is the main difference between NORMAL mode and SBS mode.
When you click “Start”, SMART-50 is operated in SBS mode, and existing spooled data will be
eliminated. To exit SBS mode, click “Stop”.
z Card
Card is to bring a card into printer and eject a card. “In” is to move a card from input hopper to
printer and “Out” is to move a card from printer to output hopper. In case the flipper is installed,
“Back” ejects a card to the back side.
z Move
Move is to move a card to specific position in the inside of printer. “Print” is to move a card to
the printing position, and “Mag.” is to the magnetic encoding position, and “IC” is to the contact
smartcard encoding position, and “RF” is to the contactless smartcard encoding position. “To
Rotator” is to move a card from printer to flipper and “From Rotator” is to move a card from
flipper to printer. “from In” is to move a card from the card in sensor to where you define
position, and “from Out” is to move a card from the card out sensor to where you define position.
z Rotate
Rotator is to flip over a card in the printer installed flipper. “Auto” is to move a card from printer
to flipper and flip over a card and move a card to the printing position automatically. “Batch” is
to repeat “Auto” as many times as the number of set. “To Bottom” is to turn to the backside of
card and “To Top” is to turn to the front side of card.
z Etc
“Cleaning Roller” is to clean the roller by cleaning card automatically. “Use Log” is to display log
in message space.
4.2.3 Print
Print can be done through the CSD file which is designed by Smart Design program. Following the
steps in this section.
1. Click “…” button and select the CSD file.
2. Click “Open” button to prepare CSD file to print.
3. Click “Print” Button to move print data to spool. In the NORMAL mode, Click “Print” button to
print a card, but in the SBS mode, “Print” button to transmit a printing data from PC to printer
and wait for printing. Therefore, you must click “DoPrint” to print in SBS mode. This function is
for detail control of printer.
4. Click “Close” button to close CSD file.
4.2.4. Batch
Batch is to repeat encoding/decoding test continuously. In the Repeat, you input the number of repeat
and click “Batch Start”, then the test is run as many times as the number of set. When you check
“Include Card In/Out”, each time the printer bring a card from input hopper and perform an encoding
][

test and eject the card. But if not, encoding test will be done only by one card. At that time, if there is no
card in the printer, the printer bring a card into the printer from input hopper and repeat the encoding test
on the card, and if there is a card in the printer, the encoding test is performed on the card repeatedly.
“Card Holding” is activated when “Include Card In/Out” is ticked. When “Card Holding” is ticked and the
repeat number is set, the printer repeats the encoding test as many times as the number of set in the
“Card Holding” without ejection. When it is completed, the printer ejects the card and brings a new card
into the printer and starts testing.
In the Setting, “Retry” is to retry the encoding test when the error occurred. “Prompt on Error”isto
display Pop up Message when the error occurred. If not, Error number will be counted without message.
The number of error is displayed at Error section.
4.2.5. Encoding
Magnetic: Magnet Stripe Encoding
“Read” is to read and display the data from magnetic stripe card. It is composed of “Do Read”
and “Read All Buffer” and runs “Do Read” and “Read All Buffer” sequentially.
“Do Read” is to read the data from magnetic stripe card and store the data in the buffer.
“Read All Buffer” is to transmit the date stored in the buffer to PC. If the track number is ticked,
the data of the ticked track is only transmitted to PC.
“Write” is to write the data to the magnetic stripe. It is composed of “Write All Buffer” and “Do
Write” and runs “Write All Buffer” and “Do Write” sequentially.
“Write All Buffer” is to transmit the data to the buffer.
“Do Write” is to write the data stored in the buffer to the magnetic stripe of card. You can
choose the magnetic foil type (LoCo or HiCo) and the track of magnetic stripe. “Random Fill” is
to create a random magnetic encoding data for testing.
Batch process repeats the following steps sequentially, Card “IN” Æ Move “Mag” Æ Magnetic
“Random Fill” Æ Magnetic “Write” Æ Magnetic “Read” Æ Card “OUT”.
Pic.117 Magnetic stripe encoding
IC(PC/SC) : Contact Smartcard Encoding
In SMART-30 printer, a contact smartcard encoder can be installed and SMART-50 printer
supports the contact smartcard encoder in the printer inside and the SIM encoder on the right of
front side. “IC(PC/SC)” is to test a contact smartcard and SIM encoding.
“Batch” is applied only to the contact smartcard encoding because SIM encoder is installed
outside and can’t move a card automatically.
“ICH Contact” is to bring the encoder head into contact with the IC chip of smartcard physically.
]\

“ICH Discontact” is to separate the encoder head from the IC chip of smartcard physically.
“Init” is to recognize and display the installed contact smartcard reader. The recognized
encoder will be displayed at the pull down control.
“Contact” is to contact with the smartcard electrically and initialize.
“Reset” is to finish the function electrically. After “Contact”, you can run “Get ATR”, “Read”,
“Write” and “Clear”.
“Get ATR” is to read the ATR data.
“Read” and “Write” are to read and write the defined data (Name, Address and Phone). These
could not be applied to all cards.
“Clear” is to clear the displayed data (ATR, Name, Address and Phone).
In case the data is read and written using APDU, Read/Write can be done by APDU commands.
“Load APDU” is to read the stored APDU commands.
“Save APDU” is to save the displayed APDU commands.
“Clear APDU” is to clear the APDU section.
“Send APDU” is to run the APDU commands.
Batch process repeats the following steps sequentially, Card “IN” Æ Move “IC” Æ IC “ICH
Contact” Æ IC “Init” Æ IC “Contact” Æ IC “Reset” Æ IC “ICH Dis-contact” Æ Card “OUT”.
Pic.118 Contact smartcard encoding
RF(PC/SC) : Contactless Smartcard Encoding
In SMART-30 printer, a contactless smartcard encoder can be installed and SMART-50 printer
has the internal and external contactless smartcard encoder. RF(PC/SC) is to read and write the
contactless smartcard. Using internal encoder, the printer brings a card into the printer from input
hopper and encodes a smartcard. Using external encoder, after putting a card on the top cover,
you can encode because the antenna installed under the top cover is used. Therefore, “Batch” is
applied only to the internal contactless smartcard encoding.
“Contact” is to contact with the contactless smartcard electrically and initialize.
“Reset” is to finish the function electrically. After “Contact”, you can run “Read”, “Write” and
“Clear”.
“Get UID” is for getting Chip Serial Number(CSN)
“Read” and “Write” are to read and write the defined data (Name, Address and Phone). These
could not be applied to all cards.
]]

“Clear” is to clear the displayed data (ATR, Name, Address and Phone).
In case the data is read and written using APDU, Read/Write can be done by APDU commands.
“Load APDU” is to read the stored APDU commands.
“Save APDU” is to save the displayed APDU commands.
“Clear APDU” is to clear the APDU section.
“Send APDU” is to run the APDU commands.
Batch process repeats the following steps sequentially, Card “IN” Æ Move “RF” Æ RF
“Connect” Æ Get UIDÆ RF “Discontact” Æ Card “OUT”
Pic.119 Contactless smartcard encoding
4.2.6. Printer status
“Get Temperature” is to get and display the temperature of Thermal Print Head. When the “Realtime
Check” is ticked, it displays the current temperature of Thermal Print Head in real time.
“Get Status” is to get and display the printer status.
Status Code
#define SMSC_M_CARDIN 0x0000000000000001 // Card In
#define SMSC_M_CARDOUT 0x0000000000000002 // Card Out
#define SMSC_M_MOVE_PRINT 0x0000000000000004 // Move to print
#define SMSC_M_MOVE_PRN2ROT 0x0000000000000008 // Move from printer to flipper
#define SMSC_M_MOVE_ROT2PRN 0x0000000000000010 // Move from flipper to printer
#define SMSC_M_MOVE_IC 0x0000000000000020 // Move to contact encode
#define SMSC_M_MOVE_RF 0x0000000000000040 // Move to contactless encode
#define SMSC_M_MOVE_MAG 0x0000000000000080 // Move to Magnetic encode
#define SMSC_M_THUP 0x0000000000000100 // Thermal head up
#define SMSC_M_THDOWN 0x0000000000000200 // Thermal head down
#define SMSC_M_ICHUP 0x0000000000000400 // Contact head up
#define SMSC_M_ICHDOWN 0x0000000000000800 // Contact head down
#define SMSC_M_PRINT 0x0000000000001000 // Printing
#define SMSC_M_MAGRW 0x0000000000002000 // Read/Write Magnetic data
#define SMSC_M_SEEKRIBBON 0x0000000000004000 // Ribbon search
#define SMSC_M_MOVERIBBON 0x0000000000008000 // Ribbon Move
#define SMSC_M_ROTATORTOP 0x0000000000010000 // Rotate Card up
]^

#define SMSC_M_ROTATORBOTTOM 0x0000000000020000 // Rotate Card down
#define SMSC_S_HOPPERHASCARD 0x0000000000040000 // Card in hopper
#define SMSC_S_THUP 0x0000000000080000 // Thermal head up
#define SMSC_S_CARDIN 0x0000000000100000 // Detect Card in
#define SMSC_S_CARDOUT 0x0000000000200000 // Detect Card out
#define SMSC_S_ROTATORTOP 0x0000000000400000 // Card front side up in Flipper
#define SMSC_S_EQUIPROTATOR 0x0000000000800000 // Flipper installed
#define SMSC_M_RECVPRINTDATA 0x0000000001000000 // Importing print buffer
#define SMSC_S_HASPRINTBUFFER 0x0000000002000000 // Reserving print buffer
#define SMSC_M_SBSRUNNING 0x0000000004000000 // Executing SBS Commands
#define SMSC_S_SBSMODE 0x0000000008000000 // SBS mode
#define SMSC_S_CASEOPEN 0x0000000010000000 // Case open
#define SMSC_M_INIT 0x0000000020000000 // Initializing
#define SMSC_S_TESTMODE 0x0000000080000000 // Test mode
From card printer firm-ware version 1.00.60 , some values are changed like bellows from black color
texts to red color texts.
#define SMSC_S_THUP 0x0000000000080000 // Thermal head up status
#define SMSC_S_CLEANWARNING 0x0000000000080000 // Need cleaning of printer
#define SMSC_S_ROTATORTOP 0x0000000000400000 // Front card up status in rotator
#define SMSC_S_EQUIPLAMINATOR 0x0000000000400000 // Laminator is installed
Error Code
#define SMSC_F_CARDIN 0x0000000100000000 // Error Card in
#define SMSC_F_MOVETOPRINT 0x0000000200000000 // Card move Error
#define SMSC_F_CARDOUT 0x0000000400000000 // Card out Error
#define SMSC_F_MOVETOMAG 0x0000000800000000 // Card move Error (Magnetic)
#define SMSC_F_MOVETOIC 0x0000001000000000 // Card move Error (Contact)
#define SMSC_F_MOVETORF 0x0000002000000000 // Card move Error (Contactless)
#define SMSC_F_MOVETOROTATOR 0x0000004000000000 // Card move Error (Printer to Flipper)
#define SMSC_F_MOVEFROMROTATOR 0x0000008000000000 // Card move Error (Flipper to Printer)
#define SMSC_F_THUP 0x0000010000000000 // Thermal head up Error
#define SMSC_F_THDOWN 0x0000020000000000 // Thermal head down Error
#define SMSC_F_ICHUP 0x0000040000000000 // Contact head up Error
#define SMSC_F_ICHDOWN 0x0000080000000000 // Contact head down Error
#define SMSC_F_ROTATORTOP 0x0000100000000000 // Card rotate up Error
#define SMSC_F_ROTATORBOTTOM 0x0000200000000000 // Card rotate down Error
#define SMSC_F_PRINT 0x0000400000000000 // Printing Error
#define SMSC_F_MAGRW 0x0000800000000000 // Magnetic data Read/Write Error
#define SMSC_E_SEEKRIBBON 0x0001000000000000 // Ribbon search Error
#define SMSC_E_MOVERIBBON 0x0002000000000000 // Ribbon move Error
#define SMSC_E_NOTH 0x0004000000000000 // Uninstalled Thermal head
#define SMSC_E_THOVERHEAT 0x0008000000000000 // Overheat Thermal head
#define SMSC_E_EMPTYRIBBON 0x0010000000000000 // No Ribbon
#define SMSC_F_DATA 0x0020000000000000 // Data Error
#define SMSC_F_CARDBACKOUT 0x0040000000000000 // Card out to back Error
#define SMSC_F_CARDERASE 0x0080000000000000 // Cannot Remove data
#define SMSC_F_INCORRECT_PW 0x0100000000000000 // Incorrect Password
#define SMSC_F_MAGREADT1 0x0200000000000000 // Read data Error Mag. Track.1
#define SMSC_F_MAGREADT2 0x0400000000000000 // Read data Error Mag. Track.2
#define SMSC_F_MAGREADT3 0x0800000000000000 // Read data Error Mag. Track.3
#define SMSC_F_LOCKED 0x1000000000000000 // Device Locked
#define SMSC_F_SPOOLFULL 0x2000000000000000 // Exceed Printer Spool
#define SMSC_F_SET 0x4000000000000000 // Recent motion fail
Laminator’s Status Code
#define LMSC_M_HEATHDRLIFTUP 0x0000000000000001 // Heat-header is being lifted up
#define LMSC_M_HEATHDRLIFTDOWN 0x0000000000000004 // Heat-header is being lifted down
#define LMSC_M_CARDIN 0x0000000000000010 // Card In
#define LMSC_M_MOVE_LAMINATE 0x0000000000000040 // Moving to laminate position
#define LMSC_M_FRONTCARDOUT 0x0000000000000100 // Card is being moved out to front.
#define LMSC_M_REARCARDOUT 0x0000000000000200 // Card is being moved out to rear.
#define LMSC_M_ROTATE 0x0000000000000400 // Rotating
#define LMSC_S_WAIT 0x0000000000000800 // Waiting
#define LMSC_S_CMDRUN 0x0000000000002000 // Command is being executed.
#define LMSC_M_HEATING 0x0000000000004000 // Heating Heat-header
#define LMSC_S_CASEOPEN 0x0000000000008000 // Top cover is opened
#define LMSC_M_LAMINATING 0x0000000000010000 // Laminating
#define LMSC_S_CARDINSENSOR 0x0000000020000000 // Caught by card in sensor
]_

#define LMSC_S_CARDOUTSENSOR 0x0000000040000000 // Caught by card out sensor
#define LMSC_S_OUTDOORSENSOR 0x0000000080000000 // Caught by stacker open sensor
Laminator’s Error Code
#define LMSC_E_HEATHDRLIFTUP 0x0000000100000000 // Error while lifting up Heat-header
#define LMSC_E_HEATHDRLIFTDOWN 0x0000000400000000 // Error while lifting down Heat-header
#define LMSC_E_CARDIN 0x0000001000000000 // Error while moving card in
#define LMSC_E_MOVE_LAMINATE 0x0000004000000000 // Error while moving to Laminate position.
#define LMSC_E_FRONTCARDOUT 0x0000010000000000 // Error while front card out (printer side)
#define LMSC_E_REARCARDOUT 0x0000020000000000 // Error while rear card out (stacker side)
#define LMSC_E_ROTATE 0x0000040000000000 // Error while rotating
#define LMSC_E_INIT 0x0000800000000000 // Error while initializing laminator
#define LMSC_E_EMPTYFILM 0x0001000000000000 // Film remain count is 0.
#define LMSC_E_NOFILM 0x8000000000000000 // No film is installed, or cannot
4.3. Firmware upgrade
When you run the CardPrinterFirmware, you can see the pop-up window as the Pic. 120.
Device: Select the local printer that you want to upgrade.
Card Printer / Laminator: Select the device you want upgrade.
Device Version: Displays the current firmware version of selected printer.
Binary File: Click “Browse” button and select new firmware file to update.
Manual Update: It is used when you want to upgrade manually.
Update: Upgrades automatically. In generally, we recommend upgrading automatically.
Close: Exit.
Message : It displays information of upgrading.
Pic.120 Upgrading printer firmware
]`

4.3.1. Card Printer Firm-ware Upgrade.
If you click “Browse” and select the new firmware, “Manual Update” and ”Update” are activated. At that
time, click “Update” button to upgrade automatically, then the printer is upgraded after rebooting.
(Caution: Please do not close upgrade dialog box until it is completed successfully and do not turn off
the printer.)
Pic.121 Ready for firm-ware upgrade
In case there are some problems in the automatic upgrade, you click “Manual Update” and can see the
pop-up widow as below picture. It shows procedure of manual upgrade. You can upgrade manually
according to this procedure.
Pic.122 Firm-ware manu al upgrade
^W

4.3.2. Laminator Firm-ware Upgrade.
This function is only for card printer firm-ware version 1.00.60 and laminator should be installed to the
printer. If you click “Browse” and select the new firmware, “Manual Update” and ”Update” are activated.
At that time, click “Update” button to upgrade automatically, then the printer is upgraded after rebooting.
(Caution: Please do not close upgrade dialog box until it is completed successfully and do not turn off
the printer.)
Pic.123 Ready for laminator f irm-ware upgrade
In case there are some problems in the automatic upgrade, you click “Manual Update” and can see the
pop-up widow as below picture. It shows procedure of manual upgrade. You can upgrade manually
according to this procedure.
Pic.124 Firm-ware manual upgrade
^X

5. Optional device driver installation
In SMART-50 printer, you can install the optional devices that encode contact smartcard or
contactless smartcard. If your purchased SMART-50 printer has optional devices, you should also
install the smart card reader drivers.
5.1. Contact smartcard reader
In SMART-50 printer, you can install the two types of optional devices which are contact
smartcard reader and mobile SIM smartcard reader. If you have one or more smartcard reader
devices on your printer, you should install the smartcard device driver as in the following, and
connect SMART-50 printer to your PC.
5.1.1. Run the smartcard driver installer
Insert the smartcard installation CD and find “\Options\Gemalto PC Twin” directory on your
CD. Find the right directory which is installed OS version on your PC, and run the installer.
You can see the smartcard reader driver installation window as the Pic.125. And click “Next”.
Pic.125 Contact smartcard reader driver installation
^Y

5.1.2. License agreement
The license agreement window as the Pic.126 is shown. Check at the agreement and click
“Next”.
Pic.126 License agreement
5.1.3. Installation
The installation message is shown as the Pic.127. Click “Install” to install driver.
Pic.127 Installing the contact smartcard reader driver
^Z

5.1.4. Complete installation
When the installation is completed, the window as the Pic.128 is shown. Click the “Finish” to
complete the installation steps.
Pic.128 Completing the smartcard reader driver installation
^[

5.2. Contactless smartcard reader
In SMART-50 printer, you can install the two types of smartcard reader which are internal
contactless smartcard reader and external contactless smartcard reader. If you have one or
more contactless smartcard reader devices on your printer, you should install the contactless
smartcard device driver as in the following, and connect SMART-50 printer to your PC.
5.2.1. Connect SMART-50 printer to PC
When you connect the printer to PC and turn on the printer, you can see the “Found New
Hardware Wizard” as the Pic.129, then Check “No, not that time” and Click “Next” to continue.
Pic.129 Found New Hardware Wizard
5.2.2. Choose the installation method
At the window as the Pic.130, select “Install from a list or specific location” and click “Next”.
Pic.130 Installation method selection
^\

5.2.3. Driver location
Insert the smartcard installation CD and find “\Options\ Omnikey 5121” directory on your CD.
Find the right directory which is installed OS version on your PC, and select the directory as
the Pic.131, and click “Next”.
Pic.131 Driver location
5.2.4. Complete installation
When the installation is completed, the window as the Pic121 is shown, click “Finish” to
complete the installation steps.
Pic.132 Completing the driver installation
^]

6. Troubleshooting
6.1. Cleaning the printer
To maintain the best condition of SMART-50 printer, you must clean the printer periodically. If you
use the exclusive cleaning card as the Pic.133, you can clean the printer easily. For purchase the
exclusive cleaning card, ask to SMART-50 printer provider.
Pic.133 Exclusive cleaning card for SMART-50 printer
If the exclusive cleaning card is ready, click the “Clean Printer” in the service tab of SMART-50
printer driver as the Pic.134. After click, Clean Printer program to clean the printer is run.
Pic.134 Printer cleaning start
Step 1. Connect the SMART-50 printer to PC and turn it on, and prepare the exclusive cleaning
card.
^^

Pic.135 Printer cleaning Step 1
Step 2. Open the hopper and top cover and remove the card and ribbon cartridge.
Pic.136 Printer cleaning Step 2
Step 3. Insert the exclusive cleaning card into the printer through input hopper as the Pic.137. When
^_

the exclusive cleaning card is inserted to the cleaning roller, it will be move automatically. It
is normal that the exclusive cleaning card is inserted to the ends and rollers are moving to
clean.
Pic.137 Printer cleaning Step 3
Step 4. Close the top cover to clean the Thermal Print Head and the printing roller. When the top
cover is closed, cleaning card will be moving back and forth to clean.
Pic.138 Printer cleaning Step 4
Step 5. Wait until the cleaning is completed. When the cleaning is completed, the exclusive cleaning
^`

card will be ejected automatically as the Pic.139.
Pic.139 Printer cleaning Step 5
Step 6. Remove the exclusive cleaning card and install ribbon cartridge into the printer.
Pic.140 Printer cleaning Step 6
_W

6.2 TPH (Thermal Print Head) replacement
1. Check the serial number and the
resistance of new Thermal Print Head
as the Pic. 141
TPH type: A = KEE, B = KPE
Serial No.: see the red box.
TPH resistance: see the green box.
Pic.141 Thermal Print Head
2. Set up the new TPH’s configuration using CardPrinterSetup program.
Step1: Run ‘Card Printer Setup’ in Utilities of the installation CD and click expansion button.
Step2: Click “Change Header” in the extended setup.
Step3: Input the TPH’s Serial No., Resistance and Type (choose KEE or KPE) on the TPH’s label,
and click “OK”.
Step4: Click “Set Config” to set the new TPH’s configuration.
Pic.142 Print head setup
3. Replacing the new TPH
Step1: Remove the old TPH from the top cover.
(1) Turn off the printer and open the top cover.
(2) Hold the TPH and press the locked hook, then the TPH is disconnected as the Pic. 143.
(3) Disconnect the TPH from print head wire carefully.
(Caution: TPH is possible to HOT.)
Step2: Installing the new TPH
(1) Connect new TPH to the print head wire.
(2). Put the new TPH on the Shift and pull it up until be locked as the Pic. 143.
_X

Pic.143 Print head replacement
A
y
4. Setup the print position and the color density.
After installing the new TPH, you must reset the print position and the color density using
CardPrinterSetup utility. Refer to “4.1.2 Default setting”
5. Calibration of Print Head
To get the best print quality, the TPH
should be located vertically with card
surface.
If print quality has the problem, it could be
caused by print head angle.
Through Adjusting print head angle b
screw (red mark in the Pic.144), you could
make good quality of print.
(Use the appropriate screw driver to
adjust, and turn the screw by 90 degrees
at a time.)
ngle
Pic.144 Print head angle
6.3. Card movement
6.3.1. Cards can’t enter into the printer from input hopper.
z Non-standard cards or bad cards.
Change the cards. You can use only ISO CR-80 card (54mm x 86mm).
z Card thickness control lever is set improperly.
Regulate the card thickness control lever to fit the current card thickness.
z Badcardarray.
Array the cards again and put them on input hopper as section 2.2 in this manual.
z Cards have static and moisture.
Remove the moisture or static.
6.3.2. Card Transfer Error occurs when the ribbon is coiled around the transfer
roller or the printing roller.
Open the top cover and remove the card and the coiled ribbon from SMART-50 printer using
front LED buttons. If this problem occurred frequently, check the below things.
z Non-standard cards or bad cards.
Change the cards. You can use only ISO CR-80 card (54mm x 86mm).
z The transfer roller or the printing roller is contaminated with the dust and dirt
Remove the dust and dirt with the cleaning kit as section 6.1
z Wrong printing position setting.
Please contact the local supplier
z When operating temperature and humidity is out of the acceptable operating limit of the
printer.
Adjust the operating environment of the printer.
_Y

6.3.3. An Error occurs while the card is being transferred.
Printing quality trouble
Printing qualit y trouble 3
First of all, check the Error message at LCD display.
Open the top cover and remove the card by LED buttons.
If this problem occurs frequently, check the followings.
z Non-standard c ards or bad cards.
Change the cards. You can use only ISO CR-80 card (54mm x 86mm).
z Printer setting is changed or is not proper.
Please contact the local supplier.
z The transfer roller o r the printing roller is contaminated with the dust and dirt.
Remove the dust and dirt with the cleaning kit as section 6.1.
z The card surface is contaminated with the dust and dirt.
Check the card surface and remove the dust and dirt and try again. If this problem occurs
again, retry with new card.
6.4. Printing quality
6.4.1. Not printed or wrong colors printed spot.
z The card surface is contaminated with the dust
and dirt.
After checking the card, change it to another card.
z The cleaning roller is contaminated with the
dust and dirt.
Check the cleaning roller. If there is much dust,
change the cleaning roller to the new one.
z Much dust in the printer.
Clean the inside of the printer with the cleaning kit.
6.4.2. Not printed horizontal line.
z The ribbon cartridge is installed improperly.
Check the ribbon cartridge installation state and
whether the ribbon has wrinkles.
z The printer head is contaminated with the dust
and dirt.
Clean the printer head with cleaning kit.
z The printer head is damaged.
Please contact the local supplier to replace the
printer head.
6.4.3. Unclear or not uniform print.
z Uneven or bad card surface.
Change the card.
z Too high or low setting of the color density.
Please contact the local supplier. The color density
default of your printer needs to be changed.
z The printer head is contaminated with the dust
and dirt.
Clean the printer head with cleaning kit.
Pic.145 Printing quality trouble 1
Pic.146
2
Pic.147
_Z

6.4.4. Not aligned color print.
Printing qualit y trouble 4
Printing qualit y trouble 5
z Non-standard cards or bad cards.
Change the cards. You can use only ISO CR-80
card (54mm x 86mm).
z Uneven or bad card surface.
Change the card.
z The transfer roller or printing roller i s
contaminated with the dust and dirt.
Clean the rollers with the cleaning kit as section 6.1.
z Worn-out printer.
Please contact the local supplier.
6.4.5. Unplanned color print.
z Non-standard cards or bad cards.
Change the cards. You can use only ISO CR-80 card
(54mm x 86mm).
z Uneven or bad card surface.
Change the card.
z The transfer roller or printing roller is
contaminated with the dust and dirt.
Clean the rollers with the cleaning kit as section 6.1.
z Worn-out printer.
Please contact the local supplier.
Pic.148
Pic.149
6.5. Magnetic stripe encoding
6.5.1. Magnetic encoding error.
First of all, Please press left LED button to retry.
z The magnetic head is contaminated with the dust and dirt.
Clean the magnetic head with the cleaning kit.
z The magnetic encoding data is not transmitted or the wrong data is transmitted.
Check the setting of the program and the driver and the magnetic encoding data you
transmitted.
z The card is not magnetic card, or inserting direction is wrong.
Change the card or the direction.
z Bad magnetic stripes on t he card.
Change the card.
6.6. General operation
6.6.1. Ribbon snapped during printing.
Open the top cover and take out the cartridge. After putting the snapped pieces on together,
install the cartridge again. Check the followings if this kind of problem occur frequently
z Non-standard cards or bad cards.
Change the cards. You can use only ISO CR-80 card (54mm x 86mm).
z Too high or low setting of the color density.
Please contact the local supplier. The color density default of your printer needs to be
changed.
.
_[

6.6.2. LCD display “Ribbon Not Found”
Press the left LED button to retry. If it occurs frequently, check the followings.
z Not genuine ribbon.
Change to the genuine ribbon.
z Ribbon is consumed.
Printing is not possible if ribbon is used up. Change the ribbon.
z Snapped ribbon.
Open the top cover and take out the cartridge. After putting the snapped pieces on together,
install the cartridge again.
6.6.3. Printer doesn’t operate even if the printing data has been transmitted.
Check the following.
z Printer power off.
Check the power. Turn on the printer power.
Check the printer adaptor whether it is connected with a socket and the printer.
z Bad power adaptor.
Please contact the local supplier for replacement of the adaptor.
z The printer driver is “Offline”.
Change the printer driver to “Online”.
z The printer’s USB cable is disconnected or the connection is bad.
Check the cable’s connection between PC and the printer.
If not good, make the USB cable connection again.
z Bad USB cable.
Change the USB cable.
z The printing is operated with another printer driver.
Select the correct SMART-50 printer driver again.
z Wrong USB port setting of the printer driver.
Check the port setting of the printer driver and change the port setting.
z No ribbon in the printer or error occurred.
Install ribbon in the printer or resolve the error.
z Too long power or USB cable (more t han 1.5M).
Usethecableprovidedwiththeprinter.
z PC’s USB port is down:
Reboot your PC.
_\

7. Printer specification
Product Specification SMART-30S SMART-30R
Printing
Print Type Dye -Sublimation / Resin Thermal Transfers Direct Thermal Printing & Erasing
Print Area
Resolution
Dual Side Printing Option -
Cards
Card Feeding
Card Size
Card Thickness
Card Type PVC, Composit PVC, PET Rewritable Thermochromic Material
ISO CR-80 (54mm x 86mm / 2.12" x 3.38")
0.38mm (15mil) ~ 0.76mm (30mil)
Print Speed(Max.)
Monochrome 6 sec. (600 cards/hour) 20 sec (180 cards/hour) for Erase & Write
YMCKO 30 sec. (120 cards/hour) YMCKOK - -
Edge to Edge
300 dpi
Automatic
Capacity
Input Hopper
Output Hopper
Monochrome Ribbon 1200 cards/roll
Color Ribbon YMCKO 250 cards/roll
80 cards
25 cards
T
T
System
Memory
Control Panel 1 LED Buttons 1 LED Buttons
Supported Platform
Communications
Power Supply
Power Consumption
Temperature/Humidity
Microsoft Windows 2003, XP, Vista(32/64bit), 7(32/64bit), 8(23/64bit)
USB, Ethernet(Option)
Free Voltage (AC 100/220V, 50~60Hz)
64MB
45W
15~35ఁ/ 20~80%
Dimensions
Size(W x L x H) 172mm x 377mm x 190mm 172mm x 377mm x 190mm
Weight 3.4Kg / 7.5lbs 3.1Kg / 6.8lbs
Encoding
Magnetic Stripe
Contact Smart Card
Contactless Smart Card
ISO7811 (Trackዜ,ዝ,ዞRead / Write), JISዝ, HiCo / LoCo
ISO7816 (ID-1), SIM Type - ISO7816 (ID-000)
MiFare, DesFire, ISO 14443(type A/B), ISO 15693, iClass
Certifications
Certifications
CE, FCC, KC
Pic.150 Printer Specification 1
_]

Product Specification SMART-50S SMART-50D
Printing
Print Type
Print Area
Resolution
Dual Side Printing Option Yes
Dye-Sublimation / Resin Thermal Transfers
Edge to Edge
300 dpi
Cards
Card Feeding
Card Size
Card Thickness
Card Type
ISO CR-80 (54mm x 86mm / 2.12" x 3.38")
0.38mm (15mil) ~ 1.0mm (40mil)
Automatic
PVC, Composit PVC, PET
Print Speed(Max.)
Monochrome
YMCKO
YMCKOK - 30 sec. (120 cards/hour)
5 sec. (720 cards/hour)
22 sec. (164 cards/hour)
Capacity
Input Hopper
Output Hopper
MonochromeRibbon
Color Ribbon
YMCKO250 cards/roll, YMCKOK 200 cards/roll
100 cards
40 cards
1200 cards/roll
System
Memory
Control Panel
Supported Platform
Communications
Power Supply
Power Consumption
Temperature/Humidity
LCD Display / 2 LED Buttons
Microsoft Windows 2003, XP, Vista(32/64bit),7(32/64bit)
USB, Ethernet(Option)
Free Voltage (AC 100/220V, 50~60Hz)
64MB
45W
15~35ఁ / 20~80%
Dimensions
Size(W x L x H) 170mm x 420mm x 195mm 170mm x 510mm x 195mm
Weight 4.5Kg / 10lbs 5.5Kg / 10lbs
Encoding
Magnetic Stripe
Contact Smart Card
Contactless Smart Card
ISO7811 (Track ዜ,ዝ,ዞ Read / Write), JISዝ, HiCo / LoCo
ISO7816 (ID-1), SIM Type - ISO7816 (ID-000)
MiFare, DesFire, ISO 14443(type A/B), ISO 15693, iClass
Certifications
Certifications
CE, UL, FCC, KC
Pic.151 Printer Specification 2
_^

Product Specification
Printing
Print Type
Print Area
Resolution
Dual Side Printing
Laminating
Laminating Mode
Laminates
Cards
Card Feeding
Card Size
Card Thickness
Card Type
Speed(Max.)
Simultaneous Mode (Front in/Back out)
YMCK & Single side Laminate
YMCFK & Single side Laminate
YMCKK & Single side Laminate
One-by-One Mode (Front in/Front out)
YMCK & Single side Laminate
YMCFK & Single side Laminate
YMCKK & Single side Laminate
SMART-50L
Dye-Sublimation
Edge to Edge
300 dpi
Yes
Single & Double with flip-over
0.6mil, 1.0mil, Clear and Holographic
Automatic
ISO CR-80 (54mm x 86mm / 2.12" x 3.38")
0.76mm (29.9mil) ~ 1.0mm (40mil)
PVC, Composit PVC, PET-G
23 sec. (156 cards/hour)
31 sec. (116 cards/hour)
33 sec. (109 cards/hour)
44 sec. (82 cards/hour)
52 sec. (69 cards/hour)
54 sec. (67 cards/hour)
Capacity
Simultaneous Mode (Front in/Back out)
Input Hopper
Output Hopper
One-by-One Mode (Front in/Front out)
Input Hopper
Output Hopper
System
Memory
Display & Control Panel
Supported Platform
Communications
Power Supply
Temperature / Humidity
Dimensions
Size(WxLxH)
Weight
Encoding
Magnetic Stripe
Contact Smart Card
Contactless Smart Card
100 cards
25 cards
100 cards
40 cards
64MB
LCD Display / 2 LED Buttons
Microsoft Windows 2003, XP, Vista(32/64bit), 7(32/64bit)
USB, Ethernet(Option)
Free Voltage (AC 100/240V, 50~60Hz)
15~35ఁ / 20~80%
170mm x 900mm x 195mm
9.2Kg / 20lbs
ISO7811 (Track ዜ,ዝ,ዞ Read / Write), JISዝ, HiCo / LoCo
ISO7816 (ID-1)
MiFare, DesFire, ISO 14443(type A/B), ISO 15693, iClass
Pic.152 Printer Specification 3
__

FCC Information
This device complies with part 15 of the FCC Results. Operation is subject to the
following two conditions :
(1) This Device may not cause harmful interface, and
(2) This device must accept any interference received, including interference that
may cause undesired operation.
Note: This equipment has been tested and found to comply with the limits for CLASS B digital
device, pursuant to Part 15 of FCC Rules. These limits are designed to provide reasonable
protection against harmful interference when the equipment is operated in a commercial
environment This equipment generates, uses and can radiate radio frequency energy and, if not
installed and used in accordance with the instructions, may cause harmful interference to radio
communications. However, there is no guarantee that interference will not occur in a particular
installation. If this equipment does cause harmful interference to radio or television reception,
which can be determined by turning the equipment off and on, the user is encouraged to try
correct the interference by one or more of the following measures:
1.1. Reorient or relocate the receiving antenna.
1.2. Increase the separation between the equipment and receiver.
1.3. Connect the equipment into an outlet on a circuit different from that to which receiver is
connected.
1.4. Consult the dealer or experienced radio/TV technician for help.
WARNING
Changes or modifications not expressly approved by the manufacturer could void the
user’s authority to operate the equipment.
“CAUTION : Exposure to Radio Frequency Radiation.
Antenna shall be mounted in such a manner to minimize the potential for human
contact during normal operation. The antenna should not be contacted during operation
to avoid the possibility of exceeding the FCC radio frequency exposure limit.
 Loading...