

Page 1
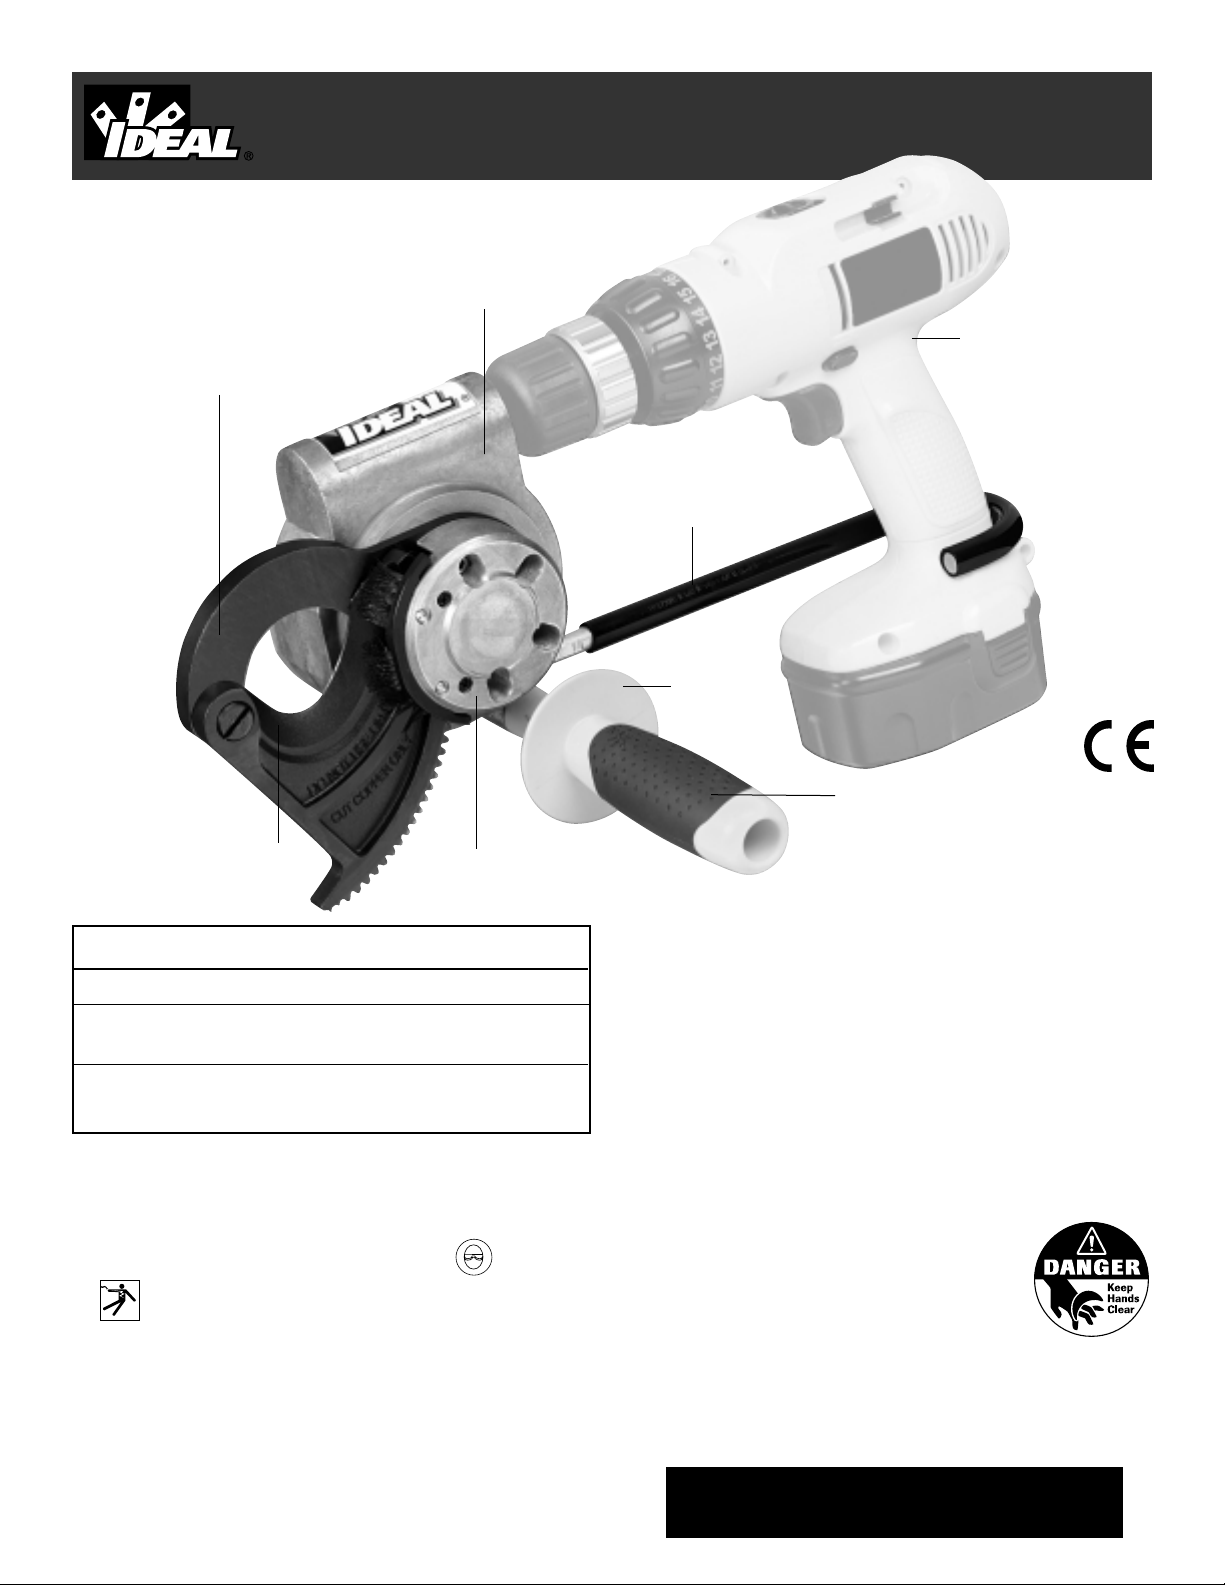
Po werBlade™Cable Cutter
Rugged metal housing
Replaceable hardened
steel blades ensure
consistent cuts and longterm durability
Contour blade design
minimizes cable distortion
Durable gears
Protective
shield
Ergonomically designed, textured
Santoprene
®
non-slip grip
Adjustable torque arm
holds drill in place
Acceptsalmost any
cordless or corded drill
Cable Cutter Assembly: 35-078
Drill Specifications: Any drill 12V or larger that accepts
3
⁄8 drive shaft
Cutting Capacity: 750 MCM Hard Drawn Copper
and up to 2 O.D. Aluminum
Specifications
Operating Precautions
1. Do not drop or abuse the unit.
2. Do not disassemble, repair or modify the assembly, except to
replace parts as shown on page 3.
3. Do not expose the unit to water or solvents.
4. Do not cut cables larger than those listed in the specifications.
5. Do not use tool in the rain to prevent blade wear and malfunction.
6. Store cutter in case provided, in a dry, secure area.
7. We strongly recommend using a reversible drill to enable backing
out of a cut when necessary.
Do not cut steel, ACSR or any other
materials containing steel or damage
to blades will result.
Each unit is tested before shipment.
Copper residue on blades may remain
from the initial quality inspection test cut.
#35-078
Use and Care Manual
WARNINGS
1. Do not overreach. Keep proper footing and balance at all times.
2. Keep out of reach of children.
3. Always wear safety glasses when using this tool.
4. Do not use on live circuits. Always disconnect power before
using this tool.
5. Keep hands away from blades while operating unit.
6. Never operate tool without torque arm installed.
7. Blade is sharp; contact with blade can result in serious personal injury.
8. Disconnect drill from power source before servicing. Always remove drill
from unit before attempting to change blades.
Failure to heed all warnings and precautions outlined
in this manual may lead to serious personal injury.
Global Patents Pending
Page 2
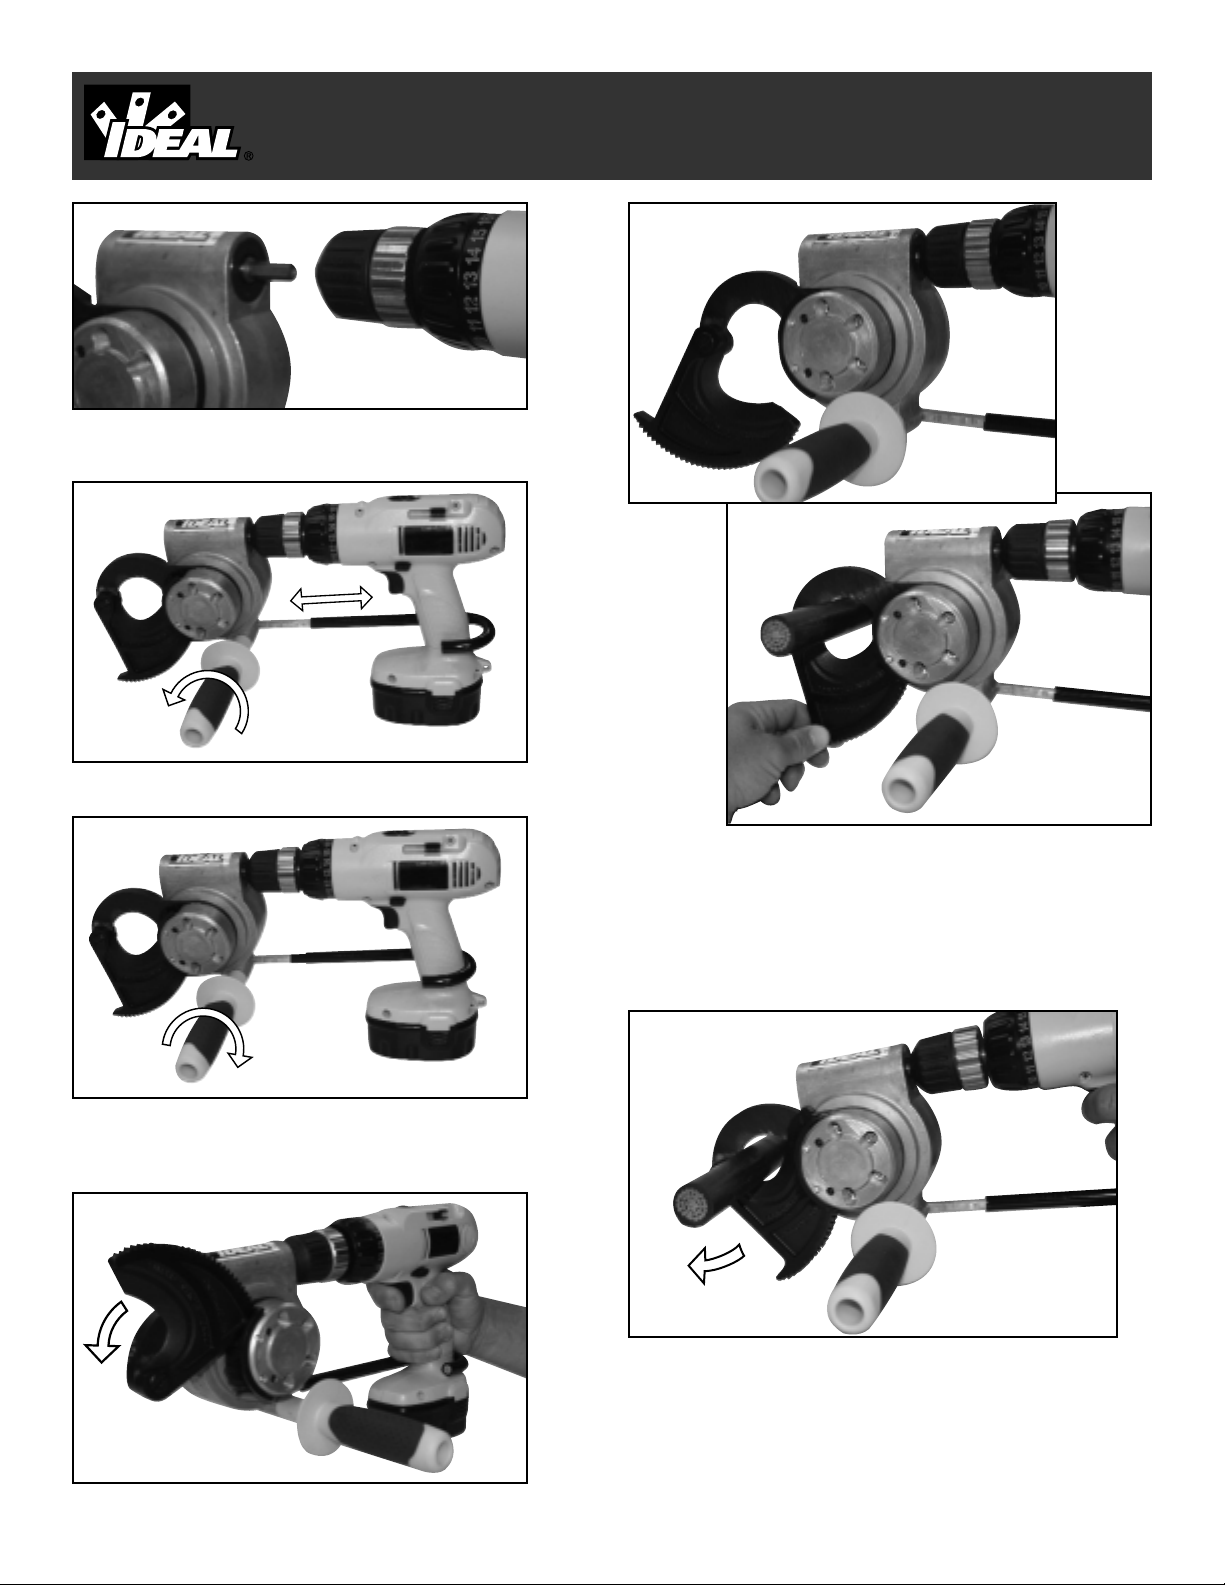
Operating Instructions
STEP 6: Press the drill trigger switch until cable is completely cut.
Reverse mode on drill can be used to back off blade if necessary.
STEP 8: When finished, remove any dust or particles that may
have become attached to the blade.
STEP 1: Attach cable cutter drive shaft to drill as shown
(Figure 1). Tighten drill chuck securely.
STEP 4: Activate the drill trigger switch to open the moving
blade (Figure 4).
Figure 1
Figure 2
Figure 3
Figure 4
Figure 7
Figure 6
Tighten
handle
Loosen
handle
STEP 2: Loosen handle so torque arm extends freely (Figure 2).
STEP 3: Loop torque arm around drill handle and tighten
handle into locking collar to lock torque arm in place (Figure 3).
Do not operate tool without torque arm in place.
Figure 5
STEP 5: Place the cable to be cut onto the stationary blade and
close the moving blade around the cable. Feed the moving blade
by hand until the first gear teeth are engaged (Figure 5 and 6).
STEP 7: To cut several small cables continuously, cut first cable as
described above, then reverse blade until opening is sufficient to
feed the next cable through. Continue to alternate between forward
and reverse modes until all cables are cut (Figure 7).
Page 3

Blade Replacement, Parts and Accessories
Blade Replacement (See exploded view above)
Your Drill-Powered Cable Cutter unit is designed for easy blade
replacement. If blade damage occurs that cannot be filed away, or if
blades are accidentally used on steel or ACSR, replace both blades
as described below:
1. Disconnect drill from power source or battery, then detach unit from
drill. Do not attempt blade replacement with drill attached.
2. Remove four hex screws from end cap that sits on top of the fixed
blade using a 5/32” hex wrench (Figure 8).
3. Remove end cap from unit (Figure 9).
4. Remove 6 hex screws attaching blade to body, using a
1
⁄8 hex
wrench (Figure 10).
5. Remove blade assembly.
6. Replace with a new blade set, IDEAL part #K-8906R.
7. Reinstall using screws removed earlier.
Always replace blades in sets for optimal performance. Replacing only
one side will increase wear and shorten overall blade life.
Handle Replacement
The comfort handle can be unscrewed and replaced if necessary.
Order IDEAL replacement handle part #K-8947R. Replacement torque
arm assemblies can also be ordered. IDEAL part #K-8909 includes
torque arm, locking collar and roll pin.
Warranty
One year limited warranty. Warranty limited solely to repair or replacement;
no warranty of merchantability, fitness for a particular purpose or
consequential damages. 90 day warranty on blades.
ITEM
PART NO. DESCRIPTION
H-3413-User
NO. Guide/QTY.
1 END CAP 1
2 K-8906R BLADE PAIR ASSEMBLY 1
3 K-8933 TORQUE ARM 1
4 LA-4192 LOCKING COLLAR 1
5 K-8947R HANDLE 1
6 K-9076 THRUST PLATE 1
7 113.161 6-32 HSCS X .375 LG. HEX SCREW 2
8 633.041 #6 LOCK WASHER 2
9 281.106 .125 DIA X .625 ROLL PIN 1
10 113.191 10-32X.500 SHCS HEX SCREW 4
11 633.059 #10 SPLIT LOCK WASHER 4
12 113.190 10-32X.375 FHMS HEX SCREW 6
13 GEARBOX ASSEMBLY 1
14 K-8926 CARRYING CASE
SCREWS
TO REMOVE
THRUST PLATE
SCREWS
TO REMOVE
END CAP
THRUST
PLATE
SCREWS
TO REMOVE
FIXED BLADE
87
END CAP
1110
6
2
BLADE
ASSEMBLY
12
13
GEARBOX
ASSEMBLY
4
3
5
1
TORQUE
ARM
LOCKING
COLLAR
HANDLE
FIGURE
8
FIGURE
10
ROLL PIN
9
FIGURE
9
Page 4

Maintenance and Inspection
Form No. ND 5095-3
©2004 IDEAL I NDUSTRIE S, INC.
Printed in U.S.A.
IDEAL INDUSTRIE S, INC.
Becker Place, Sycamore, IL 60178, USA / 815-895-5181 • 800-435-0705 in USA
33 Fuller Road, Ajax, Ontario, L1S 2E1, Canada / 905-683-3400 • 800-527-9105 in Canada
225 Europa Boulevard, Gemini Business Park, Warrington, Cheshire WA5 7TN, UK / +44-(0) 1925 444446
Gutenbergstrasse 10, 85737 Ismaning, Germany / +49-(0) 89 996860
Level 6, 75-85 Elizabeth Street, Sydney NSW 2000 Australia / 61300 765 800
Unit 505, Tower W1, The Towers, Oriental Plaza, No. 1 East Chang An Avenue,
Dong Cheng District, Beijing, 100738, China / 86-10-8518-3141
Condomínio América Business Park, Cj 201 Edifício Quebec,
Av. Marginal do Rio Pinheiros No. 5200,
CEP 05693-000 São Paulo - Brasil / 55-11-3759-8777
Prol. Americas 1600 4to. Piso, Col. Country Club / Guadalajara, Jal. 44610, Mexico
ph: 52-33-36789176 • 52-33-10688902 (mobile) • fax: 52-33-36789290
www.idealindustries.com
Innovation by I DEAL,
the Brand Electricians Trust
1. Frequent maintenance is important to keep the tool in good
working condition.
2. To ensure smooth operation and prevent rust, store the tool in
a cool, dry area.
3. Ensure that blades are clean and sharp for optimal performance.
4. Inspect blades for damage or burrs. If burrs exist, they can be
removed with a flat grinding stone or file on the back sides of
the blades.
5. Keep handle and torque arm dry, clean and free from oil or grease.
These can be cleaned with a soft cloth using mild soap and water.
Do not submerge gear box in water. Wipe unit completely dry
after cleaning.
6. Occasionally oil blades with a light cutting oil.
7. If the tool is maintained regularly, it should provide you with
trouble-free service.
8. The large shoulder screw used to attach the blades together may
loosen during use, especially when making many cuts on larger cable
sizes (750 MCM), or when blades become dull. Tighten shoulder
screw, then loosen 1/4 turn to adjust. If this screw loosens too
frequently, or if blades smash cable instead of cutting, replace blade
assembly as shown on page 3.
9. For best cutting results, we recommend replacing blades after
400-600 cuts on 750 MCM cable.
10. A generic shear pin locks the output gear to the output shaft. If too
much torque is placed on the pin and it is damaged, it can be
replaced with a standard 1/8 square key, available at your local
hardware store.
Gearbox is lubricated and sealed for the life of the tool. Do not open
the gearbox for any reason; opening will void all warranties.
 Loading...