

Page 1
Displaying Summary Pane Automatically
Keypad
To access main features:
1
Press the Menu key.
2
Use the arrows to select feature
and press Select.
To activate F1/F2 functions:
1
Use the left/right function arrows
(beside F1/F2 keys) to make the
desired function or parameter visible.
2
Press the F1 or F2 key located just
below.
To access and modify on-screen
parameters:
1
Use the arrows to select an on-screen item
(drop-down list, keyboard, check box, etc.).
2
Press Select.
To enter text or numbers with an
on-screen keyboard:
1
Use the left/right function arrows (beside
F1/F2 keys) to move the cursor in the tex
t
2
Use the up/down and left/right arrows to
select a character, and then press Select
to add it.
3
Press OK (F1/F2 key) to accept the
element and hide the keyboard.
1
Press the Menu key to
access main features.
2
Select Setup > OTDR.
3
Select Show summary
after acquisitions.
Inspecting a Fiber with the FIP
To access Probe mode on your unit:
1
Connect probe to the right side of the
unit, using an adapter if necessary.
2
Press Menu, and then select Probe to
activate the probe display.
To adjust brightness or contrast:
1
From Probe pane, select Display
Settings (F1/F2 key).
2
Adjust brightness and contrast. When you
have finished, press OK (F1/F2 key).
To exit Probe mode and return to the
regular display:
Press Exit or press Menu and select another option.
This function is available with some models only.
This function is available with some models only.
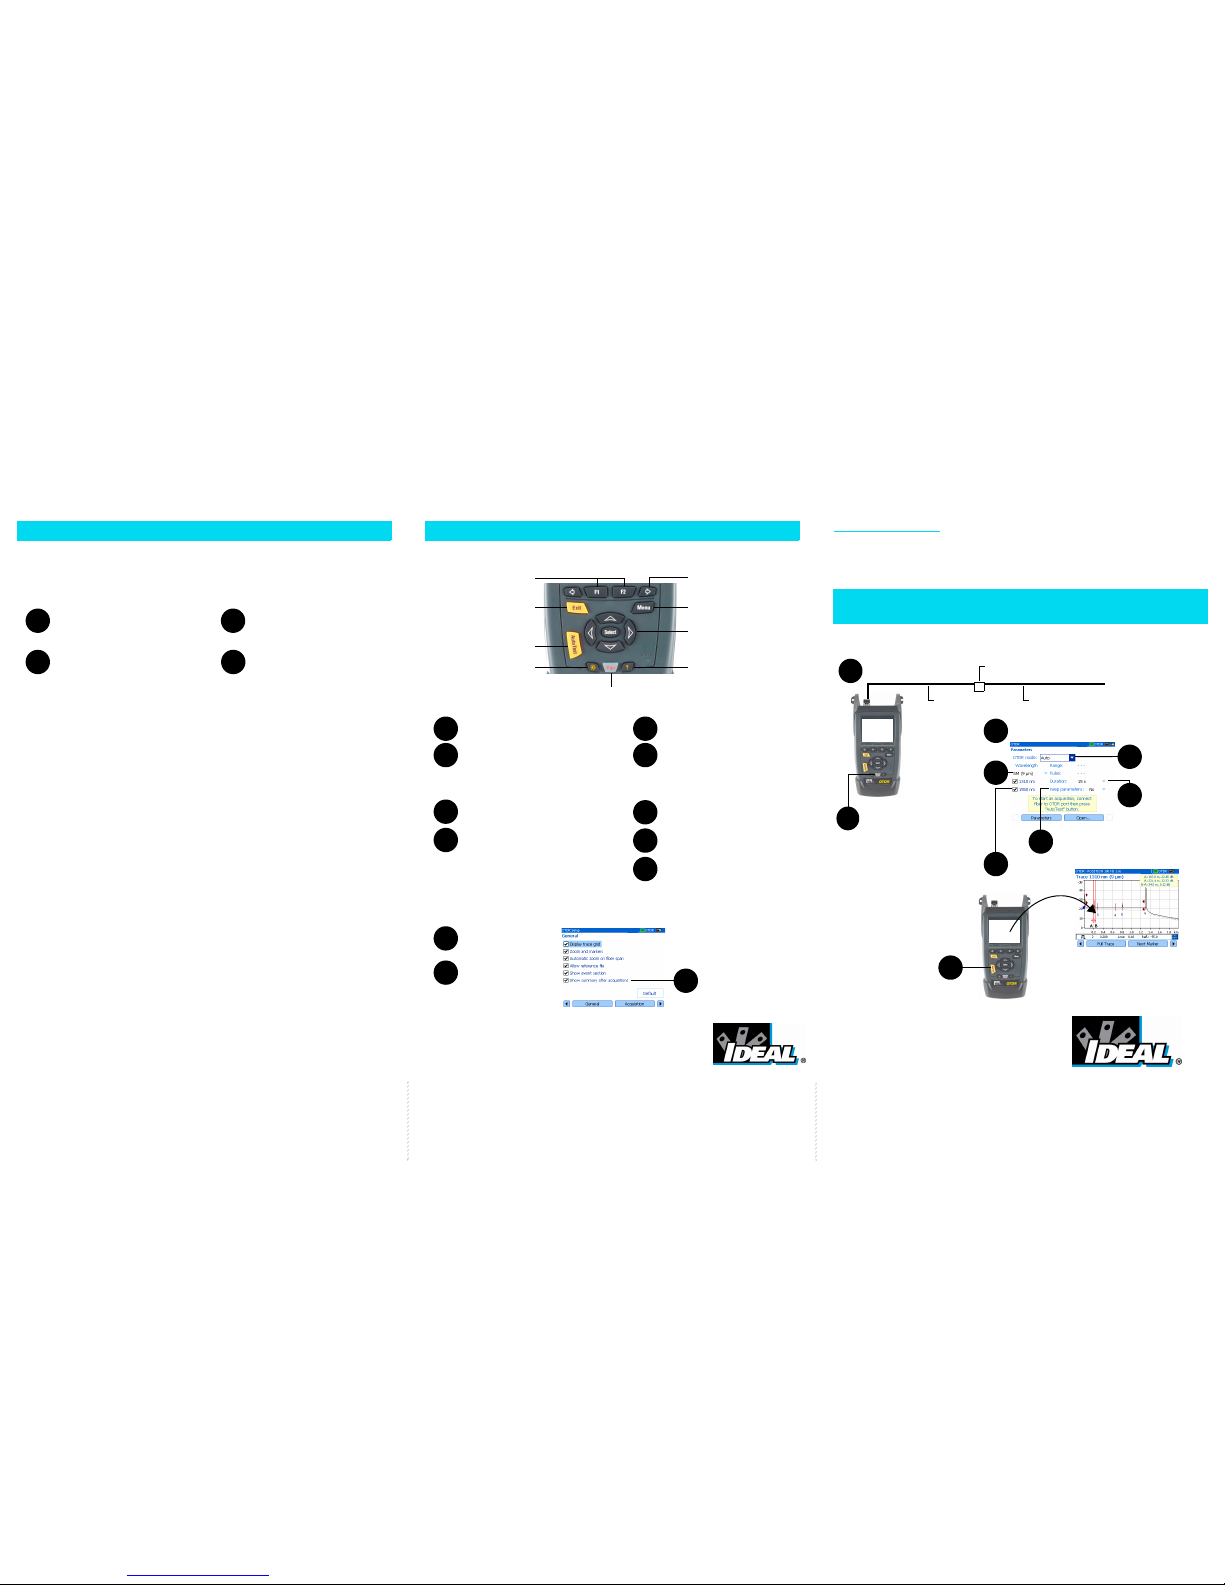
Using the Menus and Keypad
To turn unit on/off.
To move around, select items, and
change parameters.
To access the main menu.
To access help about current
function.
To scroll through available
functions.
To activate the function
displayed directly above.
To start (or stop) an acquisition
in the selected OTDR mode.
To adjust brightness (four levels).
To cancel/exit current function.
IDEAL OTDR
Testing in Auto Mode
For information on how to use the keypad, see Using the Menus and Keypad at the back of this guide.
1
Connect as shown.
2
Press Pwr to
turn unit on.
4
5
Select test wavelengths.
Select Auto.
Select duration of
acquisition.
Press Auto Test to start the
acquisition.
You can stop the acquisition
at any time by pressing
Auto Test one more time.
During acquisition, the trace is displayed.
Once all selected wavelengths have been
tested, the unit switches to Summary pane
automatically (some models only).
If not, see Displaying Summary Pane
Automatically.
Clean launch fiber
Device under test
Bulkhead adapter
3
Select Menu > OTDR > Parameters.
If your unit supports
singlemode and
multimode
wavelengths, select
fiber type
(C fiber: 50 µm;
D fiber: 62.5 µm).
6
7
To reset the range and pulse for each
acquisition, select No.
To always use the same parameters, select
Yes.
8
9
Quick Reference Guide
P/N: 6510-00-0001 Version:4.0.0
Page 2
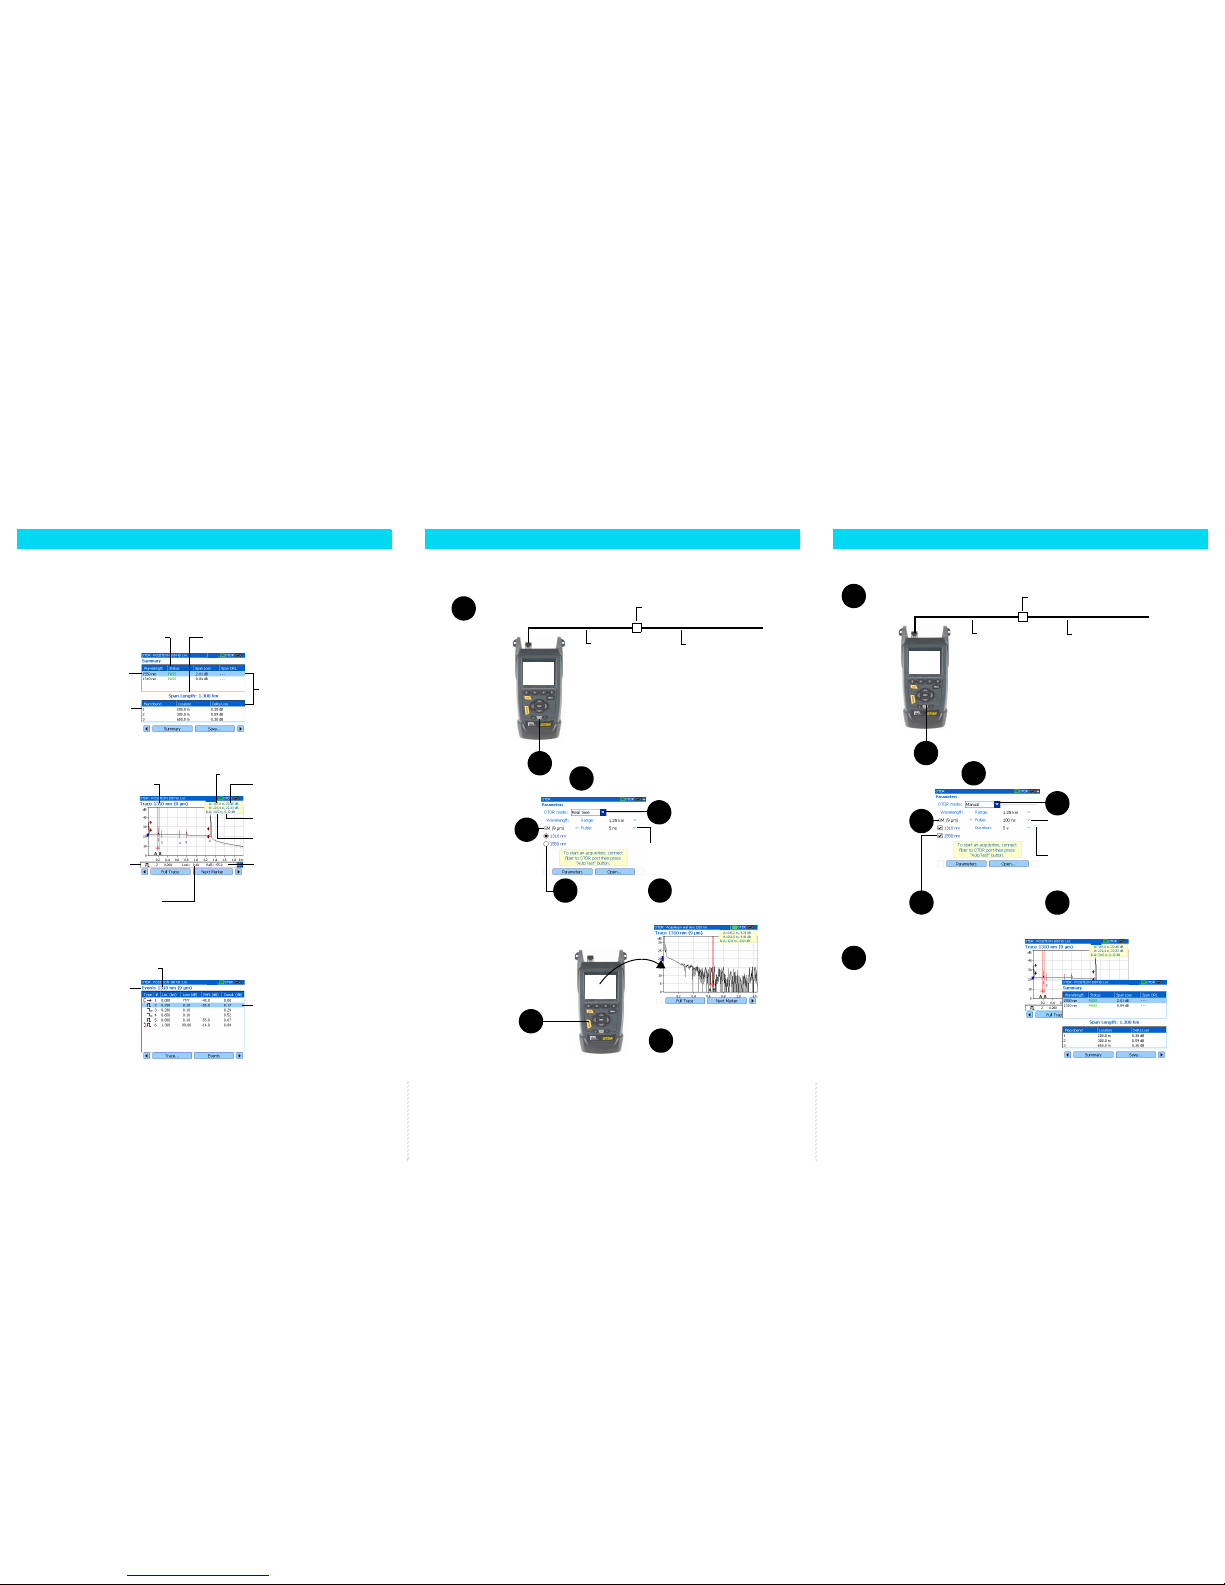
Testing in Manual (Advanced) Mode
Monitoring Fiber in Real Time Mod
e
Viewing Results
There are many ways to view the results:
³ Summary pane is displayed once the test is complete. You can also select Summary (F1/F2 keys).
Tested wavelengths
Pass/Fail status of
fiber under test
Length of
fiber under test
Information on detected
macrobends
³ Trace pane. You can select Trace (F1/F2 keys). Zoom functions are available via Zoom (F1/F2 keys).
Events (use up/down
arrows to view them in turn)
Reflectance value
(appears in red when it exceeds
the defined threshold)
Distance between span start and markersA and B
Relative power at markers A and B (use left/right
arrows to move markers)
Distance between markers A and B
Loss difference between markers A and B
Wavelength of the displayed trace
³ Events pane. You can select Events (F1/F2 keys). Values appearing in red exceed the defined thresholds.
Wavelength of the displayed trace
4
7
Configure other test parameters.
A longer pulse travels farther
down the fiber, but provides less
resolution.
8
Press Auto Test to start
the acquisition.
During acquisition, the trace is displayed.
You can view sudden changes in the fiber link. In this mode, the trace is refreshed instead of averaged.
When you have finished, press
Auto Test to stop the acquisition.
9
Select Real time.
You can select an item and
press
Select to switch to
Trace pane.
4
Select Manual.
7
Configure other test parameters.
To set period over which results are averaged.
Generally, the longer the time, the cleaner the trace.
Default value is 30 seconds.
8
Press Auto Test to start the acquisition.
You can stop the acquisition at any time by
pressing Auto Test one more time.
During acquisition, the trace is displayed.
Once all selected wavelengths have been
tested, the unit switches to Summary pane
automatically
(some models only).
If not, see Displaying Summary pane
Automatically.
A longer pulse travels farther down the fiber, but
provides less resolution.
1
Connect as shown.
2
Press Pwr to turn unit on.
Clean launch fiber Device under test
Bulkhead adapter
1
Connect as shown.
2
Press Pwr to turn unit
on.
Clean launch fiber Device under test
Bulkhead adapter
Loss value (appears in red when it exceeds
the defined threshold)
3
Select Menu > OTDR > Parameters.
Select Menu > OTDR > Parameters.
Use left/right arrows to
switch between the different
wavelengths
You can select an item and
press
Select to switch to
Trace pane.
5
Select test
wavelength.
If your unit supports
singlemode and
multimode wavelengths,
select fiber type
(C fiber: 50 µm;
D fiber: 62.5 µm).
6
5
Select test wavelengths.
If your unit supports
singlemode and
multimode
wavelengths, select
fiber type
(C fiber: 50 µm;
D fiber: 62.5 µm).
6
3
 Loading...