


iconBIT XDS1003DT2
User Manual

iconBIT XDS1003DT2 User Manual |
English |
|
|
Contents |
|
1. Introduction ..................................................................................................................................................... |
3 |
1.1.General Information.............................................................................................................................. |
3 |
1.2 Key Features .......................................................................................................................................... |
3 |
1.3 Safety Instructions ................................................................................................................................ |
4 |
2. About the Player .............................................................................................................................................. |
6 |
2.1 Remote Control..................................................................................................................................... |
6 |
2.2 Front Panel ............................................................................................................................................ |
8 |
2.3 Side Panel .............................................................................................................................................. |
8 |
2.4 Back Panel ............................................................................................................................................. |
8 |
2.5 Connection............................................................................................................................................ |
9 |
2.5.1 Connecting to a PC ................................................................................................................... |
9 |
2.5.2 TV Connection ........................................................................................................................... |
9 |
2.5.3 Digital Audio Device Connection ........................................................................................... |
10 |
2.5.4 DVB-T signal input ................................................................................................................... |
10 |
2.5.5 DVB-T signal output ................................................................................................................ |
10 |
2.6 Player Usage ........................................................................................................................................ |
11 |
2.6.1 Menu Language ...................................................................................................................... |
11 |
2.6.2 HDD Format ............................................................................................................................ |
11 |
3. Main Functions............................................................................................................................................... |
12 |
3.1 Setup Menu ......................................................................................................................................... |
12 |
3.1.1 Changing System Settings ...................................................................................................... |
12 |
3.1.2 Changing Audio Settings ........................................................................................................ |
13 |
3.1.3 Changing Video Settings ........................................................................................................ |
14 |
3.1.4 Changing Network Settings.................................................................................................... |
15 |
3.1.5 Miscellaneous.......................................................................................................................... |
16 |
3.1.6 Changing TV and Record settings ............................................................................................ |
17 |
3.2 Browsing Files and Media Playback.................................................................................................... |
18 |
3.2.1 Browse via File Manager ......................................................................................................... |
18 |
3.2.2 Browse via Media Library ........................................................................................................ |
18 |
3.2.3 Playback Option ...................................................................................................................... |
19 |
3.3 DTV ...................................................................................................................................................... |
19 |
3.3.1 Watching DVB-T Programs...................................................................................................... |
19 |
3.3.2 Schedule Recording ................................................................................................................ |
20 |
3.3.3 Channel Edit ............................................................................................................................ |
21 |
3.4 Favorites Manager .............................................................................................................................. |
21 |
3.5 3D Movie Playback .............................................................................................................................. |
21 |
3.6 Web Browser ....................................................................................................................................... |
22 |
3.7 Internet Media..................................................................................................................................... |
22 |
3.8 Android Apps ...................................................................................................................................... |
23 |
3.9 A/V Streaming via Network ................................................................................................................ |
23 |
3.10 A/V Streaming via UPnP-server ........................................................................................................ |
24 |
3.11 Music Playlist & Photo Album Management .................................................................................... |
24 |
3.12 File Copy/Delete/Move/Rename ...................................................................................................... |
25 |
3.13 NAS Function .................................................................................................................................... |
25 |
4. Upgrading the Firmware................................................................................................................................ |
27 |
5. Frequently Asked Questions.......................................................................................................................... |
28 |
6. Appendices .................................................................................................................................................... |
29 |
6.1 Warranty Information ......................................................................................................................... |
29 |
6.2 GNU General Public License (“GPL”) ................................................................................................... |
29 |
6.3 Copyrights and Trademarks ............................................................................................................... |
33 |
2

iconBIT XDS1003DT2 User Manual |
English |
|
|
1. Introduction
1.1.General Information
Dear Customer!
Thank you for choosing the iconBIT device. We hope that you will be satisfied by using our device for home entertainment. The iconBIT multimedia HD-player allows playing high-quality digital video, audio and photo from different sources on an analogue TV, HDTV (TV supporting highdefinition video), home theater and other devices.
1.2 Key Features
This iconBIT Multimedia HD-player has the following functions:
Audio/Video outputs
•HDMI V1.4 for high-definition video and digital audio
•Composite & component video and stereo audio for analog audio-visual connection
•S/PDIF coaxial & optical interface for high-fidelity digital audio
•Adjustable video output resolution (NTSC, PAL, 480p, 576p, 720p, 1080i, 1080p)
Multimedia Playback
•Supports major audio, video and image file formats (1080p HD video decoding)
•Video codecs: MPEG-1/ HD MPEG-2/ HD MPEG-4 SP/ASP/AVC (H.264)/ WMV9 (VC-1)/ RealNetworks (RM/RMVB) 8/9/10, up to 720p
•Audio codecs: MP2/3, OGG Vorbis, WMA Standard (DRM, and Advanced Profile not supported), PCM, LPCM, RA, DTS, Dolby Digital, Dolby Digital Plus, Dolby TrueHD)
•Movie format: AVI/MKV/TS/MPG/MP4/MOV/VOB/ISO/IFO/DAT/WMV/RM/RMVB/ BD ISO/BD MV
•Music format: MP3/OGG/WMA/WAV/FLAC/APE
•Photo format: HD JPEG/BMP/PNG
•Subtitle format: SRT/SMI/SSA/SUB/IDX+SUB
•Photo slide show with background music
Interfaces Support
•2 x USB 2.0 HOST port (for external USB storage devices)
•USB 3.0 DEVICE port (for computer connection)
•SD card slot
Network Feature
•A/V streaming/transmission via Ethernet (10M/100M/1000M) & Wi-Fi (802.11b/g/n, optional)
•A/V streaming via UPnP Media Server
•BitTorrent download (controlled and managed via web server)
File operation
•File system supported: FAT/FAT32/NTFS/HFS+/EXT3
•Supports copying & moving files among Card, USB, HDD, and Network.
Note: All the information contained in this manual was correct at the time of publication. However, as our engineers are always updating and improving the product, your device’s software may have a slightly different appearance or modified functionality than presented in this manual.
3

iconBIT XDS1003DT2 User Manual |
English |
|
|
1.3 Safety Instructions
Please read the safety instructions carefully prior to using the device. Keep the instructions in an easily accessible location for further use.
Warning signs
The lightning flash with arrowhead symbol, within an equilateral triangle, is intended to alert the user to the presence of uninsulated dangerous voltage within the product’s enclosure the may be of sufficient magnitude to constitute a risk of electric shock to persons.
ALERT: To reduce the risk of electric shock, do not remove the back cover. No user serviceable parts inside. Refer servicing to qualified service personnel.
The exclamation point within an equilateral triangle, is intended to alert the user to the presence of important and maintenance (servicing) instructions in the literature accompanying the appliance.
Precautions concerning power supply:
-Do not plug many devices into one electric socket. This may lead to an overcharge, combustion or electrical trauma.
-Do not touch the plug with wet hands. This may lead to electrical trauma, short circuiting and combustion.
-When connecting an electric cable, make sure that the cable is protected from damaging and is not being subject to any tension.
-It is essential to use the recommended power unit type with characteristics that comply with the
specification.
- If you are not planning to use the media player for a long time, you should disconnect it from the power system in terms of safety and energy saving. Keep in mind, that even being in standby mode the device consumes electric energy.
- You should not connect the device to the power system immediately after bringing it from a cold surrounding to a warm one. Unpack the device and leave it in the warm environment for 2 to 3 hours to let the condensate evaporate from the inner parts of the device.
Effect of radio interference and magnetic field:
- In case of absence of adequate screening virtually any electronic device becomes subject to radio interference. In some conditions the radio interferences may affect the operation of the media player.
- The iconBIT media player is designed in compliance with the FCC/CE standard, as well as the following statements:
a.This player does not produce any harmful interference or emission;
b.When placed close to a source of strong radio interference the player may not be able to
function properly.
- Do not locate the device close to sources of strong magnetic fields. Such field may damage data on your hard disk. In such case we will not be responsible for integrity of data on your hard disk.
Installation precautions:
-The device is designed for indoor usage. Do not expose it to direct sunlight; do not locate it next to any heat sources, heaters, radiators or refrigerating equipment. The operational temperature should be within the range of +5°Сto +35 °С.
-Protect the device from getting wet as this may lead to combustion or electrical trauma.
-Do not place any containers with liquid on top or next to the player.
-Do not use the device in high humidity, e.g. in a bathroom or a swimming pool.
4

iconBIT XDS1003DT2 User Manual |
English |
|
|
-When installing the device in an enclosed space, make sure there is enough space for the device to cool via heat emission. Do not cover vent holes of the device, so that sufficient amounts of air could enter the device body.
-Do not place the device on an uneven or unsteady surface. Do not drop the device and protect it from other objects getting dropped onto it.
Comments on the use of the remote control (RC):
-Point the RC directly at the infrared receiver of the device. Otherwise the RC may not function properly.
-Handle the RC with care. In case of loss of RC, contact the service centre to order a new one. A large portion of functions of the device is accessible only via the RC.
Operation precautions:
-Other devices and associated equipment should be connected via audio and video cables only when the devices are switched off.
-Do not use the device during thunder to prevent breakdown.
-Do not use the player together with any devices, which it does not support – this may lead to
player breakdown.
- Do not push the player buttons to hard.
-When disconnecting the device from PC USB hub, always use the “Safely Remove Hardware” functionality to prevent data loss.
Using hard disk drive (HDD) – precautions:
-If the device can be provided with an internal HDD for data storage, the device should not be exposed to severe external impact. This may lead to HDD or player outage.
-Make sure the HDD has cooled down prior to extracting it. The heat emitted by the HDD may burn the skin.
-The manufacturer is not responsible for loss of personal or any other confidential information
stored on your HDD resulting from physical impact, electric shock, voltage jumps, formatting etc.
-We recommend periodic backup copying to prevent data loss.
-In case of HDD productivity slowdown or other problems we recommend performing a check for bad sectors on the HDD and complete defragmentation.
Maintenance:
-When cleaning the device, always unplug the power cable. Use a soft cotton tissue or similar, that does not produce electrostatic charge.
-Never use gasoline or any other dissolvent for cleaning the player, as they might damage the device.
-In case of severe dirtying wet wipes for computers may be used.
Comments on equipment repairs:
-It is forbidden for users to modify the design of the device. Do not disassemble the player. In case of device breakdown due to self-performed repairs or modification, no warranty service will be provided.
-Should any malfunction appear, the device must be taken to an authorized service centre, where personnel will perform diagnostics and repair.
Do not dispose the device. The product is recyclable. Utilization requirements should be met. In some countries utilization of electronic devices is in the scope of specialized guidelines; please refer to relevant local organizations for additional information.
5

iconBIT XDS1003DT2 User Manual |
English |
|
|
2. About the Player
2.1 Remote Control
|
|
|
1. Power |
2. Numeric buttons |
|
||
|
|
|
3. Shuffle |
4. VOL- |
|
||
|
|
|
5. Mute |
6. Menu |
|
||
|
|
|
7. Home |
8. Navigational buttons |
|
||
|
|
|
9. Stop |
10. |
Play/Pause |
|
|
|
|
|
11. |
FR |
12. |
FF |
|
|
|
|
13. |
Red |
14. |
EPG(Green) |
|
|
|
|
15. |
Setup |
16. |
TV SYS |
|
|
|
|
17. |
Goto |
18. |
Slow |
|
|
|
|
19. |
REC |
20. |
Edit |
|
|
|
|
21. |
Copy |
22. |
Time Shift |
|
|
|
|
23. |
Angle |
24. |
Zoom |
|
|
|
|
25. |
Audio |
26. |
Subtitle |
|
|
|
|
27. |
TTX(Yellow) |
28. |
Blue |
|
|
|
|
29. |
Prev |
30. |
Next |
|
|
|
|
31. |
Info |
32. |
OK |
|
|
|
|
33. |
Back |
34. |
VOL+ |
|
|
|
|
35. |
Repeat |
36. |
Eject |
|
|
|
|
|
|
|
|
|
|
No. |
Button |
|
Function |
|
|
|
|
|
|
|
|
|
|
|
1 |
Power |
Press to enter standby mode or wake up. |
|
|
|
||
|
|
|
|
||||
2 |
Numeric |
Press to enter channel numbers or numeric input when changing |
|
||||
|
|
buttons |
settings. |
|
|
|
|
3 |
Shuffle |
Press to select shuffle mode during music playback. |
|
||||
|
|
|
|
|
|
||
4 |
VOL- |
Press to decrease the volume. |
|
|
|
||
5 |
Mute |
Press to mute audio output, and press again to resume. |
|
||||
|
|
|
|
||||
6 |
Menu |
Press to enable the option menu, where you can change the review |
|
||||
|
|
|
mode of file manager and media library; |
|
|
|
|
|
|
|
Press to display or hide the option menu during playback. |
|
|||
7 |
Home |
Press to enter the home screen. |
|
|
|
||
|
|
|
|
||||
8 |
Navigational |
Press the arrow buttons to select menu options, and the OK button to |
|
||||
|
|
buttons |
confirm. |
|
|
|
|
|
|
|
Press Up/Down to rotate a photo during photo playback. |
|
|||
9 |
Stop |
Press to stop playback. |
|
|
|
|
|
|
|
|
|
|
|
||
10 |
Play/ Pause |
Press to begin/pause playback. |
|
|
|
||
|
|
|
|
|
|
|
|
|
|
|
|
|
|
|
|
6

iconBIT XDS1003DT2 User Manual |
English |
|||||
|
|
|
|
|
|
|
11 |
|
FR |
|
Press to fast rewind the current playback. Press repeatedly to select |
||
|
|
|||||
|
|
|
|
speeds. |
|
|
|
|
|
|
|
|
|
12 |
|
FF |
|
Press to fast forward the current playback. Press repeatedly to select |
||
|
|
|
|
speeds. |
|
|
13 |
|
Red |
|
Function is available in virtual keyboard. |
|
|
|
|
|
|
|
|
|
14 |
|
EPG (Green) |
|
Press to enter the Electronic Program Guide which displays an on- |
||
|
|
|
|
screen list of programs for the coming week when watching Digital |
||
|
|
|
|
Terrestrial TV. Press to add the selected files to the playlist under |
||
|
|
|
|
browser menu. |
|
|
15 |
|
Setup |
|
Press to enter the setup menu. |
|
|
|
|
|
|
|
|
|
16 |
|
TV SYS. |
|
Press to switch between NTSC, PAL, 480P, 576P, 720P, 1080I, and |
||
|
|
|
|
1080P. |
|
|
17 |
|
Goto |
|
Press to jump to a specific point on a title. Specify the point using Title, |
||
|
|
|
|
Chapter and Time. |
|
|
18 |
|
Slow |
|
Press to play back in slow motion. Press the Play button to resume |
||
|
|
|
|
regular playback. |
|
|
19 |
|
REC |
|
Press to begin recording. |
|
|
|
|
|
|
Press repeatedly to set one touch recording (OTR) length (30 MIN. / 60 |
||
|
|
|
|
MIN. / 90 MIN. / 120 MIN. / 180 MIN. / 240 MIN. / Off). |
||
20 |
|
Edit |
|
Press to copy/delete/rename/move file in file manager. |
|
|
|
|
|
|
|
|
|
21 |
|
Copy |
|
Press to enter file selecting menu. |
|
|
|
|
|
|
|
|
|
22 |
|
Time Shift |
|
Press to activate the time shift function. Time shift function allows you |
||
|
|
|
|
to pause live TV and resume the program from the point you left it. |
||
|
|
|
|
While paused, the program is recorded to the internal HDD as long as |
||
|
|
|
|
the space is available. |
|
|
|
|
|
|
Time shift mode remains active until you press the Stop button. |
|
|
23 |
|
Angle |
|
Press to change the view angle during DVD (with multi-angle) playback. |
||
|
|
|
|
|
|
|
24 |
|
Zoom |
|
Press to zoom the image (photo or video). |
|
|
|
|
|
|
|
|
|
25 |
|
Audio |
|
Press to select an audio track. |
|
|
|
|
|
|
|
|
|
26 |
|
Subtitle |
|
Press to set subtitle options. You can change the color/size/offset/ text |
||
|
|
|
|
encoding of subtitle. |
|
|
27 |
|
TTX(Yellow) |
|
Press to open Teletext OSD if it is available in the broadcasted stream |
||
|
|
|
|
of Digital Terrestrial TV. |
|
|
28 |
|
Blue |
|
Press to open/close USB DVD-rom. |
|
|
|
|
|
|
|
|
|
29 |
|
Prev |
|
Press to view the previous file / page up. |
|
|
|
|
|
|
|
|
|
30 |
|
Next |
|
Press to view the next file / page down. |
|
|
|
|
|
|
|
|
|
31 |
|
Info |
|
Press to display current status. |
|
|
|
|
|
|
Press during playback, an onscreen display appears showing track |
||
|
|
|
|
number and time elapsed/remaining. |
|
|
32 |
|
OK |
|
Press OK button to confirm. |
|
|
33 |
|
Back |
|
Press to return to the previous screen while navigating menus. |
||
|
|
|
|
|
|
|
34 |
|
VOL+ |
|
Press to increase the volume. |
|
|
|
|
|
|
|
|
|
35 |
|
Repeat |
|
Press to set repeat option. |
|
|
36 |
|
Eject |
|
Press to safely remove the USB device. |
|
|
|
|
|
|
|
|
|
7
iconBIT XDS1003DT2 User Manual |
English |
|
|
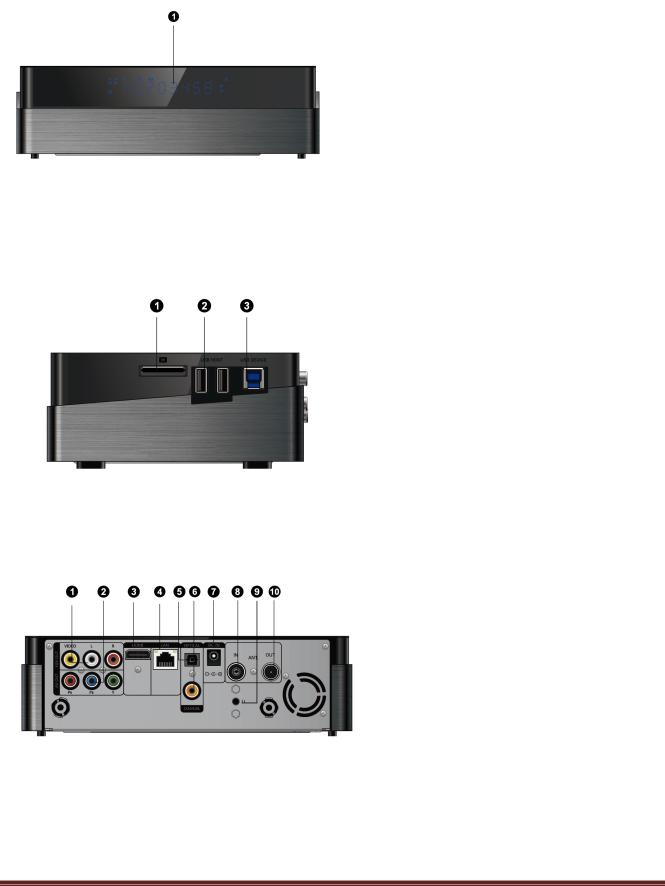
2.2 Front Panel
1. VFD display area
Mode |
Status |
|
|
Working |
Blue |
|
|
Standby |
Red |
|
|
2.3 Side Panel
1. Memory Card slot
2. USB 2.0 HOST port
3. USB 3.0 Device port
2.4 Back Panel
1. A/V OUT jack
2. Y/Pb/Pr OUT jack
3. HDMI interface
4. Gigabit LAN socket
5. S/PDIF Optical jack
6. S/PDIF Coaxial jack
7. Power input
8. ANT./RF IN socket
9. ‘U’ button, used to firmware upgrade 10.ANT./RF Out socket
8

iconBIT XDS1003DT2 User Manual |
English |
|
|
2.5 Connection
2.5.1 Connecting to a PC
This product can be used as a portable external storage device with its built-in SATA interface and high-speed USB 3.0.
Method 1, Install an internal hard disk àPlug in power adaptor to the player’s DC IN jack à Connect this player to PC with the USB3.0 cable à Press U button on back panel of the player. Method 2, Install an internal hard disk àPower on this playerà Connect this player to PC with the USB3.0 cable.
Note: A USB 3.0 cable is necessary to use this product as a portable external storage device. USB 2.0 cable is useless.
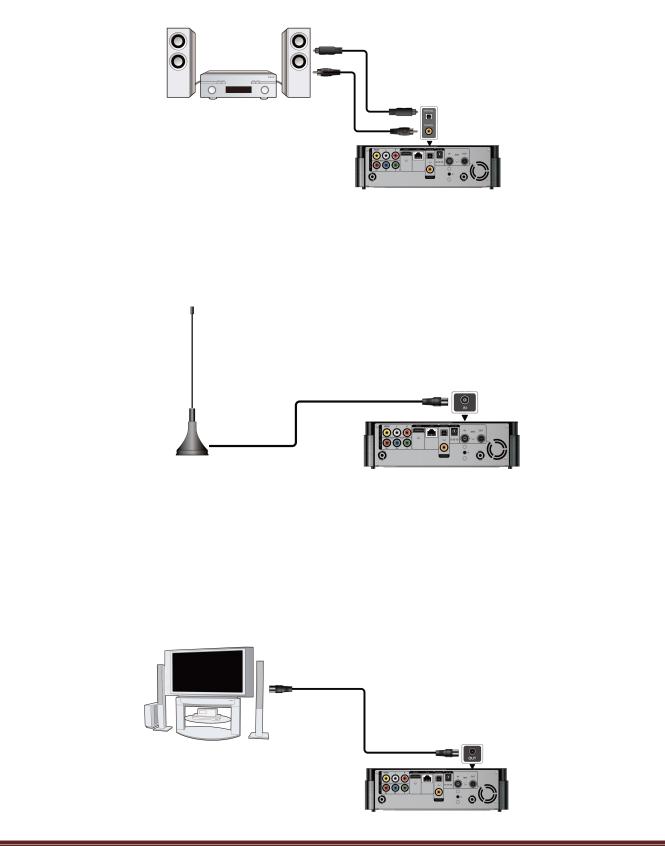
2.5.2 TV Connection
Depending on the jacks on your TV, select the connection mode. We suggest you to use HDMI output (High Definition, up to 1080p). Picture quality will be improved compared to using the component video output (use Y/Pb/Pr OUT jack) or the composite video output (Standard Definition, use A/V OUT jack).
9
iconBIT XDS1003DT2 User Manual |
English |
|
|
2.5.3 Digital Audio Device Connection
Except for HDMI jack, this player can output digital audio to amplifier though SPDIF coaxial or optical jack. Please refer to ‘3.1.2 Changing Audio settings’ for more details.
2.5.4 DVB-T signal input
Follow the picture and plug a TV Aerial to the ANT. / RF IN socket;
2.5.5 DVB-T signal output
The player can loop out the DVB-T signal to other TV receiver device by following steps.
Plug in power adaptor to the player’s DC IN jack àConnect a TV aerial to the ANT. / RF IN socket à Follow the picture and plug a TV cable to the ANT. / RF OUT socket then plug the cable to a TV or other TV receiver.
10
iconBIT XDS1003DT2 User Manual |
English |
|
|
2.6 Player Usage
2.6.1 Menu Language
The system language of this player can be set to English or other languages. Change the language you wish in the setup menu, the selected language will take effect immediately.
2.6.2 HDD Format
For users who wish to install a new SATA HDD into the player, first you need format the hard disk on the player before usage. Otherwise many functions can’t be used, such as BT download, Transmission.
You can format your HDD via Setup à System à Format menu. A password needed when you try to format the HDD, please refer to ’3.1.5 MISC ’ for more details about the password.
Note:
HDD format will remove all data stored on the hard disk drive. Please take care and backup your data in advance!
11
iconBIT XDS1003DT2 User Manual |
English |
|
|
3. Main Functions
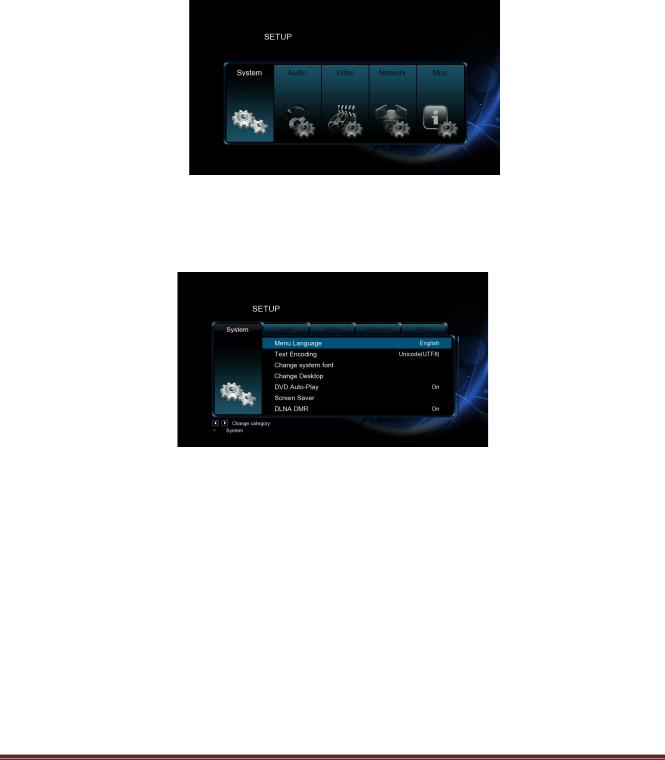
3.1 Setup Menu
The Setup menu allows you to personalize and configure the preferences for your player. To select a Setup option:
-Select the Setup icon on the home screen, or press Setup button on the remote control.
-Use the Left/Right navigational buttons to select an option, and then press OK.
3.1.1 Changing System Settings
Use this menu to configure system settings.
Menu Language
-Select to choose the OSD (On-Screen Display) language.
Text Encoding
-Select to set the text encoding option (subtitle display)
Time
-Select to set system time, you must choose the right time zone before time setting.
Screen Saver
-Here you can set the timing of screen saver and change screen saver.
DLNA DMR
-Digital Media Renderer, can play content received from a digital media controller (DMC), which will find content from a digital media server (DMS)
DLNA Device Name
-Select to name DLNA DMR.
12
iconBIT XDS1003DT2 User Manual |
English |
|
|
Mini KBD Language
-Select to change the language of the mini keyboard.
Scan storage
-Select to set the scan mode of media library.
Format
-Select to format your HDD.
BD Menu
-Here you can open the BDMV menu during BDMV folder or BD ISO playback. BD-J is not supported.
Restore Default
-Select to restore factory defaults.
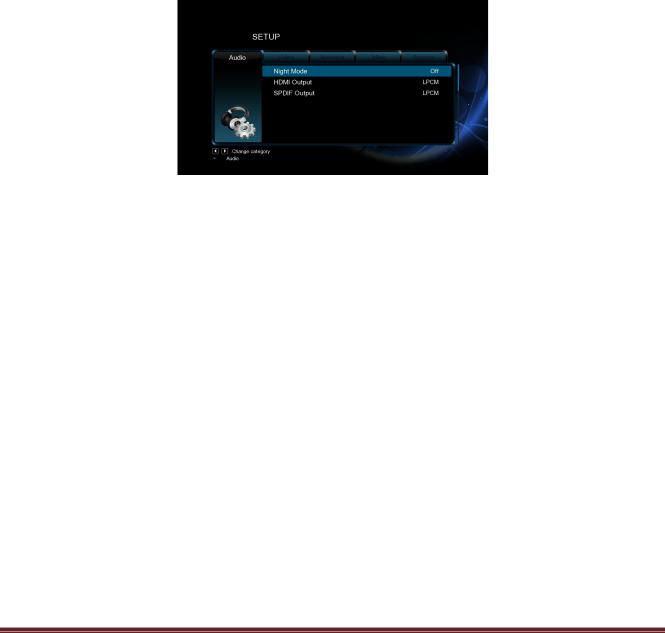
3.1.2 Changing Audio Settings
Use this menu to configure audio settings
Preferred Audio Language
-Select to choose the Audio language which you want to play
Night Mode
-Choose among Off / On / Comfort. If the option is turned on, the audio output volume will be decreased to make you more comfortable.
HDMI Output
-Choose among LPCM, LPCM Multi-Ch and RAW.
SPDIF Output
-Choose among LPCM, RAW.
Note: In raw mode, Dolby TrueHD, Dolby Digital Plus, Dolby Digital, DTS sound can be by passed to the HDMI TV or Digital amplifier.
Due to the bandwidth requirement, Dolby TrueHD and Dolby Digital Plus sound only can be by passed though HDMI cable, also the TV system must up to 720p or above.
13

iconBIT XDS1003DT2 User Manual |
English |
|
|
3.1.3 Changing Video Settings
Use this menu to configure video settings.
Aspect Ratio
-Pan Scan 4:3: Display a wide picture on the entire screen and cuts off the redundant portions. Select when a standard 4:3 TV is connected.
-Letter Box 4:3: Display a wide picture with two black borders on the top and bottom of 4:3 screen. Select when a standard 4:3 TV is connected.
-16:9: Compress the image to convert the whole image. Select when a 16:9 TV is connected.
-16:10: Select when a 16:10 TV is connected.
TV SYSTEM
-Select to adjust TV Type and video output resolution. This setting depends on your regional location. Include:
-NTSC – United States, Canada, Japan, Mexico, the Philippines, South Korea, and Taiwan.
-PAL – Europe, Greenland, parts of Africa and South America, the Mideast, China, India, Australia, and Indonesia.
1080p 24Hz
-Choose this option to enable or disable 1080P 24HZ support. A TV set with 1080P 24HZ (24P) mode is needed.
Deep Color
-Help to perform more detailed level of color depth, make continuous color change smoother. You can get more vivid color effects.
A TV set with deep color support is needed.
Screen Size
-Adjust the video output size according to the size of TV screen. Press Left/Right button to adjust the width of the screen, and Up/Down button to adjust the height of the screen. And press Zoom button to fit the screen size you have set during video playback.
14

iconBIT XDS1003DT2 User Manual |
English |
|
|
3.1.4 Changing Network Settings |
|
Wired Lan Setup
-DHCP IP (AUTO)
Select to obtain IP address automatically.
-FIX IP (MANUAL)
Select to manually input the IP Address, Subnet Mask, Default Gateway, and DNS Server IP Address.
Wireless Setup
There are 3 mode for you to select, Infrastructure (AP) and Peer to Peer (Ad Hoc) and WPS (AP) mode. Follow the prompting message on the screen and press Red button to choose Peer to Peer (Ad Hoc) or WPS (AP) mode.
Infrastructure (AP)
Infrastructure mode is used to connect computers with wireless network adapters, also known as wireless clients, to an existing wired network with the help from wireless router or access point. Please follow following steps to configure your wireless network .
Step 1: Scanning AP Access Point in your network
Follow the prompting message on the screen and press the Zoom button to select Infrastructure (AP) mode and update the access points list, and all SSID will be displayed on the screen.
Step 2: Input WEP / WPA key.
Press OK to input encryption keys via the virtual keyboard, OK to confirm and to start testing the connection.
The testing process will take for a while, please be patient to wait. If the test is ok, the network information (Profile Name, IP address, Subnet Mask, Gateway, etc.) will be displayed on the screen.
15
iconBIT XDS1003DT2 User Manual |
English |
|
|
Peer to Peer (Ad Hoc)
Peer to Peer mode, which is also called Ad Hoc mode or computer-to-computer mode, is used to connect wireless clients directly together, without the need for a wireless router or access point.
WPS (AP)
WPS, Wi-Fi Protected Setup, is used to connect a wireless router directly, without searching SSID and inputting password. In this mode, you just need to configure the parameters of your router which support WPS function. There are two modes for you to select, PBC mode and PIN mode.
PBC: First press the WPS button on the router or select the button mode in the configuration menu of the router, then select the PBC mode, the connection process will take for a while, please be patient to wait.
PIN: Input the pin code when configure your router, then select the PIN mode, the connection process will take for a while, please be patient to wait.
PPPoE Setup
-With an ADSL accountant and password, system can obtain IP address and connect to internet automatically based on PPPOE protocol.
FTP
-Configure your desired login User Name and Password.
Samba security
-Select to turn on / off password protect for Samba server. The default user name is ‘admin’, and the default password is ‘123’.
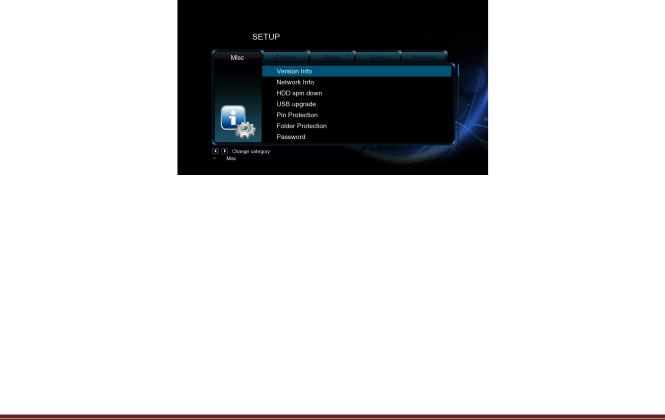
3.1.5 Miscellaneous
Use this menu to adjust miscellaneous settings.
Version Info
-This tab shows you information about the software installed and about the material components of your player.
Network Info
-This tab shows you information about your network, MAC Address, IP address Gateway, Subnet.
USB Upgrade
-Please refer to ’4. Firmware Upgrade’ for more details.
Key Tone Volume
-Here you can adjust the volume of key tone.
16

iconBIT XDS1003DT2 User Manual |
English |
|
|
3.1.6 Changing TV and Record settings
Use this menu to adjust TV and Record settings.
TV Region
-Select TV region.
Channel Scan
-In AUTO SCAN mode, the system will automatically scan for available DVB-T TV channels.
-In MANUAL SCAN mode, you can select the CH number, Bandwidth, DVB and Input Frequency. DVB option include DVB mode and DVB-T2 mode. If you select DVB, it can scan channels include only DVB streaming . If you select DVB-T2,it can scan all channels both DVB streaming and DVB-T2 streaming. Use the navigational and numerical buttons on the remote control to select or input. Press the Next button to start scanning.
Channel Sort
-Select to sort channels by Logical channel number or Channel Name.
REC Device
-Select to set device to restore the recorded files.
REC priority
-Select to choose record priority manual or schedule.
17

iconBIT XDS1003DT2 User Manual |
English |
|
|
3.2 Browsing Files and Media Playback
3.2.1 Browse via File Manager
The File Manager allows you to browse and play music, photo and movie files stored on an internal HDD, external USB device, memory card and network.
In File Manager, press Menu button, you can choose different review mode, Thumbnails, List or Preview.
3.2.2 Browse via Media Library
Enter into Movie/Photo/Music interface, only supported files will be displayed.
In media library, press MENU button to display the option menu, you can get following functions though the option menu.
18

iconBIT XDS1003DT2 User Manual |
English |
|
|
Quick-Search
-Choose the Search option in the option menu, you can search for a media file by filter media library to locate the specific media file.
Review Mode
-Choose a review mode among Thumbnails, List, Preview from option menu.
Sorting Mode
-Choose to sorting files by Name, Size, Most Viewed, Recently played or Recently Added from option menu.
Flash Animation
-Choose to display .swf files in media library.
BD/DVD
-Choose to display DVD IFO, BD MV and ISO files directly in media library.
Go to Folder
-Choose to locate the file in file manager.
Folder Directory / Leaf Folder View / Date View
-Different mode to view photos in photo library.
3.2.3 Playback Option
Press Menu button during playback, you can get following functions though the Option menu.
Title menu
-Useful for DVD IFO and ISO playback. Return to the main menu of entire disc.
Root menu
-Useful for DVD IFO and ISO playback. Return to the root main of each title.
Video Setting
-Adjust Brightness, Contrast, Saturation and Hue.
Slide Timing / Slide Transition / Select Music
-With these three options, you can choose the Interval, Transition effect and background music during the photo playback.
3.3 DTV
In this menu, you can watch and record Digital Terrestrial TV programs, or have the time shift function. To enter the DVB-T TV mode, select the DTV icon on the main menu.
3.3.1 Watching DVB-T Programs
DTV/Radio
-Choose the select TV programs or broadcasting stations.
19

iconBIT XDS1003DT2 User Manual |
English |
|
|
Channel List
-Press the OK button when watching TV programs, and the channel list where you can see the channel number and name will be displayed.
-To get the favorite channel list, press the Prev / Next button in this menu.
Info Bar
-Press the Info button when watching TV programs, an info bar will be displayed to show the channel information.
There’re 5 strings displayed on the bar. Taking the info bar in the above photo for example: 9+ – Stands for TV rating;
ENG – Stands for the voice language;
SS– Stands for subtitle;
TT– Stands for Teletext;
576 – Stands for resolution (SD - Standard Definition, HD – High Definition). When there is no string in the bar, relevant option is unavailable.
Electronic Programming Guide
-Press the EPG button when watching DVB-T TV programs, the Electronic Programming Guide will be displayed. Here you can get the program list of a whole day.
Teletext
-If the broadcasted stream supports Teletext, press the TTX button to enter the Teletext menu.
Subtitle List
-Press the Subtitle button when watching DVB-T TV programs, the Subtitle List menu will be displayed.
One Touch Recording
-Press REC button to start the recording, recording files are automatically stored in a folder named REC by default. Press REC repeatedly to set one touch recording length ,30 MIN. / 60 MIN. / 90 MIN. / 120 MIN. / 180 MIN. / 240 MIN. / Off.
Time Shifting
-Time shift function allows you to pause live TV and resume the program from the point you left it. While paused, the program is recorded to the internal HDD as long as the space is available. Press the TIME SHIFT button to active time shift function.
-Press PLAY button to resume the program. Time shift mode remains active until you press the STOP button. Pause/FF/FR/PREV/NEXT button is available while time shift mode.
3.3.2 Schedule Recording
To enter timer list, press Menu button when watching TV programs, and select Schedule Recording in the option menu. Here you can add, edit, delete recording schedules, change all schedule status and view schedule recording history.
Create a New Schedule
20
 Loading...