

Page 1

25/37/49/61/88-note velocity-sensitive piano-style keys USB
MIDI controller keyboard
iKeyboard 3X
iKeyboard 4X
iKeyboard 5X
iKeyboard 6X
iKeyboard 8X
User manual
Page 2
Important Safety Instructions
1. Read this manual thoroughly before using this unit.
2. Keep this manual for future reference.
3. Take notice of and comply with all warnings included in the user's manual or indicated on the
appliance.
4. Follow all instructions included in this manual.
5. Do not expose this unit to rain or moisture. Avoid having water or other liquids spilled on this
unit.
6. When cleaning the cabinet or other parts of this appliance, use only a dry or slightly damp soft
cloth.
7. Do not block any ventilation openings or interfere with the proper ventilation of this unit. Install
in accordance with the manufacturer's instructions.
8. Do not use or store near any heat sources such as radiators, heat registers, stoves, or other heat producing appliances.
9. Do not interfere with the safety purpose of the polarized or grounding-type plug. A polarized plug
has two blades with one wider than the other. A grounding-type plug has two blades and a third
grounding prong. These are designated for your safety. If the provided plug does not fit into your
outlet, consult an electrician.
10. Protect the power cord from being walked on or otherwise damaged by items placed on or
against them. Particular attention should be given to the plugs, receptacles, and the point where
the cord exits the appliance.
11. To avoid the risk of electrical shock, do not touch any exposed wiring while the unit is in
operation.
12. Only use attachments/accessories specified by the manufacturer.
13. Unplug this unit and all connected electrical equipment during lightning storms or when left
unused a long period of time.
14. Refer all servicing to qualified service personnel. Servicing is required when the appliance has
been damaged in any way or fails to operate normally.
WARNING: To reduce the risk of fire or electric shock, do not expose this unit to rain or moisture
Page 3

Contents
Introduction ............................................................................................................4
What's in the package? .........................................................................................4
Features ................................................................................................................5
Front Panel Layout ................................................................................................6
Rear panel layout ..................................................................................................8
Getting Started ......................................................................................................9
Connecting your iKeyboard X controller ................................................................9
Cubase ................................................................................................................10
Nuendo ................................................................................................................ 11
Logic Pro .............................................................................................................12
Samplitude...........................................................................................................13
Bitwig ...................................................................................................................15
Reason ................................................................................................................16
Reaper .................................................................................................................17
Studio One...........................................................................................................18
Ableton Live .........................................................................................................19
Pro Tools ..............................................................................................................20
iMapTM Software for Mac OS X ............................................................................22
Installing iMapTM Software for Windows ..............................................................23
Assigning MIDI functions with iMapTM ..................................................................25
iMapTM iKeyboard X software panel ....................................................................25
Firmware upgrade ...............................................................................................29
Restore the factory default settings .....................................................................32
Reverse sustain pedal connector polarity............................................................32
Velocity curve ......................................................................................................33
Appendix A...........................................................................................................34
Specications ......................................................................................................36
Services ...............................................................................................................37
Page 4

Introduction
Thank you for purchasing the ICON iKeyboard 3X / iKeyboard 4X / iKeyboard 5X /
iKeyboard 6X / iKeyboard 8X USB MIDI controller. We sincerely trust this product
will provide years of satisfactory service, but if anything is not to your complete
satisfaction, we will endeavor to make things right.
In these pages, you'll nd a detailed description of the features of the iKeyboard 3X
/ iKeyboard 4X / iKeyboard 5X / iKeyboard 6X / iKeyboard 8X, as well as a guided
tour through its front and side panels, step-by-step instructions for its setup and use,
and full specications.
You'll also nd a warranty card enclosed---please don't forget to ll it out and mail
it so that you can receive online technical support at: www.iconproaudio.com. And
so we can send you updated information about these and other ICON products in
the future. As with most electronic devices, we strongly recommend you retain the
original packaging. In the unlikely event the product must be returned for servicing,
the original packaging (or reasonable equivalent) is required.
With proper care and adequate air circulation, your iKeyboard 3X / iKeyboard 4X
/ iKeyboard 5X / iKeyboard 6X / iKeyboard 8X will operate without any trouble
for many years. We recommend that you record your serial number in the space
provided below for future reference.
Please write your serial number here for future reference:
Purchased at:
Date of purchase:
What's in the package?
● iKeyboard 3X / iKeyboard 4X / iKeyboard 5X / iKeyboard 6X / iKeyboard 8X
-
25/37/49/61/88-note velocity-sensitive piano-style keys USB MIDI controller
keyboard x 1
● CD x 1
App software – iMap (Mac & Windows)
User manual & QSG
DAW software – Bitwig
● Quick Start Guide x 1
● USB 2.0 cable x 1
4
Page 5

Features
● Powerful controller is equipped and easy setup with Mackie Control and HUI protocol.
● Backlit LED touch fader reacts in real-time with DAW. Synchronize automatically with
different channel value when switching between channels.
● Dual function encoder knob (Enter & rotate)
● 11-segment LED surrounding the encoder to indicate the rotating position.
● Velocity-sensitive piano style keyboard
● Modulation and Pitch jog-wheel
● 3-segment LED screen
● 18 assignable LED backlit buttons
● Illuminated channel buttons including Rec-enable, Solo and Mute.
● 6 illuminated transport buttons including Play, Stop, Rec, Rewind, Fast forward and
Loop
● Octave up/down buttons
● Transpose up/down buttons
● Multi velocity curves available for selection (Key and Pads)
● Midi output jack
● Expression & sustain pedal TRS connectors
● Sustain pedal connector polarity reversible
● Class-compliant with Windows XP, Vista (32-bit/64-bit), Windows 7/8/10 (32-bit & 64-
bit), and Mac OS X (IntelMac)
● USB 2.0 high speed connectivity
● Mackie control build-in for Cubase, Nuendo, Samplitude, Logic Pro and Ableton Live.
● Mackie HUI protocol build-in for Pro Tools.
TM
● iMap
● Firmware upgrade available simply via USB connection and iMap software.
● Robust metal casing with Kensington lock port
software included for easy mapping of MIDI functions
5
Page 6
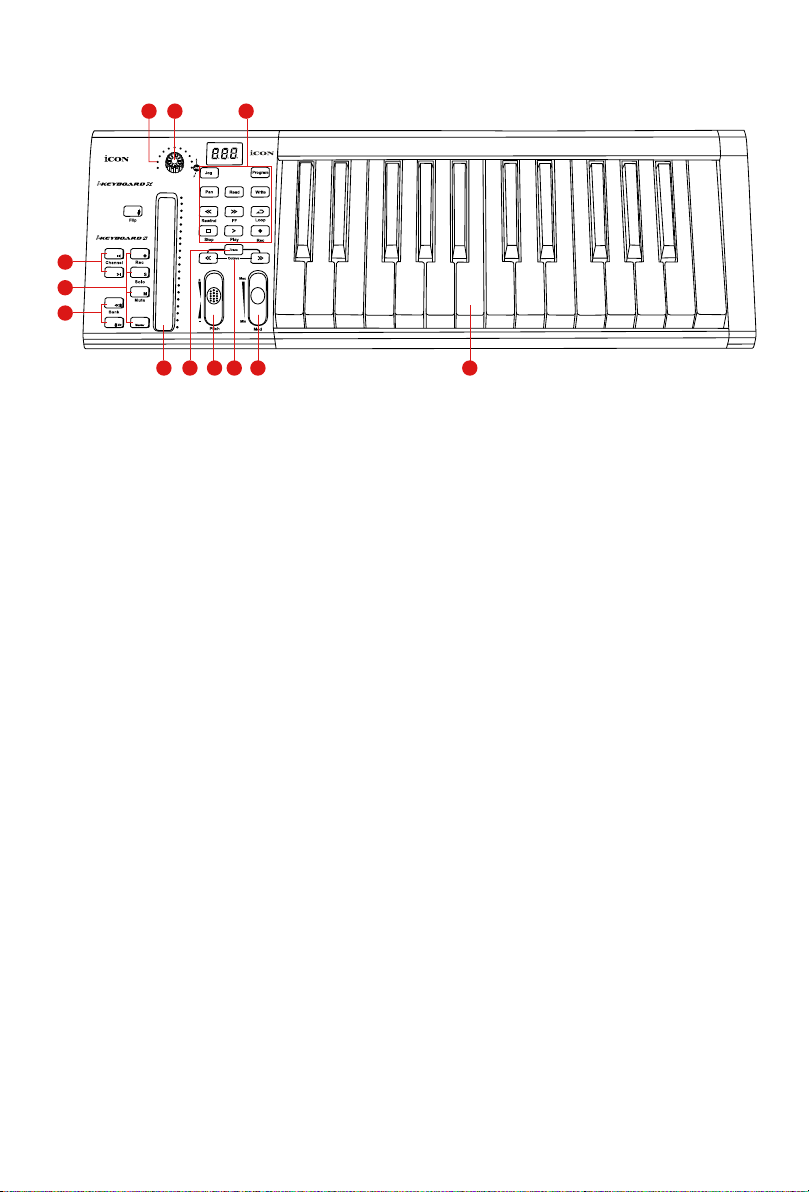
Front Panel Layout
11
2 3 4 5
6
34
10
5
11
5
92 7 8 6
1
Note: Functions operate slightly differenently between DAWs. Please refer to your
DAW manual for each function. The following description is based on the functions
that operate in Apple Logic.
1. 25/37/49/61/88-note key switches
25/37/49/61/88-note velocity-sensitive piano-action key switches.
2. Backlit LED touch fader to control DAW’s Channel/Master faders
The touch fader could be used to adjust the parameter of different channels. Press the two
“Track or Bank” shifting buttons to shift between channels. Also, by pressing the “Master”
button, the fader will change to control the parameters of the master channel.
3. Dual function encoders
The dual functioned encoder acting as a push-button and a rotary control. When an
encoder is pressed, it may be used to change modes of operation or to change what
appears in the display above the channel strips. When an encoder is rotated, depending
on its assigned function, it can be used to adjust a channel’s pan, send level, or plug-in
parameters.
4. Encoder LED
The 11-LED surrounding the encoder lights up to indicate the relative position of the
rotation without having to look at your computer.
5. Control buttons
Recording channel control buttons section
REC button - Activate and deactivate the recording state of the associated channel. The
switch will light red when the channel is armed.
SOLO button - Turn On and Off the solo state of the associated channel. The switch will
light green when the channel solo state is on and other channels will be muted. You could
solo multiple channel by pressing SOLO buttons on additional channels.
MUTE button - Activate and deactivate the mute state of the associated channel. The
switch will light blue when the channel is muted.
Master button - Switch the touch fader to control the DAW master fader.
6
Page 7

Transport control buttons section
PLAY button - Activate the play function of the DAW.
STOP button - Activate the stop function of the DAW.
REC button - Activate the record function of the DAW.
REWIND button - Activate the rewind function of the DAW.
FAST FORWARD button - Activate the fast forward function of the DAW.
LOOP button - Activate the loop function of the DAW.
Automation section
READ button - Press the READ button to activate the read function of the current audio
track.
WRITE button - Press the WRITE button to activate the write function of the current audio
track.
Other control buttons
Jog button - Activate to use the encoder as a jog wheel.
The jog wheel is used for various purposes specic to the DAW application, including shuttle
and scrubbing functions.
Program button - Use together with the encoder to change the sound bank of your soft-
synth.
(Tip: Please refer to Appendix A for Mackie Control and HUI protocol functions.)
6. Modulation jog wheel
Rotate to adjust the modulation effect.
7. Pitch jog wheel
Rotate to adjust the pitch bend. It returns to default, “0” when released.
8. Octave buttons
Raise or lower the pitches played on your keyboard.
9. Transpose button (Use in conjuction with the Octave up/dwon
buttons)
Raise or lower the pitches (by less than an octave) played on your keyboard.
(Tip: While pressing and holding the “Transpose” button, press a keyswitch within an octave
range from the original c1 position) to change the c1 to that particular switch.)
10. Track </> buttons
Track < Shift “one” channel up for all faders (except the master channel).
Track > Shift “one” channel down for all faders (except the master channel).
11. Bank </> buttons
Bank < Shift “eight” channels up for all faders (except the master channel).
Bank > Shift “eight” channels down for all faders (except the master channel).
7
Page 8

Rear panel layout
6
11
2 3 4 5
1. Expression Pedal Input
A standard expression pedal can be connected via this 1/4” input.
2. Sustain Pedal Input
This 1/4” jack can be used to connect a momentary footswitch, like a piano's sustain pedal.
(ICON SPD-01)
Tip: You may reverse the sustain pedal connector polarity with the provided iMap.
3. Midi Out Port
Use the MIDI Out terminal to connect an external synthesizer or sound module.
4. USB port
Functions as a MIDI port to your notebook (or computer) and compatible software. Also
provides power to your iKeyboard 3X/4X/5X/6X/8X.
5. 7V/1A DC power adapter connector
Connect your 7V/1A DC power adapter (optional) here.
6. Power switch
Power switch for your iKeyboard 3X/4X/5X/6X/8X.
8
Page 9

Getting Started
Connecting your iKeyboard X controller
1. Connect the ikeyboard X to your Mac/PC via the USB port.
Choose a USB port on your Mac/PC and insert the wide (at) end of the USB cable. Connect
the cable’s small jack end to the ikeyboard X. Your Mac/PC should automatically “see” the
new hardware and notify you that it is ready to use.
2. Mode select & assign the MIDI messages to iKeyboard X with iMap
software
Select Mackie Control or HUI mode from the pull down menu for pre-mapped MIDI mapping.
Select User Dened mode for self MIDI assignment. Refer to P.25 for “Assign the MIDI
messages with “iMapTM” software.
Tip: Make sure you have selected the correct DAW mode in the pull down menu.
3. Setup your DAW
Activate the ICON iKeyboard X controller in your DAW or MIDI software using “MIDI Setup”
or “MIDI Devices”.
For LogicTM, CubaseTM and NuendoTM, choose Mackie Control at the “Device List”.
(Note: Every application does this a little different, so refer to your software user manual for
the settings.)
9
Page 10
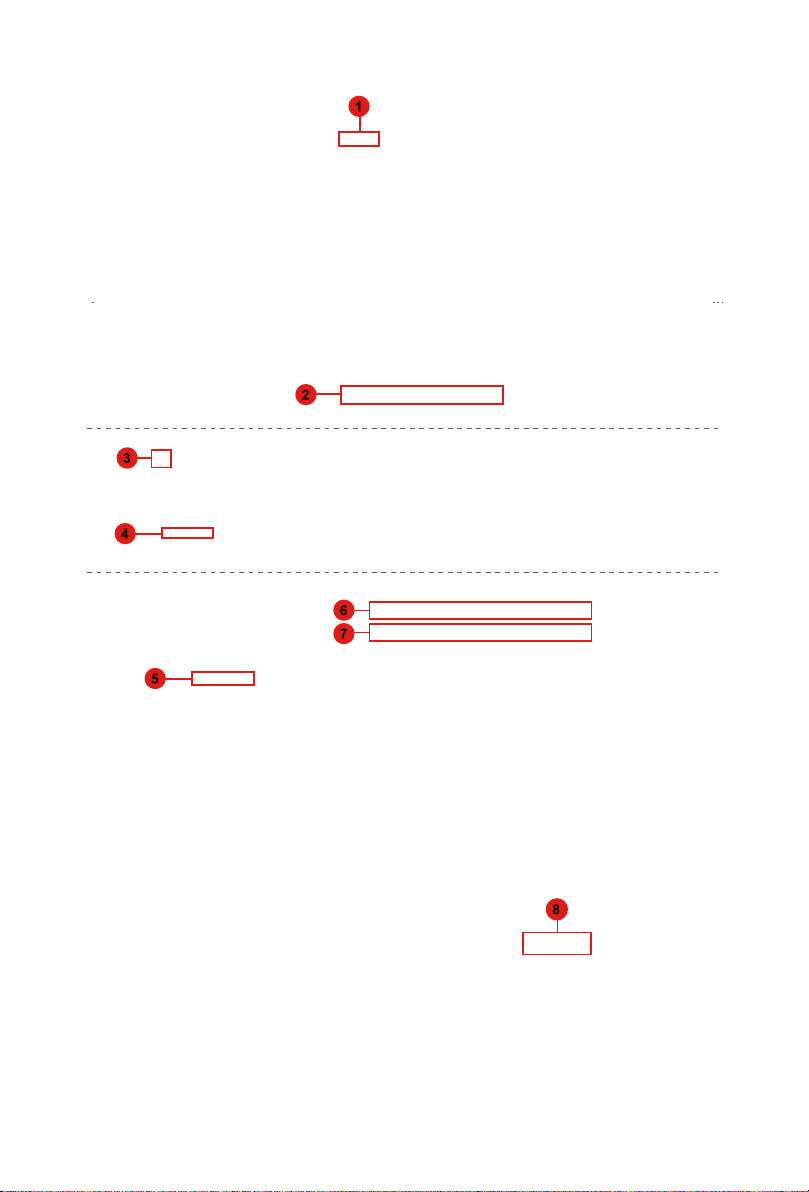
Cubase
iCON iKeyboard 3X V1.00
iCON iKeyboard 3X V1.00
10
Page 11
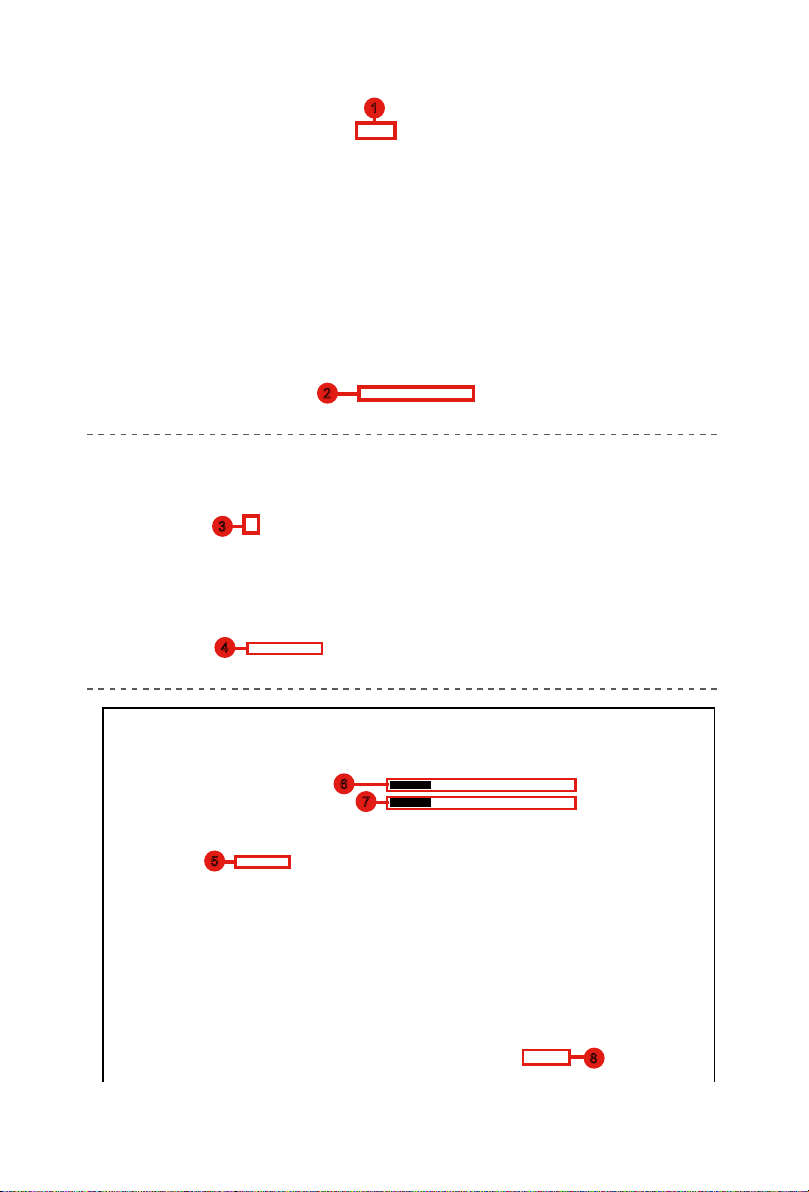
Nuendo
Nuendo
1
2
Nuendo
1
2
3
4
Nuendo
1
2
3
4
5
iCON iKeyboard 3X V1.00
6
iCON iKeyboard 3X V1.00
7
8
11
Page 12
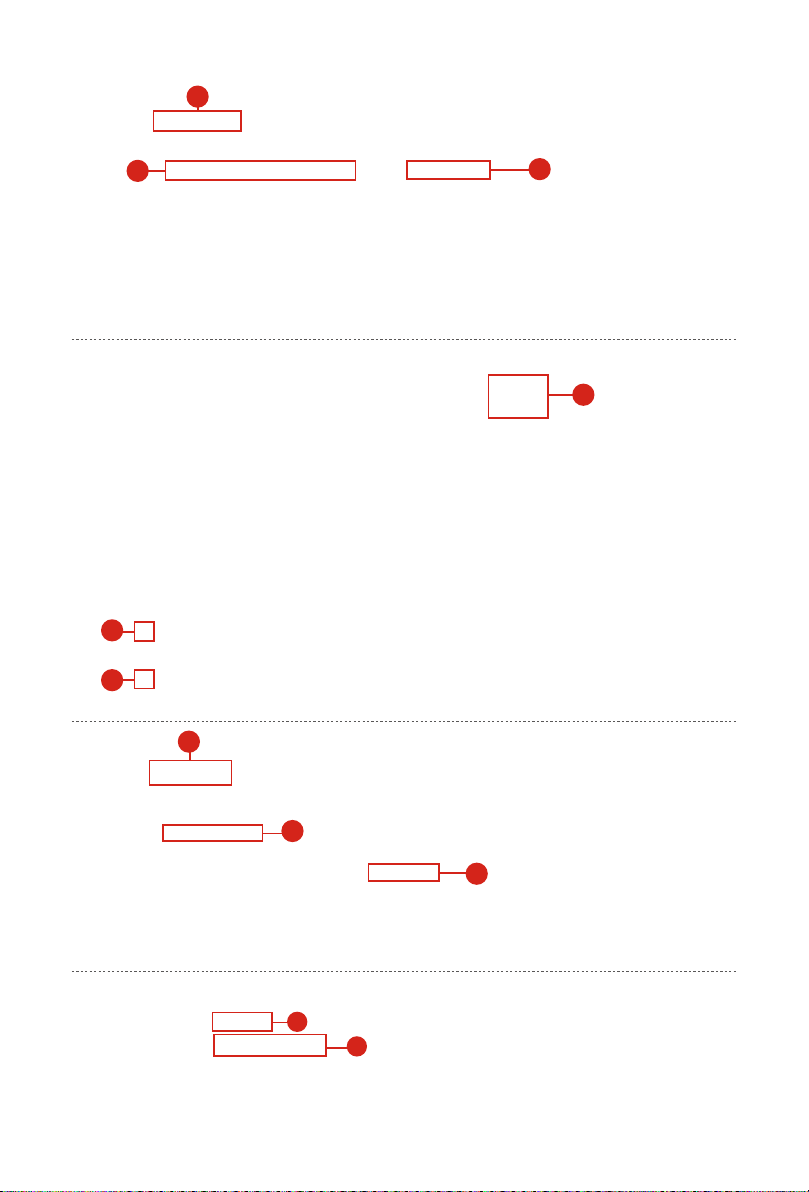
Logic Pro
1
2
5
6
7
3
4
12
8
9
10
11
Page 13
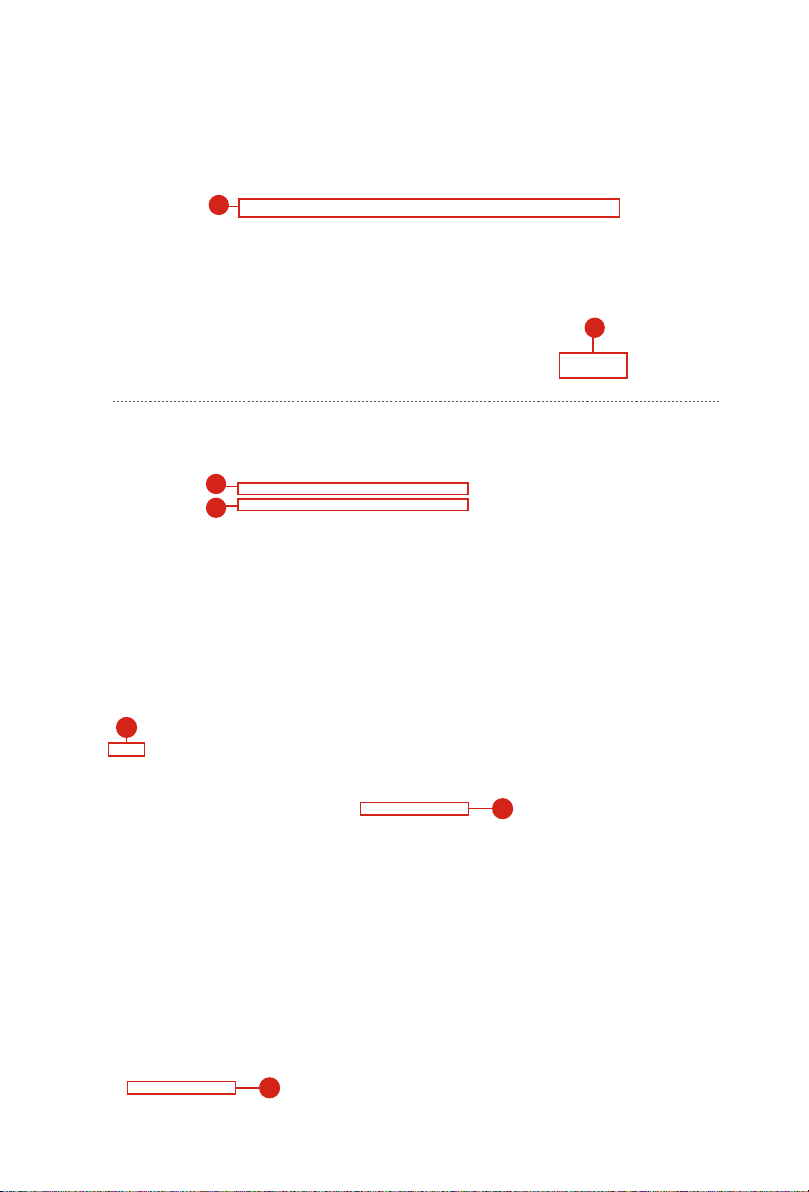
10
11
5
6
7
8
9
Samplitude
12
13
Samplitude
1
14
15
iCON iKeyboard 3X V1.00
iCON iKeyboard 3X V1.00
3
2
13
Page 14
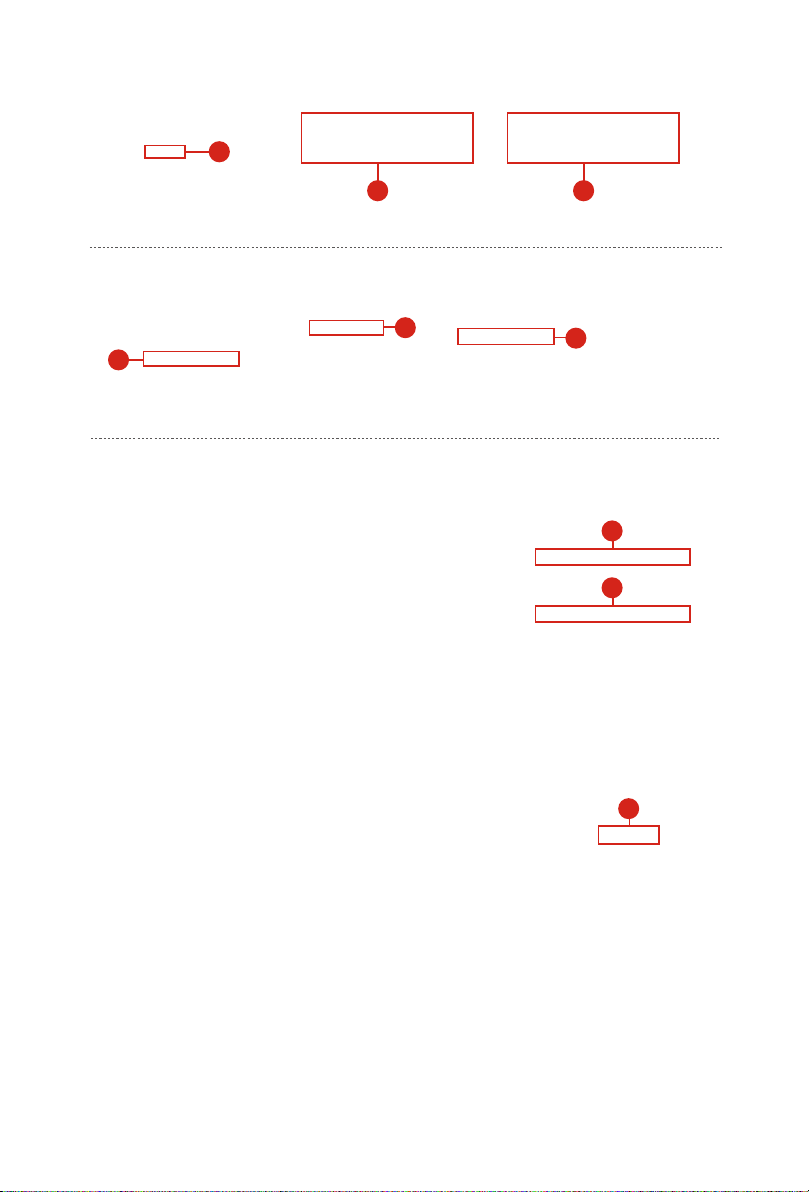
1
2
3
iCON iKeyboard 3X V1.00
iCON iKeyboard 3X V1.00 iCON iKeyboard 3X V1.00
4
iCON iKeyboard 3X V1.00
Microsoft GS Wavetable Synth
5 6
8
9
7
10
iCON iKeyboard 3X V1.00
11
iCON iKeyboard 3X V1.00
12
14
Page 15
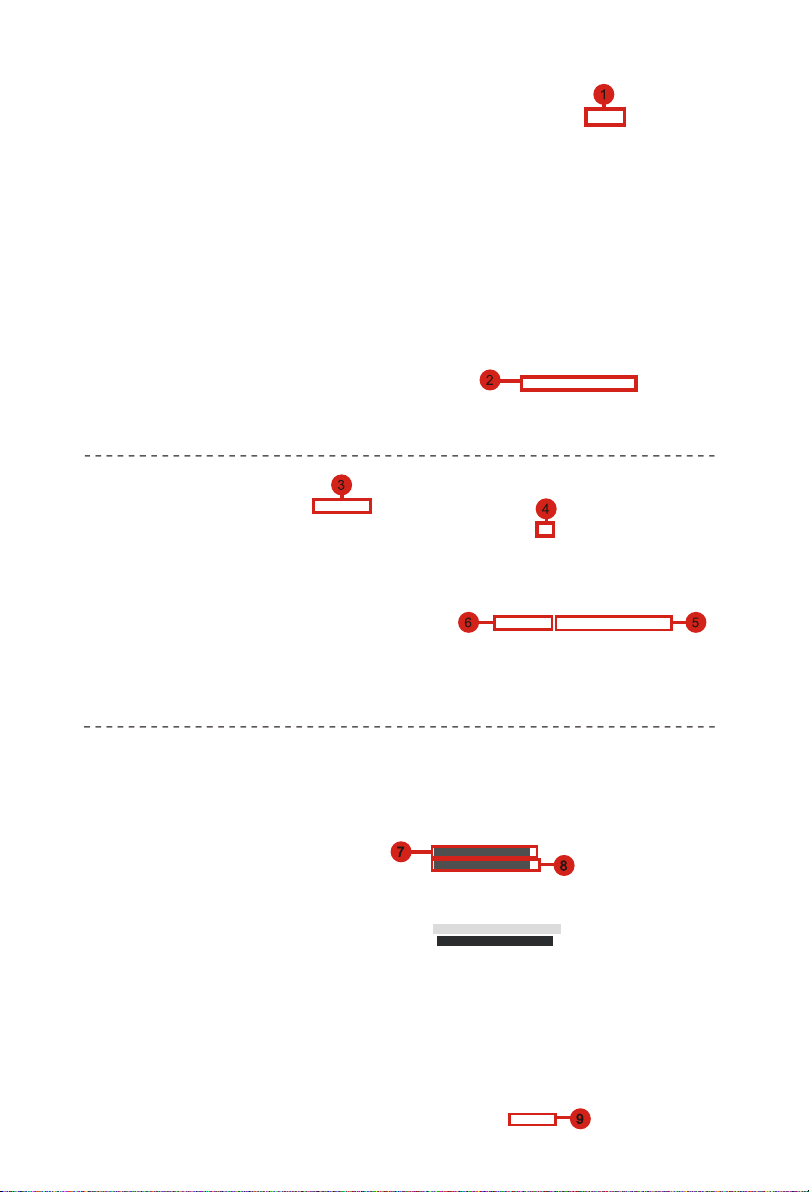
Bitwig
iCON iKeyboard 3X V1.00
iCON iKeyboard 3X V1.00
iCON iKeyboard 3X V1.00
15
Page 16
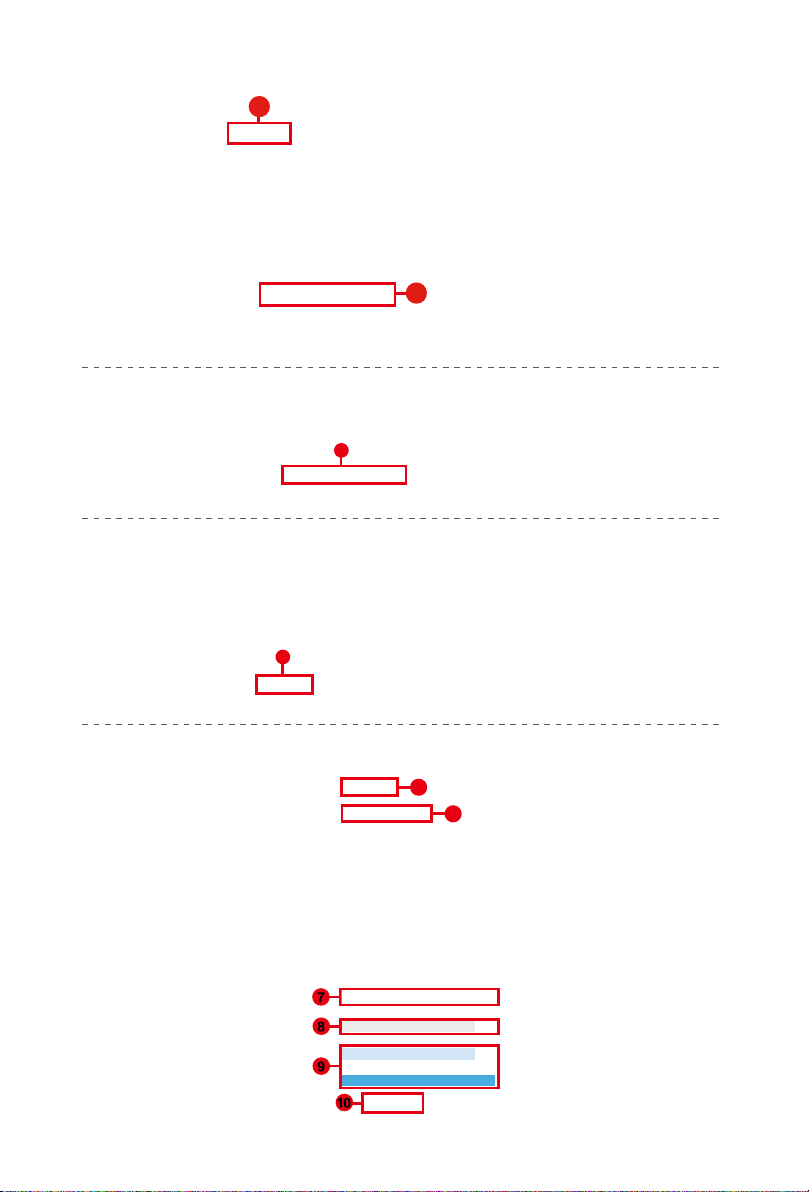
Reason
Reason
1
2
3
4
16
5
6
iCON iKeyboard 3X V1.00
iCON iKeyboard 3X V1.00
iCON iKeyboard 3X V1.00
Page 17
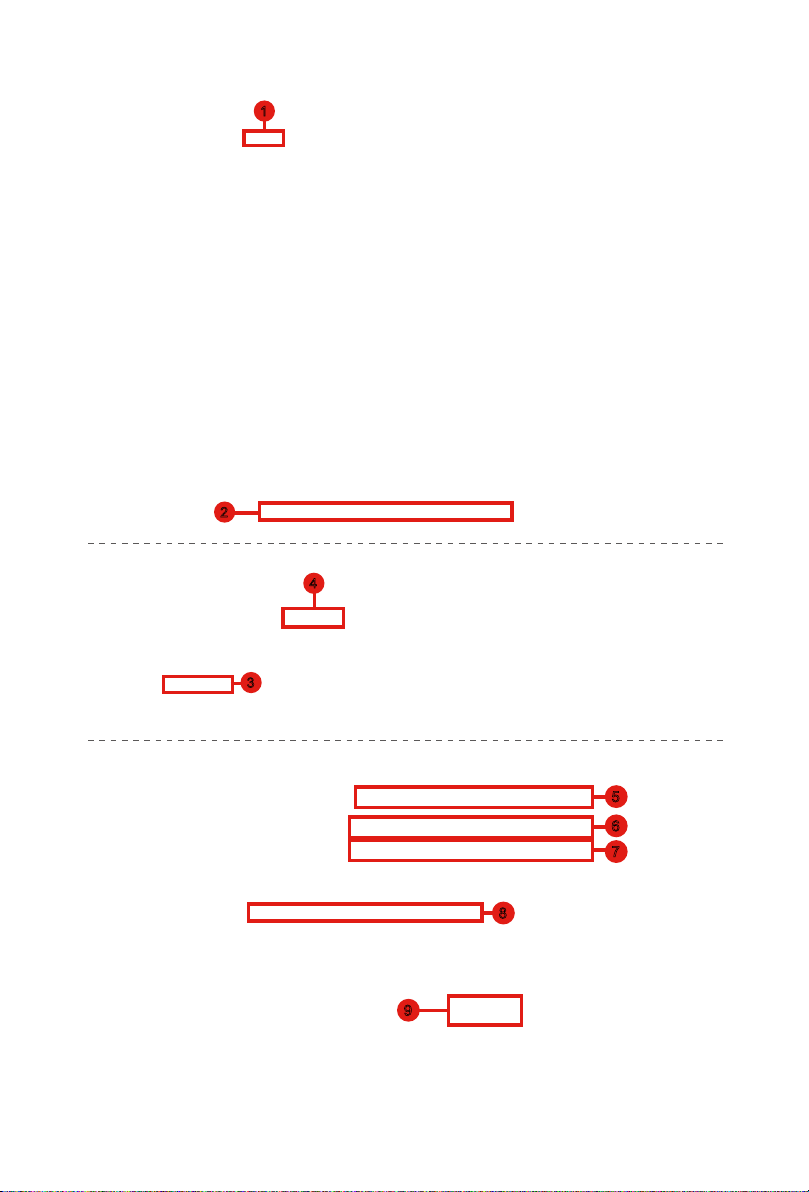
Reaper
Reaper
1
2
4
3
Mackie Control Extender
iCON iKeyboard 3X V1.00
iCON iKeyboard 3X V1.00
8
9
5
6
7
17
Page 18
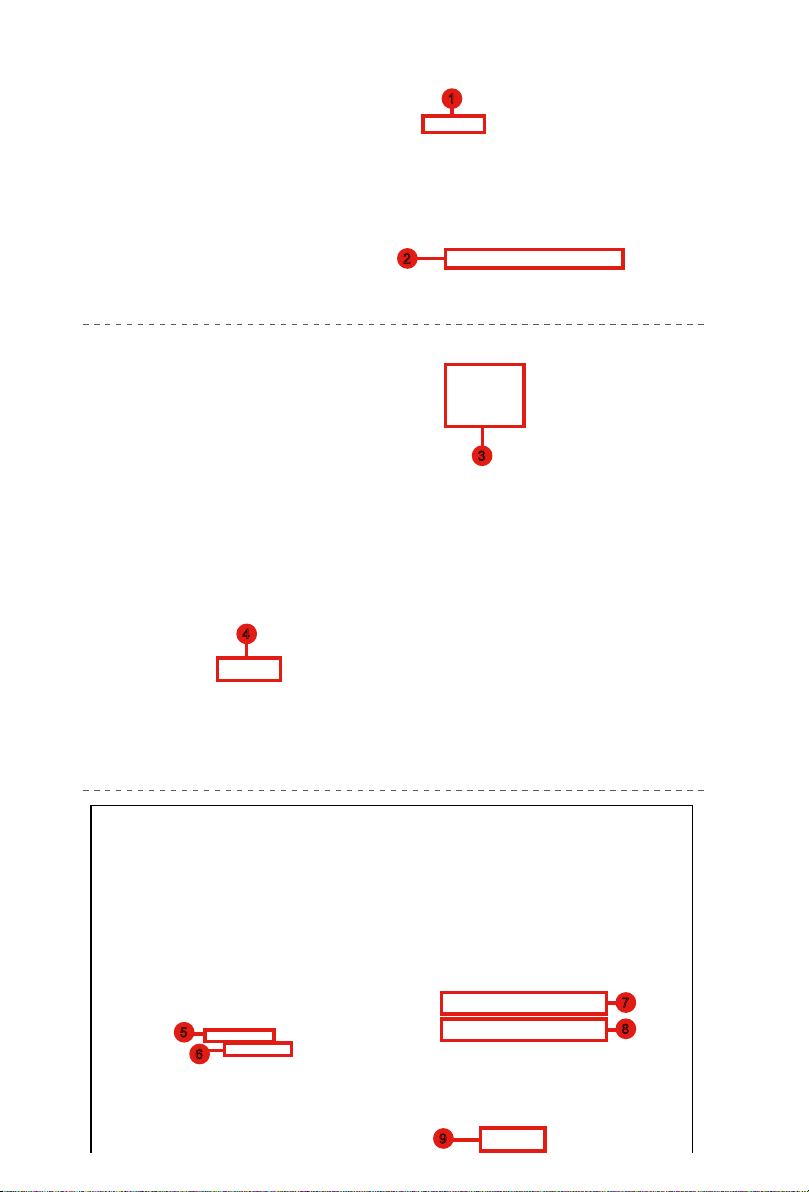
Studio One
Studio One
1
2
3
4
18
iCON iKeyboard 3X V1.00
5
6
iCON iKeyboard 3X V1.00
9
7
8
Page 19
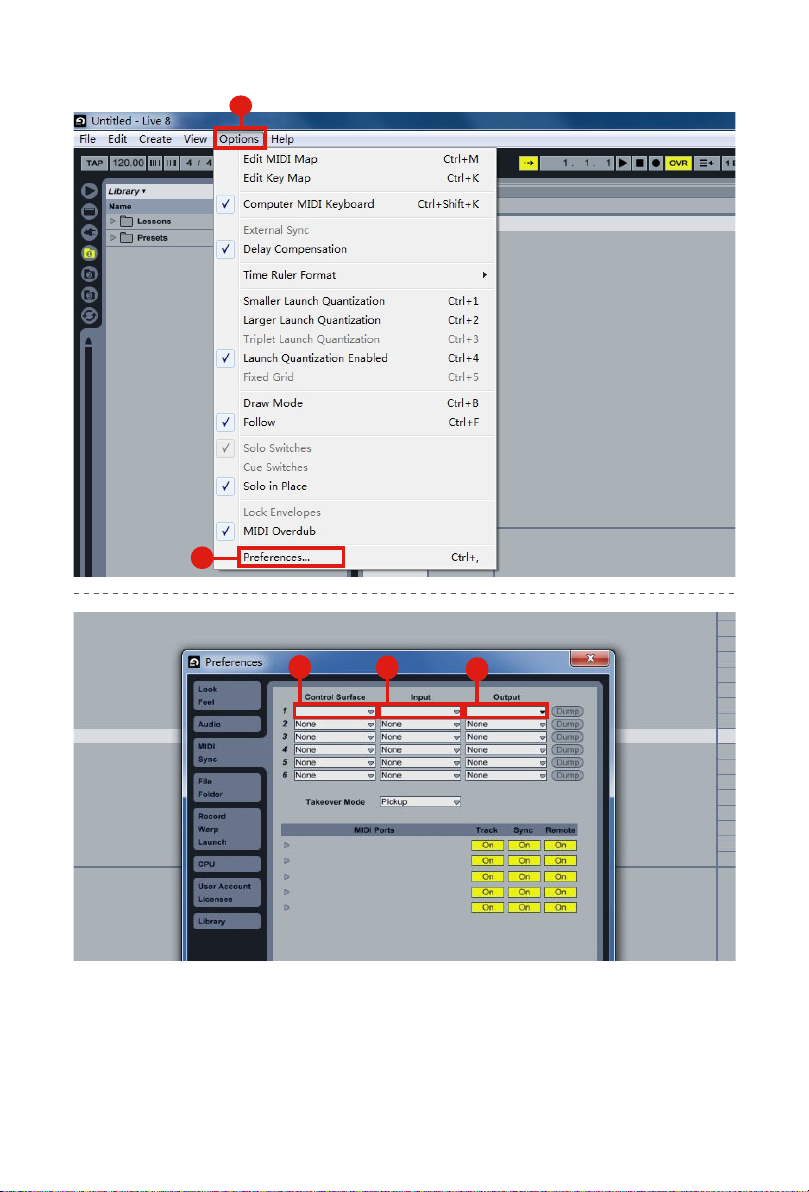
Ableton Live
2
1
3
Input: MackieControl Input(iCON iKeyboard 3X V1.00)
Output: MackieControl Output(iCON iKeyboard 3X V1.00)
Output: Microsoft GS Wavetable Synth
Automap Propellerhead
Automap MIDI
4
iCON iKeyboard 3Mackie Control iCON iKeyboard 3
5
19
Page 20
Pro Tools
Pro Tools
4 5
iCON iKeyboa
3
iCON iKeyboard 3X V1.00
6
7
Automap HUI
Automap MIDI
Automap Propellerhead
iCON iKeyboard 3X V1.00
8
Microsoft GS Wavetable Synth
Microsoft MIDI Mapper
20
iCON iKeyboaiCON iKeyboa
10
11
9
12
Page 21

Automap HUI
Automap MIDI
Automap Propellerhead
7
8
4 5
6
11
12
10
9
Microsoft GS Wavetable Synth
Microsoft MIDI Mapper
iCON iKeyboa
iCON iKeyboaiCON iKeyboa
iCON iKeyboard 3X V1.00
iCON iKeyboard 3X V1.00
Automap HUI
Automap MIDI
Automap Propellerhead
iCON iKeyboard 3X V1.00
13
14
21
Page 22

iMapTM Software for Mac OS X
Please follow the procedures below step-by-step to launch your iMapTM software in
Mac OS X.
1. Insert the Utility CD in your CD-Rom and double click “iKeyboard
X" Series iMap” icon.
Diagram 1
Tips:
By “dragging and dropping” the “iKeyboard X” icon into the “Applications” folder, you
can create a “iMap” shortcut on your Mac’s desktop.
22
Page 23

Installing iMapTM Software for Windows
Please follow the procedures below step-by-step to install your iMapTM software.
① Turn on your PC
Insert the Utility CD in your CD-Rom
②
After you have inserted the CD into your
CD-Rom, an installation screen should appear
as shown in diagram 2; click “Install”.
(Note: If the installation screen not appear
automatically go to the CD folder and
double click on “Setup”.)
Diagram 2
Setup Wizard appear
③
Setup wizard appears, please click “Next”.
Diagram 3
Choose Install Location
④
Choose your preferred install location for
iMapTM or use the default location and click
“Next”.
Select shortcut
⑤
Select the start menu folder in which you would
like to create the iMapTM shortcut. Then click
“Next”.
Diagram 4
Diagram 5
23
Page 24

Create a shortcut on your desktop
⑥
Please untick the box if you do not want to place
a shortcut icon on your desktop for iMapTM,
otherwise click “Next”.
TM
iMap
⑦
The iMapTM installation has now started, wait
for it to nish. Then click “Finish”.
Installation nished
⑧
Click “Finish” to complete the iMapTM software
installation.
started to install
Diagram 6
Diagram 7
24
Diagram 8
Page 25

Assigning MIDI functions with iMap
You can use iMapTM to easily assign the MIDI functions of your iKeyboard X.
Note: If your iKeyboard X is not connected to your Mac/PC, the message “There are no
MIDI input devices” will appear. Please connect iKeyboard X to your Mac/PC with the
provided USB cable.
Diagram 9
TM
iMapTM iKeyboard X software panel
ikeyboard X’s iMap is divided into three main sections as described below:
Section 1
Section 2
Section 2 Section 3Section 3
25
Page 26
Section 1
1.0 Keyboard elements assignment
These elements include the key switches, velocity curve, modulation/pitch bend jog
wheel, Sustain & Expression pedal, Transpose & Octave buttons. These elements are
assigned by the top three drop down windows. To assign a control, select it by clicking
it and assign a different midi message by the two drop down menus (MIDI Channel & CC).
1.3
1.1 1.2 1.4
1.1 MIDI Channel
Assign MIDI channel from 0-16.
1.2 CC valuel
Assign MIDI CC value from 0-127.
1.3 Velocity Curve
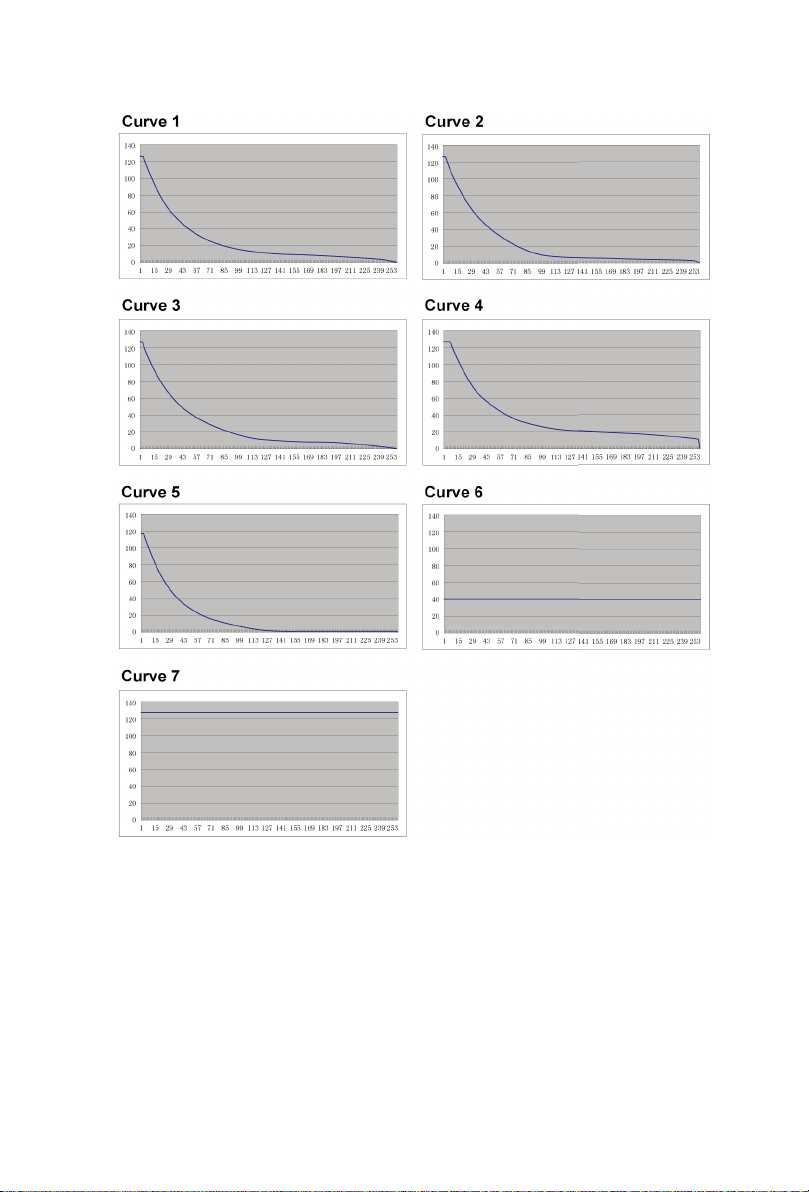
Select the available velocity curve of your keybed. For the difference velocity curve
diagram, please refer to P.33.
1.4 Sustain Pedal
You could reverse the sustain pedal connector polarity. Please refer to P.32 for details.
Section 2
2.0 Control surface elements assignment
These elements include all the buttons, the knob and the touch pad. These elements are
assigned by the lower four drop down menus.
Note: iKeyboard X has built-in Mackie Control protocols & HUI for different DAW such
as Cubase
Studio OneTM and ProToolsTM By selecting the correct DAW and Mackie control (HUI)
protocol, ikeyboard X has automatically mapped the major functions and work seamlessly
with that DAW.
26
TM
, SamplitudeTM, Abelton LiveTM, Logic ProTM, BitwigTM, ReasonsTM, ReaperTM,
2.22.1
Page 27
2.1 Control Mode
Mackie Control: Select “Mackie Control” for Mackie control protocol
HUI: Select “HUI” for HUI control protocol
User Dened: Set your own midi settings for all the controllers
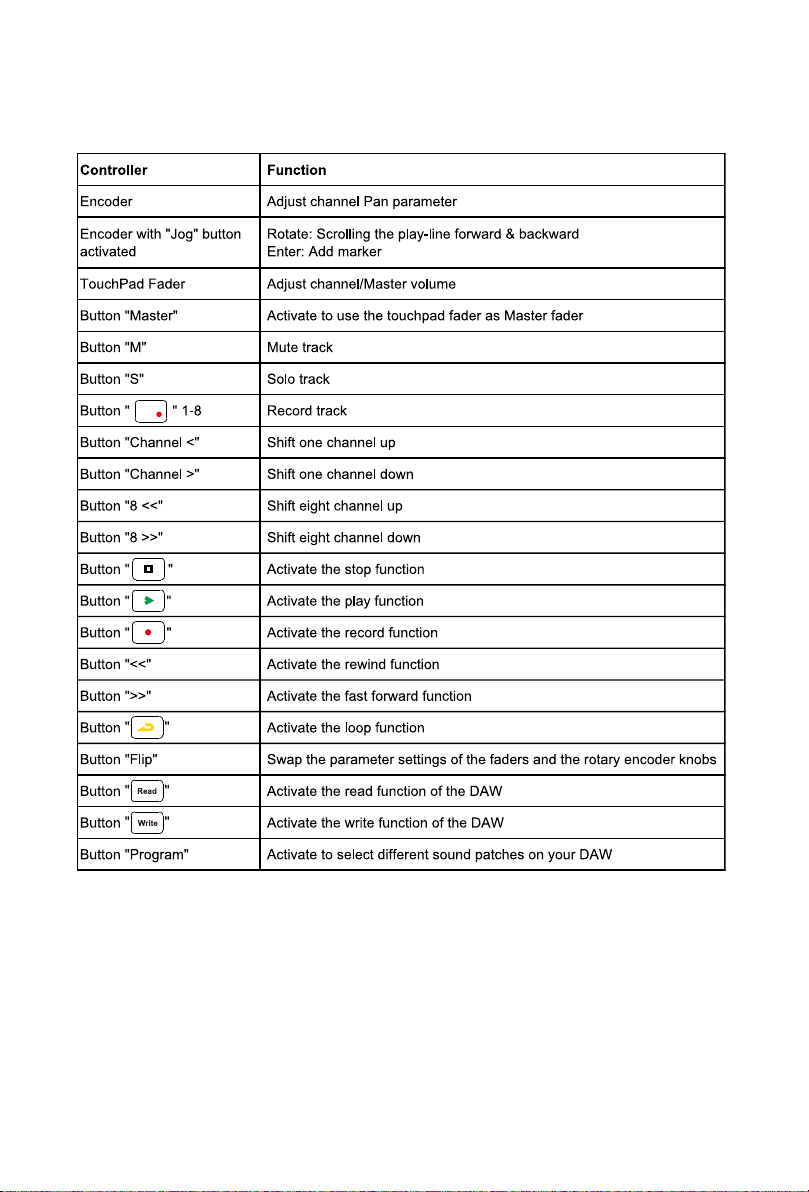
(Tip: Please refer to Appendix A for Mackie Control and HUI protocol functions.)
(Note: In “Mackie Control / HUI” mode, settings are xed and not changeable.)
2.2 User dened mode (Advance user)
If you would like to assign your own midi mapping, select “User Dened” mode at the
control mode drop down menu. To assign a control, select it by clicking it and assign a
different midi message by the three drop down menus. The table below shows the different
types of midi messages and their changeable parameters.
MIDI Message Type Channel Parameters
Note 0 to 16 -1(C) to 9(G)
CC 0 to 16 0 to 127
Section 3
3.0 General setting to the keyboard
3.1 3.3
3.5
3.2
3.4
3.1 “Save le” button
Click this button to save your current settings for the ikeyboard X. The le is an
“ikeyboard X” le.
3.2 “Load le” button
Click this button to load a previously saved “. ikeyboard X” setting le for your ikeyboard X.
3.3 “Send Data” button
Click this button to upload the iMapTM software settings to your ikeyboard X via USB
connection.
(Note:You must have connected your ikeyboard X to your Mac/PC, otherwise the settings
upload will not be successful.)
27
Page 28

3.4 “MIDI Devices” button
Click this button, a MIDI device select window will appear as shown in diagram 10. Please
select “ICON ikeyboard X” for the MIDI Out Devices.
(Note: Please make sure you have pressed this button every time you launched iMap,
select your ICON product on the MIDI input-output Device pop-up menu to make sure the
communication between iMap and your ICON product is created successfully.)
Diagram 10
3.5 “Firmware Upgrade” button
Click this button to enter into the rmware upgrade window for ikeyboard X. Please refer to P.29
for the rmware upgrade procedure.
28
Page 29
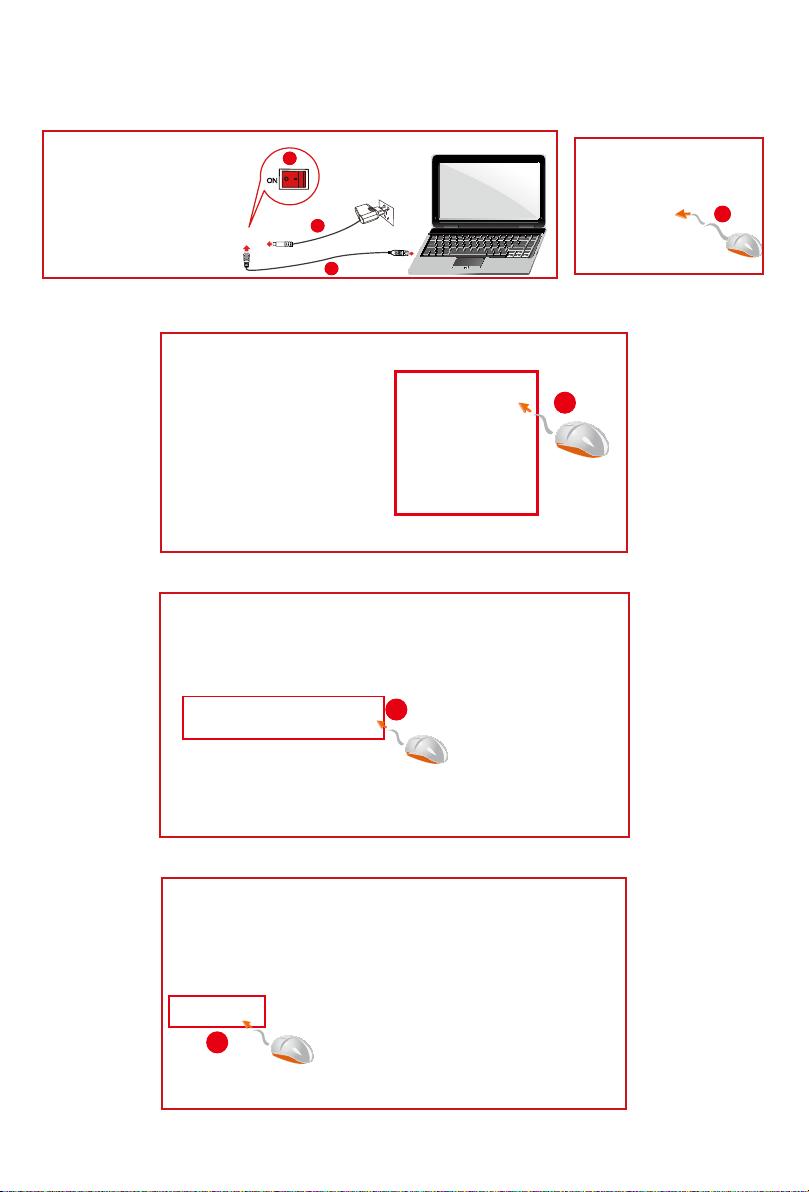
Firmware upgrade
Esc
F1
F2
F3
F4
F5
F6
F7
F8
F9
F10
F11
F12
Prtsc
sysrq
pause
Break
Lns
Del
Home
Pgup
PgDN
End
$
~
`
!
1
··
2
3
4
5
6
7
78
9
0
)
)
*
—
-
+
=
#
¥
%
*
#
#
Q
W
E
R
T
Y
U
I
O
P
{
}
|
A
S
D
F
G
H
J
K
L
:
;
Z
X
C
V
B
N
M
<
>
?
Tab
CapsLook
Shift
Ctrl
Alt AltGr
Ctrl
Backspace
[
]
|
Enter
Shift
Mac/PC
ON
1
3
2
iKeyboard X series functional firmware upload procedure
Esc
F1
F2
F3
F4
F5
F6
F7
F8
F9
F10
F11
F12
Prtsc
sysrq
pause
Break
Lns
Del
Home
Pgup
PgDN
End
$
~
`
!
1
··
2
3
4
5
6
7
78
9
0
)
)
*
—
-
+
=
#
¥
%
*
#
#
Q
W
E
R
T
Y
U
I
O
P
{
}
|
A
S
D
F
G
H
J
K
L
:
;
Z
X
C
V
B
N
M
<
>
?
Tab
CapsLook
Shift
Ctrl
Alt AltGr
Ctrl
Backspace
[
]
|
Enter
Shift
Mac/PC
ON
1
3
2
iKeyboard X series functional firmware upload procedure
5
Esc
F1
F2
F3
F4
F5
F6
F7
F8
F9
F10
F11
F12
Prtsc
sysrq
pause
Break
Lns
Del
Home
Pgup
PgDN
End
$
~
`
!
1
··
2
3
4
5
6
7
78
9
0
)
)
*
—
-
+
=
#
¥
%
*
#
#
Q
W
E
R
T
Y
U
I
O
P
{
}
|
A
S
D
F
G
H
J
K
L
:
;
Z
X
C
V
B
N
M
<
>
?
Tab
CapsLook
Shift
Ctrl
Alt AltGr
Ctrl
Backspace
[
]
|
Enter
Shift
Mac/PC
ON
1
3
2
6
F9
F10
F11
F12
Prtsc
sysrq
pause
Break
Lns
Del
Home
Pgup
PgDN
End
$
78
9
0
)
)
*
—
-
+
=
*
#
#
I
O
P
{
}
|
K
L
:
;
<
>
?
Ctrl
Backspace
[
]
|
Enter
Shift
ON
3
2
iKeyboard X series functional firmware upload procedure
4
8
9
iCON iKeyboard 3X V1.00
iKeyboard X functional rmware upload procedure
4
5
7
6
29
Page 30
Esc
F1
F2
F3
F4
F5
F6
F7
F8
F9
F10
F11
F12
Prtsc
sysrq
pause
Break
Lns
Del
Home
Pgup
PgDN
End
$
~
`
!
1
··
2
3
4
5
6
7
78
9
0
)
)
*
—
-
+
=
#
¥
%
*
#
#
Q
W
E
R
T
Y
U
I
O
P
{
}
|
A
S
D
F
G
H
J
K
L
:
;
Z
X
C
V
B
N
M
<
>
?
Tab
CapsLook
Shift
Ctrl
Alt AltGr
Ctrl
Backspace
[
]
|
Enter
Shift
Mac/PC
ON
1
3
2
10
9
6
5
F9
F10
F11
F12
Prtsc
sysrq
pause
Break
Lns
Del
Home
Pgup
PgDN
End
$
78
9
0
)
)
*
—
-
+
=
*
#
#
I
O
P
{
}
|
K
L
:
;
<
>
?
Ctrl
Backspace
[
]
|
Enter
Shift
6
ON
3
2
4
7
12
8
9
iCON iKeyboard 3X V1.00
Esc
F1
F2
F3
F4
F5
F6
F7
F8
F9
F10
F11
F12
Prtsc
sysrq
pause
Break
Lns
Del
Home
Pgup
PgDN
End
$
~
`
!
1
··
2
3
4
5
6
7
78
9
0
)
)
*
—
-
+
=
#
¥
%
*
#
#
Q
W
E
R
T
Y
U
I
O
P
{
}
|
A
S
D
F
G
H
J
K
L
:
;
Z
X
C
V
B
N
M
<
>
?
Tab
CapsLook
Shift
Ctrl
Alt AltGr
Ctrl
Backspace
[
]
|
Enter
Shift
Mac/PC
ON
1
3
2
10
14
8
9
iCON iKeyboard 3X V1.00
6
5
iCON iKeyboard 3X V1.00
8
10
30
11
12
Page 31
F9
F10
F11
F12
Prtsc
sysrq
pause
Break
Lns
Del
Home
Pgup
PgDN
End
$
78
9
0
)
)
*
—
-
+
=
*
#
#
I
O
P
{
}
|
K
L
:
;
<
>
?
Ctrl
Backspace
[
]
|
Enter
Shift
10
6
4
7
11
12
8
9
iCON iKeyboard 3X V1.00
iKeyboard 3X V2.03.bin
iKeyboard 3X V2.03.bin
17
iKeyboard 3X V2.03.bin
10
12
14
8
9
iCON iKeyboard 3X V1.00
6
5
10
13
14
20
6
iKeyboard 3X V2.03.bin
iKeyboard 3X V2.03.bin
iKeyboard 3X V2.03.bin
14
17
13
15
16
18
19
31
Page 32

Restore the factory default settings
To restore your ikeyboard X settings to factory default, simply import the “Factory Default”
setting le into your ikeyboard X with the original setting of the iMap software.
Reverse sustain pedal connector polarity
There are two major type of sustain pedal on the market, they are having a reverse polarity
and thus will have the exact opposite reaction. You may adjust the polarity of your iKeyboard
X sustain pedal connector with the provided iMap (V1.03 or above). Please follow the below
instructions to adjust the polarity.
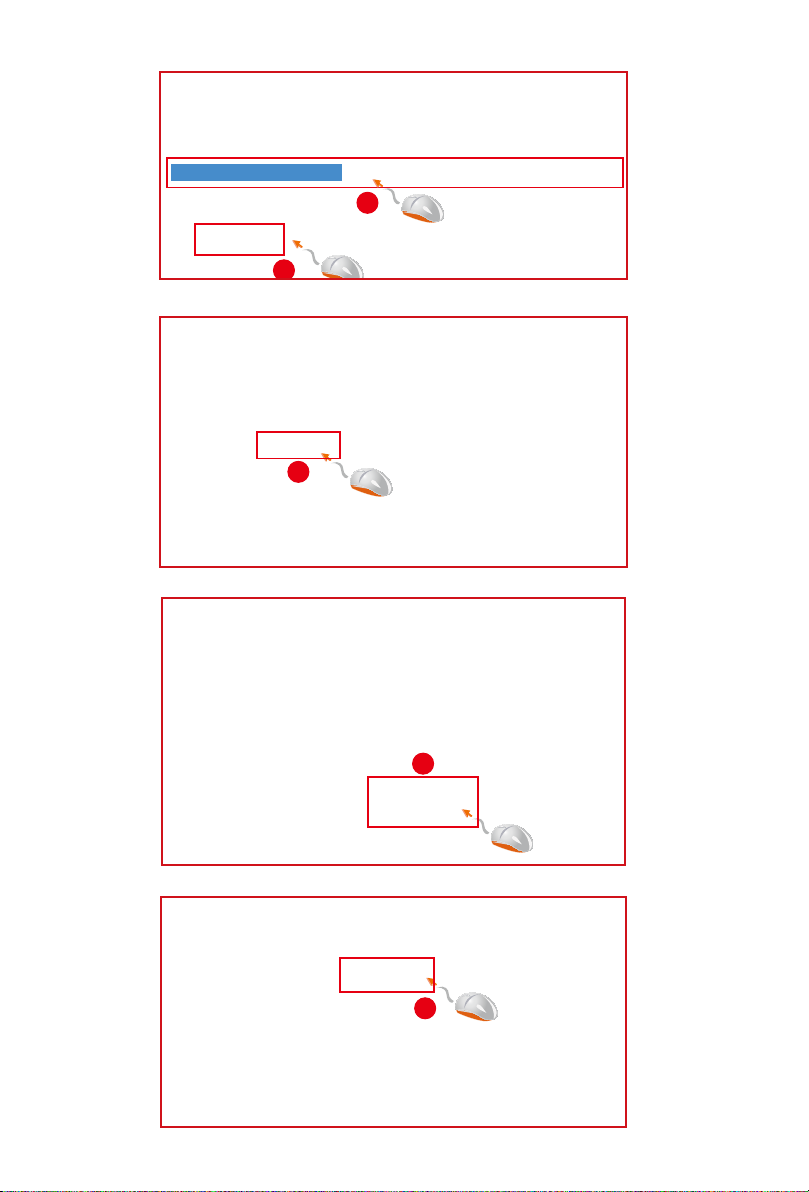
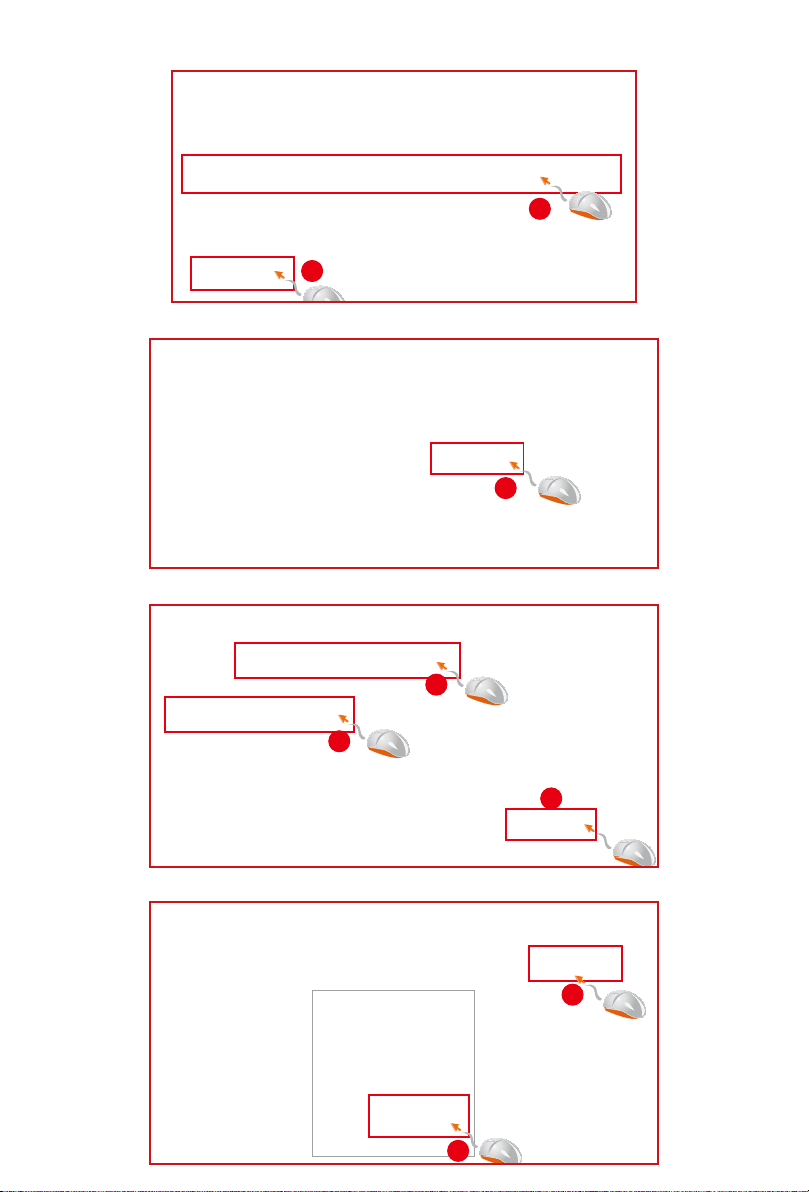
1.Launch iMap again and click “MIDI Devices” button to select iKeyboard X or USB Audio
Device form the pop-up menu
2.Click the ‘Sustain Pedal” logo and select “reverse” on the left-side pull down menu.
3.Click “Send Data” button to upload the settings to your iKeyboard X.
4.Close iMap software.
32
Page 33
Velocity curve
33
Page 34
Appendix A
Mackie Control mode function table
(Nuendo/Cubase/Logic/Bitwig/Reaper/Samplitude/Reaper/Studio One/Live)
34
Page 35
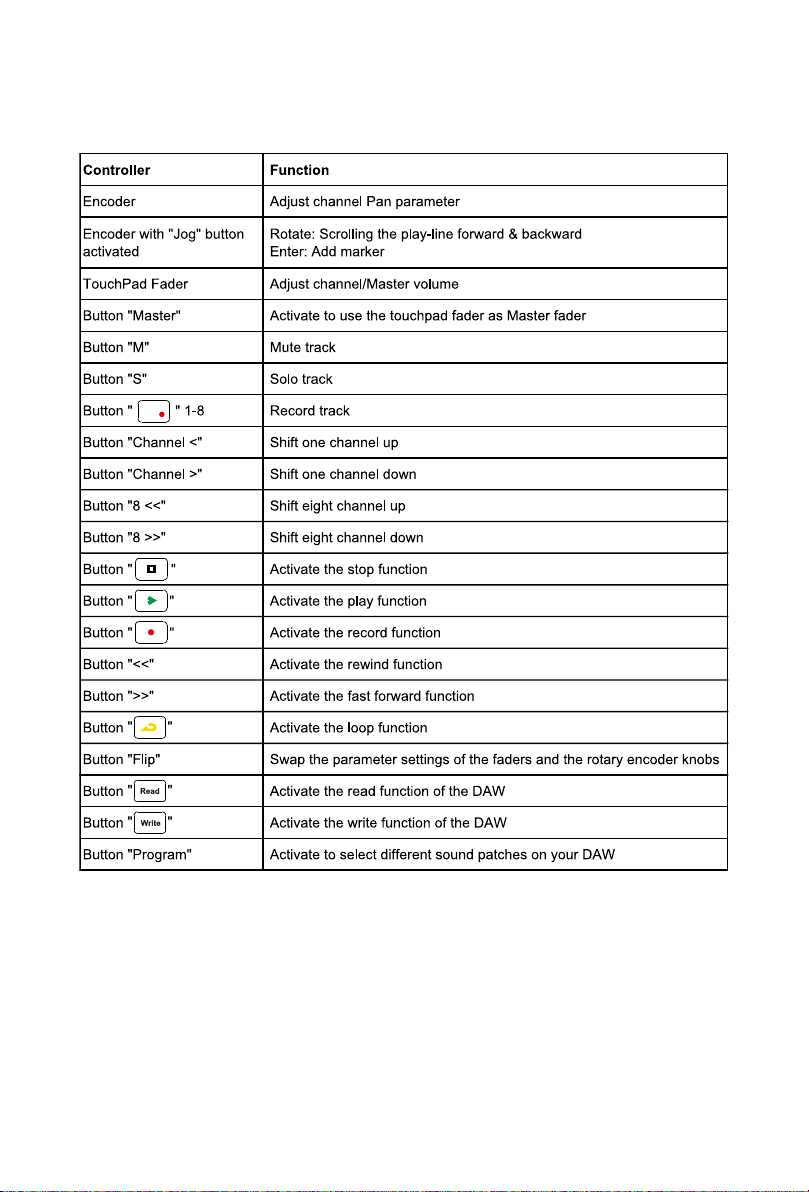
HUI mode function table
(ProTools)
35
Page 36
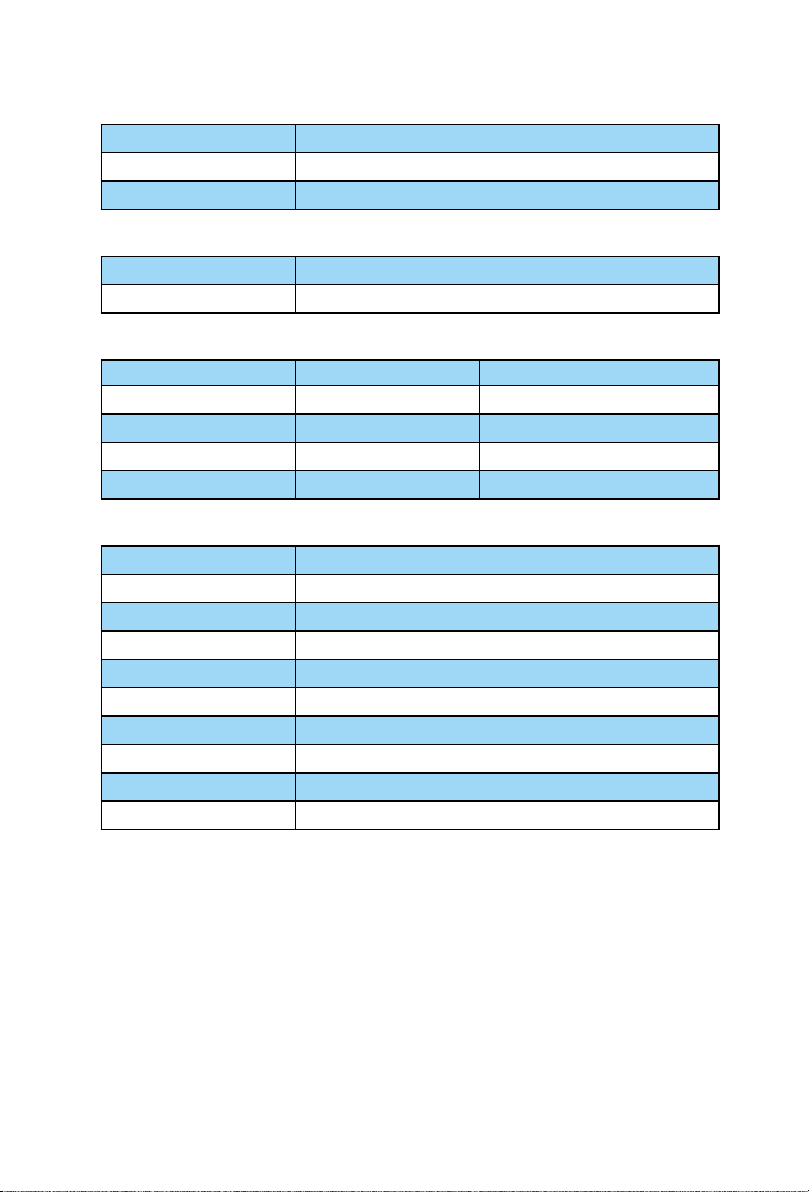
Specications
Connector:
USB USB connector (standard type)
Sustain & Expression 2x1/4” TS connectors
MIDI I/O 5-pin Din connector
Power supply 7V/1A DC
Current consumption 100mA or less
Weight:
iKeyboard 3X 2.4kg 5.3(lb)
iKeyboard 4X 3.2kg 7.06(lb)
iKeyboard 5X 4kg 8.82(lb)
iKeyboard 6X 4.8kg 10.58(lb)
iKeyboard 8X 6.61kg 14.57(lb)
Dimensions:
iKeyboard 3X 530(L)x189(W)x74(H)mm
21"(L)x7.44"(W)x2.91"(H)
iKeyboard 4X 695(L)x189(W)x74(H)mm
27.4"(L)x7.44"(W)x2.91"(H)
iKeyboard 5X 860(L)x189(W)x74(H)mm
33.9"(L)x7.44"(W)x2.91"(H)
iKeyboard 6X 1025(L)x189(W)x74(H)mm
40.4"(L)x7.44"(W)x2.91"(H)
iKeyboard 8X 1403(L)x189(W)x74(H)mm
55.24"(L)x7.44"(W)x2.91"(H)
36
Page 37

Services
If your ikeyboard X needs servicing, follow these instructions.
Check our online help centre at http://support.iconproaudio.com/hc/en-us, for
information, knowledge, and downloads such as:
1. FAQ
2. Download
3. Learn More
4. Forum
Very often you will nd solutions on these pages. If you don’t nd a solution, create
a support ticket at our online Help Center at the link below, and our technical support
team will assist you as soon as we can.
Navigate to http://support.iconproaudio.com/hc/en-us and then sign in to submit
a ticket.
As soon as you have submitted an inquiry ticket, our support team will assist you to
resolve the problem with your ICON ProAudio device as soon as possible.
To send defective products for service:
1. Ensure the problem is not related to operation error or external system devices.
2. Keep this owner's manual. We don't need it to repair the unit.
3. Pack the unit in its original packaging including end card and box. This is very
important. If you have lost the packaging, please make sure you have packed
the unit properly. ICON is not responsible for any damage that occurs due to
non-factory packing.
4. Ship to the ICON tech support center or the local return authorization. See our
service centers and distributor service points at the link below:
If you are located in Hong Kong
Send the product to:
ASIA OFFICE:
Unit F, 15/F., Fu Cheung Centre,
No. 5-7 Wong Chuk Yueng Street, Fotan,
Sha Tin, N.T., Hong Kong.
If you are located in Europe
Send the product to:
ICON Europe GmbH
Am Spitzberg 3
15834 Rangsdorf
Germany
Telephone: +49-(0)33708-933-0
Fax: +49-(0)33708-933-189
E-Mail: [email protected]
5. For additional update information please visit our website at:
www.iconproaudio.com
37
Page 38

www.iconproaudio.com
www.support.iconproaudio.com
www.facebook.com/iconproaudio
www.youtube.com/iconproaudi owww.instagram.com/iconproaudio
 Loading...