

Page 1
M IC-F300/F400/S series
q Turn power OFF, then disconnect the DC power
cable.
w Unscrew the 4 screws, then remove the bottom
cover.
e Cut or desolder the print pattern on the PC board at
the TX mic circuit (A) and RX AF circuit (B).
r Install the unit as shown in the instruction manual.
t Replace the bottom cover and screws, then the DC
power cable.
NOTE:
Modification points are marked A or B on the circuit
board. (see corresponding figures)
A : TX modulation circuit.
B : RX AF circuit.
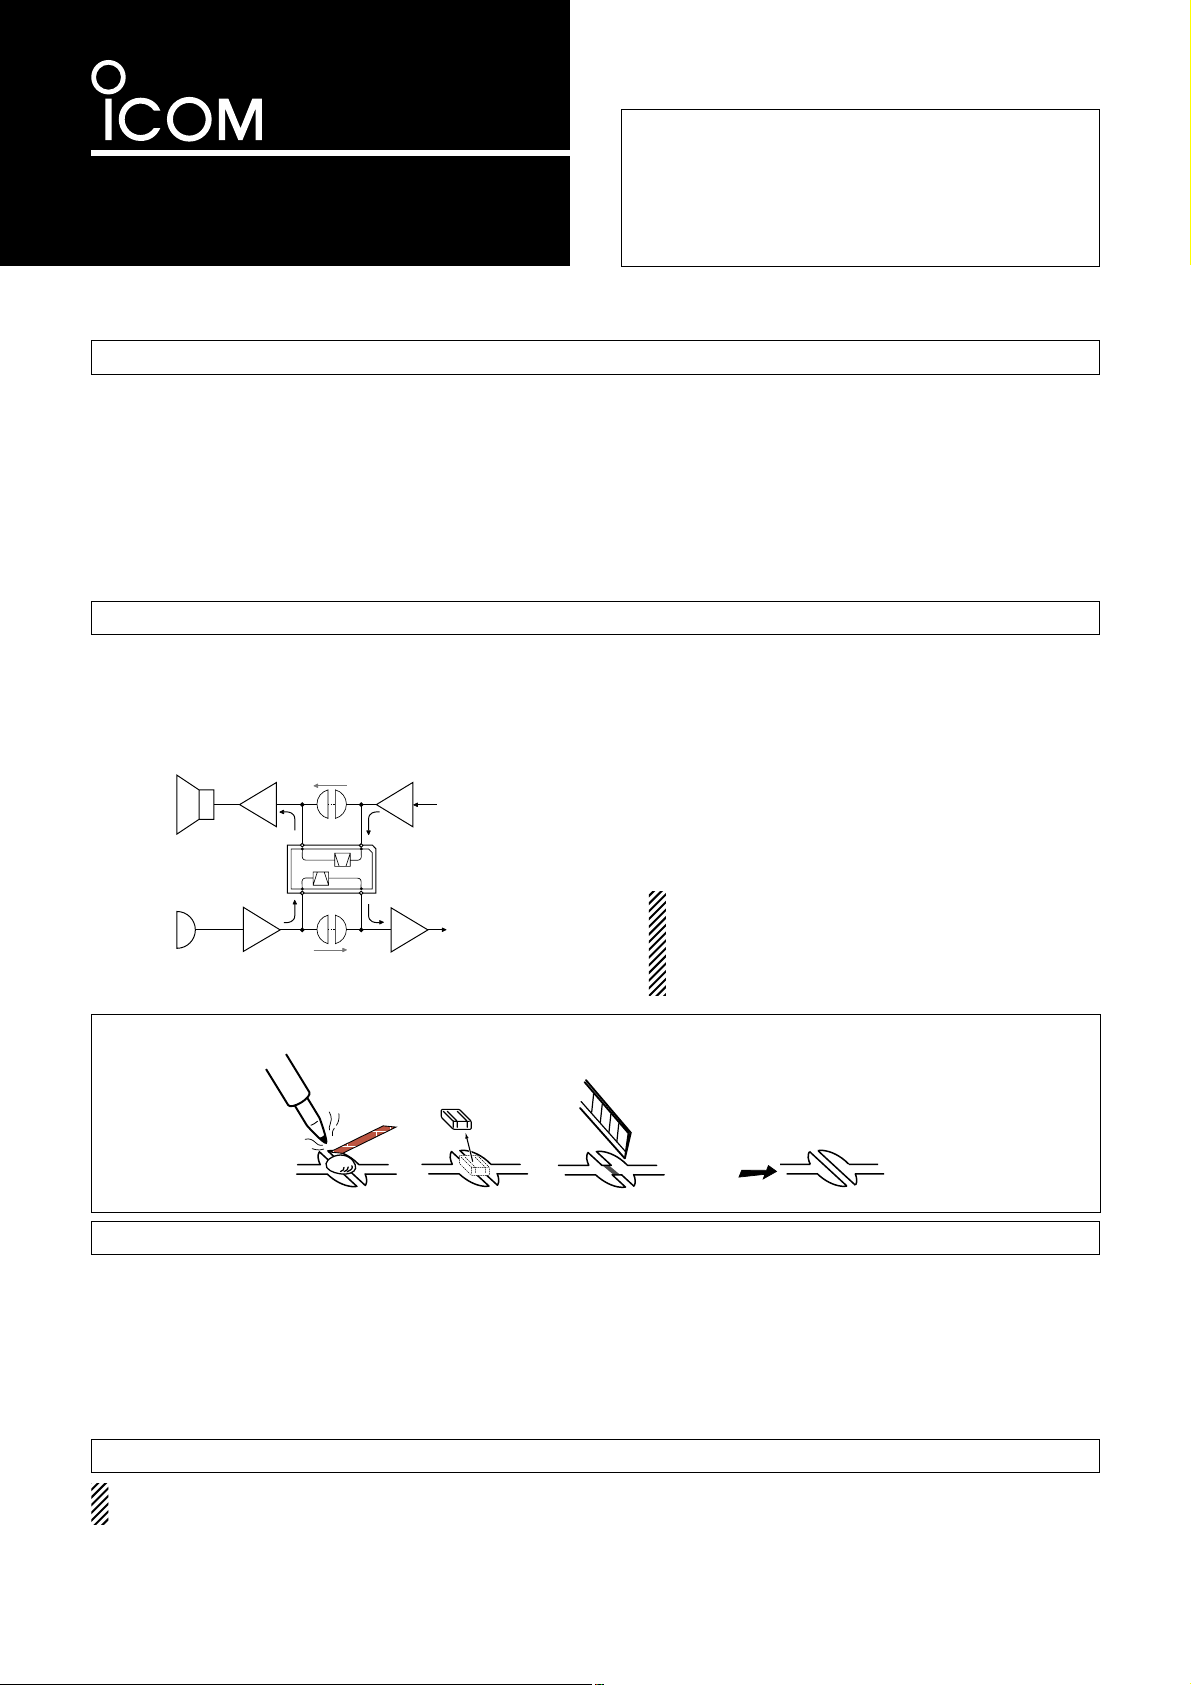
The scrambler unit may be installed between the mic
amplifier circuit and AF circuit. Cut or desolder the junction points (or take off jumper chip for IC-F3/F4/S series).
• Assign the scrambler function to a programmable key
as [SCRM] on [Key & Display Assign] screen, if required.
• Operation with the [SCRM] key:
− Push and hold to turn the voice scrambler function ON.
− Push to turn the voice scrambler function OFF.
• Program the scrambler function ON/OFF and scram-
bler codes on the [Memory CH] screen, scrambler
type*, group codes*, synchronous capture mode* and
tone start timing* on the [Common] screen with
cloning software when installing this unit. (
*UT-110
only
)
Be sure to resolder above disconnected points, otherwise no TX modulation or AF output is available when you remove the scrambler units.
• Some transceiver versions will not be able to
have scrambler units installed because of CPU
revision and other factors. Please confirm that
the transceivers’ serial number is over 50000.
• UT-109 and UT -110 scrambler units require some PC
board modifications. (See below.)
• There are 2 versions (#01: Low AF level type for ICF3/F4/S series and #02: High AF level type for the
INST ALLA TION INSTRUCTIONS
SCRAMBLER UNIT
UT-109/UT-110
Thank you for purchasing the UT-109/UT-110
SCRAMBLER UNIT. The UT-109 and UT-110 are de-
signed for Icom F series VHF/UHF FM transceivers.
Please read these instructions thoroughly before in-
stalling and operating the UT-109/UT-110.
others) for each scrambler unit. Do not install the
wrong version, as they are not compatible.
• IC-F300/F400/S series require the #02 type scrambler unit.
• The UT-110 may function as the UT-109 through
cloning software.
• Compatible cloning software: CS-F300S, CS-F300.
IC-F300/F400/S SERIES PRECAUTIONS
PC BOARD MODIFICATION
NOTE FOR REMOVAL
Scrambler
unit
SP
MIC
B
A
*normal way
*
A, B: junction points
CLONING
Block diagram
or or
* Desolder, remove a jumper chip or cut the pattern
- 1 -
Rev.1.2
Page 2
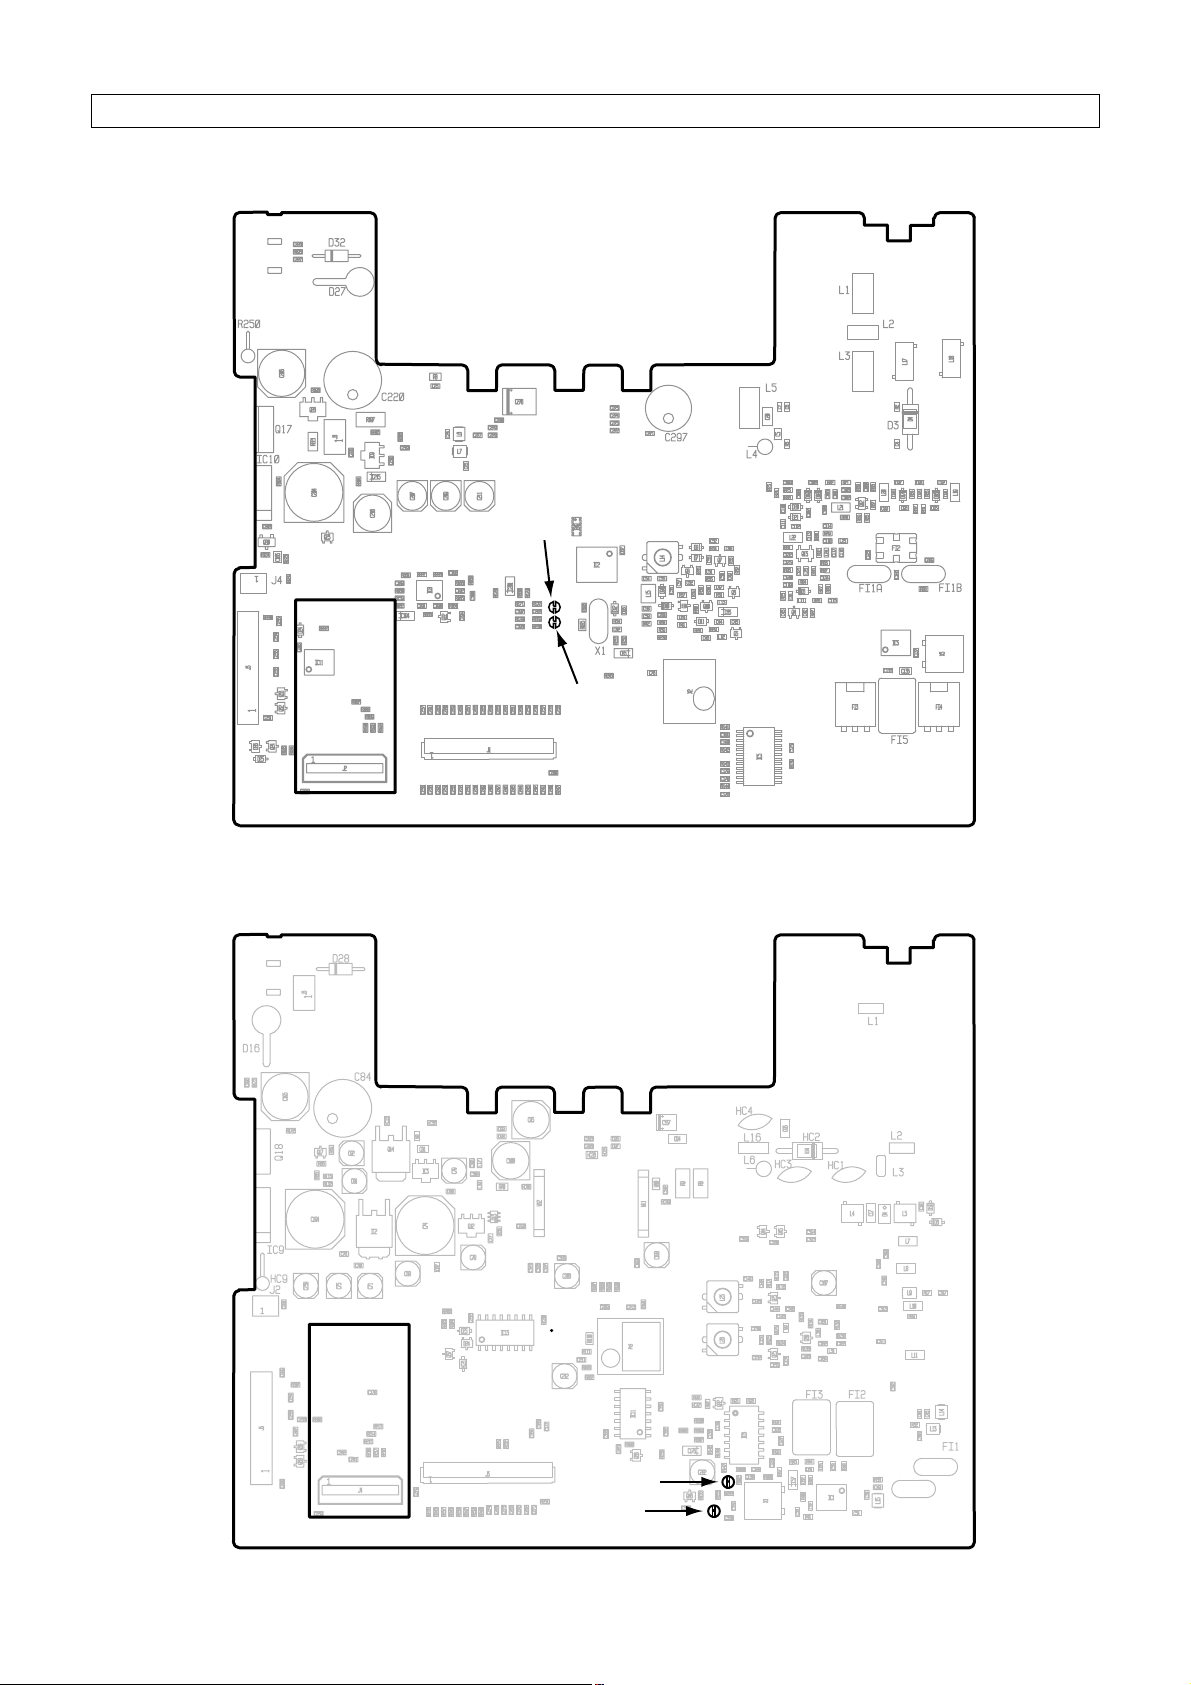
IC-F300/F400/S SERIES MODIFICATION POINTS
A
B
M Model: IC-F300/S series
Main board Aand B.
B
A
M Model: IC-F400/S series
Main board Aand B.
REAR
ANT
REAR
ANT
- 2 -
Page 3
− Push and hold to turn the voice scrambler function ON.
− Push to turn the voice scrambler function OFF.
• Some transceiver versions will not be able to
have scrambler units installed because of CPU
revision and other factors. Please confirm that
the transceivers’ serial number is over 50000.
• UT-109 and UT -110 scrambler units require some PC
board modifications. (See below.)
• IC-F3/F4/S series require a #01: Low level type
scrambler unit. Do not install the wrong version, as
they are not compatible.
• The UT-110 may function as the UT-109 through
cloning software.
• Compatible cloning software: CS-F3.
APPENDIX -1; IC-F3/F4/S SERIES PRECAUTIONS
Be sure to resolder above disconnected points, otherwise no TX modulation or AF output is available when you remove the scrambler units.
NOTE FOR REMOVAL
• Program the scrambler function ON/OFF and scrambler codes on the [Memory CH] screen, scrambler
type*, group codes*, synchronous capture mode* and
tone start timing* on the [Common] screen with
cloning software when installing this unit. (
*UT-110
only
)
• Assign the scrambler function to a programmable key
as [SCRM] on [Key & Display Assign] screen, if required.
• Operation with the [SCRM] key:
CLONING
PC BOARD MODIFICATION
M IC-F3/F4/S series
There are 2 types of PC boards are exist. Be sure to
confirm the board number in advance.
• IC-F3/IC-F3S
➥ B4929E requires LCD side and CPU side modifica-
tions.
➥ B4929F*
1
requires CPU side only.
• IC-F4/IC-F4S
➥ B4923G LCD side and CPU side modifications.
➥ B4923H*
1
requires CPU side only.
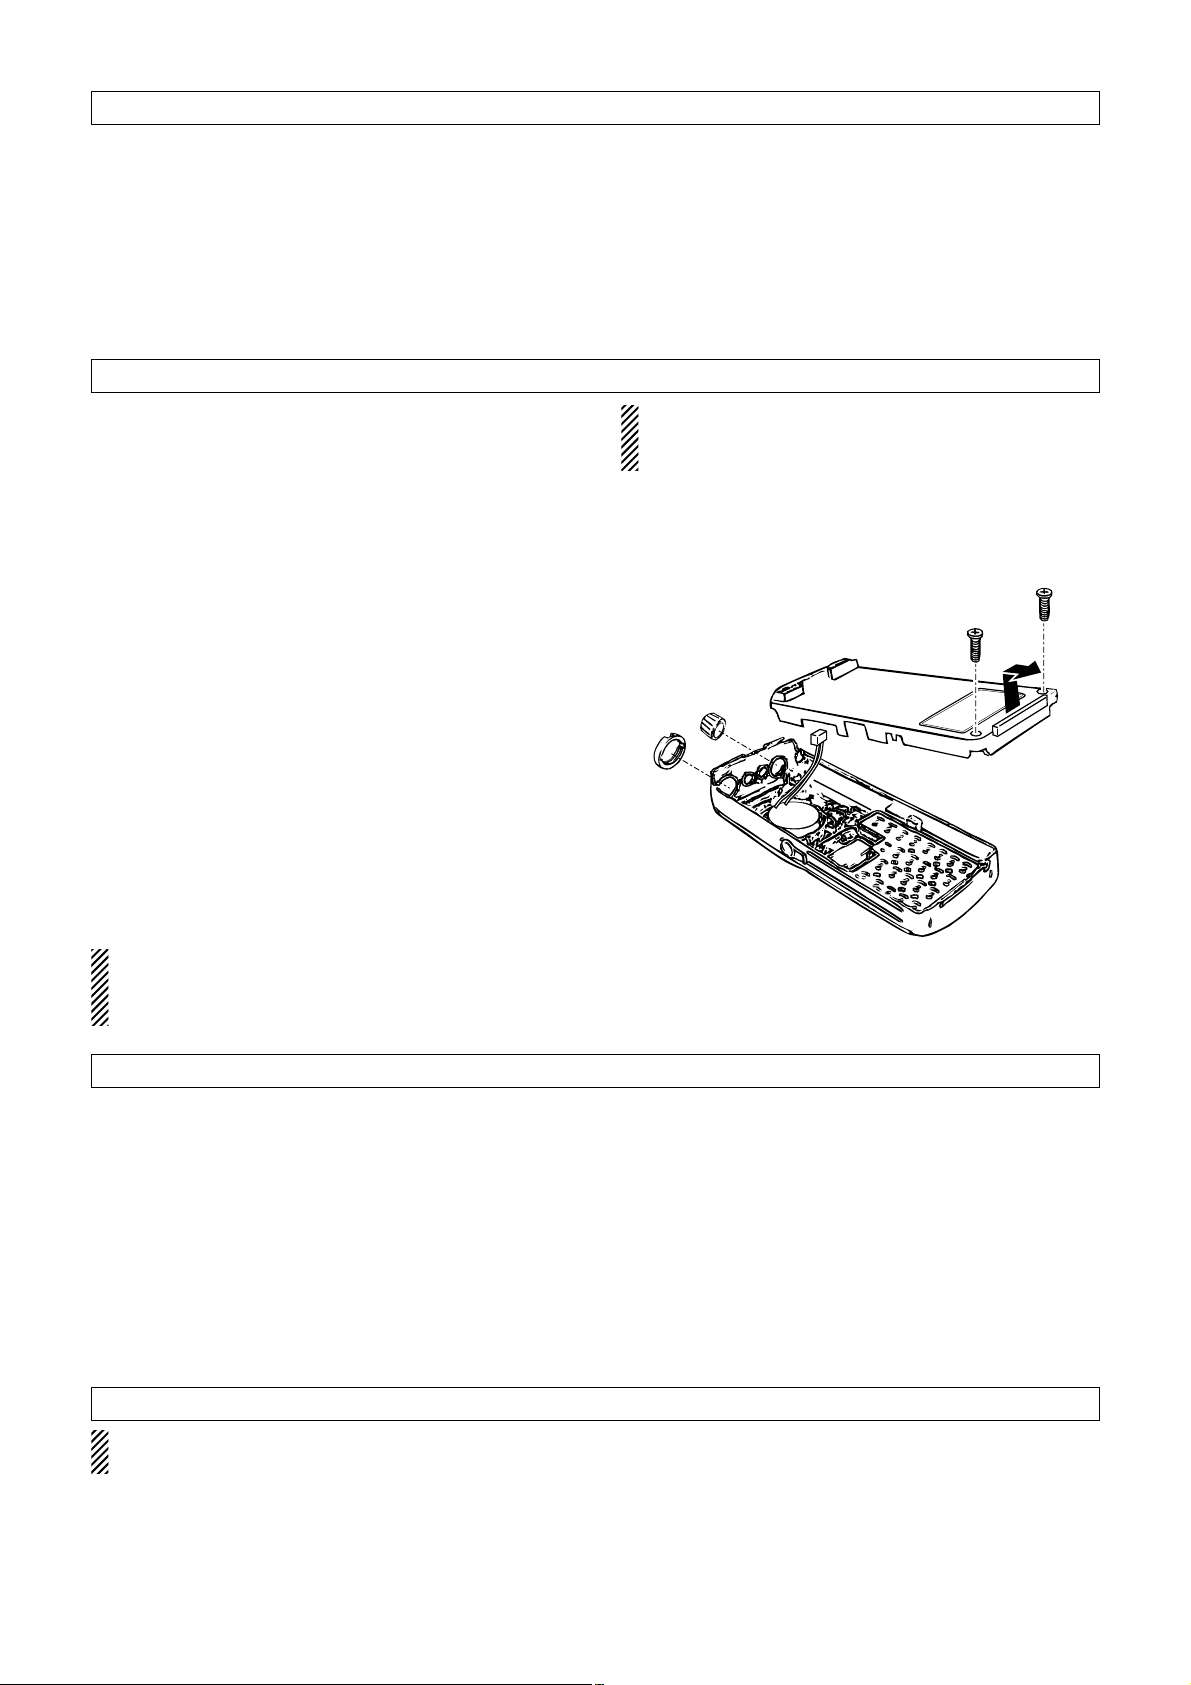
q Take out the knob and unscrew the antenna con-
nector screw.
w Unscrew the 2 screws, then remove the front panel.
e Remove the shield cover if necessary.
r Remove the jumper chip (DET)*2or (AF)*2on the
LCD side of the PC board.
t Replace the shield cover to the original position.
y Remove the jumper chip resistor(s) on the CPU side
of the PC board. (see right figures)
u Install the unit as shown in the instruction manual.
i Replace the front panel and screws.
NOTE:
*1 B4929F and B4923H's modification points may
access through the service window without take
apart.
*2 Modification points are marked DET or AF on the
main board. (see below figures)
- 3 -
Page 4
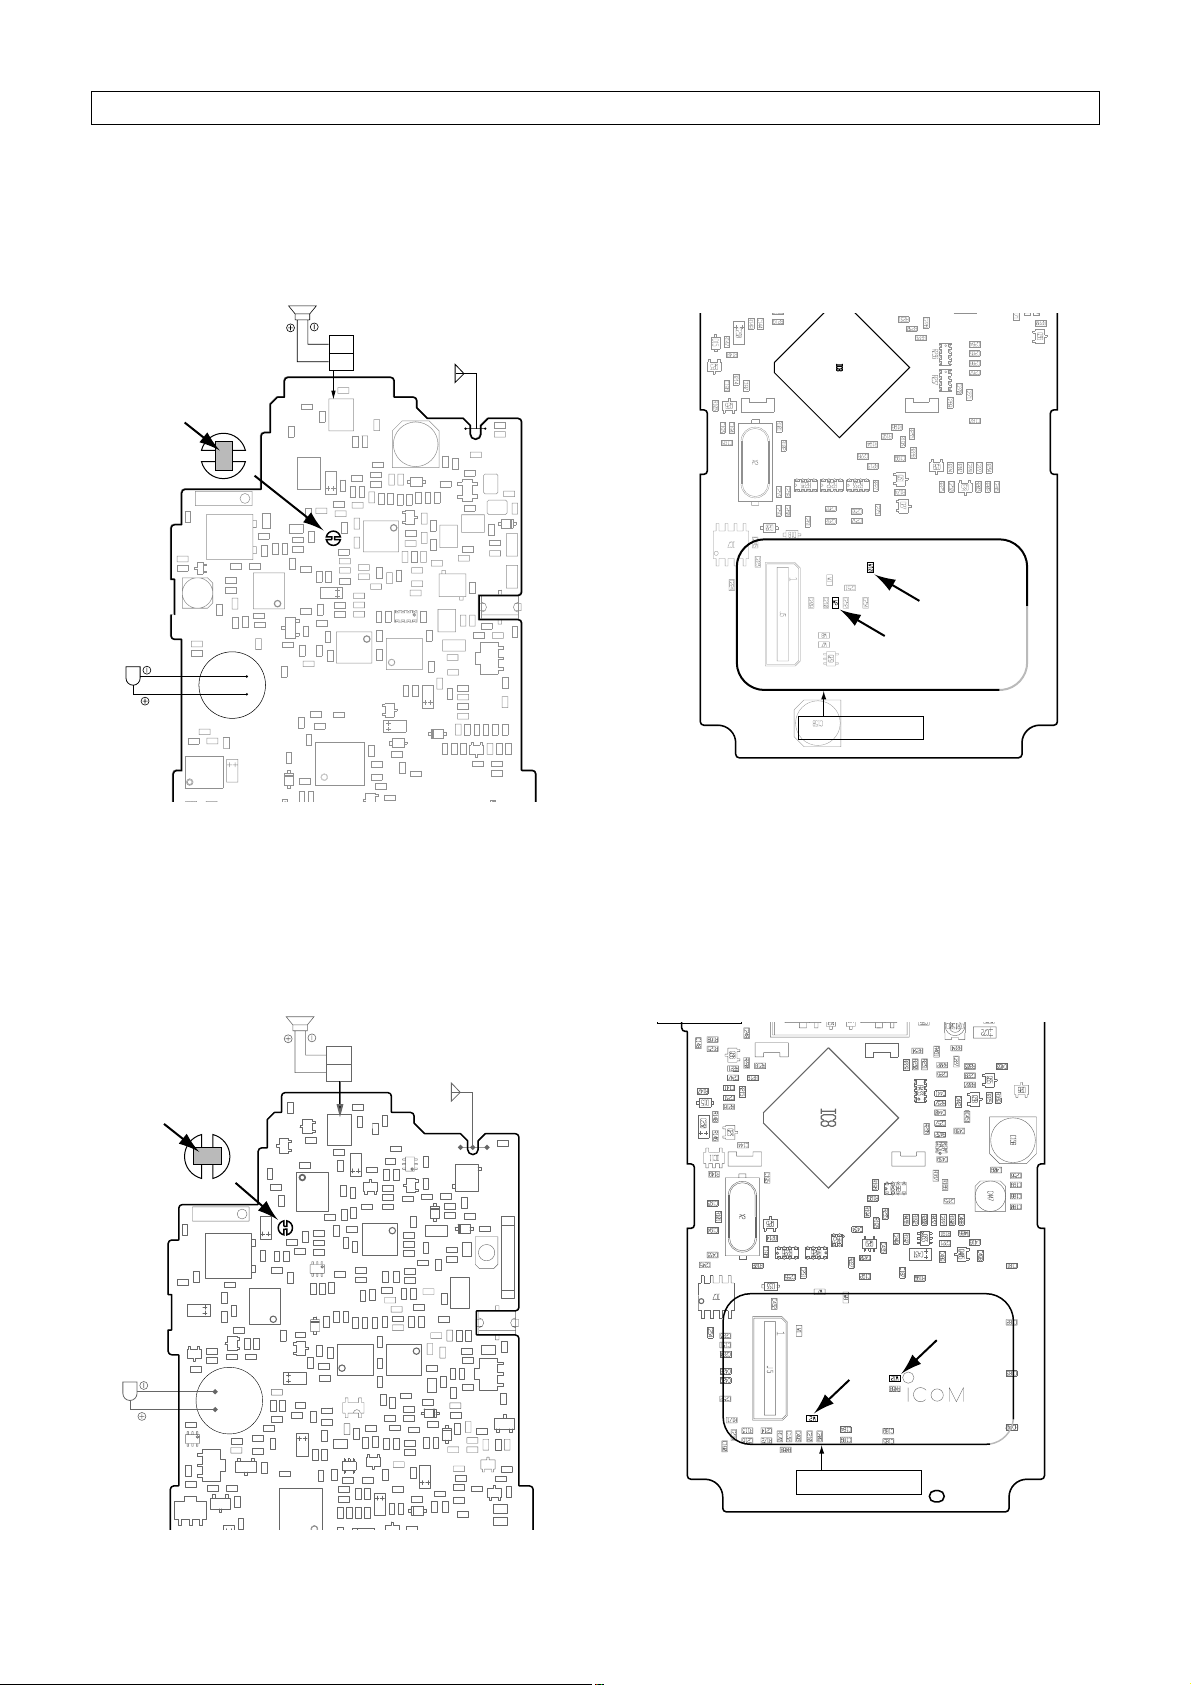
IC-F3/F4 SERIES MODIFICATION POINTS
1
C1
C2
C5
C8
C11
C12
C13
C14
C15
C16
C17
C18
C19
C20
C21
C22
C23
C24
C25
C26
C46
C50
C54
C55
C57
C59
C63
C64
C69
C73
C75
C77
C78
C79
C110
C111
C112
C113
C114
C115
C116
C117
C118
C119
C120
C121
C122
C124
C125
C126
C129
C131
C132
C133
C134
C135
C136
C137
C147
C150
C151
C152
C154
C163
C164
C165
C166
C167
C168
C169
C179
C204
C205
C211
C212
C213
C214
C217
C219
C234
C237
C238
C239
C240
C241
C242
C243
C244
D1
D3
D7
D8
IC1
IC2
IC3
IC4
IC5
IC10
L4
L5
L6
L7
L24
Q2
Q3
Q11
Q14
Q17
R253
Q37
R1
R4
R5
R6
R7
R8
R9
R10
R11
R12
R13
R14R15
R16
R30
R31
C280
C279
R44
R45
C278
R52
R53
R54
R55
R56
R79
R80
R81
R82
R83
R84
R85
R86
R87
R88
R89
R90
R91
R93
R94
R95
R96
R97
R98
R99
R100
R104
R105
R106
R107
R108
R109
R112
R113
R114
R115
R116
R117
R127
R128
R130
R131
R132
R142
R144
R151
R153
R154
R159
R160
R166
R167
R168
R169
R170
R175
R176
R178
R185
R210
R239
L28
C291
X3
L26
L27
R244
L23
R257
R250
C286
R251
R255
C290
D19
R177
C288
C287
C289
L30
D29
C1
C2
C5
C8
C11
C12
C13
C14
C15
C16
C17
C18
C19
C20
C21
C22
C23
C24
C25
C26
C46
C50
C54
C55
C57
C59
C63
C64
C69
C73
C75
C77
C78
C79
C110
C111
C112
C113
C114
C115
C116
C117
C118
C119
C120
C121
C122
C124
C125
C126
C129
C131
C132
C133
C134
C135
C136
C137
C147
C150
C151
C152
C154
C163
C164
C165
C166
C167
C168
C169
C179
C204
C205
C211
C212
C213
C214
C217
C219
C234
C237
C238
C239
C240
C241
C243
C244
D1
D3
D7
D8
IC1
IC2
IC3
IC4
IC5
IC10
L4
L5
L6
L7
L24
Q2
Q3
Q11
Q14
Q17
R253
Q37
R1
R4
R5
R6
R7
R8
R9
R10
R11
R12
R13
R14R15
R16
R30
R31
C280
C279
R44
R45
C278
R52
R53
R54
R55
R56
R79
R80
R81
R82
R83
R84
R85
R86
R87
R88
R89
R90
R91
R93
R94
R95
R96
R97
R98
R99
R100
R104
R105
R106
R107
R108
R109
R112
R113
R114
R115
R116
R117
R127
R128
R130
R131
R132
R142
R144
R151
R153
R154
R159
R160
R166
R167
R168
R169
R170
R175
R176
R178
R185
R210
R239
L28
C291
X3
L26
L27
R244
L23
R257
C286
R251
R255
C290
D19
R177
C288
C287
C289
L30
D29
J6
L2
L3
J7
J6
L2
L3
MC1
J7
Q1Q1
SP SPG
P1
ANTENNA
SPEAKER
SP1
MICROPHONE
DET
Remove the resister
from the board.
B4929F or E
w
q
Service window
1
MC1MC1
J6
J7J7
SPSP SPGSPG
P1P1
ANTENNAANTENNA
SPEAKERSPEAKER
SP1SP1
MICROPHONEMICROPHONE
C3
C5
C477
C7
C8
C10
C13
C14
C497
C17
C18
C20
C22
C25
C26
C27
C30
C32
C42
C51
C52
C60
C61
C62
C63
C64
C73
C75
C76
C99
C106
C107
C108
C109
C112
C113
C114
C115
C116
C118
C120
C124
C125
C126
C133
C134
C135
C136
C137
C139
C140
C142
C146
C149
C151
C152
C156
C160
C162
C165
C166
C167
C170
C179
C200
C201
C202
C204
C205
C217
C218
C229
C234
C237
C238
C239
C240
C242
C408
C415
C419
R438
C474
C473
C481
C482
C464
C451
C443
L6
C476
L12
L13
L20
L21
L22
L24
L404
L406
L407
R1
R3
R7
R8
R9
R12
R14
R17
R19
R21
R32
R33
R34
R40
R41
R44
R45
R46
R52
R53
R54
R55
C450
R63
R65
R67
R68
R69
R70
R72
C448
R77
R83
R84
R85
R93
R94
R95
R96
R97
R99
R100
R104
R105
R107
R108
R109
R112
R114
R115
R116
R117
R120
R121
R122
R123
R127
R128
R132
R134
R135
R137
R141
R142
C460
R153
R154
R158
R159
R160
R163
R176
R178
R184
R208
R209
R210
C455
R405
R406 R407
R408
R409
R414
R415
R420
R421
R422
R424
R451
R457
C479
R452
R453
R459
R450
R444
R458
C492
R442
R165
L411
R449
R439
R454
C452
R446
C458
R464
R455
C465
C487
L412
C486
C496
R469
C15
C483
C3
C5
C477
C7
C8
C10
C13
C14
C17
C18
C20
C22
C25
C26
C27
C30
C32
C42
C51
C52
C60
C61
C62
C63
C64
C73
C75
C76
C99
C106
C107
C109
C112
C113
C114
C115
C116
C118
C125
C126
C133
C134
C135
C137
C140
C142
C151
C152
C156
C160
C166
C167
C170
C179
C200
C204
C205
C218
C229
C234
C237
C238
C239
C240
C242
C408
C419
R438
C474
C473
C481
C451
L6
C476
L12
L13
L20
L21
L22
L24
R1
R7
R8
R9
R12
R14
R17
R19
R21
R32
R33
R34
R40
R41
R44
R45
R46
R52
R53
R54
R55
C450
R63
R65
R67
R68
R69
R70
R72
C448
R77
R82
R83
R84
R85
R93
R94
R95
R96
R99
R105
R107
R108
R109
R112
R115
R116
R120
R121
R122
R123
R126
R127
R128
R132
R134
R135
R141
C460
R153
R154
R158
R160
R176
R178
R184
R208
R209
R210
C455
R405
R406 R407
R408
R414R420
R422
R424
R451
R457
C479
R452
R459
R450
R444
R458
R165
R449
R439
C452
R446
C458
R455
C487
C496
R469
C15
C483
C9C9
W6
C11
C48
C128
C150
C154
C169
C211
D1
D3
D24
D27
D402
D404
X3
D406
D405
C467
IC2
IC3
IC4
IC6
IC10
L1
L5
L15
Q2
Q3
Q9
Q13
Q16
Q18
Q20
Q22
Q28
Q31
Q400
Q401
Q402
R5
R162
R174
C456
Q404
IC1
Q1
L414
W6
C47
C48
C117
C150
C154
C169
D3
D24
D27
D402
X3
C467
IC2
IC3
IC4
IC5
IC6
IC10
L1
L15
Q2
Q3
Q9
Q13
Q18
Q20
Q22
Q28
Q31
Q401
Q402
R5
R162
R174
C456
C491
IC1
Q403
Q1
L414
L14L14
Q37Q37
D4D4
Q34Q34
Q19Q19
D1
R156
R157
AF
Remove the resister
from the board.
Service window
q
w
B4923H or G
Jumper
chips
Jumper chips
• CPU side
• LCD side: B4923G only.
• CPU side
• LCD side: B4929E only.
M Model: IC-F3/IC-F3S
PC board number B4929E; Remove the LCD side jumper chip and the CPU side jumper chip q.
B4929F; Remove the CPU side jumper chips q and w.
M Model: IC-F4/IC-F4S
PC board number B4923G; Remove the LCD side jumper chip and the CPU side jumper chip q.
B4923H; Remove the CPU side jumper chips q and w.
- 4 -
Page 5

APPENDIX -2; CLONING -1
DD
SCRAMBLER ON/OFF/INH
Turns the scrambler function "ON" or "OFF" as a initial
setting. This item can also be turned "ON" or "OFF"
with a program function switch when the function is assigned to a switch.
"INH": This means the scrambler function selection is
inhibited.
Optional UT-109 or UT-110 Voice scrambler unit is required.
DD
Scrambler code
Set the scrambler code number.
Selectable value;
UT-109: 1 to 32
UT-110: 1 to 255
*Set the scrambler group code in the Common screen
in advance. (UT-110 only)
DD
SCRAMBLER GROUP CODE (UT-110 only)
Set the scrambler group code.
➥ Selectable value; 1 to 4.
Optional scrambler unit (UT-110) is required.
NOTE: This setting is invalid for UT-109.
DD
SCRAMBLER TYPE (UT-110 only)
Set the UT-110 Rolling type scrambler as UT-109
Non-rolling type. As UT-110 and UT-109 have different code settings, they are not compatible.
By selecting Non-rolling type in this item, you can use
UT-110 as UT-109.
➥ Selectable value;
Rolling type (UT-110 normal)
Non-rolling type (UT-110 functions as UT-109)
NOTE: This setting is invalid for UT-109.
NOTE: The following setting will be invalid: Scrambler
Group Code
DD
SYNCHRONOUS CAPTURE (UT-110 only)
"Synchronous capture mode" is useful when communicating through a repeater. However, because of
voice components, the transceiver can not maintain
synchronous mode in rare cases.
Normally it is best to set this item to "Standard".
➥ Selectable value;
Standard (Normal operation)
Continuous (repeater operation)
DD
TONE START TIMING (UT-110 only)
Tone start timing selects the synchronous tone signal
transmit delay time.
Set the delay time when the other party's transceiver
has power save mode.
➥ Selectable value; OFF(default)
0.300s, 0.600s, 1.100s
M Memory CH screen
MM
Common 2 screen
- 5 -
Page 6

APPENDIX-2; CLONING NOTES (CS-F3 and CS-F300/S)
M Setting examples
M IC-F3/F4/S series
➥ Generally, channels with voice scrambler settings
should have the power save function in the Mem-
ory CH screen turned OFF.
➥ When you want to use the voice scrambler function
on channels in which the power saver function is
ON, set the Tone Start Timing in the Common
screen to 1.100.
• For LMR:
➥ In the Common 2 screen, set the Tone Start Timing
to 1.100.
➥ In the DTMF Autodial screen, set the LOG/ID code
to 5 and the 1st Timer to 0.700.
➥ In the memory CH screen, set necessary channels
to LOG IN (L-IN).
NOTE: At these settings, when the period from
pushing PTT to when you can talk seems long, set
the 2nd timer in the Expert screen to OFF and set
the Tone Start Timing to 0.600.
➥ In the DTMF Autodial screen, set the 1st Timer to
0.200.
• For PMR:
➥ In the Common 2 screen, set the Tone Start Timing
to 1.100.
➥ In the TX Code CH screen, set CH NO.1 to 1 only.
➥ In the TX Code Common screen, set the Long Tone
Timer to 0.300.
➥ In the memory CH screen, set necessary channel
ID's to 1L (push space key to turn the Long Tone
ON/OFF). (CCIR 5-tone format)
➥ In the memory CH screen, set necessary channels
to LOG IN.
NOTE: At above settings, when the period from
pushing PTT to when you can talk seems long, set
the 2nd timer in the Expert screen to OFF and set
the Tone Start Timing to 0.600.
➥ In the memory CH screen, return necessary
channel ID's to 1 from 1L.
M Other notes
➥ For communication between F300/F400/S series
and F3/F4/S series, make sure that the F3/F4/S series power saver settings are set to the same values
as the F300/F400/S series Tone Start Timing settings.
➥ When using the UT-109/UT-110 for non-rolling type
scrambling there are 32 available scramble codes.
In the memory CH screen, 1 to 255 can be input as
codes however, many of these codes are identical
(adding 32 to a code results in the same scramble
code). The following groups of codes are the same:
1to32
(33 to 64)
(65 to 96)
(97 to 128)
(129 to 160)
(161 to 192)
(193 to 224)
(225 to 255)
➥ When using the UT-110 for rolling type scrambling
similar but different codes will often result in a
match. To avoid this, use codes that are sufficiently
different (generally speaking codes that are separated by values of 20 or more will not match).
➥ When using the UT-110 for rolling type scrambling
and a channel is in the scramble ON condition, if a
received signal includes no simultaneous tone, the
receiving station automatically enters the through
condition and the transmission can be monitored.
How ever, when non-rolling type scrambling is set,
simultaneous tone are not used and therefore signals from other stations are received with modulation reversed.
Below examples are not always needed settings,
but will be useful in cases after transmitting a synchronous tone to notify operator of times to start
talking.
- 6 -
Page 7

• Operation with the [SCRM] key:
− Push and hold to turn the voice scrambler function ON.
− Push to turn the voice scrambler function OFF.
• UT-109 and UT -110 scrambler units require some PC
board modifications. (See below.)
• IC-F3GT/GS, IC-F4GT/GS series require a #01: Low
level type scrambler unit. Do not install the wrong
version, as they are not compatible.
• The UT-110 may function as the UT-109 through
cloning software.
• Compatible cloning software: CS-F3G.
APPENDIX -3; IC-F3GT/GS, IC-F4GT/GS SERIES PRECAUTIONS
Be sure to resolder above disconnected points, otherwise no TX modulation or AF output is available
when you remove the scrambler units.
NOTE FOR REMOVAL
• Program the scrambler function ON/OFF/Inhibit and
scrambler codes on the Edit Memory CH screen,
Scrambler type*, Group code*, Synchronous Capture
mode* and Tone Start Timing* on the [Common 2]
screen with cloning software when installing this unit.
(
*UT-110 only)
• Assign the scrambler function to a programmable key
as “Scrambler” on Key & Display Assign screen, if required.
CLONING
PC BOARD MODIFICATION
M Cut junction patterns
Cut the junction patterns before install the scrambler
unit.
q Take off the optional connector access cover.
• Insert a screwdriver into the hollow of the chassis, then
lift and take away the cover. (The cover can not be used
again.)
w Cut the patterns which marked C and F.
e Install the unit as shown in the right.
r Remove the paper backing of 2251 OPT sheet sup-
plied as accessory.
t Attach the new 2251 OPT sheet to the service win-
dow.
y Program the necessary information with the cloning
software before operation.
q
- 7 -
r
t
e
Page 8

• Modification points. (C and F) • Cut the junction patterns C and F on the PC board
same as above.
• Modification points. (C and F) • Cut the junction patterns C and F on the PC board.
IC-F3GT/GS, IC-F4GT/GS SERIES MODIFICATION POINTS
F
C
Service window
F
C
Service window
M Model: IC-F3GT/GS
M Model: IC-F4GT/IC-F4GS
- 8 -
Page 9

MM
Common 2 screen
DD
SCRAMBLER TYPE (UT-110 only)
Set the UT-110 Rolling type scrambler as UT-109 Nonrolling type. As UT-110 and UT-109 have dif ferent code
settings, they are not compatible.
By selecting Non-rolling type in this item, you can use
UT-110 as UT-109.
➥ Selectable value;
Rolling type (UT-110 normal)
Non-rolling type (UT-110 functions as UT-109)
NOTE: This setting is invalid for UT-109.
DD
SCRAMBLER GROUP CODE (UT-110 only)
UT-110 has 1020 (4 groups x 255) code numbers for
providing higher communication security . Use the same
scrambler group code for same group.
➥ Selectable value; 1 to 4.
NOTE: This setting is invalid for UT-109.
DD
SYNCHRONOUS CAPTURE (UT-110 only)
"Synchronous capture mode" is useful when communicating through a repeater. However, because of voice
components, the transceiver can not maintain synchronous mode in rare cases.
Normally it is best to set this item to "Standard".
➥ Selectable value;
Standard (Normal operation)
Continuous (repeater operation)
DD
TONE START TIMING (UT-110 only)
Tone start timing selects the synchronous tone signal
transmit delay time.
Set the delay time when the other party's transceiver
has power save mode.
➥ Selectable value; OFF(default)
0.300s, 0.600s, 1.100s
IC-F3GT/GS, IC-F4GT/GS SERIES CLONING -1
M Edit Memory CH screen
DD
SCRAMBLER ON/OFF/Inhibit
Turns the scrambler function "ON" or "OFF" as a initial
setting. This item can also be turned "ON" or "OFF"
with a program function switch when the function is assigned to a switch.
"Inhibit": This means the scrambler function selection
is inhibited.
DD
Scrambler code
Set the scrambler code number.
Selectable value;
UT-109: 1 to 32
UT-110: 1 to 255
*UT-110 requires to set the scrambler group code (1
to 4) in the Common 2 screen. Use the same Group
Code and Scrambler code for same group.
- 9 -
Page 10

IC-F3GT/GS, IC-F4GT/GS SERIES CLONING NOTES
M Setting examples
M IC-F3GT/GS, IC-F4GT/GS series
➥ Generally, channels with voice scrambler settings
should have the power save function in the Edit
Memory CH screen turned OFF.
➥ When you want to use the voice scrambler function
on channels in which the power saver function is
ON, set the Tone Start Timing in the Common 2
screen to 1.100.
• In above case, non-scrambling voice will be transmitted
approx. 1 sec. after pushing PTT.
When using the UT-110 as rolling type scrambler unit
to keep the highest level of privacy, the ‘LOG IN’ function provides full time scrambling communications.
M Using ‘LOG IN’ function
• For LMR:
➥ In the Common 2 screen, set the Tone Start Timing
to 1.100.
➥ In the DTMF Autodial screen, set the LOG/ID code
to 5 and the 1st Timer to 0.700.
➥ In the memory CH screen, set necessary channels
to LOG IN (L-IN).
NOTE: At these settings, when the period from
pushing PTT to when you can talk seems long, set
the Power Save Start timer (2nd) in the Expert
screen to “0.000” and set the Tone Start Timing in
the Common 2 screen to 0.600.
➥ In the DTMF Autodial screen, set the 1st Timer to
0.200.
• For PMR:
➥ In the Common 2 screen, set the Tone Start Timing
to 1.100.
➥ In the TX Code CH screen, set CH NO.1 to 1 only.
➥ In the 5Tone setting screen, set the Long Tone Timer
to 0.300.
➥ In the Edit Memory CH screen, set necessary chan-
nel ID's to 1L (click check box to turn the Long Tone
ON). (CCIR 5-tone format)
➥ In the memory CH screen, set necessary channels
to LOG IN (L-IN).
NOTE: At above settings, when the period from
pushing PTT to when you can talk seems long, set
the Power Save Start timer (2nd) in the Expert
screen to 0.000 and set the Tone Start Timing to
0.600.
➥ In the memory CH screen, return necessary
channel ID's to 1 from 1L.
M Other notes
➥ For communication between F300/F400/S series
and F3GT/GS, F4GT/GS series, make sure that the
F3GT/GS, F4GT/GS series power saver settings are
set to the same values as the F300/F400/S series
Tone Start Timing settings.
➥ When using the UT-109/UT-110 for non-rolling type
scrambling there are 32 available scramble codes.
In the memory CH screen, 1 to 255 can be input as
codes however, many of these codes are identical
(adding 32 to a code results in the same scramble
code). The following groups of codes are the same:
1to32
(33 to 64)
(65 to 96)
(97 to 128)
(129 to 160)
(161 to 192)
(193 to 224)
(225 to 255)
➥ When using the UT-110 for rolling type scrambling
similar but different codes will often result in a
match. To avoid this, use codes that are sufficiently
different (generally speaking codes that are separated by values of 20 or more will not match).
➥ When using the UT-110 for rolling type scrambling
and a channel is in the scramble ON condition, if a
received signal includes no simultaneous tone, the
receiving station automatically enters the through
condition and the transmission can be monitored.
However, when non-rolling type scrambling is set, simultaneous tone are not used and therefore signals
from other stations are received with modulation reversed.
Below examples are not always needed settings,
but will be useful in cases after transmitting a synchronous tone to notify operator of times to start
- 10 -
Page 11

APPENDIX-4; IC-F1010/F1020/F2010/F2020 SERIES MODIFICATION POINTS
FRONT
MIC
AFO
UT-109/110
M Model: IC-F1000/F2000 series
Cut the junction patterns on Main board AFO and MIC.
• UT-109 and UT -110 scrambler units require some PC
board modifications. (See above MIC and AFO.)
• IC-F1010/F1020, IC-F2010/F2020 series require a
#02: High AF level type scrambler unit. Do not install the wrong version, as they are not compatible.
• The UT-110 may function as the UT-109 through
cloning software.
• Compatible cloning software: CS-F1000 Rev.2.2.
• Program the scrambler function OFF/ON/INH and
scrambler codes on the Memory Channel screen,
Scrambler Type*, Group Code*, Synchronous Capture* and Tone Start Timing* on the [Common 2]
screen with cloning software when installing scrambler unit. (
*UT-110 only)
• Assign the scrambler function to a programmable key
as “Scrambler” on [Key & Display Assign] screen, if
required.
• Operation with the [Scrambler] key:
− Push and hold to turn the voice scrambler function ON.
− Push to turn the voice scrambler function OFF.
• Please refer the “IC-F3/F4/S SERIES CLONING
PRECAUTIONS” on p. 3.
- 11 -
CLONING
MAIN unit
NOTE FOR REMOVAL
Be sure to resolder above disconnected points, otherwise no TX modulation or AF output is available
when you remove the scrambler units.
Page 12

• UT-109 and UT -110 scrambler units require some PC
board modifications. (See below and next.)
• IC-F30/F31GT/GS, IC-F40/F41GT/GS series require
a #02: High AF level type scrambler unit. Do not in-
stall the wrong version, as they are not compatible.
• The UT-110 may function as the UT-109 through
cloning software.
• Compatible cloning software: CS-F30G.
APPENDIX -4; IC-F30/F31GT/GS, IC-F40/F41GT/GS SERIES PRECAUTIONS
OPTIONAL UNIT INSTALLATION
M Installation
Disassemble the some parts before install the scrambler unit.
q Unscrew nut a, and remove the knobs.
w Unscrew screw b and 2 screws c, then remove
the multi-connector cover and rear panel.
e Unscrew 2 screws d, then remove the multi-con-
nector.
r Unscrew 2 screws e, then take off the chassis from
the front panel in the direction of the arrow.
Be careful!:
Flat cable is connected between the MAIN unit on
the chassis and front panel.
t
Install the desired optional unit. Insert tightly to avoid
bad contact.
NOTE: When installing UT-105 or UT-111, the unit
MUST BE plugged into OPT1. Otherwise the unit
will not work correctly. (Other optional units can be
plugged into either slot.)
y Program the necessary information with the cloning
software before operation.
• Please refer the “IC-F3GT/GS, IC-F4GT/GS SERIES
CLONING NOTES” on p. 10.
Be sure to resolder disconnected points, otherwise
no TX modulation or AF output is available after you
remove the scrambler units.
NOTE FOR REMOVAL
• Program the scrambler function ON/OFF/Inhibit and
scrambler codes on the Edit Memory CH screen,
Scrambler type*, Group code*, Synchronous Capture
mode* and Tone Start Timing* on the [Common 2]
screen with cloning software when installing scrambler unit. (
*UT-110 only)
• Assign the scrambler function to a programmable key
as “Scrambler” on Key & Display Assign screen, if required.
• Operation with the [Scrambler] key:
− Push and hold to turn the voice scrambler function ON.
− Push to turn the voice scrambler function OFF.
CLONING
OPT1
OPT2
a
b
d
d
c
e
- 12 -
Page 13

MODIFICATION POINTS
1-1-32 Kamiminami, Hirano-ku, Osaka 547-0003 Japan
Count on us!
A-8326I-1EX-w Printed in Japan
© 1997 Icom Inc.
B
urface
A
1
5
10
15 16
20
25
30
D
G
C
1
5
10
15 16
20
25
30
F
E
J1
J2
OPT1
OPT2
AF line
MIC line
OPT2 connector
for;
UT-109/110,
UT-113
*DO NOT install
UT-105 or UT-111
into OPT2.
OPT1 connector
for;
UT-105,
UT-111,
UT-109/110,
UT-113
MAIN unit
• Modification points. (Both IC-F30/F31GT/GS, F40/F41GT/GS)
• Cut the junction patterns A and B on the MAIN unit.
- 13 -
09.2000
 Loading...