

Page 1
APPLICATION SOFTWARE
RS-SAT100
The RS-SAT100 is an application that enables you to text chat through a satellite communication network by
connecting an IC-SAT100 or IC-SAT100M using Bluetooth®.
This instruction document shows how to use the application on an Android™ device.
INSTRUCTIONS
System requirements
The following system is required to use the application. (As of March 2023)
Data device for Android™
Android version 7.0 or later
L Download the application from the Google Play Store. See page 2.
Data device for iOS™
iOS version 12.0 or later
iPadOS version 13.1 or later
L Download the application from the App Store. See page 2.
IC-SAT100
Rev. 1.3 or later for an Android device
Rev. 1.4 or later for an iOS device
IC-SAT100M
Rev. 1.1 or later for an Android device
Rev. 1.2 or later for an iOS device
L The RS-SAT100 has been tested with Android 7.x.x, 8.x, 9.0, 10.0, 11.0, 12.0, and 13.0, iOS 12.x, 13.x, and 14.x, and
iPadOS 13.x and 14.x.
L This Instruction document is based on using Android 7.0, iOS 14.2, and RS-SAT100 version 1.0.2 (for an Android device)
and 1.0.1 (for an iOS device).
L If your application on an Android device requires permission to use the Bluetooth function, you must grant that permission.
For operations of the Android device, read the device’s instruction manual.
Disclaimer
• The application may not work properly, depending on the OS version, installed applications, signal strength, or
other reasons.
• Icom is not responsible for any lost prots, data, or consequential, special, indirect, or incidental damages.
• Depending on the OS version or settings, the indications or items may dier.
• The screenshots on these Instructions are just examples, so that the contents may dier from the actual ones.
Features
• You can send a message with a timestamp and a name.
• The received message is displayed on both the transceiver and the mobile device.
• You can select and send the standard text that is set in the application in advance.
Operating notes
• This application supports English and Japanese languages.
• When sending Japanese characters with the application, set the receiving transceiver’s language setting to “Japanese.”
If the receiving transceiver’s language setting is dierent, the characters may not be displayed on the transceiver.
L Use only this application to send a message in Japanese. You cannot send Japanese characters from the transceiver.
• When connecting or disconnecting the transceiver and a Bluetooth Headset, the connection between the
transceiver and this application may be temporarily disconnected.
If Bluetooth does not reconnect, try to connect again from either the application or the transceiver.
Icom and the Icom logo are registered trademarks of Icom Incorporated (Japan) in Japan, the United States, the United Kingdom, Germany,
France, Spain, Russia, Australia, New Zealand, and/or other countries.
Android and Google Play are registered trademarks or trademarks of Google LLC, and Google is registered trademark or trademark of Google, LLC.
IOS is a trademark or registered trademark of Cisco in the U.S. and other countries and is used under license.
iPadOS is a trademark of Apple Inc., registered in the U.S. and other countries and regions.
App Store is a service mark of Apple Inc.
The Bluetooth® word mark and logos are registered trademarks owned by Bluetooth SIG, Inc. and any use of such marks by Icom Inc. is under license.
All other products or brands are registered trademarks or trademarks of their respective holders.
- 1 -
Page 2

Find and download RS-SAT100
Install this application on your mobile device.
1. Turn ON your mobile device.
2. Touch “Play Store” (Android) or “App Store” (iOS).
3. Enter “RS-SAT100” in the search field and touch search.
• “RS-SAT100” will be displayed as the search result.
L You may need to enter “RS-SAT100” as a complete word to get the search result.
L If your mobile device does not support the RS-SAT100, “RS-SAT100” may not appear as the search result.
4. Touch “ RS -SAT100.”
• Displays the introduction screen of the RS-SAT100.
5. Touch <INSTALL> or <GET> (iOS).
• Installation starts.
• After the installation is nished, the RS-SAT100 icon is displayed on the device’s screen.
Pairing with the IC-SAT100 or IC-SAT100M
Follow the steps below to set the Bluetooth function of the transceiver.
1. Set the PC Command function to “Bluetooth.”
MENU > Functions > PC Command > Bluetooth
2. Turn ON the Bluetooth function.
MENU > Bluetooth > Bluetooth ON/OFF
3. Select “Waiting Pairing.”
MENU > Bluetooth > Waiting Pairing
L The Waiting Pairing screen is displayed.
→ When pairing with an Android device, see page 3 for details.
→ When pairing with an iOS application, see page 4 for details.
- 2 -
Page 3
About the Connection Settings screen
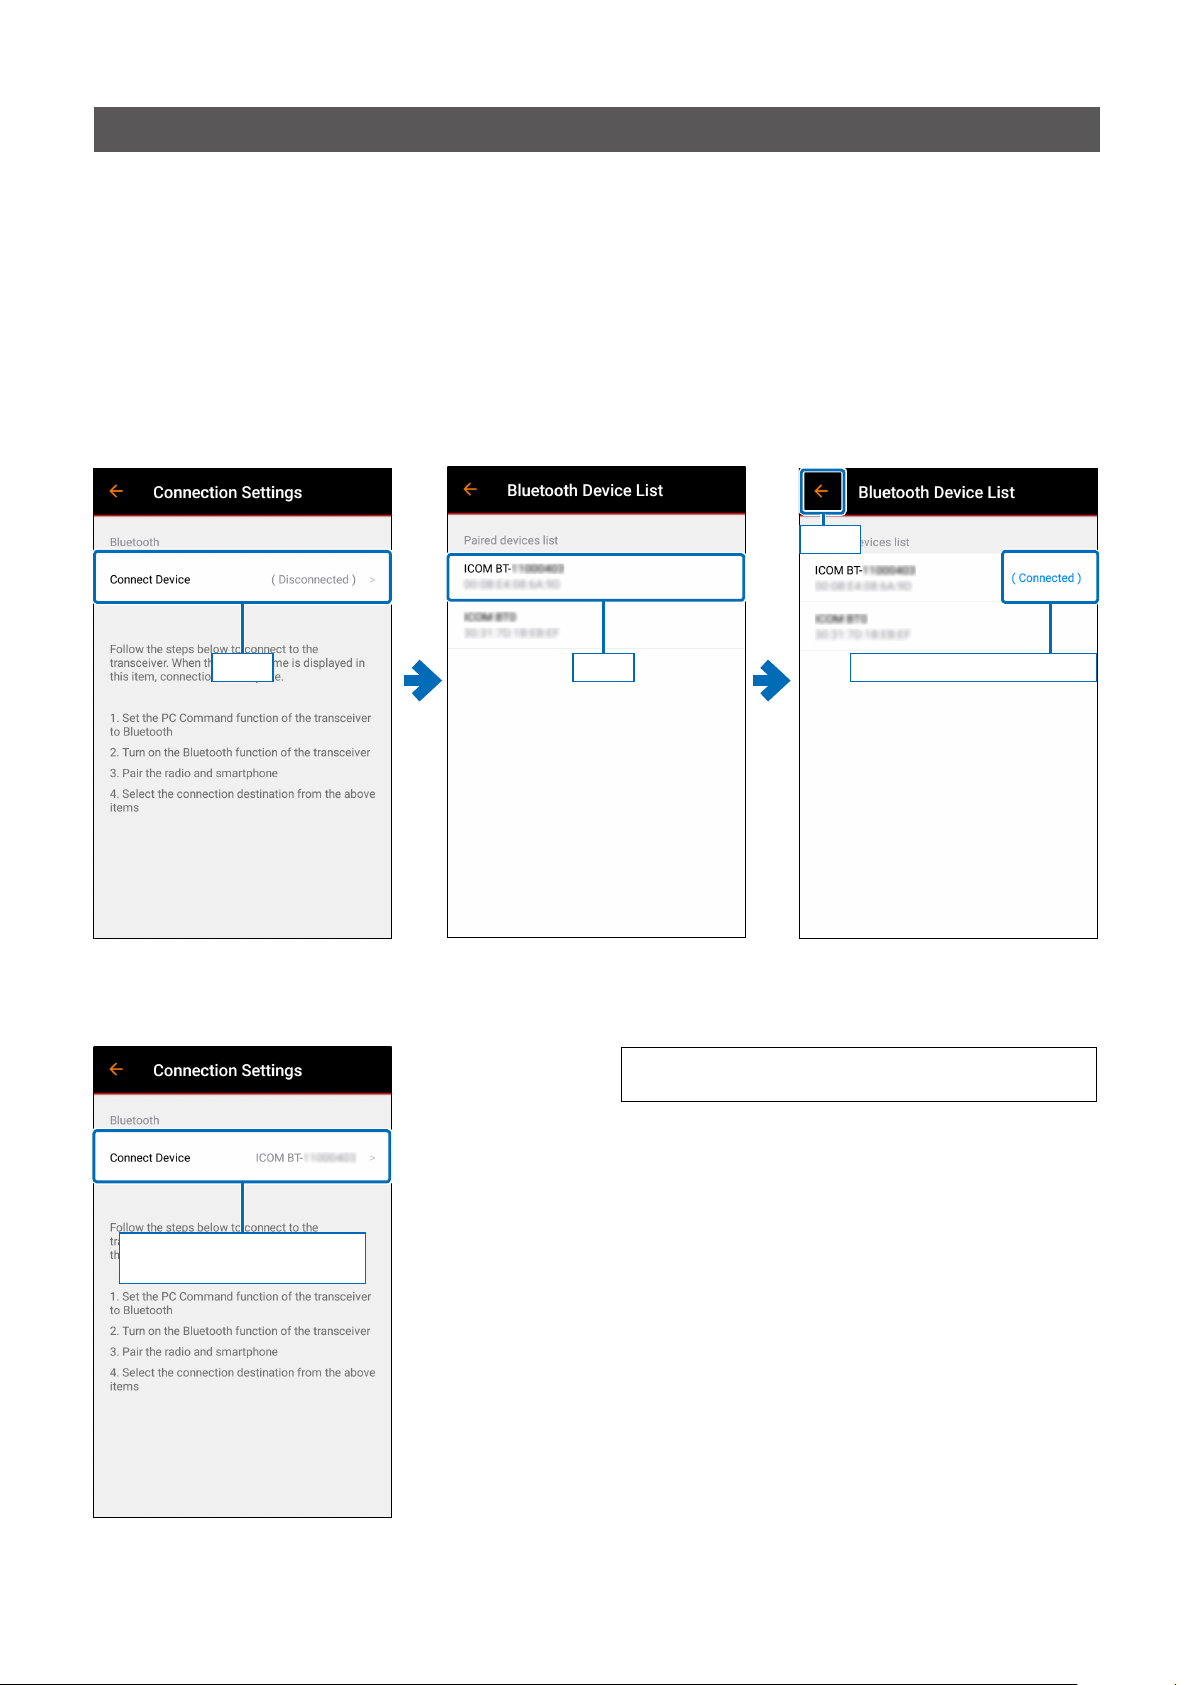
Before using this application for the rst time, you must select the Bluetooth connection destination.
When pairing with an Android device
1. Turn ON the Bluetooth function of the Android device.
2. Pair with the transceiver.
3. Touch RS-SAT100 to start the application.
4. Touch “Connect Device” to display the Bluetooth Device List screen.
5. Select the transceiver you want to connect to.
L “(Connected)” is displayed when the transceiver is connected.
6. Touc h <> to return to the Connection Settings screen.
Touch
Touch Touch
7. Touc h <> again to open the Chat screen.
L This setting can be changed in the Settings screen at any time. (p. 12)
The selected device’s name
is displayed.
“(Connected)” is displayed.
TIP: Touch the transceiver in the Bluetooth Device List
screen to disconnect it.
- 3 -
Page 4
About the Connection Settings screen
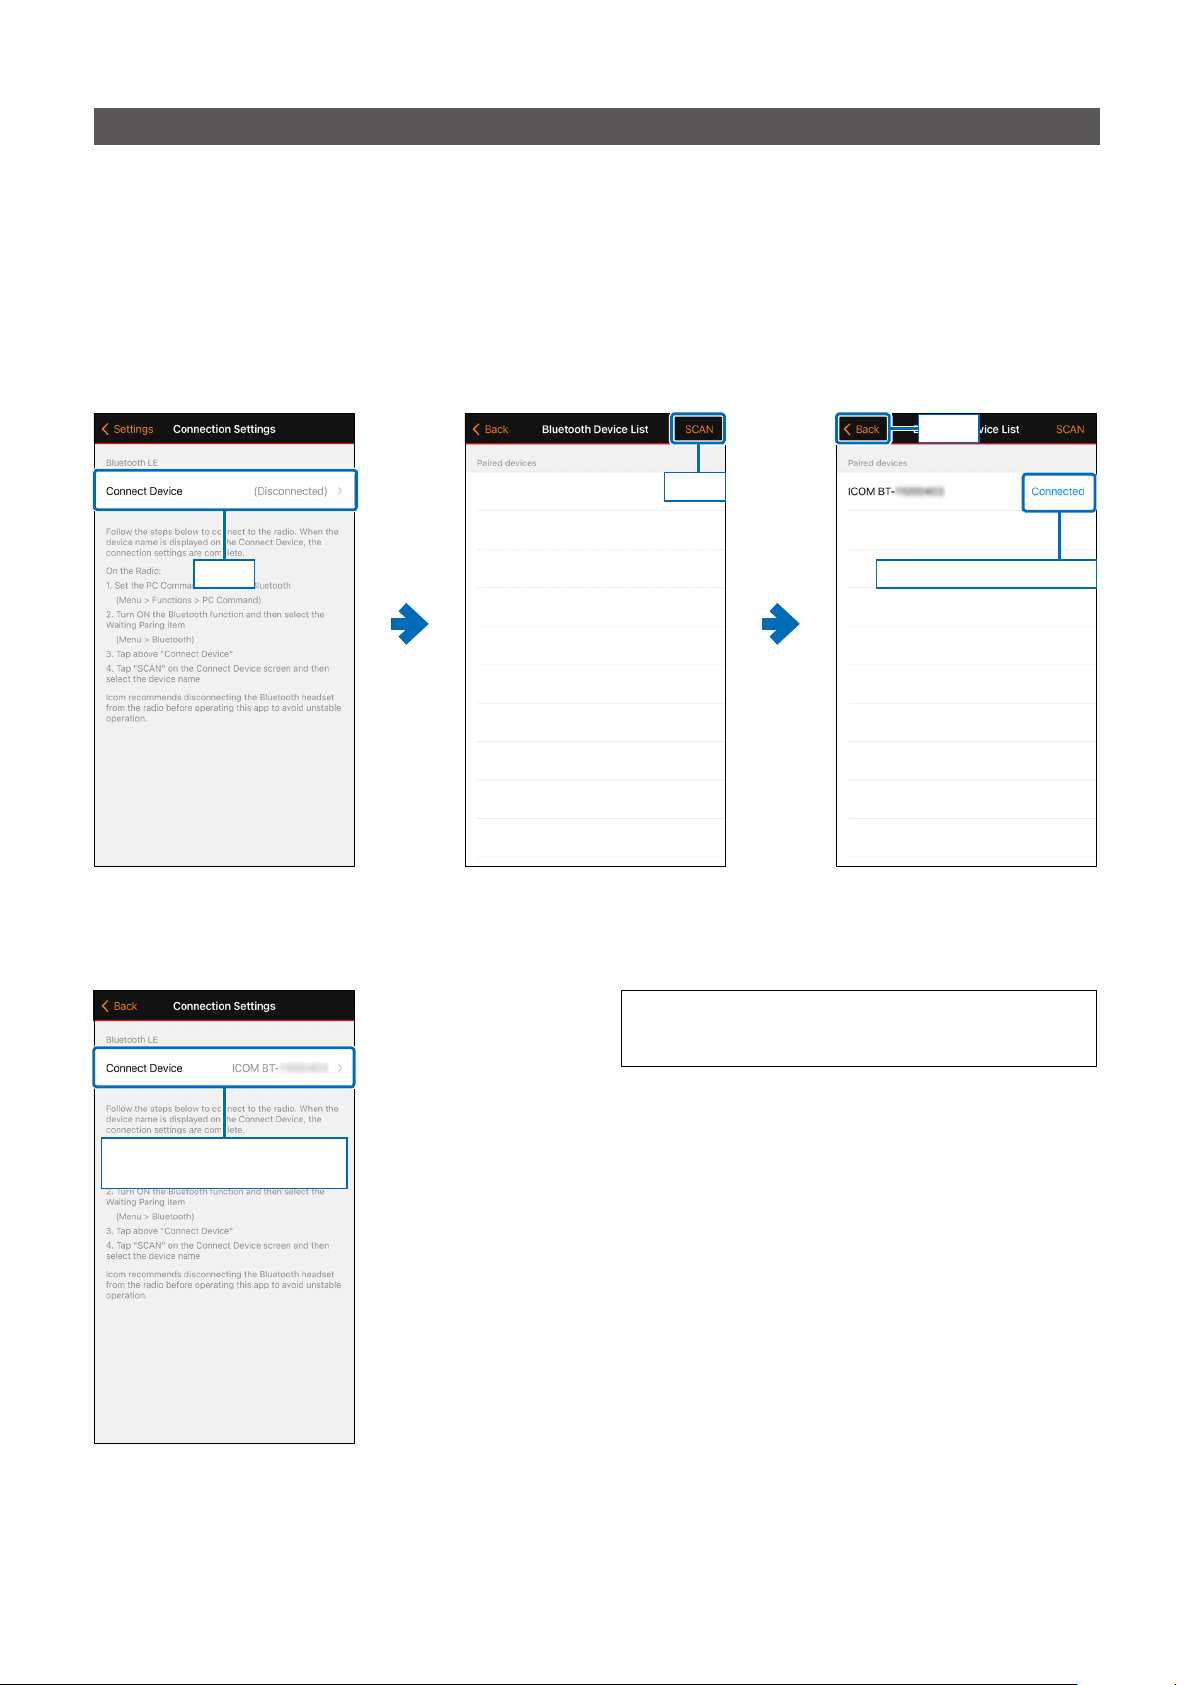
When pairing with the iOS version of the application
1. Turn ON the Bluetooth function of the iOS device.
L DO NOT pair the iOS device with the transceiver, pair with only the application.
2. Touch the RS-SAT100 to start the pairing procedure.
3. Touch “Connect Device” to display the Bluetooth Device List screen.
4. Touch <SCAN>, and then select the transceiver from the Available devices screen.
L “Success” is displayed when the pairing succeeds, and “Failure” is displayed when the pairing fails.
5. Touch << Back> to return to the Connection Settings screen.
Touch
Touch
Touch
6. Touch << Back> again to open the Chat screen.
L This setting can be changed in the Settings screen at any time. (p. 12)
The selected device’s name
is displayed.
“Connected” is displayed.
TIP: The transceiver is disconnected when you:
• Touch the transceiver in the Bluetooth Device List screen.
• Touch <SCAN> again.
- 4 -
Page 5
Chat screen
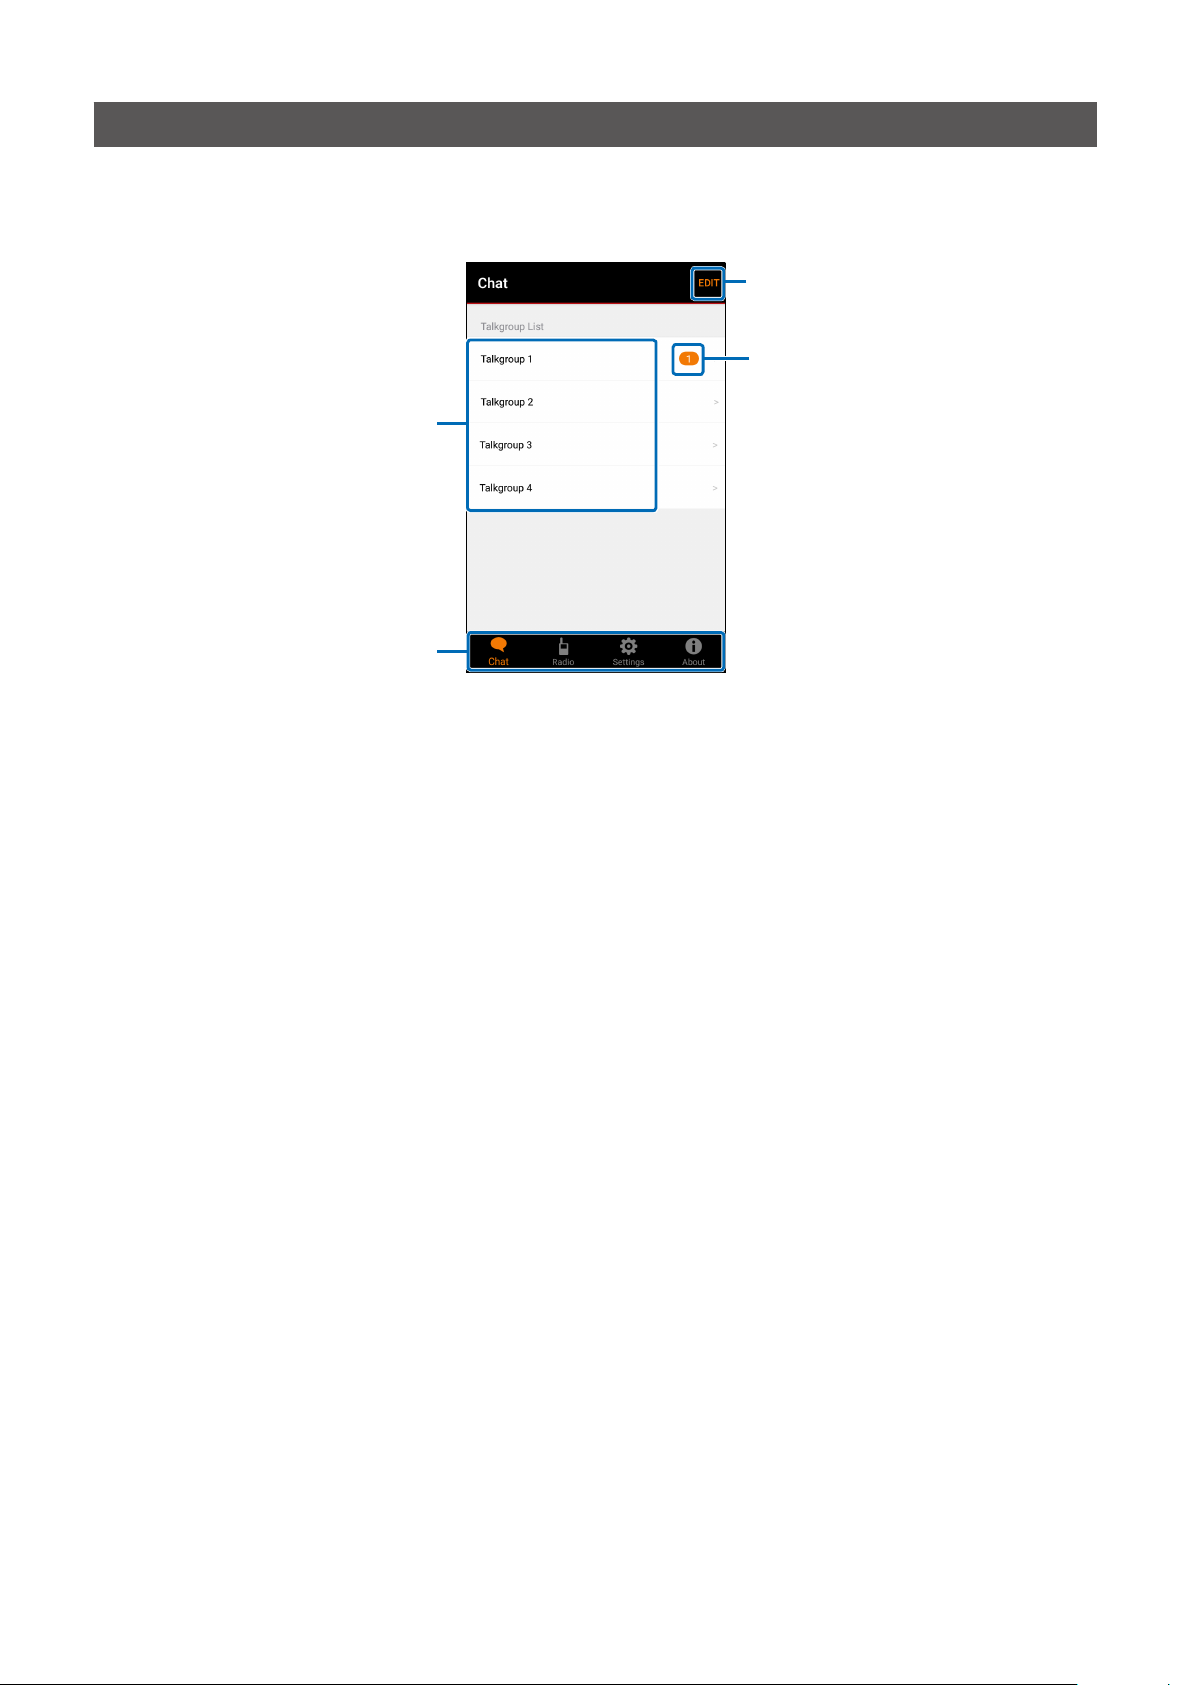
You can send a message and check a received message.
D Talkgroup List
1
2
4
3
Talkgroup List
1
Touch to open each Talk screen.
L The Talkgroup information automatically obtained from
the paired transceiver is displayed.
Tab menu
2
Touch to move to each screen.
Chat screen
Radio screen (p. 8)
Settings screen (p. 9)
About screen (p. 15)
3
Unread icon
Displayed when an unread message is received.
4
[EDIT]
Touch to select the Talkgroups to use.
- 5 -
Page 6
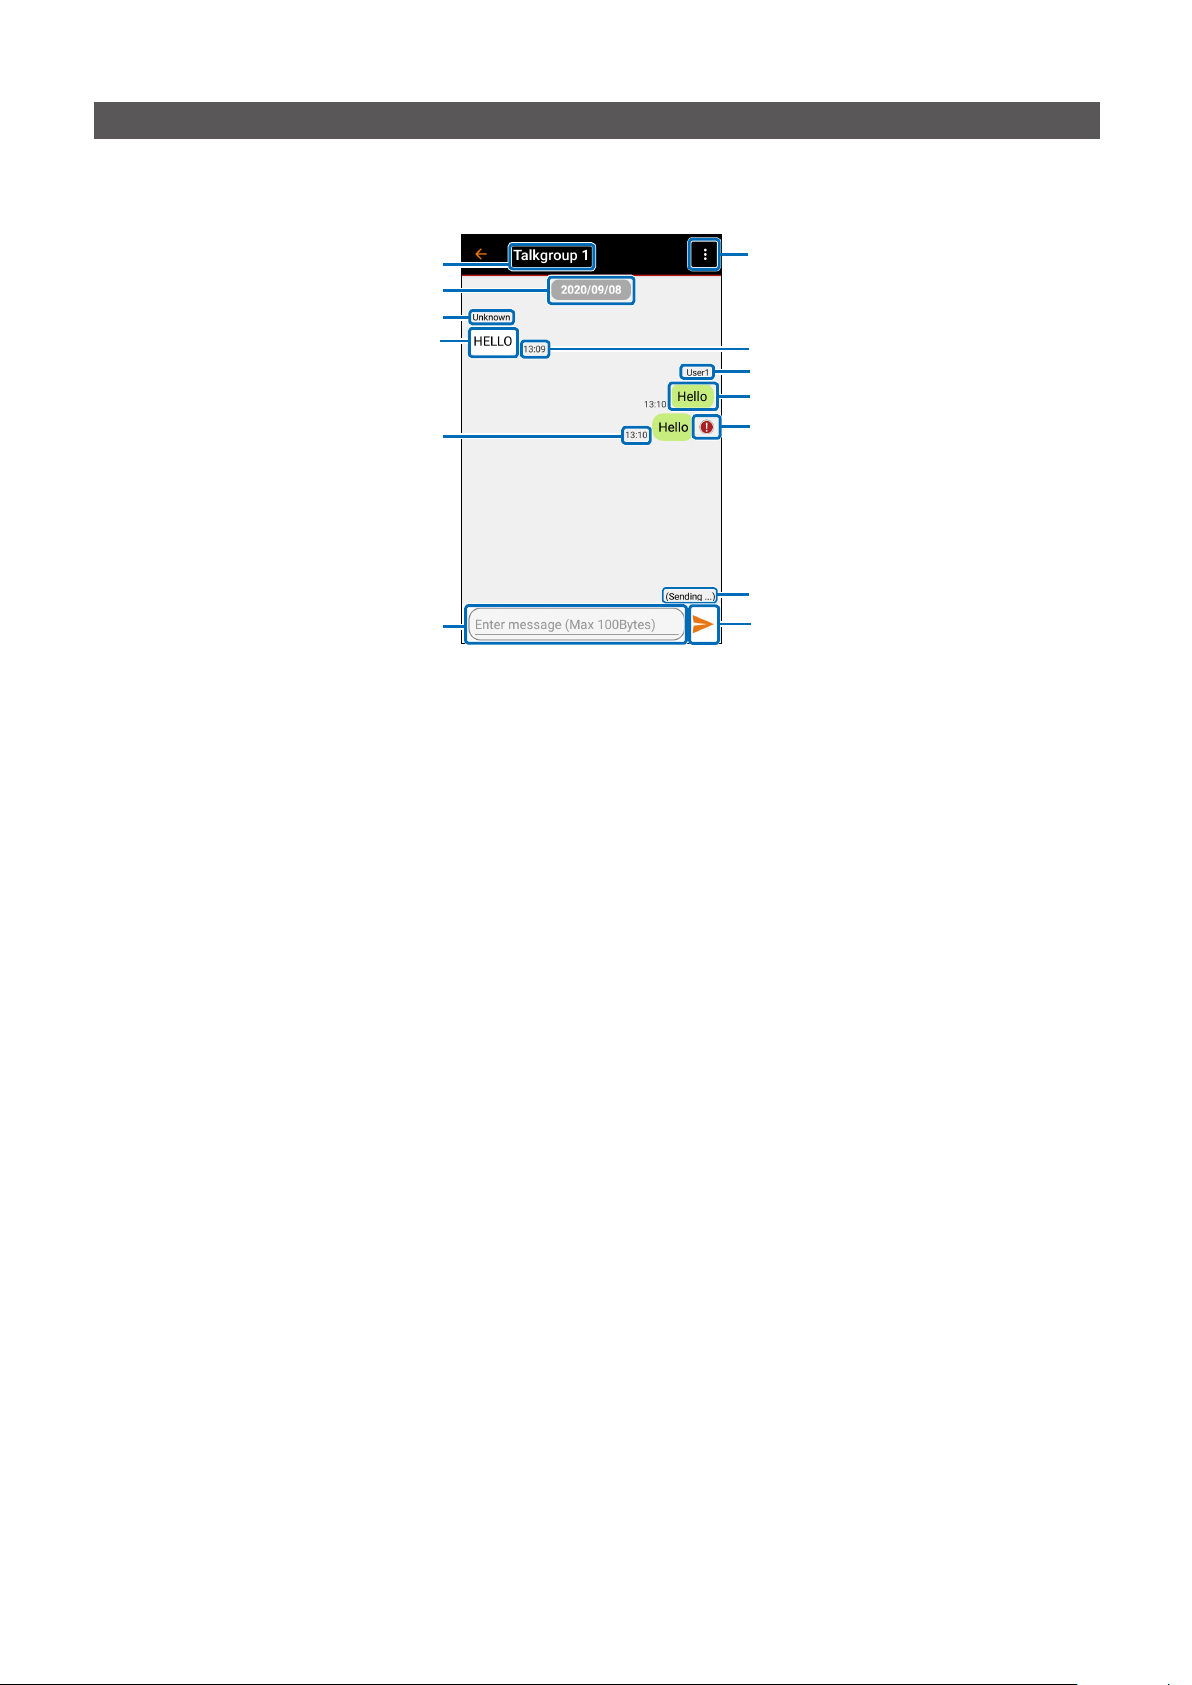
Chat screen
D Talk screen
1
2
3
4
5
6
Talkgroup Name
1
Displays the Talkgroup name selected in the
Talkgroup list.
Date
2
Displays the date the message was sent or received.
Name (Received Message)
3
Displays the sender’s name.
Received Message
4
Displays a received message.
Time (Sent Message)
5
Displays the time that the message was sent.
L When “Add Time” (p. 12) is set to “ON(Pre)” or
“ON(Post),” the time is included in the message.
L When the message is too long, the time may not be
displayed due to the message’s character limit.
6
[Enter Message]
Enter the message you want to send.
L When the transceiver is not connected, you cannot enter
the message.
L See page 7 for the number of characters that can be
entered.
7
Send button
Touch to send the message.
9
8
7
9
Stop sending icon
Displayed when the message could not be sent.
Sent Message
Displays the sent message.
Name (Sent Message)
Displays the name set in the User Name setting in
the Settings screen.
L When “Add Name” (p. 12) is turned OFF, or when
a message is sent from the transceiver, “Unknown” is
displayed.
L You can change the name in the Settings screen. (p. 9)
L When the message is too long, the name may not be
displayed due to the message’s character limit.
Time (Received Message)
Displays the time that the message was received.
Overow menu
Touch to display the following menu.
[Change connect device]
Change the transceiver to connect to.
L See page 3 for details.
[Send Standard Text]
Sends the Standard Text.
L See page 7 for details.
8
Transmission status
Displays the transmission status.
• (Requesting ...): Displayed until transmission is
possible.
• (Sending ...): Displayed when sending the message
or waiting for a response.
• (Failed): Displayed when sending the message
fails.
- 6 -
Page 7
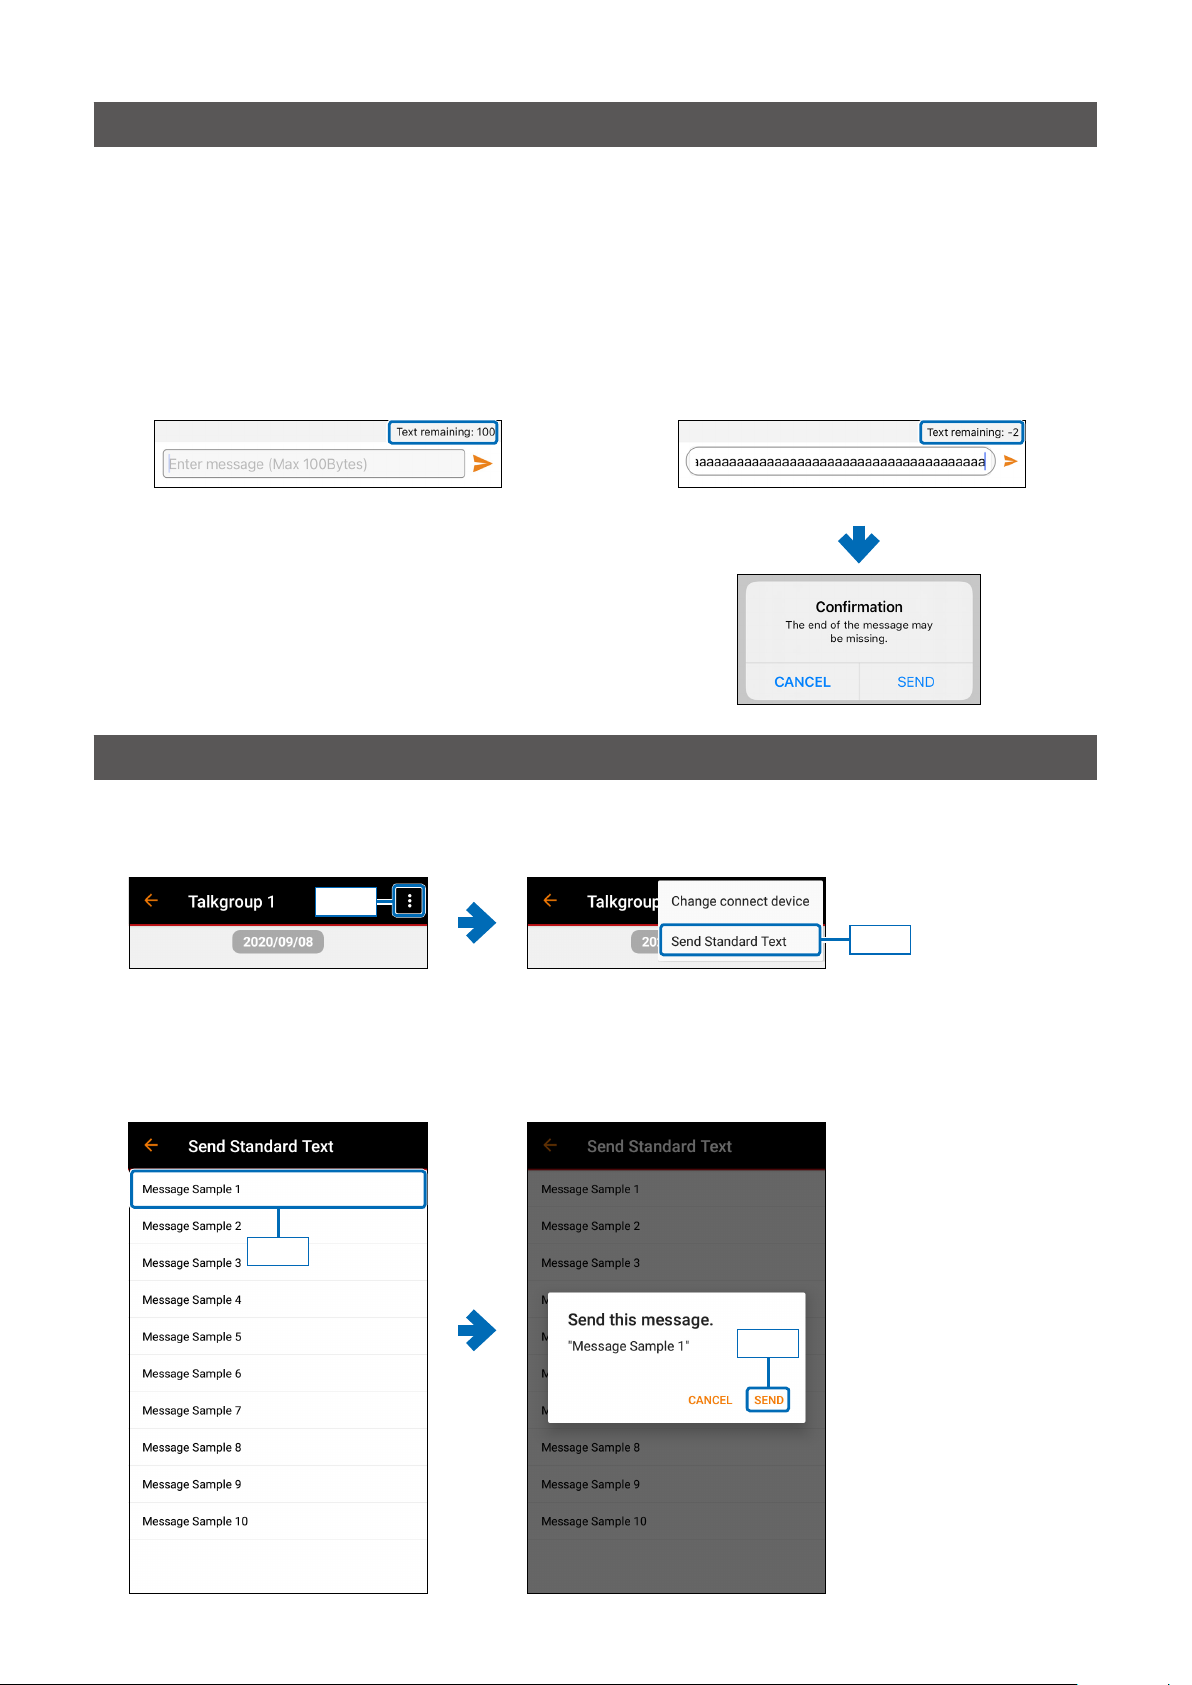
About the character format and the character limit
z In this application, alphanumeric and symbols (excluding “ and ,) are treated as “ASCII format” characters, and
other characters (Japanese, double-byte characters, and so on.) are treated as “Unicode format” characters.
z Up to 100 ASCII format characters can be sent.
L When “Add Name” (p. 12) or “Add Time” (p. 12) is turned ON, or a Unicode format character is included, the number
of characters that can be entered at one time will decrease.
z When touching the [Enter Message], the number of remaining characters is displayed in the upper right corner.
When more than the character limit is entered, the number of remaining characters is displayed as a negative number.
When touching the Send button in that state, a conrmation dialog is displayed.
Touch “SEND” to send a message or touch “CANCEL” to cancel the transmission.
When no character is entered When more than the character limit is entered
How to send the Standard Text
You can send the Standard Text from the Overow menu on the Talk screen.
1. Touch the Overflow menu, and then touch the “Send Standard Text.”
Touch
2. Select the Standard Text that you want to send.
• A conrmation dialog is displayed.
3. Touc h “SEN D.”
• The selected Standard Text is sent, and then returns to the Talk screen.
L You can change the Standard Text contents in “Edit Standard Text” on the Settings screen. (p. 11)
Touch
Touch
- 7 -
Touch
Page 8
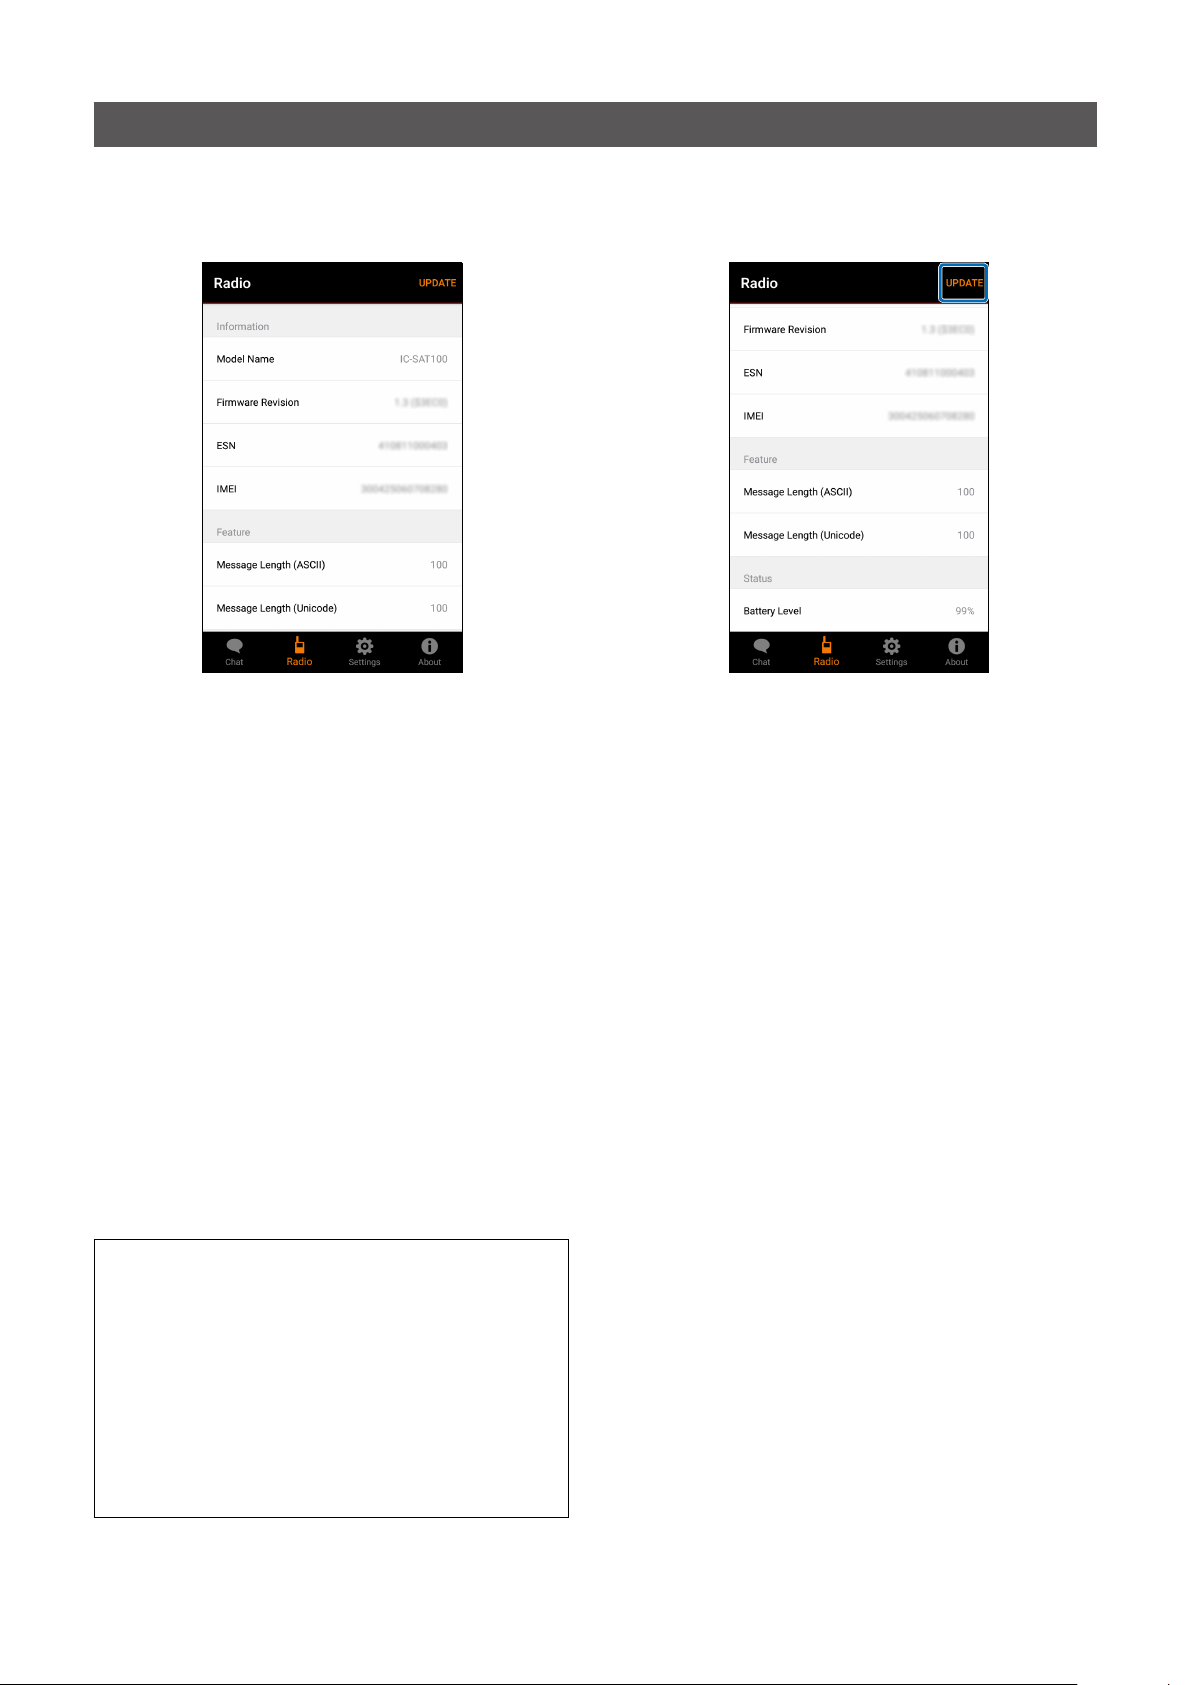
Radio screen
You can check the transceiver’s information.
1
2
3
4
5
6 7
8
Model Name
1
Displays the paired transceiver’s name.
Firmware Revision
2
Displays the transceiver’s rmware version.
ESN
3
Displays the transceiver’s ESN (Electronic Serial
Number).
IMEI
4
Displays the transceiver’s IMEI (International Mobile
Equipment Identier).
5
Message Length (ASCII)
Displays the maximum number of characters that can
be entered in ASCII format.
6
Message Length (Unicode)
Displays the maximum number of characters that can
be entered in Unicode format.
TIPS:
• In this application, alphanumeric and symbols
(excluding “ and ,) are treated as “ASCII format,” and
other characters (Japanese, double-byte characters,
etc.) are treated as “Unicode format.”
• The ASCII format can send up to 100 characters.
When the Unicode format character is included, up
to 50 characters can be sent because the amount of
information is large.
If the more than the number of characters that can
be sent is entered, the excess part is automatically
truncated when sending.
7
Battery Level
Displays the transceiver’s battery level.
L When the IC-SAT100M is paired, “(Unsupported)” is
displayed.
8
[UPDATE]
Touch to update the transceiver’s information.
- 8 -
Page 9
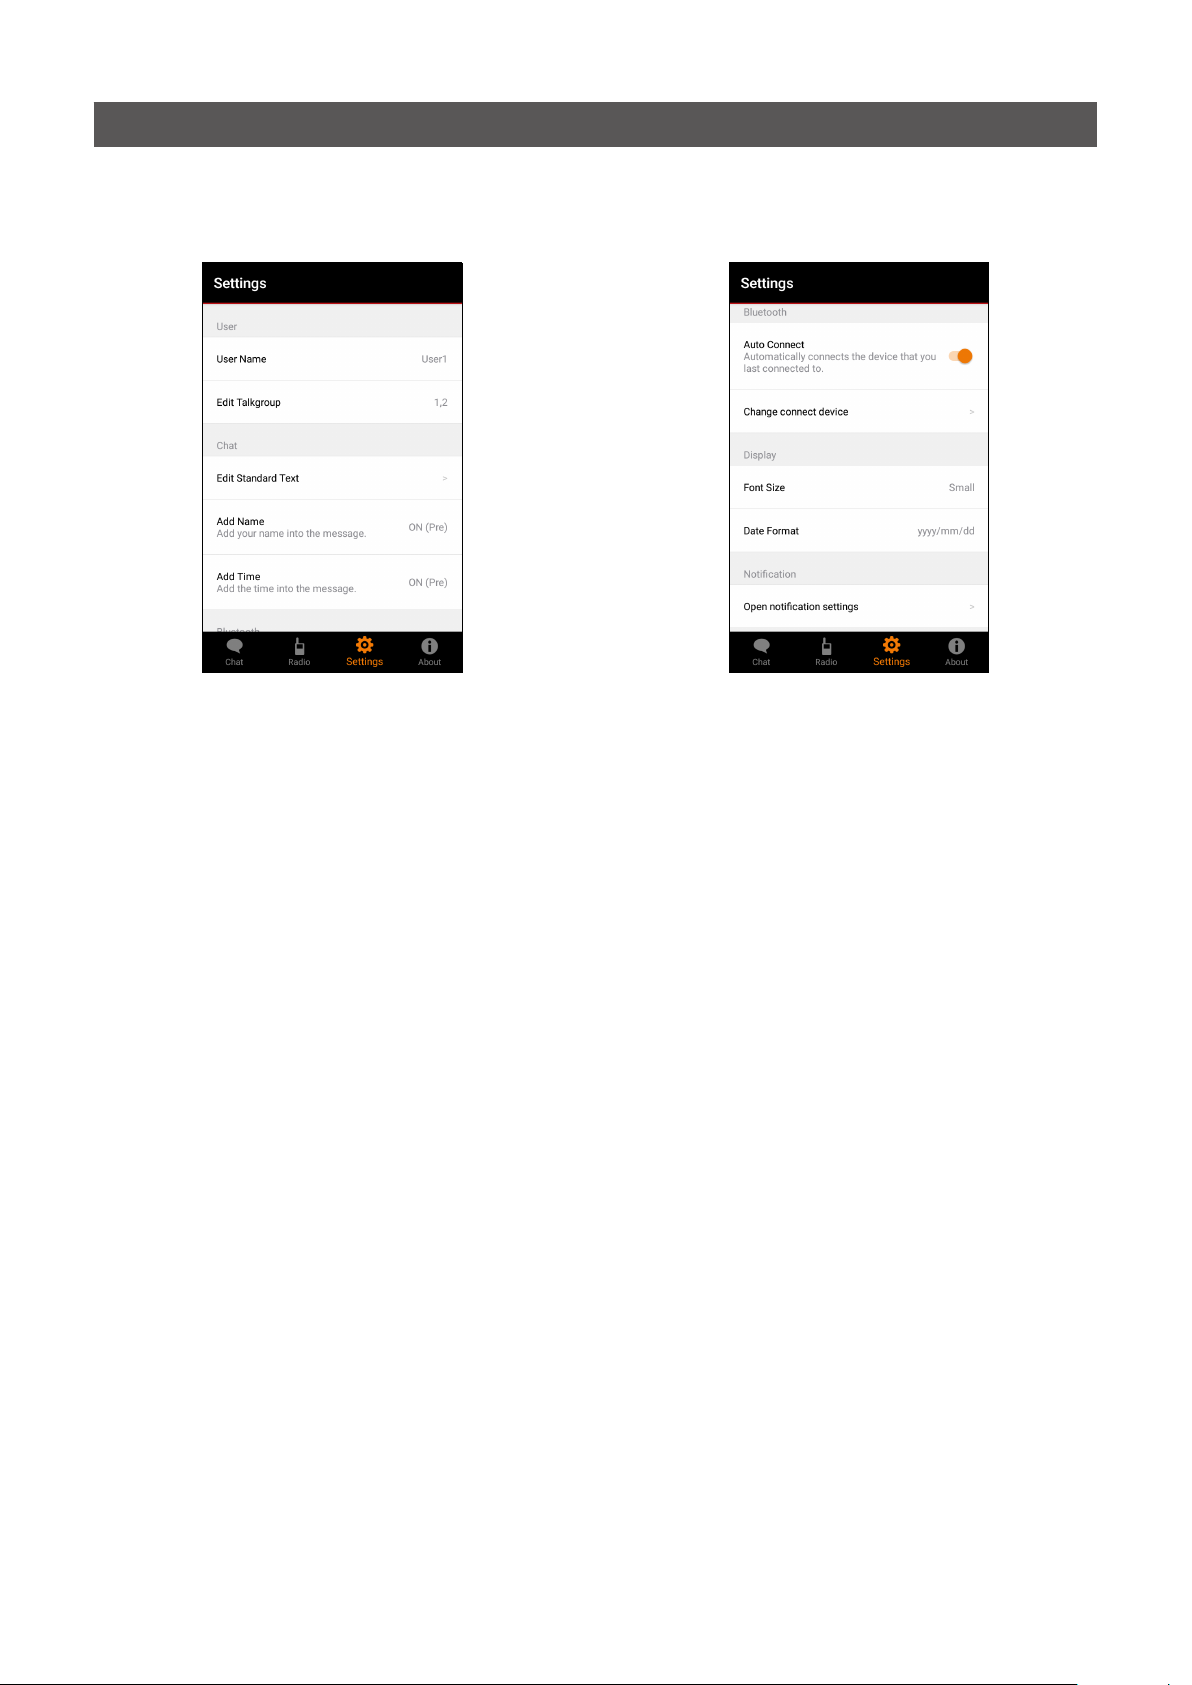
Settings screen
You can change the application’s settings.
1
2
3
4
5
User Name
1
Enter the user name that will be displayed when
sending the message. (p. 11)
Edit Talkgroup
2
Select the Talkgroup you want to use. (p. 11)
Edit Standard Text
3
Select to edit the Standard Text. (p. 11)
Add Name
4
Select whether or not to add the user name in the
message to send. (p. 12)
5
Add Time
Select whether or not to add the time in the message
to send. (p. 12)
6
7
8
9
Auto Connect
6
Select whether or not to automatically connect the
last connected transceiver using Bluetooth when the
application is started.
7
Change connect device
Select to change the connection destination. (p. 12)
8
Font Size
Select the character size of the messages, date, and
time on the Talk screen. (p. 13)
9
Date Format
Select the date display format on the Talk screen.
(p. 13)
Open notication settings
(For only an Android device)
Open the mobile device’s notication settings. (p. 13)
- 9 -
Page 10
Settings screen
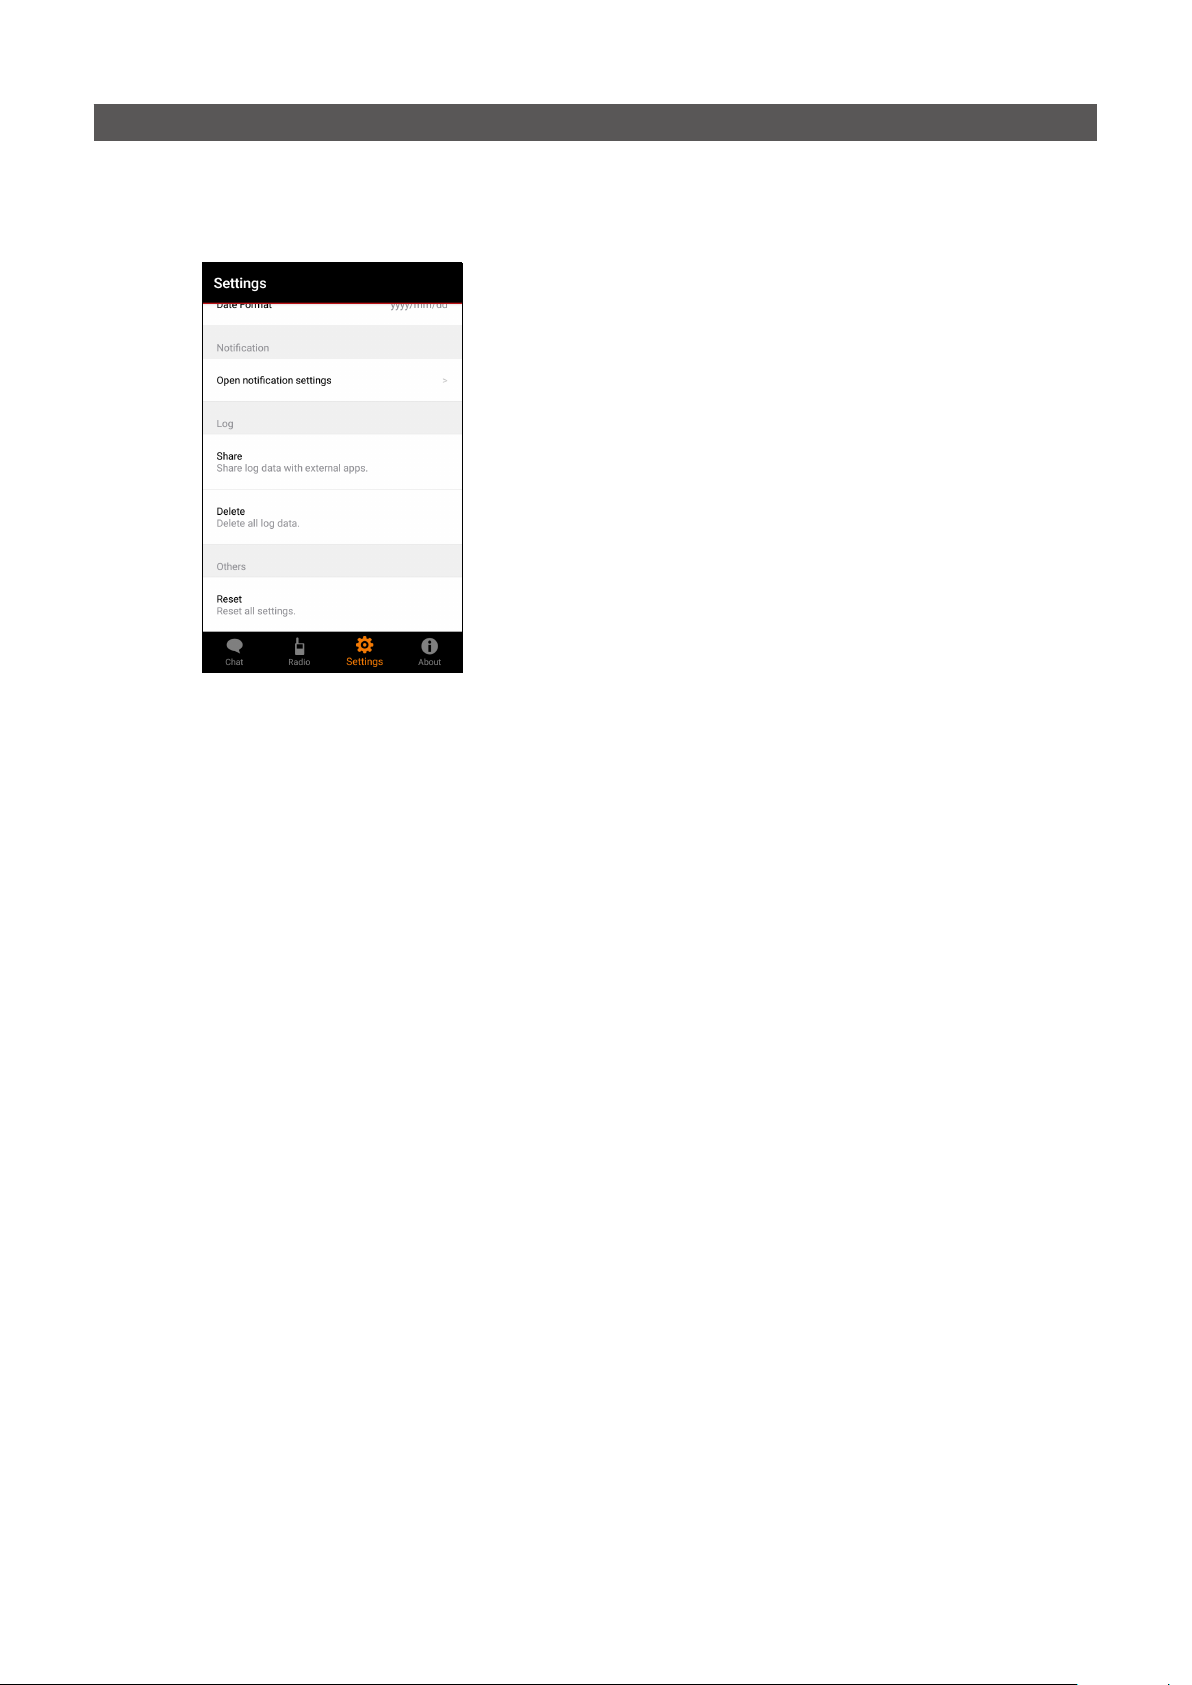
Share
Select the external application to link to transfer or
backup the log les. (p. 13)
Delete
Deletes all log les and chat contents. (p. 14)
Reset
Resets all settings of the Settings screen to their
default values. (p. 14)
- 10 -
Page 11
Settings screen
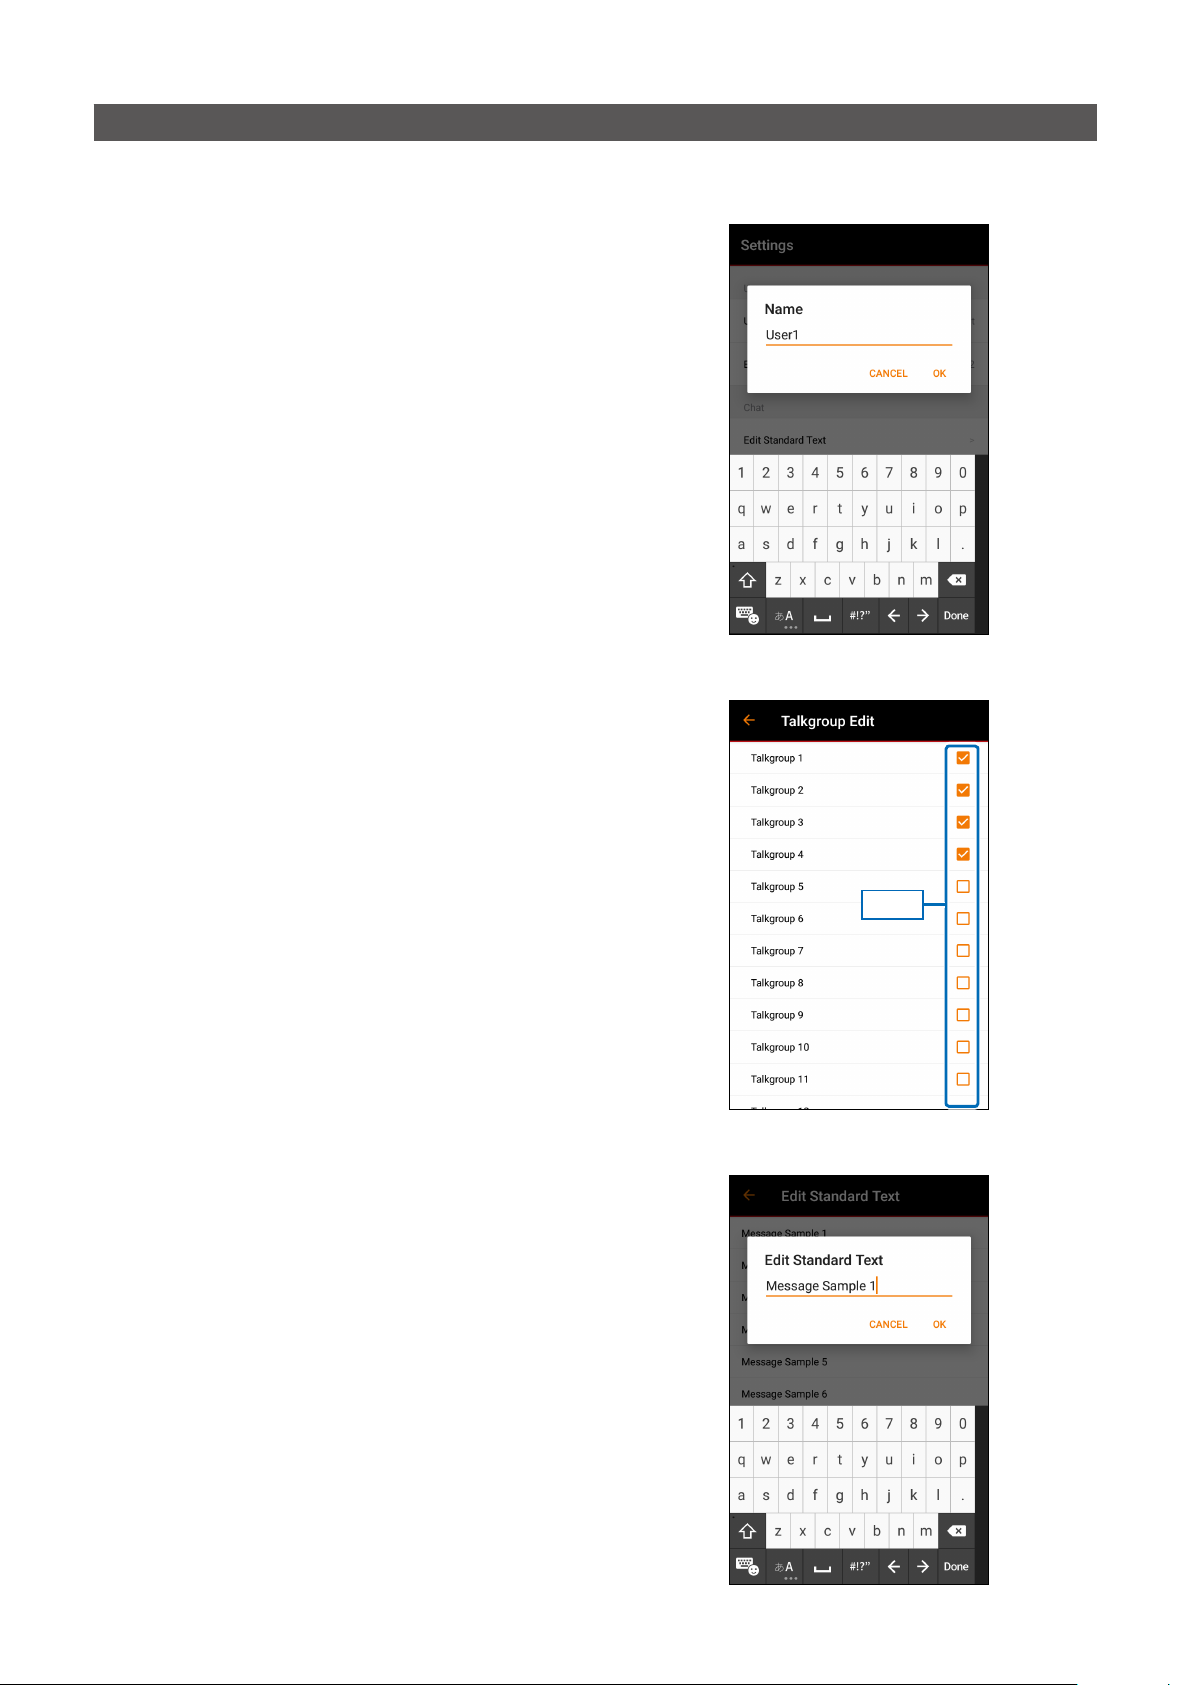
D User Name
Enter the user name that will be displayed when
sending the message.
L You can enter up to 20 characters.
D Edit Talkgroup
Select the Talkgroup (1 ~ 15) you want to use.
The checked Talkgroups can be used on the Talk
screen
.
L You can select multiple Talkgroups.
L You can also select them from “EDIT” on the Talkgroup
List screen. (p. 5)
D Edit Standard Text
You can edit the Standard Text that is used in a
message.
L See page 7 for the number of characters that can be
entered.
Touch
- 11 -
Page 12
Settings screen
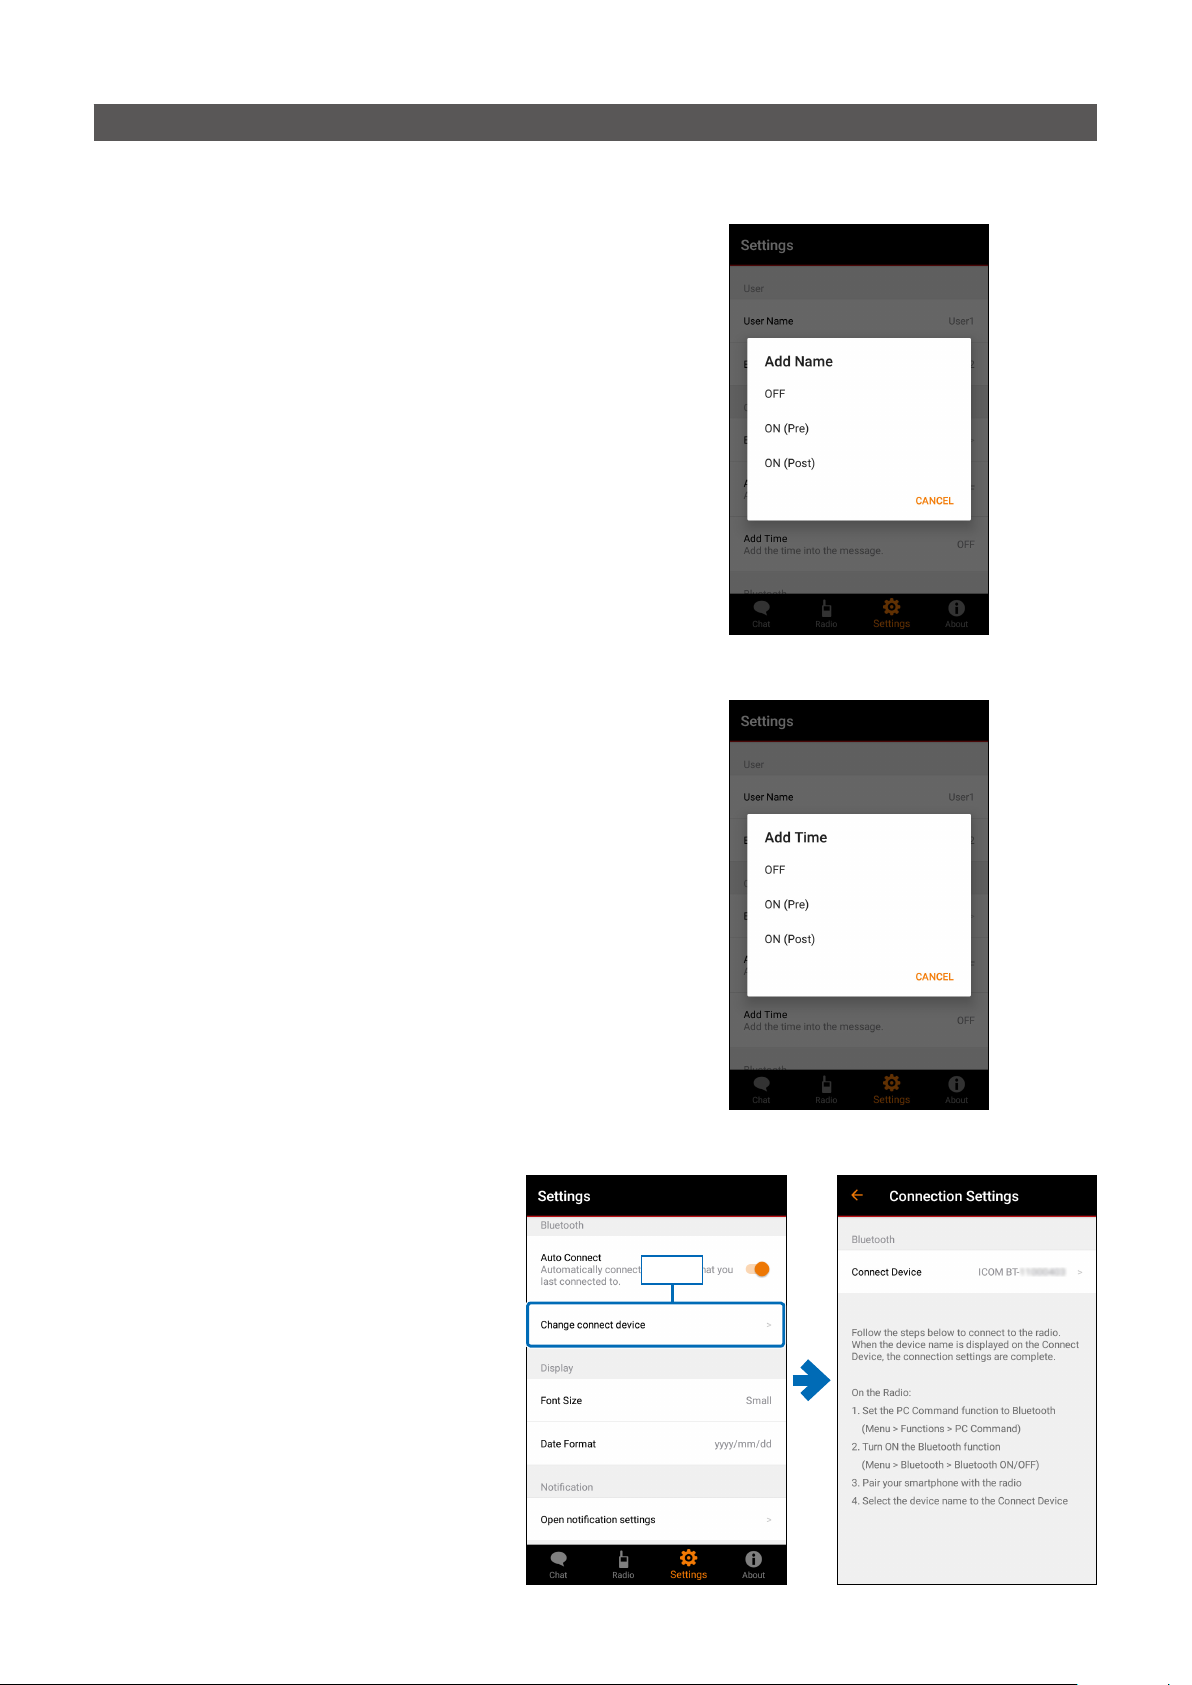
D Add Name
Select whether or not to add the user name in the
message to send.
L The name set in “User Name” is displayed. (p. 11)
OFF: The user name is not added to the
message.
ON (Pre): The user name is added at the beginning
of the message.
ON (Post): The user name is added at the end of the
message.
D Add Time
Select whether or not to add the time to the message
to send.
OFF: The time is not added to the message.
ON (Pre): The time is added at the beginning of the
message.
ON (Post): The time is added at the end of the
message.
D Change connect device
Change the connection destination.
• When touching this item, the Connection Settings
screen is displayed.
L See page 3 for details.
Touch
- 12 -
Page 13
Settings screen
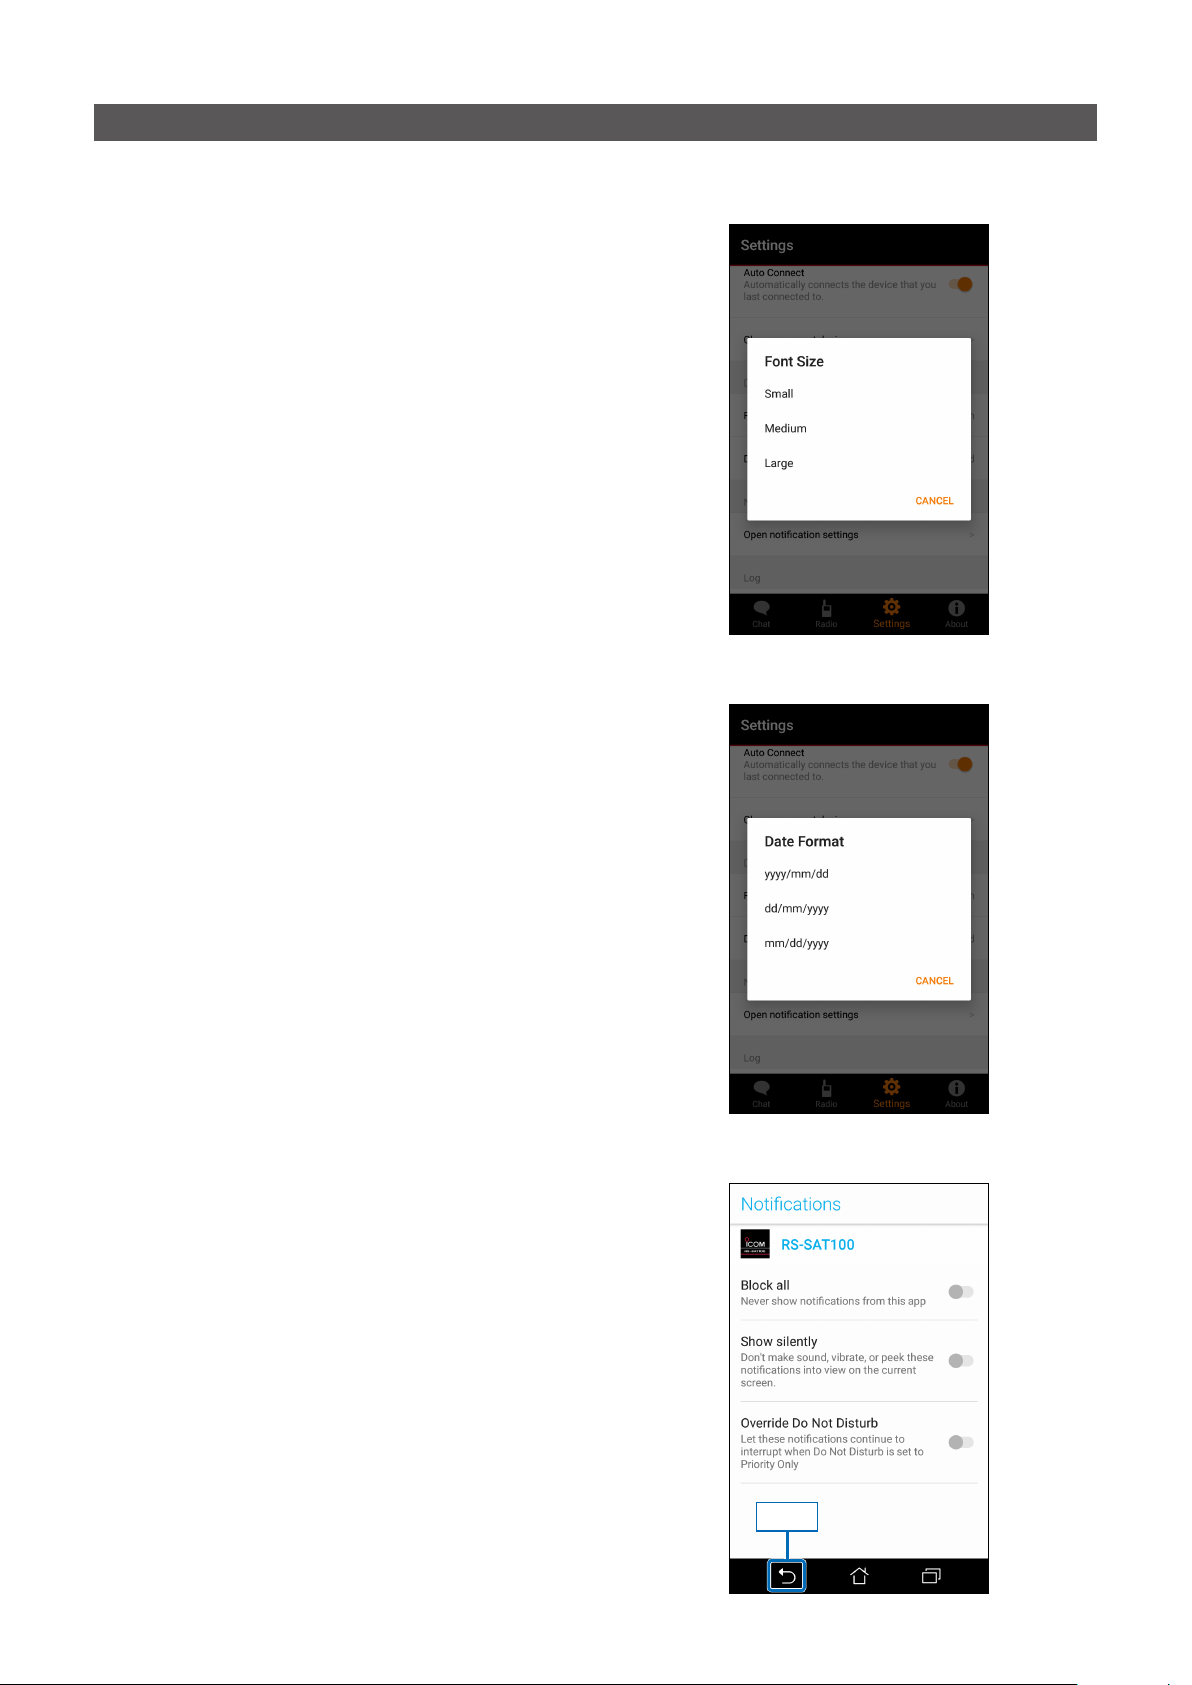
D Font Size
Select the font size of the message display, date,
and time on the Talk screen from Small, Medium, and
Large.
D Date Format
Select the date display format on the Talk screen from
“yyyy/mm/dd,” “dd/mm/yyyy,” or “mm/dd/yyyy.”
D Open notication settings (For only an Android device)
Open the mobile device’s notication settings.
Touch the back button of the mobile device to return
to the application screen.
L The position of the back button may dier, depending on
the mobile device.
- 13 -
Touch
Page 14
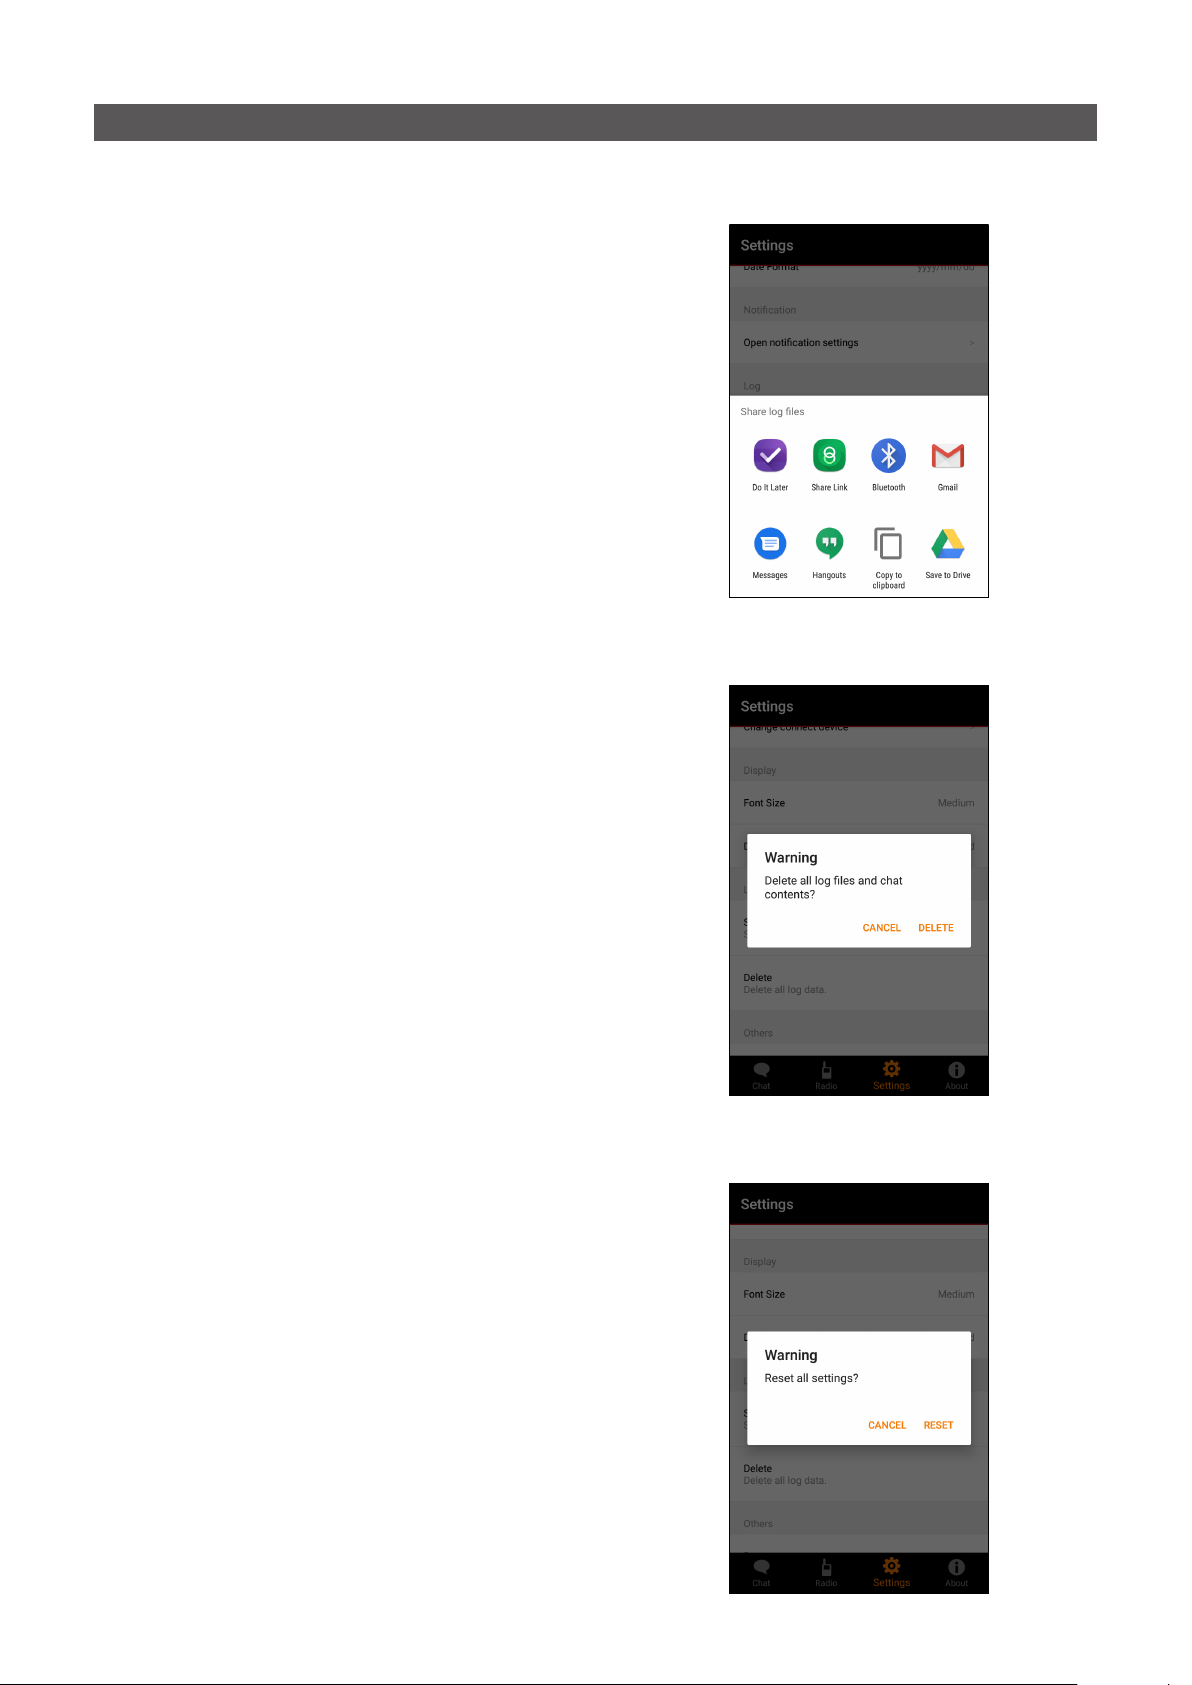
Settings screen
D Share
Select the external application to transfer or backup
the log les, or to email them.
The following methods can be used.
• Transfer the log les to an external device using the
Bluetooth le transfer function.
• Save the log les to the microSD card using the le
manager.
• Send the log les by e-mail using the e-mail application.
D Delete
Deletes all log les and chat contents.
L Touch “DELETE” in a conrmation dialog to delete.
D Reset
Resets all settings of the Settings screen to their
default values.
L Touch “RESET” in a conrmation dialog to reset.
- 14 -
Page 15
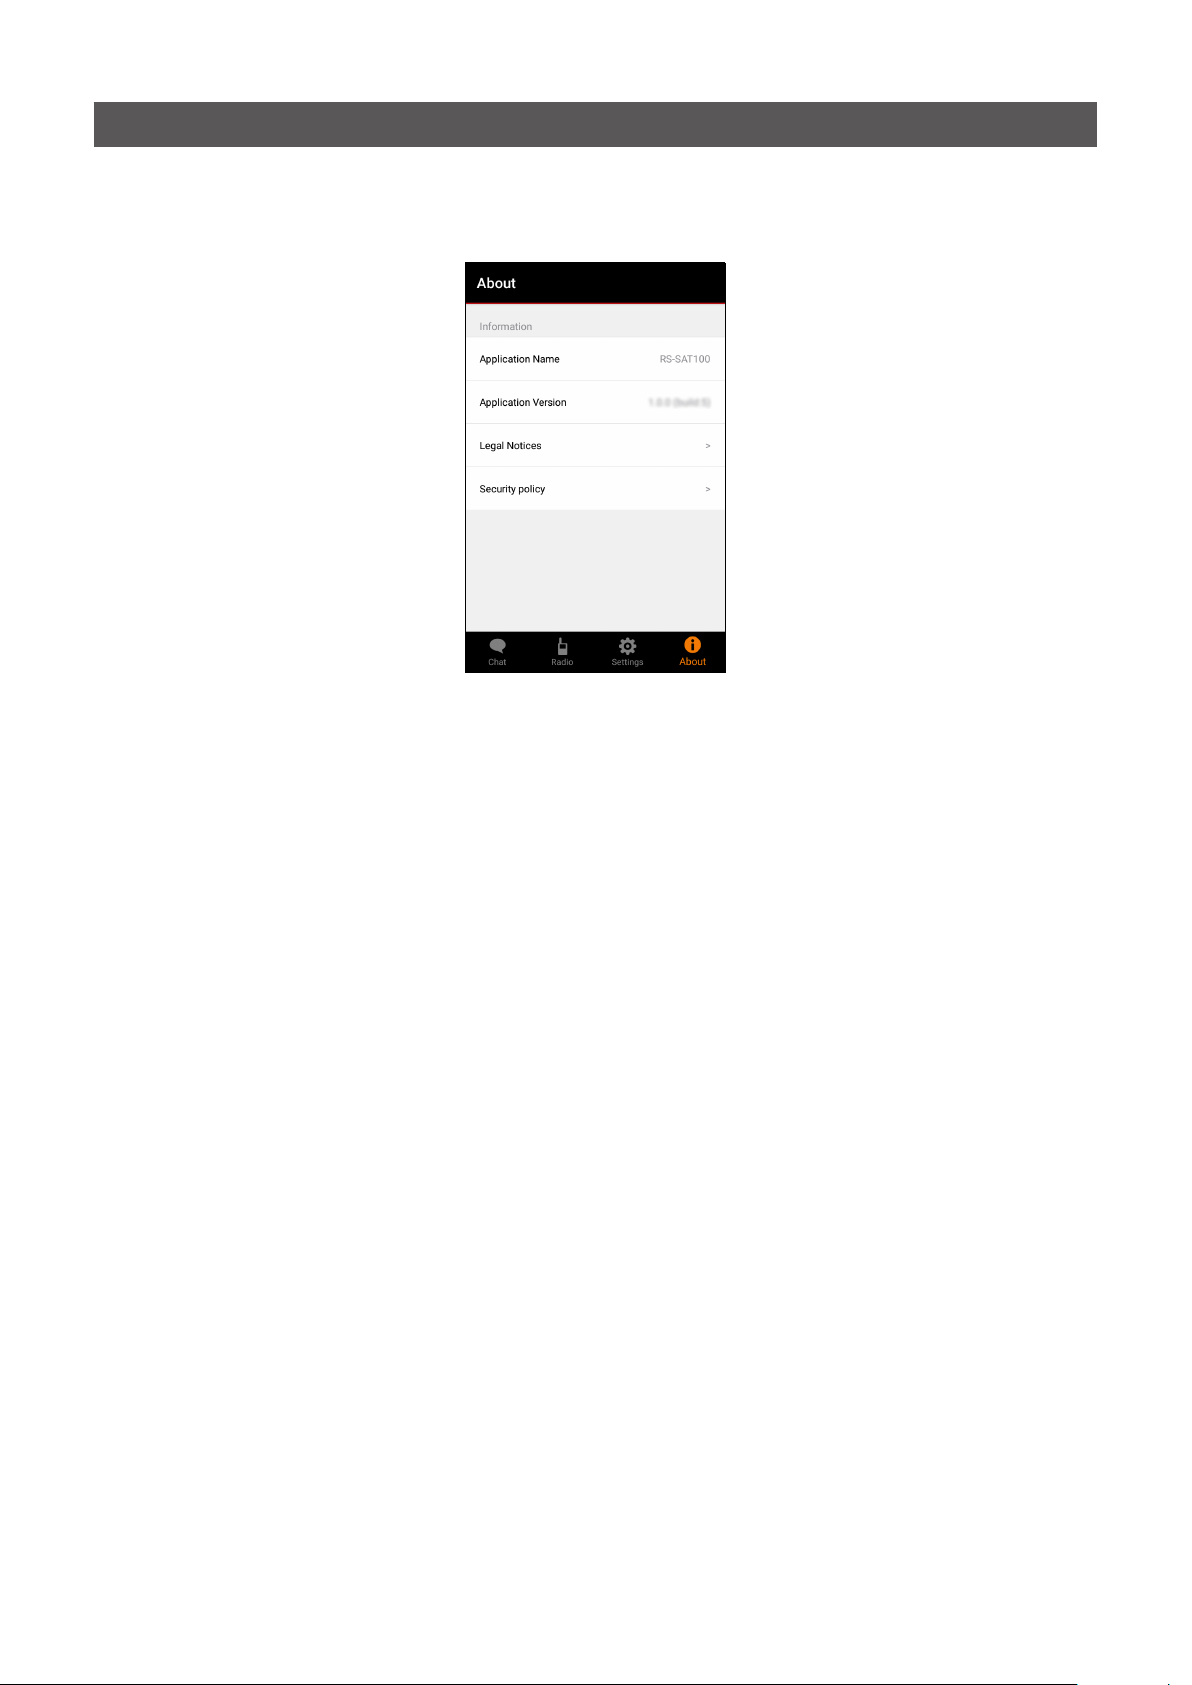
About screen
You can check the information about this application.
1
2
Legal Notice
1
Displays the information on the open-source software
used in this application.
Security policy
2
Displays the “Privacy Policy” page of the Icom website.
- 15 -
Page 16
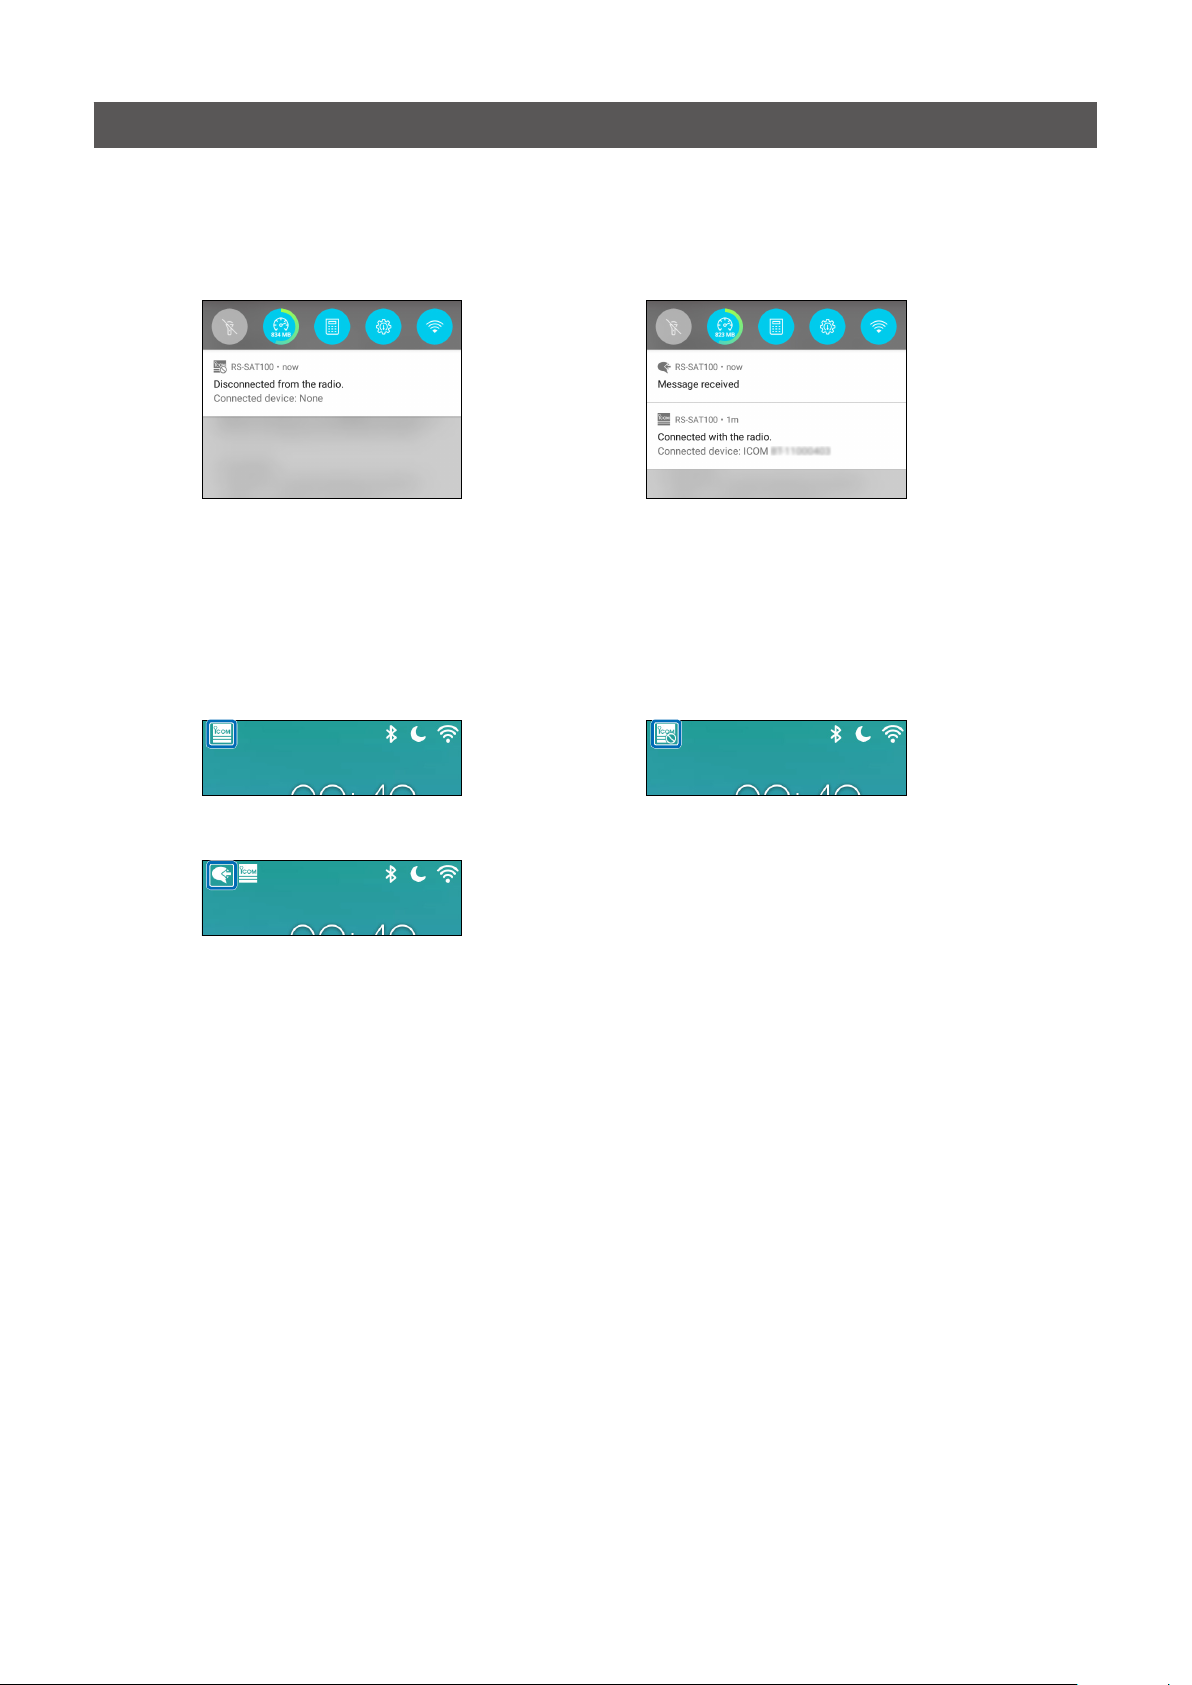
Other functions
D Local Notication
You can check the connection status and notications from the status bar or notication.
L When the Application Notication setting is turned OFF, you will not be notied.
L If the notication is not displayed through the Application Notication setting is turned ON, restart the application.
When the transceiver is disconnected
When the transceiver is connected,
and the message is received
D Background Operation (For only an Android device)
Even when the application runs in the background, the connection status can be displayed, and the message’s
receipt can be notied.
L When the Application Notication setting is turned OFF, they will not be notied.
L If the notication is not displayed, even though the Application Notication setting is turned ON, restart the application.
When the transceiver is disconnectedWhen the transceiver is connected
When a message is received
- 16 -
Page 17
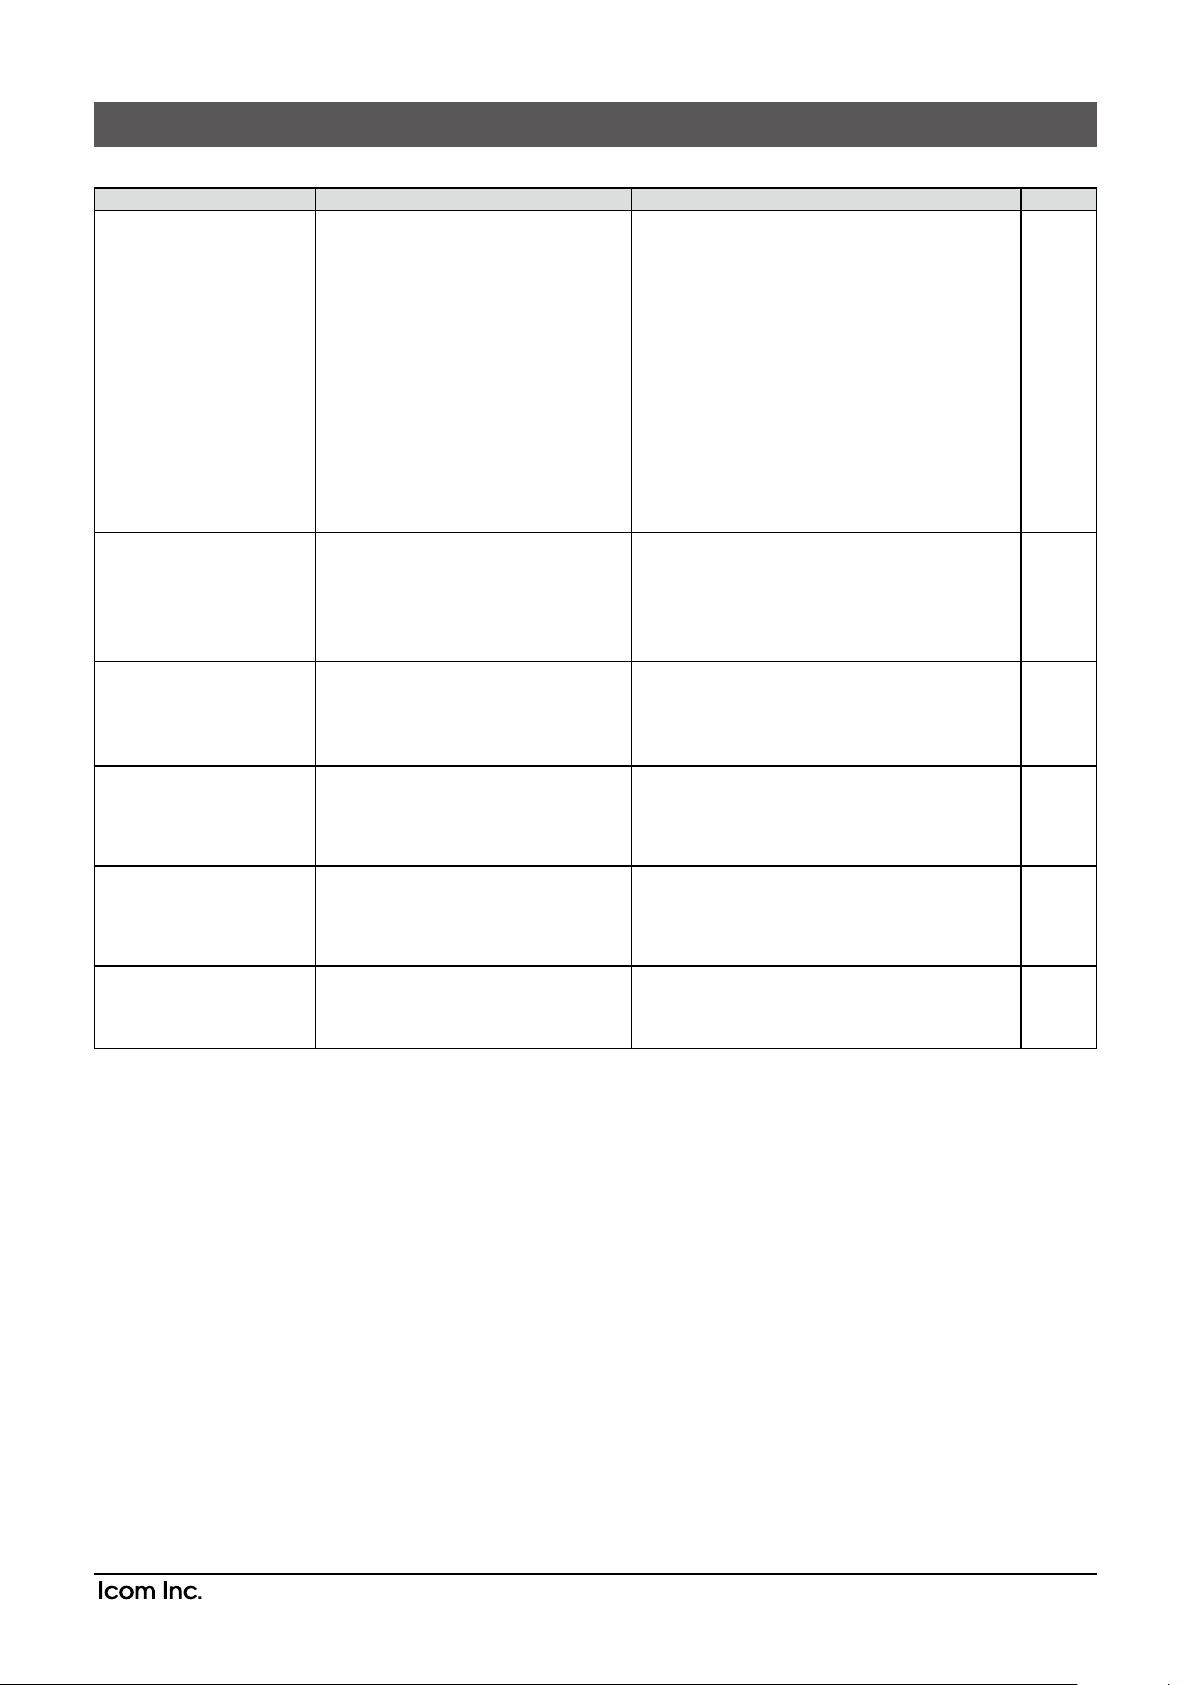
Troubleshooting
PROBLEM POSSIBLE CAUSE SOLUTION REF.
You cannot connect
the transceiver through
Bluetooth.
You cannot send a
message.
When receiving a
Japanese message, it
is not displayed in the
transceiver’s display.
You cannot check the
connection status or
message notication in
the status bar.
The end of the message
is missing.
You cannot send the
name or the time.
• The Bluetooth function in either
the transceiver or the application
is turned “OFF.”
• The Bluetooth device setting is
incorrect.
• Other Bluetooth devices are
operating around you.
• Other wireless LAN or electric
devices may interfere.
• The distance is too far from the
mobile device.
• The old pairing information still
remains in the transceiver.
• The satellite connection of the
transceiver is out of range.
• Bluetooth is not connected.
• The language setting of
the transceiver is not set to
“Japanese.”
• The notication setting of the
mobile device is turned OFF.
• The message is too long. • Reduce to within the number of
• “Add Name” or “Add Time” is
turned OFF.
• The message is too long.
• On both the transceiver and the mobile
device, turn ON the Bluetooth function.
• Correct the setting in the Settings screen.
• Stop other Bluetooth devices, or move
away from them.
• Stop other wireless LAN or electric
devices, or leave more space from them.
• Bring the mobile device closer to the
transceiver.
• Delete the old pairing information on the
transceiver’s BT Device List.
• Send after changing your location.
• Wait for a while before sending it.
• Connect the transceiver and the mobile
device through Bluetooth from the
Settings screen.
• On the transceiver, set the language
setting to “Japanese.”
• Turn ON the notication setting of the
mobile device.
characters that can be entered.
• Reduce the double-byte characters and
symbols.
• Turn ON “Add Name” or “Add Time.”
• See the “The end of the message is
missing.”(above).
p. 12
p. 12
p. 7
p. 12
1-1-32 Kamiminami, Hirano-ku, Osaka 547-0003, Japan
Mar. 2023
- 17 -
A7620-1EX-3
© 2020–2023 Icom Inc.
 Loading...