ICOM IP730D, IP740D Precautions

Page 1

o ICOM

INSTRUCTION MANUAL

HYBRID IP TRANSCEIVER IP730D IP740D

INTRODUCTION1ACCESSORIES2BEFORE USING3USING THE CELLULAR MODE4USING THE IDAS MODE5OTHER FUNCTIONS6SET MODE

7 FOR YOUR REFERENCE

Icom Inc.

Page 2

INTRODUCTION

Thank you for choosing this Icom product. This product is designed and built with Icom's state of the art technology and craftsmanship. With proper care, this product should provide you with years of trouble-free operation

IMPORTANT

FIRST CAREFULLY READ INSTRUCTIONS that is

boxed with the transceiver.

SAVE THIS INSTRUCTION MANUAL -----------------------------------instruction manual contains additional important operating instructions for the transceiver.

Icom and the Icom logo are registered trademarks of Icom Incorporated (Japan) in Japan, the United States, the United Kingdom, Germany, France, Spain, Russia, Australia, New Zealand, and/or other countries.

The Bluetooth® word mark and logos are registered trademarks owned by Bluetooth SIG, Inc. and any use of such marks by Icom Inc. is under license.

AquaQuakeTM is a trademark of Icom Incorporated.

All other products or brands are registered trademarks or trademarks of their respective holders.

Icom is not responsible for the destruction, damage to, or performance of any Icom or non-Icom equipment, if the malfunction is because of

Force majeure, including, but not limited to, fires, earthquakes, storms, floods, lightning, other natural disasters, disturbances, riots, war, or radioactive contamination

The use of Icom transceivers with any equipment that is not manufactured or approved by Icom.

Page 3
Supplied accessories 1-2
Attachable accessories 1-2
♦ Antenna 1-2
Battery pack/Battery case 1-3
♦ Belt clip 1-3
Page 4
1 ACCESSORIES

Supplied accessories

Connector cover and screw

NOTE: Some accessories are not supplied, or the shape is different, depending on the transceiver version.

Attachable accessories

♦ Antenna

Connect an optional antenna to the antenna

connector. CAUTION:

  • DO NOT carry the transceiver by holding only the antenna.
  • DO NOT connect an antenna other than the
  • supplied antenna, or those listed in this manual.
  • DO NOT transmit without an antenna.

Page 5

1 ACCESSORIES

Attachable accessories (Continued

♦ Battery pack/Battery case

CAUTION:

DO NOT attach or detach the battery pack or the battery case when the transceiver is wet or soiled. This may result in water or dust getting into the transceiver, battery pack, or battery case and may damage them.

CAUTION: Keep the battery pack terminals clean. It's a good idea to occasionally clean them.

To attach:

  • Slide the battery pack in the direction of the arrow. (1)
  • 2. Push the battery pack until the battery sliding locks make a 'click' sound. (2)

To detach:

  • 1. Pull both battery sliding locks in the direction of the arrow. (1)
  • 2. Lift up to detach the battery pack. (2)

To attach:

  • 1. Remove the battery pack from the transceiver, if it is attached.
  • 2. Slide the belt clip in the direction of the arrow until the belt clip is locked and makes a 'click' sound.
To detach:

  • 1. Remove the battery pack from the transceiver, if it is attached.
  • 2. Lift the tab up (①), and slide the belt clip in the direction of the arrow (②). ① Be careful not to break your fingernail.

Battery sliding locks

Page 6
2-2
2-2
2-2
2-2
2-2
2-3
2-3
2-3
2-3
2-4
2-4
2-4
2-4
2-4
Page 7

Panel description

♦ Front. top and side panels

♦ Status indicator

  • Lights red:
  • Lights green: Lights vellow:
  • Transmitting Receiving or squelch is open. Receiving and transmitting in

the Full-Duplex mode.

♦ Multi-connector

Connects to an optional speaker microphone or headset.

Turn OFF the transceiver before attaching or detaching the microphone.

CAUTION: DO NOT use the transceiver without the connector cover or optional equipment attached. The transceiver meets IP67 requirements for dusttight and waterproof protection only when the connector cover or the optional speaker microphone is attached. See page 7-5 for the usable speaker microphones

CAUTION: Firmly attach to the Multi connector, but do not overtighten A loose connection will allow water intrusion into the connector. Over-tightening the connection can damage the transceiver.

♦ About the assignable key functions

Functions described on page 5-10 may be assigned to the [Sub PTT], [Side 1], and [Side 2] keys, depending on a presetting. Hold down or push these keys to use the assigned functions

You can also assign the functions in the Detailed Set mode (p. 6-5).

Page 8

Function display

Cellular mode

♦ Cellular mode

ili
  • Displays the signal strength level by 3 bars
  • The connected network type (4G or 3G) is displayed on the left top.
46-2
  • Blinks when the transceiver location is out of the service area, or cannot receive a control signal.
  • Displayed if the transceiver has not been authenticated.
  • The connected network type (4G or 3G) is displayed on the left top.
25 All/Group Call
- 28 Talkgroup Call*1
1 Individual Call
T Phone Call* 1
Q
  • Displayed when the Pocket Beep function
    is ON. (p. 3-8)
  • Blinks when a call is received. It blinks
    until the transceiver returns to the standby
    mode after a received signal disappears.
P Displayed when the P-Bell function is ON.
(p. 3-8)

♦ IDAS mode

Tal Displays the relative receive signal strength level.
Ť Displayed when the signal level is low.
25 All/Group Call
1 Individual Call
9 Displayed when the Encryption function is ON. (p. 4-4)
Н Displayed* 2 when high output power is selected.
L1
  • Displayed* 2 when low output power is selected.
  • ① "L2" is displayed for 2 W, "L1" is displayed for 1 W.
R Displayed* 2 when a receive-only channel is selected.
Displayed when the channel is in the audible (unmuted) mode.
тн 10:00 @
001 сн−: 35
Address Function

IDAS mode

♦ Cellular/IDAS mode

23
  • Displayed when the Record function is
    ON. (p. 5-9)
  • Blinks while recording audio.
* Displayed when Bluetooth is activated.
(p. 5-2)* 3
8 Displayed when a Bluetooth device is connected. (p. 5-2)*3
۳O Displayed when the Key Lock function is ON. (p. 2-4)
VOX Displayed when the VOX function is ON. (p. 6-3)
E Displayed when the Emergency Call function is ON. (p. 5-5)
Ē Displays the remaining battery charge.
F Blinks when the transceiver is downloading a new firmware.
9to Displayed when the Surveillance function is ON. (p. 5-10)

*1 May be usable, depending on a presetting.

*2 Blinks when the transceiver temperature becomes hot.

*3 For only the transceiver with the Bluetooth function.

Page 9

Basic operation

♦ Turning ON the transceiver

NOTE: Before using the transceiver for the first time, the battery pack must be fully charged for optimum life and operation. See the BATTERY CHARGING section on the boxed INSTRUCTIONS.

  • Rotate [VOL] clockwise to the 12 o'clock position to turn ON the transceiver.
    • ① The dial is made tight for dust and water resistance.
    • To turn OFF the transceiver, rotate [VOL] counter-clockwise until it makes a "click" sound.
    • ① An opening text may be displayed, depending on a presetting.
♦ Adjusting the volume level

Rotate [VOL] to adjust the volume level. The Adjustment screen is displayed while adjusting.

♦ Using the Key Lock function

You can use the Key Lock function to prevent accidental channel changes and

unnecessary function access, depending on a presetting.

Functions except the following are electronically locked:

[PTT], [Sub PTT], [VOL], [Emer], and the Monitor function.

  • Hold down [CLR/Lock] for 1 second to turn the Key Lock function ON or OFF.
    • ① "ro" is displayed while the function is ON.
♦ Selecting the operation mode

You can select the operating mode, as shown below. See the section or page shown below for instructions on each operation mode.

Cellular mode: Section 3 IDAS mode: Section 4 Dual mode: p. 5-11

NOTE: About the Repeater (Bridge) mode:

The Repeater Mode relays received IDAS audio to the cellular transceiver group, while transferring the cellular radio conversations to the IDAS transceiver group. Ask your dealer about the mode details.

  • Push [FUNC] to display the function. The Function screen is displayed.
  • Push [FUNC] to display "Mode Select," if another function is displayed. ① You may need to push [FUNC] several times, depending on a presetting.
  • 3. Push [▲] or [▼] to select the operating mode, and then push [Call History]. The operating mode is selected and then returns to the Standby screen.

Page 10

USING THE CELLULAR MODE

Basic operation
♦ Operating kevs
♦ Receiving and Transmitting
Advanced operation
♦ About the Talkgroup Call 3-4
♦ Selecting a Talkgroup number 3-5
♦ Sending a message (Message Call) 3-6
♦ Browsing received messages 3-7
♦ Status Call
♦ Toggling the SIM card 3-8
♦ Pocket Beep function 3-8
♦ P-Bell function 3-8
Page 11

Basic operation

♦ Operating keys

Rotary
Selector
Rotate to select a channel, scroll the screen, or move the cursor.
[Emer] Hold down until "Emergency" is
displayed to send an Emergency
call. (p. 5-5)
[PTT] Hold down to transmit, release to receive.
[Sub PTT]
[Side 1]
[Side 2]
Functions may be assigned,
depending on a presetting. See page
5-10 for assignable function details.
You can also assign functions in the
Detailed Set mode (p. 6-5).
[Address]
  • Selects a preset address. (p. 3-3)
  • Push to toggle the Address Book
    between the call types.
[Call History]
  • Push to display the call history.
    (p. 3-6)
  • Push this key several times to
    toggle between the Call history
    types, Transmitted call, Received
    call, Sent message, Received
    message, Recording log, and
    Phone call log.
  • Hold down for 1 second to playback
    a selected Recording log. (p. 5-9)
[▲]/[▼] Push to scroll the screen, move the cursor, or selecting a channel.
[CLR/Lock]
  • Push to return to the standby screen.
  • Hold down for 1 second to turn the Key Lock function ON or OFF. (p. 2-4)
  • (PTT], [Sub PTT], [VOL], [Emer], and the Monitor function are usable even while the Key Lock function is ON.
[FUNC]
  • Push to display the Function screen.
  • In the function screen, push several times to select functions such as Operating mode selection, Talkgroup Selection, and so on*.
  • *Selectable function may differ, depending on a Set mode setting.
[VOL]
  • Rotate to turn the transceiver ON or OFF.
  • Rotate to adjust the audio output level.
Page 12

Basic operation (Continued

♦ Selecting a call-to party

  • Push [Address] to display the Address book. The Address book is displayed.
  • Push [Address] several times to toggle the call type. The selectable call type may differ, depending on a presetting.
  • 3. Rotate Rotary Selector or push [▲] or [▼] to select a call-to party.
♦ Receiving and transmitting
Receiving:

• When a Call is received, the Status indicator lights green.

Transmitting:

While holding down [PTT], speak at your normal voice level. The Status indicator lights red while [PTT] is pushed.

Talk while receiving a call:

  • While receiving a call, push [PTT] to talk in the Full-Duplex mode* like a telephone call.
    • In the Full-Duplex mode, the Status indicator lights yellow.

* Usability depends on a presetting. Ask your dealer for details.

IMPORTANT:

To maximize the readability of your signal:

  • 1. After pushing [PTT], pause briefly before you start speaking.
  • 2. Hold the microphone 5 ~ 10 cm (2 ~ 4 inches) from your mouth, then speak at your normal voice level.
About the call type:

  • All call: Transmit to all of the transceivers that belong to the network.
  • Group call: Transmit to the transceivers that belong to the same group.
  • Talkgroup call: Transmit to the transceivers that belong to the same
  • Talkgroup.
  • Individual call: Transmit to an individual transceiver.
  • Telephone call: Transmit to an IP phone.*

*Transmittable, depending on a presetting.

About the Time-out Timer:

If continuous transmission exceeds the preset Time-Out Timer time, the transmission is cut off. Release [PTT], and then hold down again to resume talking.

Page 13

Advanced operation

♦ About the Talkgroup Call

The Talkgroup Call function enables the user to communicate with call-to parties in the same Talkgroup. For example, in the illustration below, when the IP730D "00105" in its normal group "10002" selects Talkgroup "20001," it is excluded from group "10002," and can communicate with only the transceivers "00004" and "00108" that belong to Talkgroup "20001."

① This function can be used for only when the Talkgroup number is registered, and the Talkgroup Call function is assigned to a key by your dealer.

① Ask your dealer about whether or not to include the Talkgroup in the All Call.

When Talkgroup is OFF

Page 14

♦ Selecting a Talkgroup number

You can select a Talkgroup number if the Talkgroup Call function is assigned to the [FUNC] key. Ask your dealer for details.

  • Push [FUNC] to display the Function. The Function screen is displayed.
  • Push [FUNC] to display "Talkgroup," if another function is displayed. ① You may need to push [FUNC] several times, depending on a presetting.
  • 3. Rotate Rotary Selector or push [▲] or [▼] to select a Talkgroup number that you want to belong.
  • I Talkgroup I 00011 IP730D_TG1

  • 4. Push [CLR/Lock].
    • The transceiver is ready to talk to only the transceivers that belong to the same Talkgroup.
    • While the Talkgroup number is selected, you cannot transmit Normal Group call.
    • ① You can leave the Talkgroup and return to the Normal Group by selecting "OFF" in Step 2 on the "Talkgroup" screen.

Page 15
♦ Sending a message (Message Call)

You can send a message, depending on a presetting. Ask your dealer for details.

1. Selecting a call-to party

  • Push [Address] to display the Address book. The Address book is displayed.
  • Push [Address] several times to toggle the call type. Displayed call type may differ, depending on a presetting.

→All → Group → Individual → Telephone -

3. Rotate Rotary Selector or push [▲] or [▼]to select a call-to party.

TIP: You can also select a call-to party from Call history. 1. Push [Call History] to display the Call history. The Call history is displayed. 2. Push [Call History] several times to toggle the Call history between "Tx log," "Rx log," and "TX MSG log." (i) The displayed log may differ, depending on a presetting. Tx log → Rx log → Tx MSG log → Rx MSG log → Tx Call log → Rx Call log 3. Rotate Rotary Selector or push [▲] or [▼] to select a call-to party.

2. Sending a message
Sending a preset message:

  • Push [FUNC] to display the Function. The Function screen is displayed.
  • Push [FUNC] to display "Message," if another function is displayed. ① You may need to push [FUNC] several times, depending on a presetting.
  • 3. Rotate Rotary Selector or push [▲] or [▼] to select a message to send. The selected message may scroll, depending on the message length.
  • 4. Push [PTT] to send a message. ① "No Response" is displayed if the transmission failed.

Page 16
♦ Browsing received messages

You can browse received messages, depending on a presetting. Ask your dealer for details.

  • Push [Call History] to display the Call history. The Call history is displayed.
  • 2. Push [Call History] to display "Rx MSG log."
  • ① You may need to push [Call History] several times, depending on a presetting.
  • Rotate Rotary Selector or push [▲] or [▼] to browse received messages. ① The selected message may scroll, depending on the message length.

♦ Status Call

You can send a Status call depending on a presetting. Ask your dealer for details.

  • Push [FUNC] to display the Function. The Function screen is displayed.
  • Push [FUNC] to display "Status," if another function is displayed. ① You may need to push [FUNC] several times, depending on a presetting.
  • 3. Rotate Rotary Selector or push [▲] or [▼] to select a status.
  • 4. Push [PTT] to send a status.

Page 17
♦ Toggling the SIM card

The transceiver has two SIM card slots, SIM 1 and SIM 2. You can toggle which SIM card to use in the Detailed Set mode.

  • 1. Turn OFF the transceiver, if it is turned ON.
  • 2. While holding down [Address] and [FUNC], rotate [VOL] to turn ON the transceiver.
    • The Detailed Set Mode is displayed.

① Release the finger from keys when "SET (Detail)" is displayed.

  • 3. Rotate Rotary Selector or push [▲] or [▼] to select an item group "Cellular," and then push [FUNC].
  • 4. Push [Address] or [FUNC] several times to select "SIM Selection."
  • 5. Rotate Rotary Selector or push [▲] or [▼] to select a SIM card to use. ① The SIM card name may be displayed, if it is entered.
  • 6. Push [CLR/Lock] to exit "SIM Selection."
    • Push [CLR/Lock] again to exit the Detailed Set mode and return to the Standby screen.

TIP: You can also push [FUNC] to display the "SIM Selection" screen by enabling the "Show SIM selection" in the Detailed Set mode (p. 6-8).

The Pocket beep function sounds a notification tone and indication when a call is received.

  • ① This function is set by your dealer, or in the Set mode.
  • "$" is displayed when the function is ON.
  • "$" blinks and the notification beep sounds when a call is received. It blinks until the
  • transceiver returns to the standby mode after a received signal disappears.

♦ P-Bell function

The P-Bell function sounds the notification tone when a call is received.

  • A received call is muted until you reply. After pushing [PTT], the mute is released.
  • This function is set by your dealer, or in the Set mode.
  • "P" is displayed when the function is ON.
SET MODE
Cellular

SET(De

SET(Detail)
SIM Selection
Carrier A (SIM1)
Page 18
Basic operation
♦ Operating keys 4-2
♦ Selecting a Zone 4-3
♦ Selecting a channel 4-3
♦ Receiving and transmitting 4-3
♦ Transmitting Notes 4-3
Other functions 4-4
♦ Radio Access Number (RAN) 4-4
Encryption function 4-4
Page 19

Basic operation

♦ Operating keys

Rotary
Selector
Rotate to select a channel, scroll the screen, or move the cursor.
[Emer] Hold down until "Emergency" is
displayed to send an Emergency
call. (p. 5-5)
[PTT] Hold down to transmit, release to receive.
[Sub PTT]
[Side 1]
[Side 2]
Functions may be assigned,
depending on a presetting. See page
5-10 for assignable function details.
You can also assign functions in the
Detailed Set mode. (p. 6-5)
[Address] Push to display the Call-to party selection screen
[Call History]
  • Push to display the call history.
  • Push this key several times to
    toggle between the Call history
    types, Transmitted call, Received
    call, and Recording Log.
  • Hold down for 1 second to playback
    a selected Recording log (p. 5-9).
[▲]/[▼] Push to scroll the screen, move the cursor, or selecting a channel.
[CLR/Lock] Push to return to the standby
  • screen.
  • Hold down for 1 second to turn the Key Lock function ON or OFF. (p. 2-4)
  • (PTT], [Sub PTT], [VOL], [Emer], and the Monitor function are usable even while the Key Lock function is ON.
[FUNC]
  • screen.
  • Hold down for 1 second to turn the Key Lock function ON or OFF. (p. 2-4)
  • (pTT], [Sub PTT], [VOL], [Emer], and the Monitor function are usable even while the Key Lock function is ON.
  • Push to display the Function screen.
  • In the function screen, push several times to select functions such as Operating mode selection, and so on*.
  • *Selectable function may differ, depending on a Set mode setting.
Page 20
Basic operation (Continued)
♦ Selecting a Zone

Certain channels are grouped together and assigned to a Zone according to their intended use. For example, Analog channels 'Station 1' and 'Station 2' are assigned to an "Analog" Zone, and Digital channels 'Station 3' and 'Station 4' are assigned to a

"Digital" Zone.

  • ① Confirm the that the function to enter the Zone Selection screen is assigned to [Sub PTT], [Side 1], or [Side 2]. You can assign functions in the Detailed Set mode. See page 6-5 for details.
  • 1. Push or hold down the key that is assigned for entering the Zone Selection screen.
  • 2. Rotate Rotary Selector or push [▲] or [▼] select a zone.
  • 3. Push [Call History] to exit the Zone Selection screen and return to the Standby Screen.
Receiving and transmitting
Receiving:

  • 1. Rotate Rotary selector, or push [▲] or [▼] to select a channel.
    • When a Call is received, the Status indicator lights green.
Transmitting:

CAUTION: DO NOT transmit without an antenna.

  • 1. Wait until the channel is clear to avoid interference.
  • 2. While holding down [PTT], speak at your normal voice level.
  • 3. Release [PTT] to receive.
IMPORTANT

  • To maximize the readability of your signal:
  • 1. After pushing [PTT], pause briefly before you start speaking.
  • 2. Hold the microphone 5 to 10 cm (2 to 4 inches) from your mouth, then speak at your normal voice level.

NOTE: You can only transmit at low power in the IDAS mode when using an optional BP-305 battery case and alkaline batteries.

♦ Transmitting Notes
OTransmit inhibit function

The transceiver has several inhibit functions which restrict transmission under the following conditions:

Lockout function:

The function inhibits transmission when the channel is busy. However, depending on a presetting, you can transmit when a call is received that includes a nonmatching (or matching) CTCSS (DTCS), RAN (Radio Access Number), Individual ID, or Group ID.

Time-Out Timer:

If continuous transmission exceeds the preset Time-Out Timer time, the transmission is cut off. Release [PTT], and then hold down again to resume talking.

Penalty timer:

After the transmission is cut off by the Time-Out Timer, transmission is further inhibited for a preset penalty period of time.

Page 21

Other functions

♦ Radio Access Number (RAN)

Radio Access Number (RAN) is a signaling system designed for digital radio communications. When a channel is set up with a RAN, the squelch will open only when a call containing a matching RAN* is received. If a call containing a different RAN is made on the same channel a user is using, a user will not hear the call.

*Depending on the settings, not only RAN but also individual ID or group ID must match.

♦ Encryption function

The Encryption function enables voice scrambling, which provides private digital communication between stations.

When an encrypted call is received, the audio is heard only when the call contains a matching Key ID and Encryption key.

If a call containing a different ID is made on the same channel, the squelch will not open, and the user will not hear the call.

Push [Encryption] to toggle the Encryption function ON or OFF.

  • "6" is displayed when the Encryption function is ON.
  • ① When the Encryption function is ON, push [PTT] to make an encrypted call.
Page 22

Using a Bluetooth® device

(For only the transceiver with the Bluetooth function) 5-2
♦ About the VS-3 Bluetooth headset 5-2
Pairing with a Bluetooth device 5-3
Settings for the Bluetooth function 5-3
Disconnecting a paired device 5-4
♦ Initializing the Pairing lists 5-4
Using the Emergency call function 5-5
♦ The Man Down function 5-6
♦ The Lone Worker function 5-7
♦ The Stationary Detection function 5-8
♦ The Motion Detection function 5-8
Using the Voice Recorder function 5-9
♦ Using the Voice Recorder function 5-9
Deleting the recorded audio 5-9
Using assignable keys 5-10
Using the Dual mode 5-11
♦ Main mode and Sub mode 5-11
Transmitting 5-11
Page 23

Using a Bluetooth® device (For only the transceiver with the Bluetooth function)

The transceiver can operate with Bluetooth headsets. ① Only the VS-3 headset performance is guaranteed as of February 2021.

  • The Bluetooth function may not be usable, depending on a presetting. Ask your dealer for details.
  • The communication range of Bluetooth is approximately 10 m (33 ft).
  • ① May vary, depending on the environment in which the device operates. Although you can enter up to 6 Bluetooth devices in the transceiver
  • device list, it is recommended that you pair only one device at a time.
Electromagnetic Interference

When you use a Bluetooth device, pay attention to the following: Bluetooth devices operate in the 2.4 GHz band that is also used by other appliances, such as Wireless LAN products, microwave ovens, RFID systems, amateur radio stations, and so on.

When using a Bluetooth device near such devices, interference may occur, causing a decrease in communication speed, and an unstable connection.

In such case, keep the Bluetooth devices away from the other

appliances, or stop using those devices.

Bringing the Bluetooth device and the transceiver closer together also improves communication.

About the VS-3 Bluetooth headset

When you connect an optional VS-3 Bluetooth headset to the transceiver, you can wirelessly transmit and receive the headset audio.

The VS-3 has a [PTT] switch, so you can transmit in the same way as using the transceiver's [PTT] switch.

The [FWD], [RWD], and [PLAY] keys on the VS-3 are disabled while using the headset with the IP730D or IP740D.

If the headset does not work correctly, even if the power is ON, push

[RESET] with a pin to force power OFF

Function Operation Beep tone Indicator
Bluetooth
function
ON Hold down [D]//P] for 3 seconds Melody (up) Blinks blue
OFF Melody (down) OFF
Pairing
mode
Searching While Bluetooth function is OFF,
hold down [PWR] for 6 seconds
PiPa-
(ready to connect)
Quickly blinks red then blue, every 3 seconds
Connected PiRo Blinks blue twice, every 3 seconds
Transmit *1 Push [PTT] Pi* 2 Blinks red once, then blue twice, every 3 seconds
Audio
volume
Up*1 Push [VOL] (+) Pi -
Down*1 Push [VOL] (–) Воо -

*1Functional only when a Bluetooth device is connected.

*2Depends on the Notice Tone settings or "BT PTT Beep" setting in the Set mode.

Page 24
Using a Bluetooth® device (Continued)
♦ Pairing with a Bluetooth device

This is an example of connecting the transceiver to a VS-3 Bluetooth headset.

1. Entering the VS-3 Pairing mode

  • 1. Confirm the VS-3 is turned OFF.
  • 2. Hold down [PWR] for 6 seconds.
  • The indicator quickly blinks red then blue, and then the headset enters the Pairing mode.
NOTE:

  • Charge the VS-3 before operating.
  • The VS-3 starts up in the Pairing mode when its Bluetooth function
  • is ON, but no Bluetooth device is entered in its Pairing list.

2. Enable the transceiver's Bluetooth function

  • 1. Turn OFF the transceiver, if it is turned ON.
  • 2. While holding down [FUNC], rotate [VOL] to turn ON the transceiver. The Set Mode is displayed. ① Release [FUNC] when "SET MODE" is displayed.
  • 3. Rotate Rotary Selector or push [▲] or [▼] to select an item group "Common." and
  • then push [FUNC].
  • 4. Push [FUNC] or [Address] several times to select "Bluetooth."
  • 5. Rotate Rotary Selector or push [▲] or [▼] to select "ON."
3. Pairing and connecting the Bluetooth device

  • 1. Push [FUNC] several times to select "Search BT Device" in the Set mode, and then push [Call History].
    • The transceiver searches for a Bluetooth device.
    • Push [CLR/Lock] to cancel searching.
    • If found, the device's name and BD address are displayed on the screen. (Example: ICOM BT-002)
  • Push [▲] or [▼] to select the headset to pair and connect, and then push [Call History].

• "Connect" is displayed when the pairing has completed.

  • 3. Push [CLR/Lock] to exit "Search BT Device."
    • Push [CLR/Lock] again to exit the Set mode and return to the Standby screen.
    • "B" is displayed if the headset has correctly paired.
♦ Settings for the Bluetooth function

You can customize the transceiver's Bluetooth settings in the Set mode. See the Set mode section for details.

Page 25
Using a Bluetooth® device (Continued)
♦ Disconnecting a paired device

You can disconnect a paired Bluetooth device if it is not being used.

  • 1. In the standby screen, push [FUNC] several times to select "Pairing List."
  • 2. Push [▲] or [♥] to select the device to disconnect, and then push [Call History]. "Unconnected" is displayed if the headset or device is correctly disconnected. ① Do the same steps to reconnect to the Bluetooth device.
♦ Initializing the Pairing lists

If you have problems with Bluetooth operation, initialize the pairing lists, as shown below.

Initializing the Pairing list of the transceiver

① All the paired Bluetooth devices are deleted from the Pairing list by the initialization

  • The Pairing list is not initialized by the RESET function in the Detailed Set mode.
  • 1. Turn OFF the transceiver, if it is turned ON.
  • While holding down [FUNC], rotate [VOL] to turn ON the transceiver. The Set Mode is displayed. ① Release [FUNC] when "SET MODE" is displayed.
  • Rotate Rotary Selector or push [▲] or [▼] to select an item group "Common," and then push [FUNC].
  • 4. Push [FUNC] or [Address] several times to select "Init BT Unit."
  • 5. Rotate Rotary Selector or push [▲] or [▼] to select "Clear."
  • 6. Push [Call History] to initialize the Pairing Lists.
    • The pairing list is initialized, and the transceiver automatically restarts.
Initializing the Pairing list of the VS-3

  • Hold down [PWR] on the VS-3 for 3 seconds, to turn ON the Bluetooth function. The indicator blinks blue.
  • 2. Hold down [PWR] on the VS-3 for 3 seconds again, to turn OFF the Bluetooth function.
    • The indicator turns OFF.
  • 3. Within 10 seconds, while holding down both [VOL] (+) and [VOL] (–), hold down [PWR] for 10 seconds.

• The indicator lights violet, then turns OFF after the pairing list is initialized.

SET Init BT Unit Clear

Page 26

Using the Emergency call function

You can receive or transmit Emergency Call if the function is enabled.

Transmitting:

The instruction is for when the function is enabled. Ask your dealer for details.

  • Hold down [Emer] until "Emergency" is displayed. An alarm periodically sounds. If the Surveillance function is enabled, no alarm sounds
  • 2. Wait for an answer-back.
    • When the transceiver receives an answer-back, the alarm stops, and the Status indicato lights green.
    • Turn OFF the transceiver to cancel the emergency call.
    • The transceiver automatically transmits a repeat Emergency call until it receives an acknowledgement, or until a user turns OFF the transceiver.
Receiving:

  • "Emergency" is displayed and the alarm periodically sounds. If the Surveillance function is enabled, no alarm sounds.
  • 2. While holding down [PTT], talk into the microphone.
    • While holding down [PTT], the Status indicator lights red.
    • The alarm stops.
    • Returns to the Standby screen when you release [PTT].

NOTE: The Emergency function may not properly work, depending on the surrounding environment such as obstructions, weather condition, and so on. Icom is not responsible for the destruction or damage caused by using the Emergency Call function.

Page 27

Using the Emergency Call function (Continued)

The transceiver enters the Emergency mode through the following functions, depending on a presetting:

♦ The Man Down function

When the transceiver is tilted past the preset angle for the ON Timer preset time, the transceiver enters the Emergency mode.

① If a user raises the transceiver back from the preset angle towards the vertical position before the Reminder Timer set time expires, the Emergency mode is canceled.

Bends an Emergency mode. ON Timer Past the preset degrees Preset angle Time If raised back from the preset angle during the Reminder Timer, the Emergency mode is canceled.

Man Down With Stationary:

• The transceiver leans past the preset angle for the ON Timer preset time.

AND

  • The transceiver is detected as stationary (no motion) for the ON Timer set time.
  • ① If a user raises the transceiver back from the preset angle towards the vertical position, or when the user moves the transceiver before the Reminder Timer set time expires, the Emergency mode is canceled.

NOTE: The Man down function may not properly work, depending on the surrounding environment such as obstructions, weather condition, and so on.

Icom is not responsible for the destruction or damage caused by using the Man Down function.

Page 28

Using the Emergency Call function (Continued)

The transceiver enters the Emergency mode through the following functions, depending on a presetting:

♦ The Lone Worker function

When no operation occurs for the ON Timer preset time.

① If a user pushes any key before the Reminder Timer set time expires, the Emergency mode is canceled.

Lone Worker With Stationary:

• When no operation occurs for the ON Timer preset time.

AND

  • The transceiver is detected as stationary (no motion) for the ON Timer set time.
  • If a user pushes any key, or moves the transceiver before the Reminder Timer set time expires, the Emergency mode is canceled.
Example:

  • ON Timer: 60 minutes
  • Reminder Timer: 60 seconds

NOTE: The Lone Worker function may not properly work, depending on the surrounding environment such as obstructions, weather condition, and so on.

Icom is not responsible for the destruction or damage caused by using the Lone Worker function.

Page 29

Using the Emergency Call function (Continued)

The transceiver enters the Emergency mode through the following functions, depending on a presetting:

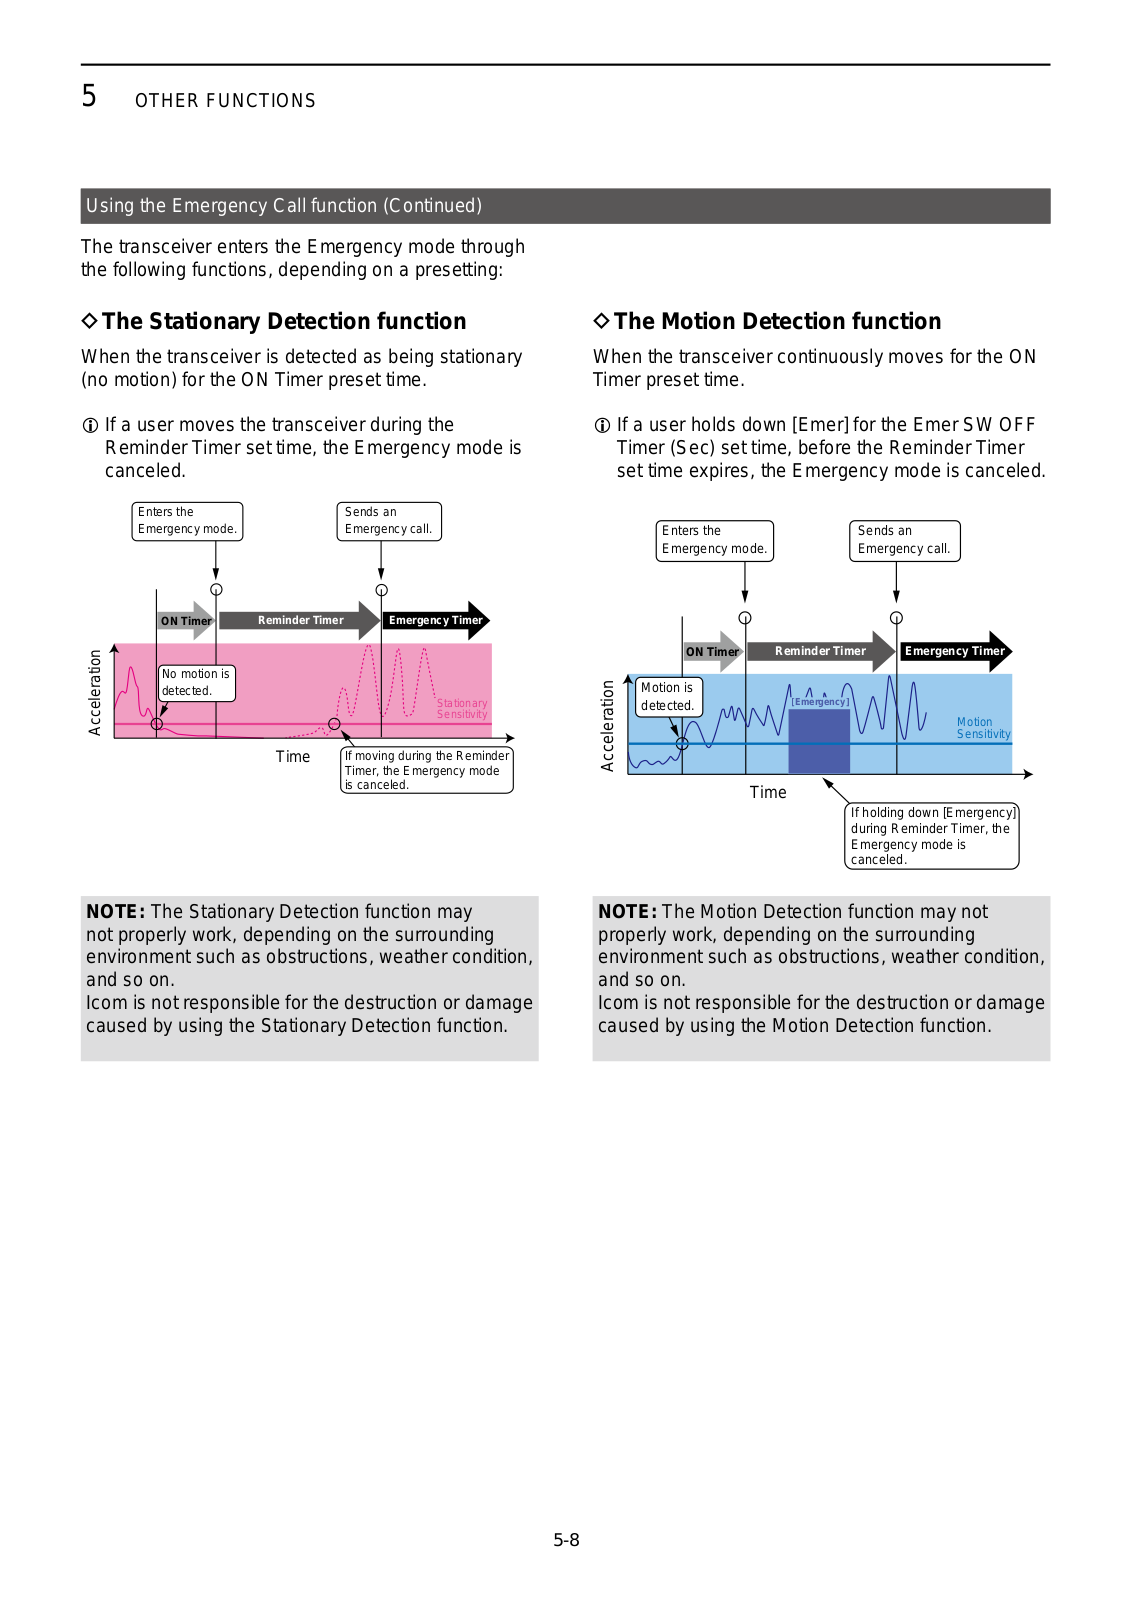
♦ The Stationary Detection function

When the transceiver is detected as being stationary (no motion) for the ON Timer preset time.

If a user moves the transceiver during the Reminder Timer set time, the Emergency mode is canceled.

♦ The Motion Detection function

When the transceiver continuously moves for the ON Timer preset time.

① If a user holds down [Emer] for the Emer SW OFF Timer (Sec) set time, before the Reminder Timer set time expires, the Emergency mode is canceled.

NOTE: The Stationary Detection function may not properly work, depending on the surrounding environment such as obstructions, weather condition, and so on

Icom is not responsible for the destruction or damage caused by using the Stationary Detection function.

NOTE: The Motion Detection function may not properly work, depending on the surrounding environment such as obstructions, weather condition, and so on.

Icom is not responsible for the destruction or damage caused by using the Motion Detection function.

Page 30

Using the Voice Recorder function

The transceiver can record and playback up to 10 of the latest incoming calls, depending on a presetting.

  • ① Records up to 4 minutes per call. If a call is longer than 4 minutes, the older will be automatically deleted.
  • () The recordable call type may differ, depending on a presetting.
  • ① A recorded audio data cannot be exported.
  • This function does not record analog audio.

♦ Using the Voice Recorder function

1. Enable the Voice Recorder function

  • 1. Turn OFF the transceiver, if it is turned ON.
  • While holding down [FUNC], rotate [VOL] to turn ON the transceiver. The Set Mode is displayed.
  • Release finger from [FUNC] when "SET MODE" is displayed.
  • Rotate Rotary Selector or push [▲] or [▼] to select an item group "Common," and then push [FUNC].
  • 4. Push [FUNC] or [Address] several times to select "Recording."
  • 5. Rotate Rotary Selector or push [▲] or [▼] to select "ON."
  • 6. Push [CLR/Lock] to exit "Recording." ① Push [CLR/Lock] again to exit the Set mode and return to the Standby screen.

2. Turning ON the Voice Recorder function

  • 1. Push [FUNC] to display the Function.
  • The Function screen is displayed.
  • Push [FUNC] to display "Recording," if another function is displayed. You may need to push [FUNC] several times, depending on a presetting.
  • 3. Rotate Rotary Selector or push [▲] or [▼] to select "ON."
  • 4. Push [CLR/Lock] to return to the Standby screen.
    • " 22 " is displayed.
3. Playing back the recorded audio

"" blinks in the Standby Screen if there is recorded audio that has not been played back.

  • 1. Push [Call History] to display the Function.
  • The Call History is displayed.
  • Push [Call History] several times to toggle the Call history from "Tx log," "Rx log," "TX MSG log," "RX MSG log," or "Recording Log."
    • ① Displayed log may differ, depending on a presetting.
  • 3. Push [▲] or [▼] to select a audio to playback.

→ Tx log → Rx log → Tx MSG log → Rx MSG log → Tx Call log → Rx Call log → Recording log −

4. Hold down [Call History] for 1 second to playback the audio. ① Push [▲] or [▼] to stop playing back the audio.

♦ Deleting the recorded audio

  • 1. Turn OFF the transceiver, if it is turned ON.
  • 2. While holding down [FUNC], rotate [VOL] to turn ON the transceiver. The Set Mode is displayed. ① Release finger from [FUNC] when "SET MODE" is displayed.
  • Rotate Rotary Selector or push [▲] or [▼] to select an item group "Common," and then push [FUNC].
  • 4. Push [FUNC] or [Address] several times to select "Delete Recording."
  • 5. Rotate Rotary Selector or push [▲] or [▼] to select "Clear."
  • 6. Push [Call History] to delete the recorded audio.
  • 7. Push [CLR/Lock] to exit "Delete Recording." ① Push [CLR/Lock] again to exit the Set mode and return to the Standby screen.

≣ SET Ξ
Delete Recordin
Clear
g |
Page 31

Using assignable keys

Functions shown below may be assigned to the [Sub PTT], [Side 1], and [Side 2] keys, depending on a presetting. Hold down or push these keys to use assigned functions.

You can also assign these functions in the Detailed Set mode (p. 6-5).

Function Descriptions
Zone Enter the Zone* Selection screen.
*Certain channels are grouped
together and assigned to a Zone
according to their intended use.
For example, Analog channels
'Station 1' and 'Station 2' are
assigned to an "Analog" Zone, and
Digital channels 'Station 3' and
'Station 4' are assigned to a "Digital"
Zone.
Monitor Turn ON the monitor function.
The function turn the squelch mute
or the CTCSS (DTCS) squelch mute
ON or OFF.
Talk Around Turn ON the Talk Around function.
The function equalizes the transmit
frequency to the receive frequency,
for direct (Simplex) communication.
Message
  • Push to directly display the Message screen.
  • The Message screen displayed by the first push differs depending on a presetting.
One Touch
  • Push to directly select particular call-
    to party.
  • The selectable call-to party differs
    depending on a presetting.
Surveillance Turn ON the Surveillance function.
When this function is turned ON, the
beep is not heard and the backlight
and the Status indicator do not light,
even when a signal is received, or a
key is pushed.
AquaQuake™
  • While holding down this key, the AquaQuake water draining function removes water from the speaker grill by vibrating the internal speaker.
  • ① Water in the speaker grill may muffle the sound coming from the speaker.
  • ① After the specified period of time, this function automatically stops, even if a user continues to hold down this key.
  • ① This key works with only the internal speaker.

Page 32

Using the Dual mode

You can use the Cellular mode and IDAS mode at the same time.

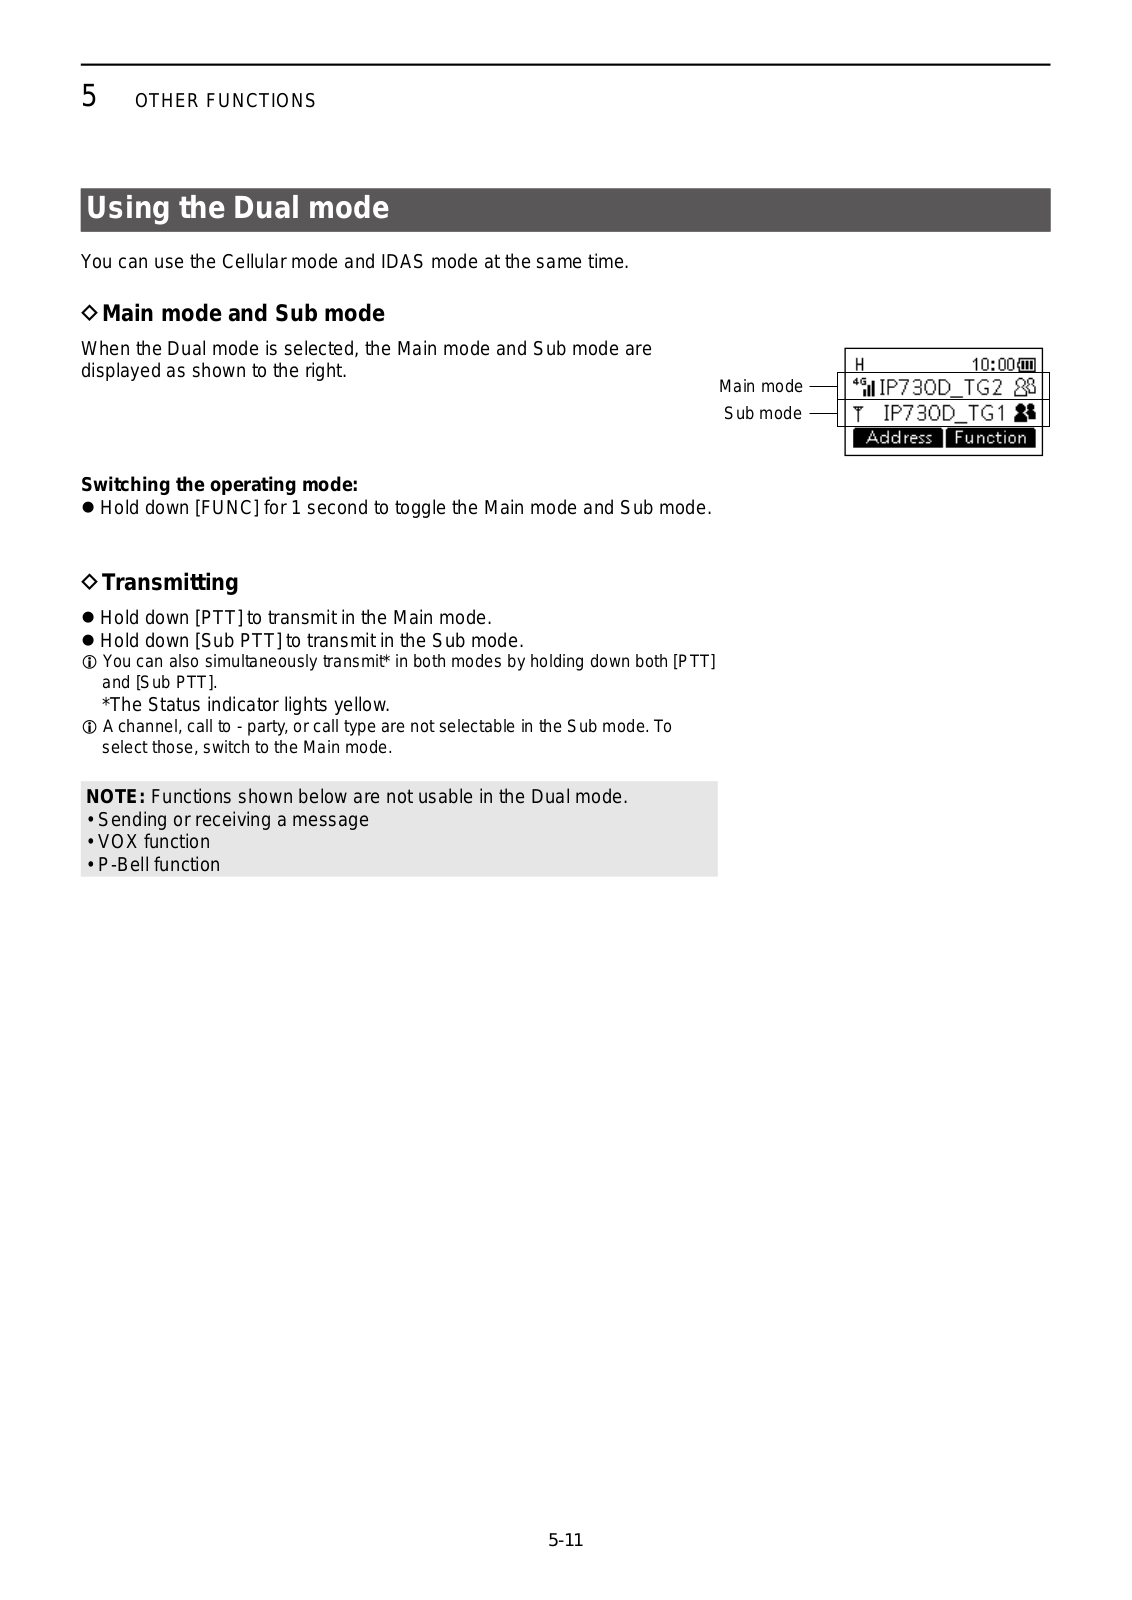
♦ Main mode and Sub mode

When the Dual mode is selected, the Main mode and Sub mode are displayed as shown to the right.

Switching the operating mode:

• Hold down [FUNC] for 1 second to toggle the Main mode and Sub mode.

♦ Transmitting

  • Hold down [PTT] to transmit in the Main mode.
  • Hold down [Sub PTT] to transmit in the Sub mode.
  • You can also simultaneously transmit* in both modes by holding down both [PTT] and [Sub PTT].
    • *The Status indicator lights yellow.
  • ① A channel, call to party, or call type are not selectable in the Sub mode. To select those, switch to the Main mode.

NOTE: Functions shown below are not usable in the Dual mode.

  • Sending or receiving a message
  • VOX function
  • P-Bell function
Page 33
Using the Set mode 6-2
♦ Basic Set mode 6-2
♦ Detailed Set mode 6-2
♦ Using the Set mode 6-2
Set mode items 6-3
♦ Common 6-3
♦ Cellular 6-7
♦ IDAS 6-9
Page 34

Using the Set mode

You can use the Set mode to set infrequently changed values or function settings. The transceiver has 2 types of Set modes, as shown below.

You cannot transmit or receive while the transceiver is in the Set mode.

♦ Basic Set mode

  • 1. Turn OFF the transceiver, if it is turned ON.
  • 2. While holding down [FUNC], rotate [VOL] to turn ON the transceiver.The Set mode is displayed.
    • ① Release finger from [FUNC] when "SET" is displayed.
  • Rotate Rotary Selector or push [▲] or [▼] to select an item group "Common," "Cellular," or "IDAS," and then push [FUNC]. Deslect "Certification" and then push [FUNC] to display certification information.

♦ Detailed Set mode

  • 1. Turn OFF the transceiver, if it is turned ON.
  • 2. While holding down [FUNC] and [Address], rotate [VOL] to turn ON the transceiver.
    • The Detailed Set mode is displayed. ① Release finger from IFUNCI when "SET (Detail)" is displayed.
  • Rotate Rotary Selector or push [▲] or [▼] to select an item group "Common," "Cellular," or "IDAS," and then push [FUNC].
♦ Using the Set mode
Example: Disabling the key touch beep.

  • 1. Turn OFF the transceiver, if it is turned ON.
  • 2. While holding down [FUNC] and [Address], rotate [VOL] to turn ON the transceiver.
    • The Detailed Set mode is displayed. ① Release finger from [FUNC] when "SET (Detail)" is displayed.
  • 3. Rotate Rotary Selector or push [▲] or [▼] to select an item group "Common," and then push [FUNC].
  • 4. Push [FUNC] or [Address] several times to select "Key-Touch Beep."
  • 5. Rotate Rotary Selector or push [▲] or [▼] to select "OFF."
  • 6. Push [CLR/Lock] to exit "Key-Touch Beep."

① Push [CLR/Lock] again to exit the Set mode and return to the Standby screen.

Page 35

Set mode items

The shaded items are also displayed in the Basic Set mode.

① Items or default values may be differ, depending on the transceiver's version or presettings. Ask your dealer for details.

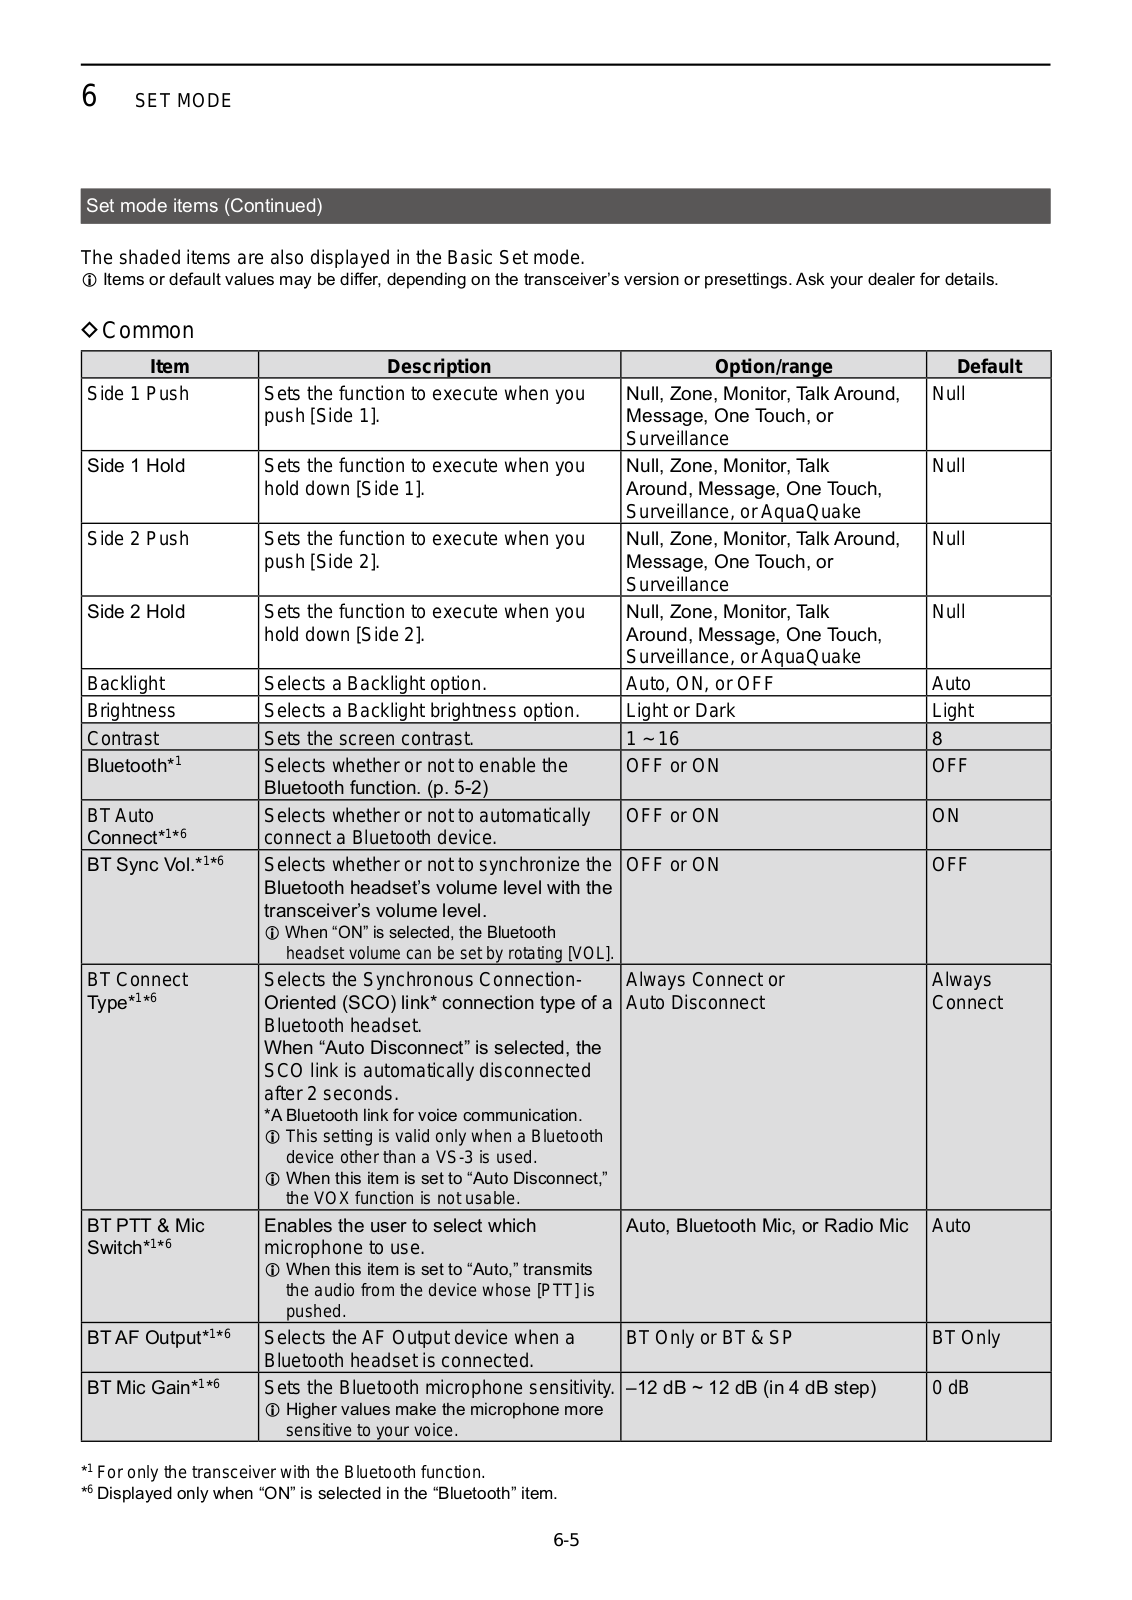
♦ Common

ltem Description Option/range Default
LOG CLEAR
  • Deletes logs.
  • ① Select "Clear," and then push [Call History] to delete.
–, Clear
FIRM UP
  • Updates the transceiver's firmware.
  • ① Select "YES," and then push [Call History] to update the firmware.
  • ① The transceiver automatically restarts.
  • ① Updating the firmware takes approximately 10 minutes.
NO or YES NO
RX Notify Vol. Sets the call or message received notification volume. 0 ~ 32 10
Notify Vol. Sets the Notification Beep level. 0 ~ 32 10
Key-Touch Beep Selects whether or not to enable the Key-
touch beep.
ON or OFF ON
Internal Mic Gain
  • Sets the internal microphone sensitivity.
  • I) Higher values make the microphone more sensitive to your voice.
–12 dB ~ 12 dB (in 4 dB step) 0 dB
External Mic Gain.
  • Sets the external microphone sensitivity.
  • ① Higher values make the microphone more sensitive to your voice.
–12 dB ~ 12 dB (in 4 dB step) 0 dB
VOX Selects whether or not to use the VOX
function.
The function automatically switches
between receive and transmit by
detecting your voice.
OFF, Bluetooth Mic* 1 , or
Earphone Mic/Headset
OFF
VOX Threshold*2
  • Sets the VOX gain level.
  • ① Lower values make the VOX function more sensitive to your voice.
1 ~ 10 5
VOX Delay*2
  • Sets the period of time the transceiver continues transmitting after the user stops speaking, and then the VOX switches to receive.
  • If you set the time too short, a pause in a conversation may be regarded as the end of conversation, and the transceiver will start receiving, even as the conversation continues.
0.5 ~ 3.0 1.0

*1 For only the transceiver with the Bluetooth function.

*2 Displayed only when "Bluetooth Mic," or "Earphone Mic" is selected in the "VOX" item.

Page 36

The shaded items are also displayed in the Basic Set mode.

① Items or default values may be differ, depending on the transceiver's version or presettings. Ask your dealer for details.

♦ Common

Item Description Option/range Default
Man Down* 3 Selects whether or not to enable the Man
Down function.
The transceiver enters the Emergency
mode when it is tilted past the preset
angle for a certain time. (p. 5-6)
OFF or ON OFF
Lone Worker *3 Selects whether or not to enable the Lone
Worker function.
The transceiver enters the Emergency
mode when no operation occurs for a
certain time. (p. 5-7)
OFF or ON OFF
Stationary
Detection *3
Selects whether or not to enable the
Stationary Detection function.
The transceiver enters the Emergency
mode when it is detected as being
stationary (no motion) for a certain time.
(p. 5-8)
OFF or ON OFF
Motion Detection* 3 Selects whether or not to enable the
Motion Detection function.
The transceiver enters the Emergency
mode when it is continuously moves for a
certain time. (p. 5-8)
OFF or ON OFF
Recording Selects whether or not to enable the Voice Recorder function. (p. 5-9) OFF or ON OFF
Record Call type*4 Selects a type of call to record. Individual Call or All Individual
Call
Delete Recording*4
  • Deletes recorded audio.
  • ③ Select "Clear," and then push [Call History] to delete.
– or Clear
Noise Canceller Selects whether or not to enable the Noise Cancelling function. ON or OFF ON
PTT Lock Selects whether or not to enable the PTT function.
The function inhibits transmission by the internal PTT.
OFF or ON OFF
Operate Inhibit Selects whether or not to inhibit the operation except using [VOL]. OFF or ON OFF
Sub PTT Push*5 Sets the function to execute when you push [Sub PTT]. Null, Zone, Monitor, Talk Around,
Message, One Touch, or
Surveillance
Null
Sub PTT Hold*5 Sets the function to execute when you hold down [Sub PTT]. Null, Zone, Monitor, Talk
Around, Message, One Touch,
Surveillance, or AquaQuake
Null

*3 Displayed only when the Emergency Call function is enabled by your dealer.

*4 Displayed only when "ON" is selected in the "Recording" item.

*5 In Dual mode, transmits in Sub mode regardless of the setting.

Page 37

The shaded items are also displayed in the Basic Set mode.

① Items or default values may be differ, depending on the transceiver's version or presettings. Ask your dealer for details.

♦ Common

ltem Description Option/range Default
Side 1 Push Sets the function to execute when you push [Side 1]. Null, Zone, Monitor, Talk Around,
Message, One Touch, or
Surveillance
Null
Side 1 Hold Sets the function to execute when you hold down [Side 1]. Null, Zone, Monitor, Talk
Around, Message, One Touch,
Surveillance, or AquaQuake
Null
Side 2 Push Sets the function to execute when you push [Side 2]. Null, Zone, Monitor, Talk Around,
Message, One Touch, or
Surveillance
Null
Side 2 Hold Sets the function to execute when you hold down [Side 2]. Null, Zone, Monitor, Talk
Around, Message, One Touch,
Surveillance, or AquaQuake
Null
Backlight Selects a Backlight option. Auto, ON, or OFF Auto
Brightness Selects a Backlight brightness option. Light or Dark Light
Contrast Sets the screen contrast. 1 ~ 16 8
Bluetooth*1 Selects whether or not to enable the Bluetooth function. (p. 5-2) OFF or ON OFF
BT Auto
Connect*1*6
Selects whether or not to automatically connect a Bluetooth device. OFF or ON ON
BT Sync Vol.*1*6
  • Selects whether or not to synchronize the Bluetooth headset's volume level with the transceiver's volume level.
  • When "ON" is selected, the Bluetooth headset volume can be set by rotating [VOL].
OFF or ON OFF
BT Connect
Type* 1*6
  • Selects the Synchronous Connection-
    Oriented (SCO) link* connection type of a
    Bluetooth headset.
  • When "Auto Disconnect" is selected, the
    SCO link is automatically disconnected
    after 2 seconds.
  • *A Bluetooth link for voice communication.
  • This setting is valid only when a Bluetooth
    device other than a VS-3 is used.
  • When this item is set to "Auto Disconnect,"
    the VOX function is not usable.
Always Connect or
Auto Disconnect
Always
Connect
BT PTT & Mic
Switch* 1*6
  • Enables the user to select which microphone to use.
  • When this item is set to "Auto," transmits the audio from the device whose [PTT] is pushed.
Auto, Bluetooth Mic, or Radio Mic Auto
BT AF Output*1*6 Selects the AF Output device when a Bluetooth headset is connected. BT Only or BT & SP BT Only
BT Mic Gain*1*6
  • Sets the Bluetooth microphone sensitivity.
  • I) Higher values make the microphone more sensitive to your voice.
–12 dB ~ 12 dB (in 4 dB step) 0 dB

*1 For only the transceiver with the Bluetooth function.

*6 Displayed only when "ON" is selected in the "Bluetooth" item.

Page 38

The shaded items are also displayed in the Basic Set mode.

① Items or default values may be differ, depending on the transceiver's version or presettings. Ask your dealer for details.

♦ Common

ltem Description Option/range Default
BT Echo
Canceller *1*6
Selects whether or not to enable the Bluetooth headset's Echo Canceller. ON or OFF ON
BT E-Cancel
Gain *1*6
Sets the Echo Canceller input gain for a Bluetooth headset. –40 dB ~ 40 dB 0dB
BT E-Cancel
Delay *1*6
Sets the Echo Canceller delay for a Bluetooth headset. 0 milliseconds ~ 160 milliseconds 70
milliseconds
BT Noise
Cancel *1*6
Selects whether or not to enable the Bluetooth headset's Noise Canceller. ON or OFF ON
BT Power Save*1*6
  • Selects whether or not to enable the
  • Bluetooth headset's Power Save function.
  • When "ON" is selected, the Power Save function automatically activates after 2 minutes of no communication.
OFF or ON OFF
BT One Touch
PTT *1*6
  • Selects whether or not to enable the One-Touch PTT function while a Bluetooth headset is connected.
  • The function toggles receiving and transmitting by momentarily pushing [PTT] on a Bluetooth headset.
  • Push [PTT] to talk, and push again to return to receive.
  • When "ON" is selected, you do not have to hold down [PTT] while you are talking.
OFF or ON OFF
Show BT One
Touch PTT* 1*6
Selects whether or not to display the "BT
One Touch PTT" item by pushing [FUNC]
on the standby screen.
OFF or ON OFF
BT PTT Beep*1*6 Selects whether or not to sound a beep
when the [PTT] on the Bluetooth headset
is pushed.
OFF or ON OFF
Search BT
Device *1*6
Searches for Bluetooth devices. Search Search
Delete BT
Device *1*6
Deletes paired devices. - No Device
Init BT Unit *1*6 Initializes the built-in Bluetooth unit and pairing list. – or Clear
BT Unit Version*1 Displays the built-in Bluetooth unit version. _ -
RESET
  • Resets the transceiver to its defaults, except for the Bluetooth pairing list.
  • ① Select "Run," and then push [Call History] to reset.
  • ① The transceiver automatically restarts.
NO or YES NO

*1 For only the transceiver with the Bluetooth function.

*6 Displayed only when "ON" is selected in the "Bluetooth" item.

Page 39

The shaded items are also displayed in the Basic Set mode.

① Items or default values may be differ, depending on the transceiver's version or presettings. Ask your dealer for details.

♦ Cellular

ltem Description Option/range Default
Success Tone
  • Selects whether or not to enable the tone that indicates an individual call was successfully transmitted.
  • The transmission result is also displayed on the screen.
ON or OFF ON
Failure Tone Selects whether or not to enable the tone
that indicates an individual call failed.
① The transmission result is also displayed
on the screen.
ON or OFF ON
Call Tone
(IND/ GRP/ALL/
TEL)
Sets the call Initiation tone.
  • OFF, Tone1 ~ Tone8
  • ① Larger number makes the tone lower.
Tone1 (Pi)
Crtsy Beep
(IND/GRP/ALL/
TEL)
Sets the call Termination beep.
  • OFF, Tone1 ~ Tone8
  • ① Larger number makes the tone lower.
Tone1 (Pi)
RX Tone
(IND/GRP/ALL/
TEL/MSG)
Sets the call Receive tone. OFF, Tone1 ~ Tone8
① Larger number makes the tone
lower.
OFF
Notify Type
(IND/GRP/ALL/
TEL)
Sets the call receive notification type. P-Bell or Pocket beep P-Bell
Notify No.
(IND/GRP/ALL/
TEL/MSG)
Sets the number of tones. Continuous (Except for "MSG"), 1,
3, 10, 20 (times)
3 (times)
RX Notify Actn. Sets the call or message receive notification type. Tone, Vibration, or
Tone + Vibration
Tone
Out of Rng Tone Selects whether or not to enable the Out-
of-Area Warning Beep. The beep also
sounds when the transceiver reenters the
service area.
OFF or ON OFF
Range Side Tone Selects whether or not to mute the Side
Tone when the transceiver is out-of-area.
OFF or ON OFF
Sidetone
  • Selects whether or not to output your voice to a headset that is connected to the transceiver.
  • The function outputs your voice even if you are not holding down [PTT], depending on the attached microphone. (p. 7-5)
OFF or ON OFF
Sidetone Volume*7 Sets the Side tone volume. 10 ~ 32 110

*7 Displayed only when "ON" is selected in the "Sidetone" item.

Page 40

The shaded items are also displayed in the Basic Set mode.

① Items or default values may be differ, depending on the transceiver's version or presettings. Ask your dealer for details.

♦ Cellular

ltem Description Option/range Default
Echo Canceller
  • Selects whether or not to enable the Echo Cancelling function.
  • ① Commonly used for an earphone MIC, and headset.
  • ① This function is not usable when the "Sidetone" is set to "ON."
ON or OFF ON
RX Buffer Type Sets the Jitter buffer size.
① Jitter buffer reduces audio interruptions.
Dynamic, 40 ~ 480 milliseconds
(in 40 milliseconds step)
Dynamic
Call Type Stnby Selects whether or not to display the
call-to party (Call type)* on the standby
screen.
*Preset by your dealer.
ON or OFF ON
One Touch PTT
  • Selects whether or not to enable the One-Touch PTT function.
  • The function toggles receiving and transmitting by momentarily pushing [PTT].
  • Push [PTT] to talk, and push again to return to receive.
  • When "ON" is selected, you do not have to hold down [PTT] while you are talking.
OFF or ON OFF
Destination ID
  • Selects a Destination ID display option.
  • If "OFF" is selected, the call-to party
    (call type) that is preset by your dealer is
    displayed on the standby screen.
OFF, All Operations, Transmit and Receive, or Transmit OFF
Show SIM
Selection
Selects whether or not to display the "SIM Selection" item by pushing [FUNC] on the standby screen. ON or OFF ON
SIM Selection
  • Selects a SIM card. (p. 3-8)
  • ① Rotate Rotary Selector or push [▲] or [▼] to select a SIM card, and then push [Call History] to restart the transceiver.
* (SIM1)
*A SIM card name is displayed, if it
is named.
(SIM1)
Show Network
Select
Selects whether or not to display the
"Network Select" item by pushing [FUNC]
on the standby screen.
OFF or ON OFF
Network Select Selects whether or not to automatically select a network carrier. Auto, Last accessed, or
User select
Auto
Cellular Unit Version Displays the internal cellular unit version. _
IMEI Displays the Communication unit's IMEI number. - -
Phone Number*8*9 Displays the SIM card's telephone number. - -
ICCID*9 Displays the SIM card's ICCID. - _

*8 May not be displayed, depending on the inserted SIM card.

*9 Displays the phone number and ICCID of the SIM card that is selected in the "SIM Selection" item.

Page 41

The shaded items are also displayed in the Basic Set mode.

① Items or default values may be differ, depending on the transceiver's version or presettings. Ask your dealer for details.

♦IDAS

ltem Description Option/range Default
SQL Level Selects whether or not to display the Squelch level adjustment screen by pushing [FUNC]. ON or OFF ON
Page 42

Section 7 FOR YOUR REFERENCE

Specifications 7-2
·
♦ General
7-2
♦ 4G (LTE)/3G (W-CDMA) 7-2
♦ IDAS 7-2
♦ Transmitter 7-3
♦ Receiver 7-3
Bluetooth (For only the transceiver with the Bluetooth function) tion)7-4
Options 7-5
♦ Battery pack/Battery case 7-5
♦ Chargers 7-5
♦ Antennas 7-5
♦ Others 7-5
♦ About the Side Tone function and headset 7-6
♦ Using the BC-227 DESKTOP CHARGER 7-6
♦ Using the BC-226 DESKTOP CHARGER 7-7
♦ Using the BP-305 BATTERY CASE 7-8
♦ Using the LC-195 CARRYING CASE 7-9
♦ Using the HM-238MC TIEPIN TYPE MICROPHONE with a
[Sub PTT] switch 7-10
♦ Using the HM-245T DTMF SPEAKER MICROPHONE 7-11
Troubleshooting 7-12
Page 43

Specifications

Measurements made without an antenna.

① All stated specifications are subject to change without notice or obligation.

♦ General

  • Antenna impedance (For IDAS):
  • Input impedance (MIC):
  • Output impedance (audio):
  • Audio power output:
50 Ω nominal
2.2 k Ω
8 Ω
  • Operating temperature range:
  • Power supply voltage:
  • Current drain (approximately):
Internal speaker
External speaker
HM-222H/HM-245T
1300 mW typical (at 5% distortion into an 8 Ω load)
650 mW typical (at 5% distortion into an 8 Ω load)
1300 mW typical (at 5% distortion into an 8 Ω load)
-30°C ~ +60°C (-22°F ~ +140°F)
7.5 V DC nominal
RX stand-by
RX max. audio
TX High (5 W)
300 mA
520 mA (Internal speaker)
1.8 A
Dimensions: 61.7 (W) × 42.8 (D) × 140.5 (H) mm,
Weight (approximately): 320 g, 11.3 oz (with BP-303)
♦ 4G (LTE)/3G (W-CDMA)
• Frequency band:
USA version LTE Band 2, 4, 12
W-CDMA Band 2, 5
EXP/EUR version LTE Band 1, 3, 7, 8, 20
W-CDMA Band 1, 8
AUS version LTE Band 1, 3, 5, 7, 8, 28
W-CDMA Band 1, 5
IP740D
USA version
LTE Band 2, 4, 12
W-CDMA Band 2, 5
EXP-02/EXP-12
EUR version
LTE Band 1, 3, 7, 8, 20
W-CDMA Band 1, 8
EXP-01/EXP-11/
AUS version
LTE Band 1, 3, 5, 7, 8, 28
W-CDMA Band 1, 5
  • Modulation:
  • Rated output power:
  • Receiver sensitivity (QPSK):
QPSK, 16QAM, 64QAM
0.25 W
–95 dBm maximum, –102 dBm typical
Page 44

Specifications (Continued)

♦IDAS

  • Frequency range:
  • Number of conventional channels:
  • Type of emission:
IP730D
IP740D
136 MHz ~ 174 MHz
350 MHz ~ 470 MHz, 400 MHz ~ 520 MHz
128 ch / 8 Zone
USA version 11K0F3E (15.0kHz), 4K00F1E, 4K00F1D (6.25 kHz)
EUR/EXP/AUS version 8K50F3E (12.5kHz), 4K00F1E, 4K00F1D (6.25 kHz)
♦ Transmitter
  • Rated output power:
  • SAR 10g (W/kg):
IP730D
IP740D
5 W (High), 2 W (Low 2), 1 W (Low 1)
0.67
6 61
  • Modulation:
  • Frequency error:
  • Spurious emissions:
IP730D Frequency modulation, FSK modulation
±1.0 ppm
USA version 70 dB minimum, 90 dB typical
EXP/EUR/AUS version 0.25 uW (1 GHz or less),
1.0 uW (More than 1 GHz)
IP740D
USA/EXP version
70 dB minimum, 90 dB typical
EUR/AUS version 0.25 uW (1 GHz or less),
1.0 uW (More than 1 GHz)
Adjacent channel power: IP730D
IP740D
60 dB minimum, 70 dB typical
60 dB minimum, 64 dB typical
FSK Error: EM Hum and Noise: 5 % maximum, 1 % typical
34 dB minimum, 60 dB typical (Without COLTT Filter)
Page 45

Specifications (Continued)

♦ Receiver

Sensitivity: IP730D
USA version
0.32 uV maximum (at 12 dB SINAD)
0.22 uV typical (at 12 dB SINAD)
EXP/EUR/AUS version 0.0 dBuVemf maximum (at 20 dB SINAD)
–2.0 dBuVemf typical (at 20 dB SINAD)
IP740D
USA/EXP version
0.32 uV maximum (at 12 dB SINAD)
0.17 uV typical (at 12 dB SINAD)
EUR/AUS version 0.0 dBuVemf maximum (at 20 dB SINAD)
–2.0 dBuVemf typical (at 20 dB SINAD)
Adjacent channel selectivity: 60 dB minimum, 67 dB typical
Intermodulation: IP730D
USA version
70 dB minimum, 74 dB typical
EXP/EUR/AUS version 65 dB minimum, 67 dB typical
IP740D
USA/EXP version
70 dB minimum, 72 dB typical
EUR/AUS version 65 dB minimum, 66 dB typical
• Hum and Noise: 34 dB minimum, 60 dB typical
(Without CCITT Filter)

Bluetooth (For only the transceiver with the Bluetooth function)

IP730D USA-01/USA-02/EXP-01/EUR-01/AUS-01 IP740D USA-01/EXP-01/EXP-02/EUR-01/AUS-01
IP/40D USA-01/EXP-01/EXP-02/EUR-01/AUS-01
4.2
Output power: Class 2
Profile: HFP, HSP
Modulation: GFSK, π/4-DQPSK, 8DPSK
IP730D USA-03/USA-04/EUR-02/AUS-02 IP740D USA-02/EUR-02/AUS-02
Version: 5.3
Output power: Class 1
Profile: HFP, HSP
Modulation: GFSK, π/4-DQPSK, 8DPSK
Page 46

Options

♦ Battery pack/Battery case

• BP-302/BP-303 BATTERY PACK
Battery
pack
Voltage Capacity Approximate
operating time*
BP-302 7.2 V 1950 mAh (Minimum)
2010 mAh (Typical)
15 hours
(Cellular mode)
8 hours
(IDAS mode)
BP-303 7.2 V 3200 mAh (Minimum)
3350 mAh (Typical)
24 hours
(Cellular mode)
13 hours
(IDAS mode)

* Calculated under the following conditions:

  • Bluetooth and Backlight are OFF
  • TX : RX : standby = 5 : 5 : 90
  • The operating time may be shorter, depending on
  • The operating conditions, such as Bluetooth. GPS. Dual mode, and so on.
  • The distance with the cellular station or the signal
• BP-305 BATTERY CASE

Battery case with 5 AA battery cells.

♦ Chargers

• BC-227 DESKTOP CHARGER + BC-242 AC ADAPTER. BC-123S AC ADAPTER. OPC-515L DC POWER CABLE To rapidly charge the battery pack.

Charging time: Approximately 4.4 hours for the BP-303 OPC-515L must be purchased separately

• BC-226 DESKTOP CHARGER + BC-228 AC ADAPTER You can connect up to 6 BC-226 together

Charging time: Approximately 4.2 hours for the BP-303

(i) A power adapter may be supplied, depending on the charger's version.

∆ Antonnas

• FA-SC25V/FA-SC28V/FA-SC29V/FA-SC55V

FA-SC25V 136–150 MHz EA-SC28V/ 1/18-162 MHz EA SC201/ 160 174 MHz FA-SC55V 150-174 MHz

  • FA-SC26VS/FA-SC27VS/FA-SC56VS/FA-SC57VS FA-SC26VS 136-144 MHz
  • FA-SC27VS 142–150 MHz
  • FA-SC56VS 150-162 MHz
  • FA-SC57VS 160-174 MHz
  • FA-SC61VC VHF CUT ANTENNAS FA-SC61VC 136-174 MHz
• EA-SC0111/EA-SC0211/EA-SC0311/EA-SC2511/ FA-SC57U/FA-SC72U

UHF ANTENNAS FA-SC01U 350-400 MHz FA-SC02U 330-380 MHz FA-SC03U 380-430 MHz FA-SC25U 400-430 MHz FA-SC57U 430-470 MHz EA-SC7211470-520 MHz

  • FΔ-SC26US/FΔ-SC73US UHF STUBBY ANTENNAS FA-SC26US 400-450 MHz EA-SC73US 450-490 MHz
  • FA-SC61UC UHF CUT ANTENNAS FA-SC61UC 380-520 MHz
  • FA-SC62V/FA-SC63V HIGH GAIN ANTENNAS FA-SC62V 155 MHz FA-SC63V 160 MHz
♦ Others

  • MB-136. MB-133 BELT CLIP
  • MB-96F. MB-96FL. MB-96N BELT HANGERS
  • LC-195 CARRYING CASE + MB-57L SHOULDER STRAP
  • VS-3 Bluetooth® HEADSET (For only the transceiver with the Bluetooth function) The Bluetooth headset with a [PTT] switch
  • VS-4MC/VS-5MC* PTT SWITCH CABLE + HS-01 HS-05 HS-07 HEADSET VS_5MC: Used to connect a headset to a
    • transceiver HS-94: Ear-hook type
    • HS-95 Neck-arm type
    • HS-97: Throat microphone * Non-waterproof
  • HM-184, HM-222, HM-222H, HM-236 SPEAKER MICROPHONE

HM-184, HM-236: Meets IP67 waterproof protection. HM-222 Meets IP68 waterproof protection HM-222H: Loud speaker version of the HM-222.

  • HM-163MC TIEPIN TYPE MICROPHONE
  • HM-238MC TIEPIN TYPE MICROPHONE With a [Sub PTT] switch
  • HM-245T DTMF SPEAKER MICROPHONE With a Ten-Keypad used for sending DTMF codes. Meets IP67 waterproof protection
  • EH-15B EARPHONE, SP-26 TUBE EARPHONE, SP-28 For use with the HM 163MC or HM 238MC
  • SP-27 TUBE EARPHONE, SP-29 EAR HOOK TYPE EARPHONE. SP-40 EARPHONE + AD-135 FARPHONE ADAPTER

AD-135: Used to connect an earphone to the transceiver's Multi-connector

• CP-23L CIGARETTE LIGHTER CABLE Used when charging a battery pack through a cigarette lighter socket

Page 47

Options (Continued)

♦ About the Side Tone function and headset

The Side tone function (p. 6-7) works differ depending on the connected microphone, as shown below

① Usable options may be added in the future. Ask your dealer for details of how they work.

When the HM-238MC or VS-5MC is attached:

The transceiver always outputs your voice to a headset.

When the HM-163MC, HM-184, HM-222, HM-222H,

HM-236, HM-245T, or VS-4MC is attached:

The transceiver outputs your voice to a headset while holding down [PTT].

♦ Using the BC-227 DESKTOP CHARGER

Charging time: approximately 4.4 hours for the BP-303.

CAUTION: Before using the charger, read the

'Battery caution' and 'Charging caution' on the INSTRUCTIONS that boxed with the transceiver

OStatus indicator
Light color Status
Orange Charging
Green Charging is completed.
Blinks orange Charging failed. It may have some
and green problems.

NOTE:

  • The transceiver MUST be turned OFF while charging. Otherwise:
    • The battery will not be charged properly.
    • The battery life may be shortened
  • Do not transmit while charging. When you need to transmit, remove the transceiver from the charger, and then turn ON the power.
  • If the battery pack does not properly charge when it is attached to the transceiver, remove it from the transceiver and insert only the battery pack into the charger.

The CP-23L (for a 12 V cigarette lighter socket) can be used instead of the power adapter.

*The shape may be different, depending on the charger version

Page 48

s (Continu

♦ Using the BC-226 DESKTOP CHARGER

Charging time: approximately 4.2 hours for the BP-303.

CAUTION: Before using the charger, read the 'Battery caution' and 'Charging caution' on the INSTRUCTIONS that boxed with the transceiver.

OStatus indicator
Light color Status
Orange Charging
Green Charging is completed.
Blinks orange Charging failed. It may have some
and green problems.

NOTE

  • The transceiver MUST be turned OFF while charging. Otherwise
    • The battery will not be charged properly.
  • The battery life may be shortened
  • Do not transmit while charging. When you need to transmit, remove the transceiver from the charger. and then turn ON the power.
  • If the battery pack does not properly charge when it is attached to the transceiver, remove it from the transceiver and insert only the battery pack into the charger.

OConnecting the BC-226 together

You can connect up to 6 BC-226 together.

  • 1. Remove the charger's right cover. (1)
  • 2. Snap the DC power plug to the another charger's DC power jack. (2)

WARNING: NEVER connect more than 6 chargers together. It may result in an electric shock, cause a fire, overheating, or damage chargers.

OFuse replacement

If a fuse blows, find and repair the cause of the problem Then replace the damaged fuse with a new adequately rated fuse.

Fuse type: 5 A/58 V (low profile mini blade fuse)

NOTE: Remove the fuse using needle-nose pliers.

Page 49

Options (Continued)

♦ Using the BP-305 BATTERY CASE

Install 5 × AA (LR6) size alkaline batteries, as shown below.

1. Open the battery case.

Push the tab (1), and then remove the battery holder (2).

3. Install batteries in the holder.

4. Insert the battery holder to the battery case until the tab makes a 'click' sound.

5. Firmly close the battery case. ① Make sure that the waterproof packing does not stick out of the case

WARNING: NEVER use batteries other than alkaline batteries, such as manganese batteries or rechargeable batteries. It may cause rupture, ignition, fire, heat generation, liquid leakage, electric shock, and burns.

CAUTION:

  • DO NOT incinerate used battery cells since internal battery gas may cause them to rupture.
  • DO NOT expose a detached battery case to water. If the battery case gets wet, be sure to wipe it dry before using it.
  • DO NOT use batteries whose insulated cover is damaged.
NOTE:

  • When installing the batteries, make sure they are all the same brand, type and capacity. Also, do not mix new and old batteries together.
  • Keep the battery terminals clean. It's a good idea to occasionally clean them.
  • Remove alkaline batteries when the battery case is not used.
  • The transceiver turns OFF when the battery case voltage falls below the operating range of the transceiver.
  • The transmission output power in the IDAS mode will be reduced to low power when using the battery case and alkaline batteries.
Page 50

Options (Continued)

♦ Using the LC-195 CARRYING CASE

The LC-195 is a leather case that is usable when the battery pack is attached. Adjust the fixing position with the hook-and-loop fasteners.

You can charge even when the leather case is attached, as shown below.

*The shape may be different, depending on the charger version

Page 51

Options (Continued)

♦ Using the HM-238MC тієрім туре міскорноме with a [Sub PTT] switch

The HM-238MC is a Tie-clip type microphone that can operate the [PTT], [Sub PTT], and [Side 1] switches of the transceiver.

NOTE: When the HM-238MC is attached to the transceiver, no audio is output from the transceiver's speaker. BE SURE to connect the EH-15B, SP-26, or SP-28 earphones to the HM-238MC before use.

Page 52

Options (Continued)

♦ Using the HM-245T DTMF SPEAKER MICROPHONE

The HM-245T is the microphone that has Ten-keypad, that allows you to send DTMF codes. You can connect an earphone (user supplied) to the earphone jack.

NOTE: When the HM-245T is attached to the transceiver, audio is output from the HM-245T's speaker.

NOTE:

  • NEVER immerse the connector in water. If the connector becomes wet, be sure to dry it BEFORE attaching to the transceiver.
  • The microphone element is located at the top left of the speaker microphone, as shown in the illustration above. To maximize the readability of your transmitted audio, hold the microphone approximately 5 to 10 cm (2 to 4 inches) from your mouth, and then speak at your normal voice level.

CAUTION: The HM-245T meets IP67 requirement for dust-tight and waterproof protection only when the earphone jack cover is firmly closed. The microphone does NOT meet dust-tight and waterproof protection if an earphone is attached.

Sending DTMF codes:

While holding down [PTT], push the keys on the Ten-Keypad. The [Sub PTT] is also usable in the Dual mode (p. 5-11).

Page 53

Troubleshooting

The following conditions are not due to a malfunction. Check before sending a request for repair.

No power comes ON.

  • Loose connection of the battery pack.
  • Clean the battery pack terminals
  • The battery is exhausted.
    • Charge the battery pack. (p. 7-6)
  • The battery pack's over-discharge protection circuitry is activated.
    • Remove the battery pack from the transceiver, then charge it for a while.
      • Attach the battery pack to the transceiver again, then turn ON the power.
No sound comes from the speaker nor earphone.

  • Volume level is set too low.
  • Rotate [VOL] to adjust the volume level.
  • Loose earphone plug connection.
    • Firmly insert the plug.

Calls cannot be made

The call-to party number or group number is wrong Check the call-to party number or group number.

No beep sounds
• Key Beep Volume level is set too low.

- Set the volume to a suitable level in the Set mode. (p. 6-3)

The "45 " blinks, or "Connecting..." is displayed (standby screen is not displayed)

  • The transceiver is located out of the service area.
  • Move your location.
  • Restart the transceiver.
No reply is received.

  • The transceiver is located out of the service area. ("45 d" blinks.)
    • Move your location, and then try again.
  • The transceiver is not registered to the system. ("45 d" is displayed.)
    • Push [PTT] to re-register the transceiver to the system.
    • Wait for a while, or change your location.
    • Check that the Cellular line is established.
  • The operator is away from the transceiver, or the transceiver is turned OFF.
    • Wait until the operator is back, or ask your system manager.
"Key lock" is displayed when you push any keys

  • The keys are locked.
    • Hold down [CLR/Lock] to unlock. (p. 2-4)
Page 54
Troubleshooting (Continued
The charging indicator blinks orange, or alternately blinks orange and green

  • The battery pack is not properly inserted. Properly insert the battery pack. (p. 7-6)
  • Charging the battery pack outside of the chargeable temperature range. Charge the battery pack in the chargeable temperature range (0°C to 60°C (32°F to 140°F))
  • Loose connection of charging transceivers.
    • Clean the charger terminals.
  • The transceiver power is ON while charging.
    • Turn OFF the power while charging. (p. 7-6)
The charging indicator is OFF even the battery pack is inserted to the charger

  • The battery pack is not properly inserted.
  • Properly insert the battery pack. (p. 7-6)
The deleted recorded audio still exists, or the recorded audio is lost

  • The battery pack was removed before the recorded audio was deleted/saved from/to memory.
    • Remove the battery pack after "Power OFF..." is displayed.
Failed to pair your Bluetooth headset

  • The Bluetooth headset is not in the Pairing mode
  • Confirm the Bluetooth headset is in the Pairing mode, and then try again. (p. 5-3)
  • There are other active Bluetooth devices nearby.
    • Stop using other Bluetooth devices.
    • Use the transceiver away from other Bluetooth devices.
  • There are other devices that are operating in the 2.4 GHz band
    • Use the transceiver away from the other devices, or stop using those devices.
  • Your transceiver version does not have a Bluetooth function.
"Pairing list is full" is displayed in the Pairing screen

(For only the transceiver with the Bluetooth function.)

  • Number of paired devices exceeds the maximum number possible.
    • Delete a Bluetooth device from the pairing list.
The call was suddenly cut off /Noise is heard

  • Too far from the Bluetooth device (When using a Bluetooth headset). Get closer to the Bluetooth device
    • The communication range of Bluetooth is approximately 10 meters (33 feet).
  • Electromagnetic interference from other electronic devices
  • Use the transceiver away from the other devices, or stop using those devices.
Page 55

How the World Communicates

Loading...