

Page 1
INSTRUCTION MANUAL
IP ADVANCED RADIO SYSTEM
IP503H
1 BEFORE USING
2 BASIC OPERATION
3 ADV ANCED OPERATION
4 SET MODE
5 OPTIONAL PRODUCTS
6 FOR YOUR REFERENCE
INDEX
Page 2

INTRODUCTION
Thank you for choosing this Icom product.
This product is designed and built with Icom’s state of the art technology and craftsmanship.
With proper care, this product should provide you with years of trouble-free operation.
IMPORTANT
FIRST, CAREFULLY READ INSTRUCTIONS that is
included with the transceiver.
SAVE THIS INSTRUCTION MANUAL— This instruction
manual contains additional important operating instructions
for the transceiver.
NOTE:
• This instruction manual is based on the IP503H Lite
Version 1.11.
• The explanations in this manual assume that the
registration to the system has been completed. Ask your
system manager for details.
FEATURES
• Communication throughout the Coverage of LTE
(4G) and 3G Network
• Simultaneous TalkListen Function for Full-Duplex
Communication
• Multiple User Communication
• Priority Interrupt Calling
• Text message reception and preprogrammed
message transmission
• IP67 Dust-Tight and Waterproof
Icom is not responsible for the destruction, damage to, or performance of any Icom or non-Icom equipment,
if the malfunction is because of:
• Force majeure, including, but not limited to, res, earthquakes, storms, oods, lightning, other natural disasters,
disturbances, riots, war, or radioactive contamination.
• The use of Icom transceivers with any equipment that is not manufactured or approved by Icom.
Icom and the Icom logo are registered trademarks of Icom Incorporated (Japan) in Japan, the United States, the United
Kingdom, Germany, France, Spain, Russia, Australia, New Zealand, and/or other countries.
3M, PELTOR, and WS are trademarks of 3M Company.
The Bluetooth
marks by Icom Inc. is under license.
Other trademarks and trade names are those of their respective owners.
®
word mark and logos are registered trademarks owned by the Bluetooth SIG, Inc. and any use of such
i
Page 3

BEFORE USING
■ Attaching the antenna .......................................................... 1-2
■ Attaching the hand strap ...................................................... 1-2
■ Attaching the belt clip .......................................................... 1-2
■ Attaching the battery pack ................................................... 1-2
■ Turning ON the power/Adjusting the audio level ................. 1-3
■ Panel description ................................................................. 1-4
■ Icons and indications ........................................................... 1-5
■ About the key operations ..................................................... 1-6
■ Battery alert beep ................................................................ 1-7
■ Key Lock function ................................................................ 1-7
Section 1
1-1
Page 4
BEFORE USING
w
w
1
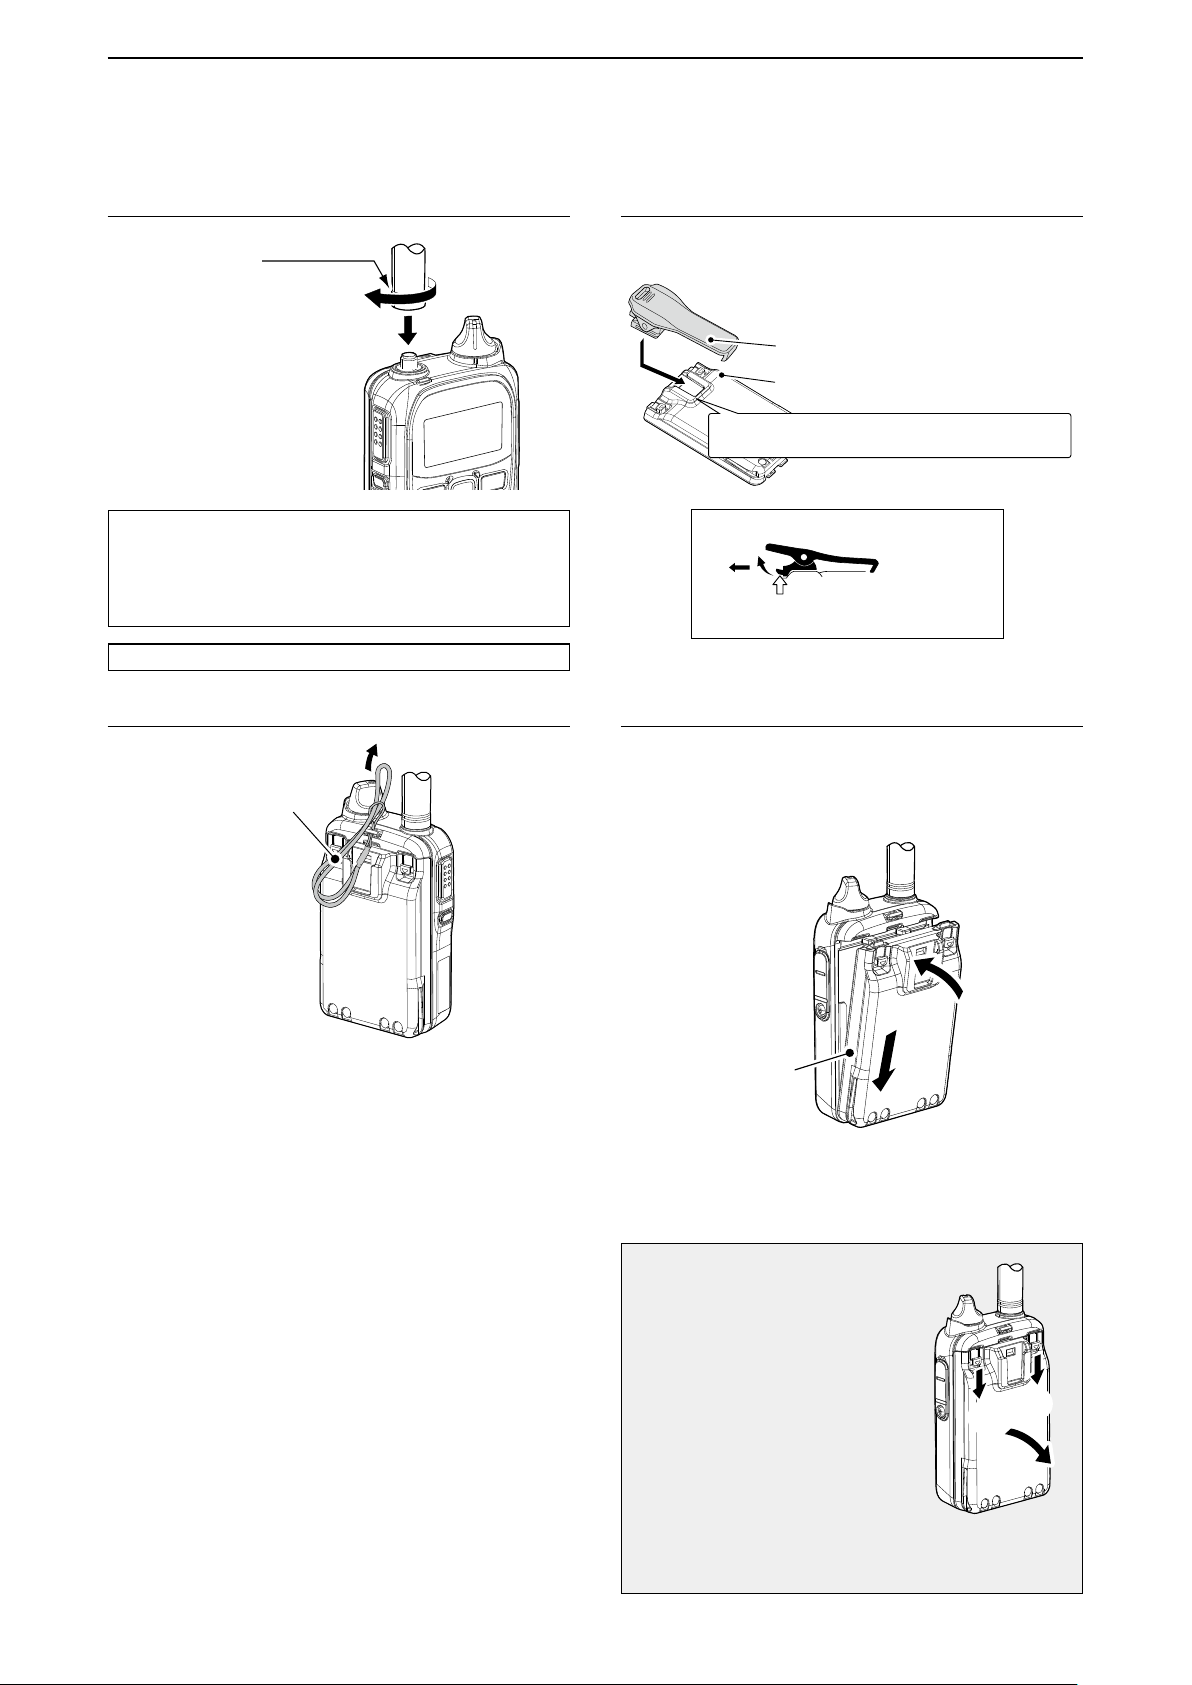
■ Attaching the antenna ■ Attaching the belt clip
Hold this part to turn.
CAUTION:
• NEVER carry the transceiver by holding only the
antenna.
• Transmitting without an antenna may damage the
internal circuit.
NOTE: You can use only the supplied antenna.
■ Attaching the hand strap
Supplied
hand strap
L Remove the battery pack before attaching or removing
the belt clip.
Belt clip
Battery pack
Slide the belt clip in the direction of the arrow until
the belt clip locks in place, and makes a ‘click’ sound.
Removing the belt clip
q
w
Lift the tab up q, and slide the belt clip in
the direction of the arrow w.
■ Attaching the battery pack
Fully charge the battery pack before turning ON for the rst
time, or after 2 months or more of no use.
LRefer to Section 5 for charging information.
q
Battery pack
Follow the order q ~ w on the illustration above.
NOTE: After attaching, check that the battery pack is
rmly attached. (2 sliding locks are in place.)
CAUTION
Even when the transceiver’s power
is OFF, a small current still ows in
the transceiver. Remove the battery
pack when not using it for a long
time. Otherwise, the battery will
become exhausted.
NOTE: Turn OFF the power before
removing the battery pack
in order q ~ w in the
illustration to the right.
L Do not remove the battery pack until “POWER
OFF…” is disappears. Otherwise the recorded audio
may be lost.
1-2
q
q
Page 5
BEFORE USING
回す
回す
00002
Booting...
All
10/4 12:57
00002
Successful
00002
Connecting
1
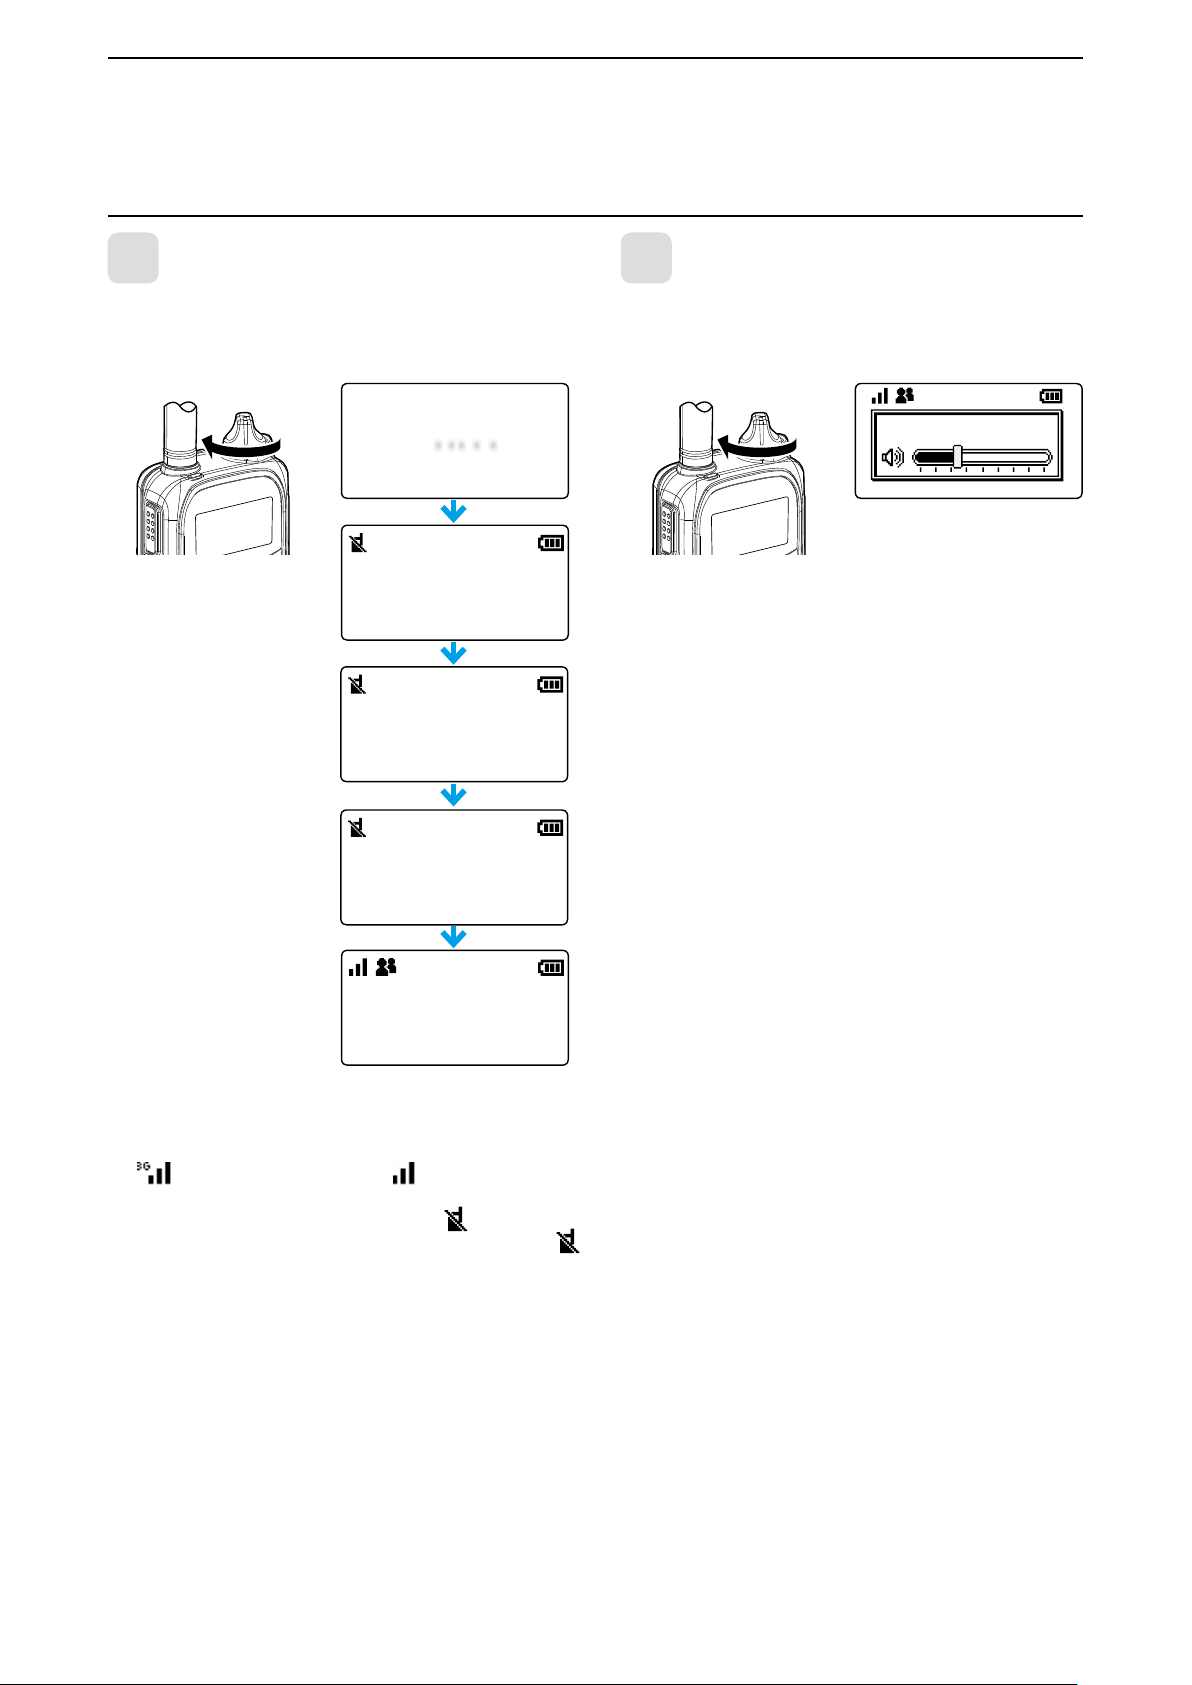
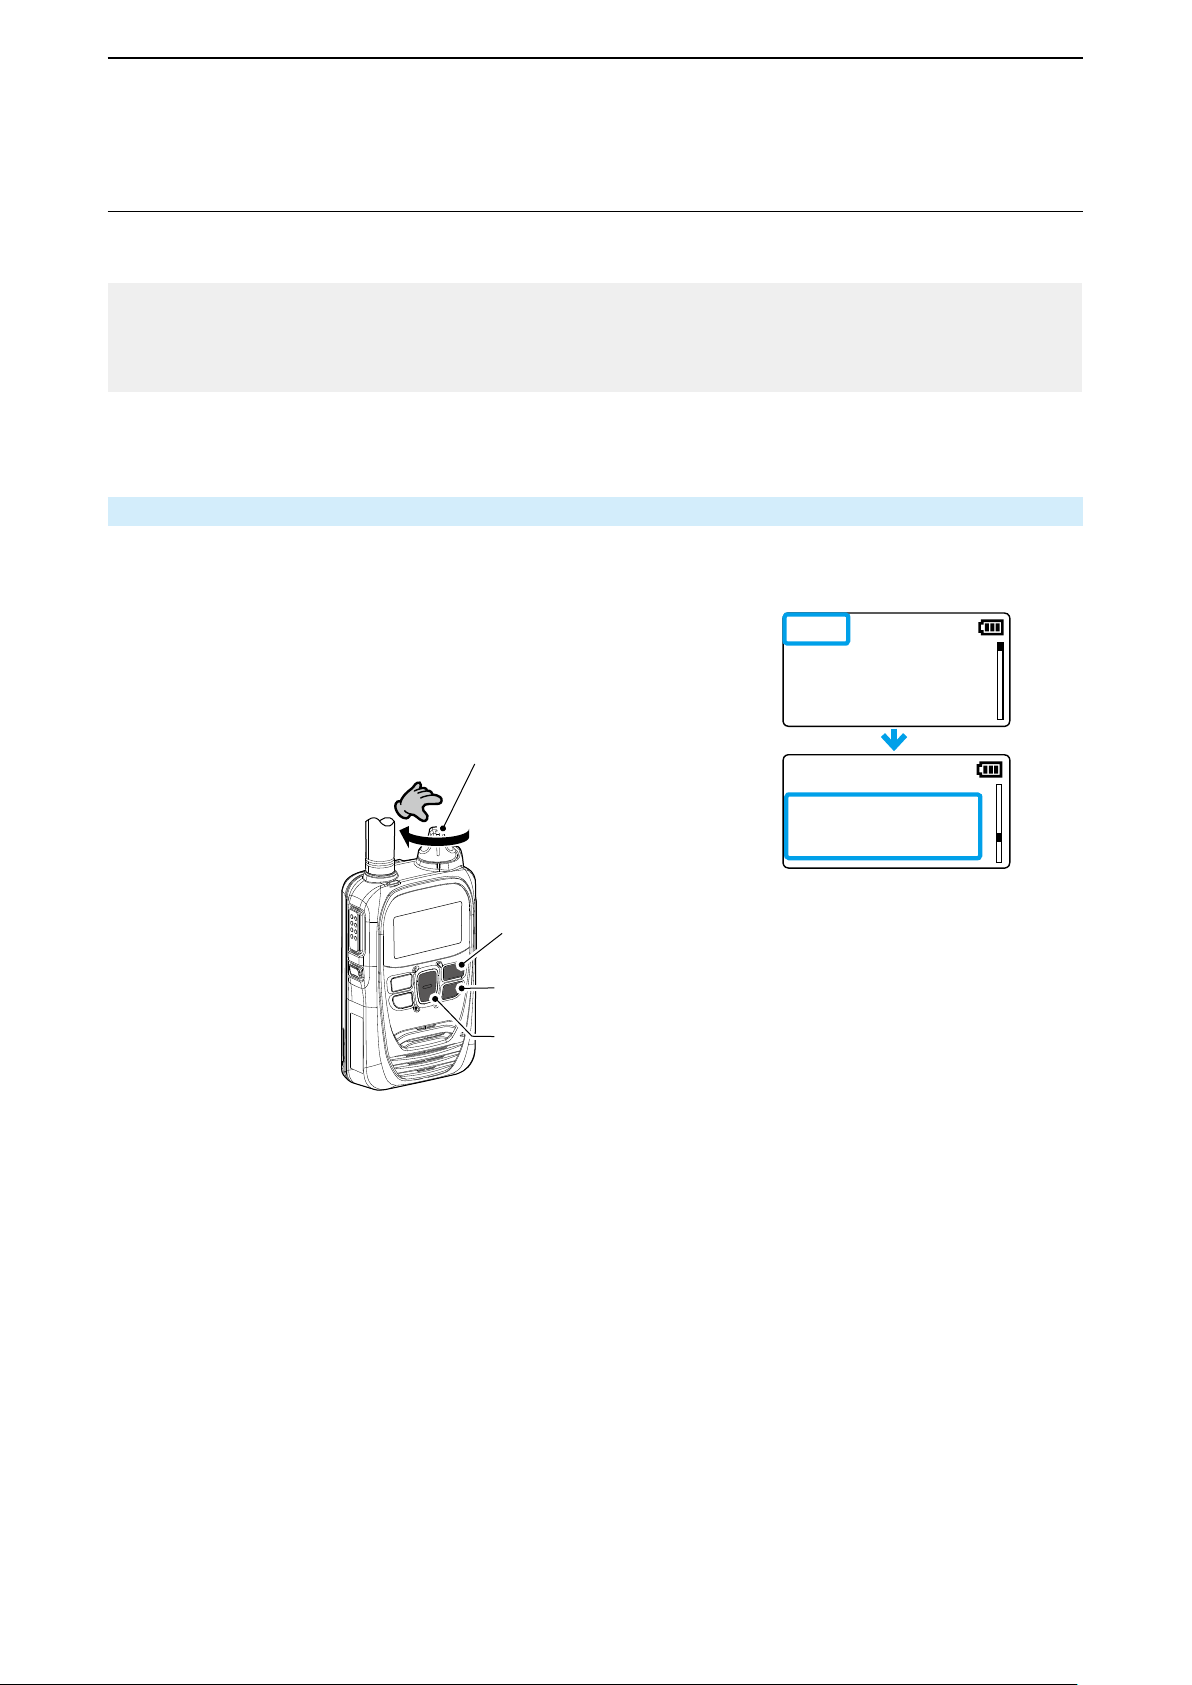
■ Turning ON the power/Adjusting the audio level
1
Turn [PWR/VOL] clockwise to the 12 o’clock position.
• A beep sounds.
L The [PWR/VOL] is
Turning ON the power
Turn
IP503H
Ver. . . /
made tight for the
dust-tight and water
resistance.
2
Turn [PWR/VOL] to adjust the audio output level.
• The volume can be adjusted between 0 and 32.
NOTE: If the output level is set to minimum, the beep does
Adjusting the audio output level
Turn
Volume:
not sound.
10
Standby screen
The signal strength is represented by 3 bars.
In the 3G mode, the received signal strength is indicated by
the
L When the transceiver location is out of the service area,
icon. In the LTE mode, the icon is displayed.
or cannot receive the control signal, the
icon blinks. If the transceiver has not been registered,
is displayed.
(out-of-area)
1-3
Page 6
BEFORE USING
電源/音量]
アンテナ
[送信/受信]ランプ
[PTT](送信)
スイッチ
[ オ プ ション
キー
Turn OFF
1
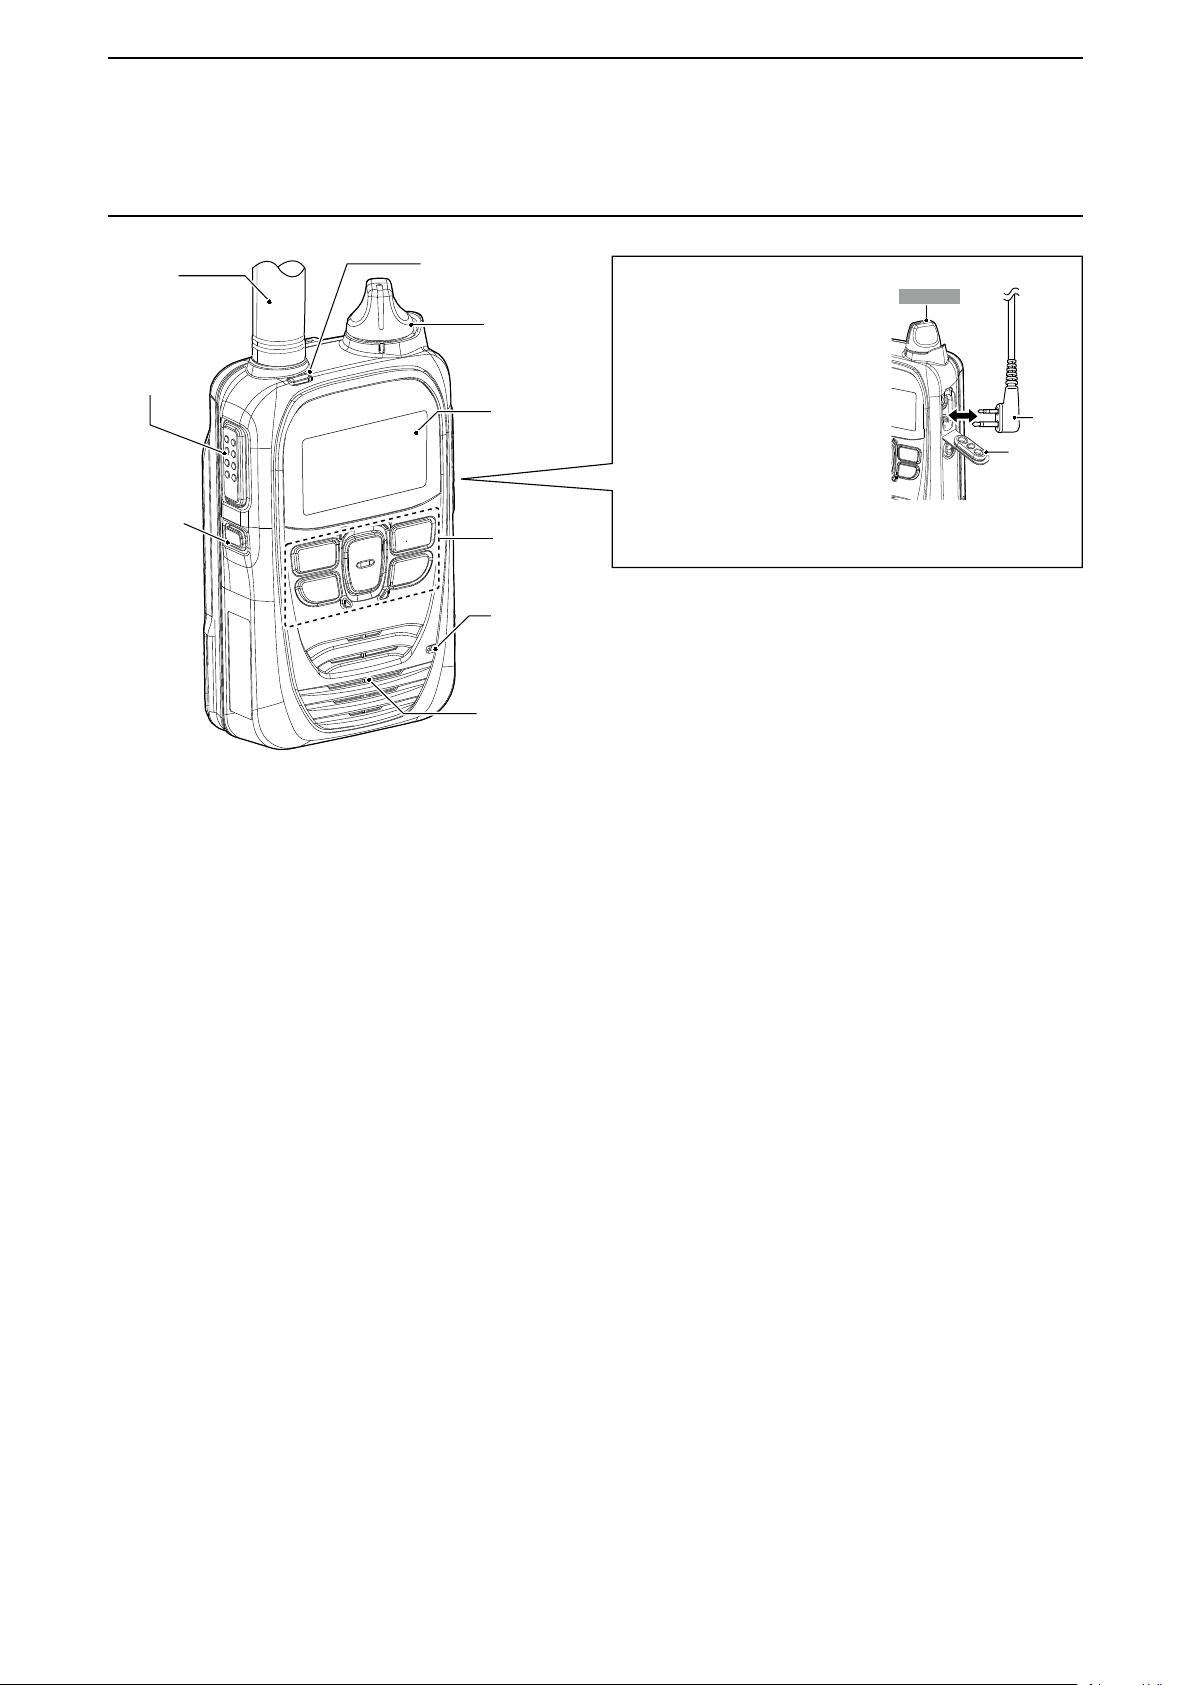
■ Panel description
Antenna
(p. 1-2)
[PTT]
p. 2-2)
(
[Option]*
(p. 3-6)
]
1
[TX/RX] indicator
(pp. 2-2 and 2-3)
[PWR/VOL]*
[
ツマミ
(p. 1-3)
Function
表示部
screen
(p. 1-5)
操作キー
Keypad
When connecting optional equipment
• Be sure to turn OFF the power
2
before connecting or disconnecting
optional equipment to or from the
jack.
• Remove the cable by holding the
plug, not the cable.
• Insert the plug securely when
connecting the cable.
CAUTION:
Attach the jack cover when no optional equipment is
connected.
Connector
cover
(p. 1-6)
マイク
Microphone
Speaker*
スピーカー
3
NOTE: Instructions and screens on this guide may differ, depending on the settings.
1
*
Ask for your dealer about the assigned function.
2
*
When the Bluetooth function is used and the “Bluetooth Synchronous Volume” item is set to “Enable” (p. 4-6), the audio
volume cannot be adjusted by [PWR/VOL] but [VOL] (+) or [VOL] (–) key on the Bluetooth device.
3
*
While connecting an optional speaker microphone or the Bluetooth function (p. 5-9) is used, the audio is not output from
the internal speaker.
Plug
1-4
Page 7
BEFORE USING
All
10/4 12:57
All
10/4 12:57
F
Updating
1
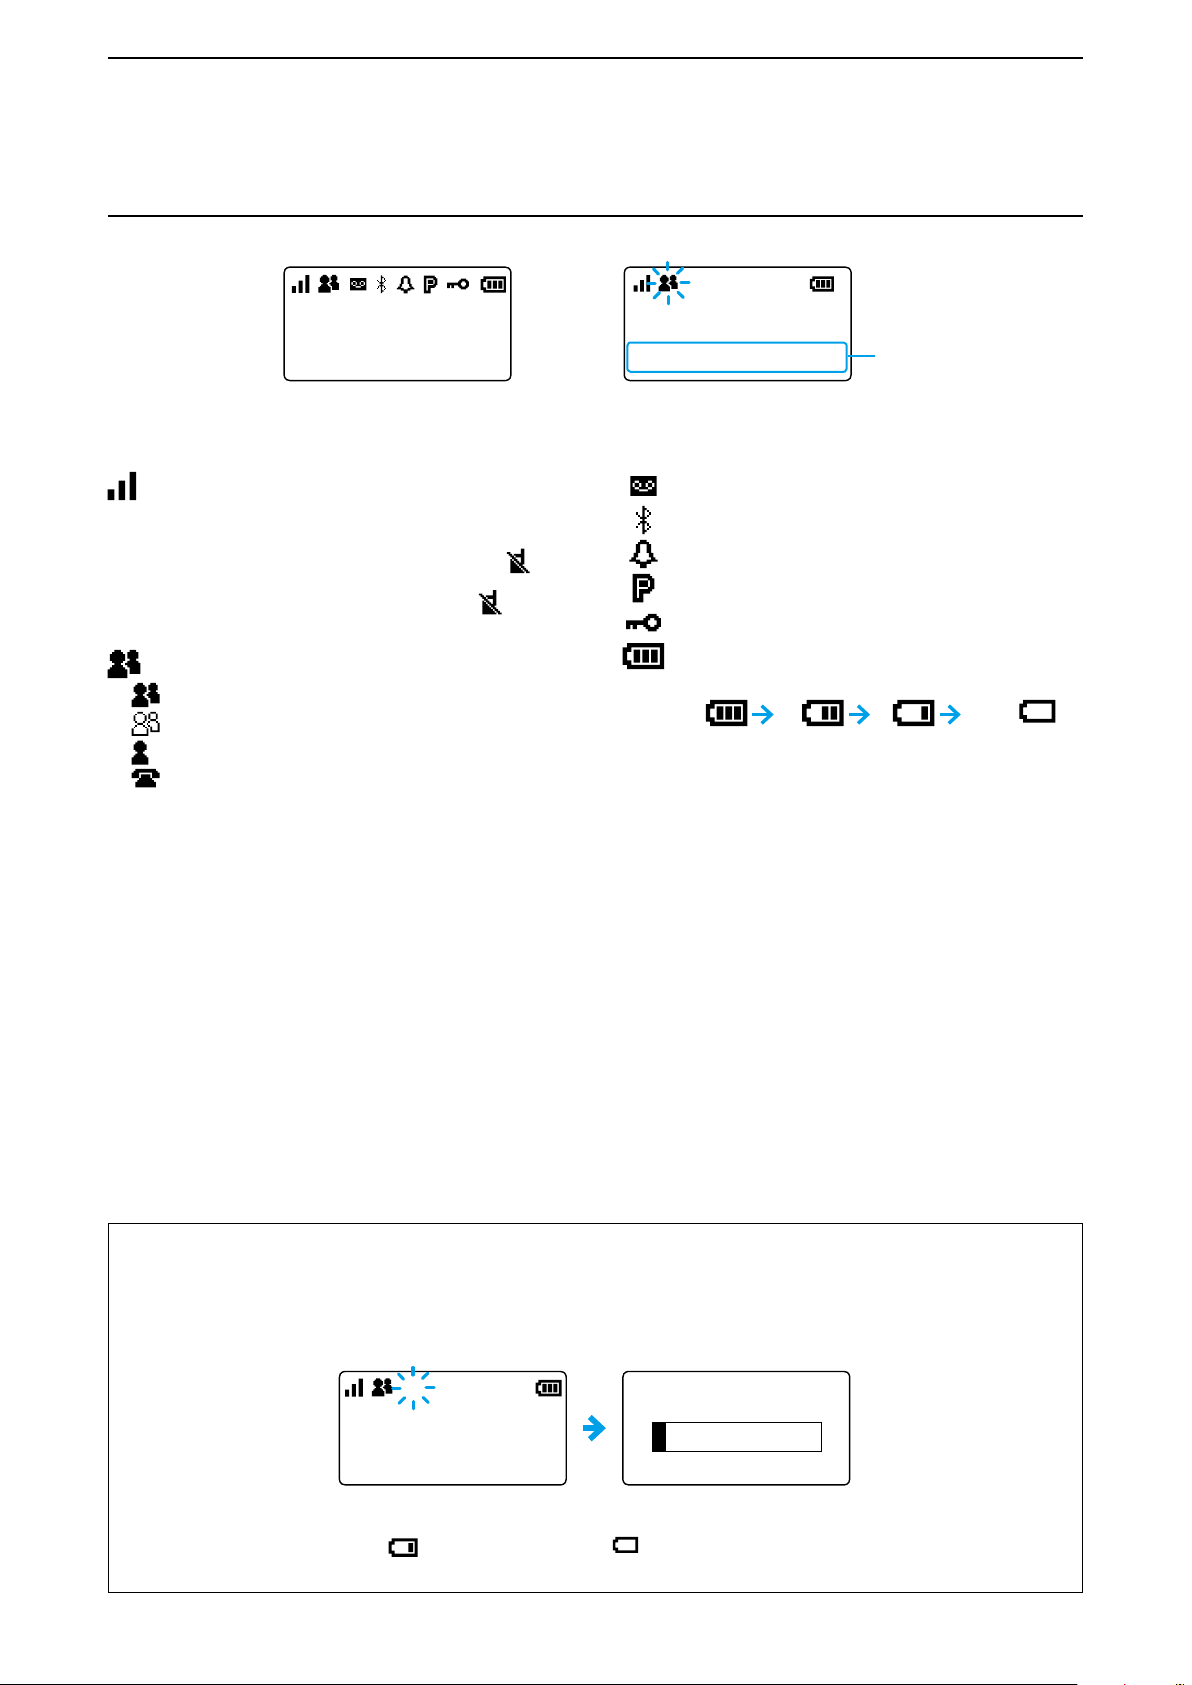
■ Icons and indications
Standby screen
Blinks
10/4 13:00
All Gather immediately
Example: A message is received
Message scrolls depend-
ing on the message length
Signal strength
The signal strength is represented by 3 bars.
When the transceiver location is out of the service
area, or cannot receive the control signal, the
(out-of-area) icon blinks.
If the transceiver has not been registered,
displayed. (p. 1-3)
Call types*
1
: All/Group Call
: Talkgroup Call*2 (p. 3-4)
: Individual Call
: Phone Call*
1
*
Blinks when a call or message is received.
2
*
May be usable, depending on a presetting.
3
*
Feature in the near future.
3
is
Recording function (p. 3-7)
Bluetooth function (p. 5-9)
Pocket beep (p. 3-10)
P-Bell function (p. 3-10)
Lock function (p. 1-7)
Remaining battery capacity
Represents the remaining capacity in 4 steps.
sufficient
capacity
exhausted
a little.
nearing exhaustion
(Charging is necessary)
Blink
Exhausted
(Charging required)
“F” blinks while downloading a new firmware:
• Do not turn OFF the transceiver until the download is nished. Place the transceiver in a good signal level area.
Downloading takes approximately 10 minutes.
• After the downloading is nished, the rmware update will start. Updating takes approximately 1 minute.
• Do not turn OFF the transceiver. The transceiver will automatically restart when the update is nished.
• If “F” has been displayed for more than 10 minutes, reboot the transceiver.
• If the battery status indication is
(nearing exhaustion) or
Blink
(exhausted), the rmware update will not start.
Charge the battery pack, then restart the transceiver and do the rmware update.
1-5
Page 8
BEFORE USING
Individual
Individual 00001
00001
All
10/4 12:57
1
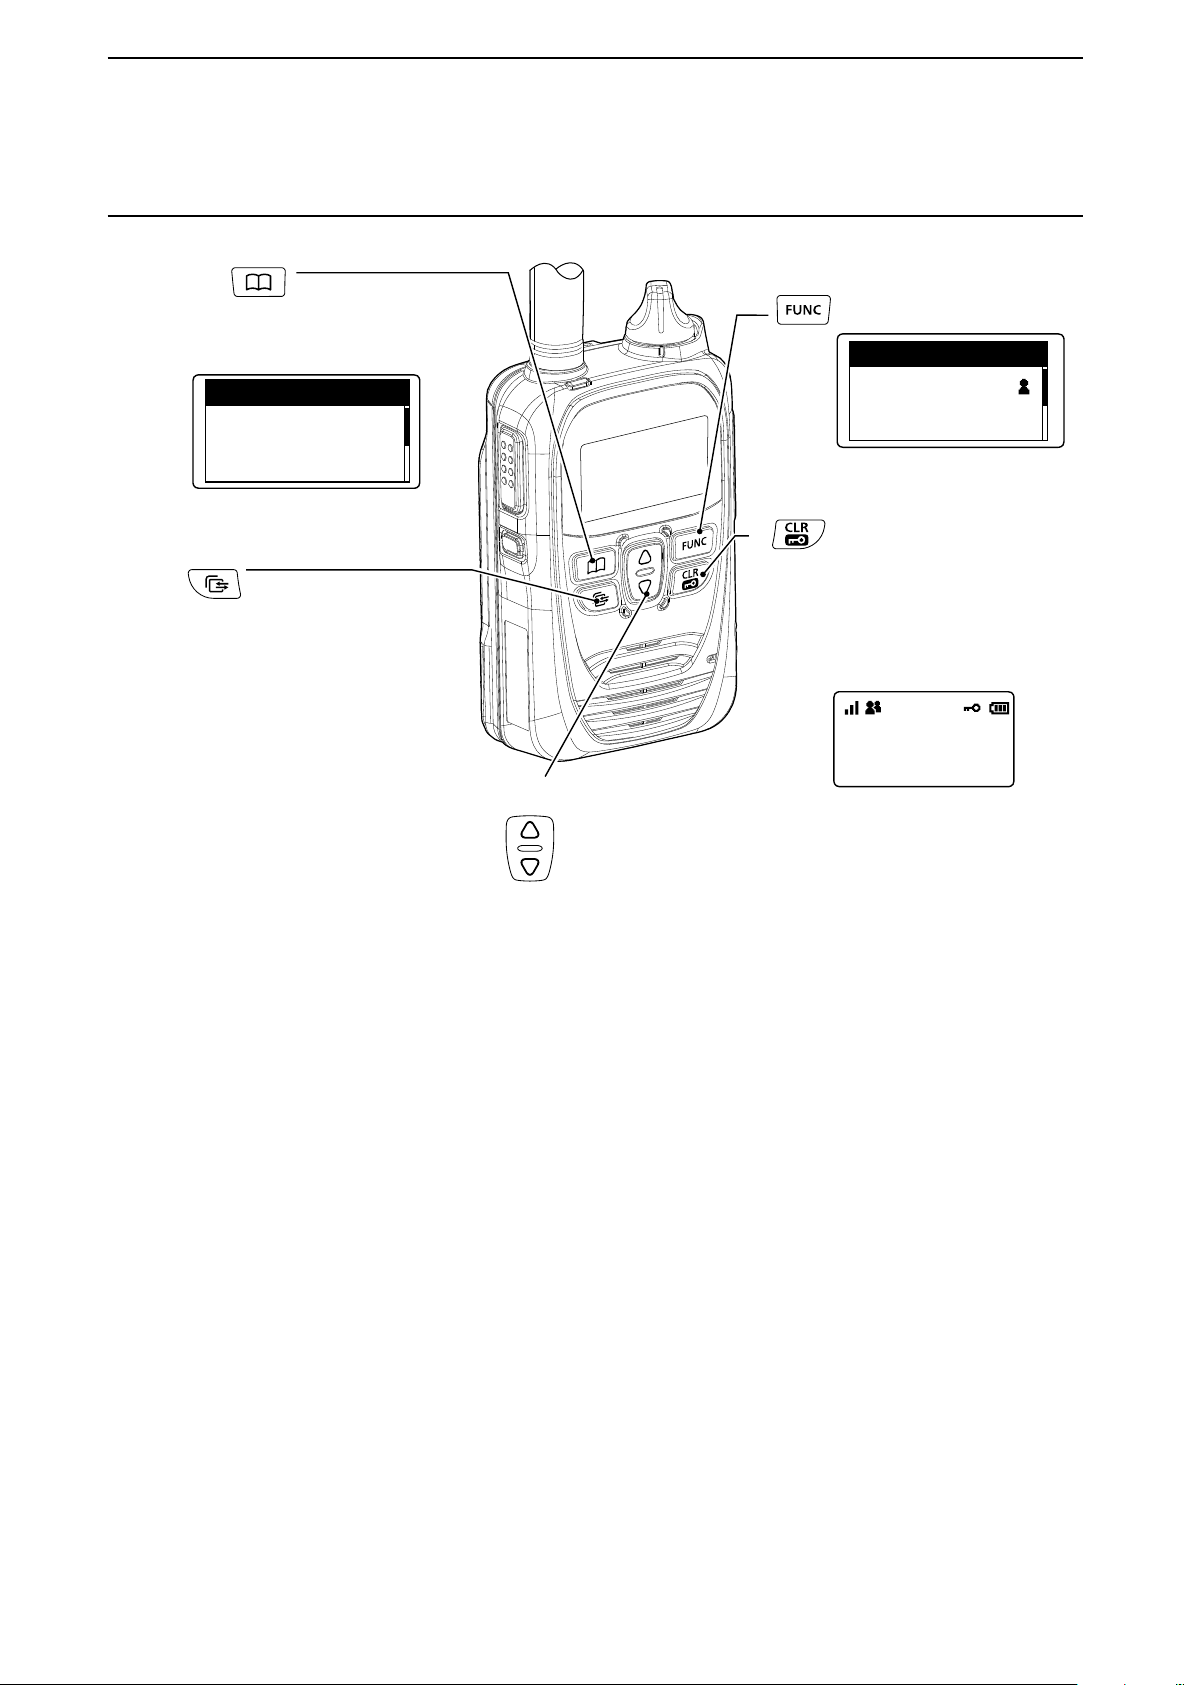
■ About the key operations
[Address] key*
Selects a preset address.
Push [▲]/[▼] to select “All Call,” “Group Call”
or “Individual Call.”
Address book: Individual
[Call history] key*
Selects the call history.
Push
[▲]/[▼]
“TX MSG log,” “RX MSG log,” “TX TEL log” or
“RX TEL log.”
• Hold down until “Emergency” is displayed
to send an emergency call, depending on
a presetting.
*May be usable, depending on a presetting.
to select the “TX log,” “RX log,”
[CLR/LOCK] key
Push to return to the previous
Hold down for 1 second to turn
L [PTT] switch and [PWR/VOL] dial can
[▲]/[▼] key
Push to scroll the screen,
or move the cursor.
[FUNC] key*
Selects the message or
Talkgroup to send.
Message
All
Gather immediately
(Example: A message is selected.)
screen from a function screen.
the Key Lock function ON or
OFF.
be used, even while the Key Lock
function is ON.
(Example: Key Lock function is ON.)
1-6
Page 9
BEFORE USING
All
10/4 13:00
All
10/4 12:57
[電源/音量]ツマミ
キー
[PTT]
スイッチ
1
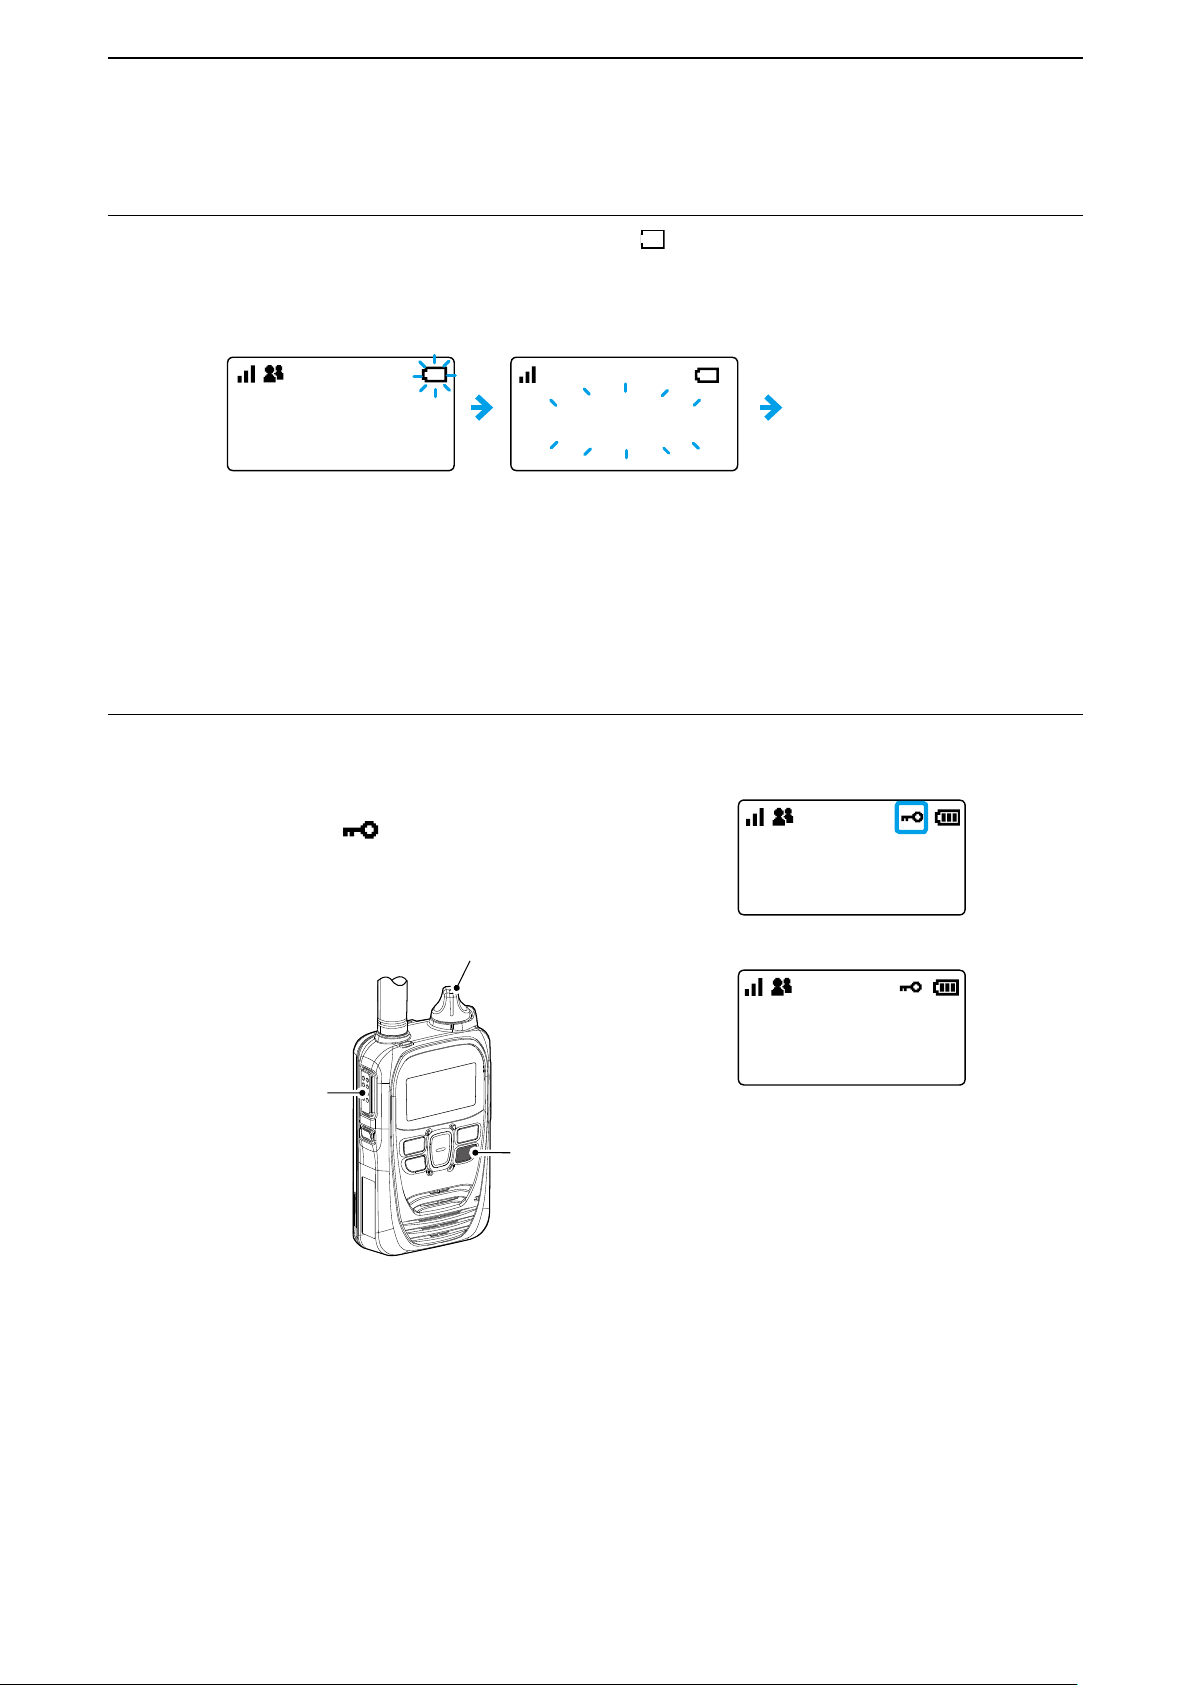
■ Battery alert beep
When the battery is almost exhausted, the battery status indicator “ ” starts blinking, and warning beeps sound every 30
seconds. Charge the battery pack immediately.
When the battery is nearly exhaustion:
Blinks
(Section 5)
Blinks
LOW BATTERY
Pi– Pi– Pi–
LWhen “LOW BATTERY” is displayed and beeps sound, the transceiver power will be automatically turned OFF soon.
Pi– PiPiPi ・・・
Automatically turned OFF
■ Key Lock function
The Key Lock function prevents accidental function access.
LAn Emergency call (p. 3-12) can be made, even while the Key Lock function is ON.
z Hold down [CLR/LOCK] for 1 second.
• A beep (Pi, Pi) sounds and “ ” appears.
LHold down [CLR/LOCK] for 1 second to cancel the function.
L [PTT] and [PWR/VOL] are functional
function is ON.
even while the Key Lock
Standby screen
[PWR/VOL]
[PTT]
(送信)
[CLR/LOCK]
[CLR/LOCK]
1-7
KEY LOCK
When a key is pushed while the Key Lock
function is ON.
Page 10

BASIC OPERATION
■ Transmitting and receiving .................................................. 2-2
■ Using the Address Book ...................................................... 2-4
■ Using the Call history .......................................................... 2-5
Section
2
2-1
2-1
Page 11
BASIC OPERATION
押し
[送信/受信]ランプ
[送信/受信]ランプ
が緑色に点灯
スピーカー
All
10/4 12:58
All
10/4 12:57
2
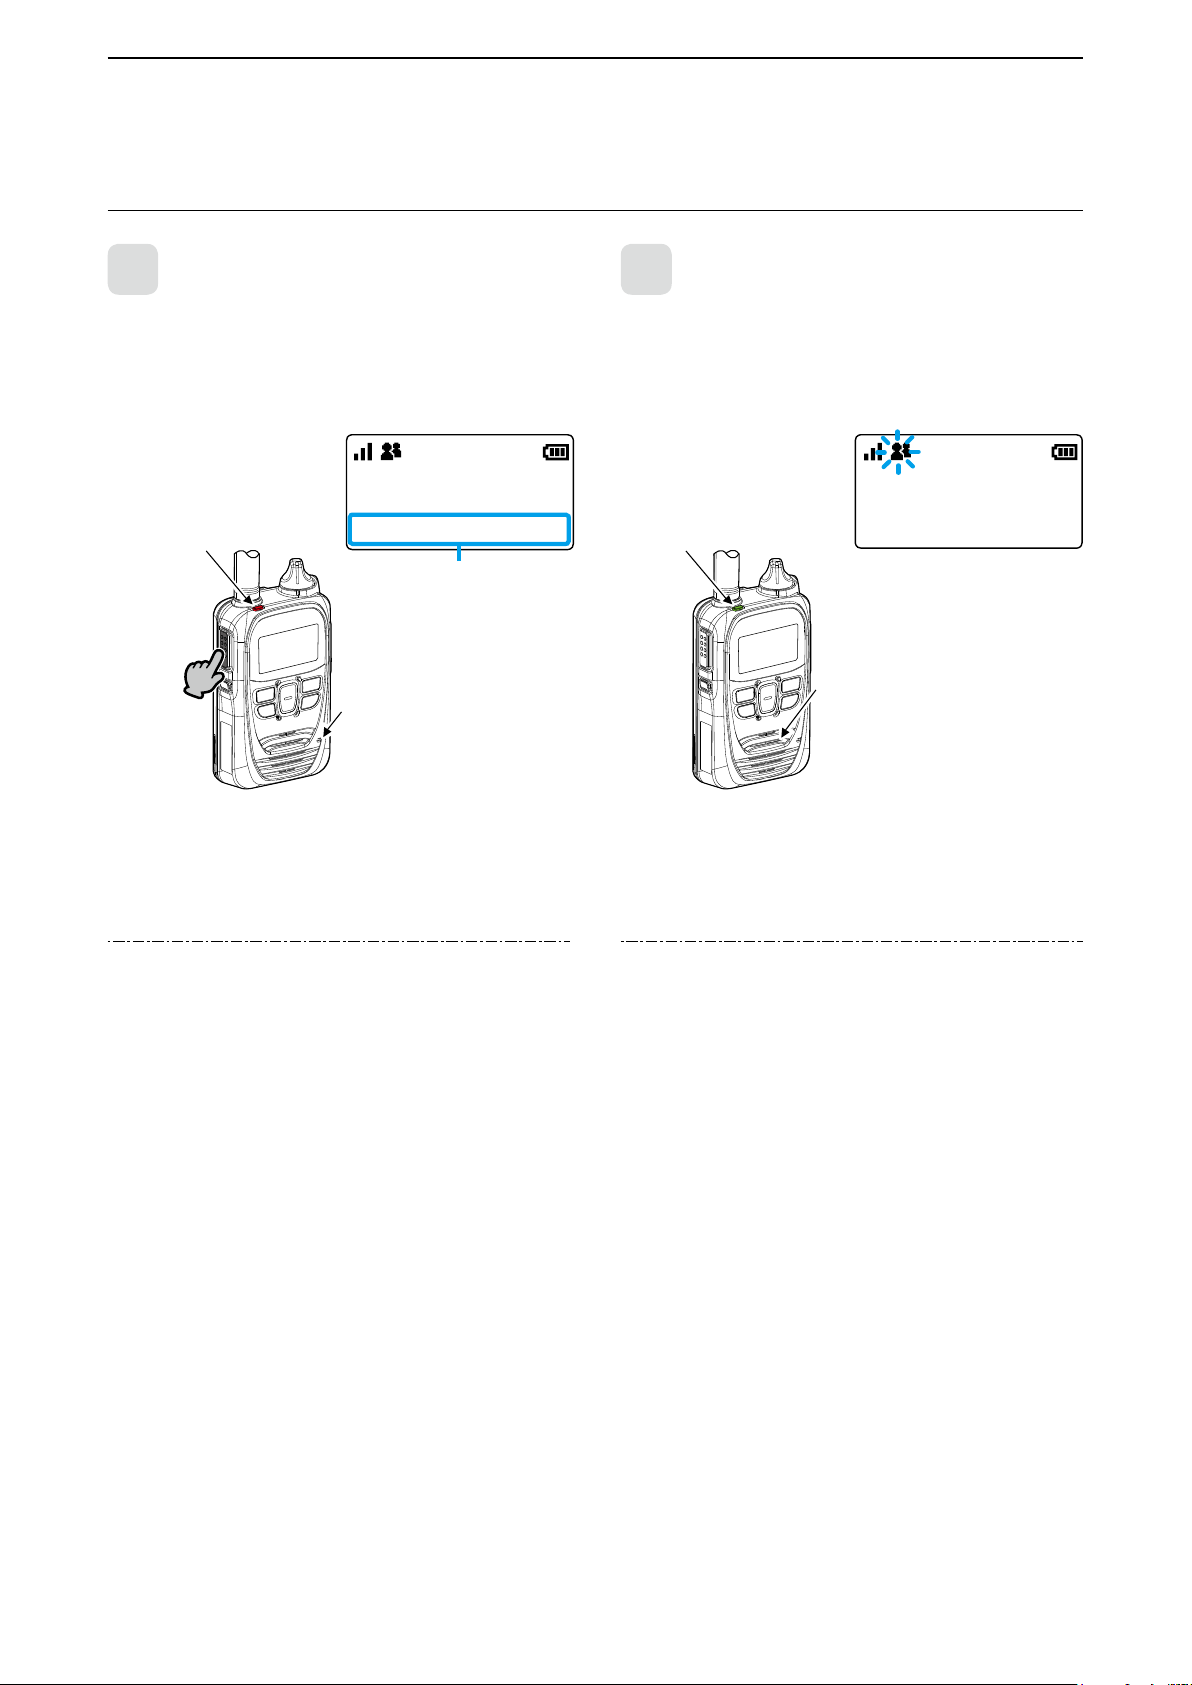
■ Transmitting and receiving
Hold down [PTT]
1
While holding down [PTT], speak into the microphone at
your normal voice level.
• The [TX/RX] indicator lights red while [PTT] is pushed.
が赤色に点灯
Lights red
All Call transmitting screen
つづける
Hold down
マイク
Microphone
2
When a Call is received, the received audio is heard.
• [TX/RX] indicator lights green while receiving.
Lights green
Receive a call
Blinks when a Call is received
Receiving an All Call
Speaker
Calling tip:
Hold the transceiver 2.5 inch away from your mouth, and
speak at your normal voice level. Talking too close to the
microphone, or in a loud voice can distort your voice.
About the Time-out Timer:
When the continuous transmission period exceeds 5
minutes, the Time-out Timer automatically stops the
transmission to prevent prolong transmissions.
Release the PTT, then hold down again to resume talking.
About the key touch beep:
Depending on a preset, a confirmation beep sounds when
you push a key.
About the alert:
Depending on a preset, the alert that noties the out of the
service area or receive status sounds.
About the Vibration function:
Depending on a preset, the Vibration function indicates that a
call is received.
About the status indicator:
The [TX/RX] indicator does not light when transmitting an
Emergency Silent call (pp. 3-12 and 3-13).
2-2
Page 12
BASIC OPERATION
回す
[送信/受信]ランプ
が橙色に点灯
2
■ Transmitting and receiving (continued)
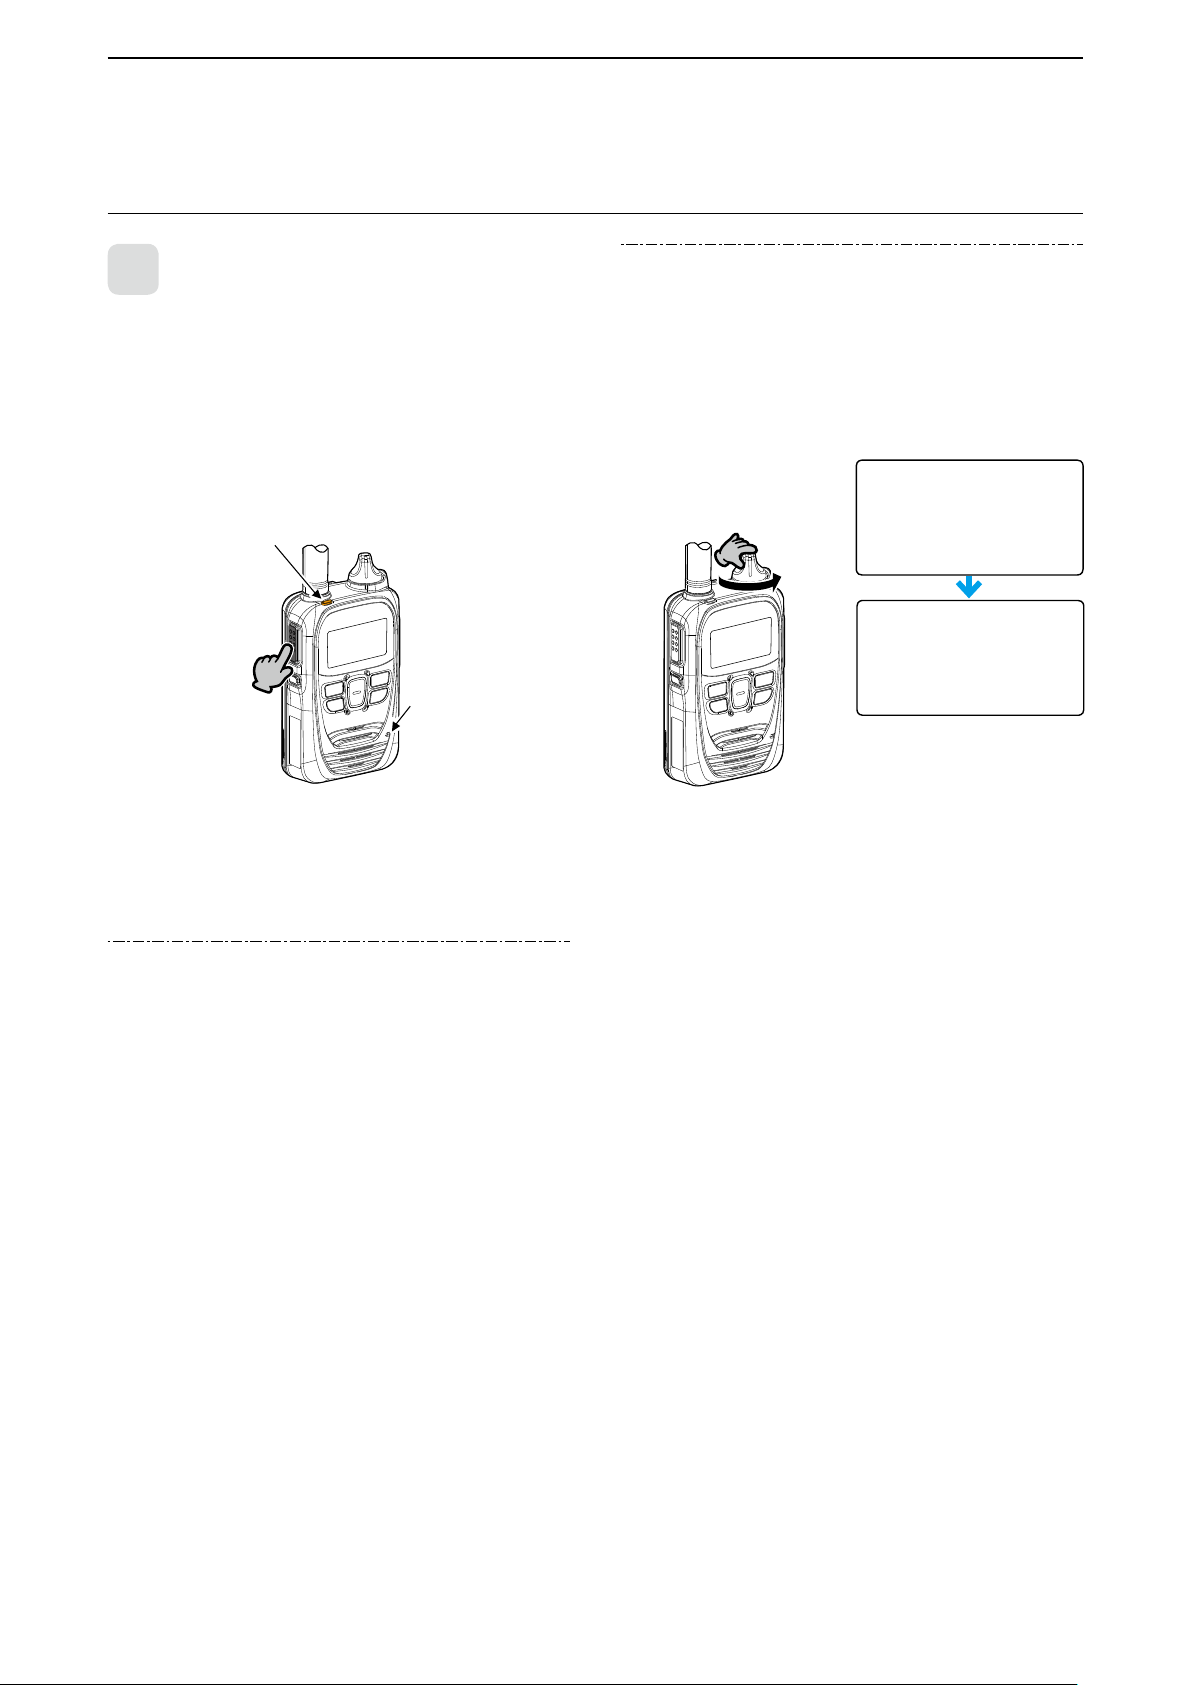
Talk while receiving a call
3
While receiving a call, push [PTT] to talk in the full duplex
mode* like a telephone call.
L In the Full Duplex mode, the [TX/RX] indicator lights
orange.
L Turn [PWR/VOL] to adjust the audio output level. Do
not cover the speaker or microphone.
Blinks orange
マイクマイク
Hold down
* Depending on a preset. Ask your dealer for details.
Microphone
Turning OFF the power:
Turn [PWR/VOL] maximum counter clockwise until it
makes a “click” sound.
L Wait for 10 seconds before you turn ON the transceiver
again.
L Before you remove the battery pack from the
transceiver, be sure that the transceiver power is OFF
(The LCD is blank). (p. 1-2)
Power Off...
Turn
About the Simplex mode:
If the communication mode is set to Simplex by your
dealer, you have to take turns to communicate: Push PTT
to talk, release to receive.
LPush PTT after the other person nishes talking.
L Saying “Over” at the end of your talk makes the
About the Back Light function:
Depending on a preset, the Back Light function operation
differs.
• Always OFF: Does not light.
• Always ON: Is always lit.
• On operation: When a Call is received or a key
NOTE: When using the Audio Recording function
The recorded audio is stored into the internal memory
on power OFF. Do not remove the battery pack until
“POWER OFF…” is disappeared. Otherwise the recorded
audio may be lost.
communication smooth.
(except [PTT] and [PWR/VOL]) is
pushed, the Back Light lights, then
automatically turns OFF after 5
seconds.
2-3
Page 13
BASIC OPERATION
押し
[送信/受信]ランプ
Sales group10
10/4 12:57
キー
[ アドレ ス 帳 ]
2
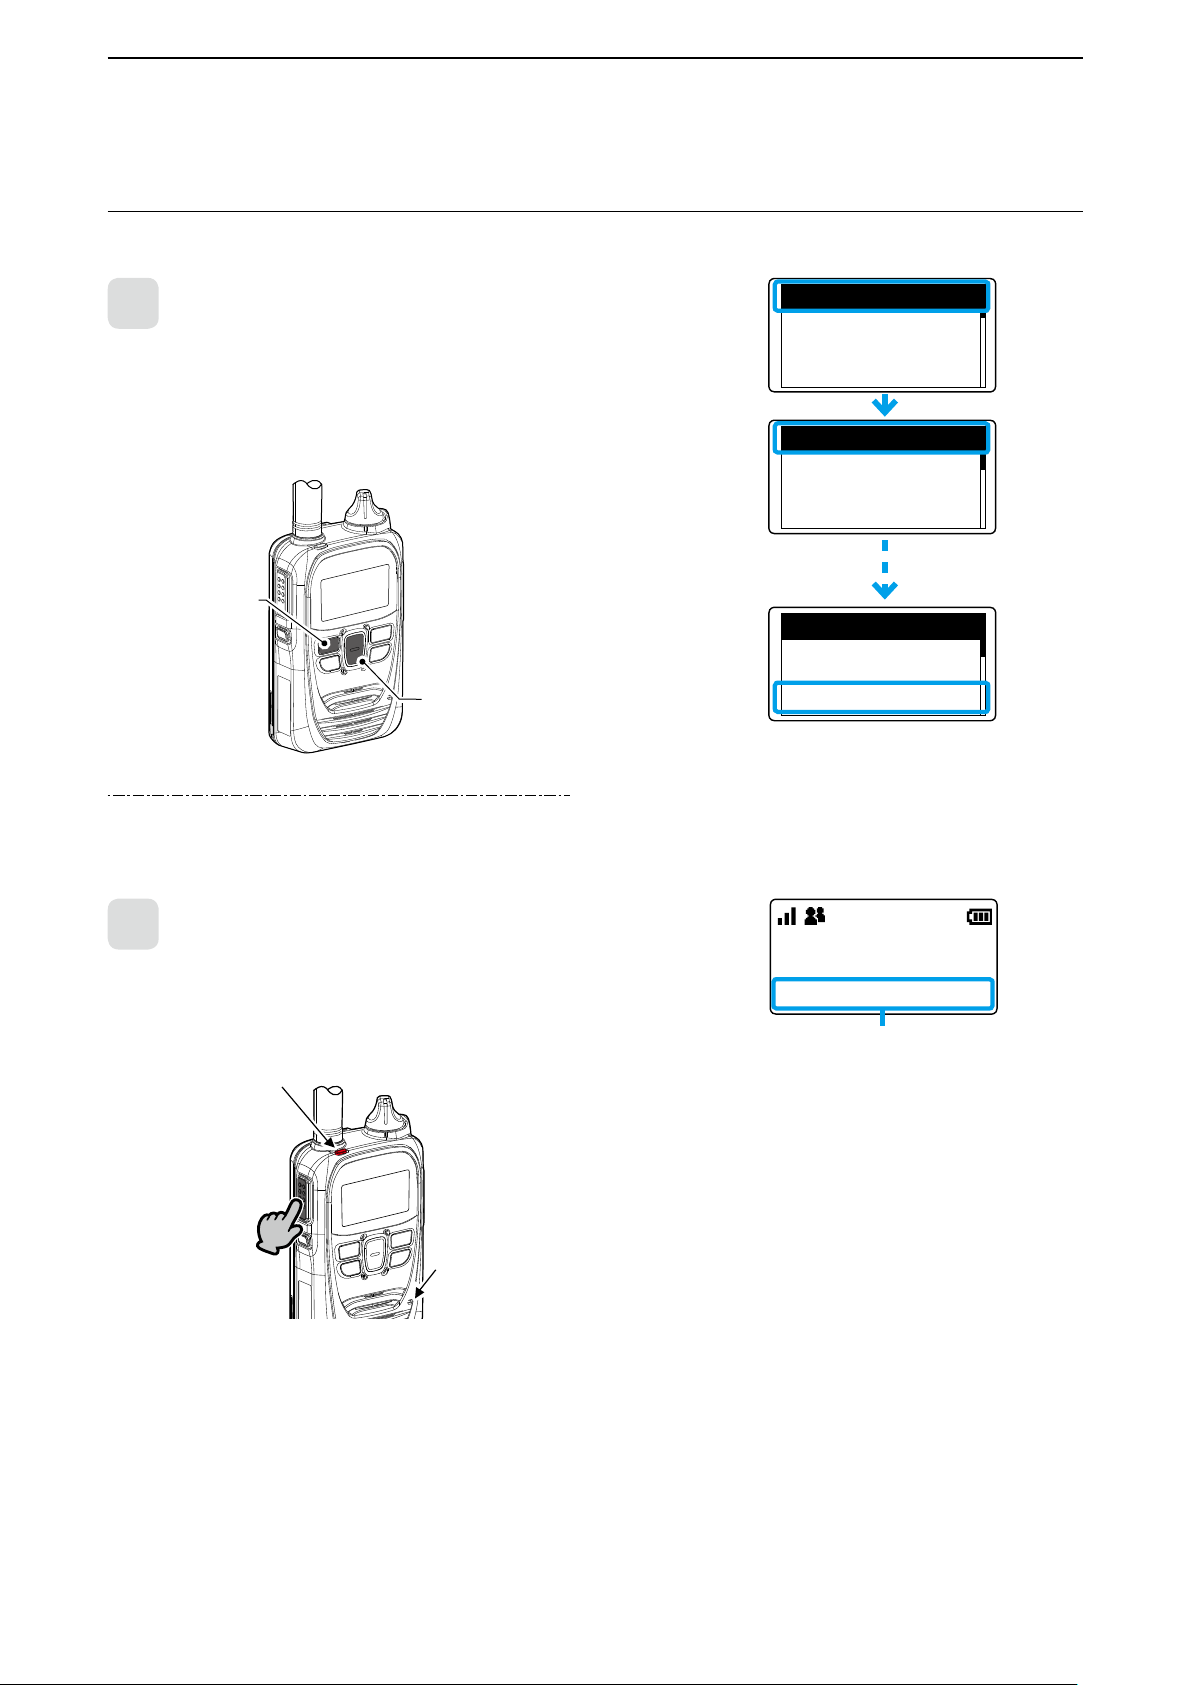
■ Using the Address Book
The [Address] key can be used, depending on a preset. Ask your dealer for details.
Select a call-to party from the Address book
1
1. Push [Address] to select a Call type. (Example: Group call)
L Push this key several times to select “All,” “Group (Talkgroup),”
“Individual” or “Phone*.”
LSee page 3-4 about the Talk Group.
2. Push [▲]/[▼] to select a call-to party. (Example: Sales group 10)
[Address]
キー
[▲]/[▼]
[▲]/[▼]
*Feature in the near future.
About the All or Group (Talkgroup) call:
Ask your dealer for details for call type setting.
All
All
Group
10001
Sales1
Group
10010
Sales10
2
While holding down [PTT], speak into the microphone.
• The [TX/RX] indicator lights red.
Hold down [PTT]
が赤色に点灯
Lights red
つづける
Hold down
マイク
Microphone
Address book: Group
2-4
Page 14
BASIC OPERATION
押し
[送信/受信]ランプ
10/3 12:57
Sales group1
Tx log
10/3 13:37
Sales1
Rx log
10/2 11:47
Sales8
Rx log
Sales8
10/4 14:53
キー
[履歴]
2
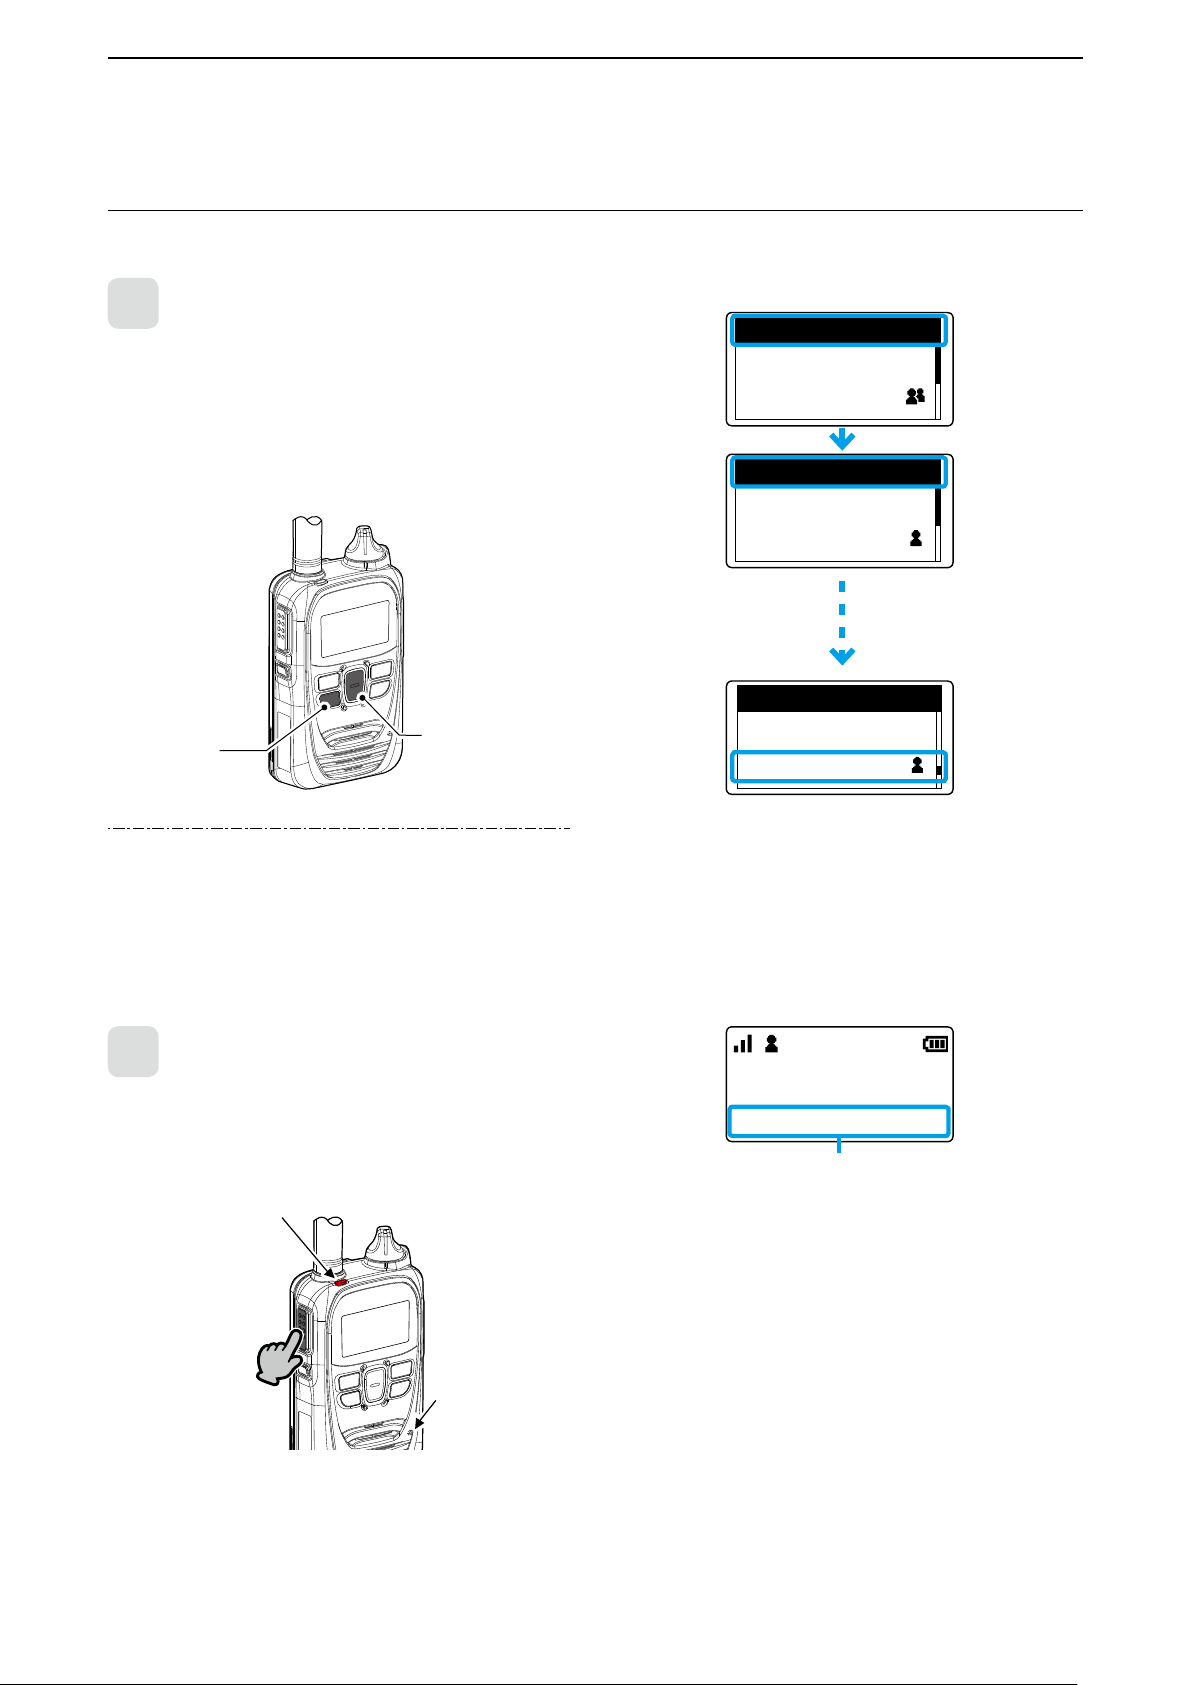
■ Using the Call history
The [Call history] key can be used, depending on a preset. Ask your dealer for details.
Select a call-to party from the Call history
1
1. Push [Call history] to select a call history (
L Push this key several times to select “TX log,” “RX log,” “TX MSG
log,” “RX MSG log,” “TX TEL log” or “RX TEL log.”
2. Push [▲]/[▼] to select a call-to party. (Example: Sales 8)
[▲]/[▼]
[Call history]
About the history log:
Up to 10 logs can be stored. The oldest log is automatically
deleted when the 11th call is received.
キー
[▲]/[▼]
“RX log”).
Hold down [PTT]
2
While holding down [PTT], speak into the microphone.
• The [TX/RX] indicator lights red.
が赤色に点灯
Lights red
つづける
Hold down
Microphone
マイク
Individual call transmitting screen
2-5
Page 15
BASIC OPERATION
CLR
LOG
SET
– – –
LOG
SET
2
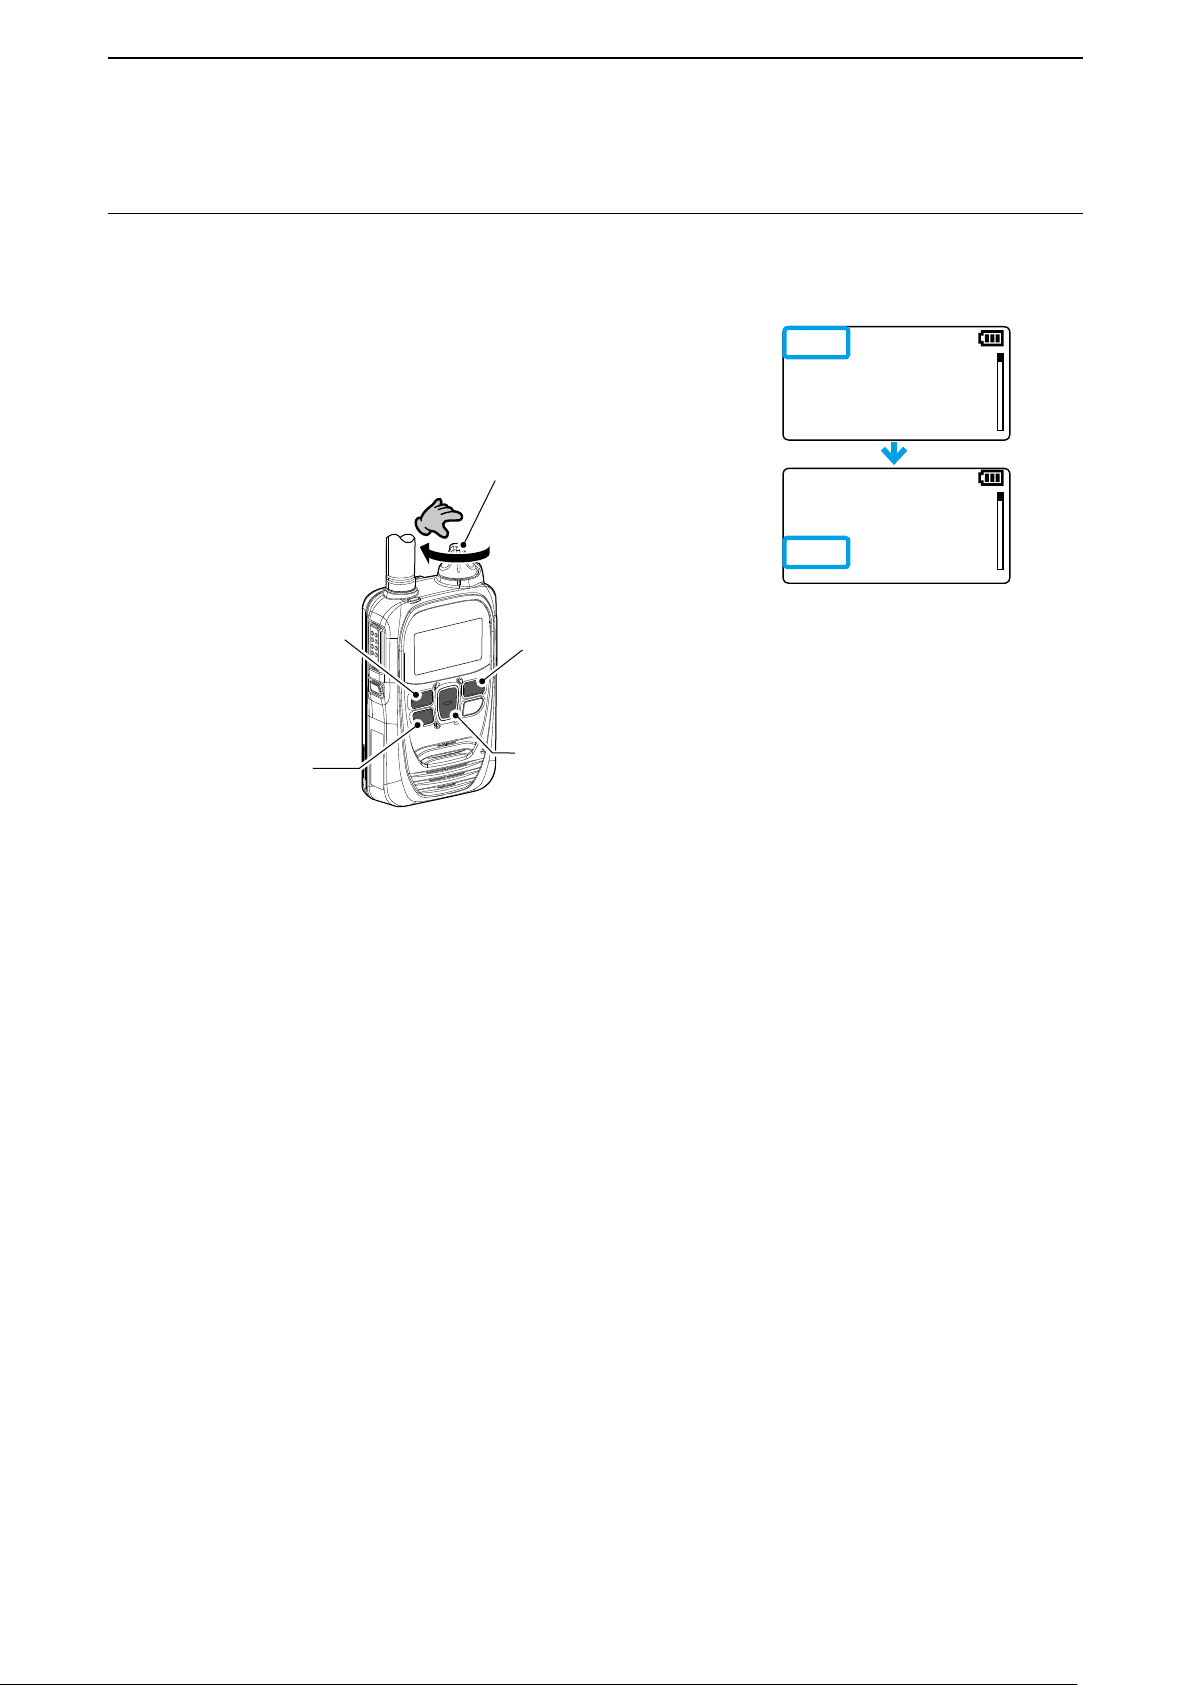
■ Using the Call history (continued)
Deleting history logs:
1. While holding down [FUNC], turn ON the power.
2. Release [FUNC] when “SET” is displayed.
3. Push [FUNC] or [Address] several times to select “LOG.”
4. Push [▲]/[▼] to select “CLR,” then push [Call history].
• All the histories except the recorded audio are deleted.
LSee page 3-9 for deleting the recorded audio.
[Address]
[Call history]
[履歴]キー
[電源/音量]ツマミ
[PWR/VOL]
[FUNC]キー
[FUNC]
[▲]/[▼]キー
[▲]/[▼]
2-6
Page 16

ADVANCED OPERATION
■ Sending a message (Message Call) ................................... 3-2
■ Viewing received messages ................................................ 3-3
■ About the Group (or Talkgroup) Call .................................... 3-4
■ Selecting a Talkgroup number with the [FUNC] key ............ 3-5
■ Selecting a Talkgroup number with the [Address] key ......... 3-5
■ About the [Option] key ......................................................... 3-6
■ Recording ............................................................................ 3-7
■ Pocket Beep function ........................................................ 3-10
■ P-Bell function ................................................................... 3-10
■ About the VOX function ......................................................3-11
■ Emergency Call function ................................................... 3-12
■ Remote Monitor function ................................................... 3-13
■ Lone Worker function ........................................................ 3-15
■ Man Down function ............................................................ 3-15
■ Searching network operator .............................................. 3-16
■ Selecting the SIM card ...................................................... 3-17
Section 3
3-1
Page 17
ADVANCED OPERATION
All
All
Group
10001
Sales1
Individual
00001
Sales1
Individual
00002
Sales2
Sales2
Reply me
Message
Successful
10/4 12:57
キー
[ アドレ ス 帳 ]
キー
[PTT]
スイッチ
3
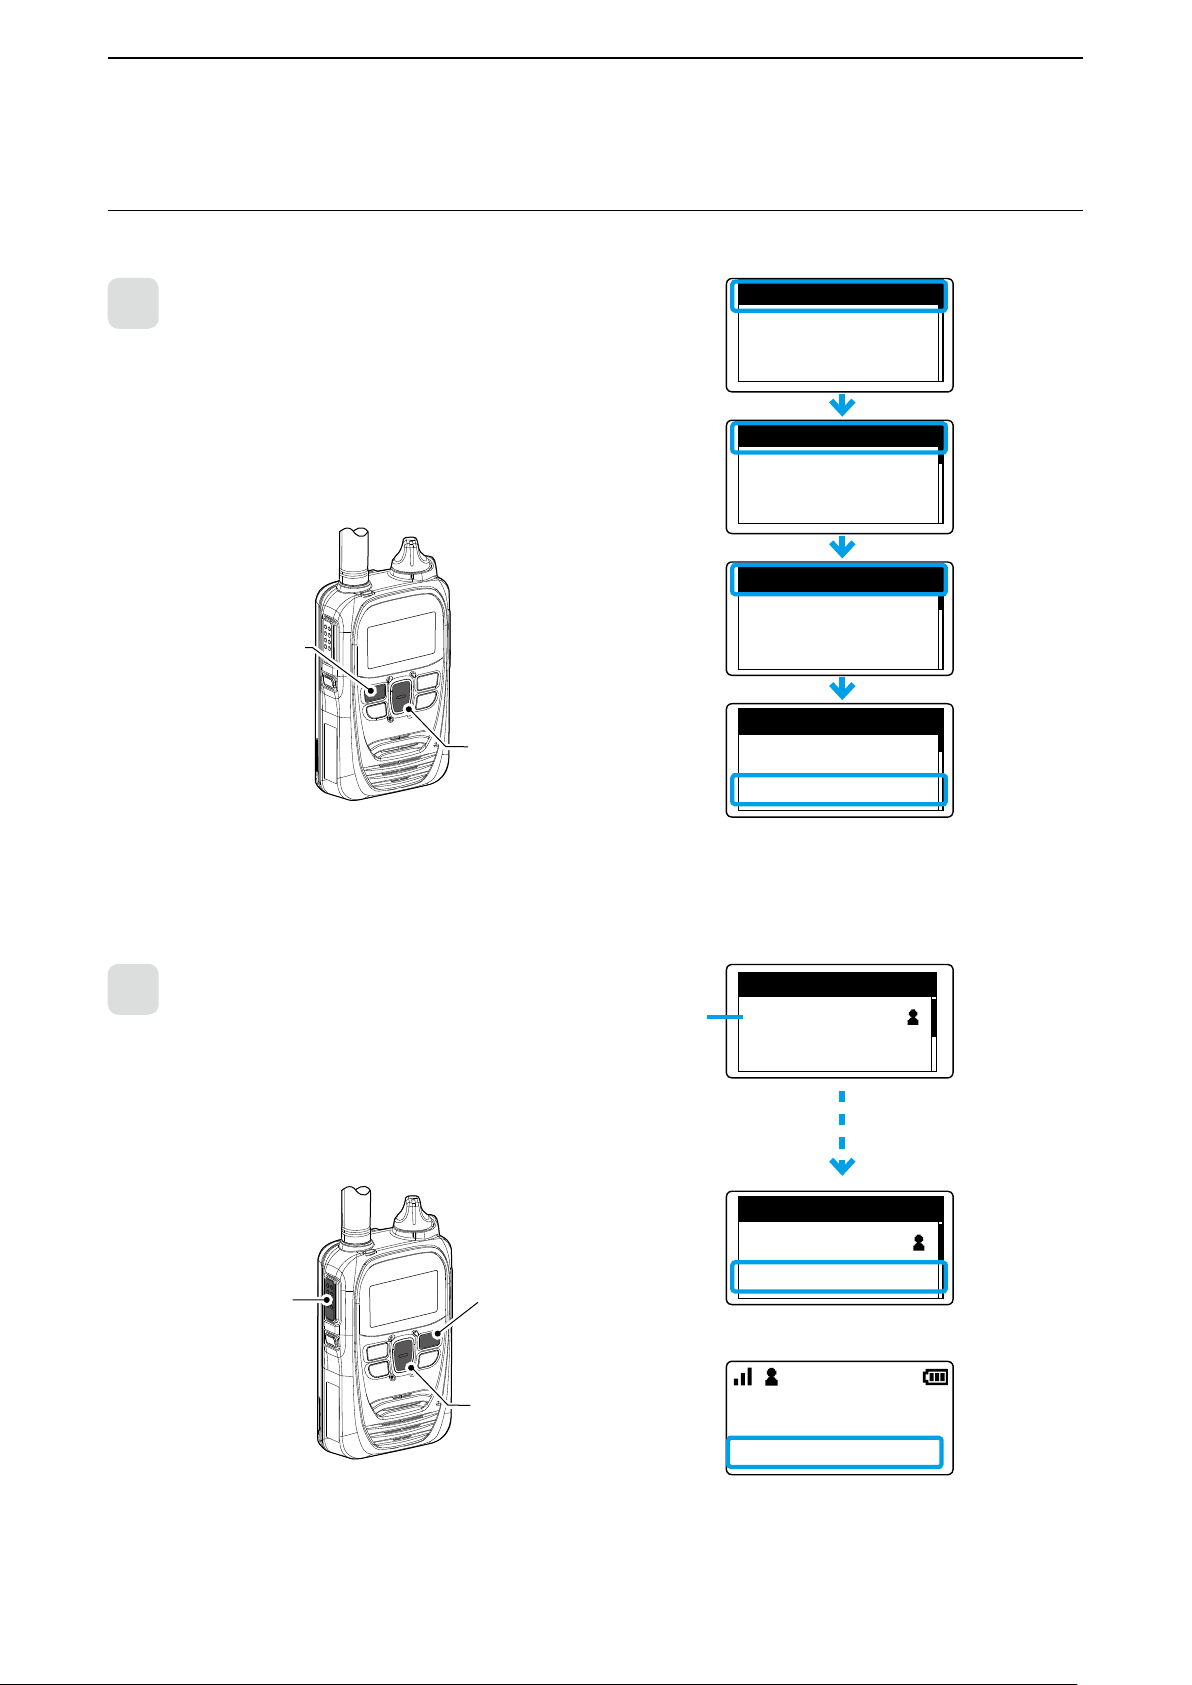
■ Sending a message (Message Call)
This function may be used, depending on a presetting. Ask your dealer for details.
Select a call-to party
1
1. Push [Address] to select a Call type. (Example: Individual)
L Push this key several times to select “All,” “Group (Talkgroup),”
“Individual” or “Phone*.”
LSee page 3-4 about the Talkgroup.
2. Push [▲]/[▼] to select the call-to party to send the message to.
(Example: Sales2)
キー
[Address]
[▲]/[▼]
[▲]/[▼]
*Feature in the near future.
LYou can select the call-to party also from the Call history (p. 2-5).
Select a message
2
Call-to party
1. Push [FUNC] to select “Message.”
2. Push [▲]/[▼] to select a message.
• The selected message may scroll, depending on the message length.
3. Push [PTT].
[FUNC]キー
[PTT]
(送信)
[FUNC]
Message
Sales2
Gather immediately
[▲]/[▼]
[▲]/[▼]
L When the Call type is set to “Individual,” the call
result (Success/Failed) is displayed after sending.
3-2
Page 18
ADVANCED OPERATION
10/4 12:57
All Gather immed
Rx MSG log
10/8 13:10
Sales1 Reply me
Rx MSG log
キー
[履歴]
3
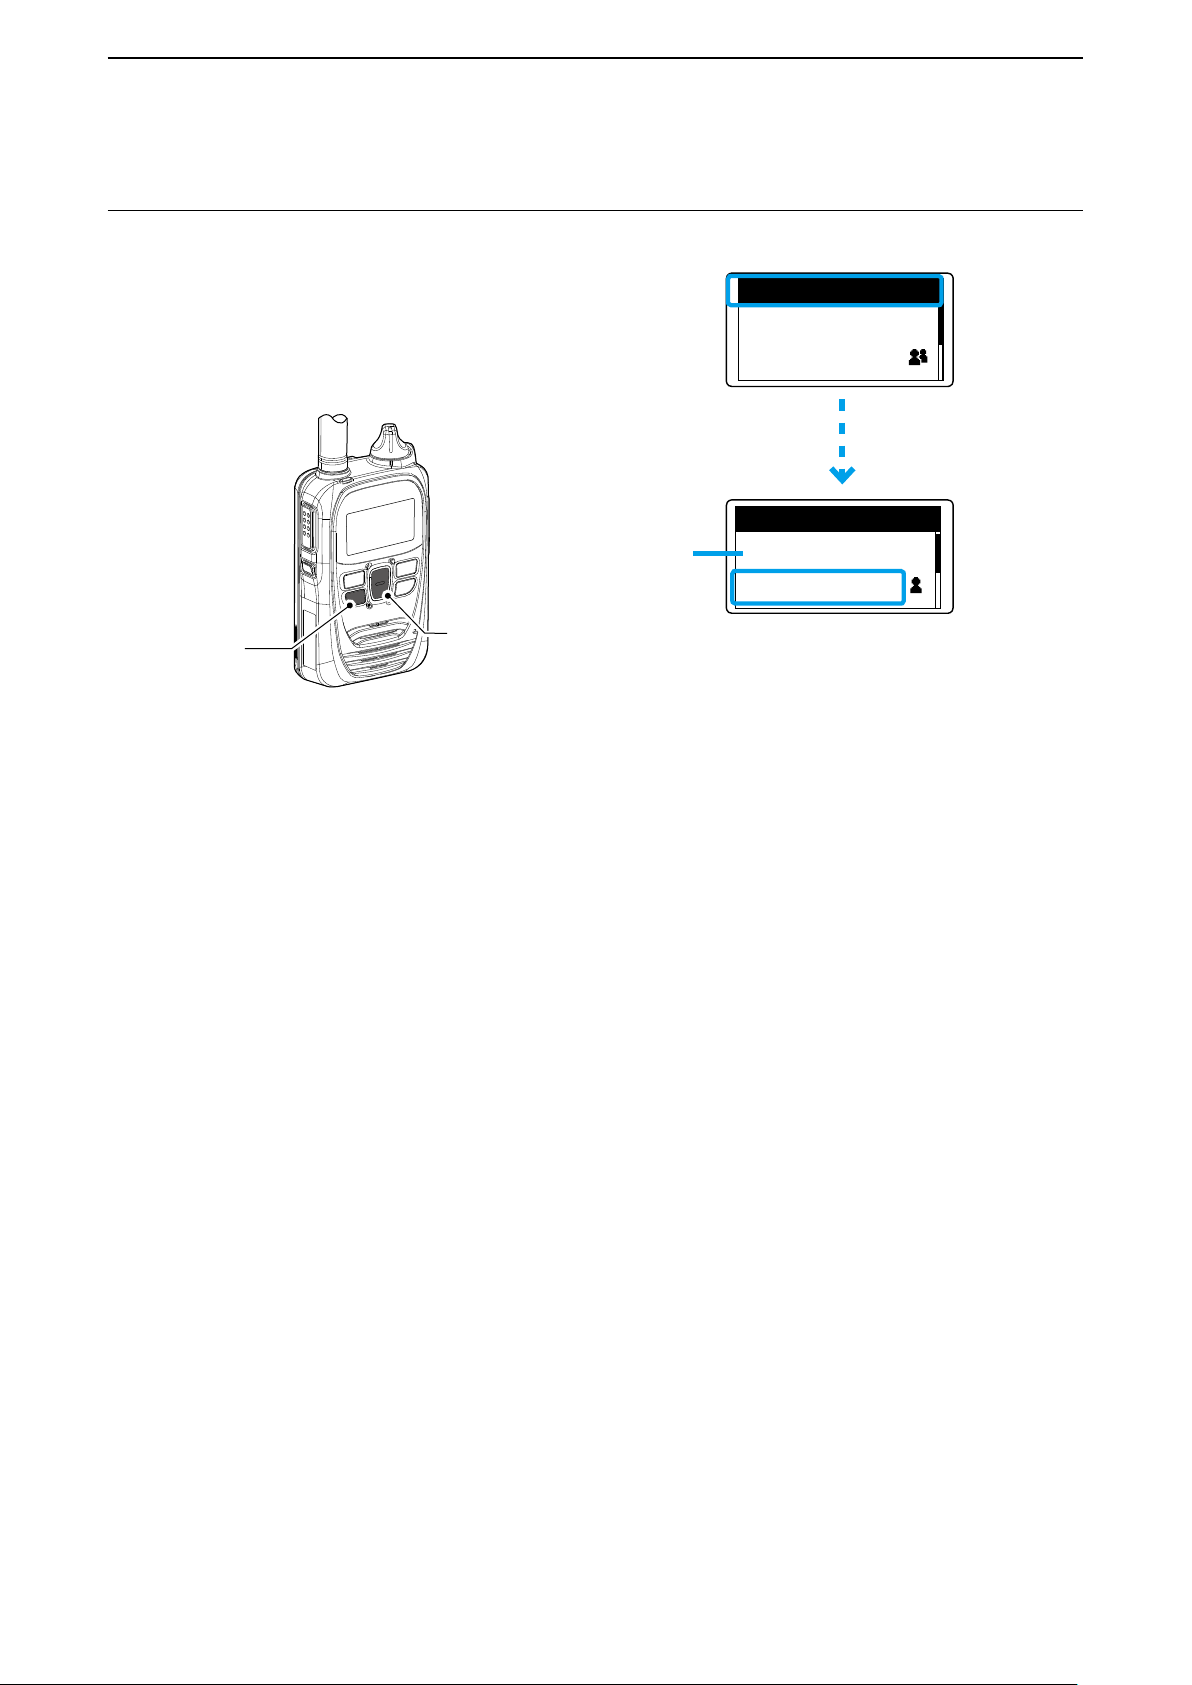
■ Viewing received messages
This function is usable only when the [Call history] key is enabled. Ask your dealer for details.
1. Push [Call history] to select “Rx MSG log.”
2. Push [▲]/[▼] to browse the message on the screen.
• The selected message may scroll, depending on the message length.
Received date and time
[Call history]
キー
[▲]/[▼]
[▲]/[▼]
The Sender and Received message
are displayed
3-3
Page 19
ADVANCED OPERATION
3
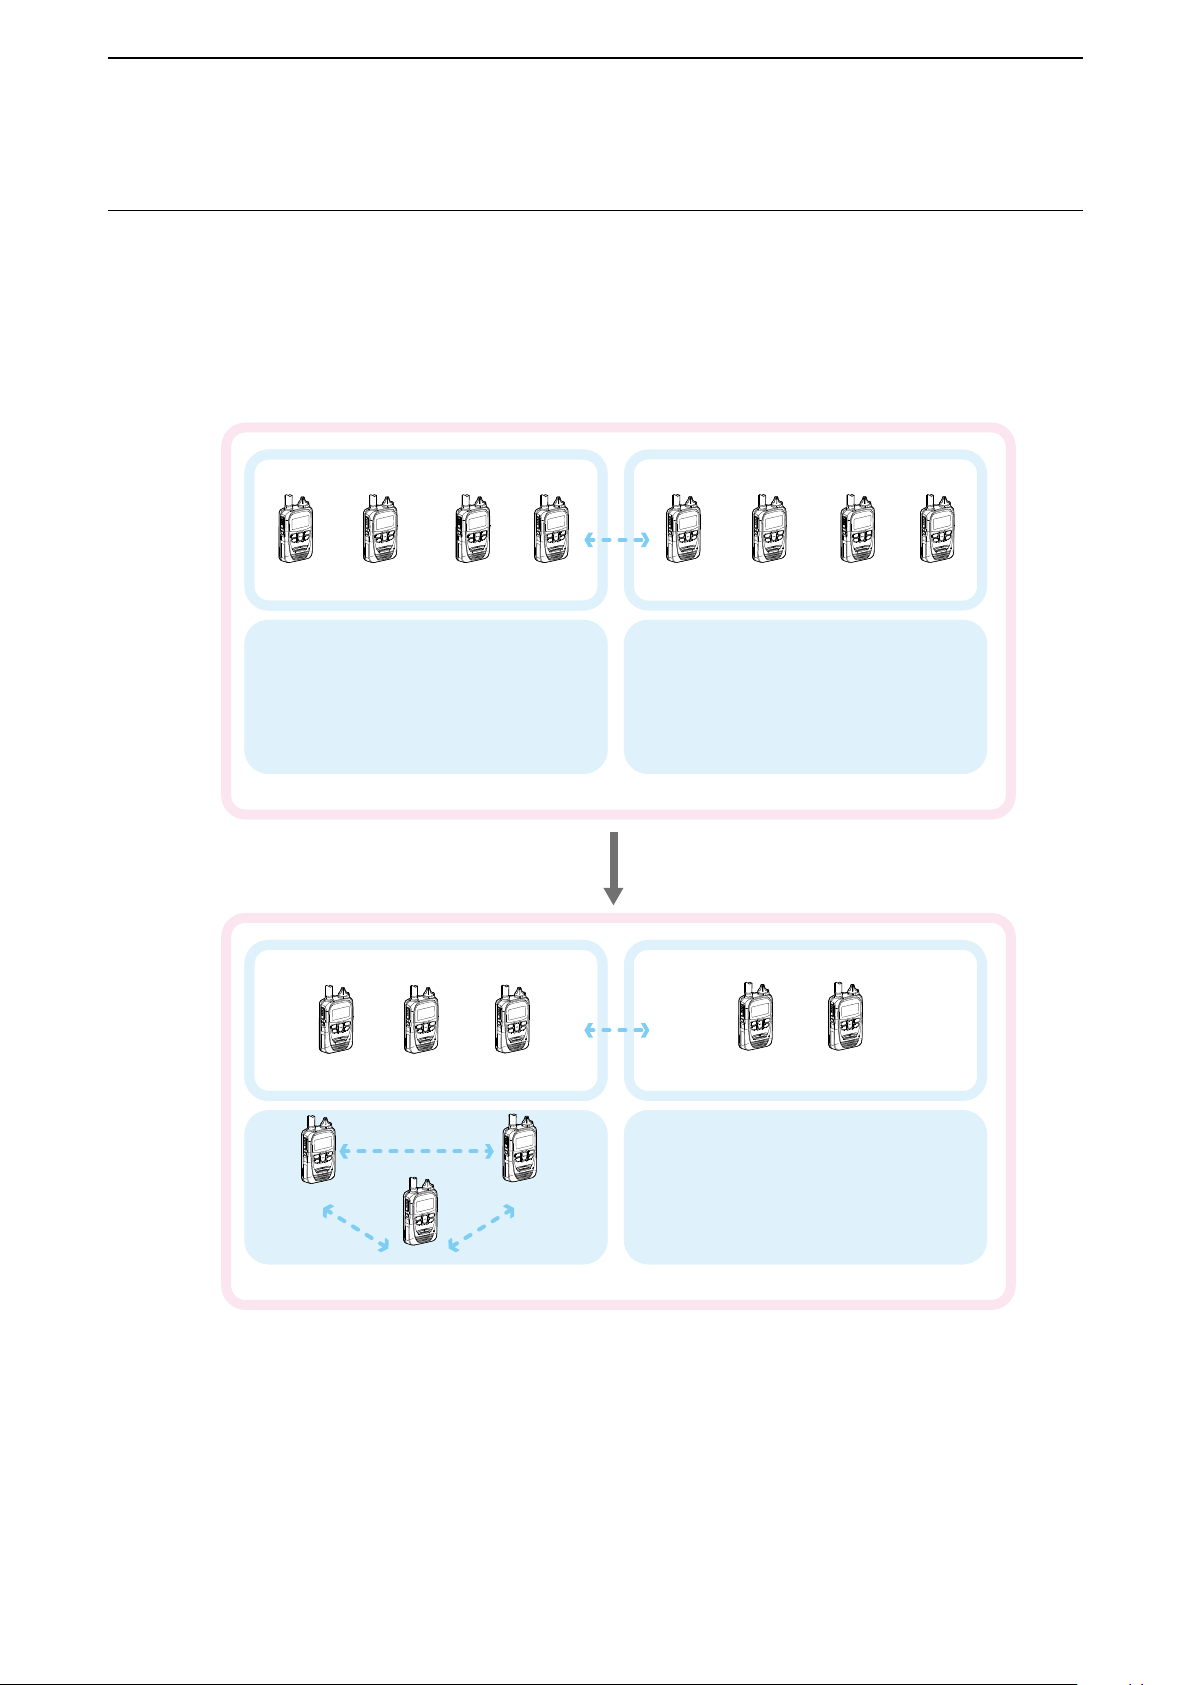
■ About the Group (or Talkgroup) Call
The Talkgroup Call function enables the user to communicate with call-to parties in the same Talkgroup.
For example, in the illustration below, when the transceiver “00004” in its normal group “10001” selects Talkgroup “20001,”
it is excluded from group “10001,” and can communicate with only transceivers “00006” and “00008” that belong to group
“20001.”
L This function may be used only when the Talkgroup number is registered and the Talkgroup Call function is assigned to
a key by your dealer.
LAsk your dealer about whether or not to include the Talkgroup in the All Call.
When Talkgroup is OFF
00001 00002 00003
Talkgroup 20001
全体
All
When Talkgroup is selected
Group 10001
Group 10001
00004
Group 10002
00005 00007 0000800006
Talkgroup 20002
Group 10002
00001
00004 00008
All
00002 00003
Talkgroup 20001
00006
00005 00007
Talkgroup 20002
3-4
Page 20
ADVANCED OPERATION
OFF
Talkgroup
Talkgroup
Talkgroup1
20001
Talkgroup
Talkgroup1
20001
Talkgroup1
10/4 12:57
Talkgroup1
10/4 12:57
Group
10001
Sales1
3
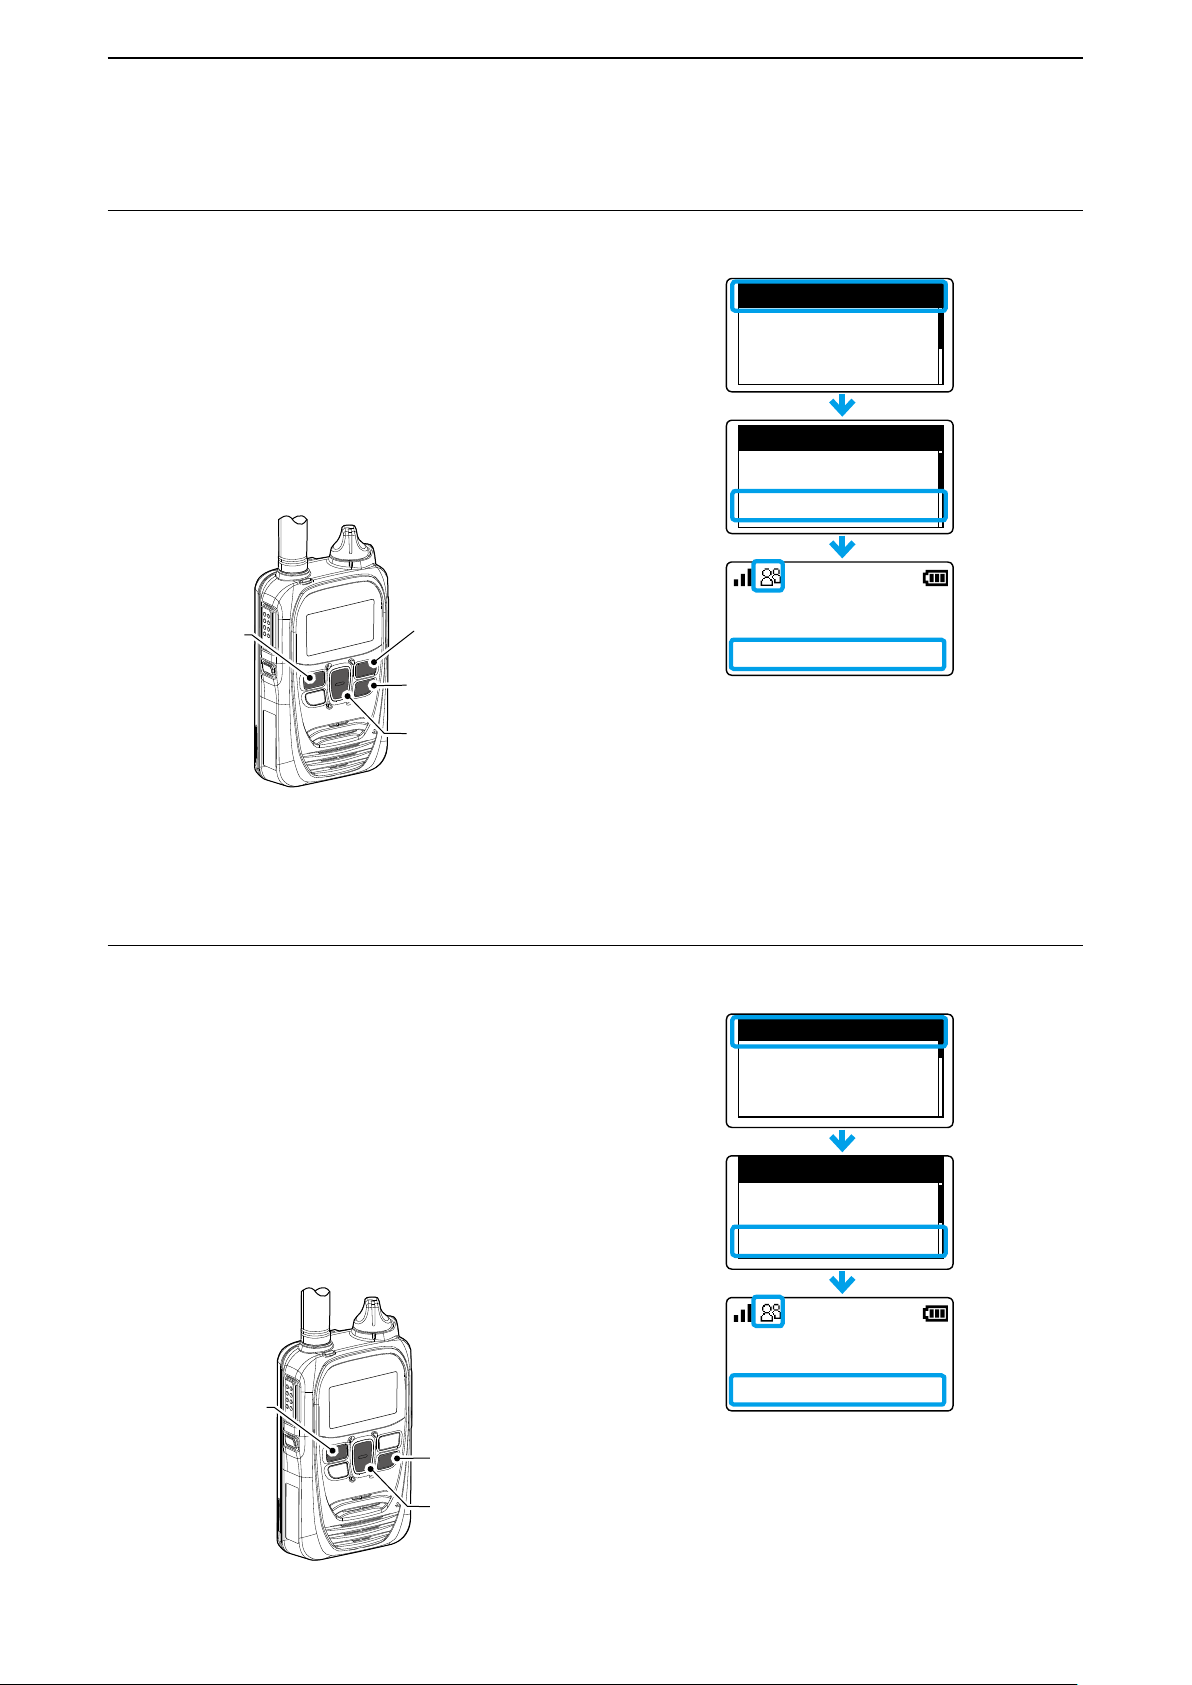
■ Selecting a Talkgroup number with the [FUNC] key
This function may be used only when the Talkgroup Call function is assigned to the [FUNC] key. Ask your dealer for details.
1. Push [FUNC] to select “Talkgroup.”
2. Push [▲]/[▼] to select a Talkgroup number you want to
belong to. (Example: 20001)
3. Push [CLR/LOCK].
• The transceiver is ready to talk to only the transceivers that belong
to the same Talkgroup.
L While the Talkgroup number is selected, the Normal Group call
cannot be made. (p. 3-4)
L You can leave the Talkgroup and return to the Normal Group by
selecting “OFF” in Step 2 on the “Talkgroup” screen.
[Address]
[FUNC]
[CLR/LOCK]
[▲]/[▼]
“Talkgroup1” is selected
■ Selecting a Talkgroup number with the [Address] key
This function may be used only when the Talkgroup Call function is assigned to [Address] key. Ask your dealer for details.
1. Push [Address] to select “Group.”
• Each push changes the Call type.
2. Push [▲]/[▼] to select a Talkgroup number you want to
belong to. (Example: 20001)
3. Push [CLR/LOCK].
• The transceiver is ready to talk to only the transceivers that belong
to the same Talkgroup.
L While the Talkgroup is selected, the Normal Group call cannot be
made. (p. 3-4)
L You can leave the Talkgroup and return to the Normal Group by
selecting “OFF” in step 2 on the “Talkgroup” screen.
[Address]
[ アドレ ス 帳 ] キー
[CLR/LOCK]キー
[CLR/LOCK]
[▲]/[▼]キー
[▲]/[▼]
“Talkgroup1” is selected
3-5
Page 21
ADVANCED OPERATION
Recording Log
Sales8
10/4 14:53
All
MUTE
[ オ プ ション ]
3
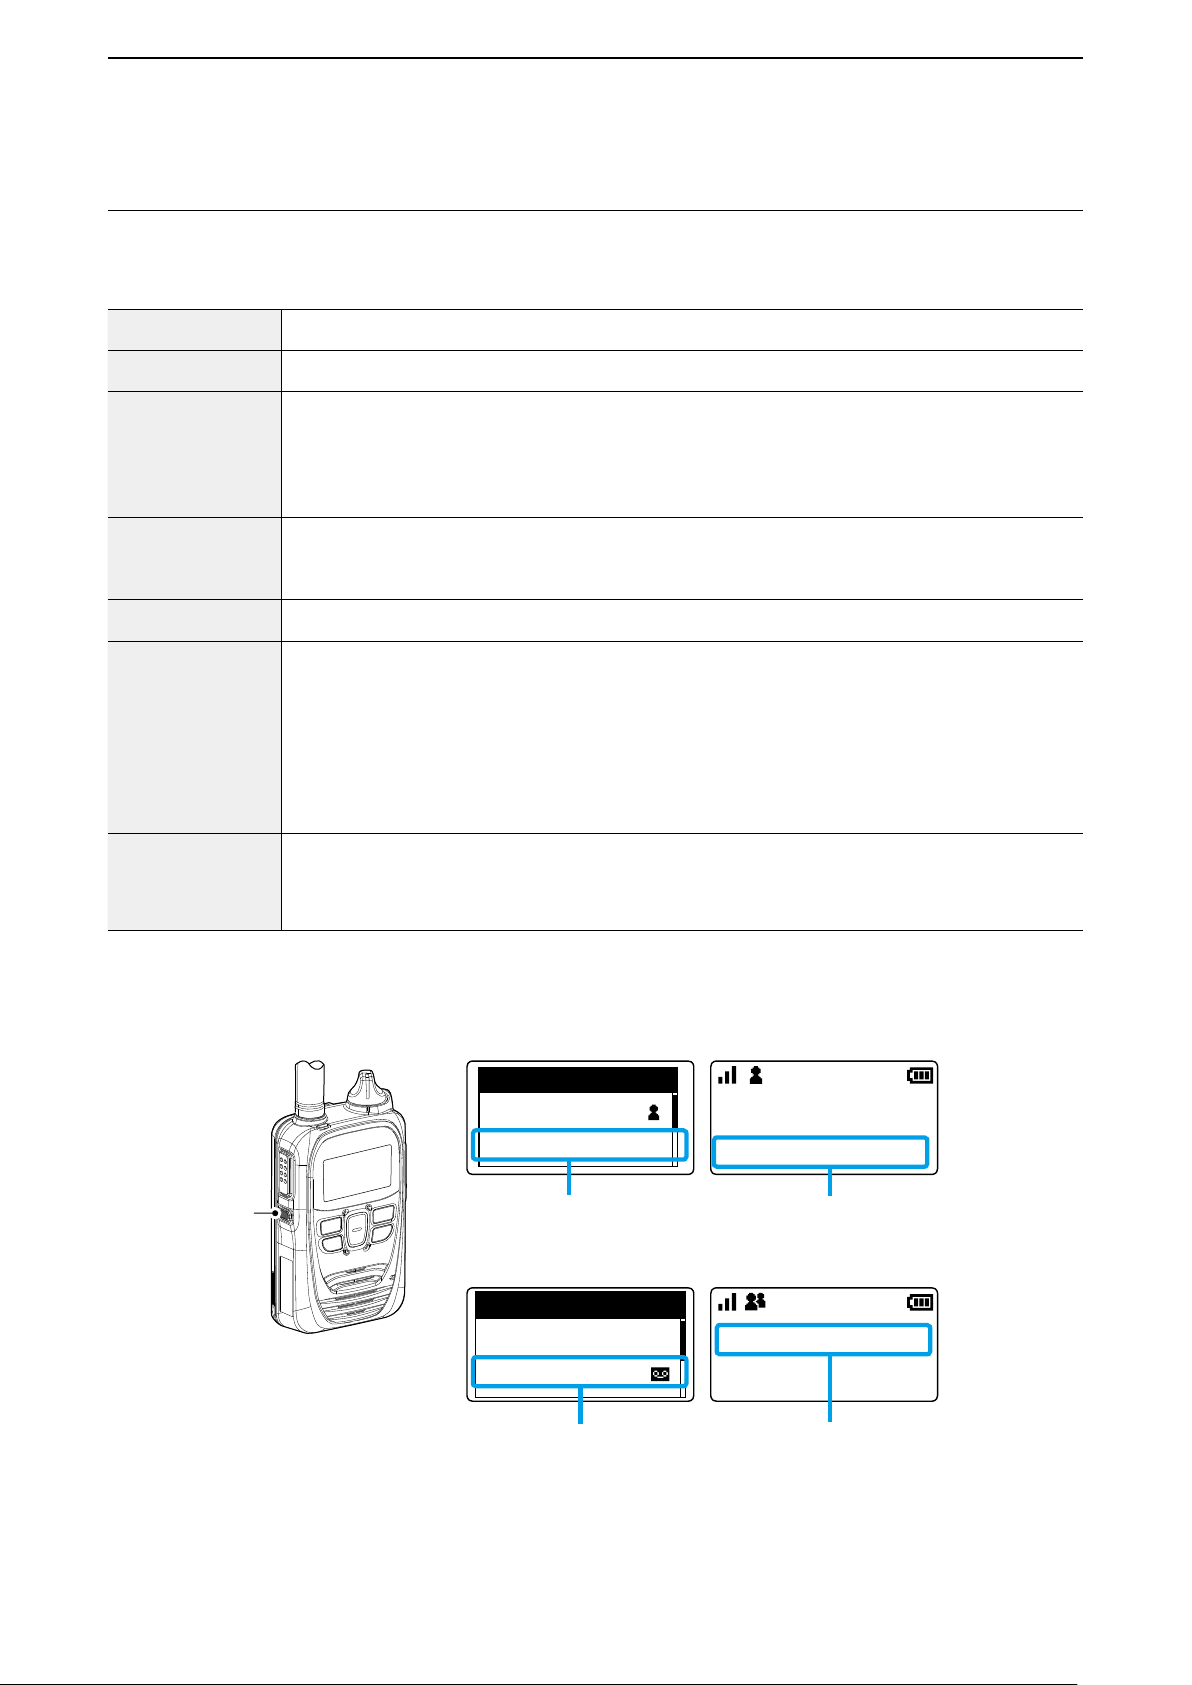
■ About the [Option] key
One of the following functions may be assigned to the [Option] key by your dealer. Ask your dealer for details.
ASSIGNABLE FUNCTIONS:
Message
One touch
Clear Down
Mute
Playbacks
Emergency
Remote Monitor
(
Emergency
Silent)
*Feature in the near future.
Selects an often used message.
Selects the often used Call type or Call-to party.
Hangs up a Telephone call*.
LYou can cancel the call by pushing [Option] again.
L The transceiver can terminate the Telephone call when:
• The call type is “Individual” and the call was initiated by the telephone.
• The call is initiated by the transceiver.
Mutes or unmutes the received audio. (The notication tone is not muted.)
• Hold down [Option] for 1 second.
LPushing [PTT] also releases the mute.
Plays back the recorded audio.
Transmits an Emergency call.
• Hold down [Option] until “Emergency” is displayed.
L “Emergency” may not be displayed, depending on the presetting.
L The Emergency call is cancelled when:
• A call is received.
• You hold down [Option] until “Emergency” disappears.
• The transceiver power is turned OFF.
• The time set in the “Cancel by Time” item has elapsed.
Transmits an Emergency call transmission request to other transceivers.
• Push [Option] to enter the Emergency Silent mode and transmit a request.
[Option]
キー
Message
Sales2
Gather immediately
Often used message
10/4 12:57
Sales2
Recorded audio
(In the Call history log)
3-6
Often called Call-to party
Mute function is ON.
Page 22
ADVANCED OPERATION
– – –
LOG
SET
Enable
Recording
SET
3
■ Recording
The Recording function records the audio of received calls.
The recording duration of a single le is up to 1 minute. The oldest le will be automatically overwritten when the 5th call is
recorded.
LYou can play the recorded audio only when the Playback function is assigned to [Option] by your dealer.
LAs the default setting, you can record Individual calls only.
LOnly the call-to party’s voice is recorded.
LThe recorded audio data cannot be exported.
NOTE: When removing the battery pack
The recorded audio is stored in memory on Power OFF. Do not remove the battery pack until “POWER OFF…” is
disappeared. Otherwise the recorded audio may be lost.
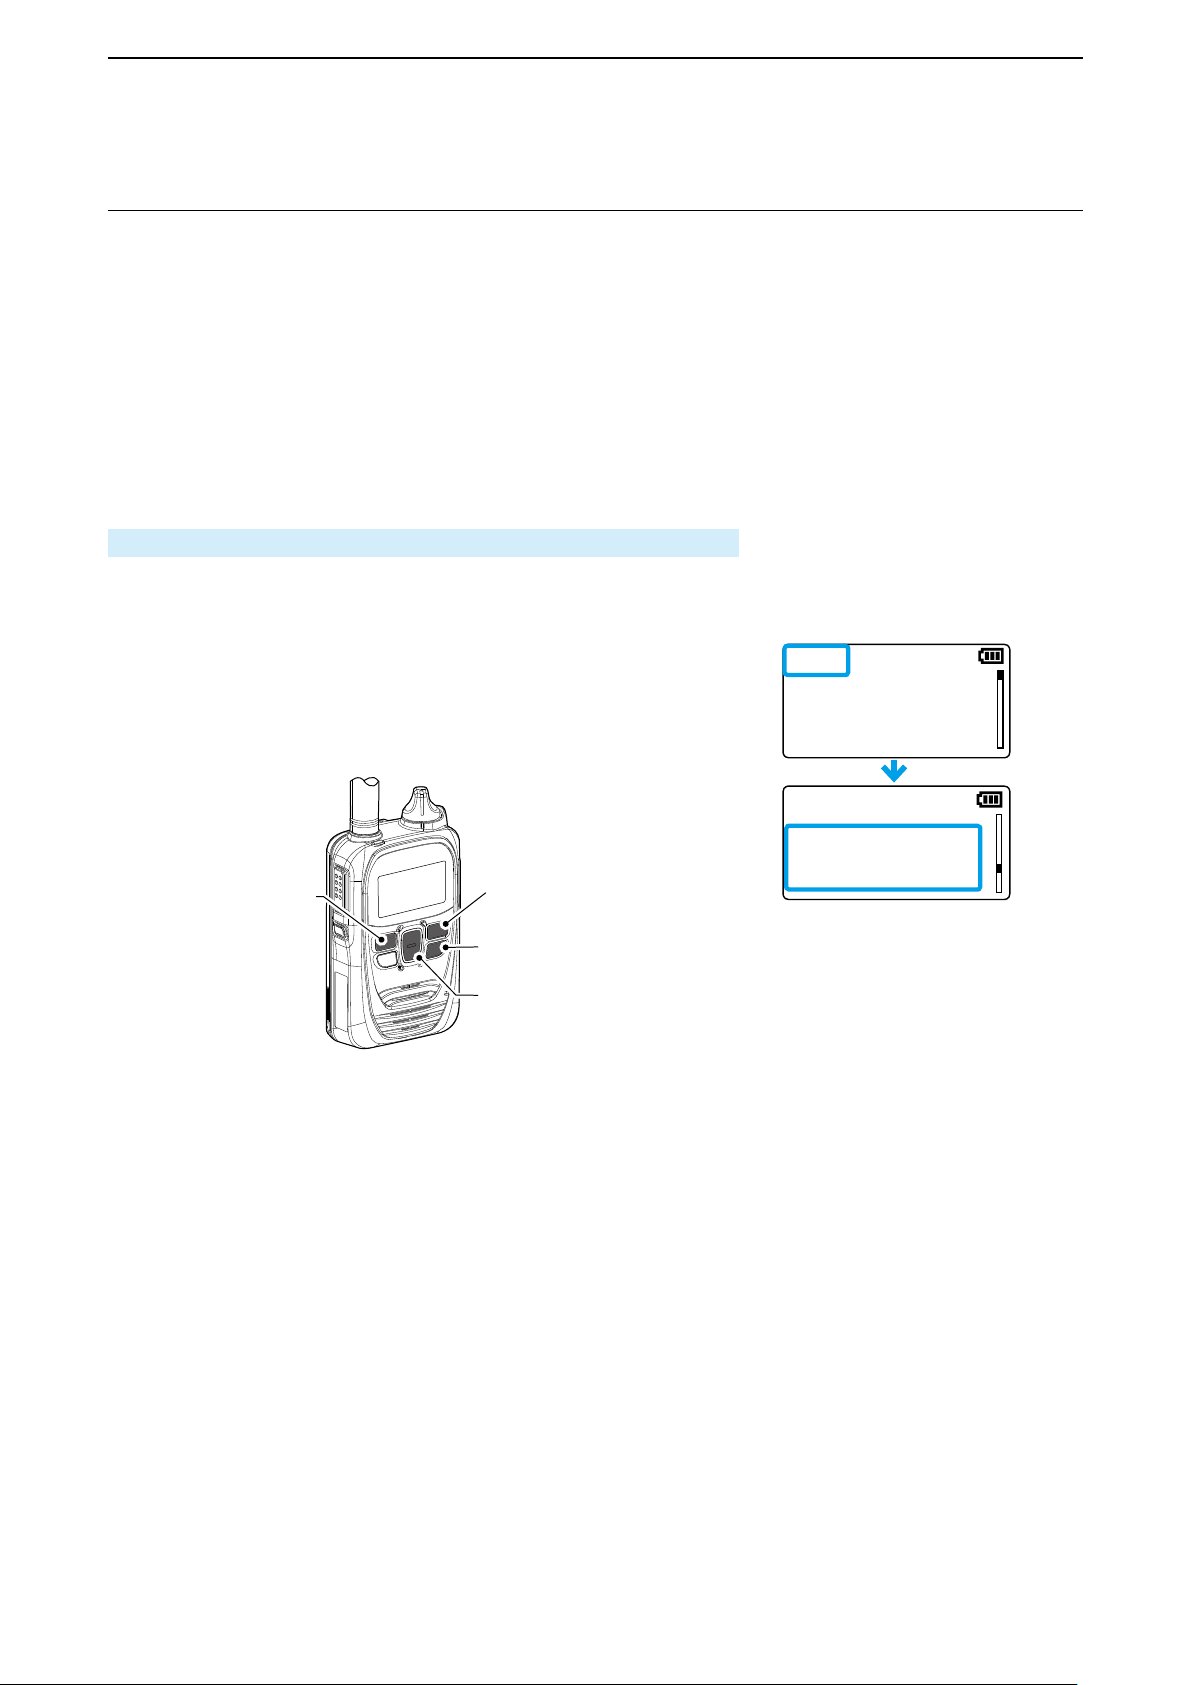
1. Setting the Recording function enable
1. While holding down [FUNC], turn ON the power.
• Enter the Set mode.
2. Release [FUNC] when “SET” is displayed.
3. Push [FUNC] or [Address] several times to select “Recording.”
4. Push [▲]/[▼] to select “Enable.”
5. Push [CLR/LOCK].
• Exits the Set mode.
[Address]
[FUNC]
[CLR/LOCK]
[▲]/[▼]
3-7
Page 23
ADVANCED OPERATION
10/3 12:57
Sales group1
Tx log
10/3 13:37
Sales1
Recording log
Playback
Sales1
Recording log
キー
[ オ プ ション ]
Recording
Recording
All
10/4 12:57
3
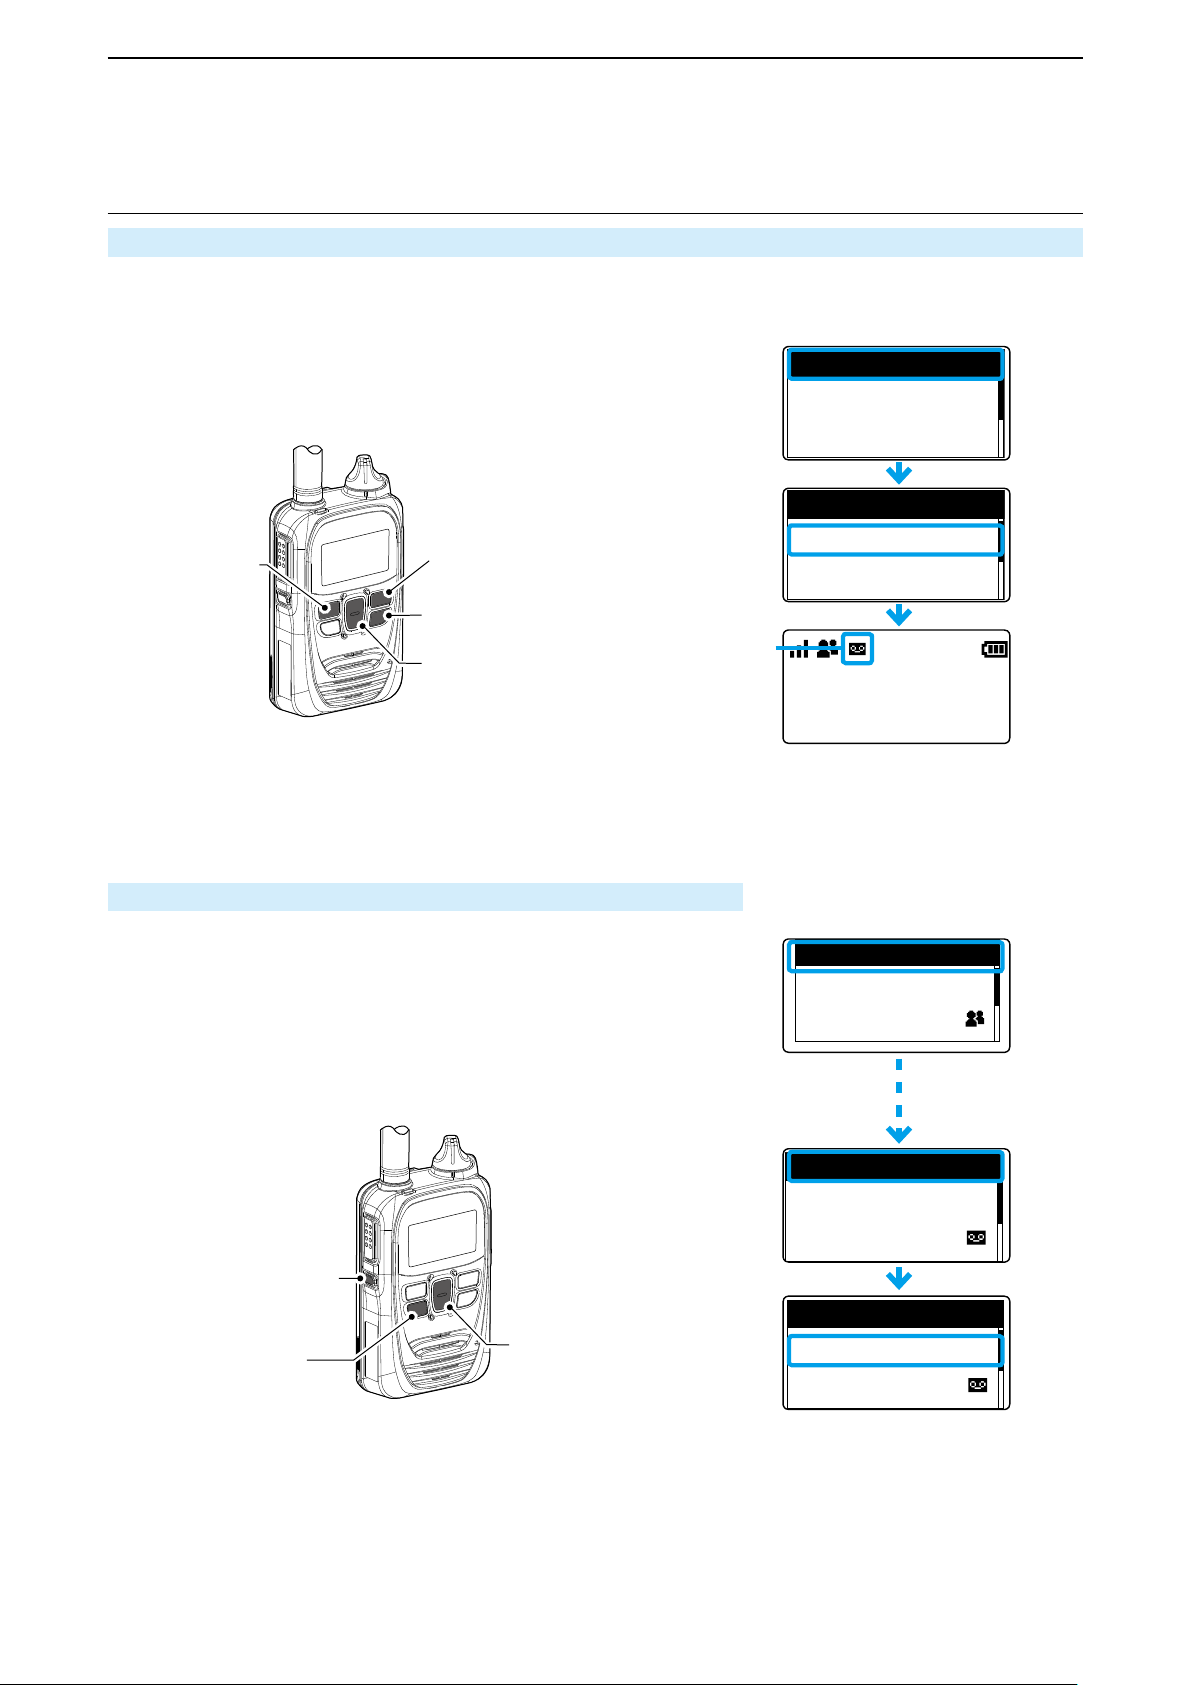
■ Recording (continued)
2. Turning ON the Recording mode
1. Push [FUNC] to select “Recording.”
2. Push [▲]/[▼] to select “ON.”
3. Push [CLR/LOCK].
• The Recording mode is ON, and the Recording mode icon is displayed.
• The icon blinks when there is a recorded audio that has not been played yet.
OFF
[Address]
3. Playing the recorded audio
[FUNC]
[CLR/LOCK]
Recording mode icon
[▲]/[▼]
1. Push [Call history] several times to select “Recording log.”
2. Push [▲]/[▼] several times to select the recorded audio to play.
3. Push [Option].
• The selected record audio is played.
• Push [Option] to stop playing.
ON
The Recording mode is ON
[Option]
[Call history]
[履歴]キー
キー
[▲]/[▼]
[▲]/[▼]
3-8
Page 24
ADVANCED OPERATION
– – –
LOG
SET
CLR
Delete Recorded A
SET
Deleting···
Delete Recorded A
SET
– – –
Delete Recorded A
SET
[電源/音量]ツマミ
キー
[履歴]
3
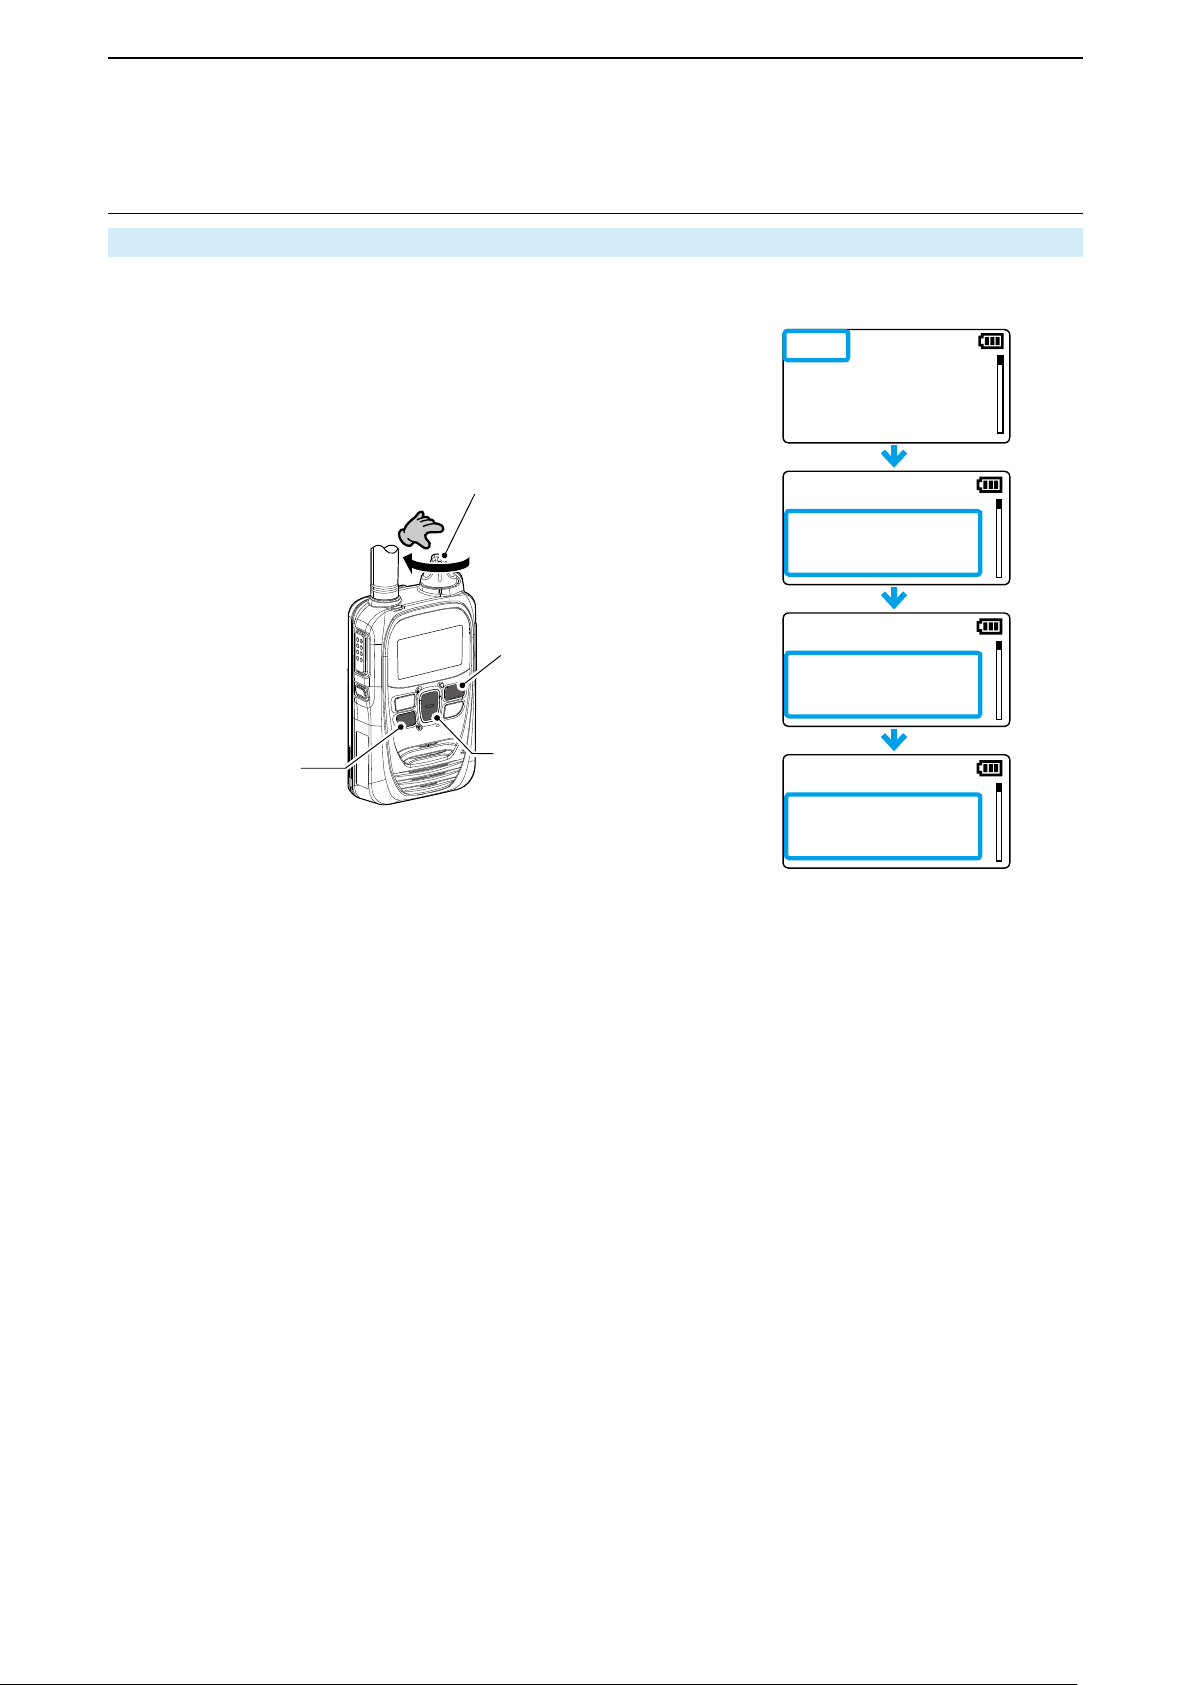
■ Recording (continued)
4. Deleting all the recorded audio history
1. While holding down [FUNC], turn ON the power.
• Enter the Set mode.
2. Release [FUNC] when “SET” is displayed.
3. Push [FUNC] several times to select “Delete Record Audio.”
4. Push [▲]/[▼] to select “CLR.”
5. Push [Call history].
• Exits the Set mode.
[PWR/VOL]
[FUNC]キー
[FUNC]
[Call history]
キー
[▲]/[▼]
[▲]/[▼]
3-9
Page 25
ADVANCED OPERATION
All
10/4 12:58
All
10/4 12:58
Sales1
10/4 12:58
3
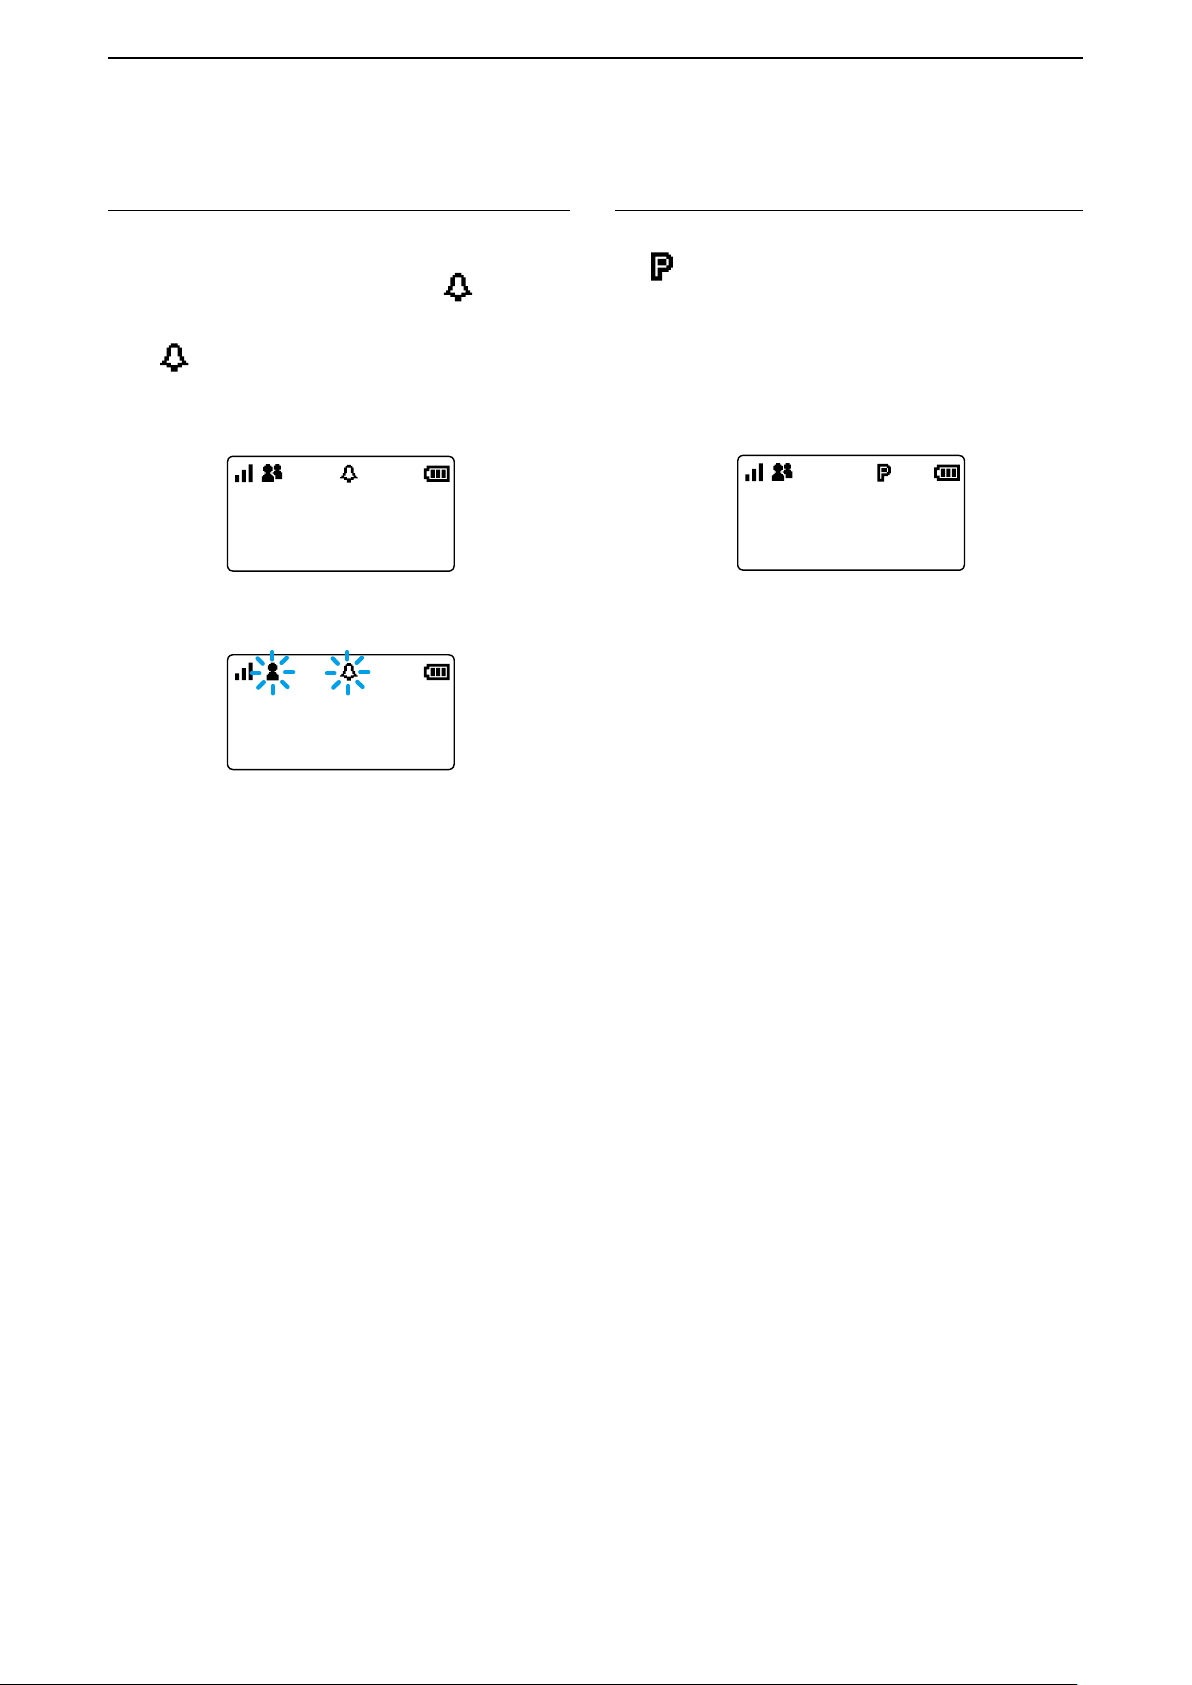
■ Pocket Beep function
The Pocket beep function sounds a notication tone and
indication when a call is received.
LThis function is usable if it is enabled by your dealer.
L When the Pocket Beep function is ON, “
displayed.
• When a call is received, the notication beep sounds
and “
” blinks.
Standby screen
Blinks
” is
■ P-Bell function
The P-Bell function sounds the notication tone when a
call is received.
The
icon is displayed when the P-Bell function is used.
LThis function is usable if it is enabled by your dealer.
L You cannot listen to the call until you reply to the call.
After pushing [PTT], the mute is released.
Standby screen
When an Individual call is received
3-10
Page 26
ADVANCED OPERATION
(別売品)
Turn OFF
3
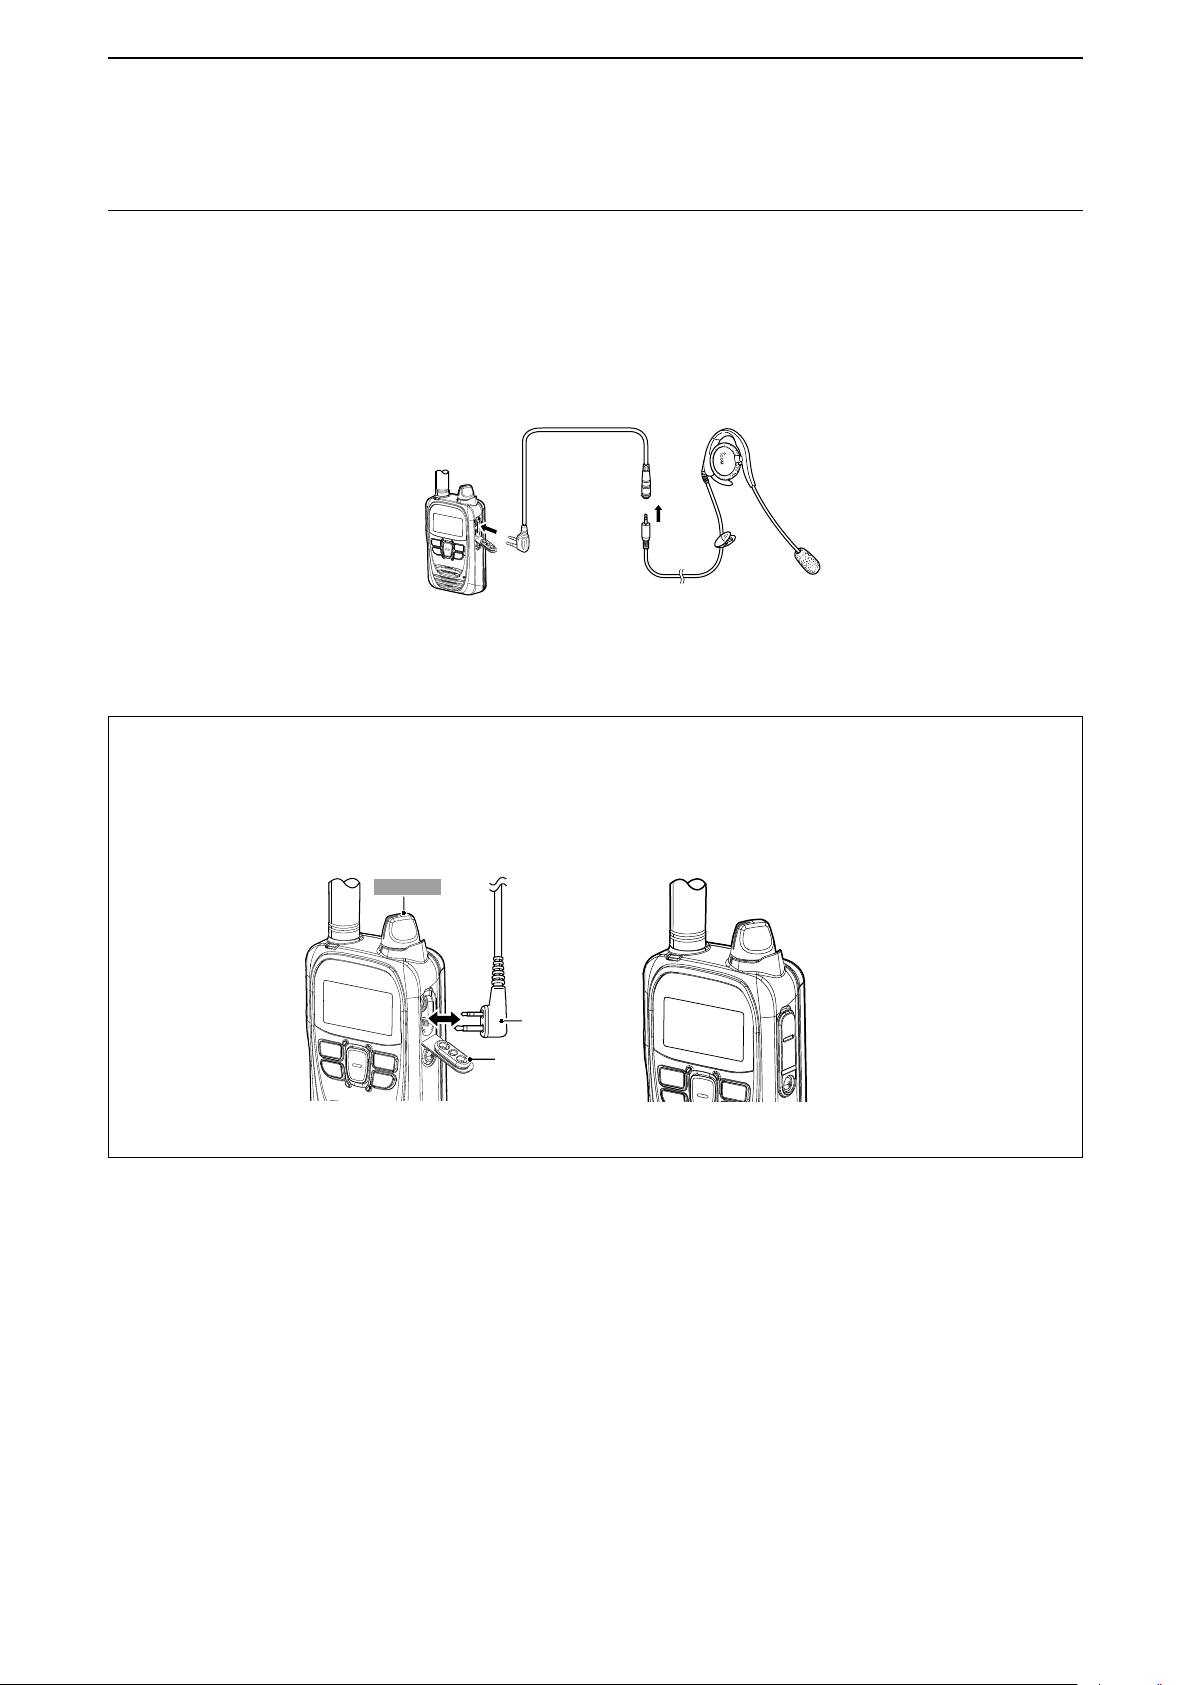
■ About the VOX function
The VOX function automatically switches between receive and transmit during voice operation.
When the VOX function is ON, speak into the headset microphone to transmit, then stop speaking to listen. In full-duplex,
you can speak and listen to the call-to party at the same time.
To use this function, an optional headset and a VOX converter cable, shown below are required.
LThis function is usable if it is enabled by your dealer.
OPC-2006LS
(Option)
OPC-2006LS
(別売品)
HS-94
(Option)
[マイク/スピーカー]
ジャッ ク に 接 続 す る
To the [MIC/SP] jack
HS-94
NOTE:
Be sure to turn OFF the power before connecting or disconnecting optional equipment to or from the jack.
• Remove the cable by holding the plug not cable.
• Insert the plug securely when connecting the cable.
• Attach the jack cover when no optional equipment is connected.
LThe jack is made tight to resist dust and water intrusion.
Plug
Connector
cover
Jack cover is attachedAttaching an optional equipment
3-11
Page 27
ADVANCED OPERATION
Sales2
Emergency
Sales1
Emergency
All
10/4 12:57
3
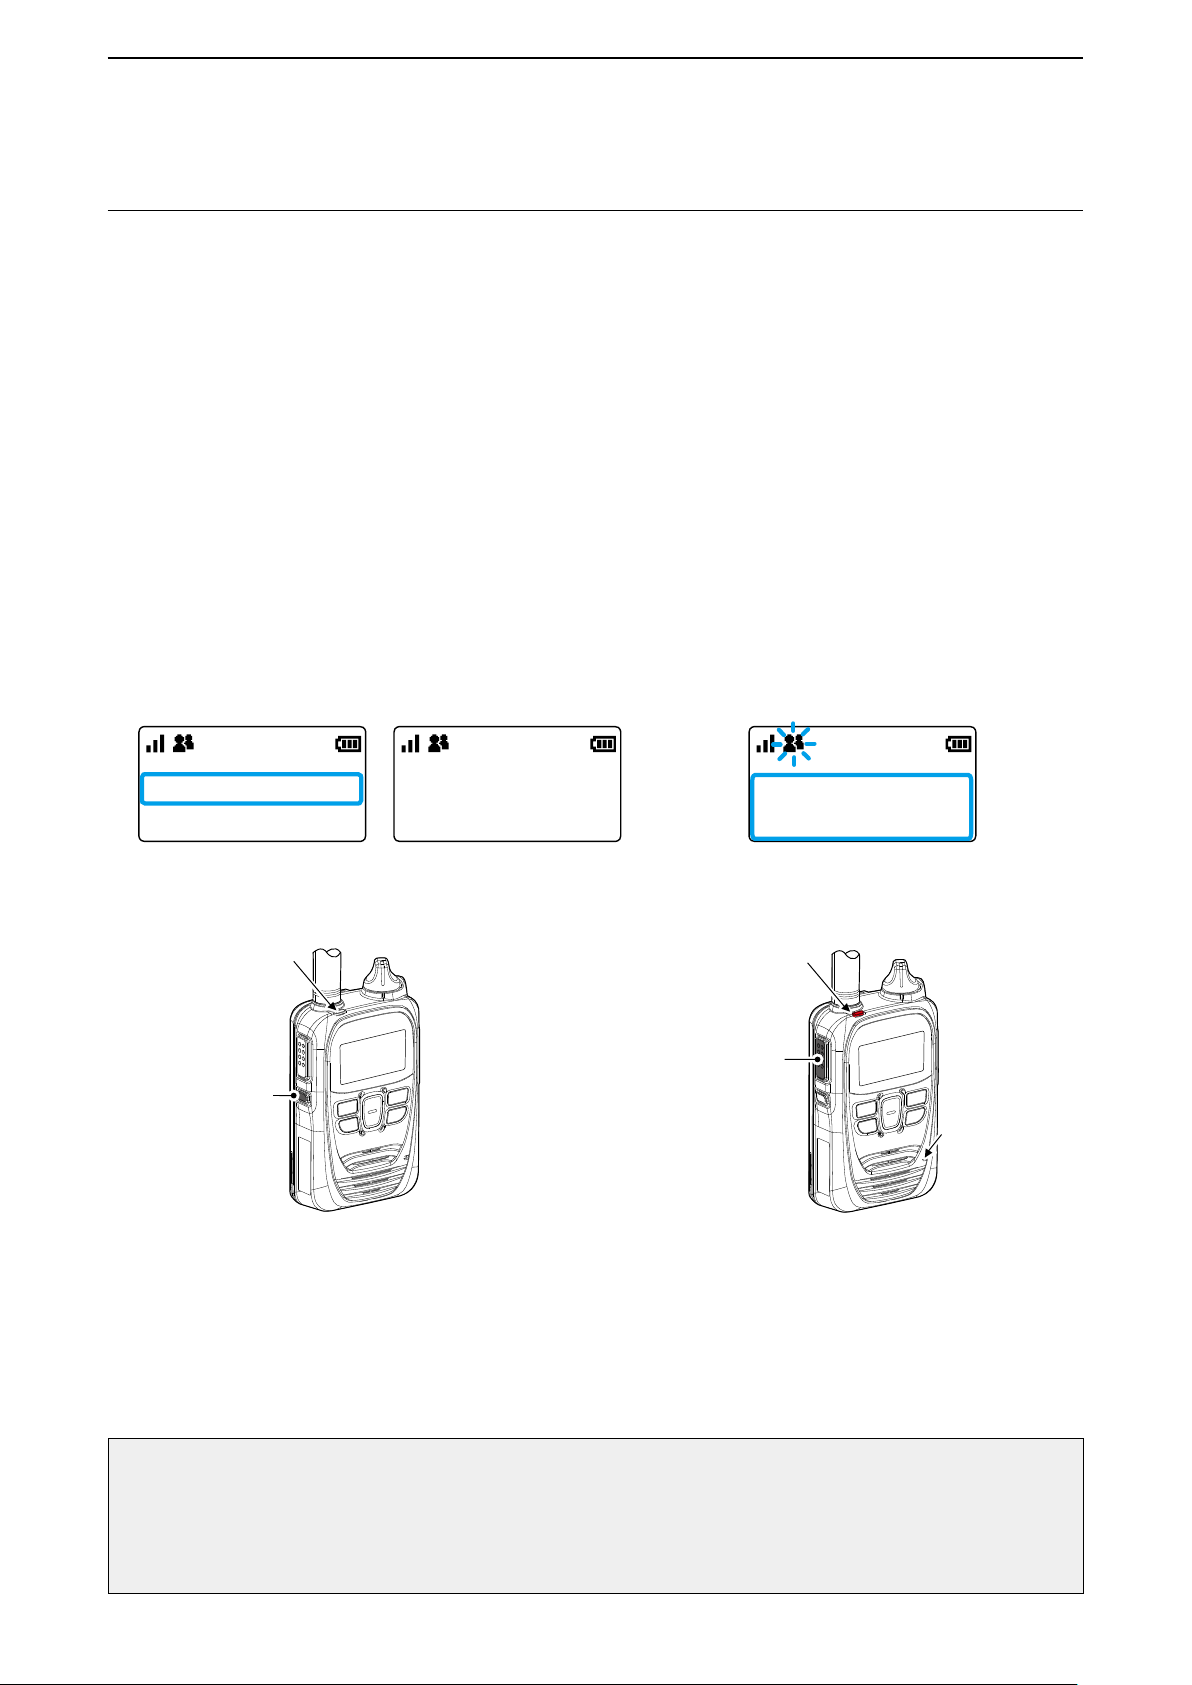
■ Emergency Call function
The Emergency Call function may be assigned to the [Option] or [Call history] key by your dealer. Ask your dealer about the
assigned function.
LThe [TX/RX] indicator does not light when transmitting an Emergency Silent call.
Transmitting an Emergency call:
1. Hold down [Option] or [Call history] until
“Emergency” is displayed.
• An alarm sounds periodically.
L When the Silent mode is set to “ON” by your
dealer, no alarm sounds, and no emergency
indication is displayed.
2. Wait for the answer back.
• When the transceiver receives an answer back, the
alarm stops, and the [TX/RX] indicator lights green.
L To cancel the emergency call, hold down [Option]
until “Emergency” disappears, or turn OFF the
transceiver.
Emergency screen Emergency screen
in the Silent mode
When an Emergency call is received:
1. “Emergency” is displayed and the alarm
periodically sounds.
L When the alarm is turned OFF by your dealer, no
alarm sounds.
2. While holding down [PTT], talk into the
microphone.
• While holding down [PTT], the [TX/RX] indicator
lights red.
• The alarm stops.
• Returns to the normal mode when PTT is released.
Blinks
When an Emergency call is received
[送信/受信]ランプ
[送信/受信]ランプ
[TX/RX] indicator
[Option]
[ オ プ ション ] キー
が赤色に点灯
Lights red
[PTT](送信)
[PTT]
スイッチ
NOTE:
Icom is not responsible for the destruction or damage caused by using the Emergency Call function.
This function may not properly work under the following circumstances or conditions:
• Remaining battery capacity is low.
• Surrounding area or environment.
• The Emergency function is not designed for secured communications.
マイク
Microphone
3-12
Page 28
ADVANCED OPERATION
3
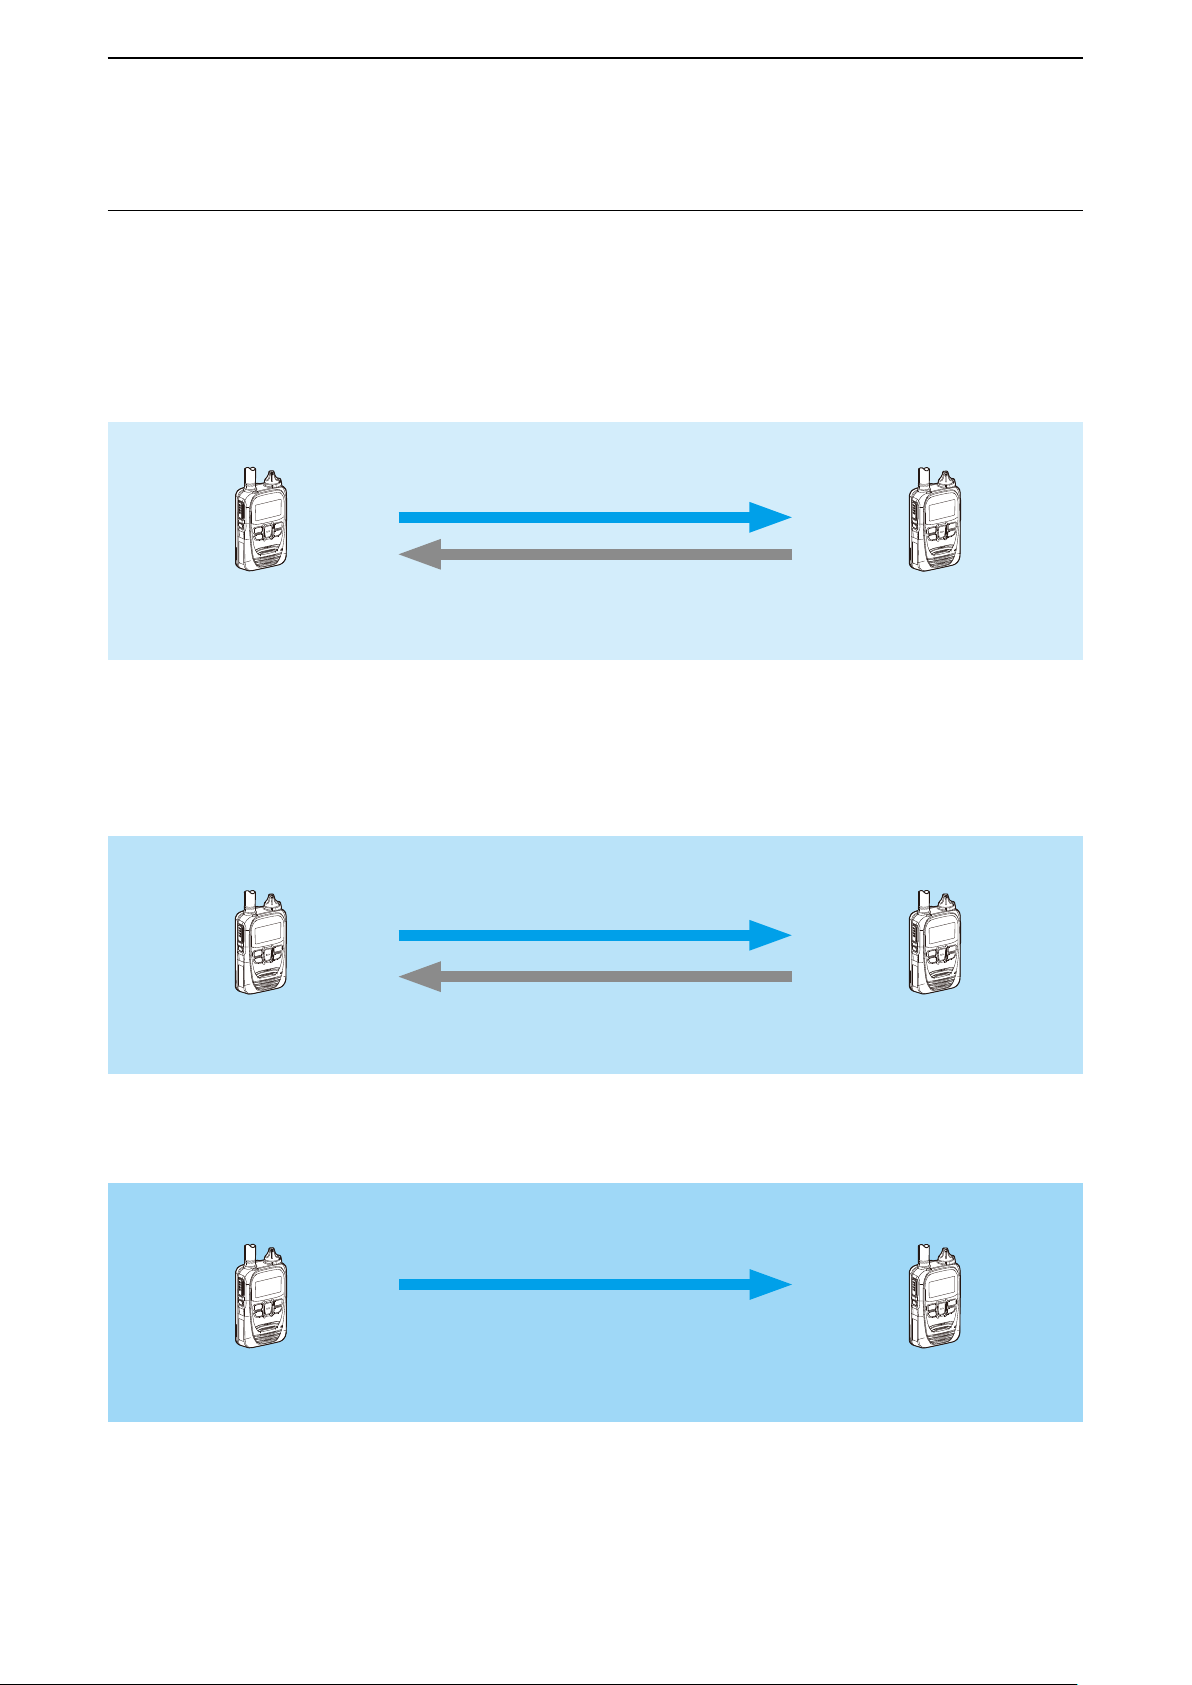
■ Remote Monitor function
The Remote Monitor function requests the target transceiver to transmit its microphone audio.
LThe function is usable only when it is enabled by your dealer.
LThe [TX/RX] indicator does not light when transmitting an Emergency Silent call.
Remote Monitor call:
z When the target transceiver receives a request, it automatically starts transmitting.
• A beep sounds, and the [TX/RX] indicator lights red.
LThe transmission period of time may differ, depending on your transceiver’s presetting.
Requests transmitting
Your transceiver
Transmits audio for the preset
period of time
Target transceiver
Remote Monitor call (Emergency Silent):
z When the target transceiver receives a request, it automatically starts transmitting an Emergency Silent call.
• No beep sounds and the [TX/RX] indicator does not light, regardless of Emergency Call Receiving settings.
LThe target transceiver transmits the call to your transceiver.
LThe transmission continues until the preset cancellation period of time ends, or a cancellation is received.
Requests transmitting an
Emergency Silent call
Your transceiver
Transmits an
Emergency Silent call
Target transceiver
(The person in an emergency)
Remote Monitor call (Emergency Silent) cancellation:
z When the target transceiver receives a request, it stops transmitting an Emergency Silent call.
Your transceiver
Requests to stop transmitting an
Emergency Silent call
Stops transmitting an
Emergency Silent call
3-13
Target transceiver
(The person in an emergency)
Page 29
ADVANCED OPERATION
All
All
Group
10001
Sales1
Individual
00001
Sales1
Individual
00002
Sales2
Remote Monitor
Sales2
Request
Remote Monitor
Sales2
Request (Emergency
キー
3
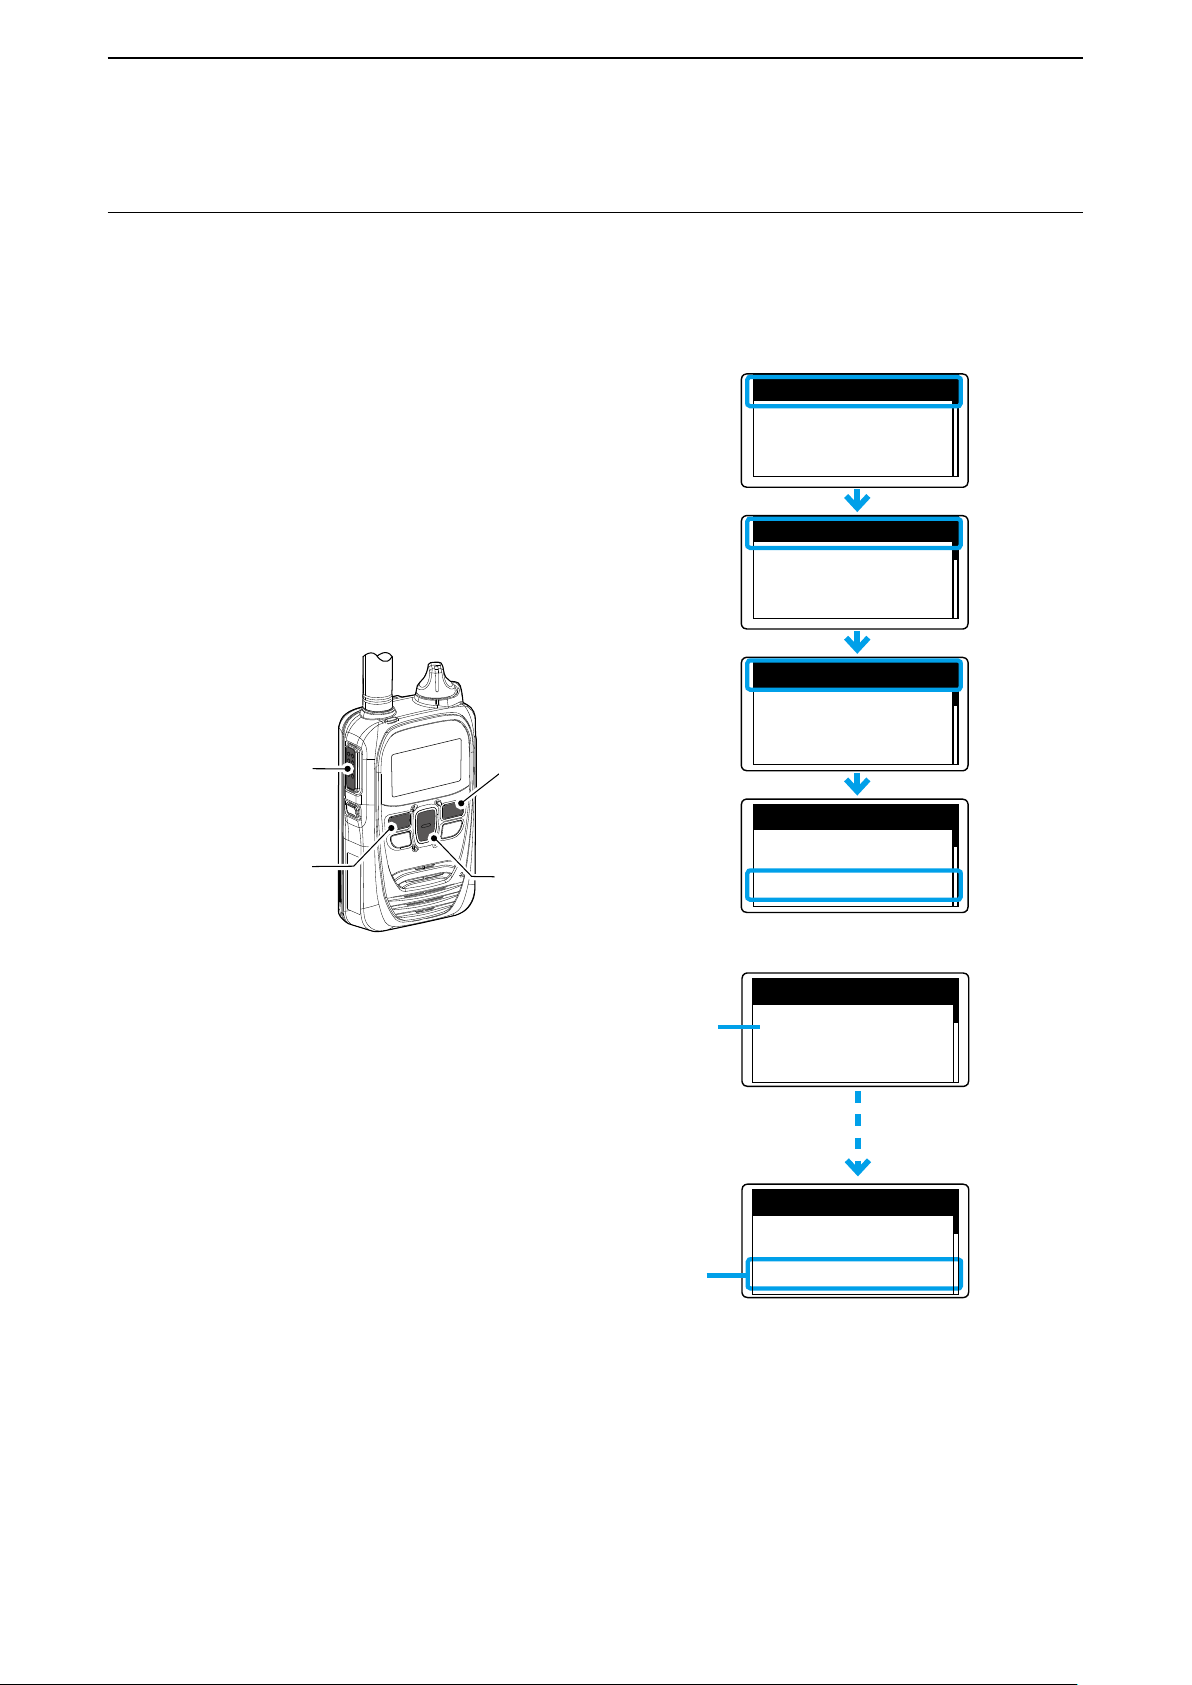
■ Remote Monitor function (continued)
Transmitting a Remote Monitor call:
LConrm the transceivers meet the requirements shown below to use the function.
• The Remote Monitor function is enabled (Your transceiver and the target transceiver).
• The Emergency Call function is enabled (The target transceiver).
1. Push [Address] several times to select a call type.
• Each push changes the Call type.
2. Push [▲]/[▼] to select a target transceiver.
3. Push [FUNC] several times to select “Remote Monitor.”
4. Push [▲]/[▼] to select a type of call (p. 3-13).
5. Push [PTT] to transmit a Remote Monitor call.
LWait until “Successful” is displayed.
[PTT]
[PTT](送信)
スイッチ
[Address]
[FUNC]キー
[FUNC]
[▲]/[▼]
[▲]/[▼]
Target
Type of call
3-14
Page 30

ADVANCED OPERATION
3
■ Lone Worker function
When the Lone Worker function is activated, the Emergency function (p. 3-12) is automatically turned ON after the trans-
ceiver has been left without any operation for the specied time period.
To reset the timer, operate any key or the volume control within the specied time period.
LThis function may be used only when the Lone Worker function is programmed by your dealer.
■ Man Down function
When the Man Down function is activated, the Emergency function (p. 3-12) is automatically turned ON after the set period
of time has passed with the transceiver leaning past the preset angle.
To reset the timer, raise back the transceiver from the preset angle towards the vertical position within this set time period.
LThis function may be used only when the Man Down function is programmed by your dealer.
NOTE:
Icom is not responsible for the destruction or damage caused by using the Lone Worker or Man Down function.
These functions may not properly work, depending on the following circumstances or conditions:
• Remaining battery capacity is low.
• Surrounding area or environment.
• The Lone Worker and Man Down function are not designed for secured communications.
3-15
Page 31
ADVANCED OPERATION
– – –
LOG
SET
– – –
LOG
SET
User select
Network Selection
SET
Search
Network Search
ABCD
12345
Network Search
Configured
Network Search
3
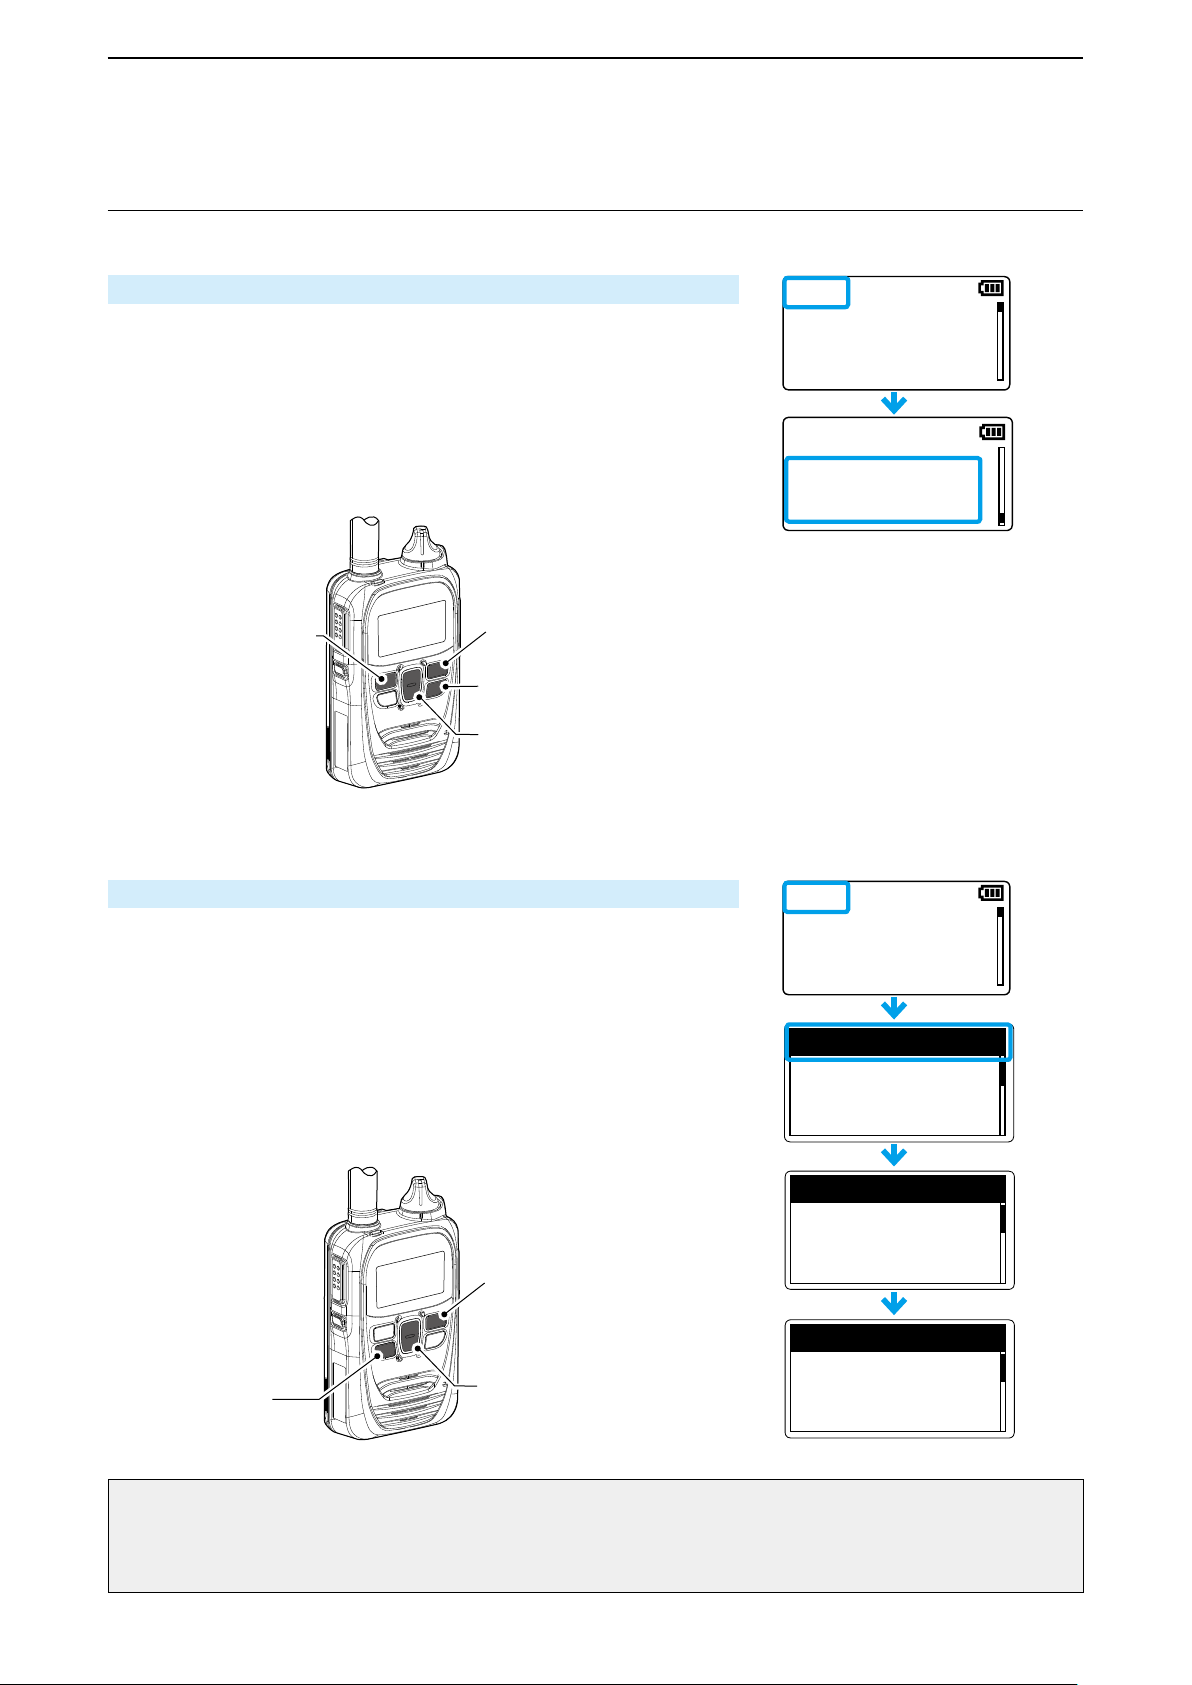
■ Searching network operator
The Network Search function search the available operator.
1. Setting the Network Search function enable
1. While holding down [FUNC], turn ON the power.
• Enter the Set mode.
2. Release [FUNC] when “SET” is displayed.
3. Push [FUNC] or [Address] several times to select “Network
Selection.”
4. Push [▲]/[▼] to select “User Select.”
5. Push [CLR/LOCK].
• Exits the Set mode.
[Address]
2. Starting a Network Search
1. Push [FUNC] several times to select “Network Search.”
2. Push [Call history] to start a search.
• Network search starts.
• The search result will be displayed in few minutes.
LSearch may take a time, depending on the environment.
LIf “Timeout” is displayed, try a different location.
3. Push [▲]/[▼] to select an operator.
• Select “Search” if you start the search again.
4. Push [Call history] to set the selected operator.
• “Congured” is displayed.
[FUNC]
[CLR/LOCK]
[▲]/[▼]
[Call history]
NOTE:
• This function may not work, depending on the country of use or service provider setting.
• The transceiver may not connect to the operator in the search result, depending on the communication service contract.
(For example: Roaming is not supported.)
[FUNC]
(Example)
[▲]/[▼]
3-16
Page 32
ADVANCED OPERATION
– – –
LOG
SET
Select ( SIM2)
SIM Selection
SET
Completed
SIM Selection
SET
3
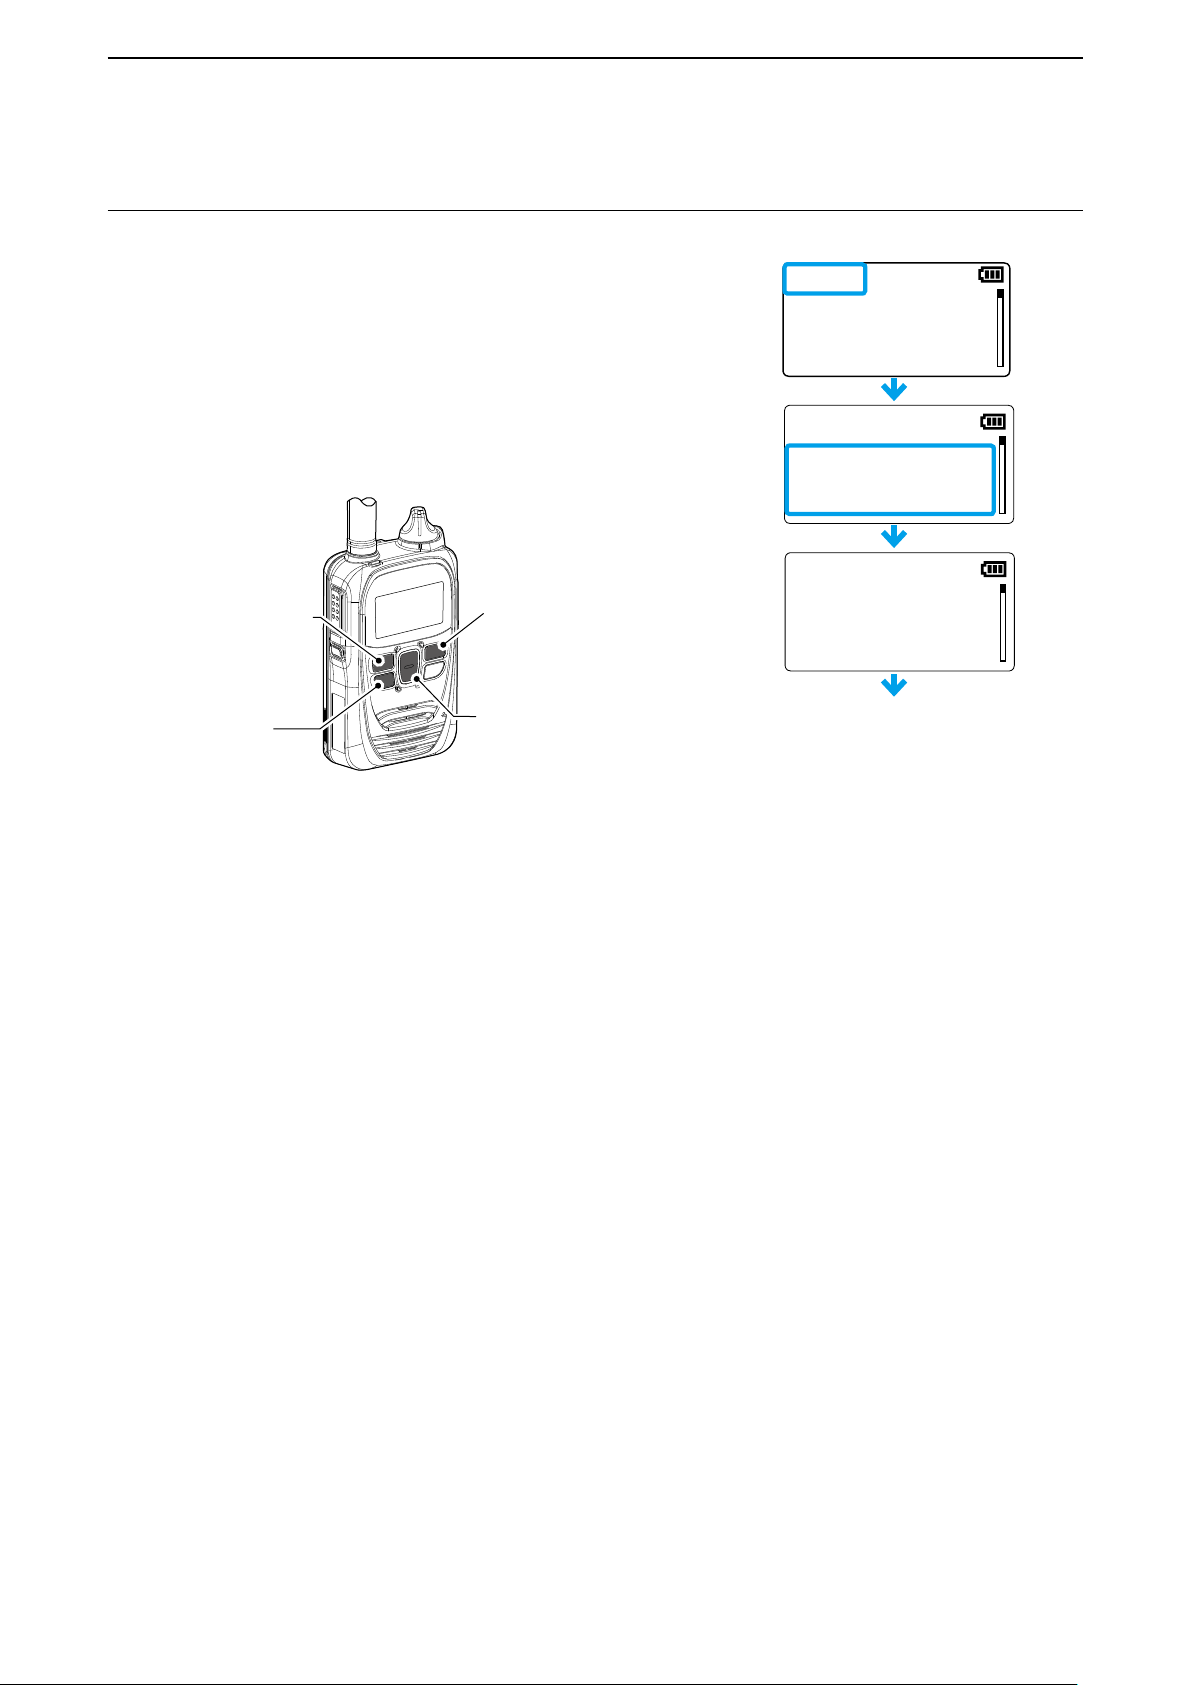
■ Selecting the SIM card
The transceiver has two SIM card slots, SIM 1 and SIM 2. You can select which SIM card to use in the Advanced Set mode.
1. While holding down [FUNC] and [Address], turn ON the transceiver.
• Enters the Advanced Set mode.
2. Release [FUNC] and [Address] when “SET” is displayed.
3. Push [FUNC] several times to select “SIM Selection.”
4. Push [▲]/[▼] to select a SIM card to use.
LIf a name is assigned to each SIM slot, the name is displayed.
5. Push [Call history].
• “Completed” is displayed.
• After a while, the transceiver automatically restarts.
[Address]
[Call history]
[FUNC]
[▲]/[▼]
Restart
3-17
Page 33

SET MODE
■ Entering to the Basic Set mode ........................................... 4-2
■ Entering to the Advanced Set mode .................................... 4-2
■ Operation in the Set mode .................................................. 4-3
■ Set mode item list ................................................................ 4-4
Section 4
4-1
Page 34
SET MODE
– – –
LOG
SET
[電源/音量]ツマミ
キー
[電源/音量]ツマミ
[ アドレ ス 帳 ]
– – –
LOG
SET
4
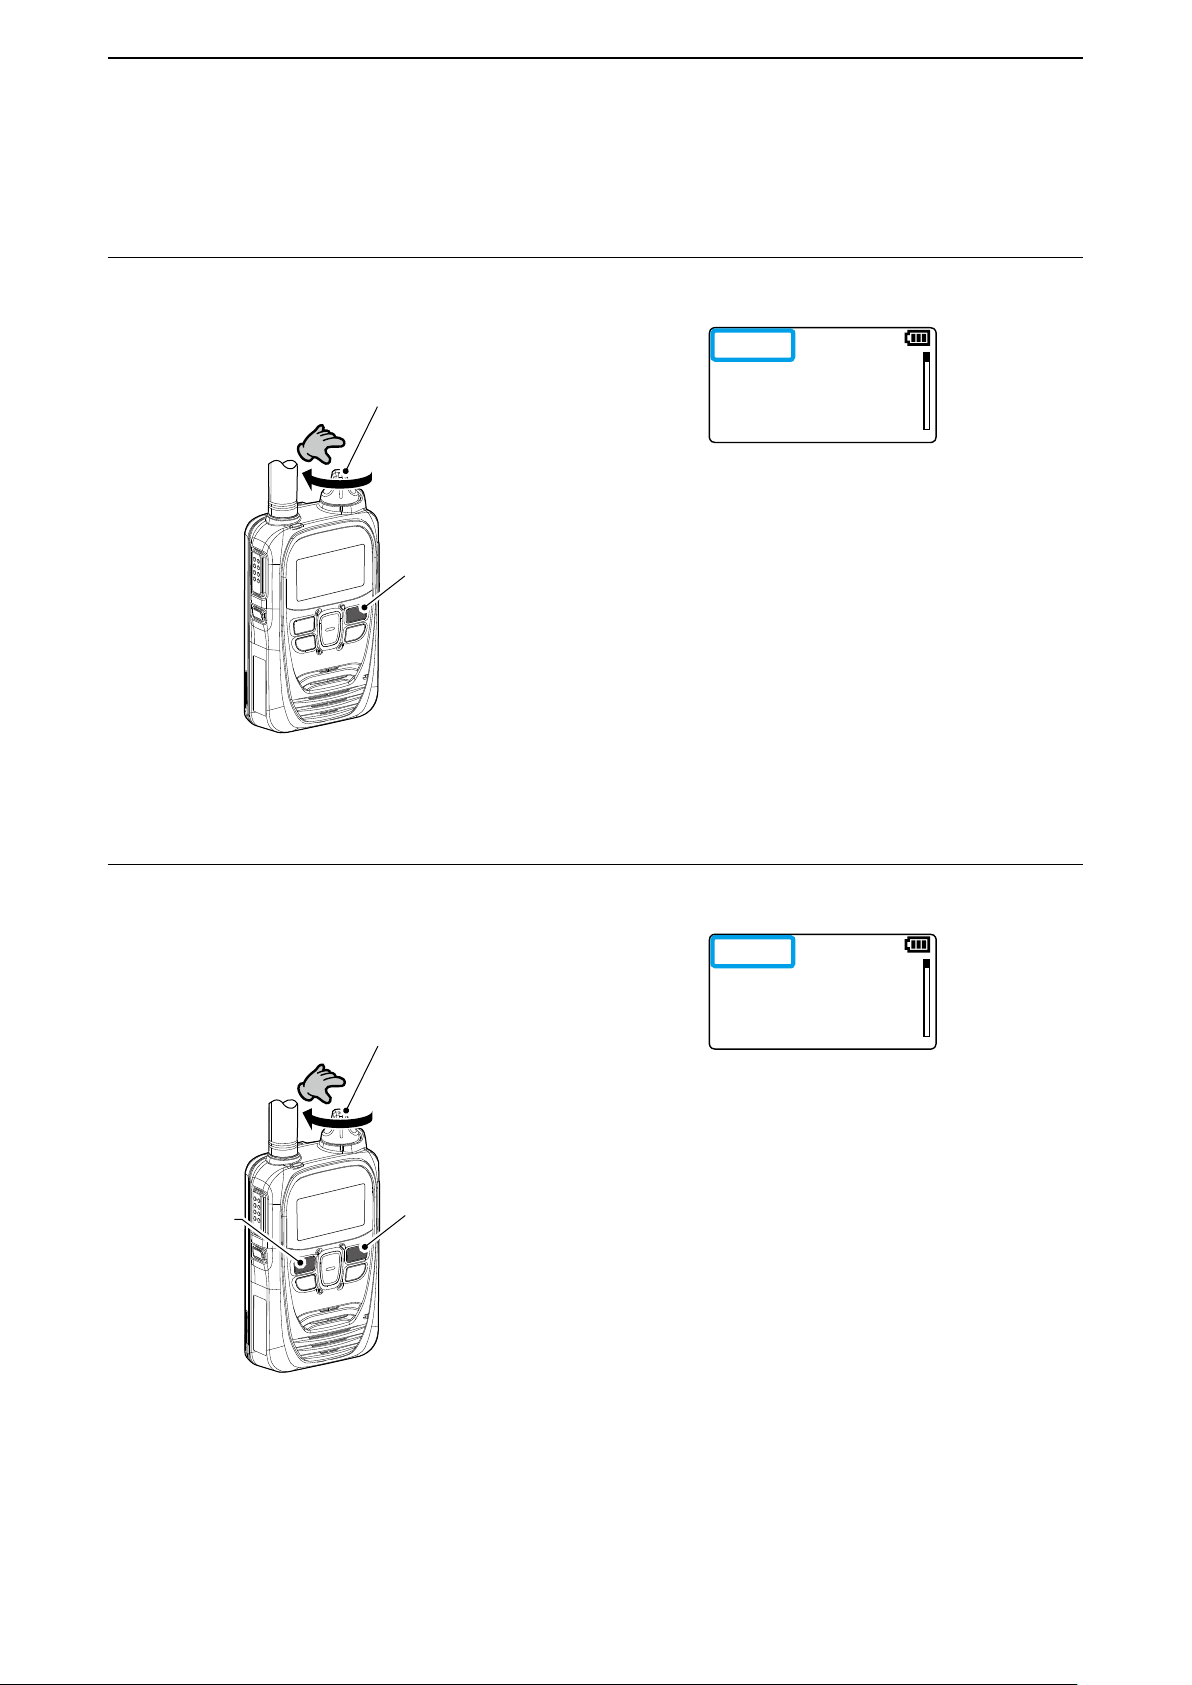
There are 2 types of Set mode: Basic and Advanced.
■ Entering to the Basic Set mode
You cannot transmit nor receive while the transceiver is in the Set mode.
1. While holding down [FUNC], turn ON the power.
2. Release [FUNC] when “SET” is displayed.
[PWR/VOL]
[FUNC]
[FUNC]
■ Entering to the Advanced Set mode
You cannot transmit or receive while the transceiver is in the Set mode.
1. While holding down [FUNC] and [Address], turn ON the power.
2. Release both keys when “SET” is displayed.
[PWR/VOL]
[FUNC]キー
[Address]
キー
[FUNC]
4-2
Page 35
SET MODE
– – –
LOG
SET
10
Key-Touch Beep Vo
SET
0
Key-Touch Beep Vo
SET
Connecting···
FIRM UP···
SET
Updating···
FIRM UP···
SET
Rcvd
FIRM UP
SET
YES
FIRM UP
SET
Updating
[履歴]
キー
[ アドレ ス 帳 ]
4
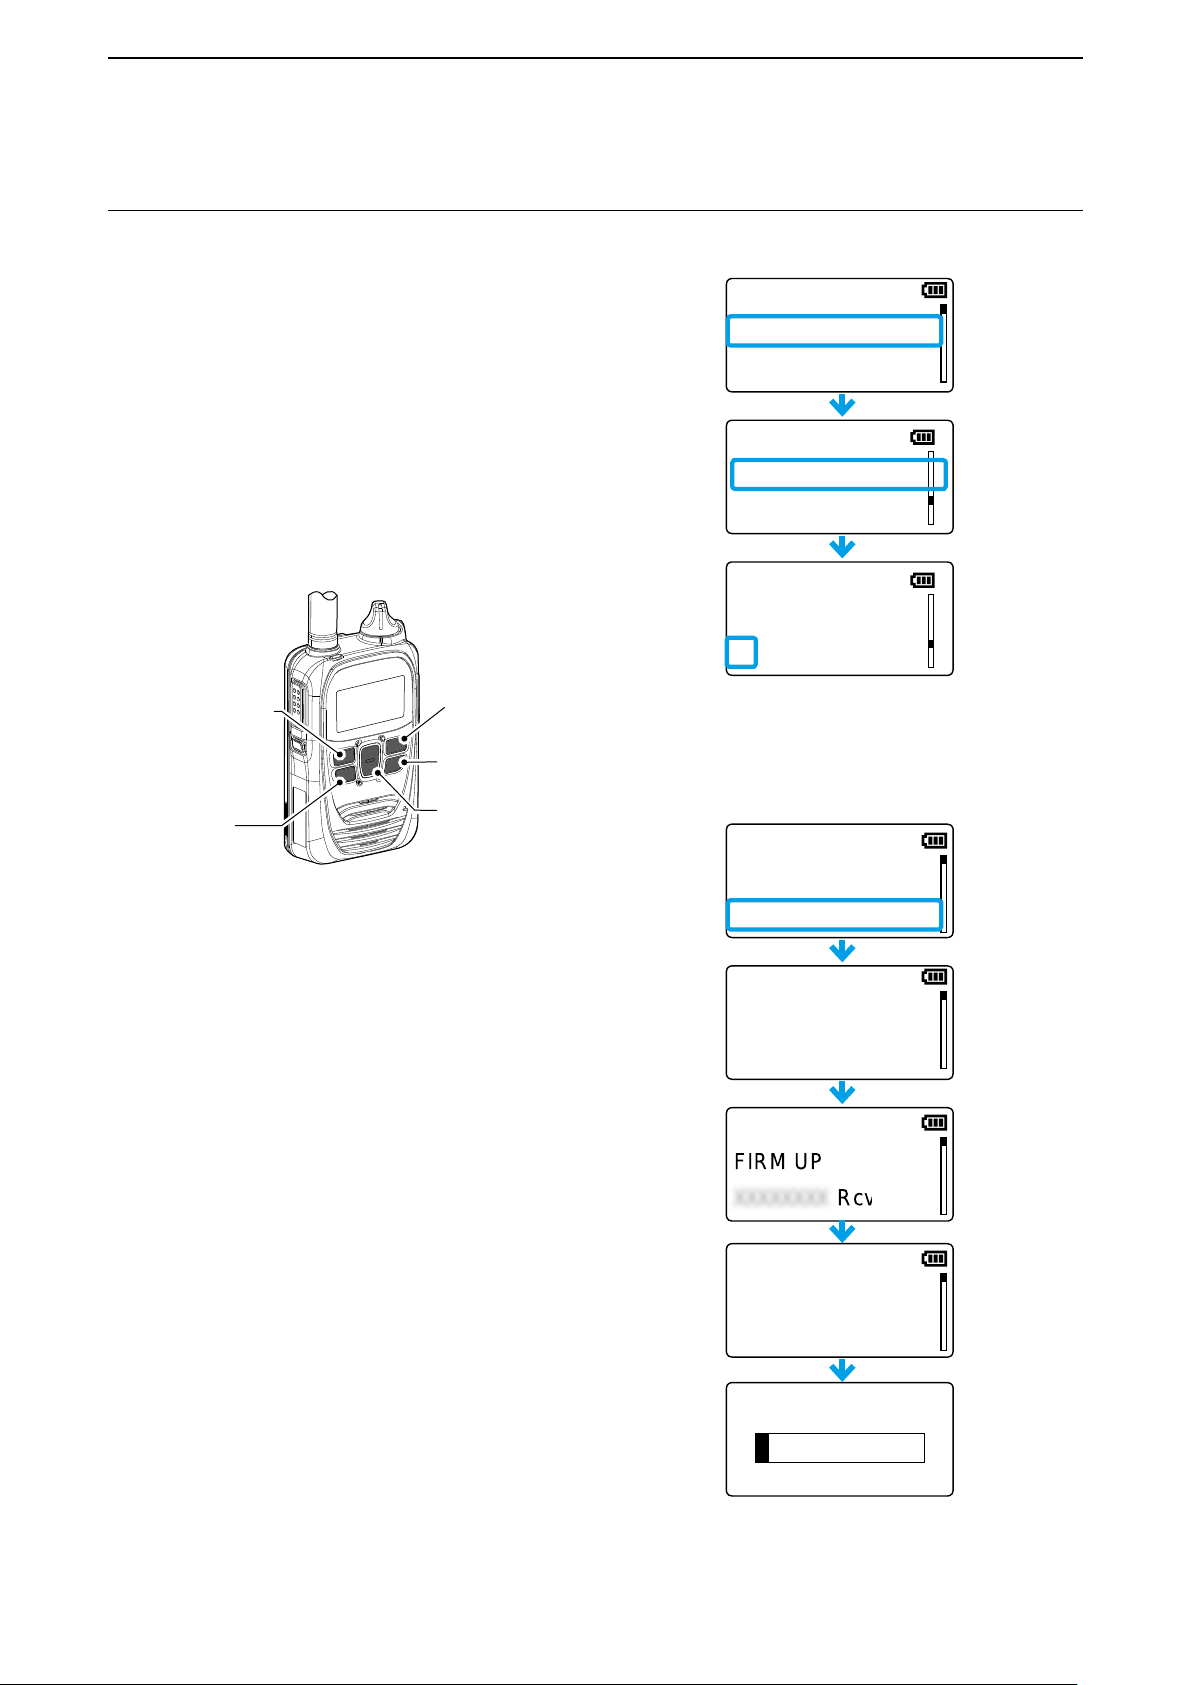
■ Operation in the Set mode
Example: Setting the Key-Touch Beep Volume
1. Push [FUNC] or [Address] to select an item.
2. Push [▲]/[▼] to set the value.
3. Push [PTT] or [CLR/LOCK] to save the value and exit the Set mode.
• Push [Call history] to execute the following functions.
• LOG
• RESET*
• FIRM UP*
• Delete Recorded Audio
• Delete Bluetooth Device
• Search Bluetooth Device
• Initialize Bluetooth Unit
• SIM Selection
*After performing these functions, the transceiver automatically restarts.
LUpdating the rmware takes approximately 10 minutes.
[Address]
[Call history]
キー
キー
[FUNC]
[FUNC]キー
[CLR/LOCK]
[CLR/LOCK]
[▲]/[▼]キー
[▲]/[▼]
Setting the Key Touch Beep Volume to “0”
Example: Updating the rmware
Updating the firmware
4-3
Page 36

SET MODE
4
■ Set mode item list
The shaded items (■ ■ ) are also displayed in the Basic Set mode.
LItems or default values may differ, depending on the presetting. Ask your dealer for details.
Item Description Option/range Default
LOG Deletes logs. –– – , CLR (Clear) –––
Initializes the transceiver.
Reset
FIRM UP Updates the rmware. NO or YES NO
Search BT Device Searches for Bluetooth devices. Search ―
Delete BT Device Deletes paired devices ― ―
Init BT Unit Initializes the pairing list. NO or YES NO
BT Unit Version
Delete Recording Deletes the recorded audio. –– – or CLR –––
UTC Offset
Daylight Saving
Time
SIM Selection
Network Selection
Network Search
LTE Unit Version Displays the version number of internal LTE unit. ― ―
IMEI
Phone Number Displays the SIM card’s telephone number. ― ―
ICCID Displays the SIM card’s ICCID. ― ―
Returns to the default values except the Bluetooth
pairing list.
Displays the version number of the internal
Bluetooth unit.
You can set this item when the transceiver uses
the SNTP server for clock synchronization.
Set the offset time between the UTC (Universal
Time Coordinated) and local time.
You can set this item when the transceiver uses
the SNTP server for clock synchronization.
Select whether or not to use Daylight Saving
Time (DST) for the clock.
Selects the SIM card.
•
Push [▲]/[▼] to select “Select (SIM2)” (default),
then push [Call history].
LAfter a while, the transceiver automatically restarts.
Select whether or not to automatically select the
Network Operator.
Execute an operator search.
L This item is displayed only when “User select”
is selected in the Network Selection item.
L “Not Ready” may be displayed right after
entering the Set mode.
Displays the IMEI number of the communication
unit.
NO or YES NO
― ―
–14:00 ~ +14:00
(in 1 minute steps)
Enable or Disable Disable
–– – (SIM1)* or Select (SIM2)*
*
If a name is assigned to
each SIM slot, the name is
displayed.
User select, Auto or Last ac-
cessed
Search ―
― ―
00:00
–– – (SIM1)
Auto
L Since obtaining the LTE unit version and ICCID takes time, “Not acquired” may be displayed right after entering the Set
mode. However they will be obtained after a while.
L“Not acquired” may be displayed in the Phone Number item, depending on the SIM card.
4-4
Page 37

OPTIONAL PRODUCTS
■ Optional products ................................................................ 5-2
■ Standard charging time and battery life ............................... 5-3
■ Battery pack cautions .......................................................... 5-4
■ Charging with the optional BC-202IP2 ................................ 5-6
■ Charging with the optional BC-211 ...................................... 5-6
■ Charging with the optional BC-202IP3L .............................. 5-7
■ Connecting BC-202IP3L together ....................................... 5-7
■ Charging with the optional BC-218 ...................................... 5-8
■ Insert the transceiver into the BC-218 ................................. 5-8
■ Bluetooth
■ HM-215/BC-218 description ...............................................5-11
■ Charging VS-3 ................................................................... 5-12
■ Pairing the transceiver with the BC-218 or VS-3 ............... 5-13
■ Connecting and disconnecting .......................................... 5-16
■ Deleting a Bluetooth device from the pairing list ............... 5-22
■ Initializing the pairing list of the transceiver ....................... 5-23
■ Initializing the pairing list of the BC-218 ............................ 5-24
■ Initializing the pairing list of the VS-3 ................................ 5-25
■ Installing the MBA-7/MBF-1 on a at surface .................... 5-26
■ LC-185 (For BP-272) ......................................................... 5-29
■ When connecting optional equipment ............................... 5-30
®
operation ............................................................ 5-9
Section 5
5-1
Page 38

OPTIONAL PRODUCTS
5
■ Optional products
Carrying case
LC-185 (For use with BP-272)
MB-57L Shoulder strap (For LC-185)
Battery Pack
BP-272: Li-ion Battery Pack (Same as supplied)
(Minimum: 1880 mAh, Typical: 2000 mAh)
BP-307:
(Minimum: 3050 mAh,
Li-ion Battery Pack
Typical: 3150 mAh)
Chargers
For the BP-272/BP-307:
BC-202IP2:
Rapid Charger (with BC-123S L-type plug)
BC-202IP3L: Rapid Charger (with BC-123S Straight type plug
for single unit, and BC-228 for multiple unit)
For the BP-272:
BC-211: Multi-charger (with BC-157S)
®
BC-218:
BC-123S:
Rapid Charger (with Bluetooth
AC
Adapter (L-type plug for BC-202IP2, and
function)
Straight type plug for BC-202IP3L)
BC-157S: AC Adapter (for BC-211)
BC-207S:
AC
Adapter (for BC-218)
CP-22 (For BC-218, 12V/24V)
CP-23L (For BC-218, 12V)
CP-25H (For BC-202IP3L, 12V)
Holder
MB-135: Belt Clip (Same as supplied)
Cables
OPC-2006LS: Plug Adapter Cable
OPC-2328:
OPC-2359:
OPC-478UC*
OPC-478UC-1*
OPC-2144:
PTT
Switch Cable
Switch Cable
PTT
3
/
3
: Programming Cable
Adapter Cable
Plug
Speaker-Microphones
HM-153LS: Earphone Microphone
HM-166LS:
HM-183LS:
HM-186LS:
HM-215:
Speaker Microphone (For BC-218)
Earphone Microphone
Speaker Microphone
Speaker Microphone
Headsets
HS-94*1: Headset (Ear hook type)
1
HS-95*
HS-97*
HS-102*
VS-3:
: Headset (Neck and arm type)
1
: Throat Microphone
2
: Headset (Earphone type)
Bl
uetooth
®
Headset
Mount
MBF-1: Mounting Base (For MBA-7)
MBA-7:
Bracket
Adapter (For BC-218)
Other
VE-SP1: Speakerphone Unit
*1 To use the VOX function, the OPC-2006LS (Plug Adapter Cable) is
necessary.
To use the talk switch, the OPC-2328 (PTT Switch Cable) is necessary.
2
*
The OPC-2359 (PTT Switch Cable) is necessary.
3
The OPC-2144 (Plug Adapter Cable) is necessary.
*
5-2
Page 39

OPTIONAL PRODUCTS
5
■ Standard charging time and battery life
NOTE: Operating time may be shorter, depending on the
operating condition such as the roaming frequency.
Frequently roaming makes the operating time
shorter.
LThe supplied battery pack is the BP-272.
• Immediately stop using the battery pack if it emits an
abnormal odor, heats up, or is discolored or deformed. If
any of these conditions occur, contact your Icom dealer or
distributor.
Battery
Spec item
Operating time
Charging time
Battery
Spec item
Operating time
Charging time
BP-272
17 hours (approximately)
TX:RX:Stand-by=5 : 5 : 90 (seconds)
2.5 hours (approximately)
Charging with the BC-202IP2
BP-307
25 hours (approximately)
TX:RX:Stand-by=5 : 5 : 90 (seconds)
4 hours (approximately)
Charging with the BC-202IP2
5-3
Page 40

OPTIONAL PRODUCTS
5
■ Battery pack cautions
WORD DEFINITION
RDANGER!
RWARNING!
CAUTION Equipment damage may occur.
NOTE
R DANGER! NEVER short the terminals of the battery pack.
Shorting may occur if the terminals touch metal objects such
as a key, so be careful when placing the battery packs (or the
transceiver) in bags, and so on. Carry them so that shorting
cannot occur with metal objects. Shorting may damage not
only the battery pack, but also the transceiver.
R DANGER! NEVER operate the transceiver near
unshielded electrical blasting caps or in an explosive
atmosphere. This could cause an explosion and death.
R DANGER! NEVER use or charge Icom battery packs
with non-Icom transceivers or non-Icom chargers. Only Icom
battery packs are tested and approved for use with Icom
transceivers or charged with Icom chargers. Using thirdparty
or counterfeit battery packs or chargers may cause smoke,
fire, or cause the battery to burst.
WARNING RF EXPOSURE! This device emits Radio
R
Frequency (RF) energy. Caution should be observed when
operating this device. If you have any questions regarding RF
exposure and safety standards, please refer to the Federal
Communications Commission Office of Engineering and
Technology’s report on Evaluating Compliance with FCC
Guidelines for Human Radio Frequency Electromagnetic Fields
(OET Bulletin 65).
R WARNING! NEVER hold the transceiver so that the
antenna is very close to, or touching exposed parts of the
body, especially the face or eyes, while transmitting. The
transceiver will perform best if the microphone is 5 to 10
cm (2 to 4 inches) away from the lips and the transceiver is
vertical.
R WARNING! NEVER operate the transceiver with a
headset or other audio accessories at high volume levels.
The continuous high volume operation may cause a ringing
in your ears. If you experience a ringing, reduce the volume
level or discontinue use.
R WARNING! NEVER operate the transceiver while driving
a vehicle. Safe driving requires your full attention— anything
less could result in an accident.
CAUTION: DO NOT use harsh solvents such as Benzine
or alcohol when cleaning, because they will damage the
transceiver’s surfaces.
CAUTION: DO NOT operate the transceiver unless the
flexible antenna, battery pack, and jack cover are securely
attached. Confirm that the antenna and battery pack are dry
before attaching. Exposing the inside of the transceiver to
dust or water will result in serious damage to the transceiver.
After exposure to water, clean the battery contacts thoroughly
with fresh water and dry them completely to remove any
water or salt residue.
DO NOT use or place the transceiver in direct sunlight or in
areas with temperatures below –10°C (14°F) or above +60°C
(140°F)
DO NOT push [PTT] when you do not actually intend to
transmit.
DO NOT modify the transceiver. The specifications may
change and then the transceiver may not comply with the
requirements of required regulations. The transceiver warranty
does not cover any problems caused by unauthorized
modification.
Personal death, serious injury or an explosion
may occur.
Personal injury, fire hazard or electric shock may
occur.
If disregarded, inconvenience only. No risk of
personal injury, fire or electric shock.
.
BE CAREFUL! The transceiver will become hot when
operating it continuously for long periods of time.
BE CAREFUL! The transceiver meets IP67* requirements
for waterproof protection. However, once the transceiver has
been dropped, waterproof protection cannot be guaranteed
because of possible damage to the transceiver’s case or
waterproof seal.
* Only when the BP-272 or BP-307, flexible antenna or
antenna cap and SP/MIC jack cap are attached.
The optional BP-272 and BP-307 meets IP67 requirements.
• Battery caution
Misuse of Li-ion batteries may result in the following
hazards: smoke, fire, or the battery may rupture. Misuse
can also cause damage to the battery or degradation of
battery performance.
R DANGER! NEVER strike or otherwise impact the battery.
Do not use the battery if it has been severely impacted
or dropped, or if the battery has been subjected to heavy
pressure. Battery damage may not be visible on the outside
of the case. Even if the surface of the battery does not show
cracks or any other damage, the cells inside the battery may
rupture or catch fire.
R DANGER! NEVER leave battery pack in places with
temperatures above 60°C (140°F). High temperature buildup
in the battery, such as could occur near fires or stoves, inside
a sun heated car, or in direct sunlight may cause the battery
to rupture or catch fire. Excessive temperatures may also
degrade battery performance or shorten battery life.
R DANGER! NEVER expose the battery to rain, snow,
seawater, or any other liquids. Do not charge or use a wet
battery. If the battery gets wet, be sure to wipe it dry before
using.
R DANGER! NEVER incinerate a used battery pack since
internal battery gas may cause it to rupture, or may cause an
explosion.
R DANGER! NEVER solder the battery terminals, or NEVER
modify the battery pack. This may cause heat generation,
and the battery may burst, emit smoke or catch fire.
R DANGER! Use the battery only with the transceiver for
which it is specified. Never use a battery with any other
equipment, or for any purpose that is not specified in this
instruction manual.
R DANGER! If fluid from inside the battery gets in your
eyes, blindness can result. Rinse your eyes with clean water,
without rubbing them, and go to a doctor immediately.
R WARNING! NEVER use deteriorated battery packs. They
could cause a fire.
R WARNING! Immediately stop using the battery if it emits
an abnormal odor, heats up, or is discolored or deformed. If
any of these conditions occur, contact your Icom dealer or
distributor.
WARNING! Immediately wash, using clean water, any part
R
of the body that comes into contact with fluid from inside the
battery.
R WARNING! NEVER put the battery in a microwave oven,
high-pressure container, or in an induction heating cooker.
This could cause a fire, overheating, or cause the battery to
rupture.
CAUTION: Always use the battery within the specified
temperature range, –10°C ~ +60°C (14°F ~ 140°F). Using
the battery out of its specified temperature range will reduce
the battery’s performance and battery life.
5-4
Page 41

OPTIONAL PRODUCTS
5
■ Battery pack cautions (continued)
CAUTION: Shorter battery life could occur if the battery is
left fully charged, completely discharged, or in an excessive
temperature environment (above 50°C (122°F)) for an
extended period of time. If the battery must be left unused
for a long time, it must be detached from the transceiver
after discharging. You may use the battery until the battery
indicator shows half capacity, then keep it safely in a cool
and dry place at the following temperature range:
–20°C (–4°F) ~ +50°C (+122°F) (within a month)
–20°C (–4°F) ~ +35°C (+95°F) (within three months)
–20°C (–4°F) ~ +20°C (+68°F) (within a year)
BE SURE to replace the battery pack with a new one
approximately five years after manufacturing, even if it still
holds a charge. The inside battery material will become weak
after a period of time, even with little use. The estimated
number of times you can charge the battery is between 300
and 500. Even when the battery appears to be fully charged,
the operating time of the transceiver may become short
when:
・ Approximately five years have passed since the battery
was manufactured.
・ The battery has been repeatedly charged.
Attention to the swelled battery pack
The battery cells may deteriorate and swell due to their
characteristics if used in an environment and conditions
such as: frequently charged, recharged immediately after full
charge, used or saved in a hot place, or charged by methods
other than the instructions. If the battery pack swells, it has
reached the end of its life due to deterioration. Replace it with
a brand new one.
• Charging caution
R DANGER! NEVER charge the battery pack in areas with
extremely high temperatures, such as near fires or stoves,
inside a sun-heated vehicle, or in direct sunlight. In such
environments, the safety/protection circuit in the battery will
activate, causing the battery to stop charging.
R WARNING!
storm. It may result in an electric shock, cause a fire or damage
the transceiver. Always disconnect the power adapter before a
storm.
R WARNING!
while charging. If any abnormal condition occurs, discontinue
using the battery pack.
R WARNING! NEVER insert the transceiver (battery attached
to the transceiver) into the charger if it is wet or soiled. This
could corrode the battery charger terminals or damage the
charger. The charger is not waterproof.
R WARNING! DO NOT charge or leave the battery in the
battery charger beyond the specified time for charging. If the
battery is not completely charged by the specified time, stop
charging and remove the battery from the battery charger.
Continuing to charge the battery beyond the specified time
limit may cause a fire, overheating, or the battery may
rupture.
CAUTION: NEVER charge the battery outside of the
specified temperature range:
BC-202IP2: 10°C ~ 40°C (50°F ~ 104°F)
BC-202IP3L:
BC-211: 10°C ~ 40°C (50°F ~ 104°F)
BC-218: 10°C ~ 40°C (50°F ~ 104°F)
Icom recommends charging the battery at 25°C (77°F). The
battery may heat up or rupture if charged out of the specified
temperature range. Additionally, battery performance or
battery life may be reduced.
NEVER charge the transceiver during a lightning
Occasionally observe the battery pack condition
10°C ~ 40°C (50°F ~ 104°F)
5-5
Page 42
OPTIONAL PRODUCTS
5
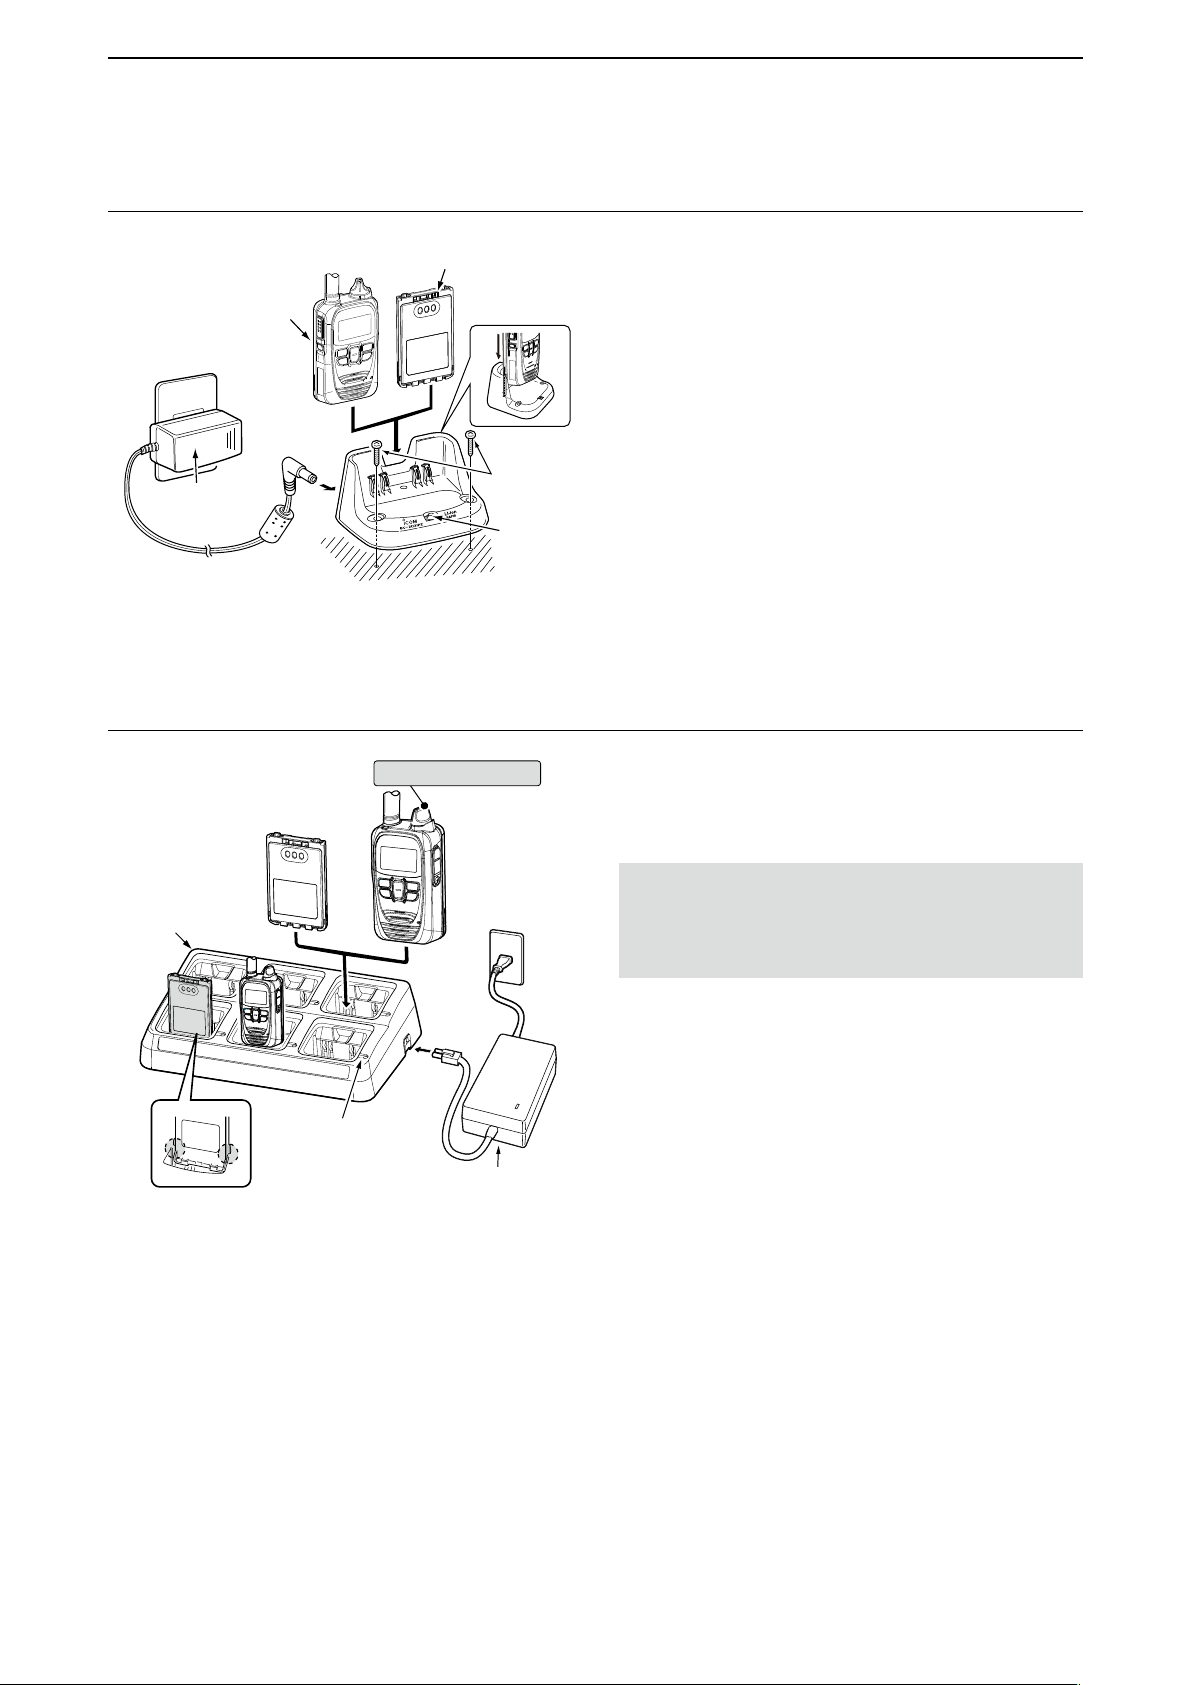
■ Charging with the optional BC-202IP2
Battery pack
[Transceiver + Battery pack]
AC outlet
BC-123S
(Supplied with
BC-202IP2)
Rapid charger (Optional BC-202IP2)
*Self-tapping screws (3.5x30 mm) (User supplied)
■ Charging with the optional BC-211
Turn OFF the power
Battery pack
Transceiver
+ battery pack
*
Charging
indicator
The BC-202IP2 rapidly charges a battery pack.
Charging time*: Approximately 2.5 hours for the BP-272
Approximately 4 hours for the BP-307
* This is the time when the battery is exhausted, and
charging with the transceiver power off.
The following item is required.
• A power adapter (not supplied with some versions.)
About charging indicator
Lights orange: Charging
Lights green: Charging completed
Blinks orange: See page 6-2.
The BC-211 rapidly charges up to 6 battery packs.
Charging time: Approximately 3.5 hours (BP-272)
The following item is required.
• A power adapter (not supplied with some versions.)
BC-211
Charging indicator
Charging: Orange
Charged: Green
(If blinks orange, see page 6-2.)
AC outlet
Power adapter
(BC-157S)
CAUTION: The transceiver power MUST be turned OFF
during charging, otherwise:
• The battery pack will not correctly charge.
• The battery life may be shortened.
The transceiver cannot be used, even while charging.
5-6
Page 43
OPTIONAL PRODUCTS
5
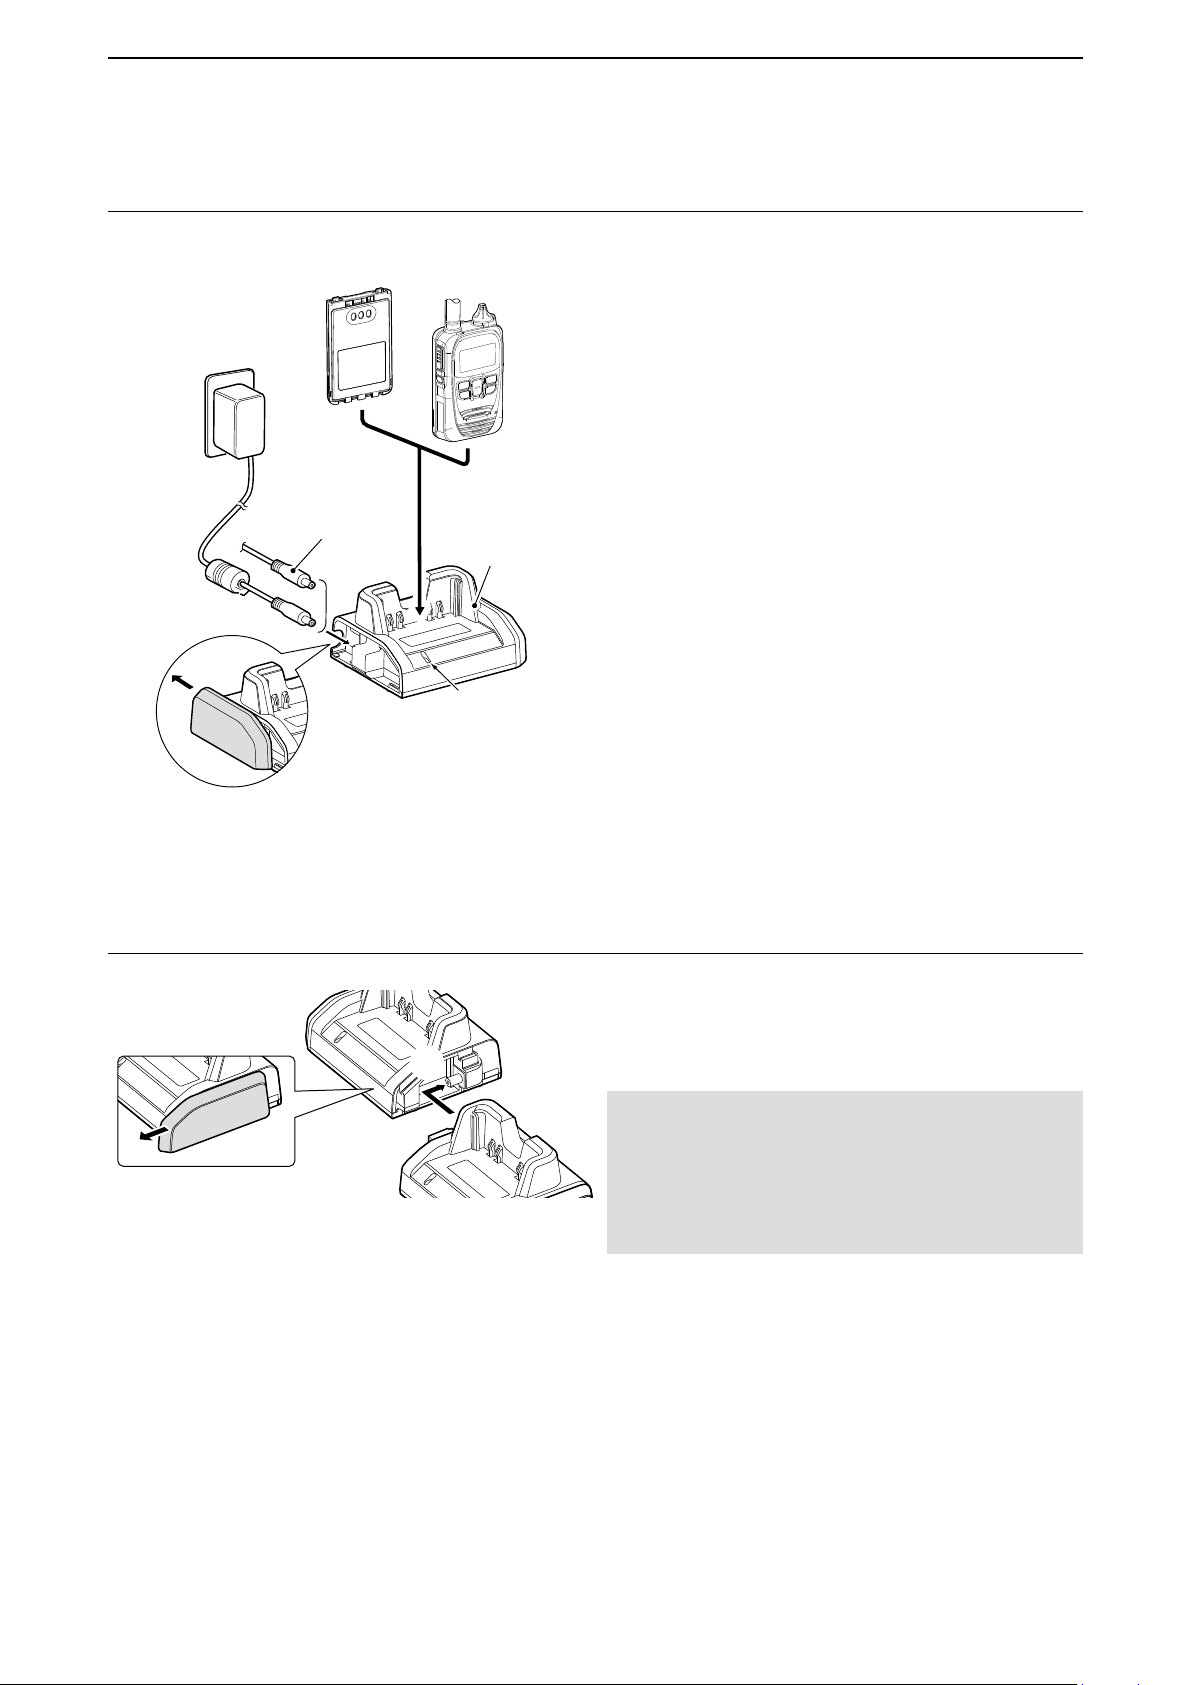
■ Charging with the optional BC-202IP3L
AC outlet
BC-123S
(straight type
plug)
Battery pack
Optional CP-25H
(for a 12 V cigarette
lighter socket) can
be used instead of
the BC-123S.
Transceiver
+ battery pack
Desktop charger
BC-202IP3L
Charging
indicator
The BC-202IP3L rapidly charges a battery pack.
Charging time*: Approximately 3.0 hours for the BP-272
Approximately 5 hours for the BP-307
* This is the time when the battery is exhausted, and
charging with the transceiver power off.
The following item is required.
• BC-123S (straight type plug)
L No BC-123S is supplied, depending on the charger
versions.
About charging indicator
Lights orange: Charging
Lights green: Charging completed
Blinks orange: See page 6-2.
■ Connecting BC-202IP3L together
2
1
You can connect up to 6 BC-202IP3L together.
1. Remove the charger’s right cover.
2. Snap the DC power plug to the another charger’s
DC power jack.
RWARNING! NEVER connect more than 6 chargers
together. It may result in an electric shock, cause a re,
overheating, or damage the chargers.
RWARNING! NEVER use other than the BC-228 AC
adapter when connecting multiple BC-202IP3L units. It
may result in an electric shock, cause a re, overheating,
or damage the chargers.
5-7
Page 44
OPTIONAL PRODUCTS
5
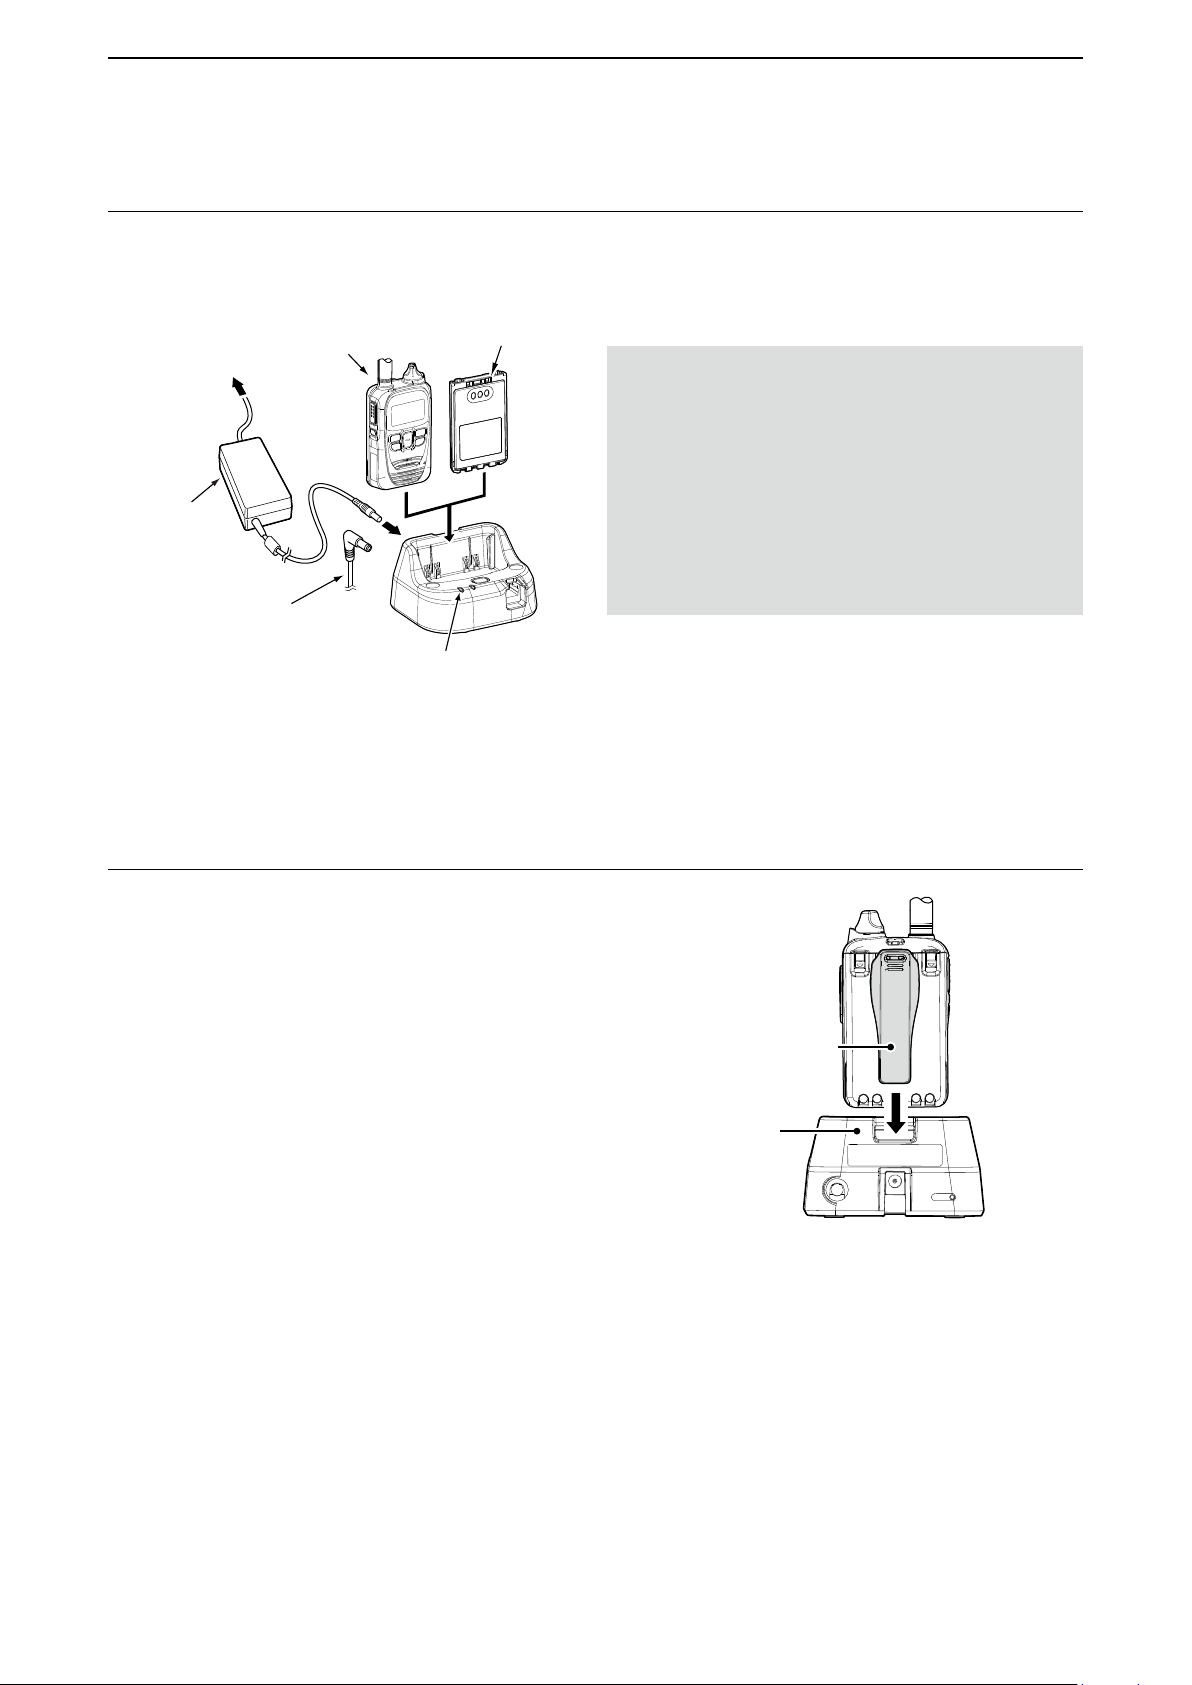
■ Charging with the optional BC-218
The BC-218 is designed to rapidly charge the BP-272 Li-ion
battery pack.
To an AC
outlet
Power adapter
BC-207S*
Optional CP-22 or CP-23L
can be used.
* May not be supplied, or the shape may differ, depending on the charger version.
Transceiver +
Battery pack
Battery pack
Charging indicator
Orange: Charging
Green: Charged
Approximate charging time
BP-272: 2.1 hours (when charging the battery pack only)
L Charging time may differ, depending on the using
conditions of the transceiver while charging.
NOTE:
• The rapid charger, BC-218 has a charging timer that
stops charging after approximately 5 hours has passed.
• If the battery pack does not properly charge when
it is attached to the transceiver, remove it from the
transceiver and insert only the battery pack into the
charger.
• After charging is completed, the BC-218 will
automatically recharge a battery pack when the battery
voltage decreases. When the battery pack is often left in
the BC-218 for long periods of time, the battery life cycle
will be shortened.
■ Insert the transceiver into the BC-218
You can insert and charge a transceiver that has the belt clip attached. Attach
the belt clip, then insert the transceiver into the BC-218 until it is locked in place.
BC-218
Belt clip
5-8
Page 45
OPTIONAL PRODUCTS
5
■ Bluetooth
®
operation
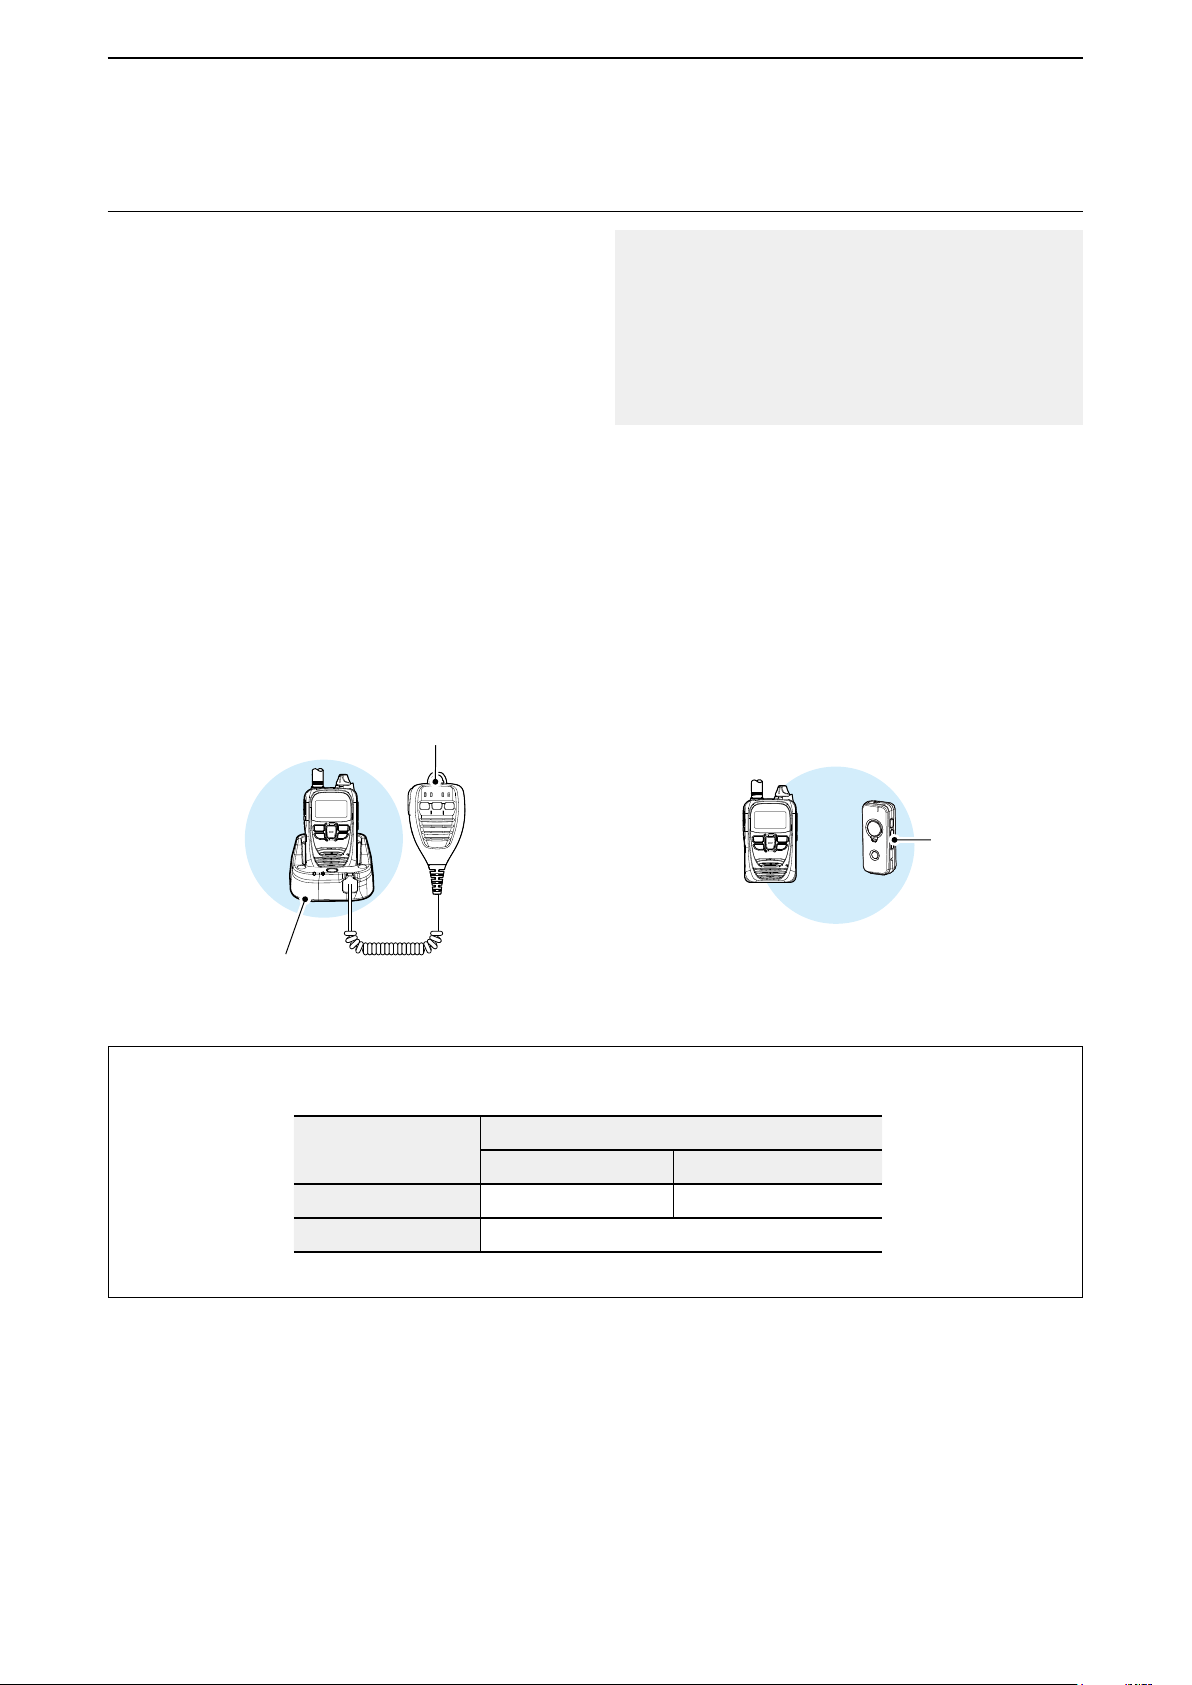
• You can connect to other Bluetooth wireless technology
enabled devices (Headset or Charger) with the installed
Bluetooth unit.
L Only the BC-218 and VS-3 are guaranteed as of July
2022.
L This function may not be usable, depending on a
preset. Ask your dealer for detail.
• The communication range of Bluetooth is approximately
10 meters (33 feet).
• Up to 6 Bluetooth devices can be stored on the pairing
device list. But using only 2 Bluetooth devices is
recommended.
◎ BC-218 Rapid Charger
When you connect the optional HM-215 speaker
microphone to the BC-218, you can transmit and receive
the audio by wirelessly connecting to the transceiver and
BC-218.
HM-215 (option)
About the Electromagnetic Interference:
Bluetooth uses the 2.4 GHz band. When using the
BC-218 in the 2.4 GHz band near a Bluetooth device,
interference may occur. This may cause a decrease in
communication speed, or an unstable connection.
In such a case, use the BC-218 away from the Blue-
tooth device communication area, or stop using the
Bluetooth device.
◎ VS-3 Bluetooth® Headset
When you connect the optional VS-3* Bluetooth
headset to the transceiver, you can wirelessly transmit
and receive the headset audio. The VS-3 has a [PTT]
switch, so you can transmit in the same way as using the
transceiver’s [PTT] switch.
L[FWD], [RWD] and [PLAY] keys on the VS-3 are disabled.
Bluetooth
Bluetooth
BC-218 (option)
NOTE:
The audio volume control differs, depending on the “Bluetooth Synchronous Volume” item setting (p. 4-6) and Bluetooth function.
Volume linkage
Disable 10* 32
Enable
* While using the HM-215, the volume level can be adjusted by the [VOL] (+) and [VOL] (–) keys.
BC-218 VS-3
According to the [PWR/VOL] dial
Volume setting
*
VS-3
(option)
5-9
Page 46
OPTIONAL PRODUCTS
5
■ Bluetooth® operation (continued)
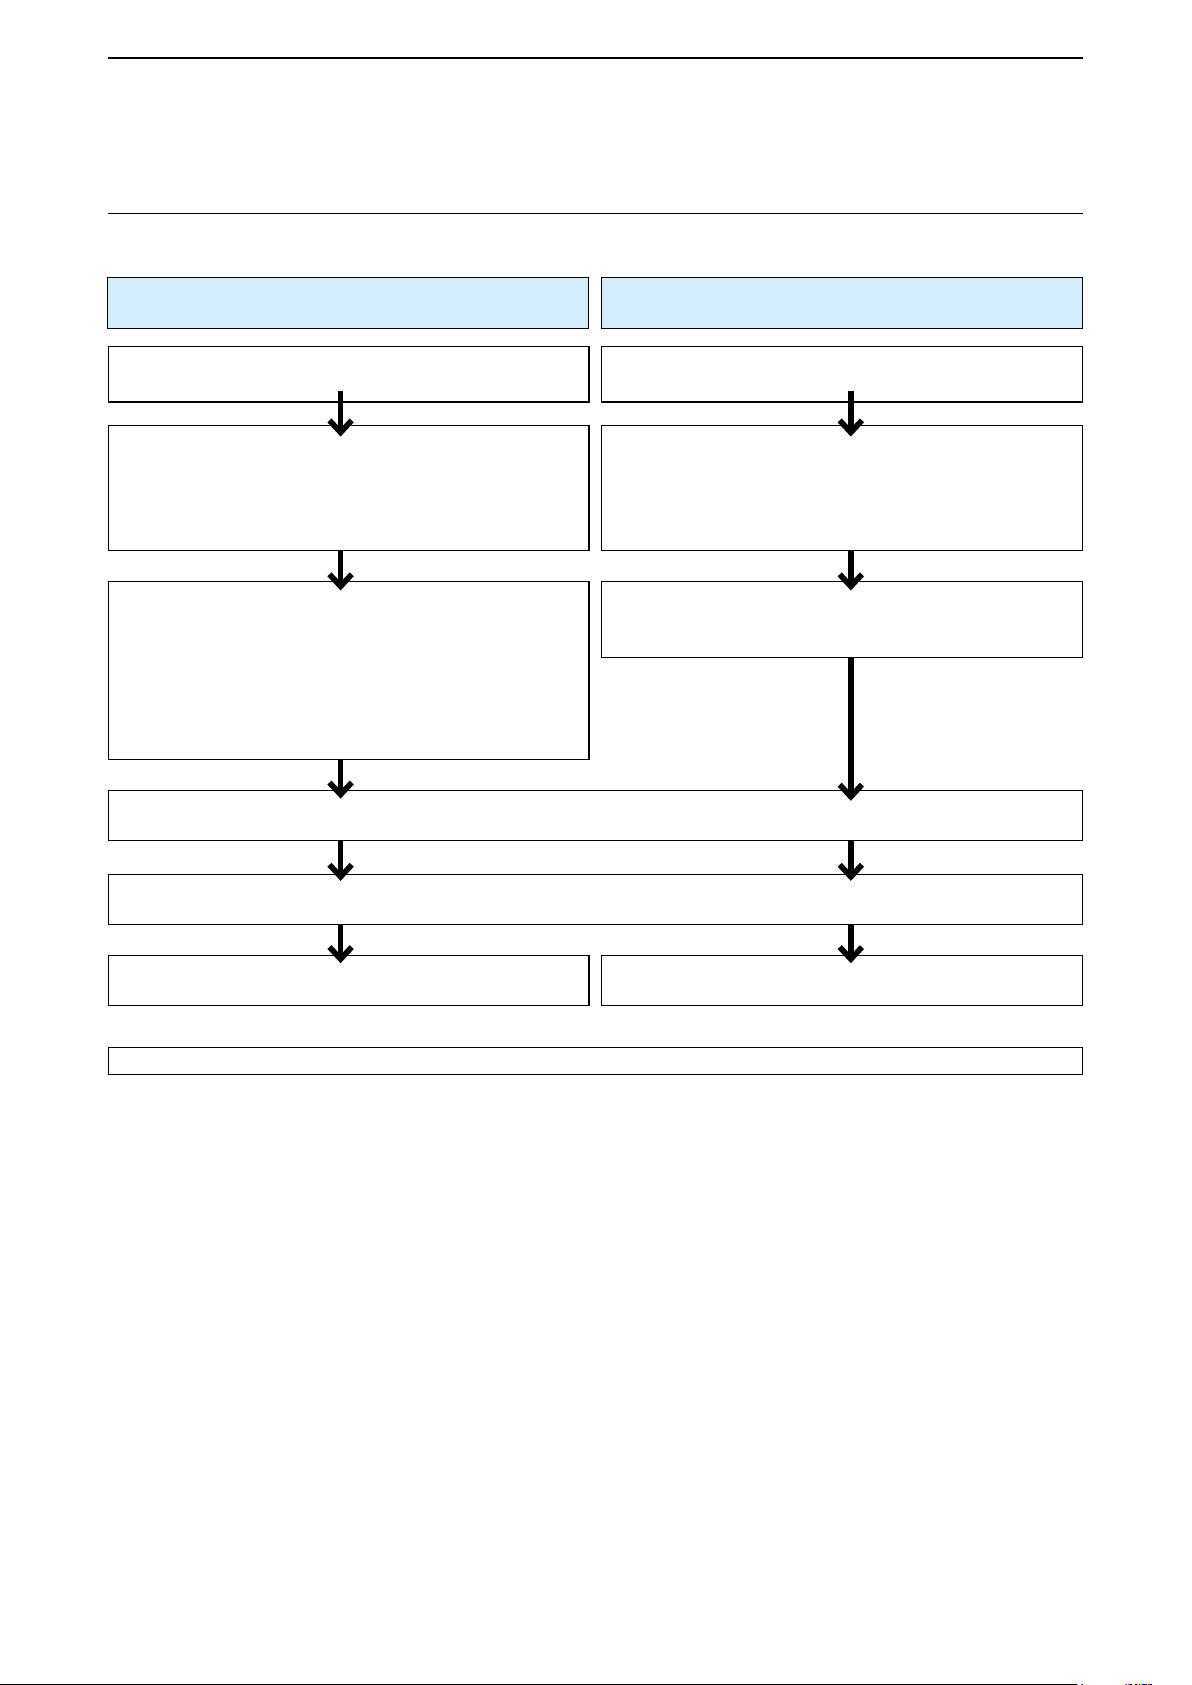
Read the instructions following the procedures shown below.
Using BC-218 (Rapid Charger) Using VS-3 (Bluetooth Headset)
HM-215/BC-218 description (p. 5-11)
Pairing the transceiver with the BC-218
1. Turning ON the Bluetooth function (p. 5-13)
2. Entering the Pairing mode (BC-218)
3. Searching for Bluetooth devices
(p. 5-15)
(p. 5-14)
Connecting and disconnecting
Connecting operation on the BC-218
•
Disconnecting the Bluetooth connection with the BC-218
•
(p. 5-19)
Selecting the disconnect device from the pairing list
•
(p. 5-21)
(p. 5-16)
Deleting a Bluetooth device from the pairing list (p. 5-22)
Initializing the pairing list (Transceiver) (p. 5-23)
Charging VS-3
(p. 5-12)
Pairing the transceiver with the VS-3
1. Turning ON the Bluetooth function (p. 5-13)
2. Enter the Pairing mode (VS-3)
3. Search for the Bluetooth devices
(p. 5-15)
(p. 5-14)
Connecting and disconnecting
Connecting/Disconnecting
•
(pp. 5-17 and 5-21)
Initializing the pairing list (BC-218) (p. 5-24) Initializing the pairing list (VS-3) (p. 5-25)
TIP: You can configure the Bluetooth function in the Set mode.
5-10
Page 47
OPTIONAL PRODUCTS
5
■ HM-215/BC-218 description
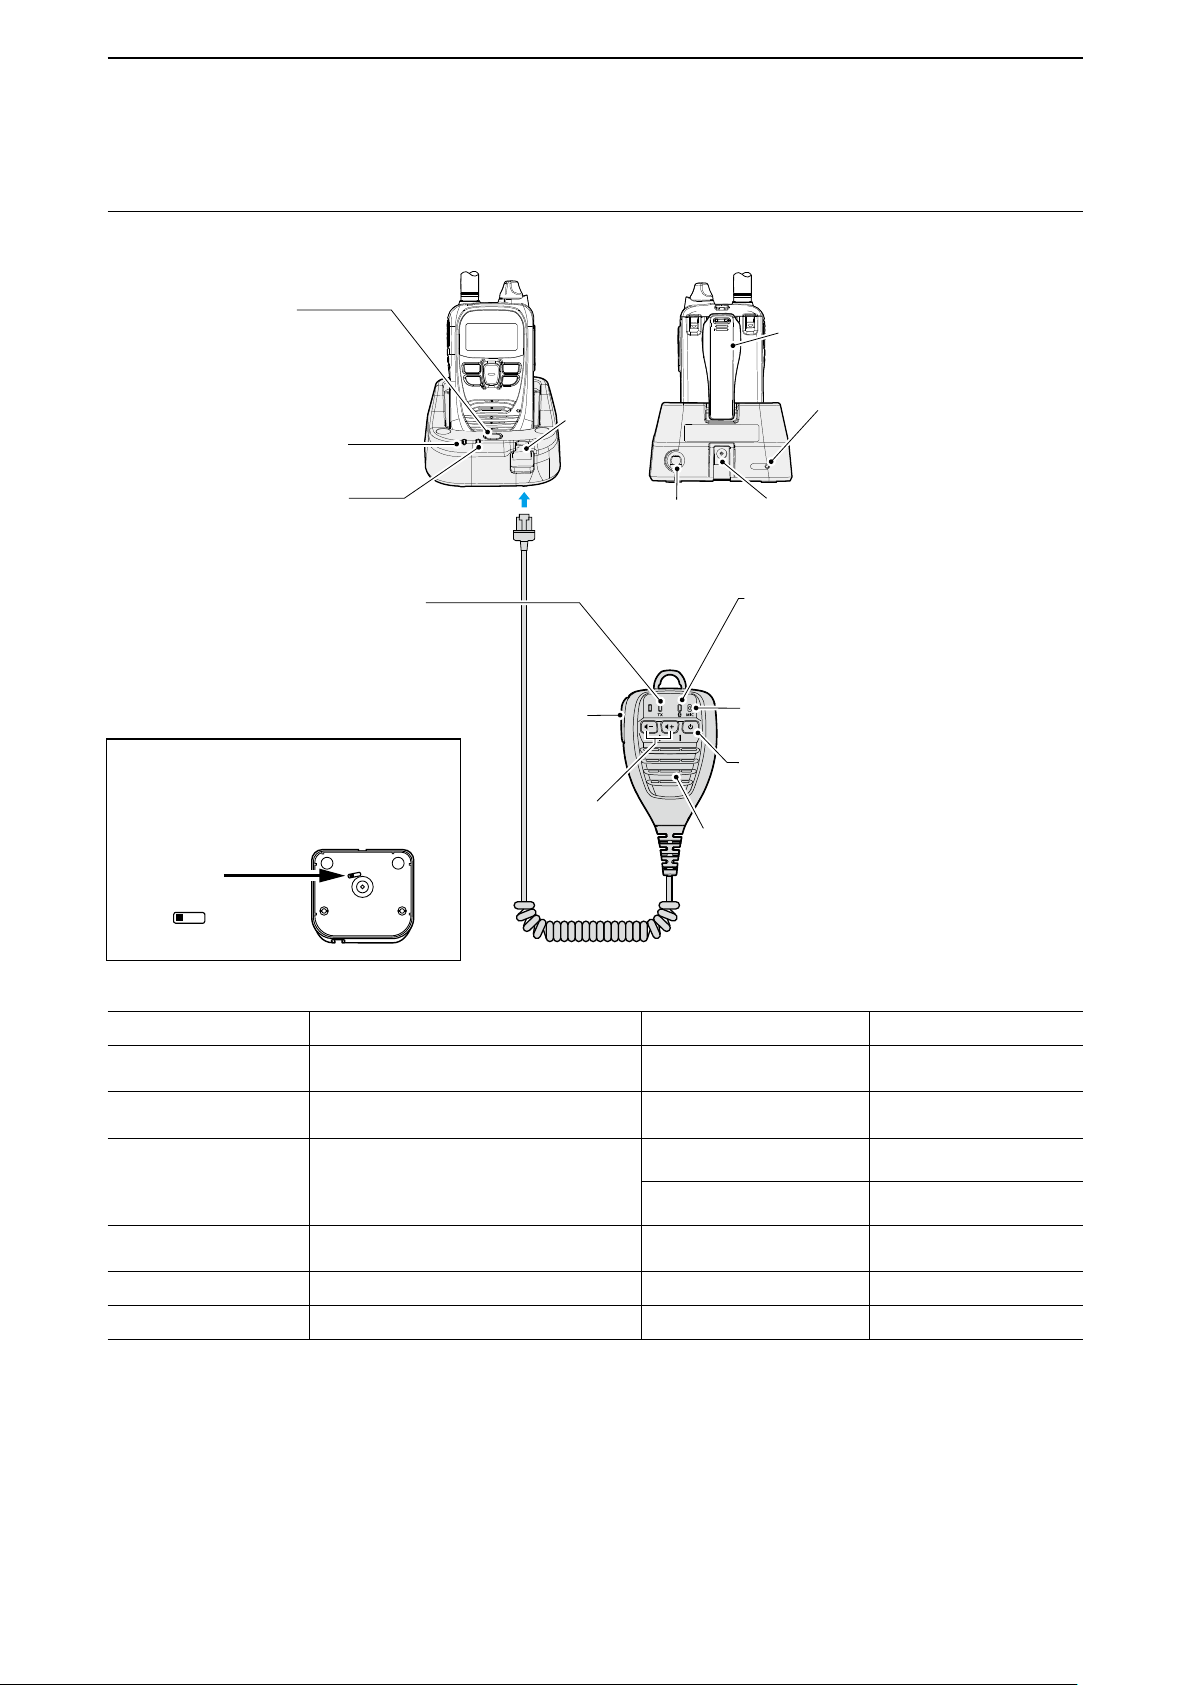
Insert the HM-215 into the BC-218’s MIC jack, and place the BC-218 on a flat surface.
Front view Rear view
Bluetooth button
Hold down for 3 seconds to turn
the Bluetooth function ON or OFF.
Hold down for 6 seconds to enter
the Pairing mode.
Supplied belt clip
BC-218
Charging Indicator
Charging: Orange
Charged: Green
Bluetooth connection indicator
Bluetooth function is ON: Blinks blue
Bluetooth function is OFF: OFF
In the Pairing mode: Blinks alternately red and blue
Initializing the pairing list: Purple
Transmitting:
Blinks alternately red, blue and blue
TX indicator
Light orange when PTT
on the HM-215 is pushed.
TIP: About the Bluetooth power switch
You can turn OFF power to the Bluetooth
unit by sliding the switch on the bottom of
the BC-218, as shown below:
Bluetooth
power switch
ON
→
OFF
MIC jack
Connect the optional SP-35.
PTT
Volume
(Down/Up)
Speaker
HM-215
RESET button
If the Buluetooth function
malfunctions, push here to
reset the unit.
DC jackExternal speaker jack
Connects the optional BC-207S, CP-22
or CP-23L.
Bluetooth connection indicator
Bluetooth function is ON: Blinks blue
Bluetooth function is OFF: OFF
In the Pairing mode: Blinks alternately red and blue
Initializing the pairing list: Purple
Transmitting:
Microphone
Bluetooth button
Hold down for 3 seconds
to turn the Bluetooth
function ON or OFF.
(Hold down for 6 seconds
to enter to the Pairing
mode.)
Blinks alternately red, blue and blue
Function Operation Comfirmation beep Bluetooth indicator
Turning ON the Bluetooth
function
Turning OFF the Bluetooth
function
Pairing
Making a call*
Setting the volume up*
Setting the volume down*
1
1
Hold down the [Bluetooth] button for 3 seconds. Melody sounds (Scale goes up) Blinks blue
Hold down the [Bluetooth] button for 3 seconds. Melody sounds (Scale goes down.) OFF
When the Bluetooth functon is OFF, hold down the
[Bluetooth] button for 6 seconds
Push [PTT]. “Pi”*2 (Default)
Push [+] ― ―
1
Push [-] ― ―
Ready to connect: “PiPa-”
Connected: “PiRo”
Alternatively Blinks red and blue
while waiting for a connection
Blinks blue twice every
3 seconds when connected
Blinks red once then Blinks blue
twice every 3 seconds
LIf the Bluetooth function is ON and the pairing list is blank, the BC-218 starts up in the Pairing mode.
1
*
Functional only when a Bluetooth device is connected.
2
*
The melody differs, depending on the “Calling Notice Tone” item (p. 4-4) or “Bluetooth PTT Beep” item (p. 4-7) in the Set
mode.
5-11
Page 48
OPTIONAL PRODUCTS
PC
5
Charging VS-3
■
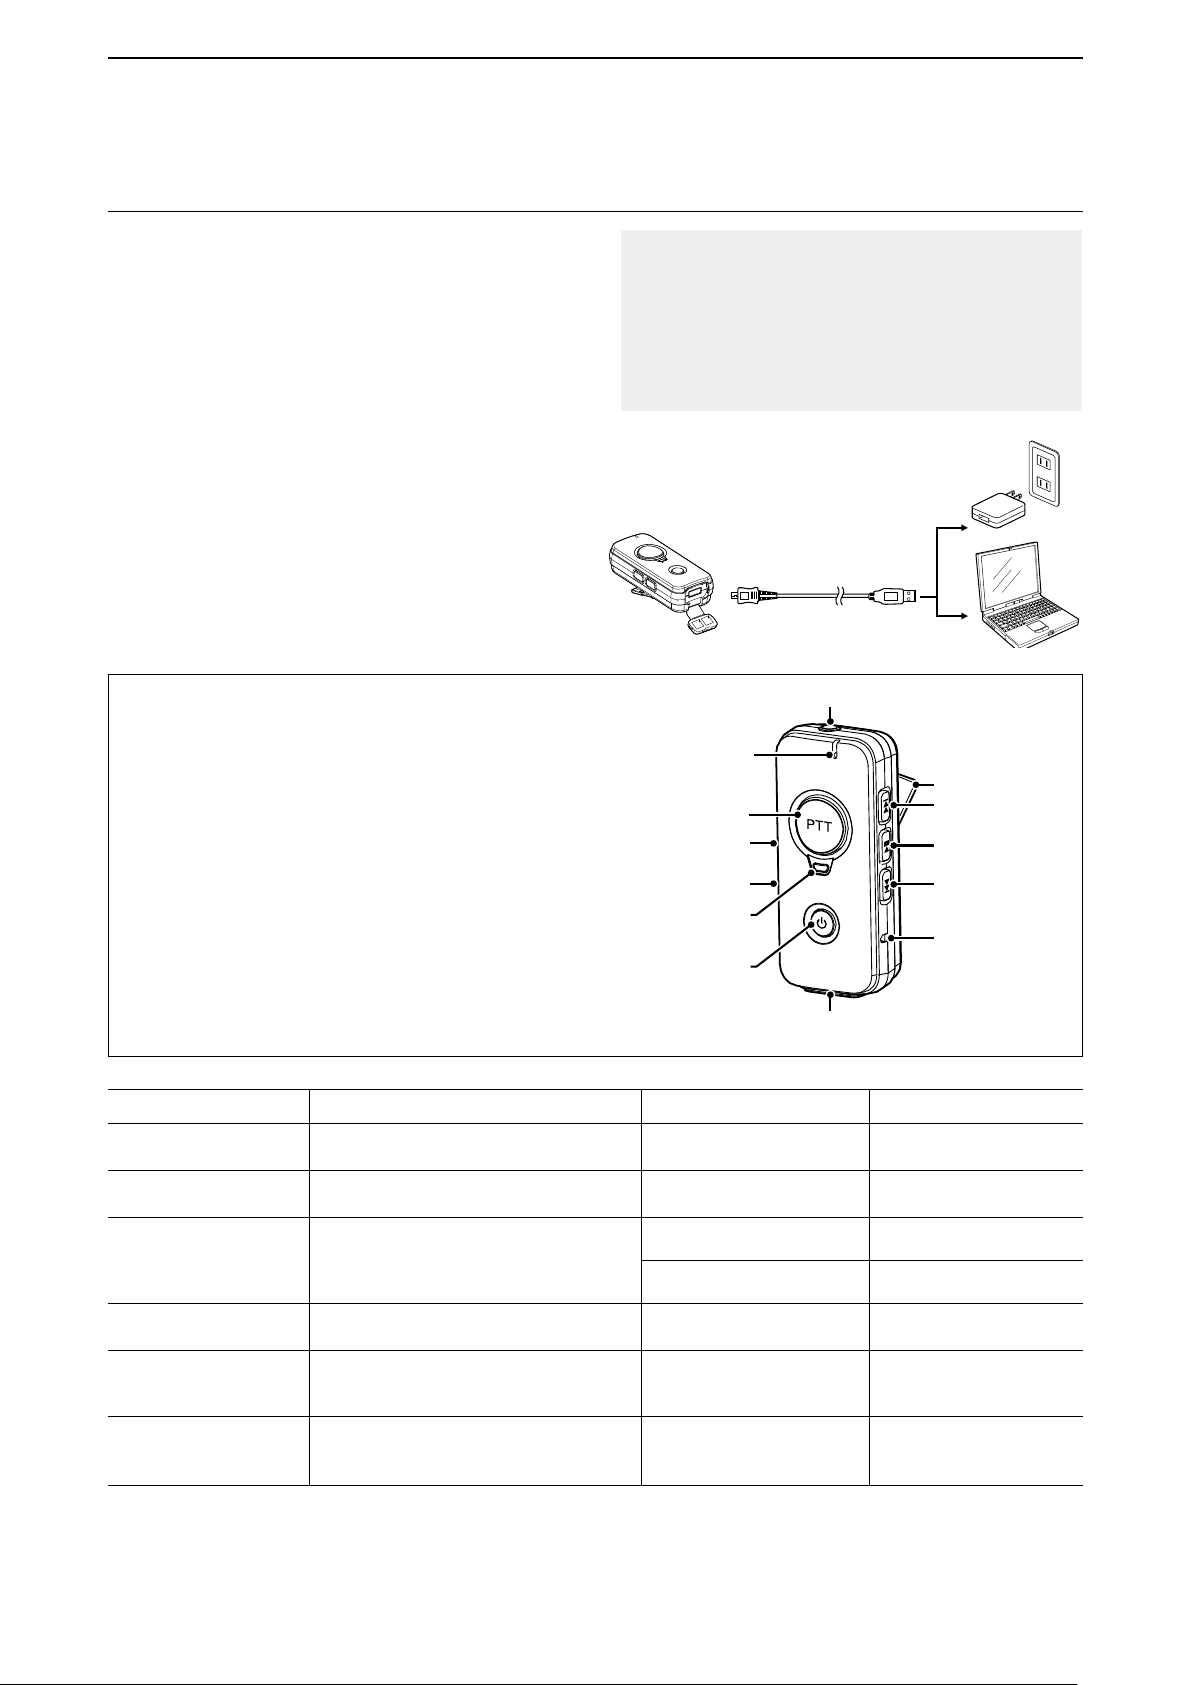
Fully charge the VS-3 before using. Charging is also
necessary when the LED blinks red every 3 seconds.
1. Make sure the headset power is OFF.
• If it’s ON, hold down [PWR] for 3 seconds.
2. Open the USB port cover, and then connect the
VS-3 to a USB power adapter, or a PC, with the
supplied USB cable.
• While charging, the LED lights red.
• When the charge is completed, the LED turns OFF.
NOTE:
• If the headset does not operate normally,
push [RESET] to perform a force power OFF.
• When the volume is set to too low in level,
the audio may not be loud enough to hear.
Setting the volume level to “28” or higher is recommended.
R DANGER!
The charging time is approximately 3 hours.
If the LED does not turn OFF after 3 hours of charging,
disconnect the USB cable to stop charging.
Overcharge may degrade the battery performance or
shorten battery life. Also, it may cause a fire or explosion.
While charging, you cannot use the headset.
USB power adapter
(user supplied)
VS-3
To a USB port
Earphone jack (3.5 (d) mm)
Microphone
Clip
[PTT]
[VOL] (+
)
[FWD]*
[PLAY]*
[VOL] (–)
LED
[PWR]
Charging port
*[FWD], [RWD] and [PLAY] keys on the VS-3 are not functional.
Function Operation Comfirmation beep Bluetooth indicator
Turning ON the Bluetooth
function
Turning OFF the Bluetooth
function
Pairing
Making a call*
Setting the volume up*
Setting the volume down*
1
1
Hold down the [PWR] for 3 seconds. Melody sounds (Scale goes up) Blinks blue
Hold down the [PWR] for 3 seconds. Melody sounds (Scale goes down.) OFF
Confirm the VS-3 is turned OFF, and then hold down
the [PWR] for 6 seconds.
Push [PTT]. “Pi”*2 (Default)
Push [+]
1
Push [-]
Ready to connect: “PiPa-”
Connected: “PiRo”
“Pi”
( High tone sounds when the volume
is set to the maximum level.)
“Boo”
( Low tone sounds when the volume
is set to the mimimum level.)
Alternatively Blinks red and blue
while waiting for a connection.
Blinks blue twice every
3 seconds when connected.
Blinks red once then Blinks blue
twice every 3 seconds.
―
―
[RWD]*
[RESET]
*1 Functional only when a Bluetooth device is connected.
2
*
The beep differs, depending on the “Calling Notice Tone” item (p. 4-4) or “BT PTT Beep” item (p. 4-7) in the Set mode.
5-12
Page 49
OPTIONAL PRODUCTS
– – –
LOG
SET
Enable
Bluetooth
SET
5
Pairing the transceiver with the BC-218 or VS-3
■
Pairing is a process to be able to establish a connection between a headset and other Bluetooth devices. Once pairing is
established with the device, there is no need to pair again.
• You may not nd a target Bluetooth device if there are many other Bluetooth
those devices, or move away from them.
• When the Bluetooth function is turned OFF, the audio is output from the transceiver. Be sure to not set the
transceiver’s volume level too high.
LGuaranteed Bluetooth devices are the BC-218 and VS-3. (as of July 2022)
1. Turning ON the Bluetooth function
®
devices nearby. In that case, stop using
1. While holding down [FUNC], turn ON the transceiver power.
• Enters the Set mode.
2. Release [FUNC] when “SET” is displayed.
3. Push [FUNC] several times to select “Bluetooth.”
4. Push [▲]/[▼] to select “Enable.”
5. Push [CLR/LOCK].
• Exits the Set mode.
[電源/音量]ツマミ
[PWR/VOL]
[FUNC]キー
[FUNC]
[CLR/LOCK]
[CLR/LOCK]キー
[▲]/[▼]
[▲]/[▼]キー
5-13
Page 50
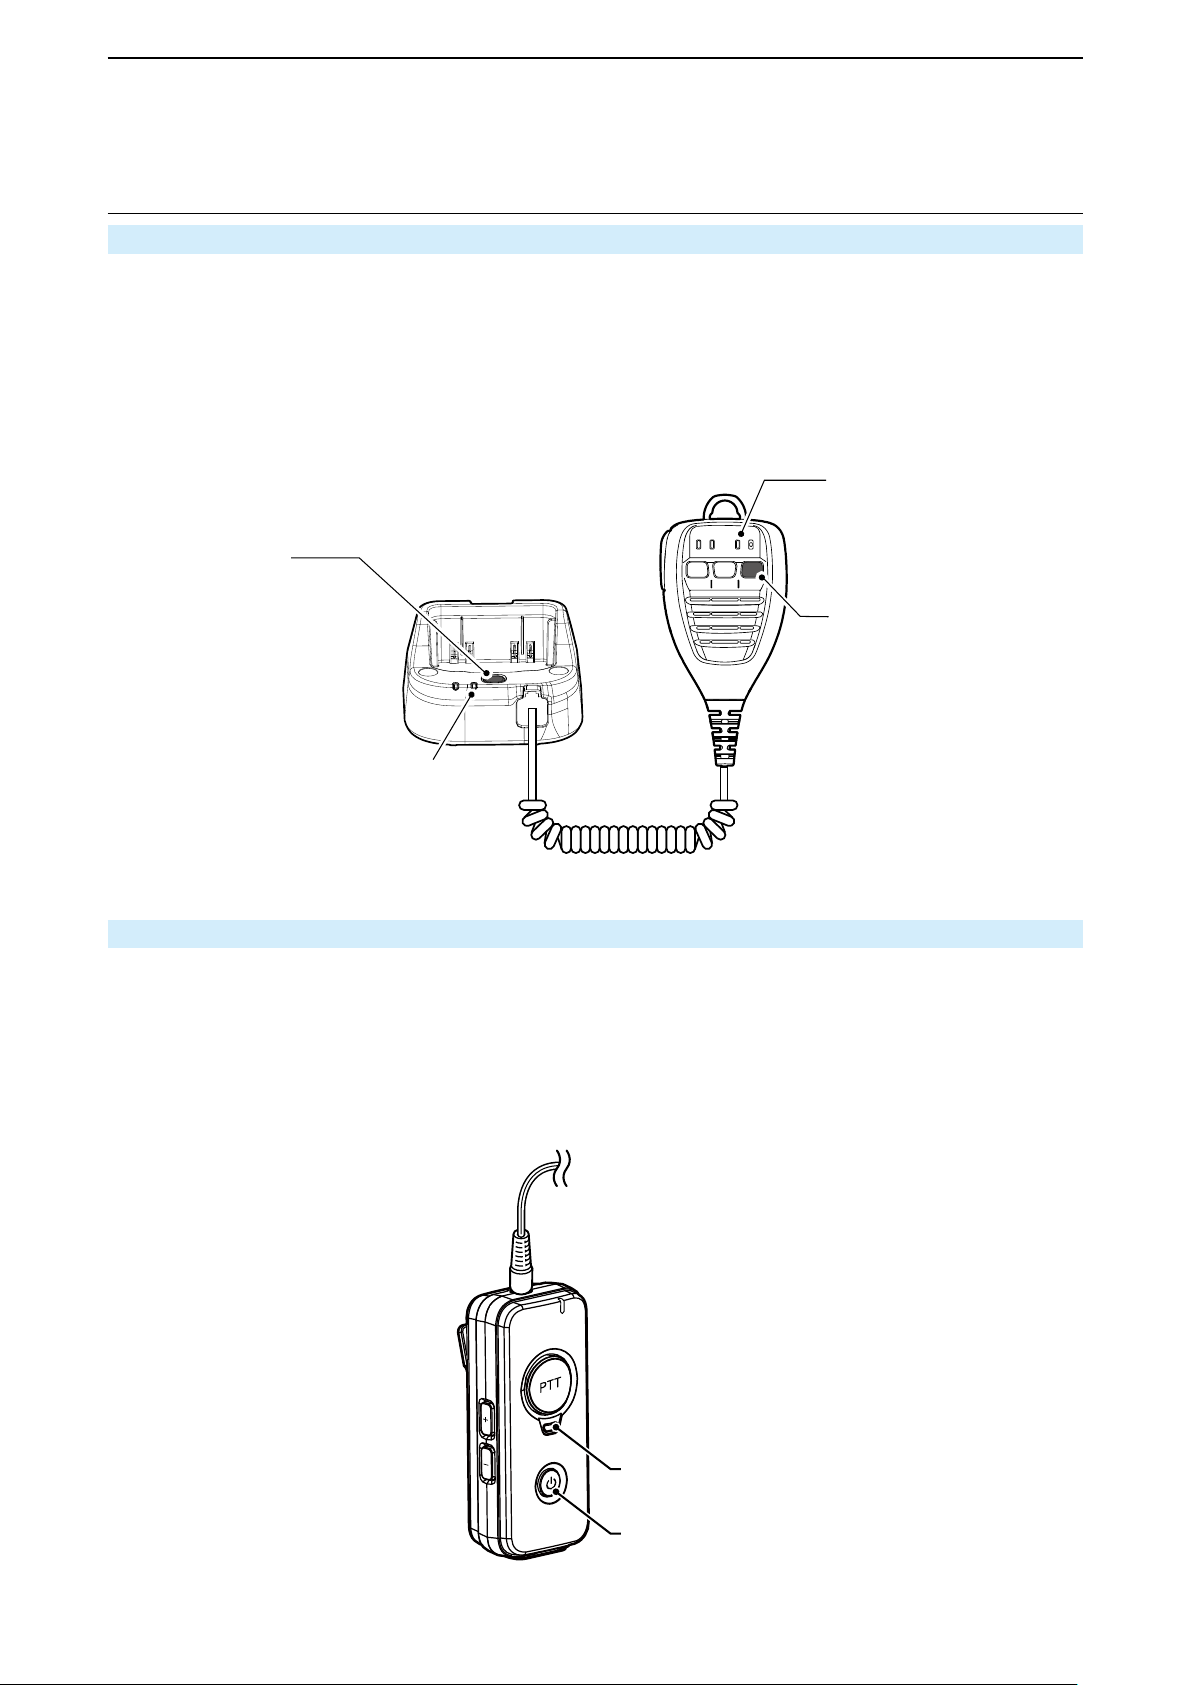
OPTIONAL PRODUCTS
Bluetooth
Bluetooth indicator
5
■ Pairing the transceiver with the BC-218 or VS-3 (continued)
2. Enter the Pairing mode with the BC-218
1. Connect the optional HM-215 to the BC-218.
2. When the Bluetooth function is OFF, hold down the Bluetooth button of either the BC-218 or HM-215) for
approximately 6 seconds until the Bluetooth indicator starts alternately blinking red and blue.
• A beep sounds.
3. Release the Bluetooth button.
LIf the pairing list is blank, the BC-218 automatically enters the Pairing mode when the BC-218 is turned ON.
L If 5 minutes has passed without any device paired, the Pairing mode is automatically canceled. After another 5
minutes has passed, the BC-218’s power is automatically turned OFF.
button
Bluetooth button
BC-218
HM-215
Bluetooth indicator
2. Enter the Pairing mode with the VS-3
1. Confirm the VS-3 is turned OFF.
2. H old down [PWR] for approximately 6 seconds.
• The indicator quickly blinks red then blue, and then the headset enters the Pairing mode.
3. Release [PWR].
LIf the pairing list is blank, the VS-3 automatically enters the Pairing mode when the it is turned ON.
L If 5 minutes has passed without any device paired, the Pairing mode is automatically canceled. After another 5
minutes has passed, the VS-3’s power is automatically turned OFF.
LED
[PWR]
5-14
Page 51
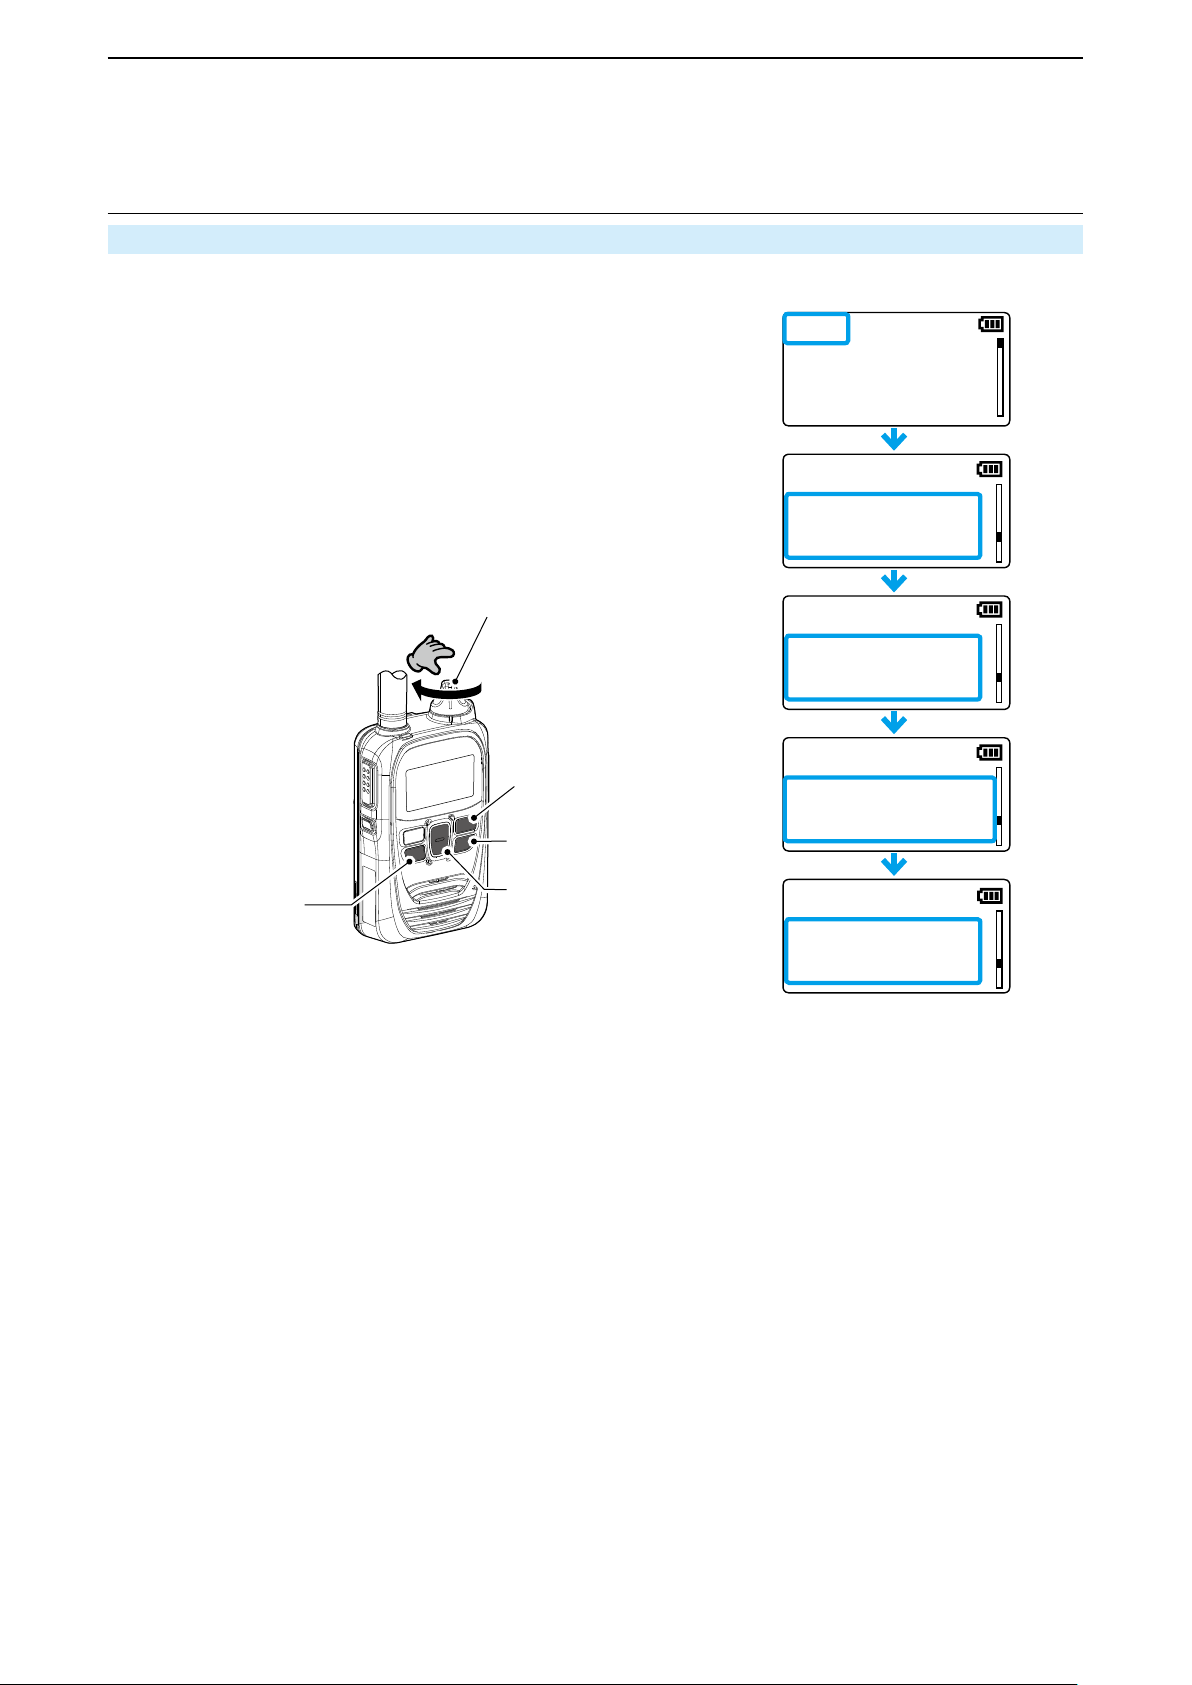
OPTIONAL PRODUCTS
– – –
LOG
SET
Search
Search BT Device
SET
Searching···
Search BT Device
SET
ICOM BT-000:00-00
SET
Connect
SET
[電源/音量]ツマミ
[履歴]
キー
5
■ Pairing the transceiver with the BC-218 or VS-3 (continued)
3. Search for Bluetooth devices
1. While holding down [FUNC], turn ON the power.
• Enters the Set mode.
2. Release [FUNC] when “SET” is displayed.
3. Push [FUNC] several times to select “Search BT Device.”
4. Push [Call history].
• “Searching…” is displayed
• When Bluetooth devices are found, their device name and BD address
are displayed on the screen.
5. Push [▲]/[▼] to select a device, then push to [Call history].
• When the pairing has succeed, “Connect” is displayed.
• To retry the search, push [▲]/[▼] to select “Search,” then push [Call history].
6. Push [CLR/LOCK].
• Exits the Set mode.
[PWR/VOL]
[Call history]
キー
[FUNC]キー
[FUNC]
[CLR/LOCK]
[CLR/LOCK]
[▲]/[▼]
[▲]/[▼]キー
5-15
Page 52
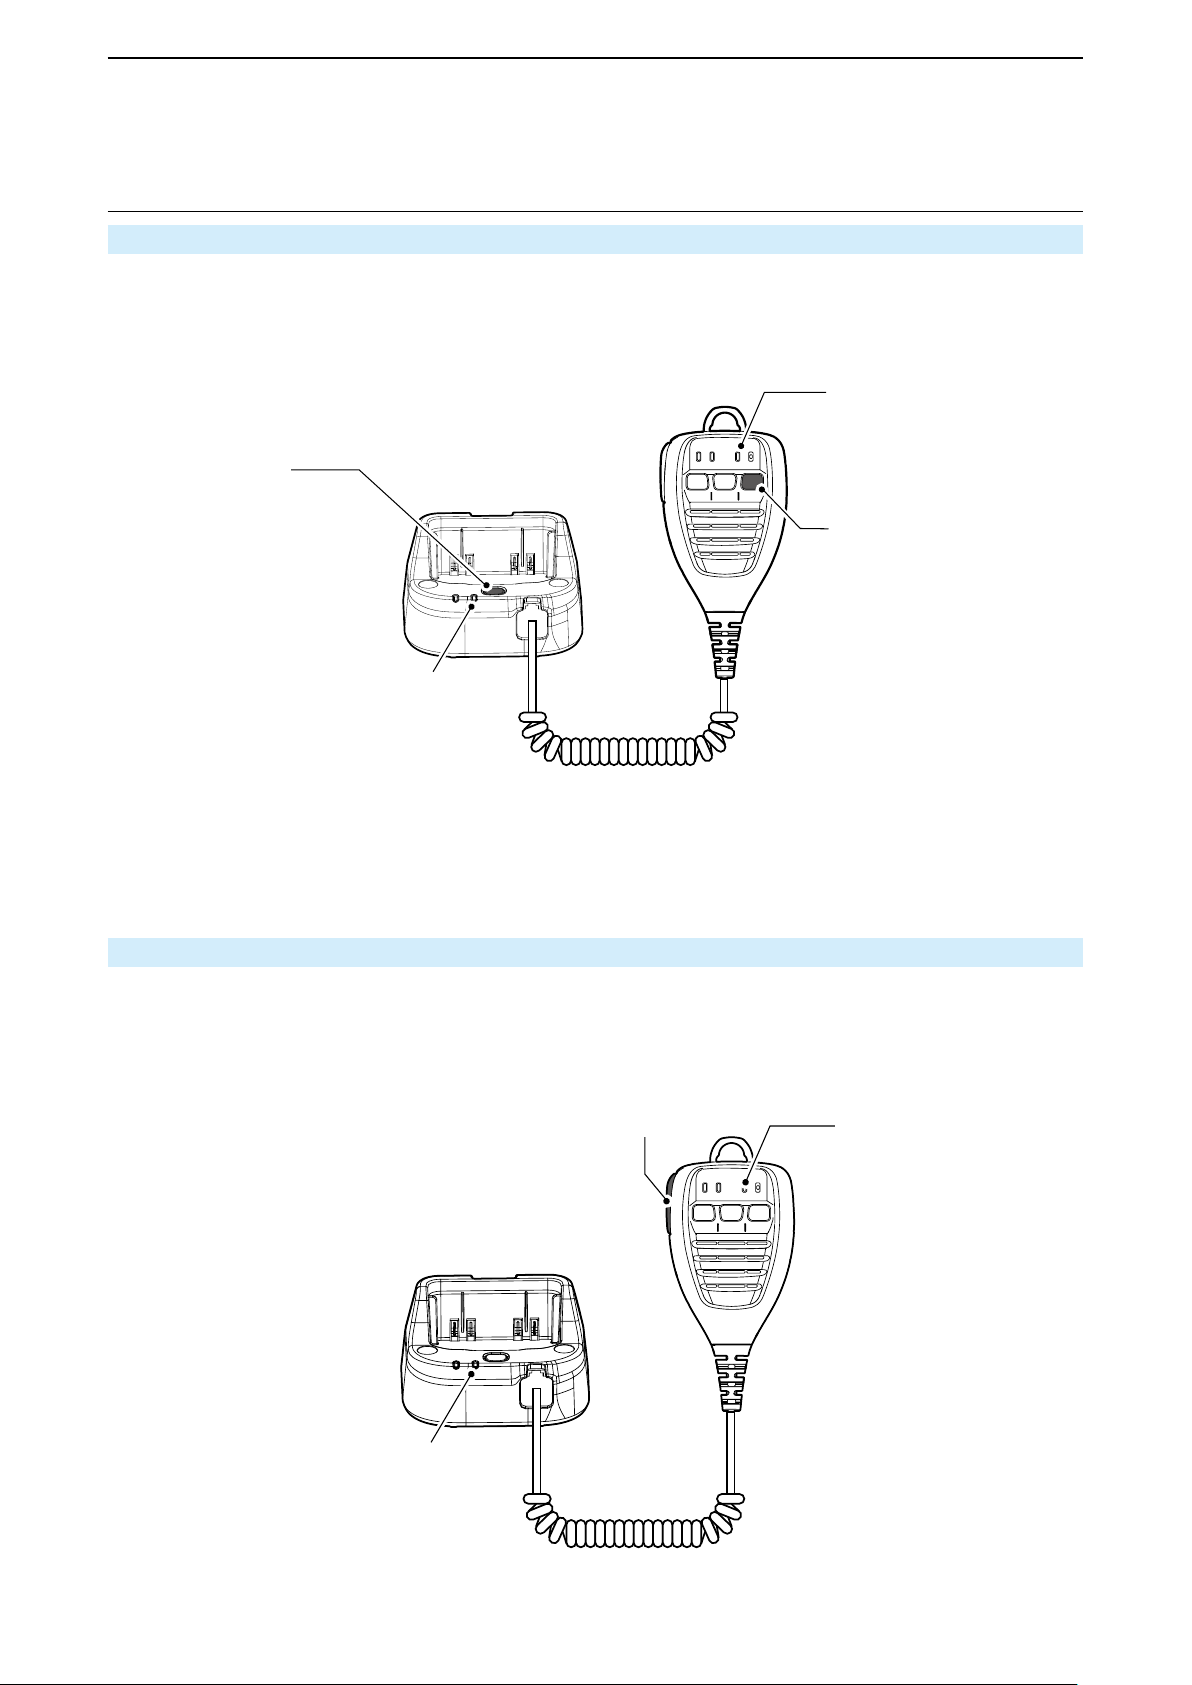
OPTIONAL PRODUCTS
Bluetooth
Bluetooth indicator
Bluetooth
indicator
5
Connecting and disconnecting
■
Connecting with the BC-218 when the Bluetooth indicator is OFF
1. Turn ON the transceiver’s Bluetooth function. (p. 5-13)
2. Hold down the Bluetooth button on the BC-218 for 3 seconds.
• The Bluetooth function is ON, and the Bluetooth indicator Blinks blue.
• After a few seconds, a beep sounds and the Bluetooth connection between the transceiver and the BC-218 is established.
button
Bluetooth button
BC-218
HM-215
Bluetooth indicator
Connecting with the BC-218 when the Bluetooth indicator blinks blue
1. Turn ON the transceiver’s Bluetooth function. (p. 5-13)
2. Push [PTT] on the HM-215 that is connected to the BC-218.
• After few seconds, a beep sounds and the Bluetooth connection between the transceiver and the BC-218 is established.
LThe paired device can be identied by its BD address on the “Pairing List.” (p. 5-18)
[PTT]
Bluetooth
BC-218
HM-215
indicator
(Blinks blue)
5-16
Page 53
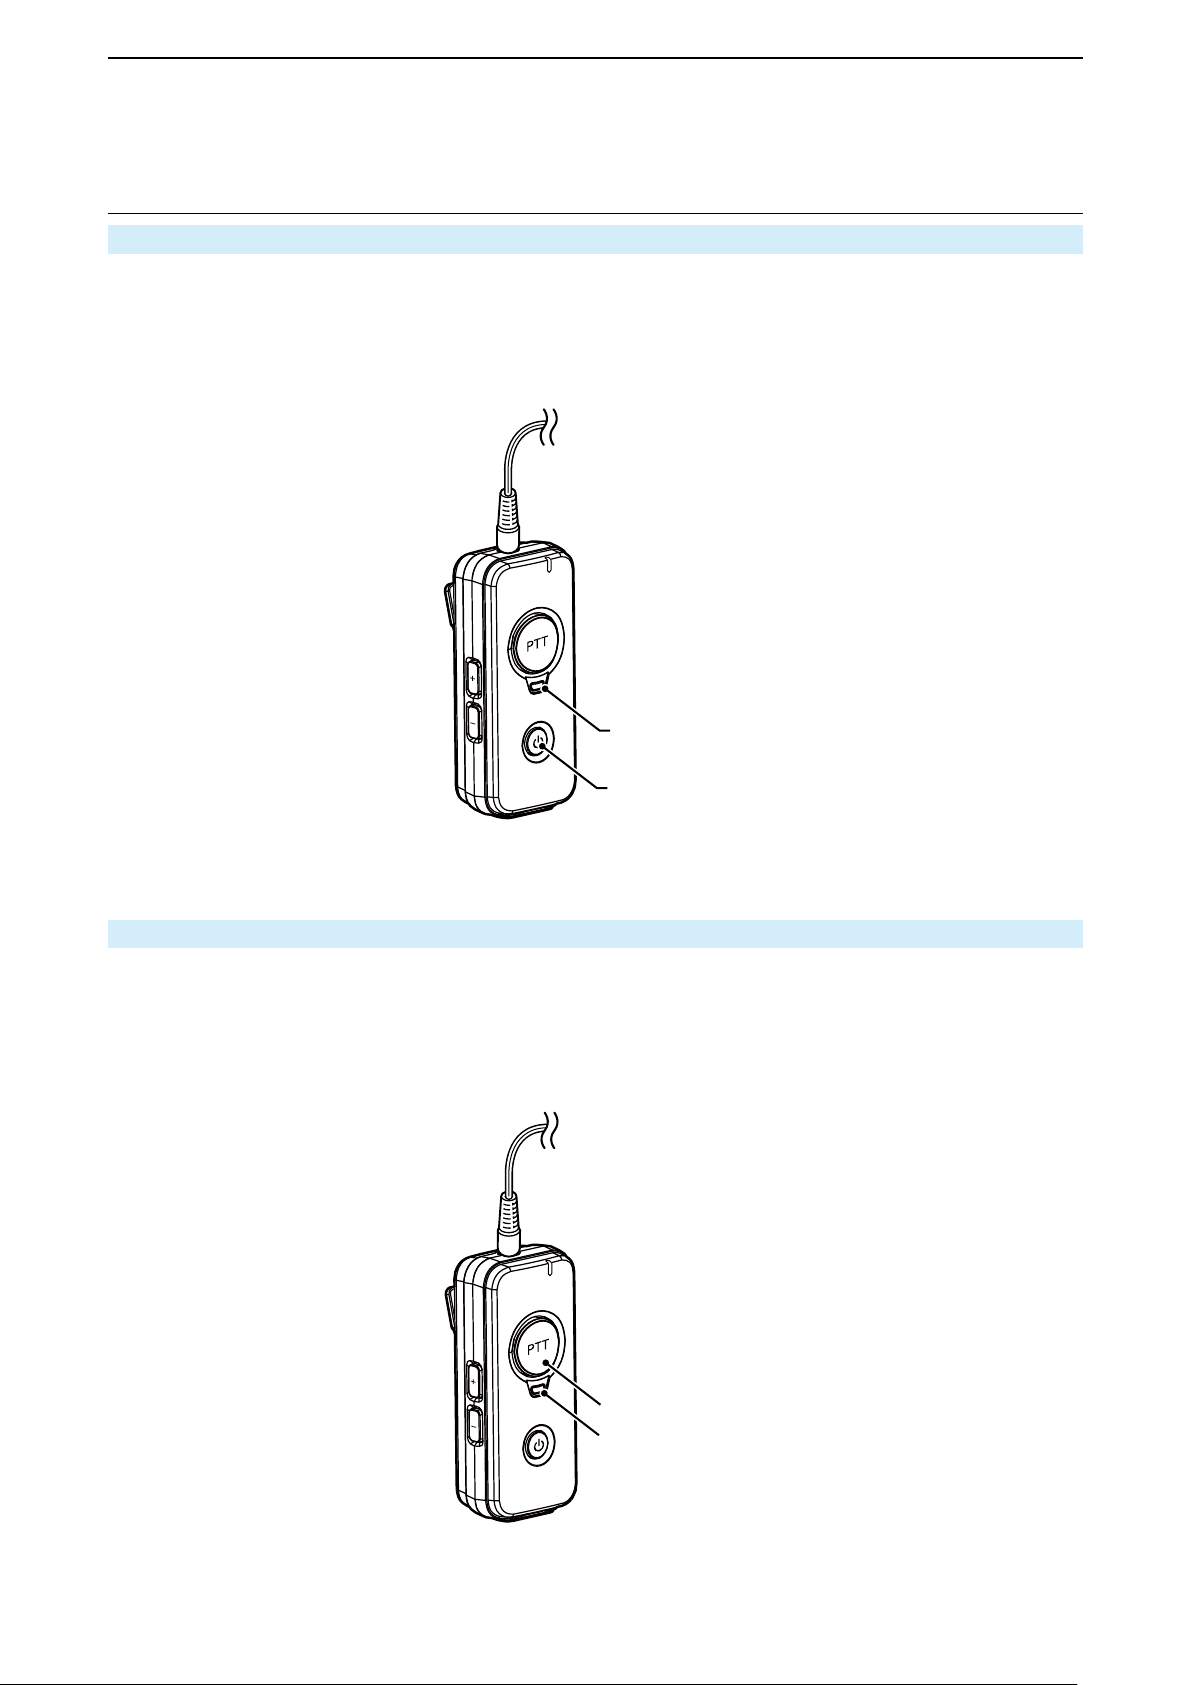
OPTIONAL PRODUCTS
5
■ Connecting and disconnecting (continued)
Connecting with the VS-3 when the Bluetooth indicator is OFF
1. Turn ON the transceiver’s Bluetooth function. (p. 5-13)
2. Hold down the [PWR] on the VS-3 for 3 seconds.
• The Bluetooth function is ON, and the Bluetooth indicator Blinks blue.
• After few seconds, a beep sounds and the Bluetooth connection between the transceiver and the VS-3 is established.
LED
[PWR]
Connecting with the VS-3 when the Bluetooth indicator blinks blue
1. Turn ON the transceiver’s Bluetooth function. (p. 5-13)
2. Hold down [PTT] on the VS-3 for 3 seconds.
• After few seconds, a beep sounds and the Bluetooth connection between the transceiver and the VS-3 is established.
LThe paired device can be identied by its BD address on the “Pairing List.” (p. 5-18)
5-17
[PTT]
LED
Page 54
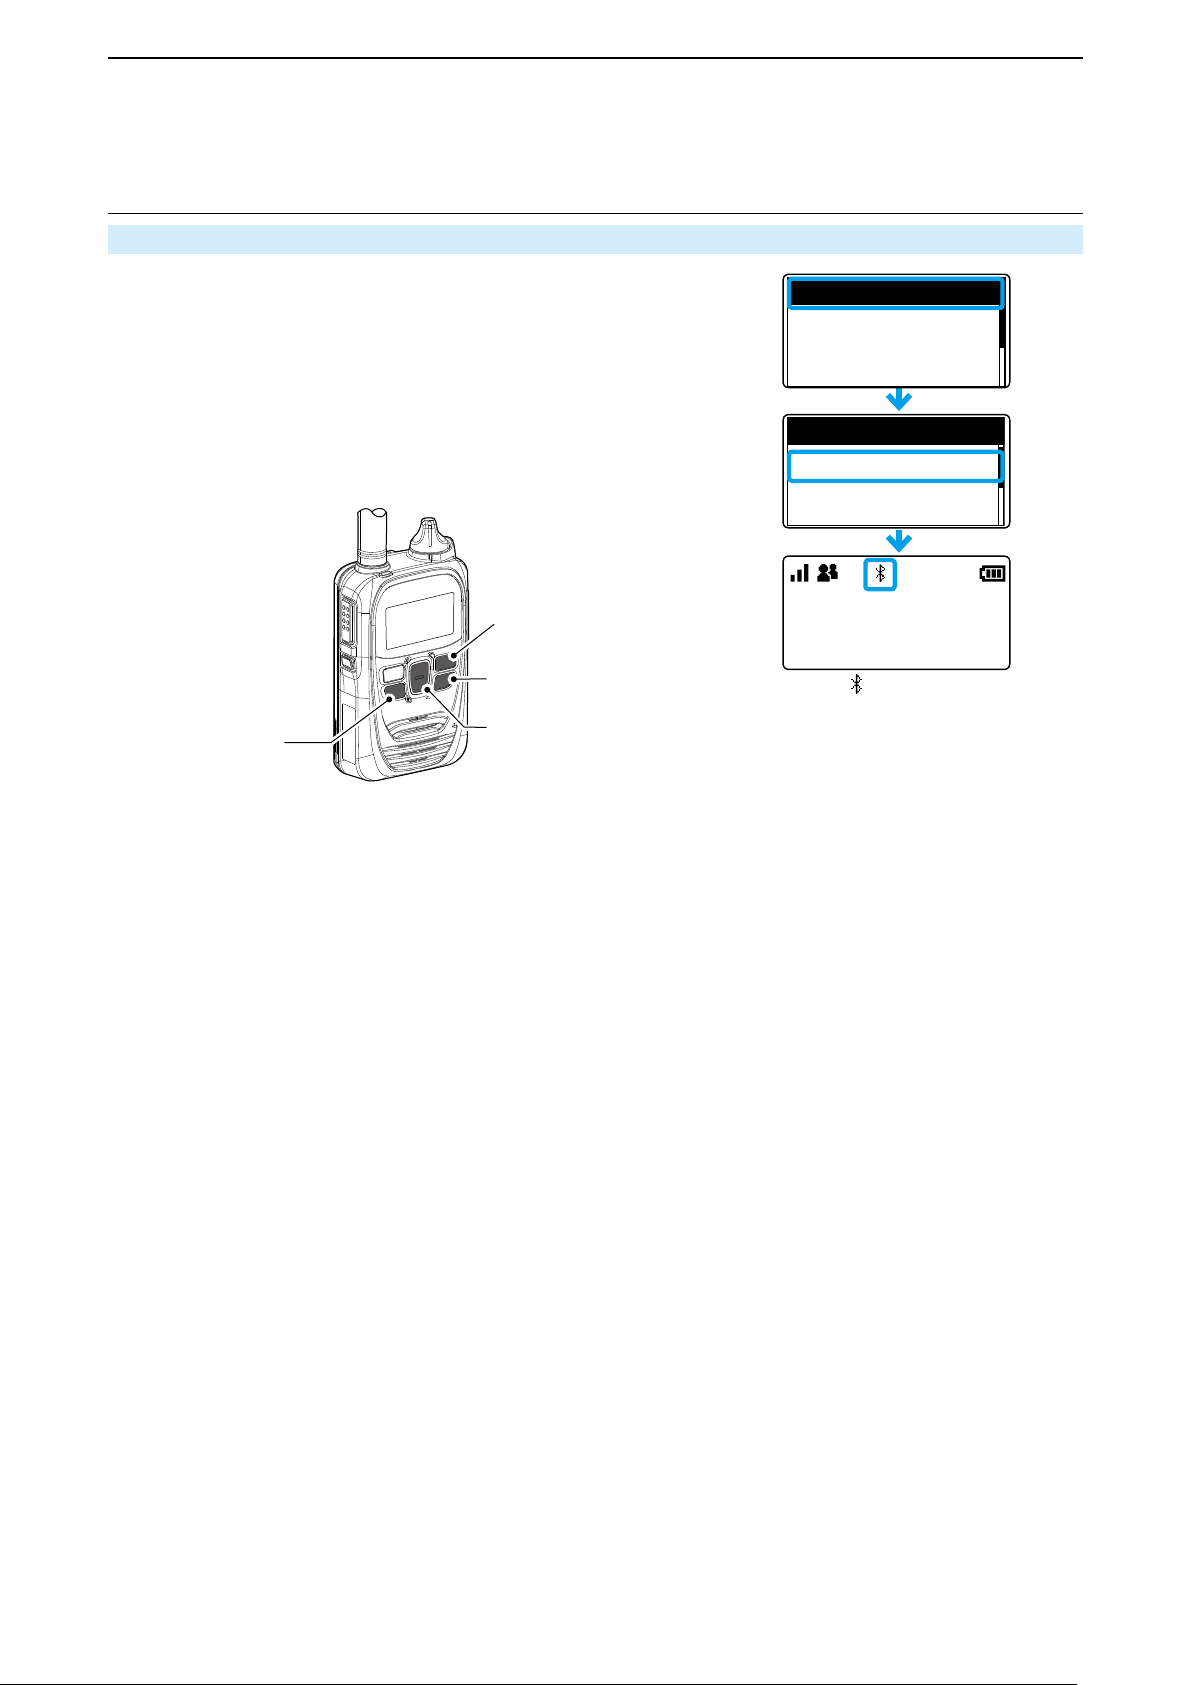
OPTIONAL PRODUCTS
All
10/4 12:57
ICOM BT-000:00-00
Unconnected
Pairing List
Pairing List
5
■ Connecting and disconnecting (continued)
Selecting the device to connect from the pairing list.
1. Turn ON the Bluetooth function. (p. 5-13)
2. Push [FUNC] to select “Pairing List.”
3. Push [▲]/[▼] to select a Bluetooth device to connect.
4. Push [Call history].
• After few seconds, a beep sounds and the Bluetooth connection
between the transceiver and the selected device is established.
5. Push [CLR/LOCK].
• Exits the Set mode.
[FUNC]キー
[FUNC]
ICOM BT-000:00-00
Connected
[Call history]
[履歴]キー
[CLR/LOCK]
[CLR/LOCK]キー
[▲]/[▼]キー
[▲]/[▼]
The “ ” icon appears
5-18
Page 55
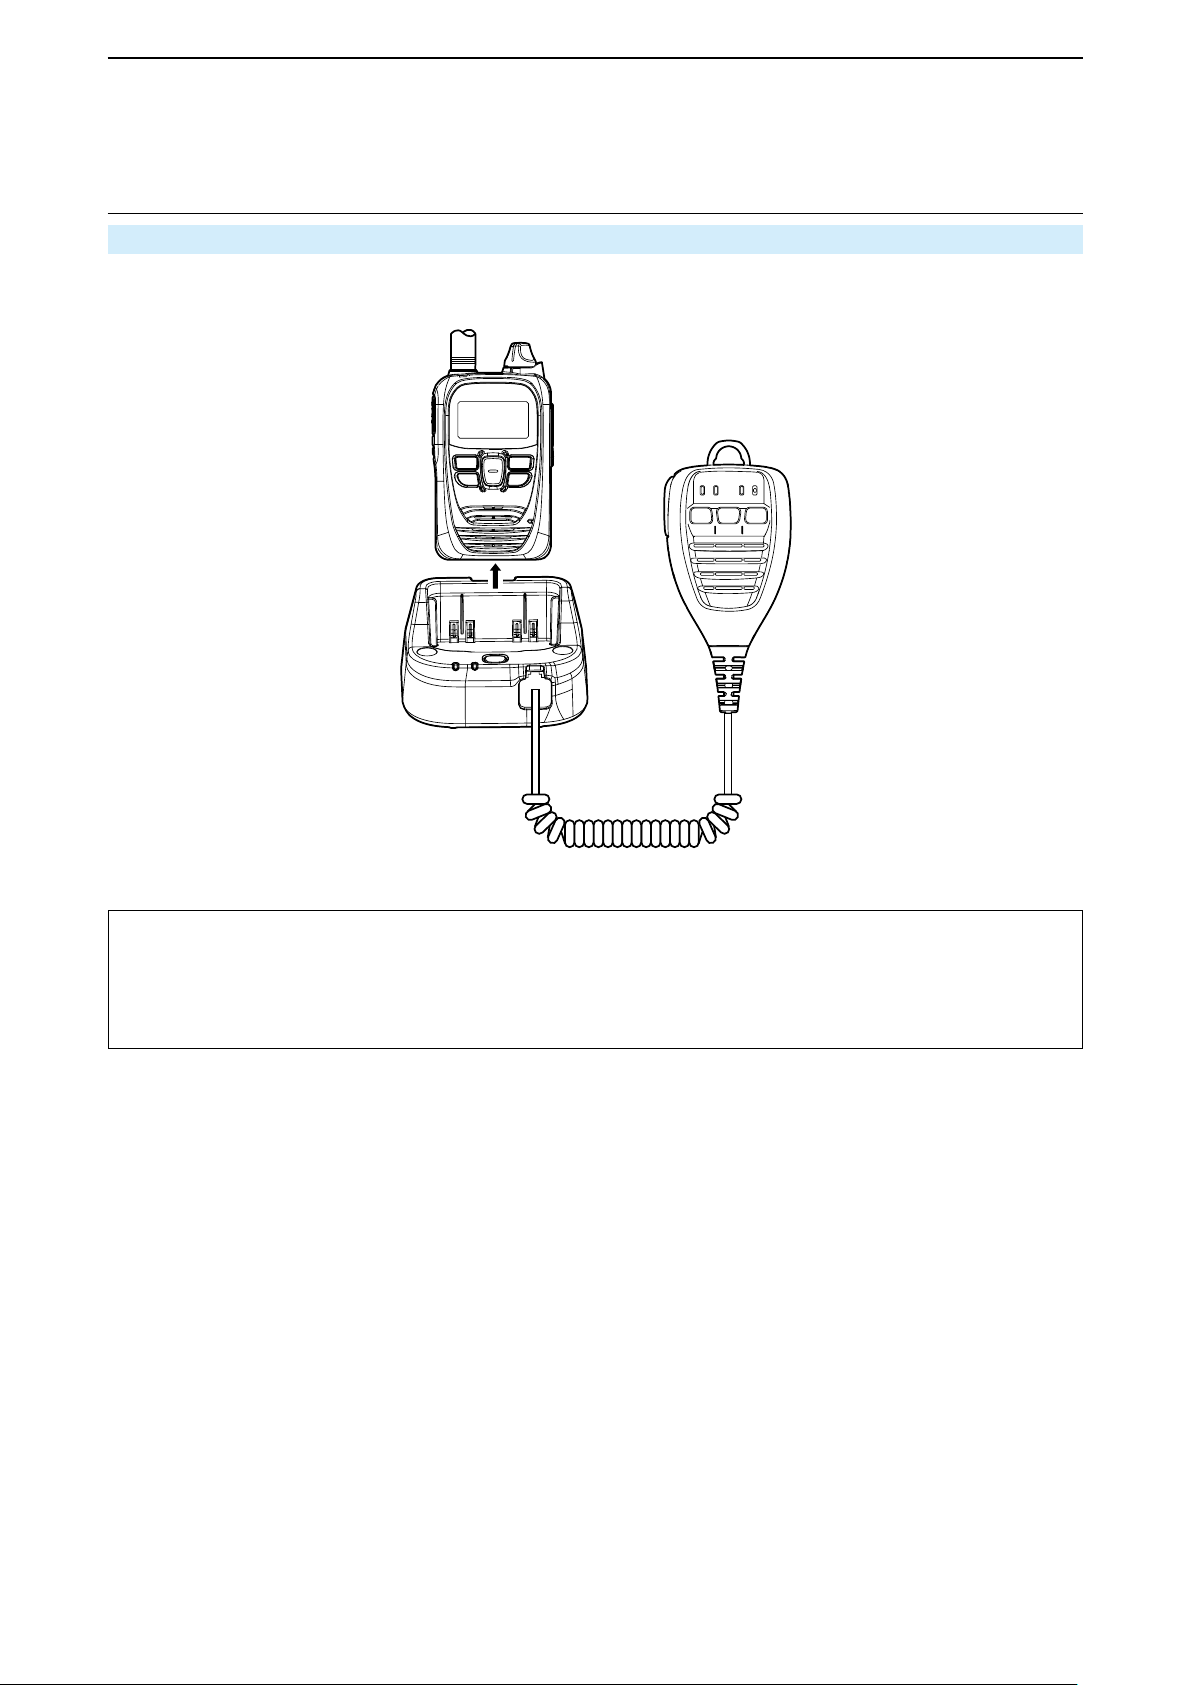
OPTIONAL PRODUCTS
BC-218
HM-215
5
■ Connecting and disconnecting (continued)
Disconnecting a Bluetooth device by removing the transceiver from the BC-218
z Remove the transceiver from the BC-218.
• A beep sounds, and then the Bluetooth device is disconnected.
NOTE:
• When you remove the transceiver from the BC-218 then insert the transceiver again within 10 minutes, the Bluetooth
connection is automatically established again.
• When 10 minutes has passed after the transceiver is removed from the BC-218, the BC-218’s Bluetooth function is
automatically turned OFF.
5-19
Page 56
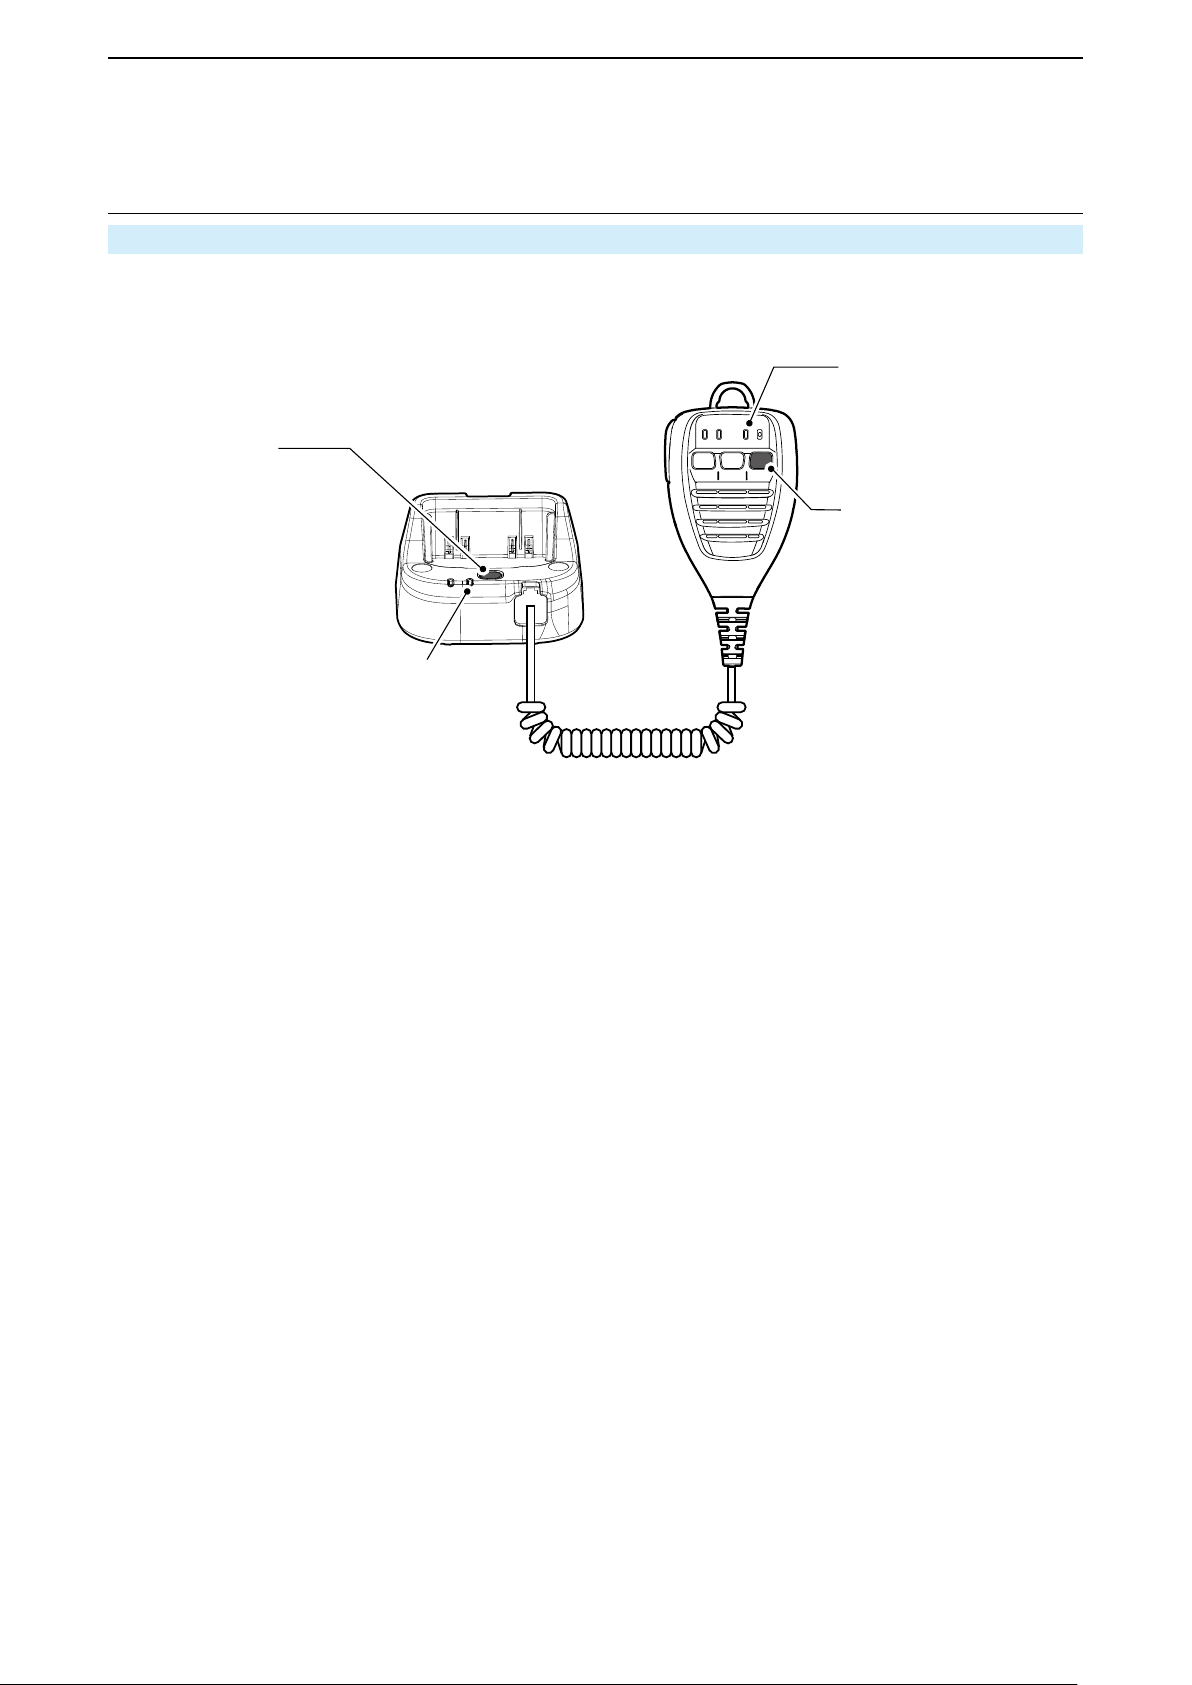
OPTIONAL PRODUCTS
Bluetooth
Bluetooth indicator
5
■ Connecting and disconnecting (continued)
Disconnecting with the BC-218 when the Bluetooth indicator blinks blue
z Hold down the Bluetooth button on the BC-218 for 3 seconds.
•
Sounds a beep then melody (Scale goes down), and the Bluetooth connection between the transceiver and the BC-218
is disconnected.
button
Bluetooth button
BC-218
HM-215
Bluetooth indicator
(Blinks blue)
5-20
Page 57
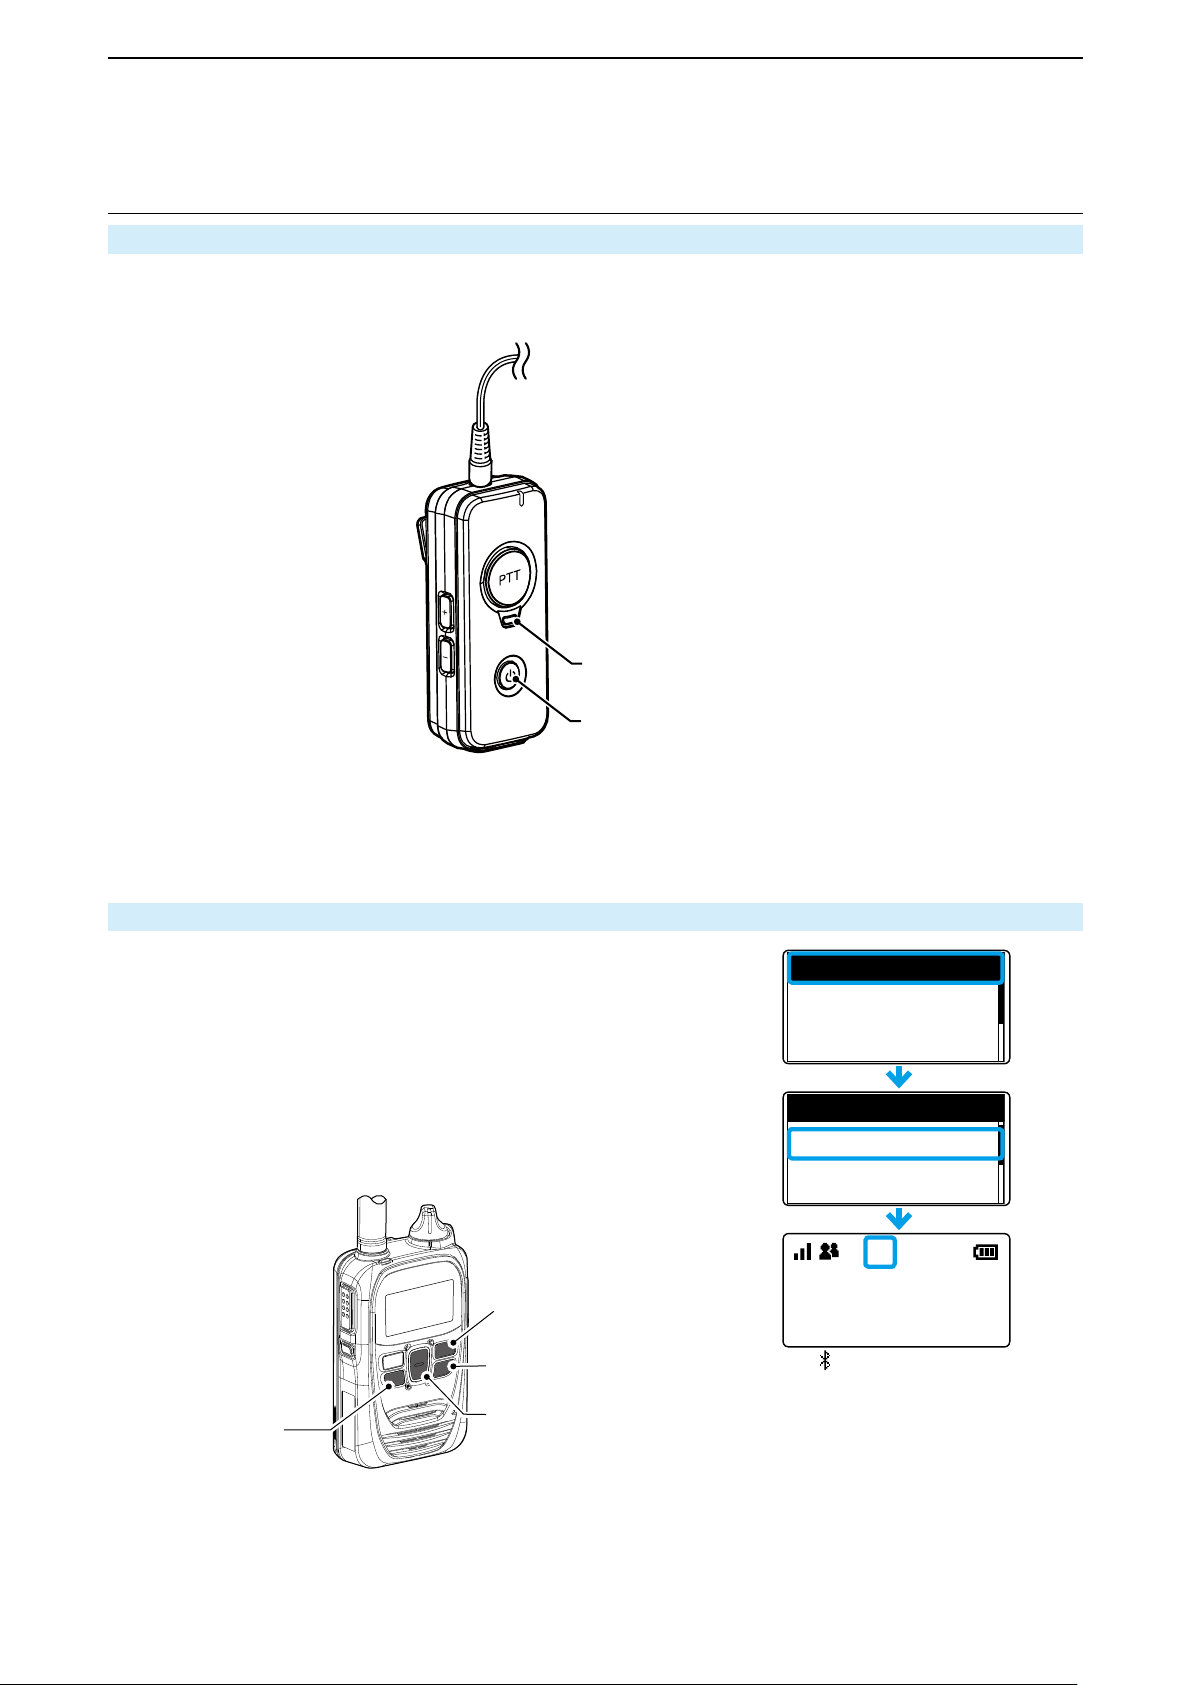
OPTIONAL PRODUCTS
Pairing List
Pairing List
5
■ Connecting and disconnecting (continued)
Disconnecting the VS-3 when the LED blinks blue
z Hold down the [PWR] on the VS-3 for 3 seconds.
• Sounds a beep then melody (Scale goes down), and the Bluetooth connection between transceiver and VS-3 are
disconnected.
LED
[PWR]
Selecting the device to disconnect from the pairing list.
1. Push [FUNC] to select “Pairing List.”
2. Push [▲]/[▼] to select the Bluetooth device to disconnect.
3. Push [Call history].
• After few seconds, a beep sounds and the Bluetooth connection
between transceiver and the selected Bluetooth device is disconnected.
4. Push [CLR/LOCK].
• Returns to the standby screen.
[FUNC]キー
[FUNC]
ICOM BT-000:00-00
Connected
ICOM BT-000:00-00
Unconnected
10/4 12:57
All
[履歴]キー
[Call history]
[CLR/LOCK]
[CLR/LOCK]キー
[▲]/[▼]
[▲]/[▼]キー
5-21
The “ ” icon is no longer displayed
Page 58
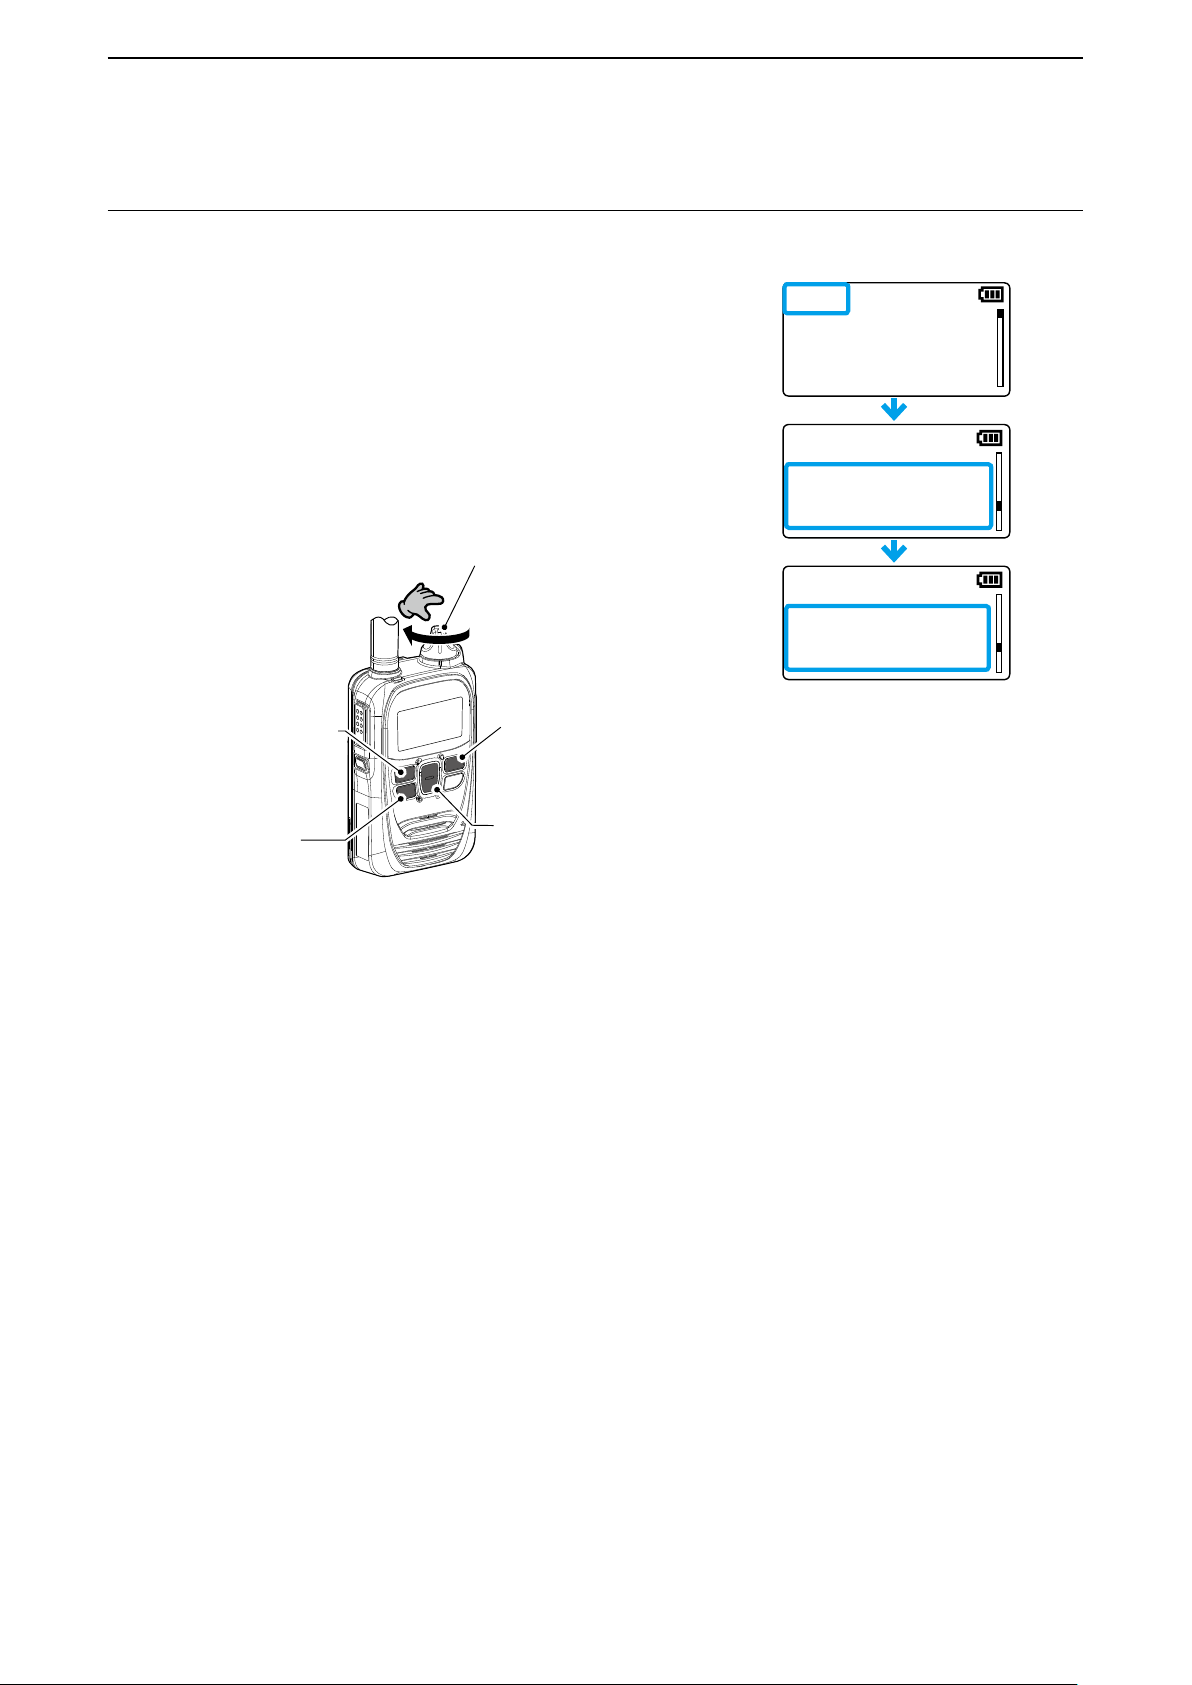
OPTIONAL PRODUCTS
– – –
LOG
SET
ICOM BT-000:00-00
Delete BT Device
SET
Completed to delete
Delete BT Device
SET
[電源/音量]ツマミ
キー
[履歴]
[ アドレ ス 帳 ]
5
■ Deleting a Bluetooth device from the pairing list
You can delete Bluetooth devices from the “Pairing List” screen.
LDisconnect the Bluetooth device before deleting if connected. (pp. 5-19 and 5-21)
1. While hold down [FUNC] and [Address], turn ON the power.
• Enters the Advanced Set mode.
2. Release [FUNC] and [Address] when “SET” is displayed.
3. Push [FUNC] several times to select “Delete BT Device.”
4. Push [▲]/[▼] to select the device to delete.
5. Push [Call history].
• “Delete?” is displayed.
• To cancel deleting, push any key other than [Call history].
6. Push [Call history].
• The selected device is deleted from the pairing list, then exits the Set mode.
[PWR/VOL]
[Address]
[Call history]
キー
キー
[FUNC]キー
[FUNC]
[▲]/[▼]
[▲]/[▼]
5-22
Page 59
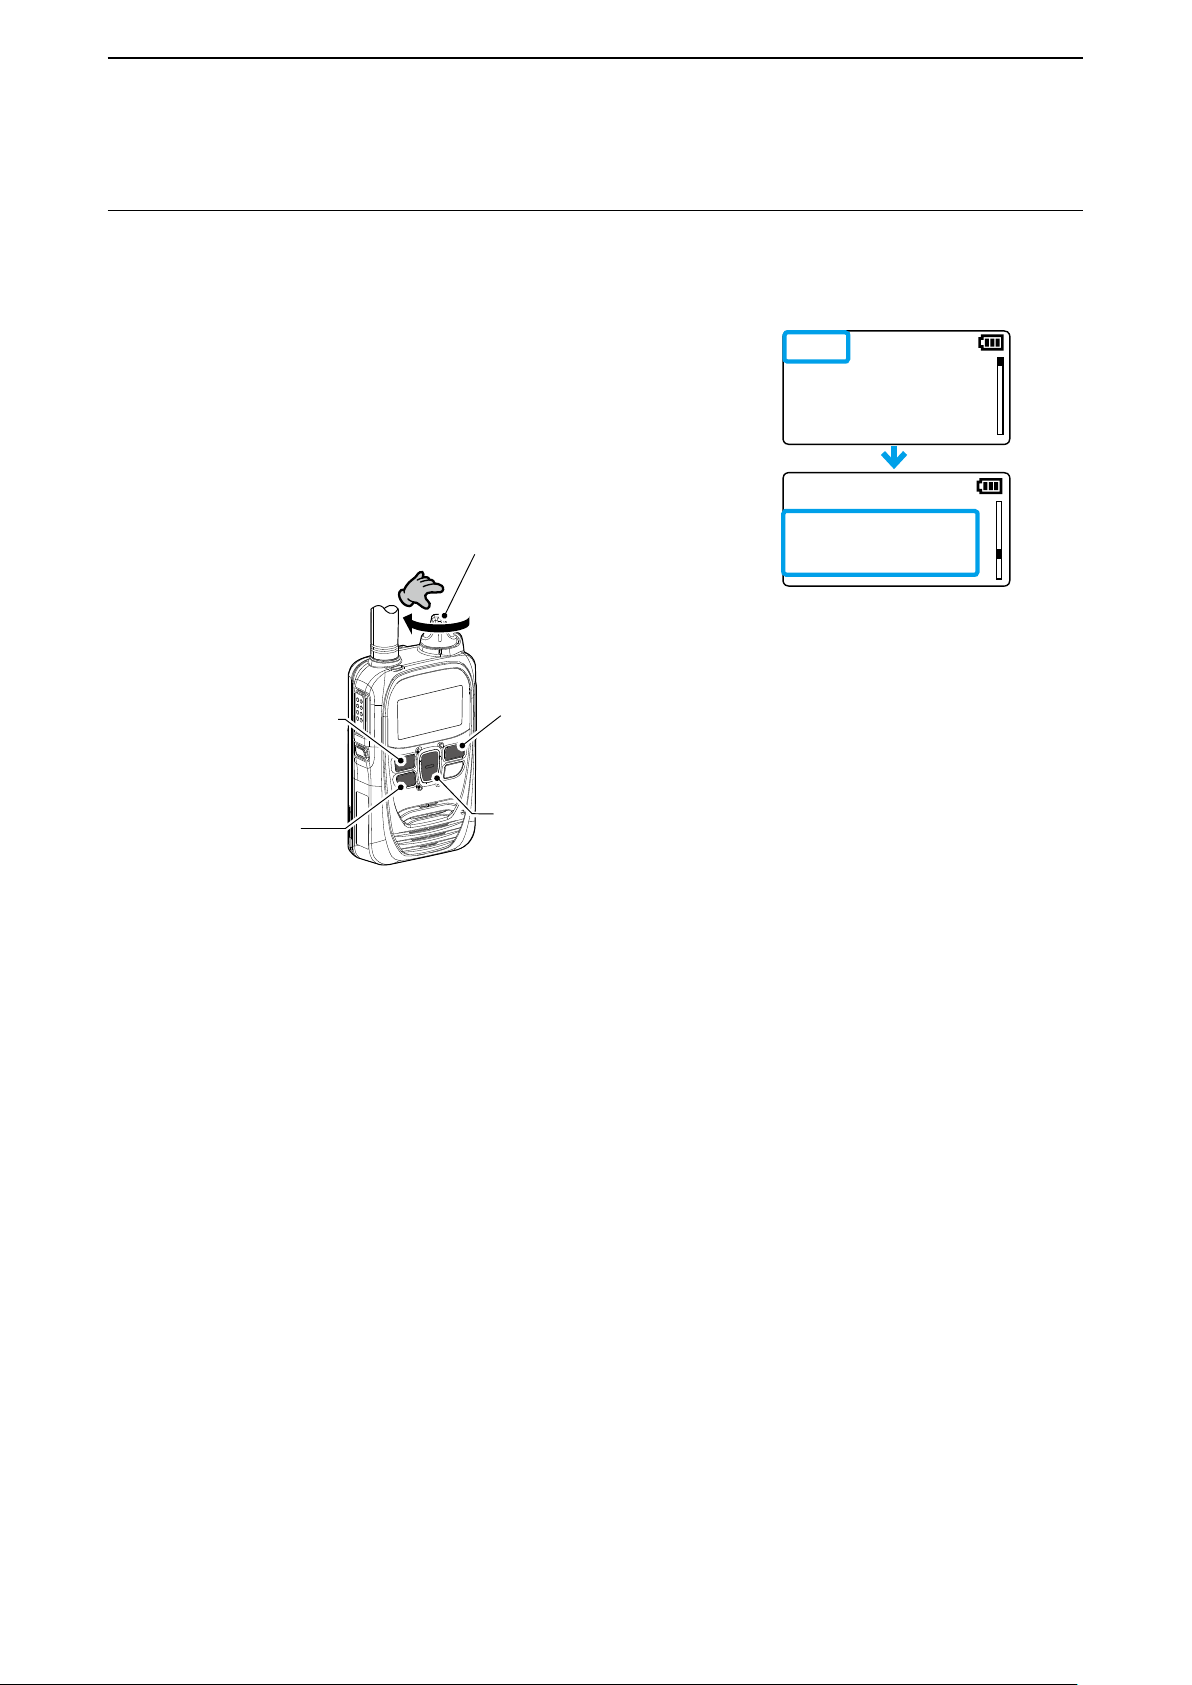
OPTIONAL PRODUCTS
– – –
LOG
SET
YES
Init BT Unit
SET
[電源/音量]ツマミ
キー
[履歴]
[ アドレ ス 帳 ]
5
■ Initializing the pairing list of the transceiver
If you have some troubles with the Bluetooth operation, initialize the pairing list, as shown below.
LAll the paired Bluetooth devices are deleted from the pairing list by the initialization.
LThe pairing list is not initialized by the “RESET” item in the Set mode.
1. While hold down [FUNC] and [Address], turn ON the power.
• Enters the Advanced Set mode.
2. Release [FUNC] and [Address] when “SET” is displayed.
3. Push [FUNC] several times to select “Init BT Unit.”
4. Push [▲]/[▼] to select “YES.”
• To cancel the initialization, push any key other than [Call history].
5. Push [Call history].
• The pairing list is initialized and the transceiver automatically restarts.
[PWR/VOL]
[Address]
[Call history]
キー
キー
[FUNC]キー
[FUNC]
[▲]/[▼]
[▲]/[▼]
5-23
Page 60
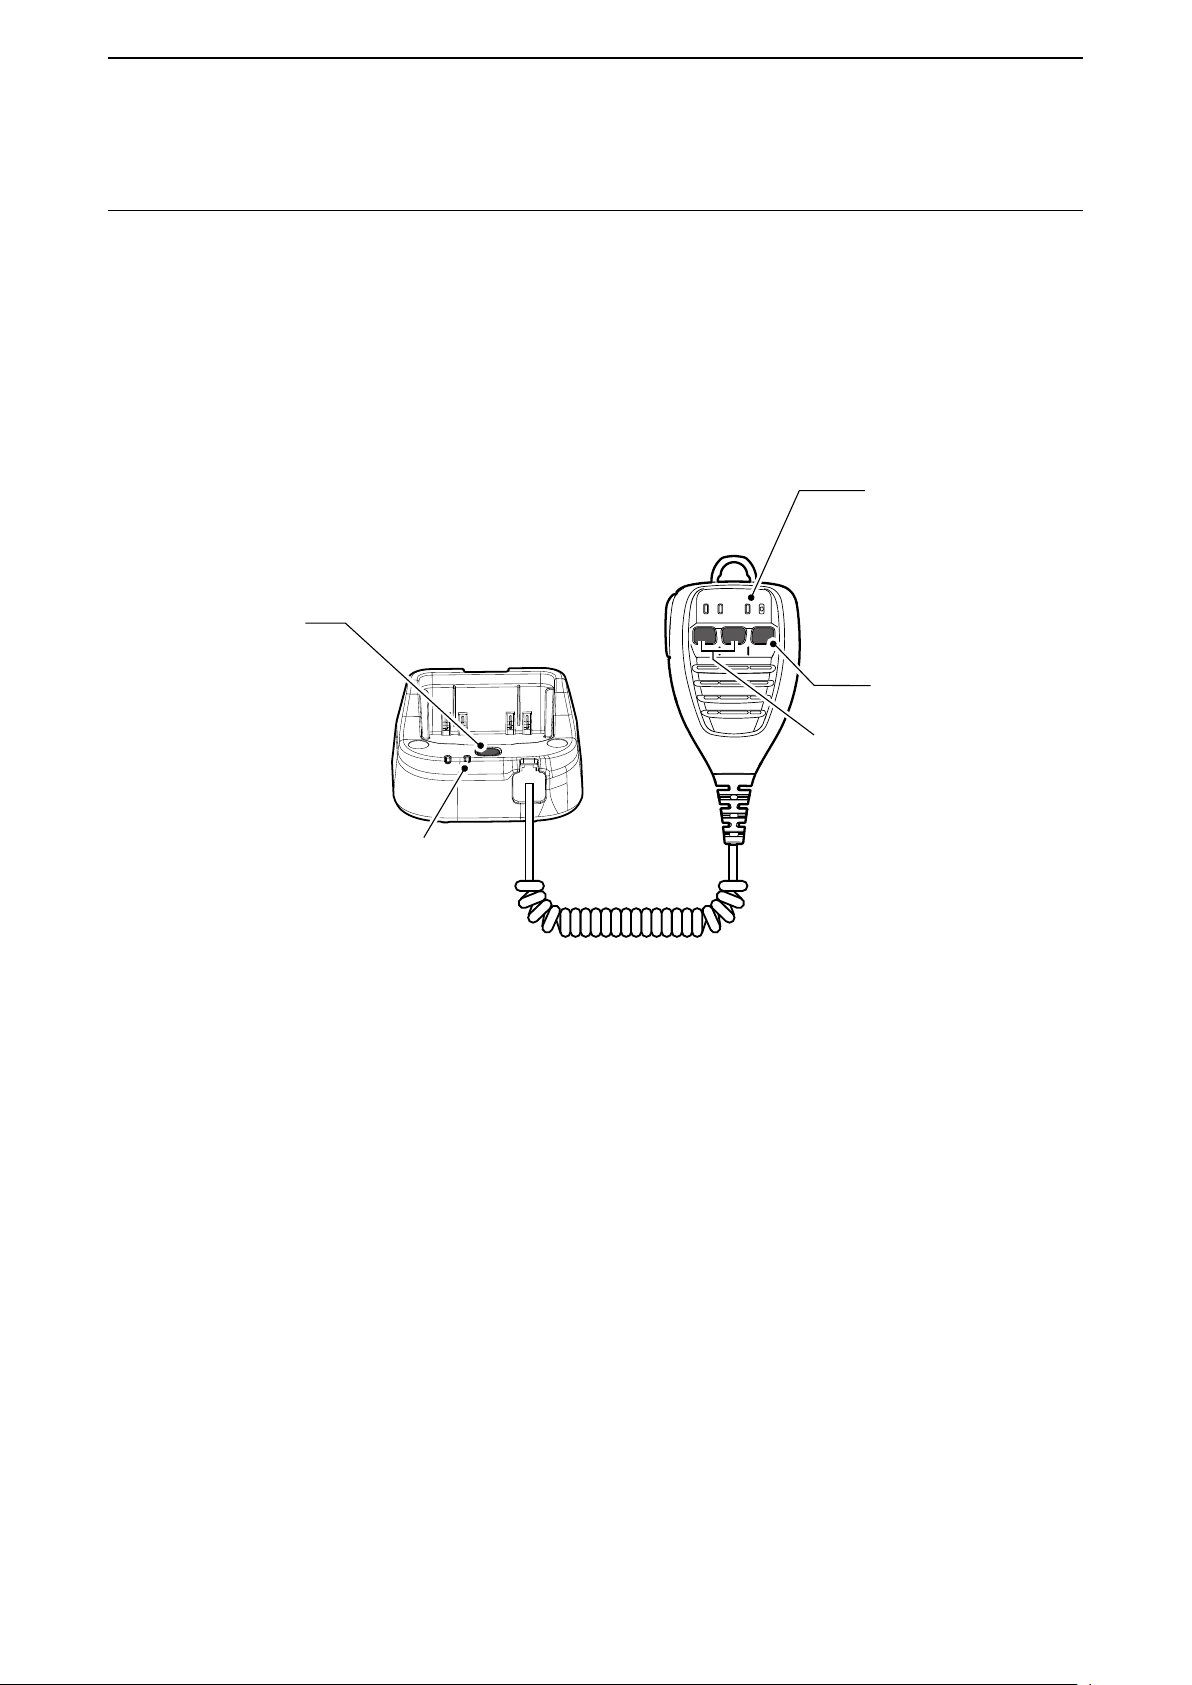
OPTIONAL PRODUCTS
Bluetooth
Bluetooth indicator
5
■ Initializing the pairing list of the BC-218
If you have some troubles with the Bluetooth operation, initialize the pairing list, as shown below.
1. Connect the HM-215 to the BC-218.
2. Hold down the Bluetooth button on the BC-218 for 3 seconds, to turn ON the Bluetooth function.
• The Bluetooth indicator Blinks blue.
3. Hold down the Bluetooth button on the BC-218 for 3 seconds again, to turn OFF the Bluetooth function.
• The Bluetooth indicator turns OFF.
4. Within 10 seconds after holding down both [UP] and [DOWN] on the HM-215,
hold down the Bluetooth button for 10 seconds.
• The Bluetooth indicator lights violet, and the pairing list is initialized.
button
BC-218
Bluetooth indicator
Bluetooth button
Volume control
(Down/Up)
HM-215
5-24
Page 61
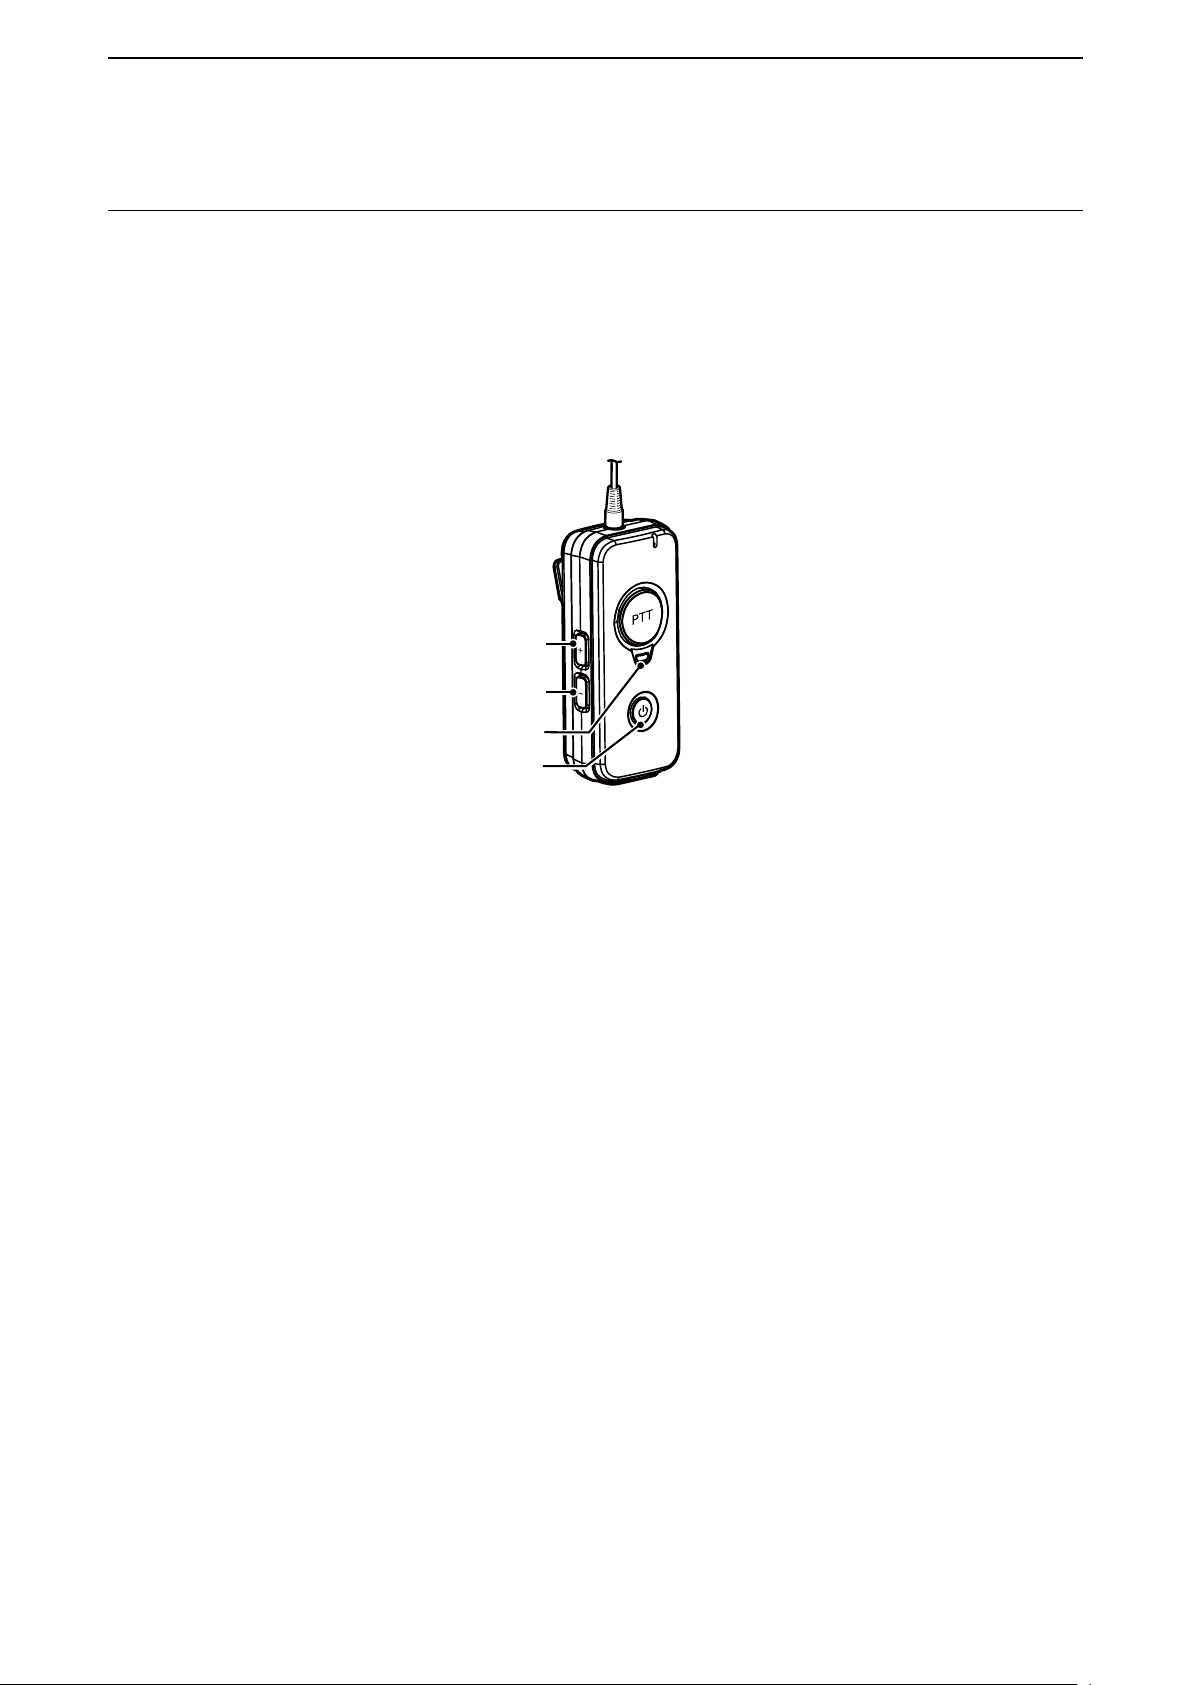
OPTIONAL PRODUCTS
5
■ Initializing the pairing list of the VS-3
If you have some troubles with the Bluetooth operation, initialize the pairing list, as shown below.
1. Hold down [PWR] on the VS-3 for 3 seconds, to turn ON the Bluetooth function.
• The LED Blinks blue.
2. Hold down [PWR] on the VS-3 for 3 seconds again, to turn OFF the Bluetooth function.
• The LED turns OFF.
3. Within 10 seconds after holding down both [VOL] (–) and [VOL] (+), hold down [PWR] for 10 seconds.
• The LED lights violet, and the pairing list is initialized.
[VOL] (+)
[VOL] (–)
LED
[PWR]
5-25
Page 62
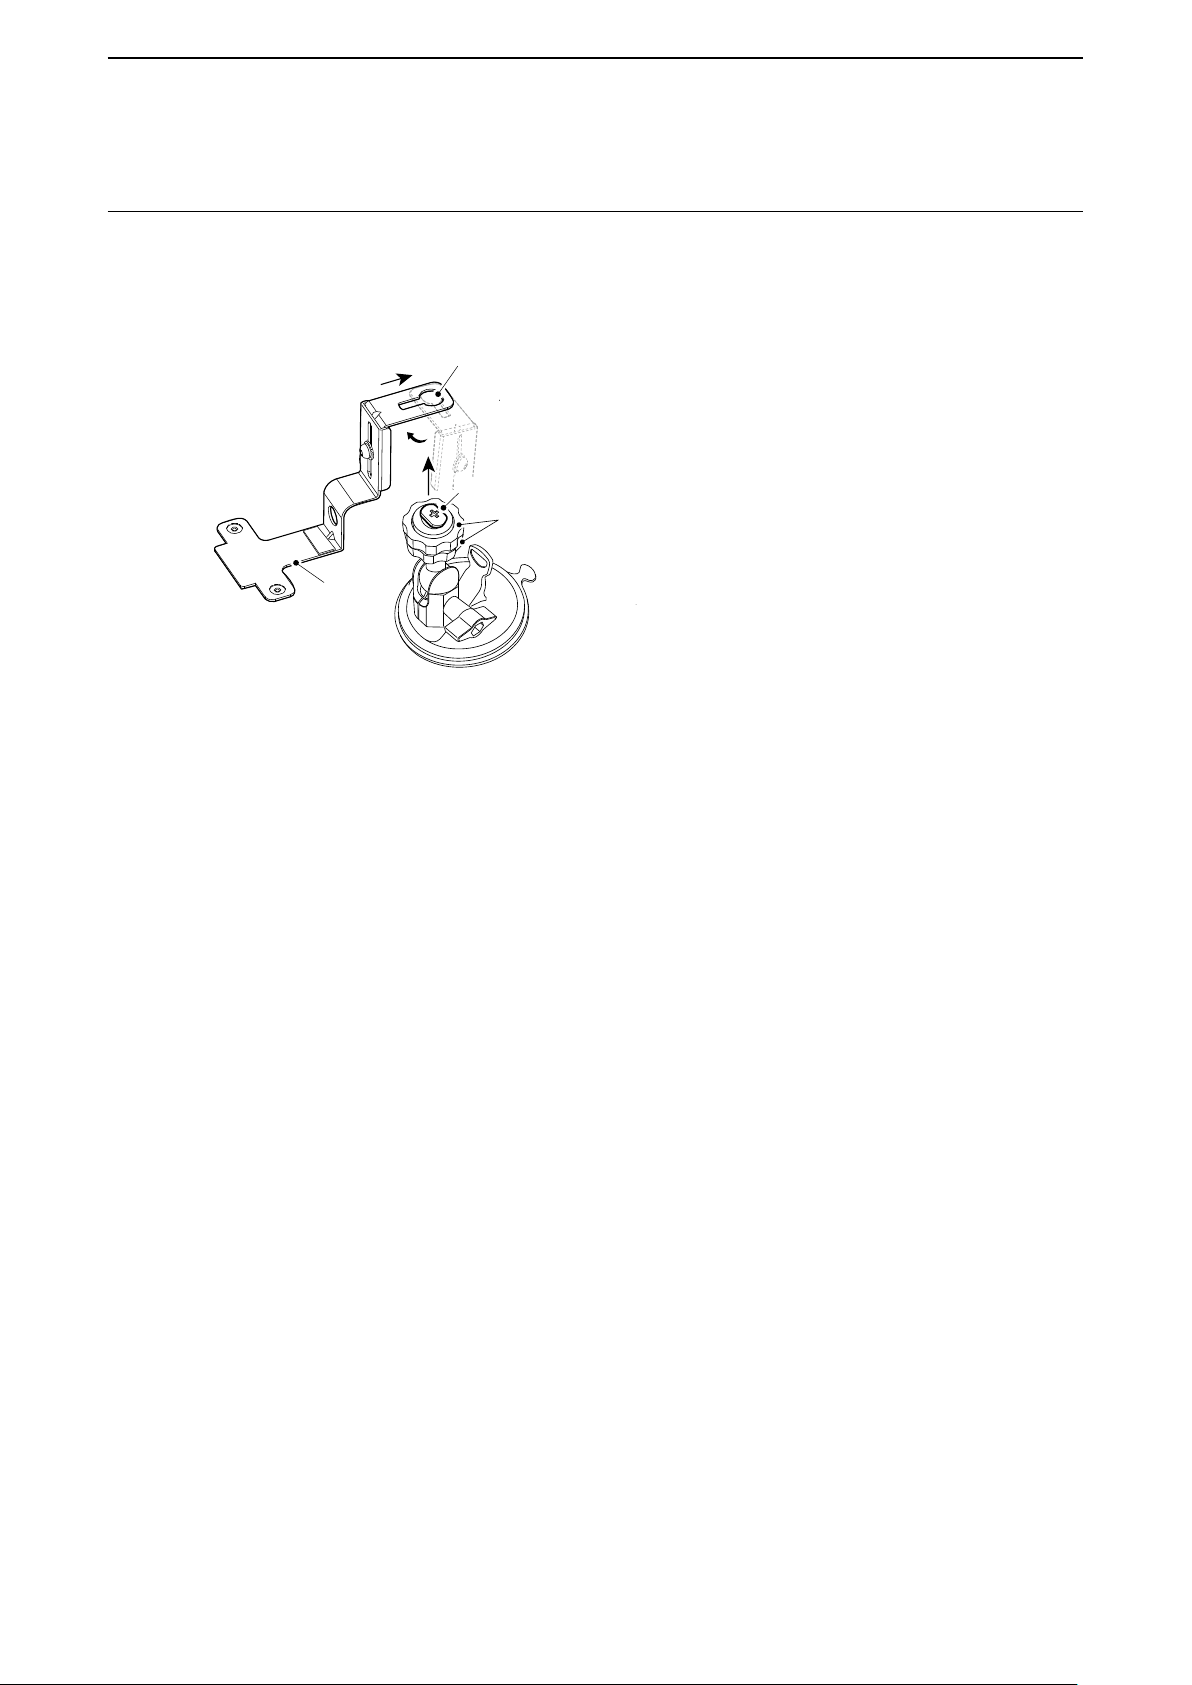
OPTIONAL PRODUCTS
5
■ Installing the MBA-7/MBF-1 on a flat surface
1. Clean the surface where the MBF-1 is attached to.
LTo install the MBF-1, approximately 90 mm2 of at surface is necessary.
2. Attach the MBA-7 to the MBF-1.
Move the holder left or right to
e
the best viewing position,
then tighten the lock knob.
Slot
Turn the Holder so the slot can be placed over the locking head.
w
Turn the holder back forward, and slide the slot’s guide under the MBF-1’s locking head.
MBA-7
Holder
Locking headLocking head
Lock knob
MBF-1
Loosen the lock knob
q
5-26
Page 63
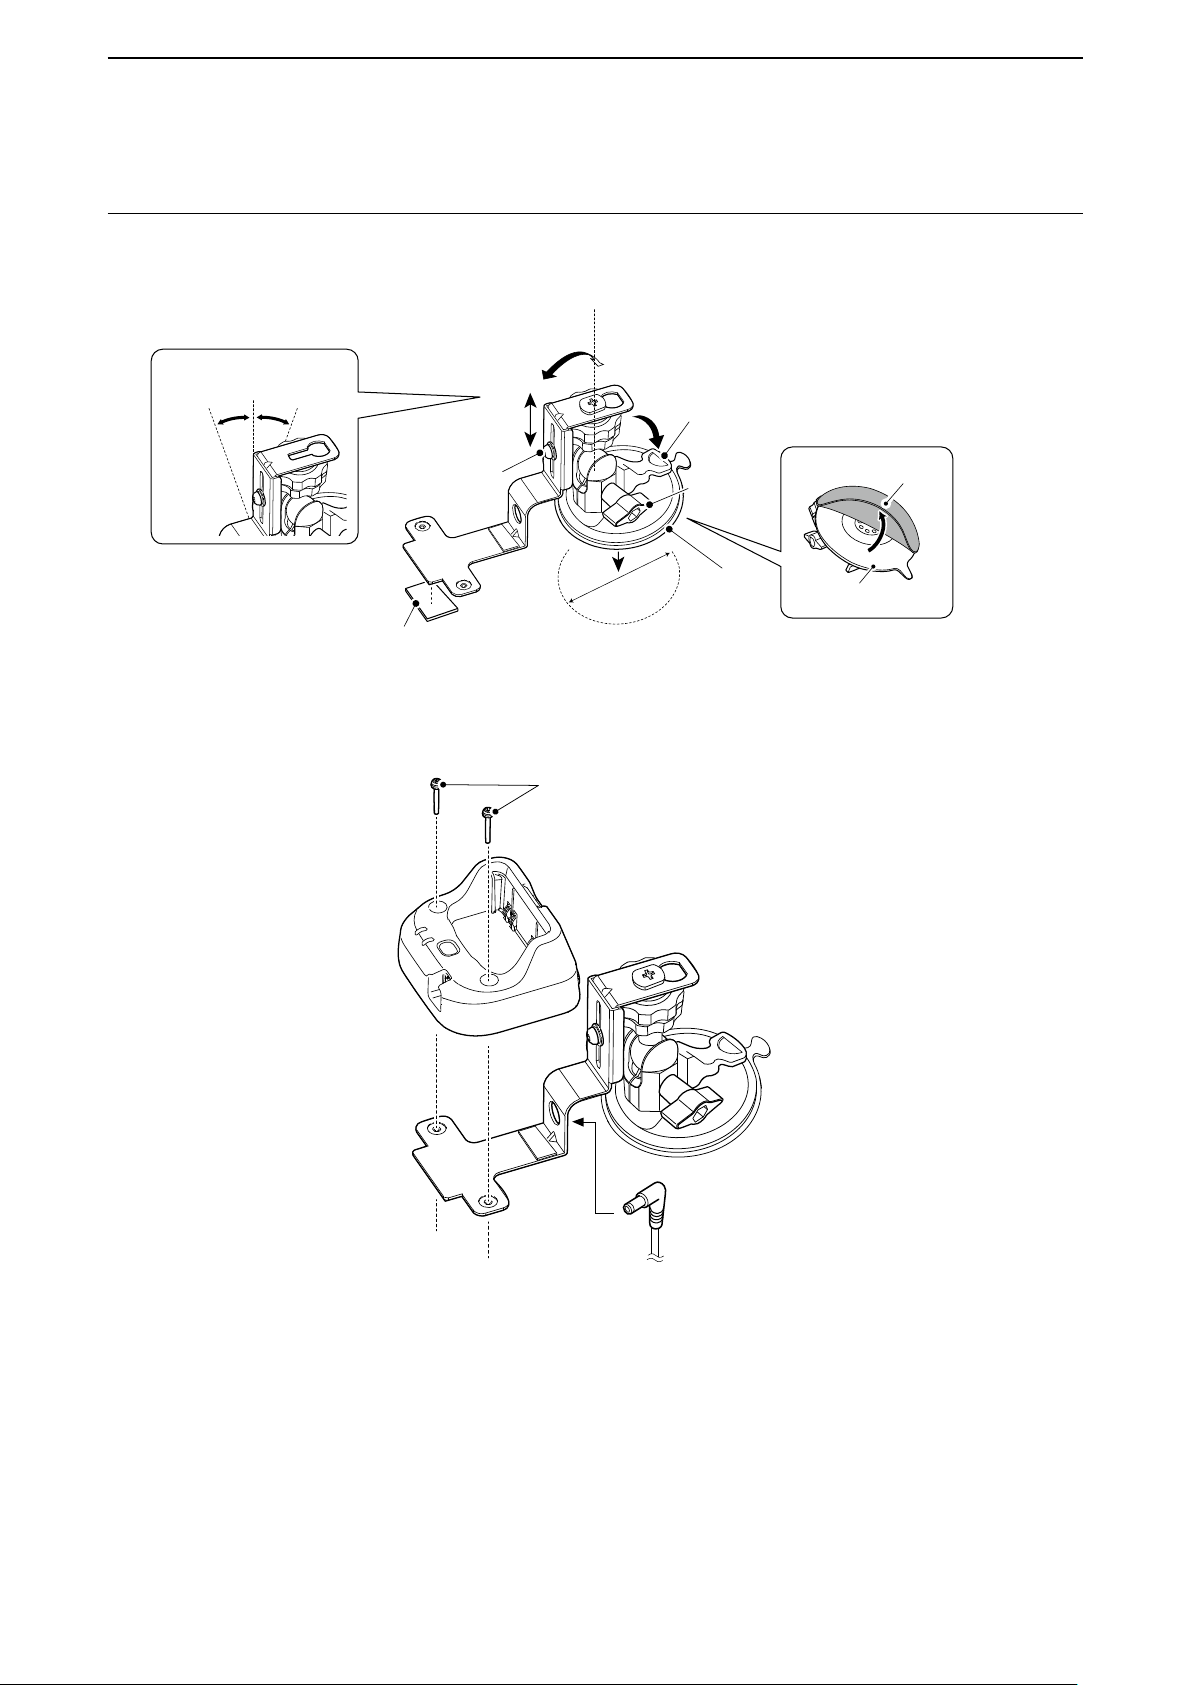
OPTIONAL PRODUCTS
Screws (supplied with MBA-7)
BC-218
CP-22 or CP-23L
5
■ Installing the MBA-7/MBF-1 (continued)
3. Make sure that the surface where MBF-1 is attached to is clean and dry, then attach the MBF-1.
4. Adjust the angle and position of MBA-7 with the MBF-1’s adjusting dial and screw.
Adjust the position by the dial or screw.
e
Adjust the angle between
+/–20 degrees
Adjust the height
and then fix the
position using a hex
wrench.
Adhesive sponge*
*Apply the adhesive sponge, to firmly fix the mount.
Approximately 90 mm
Approximately 90 mm
w
5. Attach the BC-218 to the MBA-7, then connect the DC cable.
6. Attach the strap for the fall prevention.
Push down the base lever to attach
Base lever
Dial
Suction pad
2
2
q
Suction pad cover
Suction pad
Remove the suction pad cover,
then firmly attach the suction pad to the dashboard.
5-27
Page 64
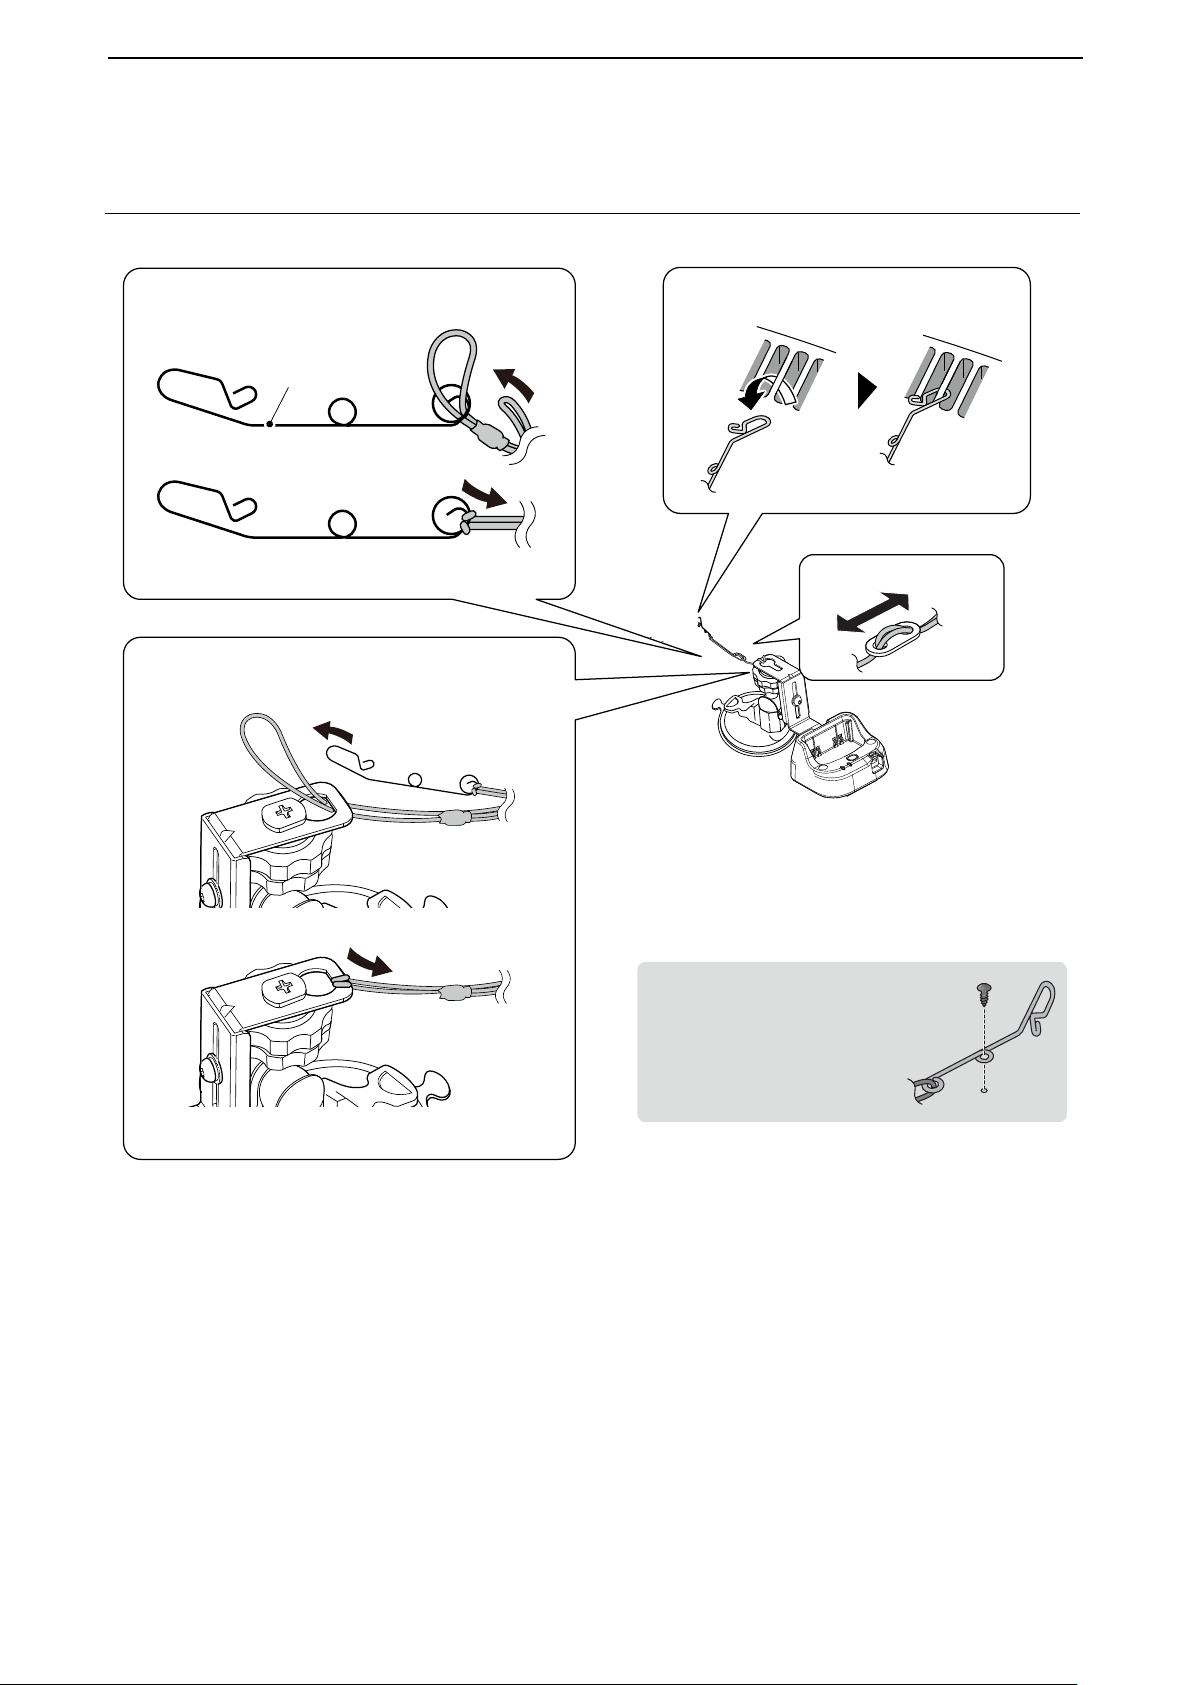
OPTIONAL PRODUCTS
5
■ Installing the MBA-7/MBF-1 (continued)
Attach the strap to the hook.
q
Hook
Attach the strap to the MBA-7.
w
Attach the hook to a hole.
e
Adjust the length.
r
If there is no hook to hang it:
Make a hole and drill a tapping screw.
5-28
Page 65
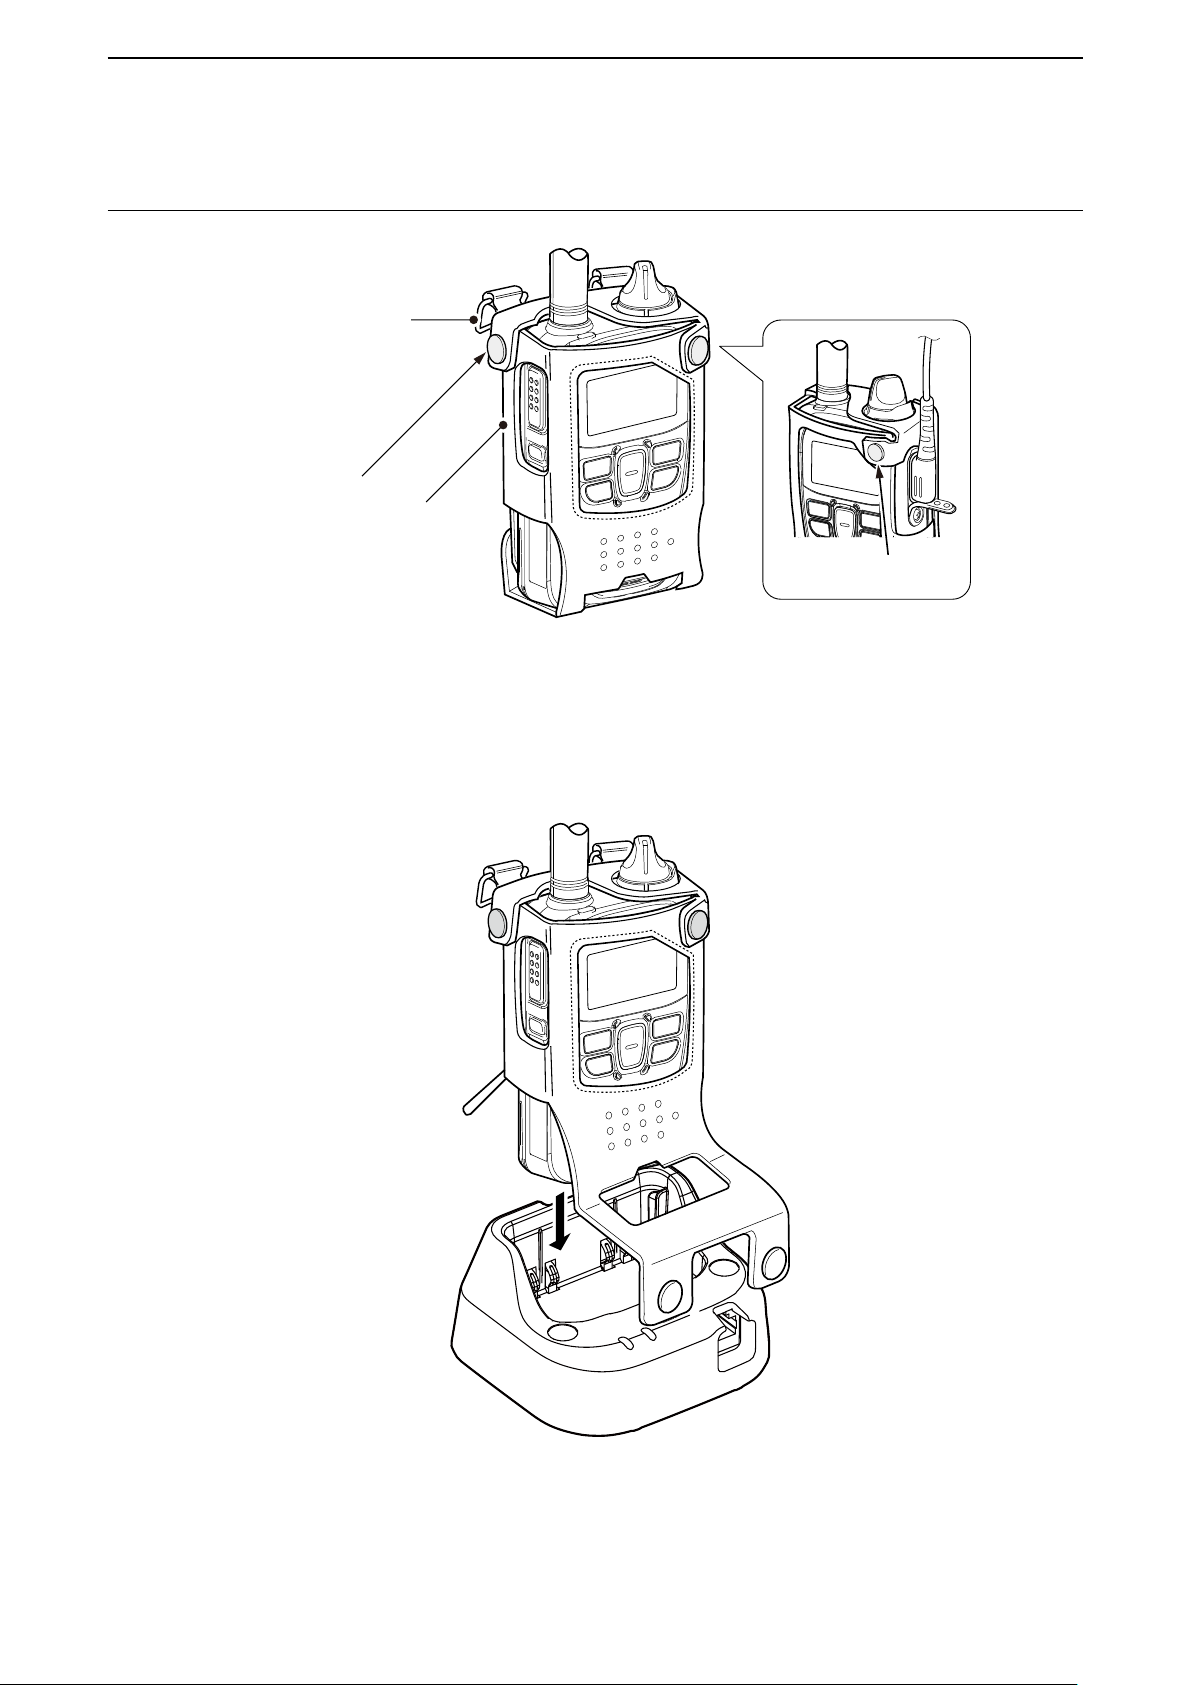
OPTIONAL PRODUCTS
5
■ LC-185 (For BP-272)
Optional MB-57L
(Shoulder strap) can be
attached.
Snap
LC-185
Snap
When you charge the BC-272 attached to the transceiver with LC-185, open the bottom part and insert to the BC-218, as shown
below.
BC-218
5-29
Page 66
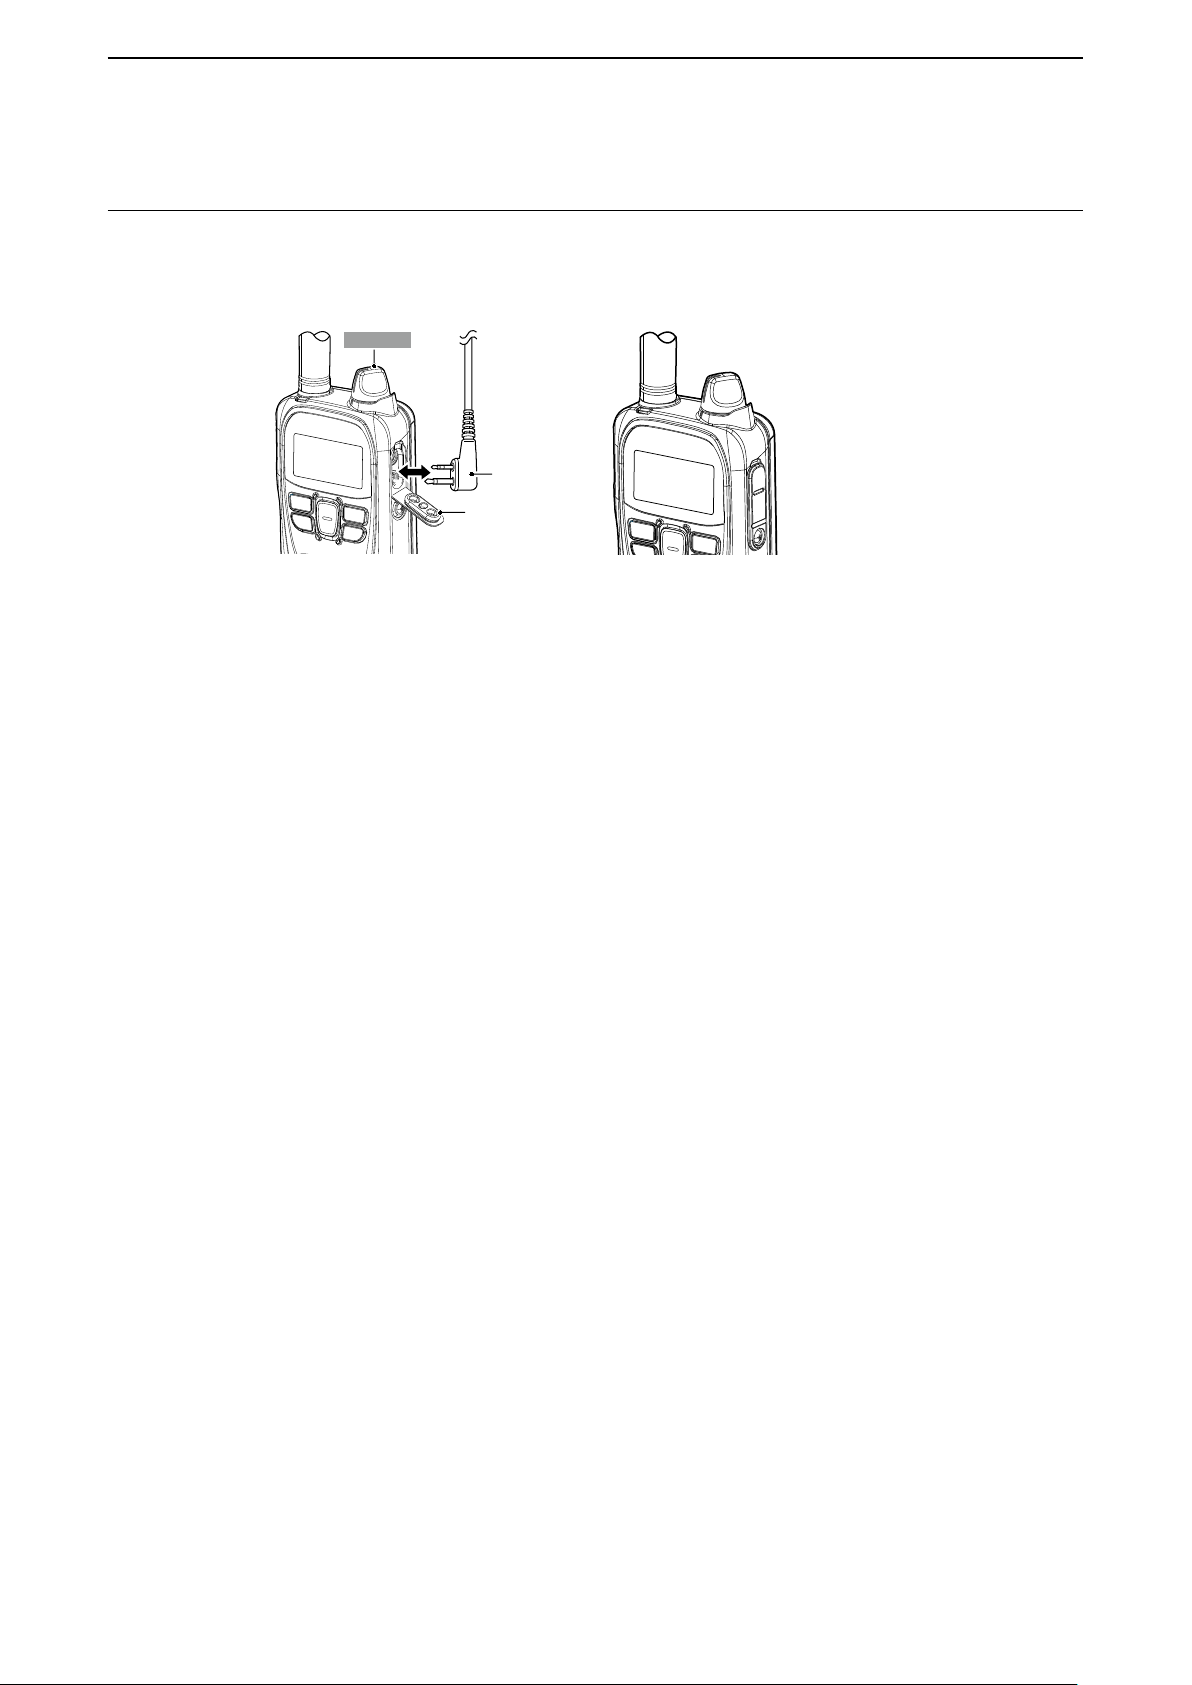
OPTIONAL PRODUCTS
Turn OFF
5
■ When connecting optional equipment
• Be sure to turn OFF the power before connecting or disconnecting optional equipment to or from the jack.
• Remove the cable by holding the plug not cable.
• Insert the plug securely when connecting the cable.
LAttach the jack cover when no optional equipment is connected.
Plug
Connector
cover
Connector cover is attachedOptional equipment is attached
5-30
Page 67

FOR YOUR REFERENCE
■ Troubleshooting ................................................................... 6-2
■ Specications ...................................................................... 6-4
■ About the licences ............................................................... 6-5
Section 6
6-1
Page 68
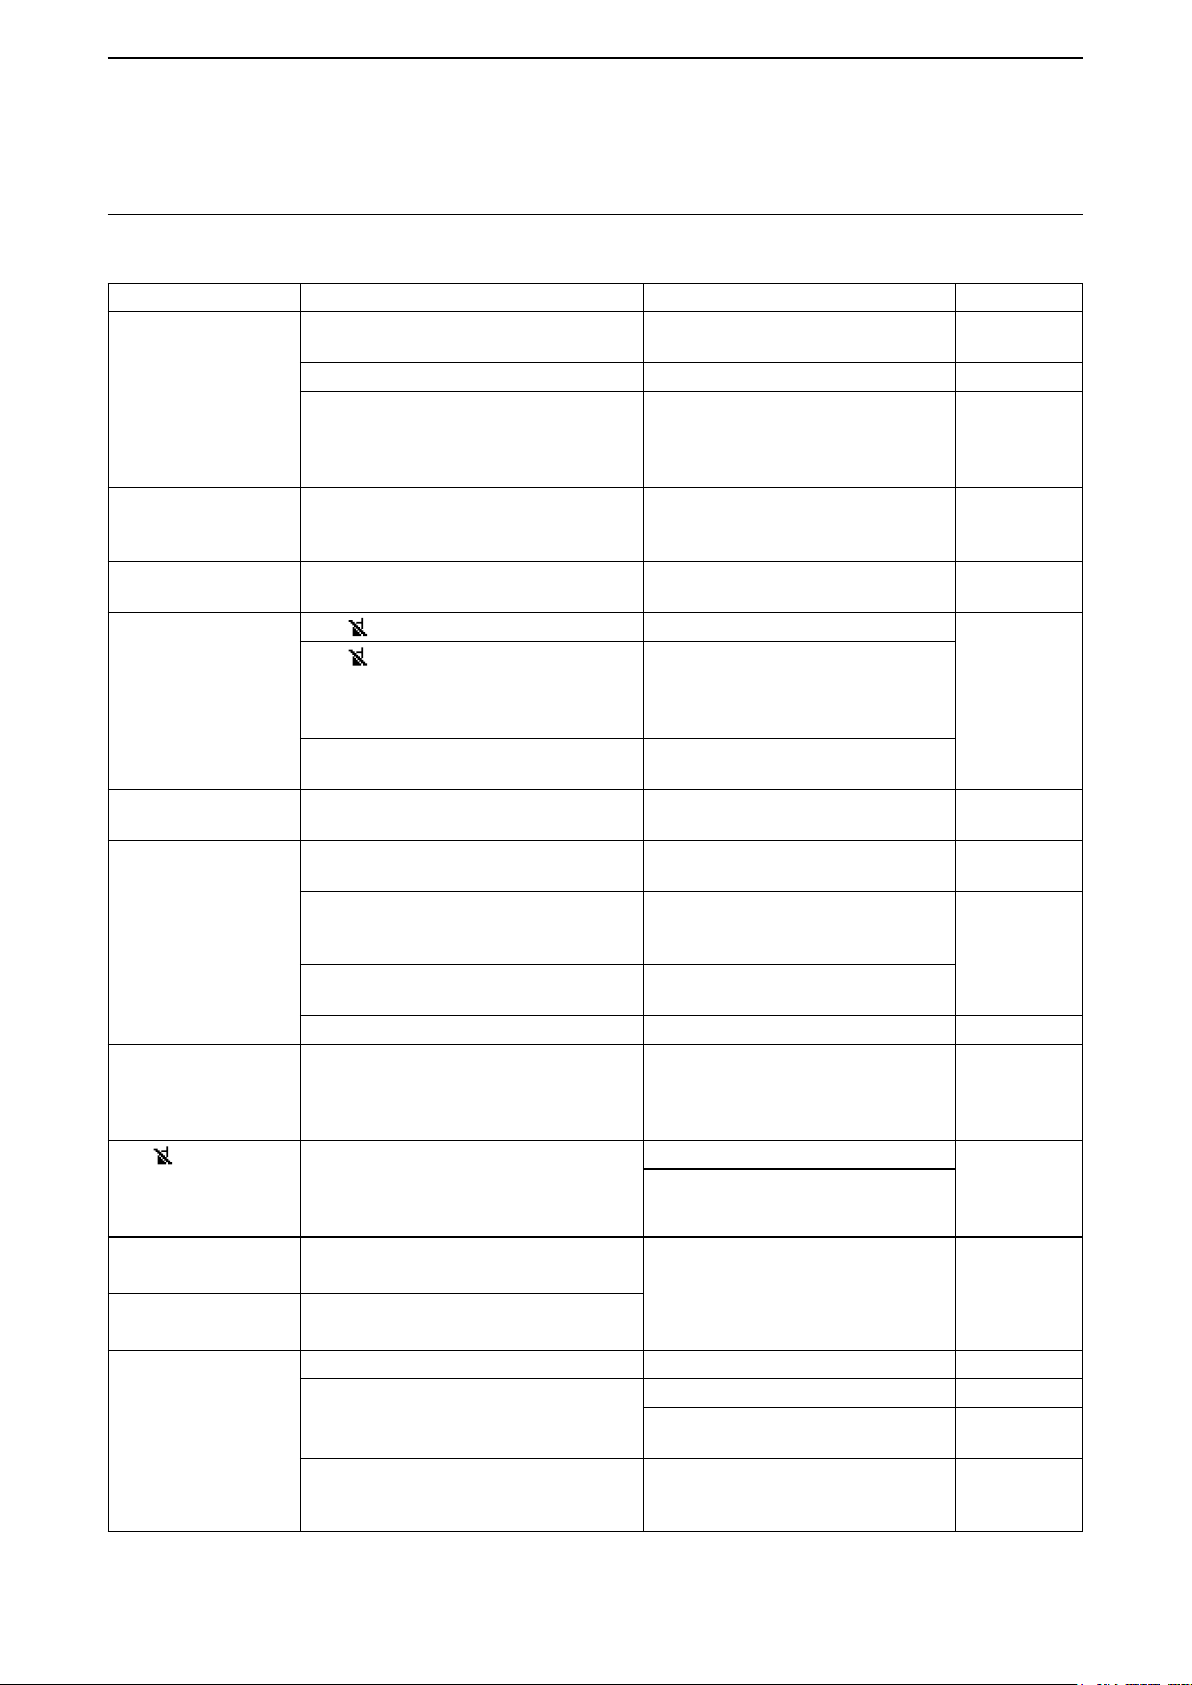
FOR YOUR REFERENCE
6
■ Troubleshooting
The following chart is designed to help you to correct problems that are not equipment malfunctions. If you are unable to locate
the cause of a problem, or solve it through the use of this chart, contact your dealer.
PROBLEM POSSIBLE CAUSE SOLUTION
No power comes ON. The connection of the battery pack is bad.
The battery is exhausted. Charge the battery pack. –
The battery pack’s over-discharge protec-
tion circuitry is activated.
No sound comes from
the speaker nor
earphone.
Calls cannot be made. The call-to party number or group number
No reply is received.
“Key lock” is displayed
when a key is pushed.
The charging indicator
blinks orange,
or alternately blinks
orange and green.
The charging indicator
is OFF even the battery
pack is inserted to the
charger.
The “
” icon blinks, or
“Connecting…” is
displayed. (standby
screen is not displayed)
The deleted recorded
audio still exists.
The recorded audio is
lost.
Volume level is set too low. Rotate [PWR/VOL] to increase the vol-
is wrong.
The “
” icon blinks.
” icon displayed.
The “
The operator is away from the transceiver,
or the transceiver is turned OFF.
The Key Lock function is turned ON. Turn OFF the Key Lock function. p. 1-7
The battery pack is not properly inserted. Insert the battery pack properly. pp. 5-6 ~ 5-8
Charging the battery pack outside of the
chargeable temperature range.
The connection of the charging terminals is
bad.
The transceiver power is ON while charging.
The battery pack is not properly inserted. Properly insert the battery pack. pp. 5-6 ~ 5-8
The transceiver is located out of the
service area.
The battery pack was removed before the
recorded audio was deleted from memory.
The battery pack was removed before the
recorded audio was stored into memory.
Remove, clean, and reattach the battery
pack terminals.
Remove the battery pack from the
transceiver, then charge it for a while.
Attach the battery pack to the trans-
ceiver again, then turn ON the power.
ume level.
Check the call-to party number or
group number.
Move your location, then try again.
Push [PTT] to re-register the transceiver
to the system.
Wait for a while, or change your location.
Check that the LTE line is established.
Wait until the operator is back, or ask
your system manager.
Charge the battery pack in the chargeable
temperature range.
10°C to 40°C (+50°F to +104°F)
Remove, clean, and reattach the
charging terminals.
Turn OFF the power while charging. –
Change your location, then try again.
Reboot the transceiver.
Remove the battery pack after “Power
OFF…” is displayed.
REFERENCE
–
–
p. 1-3
pp. 2-4, 3-5
–
p. 5-5
–
p. 3-7
Pairing failed. The transceiver is not in the Pairing mode. Enter the Pairing mode. p. 5-14
There are other active Bluetooth devices
nearby.
There are other devices that are operating
in the 2.4 GHz band.
Stop using other Bluetooth devices. –
Use the transceiver away from other
Bluetooth devices.
Use the transceiver away from the
other devices, or stop using those
devices.
–
–
6-2
Page 69

FOR YOUR REFERENCE
6
■ Troubleshooting (continued)
PROBLEM POSSIBLE CAUSE SOLUTION
“Pairing list is full” is
displayed in the Pairing
screen.
The call was suddenly
cut off /Noise is heard.
No audio output from
transceiver after the
Bluetooth connection
BC-218 is
disconnected.
No sound comes from
the earphone that is
connected to the VS-3.
“Activate locked” is
displayed when turn ON
the transceiver.
with
Number of paired devices exceeds the
maximum number.
Too far from the Bluetooth device.
(When using a Bluetooth headset)
Electromagnetic interference from other
electronic devices.
The transceiver is in the Bluetooth signal
detecting sequence. (Approximately 20
seconds)
The volume level is set too low. Increase the VS-3’s volume level. p. 5-12
Loose earphone plug connection. Firmly insert the plug. p. 1-4
Internet connection is unstable. Restart the transceiver.
Delete a Bluetooth device from the
pairing list. p. 5-22
Get closer to the Bluetooth device.
L The communication range of
Bluetooth is approximately 10
meters (33 feet).
Use the transceiver away from the
other devices, or stop using those
devices.
Push the Bluetooth button on the BC-218
to disconnect the Bluetooth device,
then turn OFF the BC-218 power. –
Increase the transceiver’s volume level.
(
When “Bluetooth Synchronous Volume”
is set to valid)
REFERENCE
–
–
pp. 1-3, 4-6
–
6-3
Page 70

FOR YOUR REFERENCE
6
■ Specifications
D General
Operating temperature range: –10°C ~ +60°C (14°F ~ 140°F)
Humidity: Less than 25 ~ 85% (Without condensation)
Dimensions: 59 (W) × 95 (H) × 32 (D) mm (Projections not included, with BP-272)
Weight: Approximately 240 g (Including antenna and BP-272)
Power supply: 7.4 V (with BP-272 Li-ion battery pack: 1880 mAh)
IP code: IP67/MIL-STD810G
Operating time: 17 hours (TX:RX:Standby=5:5:90, with BP-272)
D Audio
Codec: G.726
AF output power: More than 0.9 W (Internal speaker 8 Ω 10% distortion)
More than 0.2 W (External speaker 8 Ω 10% distortion)
AF output impedance: Internal speaker 8 Ω/External speaker 8 Ω
D 3G (W-CDMA)
Frequency band:
Australia version B1, B5
Europe version B1, B8
Transmission power: 24 dBm (Typical)
D LTE
Frequency band:
Australia version B1, B3, B5, B7, B8, B28
Europe version B1, B3, B7, B8, B20
Transmission power: 23 dBm (Typical)
D GNSS
GPS: Supported 1575.42 MHz
GLONASS: Supported 1598.0625 ~ 1605.375 MHz
D Bluetooth
Frequency range: 2402 ~ 2480 MHz
Transmission power: 9.13 dBm (Maximum) 1 Mbps,
7.3 dBm (Maximum) 3 Mbps
Version: Bluetooth Ver.2.1+EDR
Profile: HFP, HSP, SPP
All the specifications are subjects to be changed without notice or obligation.
6-4
Page 71

FOR YOUR REFERENCE
6
■ Specifications (continued)
D BC-202IP2 rapid charger (Option)
Input voltage: DC 12 ~ 16 V (Used with the supplied BC-123S power adapter)
Operating temperature range: 10°C ~ 40°C (50°F ~ 104°F)
Weight: Approximately 105 g (Power adapter not included)
Dimensions: 88.0 (W) × 47.5 (H) × 72.5 (D) mm (Projections not included)
D BC-202IP3L rapid charger (Option)
Input voltage: DC 12 ~ 15 V (Used with the supplied BC-123S Straight type plug power adapter)
Operating temperature range: 10°C ~ 40°C (50°F ~ 104°F)
Weight: Approximately 120 g (Power adapter not included)
Dimensions: 106.5 (W) × 52.5 (H) × 78.0 (D) mm (Projections not included)
D BC-211 multi charger (Option)
Input voltage: DC 12 ~ 16 V (Used with the supplied BC-157S power adapter)
Operating temperature range: 10°C ~ 40°C (50°F ~ 104°F)
Weight: Approximately 1200 g (Power adapter not included)
Dimensions: 303.2 (W) × 78.2 (H) × 179.7 (D) mm (Projections not included)
D BC-218 rapid charger (Option)
Input voltage: DC 12 ~ 16 V (Used with the supplied BC-207S power adapter)
Operating temperature range: 10°C ~ 40°C (50°F ~ 104°F)
Weight: Approximately 140 g (Power adapter not included)
Dimensions: 87.2 (W) × 48.7 (H) × 77 (D) mm (Projections not included)
Bluetooth version: Bluetooth Ver.2.1+EDR
Bluetooth profile: HFP, HSP, A2DP, AVRCP (Only HFP and HSP are guranteed)
All the specifications are subjects to be changed without notice or obligation.
■ About the licences
LZ4 - Fast LZ compression algorithm
Copyright (C) 2011-present, Yann Collet.
BSD 2-Clause License (http://www.opensource.org/licenses/bsd-license.php)
Redistribution and use in source and binary forms, with or without modication, are permitted provided that the following
conditions are met:
• Redistributions of source code must retain the above copyright notice, this list of conditions and the following disclaimer.
• Redistributions in binary form must reproduce the above copyright notice, this list of conditions and the following
disclaimer in the documentation and/or other materials provided with the distribution.
THIS SOFTWARE IS PROVIDED BY THE COPYRIGHT HOLDERS AND CONTRIBUTORS “AS IS” AND ANY
EXPRESS OR IMPLIED WARRANTIES, INCLUDING, BUT NOT LIMITED TO, THE IMPLIED WARRANTIES OF
MERCHANTABILITY AND FITNESS FOR A PARTICULAR PURPOSE ARE DISCLAIMED. IN NO EVENT SHALL THE
COPYRIGHT OWNER OR CONTRIBUTORS BE LIABLE FOR ANY DIRECT, INDIRECT, INCIDENTAL, SPECIAL,
EXEMPLARY, OR CONSEQUENTIAL DAMAGES (INCLUDING, BUT NOT LIMITED TO, PROCUREMENT OF
SUBSTITUTE GOODS OR SERVICES; LOSS OF USE, DATA, OR PROFITS; OR BUSINESS INTERRUPTION)
HOWEVER CAUSED AND ON ANY THEORY OF LIABILITY, WHETHER IN CONTRACT, STRICT LIABILITY, OR TORT
(INCLUDING NEGLIGENCE OR OTHERWISE) ARISING IN ANY WAY OUT OF THE USE OF THIS SOFTWARE, EVEN
IF ADVISED OF THE POSSIBILITY OF SUCH DAMAGE.
You can contact the author at :
• LZ4 homepage: http://www.lz4.org
• LZ4 source repository: https://github.com/lz4/lz4
6-5
Page 72

FOR YOUR REFERENCE
6
■ About the license (continued)
MbedTLS
Unless specically indicated otherwise in a le, Mbed TLS les are provided under the Apache License 2.0, or the GNU
General Public License v2.0 or later (SPDX-License-Identier: Apache-2.0 OR GPL-2.0-or-later).
A copy of these licenses can be found in apache-2.0.txt and gpl-2.0.txt
Apache License
Version 2.0, January 2004
http://www.apache.org/licenses/
TERMS AND CONDITIONS FOR USE, REPRODUCTION, AND DISTRIBUTION
1. Denitions.
“License” shall mean the terms and conditions for use, reproduction, and distribution as dened by Sections 1 through 9
of this document.
“Licensor” shall mean the copyright owner or entity authorized by the copyright owner that is granting the License.
“Legal Entity” shall mean the union of the acting entity and all other entities that control, are controlled by, or are under
common control with that entity. For the purposes of this denition, “control” means (i) the power, direct or indirect, to
cause the direction or management of such entity, whether by contract or otherwise, or (ii) ownership of fty percent
(50%) or more of the outstanding shares, or (iii) benecial ownership of such entity.
“You” (or “Your”) shall mean an individual or Legal Entity exercising permissions granted by this License.
“Source” form shall mean the preferred form for making modications, including but not limited to software source code,
documentation source, and conguration les.
“Object” form shall mean any form resulting from mechanical transformation or translation of a Source form, including
but not limited to compiled object code, generated documentation, and conversions to other media types.
“Work” shall mean the work of authorship, whether in Source or Object form, made available under the License, as
indicated by a copyright notice that is included in or attached to the work (an example is provided in the Appendix
below).
“Derivative Works” shall mean any work, whether in Source or Object form, that is based on (or derived from) the Work
and for which the editorial revisions, annotations, elaborations, or other modications represent, as a whole, an original
work of authorship. For the purposes of this License, Derivative Works shall not include works that remain separable
from, or merely link (or bind by name) to the interfaces of, the Work and Derivative Works thereof.
“Contribution” shall mean any work of authorship, including the original version of the Work and any modications or
additions to that Work or Derivative Works thereof, that is intentionally submitted to Licensor for inclusion in the Work
by the copyright owner or by an individual or Legal Entity authorized to submit on behalf of the copyright owner. For the
purposes of this denition, “submitted” means any form of electronic, verbal, or written communication sent
to the Licensor or its representatives, including but not limited to communication on electronic mailing lists, source
code control systems, and issue tracking systems that are managed by, or on behalf of, the Licensor for the purpose of
discussing and improving the Work, but excluding communication that is conspicuously marked or otherwise designated
in writing by the copyright owner as “Not a Contribution.”
“Contributor” shall mean Licensor and any individual or Legal Entity on behalf of whom a Contribution has been
received by Licensor and subsequently incorporated within the Work.
2. Grant of Copyright License. Subject to the terms and conditions of this License, each Contributor hereby grants to You
a perpetual, worldwide, non-exclusive, no-charge, royalty-free, irrevocable copyright license to reproduce, prepare
Derivative Works of, publicly display, publicly perform, sublicense, and distribute the Work and such Derivative Works in
Source or Object form.
6-6
Page 73

FOR YOUR REFERENCE
6
■ About the license (continued)
3. Grant of Patent License. Subject to the terms and conditions of this License, each Contributor hereby grants to You a
perpetual, worldwide, non-exclusive, no-charge, royalty-free, irrevocable (except as stated in this section) patent license
to make, have made, use, offer to sell, sell, import, and otherwise transfer the Work, where such license applies only
to those patent claims licensable by such Contributor that are necessarily infringed by their Contribution(s) alone or by
combination of their Contribution(s) with the Work to which such Contribution(s) was submitted. If You institute patent
litigation against any entity (including a cross-claim or counterclaim in a lawsuit) alleging that the Work or a Contribution
incorporated within the Work constitutes direct or contributory patent infringement, then any patent licenses granted to
You under this License for that Work shall terminate as of the date such litigation is led.
4. Redistribution. You may reproduce and distribute copies of the Work or Derivative Works thereof in any medium, with or
without modications, and in Source or Object form, provided that You meet the following conditions:
(a) You must give any other recipients of the Work or Derivative Works a copy of this License; and
(b) You must cause any modied les to carry prominent notices stating that You changed the les; and
(c) You must retain, in the Source form of any Derivative Works that You distribute, all copyright, patent, trademark, and
attribution notices from the Source form of the Work, excluding those notices that do not pertain to any part of the
Derivative Works; and
(d) If the Work includes a “NOTICE” text le as part of its distribution, then any Derivative Works that You distribute must
include a readable copy of the attribution notices contained within such NOTICE le, excluding those notices that
do not pertain to any part of the Derivative Works, in at least one of the following places: within a NOTICE text le
distributed as part of the Derivative Works; within the Source form or documentation, if provided along with the
Derivative Works; or, within a display generated by the Derivative Works, if and wherever such third-party notices
normally appear. The contents of the NOTICE le are for informational purposes only and do not modify the License.
You may add Your own attribution notices within Derivative Works that You distribute, alongside or as an addendum
to the NOTICE text from the Work, provided that such additional attribution notices cannot be construed as
modifying the License. You may add Your own copyright statement to Your modications and may provide additional
or different license terms and conditions for use, reproduction, or distribution of Your modications, or for any such
Derivative Works as a whole, provided Your use, reproduction, and distribution of the Work otherwise complies with
the conditions stated in this License.
5. Submission of Contributions. Unless You explicitly state otherwise, any Contribution intentionally submitted for inclusion
in the Work by You to the Licensor shall be under the terms and conditions of this License, without any additional terms
or conditions. Notwithstanding the above, nothing herein shall supersede or modify the terms of any separate license
agreement you may have executed with Licensor regarding such Contributions.
6. Trademarks. This License does not grant permission to use the trade names, trademarks, service marks, or product
names of the Licensor, except as required for reasonable and customary use in describing the origin of the Work and
reproducing the content of the NOTICE le.
7. Disclaimer of Warranty. Unless required by applicable law or agreed to in writing, Licensor provides the Work (and each
Contributor provides its Contributions) on an “AS IS” BASIS, WITHOUT WARRANTIES OR CONDITIONS OF
ANY KIND, either express or implied, including, without limitation, any warranties or conditions of TITLE, NON-
INFRINGEMENT, MERCHANTABILITY, or FITNESS FOR A PARTICULAR PURPOSE. You are solely responsible for
determining the appropriateness of using or redistributing the Work and assume any risks associated with Your exercise
of permissions under this License.
8. Limitation of Liability. In no event and under no legal theory, whether in tort (including negligence), contract, or
otherwise, unless required by applicable law (such as deliberate and grossly negligent acts) or agreed to in writing,
shall any Contributor be liable to You for damages, including any direct, indirect, special, incidental, or consequential
damages of any character arising as a result of this License or out of the use or inability to use the Work (including
but not limited to damages for loss of goodwill, work stoppage, computer failure or malfunction, or any and all other
commercial damages or losses), even if such Contributor has been advised of the possibility of such damages.
9. Accepting Warranty or Additional Liability. While redistributing the Work or Derivative Works thereof, You may choose
to offer, and charge a fee for, acceptance of support, warranty, indemnity, or other liability obligations and/or rights
consistent with this License. However, in accepting such obligations, You may act only on Your own behalf and on
Your sole responsibility, not on behalf of any other Contributor, and only if You agree to indemnify, defend, and hold
each Contributor harmless for any liability incurred by, or claims asserted against, such Contributor by reason of your
accepting any such warranty or additional liability.
END OF TERMS AND CONDITIONS
6-7
Page 74

FOR YOUR REFERENCE
6
■ About the license (continued)
APPENDIX: How to apply the Apache License to your work.
To apply the Apache License to your work, attach the following boilerplate notice, with the elds enclosed by brackets “[]”
replaced with your own identifying information. (Don’t include the brackets!) The text should be enclosed in the appropriate
comment syntax for the le format. We also recommend that a le or class name and description of purpose be included
on the same “printed page” as the copyright notice for easier identication within third-party archives.
Copyright [yyyy] [name of copyright owner]
Licensed under the Apache License, Version 2.0 (the “License”);
you may not use this le except in compliance with the License.
You may obtain a copy of the License at
http://www.apache.org/licenses/LICENSE-2.0
Unless required by applicable law or agreed to in writing, software distributed under the License is distributed on an “AS
IS” BASIS, WITHOUT WARRANTIES OR CONDITIONS OF ANY KIND, either express or implied.
See the License for the specic language governing permissions and limitations under the License.
6-8
Page 75

FOR YOUR REFERENCE
6
■ About the license (continued)
GNU GENERAL PUBLIC LICENSE
Version 2, June 1991
Copyright (C) 1989, 1991 Free Software Foundation, Inc.,51 Franklin Street, Fifth Floor, Boston, MA 021101301 USA
Everyone is permitted to copy and distribute verbatim copies of this license document, but changing it is not
allowed.
Preamble
The licenses for most software are designed to take away your freedom to share and change it. By contrast,
the GNU General Public License is intended to guarantee your freedom to share and change free software-to make sure the software is free for all its users. This General Public License applies to most of the Free
Software Foundation’s software and to any other program whose authors commit to using it. (Some other Free
Software Foundation software is covered by the GNU Lesser General Public License instead.) You can apply
it to your programs, too.
When we speak of free software, we are referring to freedom, not price. Our General Public Licenses are
designed to make sure that you have the freedom to distribute copies of free software (and charge for
this service if you wish), that you receive source code or can get it if you want it, that you can change the
software or use pieces of it in new free programs; and that you know you can do these things.
To protect your rights, we need to make restrictions that forbid anyone to deny you these rights or to ask you
to surrender the rights. These restrictions translate to certain responsibilities for you if you distribute copies of
the software, or if you modify it.
For example, if you distribute copies of such a program, whether gratis or for a fee, you must give the
recipients all the rights that you have. You must make sure that they, too, receive or can get the source code.
And you must show them these terms so they know their rights.
We protect your rights with two steps: (1) copyright the software, and (2) offer you this license which gives you
legal permission to copy, distribute and/or modify the software.
Also, for each author’s protection and ours, we want to make certain that everyone understands that there
is no warranty for this free software. If the software is modied by someone else and passed on, we want its
recipients to know that what they have is not the original, so that any problems introduced by others will not
reect on the original authors’ reputations.
Finally, any free program is threatened constantly by software patents. We wish to avoid the danger
that redistributors of a free program will individually obtain patent licenses, in effect making the program
proprietary. To prevent this, we have made it clear that any patent must be licensed for everyone’s free use or
not licensed at all.
The precise terms and conditions for copying, distribution and modication follow.
6-9
Page 76

FOR YOUR REFERENCE
6
■ About the license (continued)
GNU GENERAL PUBLIC LICENSE
TERMS AND CONDITIONS FOR COPYING, DISTRIBUTION AND MODIFICATION
0. This License applies to any program or other work which contains a notice placed by the copyright holder
saying it may be distributed under the terms of this General Public License. The “Program”, below, refers to
any such program or work, and a “work based on the Program” means either the Program or any derivative
work under copyright law: that is to say, a work containing the Program or a portion of it, either verbatim
or with modications and/or translated into another language. (Hereinafter, translation is included without
limitation in the term “modication”.) Each licensee is addressed as “you”. Activities other than copying,
distribution and modication are not covered by this License; they are outside its scope. The act of running
the Program is not restricted, and the output from the Program is covered only if its contents constitute a
work based on the Program (independent of having been made by running the Program). Whether that is
true depends on what the Program does.
1. You may copy and distribute verbatim copies of the Program’s source code as you receive it, in any
medium, provided that you conspicuously and appropriately publish on each copy an appropriate copyright
notice and disclaimer of warranty; keep intact all the notices that refer to this License and to the absence of
any warranty; and give any other recipients of the Program a copy of this License along with the Program.
You may charge a fee for the physical act of transferring a copy, and you may at your option offer warranty
protection in exchange for a fee.
2. You may modify your copy or copies of the Program or any portion of it, thus forming a work based on the
Program, and copy and distribute such modications or work under the terms of Section 1 above, provided
that you also meet all of these conditions:
a) You must cause the modied les to carry prominent notices stating that you changed the les and the
date of any change.
b) You must cause any work that you distribute or publish, that in whole or in part contains or is derived
from the Program or any part thereof, to be licensed as a whole at no charge to all third
parties under the terms of this License.
c) If the modied program normally reads commands interactively when run, you must cause it, when
started running for such interactive use in the most ordinary way, to print or display an announcement
including an appropriate copyright notice and a notice that there is no warranty (or else, saying that
you provide a warranty) and that users may redistribute the program under these conditions, and telling
the user how to view a copy of this License. (Exception: if the Program itself is interactive but does
not normally print such an announcement, your work based on the Program is not required to print an
announcement.)
These requirements apply to the modied work as a whole. If identiable sections of that work are not
derived from the Program, and can be reasonably considered independent and separate works in
themselves, then this License, and its terms, do not apply to those sections when you distribute them as
separate works. But when you distribute the same sections as part of a whole which is a work based
on the Program, the distribution of the whole must be on the terms of this License, whose permissions
for other licensees extend to the entire whole, and thus to each and every part regardless of who wrote
it.
Thus, it is not the intent of this section to claim rights or contest your rights to work written entirely by
you; rather, the intent is to exercise the right to control the distribution of derivative or collective works
based on the Program.
In addition, mere aggregation of another work not based on the Program with the Program (or with a
work based on the Program) on a volume of a storage or distribution medium does not bring the other
work under the scope of this License.
6-10
Page 77

FOR YOUR REFERENCE
6
■ About the license (continued)
3. You may copy and distribute the Program (or a work based on it, under Section 2) in object code or
executable form under the terms of Sections 1 and 2 above provided that you also do one of the following:
a) Accompany it with the complete corresponding machine-readable source code, which must be distributed
under the terms of Sections 1 and 2 above on a medium customarily used for software interchange; or,
b) Accompany it with a written offer, valid for at least three years, to give any third party, for a charge no
more than your cost of physically performing source distribution, a complete machine-readable copy
of the corresponding source code, to be distributed under the terms of Sections 1 and 2 above on a
medium customarily used for software interchange; or,
c) Accompany it with the information you received as to the offer to distribute corresponding source code.
(This alternative is allowed only for noncommercial distribution and only if you received the program in
object code or executable form with such an offer, in accord with Subsection b above.)
The source code for a work means the preferred form of the work for making modications to it. For an
executable work, complete source code means all the source code for all modules it contains, plus any
associated interface denition les, plus the scripts used to control compilation and installation of the
executable. However, as a special exception, the source code distributed need not include anything that
is normally distributed (in either source or binary form) with the major components (compiler, kernel, and
so on) of the operating system on which the executable runs, unless that component itself accompanies
the executable.
If distribution of executable or object code is made by offering access to copy from a designated place,
then offering equivalent access to copy the source code from the same place counts as distribution of the
source code, even though third parties are not compelled to copy the source along with the object code.
4. You may not copy, modify, sublicense, or distribute the Program except as expressly provided under this
License. Any attempt otherwise to copy, modify, sublicense or distribute the Program is void, and will
automatically terminate your rights under this License. However, parties who have received copies, or
rights, from you under this License will not have their licenses terminated so long as such parties remain in
full compliance.
5. You are not required to accept this License, since you have not signed it. However, nothing else grants you
permission to modify or distribute the Program or its derivative works. These actions are prohibited by law
if you do not accept this License. Therefore, by modifying or distributing the Program (or any work based
on the Program), you indicate your acceptance of this License to do so, and all its terms and conditions for
copying, distributing or modifying the Program or works based on it.
6. Each time you redistribute the Program (or any work based on the Program), the recipient automatically
receives a license from the original licensor to copy, distribute or modify the Program subject to these terms
and conditions. You may not impose any further restrictions on the recipients’ exercise of the rights granted
herein. You are not responsible for enforcing compliance by third parties to this License.
6-11
Page 78

FOR YOUR REFERENCE
6
■ About the license (continued)
7. If, as a consequence of a court judgment or allegation of patent infringement or for any other reason (not
limited to patent issues), conditions are imposed on you (whether by court order, agreement or otherwise)
that contradict the conditions of this License, they do not excuse you from the conditions of this License.
If you cannot distribute so as to satisfy simultaneously your obligations under this License and any other
pertinent obligations, then as a consequence you may not distribute the Program at all. For example, if a
patent license would not permit royalty-free redistribution of the Program by all those who receive copies
directly or indirectly through you, then the only way you could satisfy both it and this License would be to
refrain entirely from distribution of the Program.
If any portion of this section is held invalid or unenforceable under any particular circumstance, the balance
of the section is intended to apply and the section as a whole is intended to apply in other circumstances.
It is not the purpose of this section to induce you to infringe any patents or other property right claims or
to contest validity of any such claims; this section has the sole purpose of protecting the integrity of the
free software distribution system, which is implemented by public license practices. Many people have
made generous contributions to the wide range of software distributed through that system in reliance on
consistent application of that system; it is up to the author/donor to decide if he or she is willing to distribute
software through any other system and a licensee cannot impose that choice.
This section is intended to make thoroughly clear what is believed to be a consequence of the rest of this
License.
8. If the distribution and/or use of the Program is restricted in certain countries either by patents or by
copyrighted interfaces, the original copyright holder who places the Program under this License may add
an explicit geographical distribution limitation excluding those countries, so that distribution is permitted
only in or among countries not thus excluded. In such case, this License incorporates the limitation as if
written in the body of this License.
9. The Free Software Foundation may publish revised and/or new versions of the General Public License
from time to time. Such new versions will be similar in spirit to the present version, but may differ in detail to
address new problems or concerns.
Each version is given a distinguishing version number. If the Program species a version number of
this License which applies to it and “any later version”, you have the option of following the terms and
conditions
either of that version or of any later version published by the Free Software Foundation. If the Program
does not specify a version number of this License, you may choose any version ever published by the Free
Software Foundation.
10. If you wish to incorporate parts of the Program into other free programs whose distribution conditions are
different, write to the author to ask for permission. For software which is copyrighted by the Free Software
Foundation, write to the Free Software Foundation; we sometimes make exceptions for this. Our decision
will be guided by the two goals of preserving the free status of all derivatives of our free software and of
promoting the sharing and reuse of software generally.
6-12
Page 79

FOR YOUR REFERENCE
6
■ About the license (continued)
NO WARRANTY
11. BECAUSE THE PROGRAM IS LICENSED FREE OF CHARGE, THERE IS NO WARRANTY FOR THE
PROGRAM, TO THE EXTENT PERMITTED BY APPLICABLE LAW. EXCEPT WHEN OTHERWISE
STATED IN WRITING THE COPYRIGHT HOLDERS AND/OR OTHER PARTIES PROVIDE THE
PROGRAM “AS IS” WITHOUT WARRANTY OF ANY KIND, EITHER EXPRESSED OR IMPLIED,
INCLUDING, BUT NOT LIMITED TO, THE IMPLIED WARRANTIES OF MERCHANTABILITY
AND FITNESS FOR A PARTICULAR PURPOSE. THE ENTIRE RISK AS TO THE QUALITY AND
PERFORMANCE OF THE PROGRAM IS WITH YOU. SHOULD THE PROGRAM PROVE DEFECTIVE,
YOU ASSUME THE COST OF ALL NECESSARY SERVICING, REPAIR OR CORRECTION.
12. IN NO EVENT UNLESS REQUIRED BY APPLICABLE LAW OR AGREED TO IN WRITING WILL ANY
COPYRIGHT HOLDER, OR ANY OTHER PARTY WHO MAY MODIFY AND/OR REDISTRIBUTE THE
PROGRAM AS PERMITTED ABOVE, BE LIABLE TO YOU FOR DAMAGES, INCLUDING ANY GENERAL,
SPECIAL, INCIDENTAL OR CONSEQUENTIAL DAMAGES ARISING OUT OF THE USE OR INABILITY
TO USE THE PROGRAM (INCLUDING BUT NOT LIMITED TO LOSS OF DATA OR DATA BEING
RENDERED INACCURATE OR LOSSES SUSTAINED BY YOU OR THIRD PARTIES OR A FAILURE OF
THE PROGRAM TO OPERATE WITH ANY OTHER PROGRAMS), EVEN IF SUCH HOLDER OR OTHER
PARTY HAS BEEN ADVISED OF THE POSSIBILITY OF SUCH DAMAGES.
END OF TERMS AND CONDITIONS
Appendix: How to Apply These Terms to Your New Programs
If you develop a new program, and you want it to be of the greatest possible use to the public, the best way to
achieve this is to make it free software which everyone can redistribute and change under these terms.
To do so, attach the following notices to the program. It is safest to attach them to the start of each source le
to most effectively convey the exclusion of warranty; and each le should have at least the “copyright” line and
a pointer to where the full notice is found.
<one line to give the program’s name and a brief idea of what it does.>
Copyright (C) <year> <name of author>
This program is free software; you can redistribute it and/or modify it under the terms of the GNU General
Public License as published by the Free Software Foundation; either version 2 of the License, or (at your
option) any later version.
This program is distributed in the hope that it will be useful, but WITHOUT ANY WARRANTY; without even
the implied warranty of MERCHANTABILITY or FITNESS FOR A PARTICULAR PURPOSE. See the GNU
General Public License for more details.
You should have received a copy of the GNU General Public License along with this program; if not, write to
the Free Software Foundation, Inc.,
51 Franklin Street, Fifth Floor, Boston, MA 02110-1301 USA.
Also add information on how to contact you by electronic and paper mail.
If the program is interactive, make it output a short notice like this when it starts in an interactive mode:
6-13
Page 80

FOR YOUR REFERENCE
6
■ About the license (continued)
Gnomovision version 69, Copyright (C) year name of author
Gnomovision comes with ABSOLUTELY NO WARRANTY; for details type `show w’.
This is free software, and you are welcome to redistribute it under certain conditions; type `show c’ for details.
The hypothetical commands `show w’ and `show c’ should show the appropriate parts of the General Public
License. Of course, the commands you use may be called something other than `show w’ and `show c’; they
could even be mouse-clicks or menu items--whatever suits your program.
You should also get your employer (if you work as a programmer) or your school, if any, to sign a “copyright
disclaimer” for the program, if necessary. Here is a sample; alter the names:
Yoyodyne, Inc., hereby disclaims all copyright interest in the program `Gnomovision’ (which makes passes at
compilers) written by James Hacker.
<signature of Ty Coon>, 1 April 1989
Ty Coon, President of Vice
This General Public License does not permit incorporating your program into proprietary programs. If your
program is a subroutine library, you may consider it more useful to permit linking proprietary applications with
the library. If this is what you want to do, use the GNU Lesser General Public License instead of this License.
JSMN
MIT License
Copyright (c) 2010 Serge A. Zaitsev
Permission is hereby granted, free of charge, to any person obtaining a copy of this software and associated
documentation les (the “Software”), to deal in the Software without restriction, including without limitation the
rights to use, copy, modify, merge, publish, distribute, sublicense, and/or sell copies of the Software, and to
permit persons to whom the Software is furnished to do so, subject to the following conditions:
The above copyright notice and this permission notice shall be included in all copies or substantial portions of
the Software.
THE SOFTWARE IS PROVIDED “AS IS”, WITHOUT WARRANTY OF ANY KIND, EXPRESS OR
IMPLIED, INCLUDING BUT NOT LIMITED TO THE WARRANTIES OF MERCHANTABILITY, FITNESS
FOR A PARTICULAR PURPOSE AND NONINFRINGEMENT. IN NO EVENT SHALL THE AUTHORS OR
COPYRIGHT HOLDERS BE LIABLE FOR ANY CLAIM, DAMAGES OR OTHER LIABILITY, WHETHER IN AN
ACTION OF CONTRACT, TORT OR OTHERWISE, ARISING FROM, OUT OF OR IN CONNECTION WITH
THE SOFTWARE OR THE USE OR OTHER DEALINGS IN THE SOFTWARE.
6-14
Page 81

INDEX
A
[Address] key ……………………… 1-6, 2-4, 3-5, 4-2
Antenna
Audio output level adjustment
Back Light function
Battery pack ………………………………………… 1-2
BC-202IP2 …………………………………………… 5-6
BC-202IP3L
BC-21
BC-218
Belt clip
Bluetooth
[Call history] key
Calls cannot be made ……………………………… 6-2
Charging time ……………………………………… 5-3
Charging indicator
[CLR/LOCK] key
……………………………………………… 1-2
…………………… 1-3
B
………………………………… 2-3
Attaching/Detaching …………………………… 1-2
Battery life ………………………………… 5-3, 5-5
………………………………………… 5-7
1 ……………………………………………… 5-6
……………………… 5-7, 5-8, 5-10, 5-13, 5-15
………………………………………… 1-2, 5-7
……………………………………… 4-4, 5-9
Auto Connect
Connecting and disconnecting
Delete Bluetooth Device
Echo Canceller
Echo Canceller Voice Delay ………………… 4-6
Echo Canceller Input Gain …………………… 4-6
Initialize Bluetooth Unit ……………………… 4-7
Initializing pairing list …………… 5-22, 5-23, 5-24
Noise Canceller
One T
ouch PTT ………………………………… 4-7
Pairing
………………………………………… 5-12
Pairing failed …………………………………… 6-2
Power Save
Beep ……………………………………… 4-7
PTT
Search Bluetooth Device……………………… 4-7
Synchronous Volume ………… 5-8, 5-11, 4-6, 6-3
Unit Version
………………………………… 4-6
……………… 5-15
………………… 4-7, 5-21
………………………………… 4-6
……………………………… 4-6
…………………………………… 4-6
…………………………………… 4-7
C
……………… 1-6, 2-5, 3-3, 3-12, 4-3
…………………………… 5-6, 5-7
…………………………………… 1-6
E
Emergency Call ……………………………… 3-6, 3-12
F
“F” blinks …………………………………………… 1-5
Firmware update ……………………………… 1-5, 4-4
Full duplex mode …………………………………… 2-3
[FUNC] key …………………………………… 1-5, 1-6
H
Hand strap
HM-215
ICCID
Key Lock function
LC-185
Log
Lone W
LTE Unit Version …………………………………… 4-4
MBA-7 ……………………………………… 5-25, 2-26
MBF-1 ………………………………………… 5-25, 2-26
Message Call ………………………………… 3-2, 3-6
Mute ………………………………………………… 3-6
No power comes ON ……………………………… 6-2
No reply is received ………………………………… 6-2
No sound output …………………………………… 6-2
Optional products …………………………………… 5-2
[Option] key …………………………………… 3-6, 3-12
…………………………………………… 1-2
……………………………………… 5-10, 5-15
I
………………………………………………… 4-4
K
……………………………… 1-7, 6-2
L
……………………………………………… 5-28
……………………………………………… 2-5, 4-4
orker function ……………………………… 3-13
M
N
O
D
Deleting history logs………………………………… 2-6
Destination ID ……………………………………… 2-4
Page 82

INDEX
P
P-Bell function ……………………………………… 3-10
Pocket Beep function
Recording
Recording function
Play ………………………………………… 3-6, 3-8
Record data ………………………… 2-3, 3-7, 6-2
Deleting recorded audio ……………………… 3-9
Remaining battery capacity ………………… 1-5, 1-7
Remote Monitor function …………………………… 3-13
Reset ………………………………………………… 4-4
SET mode ……………………………………… 4-2, 4-4
Silent mode ………………………………………… 3-12
Simplex mode ……………………………………… 2-3
……………………………… 3-10
R
……………………… 2-3, 3-7
S
T
Talkgroup ……………………………………… 3-4, 3-5
Turning OFF the power …………………………… 2-3
Turning ON the power ……………………………… 1-3
[TX/RX] indicator …………………………………… 2-2
V
Vibration function …………………………………… 2-2
VOX function ………………………………………… 3-11
VS-3 ………………………………………… 5-11, 5-16
Page 83

How the World Communicates
A7415-10EX-4
2020–2022 Icom Inc. Jul. 2022
©
1-1-32 Kamiminami, Hirano-ku, Osaka 547-0003, Japan
 Loading...