

Page 1

OPERATING GUIDE
OPERATING GUIDE FOR
IC-F3162DT/DS
IC-F4160DT/DS
BIIS 1200/dPMR OPERATION
Page 2

IMPORTANT
Thank you for purchasing this Icom transceiver.
The Binary Interchange of Information and Signaling (BIIS)
1200 and digital Private Mobile Radio (dPMR) system functions are built into your IC-F3162DT/DS or IC-F4162DT/DS
transceiver.
NOTE: In this operating guide, the LCD illustration is
shown as having characters displayed in two lines.
READ ALL INSTRUCTIONS carefully and completely
before using the transceiver.
SAVE THIS OPERATING GUIDE — This guide con-
tains important oper ating instructions for:
• IC-F3162DT/DS
• IC-F4162DT/DS u h f dp m r m o b i l e t r a n s c e i v e r
Icom, Icom Inc. and the Icom logo are registered trademarks of Icom Incorporated (Japan) in Japan, the United States, the United Kingdom, Germany,
France, Spain, Russia and/or other countries.
All other products or brands are registered trademarks or trademarks of their
respective holders.
i
v h f dp m r m o b i l e t r a n s c e i v e r
Page 3

TABLE OF CONTENTS
IMPORTANT .......................................................................... i
TABLE OF CONTENTS ........................................................ ii
1 PREPARATION............................................................1–2
■ Programmable function keys ........................................1
2 BIIS 1200 OPERATION .............................................3–12
■ BIIS 1200 operation......................................................3
■ BIIS display ..................................................................3
■ Receiving a call ............................................................ 3
■ Transmitting a call ......................................................... 7
■ Position data transmission..........................................11
■ Stun function ..............................................................11
■ BIIS ANI .....................................................................11
■ Printer connection ......................................................12
3 dPMR OPERATION ................................................. 13–27
■ dPMR operation .........................................................13
■ dPMR display ............................................................. 13
■ Receiving a call .......................................................... 13
■ Transmitting a call ....................................................... 18
■ Transmitting a command ............................................24
■ Position data transmission..........................................26
■
Status message transmission .....................................26
■ Printer connection ......................................................27
ii
Page 4

1
PREPARATION
■ Programmable function keys
The following functions can be assigned to [EMR], [Side1],
[Side2], [Side3], [P0], [P1], [P2] and [P3] programmable
function keys.
Consult your Icom dealer or system operator for details concerning your transceiver’s programmed keys and their functions.
If the programmable function names are bracketed in the following explanations, the specific key is used to activate the
function.
D For only BIIS 1200 operation
The following key function is required for BIIS 1200 operation.
BIIS BUTTON “BIIS”
➥ Push to enter the call code memory mode.
• Push [CH Up] or [CH Down] to select a desired Individual or
Group ID.
➥ While in the call code memory mode, push to enter the
message selection mode.
• Push [CH Up] or [CH Down] to select a desired status message
or Short Data Message (SDM).
➥
While in the message selection mode, push
stand-by mode.
➥ Hold down for 1 second to toggle between the memory
channel mode and the queue channel mode.
➥ While in the queue channel mode, push to toggle between
the queue channel mode and the received message
mode.
1
to return to the
D For only dPMR operation
The following key functions are required for dPMR operation.
dPMR BUTTON “dPMR”
➥ Push to enter the ID selection mode.
• Push [CH Up] or [CH Down] to select a desired Individual or
Talkgroup ID.
➥ While in the ID selection mode, push to enter the application
selection mode.
• Push [CH Up] or [CH Down] to select a desired application from
“STATUS,” “MESSAGE,” “STAT POL,” “LISTENING,” “ STUN,”
“KILL,” “REVIVE” and “CALL LOG.”
➥ If you select “STATUS” or “MESSAGE” in the application selec-
tion mode, push to enter the message selection mode.
• Push [CH Up] or [CH Down] to select a desired message.
➥
While in the application selection mode, push
the stand-by mode.
CLEAR “CLR”
After communication is finished, push this key to send a ‘Disconnect’ signal to terminate the connection.
Depending on the pre-programmed settings, the Priority A
channel is automatically selected after a ‘Disconnect’ signal terminates a connection.
to return to
Page 5

PREPARATION
1
1
D For both BIIS 1200 and dPMR operations
The following key functions are useful for BIIS 1200 and dPMR
operations.
STATUS UP, STATUS DOWN “STUP” “STDN”
➥ Push to select a status message.
➥ When the automatic scroll function is activated, push to
cancel it, if desired.
➥ When an SDM that includes more than 12 characters is
displayed, push to manually scroll the message.
STATUS “STAT”
➥ Push to enter the status message selection mode.
• Push [CH Up] or [CH Down] to select a desired message.
➥
Hold down for 1 second to transmit the last selected status
message.
MESSAGE “MSG”
➥ Push to enter the SDM selection mode.
• Push [CH Up] or [CH Down] to select a desired SDM.
➥ While in the SDM selection mode, hold down for 1 second
to transmit the last selected SDM.
➥ While in the stand-by mode, hold down for 1 second to
enter the message editing mode. (dPMR only)
•
Set a desired message using the 10-keypad. (Only 10-key version)
(p.22)
In BIIS 1200 operation, status messages and SDM are
selectable in the same mode.
D Additional key functions
• For both BIIS 1200 and dPMR operations
The following key functions are recommended for BIIS 1200
and dPMR operations, and function as described below.
CALL “CALL”
➥ On an MSK channel, push to transmit a BIIS call.
➥ On a digital channel, push to transmit a dPMR call.
Depending on the pre-programmed settings, pushing [PTT]
makes a call in the same way as using [Call]. Moreover,
when you keep holding down [PTT] after receiving an
acknowledgement, you can start a conversation without
pushing it again.
TX CODE ENTER “TXCE”
Push to enter the ID code edit mode, and then set a desired
ID code. (pp. 7, 18)
• For only BIIS 1200 operation
The following key function is required for BIIS 1200 operation,
and functions as described below.
MONITOR (AUDIBLE) “MON”
After communication is finished, push this key to send a ‘Clear
down’ signal to terminate the connection.
Depending on the pre-programmed settings, the Priority
A channel is automatically selected after a ‘Clear down’
signal terminates a connection.
2
3
4
5
6
7
8
9
10
11
12
13
14
15
16
2
Page 6

2
BIIS CALL
Appears Appears or blinks
TXCE MON
1234
0001
Calling station’s ID
Your own ID
BIIS 1200 OPERATION
■ BIIS 1200 operation
The Binary Interchange of Information and Signalling (BIIS)
1200 standard is the best choice to add a data service to an
existing system. It enables digital communications, signalling
and message exchanges with analog transceivers.
The BIIS system provides calling features such as Individual,
Group, and Emergency calls, as well as enables receiving
and transmitting status messages and SDM.
NOTE: During BIIS 1200 operation, dPMR operation is
disabled.
■ BIIS display
The following displays appear in BIIS 1200 operation.
CONNECT : When an acknowledgement of an Individual or
OK : When an acknowledgement of a message (sta-
FAILED : When no acknowledgement of a call is re-
3
WAIT : While transmitting.
CLR DOWN : When a connection is terminated.
BUSY : When the operating channel is busy.
Group call is received.
tus message or SDM) is received.
ceived.
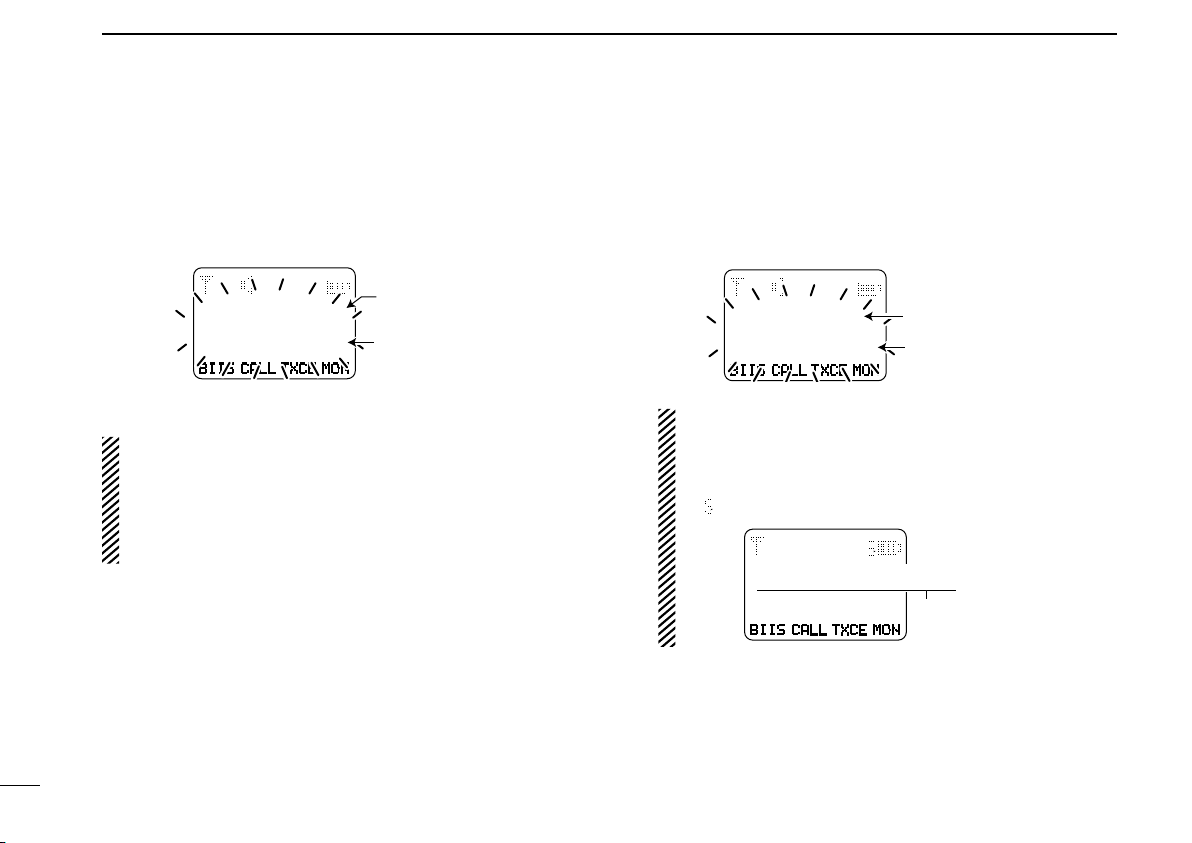
■ Receiving a call
D Receiving an Individual call
q When an Individual call is received:
• Rings sound.
• “ ” appears and the mute is released.
• “ ” appears or blinks, depending on the pre-programmed set-
tings.
• Your own ID (or name) and the calling station’s ID (or name)
blink.
w While holding down [PTT], speak into the microphone at
your normal voice level.
e Release [PTT] to receive.
r After the communication is finished, push [Moni (Audi)] to
send a ‘Clear down’ signal to terminate the connection.
• Either you or the calling station can send a ‘Clear down’ signal.
• “ ” disappears, “CLR DOWN” appears for approximately 2 sec-
onds, and the transceiver automatically returns to the stand-by
mode.
Page 7

BIIS 1200 OPERATION
BIIS CALL TXCE CLR
1234
4001
Calling station’s ID
Group ID
Appears Appears or blinks
BIIS CALL TXCE MON
1234
Calling station’s ID
Emergency
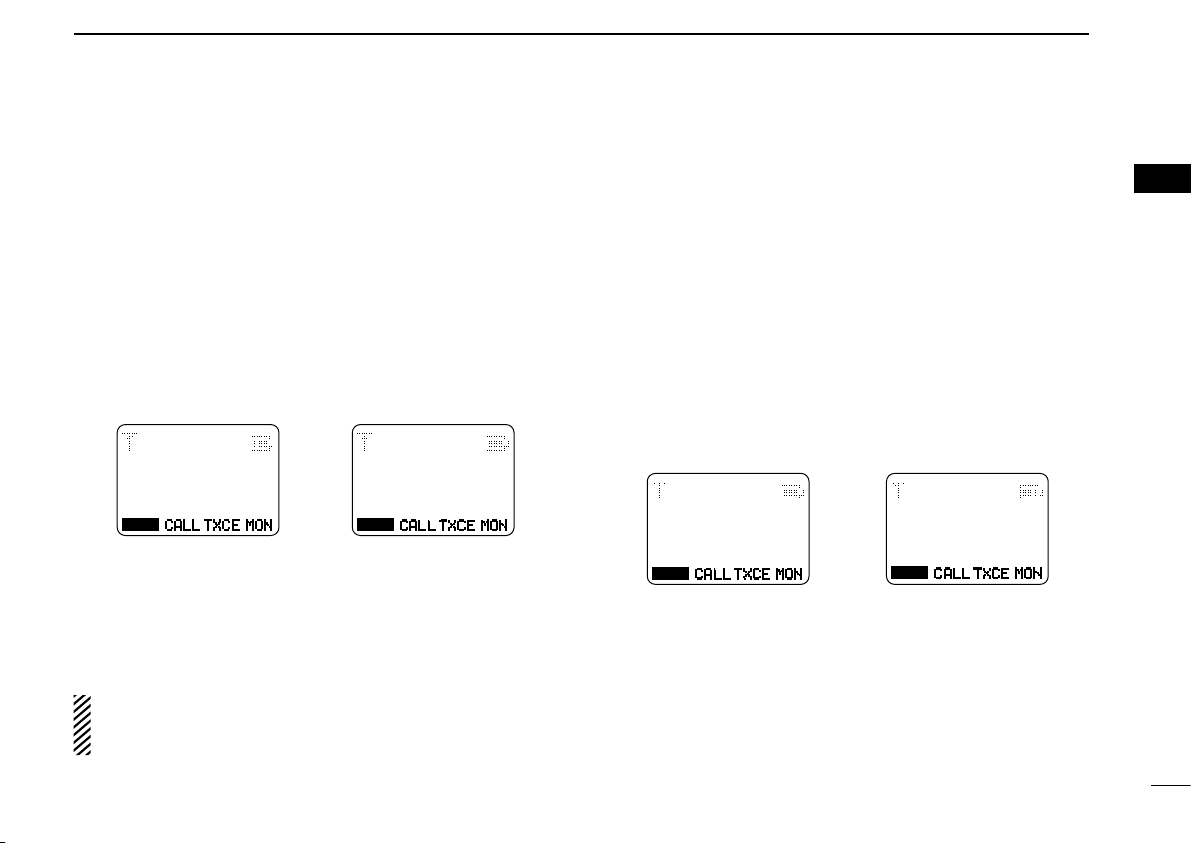
2
D Receiving a Group call
q When a Group call is received:
• Rings sound.
• “ ” appears and the mute is released.
• “ ” appears or blinks, depending on the pre-programmed set-
tings.
• The group ID (or name) and the calling station’s ID (or name)
blink.
w While holding down [PTT], speak into the microphone at
your normal voice level.
NOTE: Only one station is allowed to speak at the
same time.
e Release [PTT] to receive.
r After the communication is finished, push [Moni (Audi)] to
send a ‘Clear down’ signal to terminate the connection.
• Either station can send a ‘Clear down’ signal.
• “ ” disappears, “CLR DOWN” appears for approximately 2 sec-
onds, and the transceiver automatically returns to the stand-by
mode.
D Receiving an Emergency call
q When an Emergency call is received:
• Rings sound.
• “Emergency” and the calling station’s ID (or name) blink.
• The transceiver automatically transmits an acknowledgement to
the calling station.
w Push [Moni (Audi)] to return to the stand-by mode.
1
2
3
4
5
6
7
8
9
10
11
12
13
14
15
16
4
Page 8
BIIS 1200 OPERATION
BIIS CALL TXCE MON
1234
RX Status 01
Calling station’s ID
The received
status message
BIIS CALL TXCE MON
1234
The received SDM
Message 1
Calling station’s ID
BIIS CALL TXCE MON
1234
RETURN TO OFFICE
Scrolls
2
■ Receiving a call (continued)
D Receiving a status message
q When a status message is received:
• Rings sound.
• The calling station’s ID (or name) and the status message blink.
D Receiving an SDM
q When an SDM is received:
• Rings sound.
• The calling station’s ID (or name) and the SDM blink.
w Push [Moni (Audi)] to return to the stand-by mode.
NOTE: When the display mode is one line
If the ‘Scroll Timer’ item is set to “OFF,” even when a status message is received, only the calling station’s ID (or
name) is displayed (no message is alternately displayed).
In that case, push [Status Down] to display the status
message manually.
5
NOTE: When the SDM includes more than 12 characters, it automatically scrolls.
• Push [Status Up] or [Status Down] to stop scrolling, or
manually scroll the message.
• “ ” appears.
w Push [Moni (Audi)] to return to the stand-by mode.
Page 9
BIIS 1200 OPERATION
BIIS
CALL
TXCE MON
<
QUEUE
>
–QUEUE!–
BIIS
CALL
TXCE MON
<
QUEUE
>
NO QUEUE
BIIS
CALL
TXCE MON
MESSAGE
−
MSG!
−
BIIS
CALL
TXCE MON
MESSAGE
−
NO MSG
−
2
D Displaying a received call record
— Queue channel mode
The transceiver memorizes up to three calling station’s IDs.
When the fourth call is received, the oldest call record will be
removed, and the last received call will be added. When the
transceiver is turned OFF, all the records are deleted.
q Hold down [BIIS Button] for 1 second to enter the queue
channel mode.
• The screen display varies as shown below.
When the transceiver
has a call record
w Push [CH Up] or [CH Down] to display a desired record.
e Hold down [BIIS Button] for 1 second again to return to
the stand-by mode.
• When no operation occurs for 30 seconds, the transceiver automatically returns to the stand-by mode.
NOTE: You can call back from the queue channel record.
While displaying an ID, push [Call] to make a call using
the selected ID.
When the transceiver
has no call record
D Displaying a received message
The transceiver memorizes up to six received messages.
When the seventh message is received, the oldest message will be removed, and the last received message will be
added. When the transceiver is turned OFF, all the messages
are deleted.
q Hold down [BIIS Button] for 1 second to enter the queue
channel mode.
w Push [BIIS Button] momentary to enter the received mes-
sage mode.
• The screen display varies as shown below.
When the transceiver
has a message record
e Push [CH Up] or [CH Down] to display a desired mes-
sage.
r Hold down [BIIS Button] for 1 second again to return to
the stand-by mode.
• When no operation occurs for 30 seconds, the transceiver automatically returns to the stand-by mode.
When the tra nsceiver
has no message record
1
2
3
4
5
6
7
8
9
10
11
12
13
14
15
16
6
Page 10
BIIS 1200 OPERATION
BIIS
CALL
TXCE MON
1234
Appears
2
7
■ Transmitting a call
D General
• Editing an ID
If the transceiver has a key assigned to the TX Code Enter
function, you can edit an ID within the allowable digits.
q Push [TX Code Enter] to enter the ID edit mode.
• The digit to be edited blinks.
w Push [TX Code Enter] to select a desired digit to be ed-
ited.
e Push [CH UP] or [CH DOWN] to select a desired number.
r Push [TX Code Enter] to set. The digit to the right will au-
tomatically blink.
t Repeat step e and r to input all allowable digits.
y After editing, push [TX Code Enter] to store the setting.
• The transceiver returns to the standby mode.
NOTE: To overwrite the original ID, set the ‘Update’ item
to “Enable” using the CS-F3160/F5060 (dPMR)
s o f t w a r e . Otherwise, changing the channel or turning
OFF the transceiver discards the new ID, and returns the
original one. Ask your dealer for details.
c l o n i n g
D Transmitting an Individual or Group call
NOTE: If you want to make a call to the pre-programmed
ID, skip step q and w then directly go to step e.
q Push [BIIS Button] to enter the call code memory mode.
• The pre-programmed ID is displayed.
• “
” appears.
w Push [CH Up] or [CH Down] to select a desired Individual
ID or Group ID.
e Push [Call] to make a call.
• “WAIT” appears while transmitting.
• “ CONNECT” is displayed when an acknowledgement is received.
NOTE: If no acknowledgement is received, the transceiver automatically repeats the call three times (default). However, when no acknowledgement is received
after each of the calls, an error beep sounds and
“FAILED” is displayed. In that case, the transceiver au-
tomatically returns to the stand-by mode.
r After “CONNECT” is displayed, hold down [PTT] and speak
into the microphone at your normal voice level. Release
[PTT] to receive.
t After the communication is finished, push [Moni (Audi)] to
send a ‘Clear down’ signal to terminate the connection.
Page 11

BIIS 1200 OPERATION
BIIS
CALL
TXCE MON
TX Status 01
STATUS 01
A status message is displayed.
2
D Transmitting a status message
You can send a pre-programmed status message to an individual station or to group stations.
There are 24 status messages that can be sent, and Status
22 and 24 messages have designated meanings.
Status 22: Emergency
Status 24: GPS request
• Status 22 can also be used as a normal status message by
disabling the designated meaning. However, Status 24 is fixed.
NOTE: Depending on the pre-programmed settings, the
Priority A channel is always used to send status messages.
q Push [BIIS Button] to enter the call code memory mode.
• “
” appears.
• The pre-programmed ID is displayed.
w Push [CH Up] or [CH Down] to select a desired Individual
ID or Group ID.
e Push [BIIS Button] again to enter the message selection
mode, then push [CH Up] or [CH Down] to select a desired status message.
r Push [Call] to transmit the status message to the selected
station or group.
• “WAIT” is displayed while transmitting.
• “OK” is displayed when an acknowledgement is received.
• “FAILED” is displayed when no acknowledgment is received.
t After a specified time period, the transceiver will return to
the stand-by mode.
1
2
3
4
5
6
7
8
9
10
11
12
13
14
15
16
8
Page 12

BIIS 1200 OPERATION
BIIS
CALL
TXCE MON
SDM 1
MESSAGE 1
An SDM is displayed.
2
■ Transmitting a call (continued)
D Transmitting an SDM
You can send a pre-programmed SDM to an individual station
or to group stations.
The transceiver has eight memories to store messages.
q Push [BIIS Button] to enter the call code memory mode.
• “
• The pre-programmed ID is displayed.
w Push [CH Up] or [CH Down] to select a desired Individual
ID or Group ID.
e Push [BIIS Button] again to enter the message selection
mode, then push [CH Up] or [CH Down] to select a desired SDM.
r Push [Call] to transmit the SDM to the selected station or
group.
• “WAIT” is displayed while transmitting.
• “OK” is displayed when an acknowledgement is received.
• “FAILED” is displayed when no acknowledgment is received.
t After a specified time period, the transceiver will return to
the stand-by mode.
9
” appears.
D Direct message input (Only 10-key version)
While displaying an SDM, you can edit or change the message.
q Push [BIIS Button] twice to enter the message selection
mode, then push [CH Up] or [CH Down] to select a desired SDM.
w Push [M] or [#] to enter the message editing mode.
• The first character blinks when [#] is pushed, the last character
blinks when [M] is pushed.
e Push the appropriate digit key, [0] to [9], to enter a desired
character.
• See the table on the next page for the usable characters.
• Push [CH Up] to enter a space, and push [CH Down] to delete
the selected character.
r Push [#] to move the cursor to the right, push [M] to move
the cursor to the left.
t Repeat steps e and r to enter a message of up to 12
characters.
y Hold down [BIIS Button] for 1 second to write the new pro-
grammed message into the SDM memory.
• Push [BIIS Button] momentarily to cancel editing and return to
the original message display.
Page 13

BIIS 1200 OPERATION
Key Characters
[0]
[1]
[2]
[3]
[4]
[5]
[6]
[7]
[8]
[9]
2BAabcC
3EDdefF
4HGghiI
5KJjklL
6NMmnoO
7QPSpq rsR
9XWZwxyzY
8UTtuvV
(space)
1^@# � /–=\&% $+
0][!’”,?:_()<>;
|
2
• Usable characters
NOTE: Messages can be edited also using a PC editing
program. Ask your dealer for details.
D Transmitting an Emergency call
If an MSK channel is used as the Emergency channel, the
transceiver can access the BIIS emergency mode.
If your transceiver is programmed for Silent operation, you
can transmit Emergency calls without the beep sounding or
the display changing.
q Hold down [Emergency] for the pre-programmed time pe-
riod to enter the emergency mode.
• Countdown beeps start.
• To exit the emergency mode, hold down [Emergency] for the
pre-programmed period before the end of the count-down time
period.
w When the time period ends, the transceiver automatically
starts an Emergency call cycle, once or repeatedly, depending on the pre-programmed repeat cycle setting.
e In an Emergency call cycle, the transceiver automatically
transmits Status 22 (Emergency) to inform the dispatcher
that the user is in an emergency situation.
• “WAIT” appears while transmitting.
• “OK” is displayed when an acknowledgement is received.
• “FAILED” is displayed when no acknowledgment is received.
NOTE: Depending on the pre-programmed settings,
the transceiver does not transmit Status 22 in the repeated cycles.
r After the Emergency call cycles have ended, the trans-
ceiver automatically returns to the stand-by mode.
• To exit the emergency mode manually, turn OFF the power, and
turn ON it again.
1
2
3
4
5
6
7
8
9
10
11
12
13
14
15
16
10
Page 14

BIIS 1200 OPERATION
2
11
■ Position data transmission
When a GPS receiver is connected to the transceiver, through
the OPC-966
and latitude) can be automatically transmitted. Ask your
dealer or system operator for connection details.
*
This cable is not needed when the HM-170GP gp s s p e a k e r m i c r o -
p h o n e is used as the GPS receiver.
The position data is transmitted:
• When Status 24 (GPS request) is received.
• When [PTT] is released.
- Set the ‘Send with Logoff’ item to “Enable.”
• After sending a status message.
- Set the ‘Send with Status’ item to “Enable.”
• After sending an SDM.
- Set the ‘Send with SDM’ item to “Enable.”
• After sending Status 22 (Emergency).
- Set the ‘Send with Emergency’ item to “Enable.”
• After sending an Emergency call with the Man Down function.
- Set the ‘Send at ManDown’ item to “Enable.”
• By the Automatic Position Data Transmission function.
When the function is activated, the transceiver auto-
matically transmits position data according to the ‘Time
Marker’ and ‘Interval Timer’ settings.
- Set the ‘Auto’ item to “Enable.”
NOTE: Configure the position data transmission settings
using the CS-F3160/F5060 (dPMR)
Ask your dealer for details.
i n t e r f a c e c a b l e ,* the position data (longitude
c l o n i n g s o f t w a r e .
■ Stun function
If a call is received with a specified ID, set as the killer ID, the
stun function is activated and the transceiver is disabled. In
that case, entering the password is necessary to reactivate
the transceiver.
■ BIIS ANI
Your own ID can be transmitted each time [PTT] is pushed
(log-in) or released (log-off) during Individual or Group call
communications.
By receiving an ANI, the communication log can be recorded
when using a PC dispatch application.
In addition, when using the ANI with the Log-in function, the
PTT Side Tone function can be used to inform you that the ID
is sent and communication can begin.
Page 15

BIIS 1200 OPERATION
2
■ Printer connection
When a printer is connected to the transceiver, through the
OPC-966
station’s ID can be printed out, depending on the pre-programmed settings.
Ask your dealer or system operator for connection and setting details.
i n t e r f a c e c a b l e , received SDM and the calling
1
2
3
4
5
6
7
8
9
10
11
12
13
14
15
16
12
Page 16

3
Appears Appears or blinks
dPMR CALL TXCE CLR
ID 0000001
Calling station’s ID
dPMR OPERATION
■ dPMR operation
The IC-F3162DT/IC-F3162DS and IC-F4162DT/IC-F4162DS
provide digital Private Mobile Radio (dPMR) operation that
meets the 6.25 kHz bandwidth requirements for narrow band
operation. This increases the efficiency of channel allocation
and use of the spectrum.
■ dPMR display
The following displays appear in dPMR operation.
CONNECT : When an acknowledgement of a Voice or Emer-
OK : When an acknowledgement of a message (sta-
FAILED : When no acknowledgement of a call is re-
WAIT : While transmitting.
CLR DOWN : When a connection is terminated.
ID : When no name is programmed, appears to the
TG : When no name is programmed, appears to the
13
NOTE: During dPMR operation, BIIS 1200 operation is
disabled.
gency call is received.
tus message or SDM) or command (Ambience
Listening, Stun, Kill, or Revive) is received.
ceived.
left of the calling station’s ID.
left of the Talkgroup ID.
■ Receiving a call
D Receiving an Individual call
q When an Individual call is received:
• Rings sound.
• “ ” appears and the mute is released.
• “ ” appears or blinks, depending on the pre-programmed set-
tings.
• The calling station’s ID (or name) blinks.
w While holding down [PTT], speak into the microphone at
your normal voice level.
e Release [PTT] to receive.
r After the communication is finished, push [Clear] to send a
‘Disconnect’ signal to terminate the connection.
• Either station can send a ‘Disconnect’ signal.
• “ ” disappears, “CLR DOWN” appears for approximately 2 sec-
onds, and the transceiver automatically returns to the stand-by
mode.
Page 17

dPMR OPERATION
dPMR CALL TXCE CLR
ID
0000001
TG
0100000
Calling station’s ID
Ta lkgroup ID
Appears Appears or blinks
dPMR CALL TXCE CLR
ID 0000001
RX Status 00
Calling station’s ID
The received
status message
3
D Receiving a Group call
q When a Group call is received:
• Rings sound.
• “ ” appears and the mute is released.
• “ ” appears or blinks, depending on the pre-programmed set-
tings.
• The Talkgroup ID (or name) and the calling station’s ID (or name)
blink.
• When an All Call is received, “ALL CALL” blinks instead of “TG”
and the Talkgroup ID.
w While holding down [PTT], speak into the microphone at
your normal voice level.
e Release [PTT] to receive.
r After the communication is finished, push [Clear] to send a
‘Disconnect’ signal to terminate the connection.
• Either station can send a ‘Disconnect’ signal.
• “ ” disappears, “CLR DOWN” appears for approximately 2 sec-
onds, and the transceiver automatically returns to the stand-by
mode.
NOTE: Only one station is allowed to speak at the
same time.
D Receiving a status message
q When a status message is received:
• Rings sound.
• The calling station’s ID (or name) and the status message
blink.
w Push [Clear] to return to the stand-by mode.
1
2
3
4
5
6
7
8
9
10
11
12
13
14
15
16
14
Page 18

dPMR OPERATION
dPMR CALL TXCE CLR
ID 0000001
Message 1
Calling station’s ID
The received
message
dPMR CALL TXCE CLR
ID 0000001
RETURN TO OFFICE
Scrolls
3
■ Receiving a call (continued)
D Receiving an SDM
q When an SDM is received:
• Rings sound.
• The calling station’s ID (or name) and the SDM are displayed.
D Receiving a Stun, Kill or Revive call
If an Individual call with a Stun or Kill command is received
from a specied station, the transceiver will display “SORRY,”
and becomes unusable.
NOTE: If the transceiver receives a Stun, Kill, or Revive
command from a station other than the specified ones,
the call will be ignored, and the transceiver will not be
stunned, killed, or revived.
NOTE: When the SDM includes more than 12 charac-
ters, it automatically scrolls.
• Push [Status Up] or [Status Down] to stop scrolling, or
manually scroll the message.
• “ ” appears.
w Push [Clear] to return to the stand-by mode.
15
➥ When a Stun command is received, the transceiver is disa-
*
*2 Depending on the pre-programmed settings.
➥ When a Kill command is received, the transceiver is disa-
1
bled*
. In that case, receiving a Revive command or inputting the password*
again.
1
Depending on the pre-programmed settings, receiving a Stun
command inhibits only transmission, but the transceiver still can
receive.
bled. In that case, re-programming the transceiver is necessary to operate the transceiver again.
2
is necessary to operate the transceiver
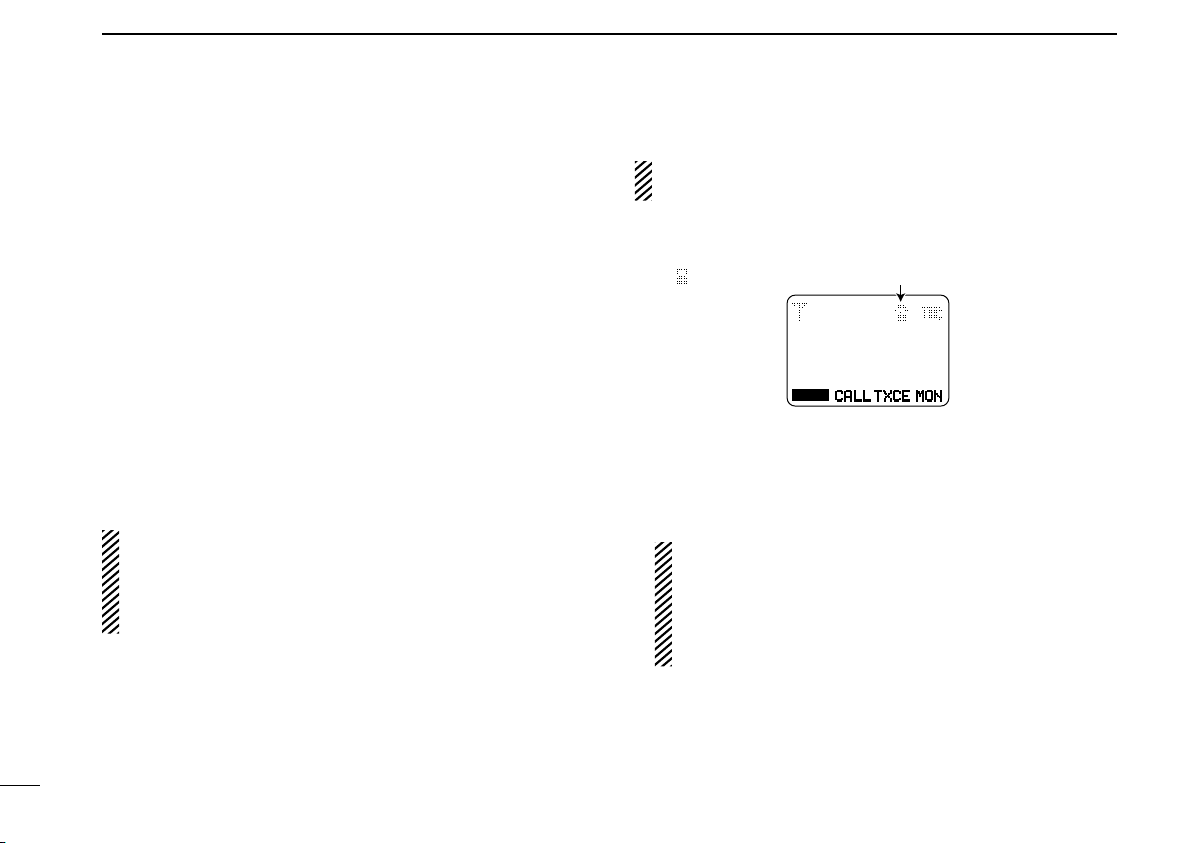
D Receiving a Status Polling call
If a Status Polling call is received, the transceiver will automatically transmit its current status.
Page 19

dPMR OPERATION
dPMR
Emergency
CALL
002 ch-01
dPMR CALL TXCE CLR
3
D Receiving an Ambience Listening call
If an Individual call with an Ambience Listening command is
received from a specified station, the transceiver will automatically transmit its microphone audio.
NOTE: If the transceiver receives an Ambience Listening
command from a station other than the specified one, the
call will be ignored, and the transceiver will not transmit its
microphone audio.
D Receiving an Emergency call
q When an Emergency call is received:
• Rings sound.
• “ Emergency” and the channel number* are alternately dis-
played.
* Depending on the pre-programmed settings, the calling sta-
tion’s ID (or name) can be displayed.
• The transceiver automatically transmits an acknowledgement to
the calling station.
w Push [Clear] to return to the stand-by mode.
D Talk back function
The Talk Back function allows you to select the same call
mode (Analog or Digital) as the received call.
If the received call is a digital signal, the Talk Back function is
activated for Voice and Emergency calls, and depending on
the pre-programmed settings, also for status messages and
SDM.
When the channel type is “Mixed-Digital”
After receiving an analog signal, “ANALOG” is displayed
during the Talk Back timer period, depending on the pre-programmed settings. When [PTT] is pushed before or during the
Talk Back timer period, you can transmit an analog signal.
When the channel type is “Mixed-Analog,” “Mixed-Digital”
or “Digital”
After receiving a digital signal, the calling station’s ID or the
Talkgroup ID is displayed until receiving a ‘Disconnect’ signal, depending on the pre-programmed settings. Even on a
“Mixed-Analog” channel, when [PTT] is pushed before receiving a ‘Disconnect’ signal, the Talk Back function allows
the transceiver to transmit a digital signal to the ID.
NOTE: When this function is not activated, the transceiver
always transmits analog signals on “Mixed-Analog” channels, and digital signals on “Mixed-Digital” channels.
• On these channels, the transceiver can receive both analog and
digital signals, regardless of the Talk Back function.
1
2
3
4
5
6
7
8
9
10
11
12
13
14
15
16
16
Page 20

dPMR OPERATION
dPMR CALL TXCE CLR
VOICE
0000001
dPMR CALL TXCE CLR
NO LOG
3
■ Receiving a call (continued)
D Displaying a received call log entry
Depending on the pre-programmed setting, the transceiver
stores up to 10 call log entries. Individual Voice, Status and
SDM call log entries are stored. When an 11th call is received, the oldest call log entry will be removed, and the last
received call will be added. When the transceiver is turned
OFF, all the log entries are deleted.
q Push [dPMR Button] twice to enter the application selec-
tion mode.
• “STATUS” appears.
w Push [CH Up] or [CH Down] to select “CALL LOG.”
e Push [dPMR Button] again to display a call log entry.
NOTE: Depending on the pre-programmed settings, pushing [Call] while displaying a call log entry makes a Voice
call using the entry’s ID. However, if a Status or SDM call
log entry is selected, the transceiver makes a Voice call
using the last selected Individual or Talkgroup ID.
When the transceiver
has a call log entry
r Push [CH Up] or [CH Down] to display a desired entry.
• If a Status or SDM call log entry is selected, not only the calling
station’s ID but also the status message or message are displayed.
t Push [dPMR Button] again to return to the stand-by
17
mode.
When the transceiver
has no call log entries
Page 21

dPMR OPERATION
3
■ Transmitting a call
dPMR operation allows you to make a call to a specific station (Individual call) or to a particular group (Talkgroup call).
Other digital mode transceivers on the channel will not receive a call that does not match their Individual or Talkgroup
ID and/or colour code.
D General
• Editing an ID
If the transceiver has a key assigned to the TX Code Enter
function, you can edit an ID within the allowable digits.
q Push [TX Code Enter] to enter the ID edit mode.
• The digit to be edited blinks.
w Push [TX Code Enter] to select a desired digit to be ed-
ited.
e Push [CH UP] or [CH DOWN] to select a desired number.
r Push [TX Code Enter] to set. The digit to the right will au-
tomatically blink.
t Repeat step e and r to input all allowable digits.
y After editing, push [TX Code Enter] to store the setting.
• The transceiver returns to the stand-by mode.
NOTE: Changing the channel or turning OFF the trans-
ceiver discards the new ID, and returns the original one.
• When no acknowledgement is received
After making a call, the transceiver waits for an acknowledgement for the pre-programmed time period. If no acknowledgement is received, the transceiver automatically repeats the
call 4 times (default). However, when no acknowledgement
is received after each of the calls, an error beep sounds and
“FAILED” is displayed. In that case, the transceiver automati-
cally returns to the stand-by mode.
• About the 10-key version
If the 10-key version is used, the keypad allows you to:
- Select an ID list number while in the ID selection mode.
- Select a Status list number while in the status message selection mode.
- Select an SDM list number while in the SDM selection
mode.
- Edit an SDM while displaying it. (p. 22)
NOTE: Depending on the pre-programmed settings, additional functions can be used only with the 10-key version.
Ask your dealer for details.
1
2
3
4
5
6
7
8
9
10
11
12
13
14
15
16
18
Page 22

dPMR OPERATION
3
■ Transmitting a call (continued)
D Transmitting a Voice Call
NOTE: If you want to make a call to the pre-programmed
ID, skip step q and w and directly go to step e.
D Transmitting a Status Polling Call
The transceiver can send a signal that causes the target station to automatically transmit its current status.
19
q Push [dPMR Button] to enter the ID selection mode.
• The pre-programmed ID is displayed.
w Push [CH Up] or [CH Down] to select a desired Individual
ID or Talkgroup ID.
e Push [Call] to make a Voice call.
• “WAIT” appears while transmitting.
• “CONNECT” is displayed when an acknowledgement is re-
ceived.
• “FAILED” is displayed when no acknowledgment is received.
r After “CONNECT” is displayed, hold down [PTT] and speak
into the microphone at your normal voice level. Release
[PTT] to receive.
t After the communication is finished, push [Clear] to send a
‘Disconnect’ signal to terminate the connection.
• Either station can send a ‘Disconnect’ signal.
q Push [dPMR Button] to enter the ID selection mode.
• The pre-programmed ID is displayed.
w Push [CH Up] or [CH Down] to select a desired Individual
ID.
e Push [dPMR Button] again to enter the application selec-
tion mode.
• “STATUS” is displayed.
r Push [CH Up] or [CH Down] to select “STAT POL.”
t Push [Call] to transmit the status polling call to the se-
lected station.
• “WAIT” is displayed while transmitting.
• When a status message is received, the message and the sta-
tion’s ID blink.
• “FAILED” is displayed when no acknowledgment is received.
After a specified time period, the transceiver will return to the
stand-by mode.
y Push [Clear] to return to the stand-by mode.
Page 23

dPMR OPERATION
dPMR CALL TXCE CLR
Status 01
TX Status 01
3
D Transmitting a status message
You can send a pre-programmed status message to an individual station or to group stations.
There are 32 status messages that can be sent.
q Push [dPMR Button] to enter the ID selection mode.
• The pre-programmed ID is displayed.
w Push [CH Up] or [CH Down] to select a desired Individual
ID or Talkgroup ID.
e Push [dPMR Button] again to enter the application selec-
tion mode.
• “STATUS” is displayed.
r Push [dPMR Button] again to enter the status message
selection mode.
• The pre-programmed status message is displayed.
t Push [CH Up] or [CH Down] to select a desired status
message.
y Push [Call] to transmit the status message to the selected
station or talkgroup.
• “WAIT” is displayed while transmitting.
• “OK” is displayed when an acknowledgement is received.
• “FAILED” is displayed when no acknowledgment is received.
u After a specified time period, the transceiver will return to
the stand-by mode.
1
2
3
4
5
6
7
8
9
10
11
12
13
14
15
16
20
Page 24

dPMR OPERATION
dPMR CALL TXCE CLR
MESSAGE 01
Message 1
3
■ Transmitting a call (continued)
D Transmitting an SDM
You can send a pre-programmed SDM to an individual station
or to group stations.
The transceiver has 10 memories to store messages.
q Push [dPMR Button] to enter the ID selection mode.
• The pre-programmed ID is displayed.
w Push [CH Up] or [CH Down] to select a desired Individual
ID or Talkgroup ID.
e Push [dPMR Button] again to enter the application selec-
tion mode.
• “STATUS” is displayed.
r Push [CH Up] or [CH Down] to select “MESSAGE.”
t Push [dPMR Button] again to enter the SDM selection
mode.
• The pre-programmed SDM is displayed.
y Push [CH Up] or [CH Down] to select a desired SDM.
• You can rewrite the contents of the SDM. See the next page for
details.
u Push [Call] to transmit the SDM to the selected station or
talkgroup.
• “WAIT” is displayed while transmitting.
• “OK” is displayed when an acknowledgement is received.
• “FAILED” is displayed when no acknowledgment is received.
i After a specified time period, the transceiver will return to
the stand-by mode.
21
Page 25

22
3
dPMR OPERATION
Key Characters
[0]
[1]
[2]
[3]
[4]
[5]
[6]
[7]
[8]
[9]
2BAabcC
3EDdefF
4HGghiI
5KJjklL
6NMmnoO
7QPSpq rsR
9XWZwxyzY
8UTtuvV
(space)
1^@# � /–=\&% $+
0][!’”,?:_()<>;
|
3
D Direct message input (Only 10-key version)
While displaying an SDM, you can edit or change the message.
q Push [dPMR Button] twice to enter the application selec-
tion mode.
• “STATUS” is displayed.
w Push [CH Up] or [CH Down] to select “MESSAGE.”
e Push [dPMR Button] again to enter the SDM selection
mode.
• The pre-programmed message is displayed.
r Push [CH Up] or [CH Down] to select a desired SDM.
t Push [M] or [#] to enter the message editing mode.
• The first character blinks when [#] is pushed, the last character
blinks when [M] is pushed.
y Push the appropriate digit key, [0] to [9], to enter a desired
character.
• See the table at right for the usable characters.
• Push [CH Up] to enter a space, and push [CH Down] to delete
the selected character, and hold down [#] for 1 second to delete
all the characters.
u Push [#] to move the cursor to the right, push [M] to move
the cursor to the left.
i Repeat steps y and u to enter a message of up to 100
characters.
o Hold down [dPMR Button] for 1 second to write the new
programmed message into the SDM memory.
• Push [dPMR Button] momentarily to cancel editing and return
to the original message display.
• Usable characters
USING [MESSAGE]:
If the transceiver has a key assigned to the Message function, you can quickly enter the message editing mode.
q While in the stand-by mode, hold down [Message] for 1
second to enter the message editing mode.
• A cursor blinks for the first character.
w Follow steps y to i described in the left column.
e Push [Call] to transmit the SDM to the last selected ID.
NOTE: In that case, you cannot store the programmed
message in the memory. Turning OFF the transceiver discards the message.
1
2
3
4
5
6
7
8
9
10
11
12
13
14
15
16
22
Page 26

dPMR OPERATION
3
■ Transmitting a call (continued)
D Transmitting an Emergency call
If a digital channel is used as the Emergency channel, the
transceiver can access the dPMR emergency mode.
If your transceiver is programmed for Silent operation, you
can transmit Emergency calls without the beep sounding or
the display changing.
q Hold down [Emergency] for the pre-programmed time pe-
riod to enter the emergency mode.
• Countdown beeps start.
• To exit the emergency mode, hold down [Emergency] for the
pre-programmed period before the end of the count-down time
period.
w When the time period ends, the transceiver automatically
starts an Emergency call cycle, once or repeatedly, depending on the pre-programmed repeat cycle setting.
e In an Emergency call cycle, the transceiver automatically
transmits a digital signal to inform the dispatcher that the
user is in an emergency situation.
• “WAIT” appears while transmitting.
• When an acknowledgement is received, “CONNECT” is dis-
played. You can communicate with the dispatcher by pushing
[PTT], until a ‘Disconnect’ signal terminates the connection.
• When no acknowledgement is received, an error beep sounds
and “FAILED” is displayed.
NOTE: Depending on the pre-programmed setting, the
transceiver does not transmit the digital signal in the repeated cycles.
r After the Emergency call cycles have ended, the trans-
ceiver automatically returns to the stand-by mode.
• To exit the emergency mode manually, turn OFF the power, and
turn ON it again.
23
Page 27

24
3
dPMR OPERATION
3
■ Transmitting a command
The following Individual calls allow you to send special commands. These calls will function if you are designated as a
specific station. Ask your dealer for details.
D Transmitting an Ambience Listening Call
An Ambience Listening call allows you to send a command
that will require the target station to transmit its microphone
audio.
q Push [dPMR Button] to enter the ID selection mode.
• The pre-programmed ID is displayed.
w Push [CH Up] or [CH Down] to select a desired Individual
ID.
e Push [dPMR Button] again to enter the application selec-
tion mode.
• “STATUS” is displayed.
r Push [CH Up] or [CH Down] to select “LISTENING.”
t Push [Call] to transmit an Ambience Listening call to the
selected station.
• “WAIT” is displayed while transmitting.
• “OK” is displayed when an acknowledgement is received, then
the called station’s microphone audio can be heard for the preprogrammed time period.
• “FAILED” is displayed when no acknowledgment is received.
y After a specified time period, the transceiver will return to
the stand-by mode.
D Transmitting a Stun Call
A Stun call allows you to send a command that will stun the
target station.
q Push [dPMR Button] to enter the ID selection mode.
• The pre-programmed ID is displayed.
w Push [CH Up] or [CH Down] to select a desired Individual
ID.
e Push [dPMR Button] again to enter the application selec-
tion mode.
• “STATUS” is displayed.
r Push [CH Up] or [CH Down] to select “STUN.”
t Push [Call] to transmit a Stun call to the selected station.
• “WAIT” is displayed while transmitting.
• “OK” is displayed when an acknowledgement is received.
• “FAILED” is displayed when no acknowledgment is received.
y After a specified time period, the transceiver will return to
the stand-by mode.
1
2
4
5
6
7
8
9
10
11
12
13
14
15
16
24
Page 28

dPMR OPERATION
3
■ Transmitting a command (continued)
D Transmitting a Kill Call
A Kill call allows you to send a command that will disable the
target station.
D Transmitting a Revive Call
A Revive call allows you to send a command that will revive
the (stunned) station.
25
q Push [dPMR Button] to enter the ID selection mode.
• The pre-programmed ID is displayed.
w Push [CH Up] or [CH Down] to select a desired Individual
ID.
e Push [dPMR Button] again to enter the application selec-
tion mode.
• “STATUS” is displayed.
r Push [CH Up] or [CH Down] to select “KILL.”
t Push [Call] to transmit a Kill call to the selected station.
• “WAIT” is displayed while transmitting.
• “OK” is displayed when an acknowledgement is received.
• “FAILED” is displayed when no acknowledgment is received.
y After a specified time period, the transceiver will return to
the stand-by mode.
q Push [dPMR Button] to enter the ID selection mode.
• The pre-programmed ID is displayed.
w Push [CH Up] or [CH Down] to select a desired Individual
ID.
e Push [dPMR Button] again to enter the application selec-
tion mode.
• “STATUS” is displayed.
r Push [CH Up] or [CH Down] to select “REVIVE.”
t Push [Call] to transmit a Revive call to the selected sta-
tion.
• “WAIT” is displayed while transmitting.
• “OK” is displayed when an acknowledgement is received.
• “FAILED” is displayed when no acknowledgment is received.
y After a specified time period, the transceiver will return to
the stand-by mode.
Page 29

dPMR OPERATION
3
■ Position data transmission
When a GPS receiver is connected to the transceiver, through
the OPC-966
and latitude) can be automatically transmitted. Ask your
dealer or system operator for connection details.
*
This cable is not needed when the HM-170GP gp s s p e a k e r m i c r o -
p h o n e is used as the GPS receiver.
The position data is transmitted:
• When the GPS Request status message is received.
- Set a status message as the GPS Request one in the ‘GPS
Request Status’ item.
• At the end of a Voice call.
- Set the ‘Send with Voice Call’ item to ‘Enable.’
• After sending a status message.
- Set the ‘Send with Status Call’ item to “Enable.”
• After sending an SDM.
- Set the ‘Send with SDM Call’ item to “Enable.”
• After making an Emergency call.
- Set the ‘Send with Emergency’ item to ‘Enable.’
•
After sending an Emergency call with the Man Down function.
- Set the ‘Send at ManDown’ item to “Enable.”
• By the Automatic Position Transmission function.
When the function is activated, the transceiver auto-
matically transmits position data according to the ‘Time
Marker’ and ‘Interval Timer’ settings.
- Set the ‘Auto’ item to “Enable.”
NOTE: Configure the position data transmission settings
using the CS-F3160/F5060 (dPMR)
Ask your dealer for details.
i n t e r f a c e c a b l e ,* the position data (longitude
c l o n i n g s o f t w a r e .
■
Status message transmission
Status messages can be automatically transmitted:
• When the transceiver is turned ON or OFF.
- Select a status message to be transmitted in the ‘Power ON
Status’ or ‘Power OFF Status’ item, respectively.
- Select a target station ID in the ‘Power Status ID’ item.
• At the end of a Voice call.
- Select a Status Message to be transmitted in the ‘Send with
Voice Call’ item.
NOTE: Configure the status message transmission settings using the CS-F3160/F5060 (dPMR)
w a r e . Ask your dealer for details.
c l o n i n g s o f t -
1
2
3
4
5
6
7
8
9
10
11
12
13
14
15
16
26
Page 30

dPMR OPERATION
3
■ Printer connection
When a printer is connected to the transceiver, through the
OPC-966
station’s ID can be printed out, depending on the pre-programmed settings.
Ask your dealer or system operator for connection and setting details.
i n t e r f a c e c a b l e , received SDM and the calling
27
Page 31

MEMO
1
2
3
4
5
6
7
8
9
10
11
12
13
14
15
16
Page 32

A-6842-2EU
© 2010 Icom Inc.
1-1-32 Kamiminami, Hirano-ku, Osaka 547-0003, Japan
 Loading...