

Page 1

ADVANCED MANUAL
UHF TRANSCEIVER
Iç-41PRO
Page 2

IMPORTANT
READ ALL INSTRUCTIONS carefully before using the IC-41PRO UHF transceiver.
KEEP THIS ADVANCED MANUAL, as it contains important operating information that may be useful in the
future.
The BASIC MANUAL is supplied with the transceiver.
This ADVANCED MANUAL describes the radio as supplied in standard factory default setting. However, the settings
on your transceiver may differ if it has been customised by your dealer. For details, refer to your authorised Icom
dealer or the administrator for your organisations radios.
TABLE OF CONTENTS
IMPORTANT .........................................................................i
TABLE OF CONTENTS ........................................................ i
1. BASIC OPERATION ...................................................1–2
PWR ON Password ......................................................... 1
Keylock ............................................................................1
Non-locked keys ..................................................... 1
D
Channel selection ...........................................................1
Zone selection .................................................................2
Priority channel ...............................................................2
Setting the Priority channel .................................... 2
D
Switching to the Priority channel ............................ 2
D
Cancelling the Priority channel ..............................2
D
Monitor ............................................................................2
Squelch ...........................................................................2
2. SET MODE .................................................................3–6
Set mode sequence ...............................................3
D
Backlight ................................................................4
D
Beep .......................................................................4
D
Beep Level .............................................................4
D
Channel Announce ................................................4
D
CTCSS/DTCS ........................................................4
D
VOX ........................................................................4
D
VOX Gain ...............................................................4
D
VOX Delay (Sec) ....................................................4
D
Roger Beep ............................................................5
D
Ringer Level ...........................................................5
D
Squelch Level .........................................................5
D
Mic Gain .................................................................5
D
Battery Voltage .......................................................5
D
Signal Monitor ........................................................5
D
Auto Power OFF.....................................................5
D
Power Save ............................................................5
D
Lockout ..................................................................6
D
Scan Stop Timer ....................................................6
D
Scan Restart .......................................................... 6
D
PTT Hold ................................................................6
D
Own ID ...................................................................6
D
3. REPEATER OPERATION ...............................................7
Repeater operation .........................................................7
4. SCAN ........................................................................8–10
Scan types ......................................................................8
Scanning preparation ......................................................8
Selecting a scan type .............................................8
D
Setting a Tag channel .............................................8
D
Setting the Scan Stop Timer ..................................9
D
Open scan .......................................................................9
Group and Priority scan ..................................................9
Repeater scan ...............................................................10
Repeater scan flow ..............................................10
D
5. TONE SQUELCH AND POCKET BEEP ................11–12
Tone Squelch ................................................................11
Setting the
D
CTCSS tone frequency/DTCS code ................... 11
Turning ON the Tone Squelch ..............................11
D
Pocket Beep ..................................................................12
Waiting for a call from a station ............................12
D
6. SELCALL (Selective calling) ................................13–14
Calling ...........................................................................13
Selecting a TX code .............................................13
D
Editing the TX code ..............................................13
D
Transmitting an individual Selcall .........................13
D
Receiving ......................................................................14
Receiving an individual Selcall .............................14
D
Recalling a memorised RX code..........................14
D
Receiving a Group call .........................................14
D
Quiet Mode ...................................................................14
Stun function .................................................................14
7. OTHER FUNCTIONS ..............................................15–16
Smart Ring and ATS
Smart Ring ........................................................... 15
D
AT S ......................................................................15
D
RX channels and frequencies .......................................15
Editing an RX frequency ......................................15
D
PTT Hold .......................................................................16
Data cloning ..................................................................16
8. SPECIFICATIONS ........................................................17
General ................................................................17
D
Transmitter ...........................................................17
D
Receiver ...............................................................17
D
INDEX ................................................................................18
(Automatic Transponder System) ......15
Icom, Icom Inc. and the Icom logo are registered trademarks of Icom Incorporated (Japan) in Japan, the United States, the United Kingdom, Germany, France, Spain,
Russia, Australia, New Zealand and/or other countries.
i
Page 3
Section 1
BASIC OPERATION
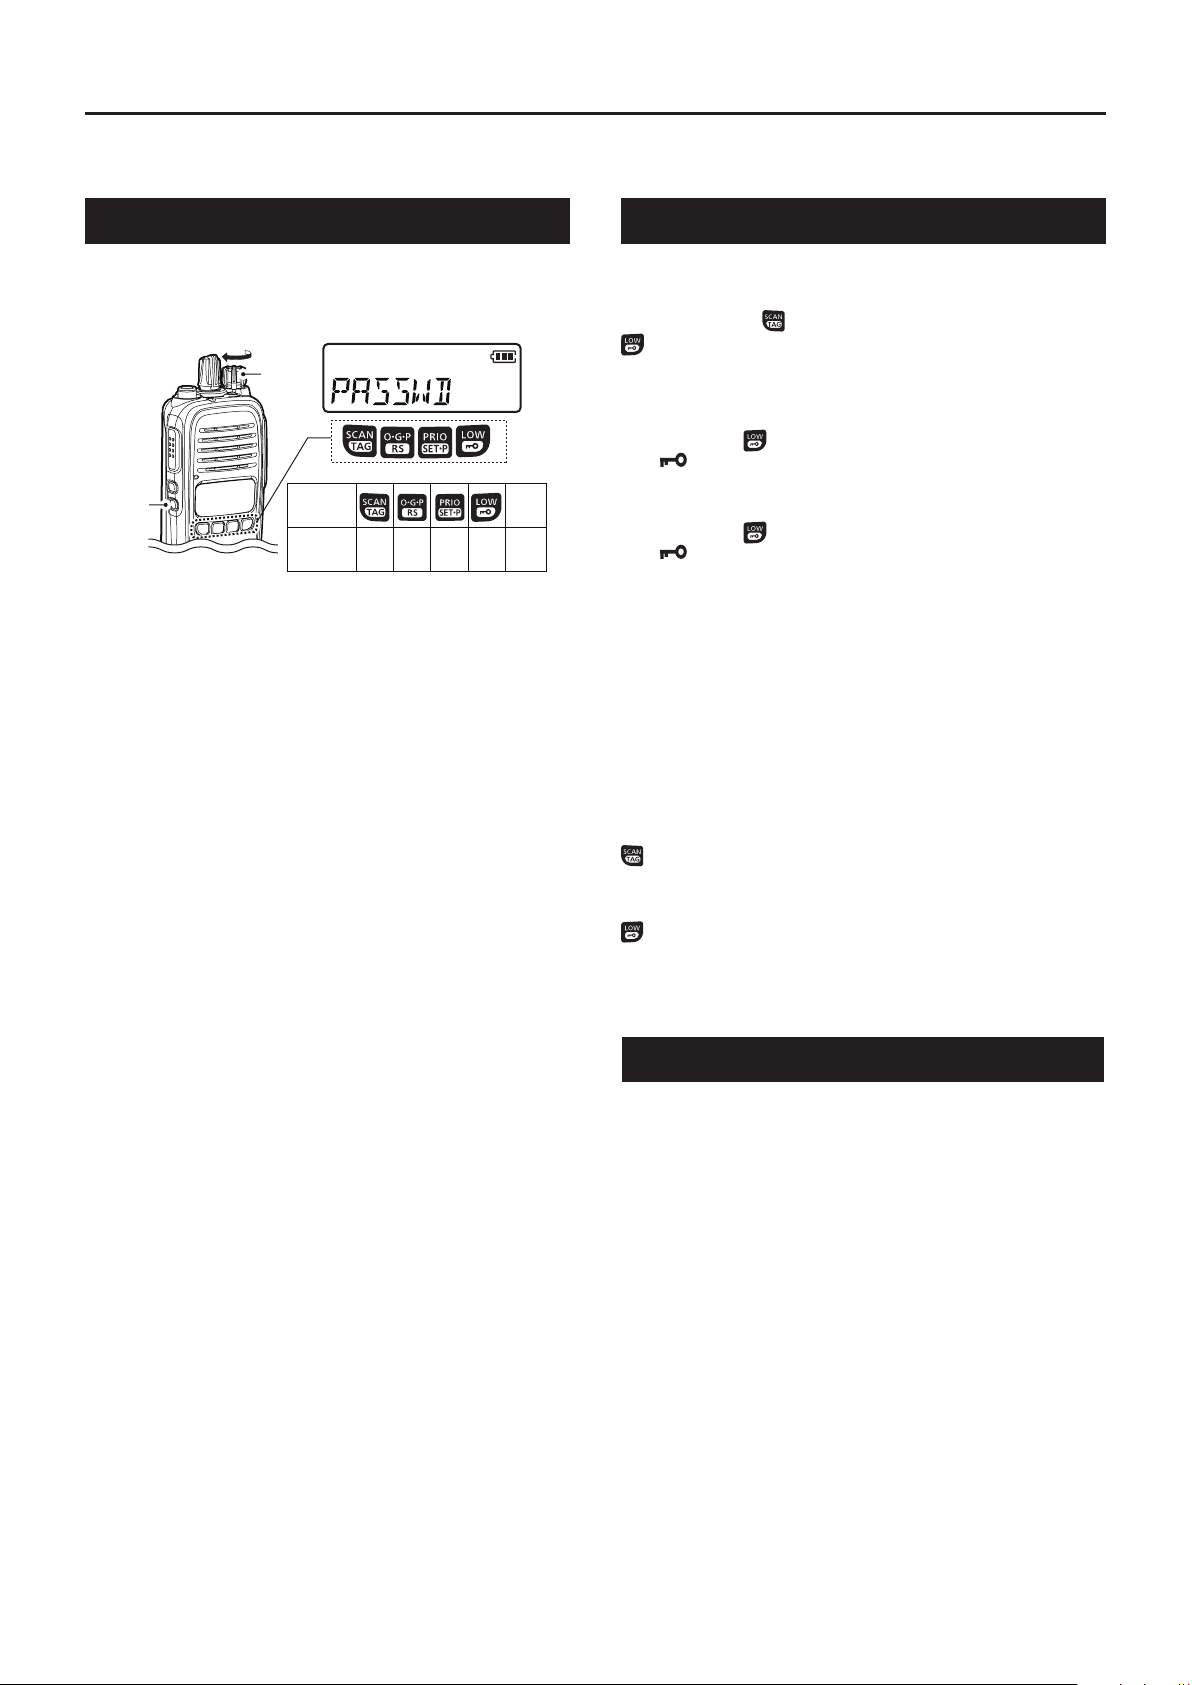
PWR ON Password
If the transceiver is set with a power ON password,
enter the password when turning ON the transceiver.
To enter the password, see the illustration below.
[VOL]
[Side 2]
KEY
NUMBER
0
5
2
1
7
6
The password is a 4 digit code (example: 1234).
➥ Push the corresponding keys to enter your password.
• Note that each key represents two digits. That means,
“3764” and “8769” are entered in exactly the same way
(requires no multiple or extended pushing.)
• The entered password will not be displayed.
• If “PASSWD” does not disappear after entering, the
entered password is incorrect. Turn OFF the transceiver,
and then try again.
Side 2
4
3
9
8
Keylock
Hold down for 2 seconds to electronically lock
[ROTARY SELECTOR] and all keys except [PTT],
[Side 1], [TOP], (When in the Function mode) and
to prevent accidental channel changing or function
access.
To lock the keys:
➥ Hold down for 2 seconds to lock.
• “ ” is displayed.
To unlock the keys:
➥ Hold down for 2 seconds again to unlock.
• “ ” disappears.
D Non-locked keys
Even when the Keylock function is ON, you can use
the following keys for certain conditions.
[PTT]: You can hold down to transmit, and release to
receive.
[Side 1]: You can push to turn the Monitor function ON
or OFF.
[TOP]: You can push to change between Normal
mode and Function mode.
: In the Function mode, you can hold down for
2 seconds to transmit the selected Selcall
code, when a CB channel is selected.
: You can hold down for 2 seconds to turn OFF
the Keylock function.
Channel selection
There are 80 UHF CB channels and you have access
to all 80 channels, including designated repeater channels. You can select between them to communicate with
a specific person(s). The IC-41PRO is also capable of
being set with an additional 35 receive only channels,
using the optional cs-41PrO clOning sOftware.
➥ Rotate [ROTARY SELECTOR] to scroll through the
selectable channels.
1
Page 4

BASIC OPERATION
1
Zone selection
(
Selectable only when more than 2 zones are set, using the
optional CS-41PRO clOning sOftware)
A zone enables you to allocate several channels into
a logical group. This is useful if you want to simplify
communications, particularly in commercial or convoy
applications, or if you want to separate out the receive
only channels to be scanned separately from CB
channels.
q Push [TOP] to enter the Function mode.
w Hold down
selection mode.
e Rotate [ROTARY SELECTOR] to select the desired
zone, and then push to set.
NOTE:
• The transceiver remains in the selected mode when
turned OFF and then ON again.
• CB-05, CB-R05 and CB-35 channels are for emergency
use, and are required to be left open for only emergency
use. CB-22 and CB-23 are used for only receiving.
for 2 seconds to enter the zone
Priority channel
The Priority channel enables you to have quick access
to a specific channel. Only one channel can be set as
the Priority channel. “P” is displayed when the Priority
channel is set.
Monitor
The Monitor function opens the Squelch or Tone
squelch, enabling you to receive weak signals. This
enables quick access to the open squelch setting.
➥ To turn the Monitor function ON or OFF, push [Side 1].
• “ MONI ON” or “MONI OF” is displayed when the function
is turned ON or OFF.
Squelch
In order to clearly receive signals, set the squelch
level to suit your environment. This eliminates
background noise when there are no signals preset.
A higher level is better for inner cities or noisy areas,
and a lower level is more beneficial in quiet, rural or
country areas.
Setting the squelch level:
q Push [Side 2] to enter the squelch setting mode.
w Rotate [ROTARY SELECTOR] to set the squelch
level to between 0 and 9.
• 0= lowest squelch level, 9= highest squelch level
e Push [Side 2] to set the selected squelch level and
exit the setting mode.
Information
You can also set the squelch level in the Set mode.
See page 5 for details.
D Setting the Priority channel
q Rotate [ROTARY SELECTOR] to select a desired
channel.
w Hold down for 2 seconds to set the selected
channel as the Priority Channel.
• “P” is displayed.
D Switching to the Priority channel
➥ Push to switch from a displayed channel to the
Priority channel. “N/A” is displayed when the Priority
channel is not set.
D Cancelling the Priority channel
➥ Push [TOP] to enter the Function mode, and then
hold down for 2 seconds to cancel the Priority
channel setting.
• “P” disappears.
2
Page 5
Section 2
• Beep
SET MODE
In the Set mode, you can change various transceiver
settings to suit your operating requirements.
q Hold down [TOP] for 2 seconds to enter the Set
mode.
• If no key is pushed for 30 seconds, the transceiver will
return to the normal mode.
w Push [Side 1] or [Side 2] to select an item.
• You can also select an item by pushing [TOP].
e Rotate [ROTARY SELECTOR] to select an option in
the selected item.
r Hold down [TOP] for 2 seconds to set and exit the
Set mode, or simply turn OFF the transceiver.
Own ID
Your Own ID is omitted from the Set mode sequence
by default. You can set this item using the optional
CS-41PRO clOning sOftware.
VOX related items
The following items are displayed in the Set mode
only when the optional HM-168LWP sPeaker
micrOPhOne or other optional external device is
connected to the transceiver. See the BASIC
MANUAL for external device connection details.
• VOX
• VOX Gain
• VOX Delay (Sec)
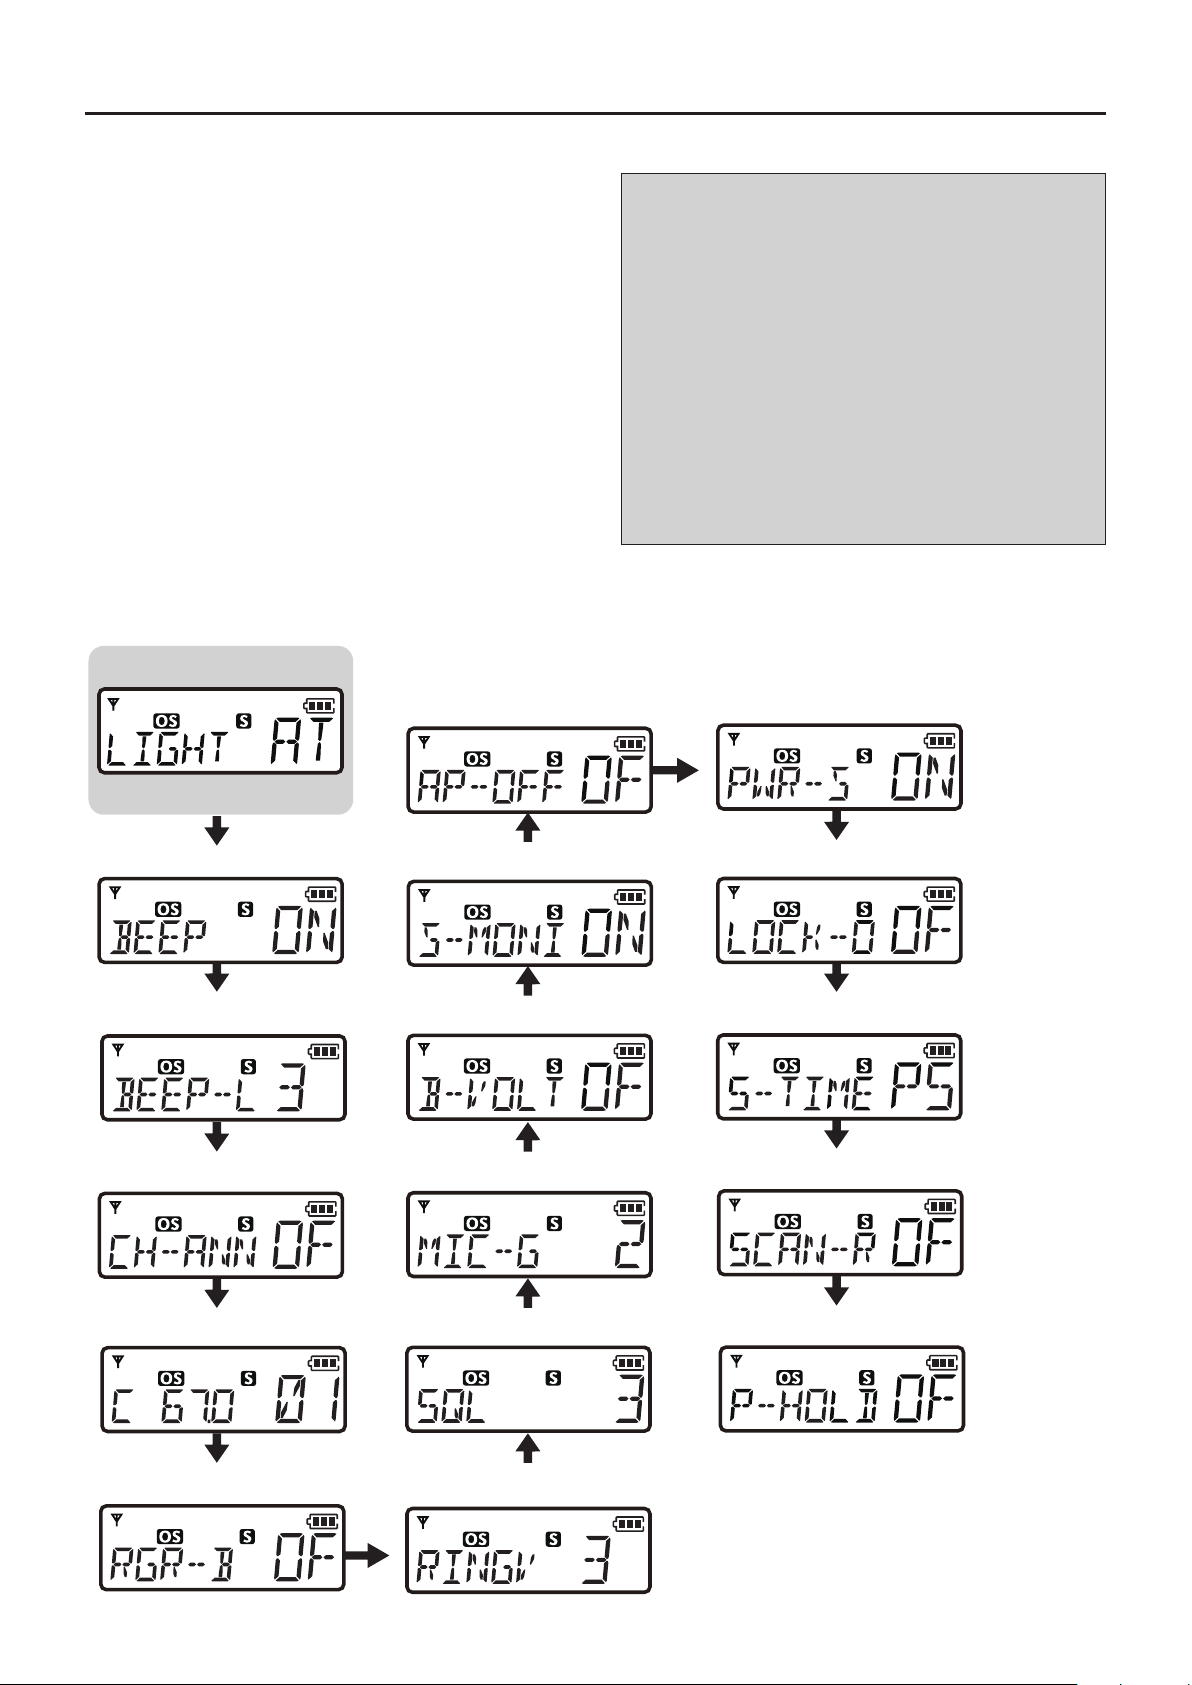
D Set mode sequence
The diagram below describes the sequence of the items in the Set mode.
• The sequence is as shown below when you push [Side 1] in the Set mode.
• Backlight
• Auto Power OFF
• Power Save
Starting item
• Beep Level
• Channel Announce
• CTCSS/DTCS
• Signal Monitor
• Battery Voltage
• Mic Gain
• Squelch Level
• Lockout
• Scan Stop Timer
• Scan Restart
• PTT Hold
• Roger Beep
• Ringer Level
3
Page 6
2
SET MODE
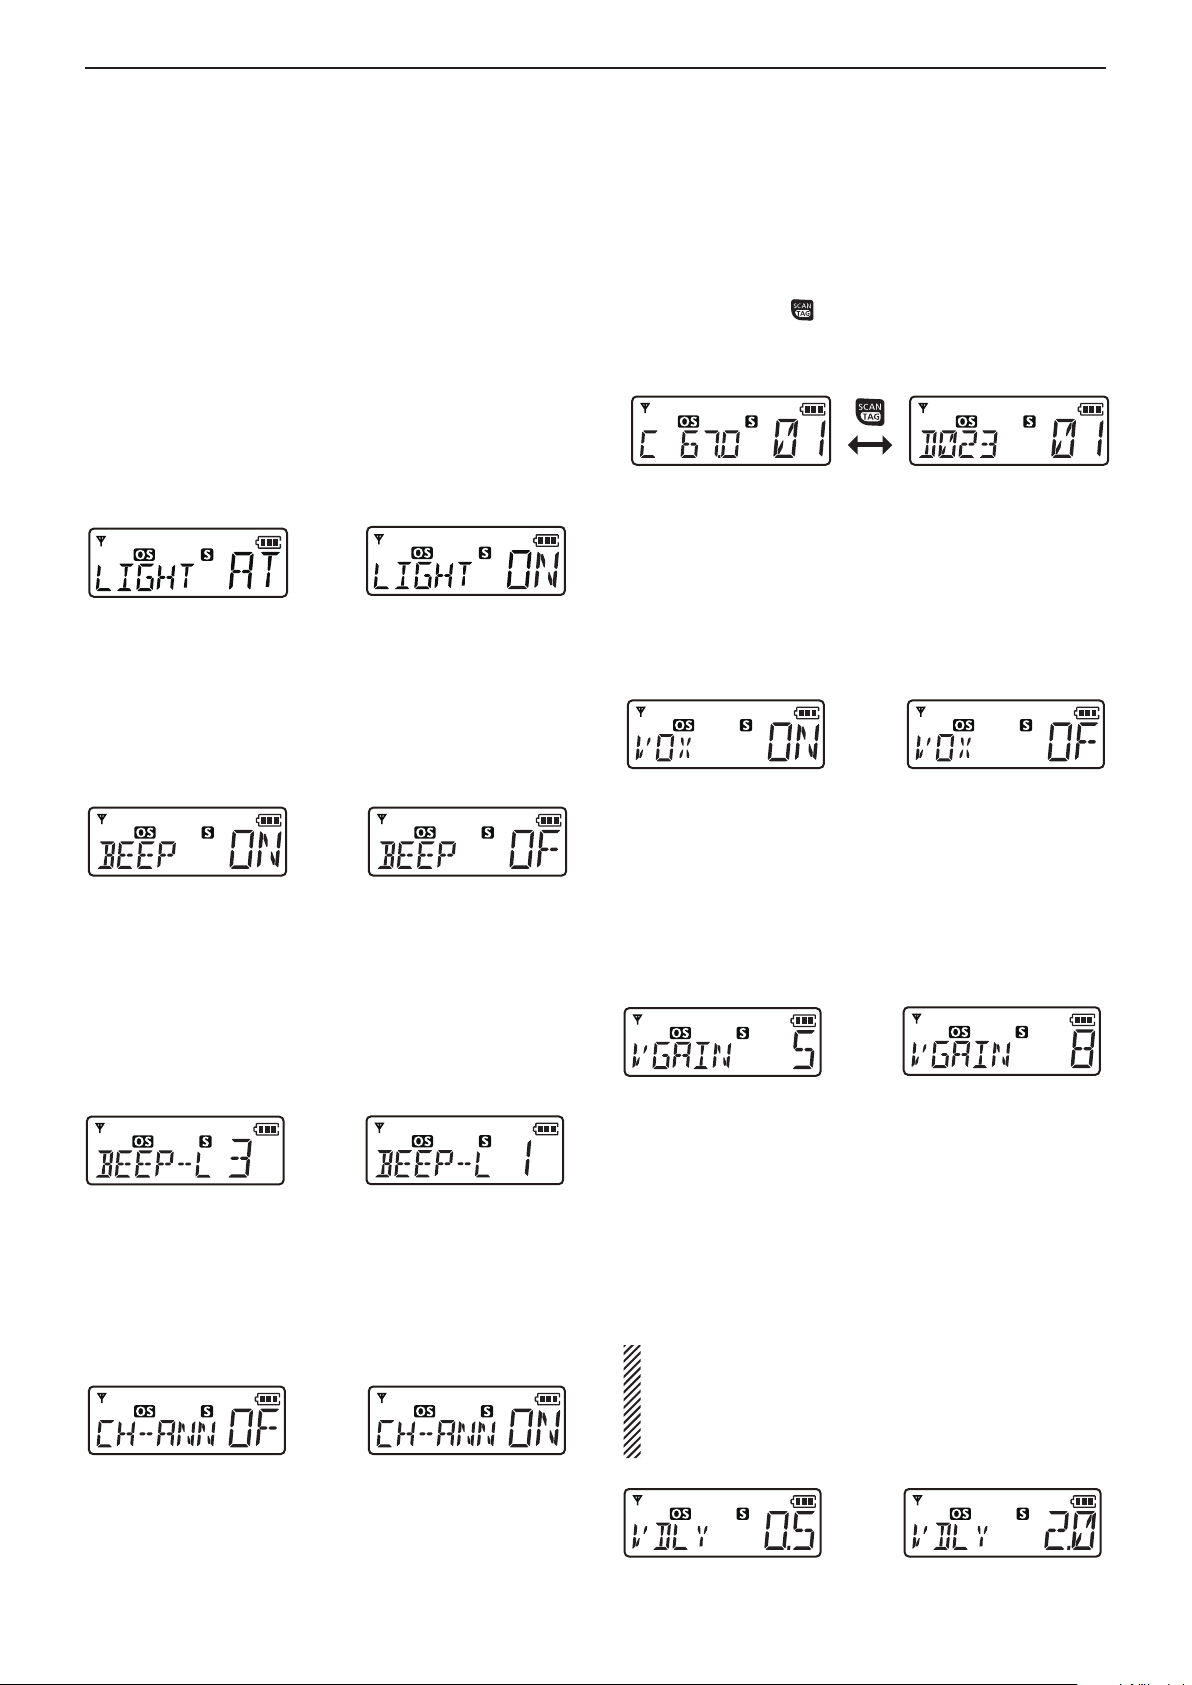
D Backlight
The transceiver features a backlit LCD display to use in
low-light conditions.
You can select the backlight mode in the Set mode.
ON: Backlight is continuously ON.
A2: Lights for 5 seconds when STATUS INDICA-
TOR changes, or when you push any key except
[PTT].
AT: Lights for 5 seconds when you transmit or re-
ceive a Selcall signal, or when you push any key
except [PTT].
OF: No backlight.
Backlight Auto (default) Backlight ON
D Beep
The confirmation beep is set to ON as the default.
You can turn OFF the beep for silent operation in the
Set mode.
D CTCSS/DTCS
Select the desired CTCSS tone frequency or DTCS
code.
You can change between CTCSS and DTCS setting
modes by pushing .
See page 11 for more information about CTCSS and
DTCS.
CTCSS tone frequency
setting mode (default)
DTCS code setting mode
D VOX
( Displayed only when an optional external device is
connected to the transceiver)
This function automatically switches between receiving
and transmitting mode by detecting your voice.
VOX function ON (default) VOX function OFF
Beep ON (default) Beep OFF
D Beep Level
You can set the volume level for the key beeps to between 1 and 5, or 1(Linked) and 5(Linked).
When a linked level is set, you can adjust the Beep
Level by rotating [VOL].
Beep level 3 (default) Beep level 1
D Channel Announce
You can turn this function ON to announce the selected channel number.
• When Beep is set to OFF, there will not be an announcement,
regardless of this setting.
Channel Announce OFF (default) Channel Announce ON
D VOX Gain
( Displayed only when an optional external device is
connected to the transceiver)
Set the VOX Gain level to between 1 and 10. Higher
gain makes the VOX function more sensitive to your
voice.
VOX Gain level 5 (default) VOX Gain level 8
VOX Delay (Sec)
D
( Displayed only when an optional external device is
connected to the transceiver)
VOX Delay is the period of time between when you
stop speaking and the transceiver stops transmitting
and then returns to receive. Set it to between 0.5 and
3.0 seconds.
NOTE:
If you set the time too short, a pause in speaking
will be regarded as the end of your conversation
and the transceiver will return to receive, even if you
continue speaking.
0.5 seconds (default)
4
VOX Delay
VOX Delay 2.0 seconds
Page 7
2
SET MODE
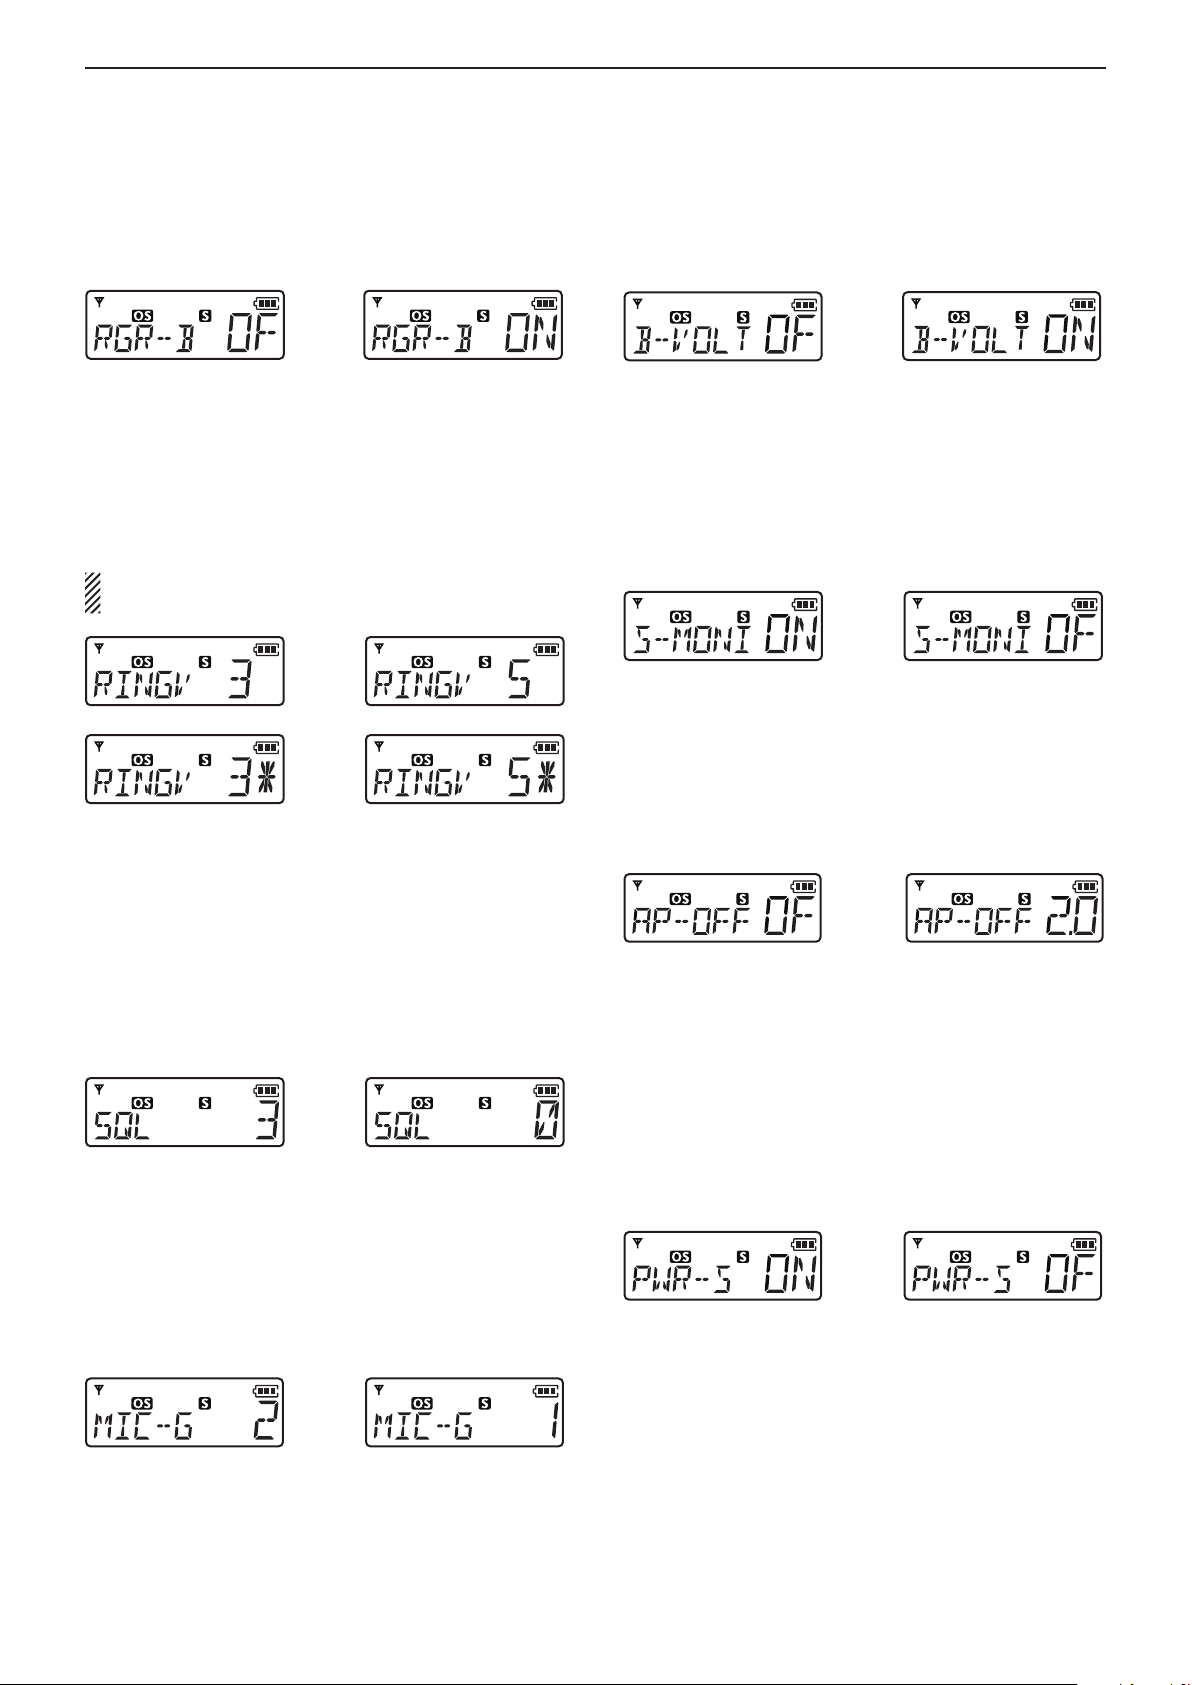
D Roger Beep
You can turn ON the Roger Beep function to beep to
indicate that the transmission has ended.
Roger Beep OFF (default) Roger Beep ON
D Ringer Level
You can set the Ringer Level to between 1 and 5, or 1
(Linked) and 5 (Linked).
When a linked level is set, you can adjust the Ringer
Level by rotating [VOL].
NOTE: You need to set the Beep function to ON
before setting the Ringer Level. (p. 4)
Ringer Level 3 (default) Ringer Level 5
Ringer Level 3 (Linked) Ringer Level 5 (Linked)
D Battery Voltage
You can set to display the Battery Voltage for 2
seconds, when you turn ON the transceiver.
Battery Voltage
OFF (default)
Battery Voltage ON
D Signal Monitor
You can select whether or not to mute a Selcall code
signal, DTMF code signal or Roger Beep emission.
ON: Unmuted
OFF: Muted
Signal Monitor ON (default) Signal Monitor OFF
D Auto Power OFF
You can set the transceiver to automatically turn OFF
after a set period without any key opertion.
You can set it to between 0.5 and 4.0 hours (0.5 hour
steps) or 8.0 hours.
D Squelch Level
The Squelch circuit eliminates background noise when
no signals are present.
Set the level to where the noise just disappears, for
proper operation.
A higher level is better for inner cities or noisy areas,
and a lower level is more beneficial in quiet, rural or
country areas. (0=lowest, 9=highest)
Squelch Level 3 (default) Squelch Level 0
D Mic Gain
You can adjust the microphone sensitivity to between
1 (minimum sensitivity) and 4 (maximum sensitivity).
With a higher sensitivity, the microphone picks up
softer voices, though it may pick up more ambient
noise.
Mic Gain
sensitivity 2 (default)
Mic Gain sensitivity 1
Auto Power OFF
is OFF (default)
2 hour setting
D Power Save
The Power Save function reduces the current drain by
deactivating the receiver circuit if a signal is not received,
or the transceiver is not used for 5 seconds.
The receiver periodically reactivates, checks for any
signals, and deactivates according to a preset timer
setting.
Power Save ON (default) Power Save OFF
5
Page 8

2
SET MODE
D Lockout
Select the transmission Lockout function mode which
temporarily inhibits transmission.
• RP (Repeater Lockout): Locks out a repeater.
• BU (Busy Lockout): Locks out a busy channel.
• OF (OFF): Turns OFF the function.
Lockout OFF (default) Repeater Lockout setting
D Scan Stop Timer
You can set the Scan Stop Timer to pause (P5) or timer
scan (5/10/15).
When a signal disappears, the scan resumes after the
set period of time. (p. 9)
5/10/15: Scan pauses for 5, 10 or 15 seconds when
a signal is detected, then resumes.
P5: Scan pauses until the signal disappears,
and then resumes after 5 seconds
(Recommended setting).
D Own ID
(
You can only set this item after enabling the function
using the optional CS-41PRO clOning sOftware.
This function enables you to allocate your Own ID
which identifies you as a target for Selcall operation
and allows tracking of the origin of transmissions.
Editing your Own ID:
q
When your Own ID is displayed, hold down for 2
seconds to enter the editing mode.
w Rotate [ROTARY SELECTOR] until the desired
number is displayed on the blinking digit.
e Push to set the blinking digit and go to the next
digit.
)
Scan Stop Timer
P5 (default)
10 second setting
D Scan Restart
This function restarts the scan 10 seconds after you
stop transmitting.
You can turn the function ON or OFF.
Scan Restart OFF (default) Scan Restart ON
D PTT Hold
You can use the PTT switch as a one-touch PTT
switch (push once between transmit and receive).
You can transmit without holding down [PTT] using this
function. Transmission automatically stops after 3
minutes in this mode.
r Repeat steps w and e until all 5 digits are set, and
then push again to save the Own ID.
PTT Hold function
OFF (default)
PTT Hold function ON
6
Page 9

Section 3
Repeater
RPT-06
Uplink —— Channel 36
(Transmitting)
Downlink — Channel 6
(Receiving)
REPEATER OPERATION
Repeater operation
Repeaters extend the operational range of the transceiver by retransmitting the signals it receives. Repeaters are
usually located on the top of a building or a mountain, as the elevation increases their effectiveness, allowing the user
to transmit and receive over greater distances. During Simplex operation, transceivers transmit and receive on the
same frequency. During Duplex operation (using a repeater) transceivers transmit and receive on different frequencies. It automatically does this when one of the repeater channels is selected.
Accessing a repeater:
To use a repeater,you need to select a repeater channel (Repeater CH 1 to 8, and 41 to 48).
You can search for any accessible repeaters in your local area by using the Repeater scan. (p. 10)
➥ Rotate [ROTARY SELECTOR] to select a repeater channel.
• “DUP” is displayed.
7
Page 10

Section 4
★★
★★
Repeatedly scans all tagged channels in sequence.
ch 40
ch 01 ch 02 ch 03
ch 04
ch 05
ch 06ch 39
OPEN SCAN
★★★
★★
★
★★
★★
Displayed
SCAN
Scan types
The transceiver has 4 scan types, a Tag function and 4
Resume options, for scanning versatility.
GROUP and PRIORITY SCAN
★★★
ch 02 ch 03 ch 04
ch 01
Priority
channel
ch 10
★★★
ch 09 ch 08 ch 07
Repeatedly checks the preset Priority
channel after scanning 5 tagged channels.
ch 05
ch 06
Scanning preparation
The IC-41PRO scans all tagged channels when a scan is
activated. When it detects a busy channel, the scan can
be set to pause, or to resume after a pause. (Except for
a Repeater scan).
• See page 6 for details on the Scan Restart function.
D Selecting a scan type
➥ Push several times to select the desired scan type.
• Select Open, Group or Priority scan.
Push
Open scan is selected.
Group scan is selected.
Priority scan is selected.
Displayed
Displayed
Push
Push
Tagged channels are independently set for Open,
Group and Priority scans. All channels may be preset
as tagged channels for all scans.
REPEATER SCAN
Scans all repeater channels (01 to 08 and 41 to 48)* in
sequence. If there are no busy channels after scanning
channels 01 to 08 and 41 to 48,* the scan begins from 01
again, and then the transceiver transmits a signal to
search for a repeater while scanning.
* Excludes emergency repeater 05.
★
Scan cancel
★
Ch 48
Ch 02Ch 01
Ch 48
★
Ch 01
★
Ch 03Ch 04
Ch 02
D Setting a Tag channel
Before setting tag channels, you must select the desired
scan type, as described above.
NOTE: All channels for each scan type are tagged by
default. To select the channels to scan, you must first
untag the undesired channels.
q Select the desired scan type.
w Rotate [ROTARY SELECTOR] to select the undesired
channel.
e Hold down for 2 seconds to untag the selected
channel.
• “S” disappears when the tag setting is OFF.
Displayed
r Repeat steps q to e until all the undesired channels
are untagged.
To tag
q Rotate [ROTARY SELECTOR] to select an untagged
channel.
w Hold down for 2 seconds to tag the selected
channel.
• “S” is displayed when the selected channel is tagged.
8
Disappears
Page 11

4
SCAN
Scanning preparation (Continued)
D Setting the Scan Stop Timer
q Hold down [TOP] for 2 seconds to enter the Set
mode.
w Push [Side 1] or [Side 2] several times to select the
Scan Stop Timer function.
• “S-TIME” is displayed.
e Rotate [ROTARY SELECTOR] to select the scan stop
time.
5/10/15: Scan pauses for 5, 10 or 15 seconds when a signal is
detected, then resumes.
P5: Scan pauses until the signal disappears, and then
resumes after 5 seconds (Recommended setting).
r Hold down [TOP] for 2 seconds to set and exit the
Set mode.
Scan Stop Timer
P5 (default)
10 second setting
Open scan
An Open scan automatically searches for busy
channels and enables you to locate new stations for
communication or listening.
Group and Priority scan
Group and Priority scans repeatedly searches for
a signal on the Priority channel while scanning the
tagged channels. This is useful when waiting for a call
on the Priority channel or several tagged channels.
Group and Priority scans are performed differently
while transmitting. Group scan searches on a Priority channel or on a busy channel, and Priority scan
searches only on the Priority channel.
q Push until Group or Priority scan is selected.
• “ ” is displayed when Group scan is selected, and
“
” is displayed when Priority scan is selected.
Displayed
Group scan is selected.
Priority scan is selected.
w If Priority scan is selected in step q, set the
Priority channel by holding down
after selecting the desired channel.
• To cancel the Priority channel setting, push [TOP] to
enter the Function mode, and then hold down
seconds.
Appears
Displayed
for 2 seconds
for 2
q Push several times until Open scan is selected.
• “ ” is displayed.
Displayed
w Push to start the scan.
Scan start channel
e When receiving a signal, the scan pauses and
resumes, according to the selected Scan Stop
Timer setting.
r Push to cancel the scan.
Blinks
e Push to start the scan.
Group scan starts.
Scan start channel*
Priority scan starts.
Priority channel*
*Priority channel is displayed instead of the scan start channel
if the Priority channel is set in step w.
Blinks
Blinks
r When receiving a signal, the scan pauses and then
resumes according to the Scan Stop Timer setting.
t Push to cancel the scan.
9
Page 12

SCAN
ies to access
ies to access
4
Repeater scan
The Repeater scan is used not only to search for a
signal on the repeater channels, but also to access
a repeater by automatically transmitting in sequence.
The Repeater scan detects repeaters that can be
accessed in the area, even if the repeater is not used.
The Repeater scan detects signals only on
channels 1 to 8 (channel 5 not included) and 41 to
48.
The scan will stop if any activity is detected on a
repeater channel, even if a repeater is not present.
Activity such as stations operating in Simplex mode
on a repeater transmit channel may give a false
indication that a repeater is present.
q Select the desired repeater channel and then hold
down for 2 seconds to start the Repeater scan.
Blinks
w When a signal is received on a repeater channel,
the scan stops.
• After automatically transmitting, 3 high beeps sound
when a signal is received, and 3 low beeps sound when
no signal is received.
e Push to cancel the scan.
• While transmitting, you cannot cancel the Repeater
scan.
D Repeater scan flow
Searches for
Scan start
channel
Scan is automatically cancelled.
NOTE: Scan excludes the emergency repeater channel 05.
Scan
(When no reply signal is received.)
Scan
signal on the
repeater output
channels.
• STATUS INDICATOR
blinks green.
Automatically tr
the repeater. (0.5 seconds)
Waits for a signal from the
repeater. (0.5 seconds)
Automatically tr
the next repeater.
• STATUS INDICATOR
blinks green and red
alternately.
10
Page 13

Section 5
CTCSS tone frequency
List number
125
21
246
42
365
63
526
84
Tone Squelch
TONE SQUELCH AND POCKET BEEP
The transceiver is equipped with 51 CTCSS tone
frequencies, and 104 DTCS codes.
CTCSS/DTCS
operation enables you to communicate in the silent
standby mode, since you will only receive calls from
group members using the same CTCSS tone frequency
or DTCS code.
NOTE: Channels 5 and 35 are used for the
emergency channels, and the CTCSS/DTCS
function is not selectable on those channels.
Information
• Selectable CTCSS tone frequencies and DTCS codes are
listed to the right.
• The transceiver has 51 tone frequencies and consequently
their spacing is narrow compared to units having 38 tones.
Therefore, some tone frequencies may receive interference
from adjacent tone frequencies.
D Setting the
CTCSS tone frequency/DTCS code
q Hold down [TOP] for 2 seconds to enter the Set
mode.
w Push [Side 1] or [Side 2] to select the CTCSS/DTCS
menu.
e Push to select between CTCSS and DTCS to
enter the setting mode.
Selectable CTCSS tone frequency list (Hz)
Freq.
No.
01
02
03
04
05
06
07
08
09
10
11
67.0
69.3
71.0
71.9
74.4
77.0
79.7
82.5
85.4
88.5
91.5
No.
12
13
14
15
16
17
18
19
20
21
22
Freq.
94.8
97.4
100.0
103.5
107.2
110.9
114.8
118.8
123.0
127.3
131.8
No.
23
24
25
26
27
28
29
30
31
32
33
Freq.
136.5
141.3
146.2
151.4
156.7
159.8
162.2
165.5
167.9
171.3
173.8
No.
34
35
36
37
38
39
40
41
42
43
44
Freq.
177.3
179.9
183.5
186.2
189.9
192.8
196.6
199.5
203.5
206.5
210.7
No.
45
46
47
48
49
50
51
Freq.
218.1
225.7
229.1
233.6
241.8
250.3
254.1
Selectable DTCS code list
Code
No.
01
02
03
04
05
06
07
08
09
10
11
12
13
14
15
16
17
18
19
20
023
025
026
031
032
036
043
047
051
053
054
065
071
072
073
074
114
115
116
122
No.
22
23
24
25
26
27
28
29
30
31
32
33
34
35
36
37
38
39
40
41
Code
131
132
134
143
145
152
155
156
162
165
172
174
205
212
223
225
226
243
244
245
No.
43
44
45
46
47
48
49
50
51
52
53
54
55
56
57
58
59
60
61
62
Code
251
252
255
261
263
265
266
271
274
306
311
315
325
331
332
343
346
351
356
364
No.
64
65
66
67
68
69
70
71
72
73
74
75
76
77
78
79
80
81
82
83
Code
371
411
412
413
423
431
432
445
446
452
454
455
462
464
465
466
503
506
516
523
No.
85
86
87
88
89
90
91
92
93
94
95
96
97
98
99
100
101
102
103
104
Code
532
546
565
606
612
624
627
631
632
654
662
664
703
712
723
731
732
734
743
754
CTCSS setting mode DTCS setting mode
DTCS code
List number
• ”List number” is the number in the grey column in the
table to the right.
r Rotate [ROTARY SELECTOR] to set the desired
CTCSS tone frequency or DTCS code.
t Hold down [TOP] for 2 seconds to save and exit the
Set mode.
D Turning ON the Tone Squelch
Before turning ON the Tone Squelch, set the desired
CTCSS tone frequency or DTCS code in the Set mode
as described to the left.
q Rotate [ROTARY SELECTOR] to select the desired
channel (excluding channel 5 or 35).
w Hold down [Side 1] for 2 seconds several times until
“TSQL” is displayed.
• Holding down [Side 1] for 2 seconds switches between
“TSQL” (Tone Squelch), “TSQL ë” (Pocket Beep) and
OFF (cancel).
• When you receive a signal with a matching tone or code,
the squelch opens, and you can hear the signal. When
you receive a signal that does not match, the squelch
does not open.
11
Page 14

TONE SQUELCH AND POCKET BEEP
5
Pocket Beep
This function uses the CTCSS (subaudible) tone and
the DTCS code for calling. You can also use it as a
“common pager” to inform you that someone called
while you were away from the transceiver.
D Waiting for a call from a station
q Rotate [ROTARY SELECTOR] to select the desired
channel (excluding channel 5 or 35).
w Hold down [Side 1] for 2 seconds several times until
“TSQL ë” is displayed.
• Holding down [Side 1] for 2 seconds switches between
“TSQL” (Tone Squelch), “TSQL ë” (Pocket Beep) and
OFF (cancel).
• When you receive a signal with a matching tone or
code, a beep sounds every 10 seconds and “ë” blinks.
Blinks
e Push [PTT] to answer and to stop the beep and
blinking.
• The transceiver automatically selects Tone Squelch.
12
Page 15

Section 6
SELCALL (Selective Calling)
Besides the Tone Squelch function for silent standby,
you can use the Selcall (Selective Calling) function.
Selcall has 100,000 options when using 5 tone.
You can use the Selcall function to call another unit
or calling a Group on the same channel, as well as
station code, text, the answer back function and auto
scan start. These, and many more, can be set using
the optional CS-41PRO clOning sOftware.
NOTE:
• Channels 5 and 35 are the emergency channels, and
Selcall cannot be used on these channels.
• A Selcall transmission is restricted to a total of 3
seconds in a 1 minute period.
Calling
TX code is the Selcall code that you transmit. A
maximum of 32 TX codes can be entered into the
IC-41PRO, using the optional CS-41PRO clOning
sOftware.
D Editing the TX code
You can edit the TX code within the allowed digits.
The Group call function enables you to edit a special
“Group code” of the Selcall ID code.
q Select the desired CB channel, except for channels
5 and 35.
w Push [TOP] to enter the Function mode, and then
push
e Hold down for 2 seconds to enter the TX code
editing mode.
r Push to select the editing digit.
to enter the TX code selection mode.
ts blinking
D Selecting a TX code
q Select the desired CB channel, except for channels
5 and 35.
w Push [TOP] to enter the Function mode, and then
push to enter the TX code selection mode.
• If entered using the CS-41PRO clOning sOftware, the
text is displayed instead of the code.
TX code
e Rotate [ROTARY SELECTOR] to select the desired
TX code or text.
r Push [PTT] to transmit the selected TX code, or
push to set the selected TX code and return to
the standby mode.
• When you transmit, a short beep sounds.
Information
TX code texts can be assigned to all the 32 TX codes
using the CS-41PRO clOning sOftware.
t Rotate [ROTARY SELECTOR] to set the desired
number.
y Repeat steps r and t to enter other digits.
u After editing, push to set the code and return to
the TX code selection mode.
i Push [PTT] to transmit the selected TX code, or push
to save the edited TX code and return to the
standby mode.
• When you transmit, a short beep sounds.
NOTE: The TX code digits that can be edited by the
user are set using the CS-41PRO clOning
sOftware.
D Transmitting an individual Selcall
q Push [TOP] to enter the Function mode, and then
push to enter the TX code selection mode.
w Rotate [ROTARY SELECTOR] to select the desired
TX code.
e Push [PTT] to transmit an individual call.
• A short beep sounds.
13
Page 16

SELCALL (Selective Calling)
6
Receiving
D Receiving an individual Selcall
q When receiving an RX code:
• Beeps sound.
• The RX code’s text is displayed, if entered.
• “ë” blinks and the channel name is displayed, and the
Selcall mute is released.
w Hold down [PTT] and speak at your normal voice
level.
Blink
NOTE:
• If the ID decode function “ID Dec” is turned ON, the
received Own ID code is displayed instead of the text,
and memorised into the transceiver. This function can
be turned ON using the CS-41PRO
• A maximum of 8 individual RX codes can be memorised
into the transceiver, using the CS-41PRO
sOftware.
clOning sOftware.
clOning
Quiet Mode
When the Quiet mode is ON, the Selcall mute function
is activated and enables silent operation until a Selcall
code is received.
q Push [TOP] to enter the Function mode.
w Push to turn the Quiet mode ON or OFF.
• “Q” is displayed when the Quiet mode is ON.
To monitor the channel:
➥ Push [Side 1] to release the
mute.
• A beep sounds.
To enable the Selcall mute:
➥ Push [Side 1] to enable the
mute.
• A beep sounds.
NOTE: The unmute mode may automatically return
to the mute mode after a specified time period,
depending on the presetting.
D Recalling a memorised RX code
q Push [TOP] to enter the Function mode, and then
hold down for 2 seconds to display the memorised
RX code.
w Rotate [ROTARY SELECTOR] to select the desired
RX code.
e Hold down [PTT] to transmit to the selected code.
NOTE:
When a 6th RX code is received, the oldest
code is deleted from the transceiver.
D Receiving a Group call
q When receiving a Group call:
• Beeps sound.
• “ë” and “GROUP” blink, and the Selcall mute is
released.
w Hold down [PTT] and speak at your normal voice
level.
Blink
Stun function
This function can only be set by your dealer. If the
transceiver is in the Stun mode, it will request a
password when you turn ON the transceiver.
password is the same as the Power ON password.
Once the password has been entered, the transceiver
will not prompt you to enter it again.
Cloning and transceiver operations are disabled
after a Kill ID is received. By activating the clone write
mode, you can use the transceiver again. (The
internal data cannot be accessed using the Clone
Read mode.)
This
• You can set the Group call receiving options using
the optional CS-41PRO
the CS-41PRO help file for more information.
clOning sOftware. Consult
14
Page 17

Section 7
If no reply is received
Blinks Blinks
w
OTHER FUNCTIONS
Smart Ring and ATS (Automatic Transponder System)
The Smart Ring and ATS functions have an answer
back feature and confirmation function for when a
call has reached the called station, even if the user is
temporarily away from the transceiver. Smart Ring is a
manual confirmation, and ATS is automatic.
D Smart Ring
q Set the same CTCSS tone frequency to all the
transceivers in the group, and then turn ON the
Tone Squelch. (p. 11)
w Push [TOP] to enter the Function mode.
e Push to send a Smart Ring call.
• When a member of the group answers the call, “ë” and
“FOUND” blink.
• If no answer is received, the transceiver sounds short
failure beeps and “FAILD” appears.
Blink
r
Push [PTT] to answer and to stop the blinking and
the beeps.
NOTE: The Smart Ring function can be used only if
the called station has the same CTCSS tone
frequency and is operating on the same channel.
NOTE: The setting to the left is for only the calling
station. A called station automatically sends an
answer back signal without any presetting. All the
IC-41PROs set to the same operating channel
within the communication area will send an answer
back call.
D AT S
q Hold down [Side 2] for 2 seconds to turn ON the
ATS function.
•
When an RX channel is selected, an error beep sounds.
• The transceiver automatically sends a searching signal
every 60 seconds.
• “
• When you receive an answer back signal, “
• If no reply is received, “
” blinks.
” stops
blinking until the next search transmission.
” blinks until the next search
transmission.
w Hold down [Side 2] for 2 seconds to turn OFF the
ATS function.
RX channels and frequencies
You can enable the use of the RX channels on the
transceiver screen using the optional CS-41PRO
clOning sOftware. RX channels are not displayed
as the default. Also, you can edit the RX frequencies
between 450 through 520 MHz using the CS-41PRO
or using the transceiver if the RX channels have been
enabled.
D Editing an RX frequency
q Select the desired RX channel (Example: RX-01).
w Push [TOP] to enter the Function mode, and then
hold down [TOP] for 2 seconds to enter the RX VFO
mode.
• Push to select the wide or narrow channel spacing.
RX channel
(in function mode)
RX VFO mode
Displayed when a Narro
channel spacing is set.
e Rotate [ROTARY SELECTOR] to select the desired
RX frequency. The frequency selection scrolls according to the bandwidth setting.
Wide channel spacing
(25 kHz steps)
r
Push to select the editing digit.
• The editing digit blinks.
Narrow channel spacing
(12.5 kHz steps)
t Rotate [ROTARY SELECTOR] to set the desired
number to the digit.
y Repeat steps r and t to edit the RX frequency.
u Hold down [TOP] for 2 seconds to save the RX
frequency and return to the standby mode.
• Two beeps sound.
15
Page 18

OTHER FUNCTIONS
OFF (default)
k
7
PTT Hold
You can use the PTT switch as a one-touch PTT switch
(each push switches between transmit and receive).
You can transmit without holding down [PTT] using this
function. To prevent accidental continuous transmission
with this function, transmission automatically stops
after 3 minutes.
q Hold down [TOP] for 2 seconds to enter the Set
mode.
w Push [Side 1] several times to select the PTT Hold
function item.
e Rotate [ROTARY SELECTOR] to turn ON the PTT
Hold function.
PTT Hold function
r Hold down [TOP] for 2 seconds to set and return to
the standby mode.
t Push [PTT] to transmit, and push again to return to
receive.
• STATUS INDICATOR lights red while transmitting.
NOTE: You cannot use the PTT Hold function with an
optional microphone connected. The PTT Hold
function setting is invalid on the optional microphone.
PTT Hold function ON
Data cloning
Data cloning enables you to transfer data quickly and
easily from a PC to your transceiver, using the optional
CS-41PRO clOning sOftware.
Data cloning can be done to or from a PC, using the
CS-41PRO clOning sOftware and the optional
OPC-478UC (USB type) clOning cable.
IC-41PRO
[VOL]
To the [SP] jac
To a USB port
USB cable
PC
OPC-478UC
16
Page 19

Section 8
SPECIFICATIONS
D General
• Frequency coverage:
CB 476.4250–477.4125 MHz
RX 450.000–520.000 MHz (RX only)
• Mode:
CB channel 8K50F3E
RX channel 8K50F3E/16K0F3E
• Channel spacing:
CB channel 12.5 kHz
RX channel 12.5/25 kHz
• Current drain (at 7.5 V): TX (at 5 W) approx. 1.7 A
Max. audio approx. 300 mA
• Power supply requirement: 7.5 V DC nominal*
(Negative ground)
*Specified Icom’s battery pack
only
• Frequency stability: ±2.5 ppm (–30°C to + 60°C)
• Antenna impedance: 50 Ω nominal
• Dimensions: W 52.2 × H 111.8 × D 30.3 mm
(Projections not included)
• Weight: Approx. 270 g (with BP-280)
D Transmitter
• Output power: 5 W/1 W (selectable)
• Modulation system: Variable reactance
frequency modulation
• Max. frequency deviation: ±2.5 kHz
• Spurious emissions: 70 dB (min)
D Receiver
• Receive system: Double conversion
superheterodyne
• Sensitivity (12 dB SINAD): 0.25 µV (typical)
• Squelch sensitivity: 0.25 µV (typical)
• Intermodulation rejection ratio: 73 dB (typical)
• Spurious response rejection ratio: 70 dB (min)
• Audio output power: 0.8 W (typical) at 5%
distortion with 12 Ω load
(INT)
All stated specifications are subject to change without
notice or obligation.
0.4 W (typical) at 5%
distortion
(EXT)
with 8 Ω load
17
Page 20

INDEX
A
ATS (Automatic Transponder System) .............................. 15
Auto Power OFF ................................................................. 5
B
Backlight ............................................................................. 4
Battery Voltage ................................................................... 5
Beep ................................................................................... 4
Beep Level .......................................................................... 4
C
Call from a station, waiting ............................................... 12
Channel Announce ............................................................. 4
Channel selection ............................................................... 1
CTCSS ............................................................................... 4
CTCSS tone frequency list ............................................... 11
CTCSS tone frequency, setting ........................................ 11
D
Data cloning ...................................................................... 16
DTCS .................................................................................... 4
DTCS code list .................................................................. 11
DTCS code, setting .......................................................... 11
G
Group call, receiving ......................................................... 14
I
Individual Selcall, receiving .............................................. 14
Individual Selcall, transmitting .......................................... 13
K
Keylock ............................................................................... 1
Keys, lock ........................................................................... 1
Keys, non-locked ................................................................ 1
keys, unlock ........................................................................ 1
L
Lockout ............................................................................... 6
M
Memorised RX code, recalling .......................................... 14
Mic Gain ............................................................................. 5
Monitor ................................................................................ 2
R
Receiving, Selcall ............................................................. 14
Repeater, accessing ........................................................... 7
Repeater operation ............................................................. 7
Ringer Level ........................................................................ 5
Roger Beep ........................................................................ 5
RX channels ..................................................................... 15
RX frequencies ................................................................. 15
RX frequency, editing ........................................................ 15
S
Scan, Group and Priority .................................................... 9
Scanning preparation ......................................................... 8
Scan, Open ......................................................................... 9
Scan, Repeater ................................................................. 10
Scan, Repeater scan flow ................................................. 10
Scan Restart ....................................................................... 6
Scan Stop Timer ................................................................. 6
Scan Stop Timer, setting ..................................................... 9
Scan types .......................................................................... 8
Scan type, selecting ........................................................... 8
Selcall, receiving (individual) ............................................ 14
Selcall mute, enabling ....................................................... 14
Selcall, transmitting (individual) ........................................ 13
Set mode sequence ............................................................ 3
Signal Monitor ..................................................................... 5
Smart Ring ....................................................................... 15
Specifications ................................................................... 17
Squelch ............................................................................... 2
Squelch Level ..................................................................... 5
Squelch level, setting .......................................................... 2
Stun function ..................................................................... 14
T
Tag channel, setting ............................................................ 8
Tone Squelch .................................................................... 11
Tone Squelch, turning ON ................................................ 11
TX code, editing ................................................................ 13
TX code, selecting ............................................................ 13
V
VOX .................................................................................... 4
VOX Delay (Sec) ................................................................. 4
VOX Gain ............................................................................ 4
VOX related items ............................................................... 3
O
Own ID ............................................................................ 3, 6
Own ID, editing ................................................................... 6
P
Pocket Beep ..................................................................... 12
Power Save ......................................................................... 5
Priority channel ................................................................... 2
Priority channel, cancelling ................................................. 2
Priority channel, setting ...................................................... 2
Priority channel, switching .................................................. 2
PTT Hold ...................................................................... 6, 16
PWR ON Password ............................................................ 1
Q
Quiet Mode ....................................................................... 14
Z
Zone selection .................................................................... 2
18
Page 21

A-7255-2AU-q
© 2015 Icom Inc.
1-1-32 Kamiminami, Hirano-ku, Osaka 547-0003, Japan
 Loading...