

Page 1
INSTRUCTION MANUAL
CLONING SOFTWARE
CS-51PLUS2
The CS-51PLUS2 is a software application to setup the ID-51A or ID-51E from your PC.
You can set Memory channels, scan settings, call signs, repeater list, and other settings.
To use the software, a computer system and some items described in “System requirements” are required.
LThe instructions are based on using Microsoft
®
Windows® 7.
Thank you for choosing this Icom product. READ
ALL INSTRUCTIONS carefully and completely
before using this product.
System requirements
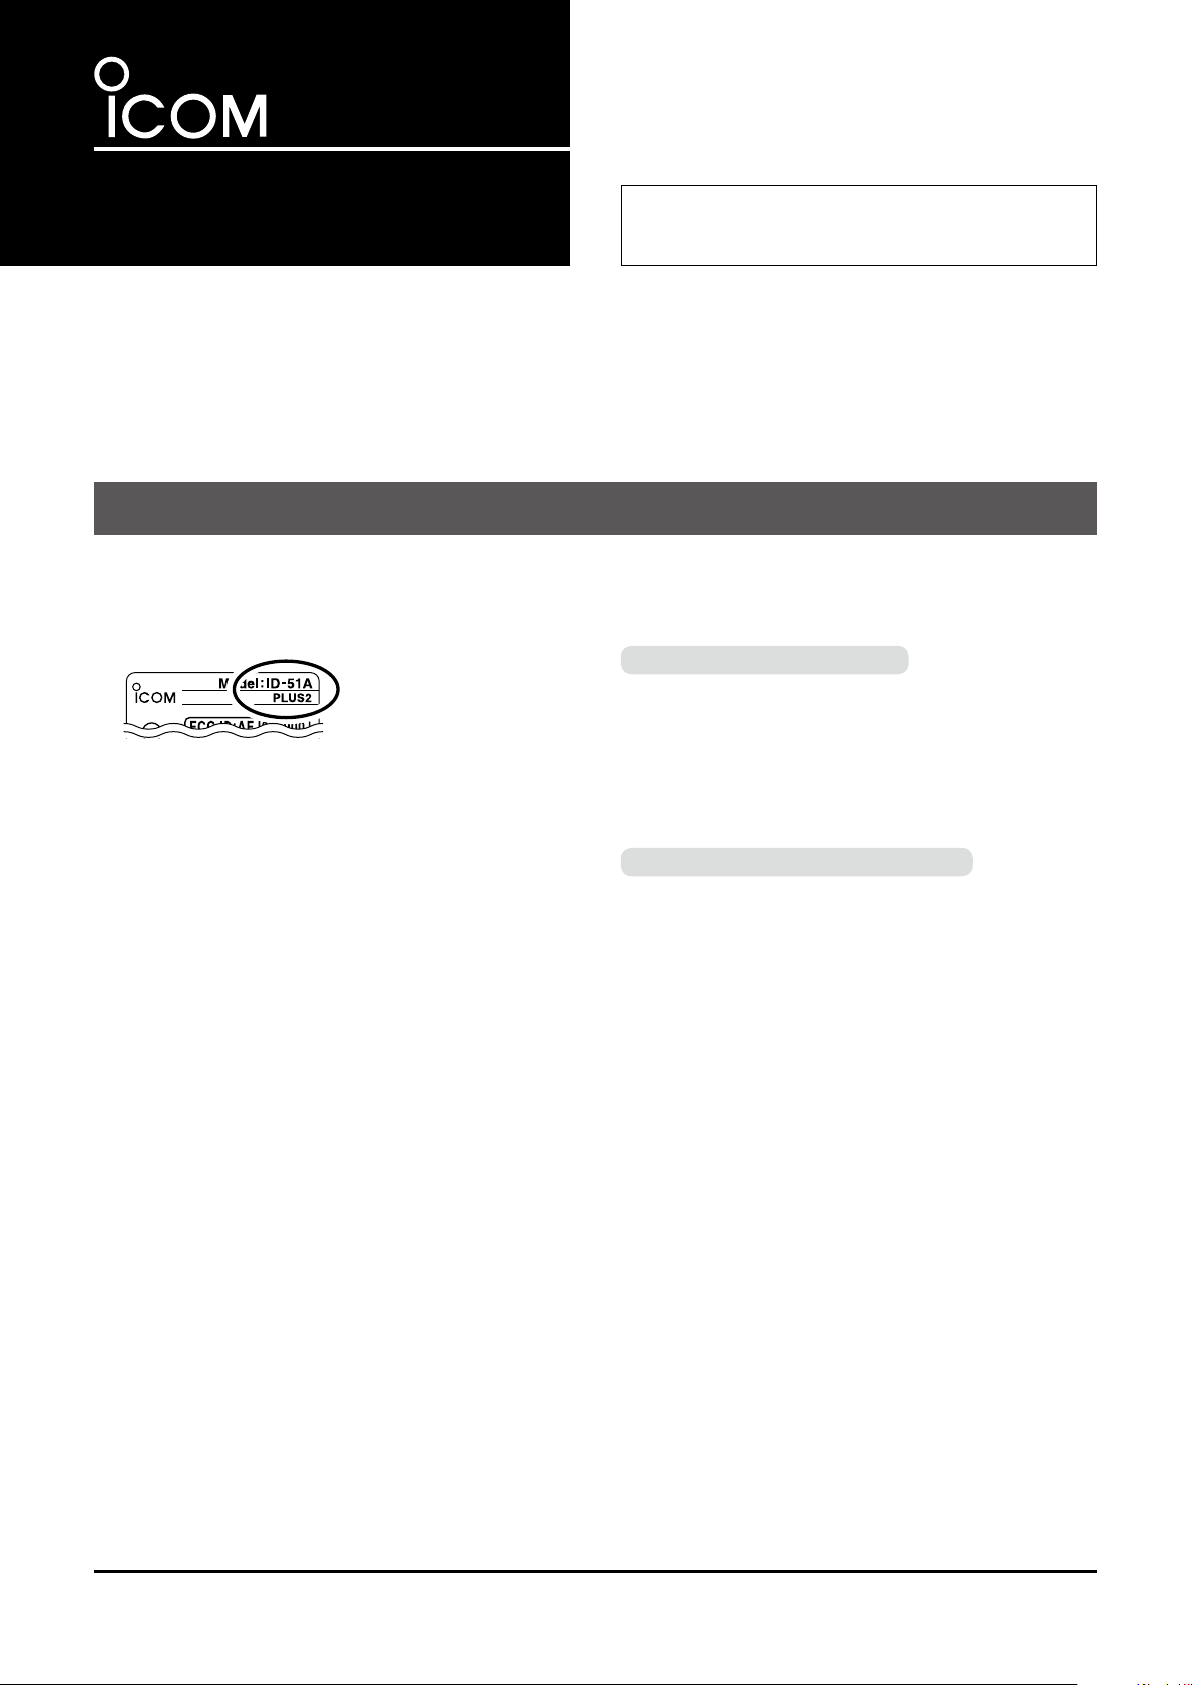
• Transceiver
An ID-51A or ID-51E with a serial number label
that has “PLUS2” printed on it.
L The illustration below is for the ID-51A version.
• Operating System (OS)
Microsoft® Windows Vista® (32/64bit)
®
Microsoft® Windows
Microsoft® Windows
Microsoft
* Except for Microsoft® Windows® RT.
®
Windows® 10 (32/64bit)
7 (32/64bit)
®
8.1 (32/64bit)*
• Others
Required items differ, depending on the setup
method.
When using a microSD card
• microSD card (User supplied)
• Memory card reader (User supplied)
or
Memory card slot built into the PC
to read the microSD card
LSee page 3 for detailed instructions.
When using an optional data cable
• OPC-2218LU
data cable
or
OPC-2350LU data cable
• A USB 1.1 or 2.0 port
LSee page 6 for detailed instructions.
– 1 –
A-7332-1EX
© 2016 Icom Inc.
Page 2
Installing the cloning software
1. Log in as the administrator.
L BE SURE no other applications are running.
2. Insert the CD into a CD drive.
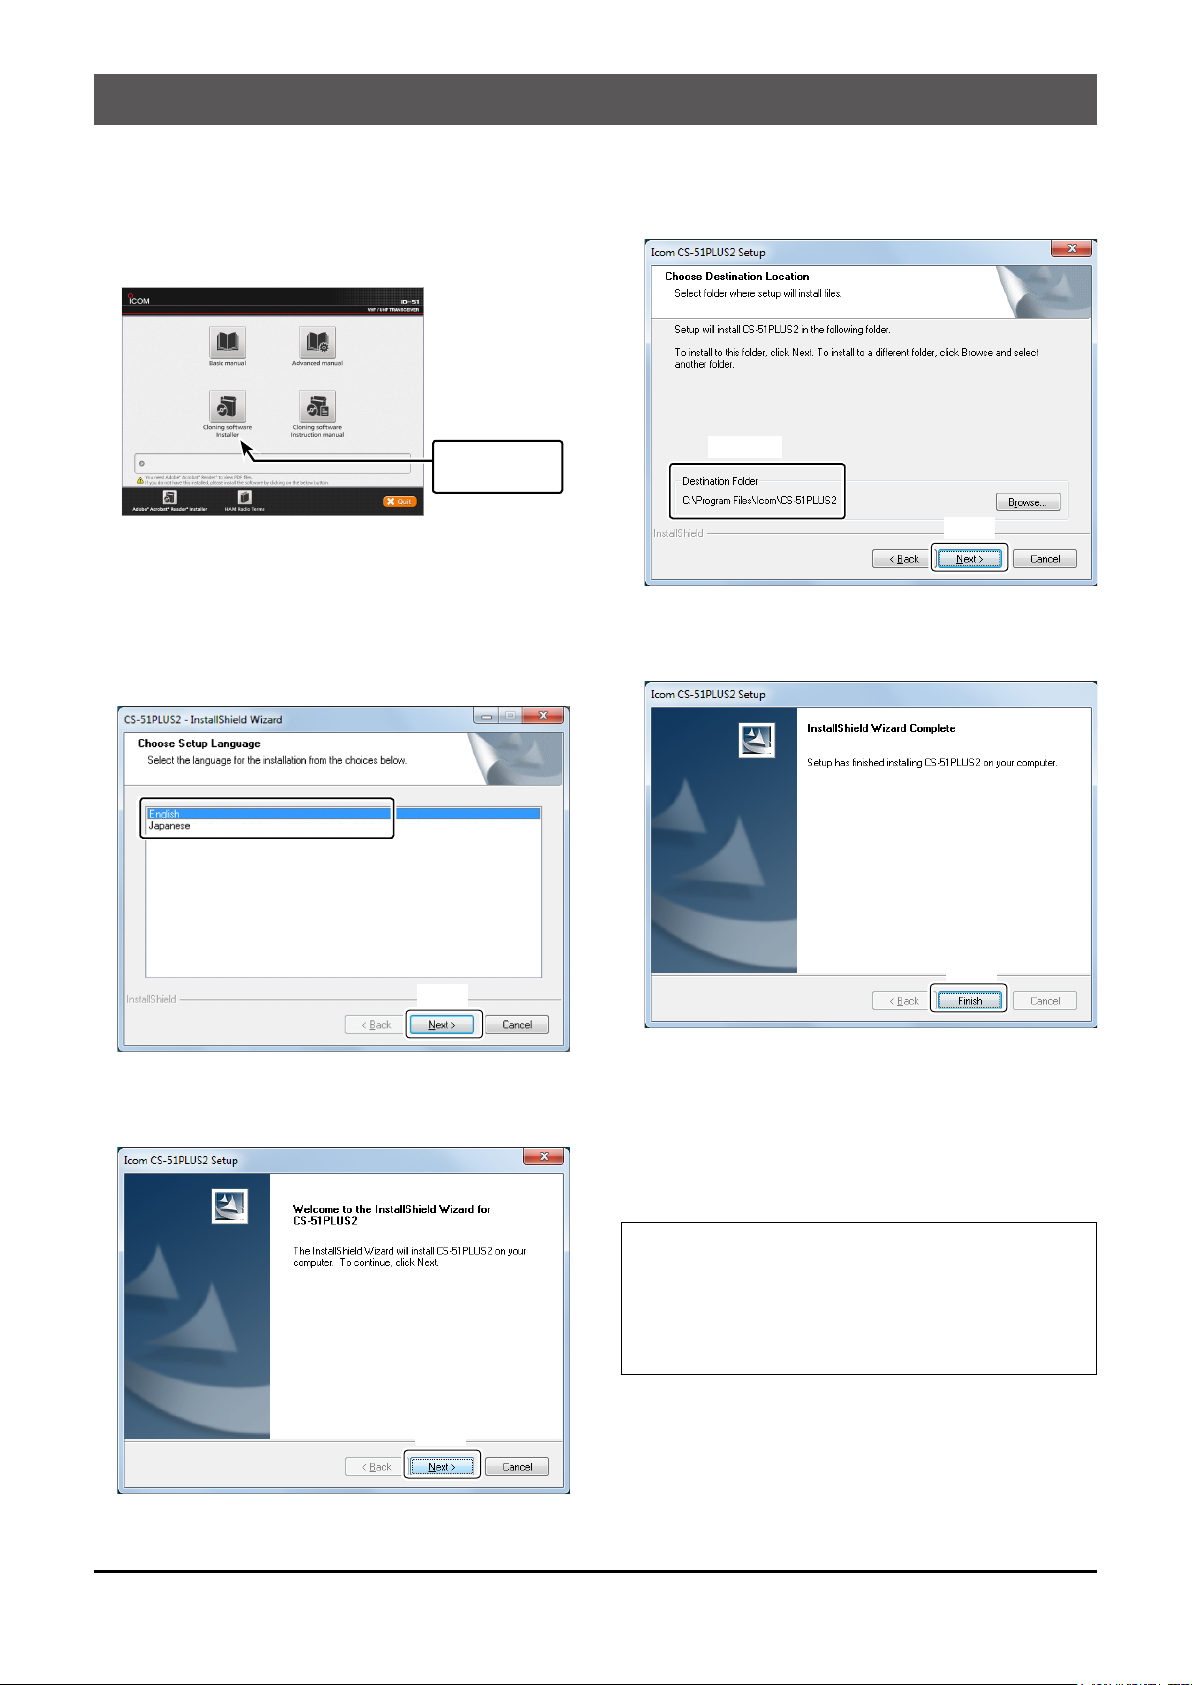
3. Double-click “Menu.exe” on the CD.
L Depending on the PC setting, the Menu screen
shown below is automatically displayed.
ID-51
Menu screen
Installs the
CS-51PLUS2
4. Click “Cloning software Installer.”
L If “User Account Control” is displayed, click <Yes> to
continue.
5. “Choose Setup Language” is displayed.
Select “English” or “Japanese,” and then click
<Next>>.
L In this document,
“English” is selected.
7. “Choose Destination Location” is displayed, and
then click <Next>>.
L If desired, click <Browse...> to select another
destination folder before clicking <Next >>.
Conrm
Click
8. After the installation is completed, “InstallShield
Wizard Complete” is displayed, and then click
<Finish>.
Select language
Click
6. “Welcome to the InstallShield Wizard for
CS-51PLUS2” is displayed, and then click
<Nex t>>.
Click
9. Click “Quit” on the Menu screen.
10. Eject the CD.
11. A program group “CS-51PLUS2” is created on
the program menu, and a “CS-51PLUS2” shortcut
icon is created on the desktop.
L You can uninstall the cloning software using
“Uninstall a program” in the Windows Control Panel.
TIP:
See the Help le of the cloning software for
assistance with the functions or settings.
To open the Help le, click “Help” in the top menu
of the cloning software and select “Contents,” or
simply push the [F1] key of the PC’s keyboard.
Click
– 2 –
A-7332-1EX
© 2016 Icom Inc.
Page 3
Setting up from a PC using a microSD card
D About a microSD card
NOTE:
The microSD and microSDHC cards are not
available from Icom.
L Through the rest of this document, the microSD
card and a microSDHC card are simply called
microSD cards.
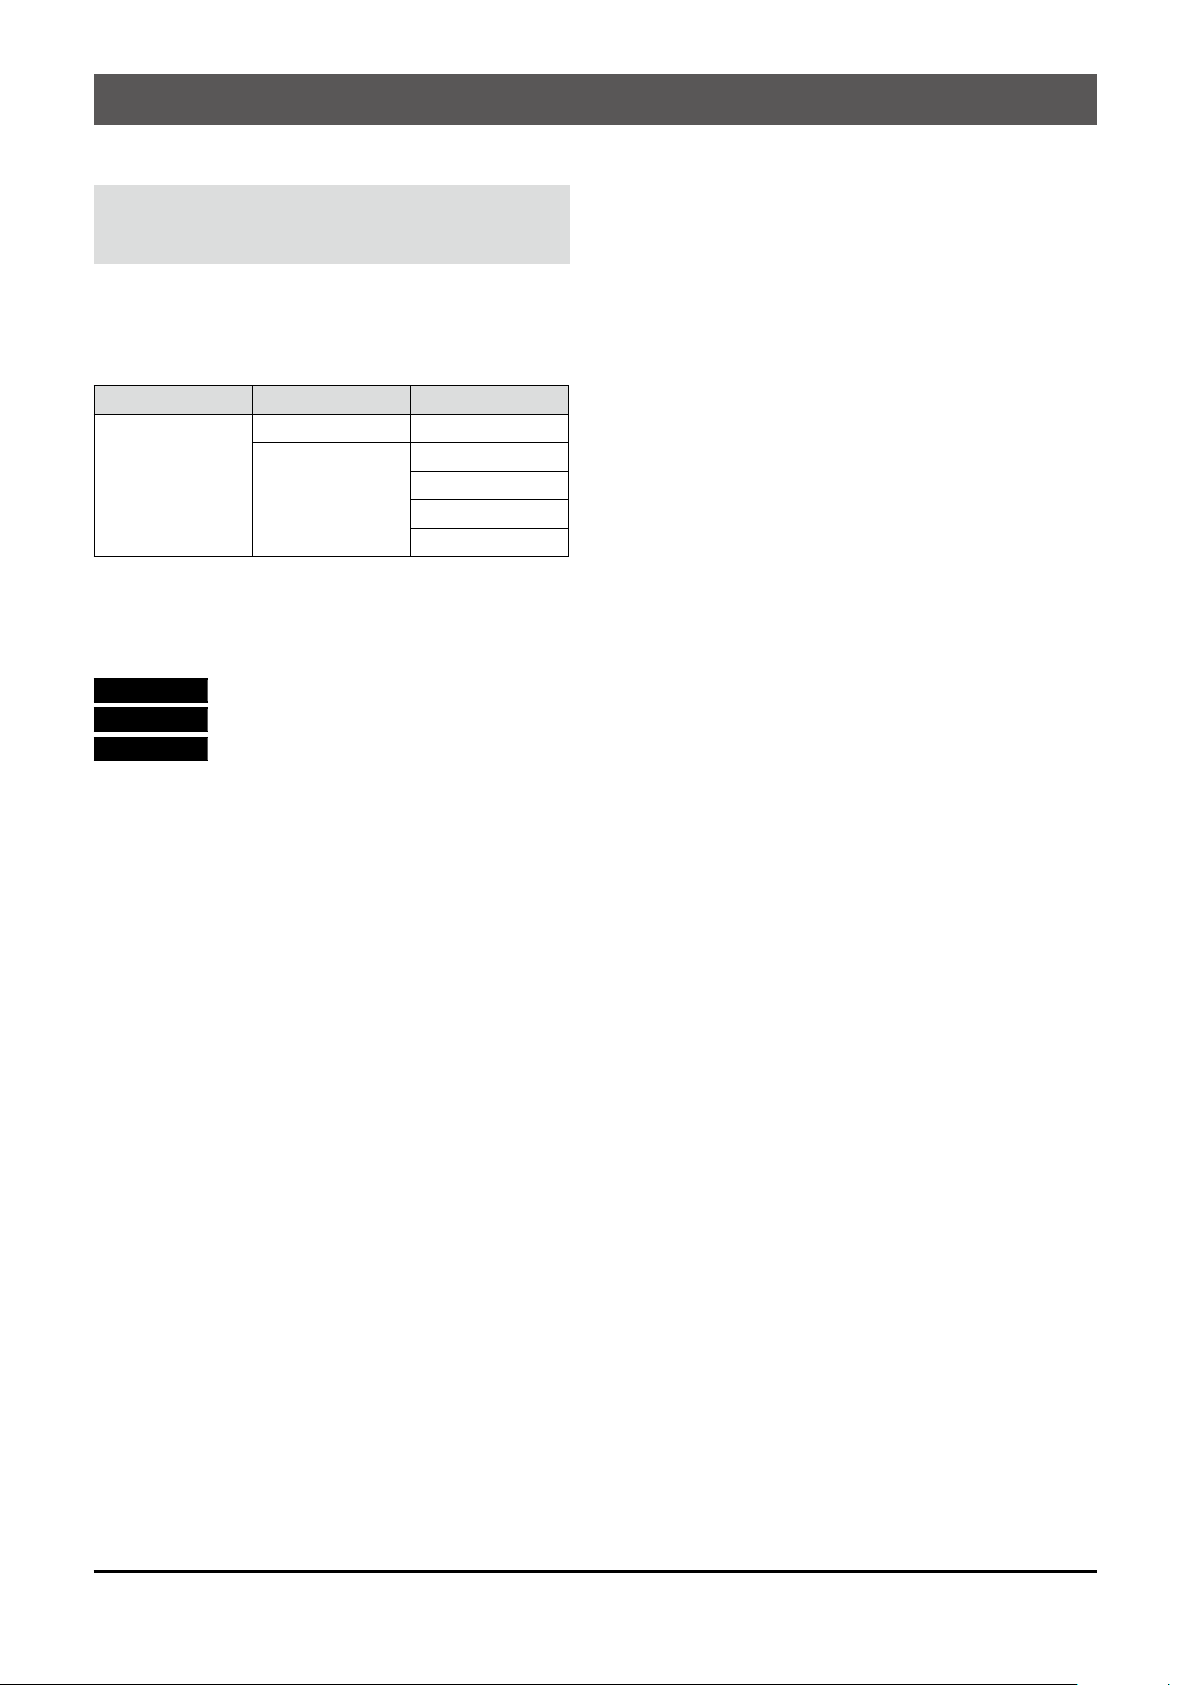
L The microSD cards listed to the left are usable
Icom has checked the compatibility with the following
microSD and microSDHC cards.
(As of September 2016)
with the ID-51 series transceivers, but their
specications are not guaranteed by Icom.
Brand Type Memory size
microSD 2 GB
4 GB
SanDisk
®
microSDHC
8 GB
16 GB
32 GB
D Procedure outline
To setup from a PC using a microSD card, follow the steps described below.
Step 1 Insert a microSD card into your PC’s card reader or card slot.
Step 2 Make the Initial setup.
Step 3 Setup. (p. 5)
D Setting up precautions
• To prevent data loss, you should rst copy the
transceiver's setting data from the microSD card to
the PC. After copying, read the data into the cloning
software, and enter or edit parameters using the
cloning software.
• Before editing or entering new data, make a backup
le onto your PC. A backup le enables easy
restoring even if the setting data in the microSD
card is accidentally deleted.
• BE SURE to turn OFF the transceiver before
inserting or removing the microSD card.
• DO NOT remove the microSD card, detach the
battery pack, or turn OFF the transceiver, while
reading or writing data to or from the microSD card.
Otherwise, the data could be lost or corrupted.
– 3 –
A-7332-1EX
© 2016 Icom Inc.
Page 4
Setting up from a PC using a microSD card (Continued)
To the Card slot
PC PC
microSD
card
D Before starting the CS-51PLUS2 setup
NOTE: If you use a brand new microSD card, rst format the card using the transceiver.
See section 2 of the ID-51A and ID-51E Basic manual for details.
1. Make a backup file.
L Save the transceiver’s setting data onto the
microSD card. Open the “Save Setting” on the
transceiver’s MENU screen to save.
(MENU > SD Card > Save Setting)
2. Turn OFF the transceiver, and remove the
microSD card.
3. Insert the card into the microSD card slot of the
PC or the microSD card reader, as shown below.
4. Copy the transceiver’s setting data (ICF file),
stored in the “Setting” folder of the card to a PC
local folder.
Transceiver
To the Card
reader
D Making the Initial setup
• About the microSD card’s folder composition
The folder composition on
the microSD card is shown
to the right.
Csv
Gps
The transceiver’s setting
data (ICF le) is stored in
the “Setting” folder.
QsoLog
Reply
RxLog
ID-51
Setting
Voice
or
VoiceRec
VoiceTx
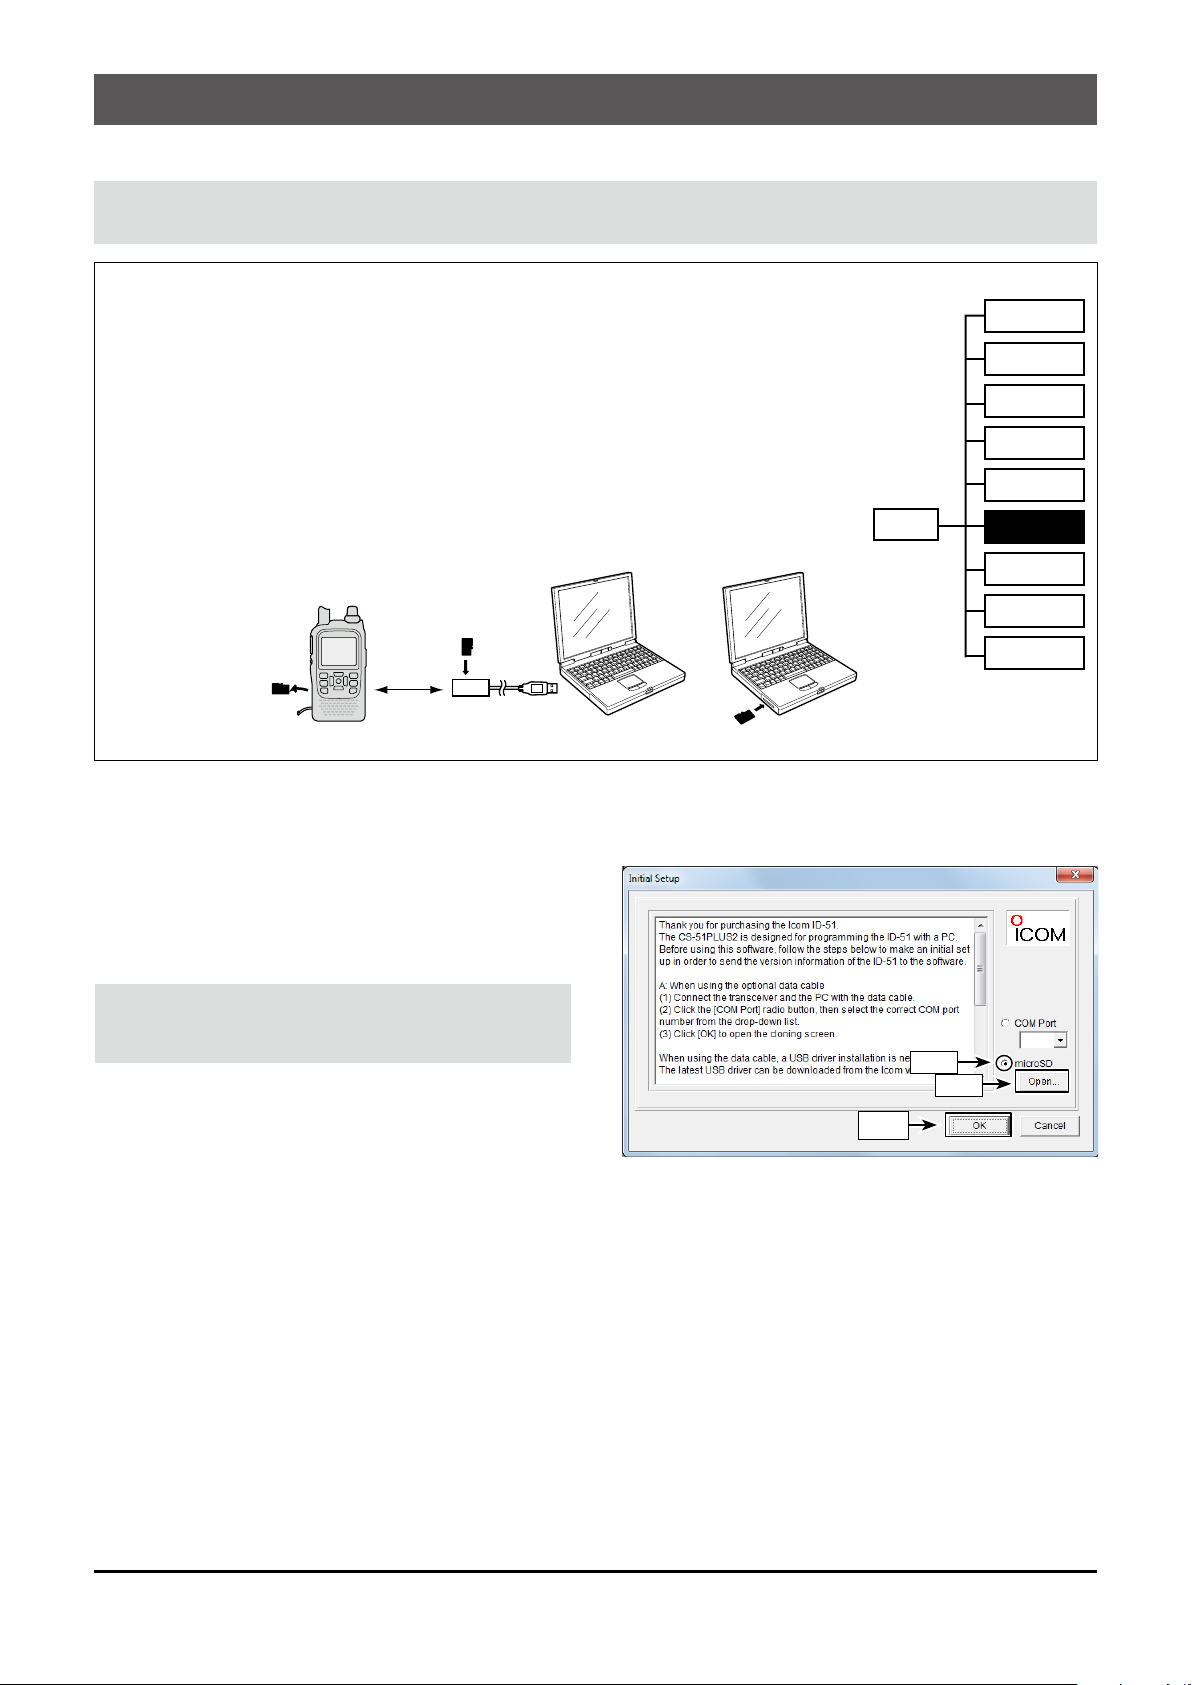
When you start the CS-51PLUS2, the Initial Setup
window is displayed. Before using the software,
follow the steps below to make the initial setup to
send the transceiver version information.
NOTE: When the transceiver version information is
not correctly sent to the software, some items may
not be displayed on the software.
1. Click the “microSD” radio button.
2. Click <Open...> to display the data file selection
window.
3. Select the setting data (ICF file) copied from the
transceiver in step 4 of “Before starting the
CS-51PLUS2 setup,” as described above.
4. Click <OK> to open the software and read the
selected file.
Click
Click
Click
– 4 –
A-7332-1EX
© 2016 Icom Inc.
Page 5

Setting up from a PC using a microSD card (Continued)
D How to setup the transceiver
Follow the steps below to write the setting data that is
edited with the CS-51PLUS2 to the transceiver using
the microSD card.
1. Set Memory channels, scan settings, call signs,
repeater list, and other settings using the
CS-51PLUS2.
2. Save the setting data in an Icom Cloning Format
(ICF) file format in a folder on your PC.
L See the Help le of the CS-51PLUS2 for assistance.
3. Copy the setting data (ICF file) into the “Setting”
folder in the “ID-51” folder on the microSD card,
as shown to the right.
4. Insert the microSD card that includes the setting
data (ICF file) into the slot of the transceiver, then
load it to complete the set up.
(MENU > SD card > Load Setting)
NOTE:
• After loading, the contents of the setting data
overwrites the current data.
• The loading contents can be selected between
“ALL,” “Except My Station,” and “Repeater List
Only.” When you want to load only the repeater list
into the transceiver, select “Repeater List Only.”
• The original skip settings in your repeater list can
be kept when loading. When “Keep ‘USE (FROM)’
settings in the Repeater List?” is displayed, select
<Yes> to keep the skip settings in the repeater list.
• See section 2 of the ID-51A and ID-51E Advanced
manual for details.
Open the “Setting” folder on the
microSD card
Double-click
Double-click
Copy the
ICF le here
5. Turn OFF the transceiver, then turn it ON again to
operate the transceiver with the loaded data.
– 5 –
A-7332-1EX
© 2016 Icom Inc.
Page 6

Setting up from a PC using a data cable
D USB driver installation
Before you use the OPC-2218LU data cable or the
OPC-2350LU data cable, you must install its USB
driver. The latest USB driver and installation guide
can be downloaded from “Options” section towards
the bottom of the rmware page on the Icom website.
NOTE for the OPC-2218LU:
DO NOT connect the transceiver to the PC with the
OPC-2218LU until the USB driver installation has
been completed.
The driver is not supported by the Windows
automatic recognition system.
Carefully read the guide, before installing the driver.
http://www.icom.co.jp/world/support/download/rm/
D Procedure outline
To setup from a PC using the OPC-2218LU or OPC-2350LU, follow the steps described below.
Step 1
Step 2
Step 3
Connect the transceiver and PC using a data cable.
Make the Initial setup.
Setup. (p. 8)
D Setting up precautions
• To prevent data loss, you should rst read all the
transceiver’s setting data into the cloning software.
After that, enter or edit parameters using the cloning
software. If you write the setting data into your
transceiver before reading, the settings such as “My
Call Sign” or “Your Call Sign” is overwritten.
• Before editing or entering, make a backup le onto
your PC. A backup le enables easy restoring even
if the setting data in the transceiver is accidentally
deleted.
• DO NOT turn OFF the transceiver or the PC, and
DO NOT disconnect the cable while reading or
writing setting data. Otherwise, the data could be
lost or deleted.
®
– 6 –
A-7332-1EX
© 2016 Icom Inc.
Page 7

Setting up from a PC using a data cable (Continued)
D Before starting the CS-51PLUS2 setup
IMPORTANT:
Before reading or writing setting data, the “DV Data TX” setting of the transceiver must be set to “PTT.”
Otherwise, when data is input from a PC through the [DATA] jack, the transceiver automatically transmits it.
(MENU > DV Set > DV Data TX)
1. Install the USB driver. (p. 6)
2. Turn OFF the transceiver.
3. Connect the data cable, as shown to the right.
4. Turn ON the transceiver.
5. Push [MENU] on the transceiver and enter the
Clone Mode.
(MENU > Others > Clone > Clone Mode)
6. Make a backup file.
L Click , or select “Read ← TR” in the <Clone>
menu to read the setting data from the transceiver.
L Click “Save As...” in the <File> menu of the
CS-51PLUS2 to save the backup le to a folder on
your PC.
To [DATA]
jack
OPC-2350LU
OPC-2218LU
To a USB port
To a USB port
PC
D Making the Initial setup
When you start the CS-51PLUS2, the Initial Setup
window is displayed. Before using the software,
follow the steps below to make the initial setup to
send the transceiver version information.
NOTE: When the transceiver version information is
not correctly sent to the software, some items may
not be displayed on the software.
1. Click the “COM Port” radio button.
2. Select the correct COM port number from the
drop-down list, or directly enter the COM port
number into the box.
L See the “USB Driver Installation Guide” that can
be downloaded from the Icom website to check the
COM port.
http://www.icom.co.jp/world/support/download/rm/
3. Click <OK> to open the software.
Click
Click
– 7 –
A-7332-1EX
© 2016 Icom Inc.
Page 8

Setting up from a PC using a data cable (Continued)
D How to setup the transceiver
Follow the steps below to write the setting data that is
edited with the CS-51PLUS2 to the transceiver using
a data cable.
1. Push [MENU] on the transceiver and enter the
Clone Mode.
(MENU > Others > Clone > Clone Mode)
2. Click , or select “Read ← TR” in the <Clone>
menu to read the data from the transceiver.
TIP: If you have an ICF le to write to the transceiver,
click
and then select the file.
3. Set Memory channels, scan settings, call signs,
repeater list, and other settings using the
CS-51PLUS2, and then save them in an Icom
Cloning Format (ICF) file format in a folder on
your PC.
L See the Help le of the CS-51PLUS2 for details.
4. Click , or select “Write → TR” in the <Clone>
menu to write the setting data into your
transceiver.
NOTE: The entered data will overwrite the current
data.
5. After the writing is completed, turn OFF the
transceiver, then turn it ON again to operate the
transceiver with the edited setting data.
or select “Open Ctrl+O” in the <File> menu,
The transceiver’s display
The Clone Mode display
When the PC starts
reading the setting
data from the
transceiver.
When the PC starts
writing the edited
setting data into the
transceiver.
Setup is completed.
– 8 –
A-7332-1EX
© 2016 Icom Inc.
Page 9

Editing the settings le
Downloading the
using the CS-51PLUS2
This section describes how to edit and save the
settings using the CS-51PLUS2.
The le format is Icom Cloning Format (ICF).
1. Editing the ICF le
Before using this software, make a initial setup
to send the transceiver version information to the
software. (pp. 3, 5)
1. Click
menu of the CS-51PLUS2 to open the ICF file.
2. Edit necessary setting for each function, using
the CS-51PLUS2.
L See the Help le of the CS-51PLUS2 for assistance.
2. Saving the ICF le
Click
<File> menu of the CS-51PLUS2 to save the edited
settings le to a folder on your PC.
or select “Open Ctrl+O” in the <File>
or select “Save Ctrl+S” or “Save As...” in the
latest ICF le and CSV les
Download the Zip le containing the latest Comma
Separated Values (CSV) les and the ICF le from
the Icom website:
http://www.icom.co.jp/world/support/download/rm/
1. Right-click on the downloaded compressed file
and select “Extract All...” to unzip it.
A “51P2_USA_160913”* folder, for example,
will be created on the same place where the
downloaded file is saved.
• File Name: 51P2_USA_160913.zip
Depending on the
version.
* “51P2_USA_160913.zip” is used as an example.
TIP:
The downloaded ZIP le includes:
For the ID-51A
• Settings le (ICF le)
• GPS memory (CSV le)
• Repeater list (CSV le)
Depending on the
updated le date.
NOTE: About the saved le format
• The settings saved in the ID-51PLUS2 format cannot be
written to the ID-51or ID-51PLUS transceivers.
• If the settings le is saved in an ID-51 or ID-51PLUS
format, the edited or added entries in the
ID-51PLULS2 are not saved.
NOTE: To reset the settings of the transceiver to
their default values, copy the ICF le contained in
the “Preset” folder of the supplied CD, to a local PC
folder, and then write it to the transceiver.
For the ID-51E
• Settings le (ICF le)
• Call channel (CSV le)
• GPS memory (CSV le)
• Repeater list (CSV le)
<Settings le (ICF le)>
All setting data of the transceiver is saved in the ICF
le.
• See to the left to edit.
• See pages 3 and 8 to set up.
File Name (Example): 51P2_USA_160913.icf
Depending on the
version.
Depending on the
updated le date.
<Each CSV le>
The name of a CSV le represents the content.
• See page 11 to edit.
• See page 10 to import.
• See page 11 to export.
File Name (Example): 51PUSARpt160913.csv
Depending
on the
version.
Depending on the
type of a CSV le.
2. Copy the ICF settings file and the CSV files
contained in the downloaded ZIP file to a folder
on your PC.
– 9 –
Depending on
the updated le
date.
A-7332-1EX
© 2016 Icom Inc.
Page 10

Importing the repeater list
Read this section before importing the repeater list in
a Comma Separated Values (CSV) format le to the
CS-51PLUS2.
NOTE:
Other CSV les contained in the downloaded ZIP
le can also be imported in the same procedure.
1. Reading the data from the transceiver
Click
, or select “Read ← TR” in the <Clone> menu
to read the data from the transceiver.
L Before importing, make a backup le of all the
transceiver’s data onto your PC to prevent data loss.
2. Importing a repeater list
1. Select the “Repeater List” folder or double-click
on it to show each repeater group on the tree
view screen.
<Tree view screen of the CS-51PLUS2>
NOTE:
When the data cable is used, the settings, except
the repeater list, can be retained by doing the
following procedures.
4. “Import from the file” is displayed, and then click
<OK>.
L If you select <Cancel>, the importing is cancelled.
Click
5. “Keep ‘USE (FROM)’ settings in the Repeater
List?” is displayed, and then click <Yes> or <No>
to start importing.
“ Repeater
List” folder
Repeater group
2. Click “Import” in the <File> menu, and then click
“All....”
• The repeater information in a CSV le is imported,
and sorted into groups according to the group
number.
NOTE: When “Group...” is selected, all repeater
information in the le is imported into the
repeater groups, selected in step 1.
If you select the “Repeater List” folder in step 1,
“Group...” cannot be selected.
3. Select the CSV le, saved in “Downloading the
latest ICF file and CSV files” described on
page 9, and then click <Open>.
Click
• Yes: The original “USE (FROM)” settings set in the
CS-51PLUS2 are kept.
• No: All the “USE (FROM)” settings are replaced with
the imported CSV files.
L See page 8 for details about how to write the
imported repeater list to the transceiver.
L See page 11 for details about how to edit or export
the repeater list.
TIP: About the “USE (FROM)” setting
Select whether or not the repeater can be selected
as an access repeater (FROM), when you rotate
[DIAL].
If you select <NO>, the repeater is not displayed in
the “FROM” selection, and is skipped during a DR
scan.
– 10 –
A-7332-1EX
© 2016 Icom Inc.
Page 11

Editing and Exporting the repeater list
Read this section before editing and exporting the
repeater list.
1. Editing the Repeater list
1. Select a repeater group in the “Repeater List”
folder on the tree view screen of the
CS-51PLUS2.
2. Edit the necessary items in the repeater list.
L See the Help le of the CS-51PLUS2 for details.
2. Exporting the Repeater list
1. Select the “Repeater List” folder, or each repeater
group on the tree view screen.
<Tree view screen of the CS-51PLUS2>
“ Repeater
List” folder
Repeater group
2. Click “Export” in the <File> menu, and then click
“Group...” or “All....”
NOTE: If you select the “Repeater List” folder in
step 1, “Group...” cannot be selected.
• Group...: Exports repeater information entered in only
the selected group.
• All...: Exports repeater information entered in all
groups.
3. Save the data in a CSV format file to a folder on
your PC.
Icom, Icom Inc. and the Icom logo are registered
trademarks of Icom Incorporated (Japan) in Japan, the
United States, the United Kingdom, Germany, France,
Spain, Russia, Australia, New Zealand, and/or other
countries.
Microsoft, Windows and Windows Vista are registered
trademarks of Microsoft Corporation in the United States
and/or other countries.
All other products or brands are registered trademarks or
trademarks of their respective holders.
1-1-32 Kamiminami, Hirano-ku, Osaka 547-0003, Japan
– 11 –
A-7332-1EX
© 2016 Icom Inc.
 Loading...