

Page 1
0
ICOM
CS-207
GETTING STARTED
Before using the program, make a backup copy of
p
the original disk. Operate the program using the
#
ba
ckup
A
This cloning program is designed to perform data
setting and cloning for the dual band transceiver
IC-207H.
I
computer’s keyboard including power ON
only connect to a DC power supply is needed
and keep the original in a safe p/ace.
cloning operations are performed from
r
the transceiver.
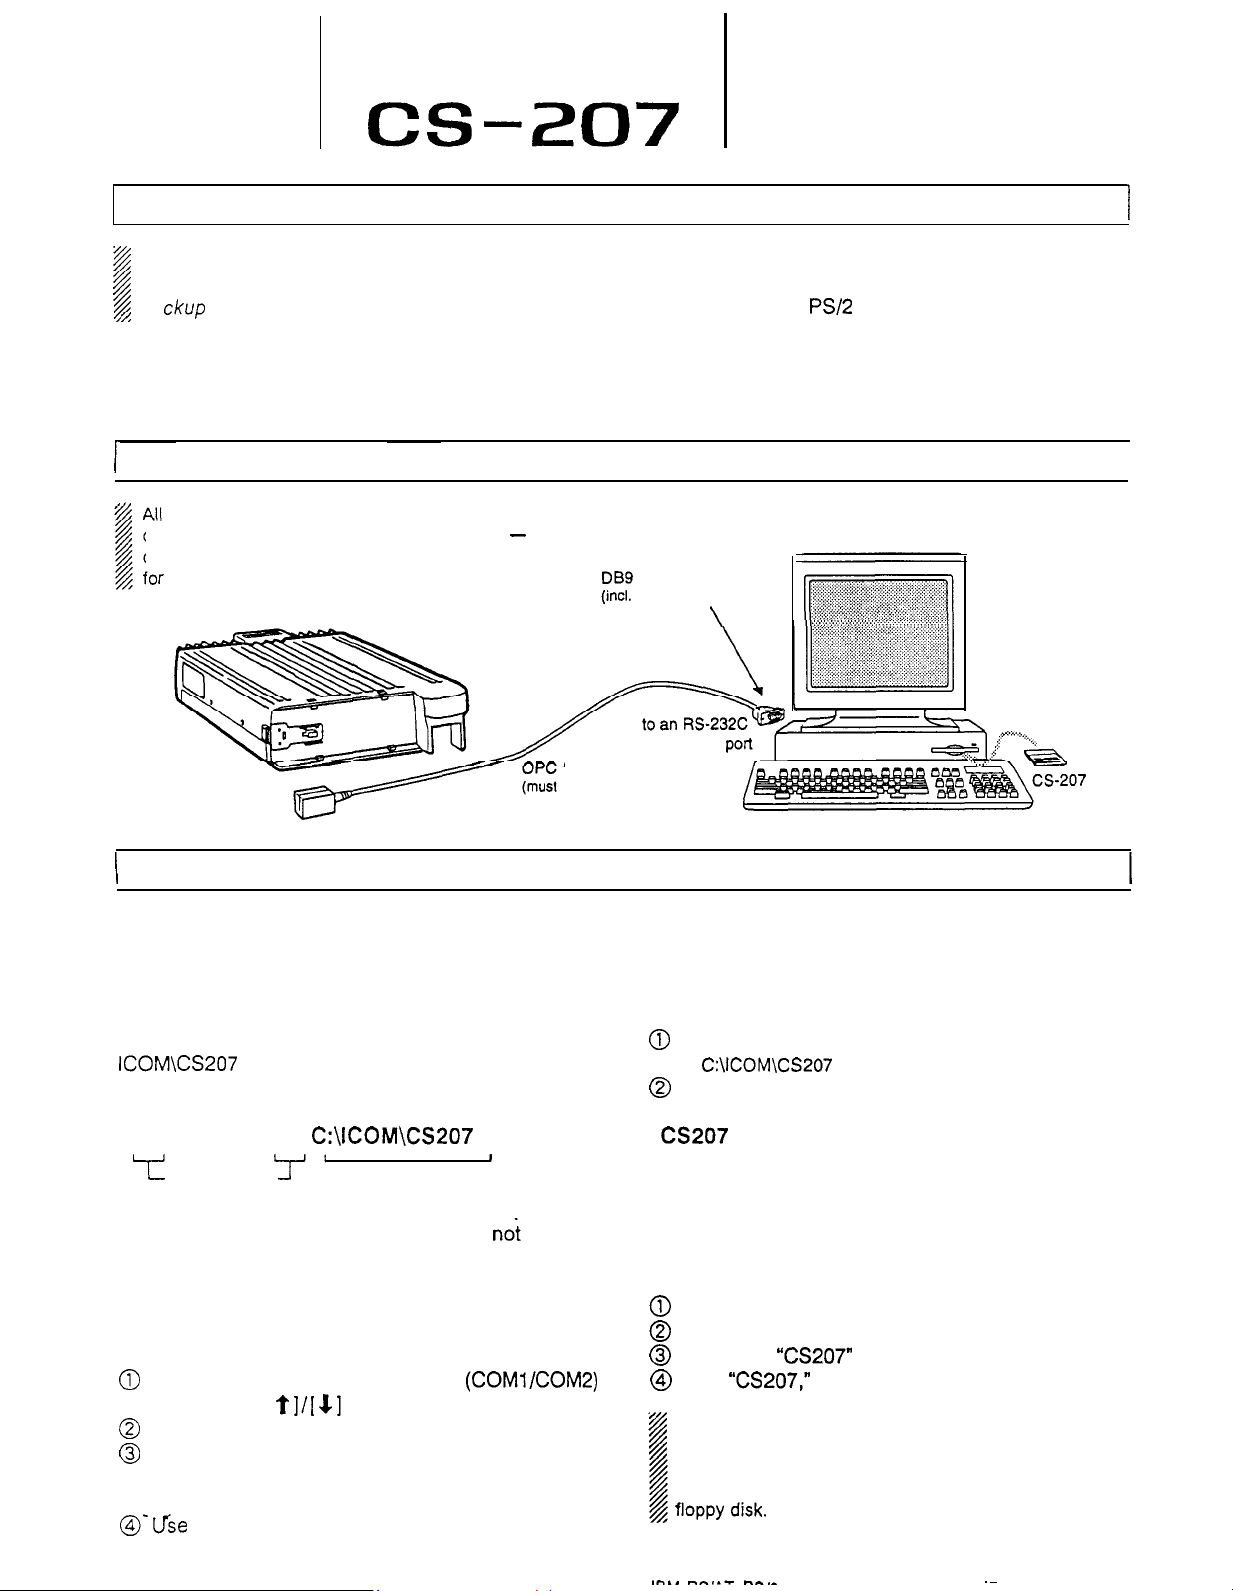
IC-207H
CONNECTIONS
-
OPERATING GUIDE (for IC-207H)
To use this program, the following hardware and
software are required:
l IBM PC/AT or
RS-232C serial port
l MS-DOS, PC-DOS or IBM DOS ver. 5.02 or higher
. OPC-646 CLONING CABLE
DB9
female plug
(incl.
level converter circuit)
\
PS/2
compatible computer with an
Personal
computer
I
I
-646
be purchased separately)
INSTALLATION AND PROGRAM START UP
n
Installation and initial setup’
Connect the transceiver and PC as above then con-
nect a DC power supply to the the transceiver.
To install the CS-207 cloning software to
ICOM\CS207
disk is in drive A, type as follows at the DOS prompt:
A:\INSTALL A:
T
Program drive
A target directory is created if it does
exist; CS-207 cannot be installed to the root directory.
After the installation is finished, the CS-207 initial
setup screen appears and the transceiver model is
checked. Proceed as follows:
0
Select the connected RS-232C
port with the [
@
Input your call sign then push [Enter].
@
After the initial setup, CS-207 is automatically
launched. Set or modify the data as desired.
l See the back page for operation.
@>‘fie
the program.
directory of drive C while the program
C:\ICOM\CS207
[Enter]
I
‘7”
Target drive/directory
not
already
(COMlKOM2)
t]/[ $1
the File sub menu to save the data or to exit
and [Enter] keys.
Cloning cable
n
Starting the program
To start the program after installation, operate as
follows at the DOS prompt:
@)
Change to the installed directory.
l
C:\ICOM\CS207
@
Type as follows to start:
CS207
n
This program can be operated from a floppy disk.
0
@
@
@
1 floppy disk.
Portions of this software are copyrighted by Microsoft Corporation.
MS-DOS is a Microsoft trademark.
I”,, m-,.-F m-.-
[Enter] (at the installed directory)
Operating from a floppy disk
Insert the backup disk into the floppy disk drive.
Select the floppy disk drive as the current drive.
Select the
Type
“CS207,”
NEVER remove the program disk from the floppy disk
drive while the7program is running.
NEVER set the floppy disk as write-protected.
Cloning will take 20 sec. or more when operating from a
in case of the example at left.
“CS207”
-- ---
directory.
then push [Enter] to start.
,.-..---
.~
Page 2

MENU FLOW
Ic.nm
Inr
Push
[Alt]
or [Esc] to select the TOP menu.
l The TOP menu lightens,
screens and operations can be selected from the TOP menu.
l
;
Push
[Fl]
to call up the help message.
To select a SUB menu, push
the highlighted key; or select
with the
[d]/[c]
push [Enter] or [ 4
keys then
1.
The screen darkens when the
menu is selected.
File
Load
Save
Delete DTMF
D
OS
Screen
Memory CH
VFO
Autodial
Common
Preset
SUB MENU
Load
Save
Delete
Exit
Loads data from a saved file.
Saves data to a desired file. File
extension
Deletes a file.
,
DESCRIPTION
(.ICF)
is added automatically.
Allows you to use a DOS command. To
g
DOS
return to the previous screen, type
“EXIT” then push [Enter].
Loads a preset file. Moves the cursor
Preset
to the first memory channel for input in
the V or U memory channel screen.
Exit
Quits and exits the program, then
returns to the DOS prompt.
Sets the operating frequency, duplex
Memory CH setting, etc. for call, memory and scan
edge channels.
c VFO
z
$j
DTMF
Autodial
Sets the operating frequency, duplex
setting, etc. for VFO.
Sets the DTMF codes, DTMF
transmission speed, etc.
Sets commonly used data, such as set
C
ommon
mode settings, initial set mode settings,
cloning comments, etc.
- _
TOP
Clone Print
Setup
Read (- TR Current Display Type
Write -) TR
Information
All Wallpaper
RS-232C
Call Sign
SUB MENU
Read (- TR
2
2
Write -) TR
0
Information
Current
-g
p
AII
Reads clone data from a connected
transceiver.
Sends clone data to a connected
transceiver.
Shows the connected transceiver model
and clone comment.
Prints out currently displayed screen
data.
Prints out all set data.
Selects the display type from color
Display
Type
and monochrome. Customized colors
can be used.
3
Wallpaper
z
RS-
232C
Call
Sian
Selects the wallpaper. This can be
previewed before selection,
Selects one of the computer’s
ports for cloning connection.
Enters your call sign.
DESCRIPTION
l/2
RS232C
 Loading...