

Page 1
INSTRUCTION MANUAL
WIRELESS ACCESS POINT
AP-12
BEFORE INSTALLATION
OBTAINING AN IP ADDRESS
FROM THE DHCP SERVER
FIXED IP ADDRESS SETTING
AP-12 MANAGER
SETTING EXAMPLES
IP CONFIGURATION
REFERENCES
1
2
3
4
5
6
7
Page 2

Page 3

INTRODUCTION
IMPORTANT
When connecting the AP-12 to a bridging type modem (or in
bridging mode) directly, a global IP address may be assigned to
the AP-12 from the modem, according to the modem settings.
When a global IP address is assigned to the AP-12, an illegal
operator, such as a cracker, a hacker, may access it.
To avoid such access, connect a router between the modem
and the AP-12.
The bridge type modem assigns a global IP address to the connected PC (only one).
The router type modem assigns a private IP address (e.g.192.168.x.x)
to the connected PCs via the HUB by the built-in routing function. The
AP-12 can be connected to a router type modem directly.
Contact your Internet Service Provider (ISP) if you do not know your
modem type.
IMPORTANT
About exchanging the AP-12 or the PC connected to the AP-12.
The AP-12 memorizes the communication settings between the AP12 and the connected PC. Thus, if the AP-12 and/or the PC connected to it changed, communication may fail.
In such case, turn the AP-12 power OFF. After waiting a few seconds, turn the power ON again.
ii
Page 4

INTRODUCTION
FOREWORD
Thank you for purchasing the Icom Wireless Access
point AP-12.
This wireless access point is provided with the functions necessary for supporting a wireless LAN.
This manual is designed to help you use the product to
its fullest potential. Read this manual carefully before
using the product.
TRADEMARK CREDITS
iii
Icom, Icom Inc. and the logo are registered trademarks of Icom Incorporated (Japan) in the United
states, the United Kingdom, Germany, France, Spain,
Russia and/or other countries.
Windows is a registered trademark of Microsoft
Corporation in the United States and/or other countries.
The screen shots that appear in this manual are used
with permission of Microsoft Corporation.
Other product and company names mentioned herein
are trademarks or registered trademarks of their
respective owners.
Page 5

INTRODUCTION
FEATURES
"" Up to 11 Mbps data transmission rate with automatic fallback function (11/5.5/2/1
Mbps).
"" The supplied utility software, [AP-12 Manager] allows you simple setup of the sys-
tem with a step-by-step tutorial. Windows XP, Windows Me, Windows 98SE,
Windows 98, Windows 2000 are supported.
"" The diversity antenna is built into the compact body to provide stable communi-
cation.
"" Versatile operating modes for Access Point mode, Bridge mode A (Peer-to-Peer),
Bridge mode B (Client mode), and Bridge mode C (Multi-site). A roaming function
is also available while in Access Point mode. It provides full mobility and seamless network access from anywhere within the area for the connected clients.
"" The DHCP client function is available to automatically obtain the network config-
uration such as the IP address (This is not activated in Bridge mode B mode operation).
"" Data can be protected with high-level security function such as 128/64-bit WEP
(Wired Equivalent Privacy) encryption and MAC address registration.
INTRODUCTION
"" AP-12 uses a direct spread-spectrum communication system which ensures sta-
bilized communication even under influence of noise and interference.
iv
Page 6

INTRODUCTION
FCC INFORMATION
FOR HOME OR OFFICE USE
AP-12
Tested to comply
with FCC standards
CAUTION:
void the user’s authority to operate this Access Point.
Class B digital device users;
This equipment has been tested and found to comply with the limits for a Class B
digital device, pursuant to Part 15 of the FCC Rules. These limits are designed to
provide reasonable protection against harmful interference in a residential installation. This equipment generates, uses, and can radiate radio frequency energy and,
if not installed and used in accordance with the instruction manual, may cause
harmful interference to radio communications. However, there is no guarantee that
interference will not occur in a particular installation. If this equipment does cause
harmful interference to radio or television reception, which can be determined by
turning the equipment off and on, the user is encouraged to try to correct the interference by one or more of the following measures:
• Reorient or relocate the receiving antenna.
• Increase the separation between the equipment and receiver.
• Connect the equipment into an outlet on a circuit different from that to which the receiver is
connected.
• Consult the dealer or an experienced radio/TV technician for help.
Changes or modifications not expressly approved by Icom Inc. could
RF EXPOSURE SAFETY INFORMATION:
CAUTION: To comply with the FCC RF exposure requirements, this transmitter (builtin antenna) must be fixed-mounted on permanent structures with a separation distance
of at least 8 inches (20cm) from all persons and must not be co-located or operating in
conjunction with any other antenna or transmitter.
For CANADA only
Operation is subject to the following two conditions: (1) this device may not cause interference, and (2) this device must accept any interference, including interference that
may cause undesired operation of the device.
v
Page 7

INTRODUCTION
GENERAL PRECAUTIONS
"" If a connection cable is disconnected or has a loose connection during operation,
an error may occur. Connect the connectors correctly, and do not touch the connectors during operation.
"" For the operation of PC and peripheral devices, follow the instructions provided in
the manuals which come with the PC and peripheral devices.
"" This device may cause signal interference when used in a domestic setting. When
interference occurs, move this unit as far as possible away from the affected
device.
"" The CD which comes with the AP-12 is for the AP-12 only.
Do not use it for any other devices.
"" Icom Inc. is not responsible for any interference that arises by incorporating a con-
figuration file for the AP-12 or a firmware update data file, which is available on
our home page, into any device other than the AP-12. Moreover, Icom Inc. is not
responsible for any interference that arises by modifying or disassembling the AP-
12. Furthermore, Icom Inc. is not responsible for any damages, lost profits or third
party’s claim resulting from any missed communication or telephone call due to
the AP-12’s fault, error, malfunction, breakage, data loss or any other external
factor such as power failure.
"" All copyrights associated with this manual and all intellectual property rights asso-
ciated with the hardware and software of the AP-12 are held by Icom Inc.
"" Unauthorised reproduction or transmission of this manual, or any part hereof, is
prohibited.
"" The content of this manual, the hardware and software associated with the AP-
12, and the appearance of the AP-12 are all subject to change without notice.
INTRODUCTION
Notational Conventions
The following notational conventions are used in this manual:
• The names of utilities, menus, windows, tabs, icons, text boxes, and check boxes
are enclosed in square brackets ([ ]).
• The names of command buttons within dialog boxes are enclosed in less-than and
greater-than signs (< >).
- Windows 98 SE represents the Windows 98 Second Edition.
Windows Me represents the Windows Millennium Edition.
- The contents of windows appearing in this manual may vary depending on the operating system installed on your PC.
vi
Page 8
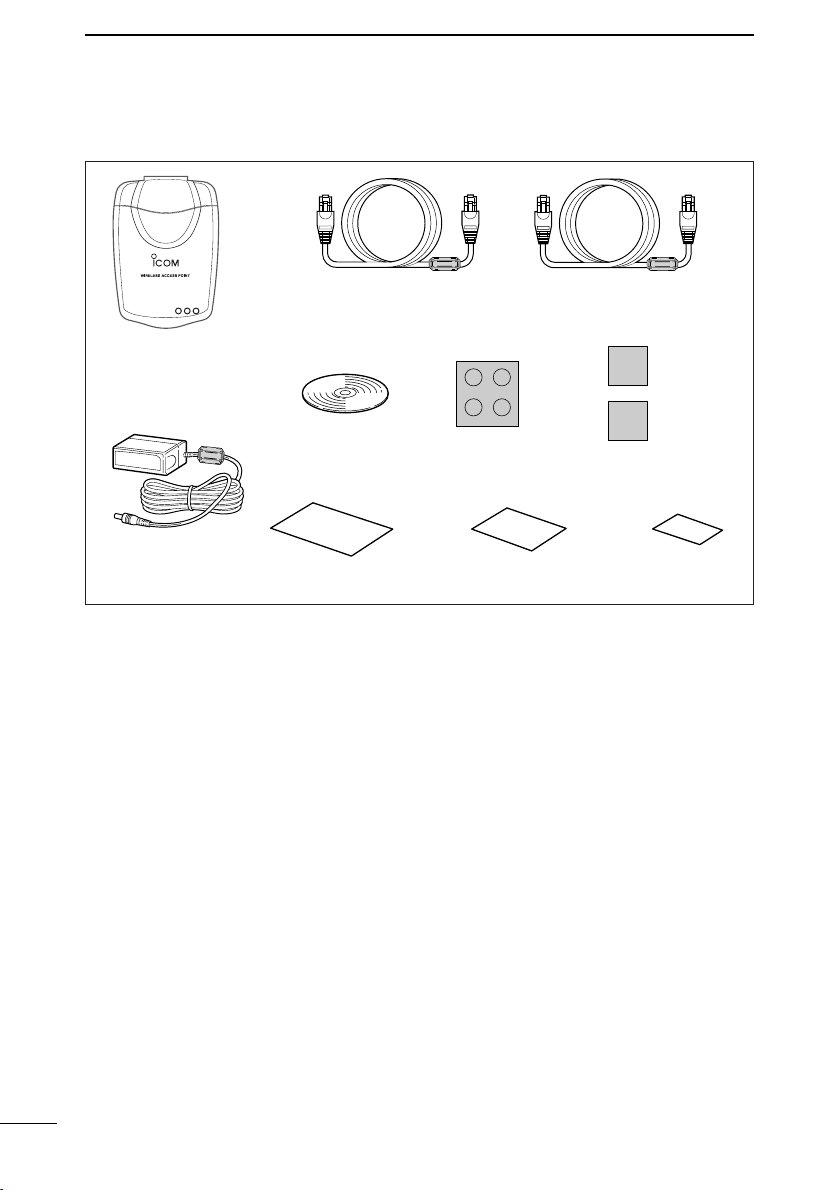
ACCESSORIES
CD
AC Adapter
Leg Pad Fixing Sheet
Patch cable
3 m (9.8 feet)
Crossover cable
1 m (3.2 feet)
Instruction Manual Registration Card Warranty Card
AP-12 Main Unit
AP-12
■ Supplied accessories
• Leg Pad ……………………
• Fixing sheets ………………
• Crossover cable……………
• Patch cable…………………
• CD …………………………
• AC Adapter…………………
vii
Attach to the bottom of the AP-12 to secure.
Attach to the bottom of the AP-12 to secure.
Remove the protective paper before attaching the
sheet.
For connection between the AP-12 and a PC.
For network connection between the AP-12 and
HUB.
[AP-12 Manager] is included.
The adapter for the AP-12.
Page 9

TABLE OF CONTENTS
IMPORTANT ………………………………………………………………………………ii
INTRODUCTION …………………………………………………………………………iii
ACCESSORIES …………………………………………………………………………vii
TABLE OF CONTENTS ………………………………………………………………viii
SAFETY PRECAUTIONS ………………………………………………………………x
Chapter 1 BEFORE INSTALLATION ………………………………1–8
1-1 Wireless functional modes ……………………………………2
1-2 Unit description …………………………………………………4
1-3 Accessory attachment …………………………………………5
1-4 Installation location ………………………………………………7
1-5 About the Ethernet card…………………………………………8
Chapter 2 OBTAINING AN IP ADDRESS
FROM THE DHCP SERVER……………………………9–14
2-1 Connecting to a LAN …………………………………………10
2-2 Installing [AP-12 Manager] ……………………………………11
2-3 Starting [AP-12 Manager] ……………………………………13
Chapter 3 FIXED IP ADDRESS SETTING ………………………15–29
3-1 Connecting to the PC …………………………………………16
3-2 Using [Easy Setting Wizard] …………………………………17
3-3 Installing [AP-12 Manager] ……………………………………25
3-4 Starting [AP-12 Manager] ……………………………………27
TABLE OF CONTENTS
Chapter 4 AP-12 MANAGER ……………………………………31–44
4-1 [AP-12 Manager] screen descriptions ………………………32
4-2 The default settings ……………………………………………43
4-3 Uninstalling [AP-12 Manager]…………………………………44
Chapter 5 SETTING EXAMPLES …………………………………45–49
5-1 Access point mode ……………………………………………46
5-2 Bridge mode A (Peer-to-Peer) ………………………………47
5-3 Bridge mode B (Client Mode)…………………………………48
5-4 Bridge mode C (Multi-site) ……………………………………49
viii
Page 10

TABLE OF CONTENTS
Chapter 6 IP CONFIGURATION …………………………………51–56
6-1 For Windows XP ………………………………………………52
6-3 For Windows 98/98SE/Me ……………………………………54
6-2 For Windows 2000 ……………………………………………55
Chapter 7 REFERENCES …………………………………………57–71
7-1 Troubleshooting ………………………………………………58
7-2 Connecting the AP-12 and HUB ……………………………60
7-3 Verifying the connection to the AP-12 ………………………60
7-4 Failure in searching for the AP-12……………………………61
7-5 IP address confirmation ………………………………………64
7-6 Connection to the router type modem ………………………66
7-7 Specifications …………………………………………………68
7-8 Glossary …………………………………………………………70
ix
Page 11

SAFETY PRECAUTIONS
Be sure to read these precautions in order to use the AP-12 safely.
• These precautions are intended to ensure that the access point is operated
safely and correctly. Follow these instructions to avoid property damage
and prevent personal injury to yourself (user) or others in the vicinity.
• Before reading the rest of this manual, read and understand the precautions
listed under “RWARNING” and “RCAUTION”.
• After reading this manual, store it in a convenient place for future review.
■ Wireless Access Point
Failure to observe the precautions listed here
RWARNING
could result in serious or fatal injury to the user or
those near the user.
● Do not use any AC adapter other than
the one provided with this product.
Otherwise fire, electric shock, or equipment failure may result.
● Use the specified parts and acces-
sories only.
Otherwise fire, electric shock, or equipment failure may result.
● Do not connect the power supply to
any terminal other than the DC jack.
Otherwise fire, electric shock, or equipment failure may result.
● Do not modify, excessively bend,
twist, pull, or heat the connecting
cables.
Otherwise the cables may be damaged
and cause a fire, electric shock, or equipment failure.
● Do not place heavy objects on the
connecting cables or allow the cables
to be pinched.
Otherwise the cables may be damaged
and cause a fire, electric shock, or equipment failure.
● Install and use in a location where
children cannot reach the power
cable and cables.
Pulled cables could result in electric
shock or personal injury.
SAFETY PRECAUTIONS
● This unit does not require adjustment.
Do not disassemble or modify the unit
or attempt to repair it yourself.
Otherwise fire, electric shock, or equipment failure may result.
● Do not install in a location where the
unit can easily become wet (such as
adjacent to a humidifier).
Otherwise fire, electric shock, or equipment failure may result.
● Do not handle the unit with wet hands.
Otherwise electric shock may result.
● Discontinue use immediately and
unplug the power cable from the AC
receptacle if the unit emits smoke, an
abnormal odor, or an abnormal noise
or if water enters the unit.
Otherwise fire, electric shock, or equipment failure may result.
Disconnect the plug of the AC adapter
and all other cables from the unit.
Confirm that the smoke, odor, or noise
has stopped and contact your dealer.
x
Page 12

SAFETY PRECAUTIONS
RCAUTION
● Do not install the unit outdoors.
Otherwise equipment failure may result.
● Do not place on a slanted or unstable
surface.
Otherwise the unit may tilt over or fall,
resulting in personal injury or equipment
failure.
● Avoid installing in humid, dusty, or
poorly ventilated locations.
Otherwise equipment failure may result.
● Do not use in locations exposed to
direct sunlight, close to heating or
cooling ducts, or otherareas subject
to severe fluctuations in temperature.
Otherwise the unit may become
deformed or discolored. Also, fire or
equipment failure may result.
● Be sure to connect the cables correctly as explained in this manual. Do
not use any other connection
arrangement.
Otherwise equipment failure may result.
● Avoid locations exposed to strong
magnetic fields or static electricity
and locations exposed to temperatures or humidity levels that exceed
the specifications listed in the manual.
Otherwise equipment failure may result.
● Do not use close to radios or television sets.
Otherwise signal interference may occur.
● Do not drop or the unit or subject it to
strong physical shock.
Otherwise personal injury or equipment
failure may result.
result in personal injury or property damage.
Failure to observe the precautions listed here could
● Do not stand, sit, or place heavy
objects on the unit. Do not pinch the
unit.
Otherwise the unit may be damaged.
● When thunder and/or lightning occur
nearby, disconnect the AC adapter
from the wall socket and do not use
the unit. Also, discontinue such work
as connecting cables, disconnecting
cables, installation, or maintenance.
Otherwise fire or electric shock may
result.
● Do not use in locations where condensation is likely to occur. Avoid
hastily moving the unit to a location
where the humidity level is very different because condensation may
occur.
Otherwise the unit may become
deformed or discolored. Also, fire or
equipment failure may result.
If condensation occurs, dry the unit or
allow the unit to remain in the same environment until it is completely dry before
using it again.
● Disconnect the AC adapter from the
unit when the unit will not be used for
a long time.
Otherwise the unit may become hot and
fire or equipment failure may result.
● Do not clean with paint thinner or benzene.
Otherwise the case material may
degrade or the coating may peel. Clean
with a soft cloth. When particularly dirty,
dampen the cloth slightly with a neutral
cleaning agent that has been diluted with
water.
xi
Page 13

SAFETY PRECAUTIONS
■ AC adapter
Failure to observe the precautions listed here could
RWARNING
● Do not use with an AC supply voltage
other than 230 V.
Otherwise fire, electric shock, or equipment failure may result.
● Do not use with any device other than
the AP-12.
Otherwise fire, electric shock, or equipment failure may result.
● Do not modify, excessively bend,
twist, pull, or heat the AC power cable.
Otherwise the cable may be damaged
and cause a fire, electric shock, or equipment failure.
● Do not place heavy objects on top of
the DC output cable or allow the cable
to be pinched.
Otherwise the cable may be damaged
and cause a fire, electric shock, or equipment failure.
result in serious or fatal injury to the user or those
near the user.
● Hold the adapter body when plugging
in and unplugging the AC adapter. Do
not yank the cable.
Otherwise fire, electric shock, or equipment failure may result.
● Do not handle the AC adapter plug or
other devices with wet hands.
Otherwise electric shock may result.
● Do not use the AC adapter if the DC
output cable is damaged or the plug
does not fit securely into the receptacle.
Otherwise fire, electric shock, equipment
failure, or data loss may result.
Consult with your dealer or the service
staff at one of our sales offices regarding
how to handle the problem or obtain a
new AC adapter.
SAFETY PRECAUTIONS
General Precautions
● The unit may malfunction if the connecting cables become disconnected or the connection
is unstable while the unit is in operation. Be sure all connectors are securely fastened and
do not touch them while the unit is in operation.
● Observe the instructions provided in the manuals included with the PC and other peripheral devices.
● This device may cause signal interference when used in a domestic setting. When interference occurs, move this unit as far as possible away from the affected device.
● The disks entitled “Utility Software” (utility for updating the firmware) is specifically intend-
ed for this unit. Do not use the disks with any other device.
● ICOM Inc. assumes no responsibility whatsoever for any trouble resulting from using the
data files originally provided with this unit or the firmware update data files provided on our
website in a device other than this unit, or modifying or disassembling this unit. Nor does
ICOM Inc. assume any responsibility whatsoever for any damages or lost profits resulting
from opportunities for voice or signal communications being lost because of the failure,
malfunction, poor condition, damage, or data loss of this unit or because of such external
causes as power failure. ICOM also dismisses all responsibility for demands made by a
third party.
● All copyrights associated with this manual and all intellectual property rights associated
with the hardware and software of this product are held by ICOM Inc.
● Unauthorised reproduction or transmission of this manual, or any part hereof, is prohibited.
● The content of this manual, the hardware and software associated with this product, and
the appearance of this product are all subject to change without notice.
xii
Page 14

Page 15

BEFORE INSTALLATION
This chapter describes what you should consider and prepare before installing the AP-12.
1-1 Wireless functional modes …………………………………………………………2
■ Access point mode …………………………………………………………………2
■ Bridge mode A (Peer-to-Peer) ……………………………………………………2
■ Bridge mode B (Client Mode) ……………………………………………………3
■ Bridge mode C (Multi-site) …………………………………………………………3
■ About a MAC address ……………………………………………………………3
1-2 Unit description ………………………………………………………………………4
1-3 Accessory attachment ………………………………………………………………5
■ Leg pads/fixing sheet attachment…………………………………………………5
■ To avoid falling………………………………………………………………………5
■ To avoid interference ………………………………………………………………6
1-4 Installation location …………………………………………………………………7
■ Examples of recommended installation …………………………………………7
■ Examples of installation not recommended ……………………………………7
■ Installation precautions ……………………………………………………………7
1-5 About the Ethernet card ……………………………………………………………8
■ Desktop PC …………………………………………………………………………8
■ Notebook PC ………………………………………………………………………8
Chapter 1
Page 16
BEFORE INSTALLATION
Wireless LAN
client
Wireless LAN
client
AP-12 [CH 11]
Ethernet LAN
CH:Channel
Wireless LAN
client
AP-12
Ethernet LAN
moving
[CH 11]
CH:Channel
[CH 6]
Access point switches
when wireless LAN
client is moved.
[CH11]
[CH11]
CH: Channel
AP-12
Ethernet LAN:1
AP-12
Ethernet LAN:2
00-90-C7-27-00-01
00-90-C7-27-00-02
1
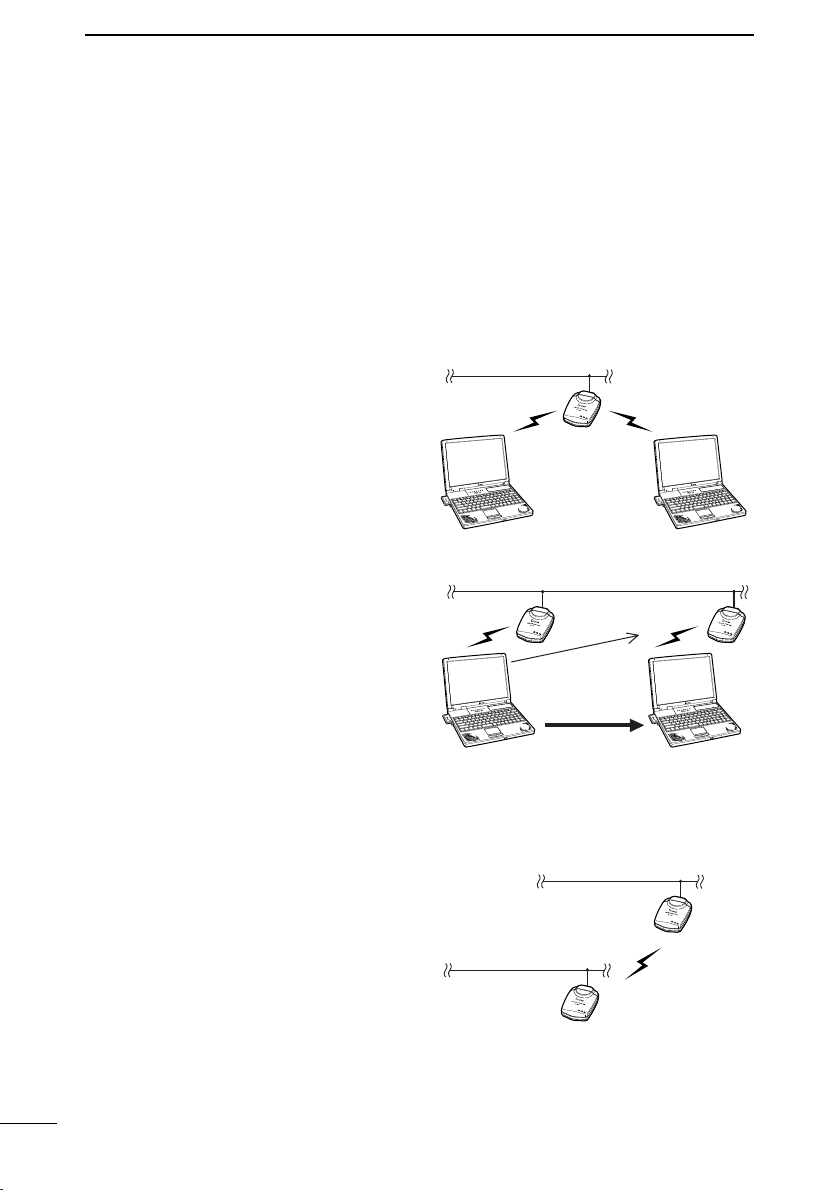
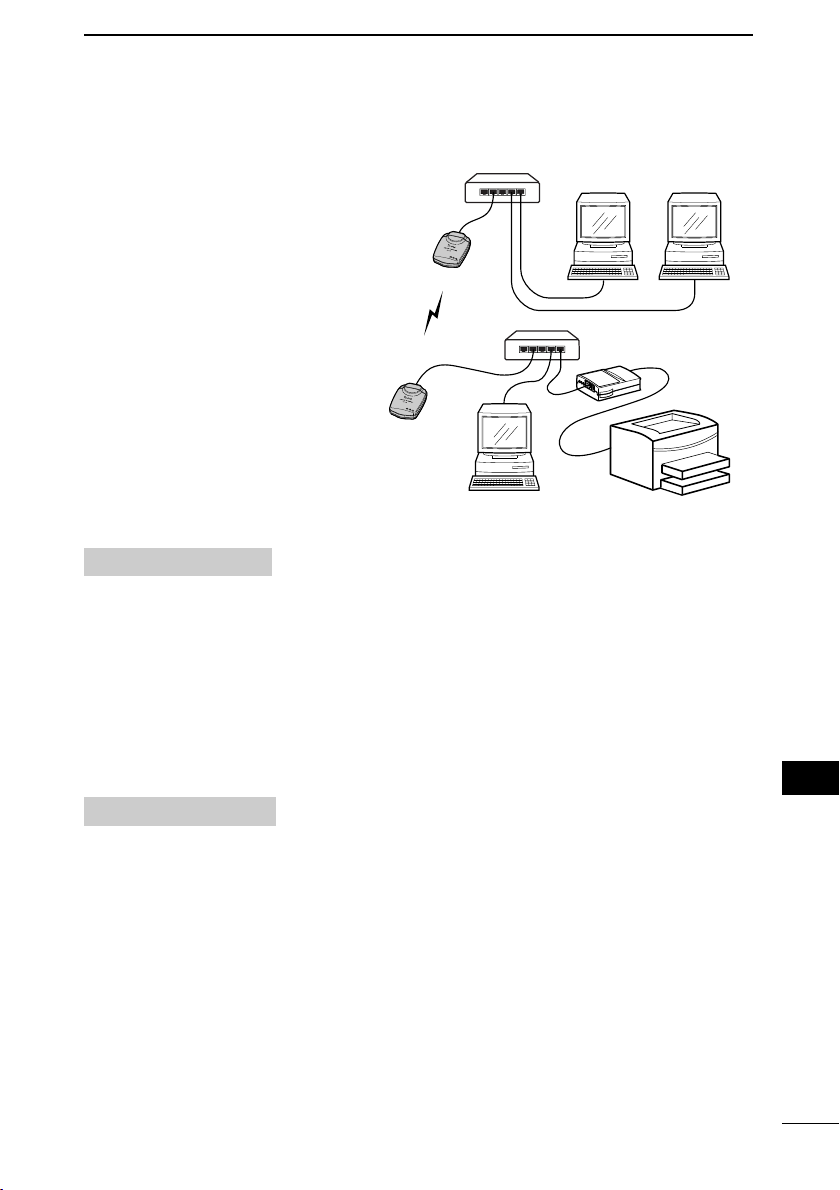
1-1 Wireless functional modes
The AP-12 has 4 wireless functional modes.
A functional mode can be selected with [AP-12 Manager].
• The AP-12 obtains an IP address from the DHCP server automatically (default).
• Bridge mode B does not support a DHCP client function.
• Connect the AP-12 to the PC directly (p. 16), then set the IP address when you use
the fixed IP address in the existing wired LAN.
■ Access point mode (default)
The AP-12 in access point mode connects the wireless LAN clients to the
other wireless LAN clients or wired
LAN.
To avoid communication speed slow
down, it is recommended to use up to
10 AP-12’s only during heavy traffic.
By connecting two or more AP-12’s to
the wired LAN, roaming is possible.
The roaming function switches to the
most suitable access point automatically when the wireless LAN client
moves.
Set the channels at least four channels apart to avoid interference.
■ Bridge mode A (Peer-to-Peer)
2
Connects two wired LAN via the AP-
12.
Only AP-12’s whose MAC address is
registered to one another, can be
accessed.
Page 17
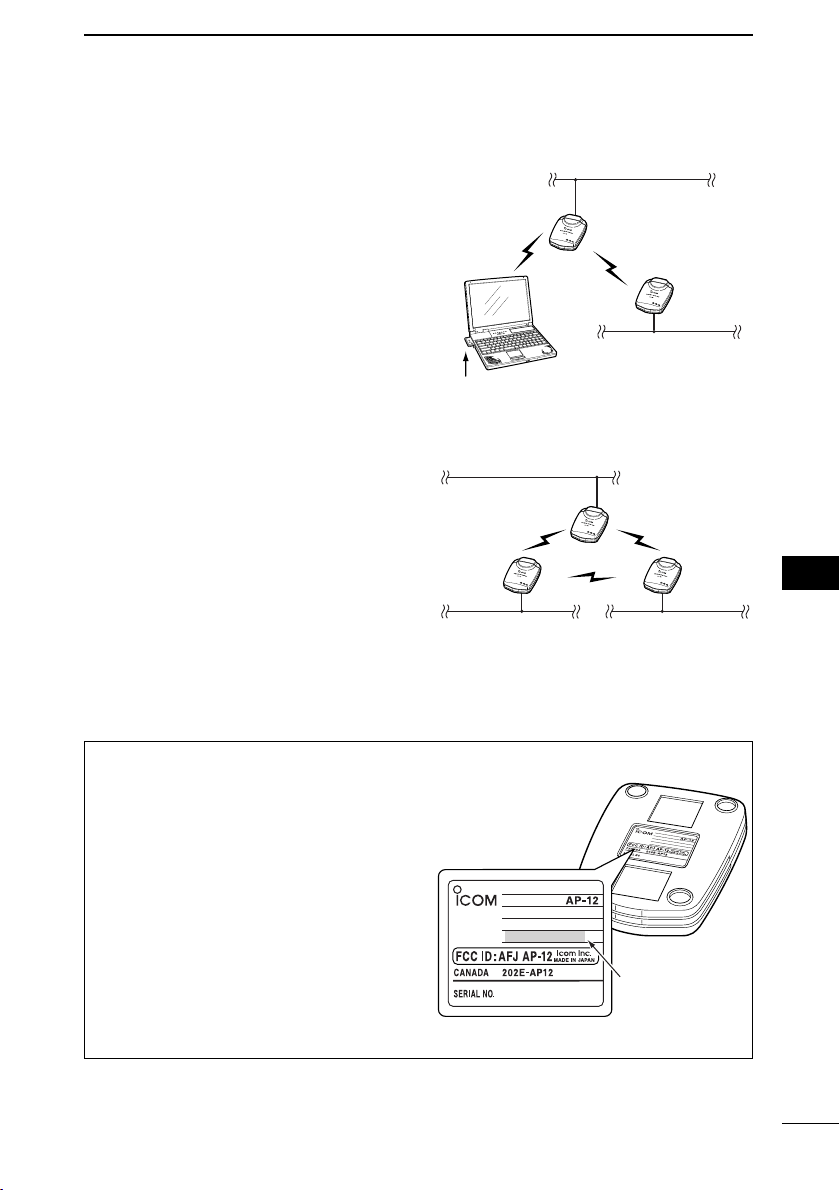
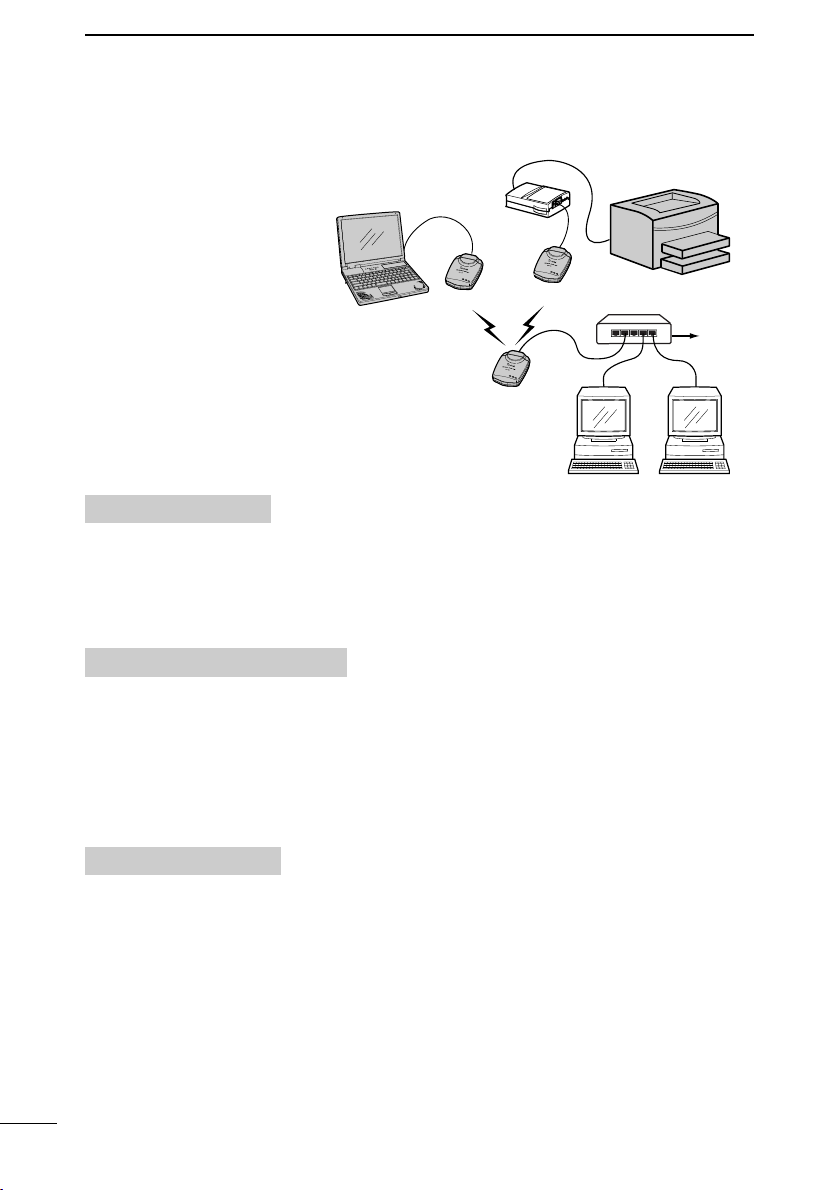
■ Bridge mode B (Client Mode)
Connects wireless LAN terminal or
the AP-12 (2) connected LAN system
via the AP-12 (1) in access point
mode.
- Only the AP-12 works as the access
point.
- Register the desired AP-12’s MAC
address, prior to communication,
with AP-12 (2) when two or more
AP-12’s operating in access point
mode are available.
BEFORE INSTALLATION
[CH11]
AP-12 (1)
Wireless LAN card
Ethernet LAN:1
00-90-C7-27-00-01
Ethernet LAN:2
1
CH:Channel
AP-12 (2)
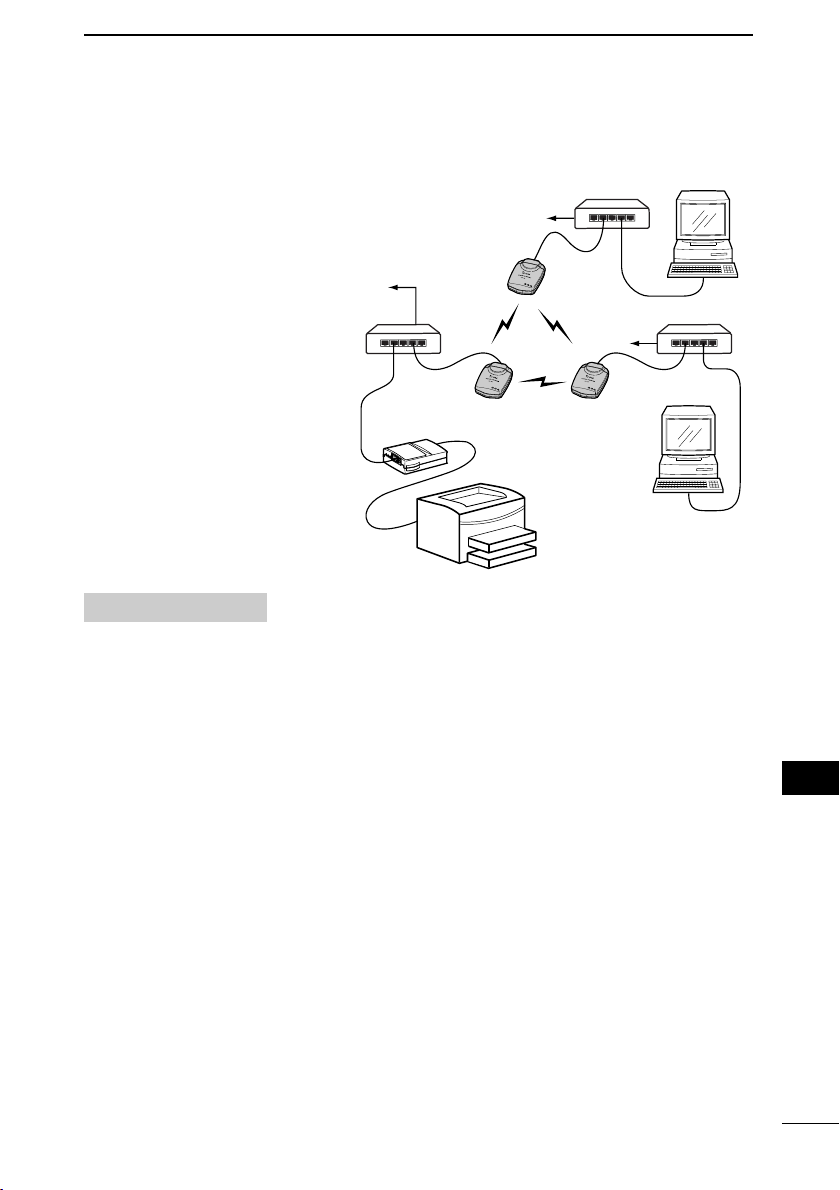
■ Bridge mode C (Multi-site)
Connects two or more wired LAN via
the AP-12.
- It is not necessary to register the
MAC address and communicate
with other AP-12s easily.
- To avoid communication speed slow
down, it is recommended to use up
to 10 AP-12’s only during heavy traffic.
■ About a MAC address
A MAC address is described on the
serial number seal. (See the figure at
right)
In bridge mode A, you need to register
your MAC address to the wireless
devices with which you communicate.
In bridge mode B, register the desired
wireless LAN device’s MAC address
prior to communication with your AP-
12.
The AP-12’s MAC address can be
checked with [AP-12 Manager] also.
Ethernet LAN:1
[CH11]
[CH11]
AP-12 AP-12
Ethernet LAN:2
Serial number seal
xxxxxxxxxxxx
CH:Channel
AP-12
[CH11]
Ethernet LAN:3
xxxxxxxxxxxx
MAC address
1
3
Page 18
BEFORE INSTALLATION
AP-12
r
t
The antenna is
built into the AP-12.
q
w
e
1
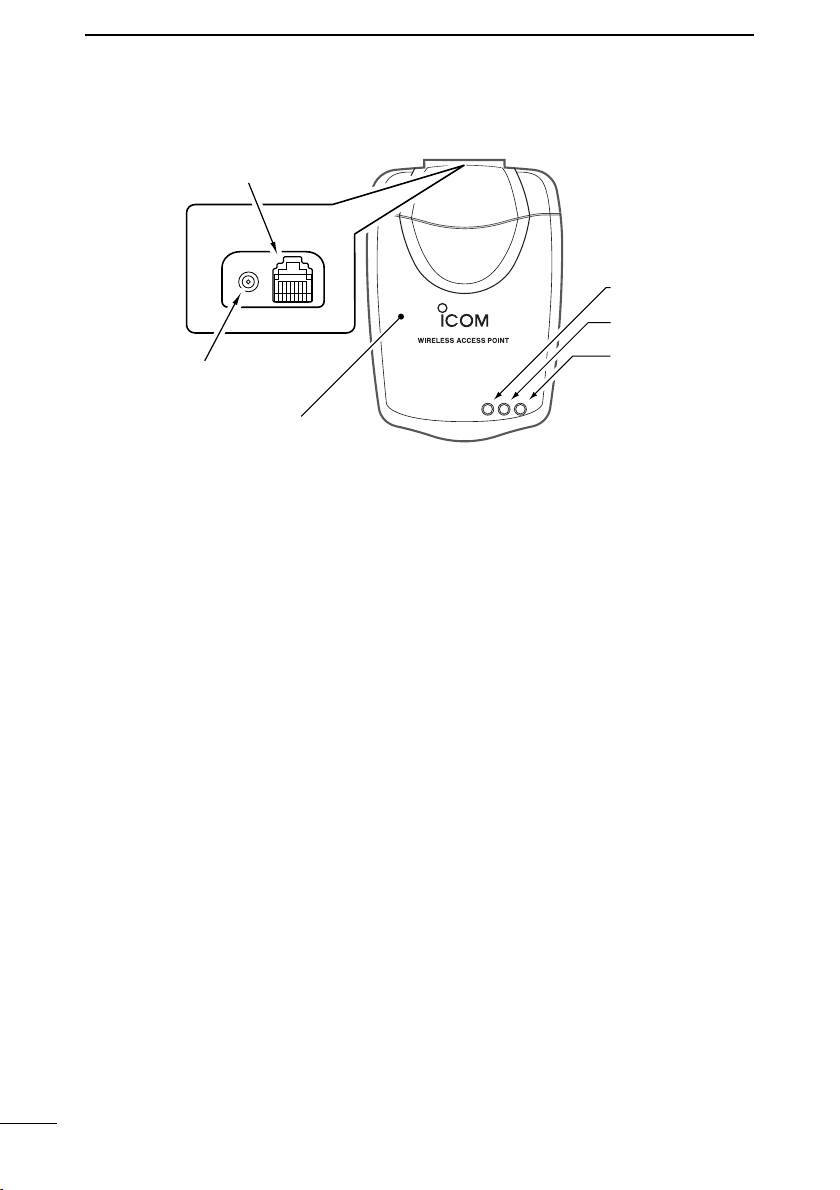
1-2 Unit description
q Power indicator
Lights when the power is ON.
w Wired LAN indicator
➥ Lights when the LAN (Ethernet)
connection is correct.
➥ Flashes when the AP-12 is com-
municating with the LAN.
• It does not light when the AP-12
does not recognize the Ethernet
port connection.
• Make sure the LAN cable is connected to the Ethernet port.
e Wireless LAN indicator
➥ Flashes when the power is ON.
➥ Flashes high speed while com-
municating data.
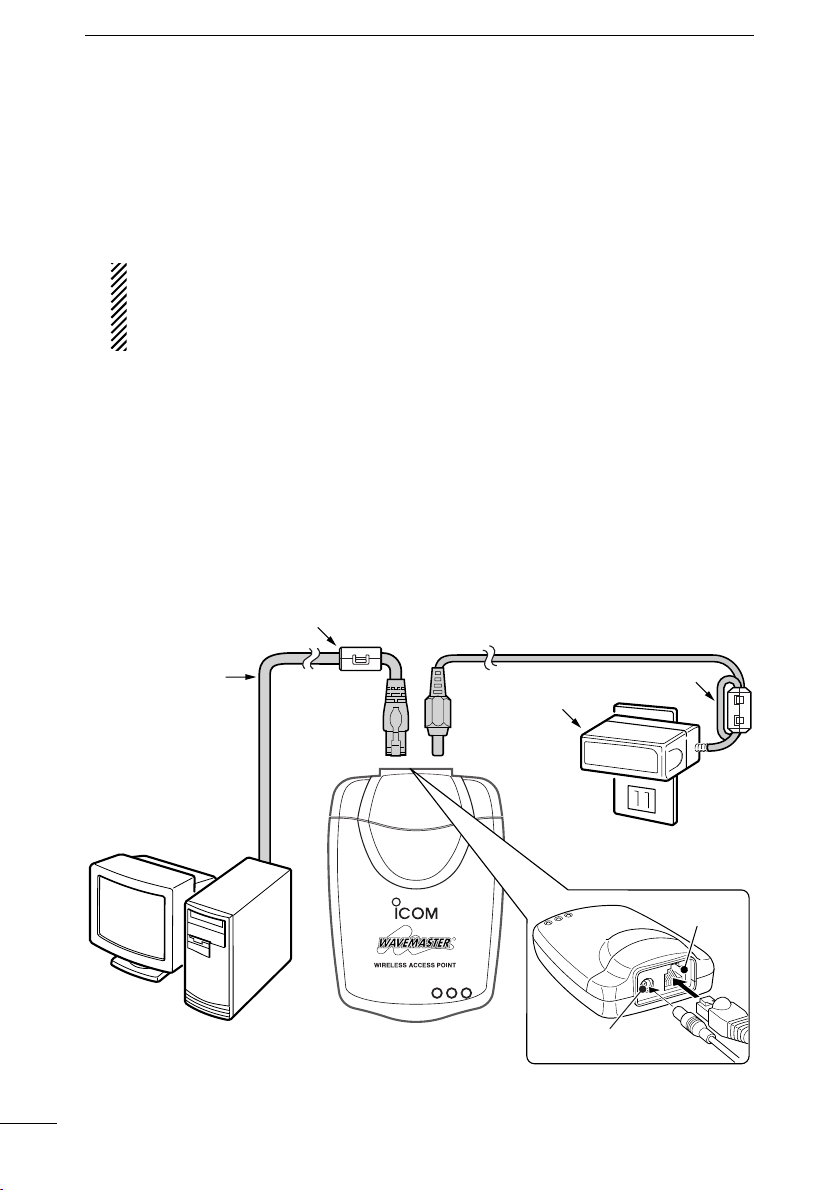
4
r Ethernet ports
➥ This is an RJ-45 type Ethernet
port.
➥ Connect to a HUB using the sup-
plied patch cable.
➥ Connect to a PC using the sup-
plied crossover cable.
t DC jack
➥ Connect the supplied AC adapter.
Page 19
AP-12
Fastener or tie
(purchase locally)
Ferrite core
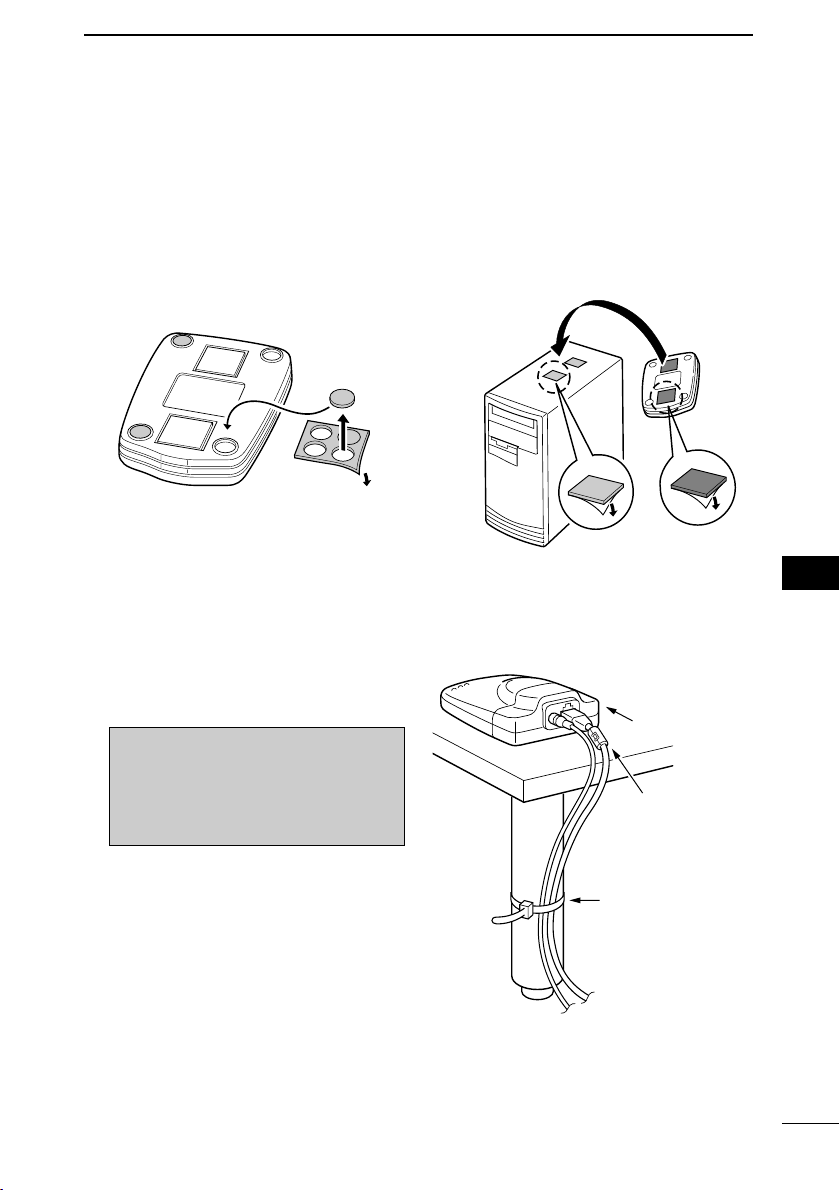
1-3 Accessory attachment
■ Leg pads/fixing sheet attachment
Use the leg pads on the bottom of
the AP-12 as below to place it on a
flat surface
■ To avoid falling
When mounting the AP-12 high on a
shelf or the like, secure it using a
cable fastener or tie to prevent the
AP-12 from accidental falling.
BEFORE INSTALLATION
Use the fixing sheets to secure the
AP-12 on a shelf.
Remove the protective paper before
attaching the sheet.
1
1
NOTE: Do not tie and fix the DC
power cable and Ethernet cable
with a metal binder, such as a wire.
The cable may damaged and a
short circuit may occur.
5
Page 20
BEFORE INSTALLATION
AC adapter (supplied)
Ethernet cable
(supplied)
To the AP-12
1
1-3 Accessory attachment (continued)
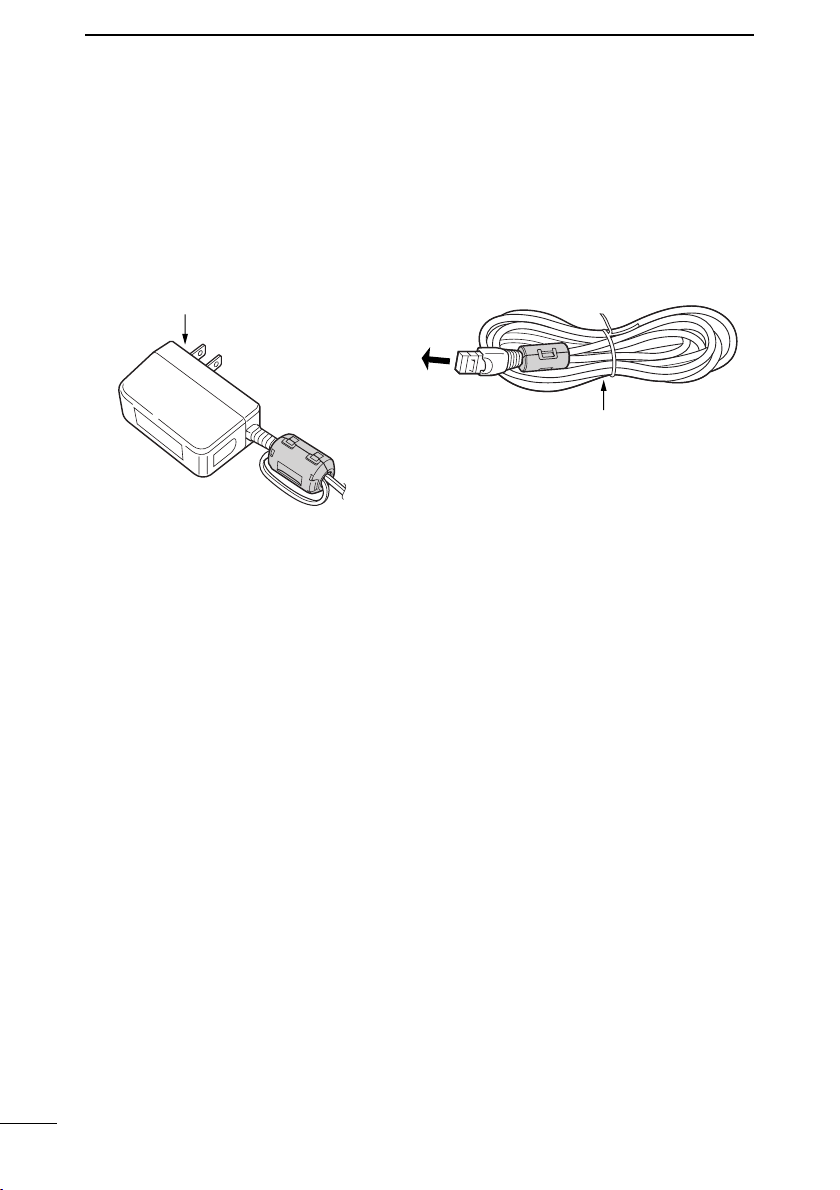
■ To avoid interference
Do not detach the ferrite core from both the AC adapter and the Ethernet cable.
Otherwise interference may occur when you use these items without the ferrite
core.
DD
AC adapter
DD
Ethernet cable
6
Page 21
BEFORE INSTALLATION
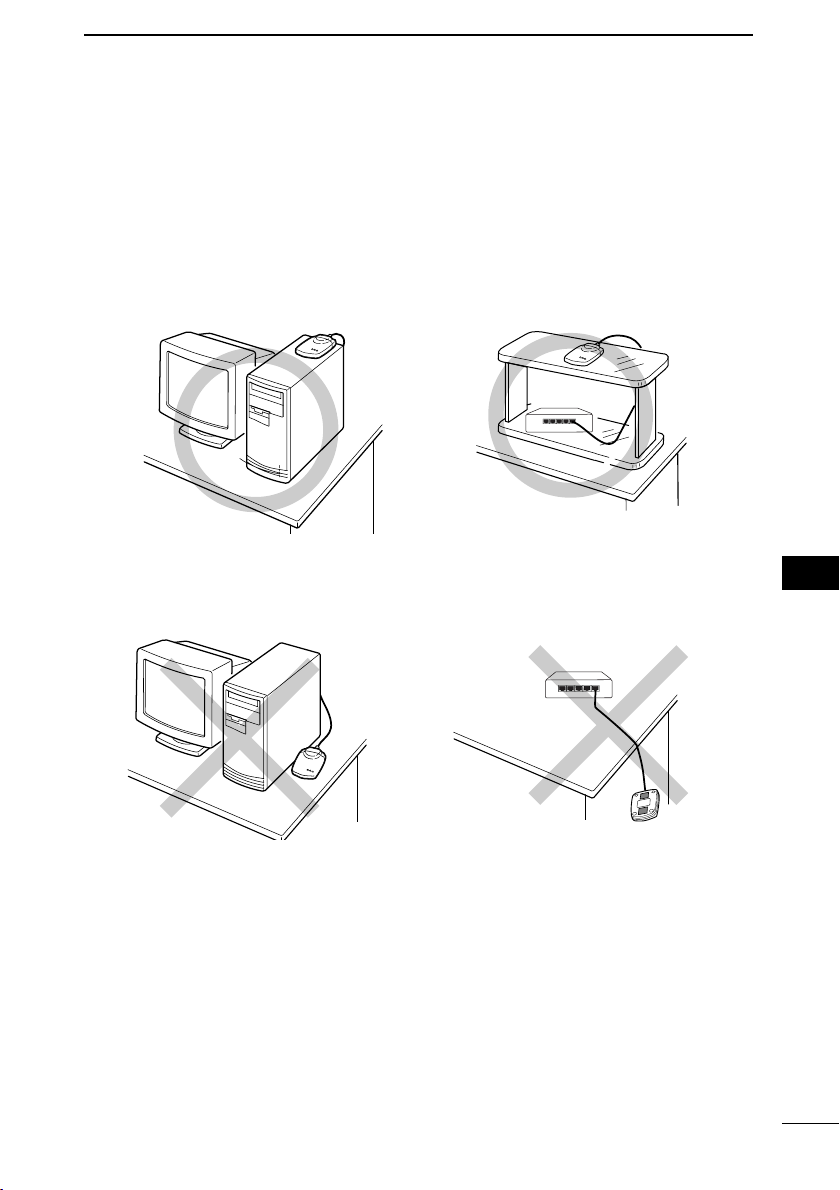
On a desktop PC
On a shelf
Do not install behind objects
Do not install with the unit dangling down
1
1-4 Installation location
The transmission range and speed may change according to the installation location.
Installing the AP-12 in wide, open air with clear line of sight (example; a high place)
is recommended.
Approximate operating range at 11 Mbps speed is 30 m (98 ft) for indoor operation.
■ Examples of recommended installation
■ Examples of installation not recommended.
(Transmission range and speed may decrease)
■ Installation precautions
Select a location as high as possible to keep a clear line of sight.
Install on a stable, flat surface without a slant, and no vibrations as the unit may fall.
Please be reminded of the following points for installation.
• NEVER put anything on the AP-12, nor stack the AP-12s on top of each other.
• Floors generally have steel girders and are installed with metal fire protection mate-
rial. Consequently, communication between different floors is often not possible.
• The transmission range is the widest in an open space. However, the signal may
be reflected from large metal walls in such a location as a warehouse.
• Radio signals will pass through walls and glass but not through metal. Concrete
walls may be reinforced with steel or other metal material that will block the signal.
1
7
Page 22
BEFORE INSTALLATION
Expansion slotEthernet card
Ethernet card
PC card slot
1
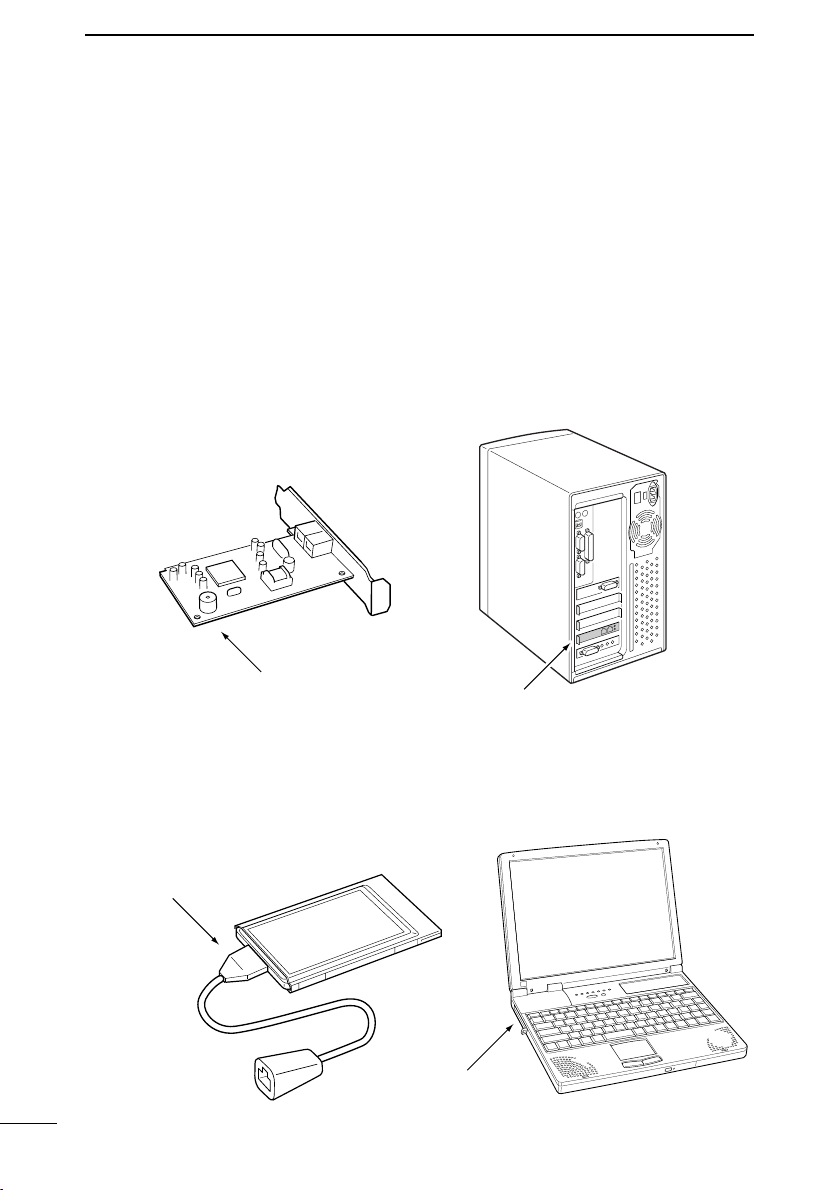
1-5 About the Ethernet card
An Ethernet port is necessary in your PC for set up.
Check that an Ethernet port is available with your PC before setting up.
• If no Ethernet port is available, purchase a suitable Ethernet card separately
according to the slot type.
■ Desktop PC
Install the Ethernet card into an expansion slot.
Several types of expansion slots are available, such as PCI, ISA, etc.
Therefore, check the vacant expansion slot type before purchasing the Ethernet
card.
■ Notebook PC
Install the Ethernet PC card into the PC card slot.
Check the Ethernet PC card type in the specifications of the PC card slot before
installing.
8
Page 23

OBTAINING AN IP ADDRESS
Chapter 2
FROM THE DHCP SERVER
This chapter describes setting instructions when setting up the AP-12’s IP address via the
DHCP server (default setting in “IP Configuration”).
See Chapter 3 when using the fixed IP address for the AP-12 or return to the default set-
ting.
2-1 Connecting to a LAN ………………………………………………………………10
2-2 Installing [AP-12 Manager] ………………………………………………………11
2-3 Starting [AP-12 Manager] …………………………………………………………13
■ [AP-12 Manager] Settings Screen ………………………………………………14
Page 24
OBTAINING AN IP ADDRESS FROM THE DHCP SERVER
Connect to the LAN
with a DHCP server,
such as a router type
modem.
Server:192.168.1.1
Automatically assigned range
AP-12
192.168.1.10
192.168.1.11
192.168.1.10 to 192.168.1.15
192.168.1.12
HUB
=
Cross Port
Patch cable (supplied)
AP-12
××
×
×
When connecting to the broadband router,
connect the Ethernet cable from the AP-12
to the [LAN] port of the router.
Ferrite core
2
2-1 Connecting to a LAN
This section enables a DHCP server to assigns an IP address automatically.
[Procedure]
q Connect the AP-12 and LAN with the supplied patch cable.
w Connect the AC adapter to the AC outlet to turn the AP-12 power ON.
• POWER indicator and wired LAN indicator on the top panel lights.
• Wireless LAN transmission indicator on the top panel flashes.
DD
About DHCP server detection
The AP-12 searches the DHCP server automatically to connect with a wired LAN
in which the DHCP server exists in. When no DHCP server is found within 30 sec.
(approx.) from power ON, the default IP address is used for the AP-12.
The default IP address is “192.168.0.1”. However, when a DHCP server is found in
the network, the AP-12 use the IP address obtained from the server.
Once the AP-12 power is turned OFF, then ON again, the AP-12 starts searching
for the DHCP server for 30 sec. (approx.) again.
10
Page 25
OBTAINING AN IP ADDRESS FROM THE DHCP SERVER
2
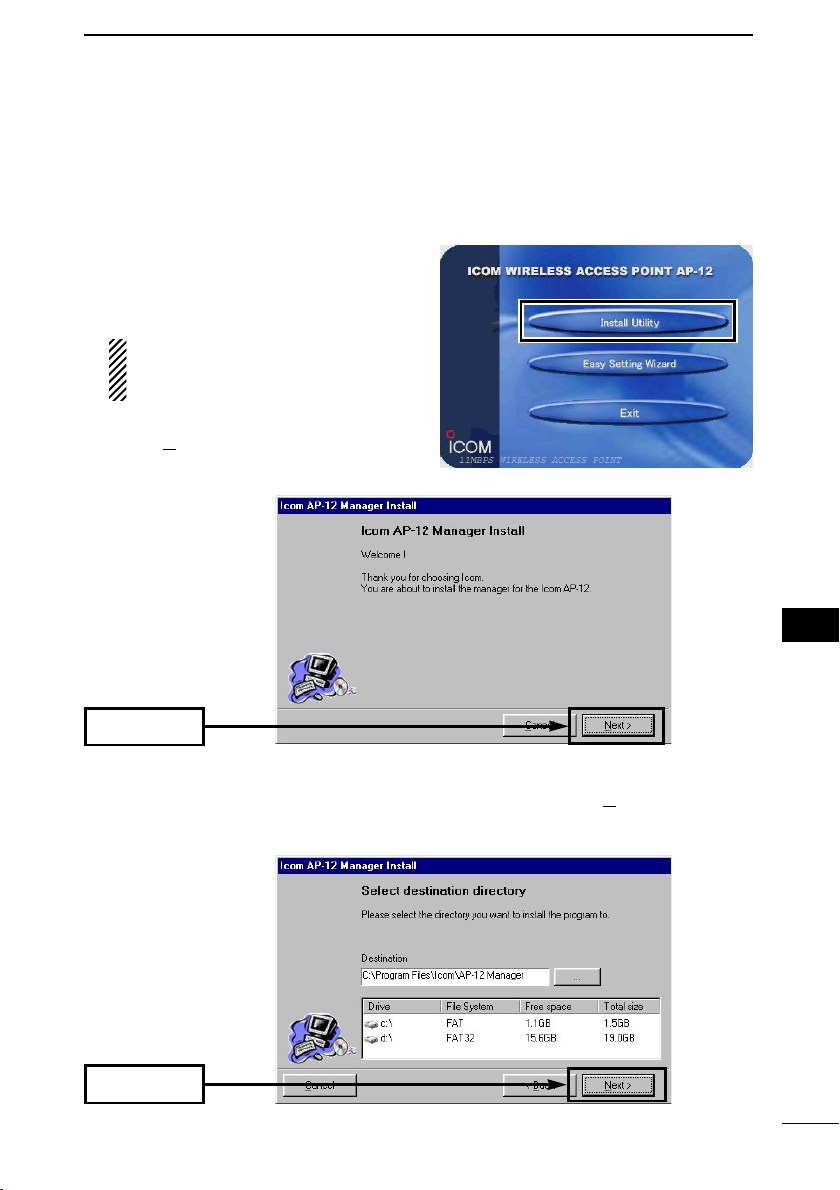
2-2 Installing [AP-12 Manager]
When installing into a Windows XP or Windows 2000 environment, log on as the
administrator.
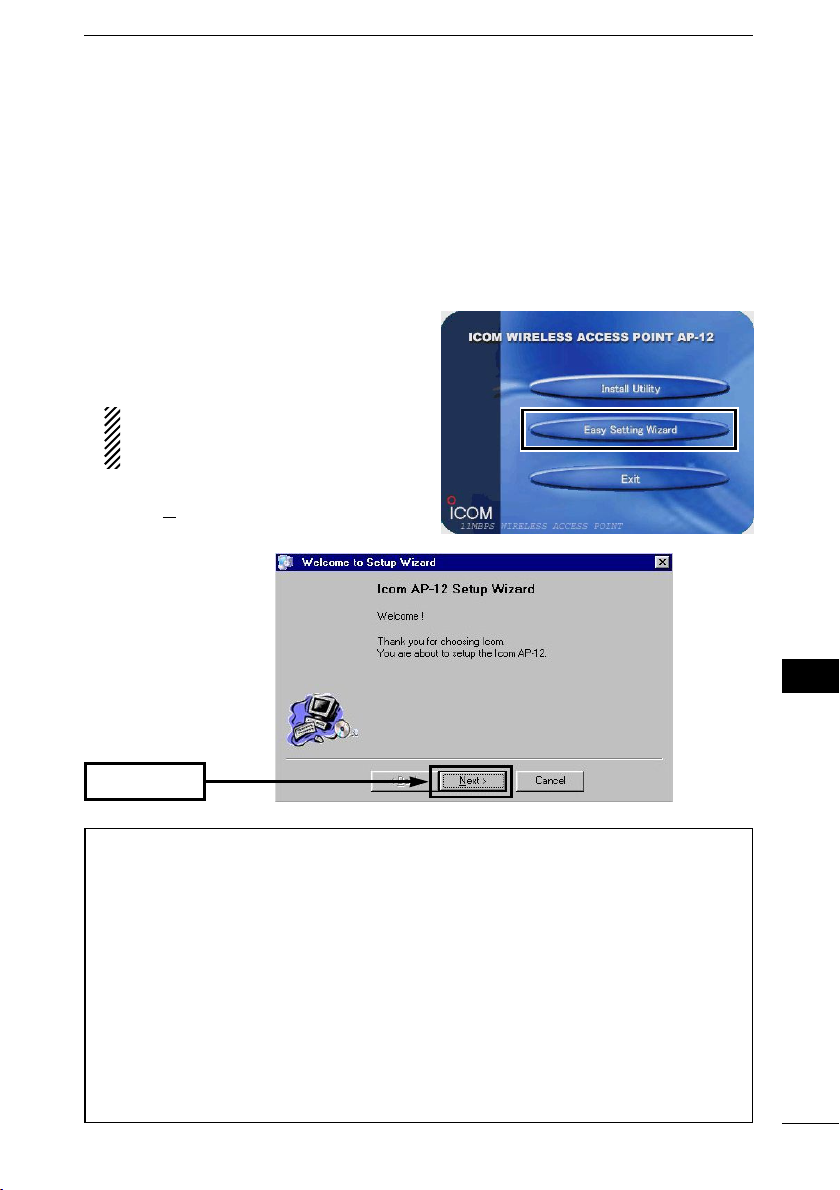
q Quit all applications when Windows is running.
w Insert the CD into the CD-ROM drive.
The Auto Run function will be activated
and the main menu will appear on the
screen as at right.
If the main menu does not appear,
double-click the “AutoRun.exe” contained in the CD.
e Click [Install Utility].
r Click <N
ext>.
2
Click
t Verify the directory in which you want to install to, then click <Next>.
• Click <…> and select the desired directory, if necessary.
Click
11
Page 26
OBTAINING AN IP ADDRESS FROM THE DHCP SERVER
2
2-2 Installing [AP-12 Manager] (continued)
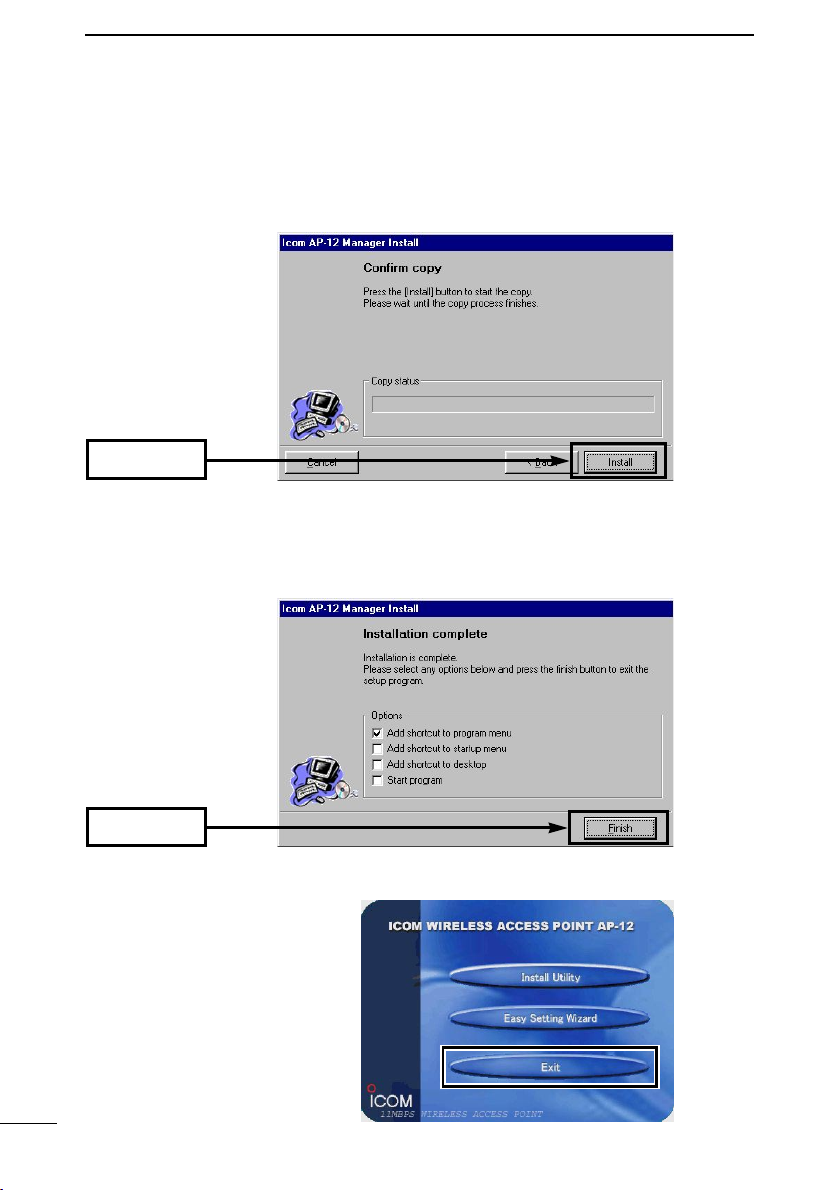
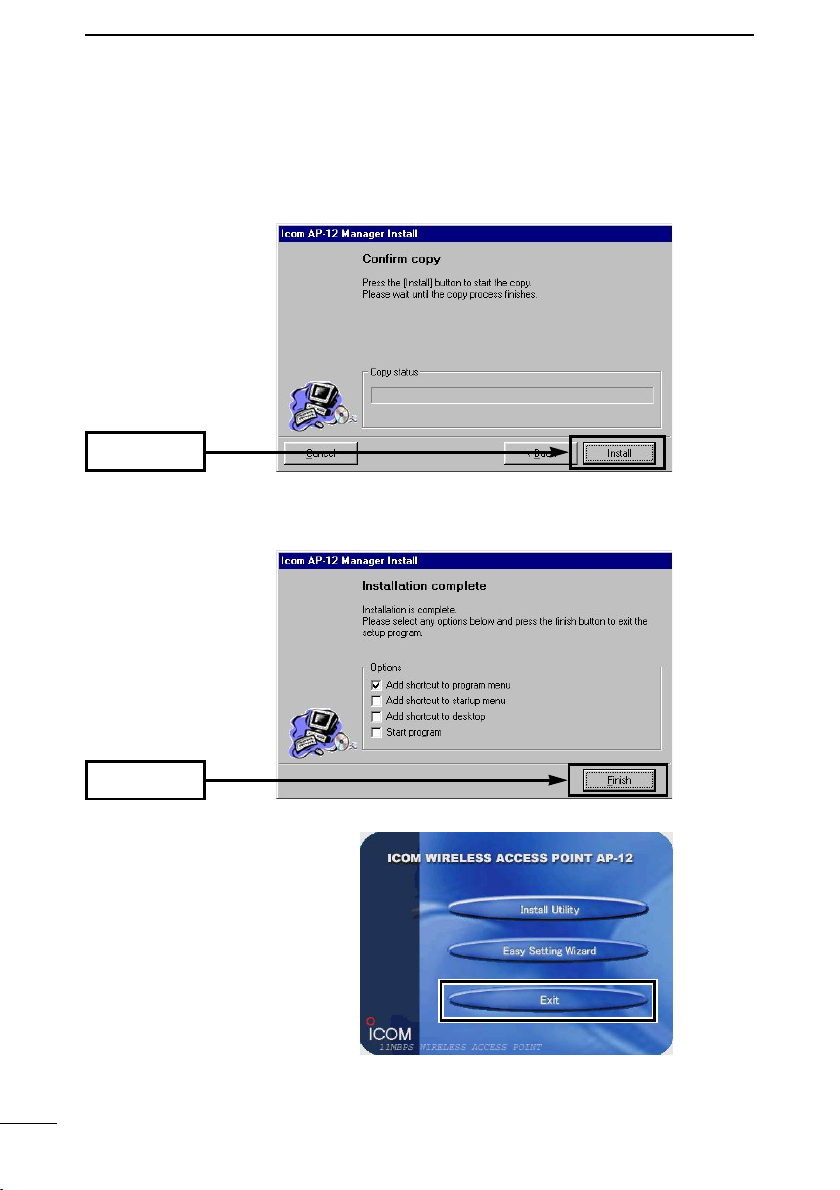
y When the dialog “Create new directory?” appears, click <OK>.
u Click <Install>.
Click
i Click <Finish>.
• The installation is now completed.
Click
o Click <Exit> to close the main
menu.
12
Page 27
OBTAINING AN IP ADDRESS FROM THE DHCP SERVER
2
2-3 Starting [AP-12 Manager]
This section describes about the verification of the IP address obtained, using the
[AP-12 Manager].
• Supposing that the connection between the LAN and AP-12 has already been done
in this section.
• Quit [Easy Setting Wizard] when it is running.
[Procedure]
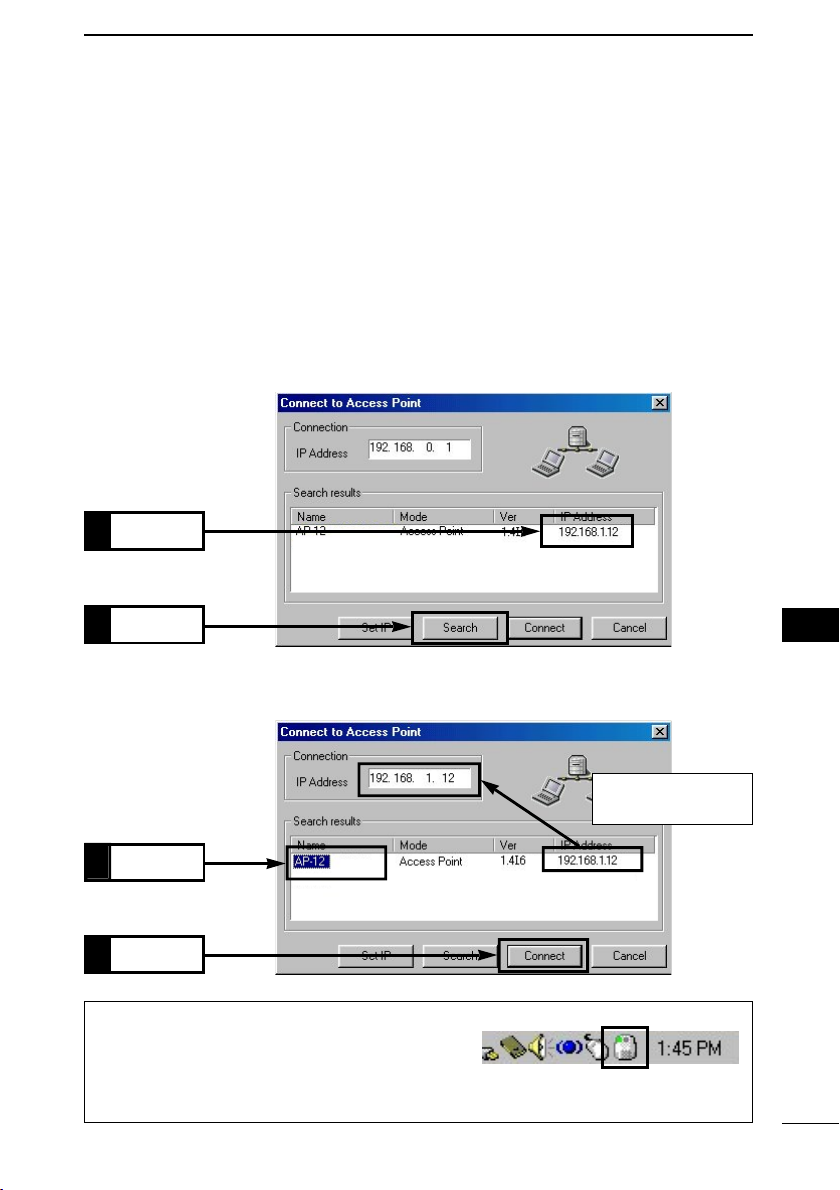
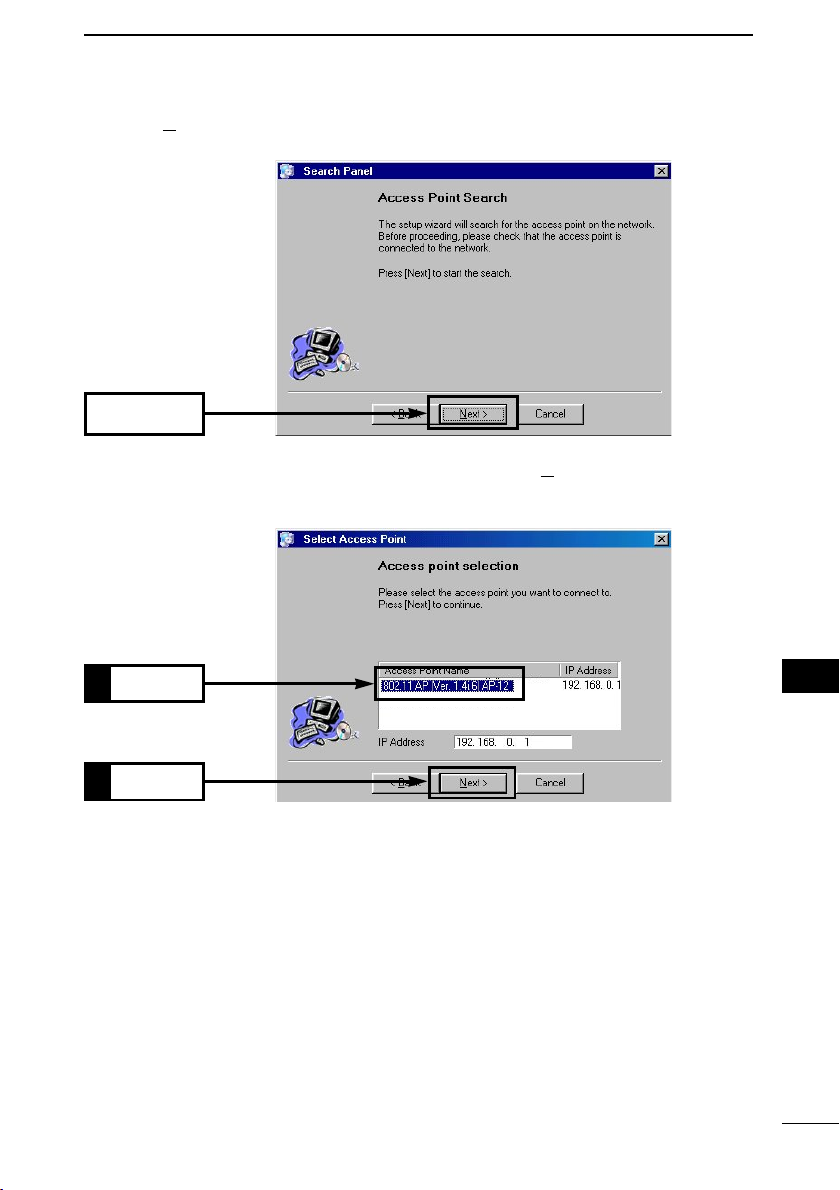
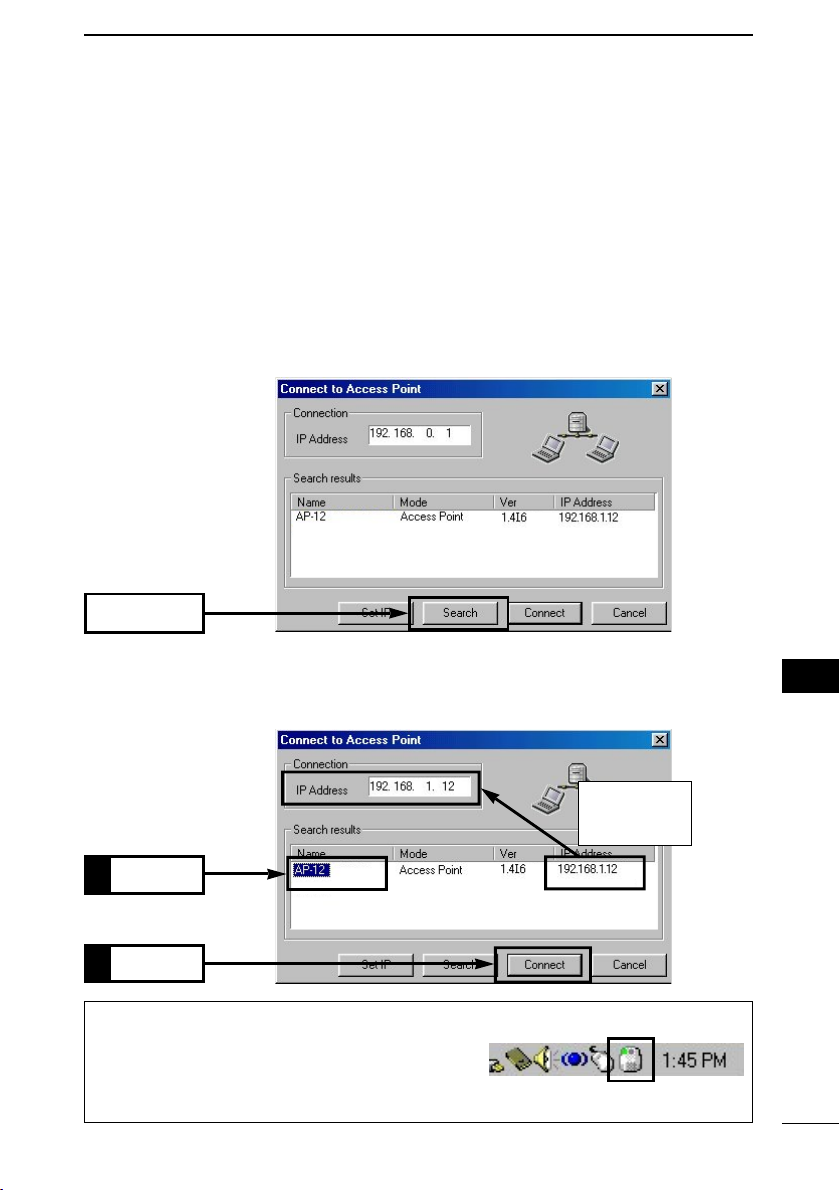
q Click <Start> and select [AP-12 Manager] from the [Program menu].
w Click <Search>, then verify the IP address obtained.
• When no IP address is displayed, click <Search> again.
Verify
2.
Click
1.
2
e Click the desired access point name and then click <Connect>.
• [AP-12 Manager] Setting screen (p. 14) appears on the screen.
Displays the connected
AP-12’s IP address
1.
Click
Click
2.
About AP-12 icon:
An icon is displayed on the task bar while the
[AP-12 Manager] is activated.
Right-click the icon and select “Connect to access point” from the menu to open the
[AP-12 Manager] setting screen.
13
Page 28
OBTAINING AN IP ADDRESS FROM THE DHCP SERVER
2
2-3 Starting [AP-12 Manager] (continued)
■ [AP-12 Manager] Setting Screen
After installing [AP-12 Manager], the following screen appears first.
q to r are common buttons in the [AP-12 Manager] screen.
wq e r
q <Restore default>
Restores all the contents of the
screen to the default settings.
The AP-12 searches the DHCP server and sets an IP address obtained
from the server.
See Chapter 3 to restore completely.
w <OK>
Registers the value or condition of all
contents in the screen to the AP-12
and closes the screen.
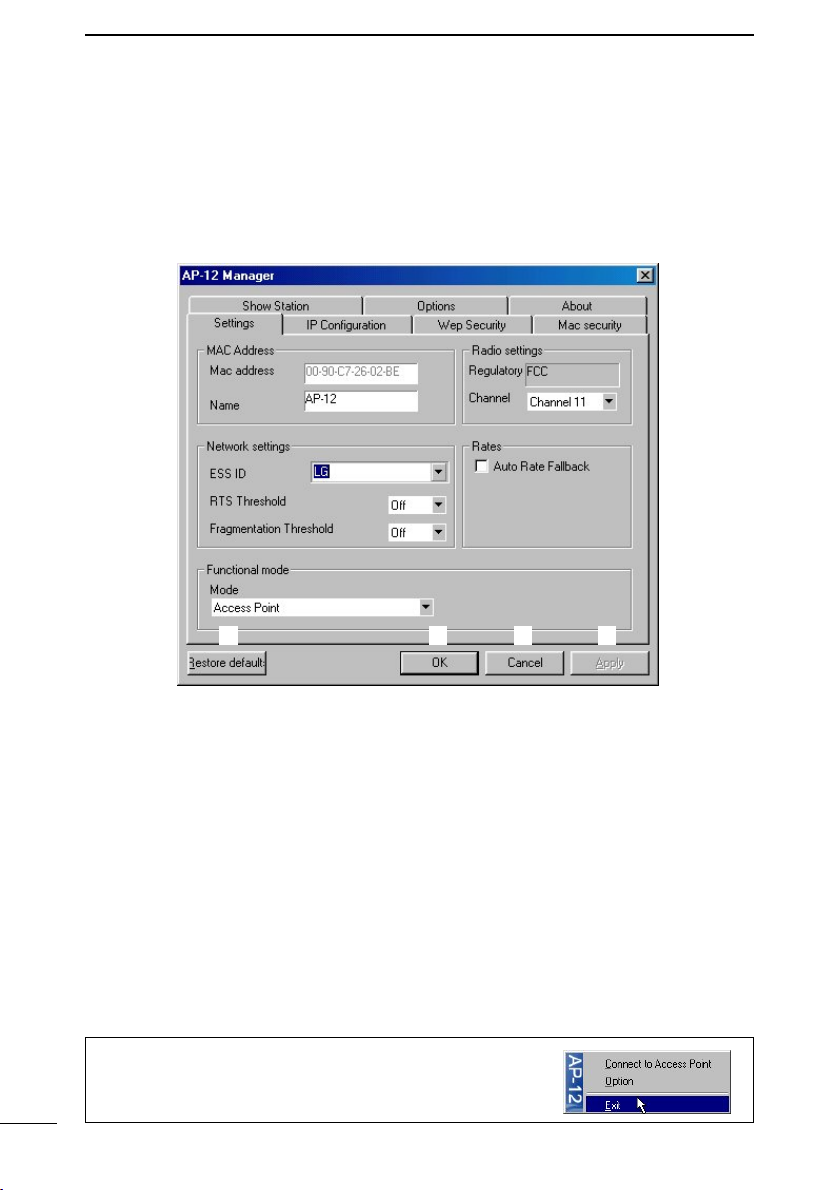
To exit [AP-12 Manager]
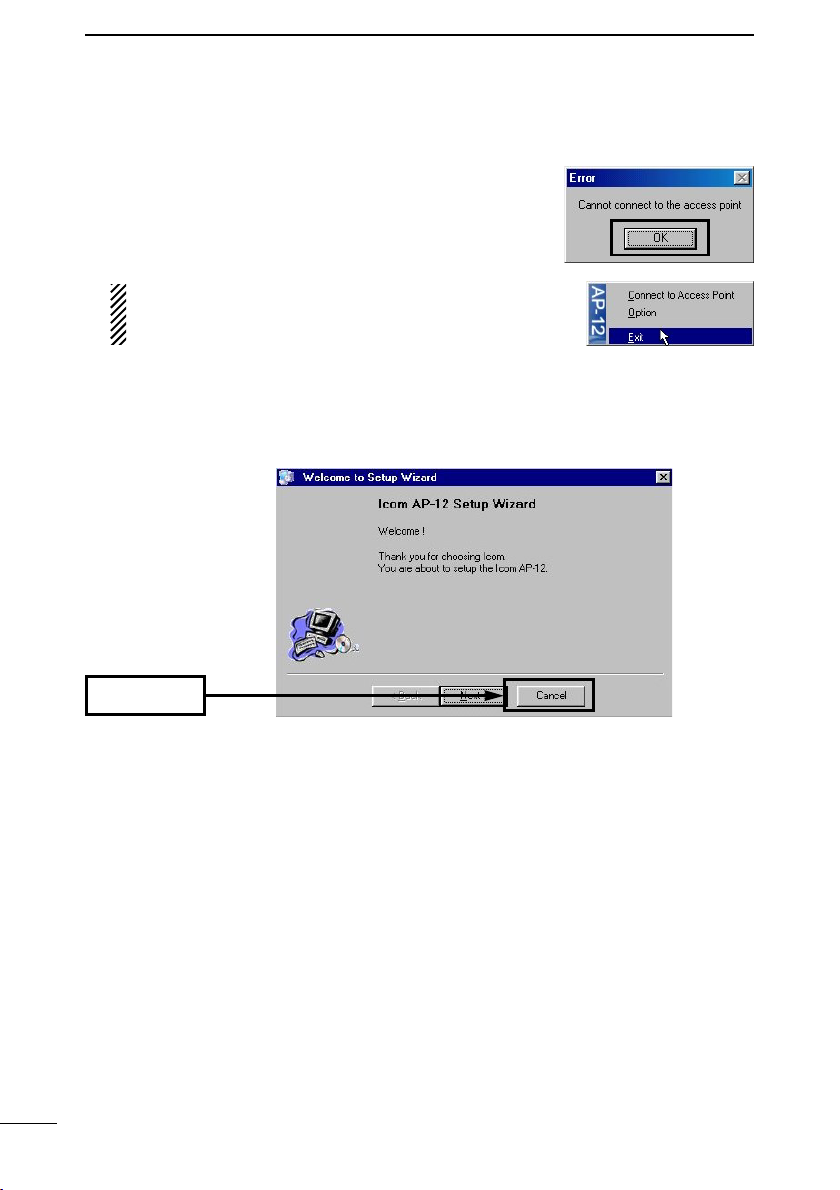
Move the cursor on the icon in the task bar then right-click.
Select “Exit” in the menu that appears.
14
e <Cancel>
Cancels the value or condition of all
contents registration in the screen
and closes the screen.
r <Apply>
Registers the value or condition of all
contents in the screen only. The
screen is kept open.
Page 29

FIXED IP ADDRESS
Chapter 3
SETTING
This chapter describes how to set the fixed IP address to the AP-12 or restore to the
default setting.
3-1 Connecting to the PC………………………………………………………………16
3-2 Using [Easy Setting Wizard] ……………………………………………………17
3-3 Installing [AP-12 Manager] ………………………………………………………25
3-4 Starting [AP-12 Manager] …………………………………………………………27
■ [AP-12 Manager] Settings screen ………………………………………………29
Page 30
FIXED IP ADDRESS SETTING
AP-12
R
AC adapter
(supplied)
Ferrite core (supplied)
Ferrite core (supplied)
AC outlet
Ethernet cross
cable (supplied)
Ethernet port
DC jack
3
3-1 Connecting to the PC
[Procedure]
q Connect the AP-12 and the PC with the supplied crossover cable.
• Use the supplied patch cable (3 m: 9.8 ft) when connecting the AP-12 and the
PC via a HUB.
NOTE: DISCONNECT THE PC FROM THE EXISTING LAN.
When the PC is connected to the existing LAN, the AP-12 searches the DHCP
server and uses the IP address obtained from the server according to the
default setting.
w Connect the supplied AC adapter to the AP-12 and an AC outlet.
• The Power indicator lights.
• The wireless LAN indicator flashes.
e Start up the PC.
• The wired LAN indicator on the top panel lights.
Check the Ethernet cable if the wired LAN indicator does not light.
16
Page 31
FIXED IP ADDRESS SETTING
3
3-2 Using [Easy Setting Wizard]
Changing the PC’s IP address is necessary using [Easy Setting Wizard] when setting up the AP-12. [Easy Setting Wizard] is contained in the utility CD and it allows
easy setting for changing the IP address.
[Procedure]
q Quit all applications when Windows is running.
w Insert the CD into the CD-ROM drive.
The Auto Run function will be activated
and the main menu will appear on the
screen as at right.
If the main menu does not appear,
double-click the “AutoRun.exe” contained in the CD.
e Click [Easy Setting Wizard].
r Click <N
ext>.
Click
DD
About [Easy Setting Wizard]
[Easy Setting Wizard] enables the PC
to access the AP-12 temporarily without changing the PC’s IP address.
The wizard searches for both the AP12 and PC’s address settings automatically.
When the PC is unable to access to the
AP-12, the wizard assigns a tentative
IP address to the PC.
3
The original IP address remains, therefore, the PC can be used in the previous setting condition after the AP-12
set-up.
• [Easy Setting Wizard] can be started
up from the supplied CD drive only.
(Unable to install.)
• When a new network is built, the IP
address of the PC using the AP-12,
must be changed.
Refer to Chapter 6 (p. 51) for details.
17
Page 32
FIXED IP ADDRESS SETTING
3
3-2 Using [Easy Setting Wizard] (continued)
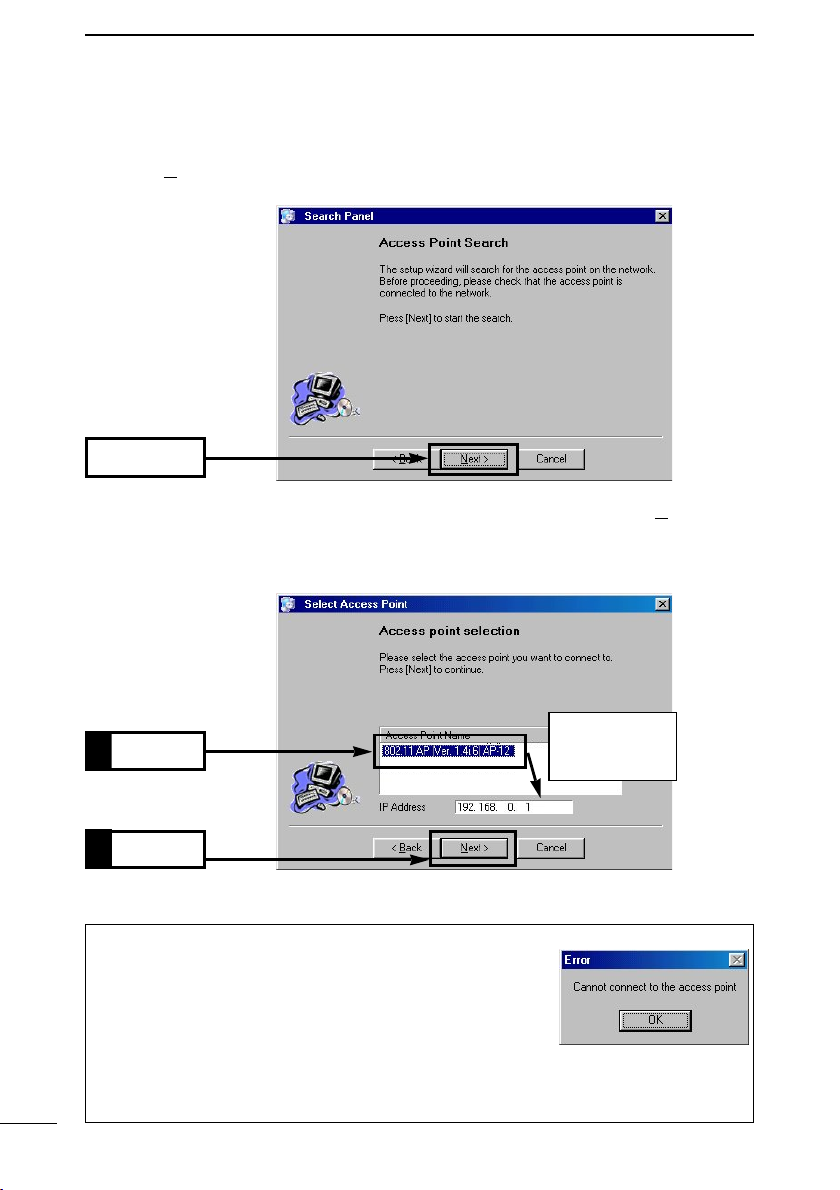
t Click <N
ext> to start searching the AP-12.
Click
y Click the desired access point name you want to set up, then click <Next>.
• The default IP address is [192.168.0.1]. However, once the AP-12 has been connected to a LAN with a DHCP server, a different IP address may be obtained.
The IP address
Click1.
of the AP-12 appears.
2.
Click
When no access point is found:
When the error dialog “Cannot connect to the access
point” appears after approx. 30 sec.
➥ Check the connection between the AP-12 and the PC.
(p. 16)
➥ The network part may be different between the AP-12 and the PC in case the
access point has been used with the fixed IP address. Refer the Chapter 7-4 (p.
61) in such a case.
18
Page 33
FIXED IP ADDRESS SETTING
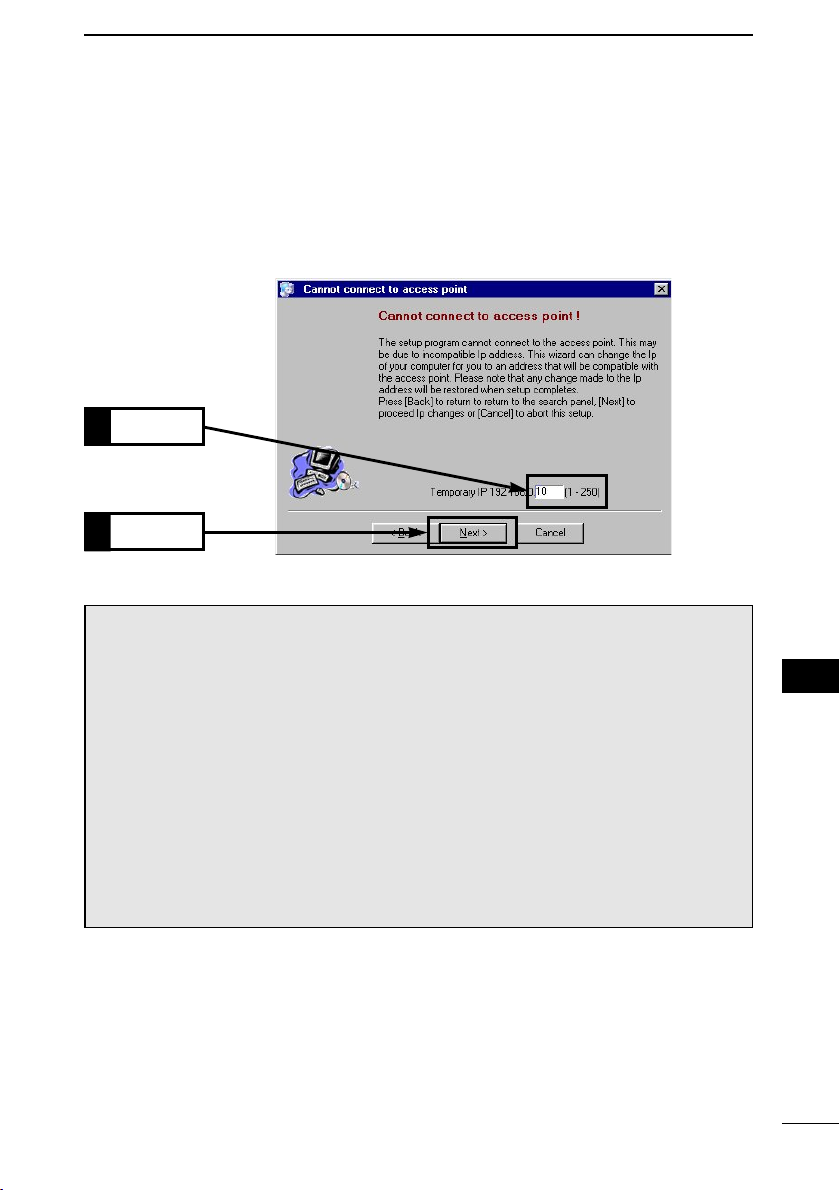
u When the PC cannot access the AP-12 due to a network address difference
between them, the following screen appears.
Enter the desired unique host address for the PC, then click <Next>.
• When the PC can access the AP-12, the screen described in step !2 appears.
• The default IP address of the AP-12 is “192.168.0.1”.
• Enter a value other than “1” in the address box.
Enter
1.
Click
2.
DD
About IP Address
The IP addresses consist of two elements, network part and host address.
For example, “192.168.0.1” (default IP
address of the AP-12; class C) has
the network part “192.168.0” and host
address “1”. Network devices, such as
the PC, with the same network part
are recognized in the same network,
and the each device is distinguished
by the host address. Pay attention to
the notes at right when obtaining IP
addresses.
• Assign the same network to the all
network devices in the same group.
• Assign an unique host address for
each device in the same group.
• NEVER assign a “network address”
(host address is 0 or starting from 0.)
• NEVER assign a “broadcast address”
(host address is 255).
3
3
19
Page 34
FIXED IP ADDRESS SETTING
3
3-2 Using [Easy Setting Wizard] (continued)
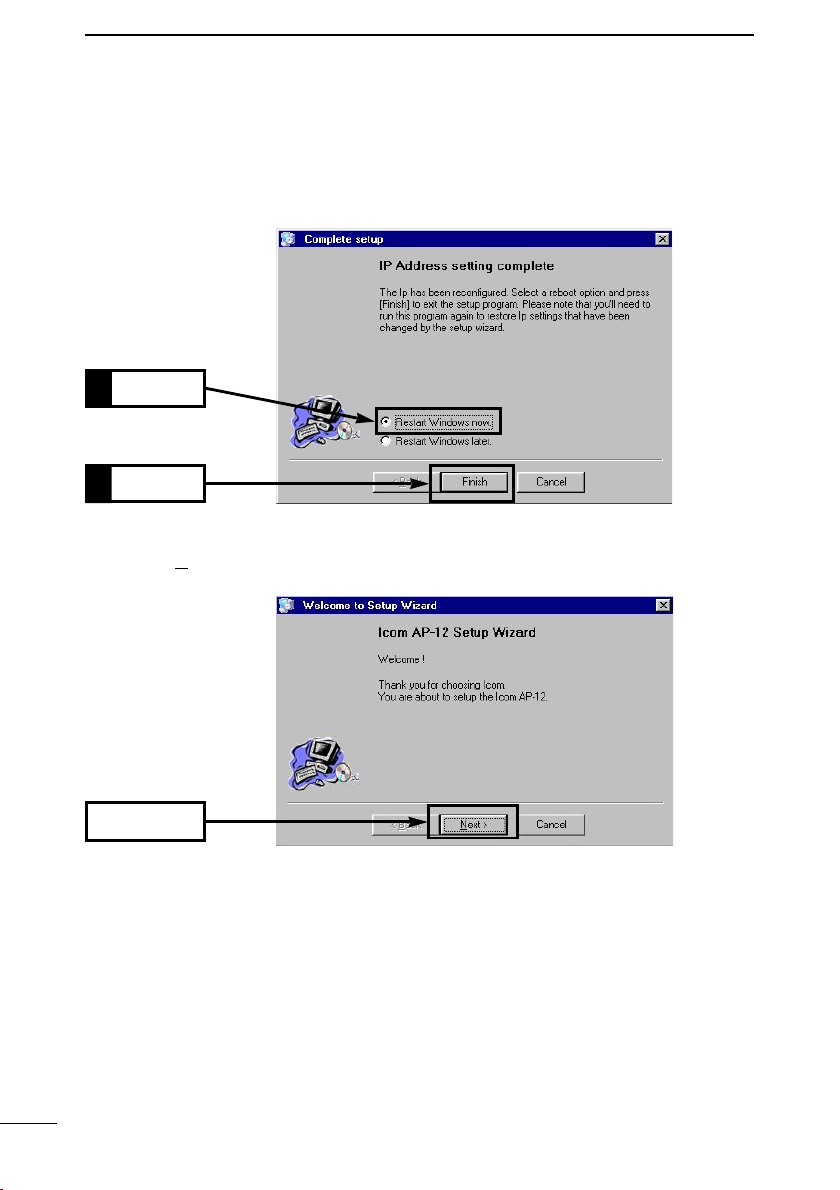
i Select [Restart Windows now] and click <Finish>.
• The PC will restart.
Click
1.
Click
2.
o [Easy Setting Wizard] will restart automatically.
• Click <N
ext>.
20
Click
Page 35
FIXED IP ADDRESS SETTING
3
!0 Click <N
ext>.
Click
!1 Click the access point, selected in step u, and click <Next>.
• The default IP address of the AP-12 is “192.168.0.1”.
Click
1.
3
2.
Click
21
Page 36
FIXED IP ADDRESS SETTING
3
3-2 Using [Easy Setting Wizard] (continued)
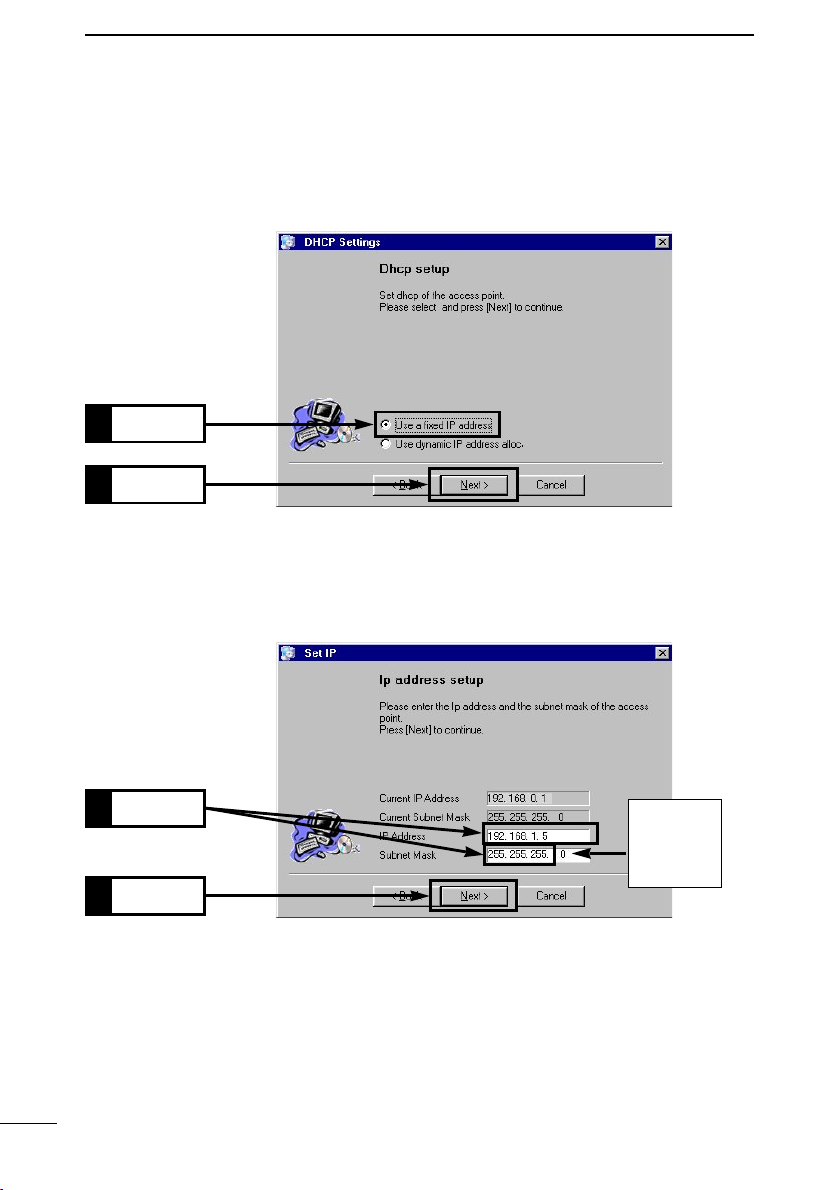
!2 Select [Use a fixed IP address] and click <Next>.
• The screen in step !4 appears when [Use dynamic IP address alloc] is selected.
Select
1.
Click
2.
!3 Enter the IP address and subnet mask for the AP-12.
• The network part must be the same as the PC IP address, and the host address
must be different from the other devices.
• Click <Next>.
22
1.
2.
Enter
Click
The end of
Subnet Mask
can not be
changed.
Page 37
FIXED IP ADDRESS SETTING
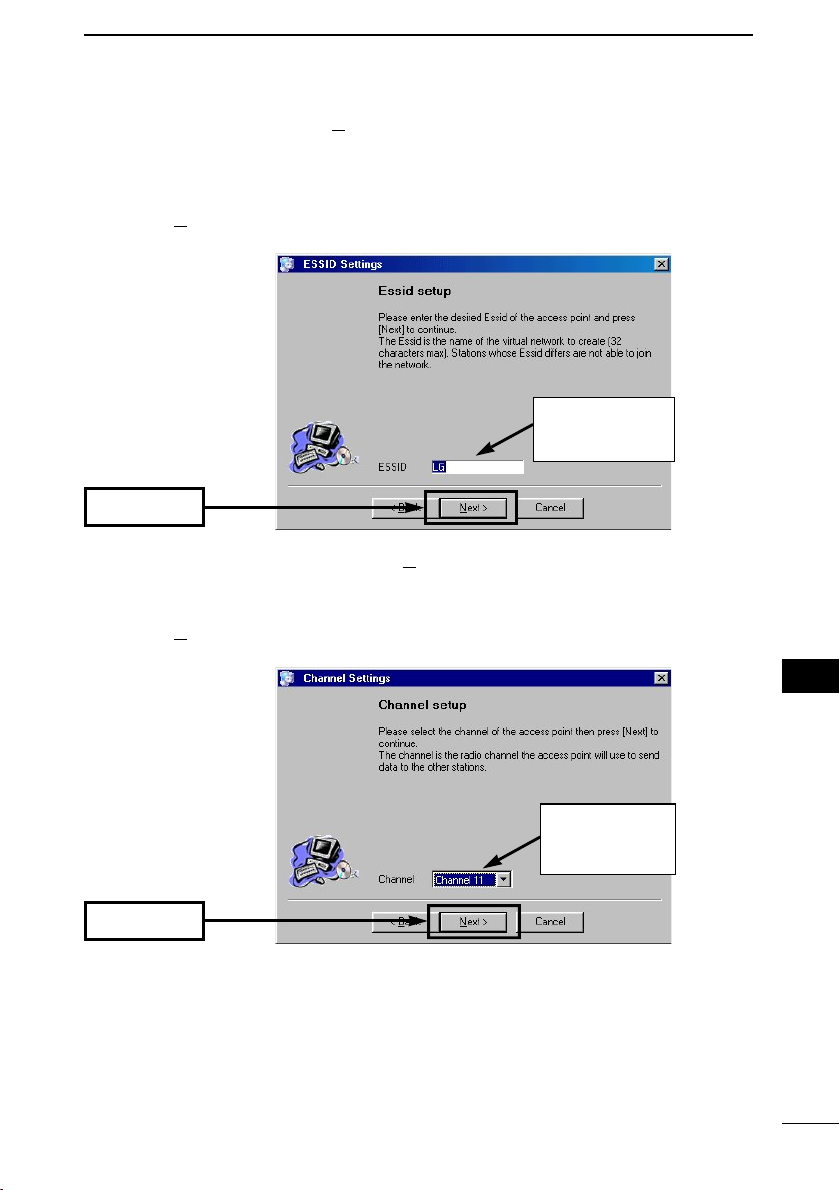
!4 Set the ESS ID, then click <Next>.
The default ID (LG) is used in this example.
• The AP-12 can communicate with the unit in which the same ESS ID as the AP-
12 and wireless LAN card is set.
• Click <N
ext> without changing the ESS ID, if desired.
The ESS ID is
changeable later.
See p. 33 for details.
Click
3
!5 Set the channel number, then click <N
The default channel (11) is used in this example.
• The same channel should be selected for the Bridge A or C operation.
• Click <N
ext> without changing the channel, if desired.
ext>.
The Channel is
changeable later.
See p. 33 for details.
Click
3
23
Page 38
FIXED IP ADDRESS SETTING
3
3-2 Using [Easy Setting Wizard] (continued)
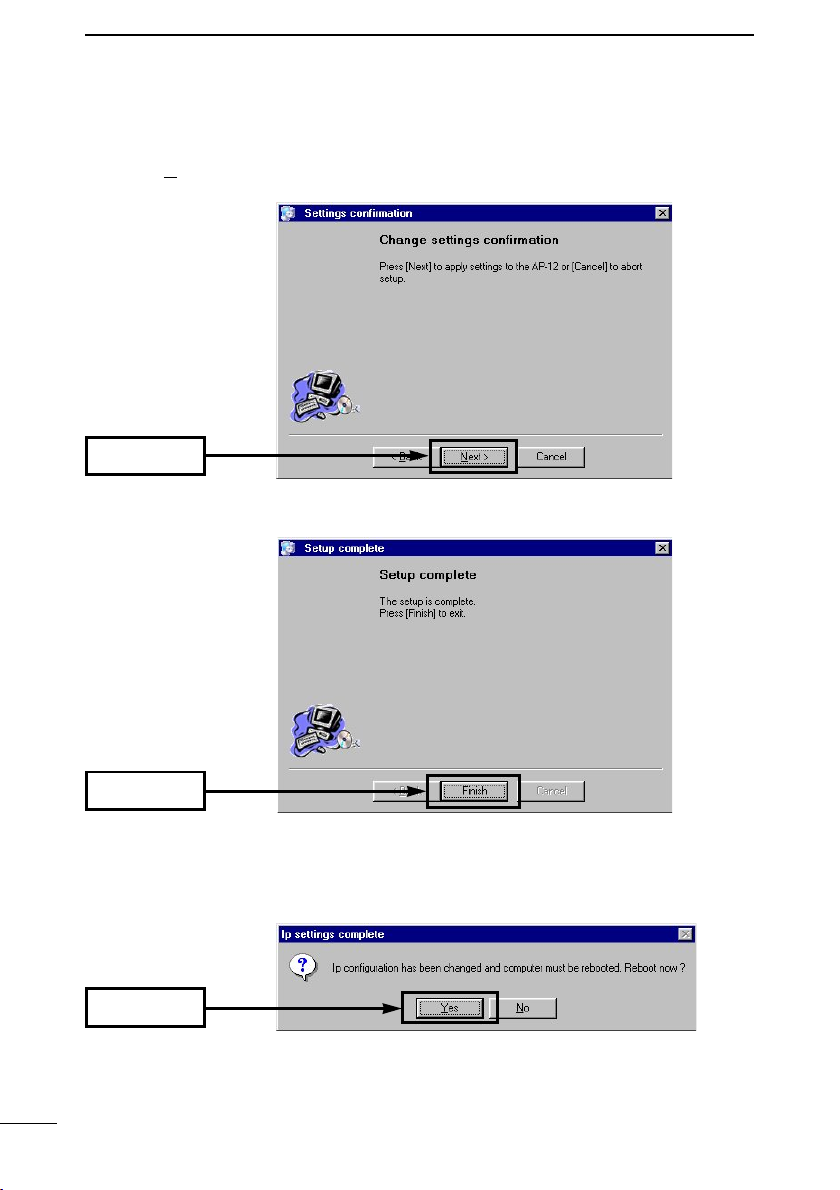
!6 Click <N
ext> to apply the settings to the AP-12.
Click
!7 Click <Finish>.
Click
!8 When the dialog “Reboot now?” appears on the screen, click <Yes>.
• When the PC can be connected to the AP-12 in step u, this dialog does not
appear on the screen.
Click
!9 The PC reboots.
• After rebooting, the original IP address remains when a tentative IP address is
assigned in step u.
24
Page 39
FIXED IP ADDRESS SETTING
3
3-3 Installing [AP-12 Manager]
This section describes the settings utility, [AP-12 Manager], installation.
[Procedure]
When installing into Windows XP or Windows 2000 environment, log on as the administrator.
q Quit all applications when Windows is
running.
w Insert the CD into the CD-ROM drive.
The Auto Run function will be activated
and the main menu will appear on the
screen as at right.
If the main menu does not appear,
double-click the “AutoRun.exe” contained in the CD.
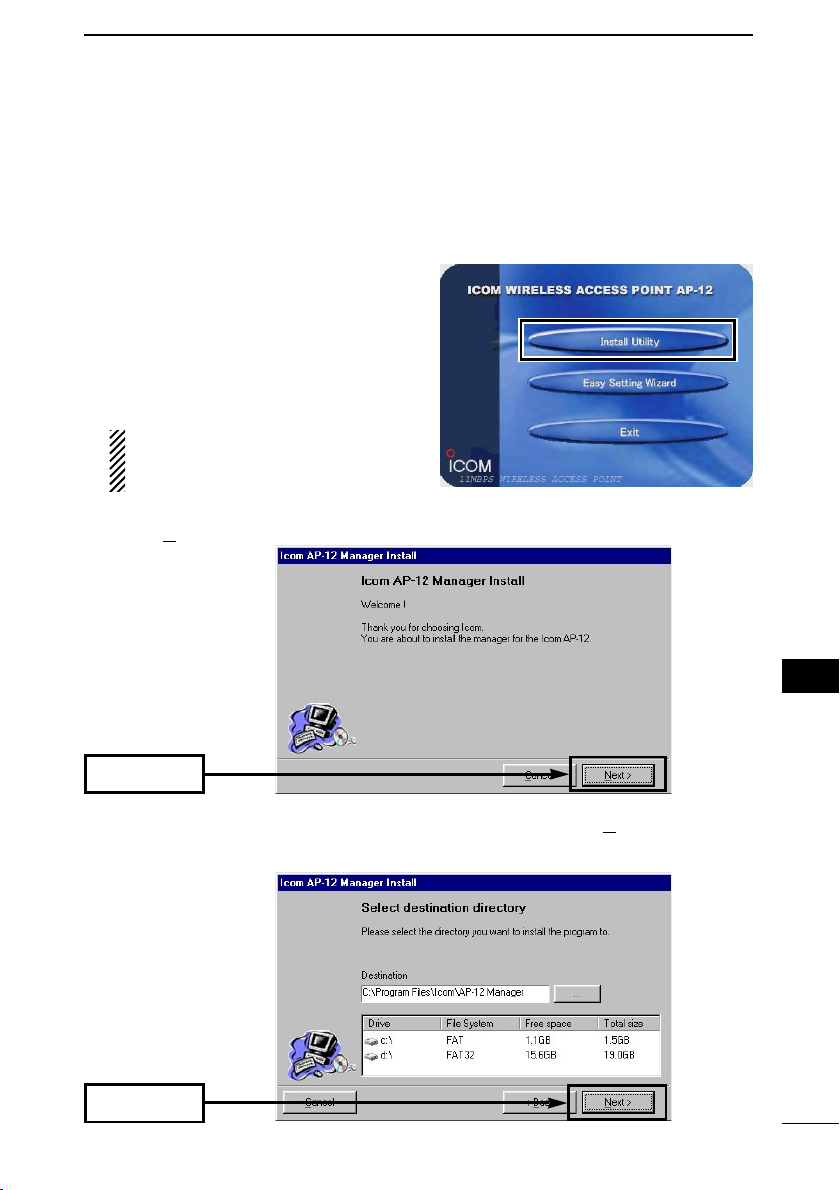
e Click [Install Utility].
r Click <N
ext>.
Click
t Verify the directory in which you want to install to, then click <Next>.
• Click <…> and select the desired directory, if necessary.
Click
3
25
Page 40
FIXED IP ADDRESS SETTING
3
3-3 Installing [AP-12 Manager] (continued)
y When the dialog “Create New Directory” appears, click <OK>.
u Click <Install>.
Click
i Click <Finish>.
• The installation is now completed.
Click
o Click <Exit> to close the
menu.
!0 Start [AP-12 Manager].
• See next page if the AP-12
is connected to the PC.
• See Chapter 2-3 (p. 13) if
you reconnect the AP-12 to
a LAN network via a HUB.
26
Page 41
FIXED IP ADDRESS SETTING
3
3-4 Starting [AP-12 Manager]
This section describes how to start up [AP-12 Manager].
• Quit [Easy Setting Wizard] when it is running.
[Procedure]
Be sure to install [AP-12 Manager] to the PC.
q Click <Start> and select [AP-12 Manager] from the [Program menu], then click
<Search>.
• When no IP address is displayed, click <Search> again.
Click
w Click the access point name and then click <Connect>.
• [The AP-12 Manager] Settings screen (p. 29) appears on the screen.
Displays the
connected AP12’s IP address.
Click
1.
Click
2.
About AP-12 icon:
An icon is displayed on the task bar while [AP-12
Manager] is activated.
Right-click the icon and select “Connect to
access point” from the menu to open [AP-12 Manager] Settings screen.
3
27
Page 42
FIXED IP ADDRESS SETTING
3
3-4 Starting [AP-12 Manager] (continued)
e When the error dialog “Cannot connect to the access
point” appears on the screen, each AP-12 and the PC’s
network IP address may be different. In such a case,
click <OK> and close the dialog. Then, exit [AP-12
Manager].
To exit the AP-12 Manager:
Move the cursor on the icon in the task bar, then rightclick. Then select “Exit” in the menu that appears.
r Follow the steps q to i in Chapter 3-2 (p. 17) to set up
the PC again.
t The following screen appears after rebooting.
Click <Cancel>.
Click
y Follow the steps q and w in Chapter 3-4 (p. 27) to re-starting [AP-12 Manager]
again.
• [AP-12 Manager] Settings screen as in page 29 is displayed when the setting is
successful.
28
Page 43
FIXED IP ADDRESS SETTING
■ [AP-12 Manager] Settings screen
After installing [AP-12 Manager], the following screen appears first.
q to r are common buttons in the [AP-12 Manager] screen.
wq e r
3
q <Restore default>
Restores all the contents of the
screen to the default settings.
The AP-12 searches the DHCP server and sets the IP address obtained
from the server.
w <OK>
Registers the value or condition of all
contents in the screen to the AP-12
and closes the screen.
3
e <Cancel>
Cancels the value or condition of all
contents registration in the screen
and closes the screen.
r <Apply>
Registers the value or condition of all
contents in the screen only. The
screen is kept open.
29
Page 44

Page 45

AP-12 MANAGER
This chapter describes for the details of [AP-12 Manager].
See Chapter 1
according to the operating mode.
4-1 [AP-12 Manager] screen descriptions …………………………………………32
■ Settings ……………………………………………………………………………32
■ IP Configuration …………………………………………………………………36
■ MAC security ………………………………………………………………………37
■ Wep security ………………………………………………………………………38
■ Show Station ………………………………………………………………………40
■ Version Information ………………………………………………………………41
■ Options ……………………………………………………………………………42
4-2 The default settings ………………………………………………………………43
4-3 Uninstalling [AP-12 Manager] ……………………………………………………44
(p. 1) or 2 (p. 9)
for installing and starting details of [AP-12 Manager],
Chapter 4
Page 46
AP-12 MANAGER
4
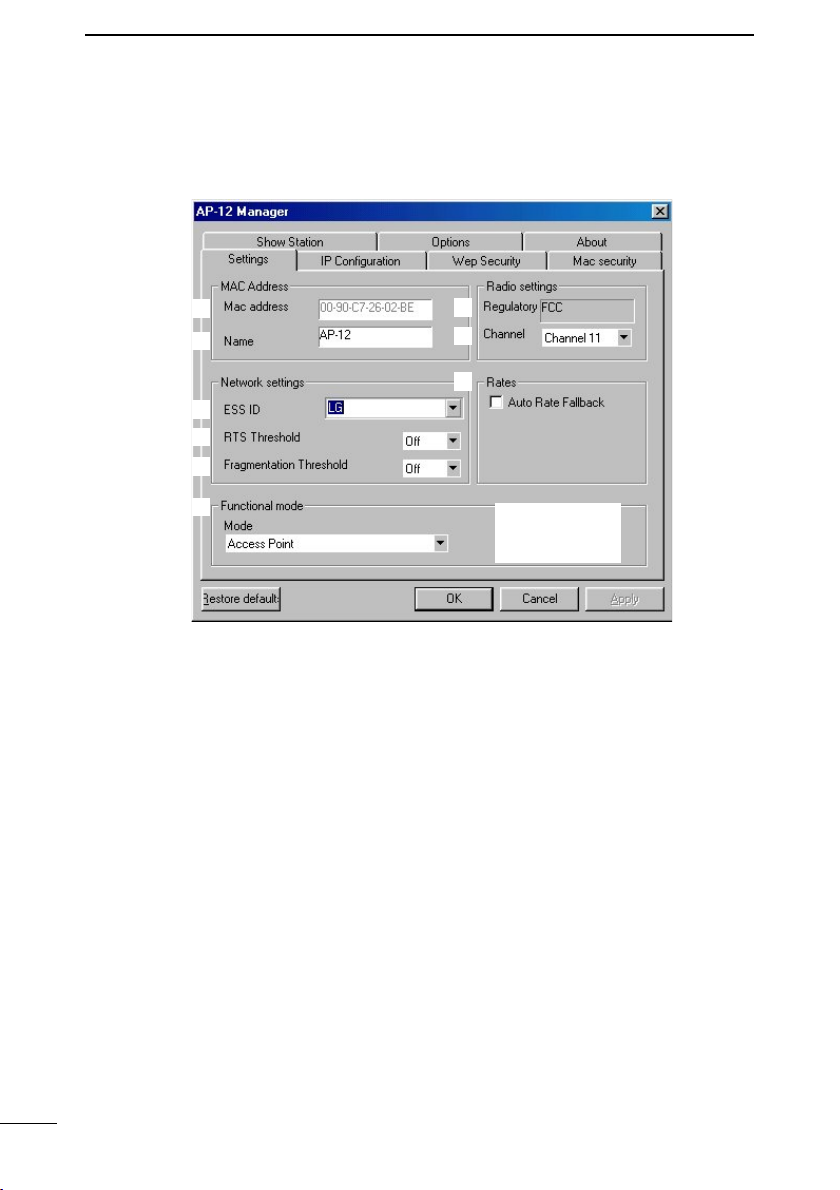
4-1 [AP-12 Manager] screen descriptions
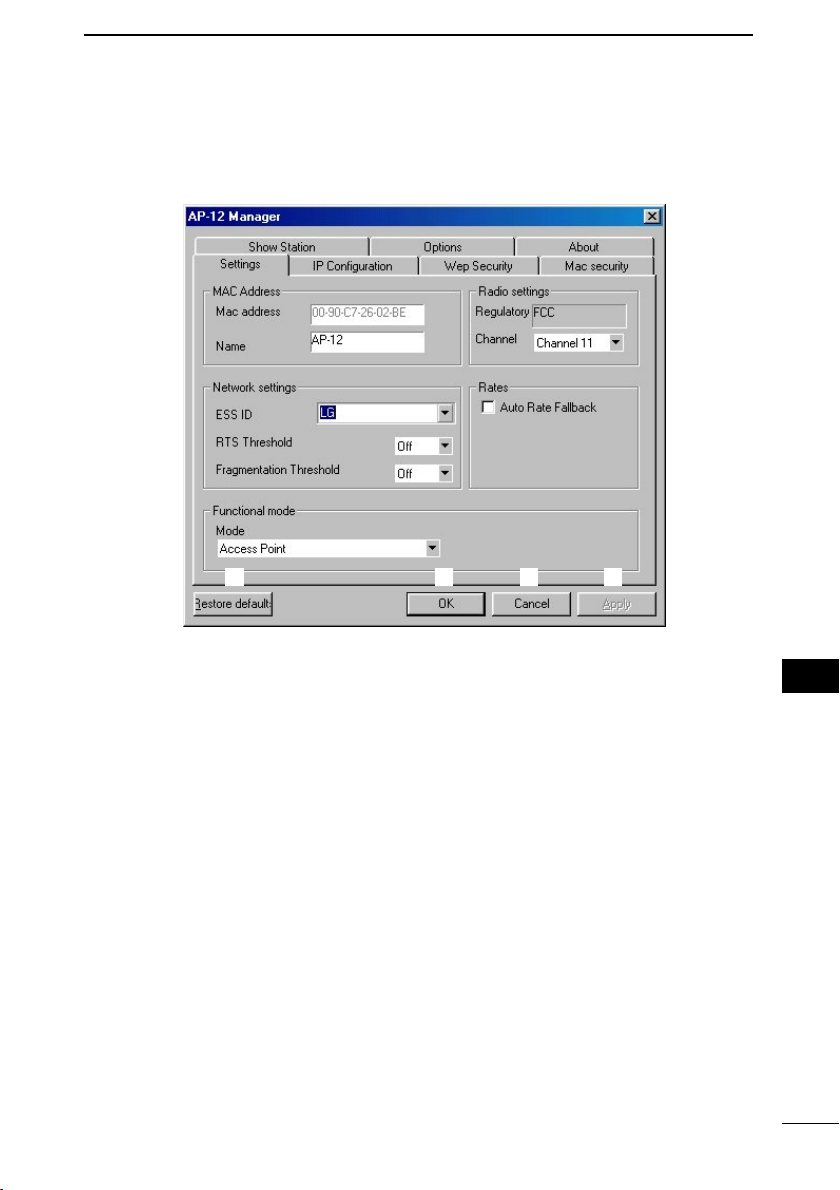
■ Settings
q
w
t
y
u
o
q MAC address………
w Name ………………
e
r
i
Click OK or Apply
to register the contents of the setting.
Shows the AP-12’s MAC address.
The address is also mentioned on the serial number
seal.
• The MAC address cannot be changed.
• The MAC address is a unique address that is
assigned to each device in the network.
Enter the desired alphanumeric name to discriminate
one AP-12 from another.
The name should be unique, and up to 29 characters
can be used.
e Regulatory …………
32
Shows the regulatory name of the AP-12.
The regulatory name cannot be changed.
Page 47

AP-12 MANAGER
4
r Channel ……………
t ESS ID ……………
y RTS Threshold ……
u Fragmentation
Threshold …………
Select the desired channel number for the wireless
communication. (default: 11)
• The same channel number should be selected with
another AP-12 when Bridge mode A or C is selected.
• Wireless LAN clients will detect the channel of the
AP-12 automatically and select it by themselves in
Bridge mode B operation.
Enter the desired ID for wireless network groups.
Up to 32 alphanumeric characters (case sensitive) can
be entered (default: LG).
• The ID entering is not possible when Bridge mode A
or C is selected in o Functional mode.
Select the packet size for negotiation of data transmission from 500 bytes, 1000 bytes and Off. When the
transmission packet size exceeds the selected value,
Rts (Request to send) and Cts (Clear to send) data is
transmitted to prevent communication speed deterioration from the “Hidden wireless client” access.
See p. 35 for “Hidden wireless terminals”.
Select the packet size for the fragmentation operation.
(default:OFF)
This setting improves total data transmission speed by
sending fragmented data, not all, when the communication is disconnected, such as that caused by interference.
4
i Rate ………………
Select the data transmission speed from 11 Mbps
(fixed) and automatic. (default:11 Mbps/fixed)
When automatic is selected (“✓” mark appears), the
data transmission speed is selected from 11, 5.5, 2
and 1 Mbps automatically according to the conditions.
33
Page 48
AP-12 MANAGER
4
4-1 [AP-12 Manager] screen descriptions
■ Settings (continued)
q
w
t
y
u
o
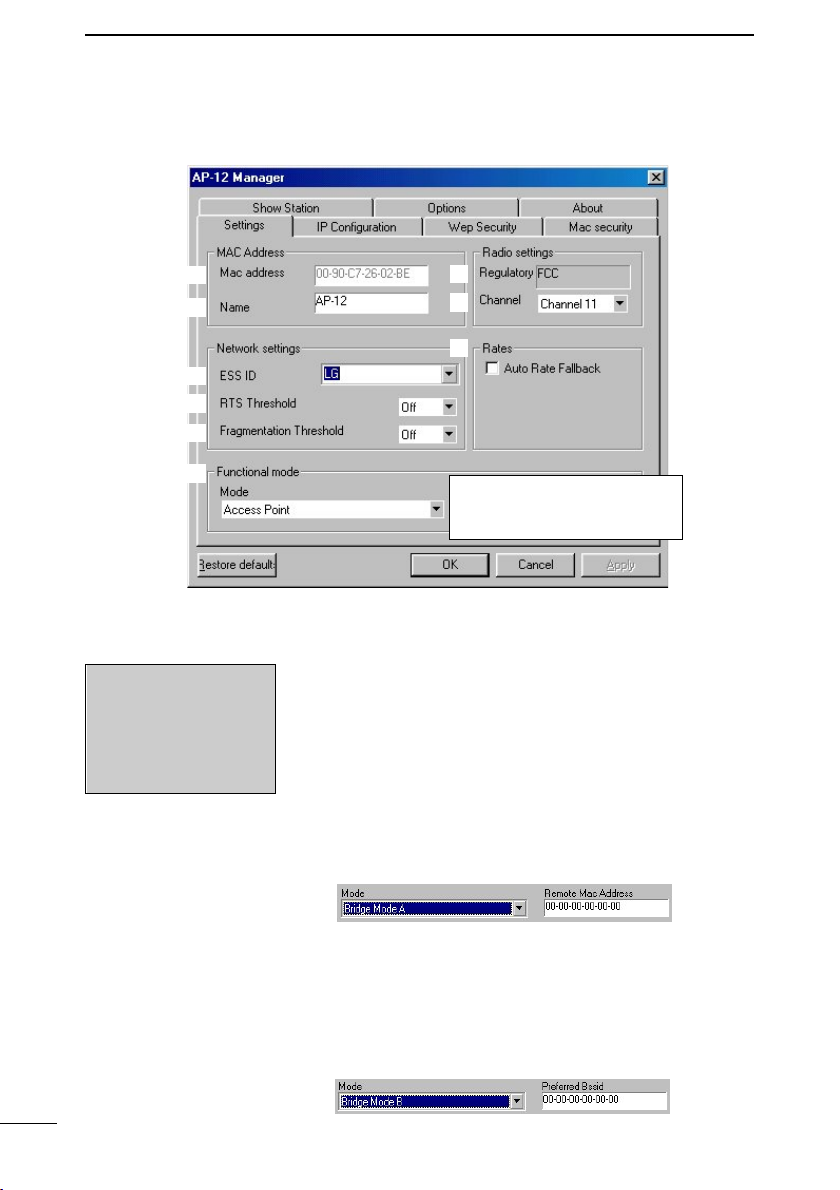
o Functional mode …
NOTE: When “Auto-
matic” is selected in IP
configuration (p. 36),
bridge mode B is not
selectable.
e
r
i
“Remote MAC Address” or “Preferred
Bssid” is displayed here according to
the selected functional mode.
Select the wireless LAN functional mode.
(default: Access Point)
See Chapter 1-1 (p. 2) for details of each mode.
The following items appear when you select Bridge
Mode A or B.
• Remote MAC Address
“Remote MAC Address” appears when Bridge Mode
A (Peer-to-Peer) is selected.
Enter the desired MAC address into the text box at
right for communication.
34
• Preferred Bssid
“Preferred Bssid” appears when Bridge Mode B
(Client Mode) is selected.
Enter the desired AP-12’s MAC address, prior to
communication, when two or more AP-12s operating
in access point mode are available.
Page 49
AP-12 MANAGER
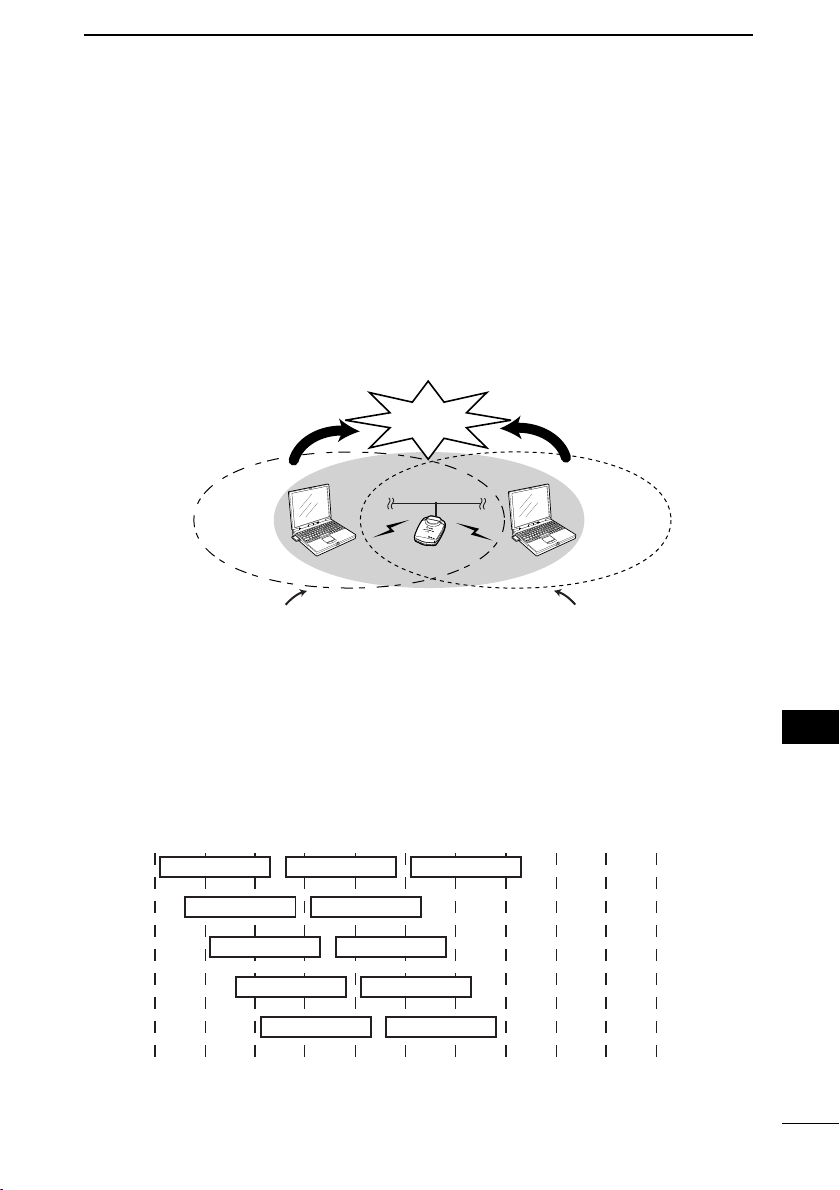
2400
2410 2420 2430 2440 2450
Frequency (MHz)
2460 2470 2480 2490 2500
1 channel
2 channel
3 channel
4 channel
5 channel
6 channel
7 channel
8 channel
9 channel
11 channel
10 channel
Ethernet LAN
A
B
AP-12 [B]
wireless transmission area
AP-12 [B]
wireless transmission area
C
Communication
collision
wireless LAN [A]
wireless transmission area
wireless LAN [C]
wireless transmission area
AP-12
DD
Hidden wireless terminals
During Access Point mode communication as shown below, wireless LAN terminal [A] and [C] cannot communicate directly, even when both terminal [A] and [C]
can access AP-12 [B].
In such a case, terminal [A] is a “Hidden wireless terminal” for [C], and terminal [C]
is a “Hidden wireless terminal” for [A].
When terminal [A] is accessing AP-12 [B], for example, to prevent the communication collision, the request-to-send (Rts) signal received by AP-12 [B] sends a
clear-to-send (Cts) signal to both terminal [A] and [C] repeatedly. Then terminal [C]
recognizes that AP-12 is busy, and forbidding to access to AP-12 [B].
4
DD
Communication channels
Set the communication channels of network groups at least four channels apart to
avoid interference if two or more access points are available in the wireless transmission area.
Otherwise, interference may occur due to partial overlap in bandwidth as shown below.
Channel settings of 1-6-11, for example, eliminates the possibility of interference.
4
35
Page 50
AP-12 MANAGER
4
4-1 [AP-12 Manager] screen descriptions (continued)
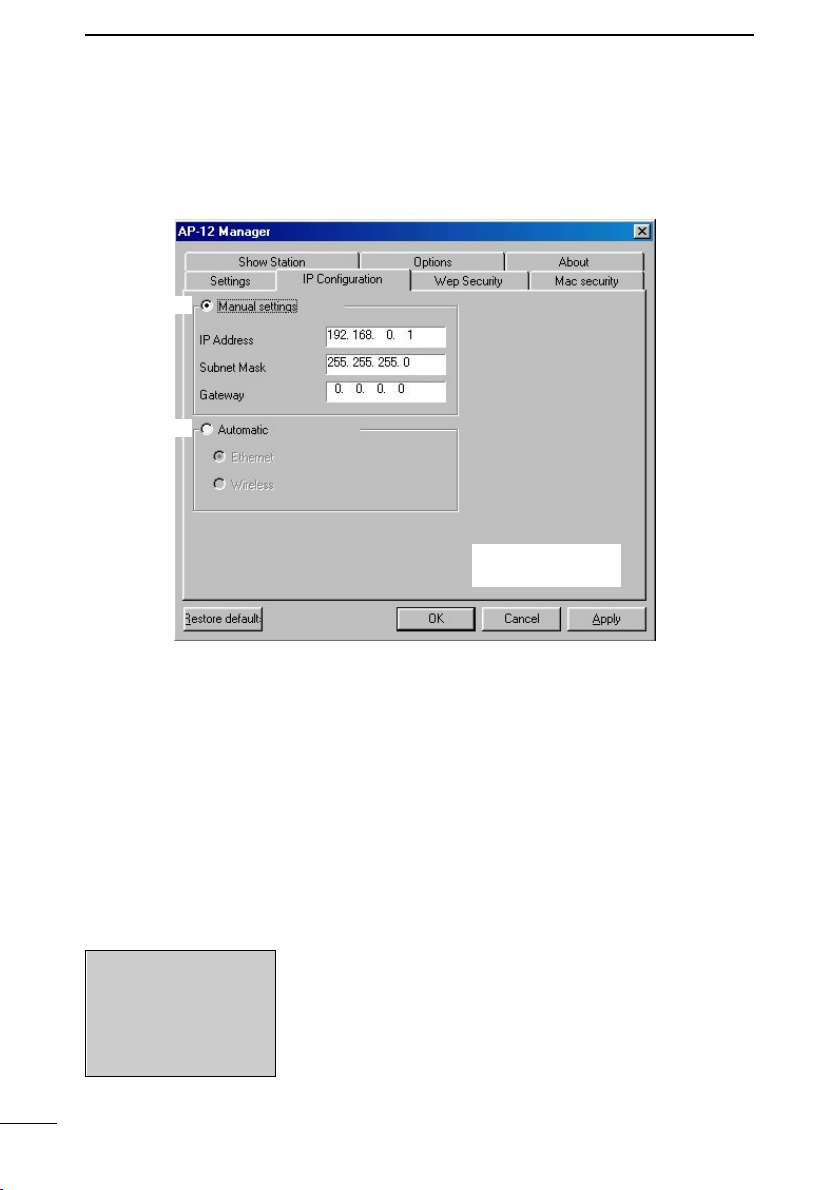
■ IP Configuration
Set the IP address of the AP-12.
q
w
Click <OK> or <Apply>
to register the setting.
q Manual settings……
w Automatic …………
NOTE: When Bridge
mode B is selected in
Settings screen (p.
34), “Automatic” is not
selectable.
36
Set the desired IP address, Subnet mask and
Gateway.
• The default settings are;
IP Address : 192.168.0.1
Subnet mask : 255.255.255.0
Gateway : 0.0.0.0
• The end of Subnet Mask can not be changed.
• It is not necessary to set Gateway.
Obtain an IP address from the DHCP server in the
LAN. (default)
• Ethernet (default)
Obtain an IP address via wired LAN.
• Wireless
Obtain an IP address via Wireless LAN.
Page 51

AP-12 MANAGER
■ MAC security
Sets MAC address security function.
This function can only be set when the access point mode or Bridge mode C is
selected.
q
w
e
Click <OK> or <Apply>
to register the setting.
4
q Enable mac security
………………………
w Refresh ……………
e Remove All ………
Turns the MAC security ON and OFF. (“✓” mark
appears when set to ON.)
(default: OFF)
When the Mac security is turned ON, the wireless
devices to which a MAC address is registered only can
access the AP-12.
Up to 40 MAC addresses can be registered.
Displays the contents of the settings.
Deletes all registered MAC addresses.
Click <Remove A
settings.
ll > then <Apply>, when deleting all
4
37
Page 52
AP-12 MANAGER
4
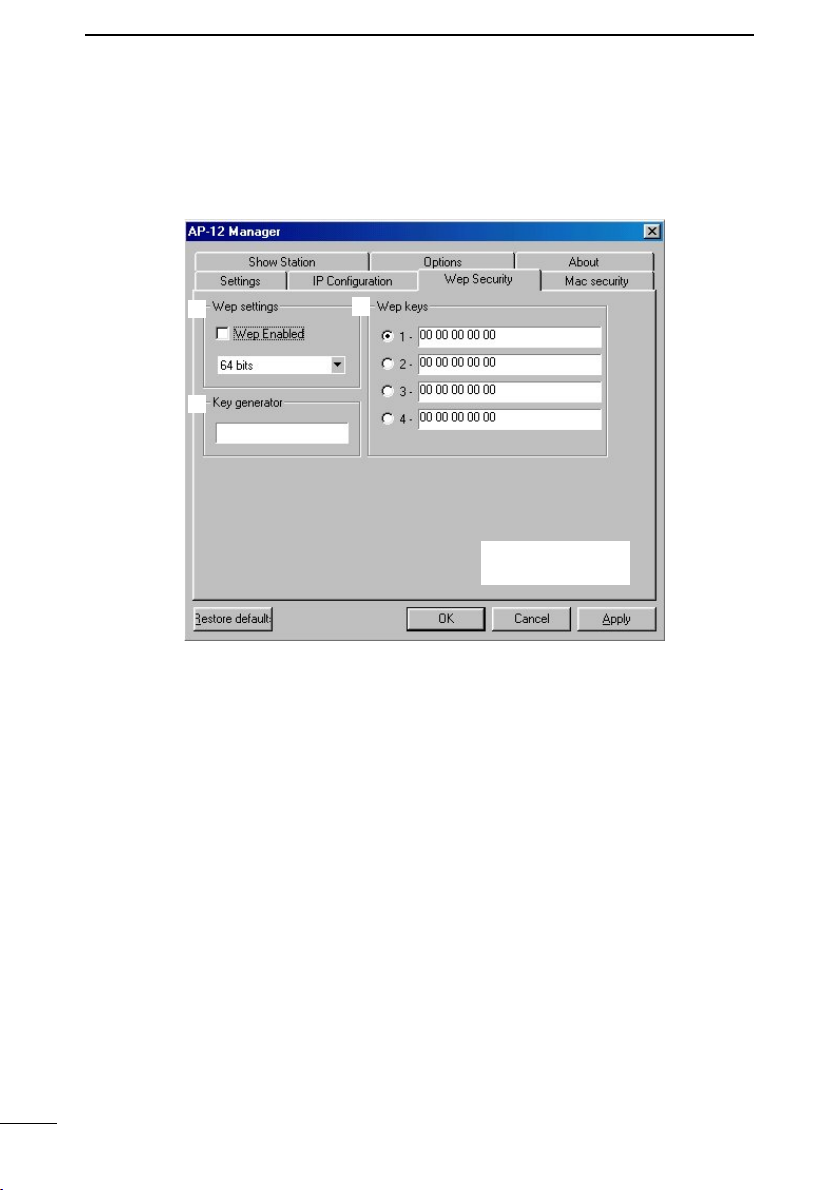
4-1 [AP-12 Manager] screen descriptions (continued)
■ Wep Security
(Setting for data security.)
q Wep settings ………
w Key generator ……
38
q
w
e
Click <OK> or <Apply>
to register the setting.
Turn the WEP transmission data encryption ON and
OFF, and select the encryption level from 64-bit and
128-bit. (“✓” mark appears when the encryption is set to
ON.) (default: OFF)
• 64 bits/128 bits
Encrypt the character string, entered in w key generator, at 64-bit/128-bit.
Enter the desired character string for data encryption
and decryption.
Up to 32 alphanumeric characters (case sensitive) can
be entered.
The generated four keys (may differ according to the
selected bit number in q Wep setting), are displayed
in the Wep keys text boxes.
- The same character string should be entered for all
the AP-12’s or terminals, to be accessed.
- After clicking <OK>, all WEP key indications in the
Wep keys text boxes return to “00 00 00 00 00.”
Page 53

AP-12 MANAGER
4
e Wep keys …………
DD
WEP Key Setting Examples– 64-bit encryption
Example 1
Select the desired WEP key number for data encryption. (default:1)
The desired key number can be selected between the
AP-12 and another AP-12 or terminal.
A key, generated by the key generator, is displayed in
the text boxes. However, the desired keys in hexadecimal numbers can be entered into the text boxes
directly when no key generator is set.
The lower 40-bit (10 hexadecimal numbers) or the
lower 104-bit (26 hexadecimal numbers) can be
entered when 64 bits or 128 bits is selected, respectively.
- No key generator is displayed when the desired key
is entered into the key text boxes directly.
- The same key content should be entered into the key
number that is selected for another AP-12 or terminal, as shown in the example 1 and 2.
No communication is made when different contents
are entered into the key number that is selected for
another AP-12 or terminal, as shown in the example
3.
Two-way communication
enable
4
Example 2
Example 3
NOTE: Above screens shows the condition before clicking <Apply>.
The display returns to “00 00 00 00 00” after clicking <Apply>.
Two-way communication
enable
Communication disable
39
Page 54
AP-12 MANAGER
4
4-1 [AP-12 Manager] screen descriptions (continued)
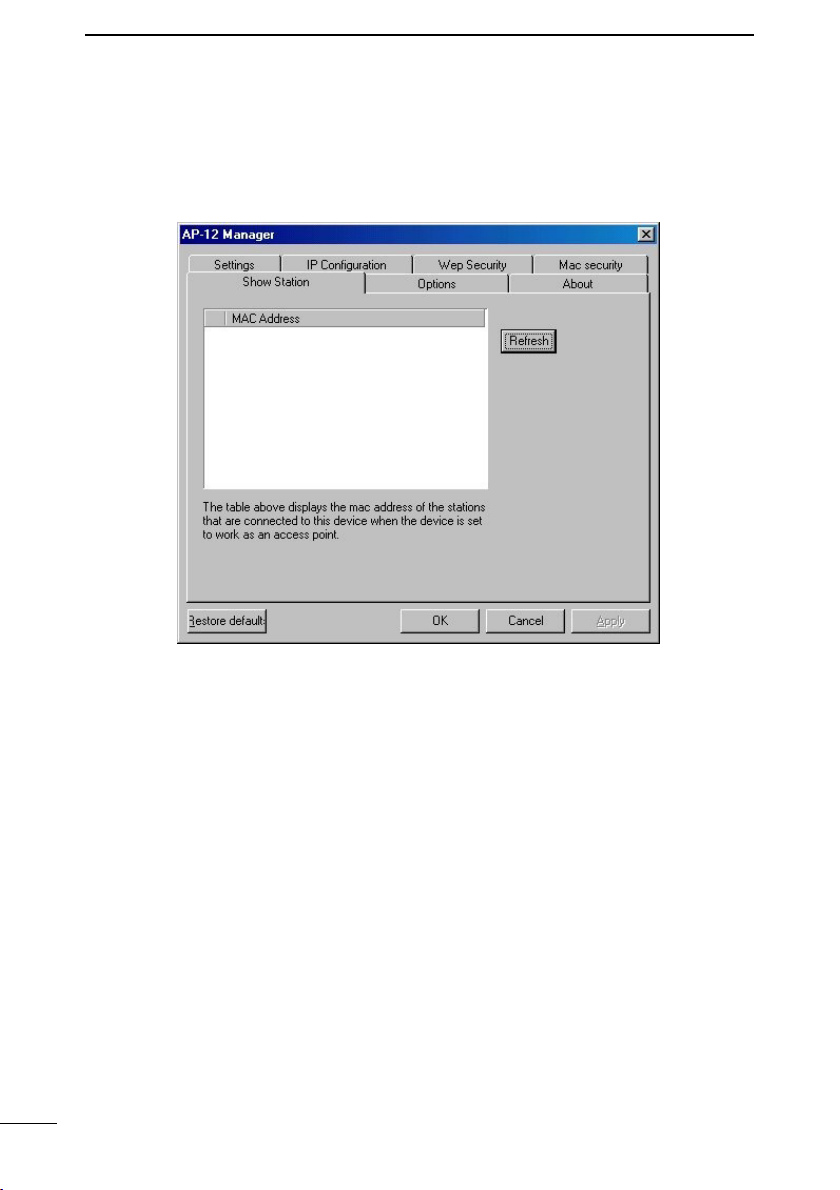
■ Show Station
Shows all MAC address for registered terminals during access point mode operation.
40
Refresh ……………
Renews the MAC address indication.
• [AP-12 Manager] recognizes a terminal is still connected for 5 minutes (approx.) after the disconnection.
Page 55

AP-12 MANAGER
■ Version Information
Shows the version number for the [AP-12 Manager] and the firmware.
(>>) links to Icom home page.
4
41
4
Page 56
AP-12 MANAGER
4
4-1 [AP-12 Manager] screen descriptions (continued)
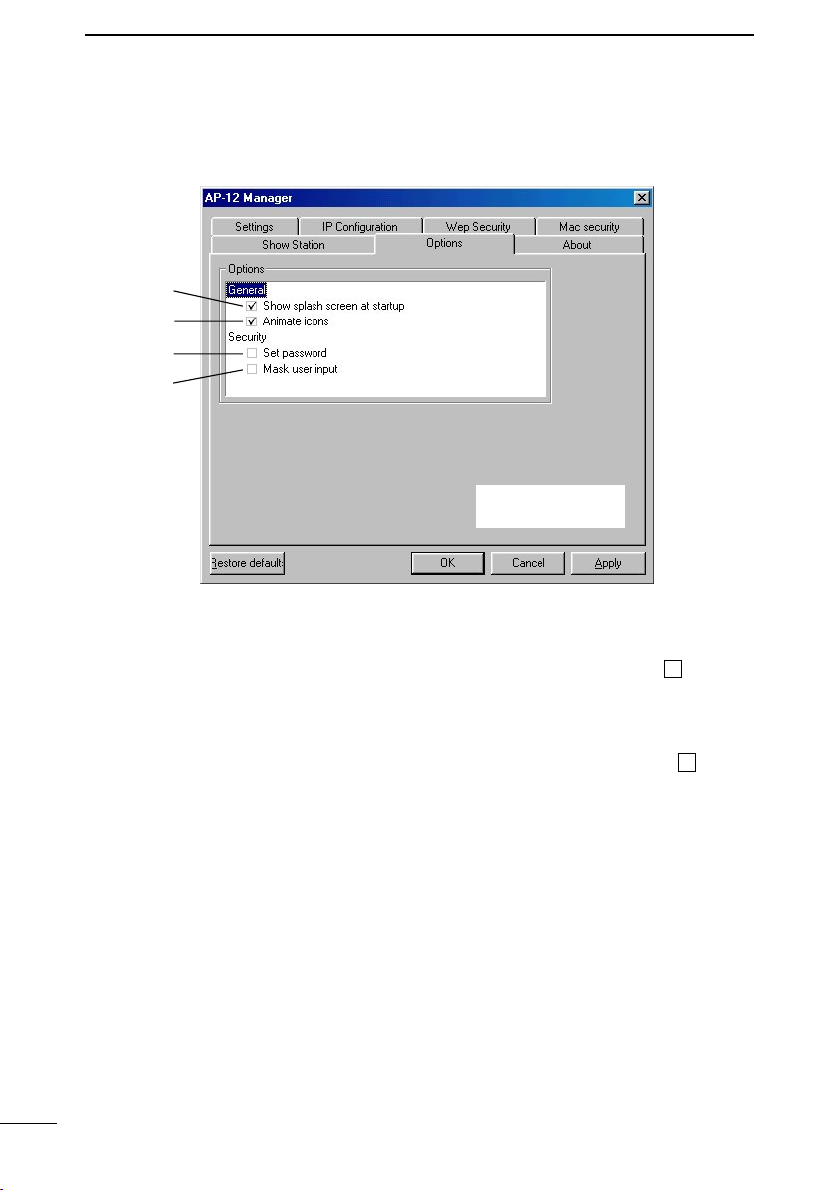
■ Options
q
w
e
r
Click <OK> or <Apply>
to register the setting.
q Show splash screen
at startup …………
Turns the splash screen ON and OFF.
The screen appears when starting up [AP-12
Manager]. (default: /Display)
✓
w Animate icons ……
e Set password………
r Mask user input …
42
Selects [AP-12 Manager] icon indicating type from
flashing or non-flashing. The icon flashes when
checked (“✓” appears). (default: /Flash)
Turns the password function ON and OFF when starting up [AP-12 Manager].
The password setting screen is displayed when re-starting [AP-12 Manager] after setting to ON (“✓” appears).
Enter the desired password within 32 characters (case
sensitive).
Once the password is set, password entry is necessary for starting up [AP-12 Manager].
Selects the entered key generator and WEP key indication type. The entered characters are displayed with
asterisks (*) when this item is checked (“✓” appears).
✓
(default: OFF)
(default: OFF)
Page 57

AP-12 MANAGER
4-2 The default settings
The default settings of [AP-12 Manager] are shown below.
■ Settings
• Mac address : The MAC address is described on the serial num-
ber seal. (The setting in this field cannot be
changed.)
• Name : AP-12
• Regulatory : FCC (The setting in this field cannot be changed.)
• Channel : 11
• ESS ID : LG
• RTS Threshold : OFF
• Fragmentation Threshold : OFF
• Rate : 11 Mbps/static
• Function Mode : Access Point
■ IP Configuration
(Ó) Manual Settings
• IP Address : 192.168.0.1
• Subnet Mask : 255.255.255.0
• Gateway : 0.0.0.0
(●) Automatic (selected)
• (●) Ethernet (selected)
• (Ó) Wireless
4
■ MAC security
• Enable mac security : OFF
N.1 to N.40: 00-00-00-00-00
■ Options
• Show splash screen at startup : /Display
• Animate icons : /Flash
• Set password : OFF
• Mask user input : OFF
■ Wep Security
• Wep Enabled : OFF
• Key generator : Blanked
• WEP keys : 1
✓
✓
4
43
Page 58

AP-12 MANAGER
4
4-3 Uninstalling [AP-12 Manager]
This section describes [AP-12 Manager] uninstallation. (Windows XP)
When your PC uses an operating system other than Windows XP, follow the onscreen messages or instructions for the OS to uninstall.
[Procedure]
q Click <Start> and select [Control Panel] from the [Settings] menu.
Double-click <Install/Uninstall>.
w Click [Add or Remove Programs] and select [ICOM AP-12 Manager] and click
<Change/Remove...>.
Select
1.
Click
2.
e [AP-12 Manager] Uninstall Wizard starts automatically.
Click <Uninstall>.
Click
The uninstall wizard appears when operating according to the installation instruction, described in Installing [AP-12 Manager] (pgs.11, 25).
After uninstalling, install [AP-12 Manager] with the install wizard appeared after the
uninstallation.
44
Page 59

SETTING EXAMPLES
This chapter describes the minimum setting requirements in each functional mode
with a setting example.
5-1 Access point mode ………………………………………………………………46
5-2 Bridge mode A (Peer to Peer) ……………………………………………………47
5-3 Bridge mode B (Client Mode) ……………………………………………………48
5-4 Bridge mode C (Multi-site)…………………………………………………………49
Chapter 5
<Function List >
The functions available will change according to the selected functional mode.
✔: Available N/A: Not Available
Bridge mode B
N/A
N/A
✔
N/A
✔
Bridge mode C
✔
✔
✔
N/A
Roaming
DHCP client
WEP security
MAC security
ESS ID
Access point mode
✔
✔
✔
✔
✔
Bridge mode A
✔
✔
N/A
Page 60
SETTING EXAMPLE
5
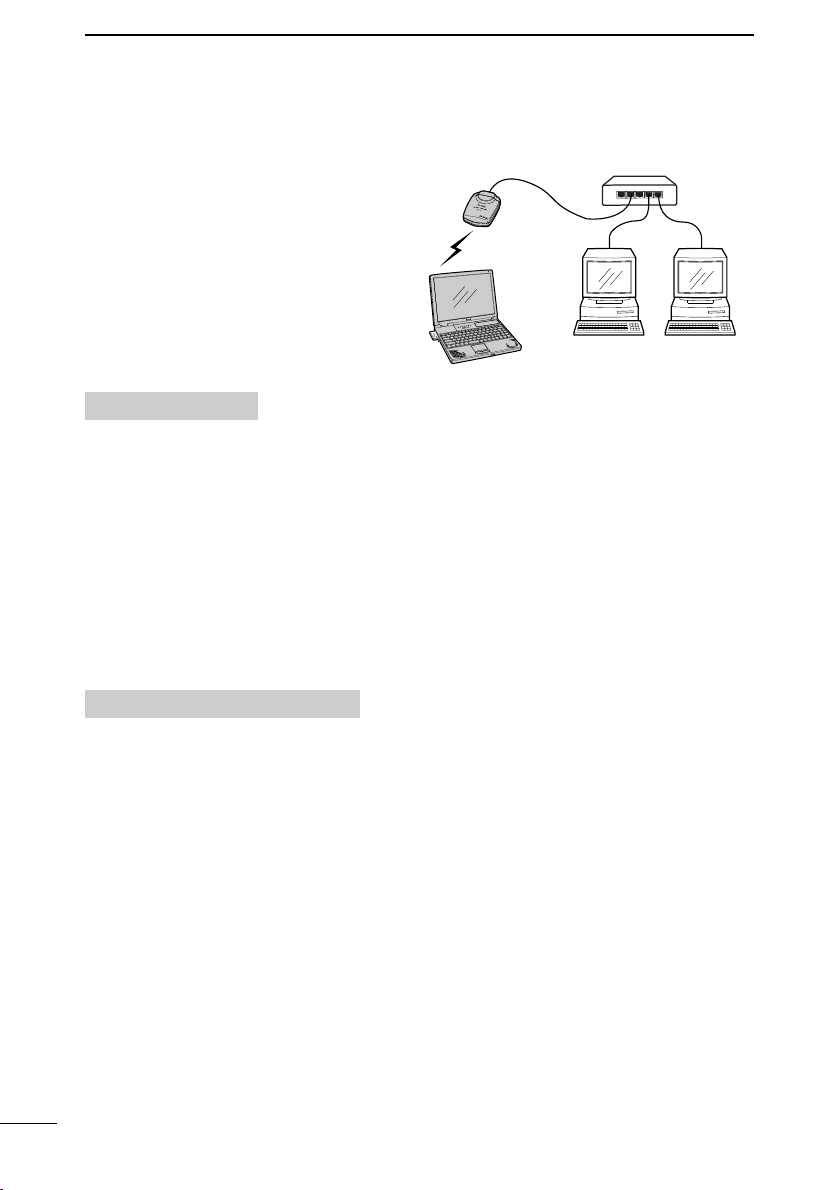
5-1 Access point mode
Set the AP-12 and the PC as in the network shown at right.
• IP address of the PC should already be
AP-12
set. (See Chapter 2 or 3)
• See Chapter 4 (p. 31) for [AP-12
wireless
terminal
Manager] details.
wired terminal
1.Setting the AP-12
Set the following items in [AP-12 Manager] Settings screen. (pgs. 33, 34)
• ESS ID:
Set the same ID as the wireless terminal.
• Channel:
Set the desired channel.
- Set the channel at least four channels apart to avoid interference if another AP-
12(s), operating on an other channel(s), are within the transmission area.
• Functional mode:
Select “Access Point”.
Check the “Auto Rate Fallback” (“✓” appears) when communication is unstable.
HUB
wired terminal
2.Setting the wireless terminal
Set the following items in the wireless LAN card.
• Network settings:
Select “Infrustructure”.
• ESS ID:
Set the same ID as the AP-12.
• Tx rate:
Select “Automatic”
46
.
Page 61
5-2 Bridge mode A (Peer-to-Peer)
AP-12 (2)
AP-12 (1)
HUB
HUB
Printer
Printer server
wired terminal
wired terminal
wired terminal
Example
00-90-C7-27-00-01
Example
00-90-C7-27-00-02
Set the AP-12 and the PC as
in the network shown at right.
• IP address of the PC should
already be set. (See Chapter
2 or 3)
• See Chapter 4 (p. 31) for
[AP-12 Manager] details.
1. Common settings
Set the following items in [AP-12 Manager] Settings screen (pgs. 33, 34).
• Channel:
Set the desired channel for both the AP-12s.
- Set the channel at least four channels apart to avoid interference if another AP-
12(s), operating on an other channel(s), are within the transmission area.
• Functional mode
Select “Bridge Mode A”.
- Check the “Auto Rate Fallback” (“✓” appears) when communication is unstable.
2. Individual settings
Set the partner’s MAC address in [AP-12 Manager] Settings screen. (p. 32)
• Remote MAC Address
Set the AP-12 (2)’s MAC Address, “00-90-C7-27-00-02”, to the AP-12 (1).
Set the AP-12 (1)’s MAC Address, “00-90-C7-27-00-01”, to the AP-12 (2).
SETTING EXAMPLE
5
5
47
Page 62
SETTING EXAMPLE
AP-12 (2)
AP-12 (3)
AP-12 (1)
HUB
Printer
Printer server
To LAN
wireless LAN
terminal
wired terminalwired terminal
Example
00-90-C7-27-00-01
5
5-3 Bridge mode B (Client Mode)
Set the AP-12 and the PC as
in the network shown at right.
• IP address of the PC should
already be set. (See Chapter
2 or 3)
• See Chapter 4 (p. 31) for
[AP-12 Manager] details.
• Follow the instruction manual of the printer server when
connecting to the AP-12.
(Usually, a crossover cable
is used.)
1. Common setting
Set the following item in [AP-12 Manager] Settings screen. (p. 33)
• ESS ID:
Set the same ID.
- Check the “Auto Rate Fallback” (“✓” is appears) when communication is unstable.
48
2. AP-12 (1) and (2) settings
Set the following items in [AP-12 Manager] Settings screen. (p. 34)
• Functional mode:
Select “Bridge Mode B.”
• Preferred BSS ID:
Set the AP-12 (3)’s MAC address, “00-90-C7-27-00-01,” prior to communication
with the AP-12 (3).
3. AP-12 (3) settings
Set the following items in [AP-12 Manager] Settings screen. (pgs. 33, 34)
• Channel:
Select the desired channel.
- Set the channel at least four channels apart to avoid interference if another AP-
12(s), operating on an other channel(s), are within the transmission area. (p. 35)
• Functional mode:
Select “Access Point.”
- AP-12 must be used for the access point when other AP-12s (AP-12 (1) and (2),
in this case) are used in “Bridge Mode B.”
Page 63
SETTING EXAMPLE
AP-12
To LAN
To LAN
AP-12
HUB
AP-12
To LAN
HUB
HUB
Printer
Printer server
LAN terminal
LAN terminal
5-4 Bridge mode C (Multi-site)
Set the AP-12 and the PC as in
the network shown at right.
• IP address of the PC should
already be set. (See Chapter 2
or 3)
• See Chapter 4 (p. 31) for [AP-
12 Manager] details.
• Follow the instruction manual of
the printer server when connecting to the AP-12. Usually, a
crossover cable is used.)
All AP-12s settings
Set the following items in [AP-12 Manager] Settings screen. (pgs. 33, 34)
• Channel:
Set the desired channel.
- Set the channel at least four channels apart to avoid interference if another AP12(s), operating on an other channel(s), are within the transmission area. (p. 35)
5
• Functional mode:
Select “Bridge Mode C.”
- Check the “Auto Rate Fallback” (“✓” appears) when communication is unstable.
5
49
Page 64

Page 65

IP CONFIGURATION
This chapter describes about changing the PC’s IP address.
Changing of the PC’s IP address is required when setting up a LAN used with the
AP-12 with a fixed IP setting and a PC.
The default IP address is used with the AP-12 (192.168.0.1) for the setting description in this chapter.
Changing the PC’s IP address is not necessary when the PC has been connected to a LAN with a DHCP server, and obtains an IP address from the DHCP server.
6-1 For Windows XP ……………………………………………………………………52
6-3 For Windows 98/98SE/Me…………………………………………………………54
6-2 For Windows 2000 …………………………………………………………………55
Chapter 6
[Setting the IP address and subnet mask]
• Set a unique IP address for each PC in the network group.
• Set the same subnet mask for all PCs in the network group.
• Set private addresses. 192.168.0.0 to 192.168.255.255 are used for a small net-
work group (up to 253 terminals). However, never assign the network address
(192.168.XXX.0) and broadcast address (192.168.XXX.255) to the terminal.
(XXX: 0 to 255)
See the following address examples of a wireless LAN comprised of three PCs.
Wireless terminal A: 192.168.0.10 (subnet mask: 255.255.255.0)
Wireless terminal B: 192.168.0.11 (subnet mask: 255.255.255.0)
Wireless terminal C: 192.168.0.12 (subnet mask: 255.255.255.0)
Page 66
IP CONFIGURATION
6
6-1 For Windows XP
[Procedure]
q Boot up the PC.
• The log-on screen appears.
w Log on as the administrator.
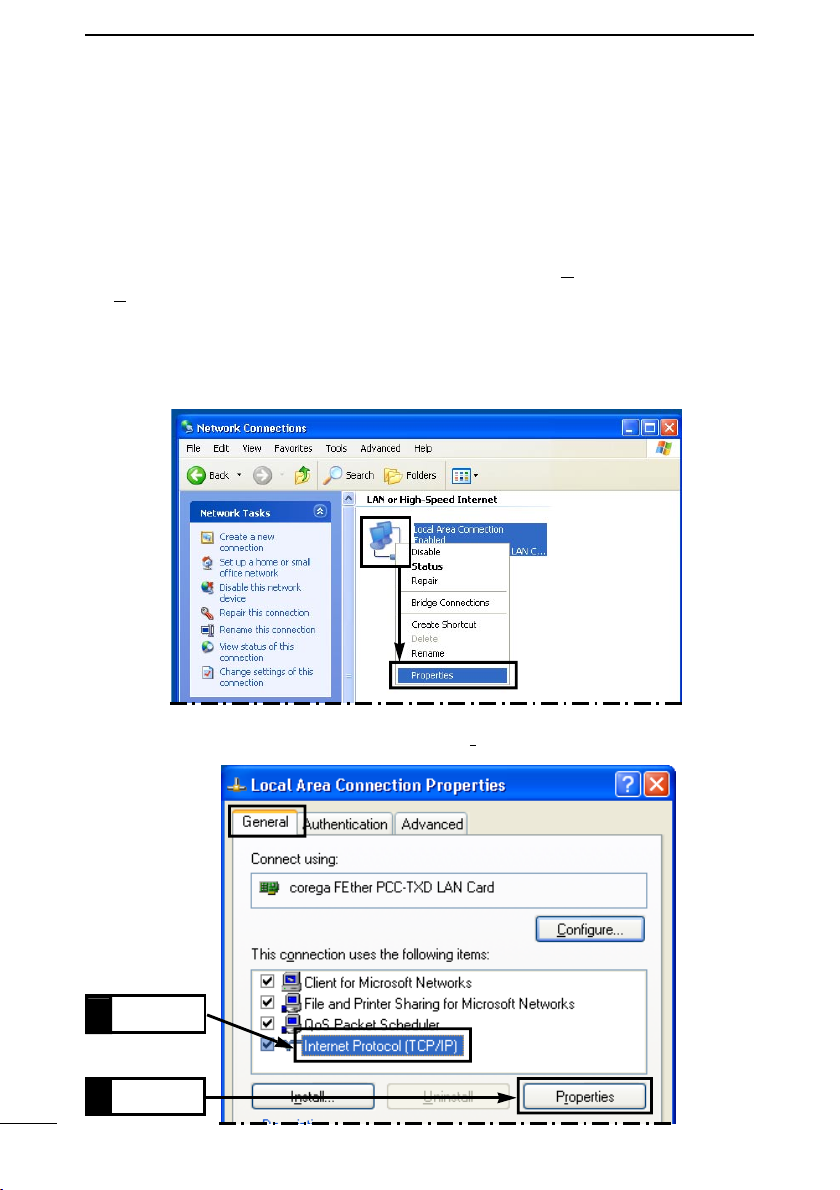
e After the PC has booted up, click <Start> and select [C
[S
ettings] menu.
r Click [Network and Internet Connections].
t Click [Network Connection].
y Right-click [Local Area Connection] icon and click [Properties] in the menu that
appears.
ontrol Panel] from the
u Click [Internet Protocol (TCP/IP)] and then [Properties].
Click
1.
Click
2.
52
Page 67
IP CONFIGURATION
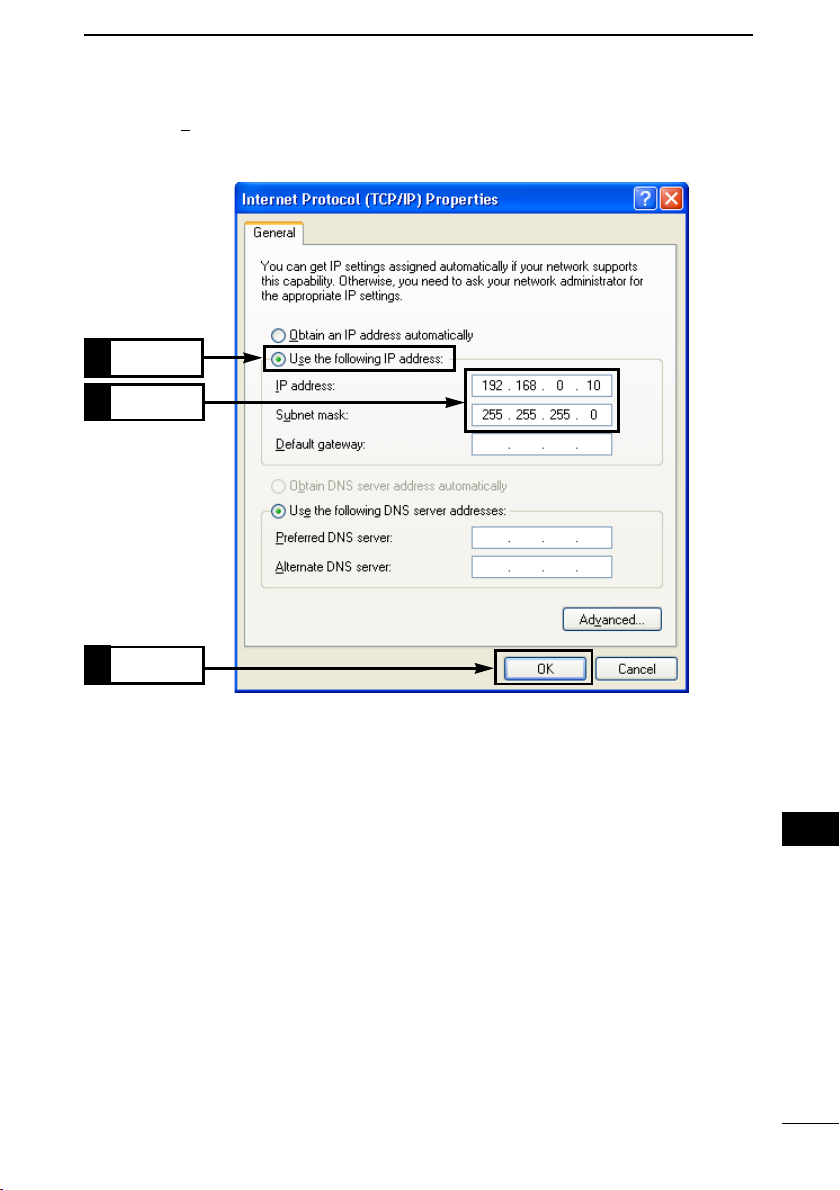
i Select [Use the following IP address] and enter the IP address and subnet mask,
then click [OK] to enable the specified settings.
Click
1.
Enter
2.
6
3.
Click
6
53
Page 68
IP CONFIGURATION
6
6-2 For Windows 98/98SE/Me
[Procedure]
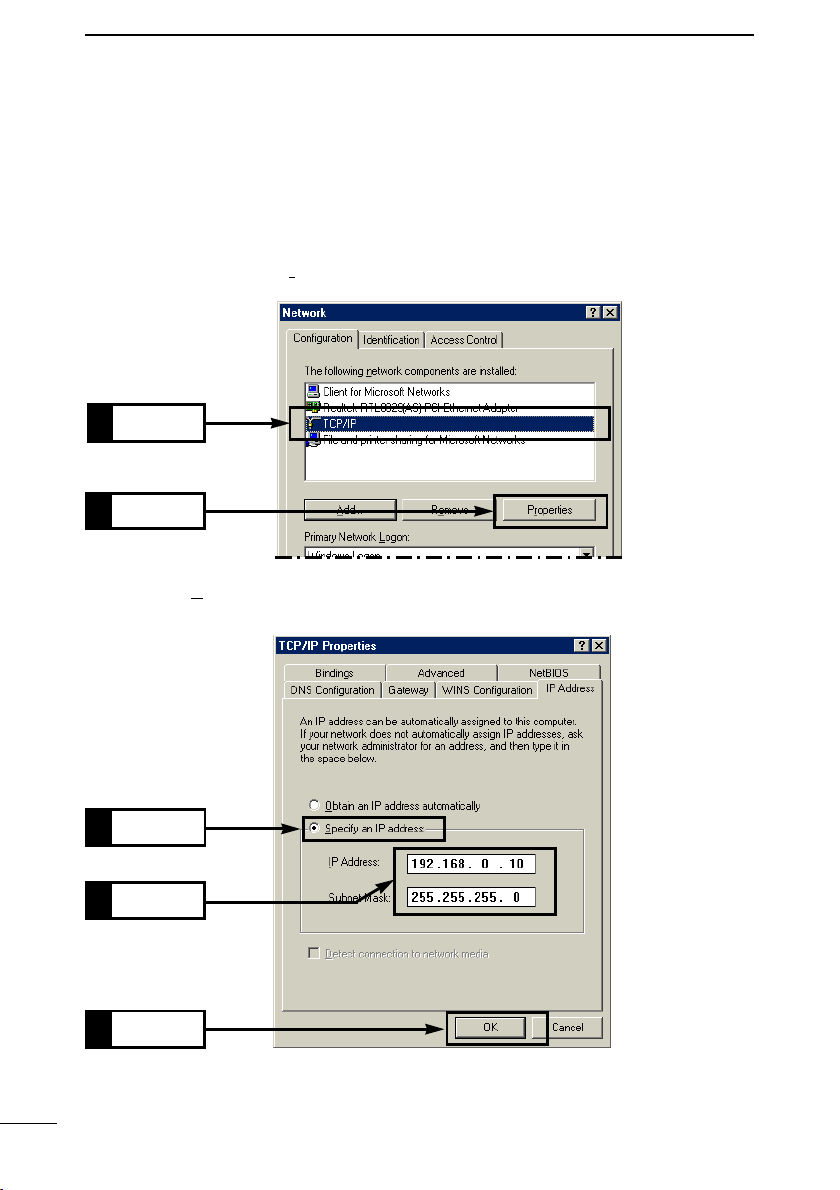
q Click <Start> and select [Control Panel] from the [Settings] menu.
Click [Network].
w Verify that [TCP/IP−>The Ethernet card name] is displayed in the screen.
Click [TCP/IP] then, [Pr
Click
1.
Click
2.
operties].
e Click the [S
mask and click <OK>.
Click
1.
Enter
2.
Click
3.
r When the message “Reboot now?” appears on the screen, click <Yes>.
After rebooting, the specified settings are available.
54
pecify an IP address] radio button, enter the IP address and subnet
Page 69
IP CONFIGURATION
6-3 For Windows 2000
[Procedure]
q Start the PC.
• The Window 2000 log-on screen appears.
w Log on as the Administrator.
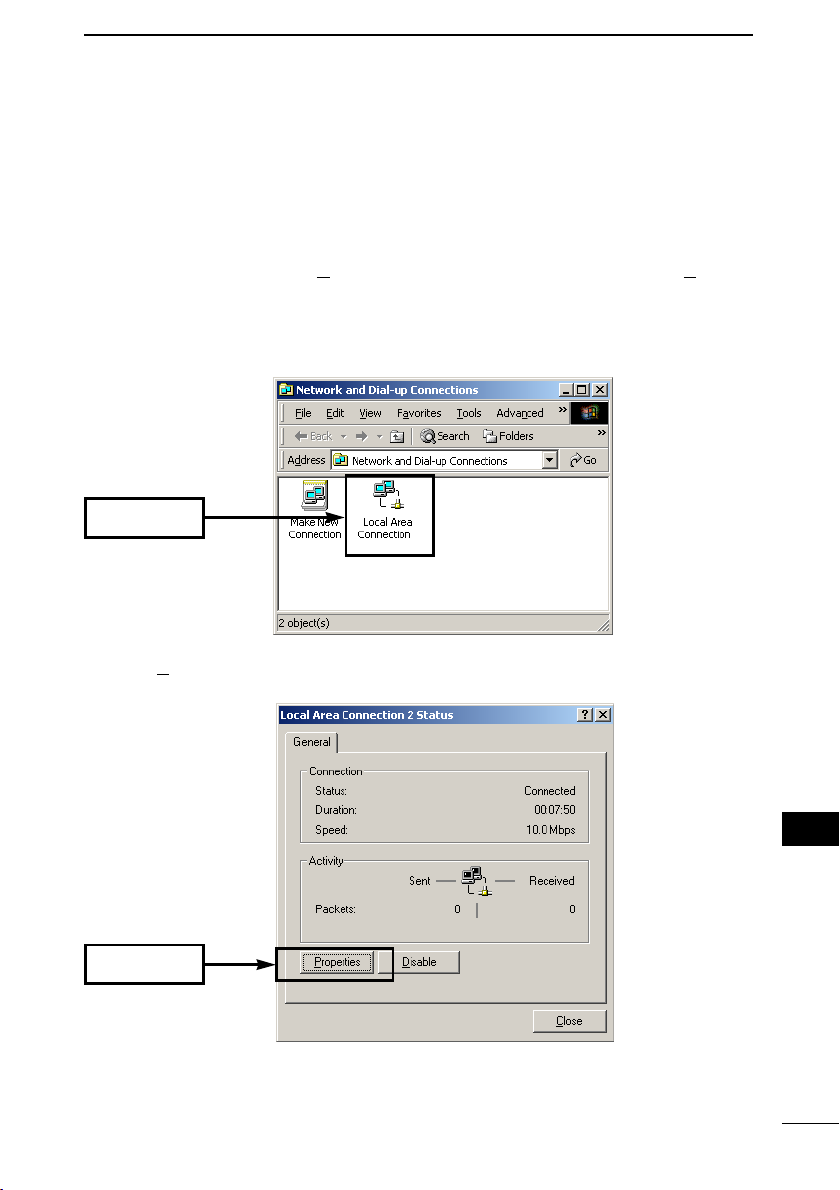
e Click <Start> and select [N
menu.
Then, double click [Local Area Connection] icon which shows your Ethernet card
name.
Double-click
etwork and Dial-up Connections] from the [Settings]
6
r Click [P
Click
roperties].
6
55
Page 70
IP CONFIGURATION
6
6-3 For Windows 2000 (Continued)
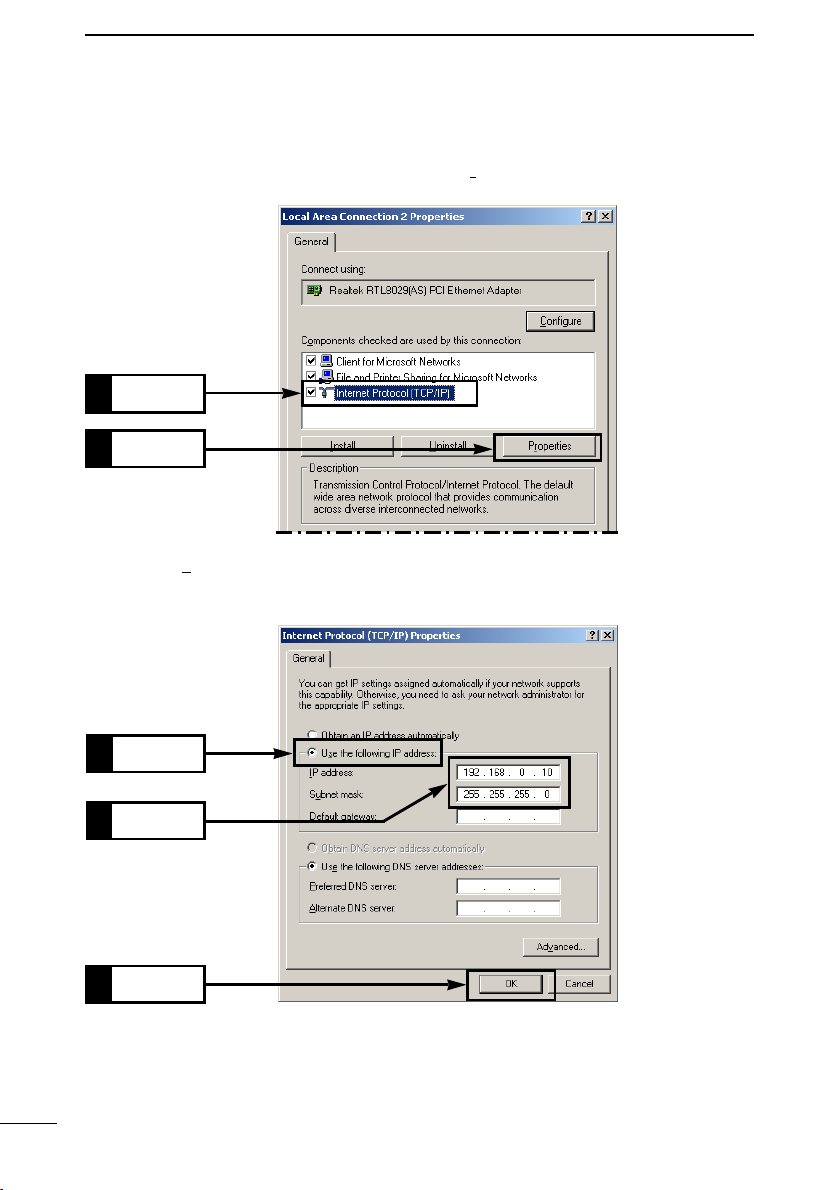
t Click [Internet Protocol (TCP/IP)] and then [Pr
Click
1.
Click
2.
y Select [Us
then click [OK] to enable the specified settings.
e the following IP address] and enter the IP address and subnet mask,
operties].
56
1.
2.
3.
Click
Enter
Click
Page 71

REFERENCES
This chapter describes additional matters about the AP-12.
7-1 Troubleshooting ……………………………………………………………………58
7-2 Connecting the AP-12 and HUB …………………………………………………60
7-3 Verifying the connection to the AP-12 …………………………………………60
7-4 Failure in searching for the AP-12………………………………………………61
7-5 IP address confirmation …………………………………………………………64
■ Windows XP ………………………………………………………………………64
■ Windows 98/98SE/Me ……………………………………………………………65
■ Windows 2000 ……………………………………………………………………65
7-6 Connection to the router type modem …………………………………………66
7-7 Specifications ………………………………………………………………………68
■ Specifications for Ethernet Plug …………………………………………………69
■ Wireless LAN for the AP-12 ……………………………………………………69
7-8 Glossary ……………………………………………………………………………70
Chapter 7
Page 72

REFERENCES
7
7-1 Troubleshooting
If your AP-12 seems to be malfunctioning, please check the following points before
sending it to a service center.
PROGRAM POSSIBLE CAUSE SOLUTION REF.
NO power comes
ON.
DC Power cable or AC
adapter is improperly connected.
Re-connect the DC power
cable or AC adapter correctly.
pgs. 10,
16
Television interference (TVI) or
broadcast interference (BCI) occurs.
Communication
with the AP-12 has
failed.
Wired LAN indicator does not light.
[AP-12 Manager] unable to be installed to
Windows XP/2000.
Menu screen does
not appear after inserting the CD.
No connection to
the AP-12 via [AP12 Manager].
58
• The AP-12 is too close to a
television set or radio.
An IP address has not been
obtained from the DHCP
server.
• Incorrect Ethernet cable is
used.
• The HUB power is OFF, or the
patch cable is connected to
the cascade port of the HUB.
The PC is not logged on as
the administrator.
Auto Run function does not
function.
The network part of IP
address for both AP-12 and
PC are different.
• Keep the AP-12 away from
a television set or radio.
Turn the AP-12 power OFF.
After waiting a few seconds,
turn power ON again. Then,
reboot the PC(s).
• Connect the correct Ethernet
cable according to the connecting condition.
• Turn the HUB power ON, or
connect the patch cable to
the cross port of the HUB.
Log on as the administrator.
Double-click “AutoRun.exe”
contained in the CD.
• When the AP-12 is connected to a LAN:
Turn the AP-12 power OFF.
After waiting a few seconds,
turn power ON again. Then
start [AP-12 Manager].
• When the AP-12 is connected to the PC:
Quit [AP-12 Manager], set
the PC’s IP address again
using the [Easy Setting
Wizard], then restart [AP-12
Manager].
p. 6
—
p. 16
pgs. 10,
60
pgs. 11,
25
pgs. 11,
17,
25
p. 13
p. 17
Page 73

REFERENCES
PROGRAM POSSIBLE CAUSE SOLUTION REF.
Connection to the
AP-12 has failed
after restoring.
The network part of the AP12’s IP address is different
from the PC’s because of the
restoring.
Reset the AP-12’s IP address
using [Easy Setting Wizard]
or the [AP-12 Manager].
7
pgs. 17,
61
No IP address is
assigned from the
DHCP server.
Wireless LAN terminal(s) unable to
obtain an IP address from the
DHCP server via
the AP-12.
“Automatic” is impossible to set.
[AP-12 Manager]
or [Easy Setting
Wizard] cannot
find the AP-12.
• Ethernet cable is not connected to wired LAN within 30
sec. from turning the AP-12
power ON.
• “Manual settings” is selected.
• No DHCP server is available
in the connected wired LAN.
• No DHCP server is available
in the connected wired LAN.
• Fixed IP address is set to
wireless LAN card.
• “Bridge Mode B” is selected
as the Functional mode.
“Bridge Mode B” is selected
as the functional mode.
• The network part of the AP12’s IP address is different
from the PC’s.
• In case of using Windows
XP, “Enabled, Firewalled” is
indicated on the [Local Area
Connection] icon.
• The personal firewall software is activated.
• Turn the AP-12 power OFF.
After waiting a few seconds,
turn power ON again, then
check the IP address.
• Select “Automatic” and connection method.
• Confirm the DHCP server
availability.
• Confirm the DHCP server
availability.
• Set the wireless LAN card to
obtain an IP address from
the DHCP server.
• Select “Access Point Mode”,
“Bridge Mode A” or “C”.
Select “Access Point Mode”,
“Bridge Mode A” or “C”.
• Set the AP-12’s IP address
using [AP-12 Manager].
• Right-click [Local Area
Connection] icon and click
[Properties]. Then, select
[Advanced] tab in the menu.
Clear the [Internet Connection
Firewall] check box.
• Set the software to enable
access to the AP-12.
*See the software’s instruction
manual or for details.
p. 10
p. 36
—
—
p. 36
p. 34
p. 34
p. 62
p. 52
—
7
Wireless communication is impossible.
Communication
with wireless LAN
card via access
point mode has
failed.
ESS ID or WEP security setting is different between the
units.
“Adhoc” mode is selected with
the wireless LAN cable.
Set the same ESS ID or WEP
security setting.
Select “Infrastructure” mode.
pgs. 33,
38
—
59
Page 74
REFERENCES
HUB
=
Cascade Port
Cross Port
HUB
AP-12
AP-12
×
×
×
×
×
×××
=
Patch cable
(supplied)
Crossover cable
(supplied)
7
7-2 Connecting the AP-12 and HUB
There are 2 ways to connect the AP-12 and HUB
DD
Connect to the Cross Port
DD
Connect to the Cascade Port
• A port with a switch may be available that switches the cascade port use as cross
port, according to the HUB.
Be careful of the switch position and the connecting Ethernet cable type.
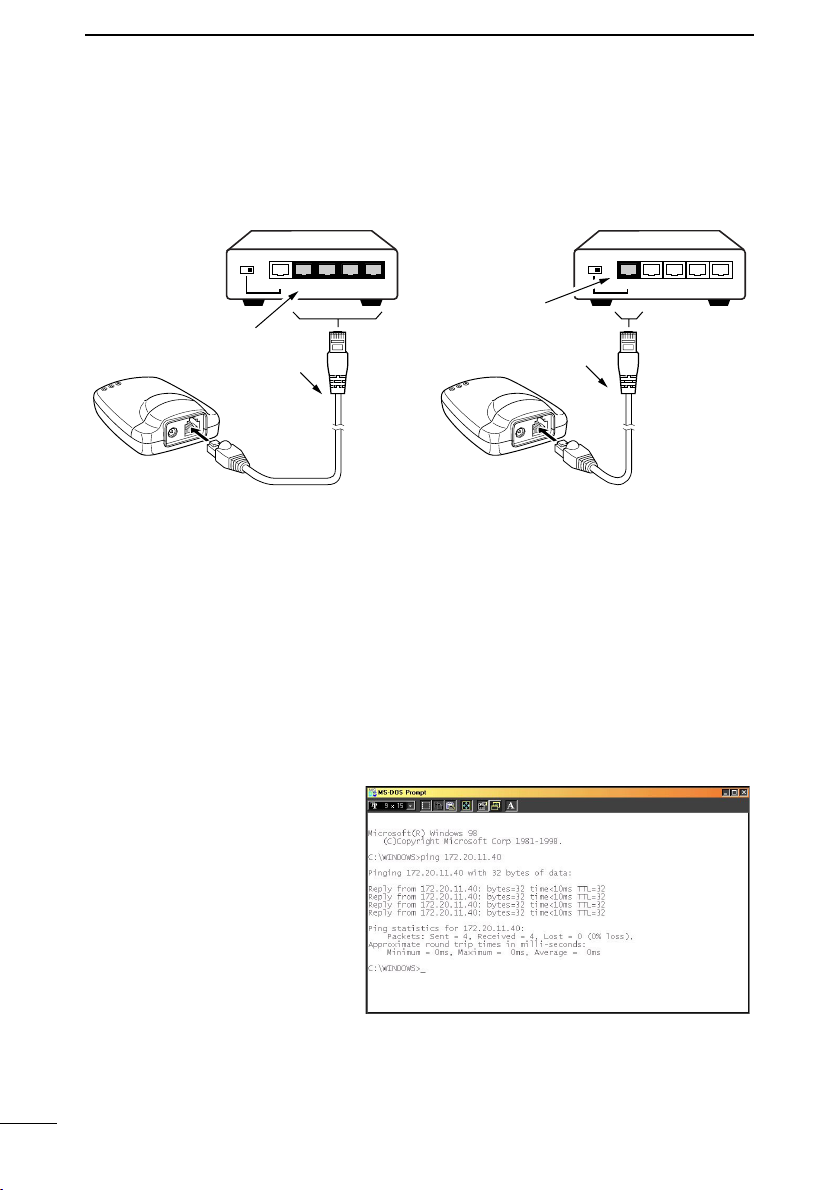
7-3 Verifying the connection to the AP-12
The IP packet received condition of the other PC can be easily checked by pinging
when the IP address for each terminal is set correctly.
Enter the following command in the MS-DOS window to verify by pinging.
“ping xxx.xxx.xxx.xxx”
Enter the desired AP-12’s IP
✰ Ping command example
address for “xxx.xxx.xxx.xxx”
Four pings (echo request) are
transmitted when executing the
command, and the reply message will be received for each
ping.
When no reply is received, check
the terminal protocol availability,
AP-12 or wireless LAN card settings, such as functional mode, ESS ID, etc.
The message “destination unreachable” will be displayed when both the IP address
and subnet mask are different between source and destination terminals.
60
Page 75
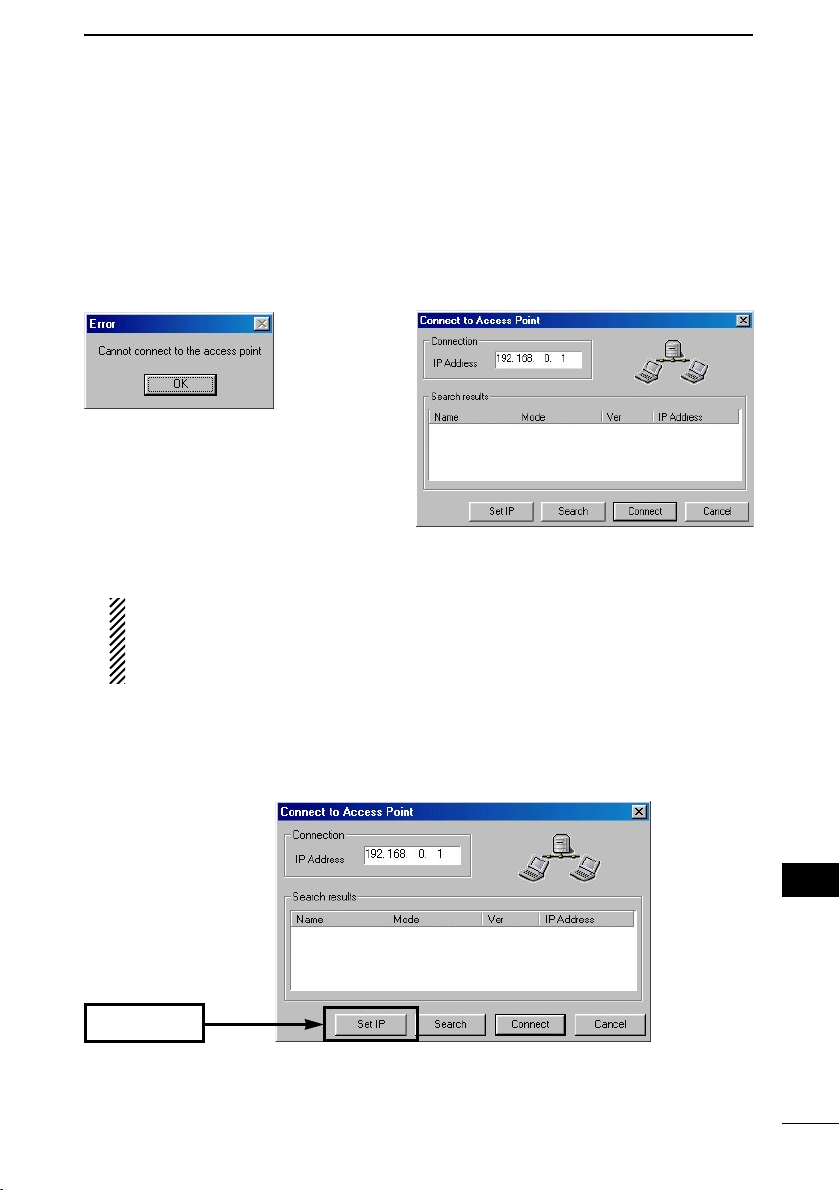
REFERENCES
7
7-4 Failure in searching for the AP-12
Manual IP address setting is necessary when no AP-12 is found (the following
screen appears) using [Easy Setting Wizard] or [AP-12 Manager], even if the connection between the AP-12 and the PC is correct.
• The following screen may take 30 sec. or more to appear.
DD
When using [Easy Setting Wizard]
[Procedure]
q Connect the PC and the AP-12 directly using the supplied crossover cable.
NOTE: DISCONNECT THE PC FROM THE EXISTING LAN.
When the PC is connected to the existing LAN, the AP-12 searches the DHCP
server and uses the IP address obtained from the server according to the
default setting.
w Start [AP-12 Manager] (p. 27).
e Click <Set IP>.
• <Access point IP address setup tool> screen appears.
DD
When using [AP-12 Manager]
Access point does not appear.
Click
7
61
Page 76
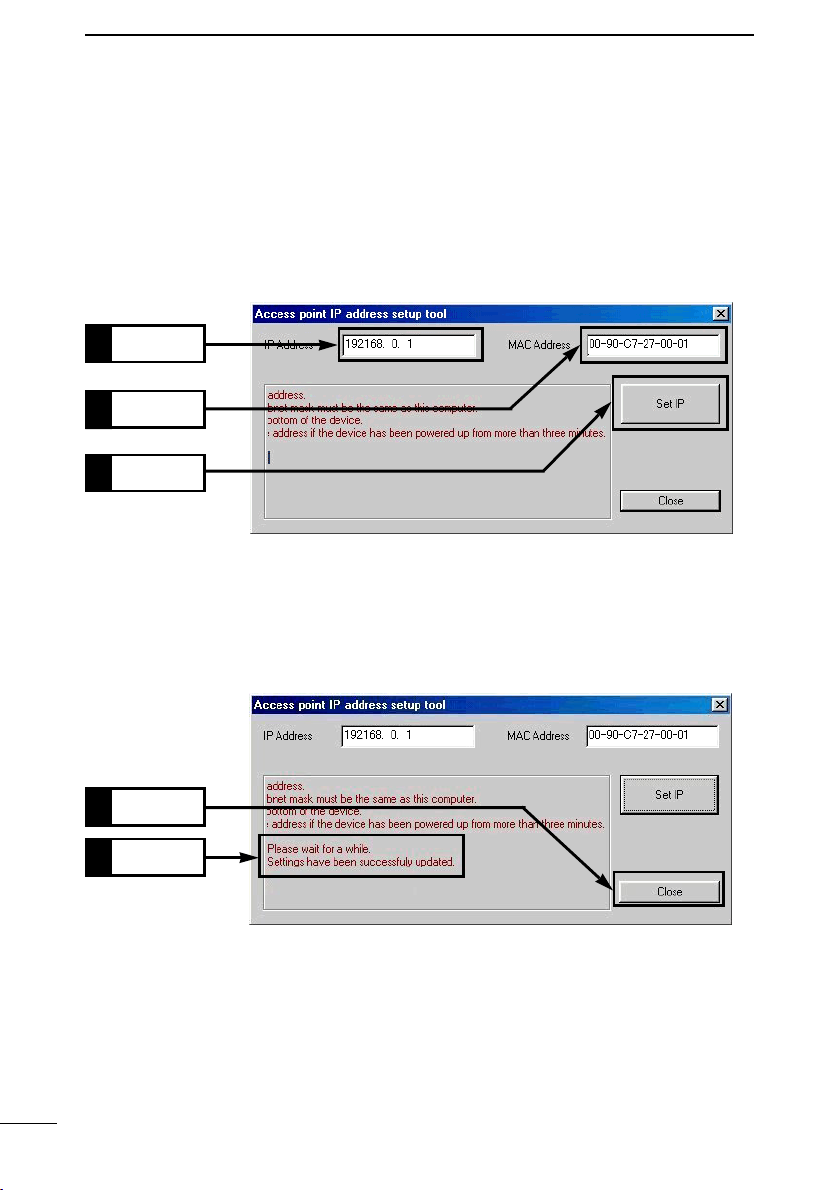
REFERENCES
7
7-4 Failure in searching for the AP-12 (continued)
r Enter the desired IP address for the AP-12. The network part must be the same
as the PC’s IP address.
t Enter the MAC address, described on the serial number seal.
y Turn the power OFF.
After waiting a few seconds, turn the power ON again.
u Click <Set IP>.
Enter
1.
Enter
2.
Click
3.
i After 30 seconds (approx.: from clicking <Set IP>), click <Close> when the mes-
sage stating that the setting is completed appears.
• Do not turn the power OFF at this stage, as the setting will be erased and return
to the condition in step r.
62
2.
1.
Click
Verify
Page 77
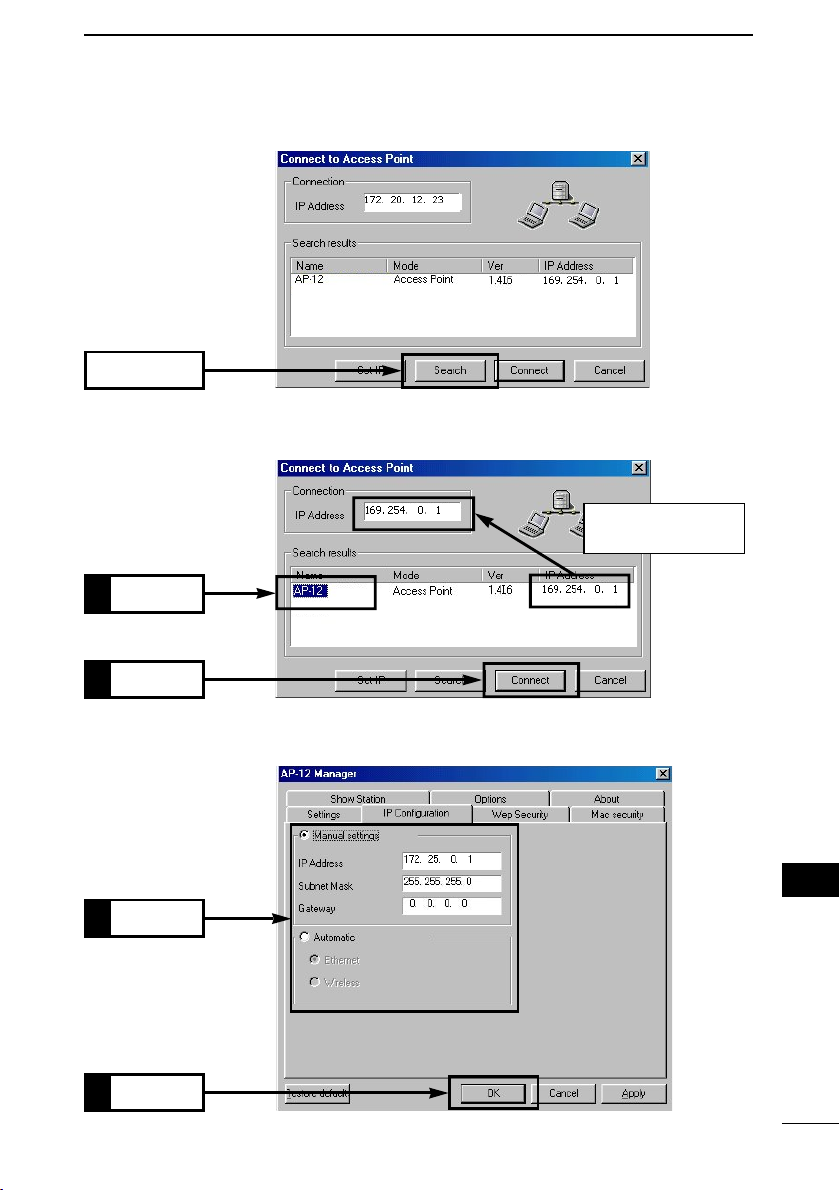
o Click <Search>.
Click
!0 Select the AP-12, then click <Connect>.
• [AP-12 Manager] Settings screen appears.
Click
1.
REFERENCES
Displays the connected
AP-12’s IP address
7
Click
2.
!1 Click [IP Configuration] and set the AP-12’s IP address as desired.
!2 Click <OK> to register all the settings in the screen to the AP-12.
Set
1.
Click
2.
7
63
Page 78
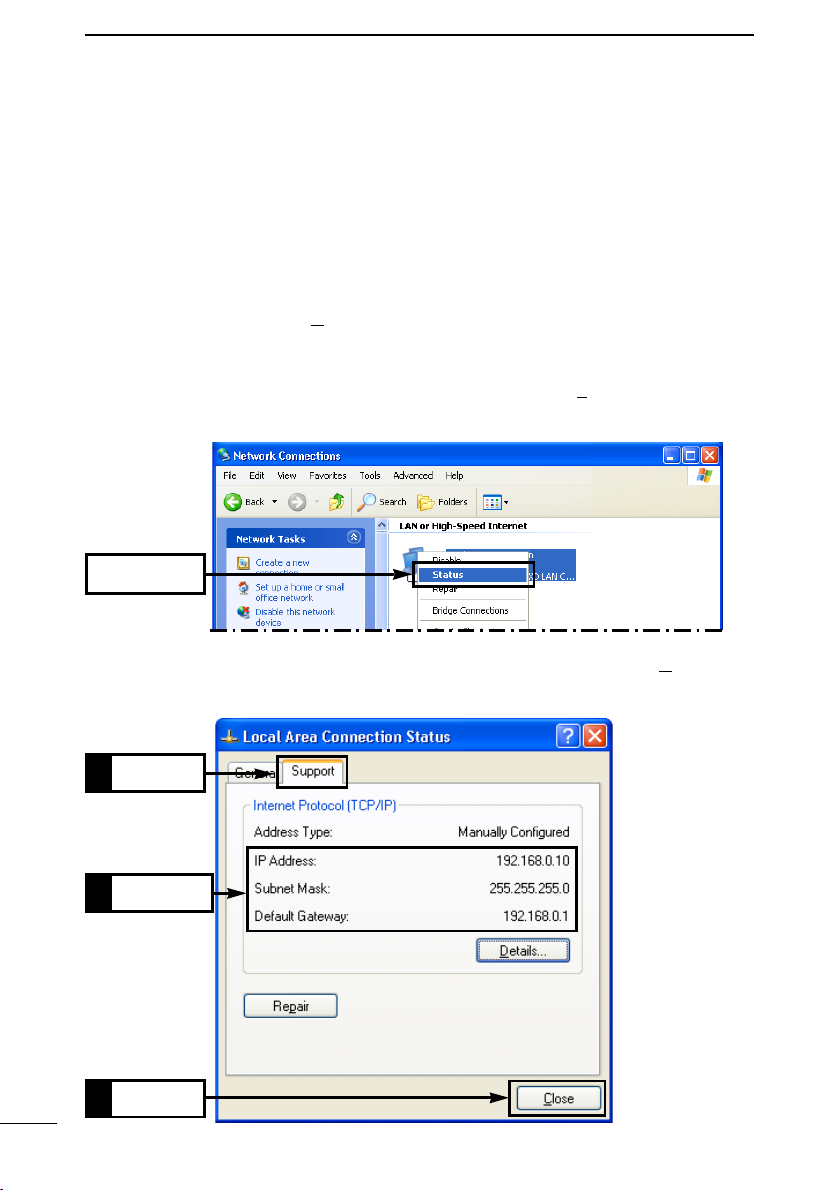
REFERENCES
7
7-5 IP address confirmation
When the PC’s IP address, including network part, is unknown, refer to the following
instructions for confirmation.
- Reset the desired fixed IP address manually, or obtain an IP address from the
DHCP server by connecting the PC to the LAN.
■ Windows XP
[Procedure]
q Click <Start> and select [C
w Click [Network and Internet Connection].
e Click [Network Connection].
r Right-click [Local Area Connection] icon and click [Statu
appears.
Click
ontrol Panel] from the [Settings] menu.
s] in the menu that
t Click [Support] tab and confirm the assigned IP address, then click <C
• IP address assigned to the PC is displayed.
Click
1.
Confirm
2.
Click
3.
64
lose>.
Page 79
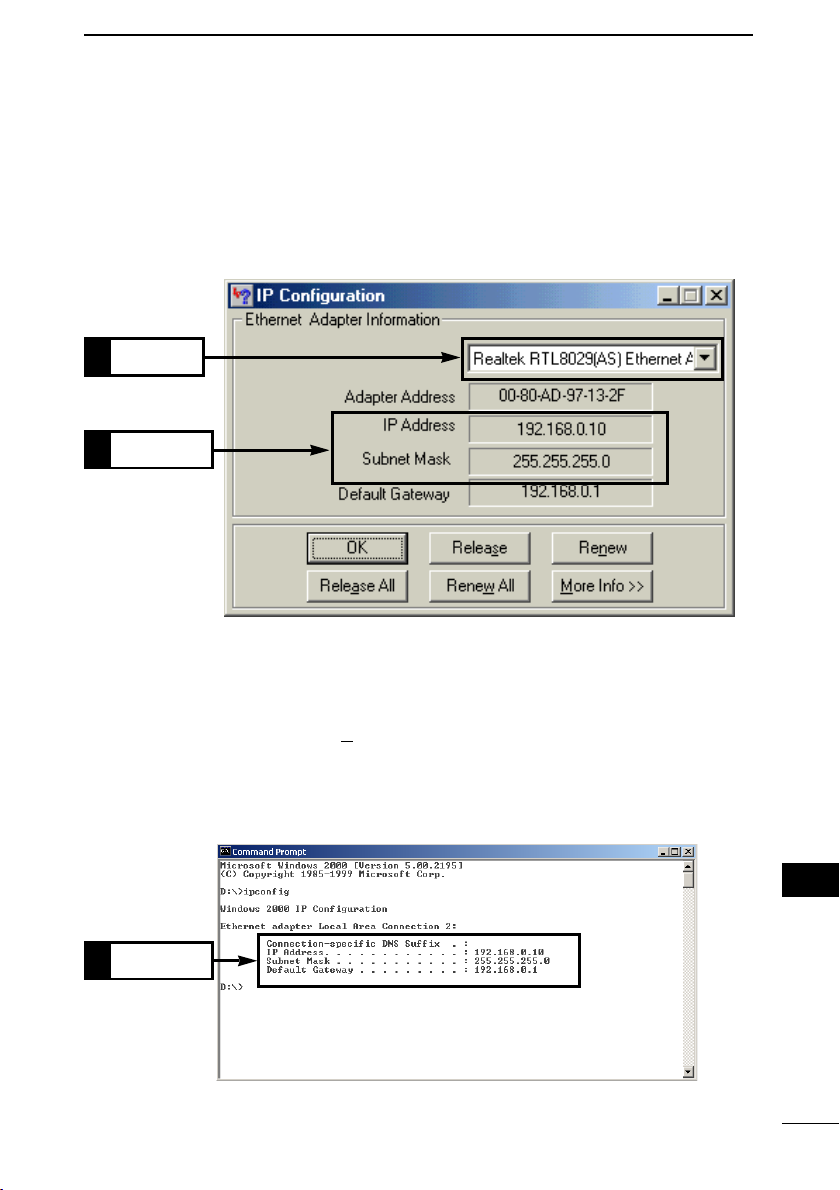
■ Windows 98/98SE/Me
[Procedure]
q Click <Start> and select [Run].
w Enter “winipcfg” and push [Enter].
e Click [▼] and select the desired Ethernet card.
• IP address assigned to the PC is displayed.
Select
1.
Confirm
2.
REFERENCES
7
■ Windows 2000
[Procedure]
q Click <Start> and select [P
[Accessory] menu.
w Enter “ipconfig” and push [Enter].
• IP address assigned to the PC is displayed.
Confirm
1.
rogram]. Then, click [Command prompt] from
7
65
Page 80

REFERENCES
7
7-6 Connection to the router type modem
This section describes the connection between a router type modem and the AP-12
with the default setting.
There are different types of modems available—bridging type and router type.
IMPORTANT!: The AP-12 cannot be connected to a bridging type modem directly.
Bridging type modem: Usually connects one PC only and a global IP address is
assigned to the PC.
Router type modem: Multiple PC’s can be connected in the LAN via the HUB, and
a private IP address is assigned to the PC.
DD
Wireless terminal preparation
After the following preparation is completed, wireless communication can be made
with the AP-12 when using Icom’s wireless LAN card.
q Prepare the PC to use the wireless LAN card.
w Install the supplied wireless LAN card driver.
Install other applications or utilities if supplied.
• Refer to the instruction manual supplied with the LAN card for driver, applications and utilities installation.
e Install [AP-12 Manager].
• [AP-12 Manager] is used for IP address confirmation, AP-12 settings, etc.
66
Page 81
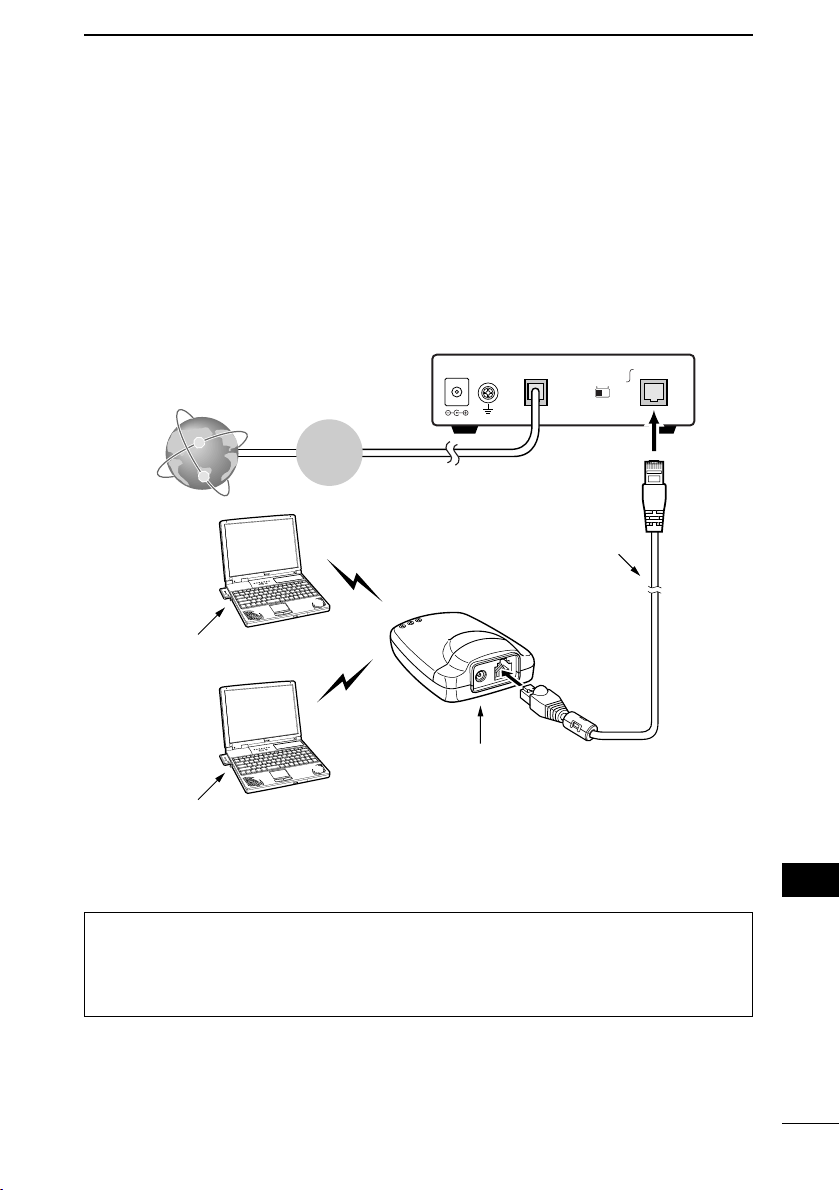
REFERENCES
DD
Connection to the router type modem
[Procedure]
q Connect the AP-12 and the router type modem using the supplied patch cable.
w Connect the AC adaptor to turn the AP-12 power ON.
• The [POWER] indicator and the LAN indicator lights.
• The [Wireless LAN] indicator flashes.
* Check the Ethernet cable connection and type if the LAN indicator does not light.
e Start the PC and obtain an IP address from the modem automatically.
Router Type Modem
DC Ethernet
MDI MDI-X
7
INTERNET
Wireless LAN card
Wireless LAN card
When communication has failed.
Turn the AP-12 power OFF. After waiting a few seconds, turn the power ON again.
Then check the wireless terminal’s IP address using [AP-12 Manager].
See the Chapter 7-5 (p. 64) for IP address confirmation.
DSL
/CATV
Patch cable
(supplied)
AP-12
Connect the AC adapter after the
Ethernet cable is connected and then
turning the modem power ON.
7
67
Page 82

REFERENCES
7
7-7 Specifications
• Input power : 7.5 V DC ±5% (Negative grounding)
With supplied AC adapter is 90 to 132 V AC
• Current drain : Transmit 400 mA (typical)
Receive 350 mA (typical)
• Operating temperature range : 0 to +55°C; +32 to +131°F
• Dimensions : 100.0(W)×30.5(H)×70.0(D) mm
• Weight : Approx. 90 g; 3.2 oz
• Standard : IEEE 802.11b
• Compliance : FCC Part 15, Canada RSS-139
• Communication method : Simple system
• Spreading system : Direct spread-spectrum communication
• Modulation : DPSK, DQPSK
• Frequency range : 2400 to 2472 MHz
• Available channels : 11
• Data transmission rate : Max. 11 Mbps
• Transmission range : Approx. 30 m; 98.4 ft (indoor) at 11 Mbps
• Security : WEP (Wired Equivalent Privacy)
• Transmission power : 100 mW or less
• Reception sensitivity : –76 dBm max. (frame error rate: 8%)
• Demodulation method : Digital demodulation (matched filter type)
• Antenna type : Diversity antenna (Built-in, non-replace-
15
3
⁄16(W)×13⁄16(H)×23⁄4(D) in
(projections not included)
system
MAC (Media Access Control)
*MAC: [Bridge Mode A] and [Bridge Mode B] is
not available.
ment)
68
Page 83

REFERENCES
• LAN interface : Ethernet plug (Type RJ-45)
Based on IEEE802.3/10BASE-T
• Transmission rate : 10 Mpbs
• User interface : Status indicators (Power, Wired LAN,
Wireless LAN)
• System requirements : PC/AT compatible computer
Windows XP/Windows Me/Windows
2000/Windows 98 or Windows 98 SE.
* The stated specifications may be subject to change without notice.
* The transmission range may vary depending on the transmission speed and
the environmental conditions.
■ Specifications for Ethernet Plug
Modular plug type RJ-45 (8-pin) ×1
1. Sending (+) 2. Sending (–)
12345678
3. Receiving (+) 4. Not used
5. Not used 6. Receiving (–)
7. Not used 8. Not used
7
* The stated specifications may be subject to change without notice.
■ Wireless LAN for the AP-12
To communicate with the AP-12, the PC must be installed with Icom’s Wireless LAN
products for 11 Mbps.
• WEP security function is available with use during communication between Icom
products.
• Bridge Mode is not available except with Icom products.
• When functional mode is Bridge Mode B, select the AP-12 as the access point.
7
69
Page 84

REFERENCES
7
7-8 Glossary
Access point
A generic name for devices or points to connect a
wired LAN and wireless LAN.
BSS ID (Basic Service Set-IDentifier)
Specified wireless LAN in MAC class.
The ID is uses the MAC address that is assigned to
each network device.
Client
A generic name for network devices which relay
packets at a MAC address level.
Crossover Cable
The transmission signal cable and receiving signal
cable are cross wired to communicate correctly.
Generally, used for connection between the PCs.
DHCP server
DHCP (Dynamic Host Configuration Protocol) is a
protocol for a client to obtain necessary information
automatically from a server on the TCP/IP network.
The DHCP server controls IP address, default gateway, domain name, etc. as network information. AP12, which has the DHCP server function, obtains the
IP address, default gateway, DNS address, etc.
when the DHCP client (Computer) has started.
ESS ID (Extended Service Set-IDentifier)
A name for identification to create several network
groups in a communication area in a wireless LAN.
In the wireless network group which communicates
to AP-12, the identifier of the wireless terminal must
be the same as that of AP-12.
Ethernet
A LAN communication system developed by Xerox,
DEC and Intel. 10BASE-T, 100BASE-TX, 10BASE5, 10BASE-2, etc. are available depending on the
cable type.
Global IP address
A unique address assigned to a device. One global
IP address is assigned to only one device in the
world.
HUB
A hub is required when the AP-12 and other devices
are used to construct a network. 10BASE-T or 100
BASE-TX cable is used for the connection to the
hub.
IP (Internet Protocol) address
32-Bit address to identify all the devices connected
to a network in which the TCP/IP protocol is used.
Usually, the IP address consists of four 8-bit numerical character strings of decimal notation (e.g.,
192.168.0.1). A private IP address specified by a
network administrator does not need to apply to an
address administration agency or internet service
provider. However, the network administrator must
assign the private address according to the rules
below. The private address must be converted into
a global IP address when connecting to an external
network. The IP addresses below can be used as
the private IP address.
Class A: 10.0.0.0 to 10.255.255.255
Class B: 172.16.0.0 to 172.31.255.255
Class C: 192.168.0.0 to 192.168.255.255
LAN (Local Area Network)
A relatively small-sized network in the same floor or
the same site.
MAC address (Media Access Control Address)
A physical address specified in individual wired or
wireless products. The network device manufacturers control this address so that a unique number
can be assigned to only one product in the world.
Ethernet equipment and wireless LAN products
send and receive a frame according to this MAC
address.
Network
The state that some devices such as a server, workstation, Computer, etc. are connected to a communication system through a cable or ADSL line, to
transmit data.
Packet
A unit to send/receive data. The packet consists of
a header, which contains information necessary for
sending/receiving, and data section which is the
data itself.
70
Page 85

Password
A character string which must be entered by a user
who is accessing a network because of network
security. If a password is set, the user cannot
access unless the user enters the valid password
correctly.
Patch Cable
The transmission signal cable and receiving signal
cable are wired straight to communicate correctly.
Generally used for connection between the PC and
HUB.
Protocol
Definition of procedure to execute send/receive data
in the communication.
Subnet mask
A subnet mask is used in one IP address as a network address and host address. Assuming that the
IP address of a host is “192.168.0.1” and the subnet
mask is “255.255.255.0” multiply the IP address of
binary notation and subnet mask of binary notation
together, and the network address “192.168.0.0” is
obtained. Then, the remainder “1” is the host
address.
Traffic
Flow of packets on the network or load applied to
the network line (e.g., data transmitted through the
network line). As the traffic increases, the data
transmission rate may decrease or data may be
lost.
REFERENCES
7
WEP (Wired Equivalent Privacy)
A function to encrypt, send and receive a wireless
LAN signal. This function can prevent wireless LAN
communication interception.
10BASE-T
One of the Ethernet standards. 10BASE-T achieves
the transmission rate of 10 Mbit/s with a twisted pair
cable.
100BASE-TX
One of the Ethernet standards. 100BASE-TX
achieves the transmission rate of 100 Mbit/s with a
twisted pair cable of Category 5.
7
71
Page 86

MEMO
Page 87

MEMO
Page 88

A-6165G-1EX
Printed in Japan
2002 Icom Inc.
©
1-1-32, Kamiminami, Hirano-ku, Osaka 547-0003, Japan
 Loading...