


msr_0444_Net_Media_Center:Layout 1 3/7/2008 3:23 PM Page 1
Net.Media Center
P R O D U C T M A N U A L
Structured Cabling Solutions
PremiumProducts • ProvenPerformance • CompetitivePrices
ICRESDC14E • ICRESDC21E
ICRESDC28E • ICRESDC42E
msr_0444_Net_Media_Center:Layout 1 3/7/2008 3:23 PM Page 2
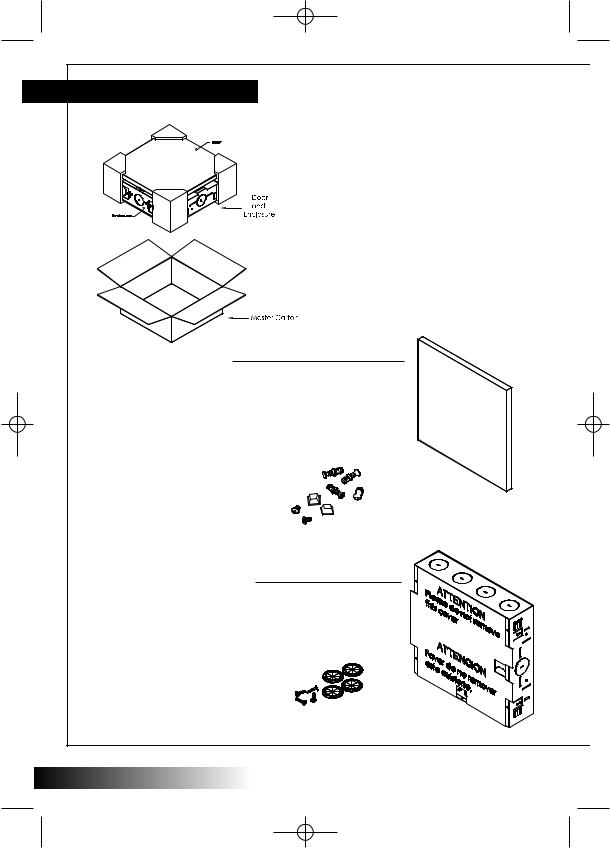
Package Content
Contenido
All Net.Media Centers include the following components in its package: (Note: ICRESDC14E is shown for illustration purposes).
Todos los Net.Media Centers incluyen los siguentes componentes:
(Nota: ICRESDC14E se encuentra ilustrado).
1. Door Package Includes:
•One (1) Door Assembly with hinge, latch, and logo
•Un (1) conjunto de puerta con bisagra, picaporte, y logo
Bagged Items/Contenido en bolsa:
•Two (2) Door Screws
•Dos (2) Tornillos para puerta
•Two (2) Rubber Bumpers
•Dos (2) Bumpers de cuacho (ULE)
•Four (4) Fasteners
•Cuatro (4) Cierres
2. Enclosure Package includes:
•One (1) Enclosure
•Una (1) caja
•One (1) Protective Cover
•Una (1) cubierta protectora
Bagged Items/Contenido en bolsa:
•Four (4) Rubber Grommets
•Cuatro (4) Ojales de cuacho
•Four (4) Mounting Screws
•Cuatro (4) Torinillos de Montar
2
msr_0444_Net_Media_Center:Layout 1 3/7/2008 3:23 PM Page 3
Features
Characteristicas
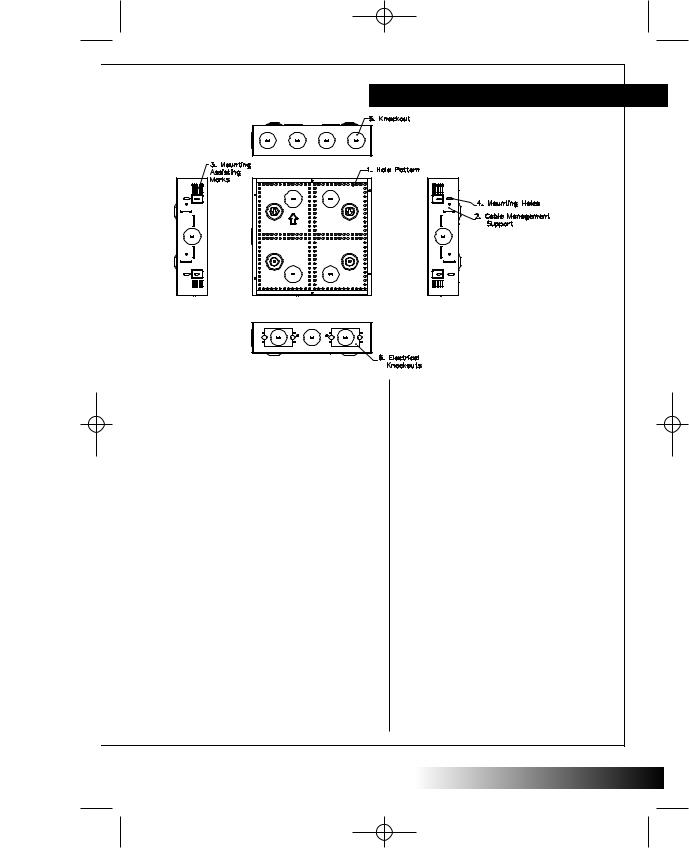
1. Hole Pattern
Can be used to mount equipment vertically or horizontally for maximum accommodations.
2. Cable Management Support:
Organize and route cable along the sides of the enclosure for a clean appearance using items ICCMSCMPR1 or ICCMSCMPR2. (sold separately) (Note: It is recommended to use only one side of the enclosure when mounting the Cable Management Rings. Cable Management Rings sold separatly).
3. Mounting Assistance Marking:
Assist in determining the mounting distance the enclosure needs to be mounted from the finished wall. Markings indicate drywall/sheetrock thickness. Enclosure shall be aligned with the wood or metal studs accordingly prior to drywall/sheetrock application.
4. Mounting Holes
Mounting holes are found along the sides of the enclosure that suit different mounting configurations
5. Knockouts:
Knockouts are convenently placed on all sides of the enclosure for cable management.
6. Electrical Knockout:
A set of electrical knockouts are located at the bottom of the enclosure for mounting up to 4 electrical outlets.
1. Serie de Hoyos
Puede montar modulos vertical y horizontal para accomdar el maximo en la caja.
2. Anillos para Manejar Cable:
Organize y dirija cable sobre las orillas de la caja para obtener una installation limpia y presentadora.
(Nota: Se recomienda usar un lado de la caja para instalar los Cable Management Rings. Cable Management Rings se venden separados).
3. Marcas en Asistencia Para Montar
Assisten para montar la caja dependiendo el grosor de la pared desiada. La caja se debe alianar con las marcas de montar y los postes de madera or metal.
4. Hoyos para montar
Hoyos de montar se encuentran a los lados de la caja para montar la caja dependiendo la configuracion usada.
5. Knockouts
Knockouts se encuentran por los lados de la caja para organizar cable.
6. Knockout Electricas
Un par de Knockout Electricas se encuentran en la parte bajade de la caja para instalar 4 enchifes electricos.
3

msr_0444_Net_Media_Center:Layout 1 3/7/2008 3:24 PM Page 4
Installation
Instalacion
STEP 1
Remove the enclosure from the master carton.
NOTE: Store the door package in a safe location to prevent loss or damage if not being installed right away.
Remueve la caja de su carton.
NOTA: Guarde la puerta en un lugar seguro para prevenir perdida y daños si no es instalada imediatamente.
STEP 2
A. Remove the Protective Cover, but DO NOT discard the cover.
Remueva la cubierta protectora pero NO la deseche.
4
 Loading...