

Page 1

Please check out our eBay auctions for more great
deals on Factory Service Manuals:
Page 2

Basic Handbook for the IBM WorkPad
Page 3

Copyright
Copyright © 1998 3Com Corporation or its subsidiaries. All rights reserved.
3Com, Palm Computin g, Graf fiti , and Hot Sync ar e re giste red trade mar ks and
the Palm Computing Platform logo is a trademark of Palm Computing Inc.,
3Com Corporation or its subsidiaries. The following are registered trademarks of International Business Machines Corporation in the United States
and/or other count ries: I BM and Work Pad. O ther compa ny, pr oduct and service brand names may be trademarks, service marks or registere d trademark s
of their respective owners.
P/N: 423-0220
Page ii Basic Handbook for the IBM WorkPad
Page 4

Contents
Chapter 1: Getting Started With Your WorkPad
Locating Front Panel Controls.............................................................2
Protective Flip Cover ............................................................................3
Locating Back Panel Components ......................................................4
Installing the Batter ies ... .......... ............ .......... ....... .......... ............ .......... 5
Calib ra t i ng the S creen.... ........ .. ... .............. ... .. ............... .. ... .............. ... .. 6
Setting the Time.....................................................................................8
Setting the Current Date.......................................................................9
Connecting the Cradle ........................................................................10
Installing WorkPa d Desk top Softw are............... ................. .............10
Chapter 2: Wo rki n g Wi th Your WorkPad
Selecting Applications ........................................................................13
Using the On-Screen Keyboard.........................................................16
Writing With the Stylus......................................................................18
Using Application Controls...............................................................28
Using Menus ........................................................................................29
Choosing Fonts ....................................................................................33
Using Categories..................................................................................34
Attaching Notes...................................................................................38
Marking Private Entries .....................................................................38
Beaming Information to Other WorkPads.......................................39
Chap te r 3: Find i n g In formation With Your Work P ad
Using the Find Command..................................................................41
Using Phone Lookup ..........................................................................42
Chapter 4: Installing and Removing Applications
Installing Applica tions .......................................................................45
Installing Games..................................................................................48
Removing Applications......................................................................48
Removing WorkPad Desktop Software ...........................................49
Chapter 5: Getting Help With Your WorkPad
Displaying Online Tips.......................................................................51
Troubleshooting...................................................................................52
Technical Support, Service and Repair ............................................57
Chapter 6: Maintain ing You r WorkPad
Caring for Your WorkPad..................................................................59
Index
Index......................................................................................................63
Contents Page iii
Page 5

Page iv Basic Ha ndbook for the I BM Work Pad
Page 6

Chapter 1
Getting Starte d With Y our Work Pad
Congratulations on your purchase of the IBM®
WorkPad
how to use your WorkPad. To learn about the
applications that come with your WorkPad, refer to
the Applications Handbook for the IBM WorkPad.
This chapt e r e xplains the p hysical buttons and controls on your
WorkPad, ho w to i nsta ll the ba tter ies, s tar t yo ur W orkPad fo r the fir st
time, and set up your WorkPad Desktop softw are .
®
PC companion. This handbook describes
Chapter 1 Page 1
Page 7

Locating Front Panel Controls
WorkPad screen
Graffiti writing area
Applic a tion but tons
Scroll button
Power button,
Backlight control
WorkPad
screen
®
Graffiti
writing
area
Applicatio n
buttons
Scroll
button
Displays the applications and information stored in
your WorkPad. It is touch-sensitive and responds to
the stylus or your finger.
The area where you write strokes using the Graffiti
alphabet. See “Writing With the Stylus” for details
about how to write Gra f fiti character strokes.
Activate the individual WorkPad applications that
corres p ond to the icons on the buttons: Da te Book,
Address Book , To Do List and Memo Pad. You can
reassig n these buttons to acti vate any applic ation on
your WorkPad. See “Button Preferences” in the
Applic atio n s H andbo o k for the IBM WorkPa d .
Note: If your WorkPad is off, pressing any
applicati on button ac tivates t he WorkPad and
opens the corresponding application.
Displays text and other information that extends
beyond the area of the WorkPad screen. Pressing the
lower ha lf of the scro l l but ton “s crol l s down ” t o vi ew
information below the viewing area, and pressing the
upper half of the button “scrolls up” to view the
information above the viewing area.
Page 2 Basic Han d book for the IB M Work Pa d
Page 8
Power
button
Turns your WorkPad on or off and controls the
backlight feature. If your WorkPad is turned off,
pressing the p owe r button turns the unit on, and
WorkPad ret urns you to the last screen you were
viewing.
If your WorkPad is turned on, pressing the power
button turns the unit off, helping to conserve battery
life. Hold ing the power button down for about two
seconds turns the backlight on or off.
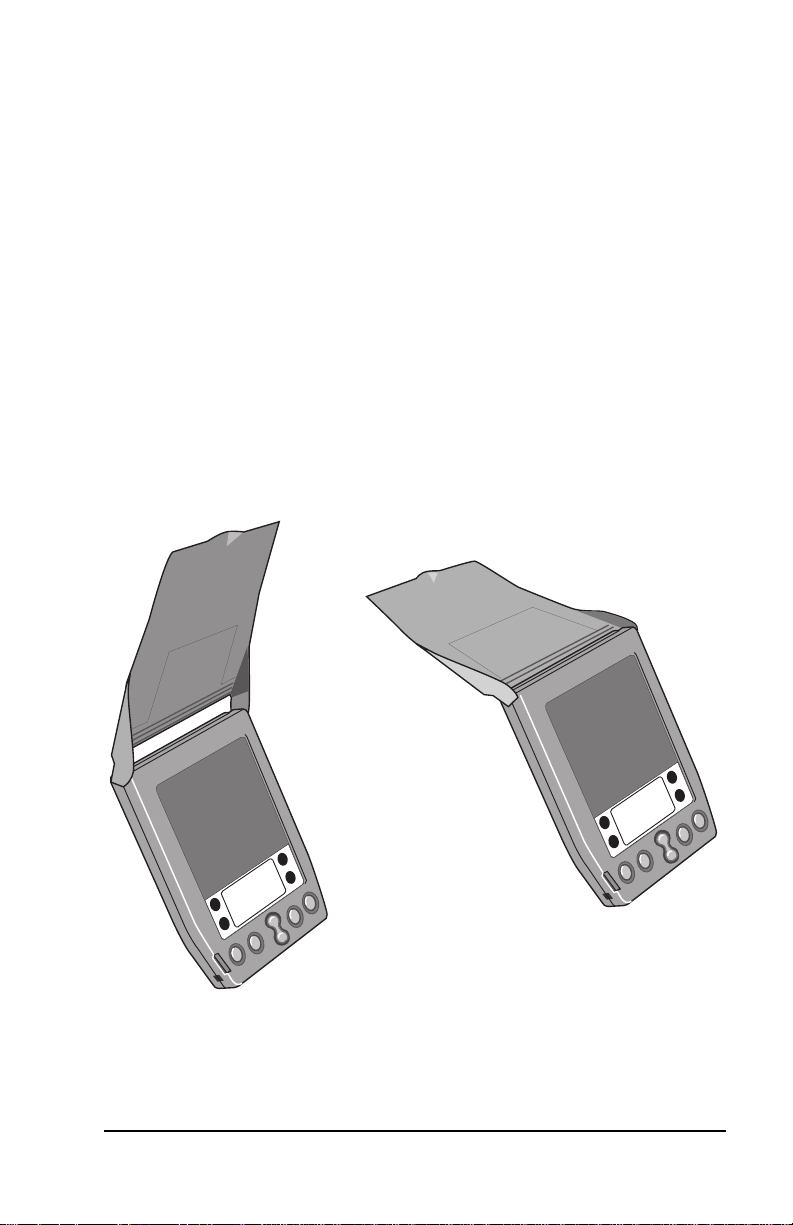
Protective Flip Cover
The cover protects the WorkPad screen when it is not in use and helps
reduce glare while you use your WorkPad. You can open the cover so
that it is at an angle, open it fully or remove it altogether by pulling the
cove r out of the h o l e s o n the si d e s of th e WorkP a d. To reat tach the
cover, reinsert the pegs in the h o les.
Chapter 1 Page 3
Page 9
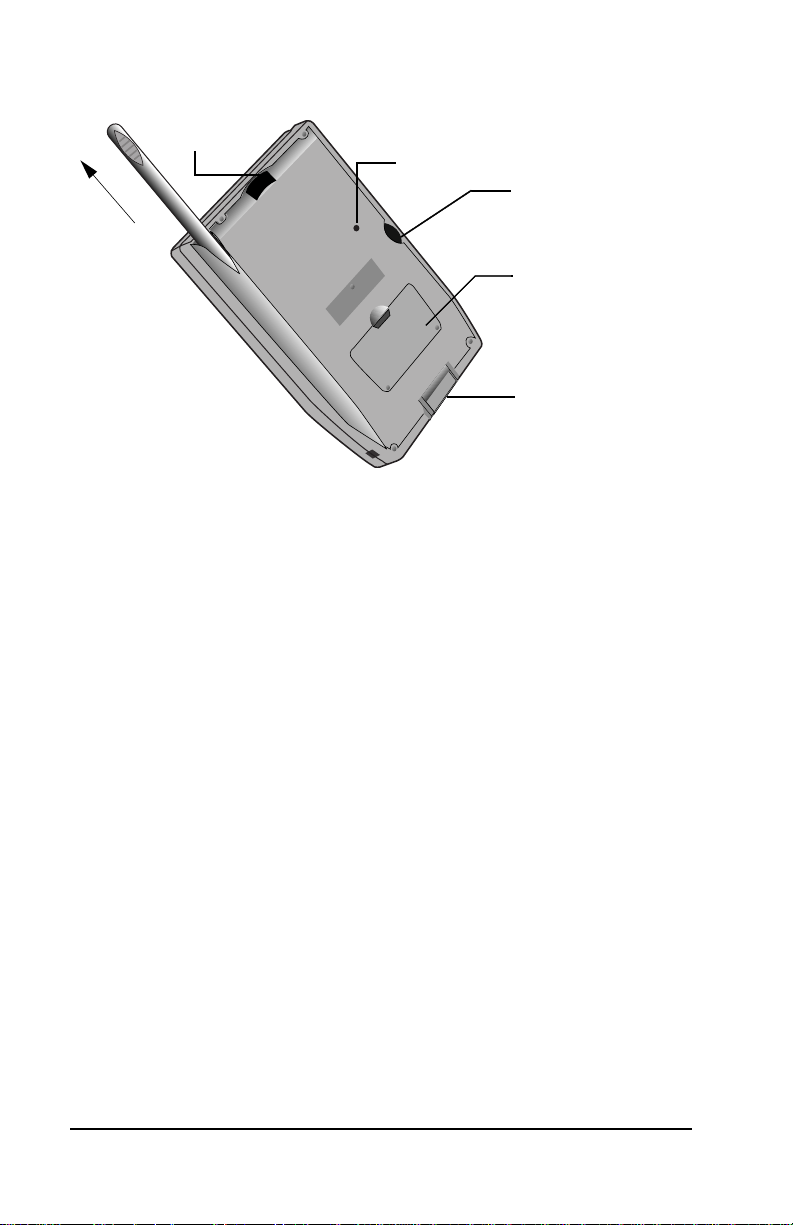
Locating Back Panel Components
IR
port
Stylus
Reset
button
Contrast
control
Batter y
door
Serial
port
door
Stylus
IR port
Reset button
Slides in and out of the slot on th e bac k si de of
the WorkPad. To use the stylus, remove it
from the s lot and h old it as you wou ld a pen or
pencil.
Important: Always use the po i nt of th e s tylu s
for tapping or making strokes on
the WorkP ad scre en. Never use an
actual pen, pencil or other sharp
object to write on the WorkPad
screen.
Uses infrared technology to tra ns mit data to
and receive data from other WorkPads. S e e
“Beaming Information to Other WorkPads”
for more information.
Under normal use, you should never have to
use the reset button. See “Resetting Your
WorkPad” fo r information about how to use
the reset button.
Page 4 Basic Han d book for the IB M Work Pa d
Page 10
Contrast
control
Adjusts the appearance of the screen for the
clearest screen display. Depending on the
lighting conditions or temp erat ure of the
environment where you use your WorkPad,
you may need to adju st the settin g of t he
contrast control.
Battery door
Covers the batteries th at power your
WorkPad. See “Inst alling th e Batter ie s” for
information on removing the battery door and
installing batteries.
Serial po rt d o or
Protects the serial port that fits into the
connector of the WorkPa d cradle to ensur e
that the co n ne ction su rf a ce of the seria l port
remains clean and clear of debris.
Installing the Batteries
To use your WorkP ad, you must install two AAA alka line batteries.
The ba t te r i e s f it b e h in d the bat te ry door on the b a ck of the W o r k P a d.
To install the batteries in your WorkPad:
1. Press the latch on the battery door and lift the battery door away
from the WorkPad.
Press tab
to open
2. Install th e two AAA alkaline batteries sup p lie d with your
WorkPad into th e battery co mp artment.
Chapter 1 Page 5
Page 11

Note: A diagram in the i nterior of the b a ttery compartment
shows the orientatio n of the + and - e nd s of the batteries.
When correctly installed , the clips in the batter y
compartment secure the batteries in place.
3. Insert the battery door back into place so that it is flush with the
back of the WorkPad and “clicks” into position.
Important: Do not force the battery door. When the batteries are
correctly installed, the batte ry door clips smoothly into
place. If you feel resistance when replacing the battery
door, make sure the door is ali gned with the slots on the
back of your Work Pad, and that the ba tteries a re firmly
seated in the battery compartment.
Calibrating the Screen
The first time you start your WorkPad the calibration screen
automatically appears. Follow the steps in this section to align the
internal circuitry of your WorkPad with its touch-sensitive screen.
To calibrate your WorkPad:
1. Press the power button on the front panel of your WorkPad to
display the cal ibration screen.
Power
button
Page 6 Basic Han d book for the IB M Work Pa d
Page 12

Note: If necessar y, adjust the c ontrast con trol locate d on the side
of the WorkPad, so the alignme nt screen is clear and
readable.
2. Remove the stylus from it s storage slot on the back of t he
WorkPad.
3. Tap the exact center of each target that appears on the screen with
the tip of the sty lus.
After you tap eac h of the t ar get s, co nt inue w ith the f oll owi ng s ect ions
to set the time and date.
About the Backlight Feature
If you have difficulty seeing the information on your WorkPad, you
can use the backlight feature to illuminate your screen.
To activate the backlight feature:
■ Press the power button and hold it down for about two seconds.
Release the button when the b a ck light turns on.
To turn off the backlight feature:
■ Press and hold the p owe r button for about two seconds. The
backlight feature also turn s of f automatically (after a period of
inactivity) with the Auto-off after feature.
In add i tion, yo u ca n u se a f u ll - s creen pe n stroke to ac ti v ate th e
backlight feature. See “Buttons Preferences” in the Applications
Handbook for the IBM WorkPad for more information.
Chapter 1 Page 7
Page 13

Setting the Time
The General Preferences screen is the first screen to appear after you
align the digi tizer on your WorkPa d.
Note: If the General Preferences screen is not on your WorkPad
screen, you may have pressed one of the application buttons
on the front panel. See “Opening Preferences Screens” in the
Applications Handbook for the IBM WorkPad for information on
displaying the General Preferences screen.
To set the current tim e:
1. Tap the Set Time box in the General Preferences sc reen to open t he
Set Time dialog.
Tap here
2. Tap the up or down arrows to change the ho ur .
3. Tap the minu te s bo x, and then t ap t he ar rows t o a djus t th e s ettin gs
for th e cu rre nt time .
4. Tap the AM or PM box to select the time of day.
Note: Your WorkPad can also display time based on a 24-hour
clock. See “Formats Preferences,” in the Applications
Handbook for the IBM WorkPad.
5. Tap the OK button to close the Set Ti me di alog and retur n to the
General Preferences screen.
Page 8 Basic Han d book for the IB M Work Pa d
Page 14
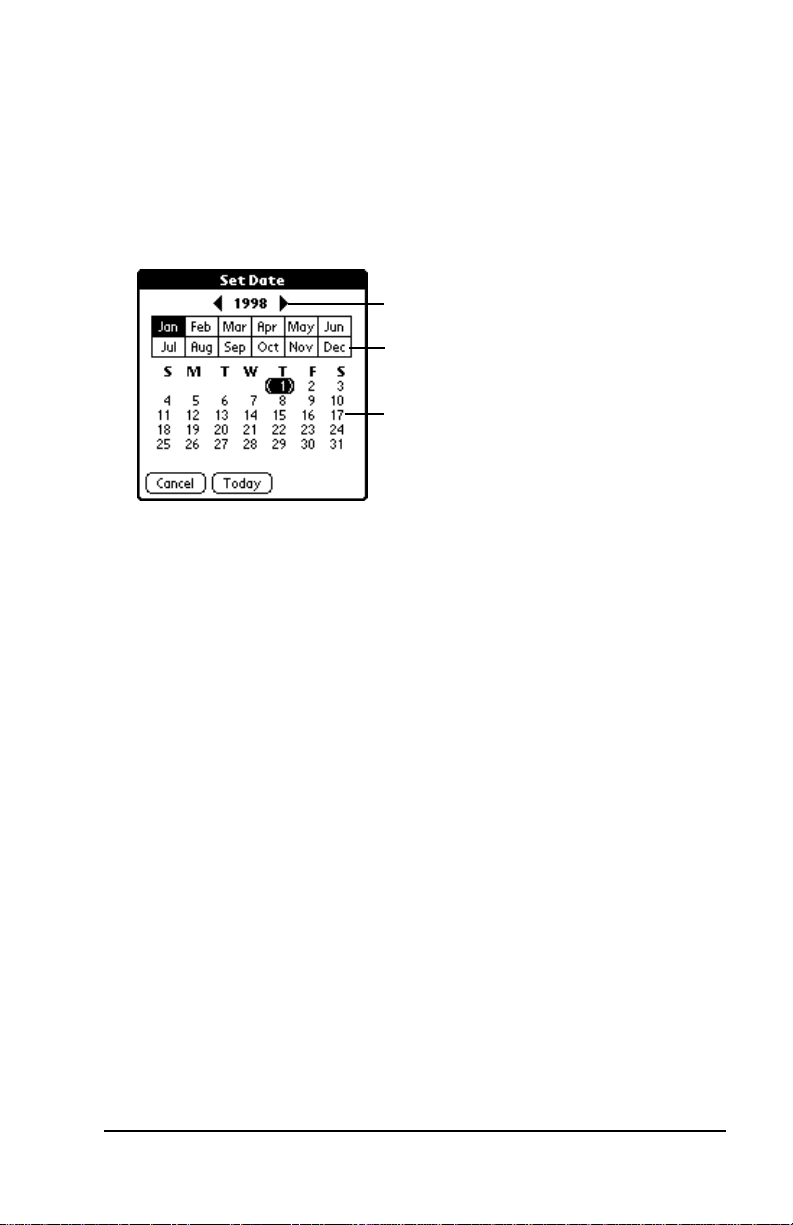
Setting the Current Date
The Set Date box in the General Preferences screen is used to set the
current date for your WorkPad.
To set the current date:
1. Tap the Se t D a t e b o x to op e n the S e t D a te di a l o g .
2. Tap the arrows at the top to sele ct the current year.
Tap arrows to select year
Tap to select month
Tap to selec t da te
3. Tap a month box to se le ct the cur r ent month.
4. Tap the current date to close th e Se t Date dialog and retu rn to the
General Preferences screen.
Note: You do not need to adjust the other General Preference
settings at this time. See “General Preferences” in the
Applications Handbook for the IBM WorkPad for
informati on about the rem a ining options.
Chapter 1 Page 9
Page 15

Connecting the Cradle
The cradle that com es with yo ur Work Pad enab les you to synchro nize
the in f ormati o n on your W o rkPa d and the W o rkPa d D e sktop
®
software usi ng Ho tS y nc
To connect the cradle:
■ Turn off your computer and plug the cable from the WorkPad
technology.
cradle into the serial communicatio ns port on your computer.
Note: Your WorkPad requires a dedicated port. It cannot share a
port wit h an inter nal mo dem or ot her de vice. If y ou a re uns ure
about the exact location of the se rial port on yo ur computer,
refer to the user’s manual supplied with the computer.
Installing WorkPad Desktop Software
WorkPad Desktop software e xtends many of th e functions of your
WorkPad to your computer. Although using WorkPad Desktop
software is optional, when you use it with y our WorkPad and the
built-in HotSync technology, you can fully synchronize the
information on your Wor kPa d with the info rma tion on your
computer. Changes you make on your WorkPad or WorkPad Desktop
appear in both places after you synchronize.
With WorkPad Desktop software you can:
■ Work with you r Wo r k P ad ap p l i ca t ions on you r com p u t er.
WorkPad Desktop duplicates the Date Book, Address Book, To Do
List and Memo Pa d a pplications o n your Work Pad, so you can
view, ente r and modify any data stored on your WorkPad.
Page 10 Basic Handbook for the IB M Work Pa d
Page 16

■ Back up the da ta stored on your WorkPad with HotSync
technol og y and synchronize the data with Wor k Pad Desktop.
Synchronization is a one-step procedure that ensures your data is
always safe and up-to-date. See th e “HotSync” chapter in the
Applications Handbook for the IBM WorkPad for information about
using this feature.
■ Import and export data, so you can easil y transfe r data fr om other
Wind ows
■ Print your Date Book, Address Book, To Do List and Memo Pad
®
applicati ons into Address B ook or Memo Pad.
information on any Windows-compatible printer.
System R equirements
To install and operate WorkPad Desktop, your computer system must
meet the following requirements:
Minimum Re q u ir em en ts
■ Windows 95 or Wind ows NT 4.0
■ IBM-compatible 486 computer or higher
■ 8 MB RAM (memory) minimum, 16 MB recommended
■ 12 MB available hard disk space
■ VGA monitor or better (the Work Pad Quick Tour req uires a 256
color vi de o di spl a y)
■ CD-ROM drive
■ Pointing device
■ One available serial port
Optional Equipment
■ Modem (such as WorkPad Modem)
■ Windows-com patib le print er
Chapter 1 Page 11
Page 17

Software Installation
The following instructions guide you through installing WorkPad
Desktop software. After you install the sof t ware, refe r to the Help
menu for comp lete information about how to use WorkP a d Desktop.
To ensure a safe and uninterrupted installation of the WorkPad
Desktop software, ple a se do the fol lowing before insta ll ing:
■ Connect the cradle to your computer.
■ If you have placed your WorkPad in the cradle, remove it during
software installation.
■ Exit all programs, including those that run automatically at
startup, su ch as fax soft ware, virus p rotection software, screen-
®
saver soft ware, and applicat ion too lbars su ch as Micr osoft
■ Do not sim ply copy the Work Pad Desk top files t o your hard dr ive.
Office .
You must use the installer to place the files in their proper
locations and to decompress the files.
To install WorkPad Desktop software:
1. Exit any open Windo ws pr ogra ms and disa ble any vi rus- sca nnin g
software.
2. Insert the WorkPad Desktop CD-ROM into the computer’s CDROM drive.
3. Wait for the introduction screen to appear.
4. Click the Ins tall button to begin the instal lation procedure.
5. Follow the instructions on the scree n to complete the install a tion.
Page 12 Basic Handbook for the IBM WorkPad
Page 18
Chapter 2
Working With Your WorkPad
This chapter explains h ow to open applic ations, us e
the on-scree n keyboard, write with the stylus and
use common features on your IBM WorkPad.
Selecting Applications
Your WorkPad is equipped with a variety of applications. All the
applications installed on your WorkPad appear in the Applications
Launcher. You can use the Applications Launcher to open any
application installed on your WorkPad. You can also open the four
main applic ati ons — D ate Book , Ad dress Book , To Do List an d Me mo
Pad — with the buttons on the front panel of your WorkPad.
Tip: When you press th e buttons on the front panel, you have
instant access t o the selec ted appli cation. You don’ t even need
to turn on your WorkPad fir s t.
In addition to providing a way for you to open applications, the
Applications Launcher displays the current time, battery level and
application cat egory .
To open applications:
1. Tap the icon on the WorkPad scree n to open the Appli cations
Launcher.
Chapter 2 Page 13
Page 19
2. Tap the icon of the application that you want to open. If you have
many applications installed on your WorkPad, tap the scroll bar to
see all of your applications.
Tip: As a shortcut, you can write the Graffiti characte r stroke
for the first letter of the application you want to use. The
Applications Launcher scrolls to the first application that
begi n s w i th that le tt e r .
Switching Applic ations
When working in any application, you can tap the icon or press the
buttons on the front panel to switch to any other application. Your
WorkPad saves your work in the current application and displays it
when you ret urn to the cur re nt screen.
Changing the Applications Launc her Display Form at
By default the Applications Launcher displays each application as an
icon. As an alternative, you can choose to show a li st of applicati ons.
To change the Applications Launcher display:
1. Tap the icon on the WorkPad screen to open the Applications
Launcher.
2. Tap the icon on the WorkPad screen to open the Applications
Launche r menus .
3. Tap Preferences from the Options menu to open the Preferences
dialog.
4. T a p the Vi e w B y p ick l ist and se l e c t the Lis t op tion.
5. Tap the OK button to close the Preferences dialog and display the
Applications Launcher in list format.
Page 14 Basic Handbo ok fo r the IB M Work P a d
Page 20

Displaying Applications by Category
The category feature enables you to limit the number of applications
that appear on the screen. You can assign categories to your
applications and then choose to display a single category or all your
applications.
To display applications by category:
1. Tap the icon on the WorkPad scree n to open the Appli cations
Launcher.
2. Tap the icon on the WorkPad screen to open the Applications
Launcher menu s .
3. Tap Category from the App menu to open the Category dialog.
4. Tap the pick list next to each application to assign it to a category.
Tip: To create a new category, tap Edit Category from the pick
list to ope n the Edit Categories dialog. Tap the New
button, enter the categ ory name, and the n tap the OK
button to add the category. Tap OK to close the Edit
Categories dialo g.
5. Tap the Don e but ton to c lose the C ategor y d ial og and ret urn to t he
Applicatio ns Launche r .
6. Tap the pick list in the upper-right corner of the screen and select
the application catego ry you want to displa y.
Tip: You can also tap the icon to scroll through the
application cat egorie s .
Chapter 2 Page 15
Page 21
Displaying Applica tion Inform ation
You can use the Applications Launcher Info dialog to display
information about the applications on your WorkPad.
To display application information:
1. Tap the icon on the WorkPad screen to open the Applications
Launcher.
2. Tap the icon on the WorkPad screen to open the Applications
Launche r menus .
3. Tap Info from the App menu to open the Info dialog.
4. Tap the Version button to display version information for the
WorkPad system software and the installed applications.
5. Tap the Records button to display the percentage of memory
available and the number of entries stored in each application.
6. Tap the Size button to di s p lay the to tal am ou nt of mem o ry
available and the amount used by each application.
7. Tap the Do ne button to retu rn to th e Applic ations Launcher screen .
Using the On-Screen Keyboard
You ca n ac ti v ate the on-sc re e n k e y b o a rd any tim e y ou n e e d to enter
text or numbers on your WorkPad. Note that you cannot enter Graffiti
characters while using the on-screen keyboard.
To use the on-screen keyboard:
1. Open any WorkPad application as described earlier in this chapter.
2. Tap any re c ord nam e, or ta p the New b u tt o n .
3. Tap the left target to open the Alpha keyboard, or tap the right
target to open the Numeric keyb oard.
Page 16 Basic Handbo ok fo r the IB M Work P a d
Page 22
Tap here for letters
keyboard
Alpha
Tap here for numbers
keyboard
Tab
Caps lock
Caps shi f t
Tap here to display
Alpha keyboard
Numeric
Tap here to disp lay
Numeric keyboard
Backspace
Carriage return
Internatio nal
Tap here to display
International keyboard
4. Tap the characters of the o n-screen keyb oard to ente r te xt and
numbers.
Note: The on-screen keyboard also includes a dialog for
international characters. You can switch among the three
dialogs at any time to enter the exact text you need.
5. After you finish, tap the Done button to close the on-screen
keyboard and place the text in your WorkPad application.
Chapter 2 Page 17
Page 23

Writing With the Stylus
Your WorkPad includes Graffiti power writing software as the
primary system for entering tex t and numbers. Graff iti power writing
software is a system where sim p le strokes yo u wr ite with the sty lus
are instantly recognized as letters or numbers.
This section explains the basics of the Graffiti alphabet, and how to
make strokes i n the Graf fiti wri ting are a. Your WorkPad als o includ es
Giraffe — a game you can use to practice writing Graffiti char acters.
See “Installing Games” for instructions on how to install Giraffe.
Opening the Memo Pad Application
The Memo Pad application is ideal for prac ticing the Graffit i alphabet.
This section explains how to open the Memo Pad and use it to practice
writing Graffiti char acters. A complete explanati on of the Memo Pad
application appears in the Applications Handbook for the IBM WorkPad.
To open the Memo Pad application:
1. Press the button on the front of your WorkPa d to open the
Memo Pad application.
2. Tap the New button to open a new Memo Page.
New
memo
cursor
Tap
New
Graffiti writing area
Note: A cursor appears in the upper-left corner of the Memo Page to
indicate where new text will appear.
Page 18 Basic Handbo ok fo r the IB M Work P a d
Page 24

Writing Graffiti Letters
Most people find they can enter text quickly and accurately with only
minutes of practice. The Graffiti alphabet includes any character you
can type on a stan dard ke yboard. Th e Graf fiti s trokes c losely r esemb le
those of the regular alphabet which makes it quick and easy to learn.
For example, the following Graffiti strokes are portions of the regular
alphabet equivalents.
AF
4
There are four basic concepts for success with writing Graffiti characters:
■ If you draw the character shape exactly as shown in the tables later
in this chapte r (like the shap e s shown in the foll owing diagram),
you achieve 100% accuracy.
■ The heavy dot on each shape shows where to begin the stroke.
Certain characters ha ve similar shapes, but different beginning
and end points . Always begin the stroke at the heavy dot.
■ Most charac te rs require only a single stroke. When you lift the
stylus from the Graffiti writing area, your WorkPad recognizes
and displays the text character immediately.
■ The Graffiti writing area is divided into two parts: one for writing
the letters of the alphabet and one for writing numbers. The small
marks at the top and bottom of the Graffiti writing area indicate
the two areas .
K
5
T
Write letters here Write numbers here
Division marks
Chapter 2 Page 19
Page 25

To write letters of the alphabet with Graffiti strokes:
1. Tap the screen where you want your text to go.
2. Use the table on th e next pa ge to fi nd the stroke shape for the letter
you want to create. For example, the stroke shown below creates
the letter “n.”
Note: There are two different stroke shapes available for some
letters. For these letters, choo se the one that’s easiest fo r
you.
Lift stylus
here
Start stroke
at heavy dot
As you’ll see later, you use these shapes to create both upper- and
lowercase lette rs.
3. Position t he st ylus i n the left- han d sid e of t he Gra ffi ti wr iti ng ar ea.
4. Start your stroke at the heavy dot, and draw the stroke shape as i t
appears in the table.
Note: Don’t try to draw the dot shape itse lf. The heavy dot is
ther e to show th e st a r t in g p oi nt of th e s tr ok e .
5. Lift the sty lus from the screen at the end of the stroke shape.
Page 20 Basic Handbo ok fo r the IB M Work P a d
Page 26

That’s all there is to it! When you lift the stylus from the screen, your
WorkPad recognizes your stroke immediately and prints the letter at
the insertion point on the screen.
As soon as you lift the stylus from the sc reen, you can begin the stroke
for the next character you want to write.
Important: You must begin the character strokes in the Graffiti
writing ar e a . If you do not make Graffiti st rokes in the
Graffiti writing area, your Wor kPad do es not rec ogniz e
them as text characters.
Graffiti Tips
When writing Graffiti characters, keep these tips in mind:
■ Accuracy improves when you write large characters. You should
draw strokes that nearly fill the Graffiti writing area.
■ To delete characters , simply set the i nsertion po int to the right of
the charac te r you want to delete and make the backspace stroke
(a line from right to left) in the Graffiti writing area.
■ Write at natural speed. Writing too slowly can generate
recognition errors.
■ Do not write on a slant. Vertical strokes should be parallel to the
sides of the Graffiti writing are a .
Chapter 2 Page 21
Page 27

The Graffiti Alphabet
Letter Strokes Letter Strokes
AN
BO
CP
DQ
ER
FS
GT
HU
IV
JW
KX
LY
MZ
Space Back Spac e
Carriage
Period
tap twice
Return
Page 22 Basic Handbook for the IBM WorkPad
Page 28

Writing Capital Letters With Graffiti Strokes
You make capital letters with the same stroke shapes as the basic
alphabet characters. To make capital letters, you must first “shi ft” to
caps — just as you press the Sh ift key on a keyboard — and then write
the character strokes.
Note: Graffiti power writing software includes a Smart Shifting
feature which automatically capitalizes the first letter when
you create a new entry (by tapp ing a New button or a blank
line).
To draw the first letter of a word as a capital letter:
■ Use the Caps Shift stroke:
Caps
Shift
Tip: When Caps Shift is active, an “up arrow” symbol appears in
the lower - right corner of the WorkPad scree n.
To enter only capital letters (Caps Lock):
■ Use the Caps Lock stroke:
Caps
Lock
Tip: When Caps Lock is active, an underlined “up arrow” symbol
appears in the lower-right corner of the WorkPad screen. To
return to lowercase, make th e Caps Shift strok e.
Writing Numbers With Graffiti Strokes
Writing numbers with Graffiti strokes is similar to writing letters of
the alphabet, except that you make the character strokes on the righthand side (numbers side) of the Graffiti writing area.
Chapter 2 Page 23
Page 29

Graffiti Numbers
Number Strokes Number Strokes
0
5
1
6
27
38
49
Writing Punctuation Marks With Graffiti Strokes
Graffiti p owe r writing software can crea te any punctuation sy mb ol
that you can enter from a standard keyboard. All punctuation marks
begin with a singl e tap on the Graffi ti writing area. When you make
this tap, you activate Punct uation Shi ft an d a dot a ppears to sh ow it is
active. The next stroke you make with th e styl us crea tes a punc tuation
mark.
Punctuation shift
Symbol Stroke Symbol Stroke
Period
.
Dash
—
Comma
,
Apostrophe
'
Question
?
Exclamation
!
Page 24 Basic Handbo ok fo r the IB M Work P a d
Left Paren
(
Right Paren
)
Slash
/
Dollar
$
Page 30

Additional Graffiti Punctuation
@ # % ^ & * < > – + = |
\ { } [ ] ~ ` ; : " tab
Note: When Punctuation Shift is active, you can make a symbol
stroke anywhere in the Graffiti writing area (the letters or
numbers side).
Writing Symbols and Extended Characters
All symbols and exte nded charac te rs begin with the stroke in the
Graffiti writing area of your WorkPad:
Symbol
Shift
When the Symbol Shift is active, a slanted shift symbol appears in the
lower-r ight corner of th e screen. The next str oke that you make crea tes
the symbol or extended character.
,
•
+
–
:
X
,
==c
ƒ
,
,
,
,
Y
∅
.
?
!
Chapter 2 Page 25
Page 31

Writing Accented Characters
To create accented characters, draw the stroke normally used to creat e
the letter, followed by an accent stroke. Graffiti power writing
software the n adds the acc e n t to th e l e tt e r.
For example, the following diagram shows the strokes required to
draw an accented “e.”
= e
Accent Strokes
a a a a a a
Using these accent strokes, you can write the following accented
letters:
à á â ã ä å è é ê ‘ “ ’ ” • ò — ô õ ö ù ú û ü – ÿ
Additional Non-English Characters
You can write the following characters in the lowercase alphabet
mode without any special punctuation or shifting:
c
a
e
Note: You must w rite th ese non- Engl ish char acte rs i n t he l eft si de of
the Graffiti writing area.
Page 26 Basic Handbo ok fo r the IB M Work P a d
Page 32

Navigation Strokes
In addition to characte r symbols, Gr af fiti power writing software
includes special strokes that you can use to navigate within text or
fields in your WorkPad applications.
Command Stroke
Move curso r right
Move cursor left
Previous field
(Address Book only)
Next Fiel d
(Address Book only)
Open Address Record
(Address Book only)
Graffiti ShortCuts
Graffiti’s ShortCu ts make entering commonly used words or phrases
quick and easy. ShortCuts are similar to the Glossary or Autotext
features of some word processors.
Graffiti power writing software comes with several predefined
ShortCuts, and you can also create your own. Each ShortCut can
represent up to 45 characters. For example, you might create a
ShortCut for your name , or for the header of a memo. Se e “ShortCuts
Preferences” in the Applications Handbook for the IBM WorkPad to learn
about creating your own ShortCuts.
To use a ShortC ut, draw t he Short Cut st roke fo llowed b y the Shor tCut
character s. When yo u draw th e Shor tCu t st rok e, t he Sho rtCut s ymb ol
appears at the insertion point to show that you ar e i n Sho rtCut mo de.
ShortCut
Chapter 2 Page 27
Page 33

Your WorkPad includes the following predefined Graffiti ShortCuts:
Entry ShortCut Entry ShortCut
Date st a mp ds Breakfast br
Time sta mp ts Lunch lu
Date / time stamp dts Dinner di
Meeting me
For example, if you want to enter the current date and time, you
would draw the following strokes:
Using Application Controls
WorkPad applications include several types of controls. Once you
become familiar with using these controls, you can easily select
options and nav igate through your WorkPad appli cations. The
following table lists the controls and how to use them.
Check box. When a check mark appears in a check
box, the corresponding option is active. If a check
box is empty, tap it to insert a check mark. If a check
box is checked, tapping it removes the check mark.
Scroll arrows. Tap the up arrow to display the
previous page of information, or tap the down
arrow to display the next page. These arrows
perform the same function as pressing the upper
and lower portions of the scrol l button on the front
panel of the WorkPad.
Pick list. Tap the arrow to display a list of choices,
and then tap an item on the list to select it.
Page 28 Basic Handbo ok fo r the IB M Work P a d
Page 34

Button. Tap a button to perform a command.
Buttons appear with different text depending on
their function. In most cases, tapping a button
opens or closes a dialog. A dialog is a screen that
appears on your WorkPad, prompting you to enter
information or make settings. A dialog always
contains an OK, Cancel or Done button, so you can
close the dialog when you are through with it. The
on-screen keyboar d is an example of a dial og.
Scroll bar. Drag the slider to scroll the display one
line at a time. To scroll to the previous page, tap the
arrow at the top of the scroll bar. To scroll to the
next page, t ap the arrow at the bottom of the scroll
bar.
Using Menus
Menus are a special s et of comm ands that are available i n most of your
WorkPad applications (Memo Pad, Date Book, etc.). The exact
commands that appear in the menus depend on the application that is
currently running on your WorkPad.
Some menu commands are common to all WorkPad applicat ions. The
common menu commands are described in this secti o n; other men u
command s a re described in the chapters about each WorkPad
application in the App l ic atio ns H andbook for th e IBM WorkPa d .
To activate the menus:
1. Open a WorkPad application (such as t he Memo Pad, as d escribed
earlier in this chapter).
2. Tap the icon t o open the menus f or the appl icati on at the t op of
the screen.
Chapter 2 Page 29
Page 35

Tap the Me nus icon
In this exampl e, three menus are avai lab le: Reco rd , Edi t and Opti ons .
The Record menu is selected and contains t h e “New Memo,” “Delet e
Memo” and “Beam Memo” commands.
Choosing a Menu
After you activate the menus for an application, tap the menu that
contains the command you want to use.
The menus and menu commands that are available depend on the
application that is currently running on your WorkPad. Also, the
menus and menu selections vary depending on which part of the
application is currently on the screen. Using the Memo Pad
application as an example, the menus are different for the Memo List
screen and the Memo screen.
Graffiti Menu Commands
Most menu comman ds h a ve Graffiti “Command stroke” equivalents
— similar to keyboard commands on computers . The command
letters appear on the right side of the menu commands.
Menu commands
Command letters
Page 30 Basic Handbo ok fo r the IB M Work P a d
Page 36

To use the Graffiti men u commands , draw the Command stroke
followed by the corresponding command letter. When you draw the
Command stroke, the Command symbol appears just above the
Graffiti writing are a to indicate th at you are in Comma nd mode.
Command
For example, to activate the Select All command in the previous
diagram, draw the Command stroke, followed by the letter “s.”
Note: You do not have to tap the icon or access the menu s when
you use the Graffiti menu commands. However, since the
Command mode is ac tive for approx imately two secon ds, you
must write the letter character immed iately to acti vate the
menu command.
Edit Menu Commands
The Edit menu is available with any screen where you enter or edit
text. In general, the Edit Menu commands available in the Edit menu
apply to text that y ou select in an application.
To select text in an application:
1. Tap the beginning of the text that you want to select.
2. Drag the stylu s over the text to highlight it ( in black).
Note: You can drag across the text to sel ect add iti onal word s, or
drag down to select a group of lines.
Chapter 2 Page 31
Page 37

The following commands may appear in an Edit menu:
Undo
Cut
Copy
Paste
Select All
Reverses th e action of the last edit command. For
example, if you used the Cut command to
remove text, the Undo command replaces the
text you re moved.
Removes the selected text and stores it
temporarily in the memory of you r Wo r k Pa d.
You can paste t he text y ou cut int o anoth er area
of the WorkPad application or into a different
WorkPad application.
Copies the selected text and stores it
temporarily in the memory of you r Wo r k Pa d.
You can paste the text that you copy into
another area of the Work Pad applica tion or into
a different WorkPad application.
Inserts the te xt that you cut or cop ied at the
selected point in your WorkP ad applic ation.
The Paste command replaces any selected text.
If you did not previously cut or copy text, the
Paste command does nothing.
Selects all of the text on th e cu rrent record or
screen. This e nabl es you to cu t or co py all of t he
text and paste it elsewhere.
Keyboard
Opens the on-screen keyboard. When you finish
with the on-screen keyboard, tap the Done
button.
Graffiti Help
Opens the dial og s that show the Graffiti
character strokes. Use this command any ti me
you forget a stroke for a particular character.
Page 32 Basic Handbo ok fo r the IB M Work P a d
Page 38

Choosing Fonts
In most of your WorkPad applications, you can change the font style
to make the text on the screen easier to read. You can even choose a
different font style for each application that supports this feature.
Note: The Expense application does not support changing fonts.
To change the font style:
1. Open a WorkPad application.
2. Tap the icon to open the menus at the top of the screen.
3. Tap Font from th e Op tions menu to open the Select Font dial og.
Tap here for large font
Tap here for bold font
Tap here for sma ll font
4. Tap the font style you want to use.
5. Tap the OK butt on t o c lose th e di alog an d r etur n to the ap plicat io n
with the new font style.
Small font
Bold font
Chapter 2 Page 33
Large font
Page 39

Using Categories
Categories can help you group Address entries, To Do items or
Memos for easy review. You cannot, however, assign categories to
Date Book events.
When you first create an entry, it is “Unfiled,” which means it does not
belong to any particular category. You can leave an entry as Unfiled
or assign it to a ca te g ory at any time. Ei ther way, the ent ry is always
available until you delete it. The category you choose is used only for
sorting and revi ewing records. The cate gory you selec t does no t affect
the ac tua l co n t e nts of the rec ord.
Note: The use of categories is optional. You do not need to assi gn
categories to use WorkPad applications.
To assign a category to an entry:
1. Tap a To Do item or Memo, o r ta p an Addre ss Book entr y th en tap
the Edit button in the Address View screen (refer to the
descriptions in the Applications Handbook for the IBM WorkPad for
details).
2. Tap the Detail s b u tton to open the Details dialog .
3. Tap the Category pick list to display a list of available categories.
4. Tap the category that you want to assign to the entry.
5. Tap the OK button to close the Deta ils dialog and act ivate your
setting.
Page 34 Basic Handbo ok fo r the IB M Work P a d
Page 40

Using Categories in Lists
After you assign categories to your entries, you can easily display lists
of your entries by category.
To use categories in a List screen:
1. Tap the category pick list in the upper-right corner of the List
screen.
Tap here
2. Tap the category of entries that you want to view.
Note: The List sc reen chang es to show on ly the records that you
filed in the selected categ ory.
3. Repeat the previous steps, and tap All in the category pick list to
restore th e list of all Address Book entries.
Tip: Pressing the application button on the front panel of the
WorkP a d toggl e s throug h th e a va il a b le ca te gorie s.
Defining a New Category
Your WorkPad comes with two default categ ories: Business and
Personal . In addition , the Address Book contains th e QuickList
category, designed as a “quick reference” of commonly used names,
addresses and phone numbers (such as doctor, lawyer, etc.).
You can change the names of these def ault cat e gories, or add ne w
categor ies to suit your ne eds. You can de f ine up to 15 categories for
each application.
Chapter 2 Page 35
Page 41

To define a new Address Boo k category:
1. Tap the category pick list in the upper-right corner of the screen.
Tap here
2. Tap the Edit Categories item to open the Edit Categories dialog.
3. Tap the New button to open another Edit Categories dialog.
4. Enter the n ame of th e new cat egory, an d tap the OK button t o close
the Edit Categories dialog.
5. Tap the OK button to close the f irst Edit Categ ories dialog and
view your new category in the pick list.
Note: You can edit any of your records and file them in the new
categories as appropriate.
Page 36 Basic Handbo ok fo r the IB M Work P a d
Page 42

Renaming Categories
You can also use the Ed it Categories dialog to change the names of any
existing category.
To change th e name of an Addre ss Book category:
1. Tap the category pick list in the upper-right corner of the screen.
2. Tap the Edit Categories item to open the Edit Categories dialog.
3. Tap the category that you want to rename, and then tap the
Rename butt on to open anothe r Edit Categori e s dialog.
4. Enter the new name that you want to assign to the category, and
tap the OK button to close the Edit Categorie s dialog.
5. Tap the OK button to close the f irst Edit Categories dialog and
view the new name in the pick list.
Note: You can “m e rge” tw o or more C a te gories b y as si gning them
the same name. For example, if you change the name of the
“Personal” category to the name “Business,” all entries
formerly in the Personal category appear in the Business
category.
Chapter 2 Page 37
Page 43

Attaching Notes
WorkPad applications (except the Memo Pad) enable you to attach a
note to a n entry . A note i s anyth in g that you wa nt to wri te, and can be
up to several thousand characters long. For example, if you have an
appointment in the Date Book application, you could attach a note
with dire ctions to the location .
To attach a note to an entry:
1. Display the entry where you want to add a note.
2. Tap the Detail s b u tton to open the Details dialog .
3. Tap the Note button to open the Note di alog.
4. Write Gra ffiti ch aracte r strokes (or use the on-scre en keyboar d) for
the text you want to appear in the note. Use the Carriage Return
stroke to move down to new lines in the note.
5. Tap the Done butto n to close the note and return to the application
screen.
Note: A small note icon appears at t he right side of any item t hat
has a note attached. To review or edit a note, tap the
icon.
Note icon
Marking P riv a te Entries
In WorkPad applications you can mark individual entries as Private.
Private entries remain visible and accessible until you change the
WorkPad Security setting to hide all Private entries. See “Security” in
the Applica t io n s Ha ndbook for th e IB M W orkP ad for complete
informati on about how to activate and use the WorkPad Security
settings.
To mark an entry as Private:
1. Display the entry that you want to mark as Private.
2. Tap the Detail s b u tton to open the Details dialog .
3. Select the Private check box to insert a check mark and mark the
entry as Private.
Page 38 Basic Handbo ok fo r the IB M Work P a d
Page 44

Beaming Information to Other WorkPads
Your WorkPad is equipped with an IR (infrared) port that you can use
to “beam” information from one WorkPad to another. The IR port is
located at th e top of the WorkPad behind the small dark shi e ld.
Note: If you are using a device other than a WorkPad, please confirm
that your device includes the required infrared hardware
before you use this feature.
You can beam the following information between WorkPads:
■ The current Address Book, Date Book, To Do List or Me mo Pad
entry
■ All the Address Book, To Do List or Memo Pad entries in the
current categ ory
■ A special Addre ss Book entry which you designate as your
“bus in e s s ca rd” (see “ Be a ming Address Entri e s to Ot h e r
WorkPads” in the Applica t ions Handbook fo r the IBM WorkPad)
■ An application installed in RAM memory (see “Installing
Application s” for details )
To beam information:
1. L oc a te th e e ntry, cat e g o ry or bu s i ne s s card you wan t to b e am .
2. Tap the Beam command from the Record menu to open the Beam
Status dialog (see the Applications Handbook for th e IBM WorkPad.)
3. Point the IR port directly at the IR port of the receiving WorkPad.
Tip: For best results, the WorkPads should be between five
centimeters (approximately 2 inches) and one meter
(approximately 40 inches) apart, and the path between
the two devices must be clear of obstacles.
4. Wait for the Beam Status dialog to indicate that the transfer is
complete before you continue working on your WorkPad.
Chapter 2 Page 39
Page 45

To receive beamed information:
1. Turn on your WorkPad.
2. Point the IR port directly at the IR port of the transmitting
WorkPad to open the Beam Status dialog.
3. Tap the Yes butt on to accept the transmission .
4. Wait for the Beam Status dialog to indicate that the transfer is
complete, and then tap the OK button to displ a y the new entry.
Note: Incoming entries are filed under the “Unfile d ” category .
Page 40 Basic Handbo ok fo r the IB M Work P a d
Page 46

Chapter 3
Findin g Information With Your WorkPad
This chapter explains how to locate informa ti on on
your IBM WorkPad PC companion with the Find
command and the Phone Lookup command.
Usi ng the Find Command
The Find command locates any text that you specify and is available
in any WorkPad app lication . You can search for whole words or the
beginning letters of a word. The Find command auto matically
searches all the data on your Wor kPa d and list s whic h applic atio ns
contain the text.
For example, suppose you want to find a particular name, but aren’t
sure where you stored it. The Find command immediately lists all
instances of that name and enable s you to jump directly to the name.
To use the Find command:
1. Tap the icon from any WorkPad application to open the Find
dialog.
Tip: If you select text in a WorkPad application before you tap
the Find button, t he selected text a utomatically appear s in
the Find dialog.
2. Enter the text that you want to fi nd in your WorkPad.
Note: The Find command is not case-sensitive. In other words,
searching for the name “davidson” also finds
“Davidson.” The Find command also search es the
contents of notes.
3. Tap the OK button to display a list of all instanc e s of the text that
you specified.
Chapter 3 Page 41
Page 47

Note: As your WorkPad searches for the text, you can tap the
Stop button at any time. You may want to do this if the
entry you want appears before your WorkPad finishes the
search. To c ontinue the se arch after you tap Stop, tap the
Find More button.
4. Tap the text that you want to review to display the selected entry
and its corresponding WorkPad application on the screen.
Using Phone Lookup
In addition to u sing the Fi nd feature t o locate text, you can se arch for
and display ph one number s with the Phon e Lookup menu command.
After you find a phone number, you can paste it directly into a
WorkPad application.
For example, if you want to include a phone number in a memo, you
could use the Phone Lookup feature to find the phone number and
transfer it directly into the m emo.
To use the Phone Lookup command:
1. Display the entry where you want to insert a phone number. This
can be an event in the Date Book, a To Do List Item or a memo in
the Memo Pad application.
Note: The Phone Lookup feature is n ot avai lable in t he Addres s
Book and Expense applications.
2. Tap the icon to open the menus for your application.
3. Tap Phone Lookup from the Options menu to display the Phone
Number Lookup screen.
Page 42 Basic Handbo ok fo r the IB M Work P a d
Page 48

4. Tap the phone number you want to use.
Note: To find a phone number more quickly, you can enter the
first le tter of the name you wan t to find in the Look Up
line at the bottom of the screen. The list automatically
scrolls to the first name that starts with that letter. You can
continue to add letter s to narrow your search.
5. Tap the Ad d button to cl ose t he Phone Number Look up scr een and
paste the name and phone number you selected into the entry you
selected in step 1.
Phone Lookup Tips
You can also use th e Graffiti Command strok e “/L ” to activate the
Phone Lookup feature.
■ You can use Phone Lookup while entering text. For example, to
insert the full name and phone number for someon e with the last
name “Williams,” you would write the Graffiti characters for “Wi”
and then the Phone Lookup Command stroke “/L.”
Assuming y ou have only one Addres s Book e ntry tha t begi ns with
“Wi,” your WorkPad inserts the full name “Williams” (and the
corresponding phone number). If you have more than one name
that begins with “Wi,” the Phone Lookup screen appears.
■ The Phone Lookup feature also works for selected text. Drag to
highlight the text, and then write the Phone Lookup Command
stroke “/L.” Your WorkPad replaces the selected text and adds the
phone number to the name that i t f inds.
Chapter 3 Page 43
Page 49

Page 44 Basic Handbo ok fo r the IB M Work P a d
Page 50

Chapter 4
Installing and Removing Applications
This chapter explai ns how to install and rem o ve
applications on your IBM W orkPa d PC com pa nion
and how to remov e the Wor kPad Desktop so ftwa re
from your computer .
Installing Applications
Your WorkPad comes with the Date Book, Addr ess Book, To Do List,
Memo Pad, Expense, Calculator and Mail applications installed and
ready to use. You can also install additional applications on your
WorkPad, such as games and other WorkPad-compatible software.
The WorkPad Install Tool makes it quick and easy to in stall softwa re
on your WorkPad dur ing a HotSync operation. You can also install
applications by beaming them between WorkPads.
There are a variety of third-party applications available for your
WorkPad. To learn more about these application s, visit the 3C om
Palm Computing web site: http://w ww.palm.com.
Note: Any game or application that you install on your WorkPad
resid e s i n RAM mem ory. A ha r d re s e t on the Wor kP a d
automatically delet es these applicat io ns; you can also delete
them manually.
To install software on your WorkPad:
1. Copy the application you want to install into the Add-on subfolder
in your WorkPad folder on your computer.
Note: If you prefer to copy the application into another folder,
you ne e d to n av i ga te to that fo l de r be fore yo u c om p le t e
step 5.
2. Double-click the WorkPad De sktop icon on your Win dows
desktop (or select WorkPad Desktop from the Start menu) to open
the WorkPad De sktop softwa re .
Chapter 4 Page 45
Page 51

3. Click the Ins tall button to op e n the WorkPad Insta ll Tool dialog.
Tip: You can also access the Install Tool dialog by selecting
Install Tool from the WorkPad Desktop program group
or by double-clicking any file with a PRC file extension.
Page 46 Basic Handbo ok fo r the IB M Work P a d
Page 52

4. Select the name that corresponds to your WorkPad in the User
drop-down l ist.
5. Click the Add button to open the Ope n dial og.
6. Click the application(s) that you want to install on your WorkPad.
7. Click the Open button to return to the Install T ool dialog.
Note: Review the list of applications you select ed in the Install
Tool dialog. If you do n ot wan t to install an appl ication,
click it and th e n click the Re move button. ( This does not
remove the application from your comp uter, it simply
removes it from the list of ap p lications to install.)
8. Perform a local HotSync operation to install the application(s) you
selected in step 6. See “Conducting a Local HotSync Operation” in
the Applications Handbook for the IBM WorkPad for details.
To beam applications between WorkPads:
1. On the transmitting WorkPad, tap the icon to open the
Applicatio ns Launche r .
2. Tap the icon to open the Applications Launcher menus.
3. Tap Beam from the App menu to open the Beam Status dialog.
4. Tap the application you want to beam.
Note: You cannot beam an application that appears with an
icon next to the applicatio n name.
5. Turn on the receiving WorkPad.
Chapter 4 Page 47
Page 53

6. Point the IR port of the transmitting Wo rkPad direc tly at the IR
port of th e receiving Work P a d and tap the Beam butt on on the
transmitting WorkPad.
7. On the receiving WorkPad, tap the Yes button to accept the
application.
Note: To beam another application, repeat steps 4 - 7.
8. Wait for the Beam Status dialog to indicate that the transfer is
complete.
9. Tap the Done button on the transmitting WorkPad to return to the
Application Launcher screen.
Installing Games
The CD-ROM that comes with your WorkPad includes several games
that you can install. These games include:
■ HardBall ■ Puzzle ■ Giraffe
■ MineHunt ■ SubHunt
Note: Giraffe is a fun, easy way for you to practice writing Graffiti
character stro kes.
After you install and start a game, the i nstructions appear in the Game
menu. Depending on the game, the Game menu may also contain
commands to show high scores , to start a new game or to set
Preferences for the game.
Removing Applications
In the event tha t you run out of me mory or d e cide that you no longer
need an application you installed, you can remove applicatio ns from
your WorkPad. You can remove only add-on applications, patches
and extensions that you install; yo u cannot remo ve the ap plicat ions
that reside in the ROM portion of yo ur Wor kPad.
To remove an add-on application:
1. Tap the icon on the WorkPad screen to open the Applications
Launcher.
2. Tap the icon on the WorkPad screen to open the Applications
Launche r menus .
3. Tap Delete from the App menu to open the Delete dialog.
Page 48 Basic Handbo ok fo r the IB M Work P a d
Page 54

4. Tap the application that you want to remove.
5. Tap the Delete b utton to display a confirmation me ssage.
6. Tap the Yes button to indicate that you want to remove the
application from your Wor kPa d.
7. Tap the Done button to close the Delete dialog and return to the
Applicatio ns Launche r .
Removing WorkPad Desktop Software
If you no longer want to use the Work Pad Desk top soft ware , you can
remove it from your computer .
To remove the WorkPad Desktop software:
1. Select Sett ings and th en C ontr ol Pan el fr om the St art men u to open
the Windows Control Panel.
1. Double-click the Add/Remove Programs icon.
2. On the Install/Uninstall tab, select WorkPad Desktop from the list.
3. Click the Add /R e move button.
4. Click Yes to confirm that you want to remove the application.
Chapter 4 Page 49
Page 55

Page 50 Basic Handbo ok fo r the IB M Work P a d
Page 56

Chapter 5
Getting Help With Your WorkPad
There are several ways to get help with your IBM
WorkPad. You can di sp lay online tip s on your
WorkPad and you can review the troubleshooting
section in this chapter and on your WorkPad
Desktop software CD. If you need add itional
assistance, you can contact IBM Technical Support.
This chapter provides details on each of these
methods.
Displaying Online Tips
Many of the dialogs that appear on your WorkPad contain an online
tips icon in the upper-right corner. Online tips contain a summary of
what is required b y the dial og, shortcu ts for using the dialog or other
useful information.
Online tips always relate to the func tion that you are cu rrently
perfo rming wi t h y our WorkP a d. Each d ialog h a s i t s ow n online tip s
that relate to that specific dialog.
To use the online tips:
1. Tap the icon in the upper-right corner of a dialog to open the
Tips dialog.
2. After you rev iew the Tips dialog, tap the Done button.
Chapter 5 Page 51
Page 57

Troubleshooting
If you enco unter a problem with your Work Pad, look i n this section
for the description that most closely matches the symptoms you
observe and try the suggestions listed.
Important: For troubleshooting tips not include d in this handbook,
refer to either the README.TXT file or the HelpNotes file
located in the WorkPad Desktop folder. These files are
also on the instal lation CD-ROM.
Installation Troubleshooting
Do not place your WorkPad in the cradle while installing the
WorkPad Desktop software. If the WorkPad is in the cradle, the
installation program may incorrectly detect that a modem is attached
to one of your ava il a b le serial po rts.
HotSync Troubleshooting
A Local HotSync operation does not complete successfully:
■ Make sure HotSync Manager is running. If HotSync Manager is
running, exit and restart it.
■ Make sure you selected Local from the HotSync Manager menu or
the WorkPad De sktop menu.
■ Check the cable connection between the WorkPad cradle and the
serial port on your computer.
■ Make su re yo u sel e ct ed the co rr e ct se rial port on the Lo ca l ta b in
the Setup dialog. It shou ld be set to the port wher e you connected
the WorkPad cradle.
■ Try a lower baud rate setting on the Local tab in the Setup dialog.
■ Make sure y o u are not runn in g an other pr ogram — su ch a s
America Online
port you selected in the Setup dialog box.
■ Read the HotSyn c Log for the user account for which you are
performing a HotSync operation.
®
, CompuSe rve® or WinFax — that uses the serial
A Modem HotSync operation does no t complete s uccessfully:
Check the following on your computer:
■ Make sure your computer is turned on, and that it does not shut
down a u to matic a l l y as part of an ener g y - sa ving f e at u re .
■ Make sure the modem connected to your computer is turned on
and is connected to the outgoing phone line.
Page 52 Basic Handbo ok fo r the IB M Work P a d
Page 58

■ Confirm that your modem doesn't have an auto-off feature
enabled.
■ Make sure the modem is connected properly to a serial port on
your compu t er and is connected to the incoming phone li ne.
■ Confirm that the Setup String in the Setup dialog box configures
your modem correctly. You may need to select a different Modem
Type or ente r a cu stom Setup String. Most modems have a Setup
String that causes them to send initial connec tion sound s to a
speaker. You can use these sounds to check the modem
connection.
■ Confirm that the Speed setting in the Setup dialog box is
approp riate for y o ur mo dem.
■ If you have probl e ms u sing the As Fast As Po ssible option or a
specific speed, try using a slower speed.
■ Make sure you selected Modem from the HotSync Manager menu.
■ Make sure you are not running another program — such as
America Online, CompuServe or WinFax — that uses the serial
port you selected in the Setup dialog box.
■ Make sure your modem resets before you try again. (Turn off your
modem, wa it a minut e , then turn it back on.)
Check the following on your WorkPad:
■ Make sure you are using the special modem cable to connect to
your modem.
Important: Do not att empt to use other cable s to conn e ct a WorkPad
to a modem.
■ Check the modem cable connection between your WorkPad and
your modem.
■ Confirm that your modem is turned on.
■ Make sure the modem you are using with your WorkPad has an
on-off switch. Your WorkPad cannot “wak e up” a modem tha t has
an auto-off feature.
■ Make sure t he diali ng inst ruc tion d i als the cor rec t ph one n umber.
■ If you need to dial an outside line prefix, make sure you selected
the Dial Pref ix option on your WorkPad and entered the correct
code.
■ If the telephone line you are using has Call Waiting, make sure
you selected the Disable call waiting option under Modem Sync
Phone Setup on your WorkPad and entered the correct code.
Chapter 5 Page 53
Page 59

■ Make sure the telephone line you are using is not noisy, which can
interrupt communications.
■ Make sure your m odem re sets b efore y ou try a gai n. (Tu rn off y our
modem, wait a minute, then turn it back on.)
General Troubleshooting
WorkPad does not turn on:
■ Adju s t the co n t ra s t co ntrol.
■ Make sure batteries are installed properly.
■ Replace the batteries. If your WorkPad still does not operate, try a
soft reset; see “Resetting Your WorkPad.”
Low battery warnin g after replacing the batteries:
■ The battery warning message may appear immediately after
replacing the batteries. In addition, if you check the battery gauge
in the Applications Launc he r imme diate ly after replacing the
batteries , the gauge may st art at “empty ” and slowly ri se to “full. ”
This is norm al. It takes a few mi nutes for the battery gauge to
accura tely sh o w the co nd ition of th e batteri e s .
No sound:
■ Check the System Sound option in the General Preferences screen.
If the option is set to off, there will be no sound. See “General
Preferences” in the Applications Handbook for the IBM WorkPad for
more information .
WorkPad turns itself off:
■ Your WorkPad is designed to turn itself off after a period of
inactivity. This period can be set at one minute, two minutes or
three minutes. Check the “Auto-off after” setting in the General
Preferences screen, and change the setting if you need a longer
delay before the automatic shutoff feature activates. See “Genera l
Preferences” in the Applications Handbook for the IBM WorkPad for
more information .
WorkPad doesn’t recognize my handwriting:
■ For your Wor kPad to recogni ze handwriti ng input with the stylus,
you need to use the Graffiti character strokes. See “Writing With
the Stylus” for information about how to write Graffiti char acter
strokes .
Page 54 Basic Handbook for the IBM WorkPad
Page 60

■ Make the Graffiti character strokes in the Graf f iti writi ng area —
not on the display part of the screen.
■ Make sure you are wri ting the strok e s for letters in the left-han d
side, and the strokes for numbers in the right-hand side of the
Graffiti writing area.
■ Make sure that the Graffiti power writing software is not shifted
into extended or punctuation modes. See “Writing With the
Stylus” for inf ormat ion about shi ftin g in to a nd out of punctuat i on
modes .
Tapping the screen buttons or icons does not activate the corr espondin g
feature:
■ Recalibrate the digitizer. Choose Digitizer from the Preferences
application pick list and follow the directions on the screen.
When I tap the icon, nothing happens:
■ Not all applications or screen s hav e menus. Try changing to a
different applicat io n.
A message appears stating that your WorkP ad memory is full:
■ Delete u nused memos and records. If necessary, you can save
these records on your computer using the Save Backup Copy
option that appears in the Delete dialogs.
■ Purge the Date Book and To Do List applications. This deletes
complete To Do items and past Da te Book events fr om the
memory of your WorkPad. Note that you may need to perform a
HotSync operation to recover the memory.
■ If you have installed additional applications on your WorkPad,
remove them to re co ver mem o ry .
Beamed data does not transmit:
■ Confirm that the WorkPads are between five centimeters
(approximately 2") and one meter (approximately 40") apart, and
that the p a th b e tw e e n the two de vices is cle ar of obs ta c l e s.
When receiving beamed data an out of memory message appears:
■ Your WorkPad requires at least twice amount of memory
available as the data you are receiving. For example, if you are
receiving a 30K application, you must have at least 60K free.
Chapter 5 Page 55
Page 61

Security Tro ubleshooting
I forgot the password, and my WorkPad is not locked:
■ You can use the Security applicat ion to delete t he password. If you
do this, your WorkPad delete s all entrie s marked a s Private.
However, you can perform a HotSync operation before you delete
the password: the HotSync process backs up all entries, whether or
not they are marked private. In this case, the following procedure
restores your private entries and lets you access them:
1. Use the WorkPad Desktop software and the WorkPad
cradle to sync hronize your da ta.
2. Tap the Forgotten Passwo rd button in th e Se curity appl ication
to remove the password and delete all Private entries.
3. Pe r f orm a Ho tS y nc operatio n to sy n c h ronize y o u r d a ta a n d
restore the private entries by transferring them from your
compu t e r to y our WorkPad.
I forgot the pa s sword and my WorkPad is lo cked:
■ If you assign a password and lock your WorkPad, you must
perform a hard rese t to continue u s ing your WorkPad. See
“Resetting Your WorkPad” for details.
Applications Troubleshooting
The following troubleshooting tips are specific to the various
WorkPad applications.
Tapping the Today button doesn’t display the current date:
■ Your WorkPad is not set to the current date. Make sure the Set
Date box in the General Preferences screen displays the current
date. See “General Preferences” in the Applications Handbook for the
IBM WorkPad for more information.
Entries seem to be missing in various applications:
■ Check the Categories pick list (upper-right corner of the screen).
Choose All to display all of the records for th e application.
■ Check the Security application and make sure that the Private
Records setting is set to Show private records.
Page 56 Basic Handbo ok fo r the IB M Work P a d
Page 62

Memo Pad application:
■ If you can not m anua lly ar ran ge th e or der of th e mem os in the L ist
screen, check the Memo Preferences setting. Make sure that Sort
by is set to Manual.
■ If you choose to view your memos alphabetically on WorkPad
Desktop and then perform a HotSync operation, the memos on
your WorkPad still appear in the order defined in the Memo
Preferen ces setting. In other word s, the sort settings tha t you use
with Wo rkPad Desktop are not transferred to your WorkPad.
Date Book application:
■ In the Week View, you cannot select overl apping events that have
the same sta rt ti me. If you h ave t wo or more even ts wit h t he sa me
start time, choose the Day View for the particular day to see the
overlapping events.
Technical Support, Service and Repair
If you have a problem using your WorkPad, make sure you have
reviewed the following:
■ The “Troubleshooting” section earlier in this chapter
■ The README file and HelpNotes located in the folder where you
instal led t he Wor kPad Deskto p sof tware on you r co mpu ter (or on
your installation CD)
■ The WorkPad Desktop software Online Help
For further assistance, you can contact technical support. Please refer
to the IBM WorkPad Warranty, Service and Support booklet that came
with your WorkPad for curren t support i nformation.
Before requesting support, please experiment a bit to reproduce and
isolate the problem. When you do contact support, pl ease be ready to
provide the following information:
■ The version of Wi ndows you are using
■ The actual error message or state you are experiencing
■ The steps you take to reproduce the problem
If you need information about WorkPad products, please refer to the
IBM WorkPad Accessory Catalog that came with your WorkP a d.
Chapter 5 Page 57
Page 63

Page 58 Basic Handbook for the IBM WorkPad
Page 64

Chapter 6
Maintaining Your Wor kP ad
This chapter provides information to help you take
proper care of your IBM WorkPad and prolong
battery life. It also di scusses how to re se t your
WorkPad.
Caring for Your WorkPad
Your WorkPad is desi gne d to be rug ge d an d relia b le an d to pr ovide
years of trouble-free service. However, you should observe the
following general tips when using your WorkPad:
■ Take care not to scratch the screen of you r Wor kPad. When
working wi th your WorkP a d, use the sup p lied stylus or plastic tipped pens intended for use with a touch-sensitive screen. Never
use an actual pen or pencil or other sharp object on the surface of
the WorkP a d screen.
■ Your WorkPad is not waterp roof and should n ot b e exposed to
rain or moisture. Under extreme conditions, water may enter the
circuitry through the front pan e l buttons . In general, treat your
WorkPad as you would a pocket calculator or other small
electronic instrument.
■ The touch-sensitive screen of your WorkPad contains a glass
element . Tak e care not to drop your WorkPad or su bject it to any
strong impact. Do not carry your WorkPad in your back pocket: if
you sit on it, th e g lass may break.
■ Protect your WorkPad from temperature extremes. Do not leave
your WorkPad on the dashboard of a car on a hot day, and keep it
away from heater s and other heat sour ces.
■ Do not store or use your WorkPad in any location that is extremely
dusty, damp or wet.
■ Use a so ft, d amp clot h to c l ean y our Work Pad . If t h e sur fac e of t he
WorkPad screen becomes soiled, clean it with a soft cloth
moistened with a diluted wind o w-cle aning solut ion.
Chapter 6 Page 59
Page 65

Battery Considerations
Please note the following considerations when replacing the batteries
in your WorkPad:
■ Under normal conditions, your WorkPad batteries should provide
several months of use. You can conserve battery life by
minimizing the use of the backlight feature, and changing the
“Auto-off af te r” settin g that automatically turns the WorkPad off
after a period of inactivity (see “General Preferences” in the
Applications Handbook for the I BM WorkPad).
■ If the batteries become low in the course of normal use, an alert
appears on the WorkPad screen describing the low battery
condition. If this alert appears, perform a HotSync
synchron ization to back up your data before you repla ce the
batteries . This helps prevent a ccidental data loss.
■ When replacing the batteries, begin by turning your WorkPad off
(so there is no screen display). Never remove the batteries while
your WorkPa d is turned on.
■ When replacing the batteries, always use good quality batt eries of
the same type. Use only alkaline batteries with your WorkPad.
■ When you remove the batteries, the built-in backup power of your
WorkPad maintains memory data for a period of up to one
minute. Whenever you remove the batteries, replace them
immediately. If you encounter any difficultie s in the course of
battery replacement, reinst all the or iginal bat teries and wai t a few
minutes for the backup power to recharge.
■ If the batteries drain to the point where your WorkPad does not
operate, it stores your data safely for about a mon th. In this case,
there is enough residual energy in the batteries to store the data,
but not enough to turn on your WorkPad. If your WorkPad does
not turn on when you press the power button, you should replace
the batteries immediately.
■ If you leave drained batteries in your WorkPad for an extended
period of time, you can lose all of the stored data. If this happens,
replace th e batteries and use the rese t b utton to reset your
WorkPad. (See “Resetting Your WorkPad ” later in this c hapter fo r
details.) After you reset your WorkPad, perform a HotSync
operation to restore the data from your computer.
Page 60 Basic Handbo ok fo r the IB M Work P a d
Page 66

Resetting Your WorkPad
Under normal circumstances, you will never have to use the reset
button. However, on rare occasions your WorkPad may “hang” (no
longer respond to button s or the scree n). In this case , you need to
perform a reset to get your WorkPad running again.
Performing a Soft Rese t
A soft reset tells you r WorkPad to s top what it’s doi ng and start over
again. All records and entries stored in your WorkPad are retained
with a soft reset. After a soft reset, the IBM WorkPad welcome scre en
appears followed by the General Preferences screen (to set time and
date).
To perform a soft reset:
■ Use the tip of an unfolded paper clip (or similar object without a
sharp tip) to gently press the reset button inside the hole on the
back panel of your WorkPad.
Reset button
Performing a Hard Reset
A hard reset also tells your Wor kPad to start ov e r ag ain. With a hard
reset all re cords and entries stored in your WorkPad are erased.
Therefore, never perform a hard reset unless a soft reset does not solve your
problem.
Note: You can restore any data previously synchronized with your
computer during the next HotSync oper ation.
Chapter 6 Page 61
Page 67

To perform a hard reset:
1. Hold down the power button on the front panel of the WorkPad.
2. While holding down the power button, use the tip of an unfolded
paper clip (or similar object without a sharp tip) to gently press the
reset button.
3. When a message appears on the WorkPad screen wa rning that you
are about to erase all the data stored on your WorkPad, do one of
the following:
■ Press the upper half of the scroll butto n on the front panel of t he
WorkPad to comp lete the ha rd reset and disp lay the Digitizer
screen.
■ Press any other button to perform a soft reset.
Note: With a ha rd reset, the curren t d a te a nd time are re ta i n e d .
Formats Preference s and other settin g s are restored to their
factory de f a u lt settin gs.
Page 62 Basic Handbo ok fo r the IB M Work P a d
Page 68

Index
A
Accented Characters
Graffiti 26
on-screen keyboard 17
Applications
beaming 39, 47
buttons 2
controls 28
finding text 41
font style 33
information 16
installing 45
Launcher 13, 14
menus 29
removing 48
sorting 15
starting 13
switching 14
B
Backlight 3, 7
activating 7
Batteri es
battery door 5
battery gauge 13
battery life 60
installing 5
Beam Data 39, 55
Beaming
applications 47
Brig htnes s Control 5
Button 29
C
Calibration 6
Capital Letters 23
Categories 34
beaming 39
merging 3 7
renaming 37
using in Applications
Launcher 15
using in lists 35
Check Box 28
Compute r
connecting 10
Contrast Control 5
Copy 32
Cover 3
Cradle 10
Cut 32
D
Date
setting 9
Deleting
applications 48
WorkPad Desktop 49
Digitizer 6
E
Edit Menu 31
Entri es
assigning categories 34
attaching n o te s 38
beaming 39
finding 41, 42
private 38
F
Find 41
Fonts 33
G
Games 48
General Preferences 8
setting date 9
setti ng time 8
Graffiti
accent character s 26
alphabet 19, 22
capital letters 23
concepts 19
defined 18
menu commands 30
navigation strokes 27
numbers 23
online help 32
punctuation marks 24
shortcuts 27
Index Page 63
Page 69

symbols 25
tips 21
writing area 2
writing character s 20
H
Hard Reset
procedure 61
reset button 4
Help
Graffiti 32
notes 52
online tips 51
tech ni ca l suppor t 5 7
HotSync
communications port 10
troubleshooting 52
I
Information
applications 16
Infrared Port 4
Infrared port 55
Installing
applications 45
batteries 5
cradle 10
games 48
troubleshooting 52
WorkPad Desktop 12
International Characters
Graffiti 26
on-screen keyboard 17
IR Port 4
beaming data 39
K
Keyboard 16
screen options 17
L
Letters
font style 33
Graffiti 19, 22
on-screen keyboard 16
M
Maintenance Information 59
Memo ry 16
Menu s
activating 29
choosing 30
command equivalents 30
edit menu 31
N
New
categories 35
Note 38
Numbers
Graffiti 23
on-screen keyboard 16
writing 23
O
On-Screen Keyboard 16
menu command 32
screen options 17
P
Paste 32
Phone Lookup 42
Pick List 28
Power Button 3
Preferences
general 8
Private Records 38
Punctuation Marks
Graffiti 24
on-screen keyboard 16
writing 24
R
Receive Data 39
Records
attaching n o te s 38
beaming 39
categories in lists 35
choosing categorie s 34
finding 41, 42
private 38
Removing
applications 48
WorkPad Desktop 49
Reset Button 4, 61
Page 64 Basic Ha ndbook for the I BM Work Pad
Page 70

S
Scroll Arrows 28
Scroll Bar 29
Scroll Button 2
Search
for text 41
phone lookup 42
Security
private records 38
troubleshooting 56
Select All 32
Send Data 39
Serial Port 5, 10
ShortCuts 27
menu commands 30
pre-defined 28
Soft Reset
procedure 61
reset button 4
Sort
applications 15
Starting Applications 13
Stylus 4
Symbols
Graffiti 25
on-screen keyboard 16
System Requirements 11
T
Techn i ca l Support 5 7
Text Entry
accent character s 26
capital letters 23
font style 33
Graffiti sh ortcuts 27
numbers 23
on-screen keyboard 16
punctuation marks 24
sym b ols 25
with Work Pad 18
writing tips 21
Time
setting 8
Toubleshooting
infrared communications 55
Transmit Data 39
Troubleshooting 52
applications 56
Date Book 57
general 54
Graffiti 54
HotSync 52
installation 52
Memo Pad 57
U
Undo 32
W
WorkP ad
application butto ns 2
applications 13
backlight 7
battery door 5
battery installation 5
caring for 59
connecting to computer 10
contrast contro l 5
cover 3
cradle 10
install tool 45
memory 16
menus 29
on-screen keyboard 16
power button 3
private records 38
reset button 61
safety tips 59
screen 2
scroll button 2
search for text 41
serial port 5
starting 6
starting applicat i on s 13
stylus 4
techn i ca l su p port 57
troubleshooting 52
writing text 18
writing tips 21
Index Page 65
Page 71

WorkPad Desktop
features 10
install tool 45
removing 49
software inst allation 12
system requirements 11
Writing
accent characters 26
capital letters 23
Graffiti shortcuts 27
numbers 23
on-screen keyboard 16
punctuation marks 24
symbols 25
text with Wor kPad 18
tips 21
Page 66 Basic Ha ndbook for the I BM Work Pad
 Loading...