

Page 1

xSeries Server
VXA-2 Internal Tape Drive
User’ s Guide
Important:
Please review the maintenance information in “Using cleaning cartridges” on page 3-4
and Appendix A, “Maintaining the tape drive”, on page A-1 as periodic maintenance is
not covered by the IBM warranty. Repairs or exchanges resulting from improper
maintenance or use of unsupported media may result in billable service charges.
Page 2

Page 3

xSeries Server
VXA-2 Internal Tape Drive
User’ s Guide
Page 4

Note: Before using this information and the product it supports, read the information in
Appendix D, “Warranty information”, on page D-1 and Appendix E, “Notices”, on
page E-1.
First Edition (February 2003)
© Copyright International Business Machines Corporation 2003. All rights reserved.
US Government Users Restricted Rights – Use, duplication or disclosure restricted by GSA ADP Schedule Contract
with IBM Corp.
Page 5

Contents
Safety ...............v
About this book ...........vii
Registering your option ..........vii
Chapter 1. Introduction .......1-1
Software description ...........1-1
Chapter 2. Installation ........2-1
Installation requirements..........2-1
Preparing for installation .........2-1
Setting the SCSI ID and termination ......2-2
Mounting the drive ...........2-3
Attaching the cables ...........2-3
Completing the installation and turning on the
device ................2-4
Updating the configuration .........2-4
Installing backup and restore software .....2-4
Chapter 3. Using the tape drive ....3-1
Front panel LEDs ............3-2
Loading data cartridges ..........3-4
Unloading data cartridges .........3-4
Using cleaning cartridges .........3-4
Setting write protection on the tape cartridge . . . 3-5
Resetting the drive............3-6
Packaging the drive for shipping .......3-6
Appendix A. Maintaining the tape
drive ...............A-1
Types of tape cartridges ..........A-1
Recommendations for data cartridge usage . . . A-2
Data cartridge erasure ..........A-2
Storage and shipping environments ......A-2
Tape cartridge storage .........A-3
Operating in harsh environments ......A-4
Placing the cartridge labels.........A-5
Ordering tape cartridges .........A-5
Appendix B. Product specifications B-1
Data capacities .............B-1
Size and weight ............B-1
Tape drive conditions...........B-2
Tape cartridge conditions .........B-2
Appendix C. Problem solving ....C-1
Appendix D. Warranty information . . D-1
Warranty period ............D-1
Service and support ...........D-1
Warranty information on the World Wide Web D-1
Online technical support ........D-1
Telephone technical support .......D-1
IBM Statement of Limited Warranty Z125-4753-06
8/2000 ...............D-3
Part 1 - General Terms .........D-3
Part 2 - Country-unique Terms ......D-5
Appendix E. Notices ........E-1
Trademarks ..............E-2
Electronic emission notices .........E-2
Federal Communications Commission (FCC)
statement ..............E-2
© Copyright IBM Corp. 2003 iii
Page 6

iv VXA-2 Internal Tape Drive: User’s Guide
Page 7

Safety
Before installing this product, read the Safety Information.
Antes de instalar este produto, leia as Informações de Segurança.
Pred instalací tohoto produktu si prectete prírucku bezpecnostních instrukcí.
Læs sikkerhedsforskrifterne, før du installerer dette produkt.
Ennen kuin asennat tämän tuotteen, lue turvaohjeet kohdasta Safety Information.
Avant d’installer ce produit, lisez les consignes de sécurité.
Vor der Installation dieses Produkts die Sicherheitshinweise lesen.
Prima di installare questo prodotto, leggere le Informazioni sulla Sicurezza.
Lees voordat u dit product installeert eerst de veiligheidsvoorschriften.
Les sikkerhetsinformasjonen (Safety Information) før du installerer dette produktet.
Antes de instalar este produto, leia as Informações sobre Segurança.
© Copyright IBM Corp. 2003 v
Page 8

Antes de instalar este producto lea la información de seguridad.
Läs säkerhetsinformationen innan du installerar den här produkten.
vi VXA-2 Internal Tape Drive: User’s Guide
Page 9

About this book
This User’s Guide the provides installation instructions and information required for
ongoing use and maintenance of the IBM®VXA-2 Internal Tape Drive. This
manual contains the following information:
Chapter 1, “Introduction” provides an introduction to the VXA-2 Internal Tape
Drive.
Chapter 2, “Installation” provides procedures for installing the tape drive in your
xSeries
Chapter 3, “Using the tape drive” provides information on how to use the drive.
This chapter contains information about caring for data cartridges, using cleaning
cartridges, and setting write protection on cartridges.
Appendix A, “Maintaining the tape drive” contains information on maintaining
your tape drive and caring for your storage media.
Appendix B, “Product specifications” provides information on product
specifications and requirements.
Appendix C, “Problem solving” provides solutions to problems that might occur
while using the tape drive.
Appendix D, “Warranty information” provides warranty information.
Appendix E, “Notices” contains trademarks and legal notices.
Note: The illustrations in this manual might differ slightly from your hardware.
Be sure to retain your proof of purchase. It might be required for warranty service.
™
server.
Registering your option
Thank you for purchasing an IBM xSeries Server option. Please take a few
moments to register your product and provide us with information that will help
IBM to better serve you in the future. Your feedback is valuable to us in
developing products and services that are important to you, as well as in
developing better ways to communicate with you. Register your option on the
http://www.ibm.com/pc/register IBM Web site.
IBM will send you information and updates on your registered product unless you
indicate on the Web site questionnaire that you do not want to receive further
information.
© Copyright IBM Corp. 2003 vii
Page 10

viii VXA-2 Internal Tape Drive: User’s Guide
Page 11

Chapter 1. Introduction
The IBM VXA-2 Internal Tape Drive is a versatile backup and restore device for
low to mid-range servers. This SCSI tape drive is capable of storing up to 80
gigabytes (GB) of native data on a 230-meter VXA tape. It can transfer data at a
sustained rate of up to 6 megabytes (MB) per second. Both capacity and transfer
rates are further enhanced with its onboard hardware data compression feature.
Figure 1-1. VXA-2 tape drive
In addition to this user’s guide, the option package contains:
v IBM VXA-2 Internal Tape Drive
v Mounting screws
v Backup application CDs (trial versions)
v Cleaning cartridge
v Quick Start Guide
v Device drivers (on the Documentation CD)
v SCSI cable
Contact your place of purchase if an item is missing or damaged. Be sure to retain
your proof of purchase and packing material. They might be required to receive
warranty service.
Software description
The IBM VXA-2 Internal Tape Drive option package includes trial-version backup
application CDs. These CDs contain popular backup and restore applications for
Microsoft
appropriate application for your computer system by following the installation
instructions that come with the CD you select. These trial versions expire after 30
to 90 days, depending on the application you use.
Use the trial period to determine the best application for your specific computer
configuration. For information on purchasing a permanent installation copy of the
®
Windows®2000, Novell NetWare, and Linux. You can install the
© Copyright IBM Corp. 2003 1-1
Page 12

desired tape drive backup application, go to the IBM tape drive Web site at
http://www.pc.ibm.com/ww/eserver/xseries/tape.html or follow the instructions
from the CD.
The CDs also contain backup applications that are used with other products but
are not applicable to the VXA-2 Internal Tape Drive. For a current list of supported
tape drive configurations, go to the http://www.pc.ibm.com/us/compat IBM
Server Compatibility Web page, select Tape Backup Units, and search for
″59P6746.″
1-2 VXA-2 Internal Tape Drive: User’s Guide
Page 13

Chapter 2. Installation
The VXA-2 Internal Tape Drive is compatible with several xSeries servers. For a list
of supported servers go to http://www.pc.ibm.com/us/compat and click on ″Tape
Backup Units.″ Refer to the documentation that comes with the server for
instructions on installing the tape drive. If you cannot locate your xSeries server
user manual, follow the instructions in the following sections to install the tape
drive.
Installation requirements
To install the tape drive in your xSeries server, you will need the following:
v A low voltage differential (Ultra2) SCSI host adapter
v Documentation for your computer, SCSI bus adapter, or external enclosure
v Phillips head and flat blade screwdrivers for the mounting screws, and for
opening your computer
v Flat-nose pliers (optional) to install and remove jumpers
v An available 5.25-inch half high drive bay
Preparing for installation
To prepare for installation, complete the following procedure:
1. Touch a known grounded surface to discharge static electricity from your body
and ensure that the work area is free from conditions that could cause ESD.
2. Turn off all devices attached to the computer in which you plan to install the
drive, then turn off the computer.
3. Disconnect all power cables.
4. Remove the drive bay’s cover plate according to the system manufacturer’s
instructions.
5. Before opening the static-protective bag containing the tape drive, touch the
bag to an unpainted metal surface on the computer for at least two seconds.
Remove the drive from the static-protective bag. If you must put the drive
down, place the drive on the static-protective bag. Do not touch any exposed
components of the tape drive. Instead, handle it carefully by the edges.
Attention: Tape drives are sensitive to static electricity discharge. The drive is
wrapped in a static-protective bag to prevent damage.
The tape drive complies with industry-standard, 5.25-inch half-high form factor
mounting requirements and can be mounted either horizontally or vertically, but
not upside down. When installing the tape drive, refer to Figure 2-1 on page 2-2 for
the location of the back-panel components.
© Copyright IBM Corp. 2003 2-1
Page 14
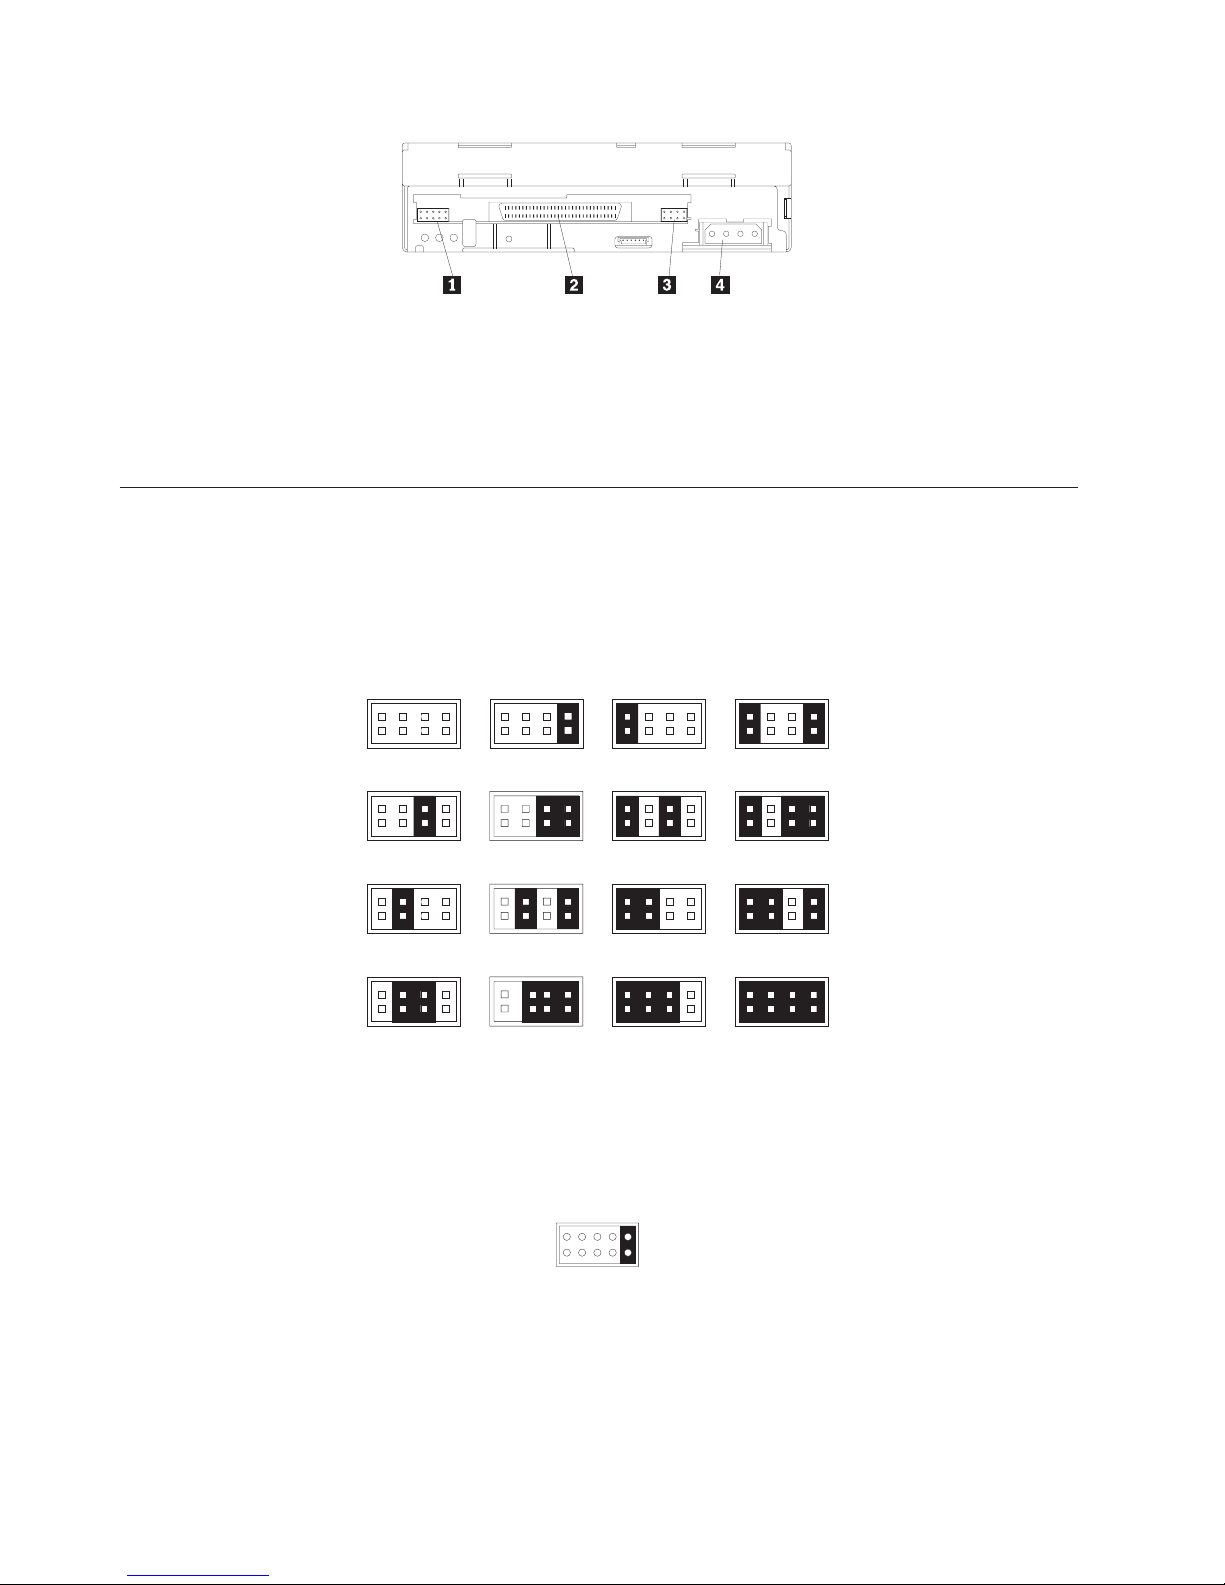
1 Term power connector 3 SCSI ID jumpers
2 SCSI connector 4 Power connector
Figure 2-1. Back-panel components
Setting the SCSI ID and termination
The drive is shipped with a SCSI ID of 0. If you want to change the default ID,
install the jumpers on the jumper block (3 in Figure 2-1) for the desired ID, as
shown in Figure 2-2. (If necessary, use flat-nose pliers to remove the jumpers.) If
you need an additional jumper, usea2mmjumper.
Figure 2-2. SCSI ID settings
You can use the connector (1 in Figure 2-1) to enable the terminator power
signal. (The drive is shipped from the factory with termination power disabled.) To
enable termination power, place a jumper across the far right pins on the auxiliary
connector. Make sure the jumper is firmly in place. Be sure to usea2mmjumper.
Address 0
Address 2 Address 3 Address 10 Address 11
Address 4 Address 5 Address 12 Address 13
Address 6 Address 7 Address 14
Address 1 Address 8 Address 9
Address 15
Figure 2-3. Term power enabled
Note: To protect the drive components if termination power is shorted, the tape
drive includes a self-resetting power fuse.
2-2 VXA-2 Internal Tape Drive: User’s Guide
Page 15

Mounting the drive
Generally, you will mount the tape drive and then attach the SCSI and power
cables. However, if there is insufficient working space to attach the connectors after
mounting the drive, attach the cables first.
Slide the drive into the server bay or external enclosure. Ensure that no cables are
caught or crimped between the drive and the chassis. Using the screws provided
with the tape drive, secure the drive in the drive bay using one of the screw
mounting combinations.
Attention:
To avoid damaging the drive, follow these precautions:
v Use only the M3 x 0.5x4mmPhillips screws provided.
v Ensure that the chassis is not distorted. (Alignment to the horizontal or
vertical plane should not exceed ±10°.)
v Ensure that no objects (screw heads, cables, or adjacent devices) are pressing
against the frame.
v Do not use a combination of the two sets of mounting holes.
v Do not obstruct the drive’s ventilation slots (top and rear).
Attaching the cables
Locate the host system’s internal power cable and connect it to the drive’s power
connector (1 in Figure 2-4). The enclosure’s power cable connector must be an
AMP 1-480424-0 series, or equivalent.
Using the provided SCSI cable, attach the non-terminated end to the host system’s
SCSI adapter and the terminated end to the back of the tape drive (2 in
Figure 2-4).
Attention: To avoid damaging the tape drive, make certain you connect pin 1
on the cable to pin 1 on the drive. Pin 1 is on the right, top row of the connector
pins.
Figure 2-4. Installing the SCSI cable
Chapter 2. Installation 2-3
Page 16

Completing the installation and turning on the device
Before completing the installation, check your work to ensure that the power and
SCSI connectors are securely attached, and that the cables are properly routed.
Then, power on the host system.
During the tape drive’s power-on self-test, the LEDs scroll sequentially right to left,
then left to right. For more information, see Table 3-1 on page 3-3.
Updating the configuration
For most computers, the configuration-setup utility program automatically
recognizes the new tape drive. However, you might need to provide information
about your system changes after you restart your computer.
Ensure that the appropriate advanced SCSI programming interface (ASPI) device
drivers are installed to support the tape drive. Device drivers are usually provided
with the SCSI adapter.
If your computer does not recognize the tape drive after startup or if you receive
startup errors, run the configuration-setup utility program as described in the
documentation that comes with your computer.
Installing backup and restore software
The tape drive is used for backing up and restoring data. Consequently, to use the
drive, you must install an appropriate backup and restore application for your
computer operating system. Use the instruction below that best fits your situation:
v If you are using software not included in the option package, follow the
directions that come with your software.
v If you are using the trial software that comes with the option, insert a trial
application CD into the CD-ROM drive and follow the on-screen installation and
operating instructions.
v If you are using the hardware installation support that your operating system
provides, and the operating system requests a device driver, insert the
Documentation CD and look in the ″device driver″ folder.
2-4 VXA-2 Internal Tape Drive: User’s Guide
Page 17

Chapter 3. Using the tape drive
This section provides information on using the tape drive. Figure 3-1 shows the
front panel of the tape drive and identifies the components.
1 Ready LED 4 Fault LED
2 Activity LED 5 Eject button
3 Cleaning LED
Figure 3-1. Front view of the tape drive
© Copyright IBM Corp. 2003 3-1
Page 18

Front panel LEDs
The tape drive contains four LEDs to indicate its operational status, as shown in
Table 3-1 on page 3-3.
3-2 VXA-2 Internal Tape Drive: User’s Guide
Page 19

Table 3-1. Definition of status light combinations
Operation LED #1 Ready
(green)
LED #2
Activity
(green)
LED #3
Cleaning
(amber)
LED #4 Fault
(amber)
Power-on self-test Flashing Off Off Off
Power On LED Test On for 2.0
seconds
No tape loaded Off Off On
Tape loaded, no
On Off On
On for 2.0
seconds
On for 2.0
seconds
1
/Off Off
1
/Off Off
On for 2.0
seconds
activity
1
Data or Cleaning
On Flashing On
/Off Off
Cartridge loaded,
activity
Cleaning Cartridge
loaded, cleaning
1
failed
Tape loading or
unloading
Unrecoverable drive
failure
1
2
Off Off On
Off Flashing On1/Off Off
On/Off Off On1/Off Flashing
1
Off
Firmware Download Flashing Off On1/Off Off
1
Firmware Update Flashing Flashing On
Microcode Download
3
failure
Over Temperature
4
Off Off On1/Off Flashing
Off Off On1/Off On
/Off Off
2
2
Notes:
1. A solid amber LED indicates the drive needs cleaning. The drive will continue to
function, but, needs cleaning as soon as possible. A power cycle must not turn off this
indicator.
2. The Fault LED will flash to indicate an unrecoverable error. An unrecoverable error is
an error condition that results in the drive not being able to function unless initiator,
operator, or service intervention is applied. An unrecoverable drive failure is usually
the result of a hardware error condition. One of the following actions will be needed to
clear the flashing Fault LED:
v Hard SCSI Reset
v Cartridge Eject
v Power Cycle
v Retry Microcode Download
An unrecoverable cartridge (media) failure is usually the result of a defective cartridge,
media, or cartridge state and will require the drive to eject the cartridge (if possible) to
clear the flashing LED.
3. The firmware download failed and the drive is not functional. The drive boot code is in
control and the microcode download should be retried.
4. The Fault LED will be on solid to indicate an over temperature condition.
Chapter 3. Using the tape drive 3-3
Page 20

Loading data cartridges
The tape drive uses data-quality VXA tape data cartridges, in various lengths,
available from IBM. These cartridges do not require formatting or other media
conditioning before use. See “Data capacities” on page B-1 for the capacities of the
VXA tape cartridges. See “Storage and shipping environments” on page A-2 for
storage guidelines.
Attention: The VXA-2 tape drive only operates with IBM recommended VXA
data cartridges. Do not attempt to use other types of cartridges, or you may
damage the tape drive.
Insert the front of the cartridge through the tape drive door into the loader
mechanism. (The colored write-protect tab on the cartridge should be closest to the
drive’s eject button.) Gently push the cartridge until the drive’s loader mechanism
activates the tape-loading process. The drive will then pull the cartridge the
remaining distance into the drive.
The tape drive loads the tape in approximately 40 seconds, during which time, the
Activity LED flashes green. When the Activity LED is steady green, the tape drive
is ready to begin write and read operations.
Unloading data cartridges
To unload a cartridge, press the eject button. The tape drive completes any
command in process, writes any buffered information to tape, rewinds to the
beginning of the tape, and ejects the cartridge in approximately 1 to 2 minutes.
Using cleaning cartridges
Clean the tape drive whenever the Cleaning LED status light comes on or a
system I/O error related to the device occurs.
Attention: Only use the IBM recommended VXA cleaning cartridges to clean
the tape drive. Use of other than recommended cleaning cartridges can damage
your drive and may void the warranty.
To clean the tape drive:
1. Make sure that the power is on.
2. If a tape cartridge is in the tape drive, eject and remove the cartridge.
Notes:
a. Cleaning cartridges can be used approximately 20 times. Once a cleaning
cartridge has been used to its maximum number of uses, the cartridge is
considered expired. The tape drive will detect, and automatically eject, an
expired cartridge. Never attempt to reuse an expired cleaning cartridge as it
will reintroduce debris removed during a previous cleaning of the tape
drive.
b. The IBM cleaning cartridge is shipped with a label on it that has 20 boxes
that are designed to be used to log the use of the cartridge. Each time the
cartridge is used, mark one of the boxes on the label with a pen or marker.
When all of the boxes have been marked, discard the cleaning cartridge.
3. Grasp the cleaning cartridge by the outer edges, with the window side up and
the write-protect switch facing you.
3-4 VXA-2 Internal Tape Drive: User’s Guide
Page 21
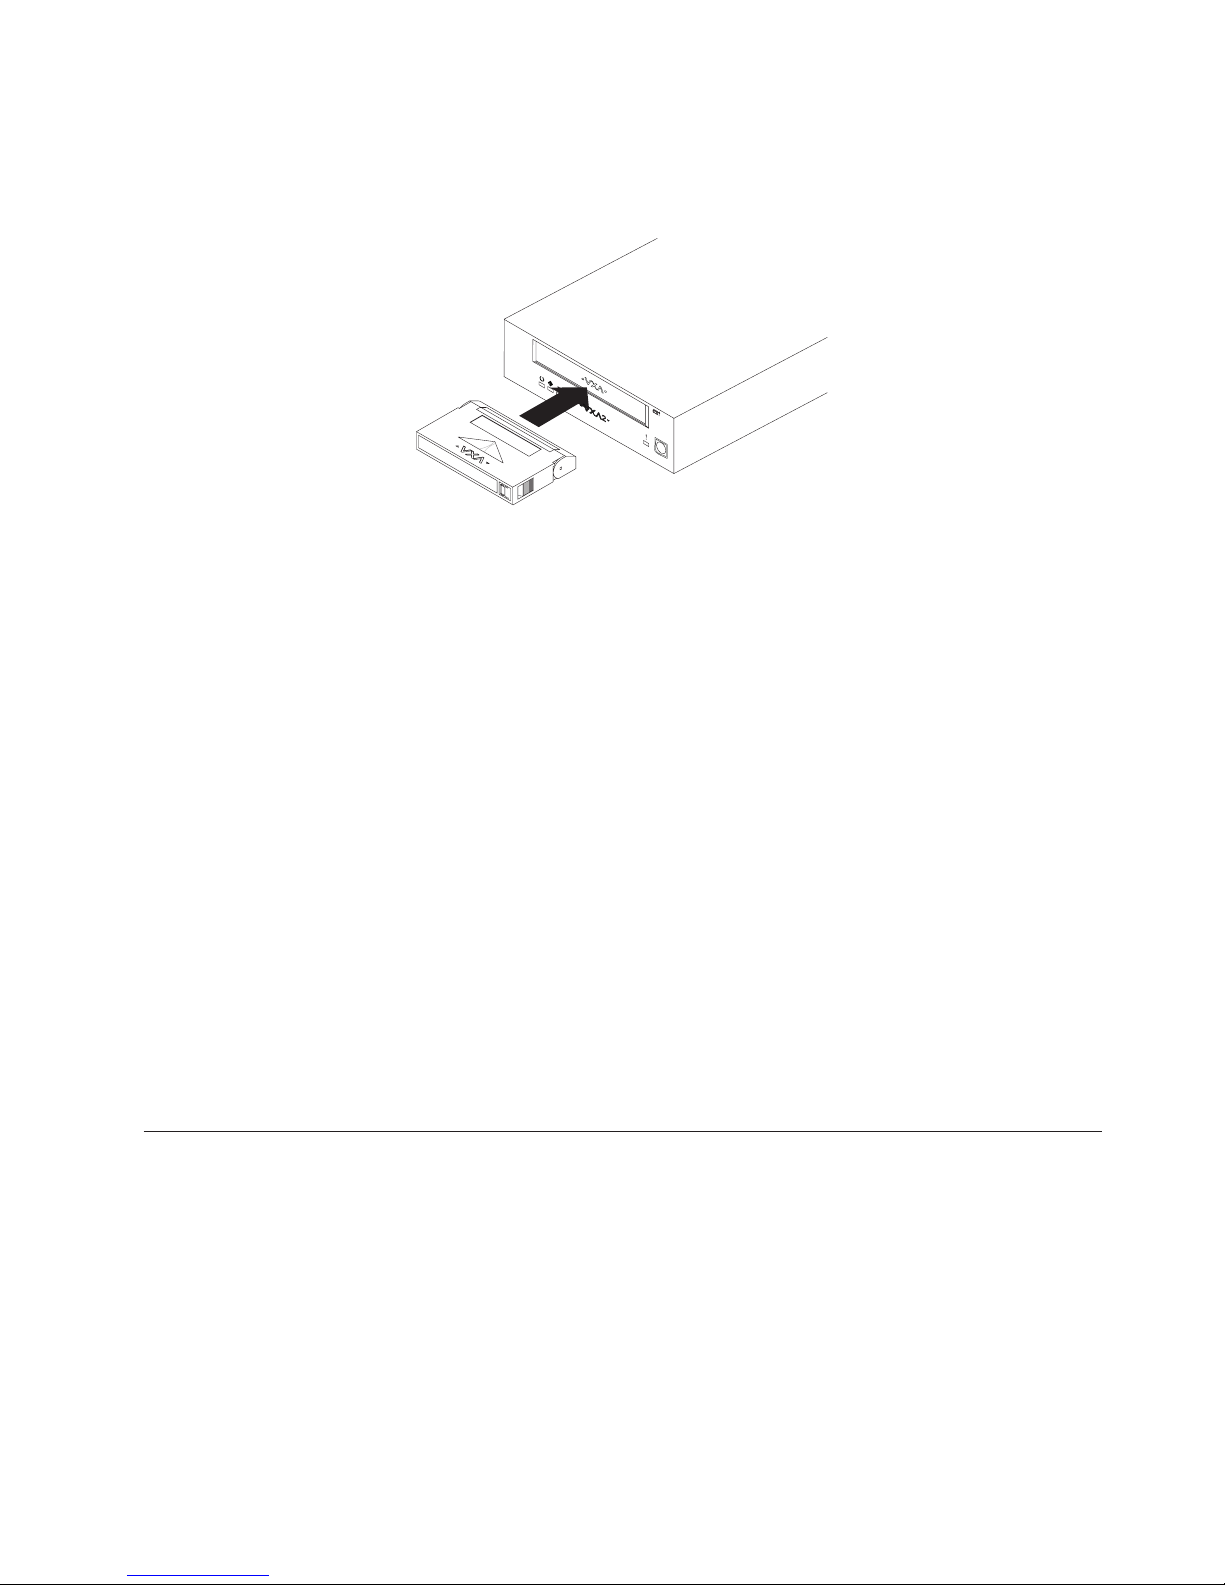
4. Slide the cartridge into the opening on the front of the tape drive (see figure
Figure 3-2) until the loading mechanism pulls the cartridge into the drive and
the drive door closes.
Figure 3-2. Loading the cleaning cartridge
After the cleaning cartridge has been inserted, the remainder of the cleaning
process is automatic. The tape drive will do the following:
1. Loads the cleaning cartridge into the tape drive
2. Cleans the drive by moving the cleaning tape forward for approximately 30
seconds
3. Unloads the cleaning cartridge when the cleaning operation is complete
4. Indicates a successful cleaning operation by turning off the Cleaning LED (if
the Cleaning LED was on prior to the cleaning process. Otherwise, the
Cleaning LED remains solid to indicate that the cleaning cartridge is no longer
usable. Obtain a new cleaning cartridge and repeat the process.)
Note: If the cleaning operation completes but the Cleaning LED remains on,
repeat the cleaning procedure with a new cleaning cartridge. If the LED
still remains on, contact your authorized service representative.
To determine how many times a cleaning cartridge may be used, check the
information printed on the cartridge. If you attempt to use a depleted cleaning
cartridge, the tape drive automatically detects the error and ejects the cartridge.
If the Cleaning LED was on prior to the cleaning process, it stays on; if the
Cleaning LED was off, the depleted cartridge causes the light to come on.
Setting write protection on the tape cartridge
Before you insert a cartridge into the tape drive, make sure the write-protect
switch on the cartridge is set correctly, as shown in Figure 3-3 on page 3-6.
Chapter 3. Using the tape drive 3-5
Page 22

Figure 3-3. Setting the write-protect switch
Resetting the drive
To reset the VXA-2 drive, perform one of the following steps:
v Press and hold the eject button for 10 seconds.
v Turn off the tape drive and turn it on again (do not perform this step if the
drive contains a cartridge).
v Use the backup/restore application software to send a reset.
Packaging the drive for shipping
If you are shipping the tape drive to another location or returning it for repair,
pack the tape drive in its original shipping container and packing materials.
Attention: To avoid damaging the tape drive, use the original shipping materials
when you ship it. Your proof of purchase might be required to receive warranty
service. If you are returning the tape drive for service, only return the tape drive.
Remove and keep all cartridges, cables, and terminators.
REC
REC
SAVE
SAVE
3-6 VXA-2 Internal Tape Drive: User’s Guide
Page 23

Appendix A. Maintaining the tape drive
The tape drive uses cartridges with VXA technology for saving and restoring
system data. It is designed to use only VXA cartridges.
The tape drive is only backward compatible to previous VXA technology media.
Attention:
v The VXA-2 tape drive only operates with IBM recommended VXA data
cartridges. Do not attempt to use other types of cartridges, or you may damage
the tape drive.
v Only use the IBM recommended VXA cleaning cartridges to clean the tape
drive. Use of other than recommended cleaning cartridges can damage your
drive and may void the warranty.
Types of tape cartridges
Data cartridge Use the VXA data cartridge to save or restore programs or data.
Cleaning cartridge
Use the specially labeled cleaning cartridge to clean the tape drive.
For instructions about how to clean the tape drive, see “Using
cleaning cartridges” on page 3-4).
To order additional cartridges, see “Ordering tape cartridges” on page A-5.
© Copyright IBM Corp. 2003 A-1
Page 24

Recommendations for data cartridge usage
The following list describes recommended guidelines that will help to protect your
data and prolong the life of your tape cartridges and the tape drive:
v Remove the tape cartridge from the drive when the drive is not in use.
v Back up and then discard any tape cartridge that repeatedly produces error
messages (the error information is in the System Error Log).
v On the data cartridge, do not open the door that covers the tape. The door
protects the tape from dirt, dust, and damage.
v Do not touch the tape. Any substance transferred to the tape by touching could
cause loss of data.
v To avoid problems with loading and unloading, use only one label on a
cartridge. Multiple or poorly placed labels can clog the drive load mechanism.
v Do not use poor-quality tape cartridges. They can cause excessive read or write
errors, and may damage the tape drive.
v Discard any tape cartridges that are dropped, as the impact may damage the
tape’s internal mechanism.
v Make sure the environment is kept clean and constant. Do not operate in a
dusty environment and always maintain a constant environment. A consistent
storage and operating environment reduces media exposure to climatic stress.
Attention: Use only the recommended cleaning cartridge to clean the tape drive.
Use of other than recommended cleaning cartridges can damage your drive and
may void the warranty.
v Printers and copiers can produce paper and toner dust. Locate the tape unit
away from these items. High traffic areas near hallways and doors can also
produce excess dust and dirt.
v All important information should be recorded on the tape label. Information,
such as the model and number of the system or tape drive, the date, the density,
any error statistics, and a log number should be included. The operating
environment and compression mode should also be noted.
Data cartridge erasure
Most bulk eraser devices do not have the capability to erase the data cartridge. To
properly erase a VXA data cartridge with a bulk eraser device, the erasure
coercivity rating must be a minimum of 3900 Oersted.
Storage and shipping environments
Before using a tape cartridge, let it acclimate to the operating environment by
placing the cartridge in the operating environment for as long as it has been away
from the environment or for 24 hours, whichever is less. (To determine the
appropriate operating environment, see “Tape cartridge conditions” on page B-2.)
Acclimation is necessary for any data cartridge exposed to a different humidity
environment or to temperature changes of 11°C (20°F) or more.
Retrieval of archived data should be performed on a tape unit that is clean and
fully operational. Try to make the recovery environment the same as the operating
environment. Allow tapes at least 24 hours to acclimate to environment of the tape
unit.
A-2 VXA-2 Internal Tape Drive: User’s Guide
Page 25

The recommended environment for storage and shipment of VXA data cartridges
is shown in Table A-1.
Table A-1. Recommended environment for VXA data cartridges
Environmental factor Storage Shipping
Temperature
Relative humidity
(noncondensing)
Maximum wet bulb
Tape cartridge storage
Tape drives record data using densities similar to hard disk drives. Because most
computer systems are not located in a dust-free, climate-controlled environment,
you must exercise special care when dealing with tape cartridges and tape drives.
They need to be treated as a valuable asset used to protect your business data.
Use the following guidelines for storing your tape cartridges:
v Temperature and humidity should be kept constant at a level comfortable for
you.
v Tape cartridges should always be stored in their protective cases. The storage
case helps prevent damage from dust and physical misuse. When the tape
cartridges are not in use or being stored, they should be in their storage cases
and stood on edge in a designated storage location. Do not stack cartridges on
the flat side or stack other items on top of the tape cartridges. Handle your tape
cartridges with care to reduce archival problems.
v Tape cartridge protective cases should be kept closed except when inserting or
removing a cartridge. Contamination can build up and be transferred to the tape
cartridge if the protective case is left open.
v Stored tapes should be exercised at least once every 12 months. Run the tape
from Beginning of Data (BOD) to End of Data (EOD) and back to BOD at
normal operating speeds. Tapes stored in a warmer environment should be
exercised more frequently.
v Sunlight can damage the tape and the cartridge shell. Store tape cartridges out
of the direct sunlight
5°C to 32°C
(41° to 90°F)
20 to 60% 5 to 80%
26°C
(79°F)
−40 to 52°C
(−40 to 125°F)
26°C
(79°F)
Attention: Operation outside of the recommended environment can result in
possible loss of data or failure of the drive.
Appendix A. Maintaining the tape drive A-3
Page 26

Operating in harsh environments
Do not use as an archival tape any tape that has been used outside of the
operating ranges specified in Appendix B, “Product specifications”, on page B-1 for
an extended period of time. The magnetic and physical strength of the tape will
have deteriorated as a result of its exposure to the environment. Do not store
important data on such a tape; transfer the data to a newer tape for reliable
archiving.
Attention: Do not operate the tape drive in a poor air-quality environment. If
your environment contains an excessive amount of particulates, contact your
service representative for more information.
A-4 VXA-2 Internal Tape Drive: User’s Guide
Page 27

Placing the cartridge labels
Use care when placing the cartridge labels on the VXA tape cartridge. Use the
following guidelines for tape cartridge labels.
v Use only labels provided with the cartridge and place them only in the
designated locations.
v IBM VXA tape cartridges are shipped with labels adhered to them. Do not
adhere a label on top of an existing label. Poorly placed or multiple labels can
clog the drive mechanism.
v Place the larger label on the end of the cartridge in the designated area 1.
v Place the smaller label on the top of the cartridge in the designated area 2.
2
1
Figure A-1. Placing the tape cartridge labels
Ordering tape cartridges
All tape cartridges are not alike. The tape composition and length, and the
construction of the cartridge itself can all affect the quality and capacity of the
recording and the performance of your tape drive. A poor quality tape cartridge
may appear to work adequately in your system, yet it can leave contamination in
the tape path or impede the speed of the recording.
The length and composition of the tape, and the size, shape, and construction of
the cartridge shell must all be considered when selecting the tape cartridge to be
used with your system. IBM supports using only data and cleaning cartridges
recommended by IBM. Data grade tape media is the only type of tape media that
should be used for backup and data processing. Saving money by using generic
media for data purposes will do little to save your business if your data is
destroyed and your backup tapes fail because of inferior media.
REC
SAVE
RBBU3514-0
Appendix A. Maintaining the tape drive A-5
Page 28

Table A-2 lists the tape cartridges that you can order for the VX2-A Internal Tape
Drive. To order cartridges in the United States and Canada, call 1-888-IBM-MEDIA.
To order cartridges in other locations, contact your local provider of IBM storage
products.
Table A-2. Tape cartridges for the tape drive
IBM part number Type of cartridge Length
19P4876 VXA 80GB data cartridge 230 m
19P4877 VXA 59GB data cartridge 170 m
19P4878 VXA 21GB data cartridge 62 m
19P4879 VXA test cartridge -19P4880 VXA cleaning cartridge --
A-6 VXA-2 Internal Tape Drive: User’s Guide
Page 29

Appendix B. Product specifications
This appendix includes the product specifications and requirements.
Data capacities
Table B-1 lists the data capacities for the VXA tape cartridge models.
Table B-1. Data capacities in gigabytes (GB)
Cartridge model Tape length Capacity
V23 230 meters 80 GB
V17 170 meters 59 GB 118 GB
V10 120 meters 40 GB 80 GB
V6 62 meters 20 GB 40 GB
a
Maximum capacity; assumes the host computer keeps the drive streaming.
b
Assumes a 2:1 compression ratio. Actual compressed capacity varies depending on the
type of data being recorded. The tape drive uses the ALDC (Adaptive Lossless Data
Compression) algorithm and integrated circuit chip. The ALDC algorithm is compliant
with the European Computer Manufacturers Association (ECMA) standard. Data
compression is controlled by the software application.
c
One gigabyte equals 1,000,000,000 bytes.
c
a
, native
Capacity
a
,
compressed
160 GB
b
Size and weight
Table B-2 shows the dimensions and width for the tape drive. The tape drive is a
5.25-inch form factor drive for integration into an enclosure.
Table B-2. Size and weight
Specification Tape drive
Height 41.2 mm (1.62 in)
Height (bezel) 42.6 mm (1.68 in)
Depth 203.0 mm (8.0 in)
Width 146.0 mm (5.75 in)
Width (bezel) 149.2 mm (5.87 in)
Weight 1.0 kg (2.2 lbs)
© Copyright IBM Corp. 2003 B-1
Page 30

Tape drive conditions
Table B-3 summarizes the environmental requirements for the tape path in the tape
drive.
Table B-3. Temperature and humidity specifications for the tape drive
Specification Operating
Temperature
range
Temperature
variation
Relative
humidity
Wet bulb 29°C (84.2°F)
Altitude -304.8 to +3,048 m
a, b
+5°C to +45°C
(+41°F to
+113°F)
1°C per min;
max 10°C per
hour
(2°F per min;
max 18°F per
hour)
20% to 80%
non-condensing
max.
Storagec/nonoperating Transporting
-40°C to +60°C (-40°F to +140°F)
1°C per min; max 20°C per hour
(2°F per min; max 36°F per hour)
5% to 95% non-condensing
-304.8 to +12,192 m
c
a
The drive temperature and humidity must be stabilized in the specified environment for
at least 24 hours.
b
Temperature measurements are made in the tape path.
c
The tape drive is in its original shipping container. When the tape drive is moved from a
cooler storage environment to a warmer operating environment, it must acclimate in its
packaging for 24 hours to prevent damage from condensation.
Tape cartridge conditions
Table B-4 summarizes the environmental requirements for the tape path in the tape
drive.
Table B-4. Temperature and humidity specifications for the tape cartridge
Specification Operating
Temperature
range
Temperature
variation
a, b
+5°C to +45°C
(+41°F to
+113°F)
1°C per min;
max 10°C per
hour
(-1,000 to +10,000 ft)
Storagea/nonoperating Transporting
+5°C to +32°C
(+41°F to +90°F
1°C per min; max 20°C per hour
(2°F per min; max 36°F per hour)
(-1,000 to +40,000 ft)
c
-40°C to +45°C
(-40°F to +113°)F
Relative
humidity
B-2 VXA-2 Internal Tape Drive: User’s Guide
(2°F per min;
max 18°F per
hour)
20% to 80%
non-condensing
5% to 95% non-condensing
Page 31

Table B-4. Temperature and humidity specifications for the tape cartridge (continued)
Specification Operating
a, b
Storagea/nonoperating Transporting
c
Wet bulb 26°C (79°F)
max.
Altitude -304.8 to +3,048 m
-304.8 to +12,192 m
(-1,000 to +10,000 ft)
a
The cartridge temperature and humidity must be stabilized in the specified environment
(-1,000 to +40,000 ft)
for at least 24 hours.
b
Temperature measurements are made in the tape path.
c
The cartridge is in its original packaging. When the cartridge is moved from a cooler
storage environment to a warmer operating environment, it must acclimate in its
packaging for 24 hours to prevent damage from condensation.
Note: When a VXA tape is brought into the room where the drive is located, allow
the VXA tape to adjust to room temperature and humidity before using it.
Appendix B. Product specifications B-3
Page 32

B-4 VXA-2 Internal Tape Drive: User’s Guide
Page 33

Appendix C. Problem solving
This appendix provides information on problem solving. Computer problems can
be caused by hardware, software, or user error. You might be able to use the
information in this section to solve problems yourself, or to gather helpful
information you can pass on to a service technician.
If, after attempting the recommended actions listed in the table, the problem still
exists or recurs, a hardware failure might be the cause. Contact your IBM service
representative.
Problem Solution
TAPE DRIVE WILL NOT ACCEPT
A CARTRIDGE
1. Determine if there is already a cartridge loaded.
Press the eject button; there may be a cartridge
already loaded in the drive.
2. Make sure you are using VXA Tape cartridges.
If the cartridge you are attempting to load is not a
VXA Tape cartridge, the tape drive automatically
ejects it.
3. Power cycle the drive.
Power down the drive. Wait 10 seconds, then turn
the drive back on.
On power-up, observe the drive’s LED code
sequence. If the LEDs do not illuminate, check the
power supply and power cable connection. If the
drive completes the power-on sequence normally,
but still does not accept the cartridge, contact IBM
technical support.
If power to the drive was interrupted when you
originally attempted to load a cartridge, the drive
detects the tape when its power is restored and
then rewinds the tape. If this is the case, press the
eject button, remove the cartridge, and begin the
session again.
© Copyright IBM Corp. 2003 C-1
Page 34

Problem Solution
FAULT LED IS STEADY AMBER
(This means the tape drive is over
temperature and must cool down
before operations can continue.)
TAPE DRIVE WILL NOT EJECT A
CARTRIDGE
1. Wait for the tape drive to cool.
When the drive cools down, LED 4 turns off. Do
not attempt to load a cartridge or perform any
operations during this time. If there is a tape
loaded in the drive, press the eject button to
unload the tape and move it to a cooler
environment.
2. If necessary, power cycle the drive.
If the tape drive does not cool down on its own,
power down the drive. Wait a few minutes, then
turn the drive back on. If Fault LED is still amber
after power-up, the tape drive may be in an
environment that is too hot. If the drive is an
internal model, check that the top and rear
ventilation slots are not blocked in the enclosure
and that the drive is not located near devices that
are emitting excessive heat. If the drive is an
external model, the enclosure’s fan may not be
working properly and you should return the drive
for service.
If you cannot determine the cause of the
over-temperature condition yourself, contact IBM
technical support.
1. Determine if the backup application is preventing
media removal.
Check for an option in the software that may be
preventing media removal and reset that option. If
necessary, use the backup application to eject the
cartridge.
2. If you cannot eject the cartridge through the
application, reset the drive.
Turn off power to the drive, wait 10 seconds, then
turn it on again. Depending on what function the
drive was performing before the reset, the drive
may automatically start a lengthy format recovery
process; wait for the format recovery to complete.
3. If the cartridge appears to be stuck in the drive,
return it for service.
If you still cannot eject the cartridge, you may
need to return the drive for repair with the
cartridge in place. The cartridge will be removed
and returned to you. If it is absolutely mandatory
that the cartridge be removed before returning the
drive for repair, contact IBM technical support.
C-2 VXA-2 Internal Tape Drive: User’s Guide
Page 35

Problem Solution
DRIVE DOES NOT RESPOND TO
SOFTWARE COMMANDS (The
drive powers up, loads and
unloads cartridges, but will not
respond to any software
commands.)
1. Make sure the tape drive is installed properly on
the SCSI bus.
Make sure you followed the correct procedures,
described in Chapter 2, “Installation”, on page 2-1,
to install the drive on the SCSI bus. The SCSI cable
should be firmly connected. Also make sure the
connector pins are not bent or broken.
2. Perform a SCSI bus reset.
If a SCSI bus reset does not cause the drive to
reset, check the following:
v Is there a broken SCSI cable or defective
connector?
v Is SCSI cable pin 1 aligned with SCSI connector
pin 1?
v Is the drive set to a unique SCSI ID?
If a SCSI bus reset does cause the drive to reset,
the problem may be with the SCSI bus addressing
or termination. Do the following:
v Check the SCSI bus addressing and termination.
v Try another known good SCSI device in the
same location.
LEDS BLINK IN AN UNKNOWN
SEQUENCE
1. Clean the drive.
See “Using cleaning cartridges” on page 3-4 for
cleaning instructions; LED 2 flashes yellow when
the drive needs to be cleaned. Use only an
IBM-approved VXA tape cleaning cartridge.
2. Retry the read or write operation.
If the drive was attempting to perform a read or
write operation when the error occurred, eject the
cartridge, insert it again, and retry the operation. If
this does not solve the problem, load a new
cartridge and try again.
3. Power cycle the drive.
If the problem persists, turn the drive off, then
back on again.
Appendix C. Problem solving C-3
Page 36

Problem Solution
BACKUP SOFTWARE IS
REPORTING AN ERROR
One of the following situations may have occurred:
v The drive needs cleaning. Always try cleaning the
drive before you assume the cartridge is bad. Be
sure to use a VXA tape cleaning cartridge. For more
information, see “Using cleaning cartridges” on
page 3-4.
v The cartridge is incompatible with the tape drive.
Be sure to use a VXA tape cartridge.
v If you are trying to write data, the cartridge may be
write-protected. Check the switch on the edge of the
cartridge. If the switch does not cover the opening,
the tape is write-protected. If the switch covers the
opening, you can write to the tape. Use a pen or
small screwdriver to move the switch. (See “Setting
write protection on the tape cartridge” on page 3-5.)
v The cartridge is not inserted properly in the drive.
Remove the cartridge, then reinsert it and retry the
operation.
C-4 VXA-2 Internal Tape Drive: User’s Guide
Page 37

Appendix D. Warranty information
This section contains the warranty period for your product, information about
obtaining warranty service and support, and the IBM Statement of Limited
Warranty.
Warranty period
Contact your place of purchase for warranty service information.
Machine - VXA-2 Internal Tape Drive
Warranty period Service delivery method
Parts: 3 years; labor: 0 years CCE (customer carry in or mail in)
Service and support
The following information describes the technical support that is available for your
product, during the warranty period or throughout the life of the product. Refer to
your IBM Statement of Limited Warranty for a full explanation of IBM warranty
terms.
Warranty information on the World Wide Web
The IBM Machine Warranties Web site at
http://www.ibm.com/servers/support/machine_warranties/ contains a
worldwide overview of the IBM Limited Warranty for IBM Machines, a glossary of
terms used in the Statement of Limited Warranty, Frequently Asked Questions
(FAQ), and links to Product Support Web pages. The IBM Statement of Limited
Warranty is available from this Web site in 29 languages in Portable Document
Format (PDF).
Online technical support
Online technical support is available during the life of your product through the
Personal Computing Support Web site at http://www.ibm.com/pc/support/.
During the warranty period, assistance for replacement or exchange of defective
components is available. In addition, if your IBM option is installed in an IBM
computer, you might be entitled to service at your location. Your technical support
representative can help you determine the best alternative.
Telephone technical support
Installation and configuration support through the IBM HelpCenter®will be
withdrawn or made available for a fee, at IBM’s discretion, 90 days after the option
has been withdrawn from marketing. Additional support offerings, including
step-by-step installation assistance, are available for a nominal fee.
To assist the technical support representative, have available as much of the
following information as possible:
v Option name
v Option number
© Copyright IBM Corp. 2003 D-1
Page 38

v Proof of purchase
v Computer manufacturer, model, serial number (if IBM), and manual
v Exact wording of the error message (if any)
v Description of the problem
v Hardware and software configuration information for your system
If possible, be at your computer. Your technical support representative might want
to walk you through the problem during the call.
For the support telephone number and support hours by country, refer to the
following table. If the number for your country or region is not listed, contact your
IBM reseller or IBM marketing representative. Response time may vary depending
on the number and nature of the calls received.
Support 24 hours a day, 7 days a week
Canada (Toronto only) 416-383-3344
Canada (all other) 1-800-565-3344
U.S.A. and Puerto Rico 1-800-772-2227
All other countries and regions Go to http://www.ibm.com/pc/support/,
and click Support Phone List.
D-2 VXA-2 Internal Tape Drive: User’s Guide
Page 39

IBM Statement of Limited Warranty Z125-4753-06 8/2000
Part 1 - General Terms
This Statement of Limited Warranty includes Part 1 - General Terms and Part 2 Country-unique Terms. The terms of Part 2 replace or modify those of Part 1. The
warranties provided by IBM in this Statement of Limited Warranty apply only to
Machines you purchase for your use, and not for resale, from IBM or your reseller.
The term “Machine” means an IBM machine, its features, conversions, upgrades,
elements, or accessories, or any combination of them. The term “Machine” does
not include any software programs, whether pre-loaded with the Machine,
installed subsequently or otherwise. Unless IBM specifies otherwise, the following
warranties apply only in the country where you acquire the Machine. Nothing in
this Statement of Limited Warranty affects any statutory rights of consumers that
cannot be waived or limited by contract. If you have any questions, contact IBM or
your reseller.
The IBM Warranty for Machines: IBM warrants that each Machine 1) is free from
defects in materials and workmanship and 2) conforms to IBM’s Official Published
Specifications (“Specifications”). The warranty period for a Machine is a specified,
fixed period commencing on its Date of Installation. The date on your sales receipt
is the Date of Installation unless IBM or your reseller informs you otherwise.
If a Machine does not function as warranted during the warranty period, and IBM
or your reseller are unable to either 1) make it do so or 2) replace it with one that
is at least functionally equivalent, you may return it to your place of purchase and
your money will be refunded.
Extent of Warranty: The warranty does not cover the repair or exchange of a
Machine resulting from misuse, accident, modification, unsuitable physical or
operating environment, improper maintenance by you, or failure caused by a
product for which IBM is not responsible. The warranty is voided by removal or
alteration of Machine or parts identification labels.
THESE WARRANTIES ARE YOUR EXCLUSIVE WARRANTIES AND REPLACE
ALL OTHER WARRANTIES OR CONDITIONS, EXPRESS OR IMPLIED,
INCLUDING, BUT NOT LIMITED TO, THE IMPLIED WARRANTIES OR
CONDITIONS OF MERCHANTABILITY AND FITNESS FOR A PARTICULAR
PURPOSE. THESE WARRANTIES GIVE YOU SPECIFIC LEGAL RIGHTS AND
YOU MAY ALSO HAVE OTHER RIGHTS WHICH VARY FROM
JURISDICTION TO JURISDICTION. SOME JURISDICTIONS DO NOT
ALLOW THE EXCLUSION OR LIMITATION OF EXPRESS OR IMPLIED
WARRANTIES, SO THE ABOVE EXCLUSION OR LIMITATION MAY NOT
APPLY TO YOU. IN THAT EVENT, SUCH WARRANTIES ARE LIMITED IN
DURATION TO THE WARRANTY PERIOD. NO WARRANTIES APPLY AFTER
THAT PERIOD.
Items Not Covered by Warranty: IBM does not warrant uninterrupted or error-free
operation of a Machine. Any technical or other support provided for a Machine
under warranty, such as assistance via telephone with “how-to” questions and
those regarding Machine set-up and installation, will be provided WITHOUT
WARRANTIES OF ANY KIND.
Warranty Service: To obtain warranty service for a Machine, contact IBM or your
reseller. If you do not register your Machine with IBM, you may be required to
present proof of purchase.
Appendix D. Warranty information D-3
Page 40

During the warranty period, IBM or your reseller, if approved by IBM to provide
warranty service, provides without charge certain types of repair and exchange
service to keep Machines in, or restore them to, conformance with their
Specifications. IBM or your reseller will inform you of the available types of
service for a Machine based on its country of installation. At its discretion, IBM or
your reseller will 1) either repair or exchange the failing Machine and 2) provide
the service either at your location or a service center. IBM or your reseller will also
manage and install selected engineering changes that apply to the Machine.
Some parts of IBM Machines are designated as Customer Replaceable Units (called
“CRUs”), e.g., keyboards, memory, or hard disk drives. IBM ships CRUs to you for
replacement by you. You must return all defective CRUs to IBM within 30 days of
your receipt of the replacement CRU. You are responsible for downloading
designated Machine Code and Licensed Internal Code updates from an IBM
Internet Web site or from other electronic media, and following the instructions
that IBM provides.
When warranty service involves the exchange of a Machine or part, the item IBM
or your reseller replaces becomes its property and the replacement becomes yours.
You represent that all removed items are genuine and unaltered. The replacement
may not be new, but will be in good working order and at least functionally
equivalent to the item replaced. The replacement assumes the warranty service
status of the replaced item. Many features, conversions, or upgrades involve the
removal of parts and their return to IBM. A part that replaces a removed part will
assume the warranty service status of the removed part.
Before IBM or your reseller exchanges a Machine or part, you agree to remove all
features, parts, options, alterations, and attachments not under warranty service.
You also agree to
1. ensure that the Machine is free of any legal obligations or restrictions that
prevent its exchange;
2. obtain authorization from the owner to have IBM or your reseller service a
Machine that you do not own; and
3. where applicable, before service is provided:
a. follow the problem determination, problem analysis, and service request
procedures that IBM or your reseller provides;
b. secure all programs, data, and funds contained in a Machine;
c. provide IBM or your reseller with sufficient, free, and safe access to your
facilities to permit them to fulfill their obligations; and
d. inform IBM or your reseller of changes in a Machine’s location.
IBM is responsible for loss of, or damage to, your Machine while it is 1) in IBM’s
possession or 2) in transit in those cases where IBM is responsible for the
transportation charges.
Neither IBM nor your reseller is responsible for any of your confidential,
proprietary or personal information contained in a Machine which you return to
IBM or your reseller for any reason. You should remove all such information from
the Machine prior to its return.
Limitation of Liability: Circumstances may arise where, because of a default on
IBM’s part or other liability, you are entitled to recover damages from IBM. In each
such instance, regardless of the basis on which you are entitled to claim damages
from IBM (including fundamental breach, negligence, misrepresentation, or other
D-4 VXA-2 Internal Tape Drive: User’s Guide
Page 41

contract or tort claim), except for any liability that cannot be waived or limited by
applicable laws, IBM is liable for no more than
1. damages for bodily injury (including death) and damage to real property and
tangible personal property; and
2. the amount of any other actual direct damages, up to the charges (if recurring,
12 months’ charges apply) for the Machine that is subject of the claim. For
purposes of this item, the term “Machine” includes Machine Code and
Licensed Internal Code.
This limit also applies to IBM’s suppliers and your reseller. It is the maximum
for which IBM, its suppliers, and your reseller are collectively responsible.
UNDER NO CIRCUMSTANCES IS IBM LIABLE FOR ANY OF THE
FOLLOWING: 1) THIRD-PARTY CLAIMS AGAINST YOU FOR DAMAGES
(OTHER THAN THOSE UNDER THE FIRST ITEM LISTED ABOVE); 2) LOSS
OF, OR DAMAGE TO, YOUR RECORDS OR DATA; OR 3) SPECIAL,
INCIDENTAL, OR INDIRECT DAMAGES OR FOR ANY ECONOMIC
CONSEQUENTIAL DAMAGES, LOST PROFITS OR LOST SAVINGS, EVEN IF
IBM, ITS SUPPLIERS OR YOUR RESELLER IS INFORMED OF THEIR
POSSIBILITY. SOME JURISDICTIONS DO NOT ALLOW THE EXCLUSION
OR LIMITATION OF INCIDENTAL OR CONSEQUENTIAL DAMAGES, SO
THE ABOVE LIMITATION OR EXCLUSION MAY NOT APPLY TO YOU.
Governing Law
Governing Law: Both you and IBM consent to the application of the laws of the
country in which you acquired the Machine to govern, interpret, and enforce all of
your and IBM’s rights, duties, and obligations arising from, or relating in any
manner to, the subject matter of this Agreement, without regard to conflict of law
principles.
Part 2 - Country-unique Terms
AMERICAS
BRAZIL
Governing Law: The following is added after the first sentence:
Any litigation arising from this Agreement will be settled exclusively by the court
of Rio de Janeiro.
NORTH AMERICA
Warranty Service: The following is added to this Section:
To obtain warranty service from IBM in Canada or the United States, call
1-800-IBM-SERV (426-7378).
CANADA
Governing Law: The following replaces “laws of the country in which you acquired the
Machine” in the first sentence:
laws in the Province of Ontario.
UNITED STATES
Appendix D. Warranty information D-5
Page 42

Governing Law: The following replaces “laws of the country in which you acquired the
Machine” in the first sentence:
laws of the State of New York.
ASIA PACIFIC
AUSTRALIA
The IBM Warranty for Machines: The following paragraph is added to this Section:
The warranties specified in this Section are in addition to any rights you may have
under the Trade Practices Act 1974 or other similar legislation and are only limited
to the extent permitted by the applicable legislation.
Limitation of Liability: The following is added to this Section:
Where IBM is in breach of a condition or warranty implied by the Trade Practices
Act 1974 or other similar legislation, IBM’s liability is limited to the repair or
replacement of the goods or the supply of equivalent goods. Where that condition
or warranty relates to right to sell, quiet possession or clear title, or the goods are
of a kind ordinarily acquired for personal, domestic or household use or
consumption, then none of the limitations in this paragraph apply.
Governing Law: The following replaces “laws of the country in which you acquired the
Machine” in the first sentence:
laws of the State or Territory.
CAMBODIA, LAOS, AND VIETNAM
Governing Law: The following replaces “laws of the country in which you acquired the
Machine” in the first sentence:
laws of the State of New York.
The following is added to this Section:
Disputes and differences arising out of or in connection with this Agreement shall
be finally settled by arbitration which shall be held in Singapore in accordance
with the rules of the International Chamber of Commerce (ICC). The arbitrator or
arbitrators designated in conformity with those rules shall have the power to rule
on their own competence and on the validity of the Agreement to submit to
arbitration. The arbitration award shall be final and binding for the parties without
appeal and the arbitral award shall be in writing and set forth the findings of fact
and the conclusions of law.
All proceedings shall be conducted, including all documents presented in such
proceedings, in the English language. The number of arbitrators shall be three,
with each side to the dispute being entitled to appoint one arbitrator.
The two arbitrators appointed by the parties shall appoint a third arbitrator before
proceeding upon the reference. The third arbitrator shall act as chairman of the
proceedings. Vacancies in the post of chairman shall be filled by the president of
the ICC. Other vacancies shall be filled by the respective nominating party.
Proceedings shall continue from the stage they were at when the vacancy occurred.
If one of the parties refuses or otherwise fails to appoint an arbitrator within 30
days of the date the other party appoints its, the first appointed arbitrator shall be
the sole arbitrator, provided that the arbitrator was validly and properly
appointed.
D-6 VXA-2 Internal Tape Drive: User’s Guide
Page 43

The English language version of this Agreement prevails over any other language
version.
HONG KONG AND MACAU
Governing Law: The following replaces “laws of the country in which you acquired the
Machine” in the first sentence:
laws of Hong Kong Special Administrative Region.
INDIA
Limitation of Liability: The following replaces items 1 and 2 of this Section:
1. liability for bodily injury (including death) or damage to real property and
tangible personal property will be limited to that caused by IBM’s negligence;
2. as to any other actual damage arising in any situation involving
nonperformance by IBM pursuant to, or in any way related to the subject of
this Statement of Limited Warranty, IBM’s liability will be limited to the charge
paid by you for the individual Machine that is the subject of the claim.
JAPAN
Governing Law: The following sentence is added to this Section:
Any doubts concerning this Agreement will be initially resolved between us in
good faith and in accordance with the principle of mutual trust.
NEW ZEALAND
The IBM Warranty for Machines: The following paragraph is added to this Section:
The warranties specified in this Section are in addition to any rights you may have
under the Consumer Guarantees Act 1993 or other legislation which cannot be
excluded or limited. The Consumer Guarantees Act 1993 will not apply in respect
of any goods which IBM provides, if you require the goods for the purposes of a
business as defined in that Act.
Limitation of Liability: The following is added to this Section:
Where Machines are not acquired for the purposes of a business as defined in the
Consumer Guarantees Act 1993, the limitations in this Section are subject to the
limitations in that Act.
PEOPLE’S REPUBLIC OF CHINA (PRC)
Governing Law: The following replaces this Section:
Both you and IBM consent to the application of the laws of the State of New York
(except when local law requires otherwise) to govern, interpret, and enforce all
your and IBM’s rights, duties, and obligations arising from, or relating in any
manner to, the subject matter of this Agreement, without regard to conflict of law
principles.
Any disputes arising from or in connection with this Agreement will first be
resolved by friendly negotiations, failing which either of us has the right to submit
the dispute to the China International Economic and Trade Arbitration Commission
in Beijing, the PRC, for arbitration in accordance with its arbitration rules in force
at the time. The arbitration tribunal will consist of three arbitrators. The language
to be used therein will be English and Chinese. An arbitral award will be final and
binding on all the parties, and will be enforceable under the Convention on the
Recognition and Enforcement of Foreign Arbitral Awards (1958).
Appendix D. Warranty information D-7
Page 44

The arbitration fee will be borne by the losing party unless otherwise determined
by the arbitral award.
During the course of arbitration, this Agreement will continue to be performed
except for the part which the parties are disputing and which is undergoing
arbitration.
EUROPE, MIDDLE EAST, AFRICA (EMEA)
THE FOLLOWING TERMS APPLY TO ALL EMEA COUNTRIES:
The terms of this Statement of Limited Warranty apply to Machines purchased
from IBM or an IBM reseller.
Warranty Service: If you purchase an IBM Machine in Austria, Belgium, Denmark,
Estonia, Finland, France, Germany, Greece, Iceland, Ireland, Italy, Latvia, Lithuania,
Luxembourg, Netherlands, Norway, Portugal, Spain, Sweden, Switzerland or
United Kingdom, you may obtain warranty service for that Machine in any of
those countries from either (1) an IBM reseller approved to perform warranty
service or (2) from IBM. If you purchase an IBM Personal Computer Machine in
Albania, Armenia, Belarus, Bosnia and Herzegovina, Bulgaria, Croatia, Czech
Republic, Georgia, Hungary, Kazakhstan, Kirghizia, Federal Republic of Yugoslavia,
Former Yugoslav Republic of Macedonia (FYROM), Moldova, Poland, Romania,
Russia, Slovak Republic, Slovenia, or Ukraine, you may obtain warranty service for
that Machine in any of those countries from either (1) an IBM reseller approved to
perform warranty service or (2) from IBM.
If you purchase an IBM Machine in a Middle Eastern or African country, you may
obtain warranty service for that Machine from the IBM entity within the country of
purchase, if that IBM entity provides warranty service in that country, or from an
IBM reseller, approved by IBM to perform warranty service on that Machine in
that country. Warranty service in Africa is available within 50 kilometers of an IBM
authorized service provider. You are responsible for transportation costs for
Machines located outside 50 kilometers of an IBM authorized service provider.
Governing Law: The applicable laws that govern, interpret and enforce rights,
duties, and obligations of each of us arising from, or relating in any manner to, the
subject matter of this Statement, without regard to conflict of laws principles, as
well as Country-unique terms and competent court for this Statement are those of
the country in which the warranty service is being provided, except that in 1)
Albania, Bosnia-Herzegovina, Bulgaria, Croatia, Hungary, Former Yugoslav
Republic of Macedonia, Romania, Slovakia, Slovenia, Armenia, Azerbaijan, Belarus,
Georgia, Kazakhstan, Kyrgyzstan, Moldova, Russia, Tajikistan, Turkmenistan,
Ukraine, and Uzbekistan, the laws of Austria apply; 2) Estonia, Latvia, and
Lithuania, the laws of Finland apply; 3) Algeria, Benin, Burkina Faso, Cameroon,
Cape Verde, Central African Republic, Chad, Congo, Djibouti, Democratic Republic
of Congo, Equatorial Guinea, France, Gabon, Gambia, Guinea, Guinea-Bissau,
Ivory Coast, Lebanon, Mali, Mauritania, Morocco, Niger, Senegal, Togo, and
Tunisia, this Agreement will be construed and the legal relations between the
parties will be determined in accordance with the French laws and all disputes
arising out of this Agreement or related to its violation or execution, including
summary proceedings, will be settled exclusively by the Commercial Court of
Paris; 4) Angola, Bahrain, Botswana, Burundi, Egypt, Eritrea, Ethiopia, Ghana,
Jordan, Kenya, Kuwait, Liberia, Malawi, Malta, Mozambique, Nigeria, Oman,
Pakistan, Qatar, Rwanda, Sao Tome, Saudi Arabia, Sierra Leone, Somalia, Tanzania,
Uganda, United Arab Emirates, United Kingdom, West Bank/Gaza, Yemen,
Zambia, and Zimbabwe, this Agreement will be governed by English Law and
D-8 VXA-2 Internal Tape Drive: User’s Guide
Page 45

disputes relating to it will be submitted to the exclusive jurisdiction of the English
courts; and 5) in Greece, Israel, Italy, Portugal, and Spain any legal claim arising
out of this Statement will be brought before, and finally settled by, the competent
court of Athens, Tel Aviv, Milan, Lisbon, and Madrid, respectively.
THE FOLLOWING TERMS APPLY TO THE COUNTRY SPECIFIED:
AUSTRIA AND GERMANY
The IBM Warranty for Machines: The following replaces the first sentence of the first
paragraph of this Section:
The warranty for an IBM Machine covers the functionality of the Machine for its
normal use and the Machine’s conformity to its Specifications.
The following paragraphs are added to this Section:
The minimum warranty period for Machines is six months. In case IBM or your
reseller is unable to repair an IBM Machine, you can alternatively ask for a partial
refund as far as justified by the reduced value of the unrepaired Machine or ask
for a cancellation of the respective agreement for such Machine and get your
money refunded.
Extent of Warranty: The second paragraph does not apply.
Warranty Service: The following is added to this Section:
During the warranty period, transportation for delivery of the failing Machine to
IBM will be at IBM’s expense.
Limitation of Liability: The following paragraph is added to this Section:
The limitations and exclusions specified in the Statement of Limited Warranty will
not apply to damages caused by IBM with fraud or gross negligence and for
express warranty.
The following sentence is added to the end of item 2:
IBM’s liability under this item is limited to the violation of essential contractual
terms in cases of ordinary negligence.
EGYPT
Limitation of Liability: The following replaces item 2 in this Section:
as to any other actual direct damages, IBM’s liability will be limited to the total
amount you paid for the Machine that is the subject of the claim. For purposes of
this item, the term “Machine” includes Machine Code and Licensed Internal Code.
Applicability of suppliers and resellers (unchanged).
FRANCE
Limitation of Liability: The following replaces the second sentence of the first paragraph
of this Section:
In such instances, regardless of the basis on which you are entitled to claim
damages from IBM, IBM is liable for no more than: (items 1 and 2 unchanged).
IRELAND
Appendix D. Warranty information D-9
Page 46

Extent of Warranty: The following is added to this Section:
Except as expressly provided in these terms and conditions, all statutory
conditions, including all warranties implied, but without prejudice to the generality
of the foregoing all warranties implied by the Sale of Goods Act 1893 or the Sale of
Goods and Supply of Services Act 1980 are hereby excluded.
Limitation of Liability: The following replaces items one and two of the first paragraph
of this Section:
1. death or personal injury or physical damage to your real property solely caused
by IBM’s negligence; and
2. the amount of any other actual direct damages, up to 125 percent of the charges
(if recurring, the 12 months’ charges apply) for the Machine that is the subject of
the claim or which otherwise gives rise to the claim.
Applicability of suppliers and resellers (unchanged).
The following paragraph is added at the end of this Section:
IBM’s entire liability and your sole remedy, whether in contract or in tort, in
respect of any default shall be limited to damages.
ITALY
Limitation of Liability: The following replaces the second sentence in the first paragraph:
In each such instance unless otherwise provided by mandatory law, IBM is liable
for no more than:
1. (unchanged)
2. as to any other actual damage arising in all situations involving nonperformance
by IBM pursuant to, or in any way related to the subject matter of this Statement
of Warranty, IBM’s liability, will be limited to the total amount you paid for the
Machine that is the subject of the claim.
Applicability of suppliers and resellers (unchanged).
The following replaces the third paragraph of this Section:
Unless otherwise provided by mandatory law, IBM and your reseller are not liable
for any of the following: (items 1 and 2 unchanged) 3) indirect damages, even if IBM
or your reseller is informed of their possibility.
SOUTH AFRICA, NAMIBIA, BOTSWANA, LESOTHO AND SWAZILAND
Limitation of Liability: The following is added to this Section:
IBM’s entire liability to you for actual damages arising in all situations involving
nonperformance by IBM in respect of the subject matter of this Statement of
Warranty will be limited to the charge paid by you for the individual Machine that
is the subject of your claim from IBM.
UNITED KINGDOM
Limitation of Liability: The following replaces items 1 and 2 of the first paragraph of
this Section:
1. death or personal injury or physical damage to your real property solely caused
by IBM’s negligence;
2. the amount of any other actual direct damages or loss, up to 125 percent of the
charges (if recurring, the 12 months’ charges apply) for the Machine that is the
subject of the claim or which otherwise gives rise to the claim;
D-10 VXA-2 Internal Tape Drive: User’s Guide
Page 47

The following item is added to this paragraph:
3. breach of IBM’s obligations implied by Section 12 of the Sale of Goods Act 1979
or Section 2 of the Supply of Goods and Services Act 1982.
Applicability of suppliers and resellers (unchanged).
The following is added to the end of this Section:
IBM’s entire liability and your sole remedy, whether in contract or in tort, in
respect of any default shall be limited to damages.
Appendix D. Warranty information D-11
Page 48

D-12 VXA-2 Internal Tape Drive: User’s Guide
Page 49

Appendix E. Notices
IBM may not offer the products, services, or features discussed in this document in
all countries. Consult your local IBM representative for information on the
products and services currently available in your area. Any reference to an IBM
product, program, or service is not intended to state or imply that only that IBM
product, program, or service may be used. Any functionally equivalent product,
program, or service that does not infringe any IBM intellectual property right may
be used instead. However, it is the user’s responsibility to evaluate and verify the
operation of any non-IBM product, program, or service.
IBM may have patents or pending patent applications covering subject matter
described in this document. The furnishing of this document does not give you
any license to these patents. You can send license inquiries, in writing, to:
IBM Director of Licensing
IBM Corporation
North Castle Drive
Armonk, NY 10504-1785
U.S.A.
INTERNATIONAL BUSINESS MACHINES CORPORATION PROVIDES THIS
PUBLICATION “AS IS” WITHOUT WARRANTY OF ANY KIND, EITHER
EXPRESS OR IMPLIED, INCLUDING, BUT NOT LIMITED TO, THE IMPLIED
WARRANTIES OF NON-INFRINGEMENT, MERCHANTABILITY OR FITNESS
FOR A PARTICULAR PURPOSE. Some jurisdictions do not allow disclaimer of
express or implied warranties in certain transactions, therefore, this statement may
not apply to you.
This information could include technical inaccuracies or typographical errors.
Changes are periodically made to the information herein; these changes will be
incorporated in new editions of the publication. IBM may make improvements
and/or changes in the product(s) and/or the program(s) described in this
publication at any time without notice.
The products described in this document are not intended for use in implantation
or other life support applications where malfunction may result in injury or death
to persons. The information contained in this document does not affect or change
IBM product specifications or warranties. Nothing in this document shall operate
as an express or implied license or indemnity under the intellectual property rights
of IBM or third parties. All information contained in this document was obtained
in specific environments and is presented as an illustration. The result obtained in
other operating environments may vary.
IBM may use or distribute any of the information you supply in any way it
believes appropriate without incurring any obligation to you.
Any references in this publication to non-IBM Web sites are provided for
convenience only and do not in any manner serve as an endorsement of those Web
sites. The materials at those Web sites are not part of the materials for this IBM
product, and use of those Web sites is at your own risk.
Any performance data contained herein was determined in a controlled
environment. Therefore, the result obtained in other operating environments may
© Copyright IBM Corp. 2003 E-1
Page 50

vary significantly. Some measurements may have been made on development-level
systems and there is no guarantee that these measurements will be the same on
generally available systems. Furthermore, some measurements may have been
estimated through extrapolation. Actual results may vary. Users of this document
should verify the applicable data for their specific environment.
Trademarks
The following terms are trademarks of International Business Machines
Corporation in the United States, other countries, or both:
AIX
IBM
IBM logo
HelpCenter
xSeries
Microsoft, Windows, and Windows NT are trademarks of Microsoft Corporation in
the United States, other countries, or both.
Other company, product, or service names may be trademarks or service marks of
others.
Electronic emission notices
Machine: VXA-2 Internal Tape Drive
Federal Communications Commission (FCC) statement
Note: This equipment has been tested and found to comply with the limits for a
Class B digital device, pursuant to Part 15 of the FCC Rules. These limits are
designed to provide reasonable protection against harmful interference in a
residential installation. This equipment generates, uses, and can radiate radio
frequency energy and, if not installed and used in accordance with the instructions,
may cause harmful interference to radio communications. However, there is no
guarantee that interference will not occur in a particular installation. If this
equipment does cause harmful interference to radio or television reception, which
can be determined by turning the equipment off and on, the user is encouraged to
try to correct the interference by one or more of the following measures:
v Reorient or relocate the receiving antenna.
v Increase the separation between the equipment and receiver.
v Connect the equipment into an outlet on a circuit different from that to which
the receiver is connected.
v Consult an IBM authorized dealer or service representative for help.
Properly shielded and grounded cables and connectors must be used in order to
meet FCC emission limits. Proper cables and connectors are available from IBM
authorized dealers. IBM is not responsible for any radio or television interference
caused by using other than recommended cables and connectors or by
unauthorized changes or modifications to this equipment. Unauthorized changes
or modifications could void the user’s authority to operate the equipment.
This device complies with Part 15 of the FCC Rules. Operation is subject to the
following two conditions: (1) this device may not cause harmful interference, and
(2) this device must accept any interference received, including interference that
may cause undesired operation.
E-2 VXA-2 Internal Tape Drive: User’s Guide
Page 51

Responsible party:
International Business Machines Corporation
New Orchard Road
Armonk, NY 10504
Telephone: 1-919-543-2193
Tested To Comply
With FCC Standards
FOR HOME OR OFFICE USE
Industry Canada Class B emission compliance statement
This Class B digital apparatus complies with Canadian ICES-003.
Avis de conformite a la reglementation d’Industrie Canada
Cet appareil numérique de la classe B est conforme à la norme NMB-003 du
Canada.
Deutsche EMV-Direktive (electromagnetische Verträglichkeit)
Zulassungbescheinigunglaut dem Deutschen Gesetz über die elektromagnetische
Verträglichkeit von Geräten (EMVG) vom 30. August 1995 (bzw. der EMC EG
Richtlinie 89/336):
Dieses Gerät ist berechtigt in Übereinstimmungmit dem Deutschen EMVG das
EG-Konformitätszeichen - CE - zu führen. Verantwortlich für die
Konformitätserklärung nach Paragraph 5 des EMVG ist die:
IBM Deutschland Informationssysteme GmbH, 70548 Stuttgart.
Informationen in Hinsicht EMVG Paragraph 3 Abs. (2) 2:
Das Gerät erfüllt die Schutzanforderungen nach EN 55024:1998 und EN 55022:1998 Klasse
B.
EN 55022 Hinweis:
“Wird dieses Gerät in einer industriellen Umgebung betrieben (wie in EN 55022:B
festgetlegt), dann kann es dabei eventuell gestört werden. In solch einem FA11 ist
der Abstand bzw. die Abschirmungzu der industriellen Störquelle zu vergröβern.”
Anmerkung:
Um die Einhaltung des EMVG sicherzustellen sind die Geräte, wie in den IBM
Handbüchern angegeben, zu installieren und zu betreiben.
European Union - emission directive
This product is in conformity with the protection requirements of EU Council
Directive 89/336/ECC on the approximation of the laws of the Member States
relating to electromagnetic compatibility.
Appendix E. Notices E-3
Page 52

IBM can not accept responsibility for any failure to satisfy the protection
requirements resulting from a non-recommended modification of the product,
including the fitting of non-IBM option cards.
This product has been tested and found to comply with the limits for Class B
Information Technology Equipment according to European Standard EN 55022. The
limits for Class B equipment were derived for typical residential environments to
provide reasonable protection against interference with licensed communication
devices.
Union Européenne - Directive Conformité électromagnétique
Ce produit est conforme aux exigences de protection de la Directive 89/336/EEC
du Conseil de l’UE sur le rapprochement des lois des États membres en matière de
compatibilité électromagnétique.
IBM ne peut accepter aucune responsabilité pour le manquement aux exigences de
protection résultant d’une modification non recommandée du produit, y compris
l’installation de cartes autres que les cartes IBM.
Ce produit a été testé et il satisfait les conditions de l’équipement informatique de
Classe B en vertu de Standard européen EN 55022. Les conditions pour
l’équipement de Classe B ont été définies en fonction d’un contexte résidentiel
ordinaire afin de fournir une protection raisonnable contre l’interférence
d’appareils de communication autorisés.
Unione Europea - Directiva EMC (Conformidad électromagnética)
Este producto satisface los requisitos de protección del Consejo de la UE, Directiva
89/336/CEE en lo que a la legislatura de los Estados Miembros sobre
compatibilidad electromagnética se refiere.
IBM no puede aceptar responsabilidad alguna si este producto deja de satisfacer
dichos requisitos de protección como resultado de una modificación no
recomendada del producto, incluyendo el ajuste de tarjetas de opción que no sean
IBM.
Este producto ha sido probado y satisface los límites para Equipos Informáticos
Clase B de conformidad con el Estándar Europeo EN 55022. Los límites para los
equipos de Clase B se han establecido para entornos residenciales típicos a fin de
proporcionar una protección razonable contra las interferencias con dispositivos de
comunicación licenciados.
Union Europea - Normativa EMC
Questo prodotto è conforme alle normative di protezione ai sensi della Direttiva
del Consiglio dell’Unione Europea 89/336/CEE sull’armonizzazione legislativa
degli stati membri in materia di compatibilità elettromagnetica.
IBM non accetta responsabilità alcuna per la mancata conformità alle normative di
protezione dovuta a modifiche non consigliate al prodotto, compresa l’installazione
di schede e componenti di marca diversa da IBM.
Le prove effettuate sul presente prodotto hanno accertato che esso rientra nei limiti
stabiliti per le le apparecchiature di informatica Classe B ai sensi del Norma
Europea EN 55022. I limiti delle apparecchiature della Classe B sono stati stabiliti
E-4 VXA-2 Internal Tape Drive: User’s Guide
Page 53

al fine di fornire ragionevole protezione da interferenze mediante dispositivi di
comunicazione in concessione in ambienti residenziali tipici.
Japanese statement of compliance for products less than or equal to 20 A per
phase
Appendix E. Notices E-5
Page 54

E-6 VXA-2 Internal Tape Drive: User’s Guide
Page 55

Page 56

Part Number: 71P9195
Printed in U.S.A.
(1P) P/N: 71P9195
 Loading...