

Page 1

IBM®ViaVoice®for Windows
®
Standard Edition
User’s Guide
Release 10
IBM
Page 2

Note
Before using this information and the product it supports, be sure to read the information in Appendix B,
“Notices” on page 105.
FirstEdition(August2003)
This edition applies to version 1, release 10, modification 0 of IBM ViaVoice for Windows Standard Edition US/UK
English (program number 5724-C96) and to all subsequent releases and modifications until otherwise indicated in
new editions.
SSFT PART NUMBER: 50-H11A-10095
When you send information to IBM, you grant IBM a nonexclusive right to use or distribute the information in any
way it believes appropriate without incurring any obligation to you.
©CopyrightInternationalBusinessMachinesCorporation1998,2003.Allrightsreserved.
US Government Users Restricted Rights – Use, duplication or disclosure restricted by GSA ADP Schedule Contract
with IBM Corp.
Page 3

Contents
Welcome to ViaVoice .........v
US English and UK English are both
described in this book ........vii
Conventions in this book .......viii
Chapter 1. Setting up your speech system . 1
Installing the ViaVoice software ......2
Setting up your microphone and audio system 6
Creating a voice model.........8
Analyzing your voice .........10
Analyzing your documents .......12
Troubleshooting setup problems .....13
Unable to install ViaVoice ......13
Problems with audio setup ......13
Poor recognition .........14
Chapter 2. The magic of dictating with
ViaVoice .............17
Practice dictating ..........18
Finding recognition errors .......20
Correcting errors ..........21
Try re-dictating your text before correction 21
Correcting misrecognized words ....21
Removing inserted words ......22
Correcting capitalization errors.....22
Next steps after correction .......23
Analyzing My Documents .......24
Troubleshooting dictation problems ....24
Chapter 3. Introducing VoiceCenter . . . 27
VoiceCenter components ........28
ViaVoice menu ...........30
Chapter 4. Dictating into SpeakPad . . . 33
SpeakPad menus and buttons ......34
General hints and tips.........36
Dictating numbers in the US English version
of ViaVoice ............37
Currency ............37
Dates .............37
Decimals ............37
Ordinals ............37
Long numbers ..........37
Timeofday...........37
Dictating numbers in the UK English version
of ViaVoice ............37
Currency ............37
Dates .............37
Decimals ............38
Ordinals ............38
Long numbers ..........38
Timeofday...........38
Dictating numbers in number mode ....38
Spelling words in spell mode ......38
Saying commands while dictating.....39
Inline dictation commands ......39
"Scratch that" command .......39
Text-editing commands .......40
Bullet lists............40
Commands recognized as text .....40
Dictating e-mail user IDs and URLs ....42
Transferring your dictation to another
application ............43
Saving your dictation in SpeakPad ....44
Saving a speech session .......44
Saving your dictation as text .....44
Finding new words in your document . . . 45
Chapter 5. Dictating into Microsoft Word 47
Installing Word Program Support .....47
Try your first dictation into Word .....48
ViaVoice menus and buttons in Word . . . 50
Using natural commands .......52
General hints and tips.........53
Dictating numbers in the US English version
of ViaVoice ............54
Currency ............54
Dates .............55
Decimals ............55
Ordinals ............55
Long numbers ..........55
Timeofday...........55
Dictating numbers in the UK English version
of ViaVoice ............55
Currency ............55
Dates .............55
Decimals ............55
Ordinals ............55
Long numbers ..........56
© Copyright IBM Corp. 1998, 2002 iii
Page 4

Timeofday...........56
Dictating numbers in number mode ....56
Spelling words in spell mode ......56
Saying commands while dictating.....57
Inline dictation commands ......57
"Scratch that" command .......57
Text-editing commands .......57
Bullet lists............58
Commands recognized as text .....58
Dictating e-mail user IDs and URLs ....60
Saving your dictation .........61
Saving a speech session .......61
Saving your dictation as text .....61
Finding new words in your document . . . 62
Chapter 6. Correcting your dictation . . . 63
Using the Correction window ......64
Correcting by voice .........66
Correcting words by typing .......67
Delayed correction ..........68
Delegated correction .........69
Chapter 7. What Can I Say ......71
Views..............72
Interacting with What Can I Say .....73
Expanding or collapsing a view ....73
Commands with words in angle brackets 73
Changing views..........73
Creating notes for What Can I Say . . . 74
Printing the commands in a view ....74
Using an Attention word with commands . . 74
Training a command .........75
Chapter 8. Using the Internet......77
Internet Explorer ..........77
Chapter 9. Customizing ViaVoice ....79
Changing VoiceCenter’s appearance ....79
Appearance tab ..........79
General tab ...........80
Taskbar tab ...........80
Docked tab ...........80
Agent tab ............80
Floating tab ...........80
Changing the microphone’s startup state . . 81
Creating additional voice models .....82
Selecting a vocabulary or topic ......82
Changing the active vocabulary to improve
performance (UK English version only) . . . 84
Adding a user ...........85
Making a user name the current user . . . 85
Backing up and restoring user data ....86
Deleting a user name or voice model....87
Setting dictation options ........87
Changing the appearance of the Correction
window .............89
Enabling command sets ........90
Setting Text-To-Speech options ......91
Adjusting recognition sensitivity .....92
Chapter 10. Creating macros......93
Creating a dictation macro .......93
Chapter 11. Getting help .......95
Information Central .........95
Getting context-sensitive help ......96
Question Button Help ........96
What’s This Help .........96
Printing help ............96
Using Teach Me commands .......96
How do I troubleshoot a problem? ....97
Appendix A. Frequently used commands in
dictation .............99
Formatting and spacing ........99
Punctuation in dictation ........99
Symbols and characters in dictation ....100
Symbols and characters in number mode 101
Symbols and characters in spell mode . . . 102
Appendix B. Notices ........105
Trademarks ............106
Other attributions ..........107
Glossary ............109
Index..............111
iv ViaVoice for Windows Standard Edition
Page 5

Welcome to ViaVoice
IBM ViaVoice will change the way you use your computer. You can now
dictate text and control your computer by voice.
Imagine yourself sitting at your computer, composing a letter to a friend. Say
"Dictate to SpeakPad". ViaVoice’s word processor opens, and you dictate the
letter using normal speech. You can do this with ViaVoice—you talk, it types!
The computer translates your words and phrases into actions that carry out
commands or create text. Imagine the simplicity of working at your computer
just by speaking. With ViaVoice, say goodbye to the drudgery of typing.
ViaVoice is probably not like any software you have ever used! To get the
most from ViaVoice and become a great user—even if you have already used
a speech-recognition product—we recommend that you go through this book
following these sign posts.
Install the software and set up your speech system. Start by
following the instructions in Chapter 1 to install ViaVoice and prepare
your sound system so that ViaVoice can understand you. You must set
up your speech system as described in Chapter 1 before you can
work satisfactorily with ViaVoice.
Get comfortable by practicing dictation. Having installed ViaVoice
and set up your speech system, you will then probably want to
practice dictating. Chapter 2 shows you how to dictate into SpeakPad.
We recommend that you practice with the material in this chapter, and
become comfortable speaking to SpeakPad, before exploring other
parts of ViaVoice.
Learn how to use the VoiceCenter. Once you are comfortable with
speaking to your computer, familiarize yourself with VoiceCenter, the
heart of your speech system. VoiceCenter controls your spoken
interactions with your computer. Chapter 3 describes the functions
available through VoiceCenter.
Once you have mastered the material in the first three chapters, explore the
other ViaVoice functions to become even more productive:
© Copyright IBM Corp. 1998, 2002 v
Page 6

v Use SpeakPad, described in Chapter 4, to dictate your documents and
letters. A word of advice: make sure you’ve gone through Chapter 2,
mentioned above, before turning to this chapter.
v Do you prefer using Microsoft
®
Word? Chapter 5 gives you the complete
picture on dictating into Word 97, Word 2000, or Word 2002.
v Your dictation is not finished until you have corrected the recognition errors
in the text. Correcting these errors is one of the most important ways to
help ViaVoice learn what you say. Do not close your dictation sessions until
you have corrected them as described in Chapter 6.
v What do you want to do? You can see all the commands for controlling
your computer in the What Can I Say window, described in Chapter 7. If
you are primarily interested in dictating documents rather than speaking
commands, you can skip this chapter.
v Once you are comfortable with your system, personalize ViaVoice.
Chapter 9 describes the features for extending the usefulness of your system
and gives you suggestions for tailoring it for your needs.
v ViaVoice is loaded with information like online help and printable online
material. Chapter 11 describes all the information available at your
fingertips.
vi ViaVoice for Windows Standard Edition
Page 7

US English and UK English are both described in this book
This book contains information on using ViaVoice in both UK English and US
English. You will select one of these languages to install on your computer.
Make sure you use the appropriate information in this book for the installed
language.
Keep in mind that these languages have many differences, and each language
version of ViaVoice is specifically tailored to understand what speakers of that
language will probably say. For example, if you are using US English and say
'analyze my voice' during a dictation, that is what you will see in your text.
However, the same words spoken for UK English will result in 'analyse my
voice'.
Other differences include the following:
v The words for some punctuation marks and symbols differ between the two
languages. In US English, the words "pound sign" result in "#"; in UK
English, the same words result in "£". The punctuation at the end of a
normal declarative sentence is "period" in US English and "full stop" in UK
English. See Appendix A, “Frequently used commands in dictation” on
page 99, where these differences are highlighted.
v Numbers and number formatting are handled differently between the two
languages. See “Dictating numbers in the US English version of ViaVoice”
on page 37 and “Dictating numbers in the UK English version of ViaVoice”
on page 37 for usage and examples.
v Folder names, window titles, program components and voice commands
are referred to using their US English names throughout this book. In the
UK English language version of ViaVoice some of these items appear in a
slightly different form, e.g.: VoiceCenter/VoiceCentre, Capitalize
this/Capitalise this, IBM ViaVoice/IBM ViaVoice UK English.
The text in this book uses the US English orthography. All pictures of
windows and panels are taken from the US English language version.
Welcome to ViaVoice vii
Page 8
Conventions in this book
Please note the following textual and graphical conventions used in this book.
Commands and words that you say to
your computer are shown in bold within
double quotation marks.
Say "Capitalize this".
Say "What Can I Say for Desktop".
Some multiple-word commands are shown
as joined words or hyphenated words.
NEWPARAGRAPH
NEWLINE
NO-SPACE
Spelling a word is shown with a hyphen
separating each letter in the word.
Dictate "r-e-c-o-g-n-i-t-i-o-n".
The names of buttons, fields and check
boxes appear in bold.
Click OK to accept the name in the User
Name field.
A series of items that you click with the
mouse to start a function appear in bold
and are separated by angle brackets. In
this example, the first item to click is the
Start button, and the last is the function to
open VoiceCenter.
Select Start > Programs > IBM ViaVoice >
VoiceCenter.
This symbol identifies information that is
particularly important.
In addition, navigation and some
commands are available only when
ViaVoice is installed on Windows 98
Second Edition, Windows Me, or Windows
XP Home Edition. This symbol alerts you
to information about this limitation.
Woodrow, the ViaVoice agent, points out a
helpful hint or tip.
viii ViaVoice for Windows Standard Edition
Page 9

Chapter 1. Setting up your speech system
This chapter describes how to install ViaVoice on your computer and then set
up your sound system. You should allow 30–45 minutes to complete the
procedures in this chapter:
v Install ViaVoice from the CD-ROM that comes in your package.
v Set up your audio system. The User Wizard will assist you!
v Record a story and let ViaVoice create a model of your voice.
v Optionally, if you already have documents that reflect the style and words
(lexicon) that you plan to dictate, you can have ViaVoice analyze those
documents.
The computer on which you will set up your speech system should be in the location where
you plan to dictate. During setup, background noises should be like those you will hear
during future dictation sessions. If there is unusual background noise (for example, street
repairs being done outside an open window) or if you plan to dictate in a noisy location
which is now quiet, wait until the acoustics return to normal before setting up your speech
system.
First check the following points before installing this program.
1. Refer to the side of the box to ensure your computer meets the minimum
requirements for installing this program.
2. If you are installing ViaVoice over an existing IBM speech product or have
IBM speech products in more than one language, read the information in
the Readme file on the ViaVoice distribution CD before installing ViaVoice.
3. Ensure that the disk drive where you plan to install ViaVoice has not been
compressed with disk-compression utilities.
4. If you are installing on Windows XP, your user ID must have
administrator authority.
© Copyright IBM Corp. 1998, 2002 1
Page 10

Installing the ViaVoice software
1. Insert the ViaVoice CD in your CD-ROM drive to start the installation
program. If it does not start automatically, do the following:
a. Click Start > Run from the Windows taskbar.
b. Type d:\setup (where d is your CD-ROM drive).
c. Click OK.
2. Follow the instructions on the screen.
During installation you will see the following windows. (This section does not
show all windows you will see.)
Language selection—Choose the language version you want to install and
click Next.
2 ViaVoice for Windows Standard Edition
Page 11
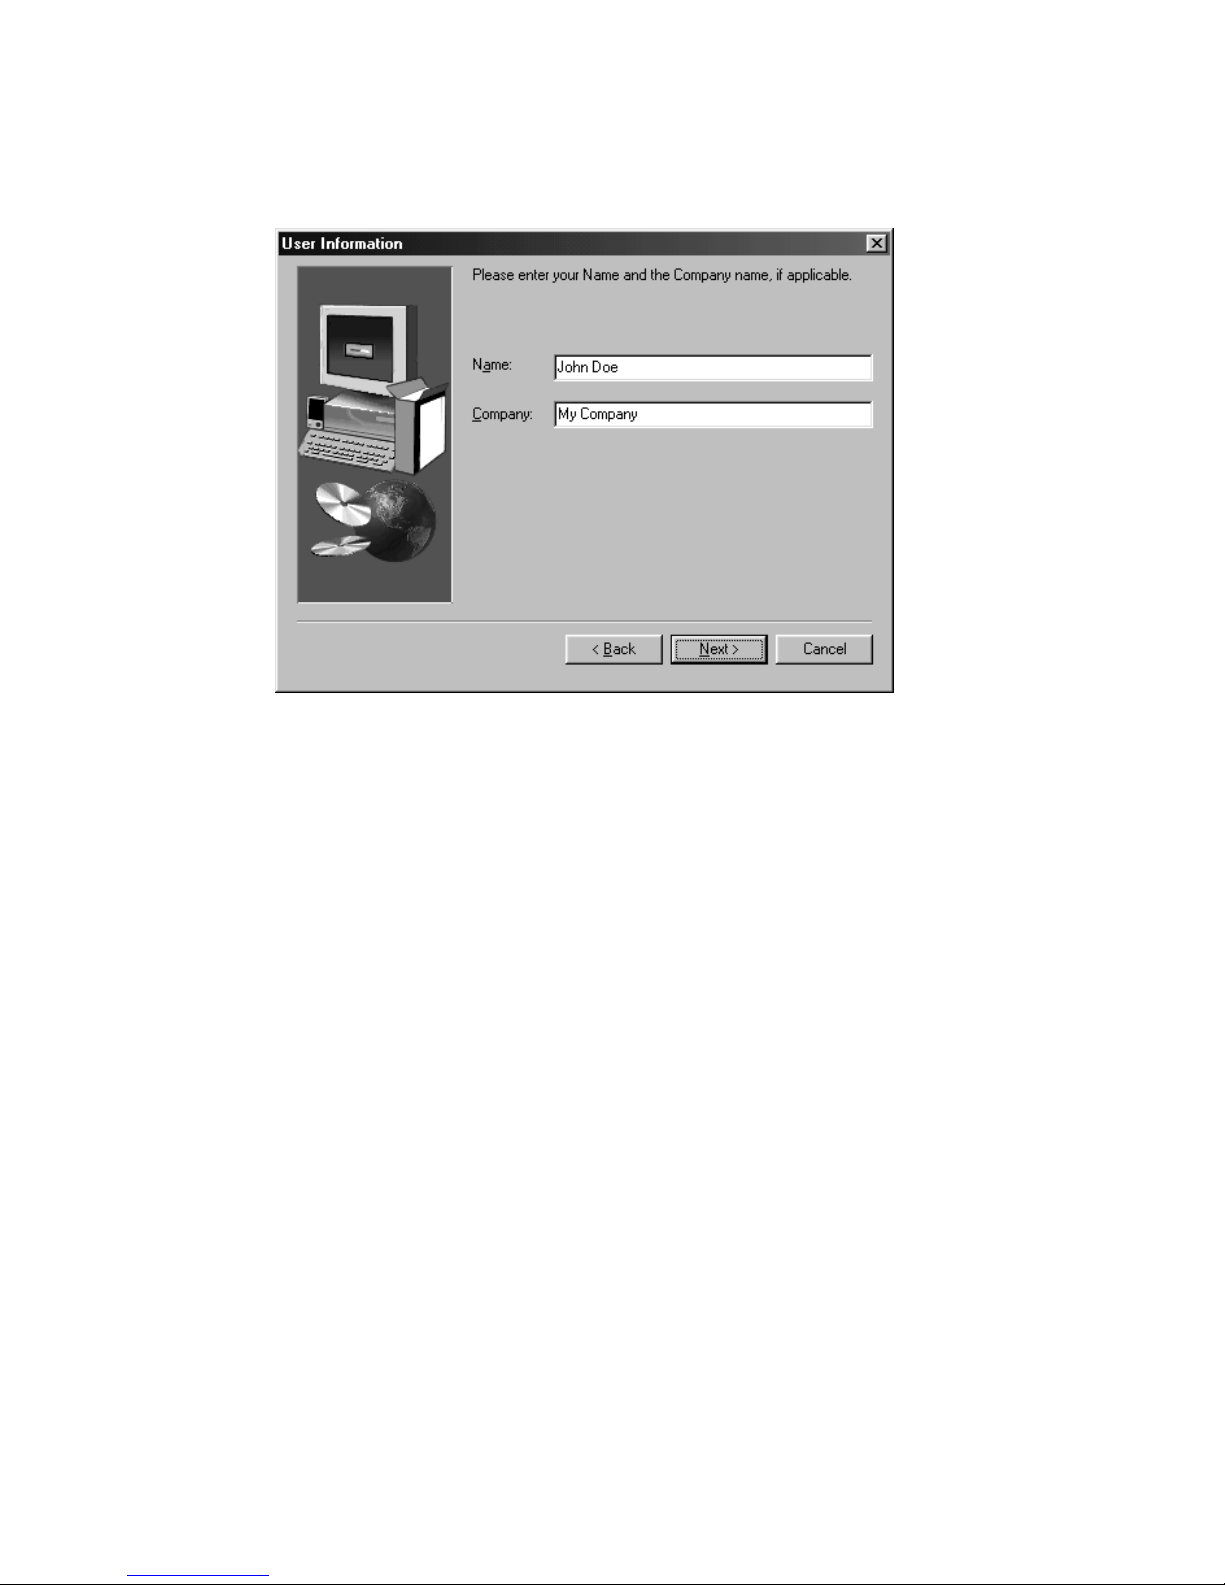
User Information—Type your name and company name, if appropriate. Click
Next when you have finished.
Chapter 1. Setting up your speech system 3
Page 12
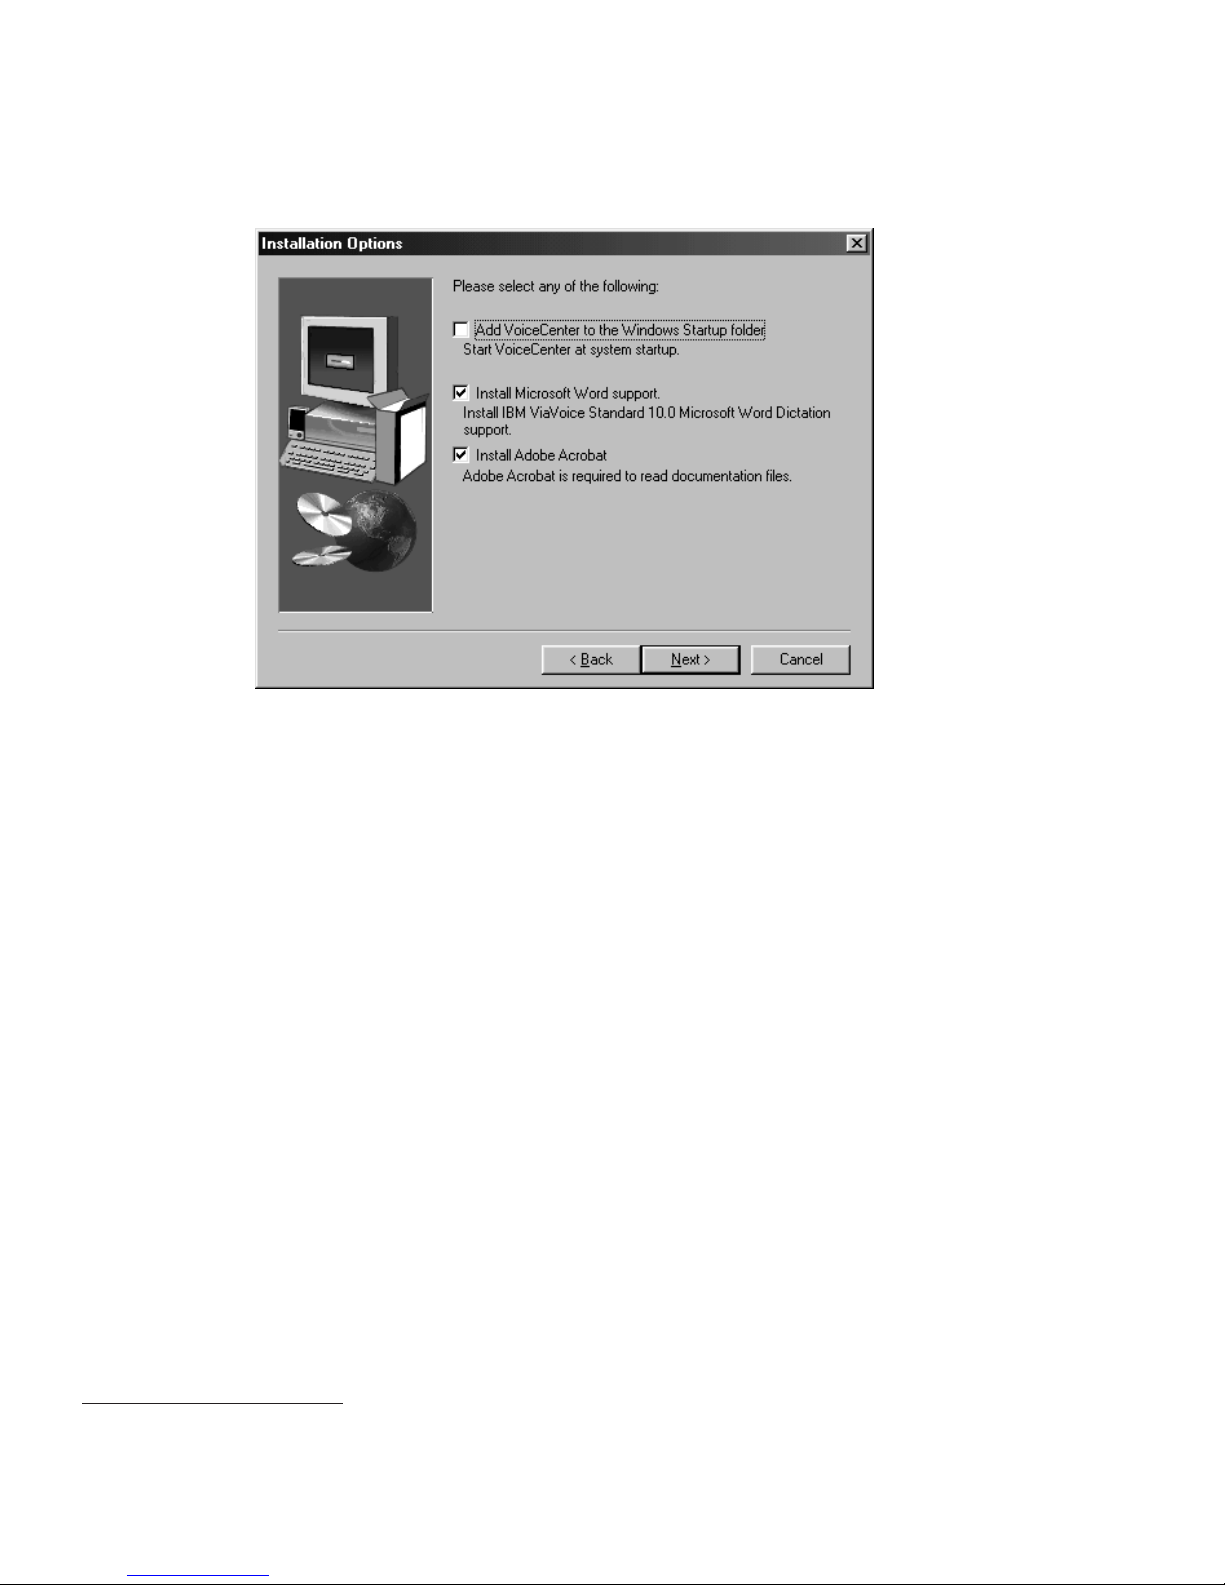
Installation Options—Select the Installation Options. To clear an option, click
on the check mark in the box.
Select to install ViaVoice support for Microsoft Word 97 or above. This option
is only available if you have Microsoft Word 97 or above installed on your
computer. This option includes support for dictation into Word and natural
commands
1
for Word. If you choose not to install this support now, you can
install it later.
Adobe Acrobat Reader—If Adobe Acrobat Reader is not already installed on
your computer, you can select this option to have ViaVoice automatically start
the Adobe Acrobat Reader installation program. Adobe Acrobat Reader
enables you to view the ViaVoice Command Reference and this book.
Click Next when you have finished.
1. Natural commands are commands that use a flexible, natural speaking style like "Make the next paragraph bold"
and "Select from here to the top".
4 ViaVoice for Windows Standard Edition
Page 13

Setup Complete—This window indicates that you have successfully installed
the software.
Chapter 1. Setting up your speech system 5
Page 14

Setting up your microphone and audio system
Woodrow appears if you placed VoiceCenter in your StartUp folder. If
Woodrow does not appear, start VoiceCenter by clicking Start > Programs >
IBM ViaVoice VoiceCenter.
Woodrow gives you a short presentation. (To skip this presentation, right-click
on Woodrow and then select Hide.) Then, the Audio Setup Wizard starts to
help you set up the microphone and audio system so you can get started with
ViaVoice.
The name in the User Name field is probably the one you typed earlier. Leave
it as it is, or type a name by which you want ViaVoice to know you. As you
use ViaVoice, words you add and other enhancements you make go into your
personal speech files. These files are associated with your user name.
You can use any name that contains the letters a to z in both uppercase and
lowercase as well as numbers, but it must not contain typographic symbols
(like " or /).
If other people will use your speech system, add their user names later but
before they start ViaVoice for themselves. (“Adding a user” on page 85
describes how to do this.) People using your speech system must have their
own user names. 'Sharing' your user name with others will corrupt your
personal speech files and cause recognition problems.
For now, ignore the other three fields and click Next.
6 ViaVoice for Windows Standard Edition
Page 15

Audio Setup Wizard—This wizard presents several windows to help you set
up your microphone. We recommend that you use the microphone that comes
with ViaVoice until you are thoroughly comfortable with your speech system.
1. If you have not already done so, remove the microphone and its
equipment from the package:
v The microphone itself
v One or more plugs and USB adapters
2
v Warranty and other material from the manufacturer.
The Audio Setup Wizard will prompt you to identify the type of
microphone and components you have.
2. With the microphone on, complete all audio tests that the Audio Setup
Wizard presents to you.
At the window shown below, for example, click Start and then read aloud the
text inside the box. Speak the text clearly in your normal voice, pausing
naturally between phrases or after punctuation marks. (Imagine you are
speaking to someone for whom English is not the native language.) After you
have read the sentences, ViaVoice will display the quality of your audio.
Should ViaVoice find that the audio quality is poor, click Fixing Poor Audio
Quality to learn how to take corrective action.
2. If you are using a USB microphone and do not have the USB port installed, the Windows program for adding this
new hardware begins. Follow the on-screen instructions to install the USB device driver. After installing the new
hardware and restarting your computer, run VoiceCenter and complete the Audio Setup Wizard.
Chapter 1. Setting up your speech system
7
Page 16

During these tests, the Audio Setup Wizard might display information
windows or even start your Web browser to display a ViaVoice-related Web
page. Use the information proposed by the wizard to solve any difficulty you
might encounter during Audio Setup. ViaVoice needs these tests to be
completed successfully to set up your system properly.
If you have difficulty completing any test successfully in the Audio Setup
Wizard, see “Troubleshooting setup problems” on page 13.
Creating a voice model
You must give ViaVoice a sample of your voice so that it can understand you.
The User Wizard makes it easy for you to do this.
When you see this window, click Start, then read aloud the text in the box,
speaking in a normal style. As ViaVoice recognizes you, some text will become
gray. In the window below, the first sentence and all but the last word of the
next sentence have been recognized. If ViaVoice does not recognize what you
say, simply say the text again until it is grayed.
8 ViaVoice for Windows Standard Edition
Page 17

When you have finished reading this text aloud, ViaVoice displays the
Analyzing My Voice window. Here you can choose what to do next.
Record my voice
This is the recommended choice. Recording your voice requires about
10 to 30 minutes and significantly increases the recognition accuracy
of ViaVoice.
I prefer to do this later
If you select this option, the User Wizard presents the Analyze My
Documents panel. (See “Analyzing your documents” on page 12 for
details.) However, your speech recognition accuracy might not be
optimal. To improve your recognition accuracy you can relaunch the
User Wizard at any time by selecting Tools > Analyze My Voice from
the ViaVoice menu.
Chapter 1. Setting up your speech system 9
Page 18
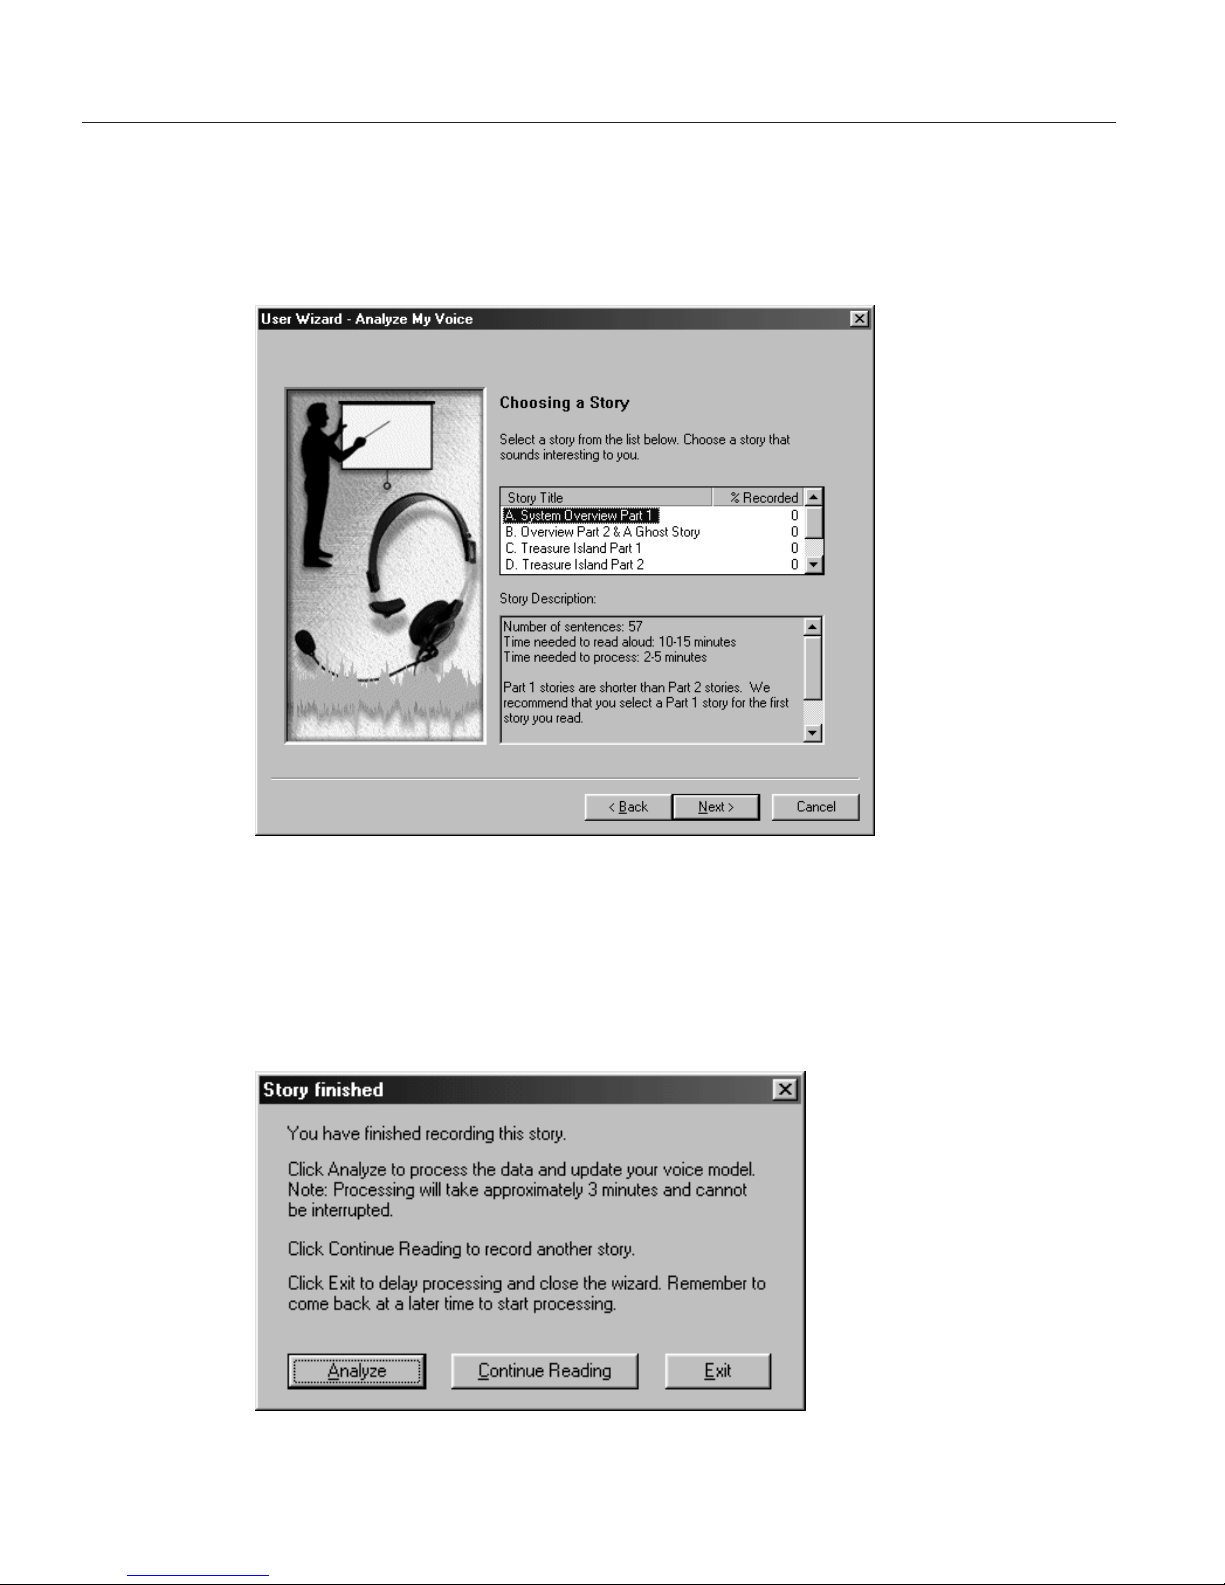
Analyzing your voice
After selecting Record my voice and clicking Next, ViaVoice displays the
Choosing a Story window. Select the story that you want to read aloud for
analyzing your voice. If the story you want has two Parts, select Part 1 first.
Read the story aloud using your normal speaking voice.
When ViaVoice has enough recorded data, you will see the Story Finished
window. Click Analyze to have ViaVoice create your voice model. However, if
you have a strong regional accent, we recommend that you click Continue
Reading so that you can record more sentences, giving ViaVoice more data for
analysis. Doing everything you can to give ViaVoice as much information
about your voice as possible is one of the best ways to ensure excellent
recognition accuracy.
10 ViaVoice for Windows Standard Edition
Page 19

You see this window after clicking Analyze.
Wait until ViaVoice has fully processed your recording before turning off your
computer or working with other processing-intensive programs.
Chapter 1. Setting up your speech system 11
Page 20
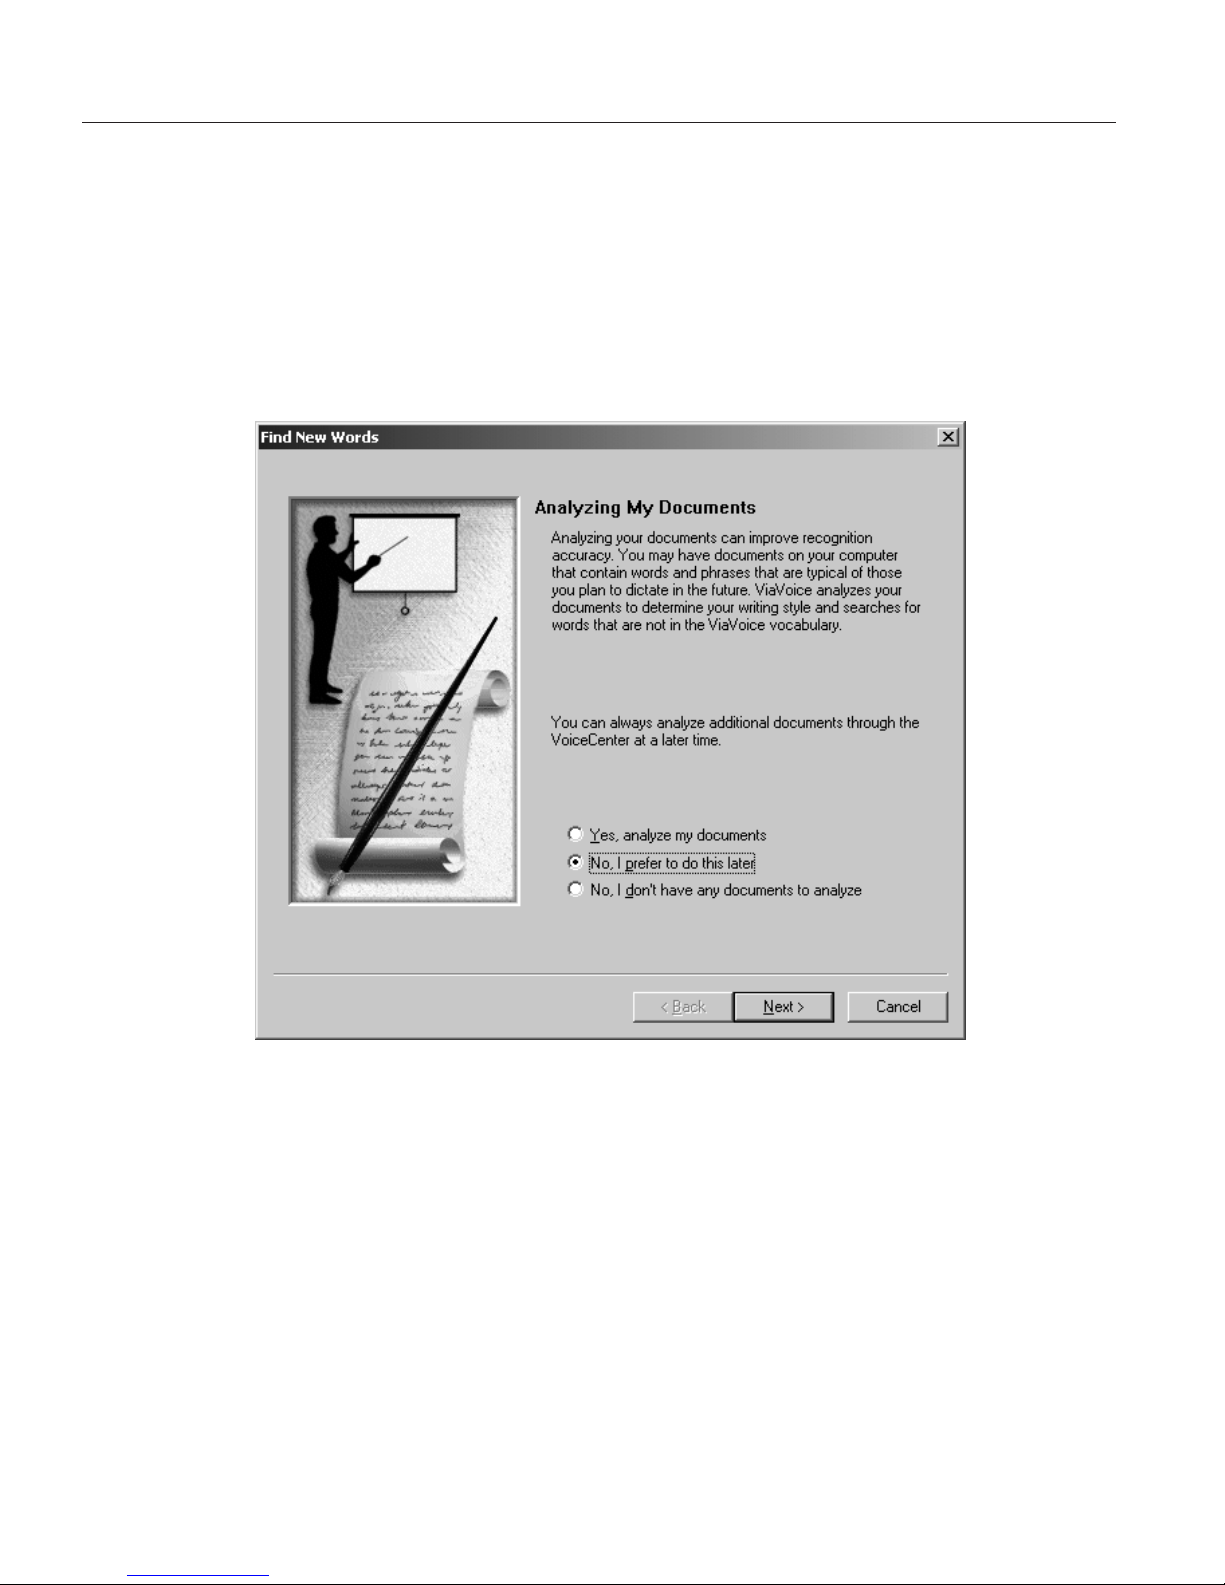
Analyzing your documents
You can get a head start on dictation by having ViaVoice analyze your
existing document files.
ViaVoice can analyze Word document files (DOC), Rich Text Format files
(RTF), text files (TXT) and HTML document files (HTM, HTML).
The User Wizard displays this window so that you can make these files
available for analysis:
When ViaVoice analyzes your files, it identifies words that are not in its base
vocabulary. You can then select which words you want added to your personal
vocabulary. (Your personal vocabulary contains new words that ViaVoice finds
in your dictated documents.) ViaVoice also updates its information with your
personal writing style so that, when you dictate in that style, it will
understand you better.
For now, select the middle or bottom option, then click Next.
Once a voice model has been created, you can go on to the next chapter,
where you will begin dictating with SpeakPad, the speech-enabled word
processor in ViaVoice. We recommend that you start with SpeakPad, which is
easy to use.
12 ViaVoice for Windows Standard Edition
Page 21

Troubleshooting setup problems
Before you can obtain satisfactory results with ViaVoice, you must install the
ViaVoice software, set up your microphone and audio system properly and
create a model of your voice. The procedures for doing these successfully
were described above. If you are unable to solve a setup problem, look for it
in this section and carry out the suggested corrective action.
Unable to install ViaVoice
U Your computer must meet the hardware and software requirements
listed on the side panel of your ViaVoice package. Refer to your
computer’s documentation to ensure that the type and speed of your
processor are sufficient for ViaVoice. Also ensure that the drive on
which you want to install ViaVoice has sufficient free disk space.
U During software installation, you should completely and accurately
provide data at every window and click Next when prompted to do
so. In windows where the Next button was inactive, did you type
data or select with the mouse until the button became active and
clickable? Dismissing windows instead of continuing with Next,or
clicking a button to cancel or exit, prevents the installation program
from completing successfully.
U If you are installing on Windows XP, your user ID must have
administrator authority.
Problems with audio setup
U The Audio Setup Wizard configures your sound system. You must
complete Audio Setup successfully. To do so, the microphone must be
plugged into your sound card or USB adapter and port correctly. The
Audio Setup Wizard shows you how to do these properly.
U Your sound card must be fully compliant with the specification on the
ViaVoice package, and the latest device driver for your sound card
should be installed on your computer. Check the sound-card
informationatourWebsiteathttp://www.scansoft.com/viavoice,
and contact your sound-card manufacturer to obtain the latest device
driver. If you have more than one sound card, there should be no
address conflict between the sound cards. ViaVoice must use the
sound card to which you attach the microphone. You can see whether
a conflict exists by looking at Start > Settings > Control Panel >
System > Device Manager. (Windows XP: Click on Start > Control
Panel > Performance and Maintenance > System > Hardware >
Device Manager.) A sound card showing a yellow exclamation mark
has an address in conflict with another device on your computer.
Look in Windows help for instructions on resolving this conflict.
U Use the microphone supplied with ViaVoice. If you want to use a
Chapter 1. Setting up your speech system 13
Page 22

different microphone, it must be one listed at
http://www.scansoft.com/viavoice ontheInternet.Youcanalso
see a list of supported microphones during Audio Setup. When setting
up your microphone, select Other microphone as the type of
microphone you are using, then click the Other microphones button
to see the list of supported microphones.
U Ensure that no special effects are set in Windows. These settings,
which can prevent the sound card from working with ViaVoice, are
found in Advanced Settings in the Device Manager for your sound
card. Effects like full-duplex, 3-D sound and reverb should be turned
off when using ViaVoice.
U Is your computer set up to record sound? If you are unsure, test your
system by doing this:
1. Click Start > Programs > Accessories > Entertainment > Sound
Recorder.
2. Try to record your voice and play it back with the Sound Recorder.
If you cannot hear your recording, contact your computer or
sound card manufacturer. If the Sound Recorder is working but
Audio Setup still fails, you might need to update the device driver
for your sound card.
The sound you hear should be free of hiss or other noise.
U Make sure that settings like volume control are set. Check boxes for
muting audio components in Windows should not be ticked. Search
for Windows Audio Settings in Windows help to see how to adjust
sound settings. Multiple mixers can cause problems.
Poor recognition
U Speak at a normal pace, not too fast, not too slowly. Don’t clip or slur
words, or elongate or exaggerate their pronunciation. Do not run
words together, but avoid overemphasizing them. At first you might
tend to speak quickly. Be patient and slow down a bit.
U Make sure you wear your microphone headset correctly and in the
same way each time you speak. The white dot next to the microphone
under the foam pad must face your mouth. Do not remove the foam
pad from the microphone when speaking; this pad acts as a
windshield. Do not position the microphone directly in front of your
mouth where it will capture breathing noises; instead, position it to
either side of your mouth, about 2 cm away from your mouth. When
speaking, do not change the position of the microphone boom or
touch the foam pad or boom. Do not allow the microphone to touch
your face or hair.
U Say only the words shown to you for the tests. Should you talk to
14 ViaVoice for Windows Standard Edition
Page 23

someone while the microphone is on, ViaVoice will capture your
conversation and not recognize your words as part of the story.
Hesitation noises like 'um' or 'uh', coughing and 'slips of the tongue'
are picked up as words.
U If a word can be pronounced more than one way—like 'thuh' and
'thee' for the word the—try both pronunciations.
U Are you actually saying all words correctly? For example, do not
misread this as the. Do not skip any words.
U If you are speaking in a room with a lot of unusual background noise,
wait until the noise subsides before reading the story.
U Are you using the appropriate language version of ViaVoice? You can
verify this by selecting Start > Settings > Control Panel > ViaVoice
Options. At the User tab in the Voice model field you will see either
'US English' or 'UK English'. If you find that you are using the wrong
language version, uninstall the program and install the correct
language version.
Chapter 1. Setting up your speech system 15
Page 24

16 ViaVoice for Windows Standard Edition
Page 25

Chapter 2. The magic of dictating with ViaVoice
Congratulations! You have successfully set up your speech system and are
now ready to practice dictation with SpeakPad, the speech-enabled word
processor in ViaVoice.
We should first establish a few guidelines to help you get started.
v If you have not used speech recognition before, relax! Talking to
your computer is fun and easy. Get a glass of water and follow
along with us in this chapter.
v ViaVoice understands when you speak clearly and in a normal,
natural manner. For some people, getting comfortable with speech
recognition takes time and practice. So, please be patient and try
not to be self-conscious! Talking to your computer is almost as
easy as talking on the telephone, and the more you use your
speech system, the more comfortable you’ll become.
v As you work through this chapter, consider everything you do as
practice—we sincerely want you to become a great ViaVoice user!
This is your chance to play with the technology and learn how to
make ViaVoice serve you.
v Work through the material in this chapter until you obtain
satisfactory results and feel comfortable speaking to your
computer.
Take your time and just follow the instructions.
© Copyright IBM Corp. 1998, 2002 17
Page 26

Practice dictating
1. If VoiceCenter is not on your screen, start it by clicking Start > Programs >
IBM ViaVoice VoiceCenter.
2. Click the ViaVoice menu button on the far left side of the VoiceCenter,
then select Dictate To and click SpeakPad.
SpeakPad opens. The microphone button changes and turns green. Your
microphone is on, and SpeakPad is ready to recognize your speech.
3. If you are using the US English version of ViaVoice, begin dictating the
following text. If you are using the UK English version, go to step 4.
Dictate this text by speaking clearly in your normal speaking voice:
The new ViaVoice has arrived EXCLAMATION POINT NEWPARAGRAPH
It contains many new features PERIOD NEWPARAGRAPH
Our new User Wizard makes it easy to get started PERIOD NEWPARAGRAPH
We hope you enjoy using the new ViaVoice PERIOD MICROPHONE-OFF
Continue with step 5 on page 19.
4. If you are using the UK English version of ViaVoice, begin dictating the
following text. Dictate this text by speaking clearly in your normal
speaking voice:
The new ViaVoice has arrived EXCLAMATION MARK NEWPARAGRAPH
It contains many new features FULLSTOP NEWPARAGRAPH
Our new User Wizard makes it easy to get started FULLSTOP NEWPARAGRAPH
We hope you enjoy using the new ViaVoice FULLSTOP MICROPHONE-OFF
18 ViaVoice for Windows Standard Edition
Page 27

5. The text appears in the SpeakPad window. It should look like this:
Congratulations, you have successfully dictated for the first time!
This being your first dictation, your text probably contains some recognition
errors. Your next step is to learn how to identify these errors, so please go to
the next section.
Chapter 2. The magic of dictating with ViaVoice 19
Page 28

Finding recognition errors
After dictating a paragraph or so of text, you should correct any recognition
errors you find in it. Recognition errors are words that ViaVoice understood in
error for the words you said. Several types of recognition errors can occur:
Type of error Examples Causes
A single word is
recognized as some
other word
You said a, but ViaVoice
displayed the.
You said their, but ViaVoice
displayed there.
v You didn’t say the word clearly.
v The word you said is not in ViaVoice’s
base vocabulary or your personal
vocabulary.
v The context of the word caused ViaVoice
to guess incorrectly.
A single word is
recognized as two or
more words
You said oversubscribed but got
over subside.
v You paused between syllables in a word.
v You didn’t say the word clearly.
v The word is not in ViaVoice’s base
vocabulary or your personal vocabulary.
A word that you did not
say is inserted in the text
You said for branch staff but got
for a branch staff.
v The microphone picked up background
noise or breathing noises.
Two or more adjacent
words are recognized as
one word
You said that this but got that’s.
v You ran the words together or spoke them
too quickly.
v You slurred the pronunciation of the
words.
A word is not capitalized
correctly
You started a sentence with
Their but ViaVoice did not
capitalize it.
v ViaVoice guessed the wrong form of the
word.
A command is
recognized as text
You said MICROPHONE OFF
but got the words microphone
off.
v You did not pause before and after saying
the command.
v ViaVoice did not interpret your words as a
command.
Recognition errors happen. Saying words that ViaVoice does not know,
making slips of the tongue, and the occasional bad guess by ViaVoice lead to
errors. By correcting recognition errors, you teach ViaVoice more about the
words you use. The more it knows, the fewer errors ViaVoice will make.
Next you will correct the recognition errors in your practice dictation.
20 ViaVoice for Windows Standard Edition
Page 29

Correcting errors
Correcting recognition errors is easy! Just go through these instructions and
correct any errors you find in your practice dictation. See “Troubleshooting
dictation problems” on page 24 if you have recurring problems while
practicing.
Try re-dictating your text before correction
Before correcting the recognition errors, read your text to see if you’re happy
with it. Ignore the errors for the time being. If you want to change a word,
phrase or sentence, simply select the word by left-clicking with the mouse, or
select multiple words by swiping them with the mouse. Then re-dictate what
you want.
Correcting misrecognized words
1. Turn on your microphone if it is off.
2. Open the Correction window by saying "Show Correction window" or by
pressing F2. Reposition the window with your mouse pointer if it is
obscuring your dictated text.
3. Using your mouse pointer as a visual guide, go through your dictation,
word by word and line by line, as a proofreader would, to find any errors.
4. Select a misrecognized word by left-clicking with the mouse. This
highlights the entire word. To select a series of words, swipe them with
the mouse. The entire series of words should now be highlighted.
5. If the correct word appears in the Correction window, say "Pick <n>",
where <n> is the number of the correct word.
3
6. If the correct word is not in the Correction window, re-dictate it. If this
does not correct the error, say "Scratch that" and try re-dictating again. If
that works, then you are done with this error and can proceed to the next
one. If the error persists, say "Scratch that" again, click on the
word-display field in the Correction window, and type the correct word in
the field. Say "Correct" or press Enter to insert the typed word into your
text.
3. By default, the Correction window shows a list of up to five alternate words. These are words that sound like the
word you actually said. You can increase or decrease the number of alternate words in the list from ViaVoice
Options. Go there by clicking the ViaVoice menu button then selecting User Options > ViaVoice Options. ViaVoice
Options is displayed. Click the Correction tab if it is not on top. At that tab select the number you want from the
drop-down list in Maximum number of alternate words. See “Changing the appearance of the Correction
window” on page 89 for more information.
Chapter 2. The magic of dictating with ViaVoice
21
Page 30

When correcting errors, you should correct words to what you actually said,
not to words you meant to say. If you find unwanted words because of a
'slip of the tongue' or because you did not speak clearly, delete them directly
from SpeakPad, then put the cursor at the right location and dictate what
you want.
Removing inserted words
1. Turn on your microphone if it is off.
2. Open the Correction window by saying "Show Correction window" or by
pressing F2. Reposition the window with your mouse pointer if it is
obscuring your dictated text.
3. Select the inserted word (or series of inserted words) with the mouse.
4. Say "Delete this", or press the Delete key.
Correcting capitalization errors
1. Turn on your microphone if it is off.
2. Open the Correction window by saying "Show Correction window" or by
pressing F2. Reposition the window with your mouse pointer if it is
obscuring your dictated text.
3. Select the word (or series of words) with the mouse.
4. Say "Capitalize this", or click the Format icon in the Correction window
and select Capitalize this from the drop-down menu.
22 ViaVoice for Windows Standard Edition
Page 31

Next steps after correction
After correcting the recognition errors, remove the text from the SpeakPad
dictation window and dictate the same practice text again. You should find
that ViaVoice understands your words better.
Should you continue to get recognition errors in your text, correct them
following the guidelines above, then try dictating again.
Dictate and correct the text, then try dictating it again, until you are satisfied
with the results.
To maximize your recognition accuracy, you should try to correct all errors
in your dictated SpeakPad documents before transferring them to another
program or exiting the document. Then allow ViaVoice to find the new
words when exiting the document. By doing so ViaVoice will learn your
manner of speaking. Get a head start on dictating by having ViaVoice
analyze the words and style of your existing documents.
If you want to continue practicing, choose from your favorite newspaper an
article that reflects the kind of documents you plan to dictate. A letter from
the Letters page is ideal. Do keep these points in mind when practicing with
your own text.
v ViaVoice understands best when you use the words and style common to
general business documents. Do not practice with cooking recipes,
sacred/religious text, poetry, text containing unusual names or foreign
words, or highly technical text. You may, of course, dictate these kinds of
text if you already have similar documents that ViaVoice can analyze
beforehand, but while you’re practicing, we recommend that you use
standard business text.
v When dictating, say your words as if ViaVoice already knows every one. Do
not stop and correct every error you see. Instead, dictate and correct a
paragraph at a time. We recommend that you do not watch the screen
while dictating to avoid becoming distracted.
v An 'out-of-vocabulary' recognition error happens when you say a word that
is not in ViaVoice’s base vocabulary or your own personal vocabulary. Use
the Correction window to correct the word to the one you actually said.
The new word will be added to your personal vocabulary. The next time
you say the word, ViaVoice should get it right.
v Say punctuation marks and formatting commands in your text. These are
listed in the What Can I Say window, which is described in Chapter 7,
“What Can I Say” on page 71. They are also shown in Appendix A,
“Frequently used commands in dictation” on page 99.
When you are satisfied with your results, continue with Chapter 3,
“Introducing VoiceCenter” on page 27 to learn about the functions in ViaVoice.
Chapter 2. The magic of dictating with ViaVoice 23
Page 32

To learn more about SpeakPad and dictating, see Chapter 4, “Dictating into
SpeakPad” on page 33, or see Chapter 5, “Dictating into Microsoft Word” on
page 47 if you want to dictate in Word 97, Word 2000, or Word 2002. To learn
more about Correction, see Chapter 6, “Correcting your dictation” on page 63.
Analyzing My Documents
If you already have documents that reflect the words and writing style that
you plan for your dictated documents, you can get a jump on your future
work by having ViaVoice analyze these documents.
Start by selecting from the ViaVoice menu > Tools > Analyze My Documents.
See “Analyzing your documents” on page 12 for more information.
Troubleshooting dictation problems
The practice dictation in this chapter was tested to obtain excellent recognition
for a majority of English speakers. If recognition errors persist in your practice
dictation, consider these strategies:
U If you created your voice model but did not let ViaVoice analyze your
voice, start Analyze My Voice and record a story. From the ViaVoice
menu click Tools > Analyze My Voice.
U If you recorded and processed only the first part of a story for your
voice model, return to Analyze My Voice and record the second part
of the story. From the ViaVoice menu click Tools > Analyze My Voice.
U Make sure you wear your microphone headset correctly and in the
same way each time you speak. The white dot next to the microphone
under the foam pad must face your mouth. Do not remove the foam
pad from the microphone when speaking; this pad acts as a
windshield. Do not position the microphone directly in front of your
mouth where it will capture breathing noises. Instead, position it to
either side of your mouth, about 2 cm away from your mouth. When
speaking, do not change the position of the microphone boom or
touch the foam pad or boom. Do not allow the microphone to touch
your face or hair.
U Is your user name displayed in VoiceCenter? Whenever VoiceCenter is
displayed, first ensure that your user name is displayed at the far
right side. You can verify this by clicking ViaVoice > User Options >
ViaVoice Options. At the User tab, make sure your name is shown in
the User Name field.
U Are you using the appropriate language version of ViaVoice? You can
verify this by clicking ViaVoice > User Options > ViaVoice Options.
24 ViaVoice for Windows Standard Edition
Page 33

At the User tab in the Voice model field you will see either 'US
English' or 'UK English'. If you find that you are using the wrong
language version, uninstall the program and install the correct
language version.
U When practicing, don’t say anything except the words in the text.
Hesitation noises or comments spoken aloud to neighbours will
appear in your text.
U Are you speaking normally? Say the sentences in your normal
speaking voice, not too fast, not too slowly. Say the words clearly
without slurring them, but do not overemphasize their pronunciation.
If you are having trouble speaking naturally and in a relaxed way, be
patient. The more you use your system, the more comfortable you’ll
become.
U Is the acoustic environment—the level and amount of background
noise—the same during dictation practice as when you recorded your
voice-model data? They should be identical or nearly so. For example,
if you recorded your voice-model data in a quiet office, do the
practice dictation in a similarly quiet location. If you plan to dictate in
locations that differ greatly in background noise, record your
voice-model data in all such locations, then use the particular voice
model for the location you’re at. (To create a new voice model, from
the ViaVoice menu click User Options > ViaVoice Options. At the
User tab, click the Add/Modify button.)
U Are you using the microphone you used to record your voice-model
data? If you have changed microphones since you created your voice
model, your voice model does not reflect the audio characteristics of
your new microphone. Create a voice model using your new
microphone, then use that voice model when practicing the dictation.
(Select the voice model you want to use from the ViaVoice menu by
clicking User Options > ViaVoice Options. At the User tab, make
sure the voice model you created with your new microphone is
shown in the Voice Model field.)
U If a word can be pronounced more than one way—like 'thuh' and
'thee' for the word the—try both pronunciations.
U Make sure you say multiple-word commands as if they were one long
word. Say New Line as a single word, not as New (short pause) Line.
U Are you actually saying all words correctly? For example, do not
misread this as the. Do not skip any words. You can always check
whether you are speaking clearly and correctly by selecting a word
and saying "Play this".
U If you are speaking in a location with a lot of unusual background
noise, wait until the noise subsides before dictating.
Chapter 2. The magic of dictating with ViaVoice 25
Page 34

U Do not eat, drink or smoke while trying to dictate. If you have a bad
cold or sore throat, consider practicing after your voice has returned
to normal.
26 ViaVoice for Windows Standard Edition
Page 35

Chapter 3. Introducing VoiceCenter
It’s worthwhile getting familiar with VoiceCenter, the control center of
ViaVoice. This chapter describes how you use VoiceCenter to control your
spoken interactions with your computer.
If you chose to place VoiceCenter in your StartUp folder during installation,
VoiceCenter starts when you start your computer. If you did not place it in
your StartUp folder, you can start it from Start > Programs > IBM ViaVoice
VoiceCenter. The microphone is off when VoiceCenter is started.
VoiceCenter appears as a taskbar at the top of your Windows desktop.
You can change the appearance (view) of VoiceCenter. See “Changing
VoiceCenter’s appearance” on page 79 for more information.
© Copyright IBM Corp. 1998, 2002 27
Page 36

VoiceCenter components
The ViaVoice button gives you access to the ViaVoice menu, which is
described in “ViaVoice menu” on page 30. To see the menu, click the
button, or say "ViaVoice Menu" when the microphone is on.
On
The microphone is on. When it is on, speech is enabled, and you can
use your voice to dictate and navigate. Click the microphone button
or say "Microphone off" to turn the microphone off. To put the
microphone in sleep mode, say "Go to sleep" to disable the
microphone for all dictation and commands except the "Wake up"
command.
Asleep
The microphone is 'sleeping'. Say "Wake up" to turn the microphone
on.
Off
The microphone is off. When the microphone is off, speech is
disabled. To turn the microphone on, click the button.
Turn off the microphone when another program needs to access the sound
card. ViaVoice suspends the microphone automatically when another
ViaVoice function (like Begin Reading) needs the sound card.
Watch the volume meter to monitor the loudness of your voice. The
volume meter should stop in the light green range whenever you
speak. If the volume meter stops in the dark green (too soft) or red
(too loud) range, or if it shows no movement, run Audio Setup from
the ViaVoice menu.
Watch the status area to see the last command that ViaVoice
recognized or to see messages that help you decide your next step.
Click the Analyze My Voice button to launch the User Wizard and
let ViaVoice analyze your voice to improve recognition accuracy. The
button will disappear as soon as enough data has been recorded and
analyzed.
Place your mouse pointer over the Analyze My Voice button to
display information on the amount of data that has been collected for
analyzing your voice.
28 ViaVoice for Windows Standard Edition
Page 37

Click the Help button to access VoiceCenter help.
Check the user-information area to make sure your own user name is
selected before you start using ViaVoice. Each user has personal
speech files—voice models, personal vocabulary, language and
ViaVoice Options—which ViaVoice uses and updates while the user is
dictating and correcting. To change the currently selected user name,
see “Making a user name the current user” on page 85.
Place your mouse pointer over the user-information area to display
the Who Am I pop-up. This pop-up shows the user name, vocabulary
and voice model that are currently selected at the User tab of
ViaVoice Options. If a Topic has been selected, its name is shown in
the pop-up. (Topics are specialised mini-vocabularies that come with
some versions of ViaVoice. Look at the User tab to see if any Topics
are available in your version.)
Your voice model reflects how you speak with a given microphone within a
particular acoustic environment. If you dictate at more than one location or
use different microphones, create a separate voice model at each location and
with each microphone. Then, make sure the appropriate voice model is
selected whenever you use ViaVoice. See “Creating additional voice models”
on page 82 for more information.
Chapter 3. Introducing VoiceCenter 29
Page 38

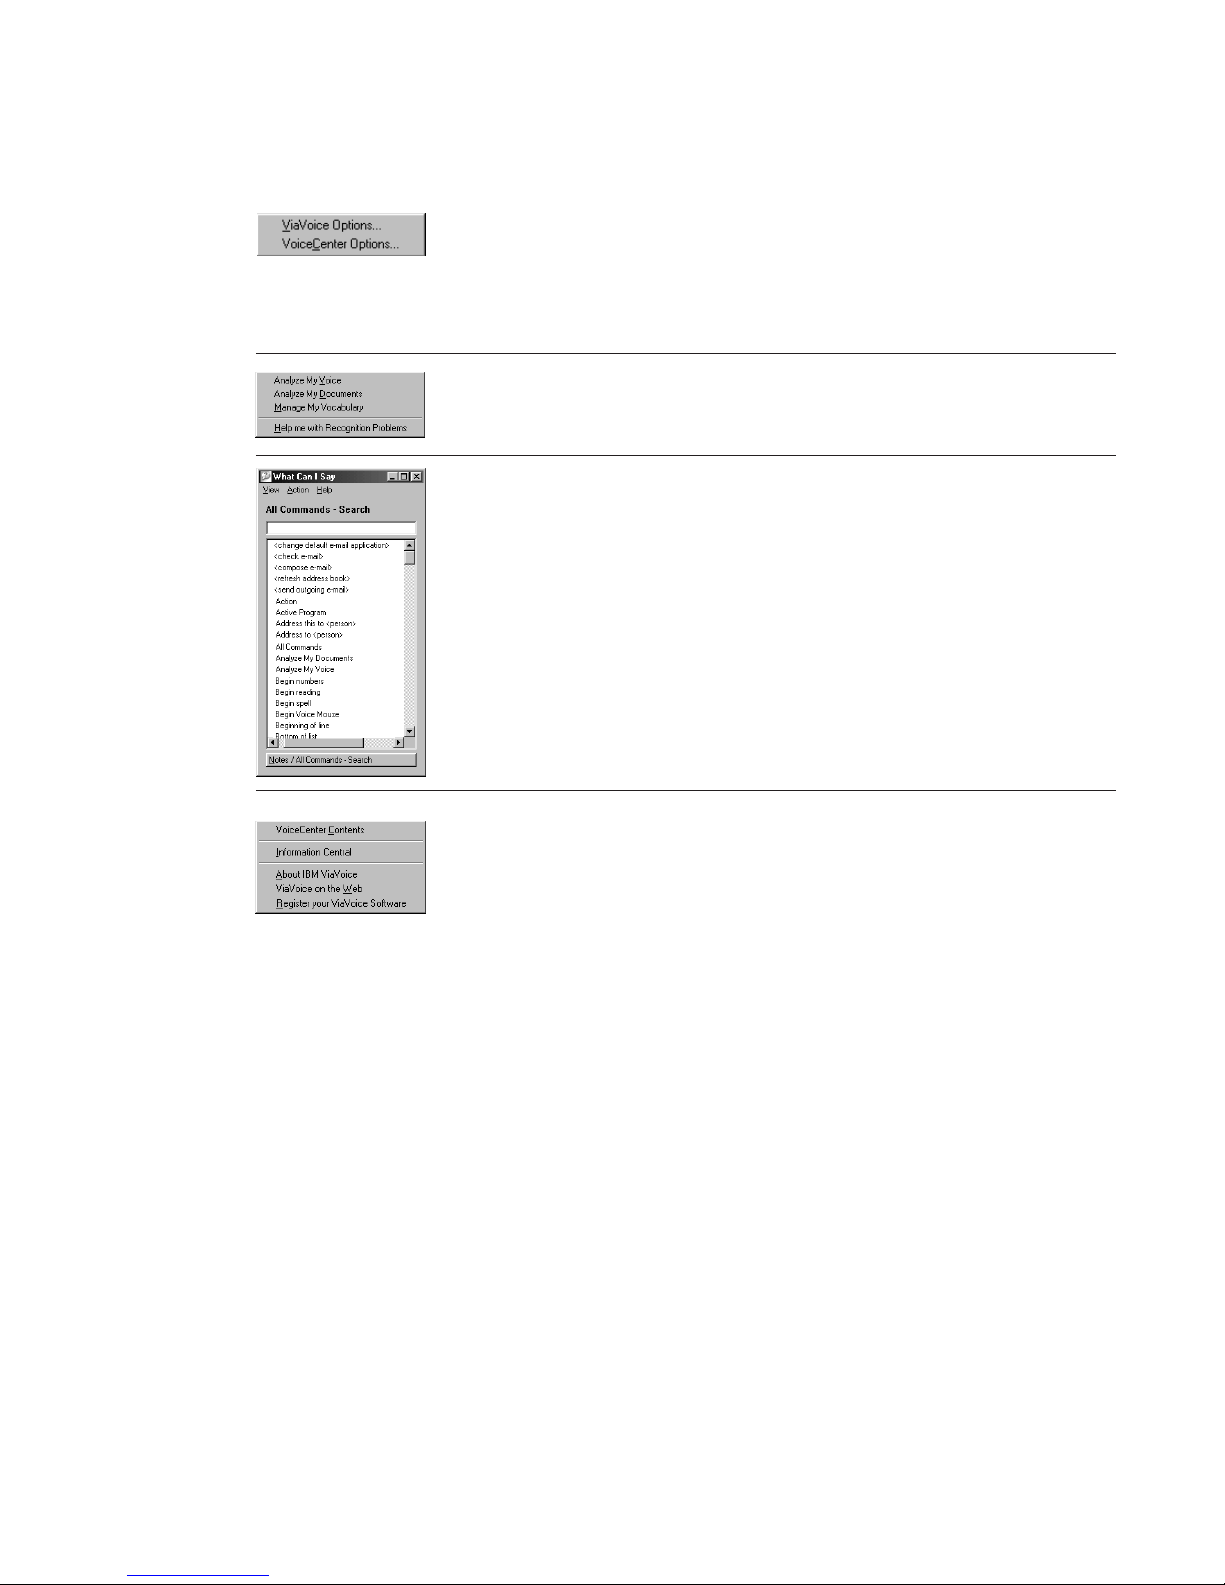
ViaVoice menu
Say "ViaVoice menu", or click the ViaVoice button, to display the ViaVoice
menu. From there, you can access all features and tools available from the
menu or from sub-menus (shown below).
30 ViaVoice for Windows Standard Edition
Page 39

To create a document with your voice, select a dictation
application from the Dictate To menu.
Say "Dictate to SpeakPad" or "Dictate to Word" (if Word is
on your computer and Microsoft Office support has been
installed).
For more information, see:
v Chapter 4, “Dictating into SpeakPad” on page 33
v Chapter 5, “Dictating into Microsoft Word” on page 47
v Chapter 6, “Correcting your dictation” on page 63
To correct your dictated text with your voice, say "Show
Correction window", or select Show Correction Window
from the ViaVoice menu. See Chapter 6, “Correcting your
dictation” on page 63.
To proofread your text when correcting errors, say "Begin
Reading", or select Begin Reading from the ViaVoice menu.
Woodrow reads aloud your document.
You can have Woodrow read only a selection of text by
highlighting that selection. Woodrow can also read aloud
text, like e-mail, that you did not create through dictation.
You cannot use voice commands when Woodrow is reading.
To start, stop or pause reading, use the buttons on the
toolbar.
To set up your microphone or audio input device to work
with ViaVoice, or to adjust settings, select Audio Setup from
the ViaVoice menu. Run Audio Setup whenever:
v The acoustics of your work area have changed.
v You have changed your microphone.
v You have installed a new sound card or changed your
computer.
Chapter 3. Introducing VoiceCenter 31
Page 40
To customize ViaVoice, select ViaVoice Options from the
User Options menu.
Select VoiceCenter Options to change the appearance of
VoiceCenter.
See Chapter 9, “Customizing ViaVoice” on page 79 for more
information.
To start (or resume) recording for a voice model, manage
your vocabulary or have ViaVoice analyze your documents,
select the appropriate tool from the Tools menu.
To view the commands you can use, say "What Can I Say",
or select What Can I Say from the ViaVoice menu.
Commands are displayed by view, such as Text Editing.
You can enable/disable separate sets of command. When a
command set is disabled, ViaVoice does not recognize any
command from it. See “Enabling command sets” on page 90
for more information.
To get more information on using VoiceCenter, select
VoiceCenter Contents from the Help menu.
To get information on using all ViaVoice features, select
Information Central from the Help menu.
32 ViaVoice for Windows Standard Edition
Page 41

Chapter 4. Dictating into SpeakPad
ViaVoice provides a speech-enabled word processor called SpeakPad into
which you can dictate your documents. This chapter describes how to use
SpeakPad to create documents by voice.
If you have not already done so, please practice dictating into SpeakPad as
described in Chapter 2, “The magic of dictating with ViaVoice” on page 17.
Most of the voice commands in this chapter work only if you have installed
ViaVoice on Windows 98 Second Edition, Windows Me, or Windows XP
Home Edition. When a command is not recognized, select the desired button
or menu item with your mouse.
Select Dictate To > SpeakPad from the ViaVoice menu, or say "Dictate to
SpeakPad". You can begin dictating when SpeakPad’s document window
opens.
© Copyright IBM Corp. 1998, 2002 33
Page 42

SpeakPad menus and buttons
ViaVoice provides menu items and icons to support dictation into SpeakPad.
Click Dictation, to access the Dictation menu. The
following options are available:
v Show Correction window — Opens the Correction
window for correcting recognition errors in your
dictation.
v Hide Correction window — Hides the Correction
window.
v Playback — Allows you to hear your dictation.
You can highlight up to 1,000 words for playback.
This option is grayed if you have not highlighted
text.
v Cancel Playback — Stops playback.
v Begin Reading — Reads your text aloud using the ViaVoice agent,
Woodrow. The text starting at the cursor location is read unless you have
highlighted text. You can choose to hide the ViaVoice agent when using
Text-To-Speech from the At Startup tab in ViaVoice Options.
v Create Macro — Creates a dictation macro for the text you have selected.
v Dictation Options — Opens ViaVoice Options to the Dictation tab.
v Correction Options — Opens ViaVoice Options to the Correction tab.
v Select Target Window — Specifies the window to which you will transfer
your dictated text.
To transfer text to another application, open the
application and make sure you can see its window on
your desktop. Then click the Select Target Window
button on the SpeakPad toolbar to display the Select
Target Application window.
Click and drag the selection pointer—the little arrow
in the middle of the window—to your target window,
then click OK. Your target window will receive the
dictated text from SpeakPad when you click the
SpeakPad Transfer button.
34 ViaVoice for Windows Standard Edition
Page 43

Say "Transfer", or click the Transfer button, to
transfer SpeakPad text to the window you have
already identified as the target window on your
desktop.
Transfer enables you to use SpeakPad as your main
dictation word processor and easily transfer text to
another word processor or other program that accepts
text.
Say "Show Correction window", or click the Correct
button to display it.
You can drag the Correction Window to any place on
your desktop. The next time you want to use the
Correction Window, it remembers where you put it
and goes to that location.
To resume dictating (and leave the Correction
window), say "Return to text", or click in your
dictation. You can say "Hide Correction window" to
close the window.
See Chapter 6, “Correcting your dictation” on page 63.
Chapter 4. Dictating into SpeakPad 35
Page 44

General hints and tips
Keep these things in mind whenever you dictate:
v Nearly everything you say into the microphone gets recognized as text or
an action to carry out—a text format, a cursor movement or a file-save,
file-close command. When your words are not recognized, you’ll see a
message to this effect in the VoiceCenter status area.
v Speak clearly in a natural way. ViaVoice translates your speech into text.
There is no need to pause between words, but make natural pauses after a
phrase or sentence. You may pause at any time to take a breath or collect
your thoughts.
v Say punctuation marks as part of your dictation. ViaVoice adjusts spacing
and capitalization accordingly. For example, when you say "Period" at the
end of a sentence, ViaVoice types a period, moves one space and starts the
next word with a capital letter.
If you are using the UK English version of ViaVoice, substitute "Full stop"
whenever you see the US English command "Period" in this User’s Guide.
When you say "New paragraph", ViaVoice inserts a line and starts the next
word with a capital letter. Look in the What Can I Say window for a list of
the punctuation and characters that you can insert into your dictation.
(Characters and punctuation are also listed in Appendix A, “Frequently
used commands in dictation” on page 99.)
v When saying a command, pause before the command, speak the command
without pausing between command words and then pause after the
command. This way, ViaVoice can interpret your speech as a command.
Incidentally, if you pause just to collect your thoughts, ViaVoice will expect
to hear a command. If the next words you say are not a command that
ViaVoice recognizes, it types your words as text.
v If you find that ViaVoice does not recognize your commands, you can begin
every command with an Attention word, which signals that you are about to
say a command. The default Attention word is 'Computer', but you can add
multiple Attention words from the Command Sets tab in ViaVoice Options.
To require the Attention word to be spoken before commands select this
option on the Dictation tab in ViaVoice Options. When it is specified, you
must use it before every command, even commands like "Microphone off".
When using the Attention word, do not pause between the Attention word
and the rest of the command.
36 ViaVoice for Windows Standard Edition
Page 45

Dictating numbers in the US English version of ViaVoice
When dictating, say numbers as you naturally say them. ViaVoice formats
numbers such as dates, money, time, and ordinal and cardinal numbers. For
example, to dictate $589, simply say "five hundred eighty-nine dollars".
Currency
To get $350.10, say "three hundred and fifty dollars and ten cents".
Dates
To get July 9, 1997, say "July ninth nineteen ninety-seven", without
punctuation.
To get July 9th say "ninth July".
Decimals
To get 3.7, say "three point seven".
Ordinals
To get 53rd, say "fifty-third".
Long numbers
To get 1200, say "twelve hundred".
To get 13,111, say "thirteen thousand one hundred and eleven".
To get 1147356, say "eleven forty-seven thirty-five six" (in pairs or single
digits).
Time of day
To get 10:30 am, say "ten thirty A M", without punctuation.
Dictating numbers in the UK English version of ViaVoice
When dictating, say numbers as you naturally say them. ViaVoice formats
numbers such as dates, money, time, and ordinal and cardinal numbers. For
example, to dictate £589, simply say "five hundred eighty-nine pounds".
Currency
To get £350.10, say "three hundred and fifty pounds and ten pence".
To get €50, say "fifty euro"
Dates
To get 9th July 1997, say "ninth of July nineteen ninety-seven".
To get July 9th, 1997, say "July the ninth nineteen ninety-seven", without
punctuation.
Chapter 4. Dictating into SpeakPad 37
Page 46

To get 25/12/2000, say "Twenty-five SLASH twelve SLASH two-thousand".
Decimals
To get 3.7, say "three point seven".
Ordinals
To get 53rd, say "fifty-third".
Long numbers
To get 1200, say "twelve hundred".
To get 13,111, say "thirteen thousand one hundred and eleven".
To get 1147356, say "one one four seven three five six". If you want commas,
say "one million one hundred and forty seven thousand three hundred and
fifty six".
Time of day
To get 10:30am, say "ten thirty A M", without punctuation.
To get 14:30, say "fourteen COLON NOSPACE thirty".
To get 9 o’clock, say "nine o’clock".
Dictating numbers in number mode
To improve the recognition of digits and numbers in your text, particularly
when you want to dictate long sequences of numbers like credit-card
numbers, enter number mode during dictation.
Say "Begin numbers" at the place in your text where you want to dictate the
number. Then say each digit of the number you want. If you want a special
character or symbol inserted in the sequence, say the name for it. You can see
the list of symbols and characters available in number mode by saying "What
Can I Say for Dictation" before saying "Begin numbers".
To exit number mode and continue with normal dictation, say "Return" or
"Cancel". If you switch focus to another window, you will automatically exit
number mode.
Spelling words in spell mode
To spell words or dictate a sequence of digits and letters, enter spell mode
during dictation.
Say "Begin spell" at the place in your text where you want to spell the word.
Then say each letter of the word you want. You may also use the phonetic
38 ViaVoice for Windows Standard Edition
Page 47

alphabet, shown on your Command Reference card, to spell words. The digits 0
to 9 and the special characters shown on the card may also be spoken in spell
mode.
To exit spell mode and continue with normal dictation, say "Return" or
"Cancel". If you switch focus to another window, you will automatically exit
spell mode.
When the Correction window has focus, you do not need to say "Begin spell"
to enter a word by spelling.
Saying commands while dictating
You can say commands to navigate through the text of your dictation and to
control SpeakPad. Pause briefly before and after you say a voice command.
However, do not pause while you are saying the words of the command itself.
If ViaVoice misrecognizes your command as text and types it on the screen,
say "Scratch that", then say the command again.
Inline dictation commands
You can edit and format text using the inline dictation commands and
text-editing commands. View these commands in the Dictation and Text
Editing views in the What Can I Say window and on the Command Reference
card.
v Say commands such as "Capital letter", "Uppercase", "Lowercase" and
"Spacebar" to format text.
v Say "<command> on" to keep the command active until you say
"<command> off". For example, say "Capitalize on" to capitalize all words
until you say "Capitalize off".
v Say "<command> this" to edit the next word or first letter of the next word.
For example, say "Underline this".
Say "What Can I Say for Dictation" to view other commands.
"Scratch that" command
Should your command be recognized as text, say "Scratch that", which
removes the unwanted text, then say the command again.
This command can also be used to restore text. For example, if you selected
text and then said a command that ViaVoice recognized as text, the
misrecognized text replaced what you had selected previously. Undo the
replacement by saying "Scratch that".
Chapter 4. Dictating into SpeakPad 39
Page 48

Text-editing commands
You can select text and move the cursor using text-editing commands, such
as:
v Say "Next line" to move the cursor to the next line.
v Say "Select <text>", where <text> is the word or phrase to select.
v Say "Select this" to select text at the cursor location.
v Say "Scratch that" to delete the last dictated phrase.
v Say "Undo this" to undo the last action.
v Say "Copy this" and "Paste this" to copy selected text to or paste text from
the clipboard.
Say "What Can I Say for Text Editing" to view other commands.
Bullet lists
Create an unordered list with "bullet" symbols by dictating words, phrases or
sentences on their own lines, then highlight the text and say "Bullets".
Commands recognized as text
ViaVoice processes your words as dictation until you pause, and then it starts
to listen for you to say a command. ViaVoice understands the commands that
you can see in the All Commands view at the What Can I Say window. If you
have selected a command set, ViaVoice will process the word as a
command—not dictation—whenever you pause before and after saying the
word. You can also use the word in regular dictation—but do not insert a
pause.
For example, suppose you wanted to dictate the sentence "It is important to
use the open quote file save close quote option regularly". If you paused
slightly before the word 'file', ViaVoice would interpret it as a command, and
the File menu would be pulled down! If you equally paused before the word
'save', the file would be saved.
To prevent dictated words from being recognized as commands, you have two
options:
v Go to the Command Sets tab in ViaVoice Options and deselect the
command set containing the specific command. Always select the command
sets that you use frequently so that you can see views of them in the What
Can I Say window. Deselect the command sets that you do not use. You can
select them again whenever you need them.
v Enforce the Attention word, such as 'Computer', before each command. To
do this, select the Attention word required check box on the Dictation tab
in ViaVoice Options. Once that is set, you must start every command with
the Attention word, such as "Computer select this". Do not pause between
the Attention word and the rest of the command. You can add multiple
Attention words from the Command Sets tab in ViaVoice Options.
40 ViaVoice for Windows Standard Edition
Page 49

When you deselect a command set, ViaVoice does not recognize the
commands in that command set. ViaVoice will process those words only as
dictation.
Chapter 4. Dictating into SpeakPad 41
Page 50

Dictating e-mail user IDs and URLs
If the e-mail user ID is composed of commonly used words (for example,
Barbara_Jones@IBM.com), try dictating it like this: "Barbara UNDERSCORE
Jones AT-SIGN ibm DOT com". If it contains unusual words or characters,
like MyM8@xenia.net, say a combination of words and spelled letters, like
this: "BEGIN SPELL Capital-M-y-Capital-M-8 AT-SIGN x-e-n-i-a DOT n-e-t".
If you are using the UK English version of ViaVoice, substitute "Full stop"
whenever you see the US English command "Period" in this User’s Guide.
If a letter or character is misrecognized, say "Scratch that" to delete it, then
say the correct letter or character again.
To dictate a URL like http://www.AZplace.net, say "http COLON SLASH
SLASH www DOT BEGIN SPELL Capital-A-Capital-Z-p-l-a-c-e DOT n-e-t
RETURN".
ViaVoice knows popular e-mail and URL domain names (sites) like aol.com,
Lycos.com, Hotmail.com and Yahoo.com, and common top-level domain
names like .co.us, .co.uk, .com, .org, .gov, .ac.us, .ac.uk and .net.
If you repeatedly use the same e-mail users or URLs in your dictations, you
can save time by creating a dictation macro for each e-mail user and URL.
See “Creating a dictation macro” on page 93 for more information.
42 ViaVoice for Windows Standard Edition
Page 51

Transferring your dictation to another application
The transfer function is the easiest and quickest way to copy your dictated
document from SpeakPad to another text-based application. To maximize your
recognition accuracy, you should transfer your dictated document only after
you have corrected the recognition errors in it, as described in Chapter 6,
“Correcting your dictation” on page 63.
To transfer text to another application:
1. Open the application to which you
want to transfer your dictation. Make
sure that the application window and
SpeakPad are both open on your
screen.
2. From SpeakPad, select Dictation >
Select Target Window, or click the
Target button for the Select Target
Application window to appear.
3. Drag the selection pointer—the little
arrow in the middle of the Select Target
Application Window—to your target
application and click OK. Your target
window will receive the text
transferred from SpeakPad.
Chapter 4. Dictating into SpeakPad 43
Page 52

Saving your dictation in SpeakPad
Before saving your dictation, decide if you want it saved as a recorded speech
session, which is your dictated text along with recorded audio of the dictated
words, or saved simply as text. To maximize your recognition accuracy,
correct errors in your dictated document before saving it.
Although the speech-session data uses a large amount of storage on your
disk—approximately 750 KB for every minute of dictation—you should save
this data if you plan to continue dictating your document or, alternatively,
want to correct and edit the document later. You do not need to save your
speech-session data if you have already corrected the recognition errors in the
dictation.
Saving a speech session
To save a speech session in SpeakPad:
1. Select File > Save session.
2. Type a name for the file.
3. Click Save.
See “Delayed correction” on page 68 for information on opening the speech
session data for correction.
Saving your dictation as text
If you have corrected all recognition errors in your dictation, save it as a
document file:
1. Select File > Save As.
2. Type a name for the file and choose a file extension (RTF, DOC, or TXT
file).
3. Click Save. The file is now saved.
44 ViaVoice for Windows Standard Edition
Page 53

Finding new words in your document
ViaVoice analyzes your text for new words when you save a document in
SpeakPad. When you close SpeakPad, ViaVoice displays a list of all new
words found in your document. You may then elect to add them to your
personal vocabulary so that they are recognized in future dictations.
When you close your document, ViaVoice displays this window:
1. Select each word that you want to add to your personal vocabulary. A
check mark appears next to each word you select.
2. Click Next.
3. If ViaVoice needs a pronunciation of a word, a window appears requesting
that you train the word. Click Record, then say the word.
4. Wait for a check mark to appear next to the word (which indicates that
you recorded it successfully). Then click Done.
If you click Cancel, choosing not to record the pronunciation of a word,
ViaVoice will not add the word to your personal vocabulary.
Chapter 4. Dictating into SpeakPad 45
Page 54

46 ViaVoice for Windows Standard Edition
Page 55

Chapter 5. Dictating into Microsoft Word
This chapter describes how to use Microsoft Word 97, Word 2000, or Word
2002 to create documents by voice. If you do not already have Word on your
computer, install it before continuing with this chapter. Alternatively, go to
Chapter 2, “The magic of dictating with ViaVoice” on page 17 and practice
dictating using SpeakPad.
Most of the voice commands in this chapter work only if you have installed
ViaVoice on Windows 98 Second Edition, Windows Me, or Windows XP
Home Edition. When a command is not recognized, select the desired button
or menu item with your mouse.
Installing Word Program Support
If you chose to install Microsoft Office support during installation, you can
immediately use natural commands and dictate when you open Word. Click
the ViaVoice menu button and then the option Dictate to. Do you see Word?
If you do, then Word support is already installed.
The Word Dictation Command Set allows you to dictate into Word. ViaVoice
loads the Dictation menu and icons on the Word menu. The Word Natural
Commands Command Set allows you to say voice commands in Word. The
What Can I Say window displays the available commands. You can select one
of these two options or both, depending on what you want to do.
If you did not install Microsoft Office support during installation, or you
installed Word after you installed ViaVoice, follow these instructions to enable
or disable the Word Dictation and Word Natural Commands Command Sets.
1. Click the ViaVoice menu and point to User Options.
2. Click ViaVoice Options and select the Commands Sets tab.
3. Select or clear the Word Dictation check box for Word dictation support.
Select or clear the Word Natural Commands check box for Word
voice-commands support. If these options are disabled (grayed), then you
do not have Word installed on your computer.
4. Click Apply to save your changes, or click OK to save the changes and
close ViaVoice Options. If VoiceCenter was open when you installed this
support, close VoiceCenter and restart it.
© Copyright IBM Corp. 1998, 2002 47
Page 56

To disable Word support temporarily, hold down the Shift key while Word
is starting. Otherwise, ViaVoice Word Support starts whenever you start
Word.
Try your first dictation into Word
1. Say "Dictate to Word". The Word document window is displayed and the
microphone is turned on.
2. If you are using the US English version of ViaVoice, continue with step 3.
If you are using the UK English version, go to step 4.
3. Dictate the following text by speaking clearly in your normal speaking
voice:
The new ViaVoice has arrived EXCLAMATION POINT NEWPARAGRAPH
It contains many new features PERIOD NEWPARAGRAPH
Our new User Wizard makes it easy to get started PERIOD NEWPARAGRAPH
We hope you enjoy using the new ViaVoice PERIOD MICROPHONE-OFF
Continue with step 5 on page 49.
4. If you are using the UK English version of ViaVoice, begin dictating the
following text. Dictate this text by speaking clearly in your normal
speaking voice:
The new ViaVoice has arrived EXCLAMATION MARK NEWPARAGRAPH
It contains many new features FULLSTOP NEWPARAGRAPH
Our new User Wizard makes it easy to get started FULLSTOP NEWPARAGRAPH
We hope you enjoy using the new ViaVoice FULLSTOP MICROPHONE-OFF
48 ViaVoice for Windows Standard Edition
Page 57

5. The text appears in the Word document window. It should look like this:
6. Save this document and correct errors later, when you read Chapter 6,
“Correcting your dictation” on page 63.
When saving a document for correction later, always save the speech-session
data when you are prompted to do so.
Chapter 5. Dictating into Microsoft Word 49
Page 58
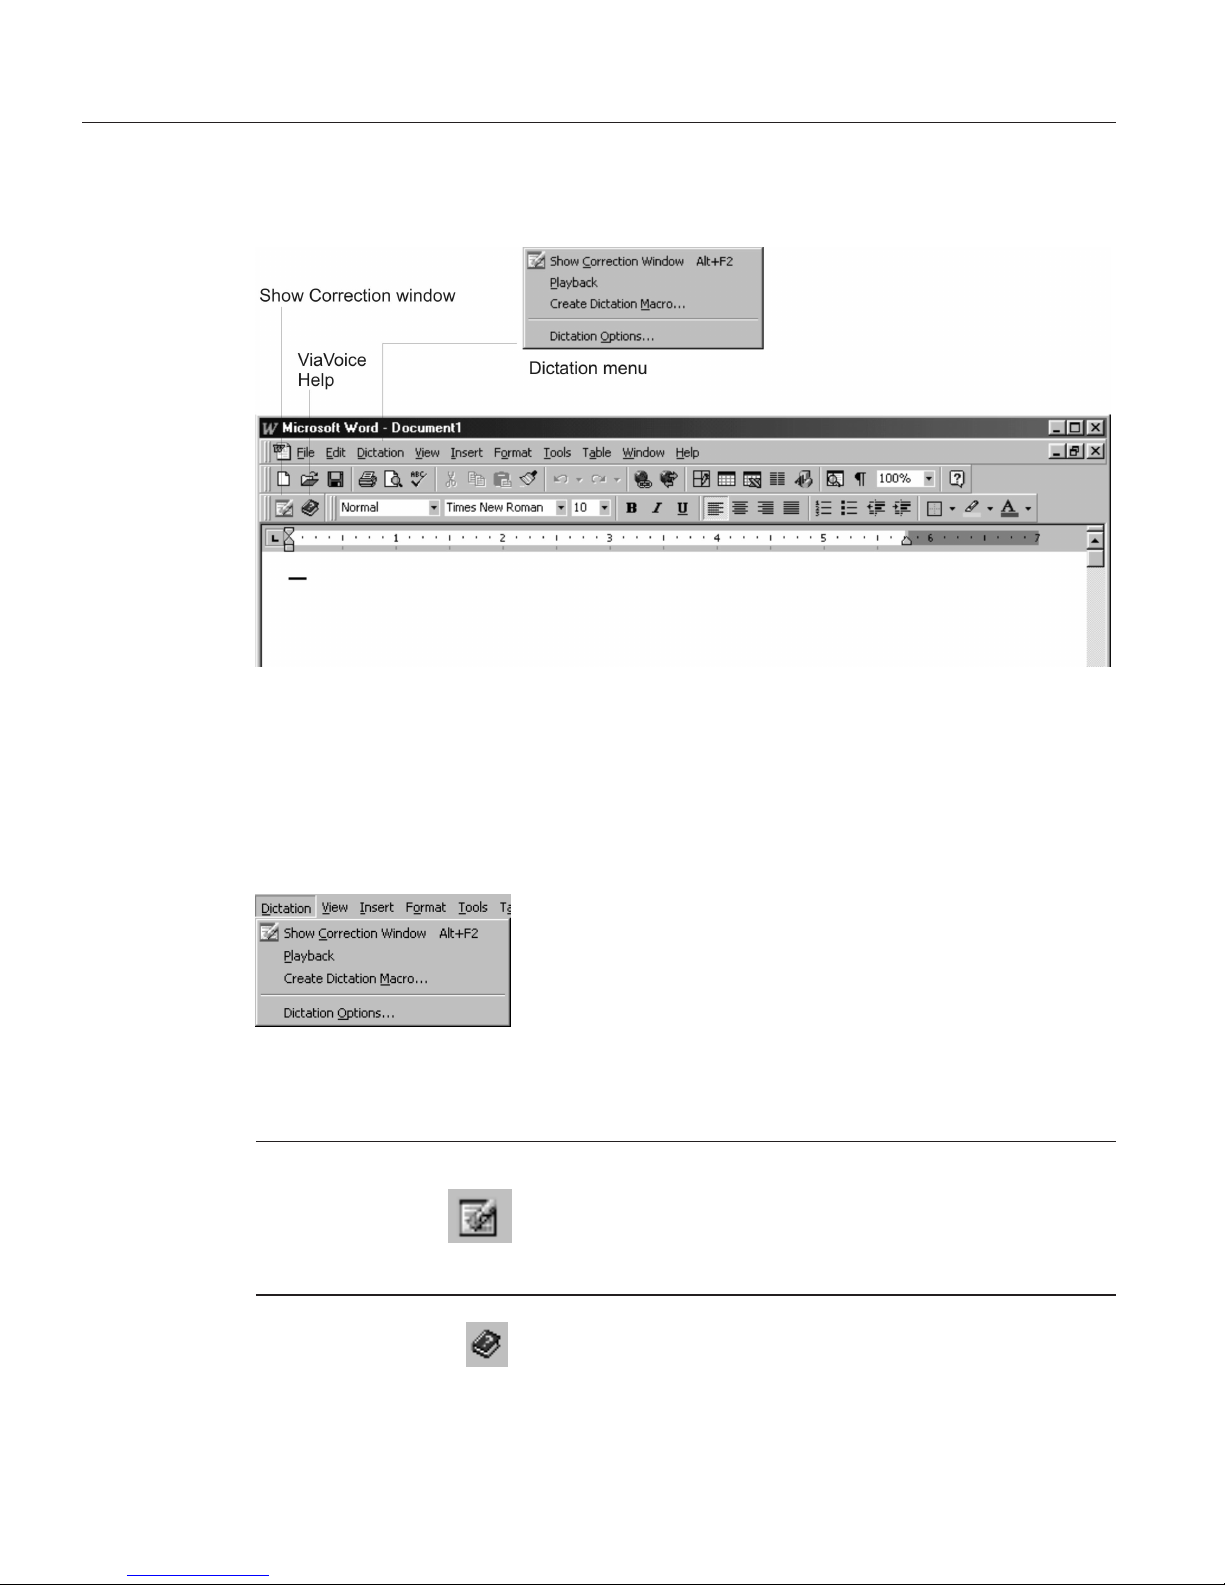
ViaVoice menus and buttons in Word
Select Dictate to > Word from the ViaVoice menu. You can begin dictating
when the Word document window opens.
ViaVoice provides additional menu items and icons as part of its dictation
support.
Click Dictation to access the Dictation menu. The
following options are available:
v Show Correction window — Opens the Correction
window for correcting recognition errors in your
dictation.
v Playback — Allows you to hear your dictation.
You can highlight up to 1,000 words for playback.
v Create dictation macro — Creates a dictation
macro for the text you have selected.
v Dictation Options — Opens ViaVoice Options to
the Dictation tab.
Say "Show Correction window" or click the Correct
button to display it.
See Chapter 6, “Correcting your dictation” on page 63
for details about using the Correction window.
Say "ViaVoice Help", or click the Help button, to
display the ViaVoice Help folder (Contents, Index and
Search).
50 ViaVoice for Windows Standard Edition
Page 59

Click Help,orsay"Help", to display the Microsoft
Word Help menu.
IBM ViaVoice Dictation Help displays help on Word
Dictation.
Chapter 5. Dictating into Microsoft Word 51
Page 60

Using natural commands
You can say natural commands only if the particular command set is enabled
for Microsoft Word. The natural commands for Word are enabled when you
select the command set. Follow these instructions to enable the command set.
1. From the ViaVoice menu, select User Options.
2. Click ViaVoice Options, and select the Commands Sets tab.
3. Select the Word Natural Commands check box. If you plan to dictate in
Word, also select the Word Dictation check box.
4. Click OK to save the changes and close ViaVoice Options.
Natural commands for Word can be used to do the following:
v Open, close and save documents
v Print and Print preview
v Check spelling and grammar
v Find and replace words
v Undo and redo
v Create tables
v Select text or tables
v Move text or the cursor
v Cut, copy, paste or delete text
v Format and highlight text
v Align text and set line spacing and indentation
Keep the following in mind as you use natural commands:
v A natural command consists of a single action. Do not combine two actions
into a single command; for example, do not say Computer move the cursor
to the beginning of the second paragraph and make the next three words
bold. Instead, say "Computer move the cursor to the beginning of the
second paragraph", then say "Computer make the next three words bold".
v Use Word terminology when composing your command. Do not use extra
words like Please or I want to—ViaVoice will not understand what to do.
Use only word-processing terms.
v Every time you press Enter or say "New Paragraph" in your Word
document, Word inserts a paragraph marker and counts this as a
paragraph. To see your paragraph markers, select
on the Microsoft
Word Standard toolbar.
When you say "Computer select the first three paragraphs", and you have
a paragraph marker between paragraphs of text, ViaVoice will select the
first paragraph, the empty line and the second paragraph.
52 ViaVoice for Windows Standard Edition
Page 61

v Say "What Can I Say for Natural Commands" to view examples of natural
commands.
v Place the cursor where you want the change to occur. Use your mouse or
say a command, such as "Computer move the cursor to the top of the
page" or "Computer select the first word".
v Use continuous speech—do not pause or hesitate while saying the
command.
General hints and tips
Keep these things in mind whenever you dictate:
v Nearly everything you say into the microphone gets recognized as text or
an action to carry out—a text format, a cursor movement or a file-save,
file-close command. When your words are not recognized, you’ll see a
message to this effect in the VoiceCenter status area.
v Speak clearly in a natural way. ViaVoice translates your speech into text.
There is no need to pause between words, but make natural pauses after a
phrase or sentence. You may pause at any time to take a breath or collect
your thoughts.
v Say punctuation marks as part of your dictation. ViaVoice adjusts spacing
and capitalization accordingly. For example, when you say "Period" at the
end of a sentence, ViaVoice types a period, moves one space and starts the
next word with a capital letter.
If you are using the UK English version of ViaVoice, substitute "Full stop"
whenever you see the US English command "Period" in this User’s Guide.
Look in the What Can I Say window for a list of the punctuation and
characters that you can insert into your dictation. (Characters and
punctuation are also listed in Appendix A, “Frequently used commands in
dictation” on page 99.)
v Owing to the concept of paragraphs and paragraph styles in Microsoft
Word, saying "New paragraph" in Word has another visual result than it
has in SpeakPad. In SpeakPad, "New paragraph" inserts a line and starts
the next word with a capital letter. In Word, the same command inserts a
paragraph marker (¶), moves the cursor to the next line and starts the next
word with a capital letter. So, in order to get the same visual result as in
SpeakPad, in Word you will need to manually increase the default
paragraph spacing in Word. To do this, click the Format menu and select
Paragraph... Then, on the Indent and Spacing page, increase the Spacing
Before/After values and click OK. Now you should see extra spacing
Chapter 5. Dictating into Microsoft Word 53
Page 62

between paragraphs in your document. Refer to Microsoft’s documentation
for more information about paragraph spacing features in Word.
When you say "New line" in Word, ViaVoice inserts a manual line break
(equivalent to pressing SHIFT+ENTER). To see the paragraph markers and
manual line breaks, select
on the Microsoft Word Standard toolbar.
v When saying a command, pause before the command, speak the command
without pausing between command words and then pause after the
command. This way, ViaVoice can translate your speech into a command.
Incidentally, if you pause just to collect your thoughts, ViaVoice will expect
to hear a command. If the next words you say are not a command that
ViaVoice recognizes, it types your words as text.
v If you find that ViaVoice does not recognize your commands, you can begin
every command with an Attention word, which signals that you are about
to say a command. Select this option on the Dictation tab in ViaVoice
Options. When it is specified, you must use it before every command, even
commands like Microphone off.
When using the Attention word, do not pause between the Attention word
and the rest of the command.
v You can use a key on your keyboard to signal that you are speaking a
command. Go to ViaVoice Options.FromtheDictation tab, select the Use
key for commands check box, then choose the key you want to use. Click
OK and return to Word’s document window. Then, while dictating, press
the key you specified in the Options, say your command, and then release
the key. (The key must remain pressed down for the entire duration of the
spoken command.) When the key has been enabled for commands,
whenever you press it while dictating in Word, ViaVoice will interpret your
next words as a command until you release the key.
You can dictate into existing Word documents that you created by typing.
Open the existing Word document of your choice, place the cursor where
you want your dictated text to appear, and then begin dictating.
Dictating numbers in the US English version of ViaVoice
When dictating, say numbers as you naturally say them. ViaVoice formats
numbers such as dates, money, time, and ordinal and cardinal numbers. For
example, to dictate $589, simply say "five hundred eighty-nine dollars".
Currency
To get $350.10, say "three hundred and fifty dollars and ten cents".
54 ViaVoice for Windows Standard Edition
Page 63

Dates
To get July 9, 1997, say "July ninth nineteen ninety-seven", without
punctuation.
To get July 9th say "ninth July".
Decimals
To get 3.7, say "three point seven".
Ordinals
To get 53rd, say "fifty-third".
Long numbers
To get 1200, say "twelve hundred".
To get 13,111, say "thirteen thousand one hundred and eleven".
To get 1147356, say "eleven forty-seven thirty-five six" (in pairs or single
digits).
Time of day
To get 10:30 am, say "ten thirty A M", without punctuation.
Dictating numbers in the UK English version of ViaVoice
When dictating, say numbers as you naturally say them. ViaVoice formats
numbers such as dates, money, time, and ordinal and cardinal numbers. For
example, to dictate £589, simply say "five hundred eighty-nine pounds".
Currency
To get £350.10, say "three hundred and fifty pounds and ten pence".
To get €50, say "fifty euro"
Dates
To get 9th July 1997, say "ninth of July nineteen ninety-seven".
To get July 9th, 1997, say "July the ninth nineteen ninety-seven", without
punctuation.
To get 25/12/2000, say "Twenty-five SLASH twelve SLASH two-thousand".
Decimals
To get 3.7, say "three point seven".
Ordinals
To get 53rd, say "fifty-third".
Chapter 5. Dictating into Microsoft Word 55
Page 64

Long numbers
To get 1200, say "twelve hundred".
To get 13,111, say "thirteen thousand one hundred and eleven".
To get 1147356, say "one one four seven three five six". If you want commas,
say "one million one hundred and forty seven thousand three hundred and
fifty six".
Time of day
To get 10:30am, say "ten thirty A M", without punctuation.
To get 14:30, say "fourteen COLON NOSPACE thirty".
To get 9 o’clock, say "nine o’clock".
Dictating numbers in number mode
To improve the recognition of digits and numbers in your text, particularly
when you want to dictate long sequences of numbers like credit-card
numbers, enter number mode during dictation.
Say "Begin numbers" at the place in your text where you want to dictate the
number. Then say each digit of the number you want. If you want a special
character or symbol inserted in the sequence, say the name for it. You can see
the list of symbols and characters available in number mode by saying "What
Can I Say for Dictation" before saying "Begin numbers".
To exit number mode and continue with normal dictation, say "Return" or
"Cancel". If you switch focus to another window, you will automatically exit
number mode.
Spelling words in spell mode
To spell words or dictate a sequence of digits and letters, enter spell mode
during dictation.
Say "Begin spell" at the place in your text where you want to spell the word.
Then say each letter of the word you want. You may also use the phonetic
alphabet, shown on your Command Reference card, to spell words. The digits 0
to 9 and the special characters shown on the card may also be spoken in spell
mode.
To exit spell mode and continue with normal dictation, say "Return" or
"Cancel". If you switch focus to another window. you will automatically exit
spell mode.
56 ViaVoice for Windows Standard Edition
Page 65

When the Correction window has focus, you do not need to say "Begin spell"
to enter a word by spelling.
Saying commands while dictating
You can say commands to navigate through the text of your dictation and
work with your Word document. Pause briefly before and after you say a
voice command. However, do not pause while you are saying the words of
the command itself.
If ViaVoice misrecognizes your command as text and types it on the screen,
say "Scratch that", then say the command again.
Inline dictation commands
You can edit and format text using the inline dictation commands and
text-editing commands. View these commands in the Dictation and Text
Editing views in the What Can I Say window and on the Command Reference
card.
v Say commands such as "Capital letter", "Uppercase", "Lowercase" and
"Spacebar" to format text.
v Say "<command> on" to keep the command active until you say
"<command> off". For example, say "Capitalize on" to capitalize all words
until you say "Capitalize off".
v Say "<command> this" to edit the next word or first letter of the next word.
For example, say "Underline this".
Say "What Can I Say for Dictation" to view other commands.
"Scratch that" command
Should your command be recognized as text, say "Scratch that", which
removes the unwanted text, then say the command again.
This command can also be used to restore text. For example, if you selected
text and then said a command that ViaVoice recognized as text, the
misrecognized text replaced what you had selected previously. Undo the
replacement by saying "Scratch that".
Text-editing commands
You can select text and move the cursor using text-editing commands, such
as:
v Say "Next line" to move the cursor to the next line.
v Say "Select <text>", where <text> is the word or phrase to select.
v Say "Select this" to select text at the cursor location.
v Say "Scratch that" to delete the last dictated phrase.
v Say "Undo this" to undo the last action.
Chapter 5. Dictating into Microsoft Word 57
Page 66

v Say "Copy this" and "Paste this" to copy selected text to or paste text from
the clipboard.
Say "What Can I Say for Text Editing" to view other commands.
Bullet lists
Create an unordered list with "bullet" symbols by dictating words, phrases or
sentences on their own lines, then highlight the text and say "Bullets".
Commands recognized as text
ViaVoice processes your words as dictation until you pause, and then it starts
to listen for you to say a command. ViaVoice understands the commands that
you can see in the All Commands view at the What Can I Say window. If you
have selected a command set, ViaVoice will process the word as a
command—not dictation—whenever you pause before and after saying the
word. You can also use the word in regular dictation—but do not insert a
pause.
For example, suppose you wanted to dictate the sentence "It is important to
use the open quote file save close quote option regularly full stop".Ifyou
paused slightly before the word 'file', ViaVoice would interpret it as a
command, and the File menu would be pulled down! If you equally paused
before the word 'save', the file would be saved.
To prevent dictated words from being recognized as commands, you have
three options:
v Set a key in ViaVoice Options to signal your command to ViaVoice. From
the Dictation tab, select the Use key for commands check box, then choose
the key you want to use. Click OK and return to Word’s document
window. Then, while dictating, press the key you specified in the Options,
say your command, and then release the key. (The key must remain pressed
down for the entire duration of the spoken command.) When the key has
been enabled for commands, whenever you press it while dictating in
Word, ViaVoice will interpret your next words as a command until you
release the key.
v Go to the Command Sets tab in ViaVoice Options and deselect the
command set containing the specific command. Always select the command
sets that you use frequently so that you can see views of them in What Can
I Say. Deselect the command sets that you do not use. You can select them
again whenever you need them.
v Enforce the Attention word, such as 'Computer', before each command. To
do this, select the Attention word required check box on the Dictation tab
in ViaVoice Options. Once that is set, you must start every command with
the Attention word, such as "Computer select this". Do not pause between
the Attention word and the rest of the command. You can add multiple
Attention words from the Command Sets tab in ViaVoice Options.
58 ViaVoice for Windows Standard Edition
Page 67

When you deselect a command set, ViaVoice does not recognize the
commands in that command set. ViaVoice will process those words only as
dictation.
Chapter 5. Dictating into Microsoft Word 59
Page 68

Dictating e-mail user IDs and URLs
If the e-mail user ID is composed of commonly used words (for example,
Barbara_Jones@IBM.com), try dictating it like this: "Barbara UNDERSCORE
Jones AT-SIGN ibm DOT com". If it contains unusual words or characters,
like MyM8@xenia.net, say a combination of words and spelled letters, like
this: "BEGIN SPELL Capital-M-y-Capital-M-8 AT-SIGN x-e-n-i-a DOT n-e-t".
If you are using the UK English version of ViaVoice, substitute "Full stop"
whenever you see the US English command "Period" in this User’s Guide.
If a letter or character is misrecognized, say "Scratch that" to delete it, then
say the correct letter or character again.
To dictate a URL like http://www.AZplace.net, say "http COLON SLASH
SLASH www DOT BEGIN SPELL Capital-A-Capital-Z-p-l-a-c-e DOT n-e-t
RETURN".
ViaVoice knows popular e-mail and URL domain names (sites) like aol.com,
Lycos.com, Hotmail.com and Yahoo.com, and common top-level domain
names like .co.us, .co.uk, .com, .org, .gov, .ac.us, .ac.uk and .net.
If you repeatedly use the same e-mail users or URLs in your dictations, you
can save time by creating a dictation macro for each e-mail user and URL.
See “Creating a dictation macro” on page 93 for more information.
60 ViaVoice for Windows Standard Edition
Page 69

Saving your dictation
Before saving your dictation, decide if you want to save your dictation as a
recorded speech session, which is your dictated text along with recorded
audio of the dictated words, or simply as text.
Although the speech-session data uses a large amount of storage on your
disk—approximately 750 KB for every minute of dictation—you should save
this data if you plan to continue dictating your document or, alternatively,
want to correct and edit the document later. You should not save your
speech-session data if you have already corrected the recognition errors in the
dictation.
Saving a speech session
To save a speech session in Word:
1. Select File > Close.
2. Select the Save Dictation Session check box to save the speech session
data.
3. Click Yes to save the changes you made to the file.
If you plan to open the document in another program, such as SpeakPad, save
the document as a Rich Text Format (RTF) document so that fonts and
paragraph formats can be used by the other program.
See “Delayed correction” on page 68 for information on opening the
speech-session data for correction.
Saving your dictation as text
If you have corrected all recognition errors in your dictation, save it as a
document file:
1. Select File > Save.
2. Select Rich Text Format (RTF) in the Save as Type field.
3. Click Save. The file is now saved.
Chapter 5. Dictating into Microsoft Word 61
Page 70

Finding new words in your document
ViaVoice analyzes your text for new words when you save a document in
Word. When you close the document, ViaVoice displays a list of all new
words in your document. You may then elect to add them to your personal
vocabulary so that they are recognized in future dictations.
When you close your document, ViaVoice displays this window:
1. Select each word that you want to add to your personal vocabulary. A
check mark appears next to each word you select.
2. Click Next.
3. If ViaVoice needs a pronunciation of a word, a window appears requesting
that you train the word. Click Record, then say the word.
4. Wait for a check mark to appear next to the word (which indicates that
you recorded it successfully). Then click Done.
If you click Cancel, choosing not to record the pronunciation of a word,
ViaVoice will not add the word to your personal vocabulary.
62 ViaVoice for Windows Standard Edition
Page 71

Chapter 6. Correcting your dictation
As you begin using ViaVoice, you might say words that are not in the
vocabulary, or ViaVoice might simply not understand words that you say.
These result in recognition errors—misrecognized words—in your dictated
text.
This chapter describes correction, the most important thing you can do to help
ViaVoice understand the words you say when dictating. When you correct
misrecognized words to the words you actually said, you provide ViaVoice
with two important benefits.
v When you correct a word that ViaVoice doesn’t know (because it is neither
in the base vocabulary nor in your personal vocabulary), that new word is
added to your personal vocabulary. The next time you use the word,
ViaVoice should get it right.
v By correcting words, you teach ViaVoice how you actually pronounce
words in the context of other words. Over time, correcting words greatly
increases recognition accuracy for subsequent dictation.
Correct each misrecognized word by using the Correction window. Display
this window whenever you have dictated text by saying "Show Correction
window". When you do not want it on the desktop, say "Hide Correction
window".
Get in the habit of correcting errors after each paragraph of dictated text. You should not
wait until you have dictated a long article to begin correction—by the time you have
finished your dictation, you might overlook some errors when proofreading.
© Copyright IBM Corp. 1998, 2002 63
Page 72

Using the Correction window
When the microphone is turned on, say "Show Correction window". You can
use the Correction window to correct the misrecognized words while you are
dictating text. Each time you use the Correction window, ViaVoice updates
your personal voice model, which improves future recognition.
The following are components found on the Correction window.
v Alternate list — This list displays the possible replacement words for the
selected text. Say "Pick <n>", where <n> is the number to the left of the
correct word. Or, click on the text in the list to insert it in your document.
v Word-display field — This field displays the word or phrase you have
selected for correction. Spell or type the correct word here if the correct
word does not appear in the alternative word list. Remember that you do
not need to capitalize the word if it is the first word of a sentence. ViaVoice
will format it automatically when the word is inserted into your document.
v Add words as phrase — This option allows you to add the words in the
word-display field to your vocabulary as a phrase, rather than as individual
words. Click this to add words that you will nearly always say as a phrase,
like 'New York' or 'Buckingham Palace'. The default setting is cleared.
v Auto-play selected text — This option automatically plays back the selected
dictated word when the Correction window is open. This will not occur
when the Correction window is closed. This option is available only when
correcting in SpeakPad or Word. The default setting is selected.
64 ViaVoice for Windows Standard Edition
Page 73

The following describes the buttons on the Correction window.
Pinned/Unpinned Thumbtack — When it is pinned,
the Thumbtack button keeps the Correction window
in the same place during correction. When the button
is unpinned, the Correction window "tracks" to the
words being corrected. This button is available only
when correcting in SpeakPad. The default setting is
pinned.
Play this — Click or say "Play this" to hear a
recording of your dictation of the highlighted word
or phrase.
Format Word — Click or say "Format" to display the
format menu. "Capitalize this" capitalizes the first
letter of each word. "Lowercase this" changes the
words to lowercase letters. "Uppercase this" changes
the words to uppercase (all capital) letters. "Numeric"
changes the words to a number. "Spell out" changes
a number or abbreviation to a spelled-out word.
To maximize your recognition accuracy, correct errors in all of your dictated
documents before transferring them to another program or exiting the
document. You can have the ViaVoice agent teach you how to make
corrections by saying "Teach me about Correction".
Chapter 6. Correcting your dictation 65
Page 74
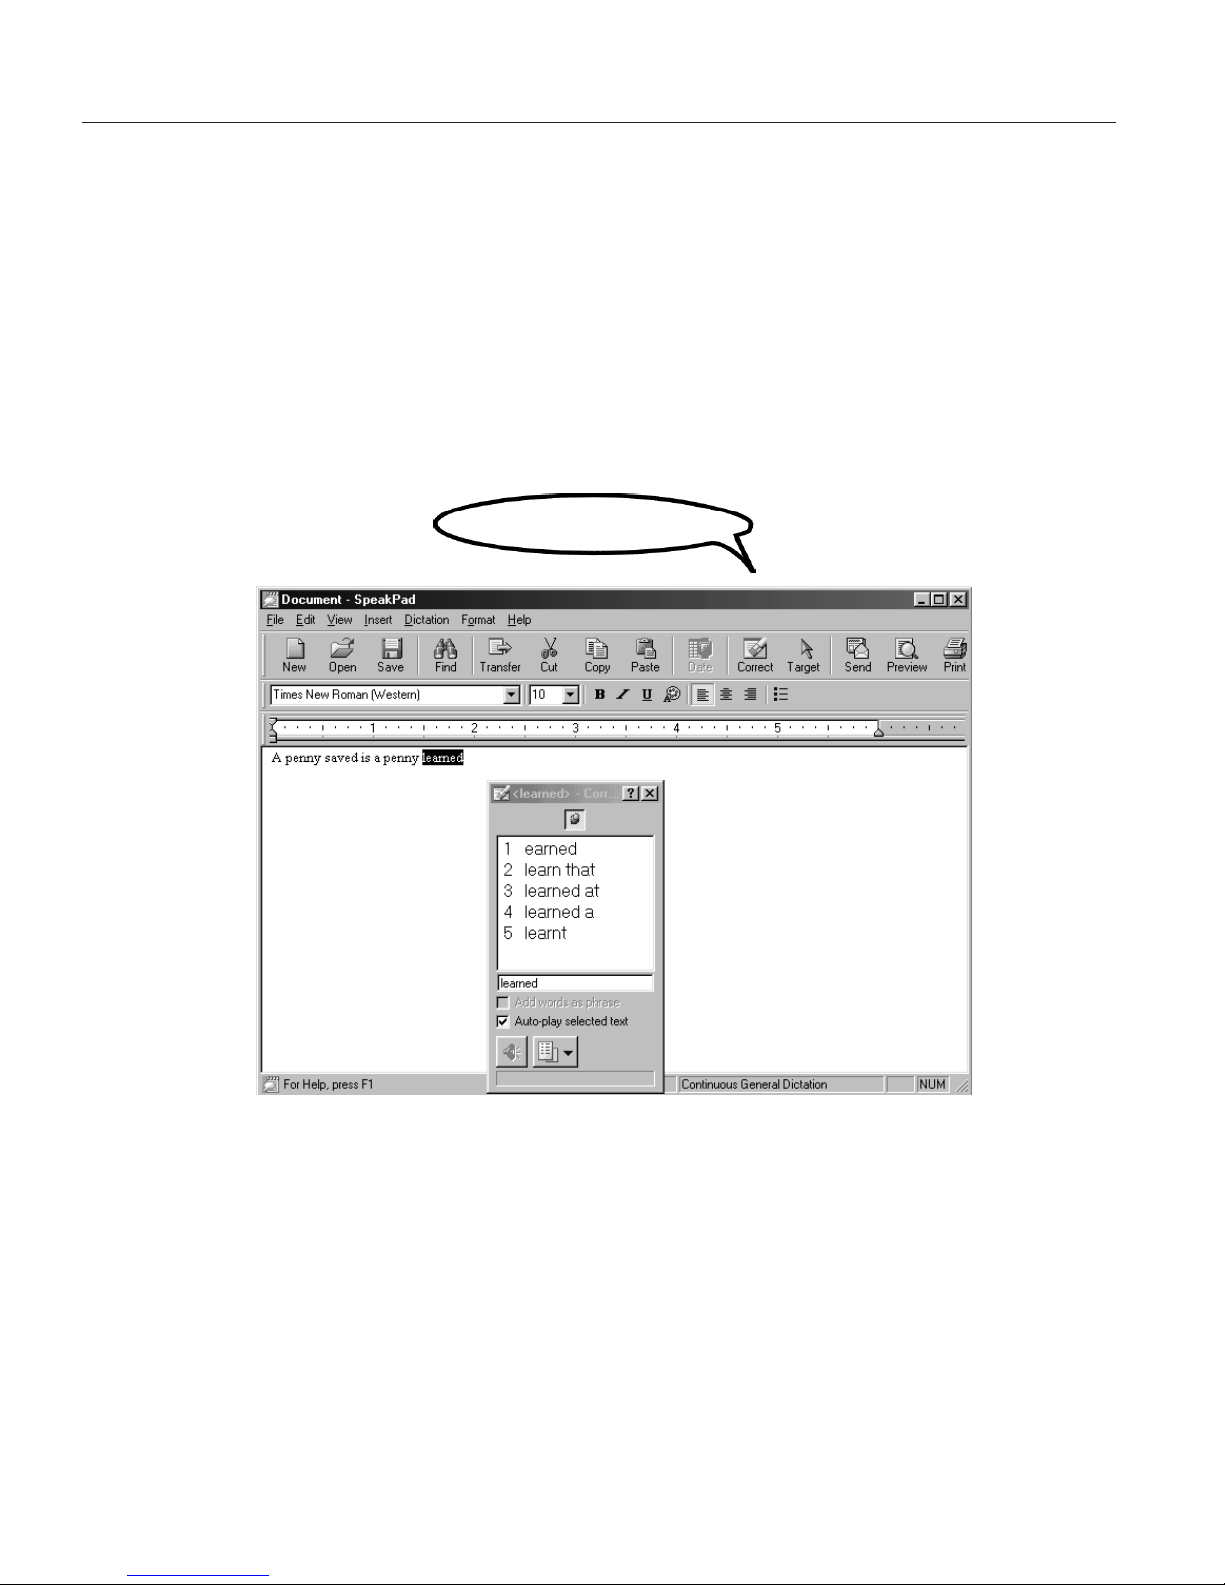
Correcting by voice
The following describes how to correct a misrecognized word in a dictated
document in the SpeakPad window.
1. Select the word or phrase to correct by saying "Correct <text>". In this
example, say "Correct learned". (If the wrong occurrence of the word or
phrase is selected, say "Try Again", and ViaVoice selects the next
occurrence.) If you want to hear what you actually said for the word or
phrase, say "Play this".
2. The selected word or phrase appears in the Correction window with a
numbered list of similar sounding words. These words are called alternate
words.
Pick 1
3. Say "Pick <n>" (where <n> is the number of the alternate word) to select
an alternate word. The selected word replaces the word on the screen.
4. Continue proofreading until you finish correcting all misrecognized text.
Say "Go to Top" to move to the beginning of your document or "Go to
Bottom" to move to the end of your document.
If a word does not appear in the list, we recommend you use this technique
to correct the word.
1. Say "Return to text" to return control to the dictation window.
2. Re-dictate the word or phrase you wanted. If this works, you can continue
proofreading.
66 ViaVoice for Windows Standard Edition
Page 75

3. If re-dictating the word or phrase did not work, say "Scratch that" to get
the original text back. Then, click the word-display field in the Correction
window, and type the word or phrase you actually said. If the word is the
first word of a sentence, you do not have to capitalize it—ViaVoice does
that for you automatically. Then say "Correct",orpressEnter, to accept it.
ViaVoice inserts the correction into your dictated text and returns focus to the
dictation window.
In some cases, you might want to correct two or more words that occur
together so that they are added to the vocabulary as a single phrase.
If the correct word is a proper name (like a family name or geographical
place name), type the word with the appropriate capitalization.
If the word you type has a pronunciation that ViaVoice cannot determine
from its spelling, the Record Word window will appear. At that window you
may have to provide a sounds-like spelling to help ViaVoice understand the
word. For example, if your dictation contains the word UU-Ranch, which
you pronounced as 'double-U ranch' but which ViaVoice did not understand,
you will have to provide 'double-U-ranch' as the sounds-like spelling.
Correcting words by typing
For the quickest correction results when correcting SpeakPad documents, use
the following combination of spoken commands, typing and mouse clicks.
1. After dictating a paragraph, search for misrecognized text.
2. Correct each misrecognized word by clicking on it in the document and
typing the correct word or spelling. To correct a phrase or a group of
words, select them with the mouse pointer until the entire phrase is
highlighted.
3. If you wish to see a list of alternate words, highlight an incorrect word or
phrase and say "Correct this" to show the Correction window.
If ViaVoice continually misrecognizes your commands, you should select the
option to require an Attention word—to be used before all voice
commands—from the Dictation tab in ViaVoice Options.
v If the correct word is in the list of alternate words, say "Pick <n>"
(where <n> is the correct number), or click on the text in the list to
insert it in your document. This corrects the selected words, and you
can continue proofreading.
Chapter 6. Correcting your dictation 67
Page 76

v If the correct words are not in the list of alternate words, try dictating
the word or phrase again. If this works, then you can continue
proofreading.
v If dictating the word does not work, say "Scratch that" to get the
original text back. Click in the word-display field in the Correction
window and type the correct spelling. Say "Correct",orpressEnter,to
accept it. You do not need to capitalize the word if it is the first word of
a sentence—ViaVoice will format it automatically when the word is
inserted into your document.
v Say "Go to Top" to move to the beginning of your document or "Go to
Bottom" to move to the end of your document.
4. For proper names or other words that are not in the vocabulary, you will
have to type or spell out the words using the Correction window. If the
Record Word window appears, use it to train ViaVoice to recognize the
word in the future.
Delayed correction
You can correct misrecognized words at another time or delegate someone
else to correct your dictated text. To do this, save the speech-session data in
SpeakPad or Word dictation. The speech-session data includes all audio and
alternate words for your dictated text.
To save the speech session in Word, select the Save Dictation Session check
box on the dialog that appears when you close your file. To save your
SpeakPad speech file, select File > Save Session from the SpeakPad menu.
When you save the file, speech-session data is removed. Because
speech-session data occupies a lot of space on your hard disk, you should
periodically remove the data that you no longer require.
To correct a previously saved speech session:
1. Open the file. If this is a SpeakPad document, look for files with the VPS
extension.
2. Select Yes to restore the speech-session data. (If you did not save the
speech-session data, the file opens automatically without the
speech-session data.)
3. Perform corrections in any way you prefer—type the words you want, use
the Correction window, or re-dictate. You can use Playback to remind you
of the original dictation.
68 ViaVoice for Windows Standard Edition
Page 77

Delegated correction
If someone has delegated correction of a previously saved, dictated speech
session to you, you can retype, re-dictate, add dictation or use the Correction
window and your voice to correct text. You can even save the speech session
and continue correction later. Just make sure that you do all of this under
your own user name so that the author’s personal speech files do not become
corrupted.
When you open someone else’s file to make corrections, first make sure that
you—not the author—are the current ViaVoice user. To update the author’s
personal speech files with the corrected text, switch to the author’s name,
then process the text through Analyze My Documents.
Chapter 6. Correcting your dictation 69
Page 78

70 ViaVoice for Windows Standard Edition
Page 79
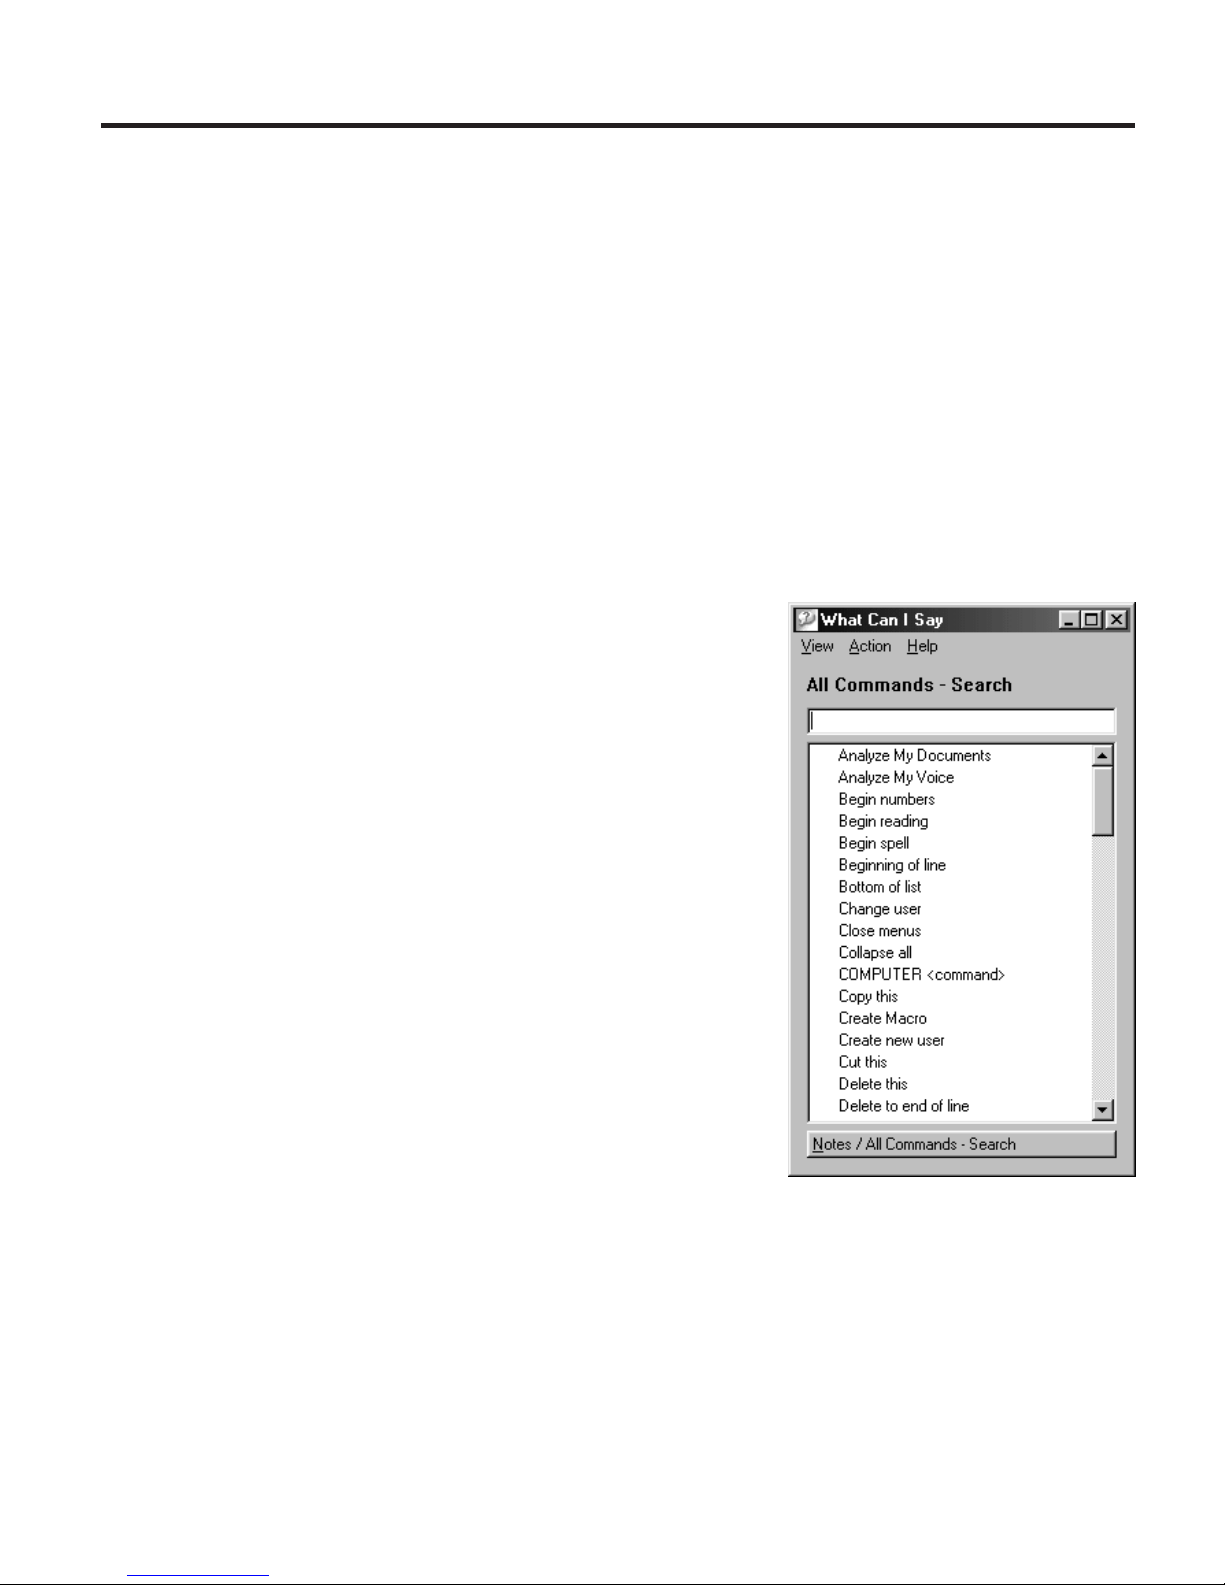
Chapter 7. What Can I Say
This chapter describes the What Can I Say window. This window lists the
commands you can say to do routine computer tasks you once did with
keyboard and mouse.
The What Can I Say window shows commands that are available. There are
two reasons why you might want to see the What Can I Say window:
v To view the commands, including those that are not readily apparent on the
desktop, that you can say.
v To train a command so that ViaVoice can recognize it. Training a command
means recording how you say it. (See “Training a command” on page 75.)
The commands listed in What Can I Say
reflect the current state of your desktop.
When you click a program and then say (or
click) "What Can I Say", you will see the
commands that are available for the program
that you clicked. Should you then go to
another program or click on the desktop
with the What Can I Say window still open,
the commands in What Can I Say will
change to reflect your last action.
To access What Can I Say from the ViaVoice
menu, select What Can I Say, and the All
Commands view appears. (If you have
already looked at the What Can I Say
window, the last view you saw is displayed.)
To see other views, select View and then
select one of the views.
© Copyright IBM Corp. 1998, 2002 71
Page 80
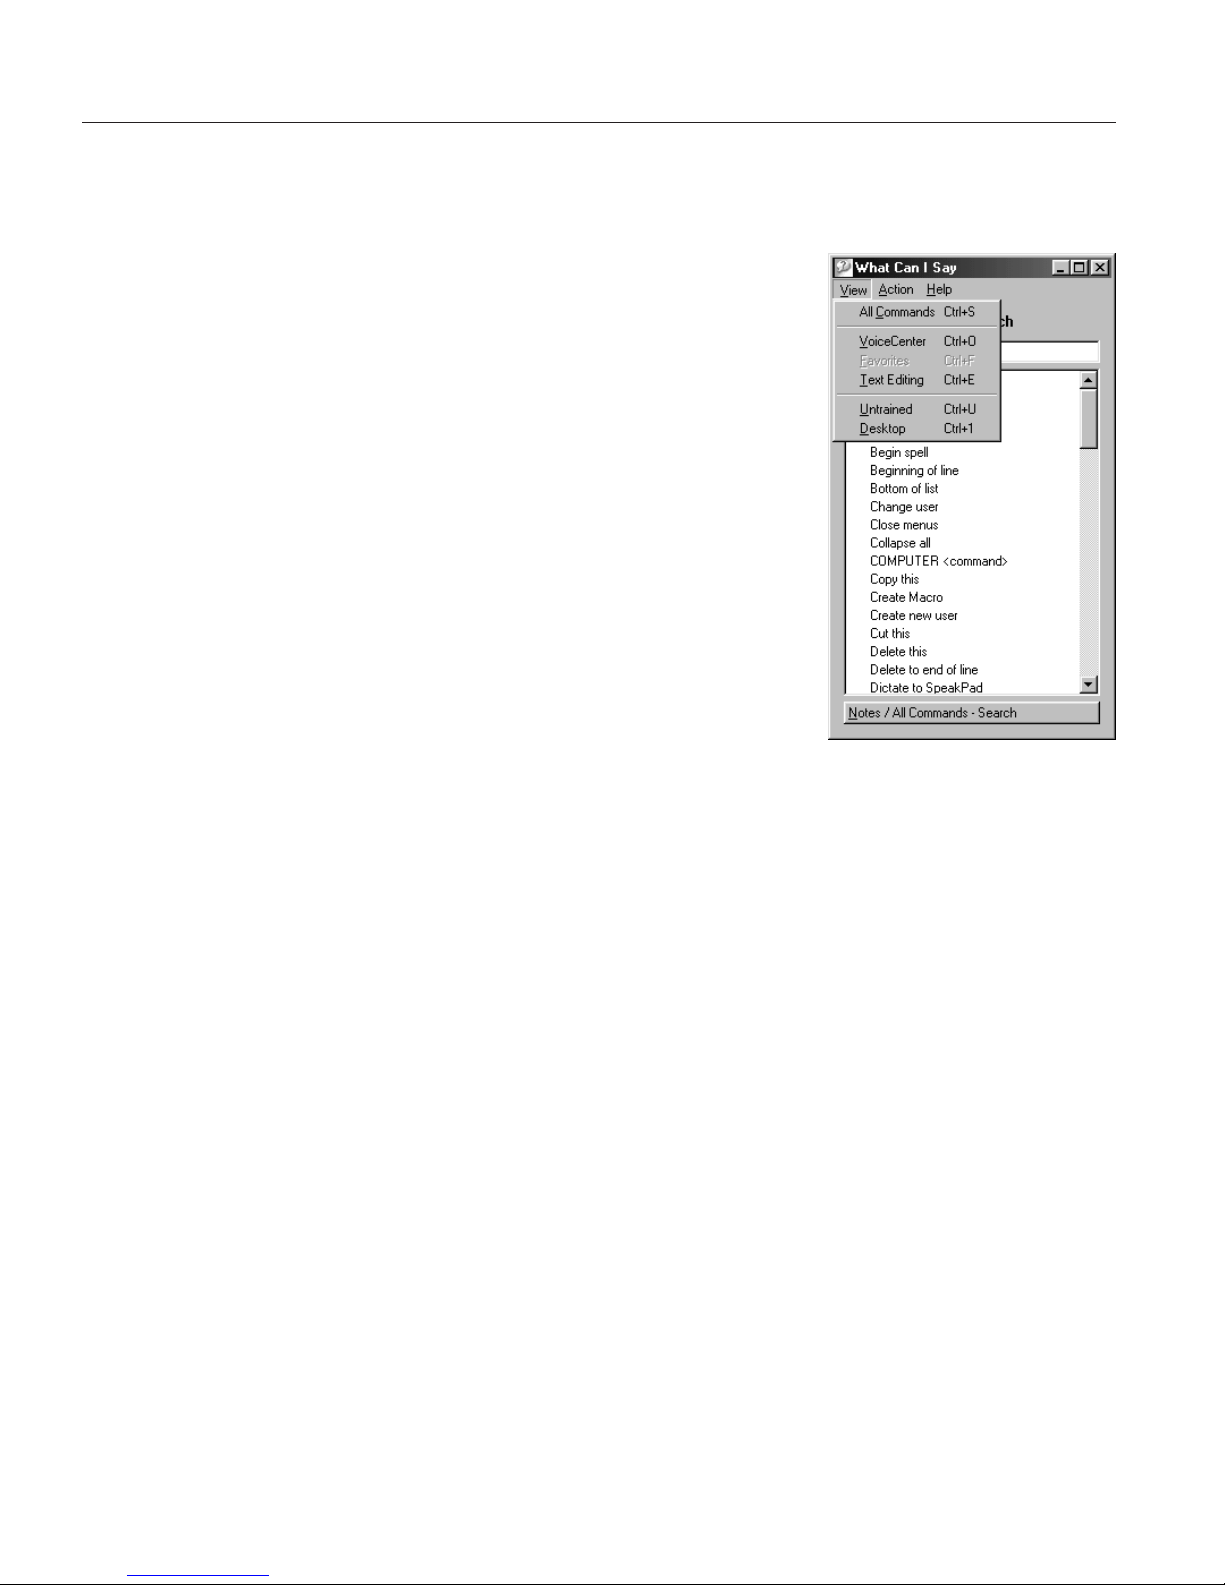
Views
Commands are displayed in the What Can I Say window in groups called
views.
v All Commands — This view lists commands
that you can see and also those that are not
readily visible. For example, menu names are
not listed in the other views, but you find them
in the All Commands view. To see the All
Commands view, say "What Can I Say for All
Commands" from wherever you happen to be.
In the field above the list, you may enter a
word to search for a voice command.
v VoiceCenter — Say "What Can I Say for
VoiceCenter" to view the commands for
controlling VoiceCenter.
v Desktop — Say "What Can I Say for Desktop"
to view the commands for opening Internet
Explorer on your desktop.
v Favorites — Say "What Can I Say for Favorites" to view the commands for
accessing the pages listed in your Favorites menu. These commands are, by
default, turned off. To make these commands available, select the Favorites
command set on the Command Sets tab in ViaVoice Options. (See
“Enabling command sets” on page 90.)
v Text Editing — Say "What Can I Say for Text Editing" to view the
commands for moving the cursor and selecting text.
v Untrained — Say "What Can I Say for Untrained" to see the commands for
which ViaVoice does not have a pronunciation. To use a command in this
view, you must train it. See “Training a command” on page 75.
v Dictation — Say "What Can I Say for Dictation" to view the commands for
dictation. This view appears in the list only when the focus window is a
program into which you can dictate.
v Natural Commands — Say "What Can I Say for Natural Commands" to
view the natural commands available for Microsoft Word.
72 ViaVoice for Windows Standard Edition
Page 81
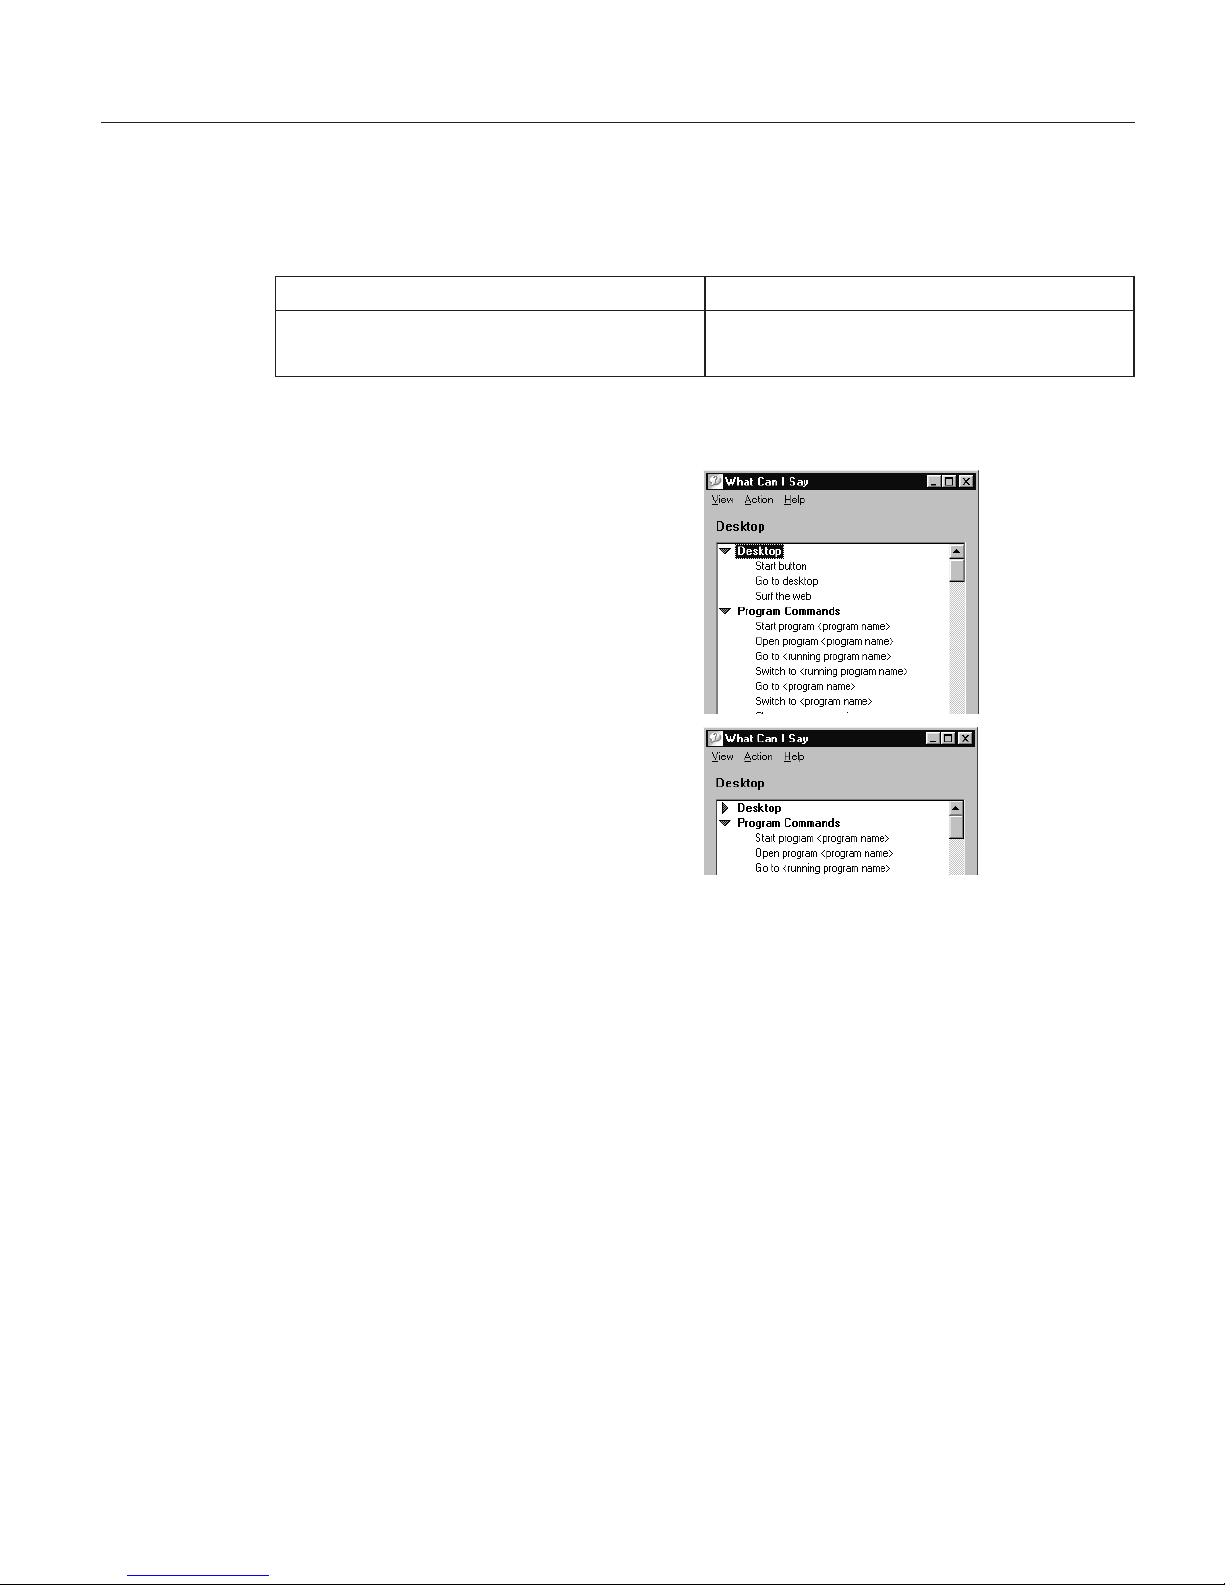
Interacting with What Can I Say
You can navigate the What Can I Say window by saying commands or by
using the mouse or keyboard. The What Can I Say window must be active
when saying commands.
Mouse Keyboard
Use the scroll bar and arrows on the right
side of the window.
Use the Up and Down arrow keys on
your keyboard.
Expanding or collapsing a view
To expand (see everything under) or
collapse (hide everything under) a
heading, click the toggle.
For example, click "Desktop" to
expand the collapsed heading (as
shown at right).
Or, click "Desktop" again to collapse
an expanded heading.
Commands with words in angle brackets
Some commands in a view are shown with one or more words in angle
brackets. To see a VoiceTip pop-up with instructions on how to say the words
in angle brackets, move your mouse cursor over the words.
Or, say "How Do I Say <direction>", where <direction> is the item shown in
angle brackets.
Changing views
The command for changing the view depends on whether you are in What
Can I Say or in a program.
v In What Can I Say, say the name of the view you want to see.
v If you are in another program, say "What Can I Say for Text Editing",
"What Can I Say for Dictation" and so on.
Chapter 7. What Can I Say 73
Page 82

To access the All Commands view, say "How Do I Say". Typically, you would
say this when What Can I Say is not the active program (the program you are
now using).
From What Can I Say, say "Return to program" to switch to the previous
program.
Creating notes for What Can I Say
You can create your own notes for
each view. The notes are saved when
you close What Can I Say.
When you write notes in a view, the
notes are associated only with the
program that had focus when you
wrote the notes. Should you switch to
another program, you will see only
the notes that you wrote for that other
view.
Printing the commands in a view
To print a list of commands, select Action > Print.
The print function prints only what is expanded. So, expand all before you
print.
Using an Attention word with commands
If you find that ViaVoice does not recognize your commands, you can begin
every command with an Attention word. The Attention word signals to
ViaVoice that you are about to say a command. The default Attention word is
'Computer', but you can specify other Attention words at the Command Sets
tab in ViaVoice Options.
To require the Attention word to be spoken before commands, go to the
Dictation tab in ViaVoice Options and make sure the Required check box is
ticked. (See “Setting dictation options” on page 87.) When the Attention word
is specified as "required", you must say it as the first word before every
command, even commands like "Microphone off".
When using the Attention word, do not pause between it and the rest of the
command.
74 ViaVoice for Windows Standard Edition
Page 83

Training a command
Whenever ViaVoice has trouble recognizing your pronunciation of a
command, you can train the command in What Can I Say. Training means
recording a pronunciation of the command. This teaches ViaVoice how you
pronounce a command, thus improving recognition accuracy.
Some commands have pronunciations that ViaVoice does not know. You can
easily identify these by the red X next to them in a view. If you want to say
these commands, you must train them. You can see all such commands in the
Untrained view of the What Can I Say window.
To train a command, follow these instructions.
1. Say the name of the view containing the command you want to train, or
say "What Can I Say for Untrained".
2. Double-click the command you want to train. It can be an untrained
command or any command for which you want to improve recognition.
3. Click the Record button.
4. Say the command and wait until recording stops.
5. Click the Done button when it becomes enabled.
Record
Stop Play
Chapter 7. What Can I Say 75
Page 84

76 ViaVoice for Windows Standard Edition
Page 85

Chapter 8. Using the Internet
This chapter describes how to navigate the Internet with your voice.
You need to ensure that the following prerequisites are met before trying the
procedures in this chapter:
v You have a connection to the Internet, either by means of an established
account with a service provider or through a connection at work. To work
with America Online (AOL), you must be registered as an AOL user.
v Internet Explorer Version 4.01 with Service Pack 2 or higher, and/or
America Online Version 7.0 is installed on your computer.
v ViaVoice is installed on your computer with your user name and voice
model currently selected.
If ViaVoice does not recognize some of your commands, try saying the
Attention word, such as 'Computer', followed by the command.
If ViaVoice continually misrecognizes your commands, you should select the
option to require an Attention word—to be used before all voice
commands—from the Dictation tab in ViaVoice Options. Or you can select
the Use key for commands check box and choose a key to press while
saying a command.
Internet Explorer
Say "Surf the Web" when ViaVoice is active to start Internet Explorer.
Say "Jump to <favorite>" to open the page specified by the item listed in
your Favorites menu (from the Windows Start button or your browser’s
tasklist). This command may be used whenever the Favorite Command Set is
active.
The following navigation commands are available:
You say You get
"Surf the Web" Launches Internet Explorer
"Jump to <favorite>" Launches Internet Explorer to the page specified
from your Favorites menu
"Back" Moves back to the previous page
© Copyright IBM Corp. 1998, 2002 77
Page 86

You say You get
"Forward" Moves forward to the next page, if you have
moved back previously
"Home" Loads your home (default) page
78 ViaVoice for Windows Standard Edition
Page 87

Chapter 9. Customizing ViaVoice
This chapter describes how you can tailor ViaVoice for your particular needs
and do routine tasks. Use VoiceCenter Options and ViaVoice Options,
available from the ViaVoice menu, to perform these tasks.
Most of the voice commands in this chapter work only if you have installed
ViaVoice on Windows 98 Second Edition, Windows Me, or Windows XP
Home Edition. When a command is not recognized, select the desired button
or menu item with your mouse.
Changing VoiceCenter’s appearance
VoiceCenter is displayed as a toolbar at the top of your screen when you first
start and use ViaVoice. You can change the appearance of VoiceCenter by
modifying the VoiceCenter options, available from the ViaVoice menu, by
selecting User Options > VoiceCenter Options.
The following tabs are available at the VoiceCenter Options: Appearance,
General, Taskbar, Docked, Agent and Floating.
Appearance tab
At the Appearance tab, select the view you want for VoiceCenter.
Taskbar view — The default view. You can change the position of the taskbar
by clicking on VoiceCenter then by dragging it either to the bottom or to the
top of the screen. You may also right-click on VoiceCenter and then select
Attach To to place the VoiceCenter on the top or the bottom.
This view supports Always on top and Auto hide modes.
Docked view — When VoiceCenter is docked, it is integrated into the
currently active application under the title bar or menu bar of the
application’s window. This view is useful when you want to know in which
application your dictation will appear or your command will take effect. As
you move from application to application, the VoiceCenter moves to the
current application.
Minimal view — To prevent your desktop from becoming cluttered, use the
minimal view to place VoiceCenter as an icon in the Windows system tray at
the bottom of the screen. Right-click on the icon to display the ViaVoice menu.
© Copyright IBM Corp. 1998, 2002 79
Page 88

In this view, a command-history box appears when you say a command. You
can move this box to other locations on the desktop by dragging and
dropping it.
Agent view — In this view, VoiceCenter is represented by the agent Brocklee
to let you know the status of the microphone. You can change Brocklee to
some other agent if others are installed on your computer. However, not all
agent characters support the animations required to show microphone states.
Floating view — This setting allows you to place the "floating" VoiceCenter
anywhere on the desktop. You can resize VoiceCenter horizontally.
General tab
At the General tab, select the default font name and size used for text in
VoiceCenter’s status area. Selections you make from the General page are the
default view for all speech information and can be changed at any time.
Taskbar tab
At the Taskbar tab, select the specific attributes and behaviors for VoiceCenter
when in Taskbar view.
Docked tab
At the Docked tab, select the programs that you want to add to allow the
VoiceCenter to appear docked under the title bar. You can add or remove this
docking feature for specific programs. By default, the VoiceCenter docks only
into the applications where speech is supported. If an application where
speech input is not accepted in the foreground application, VoiceCenter will
not appear in that window (it minimizes to the task tray), but you can still
access the ViaVoice menu and microphone button from the task tray icon.
Agent tab
At the Agent tab, select the animated agent to use when you have selected
the Agent view for VoiceCenter.
Floating tab
At the Floating tab, select the items that you want to show up on
VoiceCenter: Microphone button, Volume meter, Status area, Help button and
User name.
80 ViaVoice for Windows Standard Edition
Page 89

Changing the microphone’s startup state
Set the behavior of the microphone at the At Startup tab in ViaVoice Options.
1. Display VoiceCenter if it is
not already on your
desktop.
2. Click the ViaVoice menu
button, and select User
Options > ViaVoice
Options. ViaVoice Options
is displayed.
3. Click the At Startup tab if
it is not already on top.
4. Select the options you want
to change on this tab. Click
Apply to save changes or
click OK to save changes
and close ViaVoice Options.
5. Select the microphone state you want when VoiceCenter is started. The
default is Microphone off.
6. Select the Press to talk check box if you wish to activate the microphone
by pressing keys on your keyboard instead of clicking the microphone
button. (These shortcut keys are sometimes called hotkeys.) Then press the
key you want. The CTRL key will be added automatically if you press
only one key. For example, if you press M, you’ll turn the microphone on
by pressing CTRL+M. When you press this hotkey, you can say only one
voice command, then the microphone will turn off.
7. Select the Toggle microphone check box if you wish to toggle the
microphone state by pressing a hotkey. Then press the key you want. The
CTRL key will be added automatically. For example, if you press M, you’ll
turn the microphone on and off by pressing CTRL+M.
8. Select the Display agent during text-to-speech check box to have the
animated character appear.
9. Select the Display Recognition Wizard when problems detected check
box to have this wizard appear automatically.
Chapter 9. Customizing ViaVoice 81
Page 90

Creating additional voice models
If you dictate with more than one microphone or in locations with different
background noise and acoustics, you should create a voice model with each
type of microphone in each location. Here is how to create a voice model:
1. Display the VoiceCenter if it is not already on your desktop.
2. Click the ViaVoice menu button, and select User Options > ViaVoice
Options. ViaVoice Options is displayed.
3. Click the User tab if that tab is not already on top.
4. Select the user name for whom you want to create the voice model from
the User Name drop-down list.
5. Click Add/Modify.
6. The User Wizard will start to guide you. Follow the wizard’s instructions.
When you have more than one voice model, always ensure that the currently
selected voice model—the one displayed in the User Information pop-up from
VoiceCenter—is the one you want to use. If it is not, go to the User tab in
ViaVoice Options and select the voice model you want.
Selecting a vocabulary or topic
Specialized vocabularies are vocabularies containing words specific to a given
field. Please see the information on the box to determine if a vocabulary is
included with this program. Specialized vocabularies are useful when
dictating words not normally encountered in everyday speech, such as
medical or legal terms.
Separately available topics and specialist vocabularies may exist for some
language versions of ViaVoice (available with ViaVoice itself or via the
Internet, through Business Partners, or through other commercial
arrangements).
To activate topics or vocabularies, if they have been separately obtained and
installed, follow these instructions:
1. Display the VoiceCenter if it is not already on your desktop.
2. Click the ViaVoice menu button and select User Options > ViaVoice
Options. ViaVoice Options is displayed.
82 ViaVoice for Windows Standard Edition
Page 91

3. Click the User tab if that tab is not already on top.
4. Select the vocabulary you want from the Vocabulary drop-down list. (You
can have only one vocabulary selected.)
5. To activate a topic, select it from the Topics list, if it is available.
6. Click Apply to save changes, or click OK to save changes and close
ViaVoice Options.
To deactivate a topic, return to the User tab, deselect the topic, then click
Apply. To see which topic is active, place the mouse cursor over the user
information to display the Who Am I pop-up.
Chapter 9. Customizing ViaVoice 83
Page 92

Changing the active vocabulary to improve performance (UK English version
only)
The UK English version of ViaVoice comes with two base vocabularies, one
suitable for low-end computers, and one for high-end computers. The
high-end vocabulary is more accurate but slower than the low-end vocabulary.
Both vocabularies contain the same words.
When you installed ViaVoice, the installation program determined your
computer processor’s speed and the amount of RAM memory available. The
installation program then installed the base vocabularies and activated the one
that works best on your computer, as follows:
If your PC has...
And its processor
speed is ...
This vocabulary was
activated:
under 96 MB of
RAM
slower than 450 MHz Continuous General Dictation
- Fast
faster than 450 MHz
Continuous General Dictation
- Maximum Accuracy
(requires 96 MB RAM)
96 MB or more of
RAM
faster than 300 MHz
Continuous General Dictation
- Maximum Accuracy
(requires 96 MB RAM)
To see which vocabulary was activated for you, do the following:
1. Display the VoiceCenter if it is not already on your desktop.
2. Click the ViaVoice menu button and select User Options > ViaVoice
Options. ViaVoice Options is displayed.
3. Click the User tab if that tab is not already on top. The Vocabulary field
contains the name of the currently active vocabulary.
If Continuous General Dictation - Fast is activated, change to the 'Maximum
Accuracy' vocabulary when:
v You have upgraded your computer to 96 MB or more of RAM.
v You want recognition to be more accurate and you do not care if it takes
ViaVoice more time to recognize your words.
If your computer does not have at least 96 MB of RAM, do not switch to the
'Maximum Accuracy' vocabulary. Should you inadvertently do so, you will
find system performance to be unacceptable.
84 ViaVoice for Windows Standard Edition
Page 93

Alternatively, if Continuous General Dictation - Maximum Accuracy
(requires 96 MB RAM) is activated, change to the 'Fast' vocabulary when you
want ViaVoice to recognize your words more quickly.
Adding a user
Follow these instructions to add a new user name.
1. Display VoiceCenter if it is not already on your desktop.
2. Click the ViaVoice menu button, and select User Options > ViaVoice
Options. ViaVoice Options is displayed.
3. Click the User tab if that tab is not already on top.
4. Click Add user. The User Wizard will start. If the active speech
applications window appears, close all speech programs listed.
5. Type in a new user name.
6. Click Next to go through Audio Setup Wizard for this new user name.
Why have more than one user name?
v Each person who uses ViaVoice on your computer should have a user
name that is not used by any other user, and no user should use another
user’s name. If more than one person uses your computer, make sure that
each person has a unique user name. Get in the habit of checking the user
name every time you start to use ViaVoice, and make sure the name you
want is selected in ViaVoice Options before starting work with ViaVoice.
v You might want more than one user name if you dictate radically different
types of document styles involving different terminology. For example, if
you dictate both informal letters and scientific papers, you might want
one name for the letters, so that words you add to your letters apply only
to your dictated correspondence, and a separate name for dictating
scientific papers, so that technical terms are added only for the user name
you use for that purpose.
Each user (user name) must successfully complete the Audio Setup Wizard
and create a voice model. Voice models and other personal speech files
cannot be shared by users.
Making a user name the current user
To make a user name the currently selected user, do the following:
1. Display VoiceCenter if it is not already on your desktop.
2. Click the ViaVoice menu button, and select User Options > ViaVoice
Options. ViaVoice Options is displayed.
3. Click the User tab if that tab is not already on top.
4. Select the user name you want from the drop-down list.
Chapter 9. Customizing ViaVoice 85
Page 94

5. Click Apply to save changes, or click OK to save changes and close
ViaVoice Options.
Backing up and restoring user data
If you use more than one computer, you might want to copy your personal
speech files from one computer to another. You do this by backing up your
user data on one computer and then restoring the data on the other computer.
If you plan to back up your user data on diskettes, you should have several
formatted diskettes on hand.
1. Display VoiceCenter if it is not already on your desktop.
2. Click the ViaVoice menu button and select User Options > ViaVoice
Options. ViaVoice Options is displayed.
3. Click the User tab if that tab is not already on top.
4. Select the user name you want from the drop-down list.
5. Click the Backup User button.
6. Type a Backup description for the file. In the Back up to field, type the
full path name where the user data should be stored, or click the Browse
button to locate the target folder for the user data.
7. Click the Backup button.
8. Click Apply to save changes, or click OK to save changes and close
ViaVoice Options.
To restore your backed-up user data:
1. Click the User tab if that tab is not already on top.
2. Click the Restore User button.
3. From the Users list, select the user data you want to restore, or click the
Browse button to locate the user data.
Any data that currently exists for the user will be replaced by the backed-up
data.
4. Click the Restore button to begin the data restoration.
5. Click Apply to save changes, or click OK to save changes and close
ViaVoice Options.
86 ViaVoice for Windows Standard Edition
Page 95
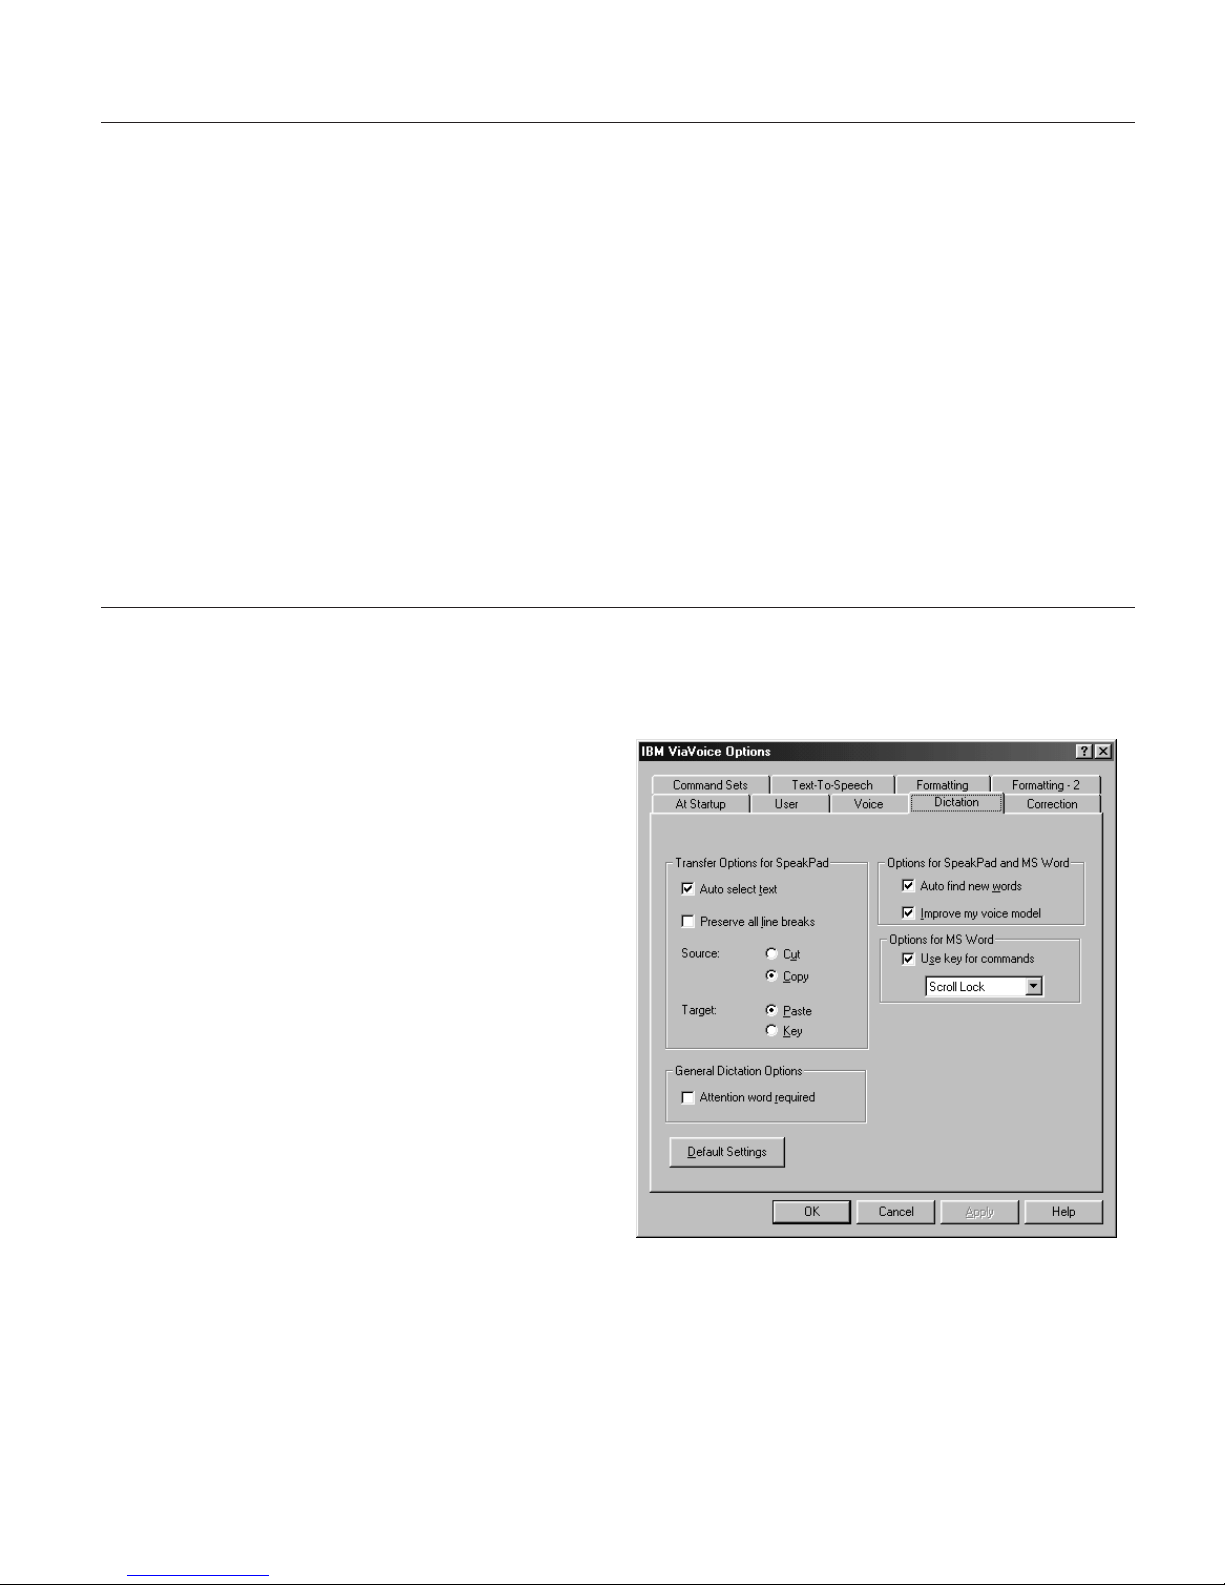
Deleting a user name or voice model
To delete a user name or a voice model, do the following:
1. Display VoiceCenter if it is not already on your desktop.
2. Click the ViaVoice menu button and select User Options > ViaVoice
Options. ViaVoice Options is displayed.
3. Click the User tab if that tab is not already on top.
4. Select the user name you want from the drop-down list.
5. To delete a voice model, select it from the drop-down list. The selected
user must have more than one voice model. Click Delete.
6. To delete the selected user and all voice models associated with that user,
click Delete User.
7. Click Apply to save changes, or click OK to save changes and close
ViaVoice Options.
Setting dictation options
You can set options to control text transfer and to make improvements to your
voice model based on your dictation sessions.
1. Display VoiceCenter if it is
not already on your
desktop.
2. Click the ViaVoice menu
button and select User
Options > ViaVoice
Options. ViaVoice Options
is displayed.
3. Click the Dictation tab if it
is not already on top.
4. Select the options you want
to change on this tab. Click
Apply to save changes, or
click OK to save changes
and close ViaVoice Options.
Chapter 9. Customizing ViaVoice 87
Page 96

5. In the Transfer Options box, select the options you want when
transferring text from SpeakPad.
v Auto select text causes all text in SpeakPad to be selected automatically
for transfer
v Preserve all line breaks places a carriage return at the end of each line
of text being transferred.
v Cut removes the transferred text from the SpeakPad document window.
Copy maintains the text in the SpeakPad document window after
transfer.
v Paste places the cut or copied text from the clipboard into the target
window. Key sends the cut or copied text one keystroke at a time to the
target window. The Key setting is useful when your text contains special
keystrokes or your target application does not support pasting from the
Windows clipboard.
6. Select the Attention word required check box to make the Attention word
required before all voice commands while dictating. You can add multiple
Attention words from the Command Sets tab in ViaVoice Options. When
the attention word is required, you must say the word, such as
'Computer', as the first word of every command. You should require this
Attention word when ViaVoice habitually misrecognizes your commands.
7. Select Auto find new words to have ViaVoice search your SpeakPad or
Word dictation for new words.
8. Select Improve my voice model to have ViaVoice collect information about
your speaking characteristics during SpeakPad or Word dictation. When it
has enough information to make improvements to your voice model,
ViaVoice will prompt you to process it. Doing so will improve your
recognition accuracy.
9. Select the Use key for commands check box, then choose a key that you
will press during a Word dictation to indicate that you are speaking a
command. For example, if you choose the Shift key and press it while
dictating, ViaVoice will listen only for commands until you release the
Shift key to dictate text again.
88 ViaVoice for Windows Standard Edition
Page 97

Changing the appearance of the Correction window
You can set your personal preferences for how the Correction window
appears whenever you correct your dictated documents.
1. Display VoiceCenter if it is
not already on your
desktop.
2. Click the ViaVoice menu
button and select User
Options > ViaVoice
Options. ViaVoice Options
is displayed.
3. Click the Correction tab if
it is not already on top.
4. Select the options you want
to change on this tab. Click
Apply to save changes, or
click OK to save changes
and close ViaVoice Options.
5. Select Check spelling of added words to have ViaVoice check the spelling
of new words before adding them to your personal vocabulary.
6. In the Maximum number of alternate words box, select the maximum
number of words to appear in the Correction window.
7. In the Text search direction from cursor box, specify the search direction
(in a SpeakPad or Word document) as left or right.
Chapter 9. Customizing ViaVoice 89
Page 98

Enabling command sets
You can enable command sets, so that you can speak the commands in them,
or disable them to provide more accurate recognition for just the commands
you use.
1. Display VoiceCenter if it is
not already on your
desktop.
2. Click the ViaVoice menu
button and select User
Options > ViaVoice
Options. ViaVoice Options
is displayed.
3. Click the Command Sets
tab if it is not already on
top.
4. Select the options you want
to change on this tab. Click
Apply to save changes, or
click OK to save changes
and close ViaVoice Options.
5. In the Commands box, each command set showing a check mark is
enabled. You also enable program support (if installed) by selecting the
command set. Click the check mark to disable the command set. To enable
a command set, click the little box to the left to insert a check mark.
6. Add, delete, or train an Attention word. This word is spoken before a
command to improve the recognition of that command. You can have a
total of five Attention words. The red X indicates the word needs to be
trained.
90 ViaVoice for Windows Standard Edition
Page 99
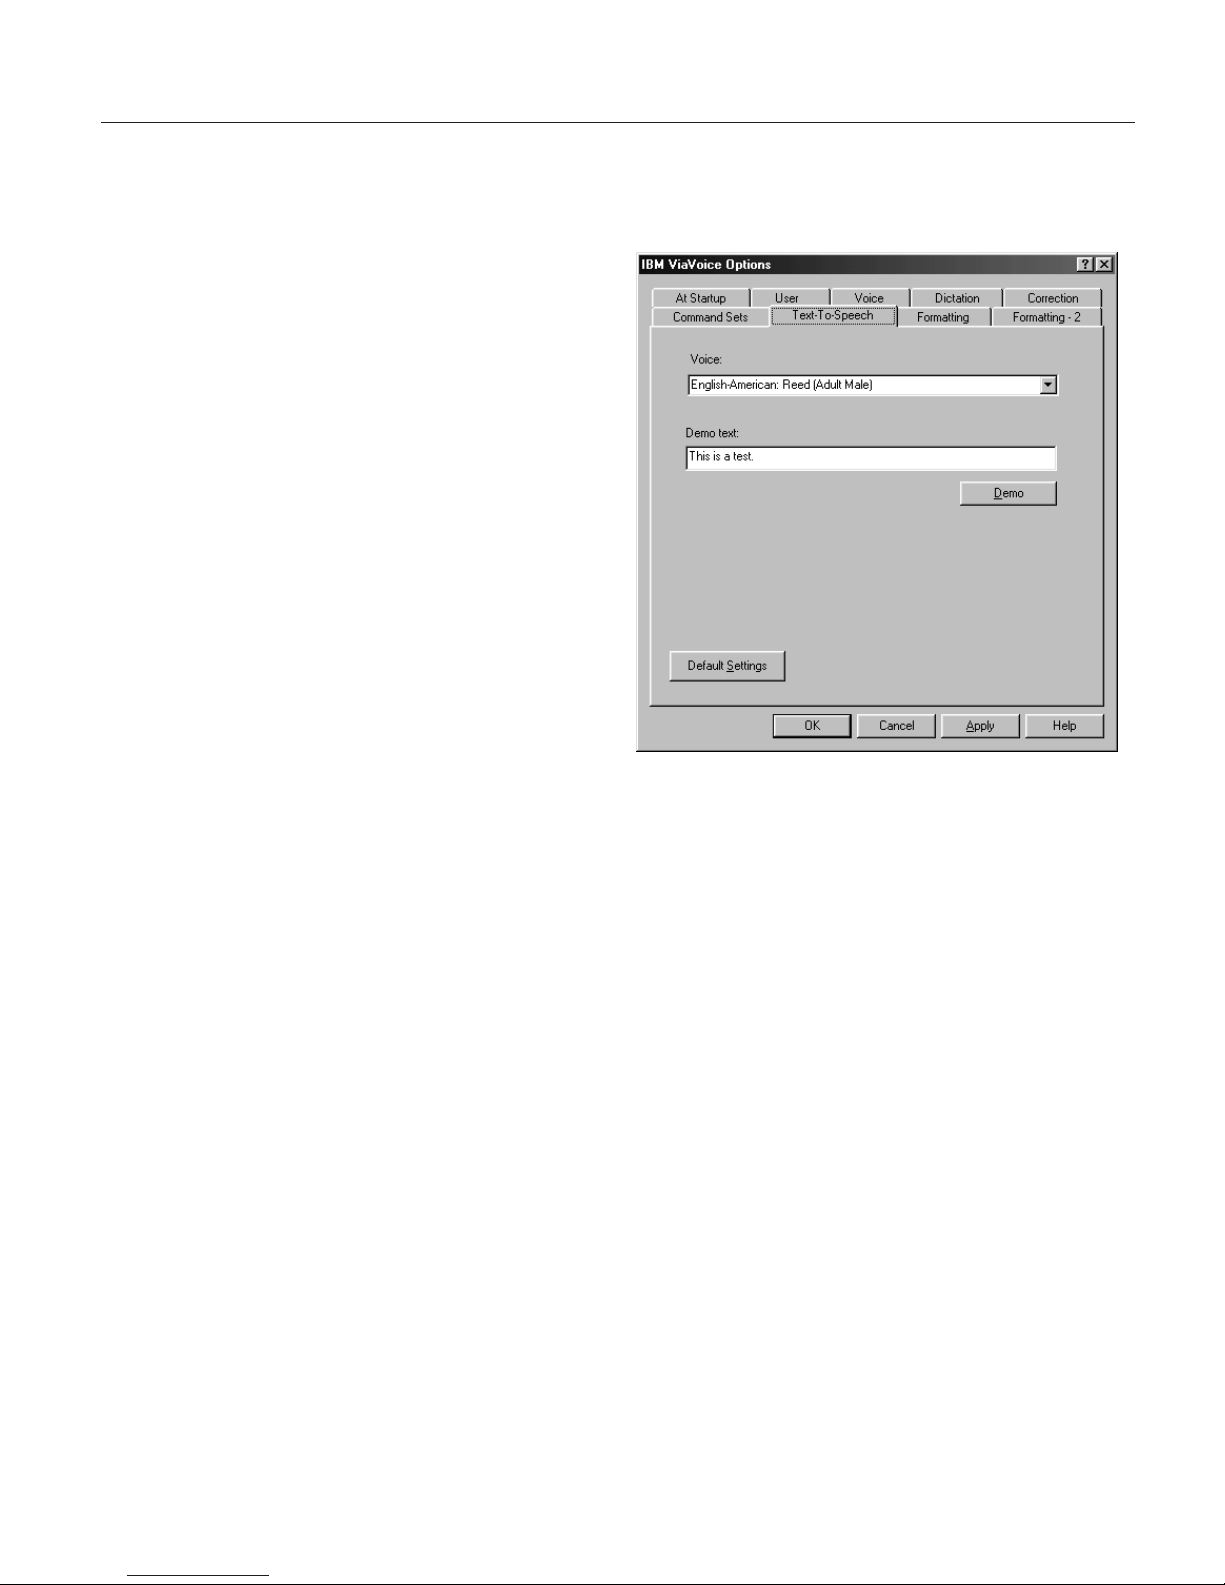
Setting Text-To-Speech options
You can select a voice for the ViaVoice agent to use when he is reading text to
you.
1. Display VoiceCenter if it is
not already on your
desktop.
2. Click the ViaVoice menu
button and select User
Options > ViaVoice
Options. ViaVoice Options
is displayed.
3. Click the Text-To-Speech
tab if it is not already on
top.
4. Select a voice from the
drop-down list.
5. Type some text in the
Demo text field. (You can
enter up to 80 characters.)
6. Click Demo to listen to the selected voice. Click Stop Demo to stop the
playback of the Demo text.
7. Click Apply to save changes, or click OK to save changes and close
ViaVoice Option.
Chapter 9. Customizing ViaVoice 91
Page 100

Adjusting recognition sensitivity
You may adjust sensitivity settings for recognition to obtain better accuracy,
depending on the speed of your computer and the background noise in your
location. Usually you do not need to adjust these settings.
1. Display VoiceCenter if it is
not already on your
desktop.
2. Click the ViaVoice menu
button and select User
Options > ViaVoice
Options. ViaVoice Options
is displayed.
3. Click the Voice tab if it is
not already on top.
4. Select the options you want
to change on this tab. Click
Apply to save changes, or
click OK to save changes
and close ViaVoice Option.
5. Move the Recognition sensitivity slider to Exact Match if there is a lot of
background noise and you want ViaVoice to be more critical in matching
sounds with words.
6. Move the Acoustic environment slider towards Noisy if there is a lot of
background noise and you want ViaVoice to ignore it. The more to the
right you move the slider the louder you will have to speak.
7. In the Recognition Performance box, select the performance setting you
want. A setting of Accurate on a computer with a fast processor, for
example, means that ViaVoice will be more accurate in matching your
sounds with words, but processing will take longer to achieve this
accuracy. On computers with slower processors, a setting of Fast will
speed up performance, but recognition accuracy might degrade. For most
users, the setting Automatic obtains the best overall results, since this
setting instructs ViaVoice to optimize performance based on your
computer’s processing capabilities.
92 ViaVoice for Windows Standard Edition
 Loading...