

IBM ThinkPad R50 1830, ThinkPad R50e 1834, ThinkPad R50p 1833, ThinkPad R52 Setup Instructions
Page 1
ThinkPad
Setup Instructions
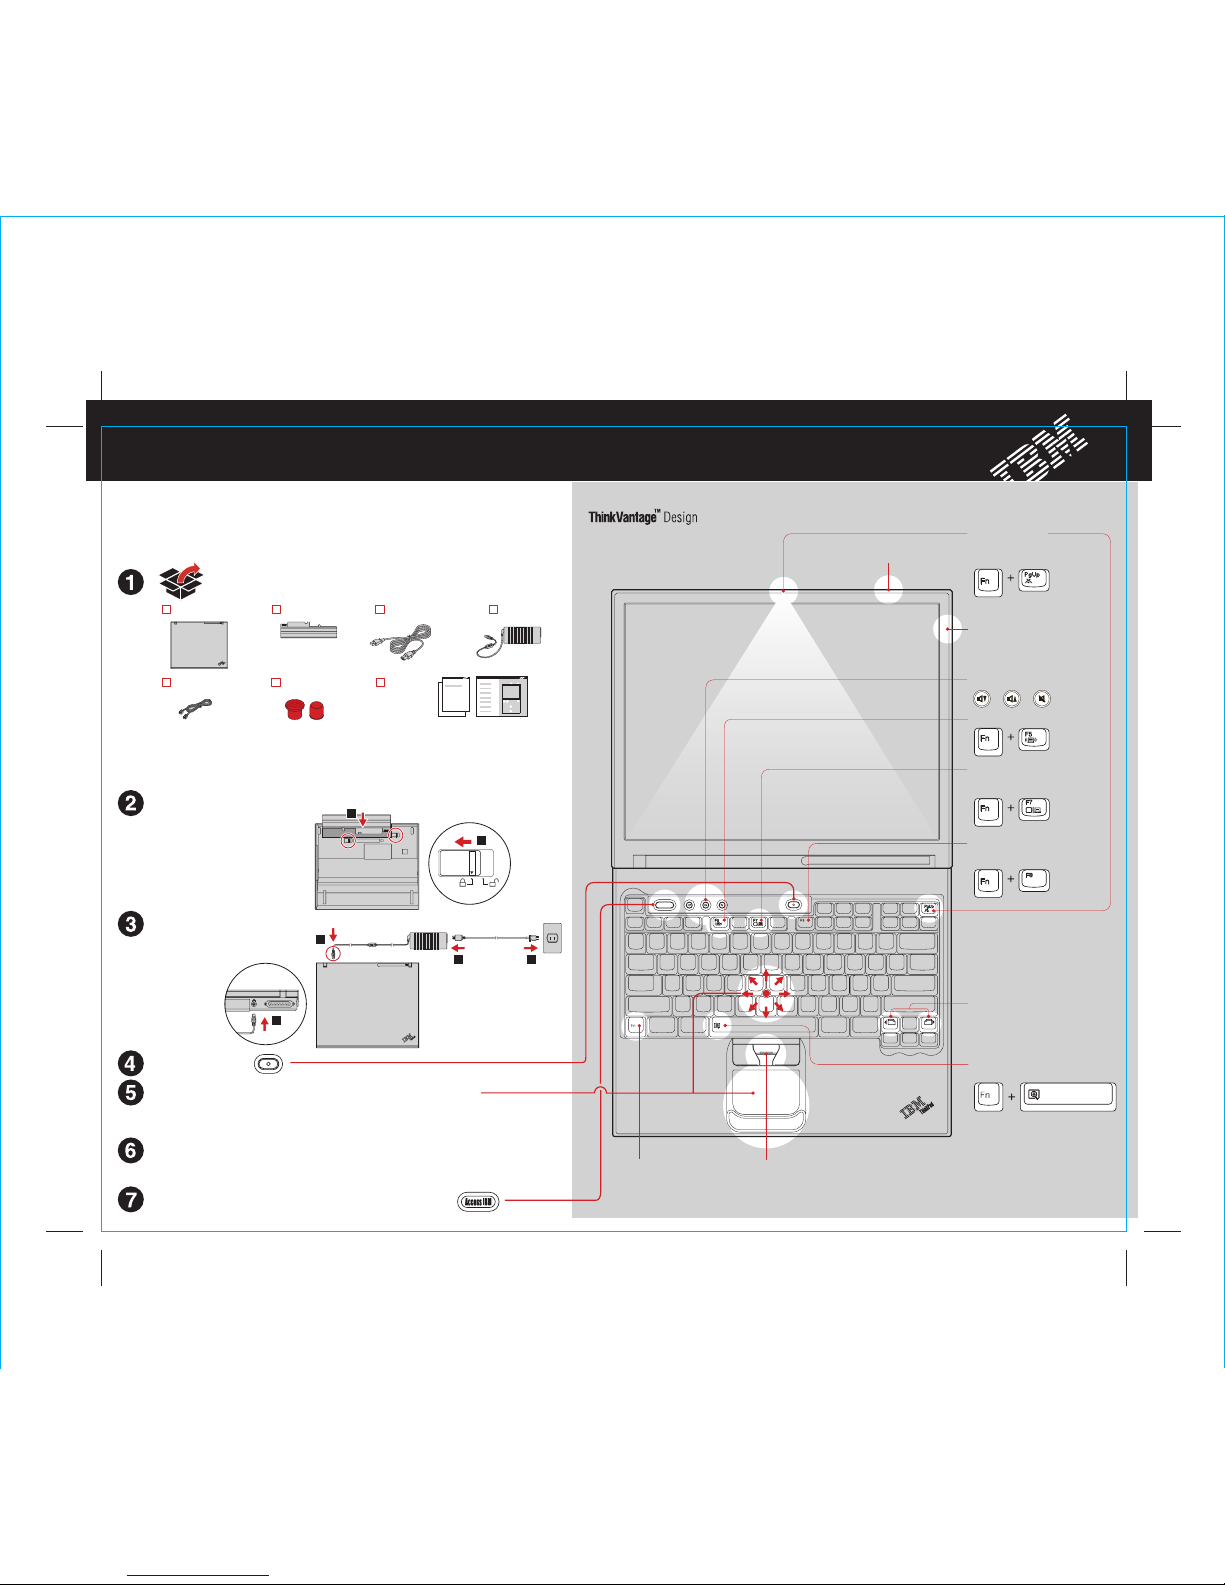
Install battery pack:
Your battery is ready to use.
Connect to power:
Turn on the power:
Point and click with UltraNav
TM
Multi-pointing Navigation System:
This process takes several minutes, and your computer may restart multiple times.
Configure the Operating System following on-screen instructions:
Unpack:
For more detailed information, press the Access IBM Button:
UltraConnect
TM
Wireless Antenna
One - Handed Latch
ThinkLight
®
Keyboard Light
Full Screen Magnifier
Zooms the entire screen
Presentation Director
Wireless Radio Control
Fn Key
Volume and Mute Buttons
Internet Navigation Keys
Web browser back and forward
TrackPoint Center Button
P/N: 27R0825
Battery packThinkPad
®
computer Power cord
2 TrackPoint
®
caps
Modem cord
AC adapter
Books
- Setup Instructions (this sheet)
- Other supplements or flyers
* See reverse for notes about unlisted,
missing, or damaged items and recovery CD.
Access IBM
Access IBM
Press the IBM TrackPoint cap or move across the touch pad in the direction you want to move
the pointer. The left and right buttons below the space bar and touch pad function like mouse buttons.
Some models may have only a TrackPoint.
Illuminates your keyboard,
so you can work in the dark
Optimal placement provides
superior range and performance
Easily give presentations or use
multiple monitors
Scroll documents or magnify an
area of the screen
Use in combination with keys
with blue icons to access
special ThinkPad features
Note: Some ThinkPad computers
may only have one battery latch.
- Service and Troubleshooting Guide
ThinkPad
EasyEject
Use to undock and remove
attachable devices
Note: Read the safety notices in the Service
and Troubleshooting Guide before you use
the computer.
1
2 3
1
1
2
These instructions are only for first time setup. For more detailed information, press the
Access IBM button.
R50 series Setup Poster
P/N 27R0825
12/10/2004
Size : 11x14 inches
Color : 2 color job = Black (PMS Process Black C) and Red (PMS 032cvc)
(#Gray=45% Black, 20% Black)
Font : IBM Fonts and Helvetica Neue Family
Material : 100 gsm gloss art paper (Use 100% recycled paper in only Japan. )
Blue line shows die-cut. DO NOT PRINT.
Please change the barcode No.
Page 2
2
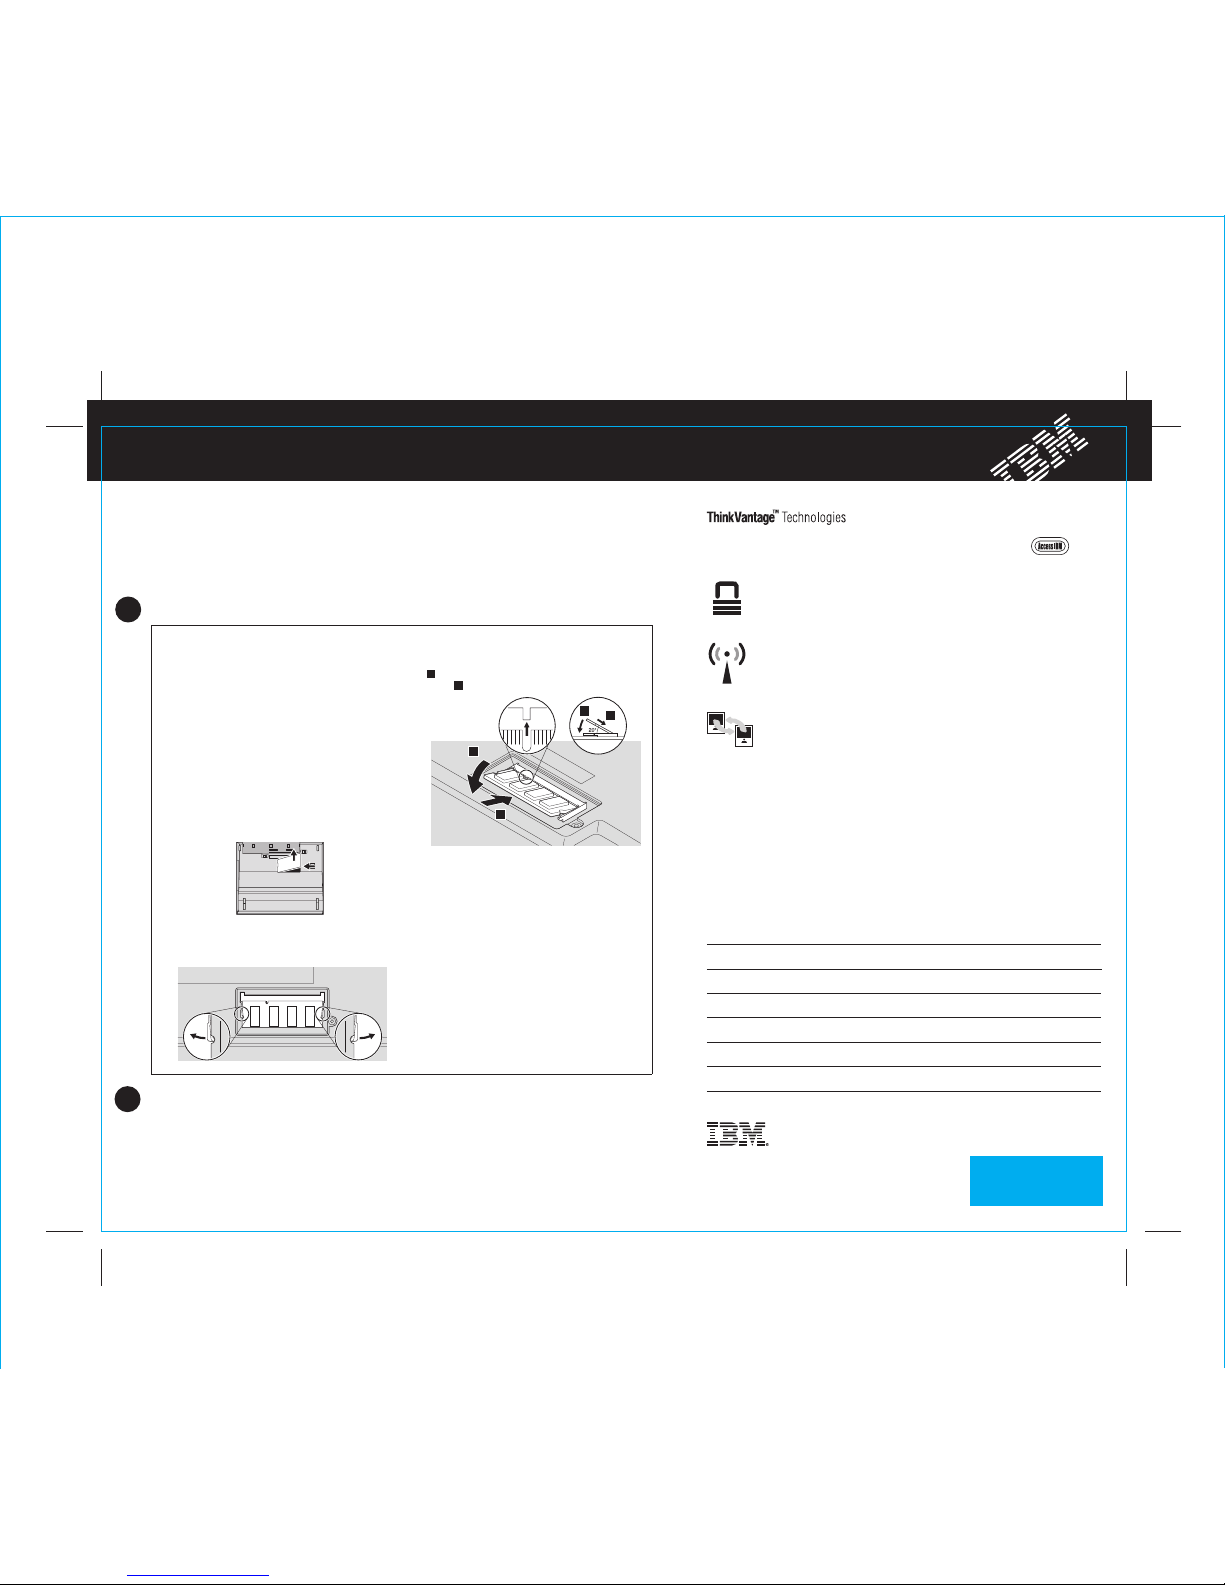
Installing Optional memory
The following terms are trademarks of the IBM Corporation in the United States
or other countries or both:
IBM, ThinkPad, TrackPoint, ThinkLight, ThinkVantage, UltraNav, and UltraConnect.
Your name:
Company name:
Model number:
Serial number:
Company or reseller service:
IBM service Web site:
IBM service number:
You can increase the amount of memory in your computer.
Verify proper installation of the optional SO-DIMM:
1 Turn on the computer.
2 Press the Access IBM button when prompted during startup.
3 Open the IBM BIOS Setup Utility by clicking "Access BIOS" under the "Configure" category or double-clicking
"Start Setup Utility."
4
1
Install the optional SO-DIMM:
1
2 Turn off the computer.
3
4
5 Remove the battery.
6 Loosen the screws on the memory slot cover, and
then remove the cover.
7
8
9 Replace the memory slot cover.
10
Note: Only use memory types supported by your computer. If you incorrectly install the optional memory or install an
unsupported memory type, a warning beep will sound when you try to start the computer. To replace the standard memory
that is accessed by removing your keyboard, refer to the procedure described within Access IBM.
Touch a grounded metal object to reduce
any static electricity in your body that could
damage the SO-DIMM. Avoid touching the contact
edge of the SO-DIMM.
Close the computer display and turn the computer
over.
Disconnect the ac adapter and all cables from the
computer.
Attention: Never use the computer with the
memory slot cover open.
Replace the battery and re-connect the ac
adapter and cables.
Verify that the "Installed memory" item shows the total amount of memory installed in your computer. For example, if your
computer had 256 MB of standard memory and you install an additional 512 MB SO-DIMM, the quantity shown in
"Installed memory" should be 768 MB.
If a SO-DIMM is already installed, remove it as
shown. Save the SO-DIMM for future use.
©
Copyright IBM Corporation 2004
For Barcode Position Only
Align the notch in the contact edge of the SO-DIMM
with the divider in the socket. Firmly insert the
SO-DIMM into the socket at an angle of 20 degrees
1 , and then pivot it downward until it snaps into
place 2 .
Security
You can get information about ThinkVantage Technologies
at any time by pressing the blue Access IBM button on your keyboard.
Access Connections
Some ThinkPad computers are equipped with a wireless LAN adapter.
To learn more about configurating wireless LAN and other com munication
adapters including your wired connections, enter "Access Connections "
in the Access IBM keyword search field.
Migration
You can move data from your old computer to this ThinkPad.
Enter "migration" in the Access IBM keyword search field to learn about
downloading data migration software.
IBM Help and Support
To learn about IBM Help and Support, choose the Get Help & Support
category in Access IBM.
* Additional unpacking notes:
1) Some models may contain items that are not listed.
2) If any item is missing or damaged, please contact your place of purchase.
3) Your computer features IBM Disk-to-Disk Recovery. Everything for recovering
factory-installed files and applications is on your hard disk eliminating the need for
a recovery CD. For more information, see "Recovering Pre-Installed Software" in
the Service and Troubleshooting Guide.
Some ThinkPad computers have an embedded security chip.
To learn about downloading the software and enabling the chip, enter
"security chip" in the Access IBM keyword search field.
1
2
1
2
R50 series Setup Poster
P/N 27R0825
12/10/2004
Size : 11x14 inches
Color : 1 color job = Black (PMS Process Black C)
(#Gray=45% Black, 20% Black)
Font : IBM Fonts and Helvetica Neue Family
Material : 100 gsm gloss art paper (Use 100% recycled paper in only Japan. )
Blue line shows die-cut. DO NOT PRINT.
Please change the barcode No.
 Loading...