


i

Note: Before using this information and the product it supports, be sure to read the general information under
“Safety Information” on page viii, and “Notices” on page 138. For ergonomics information, see the
User's Guide
.
Online
First Edition (August 1999)
The following paragraph does not apply to the United Kingdom or any country where such provisions are
inconsistent with local law:
INTERNATIONAL BUSINESS MACHINES CORPORATION PROVIDES THIS PUBLICATION "AS IS" WITHOUT ANY
WARRANTY OF ANY KIND, EITHER EXPRESS OR IMPLIED, INCLUDING, BUT NOT LIMITED TO, THE LIMITED
WARRANTIES OF MERCHANTABILITY OR FITNESS FOR A PARTICULAR PURPOSE. Some states do not allow
disclaimers or express or implied warranties in certain transactions; therefore, this statement may not apply to you.
This publication could include technical inaccuracies or typographical errors. Changes are periodically made to the
information herein; these changes will be incorporated in new editions of the publication. IBM may make improvements
or changes in the products or the programs described in this publication at any time.
Requests for technical information about IBM products should be made to your IBM Authorized Dealer or your IBM
Marketing Representative.
Copyright International Business Machines Corporation 1999. All rights reserved. Note to US Government
Users — Documentation related to restricted rights — Use, duplication, or disclosure is subject to restrictions set forth
in GSA ADP Schedule Contract with IBM Corp.
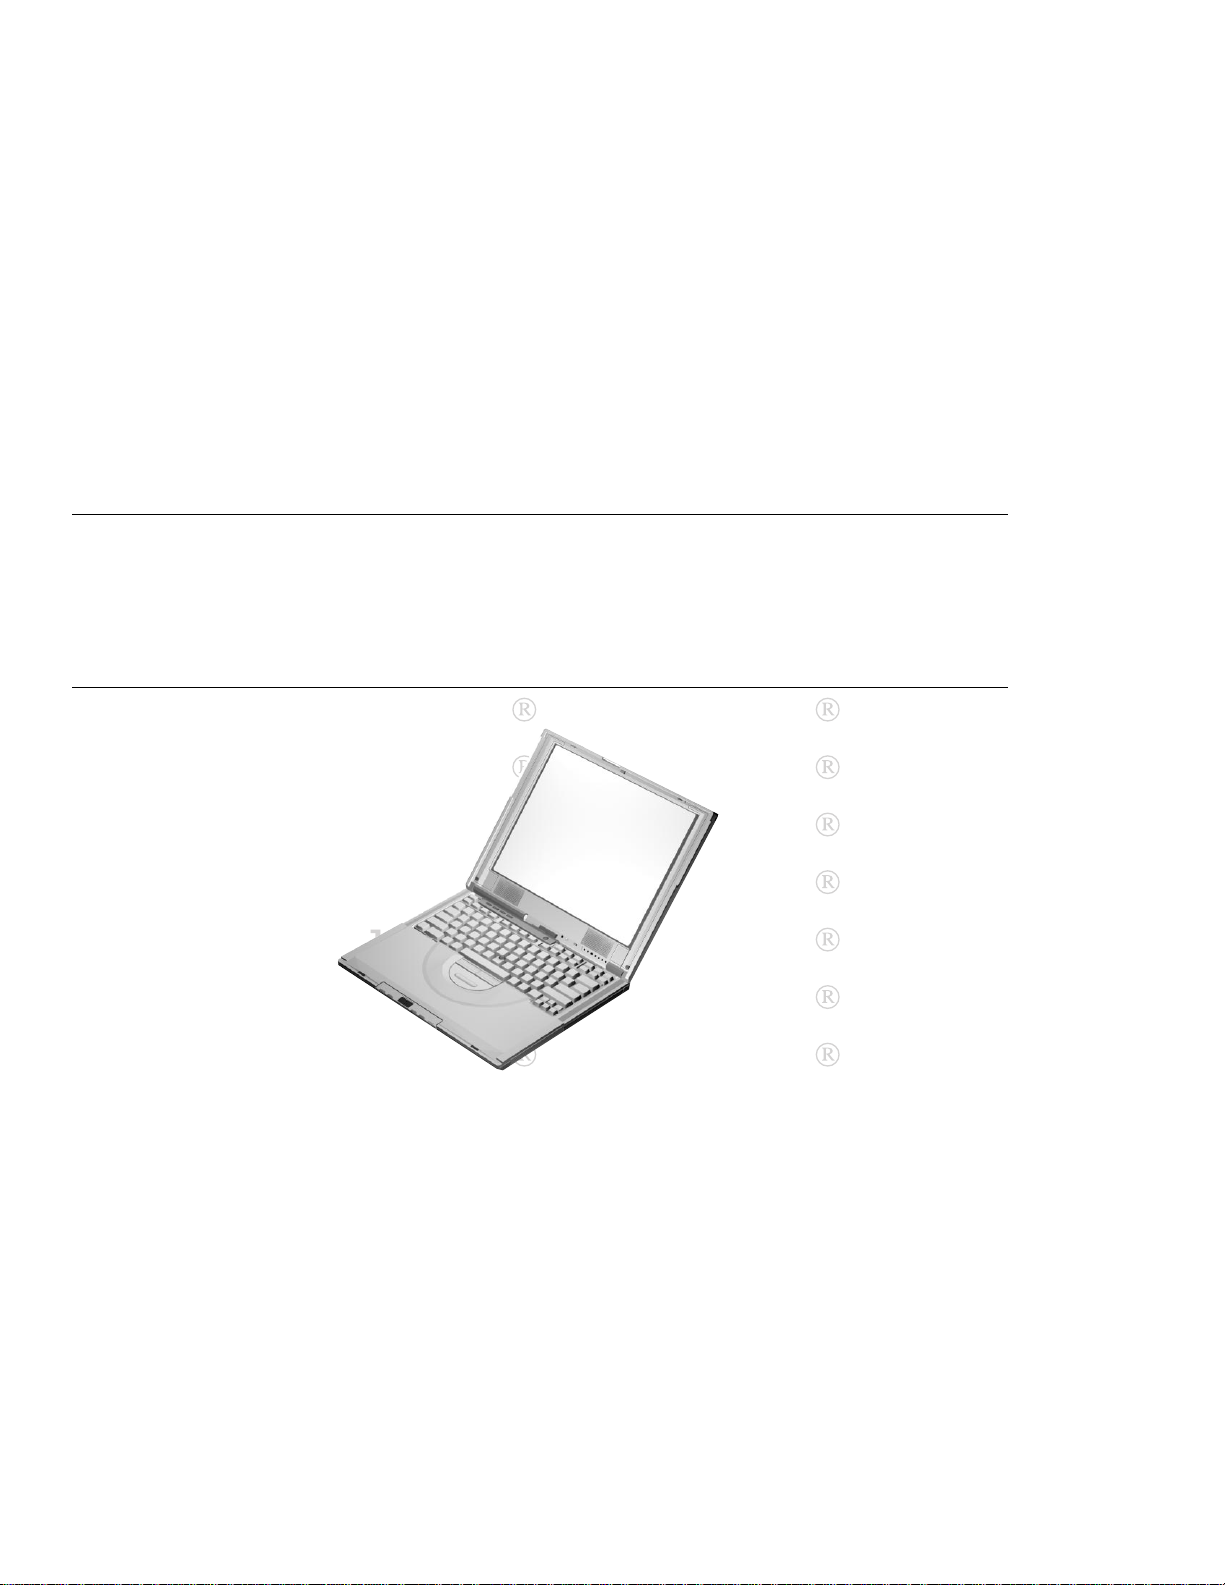
Thank You for Selecting an IBM ThinkPad i Series 1400/1500
Computer
We at IBM have developed this ThinkPad computer to meet both your technical requirements and your high expec-
tations. To help us continue to build products that address your mobile computing needs, please take a moment to
complete the ThinkPad Registration.
ThinkPad ThinkPad
ThinkPad ThinkPad
ThinkPad ThinkPad
ThinkPad ThinkPad
ThinkPad ThinkPad
ThinkPad ThinkPad
ThinkPad ThinkPad
Copyright IBM Corporation 1999 iii

Functional Highlights
All-in-one design with core technology The well-balanced,
all-in-one design of the ThinkPad i Series 1400/1500
brings ease-of-use to your computing needs.
High-speed processor The Intel high-speed processor enables
high-speed data processing and provides advanced performance.
Large-capacity hard disk drive The large-capacity hard disk drive
can respond to a wide variety of your business demands.
Large color LCD The large TFT (thin-film transistor) or HPA (high
performance addressing) display provides clear and brilliant text and graphics.
Lithium ion or nickel metal hydride battery pack The large-
capacity battery pack extends the operating time of your
computer, further enhancing its portability.
Audio with 3D Stereo Sound Your computer is equipped with
internal audio record and playback capabilities including
3D audio from four speakers. When you enable the 3D
stereo feature, sounds will appear to be generated all
around you.
iv
The audio feature supports the following:
Wave audio recording and playback of up to 16 bits,
stereo, and 48 KHz sampling.
Music CD playback with the computer turned off.
For more information on using the audio function, see the
Online User's Guide
ThinkPad Modem The ThinkPad modem enables you to send or
receive data and faxes over a telephone line.
For more information on using the ThinkPad modem, see
the
Online User's Guide
TrackPoint with Enhanced Controls Your computer has an
enhanced TrackPoint function that enables you to make
selections merely by pressing on the TrackPoint. A new
.
.

Functional Highlights
center button, the Internet Scroll Bar, converts the
TrackPoint into a scroll controlling device or a magnifying
glass on the screen.
For more information on using the TrackPoint, see
“TrackPoint” on page 10.
PC Card Support Your computer provides a PC Card slot that
accepts a 16–bit PC Card, CardBus Card, or Zoomed
Video Card.
For more information on installing PC Cards, see
“Inserting a PC Card” on page 72.
Keyboard Light (select models only) Your computer is equipped
with a light that illuminates the keyboard area for computer use in dimly lit areas.
For more information on using the Keyboard Light, see
“Keyboard Light” on page 16.
Easy Launch buttons Your computer is equipped with four
customizable buttons that allow you to connect to the
Internet or to run programs at a single press of a button.
For more information on customizing the Easy Launch
buttons, see “Easy Launch Buttons Customization Utility”
on page 37.
Media Center Your computer is equipped with the Media Center,
consisting of a status LCD and playback buttons for CDs
or DVDs (for DVD models). You can also play music CDs
without turning on the computer.
For more information, see “Playing Music CDs” on
page 19.
v
About This Book
About This Book
This book contains information that will help you operate the IBM
ThinkPad i Series 1400/1500 computer. Be sure to read the
ThinkPad i Series 1400/1500 Setup Guide
book before using the computer.
Chapter 1. "Getting Familiar with
Your Computer," acquaints you
with the basic features of your computer
and Chapter 1 of this
Chapter 2. "Extending the
Features ofYour Computer,"
provides information on installing
options and using your computer's
high-technology features.
Chapter 4. "Solving Computer Problems,"
computer problem. The chapter includes a troubleshooting guide and information on
how to recover lost or damaged software.
Chapter 5. "Getting Service,"
service.
describes various options of IBM's support and
Appendix A, Features and Specifications describes the features
and specifications associated with your computer, including information on power cords.
Appendix B, Product Warranties and Notices contains the warranty statements for your computer and notices for this book.
Chapter 3.
"ProtectingYour Computer,"
provides information on using
passwords, and using locks.
describes what to do when you have a
vi

About This Book
The book concludes with an index.
vii

Safety Information
Safety Information
Electrical Safety Notice
Note: In the U.K., by law:
The telephone line cable must be connected after the
power cord.
The power cord must be disconnected after the telephone
line cable.
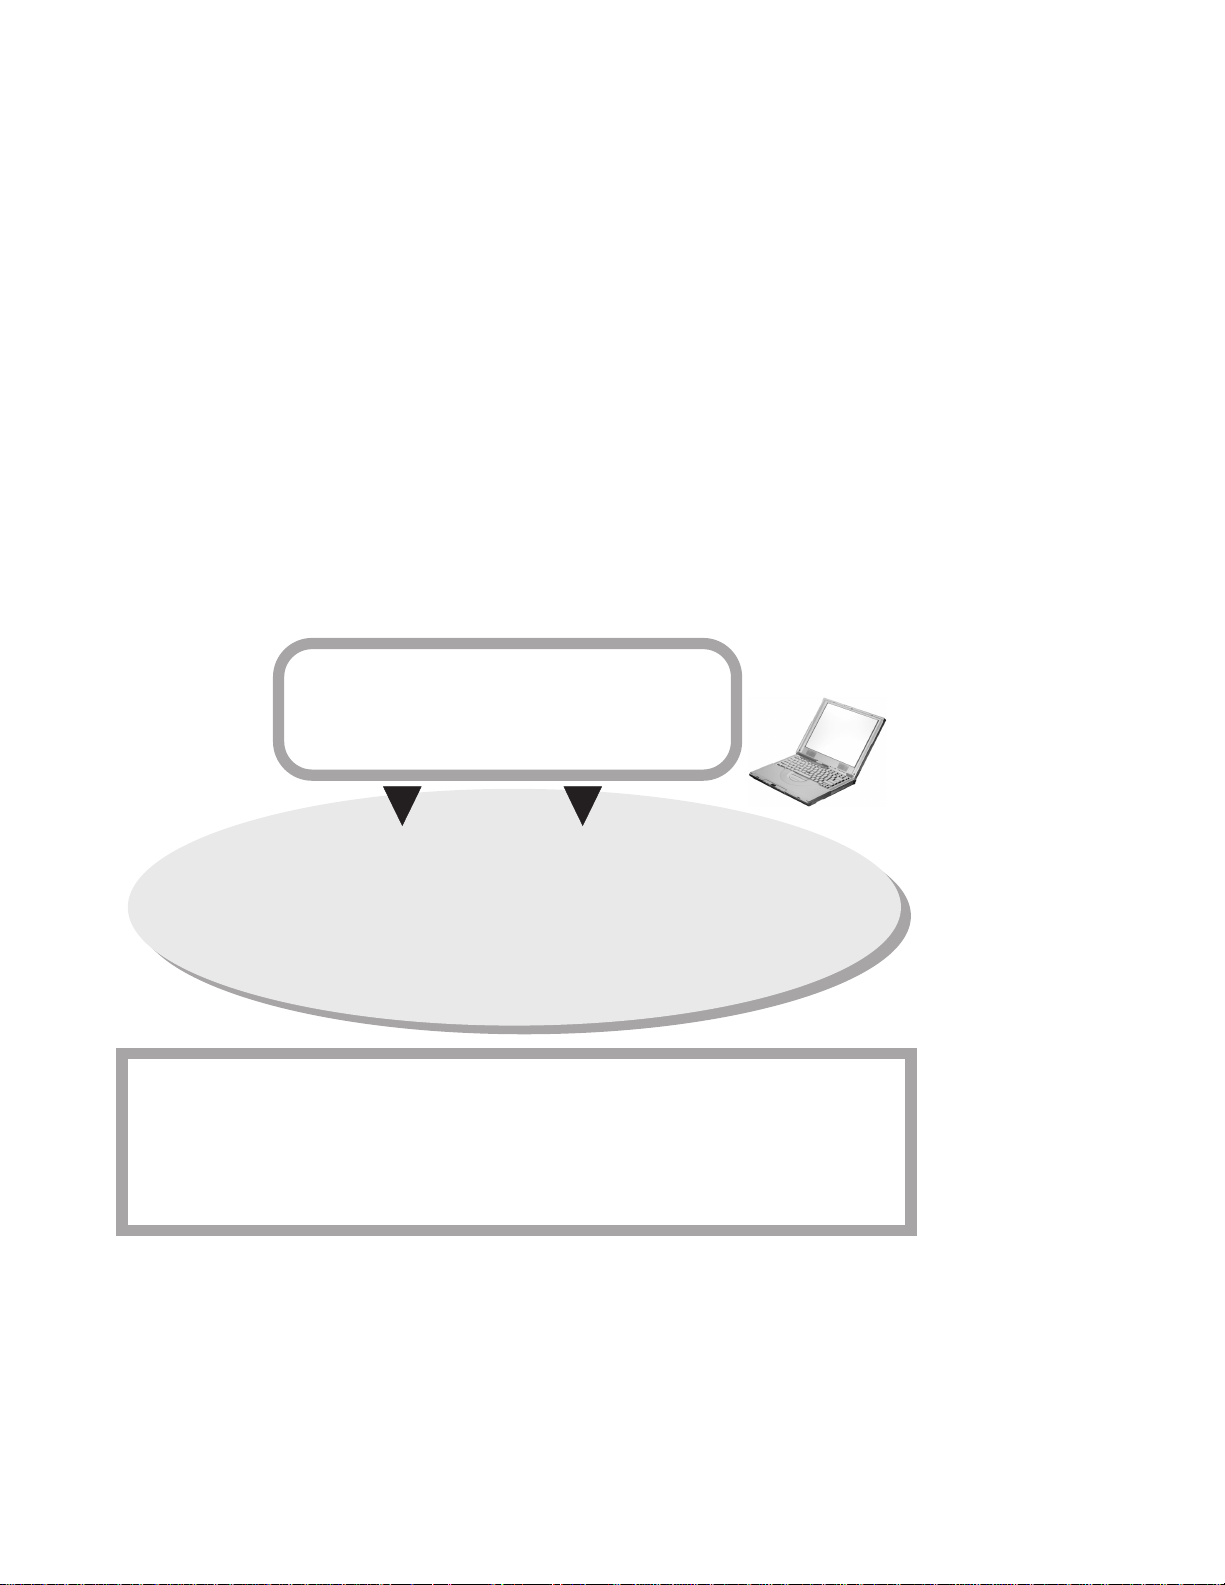
DANGER
Electrical current from power, telephone, and communication cables is hazardous. Reduce the risk of fire and
electric shock by always following basic safety precautions, including the following:
viii
Do not use your computer in or near water.
During electrical storms, do not connect the cable to
or disconnect it from the telephone outlet on the
wall.
To avoid shock hazard, connect and disconnect cables
as shown below when installing, moving, or opening the
covers of this product or attached devices. The 3–pin
power cord must be used with a properly grounded
outlet.
Safety Information
DANGER
Do not disassemble, incinerate, or short-circuit the
rechargeable battery pack. Do not put it in trash that is
disposed of in landfills. Dispose of it as required by
local ordinances or regulations. In the United States, call
IBM at 1-800-IBM-4333 for information on disposal.
ix

Safety Information
DANGER
There is a danger of an explosion if the battery is incorrectly replaced.
The lithium battery (IBM P/N 02K6502 UL-recognized
component [file no. MH12210]) contains lithium and can
explode if it is not properly handled or disposed of.
Replace only with a battery of the same type.
Do not: (1) throw or immerse it into water, (2) allow it to
heat to more than 100°C (212°F), or (3) attempt to repair
or disassemble it. Dispose of it as required by local ordinances or regulations.
CAUTION:
The fluorescent lamp in the liquid crystal display (LCD) contains
mercury. Do not put it in trash that is disposed of in landfills.
Dispose of it as required by local ordinances or regulations.
The LCD is made of glass, and rough handling or dropping the
computer can cause the LCD to break. If the LCD breaks and
the internal fluid gets into your eyes or on your hands, immediately wash the affected areas with water for at least 15
minutes; then get medical care if any symptoms are present
after washing.
Laser Compliance Statement
The CD-ROM or DVD-ROM drive of the ThinkPad i Series
1400/1500 computer is a laser product. The CD-ROM or DVD-ROM
drive's classification label (shown below) is located on the top of the
drive.
CLASS 1 LASER PRODUCT
LASER KLASSE 1
LUOKAN 1 LASERLAITE
x

Safety Information
APPAREIL A LASER DE CLASSE 1
KLASS 1 LASER APPARAT
The CD-ROM or DVD-ROM drive is certified in the U.S. to conform
to the requirements of the Department of Health and Human Services 21 Code of Federal Regulations (DHHS 21 CFR) Subchapter J
for Class 1 laser products.
In other countries, the drive is certified to conform to the requirements of EN60825.
CAUTION:
Do not open the CD-ROM or DVD-ROM drive; no user adjustments or serviceable parts are inside.
Use of controls, adjustments, or the performance of procedures
other than those specified may result in hazardous radiation
exposure.
Class 1 laser products are not considered to be hazardous. The
CD-ROM or DVD-ROM drive has an internal, Class 1, 0.5-milliwatt,
aluminum gallium-arsenide laser that operates at a wavelength of
760 to 810 nanometers. The design of the laser system and the
CD-ROM or DVD-ROM drive ensures that there is no exposure to
laser radiation above a Class 1 level during normal operation, user
maintenance, or servicing conditions.
xi

xii

Contents
Thank You for Selecting an IBM ThinkPad i Series 1400/1500
Computer . . . . . . . . . . . . . . . . . . . . . . . . . . . . . . iii
Functional Highlights . . . . . . . . . . . . . . . . . . . . . . . . . . iv
About This Book ............................ vi
Safety Information . . . . . . . . . . . . . . . . . . . . . . . . . . viii
Electrical Safety Notice ...................... viii
Laser Compliance Statement ................... x
Getting Familiar with Your Computer ............... 1
Identifying the Hardware Features .................. 3
Front View of the Computer .................... 3
Rear View of the Computer .................... 5
Bottom View of the Computer ................... 7
System Status Indicators ....................... 8
Distinctive Functions of Your Computer .............. 10
Keyboard Functions . . . . . . . . . . . . . . . . . . . . . . . . 10
CD-ROM or DVD-ROM Drive .................. 17
ThinkPad Utility Programs .................... 24
Online User's Guide ........................ 41
Reinstalling Software . . . . . . . . . . . . . . . . . . . . . . . . . 42
ThinkPad Software Selections CD ............... 42
Recovery CD . . . . . . . . . . . . . . . . . . . . . . . . . . . . 42
ThinkPad Web Site or Bulletin Board .............. 42
Replacing the Battery Pack ..................... 43
Service Hints & Tips ......................... 44
Handling Your ThinkPad Computer ............... 44
ThinkPad Don'ts . . . . . . . . . . . . . . . . . . . . . . . . . . 44
ThinkPad Do's . . . . . . . . . . . . . . . . . . . . . . . . . . . 46
Carrying Your Computer ..................... 46
Cleaning Your Computer ..................... 46
Extending Your Battery Life ................... 47
Ruggedized Mobile Computers ................. 47
For More Information ....................... 48
Extending the Features of Your Computer .......... 49
Customizing the TrackPoint ..................... 50
Copyright IBM Corporation 1999 xiii

Using the Press-to-Select Window ............... 51
Using the Sensitivity Window .................. 52
Using the Scrolling Window ................... 53
Increasing Memory . . . . . . . . . . . . . . . . . . . . . . . . . . 55
Attaching an External Mouse, Keypad or Keyboard ....... 59
Attaching an External Mouse or Numeric Keypad ...... 59
Attaching an External Keyboard and Mouse .......... 61
Disabling the TrackPoint ..................... 62
Attaching an External Monitor ................... 63
Display Output Location ..................... 64
Display Modes . . . . . . . . . . . . . . . . . . . . . . . . . . . 66
Using the Dual Display Function ................ 67
Attaching a Television to Your Computer (select models only) . 69
Attaching a Printer .......................... 71
Inserting a PC Card ......................... 72
Removing the PC Card ...................... 73
Protecting Your Computer .................... 75
Using Passwords . . . . . . . . . . . . . . . . . . . . . . . . . . . 76
Setting a Password ........................ 77
Entering a Password ....................... 79
Removing and Changing a Password ............. 80
Using Locks . . . . . . . . . . . . . . . . . . . . . . . . . . . . . . 82
xiv
Solving Computer Problems ................... 83
Frequently Asked Questions .................... 84
Hints, Tips and Considerations ................... 89
Playing DVD Movies ....................... 89
USB Connector Considerations ................. 89
Using an External Condenser Microphone ........... 89
Troubleshooting Guide . . . . . . . . . . . . . . . . . . . . . . . . 90
Troubleshooting Charts . . . . . . . . . . . . . . . . . . . . . . . 91
Error Codes or Messages .................... 92
No Error Codes or Messages .................. 94
Input Problems . . . . . . . . . . . . . . . . . . . . . . . . . . 95
Standby or Hibernation Problems ................ 97
LCD Problems . . . . . . . . . . . . . . . . . . . . . . . . . . . 99
Indicator Problems . . . . . . . . . . . . . . . . . . . . . . . . 100
Battery Problems . . . . . . . . . . . . . . . . . . . . . . . . . 100
CD-ROM or DVD-ROM Problems ................ 101
Audio Problems . . . . . . . . . . . . . . . . . . . . . . . . . . 103

Universal Serial Bus (USB) Problems ............. 103
Modem Problems . . . . . . . . . . . . . . . . . . . . . . . . . 104
PC Card Problems ........................ 105
Printer Problems . . . . . . . . . . . . . . . . . . . . . . . . . . 106
External Monitor Problems .................... 107
Other Option Problems ...................... 109
Software Problems . . . . . . . . . . . . . . . . . . . . . . . . 110
Other Problems . . . . . . . . . . . . . . . . . . . . . . . . . . 111
Recovering Lost or Damaged Software .............. 112
Using the PC-Doctor Program .................. 112
Using the ThinkPad Software Selections CD ......... 112
Using the Recovery CD ..................... 113
ThinkPad Web Site or Bulletin Board .............. 114
Getting Service . . . . . . . . . . . . . . . . . . . . . . . . . . . 115
Information on Your Computer ................... 116
Option List . . . . . . . . . . . . . . . . . . . . . . . . . . . . . 116
Identification Numbers . . . . . . . . . . . . . . . . . . . . . . 116
Problem Recording Sheet .................... 117
Customer Service and Support ................... 118
Online Support Services ..................... 118
Fax Information . . . . . . . . . . . . . . . . . . . . . . . . . . 118
Help by Telephone ........................ 119
EasyServ . . . . . . . . . . . . . . . . . . . . . . . . . . . . . . 120
Getting Help Around the World ................. 120
Purchasing Additional Services ................... 121
Enhanced PC Support Line ................... 121
Ordering Support Line Services ................. 122
Warranty and Repair Services .................. 122
Appendix A. Features and Specifications ........... 125
Features . . . . . . . . . . . . . . . . . . . . . . . . . . . . . . . . 126
Specifications . . . . . . . . . . . . . . . . . . . . . . . . . . . . . 128
IBM Power Cords ........................... 130
Appendix B. Product Warranties and Notices ........ 133
Notices . . . . . . . . . . . . . . . . . . . . . . . . . . . . . . . . . 138
Year 2000 Readiness and Instructions ............. 138
Trademarks . . . . . . . . . . . . . . . . . . . . . . . . . . . . 139
Macrovision Copyright Protection Statement ......... 139
Electronic Emission Notices ................... 140
xv

Telecommunication Notice . . . . . . . . . . . . . . . . . . . . 141
Industry Canada Requirements ................. 143
Regions where ThinkPad i Series 1400/1500 has ThinkPad
Modem Integrated . . . . . . . . . . . . . . . . . . . . . . . . 146
Notice to European Users of the IBM ThinkPad Modem ... 146
Warning Notice to New Zealand Users of the IBM ThinkPad
Modem . . . . . . . . . . . . . . . . . . . . . . . . . . . . . . 147
Index . . . . . . . . . . . . . . . . . . . . . . . . . . . . . . . . . . 149
xvi

Getting Familiar with Your Computer
This chapter provides basic information about your computer.
Identifying the Hardware Features .................. 3
Front View of the Computer .................... 3
Rear View of the Computer .................... 5
Bottom View of the Computer ................... 7
System Status Indicators ....................... 8
Distinctive Functions of Your Computer .............. 10
Keyboard Functions . . . . . . . . . . . . . . . . . . . . . . . . 10
TrackPoint . . . . . . . . . . . . . . . . . . . . . . . . . . . . 10
Fn Key . . . . . . . . . . . . . . . . . . . . . . . . . . . . . . 13
Easy Launch Buttons ..................... 14
Numeric Keypad . . . . . . . . . . . . . . . . . . . . . . . . 15
Keyboard Light . . . . . . . . . . . . . . . . . . . . . . . . . 16
CD-ROM or DVD-ROM Drive .................. 17
Using the CD-ROM or DVD-ROM Drive .......... 17
Handling CDs and DVDs ................... 18
Playing Music CDs ....................... 19
Playing DVD Movies ...................... 19
ThinkPad Utility Programs .................... 24
BIOS Utility . . . . . . . . . . . . . . . . . . . . . . . . . . . 24
Notebook Manager . . . . . . . . . . . . . . . . . . . . . . . 31
Sleep Manager . . . . . . . . . . . . . . . . . . . . . . . . . 35
Easy Launch Buttons Customization Utility ......... 37
Online User's Guide ........................ 41
Reinstalling Software . . . . . . . . . . . . . . . . . . . . . . . . . 42
ThinkPad Software Selections CD ............... 42
Recovery CD . . . . . . . . . . . . . . . . . . . . . . . . . . . . 42
ThinkPad Web Site or Bulletin Board .............. 42
Replacing the Battery Pack ..................... 43
Service Hints & Tips ......................... 44
Handling Your ThinkPad Computer ............... 44
ThinkPad Don'ts . . . . . . . . . . . . . . . . . . . . . . . . . . 44
ThinkPad Do's . . . . . . . . . . . . . . . . . . . . . . . . . . . 46
Carrying Your Computer ..................... 46
Cleaning Your Computer ..................... 46
Extending Your Battery Life ................... 47
Copyright IBM Corporation 1999 1

Ruggedized Mobile Computers ................. 47
For More Information ....................... 48
2 ThinkPad i Series 1400/1500 User's Reference
Identifying the Hardware Features
Front View of the Computer
24
23
22
21
20
1
26
25
4
11
2
1
3
4
5
6
7
13
12
14
15
16
17
18
19
10
8
9
(1) The LCD latches release the LCD when pressed and allow it to
be opened.
(2) The Keyboard Light (select models only) illuminates the keyboard
area for computer use in dimly lit areas.
(3) The color LCD screen displays computer output.
(4) The left and right internal speakers generate stereo sound.
(5) The Keyboard Light switch turns the keyboard light on and off.
(6) The indicator panel consists of the system-status indicators and
their associated symbols.
(7) The CD-ROM or DVD-ROM drive.
(8) The manual-eject hole is used to eject the CD-ROM or
DVD-ROM tray when it does not open with the eject button.
(9) The CD-ROM or DVD-ROM eject button ejects the CD-ROM or
DVD-ROM tray.
Getting Familiar with Your Computer 3

Identifying the Hardware Features
(10) The CD-ROM or DVD-ROM access indicator is on when data is
read from a CD or DVD in the CD-ROM or DVD-ROM drive.
(11) The battery pack is a built-in power source for the computer.
(12) The Media Center control panel allows your computer to function
like an audio CD player without turning on the computer. When the
computer is on, it also controls the playback of audio CDs, video
CDs and DVD movies.
(13) The previous track/chapter button jumps to the previous track in
the audio CD or video CD, or the previous chapter in the DVD
movie.
(14) The next track/chapter button jumps to the next track in the
audio CD or video CD, or the next chapter in the DVD movie.
(15)
The audio volume control adjusts the volume of the
speakers.
(16) The Media Center status LCD displays the current track number
in the audio CD or video CD, or the current chapter number in the
DVD movie.
(17) The play/pause button plays or pauses audio CD, video CD or
DVD movie playback.
(18) The stop/eject button stops audio CD, video CD or DVD movie
playback. It also ejects the CD-ROM or DVD-ROM tray when play-
back is stopped.
(19) The Media Center power button turns the Media Center on and
off for audio CD playback when the computer power is off.
(20) The Internet Scroll Bar works with the TrackPoint (23) and func-
tions as a scroll controlling device to easily scroll through Web
pages or program windows.
(21) The TrackPoint buttons work with the TrackPoint (23) and func-
tion similar to the buttons on a mouse.
(22) The Fn key is used with the function keys to activate the Fn key
functions.
(23) The TrackPoint is a built-in pointing device that provides a func-
tion similar to that of a mouse.
(24) The Easy Launch buttons are four customizable keys that allow
you to run programs at a single press of a button. See “Easy
Launch Buttons Customization Utility” on page 37 for more infor-
mation.
(25) The built-in microphone captures sound and voice when it is
used with an application program capable of handling audio.
(26)
The power switch turns the computer on and off.
4 ThinkPad i Series 1400/1500 User's Reference
Identifying the Hardware Features
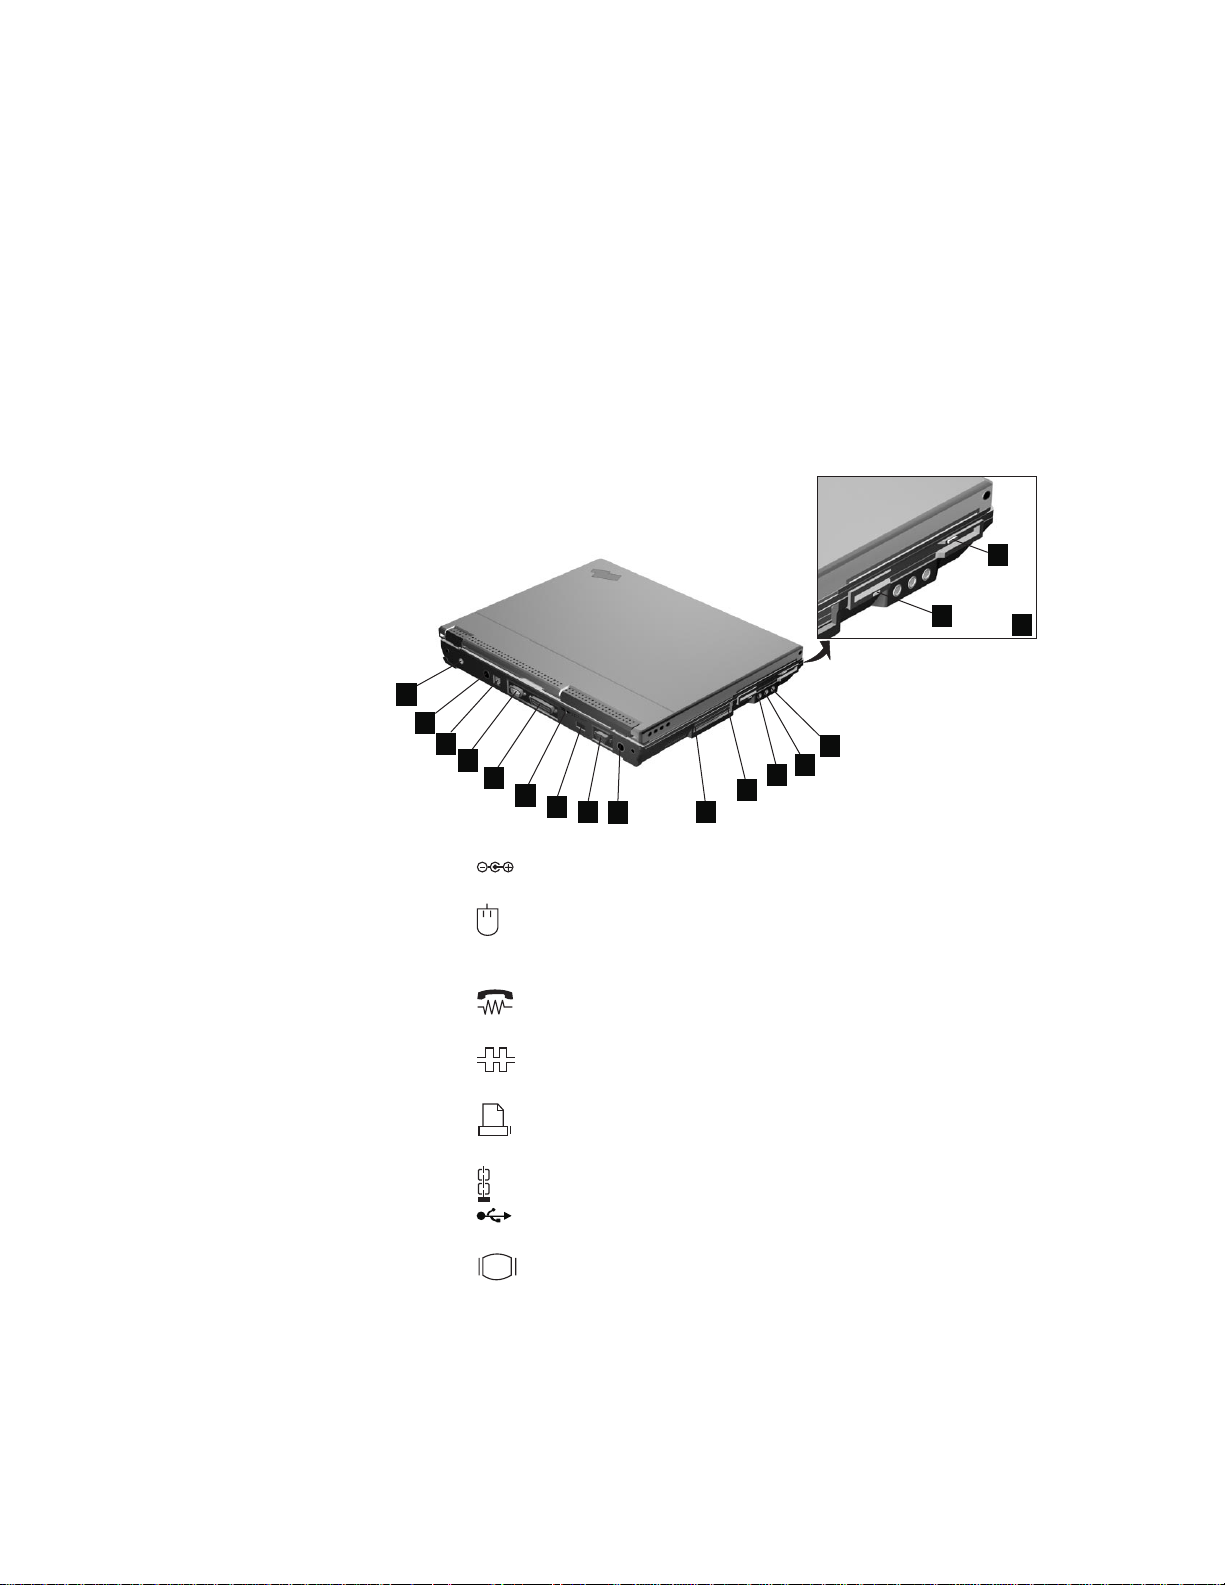
Rear View of the Computer
17
16
1
2
(1)
3
4
5
6
7
8
9
11
10
The power jack is where the AC Adapter cable is con-
12
14
13
nected.
(2)
The PS/2 mouse and keyboard connector is used to attach a
mouse, external keyboard, or external numeric keypad to the computer.
(3)
The internal modem port is used for connecting your com-
puter to an analog telephone line.
(4)
The serial connector is where you connect a 9–pin, serial-
device cable.
(5)
The parallel connector is where you connect a parallel-
printer signal cable.
(6)
The security keyhole is used with a mechanical lock.
(7)
The universal serial bus (USB) allows you to connect any
device that conforms to the USB standard.
(8)
The external-monitor connector is where you attach the
external monitor.
(9) The S-video jack (select models only) is where you connect a
television or external display devices with an S-video in-out cable.
(10) The PC Card slot accepts a PC Card.
(11) The PC Card eject button ejects the PC Card from the PC Card
slot.
15
Getting Familiar with Your Computer 5

Identifying the Hardware Features
(12)
(13)
(14)
(15) The diskette drive.
(16) The diskette-drive-activity indicator lights up when the computer
(17) The diskette-eject button ejects the diskette from the diskette
The headphone jack, a ⅛inch (3.5mm) diameter jack, is where
you connect stereo headphones or external speakers.
The line-in jack, a ⅛inch (3.5mm) diameter jack, is where
you connect an external audio device.
The microphone jack, a ⅛inch (3.5mm) diameter jack, is
where you connect a self-powered stereo microphone.
Note: Do not plug any device into the microphone jack except a
microphone.
is accessing the diskette drive.
drive.
6 ThinkPad i Series 1400/1500 User's Reference
Identifying the Hardware Features
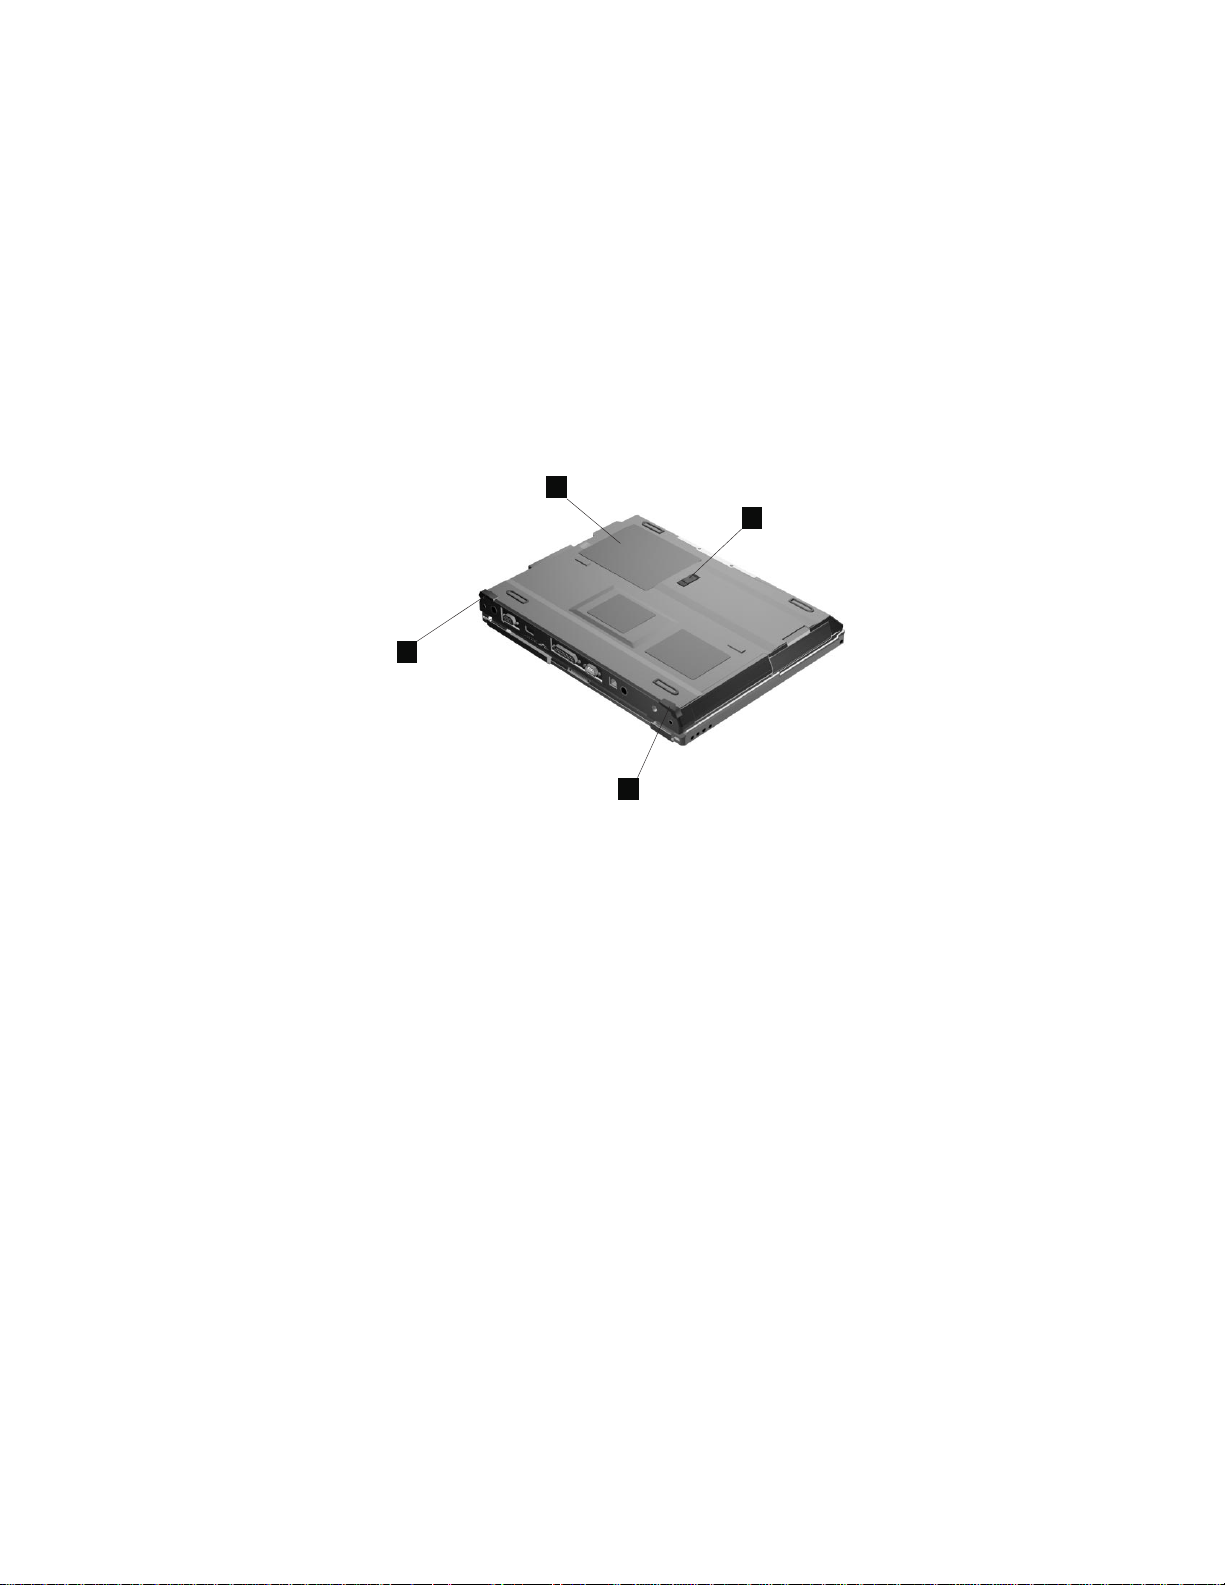
Bottom View of the Computer
2
1
3
3
(1) The battery-pack latch locks or releases the battery pack.
(2) The memory-slot cover covers the memory slot.
The two memory slots accept dual inline memory module (DIMM)
options.
Note: Base memory (32 MB or 64 MB) occupies one memory
slot.
(3) Flip out the tilt feet to tilt the computer to an angle for more com-
fortable use of your computer, especially when typing.
Getting Familiar with Your Computer 7
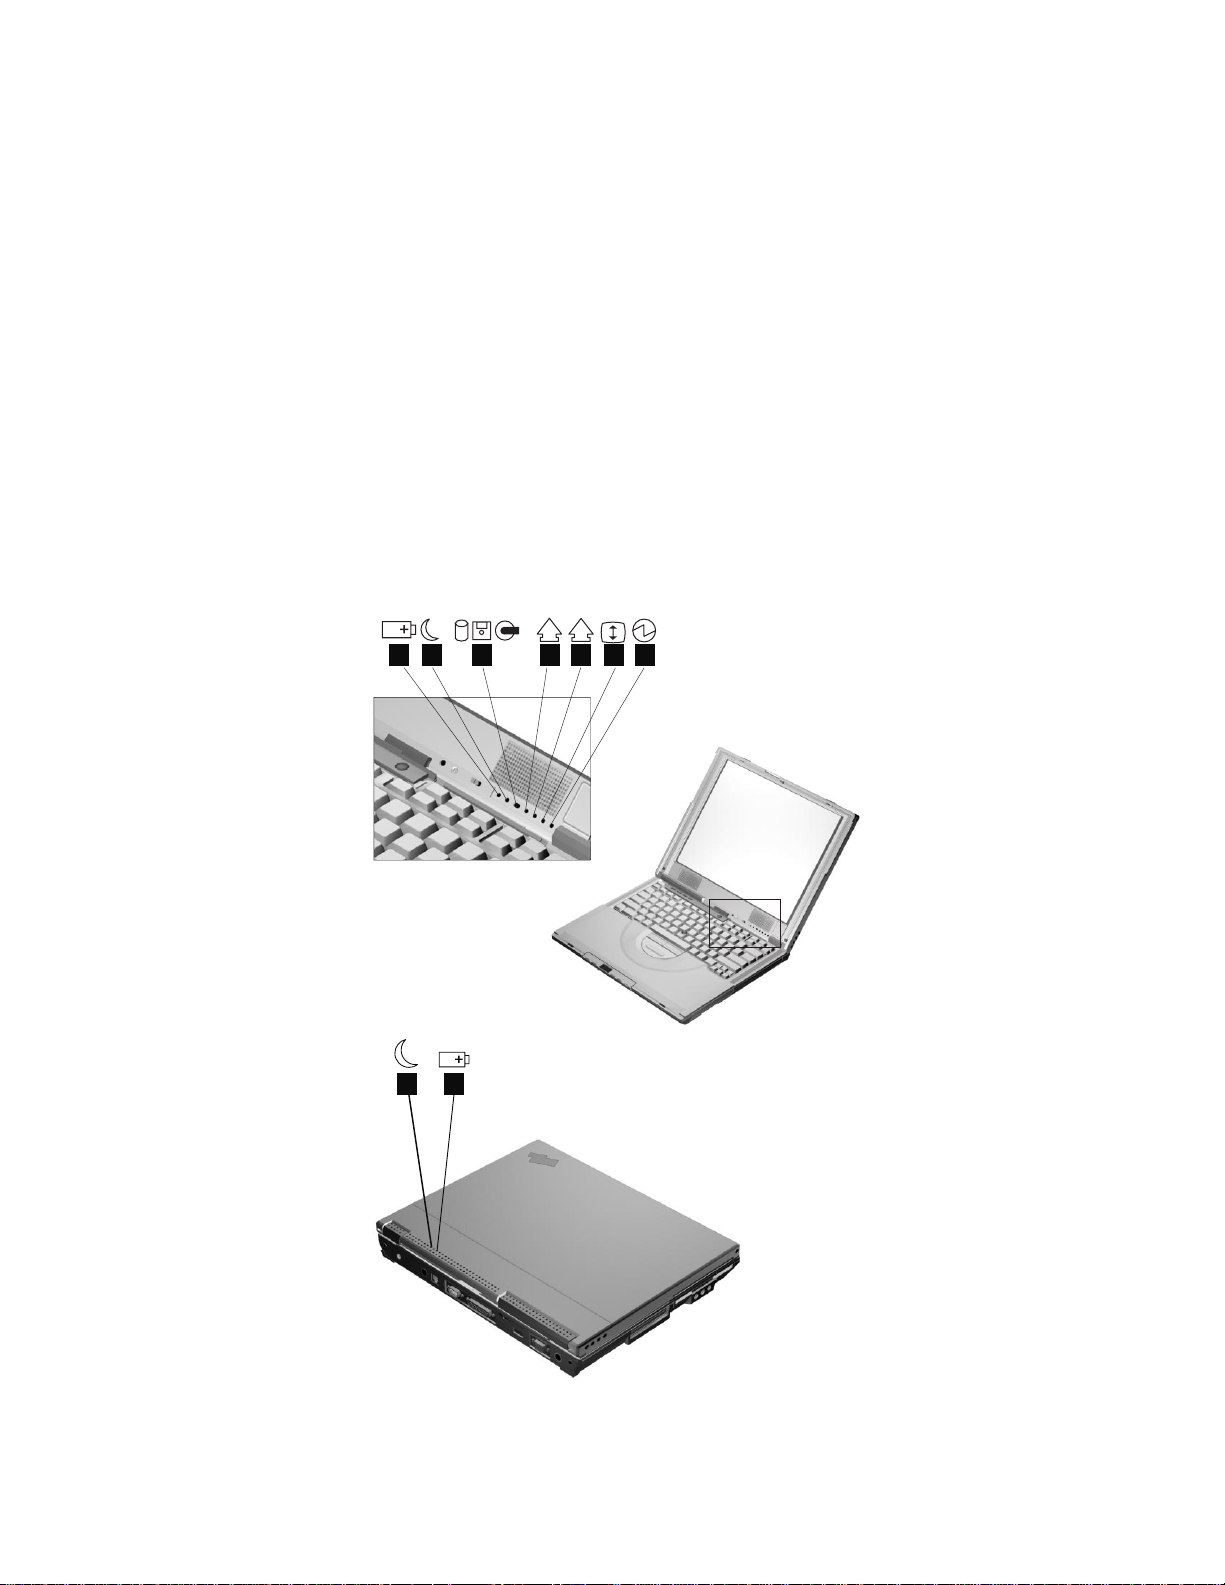
System Status Indicators
System Status Indicators
The system-status indicators on the computer show the current
status of your computer by their on or off states and colors (green
and orange). Each indicator is identified with a symbol. The following
shows the location and the meaning of each icon:
12 6
3
1
4
A
5
7
2
1
8ThinkPad i Series 1400/1500 User's Reference
System Status Indicators
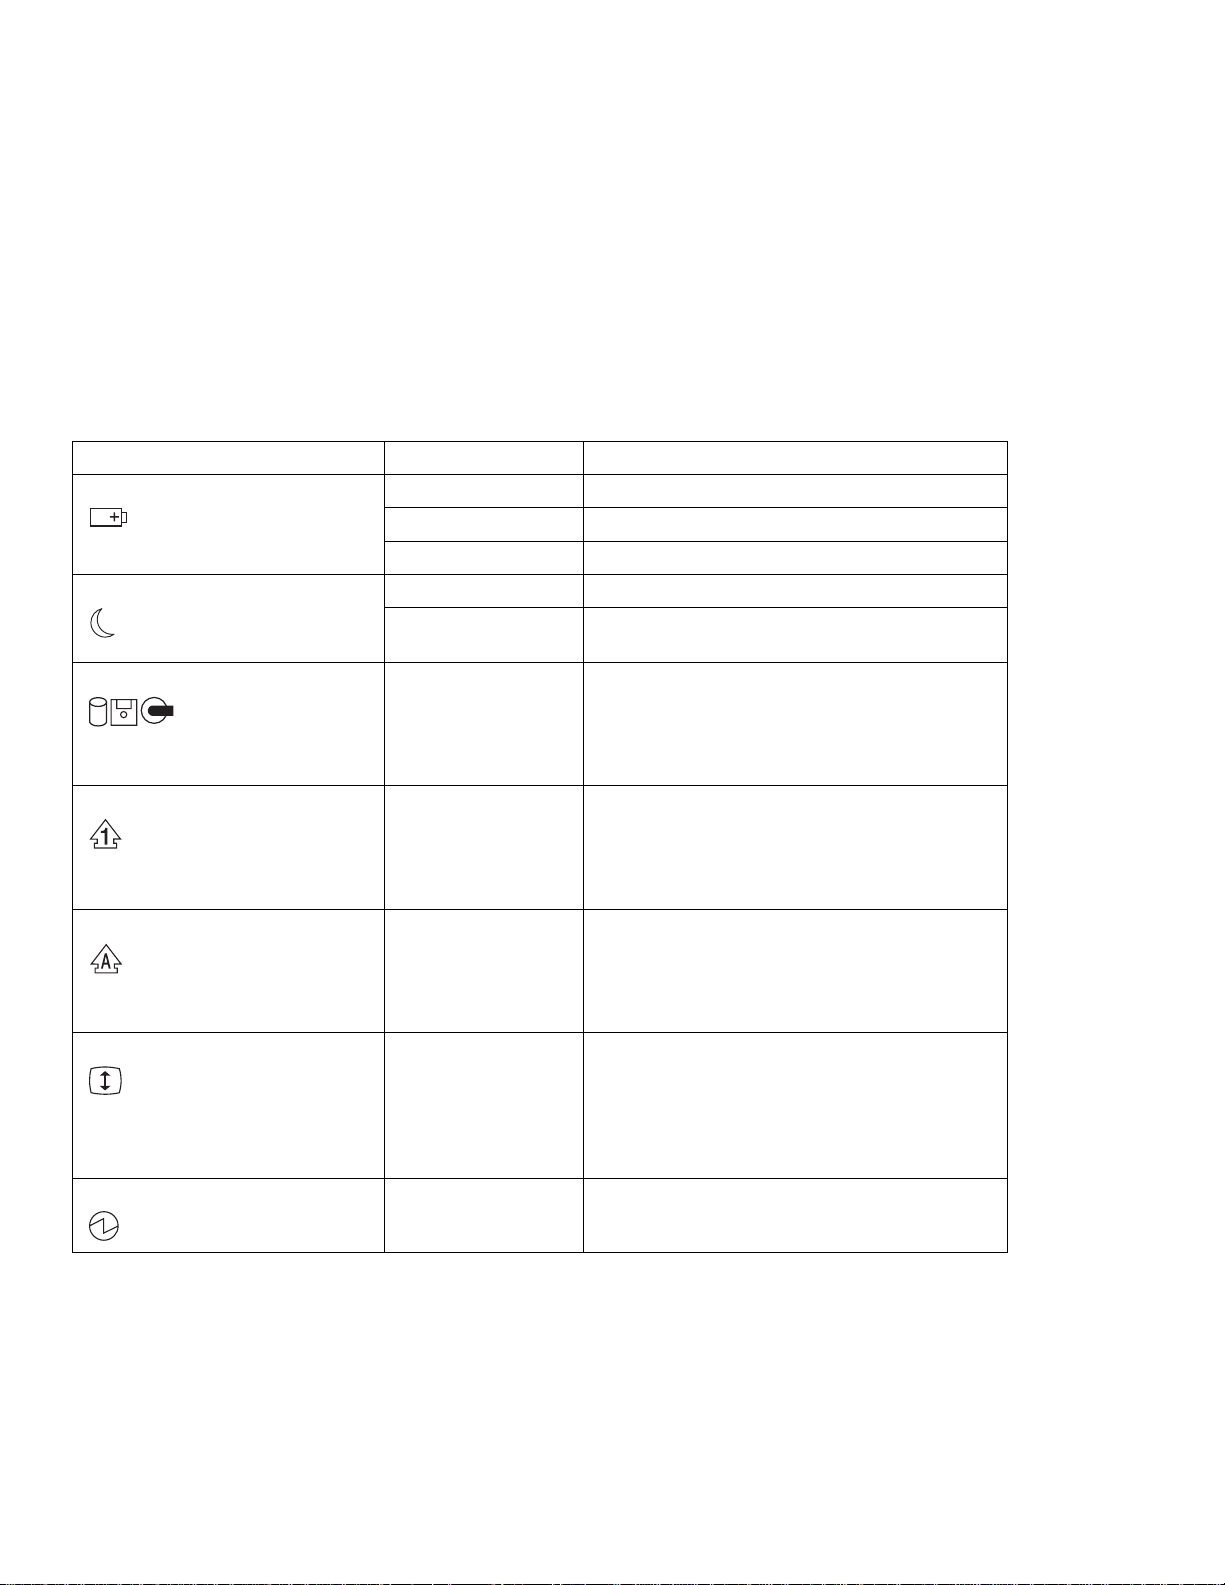
Symbol Color Meaning
(1) Battery status Green Enough battery power remains for operation.
Blinking orange The battery pack needs to be charged
Orange The battery pack is being charged.
(2) Standby mode Green The computer is in standby mode
Blinking green The computer is entering or resuming from
hibernation mode.
(3) Drive in use Orange Data is being read from or written to the hard
disk, floppy drive, or data is being read from the
CD-ROM drive. Do not enter standby mode or
power off the computer when this indicator is
on.
(4) Numeric lock Green The numeric keypad on the keyboard is
enabled. You enable or disable the keypad by
pressing and holding the Shift key, and
pressing the NumLk key. For details, see
“Numeric Keypad” on page 15.
(5) Caps lock Green Caps Lock mode is enabled. All alphabetic
characters
without the Shift key being pressed. You
enable or disable the Caps Lock mode by
pressing the Caps Lock key.
(6) Scroll lock Green Scroll Lock mode is enabled. The Arrow keys
can be used as screen-scroll function keys. The
cursor cannot be moved with the Arrow keys.
Not all application programs support this function.
pressing the ScrLk key.
(7) Power on Green The computer is operational. This indicator is on
when the computer is on.
(A-Z)
are entered in capital letters
You enable or disable Scroll Lock mode by
Getting Familiar with Your Computer 9

Distinctive Functions of Your Computer
Distinctive Functions of Your Computer
Your computer has unique keyboard functions and utility programs
for easy configuration. This section includes the following topics:
Keyboard functions
CD-ROM or DVD-ROM drive
ThinkPad utilities
Online User's Guide
Keyboard Functions
Your computer's keyboard has the following functions:
TrackPoint
Fn key
Easy Launch buttons
Numeric keypad
Keyboard Light
TrackPoint
The keyboard contains a unique cursor-pointing device called the
TrackPoint
single process you can perform without moving your fingers from
their typing position.
The TrackPoint consists of a stick on the keyboard and three click
buttons below the keyboard. Movement of the pointer on the screen
is controlled by the amount of pressure you apply to the nonslip cap
on the stick in any direction parallel to the keyboard; the stick itself
does not move. The speed at which the pointer moves corresponds
to the pressure you apply to the stick. The function of the click
buttons depends on the software you are using.
ThinkPad i Series 1400/1500 User's Reference
10
. Pointing, selecting, and dragging all become part of a

Distinctive Functions of Your Computer
Stick
Left click button
Internet Scroll Bar
Right click button
If you are not familiar with using the TrackPoint, these instructions
will help you get started:
1. Place your hands in the typing position and press gently with
either index finger on the stick in the direction you want the
cursor to move.
Pressing the stick away from you moves the cursor up the
screen; pressing it toward you moves the cursor down the
screen. You can also move the cursor side to side by pressing
sideways.
Note: The cursor may drift. This is not a defect. Do not use the
TrackPoint until the cursor stops moving.
Getting Familiar with Your Computer 11
Distinctive Functions of Your Computer
Mouse
pointer
Stick
Left click button
Internet Scroll Bar
Right click button
2. Press the click buttons with either thumb to select and drag as
required by your software.
Changing the Cap
The cap (1) on the end of the TrackPoint is removable. You can
replace it with the spare shipped with your computer.
1
For more information on customizing the TrackPoint and using the
Internet Scroll Bar, see “Customizing the TrackPoint” on page 50.
12
ThinkPad i Series 1400/1500 User's Reference

Distinctive Functions of Your Computer
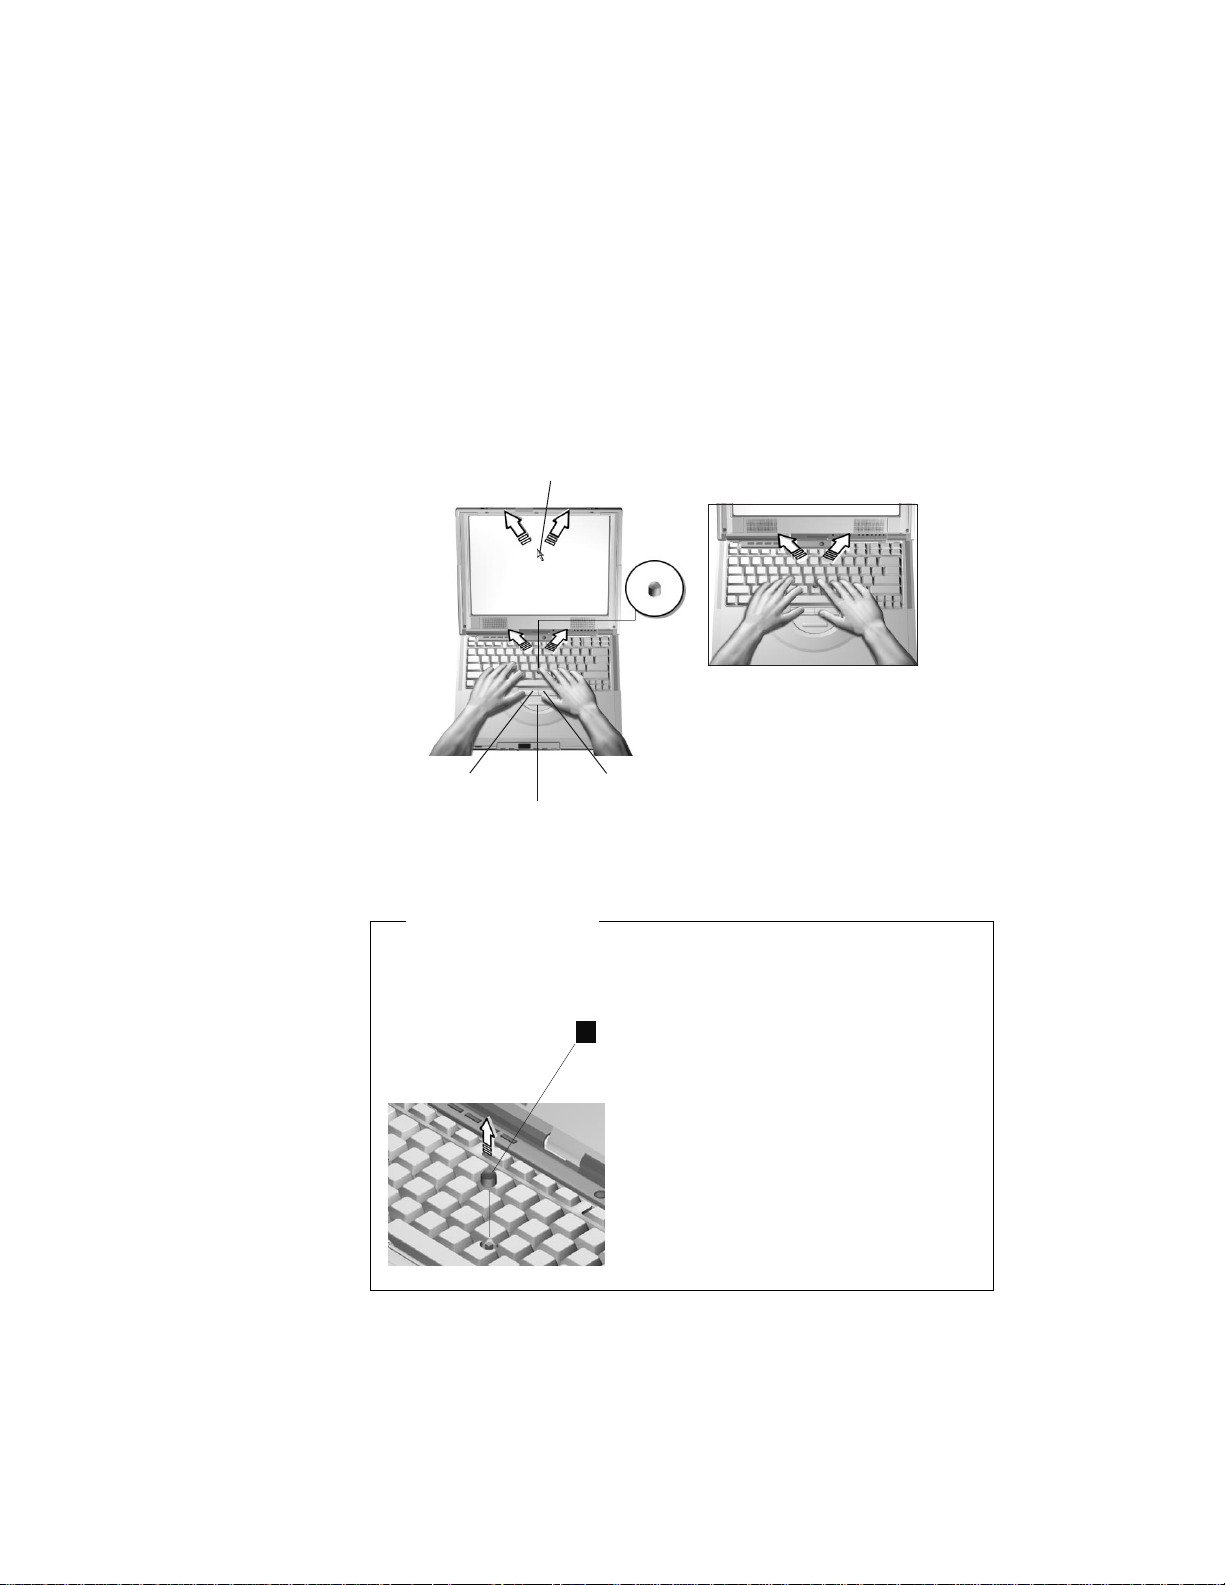
Fn Key
The Fn key function allows you to change operational features
instantly. When you use the following functions, press and hold the
Fn key; then press the appropriate function key (F1 to F12) or other
keys (Home and End).
Function
keys
Fn key
Getting Familiar with Your Computer 13
Distinctive Functions of Your Computer
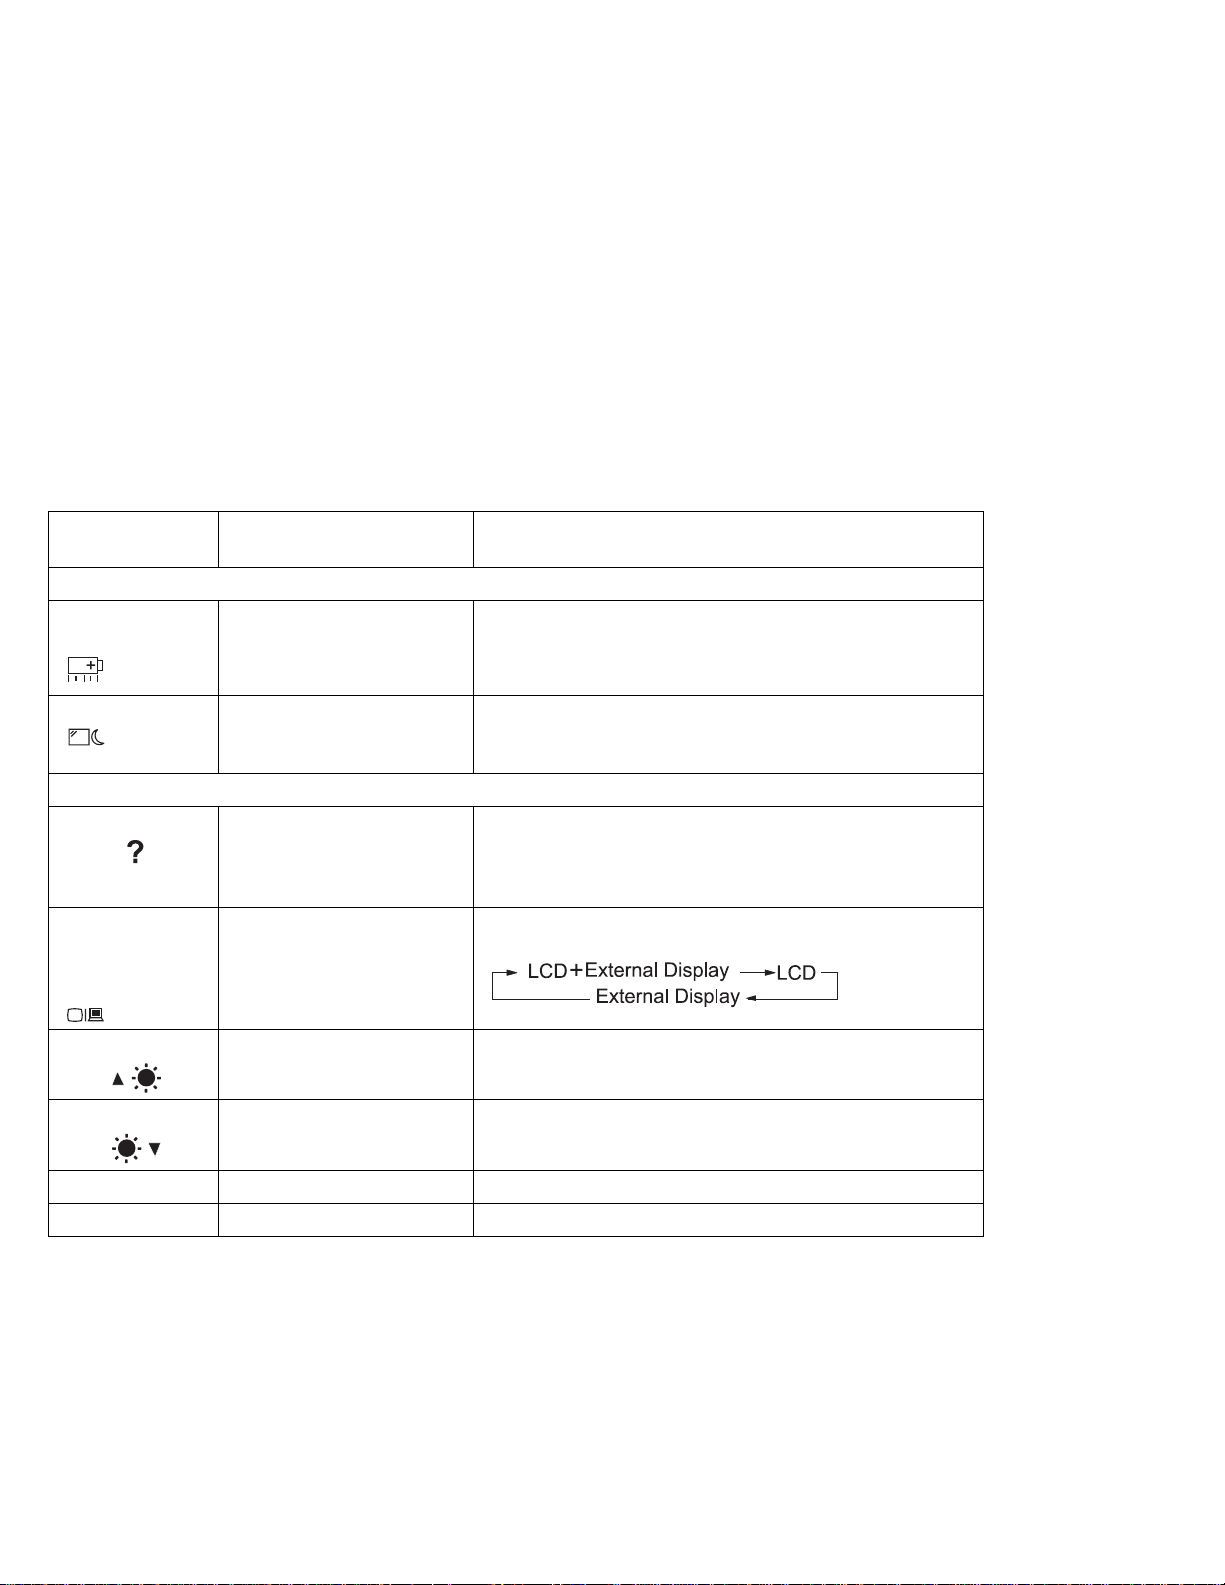
The following table shows the function of the Fn key combined with
keys:
Feature and
Icon Key Combination Meaning
Power Mode Functions
Power Manage-
ment Properties
Sleep Fn+F4 The computer enters sleep mode. You can set the sleep
Other Functions
Control at a
glance
Switching
between the
LCD and the
external monitor
Fn+F2 If you press this key combination, the Power Management
Properties window appears. You can view and set parameters for battery status in the window.
button function in the "Advanced" section of the Power
Management Properties window.
Fn+F1 The Control at a glance screen appears. This screen
briefly describes the different user control features of the
computer, including the Easy Launch buttons and the
Media Center.
Fn+F7 Computer output is displayed in the following order when
an external monitor is attached.
Increase brightness
Decrease brightness
Contrast up Fn+Insert This increases the contrast of the computer LCD.
Contrast down Fn+Delete This decreases the contrast of the computer LCD.
Fn+Home This increases the brightness of the computer LCD.
Fn+End This decreases the brightness of the computer LCD.
Note: The contrast Fn key functions are available only on HPA
models. The TFT models have optimized contrast settings.
Easy Launch Buttons
The Easy Launch buttons are four customizable keys located to the
left of the power switch. These keys allow you to launch programs or
visit Web sites at a single press of a button.
14
ThinkPad i Series 1400/1500 User's Reference
 Loading...