

Page 1

Part Number: 92P1836
Important
This publication contains product-specific parts
information for IBM ThinkPad Dock, ThinkPad Dock
II, ThinkPad Port Replicator, ThinkPad Mini Dock,
and ThinkPad Port Replicator II products.
This publication is intended for trained service
personnel who are familiar with ThinkPad products.
Before servicing an IBM ThinkPad products, be sure
to review the safety information on the hardware
maintenance manual of the ThinkPad computer.
FRU replacement notices
This section contains notices related to removing and
replacing parts. Read this section carefully before replacing
any FRU.
Screw notices
Loose screws can cause a reliability problem. In IBM
ThinkPad computer, this problem is addressed with special
nylon-coated screws that have the following characteristics:
v They maintain tight connections.
v They do not easily come loose, even with shock or
vibration.
v They are harder to tighten.
v They should be used only once.
Do the following when you service this machine:
v Keep the screw kit (for the P/N, see “Parts list” on
page 14) in your tool bag.
v Always use new screws.
v Use a torque screwdriver if you have one.
© Copyright IBM Corp. 2003
1
Page 2

Tighten screws as follows:
v Plastic to plastic
Turn an additional 90 degrees after the screw head
touches the surface of the plastic part:
90 degrees more
(Cross-section)
v Logic card to plastic
Turn an additional 180 degrees after the screw head
touches the surface of the logic card:
180 degrees more
(Cross-section)
v Torque driver
If you have a torque driver, refer to the “Torque” column
for each step.
v Make sure you use the correct screw. If you have a
torque screwdriver, tighten all screws firmly to the torque
shown in the table. Never use a screw that you
removed. Use a new one. Make sure the screws are
tightened firmly.
2
Page 3

Removing and replacing a FRU
This section presents directions and drawings for use in
removing and replacing a FRU. Be sure to observe the
following general rules:
1. Do not try to service any computer unless you have
been trained and certified. An untrained person runs
the risk of damaging parts.
2. Before replacing any FRU, review “FRU replacement
notices” on page 1.
3. Begin by removing any FRUs that have to be removed
before the failing FRU. Any such FRUs are listed at the
top of the page. Remove them in the order in which
they are listed.
4. Follow the correct sequence in the steps for removing
the FRU, as indicated in the drawings by the numbers
in square callouts.
5. When turning a screw to replace a FRU, turn it in the
direction indicated by the arrow in the drawing.
6. When removing the FRU, move it in the direction
indicated by the arrow in the drawing.
7. To put the new FRU in place, reverse the removal
procedure and follow any notes that pertain to
replacement.
8. When replacing a FRU, use the correct screw as
shown in the procedures.
DANGER
Before removing any FRU, power off the computer,
unplug all power cords from electrical outlets,
remove the battery pack, and then disconnect any
interconnecting cables.
Attention: Before the computer is powered on after FRU
replacement, make sure that all screws, springs, and other
small parts are in place and are not loose inside the
computer. Verify this by shaking the computer gently and
listening for rattling sounds. Metallic parts or metal flakes
can cause electrical short circuits.
3
Page 4
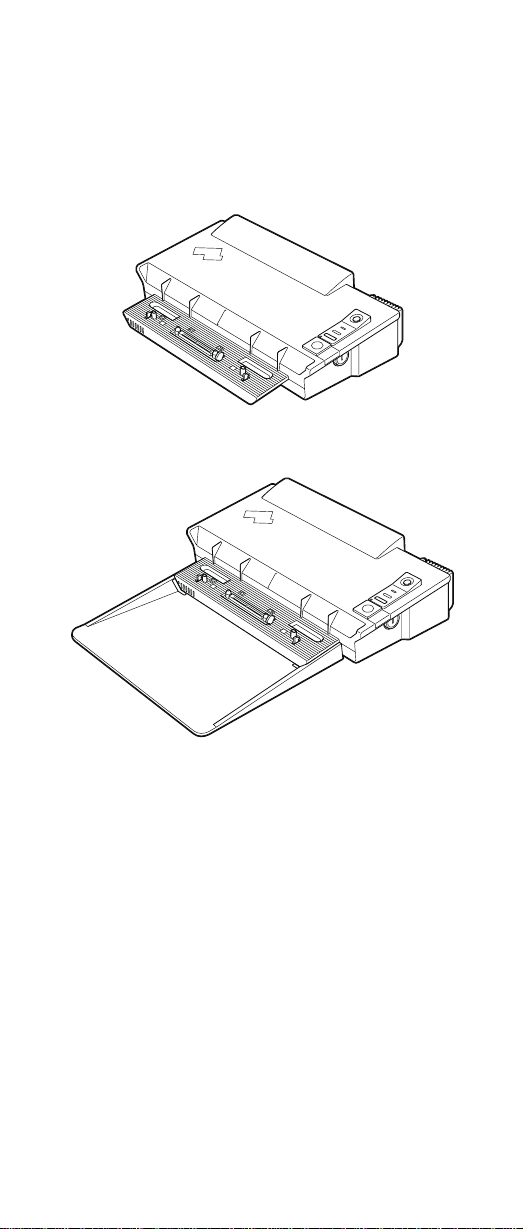
1010 ThinkPad Dock PCI cover
Before replacing the PCI cover:
There are two types of ThinkPad Dock, as follows:
v ThinkPad Dock: FRU no. 08N1546 (PCI cover: FRU no.
05K6246)
v ThinkPad Dock with extension plate: FRU no. 08N1537
(PCI cover: FRU no. 08N7317)
Confirm the FRU no. of the ThinkPad Dock first and
choose the proper PCI cover FRU for the ThinkPad Dock
you are servicing.
4
Page 5

Note: The following illustration shows how to remove the
PCI cover of ThinkPad Dock (FRU no. 08N1546).
Do the same to remove the PCI cover of ThinkPad
Dock with extension plate (FRU no. 08N1537).
1
1
2
(Bottom view)
5
Page 6

1020 ThinkPad Dock top cover
Note
This section is only for the ThinkPad Dock (FRU no.
08N1546). The top cover and screw kit for ThinkPad
Dock (FRU no. 12P4143) is not available for the
ThinkPad Dock with extension plate (FRU no.
08N1537) .
1
(Rear view)
Step Screw (quantity) Torque
1 M2.5 × 4.8 mm (2) 0.392 Nm
(4 kgfcm)
(continued)
6
Page 7

2
2
2
(Bottom view)
Step Screw (quantity) Torque
2 M2.5 × 4.8 mm (8) 0.392 Nm
(4 kgfcm)
(continued)
7
Page 8

Make sure that the system lock key A is set to the Unlock
position. Release the front latches in step 3, and then
remove the top cover 4. For step 5, see the inside
view, shown in the circle.
4
3
5
A
When replacing the top cover, do the following:
v Make sure that the springs are placed correctly.
(continued)
8
Page 9

v Make sure that the device release lever is seated
correctly.
v Make sure that the release button works correctly.
9
Page 10

2010 ThinkPad Dock II PCI cover
1
(Bottom view)
1
2
10
Page 11

2020 ThinkPad Dock II top cover
1
1
1
(Rear view)
Step Screw (quantity) Torque
1 M2.5 × 4.8 mm (3) 0.392 Nm
2
2
(4 kgfcm)
2
2
Step Screw (quantity) Torque
2 M2.5 × 4.8 mm (4) 0.392 Nm
(4 kgfcm)
(continued)
11
Page 12

3
3
(Bottom view)
Step Screw (quantity) Torque
3 M2.5 × 4.8 mm (6) 0.392 Nm
(4 kgfcm)
(continued)
12
Page 13

Make sure that the system lock key A is set to the
Unlock position. Release the front latches in step 4, and
then remove the top cover 5. Then detach the connector
cable 6 as in the figure.
5
4
6
A
13
Page 14

Parts list
FRU P/N CRU
ThinkPad Dock 08N1546 N
ThinkPad Dock with extension plate 08N1537 N
ThinkPad Dock II 67P9010 *
ThinkPad Mini Dock 67P9011 *
ThinkPad Port Replicator 08N1536 N
ThinkPad Port Replicator II 74P6735 *
ID
Optional FRUs
FRU P/N CRU
PCI cover for ThinkPad Dock 05K6246 N
Top cover and screw kit for ThinkPad Dock 12P4143 N
PCI cover for ThinkPad Dock with extension
plate
Top cover and screw kit for ThinkPad Dock II 46P3085 **
PCI cover for ThinkPad Dock II 46P3086 *
AC adapter (2 pin, 120 W), DELTA for
ThinkPad Mini Dock
AC adapter (2 pin, 120 W), LITEON for
ThinkPad Mini Dock
AC adapter (3 pin, 120 W), LITEON for
ThinkPad Mini Dock
AC adapter (3 pin, 120 W), LITEON for
ThinkPad Mini Dock
08N7317 N
02K7086 *
02K7092 *
02K7094 *
02K7096 *
ID
14
Page 15

Power cords (ThinkPad Dock and
ThinkPad Dock II)
IBM power cords for a specific country or region are
usually available only in that country or region:
For 3-pin power cords:
Region P/N CRU
Argentina 36L8868 *
Australia, New Zealand 75H8988
Brazil 49P2101
Canada, Thailand, U.S. 75H8989
Denmark 75H8992
European countries 75H8990
India, South Africa 75H8993
Israel 75H8999
Italy 75H8998
Japan 75H8996
Korea 76H3536
China (P.R.C.) (other than Hong Kong S.A.R) 02K0540
Switzerland 75H8997
U.K. 75H8994
ID
15
Page 16

Power cords (ThinkPad Mini Dock)
IBM power cords for a specific country or region are
usually available only in that country or region:
For 2-pin power cords:
Region P/N CRU
Canada, U.S. 13H5264 *
Japan 13H5273
Argentina 36L8870
Brazil 49P2095
ID
For 3-pin power cords:
Region P/N CRU
Australia, New Zealand 76H3514 *
Taiwan, Thailand 76H3516
Italy 76H3530
Denmark 76H3520
U.K., China (Hong Kong S.A.R.) 76H3524
European countries 76H3518
India, South Africa 76H3522
Israel 76H3532
Korea 76H3535
China (P.R.C.) (other than Hong Kong S.A.R.) 02K0539
Switzerland 76H3528
ID
16
 Loading...