

Page 1
Color Monitor
3-867-449-11 (1)
P76
Operating Instructions
Mode d’emploi
Bedienungsanleitung
Manual de instrucciones
Istruzioni per l’uso
GB
FR
DE
ES
IT
Page 2

Page 3
DANGER
To avoid shock hazard:
• Do not remove the covers.
• Do not operate this product unless the stand is attached.
• Do not connect or disconnect this product during an electrical storm.
• The power cord plug must be connected to a properly wired and grounded power outlet.
• Any equipment to which this product will be attached must also be connected to properly wired and grounded power
outlets.
• To isolate the monitor from the electrical supply, you must remove the plug from the power outlet. The power outlet should
be easily accessible.
Handling:
• Your color monitor is heavy, so handle it with care. IBM recommends that this monitor is moved or lifted by two people.
DANGER
Pour éviter les risques d’électrocution :
• Ne retirez pas les capots du moniteur.
• N’utilisez pas ce produit si le socle n’est pas fixé.
• Ne connectez, ni ne déconnectez ce produit pendant un orage.
• Le câble d’alimentation doit être connecté à une prise électrique correctement mise à la terre et en bon état de marche.
• Tout équipement auquel ce produit est relié doit être également connecté à une prise correctement mise à la terre et en bon
état de marche.
• Pour isoler le moniteur de la source d’alimentation électrique, vous devez le débrancher de la prise électrique. Cette prise
doit être facile d’accès
Manutention :
• Votre moniteur couleurs est lourd et doit donc être manipulé avec soin. IBM vous conseille de le déplacer ou de le porter à
deux.
Getting Started
Getting Started
GEFAHRENHINWEIS
Um die Gefahr eines elektrischen Schlags zu vermeiden, folgendes beachten:
• Unter keinen Umständen die Abdeckungen abnehmen.
• Das Produkt nicht in Betrieb nehmen, wenn der Sockel nicht montiert ist.
• Das Gerät nicht während eines Gewitters an eine Steckdose anschließen oder von ihr trennen.
• Das Netzkabel ist an eine ordnungsgemäß verdrahtete und geerdete Steckdose anzuschließen.
• Jedes Gerät, mit dem dieses Produkt verbunden wird, muß ebenfalls an eine ordnungsgemäß verdrahtete und geerdete
Steckdose angeschlossen werden.
• Um den Monitor von der Stromversorgung zu trennen, muß der Stecker aus der Steckdose gezogen werden. Die Steckdose
sollte leicht zugänglich sein.
Handhabungshinweis:
• Ihr Farbbildschirm ist schwer. Sie sollten daher beim Transport vorsichtig vorgehen. IBM empfiehlt Ihnen, den Bildschirm
zu zweit anzuheben bzw. zu tragen.
GEVAAR
Ga als volgt te werk om het gevaar van een elektrische schok te voorkomen:
• Verwijder in geen enkel geval de kap.
• Stel dit produkt alleen in werking als de voet is bevestigd.
• Sluit dit apparaat niet aan op, of verbreek de aansluiting van dit apparaat niet van een contactdoos tijdens onweer.
• Het netsnoer moet worden aangesloten op een geaarde contactdoos met correcte bedrading.
• Ook alle apparatuur waarop dit produkt wordt aangesloten moet zijn aangesloten op een contactdoos met correcte
bedrading.
• Om het beeldscherm te ontkoppelen van de netvoeding, dient u de stekker uit de contactdoos te trekken. De contactdoos
dient goed toegankelijk te zijn.
Verplaatsing:
• Uw kleurenmonitor is zwaar, ga er dus voorzichtig mee om. IBM raadt aan dat het tillen of verplaatsen ervan door twee
mensen gebeurt.
i
Page 4
PELIGRO
Para evitar riesgos de descargas eléctricas:
• No retire bajo ningún concepto las cubiertas.
• No maneje el monitor sin antes acoplar el soporte.
• No conecte ni desconecte el equipo de una toma de alimentación durante una tormenta eléctrica.
• El cable de alimentación debe estar conectado a un enchufe debidamente cableado y con toma de tierra.
• Cualquier equipo al que se vaya a conectar este producto también debe estar conectado a tomas de alimentación cableadas y
conectadas a tierra correctamente.
• Para aislar el monitor del suministro eléctrico, debe retirar el enchufe de la toma de alimentación. Esta toma deberá ser de
fácil acceso.
Movimentazione del monitor:
• Il monitor a colori è pesante, si consiglia quindi di maneggiarlo con attenzione. IBM raccomanda che il monitor venga mosso
o sollevato da due persone.
PERICOLO
Per evitare il rischio di scariche elettriche:
• Non rimuovere nessuna parte del telaio.
• Non accendere il prodotto se il piedistallo non è stato montato.
• Non collegare o scollegare il prodotto nel corso di un temporale.
• La spina del cavo di alimentazione deve essere collegata ad una presa di corrente con messa a terra, installata in maniera
appropriata.
• Le apparecchiature a cui il prodotto viene attaccato devono essere collegate a prese di corrente con messa a terra, installate
in maniera appropriata.
• Per isolare il monitor dalla corrente elettrica, staccare la spina dalla presa di alimentazione, che deve essere facilmente
accessibile.
Manipulación:
• El monitor de color es pesado, por lo que debe manipularlo con cuidado. IBM recomienda moverlo con la ayuda de dos
personas.
PERIGO
Para evitar o perigo de choques eléctricos:
• Não retire as coberturas.
• Não utilize este produto antes de montar a base.
• Não ligue nem desligue este produto durante uma tempestade eléctrica.
• O cabo de alimentação deve ser ligado a uma tomada eléctrica devidamente ligada à terra.
• Qualquer equipamento ligado a este produto deve estar ligado a tomadas eléctricas devidamente ligadas à terra.
• Para isolar o monitor da fonte de alimentação, retire a ficha do cabo de alimentação da tomada eléctrica. A tomada eléctrica
deve ser de fácil acesso.
Manuseio:
• Seu monitor colorido é pesado, então manuseie-o com cuidado. A IBM recomenda que o monitor seja movido ou carregado
por duas pessoas.
FARE
Sådan undgår du elektrisk stød:
• Kabinettet må under ingen omstændigheder fjernes.
• Undgå at anvende dette produkt, uden at vippe/drejefoden er monteret.
• Undgå at tilslutte eller frakoble dette produkt i tordenvejr.
• Netledningen skal være tilsluttet en korrekt jordet stikkontakt med korrekt ledningsføring.
• Alt udstyr, som tilsluttes dette produkt, skal også være tilsluttet korrekt jordede stikkontakter med korrekt ledningsføring.
• For at isolere skærmen fra strømforsyningen, skal stikket tages ud af stikkontakten. Stikkontakten bør være let tilgængelig.
Håndtering:
• Farveskærmen er tung, så den skal håndteres forsigtigt. IBM anbefaler, at skærmen flyttes eller løftes af to personer.
ii
Page 5
FARE
Slik unngår du fare for elektrisk støt:
• Ikke ta av dekslene.
• Ikke bruk produktet dersom sokkelen ikke er montert.
• Ikke koble produktet til eller fra under tordenvær.
• Pluggen på strømledningen må kobles til korrekt montert og jordet strømuttak.
• Utstyr som dette produktet eventuelt blir koblet til, må også kobles til korrekt montert og jordet strømuttak.
• For å isolere skjermen fra strømkilden må du ta ut pluggen fra strømuttaket. Strømuttaket bør være lett tilgjengelig.
Käsittely:
• Värinäyttö on painava, joten käsittele sitä varoen. IBM suosittelee, että kaksi henkilöä siirtää tai nostaa sitä.
Varning - livsfara
För att undvika risk för elektriska stötar måste du tänka på följande:
• Ta inte bort några skyddskåpor.
• Använd inte den här produkten innan du har satt fast stativet.
• Anslut inte produkten till ett eluttag under åskväder. Koppla inte heller ur produkten från ett eluttag under åskväder.
• Strömkabeln måste anslutas till ett felfritt och jordat uttag.
• All utrustning som den här produkten kopplas till måste också anslutas till felfria och jordade uttag.
• För att bryta strömmen till bildskärmen måste du dra ut kontakten. Vägguttaget bör vara lätt att komma åt.
Hantering:
• Färgskärmen är tung och bör därför hanteras försiktigt. IBM rekommenderar att den flyttas eller lyfts av två personer.
Getting Started
Getting Started
VAARA
Sähköiskun vaaran välttämiseksi:
• Älä avaa laitteen kansia missään tilanteessa.
• Älä käytä laitetta, ellei jalustaa ole kiinnitetty.
• Älä kytke laitetta pistorasiaan tai irrota sitä pistorasiasta ukonilman aikana.
• Virtajohto on kytkettävä asianmukaisesti johdotettuun ja maadoitettuun pistorasiaan.
• Kaikki muutkin laitteet, joihin tämä tuote on liitetty, on kytkettävä asianmukaisesti johdotettuihin pistorasioihin.
• Kun haluat erottaa näyttimen sähköverkosta, sinun pitää irrottaa sen verkkojohto pistorasiasta. Pistorasian pitäisi olla
mahdollisimman lähellä näytintä ja vaivattomasti käsillä.
Håndtering:
• Värimonitorinne on painava, joten käsitelkää sitä varovasti. IBM suosittelee, että monitorin siirtämiseen tai kantamiseen
käytetään kahta henkilöä.
ΚΙΝ∆ΥΝΟΣ
Για την αποφυγή κινδύνου ηλεκτροπληξίασ:
• Μην αφαιρείτε τα καλύµµατα.
• Μη θέτετε το προϊν αυτ σε λειτουργία χωρίσ να είναι στερεωµένη η βάση του.
• Μη συνδέετε ή αποσυνδέετε το προϊν αυτ κατά τη διάρκεια ηλεκτροθύελλασ.
• Το φισ του καλωδίου ρευµατολήπτη πρέπει να συνδεθεί σε µια πρίζα µε σωστή καλωδίωση και γείωση.
• Κάθε συσκευή στην οποία συνδεθεί αυτ το προϊν πρέπει επίσησ να συνδεθεί σε πρίζα µε σωστή καλωδίωση και
γείωση.
• Για να αποµονώσετε την οθνη απ την παροχή ρεύµατοσ, πρέπει να αφαιρέσετε το φισ απ την πρίζα. Η πρίζα
πρέπει να είναι σε σηµείο εύκολα προσβάσιµο.
Χειρισµσ:
• Η έγχρωµη οθνη σασ είναι βαριά, γι’αυτ χειριστείτε την µε προσοχή. Η IBM συνιστά η οθνη να µεταφέρεται ή
να σηκώνεται απ δύο άτοµα.
iii
Page 6

TEHLİKE
Elektrik çarpması tehlikesinden kaçınmak için:
• Kapakları çıkarmayınız.
• Bu cihazı kaidesine takılı durumda değilken çalıştırmayınız.
• Bu cihazı elektriksel fırtına sırasında prize takmayınız veya prizden çıkarmayınız.
• Elektrik kablosunun fişi, elektrik ve toprak bağlantıları usulüne uygun olarak yapılmış bir prize takılmalıdır.
• Bu cihazın bağlanacağı diğer tüm cihazlar da elektrik ve toprak bağlantıları usulüne uygun olarak yapılmış prize takılmış
olmalıdır.
• Monitörün elektrikle bağlantısını kesmek için fişini prizden çekmeniz gereklidir. Priz, kolayca erişilebilecek bir yerde olmalıdır.
Kaldırma:
• Renkli monitörünüz ağırdır; kaldırırken dikkatli olunuz. IBM, monitörün iki kişi tarafından taşınmasını veya kaldırılmasını
tavsiye etmektedir.
iv
Page 7

English
Getting Started
Getting Started
GB
F
ES
C
Page 8

Edition 1
This publication could contain technical inaccuracies or typographical errors. Changes are made periodically to the
information herein; these changes will be made in later editions. IBM may make improvements and/or changes in the
product(s) and/or program(s) at any time.
It is possible that this publication may contain reference to, or information about, IBM products (machines and programs),
programming, or services that are not announced in your country.
Requests for copies of this publication and for technical information about IBM products should be made to your IBM
Authorized Dealer or IBM Retailer.
No part of this publication may be reproduced or distributed in any form or by any means without prior permission in writing
from the International Business Machines Corporation.
References in this publication to IBM products, programs, or services do not imply that IBM intends to make these available in
all countries in which IBM operates. Any reference to an IBM product, program or service is not intended to state or imply that
only IBM’s product, program, or service may be used. Any functionally equivalent product, program, or service that does not
infringe any of IBM’s intellectual property rights or other legally protectable rights may be used instead of the IBM product,
program, or service. Evaluation and verification of operation in conjunction with other products, programs, or services, except
those expressly designated by IBM, are the user’s responsibility.
IBM may have patents or pending patent applications covering subject matter in this document. The furnishing of this
document does not give you any license to these patents.
Trademarks
The following terms, used in this publication, are trademarks or service marks of the IBM Corporation in the United States or
other countries:
IBM
© Copyright International Business Machines Corporation 1999.
All rights reserved.
Page 9

TABLE OF CONTENTS
Getting started
Precautions ...................................................................................................... 2
Identifying Parts and Controls ..................................................................... 3
Setup ................................................................................................................. 4
Customizing Your Monitor
Selecting the On-screen Display Language ................................................ 5
Adjusting the Picture Brightness and Contrast .......................................... 5
Introducing the On-screen Display System ................................................ 5
Using the SIZE/CENTER
Using the GEOMETRY
Using the COLOR
Using the CONVERGENCE
Using the LANGUAGE
Using the OPTION
Using the HELP
Resetting the Adjustments .......................................................................... 13
On-screen Display..................................................... 8
On-screen Display ..................................................... 12
On-screen Display ...................................... 6
On-screen Display ........................................... 7
On-screen Display .................................. 9
On-screen Display ......................................... 10
On-screen Display................................................ 10
Getting Started
GB
Technical Features
Power Saving Function ................................................................................ 14
Damper Wires ............................................................................................... 14
Plug & Play .................................................................................................... 14
Preset Modes ................................................................................................. 15
Displaying the Monitor’s Information....................................................... 15
Additional Information
Warning Messages........................................................................................ 15
Troubleshooting ............................................................................................ 16
Self-diagnosis Function ................................................................................ 18
Specifications ................................................................................................. 18
F
ES
C
• ENERGY STAR is a U.S. registered mark.
• Trinitron® is a registered trademark of Sony Corporation.
• VGA is a registered trademark of IBM Corporation of the U.S.A.
• VESA is a trademark of Video Electronics Standard Association.
• All other product names mentioned herein may be the trademarks or
registered trademarks of their respective companies.
• Furthermore, “™” and “®" are not mentioned in each case in this
manual.
1
Page 10
Getting started
Getting Started
Precautions
Installation
• Prevent internal heat build-up by allowing adequate air
circulation. Do not place the monitor on surfaces (rugs,
blankets, etc.) or near materials (curtains, draperies) that
may block the ventilation holes.
• Do not install the monitor near heat sources such as
radiators or air ducts, or in a place subject to direct
sunlight, excessive dust, mechanical vibration or shock.
• Do not place the monitor near equipment which generates
magnetism, such as a transformer or high voltage power
lines.
Maintenance
• Clean the cabinet, panel and controls with a soft cloth
lightly moistened with a mild detergent solution. Do not
use any type of abrasive pad, scouring powder or solvent,
such as alcohol or benzine.
• Do not rub, touch, or tap the surface of the screen with
sharp or abrasive items such as a ballpoint pen or
screwdriver. This type of contact may result in a scratched
picture tube.
• Clean the screen with a soft cloth. If you use a glass
cleaning liquid, do not use any type of cleaner containing
an anti-static solution or similar additive as this may
scratch the screen’s coating.
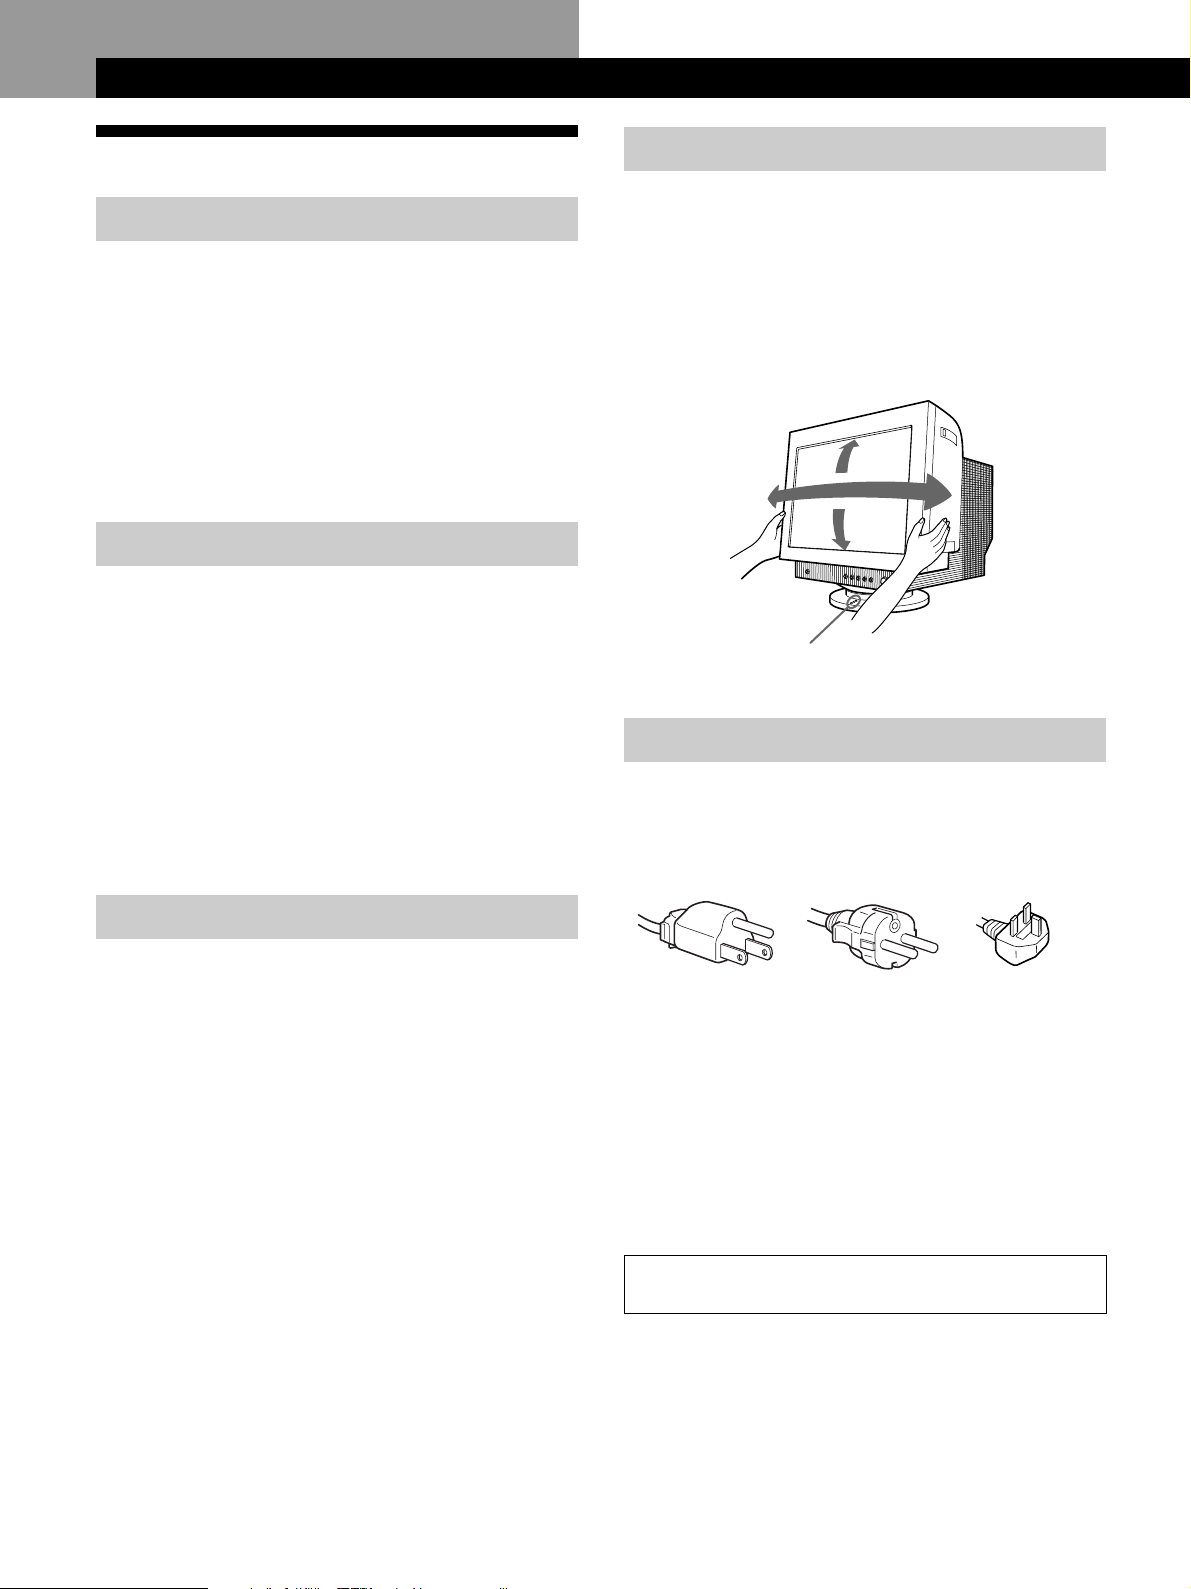
Use of the Tilt-Swivel
This monitor can be adjusted within the angles shown
below. To find the center of the monitor’s turning radius,
align the center of the monitor’s screen with the centering
dots on the stand.
Hold the monitor at the bottom with both hands when you
turn it horizontally or vertically. Be careful not to pinch
your fingers at the back of the monitor when you tilt the
monitor up vertically.
15°
90°
90°
5°
Centering dots
Warning on power connection
• Use an appropriate power cord for your local power
supply.
Examples of plug types:
Transportation
When you transport this monitor for repair or shipment, use
the original carton and packing materials.
for 100 to 120 V AC for 200 to 240 V AC
• Before disconnecting the power cord, wait at least 30
seconds after turning off the power to allow the static
electricity on the CRT display surface to discharge.
• After the power has been turned on, the CRT is
demagnetized (degaussed) for about 5 seconds. This
generates a strong magnetic field around the metal frame,
which may affect the data stored on magnetic tapes and
disks near the bezel. Place magnetic recording equipment,
tapes and disks away from this monitor.
The equipment should be installed near an easily
accessible electrical outlet.
for 240 V AC only
2
Page 11

Identifying Parts and Controls
See the pages in parentheses for further details.
Getting Started
Getting Started
Front
1 ? (reset) button (page 13)
Resets the adjustments to the factory settings.
2 ¨ (brightness) down and up (./>) buttons
(pages 5 – 13)
Adjust the picture brightness.
Function as the (./>) buttons when adjusting other
items.
3 button (pages 5 – 13, 15)
Displays the MENU OSD.
Rear
6 AC IN connector (page 4)
Provides AC power to the monitor.
7 Video input connector (HD15) (page 4)
Inputs RGB video signals (0.700 Vp-p, positive) and
SYNC signals.
1 2 3 4
876
11 12 13 14 15
5
10
9
GB
F
ES
C
4 > (contrast) left and right (?//) buttons
(pages 5 – 13, 18)
Adjust the contrast.
Function as the (?//) buttons when adjusting other
items.
5 u (power) switch and indicator (pages 14,
18)
Turns the monitor on or off.
The power indicator lights up in green when the
monitor is turned on, and either flashes in green and
orange, or lights up in orange when the monitor is in
power saving mode.
Pin No.
1
2
3
4
5
6
7
* Display Data Channel (DDC) Standard of VESA
Signal
Red
Green
(Sync on Green)
Blue
ID (Ground)
DDC Ground*
Red Ground
Green Ground
Pin No.
8
9
10
11
12
13
14
15
Signal
Blue Ground
—
Ground
ID (Ground)
Bi-Directional
Data (SDA)*
H. Sync
V. Sync
Data Clock(SCL)*
3
Page 12
Getting Started
Setup
This monitor works with platforms running at horizontal
frequencies between 30 and 96 kHz.
Step 1: Make sure the computer and
monitor are switched off
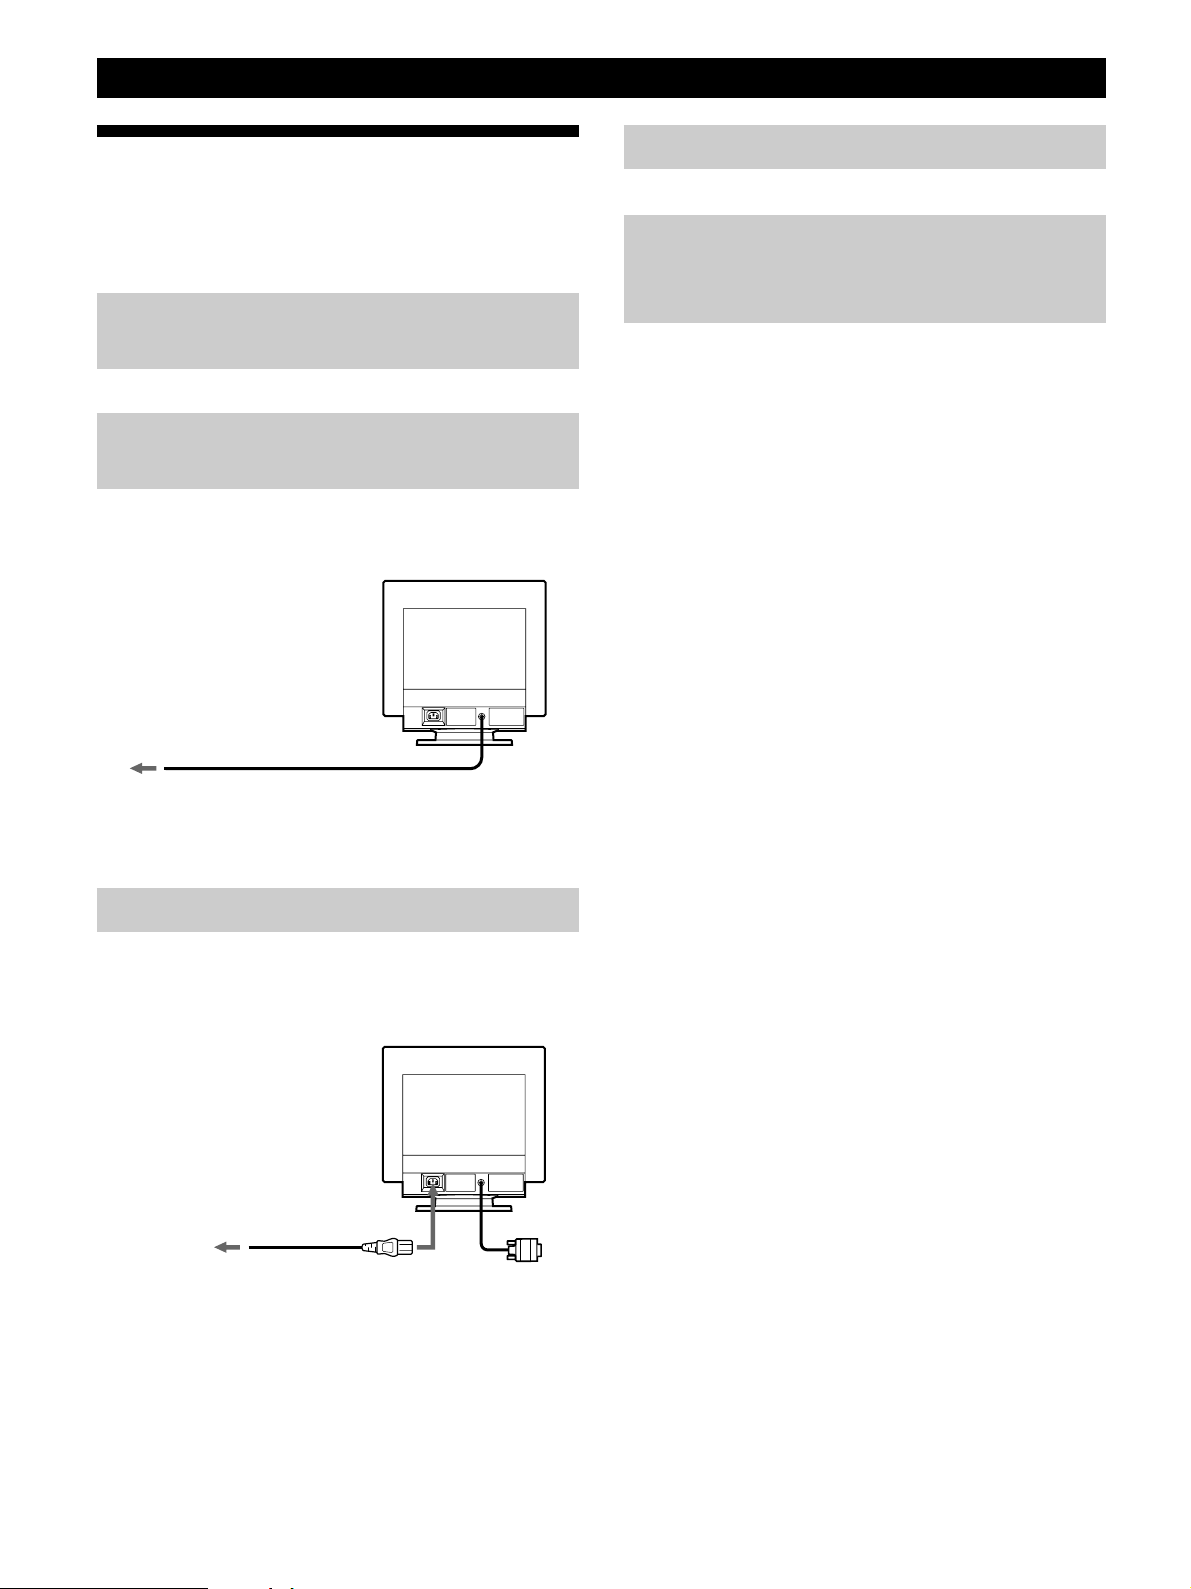
Step 2: Connect the monitor to the
computer
Connect the video signal cable to the video output of the
computer.
Step 4: Turn on the monitor and computer
Step 5: Adjust the monitor’s controls
according to your personal
preference
The installation of your monitor is complete.
Note
If no picture appears on the screen and “MONITOR IS WORKING”
or “MONITOR IS IN POWER SAVE MODE” appears on the screen,
see “Warning Messages” on page 15.
To a computer with
an HD15 video output
Note
Do not short the pins of the video signal cable.
Step 3: Connect the power cord
With the monitor switched off, connect one end of the
proper power cord for your local supply to the monitor and
the other end to a power outlet.
to a power outlet to AC IN
Power cord
4
Page 13

Customizing Your Monitor
Before adjusting
• Connect the monitor and the computer, and turn them on.
Getting Started
Customizing Your Monitor
Introducing the On-screen
Display System
Selecting the On-screen Display
Language
If you need to change the OSD language, see “Using the
LANGUAGE
The default setting is English.
On-screen Display” on page 10.
Adjusting the Picture Brightness
and Contrast
Once the setting is adjusted , it will be stored in memory for
all input signals received.
1 Press the ¨ (brightness) ./> or > (contrast) ?//
buttons.
The BRIGHTNESS/CONTRAST OSD appears.
BR I GHTNESS / CONTRAST
26 26
2 For brightness adjustment
Press the ¨./> buttons.
Most adjustments are made using the MENU OSD.
MENU OSD
Press the button to display the MENU OSD.
This MENU OSD contains links to the other OSDs described
below.
MENU
EX I T
S I ZE / CENTER
GEOMETRY
COLOR
CONVERGENCE
LANGUAGE
OPT I ON
HELP
68.7kHz/ 85Hz
1024x 768
1 EXIT
Closes the MENU OSD.
2 SIZE/CENTER
Displays the SIZE/CENTER OSD for adjusting the
picture’s size, centering or zoom.
3 GEOMETRY
Displays the GEOMETRY OSD for adjusting the picture
rotation and pincushion, etc.
OK
GB
F
ES
C
> . . . for more brightness
. . . . for less brightness
For contrast adjustment
Press the > ?// buttons.
/ . . . for more contrast
? . . . for less contrast
The OSD automatically disappears after about 3 seconds.
To reset, press the ? (reset) button while the OSD is on.
The brightness and contrast are both reset to the factory
settings.
4 COLOR
Displays the COLOR OSD for adjusting the color
temperature.
5 CONVERGENCE
Displays the CONVERGENCE OSD for adjusting the
picture’s horizontal and vertical convergence.
6 LANGUAGE
Displays the LANGUAGE OSD for selecting the
language.
7 OPTION
Displays the OPTION OSD for adjusting the OSD
position and degaussing the screen, etc.
8 HELP
Displays the HELP OSD for viewing helpful hints and
information about this monitor.
9 The horizontal and vertical frequencies of
the current input signal
The horizontal and vertical frequencies of the current
input signal are displayed.
!º The resolution of the current input signal
If the signal matches on of this monitor’s factory preset
modes, the resolution is displayed.
5
Page 14

Customizing Your Monitor
Using the SIZE/CENTER Onscreen Display
The SIZE/CENTER settings allow you to adjust the
picture’s size, centering or zoom.
Once the setting is adjusted, it will be stored in memory for
the current input signal.
1 Press the button.
The MENU OSD appears.
4 Press the ?// buttons to adjust the settings.
Select
(Horizontal Centering)
(Vertical Centering)
To
/ . . . to move the picture right
? . . . to move the picture left
/ . . . to move the picture up
? . . . to move the picture down
2 Press the ./> buttons to select “ SIZE/CENTER,”
and press the
The SIZE/CENTER OSD appears.
button again.
SI ZE / CENTER
26
3 Press the ./> buttons to select the item you want to
adjust.
Select
(Horizontal Centering)
To
adjust the horizontal centering of the
picture
(Horizontal Sizing)
(Vertical Sizing)
(Zoom)
Press the button once to return to the MENU OSD, and
twice to return to normal viewing. If no buttons are pressed,
the OSD closes automatically after about 30 seconds.
To reset, press the ? (reset) button while the OSD is on.
The selected item is reset to the factory setting.
Notes
The (Zoom) adjustment stops when the horizontal or vertical
size reaches its maximum or minimum value. The horizontal
adjustment value is not displayed in the menu.
/ . . . to increase picture width
? . . . to decrease picture width
/ . . . to increase picture height
? . . . to decrease picture height
/ . . . to enlarge the picture
? . . . to reduce the picture
(Vertical Centering)
(Horizontal Sizing)
(Vertical Sizing)
(Zoom)
6
adjust the vertical centering of the
picture
adjust the horizontal size of the
picture
adjust the vertical size of the picture
enlarge and reduce the picture
Page 15

Using the GEOMETRY Onscreen Display
The GEOMETRY settings allow you to adjust the shape and
orientation of the picture.
Once the
memory for all input signals received. All other adjustments
will be stored in memory for the current input signal.
1 Press the button.
The MENU OSD appears.
(Rotation) is adjusted, it will be stored in
Getting Started
Customizing Your Monitor
4 Press the ?// buttons to adjust the settings.
For
(Rotation)
(Pincushion)
Press
/ . . . to rotate the picture clockwise
? . . . to rotate the picture counterclockwise
/ . . . to expand the picture sides
? . . . to contract the picture sides
2 Press the ./> buttons to select “ GEOMETRY,” and
press the
The GEOMETRY OSD appears.
button again.
GEOMETRY
26
3 Press the ./> buttons to select the item you want
to adjust.
Select
(Rotation)
(Pincushion)
To
adjust the picture rotation
adjust the picture sides
(Pin Balance)
(Keystone)
(Key Balance)
Press the
twice to return to normal viewing. If no buttons are pressed,
the OSD closes automatically after about 30 seconds.
To reset, press the ? (reset) button while the OSD is on.
The selected item is reset to the factory setting.
button once to return to the MENU OSD, and
/ . . . to move the picture sides to the right
? . . . to move the picture sides to the left
/ . . . to increase the picture width at the
top
? . . . to decrease the picture width at the
top
/ . . . to move the top of the picture to
the right
? . . . to move the top of the picture to
the left
GB
F
ES
C
(Pin Balance)
(Keystone)
(Key Balance)
adjust the picture side balance
adjust the picture width
adjust the picture shape balance
7
Page 16

Customizing Your Monitor
Using the COLOR On-screen
Display
You can change the monitor’s color temperature. For
example, you can adjust or change the colors of a picture on
the screen to match the actual colors of the printed picture.
Once the setting is adjusted, it will be stored in memory for
all input signals received.
3 Press the ./> buttons to select the color
temperature.
There are two color temperature modes in the OSD.
The preset adjustments are 9,300K and 5,000K.
1 Press the button.
The MENU OSD appears.
2 Press the ./> buttons to select “ COLOR,” and
press the
The COLOR OSD appears.
button again.
COLOR
9300K
5000K
Selecting your own color temperature between
9,300K and 5,000K
Press the ./> buttons to select “
adjust by pressing the ?// buttons.
/ . . . for a higher temperature (bluish)
? . . . for a lower temperature (reddish)
Press the
twice to return to normal viewing. If no buttons are pressed,
the OSD closes automatically after about 30 seconds.
To reset, press the ? (reset) button while the OSD is on.
The selected color temperature is reset to the factory
settings.
button once to return to the MENU OSD, and
(Variable)” and
COLOR
9300K
5000K
26
8
Page 17

Using the CONVERGENCE Onscreen Display
The CONVERGENCE settings allow you to adjust the
quality of the picture by controlling the convergence.
The convergence refers to the alignment of the red, green,
and blue color signals.
If you see red or blue shadows around letters or lines, adjust
the convergence.
Once the setting is adjusted, it will be stored in memory for
all input signals received.
Getting Started
Customizing Your Monitor
4 Press the ?// buttons to adjust the settings.
For
(Horizontal Convergence)
Press
/ . . . to shift red shadows to the right
and blue shadows to the left
? . . . to shift red shadows to the left
and blue shadows to the right
1 Press the button.
The MENU OSD appears.
2 Press the ./> buttons to select “ CONVERGENCE,”
and press the
The CONVERGENCE OSD appears.
button again.
CONVERGENCE
26
3 Press the ./> buttons to select the item you want to
adjust.
/ . . . to shift red shadows up and blue
(Vertical Convergence)
Press the button once to return to the MENU OSD, and
twice to return to normal viewing. If no buttons are pressed,
the OSD closes automatically after about 30 seconds.
To reset, press the ? (reset) button while the OSD is on.
The selected item is reset to the factory setting.
shadows down
? . . . to shift red shadows down and
blue shadows up
GB
F
ES
C
Select
(Horizontal Convergence)
(Vertical Convergence)
To
adjust the horizontal convergence
adjust the vertical convergence
9
Page 18

Customizing Your Monitor
Using the LANGUAGE Onscreen Display
English, French, German, Spanish, Italian, Dutch, Swedish,
Russian and Japanese versions of the OSDs are available.
1 Press the button.
The MENU OSD appears.
2 Press the ./> buttons to select “ LANGUAGE,” and
press the
The LANGUAGE OSD appears.
button again.
LANGUAGE
ENGL I SH
FRANÇA I S
DEUTSCH
ESPAÑOL
ITALIANO
NEDERL ANDS
SVENSKA
Using the OPTION On-screen
Display
The OPTION OSD allows you to manually degauss the
screen, adjust the moire cancellation level, and adjust the
OSD position. It also allows you to lock the controls.
Degaussing the screen
The monitor screen is automatically degaussed
(demagnetized) when the power is turned on.
You can also manually degauss the monitor.
1 Press the button.
The MENU OSD appears.
2 Press the ./> buttons to select “ OPTION,” and
press the
The OPTION OSD appears.
button again.
3 Press the ./> buttons to select the desired language.
• ENGLISH
• FRANÇAIS: French
• DEUTSCH: German
• ESPAÑOL: Spanish
• ITALIANO: Italian
• NEDERLANDS: Dutch
• SVENSKA: Swedish
•
•
Press the
twice to return to normal viewing. If no buttons are pressed,
the OSD closes automatically after about 30 seconds.
To reset to English, press the ? (reset) button while the
OSD is on.
: Russian
: Japanese
button once to return to the MENU OSD, and
OPT I ON
DEGAUSS
ON
3 Press the ./> buttons to select “ (DEGAUSS).”
4 Press the / button.
The screen is degaussed for about 5 seconds.
If you need to degauss the screen a second time, wait for at
least 20 minutes before repeating the steps above.
Press the
twice to return to normal viewing. If no buttons are pressed,
the OSD closes automatically after about 30 seconds.
button once to return to the MENU OSD, and
10
Page 19

Getting Started
Customizing Your Monitor
Adjusting the moire
If elliptical or wavy patterns appear on the screen, adjust the
moire cancellation level.
1 Press the button.
The MENU OSD appears.
2 Press the ./> buttons to select “ OPTION” and
press the
The OPTION OSD appears.
button again.
OPT I ON
DEGAUS S
ON
3 Press the ./> buttons to select “ MOIRE* ADJUST.”
OPT I ON
MO I RE
ADJUST
26
4 Press the ?// buttons to adjust the amount of
moire cancellation until the moire effect is at a
minimum.
Changing the on-screen display position
You can change the OSD position (for example, when you
want to adjust the picture behind the OSD).
1 Press the button.
The MENU OSD appears.
2 Press the ./> buttons to select “ OPTION,” and
press the
The OPTION OSD appears.
button again.
OPT I ON
DEGAUSS
ON
3 Press the ./> buttons to select “ (OSD H
POSITION)” or “
Select “
(OSD H POSITION)” to adjust the horizontal
position.
Select “
(OSD V POSITION)” to adjust the vertical
position.
(OSD V POSITION).”
OPT I ON
OSD H
POS I T I ON
26
GB
F
ES
C
* Moire is a type of natural interference which products soft, wavy
lines on your screen. It may appear due to interference between
the pattern of the picture on the screen and the phosphor pitch
pattern of the monitor.
Example of moire:
Press the button once to return to the MENU OSD, and
twice to return to normal viewing. If no buttons are pressed,
the OSD closes automatically after about 30 seconds.
To reset, press the ? (reset) button while the OSD is on.
OPT I ON
OSD V
POS I T I ON
26
4 Press the ?// buttons to move the OSD to the
desired position.
Press the
button once to return to the MENU OSD, and
twice to return to normal viewing. If no buttons are pressed,
the OSD closes automatically after about 30 seconds.
To reset, press the ? (reset) button while the OSD is on.
11
Page 20

Customizing Your Monitor
Locking the controls
You can protect adjustment data by locking the controls.
1 Press the button.
The MENU OSD appears.
2 Press the ./> buttons to select “ OPTION,” and
press the
The OPTION OSD appears.
button again.
OPT I ON
DEGAUSS
ON
3 Press the ./> buttons to select “ (CONTROL
LOCK).”
OPT I ON
CONTROL
LOCK
OFF ON
Using the HELP On-screen
Display
The HELP OSD contains helpful hints and information
about this monitor. If your monitor is displaying symptoms
that match those listed in the HELP OSD, follow the onscreen instructions to resolve the problem. If the symptoms
do not match those listed in the HELP OSD or if the
problem persists, see “Troubleshooting” on page 16.
1 Press the button.
The MENU OSD appears.
2 Press the ./> buttons to select “ HELP” and press
the
button again.
The HELP OSD appears.
HELP
RETURN TO MA I N MENU
RECOMMENDED RESOLU T ION
FL ICKER
TH I N HORI ZONTAL L I NE
D I STORTED SHAPE
OUT O F FOC US
DI SCOLORAT I ON
4 Press the / button to select “ON.”
Press the
twice to return to normal viewing. If no buttons are pressed,
the OSD closes automatically after about 30 seconds.
Only the u (power) switch, EXIT, and “
LOCK)” of the “
items are selected, the
To cancel the control lock
Repeat steps 1 through 3 above and press the / button to
select “OFF.”
button once to return to the MENU OSD, and
(CONTROL
OPTION” OSD will operate. If any other
mark appears on the screen.
3 Press the ./> buttons to select a HELP menu item
and press the
Instructions or information to resolve the problem
appears on the screen. An explanation of each menu
item is given below.
RECOMMENDED RESOLUTION
If the picture does not fill the screen to the edges or if the
picture appears too large for the screen, adjust the
resolution to the figures shown in the OSD using your
computer. If the input signal matches one of this monitor’s
factory preset modes, the resolution and refresh rate of the
current input signal are displayed.
FLICKER
If the picture is flickering, adjust the refresh rate to figures
shown in the OSD. If the input signal matches one of this
monitor’s factory preset modes, the refresh rate of the
current input signal is displayed.
button again.
12
THIN HORIZONTAL LINE
The lines that appear on your screen are damper wires. See
page 13 for more information about the damper wires.
Page 21

DISTORTED SHAPE
If the shape of the picture on the screen seems distorted, try
adjusting the picture’s geometry. Press the / button to
jump directly to the GEOMETRY OSD.
OUT OF FOCUS
The picture may seem to be out of focus when the red and
blue color signals are not aligned properly, causing red or
blue shadows to appear around letters and lines. Try
adjusting the picture’s convergence to make the shadows
disappear. Press the / button to jump directly to the
CONVERGENCE OSD. When the CONVERGNECE OSD is
displayed, the contrast, brightness and moire adjustment
settings are automatically reset for all input signals.
DISCOLORATION
If the picture’s color appears abnormal in certain areas of
the screen, first check for any loose signal cables. After you
have checked the cables, try degaussing (demagnetizing)
the screen manually. Press the / button to jump directly to
the OPTION OSD, then select
(DEGAUSS).
Getting Started
Customizing Your Monitor
Resetting the Adjustments
Resetting an adjustment item
1 Press the , ./> buttons to select the OSD
containing the item you want to reset.
2 Press the ./> buttons to select the item you want to
reset.
3 Press the ? (reset) button.
Press the
twice to return to normal viewing. If no buttons are pressed,
the OSD closes automatically after about 30 seconds.
button once to return to the MENU OSD, and
Resetting all of the adjustment data for
the current input signal
When there is no OSD displayed, press the ? (reset)
button.
All of the adjustments data for the current input signal is
reset to the factory settings.
Note that adjustment data not affected by changes in input
signal (OSD language , OSD position and the control lock
function) is not reset to the factory settings.
Resetting all of the adjustment data for all
input signals
Press and hold the ? (reset) button for more than two
seconds.
All of the adjustment data, including the brightness and
contrast, is reset to the factory settings.
GB
F
ES
C
Note
The ? (reset) button does not function when (CONTROL
LOCK) is set to ON.
13
Page 22

Technical Features
Power Saving Function
This monitor meets the power-saving guidelines set by
VESA and Energy Star, as well as the more stringent
NUTEK .
If the monitor is connected to a computer or video graphics
board that is VESA DPMS (Display Power Management
Signaling) compliant, the monitor will automatically reduce
power consumption in three stages as shown below.
Note
When your computer is in a power saving mode, MONITOR IS IN
POWER SAVE MODE appears on the screen if you press any
button on the monitor (page 15). After a few seconds, the monitor
enters the power saving mode again. Once the horizontal and
vertical sync signals are detected, the monitor automatically
resumes its normal operation mode.
Power consumption
mode
Normal operation
1
Standby (1st mode)
2
Suspend (2nd mode)
3
Active-off (3rd mode)
4
Power-off
5
Screen
active
blank
blank
blank
—
Horizontal
sync signal
present
absent
present
absent
—
Damper Wires
When viewing a white background, very thin horizontal
lines may be visible on the screen as shown below. These
lines are the shadows of the damper wires and are
characteristic of CRTs that use aperture grilles. The wires
are attached to the aperture grille on the inside of the
Trinitron tube and prevent the vibration of the aperture
grille.
Damper wires
Vertical
sync signal
present
present
absent
absent
—
Power
consumption
≤ 130 W
≤ 15 W
≤ 15 W
≤ 3 W
0 W
Recovery time
—
Approx. 5 sec.
Approx. 5 sec.
Approx. 15 sec.
—
u indicator
Green
Green and orange
alternate
Green and orange
alternate
Orange
Off
Plug & Play
This monitor complies with the DDC1, DDC2B and
DDC2Bi Display Data Channel (DDC) standards of VESA.
When a DDC1 host system is connected, the monitor
synchronizes with the V. CLK in accordance with the VESA
standards and outputs the EDID (Extended Display
Identification Data) to the data line.
When a DDC2B or DDC2Bi host system is connected, the
monitor automatically switches to the appropriate standard.
DDC is a trademark of the Video Electronics Standard
Association.
14
Page 23

Technical Features
Additional Information
Getting Started
Technical Features
Preset Modes
Resolution
(dots × lines)
No.
640 × 480
1
640 × 480
2
640 × 480
3
800 × 600
4
800 × 600
5
1024 × 768
6
1024 × 768
7
1280 × 1024
8
Horizontal
Frequency
31.5 kHz
37.5 kHz
43.3 kHz
46.9 kHz
53.7 kHz
60.0 kHz
68.7 kHz
80.0 kHz
Vertical
Frequency
60 Hz
75 Hz
85 Hz
75 Hz
85 Hz
75 Hz
85 Hz
75 Hz
Graphics
Mode
VGA
VESA
VESA
VESA
VESA
VESA
VESA
VESA
Displaying the Monitor’s
Information
You can display the model name, serial number and year of
manufacture using the monitor‘s INFORMATION OSD.
Warning Messages
If no pictures appears on the screen, one of the following
messages appears on the screen.
INFORMATION
MON I TOR I S WOR K I NG
OUT OF SCAN RANGE
CHANGE PC S E T T I NG
If MONITOR IS WORKING appears on the screen
1 The monitor’s condition
MONITOR IS WORKING
This indicates that the monitor is working properly.
2 The input signal condition and the remedies
CHECK SIGNAL CABLE
This indicates that no signal is input. Check that the
video signal cable is properly connected and all plugs
are firmly seated in their sockets.
OUT OF SCAN RANGE and CHANGE PC SETTING
These indicate that the input signal is not supported by
the monitor’s specifications. Check that the video
frequency range is within that specified for the monitor.
(Horizontal: 30 – 96 kHz, Vertical: 48 –120 Hz)
GB
F
Press and hold the button for 5 seconds.
The INFORMATION OSD appears.
Example:
INFORMATION
MODE L : I BM P7 6
SER NO: 12- 34567
MANUFACTURED: 1 9 9 9 - 5 2
The INFORMATION OSD includes the model name, serial
number and manufactured year.
The OSD automatically disappears after about 30 seconds.
If MONITOR IS IN POWER SAVE MODE appears on the
screen
1 The monitor’s condition
MONITOR IS IN POWER SAVE MODE
This indicates that the computer is in power saving
mode. This message is displayed only when your
computer is in a power saving mode and you press any
one of the buttons on the monitor.
2 The remedies
ACTIVATE USING PC
Try pressing any key on the computer, and confirm that
your computer’s graphic board is completely seated in
the correct bus slot.
For more information, see “Troubleshooting” on page 16.
ES
C
15
Page 24

Additional Information
Additional Information
Troubleshooting
This section may help you isolate the cause of a problem and as a result, eliminate the need to contact technical support.
Symptom Check these items
No picture
If the u indicator is not lit
If the “CHECK SIGNAL
CABLE” message appears on
the screen, or if the u
indicator is either orange or
alternating between green and
orange
If the “MONITOR IS IN
POWER SAVE MODE”
message appears on the
screen, or if the u indicator is
either orange or alternating
between green and orange
If the “OUT OF SCAN
RANGE” message appears on
the screen
If no message is displayed
and the u indicator is green
or flashing orange
Picture is scrambled
• Check that the power cord is properly connected.
• Check that the u (power) switch is in the “on” position.
• Check that your computer power switch is in the “on” position.
• Check that the video signal cable is properly connected and all plugs are firmly seated
in their sockets.
• Ensure that no pins are bent or pushed in the HD15 video input connector.
• Check that the graphic board is completely seated in the proper bus slot.
• The computer is in power saving mode. Try pressing any key on the computer
keyboard.
• Check that your computer power switch is in the “on” position.
• Check that the graphic board is completely seated in the proper bus slot.
• Check that the video frequency range is within that specified for the monitor.
(Horizontal: 30 – 96 kHz, Vertical: 48 – 120 Hz)
Refer to your computer’s instruction manual to adjust the video frequency range.
• If you are using a video signal cable adapter, check that it is the correct one.
• See “Self-diagnosis Function” (page 18).
• Check your graphics board manual for the proper monitor setting.
• Check this manual and confirm that the graphics mode and the frequency you are
trying to operate at is supported. Even if the frequency is within the proper range,
some graphic boards may have a sync pulse that is too narrow for the monitor to sync
correctly.
Color is not uniform
You cannot adjust the
monitor with the buttons on
the front panel
16
• Degauss the monitor (page 10).
If you place equipment which generates a magnetic field, such as a loudspeaker, near
the monitor, or you change the direction of the monitor, color may lose uniformity.
The degauss function demagnetizes the metal frame of the CRT to obtain a neutral
field for uniform color reproduction. If a second degauss cycle is needed, allow a
minimum interval of 20 minutes for the best result.
• If the control lock function is set to ON, set it to OFF using the OPTION OSD
(page 12).
Page 25

Symptom Check these items
Screen image is not centered
or sized properly
• Adjust the size or centering (page 6).
Some video modes do not fill the screen to the edges. This problem tends to occur with
certain graphic boards.
Getting Started
Additional Information
Additional Information
Edges of the image are
curved
White lines show red or blue
shadows at edges
Picture is fuzzy
Picture bounces or has wavy
oscillations
Picture is flickering
Picture appears to be
ghosting
• Adjust the geometry (page 7).
• Adjust the convergence (page 9).
• Adjust the contrast and brightness (page 4).
• Degauss the monitor (page 10).
If you place equipment which generates a magnetic field, such as a loudspeaker, near
the monitor, or you change the direction of the monitor, color may lose uniformity.
The degauss function demagnetizes the metal frame of the CRT to obtain a neutral
field for uniform color reproduction. If a second degauss cycle is needed, allow a
minimum interval of 20 minutes for the best result.
• If red or blue shadows appear along the edges of images, adjust the convergence
(page 9).
• Select MOIRE ADJUST and adjust the moire cancellation effect (page 11).
• Isolate and eliminate any potential sources of electric or magnetic fields. Common
causes for this symptom are electric fans, fluorescent lighting or laser printers.
• If you have another monitor close to this monitor, increase the distance between them
to reduce the interference.
• Try plugging the monitor into a different AC outlet, preferably on a different circuit.
• Try the monitor on a different computer in a different room.
• Set the refresh rate on the computer to obtain the best possible picture by referring to
your computer’s manual.
• Eliminate the use of video cable extensions and/or video switch boxes if this symptom
occurs. Excessive cable length or a weak connection can produce this symptom.
GB
F
ES
C
Wavy or elliptical (moire)
pattern is visible
Two fine horizontal lines
(wires) are visible
Hum is heard right after the
power is turned on
• If the problem persists, call you service representative from a location near your monitor.
• Note the model name and the serial number of your monitor. Also note the make and name of your computer and graphic
board.
• Select MOIRE ADJUST and adjust the moire cancellation effect (page 11).
The moire may be modified depending on the connected computer.
• Due to the relationship between resolution, monitor dot pitch and the pitch of some
image patterns, certain screen backgrounds sometimes show moire. Change your
desktop pattern.
• These wires stabilize the vertically striped aperture grille (page 14). This aperture grille
allows more light to pass through to the screen giving the Trinitron CRT more color
and brightness.
• When the power is turned on, the auto-degauss cycle is activated. While the autodegauss cycle is activated, a hum may be heard. The same hum is heard when the
monitor is manually degaussed. This is not a malfunction.
17
Page 26

Additional Information
Self-diagnosis Function
This monitor is equipped with a self-diagnosis function. If
there is a problem with your monitor or computer, the
screen will go blank and the u indicator will either light up
green or flash orange.
u indicator
If the u indicator is green
1 Disconnect the video input cable or turn off the
connected computer.
2 Press the u button twice to turn the monitor off and
then on.
3 Press and hold the / button for 2 seconds before
the monitor enters power saving mode.
Specifications
Picture tube 0.24 mm aperture grille pitch
17 inches measured diagonally
90-degree deflection
Viewable image size Approx. 327 × 243 mm (w/h)
Resolution Horizontal: Max. 1600 dots
Standard image area Approx. 312 × 234 mm (w/h)
Deflection frequency Horizontal: 30 to 94 kHz
AC input voltage/current
Power consumption Max. 130 W
Dimensions Approx. 404 × 413.5 × 419.5 mm
Mass Approx. 20 kg (44 lb 1 oz)
7
(12
/8 × 9 5/8 inches)
16.0” viewable diagonal
Vertical: Max. 1200 lines
3
(12
/8 × 9 1/4 inches)
Vertical: 48 to 120 Hz
256 < Total Line < 1700
100 to 240 V, 50/60 Hz, Max. 1.7 A
(w/h/d)
(16 × 16
3
/8 × 16 5/8 inches)
If all four color bars appear (white, red, green, blue), the
monitor is working properly. Reconnect the video input
cable and check the condition of your computer.
If the color bars do not appear, there is a potential monitor
failure. Inform your service representative of the monitor’s
condition.
If the u indicator is flashing orange
Press the u button twice to turn the monitor off and
then on.
If the u indicator lights up green, the monitor is working
properly.
If the u indicator is still flashing, there is a potential
monitor failure. Inform your service representative of the
monitor’s condition. Be sure to note the model name and
serial number of your monitor. Also note the make and
model of your computer and video board.
* Recommended horizontal and vertical timing condition
• Horizontal sync width should be more than 1.0 µsec.
• Horizontal blanking width should be more than
3.0 µsec.
• Vertical blanking width should be more than 500 µsec.
Design and specifications are subject to change without
notice.
18
Page 27

Federal Communications Commission (FCC) Statement
This equipment has been tested and found to comply with the limits for a Class B digital device, pursuant to Part 15 of the
FCC Rules. These limits are designed to provide reasonable protection against harmful interference in a residential
installation. This equipment generates, uses, and can radiate radio frequency energy and, if not installed and used in
accordance with the instructions, may cause harmful interference to radio communications. However, there is no guarantee
that interference will not occur in a particular installation.
If this equipment does cause harmful interference to radio or television reception, which can be determined by turning the
equipment off and on, the user is encouraged to try to correct the interference by one or more of the following measures:
• Reorientate or relocate the receiving antenna.
• Increase the separation between the equipment and receiver.
• Connect the equipment into an outlet on a circuit different from that to which the receiver is connected.
• Consult an IBM authorized dealer or service representative for help.
Properly shielded and grounded cables and connectors must be used in order to meet FCC emission limits. Proper cables and
connectors are available from IBM authorized dealers. IBM is not responsible for any radio or television interference caused by
using other than recommended cables and connectors or by unauthorized changes or modifications to this equipment.
Unauthorized changes or modifications could void the user’s authority to operate the equipment.
Declaration of Conformity
Trade name: IBM Corporation
Model No.: 6556-03N
Responsible Party: Sony Electronics Inc.
Address: 1 Sony Drive, Park Ridge, NJ. 07656
Telephone No.: 201-930-6972
This Device complies with Part 15 of the FCC Rules. Operation is
subject to the following two conditions: (1) This device may not cause
harmful interference, and (2) this device must accept any interference
received, including interference that may cause undesired operation.
Power Cords
For your safety, IBM provides a power cord with a grounded attachment plug to use with this IBM product. To avoid
electrical shock, always use the power cord and plug with a properly grounded power outlet.
IBM power cords used in the United States and Canada are listed by the Underwriters Laboratories (UL) and certified by the
Canadian Standards Association (CSA).
For units intended to be operated at 115 volts: Use a UL listed and CSA certified cord set consisting of a minimum 18 AWG,
type SVT or SJT, three conductor cord, a maximum of 4.5 metres (15 feet) in length and a parallel blade, grounding type
attachment plug rated 15 amperes, 125 volts.
For units intended to be operated at 230 volts (U.S. use): Use a UL listed and CSA certified cord set consisting of a
minimum 18 AWG, type SVT or SJT, three conductor cord, a maximum of 4.5 metres (15 feet) in length and a tandem blade,
grounding type attachment plug rated 15 amperes 250 volts.
For units intended to be operated at 230 volts (outside the U.S.): Use a cord set with a grounding type attachment plug rated 13
amperes (minimum), 250 volts. The cord set should be marked <HAR> and have the appropriate safety approvals for the
country in which the equipment will be installed.
ENERGY STAR Partner, IBM Corporation has determined that this product meets the
As an
ENERGY STAR guidelines for energy efficiency.
This monitor complies with TCO’95 guidelines.
This monitor complies with TCO’99 guidelines.
I
Page 28

MPRII
This product complies with Swedish National Council for Metrology (MPR) standards issued in December 1990 (MPRII) for
very low frequency (VLF) and extremely low frequency (ELF).
Hinweise
Gemäß der Amtsblätter des BMPT Nm. 61/1991 und 6/1992 wird der Betreiber darauf aufmerksam gemächt, daß die von ihm
mit diesem Gerät zusammengestellte Anlage auch den technischen Bestimmungen dieser Amtsblätter genügen muß.
Aus ergonomischen Gründen wird empfohlen, die Grundfarbe Blau nicht auf dunklem Untergrund zu verwenden (schlechte
Erkennbarkeit, Augenbelastung bei zu geringem Zeichenkontrast).
Aus ergonomischen Gründen sollten nur Darstellungen auf dunklem Hintergrund bei Vertikalfrequenzen ab 60 Hz (ohne
Zeilensprung) benutzt werden.
Die Konvergenz des Bildes kann sich auf Grund des Magnetfeldes am Ort der Aufstellung aus der korrekten
Grundeinstellung verändern. Zur Korrektur empfiehlt es sich deshalb, die Regler an der Frontseite für H STAT und V STAT so
einzustellen, daß die getrennt sichtbaren Farblinien für Rot. Grün und Blau bei z.B. der Darstellung eines Buchstabens zur
Deckung (Konvergenz) gelangen. Siehe hierzu auch die Erklärungen zu H STAT und V STAT.
NOM
IBM de México, S.A.
IBM P76 Monitor de Color (M/T 6556)
Planta de Manufactura
6 Aza-Ikejiri, Oaza-Takada,
Ichinomiya-shi, Aichi-ken,
492 Japan
Hecho en Japón
NOM – 018
Consumo de Corriente 1.7A
Frecuencia de Operacion 50/60 Hz
Rension de Alimentacion 100 – 240 V
Industry Canada Compliance Statement
This Class B digital apparatus meets the requirements of the Canadian Interference-Causing Equipment Regulations.
Cet appareil numérique de la classe B respecte toutes les exigences du Règlement sur le matériel brouilleur du Canada.
II
Page 29

European Union (EU) Statement
This product has been tested and found to comply with the limits for Class B Information Technology Equipment according to
CISPR 22 / European Standard EN 55022. The limits for Class B equipment were derived for typical residential
environments to provide reasonable protection against interference with licensed communication devices.
Properly shielded and grounded cables and connectors must be used in order to reduce the potential for causing interference
to radio and TV communications and to other electrical or electronic equipment. Such cables and connectors are available from
IBM authorised dealers.
In accordance with EN 50082-1 1992, Performance Criterion A:, it should be noted that in the presence of certain
electromagnetic fields, some screen jitter may be observed.
Spécifications de la CEE
Ce produit a été testé et déclaré conforme aux limites de la Classe B définies pour les équipements informatiques
conformément à la norme européenne CISPR 22/EN 55022. Les limites imposées aux équipements de Classe B visent à
garantir une protection raisonnable, dans des environnements résidentiels, contre toute interférence avec des équipements de
communication agréés.
Des câbles blindés et correctement reliés à la terre doivent être utilisés pour réduire les risques d’interférence avec des
communications radio et télévisées, ainsi qu’avec des équipements électriques ou électroniques. Ces câbles et connecteurs sont
disponibles auprès de vos revendeurs IBM agréés.
Conformément à la norme EN 50082-1 1992, Performance Criterion A, veuillez noter qu’en présence de certains champs
électromagnétiques l’image de l’écran peut être instable.
Erklärung für die Europäische Union (EU)
Dieses Produkt wurde getestet, und dabei wurde festgestellt, daß es gemäß CISPR 22 / Europäische Norm EN 55022 die
Grenzwerte für Ausrüstung der Informationstechnik, Klasse B, einhält. Die Grenzwerte für Ausrüstung der Klasse B wurden
für eine typische Wohnumgebung erarbeitet, um einen angemessenen Schutz vor Störungen im Zusammenhang mit
zugelassenen Kommunikationsgeräten zu gewährleisten.
Es sind ordnungsgemäß abgeschirmte und geerdete Kabel und Stecker zu verwenden, um das Störungspotential in bezug auf
Radio- und Fernsehempfang oder andere elektrische oder elektronische Geräte zu reduzieren. Solche Kabel und Stecker sind
bei autorisierten IBM-Fachhändlern erhältlich.
In Übereinstimmung mit EN 50082-1 1992, Leistungskriterium A wird darauf hingewiesen, daß bestimmte elektromagnetische
Felder ein Flattern auf dem Bildschirm hervorrufen können.
Declaración de la Unión Europea (UE)
Este producto ha sido probado y cumple con las limitaciones estipuladas para la Clase B ITE (Information Technology
Equipment), de conformidad con CISPR 22 / Estándar Europeo EN 55022. Las limitaciones de los equipos de Clase B se
establecieron para que los entornos residenciales típicos a fin de proporcionar una protección razonable contra interferencias
con dispositivos de comunicación autorizados.
Se deben utilizar conectores y cables debidamente protegidos y conectados a tierra a fin de reducir las posibilidades de que se
produzcan interferencias con comunicaciones por radio o televisión y otros equipos eléctricos o electrónicos. Este tipo de
cables y conectores pueden adquirirse en concesionarios autorizados de IBM.
De acuerdo con la norma EN 50082-1 1992, Performance Criterion A, habría que destacar que en presencia de determinados
campos electromagnéticos, podría observarse una marcada inestabilidad e la imagen.
Dichiarazione di conformità dell’Unione Europea (UE)
Questo prodotto è stato collaudato e trovato conforme ai limiti di Classe B relativi agli apparecchi informatici secondo quanto
dispone la normativa europea CISPR 22 / EN 55022. I limiti degli apparecchi di Classe B sono stati definiti per i normali
ambienti domestici al fine di fornire un’adeguata protezione con dispositivi di comunicazione autorizzati.
Utilizzare cavi e connettori collegati a terra per ridurre il rischio potenziale di interferenza delle comunicazioni radiotelevisive
e di altri apparecchi elettrici o elettronici. I cavi sono disponibili presso i rivenditori autorizzati IBM.
In accordo con quanto previsto nel documento EN 50082-1 1992, Performance Criterion A, è importante sottolineare che in
presenza di determinati campi elettromagnetici è possibile che si verifichi un certo tremolio delle immagini.
III
Page 30

Statement of Limited Warranty U.S., Canada and Puerto Rico
The warranties provided by IBM in this Statement of Limited Warranty apply only to Machines you originally purchase for
your use, and not for resale, from IBM or your reseller. The term “Machine” means an IBM machine, its features, conversions,
upgrades, elements, or accessories, or any combination of them. Unless IBM specifies otherwise, the following warranties
apply only in the country where you acquire the Machine. If you have any questions, contact IBM or your reseller.
Machine: P76 M/T 6556
Warranty Period*: 3 years.
* Contact your place of purchase for warranty service information
Production Status
Each Machine is manufactured from new parts, or new and used parts. In some cases, the Machine may not be new and may
have been previously installed. Regardless of the Machine’s production status, IBM’s warranty terms apply.
The IBM Warranty for Machines
IBM warrants that each Machine 1) is free from defects in materials and workmanship and 2) conforms to IBM’s Official
Published Specifications. The warranty period for a Machine is a specified, fixed period commencing on its Date of
Installation. The date on your receipt is the Date of Installation, unless IBM or your reseller informs you otherwise.
During the warranty period IBM or your reseller, if authorized by IBM, will provide warranty service under the type of service
designated for the Machine and will manage and install engineering changes that apply to the Machine.
For IBM or your reseller to provide warranty service for a feature, conversion, or upgrade, IBM or your reseller may require
that the Machine on which it is installed be 1) for certain Machines, the designated, serial-numbered Machine and 2) at an
engineering-change level compatible with the feature, conversion, or upgrade. Many of these transactions involve the removal
of parts and their return to IBM. You represent that all removed parts are genuine and unaltered. A part that replaces a
removed part will assume the warranty service status of the replaced part.
If a Machine does not function as warranted during the warranty period, IBM or your reseller will repair it or replace it with
one that is at least functionally equivalent, without charge. The replacement may not be new, but will be in good working
order. If IBM or your reseller is unable to repair or replace the Machine, you may return it to your place of purchase and your
money will be refunded.
If you transfer a Machine to another user, warranty service is available to that user for the remainder of the warranty period.
You should give your proof of purchase and this Statement to that user. However, for Machines which have a life-time
warranty, this warranty is not transferable.
Warranty Service
To obtain warranty service for the Machine, you should contact your reseller or call IBM. In the United States, call IBM at 1800-772-2227. In Canada, call IBM at 1-800-565-3344. You may be required to present proof of purchase.
IBM or your reseller will provide certain types of repair and exchange service, either at your location or at IBM’s or your
reseller’s service center, to restore a Machine to good working order.
When a type of service involves the exchange of a Machine or part, the item IBM or your reseller replaces becomes its property
and the replacement becomes yours. You represent that all removed items are genuine and unaltered. The replacement may
not be new, but will be in good working order and at least functionally equivalent to the item replaced. The replacement
assumes the warranty service status of the replaced item. Before IBM or your reseller exchanges a Machine or part, you agree
to remove all features, parts, options, alterations, and attachments not under warranty service. You also agree to ensure that
the Machine is free of any legal obligations or restrictions that prevent its exchange.
You agree to:
1. obtain authorization from the owner to have IBM or your reseller service a Machine that you do not own; and
2. where applicable, before service is provided a) follow the problem determination, problem analysis, and service request procedures that IBM or your reseller provide,
b) secure all programs, data, and funds contained in a Machine, and
c) inform IBM or your reseller of changes in a Machine’s location.
IBM is responsible for loss of, or damage to, your Machine while it is 1) in IBM’s possession or 2) in transit in those cases
where IBM is responsible for the transportation charges.
IV
Page 31

Extent of Warranty
IBM does not warrant uninterrupted or error-free operation of a Machine.
The warranties may be voided by misuse, accident, modification, unsuitable physical or operating environment, improper
maintenance by you, removal or alteration of Machine or parts identification labels, or failure caused by a product for which
IBM is not responsible.
THESE WARRANTIES REPLACE ALL OTHER WARRANTIES OR CONDITIONS, EXPRESS OR IMPLIED, INCLUDING,
BUT NOT LIMITED TO, THE IMPLIED WARRANTIES OR CONDITIONS OF MERCHANTABILITY AND FITNESS FOR A
PARTICULAR PURPOSE. THESE WARRANTIES GIVE YOU SPECIFIC LEGAL RIGHTS AND YOU MAY ALSO HAVE
OTHER RIGHTS WHICH VARY FROM JURISDICTION TO JURISDICTION. SOME JURISDICTIONS DO NOT ALLOW THE
EXCLUSION OR LIMITATION OF EXPRESS OR IMPLIED WARRANTIES, SO THE ABOVE EXCLUSION OR LIMITATION
MAY NOT APPLY TO YOU. IN THAT EVENT SUCH WARRANTIES ARE LIMITED IN DURATION TO THE WARRANTY
PERIOD. NO WARRANTIES APPLY AFTER THAT PERIOD.
Limitation of Liability
Circumstances may arise where, because of a default on IBM’s part or other liability you are entitled to recover damages from
IBM. In each such instance, regardless of the basis on which you are entitled to claim damages from IBM (including
fundamental breach, negligence, misrepresentation, or other contract or tort claim), IBM is liable only for:
1. damages for bodily injury (including death) and damage to real property and tangible personal property; and 2. the amount
of any other actual direct damages or loss, up to the greater of U.S. $100,000 or the charges (if recurring, 12 months’ charges
apply) for the Machine that is the subject of the claim.
UNDER NO CIRCUMSTANCES IS IBM LIABLE FOR ANY OF THE FOLLOWING: 1) THIRD-PARTY CLAIMS AGAINST
YOU FOR LOSSES OR DAMAGES (OTHER THAN THOSE UNDER THE FIRST ITEM LISTED ABOVE); 2) LOSS OF, OR
DAMAGE TO, YOUR RECORDS OR DATA; OR 3) SPECIAL, INCIDENTAL, OR INDIRECT DAMAGES OR FOR ANY
ECONOMIC CONSEQUENTIAL DAMAGES (INCLUDING LOST PROFITS OR SAVINGS), EVEN IF IBM OR YOUR
RESELLER IS INFORMED OF THEIR POSSIBILITY. SOME JURISDICTIONS DO NOT ALLOW THE EXCLUSION OR
LIMITATION OF INCIDENTAL OR CONSEQUENTIAL DAMAGES, SO THE ABOVE EXCLUSION OR LIMITATION MAY
NOT APPLY TO YOU.
Statement of Limited Warranty, Europe.
For European warranty terms and conditions refer to enclosed IBM warranty statement Part Number 72H9623.
Référez-vous à la garantie IBM N° de référence 72H9623 pour les conditions de garantie européennes.
Die europäischen Garantiebedingungen finden Sie in der beigefügten IBM- Gewährleistungserklärung, Teilenummer
72H9623.
Los términos y condiciones de las garantías en Europa se recogen en la declaración de garantía adjunta del número de pieza
IBM 72H9623.
Per le condizioni e i termini di garanzia relativi ai paesi europei, consultare l’apposita dichiarazione IBM (numero di matricola
72H9623).
V
Page 32

TCO’99 Eco-document
Congratulations!
You have just purchased a TCO’95 approved and labelled product! Your choice has provided you with a product developed
for professional use. Your purchase has also contributed to reducing the burden on the environment and also, to the further
development of environmentally adapted electronics products.
Why do we have environmentally labelled computers?
In many countries, environmental labelling has become an established method for encouraging the adaptation of goods and
services to the environment. The main problem, as far as computers and other electronics equipment are concerned, is that
environmentally harmful substances are used both in the products and during the manufacturing. Since it has not been
possible for the majority of electronics equipment to be recycled in a satisfactory way, most of these potentially damaging
substances sooner or later enter Nature.
There are also other characteristics of a computer, such as energy consumption levels, that are important from the viewpoints
of both the work (internal) and natural (external) environments. Since all methods of conventional electricity generation have a
negative effect on the environment (acidic and climate-influencing emissions, radioactive waste, etc.), it is vital to conserve
energy. Electronics equipment in offices consume an enormous amount of energy since they are often left running
continuously.
What does labelling involve?
This product meets the requirements for the TCO’95 scheme which provides for international and environmental labelling of
personal computers. The labelling scheme was developed as a joint effort by the TCO (The Swedish Confederation of
Professional Employees), Naturskyddsforeningen (The Swedish Society for Nature Conservation) and NUTEK (The National
Board for Industrial and Technical Development in Sweden).
The requirements cover a wide range of issues: environment, ergonomics, usability, emission of electrical and magnetic fields,
energy consumption and electrical and fire safety.
The environmental demands concern restrictions on the presence and use of heavy metals, brominated and chlorinated flame
retardants, CFCs (freons) and chlorinated solvents, among other things. The product must be prepared for recycling and the
manufacturer is obliged to have an environmental plan which must be adhered to in each country where the company
implements its operational policy.
The energy requirements include a demand that the computer and/or display, after a certain period of inactivity, shall reduce
its power consumption to a lower level in one or more stages. The length of time to reactivate the computer shall be reasonable
for the user.
Labelled products must meet strict environmental demands, for example, in respect of the reduction of electric and magnetic
fields, physical and visual ergonomics and good usability.
VI
Page 33

On this page, you will find a brief summary of the environmental requirements met by this product. The complete
environmental criteria document may be ordered from:
TCO Development Unit
S-114 94 Stockholm
Sweden
Fax: +46 8 782 92 07
Email (Internet): development@tco.se
Current information regarding TCO’95 approved and labelled products may also be obtained via the Internet, using
the address:
http://www.tco-info.com/
TCO’95 is a co-operative project between TCO (The Swedish Confederation of Professional Employees),
Naturskyddsforeningen (The Swedish Society for Nature Conservation) and NUTEK (The National Board for Industrial and
Technical Development in Sweden).
Getting Started
Appendix
Environmental Requirements
Brominated flame retardants
Brominated flame retardants are present in printed circuit boards, cables, wires, casings and housings. In turn, they delay the
spread of fire. Up to thirty percent of the plastic in a computer casing can consist of flame retardant substances. These are
related to another group of environmental toxins, PCBs, which are suspected to give rise to similar harm, including
reproductive damage in fisheating birds and mammals, due to the bio-accumulative* processes. Flame retardants have been
found in human blood and researchers fear that disturbances in foetus development may occur.
TCO’95 demand requires that plastic components weighing more than 25 grams must not contain organically bound chlorine
and bromine.
Lead**
Lead can be found in picture tubes, display screens, solders and capacitors. Lead damages the nervous system and in higher
doses, causes lead poisoning.
TCO’95 requirement permits the inclusion of lead since no replacement has yet been developed.
Cadmium**
Cadmium is present in rechargeable batteries and in the colourgenerating layers of certain computer displays. Cadmium
damages the nervous system and is toxic in high doses.
TCO’95 requirement states that batteries may not contain more than 25 ppm (parts per million) of cadmium. The colourgenerating layers of display screens must not contain any cadmium.
Mercury**
Mercury is sometimes found in batteries, relays and switches. Mercury damages the nervous system and is toxic in high doses.
TCO’95 requirement states that batteries may not contain more than 25 ppm (parts per million) of mercury. It also demands
that no mercury is present in any of the electrical or electronics components concerned with the display unit.
CFCs (freons)
CFCs (freons) are sometimes used for washing printed circuit boards and in the manufacturing of expanded foam for
packaging. CFCs break down ozone and thereby damage the ozone layer in the stratosphere, causing increased reception on
Earth of ultraviolet light with consequent increased risks of skin cancer (malignant melanoma).
The relevant TCO’95 requirement: Neither CFCs nor HCFCs may be used during the manufacturing of the product or its
packaging.
* Bio-accumulative is defined as substances which accumulate within living organisms
** Lead, Cadmium and Mercury are heavy metals which are Bio-accumulative.
VII
Page 34

TCO’99 Eco-document
Congratulations!
You have just purchased a TCO’99 approved and labelled product! Your choice has provided you with a product developed
for professional use. Your purchase has also contributed to reducing the burden on the environment and also to the further
development of environmentally adapted electronics products.
Why do we have environmentally labelled computers?
In many countries, environmental labelling has become an established method for encouraging the adaptation of goods and
services to the environment. The main problem, as far as computers and other electronics equipment are concerned, is that
environmentally harmful substances are used both in the products and during their manufacture. Since it is not so far possible
to satisfactorily recycle the majority of electronics equipment, most of these potentially damaging substances sooner or later
enter nature.
There are also other characteristics of a computer, such as energy consumption levels, that are important from the viewpoints
of both the work (internal) and natural (external) environments. Since all methods of electricity generation have a negative
effect on the environment (e.g. acidic and climate-influencing emissions, radioactive waste), it is vital to save energy.
Electronics equipment in offices is often left running continuously and thereby consumes a lot of energy.
What does labelling involve?
This product meets the requirements for the TCO’99 scheme which provides for international and environmental labelling of
personal computers. The labelling scheme was developed as a joint effort by the TCO (The Swedish Confederation of
Professional Employees), Svenska Naturskyddsforeningen (The Swedish Society for Nature Conservation) and Statens
Energimyndighet (The Swedish National Energy Administration).
Approval requirements cover a wide range of issues: environment, ergonomics, usability, emission of electric and magnetic
fields, energy consumption and electrical and fire safety.
The environmental demands impose restrictions on the presence and use of heavy metals, brominated and chlorinated flame
retardants, CFCs (freons) and chlorinated solvents, among other things. The product must be prepared for recycling and the
manufacturer is obliged to have an environmental policy which must be adhered to in each country where the company
implements its operational policy.
The energy requirements include a demand that the computer and/or display, after a certain period of inactivity, shall reduce
its power consumption to a lower level in one or more stages. The length of time to reactivate the computer shall be reasonable
for the user.
VIII
Page 35

Labelled products must meet strict environmental demands, for example, in respect of the reduction of electric and magnetic
fields, physical and visual ergonomics and good usability.
Below you will find a brief summary of the environmental requirements met by this product. The complete environmental
criteria document may be ordered from:
TCO Development
SE-114 94 Stockholm, Sweden
Fax: +46 8 782 92 07
Email (Internet): development@tco.se
Current information regarding TCO’99 approved and labelled products may also be obtained via the Internet, using
the address: http://www.tco-info.com/
Getting Started
Appendix
Environmental requirements
Flame retardants
Flame retardants are present in printed circuit boards, cables, wires, casings and housings. Their purpose is to prevent, or at
least to delay the spread of fire. Up to 30% of the plastic in a computer casing can consist of flame retardant substances. Most
flame retardants contain bromine or chloride, and those flame retardants are chemically related to another group of
environmental toxins, PCBs. Both the flame retardants containing bromine or chloride and the PCBs are suspected of giving
rise to severe health effects, including reproductive damage in fish-eating birds and mammals, due to the bio-accumulative*
processes. Flame retardants have been found in human blood and researchers fear that disturbances in foetus development
may occur.
The relevant TCO’99 demand requires that plastic components weighing more than 25 grams must not contain flame
retardants with organically bound bromine or chlorine. Flame retardants are allowed in the printed circuit boards since no
substitutes are available.
Cadmium**
Cadmium is present in rechargeable batteries and in the colour-generating layers of certain computer displays. Cadmium
damages the nervous system and is toxic in high doses. The relevant TCO’99 requirement states that batteries, the colourgenerating layers of display screens and the electrical or electronics components must not contain any cadmium.
Mercury**
Mercury is sometimes found in batteries, relays and switches. It damages the nervous system and is toxic in high doses. The
relevant TCO’99 requirement states that batteries may not contain any mercury. It also demands that mercury is not present in
any of the electrical or electronics components associated with the labelled unit.
CFCs (freons)
The relevant TCO’99 requirement states that neither CFCs nor HCFCs may be used during the manufacture and assembly of
the product. CFCs (freons) are sometimes used for washing printed circuit boards. CFCs break down ozone and thereby
damage the ozone layer in the stratosphere, causing increased reception on earth of ultraviolet light with e.g. increased risks of
skin cancer (malignant melanoma) as a consequence.
Lead**
Lead can be found in picture tubes, display screens, solders and capacitors. Lead damages the nervous system and in higher
doses, causes lead poisoning. The relevant TCO’99 requirement permits the inclusion of lead since no replacement has yet
been developed.
* Bio-accumulative is defined as substances which accumulate within living organisms.
** Lead, Cadmium and Mercury are heavy metals which are Bio-accumulative.
IX
Page 36

Service Information
The following parts are for use by IBM service, or IBM authorized dealers, to support customer
warranty. Parts are for service use only.
Part No M/T-Model Description
21L4572 6556-03N Monitor UVNH (Pearl White), NA/EMEA
21L4573 6556-43N Monitor UVNH (Stealth Gray), NA/EMEA
61H0213 6556-03N Monitor UVSH (Pearl White)
61H0214 6556-43N Monitor UVSH (Stealth Gray)
61H0215 6556-03S Video Cable (Pearl White)
61H0216 6556-43S Video Cable (Stealth Gray)
X
Page 37

Getting Started
Getting Started
XI
Page 38

P202 User Guide Part Number 61H0239
EC D03285
Printed in Japan
*61H0239*
 Loading...