

Page 1

IBM Network Printer 17 IBM
User’s Guide
S544-5343-03
Page 2

Page 3

IBM Network Printer 17 IBM
User’s Guide
S544-5343-03
Page 4

Note!
Before using this information and the product it supports, be sure to read the general information under “Notices”
on page xi.
Fourth Edition (January 1997)
This version obsoletes S544-5370-02.
The following paragraph does not apply to any other country where such provisions are inconsistent with local law.
INTERNATIONAL BUSINESS MACHINES CORPORATION PROVIDES THIS PUBLICATION “AS IS” WITHOUT
WARRANTY OF ANY KIND, EITHER EXPRESS OR IMPLIED, INCLUDING, BUT NOT LIMITED TO THE IMPLIED
WARRANTIES OF MERCHANTABILITY OR FITNESS FOR A PARTICULAR PURPOSE. Some states do not allow
disclaimer of express or implied warranties in certain transactions, therefore, this statement may not apply to you.
Changes are made periodically to this publication.
Requests for IBM publications should be made to your IBM representative or to the IBM branch office serving your
locality. If you request publications from the address given below, your order will be delayed, because publications are
not stocked there.
A Reader’s Comment Form is provided at the back of this publication. You may also send comments by fax to
1-800-524-1519, by e-mail to print_pubs@vnet.ibm.com, or by regular mail to:
Department H7FE Building 003G
IBM Printing Systems Company
Information Development
PO Box 1900
Boulder CO USA 80301-9191
IBM may use or distribute whatever information you supply in any way it believes appropriate without incurring any
obligation to you.
Copyright International Business Machines Corporation 1996, 1997. All rights reserved.
Note to U.S. Government Users — Documentation related to restricted rights — Use, duplication or disclosure is
subject to restrictions set forth in GSA ADP Schedule Contract with IBM Corp.
Page 5

Contents
Statement of Limited Warranty ........................... vii
Production Status . . . . . . . . . . . . . . . . . . . . . . . . . . . . . . . . . . . vii
The IBM Warranty .................................. vii
Warranty Service . . . . . . . . . . . . . . . . . . . . . . . . . . . . . . . . . . viii
Extent of Warranty ................................. viii
Limitation of Warranty ................................ ix
Notices . . . . . . . . . . . . . . . . . . . . . . . . . . . . . . . . . . . . . . . . xi
Trademarks . . . . . . . . . . . . . . . . . . . . . . . . . . . . . . . . . . . . . . xi
Energy Star . . . . . . . . . . . . . . . . . . . . . . . . . . . . . . . . . . . . . . xii
Communications Statements . . . . . . . . . . . . . . . . . . . . . . . . . . . . . xii
Federal Communication Notices Commission (FCC) Statement ......... xii
European Union (EU) Electromagnetic Conformity Statement ......... xiii
German Conformity Statement ......................... xiii
Industry Canada Compliance Statement .................... xiii
The United Kingdom Telecommunications Act 1984 .............. xiii
Japanese VCCI Class 2 ITE Statement ..................... xiv
Safety Notices . . . . . . . . . . . . . . . . . . . . . . . . . . . . . . . . . . . xiv
Safety Precautions . . . . . . . . . . . . . . . . . . . . . . . . . . . . . . . . . xiv
Electrical Safety . . . . . . . . . . . . . . . . . . . . . . . . . . . . . . . . . xiv
Laser Safety . . . . . . . . . . . . . . . . . . . . . . . . . . . . . . . . . . . . xv
About This Book ................................. xvii
Conventions Used . . . . . . . . . . . . . . . . . . . . . . . . . . . . . . . . . xvii
Related Publications . . . . . . . . . . . . . . . . . . . . . . . . . . . . . . . . xvii
Chapter 1. About Your Printer ........................... 1
Standard Features . . . . . . . . . . . . . . . . . . . . . . . . . . . . . . . . . . 1
Optional Features . . . . . . . . . . . . . . . . . . . . . . . . . . . . . . . . . . . 2
Printer Drivers . . . . . . . . . . . . . . . . . . . . . . . . . . . . . . . . . . . . 2
Technical Support . . . . . . . . . . . . . . . . . . . . . . . . . . . . . . . . . . 3
Ordering Supplies . . . . . . . . . . . . . . . . . . . . . . . . . . . . . . . . . . . 3
Memory Requirements . . . . . . . . . . . . . . . . . . . . . . . . . . . . . . . . 3
Using Network Printer Manager Utility ........................ 5
Obtaining Network Printer Manager Utility .................... 5
Using Network Printer Resource Utility ........................ 5
Obtaining Network Printer Resource Utility .................... 5
Obtaining Adobe Acrobat Portable Data Files .................... 6
Chapter 2. Using the Operator Panel ....................... 7
Understanding the Operator Panel Indicator Lights ................. 8
Common Messages . . . . . . . . . . . . . . . . . . . . . . . . . . . . . . . . . 9
Using the Operator Panel Keys .......................... 10
Navigating Menus . . . . . . . . . . . . . . . . . . . . . . . . . . . . . . . . . . 12
Printing the Printer Configuration Page ..................... 13
Copyright IBM Corp. 1996, 1997 iii
Page 6

Other Operator Panel Tasks ............................ 16
Making Duplex or Simplex Printing the Printer Default ............. 16
Canceling a Print Job .............................. 16
Printing a Stored Page (PCL5e Jobs Only) ................... 16
Printing a List of PCL5e Fonts ......................... 17
Printing a List of PostScript Fonts ........................ 17
Printing a List of IPDS Resident Fonts ..................... 17
Adjusting Print Density (Printing Darker or Lighter) ............... 18
Changing the Power Savings (Sleep Mode) Interval .............. 18
Changing the Language Shown on the Display Panel ............. 19
Chapter 3. Paper Handling . . . . . . . . . . . . . . . . . . . . . . . . . . . . 21
Selecting Paper and Other Printable Material ................... 22
Loading Paper and Envelopes into the Printer ................... 24
Loading Letterhead and Prepunched Paper .................. 24
Loading Paper into the 250-Sheet Main Paper Tray (Tray 1) ......... 25
Loading Paper into the 100-Sheet Auxiliary Tray ................ 29
Loading Envelopes into the 100-Sheet Auxiliary Tray ............. 32
Loading Paper into the 500-Sheet Paper Trays (Tray 2, Tray 3) ........ 36
Loading Envelopes into the Envelope Feeder ................. 40
Using the Mailbox .................................. 44
Removing Prints From a Bin .......................... 44
Enabling Mailbox Bin Passwords ........................ 47
Disabling Mailbox Bin Passwords ........................ 49
Changing Mailbox Bin Passwords ........................ 51
Using the Paper Menu ............................... 53
Selecting The Default Input Tray ........................ 53
Selecting The Default Output Bin ........................ 53
Defining the Auxiliary Tray Paper Size ..................... 54
Defining the Envelope Feeder Envelope Size ................. 54
Turning Tray Switching On or Off ........................ 55
Making Duplex or Simplex Printing the Printer Default ............. 55
Chapter 4. Clearing Paper Jams ......................... 57
20 PAPER JAM: Paper Exit Area ......................... 58
21 PAPER JAM: Paper Tray Area ......................... 60
22 PAPER JAM: Duplex Unit Area ......................... 63
23 PAPER JAM: Toner Cartridge Area ....................... 68
24 PAPER JAM: Offset Paper Output Bin ..................... 70
25 PAPER JAM: Mailbox .............................. 71
Chapter 5. Operator Panel Menus ........................ 73
Test Menu . . . . . . . . . . . . . . . . . . . . . . . . . . . . . . . . . . . . . 75
Paper Menu . . . . . . . . . . . . . . . . . . . . . . . . . . . . . . . . . . . . . 77
Mailbox Menu . . . . . . . . . . . . . . . . . . . . . . . . . . . . . . . . . . . . 80
Configuration (Config) Menu ............................ 81
Memory Configuration (Memconfig) Menu ..................... 83
Parallel Menu . . . . . . . . . . . . . . . . . . . . . . . . . . . . . . . . . . . . 84
iv Network Printer 17: User’s Guide
Page 7

PCL Menu . . . . . . . . . . . . . . . . . . . . . . . . . . . . . . . . . . . . . 85
PS Menu . . . . . . . . . . . . . . . . . . . . . . . . . . . . . . . . . . . . . . 88
Token Ring Menu .................................. 89
Ethernet Menu . . . . . . . . . . . . . . . . . . . . . . . . . . . . . . . . . . . 91
Coax SCS Menu .................................. 93
Twinax SCS Menu ................................. 96
Coax Setup Menu ................................. 98
Twinax Setup Menu ................................ 100
Coax DSC/DSE Menu ............................... 102
IPDS Menu . . . . . . . . . . . . . . . . . . . . . . . . . . . . . . . . . . . . . 104
Machine Information Menu ............................. 109
Language Menu . . . . . . . . . . . . . . . . . . . . . . . . . . . . . . . . . . 110
Chapter 6. Maintaining the Printer ....................... 111
Replacing Supplies . . . . . . . . . . . . . . . . . . . . . . . . . . . . . . . . . 111
Changing the Toner Cartridge ........................... 111
Changing the Usage Kit .............................. 117
Removing the Used Fuser Unit ......................... 117
Installing a New Fuser Unit ........................... 120
Replacing the Transfer Roller .......................... 120
Removing the Used Transfer Roller ....................... 121
Installing a New Transfer Roller ......................... 124
Cleaning the Printer ................................ 125
Chapter 7. Installing Printer Options ...................... 127
Handling Static Sensitive Devices ......................... 127
The SIMM and Hard Drive Options ......................... 128
Removing the Controller Card .......................... 129
Installing a SIMM ................................ 130
Installing a Hard Drive .............................. 132
Reinstalling the Controller Card ......................... 134
The Network Interface Card ............................ 135
Installing a Network Interface Card ....................... 136
The Duplex Unit Option ............................... 140
Installing the Duplex Unit ............................ 140
Removing the Duplex Unit ........................... 142
The 500-Sheet Paper Tray Option (Tray 2, Tray 3) ................ 144
Preparing the Printer .............................. 145
Stacking Two 500-Sheet Paper Trays ..................... 147
Placing the Printer on the Paper Tray Support Unit .............. 151
Removing the 500-Sheet Paper Tray Support Units .............. 156
Uncoupling Two 500-Sheet Paper Tray Support Units ............. 159
The 500-Sheet Offset Paper Output Bin Option .................. 161
Installing the 500-Sheet Offset Paper Output Bin ................ 161
Removing the Offset Paper Output Bin ..................... 165
The 10-Bin Mailbox Option ............................. 167
Installing the 10-Bin Mailbox .......................... 167
Removing the Mailbox .............................. 172
Contents v
Page 8

The Envelope Feeder Option ............................ 174
Installing the Envelope Feeder ......................... 174
Removing the Envelope Feeder ......................... 177
Chapter 8. Configuring Printer Network Addresses .............. 179
Setting IP, Subnet Mask, and Gateway Addresses ................ 180
Setting the Locally Administered MAC Address (LAA) ............... 181
Appendix A. Troubleshooting . . . . . . . . . . . . . . . . . . . . . . . . . . 183
Appendix B. Printer Messages . . . . . . . . . . . . . . . . . . . . . . . . . 191
Status Messages . . . . . . . . . . . . . . . . . . . . . . . . . . . . . . . . . . 191
Error Messages . . . . . . . . . . . . . . . . . . . . . . . . . . . . . . . . . . . 196
Appendix C. Specifications and Repackaging ................. 203
Printer Specifications . . . . . . . . . . . . . . . . . . . . . . . . . . . . . . . . 203
Cartridge Specifications . . . . . . . . . . . . . . . . . . . . . . . . . . . . . . 204
Repackaging the Printer .............................. 205
Repair Inventory Worksheet ............................ 211
Customer Information . . . . . . . . . . . . . . . . . . . . . . . . . . . . . . 211
Inventory Checklist . . . . . . . . . . . . . . . . . . . . . . . . . . . . . . . 211
Appendix D. Print Quality Problems ...................... 213
Print Is Too Light .................................. 213
Toner Spots on the Print .............................. 213
Repetitive Marks on the Print ............................ 214
Random Deletions or Light Areas on the Print ................... 214
Vertical Marks on the Print ............................. 215
Vertical Bands of Deletions or Light Areas on the Print .............. 215
Entire Print is Black ................................. 216
Entire Print Is Blank ................................ 216
White Spots Within Black Image Area ....................... 217
Printed Image Rubs Off or Smears ......................... 217
The Print Is Damaged ............................... 218
The Printed Image Is Blurred ............................ 218
Glossary . . . . . . . . . . . . . . . . . . . . . . . . . . . . . . . . . . . . . . 219
Index . . . . . . . . . . . . . . . . . . . . . . . . . . . . . . . . . . . . . . . . 225
vi Network Printer 17: User’s Guide
Page 9

Statement of Limited Warranty
The warranties provided by IBM* in this Statement of Limited Warranty apply only to
Machines you originally purchase for your use, and not for resale, from IBM or an IBM
authorized re-seller. The term “Machine” means an IBM machine, its features,
conversions, upgrades, elements, or accessories, or any combination of them.
Machines are subject to these terms only if purchased in the United States or Puerto
Rico, or Canada, and located in the country of purchase. If you have any questions,
contact IBM or your re-seller.
Machine: Network Printer 17
Warranty Period*: 12 months
* Contact your place of purchase for warranty service information.
Production Status
Each Machine is manufactured from new parts, or new and serviceable used parts
(which perform like new parts). In some cases, the Machine may not be new and may
have been previously installed. Regardless of the Machine's production status, IBM's
warranty terms apply.
The IBM Warranty
IBM warrants that each Machine 1) is free from defects in materials and workmanship
and 2) conforms to IBM's Official Published Specifications. IBM calculates the
expiration of the warranty period from the Machine's Date of Installation. The date on
your receipt is the Date of Installation, unless IBM or your re-seller informs you
otherwise.
During the warranty period, IBM or your re-seller will provide warranty service under the
type of service designated for the Machine and will manage and install engineering
changes that apply to the Machine. IBM or your re-seller will specify the type of
service.
For a feature, conversion, or upgrade, IBM or your re-seller may require that the
Machine on which it is installed be 1) the designated, serial-numbered Machine and 2)
at an engineering-change level compatible with the feature, conversion, or upgrade.
Some of these transactions (called “Net-Priced” transactions) may include additional
parts and associated replacement parts that are provided on an exchange basis. All
removed parts become the property of IBM and must be returned to IBM.
Replacement parts assume the remaining warranty of the parts they replace.
If a Machine does not function as warranted during the warranty period, IBM or your
re-seller will repair or replace it without charge. If IBM or your re-seller is unable to do
so, you may return it to your place of purchase and your money will be refunded.
Copyright IBM Corp. 1996, 1997 vii
Page 10

If you transfer a Machine to another user, warranty service is available to that user for
the remainder of the warranty period. You should give your proof of purchase and this
Statement to that user.
Warranty Service
To obtain warranty service for the Machine, you should contact your re-seller or call
IBM. In the United States or Canada, call your point of purchase or IBM customer
technical support at 1-800-358-6661 from 8:00 a.m. to 8:00 p.m, Eastern Standard
Time. You may be required to present proof of purchase.
Depending on the Machine, the service may be 1) mail-in repair at IBM's Depot location
(called Depot Mail-in Repair), 2) a “Repair” service at your location (called “On-site”), 3)
a “Repair” service at one of IBM's or a re-seller's service locations (called “Carry-in”), or
4) “Exchange” service, either On-site or Carry-in.
When a type of service involves the exchange of a Machine or part, the item IBM or
your re-seller replaces becomes its property and the replacement becomes yours. The
replacement may not be new, but will be in good working order.
It is your responsibility to:
1. Obtain authorization from the owner (for example, your lessor) to have IBM or your
2. Where applicable, before service is provided:
3. If the machine is not shipped in an IBM box, be responsible for loss of, or damage
4. Be responsible for any damage resulting from improper packing of a Machine sent
re-seller service a Machine that you do not own;
a. Follow the problem determination, problem analysis, and service request
procedures that IBM or your re-seller provide,
b. Secure all programs, data, and funds contained in a Machine,
c. Inform IBM or your re-seller of changes in a Machine's location, and
d. For a Machine with exchange service, remove all features, parts, options,
alterations, and attachments not under warranty service. Also, the Machine
must be free of any legal obligations or restrictions that prevent its exchange;
and
to, a Machine in transit when you are responsible for the transportation charges.
to IBM for “Depot Mail-in Repair” or “Exchange.”
Extent of Warranty
IBM does not warrant uninterrupted or error-free operation of a Machine.
Misuse, accident, modification, unsuitable physical or operating environment, improper
maintenance by you, or failure caused by a product for which IBM is not responsible
may void the warranties.
viii Network Printer 17: User’s Guide
Page 11

THESE WARRANTIES REPLACE ALL OTHER WARRANTIES, EXPRESS OR
IMPLIED, INCLUDING, BUT NOT LIMITED TO, THE IMPLIED WARRANTIES OF
MERCHANTABILITY AND FITNESS FOR A PARTICULAR PURPOSE. HOWEVER,
SOME LAWS DO NOT ALLOW THE EXCLUSION OF IMPLIED WARRANTIES. IF
THESE LAWS APPLY, THEN ALL EXPRESS AND IMPLIED WARRANTIES ARE
LIMITED IN DURATION TO THE WARRANTY PERIOD. NO WARRANTIES APPLY
AFTER THAT PERIOD.
In Canada, warranties include both warranties and conditions.
Some jurisdictions do not allow limitations on how long an implied warranty lasts, so the
above limitation may not apply to you.
Limitation of Warranty
Circumstances may arise where, because of a default on IBM's part (including
fundamental breach) or other liability (including negligence and misrepresentation), you
are entitled to recover damages from IBM. In each such instance, regardless of the
basis on which you are entitled to claim damages, IBM is liable only for:
1. bodily injury (including death), and damage to real property and tangible personal
property; and
2. the amount of any other actual loss or damage, up to the greater of $100,000 or
the charge for the Machine that is the subject of the claim.
Under no circumstances is IBM liable for any of the following:
1. third-party claims against you for losses or damages (other than those under the
first item listed above);
2. loss of, or damage to, your records or data; or
3. economic consequential damages (including lost profits or savings) or incidental
damages, even if IBM is informed of their possibility.
Some jurisdictions do not allow the exclusion or limitation of incidental or consequential
damages, so the above limitation or exclusion may not apply to you.
This warranty gives you specific legal rights and you may also have other rights which
vary from jurisdiction to jurisdiction.
Statement of Limited Warranty ix
Page 12

x Network Printer 17: User’s Guide
Page 13

Notices
Trademarks
References in this publication to IBM products, programs or services do not imply that
IBM intends to make these available in all countries in which IBM operates. Any
reference to an IBM licensed product, program, or service is not intended to state or
imply that only IBM's product, program, or service may be used. Any functionally
equivalent product, program, or service that does not infringe any of IBM's intellectual
property rights may be used instead of the IBM product. Evaluation and verification of
operation in conjunction with other products, except those expressly designated by IBM,
is the user's responsibility.
Any performance data contained in this document was obtained in a controlled
environment based on the use of specific data. The results that may be obtained in
other operating environments may vary significantly. Users of this document should
verify the applicable data in their specific environment. Therefore, such data does not
constitute a performance guarantee or warranty.
IBM may have patents or pending patent applications covering subject matter in this
document. The furnishing of this document does not give you any license to these
patents. You can send license inquiries, in writing, to the IBM Corporation, IBM
Director of Licensing, 506 Columbus Ave., Thornwood, N.Y. 10594 U.S.A.
The following terms are trademarks of the IBM Corporation in the United States or other
countries or both:
AIX
Application System/400
AS/400
IBM
Intelligent Printer Data Stream
IPDS
OS/2
The following terms are trademarks or registered trademarks of other companies:
Acrobat Adobe Systems, Inc.
Macintosh Apple Corporation
PostScript Adobe Systems, Inc.
PCL5e Hewlett Packard Co.
TonerMiser DPTek
Windows Microsoft Corp.
Copyright IBM Corp. 1996, 1997 xi
OS/400
Personal System/2
Print Services Facility
PS/2
PSF
WIN-OS/2
Page 14

Energy Star
The Environmental Protection Agency (EPA) ENERGY STAR Computers program is a
partnership effort with manufacturers of data processing equipment to promote the
introduction of energy-efficient personal computers, monitors, printers, fax machines,
and copiers to help reduce air pollution and global warming caused by electricity
generation.
IBM Printing Systems Company participates in this program by introducing printers that
reduce power consumption when they are not being used. As an Energy Star Partner,
IBM Printing Systems Company, has determined that this product meets the Energy
Star guidelines for energy efficiency.
Communications Statements
Federal Communication Notices Commission (FCC) Statement
IBM 4317-001
Note: This equipment has been tested and found to comply with the limits for a Class
B digital device, pursuant to Part 15 of the FCC Rules. These limits are designed to
provide reasonable protection against harmful interference in a residential installation.
This equipment generates, uses, and can radiate radio frequency energy and, if not
installed and used in accordance with the instructions, may cause harmful interference
to radio communications. However, there is no guarantee that interference will not
occur in a particular installation. If this equipment does cause harmful interference to
radio or television reception, which can be determined by turning the equipment off and
on, the user is encouraged to try to correct the interference by one or more of the
following measures:
Reorient or relocate the receiving antenna.
Increase the separation between the equipment and receiver.
Connect the equipment into an outlet on a circuit different from that to which the
receiver is connected.
Consult an IBM authorized dealer or service representative for help.
Properly shielded and grounded cables and connectors (IEEE 1284 compliant) must be
used in order to meet FCC emission limits. Proper cables and connectors are available
xii Network Printer 17: User’s Guide
Page 15

from IBM authorized dealers. IBM is not responsible for any radio or television
interference caused by using other than recommended cables and connectors or by
unauthorized changes or modifications to this equipment. Unauthorized changes or
modifications could void the user's authority to operate the equipment.
This device complies with Part 15 of the FCC Rules. Operation is subject to the
following two conditions: (1) this device may not cause harmful interference, and (2)
this device must accept any interference received, including interference that may
cause undesired operation.
Responsible Party:
International Business Machines, Corp.
Old Orchard Road
Armonk, NY 10504
Tele: 1-800-772-2227
European Union (EU) Electromagnetic Conformity Statement
This product is in conformity with the protection requirements of EU Council Directive
89/336/EEC on the approximation of the laws of the Member States relating to
electromagnetic compatibility. IBM cannot accept responsibility for any failure to satisfy
the protection requirements resulting from a non-recommended modification of the
product, including the fitting of non-IBM option cards.
EU Conformity Statement: This product has been tested and found to comply with the
limits for Class B Information Technology Equipment according to CISPR 22/European
standard EN 55022. The limits for Class B equipment were derived for typical
environments to provide reasonable protection against interference with licensed
communication devices.
German Conformity Statement
Dieses Gerät erfüllt die Bedingungen der EN 55022 Klasse B.
Industry Canada Compliance Statement
This Class B digital apparatus meets the requirements of the Canadian
Interference-causing equipment regulations.
Cet appareil numérique de la classe B respecte toutes les exigences du Réglement sur
le matériel brouiller du Canada.
The United Kingdom Telecommunications Act 1984
This apparatus is approved under the approval No. NS/G/1234/J/100003 for the indirect
connections to the public telecommunications systems in the United Kingdom.
Notices xiii
Page 16

Japanese VCCI Class 2 ITE Statement
Safety Notices
There are three levels of safety notices:
DANGER calls attention to a situation that is potentially or extremely hazardous to
people.
CAUTION calls attention to a situation that is potentially hazardous to people.
Attention calls attention to the possibility of damage to a program, device, system, or
data. Attention notices are located throughout this publication, but are not listed here.
Safety Precautions
Electrical Safety
This printer is inspected and listed by recognized national testing laboratories, such as
Underwriters Laboratories, Inc. (UL) in the U.S.A. and Canadian Standards
Association (CSA) in Canada. Listing of a product by a national testing laboratory
indicates that the product is designed and manufactured in accordance with national
requirements intended to minimize safety hazards. IBM equipment meets a very high
standard of safety in design and manufacture. Remember, however, that this product
operates under conditions of high electrical potentials and heat generation, both of
which are functionally necessary.
Because the paper and toner used in the printer can burn, you should take normal
precautions to prevent fire. These precautions include common-sense measures, such
as keeping potentially combustible materials (for example, curtains and chemicals)
away from the printer, providing adequate ventilation and cooling, limiting unattended
operation, and having trained personnel available and assigned to the printer.
xiv Network Printer 17: User’s Guide
Page 17

Laser Safety
This printer complies with the performance standards set by the U.S. Food and Drug
Administration for a Class 1 Laser Product. This means that the printer belongs to a
class of laser products that does not produce hazardous laser radiation in a customer
accessible area. This classification was accomplished by providing the necessary
protective housing and scanning safeguards to ensure that laser radiation is
inaccessible or within Class 1 limits.
There are various tool-operated machine covers that should be moved, removed, or
replaced only by trained service personnel. There are no operator controls or
adjustments associated with the laser.
No operator maintenance is required to keep the product in compliance as a Class 1
Laser Product. No adjustments that affect laser operation or power are accessible to
the operator.
This printer is a Class 1 Laser Product that contains an enclosed Class 3B laser.
Notices xv
Page 18

xvi Network Printer 17: User’s Guide
Page 19

About This Book
This book is designed to help you use the Network Printer 17. It describes how to:
Use the operator panel to navigate menus and control the printer
Load and select paper and other print materials
Clear paper jams
Change printer supplies
Install printer options
Troubleshoot printer problems
Interpret messages displayed on the operator panel
Conventions Used
Names of keys on the operator panel are shown in bold typeface. For example:
Press the Continue/Enter key.
Press Page Eject.
Related Publications
The following books contain information that relates to the Network Printer 17:
IBM Network Printer 17: Quick Setup
Network Printer 17
IBM Network Printers: Ethernet and Token Ring Configuration Guide
describes how to configure the Ethernet and token-ring network interface cards
(this book is included with the cards)
IBM Network Printers: Twinax/Coax Configuration Guide
how to configure the twinax and coax network interface cards (this book is included
with the cards)
IBM Network Printer 17: Safety Instructions
several languages
IBM Network Printers: PCL5e and PostScript Level 2 Technical Reference
S544-5344, contains technical reference information about Network Printer 17
PostScript and PCL5e support
IBM Network Printers: IPDS and SCS Technical Reference
technical reference information about Network Printer 17 IPDS and SCS support
, G544-5346, describes how to set up the
, G544-5240,
, G544-5241, describes
, G544-5347, contains safety notices in
,
, S544-5312, contains
Copyright IBM Corp. 1996, 1997 xvii
Page 20

xviii Network Printer 17: User’s Guide
Page 21

Chapter 1. About Your Printer
The Network Printer 17 is a multifunctional, 17 page-per-minute laser printer. You can
attach it directly to your workstation and, using optional network interface cards, you
can attach it to networks and other computing environments. You can also add
optional features, such as an envelope feeder and one or two 500-sheet paper trays.
The following illustration shows the Network Printer 17 with some of the optional
features installed:
Standard Features
Standard features of the printer include:
Printing speed of up to 17 pages per minute
Resolution of 600 dots per inch (dpi)
PCL5e support
4MB of memory
Parallel interface (IEEE 1284)
250-sheet paper tray
100-sheet auxiliary tray
250-sheet paper output bin
Printer drivers
Copyright IBM Corp. 1996, 1997 1
Page 22

Optional Features
Optional features include the following:
Up to two additional 500-sheet paper trays
500-sheet offset paper output bin
Duplex unit
Envelope feeder with a capacity of 75 envelopes
10-bin mailbox
4MB, 8MB, 16MB, and 32MB memory SIMMs
Adobe PostScript Level 2 SIMM
IBM IPDS SIMM
Flash Memory SIMM (2MB, 4MB)
810MB hard drive
Attachment cards:
Note: For information about installing optional features, see Chapter 7, “Installing
Printer Options” on page 127. For information about printer memory and memory
requirements, see “Memory Requirements” on page 3.
Printer Drivers
Before you can print from your PC or workstation to your printer, you need to install the
right printer driver on your system. The Network Printer 17 includes diskettes which
contain PCL5e printer drivers for the following systems:
Windows 3.1, Windows 3.11, Windows for Workgroups 3.11, Win-OS/2
Windows 95
Windows NT 3.51, Windows NT 4.0
OS/2 2.11, OS/2 Warp
AIX 3.2.5, AIX 4.1
– IBM Network Card for Ethernet (10Base2 or 10BaseT)
– IBM Network Card for Token Ring
– IBM Twinax SCS Interface
– IBM Coax SCS/DSC/DSE Interface
Notes:
1. For your printer driver to work effectively, you must indicate to your printer driver
what features are installed on your printer, for example, what trays are installed,
and how much memory is installed. Therefore, after you install a driver, make sure
you update it to indicate the features installed on your printer. Also, if you install
(or remove) a feature at a later date, make sure you update your printer driver.
2. Each operating system has unique driver installation procedures. For specific
installation instructions, see the driver installation documentation for your operating
system and the Readme file on the diskette that includes the driver of your choice.
3. Your printer may include additional drivers not included in this list.
4. PostScript drivers are shipped with the optional PostScript feature.
5. Updated printer drivers are also available as follows:
2 Network Printer 17: User’s Guide
Page 23

Technical Support
If you run into a problem, see Appendix A, “Troubleshooting” on page 183. If you still
cannot solve the problem, IBM customer technical support is available at no additional
charge during the warranty period. In the U.S.A. and Canada, call 1-800-358-6661.
Ordering Supplies
Printing supplies can be ordered through your IBM authorized printer or printer supplies
reseller. If you have no reseller, you can call 1-888-IBM-PRINT (1-888-426-7746) in
the U.S. or Canada to ask for an authorized dealer or to order from IBM Printer
Supplies.
In other countries, contact your point of purchase for information about where to order
supplies.
In Europe, you can call IBM Supplies Fulfillment Operations at 31-43-350 2756 or at the
following numbers:
Denmark: 80015534
Finland: 08001-13110
France: 05-905871
Germany: 0130 818005
Italy: 1-678 78349
Norway: 800-11389
Sweden: 020-794270
United Kingdom: 0800-968679
a. Access the IBM Printing Systems Home Page at:
http://www.can.ibm.com/ibmprinters
b. Select Printer Drivers/Product Updates.
c. Use the menu selections to find the printer driver you want.
Memory Requirements
Table 1 on page 4 shows the minimum memory requirements for Network Printer 17
based on various functional requirements.
Notes:
1. The PAGEPROT menu item is available on the PCL Menu, the PostScript (PS)
Menu, and the IPDS Menu. It determines whether or not the printer uses
compression when it prints complex pages.
PAGEPROT=AUTO—the printer uses compression when it runs into memory
constraints. This can reduce print speed.
PAGEPROT=ON—the printer does not use compression and therefore
requires more memory.
Chapter 1. About Your Printer 3
Page 24

2.
Context Saving
allows the printer to remember information about the current data
stream when it switches back and forth from one job type (PostScript or PCL5e) to
another. (Network Printer 17 always does context saving for IPDS.) For PCL5e,
this includes information about downloaded permanent fonts, macros, and
user-defined patterns. For PostScript, this includes all of the information found in
the PostScript VM allocation.
The Memory Configuration (MEMCONFIG) Menu provides two menu items, PCL
SAVE and PS SAVE, which allow you to set context saving on or off for each data
stream. These menu items are displayed only if there is enough memory in the
printer to permit context saving. The PS SAVE menu item is displayed only if the
PostScript SIMM is installed.
Table 1. Memory Requirements
Requirement Simplex Duplex
Base configuration only
PAGEPROT=AUTO 4MB 4MB
PAGEPROT=AUTO (legal-size paper) 4MB 8MB
PAGEPROT=ON (letter-size paper) 8MB 8MB
PAGEPROT=ON (legal-size paper) 8MB 12MB
Context Saving 12MB 16MB
Base configuration with PostScript
PAGEPROT=AUTO 4MB 4MB
PAGEPROT=AUTO (legal-size paper) 4MB 8MB
PAGEPROT=ON (letter-size paper) 8MB 12MB
PAGEPROT=ON (legal-size paper) 8MB 12MB
Context Saving 12MB 16MB
Base configuration with IPDS
PAGEPROT=AUTO 8MB 8MB
PAGEPROT=AUTO (legal-size paper) 8MB 8MB
PAGEPROT=ON (letter-size paper) 8MB 12MB
PAGEPROT=ON (legal-size paper) 12MB 16MB
Context Saving 12MB 16MB
Base configuration with IPDS and PostScript
PAGEPROT=AUTO 8MB 12MB
PAGEPROT=AUTO (legal-size paper) 12MB 12MB
PAGEPROT=ON (letter-size paper) 12MB 16MB
PAGEPROT=ON (legal-size paper) 16MB 16MB
Context Saving 16MB 20MB
4 Network Printer 17: User’s Guide
Page 25

Using Network Printer Manager Utility
Network Printer Manager (NPM) Utility is a tool for network administrators. NPM can:
Enable you to install and configure IBM Network Printers in Local Area Networks
(LANs), including Novell 3.12 and 4.X networks in bindery emulation (printer
network cards can be NDS-configured with NWAdmin).
Monitor and provide network printer status information including online/offline
status, paper jams, out of toner conditions, and empty tray conditions.
NPM uses industry standard, open systems System Network Management Protocol
(SNMP). SNMP supports Management Information Base (MIB) which is a collection
of information that describes the printer's functions and features.
The initial version of NPM supports IBM OS/2. Other versions will be made available
on the World-wide Web through the IBM Printing Systems Company home page.
Obtaining Network Printer Manager Utility
To obtain the Network Printer Manager Utility, follow these steps:
1. Access the IBM Printing Systems Company Home Page at
http://www.can.ibm.com/ibmprinters
2. Select Printer Drivers/Product Updates.
3. Use the menu selections to find the Network Printer Manager Utility version or
update you want.
.
Using Network Printer Resource Utility
The Network Printer Resource Utility (NPRU) is a utility that enables administrators to
download fonts and overlays (PCL macros and PostScript overlays) to the printer.
Using NPRU, the network administrator can select PCL Intellifonts, TrueType fonts,
PostScript Type 1 fonts, and PCL or PostScript overlays on a workstation for download.
These resources can be downloaded to memory (DRAM) on the printer, or to the flash
or a hard drive, if these options are installed the printer.
The network administrator can provide a network address for the NPRU database of
downloaded resources to workstation users. Those users can then use the printer
driver to connect to the database, enabling them to select downloaded fonts and
overlays from within their applications.
The NPRU is a separate program that uses the printer driver programs to perform the
download function. For more information about using NPRU, refer to the README file
that is supplied with the utility.
Obtaining Network Printer Resource Utility
The OS/2 NPRU is shipped with the Network Printer 17. To obtain other versions or
updates, follow these steps:
Chapter 1. About Your Printer 5
Page 26

1. Access the IBM Printing Systems Company Home Page at
http://www.can.ibm.com/ibmprinters
2. Select Printer Drivers/Product Updates.
3. Use the menu selections to find the NPRU version or update you want.
Obtaining Adobe Acrobat Portable Data Files
This manual is available in Adobe Acrobat Portable Data File (PDF) format for online
viewing and printing. To obtain this manual in PDF format:
1. Access the IBM Printing Systems Company Home Page at
http://www.can.ibm.com/ibmprinters
2. Select Printer Drivers/Product Updates.
3. Use the menu selections to find the document you want.
.
.
6 Network Printer 17: User’s Guide
Page 27
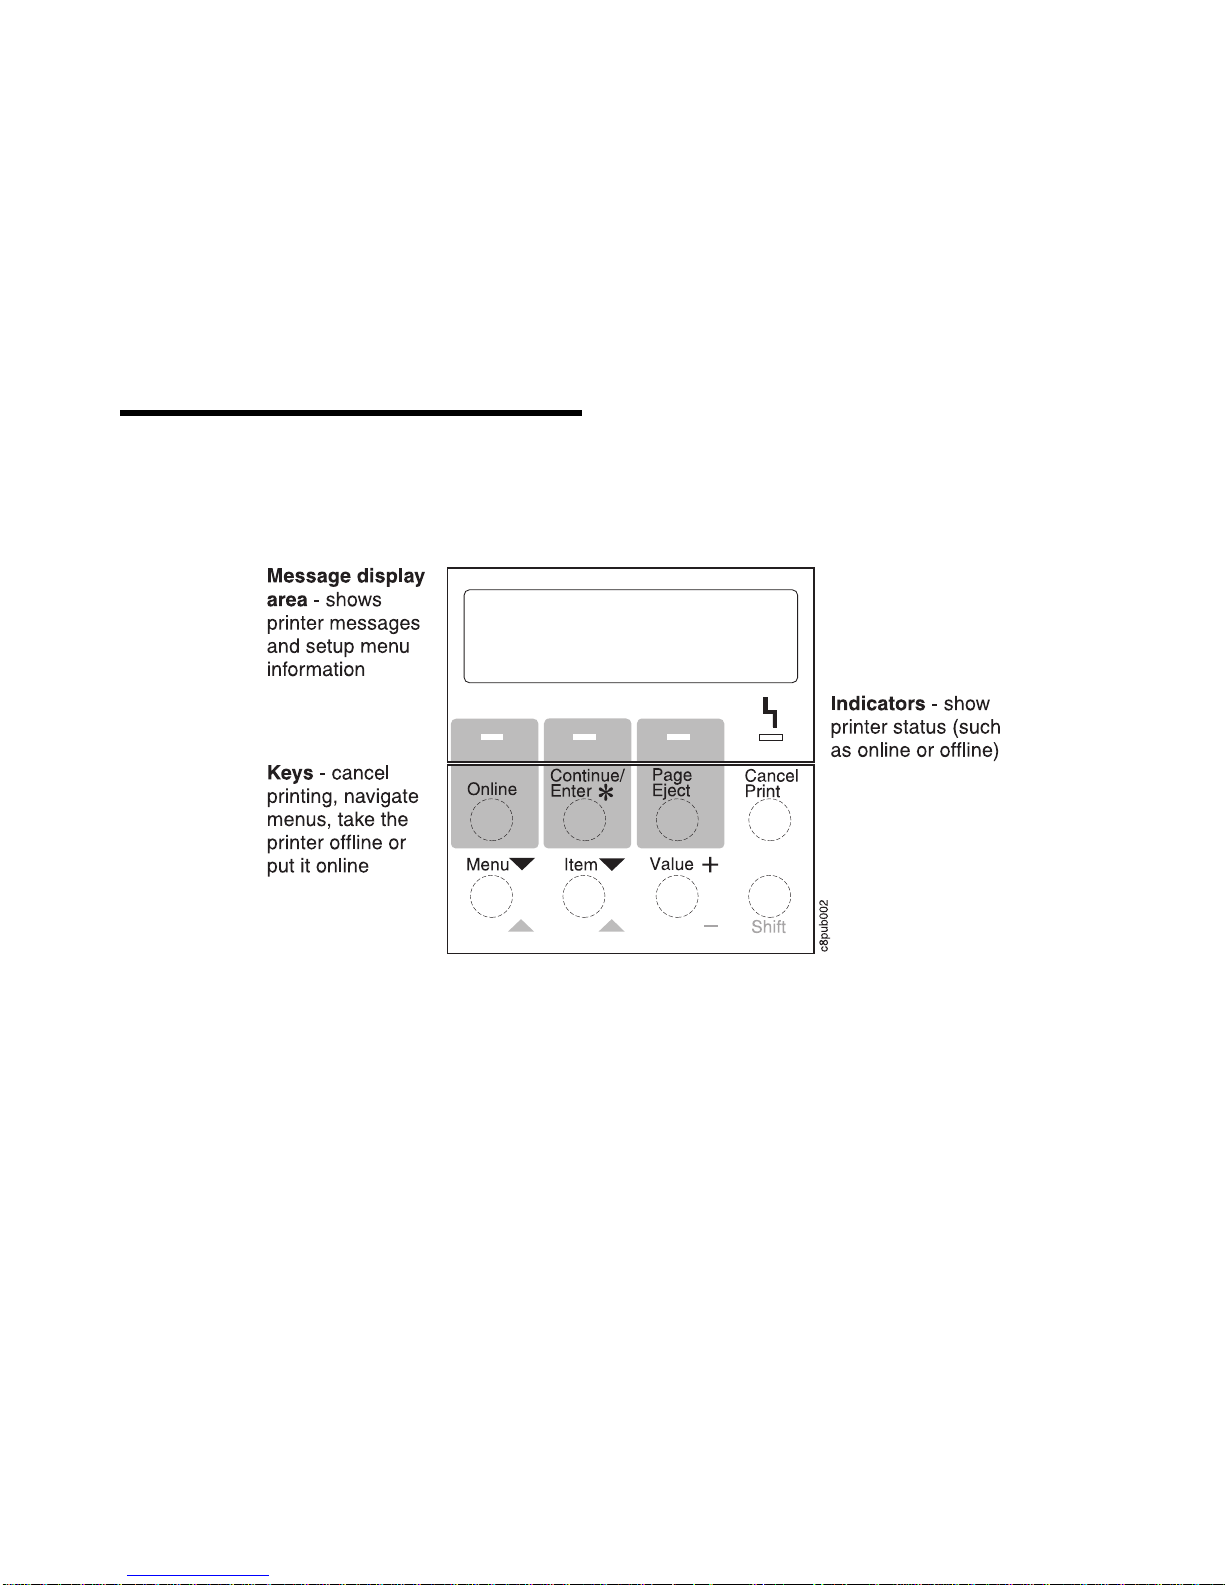
Chapter 2. Using the Operator Panel
This chapter describes how to use the Network Printer 17 operator panel. The operator
panel is located on the top, left-hand side of the printer. It consists of a message
display area, status indicator lights, and operator keys.
For information about indicator lights, see “Understanding the Operator Panel
Indicator Lights” on page 8.
For information about the most common messages you will see in the message
display area, see “Common Messages” on page 9. For a complete listing, see
Appendix B, “Printer Messages” on page 191.
For information about operator panel keys, see “Using the Operator Panel Keys” on
page 10 and “Navigating Menus” on page 12.
For an overview of some of the most common operator panel tasks, see “Other
Operator Panel Tasks” on page 16.
For a complete overview of all printer menus, see Chapter 5, “Operator Panel
Menus” on page 73.
Copyright IBM Corp. 1996, 1997 7
Page 28
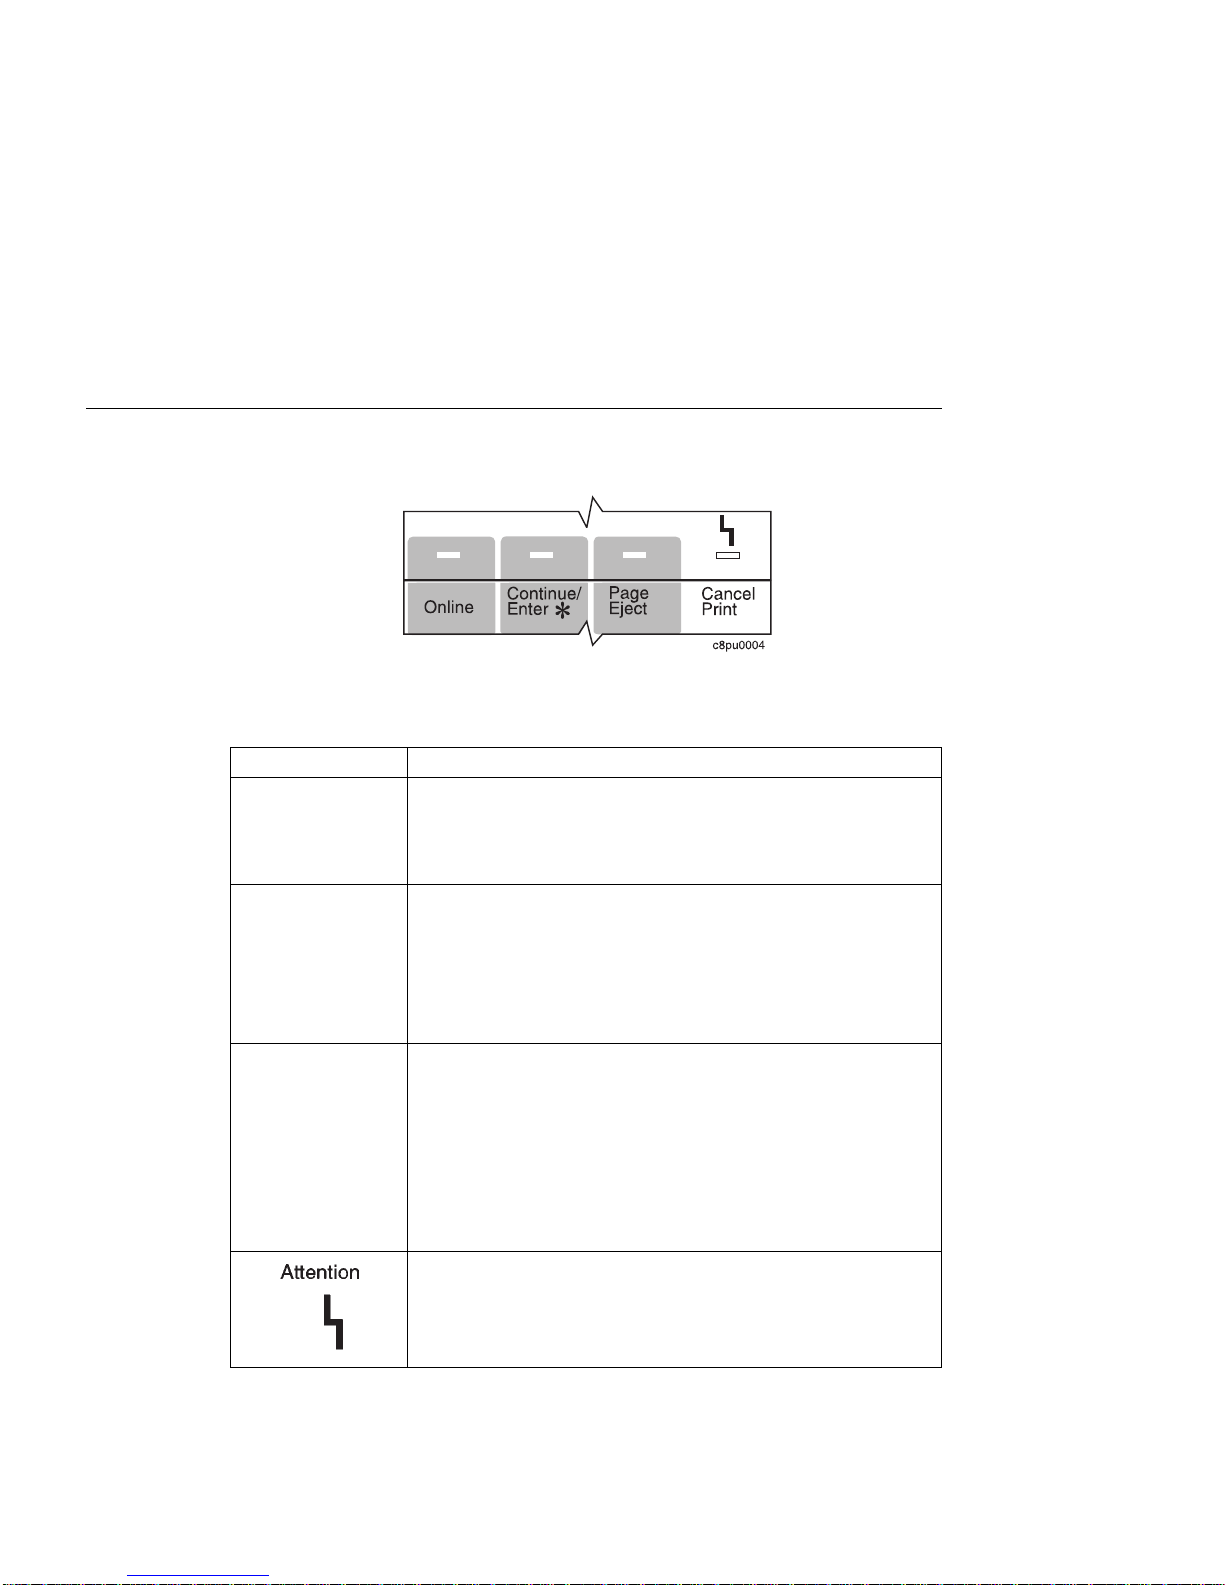
Understanding the Operator Panel Indicator Lights
The status indicators are located at the center of the operator panel.
Indicator lights can be on, off, or blinking
Indicator Condition
Online On—the printer is online and idle.
Blinking—the printer is online and receiving or processing data.
Off—the printer is offline. Note that the printer must be offline before
you can change menu settings.
Continue On—a condition that requires operator attention exists. Press the
Continue/Enter key to continue printing or press the Cancel Print
key to cancel printing. (If the Auto-continue function is on, the printer
may automatically resume printing after thirty seconds. For more
information, see the description of the AUTOCONTINU item under
“Configuration (Config) Menu” on page 81.)
Off—the printer is operating normally.
Page Eject On—a page or partial page is stored in memory. If you are printing a
PCL5e job, you can press the Page Eject key to print the page. The
Page Eject key has no effect on PostScript or IPDS jobs.
Blinking—the printer is printing the PCL5e page you pressed the
Page Eject key to print. If you are running a continuous test
(CONTINUOUS TEST from the Test Menu) and you press the
Cancel Print key, the Page Eject indicator blinks to inform you that
the printer is canceling the test.
Off—no pages are stored in the printer memory.
Blinking—the printer requires attention.
Off—the printer is operating normally.
8 Network Printer 17: User’s Guide
Page 29

Common Messages
The message display area is located at the top of the operator panel. The following
table describes the most common display messages. For a list of all messages, see
Appendix B, “Printer Messages” on page 191.
Message Description/Response
READY The printer is ready to receive a print job.
WARMING UP... The printer is warming up. When it is ready to print, the message
I/O INITIALIZING The network interface card is initializing.
OFFLINE The printer is offline and cannot receive print jobs.
PCL PARALLEL The printer is online and receiving data for a PCL5e print job through
PS PARALLEL The printer is online and receiving data for a PostScript print job
02 TONER LOW The toner is either low or depleted.
LOAD
tray
paper-size
Response: None required.
changes to READY.
Response: None required.
Response: None required.
Response: To receive printing jobs, press the Online key.
the parallel port.
Response: None required.
through the parallel port.
Response: None required.
Response: Install a new toner cartridge. See “Changing the Toner
Cartridge” on page 111.
IN
A tray is out of paper.
Response: Load paper. See “Loading Paper and Envelopes into the
Printer” on page 24.
Chapter 2. Using the Operator Panel 9
Page 30
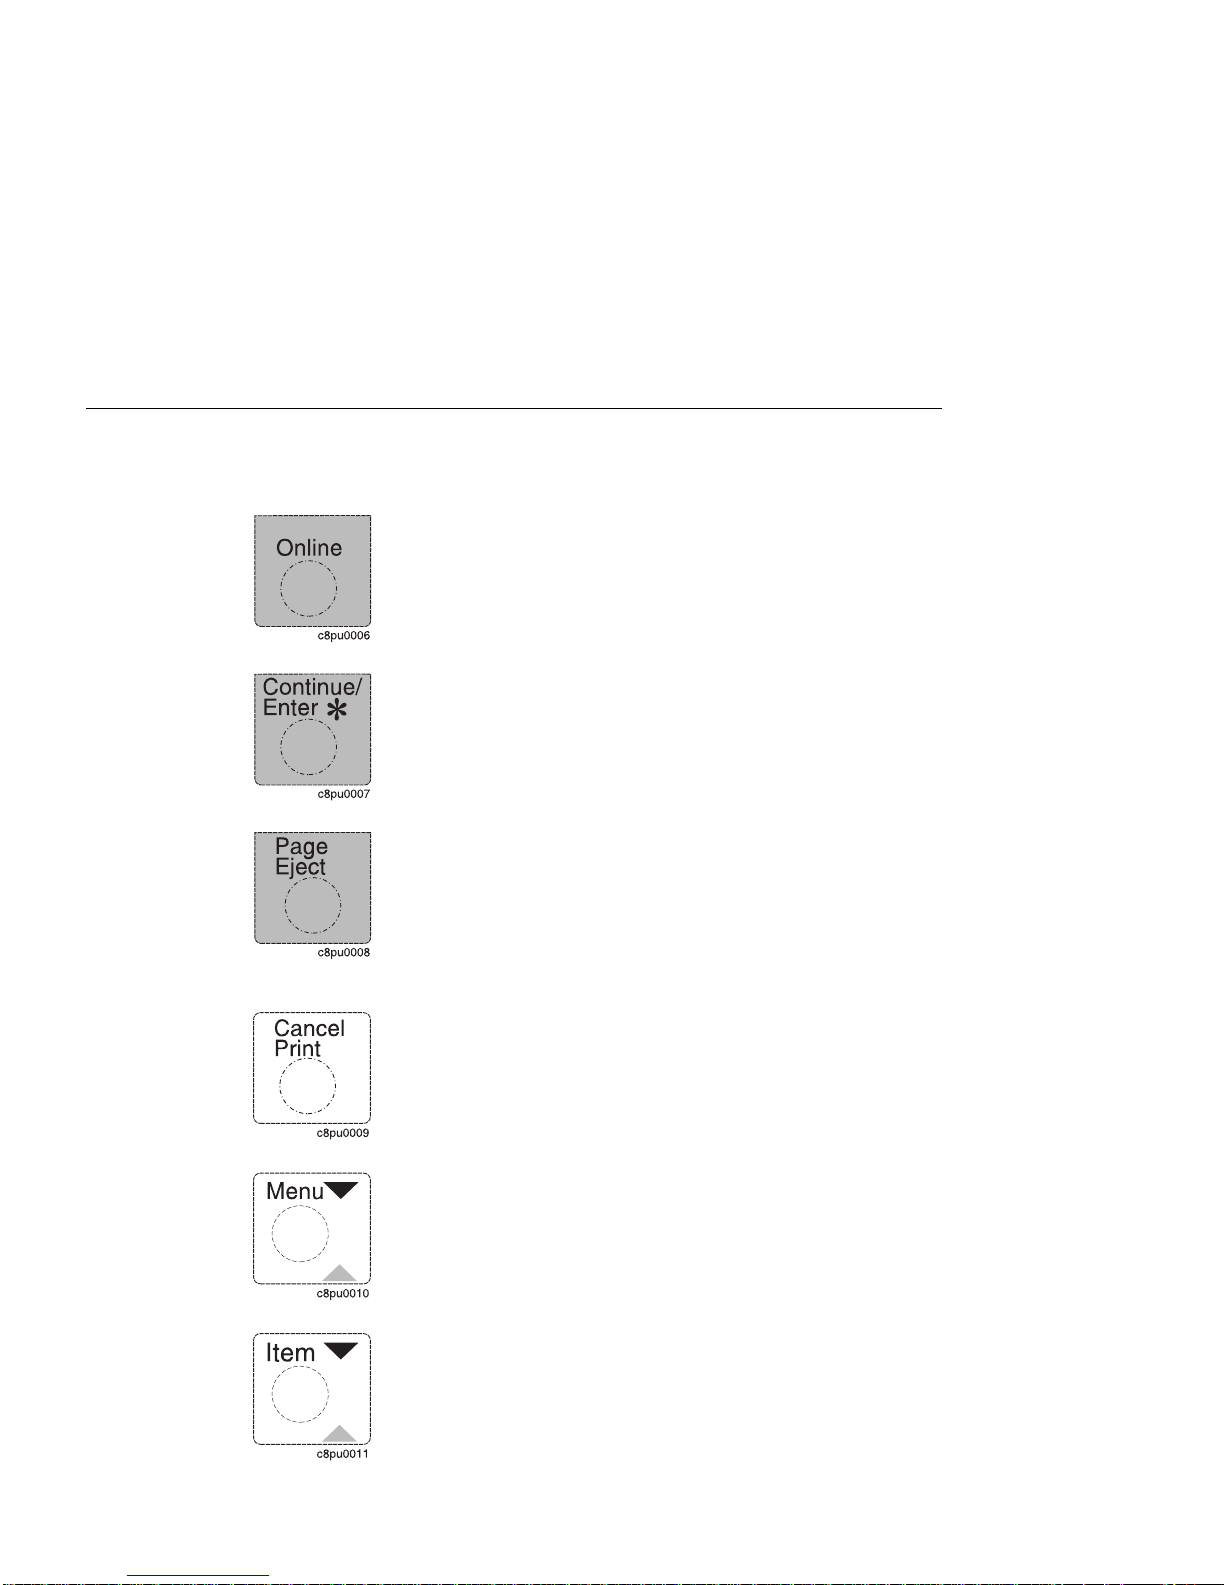
Using the Operator Panel Keys
The operator panel keys enable you to configure and operate the printer. They are
located at the bottom of the operator panel.
Use the Online key to take the printer offline or to put it back online.
Note: The printer must be offline before you can change menu
settings, cancel jobs, or use the Page Eject key.
Use the Continue/Enter key to continue printing or to confirm a menu
value.
Note: To change a menu item to a new value, you must press the
Continue/Enter key when the value is displayed in the message
display area. After you press Continue/Enter, an asterisk (*) appears
next to the new value, indicating that it is active.
Use the Page Eject key to print a PCL5e job that is stored in the
memory buffer of the printer. (The Page Eject indicator light is on when
a page is in the buffer.) The printer prints the page even if it is not
complete in the memory buffer. The Page Eject key does not apply to
PostScript or IPDS jobs.
Note: The printer must be offline before you can print the buffered
page.
Use the Cancel Print key to cancel the current print job. (After you
print the Cancel Print key, it may take a while before the current job
stops printing.) After the job is canceled, the printer begins printing the
next job in the queue.
Note: The printer must be offline before you can cancel a job.
10 Network Printer 17: User’s Guide
Use the Menu key to scroll through the menu list. As you scroll
through the list, the current menu is displayed in the message display
area.
Note: The printer must be offline before you can navigate menus.
Use the Item key to scroll through the list of items for the menu listed
in the message display area. As you scroll through the list, the current
item and, if applicable, the current value for the item is displayed in the
message display area, just below the name of the current menu.
Page 31

Use the Value key to scroll through a list of acceptable values for a
menu item. Press the Value key once to scroll forward one value.
Press and hold the Value key to scroll more quickly through the list
(especially for numeric values).
Note: To select a new value, press the Continue/Enter key when the
value is displayed in the message display area. An asterisk (*) appears
next to the value, indicating that it is now active.
Use the Shift key to reverse the order in which you scroll when you
use the Menu, Item, or Value keys.
Chapter 2. Using the Operator Panel
11
Page 32

Navigating Menus
There are two types of menus: action menus and configuration menus.
Action menus contain a list of actions you can perform, such as printing a list of active
fonts or printing a printer configuration page. There are two action menus: the Test
Menu and the Machine Info Menu.
To work with action menus:
1. Make sure the printer is offline. If the printer is online, press the Online key to
2. Press the Menu key to display the menu you want.
3. Press the Item key to display the action item you want.
4. Press the Continue/Enter key to perform the action.
For an example of working with an action menu, see “Printing the Printer Configuration
Page” on page 13.
Configuration menus contain lists of items that define current settings for the printer,
such as default fonts, default input trays and output bins, and attachment configuration
settings.
To work with configuration menus:
1. Make sure the printer is offline. If the printer is online, press the Online key to
2. Press the Menu key to display the menu you want.
3. Press the Item key to display the item you want.
4. Press the Value key to display the value you want.
5. Press the Continue/Enter key to change the setting to the value currently
Note: Once you select a new value, it stays selected until you change it or you reset
the printer defaults. Menu settings are saved when you power off the printer.
take it offline.
take it offline.
displayed in the message display area. An asterisk (*) appears next to the value
after it is selected.
Important!
Many print applications allow you to specify values such as fonts, input trays, and
output bins. If you use your print application (or printer driver) to specify a value,
that value will be used and the default value set at the printer will be ignored.
12 Network Printer 17: User’s Guide
Page 33

Printing the Printer Configuration Page
1. Make sure the printer is offline. If the printer is online, press the Online key to
take it offline.
2. Press the Menu key once. TEST MENU appears in the message display area.
3. Press the Item key once. CONFIG PAGE appears in the message display area.
Note that the menu name appears on the top line and the action item appears on
the second line.
Chapter 2. Using the Operator Panel 13
Page 34

IBM Network Printer 17
Configuration Page
TEST MENU ITEM
CONFIG PAGE
PRINT PS FONTS
PRINT PCL FONTS
PRINT PS DEMO
CONTINUOUS TEST
RESET PRINTER
FACTORY DEFAULT
ONLINE HEX PRINT
PAPER MENU
SOURCE=TRAY2
OUTPUT=MAIN
TRAY SWITCH=ON
MANUAL=OFF
AUXSIZE=LETTER
ENVSIZE=MONARCH
DUPLEX=OFF
BINDING=LONG
TRAY RENUM=OFF
CONFIG MENU ITEM
JAMRECOVERY=OFF
AUTOCONTINU=ON
DENSITY=3
PWRSAV=30 MIN
QUALITY=NORMAL
MEMCONFIG MENU ITEM
PCL SAVE=OFF
PS2 SAVE=OFF
4. Press the Continue/Enter key to print the configuration page. (It takes a moment
or two.) The following figure shows a sample printer configuration page.
PARALLEL MENU ITEM
PERSONALTY=AUTO
BI-DI=ON
PORT TMEOUT=15
PCL MENU ITEM
PAGEPROT=AUTO
COPIES=1
PAGESIZE=LETTER
ORIENTATION=P
EDGE-EDGE=OFF
FORM=60 LINES
FNTSRC=INTERNAL
FONTNUM=0
PTSIZE=12.00
PITCH=10.00
SYMSET=ROMAN-8
PS MENU ITEM
PAGEPROT=AUTO
COPIES=1
PRINT ERRS=OFF
TOKEN RING MENU ITEM
PERSONALTY=AUTO
PORT TMEOUT=15
IP ADDRESS=9.99.999.999
SUBNET MASK=255.255.255.0
GATEWAY ADDRESS=9.999.999.998
MAC ADDRESS=00.00.93.00.C0.C6
MACHINE INFO MENU ITEM
PAGE COUNT
ERROR LOG
TONER CTR
FUSER CTR
LANGUAGE MENU
LANG=ENGLISH
INSTALLED OPTIONS
TRAY 2
DUPLEX
PS
TOKEN RING
8 MB Extra Memory
TOTAL MEMORY=12MB
AUTOSENSED PAPER
TRAY 1=LETTER
TRAY 2=LETTER
PRINTER DETAILS
PAGE COUNT=1039
TONER CTR=984
FUSER CTR=984
CODE LEVELS
CTL 1.43
PCL 1.3.1
PS 1.18
TR 5.17
The configuration page lists:
Menus—All of the menu settings currently active for your printer. Note that
the list of menus you see is determined by the options you have installed; for
example, you see the Ethernet Menu only when you have the Ethernet
attachment installed. Also note that the configuration page displays the menus
and options in the order they appear on the operator panel; this allows you to
use the configuration page as a menu map.
For a description of all available menus, see Chapter 5, “Operator Panel
Menus” on page 73.
Installed Options—The options and memory you have installed.
Important: IBM recommends doing the following whenever you install a
feature:
– Print the printer configuration page. Then look under Installed Options to
make sure the printer recognizes the option and the installation was
successful.
– Update your printer driver to indicate the new feature is available. (This
includes features such as new trays and extra memory; you do not need
to indicate new network cards.)
14 Network Printer 17: User’s Guide
Page 35

Autosensed Paper—The paper loaded in various trays.
Printer Details—Page counts for the printer, the toner cartridge, and the fuser.
Note that you should reset the toner and fuser counts whenever you change
toner or the fuser. See “Machine Information Menu” on page 109 for more
information.
5. To restore the printer to READY status, press the Online key.
Chapter 2. Using the Operator Panel 15
Page 36

Other Operator Panel Tasks
The rest of this chapter contains examples of how to perform some other common
operator panel tasks. In addition, “Using the Paper Menu” on page 53 contains
examples of how you can use the operator panel to change Paper Menu settings, such
as default input trays and output bins, and default paper sizes. Chapter 8, “Configuring
Printer Network Addresses” on page 179 describes how to set TCP/IP network values
(IP address, gateway address, subnet mask, locally administered MAC address) from
the operator panel.
Making Duplex or Simplex Printing the Printer Default
Situation: You want to make duplex printing or simplex printing the printer default.
Note: Values set in print jobs (either by the print application or by the printer driver)
override values you set at the printer. If a print job specifies simplex printing and the
printer default is duplex, the printer honors the print job setting and prints on one side
only.
Action:
1. Press the Online key until you see OFFLINE in the display.
2. Press the Menu key until you see PAPER MENU in the display.
3. Press the Item key until you see DUPLEX=
4. Press the Value key until you see the new value you want.
5. Press the Continue/Enter key to select the new setting. An asterisk appears next
to the value, showing that it is active.
6. To restore the printer to READY status, press the Online key.
ON
* or DUPLEX=
OFF
in the display.
Canceling a Print Job
Situation: You want to cancel the job that is currently printing.
Action:
1. Press the Online key to take the printer offline.
2. Press the Cancel Print key. The current job will be canceled and removed from
the queue after the printer completes the current page.
3. To restore the printer to READY status, press the Online key.
Printing a Stored Page (PCL5e Jobs Only)
Situation: The Page Eject indicator is lit, indicating that the printer has data stored that
needs to be printed, but has not received a command to print the page.
Action:
1. Press the Online key to take the printer offline.
2. Press the Page Eject key. The page prints.
16 Network Printer 17: User’s Guide
Page 37

3. To restore the printer to READY status, press the Online key.
Note: The Page Eject key is valid only for PCL5e jobs; it does not print pages of
PostScript or IPDS jobs.
Printing a List of PCL5e Fonts
Situation: You want to see a list of the PCL5e fonts installed on the printer.
Action:
1. Press the Online key to take the printer offline.
2. Press the Menu key. TEST MENU appears in the display area.
3. Press the Item key until you see PRINT PCL FONTS.
4. Press the Continue/Enter key to print the PCL5e fonts list.
5. After the page prints, press the Online key to restore the printer to READY status.
Printing a List of PostScript Fonts
Situation: You have the optional PostScript Level 2 SIMM installed on your printer and
you want to see a list of the PostScript fonts.
Action:
1. Press the Online key to take the printer offline.
2. Press the Menu key. TEST MENU appears in the display area.
3. Press the Item key until you see PRINT PS FONTS. This item appears only if you
have the optional PostScript Level 2 SIMM installed on your printer.
4. Press the Continue/Enter key to print the PostScript fonts list.
5. After the page prints, press the Online key to restore the printer to READY status.
Printing a List of IPDS Resident Fonts
Situation: You have the optional IPDS SIMM installed on your printer and you want to
see a list of the IPDS resident fonts.
Action:
1. Press the Online key to take the printer offline.
2. Press the Menu key. TEST MENU appears in the display area.
3. Press the Item key until you see PRINT IPDS FONTS. (This item appears only if
you have the optional IPDS SIMM installed on your printer.)
4. Press the Continue/Enter key to print the IPDS resident fonts list.
5. After the page prints, press the Online key to restore the printer to READY status.
Chapter 2. Using the Operator Panel 17
Page 38

Adjusting Print Density (Printing Darker or Lighter)
Situation: You want to increase or decrease the print density, making the print darker
or lighter.
Action:
1. Press the Online key until you see OFFLINE in the display.
2. Press the Menu key until you see CONFIG MENU in the display.
3. Press the Item key until you see DENSITY=n* in the display, where n is the
density value currently selected. (3 is the factory default.)
4. Press the Value key until you see the value you want to assign to the toner
density; 12 is the darkest print, 0 is the lightest.
5. Press the Continue/Enter key to select the new density. An asterisk (*) appears
next to the value, showing that it is active.
6. To restore the printer to READY status, press the Online key.
Changing the Power Savings (Sleep Mode) Interval
Situation: When you first install your printer, the printer is set up to go into
power-savings mode (or sleep mode) after it is inactive for 30 minutes. In this mode,
the printer powers down most of its systems and therefore requires extra time to warm
up when the next print is requested.
Action:
1. Press the Online key until you see OFFLINE in the display.
2. Press the Menu key until you see CONFIG MENU in the display.
3. Press the Item key until you see PWRSAV=30* in the display. (If this value has
already been changed, a number other than 30 will appear in the display.)
4. Press the Value key until you see the value (number of minutes) you want to
assign to the power-saver feature.
5. Press the Continue/Enter key to select the new power-savings value. An asterisk
(*) appears next to the value, showing that it is active.
6. To restore the printer to READY status, press the Online key.
18 Network Printer 17: User’s Guide
Page 39

Changing the Language Shown on the Display Panel
Situation: You want to display operator panel messages and menus in a language
other than English.
Action:
1. Press the Online key until you see OFFLINE in the display.
2. Press the Shift and Menu keys at the same time. You see LANGUAGE MENU.
3. Press the Item key. LANG=ENGLISH* appears as the first menu item unless the
language has already been changed.
4. Press the Value key until you see the language you want to select.
5. Press the Continue/Enter key. An asterisk (*) appears next to the language,
showing that it is active.
6. To restore the printer to READY status, press the Online key.
Chapter 2. Using the Operator Panel 19
Page 40

20 Network Printer 17: User’s Guide
Page 41

Chapter 3. Paper Handling
This chapter describes how to:
Select print media
Load print media into the following:
– 250-sheet main paper tray (Tray 1)
– 100-sheet auxiliary tray
– 500-sheet paper tray (Tray 2, Tray 3)
– Envelope feeder
Use the 10-Bin Mailbox Option.
Use the Paper Menu to specify default trays, bins, and paper sizes for your printer.
Important: Values specified in your print jobs normally override defaults set at the
printer. For example, if a print job requests the 250-sheet paper tray (Tray 1), the
printer will use the 250-sheet paper tray, even if the default tray is set to something
else.
Also note that when mismatches occur between size and source (for example, a
job specifies a specific tray and a specific paper size, but the requested tray does
not contain the requested paper size), the printer attempts to satisfy the size
request first. If no tray contains the requested size, a message may indicate the
last tray the printer checked.
Copyright IBM Corp. 1996, 1997 21
Page 42

Selecting Paper and Other Printable Material
Tray or Bin Paper Sizes & Envelope
Sizes
250-sheet main
paper tray (Tray 1)
100-sheet auxiliary
tray
500-sheet paper
tray (Tray 2, Tray
3)
500-sheet offset
paper output bin
Mailbox A4, Letter Copier paper 20- to 28-pound paper (75
Envelope feeder Commercial #10,
A4, Letter, 13-in. Legal
(Folio), 14-in. Legal,
Executive, B5-JIS
Paper sizes—A4, Letter,
13-in. Legal (Folio), 14-in.
Legal, Statement,
Executive, A5, A6, B5-JIS,
B5-ISO
Envelope sizes —
Commercial #10,
Monarch, DL, C5
A4, Letter, 13-in. Legal
(Folio), 14-in. Legal
A4, Letter, 13-in. Legal
(Folio), 14-in. Legal,
Statement, Executive, A5,
A6, B5-JIS, B5-ISO
Monarch, DL, C5
Papers & Other Printable
Material
Copier paper
Recycled paper
Letterhead/preprinted
paper
Copier paper
Recycled paper
Transparencies
Paper-backed labels
Card stock
Envelopes
Copier paper
Recycled paper
Letterhead/preprinted
paper
Copier paper 16- to 28-pound paper (60
Envelopes 16- to 28-pound paper (60
Paper Weight
16- to 28-pound paper (60
grams/meter2 to 105
grams/meter2)
16- to 28-pound paper (60
grams/meter2 to 105
grams/meter2) for paper
Up to 190 grams/meter
for transparencies, labels,
and postcards
16- to 28-pound paper (60
grams/meter2 to 105
grams/meter2)
grams/meter2 to 105
grams/meter2)
grams/meter2 to 105
grams/meter2)
grams/meter2 to 105
grams/meter2)
2
Notes:
1. Paper sizes are defined as follows:
A4 — 210 x 297 mm
A5 — 148.5 x 210 mm
A6 — 105 x 148 mm
B5-JIS — 182 x 257 mm
B5-ISO — 176 x 250 mm
Statement — 8.5 x 5.5 in.
Executive — 7.25 x 10.5 in. (185 x 267 mm)
Letter — 8.5 x 11.0 in. (216 x 279 mm)
13-in. Legal (Folio) — 8.5 x 13.0 in. (216 x 330 mm)
14-in. Legal — 8.5 x 14.0 in. (216 x 356 mm)
22 Network Printer 17: User’s Guide
Page 43

2. Envelope sizes are defined as follows:
Commercial #10 — 4.125 x 9.5 in. (104.8 x 241.3 mm)
C5 —162 x 229 mm (6.48 x 9.16 in.)
DL — 110 x 220 mm (4.4 x 8.8 in.)
Monarch — 3.875 x 7.5 in. (98.4 x 190.5 mm)
3. The following paper sizes may be duplexed:
A4, Letter, 13-in. Legal (Folio), 14-in. Legal
4. Do not use the following types of paper and printable material in your printer:
Multipart forms
Stapled, folded, or wrinkled paper
Smooth or coated paper
5. Use the 100-sheet auxiliary tray to print transparencies, labels, envelopes or
postcards, or the optional envelope feeder to print envelopes. Do not feed these
types of print media from the paper trays.
6. The 250-sheet paper tray and the 500-sheet paper tray are not interchangeable.
7. Some recycled papers release paper dust that can accumulate and cause frequent
paper jams and reduced supplies life.
8. High humidity can damage paper. Try to store paper where it is cool and dry.
Chapter 3. Paper Handling 23
Page 44

Loading Paper and Envelopes into the Printer
You can add paper to your printer when the printer is off, offline, or when the READY
message is displayed. If your printer has used all of the paper in the selected paper
tray, LOAD paper-size IN tray is displayed in the message display area.
Loading Letterhead and Prepunched Paper
Your printer can print on both prepunched and preprinted paper (for example, paper
with letterhead or preprinted numbers). Use the following guidelines to load the paper:
Type of Printing Tray Orientation
One-sided 250-sheet paper tray and
500-sheet paper tray
100-sheet auxiliary tray Place preprinted side up, with the top of the
Two-sided printing (if
optional duplex unit is
installed)
250-sheet paper tray and
500-sheet paper tray
100-sheet auxiliary tray Place preprinted side down, with the top of
Place preprinted side down, with the top of
the printed paper toward the front of the
paper tray.
If using prepunched paper, place the punched
side toward the left side of the paper tray.
printed paper toward the back of the auxiliary
tray
If using prepunched paper, place the punched
side toward the left side of the auxiliary tray.
Place preprinted side up, with the top of the
printed paper toward the back of the printer.
If using prepunched paper, place the punched
side toward the left side of the paper tray.
the printed paper toward the front of the tray.
If using prepunched paper, place the punched
side toward the left side of the auxiliary tray.
24 Network Printer 17: User’s Guide
Page 45

Loading Paper into the 250-Sheet Main Paper Tray (Tray 1)
Note
Many applications allow you to specify the input tray you want to use. This value
will override any value set at the printer. If your application does not let you pick an
input tray, use the Paper Menu to select the tray.
To select the 250-sheet main paper tray, set SOURCE to TRAY1 (see “Selecting
The Default Input Tray” on page 53).
Use the following procedure to load paper into the 250-sheet paper tray:
1. Select printer paper for the 250-sheet paper tray using these guidelines:
Paper size A4, Letter, 13-in. Legal (Folio), 14-in. Legal, Executive, or B5-JIS
Paper weight 16- to 28-pound paper (60 grams/meter2 to 105 grams/meter2)
Paper Capacity Up to 25 mm (1 in.) maximum stack height
Up to 230 sheets of paper for A4 paper
Up to 250 sheets for all other paper sizes
2. Remove the paper tray from the printer and place it on a flat surface.
Chapter 3. Paper Handling 25
Page 46

3. Press down on the bottom plate of the paper tray until it snaps into position.
4. Important! If you are not changing paper size, go to Step 5 on page 27. If you
are inserting longer paper, do the following:
a. Push in on the size lock button and slide guide A out.
26 Network Printer 17: User’s Guide
Page 47

b. Slide guide B out to align it with guide A.
Note: If you are adding shorter paper, adjust guide B before you adjust guide A.
Make sure guide B presses lightly against the end of the paper stack.
5. Insert the paper into the tray. Make sure you place the corners of the paper under
the retaining clip at the front of the tray and under the plastic tabs on the end
guide.
Chapter 3. Paper Handling 27
Page 48

6. If the paper is narrower than the tray, adjust the size guide so that it presses lightly
against the side of the paper stack. The paper should lay flat in the tray and
should not be bowed.
7. Gently slide the paper tray into the printer until it clicks into place.
Note: Closing the 250-sheet tray with too much force can misalign the paper
guides.
28 Network Printer 17: User’s Guide
Page 49

Loading Paper into the 100-Sheet Auxiliary Tray
Note
Many applications allow you to specify the input tray you want to use. This value
will override any value set at the printer. If your application does not let you pick an
input tray, use the Paper Menu to select the tray.
To select the 100-sheet auxiliary tray, set SOURCE to AUXTRAY. (see “Selecting
The Default Input Tray” on page 53).
Use the following procedure to load paper into the 100-sheet auxiliary tray:
1. Select printer paper, transparencies, labels, or postcards for the 100-sheet auxiliary
tray using these guidelines:
Paper size A4, Letter, 13-in. Legal (Folio), 14-in. Legal, Statement,
Executive, A5, A6, B5-JIS, B5-ISO, transparencies, labels, and
postcards
Paper weight 16- to 28-pound paper (60 grams/meter2 to 105 grams/meter2)
for paper
Up to 190 grams/meter
Paper Capacity Up to 15 mm (0.5 in.) maximum stack height
Up to 100 sheets copier or Xerographic paper
Up to 30 sheets for transparencies, labels, and postcards
2
for transparencies, labels, and postcards
2. Press on the top of the auxiliary tray door to open it.
Chapter 3. Paper Handling 29
Page 50

3. Pull out the tray extension.
4. Insert the paper into the auxiliary tray. Make sure you place the left edge of the
paper against the left side paper guide and under the plastic tab on the paper
guide.
30 Network Printer 17: User’s Guide
Page 51

5. Adjust the size guide on the right side of the auxiliary tray to the paper size. Make
sure you place the edges of the paper under the retaining clip at the right side of
the auxiliary tray.
6. Make sure the paper fits correctly in the auxiliary tray. The paper should lay flat in
the tray and should not be bowed.
7. Use your print application or the Paper Menu to set AUXSIZE to match the paper
size you loaded in the auxiliary tray (see “Defining the Auxiliary Tray Paper Size”
on page 54). Values specified in print jobs override values you set at the printer.
If you want to feed the paper manually into the auxiliary tray, use your print
application or the Paper Menu to set MANUAL to ON (see “Paper Menu” on
page 77).
Note: PostScript jobs can override MANUAL=OFF; however, they cannot override
MANUAL=ON. Therefore, if you do set MANUAL to ON, make sure you reset
MANUAL to OFF after you complete the jobs you want to print manually.
Chapter 3. Paper Handling 31
Page 52

Loading Envelopes into the 100-Sheet Auxiliary Tray
Note
Many applications allow you to specify the input tray you want to use. This value
will override any value set at the printer. If your application does not let you pick an
input tray, use the Paper Menu to select the tray.
To select the 100-sheet auxiliary tray, set SOURCE to AUXTRAY (see “Selecting
The Default Input Tray” on page 53).
Use the following procedure to load paper into the 100-sheet auxiliary tray:
1. Select envelopes using these guidelines:
Envelope size Commercial #10 — 104.8 x 241.3 mm (4.125 x 9.5 in.)
Monarch — 98.4 x 190.5 mm (3.875 x 7.5 in.)
DL — 110 x 220 mm (4.4 x 8.8 in.)
C5 — 162 x 229 mm (6.48 x 9.16 in.)
Envelope weight 16- to 28-pound paper (60 grams/meter2 to 105 grams/meter2)
Envelope Capacity Up to 10 envelopes for all envelope sizes
2. Press on the top of the auxiliary tray door to open it.
32 Network Printer 17: User’s Guide
Page 53

3. Pull out the tray extension.
4. Pull out the envelope stopper.
Chapter 3. Paper Handling 33
Page 54

5. Load the envelopes with the flap side down and the bottom edge of the envelopes
toward the left side of the auxiliary tray. Make sure you place the bottom edge of
the envelopes against the left side paper guide and under the plastic tab on the
paper guide.
6. Adjust the size guide on the right side of the auxiliary tray to the envelope size.
Make sure you place the top edge of the envelopes under the retaining clip at the
right side of the auxiliary tray.
34 Network Printer 17: User’s Guide
Page 55

7. Push in the envelope stopper. Make sure the envelopes fit correctly in the auxiliary
tray. The envelopes should lay flat in the tray and should not be bowed.
8. Use your print application or the Paper Menu to set AUXSIZE to match the
envelope size you loaded in the auxiliary tray (see “Defining the Auxiliary Tray
Paper Size” on page 54). Values specified in print jobs override values you set at
the printer.
Chapter 3. Paper Handling 35
Page 56

Loading Paper into the 500-Sheet Paper Trays (Tray 2, Tray 3)
Note
Many applications allow you to specify the input tray you want to use. This value
will override any value set at the printer. If your application does not let you pick an
input tray, use the Paper Menu to select the tray.
To select the 500-sheet main paper tray, set SOURCE to TRAY2 or TRAY3
(TRAY2 if you have only one 500-sheet tray or for the upper tray if you have two;
TRAY3 for the lower tray if you have two. See “Selecting The Default Input Tray”
on page 53.)
Use the following procedure to load paper into the 500-sheet paper tray:
1. Select printer paper for the 500-sheet paper tray using these guidelines:
Paper size A4, Letter, 13-in. Legal (Folio), 14-in. Legal
Paper weight 16- to 28-pound paper (60 grams/meter2 to 105 grams/meter2)
Paper Capacity Up to 54 mm (2 in.) maximum stack height
2. Remove the 500-sheet paper tray from the printer and place on a flat surface.
36 Network Printer 17: User’s Guide
Page 57

3. Press down on the bottom plate of the paper tray until it snaps into position.
4. Important! If you are not changing paper size, go to Step 5 on page 38.
Otherwise, adjust the paper guides as follows:
a. Pull out on both sides while gently pushing up on the end guide. Do not push
the end guide up too far.
Chapter 3. Paper Handling 37
Page 58

b. Adjust the end guide to the correct paper size and push down on the end to
lock it into place.
5. Insert the paper along the left side of the tray. Make sure you place the corner of
the paper under the retaining clip at the front of the tray and under the plastic tabs
on the end guide. Do not load paper above the maximum line.
38 Network Printer 17: User’s Guide
Page 59

6. Press down on the gray lever on the right side of the tray and slide the size guide
so that it presses lightly against the side of the paper stack. The paper should lay
flat in the tray and should not be bowed.
7. Slide the paper tray into the paper tray support unit until it clicks into place.
Chapter 3. Paper Handling 39
Page 60

Loading Envelopes into the Envelope Feeder
Note
Many applications allow you to specify the input tray you want to use. This value
will override any value set at the printer. If your application does not let you pick an
input tray, use the Paper Menu to select the tray.
To select the envelope feeder, set SOURCE to ENVELOPE (see “Selecting The
Default Input Tray” on page 53).
Use the following procedure to load envelopes into the envelope feeder:
1. Select envelopes using these guidelines:
Envelope size Commercial #10 — 104.8 x 241.3 mm (4.125 x 9.5 in.)
Monarch — 98.4 x 190.5 mm (3.875 x 7.5 in.)
DL — 110 x 220 mm (4.4 x 8.8 in.)
C5 — 162 x 229 mm (6.48 x 9.16 in.)
Envelope weight 16- to 28-pound paper (60 grams/meter2 to 105 grams/meter2)
Envelope Capacity Up to 75 envelopes for Commercial 10, Monarch, and DL
Up to 50 envelopes for C5
2. Pull out the tray extension.
40 Network Printer 17: User’s Guide
Page 61

3. Squeeze the size guide and slide it to the right.
4. Lift the envelope weight out of the way.
Chapter 3. Paper Handling 41
Page 62

5. Load closed envelopes with the flap side down and the bottom edge of the
envelopes toward the left side of the envelope feeder.
6. Adjust the size guide to the envelope size.
42 Network Printer 17: User’s Guide
Page 63

7. Lower the envelope weight onto the envelope stack.
8. Use the Paper Menu to set ENVSIZE to match the envelope size you loaded in the
envelope feeder (see page 77).
Chapter 3. Paper Handling 43
Page 64

Using the Mailbox
The optional Mailbox feature contains ten bins, each of which can hold approximately
forty-five sheets of paper. In addition, individual bins can be password protected to
provide security.
This section describes how to use the optional 10-bin Mailbox, including how to:
Remove prints from a bin
Enter a password
Enable and disable password protection for mailbox bins
Define and change passwords for a mailbox bin
For information on how to install the 10-Bin Mailbox, see “The 10-Bin Mailbox Option”
on page 167.
Removing Prints From a Bin
1. Make sure the printer is online. (If a menu is displayed, press the Online key.
READY appears in the display area.)
2. Press the Mailbox button.
3. If your bin is not password-protected, the green indicator light next to your bin goes
on when you press the Mailbox button. You can remove the print jobs from it now
(go to Step 7 on page 46).
44 Network Printer 17: User’s Guide
Page 65

4. If your bin is password protected, you need to enter your password now. A prompt
asks you for the password.
5. Enter your 4-digit password. Use the table below to determine which operator
panel keys correspond to each digit in your password.
To enter this number... Press this key
0 Online
1 Continue/Enter
2 Page Eject
3 Cancel Printing
4 Menu
5 Item
6 Value
7 Shift
For example, to enter 4444, press the Menu key four times. To enter 4567, press
the Menu key, press the Item key, press the Value key, and then press the Shift
key.
6. After you enter the password for the bin, the green indicator light next to your bin
will light up. You can now remove your print job.
Chapter 3. Paper Handling 45
Page 66

7. Pull out your bin.
8. After you remove your job, push the bin back into place.
46 Network Printer 17: User’s Guide
Page 67

Enabling Mailbox Bin Passwords
1. Make sure the printer is offline. (If the printer is online, press the Online key to
take it offline. OFFLINE appears in the display area.)
2. Press the Menu key until you see Mailbox Menu.
3. Press the Item key until you see the bin (BIN1 - BIN10) that needs its password
enabled. In this example, we select BIN1. If your display says PW ENABLE
instead of PW DISABLE, then the password is already enabled.
4. Press the Value key until you see BIN1=PW ENABLE.
Chapter 3. Paper Handling 47
Page 68

5. Press the Continue/Enter key. If a prompt asks you for the password, enter the
previous password. (If it has never been set, use the 1111 factory default).
Use the table below to determine which operator panel keys correspond to each
digit in your password.
To enter this number... Press this key
0 Online
1 Continue/Enter
2 Page Eject
3 Cancel Printing
4 Menu
5 Item
6 Value
7 Shift
For example, to enter 4444, press the Menu key four times. To enter 4567, press
the Menu key, press the Item key, press the Value key, and then press the Shift
key.
6. After you enter the password for the bin, you see BIN1=PW ENABLE in the
display.
7. To restore the printer to READY status, press the Online key.
48 Network Printer 17: User’s Guide
Page 69

Disabling Mailbox Bin Passwords
1. Make sure the printer is offline. (If the printer is online, press the Online key to
take it offline. OFFLINE appears in the display area.)
2. Press the Menu key until you see Mailbox Menu.
3. Press the Item key until you see the bin (BIN1 - BIN10) that needs its password
disabled. In this example, we select BIN1. If your display says PW DISABLE
instead of PW ENABLE, then password protection is already disabled.
4. Press the Value key until you see BIN1=PW DISABLE.
5. Press the Continue/Enter key. A prompt asks you for the password.
Chapter 3. Paper Handling 49
Page 70

6. Enter your 4-digit password. Use the table below to determine which operator
panel keys correspond to each digit.
To enter this number... Press this key
0 Online
1 Continue/Enter
2 Page Eject
3 Cancel Printing
4 Menu
5 Item
6 Value
7 Shift
For example, to enter 4567, press the Menu key, press the Item key, press the
Value key, and then press the Shift key.
7. After you enter the password for the bin, you see BIN1=PW DISABLE in the
display.
8. To restore the printer to READY status, press the Online key.
50 Network Printer 17: User’s Guide
Page 71

Changing Mailbox Bin Passwords
1. Make sure the printer is offline. (If the printer is online, press the Online key to
take it offline. OFFLINE appears in the display area.)
2. Press the Menu key until you see Mailbox Menu.
3. Press the Item key until you see the bin (BIN1 - BIN10) that needs its password
changed. In this example, we select BIN1.
4. Press the Value key until you see BIN1=NEW PW.
5. Press the Continue/Enter key. A prompt asks you for the current password.
Chapter 3. Paper Handling 51
Page 72

6. Enter your 4-digit password. (If this is the first time a password is being set for the
bin, enter 1111.) Use the key below to determine which operator panel keys
correspond to each digit in your password.
To enter this number... Press this key
0 Online
1 Continue/Enter
2 Page Eject
3 Cancel Printing
4 Menu
5 Item
6 Value
7 Shift
For example, to enter 1111, press the Continue/Enter key four times. To enter
4567, press the Menu key, press the Item key, press the Value key, and then
press the Shift key.
7. After you enter your old password, a prompt asks you for the new password.
8. Enter a new 4-digit password.
9. To restore the printer to READY status, press the Online key.
52 Network Printer 17: User’s Guide
Page 73

Using the Paper Menu
This section describes some of the basic tasks you can perform using the Paper Menu,
including how to:
Select default input trays and output bins.
Define the paper size used by the auxiliary tray and envelope feeder
Turn tray switching on and off
Make simplex or duplex printing the printer default
For complete information about items in the Paper Menu, see “Paper Menu” on
page 77. Also, note that the printer driver or print application you use may allow you to
specify values such as paper size, input tray, output bin, and manual feeding. Values
set in print jobs (either by the print application or by the printer driver) override values
you set at the printer.
Selecting The Default Input Tray
Situation: You want to change the default input tray for your printer.
Action:
1. Press the Online key until you see OFFLINE in the display.
2. Press the Menu key until you see PAPER MENU in the display.
3. Press the Item key until you see SOURCE=
the current default.
4. Press the Value key until you see the input tray you want to use as the default.
Note that the values you see depend on the options you have installed. If you
have one 500-sheet tray installed, it appears as TRAY2; If you have two 500-sheet
trays installed, the upper tray appears as TRAY2 and the lower tray appears as
TRAY3; if you have the envelope feeder installed, it appears as ENVELOPE.
5. Press the Continue/Enter key to select the new tray. An asterisk appears next to
the value, showing that it is active.
6. To restore the printer to READY status, press the Online key.
Note: Values specified in your print jobs override defaults set at the printer. For
example, if a print job requests the 250-sheet paper tray, the printer will use the
250-sheet paper tray, even if the default tray is set to something else.
source
* in the display, where
source
is
Selecting The Default Output Bin
Situation: You have installed the Offset Output Bin or the 10-Bin Mailbox and you
want to make it the default bin.
Action:
1. Press the Online key until you see OFFLINE in the display.
2. Press the Menu key until you see PAPER MENU in the display.
Chapter 3. Paper Handling 53
Page 74

3. Press the Item key until you see OUTPUT=
the current default.
4. Press the Value key until you see the value you want. Note that the values you
see depend on whether you have the 10-Bin Mailbox or the 500-sheet Offset
Output Bin installed.
5. Press the Continue/Enter key to select the new bin. An asterisk appears next to
the value, showing that it is active.
6. To restore the printer to READY status, press the Online key.
Note: Values specified in your print jobs override defaults set at the printer. If a print
job requests the main bin, the printer uses it, even if the default bin is set to something
else.
Defining the Auxiliary Tray Paper Size
Situation: You want to define a new paper size for the auxiliary tray.
Action:
1. Press the Online key until you see OFFLINE in the display.
2. Press the Menu key until you see PAPER MENU in the display.
3. Press the Item key until you see AUXSIZE=
current default.
4. Press the Value key until you see the new value you want.
5. Press the Continue/Enter key to select the new size. An asterisk appears next to
the value, showing that it is active.
6. To restore the printer to READY status, press the Online key.
output
* in the display, where
size
* in the display, where
output
size
is
is the
Defining the Envelope Feeder Envelope Size
Situation: You want to define a new envelope size for the optional envelope feeder.
Action:
1. Press the Online key until you see OFFLINE in the display.
2. Press the Menu key until you see PAPER MENU in the display.
3. Press the Item key until you see ENVSIZE=
current default.
Note: This value appears only if the optional envelope feeder is installed.
4. Press the Value key until you see the new value you want.
5. Press the Continue/Enter key to select the new size. An asterisk appears next to
the value, showing that it is active.
6. To restore the printer to READY status, press the Online key.
54 Network Printer 17: User’s Guide
size
* in the display, where
size
is the
Page 75

Turning Tray Switching On or Off
Situation: You want to turn tray switching on or off. Tray switching specifies whether
or not to switch to another paper tray if the current one is empty. When switching is
ON (the default value) the printer automatically looks in other trays for the right size of
paper if the current tray does not contain the paper size specified by the job. The
search sequence is the default tray, followed by the 250-sheet tray (Tray 1), the first
500-sheet tray (Tray 2), the second 500-sheet tray (Tray 3), and then the auxiliary tray.
OFF specifies no switching.
Action:
1. Press the Online key until you see OFFLINE in the display.
2. Press the Menu key until you see PAPER MENU in the display.
3. Press the Item key until you see TRAY SWITCH=
the display.
4. Press the Value key until you see the new value you want.
5. Press the Continue/Enter key to select the new setting. An asterisk appears next
to the value, showing that it is active.
6. To restore the printer to READY status, press the Online key.
Making Duplex or Simplex Printing the Printer Default
Situation: You want to make duplex printing or simplex printing the printer default.
Note: Values set in print jobs (either by the print application or by the printer driver)
override values you set at the printer. If a print job specifies simplex printing and the
printer default is duplex, the printer honors the print job setting and prints on one side
only.
ON
* or TRAY SWITCH=
OFF
in
Action:
1. Press the Online key until you see OFFLINE in the display.
2. Press the Menu key until you see PAPER MENU in the display.
3. Press the Item key until you see DUPLEX=
4. Press the Value key until you see the new value you want.
5. Press the Continue/Enter key to select the new setting. An asterisk appears next
to the value, showing that it is active.
6. To restore the printer to READY status, press the Online key.
Chapter 3. Paper Handling 55
ON
* or DUPLEX=
OFF
in the display.
Page 76

56 Network Printer 17: User’s Guide
Page 77

Chapter 4. Clearing Paper Jams
If your printer has a paper jam, follow the procedures in this section to clear the paper
jam. Note that the printer tells you the areas in which it detects paper jams. It does so
by displaying a number with the PAPER JAM message.
The following paper jam messages can be displayed:
20 PAPER JAM — Paper has jammed while exiting the printer. Go to page 58.
21 PAPER JAM — Paper has jammed while being picked from one of the trays.
Go to page 60.
22 PAPER JAM — Paper has jammed in the optional duplex unit. Go to page 63.
23 PAPER JAM — Paper has jammed in the toner cartridge area. Go to page 68.
24 PAPER JAM — Paper has jammed in the optional offset paper output bin. Go
to page 70.
25 PAPER JAM — Paper has jammed in the optional mailbox. Go to page 71.
Copyright IBM Corp. 1996, 1997 57
Page 78

20 PAPER JAM: Paper Exit Area
1. Carefully remove any paper that is in the paper exit.
2. On the back of the printer, press the release lever and open the back cover of the
printer.
58 Network Printer 17: User’s Guide
Page 79

3. Locate and carefully remove paper jammed in the exit area by pulling the paper
upward.
4. Close the back cover.
5. When paper gets jammed in one area of the paper path, it often gets jammed in
other areas. If, after you finish this procedure, another PAPER JAM message
occurs, please review all of the procedures in this chapter.
Chapter 4. Clearing Paper Jams 59
Page 80

21 PAPER JAM: Paper Tray Area
1. Remove paper from the trays and feeder.
2. Remove the paper tray. If the printer is equipped with additional paper trays,
remove the lowest tray.
3. Make sure the paper is correctly loaded and the edges of the paper are under the
corner clip and the tabs of the paper tray. See Chapter 3, “Paper Handling” on
page 21 for more information.
60 Network Printer 17: User’s Guide
Page 81

4. Remove all the paper in the paper path. Make sure the printer is free of paper.
For example, locate and pull out pieces of paper that have only partially fed into
the printer from the paper tray.
5. Push the paper tray back into the printer.
If the printer is equipped with two or three trays, repeat steps 2 on page 60
through 4 for each tray.
6. On the back of the printer, press the release lever and open the back cover of the
printer.
Chapter 4. Clearing Paper Jams 61
Page 82

7. Locate and remove any jammed paper. To remove the paper, pull it straight out
the back of the printer.
8. Close the back cover.
9. When paper gets jammed in one area of the paper path, it often gets jammed in
other areas. If, after you finish this procedure, another PAPER JAM message
occurs, please review all of the procedures in this chapter.
62 Network Printer 17: User’s Guide
Page 83

22 PAPER JAM: Duplex Unit Area
Important
Using incorrect paper sizes can cause paper jams in the duplex unit area. If you
experience frequent jams in this area, please make sure you are using supported
paper. Acceptable paper sizes and weights for use with the duplex unit are as
follows:
Paper Size A4, Letter, 13-in. Legal (Folio), 14-in. Legal
Paper Weight 16 lb to 28 lb (60 grams/meter
1. Switch the printer power off.
2. Unplug the printer from the wall outlet.
3. Remove the power cord from the back of the printer.
4. On the back of the printer, press the release lever and open the back cover of the
printer.
2
to 105 grams/meter2)
Chapter 4. Clearing Paper Jams 63
Page 84

5. Locate and carefully pull up on the jammed paper to remove it from the exit path.
CAUTION:
Do not touch the fuser (labeled) inside the printer. It can be extremely hot.
Always wait at least 40 minutes for the fuser to cool down.
6. If you cannot remove the paper easily, remove the duplex unit. Press in on the
two green lock buttons located on both ends of the duplex unit and slide the unit
out of the printer.
64 Network Printer 17: User’s Guide
Page 85

7. Carefully pull out on the jammed paper to remove it from the area behind the
duplex unit.
8. If paper is jammed in the fuser, do the following:
a. Loosen the thumbscrew at the left side of the fuser cover. You may need to
use a coin or a screwdriver to loosen the screws.
Chapter 4. Clearing Paper Jams 65
Page 86

b. Pull down the fuser cover.
c. Remove the paper by carefully pulling it out toward the back of the printer.
d. Close the fuser cover and replace the thumbscrew.
66 Network Printer 17: User’s Guide
Page 87

9. Place the duplex unit into the guide channels that are located on both sides of the
back opening and slide the unit into the printer. Keep pushing until the duplex unit
locks into place.
10. Close the back cover.
11. Connect the power cord to the back of the printer.
12. Connect the other end of the power cord to a grounded AC outlet.
13. Switch the printer power on.
14. When paper gets jammed in one area of the paper path, it often gets jammed in
other areas. If, after you finish this procedure, another PAPER JAM message
occurs, please review all of the procedures in this chapter.
Chapter 4. Clearing Paper Jams 67
Page 88

23 PAPER JAM: Toner Cartridge Area
1. Remove the optional envelope feeder (if installed). See “Removing the Envelope
Feeder” on page 177 for instructions.
2. Press the release button and open the front cover of the printer.
3. Remove the toner cartridge.
68 Network Printer 17: User’s Guide
Page 89

4. Hold down the two green levers located on the left side of the printer and carefully
remove the jammed piece of paper by pulling it toward the back of the printer.
Important: Do not pull the paper toward the front of the printer. Pulling paper
toward the front of the printer can contaminate the inside of the printer with toner
residue.
5. Close the front cover.
6. If you removed the optional envelope feeder, reinstall it. See “Installing the
Envelope Feeder” on page 174 for instructions.
7. When paper gets jammed in one area of the paper path, it often gets jammed in
other areas. If, after you finish this procedure, another PAPER JAM message
occurs, please review all of the procedures in this chapter.
Chapter 4. Clearing Paper Jams 69
Page 90

24 PAPER JAM: Offset Paper Output Bin
1. Open the back cover of the offset paper output bin.
2. Remove the jammed piece of paper by pulling the paper out from the printer at an
upward angle.
3. Close the back cover of the offset tray.
4. You may need to open and close the front cover of the printer to clear the error
message from the operator panel display.
5. When paper gets jammed in one area of the paper path, it often gets jammed in
other areas. If, after you finish this procedure, another PAPER JAM message
occurs, please review all of the procedures in this chapter.
70 Network Printer 17: User’s Guide
Page 91

25 PAPER JAM: Mailbox
1. Open the back cover on the mailbox.
2. Remove any jammed paper.
3. Close the covers.
4. When paper gets jammed in one area of the paper path, it often gets jammed in
other areas. If, after you finish this procedure, another PAPER JAM message
occurs, please review all of the procedures in this chapter.
Chapter 4. Clearing Paper Jams 71
Page 92

72 Network Printer 17: User’s Guide
Page 93

Chapter 5. Operator Panel Menus
Important
1. To see a list of menus you can access and options you have installed, print a
printer configuration page. See “Printing the Printer Configuration Page” on
page 13. You can use the printer configuration page as a menu map.
2. Note that several of the menus and menu items listed in this book appear on
your operator panel only if you have a particular option installed.
3. If you are unfamiliar with using the operator panel to work with menus, please
read “Using the Operator Panel Keys” on page 10 and “Navigating Menus” on
page 12 before continuing.
This chapter describes the functions available from the printer menus. The following
table describes the basic function of each menu and lists the page where you can find
more information.
Use this menu To do this See page
TEST MENU Print the configuration page, font lists, and printer test pages; reset
the printer to use factory defaults; print a hexadecimal dump for
troubleshooting purposes.
PAPER MENU Select input trays, output bins, paper sizes, and duplex printing
options.
MAILBOX MENU Enable, disable, and set passwords for mailbox bins; define how to
handle jobs after a mailbox fills up.
CONFIG MENU Define how the printer handles paper jams and certain other error
conditions; define toner density, power savings mode, and print
quality.
MEMCONFIG MENU Define whether the printer saves data stream information when it
switches ports.
PARALLEL MENU Define how the printer handles jobs sent through the parallel port,
including the data stream, bi-directional communications, and the
timeout setting.
PCL MENU Define how the printer handles PCL5e jobs, including number of
copies, page size, page orientation, lines per page, font source, and
default font.
PS MENU Define how the printer handles PostScript jobs, including number of
copies and whether error messages are printed.
TOKEN RING MENU Define the data stream, timeout, and network address values for the
token-ring attachment.
ETHERNET MENU Define the data stream, timeout, and network address values for the
Ethernet attachment.
COAX SCS MENU Define how the printer handles SCS jobs sent through the coaxial
attachment.
75
77
80
81
83
84
85
88
89
91
93
Copyright IBM Corp. 1996, 1997 73
Page 94

Use this menu To do this See page
TWINAX SCS MENU Define how the printer handles SCS jobs sent through the twinaxial
attachment.
COAX SETUP MENU Configure the coaxial environment. 98
TWINAX SETUP MENU Configure the twinaxial environment. 100
COAX DSC/DSE MENU Define how the printer handles DSC/DSE jobs sent through the
coaxial attachment.
IPDS MENU Define how the printer handles IPDS jobs. 104
MACHINE INFO MENU Displays page counts, the error log, and the toner and fuser usage
counters.
LANGUAGE MENU Define the language the printer uses to display operator panel
messages and menus.
96
102
109
110
74 Network Printer 17: User’s Guide
Page 95

Test Menu
Use the Test Menu to display basic information about the printer and to perform basic
troubleshooting tasks.
Notes:
1. To perform the action associated with the menu item you select, press the
Continue/Enter key.
2. The actual menu items you see depend on what options you have installed. To
find out what options you have installed, print a printer configuration page. See
“Printing the Printer Configuration Page” on page 13.
3. If you are unfamiliar with using the operator panel to work with menus, please read
“Using the Operator Panel Keys” on page 10 and “Navigating Menus” on page 12
before continuing.
4. If IPDS is the active data stream when the printer is taken offline, the following
Test Menu items will not be available:
CONFIG PAGE
PRINT PS FONTS
PRINT PCL FONTS
PRINT PS DEMO
PRINT SCS CHARS
These items reappear after a port timeout occurs (the length of the timeout
depends on the host or network attachment you use); they also reappear if you
power off the printer, wait ten seconds, and then power on.
TEST MENU ITEM Description
CONFIG PAGE Prints the printer configuration page. See “Printing the Printer Configuration Page”
on page 13 for more information.
PRINT PS FONTS Prints a list of PostScript fonts installed on the printer. See “Printing a List of
PostScript Fonts” on page 17 for more information.
PRINT PCL FONTS Prints a list of PCL5e fonts installed on the printer. See “Printing a List of PCL5e
Fonts” on page 17 for more information.
PRINT PS DEMO Prints the PostScript demo page.
CONTINUOUS TEST Prints continuous test pages. To stop the test, press the Cancel Print key.
RESET PRINTER Cancels the current print job.
PRINT IPDS FONTS Prints a list of resident IPDS fonts installed on the printer.
PRINT SCS
CHARACTERS
Chapter 5. Operator Panel Menus 75
Prints the SCS code page (character set).
Page 96

TEST MENU ITEM Description
FACTORY DEFAULT Resets settings to the factory defaults. Note that some values do not get reset.
These values include LANGUAGE, AUXSIZE, PCL SAVE, PS SAVE, BI-DI, IP
ADDRESS, SUBNET MASK, GATEWAY ADDRESS, and MAC ADDRESS.
Note: To reset all values, do one of the following:
For A4 paper: power the printer off and then power the printer on while
simultaneously pressing the Cancel Print key.
For Letter paper: power the printer off and then power the printer on while
simultaneously pressing the Online key.
ONLINE HEX PRINT
CANCEL ONLN HEX
CX HEX PRT
CANCEL CX HEX
TX HEX PRT
CANCEL TX HEX
FORMAT DISK Formats the optional hard drive.
ONLINE HEX PRINT prints an ASCII hexadecimal dump for troubleshooting
purposes. After you select this item, it changes to CANCEL ONLN HEX. To cancel
the dump, select CANCEL ONLN HEX.
CX HEX PRT prints an EBCDIC hexadecimal dump of non-IPDS data coming
across the coax cable; you can use the dump for troubleshooting coax problems.
After you select this item, it changes to CANCEL CX HEX. To cancel the dump,
select CANCEL CX HEX.
TX HEX PRT prints a hexadecimal dump for troubleshooting twinax problems. After
you select this item, it changes to CANCEL TX HEX. To cancel the dump, select
CANCEL TX HEX.
76 Network Printer 17: User’s Guide
Page 97

Paper Menu
Use the Paper Menu to select input trays, output bins, paper sizes, and duplex printing
options. The following table describes the settings you can change from the Paper
Menu. An asterisk (*) next to a value in the table indicates the factory default.
Notes:
1. To select a new value, press the Continue/Enter key when the value is displayed
in the message display area. An asterisk (*) appears next to the value in the
message display area, indicating that it is now active.
2. Values set in print jobs (either by the print application or the printer driver) override
values you set at the printer.
3. The actual menu items you see depend on what options you have installed. To
find out what options you have installed, print a printer configuration page. See
“Printing the Printer Configuration Page” on page 13 for more information.
4. If you are unfamiliar with using the operator panel to work with menus, please read
“Using the Operator Panel Keys” on page 10 and “Navigating Menus” on page 12
before continuing.
5. See “Using the Paper Menu” on page 53 for examples of changing values on the
Paper Menu.
PAPER MENU
ITEM
SOURCE TRAY1*
TRAY2
TRAY3
AUXTRAY
ENVELOPE
OUTPUT MAIN*
OFFSET
BIN1
BIN2
BIN3
BIN4
BIN5
BIN7
BIN8
BIN9
BIN10
VALUE Description
Selects the default paper tray to use. Only installed trays appear
in the list.
TRAY1 is the standard 250-sheet input tray.
TRAY2 and TRAY3 are the optional 500-sheet input trays; if
you do not install them, they will not be in the list. If both are
installed, TRAY2 is the upper 500-sheet tray and TRAY3 is
the lower 500-sheet tray.
AUXTRAY is the flip-down tray in the front of the printer.
Note: If TRAY2 is installed, it is the default.
Specifies the default output bin. Note that OFFSET and
BIN1-BIN10 are displayed in the menu only if you have installed
the optional 500-sheet Offset Paper Tray Output and the Optional
10-Bin Mailbox.
Chapter 5. Operator Panel Menus 77
Page 98

PAPER MENU
ITEM
TRAY SWITCH ON*
MANUAL OFF*
AUXSIZE LETTER*
ENVSIZE MONARCH*
BINDING LONG*
VALUE Description
OFF
ON
LEGAL
A4
A5
EXEC
COM10
MONARCH
C5
DL
B5-JIS
B5-ISO
FOLIO
STAMNT
A6
DL
COM10
C5
A6
SHORT
Specifies whether or not to switch to another paper tray if the
current one is empty.
ON—specifies that if the current tray does not contain the
paper size specified by the job, the printer will automatically
look in other trays for the right size of paper. The search
sequence is the default tray, followed by the 250-sheet tray
(Tray 1), the first 500-sheet tray (Tray 2), the second
500-sheet tray (Tray 3), and then the auxiliary tray.
OFF—specifies no switching. A message is displayed when
a job specifies a paper size that is not available in the current
tray.
Specifies whether or not paper is to be fed manually from the
auxiliary tray:
OFF—paper feeding is automatic, not manual.
ON—paper feeding is manual, one sheet at a time.
Messages on the operator panel prompt you for each sheet.
Note: PostScript jobs can override MANUAL=OFF; however,
they cannot override MANUAL=ON. Therefore, if you do set
MANUAL to ON, make sure you reset MANUAL to OFF after you
complete the jobs you want to print manually.
Defines the paper or envelope size being used in the auxiliary
tray.
Defines the envelope size being used in the envelope feeder.
Specifies how to print pages in duplex mode.
LONG—prints as if the paper is to be bound along the long
edge of the paper. (On the left for portrait documents, along
the top for landscape documents.)
SHORT—prints as if the paper is to be bound along the short
edge of the paper. (On the top for portrait documents, on the
left for landscape documents.)
78 Network Printer 17: User’s Guide
Page 99

PAPER MENU
ITEM
DUPLEX OFF*
ON
TRAY RENUM OFF*
1<>2
VALUE Description
Specifies whether to print on one side or both if the duplex unit is
installed. See “Making Duplex or Simplex Printing the Printer
Default” on page 55 for an example.
Specifies tray renumbering:
OFF—no tray renumbering
1<>2—tells the printer to treat TRAY1 as TRAY2, and vice
versa.
Chapter 5. Operator Panel Menus 79
Page 100

Mailbox Menu
Use the Mailbox Menu to configure the optional Mailbox attachment. The following
table describes the settings you can change from the Mailbox Menu. The Mailbox
Menu appears only if you have the Mailbox feature installed. An asterisk (*) next to a
value in the table indicates the factory default.
Notes:
1. See “Using the Mailbox” on page 44 for information on using the Mailbox.
2. To select a new value, press the Continue/Enter key when the value is displayed
in the message display area. An asterisk (*) appears next to the value in the
message display area, indicating that is now active.
3. If you are unfamiliar with using the operator panel to work with menus, please read
“Using the Operator Panel Keys” on page 10 and “Navigating Menus” on page 12
before continuing.
MAILBOX MENU
ITEM
BIN1
BIN2
BIN3
BIN4
BIN5
BIN6
BIN7
BIN8
BIN9
BIN10
BIN FULL STOP*
PW DISABLE*
PW ENABLE
NEW PW
STDBIN
VALUE Description
Configures the mailbox bins:
PW DISABLE—disables password protection for the bin.
PW ENABLE—enables password protection for the bin.
NEW PW—lets you set or change the password for the bin.
Specifies how the printer should handle jobs for bins that are full.
STOP—no more jobs are printed until the bin is emptied.
STDBIN—jobs are printed and routed to the default output
bin.
80 Network Printer 17: User’s Guide
 Loading...