

Page 1

IdeaScan 2000 Color
Flatbed Scanner
User's Guide
OPTIONS
by IBM
Page 2

Note: Before using this information and the product it supports, be sure to read
the information under Appendix B, “Product warranty and notices” on page 2-2.
First Edition (August 1999)
The following paragraph does not apply to the United Kingdom or any country where such
provisions are inconsistent with local law: INTERNATIONAL BUSINESS MACHINES
CORPORATION PROVIDES THIS PUBLICATION “AS IS” WITHOUT WARRANTY OF
ANY KIND, EITHER EXPRESS OR IMPLIED, INCLUDING, BUT NOT LIMITED TO, THE
IMPLIED WARRANTIES OF MERCHANTABILITY OR FITNESS FOR A PARTICULAR
PURPOSE. Some states do not allow disclaimer of express or implied warranties in certain
transactions, therefore, this statement may not apply to you.
This publication could include technical inaccuracies or typographical errors. Changes are
periodically made to the information herein; these changes will be incorporated in new editions of
the publication. IBM may make improvements and/or changes in the product(s) and/or the
program(s) described in this publication at any time.
It is possible that this publication may contain reference to, or information about, IBM products
(machines and programs), programming, or services that are not announced in your country.
Such references or information must not be construed to mean that IBM intends to announce such
IBM products, programming, or services in your country.
Requests for technical information about IBM products should be made to your IBM authorized
reseller or IBM marketing representative.
Copyright International Business Machines Corporation 1999. All rights reserved.
Note to U.S. Government Users — Documentation related to restricted rights — Use, duplication
or disclosure is subject to restrictions set forth in GSA ADP Schedule Contract with IBM Corp.
Page 3

Contents
Safety: Read first ................................ iv
Product registration . . . . . . . . . . . . . . . . . . . . . . . . . . . . . . v
About this book ................................ v
Part 1: Installation and user’s guide ................ 1-1
Part 2: Appendixes . . . . . . . . . . . . . . . . . . . . . . . . . . . 2-1
Appendix A. Help and service information ................. 2-1
Online technical support ............................ 2-1
Telephone technical support .......................... 2-1
Appendix B. Product warranty and notices ................. 2-2
Warranty Statements . . . . . . . . . . . . . . . . . . . . . . . . . . . . . . 2-2
Notices . . . . . . . . . . . . . . . . . . . . . . . . . . . . . . . . . . . . 2-11
Trademarks . . . . . . . . . . . . . . . . . . . . . . . . . . . . . . . . . . 2-12
Electronic emission notices .......................... 2-12
Copyright IBM Corp. 1999 iii
Page 4

Safety: Read first
Before installing this product, read the Safety Information.
Antes de instalar este produto, leia as Informações de Segurança.
Před instalací tohoto produktu si přečtěte příručku bezpečnostních instrukcí.
Læs sikkerhedsforskrifterne, før du installerer dette produkt.
Ennen kuin asennat tämän tuotteen, lue turvaohjeet kohdasta Safety
Information.
Avant d'installer ce produit, lisez les consignes de sécurité.
Vor der Installation dieses Produkts die Sicherheitshinweise lesen.
Prima di installare questo prodotto, leggere le Informazioni sulla Sicurezza
Lees voordat u dit product installeert eerst de veiligheidsvoorschriften.
Les sikkerhetsinformasjonen (Safety Information) før du installerer dette
produktet.
Antes de instalar este produto, leia as Informações sobre Segurança.
Pred inštaláciou tohto zariadenia si pečítaje Bezpečnostné predpisy.
Antes de instalar este producto lea la información de seguridad.
Läs säkerhetsinformationen innan du installerar den här produkten.
iv IdeaScan 2000 Color Flatbed Scanner User’s Guide
Page 5

Product registration
Thank you for purchasing the IBM IdeaScan 2000 Color Flatbed Scanner. Please
take a few moments to register your product and provide us with information that will
help IBM to better serve you in the future. Your feedback is valuable to us in
developing products and services that are important to you, as well as in developing
better ways to communicate with you. Register your option on the IBM Web site at:
http://www.ibm.com/pc/register
IBM will send you information and updates on your registered product unless you
indicate on the Web site questionnaire that you do not want to receive further
information.
About this book
This book contains instructions for installing, setting up, and using your IdeaScan 2000
Color Flatbed Scanner. The manual is divided into the following parts:
Part 1: Installation and user’s guide
This section contains the product description, hardware and software
requirements, installation and operating instructions, and problem-solving
tips in the following languages:
English
German
French
Spanish
Italian
Brazilian Portuguese
Part 2: Appendixes
This section contains service, warranty and notice information.
Note: The illustrations in this publication might be slightly different from your
hardware.
v
Page 6

vi IdeaScan 2000 Color Flatbed Scanner User’s Guide
Page 7

Part 1: Installation and user’s guide
This section contains the product description, installation instructions, and operating
information.
Product description
The IBM IdeaScan 2000 Color Flatbed Scanner makes scanning easier by working
with Universal Serial Bus (USB) technology and the Microsoft Windows 98
operating system. The scanner has five Simple Access Buttons that quickly perform
basic functions of the scanner. The five Simple Access Buttons are also represented
by icons in the Simple Access Button window. For more information on the Simple
Access Buttons, go to “Using the Simple Access Buttons or the Simple Access Button
window” on page 1-6.
Your option package includes the following items.
IdeaScan 2000 Color Flatbed Scanner
AC power adapter
AC power cord
USB cable
IdeaScan 2000 Color Flatbed Scanner installation CD, which includes the
following programs:
– PaperPort 6.1 SE with TextBridge Classic OCR
– PhotoStudio 3.0 SE image editing
– PhotoFantasy 2.0 SE for imaging fun
– PhotoPrinter 2.0 SE printing utility
– PhotoMontage 1.0 SE digital art
– Online User’s Guide
IdeaScan 2000 Color Flatbed Scanner User’s Guide
Getting Started Guide
Safety information manual
Copyright IBM Corp. 1999 1-1
Page 8

Installation requirements
To use the scanner and the software, you must have an IBM PC-compatible computer
that meets the following requirements:
Intel Pentium 100 MHz or higher microprocessor
Windows 98 operating system
Available USB connector
32 MB of RAM
150 MB of free hard disk space
SVGA monitor (64K colors)
CD-ROM drive
Fax modem for the Fax function of the scanner
Printer for the Copy/Print function of the scanner
MS Exchange, Netscape Navigator, or AOL for the e-mail function of the scanner
Before you begin
Before installing the scanner, verify that your computer USB connectors are active.
You can usually view the USB setting in your computer BIOS. If your computer does
not have a BIOS setting for USB, the USB connectors might be automatically enabled.
For more information about USB connector status or your computer BIOS, refer to
your computer User’s Guide, or contact your computer manufacturer’s technical
support.
Note: The installation CD on-screen instructions notify you if you do not have an
active USB connector.
For optimum monitor performance, set the colors to High (16-bit) or True (24-bit) and
the resolution to 800 x 600 pixels or higher. To set the colors and resolution, open the
Control Panel and double-click Display. Next, click the Settings tab.
The Working with PaperPort and PaperPort Deluxe online document on the IdeaScan
2000 Color Flatbed installation CD provides more detailed information about some of
the software features. You can view or print the online guide during or after the
software installation.
1-2 IdeaScan 2000 Color Flatbed Scanner User’s Guide
Page 9

Parts of the scanner
The scanner includes the following components:
1 Scanner lock (on the bottom of the
scanner): Unlock this before using the
scanner for the first time. The lock is
engaged only during shipment.
2 Power jack: Plug the ac adapter
into this jack.
3 USB connector: Attach the USB
cable from the computer here when
prompted by the installation CD.
4 Removable document cover: Close
the document cover after placing items
on the scanner glass. You can remove
the cover to make room to scan books or
large objects.
5 Document pad: Use this pad to
secure the document in place on the
scanner glass.
6 Glass: Place items to be scanned
face down on top of the glass near the
reference icon. Keep the glass free of
fingerprints and dust.
7 Reference frame: Place items face
down within this frame.
8 Simple Access Buttons: Press these
buttons to scan, print or copy, fax,
convert items to text, and to open
PaperPort-supported applications on your
computer.
9 Reference icon: Place the document
in this corner with the top of the
document facing the buttons for optimum
scanning performance.
Note: The scanner does not have a
power switch. The scanner
becomes operational when you
turn on your computer.
Part 1: Installation and user ’s guide 1-3
Page 10

Installing the software
Notes:
1. The Getting Started Guide that comes with the scanner provides basic installation
steps for experienced users. If you have problems using these steps, use the
installation instructions in this section.
2. Be sure to unlock the scanner before starting the installation steps.
To install the software:
Attention: Do not attach the scanner USB cable to the computer until the
software on-screen installation instructions prompt you to do so.
1. Start Windows 98. Be sure to close any applications that are running.
2. Insert the installation CD into your computer CD-ROM drive. The CD software
starts automatically only if autorun is enabled.
Note: If the installation CD software does not automatically start, be sure that
the computer CD-ROM drive door is completely closed. If the CD
software still does not start after the door is closed, use the following
steps to install the software:
a. Click Start.
b. Click Run.
c. Type x:\setup.exe where x is the drive letter for your CD-ROM
drive.
3. Follow the on-screen instructions to install the software. When the on-screen
instructions prompt you to connect the scanner to the computer, connect the
scanner using instructions given in “Connecting the scanner to the computer” on
page 1-5.
4. Restart your computer when prompted by the installation CD.
1-4 IdeaScan 2000 Color Flatbed Scanner User’s Guide
Page 11

After the installation completes, the scanner software adds
taskbar at the bottom right corner of the computer screen. This icon indicates that
the scanner is properly set up and ready to be used.
If you have problems installing your software, go to “Solving scanner problems” on
page 1-21.
to the
Connecting the scanner to the computer
You can connect the scanner to any available USB connector on your computer. For
more information on USB connector locations, refer to the documentation that comes
with your computer.
Note: You do not have to turn off your computer when you are connecting the
scanner.
1. Plug one end of the included USB cable into an available USB connector on your
computer. In some newer computers, you can connect the scanner to a USB
connector on the keyboard or to a USB hub. For more information, refer to the
documentation that comes with your computer, keyboard, or USB hub.
2. Plug the other end of the USB cable into the USB connector on the rear of the
scanner. If the plug does not connect easily, be sure that you are plugging it in
properly. Do not force the plug into the connector.
3. Plug the ac power adapter into the jack on the scanner.
4. Plug one end of the ac power cord into the power adapter.
5. Plug the other end of the ac power cord into an ac power outlet. An amber
indicator on the front of the scanner lights to show that the scanner is receiving
power. When the scanner and computer begin exchanging signals, the indicator
turns green. The following diagram shows the scanner connected to a computer.
Note: The scanning lamp under the scanner glass is controlled by the computer.
After a period of inactivity, the scanning lamp automatically turns off.
Part 1: Installation and user ’s guide 1-5
Page 12

Using the scanner
You can use one of three methods to perform scan functions with your scanner. You
can press a button on the scanner, click a button in the Simple Access Button window,
or use the TWAIN imaging program. For more information on using the TWAIN
imaging program, see “Using the TWAIN imaging program” on page 1-13.
Using the Simple Access Buttons or the Simple Access Button
window
There are five Simple Access Buttons on the scanner: Cancel, Custom, Fax,
Copy/Print, and Scan. For information on the preset functions of the Simple Access
Buttons, go to “Using the preset scan configurations” on page 1-10. The Simple
Access Buttons are also represented as icons in the Simple Access Button window.
You can use one of the following methods to open the Simple Access Button window:
Right-click on the scanner icon in the lower right corner of the computer screen;
then click Preferences.
Click Start, Settings, Control Panel; then click the IBM Simple Access Button
icon.
To perform a scan function using Simple Access Buttons or the button icons in the
Simple Access Button window:
Note: It is normal for the scanner lamp to warm up if the scanner has been inactive
for a long period of time.
1. Place an item face down on the glass with the top edge and side edge of the item
on the corner of the glass near the reference icon.
2. Press any Simple Access Button except the Cancel button on the scanner or click
the corresponding button icon in the Simple Access Button window.
The following sequence takes place:
a. The scanner begins scanning the item.
b. A window opens above the taskbar to display the destination application of
the scanned image.
1-6 IdeaScan 2000 Color Flatbed Scanner User’s Guide
Page 13

c. Another window opens to display the progress of the scanning. When the
scan completes, the scanned image appears in the destination software.
Simple Access Button preset functions
The Simple Access Buttons are preset to scan items at various settings and to send the
scanned image to a preset software application. You can customize the settings for
every button except the Cancel button. For more information on customizing the
buttons, see “Customizing Simple Access Button settings” on page 1-8.
The following table lists the Simple Access Button preset functions.
Button Color Preset
function
Cancel Orange Cancels
presses of a
button or
stops a scan
in progress.
Custom Purple Converts the
item text to
word
processing
text using
TextBridge
OCR and
displays the
text in
Microsoft
Notepad.
Fax Blue Displays the
scanned item
in your fax
software
Copy/Print Yellow Prints the
scanned item
on a printer or
copier
Scan Green Displays the
scanned item
in PaperPort
Scan setting Resolution
Black and
white
Black and
white
Black and
white
8.5-in. by
11-in. color
photograph
300 dpi
300 dpi
300 dpi
100 dpi
Note: If a button does not have a preset application, such as when your computer
does not have fax software installed, a window opens to notify you that you
need to manually configure the button.
Part 1: Installation and user ’s guide 1-7
Page 14
Customizing Simple Access Button settings
You can customize the settings for the Custom, Fax, Copy/Print, and Scan buttons.
To customize button settings:
1. Press and hold down one of the Simple Access Buttons until the IBM IdeaScan
2000 Scanner Preferences window opens, or click Customize in the Simple
Access Button window. You can also open the Preferences window by
right-clicking a button icon in the Simple Access Button window; then clicking
Edit.
Each customizable button is represented by a tab at the top of the Preferences
window. There is also a Properties tab at the top of the window to set system
options and button response preferences.
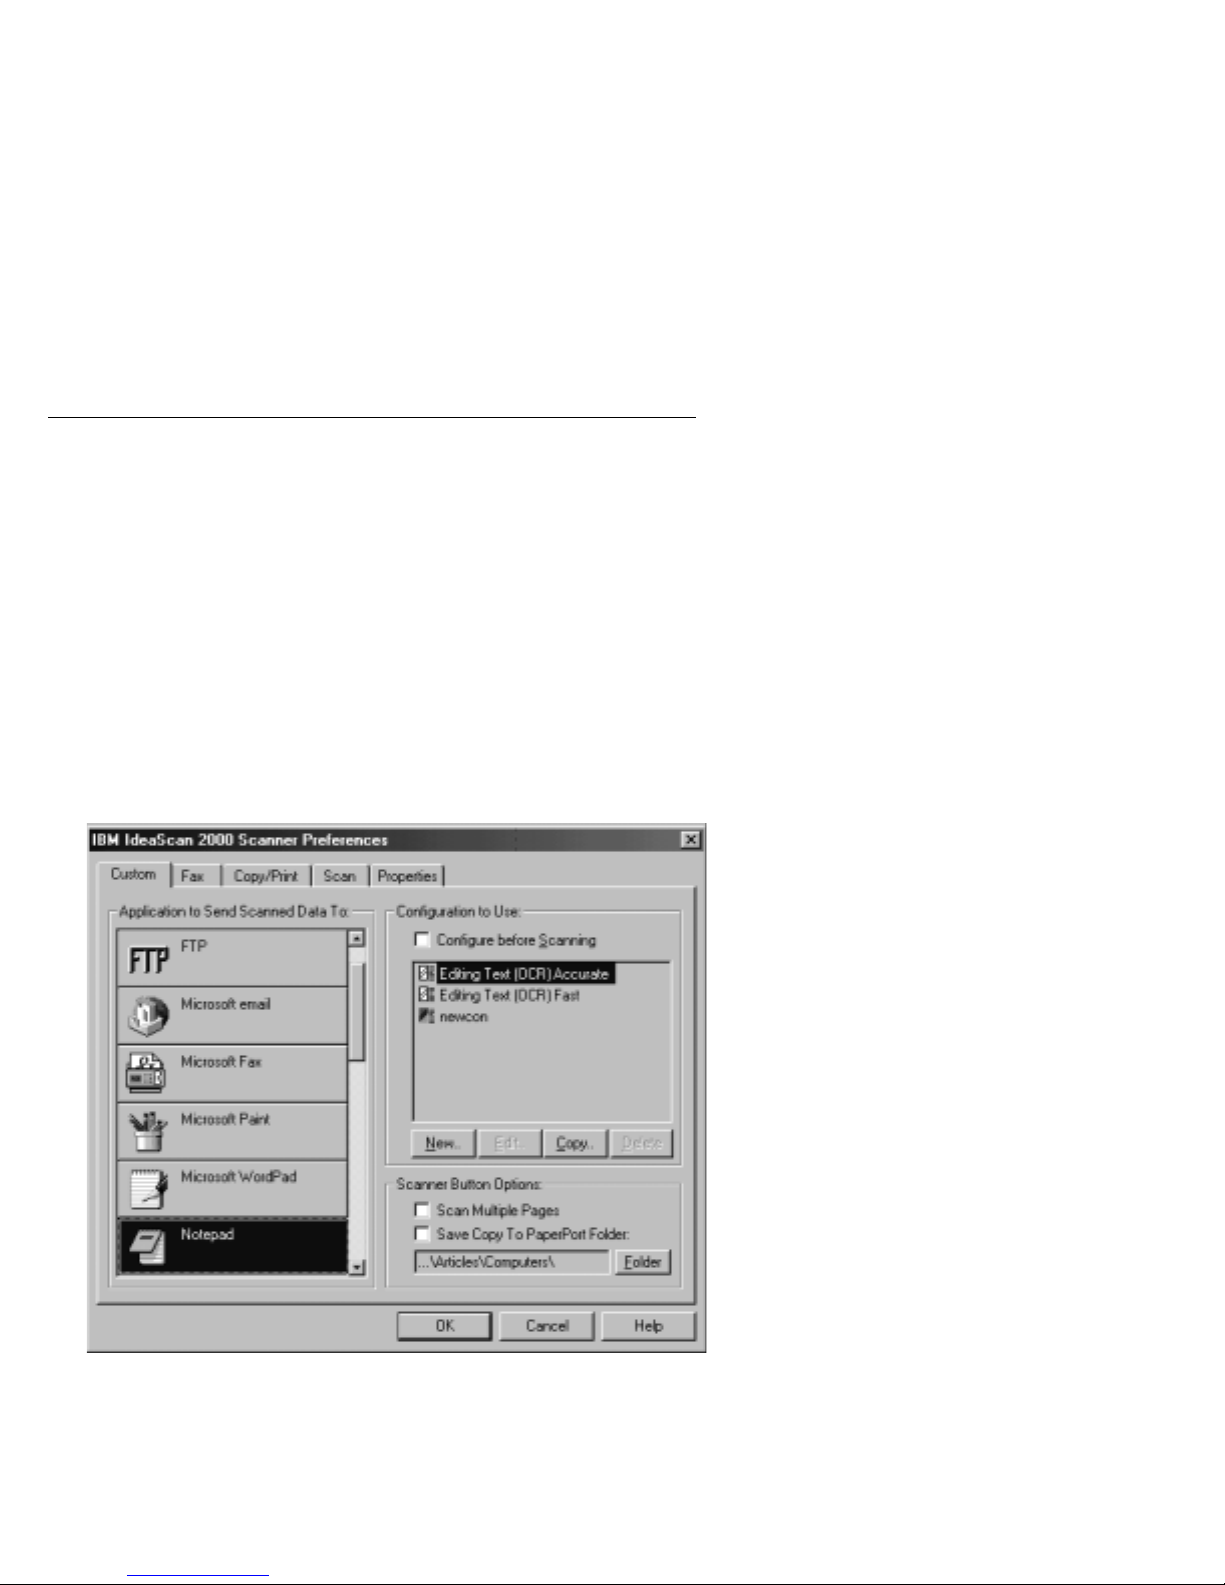
2. Click a tab to display the current settings for the button. The following
illustration shows an example of settings for the Custom button that display when
you click the Custom tab.
The Editing Text (OCR) Accurate configuration is selected in the Configuration
to Use section. Notepad is the selected application in the Application to Send
Scanned Data To section. With these selections, when the Custom button is
pressed, the item is scanned using the Editing Text (OCR) Accurate
configuration, and the converted text of the scanned image is displayed in
Notepad.
1-8 IdeaScan 2000 Color Flatbed Scanner User’s Guide
Page 15

3. Click the tab for the button you want to customize.
4. Click a new application in the list displayed in the Application to Send Scanned
Data To section.
5. Click a new scan configuration setting in the list displayed in the Configuration to
Use section. The displayed configurations are preset for the application you
selected. When you select another application, a different list of configurations
displays.
6. If you want to create your own configuration setting, click New and enter your
preferred settings in the Settings window.
If you want to create a new configuration setting from a predefined setting, select
a setting displayed in the Configuration to Use list and click Copy. You will
then need to provide a new name after adjusting the settings in the Settings
window.
If you want to edit a configuration setting that you created, click Edit and make
changes in the Settings window. For information on changing configuration
settings, see “Creating and changing scan configurations” on page 1-11.
Note: If you select an application that is a word processing program, such as
WordPad or Microsoft Word, and select a configuration for optical
character recognition (OCR), the OCR software that comes with the
scanner automatically converts the text in the scanned images to word
processing text. The converted text then displays in the selected word
processing application.
7. If you are customizing the Custom or Scan button, place a check in the
Configure before Scanning check box if you want the IdeaScan 2000 Scan
Manager window to open every time you press a button. You can then select a
configuration in the IdeaScan 2000 Scan Manager window every time you begin
to scan an image.
8. If you are scanning multiple pages and want to be prompted when PaperPort is
ready to scan the next page, place a check in the Scan Multiple Pages check box
in the Scanner Button Options section.
9. If you want to save the scanned image to a PaperPort application folder, place a
check in the Save Copy to PaperPort Folder check box in the Scanner Button
Options section; then select the folder where you would like the scan image
saved.
10. Click OK.
Using the online help
To get help with the Simple Access Buttons or the Simple Access Button window,
click Help in the IBM IdeaScan 2000 Scanner Preferences window or in the other
windows that you use to select options for the buttons.
Part 1: Installation and user ’s guide 1-9
Page 16

Using the preset scan configurations
To provide the optimum results for a scanned image, select the appropriate scan
configuration from the Configuration to Use list in the IBM IdeaScan 2000 Scanner
Preferences window before the final scan. The scan setting determines the sharpness
of the item and the number of possible shades of gray or color. These selections also
affect the speed of the scan and the file size. The IdeaScan 2000 Scanner software
comes with five preset scan configurations.
Use the following table to determine the appropriate preset scan configuration to select
for your image.
Scan page
for
Faxing,
filing, or
copying
Editing Text
(OCR)
Black and
White Photo
Color
Photo-Faster
(PaperPort
default
setting)
Color
Photo–Better
Quality
Default
setting
Black-and-white
300 dpi
Black-and-white
300 dpi
Grayscale
100 dpi
Color 75 dpi Color pages
Color 150 dpi Photographs
To scan Description
Newspaper
and magazine
articles,
receipts,
forms, and
other text
items
Business
letters,
contracts,
memos, and
other
documents
that you want
to edit
Black-and-white
photographs
with many
graphics, or
mixed
graphics and
text, line art,
or
photographs
that require a
quick scan
and color
items
Provides the fastest scan time and
smallest file size.
Enhances the use of OCR software
for converting item text to editable
text. Provides higher quality and a
larger file size than the scan
configuration for Faxing, filing, or
copying.
Provides the best setting for
black-and-white photographs.
Creates a reasonable scanned color
item in a file that is not too large
Provides the ideal setting for color
items, item editing, desktop
publishing, and high-quality output.
Results in a color scan with slower
scan time and a larger file size.
You can create new configurations. For more information, see “Creating and changing
scan configurations” on page 1-11.
1-10 IdeaScan 2000 Color Flatbed Scanner User’s Guide
Page 17

Creating and changing scan configurations
You can create a new scan configuration using your own settings or by changing the
settings in a preset scan configuration. You can also change a scan configuration that
you created.
To create or change a scan configuration:
1. Press and hold down a Simple Access Button for a few seconds until the IBM
IdeaScan 2000 Scanner Preferences window opens. The selected tab at the top of
the window corresponds to the button you pressed. If you want to adjust settings
for another button, click the tab for that button.
2. If you want to create a new configuration, click New in the Configuration to Use
section to open the configuration window. If you want to create a new
configuration by changing the settings in a preset scan configuration, click Copy
in the Configuration to Use section to open the configuration window. If you
want to change a configuration that you created, click Edit in the Configuration
to Use section to open the configuration window.
3. Click the Scan Settings tab.
4. Adjust the following scan settings:
Mode
Select Black/White to scan in black and white for items such as letters and
memos. Select Grayscale to scan items such as documents containing
drawings or black-and-white photographs. The scan produces an image in
varying shades of gray. Select Color to scan color photographs and other
color items.
Resolution
Drag the Resolution slider to the right or to the left to adjust the
dots-per-inch (dpi) resolution. The resolution can be between 50 and 600
dpi. Higher dpi settings make scanned images sharper and clearer.
However, scanning with higher dpi settings takes longer and produces larger
files for the scanned images.
Brightness and Contrast
Drag the sliders to the right or to the left to adjust the brightness and contrast
of the scanned image.
Note: For more information on appropriate scan configuration settings, see
“Using the preset scan configurations” on page 1-10.
5. Click the Page Settings tab.
Part 1: Installation and user ’s guide 1-11
Page 18

6. Adjust the following scan page settings:
Page Size
Select a page size in the Page Size drop-down menu. The outlines on the
picture represent the possible page sizes. You can also click an outline to
select a page size for the scan. If you select Custom from the drop-down
menu, boxes display instead of the picture. Type the horizontal and vertical
page dimensions for your scan in the boxes.
AutoCrop
When you select AutoCrop, the scanner automatically determines the item
size before scanning the item. For example, if you place a photograph in the
middle of the glass, the scanner automatically determines the size of the
photograph before scanning the image. The AutoCrop option overrides the
Page Size menu selection.
DeScreen
Select this option to produce a clearer image when you scan a picture from a
newspaper or magazine article, or any item that contains images with
patterns or dots. If you do not select the DeScreen option, the scanner might
produce a moire pattern from a scan of patterns or dots. However, the
scanner might take longer to produce an image when you select DeScreen.
You do not need to select this option when scanning photographs.
Gamma
Note: You must scan in an image before adjusting the Gamma setting.
You can use the Gamma option to more precisely match colors. The default
Gamma setting works fine in most cases and usually does not need to be
adjusted. However, because the computer does not always accurately display
color information on the monitor, you might need to use the Gamma feature
to make color adjustments. Drag the slider to adjust how the colors in a
scanned image display on your monitor.
7. If you are creating a new configuration or you are adjusting settings in a preset
configuration, type a new name for the configuration and press Enter. If you are
adjusting a configuration that you created, verify that the configuration name is
correct, and press Enter.
8. Click OK to return to the IBM IdeaScan 2000 Scanner Preferences window.
9. Verify that the configuration you defined is selected; then click OK so that
changes take effect.
Note: If you select the Copy/Print or Fax button, you can use the Device tab to
select an option for a printer or copier when you make changes in the
configuration setting window. For more information, refer to the online
help.
1-12 IdeaScan 2000 Color Flatbed Scanner User’s Guide
Page 19

Using the TWAIN imaging program
You can use the TWAIN imaging program in PaperPort to perform scan functions
using TWAIN-compatible items.
To scan an item using the TWAIN imaging program:
1. Open the scanner cover, place the item face down on the corner of the glass near
the reference icon, and close the cover.
2. If PaperPort is not running, double-click the PaperPort icon on the desktop.
3. Click the TWAIN icon on the Command Bar in the PaperPort desktop, or select
Acquire from the File menu to open the IdeaScan 2000 Scan Manager window.
4. Use the following options to customize the scan in TWAIN:
Scan Page For
You can use the Scan Page For section in the TWAIN window to select scan
options for the image. For information on the best scan settings to use, see
“Using the preset scan configurations” on page 1-10. If you do not want to
use the default settings in a preset scan configuration, you can manually
change the settings.
Scan Configuration
If you want to change the default settings in a preset scan configuration, you
can use the Scan Configuration section in the TWAIN window to manually
adjust the following scan configuration settings:
– Mode
From left to right, the modes are Color, Grayscale, and
Black-and-White. In the displayed configuration list, the icons for these
modes are displayed next to the preset configuration to indicate the
configuration mode setting. Click a mode to select it for the scan.
– Res
This is the dpi resolution setting for the scan. Click the drop-down
arrow, and select a dpi resolution setting from the displayed list. To
create scan images with greater definition, use higher dpi settings.
Higher dpi resolution settings are usually required for precision work,
such as photographs or fine artwork. However, scanning with higher
dpi resolution settings produces larger file sizes.
Part 1: Installation and user ’s guide 1-13
Page 20

– Size
This is the image page size. To use a preset size, click the drop-down
arrow and select a size from the displayed list. To create a custom size,
click the picture window and drag the mouse. A dotted box in the
window indicates the page size, and the two number boxes, with the
vertical and horizontal symbols next to them, show the actual page size
in inches. You can change the vertical and horizontal sizes by clicking
the up or down arrows, or by entering the vertical and horizontal
measurements in the two number boxes.
– AutoCrop
When you select this option, the scanner automatically determines the
size of the item being scanned. For example, if you place a photograph
in the middle of the glass, the scanner automatically determines the size
of the photograph. When you select AutoCrop, the scanner measures
the size of the item before scanning the image. This option overrides
the Size selections.
– Adv. Settings
Click Adv. Settings to view or adjust advanced settings for scanning.
To adjust the brightness and contrast settings:
a. Select User defined.
b. Drag the Brightness slider to the left to make the item darker or to
the right to make the item lighter. When you release the mouse
button, the change is displayed in the preview item.
c. Drag the Contrast slider to the left to decrease the contrast or to the
right to increase the contrast.
For more details about the advanced settings, see the Help information.
5. Click Preview. The scanner scans the item and displays the image so that you
can adjust the scan configuration settings before you scan the item into the
application.
6. Review the image to make sure it is what you want. Readjust the settings if
necessary. If you want to see a preview again before scanning the final image,
click Preview again.
7. If you are satisfied with the image settings, click Scan. The scanner now rescans
the item and displays the final image as a thumbnail diagram on the PaperPort
desktop. For more information about using the PaperPort software, refer to the
Working with PaperPort and PaperPort Deluxe online documentation on the
IdeaScan 2000 Color Flatbed Scanner installation CD.
1-14 IdeaScan 2000 Color Flatbed Scanner User’s Guide
Page 21

Using other TWAIN-compatible applications
To perform scan functions using other TWAIN-compatible applications other than
PaperPort, such as PhotoStudio, you must first be sure that the IBM IdeaScan 2000
Scanner is specified as the TWAIN source in the application.
All TWAIN-compatible applications use similar steps and commands. You can set up
the scanner for most applications by doing the following:
1. Open the application.
2. Click File; then click Select a Source.
3. Select IBM IdeaScan 2000 Scanner from the displayed list.
4. Click File.
5. Click Acquire.
After you have determined that the application is set up for your scanner, most
applications require that you use the following instructions to scan items:
1. Click Acquire to open the IdeaScan 2000 Scan Manager window.
2. Click Preview to view the image before making final settings and adjustments.
3. Click Scan to complete scanning.
Part 1: Installation and user ’s guide 1-15
Page 22

Performing basic scanner tasks
This section provides information on some basic tasks that you might like to try with
your scanner. You can also find an expanded list of PaperPort “How to” topics by
doing the following:
1. Click the PaperPort icon on the desktop.
2. Click Help in the PaperPort window.
3. Click PaperPort Help Topics.
4. Click How to.
You can also read or print the Working with PaperPort and PaperPort Deluxe online
document that is on the IdeaScan 2000 Color Flatbed Scanner installation CD. This
document includes detailed information about how to use PaperPort and how to work
with your scanner and images. You must use Adobe Acrobat Reader to view or print
the User’s Guide. If you do not already have Adobe Acrobat Reader, you can install it
using instructions provided on the CD.
Dragging and dropping an image to another program
The PaperPort software uses drag-and-drop mouse actions to move images, start
programs, and perform other helpful tasks. To drag and drop an item:
1. Start PaperPort.
2. Move the mouse cursor to the item in the PaperPort desktop view that you want
to work with.
3. Click the item and hold the mouse button down. The icon is highlighted with a
red border.
4. Move the mouse cursor and item to the folder or Link Bar that you want to work
with.
5. Release the mouse button on the folder or Link Bar.
If PaperPort does not have an icon in the Link Bar, you can manually create a link by
issuing a Create New Link command. For more information about creating new links,
see the PaperPort Help.
1-16 IdeaScan 2000 Color Flatbed Scanner User’s Guide
Page 23

Scanning a photograph
To scan a photograph:
1. Open the document cover, and place the photograph on the glass. Be sure to
place the photograph face down with the top edge and side edge of the
photograph on the corner of the glass near the reference icon.
2. Close the document cover.
3. Press the green Scan button on the scanner or click the the Scan button icon in
the Simple Access Button window on your computer screen to start the scanner.
Note: The scanner lamp must warm up for a few moments on the initial scan.
After the scanner has been idle for a period of time, the lamp
automatically turns off to conserve energy and lamp life .
After the scanner completes scanning the photograph, the image of the item
displays on the PaperPort desktop view. Your photograph is now stored here
until you want to take some other action such as editing, faxing, e-mailing, or
printing it.
For more information, review the PaperPort Help information by doing the following:
1. Click Help.
2. Click PaperPort Help Topics.
E-mailing a photograph
If you can send e-mail from your computer, you can send a photo image as an e-mail
attachment by using an e-mail icon in the PaperPort Link Bar at the bottom of the
PaperPort desktop. After a photograph is displayed on the PaperPort desktop view,
you can drag and drop the photograph onto an e-mail icon in the Link Bar at the
bottom of the PaperPort window. Before trying to drag and drop, be sure that you
know how to use the mouse to drag and drop an item and that you know which icon
in the PaperPort Link Bar represents your e-mail program.
To e-mail a photograph:
1. Scan a photograph using the instructions given in “Scanning a photograph.”
2. Locate the icon for your e-mail program in the PaperPort Link Bar at the bottom
of the PaperPort window. You might need to use your mouse to scroll the link
icons from side to side to find the icon.
3. In the PaperPort desktop view, locate the photograph that you want to e-mail.
4. Drag and drop the photograph on the e-mail icon.
When you drag and drop a photograph to the e-mail link, the PaperPort software
attaches the photograph to the e-mail note in its original format.
Part 1: Installation and user ’s guide 1-17
Page 24

Note: Some image formats are more Internet-friendly than others. For example, the
.JPG image format works well with the Internet because it compresses the data
and makes the image file smaller. E-mails are transmitted faster when they
contain smaller image files. You also need to use a file format that can be
viewed by the receiver of the e-mail. PaperPort saves a photograph in .MAX
format after it is scanned. If you want to save the photograph in another
format, you must save a copy in the new format.
You can customize the preferences of one of the Simple Access Buttons so that it
automatically scans, saves the image in your preferred format and attaches it to your
preferred e-mail program. For more information on setting up the Custom button to
automatically attach photographs to your e-mail, go to “Customizing Simple Access
Button settings” on page 1-8.
Sending a fax
If your computer has a fax modem and fax software, you can use the Fax button on
the scanner, or you can use the fax link in the PaperPort Link Bar to drag and drop an
item as a fax.
Note: You must configure your fax software before trying to fax with the scanner.
For more information on fax configuration, refer to the documentation that
comes with your fax software.
To send a fax using the Fax button:
1. Open the document cover, and place the item that you would like to fax on the
glass. Be sure to place the item face down with the top edge and side edge of the
item on the corner of the glass near the reference icon.
2. Close the document cover.
3. Press the blue Fax button on the scanner or click the Fax button icon in the
Simple Access Button window on your computer screen to automatically start the
scanner.
Note: The scanner lamp must warm up for a few moments on the initial scan.
The lamp automatically turns off to conserve energy and lamp life after it
has been idle for a period of time.
4. When the scanner finishes scanning the item, the scanner automatically starts your
fax program. Follow the on-screen instructions to send a fax.
1-18 IdeaScan 2000 Color Flatbed Scanner User’s Guide
Page 25

Scanning a text document into a word processing program
To scan a text document into a word processing program:
1. Open the document cover, and place the item on the glass. Be sure to place the
item face down with the top edge and side edge of the item on the corner of the
glass near the reference icon.
2. Close the document cover.
3. Press the purple Custom button on the scanner or click the Custom button icon in
the Simple Access Button window on your computer screen to automatically start
the scanner.
The scanner must warm up for a few moments on the initial scan. The lamp
automatically turns off to conserve energy and lamp life after it has been idle for
a period of time.
The scanner automatically starts the TextBridge OCR program after scanning
completes. The TextBridge OCR program converts the scanned item into text and
displays it in a word processing program.
You can change the word processing program that you use by changing the
preferences for the Custom button. Notepad is the default word processing program.
To change the word processing program:
1. Press and hold down the Custom button for a few seconds until the IBM
IdeaScan 2000 Scanner Preferences window opens, or click Customize in the
Simple Access Button window; then click the Custom tab.
2. Select the word processing program you want to make your default word
processing program.
3. Click OK.
Copying and printing
If you have a printer, you can use the Copy/Print feature. The default setting is a
black and white copy. If your printer supports color, you can change the default
setting to color for this button. To change the default setting, press and hold down the
Copy/Print button for a few seconds until the IBM IdeaScan 2000 Preferences window
opens, or click Customize in the Simple Access Button window. Next, select the scan
configuration you want as your new default mode; then click OK.
To use the Copy/Print function:
1. Open the document cover, and place the item on the glass. Be sure to place the
item face down with the top edge and side edge of the item on the corner of the
glass near the reference icon.
2. Close the document cover.
Part 1: Installation and user ’s guide 1-19
Page 26

3. Press the yellow Copy/Print button on the scanner or click the Copy/Print button
icon in the Simple Access Button window on your computer screen to
automatically start the scanner.
Note: The scanner lamp must warm up for a few moments on the initial scan.
The lamp automatically turns off to conserve energy and lamp life after it
has been idle for a period of time.
When the scanner finishes scanning the item it automatically sends it to your
printer.
Managing scanned images
Saving color and grayscale images can create large files and use large amounts of
hard-disk space. To conserve hard-disk space, save the image in a file format with a
built-in compression feature such as JPEG. The more a file is compressed, the less
disk space it requires. However, the image quality decreases when compression is
increased.
You can use the following instructions, for example, to save an image in JPEG format
in PaperPort:
1. Right-click on the item you want to use.
2. Click Export.
3. Click the pull-down arrow in the Save as Type section.
4. Click JPEG image files (*.JPG).
5. Type a new file name in the Save In box or in the File name box if you do not
like the default file name.
6. Click Save.
7. Select the desired compression quality. The compression is usually set to 90.
8. Click OK.
1-20 IdeaScan 2000 Color Flatbed Scanner User’s Guide
Page 27

Solving scanner problems
If the scanner is properly connected,
right corner of the computer screen. However, if
scanner is not properly connected, and you need to try the following actions:
1. Inspect all cable connections. Verify that all the cables are plugged in securely.
2. Inspect the scanner power light. If the light is not on, try plugging the power
adapter into another electrical outlet.
3. If the scanner icon still has a red slash through it after you have tried all the
troubleshooting procedures in this section and in the README file, your scanner
might need service. For service information, go to Appendix A, “Help and
service information” on page 2-1.
To verify proper connection of the scanner or to try to reconnect the scanner to your
computer:
1. Place the mouse pointer on the scanner icon on the taskbar.
2. Using the right mouse button, click the icon to display the shortcut menu.
3. From the shortcut menu, click Connect. A window opens while the scanner is
connecting to your computer.
displays in the taskbar at the bottom
displays in the taskbar, the
Caring for your scanner
Review the following scanner maintenance tips.
Keep dust away from your scanner.
Keep your scanner covered when not in use. Dust particles and other foreign
objects might deteriorate image quality.
Do not attempt to disassemble the scanner. There are no user-serviceable parts
inside the scanner. Disassembly of the scanner voids the warranty.
Do not subject the scanner to excessive vibration.
Operate your scanner in temperatures between 10°C (50°F) and 40°C (104°F).
To clean the scanner:
1. Lightly spray a nonabrasive glass cleaner on a lint-free cloth.
2. Use the lint-free cloth to remove any dust or grease from the scanner glass
and casing.
3. Be sure to wipe up all excess liquid before scanning.
Part 1: Installation and user ’s guide 1-21
Page 28

Part 2: Appendixes
This section contains help and service information, the product warranty, and notices.
Appendix A. Help and service information
See “Solving scanner problems” on page 1-21 before requesting help or service. This
section contains information on how to obtain online and telephone technical support.
Online technical support
Online technical support is available during the life of your product. Online assistance
can be obtained through the Personal Computing Support Web site, the PSG Electronic
Bulletin Board System, and the IBM Automated Fax System.
Online technical support
IBM Personal Computing Support Web Site http://www.ibm.com/pc/support
IBM Automated Fax System 1-800-426-3395
1-800-465-3299 (in Canada)
During the warranty period, assistance for replacement or exchange of defective
components is available. In addition, if your IBM option is installed in an IBM
computer, you might be entitled to service at your location. Your technical support
representative can help you determine the best alternative.
Telephone technical support
Marketing, installation, and configuration support through the HelpCenter will be
withdrawn or made available for a fee, at IBM’s discretion, 90 days after the option
has been withdrawn from marketing. Additional support offerings, including
step-by-step installation assistance, are available for a nominal fee.
To assist the technical support representative, have available as much of the following
information as possible:
1. Option name
2. Option number
3. Proof of purchase
4. Computer manufacturer, model, serial number (if IBM), and manual
5. Exact wording of the error message (if any)
6. Description of the problem
7. Hardware and software configuration information for your system
If possible, be at your computer. Your technical support representative might want to
walk you through the problem during the call.
Copyright IBM Corp. 1999 2-1
Page 29

For the support telephone number and support hours by country, refer to the following
table or to the enclosed technical support insert. If the number is not provided, contact
your IBM reseller or IBM marketing representative. Response time may vary
depending on the number and nature of the calls received.
Support 24 hours a day, 7 days a week
Canada 1-800-565-3344
U.S.A./Puerto Rico 1-800-772-2227
Technical Support for PaperPort and scanner drivers
U.S.A. and Canada 1-800-787-0866 (toll free)
Europe 31 20 5864 614 (toll call)
Appendix B. Product warranty and notices
Warranty Statements
The warranty statements consist of two parts: Part 1 and Part 2. Part 1 varies by country. Part 2
is the same for both statements. Be sure to read both the Part 1 that applies to your country and
Part 2.
United States, Puerto Rico, and Canada (Z125-4753-05 11/97)
(Part 1 - General Terms on page 2-2)
Worldwide except Canada, Puerto Rico, Turkey, and United States (Z125-5697-01
11/97)
(Part 1 - General Terms on page 2-5)
Worldwide Country-Unique Terms
(Part 2 - Country-Unique Terms on page 2-8)
IBM Statement of Limited Warranty for United States, Puerto
Rico, and Canada (Part 1 - General Terms)
This Statement of Limited Warranty includes Part 1 - General Terms and Part 2 - Country-unique
Terms. The terms of Part 2 may replace or modify those of Part 1. The warranties provided
by IBM in this Statement of Limited Warranty apply only to Machines you purchase for your use,
and not for resale, from IBM or your reseller. The term “Machine” means an IBM machine, its
features, conversions, upgrades, elements, or accessories, or any combination of them. The term
“Machine” does not include any software programs, whether pre-loaded with the Machine,
installed subsequently or otherwise. Unless IBM specifies otherwise, the following warranties
apply only in the country where you acquire the Machine. Nothing in this Statement of Warranty
affects any statutory rights of consumers that cannot be waived or limited by contract. If you have
any questions, contact IBM or your reseller.
2-2 IdeaScan 2000 Color Flatbed Scanner User’s Guide
Page 30

Machine - IBM IdeaScan 2000 Color Flatbed Scanner MT 0275-012
Warranty Period* - One Year
*Contact your place of purchase for warranty service information. Some IBM Machines are eligible
for On-site warranty service depending on the country where service is performed.
The IBM Warranty for Machines
IBM warrants that each Machine 1) is free from defects in materials and workmanship and 2)
conforms to IBM's Official Published Specifications. The warranty period for a Machine is a
specified, fixed period commencing on its Date of Installation. The date on your sales receipt is
the Date of Installation, unless IBM or your reseller informs you otherwise.
During the warranty period IBM or your reseller, if approved by IBM to provide warranty
service, will provide repair and exchange service for the Machine, without charge, under the type
of service designated for the Machine and will manage and install engineering changes that apply
to the Machine.
If a Machine does not function as warranted during the warranty period, and IBM or your reseller
are unable to either 1) make it do so or 2) replace it with one that is at least functionally
equivalent, you may return it to your place of purchase and your money will be refunded. The
replacement may not be new, but will be in good working order.
Extent of Warranty
The warranty does not cover the repair or exchange of a Machine resulting from misuse, accident,
modification, unsuitable physical or operating environment, improper maintenance by you, or
failure caused by a product for which IBM is not responsible. The warranty is voided by
removal or alteration of Machine or parts identification labels.
THESE WARRANTIES ARE YOUR EXCLUSIVE WARRANTIES AND
REPLACE ALL OTHER WARRANTIES OR CONDITIONS, EXPRESS OR
IMPLIED, INCLUDING, BUT NOT LIMITED TO, THE IMPLIED
WARRANTIES OR CONDITIONS OF MERCHANTABILITY AND FITNESS
FOR A PARTICULAR PURPOSE. THESE WARRANTIES GIVE YOU
SPECIFIC LEGAL RIGHTS AND YOU MAY ALSO HAVE OTHER RIGHTS
WHICH VARY FROM JURISDICTION TO JURISDICTION. SOME
JURISDICTIONS DO NOT ALLOW THE EXCLUSION OR LIMITATION OF
EXPRESS OR IMPLIED WARRANTIES, SO THE ABOVE EXCLUSION OR
LIMITATION MAY NOT APPLY TO YOU. IN THAT EVENT, SUCH
WARRANTIES ARE LIMITED IN DURATION TO THE WARRANTY
PERIOD. NO WARRANTIES APPLY AFTER THAT PERIOD.
Items Not Covered by Warranty
IBM does not warrant uninterrupted or error-free operation of a Machine.
Unless specified otherwise, IBM provides non-IBM machines
OF ANY KIND.
Any technical or other support provided for a Machine under warranty, such as assistance via
telephone with “how-to” questions and those regarding Machine set-up and installation, will be
provided
WITHOUT WARRANTIES OF ANY KIND.
Warranty Service
WITHOUT WARRANTIES
Part 2: Appendixes 2-3
Page 31

To obtain warranty service for the Machine, contact your reseller or IBM. In the United States,
call IBM at 1-800-772-2227. In Canada, call IBM at 1-800-565-3344. You may be required to
present proof of purchase.
IBM or your reseller provides certain types of repair and exchange service, either at your location
or at a service center, to keep Machines in, or restore them to, conformance with their
Specifications. IBM or your reseller will inform you of the available types of service for a
Machine based on its country of installation. IBM may repair the failing Machine or exchange it
at its discretion.
When warranty service involves the exchange of a Machine or part, the item IBM or your reseller
replaces becomes its property and the replacement becomes yours. You represent that all
removed items are genuine and unaltered. The replacement may not be new, but will be in good
working order and at least functionally equivalent to the item replaced. The replacement assumes
the warranty service status of the replaced item.
Any feature, conversion, or upgrade IBM or your reseller services must be installed on a Machine
which is 1) for certain Machines, the designated, serial-numbered Machine and 2) at an
engineering-change level compatible with the feature, conversion, or upgrade. Many features,
conversions, or upgrades involve the removal of parts and their return to IBM. A part that
replaces a removed part will assume the warranty service status of the removed part.
Before IBM or your reseller exchanges a Machine or part, you agree to remove all features, parts,
options, alterations, and attachments not under warranty service.
You also agree to
1. ensure that the Machine is free of any legal obligations or restrictions that prevent its
exchange;
2. obtain authorization from the owner to have IBM or your reseller service a Machine that you
do not own; and
3. where applicable, before service is provided
a. follow the problem determination, problem analysis, and service request procedures that
IBM or your reseller provides,
b. secure all programs, data, and funds contained in a Machine,
c. provide IBM or your reseller with sufficient, free, and safe access to your facilities to
permit them to fulfill their obligations, and
d. inform IBM or your reseller of changes in a Machine's location.
IBM is responsible for loss of, or damage to, your Machine while it is 1) in IBM's possession or
2) in transit in those cases where IBM is responsible for the transportation charges.
Neither IBM nor your reseller is responsible for any of your confidential, proprietary or personal
information contained in a Machine which you return to IBM or your reseller for any reason.
You should remove all such information from the Machine prior to its return.
Production Status
Each IBM Machine is manufactured from new parts, or new and used parts. In some cases, the
Machine may not be new and may have been previously installed. Regardless of the Machine's
production status, IBM's appropriate warranty terms apply.
Limitation of Liability
Circumstances may arise where, because of a default on IBM's part or other liability, you are
entitled to recover damages from IBM. In each such instance, regardless of the basis on which
you are entitled to claim damages from IBM (including fundamental breach, negligence,
misrepresentation, or other contract or tort claim), IBM is liable for no more than
2-4 IdeaScan 2000 Color Flatbed Scanner User’s Guide
Page 32

1. damages for bodily injury (including death) and damage to real property and tangible
personal property; and
2. the amount of any other actual direct damages, up to the greater of U.S. $100,000 (or
equivalent in local currency) or the charges (if recurring, 12 months' charges apply) for the
Machine that is the subject of the claim.
This limit also applies to IBM's suppliers and your reseller. It is the maximum for which
IBM, its suppliers, and your reseller are collectively responsible.
UNDER NO CIRCUMSTANCES IS IBM LIABLE FOR ANY OF THE
FOLLOWING: 1) THIRD-PARTY CLAIMS AGAINST YOU FOR DAMAGES
(OTHER THAN THOSE UNDER THE FIRST ITEM LISTED ABOVE); 2)
LOSS OF, OR DAMAGE TO, YOUR RECORDS OR DATA; OR 3) SPECIAL,
INCIDENTAL, OR INDIRECT DAMAGES OR FOR ANY ECONOMIC
CONSEQUENTIAL DAMAGES (INCLUDING LOST PROFITS OR SAVINGS),
EVEN IF IBM, ITS SUPPLIERS OR YOUR RESELLER IS INFORMED OF
THEIR POSSIBILITY. SOME JURISDICTIONS DO NOT ALLOW THE
EXCLUSION OR LIMITATION OF INCIDENTAL OR CONSEQUENTIAL
DAMAGES, SO THE ABOVE LIMITATION OR EXCLUSION MAY NOT
APPLY TO YOU.
IBM Statement of Warranty Worldwide except Canada, Puerto
Rico, Turkey, United States (Part 1 - General Terms)
This Statement of Warranty includes Part 1 - General Terms and Part 2 - Country-unique Terms.
The terms of Part 2 may replace or modify those of Part 1. The warranties provided by IBM
in this Statement of Warranty apply only to Machines you purchase for your use, and not for
resale, from IBM or your reseller. The term “Machine” means an IBM machine, its features,
conversions, upgrades, elements, or accessories, or any combination of them. The term
“Machine” does not include any software programs, whether pre-loaded with the Machine,
installed subsequently or otherwise. Unless IBM specifies otherwise, the following warranties
apply only in the country where you acquire the Machine. Nothing in this Statement of Warranty
affects any statutory rights of consumers that cannot be waived or limited by contract. If you have
any questions, contact IBM or your reseller.
Machine - IBM IdeaScan 2000 Color Flatbed Scanner MT 0275-012
Warranty Period* - One Year
*Contact your place of purchase for warranty service information. Some IBM Machines are eligible
for On-site warranty service depending on the country where service is performed.
The IBM Warranty for Machines
IBM warrants that each Machine 1) is free from defects in materials and workmanship and 2)
conforms to IBM's Official Published Specifications. The warranty period for a Machine is a
specified, fixed period commencing on its Date of Installation. The date on your sales receipt is
the Date of Installation, unless IBM or your reseller informs you otherwise.
During the warranty period IBM or your reseller, if approved by IBM to provide warranty
service, will provide repair and exchange service for the Machine, without charge, under the type
Part 2: Appendixes 2-5
Page 33

of service designated for the Machine and will manage and install engineering changes that apply
to the Machine.
If a Machine does not function as warranted during the warranty period, and IBM or your reseller
are unable to either 1) make it do so or 2) replace it with one that is at least functionally
equivalent, you may return it to your place of purchase and your money will be refunded. The
replacement may not be new, but will be in good working order.
Extent of Warranty
The warranty does not cover the repair or exchange of a Machine resulting from misuse, accident,
modification, unsuitable physical or operating environment, improper maintenance by you, or
failure caused by a product for which IBM is not responsible. The warranty is voided by
removal or alteration of Machine or parts identification labels.
THESE WARRANTIES ARE YOUR EXCLUSIVE WARRANTIES AND
REPLACE ALL OTHER WARRANTIES OR CONDITIONS, EXPRESS OR
IMPLIED, INCLUDING, BUT NOT LIMITED TO, THE IMPLIED
WARRANTIES OR CONDITIONS OF MERCHANTABILITY AND FITNESS
FOR A PARTICULAR PURPOSE. THESE WARRANTIES GIVE YOU
SPECIFIC LEGAL RIGHTS AND YOU MAY ALSO HAVE OTHER RIGHTS
WHICH VARY FROM JURISDICTION TO JURISDICTION. SOME
JURISDICTIONS DO NOT ALLOW THE EXCLUSION OR LIMITATION OF
EXPRESS OR IMPLIED WARRANTIES, SO THE ABOVE EXCLUSION OR
LIMITATION MAY NOT APPLY TO YOU. IN THAT EVENT, SUCH
WARRANTIES ARE LIMITED IN DURATION TO THE WARRANTY
PERIOD. NO WARRANTIES APPLY AFTER THAT PERIOD.
Items Not Covered by Warranty
IBM does not warrant uninterrupted or error-free operation of a Machine.
Unless specified otherwise, IBM provides non-IBM machines
WITHOUT WARRANTIES
OF ANY KIND.
Any technical or other support provided for a Machine under warranty, such as assistance via
telephone with “how-to” questions and those regarding Machine set-up and installation, will be
WITHOUT WARRANTIES OF ANY KIND.
provided
Warranty Service
To obtain warranty service for the Machine, contact your reseller or IBM. You may be required
to present proof of purchase.
IBM or your reseller provides certain types of repair and exchange service, either at your location
or at a service center, to keep Machines in, or restore them to, conformance with their
Specifications. IBM or your reseller will inform you of the available types of service for a
Machine based on its country of installation. IBM may repair the failing Machine or exchange it
at its discretion.
When warranty service involves the exchange of a Machine or part, the item IBM or your reseller
replaces becomes its property and the replacement becomes yours. You represent that all
removed items are genuine and unaltered. The replacement may not be new, but will be in good
working order and at least functionally equivalent to the item replaced. The replacement assumes
the warranty service status of the replaced item.
2-6 IdeaScan 2000 Color Flatbed Scanner User’s Guide
Page 34

Any feature, conversion, or upgrade IBM or your reseller services must be installed on a Machine
which is 1) for certain Machines, the designated, serial-numbered Machine and 2) at an
engineering-change level compatible with the feature, conversion, or upgrade. Many features,
conversions, or upgrades involve the removal of parts and their return to IBM. A part that
replaces a removed part will assume the warranty service status of the removed part.
Before IBM or your reseller exchanges a Machine or part, you agree to remove all features, parts,
options, alterations, and attachments not under warranty service.
You also agree to
1. ensure that the Machine is free of any legal obligations or restrictions that prevent its
exchange;
2. obtain authorization from the owner to have IBM or your reseller service a Machine that you
do not own; and
3. where applicable, before service is provided
a. follow the problem determination, problem analysis, and service request procedures that
IBM or your reseller provides,
b. secure all programs, data, and funds contained in a Machine,
c. provide IBM or your reseller with sufficient, free, and safe access to your facilities to
permit them to fulfil their obligations, and
d. inform IBM or your reseller of changes in a Machine's location.
IBM is responsible for loss of, or damage to, your Machine while it is 1) in IBM's possession or
2) in transit in those cases where IBM is responsible for the transportation charges.
Neither IBM nor your reseller is responsible for any of your confidential, proprietary or personal
information contained in a Machine which you return to IBM or your reseller for any reason.
You should remove all such information from the Machine prior to its return.
Production Status
Each IBM Machine is manufactured from new parts, or new and used parts. In some cases, the
Machine may not be new and may have been previously installed. Regardless of the Machine's
production status, IBM's appropriate warranty terms apply.
Limitation of Liability
Circumstances may arise where, because of a default on IBM's part or other liability, you are
entitled to recover damages from IBM. In each such instance, regardless of the basis on which
you are entitled to claim damages from IBM (including fundamental breach, negligence,
misrepresentation, or other contract or tort claim), IBM is liable for no more than
1. damages for bodily injury (including death) and damage to real property and tangible
personal property; and
2. the amount of any other actual direct damages, up to the greater of U.S. $100,000 (or
equivalent in local currency) or the charges (if recurring, 12 months' charges apply) for the
Machine that is the subject of the claim.
This limit also applies to IBM's suppliers and your reseller. It is the maximum for which
IBM, its suppliers, and your reseller are collectively responsible.
UNDER NO CIRCUMSTANCES IS IBM LIABLE FOR ANY OF THE
FOLLOWING: 1) THIRD-PARTY CLAIMS AGAINST YOU FOR DAMAGES
(OTHER THAN THOSE UNDER THE FIRST ITEM LISTED ABOVE); 2)
LOSS OF, OR DAMAGE TO, YOUR RECORDS OR DATA; OR 3) SPECIAL,
INCIDENTAL, OR INDIRECT DAMAGES OR FOR ANY ECONOMIC
Part 2: Appendixes 2-7
Page 35

CONSEQUENTIAL DAMAGES (INCLUDING LOST PROFITS OR SAVINGS),
EVEN IF IBM, ITS SUPPLIERS OR YOUR RESELLER IS INFORMED OF
THEIR POSSIBILITY. SOME JURISDICTIONS DO NOT ALLOW THE
EXCLUSION OR LIMITATION OF INCIDENTAL OR CONSEQUENTIAL
DAMAGES, SO THE ABOVE LIMITATION OR EXCLUSION MAY NOT
APPLY TO YOU.
Part 2 - Worldwide Country-Unique Terms
ASIA PACIFIC
AUSTRALIA: The IBM Warranty for Machines: The following paragraph is added to this
Section:
The warranties specified in this Section are in addition to any rights you may have under the
Trade Practices Act 1974 or other legislation and are only limited to the extent permitted by the
applicable legislation.
Extent of Warranty: The following replaces the first and second sentences of this Section:
The warranty does not cover the repair or exchange of a Machine resulting from misuse, accident,
modification, unsuitable physical or operating environment, operation in other than the Specified
Operating Environment, improper maintenance by you, or failure caused by a product for which
IBM is not responsible.
Limitation of Liability: The following is added to this Section:
Where IBM is in breach of a condition or warranty implied by the Trade Practices Act 1974,
IBM's liability is limited to the repair or replacement of the goods or the supply of equivalent
goods. Where that condition or warranty relates to right to sell, quiet possession or clear title, or
the goods are of a kind ordinarily acquired for personal, domestic or household use or
consumption, then none of the limitations in this paragraph apply.
PEOPLE'S REPUBLIC OF CHINA: Governing Law: The following is added to this
Statement:
The laws of the State of New York govern this Statement.
INDIA: Limitation of Liability: The following replaces items 1 and 2 of this Section:
1. liability for bodily injury (including death) or damage to real property and tangible personal
property will be limited to that caused by IBM's negligence;
2. as to any other actual damage arising in any situation involving nonperformance by IBM
pursuant to, or in any way related to the subject of this Statement of Warranty, IBM's liability
will be limited to the charge paid by you for the individual Machine that is the subject of the
claim.
NEW ZEALAND: The IBM Warranty for Machines: The following paragraph is added to
this Section:
The warranties specified in this Section are in addition to any rights you may have under the
Consumer Guarantees Act 1993 or other legislation which cannot be excluded or limited. The
Consumer Guarantees Act 1993 will not apply in respect of any goods which IBM provides, if
you require the goods for the purposes of a business as defined in that Act.
Limitation of Liability: The following is added to this Section:
Where Machines are not acquired for the purposes of a business as defined in the Consumer
Guarantees Act 1993, the limitations in this Section are subject to the limitations in that Act.
2-8 IdeaScan 2000 Color Flatbed Scanner User’s Guide
Page 36

EUROPE, MIDDLE EAST, AFRICA (EMEA)
The following terms apply to all EMEA countries.
The terms of this Statement of Warranty apply to Machines purchased from an IBM reseller. If
you purchased this Machine from IBM, the terms and conditions of the applicable IBM
agreement prevail over this warranty statement.
Warranty Service
If you purchased an IBM Machine in Austria, Belgium, Denmark, Estonia, Finland, France,
Germany, Greece, Iceland, Ireland, Italy, Latvia, Lithuania, Luxembourg, Netherlands, Norway,
Portugal, Spain, Sweden, Switzerland or United Kingdom, you may obtain warranty service for
that Machine in any of those countries from either (1) an IBM reseller approved to perform
warranty service or (2) from IBM.
If you purchased an IBM Personal Computer Machine in Albania, Armenia, Belarus, Bosnia and
Herzegovina, Bulgaria, Croatia, Czech Republic, Georgia, Hungary, Kazakhstan, Kirghizia,
Federal Republic of Yugoslavia, Former Yugoslav Republic of Macedonia (FYROM), Moldova,
Poland, Romania, Russia, Slovak Republic, Slovenia, or Ukraine, you may obtain warranty
service for that Machine in any of those countries from either (1) an IBM reseller approved to
perform warranty service or (2) from IBM.
The applicable laws, Country-unique terms and competent court for this Statement are those of
the country in which the warranty service is being provided. However, the laws of Austria
govern this Statement if the warranty service is provided in Albania, Armenia, Belarus, Bosnia
and Herzegovina, Bulgaria, Croatia, Czech Republic, Federal Republic of Yugoslavia, Georgia,
Hungary, Kazakhstan, Kirghizia, Former Yugoslav Republic of Macedonia (FYROM), Moldova,
Poland, Romania, Russia, Slovak Republic, Slovenia, and Ukraine.
The following terms apply to the country specified:
EGYPT: Limitation of Liability: The following replaces item 2 in this Section:
2. as to any other actual direct damages, IBM's liability will be limited to the total amount you
paid for the Machine that is the subject of the claim.
Applicability of suppliers and resellers (unchanged).
FRANCE: Limitation of Liability: The following replaces the second sentence of the first
paragraph of this Section:
In such instances, regardless of the basis on which you are entitled to claim damages from IBM,
IBM is liable for no more than: (items 1 and 2 unchanged).
GERMANY: The IBM Warranty for Machines: The following replaces the first sentence of
the first paragraph of this Section:
The warranty for an IBM Machine covers the functionality of the Machine for its normal use and
the Machine's conformity to its Specifications.
The following paragraphs are added to this Section:
The minimum warranty period for Machines is six months.
In case IBM or your reseller are unable to repair an IBM Machine, you can alternatively ask for a
partial refund as far as justified by the reduced value of the unrepaired Machine or ask for a
cancellation of the respective agreement for such Machine and get your money refunded.
Extent of Warranty: The second paragraph does not apply.
Warranty Service: The following is added to this Section:
Part 2: Appendixes 2-9
Page 37

During the warranty period, transportation for delivery of the failing Machine to IBM will be at
IBM's expense.
Production Status: The following paragraph replaces this Section:
Each Machine is newly manufactured. It may incorporate in addition to new parts, re-used parts
as well.
Limitation of Liability: The following is added to this Section:
The limitations and exclusions specified in the Statement of Warranty will not apply to damages
caused by IBM with fraud or gross negligence and for express warranty.
In item 2, replace “U.S. $100,000” with “1.000.000 DEM.”
The following sentence is added to the end of the first paragraph of item 2:
IBM's liability under this item is limited to the violation of essential contractual terms in cases of
ordinary negligence.
IRELAND: Extent of Warranty: The following is added to this Section:
Except as expressly provided in these terms and conditions, all statutory conditions, including all
warranties implied, but without prejudice to the generality of the foregoing all warranties implied
by the Sale of Goods Act 1893 or the Sale of Goods and Supply of Services Act 1980 are hereby
excluded.
Limitation of Liability: The following replaces items one and two of the first paragraph of this
Section:
1. death or personal injury or physical damage to your real property solely caused by IBM's
negligence; and 2. the amount of any other actual direct damages, up to the greater of Irish
Pounds 75,000 or 125 percent of the charges (if recurring, the 12 months' charges apply) for the
Machine that is the subject of the claim or which otherwise gives rise to the claim.
Applicability of suppliers and resellers (unchanged).
The following paragraph is added at the end of this Section:
IBM's entire liability and your sole remedy, whether in contract or in tort, in respect of any
default shall be limited to damages.
ITALY: Limitation of Liability: The following replaces the second sentence in the first
paragraph:
In each such instance unless otherwise provided by mandatory law, IBM is liable for no more
than: (item 1 unchanged) 2)as to any other actual damage arising in all situations involving
non-performance by IBM pursuant to, or in any way related to the subject matter of this
Statement of Warranty, IBM's liability, will be limited to the total amount you paid for the
Machine that is the subject of the claim.
Applicability of suppliers and resellers (unchanged).
The following replaces the second paragraph of this Section:
Unless otherwise provided by mandatory law, IBM and your reseller are not liable for any of the
following: (items 1 and 2 unchanged) 3) indirect damages, even if IBM or your reseller is
informed of their possibility.
SOUTH AFRICA, NAMIBIA, BOTSWANA, LESOTHO AND SWAZILAND: Limitation of
Liability: The following is added to this Section:
IBM's entire liability to you for actual damages arising in all situations involving nonperformance
by IBM in respect of the subject matter of this Statement of Warranty will be limited to the
charge paid by you for the individual Machine that is the subject of your claim from IBM.
2-10 IdeaScan 2000 Color Flatbed Scanner User’s Guide
Page 38

TURKIYE: Production Status: The following replaces this Section:
IBM fulfils customer orders for IBM Machines as newly manufactured in accordance with IBM's
production standards.
UNITED KINGDOM: Limitation of Liability: The following replaces items 1 and 2 of the
first paragraph of this Section:
1. death or personal injury or physical damage to your real property solely caused by IBM's
negligence;
2. the amount of any other actual direct damages or loss, up to the greater of Pounds Sterling
150,000 or 125 percent of the charges (if recurring, the 12 months' charges apply) for the
Machine that is the subject of the claim or which otherwise gives rise to the claim.
The following item is added to this paragraph:
3. breach of IBM's obligations implied by Section 12 of the Sale of Goods Act 1979 or Section
2 of the Supply of Goods and Services Act 1982.
Applicability of suppliers and resellers (unchanged).
The following is added to the end of this Section:
IBM's entire liability and your sole remedy, whether in contract or in tort, in respect of any
default will be limited to damages.
NORTH AMERICA
CANADA: Warranty Service: The following is added to this Section:
To obtain warranty service from IBM, call 1-800-565-3344.
UNITED STATES OF AMERICA: Warranty Service: The following is added to this
Section:
To obtain warranty service from IBM, call 1-800-772-2227.
Notices
References in this publication to IBM products, programs, or services do not imply
that IBM intends to make these available in all countries in which IBM operates. Any
reference to an IBM product, program or service is not intended to state or imply that
only IBM’s product, program, or service may be used. Any functionally equivalent
product, program, or service that does not infringe any of IBM’s intellectual property
rights or other legally protectable rights may be used instead of the IBM product,
program, or service. Evaluation and verification of operation in conjunction with other
products, programs, or services, except those expressly designated by IBM, are the
user’s responsibility.
IBM may have patents or pending patent applications covering subject matter in this
document. The furnishing of this document does not give you any license to these
patents. You can send license inquiries, in writing, to:
IBM Director of Licensing
IBM Corporation
North Castle Drive
Armonk, NY 10504-1785
U.S.A.
Part 2: Appendixes 2-11
Page 39

Licensees of this program who wish to have information about it for the purpose of
enabling: (i) the exchange of information between independently created programs and
other programs (including this one) and (ii) the mutual use of the information which
has been exchanged, should contact IBM Corporation, Department 80D, P.O. Box
12195, 3039 Cornwallis, Research Triangle Park, NC 27709, U.S.A. Such information
may be available, subject to appropriate terms and conditions, including in some cases,
payment of a fee.
Trademarks
The following terms are trademarks of the IBM Corporation in the United States or
other countries:
HelpCenter IBM
Microsoft and Windows are registered trademarks of Microsoft Corporation.
Pentium is a trademark or registered trademark of Intel Corporation.
Other company, product, and service names may be trademarks or service marks of
others.
Electronic emission notices
IBM IdeaScan 2000 Color Flatbed Scanner MT 0275-012
Federal Communications Commission (FCC) Statement
Note: This equipment has been tested and found to comply with the limits for a Class
B digital device, pursuant to Part 15 of the FCC Rules. These limits are designed to
provide reasonable protection against harmful interference in a residential installation.
This equipment generates, uses, and can radiate radio frequency energy and, if not
installed and used in accordance with the instructions, may cause harmful interference
to radio communications. However, there is no guarantee that interference will not
occur in a particular installation. If this equipment does cause harmful interference to
radio or television reception, which can be determined by turning the equipment off
and on, the user is encouraged to try to correct the interference by one or more of the
following measures:
Reorient or relocate the receiving antenna.
Increase the separation between the equipment and receiver.
Connect the equipment into an outlet on a circuit different from that to which the
receiver is connected.
Consult an IBM authorized dealer or service representative for help.
Properly shielded and grounded cables and connectors must be used in order to meet
FCC emission limits. Proper cables and connectors are available from IBM authorized
dealers. IBM is not responsible for any radio or television interference caused by
using other than recommended cables and connectors or by unauthorized changes or
modifications to this equipment. Unauthorized changes or modifications could void
the user's authority to operate the equipment.
2-12 IdeaScan 2000 Color Flatbed Scanner User’s Guide
Page 40

This device complies with Part 15 of the FCC Rules. Operation is subject to the
following two conditions: (1) this device may not cause harmful interference, and (2)
this device must accept any interference received, including interference that may
cause undesired operation.
Responsible Party:
International Business Machines Corporation
New Orchard Road
Armonk, NY 10504
Telephone: 1-919-543-2193
Tested To Comply
With FCC Standards
FOR HOME OR OFFICE USE
Industry Canada Class B emission compliance statement
This Class B digital apparatus complies with Canadian ICES-003.
Avis de conformité à la réglementation d'Industrie Canada
Cet appareil numérique de classe B est conforme à la norme NMB-003 du Canada.
European Union - emission directive
This product is in conformity with the protection requirements of EU Council
Directive 89/366/ECC on the approximation of the laws of the Member States relating
to electromagnetic compatibility.
IBM can not accept responsibility for any failure to satisfy the protection requirements
resulting from a non-recommended modification of the product, including the fitting of
non-IBM option cards.
This product has been tested and found to comply with the limits for Class B
Information Technology Equipment according to CISPR 22 / European Standard EN
55022. The limits for Class B equipment were derived for typical residential
environments to provide reasonable protection against interference with licensed
communication devices.
Part 2: Appendixes 2-13
Page 41

2-14 IdeaScan 2000 Color Flatbed Scanner User’s Guide
Page 42

Union Europea - Normativa EMC
Part 2: Appendixes 2-15
Page 43

IBM
Part Number: P00N7787
Printed in U.S.A.
PN7787
 Loading...