

Page 1
Front cover
Deploying and Customizing
IBM Sales Center for
WebSphere Commerce V6
Automated deployment with IBM
Tivoli Configuration Manager and IBM
WebSphere Everyplace Deployment
User interface and
role-based customization
Customer Care integration
with Sametime
ibm.com/redbooks
Rufus Credle
Rajesh Adukkadukkath
Amit Jain
Lorilee Jarosinski
Ravindra Pratap Singh
Mojca Spazzapan
Dagmara Ulanowski
Page 2

Page 3
International Technical Support Organization
IBM Sales Center for WebSphere Commerce V6
April 2007
SG24-7249-00
Page 4

Note: Before using this information and the product it supports, read the information in
“Notices” on page ix.
First Edition (April 2007)
This edition applies to Microsoft Windows XP, Microsoft Windows 2000 Server, Microsoft
Windows 2003 Server, IBM Rational Application Developer V6.0.1.1, WebSphere Application
Server Test Environment V6.0.2.5, IBM Sales Center for WebSphere Commerce V6.0, IBM
WebSphere Commerce Developer V6.0, WebSphere Commerce Enterprise V6.0, DB2 Universal
Database V8.2.3, IBM HTTP Server V6.0, WebSphere Application Server Network Deployment
V6.0.
© Copyright International Business Machines Corporation 2007. All rights reserved.
Note to U.S. Government Users Restricted Rights -- Use, duplication or disclosure restricted by GSA ADP
Schedule Contract with IBM Corp.
Page 5

Contents
Notices . . . . . . . . . . . . . . . . . . . . . . . . . . . . . . . . . . . . . . . . . . . . . . . . . . . . . . . ix
Trademarks . . . . . . . . . . . . . . . . . . . . . . . . . . . . . . . . . . . . . . . . . . . . . . . . . . . . x
Preface . . . . . . . . . . . . . . . . . . . . . . . . . . . . . . . . . . . . . . . . . . . . . . . . . . . . . . . xi
The team that wrote this IBM Redbook . . . . . . . . . . . . . . . . . . . . . . . . . . . . . . xii
Become a published author . . . . . . . . . . . . . . . . . . . . . . . . . . . . . . . . . . . . . . . xiv
Comments welcome. . . . . . . . . . . . . . . . . . . . . . . . . . . . . . . . . . . . . . . . . . . . . xv
Part 1. Introduction. . . . . . . . . . . . . . . . . . . . . . . . . . . . . . . . . . . . . . . . . . . . . . . . . . . . . . . . . . 1
Chapter 1. IBM Sales Center for WebSphere Commerce V6.0 . . . . . . . . . . 3
1.1 Introduction . . . . . . . . . . . . . . . . . . . . . . . . . . . . . . . . . . . . . . . . . . . . . . . . . 4
1.2 IBM Sales Center features . . . . . . . . . . . . . . . . . . . . . . . . . . . . . . . . . . . . . 6
1.3 IBM Sales Center benefits. . . . . . . . . . . . . . . . . . . . . . . . . . . . . . . . . . . . . . 7
Chapter 2. Overview of the IBM Sales Center environment . . . . . . . . . . . . 9
2.1 IBM Sales Center’s high-level architecture . . . . . . . . . . . . . . . . . . . . . . . . 10
2.2 IBM Sales Center’s functionality . . . . . . . . . . . . . . . . . . . . . . . . . . . . . . . . 11
2.2.1 Working with stores . . . . . . . . . . . . . . . . . . . . . . . . . . . . . . . . . . . . . . 11
2.2.2 Creating new customers and working with existing customers. . . . . 12
2.2.3 Performing order-related actions. . . . . . . . . . . . . . . . . . . . . . . . . . . . 12
2.2.4 Performing quote-related activities . . . . . . . . . . . . . . . . . . . . . . . . . . 13
2.2.5 Performing product-related activities. . . . . . . . . . . . . . . . . . . . . . . . . 13
2.2.6 Understanding ticklers. . . . . . . . . . . . . . . . . . . . . . . . . . . . . . . . . . . . 14
2.2.7 Understanding returns. . . . . . . . . . . . . . . . . . . . . . . . . . . . . . . . . . . . 15
2.2.8 User experience features . . . . . . . . . . . . . . . . . . . . . . . . . . . . . . . . . 15
2.2.9 IBM Support Assistant. . . . . . . . . . . . . . . . . . . . . . . . . . . . . . . . . . . . 16
2.3 IBM Sales Center default workflows . . . . . . . . . . . . . . . . . . . . . . . . . . . . . 17
2.4 Comparing IBM Sales Center with WebSphere Commerce Accelerator . 20
Part 2. Installation . . . . . . . . . . . . . . . . . . . . . . . . . . . . . . . . . . . . . . . . . . . . . . . . . . . . . . . . . . 23
Chapter 3. IBM Sales Center development environment installation. . . . 25
3.1 WebSphere Commerce Developer requirements . . . . . . . . . . . . . . . . . . . 26
3.1.1 Hardware requirements. . . . . . . . . . . . . . . . . . . . . . . . . . . . . . . . . . . 26
3.1.2 Operating system requirements . . . . . . . . . . . . . . . . . . . . . . . . . . . . 27
3.1.3 Networking requirements . . . . . . . . . . . . . . . . . . . . . . . . . . . . . . . . . 28
3.2 Prerequisites for WebSphere Commerce Developer installation . . . . . . . 29
3.2.1 IBM Rational Application Developer V6.0 installation . . . . . . . . . . . . 30
© Copyright IBM Corp. 2007. All rights reserved. iii
Page 6

3.2.2 Applying the IBM Rational Application Developer fixes . . . . . . . . . . 34
3.2.3 Applying the WebSphere Application Server Test Environment fixes35
3.2.4 IBM Sales Center for WebSphere Commerce installation . . . . . . . . 38
3.3 WebSphere Commerce Developer install . . . . . . . . . . . . . . . . . . . . . . . . . 38
3.3.1 Installing both the toolkits on the same machine . . . . . . . . . . . . . . . 40
3.3.2 Installing the IBM Sales Center toolkit in the WebSphere Commerce
development environment . . . . . . . . . . . . . . . . . . . . . . . . . . . . . . . . 42
3.3.3 Installing only the IBM Sales Center toolkit. . . . . . . . . . . . . . . . . . . . 43
Chapter 4. IBM Sales Center production environment installation . . . . . 45
4.1 IBM Sales Center client requirements. . . . . . . . . . . . . . . . . . . . . . . . . . . . 46
4.1.1 Hardware requirements. . . . . . . . . . . . . . . . . . . . . . . . . . . . . . . . . . . 46
4.1.2 Operating system requirements . . . . . . . . . . . . . . . . . . . . . . . . . . . . 46
4.1.3 Networking requirements . . . . . . . . . . . . . . . . . . . . . . . . . . . . . . . . . 47
4.2 Prerequisites to use the IBM Sales Center client . . . . . . . . . . . . . . . . . . . 47
4.2.1 WebSphere Commerce server . . . . . . . . . . . . . . . . . . . . . . . . . . . . . 48
4.2.2 IBM Sales Center client security considerations . . . . . . . . . . . . . . . . 49
4.2.3 IBM Sales Center distribution mechanisms . . . . . . . . . . . . . . . . . . . 49
4.3 IBM Sales Center Quick Install . . . . . . . . . . . . . . . . . . . . . . . . . . . . . . . . . 50
4.3.1 IBM Sales Center for WebSphere Commerce interactive install. . . . 52
4.3.2 Manual installation of the IBM Sales Center updates using the Eclipse
Update Manager . . . . . . . . . . . . . . . . . . . . . . . . . . . . . . . . . . . . . . . . 55
4.4 Manual installation of customizations using
the Eclipse Update Manager . . . . . . . . . . . . . . . . . . . . . . . . . . . . . . . . . . 59
4.5 Automatic installation of customizations and updates . . . . . . . . . . . . . . . . 61
4.5.1 The production installation of IBM Sales Center . . . . . . . . . . . . . . . . 61
4.5.2 Automatically deploying customizations using IBM Tivoli Configuration
Manager . . . . . . . . . . . . . . . . . . . . . . . . . . . . . . . . . . . . . . . . . . . . . . 62
4.5.3 Automatically deploying customizations using WebSphere Everyplace
Deployment. . . . . . . . . . . . . . . . . . . . . . . . . . . . . . . . . . . . . . . . . . . . 77
Part 3. IBM Sales Center customizations . . . . . . . . . . . . . . . . . . . . . . . . . . . . . . . . . . . . . . . 93
Chapter 5. Requirements and design . . . . . . . . . . . . . . . . . . . . . . . . . . . . . 95
5.1 Planning and designing IBM Sales Center customizations . . . . . . . . . . . . 96
5.1.1 Phase 1: Requirements gathering. . . . . . . . . . . . . . . . . . . . . . . . . . . 96
5.1.2 Phase 2: Fit-gap analysis . . . . . . . . . . . . . . . . . . . . . . . . . . . . . . . . . 97
5.1.3 Phase 3: Solution design . . . . . . . . . . . . . . . . . . . . . . . . . . . . . . . . . 97
5.1.4 Phase 4: Macro design and micro design . . . . . . . . . . . . . . . . . . . . . 98
5.1.5 Phase 5: Post-design activities . . . . . . . . . . . . . . . . . . . . . . . . . . . . . 99
5.2 An example using IBM Sales Center. . . . . . . . . . . . . . . . . . . . . . . . . . . . 100
5.2.1 Requirements gathering . . . . . . . . . . . . . . . . . . . . . . . . . . . . . . . . . 100
5.2.2 Fit-gap analysis . . . . . . . . . . . . . . . . . . . . . . . . . . . . . . . . . . . . . . . . 101
5.2.3 Solution design . . . . . . . . . . . . . . . . . . . . . . . . . . . . . . . . . . . . . . . . 101
iv IBM Sales Center for WebSphere Commerce V6
Page 7

5.2.4 Macro design and micro design . . . . . . . . . . . . . . . . . . . . . . . . . . . 106
Chapter 6. Customization scenarios. . . . . . . . . . . . . . . . . . . . . . . . . . . . . 109
6.1 IBM Sales Center client changes . . . . . . . . . . . . . . . . . . . . . . . . . . . . . . 111
6.2 WebSphere Commerce server changes . . . . . . . . . . . . . . . . . . . . . . . . . 113
6.3 IBM Sales Center and WebSphere Commerce changes . . . . . . . . . . . . 114
6.4 Integration customization scenarios . . . . . . . . . . . . . . . . . . . . . . . . . . . . 116
Chapter 7. Developing customizations for IBM Sales Center . . . . . . . . . 119
7.1 Skill prerequisites . . . . . . . . . . . . . . . . . . . . . . . . . . . . . . . . . . . . . . . . . . 120
7.2 IBM Sales Center architecture . . . . . . . . . . . . . . . . . . . . . . . . . . . . . . . . 121
7.2.1 The Eclipse framework . . . . . . . . . . . . . . . . . . . . . . . . . . . . . . . . . . 125
7.2.2 The IBM Sales Center user interface framework . . . . . . . . . . . . . . 125
7.3 Steps to develop customizations. . . . . . . . . . . . . . . . . . . . . . . . . . . . . . . 126
7.4 Developing the IBM Sales Center client components . . . . . . . . . . . . . . . 128
7.4.1 User interface organization . . . . . . . . . . . . . . . . . . . . . . . . . . . . . . . 128
7.4.2 User interface elements . . . . . . . . . . . . . . . . . . . . . . . . . . . . . . . . . 129
7.4.3 IBM Sales Center framework user interface elements . . . . . . . . . . 139
7.4.4 Service requests and Service request handlers . . . . . . . . . . . . . . . 142
7.4.5 Model object . . . . . . . . . . . . . . . . . . . . . . . . . . . . . . . . . . . . . . . . . . 142
7.4.6 UserData property . . . . . . . . . . . . . . . . . . . . . . . . . . . . . . . . . . . . . . 144
7.4.7 UserData support for the command extension . . . . . . . . . . . . . . . . 144
7.4.8 Dynamic extension ID resolvers . . . . . . . . . . . . . . . . . . . . . . . . . . . 145
7.4.9 System configurators . . . . . . . . . . . . . . . . . . . . . . . . . . . . . . . . . . . 146
7.4.10 Resources . . . . . . . . . . . . . . . . . . . . . . . . . . . . . . . . . . . . . . . . . . . 147
7.5 Developing IBM Sales Center server components . . . . . . . . . . . . . . . . . 148
7.5.1 Message mappers. . . . . . . . . . . . . . . . . . . . . . . . . . . . . . . . . . . . . . 148
7.5.2 Response builders . . . . . . . . . . . . . . . . . . . . . . . . . . . . . . . . . . . . . 150
7.5.3 WebSphere Commerce server customizations . . . . . . . . . . . . . . . . 151
Chapter 8. Development tools and customization deployment . . . . . . . 153
8.1 Development tools. . . . . . . . . . . . . . . . . . . . . . . . . . . . . . . . . . . . . . . . . . 154
8.1.1 Deciding on the development environment to use . . . . . . . . . . . . . 154
8.1.2 Widget hover logging . . . . . . . . . . . . . . . . . . . . . . . . . . . . . . . . . . . 155
8.1.3 Enabling the task of showing the contents . . . . . . . . . . . . . . . . . . . 158
8.1.4 Debugging in the IBM Sales Center development environment . . . 160
8.1.5 Tracing in the IBM Sales Center development environment. . . . . . 161
8.1.6 Enabling tracing and debugging in the IBM Sales Center client . . . 161
8.2 Deploying the customizations . . . . . . . . . . . . . . . . . . . . . . . . . . . . . . . . . 163
8.2.1 Exporting the client code from the development environment . . . . 163
8.2.2 Exporting the server code from the development environment. . . . 166
8.2.3 Deploying the customizations . . . . . . . . . . . . . . . . . . . . . . . . . . . . . 167
Part 4. Customization scenario examples . . . . . . . . . . . . . . . . . . . . . . . . . . . . . . . . . . . . . 169
Contents v
Page 8

Chapter 9. User interface customization. . . . . . . . . . . . . . . . . . . . . . . . . . 171
9.1 Introduction . . . . . . . . . . . . . . . . . . . . . . . . . . . . . . . . . . . . . . . . . . . . . . . 172
9.2 Implementing the customization . . . . . . . . . . . . . . . . . . . . . . . . . . . . . . . 175
9.3 Developing the WebSphere Commerce server backend . . . . . . . . . . . . 176
9.3.1 Defining the new table. . . . . . . . . . . . . . . . . . . . . . . . . . . . . . . . . . . 176
9.3.2 Implementing the new ExtPet EJB and ExtPetAccessBean . . . . . . 177
9.3.3 Implementing the new commands . . . . . . . . . . . . . . . . . . . . . . . . . 178
9.4 Developing the Sales Center client customization base . . . . . . . . . . . . . 179
9.4.1 Defining the configurator and the properties . . . . . . . . . . . . . . . . . . 179
9.4.2 Defining the new model objects . . . . . . . . . . . . . . . . . . . . . . . . . . . 180
9.5 Developing the new customer pet editor page . . . . . . . . . . . . . . . . . . . . 186
9.5.1 Implementing the user interface components . . . . . . . . . . . . . . . . . 187
9.5.2 Implementing the integration code on the client side (part 1) . . . . . 205
9.5.3 Implementing the integration code on the server side . . . . . . . . . . 214
9.5.4 Implementing the integration code on the client side (part 2) . . . . . 220
9.6 Developing the new add pet dialog box . . . . . . . . . . . . . . . . . . . . . . . . . 222
9.6.1 Implementing the user interface components . . . . . . . . . . . . . . . . . 223
9.7 Developing the find customer by pet dialog box . . . . . . . . . . . . . . . . . . . 230
9.7.1 Implementing the user interface components . . . . . . . . . . . . . . . . . 231
9.7.2 Implementing the integration code on the server side . . . . . . . . . . 234
9.7.3 Implementing the integration code on the client side . . . . . . . . . . . 241
9.8 Loading the customizations into WebSphere Commerce Developer . . . 244
9.8.1 Installing the WebSphere Commerce Developer 6.0.0.1 Fix Pack . 244
9.8.2 Creating the XPET table on the WebSphere Commerce toolkit . . . 245
9.8.3 Loading the access control policies . . . . . . . . . . . . . . . . . . . . . . . . 246
9.8.4 Mapping a modified Business Object Document message . . . . . . . 247
9.8.5 Importing the EJB JAR file . . . . . . . . . . . . . . . . . . . . . . . . . . . . . . . 249
9.8.6 Importing the commands and the new bodreply messages . . . . . . 250
9.8.7 Loading the client code into the IBM Sales Center toolkit . . . . . . . . 251
9.9 Testing the customized code. . . . . . . . . . . . . . . . . . . . . . . . . . . . . . . . . . 251
Chapter 10. Role-based customizations. . . . . . . . . . . . . . . . . . . . . . . . . . 257
10.1 Duplicating an existing role . . . . . . . . . . . . . . . . . . . . . . . . . . . . . . . . . . 258
10.1.1 Creating a new role and a user in the Organization Administration
console . . . . . . . . . . . . . . . . . . . . . . . . . . . . . . . . . . . . . . . . . . . . . . 258
10.1.2 Revising and loading the access control policies . . . . . . . . . . . . . 259
10.1.3 Extending the server code for ShowStore. . . . . . . . . . . . . . . . . . . 262
10.1.4 Extending the client side for the new role . . . . . . . . . . . . . . . . . . . 266
10.1.5 Testing the new role . . . . . . . . . . . . . . . . . . . . . . . . . . . . . . . . . . . 268
10.2 Chapter checkpoint . . . . . . . . . . . . . . . . . . . . . . . . . . . . . . . . . . . . . . . . 269
10.3 Displaying the menu items based on the roles . . . . . . . . . . . . . . . . . . . 269
10.3.1 Installing the samples . . . . . . . . . . . . . . . . . . . . . . . . . . . . . . . . . . 269
10.3.2 Extending the samples to display the context menu . . . . . . . . . . . 270
vi IBM Sales Center for WebSphere Commerce V6
Page 9

10.3.3 Creating the activities and activity sets and mapping
them to roles . . . . . . . . . . . . . . . . . . . . . . . . . . . . . . . . . . . . . . . . . . 274
10.3.4 Testing your changes . . . . . . . . . . . . . . . . . . . . . . . . . . . . . . . . . . 280
10.3.5 Deploying to production for both the server and the client . . . . . . 283
Part 5. Integration customization scenario examples. . . . . . . . . . . . . . . . . . . . . . . . . . . . 285
Chapter 11. Customer Care integration with Lotus Sametime . . . . . . . . 287
11.1 Introduction to Customer Care . . . . . . . . . . . . . . . . . . . . . . . . . . . . . . . 288
11.2 Installation and configuration. . . . . . . . . . . . . . . . . . . . . . . . . . . . . . . . . 288
11.2.1 Software prerequisites . . . . . . . . . . . . . . . . . . . . . . . . . . . . . . . . . 288
11.2.2 Installing IBM Lotus Sametime . . . . . . . . . . . . . . . . . . . . . . . . . . . 289
11.2.3 Changing the default Hypertext Transfer Protocol port for the
Sametime server. . . . . . . . . . . . . . . . . . . . . . . . . . . . . . . . . . . . . . . 289
11.2.4 Installing the Customer Care component . . . . . . . . . . . . . . . . . . . 290
11.2.5 Enabling Customer Care in WebSphere Commerce . . . . . . . . . . 291
11.2.6 Configuring the Lotus Sametime self-registration feature. . . . . . . 294
11.2.7 Enabling the flex flow for the Customer Care feature . . . . . . . . . . 296
11.3 Adding Customer Care to your store. . . . . . . . . . . . . . . . . . . . . . . . . . . 297
11.4 Integrating Customer Care with IBM Sales Center . . . . . . . . . . . . . . . . 299
11.4.1 Use case example. . . . . . . . . . . . . . . . . . . . . . . . . . . . . . . . . . . . . 300
11.4.2 Prerequisites . . . . . . . . . . . . . . . . . . . . . . . . . . . . . . . . . . . . . . . . . 301
11.4.3 Sample integration application implementation. . . . . . . . . . . . . . . 301
11.4.4 Scope for further expansion . . . . . . . . . . . . . . . . . . . . . . . . . . . . . 312
Part 6. Reports . . . . . . . . . . . . . . . . . . . . . . . . . . . . . . . . . . . . . . . . . . . . . . . . . . . . . . . . . . . 313
Chapter 12. Installing, configuring, and running the WebSphere Commerce
Analyzer. . . . . . . . . . . . . . . . . . . . . . . . . . . . . . . . . . . . . . . . . . . 315
12.1 Introduction to WebSphere Commerce Analyzer . . . . . . . . . . . . . . . . . 316
12.2 Installing the WebSphere Commerce Analyzer. . . . . . . . . . . . . . . . . . . 317
12.2.1 WebSphere Commerce databases supported by WebSphere
Commerce Analyzer . . . . . . . . . . . . . . . . . . . . . . . . . . . . . . . . . . . . 317
12.2.2 Hardware and software prerequisites . . . . . . . . . . . . . . . . . . . . . . 317
12.2.3 The WebSphere Commerce Analyzer installation program . . . . . 318
12.3 Preparing WebSphere Commerce for analytics . . . . . . . . . . . . . . . . . . 324
12.3.1 Configuring WebSphere Commerce to record analytics data . . . . 324
12.3.2 Verifying the currency conversions setup in
WebSphere Commerce . . . . . . . . . . . . . . . . . . . . . . . . . . . . . . . . . 329
12.3.3 Collecting the information required for WebSphere Commerce
Analyzer configuration . . . . . . . . . . . . . . . . . . . . . . . . . . . . . . . . . . 329
12.4 WebSphere Commerce Analyzer configuration . . . . . . . . . . . . . . . . . . 330
12.5 Integrating the WebSphere Commerce Analyzer with WebSphere
Commerce . . . . . . . . . . . . . . . . . . . . . . . . . . . . . . . . . . . . . . . . . . . . . . . 341
Contents vii
Page 10

12.6 Running the WebSphere Commerce Analyzer . . . . . . . . . . . . . . . . . . . 343
12.6.1 Running the capture program on the WebSphere
Commerce database . . . . . . . . . . . . . . . . . . . . . . . . . . . . . . . . . . . 343
12.6.2 Running the replication and the extract, transform,
and load processes. . . . . . . . . . . . . . . . . . . . . . . . . . . . . . . . . . . . . 345
Chapter 13. Developing and customizing customer service reports. . . 347
13.1 WebSphere Commerce customer service reports . . . . . . . . . . . . . . . . 348
13.2 Developing customer service reports . . . . . . . . . . . . . . . . . . . . . . . . . . 350
13.2.1 Writing the JavaServer Page files . . . . . . . . . . . . . . . . . . . . . . . . . 350
13.2.2 Writing the Extensible Markup Language files . . . . . . . . . . . . . . . 358
13.2.3 Updating the common files to reflect the new report . . . . . . . . . . . 361
13.2.4 Loading the access control policies for new reports . . . . . . . . . . . 366
13.3 Displaying the customer service reports in the WebSphere Commerce
Accelerator . . . . . . . . . . . . . . . . . . . . . . . . . . . . . . . . . . . . . . . . . . . . . . . 368
Appendix A. Additional material . . . . . . . . . . . . . . . . . . . . . . . . . . . . . . . . 375
Locating the Web material . . . . . . . . . . . . . . . . . . . . . . . . . . . . . . . . . . . . . . . 375
Using the Web material . . . . . . . . . . . . . . . . . . . . . . . . . . . . . . . . . . . . . . . . . 376
How to use the Web material . . . . . . . . . . . . . . . . . . . . . . . . . . . . . . . . . . 376
Related publications . . . . . . . . . . . . . . . . . . . . . . . . . . . . . . . . . . . . . . . . . . 377
IBM Redbooks . . . . . . . . . . . . . . . . . . . . . . . . . . . . . . . . . . . . . . . . . . . . . . . . 377
Online resources . . . . . . . . . . . . . . . . . . . . . . . . . . . . . . . . . . . . . . . . . . . . . . 377
How to get IBM Redbooks . . . . . . . . . . . . . . . . . . . . . . . . . . . . . . . . . . . . . . . 382
Help from IBM . . . . . . . . . . . . . . . . . . . . . . . . . . . . . . . . . . . . . . . . . . . . . . . . 382
Index . . . . . . . . . . . . . . . . . . . . . . . . . . . . . . . . . . . . . . . . . . . . . . . . . . . . . . . 383
viii IBM Sales Center for WebSphere Commerce V6
Page 11

Notices
This information was developed for products and services offered in the U.S.A.
IBM may not offer the products, services, or features discussed in this document in other countries. Consult
your local IBM representative for information on the products and services currently available in your area.
Any reference to an IBM product, program, or service is not intended to state or imply that only that IBM
product, program, or service may be used. Any functionally equivalent product, program, or service that
does not infringe any IBM intellectual property right may be used instead. However, it is the user's
responsibility to evaluate and verify the operation of any non-IBM product, program, or service.
IBM may have patents or pending patent applications covering subject matter described in this document.
The furnishing of this document does not give you any license to these patents. You can send license
inquiries, in writing, to:
IBM Director of Licensing, IBM Corporation, North Castle Drive, Armonk, NY 10504-1785 U.S.A.
The following paragraph does not apply to the United Kingdom or any other country where such
provisions are inconsistent with local law: INTERNATIONAL BUSINESS MACHINES CORPORATION
PROVIDES THIS PUBLICATION "AS IS" WITHOUT WARRANTY OF ANY KIND, EITHER EXPRESS OR
IMPLIED, INCLUDING, BUT NOT LIMITED TO, THE IMPLIED WARRANTIES OF NON-INFRINGEMENT,
MERCHANTABILITY OR FITNESS FOR A PARTICULAR PURPOSE. Some states do not allow disclaimer
of express or implied warranties in certain transactions, therefore, this statement may not apply to you.
This information could include technical inaccuracies or typographical errors. Changes are periodically made
to the information herein; these changes will be incorporated in new editions of the publication. IBM may
make improvements and/or changes in the product(s) and/or the program(s) described in this publication at
any time without notice.
Any references in this information to non-IBM Web sites are provided for convenience only and do not in any
manner serve as an endorsement of those Web sites. The materials at those Web sites are not part of the
materials for this IBM product and use of those Web sites is at your own risk.
IBM may use or distribute any of the information you supply in any way it believes appropriate without
incurring any obligation to you.
Information concerning non-IBM products was obtained from the suppliers of those products, their published
announcements or other publicly available sources. IBM has not tested those products and cannot confirm
the accuracy of performance, compatibility or any other claims related to non-IBM products. Questions on
the capabilities of non-IBM products should be addressed to the suppliers of those products.
This information contains examples of data and reports used in daily business operations. To illustrate them
as completely as possible, the examples include the names of individuals, companies, brands, and products.
All of these names are fictitious and any similarity to the names and addresses used by an actual business
enterprise is entirely coincidental.
COPYRIGHT LICENSE:
This information contains sample application programs in source language, which illustrate programming
techniques on various operating platforms. You may copy, modify, and distribute these sample programs in
any form without payment to IBM, for the purposes of developing, using, marketing or distributing application
programs conforming to the application programming interface for the operating platform for which the
sample programs are written. These examples have not been thoroughly tested under all conditions. IBM,
therefore, cannot guarantee or imply reliability, serviceability, or function of these programs.
© Copyright IBM Corp. 2007. All rights reserved. ix
Page 12

Trademarks
The following terms are trademarks of the International Business Machines Corporation in the United States,
other countries, or both:
Redbooks (logo) ™
developerWorks®
eServer™
i5/OS®
xSeries®
AFS®
BladeCenter®
Cloudscape™
Domino Designer®
The following terms are trademarks of other companies:
Oracle, JD Edwards, PeopleSoft, Siebel, and TopLink are registered trademarks of Oracle Corporation
and/or its affiliates.
Oracle, JD Edwards, PeopleSoft, and Siebel are registered trademarks of Oracle Corporation and/or its
affiliates.
Enterprise JavaBeans, EJB, Java, Javadoc, JavaBeans, JavaServer, JavaServer Pages, JDBC, JSP, JVM,
J2EE, Solaris, and all Java-based trademarks are trademarks of Sun Microsystems, Inc. in the United
States, other countries, or both.
Internet Explorer, Microsoft, Windows Server, Windows, Win32, and the Windows logo are trademarks of
Microsoft Corporation in the United States, other countries, or both.
Intel, Pentium, Intel logo, Intel Inside logo, and Intel Centrino logo are trademarks or registered trademarks
of Intel Corporation or its subsidiaries in the United States, other countries, or both.
Linux is a trademark of Linus Torvalds in the United States, other countries, or both.
Other company, product, or service names may be trademarks or service marks of others.
Domino®
DB2 Universal Database™
DB2®
Everyplace®
IBM®
Lotus Notes®
Lotus®
Notes®
Rational®
Redbooks™
Sametime®
System x™
Tivoli Enterprise™
Tivoli®
WebSphere®
Workplace™
Workplace Managed Client™
x IBM Sales Center for WebSphere Commerce V6
Page 13

Preface
The IBM Sales Center for WebSphere Commerce V6 is an application for
customer service representatives to capture and manage customer orders. This
IBM® Redbook helps you understand IBM Sales Center for WebSphere
Commerce and provides you with how-to instructions to deploy the business
solution, customize it, and integrate the Sales Center with other applications.
This IBM Redbook helps you install, tailor, and configure the Sales Center
development environment and production environment for creating and
deploying the Sales Center customizations. In addition, this book discusses the
use of IBM Tivoli Configuration Manager and IBM WebSphere Everyplace
Deployment, to perform automated deployment.
This book discusses how to plan and design Sales Center customizations.
Examples are provided to help you through this process. The customization
scenarios that include the integration of additional IBM software and original
equipment manufacturer (OEM) software are described.
This book provides user interface and role-based customization examples to
demonstrate customization within the user interface framework and the
role-based tools.
This book also provides code sample that you can use to integrate IBM Lotus
Sametime V7.5 into Sales Center, where live help and customer care
functionality are achieved.
IBM WebSphere Commerce Analyzer allows you to view analytical data and
provide customer service reports. This book provides instructions about how to
use this tool to gather information for analyzing data in order to help the
marketing, sales, and customer service representative supervisors take more
informed business decisions.
This book is useful for IT architects, IT specialists, application designers,
application developers, application deployers, and consultants because it
contains information that is necessary to design, develop, deploy, and
customize.
© Copyright IBM Corp. 2007. All rights reserved. xi
Page 14

The team that wrote this IBM Redbook
This IBM Redbook was produced by a team of specialists from around the world
working at the International Technical Support Organization (ITSO),
Poughkeepsie Center, USA.
Rufus Credle is a Certified Consulting IT Specialist at the ITSO, Raleigh Center.
In his role as Project Leader, he conducts residencies and develops IBM
Redbooks™ on network operating systems, enterprise resource planning (ERP)
solutions, voice technology, high availability, and clustering solutions, Web
application servers, pervasive computing, IBM and OEM e-business
applications, IBM System x™, IBM eServer™ xSeries®, and IBM BladeCenter®.
The various positions he has held during the course of his career at IBM include
assignments in administration and asset management, systems engineering,
sales and marketing, and IT services. He holds a BS degree in Business
Management from Saint Augustine's College. He has been employed at IBM for
26 years.
Rajesh Adukkadukkath is a Staff Software Engineer in India Software Labs,
Bangalore, India. He has six years of experience in software design and
development of e-business, network management systems, and client-server
technologies. He holds a degree in Master of Computer Applications from
Bharathiar University, Coimbatore, India. He has worked extensively on IBM
Sales Center development for WebSphere Commerce and his areas of expertise
include Java™ and Java 2 Platform, Enterprise Edition (J2EE™) technologies,
including plug-in development on the Eclipse framework.
Amit Jain is a Technical Architect in the Portal and eCommerce competency at
IBM India. He has nine years of experience in consulting, software design, and
development of e-business and client-server technologies. He has carried out
extensive work on WebSphere Commerce customizations for several IBM
customers. He has been with IBM since 2000. He holds a degree in Computer
Science from Rohailkhand University, India. His areas of expertise include
solution design, analysis, and development of Java and J2EE applications, and
IBM WebSphere® technologies. He has practical experience in problem
determination and resolution.
Lorilee Jarosinski is a Staff Software Developer at the IBM Toronto Lab. She is
responsible for programming and customizing tutorials for WebSphere
Commerce. She has five years of experience working on the build, development,
and technical writing teams. She has written extensively on IBM Sales Center
customization, including tutorials, samples, and a white paper. Lorilee holds a
degree in Computer Science from York University, Toronto.
xii IBM Sales Center for WebSphere Commerce V6
Page 15

Ravindra Pratap Singh is a Software Engineer in IBM India. He has over three
years of experience in the WebSphere Commerce field. He holds a Master of
Computer Applications degree from Jawaharlal Nehru University, New Delhi,
India. His areas of expertise include WebSphere Commerce Analyzer. He has
written several articles and tutorials in IBM developerWorks® about WebSphere
Commerce and WebSphere Commerce Analyzer.
Mojca Spazzapan is an Advisory Product Services Specialist for WebSphere
Commerce in the Europe, Middle East, and Africa (EMEA) support team, working
in IBM Slovenia since 2001. She has four years of experience in diverse
WebSphere Commerce products areas, with practical experience in problem
determination and resolution. She holds a Master’s degree in Electrical
Engineering from the University of Ljubljana, Slovenia. Mojca’s areas of
expertise include software programming, middleware applications, and
e-commerce. She has co-authored an IBM Redbook, WebSphere Commerce
V5.4 Handbook: Architecture and Integration Guide, SG24-6567, and an IBM
Redpaper, WebSphere Commerce V5.4 for Solaris and Oracle9i, Infrastructure
and Deployment Patterns, REDP-0316.
Dagmara Ulanowski is a WebSphere Commerce Consultant with the IBM
Software Services for WebSphere team, working in IBM Canada. She has
several years of experience in consulting and developing e-commerce solutions
using WebSphere Commerce. She has worked on implementing the WebSphere
Commerce solution for various IBM customers. She holds an Honors degree in
Computer Science from York University, Toronto, Canada. Her areas of
expertise include IBM Sales Center and IBM WebSphere Commerce Accelerator
customization.
Thanks to the following people for their contributions to this project:
Carolyn Sneed, Tamikia Barrow
ITSO, Poughkeepsie Center
Brian Nolan, IT Architect, WebSphere Business Integration Services Planning
IBM Research Triangle Park
Bill MacIver, WebSphere Commerce Suite Sr Development Manager
IBM Markham, Canada
Carl Kaplan, Worldwide e-Commerce Sales
IBM Waltham
Anthony Tjong, Manager, WebSphere Commerce Development
IBM Markham, Canada
Preface xiii
Page 16

Michael Au, Manager, WebSphere Commerce Foundation Development
IBM Markham, Canada
Peter Swithinbank, ITSO Project Leader
IBM Hursley, UK
Andy Kovacs, Support, Quality, and Measurements
IBM Markham, Canada
Tack Ton g, Mar kh am La b
IBM Markham, Canada
Judy Chan, WebSphere Commerce Business-to-Business Solutions
IBM Markham, Canada
Brian Thomson, STSM Performance, Scalability, Availability
IBM Markham, Canada
Glenn Jones, SWG VoIP Infrastructure, Backup AFS® Cell Admin
IBM Markham, Canada
Wai-Kong Ho, Senior IT Specialist
IBM, Australia
Jegathasan Thambipillai, End User Support
IBM Toronto
Ramya Rajendiran, Associate Software Engineer
IBM India
Become a published author
Join us for a two-week to six-week residency program! Help write an IBM
Redbook dealing with specific products or solutions, while getting hands-on
experience with leading-edge technologies. You will have the opportunity to team
with IBM technical professionals, Business Partners, and Clients.
Your efforts will help increase product acceptance and customer satisfaction. As
a bonus, you will develop a network of contacts in IBM development labs, and
increase your productivity and marketability.
Find out more about the residency program, browse the residency index, and
apply online at:
ibm.com/redbooks/residencies.html
xiv IBM Sales Center for WebSphere Commerce V6
Page 17

Comments welcome
Your comments are important to us!
We want our IBM Redbooks to be as helpful as possible. Send us your
comments about this or other IBM Redbooks in one of the following ways:
Use the online Contact us review IBM Redbook form found at:
ibm.com/redbooks
Send your comments in an e-mail to:
redbooks@us.ibm.com
Mail your comments to:
IBM Corporation, International Technical Support Organization
Dept. HYTD Mail Station P099
2455 South Road
Poughkeepsie, NY 12601-5400
Preface xv
Page 18

xvi IBM Sales Center for WebSphere Commerce V6
Page 19

Part 1
Part 1 Introduction
This part introduces IBM Sales Center for WebSphere Commerce V6 and
discusses the functionality and value of this product.
© Copyright IBM Corp. 2007. All rights reserved. 1
Page 20

2 IBM Sales Center for WebSphere Commerce V6
Page 21

Chapter 1. IBM Sales Center for
WebSphere Commerce V6.0
This chapter describes the most common call center pains and how you can
resolve them using IBM Sales Center for WebSphere Commerce.
1
© Copyright IBM Corp. 2007. All rights reserved. 3
Page 22

1.1 Introduction
IBM Sales Center for WebSphere Commerce is a new and separately orderable
feature that leverages the catalog, order management, promotions, and
merchandising capabilities of WebSphere Commerce to provide call center
representatives with the functionalities they require to service and up-sell to
cross-channel customers.
More than two-thirds of customers were unsatisfied with agent-assisted phone
support. Many companies are finding that their existing call center applications
are failing to accommodate the high volume of requests they receive and that the
call center representatives have inadequate access to customer data and order
data from other channels. In addition, most call center representatives are not
equipped to perform cross-sell and up-sell activities, losing additional revenue
opportunities. IBM Sales Center for WebSphere Commerce helps address these
issues and contributes to a more efficient call center operation.
4 IBM Sales Center for WebSphere Commerce V6
Page 23

Figure 1-1 shows a sample IBM Sales Center customer editor.
Figure 1-1 IBM Sales Center customer editor
Chapter 1. IBM Sales Center for WebSphere Commerce V6.0 5
Page 24
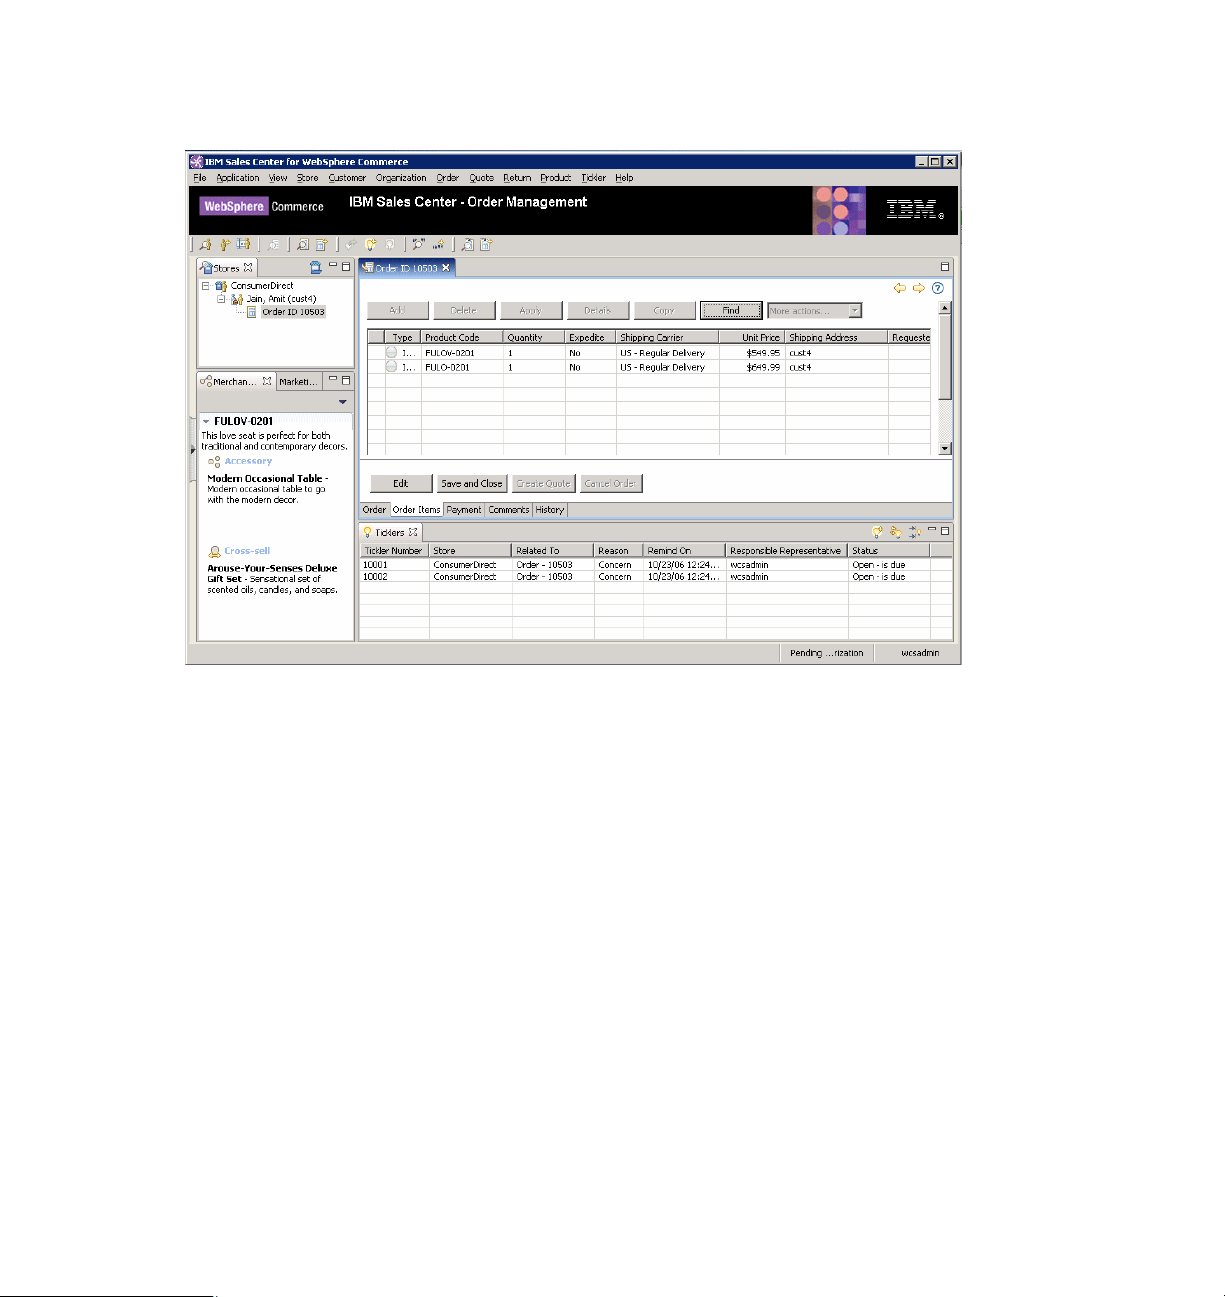
Figure 1-2 shows a sample IBM Sales Center order editor.
Figure 1-2 IBM Sales Center order editor
1.2 IBM Sales Center features
IBM Sales Center’s key features include the following:
Works with multiple stores, orders, and customers simultaneously
Views cross-sell, up-sell, and promotion information
Finds and compares products, and views product availability
Views and takes control of customers’ shopping carts
Creates quotes and turns them into orders
Overrides contract and list pricing
Creates, updates, cancels orders, and processes payments
Creates and manages profiles and ticklers (reminders)
Integrates with other applications
6 IBM Sales Center for WebSphere Commerce V6
Page 25

1.3 IBM Sales Center benefits
IBM Sales Center provides the following benefits:
Improves the productivity of call center employees
Increases sales in call center through cross-sell and up-sell
Improves service for cross-channel customers
Reduces IT cost and complexity by using a central server for both the call
center and the Web, and by reducing the number of systems requiring
replicated catalog, customer, promotion, and order data
Chapter 1. IBM Sales Center for WebSphere Commerce V6.0 7
Page 26

8 IBM Sales Center for WebSphere Commerce V6
Page 27

2
Chapter 2. Overview of the IBM Sales
Center environment
This chapter discusses the IBM Sales Center architecture and the functions of
the IBM Sales Center environment. It also provides a comparison with the IBM
WebSphere Commerce Accelerator tool.
© Copyright IBM Corp. 2007. All rights reserved. 9
Page 28

2.1 IBM Sales Center’s high-level architecture
IBM Sales Center for WebSphere Commerce consists of the IBM Sales Center
client component and the WebSphere Commerce server. A large number of IBM
Sales Center clients can connect to the WebSphere Commerce server using
Web services. Multiple customer service representatives (CSRs) can use IBM
Sales Center clients simultaneously to perform their daily tasks. IBM Sales
Center accesses and updates the data in the WebSphere Commerce database.
This data, for example, order and product information, is the same data
accessed and updated through the storefront and the WebSphere Commerce
Accelerator tool.
Figure 2-1 shows a high-level view of the IBM Sales Center clients and the
WebSphere Commerce server. The IBM Sales Center clients are installed
directly on the CSRs’ machines unlike browser-based tools.
Interactive
Switch CTI Server
Telephone
Network
Telephone
Agent Desktop
with IBM Sales
Center
Voice
Response
IVR
Phone Line
Telephone
Figure 2-1 A high-level view of IBM Sales Center
Network Line
Agent Desktop
with IBM Sales
Center
Database
Server
Telephone
WebSphere
Commerce
Agent Desktop
with IBM Sales
Center
10 IBM Sales Center for WebSphere Commerce V6
Page 29
2.2 IBM Sales Center’s functionality
IBM Sales Center provides various functionalities for CSRs to work easily and
efficiently with WebSphere Commerce. The following sections describe some of
these functionalities.
2.2.1 Working with stores
With IBM Sales Center, you can work with any of the stores your role has access
to, for example, WebSphere Commerce might contain a consumer direct store
and a business-to-business direct store (Figure 2-2). If your role is to service the
customers of the consumer direct store, you may be restricted from viewing the
business-to-business direct store. Any of the stores with which you are working
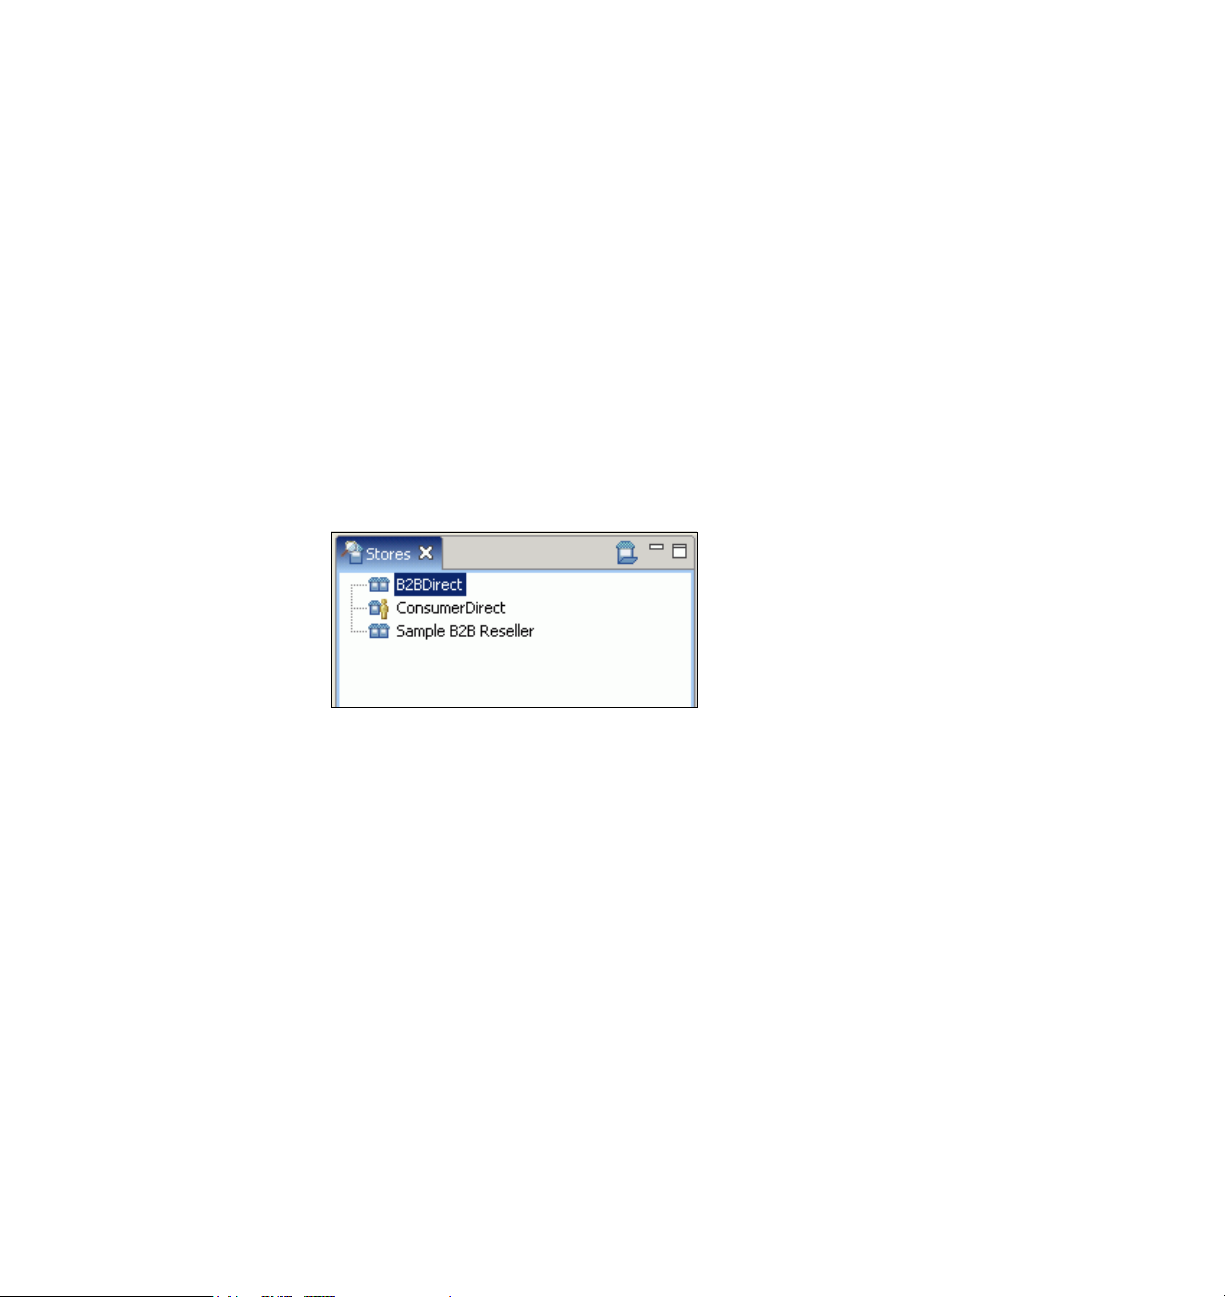
are listed in the Stores view. Figure 2-2 shows an example of the Stores view
with three stores open, Business-to-business Direct, Consumer Direct, and
Sample Business-to-business Reseller.
Figure 2-2 A Stores view
Chapter 2. Overview of the IBM Sales Center environment 11
Page 30
2.2.2 Creating new customers and working with existing customers
You can create new customers and work with existing customers in IBM Sales
Center. Existing customers might have registered themselves through the
storefront or might have been created by another CSR.
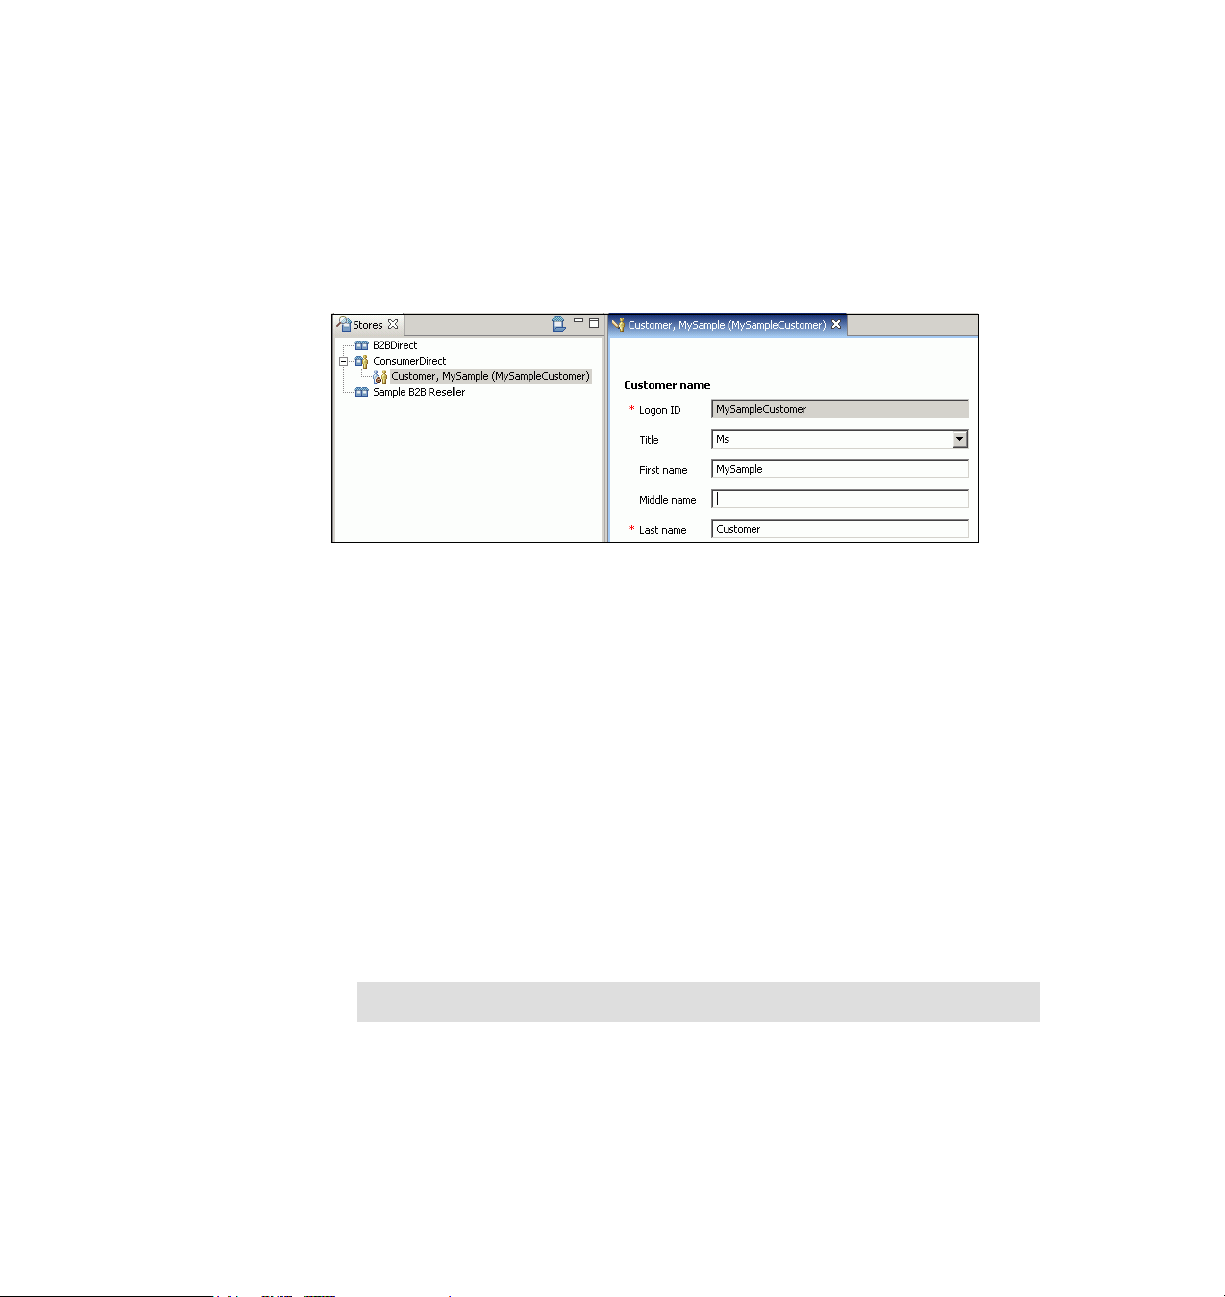
When the Customer editor opens, the customer name and login ID is displayed in
the Stores view, as shown in Figure 2-3.
Figure 2-3 The Stores view and the Customer editor
2.2.3 Performing order-related actions
In IBM Sales Center, you can perform the following order-related actions:
Create an order for a new or existing customer by beginning with a new order
or by using the information from an existing order or quote
Modify many of the details in an existing order such as item quantities,
shipping addresses, and payment methods after the order is submitted, but
before all the items in the order are fulfilled
View and work with the merchandising associations that are related to the
items in an order, and view the marketing promotions that might be of interest
to the customer
Create guest orders for direct customers who have not registered or do not
want to register with the consumer direct store
Note: Guest orders cannot be created in a business-to-business store.
Manage manually blocked orders (A CSR can resolve manual blocks, but
automatic blocks must be removed by an authorized administrator using the
WebSphere Commerce Accelerator tool.)
12 IBM Sales Center for WebSphere Commerce V6
Page 31

2.2.4 Performing quote-related activities
A customer might want to get a cost quotation before deciding about whether to
place an order. You can perform the following quote-related activities:
Create a quote for a new or existing customer by beginning with an empty
quote or based on the information in an existing quote or order. You can also
modify many of the details in an existing quote, such as item quantities and
shipping addresses.
View and work with merchandising associations relating to the items in a
quote, and view marketing promotions that might be of interest to the
customer.
Blocks can be placed on a quote automatically, and you can work with these
blocks to resolve any issues. Blocks on quotes do not halt the quote life cycle.
However, when an order gets generated from a quote, any blocks that are
applicable are transferred to the order and prevent it from being released to
fulfilment until the blocks are removed by an authorized person.
2.2.5 Performing product-related activities
You can search for products, add products to an order, and perform side-by-side
product comparisons (Figure 2-4) in the IBM Sales Center. The products might
be grouped into bundles, packages, and static and dynamic kits, in the same way
in which they are grouped in the online store. Products can also be related to
each other using merchandising associations such as cross-sells and up-sells.
Chapter 2. Overview of the IBM Sales Center environment 13
Page 32

Merchandising associations are displayed in a view next to the Order editor so
that CSRs can see both at the same time. This functionality allows CSRs to drive
revenue by suggesting associated products to customers at the same time as
working on an order.
Figure 2-4 Side-by-side comparison of two products
2.2.6 Understanding ticklers
Ticklers are notifications and reminders for CSRs to take action. Ticklers can be
created automatically, for example, when a CSR exceeds the price override limit,
the order is automatically blocked and the CSR Supervisor receives a tickler to
follow up on the blocked order. Ticklers can also be created manually, for
example, to remind a CSR to follow up with a dissatisfied customer, a tickler can
be created and assigned to the corresponding CSR. Ticklers can be assigned to
self, to a specific person, to a specific group, or to a specific person within a
group, depending on the system setup.
14 IBM Sales Center for WebSphere Commerce V6
Page 33

2.2.7 Understanding returns
A return, which is also referred to as a Return Merchandise Authorization, is
created when a customer wants to return a product purchased earlier from a
store. A CSR can create, view, and edit the returns. Editing a return includes
adding items to the return, removing items from the return, and changing the
credit method, credit amount, and other key information, and approving it for
further processing.
2.2.8 User experience features
In addition to typical features such as logging in, logging out, and changing
passwords, the IBM Sales Center offers the following functionalities:
Views and perspectives
Views support the editors and are used to navigate information or display the
properties for an active editor. In IBM Sales Center, for example, the Stores
view displays open stores, customers, orders, and quotes. Each view has its
own toolbar, and can have its own context menu. Views can be opened,
closed, resized, and moved to suit the work environment and habits.
Perspectives contain a set of views used to accomplish a specific type of
task, for example, in the IBM Sales Center, the IBM Sales Center - Order
Management Perspective contains the views that are required by a CSR to
perform daily tasks in a call center.
Setting preferences
Several preferences can be set in the IBM Sales Center to facilitate daily
tasks, for example, if you work frequently with one store, you can set a
preference so that this store opens immediately after login.
Chapter 2. Overview of the IBM Sales Center environment 15
Page 34

Keyboard navigation and shortcut keys
IBM Sales Center is accessible from a keyboard instead of the mouse to
support people with disabilities and those who prefer the keyboard to the
mouse. The F10 key in the keyboard, for example, accesses the menus on
the main menu bar, and the combination of Ctrl+L opens the logon dialog box.
You can customize the keyboard shortcuts based on your requirements. The
default keyboard shortcuts are listed next to the menu items they represent,
as shown in Figure 2-5.
Figure 2-5 The Ctrl+L combination opens the logon dialog box
For a complete list of the default keyboard shortcuts, refer to the following
Web site:
http://publib.boulder.ibm.com/infocenter/wchelp/v6r0m0/topic/com.ibm
.commerce.telesales.tsr.doc/concepts/ctrhotkeys.htm
2.2.9 IBM Support Assistant
The IBM Support Assistant is an application that helps you find answers to your
questions regarding IBM software products. Launch the IBM Support Assistant
by selecting Help → IBM Support Assistant in the IBM Sales Center client
running in the administrator mode. Use the IBM Support Assistant to perform the
following tasks:
Search technical notes and IBM Web resources, including newsgroups and
developerWorks
Submit service requests through a link to the IBM software support Web site,
where you can create a new service request or problem management record
(PMR) using the Electronic Service Request (ESR) tool.
Note: You require a valid ESR user ID and password to use the ESR tool.
16 IBM Sales Center for WebSphere Commerce V6
Page 35

2.3 IBM Sales Center default workflows
IBM Sales Center supports a variety of functions. To understand these functions,
many documented business process workflows exist. Workflows are a pictorial
representation of processes that help users understand the steps and their
sequence in the process. An orange box in a workflow represents a high-level
grouping of activities that take place in a business process. It may contain other
task objects and subprocesses, creating a hierarchy. The details of the
subprocesses are documented in a separate page.
As an example, the Sales Center workflow (Figure 2-6) describes the CSR tasks,
the objectives and features of this process, and the customization and links to its
subprocesses. CSRs inquire about how they may help customers and respond
with the most appropriate actions.
Figure 2-6 The Sales Center workflow
Chapter 2. Overview of the IBM Sales Center environment 17
Page 36

The identify customer workflow (Figure 2-7) describes the steps a CSR follows
to find a customer, given certain search criteria.
Figure 2-7 The identify customer workflow
Following is the identify customer process:
1. The CSR enters the search criteria.
The CSR chooses the key information that is to be used to find a customer
profile, and then enters the key information about a customer in order to
determine whether the customer profile has already been entered into the
system.
2. The CSR examines the search result.
The CSR looks at the customer profiles that are a potential match to the
customer.
3. If the customer is in the search result, the CSR performs the
task.
The CSR chooses the customer profile that matches the customer from
among the list of potential matches, and the customer profile loads.
4. If the customer is not in the search result, the CSR can perform the
customer
The orange box indicates that the Add Customer workflow is described in a
separate document.
18 IBM Sales Center for WebSphere Commerce V6
task.
Select customer
Add
Page 37

work with return workflow (Figure 2-8) describes the steps a CSR follows to
The
work with a return.
Figure 2-8 The work with return workflow
Following is the work with return process:
If the return is a new return, the
followed. The orange box indicates that this process may contain other task
objects and subprocesses that are explained in a separate page.
If a new tickler is required, the
box indicates that this process may contain other task objects and
subprocesses that are explained in a separate page.
Capture return with prior approval process is
Create tickler process is followed. The orange
If the return is an existing return, the CSR can update the return.
If a new tickler is required, the Create tickler process is followed. The orange
box indicates that this process may contain other task objects and
subprocesses that are explained in a separate page.
Note: To view all the workflows of the business processes, refer to the
WebSphere Commerce V6 Information Center:
http://publib.boulder.ibm.com/infocenter/wchelp/v6r0m0/topic/com.ibm
.commerce.business_process.doc/concepts/processSales_Center.htm
Chapter 2. Overview of the IBM Sales Center environment 19
Page 38

2.4 Comparing IBM Sales Center with WebSphere Commerce Accelerator
There may be some amount of confusion about when to use IBM Sales Center
and when to use the WebSphere Commerce Accelerator. Both are WebSphere
Commerce tools, but they are targeted at different users.
IBM Sales Center must be used by CSRs who require a highly efficient user
interface for day-to-day call center tasks. It can also be used for in-store
customer service tasks, where in-store staff can use it to find a user account
quickly and work with a customer’s privileges, for example, promotions and
coupons. IBM Sales Center helps implement online order pick-up in-store and
provide the in-store staff with all the information pertaining to cross-sell,
promotions, and so on.
The WebSphere Commerce Accelerator tool is targeted at roles that maintain
online stores, hubs, and catalogs by completing various store operations, from
managing the look and feel of an online store, to creating and maintaining orders,
and tracking store activities. With the WebSphere Commerce Accelerator tool,
you can, for example, manage the catalogs, create marketing campaigns, and
view operational reports. The WebSphere Commerce Accelerator can be used
for some call center tasks. However, it does not provide the same rich and
high-performance user experience as the IBM Sales Center.
Many of the functionalities of IBM Sales Center are also available in WebSphere
Commerce Accelerator. However, not all the functionalities of WebSphere
Commerce Accelerator are available in IBM Sales Center.
Table 2-1 shows a comparison of the IBM Sales Center and WebSphere
Commerce Accelerator functionalities.
Table 2-1 Comparison of IBM Sales Center and WebSphere Commerce Accelerator functionalities
Category IBM Sales Center WebSphere Commerce
Accelerator
Rich client-based or
browser-based
Audience CSRs who require an efficient
Eclipse rich client that is installed
on the user’s machine
graphical user interface (GUI)
Browser-based Web application
Roles responsible for store
maintenance such as Marketing
Managers, Product Managers,
and Returns Administrators
20 IBM Sales Center for WebSphere Commerce V6
Page 39

Category IBM Sales Center WebSphere Commerce
Accelerator
Multitasking Can multitask by working on
multiple stores, customers, and
orders simultaneously. Can see
multiple views (orders, ticklers,
up-sells, and so on) at the same
time.
Efficiency tools and role-based
GUIs
Creating customers Can create customers in IBM
Performing customizations Customizations performed by
Efficiency tools such as
drag-and-drop, closing and
hiding views that are not wanted
or required for viewing, and hot
keys. GUI elements can be
suppressed or shown depending
on the user’s role.
Sales Center
using the Eclipse framework and
Standard Widget Toolkit (SWT)
or by using the WebSphere
Commerce's own customization
framework, and Extensible
Markup Language (XML) files to
manipulate the user interface.
Multitasking is not possible. The
user must work on one customer,
order, product, and so on at a
time.
Menu items can be displayed or
hidden based on the user’s role
Cannot create a customer in
Accelerator. Must use
Organization Administration
Console and have the proper
user authority to create
customers.
Customizations performed by
using JavaServer™ pages
(JSP™) and XML files
Viewing merchandising
associations and promotions
when taking an order
Reminders Ticklers are reminders or tasks
Quotes Can create quotes for a customer Not available in Accelerator
When creating an order in Sales
Center, appropriate promotions
and merchandising associations
(up-sells, cross-sells) display in
an adjacent view. CSRs do not
have to remember what
promotions and merchandising
associations are available.
that can be assigned to other
users or departments
Chapter 2. Overview of the IBM Sales Center environment 21
Not available in Accelerator
Not available in Accelerator
Page 40

22 IBM Sales Center for WebSphere Commerce V6
Page 41

Part 2
Part 2 Installation
This part discusses and describes the installation and building of the IBM Sales
Center for WebSphere Commerce development environment and production
environment.
© Copyright IBM Corp. 2007. All rights reserved. 23
Page 42

24 IBM Sales Center for WebSphere Commerce V6
Page 43

Chapter 3. IBM Sales Center
development environment
installation
IBM Sales Center development environment and WebSphere Commerce
development environment are the recommended tools for creating the IBM Sales
Center client and the WebSphere Commerce server customizations.
3
This chapter describes the hardware, software, and networking requirements. It
also addresses the development environment installation prerequisites.
This chapter describes how to install the development environment with the IBM
Sales Center toolkit and the WebSphere Commerce toolkit, both as components
of WebSphere Commerce Developer product installation. It then outlines the
installation steps involved in different installation scenarios.
Refer to Chapter 7, “Developing customizations for IBM Sales Center” on
page 119 to determine which installation scenario is appropriate for the type of
customization that you plan to develop.
© Copyright IBM Corp. 2007. All rights reserved. 25
Page 44

3.1 WebSphere Commerce Developer requirements
The development environment must comply with the hardware requirements,
operating system requirements, and networking requirements described in this
section.
3.1.1 Hardware requirements
This section describes the hardware requirements of the WebSphere Commerce
Developer.
Tip: For updates, refer to the Technote IBM WebSphere Commerce
Developer, V6.0 hardware prerequisites, which is available in the following
Web site:
http://www-1.ibm.com/support/docview.wss?uid=swg27007490
Depending on which development environment component you are installing
(IBM Sales Center, WebSphere Commerce, or both), ensure that the minimum
hardware requirements for WebSphere Commerce Developer are as follows:
An Intel® Pentium® III IBM-compatible personal computer with a minimum of
800 MHz processor
Note: A 1.6 GHz Intel Pentium 4 processor is recommended.
A minimum of 1.5 GB of RAM
Note: A 2.0 GB of RAM is recommended.
A minimum of 6.1 GB of free disk space on the target installation drive,
broken down as follows:
– IBM Rational Application Developer V6.0 requires 4.2 GB
– WebSphere Commerce Developer requires 1.9 GB
Note: If you choose to install WebSphere Commerce Developer only with
the IBM Sales Center toolkit component (without the WebSphere
Commerce toolkit), the free disk space that is required is about 100 MB.
26 IBM Sales Center for WebSphere Commerce V6
Page 45

Enough free disk space to install the Rational Application Developer 6.0.1.1
Fix Pack:
– 906 MB to install the fix pack directly from the IBM update server or 1.7
GB to download, extract, and install the fix pack from a compressed file if
you already have Rational Application Developer Refresh Pack 6.0.1 or
later installed.
– 3.5 GB to install the fix pack directly from the IBM update server or 6.5 GB
to download, extract, and install the fix pack from a compressed file if you
do not already have Rational Application Developer Refresh Pack 6.0.1 or
later installed.
A graphics-capable monitor with a screen resolution of 800 x 600 display
resolution
Note: A 1024 x 768 display resolution is recommended.
A CD-ROM drive or another media for installing the software, that is, network
drive
3.1.2 Operating system requirements
This section describes the operating system requirements of the WebSphere
Commerce Developer.
Tip: For updates, refer to the Technote IBM WebSphere Commerce
Developer Version 6.0 operating system prerequisites, which is available on
the Web at:
http://www-1.ibm.com/support/docview.wss?uid=swg27007488
Ensure that the WebSphere Commerce Developer system is running on one of
the following operating systems:
Microsoft® Windows® 2000, Server Edition with Service Pack 4
Microsoft Windows 2000, Advanced Server Edition with Service Pack 4
Microsoft Windows 2000, Professional Edition with Service Pack 4
Microsoft Windows XP Professional with Service Pack 2
Chapter 3. IBM Sales Center development environment installation 27
Page 46

Note: In addition to the required operating system service pack levels, ensure
that the system has the following:
All the latest critical fixes issued by Microsoft
Microsoft Internet Explorer® 6.0 Service Pack 1 or higher with the latest
critical security updates
To obtain the latest service packs and critical fixes, refer to the Microsoft
Windows Update Web site:
http://windowsupdate.microsoft.com
3.1.3 Networking requirements
This section describes the networking requirements of the WebSphere
Commerce Developer.
Tip: For updates, refer to the Technote WebSphere Commerce Developer
Version 6.0 Networking Prerequisites, which is available on the Web at:
http://www-1.ibm.com/support/docview.wss?uid=swg27007489
Depending on which development environment component you are installing
(IBM Sales Center, WebSphere Commerce, or both), ensure that the network
configuration of the system meets the following requirements:
The system must have a resolvable, fully qualified host name. This host name
is the host name combined with the domain name. If, for example, the host
name is system1 and the domain is mydomain.com, the fully qualified host
name is system1.mydomain.com
Issue the following command from a command prompt to return the IP
address of the system:
nslookup fully_qualified_host_name
The result must be a reply with the correct IP address of the system.
The IP address of the system must resolve to a host name, including a
domain. To determine if the IP address is mapped to a fully qualified host
name, start a command prompt session and issue the following command:
nslookup IP_address
The result must be a reply with the correct, fully qualified host name of the
system.
28 IBM Sales Center for WebSphere Commerce V6
Page 47

Ensure that all the nodes in the configuration can be reached from other
machines in the network by pinging the fully qualified host name of each node
in the configuration.
Note: If you choose to install both the toolkits on the same system, you
might have only one node in your configuration.
If you choose to install only the IBM Sales Center toolkit, the IBM Sales
Center client in the IBM Sales Center development environment is required
to connect to the WebSphere Commerce server (testing environment or
development environment) for customization development testing
purposes, possibly running on another node in your configuration.
3.2 Prerequisites for WebSphere Commerce Developer installation
Depending on which development environment component you are installing
(IBM Sales Center, WebSphere Commerce, or both), have the following software
installed and configured at a minimum fix pack level:
IBM Rational Application Developer V6.0 updated to 6.0.1.1 Fix Pack level
WebSphere Application Server Test Environment V6.0 updated to a minimum
6.0.2.5 Fix Pack level, with the necessary fixes installed (required for
WebSphere Commerce toolkit only)
Eclipse-based IBM Sales Center for WebSphere Commerce V6.0 rich client
(required for IBM Sales Center toolkit only)
Note: IBM Sales Center is only available for WebSphere Commerce
Professional and WebSphere Commerce Enterprise.
In our case, we followed the installation guide WebSphere Commerce Developer
Enterprise and Professional Version 6.0 Installation Guide (GC10-4255-03) to
install IBM WebSphere Commerce Developer Enterprise 6.0 with the
WebSphere Commerce toolkit and the IBM Sales Center toolkit, both on the
same system, running the Windows XP SP2 operating system. The following
installation guide describes how to install and configure IBM WebSphere
Commerce Developer V6.0, and is available for download from the IBM
Publications Center site:
http://www.elink.ibmlink.ibm.com/public/applications/publications/cgibi
n/pbi.cgi?CTY=US&FNC=SRX&PBL=GC104255
Chapter 3. IBM Sales Center development environment installation 29
Page 48

Tip: All the product documentation is available for download from the
WebSphere Commerce Developer product library page:
http://www-306.ibm.com/software/genservers/commerce/commercestudio/l
it-tech-general-be-en.html#v60
The following sections outline the installation process of the WebSphere
Commerce Developer V6.0 prerequisite software.
3.2.1 IBM Rational Application Developer V6.0 installation
Regardless of whether you install only the IBM Sales Center toolkit, only the
WebSphere Commerce toolkit, or both the toolkits on a machine, the first step in
preparing the environment for WebSphere Commerce Developer installation is to
install the Rational Application Developer V6.0 on the same machine.
Tip: If you already have Rational Application Developer installed, proceed to
3.2.2, “Applying the IBM Rational Application Developer fixes” on page 34.
During the installation process, you might see the options to install software that
do not ship with WebSphere Commerce Developer. The only options of Rational
Application Developer that are available for install from the WebSphere
Commerce Developer CDs are:
Rational Application Developer 6.0
WebSphere Application Server 6.0 Integrated Test Environments
Remote Agent
To install Rational Application Developer V6.0, perform the following tasks:
1. Log in as a user with Administrator privileges.
2. Run launchpad.exe and select Install IBM Rational Application Developer
V6.0 (Figure 3-1).
30 IBM Sales Center for WebSphere Commerce V6
Page 49

Note: You can install Rational Application Developer by running
launchpad.exe in the disk1 directory or by running setup.exe in the
disk1\setup directory.
Figure 3-1 Selecting Install IBM Rational Application Developer V6.0
Chapter 3. IBM Sales Center development environment installation 31
Page 50

3. In the Welcome window, click Next.
4. In the window that appears, ensure that you specify a short directory name
such as C:\RAD601 and click Next (Figure 3-2).
Notes:
Do not accept the default installation path for IBM Rational Application
Developer V6.0. The default installation path is too long for
configuration with the WebSphere Commerce development
environment.
Specify a short directory name such as C:\RAD601. Avoid using periods
(.), spaces, or dollar signs ($) in the directory names.
Figure 3-2 Specifying a short directory name to install Rational® Application Developer
32 IBM Sales Center for WebSphere Commerce V6
Page 51

5. When prompted to select the features that are to be installed, ensure that you
select IBM WebSphere Application Server V6.0 Integrated Test
Environment, and click Next (Figure 3-3).
Figure 3-3 Selecting IBM WebSphere Application Server V6.0 Integrated Test Environment
6. Review the summary information (Figure 3-4) and click
Next
to begin the
installation.
Figure 3-4 Summary information of the IBM Rational Application Developer V6.0 installation
Chapter 3. IBM Sales Center development environment installation 33
Page 52

7. After the Rational Application Developer installation is completed, you are
prompted to install the Agent Controller feature (Figure 3-5). If you do not want
to install this component at this juncture, deselect
Install
and click
feature.)
Figure 3-5 Prompt to launch the Agent Controller install
Finish
to exit the wizard. (In our case, we did not install this
Launch Agent Controller
3.2.2 Applying the IBM Rational Application Developer fixes
After the installation of IBM Rational Application Developer V6.0, apply the
Rational Application Developer fixes to update it to a minimum level of 6.0.1.1.
Tip: If you already have the Rational Application Developer V6.0 fixes
installed, proceed to 3.2.3, “Applying the WebSphere Application Server Test
Environment fixes” on page 35.
To install the IBM Rational Application Developer fix pack and fixes, perform the
following tasks:
1. Open the Rational Product Updater by selecting Start → Programs → IBM
Rational → Rational Product Updater.
2. Select IBM Rational Application Developer → Find Updates.
3. The Rational Product Updater detects all the applicable fixes. Choose Select
All → Install Updates.
34 IBM Sales Center for WebSphere Commerce V6
Page 53

Note: Incremental updates might be required. To apply these updates, run
the Rational Product Updater multiple times.
4. Accept the license agreement and click Finish.
5. Follow the prompts to install all the updates.
Note: Install the fix pack and the fixes directly from the IBM update server
as described earlier. However, updates are also available for download.
Download and install the fix pack in certain situations, such as the
following:
You have a slow or unstable Internet connection and want to use a
download manager that can resume the download
You have difficulty accessing the live IBM update servers from behind a
firewall
You prefer to download the fix pack and install it later
For information about how to download and install the fix pack, refer to the
Te ch no te IBM Rational Application Developer Fix Pack 6.0.1.1, which is
available on the Web at:
http://www-1.ibm.com/support/docview.wss?uid=swg24010926
3.2.3 Applying the WebSphere Application Server Test Environment fixes
If you choose to install the WebSphere Commerce toolkit, update the
WebSphere Application Server Test Environment V6.0 to the minimum 6.0.2.5 fix
pack level and apply the required fixes before installing the WebSphere
Commerce toolkit. The recommended way to update the WebSphere Application
Server Test Environment 6.0 is by using the WebSphere Commerce installation
wizard.
Tip: If you are installing only the WebSphere Commerce toolkit, and you
already have the IBM WebSphere Application Server V6.0 Test Environment
6.0.2.5 or later Fix Pack, and have all the required fixes installed, proceed to
3.3, “WebSphere Commerce Developer install” on page 38.
If you are installing only the IBM Sales Center toolkit or both the toolkits, and
you already have the required WebSphere Application Server Test
Environment fixes installed, proceed to 3.2.4, “IBM Sales Center for
WebSphere Commerce installation” on page 38.
Chapter 3. IBM Sales Center development environment installation 35
Page 54

There are several WebSphere Application Server Test Environment fix pack and
fix installation scenarios that are possible. Each scenario requires the application
of specific fixes in order to bring it to the appropriate level. Apply the WebSphere
Application Server Test Environment fixes that are specific to your installation
scenario. Refer to the Technote WebSphere Commerce Developer, V6.0
required maintenance, which is available on the Web at:
http://www-1.ibm.com/support/docview.wss?uid=swg21236356
If you have, for example, manually applied the 6.0.2.5 Fix Pack to your
WebSphere Application Server Test Environment, and no required fixes were
applied, refer to the Technote Required Maintenance Scenario: WebSphere
Application Server was manually installed at the version 6.0.2.5 level, which is
available on the Web at:
http://www-1.ibm.com/support/docview.wss?uid=swg21237197
Furthermore, WebSphere Application Server Test Environment can be updated
to a Fix Pack V6.0.2.5 or later. If this update is made to 6.0.2.10 or later, apply
one of the three solutions as described in the Technote Installation of
WebSphere Commerce Developer with WebSphere Application Server Fix Pack
6.0.2.11 fails, before proceeding to 3.3, “WebSphere Commerce Developer
install” on page 38. The Technote is available on the Web at:
http://www-1.ibm.com/support/docview.wss?uid=swg21243206
Perform the following tasks to install the required fixes to the WebSphere
Application Server V6.0 Test Environment by using the WebSphere Commerce
installation wizard:
1. Log in as a user with Administrator privileges.
2. Stop all the Java applications running on the machine.
3. Insert the WebSphere Application Server CD disk2 from the WebSphere
Commerce package, which is provided with WebSphere Commerce
Developer, into the CD-ROM drive of the machine on which Rational
Application Developer is installed. Run install.exe and click Next in the
welcome window.
4. Accept the terms and conditions shown in the agreement window and click
Next.
5. After verifying that your system has completed the prerequisites check
successfully, click Next.
36 IBM Sales Center for WebSphere Commerce V6
Page 55

6. When prompted by the install wizard, select Apply maintenance and add
features (Figure 3-6). Ensure that you select the WebSphere Application
Server that is used by Rational Application Developer, for example,
<RAD_installdir>\runtimes\base_v6. Click Next.
Figure 3-6 Selecting the Apply maintenance and add features option
Tip: If your WebSphere Application Server V6.0 Test Environment is not
detected properly as <RAD_installdir>\runtimes\base_v6, that is,
C:\RAD601\runtimes\base_v6, verify whether the WebSphere Application
Server Test Environment was selected to be installed at the time of
Rational Application Developer installation (Figure 3-3 on page 33).
If the WebSphere Application Server Test Environment was not installed
during the Rational Application Developer installation, install the IBM
WebSphere Application Server V6.0 Test Environment manually.
Refer to WTE V6 MANUAL INSTALL instructions in the Technote Install of
the Rational Application Developer 6.x WebSphere Test Environment 6.0
server failed on Windows Operating System, which is available on the Web
at:
http://www-1.ibm.com/support/docview.wss?uid=swg21209120
7. When the update installation wizard is completed, click Finish.
Chapter 3. IBM Sales Center development environment installation 37
Page 56

3.2.4 IBM Sales Center for WebSphere Commerce installation
If you choose to install the IBM Sales Center toolkit, install the IBM Sales Center
for WebSphere Commerce client before installing the IBM Sales Center toolkit.
Install the IBM Sales Center for WebSphere Commerce client by using
interactive install:
1. Insert the IBM Sales Center for WebSphere Commerce CD into the CD-ROM
drive.
2. Browse the CD-ROM drive and run the setup.exe.
3. Follow the prompts in the installation wizard.
For detailed information about installing the client IBM Sales Center for
WebSphere Commerce, refer to Chapter 4, “IBM Sales Center production
environment installation” on page 45.
Note: Microsoft Windows XP is the only supported platform for the IBM Sales
Center client. For updates, refer to the Technote IBM WebSphere Commerce,
version 6.0 operating system prerequisites, which is available on the Web at:
http://www-1.ibm.com/support/docview.wss?uid=swg27007429
3.3 WebSphere Commerce Developer install
IBM Sales Center toolkit and WebSphere Commerce toolkit are the components
of the WebSphere Commerce Developer product, and are used to create IBM
Sales Center and WebSphere Commerce customizations, as described in
Chapter 7, “Developing customizations for IBM Sales Center” on page 119.
Note: The IBM Sales Center toolkit is only available for WebSphere
Commerce Developer Professional and WebSphere Commerce Developer
Enterprise. Use the WebSphere Commerce Developer that matches your
WebSphere Commerce server version:
WebSphere Commerce Developer Enterprise with WebSphere Commerce
Enterprise
WebSphere Commerce Developer Professional with WebSphere
Commerce Professional
WebSphere Commerce Developer Express with WebSphere Commerce -
Express
38 IBM Sales Center for WebSphere Commerce V6
Page 57

Depending on the type of the customizations you will be developing, you can
install only the IBM Sales Center toolkit, the WebSphere Commerce toolkit, or
both the toolkits. Also, depending on your hardware performance, you can install
the IBM Sales Center toolkit and the WebSphere Commerce toolkit on the same
system, or can have the two development environments installed on two different
machines.
Note: The IBM Sales Center development environment is launched in another
workspace that is separate from the WebSphere Commerce development
environment workspace. If you choose to install both the toolkits in the same
Rational Application Developer (on the same system), you will be able to
launch each development environment separately.
The WebSphere Commerce Developer is built on Rational Application Developer
V6.0. In addition to Rational Application Developer V6.0.1.1, which is required for
both the toolkits, the WebSphere Commerce development environment requires
a WebSphere Application Server Test Environment at a minimum 6.0.2.5 Fix
Pack level, with all the required fixes installed. The IBM Sales Center
development environment requires IBM Sales Center for WebSphere Commerce
(Eclipse-based rich client) to be installed on the same machine.
The IBM Sales Center development environment is configured to launch the
plug-in development environment perspective (default). The target platform is set
to the IBM Sales Center client, and a runtime workbench configuration is
available to launch the IBM Sales Center application (either in debug or normal
mode). No projects are available in the workspace initially.
The WebSphere Commerce development environment is configured to launch
the Java 2, Enterprise Edition (J2EE) perspective (default). The WebSphere
Commerce Test Server is created as part of the WebSphere Commerce
Developer installation in order to deploy and test the customized code. You can
start and stop the WebSphere Commerce Test Server within the Rational
Application Developer graphical user interface (GUI). However, you might want
to run the WebSphere Commerce Test Server without running the Rational
Application Developer GUI. You might, for example, want to test the code in your
development environment and do not want to examine or change the code.
Running the WebSphere Commerce Test Server without the Rational Application
Developer GUI reduces the resources used on your system and may result in
better performance.
Chapter 3. IBM Sales Center development environment installation 39
Page 58

Note: For information about starting the WebSphere Commerce Test Server
from the command prompt, refer to the topic “Starting and stopping the
WebSphere Commerce Test Server via command line” in the WebSphere
Commerce information center, which is available on the Web at:
http://publib.boulder.ibm.com/infocenter/wchelp/v6r0m0/topic/com.ibm
.commerce.developer.doc/tasks/tsrwcdevnogui.htm
For information about launching the IBM Sales Center development
environment, refer to the topic “Launching the IBM Sales Center development
environment” in the WebSphere Commerce information center, which is
available on the Web at:
http://publib.boulder.ibm.com/infocenter/wchelp/v6r0m0/topic/com.ibm
.commerce.telesales.developer.doc/tasks/ttrdevlaunch.htm
3.3.1 Installing both the toolkits on the same machine
For moderate and extensive customizations, install both the toolkits, the IBM
Sales Center toolkit and the WebSphere Commerce toolkit, either on two
separate machines, or on the same machine, depending on your hardware
performance.
To install WebSphere Commerce Developer Enterprise V6.0 with the
WebSphere Commerce toolkit and the IBM Sales Center toolkit components,
both on the same machine using GUI installation, perform the following tasks:
1. Log in as a user with Administrator privileges.
2. Install the prerequisite software as outlined in 3.2, “Prerequisites for
WebSphere Commerce Developer installation” on page 29.
3. Ensure that no Java applications are running and insert the WebSphere
Commerce Developer CD in the CD-ROM of the Rational Application
Developer machine. (If the WebSphere Commerce toolkit installation wizard
does not start automatically, run setup.exe in the root of the WebSphere
Commerce Developer CD.)
4. Select the Language to be used for the install wizard, and click OK.
5. In the welcome window click Next.
6. Accept the terms in the agreement window and click Next.
7. Specify a short directory name such as C:\WCToolkit60 and click Next.
40 IBM Sales Center for WebSphere Commerce V6
Page 59
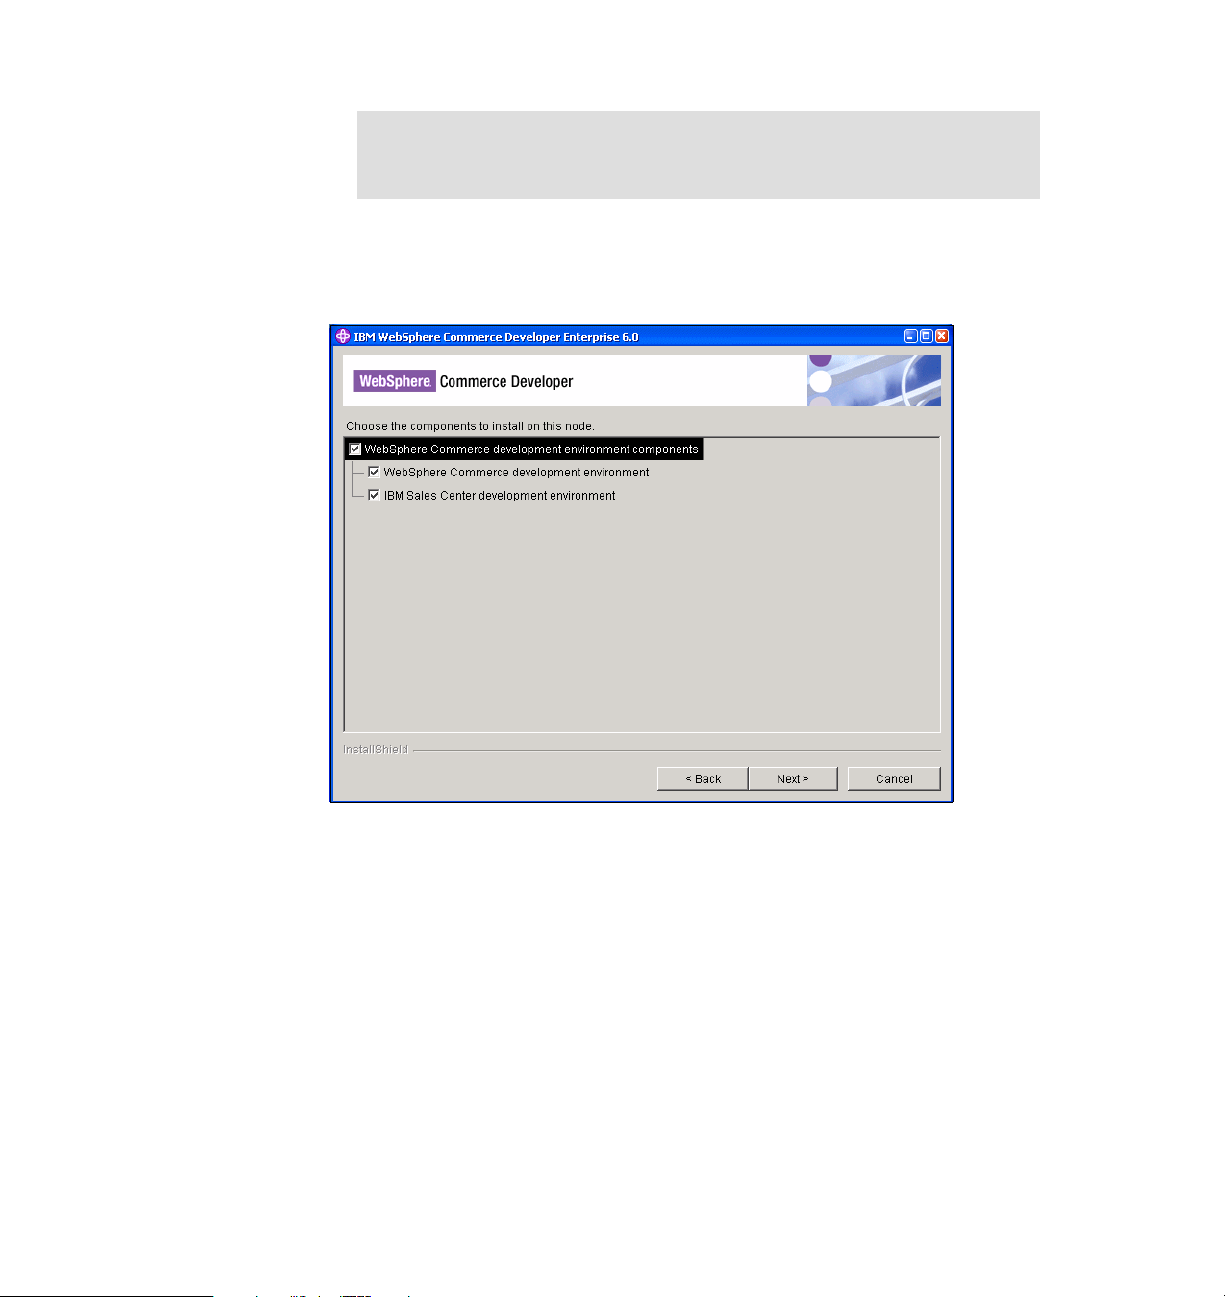
Note: Long installation paths can cause errors with some WebSphere
Commerce additional software. Use a short directory name such as
C:\WCToolkit60 or C:\WebSphere\WCToolkit60.
8. Select the WebSphere Commerce development environment and the IBM
Sales Center development environment components (Figure 3-7) and click
Next.
Figure 3-7 Selecting the components to install
9. Verify the summary information and click Next.
10.Verify that the installation is successful and click Finish.
Chapter 3. IBM Sales Center development environment installation 41
Page 60

Tip: To verify whether the installation is successful, perform the following
tasks:
1. For the WebSphere Commerce development environment installation,
examine the contents of the <WCDE_installdir>/logs/setup.log
For the IBM Sales Center development environment installation,
examine the contents of <WCDE_installdir>/logs/setupmsc.log
2. If these logs do not exist, are empty, or have errors, try running
<WCDE_installdir>/bin/setup.bat and
<WCDE_installdir>/bin/setupmsc.bat manually from the command line.
3. Examine the <
RAD_HOME environment variable points to the correct Rational
Application Developer installation location, and that the WED_HOME
environment variable points to the correct IBM Sales Center for
WebSphere Commerce (rich client) location, for example, setenv.bat
sets these variables to:
RAD_HOME=C:\RAD601
WED_HOME=C:\WebSphere\SalesCenter60
WCDE_installdir>/bin/setenv.bat file to ensure that the
3.3.2 Installing the IBM Sales Center toolkit in the WebSphere Commerce development environment
To develop moderate and extensive IBM Sales Center customizations, you may
choose to install the IBM Sales Center toolkit on a machine with an existing
WebSphere Commerce Developer, where you already have the WebSphere
Commerce toolkit installed.
To add the IBM Sales Center toolkit to an existing WebSphere Commerce
Developer, perform the following tasks:
1. Preinstall IBM Sales Center for WebSphere Commerce client. For more
information, refer to 3.2.4, “IBM Sales Center for WebSphere Commerce
installation” on page 38.
2. Run the WebSphere Commerce Developer installation wizard as described in
3.3.1, “Installing both the toolkits on the same machine” on page 40. When
performing the task described in step 8 on page 41, opt to install only the IBM
Sales Center development environment component.
3. Open the file <WCDE_installdir>/bin/setenv.bat in a text editor. Ensure that
the RAD_HOME environment variable points to the correct Rational
Application Developer installation location, for example,
RAD_HOME=C:\RAD601.
42 IBM Sales Center for WebSphere Commerce V6
Page 61

Ensure that the WED_HOME environment variable points to the correct IBM
Sales Center for WebSphere Commerce client location, for example,
WED_HOME=C:\WebSphere\SalesCenter60
4. Save the file and exit.
3.3.3 Installing only the IBM Sales Center toolkit
For moderate and extensive customizations where you choose to install the IBM
Sales Center toolkit and the WebSphere Commerce toolkit on two separate
machines, and for simple customizations where you only require the IBM Sales
Center toolkit, you can install the IBM Sales Center toolkit on a machine only as
part of the WebSphere Commerce Developer installation.
Note: You can create the IBM Sales Center development environment without
the WebSphere Commerce toolkit component. However, in order to test the
customized IBM Sales Center code, you must log in from the IBM Sales
Center client, which is a part of the IBM Sales Center development
environment, to the WebSphere Commerce server. This can be a WebSphere
Commerce Test Server running within the WebSphere Commerce toolkit on
the same system or on another system as the IBM Sales Center toolkit. It can
also be a runtime WebSphere Commerce server, running on the same system
or on another system as the WebSphere Commerce Developer when no
WebSphere Commerce customizations are required, for example, when
developing simple IBM Sales Center customizations.
To install only the IBM Sales Center toolkit, perform the following tasks:
1. Preinstall Rational Application Developer as outlined in 3.2, “Prerequisites for
WebSphere Commerce Developer installation” on page 29.
2. Preinstall IBM Sales Center for WebSphere Commerce. For more information
about this, refer to 3.2.4, “IBM Sales Center for WebSphere Commerce
installation” on page 38.
3. Run the WebSphere Commerce Developer installation wizard as described in
3.3.1, “Installing both the toolkits on the same machine” on page 40. When
you perform the task described in step 8 on page 41, opt to install only the
IBM Sales Center development environment component.
Chapter 3. IBM Sales Center development environment installation 43
Page 62

44 IBM Sales Center for WebSphere Commerce V6
Page 63

4
Chapter 4. IBM Sales Center production
environment installation
The IBM Sales Center production environment may involve anywhere from tens
to thousands of clients. The enterprise requires a scalable and repeatable way in
which to distribute and update IBM WebSphere Everyplace® Deployment for
Windows and Linux® (WED4WL) and the IBM Sales Center components, and to
distribute their customizations.
This chapter describes the basic hardware, software, and networking
requirements for the IBM Sales Center production environment. It provides
details about the production environment installation prerequisites, security
considerations, and different distribution mechanisms.
The chapter then outlines the quick install of the client with manual installation
tasks, and the manual installation of IBM Sales Center customizations and IBM
Sales Center updates, for example, fix pack installation using the Eclipse Update
Manager.
The last part of this chapter describes how to create a fully automated production
environment using automated deployment with IBM Tivoli Configuration Manager
and IBM WebSphere Everyplace Deployment.
© Copyright IBM Corp. 2007. All rights reserved. 45
Page 64

4.1 IBM Sales Center client requirements
The production environment must comply with the hardware requirements,
operating system requirements, and networking requirements described in this
section.
4.1.1 Hardware requirements
This section describes the hardware requirements for installing IBM Sales Center
for WebSphere Commerce:
An Intel Pentium III IBM-compatible personal computer with the following
minimum hardware requirements:
– A minimum of 384 MB of RAM
– A minimum of 350 MB of free disk space on the target installation drive
A graphics-capable monitor with a screen resolution of 1024 x 768 display
resolution
Tip: For updates, refer to the Technote IBM WebSphere Commerce, version
6.0 hardware prerequisites, which is available on the Web at:
http://www-1.ibm.com/support/docview.wss?uid=swg27007428
4.1.2 Operating system requirements
This section describes the operating system requirements to install the IBM
Sales Center for WebSphere Commerce.
Tip: For updates, refer to the Technote IBM WebSphere Commerce V6.0
operating system prerequisites, which is available on the Web at:
http://www-1.ibm.com/support/docview.wss?uid=swg27007429
Ensure that you have Microsoft Windows XP with Service Pack 1, which is the
minimum operating system, installed.
Note: In addition to the required operating system service pack levels, ensure
that your system has all the latest critical fixes issued by Microsoft. To obtain
the latest service packs and critical fixes, refer to the Microsoft Windows
Update Web site:
http://windowsupdate.microsoft.com
46 IBM Sales Center for WebSphere Commerce V6
Page 65

4.1.3 Networking requirements
This section describes the networking system requirements that are required to
create the IBM Sales Center production environment.
In addition to the hardware and software requirements, ensure that the network
configuration of the systems involved meets the following requirements:
The WebSphere Commerce server in your configuration can be reached from
all IBM Sales Center clients in the network by pinging the fully qualified host
name of the server from the client computer.
The communication port is opened.
Note: The default port for communication between the IBM Sales Center
client and the WebSphere Commerce server is 8000.
4.2 Prerequisites to use the IBM Sales Center client
The prerequisites for using the IBM Sales Center client in a production
environment are as follows:
The WebSphere Commerce V6.0 server must be installed and running
At least one store must exist
Note: IBM Sales Center is only available for WebSphere Commerce
Professional and WebSphere Commerce Enterprise.
Also consider the security precautions with regard to the machines on which the
IBM Sales Center client is installed. For more information about this, refer to the
IBM Sales Center client security considerations.
The next section briefly describes the installation and configuration processes
pertaining to the WebSphere Commerce V6.0 server environment.
Chapter 4. IBM Sales Center production environment installation 47
Page 66

4.2.1 WebSphere Commerce server
The first step in creating the IBM Sales Center production environment is to
ensure that WebSphere Commerce V6.0 is installed, and that at least one store
exists.
Tip: If you already have WebSphere Commerce V6.0 installed and
configured, proceed to 4.2.2, “IBM Sales Center client security considerations”
on page 49.
In our case, we followed the IBM WebSphere Commerce V6.0 Enterprise and
Professional Installation Guide for Windows (GC10-4261-00) to install
WebSphere Commerce Enterprise V6.0 on the Windows 2003 Server Standard
Edition operating system platform. This installation guide describes how to install
and configure IBM WebSphere Commerce V6.0, and is available for download
from the IBM Publications Center site:
http://www.elink.ibmlink.ibm.com/public/applications/publications/cgibi
n/pbi.cgi?CTY=US&FNC=SRX&PBL=GC104261
We installed WebSphere Commerce V6.0 on a clean system, as a stand-alone
one-tier server, by following the instructions in the product installation guide,
using the WebSphere Commerce Quick Install. The Quick Install performs the
following tasks:
Installs DB2® Universal Database™ V8.2.3
Installs IBM HTTP Server V6.0
Installs WebSphere Application Server Network Deployment V6.0.2.5
Installs Web server plug-ins for the WebSphere Application Server
Installs WebSphere Commerce V6.0
Creates a WebSphere Commerce instance named
After the server was installed, we published two starter stores using the
WebSphere Commerce Administration Console:
Consumer Direct B2C starter store (ConsumerDirect.sar) with housewares
catalog. In our case, we chose the Available to Promise-enabled inventory
option for the store in the store publish wizard.
Advanced Business-to-business Direct starter store (AdvancedB2BDirect.sar)
under Seller Organization with the electronics catalog. In our case, we chose
the Available to Promise-enabled inventory option for the store in the store
publish wizard.
48 IBM Sales Center for WebSphere Commerce V6
demo
Page 67

Tip: By default, Windows 2003 Internet Explorer enables tight security. If you
see a blank page when accessing the tools (Accelerator, Adminconsole,
Organization Adminconsole), verify and modify the Internet Explorer security
settings, for example, add the server site to your trusted sites.
For the most current list of the required maintenance, refer to the Technote
WebSphere Commerce required maintenance, which is available on the Web at:
http://www-1.ibm.com/support/docview.wss?uid=swg21232042
For details about the recommended fixes for the IBM WebSphere Application
Server, refer to the Technote Recommended fixes for WebSphere Application
Server, which is available on the Web at:
http://www-1.ibm.com/support/docview.wss?uid=swg27004980#ver60
4.2.2 IBM Sales Center client security considerations
Security is an important concern whenever technology and commerce are
involved. The IBM Sales Center client is no exception. It is important that you
take the following precautions with regard to the machines on which the IBM
Sales Center client is installed:
Ensure that the client is behind a firewall
Physically secure the machine from intruders
Use a password-protected screen saver
Without these precautions, an intruder can install software on the client machine,
which can, in turn, compromise the security of the information in the IBM Sales
Center for WebSphere Commerce.
Note: Treat the files under the IBM Sales Center installation path
<SC_installdir> with care because their exposure can cause security
problems. Ensure that proper file permissions and access control settings are
set to protect these files.
4.2.3 IBM Sales Center distribution mechanisms
Depending on the number of clients and the frequency of the updates required,
you have several choices for installing and updating the IBM Sales Center.
The IBM Sales Center for WebSphere Commerce Quick Install installer provides
a one time (one-off) install capability for the Eclipse-based rich client and the IBM
Sales Center components. Installation scenarios requiring more scalability or
Chapter 4. IBM Sales Center production environment installation 49
Page 68

automation use servers that provide local area network (LAN) booting,
reimaging, software installation, and inventory tracking so that the software
installed on a large number of clients can be remotely managed completely.
Updates are distributed and managed through a similar group of manual and
automated technologies, as are IBM Sales Center client preference settings.
Table 4-1 indicates the different tasks for which the different technologies
described in this chapter are suitable.
Table 4-1 Different technologies to distribute code
IBM Sales
Center Quick
Install
Image install
mechanisms
Manual install
with Eclipse
Update
Manager
IBM Tivoli®
Device
Management
Server
Other
software
distribution
systems
Initial client
installation
Installing
customizations
Applying
updates
Centrally
managing the
client
configuration
Easy, limited
flexibility,
manual
N/ A N/ A Yes , m a n u al Yes ,
N/ A N/ A Yes , m a n u al Yes ,
N/A N/A N/A Yes Yes
Better for high
volumes
N/A N/A N/A
4.3 IBM Sales Center Quick Install
For simple deployment, IBM provides a Quick Install package that installs the
complete IBM Sales Center for WebSphere Commerce client and the full
WebSphere Everyplace Deployment for Windows and Linux V6.0 (WED4WL)
runtime on a single machine.
Quick Install has a graphical user interface-based (GUI-based) installer
packaged on a single CD, and supports manual installation. It is appropriate for
the following circumstances:
Irregular and occasional installation, including installing for evaluation
purposes
automated
automated
Ye s ,
automated
Ye s ,
automated
Generally, ad hoc installation and uninstallation
50 IBM Sales Center for WebSphere Commerce V6
Page 69

Production use only in very limited deployments
Under difficult circumstances, for example, to replace or rebuild a client on
site when the usual software deployment mechanisms are not available
For developers, to install an instance of IBM Sales Center on the
development environment, as described in Chapter 3, “IBM Sales Center
development environment installation” on page 25
Note: IBM Sales Center Quick Install cannot be used to install user
customizations. The customizations must be built in the form of an Eclipse
update site. Any of the postdeployment provisioning mechanisms can then be
used to install custom extensions to the IBM Sales Center installed using
Quick Install. If Quick Install was chosen to perform an ad hoc install in the
absence of a deployment infrastructure, the manual installation of
customizations using the Eclipse Update Manager can be used because this
method does not require installation servers or deployment infrastructure to be
in place.
This type of installation is not appropriate under the following circumstances:
You require manual installation of only a subset of WED4WL.
The WED4WL installer provides the flexibility that the IBM Sales Center
Quick Install does not expose. You can, for example, initially install a minimal
WED4WL, and then add the optional features.
IBM Sales Center for WebSphere Commerce requires the WED4WL
International Components for Unicode for Java (ICU4J) optional feature,
which must be installed before IBM Sales Center can be added.
For more information, refer to the installation instructions in WebSphere
Everyplace Deployment System Administrator's Guide, which is available on
the Web at:
http://www-1.ibm.com/support/docview.wss?uid=swg27006861
You have to install WED4WL with the Enterprise Management Agent already
enabled.
As part of the IBM Sales Center installation, WebSphere Everyplace
Deployment for Windows and Linux V6.0 (WED4WL) containing the
Enterprise Management Agent is installed. However, by default, this
component is not enabled in IBM Sales Center when Quick Install is used.
Chapter 4. IBM Sales Center production environment installation 51
Page 70

You can install IBM Sales Center for WebSphere Commerce manually in the
following ways:
Install IBM Sales Center for WebSphere Commerce interactively from a CD
Install IBM Sales Center for WebSphere Commerce silently from a CD, the
instructions for which are available in the following Web site:
http://publib.boulder.ibm.com/infocenter/wchelp/v6r0m0/topic/com.ibm
.commerce.telesales.admin.doc/tasks/ttrin_silent.htm
For this book, we installed IBM Sales Center for WebSphere Commerce using an
interactive GUI install, as described in the next section.
4.3.1 IBM Sales Center for WebSphere Commerce interactive install
To interactively install IBM Sales Center for WebSphere Commerce from a CD,
complete the following tasks:
1. Ensure that the computer on which you are installing the IBM Sales Center for
WebSphere Commerce meets the hardware, operating system, and
networking requirements (4.1, “IBM Sales Center client requirements” on
page 46).
2. Ensure that you are logged in as a user with sufficient system privileges to
install new software, and that the basic IBM Sales Center client security is set
(4.2.2, “IBM Sales Center client security considerations” on page 49).
3. Collect the following information:
– The directory in the computer on which you want to install the IBM Sales
Center
– WebSphere Commerce server information:
• Fully qualified host name for WebSphere Commerce
This is the host name that you will use when accessing WebSphere
Commerce tools such as WebSphere Commerce Accelerator
• Port number for communication with WebSphere Commerce
The default port is 8000
– (Optional) The Uniform Resource Locator (URL) for the Update Manager
site. This URL is used to update the IBM Sales Center components and
can be set at any time.
– The starting language for IBM Sales Center. This is the language that IBM
Sales Center displays in when it starts.
52 IBM Sales Center for WebSphere Commerce V6
Page 71

Note: The application starts the first time using the default language
properties file if no locale setting is detected on the client machine. The
language that IBM Sales Center uses to display menus and labels is set
by the -nl argument on the command line or, if no such argument is
provided, by the operating system language setting (Regional Settings
in Windows).
Refer to the information center topic “Globalization in the IBM Sales
Center”, which is available on the Web at:
http://publib.boulder.ibm.com/infocenter/wchelp/v6r0m0/topic/co
m.ibm.commerce.telesales.developer.doc/concepts/ctrglobalizatio
n.htm
4. Insert the IBM Sales Center for WebSphere Commerce CD into the CD-ROM
drive, browse the CD-ROM drive, and run setup.exe.
5. Select the Language to be used for the install wizard, and click OK.
6. In the welcome window, click Next.
7. In the agreement window, accept the terms and click Next.
8. In the page that appears, specify a short directory name such as
C:\WebSphere\SalesCenter60 and click Next.
Chapter 4. IBM Sales Center production environment installation 53
Page 72

9. Verify the summary information (Figure 4-1) and click Next.
Figure 4-1 Summary information of IBM Sales Center for WebSphere Commerce V6 installation
54 IBM Sales Center for WebSphere Commerce V6
Page 73

10.The installation starts. After the installation is complete, verify if the
installation is successful, and click Finish (Figure 4-2).
Figure 4-2 IBM Sales Center for WebSphere Commerce installation completed
After the installation process is complete, review the
<SC_installdir>\log\tsinstall.log file to ensure that no errors occurred during the
installation. (In our example, the <SC_installdir> install directory was
C:\WebSphere\SalesCenter60.)
4.3.2 Manual installation of the IBM Sales Center updates using the Eclipse Update Manager
To install the IBM Sales Center client updates, for example, the IBM Sales
Center fix pack using the Eclipse Update Site, perform the following tasks:
1. Open the IBM Sales Center client in administrator mode, using the
-clientAdmin parameter.
Add the -clientAdmin parameter inside the startup.bat file (if you are using it)
in order to start the IBM Sales Center client, or add to the command that is
used to start IBM Sales Center.
Chapter 4. IBM Sales Center production environment installation 55
Page 74
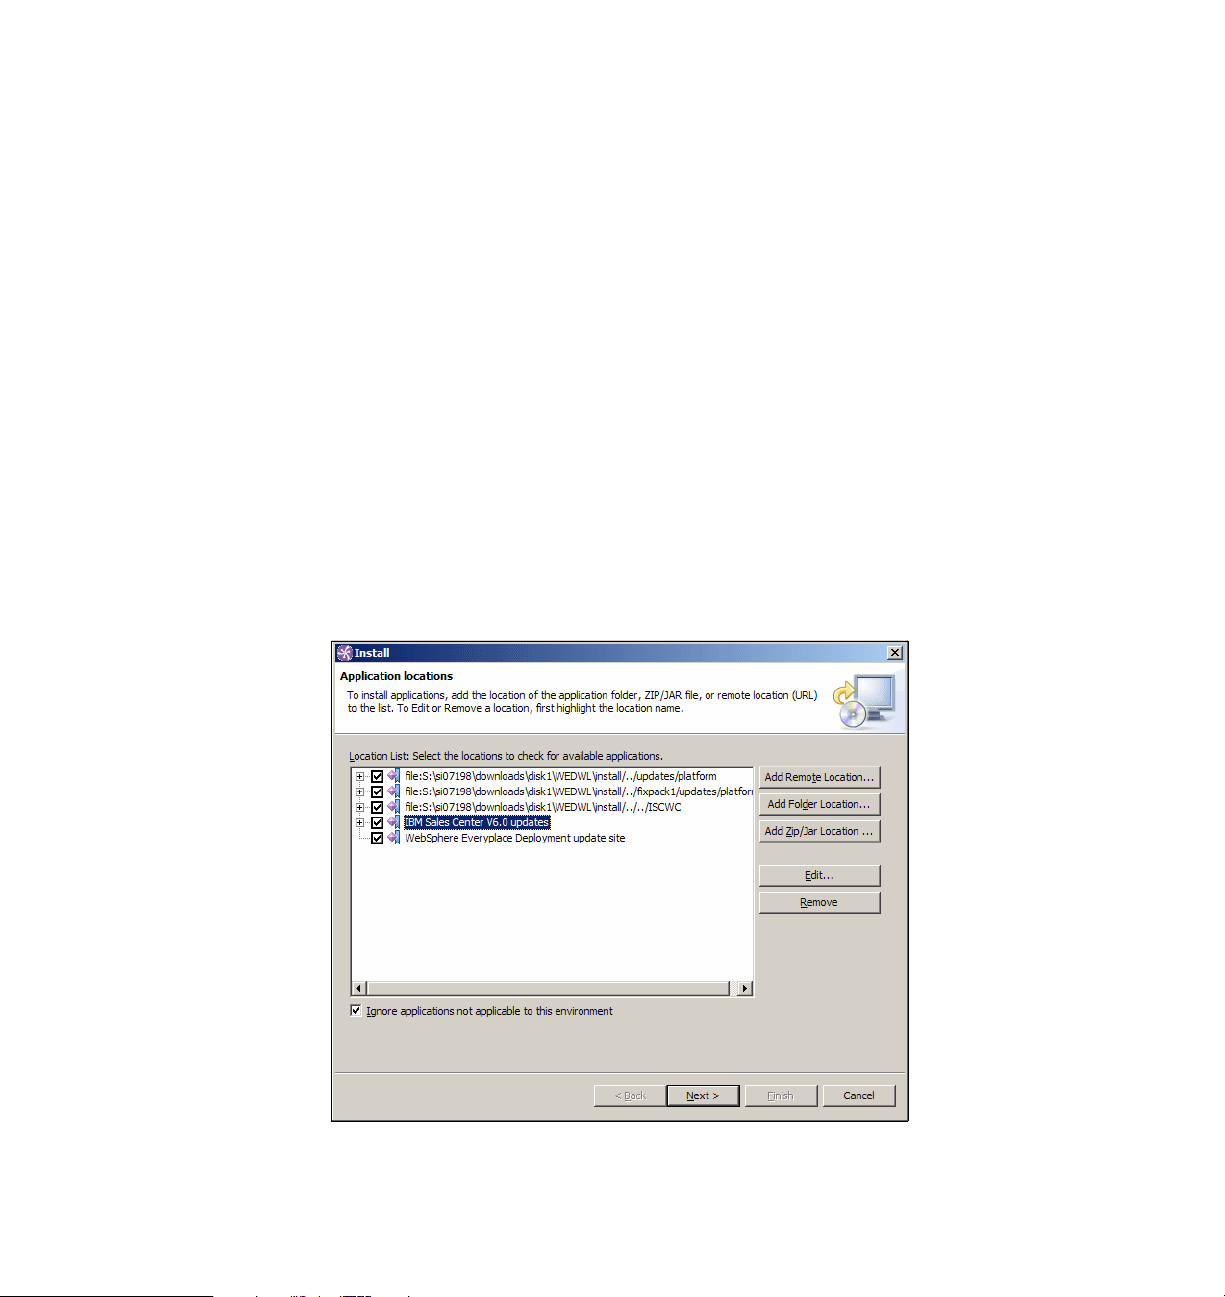
This mode provides access to administrative functions that are normally
hidden at start. It is neither necessary to log in to IBM Sales Center nor to
launch the Order Capture application to install the fix pack.
We created a copy of startup.bat located in the <SC_installdir>,
C:\WebSphere\SalesCenter60, and edited it to add the -clientAdmin
parameter. Our copy of startup.bat, renamed to, for example,
Adminstartup.bat, contains the following command in one line:
"%~dp0rcp\rcplauncher.exe" -product
com.ibm.commerce.telesales.TelesalesWorkbenchProduct -clientAdmin
2. From the menu, select Application → Install → Add Remote Location.
3. The New Remote location window appears with the Field Name and the URL.
– In the Name field, enter a name for the update location, for example, IBM
Sales Center v6.0 updates
– In the URL field, enter the following:
ftp://ftp.software.ibm.com/software/websphere/commerce/60/salesce
nter/update/
4. The new update site is defined in the Location List (Figure 4-3). Select the
newly created update site and click Next.
Figure 4-3 Application install locations
56 IBM Sales Center for WebSphere Commerce V6
Page 75
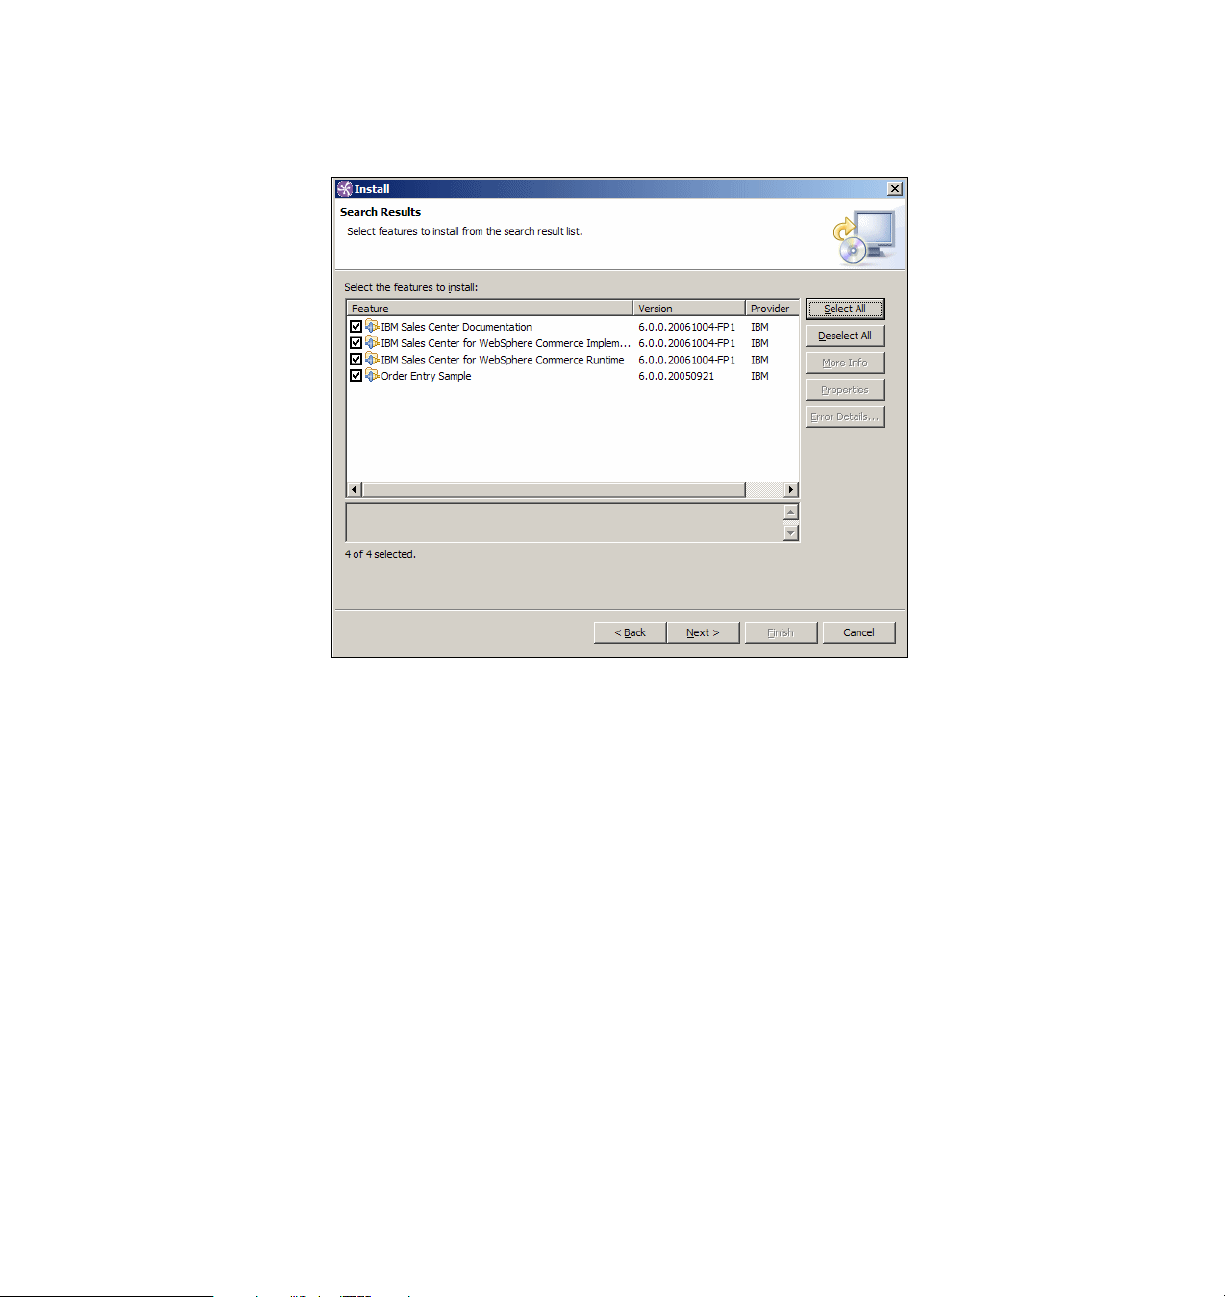
5. Select the features to install. You can, for instance, select all of them. Click
Next (Figure 4-4).
Figure 4-4 Search Results window
6. Accept the terms in the license agreements and click Next.
7. If you are presented with an optional features page, click Next.
Chapter 4. IBM Sales Center production environment installation 57
Page 76
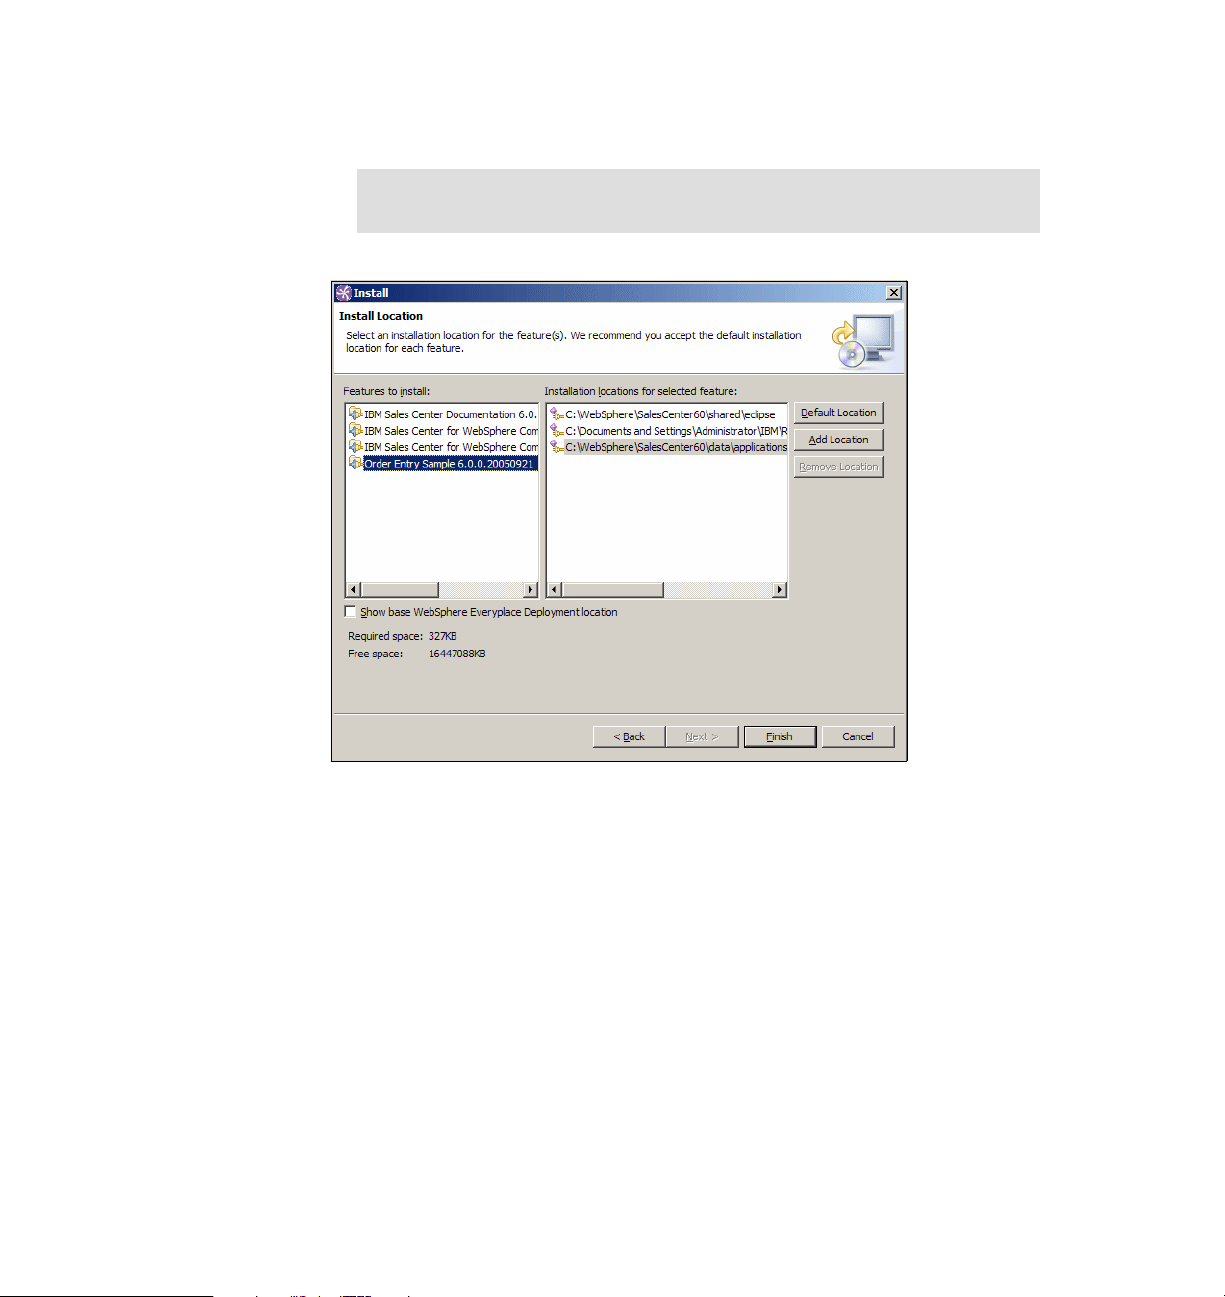
8. Select the installation location for the features (Figure 4-5). Click Finish to
perform the update.
Note: IBM Sales Center fix pack updates are not enabled to change the
location of the installed feature.
Figure 4-5 Install Location window
58 IBM Sales Center for WebSphere Commerce V6
Page 77

9. If presented with a Jar Verification window (Figure 4-6) after feature
verification, click Install.
Figure 4-6 Feature Verification window
10.When the installation is completed, you will be prompted to restart the
WebSphere Everyplace Deployment workbench. Click Restart.
4.4 Manual installation of customizations using the Eclipse Update Manager
The WED4WL platform has the built-in ability to install the features packaged in
an Eclipse Update Site. The installation of updates can be initiated manually by
an IBM Sales Center client user if the administrator mode option is enabled.
The following list includes the prerequisites for the manual installation of
customizations using the Eclipse Update Manager:
WED4WL must be installed on the client
WED4WL can be installed using the WED4WL installer or the IBM Sales
Center Quick Install. For production install by client imaging, install WED4WL
Chapter 4. IBM Sales Center production environment installation 59
Page 78

on the prototype client using either of these methods, so that it becomes a
part of the initial client image.
WED4WL must not be using Enterprise Management Agent
The update manager's GUI is not available after the Enterprise Management
Agent is enabled.
The update site must be available to the client
It may be on the client's local hard disk, CD-ROM, a file server, the Web, or
the File Transfer Protocol (FTP) server accessible from the client.
To manually install your customizations and updates, perform the following
tasks:
1. Open the IBM Sales Center client in administrator mode using the
-clientAdmin parameter. (For instructions about this, refer to step 1 on
page 55.)
2. Select Application → Install.
3. If the update site directory is available on the client hard disk, CD-ROM, or on
a shared file server, click Add Folder Location in the Application Locations
dialog box and enter the path to the update site directory. Otherwise, click
Add Remote Location and enter the URL to the update site if it is available
on an FTP server, Hypertext Transfer Protocol (HTTP) server or Hypertext
Transfer Protocol Secure (HTTPS) server. Click OK.
4. In the Application Locations dialog box, ensure that the new update site is
selected. Click Next.
5. From the update site, select the features you want to install, and click Next.
6. Accept the license agreement and click Next.
7. At the Install Location prompt, select the features to install and the location.
(Do
not select the check box labeled Show base WebSphere Everyplace
Deployment location.) Click Finish.
Note: If you select Show base WebSphere Everyplace Deployment
location, other base WebSphere Everyplace Deployment locations are
displayed. However, if you choose to install features to the base
WebSphere Everyplace Deployment location, they cannot be updated,
disabled, nor uninstalled using the Application Manager.
8. The feature verification window is shown. Click Install.
9. A dialog box will ask you whether you want to restart the workbench. Click
Yes.
60 IBM Sales Center for WebSphere Commerce V6
Page 79

Tip: To uninstall or disable updates, perform the following tasks:
1. Launch IBM Sales Center in administrator mode (see instructions in step 1
on page 55).
2. Select Application → Application Management → <the feature> to
uninstall.
3. In the right panel click Uninstall.
4.5 Automatic installation of customizations and updates
As discussed earlier, the production use of IBM Sales Center is expected to
involve anywhere from tens to thousands of IBM Sales Center clients. The
enterprise requires a scalable and repeatable way of distributing and updating
WebSphere Everyplace Deployment for Windows and Linux (WED4WL) and
IBM Sales Center components, and to distribute their customizations. This
chapter provides the recommendations pertaining to this activity. These
recommendations involve exploiting the capabilities of Eclipse and the
management capabilities built into WED4WL.
The automation of this process requires additional software, which is available
from IBM, external parties, and from the Eclipse Web site:
http://www.eclipse.org
This process also requires additional setup, including installing and configuring
the management and software distribution servers. The automation process is
attractive when this activity is spread over a sufficient number of clients.
Otherwise, manual installation is recommended.
4.5.1 The production installation of IBM Sales Center
The production installation of the IBM Sales Center client is performed in two
stages:
1. First, the base image consisting of Windows XP and an initial load of the
client software is installed.
2. The client is then deployed and further provisioned with the remaining client
application (if any), using one of the supported automated software
distribution mechanisms. (Over the lifetime of the client, updates and
additional features are installed using the same automated mechanisms.)
Chapter 4. IBM Sales Center production environment installation 61
Page 80

Deciding about where to draw the line between the initial load of the client
software that occurs before client deployment and the further provisioning that
happens afterwards is a customer design decision. The competing factors that
contribute to this decision are:
The initial load must include a minimal enabling software for postdeployment
provisioning. What this enabling software consists of depends on the
provisioning method.
The initial load might require a significant setup effort that is repeated for each
choice of initial load content. This argues the point that the initial load must
contain only components that are relatively stable and common to all the
supported configurations in order to minimize the number of times the setup is
to be performed.
If postdeployment provisioning involves a low bandwidth channel or a channel
whose bandwidth is already committed to a high-priority business function, it
is advantageous to make the initial load as complete as possible. In an
extreme situation, the initial load may contain all the software that is
necessary for a fully functioning client, and postdeployment provisioning only
applies updates to sections of the client that have changed since the time the
initial load image was created.
If the deployed client has a high bandwidth channel to the provisioning server,
it is possible to deploy the bare hardware and perform both the initial load and
the subsequent provisioning at the deployment site. This method is also
useful to reimage a client that has been corrupted in the field.
The next section describes how to automatically deploy customizations to IBM
Sales Center.
4.5.2 Automatically deploying customizations using IBM Tivoli Configuration Manager
Many third-party enterprise software management systems are capable of
moving a set of files to a managed system and issuing a command on that
system or running a native installer there. Use these management systems to
install and maintain IBM Sales Center for WebSphere Commerce and the
customizations you build.
IBM Tivoli Configuration Manager is used to illustrate this. Tivoli Configuration
Manager is a highly scalable system for monitoring, installing, and controlling IT
resources across an enterprise. Its software distribution and inventory monitoring
can be implemented over large numbers of geographically distributed clients.
62 IBM Sales Center for WebSphere Commerce V6
Page 81

Relevant concepts are referred to using their Tivoli Configuration Manager
nomenclature. The following descriptions of the nomenclature will help you
identify the corresponding terms in your software management product:
Tivoli management region
In a Tivoli environment, a Tivoli server and the set of clients that it serves form
a Tivoli management region. An organization can have more than one region.
Tivoli server
The server for a specific Tivoli management region that holds or references
the complete set of Tivoli software, including the full object database.
Managed node
A management server on which the Tivoli Management Framework is
installed, and which can therefore participate in providing management
services to endpoints.
Gateway
The software that provides communication services between endpoints and
the rest of the Tivoli environment. The gateway is a managed node. In a
minimal configuration, a single machine hosts a
Repeater
A managed node or gateway that caches and transmits data through a
repeater hierarchy to designated targets. Repeaters are used for multiplexed
distribution and collection operations. A repeater is a managed node.
Tivoli server and a gateway.
Endpoint
The final recipient of any type of Tivoli operation. IBM Sales Center clients in
a Tivoli management region are endpoints, not managed nodes. For
scalability reasons, endpoints communicate with gateways instead of directly
with the Tivoli server.
Endpoints require an endpoint agent installed as a Windows service. The
agent communicates with a gateway to send and receive data and to perform
actions. Tivoli Configuration Manager uses the Tivoli Management
Framework endpoint agent, lcfd.
In contrast to the Device Management Server whose agent is included as part
of the Workplace™ Managed Client platform, a Tivoli Management
Framework agent is not included in the client and must be installed
separately. Although this involves an extra component, it has the advantage
of the agent being active and managing the client even when the IBM Sales
Center client is not running. It is also possible to use Tivoli Configuration
Manager to perform the base Workplace Managed Client™ install, in addition
to distributing Eclipse update sites to the client.
Chapter 4. IBM Sales Center production environment installation 63
Page 82

There are several ways of installing an agent, including CD installation and
remote installation methods. For more information about this, refer to the “Tivoli
Enterprise™ Installation Guide” section under “Installing endpoints”. The Tivoli
Enterprise Installation Guide is part of the Tivoli Management Framework
documentation, and is available for download from the following Web site:
http://publib.boulder.ibm.com/infocenter/tivihelp/v3r1/topic/com.ibm.ti
voli.frmwrk.doc/instguid.htm
In the rest of this section, it is assumed that the Tivoli Configuration Manager
server and the gateway is installed and configured, and that an endpoint agent is
installed and running on the client.
Environment
In our environment, we installed and configured the following components:
The Tivoli server and gateway are installed and configured with at least the
Tivoli Configuration Manager Software Distribution, Inventory, Activity
Planner, and Change Manager features. Our Tivoli server ran on a Windows
2000 Server machine.
An endpoint agent is running on the target client and successfully connecting
with the gateway. We used a desktop machine with Windows XP Professional
as the target machine to run the endpoint.
Note: The endpoint agent must be configured to run under the Windows
user identity, and not under the Local Server identity. Eclipse Update Site
installations fail if the agent runs as Local Server.
The endpoint machine or the machine where the server is running, or any
other machines connected to the same network that can also be used as a
the development client, has a copy of the Tivoli Configuration Manager
Software Package Editor component installed. The Software Package Editor
is a part of the software distribution function of the Tivoli Configuration
Manager. We used the same machine on which the Tivoli server was running
to run the Software Package Editor and the Tivoli desktop.
The IBM Sales Center client install CD image is available to the development
client, which, in our case, was installed and configured on the Tivoli server.
64 IBM Sales Center for WebSphere Commerce V6
Page 83

Figure 4-7 shows our laboratory environment.
Figure 4-7 Tivoli Management Framework environment
Creating and distributing a WED4WL software package
This section discusses how to create and distribute a WED4WL software
package using the Tivoli Configuration Manager. Use the method described here
to remotely distribute a large number of WED4WL clients in a Tivoli environment.
To create, test, and distribute the WED4WL software package, perform the
following tasks:
1. On the development client, run the WED4WL installer with the option to
generate a prototype response file:
setupwin32.exe -options-template c:\response.txt
2. Use a text editor to customize the generated response file by following the
instructions provided in the WED4WL System Administrator's Guide. Do not
set the installLocation product bean property. Set the following product bean
properties in the responses file:
– -G licenseAccepted=true
– -W launchPlatformPanel.launchPlatform="0"
3. Launch the Software Package Editor on the development client.
Chapter 4. IBM Sales Center production environment installation 65
Page 84

4. In the Software Package Editor Selector window (Figure 4-8), select Generic
Software Package and click OK.
Figure 4-8 Software Package Editor Selector window
5. In the page that opens, right-click Noname package in the left-hand
navigator and select Properties.
6. In the General tab, set the Package Name to WMC and the Version to 6.0. Click
Condition.
66 IBM Sales Center for WebSphere Commerce V6
Page 85

7. In the Condition Editor window, double-click os_name, click ==, and type
Windows_NT in the text window, as shown in Figure 4-9. Click OK.
Figure 4-9 Condition Editor
Note: In Tivoli Configuration Manager, Windows_NT is the name used to
refer to all the supported Windows operating systems. Refer to the Tivoli
Configuration Manager Reference Manual for Software Distribution for
information about the condition variables.
Chapter 4. IBM Sales Center production environment installation 67
Page 86

8. In the Package Properties editor (Figure 4-10), select Variable list. In the
variable editor, type install_location in the Name field and
$(program_files)\IBM\WED in the Value field, and click Set. This creates a
variable and its default value, which you can use in the installation script to
control the place where the WED4WL will install. Also create another variable
install_temp with the value $(install_location)\temp (Figure 4-10). This
directory will be used to temporarily hold the install image files. Click OK.
Figure 4-10 Package Properties editor
68 IBM Sales Center for WebSphere Commerce V6
Page 87
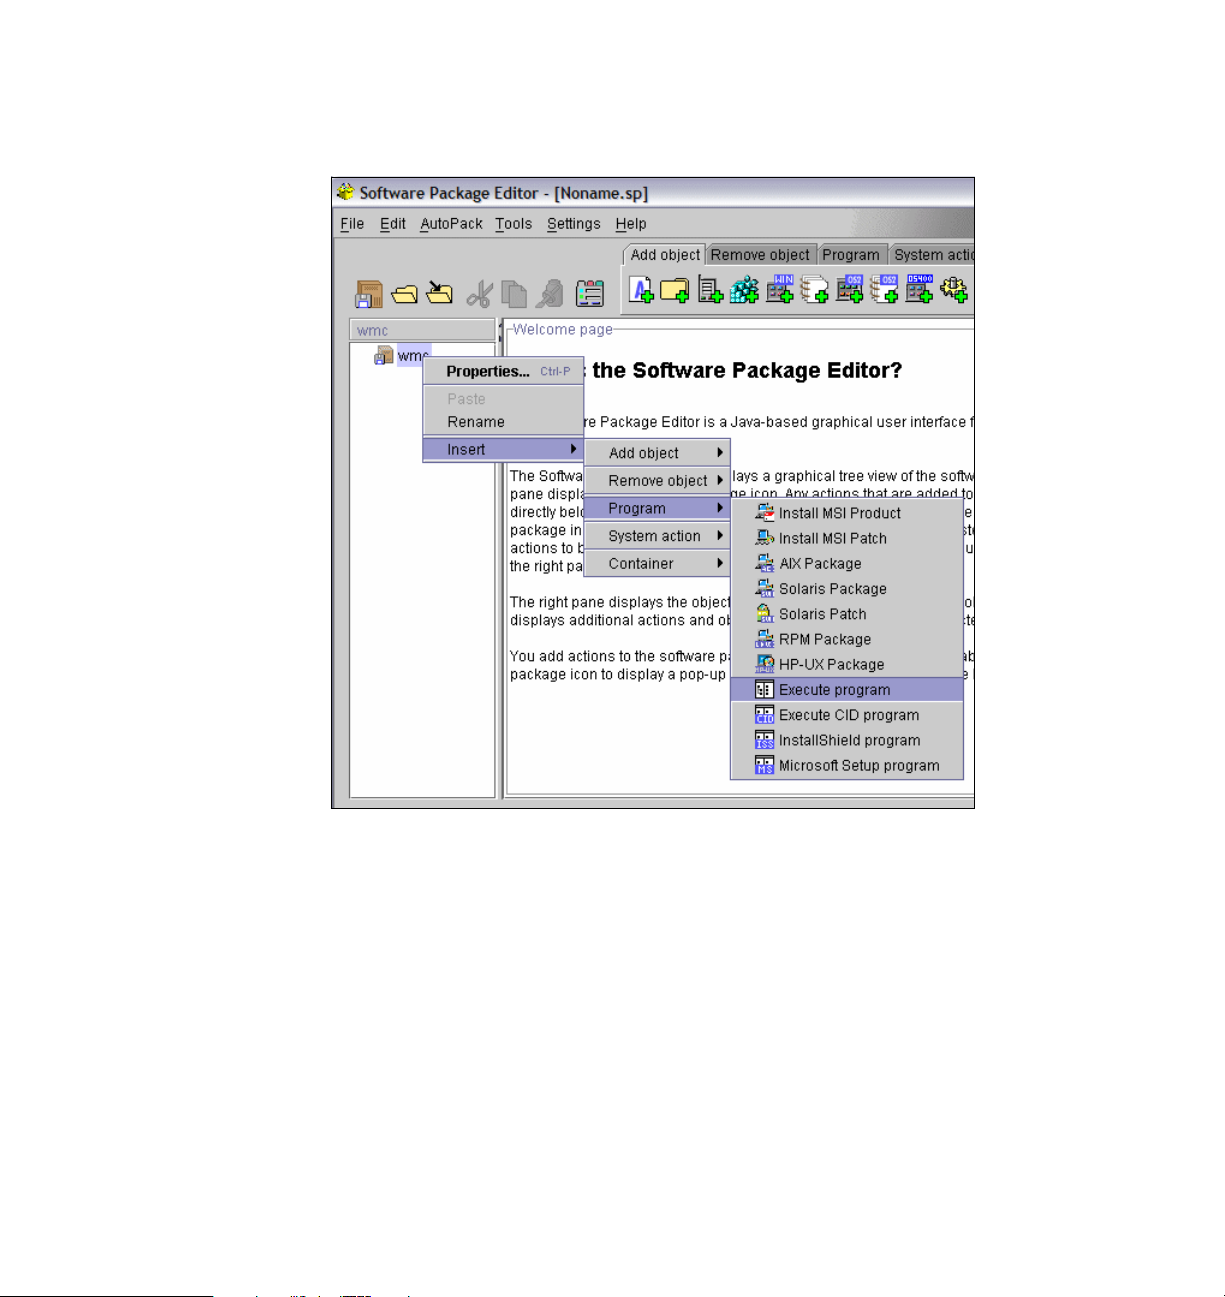
9. In the Software Package Editor page, right-click the package icon again and
select Insert → Program → Execute program (Figure 4-11).
Figure 4-11 The Software Package Editor
10.The Execute Program Properties editor opens. In the Install tab of the
Execute Program Properties editor, type cmd in the Path field. This is the
program that will run the Windows Command Interpreter.
Chapter 4. IBM Sales Center production environment installation 69
Page 88

11.Click Advanced and fill in the properties listed in Table 4-2, including the
quotes that are provided. Click OK.
Table 4-2 Property information
Arguments “$(install_location)”
Inhibit parsing Not checked
Working directory $(install_temp)
Reporting standard error file on server Check
12.In the Execute Program Properties window, click Add in the Corequisite Files
section. Navigate to the local file system location where the WED4WL install
images are present, and select the install directory. Click Open. Select the
directory icon that has just been created and click Edit.
13.In the Add Directory Properties window (Figure 4-12), change the Destination
Location to $(install_temp). This temporarily copies the install directory and
all the files and subdirectories to the path $(install_temp)/install. Click OK.
Figure 4-12 Add Directory Properties window
70 IBM Sales Center for WebSphere Commerce V6
Page 89

14.Ensure that the Directory icon is not selected and click Add again. This time,
copy the updates directory to $(install_temp)/updates.
15.Deselect any unwanted icons once again and click Add one more time.
Navigate to the response.txt file created in step 1 on page 65. Edit the created
file entry to again set the Destination location to $(install_temp). The editor
looks similar to Figure 4-13. Click OK.
Figure 4-13 Execute Program Properties settings
16.In the main editor window, from the menu, select File → Save as. Select the
Software Package Block file type and provide the name wmc6 for the file.
17.To test the package locally on the development client, open a command shell
window, with the software distribution command line environment
established. Your Start menu must contain a shortcut named SWDIS ENV
that will open this. Issue the following command:
wdinstsp -Dinstall_location=c:\WMC6 wmc6.spb
In this command, wmc6.spb is the software package block file created earlier.
The property C:\WMC6 overrides the default install location of C:\Program
Files\IBM\WED and the package installs in the C:\WMC6 directory.
Chapter 4. IBM Sales Center production environment installation 71
Page 90

18.When the software package is ready, it is distributed to the endpoint using the
Tivoli desktop.
Tip: Refer to the IBM Tivoli Configuration Manager Reference Manual for
Software Distribution for more information about disconnected
command-line interface commands and the software package change
management states.
Creating and distributing an Eclipse Update Site
software package
This section discusses how to create and distribute an IBM Sales Center feature
using Tivoli Configuration Manager. Use the method described here to remotely
distribute a large number of IBM Sales Center clients in a Tivoli environment. A
software package bundle is created in a Tivoli environment for packaging and
distributing any software you want to distribute.
Perform the following tasks to create a software package from an Eclipse Update
Site. For this book, the IBM Sales Center Update Site was used. However, the
same procedure can be used to distribute update sites built with your own
customizations:
1. Launch the Software Package Editor on the development client.
2. In the Software Package Editor Selector window, select Generic Software
Package and click OK.
3. In the window that opens, right-click the Noname package icon in the
left-hand navigator and select Properties.
4. Enter the Name as Sales Center and the Version as 1.0. Click Condition.
5. In the Condition Editor window, double-click os_name, click the == button,
and type Windows_NT in the text window. Click OK.
6. In the Package Properties editor, click the Variable list tab. In the variable
editor, type install_location in the Name field and
$(program_files)\IBM\WED in the Value field, and click Set. When the
distribution is installed, this variable must be set to the path where WED4WL
has already been installed. Also create a variable install_temp with the value
$(install_location)\temp. This directory will be used to temporarily hold the
install image files. Click OK.
7. In the Software Package Editor, right-click the Package icon again and select
Insert → Program → Execute.
72 IBM Sales Center for WebSphere Commerce V6
Page 91

8. An Execute Program Properties editor opens. In the Install tab of the Execute
Program Properties editor, type installfeature.bat in the Path field. This is
the name of the Windows batch file that will be executed. Click Advanced
and fill in the properties as shown in Table 4-3, including the quotes that are
provided. Click OK.
Table 4-3 Property information
Arguments “$(install_location)”
Inhibit parsing Not checked
Working directory $(install_temp)
Reporting standard error file on server Check
9. Create a copy of installfeature.bat (Example 4-1) and copy it to a location in
the development client.
Edit this file by replacing the text FEATUREID with the name of the feature to
install and the VERSION with its version number.
To install Sales Center, replace FEATUREID with the name of the primary
feature, com.ibm.commerce.telesales.impl.feature, and VERSION with
6.0.0. Any nested features in the update site will also be installed. If your site
has more than one primary feature, replicate those lines and replace
FEATUREID and VERSION with the corresponding values for the other
features as many times as necessary.
This script takes one command-line argument, that is, the path where an
instance of WED4WL is already installed. The script assumes that it will be in
the same directory in which the update site's site.xml file is located. It
implicitly creates an install site named sc. You might encounter errors if you
attempt to use an existing install site instead. In particular, the site in
%WED_HOME%\shared\eclipse path cannot be installed into using this
mechanism.
Example 4-1 installfeature.bat
setlocal enableextensions
set WED_HOME=%1
set CUR_DIR=%~dp0
%WED_HOME%\rcp\rcplauncher -application
org.eclipse.update.core.standaloneUpdate -nosplash -os win32 -arch x86
-command install -featureId FEATUREID -version VERSION -from
"file:/%CUR_DIR%/" -to %WED_HOME%\sc\eclipse -rcpLauncherWait
-consolelog -data "%CUR_DIR%/data"
set rc=%ERRORLEVEL%
if errorlevel 1 goto :error
Chapter 4. IBM Sales Center production environment installation 73
Page 92

rem replicate previous lines to add other features
:error
rem endlocal is implied by end of script
exit %rc%
10.In the Execute Program Properties window, select Add in the Corequisite
Files section. Navigate to the local file system location of the Eclipse update
site and select its directory. Click Open. Select the directory icon just created,
and click Edit.
11.In the Add Directory Properties window (Figure 4-14), change the Destination
Location to $(install_temp) and the Destination Name to ".", and select the
Descend directories option. This maps the Update Site directory and all the
files and subdirectories it contains, to the path $(install_temp). Click OK.
Figure 4-14 Add Directory Properties window
74 IBM Sales Center for WebSphere Commerce V6
Page 93

12.In the Execute Program Properties window (Figure 4-15), deselect all the
icons and click Add. Navigate to the customized installfeature.bat file and
select Open. Click Edit and set the Destination Location as $(install_temp).
Click OK.
Figure 4-15 Adding installfeature.bat file properties
13.Configure the actions to be uninstalled. Select the Remove tab and type
uninstallfeature.bat in the Path field. Click Advanced and set the fields in
such a way that they are identical to the way they were set for the Install
action.
Chapter 4. IBM Sales Center production environment installation 75
Page 94

14.Create a copy of uninstallfeature.bat (Example 4-2) and copy it to a location in
the development client. Again, customize the FEATUREID and VERSION and
the install site location. Duplicate the text if more than one feature is to be
uninstalled. Because features must be disabled before they can be
uninstalled, this script performs two actions for each feature.
Example 4-2 uninstallfeature.bat
setlocal enableextensions
set WED_HOME=%1
set CUR_DIR=%~dp0
%WED_HOME%\rcp\rcplauncher -application
org.eclipse.update.core.standaloneUpdate -nosplash -os win32 -arch x86
-command disable -featureId FEATUREID -version VERSION -to
%WED_HOME%/sc/eclipse -rcpLauncherWait -consolelog -data
"%CUR_DIR%/data"
set rc=%errorlevel%
if errorlevel 1 goto :error
%WED_HOME%\rcp\rcplauncher -application
org.eclipse.update.core.standaloneUpdate -nosplash -os win32 -arch x86
-command uninstall -featureId FEATUREID -version VERSION -to
%WED_HOME%/sc/eclipse -rcpLauncherWait -consolelog -data
"%CUR_DIR%/data"
set rc=%errorlevel%
if errorlevel 1 goto :error
:error
rem endlocal implied by end of script
exit %rc%
15.Select Add in the Execute Program Properties editor and map the
customized uninstallfeature.bat file to the directory $(install_temp). Click OK.
16.As in the previous example, save in the Software Package Block format.
17.Test using the wdinstsp command on the development client to install
features into a previously installed WED4WL. The install succeeds
irrespective of whether the client is running or not, but the installed features
become accessible only after the client is restarted.
Test the uninstall action on the development client using the following
software distribution disconnected command:
wdrmvsp "Sales Center^1.0"
76 IBM Sales Center for WebSphere Commerce V6
Page 95

Note: If the features are removed when the client is running, the results are
unpredictable. Therefore, uninstalls must normally be scheduled when the
client is not in use.
The Tivoli desktop can now be used to import the software distribution packages
built in this section into a Profile Manager in the management region, and
activities can be scheduled to distribute them to endpoints. There are other
variations in the distribution mechanism where, for example, the corequisite files
are served from a file server instead of being copied to each endpoint, or the
package is served from a repeater depot.
4.5.3 Automatically deploying customizations using WebSphere Everyplace Deployment
IBM Workplace Managed Client includes an Enterprise Management Agent that
can be used in conjunction with a Tivoli Device Management Server to install,
upgrade, and configure applications running on the WED4WL client. The agent
and the server can also manage other aspects of the client machine, such as
installing or upgrading native applications or manipulating the contents of the
Windows registry.
Note: The Tivoli Device Management Server is not supplied with WebSphere
Commerce, but is a component of several IBM products that may be
separately acquired. The Enterprise Management Agent in WED4WL requires
a Device Management Server V1.8 or later. An appropriate Device
Management Server is available in the IBM products WebSphere Everyplace
Deployment V6.0 and WebSphere Everyplace Device Manager V6.0.
For information about installing and configuring the Device Management Server,
and the full set of capabilities it provides, refer to the documentation supplied
with the product. In this case, we assume that the server is already configured
and the objective is to use it to install or uninstall the Eclipse features in a
WED4WL runtime.
The Device Management Server is capable of running a number of different
types of management operations on a variety of different device types. In Device
Management Server terms, the distribution of IBM Sales Center or of customized
Eclipse features to install on a WED4WL Windows XP client uses a native
software distribution job targeting a Windows 32-bit device. This device is a
subset of the Open Services Gateway initiative (OSGi) devices, which in turn, are
a type of Open Mobile Alliance Device Management (BaseOMA DM) device.
Chapter 4. IBM Sales Center production environment installation 77
Page 96

To distribute software to the client platform, use the NativeAppBundle tool that is
provided as part of the Device Management Server distribution to wrap the
Eclipse update site in an OSGi bundle. After this, create and schedule a software
distribution job targeting the client. When the created bundle is received on the
client by the agent, it programmatically invokes the Eclipse Update Manager to
install the features packaged in the update site.
Prerequisites
The following components were installed and configured on our environment:
WebSphere Everyplace Deployment 6.0 Server
This is installed and configured on a server whose port 80 is accessible from
the client. Enable WebSphere Application Server security on the Device
Management Server. Although the Device Manager Installation Guide
indicates that enabling security is optional, security is mandatory to correctly
support Windows 32-bit devices.
Before starting the WebSphere Everyplace Deployment Server, apply IBM
WebSphere Everyplace Deployment V6.0 Interim Fix 2.
For information about applying IBM WebSphere Everyplace Deployment V6.0
Interim Fix 2 and the location information, refer to the following Web site:
http://www-1.ibm.com/support/docview.wss?rs=2314&context=SSNLT6&dc=D
400&q1=wedfpintfx&uid=swg24013683&loc=en_US&cs=utf-8&lang=en
WebSphere Everyplace Deployment for Windows and Linux (WED4WL) 6.0
Install WED4WL on the client either by using the WED4WL installer or the
IBM Sales Center Quick Install.
Apply the following fixes on the WED4WL:
– Fix Pack 1 for WebSphere Everyplace Deployment for Windows and Linux
6.0
For information about applying Fix Pack 1 for WebSphere Everyplace
Deployment for Windows and Linux 6.0 and the location information, refer
to the following Web site:
http://www-1.ibm.com/support/docview.wss?rs=2314&context=SSNLT6&d
c=D400&q1=wedfpintfx&uid=swg24012062&loc=en_US&cs=utf-8&lang=en
78 IBM Sales Center for WebSphere Commerce V6
Page 97

– WebSphere Everyplace Deployment for Windows and Linux 6.0 Interim
Fix 3
For information about applying the WebSphere Everyplace Deployment
for Windows and Linux 6.0 Interim Fix 3 and the location information, refer
to the following Web site:
http://www-1.ibm.com/support/docview.wss?rs=2314&context=SSNLT6&d
c=D400&q1=wedfpintfx&uid=swg24013807&loc=en_US&cs=utf-8&lang=en
Following are the tasks that we performed (each of these tasks are described
subsequently):
Enabling the Enterprise Management Agent
Creating an Eclipse NativeAppBundle
Registering the NativeAppBundle with the Device Management Server
Scheduling a software distribution job
Uninstalling using a bundle control job
Enabling the Enterprise Management Agent
To enable the Enterprise Management Agent, perform the following tasks:
1. Start the IBM Sales Center client with the -clientAdmin command-line option.
For instructions, refer to step 1 on page 55.
2. In the Preferences window (Figure 4-16):
– Select the Enterprise Management Agent preferences page.
– Select the check box against Enable Enterprise Management Agent. A
dialog box pops up asking you to confirm whether you want to enable the
Enterprise Management Agent. Click OK.
– In the Server IP Address field, enter the following:
http://<hostname>/dmserver/SyncMLDMServerAuthRequired
– <hostname> represents the Device Management Server host name.
– For the Device User Name and Device User Password fields, provide valid
information for a user authorized to access the Device Management
Server. These users are defined in the user registry selected during the
WebSphere Application Server configuration. You can test a user and
password combination by accessing the server URL with a Web browser.
– Review the polling configuration. The Enterprise Management Agent
contacts the Device Management Server based on a start and stop polling
window. When the Enterprise Management Agent is enabled for the first
time, it attempts to contact the Device Management Server regardless of
the polling window settings. On each subsequent restart, the agent will not
contact the Device Management Server if it is outside the polling window.
Chapter 4. IBM Sales Center production environment installation 79
Page 98

The polling configuration is not changeable in this window. It can be
changed by a Device Management Server Configuration Job.
Click OK.
Figure 4-16 Agent Preferences page
Creating an Eclipse NativeAppBundle
Following is the process involved in creating an Eclipse NativeAppBundle:
1. Log in to the server where the Device Management Server is installed and
copy the Eclipse update site to a directory on that machine.
2. Change the current directory to <DM Server install directory>/bin.
3. Run the command shown in Example 4-3 to create your software bundle.
Example 4-3 Creating a software bundle
NativeAppBundle -BundleName=<bundle_name> -InputDirectory=<path to your
update site> -InstallDirectory=<temporary_install_directory>
-BuildDirectory=<HTTP server document directory>/bundles
-Eclipse=default -BundleVersion=<version> -CleanupAfterInstall=yes
-RemoveOnUninstall=no
80 IBM Sales Center for WebSphere Commerce V6
Page 99

In this command:
<bundle_name> is a name of the bundle that will be generated to wrap
–
the Eclipse update site.
The bundle name may not contain spaces or periods. Each bundle that
you define using the NativeAppBundle tool must use a unique bundle
name, for example, if you have created a distribution bundle with a
BundleName of MyApp, containing V1.0.0 of your application, you must use
a different BundleName when creating a distribution bundle containing
V2.0.0. This refers only to the BundleName specified as parameters to the
NativeAppBundle program, and not to the features or plug-ins contained in
the update site.
–
<path to your update site> is the location of the input update site on the
Device Management Server machine.
–
<temporary_install_directory> is the name of the directory that will be
used on the client, and is operating system-specific. This value may
contain a variable reference that will be replaced on the client during
bundle installation. The manifest file generated for this bundle uses % as
the delimiter surrounding the variable name. The search order for the
variable value is the operating system environment, followed by the Java
system properties.
If the NativeAppBundle command is being run on a Windows system,
escape characters are required, for example, in order to use the value of
the environment variable TEMP on the client system, you must specify
-InstallDirectory=^%^%TEMP^%^%.
The variable name is case-sensitive, unlike the usual behavior on
Windows systems.
–
<HTTP Server document directory> is the destination where the OSGi
bundle jar will be written. Because the client has to access it using either
the HTTP or the FTP protocol, it is most convenient to generate it directly
into a document directory served by a Web server or an FTP server. An
example path would be C:/Program Files/IBM HTTP
Server/htdocs/en_US/bundles.
– The -Eclipse parameter indicates that the target bundle contains an
Eclipse update site for installation into an Eclipse extension framework. Its
value defines the Eclipse install site into which the features will be
installed. The special value default installs the features into the default
install site for WED4WL. Any other value must be an absolute file system
path to the Eclipse subdirectory of the install site, for example,
-Eclipse=c:/Program Files/IBM/WED/SalesCenter/eclipse.
Chapter 4. IBM Sales Center production environment installation 81
Page 100

Example 4-4 shows the command that we ran.
Example 4-4 Targeted bundle command
NativeAppBundle -BundleName=MCSC1 -InputDirectory=C:\WED-SW-Dump\ISCWC
-installDirectory=C:\Temp\mcsc -BuildDirectory=c:\IBM\IBM HTTP
Server\htdocs\en_US\bundles -Eclipse=default -BundleVersion=1.0.0
-CleanupAfterInstall=yes -RemoveOnUninstall=noand on successful
execution generates the response
After the command has run successfully, the output is as follows:
SMF bundle: c:\Program Files\IBM HTTP
Server\htdocs\en_US\bundles\MCSC1+1_0_0.jar successfully created
Registering the NativeAppBundle with the Device
Management Server
To register the NativeAppBundle with the Device Management Server, perform
the following tasks:
1. Start the Device Manager console. The console is automatically installed on
the Device Management Server, but may also be installed on other Windows
systems using a browser. For instructions, refer to the topic “Installing the
Device Manager console” in the Device Management Server documentation.
Ensure that the Device Manager Server field contains the Device Manager
Server host name.
2. Log in to the Device Manager console with the appropriate user ID and
password:
– In a WebSphere Everyplace Deployment server, use the WebSphere
Everyplace Deployment administrator user ID and password.
– In a WebSphere Everyplace Device Management server, the default
Subscription Manager authorizes the user ID dmadmin with the password
dmadmin.
If you have implemented a custom Subscription Manager on the server, it will
determine which IDs and passwords are valid.
82 IBM Sales Center for WebSphere Commerce V6
 Loading...