

Page 1

AGP/PCI Digital
TFT 2D/3D G200 P&D A/D
Graphic Accelerator Adapters
User's Guide Supplement
OPTIONS
by IBM
Page 2

Note: If you are using this product in the United States, Canada, or Puerto Rico, be sure to read the information under “Product warranty
and notices” on page 2-1 before using this information and the product it supports.
For all other countries, the warranty terms and conditions applicable in the country of purchase are available from IBM or your reseller.
First Edition (January 1999)
The following paragraph does not apply to the United Kingdom or any country where such provisions are inconsistent with local law: INTERNATIONAL
BUSINESS MACHINES CORPORATION PROVIDES THIS PUBLICATION “AS IS” WITHOUT WARRANTY OF ANY KIND, EITHER EXPRESS OR
IMPLIED, INCLUDING, BUT NOT LIMITED TO, THE IMPLIED WARRANTIES OF MERCHANTABILITY OR FITNESS FOR A PARTICULAR
PURPOSE. Some states do not allow disclaimer of express or implied warranties in certain transactions, therefore, this statement may not apply to you.
This publication could include technical inaccuracies or typographical errors. Changes are periodically made to the information herein; these changes will be
incorporated in new editions of the publication. IBM may make improvements and/or changes in the product(s) and/or the program(s) described in this publication
at any time.
This publication was developed for products and services offered in the United States of America. IBM may not offer the products, services, or features discussed
in this document in other countries, and the information is subject to change without notice. Consult your local IBM representative for information on the
products, services, and features available in your area.
Requests for technical information about IBM products should be made to your IBM reseller or IBM marketing representative.
Copyright International Business Machines Corporation 1999. All rights reserved.
Note to U.S. Government Users — Documentation related to restricted rights — Use, duplication or disclosure is subject to restrictions set forth in GSA ADP
Schedule Contract with IBM Corp.
Page 3

Contents
Product registration . . . . . . . . . . . . . . . . . . . . . . iv
Part 1: Installation Guide . . . . . . . . . . . . . . . . . . . . . . . . . . . . . . . . . . . . . . . . . . . . . . . . . . . . . 1-1
Part 2: Appendixes . . . . . . . . . . . . . . . . . . . . . . . . . . . . . . . . . . . . . . . . . . . . . . . . . . . . . . . . . 2-1
Product warranty and notices ................ 2-1
Notices . . . . . . . . . . . . . . . . . . . . . . . . . . . . 2-4
Trademarks . . . . . . . . . . . . . . . . . . . . . . . . . . 2-4
Electronic emission notices .................. 2-5
Copyright IBM Corp. 1999 iii
Page 4

Product registration
Thank you for purchasing OPTIONS by IBM. Please take a few
moments to register your product and provide us with information that
will help IBM to better serve you in the future. Your feedback is
valuable to us in developing products and services that are important
to you, as well as in developing better ways to communicate with you.
Register your option on the IBM Web site at:
http://www.pc.ibm.com/register
IBM will send you information and updates on your registered product
unless you indicate on the Web site questionnaire that you do not want
to receive further information.
iv User's Guide Supplement
Page 5

Part 1: Installation Guide
About this book
This supplement provides the following information:
Description of the product
Preparing for installation and taking antistatic precautions
Installing an AGP/PCI Digital TFT 2D/3D P&D A/D G200
Graphics Accelerator Adapter
Installing the software
Software setup and adjustment for Windows 95/98
Software setup and adjustment for Windows NT 4.0
Product description
The graphic accelerator adapters use a Matrox graphics engine to help
your monitor provide superior performance with Windows, digital
video and 3D graphics. To further accelerate 3D programs, your
graphic accelerator adapters use bus mastering and have
hardware-accelerated features, including texture mapping, Gouraud
shading and Z-buffering. The graphic accelerator adapters also
support more advanced 3D features such as alpha-blending,
anti-aliasing, and MIP-mapping. Depending on the model of your
graphic accelerator adapter, it supports resolutions up to 1800 x 1440
and 1920 x 1200. Your graphic accelerator adapters are VGA
compatible and support all VESA standards: VBE 2.0 (Super VGA
modes), DPMS (energy saving), and DDC-2B (Plug-and-Play
monitors). Also, depending on the model of your graphic accelerator
adapter, you can upgrade it with more graphics memory or multimedia
hardware add-ons. For more information on available upgrades, see
the Matrox Web site (www.matrox.com/mga).
Preparing for installation
Before you install a graphic accelerator adapter, you must take the
following precautions in order to prevent static electricity from
damaging electronic parts.
Before touching any electronic parts, drain the static electricity
from your body. You can do this by touching the metal frame of
your computer.
Do not remove a card from the antistatic shipping container until
you are ready to install it. When you remove a card from your
computer, place it back in its container.
When handling a card, hold it by its edges, and avoid touching its
circuitry.
Copyright IBM Corp. 1999 1-1
Page 6

Before you begin installing a graphic accelerator adapter, ensure that
your display driver is set to standard VGA mode (640 x 480) by
following the table below.
Installing an AGP/PCI Digital TFT
2D/3D P&D A/D G200 Graphics
Operating System Procedure
Windows 95/98 No actions required.
Windows NT 4.0 1. Click Start, Settings, and
then Control Panel.
2. Double-click the Display
icon.
3. Click the Settings tab.
4. In the Desktop Area move
the marker to 640 x 480.
5. Click OK
Accelerator Adapter
To install an AGP/PCI Digital TFT 2D/3D P&D A/D G200 Graphics
Accelerator Adapter:
1. Turn off your computer and all peripherals such as your monitor
or printer and open your computer.
2. A graphics adapter is often built into your computer's
motherboard so you do not need to remove any hardware.
However, if there is a graphics adapter card in a separate
expansion slot, you should remove it.
Note: Inserting a graphic accelerator adapter into the wrong type
of slot could damage your card, your computer, or both.
3. Most computers have different types of expansion slots. Choose
an AGP or PCI slot, depending on the type of graphic accelerator
adapter you have. Your system manual should identify the
location of each type of expansion slot in your computer.
If you have an AGP card, do not insert the plastic tab next to the
connector pins into the slot.
4. Remove the cover for the slot you intend to use. Save the screw
for the mounting bracket. Position your graphic accelerator
adapter over the expansion slot you have chosen. Push the card
in firmly and evenly until it is fully seated in the slot. Replace
1-2 User's Guide Supplement
Page 7
the screw to secure the bracket of your graphic accelerator
adapter to the computer frame.
Accelerator Adapter. Plug the other end of the monitor cable into
your monitor.
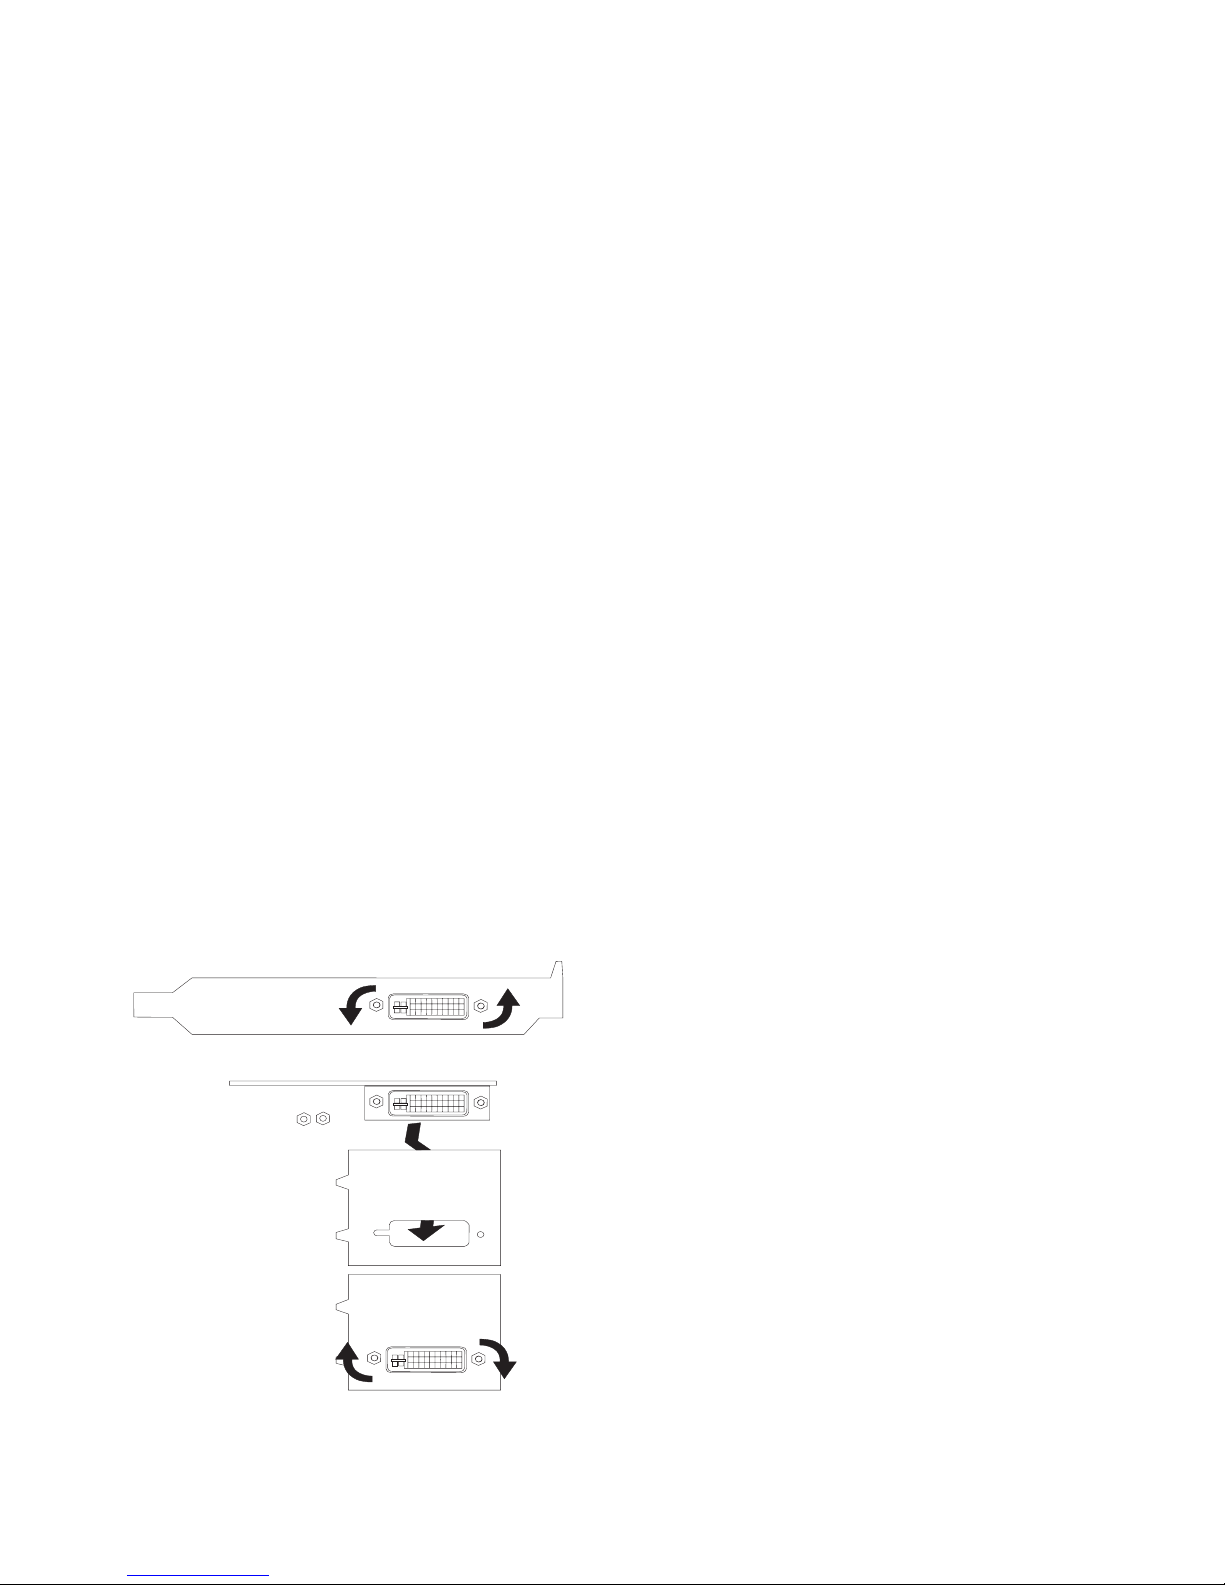
This adapter comes with the bracket for the ATX-type computer
installed. To install the bracket in an NLX-type computer, follow
the diagram below.
5. Plug one end of the monitor cable into the monitor connector on
an AGP/PCI Digital TFT 2D/3D P&D A/D G200 Graphics
Refer to the your monitor’s installation guide to make sure that
the monitor is properly set up.
For IBM systems, refer to About Installing Options for instructions on
opening the computer cover, removing existing adapter cards, and
installing adapter cards in expansion slots.
Installing the software
This section has instructions for installing the software and device
drivers for an AGP/PCI Digital TFT 2D/3D P&D A/D G200 Graphics
Accelerator Adapter. Instructions are for installing the software with
either Windows 95/98 or Windows NT 4.0.
1. Start your computer.
Windows 95/98 will automatically detect your new hardware and
will start the New Hardware Wizard. If appropriate display
drivers have not been previously installed, Windows 95 reports
finding a PCI adapter (even if you have an AGP card).
If the New Hardware Found dialog box is displayed, click
Do not install a driver, then click OK.
If the Update Device Driver Wizard dialog box is
displayed, click Next, then click Finish.
If the Add New Hardware Wizard dialog box is displayed,
click Next four times, then click Finish, and then click Yes
to restart your computer.
Part 1: Installation Guide 1-3
Page 8

2. Locate the diskettes which are labeled for your operating system.
(There are two sets of diskettes, one set for Windows 95/98, and
another set for Windows NT 4.0.)
3. Insert the first diskette into your diskette drive.
10. After installation is complete, remove the diskette from the
diskette drive, and click OK to restart your computer.
Your computer must be restarted for the changes to take
effect.
4. Click Start and then select Run.
5. Type SETUP.EXE in the command box and click OK.
6. When prompted, select the language you want to use, then click
Next.
7. If this is a first-time installation, the setup program lists the
software that needs to be installed to take advantage of your new
graphic accelerator adapter hardware. To begin the software
installation, click Install.
8. When prompted, choose an installation type:
To install the complete MGA Matrox PowerDesk package,
click Typical.
To customize the package as it is installed, click Custom.If
you click Custom, the setup program prompts you for a
destination folder and the PowerDesk options you want to
install.
After you choose an installation type, the setup program will
install the software and device drivers.
9. Change the diskette according to the on-screen instructions, and
continue with the installation.
Attention: For future software and driver updates for this
product, visit the IBM support Web site, at:
http://www.pc.ibm.com/support
On this Web page, select Options by IBM Support. This will
take you to another Web page, where you can either select a
category of product, or enter the part number for which you want
information. Once you have done this, you will see a list of files
available for your product. Scroll down until you find the
appropriate files and follow the instructions for downloading.
Software setup for Windows 95/98
To access the adapter software and online documentation, click Start,
then select Programs, then select MGA Matrox PowerDesk. You
can access commonly used PowerDesk features by right-clicking the
Windows desktop background, then selecting Matrox Display
Properties. You can also access the software by clicking on the
Matrox QuickDesk icon on the Windows taskbar. The icon looks like
a monitor.
1-4 User's Guide Supplement
Page 9

Note: The Matrox display driver for Windows 95/98 supports
multiple displays with Windows 98. However, Matrox
PowerDesk features are disabled in multi-display mode. To
change your display settings while in multi-display mode, use the
Windows controls. For more information on multi-display mode,
see Windows 98 online help under “Multiple Display Support.”
Monitor setup
To check your monitor settings:
1. Click the Start button, then select Programs, Matrox
PowerDesk, Matrox Display Properties, and Monitor.
2. If you have a Plug-and-Play monitor:
Click the button next to Windows monitor, and make sure that
either Plug-and-Play Monitor, or the model name of your
monitor, appears under “Windows monitor.”
If you do not have a Plug-and-Play monitor:
If the monitor type listed under the Windows monitor button is
incorrect or shows Unknown Monitor, you need to select a
monitor. Click the Matrox Monitor button, select your monitor
by name in the list below this button, then click OK. If your
monitor does not appear in the list, you can try the Windows
method of monitor selection. For more information on monitor
selection, see the Matrox PowerDesk online user's guide.
Note: Many Plug-and-Play monitors do not automatically report
whether they are capable of 1152 x 864 or 1600 x 1200 and
higher resolutions. To use these resolutions, or to use higher
refresh rates than those reported by the monitor, you can use the
Matrox monitor selection method. More information on the
monitor selection method can be found in the Matrox PowerDesk
online user's guide.
ATTENTION: Some monitors can be damaged if incorrect
software monitor settings are applied. For more information, see
the documentation that comes with your monitor.
Display setup
After checking your monitor's software settings, you can change your
display resolution, color palette, and other settings. To change display
settings, click the Start button, then select Programs, MGA Matrox
PowerDesk, and MGA Matrox Display Properties. To change your
display resolution or color palette, click the Settings tab. For more
information on changing your display settings, see the online MGA
Matrox PowerDesk guide.
Part 1: Installation Guide 1-5
Page 10

Overview of software
MGA Matrox PowerDesk for Windows 95/98 includes:
A display driver with:
Hot Key property sheet, where you can choose keyboard
shortcuts for:
– CenterWINDOW to center the view area in the active
window.
– DirectDraw and Direct3D support for direct access to
hardware.
– Plug-and-Play (DDC-2B) and Energy Star (DPMS) support.
Settings property sheet, which allows you to change your display
settings. Use the Settings property sheet to access features such
as:
– Desktop mode buttons, which you can use to set up a
proportional, horizontal, or vertical virtual desktop.
– Display schemes, which give you the option of choosing a
predefined display setting.
– Performance property sheet, which you can use to change
the display driver performance settings.
– Utilities property sheet, which you can use to configure
Matrox PowerDesk options.
Monitor property sheet which informs the display driver of your
monitor's capabilities. You can use this property sheet instead of
using the Windows method of monitor selection.
Color property sheet, where you can change your display's color
balance.
– MaxVIEW to resize the active window to the size of your
current display area.
– PanEND to move your display area to the right or bottom of
your virtual desktop.
– PanHOME to move your display area to the left or top of
your virtual desktop.
– PanLOCK to enable or disable panning.
– PixelTOUCH to magnify part of your virtual desktop area.
– Display schemes
Information property sheet, where you can find information on
your display hardware and software.
1-6 User's Guide Supplement
Page 11

Software setup for Windows NT 4.0
To access PowerDesk programs and online documentation, click the
Start button, then select Programs, and Matrox PowerDesk NT.
You can also access PowerDesk features by clicking on the Matrox
QuickDesk icon in the Windows taskbar. The icon looks like a
computer monitor.
Monitor setup
To check your monitor settings:
1. Click the Start button, then select Programs, Matrox
PowerDesk NT, Matrox Display Properties, and Monitor.
2. If you have a Plug-and-Play monitor:
Make sure the Plug-and-Play (DDC) monitor button is selected.
If it is, the display driver automatically uses the correct settings
for your monitor. If the button is not already selected, click it
and then click Apply.
If you do not have a Plug-and-Play monitor:
See if the Default monitor (60 Hz) button is selected. If it is,
use the Matrox monitor selection method. For more information
on monitor selection, see the online Matrox PowerDesk guide.
Note: Many Plug-and-Play monitors don’t automatically report
whether they are capable of 1152 x 864 or 1600 x 1200 and
higher resolutions. To use these resolutions, or to use higher
refresh rates than those reported by the monitor, you can use the
Matrox monitor selection method. More information on the
monitor selection method can be found in the Matrox PowerDesk
online user's guide.
ATTENTION: Some monitors can be damaged if incorrect
software monitor settings are applied. For more information, see
the documentation that comes with your monitor.
Display setup
After checking your monitor's software settings, you can change your
display resolution, color palette, and other MGA Matrox PowerDesk
settings. To access the Matrox Display Properties sheet, click the
Start button, select Programs, then Matrox PowerDesk NT, then
Matrox Display Properties. To change your display resolution or
color palette, click the Settings tab. For more information on
changing your display setings, see the MGA Matrox PowerDesk online
user's guide.
Part 1: Installation Guide 1-7
Page 12

Overview of software
MGA Matrox PowerDesk for Windows NT includes:
A display driver with:
– Multi-display support, so you can use up to five monitors at
a time. You need one AGP/PCI Digital TFT 2D/3D P&D
A/D G200 Graphics Accelerator Adapter in your computer
for each monitor used; five monitors used would require five
graphic accelerator adapters installed in your computer.
– Accelerated DirectDraw and OpenGL support, allowing
direct access to hardware.
– Plug-and-Play (DDC-2B) monitor support.
Settings property sheet, which you can use to change your
display settings. This sheet provides easy access to the following
Matrox PowerDesk features:
– Desktop mode buttons, which you can use to choose a
proportional, horizontal, or vertical virtual desktop.
– Display schemes which give you the option of choosing a
pre-defined display setting.
Monitor property sheet, which sends information on your
monitor’s capabilities to the display driver.
PowerDesk property sheet with settings for:
– PixelTOUCH which allows you to zoom in and pan on your
view area.
– CenterWINDOW which you can use to center windows in
your view area.
– MaxVIEW which is used to maximize windows in your view
area instead of on your desktop.
– CenterPOPUP which causes new windows to pop up in the
center of your current view area.
Information property sheet, which displays hardware and
software version numbers and capabilities.
Performance property sheet, which you can use to configure
advanced driver performance settings.
1-8 User's Guide Supplement
Page 13

Installation Guide (Translate)
About this book
This supplement provides the following information:
Description of the product
Preparing for installation and taking antistatic precautions
Installing an AGP/PCI Digital TFT 2D/3D P&D A/D G200
Graphics Accelerator Adapter
Installing the software
Software setup and adjustment for Windows 95/98
Software setup and adjustment for Windows NT 4.0
Product description
The graphic accelerator adapters use a Matrox graphics engine to help
your monitor provide superior performance with Windows, digital
video and 3D graphics. To further accelerate 3D programs, your
graphic accelerator adapters use bus mastering and have
hardware-accelerated features, including texture mapping, Gouraud
shading and Z-buffering. The graphic accelerator adapters also
support more advanced 3D features such as alpha-blending,
anti-aliasing, and MIP-mapping. Depending on the model of your
graphic accelerator adapter, it supports resolutions up to 1800 x 1440
and 1920 x 1200. Your graphic accelerator adapters are VGA
compatible and support all VESA standards: VBE 2.0 (Super VGA
modes), DPMS (energy saving), and DDC-2B (Plug-and-Play
monitors). Also, depending on the model of your graphic accelerator
adapter, you can upgrade it with more graphics memory or multimedia
hardware add-ons. For more information on available upgrades, see
the Matrox Web site (www.matrox.com/mga).
Preparing for installation
Before you install a graphic accelerator adapter, you must take the
following precautions in order to prevent static electricity from
damaging electronic parts.
Before touching any electronic parts, drain the static electricity
from your body. You can do this by touching the metal frame of
your computer.
Do not remove a card from the antistatic shipping container until
you are ready to install it. When you remove a card from your
computer, place it back in its container.
When handling a card, hold it by its edges, and avoid touching its
circuitry.
Part 1: Installation Guide 1-9
Page 14

Before you begin installing a graphic accelerator adapter, ensure that
your display driver is set to standard VGA mode (640 x 480) by
following the table below.
Installing an AGP/PCI Digital TFT
2D/3D P&D A/D G200 Graphics
Operating System Procedure
Windows 95/98 No actions required.
Windows NT 4.0 1. Click Start, Settings, and
then Control Panel.
2. Double-click the Display
icon.
3. Click the Settings tab.
4. In the Desktop Area move
the marker to 640 x 480.
5. Click OK
Accelerator Adapter
To install an AGP/PCI Digital TFT 2D/3D P&D A/D G200 Graphics
Accelerator Adapter:
1. Turn off your computer and all peripherals such as your monitor
or printer and open your computer.
2. A graphics adapter is often built into your computer's
motherboard so you do not need to remove any hardware.
However, if there is a graphics adapter card in a separate
expansion slot, you should remove it.
Note: Inserting a graphic accelerator adapter into the wrong type
of slot could damage your card, your computer, or both.
3. Most computers have different types of expansion slots. Choose
an AGP or PCI slot, depending on the type of graphic accelerator
adapter you have. Your system manual should identify the
location of each type of expansion slot in your computer.
If you have an AGP card, do not insert the plastic tab next to the
connector pins into the slot.
4. Remove the cover for the slot you intend to use. Save the screw
for the mounting bracket. Position your graphic accelerator
adapter over the expansion slot you have chosen. Push the card
in firmly and evenly until it is fully seated in the slot. Replace
1-10 User's Guide Supplement
Page 15

the screw to secure the bracket of your graphic accelerator
adapter to the computer frame.
Accelerator Adapter. Plug the other end of the monitor cable into
your monitor.
This adapter comes with the bracket for the ATX-type computer
installed. To install the bracket in an NLX-type computer, follow
the diagram below.
5. Plug one end of the monitor cable into the monitor connector on
an AGP/PCI Digital TFT 2D/3D P&D A/D G200 Graphics
Refer to the your monitor’s installation guide to make sure that
the monitor is properly set up.
For IBM systems, refer to About Installing Options for instructions on
opening the computer cover, removing existing adapter cards, and
installing adapter cards in expansion slots.
Installing the software
This section has instructions for installing the software and device
drivers for an AGP/PCI Digital TFT 2D/3D P&D A/D G200 Graphics
Accelerator Adapter. Instructions are for installing the software with
either Windows 95/98 or Windows NT 4.0.
1. Start your computer.
Windows 95/98 will automatically detect your new hardware and
will start the New Hardware Wizard. If appropriate display
drivers have not been previously installed, Windows 95 reports
finding a PCI adapter (even if you have an AGP card).
If the New Hardware Found dialog box is displayed, click
Do not install a driver, then click OK.
If the Update Device Driver Wizard dialog box is
displayed, click Next, then click Finish.
If the Add New Hardware Wizard dialog box is displayed,
click Next four times, then click Finish, and then click Yes
to restart your computer.
Part 1: Installation Guide 1-11
Page 16

2. Locate the diskettes which are labeled for your operating system.
(There are two sets of diskettes, one set for Windows 95/98, and
another set for Windows NT 4.0.)
3. Insert the first diskette into your diskette drive.
10. After installation is complete, remove the diskette from the
diskette drive, and click OK to restart your computer.
Your computer must be restarted for the changes to take
effect.
4. Click Start and then select Run.
5. Type SETUP.EXE in the command box and click OK.
6. When prompted, select the language you want to use, then click
Next.
7. If this is a first-time installation, the setup program lists the
software that needs to be installed to take advantage of your new
graphic accelerator adapter hardware. To begin the software
installation, click Install.
8. When prompted, choose an installation type:
To install the complete MGA Matrox PowerDesk package,
click Typical.
To customize the package as it is installed, click Custom.If
you click Custom, the setup program prompts you for a
destination folder and the PowerDesk options you want to
install.
After you choose an installation type, the setup program will
install the software and device drivers.
9. Change the diskette according to the on-screen instructions, and
continue with the installation.
Attention: For future software and driver updates for this
product, visit the IBM support Web site, at:
http://www.pc.ibm.com/support
On this Web page, select Options by IBM Support. This will
take you to another Web page, where you can either select a
category of product, or enter the part number for which you want
information. Once you have done this, you will see a list of files
available for your product. Scroll down until you find the
appropriate files and follow the instructions for downloading.
Software setup for Windows 95/98
To access the adapter software and online documentation, click Start,
then select Programs, then select MGA Matrox PowerDesk. You
can access commonly used PowerDesk features by right-clicking the
Windows desktop background, then selecting Matrox Display
Properties. You can also access the software by clicking on the
Matrox QuickDesk icon on the Windows taskbar. The icon looks like
a monitor.
1-12 User's Guide Supplement
Page 17

Note: The Matrox display driver for Windows 95/98 supports
multiple displays with Windows 98. However, Matrox
PowerDesk features are disabled in multi-display mode. To
change your display settings while in multi-display mode, use the
Windows controls. For more information on multi-display mode,
see Windows 98 online help under “Multiple Display Support.”
Monitor setup
To check your monitor settings:
1. Click the Start button, then select Programs, Matrox
PowerDesk, Matrox Display Properties, and Monitor.
2. If you have a Plug-and-Play monitor:
Click the button next to Windows monitor, and make sure that
either Plug-and-Play Monitor, or the model name of your
monitor, appears under “Windows monitor.”
If you do not have a Plug-and-Play monitor:
If the monitor type listed under the Windows monitor button is
incorrect or shows Unknown Monitor, you need to select a
monitor. Click the Matrox Monitor button, select your monitor
by name in the list below this button, then click OK. If your
monitor does not appear in the list, you can try the Windows
method of monitor selection. For more information on monitor
selection, see the Matrox PowerDesk online user's guide.
Note: Many Plug-and-Play monitors do not automatically report
whether they are capable of 1152 x 864 or 1600 x 1200 and
higher resolutions. To use these resolutions, or to use higher
refresh rates than those reported by the monitor, you can use the
Matrox monitor selection method. More information on the
monitor selection method can be found in the Matrox PowerDesk
online user's guide.
ATTENTION: Some monitors can be damaged if incorrect
software monitor settings are applied. For more information, see
the documentation that comes with your monitor.
Display setup
After checking your monitor's software settings, you can change your
display resolution, color palette, and other settings. To change display
settings, click the Start button, then select Programs, MGA Matrox
PowerDesk, and MGA Matrox Display Properties. To change your
display resolution or color palette, click the Settings tab. For more
information on changing your display settings, see the online MGA
Matrox PowerDesk guide.
Part 1: Installation Guide 1-13
Page 18

Overview of software
MGA Matrox PowerDesk for Windows 95/98 includes:
A display driver with:
Hot Key property sheet, where you can choose keyboard
shortcuts for:
– CenterWINDOW to center the view area in the active
window.
– DirectDraw and Direct3D support for direct access to
hardware.
– Plug-and-Play (DDC-2B) and Energy Star (DPMS) support.
Settings property sheet, which allows you to change your display
settings. Use the Settings property sheet to access features such
as:
– Desktop mode buttons, which you can use to set up a
proportional, horizontal, or vertical virtual desktop.
– Display schemes, which give you the option of choosing a
predefined display setting.
– Performance property sheet, which you can use to change
the display driver performance settings.
– Utilities property sheet, which you can use to configure
Matrox PowerDesk options.
Monitor property sheet which informs the display driver of your
monitor's capabilities. You can use this property sheet instead of
using the Windows method of monitor selection.
Color property sheet, where you can change your display's color
balance.
– MaxVIEW to resize the active window to the size of your
current display area.
– PanEND to move your display area to the right or bottom of
your virtual desktop.
– PanHOME to move your display area to the left or top of
your virtual desktop.
– PanLOCK to enable or disable panning.
– PixelTOUCH to magnify part of your virtual desktop area.
– Display schemes
Information property sheet, where you can find information on
your display hardware and software.
1-14 User's Guide Supplement
Page 19

Software setup for Windows NT 4.0
To access PowerDesk programs and online documentation, click the
Start button, then select Programs, and Matrox PowerDesk NT.
You can also access PowerDesk features by clicking on the Matrox
QuickDesk icon in the Windows taskbar. The icon looks like a
computer monitor.
Monitor setup
To check your monitor settings:
1. Click the Start button, then select Programs, Matrox
PowerDesk NT, Matrox Display Properties, and Monitor.
2. If you have a Plug-and-Play monitor:
Make sure the Plug-and-Play (DDC) monitor button is selected.
If it is, the display driver automatically uses the correct settings
for your monitor. If the button is not already selected, click it
and then click Apply.
If you do not have a Plug-and-Play monitor:
See if the Default monitor (60 Hz) button is selected. If it is,
use the Matrox monitor selection method. For more information
on monitor selection, see the online Matrox PowerDesk guide.
Note: Many Plug-and-Play monitors don’t automatically report
whether they are capable of 1152 x 864 or 1600 x 1200 and
higher resolutions. To use these resolutions, or to use higher
refresh rates than those reported by the monitor, you can use the
Matrox monitor selection method. More information on the
monitor selection method can be found in the Matrox PowerDesk
online user's guide.
ATTENTION: Some monitors can be damaged if incorrect
software monitor settings are applied. For more information, see
the documentation that comes with your monitor.
Display setup
After checking your monitor's software settings, you can change your
display resolution, color palette, and other MGA Matrox PowerDesk
settings. To access the Matrox Display Properties sheet, click the
Start button, select Programs, then Matrox PowerDesk NT, then
Matrox Display Properties. To change your display resolution or
color palette, click the Settings tab. For more information on
changing your display setings, see the MGA Matrox PowerDesk online
user's guide.
Part 1: Installation Guide 1-15
Page 20

Overview of software
MGA Matrox PowerDesk for Windows NT includes:
A display driver with:
– Multi-display support, so you can use up to five monitors at
a time. You need one AGP/PCI Digital TFT 2D/3D P&D
A/D G200 Graphics Accelerator Adapter in your computer
for each monitor used; five monitors used would require five
graphic accelerator adapters installed in your computer.
– Accelerated DirectDraw and OpenGL support, allowing
direct access to hardware.
– Plug-and-Play (DDC-2B) monitor support.
Settings property sheet, which you can use to change your
display settings. This sheet provides easy access to the following
Matrox PowerDesk features:
– Desktop mode buttons, which you can use to choose a
proportional, horizontal, or vertical virtual desktop.
– Display schemes which give you the option of choosing a
pre-defined display setting.
Monitor property sheet, which sends information on your
monitor’s capabilities to the display driver.
PowerDesk property sheet with settings for:
– PixelTOUCH which allows you to zoom in and pan on your
view area.
– CenterWINDOW which you can use to center windows in
your view area.
– MaxVIEW which is used to maximize windows in your view
area instead of on your desktop.
– CenterPOPUP which causes new windows to pop up in the
center of your current view area.
Product service and warranty information
For technical support, support hours, and warranty terms and
conditions, see the enclosed inserts (flyer or diskette), or contact your
IBM reseller or IBM marketing representative.
Information property sheet, which displays hardware and
software version numbers and capabilities.
Performance property sheet, which you can use to configure
advanced driver performance settings.
1-16 User's Guide Supplement
Page 21

Part 2: Appendixes
Product warranty and notices
The following warranty information applies to products purchased in the United States, Canada, and Puerto Rico. For warranty terms and
conditions for products purchased in other countries, see the enclosed Warranty insert, or contact your IBM reseller or IBM marketing
representative.
International Business Machines Corporation Armonk, New York, 10504
Statement of Limited Warranty
The warranties provided by IBM in this Statement of Limited Warranty apply only to Machines you originally purchase for your use, and not for resale, from IBM or
your reseller. The term “Machine” means an IBM machine, its features, conversions, upgrades, elements, or accessories, or any combination of them. Unless IBM
specifies otherwise, the following warranties apply only in the country where you acquire the Machine. If you have any questions, contact IBM or your reseller.
Machine: AGP/PCI Digital TFT 2D/3D P&D A/D G200 Graphic Accelerator Adapters
Warranty Period*: One Year
*Contact your place of purchase for warranty service information.
Production Status
Each Machine is manufactured from new parts, or new and used parts. In some cases, the Machine may not be new and may have been previously installed.
Regardless of the Machine's production status, IBM's warranty terms apply.
The IBM Warranty for Machines
IBM warrants that each Machine 1) is free from defects in materials and workmanship and 2) conforms to IBM's Official Published Specifications. The warranty
period for a Machine is a specified, fixed period commencing on its Date of Installation. The date on your receipt is the Date of Installation, unless IBM or your
reseller informs you otherwise.
Copyright IBM Corp. 1999 2-1
Page 22

During the warranty period IBM or your reseller, if authorized by IBM, will provide warranty service under the type of service designated for the Machine and
will manage and install engineering changes that apply to the Machine.
For IBM or your reseller to provide warranty service for a feature, conversion, or upgrade, IBM or your reseller may require that the Machine on which it is
installed be 1) for certain Machines, the designated, serial-numbered Machine and 2) at an engineering-change level compatible with the feature, conversion, or
upgrade. Many of these transactions involve the removal of parts and their return to IBM. You represent that all removed parts are genuine and unaltered. A part
that replaces a removed part will assume the warranty service status of the replaced part.
If a Machine does not function as warranted during the warranty period, IBM or your reseller will repair it or replace it with one that is at least functionally
equivalent, without charge. The replacement may not be new, but will be in good working order. If IBM or your reseller is unable to repair or replace the
Machine, you may return it to your place of purchase and your money will be refunded.
If you transfer a Machine to another user, warranty service is available to that user for the remainder of the warranty period. You should give your proof of
purchase and this Statement to that user. However, for Machines which have a life-time warranty, this warranty is not transferable.
Warranty Service
To obtain warranty service for the Machine, you should contact your reseller or call IBM. In the United States, call IBM at 1-800-772-2227. In Canada, call IBM
at 1-800-565-3344. You may be required to present proof of purchase.
IBM or your reseller will provide certain types of repair and exchange service, either at your location or at IBM's or your reseller's service center, to restore a
Machine to good working order.
When a type of service involves the exchange of a Machine or part, the item IBM or your reseller replaces becomes its property and the replacement becomes
yours. You represent that all removed items are genuine and unaltered. The replacement may not be new, but will be in good working order and at least
functionally equivalent to the item replaced. The replacement assumes the warranty service status of the replaced item. Before IBM or your reseller exchanges a
Machine or part, you agree to remove all features, parts, options, alterations, and attachments not under warranty service. You also agree to ensure that the
Machine is free of any legal obligations or restrictions that prevent its exchange.
You agree to:
1. obtain authorization from the owner to have IBM or your reseller service a Machine that you do not own; and
2. where applicable, before service is provided —
a. follow the problem determination, problem analysis, and service request procedures that IBM or your reseller provide,
b. secure all programs, data, and funds contained in a Machine, and
c. inform IBM or your reseller of changes in a Machine's location.
2-2 User's Guide Supplement
Page 23

IBM is responsible for loss of, or damage to, your Machine while it is 1) in IBM's possession or 2) in transit in those cases where IBM is responsible for the
transportation charges.
Extent of Warranty
IBM does not warrant uninterrupted or error-free operation of a Machine.
The warranties may be voided by misuse, accident, modification, unsuitable physical or operating environment, improper maintenance by you, removal or alteration
of Machine or parts identification labels, or failure caused by a product for which IBM is not responsible.
THESE WARRANTIES REPLACE ALL OTHER WARRANTIES OR CONDITIONS, EXPRESS OR IMPLIED, INCLUDING, BUT NOT
LIMITED TO, THE IMPLIED WARRANTIES OR CONDITIONS OF MERCHANTABILITY AND FITNESS FOR A PARTICULAR
PURPOSE. THESE WARRANTIES GIVE YOU SPECIFIC LEGAL RIGHTS AND YOU MAY ALSO HAVE OTHER RIGHTS WHICH
VARY FROM JURISDICTION TO JURISDICTION. SOME JURISDICTIONS DO NOT ALLOW THE EXCLUSION OR LIMITATION OF
EXPRESS OR IMPLIED WARRANTIES, SO THE ABOVE EXCLUSION OR LIMITATION MAY NOT APPLY TO YOU. IN THAT
EVENT SUCH WARRANTIES ARE LIMITED IN DURATION TO THE WARRANTY PERIOD. NO WARRANTIES APPLY AFTER
THAT PERIOD.
Limitation of Liability
Circumstances may arise where, because of a default on IBM's part or other liability you are entitled to recover damages from IBM. In each such instance,
regardless of the basis on which you are entitled to claim damages from IBM (including fundamental breach, negligence, misrepresentation, or other contract or
tort claim), IBM is liable only for:
1. damages for bodily injury (including death) and damage to real property and tangible personal property; and
2. the amount of any other actual direct damages or loss, up to the greater of U.S. $100,000 or the charges (if recurring, 12 months' charges apply) for the
Machine that is the subject of the claim.
UNDER NO CIRCUMSTANCES IS IBM LIABLE FOR ANY OF THE FOLLOWING: 1) THIRD-PARTY CLAIMS AGAINST YOU FOR
LOSSES OR DAMAGES (OTHER THAN THOSE UNDER THE FIRST ITEM LISTED ABOVE); 2) LOSS OF, OR DAMAGE TO, YOUR
RECORDS OR DATA; OR 3) SPECIAL, INCIDENTAL, OR INDIRECT DAMAGES OR FOR ANY ECONOMIC CONSEQUENTIAL
DAMAGES (INCLUDING LOST PROFITS OR SAVINGS), EVEN IF IBM OR YOUR RESELLER IS INFORMED OF THEIR
POSSIBILITY. SOME JURISDICTIONS DO NOT ALLOW THE EXCLUSION OR LIMITATION OF INCIDENTAL OR
CONSEQUENTIAL DAMAGES, SO THE ABOVE EXCLUSION OR LIMITATION MAY NOT APPLY TO YOU.
Part 2: Appendixes 2-3
Page 24

Notices
Trademarks
References in this publication to IBM products, programs, or services
do not imply that IBM intends to make these available in all countries
in which IBM operates. Any reference to an IBM product, program,
or service is not intended to state or imply that only that IBM product,
program, or service may be used. Subject to IBM’s valid intellectual
property or other legally protectable rights, any functionally equivalent
product, program, or service may be used instead of the IBM product,
program, or service. The evaluation and verification of operation in
conjunction with other products, except those expressly designated by
IBM, are the responsibility of the user.
IBM may have patents or pending patent applications covering subject
matter in this document. The furnishing of this document does not
give you any license to these patents. You can send license inquiries,
in writing, to:
IBM Director of Licensing
IBM Corporation
North Castle Drive
Armonk, NY 10504-1785
U.S.A.
Any references in this publication to non-IBM Web sites are provided
for convenience only and do not in any manner serve as an
endorsement of those Web sites. The materials at those Web sites are
not part of the materials for this IBM product and use of those Web
sites is at your own risk.
IBM is a trademark of the IBM Corporation in the United States or
other countries or both.
Microsoft, Windows, and Windows NT are trademarks or registered
trademarks of Microsoft Corporation.
Other company, product, and service names may be trademarks or
service marks of others.
2-4 User's Guide Supplement
Page 25

Electronic emission notices
AGP/PCI Digital TFT 2D/3D P&D A/D G200 Graphic Accelerator Adapters
Federal Communications Commission (FCC) Statement
Note: This equipment has been tested and found to comply with the limits for a Class B digital device, pursuant to Part 15 of the FCC Rules.
These limits are designed to provide reasonable protection against harmful interference in a residential installation. This equipment generates,
uses, and can radiate radio frequency energy and, if not installed and used in accordance with the instructions, may cause harmful interference to
radio communications. However, there is no guarantee that interference will not occur in a particular installation. If this equipment does cause
harmful interference to radio or television reception, which can be determined by turning the equipment off and on, the user is encouraged to try
to correct the interference by one or more of the following measures:
Reorient or relocate the receiving antenna.
Increase the separation between the equipment and receiver.
Connect the equipment into an outlet on a circuit different from that to which the receiver is connected.
Consult an IBM authorized dealer or service representative for help.
Properly shielded and grounded cables and connectors must be used in order to meet FCC emission limits. Proper cables and connectors are
available from IBM authorized dealers. IBM is not responsible for any radio or television interference caused by using other than recommended
cables and connectors or by unauthorized changes or modifications to this equipment. Unauthorized changes or modifications could void the
user's authority to operate the equipment.
This device complies with Part 15 of the FCC Rules. Operation is subject to the following two conditions: (1) this device may not cause
harmful interference, and (2) this device must accept any interference received, including interference that may cause undesired operation.
Responsible Party:
International Business Machines Corporation
New Orchard Road
Armonk, NY 10504
Telephone: 1-919-543-2193
Part 2: Appendixes 2-5
Page 26

Industry Canada Class B emission compliance statement
This Class B digital apparatus complies with Canadian ICES-003.
Avis de conformité à la réglementation d'Industrie Canada
Cet appareil numérique de la classe B est conform à la norme NMB-003 du Canada.
European Union - emission directive
This product is in conformity with the protection requirements of EU Council Directive 89/366/ECC on the approximation of the laws of the
Member States relating to electromagnetic compatibility.
IBM can not accept responsibility for any failure to satisfy the protection requirements resulting from a non-recommended modification of the
product, including the fitting of non-IBM option cards.
This product has been tested and found to comply with the limits for Class B Information Technology Equipment according to CISPR 22 /
European Standard EN 55022. The limits for Class B equipment were derived for typical residential environments to provide reasonable
protection against interference with licensed communication devices.
2-6 User's Guide Supplement
Page 27

Part 2: Appendixes 2-7
Page 28

2-8 User's Guide Supplement
Page 29

Union Europea - Normativa EMC
Part 2: Appendixes 2-9
Page 30

IBM
Part Number: 28L2260
Printed in U.S.A.
28L226
 Loading...