

Page 1

IBM
by IBM
Small Business
Computer Telephony Solution
Installation Guide
Options
Page 2

Note: Before using this information and the product it supports, be sure to
read the software license agreement in Appendix B and general information in
Product Warranty and Notices.
First Edition ( June 1998)
The following paragraph does not apply to the United Kingdom or any country
where such provisions are inconsistent with local law: INTERNATIONAL
BUSINESS MACHINES CORPORATION PROVIDES THIS
PUBLICATION “AS IS” WITHOUT WARRANTY OF ANY KIND, EITHER
EXPRESS OR IMPLIED, INCLUDING, BUT NOT LIMITED TO, THE
IMPLIED WARRANTIES OF MERCHANTABILITY OR FITNESS FOR A
PARTICULAR PURPOSE. Some states do not allow disclaimer of express or
implied warranties in certain transactions, therefore, this statement may not apply
to you.
This publication could include technical inaccuracies or typographical errors.
Changes are periodically made to the information herein; these changes will be
incorporated in new editions of the publication. IBM may make improvements
and/or changes in the product(s) and/or the program(s) described in this
publication at any time.
It is possible that this publication may contain reference to, or information about,
IBM products (machines and programs), programming, or services that are not
announced in your country. Such references or information must not be
construed to mean that IBM intends to announce such IBM products,
programming, or services in your country.
Requests for technical information about IBM products should be made to your
IBM reseller or IBM marketing representative.
© Copyright International Business Machines Corporation 1998. All rights
reserved.
Note to U.S. Government Users — Documentation related to restricted rights —
Use, duplication or disclosure is subject to restrictions set forth in GSA ADP
Schedule Contract with IBM Corp.
Page 3

i
Contents
1. SAFETY INFORMATION 1
2. INTRODUCTION 5
2.1 IBM Computer Telephony Solution (CTS) overview 5
2.2 About this book 5
3. IBM TELEPHONY INSTALLATIONS 7
3.1 Prerequisite Hardware and Software 7
3.2 Preparing for New Installations 8
3.3 Installing Server Software and Utilities 8
3.4 IBM VoiceMaster Startup and Configuration 13
3.5 IBM Call Manager Installation 15
3.6 IBM Call Manager Setup 16
3.7 Finishing Your Installation 17
3.8 Enabling NT Level 2 ( LOGON ) Security 17
4. UPGRADE INSTALLATIONS 21
4.1 Preparing for Upgrade Installations 21
4.2 Upgrading Server Software and Utilities 22
4.3 Upgrading the Translation Table 25
4.4 IBM VoiceMaster Startup and Configuration 26
IBM CTS Installation Guide
Page 4

ii
5. INSTALLING CT-618 HARDWARE 27
5.1 Unpacking the CT-618 Board 27
5.2 Important Safety Information 27
5.3 Installing the CT-618 28
5.4 Adding boards to a IBM Computer Telephony system 29
5.5 Specifying and changing board settings 31
5.6 Changing registry entries 31
6. TELEPHONE WIRING 35
6.1 Safety instructions 35
6.2 Wiring Configurations 35
7. IBM CT-618 FUNCTIONS 39
7.1 Incoming calls 39
7.2 Dialing calls 39
7.3 Call management 40
7.4 Transferring calls 40
8. IBM CT SYSTEM ADMINISTRATION 43
8.1 Basic commands and utilities 43
8.2 Using the IBM CT Administration Utility 43
9. UNINSTALLING IBM TELEPHONY SOFTWARE 47
10. TROUBLESHOOTING 49
IBM CTS Installation Guide
Page 5

iii
11. HELP AND SERVICE INFORMATION 51
11.1 Step 1: Troubleshooting 51
11.2 Step 2: Preparing for the Call 51
11.3 Step 3: Placing the Call to IBM 52
12. PRODUCT WARRANTY 53
13. APPENDIX A: NOTICES 59
13.1 Electronic Emission Notices 59
13.2 Telecommunication Notices 60
13.3 Canadian Department of Communications Certification Label 61
13.4 Patent Notices 63
13.5 Trademarks 63
14. APPENDIX B: SOFTWARE LICENSE AND WARRANTY INFORMATION 65
14.1 NetPhone, Inc. Limited Software Warranty And License Agreement65
15. APPENDIX C: SPECIFICATIONS 69
15.1 PC Host Requirements 69
15.2 CT-618 Specifications 69
15.3 RJ21X Telco connector pinout 70
15.4 PBX CT-618 Functions 71
16. INDEX 75
IBM CTS Installation Guide
Page 6

IBM CTS Installation Guideiv
Page 7
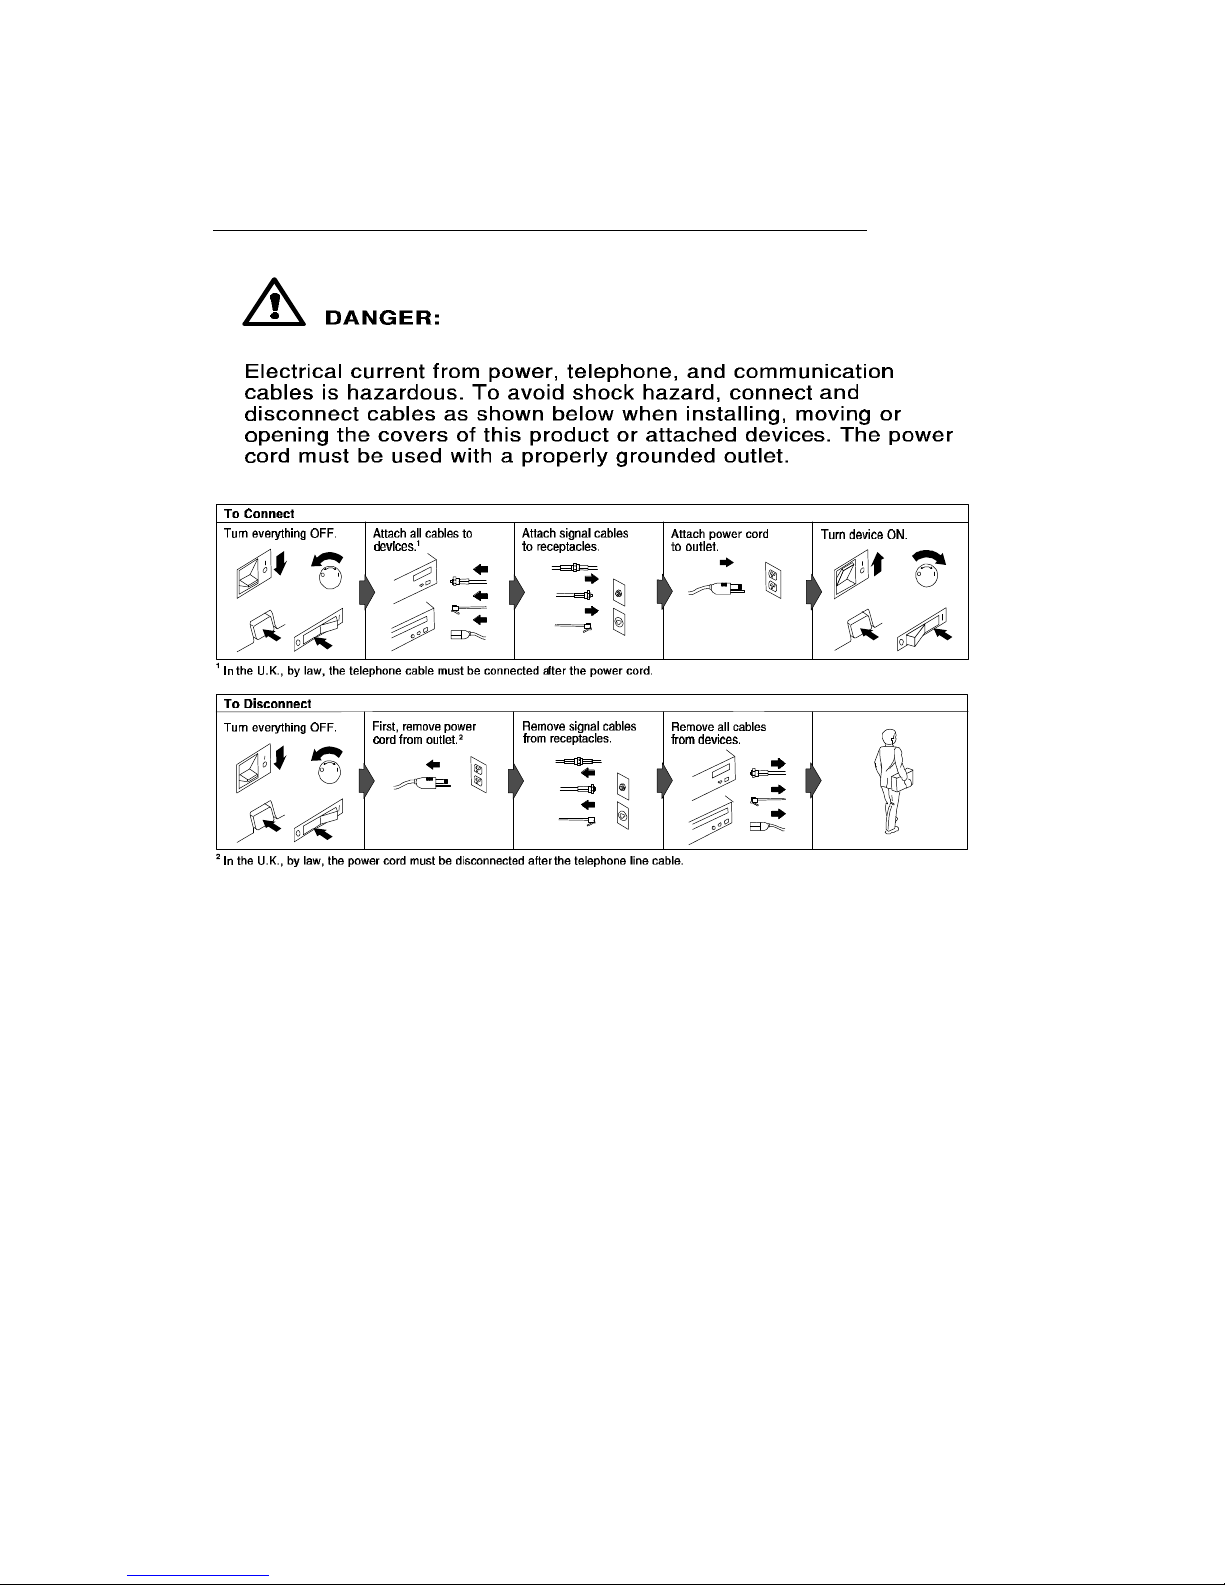
1. Safety Information
Safety Information
IBM CTS Installation Guide 1
Page 8
Safety Information
IBM CTS Installation Guide2
Page 9

Safety Information
To avoid a shock hazard, do not connect or disconnect any cables or perform
installation, maintenance, or reconfiguration of this product during an electrical
storm.
To avoid shock hazard:
• The power cord must be connected to a properly wired and earthed
receptacle.
• Any equipment to which this product will be attached must also be
connected to properly wired receptacles.
Pour éviter tout risque de choc électrique, ne manipulez aucun câble et
n'effectuez aucune opération d'installation, d'entretien ou de reconfiguration de ce
produit au cours d'un orage.
Pour éviter tout risque de choc électrique:
• Le cordon d'alimentation doit être branché sur une prise d'alimentation
correctement câblée et mise à la terre.
• D'autre part, tout le matériel connecté à ce produit doit également être
branché sur des prises d'alimentation correctement câblées et mises à la
terre.
Para evitar peligo de descargas, no contecte o desconecte ningún cable, ni realice
ninguna instalación, mantenimiento o reconfiguración de este producto durante
una tormenta eléctrica.
Para evitar peligro de descargas:
• El cale de alimentación debe estar conectado a una toma de alimentación
adecuadamente cableada y con toma de tierra.
• Cualquier equipo al cual se conecte este producto debe estar tamblén
conectado a tomas de alimentación adecuadamente
cableadas.
• Cuando sea posible, utilice una mano para conectar o desconectar los cables
de señal para impedir que se produzcan posible descargas eléctricas al tocar
dos superficies con potencial eléctrico distinto.
IBM CTS Installation Guide 3
Page 10

Safety Information
DANGER
• When using your telephone equipment basic safety precautions should always
be followed to reduce the risk of fire, electrical shock, and injury to persons,
including the following:
• Never install telephone jacks in wet locations unless the jack is specifically
designed for wet locations.
• Never touch uninsulated telephone wires or terminals unless the telephone
line has been disconnected at the network interface.
• Use caution when installing or modifying telephone lines.
• Avoid using a telephone (other than a cordless type) during an electrical
storm. There may be a remote risk of electrical shock from lightning.
• Do not use the telephone to report a gas leak in the vicinity of the leak.
IBM CTS Installation Guide4
Page 11

Introduction
2. Introduction
2.1 IBM Computer Telephony Solution (CTS) overview
The IBM CT-618 hardware and software comprise a complete Windows NT
server-based phone system. This system is flexible and extensible; simply add
additional CT-618 boards as your needs increase.
• The IBM Telephony Administration software provides a graphical interface
for administrative functions, including line configuration, database
maintenance and translation table editing.
• Individual phone users can perform calling operations through the telephone
handset, or use the optional IBM Call Manager software to manage calls
through their PC.
• The IBM VoiceMaster software provides a complete set of voice mail
functions, including integrated messaging to allow e-mail and pager
notification.
2.2 About this book
This manual is intended for the IBM Computer Telephony system administrator,
and assumes that you are familiar with Windows NT operations and server
administration, and with basic telephone and PC hardware installation.
The following topics are covered in this manual:
IBM Computer Telephony Installation
• Configuring your telephone wiring
• Installing IBM CT-618 boards
• Installing and configuring IBM Computer Telephony software
IBM Telephony Administration
• Creating/maintaining the company database
• Setting and maintaining line configuration information
• Modifying the CT-618 translation table
IBM CTS Installation Guide 5
Page 12

Introduction
• Configuring voice mailboxes
• Setting up integrated messaging setup
• Using TAPI based applications with the IBM Computer Telephony Solution
• Collecting usage data with SMDR
• Troubleshooting
• Uninstalling
This book is also available on the IBM Telephony CD as an Adobe Portable
Document Format (PDF) file. This file is located in the CD’s
Documentation/IBMCT folder, and will also be installed on your system, along
with the Adobe Acrobat Reader, if you perform a typical installation (or select the
Install Documentation option) during the installation process.
IBM CTS Installation Guide6
Page 13

IBM Telephony Installations
7
3. IBM Telephony
Installations
These installation instructions are intended for a typical new IBM Telephony
installation. If you are upgrading a IBM Telephony system, refer to the Upgrade
Installations section on page 19.
3.1 Prerequisite Hardware and Software
Server:
• 586/133mhz (Pentium) or higher with at least 64MB RAM, running
Windows NT Server Software V4.0 (including service pack 3 or above).
• A CD-ROM and diskette drive are required for installation.
• A typical IBM Telephony installation will require at least 16MB disk space on
the server. Additional disk space requirements are dependent on number of
voice mail users and number and size of stored messages.
Clients:
• 486 (or higher) or Pentium with at least 16MB RAM, running Windows 95
or Windows NT.
• IBM Call Manager clients must have a server user account.
• Sound capability is required to play voice mail messages delivered by e-mail.
The IBM Telephony installation process should take approximately 45 minutes.
Telephones will not be operational during parts of the installation process. You
should schedule installation for a time when this will not affect phone users.
IBM CTS Installation Guide
Page 14

IBM Telephony Installations
3.2 Preparing for New Installations
Make sure the following are available before starting the installation process:
• An Administrator account and password for the server (An account with
administrator privileges is not sufficient.)
• A working trunk and extension available for testing purposes.
• Your server’s name and IP address:________________________________ .
• During the firmware upgrade, you will need to boot your server in DOS (if
not configured with this as a boot option, you will need a DOS boot disk).
3.3 Installing Server Software and Utilities
IBM Telephony software installation is easy since the installation wizard will
prompt you through the process. As the installation proceeds, you will be
prompted for selections or input. When your entries are complete, click Next to
proceed, or click Back to return to a previous screen and review/modify your
entries. You can click Cancel to stop the installation.
1. Log on to the NT server as ADMINISTRATOR. (An account with
administrator privileges is NOT sufficient for IBM Telephony installation.)
2. Exit all programs, then insert the IBM Telephony Installation CD in the
server to auto-run the installation wizard, (or double-click or run the file
Setup.exe).
3. The Welcome screen will display. After reading, click Next.
4. The License Agreement will display. If you agree with the license terms,
click Next. If you do not agree, click Cancel to stop the installation.
5. Select IBM Telephony Software components. The Select Components
window displays a list of components. Click the checkboxes to select the
components you wish to install. Clicking on a plus sign (+) next to an item
will expand it to display individual options for each group. If you select an
item with sub-options, the sub-options will also be selected. You can
customize your installation by expanding the upper level options by clicking
on the plus sign, then selecting the sub-options desired.
IBM CTS Installation Guide8
Page 15
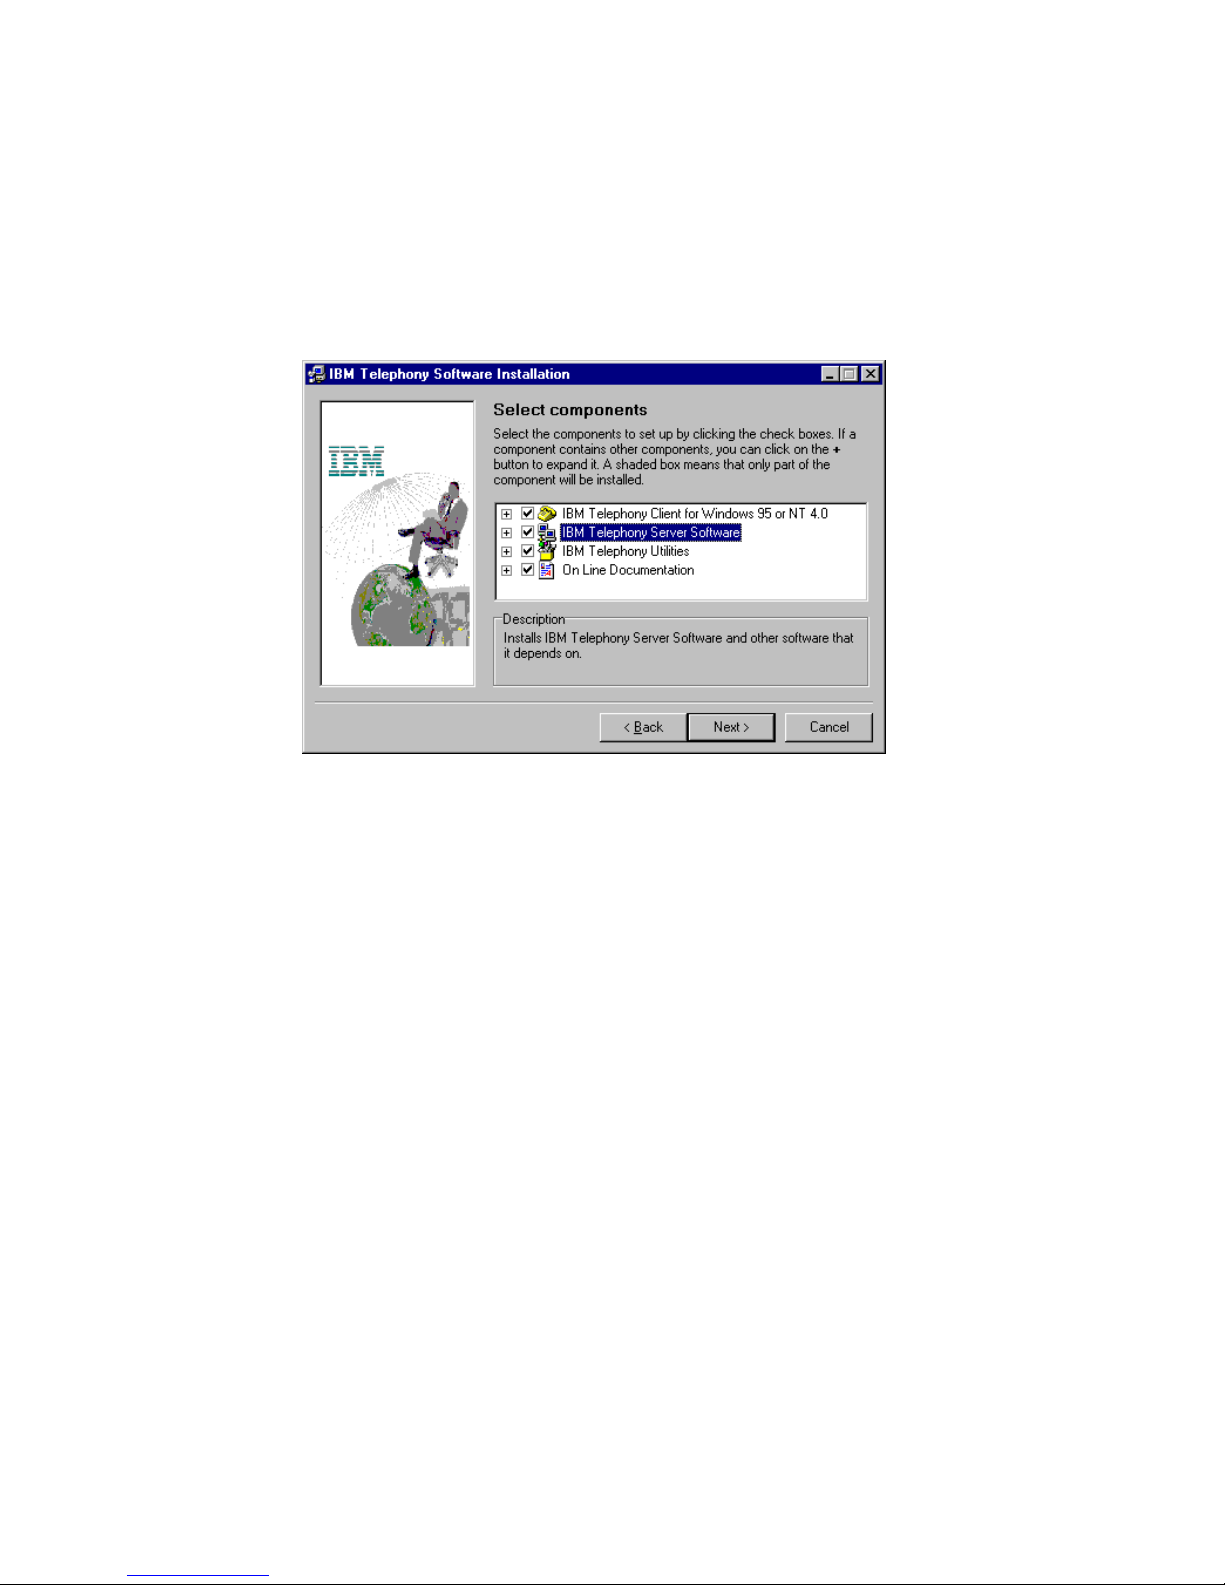
For a typical installation, select the following:
IBM Telephony Client for Windows 95 or NT
IBM Telephony Server Software
IBM Telephony Utilities
On-line Documentation
IBM Telephony Installations
At a minimum, you must install the IBM Telephony Server Software
and IBM Telephony Administration Utility.
a) When you have selected the components, click Next.
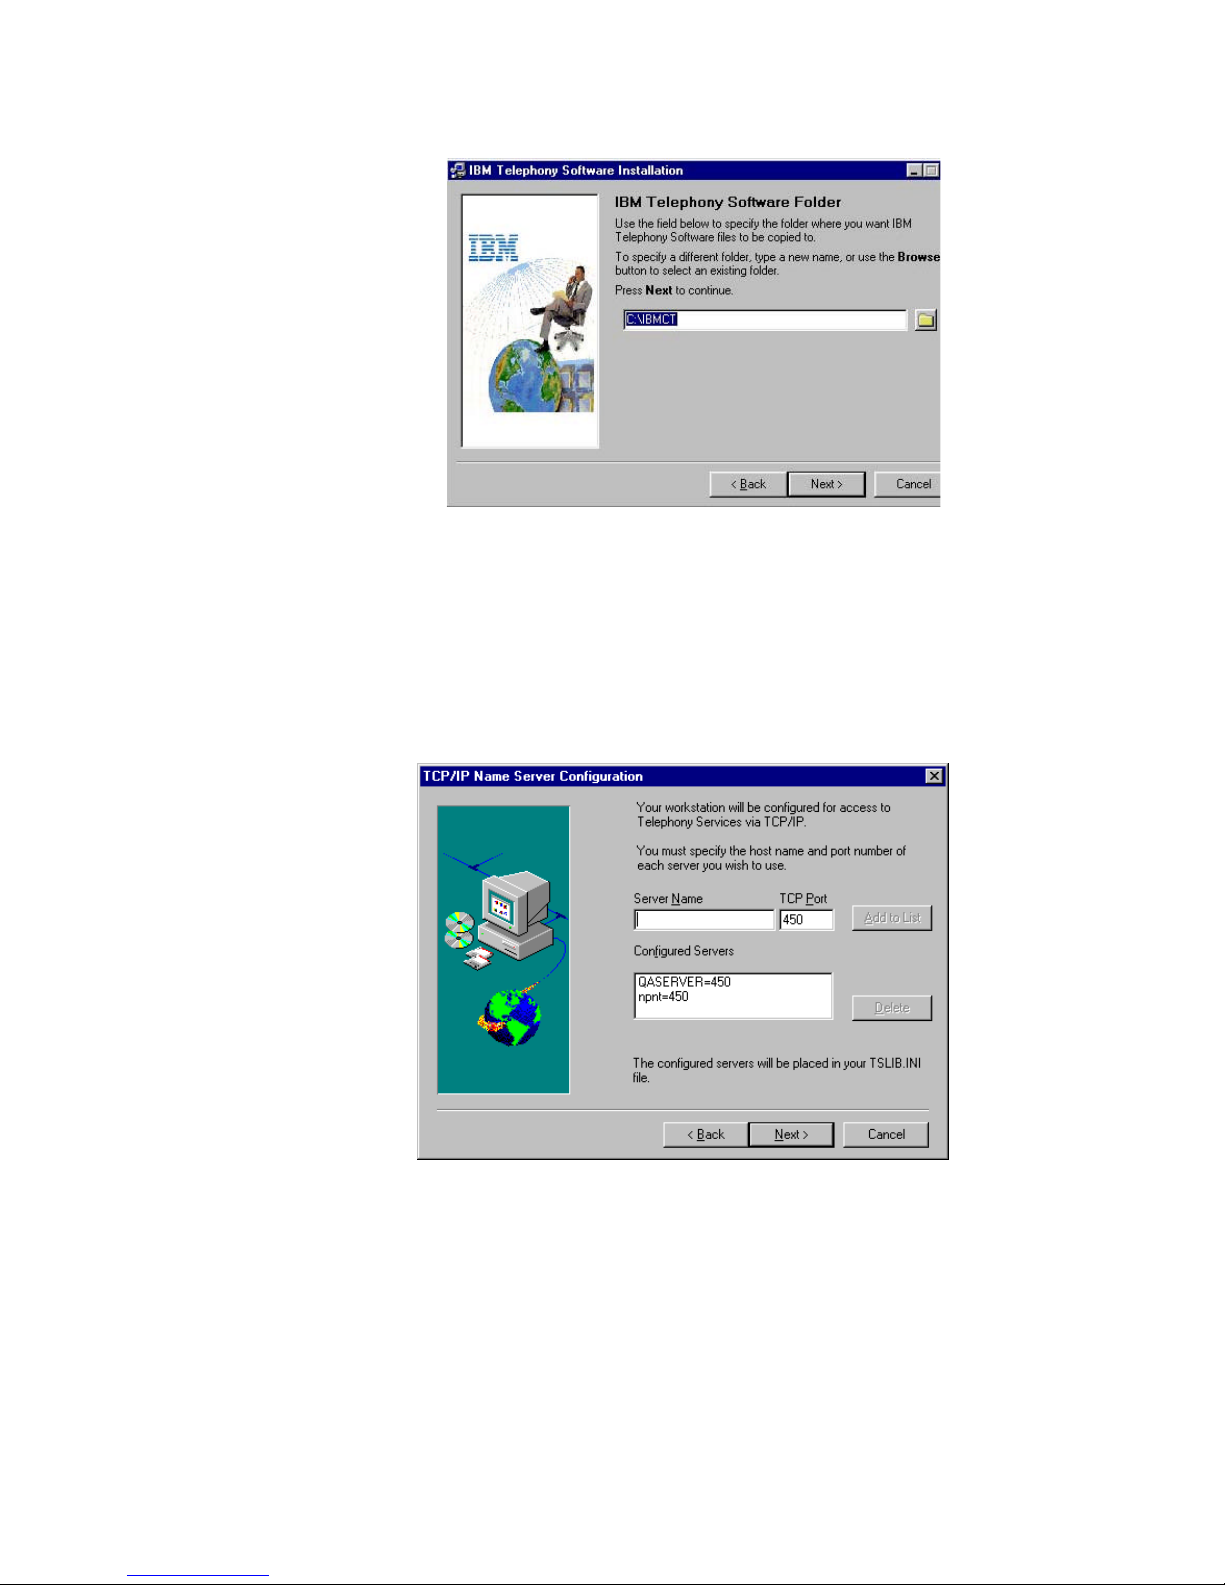
b) The next windows displayed will prompt you for locations and names
of software destination folders and Program Icons folder. You may
accept the defaults (recommended) or modify these entries. Click Next
on each of these windows.
IBM CTS Installation Guide 9
Page 16
IBM Telephony Installations
The installation program will check for sufficient space, then copy files to
your server.
2. Telephony Services installation
a) The Welcome screen will display. After reading, click Next.
a) The Telephony Services installation will require you to choose a
destination for files. You may accept the defaults or modify these
entries.
IBM CTS Installation Guide10
Page 17

IBM Telephony Installations
b) Enter the server’s IP address when prompted, then click OK.
Note: If using a system with DHCP (Dynamic Host Configuration
Protocol), make sure that you specify a static IP address, rather than
accepting the automatic IP address assignment.Insert the Lucent
license disk when requested, then click OK and remove diskette.
c) When Telephony Services installation is complete, click OK.
2. Btrieve Workstation Engine Installation
a) The Welcome screen will display. After reading, click Next.
b) The Btrieve Technologies installation will prompt you for locations and
names of the Btrieve Database folder and Program folder. You may
accept the defaults or modify these entries.
c) You may choose to view the Read Me file. Click finish when complete.
3. Telephony Services 32-bit Windows client installation.
a) The Welcome screen will display. After reading, click Next.
b) Check box to install Telephony Services Administration (required for
security level 2).
c) Select destination directory.
d) Add server name, then click Next. The installer will verify locations
and search for older versions of files.
e) When complete, click OK.
f) The Configuration Assistant will appear, displaying the suggested
settings for your CT-618 boards. Click OK.
4. IBM VoiceMaster installation
a) The Welcome screen will display. After reading, click Next.
b) The License Agreement will display. After reading, click Next.
c) The Release Notes will display. After reading, click Next.
d) The selection window will display options for VoiceMaster and Voice
Files. The selection boxes for both options must be checked.
e) The next window displayed will prompt you for the Telephony server
location. Make sure the information is correct, then click Next.
f) The Voice files window will prompt for destination of voice files. Click
Next.
IBM CTS Installation Guide 11
Page 18

IBM Telephony Installations
g) Click Next.
h) When setup successfully completes, click Close.
5. Acrobat Reader Installation
a) The Welcome screen will display. After reading, click Next.
b) The License Agreement will display. If you agree with the license
terms, click Next. If you do not agree, click Cancel to stop the
installation.
c) Choose destination folders for the Acrobat Reader software.
d) Setup will continue. You will be prompted to view the read me file
(optional). Click finish..
e) When complete, click OK.
6. If you are installing CT-618 boards, power down the server and install
boards according to the Hardware Installation instructions on page 17. (If
CT-618 boards are already installed in the server, power down the server and
proceed to Step 7.)
7. Upgrade the CT-618 board firmware:
Note: If your server is set up as NTFS: During the board firmware update
process you will need to run in DOS mode. Since NTFS is not visible from
DOS, you will need to access required files from a FAT partition or a
diskette. If you are not installing the IBM Telephony software to a FAT
partition, you will need to copy the following files from the
IBMCT/SYSTEM folder to a FAT partition (or to a diskette):
BOOTLOAD.HEX, MONITOR.HEX, NETPHO32.HEX and NL.EXE.
a) Restart the server in DOS. (Note: A DOS window will not work.) You
may need to boot with a DOS boot disk if your server is not set up to
boot in DOS.
b) Go to C:/IBMCT/SYSTEM (or the drive you selected during
installation) and enter the following command from the DOS prompt:
NL -B -LNETPHO32.HEX
This loads the firmware using default I/O port and IRQ settings (I/O
Port 3e0, IRQ 5). If not using these defaults, refer to Specifying and
changing board settings on page 31 for instructions on specifying values
IBM CTS Installation Guide12
Page 19

IBM Telephony Installations
in this command, or enter NL -? at the DOS prompt for help with NL
commands.
Note: If you have chosen an installation directory other than the
default of C, then IBMCT/SYSTEM will be in that directory. If your
server is set up as NTFS, use the files on the diskette you created
earlier.
8. Restart server in Windows NT.
9. Configure telephony services to autostart:
a) From the Start menu, navigate to Programs/TSAPI Telephony
Services/TSAPI Telephony Services Controller.
b) Check box for Auto Load.
c) Click Start (if not already running), then click Close (display should be:
Status=Running, Startup=Automatic).
10. Test your installation. You should have dial tone on an extension connected
to the IBM Telephony server.
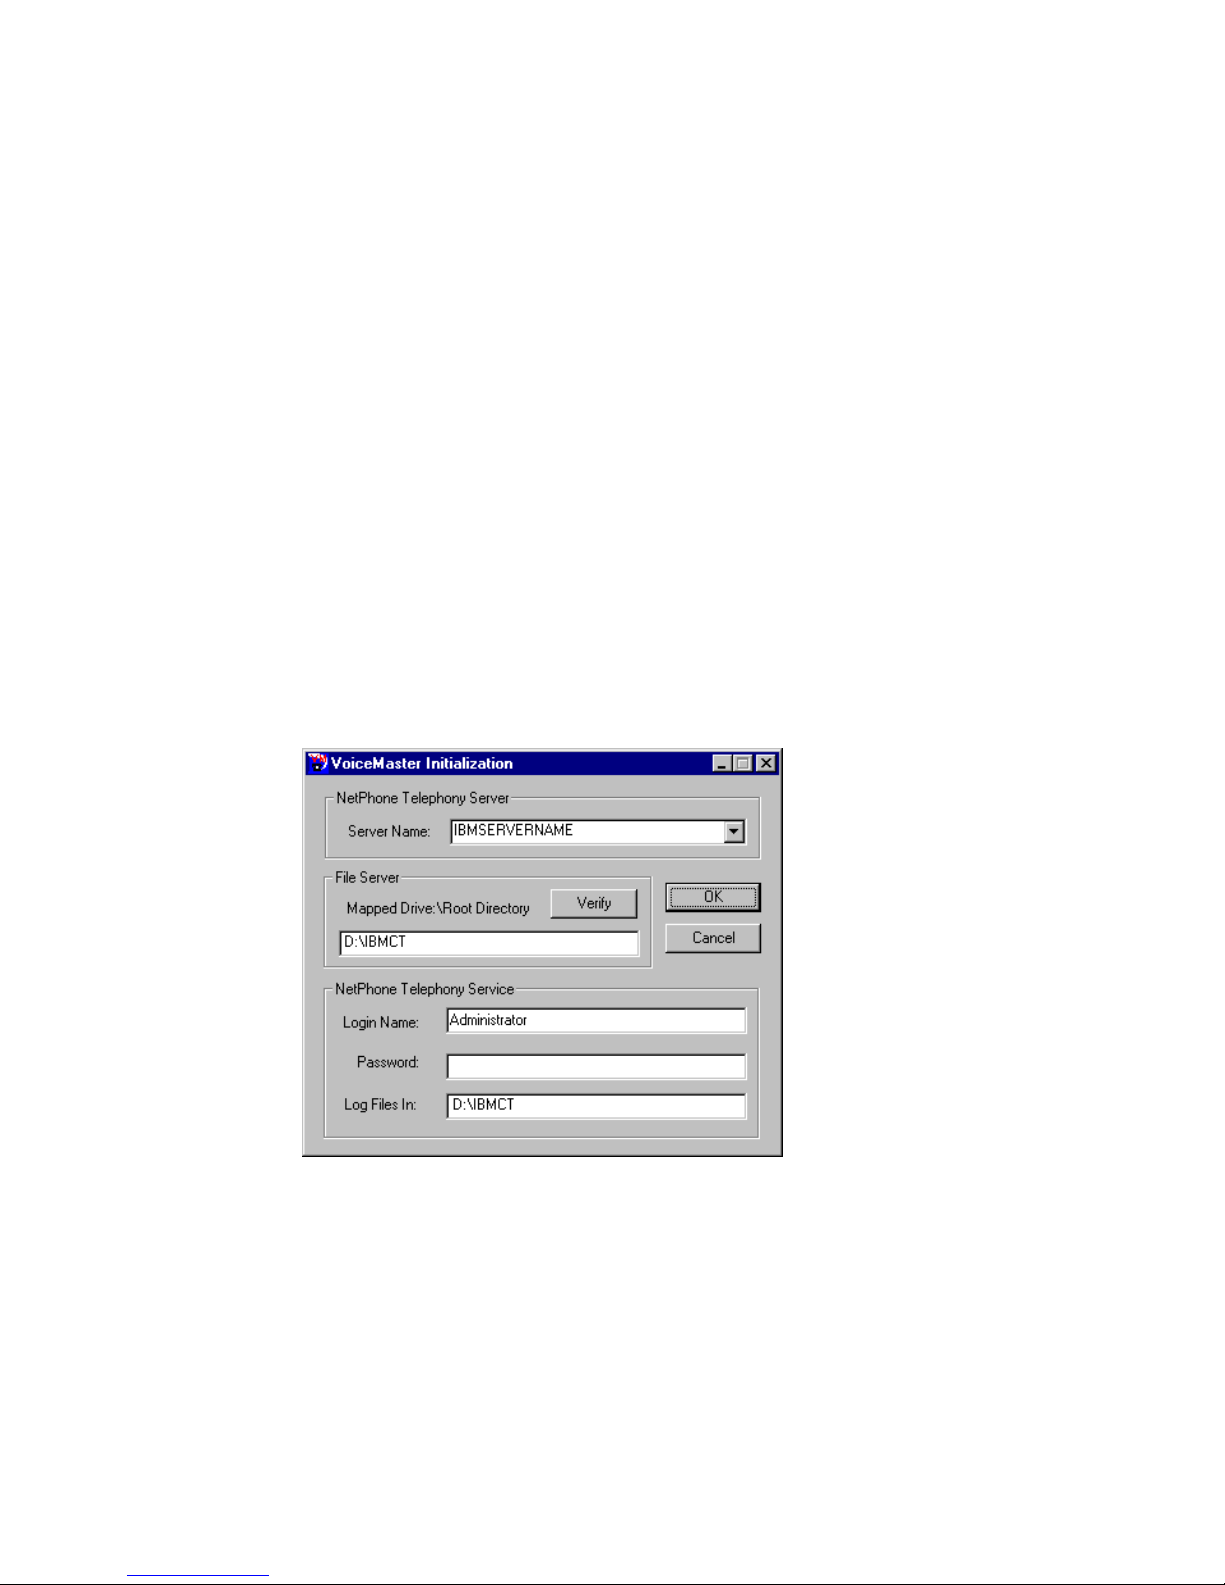
3.4 IBM VoiceMaster Startup and Configuration
IBM CTS Installation Guide 13
Page 20
IBM Telephony Installations
If you installed IBM VoiceMaster, you will need to start the VoiceMaster service
and add voice mailboxes.
1. From the Start menu, navigate to Programs/IBM Computer Telephony/
VoiceMaster/Register VoiceMaster Service. The IBM VoiceMaster
Initialization window will display.
1. Edit the Mapped Drive:/Root Directory information if it is not correct.
Click Verify to make sure this is a valid location.
2. You may enter a user name and password (it must be the same as that for the
IBM Telephony server).
3. Click OK. You will be prompted to start the VoiceMaster service. Click Yes.
4. Add voice mailboxes:
a) From the start menu, navigate to Programs/IBM Computer
Telephony/IBM VoiceMaster/VoiceMaster Administration.
b) Click Edit Mailbox List to open the IBM VoiceMaster Mailbox
Administrator window.
c) Enter a mailbox (extension) number in the box (maximum 5 digits).
d) Click Add.
e) If successful, a confirmation message will display. An error message will
IBM CTS Installation Guide14
Page 21

IBM Telephony Installations
display if you have entered an invalid mailbox ID.
f) Click OK to acknowledge the confirmation.
g) Continue to add desired mailboxes. When you are finished, click
Close.
5. When installations are complete, close the windows. You can test your
installation by pressing *6 on the handset. If your installation was successful,
a IBM VoiceMaster dialog will play.
Refer to the IBM VoiceMaster Administration on-line help or the IBM CTS
Administration Guide for additional setup and configuration information.
3.5 IBM Call Manager Installation
Note: Client accounts must be established on the server before IBM Call
Manager is installed on client PCs.
IBM Call Manager Desktop Call Control will generally be installed on all PC
clients, as well as the server. The client must have mapped drives to the IBM
Telephony server and IBM VoiceMaster (if using IBM VoiceMaster voice mail).
1. Insert IBM Telephony CD in the client PC to autorun the installation utility
(or run or double-click Setup.exe).
2. The Welcome screen will display. After reading, click Next.
3. The License Agreement will display. If you agree with the license terms, click
Next. If you do not agree, click Cancel to stop the installation.
4. Click the checkbox for IBM Call Manager Client for Windows 95 or NT4.0,
then click Next.
5. You will be prompted through the installation process. The windows
displayed will prompt you for locations and names of the IBM CT Software
Folder, Server System folder, and Program Icons folder. You may accept the
defaults (recommended) or modify these entries.
6. When complete, click Exit and remove the IBM Telephony CD.
Note: IBM Call Manager clients can be installed over the network if the IBM
Telephony CD is mounted in a drive accessible to the client PC, or if the
IBM CTS Installation Guide 15
Page 22

IBM Telephony Installations
installation CD contents have been copied to an accessible directory (you may
not use long directory names or spaces in the directory name).
3.6 IBM Call Manager Setup
The first time you run IBM Call Manager you will need to enter login
information and setup directories.
1. From the Start menu, navigate to Programs/IBM Computer Telephony/IBM
Call Manager.
2. When the login window displays, enter your user name, password and
extension number. You can check the box to save this information, and you
will not need to enter it the next time you log in. Click OK when done.
3. The Voice Mail Path window will display. If you are using IBM VoiceMaster
voice mail, make sure the path information is correct. If you are not using
IBM VoiceMaster, check “Do not use NetPhone voice mail”. Click OK when
done.
4. Refer to the IBM Call Manager on-line help and/or the IBM Call Manager
User’s Guide for more information.
If you have more than one IBM Computer Telephony server:
To allow a IBM Call Manager client to access multiple servers, the client’s
TSLIB.INI file must be edited to add the additional server names, as in the
example below:
[Telephony Servers]
; This is a list of the servers offering Telephony
Services via TCP/IP.
; Either domain name or IP address may be used;
default port number is 450
; The form is: host_name=port_number For example:
;
; tserver.mydomain.com=450
; 127.0.0.1=450
;
IBM CTS Installation Guide16
Page 23

IBM Telephony Installations
17
myservr=450
serv2=450
serv3=450
[Shared Admin]
; Instead of each workstation maintaining its own
list of servers, a shared
; tslib.ini file may be placed on a network file
system, for example:
;
; tslib.ini=n:\csta\tslib.ini
;
; This entry overrides the [Telephony Servers]
section, if any.
3.7 Finishing Your Installation
In order to complete your IBM Telephony installation and fully customize your
system, you may need to perform some of the tasks listed below. Refer to the IBM
CTS Administration Guide for assistance with these tasks.
• Voice mailbox administration
• Setting system and line information
• Voice mail to e-mail messaging
• Pager notification
• Installing and using SMDR call logging
• Using TAPI applications
• Customizing the translation table
3.8 Enabling NT Level 2 ( LOGON ) Security
Windows NT logon security requires users to enter a user name and password in
order to access the system. To enable NT Level 2 security for users, the NT
administrator will need to add user names to Telephony Services database,
IBM CTS Installation Guide
Page 24

IBM Telephony Installations
configure logon access for IBMCT Utility and IBM VoiceMaster services, and
change security level in the registry using the Set SecurityLevel Utility as described
below.
Add user names to the Telephony Services database
1. From the Windows NT Start menu, navigate to Programs/TS Win32
Client/Telephony Services Admin.
2. In the Open Tserver window, select the default Tserver and Login
(administrator). Click OK.
3. In the Telephony Services Administrator 32-bit window, click on Users in
the SDB tree.
4. Click Create User from the Admin menu.
5. In the Information tab, enter the Login, Name, and Worktop name (if
applicable) of each IBM Telephony user. (Note: Telephony Services user
names must match NT Server user names). Click Apply to add each user.
6. Click OK when done and close the Telephony Services Administrator 32-
bit window(s)
Configure logon access for NetPhone Utility and IBM VoiceMaster
services
1. From the Start menu, navigate to Settings/Control Panel Services.
2. Select NetPhone Utility and double-click to open.
3. Under Log On As, click button for This Account.
4. For user name, enter Administrator (other names will not work, even if they
have administrator privileges).
If IBM VoiceMaster is installed, repeat the above procedure for the IBM
VoiceMaster service.
Set security level
1. From the Start menu, navigate to Programs/IBM Computer
Telephony/Utilities/Set Security Level.
2. When the Set Security Level window displays, click Logon (level 2).
3. Click Apply, then Exit.
4. Reboot the IBM CTS NT Server or do the following:
IBM CTS Installation Guide18
Page 25

a) Stop all Telephony services Clients.
b) Stop Service NetPhone Utility
c) Stop Service TSAPI Telephony Services
d) Start Service TSAPI Telephony Services
e) Start Service NetPhone Utility
IBM Telephony Installations
IBM CTS Installation Guide 19
Page 26

Page 27

Upgrade Installations
4. Upgrade Installations
These installation instructions are intended for a typical upgrade of an existing
IBM Telephony installation. If you do not have an existing IBM Telephony
installation, follow the instructions for new installations on page 7.
4.1 Preparing for Upgrade Installations
Make sure the following are available before starting the installation process:
• An Administrator account and password for the server (An account with
administrator privileges is not sufficient.)
• You must use the default IBM Telephony administration utility password
(NETPHONE). If you have changed the password, set it to NETPHONE.
You can change it again after the upgrade installation is complete.
• During the firmware upgrade, you will need to boot your server in DOS (if
not configured with this as a boot option, you will need a DOS boot disk).
• If your server is set up as NTFS: During the board firmware update process
you will need to run in DOS mode. Since NTFS will not be visible from
DOS, you will need to access required files from a diskette. Copy the
following files from the installation CD’s Server/Ibmct folder to a diskette:
BOOTLOAD.HEX, MONITOR.HEX, NETPHO32.HEX and NL.EXE.
• IBM Telephony installation will install default company database files. To
preserve your existing company database master files (company.dbf and
company.mdx), copy them from the server’s Ibmct folder to another folder.
• To retain your current line settings, rename NetPhone.ini. After installation,
name the file back to NetPhone.ini. This will return your current line
settings, as well as your current translation table. You must then update the
translation table, using the default table supplied with this release (see page
25).
• If the IBM VoiceMaster service has been set to interact with the desktop,
change this before upgrading.
IBM CTS Installation Guide 21
Page 28

Upgrade Installations
4.2 Upgrading Server Software and Utilities
IBM Telephony software installation is easy since the installation wizard will
prompt you through the process. As the installation proceeds, you will be
prompted for selections or input. When your entries are complete, click Next to
proceed, or click Back to return to a previous screen and review/modify your
entries. You can click Cancel to stop the installation.
1. IMPORTANT: You must log on as ADMINISTRATOR, or your
installation will not be successful. (An account with administrator privileges
is not sufficient.)
2. Go to the NT control panel (Start/Settings/Control Panel) and stop the
NP618 driver (in the Devices folder) before starting installation. This will
also stop the TSAPI Telephony Services and IBM VoiceMaster services.
3. Exit all windows programs, then insert the IBM Telephony Installation
CD in the server to auto-run the installation wizard (or double-click or run
the file Setup.exe).
The Welcome screen will display. Click Next to proceed to the IBM
Telephony License Agreement. If you agree with the license terms, click
Next. If you do not agree, click Cancel to stop the installation.
4. Select IBM Telephony Software components. When the Select
Components window appears, click the checkbox to select components you
IBM CTS Installation Guide22
Page 29

Upgrade Installations
wish to install. Clicking on a plus sign (+) next to an item will expand it to
display individual options for each group. If you select an item with suboptions, the sub-options will also be selected. You can customize your
installation by expanding the upper level options by clicking on the plus
sign, then selecting the sub-options desired. For a typical installation, select
the following:
IBM Call Manager Client for Windows 95 or NT
IBM Telephony Server Software
IBM Telephony Utilities
On-line Documentation
At a minimum, you must install the IBM Telephony Server Software
and IBM Telephony Administration Utility.
5. When you have selected the components, click Next.
6. The next windows displayed will prompt you for locations and names of the
IBM Computer Telephony Software folder, Server System folder, and
Program Icons folder. You may accept the defaults (recommended) or
modify these entries, then click Next.
a) The installation program will then begin copying files and individual
component installation routines will run.
7. Telephony Services installation
a) The Telephony Services installation will require you to choose a
destination for files. You may accept the defaults or modify these
entries.
b) Enter the server’s IP address when prompted, then click OK. Note: If
using a system with DHCP (Dynamic Host Configuration Protocol),
make sure that you specify a static IP address, rather than accepting the
automatic IP address assignment.
c) Insert the Lucent license disk when requested, then click OK and
remove diskette.
8. Btrieve Workstation Engine Installation
a) The Btrieve Technologies installation will prompt you for locations and
names of the Btrieve Database folder and Program folder. You may
accept the defaults or modify these entries.
9. Telephony Services 32-bit Windows client installation.
IBM CTS Installation Guide 23
Page 30

Upgrade Installations
a) Check box to install Telephony Services Administration (required for
security level 2).
b) Select destination directory.
c) Your server name will be displayed. The installer will verify locations
and search for older versions of files. When complete, click Close.
d) The Configuration Assistant will appear, detecting any CT-618 boards
installed in the server and the resources used. (You may wish to make a
note of these resource assignments.) Click OK.
10. IBM VoiceMaster installation provides options for IBM VoiceMaster and
Voice Files. If you want to retain customized dialog files, un-check the Voice
Files selection box.
11. When setup successfully completes, click Close.
12. Power down the server.
13. Upgrade the CT-618 board firmware:
Note: If your server is set up as NTFS: During the board firmware update
process you will need to run in DOS mode. Since NTFS is not visible from
DOS, you will need to access required files from a FAT partition or a
diskette. If you are not installing the IBM Telephony software to a FAT
partition, you will need to copy the following files from the
IBMCT/SYSTEM folder to a FAT partition (or to a diskette):
BOOTLOAD.HEX, MONITOR.HEX, NETPHO32.HEX and NL.EXE.
a) Restart the server in DOS. (Note: A DOS window will not work.) You
may need to boot with a DOS boot disk if your server is not set up to
boot in DOS.)
b) Go to C:/IBMCT/SYSTEM (or the drive you selected during
installation) and enter the following command from the DOS prompt:
NL -B -LNETPHO32.HEX
This loads the firmware using default I/O port and IRQ settings (I/O
Port 3e0, IRQ 5). If not using these defaults, refer to Specifying and
changing board settings on page 31 for instructions on specifying
values in this command, or enter NL -? at the DOS prompt for help
with NL commands.
IBM CTS Installation Guide24
Page 31

Upgrade Installations
Note: If you have chosen an installation directory other than the
default of C, then IBMCT/SYSTEM will be in that directory. If your
server is set up as NTFS, use the files on the diskette you created
earlier.
14. Restart server in Windows NT.
15. Configure telephony services to autostart:
a) From the Start menu, navigate to Programs/TSAPI Telephony
Services/TSAPI Telephony Services Controller.
b) Check box for Auto Load.
c) Click Start (if not already running), then click Close (display should be:
Status=Running, Startup=Automatic).
16. Test your installation. You should have dial tone on an extension connected
to the IBM Telephony server.
4.3 Upgrading the Translation Table
The translation table supplied with this release has entries that support new
product features. Since an upgrade installation does not replace your existing
translation table, you must upgrade the table manually in order to take advantage
of the new features. Refer to the IBM Computer Telephony Administration Guide
for additional information about working with the CT-618 translation table.
1. Start the IBM Telephony Administration utility and go to the Translation
Table tab.
2. Select Read from NetPhone from the Translations menu. This will read your
current information.
3. Select Save to File from the Translations menu to save a reference copy of
your file.
4. Select Read from File from the Translations menu, and read in the default
table file (Default_24.trn) supplied on the CD.
5. Make any desired edits (using your saved file as a reference for previous
modifications).
6. When complete, select Write to NetPhone from the Translations menu to
write the new information to the board.
IBM CTS Installation Guide 25
Page 32

Upgrade Installations
Tip: You can use a file comparison program to compare your old translation table
file with the default file. This will assist you in picking up your previous
customizations.
4.4 IBM VoiceMaster Startup and Configuration
If you installed IBM VoiceMaster, you will need to start the IBM VoiceMaster
service and configure the voice mailboxes.
1. From the Start menu, navigate to Programs/IBM Computer Telephony/
VoiceMaster/Register Voice Mail Service. The IBM VoiceMaster
Initialization window will display, with the server path filled in. You must
edit this if not the correct location. Click Verify to make sure this is a valid
location. If you enter a user name and password, it must be the same as that
for the IBM Telephony server.
2. Click OK. You will be prompted to start the VoiceMaster service. Click Yes.
3. When installation is complete, close the windows. You can test your
installation by pressing *6 on the handset. If your installation was successful,
a IBM VoiceMaster dialog will play.
Refer to the IBM CTS Administration Guide for additional setup and
configuration information.
IBM CTS Installation Guide26
Page 33

Installing CT-618 Hardware
27
5. Installing CT-618
Hardware
5.1 Unpacking the CT-618 Board
CAUTION: The CT-618 board is packed in antistatic material to protect it
during shipment. To avoid damaging any highly static-sensitive components on
the CT-618 board or the computer, be sure to reduce any static on your person.
One way to do this is to touch the metal chassis of your computer. You can
maintain grounding by wearing a wrist strap attached to the chassis.
1. Carefully lift the CT-618 board and other items out of the box by removing
the inner protective carrier.
2. Remove the CT-618 board from its anti-static foam, holding it by the edges.
3. Check the CT-618 board for any visible signs of damage. If you find a
problem, immediately notify your supplier and the carrier that delivered the
CT-618 board.
Retain all packing materials and store in a safe place. If you should need to
return the CT-618 board, pack it in the original (or equivalent) packing material.
5.2 Important Safety Information
DANGER: The CT-618 board is to be installed only by authorized service
personnel.
DANGER: La carte CT-618 doit être installée par un technicien autorisé
seulement.
The board should only be installed in a computer that (1) has a proper fireproof
enclosure in compliance with UL 1950 (3rd ed.), and (2) is connected to a socketoutlet with a protective earthing connection.
IBM CTS Installation Guide
Page 34

Installing CT-618 Hardware
J1
J0
5.3 Installing the CT-618
1. Before you remove the computer cover, turn off the computer and unplug the
unit from its power source (Please refer to section 1 - safety).
2. Remove the computer’s cover according to the manufacturer’s instructions.
3. Choose a full size, 16-bit ISA or EISA expansion slot. If you are installing
more than one CT-618 board, they should be placed in adjacent slots for ease
of cabling. The slot must not have any memory modules, CPU heat sinks, or
anything else that sticks up and will interfere with the CT-618 PBX board.
4. Remove the slot cover(s) from the back of the computer.
5. If this is not the first (master) CT-618 PBX board, remove the master
jumper located at the top edge of the board next to the green LED (see
Figure 1). There must be only one master CT-618 PBX board in a PC. The
others are slaves, and must have the master jumpers removed.
Figure 1. The master board
must have a jumper installed as
shown at right. Remove this
jumper from all other boards in
the system.
6. Carefully insert the CT-618 PBX board at an angle, inserting the RJ-21X
Telco connector end in first, then sliding the other end into the card guide.
The gold fingers on the board should not be visible when it is plugged in
correctly. It may be easier to insert the CT-618 PBX board if you
temporarily remove the RJ-21X wire clips (squeeze clip to release).
7. Screw the metal shielding bracket to the PC chassis.
8. If there are multiple CT-618 PBX boards in the server, plug the interboard
cable into all CT-618 boards, making sure all prongs are connected.
9. Plug in the hold music cable if this is the first (master) CT-618 board in the
system, and you want to provide music on hold from an external source.
This connector is a standard (3.5mm) stereo jack. You can use a right angle
IBM CTS Installation Guide28
Page 35

Installing CT-618 Hardware
jack adapter to clear some Telco cables. Music on hold should be provided to
additional boards either by using a splitter and additional audio cables, or by
connecting additional audio sources directly to the boards.
10. Plug in the Telco cable and secure it with the two wire clips (optional). If
using a cable with screws, remove the screws in the CT-618 board and use
the cable screws to secure the cable.
11. Replace the PC’s cover.
12. Reconnect the PC to the power source and start the PC. If the CT-618 green
diagnostic LED is ON, the CT-618 board has passed a self-test and selfconfiguration check in your system, and has come up as a PBX with default
settings. If the LED is not ON steadily, contact IBM customer support.
5.4 Adding boards to a IBM Computer Telephony
system
Note: Do not install additional boards until you have upgraded your existing
system to the current release.
Before you start:
All CT-618 boards must be at the same firmware revision level in order to
successfully perform a firmware upgrade. This can be ensured by upgrading only
one board at a time. Boards may be upgraded in any DOS-bootable PC.
To upgrade and install additional boards in the server:
1. Install new board(s) in a DOS-bootable PC. See Installing the CT-618 on
page 28 for details.
2. Follow the firmware update process.
3. Power down the PC and remove the upgraded board(s).
4. Power down the IBM CTS.
5. Install the additional CT-618 board(s) you have upgraded. Make sure that
only one board is a master board.
6. Restart the server.
IBM CTS Installation Guide 29
Page 36

Installing CT-618 Hardware
IBM CTS Installation Guide30
Page 37

Installing CT-618 Hardware
5.5 Specifying and changing board settings
If you are not using default settings, you must specify your settings, as shown in
the example below:
DOS> NL -P3e0 -Q5 -LNETPHO32.HEX
(Where "-P3e0" is I/O Port 3e0 and "-Q5" is IRQ 5.)
You can change your I/O port setting using the following command:
DOS> NL -P3e0 (current port) -R280 (new port)
The following hardware resources are required (Hexadecimal values):
Default Acceptable
PORT 3E0 260, 280, 290, 2a0, 2b0, 2e0, 2f0, 300, 310, 390, 3e0
IRQ 5 5, b, c
DMA 6 5, 6, 7
Note that any I/O port changes must be reflected in the registry (see below).
5.6 Changing registry entries
During installation the NP618 Configuration assistant will display suggested
settings for your CT-618 board(s), based on default settings and available
IBM CTS Installation Guide 31
Page 38

Installing CT-618 Hardware
resources. If settings are acceptable, click OK. If these settings are unacceptable, or
there is a conflict, you will need to change the registry entries for the CT-618
board.
To change registry entries:
1. From the Start menu, navigate to Programs/IBM Computer
Telephony/Utilities/Change IBM Telephony Hardware Settings. The
Configuration assistant will display. Use the scroll boxes to enter new
values, then click OK. This will change the registry entries.
2. You must also change the board settings using the NL command (see
above) or the administrator’s handset (see page 73).
5.6.1 CT-618 jumper settings
J1 J0
0 0 Slave board
1 0 Test Mode
0 1 Master board
1 1 Use I/O 3E0 (Emergency boot and reload)
IBM CTS Installation Guide32
Page 39

Installing CT-618 Hardware
IBM CTS Installation Guide 33
Page 40

Page 41

Telephone Wiring
6. Telephone Wiring
DANGER: If you are not experienced with telephone wiring/installation, you
should only have wiring installation performed by a qualified telecom
installation service.
DANGER: Le câblage téléphonique ne doit être effectué que par un
technicien spécialisé
6.1 Safety instructions
• Always disconnect the Telco connector before touching the CT-618 board or
before changing boards in the PC.
• Never touch non-insulated telephone wires or terminals unless the telephone
line has been disconnected at the network interface.
• Never install telephone wiring during a lightning storm.
• Never install telephone jacks in wet locations unless the jack is specifically
designed for wet locations.
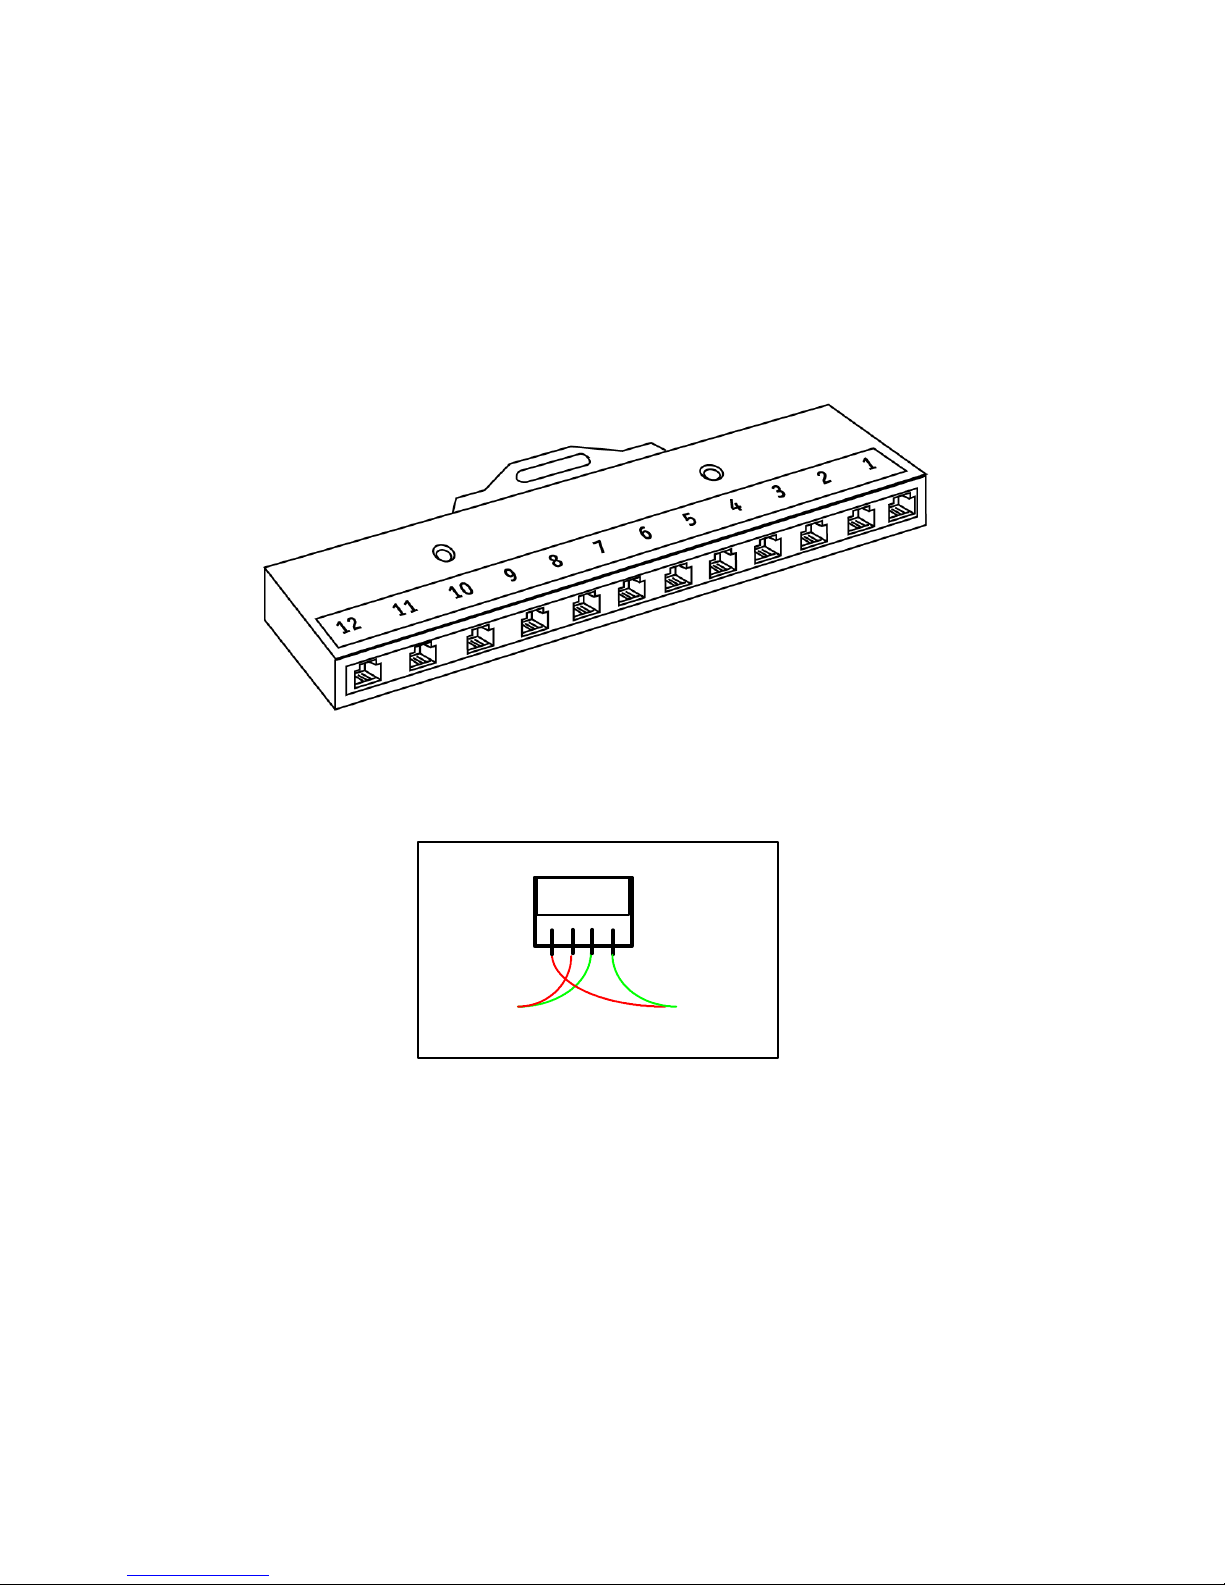
6.2 Wiring Configurations
In most cases, your incoming telephone service will be located in a
wiring/telephone closet. A punch down block will be used to distribute the wiring
to the individual lines and extensions, and a 25-pair cable is used to connect the
punch down block to the CT-618 board (see RJ21X Telco connector pinout).
A typical telephone installation is illustrated in Figure 1.
You can also set up a demonstration configuration by connecting the IBM
Computer Telephony server to a harmonica, as shown in Figure 2. Two phones
can be wired to each RJ11 as illustrated in Figure 3.
In order to connect and configure your IBM Computer Telephony system you
may need additional cables.
Note: To avoid noise pickup, do not wire telephone cable in parallel with an
AC power source or computer cable unless the cable is shielded.
IBM CTS Installation Guide 35
Page 42

Telephone Wiring
IBM Telephony
Server
Network
Interfaces
Punch Down
Block
First 6 pairs used
for trunk
lines, 18 for
extensions
25 Pair
Cable
Incoming
Telephone Service
Wiring
Closet
RJ11 Wall
Jacks
Figure 1: Typical Installation
(
(
(
IBM CTS Installation Guide36
Page 43
Telephone Wiring
37
RJ11
The 12 port harmonica shown in Figure 2 has a 50-pin RJ-21 connector and is
connected to the telephony server with 25 pair cable. This harmonica can be
wired to support 6 trunk (central office) lines (Port 1 for trunks 1 & 2, Port 2 for
trunks 3 & 4, Port 3 for trunks 5 & 6). The remaining ports can be used for a
total of 18 extensions (Port 4 for extensions 1 & 2, Port 5 for extensions 3 & 4,
etc.). Note that each RJ11 can be wired for two extensions as shown in Figure 3
below.
Figure 3: RJ11 wired for two phones
(
Figure 2: Harmonica (12 port) used for demonstration or lab configurations
IBM CTS Installation Guide
(
Page 44

Telephone Wiring
IBM CTS Installation Guide38
Page 45

IBM CTS PBX Functions
7. IBM CT-618 Functions
7.1 Incoming calls
An incoming call on a trunk rings the operator extension. After an adjustable
number of rings the call is connected to the auto attendant message and permits
the caller to dial an extension. After the message, the call is again sent to the
operator extension. If the number of rings is set to 0, callers will immediately
connect to the auto Attendant without the operator’s extension ringing first.
7.2 Dialing calls
Dialing calls with IBM CT is similar to dialing with most Centrex or other
business phone systems. The dialing instructions described below are the defaults
supplied with the IBM CT system. You may find differences if your system has
been reconfigured by your IBM CT Administrator.
Other Extensions
To call another extension, enter the digits of the extension number.
Operator
To place a call to the internal operator, press 0.
Outside Calls
To dial an outside local call press 9, then the seven digits of the phone
number you wish to call. To dial an outside long distance call press 9 + 1,
then the ten digits of the phone number you wish to call (provided that
your extension has privilege to dial 1+10 digit calls).
911 Emergency Services
To place a call to 911 emergency services, press 911.
Directory Assistance
To place a call to phone company directory assistance, press 9 plus the
appropriate directory assistance number.
IBM CTS Installation Guide 39
Page 46

IBM CTS PBX Functions
7.3 Call management
Picking up ringing calls on other extensions
You can pick up any ringing extension within your pickup group by
pressing *5. A pickup group is any set of phone extensions forming part of
a group, as assigned by the IBM CT Administrator, usually all extensions
within one office or department.
Placing calls on hold
Depressing and quickly releasing the switch hook (in less than one second)
is called a “Flash.” Flashing places the current call on hold and gives an
acknowledge dial tone. You can then transfer or conference the call. The
IBM CTS also supports handsets that have a “flash” button for this
function.
Picking up a held call
To pick up a call placed on hold, enter *4 (pickup Held), or flash to
reconnect. If you have more than one held call, the last call placed on hold
is picked up first.
7.4 Transferring calls
Announced transfers
You can make a screened (announced) transfer by:
1. Flash to place the call on hold.
2. Dial the transferee.
3. When connection is made, announce the caller to transferee.
4. If the transferee wants to speak with the caller, flash to place the
transferee on hold.
5. Press *8 to transfer the call.
Blind transfers
You can transfer a caller without announcing the call (blind transfer).
1. Depress and quickly release the switch hook or use the flash button to
place the call on hold.
2. Dial the transferee’s number and hang up within five seconds. (If you
do not complete the transfer within five seconds, you have hung up on
IBM CTS Installation Guide40
Page 47

IBM CTS PBX Functions
the number you are transferring to, and the call will ring back on your
extension.
Creating a conference
You can create a conference of held calls, with the option of including
yourself in the conference.
1. Place calls to be conferenced on hold
2. Press *2 (Conference). This will create a conference of all held calls
plus yourself. Press *8 to create a conference of held calls, but not
include your extension.
7.4.1 Forwarding calls
You can set your calls to forward to other extensions if your line is busy, not
answered, or you do not wish to be disturbed.
Forward if Busy
You can set your extension so that calls will forward to another extension if
your line is busy.
To set Forward if Busy press *92 plus the extension calls will forward to.
(Enter *88 in place of the extension number to forward calls to voice mail.)
To cancel Forward if Busy press *92#.
Forward Immediately
To set your extension so that calls will Forward Immediately to another
extension press *94 plus the extension calls will forward to. (Enter *88 in
place of the extension number to forward calls to voice mail.) To cancel
Forward Immediately press *94#.
Forward if No Answer
You can set your extension so that calls will forward if your extension does
not answer.
To set your extension to Forward if No Answer press *96 plus the extension
calls will forward to. (Enter *88 in place of the extension number to forward
calls to voice mail.) To cancel Forward if No Answer press *96#.
IBM CTS Installation Guide 41
Page 48

IBM CTS PBX Functions
IBM CTS Installation Guide42
Page 49

IBM CTS PBX System Administration
8. IBM CT System
Administration
The IBM CT administrator is responsible for the configuration and maintenance
of the IBM CT system. Administration duties include:
• System Configuration - including setting trunk reservation and rotation, on-
hold audio source, flash hook timing and digit play/quiet time.
• Line Configuration, including pickup group and class of service assignments.
• Creation and maintenance of the Company listing.
• Slave board configuration.
• Auto attendant message recording and maintenance.
8.1 Basic commands and utilities
8.2 Using the IBM CT Administration Utility
Most IBM CT administration functions are performed through the IBM CT
administration utility. Certain commands may also be entered via the handset
(that has a class of service with administrative privileges), and some functions can
only be performed using a handset. Where applicable, both methods are included
in this guide.
Starting the IBM CT Administration Utility
1. From the Start Menu, navigate to Programs/IBM Computer
Telephony/Admin/IBM Telephony Administration Utility.
2. Enter the IBM CT Administrator password in the box provided (asterisks will
appear in the box as you type), then click OK or press enter. Note that IBM
CT passwords are case-sensitive.
Note: The default password supplied with the system is NETPHONE. It is
strongly suggested that you change this password immediately.
Refer to the IBM CT Administration Utility on-line help and the IBM CTS
Administration Guide for more information.
IBM CTS Installation Guide 43
Page 50

IBM CTS Installation Guide44
Page 51

IBM CTS PBX System Administration
IBM CTS Installation Guide 45
Page 52

Page 53

47
9. Uninstalling IBM
Telephony Software
Important: Make sure IBM Telephony is not running before uninstalling.
IBM CT provides uninstall utilities for removing the executable files for IBM
Telephony Server Software and IBM VoiceMaster. The uninstall utilities will
remove the application files. Files created by the user, such as voice mail files, will
not be removed. After running uninstall, you may remove these manually, along
with the parent folders of such files.
To uninstall the server software:
1. Stop the NetPhone Utility and TSAPI Telephony services before starting
installation.
2. From the Start menu, navigate to Programs/IBM Telephony/IBM Telephony
Software Uninstall
To uninstall IBM VoiceMaster software:
From the Start menu, navigate to Programs/IBM Telephony/
VoiceMaster/Unregister VoiceMaster Service.
1. Select Start/Settings/Control Panel/Add Remove Programs.
2. Select IBM VoiceMaster
3. Click Add/Remove.
4. The Uninstall Wizard will prompt you through the process of removing IBM
VoiceMaster files.
To uninstall IBM Call Manager:
1. Use Windows explorer to navigate to the IBM CT folder on your PC.
2. Select and delete the IBM CT folder.
The uninstall utilities will remove the application files. Files created by the user,
such as call logs, will not be removed. After running uninstall, you may remove
these manually, along with the parent folders of such files.
IBM CTS Installation Guide
Page 54

IBM CTS Installation Guide48
Page 55

10. Troubleshooting
If you encounter a problem during installation, check the following symptoms and
suggestions
CT-618 green LED off or flashing
• Make sure the PC power is on and that the board is plugged into the slot
completely. The gold fingers on the board should not be visible when it is
plugged in correctly.
• Make sure that jumper settings are correct.
• The board may be failing an internal self-test. Obtain the following system
information prior to contacting technical support: PC manufacturer and
model number, CPU type and speed, and the BIOS settings for the system
clock and bus clock.
No Dial Tone on an Extension
• Check that the cable is securely plugged into the CT-618 board.
• • Check that your telephone is set to tone and not pulse generation.
• Try a different telephone that is known to work.
Dial tone but no DTMF tones on an extension
• Check that the telephone is set to tone and not pulse generation.
• Try a different telephone that is known to work.
• Try swapping the tip and rings wires, as some old style phones will not
produce DTMF tones if tip and ring are reversed.
Cannot access an outside line (fast busy)
• Check that you have not inadvertently reserved all trunks for incoming calls.
You can free all trunks by entering *30 at the operator extension or through
the IBM Telephony Administration Utility.
• Check that the RJ-21X cable is securely plugged into the CT-618 board.
• Check that the trunk is active and that the wiring is correct by connecting a
telephone directly to the telephone company Network Interface.
IBM CTS Installation Guide 49
Page 56

Troubleshooting
• Remove the RJ-21X cable and measure the voltage between the tip and ring.
If the voltage difference is less than 40 volts, contact the telephone company
to have them correct the problem.
• When IBM Telephony server is powered down, line X1 and trunk 1 will still
be available. If they are not, your phone wiring may be at fault.
No audio while on hold
• Connect headphones to the audio cable to make sure that there is audio
playing
• Make sure that you have selected audio in your system configuration.
Your new auto attendant recording doesn’t play
• ATTEND.MU is the correct file name for the auto attendant message.
• If you recorded a new message, make sure that you have copied the file
RECORD.MU to ATTEND.MU in IBMCT/AUDIO.
Unexpected results from calling operations
• Verify which translation table information has been written to the IBM-
CT618 board.
• Make sure that the translation table entries are correct. IBM Telephony does
not validate the information entered in the translation table.
Using Flash button to place call on hold hangs up call
• Flash interval may need to be increased for your model of handset. Refer to
the Administration Guide for information.
Speaker phone not functioning
• Some speakerphones do not operate properly with IBM CTS if used without
batteries or an external power source, since they draw more current than the
CT-618 can supply.
IBM CTS Installation Guide50
Page 57

Help and Service Information
11. Help and Service
Information
Before calling, please prepare for your call by following these steps.
11.1 Step 1: Troubleshooting
Please read the items in the troubleshooting section of this manual to see if you
can resolve the problem.
11.2 Step 2: Preparing for the Call
To assist the technical support representative, have available as much of the
following information as possible:
• Computer manufacturer and computer model.
• Option number.
• Option name.
• Serial number (if available).
• Proof of purchase (including date and place).
• Exact wording of the error message (if any)
• Description of the problem
• Hardware and software configuration information for your system
If possible, be at your computer. Your technical support representative might want
to walk you through the problem during the call.
IBM CTS Installation Guide 51
Page 58

Help and Service Information
11.3 Step 3: Placing the Call to IBM
Technical support is available during the warranty period to answer any questions
about your new IBM option. Support response time will vary depending on the
number and nature of calls received.
Marketing, installation, and configuration support will be withdrawn from the PC
Company HelpCenter 90 days after the option has been withdrawn from
marketing.
If you call 90 days after the date of withdrawal or after your warranty has expired,
you might be charged a fee. Additional support is available through the IBM PC
Company automated Fax system, the PC Company Web Page, the PC Company
Electronic Bulletin Board System and HelpWare offerings.
• The IBM web site at “http://www.pc.ibm.com
• The IBM Fax system at (800) 426-3395 or (919) 517-0011
• The IBM BBS system at (919) 517-0001
For the support telephone and support hours by country, refer to the following
table or to an optional enclosed technical support insert. If the number is not
provided in the table or insert, contact your IBM reseller or IBM marketing
representative.
Support 24 hours a day, 7 days a week
Canada 1-800-565-3344
United States / Puerto Rico 1-800-772-2227
IBM CTS Installation Guide52
Page 59

Product Warranty
12. Product Warranty
The following warranty information applies to products purchased in the United
States, Canada, and Puerto Rico. For warranty terms and conditions for products
purchased in other countries, see the enclosed Warranty insert, or contact your
IBM reseller or IBM marketing representative.
International Business Machines CorporationArmonk, New York, 10504
Statement of Limited Warranty
The warranties provided by IBM in this Statement of Limited Warranty apply only to
Machines you originally purchase for your use, and not for resale, from IBM or your
reseller. The term “Machine” means an IBM machine, its features, conversions,
upgrades, elements, or accessories, or any combination of them.
Unless IBM specifies otherwise, the following warranties apply only in the country
where you acquire the Machine. If you have any questions, contact IBM or your
reseller.
Machine: IBM CT-618 Adapter
Warranty Period*: Three (3) years
*Contact your place of purchase for warranty service information.
Production Status
Each Machine is manufactured from new parts, or new and used parts. In some
cases, the Machine may not be new and may have been previously installed.
Regardless of the Machine's production status, IBM's warranty terms apply.
IBM CTS Installation Guide 53
Page 60

Product Warranty
The IBM Warranty for Machines
IBM warrants that each Machine 1) is free from defects in materials and
workmanship and 2) conforms to IBM's Official Published Specifications.
The warranty period for a Machine is a specified, fixed period commencing on its
Date of Installation. The date on your receipt is the Date of Installation, unless
IBM or your reseller informs you otherwise.
During the warranty period IBM or your reseller, if authorized by IBM, will
provide warranty service under the type of service designated for the Machine and
will manage and install engineering changes that apply to the Machine.
For IBM or your reseller to provide warranty service for a feature, conversion, or
upgrade, IBM or your reseller may require that the Machine on which it is
installed be 1) for certain Machines, the designated, serial-numbered Machine and
2) at an engineering-change level compatible with the feature, conversion, or
upgrade.
Many of these transactions involve the removal of parts and their return to IBM.
You represent that all removed parts are genuine and unaltered. A part that
replaces a removed part will assume the warranty service status of the replaced
part.
If a Machine does not function as warranted during the warranty period, IBM or
your reseller will repair it or replace it with one that is at least functionally
equivalent, without charge. The replacement may not be new, but will be in good
working order. If IBM or your reseller is unable to repair or replace the Machine,
you may return it to your place of purchase and your money will be refunded.
If you transfer a Machine to another user, warranty service is available to that user
for the remainder of the warranty period. You should give your proof of purchase
and this Statement to that user. However, for Machines which have a life-time
warranty, this warranty is not transferable.
IBM CTS Installation Guide54
Page 61

Product Warranty
Warranty Service
To obtain warranty service for the Machine, you should contact your reseller or
call IBM.
In the United States, call IBM at 1-800-772-2227.
In Canada, call IBM at 1-800-565-3344.
You may be required to present proof of purchase.
IBM or your reseller will provide certain types of repair and exchange service,
either at your location or at IBM's or your reseller's service center, to restore a
Machine to good working order.
When a type of service involves the exchange of a Machine or part, the item IBM
or your reseller replaces becomes its property and the replacement becomes yours.
You represent that all removed items are genuine and unaltered. The replacement
may not be new, but will be in good working order and at least functionally
equivalent to the item replaced. The replacement assumes the warranty service
status of the replaced item. Before IBM or your reseller exchanges a Machine or
part, you agree to remove all features, parts, options, alterations, and attachments
not under warranty service. You also agree to ensure that the Machine is free of
any legal obligations or restrictions that prevent its exchange.
IBM CTS Installation Guide 55
Page 62

Product Warranty
You agree to:
1. obtain authorization from the owner to have IBM or your reseller service
a Machine that you do not own; and
2. where applicable, before service is provided --
a) follow the problem determination, problem analysis, and service request
procedures that IBM or your reseller provide,
b) secure all programs, data, and funds contained in a Machine, and
c) inform IBM or your reseller of changes in a Machine's location.
IBM is responsible for loss of, or damage to, your Machine while it is 1) in IBM's
possession or 2) in transit in those cases where IBM is responsible for the
transportation charges.
IBM CTS Installation Guide56
Page 63

Product Warranty
57
Extent of Warranty
IBM does not warrant uninterrupted or error-free operation of a Machine.
The warranties may be voided by misuse, accident, modification, unsuitable
physical or operating environment, improper maintenance by you, removal or
alteration of Machine or parts identification labels, or failure caused by a product
for which IBM is not responsible.
THESE WARRANTIES REPLACE ALL OTHER WARRANTIES OR
CONDITIONS, EXPRESS OR IMPLIED, INCLUDING, BUT NOT
LIMITED TO, THE IMPLIED WARRANTIES OR CONDITIONS OF
MERCHANTABILITY AND FITNESS FOR A PARTICULAR PURPOSE.
THESE WARRANTIES GIVE YOU SPECIFIC LEGAL RIGHTS AND YOU
MAY ALSO HAVE OTHER RIGHTS WHICH VARY FROM
JURISDICTION TO JURISDICTION. SOME JURISDICTIONS DO NOT
ALLOW THE EXCLUSION OR LIMITATION OF EXPRESS OR IMPLIED
WARRANTIES, SO THE ABOVE EXCLUSION OR LIMITATION MAY
NOT APPLY TO YOU. IN THAT EVENT SUCH WARRANTIES ARE
LIMITED IN DURATION TO THE WARRANTY PERIOD. NO
WARRANTIES APPLY AFTER THAT PERIOD.
IBM CTS Installation Guide
Page 64

Product Warranty
Limitation of Liability
Circumstances may arise where, because of a default on IBM's part or other
liability you are entitled to recover damages from IBM. In each such instance,
regardless of the basis on which you are entitled to claim damages from IBM
(including fundamental breach, negligence, misrepresentation, or other contract
or tort claim), IBM is liable only for:
1. damages for bodily injury (including death) and damage to real property and
tangible personal property; and
2. the amount of any other actual direct damages or loss, up to the greater of
U.S. $100,000 or the charges (if recurring, 12 months' charges apply) for the
Machine that is the subject of the claim.
UNDER NO CIRCUMSTANCES IS IBM LIABLE FOR ANY OF THE
FOLLOWING:
1. THIRD-PARTY CLAIMS AGAINST YOU FOR LOSSES OR DAMAGES
(OTHER THAN THOSE UNDER THE FIRST ITEM LISTED ABOVE);
2. LOSS OF, OR DAMAGE TO, YOUR RECORDS OR DATA; OR
3. SPECIAL, INCIDENTAL, OR INDIRECT DAMAGES OR FOR ANY
ECONOMIC CONSEQUENTIAL DAMAGES (INCLUDING LOST
PROFITS OR SAVINGS), EVEN IF IBM OR YOUR RESELLER IS
INFORMED OF THEIR POSSIBILITY. SOME JURISDICTIONS DO
NOT ALLOW THE EXCLUSION OR LIMITATION OF INCIDENTAL
OR CONSEQUENTIAL DAMAGES, SO THE ABOVE EXCLUSION
OR LIMITATION MAY NOT APPLY TO YOU.
IBM CTS Installation Guide58
Page 65

Appendix A: Notices
13. Appendix A: Notices
13.1 Electronic Emission Notices
Federal Communications Commission (FCC) Statement
Note: This equipment has been tested and found to comply with the limits for a Class A
digital device, pursuant to Part 15 of the FCC Rules. These limits are designed to provide
reasonable protection against harmful interference in a commercial environment. This
equipment generates, uses, and can radiate radio frequency energy and, if not installed and
used in accordance with the instructions, may cause harmful interference to radio
communications. Operation of this equipment in a residential area is likely to cause
harmful interference in which case the user will be required to correct the interference at
his own expense.
IBM is not responsible for any radio or television interference caused by unauthorized
changes or modifications to this equipment. Unauthorized changes or modifications could
void the user's authority to operate the equipment.
This device complies with Part 15 of the FCC Rules. Operation is subject to the following
two conditions:
1. This device may not cause harmful interference, and
2. This device must accept any interference received, including interference that may
cause undesired operation.
Industry Canada Class A Emission Compliance Statement
This Class A digital apparatus complies with Canadian ICES-003.
Avis de conformité à la réglementation d'Industrie Canada
Cet appareil numérique de la classe A est conform à la norme NMB-003 du
Canada.
IBM CTS Installation Guide 59
Page 66

Appendix A: Notices
13.2 Telecommunication Notices
Federal Communications Commission (FCC) and Telephone Company
Requirements
1. This adapter complies with Part 68 of the FCC rules. A label is affixed to the adapter
that contains, among other things, the FCC registration number, USOC, and Ringer
Equivalency Number (REN) for this equipment. If these numbers are requested,
provide this information to your telephone company.
2. The REN is useful to determine the quantity of devices you may connect to your
telephone line and still have those devices ring when your number is called. In most,
but not all areas, the sum of the RENs of all devices should not exceed five (5.0). To
be certain of the number of devices you may connect to your line, as determined by
the REN, you should call your local telephone company to determine the maximum
REN for your calling area.
3. If the adapter causes harm to the telephone network, the telephone company may
discontinue your service temporarily. If possible, they will notify you in advance; if
advance notice is not practical, you will be notified as soon as possible. You will be
advised of your right to file a complaint with the FCC.
4. Your telephone company may make changes in its facilities, equipment, operations, or
procedures that could affect the proper operation of your equipment. If they do, you
will be given advance notice to give you an opportunity to maintain uninterrupted
service.
5. If you experience trouble with this product, contact your Authorized Reseller, or call
IBM. In the United States, call IBM at 1-800-772-2227. In Canada, call IBM at
1-800-565-3344. You may be required to present proof of purchase.
The telephone company may ask you to disconnect the adapter from the network
until the problem has been corrected, or until you are sure the adapter is not
malfunctioning.
6. No customer repairs are possible to the adapter. If you experience trouble with the
adapter, contact your Authorized Reseller or see Help and Service section of this
manual for information.
7. This adapter may not be used on coin service provided by the telephone company.
Connection to party lines is subject to state tariffs. Contact your state public utility
commission or corporation commission for information.
8. When ordering network interface (NI) service from the local Exchange Carrier, specify
service arrangement USOC RJ11C.
IBM CTS Installation Guide60
Page 67

Appendix A: Notices
13.3 Canadian Department of Communications
Certification Label
NOTICE: The Canadian Department of Communications label identifies certified
equipment. This certification means that the equipment meets certain telecommunications
network protective, operational, and safety requirements. The Department does not
guarantee the equipment will operate to the user's satisfaction.
Before installing this equipment, users should ensure that it is permissible to be connected
to the facilities of the local telecommunications company. The equipment must also be
installed using an acceptable method of connection. In some cases, the company's inside
wiring associated with a single line individual service may be extended by means of a
certified connector assembly (telephone extension cord). The customer should be aware
that compliance with the above conditions may not prevent degradation of service in some
situations.
Repairs to certified equipment should be made by an authorized Canadian maintenance
facility designated by the supplier. Any repairs or alterations made by the user to this
equipment, or equipment malfunctions, may give the telecommunications company cause
to request the user to disconnect the equipment.
Users should ensure for their own protection that the electrical ground connections of the
power utility, telephone lines, and internal metallic water pipe system, if present, are
connected together. This precaution may be particularly important in rural areas.
CAUTION: Users should not attempt to make such connections themselves, but should
contact the appropriate electric inspection authority, or electrician, as appropriate.
NOTICE: The LOAD NUMBER (LN) assigned to each terminal device denotes the
percentage of the total load to be connected to a telephone loop which is used by the
device, to prevent overloading. The termination on a loop may consist of any combination
of devices subject only to the requirement that the sum of the LOAD NUMBERS of all
the devices does not exceed 100.
IBM CTS Installation Guide 61
Page 68

Appendix A: Notices
Étiquette d'homologation du ministère des Communications du Canada
AVIS : L'étiquette du ministère des Communications du Canada identifie le matériel
homologué. Cette étiquette certifie que le matériel est conforme à certaines normes de
protection, d'exploitation et de sécurité des réseaux de télécommunications. Le ministère
n'assure toutefois pas que le matériel fonctionnera à la satisfaction de l'utilisateur.
Avant d'installer ce matériel, l'utilisateur doit s'assurer qu'il est permis de le raccorder aux
installations de l'entreprise locale de télécommunications. Le matériel doit également être
installé en suivant une méthode acceptée de raccordement. L'abonné ne doit pas oublier
qu'il est possible que la conformité aux conditions énoncées ci-dessus n'empêchent pas la
dégradation du service dans certaines situations.
Les réparations de matériel homologué doivent être effectuées par un centre d'entretien
canadien autorisé désigné par le fournisseur. La compagnie de télécommunications peut
demander à l'utilisateur de débrancher un appareil à la suite de réparations ou de
modifications effectuées par l'utilisateur ou à cause d'un mauvais fonctionnement.
Pour sa propre protection, l'utilisateur doit s'assurer que tous les fils de mise à la terre de la
source d'énergie électrique, des lignes téléphoniques et des canalisations d'eau métalliques,
s'il y en a, sont raccordés ensemble. Cette précaution est particulièrement importante dans
les régions rurales.
Avertissement: l'utilisateur ne doit pas tenter de faire ces raccordements lui-même, il doit
avoir recours à un service d'inspection des installations électriques ou à un électricien,
selon le cas.
AVIS: L'INDICE DE CHARGE (IC) assigné à chaque dispositif terminal indique, pour
éviter toute surcharge, le pourcentage de la charge totale qui peut être raccordé à un circuit
téléphonique bouclé utilisé par ce dispositif. L'extrémité du circuit bouclé peut consister en
n'importe quelle combinaison de dispositifs pourvu que la somme des INDICES DE
CHARGE de l'ensemble des dispositifs ne dépasse pas 100.
IBM CTS Installation Guide62
Page 69

Appendix A: Notices
13.4 Patent Notices
IBM may have patents or pending patent applications covering subject matter in
this document. The furnishing of this document does not give you any license to
these patents. You can send license inquiries, in writing:
IBM Director of Licensing
IBM Corporation
500 Columbus Avenue
Thornwood, NY 10594
U.S.A.
13.5 Trademarks
The following terms used in this publication, are trademarks of the IBM
Corporation in the United States or other countries:
IBM
Windows 3.1, Windows NT and Windows95 are trademarks or registered
trademarks of Microsoft Corporation.
Pentium is a registered trademark of Intel Corporation.
NetPhone and PhoneMaster are registered trademarks, and VoiceMaster and the
NetPhone logo are trademarks of NetPhone, Inc.
FoxPro and Microsoft are registered trademarks of Microsoft Corporation.
PassageWay is a registered trademark of Lucent Technologies.
Other company, product, and service names, which may be denoted by a double
asterisk (**), may be trademarks or service marks of others.
IBM CTS Installation Guide 63
Page 70

Appendix A: Notices
IBM CTS Installation Guide64
Page 71

Appendix C: Specifications
14. Appendix B: Software
license and warranty
information
14.1 NetPhone, Inc. Limited Software Warranty And
License Agreement
IMPORTANT: READ THE FOLLOWING TERMS AND CONDITIONS
CAREFULLY BEFORE OPENING THIS SEALED SOFTWARE PACKAGE.
THESE TERMS AND CONDITIONS CONSTITUTE THE ENTIRE
AGREEMENT BETWEEN YOU AND NETPHONE, INC. (“NETPHONE”)
CONCERNING THE PROGRAM, SUPPLIED ON MEDIA (“THE
PROGRAM”) AND THE USER DOCUMENTATION (THE
“DOCUMENTATION”).
BY OPENING THIS PACKAGE YOU INDICATE YOUR ACCEPTANCE
OF THESE TERMS AND CONDITIONS. IF YOU DO NOT AGREE WITH
THEM, PROMPTLY RETURN THIS PACKAGE UNOPENED, ALONG
WITH THE DOCUMENTATION, AND YOUR MONEY WILL BE
REFUNDED. NO REFUNDS WILL BE GIVEN FOR RETURNED
PACKAGES MISSING ANY ITEMS.
GRANT OF LICENSE. NetPhone grants you a non-exclusive, non-transferable
license to install and use the Program on a single local area network. You may
make copies of the Program for back-up. You may transfer the Program from a
single network server to another if you erase it from the old network server. You
may not copy the Documentation, or reverse-engineer, disassemble, or decompile
the Program. You may not assign, sublicense, rent loan, or lease the Program. Any
software programs and documentation owned by third parties (“Third Party
Programs”) included with the Program as optional or bundled features (i) are
licensed solely for use with the Program and (ii) are subject to the terms and
conditions of the separate License Agreement governing such Third Party
Programs, that is provided on a separate sealed disk envelope.
OWNERSHIP. The Program is a proprietary product owned by NetPhone and is
protected under U.S. copyright law and international treaty provisions. All
intellectual property rights in and to the Program are retained by NetPhone.
IBM CTS Installation Guide 65
Page 72

Appendix B: Software License and Warranty Information
TERM. This agreement is effective upon your opening this Package and, except
for evaluation licenses, shall continue until terminated. Evaluation license
terminate in the number of days specified on the Package. You may terminate this
Agreement at any time by returning all copies of the Program and Documentation
to the NetPhone authorized distributor or reseller. NetPhone may terminate this
Agreement if you breach any term of this Agreement. Upon any termination, you
will return all existing copies of the Program and the Documentation to the
NetPhone distributor or reseller.
LIMITED WARRANTY. NetPhone warrants that the media on which the
Program is furnished shall be free from defects in material and workmanship for a
period of 90 days, beginning from date of installation or 30 days after purchase,
whichever comes first. If a defect in the media appears during that period, you
may return the Program and Documentation to NetPhone or its authorized
reseller for either replacement or, if so elected by the NetPhone distributor or
reseller, refund of your purchase price. The foregoing constitutes your sole
remedy for breach by NetPhone of any warranties (express or implied) made
under this Agreement. EXCEPT FOR THE WARRANTIES SET FORTH
ABOVE, THE PROGRAM AND THE DOCUMENTATION ARE LICENSE
“AS IS,” AND NETPHONE DISCLAIMS ANY AND ALL OTHER
WARRANTIES, EXPRESS OR IMPLIED, INCLUDING WITHOUT
LIMITATION ANY IMPLIED WARRANTIES OF MERCHANTABILITY,
FITNESS FOR A PARTICULAR PURPOSE, TITLE AND NONINFRINGEMENT. Some states do not allow the exclusion of implied warranties
or limitations on how long an implied warranty may last, so the above limitations
and exclusions may not apply to you. This warranty gives you specific legal rights,
and you may also have other rights which vary from state to state.
LIMITATION OF LIABILITY. NetPhone’s cumulative liability to you and all
other parties for any loss or damages resulting from any claims, demands, or
actions arising out of or relating to the Agreement shall not exceed the license fee
you paid for the use of the Program. NETPHONE SHALL NOT BE LIABLE
FOR ANY INDIRECT, SPECIAL, INCIDENTAL, OR CONSEQUENTIAL
DAMAGES, INCLUDING LOST PROFITS OR LOST DATA ARISING OUT
OF THE USE OR INABILITY TO USE THE PROGRAM OR ANY DATA
SUPPLIED THEREWITH, OR ARISING FROM THE BREACH OF THE
WARRANTY, EVEN IF NETPHONE HAS BEEN ADVISED OF THE
POSSIBILITY OF SUCH DAMAGES. Some states do not allow the limitation or
exclusion of liability for incidental or consequential damages, so the above
limitation may not apply to you.
U.S. GOVERNMENT LICENSES. The Program and the Documentation are
provided with “restricted rights”. Use, duplication or disclosure by the
IBM CTS Installation Guide66
Page 73

Appendix C: Specifications
67
Government is subject to restrictions as set forth in Subparagraph 252.227-7013
(c )(1)(ii) (Rights in Technical Data and Computer Software) of the Department
of Defense Federal Acquisition Regulations Supplement or Subparagraphs
52.227-19 ( c )(1) and ( c )(2) (Commercial Computer Software - Restricted
Rights) of Title 48 of the Code of Federal Regulations, as applicable.
Contractor/manufacturer is NetPhone, Inc., 313 Boston Post Road West,
Marlborough, MA 01752.
EXPORT ASSURANCES. You agree that the Program will not be shipped,
transferred, or re-exported, directly or indirectly, into any country prohibited by
the United States Export Administration Act and the regulations thereunder or
used for any purpose prohibited by such Act.
This Agreement is governed by the laws of the Commonwealth of Massachusetts.
IBM CTS Installation Guide
Page 74

Appendix B: Software License and Warranty Information
IBM CTS Installation Guide68
Page 75

Appendix C: Specifications
15. Appendix C: Specifications
15.1 PC Host Requirements
PC CPU Requirements 586-133 MHz (Pentium) with 64Mb
RAM for minimum configuration
Bus Interface ISA 16 bit
Cable Interface 50 Pin Telco (RJ-21X)
Power Required +5V 1.6A, +12V 1.0A, -5V 0.1 A
Operating Temperature 10 Deg C Min / 40 Deg C Max
Storage Temperature 0 Deg C Min / 65 Deg C Max
Operating Humidity 20 to 80% relative, non-condensing
15.2 CT-618 Specifications
Number of Ports 6 Trunks / 18 Extensions
Switching Digital Type Non-Blocking
Station Compatibility Analog 2500 Series (Loop Start)
Station Interface Loop Limit 1200 Ohms Max
Station Impedance 600 Ohms
Trunk Impedance 600 Ohms
CO Min Leak Resistance 30,000 Ohms
System Crosstalk >75 dB down
System Longitudinal Balance >58 dB (200 to 3,000 Hz) on/off-hook
System Return Loss >18 dB ERL
System Idle Circuit Noise <20 dBrnC
Insertion Loss Station to Station 1 dB
Insertion Loss Station to Trunk 2 dB
IBM CTS Installation Guide 69
Page 76

Appendix C: Specifications
15.3 RJ21X Telco connector pinout
Color Function Pin Pin Function Color
BLU-WHT Trunk 1 - Tip 1 26 Trunk 1 - Ring WHT-BLU
ORN-
Trunk 2 - Tip 2 27 Trunk 2 - Ring WHT-ORN
WHT
GRN-
Trunk 3 - Tip 3 28 Trunk 3 - Ring WHT-GRN
WHT
BRN-WHT Trunk 4 - Tip 4 29 Trunk 4 - Ring WHT-BRN
SLT-WHT Trunk 5 - Tip 5 30 Trunk 5 - Ring WHT-SLT
BLU-RED Trunk 6 - Tip 6 31 Trunk 6 - Ring RED-BLU
ORN-RED Ext 1 - Tip 7 32 Ext 1 - Ring RED-ORN
GRN-RED Ext 2 - Tip 8 33 Ext 2 - Ring RED-GRN
BRN-RED Ext 3 - Tip 9 34 Ext 3 - Ring RED-BRN
SLT-RED Ext 4 - Tip 10 35 Ext 4 - Ring RED-SLT
BLU-BLK Ext 5 - Tip 11 36 Ext 5 - Ring BLK-BLU
ORN-BLK Ext 6 - Tip 12 37 Ext 6 - Ring BLK-ORN
GRN-BLK Ext 7 - Tip 13 38 Ext 7 - Ring BLK-GRN
BRN-BLK Ext 8 - Tip 14 39 Ext 8 - Ring BLK-BRN
SLT-BLK Ext 9 - Tip 15 40 Ext 9 - Ring BLK-SLT
BLU-YEL Ext 10 - Tip 16 41 Ext 10 - Ring YEL-BLU
ORN-YEL Ext 11 - Tip 17 42 Ext 11 - Ring YEL-ORN
GRN-YEL Ext 12 - Tip 18 43 Ext 12 - Ring YEL-GRN
BRN-YEL Ext 13 - Tip 19 44 Ext 13 - Ring YEL-BRN
SLT-YEL Ext 14 - Tip 20 45 Ext 14 - Ring YEL-SLT
IBM CTS Installation Guide70
Page 77

Appendix C: Specifications
BLU-VIO Ext 15 - Tip 21 46 Ext 15 - Ring VIO-BLU
ORN-VIO Ext 16 - Tip 22 47 Ext 16 - Ring VIO-ORN
GRN-VIO Ext 17 - Tip 23 48 Ext 17 - Ring VIO-GRN
BRN-VIO Ext 18 - Tip 24 49 Ext 18 - Ring VIO-BRN
SLT-VIO n/c 25 50 n/c VIO-SLT
Notes:
1. SLT (Slate) is sometimes referred to as GRY (Gray).
2. The Ext xx numbers correspond to the default extension numbering scheme,
so that Ext 1 is extension 201 on the first CT-618 board, 219 on the second
CT-618 board, etc.
3. The power down fail-safe mode of the CT-618 board connects Trunk 1 (Tip
and Ring) to Ext 1 (Tip and Ring). For this reason, we recommend that Ext
1 be used for the Operator extension (201) in normal usage.
15.4 PBX CT-618 Functions
When first installed, the following default PBX keypad commands are in effect.
Note that these defaults may change with subsequent versions of the IBM
Telephony software.
Normal extension handset dialing
201-299 Place a call to extension 201 through 299.
9+7 digits Connect to a trunk and dial a local call.
1+10 digits Connect to a trunk and dial a non-local call.
9+11 digits Connect to a trunk, wait for a dial tone, and dial all digits
911 Connect to a trunk, wait for dial tone and dial 911.
0 Place a call to the Operator (default is extension 201).
** Listen to recorded IBM CT Help.
*2 Make all held calls a conference, joining the conference yourself
(*2=*C - Conference).
IBM CTS Installation Guide 71
Page 78

Appendix C: Specifications
*30+two digit
Park a call.
parking station
*31+two digit
Pick up parked call.
parking station
*4 Pick up a held call (*4=*G -Get Held).
*5 Pick up a ringing call from your pickup group .
*8 Make all held calls a conference and hang-up on the conference
(*8=*T - Transfer Hang-up).
*6 Check voice mail messages (requires optional IBM VoiceMaster
voice mail software).
*7 Leave voice mail message (requires optional IBM VoiceMaster
voice mail software).
*92+digits of
Set call forward on busy (*92# to cancel).
forward
extension
*94+digits of
Set call forward immediately (*94# to cancel).
forward
extension
*96+digits of
Set call forward on no answer (*96# to cancel).
forward
extension
*11 Record a message (file RECORD.MU).
*12 Play a message (file RECORD.MU).
*13 Play the auto attendant message (file ATTEND.MU).
Administration and Test Functions
Administration and test functions are performed from the Operator extension or
an extension with administrator privileges (class of service 6).
8 Connect to a trunk and permit dialing an outside call.
*11 Record auto attendant message (RECORD.MU).
*12 Play RECORD.MU.
IBM CTS Installation Guide72
Page 79

Appendix C: Specifications
*13 Play current auto attendant message.
#20-#26 Set number of rings before Auto-Attendant (0-6 respectively).
#30-#36 Reserve trunks for incoming calls (0 through 6 trunks,
respectively).
#40-#50 Set the I/O port to one of the following respectively: 0x260,
0x280, 0x290, 0x2A0, 0x2b0, 0x2e0, 0x2f0, 0x300, 0x310,
0x390, 0x3e0.Used only for initial configuration when there is an
I/O conflict. After the system is powered up and the green light is
on, enable this feature by removing jumper J0 and installing
jumper J1. Replace the jumpers immediately before trying to run
the setup software.
#71 Connect call to on hold audio.
#83 Recalculate the number of trunks (when trunks have been
added/removed).
#85 Count number of trunks (will produce a beep tone for each
trunk).
#99 Set factory defaults (requires jumpers as above).
IBM CTS Installation Guide 73
Page 80

Appendix C: Specifications
IBM CTS Installation Guide74
Page 81

16. Index
A
Administrator password · 39
Adobe Acrobat · 6
ATTEND.MU · 46, 68
Auto attendant · 35, 68
C
Call management · 36
Company listing · 39
Conference calls · 37
CT-618 PBX board
Adding to system · 27
Connecting cable · 31
Unpacking · 25
D
Dialing
Handset dialing default settings · 67
PBX administration functions · 68
F
Forwarding calls · 37
H
Harmonica · 31, 33
I
IBM CT Administration utility · 39
IBM Telephony
Overview · 5
Installation
Hardware installation · 25
New installations · 7
Upgrade installations · 19
J
Jumper settings · 29
Test Mode · 29
Dialing calls · 35
IBM CTS Installation Guide 75
Page 82

Index
L
Lab Configuration · 31
Logon Security
NT Level 2 · 17
M
Master jumper · 26
Multiple servers
Accessing with Call Manager · 16
P
PBX settings
Default settings · 67
Picking up held calls · 36
Pickup group · 36
Requirements · 7
S
Safety Information · 3
Safety instructions · 31
Shock hazard
avoiding · 3
T
Test Mode · 29
Transferring calls · 36
V
VoiceMaster · 68
Placing calls on hold · 36
Punch down block · 31
R
RECORD.MU · 46, 68
W
Wiring/installation · 31
IBM CTS Installation Guide76
Page 83

Page 84

Software License Agreement
OF THESE TERMS.
Part Number: 20L0393
Located in the IBM International Program License Agreement
shipped with this product.
PLEASE READ THIS AGREEMENT CAREFULLY BEFORE
USING THESE PROGRAMS. INITIAL USE OF THESE
PROGRAMS INDICATES YOUR ACCEPTANCE
 Loading...