

Page 1

IBM Solutions Builder Express Portfolio
Collaborative Portal
Implementation Guide
Version 2.2.1
Windows
Page 2

Note
Before using this information and the product it supports, read the information in Appendix. Notices.
If you are not an IBM Business Partner, you are only authorized to use these materials for your internal
use and for the sole purpose of evaluating products and services from IBM and the IBM Business Partner.
You may not make the materials available to any third party.
Fourth Edition (April 2007)
Copyright International Business Machines Corporation 2006, 2007. All rights reserved.
US Government Users Restricted Rights -- Use, duplication or disclosure restricted by GSA ADP
Schedule Contract with IBM Corp.
ii Collaborative Portal: Implementation Guide
Page 3

Preface
How to Use Starting Point Assets
This set of solution enablement materials provides a starting point that helps you develop and deploy a
solution for a particular type of customer problem. It provides a framework around which you can build
similar solutions that meet your customer's unique needs.
Comments Welcome
Your comments are important to us. Please send your feedback about this and other IBM Solutions
Builder starting points directly to us at sbuilder@us.ibm.com
iii Collaborative Portal: Implementation Guide
Page 4

Legend
Used to identify worksheets, sample code, or other reusable files that are
provided with this specific solution.
Used to identify areas where there is more than one implementation option
for the solution.
Used to identify tasks or places that require special attention.
Used to identify websites referenced in this solution.
Used to identify IBM Redbooks referenced in this solution.
What's New in Version 2.2.1 of this Solution Starting Point
Version 2.2.1 of Collaborative Portal refreshes the IBM WebSphere Portal Express software to the latest
version, V6.0. The new release of the Portal Express product package contains the IBM WebSphere
Portal Express V6.0 server, which is at the same level as IBM WebSphere Portal Server V6.0.0.1. This
product package includes:
● IBM WebSphere Portal Express Server V6.0
● IBM WebSphere Application Server Network Deployment V6.0.2.15
● IBM DB2 Express Edition V9.1.0
● IBM Tivoli Directory Server v6.0
● IBM Lotus Component Designer V6.0
● IBM Lotus Sametime Connect V7.5
● IBM Lotus Domino Server V7.0.1
Installation and use of components of IBM WebSphere Portal Express V6.0 is governed by its license. For
details and allowable configuration and restrictions, refer to the IBM License Information Document for
Program Number 5724-E77 located at: http://www-
03.ibm.com/software/sla/sladb.nsf/lilookup/C782A24DA04F76130025727300574146?opendocument&li_s
elect=C8DC73AEEB7FBD2B0025727300574107.
Contributors
Collaborative Portal was produced by members of the IBM Solutions Builder Express Portfolio team with
the assistance of the following specialists:
Business Partners
Luiz Otavio Schmitt is a senior Technical Architect and helps design IT solutions for De dalus Systems, a
MainLine partner, and IBM Premier Business Partner. He has 7 years of experience in the hardwa re and
software fields mainly providing Sun Microsystems' solutions for small and medium business. Prior to
joining Dedalus Systems, Luiz led efforts associated with telecommunication market solutions at Sun
Microsystems. He has a Bachelor of Systems Analysis degree and is working towards a Master's degree
in e-Learning.
Via Bulatao is a Technical Consultant with Summa Technologies in Pittsburgh, PA. She specializes in
J2EE application development and WebSphere products, focusing on WebSphere Portal. Before Summa,
iv Collaborative Portal: Implementation Guide
Page 5

she was with IBM Global Services in the Philippines for four years. There, she worked in the
telecommunications and construction industries, serving as technical support for the Customer Care &
Billing System and as a technical analyst for Ariba Buyer. She holds a bachelor's degree in Compute r
Science from the University of the Philippines, as well as a master's degree in Electronic Commerce from
Carnegie Mellon University in Pittsburgh.
Jose Carlos Ramos is a Technical Manager in a premier Spanish Business Partner: Aitana SBS
(www.aitanasbs.com). He has a Masters degree in Telecommunication Engineering and a Masters
degree in Business Administration. Jose Carlos has worked as a proj ect manager on several projects
using the Start Now program. He has also trained technical professionals and executive s at the university
level. He is currently doing research on the impact of Intranets and knowledge management in SMB
companies for his PhD.
IBM Services
Shankara Naraynan is a Senior IT Specialist for ibm.com Information Planning and Operations in
Atlanta, Georgia. He has over seven years of extensive experience architecting collaborative solutions
using Domino, Java, and Web technologies. He holds a Bachelors Deg ree in Electronics and
Communication Engineering and is a Certified Lotus Professional Administrator and Develop er, a Sun
Certified Java Programmer, and a Sun Certified Web Components Developer for J2EE and MCSE.
Larissa Schoeffing is an IT Specialist at IBM Germany. She has several years of experience at the
WebSphere Innovation Center Stuttgart enabling IBM Business Partners for WebSphere Portal projects.
She holds a diploma in Information Technology from the University of Cooperative Education Stuttgart.
Prerequisites
There are no prerequisite Solution Starting Points.
However, this Solution Starting Point assumes that the customer already has e-mail and directory
systems in their environment.
Related Solutions
The following additional solutions can be used to enhance this solution:
● Process Integration - This Solution Starting Point illustrates how to integrate multiple applications
using a sample business process. This sample show s a parts requisition process that can be
customized for other business processes. The focus is on the approach with the samples
provided so a working prototype can be created quickly. Although parts requisition is the process
used in the sample, the samples can be used to develop a solution for other business processes.
v Collaborative Portal: Implementation Guide
Page 6

Contents
Collaborative Portal Implementation Guide ..............................................................................i
Preface........................................................................................................................................iii
How to Use Starting Point Assets .................................................................................................................................iii
Legend..........................................................................................................................................................................iv
What's New in Version 2.2.1 of this Solution Starting Point ..........................................................................................iv
Contributors ..................................................................................................................................................................iv
Prerequisites..................................................................................................................................................................v
Related Solutions...........................................................................................................................................................v
Chapter 1. Prepare for Implementation.....................................................................................1
Development Environment Architecture.........................................................................................................................2
Development Tools........................................................................................................................................................3
Required Materials Checklist .........................................................................................................................................5
Preparing the Systems...................................................................................................................................................8
Chapter 2. Install and Configure Essential Solution Software .............................................12
Task Summary.............................................................................................................................................................12
Install IBM WebSphere Portal Express........................................................................................................................13
Set up the Domino Directory Server.............................................................................................................................17
Install the Notes and Administrator Clients ..................................................................................................................21
Configure the Domino Domain.....................................................................................................................................23
Install the Sametime Connect Server in the Domino Domain ......................................................................................29
Set up the IBM Lotus Sametime Connect....................................................................................................................31
Configure Domino Web Access for Instant Messaging................................................................................................34
Configure IBM WebSphere Portal Express Server to Use Domino Directory...............................................................36
Enable Collaborative Components...............................................................................................................................41
Configure Lotus Collaborative Components.................................................................................................................44
Chapter 3. Create Demo Users ................................................................................................48
Chapter 4. Using the Solution..................................................................................................50
Notes for a Customer Demonstration...........................................................................................................................50
Preparing for the Demonstration..................................................................................................................................50
Entering the Portal .......................................................................................................................................................51
Collaboration Scenario.................................................................................................................................................52
Chapter 5. Customize the Solution .........................................................................................54
Creating New Themes .................................................................................................................................................54
Create New Skins ........................................................................................................................................................56
Appendix. Notices.....................................................................................................................58
Trademarks..................................................................................................................................................................59
vi Collaborative Portal: Implementation Guide
Page 7

Chapter 1. Prepare for Implementation
This section helps you understand and execute steps that should be performed prior to starting the
implementation.
Specifically, this solution illustrates how to design and implement a collaborative portal solution. Portals
are websites targeted at specific audiences and communities, providing content, collaboration, and
services, as well as applications access, for target audiences delivered in a customized manner. The
implementation steps described in Chapter 2. Install and Configure Essential Solution Software
12 can be used as a starting point for building your own customized portal, or simply as an illustration for
demonstration or learning purposes.
The primary focus of this solution is to install IBM WebSphere Portal Express with collaborative
components on the Portal Server. Chapter 2. Install and Configure Essential Solution Software
12 outlines other deployment scenarios including installing a base portal without the collaborative
components.
The paths for following variations are identified for you throughout.
on page
on page
Understanding the Implementation
The instructions in this Solution Starting Point explain how to set up the complete solution - that is, no
assumptions of existing e-mail servers, Web servers, database servers, etc. are made. If you are
installing this solution in your customer's environment, you may not need to install all of these items. This
Solution Starting Point explains how to perform the following:
● Installing a base IBM WebSphere Portal Express Server, where the portal server, supporting IBM
WebSphere Application Server, and HTTP server are combined on one system.
● Installing the two backend application servers that will be used to demonstrate this solution.
These include:
○ A Lotus
(R)
Domino
(R)
server for e-mail and applications, also to be used as the Lightweight
Directory Access Protocol (LDAP) directory server in this example. This Domino server also
acts as the master server for the secondary Domino servers in the domain. Even though the
Domino product is included in IBM WebSphere Portal Express V6.0, using Domino in the way
described here requires an additional license. See What's New in Version 2.2.1 of this
Solution Starting Point on page iv for more information.
○ A Lotus Domino server for IBM Lotus Sametime Connect
● Integrating the portal server with the external LDAP directory to enable the collaborative features.
● Configuring the portal interface, and the installation and configuration of portlets. A portlet is the
basic building block of a portal. The term refers to an application that provides access to
applications, Web-based content or other services. Portlets usually display their contents in a
small window-like box within the portal framework. Similar to a window in a PC desktop, each
portlet owns a portion of the browser or personal digital assistant (PDA) screen where it displays
results.
This portal solution does not require a database server, but your customer could choose to use one
for data storage. IBM DB2 Express Edition is included as part of IBM WebSphere Portal Express V6.0; it
is used as the underlying database for the Portal Server and not as a generic relational database.
For more information about integrating Lotus Domino with IBM Lotus Sametime Connect, see the IBM
Redbook Lotus Domino 6.5.1 and Extended Products Integration Guide, SG24-6357-00. Redbooks
(TM)
(R)
are available at:
1 Collaborative Portal: Implementation Guide
Page 8
www.ibm.com/redbooks
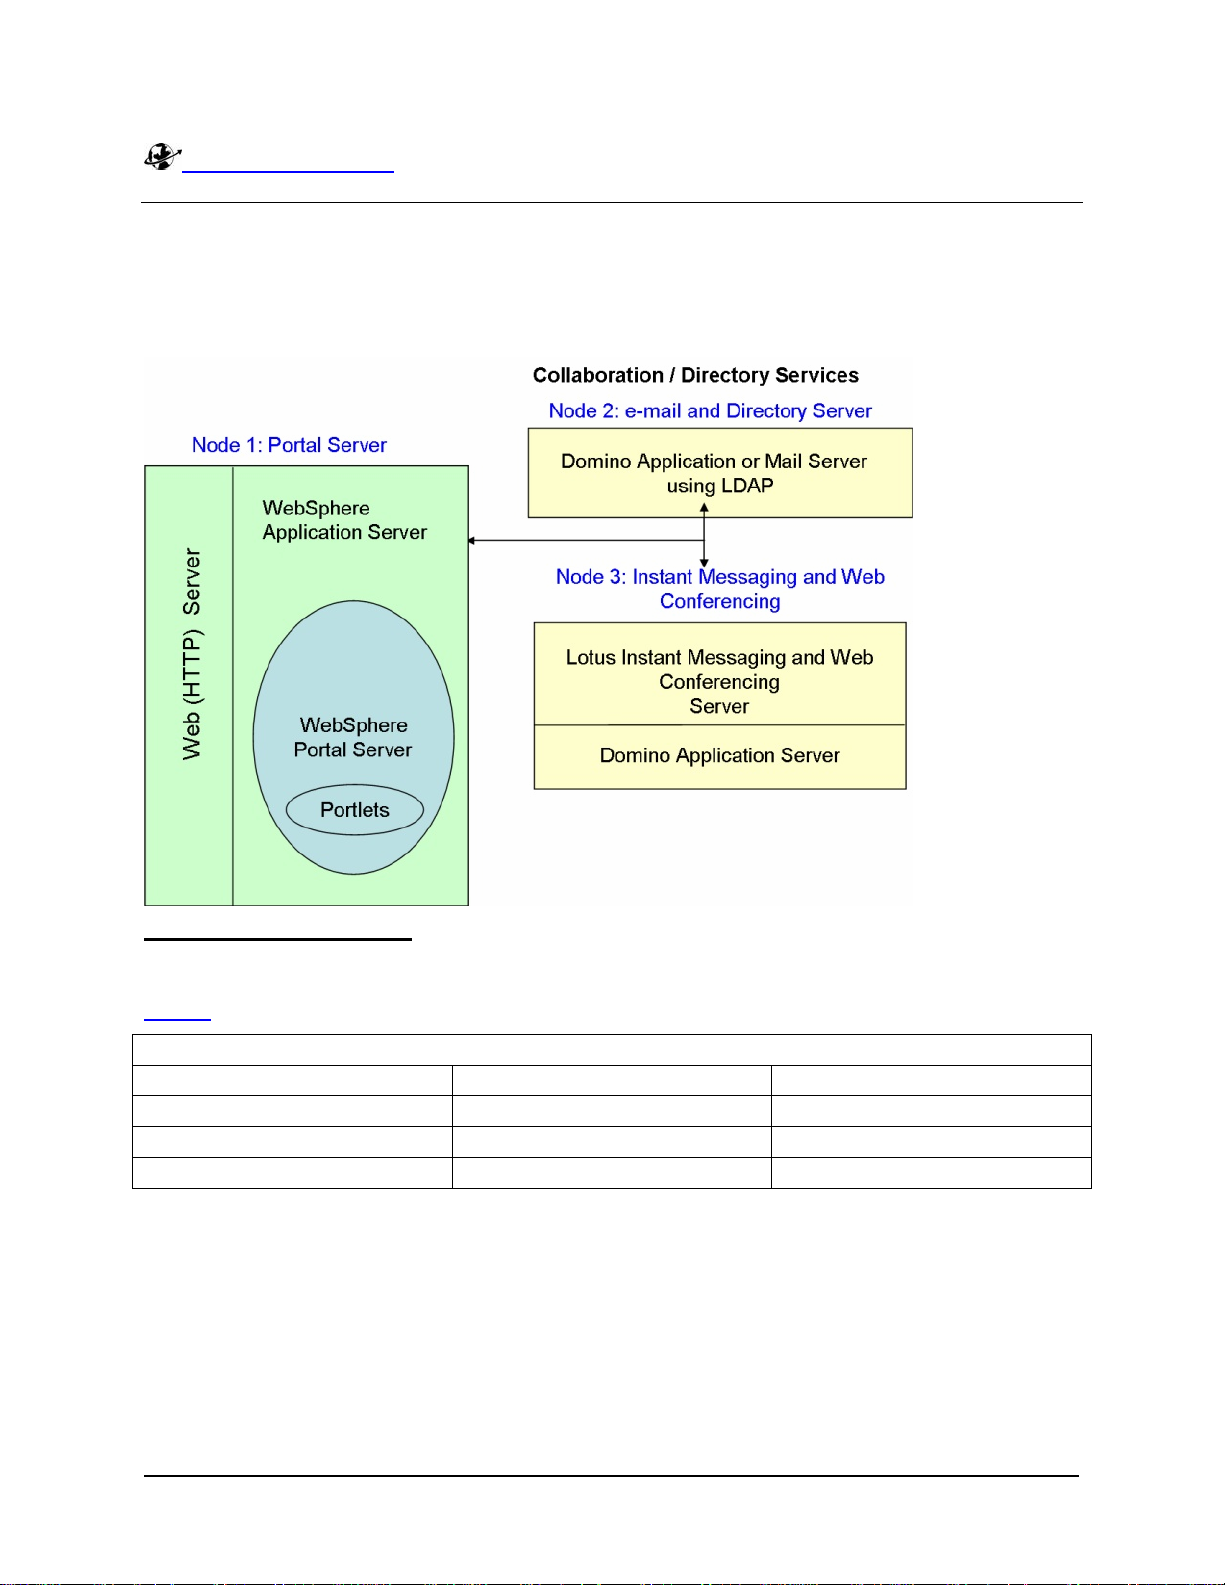
Development Environment Architecture
The following diagram depicts the systems and applications that are described in this Solution Starting
Point.
Figure 1. Development Environment Architecture
Server Naming Conventions
In this Solution Starting Point, servers are referred to by product name, function, DNS host name and
Domino domain name, depending on context. In order to avoid confusion and maintain consistency, use
Table 1
below to map the nodes (machines) defined above to the following names.
Table 1. Server Naming Conventions
Machine and Server Name DNS Host Name Domino Server Name
Portal Server
Directory Server
Sametime Connect Server
portal.mynetwork.com
n/a
directory.mynetwork.com directory/mycompany
sametime.mynetwork.com sametime/mycompany
The DNS and Domino domains are samples only. You need to use host names and DNS domain
determined by your TCP/IP network. You may choose any Domino domain name you wish when you
install the first Domino Server. The Domino Server name consists of the server hostname and the Domi no
domain name. For example, if your Directory Server is called svrp01.ca.acme.com and your Domino
domain is acmedomain, then the Domino host name would be srvp01/acmedomain.
2 Collaborative Portal: Implementation Guide
Page 9

Development Tools
It is recommended to use the IBM Lotus Component Designer V6 (formerly IBM Workplace Designer) or
IBM WebSphere Portlet Factory for developing portlets to use with IBM WebSphere Portal Express V6.0.
IBM Lotus Component Designer V6 ships with IBM WebSphere Portal Express V6.0 and is an innovative,
easy-to-use, standards-based development tool that script developers, Microsoft Visual Basic developers,
IBM Lotus Domino application designers, and others can use to create components for IBM WebSphere
Portal Express V6.0. Supporting a service-oriented architecture (SOA), Lotus Component Designer is
ideal for composite application development and for extending existing applications with collaborative
components.
IBM Lotus Component Designer V6 is a software development tool that helps a broad set of developers in
small to medium businesses to quickly develop line-of-business applications for IBM WebSphere Portal
Express V6.0 without writing code. It is built on the Eclipse 3.2 platform, developers can build
applications, integrate new technology and support Web 2.0 concepts more quickly and effectively.
It can be used to:
● Quickly build applications such as expense reports, project management, document approvals or
change requests, or collaboration tools such as blogs and discussion boards. An easy-to-use,
familiar software development tool for IBM Lotus Domino and Microsoft Visual Basic developers.
● More easily bring together people, applications and business processes to support specific job
functions through Composite Application development.
● Quickly create situational applications that serve short-term business needs, or extend existing
applications with collaborative components
Lotus Component Designer includes the following features:
● Intuitive design paradigm: A form designer to create the presentation layer of the component.
Forms allow entry, display, and processing of information through fields, views, buttons, and other
user interface controls.
● Full programming support: Events to support programming capabilities that include button
onClick, field onChange, form onSubmit, and other events to support the event-driven
programming model.
● Powerful script capabilities: Scripting with JavaScript and JavaScript interfaces to built-in
functions. Script editor with syntax coloring and code assist features to speed development.
There is also a complete API available that makes it easy to access documents.
● Productivity enhancers: Pre-built actions that can be added to a form for performing specific
commands.
● Visual tools palette: Widget palette that allows the developer to drag and drop controls onto the
form.
● Quick to get up and running: Easy deployment options are available for component testing and
production scenarios.
For more information on Lotus Component Designer V6, visit:
http://www.ibm.com/developerworks/workplace/products/designer/
IBM WebSphere Portlet Factory (separately licensed) features two components:
● IBM WebSphere Portlet Factory Designer (The "Designer" component is an Eclipse-based
development tool.)
● CPU-based and licensed WebSphere Portlet Factory (the runtime )
3 Collaborative Portal: Implementation Guide
Page 10

It complements WebSphere Portal with tools and technology to rapidly create, customize, maintain, and
deploy portlets. WebSphere Portlet Factory's ease of use and advanced development features
dramatically streamline the entire portlet development process. This acts to speed WebSphere Portal
deployments and increase ROI. The Portlet Factory runtime component is included with IBM WebSphe re
Portal Express V6.0; therefore, portlets created with Portal Factory Designer can be deployed without
requiring an additional license. IBM PartnerWorld members may have access to WebSphere Portlet
Factory Designer free of charge. Logon to IBM PartnerWorld (http://www.ibm.com/partnerworld
) for more
information.
Some benefits are:
● Speeds IBM WebSphere Portal deployments by automating portlet development for faster timeto-value
● Enables developers of any skill level to construct, change, deploy, and maintain custom portlets
● Creates a SOA entry point for companies by delivering SOA-based portal applications
● Provides pre-built integrations for existing applications such as Lotus Notes and Domino, SAP,
PeopleSoft, Siebel, Databases, and Web Services
● Acts as a foundation for IBM Lotus ActiveInsight
IBM WebSphere Portlet Factory includes the following features:
● Builders provide reusable components in the IBM WebSphere Portlet Factory Designer that
developers employ to automate and speed portlet development and deployment
● Dynamic Profiling enables on demand delivery of portlet variations without writing additional
custom code
For more information on WebSphere Portlet Factory, visit:
http://www.ibm.com/software/genservers/portletfactory/
Important Note Regarding Terms and Conditions of IBM WebSphere Portal Express V6.0 License
IBM WebSphere Portal Express V6.0 is available in two licensing options: Authorized User License
Option and Processor Value Unit License Option. Each Authorized User License Option entitles the
customer to install a single copy of IBM WebSphere Portal Express for use by twenty (20) authorized
portal users. The customer must acquire a sufficient number of User License Option licenses to provide
an entitlement for use for each Portal authorized user who accesses IBM WebSphere Portal Express. For
example, if you wish to provide fifty (50) individuals with access to IBM WebSphere Portal Express, you
must acquire three (3) User License Option licenses which provide portal use for up to sixty (60)
individuals. You may not install copies of the program representing more than 50 Authorized User License
Options on one server. This means there cannot be more than 1000 autho rized users on one server. The
Processor License Option entitles you to install and use one (1) copy of the program on one (1) server.
You must acquire a Processor License for all the processor cores on a server on whi ch you ha ve installed
a copy of the program.
The IBM WebSphere Portal Express V6.0 program is licensed as a multi-package and includes other
products distributed with the Program. You are authorized to install and use such other IBM Programs
only in association with Your licensed use of the Program. Consult the License Information Document for
IBM WebSphere Portal Express for additional restrictions and the official terms and conditions of the
license. It can be found at:
http://www.ibm.com/software/sla, then searching on program/part number 5724-E77.
4 Collaborative Portal: Implementation Guide
Page 11

Required Materials Checklist
The following is a list of the items you need to gather to complete the task of installing and configuring the
solution:
Table 2. Required Materials Checklist
Category
Hardware
Server machines:
Development client machine (optional)
Software
IBM WebSphere Portal Express V6.0
Adobe Acrobat Reader, to view online publications (www.adobe.com)
Item
● Portal Server
● Domino Mail and Directory Server
● Sametime Connect Server
Note: For more information about these servers, refer to the Solution
Architecture section of the Overview Guide.
Operating system software (see the Product Recommendations section
of the Overview Guide)
An application to unzip files (for example, WinZip located at
www.winzip.com
Product-related documentation that you need to refer to during
installation and configuration includes the following:
● IBM WebSphere Portal Express Information Center for V6.05.0.2,
Release Notes, Hardware and Software Requirements and
Installation Readmes for V6.0 (available from
http://www.software.ibm.com/wsdd/zones/portal/proddoc.html)
) that provides the facility to unzip a .war file
Other
All required licenses for the products you are installing
All required IP addresses
Download IBM WebSphere Portal Express Software
Space Requirements
● 3.1 GB of disk space is needed to store the full set of required downloadable parts, plus 1 GB of
disk space to unpack the images
● 4 GB of disk space is needed to install the product and 1.5 GB (minimum) of disk space in the
tmp directory to run the installation program
To download the files from the PartnerWorld for Software site, you can perform the following steps to get
the required software.:
1. Log into
2. Navigate to the Software Download site and accept the license agreement.
3. Use the Find by Search Text options to find IBM WebSphere Portal Express V6.0.
5 Collaborative Portal: Implementation Guide
http://www.ibm.com/partnerworld with your user name and password.
Page 12

4. Download the following required files, and the applicable optional files:
Table 3. Required files for IBM WebSphere Portal Express
Product Name and description Filename
IBM WebSphere Portal Express V6.0 Quick Start Guide
IBM WebSphere Portal Express Quick Start and Server
C97Q2ML
C97Q3ML
Install, V6.0 (W, IL, I - Setup)
IBM WebSphere Application Server Network Deployment
C97Q4ML
for Windows, V6.0.2.15 (W-1)
IBM DB2 UDB, Express Edition for Windows, V9.1.0 (W-2)
IBM WebSphere Portal Express (Disc 1 of 2), V6.0 (W-3,
C97Q5ML
C97Q6ML
IL-3, I-3)
IBM WebSphere Portal Express (Disc 2 of 2), V6.0 (W-4,
C97Q7ML
IL-4, I-4)
IBM WebSphere Portal Express (Disc 2 of 2), V6.0 (W-4,
C97Q7ML
IL-4, I-4)
IBM WebSphere Portal Express, V6.0 (W-5, IL-5, I-5)
IBM Lotus Sametime 7.5 Windows Server Multilingual
IBM Lotus Sametime 7.5 Server Cumulative Fix Pack 1 for
C97Q8ML
C90MQML
C96M1ML
Windows Multilingual
IBM Lotus Domino Server 7.0.1 for Windows 2000, 2003
C88R6NA
English
IBM Lotus Notes, Designer, Admin Clients 7.0.1 for
C88RDNA
Windows 2000 and XP Professional English
Note:
The Admin Client is required. If you require a
language other than English, see Table 4
below.
You may also need the following optional files (several languages listed below):
Table 4. Optional files
Product Name and description Filename
IBM Lotus Component Designer V6.0 for Windows
C96YUML
Multilingual Quick Start Guide
IBM Lotus Component Designer V6.0 Runtime for
C97N5ML
Windows Multilingual
IBM Lotus Component Designer V6.0 Tool for Windows
C97N6ML
Multilingual
WebSphere Portal V6.0 and Workplace Web Content
C93LXML
Management V6.0 - IBM Tivoli Directory Server for
Windows Multilingual
WebSphere Portal V6.0 and Workplace Web Content
C93LYML
Management V6.0 - IBM Tivoli Directory Server Fixpack
for Windows Multilingual
IBM Lotus Domino 7.0.1 Language Pack for Windows
C8990BP
2000/2003 and i5/OS Brazilian Portuguese
IBM Lotus Domino 7.0.1 Language Pack for Windows
C8990DE
2000/2003 and i5/OS German
6 Collaborative Portal: Implementation Guide
Page 13

Table 4. Optional files
Product Name and description Filename
IBM Lotus Domino 7.0.1 Language Pack for Windows
C8990ES
2000/2003 and i5/OS Spanish
IBM Lotus Domino 7.0.1 Language Pack for Windows
C8990FR
2000/2003 and i5/OS French
IBM Lotus Domino 7.0.1 Language Pack for Windows
C8990IT
2000/2003 and i5/OS Italian
IBM Lotus Domino 7.0.1 Language Pack for Windows
C89UVDA
2000/2003 and i5/OS Danish
IBM Lotus Domino 7.0.1 Language Pack for Windows
C89UVFI
2000/2003 and i5/OS Finnish
IBM Lotus Domino 7.0.1 Language Pack for Windows
C89UVNL
2000/2003 and i5/OS Dutch
IBM Lotus Domino 7.0.1 Language Pack for Windows
C89UVNO
2000/2003 and i5/OS Norwegian
IBM Lotus Domino 7.0.1 Language Pack for Windows
C89UVSV
2000/2003 and i5/OS Swedish
IBM Lotus Domino 7.0.1 Language Pack for Windows
C89V6CS
2000/2003 and i5/OS Czech
IBM Lotus Domino 7.0.1 Language Pack for Windows
C89V6EL
2000/2003 and i5/OS Greek
IBM Lotus Domino 7.0.1 Language Pack for Windows
C89V6HU
2000/2003 and i5/OS Hungarian
IBM Lotus Domino 7.0.1 Language Pack for Windows
C89V6PL
2000/2003 and i5/OS Polish
IBM Lotus Domino 7.0.1 Language Pack for Windows
C89V6PT
2000/2003 and i5/OS Portuguese
IBM Lotus Domino 7.0.1 Language Pack for Windows
C89V6RU
2000/2003 and i5/OS Russian
IBM Lotus Domino 7.0.1 Language Pack for Windows
C89V6TR
2000/2003 and i5/OS Turkish
IBM Lotus Domino 7.0.1 Language Pack for Windows
C90TJJA
2000/2003 and i5/OS Japanese
IBM Lotus Domino 7.0.1 Language Pack for Windows
C8990KO
2000/2003 and i5/OS Korean
IBM Lotus Domino 7.0.1 Language Pack for Windows
C8990SC
2000/2003 and i5/OS Simplified Chinese
IBM Lotus Domino 7.0.1 Language Pack for Windows
C8990TC
2000/2003 and i5/OS Traditional Chinese
For details on choosing and setting up the installation source, review the information in the product
Information Center here:
http://publib.boulder.ibm.com/infocenter/wpdoc/v6r0/topic/com.ibm.wp.exp.doc/wpf/inst_source.html
For additional information on the installation process, review the information on the product Information
Center here:
7 Collaborative Portal: Implementation Guide
Page 14

http://publib.boulder.ibm.com/infocenter/wpdoc/v6r0/topic/com.ibm.wp.exp.doc/wpf/inst_exp_prod.ht
ml
If you choose to install a non-collaborative portal without the instant messaging or other IBM Lotus
Domino based products, you may choose to use IBM WebSphere Portal Express by itself. The solution
example and solution use cases provided in this Solution Starting Point and additional Industry
Supplements require a collaborative portal and do not work in a portal-only environment.
Software Topology
IBM WebSphere Portal Express installs and runs as an application server on the WebSphere Application
Server platform. For each installation of portal, an installation of IBM WebSphere Application Server is
required, and both the portal and WebSphere Application Server installations must reside on the same
machine. Installing multiple portals on a single WebSphere Application Server profile is not supported.
Hypertext Transfer Protocol (HTTP) is used as the transport protocol for portal requests. By default, IBM
WebSphere Portal Express uses the internal HTTP transport within WebSphere Application Server to
handle these requests. You can optionally configure an external Web server, such as IBM HTTP Server,
to work with IBM WebSphere Portal Express.
Because portal administration and configuration are dependent on IBM WebSphere Application Server,
you might have to use the administrative tools that are provided with IBM WebSphere Application Server
to monitor or control activities that are related to the portal. Additionally, if you configure an external Web
server for use with the portal, you might need to use the Web server interface to administer portal-related
activities. A database subsystem is required for IBM WebSphere Portal Express. DB2 is the default
database provided with the product to store information about configuration, access control, user
identities, credentials, and permissions for accessing portal resources and user data.
Additionally, IBM WebSphere Portal Express and IBM WebSphere Application Server require access to a
user registry. The following list provides different sources that the portal can use to access a user registry:
● Lightweight Directory Access Protocol (LDAP) directory, such as IBM Tivoli Directory Server or
Domino Directory
● Database user registry
● Customer supplied custom user registry
IBM WebSphere Portal Express uses a database as the default user registry for authentication. You can
configure IBM WebSphere Portal Express to use an LDAP directory to store user information and to
authenticate users.
Portlets are key to the portal experience, and IBM WebSphere Portal Express has built-in portlets that
interface with tooling that extends portal functionality. The Lotus Domino and Extended Products servers IBM Lotus Domino and IBM Lotus Sametime Connect - are used with IBM WebSphere Portal Express to
support collaborative features in the provided Domino and Extended Products Portlets (formerly Lotus
Collaboration Center portlets). Portlets are also provided to integrate with extended search capabilities.
For each installation of IBM Lotus Sametime Connect or Lotus Domino Document Manager, an
underlying installation of Lotus Domino is required on the same machine.
Preparing the Systems
Preparing the systems for this Solution Starting Point involves:
● Installing and configuring the operating system
● Establishing system IDs
8 Collaborative Portal: Implementation Guide
Page 15

Server Information Worksheet
Install the operating systems on all the required servers. Use the following table to record your
values. A separate spreadsheet of this table is packaged with this Solution Starting Point.
Table 5. Server Information Worksheet
System Parameter Portal Server Directory Server
Administrator-level ID
1
Administrator-level ID
<your choice> <your choice> <your choice>
<your choice> <your choice> <your choice>
password
Hardware Model
Hardware Serial
Number
Contact name and
organization of the
owner of this server
Microsoft network
computer name
Microsoft windows
workgroup/domain
name
Primary & secondary
DNS
TCP/IP Address
Numerical IP address
of the default gateway /
router for this machine
TCP/IP fully Qualified
Host Name
TCP/IP sub-net mask
of the network of which
this server is a member
Sametime Connect
Server
Note:
● System user with administrative rights, usually other than "Administrator" and commonly referred
to as a "superuser". Often configured with special user rights for the purpose of executing
specific server tasks.
Installing the Operating System
This section describes the components that should be configured before you begin the solution
installation and the key installation parameters for the server. The detailed installation steps are not
described here, but you can follow the configuration information below as a guide during installation.
IMPORTANT: The portal collaborative functions only work properly if the time differentials (date,
time and time zone) between the IBM Lotus Sametime Connect system are within the session timeout
value specified in the Directory Server (the Domino LDAP server). For testing or demonstration
9 Collaborative Portal: Implementation Guide
Page 16

purposes, you may want to set all servers to the same time zone, and the same time and date. You need
to adjust the session timeout value for the Domino directory server to accommodate requirements from
your customer.
A Domino directory is a collection of user and resource information, such as user names, user IDs,
passwords, server names and information used by software programs for lookup and authentication.
Each domain has a Domino Directory that is the control and administration center for the Domino Servers
in the domain. Also called the Public Address Book (names.nsf), the Domino Directory contains both a
Server document for each server and a Person document for each user. Additionally, you can create
Group documents to establish relationships among servers and users for mailin g and security purposes,
and create Connection documents to schedule replication and mail routing among servers.
For additional details on how to set up the server on which you install IBM WebSphere Portal Express
Server, refer to the Preparing your Operating System section of the IBM WebSphere
Information Center and follow the documentation provided under the respective operating system header
(Windows
(R)
or Linux
(R)
). In the Information Center, from the left frame select Installing -> WebSphere
(R)
Portal - Express
Portal -> Preparing your operating system to navigate to this section.
If you want to establish a portal on a platform that is not described in this Solution Starting Point, refer to
the Information Center for details.
Windows Installation Parameters
When you install Windows, you should follow these recommendations:
Table 6. Windows Installation Parameters
Item
Portal Server Configuration
Values
Domino Server Configuration
Values
Server type Standalone Standalone
File system NTFS NTFS
Protocols TCP/IP TCP/IP
SMTP mail Do not install Do not install
Network configuration Static IP address
Fully qualified hostname
Web browser
Microsoft Internet Explorer 6.0 with
Static IP address
Fully-qualified hostname
Service Pack 1
Note:
Ensure that the first eight characters of all computer names and database names are unique on the
network. Ensure the user IDs are unique in each domain.
Create User IDs
The following operating system User IDs need to be created.
Table 7. User IDs
Parameter Suggested Value Your Value
Portal Express Server
ID: wpsadmin
Administrator
Portal Express Server Administrator ID
To install IBM WebSphere Portal Express, you must log on to Windows with a locally defined user ID that
has administrative access to the system. In this solution, the user ID wpsadmin is used for this purpose.
10 Collaborative Portal: Implementation Guide
Page 17

1. On the system that will be used as the portal server, create a Windows user ID and make this
user a member of the Administrators group to provide it with administrative rights.
2. Assign the following user rights to the user account:
● Act as part of the operating system
● Log on as a service
User rights are maintained with the Local Security Policy tool. To view or modify the user rights:
1. Navigate through the Start menu to the Administrator tools menu, and then to the local security
policy option.
2. Double-click on the local policies and then double-click the user rights assignment.
3. Double-click on the user right you are interested in. The Local Security Policy Setting window
for the user right is displayed, listing the users who have been granted the user right.
During the Portal installation, you can select to run IBM WebSphere Application Server and IBM HTTP
Server as services, and then you must provide the system logon user ID and password. This user ID must
have the rights noted above.
Note the following if you intend to run IBM WebSphere Application Server and IBM HTTP Server as
services:
● The user ID you provide must already exist prior to the portal installation.
● If the user ID does not have the required privileges, then a reboot is required during the
installation to update the ID with the required privileges.
● Because a single user ID and password is used, the portal installation does not allow you to
create separate user accounts for these services.
11 Collaborative Portal: Implementation Guide
Page 18
Chapter 2. Install and Configure Essential Solution Software
This section describes how to install and configure the products required to implement this solution.
Task Summary
Perform the tasks as listed in the table below in the order listed and on the machine identified. A
separate spreadsheet of this table is packaged with this Solution Starting Point for your use. To ensure
each task is completed, you may want to print out this table and use it as a checklist.
Table 8. Task Checklist
Machine Name
Portal Server Install IBM WebSphere Portal Express on page 13
Directory Server
Sametime Connect Server
Set up the Domino Directory Server on page 17
Install the Notes and Administrator Clients
Directory Server Configure the Domino Domain on page 23
Sametime Connect Server
Set up the IBM Lotus Sametime Connect
Task
on page 21
Install the Sametime Connect Server in the Domino Domain
on page 29
on page 31
Directory Server
Directory Server
Portal Server
Configure Domino Web Access for Instant Messaging
page 34
Configure IBM WebSphere Portal Express Server to Use
Domino Directory
on page 36
on
Enable Collaborative Components on page 41 Portal Server
Configure Lotus Collaborative Components
on page 44
If you are interested in installing just IBM WebSphere Portal Express without the collaborative functions of
portal, the install procedure can be simplified to the below tasks.
Table 9. Task Checklist
Machine Name
Task
Portal Server Install IBM WebSphere Portal Express on page 13
The solution example and solution use cases provided in this Solution Starting Point require a
collaborative portal and do not work in a portal-only environment.
The next topics provide details about the activities you will need to perform to implement the solution. It is
recommended that you look ahead at the installation and configuration tasks to identify any information
you may need to ask the customer prior to starting the implementation.
12 Collaborative Portal: Implementation Guide
Page 19

Install IBM WebSphere Portal Express
Perform this task on the Portal Server.
This section is a guide for the installation of IBM WebSphere Portal Express. Detailed installation steps
are located in the Information Center provided on the setup CD. IBM WebSphere Portal Express is
installed on the Portal Server.
For more information, see the main product website at:
http://www.ibm.com/software/genservers/portalexpress
Information Center Prerequisites
The Information Center requires a browser that supports the following:
● HTML 4
● Cascading style sheets
(TM)
applets
(TM)
(R)
Internet Explorer 6 or higher.
● JavaScript
● Java
Examples of such browsers are Microsoft
It is recommended that JavaScript be enabled in the browser. If you use a different or earlier version of a
browser, your pages may format differently and some functions may not work correctly. Also, the
Information Center uses Java applets for search and the collapsible table of contents. Not all browsers
support these applets. Therefore, there is an alternate HTML-based table of contents that you can use if
you have trouble with the Java-based table of contents.
Some browsers that do not provide a Java Virtual Machine (JVM) by default may require that you install a
JVM to use any Java based code such as J a vaScript or Java applets. Refer to support for your browser
for more information.
Before You Begin
Prerequisites
The following prerequisites must be satisfied prior to installing the Portal Server:
● Install the appropriate operating system.
See the section Installing -> Supported hardware and software -> Software requirements ->
Required on the portal machine: a supported operating system in the WebSphere Portal
Information Center (available on the IBM WebSphere Portal Express setup CD) to see which
operating systems are supported.
● The WebSphere Portal Information Center also provides a set of tasks that must be performed to
ensure that your machine is ready for installation. To see this list, navigate to Installing ->
WebSphere Portal -> Preparing your operating system -> Linux/Windows.
Special Considerations
Consider the following before installing IBM WebSphere Portal Express:
● View the section of the Information Center under Planning for Deployment -> Supported
hardware and software for WebSphere Portal Express v6.0, for details on which operating
systems and fix pack levels are supported.
13 Collaborative Portal: Implementation Guide
Page 20

● IBM WebSphere Portal Express requires IBM WebSphere Application Server in order to function.
In this Solution Starting Point, it is assumed that IBM WebSphere Application Server is not
already present in the network, and therefore it is installed with the portal software.
For more information, in the Information Center for IBM WebSphere Portal Express, navigate to Installing
-> Installing on Windows and Linux and read the sections on the various installation choices for the
IBM WebSphere Application Server for more special considerations.
Installation Options
Both a silent installation and a manual installation are documented here; you can choose which
type of installation you want to follow. A silent installation is when a product is installed using a response
file. The response file is a text file that can be customized with setup and configuration data that will
automate the software installations. The setup and configuration data normally have to be entered during
a manual installation, but with a response file, the installation can proceed without any intervention.
IBM WebSphere Portal Express supports a silent installation procedure. If you would prefer the manual
installation, proceed to Manual Installation
to the Silent Installation
on page 15.
below. If you would like to perform a silent installation, proceed
Manual Installation
In this section you are installing IBM WebSphere Portal Express with a new instance of IBM WebSphere
Application Server. This installation also includes IBM HTTP Server and uses the graphical installation
program. For more information, detailed installation steps are located in the documentation that is
provided with the IBM WebSphere Portal Express product.
1. Log on with an administrative ID such as the
2. Insert the IBM WebSphere Portal Express setup CD into the CD drive, or open the root directory
of the downloaded CD image. The installation program should start automatically. If it does not,
then from the root directory of the CD, run the setup.exe file from a Windows command prompt.
3. The Welcome window opens.
For additional information, visit the IBM WebSphere Portal Express website. Select Quick Start
from the left navigation pane and then select IBM WebSphere Portal Express product
information on the right pane to open the WebSphere Portal and Workplace Web Content
Management web page. From the Use and Maintain tab, select Product documentation and
from under the Version 6.0 tab, Information Center section, select view to launch the product
Information Center.
Use the Information Center instructions for reference as necessary during the installation
procedure.
4. Select Install and then Start Installation to launch the installation wizard for Windows.
5. Select the language.
6. On the WebSphere Portal Express Version 6.0 Installation window, read and accept the
license agreement.
7. Use Table 10
If desired, use this table to record information you provide during the installation for later
reference. A separate spreadsheet of this table is packaged with this Solution Starting Point.
below as you proceed through the installation to input data during the process.
IBM WebSphere Application Server Administrator.
Table 10. IBM WebSphere Portal Express Installation Parameters
System Parameter Suggested Value Your Value
14 Collaborative Portal: Implementation Guide
Page 21

Table 10. IBM WebSphere Portal Express Installation Parameters
Setup type Typical
Installation Directory 1
● Run WebSphere
Application Server as
a service
● System Logon User
ID
C:\IBM\PE
Values:
● Selected
● wpsadmin
● N/A
● Password
Node Name (of Portal
<portal>
Server machine)
Host Name (fully-
<portal.mynetwork.com>
qualified hostname of
Portal Server machine)
Properties for this
instance of the
WebSphere Application
Server:
2
Cell name
Node name
Host name
Portal Express Server
<wpsadmin>
Administrator ID
Portal Express Server
N/A
Administrator Password
Note:
1. The IBM WebSphere Portal Express code is installed in a subfolder, PortalServer, under
this directory. This PortalServer folder (for example, C:\IBM\PE\PortalServer) is referred
to as the <wp_root> directory in this Solution Starting Point. The WebSphere profile code is
installed to the C:\IBM\WebSphere\profiles\wp_profile directory; this directory is
referred to as <was_profile_root> in this Solution Starting Point.
2. These values are derived from the hostname of this server established during the operating
system installation.
8. When the installation completes, an "Installation was succe ssful" message appears. Check the
option to launch First Steps and click Finish. Do not launch the Advanced Configuration
Wizard at this time. You will use it to configure Lotus Domino as LDAP later in Configure IBM
WebSphere Portal Express Server to Use Domino Directory on page 36.
Note:
A DB2 administrator ID wpdb2ins is created during the installation process for accessing DB2. This
DB2 administrator ID uses the same password that you have specified for the IBM WebSphere
Portal Express and WebSphere Application Server administrator ID.
Proceed to Verification Procedure
on page 17 to continue.
Silent Installation
This section describes the silent installation procedure and how to edit certain values to meet your
customer's unique requirements.
15 Collaborative Portal: Implementation Guide
Page 22

Preparing the Silent Installation
Copy the files on the WebSphere Portal CDs to the local hard drive, or a network share. Use a directory
structure similar to c:\cdimg\w-setup, c:\cdimg\w-1, etc.
Copy the installresponse.txt file to a temporary location such as c:\temp, and then using a text
editor, modify the following key values.
Table 11
Key Parameters
below identifies the installation value and options chosen for this response file.
This table contains some of the values used in the silent installation response file that you can
change to meet your customer requirements. If desired, you can also use this table to record the values
you changed. A separate spreadsheet of this table is packaged with this Solution Starting Point.
Table 11. IBM WebSphere Portal Express Silent Installation Parameters
Response File
Suggested Value Your Value
Attribute
licenseAccepted true
express.location
portal.location
db2express.location
was.location
nodeCellHost.cellName
nodeCellHost.nodeNam
C:\IBM\PE
C:\IBM\PE\PortalServer
C:\IBM\PE\db2
C:\IBM\PE\AppServer
PEV6H
PEV6H
e
nodeCellHost.hostNam
<portal.mynetwork.com>
e
wasAdmin.user1
wpsadmin
wasAdmin.password
portalAdmin.user
wpsadmin
portalAdmin.password
db2Admin.user
wpdb2ins
db2Admin.password
wasService.was true
wasService.wps true
cdSetup.cdPath
userInputCDLocWas.cd
c:\cdimg\w-setup
c:\cdimg\w-1
Path
userInputCDLocDb2.cd
c:\cdimg\w-2
Path
archiveMediaPanel1.cd
c:\cdimg\w-3
Path
archiveMediaPanel2.cd
c:\cdimg\w-4
Path
userInputCDLocProfile.
c:\cdimg\w-5
cdPath
16 Collaborative Portal: Implementation Guide
Page 23

Note:
1. This user should have logon as a service, act as part of the operating system, and belong to the
Administrators group. It was created in Create User IDs
on page 10.
Starting the Silent Installation
Execute the following command to perform the installation silently using the response file:
c:\w-Setup\cdSetup\install.bat-options c:\temp\installresponse.txt
Verification Procedure
After you have completed installing IBM WebSphere Portal Express, verify that the installation was
successful by logging in to the portal using the
password. Launch IBM WebSphere Portal Express by selecting Launch WebSphere Portal Express
from the IBM WebSphere Portal Express version 6 launch window.
To launch IBM WebSphere Portal Express again in the future, select Start -> Programs -> IBM
WebSphere -> Portal.
Portal Express Server Administrator (wpsadmin) and
Troubleshooting
Open the Information Center for IBM WebSphere Portal Express and navigate to Troubleshooting ->
Search the product documentation for a solution -> Troubleshooting WebSphere Portal Express
Installation and review the detailed list of solutions to installation problems.
Starting and Stopping the Portal Server
Even though the default installation procedure installs the IBM WebSphere Portal Express Server as a
Windows service, the service is set to be started manually (it is recommended that you keep this setting).
Starting and stopping the portal server can be done either from the Windows Start menu or by command
line.
● From the Start menu: Start -> Programs -> IBM WebSphere -> Portal Server v5.0 -> Start the
Server (and Stop the Server )
● By command line, open a command window to <WAS_root>\bin (where <WAS_root> is
c:\ibm\pe\websphere) and issue the startServer or stopServer command. See the
following example:
startServer WebSphere_Portal
or
stopServer WebSphere_Portal
In addition to the WebSphere_Portal server, the IBM WebSphere Application Server named server1
must be running to perform certain configuration tasks, as you see below. Immediately following
successful WebSphere Portal installation (and before rebooting the server), both servers should be
running. You can verify this by using the serverStatus command with the -all option. The command
(in the <WAS_root>/bin directory) displays all the defined application servers and their current status.
Set up the Domino Directory Server
This task needs to be performed on the following systems:
Directory Server
17 Collaborative Portal: Implementation Guide
Page 24

Sametime Connect Server
This section describes how to set up the IBM Lotus Domino Server for Directory and Web mail services.
Before You Begin
IMPORTANT: It is critical that all servers are set up for the same time and date in order for single-
sign on to work.
IBM Lotus Domino Server installation must be completed as a prerequisite for setting up Web mail,
Domino applications, the LDAP directory services, instant messaging, and e-meetings. IBM Lotus Domino
Server is installed on two machines in this solution implementation:
● Directory Server (directory)
● Sametime Connect Server (sametime)
Note:
To facilitate later integration with IBM WebSphere Portal Express Server through the Collaborative
Component portlets, these instructions are written with suggested values for use with WebSphere.
However, the resulting installations work without being integrated into WebSphere.
Prerequisites
The following prerequisites must be satisfied prior to installing the IBM Lotus Domino Server:
Table 12. Prerequisites
Obtain an IP address for the server
Obtain a fully-qualified DNS name
Obtain the installation code
Understand hardware requirements
Understand software requirements
Prerequisite
Installation Procedure
The following are general steps for installing IBM Lotus Domino Server. Perform these steps on each of
the servers: Directory Server and Sametime Connect Server.
1. Use the Domino CD or expand the downloaded file (C88R6NA.EXE) and run setup.exe to
install Domino code.
2. Read and accept the License Agreement statement.
3. Accept the defaults until you are prompted to select the destination folders. It is recommended
that you keep the defaults, changing only the installation drive if necessary.
a. Program Folder: C:\Lotus\Domino
b. Data Folder: C:\Lotus\Domino\Data
4. Choose Domino Enterprise Server as the server type.
5. Accept the defaults for the rest of the options until the server begins installing and then wait while
the server copies all the files to the appropriate directories.
6. Finish the installation.
18 Collaborative Portal: Implementation Guide
Page 25

Configure the Directory Server
For this installation, you configure the Directory Server as the first Domino server in the Domino domain.
Key Parameters
If desired, use this table to record information you provide during the configuration for later reference.
A separate spreadsheet of this table is packaged with this Solution Starting Point.
Table 13. IBM Lotus Domino Server Configuration Parameters
System Parameter Suggested Value Your Value
Fonts
"Set up the first server or stand-
alone server" or "Add a server to
Set up the first server or standalone server
a domain"?
Server Name 1
directory
Server Title
Organization Name 2
mycompany
Organization Certifier Password 3
Domain Name 4
Portal Express Server
Administrator ID
5
mycompany
wpsadmin
Administrator Password
Internet Services 6 Select HTTP and LDAP only
Server Hostname 7
directory.mynetwork.com
Note:
1. Specify the server name of the primary Domino Directory server. Be aware that the name of the
Domino server might be different than the machine name. Use the name you have chosen when
installing the Domino Directory server, not the host name.
2. Used for security and authentication, the Organization Name is a meaningful identifier of your
company. It is appended to every user and server name that is created in your domain.
3. The password for the Certifier ID is used when certifying new users into the domain. The
minimum password length is eight characters. It is recommended you use a password of at least
13 characters. A phrase is more secure than a password and may be easier to remember. For
the first server you need to create a Certifier ID file. It should be called cert.id and the
configuration program saves it to your Domino data directory.
Each grouping of Domino servers, known as a domain or an organization, has a certifier ID that
automatically certifies, or authorizes, the IDs of the administrator and first server. This certifier ID
is sometimes referred to as the certifier name. When you register new users or servers, you must
use the certifier ID to give them access to the organization's resources. You also need the
organization certifier name to create organizational unit certifiers for a hierarchical naming
scheme. Domino creates the certifier ID automatically during the first server configuration by
using the organization name you specify and an optional password.
(R)
4. Domino Servers and Lotus Notes
clients are grouped into domains, which are the basis for the
design of a Lotus Notes environment. A domain is a group of servers that use the same Do mino
Directory. Specify the domain name that you want to use. This domain name is not the same as
the DNS suffix of the server's hostname.
19 Collaborative Portal: Implementation Guide
Page 26

5. The wpsadmin ID and password are used to administer two servers in the Domino domain: the
Directory Server and IBM Lotus Sametime Connect.
6. This option enables Web Browsers (HTTP services), Internet Mail Clients (SMTP, POP3, and
IMAP services), and Directory Services (LDAP services) on the server.
7. The server's TCP/IP host name. It is recommended that you use the following convention:
servername.your_organization_domain_name. If you choose to use a different name, you
may need to update your Domain Name Server (DNS) definitions with the new Domino Server
host name.
Configuration Procedure
The Domino software provides a wizard to help you set up the server. Refer to the Table 13
on page 19
for help in choosing the values. To set up Domino, follow these general steps:
1. Use the Start menu to start the Lotus Domino Server program (Start -> Programs -> Lotus
Applications -> Lotus Domino Server).
2. Select Start Domino as a Windows service, make sure that Always start Domino as a
service at system startup and Don't ask me again are checked, and click OK.
3. Accept the default fonts.
4. Since this is the first server in the domain, select the option to Set up the first server or stand-
alone server (all future servers will select the option to Set up an additional server).
5. When prompted for the server name and title:
a. Enter a name for the Domino server (server host name recommend ed).
b. If you prefer, you can enter a short title/description for the Domino server (this is an optional
value and has no other effect on the server).
c. Leave I want to use an existing serv er ID file unselected.
6. When prompted for the organization name:
a. Enter the organization name for this infrastructure.
b. Enter a password for the certifier file (twice for confirmation).
c. Leave I want to use an existing serv er ID file unselected.
7. When prompted for the Domino domain name:
a. Enter the Domino domain name for this installation.
8. When prompted for an Administrator name and password:
a. Enter the name of the first Domino Administrator (
Portal Express Server Administrator). If
you are using a generic account name such as wpsadmin, fill in only the Last name field.
b. Enter a password for this account (twice for confirmation).
c. Select the box to save a local copy of the ID file and change the location for saving it, if
desired.
9. When prompted to specify Internet services:
a. Select HTTP and LDAP.
b. Do not select IMAP, POP3, and/or SMTP (they can be enabled later on specific servers, if
needed).
10. On the Domino network settings page, click the Customize button to configure the port drivers
and host name:
a. Deselect NetBIOS ports.
20 Collaborative Portal: Implementation Guide
Page 27

b. In the TCP/IP line, verify that the Host Name field shows the fully qualified host name for the
server.
c. If needed, modify the fully qualified internet host name for this Domino server in the box
below the port settings (should match the entry in step b above).
d. After you click OK, you are taken back to the Domino network settings page where you can
click Next.
11. Keep the default security settings.
12. Verify the settings summary and click Setup.
13. Click Finish to exit the configuration wizard.
The setup program creates the ID files and databases needed for the server to run. Once this has
finished, start the server from the Start menu or from the Windows Services panel. When the server
launches for the first time, the remaining system databases are created.
Starting and Stopping Lotus Domino Server
Start the Domino server program by using the Windows Start menu.
Stop the Domino server by typing quit in the Domino console.
When the Lotus Domino server starts, a Domino console opens. Leave this console running in the
background at all times until you shut down the server. It is recommended that this console window be set
to a larger size, and that the Domino Server console window's page buffer be raised to 200 or more lines.
You can set these by opening the window's properties and modifying the settings.
Install the Notes and Administrator Clients
This task needs to be performed on the following systems:
Directory Server
Sametime Connect Server
Before you can install and configure the remaining base Domino servers for the extended products, you
must install the Notes
This section is an overview of the installation for the Lotus Notes clients: Lotus Notes and Domino
Administrator. Detailed installation steps are located in the documentation that is provided with the Lotus
client products.
(R)
and Administrator clients.
Lotus Notes and Domino Administrator allow administrators and developers to manage and monitor their
entire Lotus Domino infrastructure, including Sametime Connect Server. They also have the ability to
manage databases on each server, including access control lists (ACLs). An access control list is a list
associated with a file that identifies users who can access the file and identifie s their access rights to that
file.
Before You Begin
Prerequisites
The following prerequisites must be satisfied prior to installing the clients:
● IBM Lotus Domino Server must be installed in the network
● Obtain the server name or the IP address of the Directory Server
● Start the IBM Lotus Domino Server program on the Directory Server
21 Collaborative Portal: Implementation Guide
Page 28

Special Considerations
For demonstration, evaluation, or development purposes, it is easiest to install the clients on one of the
Domino-based servers if you have a Windows environment. In a production env ironment, however, you
should install the Domino Administrator client along with Lotus Notes on a machine other than the server.
If you are installing a client on a system that has a Domino server installed on it, make absolutely certain
that the client is installed into the Notes client directory, not into the Domino (server) directory.
Installation Procedure
Key Parameters
If desired, use this table to record information you provide during the installation for later reference. A
separate spreadsheet of this table is packaged with this Solution Starting Point.
Table 14. Domino Clients Installation Parameters
System Parameter Suggested Value Your Value
Domino Server Name 1
User ID ( Portal Express
Server Administrator)
2
Password 3
Note:
1. The name of the Domino server that will provide services for the client.
directory/mycompany
wpsadmin
Note: The server's full name is a combination of the Server Name and the Organization Name
separated by a slash. For example, directory/mycompany is a full server name where
directory is the Server Name and mycompany is the Organization Name.
2. Specify the administrator's first and last name as it appears in the Domino Directory. For
demonstrating and using the solution, it is easiest to browse to the administrator's ID file that you
created when installing the IBM Lotus Domino Server.
3. The administrator's password.
Procedure
To install the client, perform the following:
1. Use the Domino CD or expand the downloaded file (C88RNDA.EXE) and run setup.exe to
install the Notes code.
2. Accept the License Agreement and click Next.
3. Fill in the User Name and Organization fields with the administrator name and organization
specified for the server configuration. (e.g., wpsadmin and mycompany). Click Next.
4. Change the installation path for program files and data to <drive>:\Lotus\notes and
<drive>:\Lotus\notes\data, respectively. Click Next.
5. Select the following program features to be installed to the hard drive, and click Next.
● Notes Client (with Help Files and Spell checker)
● Domino Administrator (with Help Files and Migration Tools)
● Symbol Files
6. Click Install and when the installation completes, click Finish.
22 Collaborative Portal: Implementation Guide
Page 29

7. Start the Domino Administrator client (there is an icon on the desktop, or use the Start menu).
The Notes client configuration wizard appears.
8. On the Welcome screen, click Next.
9. On the User Information screen, enter the administrator's name (for example, wpsadmin) and
the master domino server name (for example, directory/mycompany). Check the box to
indicate that you want to connect to a Domino server. Click Next.
10. Respond to the password prompt with the administrator's password.
11. On the Instant Messaging Setup screen, uncheck the box to setup instant messaging and click
Next.
12. On the Additional Services screen, leave all the services unchecked (you configure services
later) and click Next. You should see a popup message indicating that setup is complete.
13. Once Notes has finished configuring itself, you are brought to the default Welcome page.
Configure the Domino Domain
Perform this task on the Directory Server.
In this section, you configure the Domino domain on the Directory Server.
Before You Begin
The following actions must be performed prior to configuring the Domino domain:
● IBM Lotus Domino Server must be installed in the network
● Start the IBM Lotus Domino Server program on the Directory Server
● Choose the name of the Sametime Connect Server (see Table 15
● Domino Administrator client is installed
All of the configuration tasks in this section are performed from the Domino Administrator client. There is
no need to close the client between tasks.
on page 24)
Register the Other Domino Servers
1. Start the Domino Administrator client. Click Do not show again on the Welcome page and
close it. You should now be on the MYCOMPANY domain tab showing Server:
directory/mycompany.
2. Click the Configuration tab and then open the Registration section in the Tools bar on the right
side of the menu.
23 Collaborative Portal: Implementation Guide
Page 30
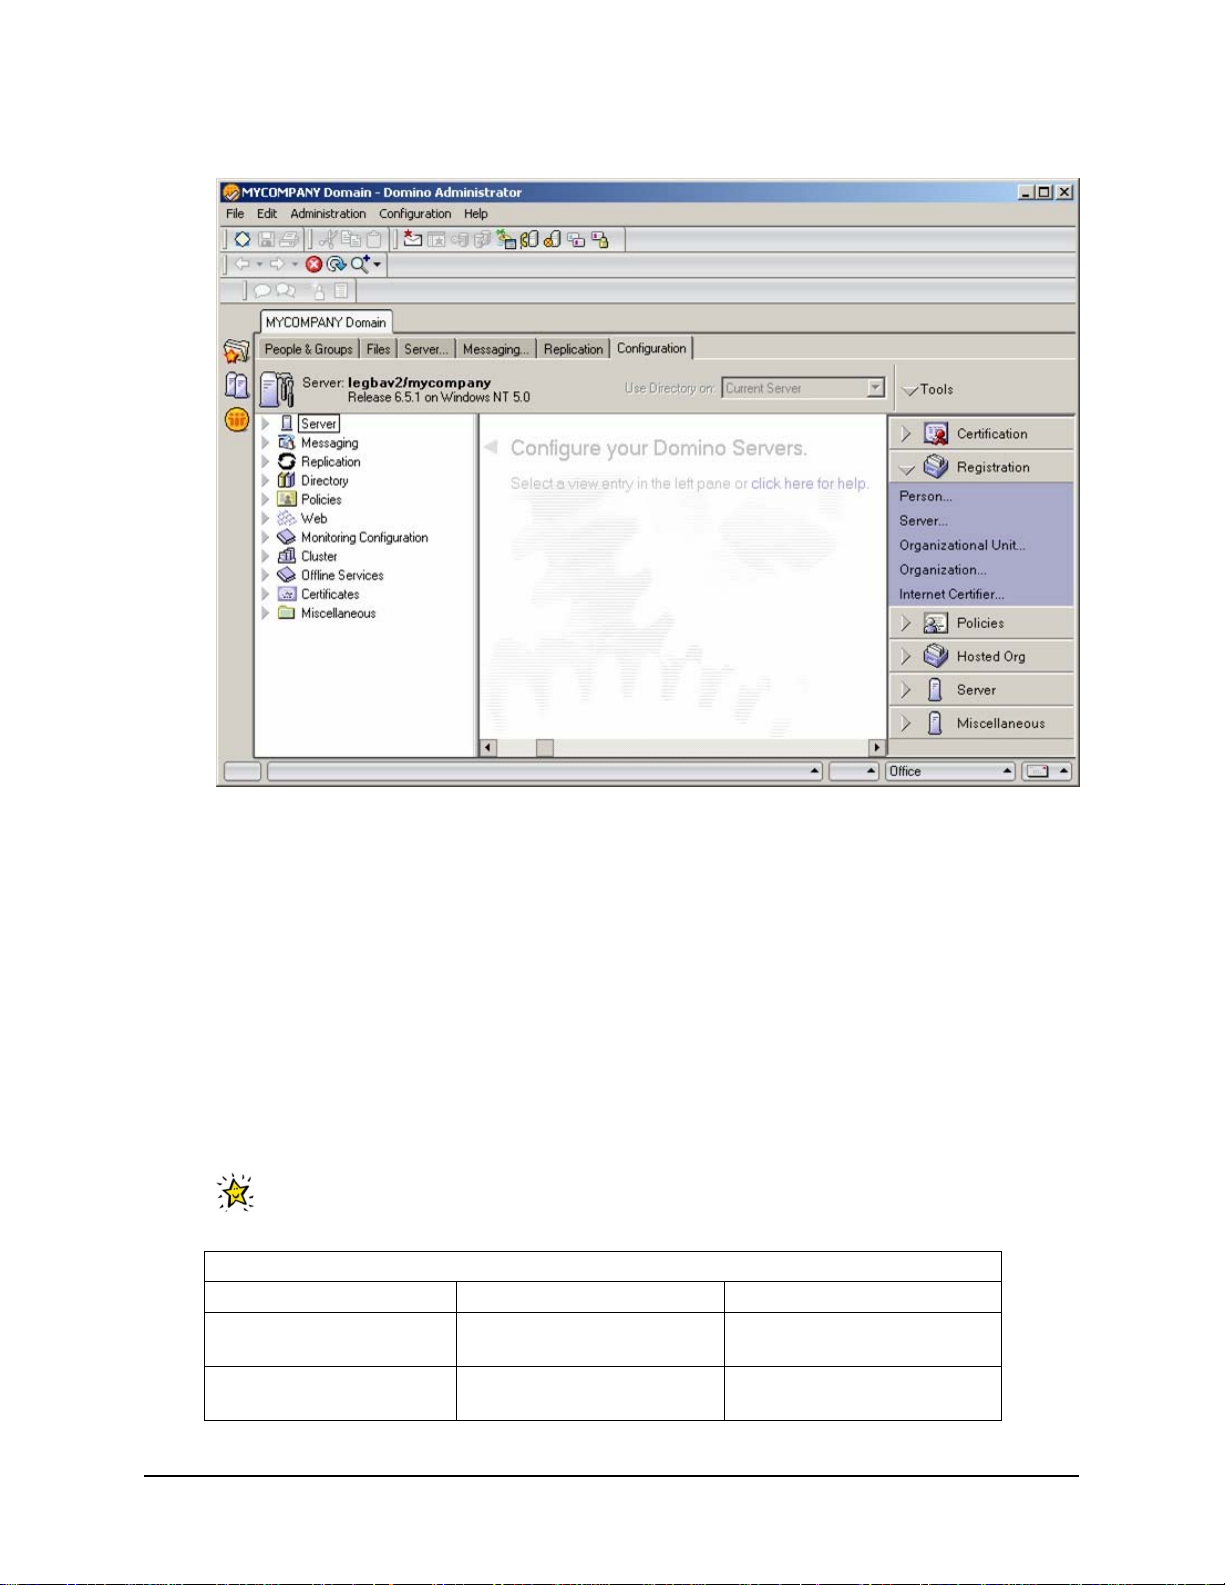
Figure 2. Registration Screen in Domino Administrator
3. Click Server... to open the Server registration tool.
4. On the Choose a Certifier panel, click Server... and select the directory server.
a. Select Supply certifier ID and password and click Certifier ID...
b. Navigate to c:\Lotus\Domino\data and select the certifier ID (cert.id).
c. Click OK and enter the certifier password when prompted.
d. On the Certifier Recovery Information Warning, check the box to not show future warnings
and click OK.
Note: In a production environment you would normally enable password recovery. See the
Domino Administrator help for details.
e. Verify that the registration server, certifier and the certification expiration date are correct (you
may want to change the certification expiration date if your organization's security policies
require it).
If desired, use this table to record information you provide for later reference. A separate
spreadsheet of this table is packaged with this Solution Starting Point.
Table 15. Other Domino Base Server Names
System Parameter Suggested Value Your Value
Sametime Connect
sametime/mycompany
Server Name
Sametime Connect
Server Hostname
sametime.mynetwork.c
om
24 Collaborative Portal: Implementation Guide
Page 31

5. Click Continue.
6. Fill in the registration details for each new server:
a. Server name (for example, sametime)
b. Verify that the server administrator is correct.
Tip: You can select the LocalDomainAdmins group for the Server Administrator name field.
This allows everyone who is in the LocalDomainAdmins group to administer the server. Once
you have created new users, you can add the appropriate names to this group to grant them
administrator rights to the server. This saves you from having to edit every server document
in order to add administrators. (Click the person icon next to the Administrator name field,
switch to the "mycompany's Directory" address book and select LocalDomainAdmins.)
c. Uncheck the option to store the server ID in Domino Directory
Note: Each Domino Server has a unique name that is maintained in its own ID file. If you are
creating the first server in a new domain, Domino creates the server ID automatically during
the server configuration program. If you are creating an additional server in an existing
domain, then a unique ID file is created for the new server as part of the configuration
process.
d. Check the option to save the server ID to a file and make note of the name and location. (for
example, c:\Lotus\Domino\data\sametime.id) You need this file when installing the other
Domino servers.
e. Click the green checkmark to add the server to the Registration queue.
f. Repeat these steps for each of the other server(s) to be registered, if there is additional
server planned (see Table 15
on page 24).
7. Once you have created entries for all of the servers, select Register All. The ID files are saved to
the location you specified. These files need to be copied to their respective servers.
8. Click Done to close the Registration tool.
Create the Replication Topology
Setting up replication of databases between the master Domino server (directory) and the other
Domino servers (for example, sametime) involves defining a server group and creating a connection
document.
In the Domino Administrator client:
1. Go to the People and Groups tab and select Groups in the navigation tree (on the left).
2. Click Add Group.
3. Fill in the following fields:
● Group name: name (for example, MyCompanyServers - no blanks in name)
● Group type: select Servers only
● Members: enter or select the servers added in the previous section (for example,
sametime/mycompany)
4. Click Save & Close.
5. Go to the Configuration tab and select Server -> Connections in the navigation tree (on the
left).
6. Click Add Connection.
25 Collaborative Portal: Implementation Guide
Page 32

7. On the Basics tab, set or verify the following values:
● Connection type: Local Area Network
● Source server: master server (for example, directory/mycompany)
● Destination Server: name of server group (for example, MyCompanyServers)
8. Click Save & Close.
Update Server Configurations
In the Domino Administrator client:
1. Go to the Configuration tab and select Server -> All Server Documents in the navigation t ree.
2. For the two servers listed (directory andsametime):
a. Select the document and click Edit Server.
b. On the Basics tab, set Fully qualified Internet host name: <fully-qualified host
name>
c. On the Internet Protocols tab, HTTP subtab, set Hostname(s): <fully-qualified host
name>
d. On the Security tab, scroll down to the Internet Access section. Set Internet
Authentication to More variations with lower security (this allows the use of user
shortnames).
e. Click Save & Close.
Configure LDAP
In the Domino Administrator client:
1. Go the Configuration tab and select Directory -> LDAP -> Settings.
2. Click Yes at the prompt to create a new document.
3. Go to the LDAP tab and click the Select Attribute Types button.
a. Select dominoServerResource in the Object Classes drop-down list and click Display
Attributes.
b. Select MailFile, MailServer and SametimeServer from the attribute list and click Add.
c. Select dominoServer in the Object Classes drop-down list and click Display Attributes.
d. Select NetAddresses from the attribute list and click Add.
e. Click OK when done to close the dialog.
4. Back on the LDAP tab, select Yes for Allow LDAP users write access.
5. Click Save & Close.
Configure Single Sign-On
Single Sign-On (SSO) allows users to log into one server and switch to another one without presenting
authentication credentials again.
In the Domino Administrator client:
1. Go to the Configuration tab and select Server -> All server documents.
2. Click the Web... button and select Create Web SSO Configuration.
26 Collaborative Portal: Implementation Guide
Page 33

3. In the SSO configuration document make the following entries:
a. Configuration name: LtpaToken (default)
b. Organization: Leave this blank.
c. DNS Domain: Enter the Internet domain that all of your servers share.
d. Domino Server Names: Select and add all of the servers (directory and sametime) from
the directory (this uses the proper hierarchical name for each server).
e. Click Keys... on the action bar and select Create a Domino SSO key; you receive a
confirmation when it has been successfully created.
f. Save and close the Web SSO document.
Important: The Web SSO document is encrypted with the ID of the user who created it.
If another administrator subsequently needs to edit the document, that administrator receives
a warning about the document being encrypted and is not able to edit it.
(R)
You may encounter this if you install Sametime
before creating the Web SSO document.
Sametime creates a Web SSO document if it does not find one with itself listed in the Domino
Servers Names field. If this happens, delete the document and create a new one so you can
add all the servers to the document.
4. Open (edit) each server document and make the following changes on the Internet Protocols /
Domino Web Engine tab:
a. Session Authentication: Multiple Servers (SSO)
b. Web SSO Configuration: LtpaToken
c. Click Save & Close.
This completes the Domino Domain configuration. Close the Domino Administrator client and restart the
Domino server.
Verification
Add Test Users
For verification you need to add test users, tuser1 and tuser2, to the LDAP directory to ensure that the
LDAP and Web-based mail components of the Domino Web Access server are working correctly.
1. Start the Domino Administrator client.
2. Select the People and Groups tab, and then the People view in the navigation area on the left.
3. In the Tools menu (on the right side of the screen), expand the People menu and select
Register...
4. Enter the certifier password.
5. Select the Registration Server to be the Directory server (for example,
directory/mycompany).
6. Click the Advanced checkbox to show additional tabs below the Basics tab.
27 Collaborative Portal: Implementation Guide
Page 34

Figure 3. Register Person Screen in Domino Administrator Client
7. Enter the First Name (test) and Last Name (user1) of the user. Note that the short name
defaults to tuser1.
8. Under Mail System select Domino Web Access. Click Yes to accept the registration settings
changes.
9. Enter the Password.
10. Click the ID Info tab and select a certifier (/mycompany) in the Certifier Name list.
11. Click the green checkmark button to add test user1 to the registration queue.
12. Return to the Basics tab and to create a second user (test user2). You only need to enter the
First name, Last Name and Password. The previous settings for Mail System, password
synchronization and Certifier name are preserved.
13. Click the green checkmark button to add test user2 to the registration queue.
14. Click the Register All button. After the users are successfully register ed, click Done.
15. Refresh the view under People (press F9) to see the new users listed.
Verify Domino Mail
1. Open a Web browser and enter http://directory.mynetwork.com/mail/tuser1.nsf to
access the iNotes
(TM)
Web Access mailbox of test user1. Enter the user name (or short name)
and password to log on.
28 Collaborative Portal: Implementation Guide
Page 35

2. Go to the Mail tab and click New. Click Yes to the security warnings to download and run
Domino Web Access Control.
3. Select new message from the Mail tab to open the e-mail editor window. In the e-mail editor,
click the To: button to bring up the Select Addresses dialog. Select mycompany's Directory in
the Search dropdown list. Select user2, test and click the To: button. Click OK to close the
Select Addresses dialog.
4. Enter a subject and some text. Click Send and File... and save the e-mail to the Inbox.
5. Click Logout.
6. Open a Web browser, enter http://directory.mynetwork.com/mail/tuser2.nsf and
log in as tuser2. Click the Mail tab to see the e-mail from test user1.
7. Click Logout.
8. Choose the appropriate security setting for shared PC or Kiosk user and then close the window.
Install the Sametime Connect Server in the Domino Domain
Perform this task on the Sametime Connect Server.
This section describes the base Domino server installation and configuration of the Sametime Connect
Server in the domain.
Before You Begin
● Make sure that the date and time of all the servers match as closely as possible. Some
administrators find that it is helpful to install software that checks the GMT and adjusts the time of
the server on a regular basis.
One option is to create a batch file containing the line:
net time /setsntp:ncnoc.ncron.net
and add it to the Startup folder of the server, so synchronization occurs whenever the server is
started or re-booted.
● The master Domino Domain server must be running and available on the network.
● You must have access to (or copies of) the server ID files (located in the
c:\Lotus\Notes\Data\ids\servers folder if you used the sample installation folder
choices) created when the servers were registered on the master Domino Domain server.
Installation and Configuration
To install the Domino server code, follow the steps in Installation Procedure on page 18 .
For more detailed information on the installation of Lotus Domino servers, refer to the product
documentation.
To configure the servers, perform the following steps:
1. Use the Start menu to start the Lotus Domino Server program.
2. Select Start Domino as a Windows service, make sure that Always start Domino as a
service at system startup and Don't ask me again are checked, and click OK.
3. Accept the default fonts.
4. Since this is NOT the first server in the domain, select the option to Set up an additional server.
29 Collaborative Portal: Implementation Guide
Page 36

5. Select The server ID file is stored on a floppy disk, CD or network drive and browse to the ID
file created when the server was registered on the master Domino server.
6. The server name is determined from the ID file.
7. When prompted to specify Internet services, select only Web Browsers (HTTP services).
8. On the Domino network settings page, click the Customize button to configure the port drivers
and host name:
a. Deselect NetBIOS ports.
b. In the TCP/IP line, verify that the Host Name field shows the fully qualified host name for the
server.
c. If needed, modify the fully qualified internet host name for this Domino server in the box
below the port settings (should match the entry in step b above).
d. After you click OK, you are taken back to the Domino network settings page where you can
click Next.
9. On the system databases page, set the Other Domino server name to the master server name
(for example, directory/mycompany) and the Optional network address to the master
server's fully-qualified host name (for example, directory.mynetwork.com).
10. On the type of Domino Directory page, select Set up as a primary Domino Directory.
11. Keep the default security settings.
12. Verify the settings summary and click Setup.
13. Click Finish to exit the configuration wizard.
14. Start the Domino server. The configuration completes and at some point (within 15 minutes) the
server replicates with the master server. To force replication, issue the replicate command in the
Domino server window on the master server (for example, replicate sametime).
Verification
1. Go to the master server and examine the Domino server window. You should see messages
indicating of successful replication with the new server. (for example, "Finished replication with
server sametime/mycompany") If replication has not yet occurred, issue the replicate
command.
2. To verify single sign-on:
a. Point a browser to the URL http://<master_server>/webadmin.nsf (for example,
http://directory.mynetwork.com/webadmin.nsf). This is the Domino
Administrator Web interface.
b. Log on as the
c. Without closing the browser, point to the same URL on the new server (for example,
http://sametime.mynetwork.com/webadmin.nsf). You should be seamlessly
connected to the new server without a challenge for a user ID and password.
Portal Express Server Administrator (wpsadmin).
30 Collaborative Portal: Implementation Guide
Page 37

Set up the IBM Lotus Sametime Connect
Perform this task on the Sametime Connect Server.
This section describes how to set up the IBM Lotus Sametime Connect. As with the Directory Server,
installation of a standard IBM Lotus Sametime Connect (Sametime) server is straightforward. The
procedure for installing a Sametime server into a Domino infrastructure is provided below.
IMPORTANT: Sametime requires that the Domino executables and data files reside on the same
drive. If you did not configure the underlying Domino server this way you need to reinstall it so it can host
the Sametime server.
Before You Begin
IMPORTANT: It is critical that all servers are set up for the same time and date in order for Single
Sign-On to work.
Installation Procedure
Perform the following steps:
1. Stop the Domino server on which Sametime will be installed.
2. Use the Sametime 7.5 CD or expand the downloaded file (C90MQML.EXE) and run demo32.exe
to install the Sametime code.
3. Select your language.
4. Click Install the Sametime Server.
5. Accept the license agreement.
6. Select the directory to use for collaboration by placing a check mark next to Domino Directory
(not LDAP Directory).
7. Select to allow HTTP tunneling on a Sametime server with a single IP address: place check mark
on the Enable line.
8. Verify that the installation directories match the Domino server directories and allow the
installation to continue; when prompted, click Finish.
9. Obtain the Sametime 7.5 Server Cumulative Fix Pack 1 (CF1) for Windows Multilingual file
(C96M1ML.ZIP) and expand it to a temporary folder location. Then expand the win_bin.zip
file and copy the content into the Domino Program Directory (c:\Lotus\Domino), and expand
the win_data.zip file and copy the content into the Domino server data directory
(c:\Lotus\Domino\Data).
10. Update the configuration:
a. Update the serlets.properties file so UnserInfoServlet is initialized when the HTTP
services loads. The file is located at c:\Lotus\Domino\Data\servlets.properties.
b. Locate the line in the file that begins with servlets.startup=.
31 Collaborative Portal: Implementation Guide
Page 38

c. Add UserInfoServlet to the list of servlets on this line and separate it from the other
servlet names with a blank space.
d. Restart the Domino and Sametime servers.
Note:
Even after the console says, "Sametime Server: Running", some services are still being loaded in
the background. Use the Windows Services applet to monitor the status of all the Sametime
services (prefixed by "ST").
Update stpolicy.nsf for New File Transfer Policy
If you want to allow file transfer between clients that do not involve the server, you must manually update
stpolicy.nsf and add the new policy. If you take no action, peer-to-peer transfer will no longer be
permitted after CF1 is installed. Review and follow the instructions given in the readme.txt file
accompanying this fix pack for details.
Background Sametime Configuration
Sametime automatically configures the server for multi-server Single Sign-On:
● If not already configured, Sametime sets the server for multi-server single sign-on authentication
and create a Web SSO document. If it detects that this has already been done, it leaves the
existing settings unchanged.
● If not already created, Sametime creates the Domino Web Configuration database
● Sametime creates and configures a Sign-In Form Mapping document in the Domino Web
Configuration database to support SSO
Post Installation Configuration
This section shows you how to configure the default HTTP home page and access the administration
features of the Sametime server.
Configure the Default HTTP Home Page
From the Domino Administrator client (on the master server):
1. On the Configuration tab, select Servers -> All Server Documents in the navigation pane.
2. Open the Sametime server's server document for editing and go to the Internet Protocols /
HTTP tab.
3. In the Mapping section, change Home URL to /stcenter.nsf?Open
4. Save and close the document.
5. Replicate with the Sametime server.
● In the Configuration tab, make sure sametime/mycompany is selected.
● As an alternative to the replicate command, go to the Admin client's File menu and select
Replication -> Replicate...
● In the Replicate with drop-down list, select Other and then choose the Sametime server (for
example, sametime/mycompany). Click OK.
● Leave Send documents to server and Receive documents from server selected.
6. Return to the Sametime server and restart its Domino server. The Sametime server does not
support the restart server command, so you must enter quit in the Domino server window.
Restart the Domino server from the Start menu. Be sure to wait for all the Sametime services to
32 Collaborative Portal: Implementation Guide
Page 39

start before attempting verification. Check Windows Services to make sure all the Sametime
services (prefaced with "ST") have started.
Verification
When you enter the URL for the Sametime server, for example:
http://sametime.mynetwork.com
you should see the Welcome to Sametime screen.
When you attempt to do something that requires authentication (for example, administer the server) you
should see the Log On to Sametime SSO login screen.
Administer the Server
This section does not show you all of the administration features of the Sametime server. It introduces
you to configuring the server. For more information about all of the configuration options, see the
Sametime Administration guide.
1. In a Web browser, enter the URL for the Sametime server:
http://sametime.mynetwork.com
This opens the home URL for the Sametime server as defined above.
2. On the left navigation pane, click the Administer the Server link.
3. When prompted, enter the Domino administrator's ID (
Portal Express Server Administrator-
wpsadmin) and password.
4. Browse through the Configuration options, but do not change anything at this point (notice that
the Directory is configured for Domino and not LDAP)
Verification Procedure
Once the server is set up, use the following procedures to ensure that Sametime is functioning properly. It
is important that you verify that both anonymous and registered users can logon on to the server.
Verify Sametime Chat
1. Use a browser to navigate to the Sametime server (for example,
http://sametime.mynetwork.com).
2. From the Welcome to IBM Lotus Sametime window, click Download for Lotus Sametime
Connect 7.5 Client and follow the on screen instructions to install the Sametime client.
3. When the installation is completed, launch Sametime 7.5.
4. Enter a user's name and password (
Upon successful login you will see "connected" on the status bar on the bottom of the window.
5. Log in from another machine using a different account (
and repeat the download and installation of the client.
6. When the installation is completed, launch Sametime 7.5. Select File -> Add -> Contact and
enter an user name (test user1). You will receive a pop-up message telling that name has
been added, and you should see the name appear on the Sametime window contact list.
7. Double-click test user1 and send a message. Verify that test user1 sees the new
message.
Test User 1: test user1, passw0rd) and click login.
Test User 2:test user2, passw0rd)
33 Collaborative Portal: Implementation Guide
Page 40

Verify Sametime Meetings
Note:
You need to have Java Virtual Machine (JVM) enabled for the selected browser for the Sametime
Meetings to work. Ensure your browser meets this requirement or go to http://www.java.sun.com
download and install the Sun JVM. During our testing of this solution, both versions 1.4 and 1.5
were used and they functioned. Go to:
http://java.sun.com/j2se/1.4.2/download.html
or http://java.sun.com/j2se/1.5.0/download.html
before continuing with the instructions below.
1. Use a browser to navigate to the Sametime server.
2. Click the Schedule a Meeting link.
3. If prompted, enter a username and password for someone authorized to create meetings (the
default setup allows anonymous users to create meetings).
4. Enter a meeting name; select Start Now and click Save to launch the meeting.
5. The meeting should open in a new window.
Note: It may take a few minutes to completely load the meeting applets. If your workstation has a
significantly different time than the server, you may need to get them in sync to get the meeting to
start. You may also be prompted to trust IBM to download some software. Click Yes, or the
applets do not load and you do not get into the meeting.
Specify a guest name when prompted. Click Share my entire screen.
to download the Java Runtime Environment (JRE)
to
6. Log in from another browser as another user and join the meeting (use Attend a Meeting from
the Sametime server home page).
7. Test the tools in the meeting (whiteboard, screen sharing, etc.).
Configure Domino Web Access for Instant Messaging
Perform this task on the Directory Server.
There are several post-installation configuration tasks to be completed before Domino Web Access acts
as expected. There are also some optional configuration tasks. Both are addressed below.
Define the Sametime Server for Users
In this section, you set the same Sametime server for all users on the Directory Server.
In an environment where there is only one Sametime server, or where all users on a given Directory
Server always use the same Sametime server, you can use a Notes.ini variable on the Directory
Server to refer all Sametime connections to a specific server. Perform the following steps:
1. Add the following line to the Directory Server Notes.ini file (in c:\Lotus\Domino):
iNotes_WA_SametimeServer=sametime.mynetwork.com
2. Note that the name of the Sametime server in this setting must be the fully qualified host name of
the server.
3. Continue to the next section before restarting the Directory server.
34 Collaborative Portal: Implementation Guide
Page 41

Turn Off Secrets and Tokens Database for Domino
By default, Domino tries to use the Sametime Secrets and Tokens authentication. If you want to enable
Domino to use SSO, you must turn this off. Although not technically required, it is strongly recommend
that you do this because SSO is a critical new support feature across all of the products starting in version
6.5, including the Notes client. To convert to SSO:
1. Add the following line to the Directory Server Notes.ini file:
iNotes_WA_SametimeToken=0
2. Save the notes.ini file.
3. Continue to the next section before restarting the Directory Server.
Copy Key Files Between the Directory and Sametime Servers
Certain files must be copied between the Directory Server and Sametime Connect Server in order for
presence awareness to work.
Copy the stlinks folder (and all its contents) from the Sametime Connect Server to a folder with the
same name and the same relative location on the Directory Server; see the following example:
\Lotus\Domino\Data\domino\html\sametime\stlinks
This folder name is not case-sensitive. Because there are so many files in this folder, it is easiest to select
the folder and copy it and its contents all at once.
Note:
The stlnks folder may already exist on the Directory Server. However, its content may be different
from that of the Sametime Connect Server. Therefore, it's important to perform this step.
IMPORTANT: Restart the Directory Server to activate these changes.
Client Configuration
Each user must enable instant messaging when they access their mail on the Directory Server:
1. Access the e-mail file on the Directory Server with a browser. Use one of the test users defined
previously, see the following example:
http://directory.mynetwork.com/mail/tuser1.nsf
On the upper left corner of the screen, you should see a blue bar with two messages, "Welcome,
Logged in as tuser1" followed by an x symbol with " IM Disconnected."
2. In the upper right-hand corner of the screen, click the Preferences link.
3. Click the Basics tab in the navigation panel and then select Enable Instant Messaging in the
Instant Messaging section.
4. Click OK.
Now you should see on the upper left corner of the screen the x symbol with the text "IM Disconnected" to
a circle before the text "IM Disconnected."
35 Collaborative Portal: Implementation Guide
Page 42

Configure IBM WebSphere Portal Express Server to Use Domino Directory
This task needs to be performed on the following systems:
Directory Server
Portal Server
The next sections take you through the various steps necessary to connect Secure Portal to the Domino
Collaborative Servers using the Lotus Collaborative Components to enable users to experience single
sign-on (SSO) between the Portal Server and Domino E-mail and Sametime Connect Server (Sametime).
Create WebSphere User and Group in Domino Directory
IBM WebSphere Portal Express Server and IBM WebSphere Application Server need a wpsadmins
group containing the wpsadmin and wpsbind user IDs and the following groups:
● wpsContentAdministrators
● wpsDocReviewer
● wcmadmins
The wpsadmin ID already exists. The new user and group are created in the Domino Directory using
the Domino Administrator client.
1. Log on to the Domino Admin client as wpsadmin (
IMPORTANT: Be sure that you are connected to the master Directory server
(directory/mycompany). The current server is displayed just above the navigation pane on
the left of the window.
If you need to change servers, go to File -> Open Server... to switch to the Directory Server.
2. Click the People and Groups tab and then click People in the navigation pane.
3. Click Add Person and create a person document for the IBM WebSphere Application Server
user ID (wpsbind), filling in the fields in Table 16
If desired, use this table to record information you provide for later reference. A separate
spreadsheet of this table is packaged with this Solution Starting Point.
Table 16. Parameters for IBM WebSphere Application Server User ID
System Parameter Suggested Value Your Value
Last name
User name 1
Short name/ IBM
WebSphere Application
Server User ID
Internet password
Mail system None
wpsbind
wpsbind/mycompany
wpsbind
Portal Express Server Administrator).
below.
36 Collaborative Portal: Implementation Guide
Page 43

Note:
1. Enter each value on a separate line in the entry field.
4. Click Save & Close.
5. Click Groups in the navigation pane and click Add Group.
6. Enter wpsadmins as the group name and add wpsadmin and wpsbind as members.
7. Click Save & Close.
8. Repeat steps 5 to 7 to add the three groups and do not add any new users in them at this time.
You must ensure that the administrator group, wpsadmins, has the proper permissions and roles in the
Domino Directory.
1. Go to the Files tab and right-click the file for mycompany's directory (names.nsf). Hint: Click the
title bar on the filename column to sort the list for finding names.nsf file easier.
2. Select Access Control -> Manage...
3. Click Add and select the wpsadmins group.
4. Under Access Control, set the following:
● User type: Person Group
● Access: Editor
● Roles: GroupCreator, GroupModifier, UserCreator, UserModifier
5. Click OK.
6. Exit the Domino Administrator client.
Configure Trusted IP Addresses for Sametime
For security reasons, a Sametime server only allows connections from other server applications if the IP
address is known by Sametime. These trusted IP addresses are defined in the Community Connectivity
document on the Sametime server.
1. Log onto the Domino Administrator client and use File -> Open Server... to switch to the
Sametime server.
2. Click the Files tab and open the Sametime Configuration document (stconfig.nsf).
3. Open the document under Community Connectivity (double-click the row immediately below
with the date/timestamp).
4. Double-click inside the document (Untitled) to switch to Edit mode.
5. Enter the IP address of the Portal server in the Community Trusted IPs field.
6. Close the document and click Yes to save the changes.
7. Restart the Sametime server.
Enable Picker on the Domino Server
Domino Internet Inter-ORB Protocol (DIIOP) must also be running on the Domino server. If DIIOP is
running, the picker feature in a portlets' edit mode is enabled. The picker feature enables brow sing of
Domino databases on a given server.
37 Collaborative Portal: Implementation Guide
Page 44

1. In the Domino Administrator client, go to the Configuration tab and navigate to Server -> All
Server Documents. (Be sure to switch back to the Directory server using File -> Open
Server...)
2. Edit the configuration document for the Directory server (directory/mycompany).
3. On the Internet Protocols tab, select the HTTP tab, and ensure that the following settings are
specified:
a. Host Name - The fully-qualified host name of the server; for example,
directory.mynetwork.com.
4. On the Basics tab, set Allow HTTP clients to browse databases to Yes. This enables the
server and database selection lists that appear when users edit the properties of Lotus
collaborative portlets.
5. Save and close the document.
6. To enable DIIOP on the server, edit the C:\Lotus\Domino\notes.ini file, locate the line
starting with ServerTasks=, and append ,DIIOP. See the following example:
ServerTasks=Update,Replica,Router,AMgr,AdminP,CalConn,Sched,HTTP,LDAP,D
IIOP
7. Save the file and restart the Domino server.
Note:
After all portlet development, deployment and configuration is complete, including WPAI portlets, a
common security practice is to set the Allow HTTP clients to browse databases value to No.
Perform Configuration Tasks
Some configuration steps are required to get IBM WebSphere Portal Express Server to work with the
Domino LDAP. Use Table 17
configuration and launch the Advanced Configuration Wizard to perform this task.
1. Go to the <wp_root>\config\wizard directory.
2. Run the configwizard.bat batch file.
3. Select a language from the pop-up window and you will see the Portal Express Configuration
Wizard window opened.
4. Using Table 17
the configuration task.
Table 17. Configure IBM WebSphere Portal Express Server to Use Domino Directory LDAP
Property Example Value Description
WasUserid cn=wpsbind,o=mycompany
WasPassword
Password for wpsbind
PortalAdminId cn=wpsadmin,o=mycompany
below for reference to specify the parameter values for your specific
below as a reference, enter the requested information in the Wizard to perform
The user ID for IBM WebSphere Application
Server security authentication. This ID is
needed to stop and start IBM WebSphere
Application Server from now on. This has to
be the fully-qualified distinguished name.
The password for IBM WebSphere Application
Server security authentication. This ID is
needed to stop and start IBM WebSphere
Application Server from now on.
The user ID for the IBM WebSphere Portal
Express Server administrator. This has to be
the fully-qualified distinguished name.
38 Collaborative Portal: Implementation Guide
Page 45

Table 17. Configure IBM WebSphere Portal Express Server to Use Domino Directory LDAP
PortalAdminIdS
hort
PortalAdminPwd
wpsadmin
Password for wpsadmin
The short name for the IBM WebSphere Portal
Express Server administrator.
The password for the IBM WebSphere Portal
Express Server administration.
PortalAdminGro
upId
cn=wpsadmins
The group ID for the group to which the IBM
WebSphere Portal Express Server
administrator belongs
PortalAdminGro
upIdShort
wpsadmins
The short name of the group ID for the group
to which the IBM WebSphere Portal Express
Server administrator belongs
LTPA
Password for wpsadmin
The password for the LTPA bind
LTPA timeout 120 Timeout for the LTPA bind
SSOEnabled
true
Specifies that the SSO function has to be
enabled
SSODomainName mynetwork.com
LDAPHostName directory.mynetwork.com
Single Sign On domain
The host for the LDAP server which IBM
WebSphere Portal Express Server uses
LDAPPort
389
The port number for the LDAP server which
IBM WebSphere Portal Express Server uses
LDAPAdminUId cn=wpsadmin,o=mycomany
LDAPAdminPwd
Password for wpsadmin
LDAPServerType DOMINO502
LDAPBindID cn=wpsbind,o=mycompany
LDAPBindPasswo
Password for wpsbind
The LDAP administrator ID
The LDAP administrator password
Type of LDAP Server to be used
User ID for LDAP Bind authentication
Password for LDAP Bind authentication
rd
LDAPSuffix
(be sure this is blank)
LDAP Suffix, for Domino LDAP leave this
entry blank
LDAPUserPrefix cn
Distinguished name prefix attribute name for
user entries
LDAPUserSuffix o=mycompany
Distinguished name suffix attribute name for
user entries
LDAPGroupPrefi
x
LDAPGroupSuffi
x
cn
(be sure this is blank)
Distinguished name prefix attribute name for
group entries
Distinguished name suffix attribute name for
group entries, for Domino LDAP leave this
entry blank
LDAPUserObject
Class
LDAPGroupObjec
tClass
LDAPGroupMembe
r
LDAPsslEnabled
dominoPerson
User object class corresponding to LDAP
directory
dominoGroup
Group object class corresponding to LDAP
directory
member
The attribute name of the membership
attribute of your group objectclass
false Specifies if SSL
39 Collaborative Portal: Implementation Guide
Page 46

Detailed Steps for the Advanced Configuration Wizard
1. Select the task you want to perform. Choose the Enable LDAP security radio button.
2. Specify the
Portal Express Server Administrator user ID and password used during the IBM
WebSphere Portal Express installation. Enter as cn=user_id,o=organization_name.
3. You should see the message, "Before continuing, the WebSphere Application Server must be
stopped. To stop the server and start the configuration task, click Next. To exit and run the at a
later time, click Cancel." Click Next to continue.
4. Enter the LDAP server connection information:
● The LDAP server hostname (for example, directory.mynetwork.com)
● LDAP server port number (for example, 389)
5. Specify the user ID and password to be used to connect to the LDAP server:
● LDAP administrator ID (for example, wpsadmin)
● LDAP administrator password
6. Specify the LDAP object classes configured for Lotus Domino Enterprise Server for the LDAP
server hostname entered in step 4 above. For object class of Portal users in LDAP directory
(LDAPUserObjectClass), enter dominoPerson. For object class of portal groups in LDAP
directory (LDAPGroupObjectClass), enter dominoGroup.
7. Specify prefixes and suffixes configured for Lotus Domino Enterprise Server for the LDAP serv er
hostname entered in step 4 above.
● LDAPSuffix = leave blank
● LDAPUserPrefix = cn
● LDAPUserSuffix = o=organiziation_name
● LDAPGroupPrefix = cn
● LDAPGroupSuffix = leave blank
8. Specify the LDAP administration account user ID and password that works with IBM WebSphere
Portal Express:
● Portal Administrator user ID (PortalAdminId); enter as
cn=user_id,o=organization_name
● Portal Administrator password (PortalAdminPwd)
● Portal Administrator group ID (PortalAdminGroupId); enter as cn=wpsadmins
9. Specify the LDAP group names for Web Content management (WCM):
● Web Content Management Administrator Group (wcmAdminGroupId); enter as
cn=wcwadmins
● WebSphere Content Administrator Group (WpsContentAdministrators); enter as
cn=WpsContentAdministrators
● WebSphere Document Reviewer Group (WpsDocReviewer); enter as cn=WpsDocReview
10. Enter the Member Manager user ID and password:
● User name: wpdb2ins
40 Collaborative Portal: Implementation Guide
Page 47

● Password: enter the same password used for ID used to install IBM WebSphere Portal
Express
11. You will see message, "Validating input, please wait." Go back to correct any input not validated;
otherwise, you will see message, "IBM Portal Express is ready to run the following configuration,
and the list of values you have entered." Review the list and ensure all values are correct, then
click Next to proceed.
Note:
From this point on, WebSphere Global security is turned on and wpsadmin (
Application Server User ID) has been set as the administrative ID if you want to sign on and
manage the server using the administrative console. The same is true if you want to start or stop
WebSphere or WebSphere Portal Servers.
IBM WebSphere
Verification
1. Log on to the Portal as the Portal Express Server Administrator, wpsadmin (http://<fully-
qualified_portal_server _hostname>:10038/wps/portal).
2. Self-register a new user (click Sign up) and log in to the portal.
3. Log on to the Domino Administrator Client and verify the new user under People and Groups.
Note:
Users created through the portal are not automatically given Domino iNotes e-mail accounts. Only
users registered through Domino have e-mail access.
Enable Collaborative Components
Perform this task on the Portal Server.
In this section, you configure collaborative components on the Portal Server a nd enable SSO in the
WebSphere - Domino environment.
Configure Collaborative Components on the Portal Server
This task enables the portal with the Lotus Collaborative Components. You install all components except
the Discovery Server.
On the Portal Server:
1. Open a command window to <WAS_root>/bin.
2. Use the serverstatus command to see which WebSphere servers are running:
serverstatus -all -user wpsbind -password <wpsbind password>
3. Use the stopserver command:
stopserver.bat WebSphere_Portal -user admin_userid -password
admin_password
4. Stop any running servers as indicated by the list.
5. Locate the <wp_root>/config/wpconfig.properties file and create a back up copy
before changing any values.
6. Use a text editor to open the <wp_root>/config/wpconfig.properties file. Scroll down to
the Lotus Collaborative Components Properties and enter the values appropriate for your
environment.
41 Collaborative Portal: Implementation Guide
Page 48

Table 18. Values for Collaborative Components Properties
Property Example Value Description
LCC.Sametime.Enable
d
LCC.Sametime.Server
LCC.Sametime.Protoc
ol
true
sametime.mynetwork.c
om
http
Is Lotus Sametime enabled
in the environment?
The Lotus Sametime server
name.
The protocol used to
connect to the Lotus
Sametime server.
LCC.Sametime.Port 80
The port number for the
Lotus Sametime server.
LCC.DominoDirectory
.Enabled
LCC.DominoDirectory
.Server
LCC.DominoDirectory
.Port
true
directory.mynetwork.
com
389
Is Lotus Domino Directory
enabled in the environment?
The Lotus Domino Directory
server name.
The port number for the
Lotus Domino Directory
server.
LCC.DominoDirectory
.SSL
false
Is SSL used to connect to
the Lotus Domino Directory
Server?
7. Save the file.
8. At a command line, change to the directory <wp_root>/config
9. Type the following command to run the configuration task:
WPSconfig.bat lcc-configure-all
10. At a command line, change to the directory <WAS_root>/bin.
11. Type the following at the command line to start IBM WebSphere Portal Express Server.
startServer WebSphere_Portal -user wpsbind -password
<yourWpsBindPassword>
Enable SSO between WebSphere and Domino
To provide SSO in the WebSphere - Domino environment, you need to generate authentication keys on
IBM WebSphere Application Server and then import them into the Domino servers.
To generate and extract SSO configuration keys from IBM WebSphere Application Server, follow these
steps:
1. If the IBM WebSphere Application Server instance server1 is not running, start it.
2. Log into the IBM WebSphere Application Server administration console (go to Start -> All
programs -> IBM WebSphere -> Application Server Network Deployment v6 -> Profiles ->
wp_profile -> Administrative console or launch a browser window to
https://portal.mynetwork.com:10003/ibm/console/logon.jsp) and log in as the
IBM WebSphere Application Server User ID (wpsbind with password
<yourWpsBindPassword>)
3. Expand the Security section.
4. Select Global security.
42 Collaborative Portal: Implementation Guide
Page 49

5. Expand the Authentication mechanisms section.
6. Click Single Sign on (SSO) in the Additional Properties section.
7. Make sure you check the boxes for Enabled and Interoperability Mode, and fill in the Domain
name (for example, mynetwork.com).
Note: Make sure there is no leading dot (.) in the domain name.
Click OK.
8. Select the LTPA link.
9. Within the Key File Name field, provide a file name in which to save the SSO key (for example,
portalsso.key).
10. Select to Export the Keys.
11. Select the Save link in the message box at the top of the screen, and then select the Save option
again in the following page to save the master configuration.
The key file is now available in the directory <WAS_root>.
Follow these steps to import the keys to the Domino server:
1. Copy the key file to the file system of the Domino server (for example,
<installation_drive>:\portalsso.key).
2. Start the Lotus Notes and Domino Administrator Client.
3. Ensure that the Directory Server is indicated as the current server.
4. Select the Configuration tab and navigate to Server -> All Server Documents.
5. On the tool bar click Web... View Current Configurations.
6. Edit the document Web SSO Configuration for LtpaToken.
7. Select Keys -> Import WebSphere LTPA Keys from the pull-down menu. Click OK to continue.
8. Enter the full path to the key file that you copied to the Domino server in step 1; for example,
<installation_drive>:\portalsso.key.
9. Enter the LTPA password (specified in the wpconfig.properties file above) and then select
OK.
10. Select OK on the Success panel.
11. Check that the LDAP Realm is set to <directory.mynetwork.com>:389.
12. Select to save and close the document.
13. Replicate the new SSO document to the Sametime server:
a. Select File -> Replication -> Replicate.
b. Replicate with the Sametime server name.
c. Select OK.
14. Restart all servers (enter the command restart server in each console window) in the following
sequence:
Note: "Restart" does not mean reboot. It means shutting down and restarting the Domino
application server process on the machine.
a. Domino e-mail/LDAP server
b. Sametime Server (The restart server command does not work with Sametime. You
must issue the command quit.)
43 Collaborative Portal: Implementation Guide
Page 50

Verification Procedure
You can validate the SSO function with these steps:
1. Open a browser to http://portal.mynetwork.com:10038/wps/portal. Log in to the
portal as the one of the test users (
displays "Log Out: tuser1." (Do not click on it.)
2. To verify SSO with both Domino servers, keep the browser window open and switch to the
Directory Server: http://directory.mynetwork.com/mail/tuser1.nsf
Verify the upper left displays "Welcome tuser1."
3. Switch to the Sametime Connect Server: http://sametime.mynetwork.com
Verify the upper right corner of the screen displays "Logged in as tuser1."
In both cases you should be logged in without being challenged for credentials.
Note:
The SSO token which is created by IBM WebSphere Application Server and then distributed to the
Domino servers has a specific expiration time. Therefore, for SSO to work, all machines that belong
to the domain should have the same system time and date relative to GMT. Otherwise, the token
that is generated on one machine could be considered as expired on the other machine.
Test User 1 - test user1). Verify that the upper right
Configure Lotus Collaborative Components
Perform this task on the Portal Server.
A default portal is installed as part of the IBM WebSphere Portal Express installation process, with a set
of Lotus collaborative components. However, to enable some of these components (i.e., portlets) some
configuration tasks are required.
This section covers the following:
● An overview of the default portal
● Configuration tasks to enable the Mail portlet in Messaging
● Configuration tasks to enable the Mail portlet in Domino Web Integration
● Configuration task to enable Lotus Web Conferencing portlet in Domino Integration
● Configuration task to enable Lotus Sametime in Domino Integration
Default Portal Overview
From any workstation or server in the network, open a browser and logon to the p ortal server. For
example, go to http://portal.mynetwork.com:10038/wps/myportal and log in using one of the
established user IDs (for example, tuser1). You will see the portal home page and the user ID you used
to log in on the top right corner (LogOut:<userid>). Note that on the top left it displays Intranet
Jumpstart > Home >. This page is organized with 3 tabs: Home, Work, and Collaboration.
From the bottom of this page, click the Messaging icon. This brings up the Messaging Welcome page.
The Messaging page is organized with 3 tabs: Welcome, Mail, and Calendar. From the bottom of the
Welcome page, click on To learn more about Domino Integration, go to the Domino Integration
page to bring up the Domino Integration page. The Domino Integration page is organized with 4 tabs:
Welcome, My Work, My Team, and My Database.
44 Collaborative Portal: Implementation Guide
Page 51

Enable the Mail Portlet in Messaging
Perform the following steps to enable the Mail portlet in Messaging:
1. Login to the portal using a Portal Administrator ID (for example, wpsadmin) and password.
2. Go to the Messaging Welcome page.
3. Click the Mail tab.
4. Move the mouse pointer to the top of the Mail portal window and you will see a downward
pointing triangle on the right corner. Click on the triangle to see a down-drop list and select
configure from the list.
5. In the Mail Configuration portal window, select the IBM Lotus Notes radio button to select
Notes as the default Server Type/Protocol.
6. On the IBM Lotus Notes line, click the configure icon.
7. In the Mail portal window, enter the mail server name. For this Solution Starting Point, this is the
same as your directory server (for example, directory.mynetwork.com) and the port number
(for example, 80).
8. Click OK.
9. When it returns to the Mail configuration portal window, click Done.
10. Logout from the portal and login again using a non-administrator ID and password. Go to the
Messaging Welcome page and select the Mail tab to verify Lotus mail is available in the Mail
portal window.
Enable the Mail Portlet in Domino Web Integration
Perform the following steps to enable the Mail portlet in Domino Web Access:
1. Stop the IBM WebSphere Portal Express by going to the <was_profile_root>\bin directory
and enter the following command in a command prompt window:
stopserver.bat WebSphere_Portal -user <admin_userid> -password
<admin_password>
2. Go to the <WP_root>\shared\app\config directory and locate the
CSEnvironment.properties file.
3. Make a backup copy of this file before editing it.
4. Open this file in a text editor.
5. Locate the following section in the file:
# Add default IIOP/ SSL port
6. Under the heading in the previous step, remove the comment tag (#) from the beginning of the
line that contains CS_SERVER_DOMINO_DIRECTORY_1.userid=
7. At the end of the line, add a user ID that has appropriate access in the LDAP directory that
supports Collaborative Services. Type the Lotus Domino LDAP fully-qualified name (for example,
cn=wpsadmin,o=organization_name) for the user.
8. Go to the line that contains CS_SERVER_DOMINO_DIRECTORY_1.encryptedpwd=
9. Remove the comment tag (#) from the beginning of the line.
10. Copy the line that contains CS_SERVER_DOMINO_DIRECTORY_1.encryptedpwd= and paste it
into a new file.
45 Collaborative Portal: Implementation Guide
Page 52

11. In the new file, at the end of the line, add the internet password for the user ID (that was entered
for CS_SERVER_DOMINO_DIRECTORY_1.userid).
12. Save and close the new file as dominobind.txt in the <was_profile_root> directory.
13. Open a command prompt to the <was_profile_root>\bin directory.
14. In the same directory, run the following command (type as one line with a space character
separating it):
PropFilePasswordEncoder dominobind.txt
CS_SERVER_DOMINO_DIRECTORY_1.encryptedpwd
15. In the same directory, open the dominobind.txt file, and copy the encrypted password after
CS_SERVER_DOMINO_DIRECTORY_1.encryptedpwd=
16. Go back to the CSEnvironment.properties file.
17. Paste the encrypted password after CS_SERVER_DOMINO_DIRECTORY_1.encryptedpwd=
18. Save and close the CSEnvironment.properties file.
19. Close and delete the dominobind.txt file (and dominobind.bak file if it exists).
20. Use the following command to start the IBM WebSphere Portal Express server:
a. Open a command prompt and change to the directory: <was_profile_root>\bin
b. Enter the following command: startserver.bat WebSphere_Portal
Note: This command is case sensitive.
21. After the Portal Server is started, login to the portal as a user (for example, tuser1) and go to
the Domino Web Access Welcome page. (From the Portal home page, click Launch and then
Domino Integration to go to the Domino Integration Welcome page.)
22. Click the My Work tab, and you should see your Lotus mail in the Domi no Web Access portal
window.
Enable Web Conferencing
Perform the following steps to enable Web conferencing:
1. Login to the portal using a Portal administrator ID (for example, wpsadmin) and password.
2. Open the Administration page by clicking Launch and then Administration.
3. Select Portlets from Portlet Management.
4. In the search box, enter Lotus Web Conferencing and then click Search.
5. Click the Configure Portlet icon on the line where it displays Lotus Web Conferencing.
6. Click the edit parameters icon on the line that displays SametimeServer1 and enter the
hostname of your Sametime server (for example, sametime.mynetwork.com).
7. Click OK.
8. Repeat steps 6 and 7 to enter the SametimeUserName1 and SametimePassword1 fields (for
example, wpsadmin and your password).
9. Logout and login again using a non-administrator ID and password (for example, tuser2).
10. Click Launch and then Domino Integration to go the Domino Integration page.
11. Click the My Team tab and you should see the Lotus Web Conferencing portal window where
you can start or find a meeting to attend.
46 Collaborative Portal: Implementation Guide
Page 53

Enable Lotus Sametime in Domino Integration
Perform the following steps to enable Lotus Sametime in Domino integration:
1. Stop the IBM WebSphere Portal Express server by going to the <was_profile_root>\bin
directory and enter the following command in a command prompt window:
stopserver.bat WebSphere_Portal -user <admin_userid> -password
<admin_password>
2. Go to the <WP_root>\shared\app\config directory and locate the
CSEnvironment.properties file.
3. Make a backup copy of this file before editing it.
4. Open this file in a text editor.
5. Locate the line #CS_SERVER_SAMETIME_1.dnNameSeparator=,
6. Remove the comment tag (#) from the beginning of the line.
7. Change the character after the '=' sign to be '/'. For example:
#CS_SERVER_SAMETIME_1.dnNameSeparator=/
8. Save and close the file.
9. Use the following command to start the IBM WebSphere Portal Express server:
a. Open a command prompt and change to the directory: <was_profile_root>\bin
b. Enter the following command: startserver.bat WebSphere_Portal
Important: You have completed the installation and configuration tasks for the solution. If you would like
to use the sample included with this Solution Starting Point, continue to Chapter 3. Create Demo Users
on page 48.
47 Collaborative Portal: Implementation Guide
Page 54

Chapter 3. Create Demo Users
Perform this task on the Directory Server.
You need to create the following users for the demo use cases.
Table 19. Users for Demo Use Cases
User Name User ID Group Membership (Role)
Mike Rotz mrotz
Vic Sargent vsargent
Betsy Parker bparker
Kristen Baker kbaker
Lisa Bello lbello
Michael Davis mdavis
Gary Spurr gspur
Elizabeth Flur eflur
William Woolf wwoolf
Executives
Managers
Managers, HR
Employees, HR
Employees, HR
Employees, HR
Employees, Marketing
Employees, Sales
Employees
You could create the users manually as described in Add Test Users
on page 27, but you can automate
this process by importing a Lightweight Directory Interchange Format (LDIF) file to Domino.
Before continuing, you must first copy people.ldif from the solution samples to the temp directory on
the Domino Directory server.
IMPORTANT: This file contains the sample values "mynetwork.com" and "mycompany". You must
edit this file to change the sample values to match your environment.
Perform the following steps:
1. Log on to the Domino Administrator Client as wpsadmin.
2. Click the People and Groups tab.
3. From the Tools pane, click People - Register.
4. When prompted, enter the certifier ID password and click OK.
5. On the Register Person dialog window, check the Advanced box to show the advanced settings
tabs.
6. On the Basics tab, select Domino Web Access in the Mail System field. Click Yes on the
prompt to change user registration settings.
7. On the ID Info tab, check to make sure Certifier ID has the correct name (for example,
<mycompany>).
8. Click Migrate People.
9. From the People and Group Migration dialog box, select LDIF Entries from the Foreign
Directory Source List.
10. In the Select LDIF File dialog box, specify the people.ldif file and click OK.
48 Collaborative Portal: Implementation Guide
Page 55

11. Click Migrate and click OK to close the message that indicates the number and status of the
users queued for registration. (There should be 9.)
12. Click Done.
13. The people queued for registration now appear in the Registration status box. Click Register
All. A status bar appears showing the progress, which may take from 10 to 30 seconds per user
depending on processor speed.
14. After the process completes, a message appears informing you of the registration status. Users
who could not be imported continue to be listed in the Registration status box with a status
message indicating the reason for the failure. Correct the information in the registration profile
and attempt to import the user again.
15. Click Done to dismiss the registration dialog. Refresh the People and Groups view to see the
new users.
16. Log on to the portal as one of the registered users listed and verify that the Notes and Sametime
portlets function normally.
Note:
The demo users are created with the password set to passw0rd.
49 Collaborative Portal: Implementation Guide
Page 56

Chapter 4. Using the Solution
This section contains a set of use cases that can be followed to ensure the solution is installed and
configured correctly. They can also be used as the basis for a demonstration to customers.
These use cases help you to understand how to use the portal that you have implemented from the point
of view of the end users. You can follow the navigation as it is laid out in this section to become familiar
with the portal. You can then adapt this to use with your customers and to provide a live demonstration.
The use cases focus on navigating through the sample portal in order to help you become familiar with
the features of such a solution. Before you prepare for your own customer demonstration, you probably
want to customize the portal solution to reflect user roles, applications and industry asp ects of your
prospective or existing customer.
Notes for a Customer Demonstration
In a customer demonstration, you should always emphasize the business value of the portal solution. As
you show the functions available to users through the portal, focus your customer's attention on how
these relate to the following:
● How your customer can save money - for example, no updates to client machines are required,
since all applications are accessed through browsers
● How your customer can save time and money implementing the portal solution, since many
components required to access applications and collaborative features are already available - the
applications just need to be customized
● How employees can find information faster - for example, everything is customized to an
employee's role
● How employees can be more productive - they can collaborate faster, do not need to start several
applications, and can log in to different sources
● How time can be saved when an employee moves from one department to another, because
access rights can be managed from one single point
Preparing for the Demonstration
Demonstrating a portal can be challenging. It is easy to divert from an organized navigation path and
confuse your audience by focusing too much on details of a specific page or portlet. The following
approach to showing the portal is suggested:
● Because a portal is an integration platform, begin by explaining to your customer which
applications the portal integrates (or can integrate) into a single user interface. This shows the
customer how to have a single point of access to all business application s o r da tabases.
● The second step is to explain to the customer which roles the portal supports. Explain that the
portal's capability to provide customized access to applications and information helps employees
find information more quickly and access applications they need in their daily business.
Provide one or more diagrams showing the layout of the portal to give your customer a visual
guide.
● The third step is to show the customer several applications supported by the portal solution.
Concentrate on the collaborative features and explain how employees can be more produ ctive
using these features. Also mention other applications that were previously accessible through
50 Collaborative Portal: Implementation Guide
Page 57

specific clients and now can be accessed using a single browser access point. Explain that
employees can use their customized environment with all required applications, from everywhere,
when they can access the portal.
The easiest way to do this is to center your navigation on what each user role can see. For each
one, describe the available features for a normal end user and for a content manager user and
how they can access and use the portal.
Demo Roles and User IDs
Several different user IDs are used, one for each role. These users and groups, listed in Table 20 below,
should have been created in Chapter 3. Create Demo Users
Table 20. Demo Users and Groups
User Name User ID Group Membership (Role)
Mike Rotz mrotz
Vic Sargent vsargent
Betsy Parker bparker
Kristen Baker kbaker
Lisa Bello lbello
Michael Davis mdavis
Gary Spurr gspur
Elizabeth Flur eflur
William Woolf wwoolf
on page 48.
Executives
Managers
Managers, HR
Employees, HR
Employees, HR
Employees, HR
Employees, Marketing
Employees, Sales
Employees
Use the administrative ID (wpsadmin) if you want to show administrative tasks to your audience.
Enable Sametime Awareness
Remember, each user must enable instant messaging when they access their mail on the Directory
Server. At a minimum, do this for Kristen Baker and Vic Sargent for the use case, Instant Messaging for
Immediate Help on page 52.
1. Log onto the portal and navigate to Intranet Jump Start -> Home -> Collaboration.
2. In the Sametime Contact List portal window, click Options and then select Change online
status.
3. Check the I am active radio button and click OK.
4. Click Save & Close.
5. You should now see the user name turn green indicating that you are active in Sametime.
Entering the Portal
To enter the intranet portal, a user should open a browser and type the following URL:
http://portal_server_name.com:10038/wps/portal
where portal_server_name.com is the hostname of the Portal Server.
The first page that appears contains general news and information and can be accessed by all non-
authorized users.
51 Collaborative Portal: Implementation Guide
Page 58

The rest of these examples present the different views in the portal that the employees have, depending
on their role.
Collaboration Scenario
Collaboration addresses many aspects of communication within the business e nvironment including email, instant messaging, and online e-meetings. Collaboration enables virtual teams to form and dissolve
as needed to tackle business problems and effectively manage projects.
Online e-meetings are especially useful for participants in different locations. Using e-meetings replaces
the need for costly travel and face-to-face meetings. E-meetings improve communications among offices
that are often spread across a wide area. A regional manager, for example, can save time by running
weekly status updates through an e-meeting, saving significant commute time and having to repeat the
same information at each location.
This demonstration illustrates instant messaging and online e-meetings.
Instant Messaging for Immediate Help
This part shows someone who needs help using PeopleFinder to locate a specific person or a person with
a specific skill. As part of locating that person, they look at the organization structure (to ensure they
have the right person) and then use the context-sensitive menu to ping that person. Kristen's next task is
to communicate the new vacation policy to the store managers. She sets up an e-meeting to do this, but
she needs to contact a regional director to determine a good time to do this. She can't remember the
name of the regional director she needs to contact, so she searches on job title.
This section demonstrates the following:
● How to search the employee profiles for a specific person
● How a contact a person using instant messenger
Search the Employees Directory for a Specific Person
The following steps demonstrate how you can search the employee directory for a specific person.
1. Log in to the portal as Vic Sargent.
2. On another client, log in to the portal as HR Advisor, Kristen Baker.
3. The People Finder portlet appears on all the Collaboration pages. Cha nge the drop-down menu
to Job Title and enter Operations Analyst in the Search for field. Then click the Search
(magnifying glass) icon.
4. The search returns William Woolf. Click William's name and sele ct Show in Organization View
to show his management chain.
Contact an Employee using IBM Lotus Sametime Connect (Sametime)
The following steps demonstrate how you can contact another employee using IBM Lotus Sam etime
Connect (Sametime).
1. When Kristen sees that Vic Sargent manages Williams's department, she is sure that Vic is the
right person. Do a search by name for Sargent. In the results, click on Vic Sargent's name and
select Add to Sametime list. In the pop-up window, enter a new group if desired or select an
existing group and click OK. Refresh the page so Vic's name shows up in the Sametime Contact
list. Vic is active in Sametime, so Kristen decides to send him an instant message. Click Vic's
name to open a Chat window.
2. Type When would be a good time to set up the e-meeting about the new
vacation policy?
52 Collaborative Portal: Implementation Guide
Page 59

3. Click Send.
4. On Vic's client machine, respond Tomorrow from 3-4 would be perfect. and click Send.
HR Policy Education Using e-meetings
This section demonstrates how an e-meeting is used to educate store managers on updated HR policies.
Create an e-meeting
The following steps demonstrate how team members can create an e-meeting and hold a discussion.
1. Log in to the portal as HR Advisor, Kristen Baker.
2. Select Launch -> Domino Integration. Select the My Team tab.
3. In the Web Conferences portlet, click New Meeting.
4. Enter the following information and click Save.
● Meeting name: Vacation Policy
● When: Start now
● Password: <meeting password>
● Leave defaults for the rest
5. Click Save.
6. Click the link in the Locations section to open the meeting.
7. Click Attending Meeting.
8. Click Yes to any security warnings.
9. On a different client, log on as Vic Sargent as well. Go to Web Conferences and search for all
meetings in progress. Sign on to the Vacation Policy meeting.
10. On Kristen Baker's client, open the sample file Vacation Policy.ppt.
11. Click Sharing in the meeting window and then select Start Sharing. Select the Vacation
Policy.ppt from the Currently running applications list and click OK.
12. The program should appear on Vic Sargent's client.
13. On Kristen Baker's screen, cycle through the slides in slideshow mode.
14. After reviewing the slides, click Stop Sharing. Select File -> End meeting to close the meeting
window.
Important: This concludes the description of the use cases for this solution. Proceed to Chapter 5.
Customize the Solution on page 54 to learn how you can adjust this solution to meet the specific need s of
your customer.
53 Collaborative Portal: Implementation Guide
Page 60

Chapter 5. Customize the Solution
When you are developing a solution to satisfy the customer requirements some form of customization is
usually involved. This section helps you understand and implement common customizations for this
solution and how to create a unique theme and skin for your portal.
Creating New Themes
Perform this task on the Development Client.
To customize the look and feel of the portal, for example to give it the corporate identity of your customer,
you can modify the theme and skin that is used on the pages. This includes changing colo rs, banners,
styles, fonts, layout, and other items that can make the portal look unique.
Defining your own theme involves creating a subdirectory using the theme name in the following directory:
<was_profile_root>/installedApps/cellname/wps.ear/wps.war/themes/markup
You must also create the supporting resources within that directory. HTML is the only markup language
that is provided by IBM WebSphere Portal Express that supports more than one theme. The following
steps provide one way of creating your own HTML-based theme using an existing theme.
1. Create a new directory using the new theme name; for example:
<was_profile_root>/installedApps/cellname/wps.ear/wps.war/themes/html/M
yTheme
Note: To avoid problems with the directory name, do not use DBCS characters.
2. Copy all of the files and subdirectories from another theme directory into the new directory. For
example, you could copy the files from the /Express theme.
3. Make updates to the following files according to the requirements of your portal site.
JSPs
Default.jsp and its included JSPs are used to provide the appearance and layout and
determine where the screen element goes.
Images
Images are used for icons and tools within the theme pages. They are typically located in an
images directory. You can modify these images or create your own and add them to the JSPs.
Style sheets
In order to handle the different locales and browsers supported by a theme, the style sheets are
actually JSPs. The <portal-theme:cacheProxyUrl/> tag and servlet, which is used to make
sure the output of CSS JSPs is cacheable, makes sure that the JSP is aware of the current
browser and locale.
Note: For security reasons, the cache proxy servlet will only serve URLs pointing to resources
located in the themes, skins, and screens directories. This makes all resources underneath these
directories public. Also, any URLs containing the ".." characters will not be served.
All style sheets reside in the css directory in the /MyTheme directory. The main style sheet is
styles.jsp. styles.jsp contains only statically included JSP fragments (JSPFs - .jspf file
extension). The easiest way to add your own styles is to create your own JSP fragment file and
54 Collaborative Portal: Implementation Guide
Page 61

add it to styles.jsp. You can change the style definitions. However, make sure that you do not
delete any style sheets or remove any style classes.
4. To add the theme, use the Themes and Skins portlet under Administration -> Portal User
Interface.
5. Edit the properties of a test page and set the page to use the new theme that you created.
Note: Be sure to use a test page for the new theme to work out any problems before setting the
default page to the new theme. Setting the portal default to use a theme with errors can cause
problems accessing the portal site.
6. When you are ready to offer the theme for general use, create a preview that users and
administrators can see from the page properties:
a. Create a screen capture of the theme.
b. Reduce the screen capture to fit in the preview box. The recommended size is 300 x 225
pixels.
c. Name the image preview.gif. GIF files are limited to 256 colors.
d. Copy the image to:
<was_profile_root>/installedApps/cellname/wps.ear/wps.war/themes/htm
l/<theme_name>
For example:
<was_profile_root>/installedApps/cellname/wps.ear/wps.war/themes/htm
l/MyTheme/preview.gif
7. After the theme is fully developed and tested, update and redeploy the IBM WebSphere Portal
Express .EAR file with the new theme.
Note:
If the IBM theme directory is either deleted or renamed, the portal resource loader uses the
themes/html/Default.jsp. In this case, you should also use the fallback skin. To do this,
rename the skins directory. For example, the skins/html/IBM directory should be renamed
skins/html/IBM1. If you have a broken theme, you can rename the theme and skin directories
which are causing the problem to get to a working minimal theme.
Enable Organize Favorites Function in Custom Themes
The My Favorites feature in IBM WebSphere Portal Express lets you bookmark a page in the portal so
you can return to it at a later time. The page is then added to your My Favorites list which is maintained
by means of the Organize Favorites feature. Organize Favorites, a page containing the Organize
Favorites portlet, lets you create, edit, activate, order, and delete labels and URLs in the My Favori tes
list.
In a default installation of IBM WebSphere Portal Express V6.0, you cannot directly access the Organize
Favorites function. The following tasks, however, can be done to access the Organize Favorites function
in your newly created theme by doing the following:
1. Use the <portal-navigation:navigation> tag with the scopeUniqueName attribute as
wps.p.Favorites to create the links to the Favorites in the theme. This replaces the
<portal:favoritesLoop/> tag for enabling the Organize Favorites function.
2. Create a URL to Organize Favorites in the theme using the <portalnavigation:urlGeneration> tag to wps.OrganizeFavorites.
3. Create a My Favorites label to store the favorites by doing the following:
a. Click Administration -> Portal User Interface -> Manage Pages.
55 Collaborative Portal: Implementation Guide
Page 62

b. Select the Content Root page title to select the Content Root page.
c. At the Content Root page, click New Label.
d. Create a label called My Favorites.
e. Assign privileged user access to all authenticated users.
f. Click OK when you have finished.
g. Click Portal Settings -> Custom Unique Names.
h. Assign wps.My Favorites as a unique name to the My Favorites label you just created.
i. Click OK when you have finished.
j. Click Administration -> Portal User Interface -> Manage Pages.
k. Add a page parameter key of Favorites with a value of Yes.
l. Add <portal-logic:if/> tags with the pageBookmarkable attribute set to true to pages
that you want to be able to bookmark.
Enable Dynamic Theme Reloading
Since you are changing the portal themes and skins, it is helpful to have these changes enabled without
restarting the portal. To do this, follow these steps:
1. Stop the Portal Server.
2. Locate and edit the following file:
<WAS_root>\config\cells\<node_name>\applications\wps.ear\deployments\wp
s\wps.war\WEB-INF\ibm-web-ext.xmi
3. Search the file for the parameter named reloadingEnabled and change the setting from false
to true.
Note: The file also contains a parameter with a similar name, reloadEnable, which is already
set to true. Ensure that you change the reloadingEnabled parameter, which is located in the
header portion of the file.
4. Save the file and restart the Portal Server.
Note: There is a significant performance impact when running the server with the
reloadingEnabled parameter set to true. Only change this setting while developing a new
theme or skin. When you are finished developing the theme or skin, change the setting back to
false, and then stop and restart the server.
Create New Skins
Perform this task on the Development Client.
Defining your own skins involves creating a subdirectory using the skin name in the following directory:
<was_profile_root>/installedApps/cellname/wps.ear/wps.war/skins/<markup_type>
/
You must also create the supporting resources within that directory. The following steps describe one way
to create your own HTML-based skin using an existing skin.
1. Create a new directory using the new skin name; for example:
56 Collaborative Portal: Implementation Guide
Page 63

<was_profile_root>/installedApps/cellname/wps.ear/wps.war/skins/markup_
type/MySkin
Note: To avoid problems with the directory name, do not use DBCS characters.
2. Copy all of the files and subdirectories from another skin directory into the new directory. For
example, you could copy the files from the /IBM skin.
Note: If you are using the portlet context menus then the portletContextMenu.jsp file from
/themes/html/IBM should also be copied into the themes/html/<your_theme> directory
for any themes you wish your skin to work with.
3. Make updates to the following files according to the requirements of your portal site.
JSPs
Edit Control.jsp to create the title bar and border around individual portlets. The other JSPs,
such as UnlayeredContainer-H.jsp and UnlayeredContainer-V.jsp, are used by the
portal customization to arrange portlets within the page.
Images
These are images that are used to create the portlet title bar or background images. You can
modify these images or create your own and add them to the JSPs.
4. To add the skin, use the Themes and Skins portlet under Administration, Portal User
Interface. The skin name that you add must be the same as the subdirectory name that you used
for the skins.
5. Use the Appearance portlet to test and make changes to the new skins as you are workin g on
them.
6. When you are ready to provide the skin for general use, create a preview that users and
administrators can see from the page properties:
a. Create a screen capture of the skin.
b. Reduce the screen capture image to fit in the preview box. The recommended size is 307 x
159 pixels.
c. Name the image preview.gif. GIF files are limited to 256 colors.
d. Copy the image to:
<was_profile_root>/installedApps/cellname/wps.ear/wps.war/skins/html
/<skin_name>
For example:
<was_profile_root>/installedApps/cellname/wps.ear/wps.war/skins/html
/MySkin/preview.gif
7. After the skin is fully developed and tested, update and redeploy the IBM WebSphere Portal
Express .EAR file with the new skin.
Note:
If the IBM theme directory is either deleted or renamed, the portal resource loader uses the
themes/html/Default.jsp. In this case, you should also use the fallback skin. To do this,
rename the skins directory. For example, the skins/html/IBM directory should be renamed
skins/html/IBM1. If you have a broken theme, you can rename the theme and skin directories
which are causing the problem to get to a working minimal theme.
Important: You have completed the installation and configuration tasks for the solution.
57 Collaborative Portal: Implementation Guide
Page 64

Appendix. Notices
This information was developed for products and services offere d in the U.S.A.
IBM may not offer the products, services, or features discussed in this document in other countries.
Consult your local IBM representative for information on the products and services currently available in
your area. Any reference to an IBM product, program, or service is not intended to state or imply that only
that IBM product, program, or service may be used. Any functionally equivalent product, program, or
service that does not infringe any IBM intellectual property right may be used instead. However, it is the
user's responsibility to evaluate and verify the operation of any non-IBM product, program, or service.
IBM may have patents or pending patent applications covering subject matter described in this document.
The furnishing of this document does not grant you any license to these patents. You can send license
inquiries, in writing, to:
IBM Director of Licensing
IBM Corporation
North Castle Drive
Armonk, NY 10504-1785
U.S.A.
For license inquiries regarding double-byte (DBCS) information, contact the IBM Intellectual Property
Department in your country or send inquiries, in writing, to:
IBM World Trade Asia Corporation
Licensing
2-31 Roppongi 3-chome, Minato-ku
Tokyo 106-0032, Japan
The following paragraph does not apply to the United Kingdom or any other coun try where such
provisions are inconsistent with local law: INTERNATIONAL BUSINESS MACHINES
CORPORATION PROVIDES THIS PUBLICATION "AS IS" WITHOUT WARRANTY OF ANY KIND,
EITHER EXPRESS OR IMPLIED, INCLUDING, BUT NOT LIMITED TO, THE IMPLIED WARRANTIES
OF NON-INFRINGEMENT, MERCHANTABILITY OR FITNESS FOR A PARTICULAR PURPOSE. Some
states do not allow disclaimer of express or implied warranties in certain transactions, therefore, this
statement may not apply to you.
This information could include technical inaccuracies or typographical errors. Changes are periodically
made to the information herein; these changes will be incorporated in new editions of the publication. IBM
may make improvements and/or changes in the product(s) and/or the program(s) described in this
publication at any time without notice.
Any references in this information to non-IBM Web sites are provided for convenience only and do not in
any manner serve as an endorsement of those Web sites. The materials at those Web sites are not part
of the materials for this IBM product and use of those Web sites is at your own risk.
IBM may use or distribute any of the information you supply in any way it believes appropriate without
incurring any obligation to you.
Licensees of this program who wish to have information about it for the purpose of enabling: (i) the
exchange of information between independently created programs and other programs (including this
one) and (ii) the mutual use of the information which has been exchanged, should contact:
IBM Corporation
TL3B/503
3039 Cornwallis Road
Research Triangle Park, NC 27709
U.S.A.
58 Collaborative Portal: Implementation Guide
Page 65

Such information may be available, subject to appropriate terms and conditions, including in some cases,
payment of a fee.
The licensed program described in this information and all licensed material available for it are provided
by IBM under terms of the IBM Customer Agreement, IBM International Program License Agreement, or
any equivalent agreement between us.
Any performance data contained herein was determined in a controlled environment. Therefore, the
results obtained in other operating environments may vary significantly. Some measurements may have
been made on development-level systems and there is no guarantee that these mea sureme nts will be the
same on generally available systems. Furthermore, some measurements may have been estimated
through extrapolation. Actual results may vary. Users of this document should verify the applicable data
for their specific environment.
Information concerning non-IBM products was obtained from the suppliers of those products, their
published announcements or other publicly available sources. IBM has not tested those produ cts an d
cannot confirm the accuracy of performance, compatibility or any other claims related to non-IBM
products. Questions on the capabilities of non-IBM products should be addressed to the suppliers of
those products.
Any IBM prices shown are IBM's suggested retail prices, are current and are subject to change without
notice. Dealer prices may vary.
This information may contain examples of data and reports used in daily business operations. To illustrate
them as completely as possible, the examples include the names of individuals, companies, brands, and
products. All of these names are fictitious and any similarity to the names and addresses used by an
actual business enterprise is entirely coincidental.
COPYRIGHT LICENSE:
This information may contain sample application programs in source language, which illustrate
programming techniques on various operating platforms. You may copy, modify, and distribute these
sample programs in any form without payment to IBM, for the purposes of developing, using, marketing or
distributing application programs conforming to the application programming interface for the operating
platform for which the sample programs are written. These examples have not been thoroughly tested
under all conditions. IBM, therefore, cannot guarantee or imply reliability, serviceability, or function of
these programs.
Trademarks
The following terms are trademarks of International Business Machines Corporation in the United States,
other countries, or both:
(R)
AIX
alphaWorks
BladeCenter
Cloudscape
(R)
DB2
(R)
(R)
DB2 Extenders
DB2 OLAP Server
DB2 Universal
Database
developerWorks
(R)
Domino
Domino Designer
Domino.Doc
e-business on
demand
e(logo)server
e(logo)business
eServer
Express Middleware
Express Portfolio
Express Servers
IBM
Intel
(R)
, Celeron
(R)
, Intel Xeon
(TM)
, Intel Inside
trademarks of Intel Corporation or its subsidiaries in the United States and other countries.
(R)
(R)
(R)
(logos),and Pentium
(R)
(R)
ibm.com
i5/OS
iSeries
Lotus
Lotus Notes
Lotus Workflow
MQSeries
OS/400
PartnerWorld
pSeries
(R)
(R)
(R)
(R)
(R)
are trademarks or registered
QMF
Rational
Redbooks
RS/6000
Sametime
Tivoli
(R)
(R)
(R)
WebSphere
Workplace
xSeries
(R)
Microsoft, Windows, Windows Server, the Windows logo, PowerPoint, Excel, and Microsoft Internet
Explorer 6 are trademarks of Microsoft Corporation in the United States and/or other countries.
59 Collaborative Portal: Implementation Guide
Page 66

Java and all Java-based trademarks are trademarks of Sun Microsystems, Inc. in the United States, other
countries, or both.
Linux is a trademark of Linus Torvalds in the United States, other countries, or both.
(R)
UNIX
is a registered trademark of The Open Group in the United States and other countries.
Adobe and Adobe Acrobat are trademarks of Adobe Systems Incorporated.
Bowstreet is a trademark of Bowstreet, Inc.
The IBM logo is a registered trademark of IBM Corporation.
The e-business logo is a trademark of IBM Corporation.
Netscape is a registered trademark of Netscape Communications Co rporation in the United States and
other countries.
Oracle is a registered trademark of Oracle Corporation.
PeopleSoft is a registered trademark of PeopleSoft, Inc.
Red Hat is a registered trademark of Red Hat, Inc.
SAP is the trademark or registered trademark of SAP AG in Germany and in several other countries.
Siebel is a trademark of Siebel Systems, Inc.
SUSE is a trademark of SUSE LINUX Products GmbH, a Novell business.
Other company, product, or service names may be trademarks or service marks of others.
60 Collaborative Portal: Implementation Guide
 Loading...