

Page 1

IBM® Carrier Grade Server
X3650 T
SysCon User’s Guide
Order Number: D23731-003
Revision 3.0
March 2006
Page 2

IBM® Carrier Grade Server X3650 T
Revision History
Date Revision
Number
May 2005 1.0 Preliminary. Initial Release.
June 2005 2.0 Preliminary. Restructured installation information.
March 2006 3.0 ECO release.
Modifications
Revision 3.0
ii
Page 3

IBM® Carrier Grade Server X3650 T
Disclaimers
Information in this document is provided in connection with IBM® products. No license, express
or implied, by estoppel or otherwise, to any intellectual property rights is granted by this
document. Except as provided in IBM's Terms and Conditions of Sale for such products, IBM
assumes no liability whatsoever, and IBM disclaims any express or implied warranty, relating to
sale and/or use of IBM products including liability or warranties relating to fitness for a particular
purpose, merchantability, or infringement of any patent, copyright or other intellectual property
right. IBM products are not intended for use in medical, life saving, or life sustaining
applications. IBM may make changes to specifications and product descriptions at any time,
without notice.
Designers must not rely on the absence or characteristics of any features or instructions marked
"reserved" or "undefined." IBM reserves these for future definition and shall have no
responsibility whatsoever for conflicts or incompatibilities arising from future changes to them.
This document contains information on products in the design phase of development. Do not
finalize a design with this information. Revised information will be published when the product
is available. Verify with your local sales office that you have the latest datasheet before
finalizing a design.
The IBM® Telco Carrier Grade Server X3650 T may contain design defects or errors known as
errata which may cause the product to deviate from published specifications. Current
characterized errata are available on request.
This document and the software described in it is furnished under license and may only be used
or copied in accordance with the terms of the license. The information in this manual is
furnished for informational use only, is subject to change without notice, and should not be
construed as a commitment by IBM Corporation. IBM Corporation assumes no responsibility or
liability for any errors or inaccuracies that may appear in this document or any software that may
be provided in association with this document.
Except as permitted by such license, no part of this document may be reproduced, stored in a
retrieval system, or transmitted in any form or by any means without the express written consent
of IBM Corporation.
Intel, Pentium, Itanium, and Xeon are trademarks or registered trademarks of Intel Corporation.
*Other brands and names may be claimed as the property of others.
Copyright © IBM Corporation 2005-2006.
Revision 3.0
iii
Page 4

IBM® Carrier Grade Server X3650 T
Table of Contents
1. Introduction ..........................................................................................................................1
2. SysCon Features ..................................................................................................................2
2.1 Automatic preservation of system settings .............................................................. 2
2.2 Detection of system setting changes ....................................................................... 2
2.3 Transfer of system settings...................................................................................... 2
3. Installing the SysCon Feature............................................................................................. 3
3.1 Microsoft Windows* ................................................................................................. 3
3.1.1 Python...................................................................................................................... 5
3.1.2 Installing the SysCon Device ................................................................................... 9
3.1.3 Installation Issues using Microsoft* Software ........................................................13
3.2 Linux ...................................................................................................................... 14
3.2.1 Installation Procedure ............................................................................................ 14
3.3 Activating/Deactivating the SysCon Feature ......................................................... 15
3.3.1 Activating the SysCon feature ...............................................................................15
3.3.2 Deactivating the SysCon feature ........................................................................... 18
4. SysCon Feature Operation Overview ............................................................................... 19
4.1 Configuring and booting the first time .................................................................... 19
4.2 Reconfiguring the system ...................................................................................... 19
5. Booting the System............................................................................................................ 20
6. Controlling SysCon Behavior Using Policies.................................................................. 21
7. Interacting with the SysCon Feature ................................................................................ 22
7.1 Using the SysCon Menu ........................................................................................ 23
7.1.1 Using the EFI Shell ................................................................................................ 25
7.2 Detecting system setting changes ......................................................................... 26
7.3 Applying transferred settings ................................................................................. 26
7.4 Using a SysCon Key.............................................................................................. 28
7.4.1 Backup system settings to a SysCon Key ............................................................. 28
7.4.2 Restore system settings from a SysCon Key Backup............................................ 28
7.4.3 Installing a SysCon Device using a SysCon Key................................................... 29
7.4.4 Updating a SysCon Device using a SysCon Key................................................... 34
8. Creating System Settings Files......................................................................................... 36
8.1 Encrypting Settings Data ....................................................................................... 36
Revision 3.0
iv
Page 5

IBM® Carrier Grade Server X3650 T
8.2 Applying new user-specified settings..................................................................... 37
8.3 Importing User-Specified Settings ......................................................................... 39
9. Monitoring SysCon Activity............................................................................................... 41
9.1 Logging SysCon Events ........................................................................................41
9.2 Configuring Event Notification Actions................................................................... 42
10. Using SysCon Operating System Services and Utilities ................................................ 43
11. Using the SysCon Device for Application Data ............................................................... 44
12. SysCon Services ................................................................................................................45
12.1 SysCon Service for Linux Features ....................................................................... 45
12.1.1 SysCon Install tool ................................................................................................. 45
12.1.2 Auto-mounting and Monitoring of the SysCon Device ........................................... 45
12.1.3 Auto-mounting and Monitoring of SysCon Keys .................................................... 45
12.1.4 Linux Hot-plug USB Support and SysCon Hot-plug Plugin.................................... 45
12.1.5 SysCon Daemon (syscond) ................................................................................... 45
12.2 Events, Notification, and Actions ........................................................................... 46
12.2.1 SysCon Events ...................................................................................................... 46
12.2.2 SysCon Event Logging and Notification ................................................................46
12.2.3 SysCon Event Logging and Notification Policies ................................................... 48
12.2.4 SysCon Actions on Events ....................................................................................48
12.2.5 SysCon Event/Notification API and Query Languages.......................................... 48
12.3 Other Policies ........................................................................................................53
13. APPENDIX A – SysCon Environment Folder Structure .................................................. 54
14. APPENDIX B – SysCon Policy File Format ...................................................................... 55
14.1 SysCon Device Policy Defaults: policydefaults.xml .............................................. 56
14.2 SysCon Policy Schema: syscon.xsd..................................................................... 63
15. APPENDIX C – System Settings File Format ................................................................... 64
15.1 A Typical System Settings File Example ...............................................................64
15.2 A “Full” System Settings File Example .................................................................. 68
15.3 System / Component Schema ............................................................................... 72
15.3.1 syscfg:BIOSV001 Settings..................................................................................... 73
15.3.2 bmccfg:IMMV001 Settings..................................................................................... 73
15.3.3 Nic:NICV001 Settings ............................................................................................ 74
15.4 Updating BIOS and Intel® Management Module firmware..................................... 75
15.4.1 Intel:BIOSVersion update example........................................................................ 75
15.4.2 Intel:IMMVersion update example ......................................................................... 75
Revision 3.0
v
Page 6

IBM® Carrier Grade Server X3650 T
16. APPENDIX D – SysCon Log File Format .......................................................................... 76
17. APPENDIX E – POSIX Logging API and Query Specification for SysCon ....................77
17.1 Logging Functions .................................................................................................77
17.1.1 Write to the Log .....................................................................................................77
17.1.2 Write Formatted String to Log................................................................................ 79
17.2 Log Processing Functions .....................................................................................80
17.2.1 Open an Event Log for Read Access ....................................................................80
17.2.2 Read from an Event Log........................................................................................ 81
17.2.3 Notify Process of Availability of System Log Data ................................................. 82
17.2.4 Remove Notification Request ................................................................................ 86
17.2.5 Close Event Log ....................................................................................................86
17.2.6 Reposition the Read Pointer.................................................................................. 87
17.2.7 Compare Event Record Severities ........................................................................ 88
17.2.8 Create Log Query .................................................................................................. 89
17.2.9 Destroy Log Query................................................................................................. 96
17.2.10 Test Event Record against Query Criteria ............................................................. 97
18. Appendix F: Troubleshooting the SysCon Feature........................................................ 99
18.1 Embedded USB Device “Present” ......................................................................... 99
18.2 Embedded USB device “Not Present” ................................................................. 100
18.3 Problem USB devices.......................................................................................... 100
Revision 3.0
vi
Page 7

IBM® Carrier Grade Server X3650 T
List of Tables
Table 1. Seek Directions.............................................................................................................87
Table 2. Query Purpose Flags ....................................................................................................90
Table 3. Required Operations on Standard Attributes ................................................................ 93
Table 4. Required Operations in Limited Queries....................................................................... 95
Revision 3.0
vii
Page 8

IBM® Carrier Grade Server X3650 T
< This page intentionally left blank. >
Revision 3.0
viii
Page 9

IBM® Carrier Grade Server X3650 T
1. Introduction
The IBM SysCon feature checks server system configuration during the pre-boot process and manages
the configuration of system components based on configuration data, vendor rules, and user policy
settings. The SysCon feature includes a pre-boot application which controls the process of examining
the system configuration and taking appropriate action during the system boot process.
The SysCon feature also provides OS (Linux and Windows*) services and utilities that allow secure
access to data on the SysCon devices used for managing system configuration.
This User’s Guide describes the SysCon environment and the use of the SysCon Pre-Boot Application
and operating system-based SysCon Services.
Revision 3.0
1
Page 10

IBM® Carrier Grade Server X3650 T
2. SysCon Features
The SysCon feature is available on IBM servers that include an embedded USB device called a SysCon
Device. The SysCon Device works in conjunction with the system firmware (BIOS) to manage the system
settings for the BIOS and server management features (BMC and/or Intel
In addition, the user may use a removable USB flash device called a SysCon Key. A SysCon Key is a
removable USB mass storage device that has been installed as a SysCon Key device (i.e. the SysCon
runtime environment has been installed). A SysCon Key can be used to load and apply settings for
multiple systems.
Services and utilities for managing a SysCon Device and SysCon Keys are available for both Linux and
Windows* operating environments. SysCon utilities allow the user to install SysCon Devices and Keys
and to perform other tasks, as well as providing continuous monitoring of SysCon devices to ensure their
availability and security.
2.1 Automatic preservation of system settings
The SysCon feature is activated during system startup, immediately before the system firmware begins to
determine the system boot device or path. The SysCon feature extracts and preserves the current
settings of the BIOS and the server management features (BMC, Intel
®
Management Module).
®
Management Module).
2.2 Detection of system setting changes
The SysCon feature compares the current settings (recently-extracted) with settings that it has saved
from previous system restarts. By default, if the current settings are different from those that were
previously saved, the SysCon feature will restore saved settings to a system component and reboot the
system. The user can modify this behavior through the use of SysCon policy settings, detailed later in
this document.
2.3 Transfer of system settings
The SysCon feature allows the user to transfer system settings to a second system. If a system is to be
replaced due to redeployment or for repair, the user can remove the SysCon Device and install it into the
replacement system. The SysCon feature will determine that the SysCon Device has been relocated to a
new system and will configure the new system using the settings currently stored on the Device.
Note: The SysCon feature will only allow settings to be transferred between systems with the same
system BIOS, server management feature versions and the same Intel® Management Module versions
(firmware, PIA and Boot Block).
The SysCon feature also allows the user to transfer settings using a SysCon Key. When a SysCon Key
is present during system boot, the user can export the current system settings onto the SysCon Key.
The exported settings can then be used to configure other systems.
Revision 3.0
2
Page 11

IBM® Carrier Grade Server X3650 T
3. Installing the SysCon Feature
The SysCon feature may only be installed on IBM servers that are equipped with an IBM SysCon Device.
See your system documentation to confirm that your system has a SysCon Device.
The SysCon feature should be installed following operation system installation in order to ensure that the
security of the data on the SysCon Device is maintained. Installation packages for Microsoft Windows*
and Linux are available on the Resource CD.
First, install the Operating System (Linux Red Hat EL 3, EL 4, SuSE SLES 9, or Microsoft Windows* 2003
Enterprise Edition Server) on your IBM® Carrier Grade Server X3650 T. Next, install the SysCon feature
by inserting the IBM® Carrier Grade Server X3650 T IBM Server Resource CD into the system’s DVDROM drive and wait for the auto-launcher to display a start-up web page. Use the following procedure if
the page does not display:
1. Go to the application used to explore files on your system and double click the CD ROM
drive.
2. Open the x3650 T folder.
3. Open the file welcome.htm
4. If prompted, accept the license agreement.
5. Click on the “Additional Management Utilities” link in the left frame of browser’s display.
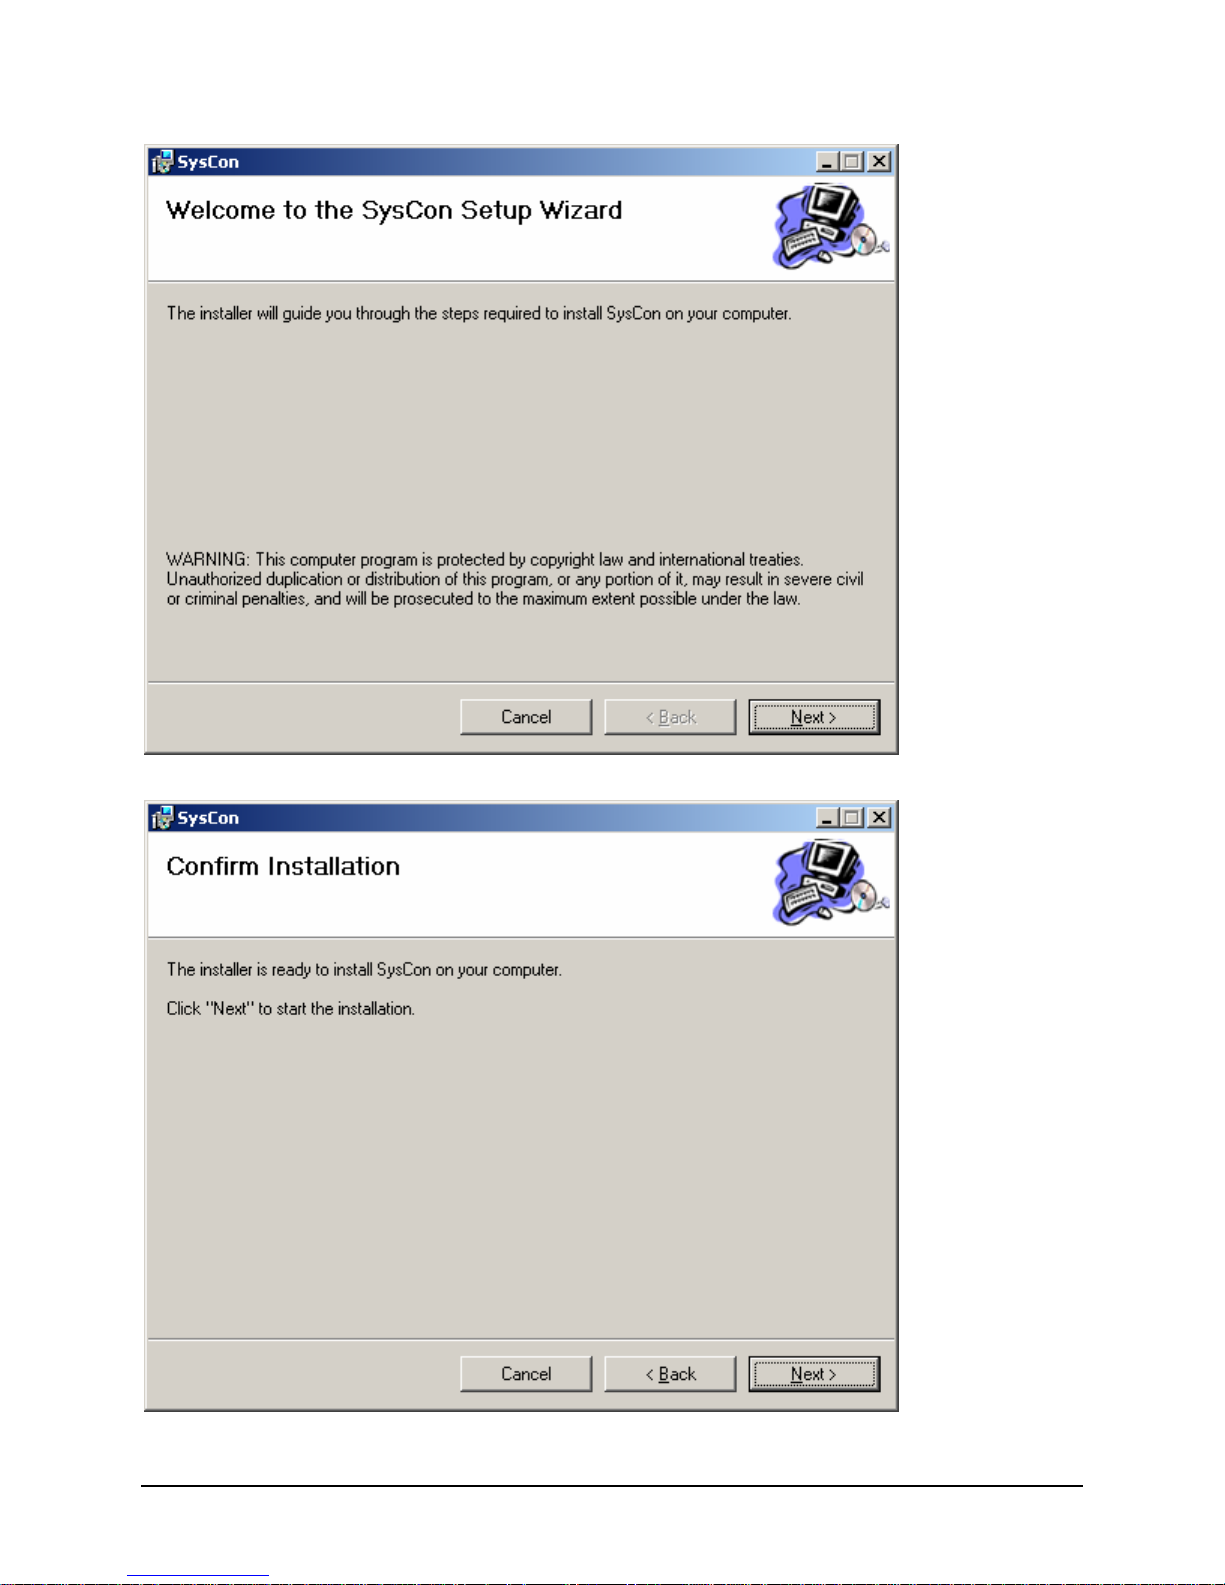
3.1 Microsoft Windows*
The SysConSetup.msi file found on the Resource CD installs the SysCon feature on Microsoft Windows*
2003 Enterprise Edition Server systems. It installs a Windows service to automatically mount the SysCon
Device or SysCon Keys. Follow these installation windows until installation is complete.
Revision 3.0
3
Page 12
IBM® Carrier Grade Server X3650 T
Revision 3.0
4
Page 13
IBM® Carrier Grade Server X3650 T
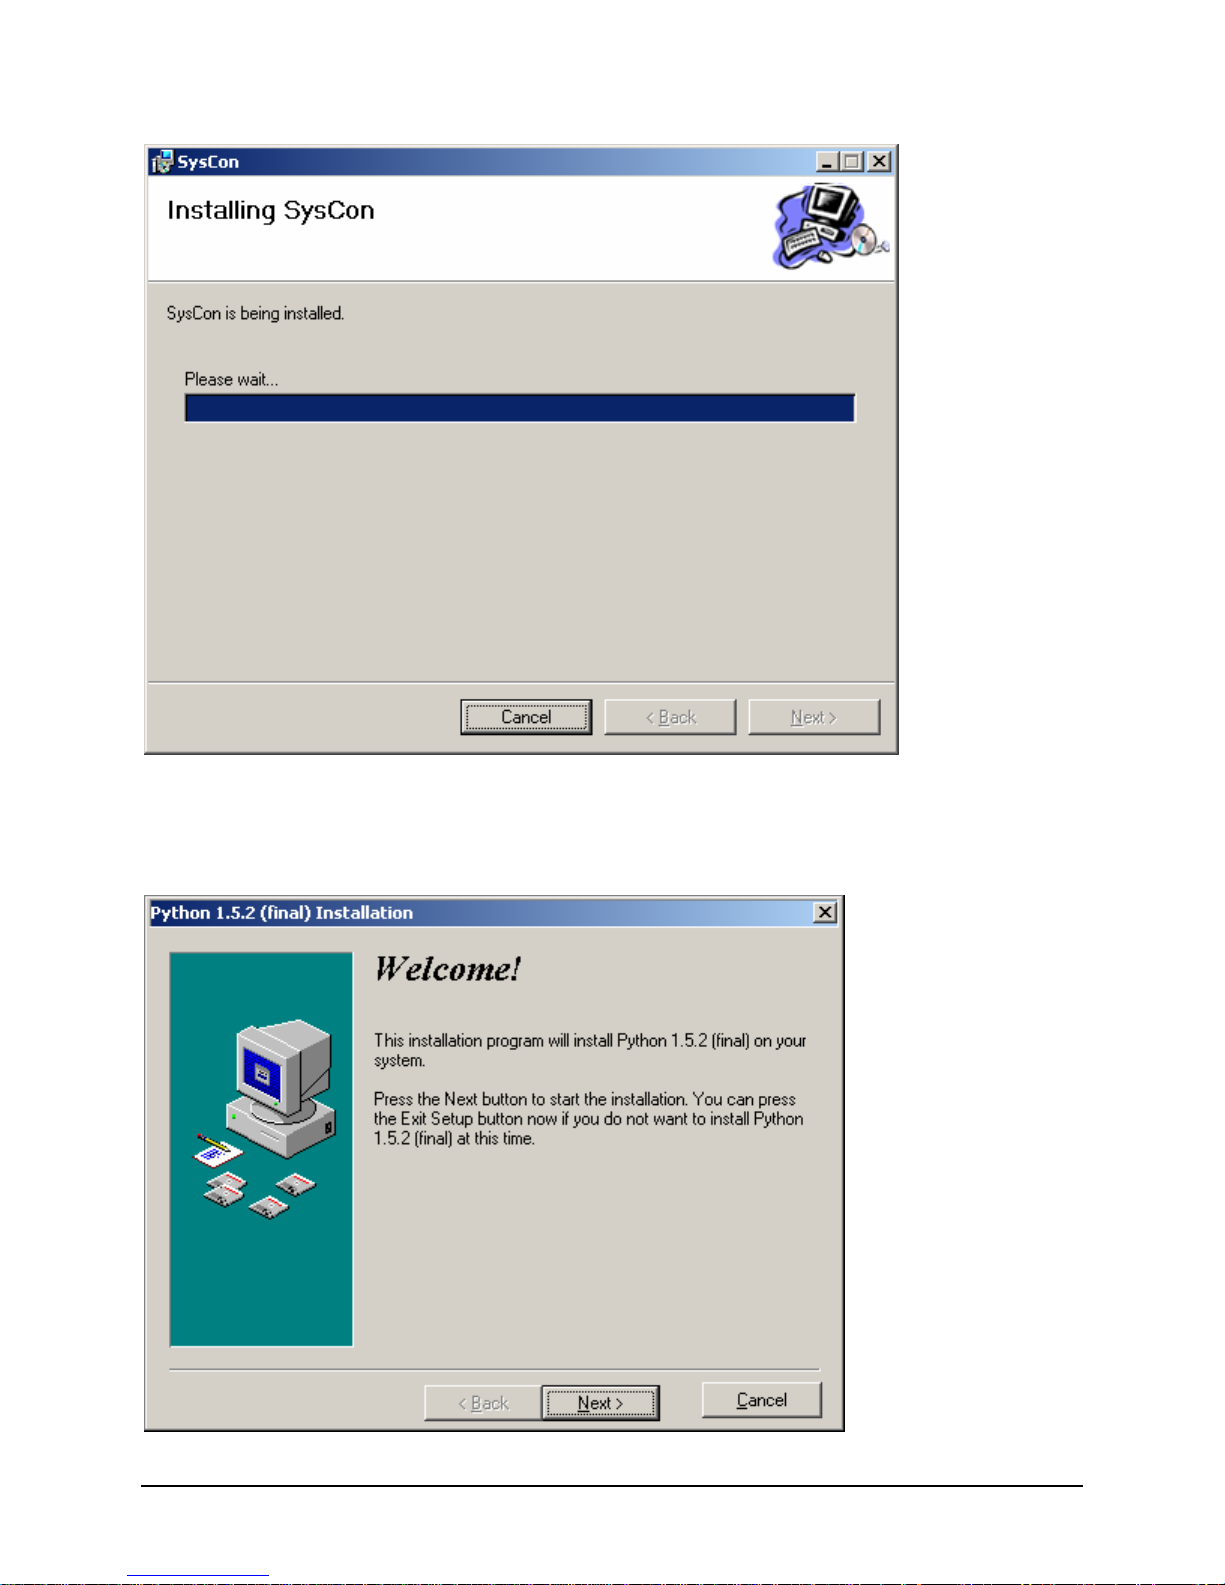
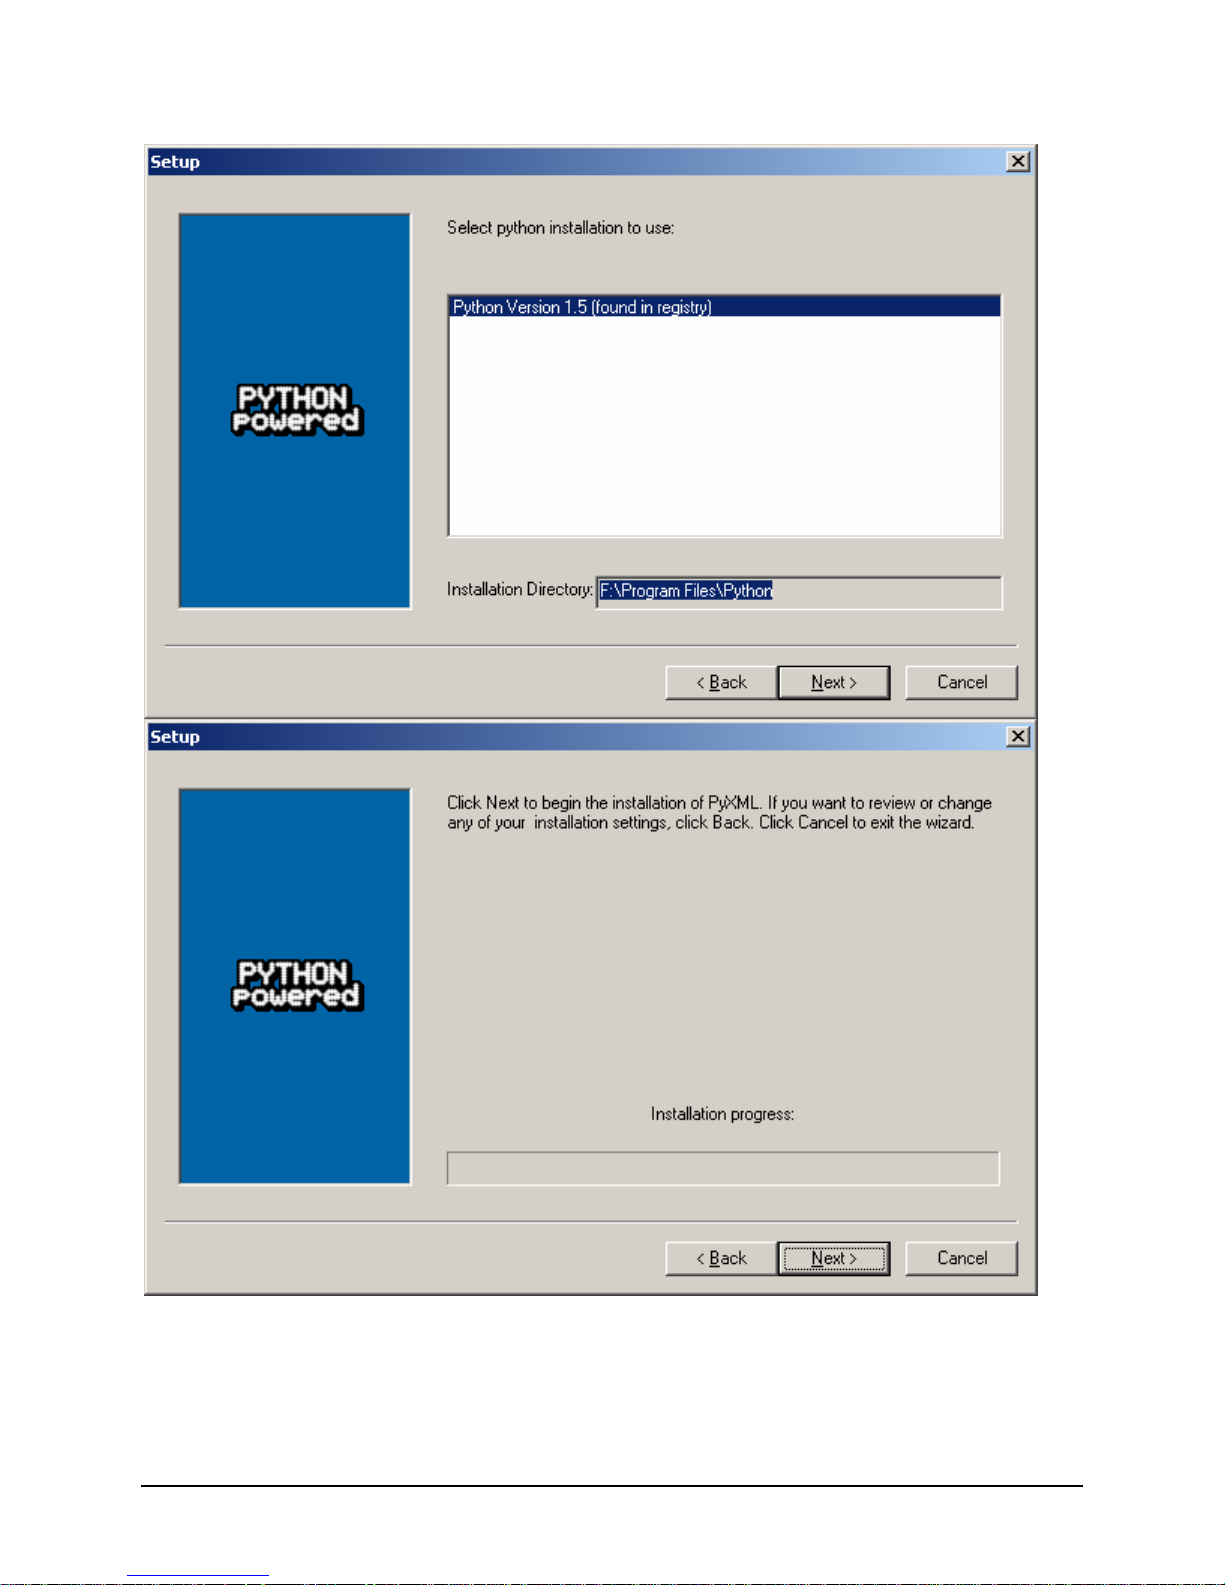
3.1.1 Python
Python is required to complete the installation of the SysCon device. Python version 1.5 is supported in
EFI. These Python install packages can be skipped if a newer version of Python is already installed.
Revision 3.0
5
Page 14

IBM® Carrier Grade Server X3650 T
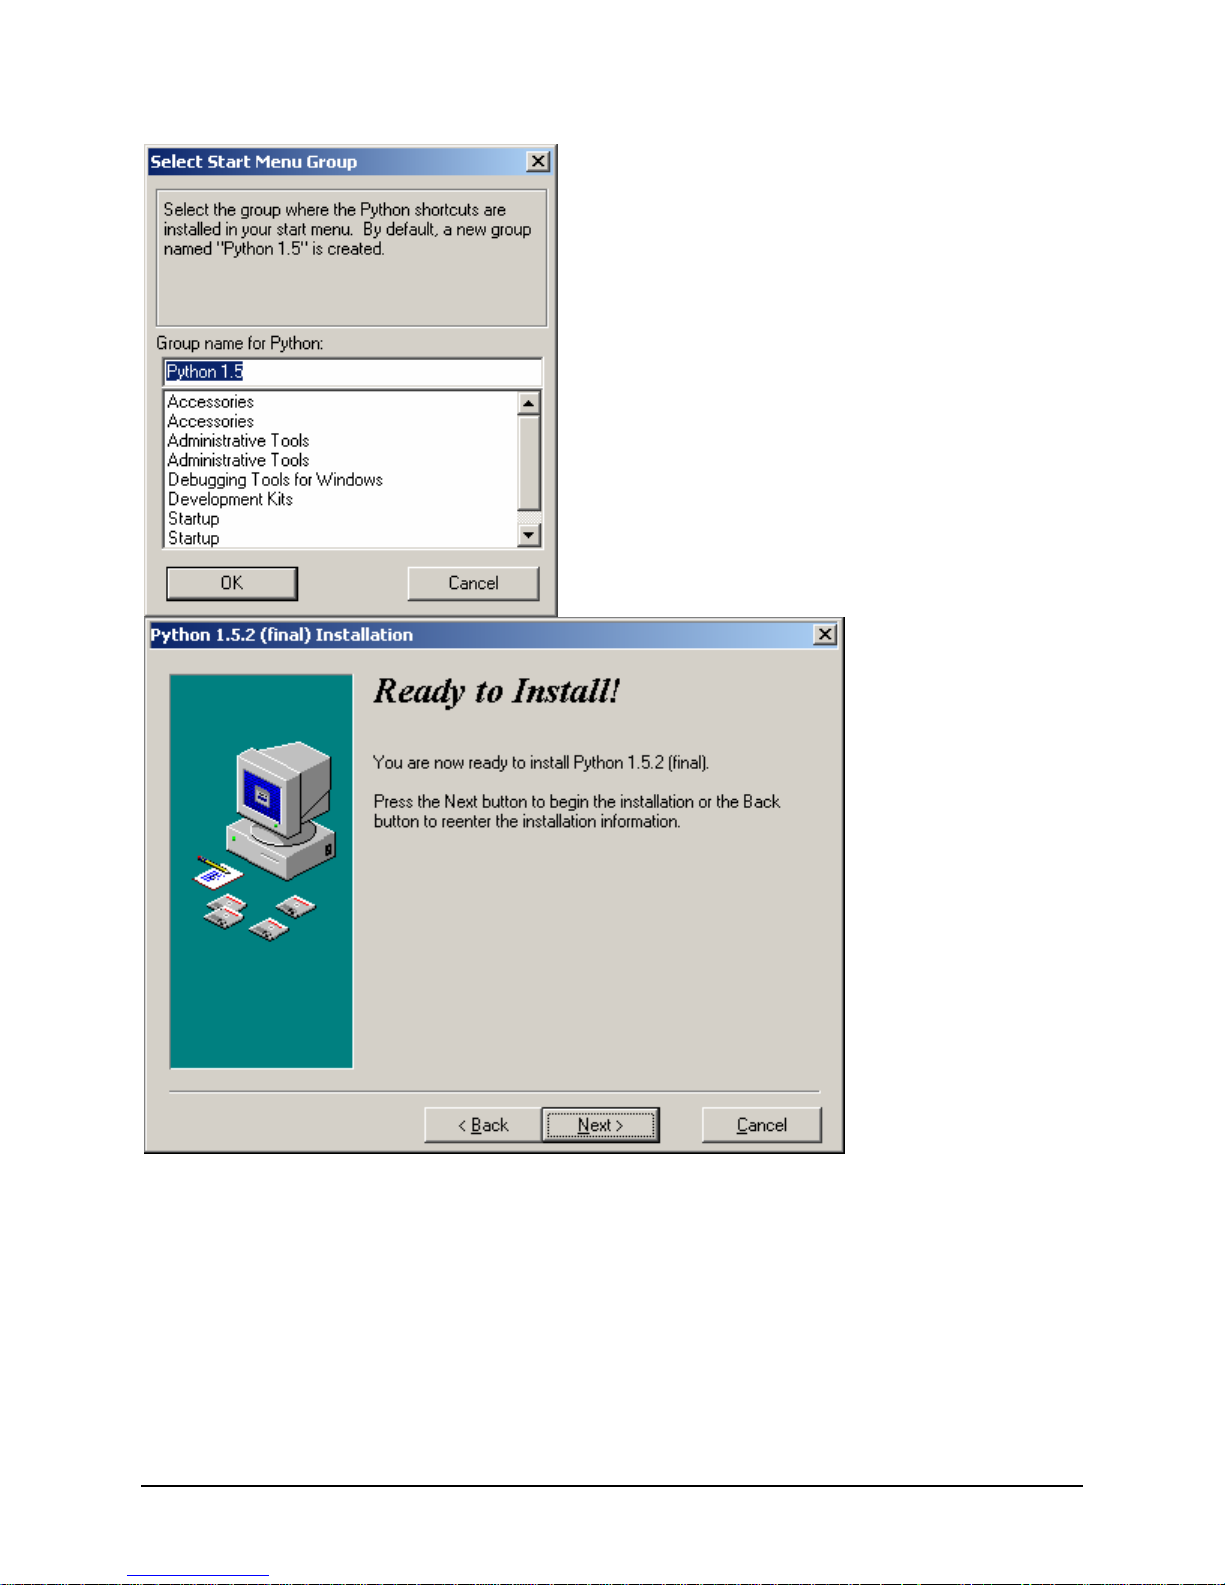
In this example “F:” happens to be the Windows system root device. It is normally “C:.”
Tcl/TK is optional. You can uncheck this component here.
Revision 3.0
6
Page 15
IBM® Carrier Grade Server X3650 T
Revision 3.0
7
Page 16
IBM® Carrier Grade Server X3650 T
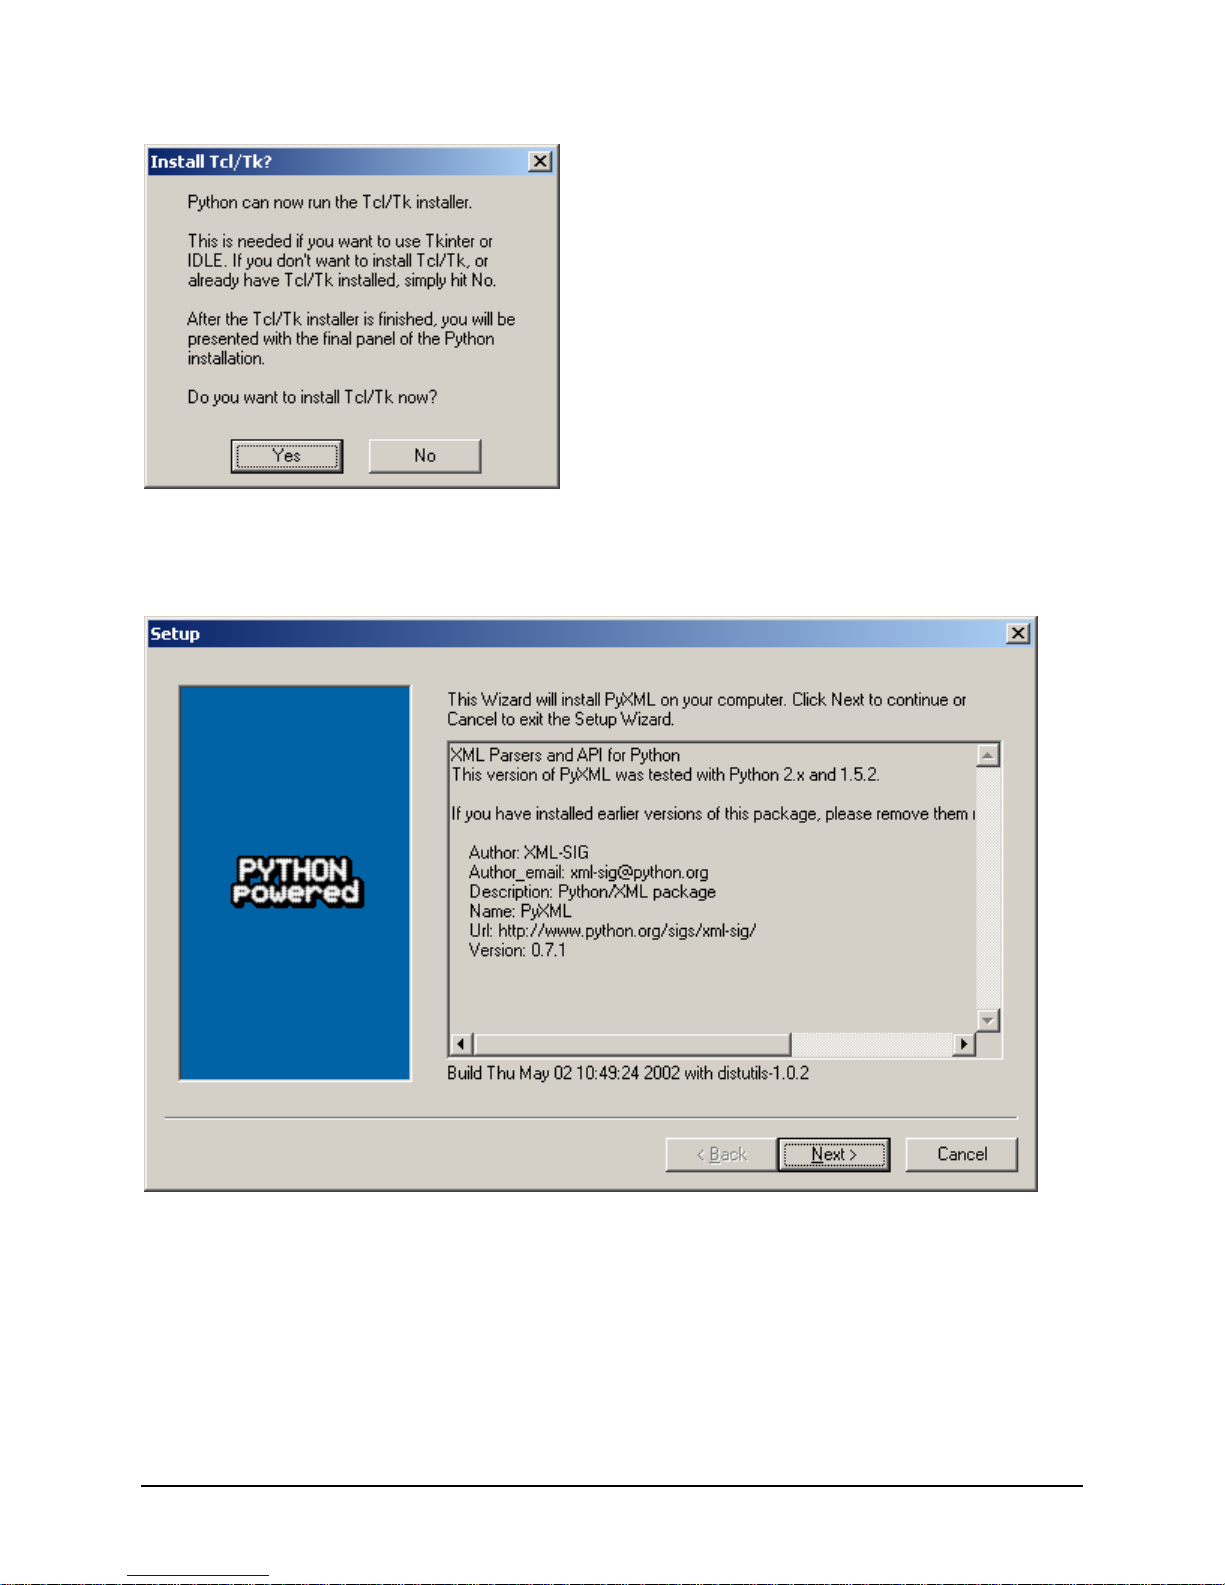
Tcl/Tk is optional. You can click on "No" here. Or, if you decide to install Tcl/Tk, click “Yes” and follow the
install instructions that follow.
PyXML is required also to complete the installation of the SysCon device. This package is included in
newer versions of Python; it can be skipped if Python 2.3 or later is already installed.
Revision 3.0
8
Page 17
IBM® Carrier Grade Server X3650 T
Revision 3.0
9
Page 18
IBM® Carrier Grade Server X3650 T
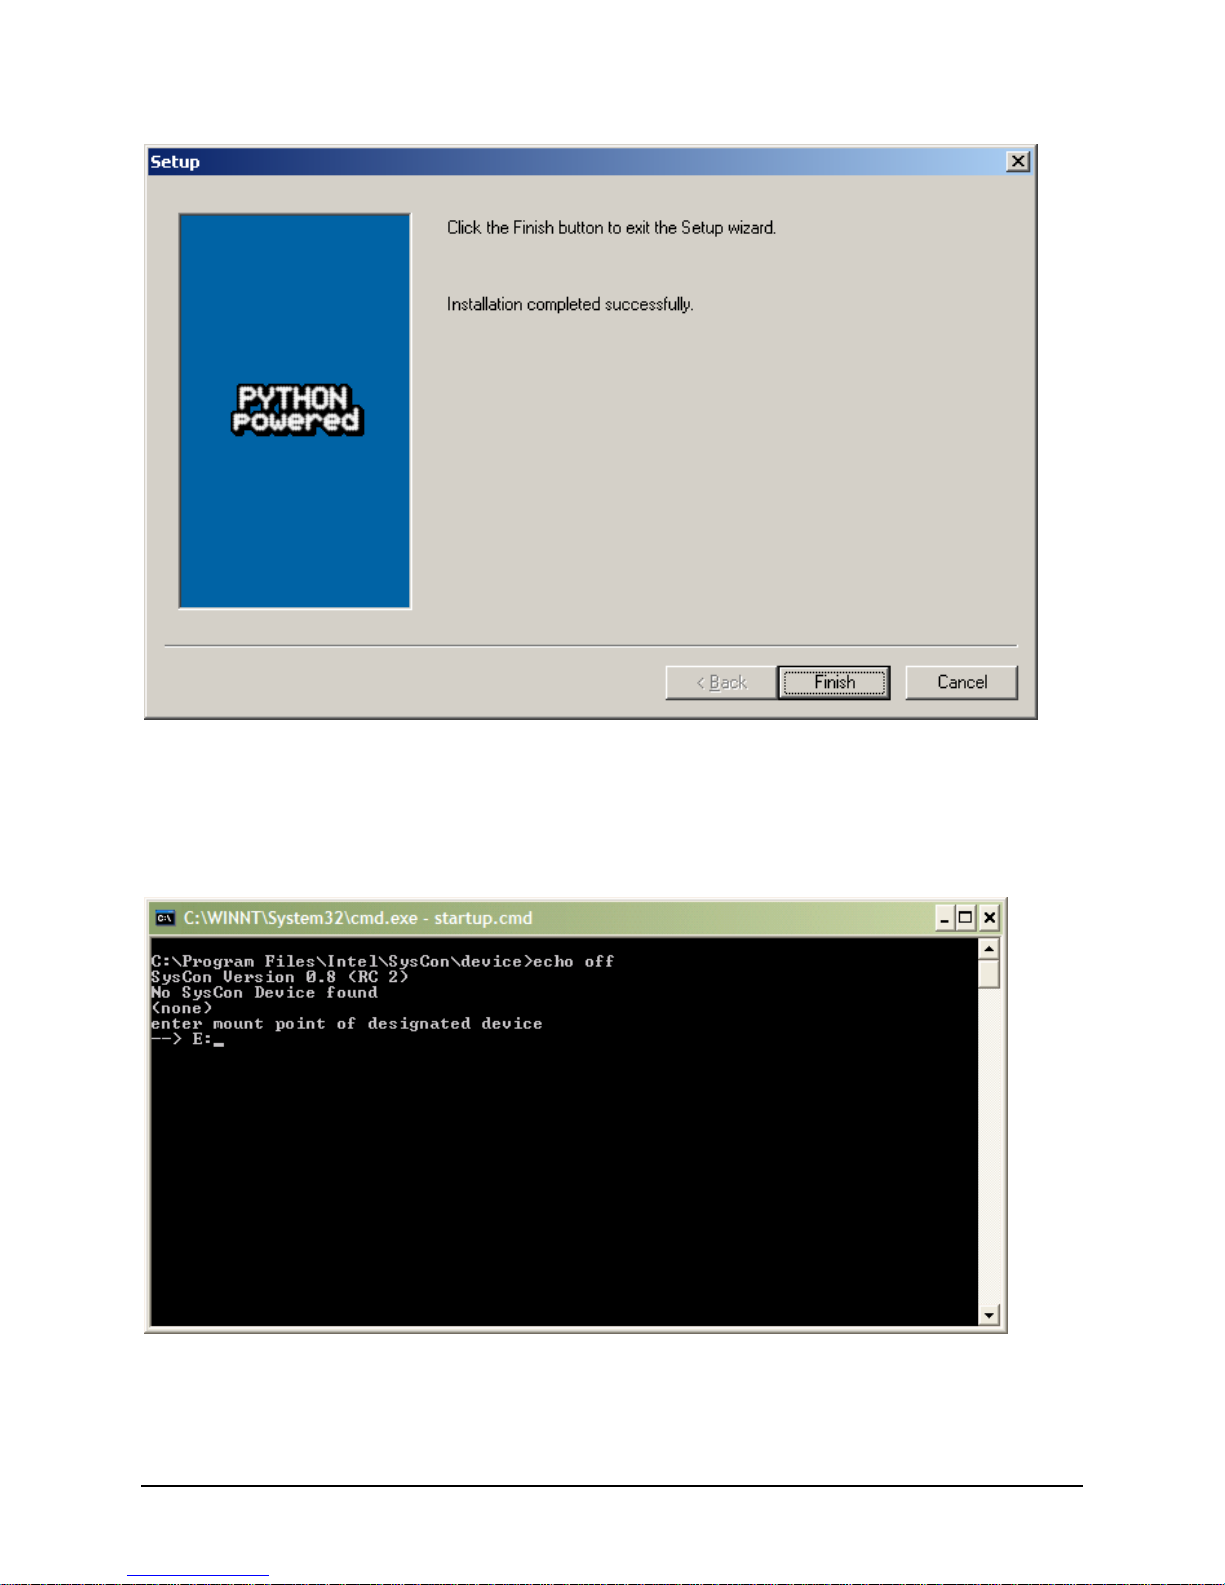
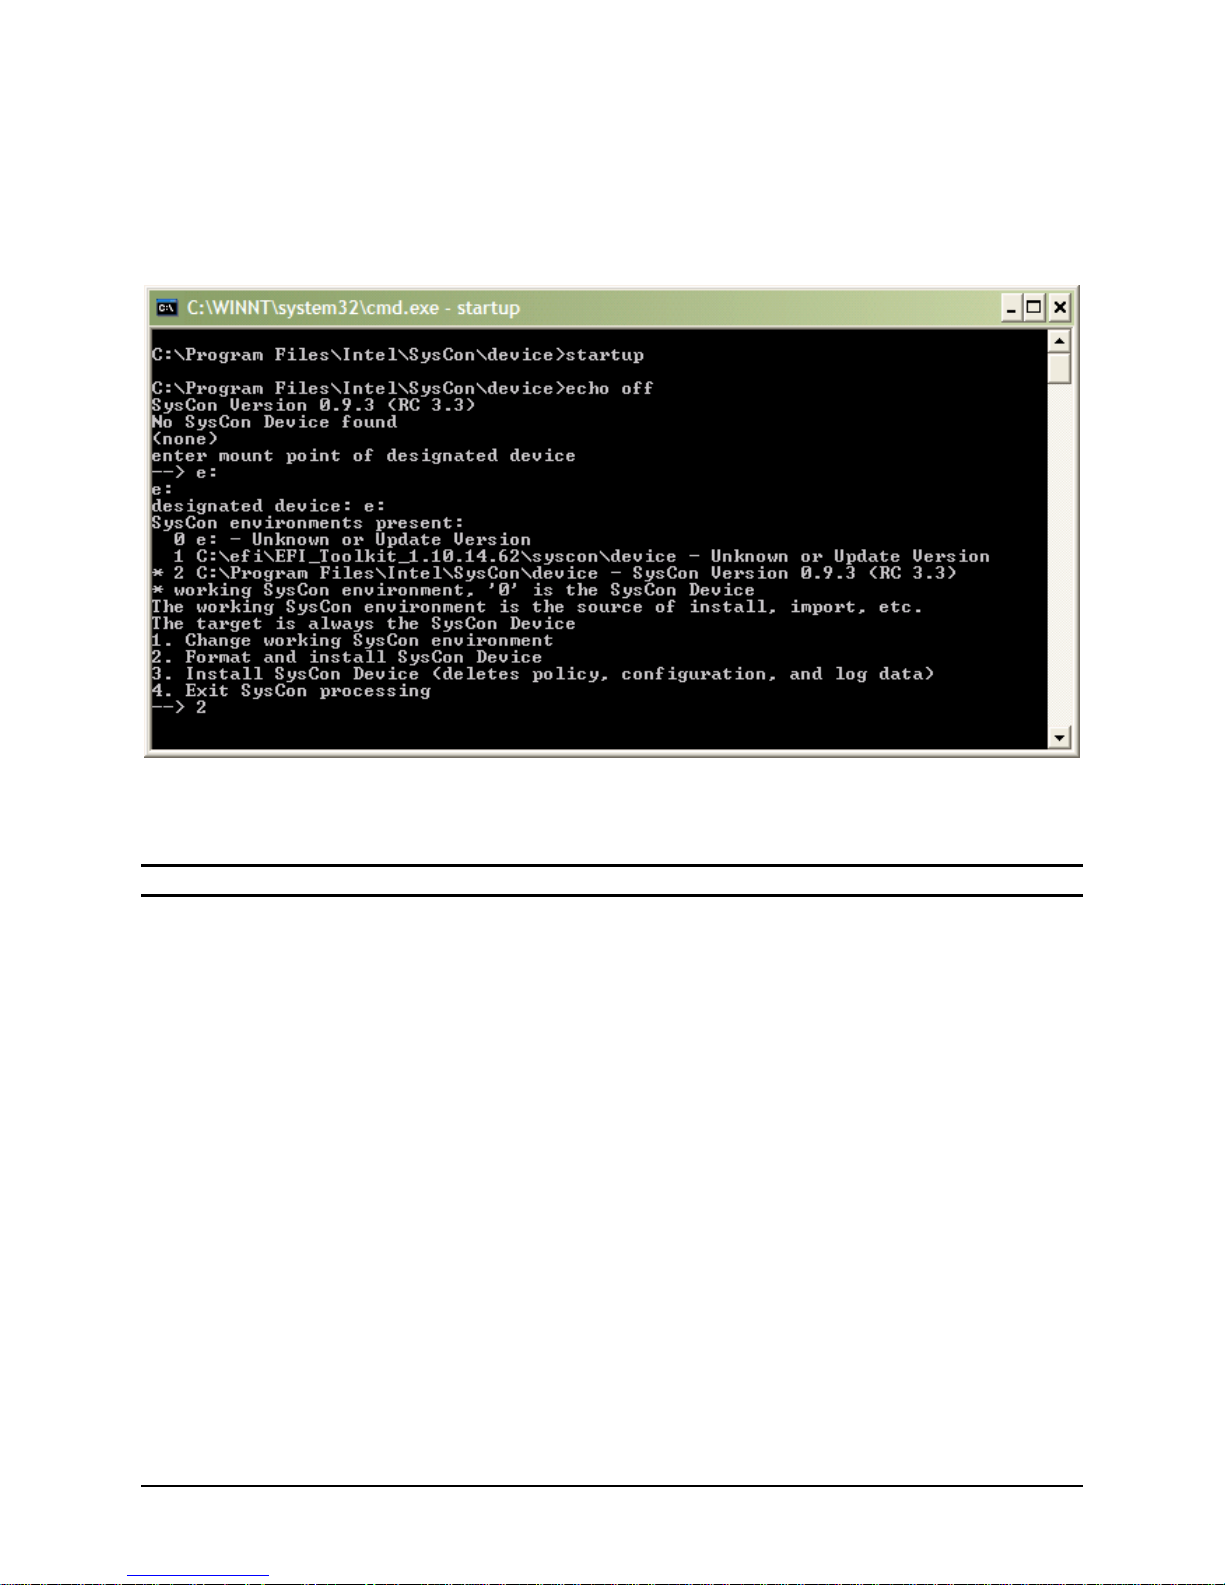
3.1.2 Installing the SysCon Device
Once Python is installed and the SysCon Service is installed and running, a Windows command window
is launched to install the SysCon files onto the SysCon device. The user is required to enter the mount
point of the SysCon USB device. Normally it is the next DOS drive letter following the DVD-ROM drive.
If there are SysCon files already installed on the SysCon device, the SysCon service will have remounted
the device under the System Root directory in the “SysCon” folder as shown in the following example.
Revision 3.0
10
Page 19
IBM® Carrier Grade Server X3650 T
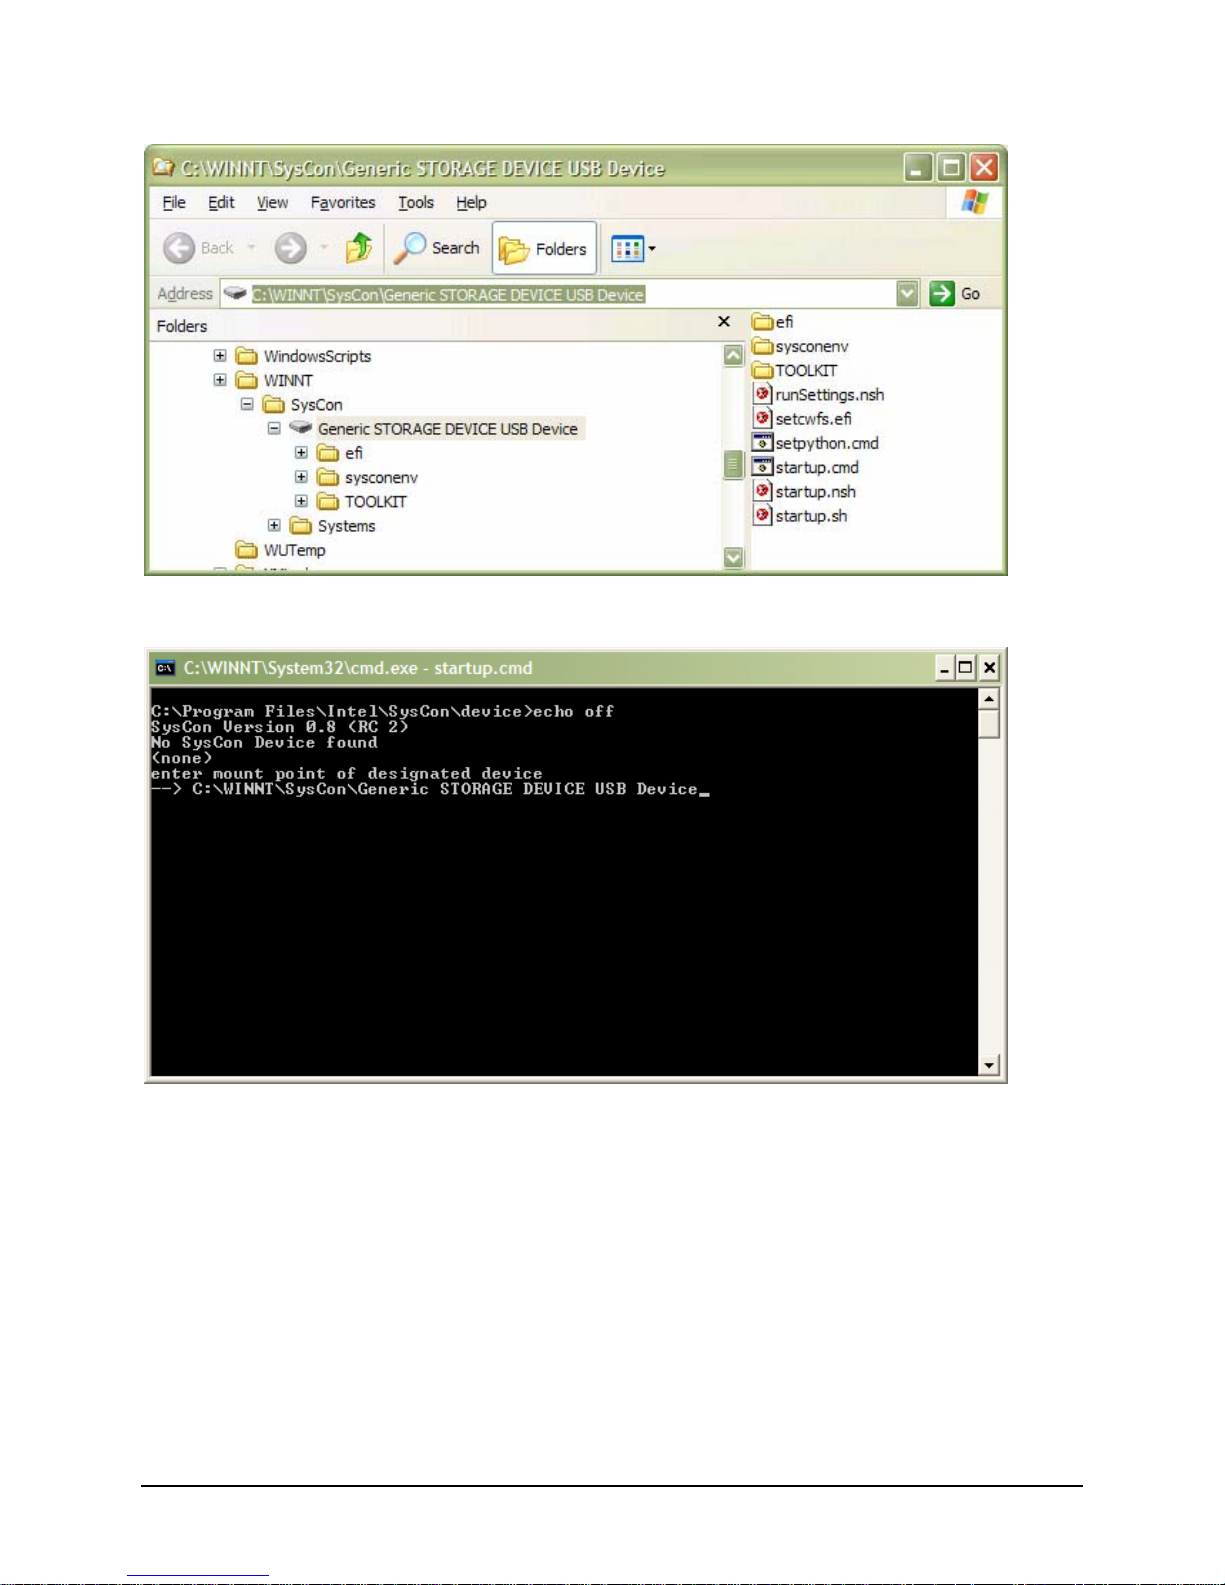
When prompted for the SysCon device, you may copy and paste the mount point of the device into the
command window.
Select Option 2 to install the SysCon device. Other options are not appropriate in this situation.
Revision 3.0
11
Page 20
IBM® Carrier Grade Server X3650 T
Once the files are installed to the device, the SysCon service is automatically restarted. This will remount
the SysCon device under the System Root in the “SysCon” folder.
To reformat the SysCon device using the startup.cmd the SysConMonitor service must be stopped. After
the SysConMonitor service has been stopped the SysCon device will again have an assigned DOS drive
mapping.
Revision 3.0
12
Page 21
IBM® Carrier Grade Server X3650 T
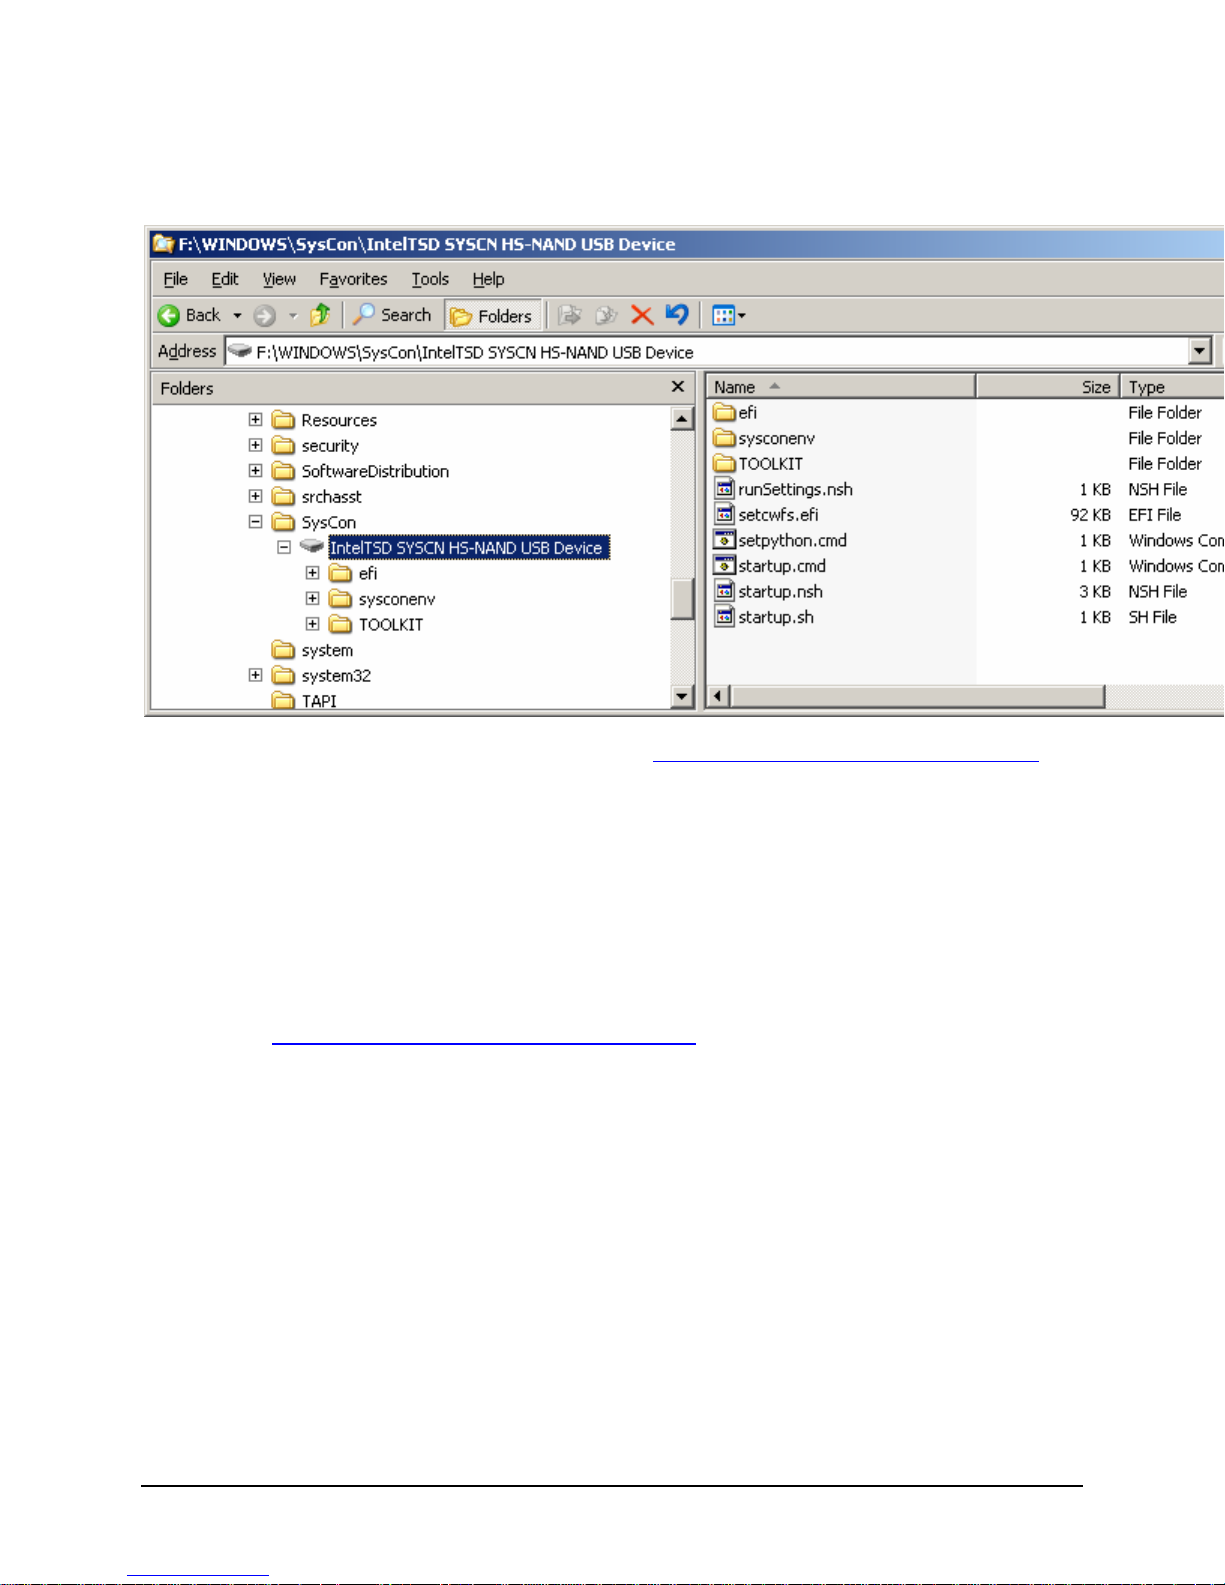
The install script restarts the SysConMonitor service so the USB device will no longer have a DOS drive
letter mapping. In this case, it is remapped under the Windows system root directory generally
"C:\Windows\SysCon\IntelTSD SYSCN HS-NAND USB Device"
The SysCon device now has been prepared for use. See Activating/Deactivating the SysCon Feature for
the procedure to enable the SysCon feature.
3.1.3 Installation Issues using Microsoft* Software
3.1.3.1 Deleted SysCon device partition
When installing to Windows*, setup presents the SysCon device as a detected DOS partition and assigns
it a DOS drive letter - usually C:. This partition must be deleted if the user wants the Windows installation
to be assigned the DOS drive letter C:. Deleting the SysCon device’s partition removes the FAT file
system on the device, so it must be recreated to install the SysCon feature. While the Windows Disk
Manager will do this, the FAT file system that is created using this method is not recognized by EFI. The
SysCon device needs to be formatted with the EFI format utility. An EFI menu option is provided for this
purpose - see Installing a SysCon Device using a SysCon Key
3.1.3.2 Introducing a new SysCon Key
If Windows is started with a SysCon key inserted in a USB port, and the device is “new “to Windows (i.e.
it has not yet been configured as a Windows device on the target system), it will not be mapped under the
System Root in the “SysCon” folder. Using Windows Services, restart the SysConMonitor service - the
SysCon key will now be mapped properly whenever Windows starts.
If the SysCon device or a SysCon key needs to be reformatted, first use Windows Services to stop the
SysConMonitor service. This will remap all the SysCon environments to a DOS drive letter. Use Windows
Explorer to reformat the USB device, and then restart the SysConMonitor service.
.
3.1.3.3 Reinstalling the SysCon device
In the event that the SysCon device needs to be reinstalled, open a Windows Command prompt and
change to the “device” directory of the SysCon installation, typically “C:\Program
Revision 3.0
13
Page 22
IBM® Carrier Grade Server X3650 T
Files\Intel\SysCon\device.” Next, execute the command script “startup.cmd.” If python.exe is
not in the search path, this script will fail. This may be remedied by running the command script
“setpython.cmd”. If you want to format the USB device first you must stop the SysConMonitor service.
The script will ask for the DOS drive letter to designate as the target device. If the SysConMonitor
process is running, the scripts will detect the SysCon device and reinstall it.
The SysConMonitor service is started after the installation is complete, remapping the installed device to
the SysCon directory.
Note: The format option is not available when the device is mapped to the SysCon directory.
3.2 Linux
The Linux SysCon feature is contained in the RPM: syscon-*.i386.rpm. The following packages, which
are included with the Red Hat Linux distribution, must also be installed prior to installing the SysCon
utilities:
• perl-libxml-enno.rpm (Red Hat distribution only)
• net-snmp
• net-snmp-utils
Additional utilities required for full SysCon functionality are the ipmiutil package and the Telco Alarms
Manager (TAM) package, both of which are available on the Resource CD.
3.2.1 Installation Procedure
1. Insert the Resource CD into the IBM® Carrier Grade Server X3650 T running an XFree86
session.
2. From the opening page, click on the “Additional Management Utilities” link in the left frame of
browser’s display.
Revision 3.0
14
Page 23

IBM® Carrier Grade Server X3650 T
3. Click the “Install SysCon feature on Linux” button to initiate the installation. When prompted,
reboot the system.
4. Following the system reboot, restart the SysCon service to complete the initial service setup
by executing /etc/init.d/syscon restart from a Linux shell prompt.
5. Run the Linux mount command from a shell prompt and review the output to the screen:
/etc/sysconfig/syscon should appear as a mounted device. If it does not
mounted device, then the SysCon device has not yet been completely installed and
populated. Use the following steps to complete this process:
a. For Red Hat EL 3 and EL 4, run the command syscon_scan. Make note of the output:
the scan will indicate the SysCon device mapping (e.g. /dev/sdb). For SuSE Linux
Enterprise Server 9, run the command udevinfo to identify the SysCon device.
Note: If syscon_scan, or udevinfo, does not report a SysCon device, there may be a hardware issue
preventing its detection.
b. Determine if the SysCon device has a filesystem installed on it by attempting to mount
the device with the following shell commands:
i. mkdir /etc/syscon/mnt2
ii. mount <dev> /etc/syscon/mnt2 (where <dev> is the device identifier noted in (a.)
above).
appear as a
• If the device mount fails, the SysCon device needs to be formatted via the
following procedure:
syscon_format <dev> (where <dev> is the device identifier noted in (a.)
above).
Note: syscon_format will destroy any information currently stored on the SysCon device.
Restart the system and continue SysCon configuration detailed in step iii
below.
• If the device is mounted successfully, continue to the next step.
iii. Perform a SysCon copy by issuing the following commands:
• syscon_copy /etc/syscon/mnt2
• umount /etc/syscon/mnt2
• /etc/init.d/syscon restart
The device is now installed and will be mounted to the /etc/sysconfig/syscon
mount point.
Note: If the SysCon device has been installed previously and you are upgrading to a newer version of the
SysCon RPM package, performing a syscon_format is necessary to re-initialize the SysCon Device.
3.3 Activating/Deactivating the SysCon Feature
Following installation via the operating system installation procedures noted above, the SysCon feature
must be activated via the system BIOS.
Revision 3.0
15
Page 24
IBM® Carrier Grade Server X3650 T
Note: the SysCon feature may be activated and deactivated without uninstalling the operating system
files.
3.3.1 Activating the SysCon feature
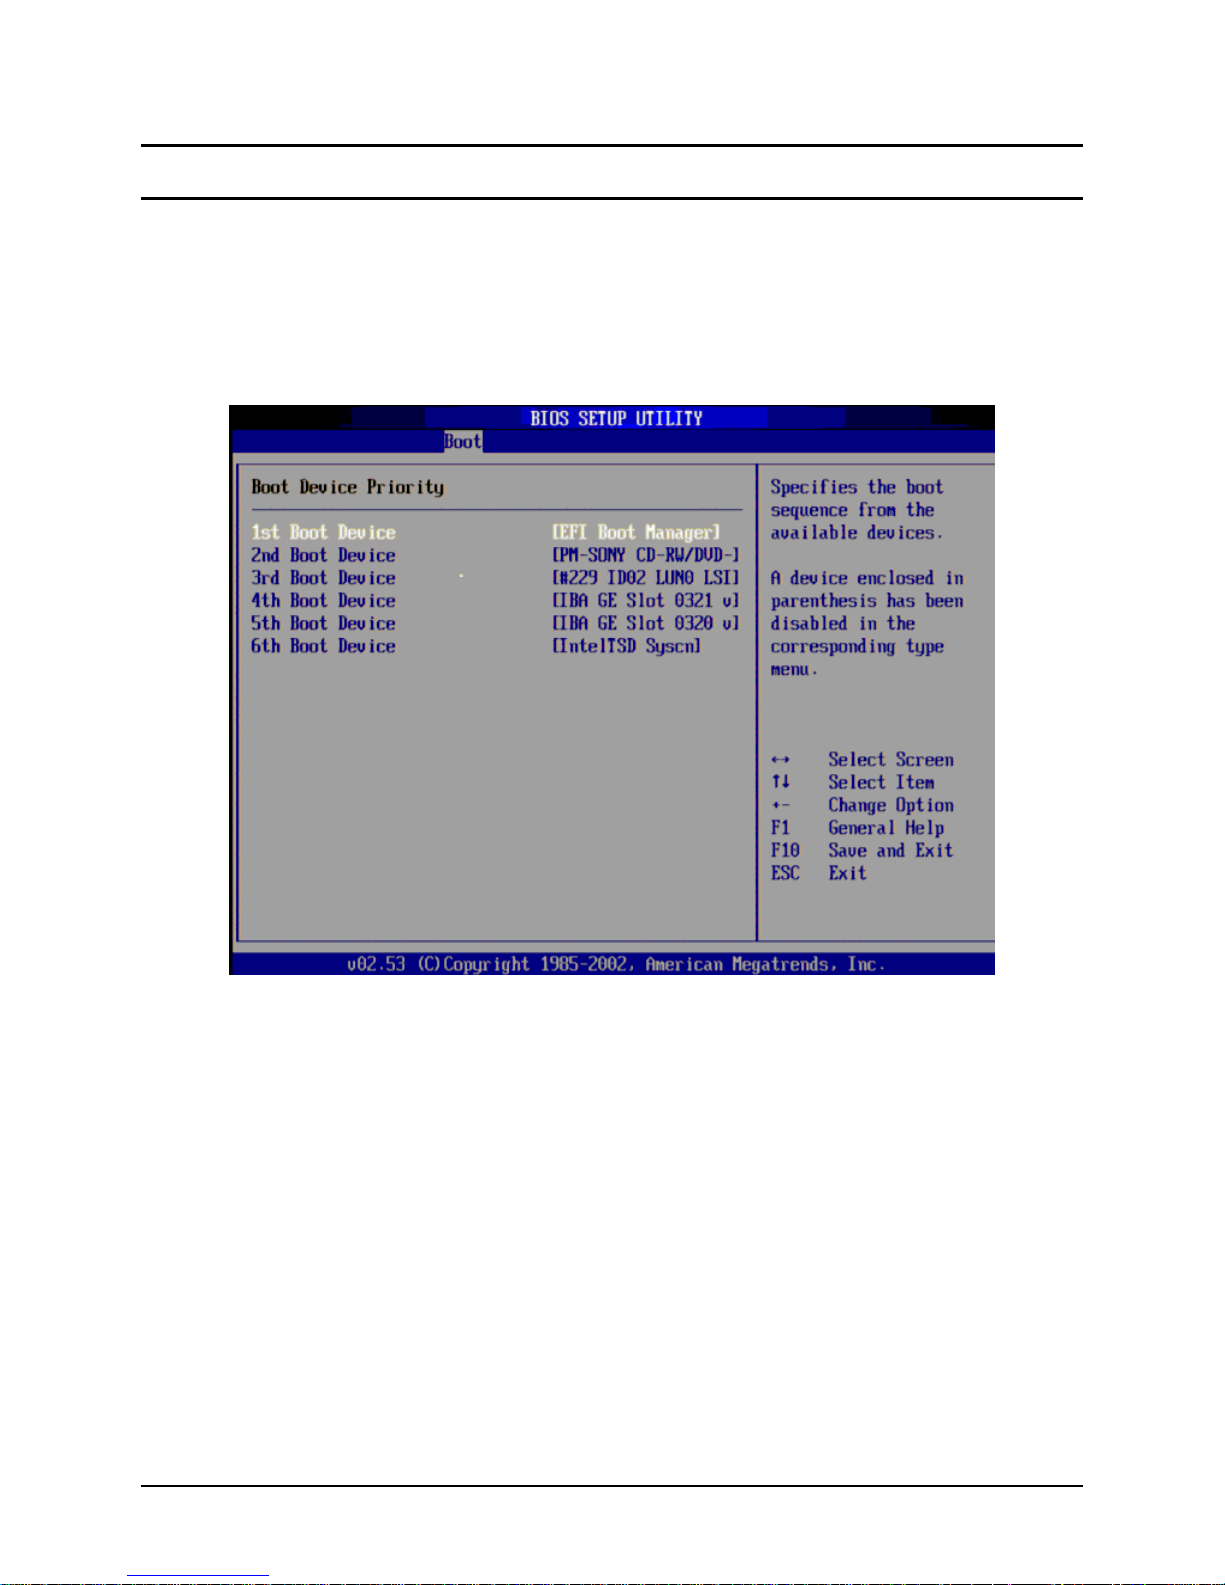
• On system startup, press [F2] to enter the BIOS setup.
• From the [Boot] options page, highlight the [Boot Device Priority] option and press [Enter].
• Set the [EFI Boot Manager] option as the first item in the boot order and press [F10] to save your
changes and restart the server.
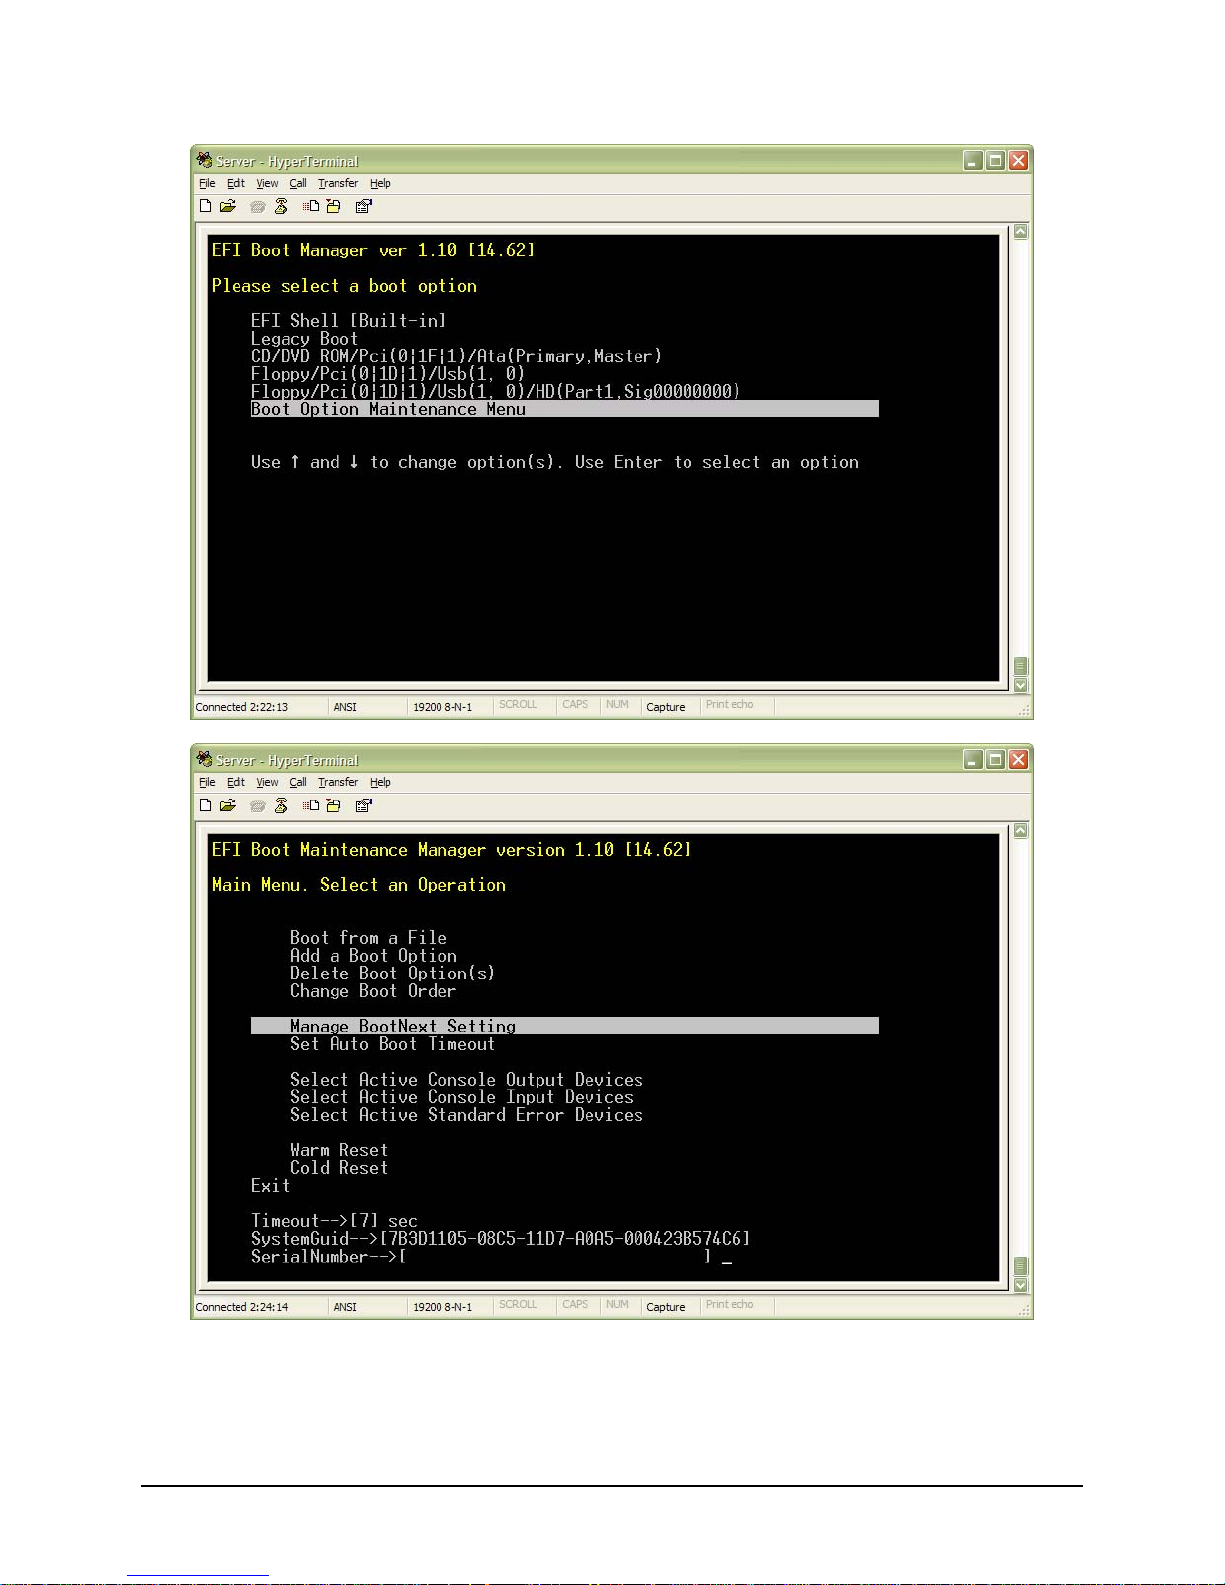
On restart, the system will boot to the Extensible Firmware Interface – an embedded, pre-OS
•
system management environment.
From the EFI Main Menu, select “Boot Option Maintenance Menu” – a list of EFI boot options will
•
be displayed.
Select “Boot Option Maintenance Menu” and scroll to the “Manage BootNext Setting” option and
•
press Enter.
•
Add “EFI Shell [Built-in]” to the beginning of the Boot Manager list.
Set “Legacy Boot” as the second EFI Boot Manager selection – this option causes the next boot
•
device in the BIOS Boot Menu to be selected for boot. All ofther EFI boot selections are
unsupported.
•
Finally, select “Save Settings to NVRAM” and “Exit”.
Revision 3.0
16
Page 25
IBM® Carrier Grade Server X3650 T
Revision 3.0
17
Page 26

IBM® Carrier Grade Server X3650 T
3.3.2 Deactivating the SysCon feature
To deactivate the SysCon device, simply remove it from the top of the boot sequence in the BIOS Boot
Selection Menu.
Revision 3.0
18
Page 27

IBM® Carrier Grade Server X3650 T
4. SysCon Feature Operation Overview
4.1 Configuring and booting the first time
Once the SysCon feature has been installed and activated, but before rebooting the system, the user
may configure the system and any components using the normal configuration methods, including using
the BIOS Setup menus, the System Configuration Wizard, etc. Once the system is configured as
desired, the user may boot the system normally.
The first time that a system is rebooted after installing the SysCon feature, the feature will extract system
settings and store them to the SysCon Device before proceeding to boot using the configured system
boot order.
4.2 Reconfiguring the system
After the SysCon feature has run once and saved the system settings, policy settings are used to
compare the system settings stored on the device to those of the system itself, detecting any changes
and acting according to its policy settings. By default, the SysCon policy is to reconfigure the system
using saved settings whenever it detects that system settings have changed. The user may change this
policy using the SysCon policy settings (see Controlling SysCon Behavior Using Policies
).
Changes to the SysCon configuration can be implemented in three ways:
1. Reconfigure the system using any of the normal system configuration tools, and then interrupt the
SysCon feature during system boot (see Interacting with the SysCon Feature
2. Remove the settings files stored in the “saved” folder and reconfigure the system using any of the
normal system configuration tools. On the next system boot, the SysCon device will save the current
(new) settings (see APPENDIX A – SysCon Environment Folder Structure
3. From either the EFI shell or the operating system, create a new settings file in the “specified” folder
on the SysCon Device and reboot the system. The settings will be applied during reboot (see
Creating System Settings Files
).
.)
).
Revision 3.0
19
Page 28

IBM® Carrier Grade Server X3650 T
5. Booting the System
Each time the system is booted, the SysCon feature will extract the current system settings and save
them to the SysCon device. Once the current system settings are saved, the SysCon Device uses the
policy settings to determine how to examine the system settings. This section describes the behavior of
the SysCon feature whenever the default policy settings are in effect (see APPENDIX A – SysCon
Environment Folder Structure).
On system boot, the SysCon device checks the “specified” folder for any user-specific settings.
1) If user-specified settings are present, the SyCon device will:
a) Configure the system using the user-specified settings.
b) Move the user-specified settings from the “specified” folder to the “applied” folder.
c) Capture the current system settings in the “current” folder of the SysCon Device.
d) Copy the settings from “current” to the “saved” folder.
e) Reboot the system.
(See Creating System Settings Files
2) If user-specified settings are not
a) Capture the current system settings in the “current” folder of the SysCon Device.
b) Compare the current settings (in “current” folder) with previously-saved settings (in the “saved”
folder). If settings are different, configure the system using using the saved settings and reboot
the system.
The SysCon feature displays a message indicating that it is beginning its system configuration check. If a
system configuration action is required, the feature will display a message indication that reconfiguration
is in progress. When reconfiguration is complete, the SysCon Pre-Boot Application displays a message
that indicates that it is restarting the system with the updated settings.
for additional details).
present, the SysCon device will:
Revision 3.0
20
Page 29

IBM® Carrier Grade Server X3650 T
6. Controlling SysCon Behavior Using Policies
The behavior of the SysCon feature can be customized by using the SysCon policy settings file, which
details the policies in effect for a single system and resides in the top-level settings folder for that system.
For example, the file sysconenv/data/config/thisSystem/policysettings.xml contains the
policy settings for the current system. If this file does not exist, the file
sysconenv/data/common/policies/policydefaults.xml is copied to
sysconenv/data/config/thisSystem/policysettings.xml and used as the policy settings for
the system.
In order to change SysCon feature policies, the user must edit the policy settings file. The policy settings
file may be edited using an OS-based or EFI shell-based text editing tool.
The following SysCon policies are user-definable. The exact syntax of the policy settings file is
documented in Appendix B
behavior that can be customized by the user. These policies and their format are described in detail in
the SysCon Service User’s Guide.
"AlwaysArchiveSystemSettingsCopy"
When this policy is selected, the SysCon feature will copy the extracted settings to a file in the “archived”
folder each time the system is booted. If archival limited by policy or physical space on the SysCon
device, the SysCon feature will remove the oldest copy of the extracted sectings and retain the latest
copy.
. Note that the OS-based SysCon service also provides policy-driven
"AlwaysRestoreSavedSettings"
When this policy is selected, the SysCon feature will always restore the system to settings from the
“saved” folder when it detects that the current settings have changed. This policy also applies to the
transfer case, in which a replacement system is detected. In this case, settings from the previous system
will be applied to the replacement system.
"AllowSysConKeyUse"
When this policy is selected, the SysCon feature will attempt to detect and use any SysCon Keys that are
inserted into the system. This policy is not selected by default and is not implemented in the initial
release.
"CopySavedSettingsToKey"
When this policy is selected, the SysCon feature will copy the current settings to a SysCon Key (when
present).
Revision 3.0
21
Page 30
IBM® Carrier Grade Server X3650 T
7. Interacting with the SysCon Feature
If access to the system console is available during boot time, the user may interrupt the SysCon feature
and override its behavior. The SysCon feature is started after the system performs any pre-boot
diagnostics but before the system searches for a boot device. If there is no console, or if the console
prompts time out, the SysCon feature follows the preset policies to determine its course of action.
At startup, the SysCon feature displays a message to the user indicating that the user can enter a
keystroke at the system console in order to suspend the SysCon feature and:
• Enter the SysCon Menu;
• Enter command prompt mode;
• Override SysCon feature behavior; or
• Skip the SysCon process entirely and go immediately to the production boot device list.
Revision 3.0
22
Page 31

IBM® Carrier Grade Server X3650 T
As illustrated below, whenever the following three lines are displayed, the user has three choices:
SysCon processing is about to begin in 5 seconds, wait
or - enter BIOS admin password to perform SysCon configuration
or - press space bar and 'Enter' to skip SysCon processing and boot the OS:
• allow SysCon processing to continue by doing nothing
• enter the BIOS password to access the SysCon menu
• press the space bar and the ‘Enter’ key to skip SysCon processing
Important: If a BIOS password has been established, the BIOS password must be made known to
SysCon on the SysCon device to enable settings to be restored properly. Therefore before an installation
is complete, the user must enter the BIOS password. Once the user has been authorized, the SysCon
pre-boot menu will be displayed and the user can select the menu option resume SysCon processing.
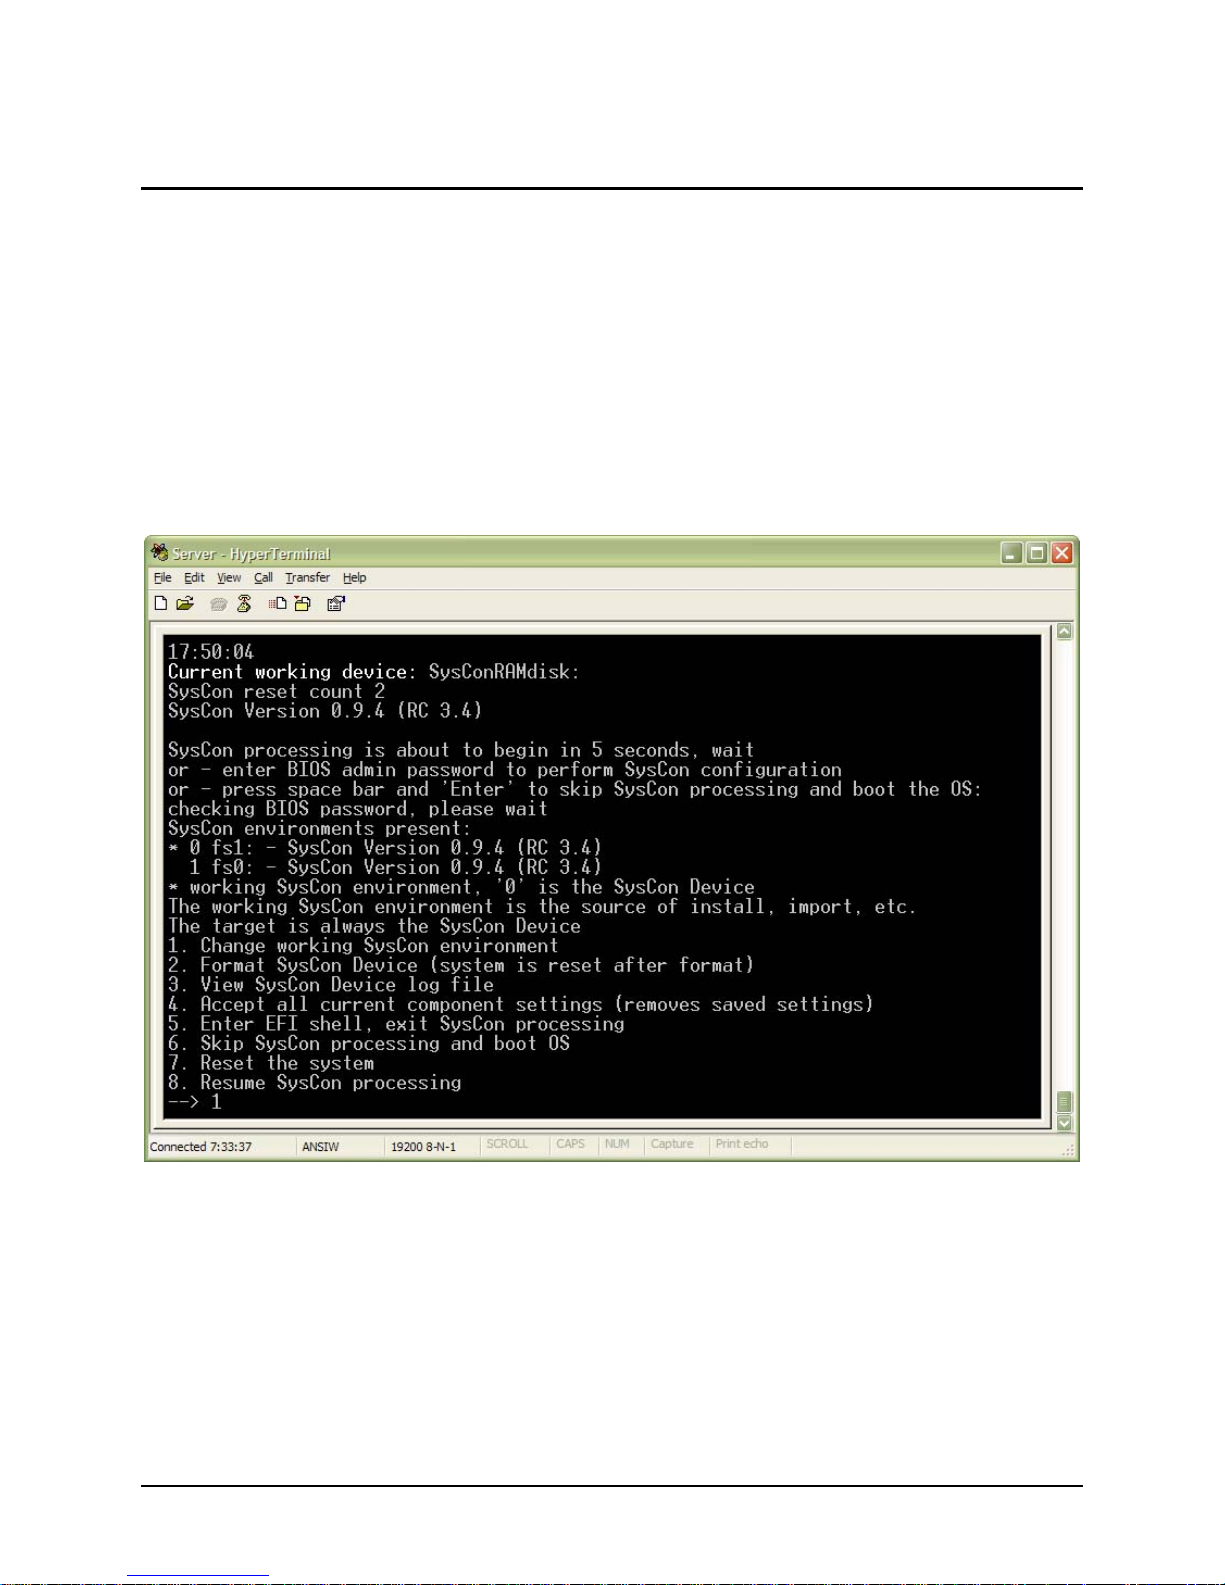
7.1 Using the SysCon Menu
The user must enter the system firmware (BIOS) password in order to gain access to the SysCon menu,
an EFI shell prompt, or allow the system to continue to production boot without a configuration check.
Once the user is authenticated, the SysCon feature displays a description of the SysCon environment
and the SysCon Menu:
SysCon environments present:
0. fs1: - SysCon Version 1.0
1. fs2: - Unknown or Update Version
*2. fs0: - SysCon Version 1.1
* working SysCon environment, ‘0’ is the SysCon Device
1. Change working SysCon environment
2. Format SysCon Device (system is reset after format)
3. Install SysCon Device (deletes policy, configuration, and log data)
4. Update SysCon Device (preserves policy, configuration, and log data)
5. View SysCon Device log file
6. Accept all current component settings (removes the saved settings)
7. Backup configuration data to Key
8. Restore configuration data from Key
9. Import user-specified settings from Key
10. Enter EFI shell, exit SysCon processing
11. Skip SysCon processing and boot OS
12. Resume SysCon processing
13. Reset the system - should do after install
--> █
In this example, the SysCon feature has detected two SysCon devices. The device at position “0” is
always the SysCon device. Any other devices (such as the device at position “2” in the example above)
are always SysCon Key devices.
The SysCon menu is displayed after the user has been authenticated and will be redisplayed each time a
menu option is executed until one of options 10 - 13 is selected. For informational purposes, all of the
possible actions are shown in the example. However, only those actions that are allowable in the current
context are displayed. Selecting an action can result in menu items (actions) being added to or removed
from the menu. Changes are displayed the next time the menu is presented.
Revision 3.0
23
Page 32

IBM® Carrier Grade Server X3650 T
In following example, option 4 “Accept all current component settings (removes saved settings)” - which
deletes all saved setting from the ‘saved’ folder - was selected. Note that because this operation is only
performed once per session, it is not displayed as an option the next time the menu is displayed.
Revision 3.0
24
Page 33

IBM® Carrier Grade Server X3650 T
7.1.1 Using the EFI Shell
If “Enter the EFI shell” is selected from the EFI Menu, the user is able to use EFI shell commands to
modify files directly in the SysCon environment and/or affect the execution of the SysCon feature.
Note that, upon entering the EFI shell in the example above, the directive “type ‘startup here resume’
from the SysConRAMdisk:\ to restart SysCon” appears. This allows the user to restart the SysCon
feature execution from the root directory of any SysCon environment. Using the word “resume” will
prevent recreating a RAM disk if it is in use and reloading it with the SysCon feature. The RAM disk is
used to increase the performance of the SysCon feature with a slow USB connection. Currently the RAM
disk is not enabled because of performance improvements in other areas, therefore the word “resume” is
not needed when the RAM disk is not being used.
Revision 3.0
25
Page 34

IBM® Carrier Grade Server X3650 T
7.2 Detecting system setting changes
If a “saved” configuration exists on the SysCon device (i.e. a configuration has been placed in the “saved”
folder) and it is different from the current settings, the SysCon feature will provide an additional prompt in
addition to the standard SysCon prompt:
Saved Intel-BIOS-syscfg-V001 settings will be restored in 5 seconds, wait
or - press 's' and 'Enter' keys to save current Intel-BIOS-syscfg-V001
settings
or - press the 'Enter' key to abort restore of Intel-BIOS-syscfg-V001 settings
This prompt will time out after a short period of time or the user can abort the request by pressing
<Enter>. If the user presses <Enter>, the SysCon feature retains the current configuration and does not
update the saved configuration on the SysCon Device. If the user presses <s> then <Enter>, the SysCon
feature removes the files in the ‘saved’ folder so the current configuration will be updated as the saved
configuration on the SysCon Device.
If the user allows the timeout to occur, the SysCon feature will restore the saved configuration and reboot
the system.
7.3 Applying transferred settings
The SysCon Device may be physically transferred from one system to another. When the SysCon
Device is used for the first time in the different system, the SysCon feature discovers this change by
comparing a unique attribute of the previous system to the current system. If all other attributes are
compatible and if the policy is ‘AlwaysRestoreSavedSettings’ the settings that are saved on the
Revision 3.0
26
Page 35

IBM® Carrier Grade Server X3650 T
SysCon Device will be automatically adopted as the settings for the current system and the following
messages are displayed and logged:
Replacement system detected due to system attribute change
Restoring settings to replacement system
If the policy ‘AlwaysRestoreSavedSettings’ is not set, the following messages are displayed and
logged:
Replacement system detected due to system attribute change
Not restoring settings to replacement system
The user may enter the SysCon shell environment to manually adjust the transferred settings or allow the
system to reboot and use the system’s BIOS menus to adjust the settings and then enter the appropriate
key sequence during the reboot to save those adjusted settings to the SysCon Device.
Revision 3.0
27
Page 36

IBM® Carrier Grade Server X3650 T
7.4 Using a SysCon Key
A SysCon key is a removable USB storage device that contains a SysCon environment. The primary use
of the SysCon Key is to backup and restore settings for a single system. Each system is identified by the
unique identifier of the baseboard. This identifier is known as a Universally Unique ID or UUID. The
sysconenv\data\config folder contains folder with this UUID as shown below.
7.4.1 Backup system settings to a SysCon Key
When a SysCon Key is present during system boot, the SysCon feature will copy the set of folders for the
system onto the SysCon Key. This can also be accomplished with the following menu option:
7. Backup configuration data to Key
The user can disable this function using the SysCon policy settings (See Controlling SysCon Behavior
Using Policies).
7.4.2 Restore system settings from a SysCon Key Backup
When a SysCon Key is present during system boot, the SysCon feature will scan the SysCon Key to
determine if configuration files for this system exist on the Key. When a UUID folder on a SysCon key
matches the UUID of the system, the following menu options will be displayed:
7. Backup configuration data to Key
8. Restore configuration data from Key
The restore process copies the appropriate files from the key to the SysCon device. The settings are
applied to the system when SysCon processing is resumed or reinitiated.
Revision 3.0
28
Page 37

IBM® Carrier Grade Server X3650 T
Restoring settings from a SysCon Key is currently only supported for the same system from which the
settings were initially backed up to a key. This capability is not intended and does not support restoring
settings onto any system other than the system from which those settings have been backed up.
7.4.3 Installing a SysCon Device using a SysCon Key
When the system’s SysCon Device is not installed, the user may install the feature using a SysCon Key.
However, installing the SysCon feature from EFI is not recommended for 2 reasons.
1. OS services must be installed first to maintain data security.
2. EFI operates the SysCon Device at USB 1.1 speed, so this process is very slow.
To install a system’s SysCon Device using a SysCon Key, the user must have access to the system
console.
After making the required changes to the BIOS boot order and the EFI Boot Manager, the system will
boot to the EFI Shell.
Revision 3.0
29
Page 38

IBM® Carrier Grade Server X3650 T
A SysCon key should be inserted at this point and the ‘map -r’ EFI command executed. Note that the EFI
mapping table now contains a new file system designated ‘fs1:’ representing the USB device that was
inserted in the front panel (for Pci/(1D|1)/Usb(0,0)). Now enter ‘fs1:’ at the EFI prompt and then the
command ‘startup here’.
Revision 3.0
30
Page 39

IBM® Carrier Grade Server X3650 T
After entering the BIOS password, the user will be presented with the following menu:
Select menu option 3 to install the SysCon feature to the SysCon Device.
Note: The menu above will also be presented if the “Format SysCon Device” option is selected and a
SysCon Key is present when the system resets. A SysCon installation may also be initiated from this
point.
Revision 3.0
31
Page 40

IBM® Carrier Grade Server X3650 T
The user may enter the EFI shell at this point; however, it is recommended that the system be reset first.
To verify that the EFI environment is set up correctly, one can exit to the EFI shell and execute the ‘map’
command. The ‘set’ command shows the EFI ‘EfiMapTable’ variable settings, which designates the
SysCon device to EFI. By default, EFI will search for the startup.nsh script on the SysCon device before
searching other devices for a startup.nsh.
Revision 3.0
32
Page 41

IBM® Carrier Grade Server X3650 T
It should be noted that the SysCon device is always located at Pci/(1D|1)/Usb(1,0) in the system.
Changing to the newly installed file system with the EFI command ‘fs0:’ one can now enter ‘startup’ to
execute the EFI startup.nsh script and run the SysCon feature for the first time. This procedure will copy
the default policies to the ‘thisSystem’ directory on the SysCon key then capture and save system
settings.
Revision 3.0
33
Page 42

IBM® Carrier Grade Server X3650 T
After SysCon processing is complete, the EFI shell exits to ‘Legacy Boot’ which will then boot the next
item in the BIOS boot order.
Important: If a BIOS password has been established, the BIOS password must be made known to
SysCon on the SysCon device to enable settings to be restored properly. Before continuing with the
installation, the user must enter the BIOS password. Once the user has been authenticated, the SysCon
pre-boot menu will be displayed and the user can select the menu option “resume SysCon processing.”
7.4.4 Updating a SysCon Device using a SysCon Key
When the SysCon device already has an established SysCon environment, and a SysCon Key is inserted
during the boot process, one sees two SysCon file systems (fs0: and fs1:) with SysCon environments
present. The updated version present on the SysCon key will be unknown to the installed version. The
“working SysCon environment” is the SysCon device or key where the menu items are performed. After
changing the SysCon working environment, the menu options change. In this case option 3 (Install)
replaces all the files and remove any saved settings. Option 4 preserves system data and only updates
the SysCon feature files.
Revision 3.0
34
Page 43

IBM® Carrier Grade Server X3650 T
Revision 3.0
35
Page 44

IBM® Carrier Grade Server X3650 T
8. Creating System Settings Files
The SysCon feature allows the user to configure multiple system components using Extensible Markup
Language (XML) syntax. XML schema files (or XSDs) that describe the XML element types and value
constraints for each component are provided on the SysCon Device.
To setup the SysCon Device so that user-specified settings are applied on the next system boot, the user
must create an XML file with the desired settings in the “user-specified” SysCon folder for the system.
APPENDIX C – System Settings File Format
component type and example XML files for establishing user-specified settings.
The user may use any text editing tool to edit the system settings file and change the value of the XML
elements corresponding to the component settings. It is recommended that the user validate the
resulting settings file using the XML schema provided. Non-valid XML elements may have unpredictable
results when processed by the SysCon scripts. Errors generated during SysCon processing can be
found in the log.xml file located in sysconenv\data\config\thisSystem folder of the SysCon
Device.
8.1 Encrypting Settings Data
If desired, the user may encrypt component settings data in order to protect sensitive data that may
appear in settings files. The SysconCipher.py utility provides a means for encrypting XML settings files
that are stored in the ‘specified’ folder:
contains a listing of the supported system settings by
Note: Although cipher will work on any XML file where the Xpath for the element is found, the decipher
code is only performed for Settings files found in the 'specified' folder.
SysconCipher is invoked as follows:
python SysconCipher.py ciphertemplate sourceFile elementsToEncrypt
Example:
python SysconCipher.py ciphertemplate.xml settings.xml \
/config:Settings/config:ComponentSettings/syscfg:BIOSV001 \
/bios:SecurityV001
The following is a Windows cmd batch file that encrypts a settings file twice, with the second pass
encrypting the root element of the XML document. Note that the decipher code recursively decrypts until
all elements are decrypted.
echo off
set cwfs=%CD%
set Path=.;%cwfs%\sysconenv\syscon\Windows;%Path%
set \
PYTHONPATH=.;./sysconenv/syscon/python1.5/Lib;./sysconenv/syscon/python1.5
python sysconenv/syscon/python1.5/SysconCipher.pyc \
sysconenv\data\common\ciphertemplate.xml \
sysconenv\data\config\thisSystem\specified\applied\Intel-settings.xml \
Revision 3.0
36
Page 45

IBM® Carrier Grade Server X3650 T
/config:Settings/config:ComponentSettings/syscfg:BIOSV001/bios:SecurityV001
\ >sysconenv\data\config\thisSystem\specified\sectest.xml
python sysconenv/syscon/python1.5/SysconCipher.pyc \
sysconenv\data\common\ciphertemplate.xml \
sysconenv\data\config\thisSystem\specified\sectest.xml \
/config:Settings \
>sysconenv\data\config\thisSystem\specified\settest.xml
8.2 Applying new user-specified settings
When the SysCon feature detects that there are user-specified settings present on the SysCon Device in
the “specified” folder, the application will apply these settings regardless of the state of the “current” and
“saved” settings. User-specified settings are applied once, and then moved to the “applied” folder to
indicate that they have been applied. User-specified settings may be placed on the SysCon Device via
user interruption of the Pre-Boot application, user-authorized import of settings from a SysCon Key to the
Device, or in-service distribution of specified settings by a provisioning application to the Device.
The Windows File Explorer example below shows two files installed in the ‘specified’ folder. The settings
in these two files will be applied the next time the SysCon feature is run, with component-specific settings
files applied first. In the example below, ‘Intel-syscfg-V001.scf’ will be applied, then all the XML files with
a “config:Settings” root element will be parsed. Settings for the installed components will then be applied.
Typically, common settings would be applied by the component-specific file (such as Intel-syscfgV001.scf below) then system unique settings would be applied using an XML config:Settings file.
Revision 3.0
37
Page 46

IBM® Carrier Grade Server X3650 T
When the application detects and applies user-specified settings, the following messages are displayed:
As indicated above, the specified file ‘Intel-syscfg-V001.scf’ is applied, then the ‘Intel-imm-chassis.xml’ is
scanned for settings for each installed SysCon component. Once the settings are applied, they are
captured in the “current” folder and copied into the “saved” folder.
Revision 3.0
38
Page 47

IBM® Carrier Grade Server X3650 T
8.3 Importing User-Specified Settings
The SysCon feature can be used to apply settings common to a group of servers in the enterprise.
XML files designating the settings changes can be copied to a SysCon key, from which the settings
may be applied to other servers. Sample XML files are provided to assist in properly setting desired
values. Once the XML files have been prepared, they can be copied to the
‘sysconenv\data\common\settings\specified’ folder of a SysCon key. One or more of the
sample XML files shown below can used to create a SysCon key where the ‘Import user-
specified settings from Key’ EFI menu option can be used to import the prepared settings.
This import menu option will not be displayed if there are no files in the
‘sysconenv\data\common\settings\specified’ folder of the SysCon key. The import option
copies the files in the ‘sysconenv\data\common\settings\specified’ folder of the SysCon key to
the ‘sysconenv\data\config\thisSystem\specified’ folder on the SysCon device. These
specified settings will be applied when SysCon processing is resumed or restarted in EFI.
See ‘Creating System Settings Files
creating XML files. See ‘Using the SysCon Menu
XML files may also be added to the device\sysconenv\data\common\settings\specified
folder of the SysCon feature installation. Keys may then be created containing the specified files. To
create a key, first stop the SysConMonitor service so the target for the SysCon files can be designated.
Note: If the SysConMonitor service is not stopped, the scripts will detect the SysCon device as the target
of the installation.
Next, browse to the ‘device’ directory where the SysCon feature was installed (usually C:\Program
Files\Intel\SysCon\device) and open a Command Shell. Run to command script
Revision 3.0
’ and ‘APPENDIX C – System Settings File Format’ for details on
’ for more details on using the EFI menu.
39
Page 48

IBM® Carrier Grade Server X3650 T
“startup.cmd” - the script will ask for the DOS drive letter to designate as the target device - be sure
that the target device drive letter is not the DOS drive letter of the SysCon device.
Device ‘0’ should be selected as the target of the installation; a new key will appear as uninstalled as
shown above. If the key has an existing SysCon environment on it, the version information will be
displayed. After the key has been installed the SysConMonitor service will be restarted, mapping the
SysCon Device and the new SysCon key under the “SysCon” folder. Use the “Safely Remove Hardware”
icon in the Windows taskbar before removing the key from the system. Be aware that there will be at least
two USB Mass Storage Devices listed. One of them will be the SysCon device, which should not
be
stopped: “IntelTSD Syscn HS-NAND USB Device.”
Revision 3.0
40
Page 49

IBM® Carrier Grade Server X3650 T
9. Monitoring SysCon Activity
9.1 Logging SysCon Events
The SysCon feature logs events during the pre-boot phase to one or more destinations, as directed by its
policy settings. The user can control the depth of logging as well as the destination type for logged
events.
The user may control the SysCon logging policy by modifying the ‘policysettings.xml’ file and using the
elements described in Appendix X. User-selectable logging policy settings include:
Log entry severity filter Designates the severity level of logged events. Event severities
are (in most severe to least severe order):
CRITICAL
ERROR
WARNING
INFO
DEBUG
Maximum log size The maximum log file size (in kilobytes).
Log entry destination(s) The destination or destinations for log entries. SysCon pre-boot
events may be logged to one or more of the following:
System Event Log (SEL) The SysCon feature can use the IPMI interface to log
SysCon events into the hardware-based SEL. SEL
entries are accessible out-of-band via the Intel
Management Module.
SysCon event log The SysCon feature can log events to a text file on the
SysCon Device itself. The SysCon event log is an XML
document which follows the schema documented in
Appendix D.
®
Revision 3.0
41
Page 50

IBM® Carrier Grade Server X3650 T
9.2 Configuring Event Notification Actions
In addition to logging events, the SysCon feature provides the capability to proactively notify a user or
management application of a SysCon event. SysCon event notifications can be directed to the following
destinations:
Telco Alarm Panel The SysCon feature can generate a Telco alarm that will be
indicated on the Telco Alarm Panel of the unit.
Revision 3.0
42
Page 51

IBM® Carrier Grade Server X3650 T
10. Using SysCon Operating System Services and
Utilities
IBM provides application software for managing the SysCon feature from the host operating system
environment. This section gives a brief overview of the functions provided by the services and utilities.
A full user’s guide is available for each of the operating systems supported (Linux, Windows).
- Install the SysCon environment on SysCon Devices and Keys
- Automatically detect, mount and monitor SysCon Device and Keys
o The SysCon service auto-mounts the detected SysCon Device and/or SysCon Keys and
assigns access credentials that restrict access to the system administrator-level
o The service may be configured to continuously monitor the presence of the SysCon
Device and the user may set policies for actions to take when the Device is not present
- Event Logging for SysCon conditions
o The user may set policies selecting the SysCon conditions for which the service will
generate an event (Linux only)
See the appropriate SysCon service User’s Guide for your operating system for details on these and
other features.
Revision 3.0
43
Page 52

IBM® Carrier Grade Server X3650 T
11. Using the SysCon Device for Application Data
Since the SysCon Device is implemented as a Mass Storage device that is visible to the operating
system and applications, the user may store operating system and/or application data on the device
(though this practice is not recommended). The user should not store any data in the “sysconenv”,
“TOOLKIT”, or “efi” folders and sub-folders in any circumstance, as this data may interfere with the
proper use of the SysCon feature. Also, the user should monitor the free space on the device to ensure
that there is ample room for changes in SysCon configuration data size.
The SysCon feature does not provide any specific tools for managing user-stored data on the SysCon
Device.
Revision 3.0
44
Page 53

IBM® Carrier Grade Server X3650 T
12. SysCon Services
12.1 SysCon Service for Linux Features
12.1.1 SysCon Install tool
A Linux syscon_format utility is provided to partition and format a USB storage device and to install the
SysCon runtime environment either as a SysCon Device or SysCon Key. The SysCon runtime
environment includes the configuration, policy, and vendor data. The resulting SysCon device can be
accessed from EFI and Windows as well as Linux. A device with at least 64 MB is recommended.
12.1.2 Auto-mounting and Monitoring of the SysCon Device
When the SysCon service is installed and enabled, the SysCon Device is automatically mounted during
system startup. The SysCon daemon checks the status of the SysCon device every 10 seconds. If the
device is not detected, or if the device is not mounted and a remount fails, the default SysCon policy is for
a major error to be reported to all logging and notification services, and the system to be shut down. Note
that logging, notification, and default actions can be modified through SysCon policies.
12.1.3 Auto-mounting and Monitoring of SysCon Keys
A SysCon Key is a removable USB storage device that is formatted just like the SysCon Device. The
main purpose of the Key is to copy a SysCon configuration from the SysCon Device of one system and
use this to replicate the configuration on other systems. The USB hot plug feature in Linux is configured
so that a SysCon Key is automatically mounted (if the SysCon Key feature is enabled) after the device is
inserted. Like the SysCon device, after a Key is mounted, the SysCon daemon service checks the status
of the SysCon Key every 10 seconds. Unlike the SysCon Device, if a Key is present but becomes
unmounted, a umount message is reported to the SysCon log and the device is removed from the
daemon’s checklist (see 12.1.2 for details on the default actions associated with the SysCon Device).
Note that logging, notification, and default actions can be modified through SysCon policies.
12.1.4 Linux Hot-plug USB Support and SysCon Hot-plug Plugin
Before the Linux init scripts are executed, the kernel detects all connected USB devices and performs the
same actions as those executed when a USB device is hot-plugged. If the USB device is a storage
device (disk-on-key, floppy, or hard disk), the device is temporarily mounted to determine if it is a SysCon
formatted device, and if so whether it is a SysCon Device or a SysCon Key based on the physical
address of the USB device or the device’s product ID. The SysCon device addresses and/or product
Device ID are defined in the vendor XML file for the system.
The SysCon Device will always be mounted at /etc/sysconfig/syscon and all removable key devices will
be mounted at /etc/sysconfig/syscon2 to /etc/sysconfig/sysconN where N is a number from two to 99.
Devices that appear at addresses not defined in the vendor XML file for a particular system will then be
mounted at locations /etc/sysconfig/syscon100 to /etc/sysconfig/sysconN where N is greater than 100. A
SysCon script (through the use of syscon_log_write –a and –m) locks and updates the syscontab
file with all device mounts and their unique serial number and vendor ID.
12.1.5 SysCon Daemon (syscond)
The syscond daemon is started at system startup. All syscon log events are created by the daemon or
passed to the daemon with the syscon_log_write utility. At startup, the XML policies are parsed to create
the /etc/syscon.conf file, which in turn is read by the daemon to determine all configuration parameters
Revision 3.0
45
Page 54

IBM® Carrier Grade Server X3650 T
and policies. In addition to the XML policies, the /etc/syscon.conf also contains two basic parameters for
starting and controlling the SysCon service: SYSCONENABLE and SYSCONINTERVAL.
If SYSCONENABLE is not set, the daemon dies and all syscon device monitoring and logging are
disabled. SysCon devices will continue to be securely mounted but the system policies will not be in
effect. When SYSCONENABLE is set, the syscon daemon runs normally and performs checks on all
SysCon devices at a rate specified in the SYSCONINTERVAL parameter. By default SYSCONINTERVAL
is set to 10 to force a check of all SysCon devices every ten seconds.
All other values in /etc/syscon.conf are read-only and are derived from the XML SysCon policies found in
/etc/syscon/runtime/policysettings.xml. Since the SysCon device is not available at installation time (and
possibly at daemon startup), the default policysettings.xml file is used until the SysCon device is located
and mounted. From that point on, a sync action is performed at daemon startup to copy the SysCon
device’s runtime/policysettings.xml file to the system at: /etc/syscon/runtime/policysettings.xml, where it
will be used in the creation of the syscon.conf file.
12.2 Events, Notification, and Actions
12.2.1 SysCon Events
A “SysCon event” occurs whenever a device or key is inserted, mounted, changed, unmounted, or
removed. An event also occurs in the case of device/key remount failure. Each event has a device type
associated with it: Device (embedded) or Key (removable). It is important to distinguish between the two
since event actions may differ according to the associated device type.
Entry as it appears in policysettings.xml Description
SysConDevInsert Physical insertion of the SysCon device
SysConDevMntb Successful mount of the SysCon device. XML data
defines the mount point based on the physical
address of the device.
SysConDevMntFail In the case in which a mount retry is defined by
SysCon policy, this event indicates that the attempt
to remount the SysCon device has failed.
SysConDevChange Data has been written to the SysCon Device.
SysConDevUnMnt The device has been unmounted.
SysConDevRemoval Physical removal or possible failure of the SysCon
Device has been detected.
SysConKeyInsert Physical insertion of a removable SysCon Key
SysConKeyMnt Successful mount of a removable SysCon Key. XML
data defines the mount point based on the physical
address of the detected key.
SysConKeyMntFail In the case in which a mount retry is defined by
SysCon policy, this event indicates that the attempt
to remount the SysCon Key has failed.
SysConKeyChange Data has been written to the SysCon Key removable
key.
SysConKeyUnMnt The removable key has been unmounted.
SysConKeyRemoval Physical removal of the removable SysCon key has
been detected.
Revision 3.0
46
Page 55

IBM® Carrier Grade Server X3650 T
12.2.2 SysCon Event Logging and Notification
All SysCon events are logged to the SysCon log (/var/log/syscon) and notification made available to any
process that has registered an event query with the SysCon daemon through the SysCon API.
Depending on policy, each event type may also be logged to the SysCon event log, and/or syslog. In
addition, notification may be sent through SNMP and/or the Telco Alarms Manager (TAM).
A complete list of policies that enable logging and notification appears below. These policies can be
applied to each event type/device type combination. If no notification policy is specified in the XML policy
file, then notification is limited to the SysCon log and to processes that have registered queries with the
SysCon service (daemon).
The SysCon installation configures the Linux LogRotate process to occur once each week; as such,
SysCon Log data is limited to the previous six weeks.
SysCon Event Log Structure:
struct syscon_log_entry {
syscon_log_recid_t log_recid;
size_t log_size;
int log_format;
int log_event_type;
syscon_log_dev_type_t log_dev_type;
syscon_log_severity_t log_severity;
uid_t log_uid;
gid_t log_gid;
pid_t log_pid;
pid_t log_pgrp;
struct timespec *log_time;
unsigned int log_flags;
char log_dev[128];
char log_mntpnt[128];
char log_nodeid[68];
char log_mesg[SYSCONLOG_ENTRY_MAXLEN];
SysCon Event Log file format:
struct syscon_log_entr new
"%d;%d;%d;%d;%d;%d;%d;%d;%d;%d;%d;%d;%s;%s;%s;%s",
new.log_recid, new.log_size, new.log_format, new.log_event_type,
new.log_dev_type, new.log_severity, new.log_uid, new.log_gid,
new.log_pid, new.log_pgrp, new.log_time, new.log_flags,
new.log_dev, new.log_mntpnt, new.log_nodeid, new.log_mesg
Syslog file format:
struct syscon_log_entr new
"PX25;%d;%d;%d;%d;%d;%d;%d;%d;%d;%d;%d;%d;%s;%s;%s;%s",
new.log_recid, new.log_size, new.log_format, new.log_event_type,
new.log_dev_type, new.log_severity, new.log_uid, new.log_gid,
new.log_pid, new.log_pgrp, new.log_time, new.log_flags,
new.log_dev, new.log_mntpnt, new.log_nodeid, new.log_mesg
SEL entry format:
Slot/Connector 00 entries in the SEL are SysCon events. The data fields (enclosed in brackets at
the end of each entry) contain the event-type (00,02,03,04,06,07) in the first byte; the second and
third bytes are the major and minor numbers of the SysCon SCSI device. Examples for the six
event types are as follows:
Revision 3.0
47
Page 56

IBM® Carrier Grade Server X3650 T
SysConDevInsert + SysConKeyInsert:
0001 01/20/05 04:28:55 BMC 21 Slot/Connector 00 Inserted 00 [02 08 21]
SysConDevMnt + SysConKeyMnt:
0002 01/20/05 04:28:56 BMC 21 Slot/Connector 00 InsReady 00 [03 08 21]
SysConDevChange + SysConKeyChange:
0005 01/20/05 04:39:57 BMC 21 Slot/Connector 00 Interlock 00 [07 08 21]
SysConDevUnMnt + SysConKeyUnMnt:
0008 01/20/05 04:41:02 BMC 21 Slot/Connector 00 RemReady 00 [04 08 11]
SysConDevRemove + SysConKeyRemove:
0007 01/20/05 04:40:57 BMC 21 Slot/Connector 00 RemRequest 00 [06 08 11]
SysConDevMntFail + SysConKeyMntFail:
000b 01/20/05 04:59:51 BMC 21 Slot/Connector 00 Fault 00 [00 08 11]
12.2.3 SysCon Event Logging and Notification Policies
To enable one or more of the following logging/notification actions for a given event type, the following
entry must be included in with the specific event type/device type section of the policysettings.xml file.
Entry in policysettings.xml Description, requirements, additional XML settings
LogUsingSEL System event log (SEL) (Requires BMC firmware log and IPMI
driver). Severity may be specified as Crit, Major, Minor, or Info.
LogUsingSyslog Linux SysLog Severity may be specified as Emerg, Alert, Crit, Err,
Warning, Notice, Info, or Debug.
AlertUsingSNMP SNMP Trap Notification (requires Net-SNMP). Severity may be
specified as Crit, Major, Minor, or Info.
AlertUsingTAM Telco Alarms Manager LED/Relay activation (Requires TAM
hardware and software). Severity may be specified as Crit, Major, or
Minor.
12.2.4 SysCon Actions on Events
The SysCon service allows three types of actions to take place on any event-type/device-type condition.
The polictsettings.xml allows for the configuration of these actions.
Shutdown/Reboot Action
A shutdown can be specified with a “Shutdown” action or a system reset can be specified with a
“Reboot” action. You can not specify both reboot and shutdown for the same event-type/device-type
combination.
Mount Retry Action
A “Retry” action only applies to the SysConDevUnMnt and SysConKeyUnMnt events. This action
instructs the SysCon daemon to remount the SysCon device (or a SysCon key) if it detects that the state
of the device/key has changed from mounted to unmounted. If used in conjunctions with a
Shutdown/Reboot action, the mount retry will be attempted and the Shutdown/Reboot action will occur in
case of remount failure.
Call Script Action
The “CallScript” instructs the SysCon daemon to call a custom script (which can also be specified for
each event type/device type combination).
12.2.5 SysCon Event/Notification API and Query Languages
Daemon registration and notification services
Revision 3.0
48
Page 57

IBM® Carrier Grade Server X3650 T
The syscond daemon provides real-time event notification to any process that registers an event query
string with the daemon. Any event matching the query will invoke a Linux RT signal which will send the
client into a function registered with the query. Within this function, a full SysCon event log API is
available to retrieve additional information on the trigger event as well as other events in the log. The
registration and query language is also implemented within the API and external lexical analyzer. The API
is made available in a shared library in the syscon RPM. The API is similar to the open source POSIX
event logging API. The SysCon event log and API, however, do not depend on any POSIX Event log
components or kernel patches.
SysCon Event Log API:
“POSIX Event Log” API calls used in SysCon implementation:
This section lists the API C-library functions. See APPENDIX E – POSIX Logging API and Query
Specification for SysCon for details on each function.
int syscon_log_write(syscon_log_dev_type_t dev_type, int event_type,
syscon_log_severity_t severity, const void *buf, size_t len,
int format);
int syscon_log_printf(syscon_log_dev_type_t dev_type, int event_type,
syscon_log_severity_t severity, const char *format, ...);
int syscon_log_open(syscon_logd_t *logdes, const char *path);
int syscon_log_read(syscon_logd_t logdes, struct syscon_log_entry
*entry,
void *log_buf, size_t log_len);
int syscon_log_notify_add(const syscon_log_query_t *query,
const struct sigevent *notification, int flags,
syscon_log_notify_t *nfyhandle);
int syscon_log_siginfo_recid(const siginfo_t *info, void *context,
syscon_log_recid_t *recid);
int syscon_log_sigval_recid(union sigval sval, syscon_log_recid_t
*recid);
int syscon_log_notify_get(syscon_log_notify_t nfyhandle,
struct sigevent *notification, int *flags, char *qsbuf,
size_t qslen, size_t *reqlen);
int syscon_log_notify_remove(syscon_log_notify_t nfyhandle);
int syscon_log_close(syscon_logd_t logdes);
int syscon_log_seek(syscon_logd_t logdes, const syscon_log_query_t
*query,
int direction);
int syscon_log_severity_compare(int *order, syscon_log_severity_t s1,
syscon_log_severity_t s2);
int syscon_log_query_create(const char *query_string, int purpose,
syscon_log_query_t *query, char *errbuf, size_t errlen);
int syscon_log_query_get(const syscon_log_query_t *query, int *purpose,
char *qsbuf, size_t qslen, size_t *reqlen);
Revision 3.0
49
Page 58

IBM® Carrier Grade Server X3650 T
int syscon_log_query_destroy(syscon_log_query_t *query);
int syscon_log_query_match(const syscon_log_query_t *query,
const struct syscon_log_entry *entry, const void *buf,
int *match);
SysCon-only API calls:
int syscon_message(int dev_type, int type, char *dev, char *mntpnt, char
*mesg);
int sellog(int dev_type, char dev[], int event_type, int sev);
int snmplog(int sev, char *mesg);
int tamlog(int sev);
int syscon_mount(char *dev, char *mntpnt);
int call_script(char *script);
int godown(int reboot);
int stop_godown();
int syscon_mount(char *dev, char *mntpnt);
int call_script(char *script);
SysCon command line utilities and usage:
syscon_scan – Utility that returns all the USB syscon devices (FAT serial, Product ID, and GUID in first
field and SCSI device ID in second field).
Sample output:
0x17e9242f0000000124623971725000000000000 /dev/sdb
0x41eee7440509C30831003922 /dev/sdc
syscon_getdev – Utility that, given the mount point of a SysCon device/key, returns the device-type,
physical address (USB bus, level, port), status, and mount point.
Usage: syscon_getdev syscon-mount-point
Sample output:
type=device bus=2 lev=1 port=0 status=unknown mnt=/etc/sysconfig/syscon
syscon_log_read – Utility that allows any user to view entries in the SysCon event log
(/var/log/syscon). An optional query string can be added to the end of the command to select certain
types of events. The -o option can be used to specify a output options. The direction that the log is read
can be controlled by the -f (forward) or -b (backward) options where -f forces the output to start on the
oldest entry. The -b option reads the newest entries first. The -1 option can be used to return – only - the
first matched entry.
Usage: syscon_log_read [bfq1] -o <output format> -s <separator> [query string]
-b
Read from the end of the log to the beginning (default)
-f
Read from the beginning of log to the end (end being the most recent).
-1
Display only the first matching event
-q
Revision 3.0
50
Page 59

IBM® Carrier Grade Server X3650 T
Quiet (log entry is not returned). Returns zero if an entry is found and non-zero if no
entries are found.
-o <format>
Display log output in user specified format using:
recid - Record ID (1-N)
event_type - Event Type (devadd,devmnt,devchg,devunmnt,
devfail,devrm
dev_type - Device Type (device or key)
severity - Severity ()
time - Time (1-N in seconds)
date - Regular Year-Month-Day and Time (ISO format)
dev - Device (/dev/sdb1,/dev/sdc1,..)
mntpnt - Mount Point (/etc/sysconfig/syscon,
/etc/sysconfig/syscon2,..)
uid - User ID
gid - Group ID
pid - Process ID
pgrp - Process Group ID
nodeid - Machine Node ID
mesg - Message section of the Log entry
Format string fields must be comma separated. The fields will be displayed in the order specified.
The -s option can be used to select the display separator. The default separator is a space.
Example: syscon_log_read -o recid,event_type,dev_type,date "date > 2004-11-03T10:25"
[query string]
The query string allows a user to filter the log file for only certain events. The full query language
is defined in syscon_query
(1) man page. Three examples are provided below:
The following query string will limit the displayed entries to only key insertions:
syscon_log_read "event_type = devadd && dev_type = key"
The following query string will limit the displayed entries to events with record IDs between 5 and
10: syscon_log_read "recid > 4 && recid <= 10"
The following query string will show all events that contain the string "changed" in the message
portion of the event entry: syscon_log_read "data contains changed"
-s space,comma,semicolon
This option allows you to force a special separator. The default is to separate fields with a
space character, but a "," or ";" may also be specified with this option.
Example:
syscon_log_read -f -o recid,event_type,dev_type,severity,pid,date
"dev_type = device && date > 2005-03-10T09:45"
7 devchg device INFO 7683 2005-03-10T09:56
8 devunmnt device ALERT 7683 2005-03-10T09:57
9 devmnt device INFO 7683 2005-03-10T09:57
syscon_log_write – Utility (for super-user only) that generates syscon
device events such as device add, remove, mount, umount. Usage:
Usage: syscon_log_write [armufdp] –p mntpnt –d dev message
-a Send a SysCon device add event.
-r Send a SysCon device remove event.
-m Send a SysCon device mount event.
Revision 3.0
51
Page 60

IBM® Carrier Grade Server X3650 T
-u Send a SysCon device unmount event.
-f Send a SysCon device mount failure.
-p provide mount point of the SysCon device.
-d provide the SCSI name of the SysCon device.
syscon_format – Utility that formats and initializes a syscon device.
Usage: syscon_format device [noninteractive|interactive]
Examples: syscon_format /dev/sde
syscon_format /dev/sde noninteractive
syscon_copy – Utility that copies data from one syscon device to another.
Usage: syscon_copy source-syscon-mnt-point destination-syscon-mnt-point
syscon_monitor – A real-time event notification client used for demonstration/example
purposes. A query string is provided as the argument and query event matches will produce a
demonstration of many of the syscon API routines.
Example:
#syscon_monitor "dev_type = key"
Registered with SYSCON Event logger (handle=3)
Waiting for an event..
****************** test_function1 activated by: ****************
Query string: dev_type = key
signal=34 from event: Record ID=1
searching event log for record ID... Found Recid=1
Device Type=SysCon Removable Device
Severity=Warning, User=root, Group=root
Event Type: A SysCon device has been removed.
This event is related to a Removable SysCon device.
Message size=87, date/time=Tue Nov 9 17:18:18 2004
Mesg=[Nov 09 17:18:14 SCM: 112 1 -d PID=23024: /dev/sdd1 /dev/sdd1
Device r]
Found first query (dev_type = removable) at recid=1
Found last query (dev_type = removable) at recid=1
****************** test_function1 activated by: ****************
Query string: dev_type = removable
signal=34 from event: Record ID=4
searching event log for record ID... Found Recid=4
Device Type=SysCon Removable Device
Severity=Warning, User=root, Group=root
Event Type: A SysCon device has been added.
This event is related to a Removable SysCon device.
Message size=126, date/time=Tue Nov 9 17:18:28 2004
Mesg=[Nov 09 17:18:24 SCM: 112 2 /dev/sde1 /etc/sysconfig/syscon2
PID=24136:]
Found first query (dev_type = removable) at recid=1
Found second query (dev_type = removable) at recid=4
Found last query (dev_type = removable) at recid=4
Found last backward query (dev_type = removable) at recid=3
syscon_gui – X-Windows GUI SysCon monitor. A query string is the argument.
Revision 3.0
52
Page 61

IBM® Carrier Grade Server X3650 T
Example screen:
12.3 Other Policies
The policysettings.xml file must contain SysConKeyEnable to enable the use of removable SysCon Keys.
If this entry is not in the policysettings.xml file, the SysCon mounting routines will only mount and monitor
the SysCon Device.
Revision 3.0
53
Page 62

IBM® Carrier Grade Server X3650 T
13. APPENDIX A – SysCon Environment Folder
Structure
The following folders and files are found on a SysCon Device and on SysCon Keys:
sysconenv/data
Contains working data, including system settings files, saved and user-specified.
sysconenv/data/config
Contains system settings files. Each folder represents settings folders for a single system.
sysconenv/data/config/systemidentifier
Contains system settings files for the identified system.
sysconenv/data/config/thisSystem
Contains system settings files for the host (current) system.
sysconenv/data/config/thisSystem/saved
Saved settings for this system.
sysconenv/data/config/thisSystem/specified
User-specified settings for this system.
sysconenv/data/config/thisSystem/archived
Archived settings for this system.
sysconenv/data/config/thisSystem/policysettings.xml
Contains the current policy settings in-effect that control SysCon behavior.
sysconenv/data/config/thisSystem/log.xml
Contains the logged SysCon events for the host (current) system.
sysconenv/data/config/thisSystem/system.xml
System attributes and installed component information extracted from this system.
sysconenv/data/common/schema
Contains standard settings schema files that are reused by many components.
sysconenv/data/common/schema/config.xsd
The core XML schema from which all system and component settings files are formatted.
sysconenv/data/common/schema/syscon.xsd
The XML schema that defines all SysCon feature policy, log, and settings files.
sysconenv/data/common/schema/biosCommon.xsd
An XML schema for BIOS settings.
sysconenv/data/common/schema/cim_policy.xsd
An XML schema for policy settings, based on the CIM policy model.
sysconenv/data/common/schema/biosCommon.xsd
Revision 3.0
54
Page 63

IBM® Carrier Grade Server X3650 T
An XML schema for IPMI v1.5 settings.
sysconenv/data/vendor
Contains vendor-supplied system and component specification files that govern system and component
configuration. Each folder represents specification files from a single vendor.
sysconenv/data/vendor/SystemSpecs.xml
Contains a system specification for each system type supported by this installation of the SysCon feature.
Documents the system types known to the SysCon environment. If a new system type is to be
configured, it must be added to this file in this environment.
sysconenv/data/vendor/<vendorname>
System and component type specifications for a single vendor.
sysconenv/data/vendor/<vendorname>/schema
System and component type schema.
sysconenv/data/vendor/Intel/schema/IntelSystems.xsd
An XML schema for Intel system attributes.
sysconenv/data/vendor/Intel/schema/imm.xsd
An XML schema for Intel
®
Management Module settings.
sysconenv/data/vendor/Intel/schema/syscfg.xsd
An XML schema for ‘syscfg’ utility-accessible settings.
sysconenv/data/vendor/<vendorname>/<productname>Components.xml
The components known to the SysCon environment. If a new component type is to be configured, it must
be added to this file in this environment.
sysconenv/data/vendor/Intel/SE7520JR23components.xml
Intel component type specifications for SE7520JR23 systems.
sysconenv/data/common/settings/samples
A folder containing many example XML files for creating user-specified settings for installed components.
sysconenv/data/common/settings/samples/Intel-starter.xml
A starter file for creating user-specified settings for an Intel system.
sysconenv/data/common/settings/specified
A folder containing component settings files for a key that are intended to be imported to a system’s
SysCon device’s sysconenv/data/config/thisSystem/specified folder.
sysconenv/data/common/policies/policydefaults.xml
Contains the SysCon policy settings that are in-effect by default. The user can copy this file into the
runtime path and modify it to establish new SysCon policy settings.
sysconenv/syscon
Contains the core SysCon binaries files.
Revision 3.0
55
Page 64

IBM® Carrier Grade Server X3650 T
14. APPENDIX B – SysCon Policy File Format
Control of SysCon feature behavior is implemented via the SysCon policy file. The default values for the
SysCon Device policy are documented in the file “policydefaults.xml”. The user may copy this file to the
system settings folder and modify it to suit the deployed environment.
The SysCon policy schema is also used to manage policy settings for the SysCon Service. The default
settings for the SysCon Service are listed here, after the SysCon Device settings.
The SysCon policy schema is listed at the end of this appendix.
14.1 SysCon Device Policy Defaults: policydefaults.xml
The “policydefaults.xml” file and excerpts from the XML schema for the SysCon policy file are provided
here for convenience. For additional information, please refer to the files on the SysCon Device.
<?xml version="1.0" encoding="UTF-8"?>
<policy:PolicyConfiguration xmlns:xsi="http://www.w3.org/2001/XMLSchema-instance"
xmlns:xs="http://www.w3.org/2001/XMLSchema"
xmlns:policy="http://developer.intel.com/software/XML/2004/CIM29PolicySchema"
xsi:schemaLocation="http://developer.intel.com/software/XML/2004/SysConSchema ../../../syscon/schema/syscon.xsd"
xmlns:syscon="http://developer.intel.com/software/XML/2004/SysConSchema">
<policy:PolicySetAppliesToElement>
<!--
The "ManagedElementName" is the id of the system that this set of Policy Configurations applies to.
All policies contained apply to the system with this ID.
-->
<policy:ManagedElementName>system-UUID goes here</policy:ManagedElementName>
<!--
This entry in the User Policy configuration file indicates that the "AlwaysArchiveSystemSettingsCopy" policy is in-effect.
-->
<syscon:CommonName>AlwaysArchiveSystemSettingsCopy</syscon:CommonName>
<!--
This entry in the User Policy configuration file indicates that the "AlwaysRestoreSavedSettings" policy is in-effect.
-->
<syscon:CommonName>AlwaysRestoreSavedSettings</syscon:CommonName>
<!--
This entry in the User Policy configuration file indicates that the "AllowSysConKeyUse" policy is in-effect.
By Default, this policy is not active.
<syscon:CommonName>AllowSysConKeyUse</syscon:CommonName>
-->
<!--
This entry in the User Policy configuration file indicates that the "CopySavedSettingsToKey" policy is in-effect.
-->
<syscon:CommonName>CopySavedSettingsToKey</syscon:CommonName>
<!--
Revision 3.0
56
Page 65

IBM® Carrier Grade Server X3650 T
Key and Device status change policies
The following conditions are known to the SysCon service:
SysConDevRemoval
SysConDevMnt
SysConDevUnMnt
SysConDevMntFail
SysConDevInsert
SysConDevChange
SysConKeyRemoval
SysConKeyMnt
SysConKeyUnMnt
SysConKeyMntFail
SysConKeyInsert
SysConKeyChange
If no policy is defined for a condition above, the condition is ignored.
The following SysCon actions are configurable for each condition (exclusive - only one action is selectable)
Retry
CallScript (script path must be identified in an "ActionData" element)
Reboot
Shutdown
When "DoActionLogging" is set to "True", the Log Actions determine what reporting mechanisms are used.
Available Log Actions are: LogUsingSEL and LogUsingSysLog
Available Alert Actions are: AlertUsingSNMP and AlertUsingTAM
TAM Severity levels may be assigned to TAM alarms using tag "TAMSeverity" (Critical, Major, Minor)
-->
<!--
"SysCon Device Insert" policy
-->
<syscon:PolicyRule>
<syscon:PolicyCondition>
<syscon:PolicyConditionName>SysConDevInsert</syscon:PolicyConditionName>
</syscon:PolicyCondition>
<syscon:PolicyActions>
<syscon:PolicyAction>
<syscon:DoActionLogging>true</syscon:DoActionLogging>
<syscon:Actions>
<syscon:SysConAction>NoAction-ReportOnly</syscon:SysConAction>
<syscon:LogAction>LogUsingSEL</syscon:LogAction>
<syscon:LogAction>LogUsingSysLog</syscon:LogAction>
<syscon:AlertAction>AlertUsingSNMP</syscon:AlertAction>
<syscon:SysLogSeverity>INFO</syscon:SysLogSeverity>
<syscon:SNMPSeverity>Info</syscon:SNMPSeverity>
<syscon:SELSeverity>Info</syscon:SELSeverity>
</syscon:Actions>
</syscon:PolicyAction>
</syscon:PolicyActions>
</syscon:PolicyRule>
<!--
Revision 3.0
57
Page 66

IBM® Carrier Grade Server X3650 T
"SysCon Device Mount" policy
-->
<syscon:PolicyRule>
<syscon:PolicyCondition>
<syscon:PolicyConditionName>SysConDevMnt</syscon:PolicyConditionName>
</syscon:PolicyCondition>
<syscon:PolicyActions>
<syscon:PolicyAction>
<syscon:DoActionLogging>true</syscon:DoActionLogging>
<syscon:Actions>
<syscon:SysConAction>NoAction-ReportOnly</syscon:SysConAction>
<syscon:LogAction>LogUsingSEL</syscon:LogAction>
<syscon:LogAction>LogUsingSysLog</syscon:LogAction>
<syscon:AlertAction>AlertUsingSNMP</syscon:AlertAction>
<syscon:SysLogSeverity>INFO</syscon:SysLogSeverity>
<syscon:SNMPSeverity>Info</syscon:SNMPSeverity>
<syscon:SELSeverity>Info</syscon:SELSeverity>
</syscon:Actions>
</syscon:PolicyAction>
</syscon:PolicyActions>
</syscon:PolicyRule>
<!--
"SysCon Device Changed" policy
-->
<syscon:PolicyRule>
<syscon:PolicyCondition>
<syscon:PolicyConditionName>SysConDevChange</syscon:PolicyConditionName>
</syscon:PolicyCondition>
<syscon:PolicyActions>
<syscon:PolicyAction>
<syscon:DoActionLogging>true</syscon:DoActionLogging>
<syscon:Actions>
<syscon:SysConAction>CallScript</syscon:SysConAction>
<syscon:DevScriptFile context="linux">
<syscon:File>/home/devchg.sh</syscon:File>
</syscon:DevScriptFile>
<syscon:LogAction>LogUsingSysLog</syscon:LogAction>
<syscon:SysLogSeverity>INFO</syscon:SysLogSeverity>
</syscon:Actions>
</syscon:PolicyAction>
</syscon:PolicyActions>
</syscon:PolicyRule>
<!--
Revision 3.0
58
Page 67

IBM® Carrier Grade Server X3650 T
"SysCon Device Removal" policy
-->
<syscon:PolicyRule>
<syscon:PolicyCondition>
<syscon:PolicyConditionName>SysConDevRemoval</syscon:PolicyConditionName>
</syscon:PolicyCondition>
<syscon:PolicyActions>
<syscon:PolicyAction>
<syscon:DoActionLogging>true</syscon:DoActionLogging>
<syscon:Actions>
<syscon:SysConAction>Shutdown</syscon:SysConAction>
<syscon:LogAction>LogUsingSEL</syscon:LogAction>
<syscon:LogAction>LogUsingSysLog</syscon:LogAction>
<syscon:AlertAction>AlertUsingSNMP</syscon:AlertAction>
<syscon:AlertAction>AlertUsingTAM</syscon:AlertAction>
<syscon:SysLogSeverity>ALERT</syscon:SysLogSeverity>
<syscon:SELSeverity>Major</syscon:SELSeverity>
<syscon:SNMPSeverity>Major</syscon:SNMPSeverity>
<syscon:TAMSeverity>Major</syscon:TAMSeverity>
</syscon:Actions>
</syscon:PolicyAction>
</syscon:PolicyActions>
</syscon:PolicyRule>
<!--
"SysCon Device Unmounted" policy
-->
<syscon:PolicyRule>
<syscon:PolicyCondition>
<syscon:PolicyConditionName>SysConDevUnMnt</syscon:PolicyConditionName>
</syscon:PolicyCondition>
<syscon:PolicyActions>
<syscon:PolicyAction>
<syscon:DoActionLogging>true</syscon:DoActionLogging>
<syscon:Actions>
<syscon:SysConAction>Retry</syscon:SysConAction>
<syscon:LogAction>LogUsingSEL</syscon:LogAction>
<syscon:LogAction>LogUsingSysLog</syscon:LogAction>
<syscon:AlertAction>AlertUsingSNMP</syscon:AlertAction>
<syscon:AlertAction>AlertUsingTAM</syscon:AlertAction>
<syscon:SysLogSeverity>ALERT</syscon:SysLogSeverity>
<syscon:SELSeverity>Minor</syscon:SELSeverity>
<syscon:SNMPSeverity>Minor</syscon:SNMPSeverity>
<syscon:TAMSeverity>Minor</syscon:TAMSeverity>
</syscon:Actions>
</syscon:PolicyAction>
</syscon:PolicyActions>
</syscon:PolicyRule>
<!--
Revision 3.0
59
Page 68

IBM® Carrier Grade Server X3650 T
"SysCon Device Mount Fail" policy
-->
<syscon:PolicyRule>
<syscon:PolicyCondition>
<syscon:PolicyConditionName>SysConDevMntFail</syscon:PolicyConditionName>
</syscon:PolicyCondition>
<syscon:PolicyActions>
<syscon:PolicyAction>
<syscon:DoActionLogging>true</syscon:DoActionLogging>
<syscon:Actions>
<syscon:SysConAction>Shutdown</syscon:SysConAction>
<syscon:LogAction>LogUsingSEL</syscon:LogAction>
<syscon:LogAction>LogUsingSysLog</syscon:LogAction>
<syscon:AlertAction>AlertUsingSNMP</syscon:AlertAction>
<syscon:AlertAction>AlertUsingTAM</syscon:AlertAction>
<syscon:SysLogSeverity>ALERT</syscon:SysLogSeverity>
<syscon:SELSeverity>Major</syscon:SELSeverity>
<syscon:SNMPSeverity>Major</syscon:SNMPSeverity>
<syscon:TAMSeverity>Major</syscon:TAMSeverity>
</syscon:Actions>
</syscon:PolicyAction>
</syscon:PolicyActions>
</syscon:PolicyRule>
<!--
"SysCon Key Insert" policy
-->
<syscon:PolicyRule>
<syscon:PolicyCondition>
<syscon:PolicyConditionName>SysConKeyInsert</syscon:PolicyConditionName>
</syscon:PolicyCondition>
<syscon:PolicyActions>
<syscon:PolicyAction>
<syscon:DoActionLogging>true</syscon:DoActionLogging>
<syscon:Actions>
<syscon:SysConAction>NoAction-ReportOnly</syscon:SysConAction>
<syscon:LogAction>LogUsingSEL</syscon:LogAction>
<syscon:LogAction>LogUsingSysLog</syscon:LogAction>
<syscon:AlertAction>AlertUsingSNMP</syscon:AlertAction>
<syscon:SysLogSeverity>INFO</syscon:SysLogSeverity>
<syscon:SNMPSeverity>Info</syscon:SNMPSeverity>
<syscon:SELSeverity>Info</syscon:SELSeverity>
</syscon:Actions>
</syscon:PolicyAction>
</syscon:PolicyActions>
</syscon:PolicyRule>
<!--
Revision 3.0
60
Page 69

IBM® Carrier Grade Server X3650 T
"SysCon Key Mount" policy
-->
<syscon:PolicyRule>
<syscon:PolicyCondition>
<syscon:PolicyConditionName>SysConKeyMnt</syscon:PolicyConditionName>
</syscon:PolicyCondition>
<syscon:PolicyActions>
<syscon:PolicyAction>
<syscon:DoActionLogging>true</syscon:DoActionLogging>
<syscon:Actions>
<syscon:SysConAction>NoAction-ReportOnly</syscon:SysConAction>
<syscon:LogAction>LogUsingSEL</syscon:LogAction>
<syscon:LogAction>LogUsingSysLog</syscon:LogAction>
<syscon:AlertAction>AlertUsingSNMP</syscon:AlertAction>
<syscon:SysLogSeverity>INFO</syscon:SysLogSeverity>
<syscon:SNMPSeverity>Info</syscon:SNMPSeverity>
<syscon:SELSeverity>Info</syscon:SELSeverity>
</syscon:Actions>
</syscon:PolicyAction>
</syscon:PolicyActions>
</syscon:PolicyRule>
<!--
"SysCon Key Changed" policy
-->
<syscon:PolicyRule>
<syscon:PolicyCondition>
<syscon:PolicyConditionName>SysConKeyChange</syscon:PolicyConditionName>
</syscon:PolicyCondition>
<syscon:PolicyActions>
<syscon:PolicyAction>
<syscon:DoActionLogging>true</syscon:DoActionLogging>
<syscon:Actions>
<syscon:SysConAction>CallScript</syscon:SysConAction>
<syscon:DevScriptFile context="linux">
<syscon:File>/home/keychg.sh</syscon:File>
</syscon:DevScriptFile>
<syscon:LogAction>LogUsingSysLog</syscon:LogAction>
<syscon:SysLogSeverity>INFO</syscon:SysLogSeverity>
</syscon:Actions>
</syscon:PolicyAction>
</syscon:PolicyActions>
</syscon:PolicyRule>
<!--
Revision 3.0
61
Page 70

IBM® Carrier Grade Server X3650 T
"SysCon Key Removal" policy
-->
<syscon:PolicyRule>
<syscon:PolicyCondition>
<syscon:PolicyConditionName>SysConKeyRemoval</syscon:PolicyConditionName>
</syscon:PolicyCondition>
<syscon:PolicyActions>
<syscon:PolicyAction>
<syscon:DoActionLogging>true</syscon:DoActionLogging>
<syscon:Actions>
<syscon:SysConAction>NoAction-ReportOnly</syscon:SysConAction>
<syscon:LogAction>LogUsingSEL</syscon:LogAction>
<syscon:LogAction>LogUsingSysLog</syscon:LogAction>
<syscon:AlertAction>AlertUsingSNMP</syscon:AlertAction>
<syscon:SysLogSeverity>INFO</syscon:SysLogSeverity>
<syscon:SELSeverity>Info</syscon:SELSeverity>
<syscon:SNMPSeverity>Info</syscon:SNMPSeverity>
</syscon:Actions>
</syscon:PolicyAction>
</syscon:PolicyActions>
</syscon:PolicyRule>
<!--
"SysCon Key Unmounted" policy
-->
<syscon:PolicyRule>
<syscon:PolicyCondition>
<syscon:PolicyConditionName>SysConKeyUnMnt</syscon:PolicyConditionName>
</syscon:PolicyCondition>
<syscon:PolicyActions>
<syscon:PolicyAction>
<syscon:DoActionLogging>true</syscon:DoActionLogging>
<syscon:Actions>
<syscon:SysConAction>NoAction-ReportOnly</syscon:SysConAction>
<syscon:LogAction>LogUsingSysLog</syscon:LogAction>
<syscon:SysLogSeverity>INFO</syscon:SysLogSeverity>
</syscon:Actions>
</syscon:PolicyAction>
</syscon:PolicyActions>
</syscon:PolicyRule>
<!--
"SysCon Key Mount Fail" policy
-->
<syscon:PolicyRule>
<syscon:PolicyCondition>
<syscon:PolicyConditionName>SysConKeyMntFail</syscon:PolicyConditionName>
</syscon:PolicyCondition>
<syscon:PolicyActions>
<syscon:PolicyAction>
<syscon:DoActionLogging>true</syscon:DoActionLogging>
<syscon:Actions>
<syscon:SysConAction>NoAction-ReportOnly</syscon:SysConAction>
<syscon:LogAction>LogUsingSysLog</syscon:LogAction>
<syscon:SysLogSeverity>ERR</syscon:SysLogSeverity>
</syscon:Actions>
</syscon:PolicyAction>
</syscon:PolicyActions>
</syscon:PolicyRule>
<!--
"SysCon Log" policy
Revision 3.0
62
Page 71

IBM® Carrier Grade Server X3650 T
-->
<syscon:PolicyRule>
<syscon:PolicyCondition>
<syscon:PolicyConditionName>SysConDevLog</syscon:PolicyConditionName>
</syscon:PolicyCondition>
<syscon:PolicyActions>
<syscon:PolicyAction>
<syscon:DoActionLogging>true</syscon:DoActionLogging>
<syscon:Actions>
<syscon:LoggingLevel>INFO</syscon:LoggingLevel>
<syscon:LogEntryLimit>50</syscon:LogEntryLimit>
</syscon:Actions>
</syscon:PolicyAction>
</syscon:PolicyActions>
</syscon:PolicyRule>
<!--
-->
</policy:PolicySetAppliesToElement>
</policy:PolicyConfiguration>
14.2 SysCon Policy Schema: syscon.xsd
The “syscon.xsd” file defines the domain of values that are allowable for elements of the various SysCon
policy and configuration files. The excerpts from “syscon.xsd” below illustrate these domain values.
The element <SysConCommonNameType> defines the valid policies that may be established by the user
to control SysCon feature behavior. The values in bold type apply only to the SysCon preboot feature.
Other policies are used by the SysCon Service (OS-resident).
<xs:simpleType name="SysConCommonNameType">
<xs:restriction base="policy:CommonNameType">
<xs:enumeration value="AlwaysArchiveSystemSettingsCopy"/>
<xs:enumeration value="AlwaysRestoreSavedSettings"/>
<xs:enumeration value="AllowSysConKeyUse"/>
<xs:enumeration value="CopySavedSettingsToKey"/>
<xs:enumeration value="ApplySavedSettingsToReplacementSystemOnce"/>
<xs:enumeration value="SysConDevRemoval"/>
<xs:enumeration value="SysConDevMnt"/>
<xs:enumeration value="SysConDevUnMnt"/>
<xs:enumeration value="SysConDevMntFail"/>
<xs:enumeration value="SysConDevInsert"/>
<xs:enumeration value="SysConDevChange"/>
<xs:enumeration value="SysConKeyRemoval"/>
<xs:enumeration value="SysConKeyMnt"/>
<xs:enumeration value="SysConKeyUnMnt"/>
<xs:enumeration value="SysConKeyMntFail"/>
<xs:enumeration value="SysConKeyInsert"/>
<xs:enumeration value="SysConKeyChange"/>
<xs:enumeration value="SysConDevLog"/>
</xs:restriction>
</xs:simpleType>
Revision 3.0
63
Page 72

IBM® Carrier Grade Server X3650 T
15. APPENDIX C – System Settings File Format
The SysCon feature allows the user to configure two system components: the system firmware (BIOS)
and the system’s server management features (Intel
®
Management Module, which includes a Baseboard
Management Controller or BMC). The settings for these two components are captured in a single file in
Extensible Markup Language (XML) syntax. XML schema files (or XSDs) that describe the XML element
types and value constraints for each component are provided on the SysCon device.
System settings files for a typical system are provided as examples below. Following the examples are
sections contain listings of the XML schema for component settings included in the SysCon feature.
Each listing is labeled with the file path of the XML schema on the SysCon Device. These listings are
provided as examples only. To ensure that the proper values are selected for a particular component, the
user should reference the actual XML schema file version stored on the SysCon Device.
15.1 A Typical System Settings File Example
<?xml version="1.0" encoding="UTF-8"?>
<!-- edited with XMLSPY v5 rel. 4 U (http://www.xmlspy.com) by Todd C Davis (private) -->
<config:Settings xmlns:xsi="http://www.w3.org/2001/XMLSchema-instance"
xsi:schemaLocation="http://developer.intel.com/software/XML/2004/ConfigSchema ../../../vendor/SystemsComponents.xsd"
xmlns:config="http://developer.intel.com/software/XML/2004/ConfigSchema">
<config:CheckPoint>
<config:DateTime>2004-04-15T09:30:47-05:00</config:DateTime>
<config:Description>optional check point for illustration, EFI settings</config:Description>
</config:CheckPoint>
<config:ComponentSettings>
<config:ComponentKey>
<config:ComponentIdString>Intel-BIOS-syscfg-V001</config:ComponentIdString>
</config:ComponentKey>
<?SysCon root="syscfg:BIOSV001" handler="syscfg.BIOSV001" path="./sysconenv/data/vendor/Intel "?>
<syscfg:BIOSV001 UUID="ECED5B47-7275-43fd-967F-A03A1AC21E74"
xmlns:syscfg="http://developer.intel.com/software/XML/2004/SyscfgSchema"
xmlns:bios="http://developer.intel.com/software/XML/2003/BIOSSchema">
<bios:CPUConfigurationV001 alias="bht" UUID="8CADF575-A80C-42a6-AAF8-699B855417F2">
<bios:ProcessorHyperThreadingEnable>true</bios:ProcessorHyperThreadingEnable>
</bios:CPUConfigurationV001>
<bios:ConsoleConfigurationV001 alias="bcr" UUID="90350120-262B-4a83-AA3E-F03E84206785">
<bios:RedirectionPort>Serial 1</bios:RedirectionPort>
<bios:FlowControl>CTS/RTS</bios:FlowControl>
<bios:BaudRate>19200</bios:BaudRate>
<bios:TerminalType>VT100+</bios:TerminalType>
</bios:ConsoleConfigurationV001>
</syscfg:BIOSV001>
</config:ComponentSettings>
<config:ComponentSettings>
<config:ComponentKey>
<config:ComponentIdString>Intel-IMM-syscfg-V001</config:ComponentIdString>
</config:ComponentKey>
<?SysCon root="bmccfg:IMMV001" handler="bmccfg.IMMV001" path="./sysconenv/data/vendor/Intel" ?>
<bmccfg:IMMV001 UUID="083A0F80-EC5E-44a5-9D5B-88F7653E0C06"
xmlns:bmccfg="http://developer.intel.com/software/XML/2005/bmccfgSchema"
xmlns:ipmi15="http://developer.intel.com/software/XML/2004/IPMI15Schema"
xmlns:imm="http://developer.intel.com/software/XML/2004/IMMSchema">
<bmccfg:ChannelV001 channelNo="1" UUID="6056002A-3556-4019-81EA-DF23A1393C30">
<bmccfg:ChannelSettingsV001 UUID="D0A18C38-C3A6-4727-8099-8F74A79B6006">
<ipmi15:enablePEFAlerting>true</ipmi15:enablePEFAlerting>
<ipmi15:AccessModeForIPMIMessaging>Always Available</ipmi15:AccessModeForIPMIMessaging>
<ipmi15:ChannelPrivilegeLimit>Admin</ipmi15:ChannelPrivilegeLimit>
</bmccfg:ChannelSettingsV001>
<bmccfg:LANConfigurationV001 UUID="986C7E53-28D2-4e90-B77A-87B2CCE3E179">
Revision 3.0
64
Page 73

IBM® Carrier Grade Server X3650 T
<ipmi15:IPAddressSource>Static</ipmi15:IPAddressSource>
<ipmi15:IPAddress>10.243.42.116</ipmi15:IPAddress>
<ipmi15:SubnetMask>255.255.255.0</ipmi15:SubnetMask>
<ipmi15:DefaultGateway>10.243.42.251</ipmi15:DefaultGateway>
<ipmi15:DefaultGatewayMacAddress>00.d0.06.21.eb.fc</ipmi15:DefaultGatewayMacAddress>
<ipmi15:BackupGateway>0.0.0.0</ipmi15:BackupGateway>
<ipmi15:BackupGatewayMacAddress>00.00.00.00.00.00</ipmi15:BackupGatewayMacAddress>
<ipmi15:CommunityString>public</ipmi15:CommunityString>
<bmccfg:LANAlertDestinationV001 UUID="EA3D84C1-6DB0-47f2-8D3D-ABBD1DBAB199">
<ipmi15:AlertIPAddress>10.243.42.116</ipmi15:AlertIPAddress>
<ipmi15:AlertIPAddress>10.243.42.189</ipmi15:AlertIPAddress>
<ipmi15:AlertMacAddress>00.04.23.bc.ac.1a</ipmi15:AlertMacAddress>
<ipmi15:AlertMacAddress>00.06.29.4f.ca.5a</ipmi15:AlertMacAddress>
</bmccfg:LANAlertDestinationV001>
</bmccfg:LANConfigurationV001>
<imm:SOLConfigurationV001 UUID="39EAEFEF-D196-4af0-AB22-2B1F12B99601">
<imm:enableSOL>true</imm:enableSOL>
<ipmi15:PrivilegeLevelLimit>User</ipmi15:PrivilegeLevelLimit>
<imm:SOLbitrate>19200</imm:SOLbitrate>
<imm:SOLRetryCount>5</imm:SOLRetryCount>
<imm:SOLRetryInterval>20</imm:SOLRetryInterval>
</imm:SOLConfigurationV001>
</bmccfg:ChannelV001>
<bmccfg:ChannelV001 channelNo="3" UUID="6056002A-3556-4019-81EA-DF23A1393C30">
<bmccfg:ChannelSettingsV001 UUID="D0A18C38-C3A6-4727-8099-8F74A79B6006">
<ipmi15:enablePEFAlerting>true</ipmi15:enablePEFAlerting>
<ipmi15:AccessModeForIPMIMessaging>Always Available</ipmi15:AccessModeForIPMIMessaging>
<ipmi15:ChannelPrivilegeLimit>Admin</ipmi15:ChannelPrivilegeLimit>
</bmccfg:ChannelSettingsV001>
<bmccfg:LANConfigurationV001 UUID="986C7E53-28D2-4e90-B77A-87B2CCE3E179">
<ipmi15:IPAddressSource>Static</ipmi15:IPAddressSource>
<ipmi15:IPAddress>10.243.42.115</ipmi15:IPAddress>
<ipmi15:SubnetMask>255.255.255.0</ipmi15:SubnetMask>
<ipmi15:MacAddress>00.02.b3.f3.f3.81</ipmi15:MacAddress>
<ipmi15:DefaultGateway>10.243.42.251</ipmi15:DefaultGateway>
<ipmi15:DefaultGatewayMacAddress>00.05.9a.da.d3.fc</ipmi15:DefaultGatewayMacAddress>
<ipmi15:BackupGateway>0.0.0.0</ipmi15:BackupGateway>
<ipmi15:BackupGatewayMacAddress>00.00.00.00.00.00</ipmi15:BackupGatewayMacAddress>
<ipmi15:CommunityString>!telc03</ipmi15:CommunityString>
<bmccfg:LANAlertDestinationV001 UUID="EA3D84C1-6DB0-47f2-8D3D-ABBD1DBAB199">
<ipmi15:AlertIPAddress>10.243.42.189</ipmi15:AlertIPAddress>
<ipmi15:AlertIPAddress>10.243.42.203</ipmi15:AlertIPAddress>
<ipmi15:AlertMacAddress>00.06.29.4f.ca.5a</ipmi15:AlertMacAddress>
<ipmi15:AlertMacAddress>00.08.74.4f.f2.a3</ipmi15:AlertMacAddress>
</bmccfg:LANAlertDestinationV001>
</bmccfg:LANConfigurationV001>
<imm:SOLConfigurationV001 UUID="39EAEFEF-D196-4af0-AB22-2B1F12B99601">
<imm:enableSOL>true</imm:enableSOL>
<ipmi15:PrivilegeLevelLimit>Admin</ipmi15:PrivilegeLevelLimit>
<imm:SOLbitrate>19200</imm:SOLbitrate>
<imm:SOLRetryCount>6</imm:SOLRetryCount>
<imm:SOLRetryInterval>20</imm:SOLRetryInterval>
</imm:SOLConfigurationV001>
<imm:HTTPConfigurationV001 UUID="3EAEBFFB-9328-40fc-8771-998C13F630E4">
<imm:enableHTTP>true</imm:enableHTTP>
<imm:ServerPort>80</imm:ServerPort>
</imm:HTTPConfigurationV001>
<imm:TELNETConfigurationV001 UUID="BAB62487-9B9F-459d-9B65-E16E5E4FD264">
<imm:enableTelnet>true</imm:enableTelnet>
<imm:TelnetPort>23</imm:TelnetPort>
</imm:TELNETConfigurationV001>
<imm:KVMConfigurationV001 UUID="49F8CC73-E1F0-44c1-A7F1-0623A79ABD82">
<imm:enableKVM>true</imm:enableKVM>
</imm:KVMConfigurationV001>
<imm:SNMPConfigurationV001 UUID="FDB6EBC6-CF11-4020-BF59-2EF3E9A84192">
<imm:enableSNMP>true</imm:enableSNMP>
Revision 3.0
65
Page 74

IBM® Carrier Grade Server X3650 T
<imm:UDPPort>161</imm:UDPPort>
</imm:SNMPConfigurationV001>
</bmccfg:ChannelV001>
<bmccfg:ChannelV001 channelNo="4" UUID="6056002A-3556-4019-81EA-DF23A1393C30">
<bmccfg:ChannelSettingsV001 UUID="D0A18C38-C3A6-4727-8099-8F74A79B6006">
<ipmi15:enablePEFAlerting>false</ipmi15:enablePEFAlerting>
<ipmi15:AccessModeForIPMIMessaging>Always Available</ipmi15:AccessModeForIPMIMessaging>
<ipmi15:ChannelPrivilegeLimit>Admin</ipmi15:ChannelPrivilegeLimit>
</bmccfg:ChannelSettingsV001>
<ipmi15:SerialConfigurationV001 UUID="E371D92A-16B6-48d5-A998-A3410D99D86B">
<ipmi15:MessagingSettingsV001 UUID="A5F239DE-F171-4937-9B05-938EC62DABB3">
<bmccfg:SerialConnectionModeV001 UUID="92A1C2EF-C812-4379-9D8F-25880225C3A0">
<ipmi15:ConnectionMode>Direct</ipmi15:ConnectionMode>
</bmccfg:SerialConnectionModeV001>
<bmccfg:ModemSettingsV001 UUID="610B9B33-9DE3-4a80-A765-90CDF7A4BD04">
<ipmi15:ModemRingDuration>43</ipmi15:ModemRingDuration>
<ipmi15:ModemInitString>ATE1Q0V1X4&D2&C1S0=0</ipmi15:ModemInitString>
<ipmi15:ModemEscapeSequence>+++</ipmi15:ModemEscapeSequence>
<ipmi15:ModemHangupSequence>ATH</ipmi15:ModemHangupSequence>
<ipmi15:ModemDialCommand>ATD</ipmi15:ModemDialCommand>
<bmccfg:SystemPhoneNumber/>
</bmccfg:ModemSettingsV001>
</ipmi15:MessagingSettingsV001>
<ipmi15:AlertSettingsV001 UUID="9269EE1B-07AE-474f-9A78-F6DD6D8D2CA0">
<ipmi15:PageBlackoutInterval>6</ipmi15:PageBlackoutInterval>
</ipmi15:AlertSettingsV001>
</ipmi15:SerialConfigurationV001>
</bmccfg:ChannelV001>
<bmccfg:UserSettingsV001 userNo="1" UUID="B17B14F5-0A25-46d7-A1A0-D92B318F355A">
<ipmi15:UserName>anonymous</ipmi15:UserName>
<bmccfg:ChannelAccessV001 channelNo="1" UUID="DF78C026-E319-4f09-B75B-A377896379EE">
<ipmi15:enableUser>true</ipmi15:enableUser>
<ipmi15:PrivilegeLevelLimit>Admin</ipmi15:PrivilegeLevelLimit>
</bmccfg:ChannelAccessV001>
<bmccfg:ChannelAccessV001 channelNo="3" UUID="DF78C026-E319-4f09-B75B-A377896379EE">
<ipmi15:enableUser>true</ipmi15:enableUser>
<ipmi15:PrivilegeLevelLimit>Admin</ipmi15:PrivilegeLevelLimit>
<bmccfg:enableTelnet>true</bmccfg:enableTelnet>
<bmccfg:enableHTTP>true</bmccfg:enableHTTP>
</bmccfg:ChannelAccessV001>
<bmccfg:ChannelAccessV001 channelNo="4" UUID="DF78C026-E319-4f09-B75B-A377896379EE">
<ipmi15:enableUser>true</ipmi15:enableUser>
<ipmi15:PrivilegeLevelLimit>Admin</ipmi15:PrivilegeLevelLimit>
</bmccfg:ChannelAccessV001>
<bmccfg:EncryptedPassword>7ea8d7b125a072c6f2404328c9b9141595c3bd3a</bmccfg:EncryptedPassword>
<bmccfg:PasswordEncryptionId>95c3bd3a</bmccfg:PasswordEncryptionId>
</bmccfg:UserSettingsV001>
<bmccfg:UserSettingsV001 userNo="2" UUID="B17B14F5-0A25-46d7-A1A0-D92B318F355A">
<ipmi15:UserName>u2</ipmi15:UserName>
<bmccfg:ChannelAccessV001 channelNo="1" UUID="DF78C026-E319-4f09-B75B-A377896379EE">
<ipmi15:enableUser>true</ipmi15:enableUser>
<ipmi15:PrivilegeLevelLimit>Admin</ipmi15:PrivilegeLevelLimit>
</bmccfg:ChannelAccessV001>
<bmccfg:ChannelAccessV001 channelNo="3" UUID="DF78C026-E319-4f09-B75B-A377896379EE">
<ipmi15:enableUser>true</ipmi15:enableUser>
<ipmi15:PrivilegeLevelLimit>Admin</ipmi15:PrivilegeLevelLimit>
<bmccfg:enableTelnet>true</bmccfg:enableTelnet>
<bmccfg:enableHTTP>true</bmccfg:enableHTTP>
</bmccfg:ChannelAccessV001>
<bmccfg:ChannelAccessV001 channelNo="4" UUID="DF78C026-E319-4f09-B75B-A377896379EE">
<ipmi15:enableUser>true</ipmi15:enableUser>
<ipmi15:PrivilegeLevelLimit>Admin</ipmi15:PrivilegeLevelLimit>
</bmccfg:ChannelAccessV001>
<bmccfg:EncryptedPassword>7ea8d7b125a072c6f2404328c9b9141595c3bd3a</bmccfg:EncryptedPassword>
Revision 3.0
66
Page 75

IBM® Carrier Grade Server X3650 T
<bmccfg:PasswordEncryptionId>95c3bd3a</bmccfg:PasswordEncryptionId>
</bmccfg:UserSettingsV001>
<bmccfg:UserSettingsV001 userNo="3" UUID="B17B14F5-0A25-46d7-A1A0-D92B318F355A">
<ipmi15:UserName>u3</ipmi15:UserName>
<bmccfg:ChannelAccessV001 channelNo="1" UUID="DF78C026-E319-4f09-B75B-A377896379EE">
<ipmi15:enableUser>true</ipmi15:enableUser>
<ipmi15:PrivilegeLevelLimit>User</ipmi15:PrivilegeLevelLimit>
</bmccfg:ChannelAccessV001>
<bmccfg:ChannelAccessV001 channelNo="3" UUID="DF78C026-E319-4f09-B75B-A377896379EE">
<ipmi15:enableUser>true</ipmi15:enableUser>
<ipmi15:PrivilegeLevelLimit>User</ipmi15:PrivilegeLevelLimit>
<bmccfg:enableTelnet>true</bmccfg:enableTelnet>
<bmccfg:enableHTTP>true</bmccfg:enableHTTP>
</bmccfg:ChannelAccessV001>
<bmccfg:ChannelAccessV001 channelNo="4" UUID="DF78C026-E319-4f09-B75B-A377896379EE">
<ipmi15:enableUser>true</ipmi15:enableUser>
<ipmi15:PrivilegeLevelLimit>User</ipmi15:PrivilegeLevelLimit>
</bmccfg:ChannelAccessV001>
<bmccfg:EncryptedPassword>7ea8d7b125a072c6f2404328c9b9141595c3bd3a</bmccfg:EncryptedPassword>
<bmccfg:PasswordEncryptionId>95c3bd3a</bmccfg:PasswordEncryptionId>
</bmccfg:UserSettingsV001>
<bmccfg:UserSettingsV001 userNo="4" UUID="B17B14F5-0A25-46d7-A1A0-D92B318F355A">
<ipmi15:UserName>u4</ipmi15:UserName>
<bmccfg:ChannelAccessV001 channelNo="1" UUID="DF78C026-E319-4f09-B75B-A377896379EE">
<ipmi15:enableUser>true</ipmi15:enableUser>
<ipmi15:PrivilegeLevelLimit>Operator</ipmi15:PrivilegeLevelLimit>
</bmccfg:ChannelAccessV001>
<bmccfg:ChannelAccessV001 channelNo="3" UUID="DF78C026-E319-4f09-B75B-A377896379EE">
<ipmi15:enableUser>true</ipmi15:enableUser>
<ipmi15:PrivilegeLevelLimit>Operator</ipmi15:PrivilegeLevelLimit>
<bmccfg:enableTelnet>true</bmccfg:enableTelnet>
<bmccfg:enableHTTP>true</bmccfg:enableHTTP>
</bmccfg:ChannelAccessV001>
<bmccfg:ChannelAccessV001 channelNo="4" UUID="DF78C026-E319-4f09-B75B-A377896379EE">
<ipmi15:enableUser>true</ipmi15:enableUser>
<ipmi15:PrivilegeLevelLimit>Operator</ipmi15:PrivilegeLevelLimit>
</bmccfg:ChannelAccessV001>
<bmccfg:EncryptedPassword>7ea8d7b125a072c6f2404328c9b9141595c3bd3a</bmccfg:EncryptedPassword>
<bmccfg:PasswordEncryptionId>95c3bd3a</bmccfg:PasswordEncryptionId>
</bmccfg:UserSettingsV001>
<imm:SMTPConfigurationV001 UUID="5975E674-5F99-4d12-989F-5CF8106E6554">
<imm:SendingSystemName>"Silver"</imm:SendingSystemName>
<imm:SMTPConfigurationEntryV001 tableIndex="1" UUID="CC961998-5311-4f00-AA05-2BAD52EDDF68">
<imm:SMTPSendingAddr>KenB@SysConSRA.com</imm:SMTPSendingAddr>
<imm:SMTPReceivingAddr>Ken.Banks@Intel.com</imm:SMTPReceivingAddr>
<imm:SMTPSubjectLine>lan6.ini</imm:SMTPSubjectLine>
</imm:SMTPConfigurationEntryV001>
</imm:SMTPConfigurationV001>
</bmccfg:IMMV001>
</config:ComponentSettings>
</config:Settings>
Revision 3.0
67
Page 76

IBM® Carrier Grade Server X3650 T
15.2 A “Full” System Settings File Example
<?xml version="1.0" encoding="UTF-8"?>
<!-- edited with XMLSPY v5 rel. 4 U (http://www.xmlspy.com) by Todd C Davis (private) -->
<config:Settings xmlns:xsi="http://www.w3.org/2001/XMLSchema-instance"
xsi:schemaLocation="http://developer.intel.com/software/XML/2004/ConfigSchema ../../../vendor/SystemsComponents.xsd"
xmlns:config="http://developer.intel.com/software/XML/2004/ConfigSchema">
<config:CheckPoint>
<config:DateTime>2004-04-15T09:30:47-05:00</config:DateTime>
<config:Description>optional check point for illustration, EFI settings</config:Description>
</config:CheckPoint>
<config:ComponentSettings>
<config:ComponentKey>
<config:ComponentIdString>Intel-BIOS-syscfg-V001</config:ComponentIdString>
</config:ComponentKey>
<?SysCon root="syscfg:BIOSV001" handler="syscfg.BIOSV001" path="./sysconenv/data/vendor/Intel"?>
<syscfg:BIOSV001 UUID="ECED5B47-7275-43fd-967F-A03A1AC21E74"
xmlns:syscfg="http://developer.intel.com/software/XML/2004/SyscfgSchema"
xmlns:bios="http://developer.intel.com/software/XML/2003/BIOSSchema">
<bios:CPUConfigurationV001 alias="bht" UUID="8CADF575-A80C-42a6-AAF8-699B855417F2">
<!-- HyperThreadingenable values: true, false -->
<bios:ProcessorHyperThreadingEnable>true</bios:ProcessorHyperThreadingEnable>
</bios:CPUConfigurationV001>
<bios:ConsoleConfigurationV001 alias="bcr" UUID="90350120-262B-4a83-AA3E-F03E84206785">
<!-- Redirection Port values: Disable, Serial 1, Serial 2 -->
<bios:RedirectionPort>Serial 1</bios:RedirectionPort>
<!-- Flow Control values: None, CTS/RTS, XON/XOFF, CTS/RTS + CD -->
<bios:FlowControl>CTS/RTS</bios:FlowControl>
<!-- BaudRate values: 9600, 19200, 38400, 57600, 115200 -->
<bios:BaudRate>19200</bios:BaudRate>
<!-- TerminalType values: PC-ANSI, VT100+, VT-UTF8 -->
<bios:TerminalType>VT100+</bios:TerminalType>
</bios:ConsoleConfigurationV001>
<bios:SecurityV001 UUID="A13F3CD0-BCB4-40fa-9A2F-FC7D3F26A5E6">
<!-- Password values are either nothing (nil) or a sting (max 7 chars) -->
<bios:AdministratorPassword/>
<bios:AdministratorPassword>system</bios:AdministratorPassword>
<bios:UserPassword/>
<bios:UserPassword>userpw</bios:UserPassword>
</bios:SecurityV001>
<syscfg:BootMenuV001 UUID="C1E7550F-5A66-426d-8335-1CB28FC10157">
<bios:BootSettingsConfigurationV001 alias="bqb" UUID="1AE26FDC-258D-491c-9FFB-3531F85E33C3">
<!-- QuietBoot values: true, false -->
<bios:QuietBoot>false</bios:QuietBoot>
</bios:BootSettingsConfigurationV001>
<!-- List numbers in the order of the desired changes from the current order -->
<syscfg:BootDevicePriorityV001 alias="bbo" UUID="1E1B6702-A46E-466a-A18E-C580FBB76B57">
<bios:BootDeviceNumber>2</bios:BootDeviceNumber>
<bios:BootDeviceNumber>1</bios:BootDeviceNumber>
<bios:BootDeviceNumber>3</bios:BootDeviceNumber>
<bios:BootDeviceNumber>4</bios:BootDeviceNumber>
<bios:BootDeviceNumber>5</bios:BootDeviceNumber>
</syscfg:BootDevicePriorityV001>
<!-- List numbers in the order of the desired changes from the current order -->
<syscfg:BootHardDiskDrivesV001 alias="bhd" UUID="45A0D699-67D5-4b9c-8358-4D1FD88BE44B">
<bios:HardDiskDriveNumber>2</bios:HardDiskDriveNumber>
<bios:HardDiskDriveNumber>1</bios:HardDiskDriveNumber>
</syscfg:BootHardDiskDrivesV001>
</syscfg:BootMenuV001>
</syscfg:BIOSV001>
</config:ComponentSettings>
<config:ComponentSettings>
<config:ComponentKey>
<config:ComponentIdString>Intel-IMM-bmccfg-V001</config:ComponentIdString>
</config:ComponentKey>
Revision 3.0
68
Page 77

IBM® Carrier Grade Server X3650 T
<?SysCon root="bmccfg:IMMV001" handler="bmccfg.IMMV001" path="./sysconenv/data/vendor/Intel" ?>
<bmccfg:IMMV001 UUID="083A0F80-EC5E-44a5-9D5B-88F7653E0C06"
xmlns:bmccfg="http://developer.intel.com/software/XML/2005/bmccfgSchema"
xmlns:ipmi15="http://developer.intel.com/software/XML/2004/IPMI15Schema"
xmlns:imm="http://developer.intel.com/software/XML/2004/IMMSchema">
<bmccfg:ChannelV001 channelNo="1" UUID="3CB2F383-BF03-4a28-B44A-5E6307A60F73">
<bmccfg:ChannelSettingsV001 UUID="97DC9363-9B8D-4ca0-A9C3-5B96D0688966">
<!-- [LAN::CHANNEL1]LANAlert -->
<ipmi15:enablePEFAlerting>false</ipmi15:enablePEFAlerting>
<!-- [LAN::CHANNEL1]AccessMode -->
<ipmi15:AccessModeForIPMIMessaging>Disabled</ipmi15:AccessModeForIPMIMessaging>
<!-- [LAN::CHANNEL1]PrivLevelLanChannel -->
<ipmi15:ChannelPrivilegeLimit>Admin</ipmi15:ChannelPrivilegeLimit>
</bmccfg:ChannelSettingsV001>
<bmccfg:LANConfigurationV001 UUID="6A467E4D-D3DD-4094-8902-6894C2CF08C6">
<!-- [LAN::CHANNEL1]DHCPMode -->
<ipmi15:IPAddressSource>DHCP</ipmi15:IPAddressSource>
<!-- [LAN::CHANNEL1]HostIPAddress -->
<ipmi15:IPAddress>128.128.0.1</ipmi15:IPAddress>
<!-- [LAN::CHANNEL1]SubnetIPAddress -->
<ipmi15:SubnetMask>255.255.0.255</ipmi15:SubnetMask>
<!-- [LAN::CHANNEL1]GatewayIPAddress -->
<ipmi15:DefaultGateway>128.128.0.2</ipmi15:DefaultGateway>
<!-- [LAN::CHANNEL1]GatewayMACAddress -->
<ipmi15:DefaultGatewayMacAddress>AE-ED-DE-FA-12-12</ipmi15:DefaultGatewayMacAddress>
<!-- [LAN::CHANNEL1]BackupGatewayIPAddress -->
<ipmi15:BackupGateway>128.128.0.4</ipmi15:BackupGateway>
<!-- [LAN::CHANNEL1]BackupGatewayMACAddress -->
<ipmi15:BackupGatewayMacAddress>32-23-DF-FD-EA-CC</ipmi15:BackupGatewayMacAddress>
<!-- [LAN::CHANNEL1]CommunityString -->
<ipmi15:CommunityString>public</ipmi15:CommunityString>
<bmccfg:LANAlertDestinationV001 UUID="7533A810-6A48-4b2f-9B6C-3E4E310FBDC2">
<!-- [LAN::CHANNEL1]AlertIPAddress1 -->
<!-- [LAN::CHANNEL1]AlertIPAddress2 -->
<ipmi15:AlertIPAddress>128.128.0.3</ipmi15:AlertIPAddress>
<!-- [LAN::CHANNEL1]AlertMACAddress1 -->
<!-- [LAN::CHANNEL1]AlertMACAddress2 -->
<ipmi15:AlertMacAddress>AE-ED-DE-FA-12-12</ipmi15:AlertMacAddress>
</bmccfg:LANAlertDestinationV001>
</bmccfg:LANConfigurationV001>
<imm:SOLConfigurationV001 UUID="39EAEFEF-D196-4af0-AB22-2B1F12B99601">
<!-- [LAN::CHANNEL1]SOLAccessMode -->
<imm:enableSOL>true</imm:enableSOL>
<!-- [LAN::CHANNEL1]PrivLevelSerialChannel -->
<ipmi15:PrivilegeLevelLimit>Admin</ipmi15:PrivilegeLevelLimit>
<!-- [LAN::CHANNEL1]SOLBaudRate -->
<imm:SOLbitrate>57600</imm:SOLbitrate>
<!-- [LAN::CHANNEL1]SOLNumberOfRetries -->
<imm:SOLRetryCount>5</imm:SOLRetryCount>
<!-- [LAN::CHANNEL1]SOLRetryInterval -->
<imm:SOLRetryInterval>255</imm:SOLRetryInterval>
</imm:SOLConfigurationV001>
</bmccfg:ChannelV001>
<bmccfg:ChannelV001 channelNo="3" UUID="3CB2F383-BF03-4a28-B44A-5E6307A60F73">
<bmccfg:ChannelSettingsV001 UUID="97DC9363-9B8D-4ca0-A9C3-5B96D0688966">
<ipmi15:enablePEFAlerting>false</ipmi15:enablePEFAlerting>
<ipmi15:AccessModeForIPMIMessaging>Disabled</ipmi15:AccessModeForIPMIMessaging>
<ipmi15:ChannelPrivilegeLimit>Admin</ipmi15:ChannelPrivilegeLimit>
</bmccfg:ChannelSettingsV001>
<bmccfg:LANConfigurationV001 UUID="6A467E4D-D3DD-4094-8902-6894C2CF08C6">
<ipmi15:IPAddressSource>Static</ipmi15:IPAddressSource>
<ipmi15:IPAddress>128.128.0.1</ipmi15:IPAddress>
<ipmi15:SubnetMask>255.255.0.255</ipmi15:SubnetMask>
<ipmi15:MacAddress>AE-DF-ED-DE-12-12</ipmi15:MacAddress>
<ipmi15:DefaultGateway>128.128.0.2</ipmi15:DefaultGateway>
<ipmi15:DefaultGatewayMacAddress>AE-ED-DE-FA-12-12</ipmi15:DefaultGatewayMacAddress>
Revision 3.0
69
Page 78

IBM® Carrier Grade Server X3650 T
<ipmi15:BackupGateway>128.128.0.4</ipmi15:BackupGateway>
<ipmi15:BackupGatewayMacAddress>32-23-DF-FD-EA-CC</ipmi15:BackupGatewayMacAddress>
<ipmi15:CommunityString/>
<bmccfg:LANAlertDestinationV001 UUID="7533A810-6A48-4b2f-9B6C-3E4E310FBDC2">
<ipmi15:AlertIPAddress>128.128.0.3</ipmi15:AlertIPAddress>
<ipmi15:AlertMacAddress>AE-ED-DE-FA-12-12</ipmi15:AlertMacAddress>
</bmccfg:LANAlertDestinationV001>
</bmccfg:LANConfigurationV001>
<imm:HTTPConfigurationV001 UUID="3EAEBFFB-9328-40fc-8771-998C13F630E4">
<imm:ServerType>https</imm:ServerType>
<!-- [ADVANCED]HTTP -->
<imm:enableHTTP>true</imm:enableHTTP>
<!-- [ADVANCED]HTTPPort -->
<imm:ServerPort>4232</imm:ServerPort>
</imm:HTTPConfigurationV001>
<imm:TELNETConfigurationV001 UUID="BAB62487-9B9F-459d-9B65-E16E5E4FD264">
<!-- [ADVANCED]Telnet -->
<imm:enableTelnet>false</imm:enableTelnet>
<!-- [ADVANCED]TelnetPort -->
<imm:TelnetPort>23</imm:TelnetPort>
</imm:TELNETConfigurationV001>
<imm:KVMConfigurationV001 UUID="49F8CC73-E1F0-44c1-A7F1-0623A79ABD82">
<!-- [ADVANCED]KVM -->
<imm:enableKVM>true</imm:enableKVM>
</imm:KVMConfigurationV001>
<imm:SNMPConfigurationV001 UUID="FDB6EBC6-CF11-4020-BF59-2EF3E9A84192">
<!-- [ADVANCED]SNMP -->
<imm:enableSNMP>false</imm:enableSNMP>
<!-- [ADVANCED]SNMPPort -->
<imm:UDPPort>80</imm:UDPPort>
</imm:SNMPConfigurationV001>
</bmccfg:ChannelV001>
<bmccfg:ChannelV001 channelNo="4" UUID="3CB2F383-BF03-4a28-B44A-5E6307A60F73">
<bmccfg:ChannelSettingsV001 alias="ChannelSetting" UUID="97DC9363-9B8D-4ca0-A9C35B96D0688966">
<!-- [EMP]PEPAlertMode -->
<ipmi15:enablePEFAlerting>true</ipmi15:enablePEFAlerting>
<!-- [EMP]AccessMode -->
<ipmi15:AccessModeForIPMIMessaging>Always Available</ipmi15:AccessModeForIPMIMessaging>
<!-- [EMP]PrivLevelLimit -->
<ipmi15:ChannelPrivilegeLimit>Admin</ipmi15:ChannelPrivilegeLimit>
</bmccfg:ChannelSettingsV001>
<ipmi15:SerialConfigurationV001 alias="SerialModemConfiguration" UUID="E371D92A-16B6-48d5-A998A3410D99D86B">
<ipmi15:MessagingSettingsV001 alias="MessagingSettings" UUID="A5F239DE-F171-4937-9B05938EC62DABB3">
<bmccfg:SerialConnectionModeV001 alias="SerialConnectionMode" UUID="5C16EA92-70DA-4c1f9BB6-64E94E024DA5">
<!-- [EMP]ConnectionMode -->
<ipmi15:ConnectionMode>Modem</ipmi15:ConnectionMode>
</bmccfg:SerialConnectionModeV001>
<bmccfg:ModemSettingsV001 alias="ModemSettings" UUID="3F74BB74-084E-488e-8911BA5EAC554303">
<!-- [EMP]ModemRingTime -->
<ipmi15:ModemRingDuration>0</ipmi15:ModemRingDuration>
<!-- [EMP]ModemInitString -->
<ipmi15:ModemInitString>ATE1Q0v1x4&s0s0=0</ipmi15:ModemInitString>
<!-- [EMP]EscapeSequence -->
<ipmi15:ModemEscapeSequence>+++</ipmi15:ModemEscapeSequence>
<!-- [EMP]HangupString -->
<ipmi15:ModemHangupSequence>ATH</ipmi15:ModemHangupSequence>
<!-- [EMP]ModemDialCommand -->
<ipmi15:ModemDialCommand>ATDT</ipmi15:ModemDialCommand>
<!-- [EMP]SystemPhoneNumber -->
<bmccfg:SystemPhoneNumber>800-555-1212</bmccfg:SystemPhoneNumber>
</bmccfg:ModemSettingsV001>
Revision 3.0
70
Page 79

IBM® Carrier Grade Server X3650 T
</ipmi15:MessagingSettingsV001>
<ipmi15:AlertSettingsV001 alias="AlertSettings" UUID="9269EE1B-07AE-474f-9A78F6DD6D8D2CA0">
<!-- [EMP]BlackoutPeriod -->
<ipmi15:PageBlackoutInterval>0</ipmi15:PageBlackoutInterval>
</ipmi15:AlertSettingsV001>
</ipmi15:SerialConfigurationV001>
</bmccfg:ChannelV001>
<!-- [USERS::USER1] -->
<!-- [USERS::USER2] -->
<!-- [USERS::USER3] -->
<!-- [USERS::USER4] -->
<!-- [USERS]NumberOfUsers=4 -->
<bmccfg:UserSettingsV001 userNo="1" UUID="FEBD28B4-E0F5-41cf-9DB5-2156118CC1CA">
<!-- [USERS::USER1]Username -->
<ipmi15:UserName/>
<!-- [USERS::USER1]Password -->
<!-- [USERS::USER1]EncryptedPassword -->
<!-- [USERS::USER1]PasswordEncryptionId -->
<ipmi15:Password/>
<bmccfg:ChannelAccessV001 channelNo="1" UUID="33A948D9-B452-4b56-AAA4-3F050CD90CB2">
<!-- [USERS::USER1]Status -->
<ipmi15:enableUser>true</ipmi15:enableUser>
<!-- [USERS::USER1]PrivLimitLanChannel1 -->
<ipmi15:PrivilegeLevelLimit>Admin</ipmi15:PrivilegeLevelLimit>
</bmccfg:ChannelAccessV001>
<bmccfg:ChannelAccessV001 channelNo="3" UUID="33A948D9-B452-4b56-AAA4-3F050CD90CB2">
<!-- [USERS::USER1]Status -->
<ipmi15:enableUser>true</ipmi15:enableUser>
<!-- [USERS::USER1]PrivLimitAdvancedLanChannel -->
<ipmi15:PrivilegeLevelLimit>Admin</ipmi15:PrivilegeLevelLimit>
<!-- [USERS::USER1]TelnetEnable -->
<bmccfg:enableTelnet>true</bmccfg:enableTelnet>
<!-- [USERS::USER1]HTTPEnable -->
<bmccfg:enableHTTP>true</bmccfg:enableHTTP>
</bmccfg:ChannelAccessV001>
<bmccfg:ChannelAccessV001 channelNo="4" UUID="33A948D9-B452-4b56-AAA4-3F050CD90CB2">
<!-- [USERS::USER1]Status -->
<ipmi15:enableUser>true</ipmi15:enableUser>
<!-- [USERS::USER1]PrivLimitSerialChannel -->
<ipmi15:PrivilegeLevelLimit>Admin</ipmi15:PrivilegeLevelLimit>
</bmccfg:ChannelAccessV001>
</bmccfg:UserSettingsV001>
<imm:SMTPConfigurationV001 UUID="5975E674-5F99-4d12-989F-5CF8106E6554">
<!-- [ADVANCED]SMTPSenderMachineName -->
<imm:SendingSystemName>TelcoPower</imm:SendingSystemName>
<imm:SMTPConfigurationEntryV001 tableIndex="1" UUID="CC961998-5311-4f00-AA05-2BAD52EDDF68">
<!-- [ADVANCED]SMTPMailFrom -->
<imm:SMTPSendingAddr>TelcoPower@companyx.com</imm:SMTPSendingAddr>
<!-- [ADVANCED]SMTPMailTo -->
<imm:SMTPReceivingAddr>jane.doe@companyx.com</imm:SMTPReceivingAddr>
<!-- [ADVANCED]SMTPMailSubject -->
<imm:SMTPSubjectLine>TelcoPower has detected a fault</imm:SMTPSubjectLine>
</imm:SMTPConfigurationEntryV001>
</imm:SMTPConfigurationV001>
</bmccfg:IMMV001>
</config:ComponentSettings>
<config:ComponentSettings>
<config:ComponentKey>
<config:ComponentIdString>Intel-NIC-eeupdate-V001</config:ComponentIdString>
</config:ComponentKey>
<?SysCon root="NicUpdate:NICV001" handler="NicUpdate.NICV001" path="./sysconenv/data/vendor/Intel"?>
<Nic:NICV001 UUID="21F2F4A2-F629-4b11-A71B-5C8535D68E94"
xmlns:Nic="http://developer.intel.com/software/XML/2005/NicSchema">
<!-- The MAC address for a "Dual Port" NIC is the first of the 2 consecutive MAC addresses for the NIC -->
Revision 3.0
71
Page 80

IBM® Carrier Grade Server X3650 T
<!-- Setting MAC addresses must be done with great care to ensure that duplicate MAC addresses are not the
same subnet -->
<Nic:OptionsV001 instance="1" description="Intel(R) PRO/1000 MT Dual Port Server Adapter"
UUID="22965F9B-FEE5-4407-9051-4E46D907E60B">
<!-- Valid MAC adress in the form xx-xx-xx-xx-xx-xx -->
<Nic:MAC>AE-DF-ED-DE-12-12</Nic:MAC>
</Nic:OptionsV001>
<Nic:OptionsV001 instance="3" description="Intel(R) PRO/100+ Dual Port Server Adapter" UUID="22965F9BFEE5-4407-9051-4E46D907E60B">
<!-- Valid MAC adress in the form xx-xx-xx-xx-xx-xx -->
<Nic:MAC>AE-DF-ED-DE-12-14</Nic:MAC>
</Nic:OptionsV001>
<Nic:OptionsV001 instance="5" description="Intel(R) PRO/100+ Dual Port Server Adapter" UUID="22965F9BFEE5-4407-9051-4E46D907E60B">
<!-- Valid MAC adress in the form xx-xx-xx-xx-xx-xx -->
<Nic:MAC>AE-DF-ED-DE-12-16</Nic:MAC>
</Nic:OptionsV001>
<Nic:OptionsV001 instance="7" description="Intel(R) PRO/1000 MT Dual Port Network Connectio"
UUID="22965F9B-FEE5-4407-9051-4E46D907E60B">
<!-- Valid MAC adress in the form xx-xx-xx-xx-xx-xx -->
<Nic:MAC>AE-DF-ED-DE-12-18</Nic:MAC>
</Nic:OptionsV001>
<Nic:OptionsV001 instance="9" description="Intel(R) PRO/100 S Server Adapter" UUID="22965F9B-FEE54407-9051-4E46D907E60B">
<!-- Valid MAC adress in the form xx-xx-xx-xx-xx-xx -->
<Nic:MAC>AE-DF-ED-DE-12-1A</Nic:MAC>
</Nic:OptionsV001>
<Nic:OptionsV001 instance="10" description="Intel(R) PRO/100 S Server Adapter" UUID="22965F9B-FEE54407-9051-4E46D907E60B">
<!-- Valid MAC adress in the form xx-xx-xx-xx-xx-xx -->
<Nic:MAC>AE-DF-ED-DE-12-1B</Nic:MAC>
</Nic:OptionsV001>
</Nic:NICV001>
</config:ComponentSettings>
</config:Settings>
15.3 System / Component Schema
The SysCon feature depends on vendor-provided XML schema files (*.xsd files) to describe the
parameters and settings values for those parameters. These files are stored on the SysCon device (see
APPENDIX A – SysCon Environment Folder Structure
schema files document the allowable values for each parameter of the component referenced.
The following sections correspond to schema files provided by the base SysCon feature. Each table
contains element names of the schema that are user-configurable and the allowable values for each of
the elements.
IBM provides XML schema files for IBM server components that are configured by the SysCon feature.
For detailed descriptions of the component settings described in IBM XML settings files, please see the
following Intel documentation:
®
Intel
Server Board SE7520JR2 BIOS External Product Specification
®
Intel
Server Board SE7520JR2 Baseboard Management Controller External Product
Specification
®
Intel
Management Module Firmware Core External Product Specification
DOS-based Save and Restore System Configuration Utility, Version 1.0
for the location of these schema files). The XML
Revision 3.0
72
Page 81

IBM® Carrier Grade Server X3650 T
15.3.1 syscfg:BIOSV001 Settings
Parameter List XML element name of parameter Allowable values or format
bios:CPUConfigurationV001 bios:ProcessorHyperThreadingEnable true, false
bios:ConsoleConfigurationV001
bios:BootSettingsConfigurationV001 bios:QuietBoot true, false
syscfg:BootDevicePriorityV001 bios:BootDeviceNumber 1 - 12
syscfg:BootHardDiskDrivesV001 bios:HardDiskDriveNumber 1 - 12
Boot device numbers and hard drive numbers must be known when the settings are applied because
they indicate the current positions in the boot order.
bios:RedirectionPort Disabled, Serial 1, Serial 2
bios:FlowControl
bios:BaudRate
bios:TerminalType PC-ANSI, VT100+, VT-UTF8
bios:UserPassword Valid BIOS password bios:SecurityV001
bios:AdministratorPassword Valid BIOS password
None, CTS/RTS, XON/XOFF,
CTS/RTS + CD
9600, 19200, 38400, 57600,
115200
15.3.2 bmccfg:IMMV001 Settings
Parameter List
bmccfg:ChannelV001 channelNo (attribute) 1,3,4
bmccfg:ChannelSettingsV001
bmccfg:LANConfigurationV001
imm:SOLConfigurationV001
imm:TELNETConfigurationV001 imm:enableTelnet true, false
XML element name of parameter
ipmi15:enablePEFAlerting true, false
ipmi15:AccessModeForIPMIMessaging
ipmi15:ChannelPrivilegeLimit User, Operator, Admin
ipmi15:IPAddressSource DHCP, Static
ipmi15:IPAddress ddd.ddd.ddd.ddd
ipmi15:SubnetMask ddd.ddd.ddd.ddd
ipmi15:MacAddress
ipmi15:DefaultGateway ddd.ddd.ddd.ddd
ipmi15:DefaultGatewayMacAddress xx-xx-xx-xx-xx-xx
ipmi15:BackupGateway ddd.ddd.ddd.ddd
ipmi15:BackupGatewayMacAddress xx-xx-xx-xx-xx-xx
ipmi15:CommunityString String up to 16 characters
ipmi15:AlertIPAddress ddd.ddd.ddd.ddd bmccfg:LANAlertDestinationV001
ipmi15:AlertMacAddress xx-xx-xx-xx-xx-xx
imm:enableSOL true, false
ipmi15:PrivilegeLevelLimit User, Operator, Admin
imm:SOLbitrate 9600, 19200, 38400,
imm:SOLRetryCount 0-7
imm:enableHTTP true, false imm:HTTPConfigurationV001
imm:ServerPort 1 – 65535
Allowable values or
Always Available,
Disabled
xx-xx-xx-xx-xx-xx
channelNo ="3" only
57600, 115200
format
Revision 3.0
73
Page 82

IBM® Carrier Grade Server X3650 T
Parameter List
imm:KVMConfigurationV001 imm:enableKVM true, false
bmccfg:SerialConnectionModeV001 ipmi15:ConnectionMode Modem, Direct
bmccfg:ModemSettingsV001
ipmi15:AlertSettingsV001 ipmi15:PageBlackoutInterval 0-255
bmccfg:UserSettingsV001
bmccfg:ChannelAccessV001
imm:SMTPConfigurationV001 <imm:SendingSystemName Up to 64 characters
imm:SMTPConfigurationEntryV001
XML element name of parameter
imm:TelnetPort 1 – 65535
imm: enableSNMP true, false imm:SNMPConfigurationV001
imm: UDPPort 1 – 65535
ipmi15:ModemRingDuration 0-63
ipmi15:ModemInitString Up to 32 characters
ipmi15:ModemEscapeSequence Up to 4 characters
ipmi15:ModemHangupSequence Up to 8 characters
ipmi15:ModemDialCommand Up to 8 characters
bmccfg:SystemPhoneNumber
userNo (attribute) 0-4
ipmi15:UserName Up to 16 characters
ipmi15:Password Up to 16 characters
bmccfg:EncryptedPassword bmccfg encryption data
bmccfg:PasswordEncryptionId bmccfg encryption data
channelNo (attribute) 1,3,4
ipmi15:enableUser true, false
ipmi15:PrivilegeLevelLimit User, Operator, Admin
bmccfg:enableTelnet true, false
bmccfg:enableHTTP true, false
imm:SMTPSendingAddr Up to 64 characters
imm: SMTPReceivingAddr Up to 64 characters
imm: SMTPSubjectLine Up to 64 characters
Allowable values or
format
Numeric string of 32
bytes. '.','-'and ''
15.3.3 Nic:NICV001 Settings
Parameter List XML element name of parameter Allowable values or format
Nic:OptionsV001
The ‘Intel-NIC-eeupdate-V001’ parameter manages the MAC addresses for Intel Ethernet
controllers. Because duplicate MAC addresses on a subnet can cause serious network problems, the
component is disabled by default. This component must be used with great care to ensure that duplicate
MAC addresses do not appear on the same subnet. Using this component in conjunction with SysCon is
safe as long as the there is no attempt to change the MAC addresses and no Intel NICs are added or
removed. The primary reason for including the component is to enable the transfer of MAC address to a
replacement NIC or a replacement system. To enable the component to transfer MAC addresses to a
replacement NIC or a replacement system, simply remove the XML comment lines around the
Revision 3.0
74
instance (attribute)
description (attribute)
bios: MAC xx-xx-xx-xx-xx-xx
No. of the NIC or Dual Port NIC in
the system
Branding string found in the
EERPOM for the Intel Network
Interface Controller
Page 83

IBM® Carrier Grade Server X3650 T
config:SystemComponentSpecification element for the Intel-NIC-eeupdate-V001
component in the sysconenv/data/vendor/SystemSpecs.xml file.
15.4 Updating BIOS and Intel® Management Module firmware
The fsysconenv/data/vendor/Intel/SE7520JR23components.xml file contains the Intel
component type specifications. The BIOS and Intel
match the installed BIOS and Intel
®
Management Module firmware versions. The new version, if
®
Management Module component attributes must
compatible, is added to the list of compatible versions for the component.
15.4.1 Intel:BIOSVersion update example
<?SysCon root="Intel:BIOSAttributesV002" handler="bioscfg.BIOSAttributesV002"
methods="bioscfg.bioscfgMethods" path="./sysconenv/data/vendor/Intel"?>
<Intel:BIOSAttributesV002 UUID="C7C39FF7-236F-4302-B89E-08AD7CA89C05"
xmlns:Intel="http://developer.intel.com/software/XML/2004/IntelSystemsSchema">
<config:Version>
<config:label>BIOS version 09.00</config:label>
<config:token>09.00</config:token>
</config:Version>
<config:Version>
<config:label>BIOS version 09.10</config:label>
<config:token>09.10</config:token>
</config:Version>
<config:Vendor>
<config:label>Intel Corporation</config:label>
<config:token>Intel</config:token>
</config:Vendor>
</Intel:BIOSAttributesV002>
15.4.2 Intel:IMMVersion update example
<?SysCon root="Intel:IMMAttributesV001" handler="bmccfg.IMMAttributesV001"
methods="bmccfg.bmccfgMethods" path="./sysconenv/data/vendor/Intel"?>
<Intel:IMMAttributesV001 UUID="9A61D272-ADF1-4fc5-A325-A6AFEF19F704"
xmlns:Intel="http://developer.intel.com/software/XML/2004/IntelSystemsSchema">
<Intel:Vendor>Intel</Intel:Vendor>
<Intel:IMMVersion>0.46</Intel:IMMVersion>
<Intel:IMMVersion>0.47</Intel:IMMVersion>
<Intel:IMMVersion>2e.48</Intel:IMMVersion>
<Intel:IMMVersion>0.48</Intel:IMMVersion>
<Intel:IMMVersion>0.49</Intel:IMMVersion>
<Intel:IMMVersion>0.50</Intel:IMMVersion>
</Intel:IMMAttributesV001>
Revision 3.0
75
Page 84

IBM® Carrier Grade Server X3650 T
16. APPENDIX D – SysCon Log File Format
The SysCon Device log file format is defined in elements contained in the SysCon “syscon.xsd” policy
schema file. An example SysCon log file is provided below:
<?xml version="1.0" encoding="UTF-8"?>
<syscon:log xmlns:config="http://developer.intel.com/software/XML/2004/ConfigSchema"
xsi:schemaLocation="http://developer.intel.com/software/XML/2004/ConfigSchema ../../vendor/SystemsComponents.xsd"
xmlns:syscon="http://developer.intel.com/software/XML/2004/SysConSchema"
xmlns:xsi="http://www.w3.org/2001/XMLSchema-instance">
<config:System>
<config:SystemName>thisSystem</config:SystemName>
<config:SystemAttributes SyncDateTime="2005-12-14T09:10:06>
<config:ComponentKey>
<config:ComponentIdString>Intel-X3650 T-SE7520JR23</config:ComponentIdString>
</config:ComponentKey>
<?SysCon root="Intel:SystemAttributesV001" handler="Intel.SystemAttributesV001"
path="./sysconenv/data/vendor/Intel"?>
<Intel:SystemAttributesV001 UUID="FF992C88-3DD8-475b-9233-C168E5DC6442"
xmlns:Intel="http://developer.intel.com/software/XML/2004/IntelSystemsSchema">
<Intel:Vendor>Intel</Intel:Vendor>
<Intel:SystemType>X3650 T</Intel:SystemType>
<Intel:SystemBaseboardType>SE7520JR23</Intel:SystemBaseboardType>
<Intel:SystemBaseboardUUID>7b3d1105-08c5-11d7-a0a5-000423b574c6</Intel:SystemBaseboardUUID>
</Intel:SystemAttributesV001>
</config:SystemAttributes>
</config:System>
<syscon:eventSet>
<syscon:event level="INFO" module="config.SystemSpecification" date="2005-12-14T09:08:30">
<syscon:message>System Type detected: Intel-X3650 T-SE7520JR23</syscon:message>
</syscon:event>
<syscon:event level="INFO" module="syscfg.BIOSAttributesV001" date="2005-12-14T09:08:49">
<syscon:message>BIOS version discovered from SMBIOS is 09.00</syscon:message>
</syscon:event>
<syscon:event level="INFO" module="config.ComponentSpecification" date="2005-12-14T09:08:49">
<syscon:message>Component Intel-BIOS-syscfg-V001 found on system</syscon:message>
</syscon:event>
<syscon:event level="INFO" module="bmccfg.IMMAttributesV001" date="2005-12-14T09:09:04">
<syscon:message>IMM firmware version is 0.50</syscon:message>
</syscon:event>
<syscon:event level="INFO" module="config.ComponentSpecification" date="2005-12-14T09:09:04">
<syscon:message>Component Intel-IMM-bmccfg-V001 found on system</syscon:message>
</syscon:event>
<syscon:event level="INFO" module="config.ComponentSpecification" date="2005-12-14T09:09:46">
<syscon:message>Captured settings to fs2:\sysconenv\data\config\thisSystem\current\Intel-BIOS-syscfgV001.scf</syscon:message>
</syscon:event>
<syscon:event level="INFO" module="config.ComponentSpecification" date="2005-12-14T09:10:02">
<syscon:message>Captured settings to fs2:\sysconenv\data\config\thisSystem\current\Intel-IMM-bmccfgV001.ini</syscon:message>
</syscon:event>
</syscon:eventSet>
</syscon:log>
Revision 3.0
76
Page 85

IBM® Carrier Grade Server X3650 T
17. APPENDIX E – POSIX Logging API and Query
Specification for SysCon
17.1 Logging Functions
17.1.1 Write to the Log
Function: syscon_log_write()
17.1.1.1 Synopsis
#include <syscon.h>
int syscon_log_write(syscon_log_event_type_t event_type, int event_type,
syscon_log_severity_t severity, const void *buf, size_t len,
int format);
17.1.1.2 Description
The syscon_log_write() function writes an event record to the syscon event log. The syscon_log_write()
succeeds in writing a complete log record or it leaves the system log unchanged. The event record
consists of a syscon_log_entry structure (or an implementation-defined object that includes the members
of struct syscon_log_entry) and a copy of the data (if any) referenced by the buf argument.
The event record’s log_size member shall be set to the value of the len argument, or to zero if buf is
NULL. The len argument specifies the length in bytes of the data referenced by buf. If buf is NULL, or
the len argument is zero, then only the syscon_log_entry structure is included in the event record.
If the value of len is greater than {SYSCONLOG_ENTRY_MAXLEN} and buf is not NULL, the result of
the syscon_log_write() shall be as follows:
• If {SYSCONLOG_TRUNCATE} is not defined by the implementation, syscon_log_write() shall fail.
• Otherwise, syscon_log_write() will set the {SYSCONLOG_TRUNCATE} flag in the event record’s
log_flags member, the event record’s log_size member will be set to
{SYSCONLOG_ENTRY_MAXLEN}, and only the first {SYSCONLOG_ENTRY_MAXLEN} bytes of the
data pointed to by buf will be included in the data portion of the event record. If the value of the
format argument is {SYSCONLOG_STRING}, a null character will be stored at the end of the data
portion of the record, so that the truncated string is null-terminated.1
If buf is NULL, or the len argument is zero, the event record's log_format member will be set to
{SYSCONLOG_NODATA}; otherwise, the event record's log_format member will be set to the value of
the format argument. The interpretation of this value will be implementation-defined, with the following
exception:
A format of {SYSCONLOG_STRING} shall indicate that buf points to a null-terminated character string
whose length in bytes (including the terminating null character) is len.
The event_type argument identifies the type of event record being written. Its value and interpretation are
left to the application or the implementation. The event record’s log_event_type member shall be set to
the value of the event_type argument.
1
Note, however, that the implementation is not permitted to accomplish this by setting
buf[SYSCONLOG_ENTRY_MAXLEN-1] to the null character, since buf points to a const buffer.
Revision 3.0
77
Page 86

IBM® Carrier Grade Server X3650 T
The event_type argument indicates the event type that is logging the event. The event record’s
log_event_type member shall be set to the value of the event_type argument. The value of the
event_type argument shall be a valid log event type or the syscon_log_write() function shall fail.
The severity argument indicates the severity level of the event record. The event record’s log_severity
member shall be set to the value of the severity argument. The value of the severity argument shall be
one of the severity levels defined in <syscon.h>, or the syscon_log_write() function shall fail.
The event record’s log_uid member shall be set to the effective user-ID of the calling process. The event
record’s log_gid member shall be set to the effective group-ID of the calling process. The event record’s
log_pid member shall be set to the process ID of the calling process. The event record’s log_pgrp
member shall be set to the process-group ID of the calling process. The event record’s log_time member
shall be set to the time of the call to syscon_log_write(). (If {_POSIX_TIMERS} is defined, this shall be
the current value of the CLOCK_REALTIME clock.)
The event record’s log_recid member shall be set to an implementation-defined value that uniquely
identifies this event record in the active system log.
If one or more processes have registered (via the syscon_log_notify_add() function) to be notified of new
events, it is up to the implementation whether those notifications occur before or after control returns from
the syscon_log_write() function.
Note that there is no need to “open” the system log before writing to it with syscon_log_write().
17.1.1.3 Returns
Upon successful completion, the syscon_log_write() function shall return zero. Otherwise an error
number shall be returned to indicate the error.
17.1.1.4 Errors
If any of the following conditions occur, the syscon_log_write() function shall return the corresponding
error number:
• [EINVAL]: The event_type argument is not a valid log event type.
• [EINVAL]: The severity argument is invalid.
• [EINVAL]: The format argument is invalid.
• [EMSGSIZE]: The len argument exceeds {SYSCONLOG_ENTRY_MAXLEN} length, and
{SYSCONLOG_TRUNCATE} is not defined by the implementation.
• [EBADMSG]: The format argument is equal to {SYSCONLOG_STRING}, but buf does not point
to a null-terminated string whose length is len bytes.
• [ENOSPC]: The log has run out of space.
• [EIO]: An I/O error occurred in writing to the system log.
Revision 3.0
78
Page 87

IBM® Carrier Grade Server X3650 T
For each of the following conditions, if the condition is detected, the syscon_log_write() function shall
return the corresponding error number:
• [EPERM]: The caller does not have the appropriate implementation-defined privilege for writing
with the given event type. For example, an application whose effective user ID is not root has
attempted to log an event with a reserved event_type code.
• [ECANCELED]: The event-logging system has declined to log this event, for some
implementation-defined reason. For example, this event is a duplicate of another recently logged
event, or the event-logging system has been configured to screen out events such as this one.
17.1.1.5 Cross-References
write(), Clocks and CLOCK_REALTIME, getpid(), geteuid(), getegid(), getpgrp()
17.1.2 Write Formatted String to Log
Function: syscon_log_printf()
17.1.2.1 Synopsis
#include <syscon.h>
int syscon_log_printf(syscon_log_event_type_t event_type, int event_type,
syscon_log_severity_t severity, const char *format, ...);
17.1.2.2 Description
The call
syscon_log_printf(fac, type, sev, format, args);
where args is a set of zero or more comma-separated arguments, is equivalent to the following code:
char buf[SYSCONLOG_ENTRY_MAXLEN];
sprintf(buf, format, args);
syscon_log_write(fac, type, sev, buf, strlen(buf)+1, SYSCONLOG_STRING);
If the implied call to sprintf() would create a string whose length (including terminating null character) is
greater than SYSCONLOG_ENTRY_MAXLEN, the behavior of syscon_log_printf() is undefined.
17.1.2.3 Returns
Upon successful completion, the syscon_log_printf() function shall return zero. Otherwise an error
number shall be returned to indicate the error.
Revision 3.0
79
Page 88

IBM® Carrier Grade Server X3650 T
17.1.2.4 Errors
If any of the following conditions occur, the syscon_log_printf() function shall return the corresponding
error number:
• [EINVAL]: The event_type argument is invalid, or the severity argument is invalid.
• [EINVAL]: The format argument is NULL.
• [ENOSPC]: The log has run out of space.
• [EIO]: An I/O error occurred in writing to the system log.
For each of the following conditions, if the condition is detected, the syscon_log_printf() function shall
return the corresponding error number:
• [EPERM]: See the description of the [EPERM] error condition under syscon_log_write().
• [ECANCELED]: See the description of the [ECANCELED] error condition under
syscon_log_write().
17.2 Log Processing Functions
17.2.1 Open an Event Log for Read Access
Function: syscon_log_open()
17.2.1.1 Synopsis
#include <syscon.h>
int syscon_log_open(syscon_logd_t *logdes, const char *path);
17.2.1.2 Description
The syscon_log_open() function establishes a connection between an event log and a log descriptor.
The log descriptor is used by other log functions to refer to that log. The path argument points to a
pathname, naming a log file. A path argument of NULL specifies the active system log.
The read pointer associated with this log descriptor is set to the beginning of the log.
17.2.1.3 Returns
Upon successful completion, syscon_log_open() shall open the specified event log and store a log
descriptor into the location pointed to by logdes, and return zero. Otherwise, an error number shall be
returned to indicate the error.
17.2.1.4 Errors
If any of the following conditions occur, the syscon_log_open() function shall return the corresponding
error number:
Revision 3.0
80
Page 89

IBM® Carrier Grade Server X3650 T
• [EACCES]: Search permission is denied on a component of the path prefix, or the log file exists
and read permission is denied.
• [EINVAL]: The path argument refers to a file that is not a log file.
• [EMFILE]: The calling process already has {SYSCONLOG_OPEN_MAX} log descriptors open, or
a per-process limit on resources such as file descriptors would be exceeded by this call.
• [ENAMETOOLONG]: The length of the path string exceeds {PATH_MAX}, or a pathname
component is longer than {NAME_MAX} while {_POSIX_NO_TRUNC} is in effect.
• [ENFILE]: An implementation-defined, system-wide limit on log descriptors, file descriptors, or
other such resources would be exceeded by this call.
• [ENOENT]: The file specified by the path argument does not exist.
• [ENOTDIR]: A component of the path prefix is not a directory.
• [EPERM]: The caller does not have the appropriate implementation-defined permission to read
from the specified log file.
• [EBUSY]: The active system log is temporarily unavailable due to maintenance activity.
17.2.1.5 Cross-References
open()
17.2.2 Read from an Event Log
Function: syscon_log_read()
17.2.2.1 Synopsis
#include <syscon.h>
int syscon_log_read(syscon_logd_t logdes, struct syscon_log_entry *entry,
void *log_buf, size_t log_len);
17.2.2.2 Description
The syscon_log_read() function shall read the event record at the read pointer associated with log
descriptor logdes, from the log file associated with logdes. syscon_log_read() shall copy the event
record's syscon_log_entry structure into the buffer pointed to by entry, and the record's variable-length
data into the buffer pointed to by log_buf.
If the log_buf argument is NULL or the log_len argument is zero, no data shall be copied to the log_buf
buffer. Otherwise, n bytes of the variable portion of the event record shall be copied to the log_buf buffer,
where n is the smaller of log_len and the event record’s log_size member. The value of entry->log_size
shall be set to the value of the event record’s log_size member, no matter how many bytes are copied to
log_buf.
A successful call to syscon_log_read() shall advance the read pointer associated with logdes to the next
event record following the one read (or to the end of the log, if there is no next record).
17.2.2.3 Returns
Upon successful completion, syscon_log_read() shall return zero. Otherwise, an error number shall be
returned to indicate the error, the read pointer shall remain unchanged, and the data pointed to by entry
and log_buf shall be undefined.
Revision 3.0
81
Page 90

IBM® Carrier Grade Server X3650 T
17.2.2.4 Errors
If any of the following conditions occur, the syscon_log_read() function shall return the corresponding
error number:
• [EINVAL]: The logdes argument is not a valid log descriptor (as returned by the syscon_log_open()
function), or the entry argument is NULL.
• [EAGAIN]: The read pointer associated with logdes is at the end of the log. A subsequent read at this
same read pointer will succeed only after one or more new events are logged, and only if logdes
references the active system log.
• [EIO]: An I/O error occurred in reading from the event log.
17.2.2.5 Cross-References
read(), syscon_log_open()
17.2.3 Notify Process of Availability of System Log Data
Functions: syscon_log_notify_add(), syscon_log_siginfo_recid(), syscon_log_sigval_recid(),
syscon_log_notify_get()
17.2.3.1 Synopsis
#include <signal.h>
#include <syscon.h>
int syscon_log_notify_add(const syscon_log_query_t *query,
const struct sigevent *notification, int flags,
syscon_log_notify_t *nfyhandle);
int syscon_log_siginfo_recid(const siginfo_t *info, void *context,
syscon_log_recid_t *recid);
int syscon_log_sigval_recid(union sigval sval, syscon_log_recid_t *recid);
int syscon_log_notify_get(syscon_log_notify_t nfyhandle,
struct sigevent *notification, int *flags, char *qsbuf,
size_t qslen, size_t *reqlen);
17.2.3.2 Description
17.2.3.2.1 syscon_log_notify_add()
The syscon_log_notify_add() function registers the calling process to be notified of event records
received by the system log that match the query parameters associated with the query object pointed to
by query. If the query argument is NULL, all newly received events shall be considered to match. When
the system log receives a matching event, the notification specified by the notification argument shall be
sent to the calling process.
If the nfyhandle argument is not NULL, syscon_log_notify_add() shall store an object of type
syscon_log_notify_t to the location pointed to by nfyhandle. This object can be used when removing this
notification request via the syscon_log_notify_remove() function. Subsequent to this
syscon_log_notify_add() call, changes to the query object pointed to by query shall have no effect on this
notification request, and removal of this notification request shall have no effect on the query object.
If query is not NULL and the indicated query object’s purpose code does not include the
{SYSCONLOG_PRPS_NOTIFY} flag, the syscon_log_notify_add() function shall fail.
Revision 3.0
82
Page 91

IBM® Carrier Grade Server X3650 T
The flags argument shall be the bitwise OR of zero or more of the following three flags. These flags
(along with SYSCONLOG_NFY_DISABLED, (which may be returned by syscon_log_notify_get()) shall
be defined in <syscon.h>.
SYSCONLOG_ONCE_ONLY: If this flag is zero, the specified notification request shall remain in effect
until it is removed (via the syscon_log_notify_remove() function, or when the process execs or
terminates) or disabled. If this flag is set, the notification request shall be automatically disabled
(suppressing further notifications associated with that request) as soon as the first associated notification
is sent. Since a disabled request is of no further use, the application should remove it at some later time
to make room under the {SYSCONLOG_NOTIFY_MAX} limit (explained later in this section) for other
notification requests.
SYSCONLOG_SEND_RECID and SYSCONLOG_SEND_SIGVAL: These flags determine what value(s)
shall be made available to the function that handles delivery of an event notification. This function can be
either a signal-catching function (if the value of notification->sigev_notify is equal to SIGEV_SIGNAL) or
the start_routine of a new thread (if the value of notification->sigev_notify is equal to SIGEV_THREAD).
If SYSCONLOG_SEND_RECID is set, then the notification-handling function shall be able to obtain the
record ID of the event associated with the current notification:. A signal-catching function would call
syscon_log_siginfo_recid() to obtain this value, and a new thread’s start_routine would call
syscon_log_sigval_recid().
If SYSCONLOG_SEND_SIGVAL is set, the value of notification->sigev_value (at least the sival_int or
sival_ptr member) shall be available to the notification-handling function. This value shall be available
either as the si_value member of the siginfo_t object that is passed to a signal-catching function, or as the
sigval object that is passed to a new thread’s start_routine.
If neither SYSCONLOG_SEND_RECID nor SYSCONLOG_SEND_SIGVAL is set,
syscon_log_notify_add() shall behave as if SYSCONLOG_SEND_SIGVAL were set (and
SYSCONLOG_SEND_SIGVAL will be set in the flags returned by syscon_log_notify_get()). Whether
both these flags can be set is implementation-defined, and may depend on whether notification-
>sigev_notify is equal to SIGEV_SIGVAL or SIGEV_THREAD.
17.2.3.2.2 Delivery of Notification
If the value of notification->sigev_notify is equal to SIGEV_SIGNAL, the value of the si_code member of
the siginfo_t structure that is delivered to the signal-catching function shall be SI_EVLOG. The header
<syscon.h> shall define SI_EVLOG. It is not guaranteed that the value of SI_EVLOG shall be unique
among possible values for si_code. (For example, a switch statement that has cases for both SI_EVLOG
and SI_MESGQ might not compile.)
17.2.3.2.3 syscon_log_siginfo_recid()
The syscon_log_siginfo_recid() function shall store the record ID of the event record associated with the
current notification to the location pointed to by the recid argument. If the SYSCONLOG_SEND_RECID
flag is not set in the associated notification request, the value stored to recid shall be undefined.
This function is intended to be called from the signal-catching function that handles delivery of an event
notification. (In the associated notification request, notification->sigev_notify must be SIGEV_SIGNAL.)
The info and context arguments shall be equal to the info and context arguments of the signal-catching
function. The effect of calling syscon_log_siginfo_recid() under other circumstances shall be undefined.
Revision 3.0
83
Page 92

IBM® Carrier Grade Server X3650 T
17.2.3.2.4 syscon_log_sigval_recid()
The syscon_log_sigval_recid() function shall store the record ID of the event record associated with the
current notification to the location pointed to by the recid argument. If the SYSCONLOG_SEND_RECID
flag is not set in the associated notification request, the value stored to recid shall be undefined.
This function is intended to be called from the new thread that handles delivery of an event notification.
(In the associated notification request, notification->sigev_notify must be SIGEV_THREAD.) The sval
argument of syscon_log_sigval_recid() shall be the sigval argument of that thread’s start_routine. The
effect of calling syscon_log_sigval_recid() under other circumstances shall be undefined.
17.2.3.2.5 syscon_log_notify_get()
The syscon_log_notify_get() function retrieves the parameters of the notification request associated with
the nfyhandle argument. A copy of the notification request’s sigevent structure shall be stored to the
location pointed to by the notification argument.
A copy of the notification request’s flags shall be stored to the location pointed to by the flags argument.
If the notification request is currently disabled, the SYSCONLOG_NFY_DISABLED flag shall be set.
syscon_log_notify_get() shall also store a textual query expression to the buffer pointed to by the qsbuf
argument; this expression (a null-terminated string) shall be functionally equivalent to the one that was
used to create the notification request’s query object. (If the notification request’s query object is NULL, a
null character shall be stored to qsbuf[0].) The buffer pointed to by qsbuf is assumed to be at least qslen
bytes long. If qsbuf is equal to NULL, or the buffer is too small to hold the returned character string, the
syscon_log_notify_get() function shall fail. In any case, if the reqlen argument is not NULL, the length in
bytes of the query expression shall be stored in the location pointed to by reqlen.
17.2.3.2.6 Notification Requests
A process may have up to {SYSCONLOG_NOTIFY_MAX} notification requests (including disabled
requests) registered at any one time. Registration (creation), disabling, or removal of one notification
request has no effect on other notification requests. When the system log receives a new event record,
all notification requests for a particular process are processed sequentially and independently. If a
process has more than one notification request that is matched by a particular event, then the notification
associated with each such notification request will be sent to the process.
Notifications shall not be sent before the associated event record has been added to the system log, and
is available for detection by syscon_log_seek() and reading by syscon_log_read().
17.2.3.3 Returns
Upon successful completion, these functions shall return zero. Otherwise, an error number shall be
returned to indicate the error. If syscon_log_notify_add() fails, the data pointed to by nfyhandle shall
remain unchanged. If syscon_log_siginfo_recid() or syscon_log_sigval_recid() fails, the data pointed to
by the recid argument shall remain unchanged. If syscon_log_notify_get() fails, the data pointed to by the
notification and query_string arguments shall remain unchanged.
Revision 3.0
84
Page 93

IBM® Carrier Grade Server X3650 T
17.2.3.4 Errors
If any of the following conditions occur, the syscon_log_notify_add() function shall return the
corresponding error number:
• [EINVAL]: The query argument is not NULL and does not point to a valid query object.
• [EINVAL]: The notification argument does not point to a valid sigevent object.
• [EAGAIN]: The process already has {SYSCONLOG_NOTIFY_MAX} notification requests
registered.
• [ENOTSUP]: The query object’s purpose code does not include the
{SYSCONLOG_PRPS_NOTIFY} flag.
• [ENOTSUP]: Both SYSCONLOG_SEND_RECID and SYSCONLOG_SEND_SIGVAL are set in
the flags argument, but the implementation cannot deliver both these values to the indicated
notification-handling function.
For each of the following conditions, if the condition is detected, the syscon_log_notify_add() function
shall return the corresponding error number:
• [EPERM]: The process does not have the appropriate implementation-defined privilege to receive
notification of the indicated class of events.
• If any of the following conditions occur, the syscon_log_siginfo_recid() function shall return the
corresponding error number:
• [EINVAL]: The info argument is NULL, or the recid argument is NULL.
• If any of the following conditions occur, the syscon_log_sigval_recid() function shall return the
corresponding error number:
• [EINVAL]: The recid argument is NULL.
• If any of the following conditions occur, the syscon_log_notify_get() function shall return the
corresponding error number:
• [EINVAL]: The nfyhandle argument is not a handle for a valid notification request.
• [EINVAL]: The notification argument is NULL, or the once_only argument is NULL, or the
disabled argument is NULL.
• [EMSGSIZE]: The qsbuf argument is NULL, or the buffer length (as specified by the qslen
argument) is insufficient to hold the returned character string.
17.2.3.5 Cross-References
Signal Generation and Delivery, Signal Actions, mq_notify(), Thread Creation,
syscon_log_query_create()
Revision 3.0
85
Page 94

IBM® Carrier Grade Server X3650 T
17.2.4 Remove Notification Request
Function: syscon_log_notify_remove()
17.2.4.1 Synopsis
#include <syscon.h>
int syscon_log_notify_remove(syscon_log_notify_t nfyhandle);
17.2.4.2 Description
The syscon_log_notify_remove() function shall remove the notification request, if any, associated with the
nfyhandle argument. The nfyhandle argument must be a valid syscon_log_notify_t object, as created by
a previous call to syscon_log_notify_add().
17.2.4.3 Returns
Upon successful completion, syscon_log_notify_remove() shall return zero. Otherwise, an error number
shall be returned to indicate the error.
17.2.4.4 Errors
If any of the following conditions occur, the syscon_log_notify_remove() function shall return the
corresponding error number:
[EINVAL]: The nfyhandle argument is not valid.
17.2.4.5 Cross-References
syscon_log_notify_add()
17.2.5 Close Event Log
Function: syscon_log_close()
17.2.5.1 Synopsis
#include <syscon.h>
int syscon_log_close(syscon_logd_t logdes);
17.2.5.2 Description
The syscon_log_close() function shall deallocate (i.e. make available for reuse by subsequent
syscon_log_open()s executed by the process) the open log descriptor indicated by logdes. This log
descriptor remains invalid unless and until it is reinitialized by a subsequent call to syscon_log_open().
17.2.5.3 Returns
Upon successful completion, syscon_log_close() shall return zero. Otherwise, an error number shall be
returned to indicate the error.
Revision 3.0
86
Page 95

IBM® Carrier Grade Server X3650 T
17.2.5.4 Errors
If any of the following conditions occur, the syscon_log_close() function shall return the corresponding
error number:
[EBADF]: The logdes argument is not a valid log descriptor.
17.2.5.5 Cross-References
close()
17.2.6 Reposition the Read Pointer
Function: syscon_log_seek()
17.2.6.1 Synopsis
#include <syscon.h>
int syscon_log_seek(syscon_logd_t logdes, const syscon_log_query_t *query,
int direction);
17.2.6.2 Description
The syscon_log_seek() function shall change the read pointer associated with the logdes log descriptor
to the position specified by the query and direction arguments, as described below. If the query argument
is equal to NULL, it is considered to match every record in the log.
The direction argument must be one of the seek directions listed in Table 1. Each seek direction shall be
a constant of type int. These seek directions shall be defined in the header <syscon.h>:
Table 1. Seek Directions
Name Description
SYSCONLOG_SEEK_START Set the read pointer to the beginning of the log.
SYSCONLOG_SEEK_END Set the read pointer to the end of the log.
SYSCONLOG_SEEK_FIRST Set the read pointer to point to the first event record that matches query
SYSCONLOG_SEEK_LAST Set the read pointer to point to the last event record that matches query
SYSCONLOG_SEEK_FORWARD Advance the read pointer to the next event record that matches query
SYSCONLOG_SEEK_BACKWARD Move the read pointer backward to the next event record that matches
query
If the direction argument is equal to SYSCONLOG_SEEK_START, the read pointer shall be set to the
beginning of the log (i.e., pointing to the first record, if any, in the event log). If the query argument is not
equal to NULL, syscon_log_seek() shall fail.
If the direction argument is equal to SYSCONLOG_SEEK_END, the read pointer shall be set to the end
of the log (i.e., after the last record, if any, in the event log). If the query argument is not equal to NULL,
syscon_log_seek() shall fail.
If the direction argument is equal to SYSCONLOG_SEEK_FIRST, then the read pointer shall be set to
point to the first record in the event log that matches query. If there is no matching record,
syscon_log_seek() shall fail.
Revision 3.0
87
Page 96

IBM® Carrier Grade Server X3650 T
If the direction argument is equal to SYSCONLOG_SEEK_LAST, then the read pointer shall be set to
point to the last record in the event log that matches query. If there is no matching record,
syscon_log_seek() shall fail.
If the direction argument is equal to SYSCONLOG_SEEK_FORWARD, the read pointer shall be
advanced (toward the end of the log) until it points to the next event record that matches query. If, before
the call to syscon_log_seek(), the read pointer already points to a record that matches query, the read
pointer shall remain unchanged.2 If there is no matching record between the current read pointer and the
end of the log, syscon_log_seek() shall fail.
If the direction argument is equal to SYSCONLOG_SEEK_BACKWARD, the read pointer shall be moved
backward (toward the beginning of the log) until it points to an event record that matches query. The read
pointer shall always be moved backward at least one record unless syscon_log_seek() fails. If there is
no matching record between the current read pointer and the beginning of the log, syscon_log_seek()
shall fail.
17.2.6.3 Returns
Upon successful completion, syscon_log_seek() shall return zero. Otherwise, an error number shall be
returned to indicate the error, and the read pointer associated with logdes shall remain unchanged.
17.2.6.4 Errors
If any of the following conditions occur, the syscon_log_seek() function shall return the corresponding
error number:
• [EINVAL]: The logdes argument is not a valid log descriptor.
• [EINVAL]: The direction argument is not a valid direction code.
• [EINVAL]: The query argument is not NULL, but does not point to a valid query object.
• [EINVAL]: The direction argument is equal to SYSCONLOG_SEEK_START or
SYSCONLOG_SEEK_END, but the query argument is not NULL.
• [ENOENT]: The direction argument is equal to SYSCONLOG_SEEK_FIRST or
SYSCONLOG_SEEK_LAST, but there is no matching record in the specified log.
• [ENOENT]: The direction argument is equal to SYSCONLOG_SEEK_FORWARD, but there is no
matching record in the specified log between the current pointer and the end.
• [ENOENT]: The direction argument is equal to SYSCONLOG_SEEK_BACKWARD, but there is
no matching record in the specified log between the current pointer and the beginning.
17.2.6.5 Cross-References
lseek(), syscon_log_query_create()
17.2.7 Compare Event Record Severities
Function: syscon_log_severity_compare()
2
In particular, syscon_log_seek(logdes, NULL, SYSCONLOG_SEEK_FORWARD), though permitted, shall never
advance the read pointer.
Revision 3.0
88
Page 97

IBM® Carrier Grade Server X3650 T
17.2.7.1 Synopsis
#include <syscon.h>
int syscon_log_severity_compare(int *order, syscon_log_severity_t s1,
syscon_log_severity_t s2);
17.2.7.2 Description
The syscon_log_severity_compare() function shall compare the severities of the s1 and s2 arguments. If
s1 is more severe than s2, then the integer pointed to by order shall be set to a positive value. If s1 is the
same severity as s2, then the integer pointed to by order shall be set to zero. Otherwise, the integer
pointed to by order shall be set to a negative value.
17.2.7.3 Returns
Upon successful completion, syscon_log_severity_compare() shall return zero. Otherwise, an error
number shall be returned to indicate the error.
17.2.7.4 Errors
For each of the following conditions, if the condition is detected, the syscon_log_severity_compare()
function shall return the corresponding error number:
• [EINVAL]: The value of either s1 or s2 is not a valid severity.
• [EINVAL]: The order argument is NULL.
17.2.7.5 Cross-References
None.
17.2.8 Create Log Query
Functions: syscon_log_query_create(), syscon_log_query_get()
Revision 3.0
89
Page 98

IBM® Carrier Grade Server X3650 T
17.2.8.1 Synopsis
#include <syscon.h>
int syscon_log_query_create(const char *query_string, int purpose,
syscon_log_query_t *query, char *errbuf, size_t errlen);
int syscon_log_query_get(const syscon_log_query_t *query, int *purpose,
char *qsbuf, size_t qslen, size_t *reqlen);
17.2.8.2 Description
17.2.8.2.1 syscon_log_query_create()
The syscon_log_query_create() function shall initialize the query object pointed to by the query argument
according to the textual query expression pointed to by the query_string argument. If the query object
was previously initialized by syscon_log_query_create(), but not subsequently destroyed by
syscon_log_query_destroy(), the result of re-initializing it shall be undefined.
The arguments errbuf and errlen specify the location and size (in bytes), respectively, of a buffer. If
syscon_log_query() rejects the aforementioned query expression because it contains syntactic or
semantic errors, and errbuf is not NULL and errlen is greater than zero, an implementation-defined error
message shall be stored in that buffer. If the error message is too long to fit in the buffer, the first errlen-1
bytes of the message, followed by a null character, shall be stored in the buffer. If syscon_log_query()
succeeds, the contents of the buffer shall be unchanged.
The query object shall be initialized for the purpose(s) specified by the purpose argument, which shall be
the bitwise OR of one or more of the purpose flags defined in the header <syscon.h>. Each purpose
flag shall be a constant of type int. The header <syscon.h> shall define at least the purpose flags listed
in Table 2.
Table 2. Query Purpose Flags
Name Description
SYSCONLOG_PRPS_NOTIFY The query object is to be used for notification purposes -- i.e., passed to
syscon_log_notify_add().
SYSCONLOG_PRPS_SEEK The query object is to be used for seek operations -- i.e., passed to
syscon_log_seek().
SYSCONLOG_PRPS_GENERAL The query object can be used for any purpose that does not require a limited
query.
The value of (SYSCONLOG_PRPS_SEEK & SYSCONLOG_PRPS_GENERAL) shall be non-zero. That
is, the implementation shall not require that only limited queries are used for seek operations.
If the implementation allows general queries (as opposed to just limited queries) to be used for
notification purposes, the value of (SYSCONLOG_PRPS_NOTIFY & SYSCONLOG_PRPS_GENERAL)
shall be non-zero. Otherwise, if the purpose argument has the SYSCONLOG_PRPS_NOTIFY flag set,
and the query object specified by query_string does not qualify as a limited query,
syscon_log_query_create() shall fail.
All flags set in the purpose argument shall also be set in the query object’s purpose flags. The query
object’s purpose flags may also include implementation-defined flags.
Revision 3.0
90
Page 99

IBM® Carrier Grade Server X3650 T
17.2.8.2.2 syscon_log_query_get()
The syscon_log_query_get() function shall store a textual query expression to the buffer pointed to by the
qsbuf argument. This expression shall be functionally equivalent to the one that was passed to
syscon_log_query_create() to create the query object pointed to by the query argument.
The buffer pointed to by qsbuf is assumed to be at least qslen bytes long. If qsbuf is equal to NULL, or
the buffer is too small to hold the returned character string, the syscon_log_query_get() function shall fail.
In any case, if the reqlen argument is not NULL, the length in bytes of the query expression (including the
terminating null character) shall be stored in the location pointed to by reqlen.
If the purpose argument is not NULL, syscon_log_query_get() shall store the value of the indicated query
object’s purpose flags to the location pointed to by purpose.
If the query object was not initialized by syscon_log_query_create(), then the result of the call to
syscon_log_query_get() shall be undefined.
17.2.8.2.3 Query Expressions: Overview
The following sections define the syntax and semantics of a “general” query expression. Limited queries
are defined in section 20.4.8.2.8.
A simple query expression is a single test of the form "attribute-name op val", where
• attribute-name is the name of an event attribute,
• op is a comparison operator such as == or <, and
• val is the reference value for the test – typically a symbolic constant, an integer constant, or a
string literal.
An event record is said to pass the test if the comparison between the reference value and the value of
the named attribute in the event record evaluates to true (non-zero).
More complex queries can be constructed by combining queries using operators such as && and ||
(“and” and “or”, respectively), or by negating a query using the '!' operator. An event record is said to
match a query if the query expression evaluates to true (non-zero) for that record.
Revision 3.0
91
Page 100

IBM® Carrier Grade Server X3650 T
17.2.8.2.4 Query Grammar
A strictly conforming textual query expression shall conform to the following grammar, expressed using
the notation and terminology of the C Standard. The implementation may support syntactic and/or
semantic extensions to the grammar, so long as strictly conforming query expressions are interpreted
according to this query standard.
query:
and-expression
query || and-expression
and-expression:
unary-expression
and-expression && unary-expression
unary-expression:
test
! unary-expression
test:
attribute-name op integer-constant
attribute-name op string-literal
attribute-name op identifier
attribute-name
( query )
attribute-name:
identifier
op: one of = == != < <= > >= & contains
A query expression may be syntactically correct (i.e. conform to this grammar) but be semantically
incorrect. For example, the expression "recid contains 3" is accepted by the grammar but makes no
sense semantically. Semantic rules are explained in the following sections. syscon_log_query_create()
shall fail if the query expression is syntactically or semantically incorrect, and this determination can be
made at the time of the call to syscon_log_query_create().
17.2.8.2.5 Lexical Elements and Semantics
Blanks (spaces), horizontal tabs, and newlines (collectively, "white space") are ignored outside of
character string literals, except as they serve to separate tokens.
As in the C language, if the textual query expression has been parsed into tokens up to a given character,
the next token is the longest sequence of characters that could possibly constitute a token.
As in the C language, the expression "x || y" evaluates to zero if x and y both have the value zero;
otherwise it evaluates to 1.
As in the C language, the expression "x && y" evaluates to 1 if x and y both have non-zero values;
otherwise it evaluates to zero.
When used with integer values, each of the following operators has the meaning specified for that token
in the C language: "==", "!=", "<", "<=", ">", ">=". When used with character-string values, these
Revision 3.0
92
 Loading...