

Page 1

AS/400 Advanced Series IBM
Advanced Function Printing Utilities for
AS/400 User’s Guide
S544-5349-01
Page 2

Page 3

AS/400 Advanced Series IBM
Advanced Function Printing Utilities for
AS/400 User’s Guide
S544-5349-01
Page 4

Note!
Before using this information and the product it supports, be sure to read the general information in
“Notices” on page xv.
Second Edition (February 1998)
This edition applies to Version 4 Release 2 of AFP Utilities for AS/400 (Program 5769-AF1), and to all subsequent releases and
modifications until otherwise indicated in new editions or technical newsletters.
Order publications through your IBM representative or the IBM branch office serving your locality. Publications are not stocked at the
address given below.
The IBM Printing Systems Company welcomes your comments. A form for reader's comments is provided at the back of this
publication. If the form has been removed, you may send your comments to the following address:
INFORMATION DEVELOPMENT
THE IBM PRINTING SYSTEMS COMPANY
DEPARTMENT H7FE BUILDING 003G
PO BOX 1900
BOULDER CO 80301-9191
If you prefer to send comments electronically, use one of the following methods:
| Internet: printpub@us.ibm.com
Fax: 1-800-524-1519
Internet
| Visit our home page at http://www.printers.ibm.com
When you send information to IBM, you grant IBM a nonexclusive right to use or distribute the information in any way it believes
appropriate without incurring any obligation to you.
Copyright International Business Machines Corporation 1996, 1998. All rights reserved.
Note to U.S. Government Users — Documentation related to restricted rights — Use, duplication or disclosure is subject to
restrictions set forth in GSA ADP Schedule Contract with IBM Corp.
Page 5

Contents
Notices . . . . . . . . . . . . . . . . . . . . . . . . . . . . . . . . . . . . . . . . . xv
Trademarks and Service Marks ........................... xv
About IBM Advanced Function Printing Utilities for AS/400 ......... xvii
Who Should Use This Book ............................. xviii
Chapter 1. What are the IBM Advanced Function Printing Utilities for
AS/400? . . . . . . . . . . . . . . . . . . . . . . . . . . . . . . . . . . . . . . . . . 3
What You Can Do with AFP Utilities for AS/400 ................... 4
Using Overlays . . . . . . . . . . . . . . . . . . . . . . . . . . . . . . . . . . . . 6
Using Images . . . . . . . . . . . . . . . . . . . . . . . . . . . . . . . . . . . . . 8
Using Bar Codes ................................... 8
Using Graphics . . . . . . . . . . . . . . . . . . . . . . . . . . . . . . . . . . . . 8
Overlay Utility . . . . . . . . . . . . . . . . . . . . . . . . . . . . . . . . . . . . . . . 9
Print Format Utility ................................... 10
Resource Management Utility ............................. 12
AFP Resource and AFP Utilities for AS/400 .................... 13
Requirements for Use of the AFP Utilities for AS/400 ............... 13
Hardware Requirement . . . . . . . . . . . . . . . . . . . . . . . . . . . . . . . 13
Software Requirement . . . . . . . . . . . . . . . . . . . . . . . . . . . . . . . 14
AFP Utilities Fundamentals (Concepts) ....................... 14
Libraries, Files, and Members ........................... 14
Elements . . . . . . . . . . . . . . . . . . . . . . . . . . . . . . . . . . . . . . . 15
AFP Utilities for AS/400 Displays ......................... 15
Menu Display . . . . . . . . . . . . . . . . . . . . . . . . . . . . . . . . . . . 15
Work with Display ................................ 15
Design display . . . . . . . . . . . . . . . . . . . . . . . . . . . . . . . . . . 16
Function Keys . . . . . . . . . . . . . . . . . . . . . . . . . . . . . . . . . . . . 17
Related Online Information .............................. 19
Help for Displays .................................. 19
InfoSeeker . . . . . . . . . . . . . . . . . . . . . . . . . . . . . . . . . . . . . . 19
Help for Control Language Commands ...................... 19
Chapter 2. Introduction to the Overlay Utility ................. 23
Print Form and Overlay ................................ 23
Source Overlay . . . . . . . . . . . . . . . . . . . . . . . . . . . . . . . . . . . . . 24
Overlay Specifications . . . . . . . . . . . . . . . . . . . . . . . . . . . . . . . 24
Overlay Fonts . . . . . . . . . . . . . . . . . . . . . . . . . . . . . . . . . . . . 24
Design Overlay . . . . . . . . . . . . . . . . . . . . . . . . . . . . . . . . . . . 24
Operation Flow . . . . . . . . . . . . . . . . . . . . . . . . . . . . . . . . . . . . . 25
Chapter 3. Getting Started with the Overlay Utility .............. 29
Step 1 - Starting the Overlay Utility ......................... 30
Step 2 - Creating a Source Overlay File ...................... 31
Step 3 - Creating a Source Overlay ......................... 33
Defining a Text Element .............................. 34
Defining a Line Element .............................. 37
Defining a Box Element .............................. 38
Defining a Bar Code Element ........................... 40
Placing a Graphics Element ............................ 42
Copyright IBM Corp. 1996, 1998 iii
Page 6

| Viewing the Overlay with the AFP Workbench Viewer ............. 44
| Saving the Source Overlay ............................. 45
Step 4 - Changing a Source Overlay ........................ 48
Placing a Page Segment .............................. 48
Creating an Overlay from a Source Overlay ................... 53
Step 5 - Using an Overlay ............................... 55
Overriding a Printer File .............................. 55
Using the Printer File ................................ 55
Printing Overlays with AFP Utilities for AS/400 ................. 56
Chapter 4. Starting and Ending the Overlay Utility .............. 57
Starting the Overlay Utility ............................... 57
Option 1 (Work with source overlays) ...................... 58
Option 2 (Work with source overlay files) .................... 58
Ending the Overlay Utility ............................... 58
Chapter 5. Work with Source Overlays ..................... 59
Prompts . . . . . . . . . . . . . . . . . . . . . . . . . . . . . . . . . . . . . . . . 59
Options . . . . . . . . . . . . . . . . . . . . . . . . . . . . . . . . . . . . . . . . 60
Columns . . . . . . . . . . . . . . . . . . . . . . . . . . . . . . . . . . . . . . . 61
Showing a Source Overlay List ............................ 62
Selecting a Source Overlay from a List ....................... 62
1=Create a Source Overlay .............................. 63
Define Overlay Specifications ........................... 64
Change Overlay Specifications ......................... 67
Confirm Delete of Elements .......................... 69
Work with Source Overlay Fonts ......................... 70
Design Overlay . . . . . . . . . . . . . . . . . . . . . . . . . . . . . . . . . . . 70
Saving a Source Overlay ............................ 71
2=Change a Source Overlay ............................. 73
3=Copy a Source Overlay ............................... 74
4=Delete a Source Overlay .............................. 75
6=Print a Source Overlay ............................... 76
7=Rename a Source Overlay ............................. 77
9=Create Overlay . . . . . . . . . . . . . . . . . . . . . . . . . . . . . . . . . . . . 77
Chapter 6. Work with Source Overlay Files ................... 81
Prompts . . . . . . . . . . . . . . . . . . . . . . . . . . . . . . . . . . . . . . . . 83
Options . . . . . . . . . . . . . . . . . . . . . . . . . . . . . . . . . . . . . . . . 84
Columns . . . . . . . . . . . . . . . . . . . . . . . . . . . . . . . . . . . . . . . 85
Showing a Source Overlay File List ......................... 85
Selecting a Source Overlay File from a List .................... 86
1=Create Source Overlay File ............................ 87
2=Change Source Overlay File Description ..................... 89
3=Copy Source Overlay File ............................. 90
4=Delete Source Overlay File ............................. 91
7=Rename Source Overlay File ........................... 92
8=Display Description of Source Overlay File ................... 92
12=Work with Source Overlays ............................ 92
Chapter 7. Introduction to Print Format Utility ................. 95
Printout Format Definition (PFD Definition) ..................... 95
PFD Specifications . . . . . . . . . . . . . . . . . . . . . . . . . . . . . . . . . 95
PFD Definition Fonts ................................ 96
iv AFP Utilities for AS/400 User’s Guide
Page 7

Database File . . . . . . . . . . . . . . . . . . . . . . . . . . . . . . . . . . . . 96
Record Layout . . . . . . . . . . . . . . . . . . . . . . . . . . . . . . . . . . . . 96
Page Layout . . . . . . . . . . . . . . . . . . . . . . . . . . . . . . . . . . . . . 97
Elements . . . . . . . . . . . . . . . . . . . . . . . . . . . . . . . . . . . . . . . 98
Record Selection . . . . . . . . . . . . . . . . . . . . . . . . . . . . . . . . . . 98
Printout Specifications . . . . . . . . . . . . . . . . . . . . . . . . . . . . . . . 98
Mapping Object Name ............................... 98
Printing with Print Format Utility .......................... 99
Operation Flow . . . . . . . . . . . . . . . . . . . . . . . . . . . . . . . . . . . . 100
Chapter 8. Getting Started with Print Format Utility ............ 103
| Step 1 - Starting the Print Format Utility ...................... 104
Step 2 - Creating a PFD Definition File ...................... 105
Step 3 - Creating a PFD Definition ......................... 107
| Specifying a Database File ............................ 108
| Designing a Record Layout ........................... 110
Specifying Fixed Text Data .......................... 111
Specifying Variable Text Data from a Database File Record ....... 113
Specifying a Page Segment ......................... 116
Specifying a Bar Code Element ....................... 118
Specifying a Box Element ........................... 119
Specifying a Line Element .......................... 121
Exiting from Design Record Layout ..................... 122
| Designing a Page Layout ............................ 122
Defining Printout Specifications ......................... 126
Exiting from Defining the PFD Definition .................... 127
Step 4 - Printing a Database File ......................... 130
| Step 5 - Ending the Print Format Utility ...................... 131
| Step 6 - Printing the AFP Utilities tutorial ..................... 132
Chapter 9. Starting and Ending the Print Format Utility .......... 135
| Starting the Print Format Utility ........................... 135
Option 11 (Work with PFD definitions) ..................... 136
Option 12 (Work with PFD definition files) ................... 136
Option 13 (Print Database File Member) .................... 136
| Option 14 (Print AFP Utilities tutorial) ..................... 136
| Ending the Print Format Utility ........................... 137
Chapter 10. Work with PFD Definitions .................... 139
Prompts . . . . . . . . . . . . . . . . . . . . . . . . . . . . . . . . . . . . . . . 140
Options . . . . . . . . . . . . . . . . . . . . . . . . . . . . . . . . . . . . . . . 141
Columns . . . . . . . . . . . . . . . . . . . . . . . . . . . . . . . . . . . . . . 142
Showing a PFD Definition List ........................... 142
Selecting a PFD Definition from a List ....................... 142
1=Create PFD Definitions .............................. 143
Define PFD Specifications ............................ 146
Change PFD Specifications .......................... 150
Confirm Delete of Elements ......................... 152
Work with PFD Definition Fonts ......................... 154
Specify Database File .............................. 154
Select Database File .............................. 155
Select Record Format ............................. 156
Specify Break Fields ............................... 157
Design Record Layout .............................. 158
Contents v
Page 8

Data in Record Layout ............................ 159
Numeric Editing . . . . . . . . . . . . . . . . . . . . . . . . . . . . . . . . 163
Design Page Layout ............................... 165
Repetition of the Record in the Page .................... 168
Specify Record Selection ............................. 179
Define Printout Specifications .......................... 182
Specify Mapping Object Name ......................... 185
Saving PFD Definition ............................. 188
2=Change PFD Definition .............................. 190
3=Copy PFD Definition ............................... 191
4=Delete PFD Definition ............................... 193
6=Print PFD Definition ................................ 194
7=Rename PFD Definition .............................. 194
9=Print Database File ................................ 194
Chapter 11. Work with PFD Definition Files ................. 195
Prompts . . . . . . . . . . . . . . . . . . . . . . . . . . . . . . . . . . . . . . . 198
Options . . . . . . . . . . . . . . . . . . . . . . . . . . . . . . . . . . . . . . . 199
Columns . . . . . . . . . . . . . . . . . . . . . . . . . . . . . . . . . . . . . . 199
Showing a PFD Definition File List ......................... 200
Selecting a PFD Definition File from a List .................... 200
1=Create PFD Definition File ............................ 201
2=Change PFD Definition File ........................... 203
3=Copy PFD Definition File ............................. 204
4=Delete PFD Definition File ............................ 205
7=Rename PFD Definition File ........................... 206
8=Display Description of PFD Definition File ................... 206
12=Work with PFD Definitions ........................... 206
Chapter 12. Print Database File Member ................... 207
Start Printing from Work with PFD Definitions Display ............. 207
Start Printing from the AFP Utilities Menu .................... 213
Start Printing by PRTPFDDTA ........................... 215
Chapter 13. Design Operation . . . . . . . . . . . . . . . . . . . . . . . . . . 219
Element Types . . . . . . . . . . . . . . . . . . . . . . . . . . . . . . . . . . . . 219
Text . . . . . . . . . . . . . . . . . . . . . . . . . . . . . . . . . . . . . . . . . 219
Line . . . . . . . . . . . . . . . . . . . . . . . . . . . . . . . . . . . . . . . . . 219
Box . . . . . . . . . . . . . . . . . . . . . . . . . . . . . . . . . . . . . . . . . 219
Bar Code . . . . . . . . . . . . . . . . . . . . . . . . . . . . . . . . . . . . . . 219
Page Segment . . . . . . . . . . . . . . . . . . . . . . . . . . . . . . . . . . . 219
Graphics . . . . . . . . . . . . . . . . . . . . . . . . . . . . . . . . . . . . . . 220
Record Layout . . . . . . . . . . . . . . . . . . . . . . . . . . . . . . . . . . . 220
Defining Elements on the Design Display ..................... 220
Design Display . . . . . . . . . . . . . . . . . . . . . . . . . . . . . . . . . . . 221
Screen View . . . . . . . . . . . . . . . . . . . . . . . . . . . . . . . . . . 221
List View . . . . . . . . . . . . . . . . . . . . . . . . . . . . . . . . . . . . . 221
Defining Elements in the Screen View ..................... 222
Layout of the Screen View .......................... 222
Element Indication on Image Area - Element Mark ............ 223
Element Mark On/Off ............................. 224
Hide . . . . . . . . . . . . . . . . . . . . . . . . . . . . . . . . . . . . . . . 224
Refresh . . . . . . . . . . . . . . . . . . . . . . . . . . . . . . . . . . . . . 224
Scroll . . . . . . . . . . . . . . . . . . . . . . . . . . . . . . . . . . . . . . . 225
vi AFP Utilities for AS/400 User’s Guide
Page 9

Element Operations in the Screen View .................... 226
Define Element Operation ........................... 226
Change Element Operation .......................... 226
Edit Operation . . . . . . . . . . . . . . . . . . . . . . . . . . . . . . . . . 227
Function Keys on the Design Display ..................... 227
Defining or Changing an Element ........................ 230
Text . . . . . . . . . . . . . . . . . . . . . . . . . . . . . . . . . . . . . . . 233
Line . . . . . . . . . . . . . . . . . . . . . . . . . . . . . . . . . . . . . . . 240
Box . . . . . . . . . . . . . . . . . . . . . . . . . . . . . . . . . . . . . . . . 243
Bar Code . . . . . . . . . . . . . . . . . . . . . . . . . . . . . . . . . . . . 253
Page Segment . . . . . . . . . . . . . . . . . . . . . . . . . . . . . . . . . 263
Graphics . . . . . . . . . . . . . . . . . . . . . . . . . . . . . . . . . . . . . 269
Record Layout . . . . . . . . . . . . . . . . . . . . . . . . . . . . . . . . . 275
Copy, Move, and Remove an Existing Element ................ 279
Element Edit . . . . . . . . . . . . . . . . . . . . . . . . . . . . . . . . . . 279
Block Edit . . . . . . . . . . . . . . . . . . . . . . . . . . . . . . . . . . . . 280
Changing Elements in the List View ........................ 282
Layout of the List View ............................ 282
Create or Change the Element ......................... 285
Create . . . . . . . . . . . . . . . . . . . . . . . . . . . . . . . . . . . . . . 285
Change . . . . . . . . . . . . . . . . . . . . . . . . . . . . . . . . . . . . . 286
Sort Element List ................................. 286
Copy, Move, Remove, or Restore ........................ 286
Element Edit . . . . . . . . . . . . . . . . . . . . . . . . . . . . . . . . . . 286
Chapter 14. Work with Fonts .......................... 289
2=Change Font . . . . . . . . . . . . . . . . . . . . . . . . . . . . . . . . . . . . 292
5=Display Font . . . . . . . . . . . . . . . . . . . . . . . . . . . . . . . . . . . . 296
9=Set Initial Font ................................... 298
Chapter 15. Introduction to the Resource Management Utility (RMU) .. 301
Converting to an AS/400 Page Segment ..................... 301
Converting to a Page Segment from an AS/400 Database File ....... 301
Converting to a Page Segment from a PC Document ............ 302
Working with Overlays ................................ 303
Copying an Overlay .............................. 303
Deleting an Overlay .............................. 304
Renaming an Overlay ............................. 304
Printing an Overlay .............................. 304
Displaying an Overlay Description ...................... 304
Changing an Overlay Description ...................... 304
Converting an Overlay to Physical File Member .............. 304
Working with Page Segments ........................... 304
Copying a Page Segment ........................... 304
Deleting Page Segments ........................... 304
Renaming a Page Segment ......................... 304
Printing a Page Segment ........................... 305
Displaying a Page Segment Description .................. 305
Changing a Page Segment Description ................... 305
Converting a Page Segment to a Physical File Member ......... 305
Chapter 16. Getting Started with the Resource Management Utility ... 307
Starting Resource Management Utility ....................... 307
Converting a PC Document to a Page Segment ................. 308
Contents vii
Page 10

Printing an Overlay .................................. 309
Printing a Page Segment .............................. 312
Chapter 17. Starting and Ending the Resource Management Utility ... 315
Starting the Resource Management Utility .................... 315
Starting the Resource Management Utility with the STRAFPU Command 315
Option 21 : Convert to Page Segment Function .............. 316
Option 22 : Work with Overlays Function .................. 316
Option 23 : Work with Page Segments Function ............. 316
Starting the Resource Management Utility with the CVTPCDPAGS
Command . . . . . . . . . . . . . . . . . . . . . . . . . . . . . . . . . . . . . 316
Starting the Resource Management Utility with the CVTPFMPAGS
Command . . . . . . . . . . . . . . . . . . . . . . . . . . . . . . . . . . . . . 318
Starting the Resource Management Utility with the CVTOVLPFM Command 320
Starting the Resource Management Utility with the CVTPAGSPFM
Command . . . . . . . . . . . . . . . . . . . . . . . . . . . . . . . . . . . . . 321
| Ending the Resource Management Utility ..................... 322
Chapter 18. Convert to Page Segment Function ............... 323
Chapter 19. Work with Overlays Function .................. 333
Prompts . . . . . . . . . . . . . . . . . . . . . . . . . . . . . . . . . . . . . . . 334
Options . . . . . . . . . . . . . . . . . . . . . . . . . . . . . . . . . . . . . . . 334
Columns . . . . . . . . . . . . . . . . . . . . . . . . . . . . . . . . . . . . . . 335
3=Copy Overlay Object ............................... 335
4=Delete Overlays . . . . . . . . . . . . . . . . . . . . . . . . . . . . . . . . . . 335
6=Print Overlay . . . . . . . . . . . . . . . . . . . . . . . . . . . . . . . . . . . . 336
7=Rename Overlay . . . . . . . . . . . . . . . . . . . . . . . . . . . . . . . . . . 338
8=Display Overlay Description ........................... 338
9=Convert Overlay to Physical File Member ................... 338
13=Change Overlay Text .............................. 341
Chapter 20. Work with Page Segments Function .............. 343
Prompts . . . . . . . . . . . . . . . . . . . . . . . . . . . . . . . . . . . . . . . 344
Options . . . . . . . . . . . . . . . . . . . . . . . . . . . . . . . . . . . . . . . 344
Columns . . . . . . . . . . . . . . . . . . . . . . . . . . . . . . . . . . . . . . 345
3=Copy Page Segment ............................... 345
4=Delete Page Segments .............................. 345
6=Print Page Segment ................................ 346
7=Rename Page Segment ............................. 348
8=Display Page Segment Description ....................... 348
9=Convert Page Segment to Physical File Member ............... 348
13=Change Page Segment Text .......................... 351
Chapter 21. AFP Utilities for AS/400 Commands .............. 355
STRAFPU (Start AFP Utilities for AS/400) Command .............. 355
STROVLU (Start Overlay Utility) Command ................... 355
STRPFU (Start Print Format Utility) Command .................. 357
PRTPFDDTA (Print PFD Data) Command .................... 360
CVTPCDPAGS (Convert PC Document to Page Segment) Command .... 366
CVTPFMPAGS (Convert Physical File Member to Page Segment) Command 372
CVTOVLPFM (Convert Overlay to Physical File Member) Command ..... 378
CVTPAGSPFM (Convert Page Segment to Physical File Member) Command 382
viii AFP Utilities for AS/400 User’s Guide
Page 11

Chapter 22. Limitations and Restrictions ................... 387
Overlay Utility . . . . . . . . . . . . . . . . . . . . . . . . . . . . . . . . . . . . . 387
Limitations . . . . . . . . . . . . . . . . . . . . . . . . . . . . . . . . . . . . . 387
Minimum and Maximum Limitations ..................... 387
Dashed and Dotted Lines ........................... 387
Line Width and Overlay Size ......................... 387
Element Position . . . . . . . . . . . . . . . . . . . . . . . . . . . . . . . . 387
Restrictions . . . . . . . . . . . . . . . . . . . . . . . . . . . . . . . . . . . . . 388
Source Overlay File .............................. 388
Font . . . . . . . . . . . . . . . . . . . . . . . . . . . . . . . . . . . . . . . 388
Page Segment . . . . . . . . . . . . . . . . . . . . . . . . . . . . . . . . . 389
Line . . . . . . . . . . . . . . . . . . . . . . . . . . . . . . . . . . . . . . . 389
Box . . . . . . . . . . . . . . . . . . . . . . . . . . . . . . . . . . . . . . . . 389
Text in Box ................................... 389
Shading in Box ................................. 390
Graphics (GDF) Size ............................. 390
Text Font in Graphics (GDF) ......................... 390
Overlay object authority ............................ 390
Printer Dependencies . . . . . . . . . . . . . . . . . . . . . . . . . . . . . 390
Print Format Utility .................................. 390
Limitations . . . . . . . . . . . . . . . . . . . . . . . . . . . . . . . . . . . . . 390
Minimum and Maximum Limitations ..................... 390
Dashed and Dotted Lines ........................... 391
Line Width and Page Size .......................... 391
Element Position . . . . . . . . . . . . . . . . . . . . . . . . . . . . . . . . 391
Restrictions . . . . . . . . . . . . . . . . . . . . . . . . . . . . . . . . . . . . . 392
PFD Definition File ............................... 392
Font . . . . . . . . . . . . . . . . . . . . . . . . . . . . . . . . . . . . . . . 392
Page Segment . . . . . . . . . . . . . . . . . . . . . . . . . . . . . . . . . 392
Line . . . . . . . . . . . . . . . . . . . . . . . . . . . . . . . . . . . . . . . 393
Box . . . . . . . . . . . . . . . . . . . . . . . . . . . . . . . . . . . . . . . . 393
Text in Box ................................... 393
Shading in Box ................................. 393
Graphics (GDF) Size ............................. 393
Text Font in Graphics (GDF) ......................... 393
Printer Dependencies . . . . . . . . . . . . . . . . . . . . . . . . . . . . . 394
Resource Management Utility ............................ 394
Limitations . . . . . . . . . . . . . . . . . . . . . . . . . . . . . . . . . . . . . 394
Restrictions . . . . . . . . . . . . . . . . . . . . . . . . . . . . . . . . . . . . . 394
IMDS (IOCA) Data Stream .......................... 394
Print Operation . . . . . . . . . . . . . . . . . . . . . . . . . . . . . . . . . 394
Creating Page Segment ............................ 394
Converting an Overlay to a Physical File Member ............. 394
Converting the Page Segment to a Physical File Member ........ 394
Sending Source Overlays and PFD Definitions .................. 395
Chapter 23. Problem Analysis . . . . . . . . . . . . . . . . . . . . . . . . . . 397
How to Use This Procedure ............................. 397
Identifying Problems . . . . . . . . . . . . . . . . . . . . . . . . . . . . . . . . . 397
0100: Problem Analysis Procedures ...................... 397
Common Symptoms and Possible Causes .................... 402
Sense Codes and Possible Causes ........................ 405
Contacting Your Service Representative ..................... 407
Element Type and Position ............................. 407
Contents ix
Page 12

Text Element and Position ............................ 407
Measurement Method is Row/Column .................... 407
Measurement Method is Inch or Centimeter ................ 407
Line Element and Position ............................ 408
Measurement Method is Row/Column .................... 408
Measurement Method is Inch or Centimeter ................ 409
Box Element and Position ............................ 409
Measurement Method is Row/Column .................... 409
Measurement Method is Inch or Centimeter ................ 410
Bar Code Element and Position ......................... 410
Measurement Method is Row/Column .................... 410
Measurement Method is Inch or Centimeter ................ 410
Page Segment Element and Position ...................... 410
Measurement Method is Row/Column .................... 410
Measurement Method is Inch or Centimeter ................ 411
Record Layout Element and Position ...................... 411
Measurement Method is Row/Column .................... 411
Measurement Method is Inch or Centimeter ................ 411
Graphics Element and Position ......................... 411
Measurement Method is Row/Column .................... 411
Measurement Method is Inch or Centimeter ................ 412
Appendix A. Printer Characteristics . . . . . . . . . . . . . . . . . . . . . . 413
Supported Printers . . . . . . . . . . . . . . . . . . . . . . . . . . . . . . . . . . 413
Printable Area . . . . . . . . . . . . . . . . . . . . . . . . . . . . . . . . . . . . . 414
Printer Storage Limitations ............................. 414
Limitations for Each Printer ............................. 414
3812 Printer . . . . . . . . . . . . . . . . . . . . . . . . . . . . . . . . . . . . 415
3816 and 3930 Printers ............................. 415
3820 Printer . . . . . . . . . . . . . . . . . . . . . . . . . . . . . . . . . . . . 415
3825 Printer . . . . . . . . . . . . . . . . . . . . . . . . . . . . . . . . . . . . 415
3827 and 3829 Printers ............................. 416
3831 Printer . . . . . . . . . . . . . . . . . . . . . . . . . . . . . . . . . . . . 416
3835 Printer . . . . . . . . . . . . . . . . . . . . . . . . . . . . . . . . . . . . 416
3900 Printer . . . . . . . . . . . . . . . . . . . . . . . . . . . . . . . . . . . . 417
3916 and 4028 Printers ............................. 417
4224 Printer . . . . . . . . . . . . . . . . . . . . . . . . . . . . . . . . . . . . 417
3935 Printer . . . . . . . . . . . . . . . . . . . . . . . . . . . . . . . . . . . . 418
4234 Printer . . . . . . . . . . . . . . . . . . . . . . . . . . . . . . . . . . . . 418
4230 Printer . . . . . . . . . . . . . . . . . . . . . . . . . . . . . . . . . . . . 419
Appendix B. Rotation, Format, and Shading Pattern in Box ....... 421
Format, Text Placement and Rotation ....................... 421
Format . . . . . . . . . . . . . . . . . . . . . . . . . . . . . . . . . . . . . . . 421
Text Placement . . . . . . . . . . . . . . . . . . . . . . . . . . . . . . . . . . 421
Degree of Rotation ................................ 422
Shading Pattern in Box ............................... 437
Appendix C. Rotation of Graphics ....................... 439
Appendix D. Using GDFs in AFP Utilities ................... 441
Appendix E. How to Do a Task ......................... 445
How to Use This Chapter .............................. 445
x AFP Utilities for AS/400 User’s Guide
Page 13

Tasks Related to Source Overlays ......................... 445
Tasks Related to Source Overlay Files ...................... 446
Tasks Related to PFD Definitions ......................... 446
Tasks Related to PFD Definition Files ....................... 447
Tasks Related to Overlay Objects ......................... 447
Tasks Related to Page Segments ......................... 448
Tasks Related to Screen View of Design Display ................ 448
Defining an Element ............................... 448
Handling Existing Elements ........................... 449
Changing the View of the Display ........................ 450
Tasks Related to List View of Design Display .................. 450
Defining an Element ............................... 450
Handling Existing Elements ........................... 450
Tasks Related to Each Element .......................... 451
Text Element . . . . . . . . . . . . . . . . . . . . . . . . . . . . . . . . . . . . 451
Line Element . . . . . . . . . . . . . . . . . . . . . . . . . . . . . . . . . . . . 452
Box Element . . . . . . . . . . . . . . . . . . . . . . . . . . . . . . . . . . . . 452
Bar Code Element ................................. 452
Graphics Element . . . . . . . . . . . . . . . . . . . . . . . . . . . . . . . . . 453
Page Segment Element ............................. 453
Record Layout Element ............................. 454
Tasks Related to Database File Selection .................... 454
Tasks Related to Record Selection ........................ 454
Tasks Related to Overlay Specifications and PFD Specifications ....... 455
Tasks Related to Font ................................ 455
Task Related to Printout Specifications ...................... 456
Task Related to Mapping Object .......................... 456
Task Related to Break Fields ............................ 456
Appendix F. Portability to Other Systems ................... 457
Restrictions . . . . . . . . . . . . . . . . . . . . . . . . . . . . . . . . . . . . . . 457
IPDS Towers . . . . . . . . . . . . . . . . . . . . . . . . . . . . . . . . . . . . 457
PT2 Tower (Underline and Overstrike) ..................... 457
Fonts . . . . . . . . . . . . . . . . . . . . . . . . . . . . . . . . . . . . . . . . 458
Page Segments . . . . . . . . . . . . . . . . . . . . . . . . . . . . . . . . . . 458
PSF (Print Service Facility) ........................... 458
Appendix G. Sample Overlays and Sample PFD Definitions ....... 459
Sample Overlays . . . . . . . . . . . . . . . . . . . . . . . . . . . . . . . . . . . 459
DMAS Forms . . . . . . . . . . . . . . . . . . . . . . . . . . . . . . . . . . . 459
MAPICS/DB Forms . . . . . . . . . . . . . . . . . . . . . . . . . . . . . . . . 460
Sample PFD Definitions ............................... 460
AIAG (Automotive Industry Action Group) Labels ............... 461
EIA (Electronic Industries Association) Labels ................ 461
| AFP Utilities Tutorial PFD Definitions ...................... 461
Appendix H. Code 128 Character Set ..................... 463
Appendix I. Font Samples . . . . . . . . . . . . . . . . . . . . . . . . . . . . 465
Times New Roman Medium ............................. 465
Helvetica Roman Bold ................................ 466
Courier . . . . . . . . . . . . . . . . . . . . . . . . . . . . . . . . . . . . . . . . . 467
Glossary . . . . . . . . . . . . . . . . . . . . . . . . . . . . . . . . . . . . . . . 469
Contents xi
Page 14

Index . . . . . . . . . . . . . . . . . . . . . . . . . . . . . . . . . . . . . . . . . . 479
xii AFP Utilities for AS/400 User’s Guide
Page 15

Figures
1. Conventional Letter Preparation ......................... 5
2. Letter Preparation Using AFP Utilities ...................... 6
3. Using Overlays . . . . . . . . . . . . . . . . . . . . . . . . . . . . . . . . . . . 7
4. Using Page Segments .............................. 8
5. Sample Overlay (Created by the Overlay Utility) ............... 9
6. Sample Label (Created by the Print Format Utility) ............. 10
7. Print Sample (Labels) .............................. 11
8. Members and Files in a Library ........................ 14
9. Menu for the IBM Advanced Function Printing Utilities for AS/400 .... 15
10. Prompts and Columns on the Work with Source Overlays Display .... 16
11. Design Display . . . . . . . . . . . . . . . . . . . . . . . . . . . . . . . . . . 17
12. Summary of AFP Utilities Function Keys ................... 18
13. Sample Overlay . . . . . . . . . . . . . . . . . . . . . . . . . . . . . . . . . 24
14. Overview of Overlay Utility Operation ..................... 26
15. Sample Overlay . . . . . . . . . . . . . . . . . . . . . . . . . . . . . . . . . 34
16. The Cause of a Message and Its Results .................. 68
17. Record Layout Sample ............................. 96
18. Page Layout Sample .............................. 97
19. Overview of Print Format Utility Operation ................. 100
20. Sample Label . . . . . . . . . . . . . . . . . . . . . . . . . . . . . . . . . . 107
21. The Cause of Message and Its Result ................... 150
22. Function Keys for Scroll Operation ..................... 225
23. Commands in Control Field for Scroll Operation .............. 225
24. Common Function Keys for all Operations on the Design Display ... 227
25. Function Keys for Base Operation on the Design Display ........ 228
26. Function Keys for Define or Change Operation on the Design Display . 229
27. Function Keys for Place Operation on the Design Display ........ 229
28. Function Keys for Edit Operation on the Design Display ......... 230
29. Function Keys to Specify End Position on the Design Display ..... 230
30. Position and Distance of the Record in the Page Layout ......... 278
31. Process of Converting to Page Segment .................. 302
32. Letters which Contain a Page Segment .................. 303
33. Example of Position-and-Trim Mapping ................... 329
34. Example of Scale-to-Fit Mapping ...................... 329
35. Example of Center-and-Trim Mapping ................... 330
36. Example of Rotating the Image Block .................... 331
37. Command Syntax for STROVLU Command ................ 356
38. The Command Syntax for STRPFU Command .............. 358
39. The Command Syntax for PRTPFDDTA Command ............ 361
40. The Command Syntax for CVTPCDPAGS Command .......... 367
41. The Command Syntax for CVTPFMPAGS Command .......... 373
42. The Command Syntax for CVTOVLPFM Command ........... 379
43. The Command Syntax for CVTPAGSPFM Command .......... 382
44. Print Example - 1 ............................... 423
45. Print Example - 2 ............................... 424
46. Print Example - 3 ............................... 425
47. Print Example - 4 ............................... 426
48. Print Example - 5 ............................... 427
49. Print Example - 6 ............................... 428
50. Print Example - 7 ............................... 429
Copyright IBM Corp. 1996, 1998 xiii
Page 16

51. Print Example - 8 ............................... 430
52. Print Example - 9 ............................... 431
53. Print Example - 10 ............................... 432
54. Print Example - 11 ............................... 433
55. Print Example - 12 ............................... 434
56. Print Example - 13 ............................... 435
57. Print Example - 14 ............................... 436
58. Print Example - 15 ............................... 437
59. . . . . . . . . . . . . . . . . . . . . . . . . . . . . . . . . . . . . . . . . . . 442
60. Times New Roman Medium ......................... 465
61. Helvetica Roman Bold ............................. 466
62. Courier Font Samples ............................. 467
xiv AFP Utilities for AS/400 User’s Guide
Page 17

Notices
References in this publication to products or services of IBM do not suggest or imply that IBM will make
them available in all countries where IBM does business or that only products or services of IBM may be
used. Noninfringing equivalents may be substituted, but the user must verify that such substitutes, unless
expressly designated by IBM, work correctly. No license, expressed or implied, to patents or copyrights of
IBM is granted by furnishing this document. You can send license inquiries, in writing, to the IBM Director
of Licensing, IBM Corporation, 500 Columbus Avenue, Thornwood, NY 10594, USA.
Licensees of this program who wish to have information about it for the purpose of enabling: (1) the
exchange of information between independently created programs and other programs (including this one)
and (2) the mutual use of the information, which has been exchanged, should contact: IBM Corporation,
Printing Systems Company Legal Department, Mail Drop 001W, Boulder, Colorado 80301 USA. Such
information may be available, subject to appropriate terms and conditions, including in some cases,
payment of a fee.
Trademarks and Service Marks
The following terms, denoted by an asterisk (*) in this publication, are trademarks of the IBM Corporation
in the United States or other countries or both:
| Advanced Function Presentation
Advanced Function Printing
AFP
Application System/400
AS/400
BCOCA
GDDM
IBM
IPDS
MAPICS
Other company, product and service names, which may be denoted by a double asterisk (**), may be
trademarks or service marks of others.
OS/2
OS/400
Personal Computer AT
Personal System/2
Print Services Facility
PSF
System/370
400
Copyright IBM Corp. 1996, 1998 xv
Page 18

xvi AFP Utilities for AS/400 User’s Guide
Page 19

About IBM Advanced Function Printing Utilities for AS/400
| The IBM Advanced Function Printing Utilities for AS/400 (AFP/U), Version 4
| Release 2, is a licensed program consisting of three integrated modules that
| provide support for Advanced Function Printing (AFP) applications on AS/400. This
| book describes how to use the AFP Utilities for AS/400. It includes detailed
| reference information as well as extensive examples.
This book consists of the following parts.
Introduction to IBM Advanced Function Printing Utilities for AS/400
introduces the concept of AFP Utilities for AS/400 and provides general
information.
Overlay Utility provides detailed information about the Overlay Utility, helps
you decide how to use the Overlay Utility, and provides practical exercises.
Print Format Utility provides detailed information about the Print Format Utility,
and describes how to use the Print Format Utility with practical exercises.
Design Operation and Fonts provides detailed information about designing
elements in an overlay, in a record layout, and in a page layout. It also
provides detailed information about the fonts that you can use for the Overlay
Utility and Print Format Utility.
Resource Management Utility provides detailed information about the
Resource Management Utility, and describes how to use the Resource
Management Utility with practical exercises.
Reference describes the AFP Utilities for AS/400 commands, the limitations
and restrictions of the AFP Utilities for AS/400 program, and provides problem
analysis information.
Practice exercises described in the “Getting Started with ...” chapters enable you to
quickly become familiar with AFP Utilities for AS/400. After the exercises, see the
| detailed information to do more complex tasks. The best resource for learning
| about AFP applications on AS/400 is the
|
Presentation and Print Services Facility,
AS/400 Guide to Advanced Function
S544-5319.
The following AS/400 books contain information you may need.
CL Reference
Printer Device Programming
, SC41-4722, provides the information about the CL commands.
, SC41-4713, provides the information about printing on
the AS/400 system.
|
| information about AFP printers, their characteristics, and resident fonts.
Advanced Function Presentation: Printer Information
, S544-3290, provides general
For information about other AS/400 publications, see either of the following:
The
The
Publications Reference
book, SC41-4003, in the AS/400 Softcopy Library.
AS/400 Information Directory
, a unique, multimedia interface to a
searchable database containing descriptions of titles available from IBM or from
selected other publishers. The
AS/400 Information Directory
is shipped with
your system at no charge.
Copyright IBM Corp. 1996, 1998 xvii
Page 20

Who Should Use This Book
This book is intended for AS/400 users, such as system administrators, system
programmers, and anyone who uses the AS/400 system.
Before you use this book, you should be familiar with the introductory material for
using the AS/400 system. You do not need to understand how to use a high-level
programming language to use AFP Utilities
xviii AFP Utilities for AS/400 User’s Guide
Page 21

Introduction to IBM Advanced Function Printing Utilities for
AS/400
Chapter 1. What are the IBM Advanced Function Printing Utilities for
AS/400? . . . . . . . . . . . . . . . . . . . . . . . . . . . . . . . . . . . . . . . . . 3
What You Can Do with AFP Utilities for AS/400 ................... 4
Using Overlays . . . . . . . . . . . . . . . . . . . . . . . . . . . . . . . . . . . . 6
Using Images . . . . . . . . . . . . . . . . . . . . . . . . . . . . . . . . . . . . . 8
Using Bar Codes ................................... 8
Using Graphics . . . . . . . . . . . . . . . . . . . . . . . . . . . . . . . . . . . . 8
Overlay Utility . . . . . . . . . . . . . . . . . . . . . . . . . . . . . . . . . . . . . . . 9
Print Format Utility ................................... 10
Resource Management Utility ............................. 12
AFP Resource and AFP Utilities for AS/400 .................... 13
Requirements for Use of the AFP Utilities for AS/400 ............... 13
Hardware Requirement . . . . . . . . . . . . . . . . . . . . . . . . . . . . . . . 13
Software Requirement . . . . . . . . . . . . . . . . . . . . . . . . . . . . . . . 14
AFP Utilities Fundamentals (Concepts) ....................... 14
Libraries, Files, and Members ........................... 14
Elements . . . . . . . . . . . . . . . . . . . . . . . . . . . . . . . . . . . . . . . 15
AFP Utilities for AS/400 Displays ......................... 15
Menu Display . . . . . . . . . . . . . . . . . . . . . . . . . . . . . . . . . . . 15
Work with Display ................................ 15
Design display . . . . . . . . . . . . . . . . . . . . . . . . . . . . . . . . . . 16
Function Keys . . . . . . . . . . . . . . . . . . . . . . . . . . . . . . . . . . . . 17
Related Online Information .............................. 19
Help for Displays .................................. 19
InfoSeeker . . . . . . . . . . . . . . . . . . . . . . . . . . . . . . . . . . . . . . 19
Help for Control Language Commands ...................... 19
Copyright IBM Corp. 1996, 1998 1
Page 22

2 AFP Utilities for AS/400 User’s Guide
Page 23

Chapter 1. What are the IBM Advanced Function Printing
Utilities for AS/400?
| The IBM Advanced Function Printing Utilities for AS/400 (AFP/U), Version 4
| Release 2, is a licensed program consisting three integrated utilities that provide
| support for Advanced Function Printing (AFP) applications on AS/400. These
| utilities enable you to create and manage electronic forms (overlays), to create and
| manage image resources, and to create AFP applications from AS/400 database
| files. The three AFP Utilities are:
| Overlay Utility: Enables you to create electronic forms directly on AS/400 for use
| in AS/400 AFP applications. The Overlay Utility works with any AS/400 terminal,
| providing an interactive design interface. Overlay Utility functions include:
| Create AFP electronic forms from any AS/400 terminal
| Place text, lines, boxes, shading, bar codes, graphics, and page segments at
| any location on the overlay page
| Present text in a wide variety of fonts using either downloadable fonts
| (AS/400-resident) or printer-resident fonts
| Present text in either single byte character sets (SBCS) or double byte
| character sets (DBCS)
| Present text in four orientations (across, down, back, and up) and three formats
| (horizontal, vertical, and vertical right to left)
| Define horizontal and vertical lines, with control of line type (solid, dashed, or
| dotted) and line thickness
| Define boxes, with control over box type (solid, dashed, or dotted) and shading
| Define any of 14 standard bar code symbologies with control over sizing,
| human-readable information, and orientation. Supported bar codes are:
| – 3-of-9 code, MHI/AIM US-3
| – Interleave 2-of-5
| – MSI Plessey
| – Industrial 2-of-5
| – Codabar
| – UPC-A
| – UPC-E
| – EAN-8
| – EAN-13
| – Matrix 2-of-5
| – POSTNET
| – Code128
| – Japan Postal
| – Royal Mail
| Position overlay, page segment, and graphic elements by row/column or direct
| page offset in inches or centimeters.
| Resource Management Utility: Provides full management of overlay and page
| segment (image) resources. Images scanned on a client workstation can be
| processed, resized, rotated, created, and printed. Resource Management Utility
| functions include:
| Manage overlays and overlay source files, including print and view options
| Create page segments from scanned image files, with sizing and rotation
| options
Copyright IBM Corp. 1996, 1998 3
Page 24

| Manage page segments, including print support
| Convert overlays and page segments to file format for use with client
| workstation applications
| Print Format Utility: Provides an interactive method for creating AFP printing
| applications directly from AS/400 database files. The Print Format Utility is similar
| to Query for AS/400, but the Print Format Utility is designed for creating AFP
| output, not reports. With the Print Format Utility, complex document applications
| that combine database-driven variable data with overlays, image, bar coding, fonts,
| and other document elements can be produced. Print Format Utility functions
| include:
| All of the text, box, line, bar code, graphics, and image functions supported with
| the Overlay Utility
| Ability to design a record layout and page layout
| Select records from a database file
| Place database fields anywhere in the record layout
| Place variable page segments (images) and graphics in the record layout
| Replicate the record layout across and down the page
| Select overlays to be added to each page
| Specify control breaks for selected fields in the database file
The AFP Utilities for AS/400 provide you the above AFP* functions on the AS/400
system interactively. You can perform your task by selecting options or typing
choices on the menu display.
This chapter describes the following:
What you can do with AFP Utilities for AS/400
Functions of AFP Utilities for AS/400
Requirements for use of AFP Utilities for AS/400
What You Can Do with AFP Utilities for AS/400
AFP Utilities for AS/400 enable you to print a document such as a business letter in
only one step. In conventional printing, you must load letterhead paper into your
printer, print the letter texts, and then manually sign the letter.
4 AFP Utilities for AS/400 User’s Guide
Page 25
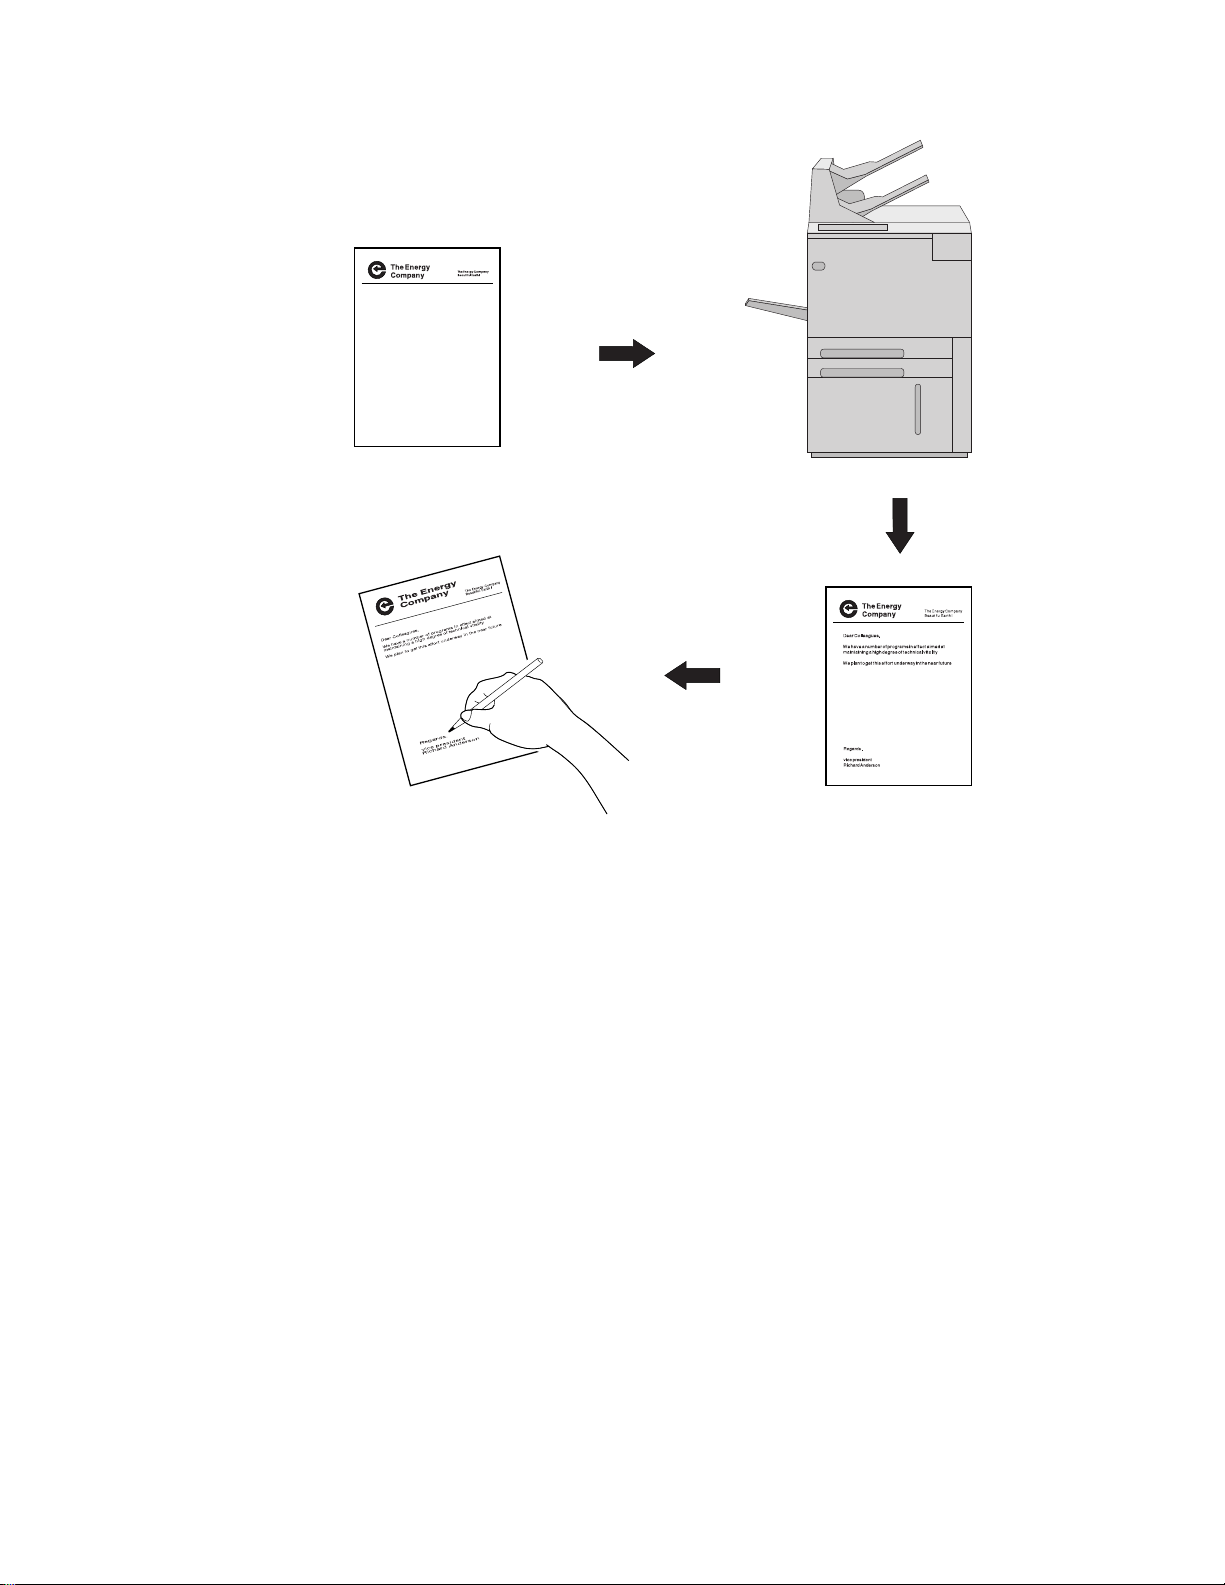
Figure 1. Conventional Letter Preparation
With the AFP Utilities for AS/400, you can electronically store your letterhead and
signature and print the letterhead, text, and signature all at the same time on blank
paper already in your IPDS printer. You can also include graphics such as a line
chart or bar chart in your letter, creating a composite document.
Chapter 1. What are the IBM Advanced Function Printing Utilities for AS/400? 5
Page 26
Figure 2. Letter Preparation Using AFP Utilities
| The AFP Utilities provide flexible printing. For example, with AFP Utilities you can:
Highlight a list of items by printing the list in a different type style from the
remainder of the text.
Print your letterhead in one font and your text in another font.
You can electronically store your letterhead so it always prints in the same style.
This printing concept is described in “Using Overlays.”
Using Overlays
Overlays are stored constructs of text, boxes, lines, graphics, images, and bar
codes with all the instructions needed to print. They are often in complex
configurations. An overlay is always printed in the same format as it was stored in
and can be positioned anywhere on the page.
Overlays are useful for letterheads and forms as shown in the following figure.
6 AFP Utilities for AS/400 User’s Guide
Page 27
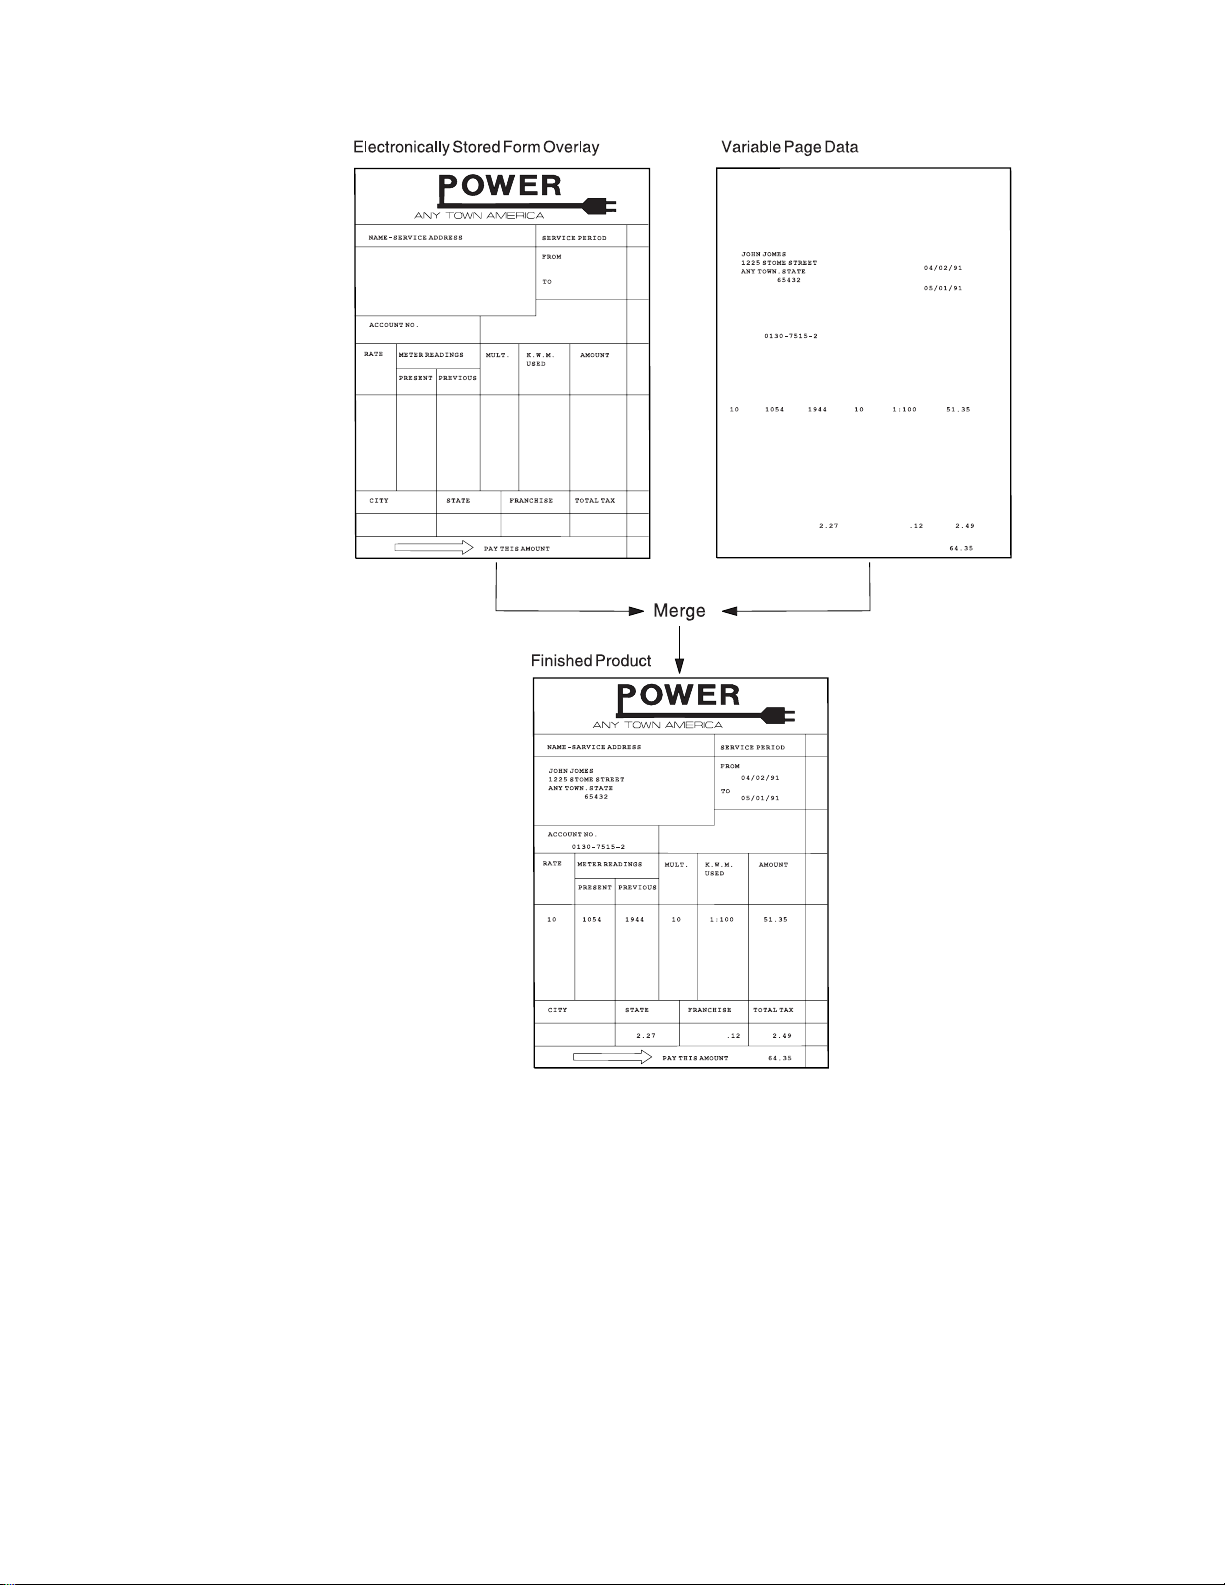
Figure 3. Using Overlays
Chapter 1. What are the IBM Advanced Function Printing Utilities for AS/400? 7
Page 28
Using Images
You can place images anywhere on the page.
Figure 4. Using Page Segments
Using Bar Codes
Bar code data is encoded information that is recognized by optical scanning
devices. The AFP Utilities for AS/400 can print various types of bar codes in any
size and with variations, such as with or without the human readable interpretation
(HRI) characters.
Using Graphics
The AFP Utilities for AS/400 can include the Graphics Data File (GDF). GDF can
| be created by OS/400* graphics or created by GDDM* on the System/390*. See
Appendix D, “Using GDFs in AFP Utilities” on page 441 for more information.
8 AFP Utilities for AS/400 User’s Guide
Page 29
Overlay Utility
| The Overlay Utility enables you to create overlays (electronic forms). Once
| created, an overlay can be placed on pages of output using AS/400 printer file
| support, Data Description Specifications (DDS) in conjunction with High-Level
| Language (HLL) application programs, Advanced Print Utility, AS/400 page and
| form definitions, AFP Toolbox for AS/400, Print Format Utility, and other AFP
| document enabling applications. Figure 3 on page 7 shows how an overlay can
| be merged with data.
You can:
Design an overlay interactively on a display screen.
An overlay can contain text with several kinds of fonts, lines, boxes, images,
bar codes, and graphics.
Store the source data of the overlay (source overlay) that you designed in your
file.
Change the source overlay that was previously stored in the file.
Create an overlay object from the source overlay.
Print the overlay object that was created in the specified library.
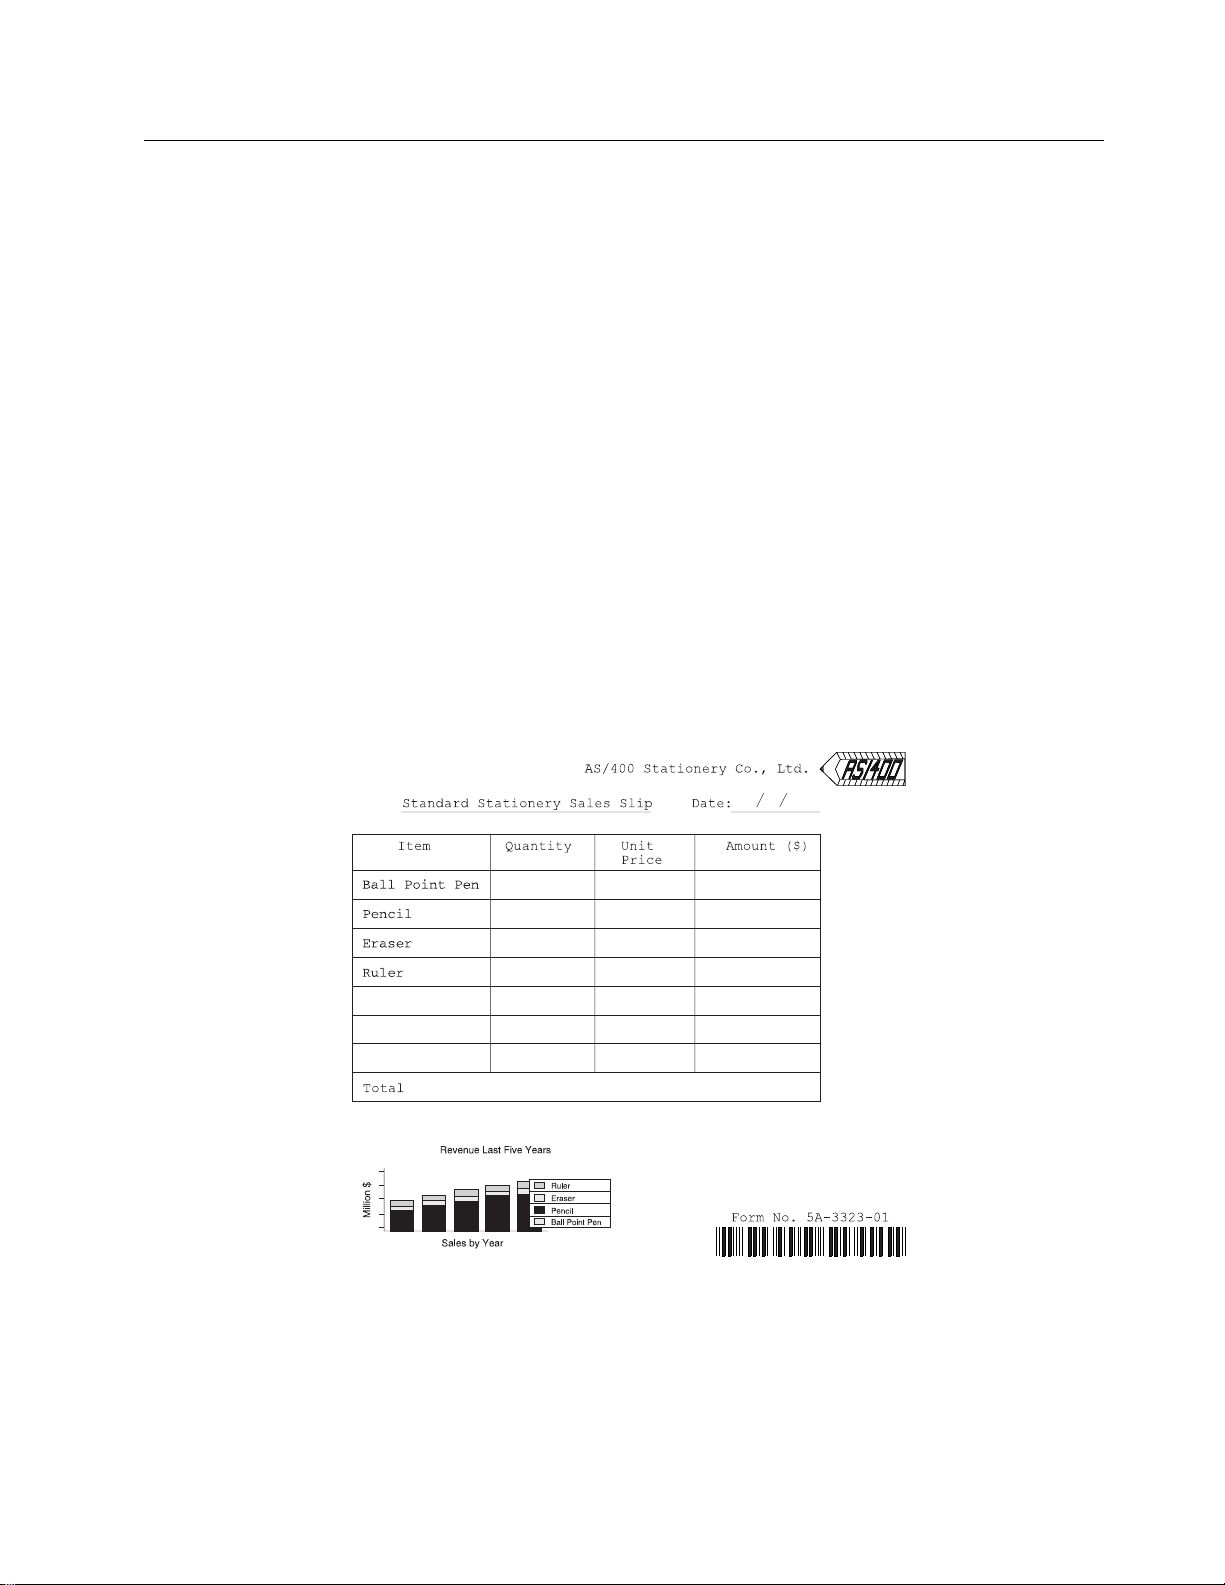
Figure 5 shows a sample overlay.
Figure 5. Sample Overlay (Created by the Overlay Utility)
Chapter 1. What are the IBM Advanced Function Printing Utilities for AS/400? 9
Page 30

Print Format Utility
| The Print Format Utility provides the capability to develop AFP output applications
| directly from AS/400 database files. With the Print Format Utility, you can:
Design your desired layout of a record interactively in the same way as the
Overlay Utility.
You can define headings, boxes, or logos which contain text, lines, boxes,
images, bar codes, and graphics to be printed in addition to the data in the
database file member.
Figure 6 shows a sample label you can create from a record in a database file
using the Print Format Utility.
Figure 6. Sample Label (Created by the Print Format Utility)
Design a page layout interactively in the same way as in the Overlay Utility.
You can define headings, boxes, or logos which contain text, lines, boxes,
images, bar codes, and graphics to be printed.
Save the record layout and page layout as a printout format definition in your
file.
Print a database file member according to the printout format definition.
| Replicate a record layout across and down the page such as in a multiple-up
| label application.
Figure 7 on page 11 shows a print sample of the labels you can create using the
Print Format Utility.
10 AFP Utilities for AS/400 User’s Guide
Page 31

Figure 7. Print Sample (Labels)
You can create various kinds of output from one database file member. For
| example, you can print a list of products, product descriptions, or even delivery
labels as shown below from one database file member by using different printout
format definitions.
Chapter 1. What are the IBM Advanced Function Printing Utilities for AS/400? 11
Page 32

┌───────────────┐
││
│ Database File │
││
└───────┬───────┘
│
┌──────────────────────┼─────────────────────────┐
│ │ │
│ │ │
┌───────────┐ ┌───────────┐ ┌───────────┐
│ Print │ │ Print │ │ Print │
│ Operation │ │ Operation │ │ Operation │
└─────┬─────┘ └─────┬─────┘ └─────┬─────┘
│ │ │
│ │ │
│ ┌───────────────┐ │ ┌───────────────┐ │ ┌───────────────┐
│─┤Printout Format│ │─┤Printout Format│ │─┤Printout Format│
│ │Definition 1 │ │ │Definition 2 │ │ │Definition 3 │
│ └───────────────┘ │ └───────────────┘ │ └───────────────┘
│ │ │
Printout 1 │ Printout 2 │ Printout 3 │
┌─────────────────────┐ ┌────────────────────┐ ┌───────────────────────────┐
│ List of products ││Product descriptions││ Delivery label │
│┌────────────┬─────┐ │ │ │ │ ┌──────────┐ ┌──────────┐ │
││Product Name│Price│ │ │ Product name: │ │ │ Color TV │ │ AM Radio │ │
│├────────────┼─────┤ │ │ ──────────────── │ │ │ 3 │ │ 2 │ │
││ Color TV │ 3│ │ │ Color TV │ │ │ ││ │││ │ │ │││ ││ │ │
││ AM Radio │ 2│ │ │ ──────────────── │ │ │ ││ │││ │ │ │││ ││ │ │
││ Video │ 5│ │ │ Price : $3. │ │ └──────────┘ └──────────┘ │
││ : │ : │ │ │ Country : U.S.A. │ │ ┌──────────┐ ┌──────────┐ │
││ │ │ │ │ Stock : xxxxx │ │ │ Video │ │CD Player │ │
││ │ │ │ │ : : │ │ │ 5 │ │ 1 │ │
││ │ │││ : : │││ ││ ││
││ │ │││ │││ ││ ││
││ │ │││ ││: :: :│
│└────────────┴─────┘ │ │ │ │ └──────────┘ └──────────┘ │
└─────────────────────┘ └────────────────────┘ └───────────────────────────┘
Resource Management Utility
| The images used by the Overlay Utility and the Print Format Utility (or any AFP
| application) are stored as page segments on AS/400. These images are normally
| scanned into a client workstation. The Resource Management Utility is an
| interactive tool to:
Convert an image to a page segment.
Convert a page segment to a physical file.
Convert an overlay object to a physical file.
| Resize and rotate images as they are being created.
It also maintains AFP resource objects, such as page segments or overlay objects.
You can:
Create a page segment from a physical file member.
Create a page segment from a PC document.
12 AFP Utilities for AS/400 User’s Guide
Page 33

Convert a page segment or an overlay to a physical file member. (You can
then transfer these AFP resource objects to other systems such as the
System/370.)
Copy, delete, rename, and print an overlay object, or display and change the
description of an overlay object.
Copy, delete, rename, and print a page segment, or display and change the
description of a page segment.
AFP Resource and AFP Utilities for AS/400
There are five kinds of AFP resources. The following table describes the
relationship between AFP resources and AFP Utilities for AS/400.
AFP Resource AS/400 Object
Type
Overlay *OVL Create, change1, copy, delete, print, rename,
Page segment *PAGSEG Create2, copy, delete, print, rename, display
| Form definition| *FORMDF| A form definition
| *INLINE can be specified for printing
| database file members.
Page definition *PAGDFN No relation
| Font| *FNTRSC| Font resources, both AS/400-resident and
| printer-resident, are used to print text within
| the Overlay Utility and the Print Format
| Utility.
Note:
1
means that an AFP Utilities for AS/400 source overlay is used.
2
means that a physical file or a PC document is used.
|
| when defining printout specifications for PFD Definitions.
3
The Form definition option can be specified when printing a database file member or
Relationship to AFP Utilities
display and change description, and convert
to a physical file.
and change description, and convert to a
physical file.
3
name or special value
Requirements for Use of the AFP Utilities for AS/400
To use the AFP Utilities for AS/400, the following hardware and software products
are required.
Hardware Requirement
Any model of AS/400.
Any model of a 5250 display terminal or 5250 emulated work station that
supports an 80 x 24 display size.
For DBCS support, a DBCS display work station is required.
One of the following IPDS printers is required:
– 4224, 4230, 4234-12, 4230-102, 4247, 6400, 6404, 6408, 3130, 3160,
3812, 3816, 3930, 3112, 3116, 4312, 4317, 3912, 3916, 3931, 3935 and
4028 with the Arctic attachment
– 3820 with SNA LU6.2 (SDLC attachment)
Chapter 1. What are the IBM Advanced Function Printing Utilities for AS/400? 13
Page 34

– 3820, 3825, 3827, 3829, 3831, 3835, and 3900 with the SNA LU6.2 (Token
Ring attachment through Remote Print Manager on Personal Computer AT*
or Personal System/2*)
Software Requirement
| OS/400 Version 4 Release 2.0.
| Print Services Facility for 400, Version 4 Release 2.0 (5769-SS1), for printing to
| IPDS printers. Overlays and AFP applications created by AFP/U can also be
| printed on HP-PCL printers if transformed first by the Host Print Transform,
| which is an integrated print subsystem of OS/400.
| Support for accessing image files on a client workstation through a program
| such as Client Access for AS/400.
| AS/400-resident AFP fonts as required by overlays and Print Format Utility
| applications. Fonts are available in 240 dot per inch (dpi), 300 dpi, and outline
| fonts with AFP Font Collection (5468-113), in both SBCS (single byte character
| set) and DBCS (double byte character set) versions.
AFP Utilities Fundamentals (Concepts)
This section describes the concepts and terminology used in AFP Utilities for
AS/400.
Libraries, Files, and Members
Information or data is organized and stored on your system in various forms. When
you work with AFP Utilities for AS/400, you need to understand the relationship
between libraries, files, and members on the AS/400. A library is a place on the
system to store files and objects. A file contains one or more members. When a
file is copied to another file, all the members that are contained in the original file
are copied to the new file also. When a file is erased, all the members that are
contained in the original file are erased also.
Figure 8 shows the relationship of the members and the files in the library.
Figure 8. Members and Files in a Library
When you create a member such as a source overlay or a printout format definition
(PFD definition), you need to create a library and a file (a source overlay file or a
PFD definition file) in advance to store the member.
14 AFP Utilities for AS/400 User’s Guide
Page 35

Elements
The elements are text, lines, boxes, bar codes, page segments, and graphics that
are defined in a source overlay and a printout format definition. In a page layout of
a printout format definition, you can define a record as an element.
See Chapter 13, “Design Operation” on page 219 for more information about
defining elements in a source overlay and a printout format definition.
AFP Utilities for AS/400 Displays
Several types of displays are shown when you use the AFP Utilities for AS/400.
Menu Display
When you start AFP Utilities for AS/400 by entering the STRAFPU command, the
menu for IBM Advanced Function Printing Utilities for AS/400 is shown. You can
start any function of AFP Utilities for AS/400 from this menu.
à ð
AFPU IBM Advanced Function Printing Utilities for AS/4ðð
Select one of the following:
Overlay Utility
1. Work with source overlays
2. Work with source overlay files
Print Format Utility
11. Work with PFD definitions
12. Work with PFD definition files
| 14. Print AFP Utilities tutorial
| Resource Management Utility
| 21. Convert to page segment
| 22. Work with overlays
| 23. Work with page segments
á
Figure 9. Menu for the IBM Advanced Function Printing Utilities for AS/400
13. Print database file member
Selection or command
===>
F3=Exit F4=Prompt F9=Retrieve F12=Cancel F16=System main menu
(C) COPYRIGHT IBM CORP. 1991, 1996.
Work with Display
To indicate fields on the Work with display, two different words are used in this
manual. They are prompts and columns.
ñ
Prompts:
type a response. For example, the
A prompt is a request for information on a display that allows you to
File, Library, Source overlay
, and
Position to
fields are prompts on the Work with Source Overlays display.
When
F4 for list
is shown to the right of the prompt, you can show a list by placing
the cursor in the field and pressing the F4 key.
Chapter 1. What are the IBM Advanced Function Printing Utilities for AS/400? 15
Page 36
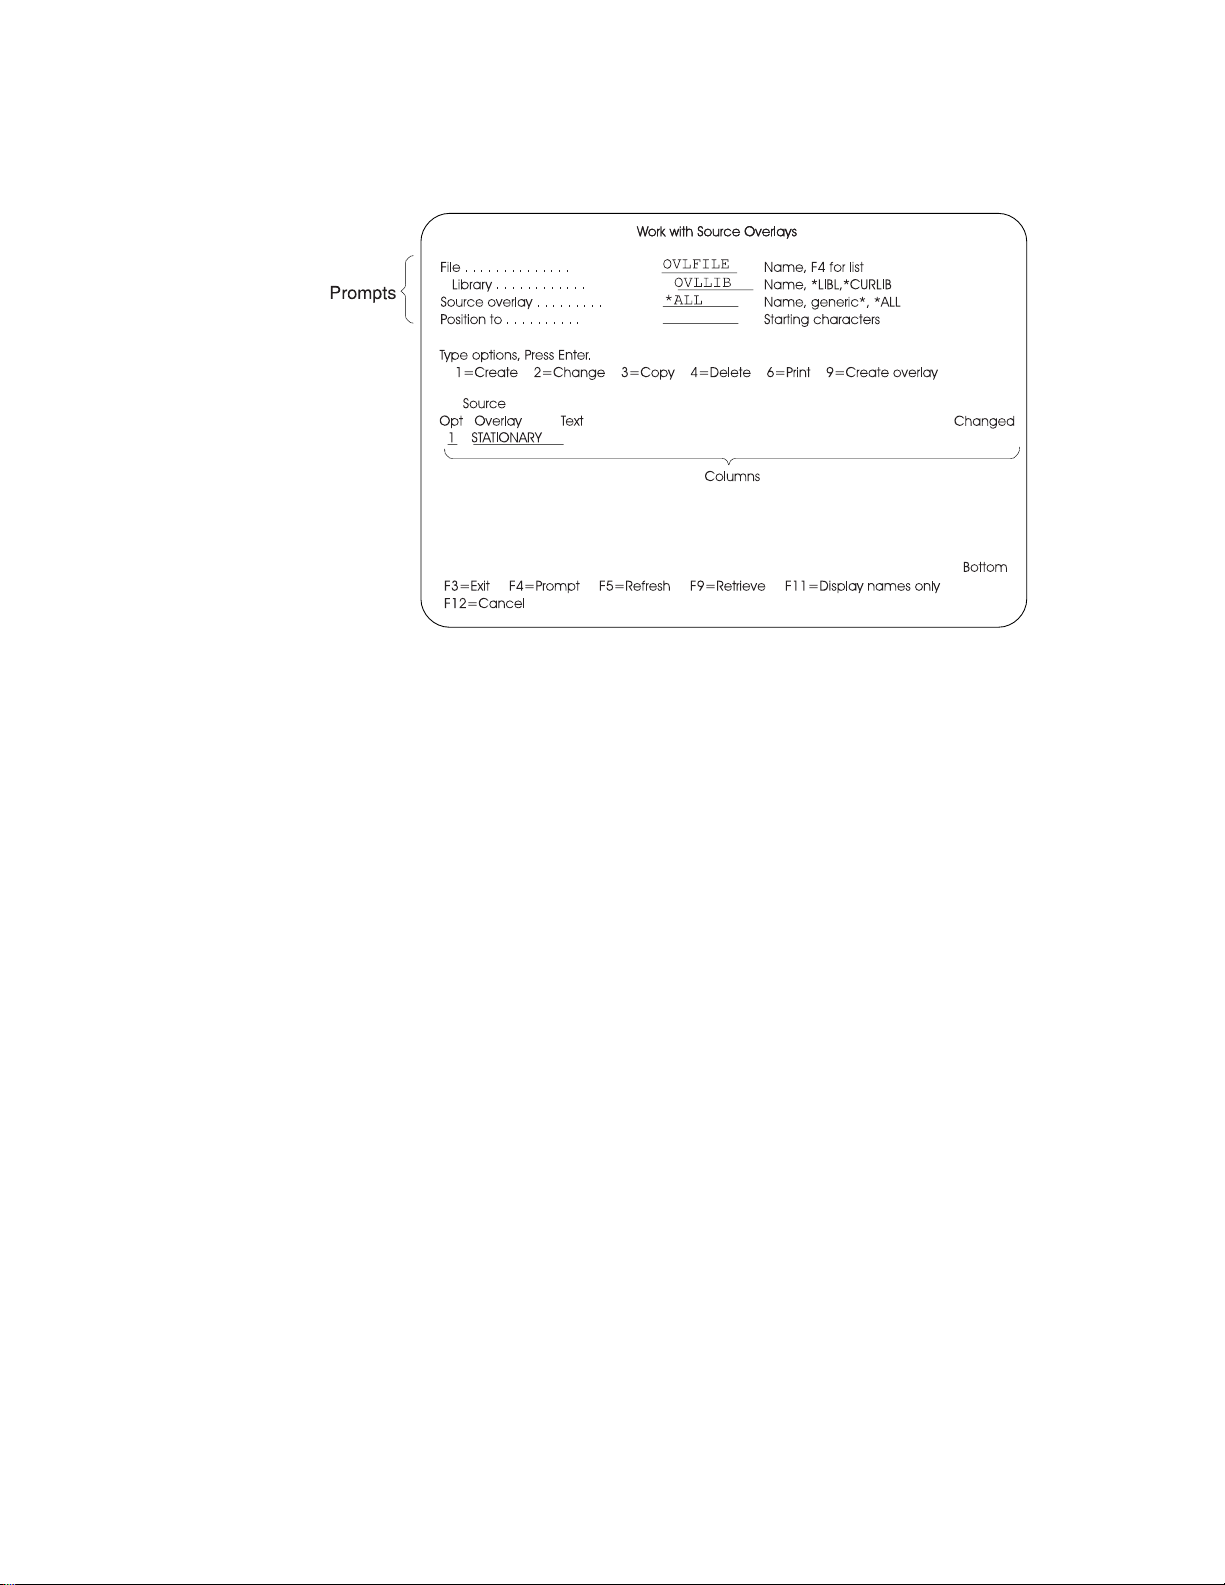
Columns:
define certain fields in a list. For example, the
Changed
Figure 10. Prompts and Columns on the Work with Source Overlays Display
A column is either a request for information or lines of information that
Opt, Source Overlay, Text
fields are columns on the Work with Source Overlays display.
, and
Design display
The following Design displays are available:
Design Overlay display
Design Record Layout display
Design Page Layout display
The Design display has two views. One is the screen view and the other is the
list view. You can switch the view from one to the other by pressing the F17 key.
┌───────────────────┐ F17 ┌────────────────┐
│ │ ───── │ │
│ Screen View │ │ List View │
│ │ ───── │ │
└───────────────────┘ F17 └────────────────┘
Screen View:
upper part of the screen called the image area. You can design an overlay, a
record layout, and a page layout while viewing the approximate print image being
created on the display. When you enter the Design display, the display is initially
set to the screen view.
In the screen view, the display is divided into the image area and the key entry
area when you define or change an element as follows:
In the screen view, an approximate print image is displayed in the
16 AFP Utilities for AS/400 User’s Guide
Page 37

à ð
Control . . _____ Source overlay . . . . . STATIONERY
...+....1....+....2....+....3....+....4....+....5....+....6....+....7....
1 ─┐
2 %T1 │
3 │
4 │
5 │
6 ├Image area
7 │
8 │
9 │
1 │
11 │
12 ─┘
More...
Define Text ─┐
Mark . . . . . . : T1 Measurement method . . . . : Row/Column │ Key entry
Position . . . . . Across 32 Down 2 ├ area
Text Data. . . . . │
─┘
F3=Exit F4=Detail F6=Change measurement method
F12=Cancel F24=More keys
á
Figure 11. Design Display
Design Overlay Columns: 1- 74
ñ
See “Defining Elements in the Screen View” on page 222 for more information.
List view:
In the list view, all element definitions are listed on the display in the
order of the sequence number unless the list has been sorted using F4=Sort. The
list can be sorted by the sequence number (NBR), name, or across or down
position. Each line describes one element. The intended use of the list view is to
view elements that are already designed and to make changes to the elements.
However, list view can also be used to define, copy, move, or remove elements.
You may easily find an element because you can see part of the definitions such
as the bar code data and the page segment name that are not displayed on the
image area in the screen view. You can switch to the screen view by pressing
F17. See “Changing Elements in the List View” on page 282 for more information.
Function Keys
| You can use the available function keys on each display in AFP Utilities for AS/400
| to perform specific tasks. For example, if you press F12, the display changes to
the one you worked on before the current display appeared.
Note: The functions available for your use are shown at the bottom of the display.
| If both lines show function keys, there may be additional ones that are not shown.
| To see a complete list of function keys supported on a display, press F24 to show
the remaining keys, or position the cursor in the function key area of the display
and press the Help key.
On the Design display, some function keys work differently depending on the
situation. See “Function Keys on the Design Display” on page 227 for the
description about the function keys supported on the Design displays.
Chapter 1. What are the IBM Advanced Function Printing Utilities for AS/400? 17
Page 38

Figure 12. Summary of AFP Utilities Function Keys
Work Station Key Key Name Description
F1 or Help Help Shows additional information about a
field, display, or message.
F3 Exit Ends the current task and returns to the
display where you started.
F4 For list or
Prompt
F5 Refresh Restore the input fields of the display to
F6 Change
measurement
method
F11 Alternate view If there is a list of information on the
F12 Cancel Quits the current display. Any
F24 More keys Shows the next set of function keys
Enter Enter Submits information on the display for
Roll Up (Page
Down)
Roll Down (Page
Up)
Roll Up (Page
Down)
Roll Down (Page
Up)
Print Print Prints information currently shown on
Sys Req System Request Interrupts the job you are currently
Shows a list of items you can select if
the cursor is on a field that supports F4
for list.
You can type a command on the
command line and press F4 to show
the prompt display of the command.
On the command prompt display, you
can press the F4 key to see a list of
possible entries for the field where the
cursor is positioned.
their original values. If there is a list of
information on the display, the list is
updated to reflect the latest information
of the system.
Change the measurement method used
to specify the position and other fields,
such as width and height, between
row/column and inch/centimeter.
display and the list has another format,
the list is changed to the other format.
For example, on the Work with Source
Overlays display, by pressing F11, the
Text disappears and additional source
overlay names are shown on the
display.
information entered is ignored. The
previous display appears.
available for the display.
processing.
Moves forward to show additional
information for this display or another
message.
Moves backward to show additional
information for this display or another
message.
this display.
working on and shows a menu from
which you can do various tasks.
18 AFP Utilities for AS/400 User’s Guide
Page 39

Related Online Information
The following online information is available on the AS/400 system. After pressing
the Help key on any menu, press the Help key a second time to see an explanation
of how the online information works, including the InfoSeeker function. You can
press either the Help key or F1 for help.
Help for Displays
| You can press the Help key on any display to see information about the display.
| Two types of help are available:
Contextual
Extended
InfoSeeker
Contextual help
the Help key. For example, it describes the choices available for a prompt. If a
system message appears at the bottom of the display, position the cursor on the
message and press the Help key to see information about the cause of the
message and the appropriate action to take.
Extended help
press the Help key when the cursor is outside the areas for which contextual help
is available, or if you press F2 (Extended help) when you are looking at the
contextual help.
To exit the online information, press F3 (Exit). You return to the display where you
pressed the Help key.
InfoSeeker is the OS/400 implementation of the IBM BookManager Read
architecture; InfoSeeker provides access to online books from any workstation. It
provides powerful search and retrieval functions and allows the grouping of
information to meet individual installation needs. InfoSeeker can read any book
created by the IBM BookManager BUILD license programs (available for VM, MVS,
and OS/2 systems).
To use InfoSeeker, press the Help key, then press F11 (InfoSeeker). You can also
use InfoSeeker by selecting option 20 (InfoSeeker) on the GO INFO menu.
explains the field on which the cursor is positioned when you press
explains the purpose of the display. Extended help appears if you
Help for Control Language Commands
To see prompts for parameters for a control language command, type the
command, then press F4 (Prompt) instead of the Enter key. To see extended help
for the command, type the command and press the Help key. You can see
contextual help for CL commands also.
Chapter 1. What are the IBM Advanced Function Printing Utilities for AS/400? 19
Page 40

20 AFP Utilities for AS/400 User’s Guide
Page 41

Overlay Utility
Chapter 2. Introduction to the Overlay Utility ................. 23
Print Form and Overlay ................................ 23
Source Overlay . . . . . . . . . . . . . . . . . . . . . . . . . . . . . . . . . . . . . 24
Overlay Specifications . . . . . . . . . . . . . . . . . . . . . . . . . . . . . . . 24
Overlay Fonts . . . . . . . . . . . . . . . . . . . . . . . . . . . . . . . . . . . . 24
Design Overlay . . . . . . . . . . . . . . . . . . . . . . . . . . . . . . . . . . . 24
Operation Flow . . . . . . . . . . . . . . . . . . . . . . . . . . . . . . . . . . . . . 25
Chapter 3. Getting Started with the Overlay Utility .............. 29
Step 1 - Starting the Overlay Utility ......................... 30
Step 2 - Creating a Source Overlay File ...................... 31
Step 3 - Creating a Source Overlay ......................... 33
Defining a Text Element .............................. 34
Defining a Line Element .............................. 37
Defining a Box Element .............................. 38
Defining a Bar Code Element ........................... 40
Placing a Graphics Element ............................ 42
| Viewing the Overlay with the AFP Workbench Viewer ............. 44
| Saving the Source Overlay ............................. 45
Step 4 - Changing a Source Overlay ........................ 48
Placing a Page Segment .............................. 48
Creating an Overlay from a Source Overlay ................... 53
Step 5 - Using an Overlay ............................... 55
Overriding a Printer File .............................. 55
Using the Printer File ................................ 55
Printing Overlays with AFP Utilities for AS/400 ................. 56
Chapter 4. Starting and Ending the Overlay Utility .............. 57
Starting the Overlay Utility ............................... 57
Option 1 (Work with source overlays) ...................... 58
Option 2 (Work with source overlay files) .................... 58
Ending the Overlay Utility ............................... 58
Chapter 5. Work with Source Overlays ..................... 59
Prompts . . . . . . . . . . . . . . . . . . . . . . . . . . . . . . . . . . . . . . . . 59
Options . . . . . . . . . . . . . . . . . . . . . . . . . . . . . . . . . . . . . . . . 60
Columns . . . . . . . . . . . . . . . . . . . . . . . . . . . . . . . . . . . . . . . 61
Showing a Source Overlay List ............................ 62
Selecting a Source Overlay from a List ....................... 62
1=Create a Source Overlay .............................. 63
Define Overlay Specifications ........................... 64
Change Overlay Specifications ......................... 67
Confirm Delete of Elements .......................... 69
Work with Source Overlay Fonts ......................... 70
Design Overlay . . . . . . . . . . . . . . . . . . . . . . . . . . . . . . . . . . . 70
Saving a Source Overlay ............................ 71
2=Change a Source Overlay ............................. 73
3=Copy a Source Overlay ............................... 74
4=Delete a Source Overlay .............................. 75
6=Print a Source Overlay ............................... 76
Copyright IBM Corp. 1996, 1998 21
Page 42

7=Rename a Source Overlay ............................. 77
9=Create Overlay . . . . . . . . . . . . . . . . . . . . . . . . . . . . . . . . . . . . 77
Chapter 6. Work with Source Overlay Files ................... 81
Prompts . . . . . . . . . . . . . . . . . . . . . . . . . . . . . . . . . . . . . . . . 83
Options . . . . . . . . . . . . . . . . . . . . . . . . . . . . . . . . . . . . . . . . 84
Columns . . . . . . . . . . . . . . . . . . . . . . . . . . . . . . . . . . . . . . . 85
Showing a Source Overlay File List ......................... 85
Selecting a Source Overlay File from a List .................... 86
1=Create Source Overlay File ............................ 87
2=Change Source Overlay File Description ..................... 89
3=Copy Source Overlay File ............................. 90
4=Delete Source Overlay File ............................. 91
7=Rename Source Overlay File ........................... 92
8=Display Description of Source Overlay File ................... 92
12=Work with Source Overlays ............................ 92
22 AFP Utilities for AS/400 User’s Guide
Page 43

Chapter 2. Introduction to the Overlay Utility
The Overlay Utility is one of the AFP Utilities that allows you to create electronic
form overlays, which can always be printed in their stored format and can be
positioned anywhere on the page.
Using the overlay utility, you can:
1. Design an overlay interactively on a display.
The information you defined for an overlay is called a source overlay.
2. Save a source overlay in your file.
3. Create an overlay object from a source overlay, which can be printed on the
IPDS printers.
You can change the design of the overlay by changing the source overlay.
Notes:
1. You cannot directly change the overlay object. You need to change the source
overlay and create the overlay object from it.
2. You can work with the overlay object using the resource management utility.
See Chapter 19, “Work with Overlays Function” on page 333 for more
information.
Print Form and Overlay
You can merge the overlay object with various spooled files as your final printout.
You can use overlays at any time you want on various types of forms. Thus, you
can eliminate the use of preprinted paper forms.
The overlay can be composed of text, images, graphics, lines, boxes, and bar
codes called elements. All of the environmental data (such as font references) is
defined as a part of the overlay definition. The fonts defined for the overlay are not
influenced by the fonts used for the variable data on the logical page.
The basic function of the overlay is to provide a template-like pattern that
establishes fixed data for merging with various spooled files.
For each element, you must specify its position and the horizontal and vertical
distances from the overlay origin. You can also specify the offset, and horizontal
and vertical distances of the overlay origin from the origin of the page. The initial
values are set to zero offset in both directions, which means the overlay origin will
coincide with the page origin. This eliminates the need for preprinted paper forms.
Figure 13 on page 24 shows a sample overlay.
Copyright IBM Corp. 1996, 1998 23
Page 44

Figure 13. Sample Overlay
Source Overlay
A source overlay provides the necessary information to create an overlay object
that can be printed on an IPDS printer.
The following information must be provided in a source overlay.
Overlay Specifications
The specifications contain characters per inch, lines per inch, degree of rotation,
default element measurement method, and so on.
Overlay Fonts
Fonts are predefined, but can be changed.
Design Overlay
An overlay image can be designed in a source overlay. The following elements
can be placed or defined in a source overlay.
Text Text, such as ABCDE, specified in an overlay is called a text
element. It can be placed at any specified position on the overlay.
The text attributes may also be specified to describe the text
characteristics such as font selection, vertical and horizontal
format, character size, overstrike, and color.
Line The line element is any straight line that connects two points either
vertically or horizontally. You may select the type of line, such as
dotted, dashed, or solid, and the line width.
24 AFP Utilities for AS/400 User’s Guide
Page 45

Box The box element is a rectangle that is defined by the two
diagonally opposite corners. It can be placed anywhere on the
overlay. You can select the shade pattern inside the box, the type
of box line (either dotted, dashed, or solid), and line width. You
may define text inside the box. Optionally, the text may be
justified inside the box.
Bar Code The bar code element is a set of bars and spaces of various width
created from data by IPDS printers or AFP Utilities. It can be
placed at a specified position on the overlay. You can specify the
following:
Bar code data
Placement position
Type of bar code
Size
Color
Whether or not to print a human-readable interpretation (HRI),
Whether or not to include a check digit.
Page Segment A page segment is an image in the AFP resource library. You can
refer to a page segment by its name and specify the print position
to define it as an overlay element. You can include the same
page segment repeatedly in an overlay.
| Graphic A graphic is an image constructed by vector data. Graphics can
| be created by using AS/400 GDDM (Graphical Data Display
| Manager) or Business Graphics Utility. A graphic is stored on
| AS/400 as a graphic data file. or AS/400 GDDM and stored in an
AS/400 file. You can refer to a graphics by its file and library
name and specify an area that is defined by the two diagonally
opposite corners to define it as an overlay element. See
Appendix D, “Using GDFs in AFP Utilities” on page 441 on how to
create GDF files.
You can select any of the overlay elements above and place them at the desired
positions to define the overlay.
Operation Flow
Figure 14 on page 26 shows an overview of the overlay utility operation and how
to create an overlay.
Chapter 2. Introduction to the Overlay Utility 25
Page 46

┌───────────────────┐
Step 1 │ Define overlay │
│ specifications │
│ and fonts │
└─────────┬─────────┘
│
┌──────────────────┼───────────────────┐
│ ┌─────────────│ │
││ │
│ │ ┌───────────────────┐ │
│ │ │ Place Element on │ │
│ │ │ a Source Overlay │ │
│ │ └─────────┬─────────┘ │
Step 2 │ │ │
│ │ ┌───────────────────┐ │
│ │ │ Define Contents │ │
│ │ │ of Element │ │
│ │ └─────────┬─────────┘ │
│ └──────────────┤ │
└──────────────────┼───────────────────┘
┌───────────────────┐
Step 3 │ Save a Source │
│ Overlay │
└─────────┬─────────┘
┌───────────────────┐
Step 4 │ Create │
│ an Overlay │
└───────────────────┘
Figure 14. Overview of Overlay Utility Operation
Step 1. This is an optional step.
You can change the default values of the overlay specifications. These
include printer type, characters per inch (CPI), lines per inch (LPI), degree
of rotation, unit of measure, default data elements measurement method,
overlay size, offset, and a grid to help design the overlay. See “Define
Overlay Specifications” on page 64 for more information.
You can change the fonts used to print text. See Chapter 14, “Work with
Fonts” on page 289 for more information.
Step 2. Design your overlay.
Repeat the following operations:
a. Position the cursor on the screen where you want to enter an
element, such as text, box, and so on.
b. Place an element in the overlay by pressing the function key assigned
for the element.
c. Type the element specification. After entering the data, a mark is
assigned for the element by the overlay utility. The mark is placed at
the element position on the screen.
See Chapter 13, “Design Operation” on page 219 for more information.
Step 3. After designing the overlay, save it as a source overlay in your library.
The overlay utility prompts you to specify the source overlay and library
name in which to save the source overlay. See “Saving a Source
Overlay” on page 71 for more information.
26 AFP Utilities for AS/400 User’s Guide
Page 47

Step 4. Create an overlay object from this source overlay and save it in the AFP
resource library. See “9=Create Overlay” on page 77 for more
information.
The following chapters show you how to:
Get started with the Overlay Utility and use it practically by performing an
exercise.
Start and end the overlay utility.
Work with a source overlay
– Create a source overlay
- Define overlay specifications
- Work with source overlay fonts
- Design overlay
– Change a source overlay
– Copy a source overlay
– Delete a source overlay
– Rename a source overlay
– Print a source overlay
– Create an overlay
Work with a source overlay file.
– Create a source overlay file
– Change a source overlay file description
– Copy a source overlay file
– Delete a source overlay file
– Rename a source overlay file
– Display a source overlay file description
While using IBM Advanced Function Printing Utilities for AS/400, you can press the
F1 key to display help information.
Chapter 2. Introduction to the Overlay Utility 27
Page 48

28 AFP Utilities for AS/400 User’s Guide
Page 49

Chapter 3. Getting Started with the Overlay Utility
This chapter describes how to create an overlay with the Overlay Utility by showing
a practical exercise.
The operational steps of creating an overlay with the Overlay Utility are as follows:
Step 1. Starting the Overlay Utility.
Step 2. Creating a source overlay file in a library.
Step 3. Creating a source overlay in the previously created source overlay file.
This step consists of the following sub-steps:
a. Designing a source overlay
1) Defining a text element
2) Defining a line element
3) Defining a box element
4) Defining a bar code element
5) Placing a graphics element
| b. Viewing the overlay with the AFP Workbench Viewer
c. Saving the source overlay
Step 4. Changing a source overlay.
This step consists of the following sub-steps:
a. Designing a source overlay, including placing a page segment.
b. Saving the source overlay.
c. Creating an overlay from a source overlay
Step 5. Using an overlay.
Notes:
1. Some printers do not support bar code and graphics architectures. If your
printer does not support graphics, you should not place graphics in a source
overlay. If your printer does not support bar codes, you should specify your
printer type on the Define Overlay Specifications display in the "Creating a
Source Overlay" step. AFP Utilities for AS/400 generates appropriate data to
print a bar code on those printers. See “Limitations for Each Printer” on
page 414 to check if your printer supports them.
2. To perform the following task, you need a page segment and a physical file.
Page segment QFCLOGO and physical file QAFCGRPH should exist in library
QGPL. If they do not exist, copy page segment QFCPAGS and physical file
QAFCGDF from library QAFP to library QGPL as page segment QFCLOGO
and physical file QAFCGRPH. You can use the Create Duplicate Object
(CRTDUPOBJ) command to accomplish this.
Copyright IBM Corp. 1996, 1998 29
Page 50

Step 1 - Starting the Overlay Utility
Example Actions:
1. Type STRAFPU on the command line.
2. Press the Enter key.
The IBM Advanced Function Printing Utilities for AS/400 menu appears.
à ð
AFPU IBM Advanced Function Printing Utilities for AS/4ðð
Select one of the following:
Overlay Utility
1. Work with source overlays
2. Work with source overlay files
Print Format Utility
11. Work with PFD definitions
12. Work with PFD definition files
| 14. Print AFP Utilities tutorial
13. Print database file member
Resource Management Utility
21. Convert to page segment
22. Work with overlays
23. Work with page segments
Selection or command
===> 2
F3=Exit F4=Prompt F9=Retrieve F12=Cancel F16=System main menu
(C) COPYRIGHT IBM CORP. 1991, 1996
á
ñ
From this display, you can select any function of AFP Utilities for AS/400.
The overlay utility functions are:
Option Function
1 Work with source overlays
2 Work with source overlay files
Before you create a source overlay, you must create a source overlay file to store
it.
Note: You need a library to create a source overlay. OVLLIB is used in the
following example, but you may use the name of your library instead. If you do not
have any libraries, create a library by typing CRTLIB OVLLIB on the command line
and pressing the Enter key.
30 AFP Utilities for AS/400 User’s Guide
Page 51

Step 2 - Creating a Source Overlay File
Example Actions:
1. Type 2 on the command line.
2. Press the Enter key.
The Work with Source Overlay Files display appears.
à ð
Type choices, press the Enter key.
Library . . . . . . . . . . . OVLLIB Name, USRLIBL, LIBL
File . . . . . . . . . . . . . ALL Name, generic, ALL
Parameters or command
===>
F3=Exit F4=Prompt F5=Refresh F9=Retrieve F12=Cancel
á
Example Action:
Work with Source Overlay Files
Type OVLLIB in the
Library
CURLIB, ALLUSR, ALL
prompt and press the Enter key to
list source overlay files stored in OVLLIB.
à ð
Library . . . . . . . . . OVLLIB Name, USRLIBL, LIBL, CURLIB...
File . . . . . . . . . . ALL Name, generic, ALL
Position to . . . . . . . Starting characters
Type options, press Enter.
1=Create 2=Change 3=Copy 4=Delete 7=Rename
8=Display description 12=Work with source overlays
Opt File Library Text Changed
1 OVLFILE OVLLIB
(No source overlay files in library)
Work with Source Overlay Files
ñ
Bottom
Parameters or command
===>
F3=Exit F4=Prompt F5=Refresh F9=Retrieve F11=Display names only
F12=Cancel
á
ñ
Note: No source overlay file is shown because no source overlay file is stored in
OVLLIB.
Chapter 3. Getting Started with the Overlay Utility 31
Page 52

Example Actions
1. Type 1 (Create) in the
2. Type OVLFILE in the
3. Type OVLLIB in the
Opt
column on the first line of the list.
File
column on the first line of the list.
Library
column on the first line of the list.
4. Press the Enter key.
The Create Source Overlay File display appears.
à ð
File . . . . . . . . . . . . : OVLFILE
Library . . . . . . . . . : OVLLIB
Type choices, press Enter.
User specified DBCS data . . N Y=Yes, N=No
Text 'description' . . . . . Source overlay file for exercise
Authority . . . . . . . . . LIBCRTAUT Name, LIBCRTAUT, ALL
F3=Exit F5=Refresh F12=Cancel
Create Source Overlay File
CHANGE, EXCLUDE, USE
á
ñ
From this display you can specify:
Whether or not you use DBCS data (this prompt is only displayed on DBCS
systems)
A short description of the source overlay file up to 50 SBCS characters long.
This description is saved with the source overlay file and displayed when the
source overlay files are listed to help you to identify the source overlay files.
Authority given to users who do not have specific authority to the source
overlay file.
Example Actions
1. Do not change the default value for the
User specified DBCS data
prompt.
Note: This prompt field appears only when your system is DBCS capable.
2. Type Source overlay file for exercise for the
Text 'description'
prompt.
3. Press the Enter key.
The Work with Source Overlays display appears.
32 AFP Utilities for AS/400 User’s Guide
Page 53

Step 3 - Creating a Source Overlay
In this step, an overlay is designed by creating a source overlay.
à ð
File . . . . . . . . . . OVLFILE Name, F4 for list
Library . . . . . . . . OVLLIB Name, LIBL, CURLIB
Source overlay . . . . . ALL Name, generic, ALL
Position to . . . . . . . Starting characters
Type options, press Enter.
1=Create 2=Change 3=Copy 4=Delete 6=Print 7=Rename
9=Create overlay
Source
Opt Overlay Text Changed
1 STATIONERY
(No source overlays in file)
Bottom
Parameters or command
===>
F3=Exit F4=Prompt F5=Refresh F9=Retrieve F11=Display names only
F12=Cancel
á
Work with Source Overlays
Example Actions
1. Type 1 (Create) in the
2. Type STATIONERY in the
Opt
column in the first line of the list.
Source Overlay
column in the first line of the list.
3. Press the Enter key.
ñ
Note: Unless it is changed, the first 8 characters of the source overlay name will
be used for the overlay (object) name when you create an overlay (object) using
option 9 (Create overlay). Any remaining characters are discarded.
The Create Source Overlay display appears.
à ð
File . . . . . . . . . . . . : OVLFILE
Library . . . . . . . . . : OVLLIB
Source overlay . . . . . . . : STATIONERY
Type options, press Enter.
1=Select
Opt Action
Define overlay specifications
Work with source overlay fonts
1 Design overlay
F3=Exit F5=Refresh F9=Select all F12=Cancel
Create Source Overlay
á
Chapter 3. Getting Started with the Overlay Utility 33
ñ
Page 54
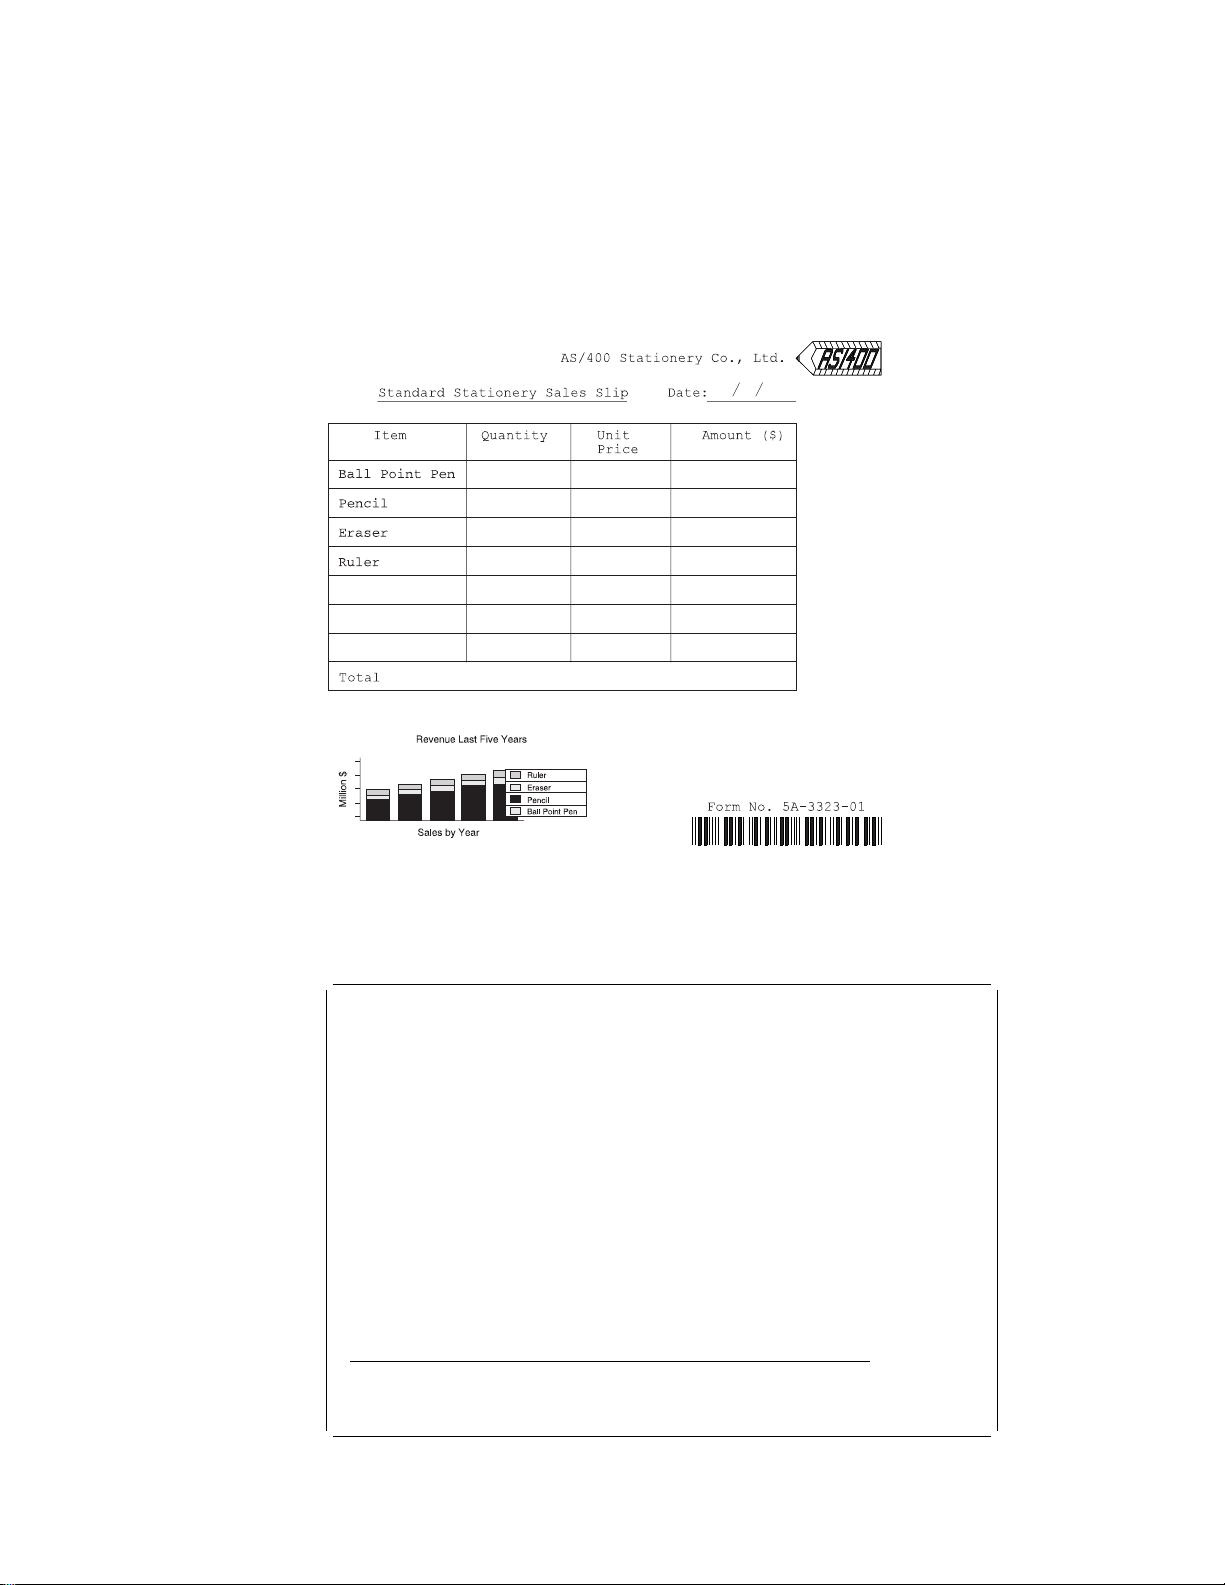
Example Action
1. Press the Enter key.
The Design Overlay display appears.
In this example, source overlay STATIONERY in OVLFILE is being used to design
an overlay.
Figure 15. Sample Overlay
Defining a Text Element
à
Control . . ______ Source overlay . . . . . STATIONERY
...+....1....+....2....+....3....+....4....+....5....+....6....+....7....
1
2
3
4
5
6
7
8
9
1
11
12
13
14
15
16
17
More...
F3=Exit F6=Text F9=Line F1=Box
F11=Bar code F21=Element edit F22=Block edit F24=More keys
á
Design Overlay Columns: 1- 74
ð
ñ
34 AFP Utilities for AS/400 User’s Guide
Page 55

Example Actions
1. Move the cursor to the position (Across : 32, Down : 2) where you want to
place the text.
2. Press the F6 key.
Mark %T1 to indicate a text element appears in the image area and the key entry
area appears on the lower part of the display.
à ð
Control . . ______ Source overlay . . . . . STATIONERY
...+....1....+....2....+....3....+....4....+....5....+....6....+....7....
1
2 %T1
3
4
5
6
7
8
9
1
11
12
More...
Define Text
Mark . . . . . . : T1 Measurement method . . . . : Row/Column
Position . . . . . Across 32 Down 2
Text data . . . . AS/4 Stationery Co., Ltd.
F3=Exit F4=Detail F6=Change measurement method
F12=Cancel F24=More keys
á
Design Overlay Columns: 1- 74
Example Actions
1. Type AS/4 Stationery Co., Ltd. in the
Text data
prompt.
2. Press the Enter key.
ñ
The following display appears.
à ð
Control . . ______ Source overlay . . . . . STATIONERY
...+....1....+....2....+....3....+....4....+....5....+....6....+....7....
1
2 T1 Stationery Co., Ltd.
3
4
5
6
7
8
9
1
11
12
13
14
15
16
17
More...
F3=Exit F6=Text F9=Line F1=Box
F11=Bar code F21=Element edit F22=Block edit F24=More keys
á
Chapter 3. Getting Started with the Overlay Utility 35
Design Overlay Columns: 1- 74
ñ
Page 56

Example Actions:
Define another text element.
1. Move the cursor to position (Across : 10, Down : 4).
2. Press the F6 key.
3. Type Standard Stationery Sales Slip Date: / / on the
Text data
prompt in the key entry area.
4. Press the Enter key.
The following display appears.
à ð
Control . . ______ Source overlay . . . . . STATIONERY
...+....1....+....2....+....3....+....4....+....5....+....6....+....7....
1
2 T1 Stationery Co., Ltd.
3
4 T2 rd Stationery Sales Slip Date: / /
5
6
7
8
9
1
11
12
13
14
15
16
17
More...
F3=Exit F6=Text F9=Line F1=Box
F11=Bar code F21=Element edit F22=Block edit F24=More keys
Design Overlay Columns: 1- 74
á
ñ
36 AFP Utilities for AS/400 User’s Guide
Page 57

Defining a Line Element
Example Actions
1. Move the cursor to position (Across : 10, Down : 5) to start defining a line.
2. Press the F9 key.
The following display appears.
à ð
Control . . ______ Source overlay . . . . . STATIONERY
...+....1....+....2....+....3....+....4....+....5....+....6....+....7....
1
2 T1 Stationery Co., Ltd.
3
4 T2 rd Stationery Sales Slip Date: / /
5 %L3
6
7
8
9
1
11
12
13
14
15
16
17
More...
F3=Exit F5=Refresh F9=Line F12=Cancel
F15=Mark on/off F16=Hide F19=Left F2=Right
Specify opposite end of line and press F9.
á
Design Overlay Columns: 1- 74
ñ
Example Actions
1. Move the cursor to position (Across : 39, Down : 5) to define the end of the
line.
2. Press the F9 key.
The key entry area appears on the display.
à ð
Control . . ______ Source overlay . . . . . STATIONERY
...+....1....+....2....+....3....+....4....+....5....+....6....+....7....
1
2 T1 Stationery Co., Ltd.
3
4 T2 rd Stationery Sales Slip Date: / /
5 %L3 ----------------------- 6
7
8
9
1
11
12
More...
Define Line
Mark . . . . . . : L3 Measurement method . . . . : Row/Column
Start position . . Across 1 Down 5
End position . . . Across 39 Down 5
F3=Exit F4=Detail F6=Change measurement method
F12=Cancel F24=More keys
á
Chapter 3. Getting Started with the Overlay Utility 37
Design Overlay Columns: 1- 74
ñ
Page 58

Example Action:
Press the Enter key to define the line element in the source
overlay.
The following display appears.
à ð
Control . . ______ Source overlay . . . . . STATIONERY
...+....1....+....2....+....3....+....4....+....5....+....6....+....7....
1
2 T1 Stationery Co., Ltd.
3
4 T2 rd Stationery Sales Slip Date: / /
5 L3 ----------------------- 6
7
8
9
1
11
12
13
14
15
16
17
More...
F3=Exit F6=Text F9=Line F1=Box
F11=Bar code F21=Element edit F22=Block edit F24=More keys
á
Design Overlay Columns: 1- 74
ñ
Mark %L003 changes to *L003 in the display to show that the line is correctly
defined.
Defining a Box Element
Example Action:
defining a box, and press the F10 key.
The following display appears.
à ð
Control . . ______ Source overlay . . . . . STATIONERY
...+....1....+....2....+....3....+....4....+....5....+....6....+....7....
1
2 T1 Stationery Co., Ltd.
3
4 T2 rd Stationery Sales Slip Date: / /
5 L3 ----------------------- 6
7 %B4
8
9
1
11
12
13
14
15
16
17
More...
F3=Exit F5=Refresh F1=Box F12=Cancel
F15=Mark on/off F16=Hide F19=Left F2=Right
Specify opposite corner of box and press F1ð.
á
Move the cursor to position (Across : 5, Down : 7) to start
Design Overlay Columns: 1- 74
ñ
38 AFP Utilities for AS/400 User’s Guide
Page 59

Example Actions
1. To specify the opposite corner of the box, press the Page Down (Roll Up) key
two times.
2. Move the cursor to position (Across : 60, Down : 26) to define the opposite
corner of the box and press the F10 key.
The key entry area appears on the display.
à ð
Control . . ______ Source overlay . . . . . STATIONERY
...+....1....+....2....+....3....+....4....+....5....+....6....+....7....
17 : :
18 : :
19 : :
2 : :
21 : :
22 : :
23 : :
24 : :
25 : :
26 +------------------------------------------------------+
27
28
More...
Define Box
Mark . . . . . . : B4 Measurement method . . . . : Row/Column
Start position . . Across 5 Down 7
End position . . . Across 6 Down 26
F3=Exit F4=Detail F6=Change measurement method
F12=Cancel F24=More keys
á
Example Action:
Press the Enter key to define the box element in the source
Design Overlay Columns: 1- 74
overlay.
The following display appears.
ñ
à ð
Control . . ______ Source overlay . . . . . STATIONERY
...+....1....+....2....+....3....+....4....+....5....+....6....+....7....
17 : :
18 : :
19 : :
2 : :
21 : :
22 : :
23 : :
24 : :
25 : :
26 +------------------------------------------------------+
27
28
29
3
31
32
33
More...
F3=Exit F6=Text F9=Line F1=Box
F11=Bar code F21=Element edit F22=Block edit F24=More keys
á
Chapter 3. Getting Started with the Overlay Utility 39
Design Overlay Columns: 1- 74
ñ
Page 60

Example Actions:
Define the following elements in the same way:
1. A line element from (Across : 5, Down : 24) to (Across : 60, Down : 24).
2. A line element from (Across : 5, Down : 22) to (Across : 60, Down : 22).
3. A line element from (Across : 5, Down : 20) to (Across : 60, Down : 20).
4. A line element from (Across : 5, Down : 18) to (Across : 60, Down : 18).
5. A line element from (Across : 5, Down : 16) to (Across : 60, Down : 16).
6. A line element from (Across : 5, Down : 14) to (Across : 60, Down : 14).
7. A line element from (Across : 5, Down : 12) to (Across : 60, Down : 12).
8. A line element from (Across : 5, Down : 10) to (Across : 60, Down : 10).
9. A text element Ball Point Pen at (Across : 7, Down : 11).
10. A text element Pencil at (Across : 7, Down : 13).
11. A text element Eraser at (Across : 7, Down : 15).
12. A text element Ruler at (Across : 7, Down : 17).
13. A line element from (Across : 22, Down : 7) to (Across : 22, Down : 24).
14. A text element Total at (Across : 7, Down : 25).
15. A line element from (Across : 35, Down : 24) to (Across : 35, Down : 7).
16. A line element from (Across : 46, Down : 7) to (Across : 46, Down : 24).
17. A text element Item at (Across : 10, Down : 8).
18. A text element Quantity at (Across : 24, Down : 8).
19. A text element Unit at (Across : 37, Down : 8).
20. A text element Price at (Across : 37, Down : 9).
21. A text element Amount($) at (Across : 48, Down : 8).
22. A line element from (Across : 52, Down : 5) to (Across : 59, Down : 5).
23. A text element Form No. 5A-3233-1 at (Across : 45, Down : 33).
When the above elements are defined, the following display appears.
à ð
Control . . ______ Source overlay . . . . . STATIONERY
...+....1....+....2....+....3....+....4....+....5....+....6....+....7....
25 : T18 :
26 +------------------------------------------------------+
27
28
29
3
31
32
33 T27 o. 5A-3233-1
34
35
36
37
38
39
4
41
More...
F3=Exit F6=Text F9=Line F1=Box
F11=Bar code F21=Element edit F22=Block edit F24=More keys
á
Defining a Bar Code Element
Now, define a bar code element below text element *T027.
Design Overlay Columns: 1- 74
ñ
40 AFP Utilities for AS/400 User’s Guide
Page 61

Example Action:
Move the cursor to position (Across : 43, Down : 34) to define a
bar code element, and press the F11 key.
The following display appears.
à ð
Control . . ______ Source overlay . . . . . STATIONERY
...+....1....+....2....+....3....+....4....+....5....+....6....+....7....
25 : T18 :
26 +------------------------------------------------------+
27
28
29
3
31
32
33 T27 o. 5A-3233-1
34 %C28
35
36
More...
Define Bar Code
Mark . . . . . . : C28 Measurement method . . . . : Row/Column
Position . . . . . Across 43 Down 34 Bar code type . . . 1
Bar code data . . 5A-3233-1
F3=Exit F4=Detail F6=Change measurement method
F12=Cancel F24=More keys
á
Design Overlay Columns: 1- 74
ñ
Example Action
1. Type 1 in the
2. Type 5A-3233-1 in the
Bar code type
Bar code data
prompt.
prompt.
3. Press the Enter key to define the bar code element in the source overlay.
The following display appears.
à ð
Control . . ______ Source overlay . . . . . STATIONERY
...+....1....+....2....+....3....+....4....+....5....+....6....+....7....
25 : T18 :
26 +------------------------------------------------------+
27
28
29
3
31
32
33 T27 o. 5A-3233-1
34 C28
35
36
37
38
39
4
41
More...
F3=Exit F6=Text F9=Line F1=Box
F11=Bar code F21=Element edit F22=Block edit F24=More keys
Design Overlay Columns: 1- 74
á
Chapter 3. Getting Started with the Overlay Utility 41
ñ
Page 62

Placing a Graphics Element
Note: If your selected printer does not support graphics, skip this section.
Now, place a graphics element at the bottom of the overlay.
Example Actions
1. Move the cursor to position (Across : 5, Down : 28) to place a graphics
element.
2. Press the F13 key, then press the F6 key.
The following display appears.
à ð
Control . . ______ Source overlay . . . . . STATIONERY
...+....1....+....2....+....3....+....4....+....5....+....6....+....7....
25 : T18 :
26 +------------------------------------------------------+
27
28 %G29
29
3
31
32
33 T27 o. 5A-3233-1
34 C28
35
36
37
38
39
4
41
More...
F3=Exit F5=Refresh F6=Place graphics F12=Cancel
F15=Mark on/off F16=Hide F19=Left F2=Right
Specify opposite corner of graphics block and press F6.
á
Example Action:
Move the cursor to the right bottom corner of the graphics area
Design Overlay Columns: 1- 74
(Across: 25, Down: 34) and press the PF6 key again.
The following display appears.
ñ
42 AFP Utilities for AS/400 User’s Guide
Page 63

à ð
Control . . ______ Source overlay . . . . . STATIONERY
...+....1....+....2....+....3....+....4....+....5....+....6....+....7....
25 : T18 :
26 +------------------------------------------------------+
27
28 %G29 -------------+
29 : :
3 : :
31 : :
32 : :
More...
Place Graphics
Mark . . . . . . : G29 Measurement method . . . . : Row/Column
Start position . . Across 5 Down 28
End position . . . Across 25 Down 34
Source object type . 2 1=PC document, 2=File
F3=Exit F5=Refresh F6=Change measurement method F12=Cancel
F15=Mark on/off F16=Hide F19=Left F2=Right
á
Design Overlay Columns: 1- 74
Example Actions
1. Type 2 in the
Source object type
prompt.
2. Press the Enter key.
ñ
The following display appears.
à ð
Control . . ______ Source overlay . . . . . STATIONERY
...+....1....+....2....+....3....+....4....+....5....+....6....+....7....
25 : T18 :
26 +------------------------------------------------------+
27
28 %G29 --------------+
29 : :
3 : :
31 : :
32 : :
More...
Place Graphics
Mark . . . . . . : G29 Measurement method . . . . : Row/Column
Start position . . Across 5 Down 28
End position . . . Across 25 Down 34
Source object type . 2 1=PC document, 2=File
File . . . . . . . . QAFCGRPH Name
Library . . . . . QGPL Name, LIBL, CURLIB
Member . . . . . . . FIRST Name, FIRST
F3=Exit F4=Detail F6=Change measurement method
F12=Cancel F24=More keys
á
Design Overlay Columns: 1- 74
Example Actions
1. Type QAFCGRPH in the
2. Type QGPL in the
File
Library
prompt.
prompt.
3. Press the Enter key.
ñ
FIRST in the
Chapter 3. Getting Started with the Overlay Utility 43
Member
prompt changes to QAFCGDF.
Page 64

Example Action:
Press the Enter key again to place the graphics element in the
source overlay.
The following display appears.
à ð
Control . . ______ Source overlay . . . . . STATIONERY
...+....1....+....2....+....3....+....4....+....5....+....6....+....7....
25 : T18 :
26 +------------------------------------------------------+
27
28 G29 -----------------+
29 : :
3 : :
31 : :
32 : :
33 : : T27 o. 5A-3233-1
34 +----------------------+ C28
35
36
37
38
39
4
41
More...
F3=Exit F6=Text F9=Line F1=Box
F11=Bar code F21=Element edit F22=Block edit F24=More keys
á
Design Overlay Columns: 1- 74
ñ
All elements have been defined.
| Viewing the Overlay with the AFP Workbench Viewer
| Note: To use the AFP Workbench Viewer, the workstation must be a
programmable workstation (PC) and connected to the AS/400 system with Client
Access for OS/400 V3R1M3 or later. See the online Client Access Users Guide for
information about connecting Client Access to the AS/400. The Client Access
connection must use the same user ID that is used for the AS/400 session. The
| Client Access Workbench Viewer must also be installed on the PC. If your
| workstation is not a PC or the Client Access Workbench Viewer is not installed on
| your system, skip this step.
| Now view what the overlay will look like by using the AFP Workbench Viewer.
|
| 1. Press the TAB key to position the cursor to the Control field.
| 2. Type VIEW, and press Enter.
| A display appears showing a simulated printout of a temporary overlay object
| created from your source overlay. When you are finished looking at the simulated
| printout, close the window and proceed.
| Note: Included page segments that are not in a library that is in the system library
| list will not be displayed. Message CWBNP1019, AFP Resource not found, will be
| displayed instead. To view these page segments, do one of the following:
Example Actions
| Add the library name to the system library list (command CHGSYSLIBL).
| Copy the page segments to library QGPL (command CRTDUPOBJ).
44 AFP Utilities for AS/400 User’s Guide
Page 65

| Saving the Source Overlay
Example Action:
The following display appears.
Press the F3 key (Exit).
à ð
File . . . . . . . . . . . . : OVLFILE
Library . . . . . . . . . : OVLLIB
Source overlay . . . . . . . : STATIONERY
Type options, press Enter.
1=Select
Opt Action
Define overlay specifications
Work with source overlay fonts
Design overlay
F3=Exit F5=Refresh F9=Select all
á
Example Action:
Press the F3 key to exit from this display.
Create Source Overlay
The following display appears.
ñ
à ð
Type choices, press Enter.
Option . . . . . . . . . . . . . 1 1=Save and exit
Return to source overlay list . . Y Y=Yes, N=No
F12=Cancel
á
Exit Overlay Utility
2=Exit without saving
3=Resume Overlay Utility session
Example Actions
1. Type 1 (Save and exit) in the
Option
prompt.
2. Press the Enter key.
ñ
The following display appears.
Chapter 3. Getting Started with the Overlay Utility 45
Page 66

à ð
Type choices, press Enter.
Source overlay . . . . . . . . . . . STATIONERY Name, F4 for list
File . . . . . . . . . . . . . . . . OVLFILE Name, F4 for list
Library . . . . . . . . . . . . . OVLLIB Name, CURLIB
Text 'description' . . . . . . . . . Sample Form number 3
Delete removed elements . . . . . . N Y=Yes, N=No
F4=Prompt F5=Refresh F12=Cancel
á
Save Source Overlay
Example Actions
1. Type Sample Form number 3 in the
Text 'description'
prompt.
2. Press the Enter key.
ñ
The following display appears.
à ð
Create Overlay
File . . . . . . . . . . . . : OVLFILE
Library . . . . . . . . . : OVLLIB
Source overlay . . . . . . . : STATIONERY
Text . . . . . . . . . . . . : Sample Form number 3
Type choices, press Enter.
Create overlay . . . . . . . N Y=Yes, N=No
Overlay . . . . . . . . . . STATIONE Name
Library . . . . . . . . . OVLLIB Name, CURLIB
Text 'description' . . . . . Sample Form number 3
Include grid . . . . . . . . N Y=Yes, N=No
Replace if exists . . . . . N Y=Yes, N=No
Print overlay . . . . . . . N Y=Yes, N=No
Authority . . . . . . . . . LIBCRTAUT Name, LIBCRTAUT, ALL
F3=Exit F5=Refresh F12=Cancel
á
Example Action:
Press the Enter key.
CHANGE, EXCLUDE, USE
ñ
The following display appears with the completion message.
46 AFP Utilities for AS/400 User’s Guide
Page 67

à ð
File . . . . . . . . . . OVLFILE Name, F4 for list
Library . . . . . . . . OVLLIB Name, LIBL, CURLIB
Source overlay . . . . . ALL Name, generic, ALL
Position to . . . . . . . Starting characters
Type options, press Enter.
1=Create 2=Change 3=Copy 4=Delete 6=Print 7=Rename
9=Create overlay
Source
Opt Overlay Text Changed
STATIONERY
STATIONERY Sample Form number 3 12/12/9
Bottom
Parameters or command
===>
F3=Exit F4=Prompt F5=Refresh F9=Retrieve F11=Display names only
F12=Cancel
Source overlay STATIONERY saved in file OVLFILE successfully.
á
Work with Source Overlays
ñ
Source overlay STATIONERY has been created in file OVLFILE in library OVLLIB,
and it is shown in the list.
Example Action:
Press the F3 key to complete the source overlay creation.
The following display appears.
à ð
Library . . . . . . . . . OVLLIB Name, USRLIBL, LIBL, CURLIB...
File . . . . . . . . . . ALL Name, generic, ALL
Position to . . . . . . . Starting characters
Type options, press Enter.
1=Create 2=Change 3=Copy 4=Delete 8=Display description
12=Work with source overlays
Opt File Library Text Changed
OVLFILE OVLLIB
OVLFILE OVLLIB Source overlay file for exerci 12/12/9
Bottom
Parameters or command
===>
F3=Exit F4=Prompt F5=Refresh F9=Retrieve F12=Cancel
Source overlay file OVLFILE created in library OVLLIB.
á
Work with Source Overlay Files
ñ
Source overlay file OVLFILE, which contains source overlay STATIONERY, has
been created in library OVLLIB, and it is shown in the list.
Example Action:
Press the F3 key to exit from this display.
The IBM Advanced Function Printing Utilities for AS/400 menu appears.
Chapter 3. Getting Started with the Overlay Utility 47
Page 68

Step 4 - Changing a Source Overlay
Placing a Page Segment
When you want to place a logo image, created as a page segment, on the overlay
that you have created, perform the following:
Example Actions:
1. Type STRAFPU on the command line.
2. Press the Enter key.
The IBM Advanced Function Printing Utilities for AS/400 menu appears.
à ð
AFPU IBM Advanced Function Printing Utilities for AS/4ðð
Select one of the following:
Overlay Utility
1. Work with source overlays
2. Work with source overlay files
Print Format Utility
11. Work with PFD definitions
12. Work with PFD definition files
| 14. Print AFP Utilities tutorial
13. Print database file member
Resource Management Utility
21. Convert to page segment
22. Work with overlays
23. Work with page segments
Selection or command
===> 1
F3=Exit F4=Prompt F9=Retrieve F12=Cancel F16=System main menu
(C) COPYRIGHT IBM CORP. 1991, 1996.
á
ñ
Example Actions:
1. Type 1 on the command line.
2. Press the Enter key.
The Work with Source Overlays display appears.
48 AFP Utilities for AS/400 User’s Guide
Page 69

à ð
File . . . . . . . . . . OVLFILE Name, F4 for list
Library . . . . . . . . OVLLIB Name, LIBL, CURLIB
Source overlay . . . . . ALL Name, generic, ALL
Position to . . . . . . . Starting characters
Type options, press Enter.
1=Create 2=Change 3=Copy 4=Delete 6=Print 7=Rename
9=Create overlay
Source
Opt Overlay Text Changed
2 STATIONERY Sample Form number 3 12/12/9
Bottom
Parameters or command
===>
F3=Exit F4=Prompt F5=Refresh F9=Retrieve F11=Display names only
F12=Cancel
á
Work with Source Overlays
Example Actions:
1. Type 2 in the
Opt
column next to the source overlay name STATIONERY.
2. Press the Enter key.
ñ
The Change Source Overlay display appears.
à ð
File . . . . . . . . . . . . : OVLFILE
Library . . . . . . . . . : OVLLIB
Source overlay . . . . . . . : STATIONERY
Type options, press Enter.
1=Select
Opt Action
Define overlay specifications
Work with source overlay fonts
1 Design overlay
F3=Exit F5=Refresh F9=Select all F12=Cancel
á
Example Action:
Press the Enter key.
Change Source Overlay
ñ
The Design Overlay display appears.
Chapter 3. Getting Started with the Overlay Utility 49
Page 70

à ð
Control . . ______ Source overlay . . . . . STATIONERY
...+....1....+....2....+....3....+....4....+....5....+....6....+....7....
1
2 T1 Stationery Co., Ltd.
3
4 T2 rd Stationery Sales Slip Date: / /
5 L3 ------------------------ L26 - 6
7 B4 -----------L17 -------:----------L2 --------+
8 : T21 : T22 ty : T23 : T25 ( $ ):
9 : : : T24 : :
1 L12 -----------:------------:----------:------------- 11 : T13 oint Pen : : : :
12 L11 -----------:------------:----------:------------- 13 : T14 : : : :
14 L1 -----------:------------:----------:------------- 15 : T15 : : : :
16 L9 -----------:------------:----------:------------- 17 : T16 : : : :
More...
F3=Exit F6=Text F9=Line F1=Box
F11=Bar code F21=Element edit F22=Block edit F24=More keys
á
Design Overlay Columns: 1- 74
ñ
Example Actions:
1. Move the cursor to position (Across : 60, Down 1) to place the logo.
2. Press the F13 key.
A % appears at the cursor position, a message prompts you to press the F9 key,
and the function key area changes.
à ð
Control . . ______ Source overlay . . . . . STATIONERY
...+....1....+....2....+....3....+....4....+....5....+....6....+....7....
1 %
2 T1 Stationery Co., Ltd.
3
4 T2 rd Stationery Sales Slip Date: / /
5 L3 ------------------------ L26 - 6
7 B4 -----------L17 -------:----------L2 --------+
8 : T21 : T22 ty : T23 : T25 ( $ ):
9 : : : T24 : :
1 L12 -----------:------------:----------:------------- 11 : T13 oint Pen : : : :
12 L11 -----------:------------:----------:------------- 13 : T14 : : : :
14 L1 -----------:------------:----------:------------- 15 : T15 : : : :
16 L9 -----------:------------:----------:------------- 17 : T16 : : : :
More...
F3=Exit F6=Place graphics F9=Place page segment F12=Cancel
F24=More keys
Press F6 or F9 to place graphics or page segment.
á
Example Action:
Press the F9 key.
Design Overlay Columns: 1- 74
ñ
The mark %S030 appears in the image area, indicating a page segment, and the
key entry area is displayed, prompting you to enter a page segment name.
50 AFP Utilities for AS/400 User’s Guide
Page 71

à ð
Control . . ______ Source overlay . . . . . STATIONERY
...+....1....+....2....+....3....+....4....+....5....+....6....+....7....
1 %S3
2 T1 Stationery Co., Ltd.
3
4 T2 rd Stationery Sales Slip Date: / /
5 L3 ------------------------ L26 - 6
7 B4 -----------L17 -------:----------L2 --------+
8 : T21 : T22 ty : T23 : T25 ( $ ):
9 : : : T24 : :
1 L12 -----------:------------:----------:------------- 11 : T13 oint Pen : : : :
12 L11 -----------:------------:----------:------------- More...
Place Page Segment
Mark . . . . . . : S3 Measurement method . . . . : Row/Column
Position . . . . . Across 6 Down 1
Page Segment . . . QFCLOGO Name
F3=Exit F4=Detail F6=Change measurement method
F12=Cancel F24=More keys
á
Design Overlay Columns: 1- 74
ñ
Example Actions:
1. Type QFCLOGO for the
Page segment
prompt.
2. Press the Enter key.
Note: The page segment you specify is not searched for now, but is searched for
in the libraries in the library list when the overlay is printed. See “Page Segment”
on page 389 for more information.
The mark changes from %S030 to *S030 to indicate the element has been placed.
à ð
Control . . ______ Source overlay . . . . . STATIONERY
...+....1....+....2....+....3....+....4....+....5....+....6....+....7....
1 S3
2 T1 Stationery Co., Ltd.
3
4 T2 rd Stationery Sales Slip Date: / /
5 L3 ------------------------ L26 - 6
7 B4 -----------L17 -------:----------L2 --------+
8 : T21 : T22 ty : T23 : T25 ( $ ):
9 : : : T24 : :
1 L12 -----------:------------:----------:------------- 11 : T13 oint Pen : : : :
12 L11 -----------:------------:----------:------------- 13 : T14 : : : :
14 L1 -----------:------------:----------:------------- 15 : T15 : : : :
16 L9 -----------:------------:----------:------------- 17 : T16 : : : :
More...
F3=Exit F6=Text F9=Line F1=Box
F11=Bar code F21=Element edit F22=Block edit F24=More keys
á
Example Action:
Press the F3 key to complete designing overlay.
Design Overlay Columns: 1- 74
ñ
The Change Source Overlay display appears.
Chapter 3. Getting Started with the Overlay Utility 51
Page 72

à ð
File . . . . . . . . . . . . : OVLFILE
Library . . . . . . . . . : OVLLIB
Source overlay . . . . . . . : STATIONERY
Type options, press Enter.
1=Select
Opt Action
Define overlay specifications
Work with source overlay fonts
Design overlay
F3=Exit F5=Refresh F9=Select all
á
Example Action:
Press the F3 key to exit changing a source overlay.
Change Source Overlay
The Exit Overlay Utility display appears.
ñ
à ð
Type choices, press Enter.
Option . . . . . . . . . . . . . 1 1=Save and exit
Return to source overlay list . . Y Y=Yes, N=No
F12=Cancel
á
Exit Overlay Utility
2=Exit without saving
3=Resume Overlay Utility session
Example Actions:
1. Type 1 for the
Option
prompt.
2. Press the Enter key.
The Save Source Overlay display appears.
ñ
52 AFP Utilities for AS/400 User’s Guide
Page 73

à ð
Type choices, press Enter.
Source overlay . . . . . . . . . . . STATIONERY Name, F4 for list
File . . . . . . . . . . . . . . . . OVLFILE Name, F4 for list
Library . . . . . . . . . . . . . OVLLIB Name, CURLIB
Text 'description' . . . . . . . . . Sample Form number 3
Delete removed elements . . . . . . N Y=Yes, N=No
F4=Prompt F5=Refresh F12=Cancel
á
Example Action:
Press the Enter key.
Save Source Overlay
The Create Overlay display appears.
ñ
Creating an Overlay from a Source Overlay
à
Create Overlay
File . . . . . . . . . . . . : OVLFILE
Library . . . . . . . . . : OVLLIB
Source overlay . . . . . . . : STATIONERY
Text . . . . . . . . . . . . : Sample Form number 3
Type choices, press Enter.
Create overlay . . . . . . . Y Y=Yes, N=No
Overlay . . . . . . . . . . STATIONE Name
Library . . . . . . . . . OVLLIB Name, CURLIB
Text 'description' . . . . . Sample Form number 3
Include grid . . . . . . . . N Y=Yes, N=No
Replace if exists . . . . . N Y=Yes, N=No
Print overlay . . . . . . . N Y=Yes, N=No
Authority . . . . . . . . . LIBCRTAUT Name, LIBCRTAUT, ALL
F3=Exit F5=Refresh F12=Cancel
á
You can create an overlay from this display. Except for the overlay name, the
default names and text description are the same as those of the source overlay.
The first eight characters of the source overlay name are used as the default
overlay name.
ð
CHANGE, EXCLUDE, USE
ñ
Example Actions:
1. Type Y for the
Create overlay
prompt.
2. Press the Enter key.
Chapter 3. Getting Started with the Overlay Utility 53
Page 74

The Work with Source Overlays display appears with completion messages. A +
character at the end of the message line indicates that there are more messages
remaining. In this case, the completion message for creating an overlay is the
remaining message.
To look at the remaining message, move the cursor to the message line and press
the Page Down (Roll Up) key. You should look at the remaining messages
because error messages may be displayed.
à ð
File . . . . . . . . . . OVLFILE Name, F4 for list
Library . . . . . . . . OVLLIB Name, LIBL, CURLIB
Source overlay . . . . . ALL Name, generic, ALL
Position to . . . . . . . Starting characters
Type options, press Enter.
1=Create 2=Change 3=Copy 4=Delete 6=Print 7=Rename
9=Create overlay
Source
Opt Overlay Text Changed
STATIONERY Sample Form number 3 12/12/9
Bottom
Parameters or command
===>
F3=Exit F4=Prompt F5=Refresh F9=Retrieve F11=Display names only
F12=Cancel
Source overlay STATIONERY saved in file OVLFILE successfully. +
á
Example Action:
Work with Source Overlays
Press the F3 key.
The IBM Advanced Function Printing Utilities for AS/400 menu appears.
ñ
54 AFP Utilities for AS/400 User’s Guide
Page 75

Step 5 - Using an Overlay
| Once an overlay is created, there are a variety of ways to place an overlay in AFP
| document applications. Overlays can be referenced in the AS/400 printer file, in
| DDS output specifications (using the OVERLAY keyword), with the Advanced Print
| Utility, with page and form definitions, with AFP Toolbox for AS/400 APIs, and with
| numerous third party applications. Refer to the
|
| on application options for AFP documents.
Function Presentation and Print Services Facility
AS/400 Guide to Advanced
(S544-5319) for more information
Overriding a Printer File
To use an overlay with a printer file, enter an OVRPRTF command to override the
printer file with the overlay.
See the
In the following example, the printer file PRINTF is used as an example. You can
use the name of your own printer file instead.
Example Actions:
1. Type OVRPRTF FILE(PRINTF) FRONTOVL(OVLLIB/STATIONE) on the command line.
2. Press the Enter key.
Using the Printer File
To create a spooled file that contains the overlay, use the printer file. Any program
that uses the printer file will do.
In the following example, a program CRTPRT is used to create a spooled file. You
should use the name of your own program that uses the printer file PRINTF.
Example Actions
1. Type CALL CRTPRT on the command line.
2. Press the Enter key.
If you do not have a program that uses the printer file, you can try using the overlay
with system-supplied programs as follows:
CL Reference
book for detail of the OVRPRTF command.
1. Type OVRPRTF FILE(QSYSPRT) FRONTOVL(OVLLIB/STATIONE) on the command
line.
2. Press the Enter key.
3. Press the Print key.
When you press the Print key, a system program prints a copy of the displayed
panel by using printer file QSYSPRT. Thus, overlay STATIONE is printed on the
hard copy of the display you are seeing.
You can specify overlays in record formats of a DDS source for the printer file if the
printer device type is *AFPDS. See
Reference Version 2, SC41-9620
Chapter 3. Getting Started with the Overlay Utility 55
AS/400 Data Description Specifications
for more information.
Page 76

Printing Overlays with AFP Utilities for AS/400
Overlays can be printed using AFP Utilities for AS/400 menu option 22, then
specifying option 6=Print next to the overlay name. To print overlays with Printout
Format Definitions, select the "Define Printout Specifications" option on either the
Create PFD Definition or Change PFD Definition panel. Then, specify the overlay
name and library name for Front side overlay and Back side overlay.
56 AFP Utilities for AS/400 User’s Guide
Page 77

Chapter 4. Starting and Ending the Overlay Utility
This chapter provides additional information for starting and ending the Overlay
Utility.
Starting the Overlay Utility
You can start the Overlay Utility by typing either of the following commands on the
command line and pressing Enter.
1. STRAFPU (Start Advanced Function Printing Utilities/400)
2. STROVLU (Start Overlay Utility)
If you start by using STRAFPU, the following display appears:
à ð
AFPU IBM Advanced Function Printing Utilities for AS/4ðð
Select one of the following:
Overlay Utility
1. Work with source overlays
2. Work with source overlay files
Print Format Utility
11. Work with PFD definitions
12. Work with PFD definition files
| 14. Print AFP Utilities tutorial
á
13. Print database file member
Resource Management Utility
21. Convert to page segment
22. Work with overlays
23. Work with page segments
Selection or command
===>
F3=Exit F4=Prompt F9=Retrieve F12=Cancel F16=System main menu
(C) COPYRIGHT IBM CORP. 1991, 1993.
You can start the following two Overlay Utility functions from this menu:
Option Function
1 Work with source overlays
2 Work with source overlay files
ñ
The following describes the options available on the above menu. To select one of
the following, type the number of the option on the command line, and press Enter.
Copyright IBM Corp. 1996, 1998 57
Page 78

Option 1 (Work with source overlays)
Work with source overlays allows you to do the following:
Create a source overlay. You can start this option by specifying a source
overlay name with the option number.
Change a source overlay.
Copy a source overlay.
Delete a source overlay.
Print a source overlay.
Rename a source overlay.
Create an overlay object from a source overlay.
See Chapter 5, “Work with Source Overlays” on page 59 for more information.
Option 2 (Work with source overlay files)
Work with source overlay files allows you to do the following:
Create a source overlay file by specifying the name of an AS/400 library and a
source overlay file name with the option number.
Change the description of a source overlay file.
Copy a source overlay file.
Delete a source overlay file.
Rename a source overlay file.
Display the description of a source overlay file.
Call the Work with Source Overlays display.
See Chapter 6, “Work with Source Overlay Files” on page 81 for more information.
If you start Overlay Utility by STROVLU, the Work with Source Overlays displayed
on page 59 appears. You can skip the Work with Source Overlays display by
specifying a source overlay name and an option number with the command.
See Chapter 21, “AFP Utilities for AS/400 Commands” on page 355 for more
information.
Ending the Overlay Utility
When you have finished working with the Overlay Utility, press the F3 key
repeatedly. If you used the STRAFPU command to start the Overlay Utility, the
menu panel displayed on page 57 appears.
If you started the Overlay Utility by the STROVLU command, the menu panel
display on page 59 appears.
To end the Overlay Utility, press the F3 key one more time. Then the screen
returns to the AS/400 display from which you started the Overlay Utility.
58 AFP Utilities for AS/400 User’s Guide
Page 79

Chapter 5. Work with Source Overlays
This chapter provides detailed information about the Work with source overlays
option.
You can select the following tasks from this display:
Create a source overlay
Change a source overlay
Copy a source overlay
Delete a source overlay
Rename a source overlay
Print a source overlay
Create an overlay object from a source overlay
Note: Before you create a source overlay, you need to create a source overlay file
by selecting 1 (Create) on the Work with Source Overlay Files display.
Type 1 (Work with source overlays) on the IBM Advanced Function Printing Utilities
for AS/400 menu on page 135 and press Enter. The Work with Source Overlays
display appears:
à ð
File . . . . . . . . . . OUFILE Name, F4 for list
Library . . . . . . . . OULIB Name, LIBL, CURLIB
Source overlay . . . . . ALL Name, generic, ALL
Position to . . . . . . . Starting characters
Type options, press Enter.
1=Create 2=Change 3=Copy 4=Delete 6=Print 7=Rename
9=Create overlay
Source
Opt Overlay Text Changed
OVL1 Overlay 1 12/12/9
OVL2 Overlay 2 12/12/9
OVL3 Overlay 3 12/12/9
OVL4 Overlay 4 12/12/9
More...
Parameters or command
===>
F3=Exit F4=Prompt F5=Refresh F9=Retrieve F11=Display names only
F12=Cancel
á
Work with Source Overlays
The following tables describe the Work with Source Overlays display.
ñ
Prompts
Field Name Description
File Specifies the source overlay file that contains the source overlays you
want to list and work with.
Press F4 to go to a selection list of source overlay files in the specified
library.
Copyright IBM Corp. 1996, 1998 59
Page 80

Field Name Description
Library Specifies the name of the library that contains the source overlay file
containing the source overlays you want to work with. The possible
library values in this field are:
*LIBL Specifies that the file containing the source overlays you
want to work with is in one of the libraries in the library list.
*CURLIB Specifies that the file containing the source overlays you
want to work with is the current library. If no library is
specified as the current library for the job, library QGPL is
used.
library-name
Specifies the name of the library that contains the file
containing the source overlays you want to work with.
Source overlay Specifies that you want to work with all the source overlays in the file or
a subset of the source overlays in the file. Choose from the following:
source overlay name
Specifies a source overlay name for a display with only that
source overlay name in the list.
generic name
Specifies a partial name of the source overlay name
qualified by an asterisk (*) to display a specific subset of
source overlays. The generic name is the following format:
ABC
The source overlays that begin with the characters ABC
such as ABC, ABCD, and ABCTEST are shown in the list.
*ALL Specifies *ALL to display all the source overlays in the
specified file.
Note: The first 8 characters of the source overlay name will be used
for the overlay (object) name when you create an overlay (object) using
the option 9 (Create overlay). Any remaining characters are discarded.
Position to This prompt is used for quick repositioning of the list, not for creating a
subset of the list. Choose one of the following:
*TOP To go to the top of the list.
*BOT To go to the bottom of the list.
name or partial name
Specifies the name or partial name you want to go to in the
list. The list is positioned to the first name beginning with
the string specified.
Options
Option Description
1=Create Creates a source overlay.
You can create a new source overlay. Type 1 in the
the name of the source overlay you want to create in the first line in the
list.
See “1=Create a Source Overlay” on page 63 for more information.
Note: Before you create a source overlay, you need to create a
source overlay file by selecting 1 (Create) on the Work with
Source Overlay Files display.
60 AFP Utilities for AS/400 User’s Guide
Opt
column and
Page 81

Option Description
2=Change Changes a source overlay.
You can change a source overlay and save it with either the same
name or a new name. That is, you can create a new source overlay
based on an existing source overlay using this option. It is also
possible to save the source overlay in a different source overlay file or
in a different library. Type 2 in the
source overlay you want to change.
See “2=Change a Source Overlay” on page 73 for more information.
3=Copy Copies a source overlay to a new source overlay.
You can also copy a source overlay to another file, another library, or
both. Type 3 in the
you want to copy.
See “3=Copy a Source Overlay” on page 74 for more information.
4=Delete Deletes a source overlay from the source overlay file.
You can confirm the choice on the next display before deleting it. Type
4 in the
delete.
See “4=Delete a Source Overlay” on page 75 for more information.
6=Print Prints a source overlay.
Type 6 in the
want to print.
See “6=Print a Source Overlay” on page 76 for more information.
7=Rename Renames a source overlay name. Type 7 in the
name of the source overlays you want to change.
See “7=Rename a Source Overlay” on page 77 for more information.
9=Create an
overlay
Creates an overlay object from a source overlay.
Type 9 in the
you want to create an overlay object from.
See “9=Create Overlay” on page 77 for more information.
Opt
column beside the name of the source overlay you want to
Opt
column beside the name of the source overlay
Opt
column beside the name of the source overlay you
Opt
column beside the name of the source overlay which
Opt
column beside the name of the
Opt
column beside the
Columns
Field Name Description
Opt Specifies the number of the task in the
overlay you want to perform the task with.
You can type the same option next to more than one source overlay at
a time, and you can also type different options next to different source
overlay at the same time.
Source Overlay Shows a list of all the source overlays in the specified file that meets
the subset criteria. You can use the top position in the list to type a
source overlay you want to create or select another option.
Text The text description of the source overlay is shown.
Changed The date when you last changed the source overlay is shown.
Chapter 5. Work with Source Overlays 61
Opt
prompt beside the source
Page 82

Showing a Source Overlay List
The source overlays can be listed on the lower part of the display by specifying the
Library
prompt and
specify the name of a file and library, and press the Enter key. You can page up or
down the list on the display by specifying the starting characters in the
prompt.
File
prompt. When you want to change the content of the list,
Position to
Note: When you specify either the
Library
prompt, you can not specify an option in the
Selecting a Source Overlay from a List
The list on the display contains the names of all or a specified subset of the source
overlays that exist in the source overlay file indicated by the
that describes the source overlays and the date when the source overlay was last
changed are also shown in the list.
When a list is shown, a one-word indicator always appears below and to the right
of the list to tell you where you are in the list. More... means that there are more
items after the item currently shown. Bottom means that you are at the end of the
list.
Use the Page or Roll keys to move forward or backward through the list.
If you are creating a source overlay, you can check this list to see what names are
already used before you choose a new name. You can create a source overlay by
typing 1 and a source overlay name in the first list position, and you can select
other source overlays from the list using any of the options except 1 (Create).
Therefore, you can select one or more names by doing one or both of the following:
Source overlay
prompt,
File
prompt, or the
Opt
column.
File
prompt. The text
In the
In only the first (top) position of the list, type an option number (for the task), a
Note: You can create a source overlay by specifying the new source overlay
name from this display, but you can not create a source overlay file from this
display. Use the Work with Source Overlay Files display to create a source overlay
| file. If you do not have a library for the source overlay file, use the Create Library
| (CRTLIB) command to create a library.
Opt
column beside the source overlay name in the list that you want to
use, type the number of the option (task) to be used.
source overlay name in the
Opt
and
Source Overlay
columns respectively.
62 AFP Utilities for AS/400 User’s Guide
Page 83

1=Create a Source Overlay
To create a source overlay, do the following on the display on page 59.
1. Type 1 in the
2. Type the source overlay name in the
Opt
column in the first line of the list.
Source Overlay
column in the first line of
the list.
3. Press Enter.
The Create Source Overlay display appears:
à ð
File . . . . . . . . . . . . : OVLFILE
Library . . . . . . . . . : OVLLIB
Source overlay . . . . . . . : STATIONERY
Type options, press Enter.
1=Select
Opt Action
Define overlay specifications
Work with source overlay fonts
1 Design overlay
Create Source Overlay
F3=Exit F5=Refresh F9=Select all F12=Cancel
á
On this display, you can create a source overlay. By typing a 1 in the
Opt
column
of this display, you can go to the Define Overlay Specifications display, the Work
with Source Overlay Fonts display, or the Design Overlay display.
Field Name Description
File Shows the source overlay file name in which the source overlay you are
creating resides.
Library Shows the library name that contains the source overlay file in which
the source overlay you are creating resides.
Source overlay Shows the source overlay name that you are creating.
1=Select Allows you to take an action or some actions by typing 1 in the
column.
Opt Specifies 1 in the
Action Shows you the action to be taken by the system when you type 1 in the
Opt
column.
Opt
column beside the action you want to take.
Opt
ñ
Chapter 5. Work with Source Overlays 63
Page 84

Define Overlay Specifications
Each source overlay has the various specifications to describe itself. These
specifications are used by the IBM Advanced Function Printing Utilities for AS/400
throughout designing the overlay. They are also used to determine how the overlay
is merged onto the user data, such as the offset position and the degree of rotation.
à ð
Type choices, press Enter.
Printer type . . . . . . . . 9 1=4224/4234/423
2=3812/3816/393
3=3916/428
4=382/3825/3827/3829/3835/39
5=3825/3835/39(image capable)
6=3831
7=3935
9=Not specified
Characters per inch . . . . 1. 5., 1., 12., 13.3, 15.
Lines per inch . . . . . . . 6. 3., 4., 6., 7.5, 8., 9.
12.
Degree of rotation . . . . . , 9, 18, 27
DBCS SO/SI spacing . . . . . Y Y=Yes, N=No
More...
F3=Exit F5=Refresh F12=Cancel
á
à
Type choices, press Enter.
Unit of measure . . . . . . 1 1=Inch, 2=Centimeter
Data element . . . . . . . . 1 1=Inch, 2=Centimeter
Measurement method . . . . 1 1=Row/Column, 2=Inch/Centimeter
Size:
Measurement method . . . . 1 1=Row/Column, 2=Inch/Centimeter
Width . . . . . . . . . . 8 1-999
Height . . . . . . . . . . 6 1-999
Offset:
Measurement method . . . . 1 1=Row/Column, 2=Inch/Centimeter
Across . . . . . . . . . . -999
Down . . . . . . . . . . . -999
Grid:
Measurement method . . . . 1 1=Row/Column, 2=Inch/Centimeter
Across . . . . . . . . . . 1 1-999
Down . . . . . . . . . . . 6 1-999
Define Overlay Specifications
16.7, 18., 2.
Define Overlay Specifications
ñ
ð
Bottom
F3=Exit F5=Refresh F12=Cancel
á
ñ
Using the Define Overlay Specifications display, you can define the overlay
specifications.
The information specified on this display is used :
| When designing the overlay, to check its size and whether or not it is
| applicable for the printer type
| When creating an overlay object, to generate the appropriate data stream
64 AFP Utilities for AS/400 User’s Guide
Page 85

Field Name Description
Printer type Specifies the printer type you are going to use.
1 4224, 4234, 4230
2 3812, 3816, 3930
3 3916, 4028
4 3820, 3825, 3827, 3829, 3835, 3900
5 3825, 3835, 3900 with the Advanced Function Image and
Graphics feature
6 3831
7 3935
9 Not specified
The specified value is used to :
Check if each element is supported by the printer.
Create the appropriate data stream to each printer.
| If 9 or *DEFAULT is selected, another panel is displayed to confirm or
| change the following attributes for your printer:
| Pel density
| Graphics
| Text color
| Color shading
| Vertical right to left format, for DBCS
| PTOCA Tower 2, Underline, Overstrike, Character enlarge
| BCOCA, Bar Code Object Content Architecture
See Appendix A, “Printer Characteristics” on page 413 for the
differences of printers.
Characters per
inch
Lines per inch Specifies the distance from one row to the next. For example, 8 LPI
Degree of
rotation
DBCS SO/SI
spacing
Specifies the width of a column. For example, at 12 CPI, each column
takes one-twelfth inch width. The valid values are 5.00, 10.00, 12.00,
13.30, 15.00, 16.70, 18.00, and 20.00.
This value is used to specify horizontal positions when the
measurement method is Row/Column.
This value is also used to specify horizontal positions of the text in a
box element.
means that the distance between the bottom of a row and that of the
next one is one-eighth inch. The valid values are 3.00, 4.00, 6.00,
7.50, 8.00, 9.00, and 12.00.
This value is used to specify vertical positions when the measurement
method is Row/Column.
This value is also used to specify vertical positions of the text in a box
element.
Specifies 0, 90, 180, or 270 for the degrees of clockwise rotation of an
overlay.
Specifies whether or not shift-out (SO) and shift-in (SI) characters are
printed as blanks.
Y (Yes) The shift-out and shift-in characters in the text data are
printed as blank characters.
N (No) The shift-out and shift-in characters in the text data are not
printed. They occupy no space in the printout.
Note: DBCS SO/SI spacing is valid only when the file is a DBCS
capable file.
Chapter 5. Work with Source Overlays 65
Page 86

Field Name Description
Unit of measure Specifies the unit of measure to use.
1 Inch
2 Centimeter
Data element
measurement
method
Size Specifies the size of the overlay by the following:
Measurement
method
Width Specifies the horizontal size of the overlay.
Height Specifies the vertical size of the overlay.
Offset Specifies the offset of the overlay in the page by the following:
Measurement
method
Specifies the initial measurement method to be used when defining or
placing elements, such as text, lines, boxes, bar codes, graphics, or
page segments. The measurement can still be changed on the define
elements and change elements panels.
Possible values are:
1 The initial measurement will be Row/Column
2 The initial measurement method will be inch or centimeter
depending on the value specified for the unit of measure.
Measurement method
Width
Height
Specifies the measurement method being used to specify the overlay
size.
Possible values are:
1 Row/Column is used as the measurement method.
2 Either inch or centimeter is used as the measurement
method depending on the value specified for the
measure
Note: To change both the measurement method and its following
fields, you need to change the value for the measurement
method and press Enter, before you change the following fields.
Possible values are:
1 to 999 (columns)
0.10 to 22.25 (inches)
0.10 to 57.79 (centimeters)
Possible values are:
1 to 999 (rows)
0.10 to 22.25 (inches)
0.10 to 57.79 (centimeters)
Measurement method
Across
Down
Specifies the measurement method being used for the offset.
Possible values are:
1 Row/Column is used as the measurement method.
2 Either inch or centimeter is used as the measurement
method depending on the value specified for the
measure
Note: To change both the measurement method and its following
fields, you need to change the value for the measurement
method and press Enter, before you change the following fields.
.
.
Unit of
Unit of
66 AFP Utilities for AS/400 User’s Guide
Page 87

Field Name Description
Across Specifies the value of the horizontal distance from the left edge of the
logical page to the origin of the source overlay to be created.
Possible values are:
0 to 999 (columns)
0 to 22.25 (inches)
0 to 57.79 (centimeters)
Down Specifies the vertical distance from the top edge of the logical page to
the origin of the overlay to be created.
Possible values are:
0 to 999 (rows)
0 to 22.25 (inches)
0 to 57.79 (centimeters)
Grid Specifies the distance between the grid lines by the following:
Measurement method
Across
Down
Measurement
method
Across Specifies the horizontal distance between vertical lines of grid.
Down Specifies the vertical distance between horizontal lines of grid.
Specifies the measurement method being used for the grid.
Possible values are:
1 Row/Column is used as the measurement method.
2 Either inch or centimeter is used as the measurement
method depending on the value specified for the
measure
Note: To change both the measurement method and its following
fields, you need to change the value for the measurement
method and press Enter, before you change the following fields.
You can specify to print horizontal and vertical lines with the printout to
help your designing work. The following fields specify the horizontal
and vertical distances between grid lines.
The valid values are:
1 to 999 (columns)
0.10 to 22.25 (inches)
0.10 to 57.79 (centimeters)
The valid values are:
1 to 999 (rows)
0.10 to 22.25 (inches)
0.10 to 57.79 (centimeters)
.
Unit of
The overlay utility displays the required information to define overlay specifications.
You can type appropriate values and press the Enter key to set the overlay
specifications.
Change Overlay Specifications
| You can change overlay specifications of the existing overlay, or you can create a
| new overlay based on the existing source source overlay by changing it. Conflicts
| can occur between previously defined elements and changed overlay specifications
| in the same source overlay. This function is usually preferred in the following
cases.
Chapter 5. Work with Source Overlays 67
Page 88

Note: The change operation is similar to the create operation. The only difference
is that the previously entered parameters are already placed in each field when the
display appears. See “Define Overlay Specifications” on page 64 for the
description of each parameter.
Making the overlay size smaller
| When you try to reduce the overlay size from the previously defined values,
| some overlay elements may be positioned outside the newly defined overlay.
| The overlay size is always measured from the origin, the top-left corner of the
| overlay. For example, the overlay elements placed near the right edge or
| bottom of the previous overlay may be positioned outside the newly defined
| overlay. In this case, elements are deleted if their positions extend beyond the
| overlay boundaries.
The overlay utility displays the confirmation display when such a situation
occurs to let you enter the delete element operation or cancel the change
overlay specifications operation. See “Confirm Delete of Elements” on page 69
for more information.
Changing the unit of measure
The overlay utility allows you to change the unit of measure in the overlay
specifications between inches and centimeters. The defined numbers in each
| element do not change. Therefore, some elements are positioned outside the
| overlay when the number specified for the size exceeds the possible maximum
| value for the unit. Also some values may exceed the lower limit of parameters
such as module width.
Changing the printer type
The overlay utility allows you to change the printer type in the overlay
specifications. The overlay utility checks the compatibility between previously
defined overlay elements with the newly specified printer type. If the overlay
utility finds any mismatched elements, the overlay utility displays the
| confirmation display and lists these elements on the display. You can then
| delete the elements or cancel the change overlay specifications.
When the parameter values of the elements become incorrect by changing the
parameter values of the overlay specifications, a warning message is displayed.
| You can adjust parameter values of those elements by pressing the Enter key, or
| you can change the parameter values of the overlay specifications to correct the
errors.
The following table describes the cause of warning messages and the results.
Figure 16 (Page 1 of 2). The Cause of a Message and Its Results
Cause Result
The
Unit of measure
to 2=Centimeter and the value for
width
gets too small. For example, 0.001
inches becomes 0.001 centimeters.
The
Unit of measure
2=Centimeter to 1=Inch and the value for
Module width
For example, 2 centimeters becomes 2
inches.
or
changed from 1=Inch
changed from
Line width
gets too large.
Module
The correct minimum value .3
centimeter is used.
The correct maximum value 1 inch is used.
68 AFP Utilities for AS/400 User’s Guide
Page 89

Figure 16 (Page 2 of 2). The Cause of a Message and Its Results
Cause Result
The
Printer type
1=4224/4234/423 or 9=Not specified to
another type and the value for
becomes incorrect. For example, 1=Blue is
incorrect.
The
Printer type
to 1=4224/4234/423, or 2=3812/3816/393,
or 3=3916/428, or 7=3935 and the value for
Format
becomes incorrect. For example,
2=Vertical is incorrect.
The
Printer type
1=4224/4234/423, or 2=3812/3816, or
3=3916/428, or 7=3935, or 9=Not specified
to another type and the value for
becomes incorrect. For example, X is
incorrect.
The
Printer type
1=4224/4234/423, or 2=3812/3816/393, or
3=3916/428, or 7=3935, or 9=Not specified
to another type and the value for
becomes incorrect. For example, Y is not
correct.
The
Printer type
1=4224/4234/423, or 2=3812/3816/393, or
3=3916/428, or 7=3935, or 9=Not specified
to another type and the value for
size
becomes incorrect. For example, 1 is
not correct.
changed from
Color
changed from another type
changed from
Overstrike
changed from
Underline
changed from
Character
The value DEFAULT is used.
The value 1=Horizontal is used.
Blank is used.
The value N is used.
The value DEFAULT is used.
Confirm Delete of Elements
à ð
Press Enter to confirm your choices for delete.
Press F12 to return to change your choices.
Position Position
Mark Name Across Down Reason
T1 135 4 Out of overlay
T12 18.3 .42 Out of overlay
T13 18.3 .83 Out of overlay
T14 18.3 1.24 Out of overlay
L2 17. 1.5 Out of overlay
B21 2.1 1.5 Out of overlay
S26 LOGO 136 1 Out of overlay
B29 2.12 12.23 Out of overlay
G31 GDF1 5.6 1.85 Not supported by printer type
Bottom
F12=Cancel
á
Confirm Delete of Elements
ñ
Chapter 5. Work with Source Overlays 69
Page 90

The Confirm Delete of Elements display shows the list of the elements to be
deleted due to a change in the overlay specifications. The
why the element is to be deleted.
You can delete these elements by pressing Enter. If you do not want to delete
these elements, press F12 to cancel, then the Define Overlay Specifications display
appears.
Field Name Description
Mark Shows the element mark of the element to be deleted. The mark
consists of an asterisk (*), a character that shows the element type, a
three digit number (001 to 999), and a blank. The character for each
element type is:
T Text
L Line
B Box
C Bar code
S Page segment
G Graphics
Name Shows the element name that is specified on the Define Element Detail
display.
Position Across Shows the horizontal starting position of the overlay element.
Position Down Shows the vertical starting position of the overlay element.
Reason Shows the reason the element is to be deleted.
The values are:
Out of overlay
Either horizontal and/or vertical position of the element is not
within the size of the overlay.
If the element is text, bar code, or page segment, its
start position is outside.
If the element is line, box, or graphics, its bottom-right
corner is outside.
Not supported by printer type
The element uses a function that is not supported by the
specified printer type.
If the element is graphics, the printer does not support the
function to print graphics.
Reason
column shows
Work with Source Overlay Fonts
The Work with Source Overlay Fonts display appears. For the work with fonts
operation, see Chapter 14, “Work with Fonts” on page 289.
Design Overlay
You can design a source overlay on the Design Overlay display. In a source
overlay, you can define the following elements:
Text
Line
Box
Bar code
Page segment
Graphics
70 AFP Utilities for AS/400 User’s Guide
Page 91

For more information about the design operation of a source overlay, see
Chapter 13, “Design Operation” on page 219.
Saving a Source Overlay
When you create a source overlay, do the following to save it.
Step 1. Press the F3 key on the Design Overlay display.
Step 2. The Create Source Overlay display appears.
Press the F3 key.
Step 3. The following display appears.
à ð
Type choices, press Enter.
Option . . . . . . . . . . . . . 1 1=Save and exit
Return to source overlay list . . Y Y=Yes, N=No
F12=Cancel
á
Exit Overlay Utility
2=Exit without saving
3=Resume Overlay Utility session
Using the Exit Overlay Utility display, you can specify to:
Save the source overlay
| Exit creating or changing the source overlay without saving it.
Resume the overlay utility session.
Field Name Description
Option Specifies how you want to handle the source overlay that you are
working with:
Return to source
overlay list
1
2
3
Specifies one of the following selections:
Y (Yes) Returns to the Work with Source Overlays display.
N (No) Bypasses the Work with Source Overlays display and
Save and exit
have created. The Save Source Overlay display appears to
save the source overlay.
Exit without saving
saving the source overlay. Everything you have entered
while you were designing the overlay is discarded.
Resume overlay utility session
Create Source Overlay display.
returns to the display from which you started the overlay
utility.
allows you to save the source overlay that you
allows you to exit from the task without
allows you to return to the
ñ
Chapter 5. Work with Source Overlays 71
Page 92

Step 4. Type 1 in the
Option
prompt, and press the Enter key. The Save Source
Overlay display appears.
à ð
Type choices, press Enter.
Source overlay . . . . . . . . . . . OVL1 Name, F4 for list
File . . . . . . . . . . . . . . . . OUFILE Name, F4 for list
Library . . . . . . . . . . . . . OULIB Name, CURLIB
Text 'description' . . . . . . . . . Overlay 1
Delete removed elements . . . . . . N Y=Yes, N=No
F4=Prompt F5=Refresh F12=Cancel
á
Save Source Overlay
ñ
On the Save Source Overlay display, you can specify the following:
Field Name Description
Source overlay Shows the previously selected source overlay name as the default.
File Shows the default file name that was specified for the source overlay
being created or specifies your own source overlay file name in which
the source overlay is to be saved.
Library Shows the default library name that was specified for the source
overlay being created or specifies the library name in which the source
overlay is to be saved.
Text 'description' Specifies the description of the source overlay.
Delete removed
elements
Specify Y to delete the elements you removed. The numbers in each
element mark of the other elements are re-numbered. Then the overlay
utility saves the overlay.
Specify N to not delete the elements you removed.
The default value is N.
The removed elements are those which you removed by using the
remove element function. Removed elements are not displayed in the
screen view, and are displayed with an asterisk (*) after the element
type in the list view. You can recover removed elements with the
restore (S) command in the list view.
Note: All or any one of the fields in the Save Source Overlay can be
changed.
Step 5. When you complete the operation in this display and press the Enter key,
the Create Overlay display appears.
Step 6. Press the Enter key. The Work with Source Overlays display appears.
72 AFP Utilities for AS/400 User’s Guide
Page 93

2=Change a Source Overlay
To change a source overlay, see the Work with Source Overlays display on page
59.
1. Type a 2 in the
2. Press Enter.
The Change Source Overlay display appears:
à ð
File . . . . . . . . . . . . : OUFILE
Library . . . . . . . . . : OULIB
Source overlay . . . . . . . : OVL6
Type options, press Enter.
1=Select
Opt Action
Define overlay specifications
Work with source overlay fonts
1 Design overlay
F3=Exit F5=Refresh F9=Select all F12=Cancel
Opt
column beside the source overlay you want to change.
Change Source Overlay
á
Using the Change Source Overlay display, you can change the existing source
overlay by selecting the action on the above display in the same way you do to
create a source overlay. See “1=Create a Source Overlay” on page 63 for more
information.
ñ
Chapter 5. Work with Source Overlays 73
Page 94

3=Copy a Source Overlay
| To copy a source overlay, do the following on the Work with Source Overlays
| display on page 59.
1. Type a 3 in the
Opt
column beside the source overlay you want to copy.
2. Press Enter.
The Copy Source Overlay display appears:
à ð
From file . . . . . . . . . : OUFILE
Library . . . . . . . . . : OULIB
Source overlay . . . . . . . : OVL1
Text . . . . . . . . . . . . : Overlay 1
Type choices, press Enter.
To file . . . . . . . . . . OUFILE Name, F4 for list
Library . . . . . . . . . OULIB Name, CURLIB, LIBL
Source overlay . . . . . . . OVL2 Name
Text 'description' . . . . . Overlay 2
F3=Exit F4=Prompt F5=Refresh F12=Cancel
Copy Source Overlay
á
Using the Copy Source Overlay display, you can copy the source overlay to a
source overlay in the same or different file or library.
| When invoked, the Copy Source Overlay function displays a screen showing the
| From File name, the From Library name and the name of the From Source Overlay.
| It also displays the same From File name, From Library name and Source Overlay
| name for the receiving File name, Library name and Source Overlay name.
In order for the copy request to work correctly, one of the values displayed in the
Prompt screen must be unique.
Field Name Description
From file Shows the name of the source overlay file that contains the source
overlay you are going to copy.
Library Shows the name of the library containing the file with the source
overlay you are going to copy.
Source overlay Shows the name of the source overlay you are going to copy.
Text Shows the text description of the source overlay you are going to copy.
ñ
74 AFP Utilities for AS/400 User’s Guide
Page 95

Field Name Description
To file Press F4 to display a selection list of source overlay file names that are
eligible to receive the copied overlay. This display also shows, for the
To File, the same name as the From file name, the same name as the
From Library name and the same name as the Source Overlay name.
Leave the default To file and library names if the Source Overlay is
being copied to the same file as the sending file.
From Library Specifies the name of the library that contains the Source Overlay that
is being copied.
To Library Specifies the name of the Library that will receive the copied Source
Overlay.
The possible values in this field are:
*LIBL to specify the Library that will contain the copied source
overlay is in one of the libraries in the library list.
*CURLIB to specify that the file that will contain the copied source
overlay is in the current library. If no library is specified as
the current library for the job, library QGPL is used.
library-name
to specify the specific library name you want to copy the
source overlay to.
Source overlay Specifies the new source overlay you are going to copy to. This field
has the same source overlay name as the from source overlay name.
Leave the default if you want to copy the source overlay to a different
file or to different library with the same source overlay name.
Text 'description' Specify a short description of the source overlay in this field or leave
the default if you want to copy the source overlay with the same
description as the description of the from source overlay. This
description is saved with the source overlay and displayed when the
source overlays are listed to help you identify the source overlays.
Press the Enter key after you type the choices.
4=Delete a Source Overlay
To delete a source overlay, do the following on the Work with Source Overlay
display on page 59.
1. Type a 4 in the
You can select more than one source overlay on the display.
2. Press Enter.
The Confirm Delete of Source Overlays display appears:
Opt
column beside the source overlay you want to delete.
Chapter 5. Work with Source Overlays 75
Page 96

à ð
File . . . . . . . . . . . . : OUFILE
Library . . . . . . . . . : OULIB
Press Enter to confirm your choices for 4=Delete.
Press F12 to return to change your choices.
Source
Opt Overlay Text Changed
4 OVL2 Overlay 2 12/12/9
4 OVL3 Overlay 3 12/12/9
4 OVL4 Overlay 4 12/12/9
Bottom
F11=Display names only F12=Cancel
á
Confirm Delete of Source Overlays
On this display, all source overlays that you specified to delete are listed for your
confirmation. Press Enter to confirm your choices for deletion, after which these
source overlays are deleted. If you do not want to delete these source overlays,
press F12 to return to the previous display to change your choices.
ñ
Field Name Description
File The name of the source overlay file in which the source overlay resides
is shown.
Library Shows the name of the library containing the source overlay file with
the source overlay you chose to delete.
Opt The
Source overlay Shows a list of all source overlays you chose to delete.
Text Shows the text description of the source overlay.
Changed The latest date you changed the source overlay is shown.
Opt
column showing the delete option which causes the
confirmation display to be shown. For this display, the option number is
always 4.
Press the Enter key to delete source overlays.
6=Print a Source Overlay
| To print a source overlay, do the following on the Work with Source Overlay display
| on page 59.
1. Type a 6 in the
2. Press Enter.
The specified source overlay is printed.
Opt
column beside the source overlay.
76 AFP Utilities for AS/400 User’s Guide
Page 97

7=Rename a Source Overlay
| To rename a source overlay, do the following on the Work with Source Overlay
| display on page 59.
1. Type a 7 in the
Opt
column beside the source overlay.
2. Press Enter.
The Rename Member display appears. Type the new name of the source overlay
in the
New member
9=Create Overlay
| To create an overlay object from a source overlay, perform the following steps on
| the Work with Source Overlay display on page 59.
1. Type a 9 in the
prompt.
Opt
column beside the source overlay.
2. Press Enter.
The Create Overlay display appears:
à ð
Create Overlay
File . . . . . . . . . . . . : OUFILE
Library . . . . . . . . . : OULIB
Source overlay . . . . . . . : OVL1
Text . . . . . . . . . . . . : Overlay 1
Type choices, press Enter.
Create overlay . . . . . . . Y Y=Yes, N=No
Overlay . . . . . . . . . . OVL1 Name
Library . . . . . . . . . OULIB Name, CURLIB
Text 'description' . . . . . Overlay 1
Include grid . . . . . . . . N Y=Yes, N=No
Replace if exists . . . . . N Y=Yes, N=No
Print overlay . . . . . . . N Y=Yes, N=No
Authority . . . . . . . . . LIBCRTAUT Name, LIBCRTAUT, ALL
F3=Exit F5=Refresh F12=Cancel
á
CHANGE, EXCLUDE, USE
ñ
Chapter 5. Work with Source Overlays 77
Page 98

Using this display, you can create an overlay object from the source overlay that
you created using the overlay utility.
Field Name Description
File Shows the source overlay file name in which the source overlay
resides.
Library Shows the library name that contains the source overlay file in which
the source overlay you are working with resides.
Source overlay Shows the source overlay name that you are working with.
Text Shows the description text of the source overlay.
Create overlay Specify a Y to create the overlay object, type N to not create the
overlay object.
By specifying a Y for the create option and pressing Enter, the overlay
utility creates an overlay from the source overlay.
Overlay Specifies the overlay object name. The default value is provided as the
first eight characters of the name of the source overlay.
Library Specifies the library name to store the overlay object.
Text 'description' Specifies the description of the overlay object. The default value is the
same as the text of the source overlay.
Include grid Specify a Y to print out the grid with the overlay. The overlay utility
creates the grid according to the values specified in the overlay
specifications.
The default value is N.
Replace if exists Specify a Y to save the overlay object in the library unconditionally.
Specify an N to avoid replacing the object if one of the same name
exists.
The default value is N.
Print overlay Specify a Y to print the overlay. The overlay utility creates the overlay
print data stream with spooled file type of *AFPDS for the printer. The
default value is N.
Note: The Print Overlay display appears.
78 AFP Utilities for AS/400 User’s Guide
Page 99

Field Name Description
Authority Specifies the authority given to users who do not have specific authority
to the overlay, who are not on the authorization list, and whose user
group has no specific authority to the overlay.
Note: This value is ignored and the current authority remains if you
are replacing an existing overlay.
You can specify the following values for this parameter:
*LIBCRTAUT
The system determines the authority for the overlay by
using the value specified on the
(CRTAUT parameter) on the Create Library command
(CRTLIB) for the library containing the overlay to be
created. If the value specified on the
prompt (CRTAUT parameter) is changed, the new value
will not affect any existing overlays.
*CHANGE Change authority allows the user to perform all operations
on the overlay except those limited to the owner or
controlled by object existence authority and object
management authority. The user can change the overlay
and perform basic functions on the overlay. Change
authority provides object operational authority and all data
authority.
*ALL All authority allows the user to perform all operations on the
overlay except those limited to the owner or controlled by
authorization list management authority. The user controls
the existence of the overlay, specifies the security for the
overlay, changes the overlay, and performs basic functions
on the overlay. The user cannot transfer ownership of the
overlay.
*USE Use authority allows the user to perform basic operations
on the overlay, such as run a program or read a file. The
user is prevented from changing the overlay. Use authority
provides object operational authority, read authority, and
execute authority.
*EXCLUDE
Exclude authority prevents the user from accessing the
overlay.
Authorization-list-name
Specifies the name of the authorization list that is used to
secure the overlay object to be created.
Create authority
Create authority
prompt
An overlay is created from a source overlay. The source overlay consists of:
Overlay specifications
Font information
Element definitions
Press the Enter key to create the overlay. When the overlay object is created
successfully, the Work with Source Overlays display or the screen before the Work
with Source Overlays display appears with a message at the bottom of the screen.
It depends on the value of the
Return to source overlay list
prompt in the Exit
Overlay display.
If any error is found in the input parameters or in the resource selection on the
screen, the field which contains the error is reversed and an error message
appears at the bottom of the screen.
Chapter 5. Work with Source Overlays 79
Page 100

80 AFP Utilities for AS/400 User’s Guide
 Loading...