

Page 1

Please check out our eBay auctions for more great
deals on Factory Service Manuals:
Page 2

Title: C79DMMST CreationDate: 07/16/97 13:09:22
IBM
IBM ThinkPad 770 User's Guide
Page 3

Title: C79DMMST CreationDate: 07/16/97 13:09:22
Note
Before using this information and the product it supports, be sure to read the general information in “Safety
Information” on page vii, Appendix C, and Appendix E.
First Edition (September 1997)
The following paragraph does not apply to the United Kingdom or any country where such provisions are
inconsistent with local law:
INTERNATIONAL BUSINESS MACHINES CORPORATION PROVIDES THIS PUBLICATION “AS IS” WITHOUT ANY
WARRANTY OF ANY KIND, EITHER EXPRESS OR IMPLIED, INCLUDING, BUT NOT LIMITED TO, THE LIMITED
WARRANTIES OF MERCHANTABILITY OR FITNESS FOR A PARTICULAR PURPOSE. Some states do not allow
disclaimers or express or implied warranties in certain transactions; therefore, this statement may not apply to you.
This publication could include technical inaccuracies or typographical errors. Changes are periodically made to the
information herein; these changes will be incorporated in new editions of the publication. IBM may make
improvements or changes in the products or the programs described in this publication at any time.
Requests for technical information about IBM products should be made to your IBM authorized dealer or your IBM
marketing representative.
Copyright International Business Machines Corporation 1997. All rights reserved. Note to U.S. Government
Users – Documentation related to restricted rights – Use, duplication, or disclosure is subject to restrictions set forth in
GSA ADP Schedule Contract with IBM Corp.
Page 4

Title: C79DMMST CreationDate: 07/16/97 13:09:22
Safety Information . . . . . . . . . . . . . . . . . . . . . . . . . . vii
Laser Compliance Statement ..................... ix
Chapter 1. Getting to Know Your Computer ......... 1-1
Knowing the Indicators on the LCD Indicator Panel ....... 1-7
Using the Fn Key Function ..................... 1-9
Using the Numeric Keypad .................... 1-11
Knowing the LED Color Indications ............... 1-12
Functional Highlights . . . . . . . . . . . . . . . . . . . . . . . . 1-13
Contents
DVD . . . . . . . . . . . . . . . . . . . . . . . . . . . . . . . . 1-13
Audio . . . . . . . . . . . . . . . . . . . . . . . . . . . . . . . 1-13
Audio with 3D Stereo Sound .................. 1-13
Video Capture . . . . . . . . . . . . . . . . . . . . . . . . . . 1-13
Infrared . . . . . . . . . . . . . . . . . . . . . . . . . . . . . . 1-14
Video Phone Features ..................... 1-14
System Management Features ................ 1-14
TrackPoint with Enhanced Controls .............. 1-14
Chapter 2. Fine-Tuning Your Computer ............ 2-1
Starting the ThinkPad Configuration Program .......... 2-3
ThinkPad Configuration Program for Windows 95 ...... 2-3
ThinkPad Configuration Program for Windows NT ...... 2-4
ThinkPad Configuration for DOS ................ 2-5
Switching Screens . . . . . . . . . . . . . . . . . . . . . . . . . 2-7
Switching between the External Display and Television ... 2-7
Using the TrackPoint ......................... 2-9
Operating the TrackPoint ..................... 2-9
Cleaning the Cap ........................ 2-10
Customizing the TrackPoint .................. 2-10
Using the ThinkPad Online Book ................. 2-15
Using the Security Features .................... 2-16
Using Passwords . . . . . . . . . . . . . . . . . . . . . . . . 2-16
Using the Personalization Editor ............... 2-24
Saving Battery Power ....................... 2-26
Using the Power Management Modes ............ 2-26
Using Other Battery Saving Methods ............. 2-30
Checking the Battery Status .................. 2-31
Using the Fuel Program .................... 2-32
Using the Audio Features ..................... 2-35
Using the 3D Sound Retrieval System (SRS) Function .. 2-36
Copyright IBM Corp. 1997 iii
Page 5

Title: C79DMMST CreationDate: 07/16/97 13:09:22
Using the MIDI Features .................... 2-37
Using the ThinkPad Modem .................... 2-39
Using the ThinkPad Modem in Windows 95 and Windows
NT . . . . . . . . . . . . . . . . . . . . . . . . . . . . . . . . 2-41
Using the ThinkPad Modem in OS/2 ............. 2-41
Using the 56 Kbps Modem ................... 2-41
Telephony Features . . . . . . . . . . . . . . . . . . . . . . . 2-43
Using the DVD and Enhanced Video Adapter ......... 2-44
Using the DVD Enhanced Video Adapter with Windows 95 2-45
Using the Enhanced Video Features in OS/2 ........ 2-51
Using Easy-Setup . . . . . . . . . . . . . . . . . . . . . . . . . 2-54
Knowing Your Configuration .................. 2-56
Setting the Date and Time ................... 2-57
Changing the Drive Startup Sequence ............ 2-57
Chapter 3. Installing Options . . . . . . . . . . . . . . . . . . 3-1
Installing IBM Options ........................ 3-2
Installing a Memory Option .................... 3-2
Replacing the Hard Disk Drive in the HDD Bay ........ 3-5
Installing the Battery Pack .................... 3-6
Removing and Installing a Device in UltraBay II ....... 3-7
Installing the DVD and Enhanced Video Adapter ...... 3-10
Replacing the Backup Battery ................. 3-11
Attaching a Mouse, a Numeric Keypad, or an External
Keyboard . . . . . . . . . . . . . . . . . . . . . . . . . . . . 3-13
Inserting or Removing a PC Card ............... 3-15
Installing Other Devices ...................... 3-17
Using a Docking Station .................... 3-17
Using the Security System Lock ............... 3-21
Attaching a Television to Your Computer .......... 3-22
Chapter 4. Solving Computer Problems ............ 4-1
Frequently Asked Questions .................... 4-2
Troubleshooting Guide . . . . . . . . . . . . . . . . . . . . . . . . 4-3
Troubleshooting Charts . . . . . . . . . . . . . . . . . . . . . . . 4-4
Error Codes or Screen Messages ................ 4-5
No Error Codes or Screen Messages ............ 4-10
An Input Problem ........................ 4-11
A Suspend or Hibernation Problem .............. 4-12
An LCD Problem ........................ 4-16
iv
Page 6

Title: C79DMMST CreationDate: 07/16/97 13:09:22
An Indicator Problem ...................... 4-17
A Battery Problem ........................ 4-17
A CD-ROM Drive Problem ................... 4-18
A DVD Problem ......................... 4-20
An Infrared Communication Problem ............. 4-21
An Enhanced Video/MPEG Problem ............. 4-22
An Audio or a Telephony Problem .............. 4-22
A Universal Serial Bus (USB) Problem ............ 4-23
A Modem Problem ....................... 4-23
Other PC Card Problems .................... 4-26
A SelectaDock Problem .................... 4-26
A Printer Problem ........................ 4-27
An External Display Problem ................. 4-27
A Television Problem ...................... 4-29
Other Option Problems ..................... 4-29
A Software Problem ....................... 4-31
Other Problems . . . . . . . . . . . . . . . . . . . . . . . . . 4-31
Testing Your Computer ...................... 4-32
Chapter 5. Getting Service . . . . . . . . . . . . . . . . . . . . 5-1
Information on Your ThinkPad ................... 5-2
Option List . . . . . . . . . . . . . . . . . . . . . . . . . . . . . 5-2
Identification Numbers . . . . . . . . . . . . . . . . . . . . . . 5-2
Problem Recording Sheet .................... 5-3
How to Receive Customer Support and Service ......... 5-4
Help by Telephone ........................ 5-4
ThinkPad EasyServ . . . . . . . . . . . . . . . . . . . . . . . . 5-5
Getting Help around the World ................. 5-5
Online Housecall . . . . . . . . . . . . . . . . . . . . . . . . . 5-6
Fax Information . . . . . . . . . . . . . . . . . . . . . . . . . . 5-6
Electronic Support Services ................... 5-6
Purchasing Additional Services ................... 5-8
Enhanced PC Support Line ................... 5-8
Network and Server Support Line ................ 5-8
Ordering Support Line Services ................. 5-9
Warranty and Repair Services ................. 5-10
Obtaining IBM Operating System Updates ........... 5-11
Getting Update Diskettes .................... 5-11
Ordering Publications . . . . . . . . . . . . . . . . . . . . . . 5-11
About Your Warranty ...................... 5-11
Contents v
Page 7

Title: C79DMMST CreationDate: 07/16/97 13:09:22
Appendix A. Operating Requirements . . . . . . . . . . . . . A-1
Specifications . . . . . . . . . . . . . . . . . . . . . . . . . . . . . A-2
Operating Environment . . . . . . . . . . . . . . . . . . . . . . . A-3
Power Cord Requirements ..................... A-5
For 2-Pin Power Cords ...................... A-5
For 3-Pin Power Cords ...................... A-6
Appendix B. Installing a New Operating System ...... B-1
Appendix C. Ergonomics Information . . . . . . . . . . . . . C-1
Appendix D. Product Warranty . . . . . . . . . . . . . . . . . D-1
Appendix E. Notices . . . . . . . . . . . . . . . . . . . . . . . . E-1
Trademarks . . . . . . . . . . . . . . . . . . . . . . . . . . . . . . E-1
Electronic Emission Notice ..................... E-2
Federal Communications Commission (FCC) Statement .. E-2
Canadian Department of Communications Compliance
Statement . . . . . . . . . . . . . . . . . . . . . . . . . . . . . E-2
Avis de conformité aux normes du ministère des
Communications du Canada .................. E-3
European Community Directive Conformance Statement .. E-3
Telecommunication Notice . . . . . . . . . . . . . . . . . . . . . E-4
Industry Canada Requirements ................... E-6
Notice . . . . . . . . . . . . . . . . . . . . . . . . . . . . . . . . E-6
Caution . . . . . . . . . . . . . . . . . . . . . . . . . . . . . . . E-6
Notice . . . . . . . . . . . . . . . . . . . . . . . . . . . . . . . . E-7
Avis . . . . . . . . . . . . . . . . . . . . . . . . . . . . . . . . . E-7
Avertissement . . . . . . . . . . . . . . . . . . . . . . . . . . . E-8
Index . . . . . . . . . . . . . . . . . . . . . . . . . . . . . . . . . . X-1
vi
Page 8
Title: C79DMMST CreationDate: 07/16/97 13:09:22
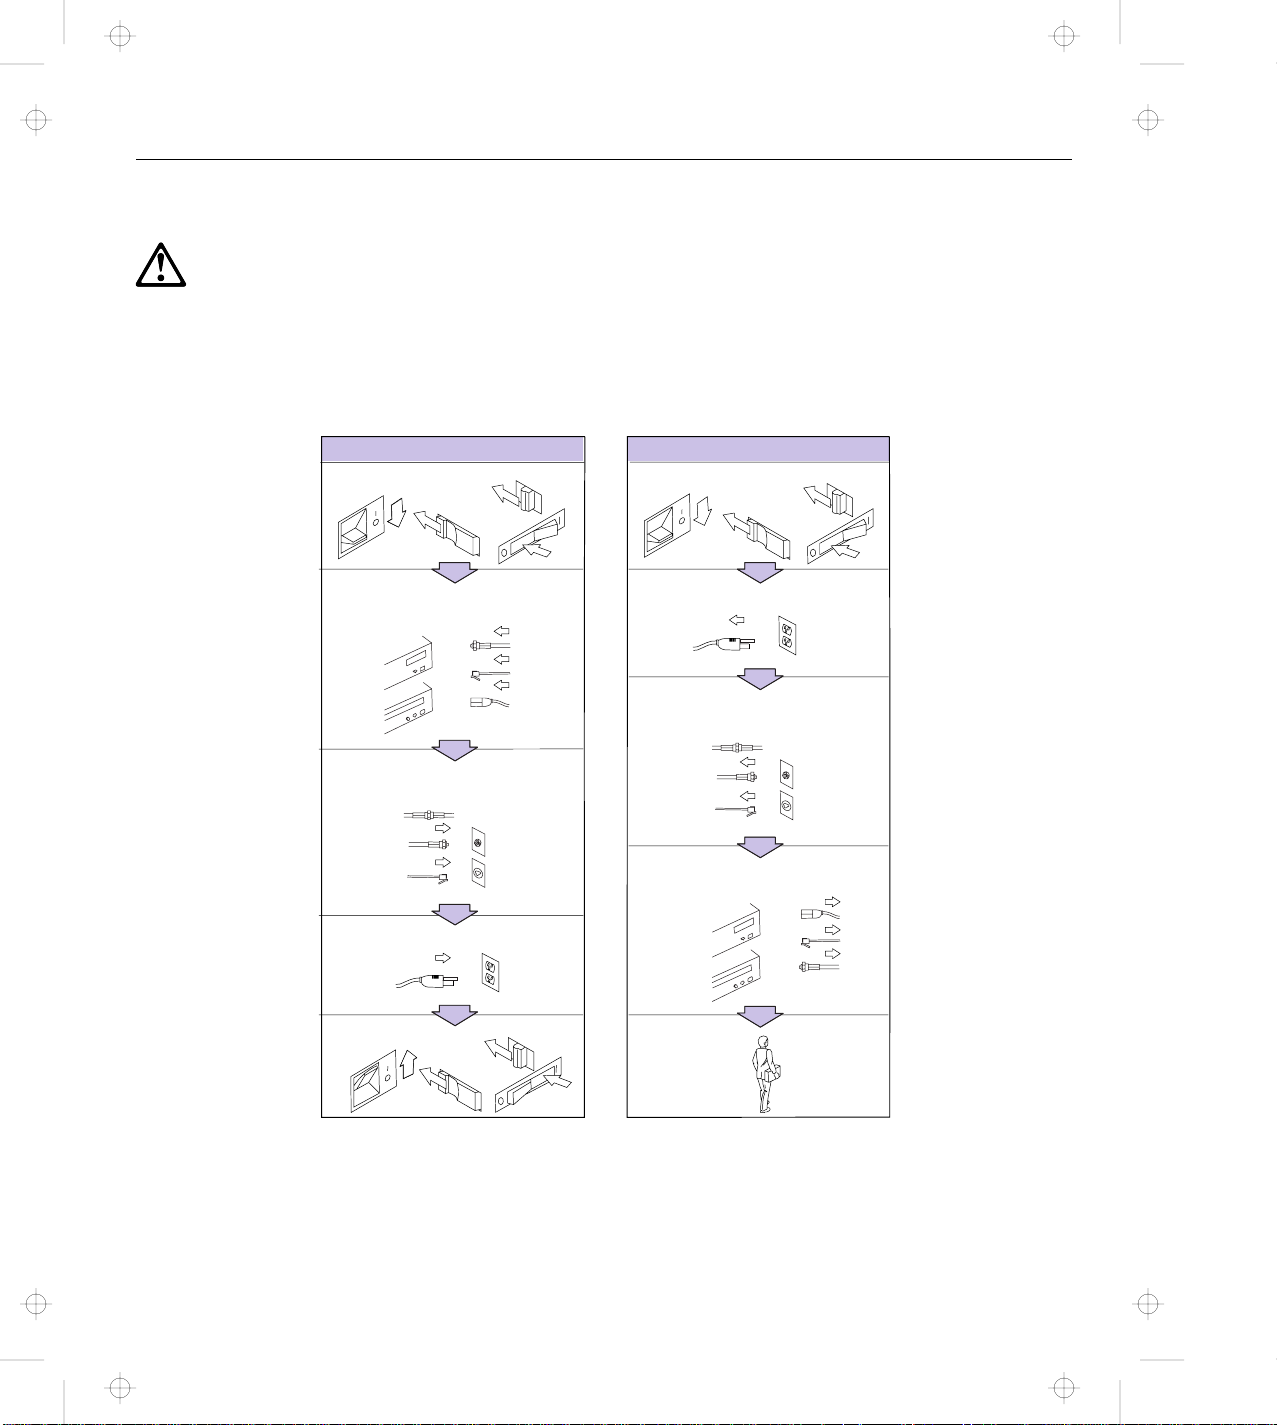
Safety Information
Danger:
Electrical current from power, telephone, and communication cable is hazardous. To avoid shock
hazard, connect and disconnect cables as shown below when installing, moving, or opening the covers
of this product or attached devices. The 3-pin power cord must be used with a properly grounded
outlet.
To Connect
Turn everything OFF.
First, attach all cables to devices.
Attach the signal cables to
receptacles.
Attach the power cord to an outlet.
To Disconnect
Turn everything OFF.
First, remove the power cord from
the outlet.
Remove signal cables from
receptacles.
Remove all cables from devices.
Turn the device ON.
In the U.K., by law:
The telephone line cable must be connected after the power cord.
The power cord must be disconnected after the telephone line cable.
Copyright IBM Corp. 1997
vii
Page 9

Title: C79DMMST CreationDate: 07/16/97 13:09:22
Danger:
Do not disassemble, incinerate, or short-circuit the rechargeable
battery pack. Do not put it in trash that is disposed of in
landfills. Dispose of it as required by local ordinances or
regulations. In the United States, call IBM at 1-800-IBM-4333 for
information on disposal.
Caution:
The fluorescent lamp in the liquid crystal display (LCD) contains
mercury. Do not put it in trash that is disposed of in landfills.
Dispose of it as required by local ordinances or regulations.
The LCD is made of glass, and rough handling or dropping the
computer can cause the LCD to break. If the LCD breaks and the
internal fluid gets into your eyes or on your hands, immediately wash
the affected areas with water for at least 15 minutes; then get
medical care if any symptoms are present after washing.
viii
Page 10

Title: C79DMMST CreationDate: 07/16/97 13:09:22
Laser Compliance Statement
The optional CD-ROM and DVD drives in the IBM ThinkPad 770 are
laser products. The drives' classification label (shown below) are
located on the top of these drives.
CLASS 1 LASER PRODUCT
LASER KLASSE 1
LUOKAN 1 LASERLAITE
APPAREIL A LASER DE CLASSE 1
KLASS 1 LASER APPARAT
The CD-ROM and DVD drives are certified in the U.S. to conform to
the requirements of the Department of Health and Human Services
21 Code of Federal Regulations (DHHS 21 CFR) Subchapter J for
Class I laser products.
In other countries, the drives are certified to conform to the
requirements of EN60825.
Caution:
Do not open the CD-ROM or DVD drive; no user adjustments or
serviceable parts are inside.
Use of controls, adjustments, or the performance of procedures other
than those specified may result in hazardous radiation exposure.
Class I (1) laser products are not considered to be hazardous. The
CD-ROM and DVD drives have an internal, Class I (1), 0.5-milliwatt,
aluminum gallium-arsenide laser that operates at a wavelength of
760 to 810 nanometers. The design of the laser system and the
CD-ROM and DVD drives ensure that there are no exposure to laser
radiation above a Class I (1) level during normal operation, user
maintenance, or servicing conditions.
Safety Information ix
Page 11

Title: C79DMMST CreationDate: 07/16/97 13:09:22
x
Page 12

Title: C79DMMST CreationDate: 07/16/97 13:09:22
Chapter 1. Getting to Know Your Computer
Thank you for purchasing the IBM ThinkPad Computer. The
ThinkPad 770 series of computers incorporates the latest in
hardware technology. The high-end models have a larger screen
than the low-end models and are equipped with an internal modem.
A digital versatile disk is available as an option for playing
off-the-shelf DVD titles and movies.
You can use this book to find out how to use the various software
bundled with your computer and also about the hardware features.
You can also refer to the online book which is in your hard disk, to
find out on more technical matters. See “Using the ThinkPad Online
Book” on page 2-15 for details.
Knowing the Indicators on the LCD Indicator Panel ....... 1-7
Using the Fn Key Function ..................... 1-9
Using the Numeric Keypad .................... 1-11
Knowing the LED Color Indications ............... 1-12
Functional Highlights . . . . . . . . . . . . . . . . . . . . . . . . 1-13
DVD . . . . . . . . . . . . . . . . . . . . . . . . . . . . . . . . 1-13
Audio . . . . . . . . . . . . . . . . . . . . . . . . . . . . . . . 1-13
Audio with 3D Stereo Sound .................. 1-13
Video Capture . . . . . . . . . . . . . . . . . . . . . . . . . . 1-13
Infrared . . . . . . . . . . . . . . . . . . . . . . . . . . . . . . 1-14
Video Phone Features ..................... 1-14
System Management Features ................ 1-14
TrackPoint with Enhanced Controls .............. 1-14
Copyright IBM Corp. 1997 1-1
Page 13
Title: C79DMMST CreationDate: 07/16/97 13:09:22
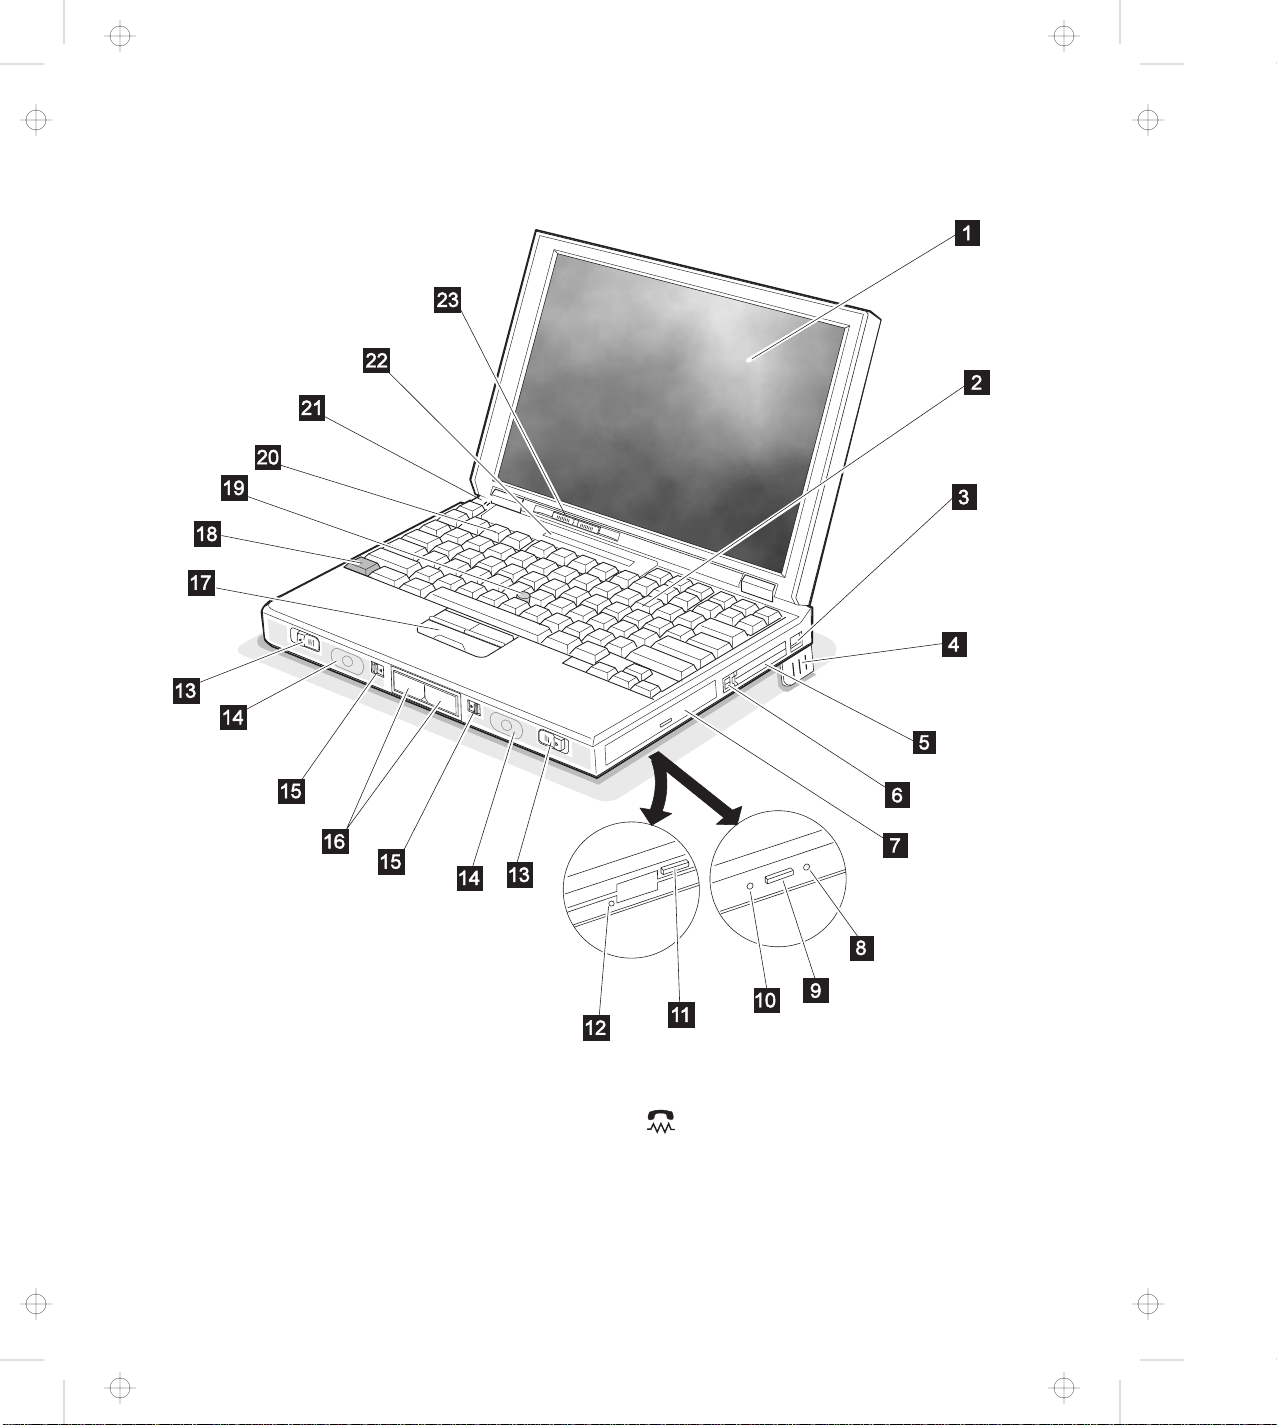
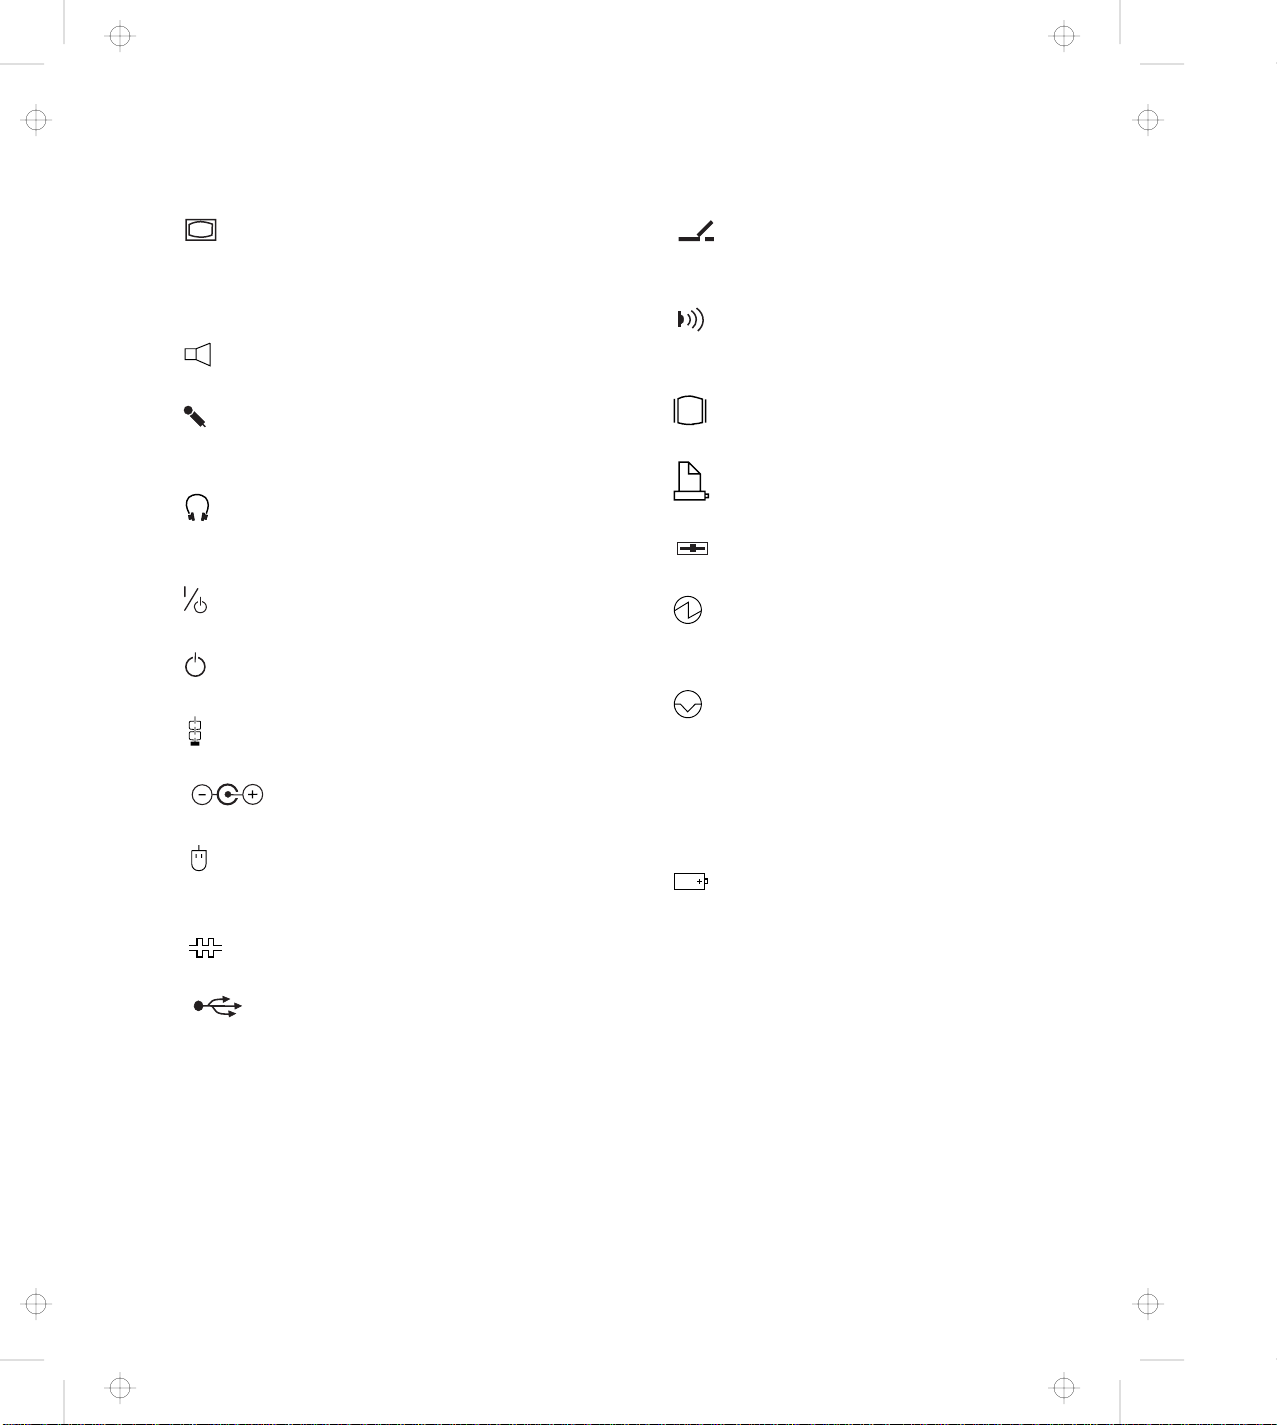
1 The liquid crystal display (LCD) displays
text and graphics on the computer screen.
2 The numeric keypad is used for typing
numbers in NumLk mode.
3
The internal modem port (also called
the telephone jack), equipped on some
models, is used for connecting your computer
to a telephone line.
1-2
Page 14

Title: C79DMMST CreationDate: 07/16/97 13:09:22
4 The legs can be extended to angle the
keyboard for more comfortable typing.
5 The PC Card slots support the following
type of PC cards: PCMCIA (Type I, Type II,
and Type III), CardBus, and Zoomed Video
(ZV) card. The eject buttons 6 eject the
PC cards from the slots.
7 The UltraBay II is used for inserting various
devices such as a CD-ROM drive, diskette
drive, DVD drive, a secondary hard disk
drive, and a secondary battery pack.
8 The emergency eject hole is used to eject
the optional DVD or CD-ROM tray when it
does not open with the eject button 9 .
Insert a pin to eject the tray.
9 The eject button ejects the tray from the
optional CD-ROM or DVD drive.
1 The drive-in-use lamp goes on when data
is being read from a CD-ROM or a DVD disc
in the optional CD-ROM or DVD drive. Do
not enter suspend mode or eject a disc when
this lamp is on.
15 The left and right release latches release
the left and right bay eject levers 16 which
release any device in the battery bay or the
UltraBay II, respectively. The right release
latch contains an LED that indicates when
you can safely remove a device from the
UltraBay II. See page 1-12 for details of the
lamp color indications.
17 The left click, right click, and center click
buttons are used to select items on the
screen, double-click and bring up context
menus. They work like mouse click buttons.
The center click button (below the other
buttons) is used to activate the enhanced
TrackPoint functions. See page 2-9.
18 Press the Fn key with certain function keys
(F1–F12) to activate special ThinkPad
functions (shown with blue-gray icons on the
function keys). See page 1-9.
19 The TrackPoint is a built-in pointing stick
that functions like a mouse. It also has
enhanced features that a mouse does not
have. See page 2-9.
11 The diskette eject button ejects a diskette
from the diskette drive.
12 The diskette drive-in-use lamp goes on
when data is being written to or is being read
from a diskette. Do not enter suspend mode
or eject a diskette when this lamp is on.
13 The left and right cover release latches
release the cover for operation.
14 The left and right internal speakers
generate stereo sound.
Chapter 1. Getting to Know Your Computer 1-3
2 The function keys are used for activating
various functions.
21 The built-in microphone is used for sound
recording and telephony.
22 The LCD indicator panel shows the current
status of the computer and battery power
with indicators and numeric information. See
page 1-7.
23 The brightness control lever adjusts
the brightness of the screen.
Page 15
Title: C79DMMST CreationDate: 07/16/97 13:09:22
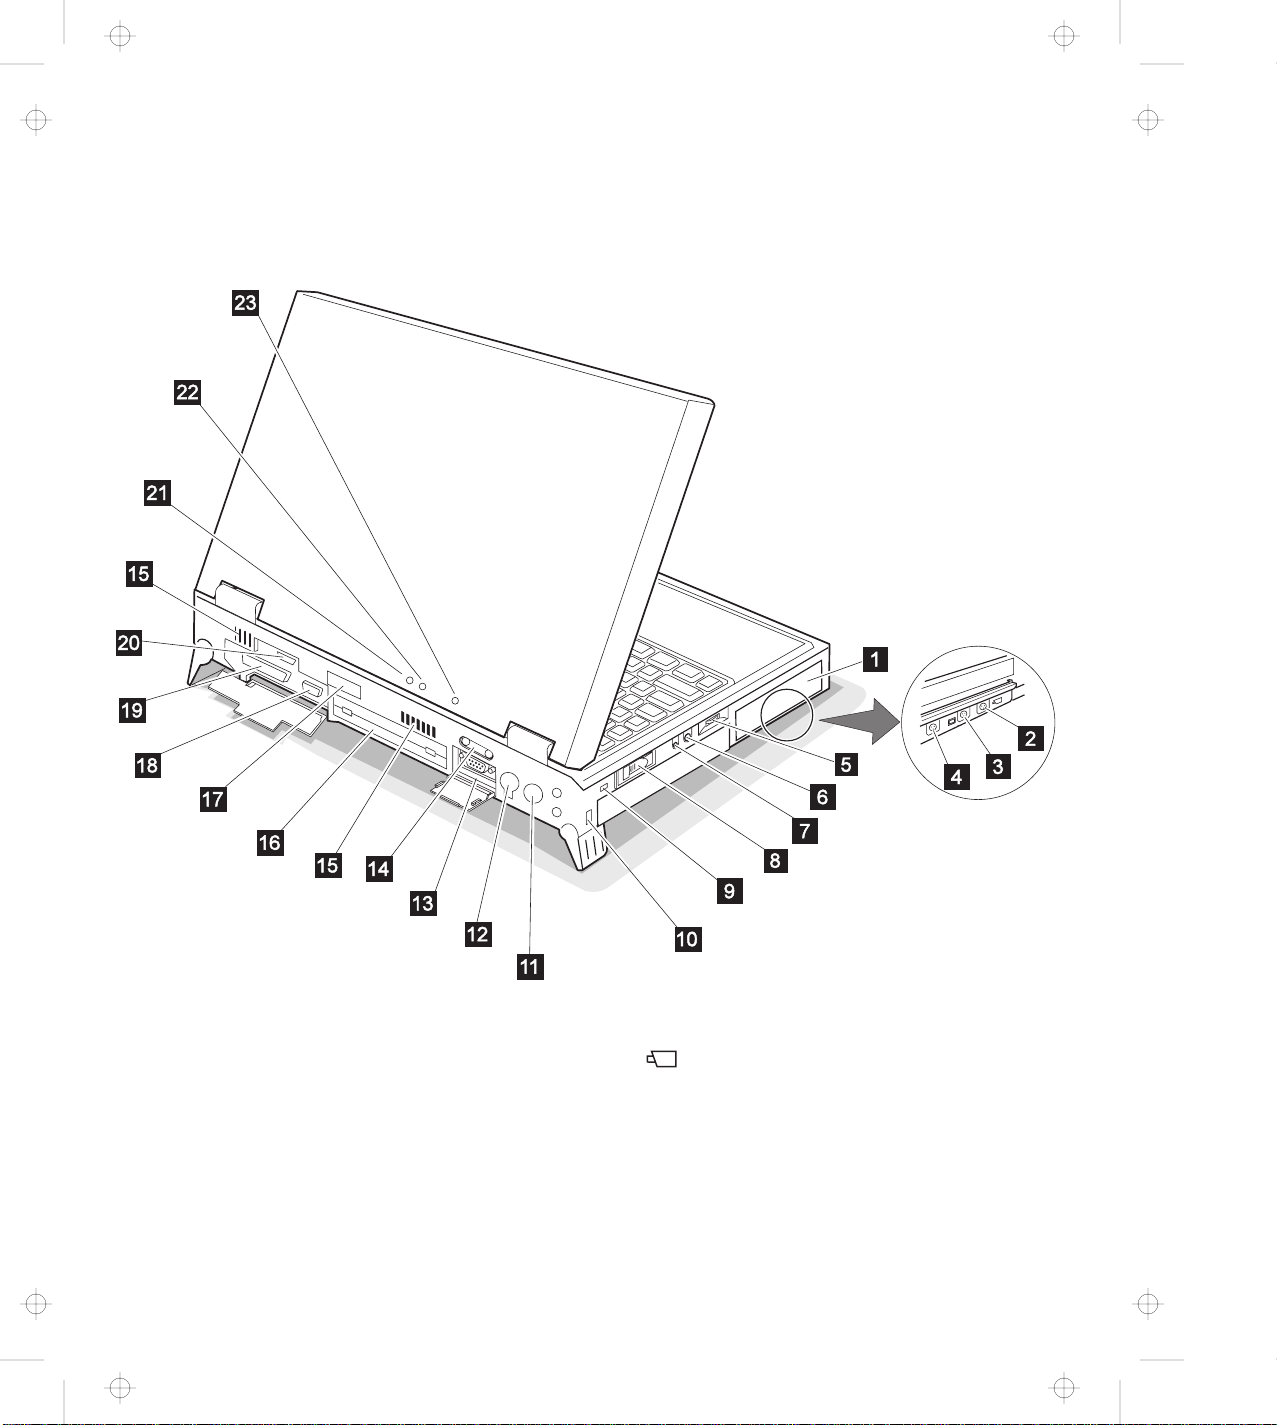
1 The battery pack is a built-in power source
for the computer. It allows you to operate the
computer when ac power is not available.
2
The video-in port is used for
connecting such devices as the VCR and
video camera to receive video images.
1-4
Page 16
Title: C79DMMST CreationDate: 07/16/97 13:09:22
3
The video-out port is used for
connecting your computer to a television or a
VCR to send video images to these devices.
4 Reserved.
5
6
The volume control adjusts the sound
level of the built-in speakers.
The microphone/line-in jack is where
you connect a stereo microphone or external
audio device.
7
The headphone jack is where you
connect a stereo headphone or external
speakers.
8
The power switch turns the computer on
and off.
9
The reset switch resets the system in an
emergency.
1 The security keyhole is used with a
security lock. See page 3-21.
11
connect the AC Adapter cable.
The AC power jack is where you
12 The external-input-device port allows
you to attach a mouse, an external keyboard,
or an external numeric keypad.
13 The serial port (9-pin) is where you
connect a serial-device cable.
14
allows you to connect any device that
The universal serial bus (USB)
conforms to this new interface. Many recent
digital devices comply to this new standard.
15 The fan louvers are for circulating air within
the computer.
Do not place any object in
front of these louvers.
16
The system-expansion port (240-pin)
allows you to connect the IBM ThinkPad
SelectaBase 770 port replicator.
17 The rear infrared port allows your
computer to communicate with other devices
that have infrared data-transfer capabilities.
18 The external-display port (15-pin) is
where you attach an external display.
19 The parallel port (25-pin) is where you
usually connect a parallel-printer signal cable.
2 The external-diskette-drive port is
where you attach an external-diskette-drive.
21 The power-on lamp indicates that the
computer power is on, regardless of whether
the computer is in suspend mode.
22 The suspend lamp indicates that the
computer is in suspend mode.
Green: The computer is in suspend
mode.
Blinking green: The computer is in the
process of changing modes.
23 The charge lamp shows the charge
status of your battery.
Green: Enough battery power is left for
operation.
Orange: The battery pack is being
charged.
Blinking orange: The battery pack
needs to be charged.
You will hear three beeps the moment this
lamp starts blinking if you had set the alarm
in the ThinkPad Configuration program.
Chapter 1. Getting to Know Your Computer 1-5
Page 17
Title: C79DMMST CreationDate: 07/16/97 13:09:22
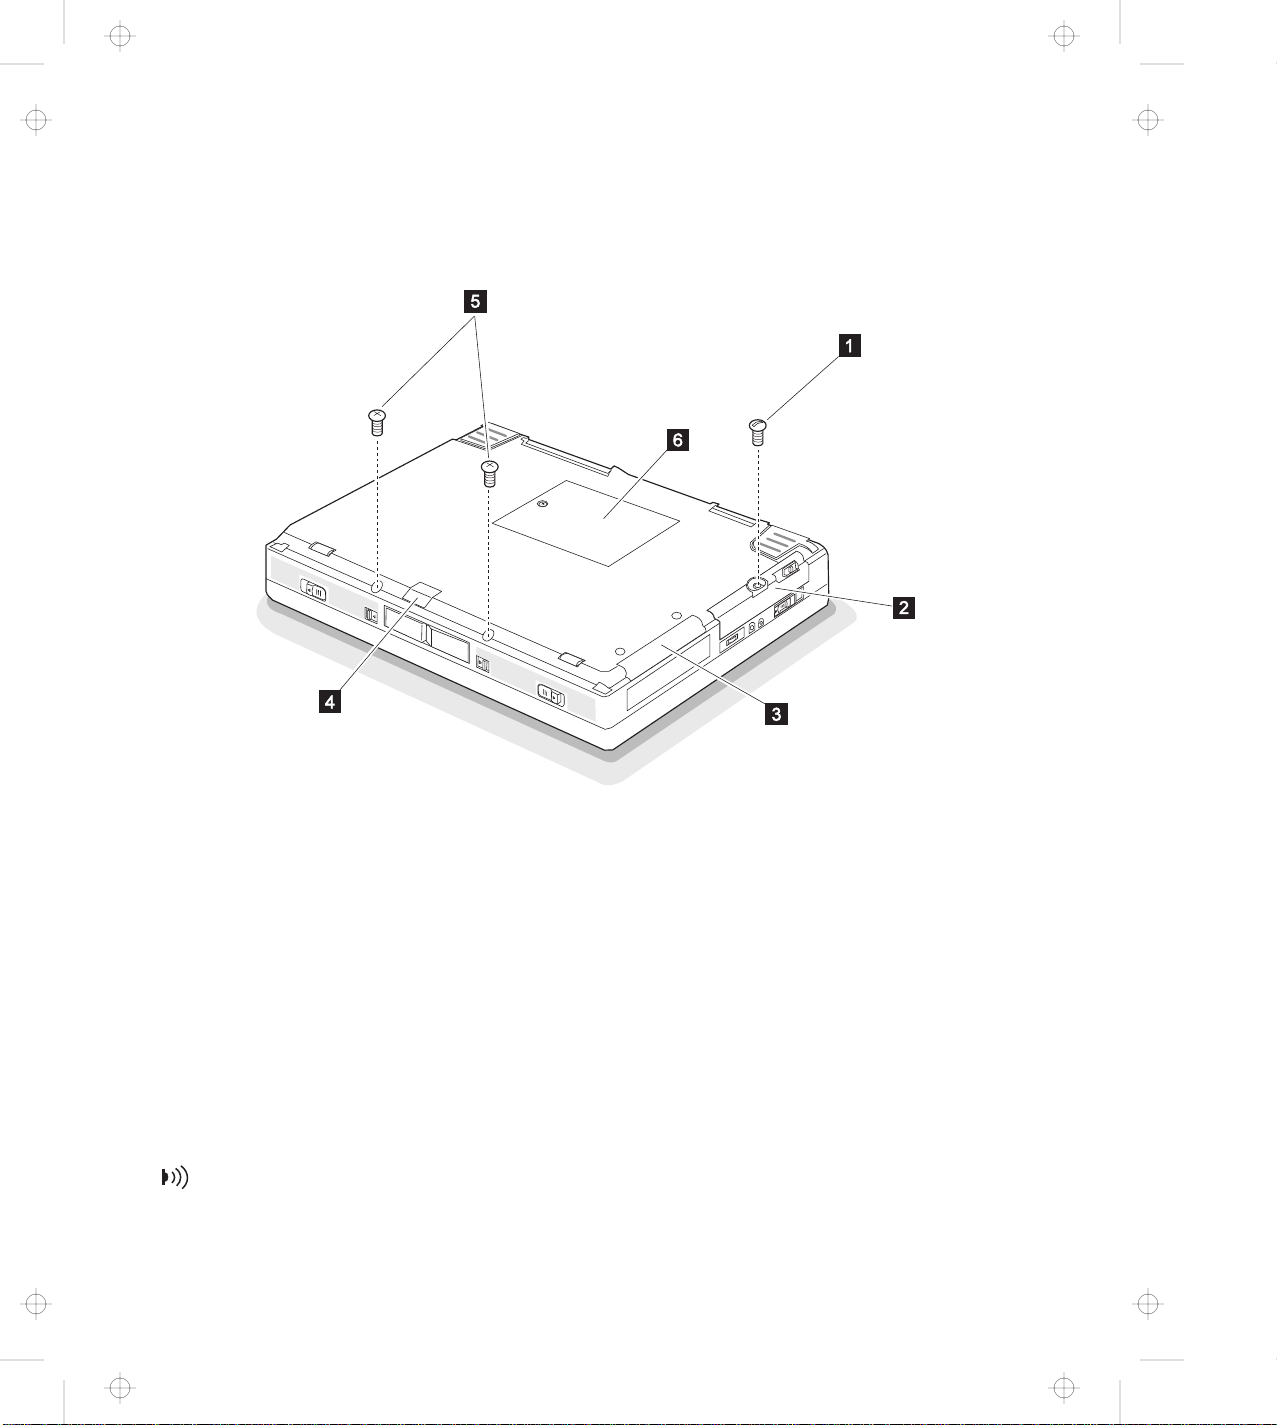
1 The coin screw can be changed to a normal
screw shipped with your computer to prevent
others from gaining access to the hard disk in
the hard disk bay.
2 The hard disk bay houses the replaceable
hard disk drive.
3 The adapter bay is a slot for installing the
DVD and Enhanced Video Adapter
, a
standard feature on some models.
4
The front infrared port allows your
computer to communicate with other devices
that have infrared data-transfer capabilities.
5 The security screws are normal screws that
can be installed to prevent others from
releasing the left and right release latches
and easily gaining access to the battery bay
and the UltraBay II.
6 The bottom compartment houses the DIMM
memory slots and the backup battery slot.
You can insert up to two DIMM memory
cards into the memory slots to upgrade your
system memory. The backup battery in the
battery slot is used for retaining computer
information in computer memory and also for
running the time-of-day clock.
1-6
Page 18
Title: C79DMMST CreationDate: 07/16/97 13:09:22
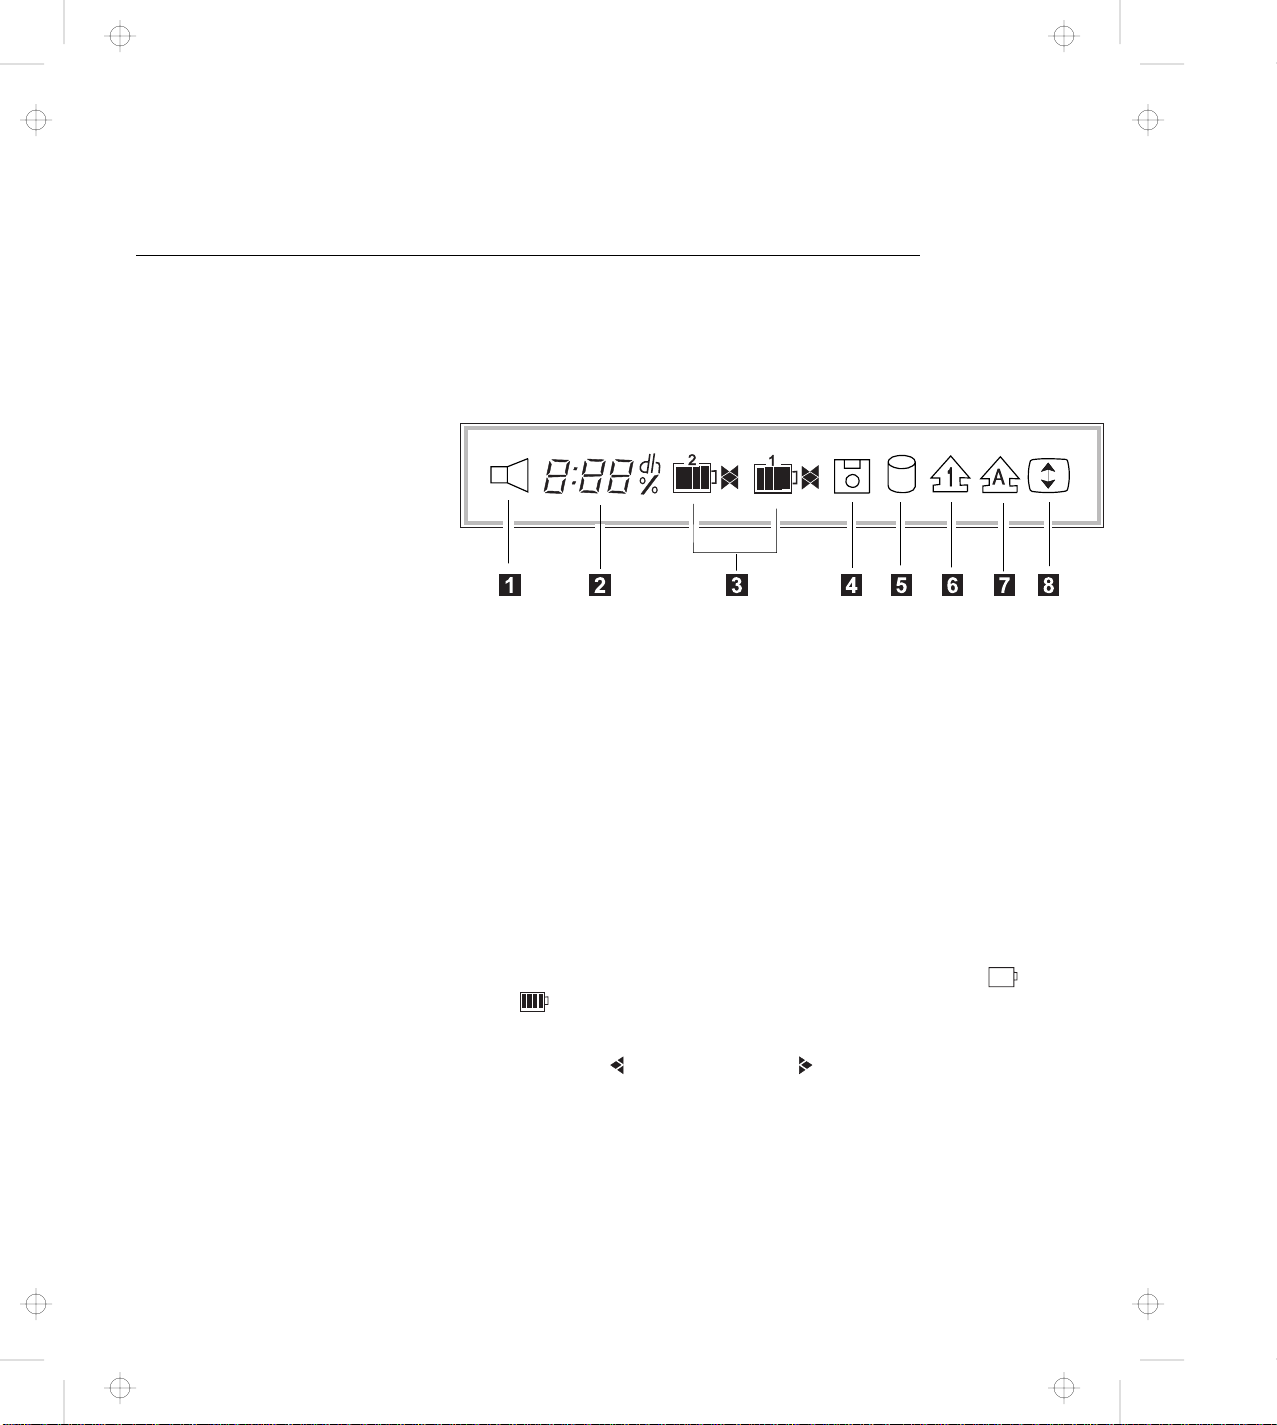
Knowing the Indicators on the LCD Indicator Panel
Various indicators appear on the LCD indicator panel. These
indicators show the operating conditions of your computer. You will
be able to use your computer more efficiently if you know what these
indicators mean.
1 The speaker indicator appears when the speaker beeps. It
turns off when a key is pressed.
2 The remaining battery indicator shows the remaining battery
power in either percent (%), days (d), hours (h), or hours and
minutes (
When a secondary battery is used, the indicator shows the
average percentage of the main battery and the secondary
battery combined.
3 The battery status indicator shows the status of the main
battery pack 1 (in the battery bay) and the secondary battery
pack 2 (in the UltraBay II) in five levels, from empty to full
The indicator on the right shows the battery charge status;
charging ( ) and discharging ( ). A blank indicates no
battery activity.
hh:mm
.
).
Chapter 1. Getting to Know Your Computer 1-7
Page 19

Title: C79DMMST CreationDate: 07/16/97 13:09:22
4 The diskette drive in-use indicator appears when data is
5 The hard disk in-use indicator appears when data is being
6 The numeric lock indicator indicates that the numeric keypad
7 The caps lock indicator indicates that the caps lock mode is
being read from or is being written to a diskette.
Do not enter suspend mode or eject the diskette when this
indicator is being displayed.
read from or is being written to the hard disk.
Do not enter suspend mode or turn off the computer when this
indicator is being displayed.
function is enabled. Press and hold the Shift key while
pressing the NumLk key to enable or disable this function.
enabled. This mode enables you to enter the alphabet
characters (A–Z) in capital letters without using the Shift key.
The Caps Lock key enables and disables this mode.
8 The scroll lock indicator indicates that the scroll lock function
is enabled. This function enables you to use the Arrow keys
to scroll the screen. However, you will not be able to move
the cursor with these keys when this function is enabled. The
ScrLk key enables and disables this function. Not all
application programs support this function.
1-8
Page 20
Title: C79DMMST CreationDate: 07/16/97 13:09:22
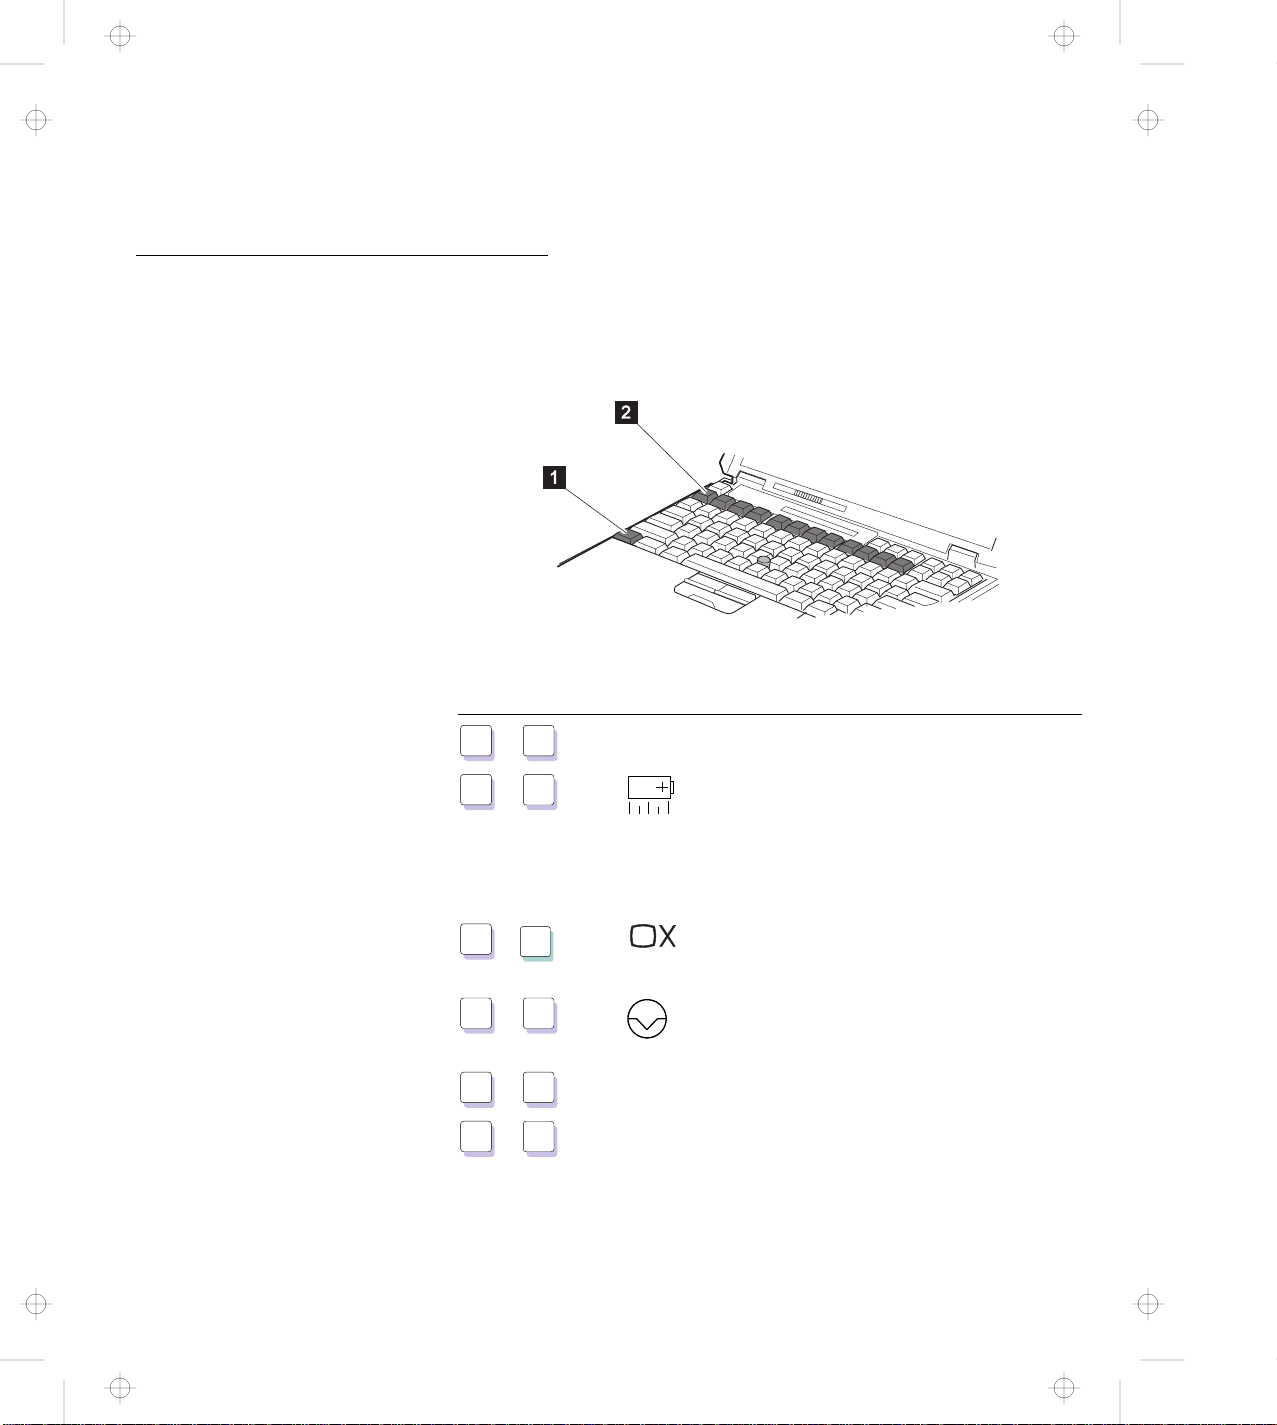
Using the Fn Key Function
The Fn key allows you to change the operating conditions of your
computer instantly. To use the ThinkPad functions, press and hold
the Fn key 1 ; then press the appropriate function key 2 (F1 to
F12).
Key
Combination
Fn
Fn
Fn
Fn
Fn
Fn
+
+
+
+
+
+
F1
F2
F3
F4
F5
F6
Keytop Function
— Unused
Displays the battery power status
indicator or erases it when it is being
displayed. The Fuel program must be
activated before you can use this
function. See page 2-32.
Places the computer in standby mode.
See page 2-26.
Places the computer in suspend mode.
See page 2-26.
— Unused
— Unused
Chapter 1. Getting to Know Your Computer 1-9
Page 21
Title: C79DMMST CreationDate: 07/16/97 13:09:22
Key
Combination
Fn
Fn
Fn
Fn
Fn
+
+
+
+
+
F7
F8
F9
F10
F11
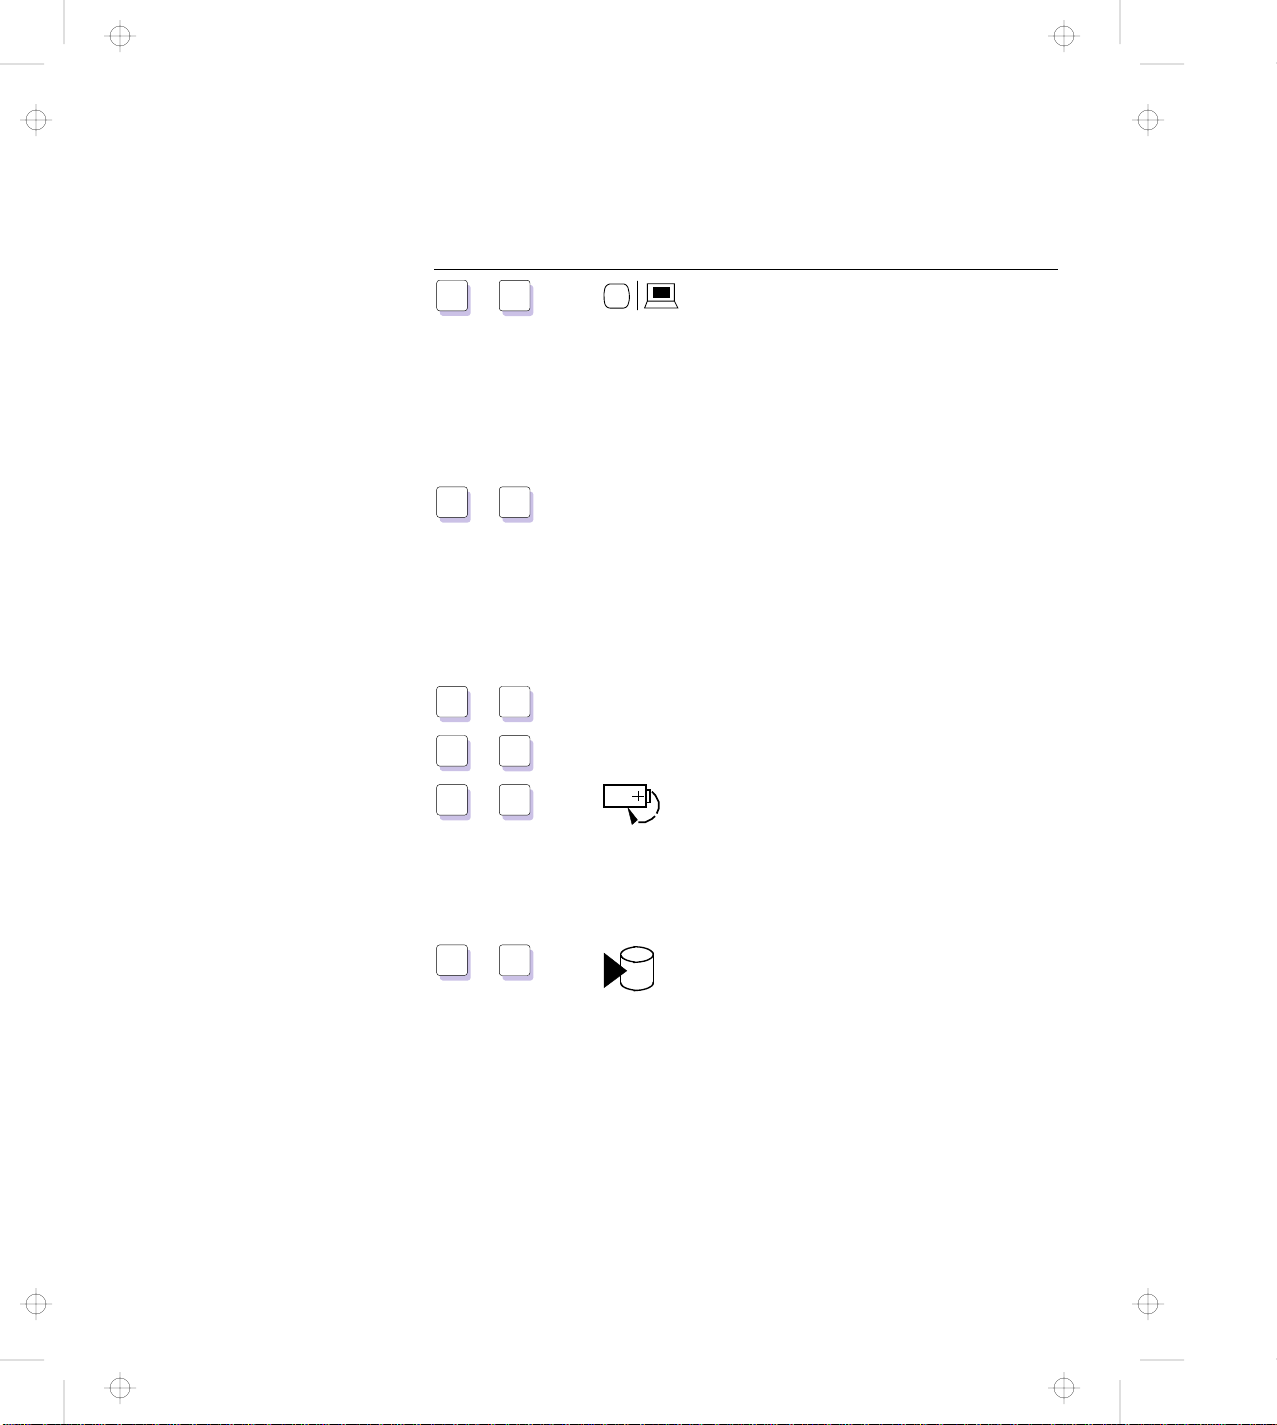
Keytop Function
Switches the computer display in the
following sequence when an external
display is attached.
External Both
Display
LCD
— Switches the LCD mode between
expanded and shrunk mode. You
should expand the LCD screen as
much as possible in expanded mode.
If you are displaying in full colors, your
display area will be smaller even in
expanded mode.
— Unused
— Unused
Switches the power mode in the
following sequence:
High Auto
Customized
Fn
+
F12
Places the computer in hibernation
mode. See page 2-26.
1-10
Page 22
Title: C79DMMST CreationDate: 07/16/97 13:09:22
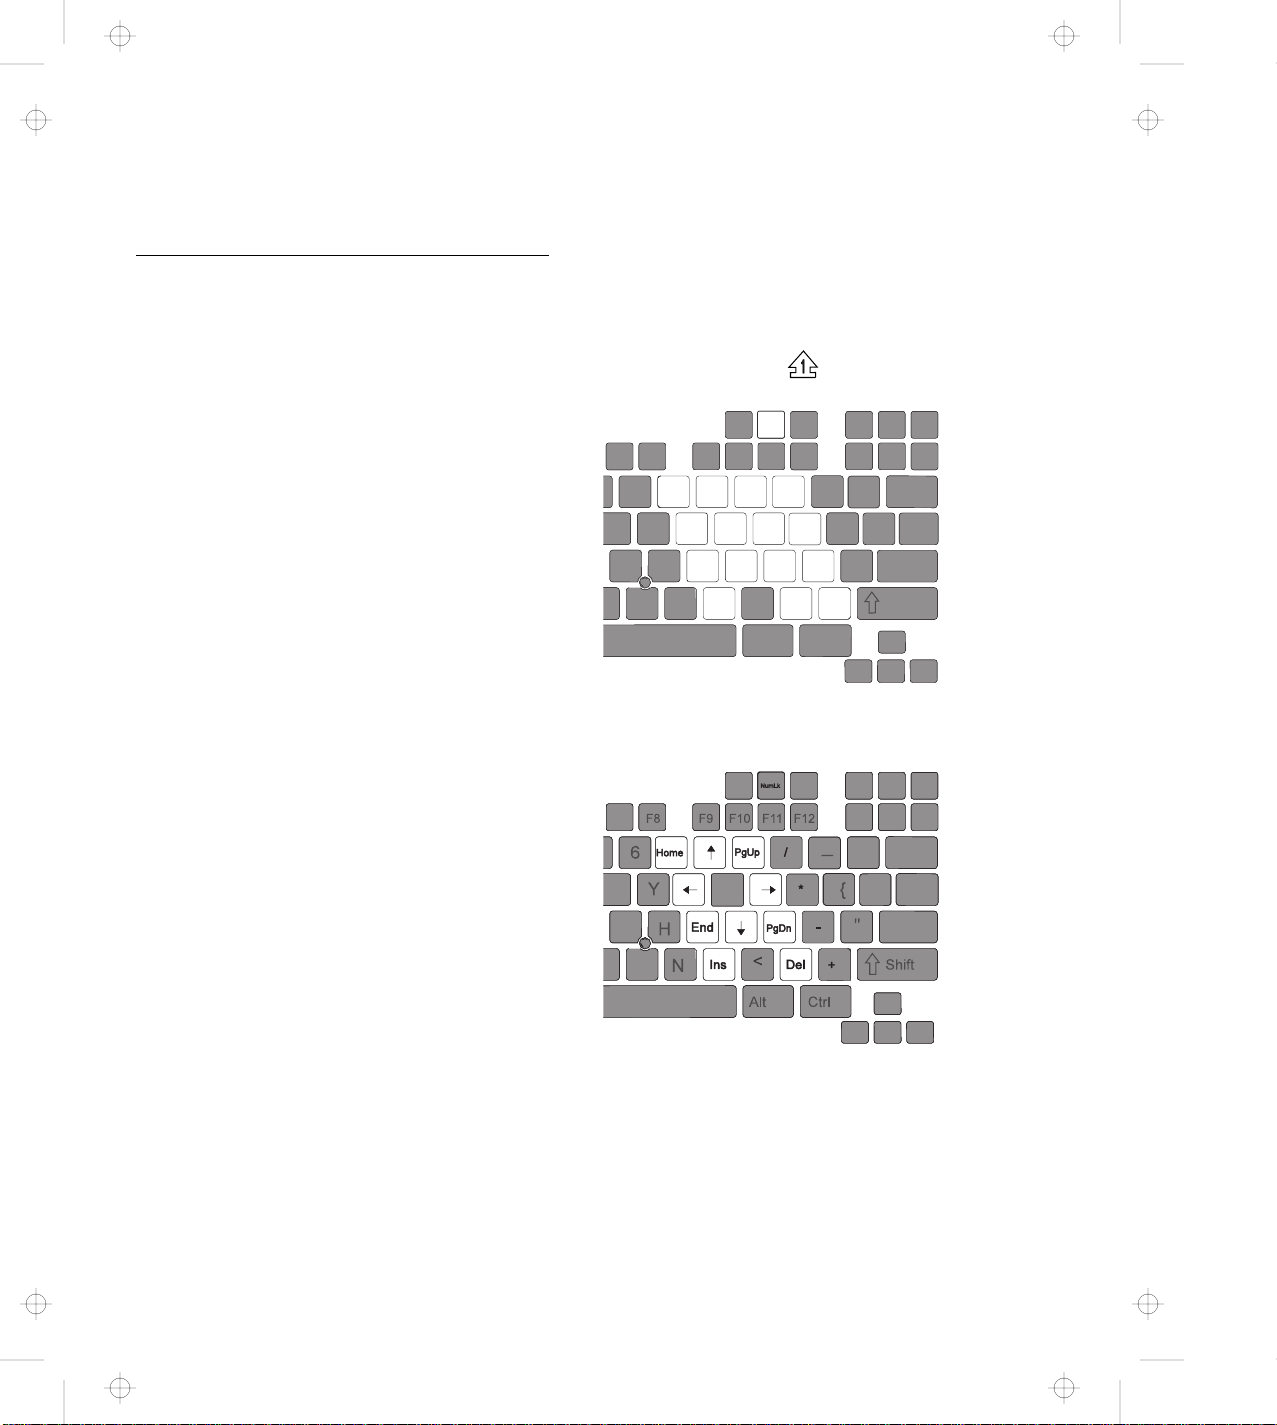
Using the Numeric Keypad
You can use a group of keys on the keyboard as numeric keys.
There are numbers engraved in the lower right corner of these keys.
To enable this function, press and hold the Shift key and then press
the NumLk key. The NumLK icon ( ) appears on the LCD
indicator panel.
NumLk
F8 F9 F10
6
7
Y
4 5 6
1 2 3
H
N
8 9
0
F11 F12
/
*
.
<
Alt Ctrl
_
{
"
-
+
Shift
Once you enable this function, you can also use the following keys
for cursor-control and screen-control by pressing and holding the
Shift key.
To disable the numeric keypad function, press and hold the Shift
key; then press NumLk again.
Note: You cannot use the numeric keypad function when you are
using an external numeric keypad or an external keyboard.
Chapter 1. Getting to Know Your Computer 1-11
Page 23

Title: C79DMMST CreationDate: 07/16/97 13:09:22
Knowing the LED Color Indications
The ThinkPad computer enables you to attach or detach devices
dynamically (
UltraBay II.
hot
or
warm plugging
and
unplugging
) in the
Hot plug
the computer is operating.
Warm plug
while the computer is in suspend mode.
Cold plug
the computer is powered off. Your computer supports cold
plugging and unplugging for all devices.
See the
this function.
The LED at the front of your computer and a beep indicates the
following conditions of the UltraBay II:
Color Action Sound
Green Ready to remove a device from or install a device in the UltraBay
II.
Blinking green Removal or installation in-process. Wait. No beep
Black (off) A device is operating normally in the UltraBay II or there is no
device is in the UltraBay II.
Blinking yellow A device (such as a hard disk drive) is about to be removed
and the
Do not remove the device. Push back the bay eject lever.
A device (such as a hard disk drive) is about to be installed
and the
not install the device. Push back the bay eject lever, power
off your computer; then reinstall the device.
hot
hot
and
warm unplugging
and
warm plugging
or
unplug
means to attach or detach a device while
or
or
unplug
unplug
means to attach or detach a device
means to attach or detach a device while
User's Guide Supplement
function is not supported.
function is not supported. Do
for a list of devices that support
No beep
No beep
A short beep
followed by a
continuous
beep
Yellow A device that was not supposed to be removed (such as a hard
disk drive) was removed. The computer may be damaged.
1-12
A long beep
Page 24

Title: C79DMMST CreationDate: 07/16/97 13:09:22
Functional Highlights
DVD
Audio
This section summarizes the major functions of your computer.
These functions are offered as standard on some models and as
options on others.
The digital versatile disk (DVD) drive can play standard CD-ROM
discs. When used with the DVD and Enhanced Video Adapter, it
can play business presentations recorded in DVD format or play
off-the-shelf DVD titles and movies.
The audio feature supports the following:
Wave audio recording and playback of up to 16 bits, stereo, and
44 KHz sampling.
DOS games using the Sound Blaster** interface.
A model equipped with the IBM Advanced Communications
Processor provides a high-quality MIDI wave table synthesizer with
128 instruments and up to 32 voices.
Audio with 3D Stereo Sound
Your computer is equipped with internal audio record and playback
capabilities including 3D audio from just two speakers. When 3D
stereo sound is enabled, sounds will appear to be generated all
around you, even though only two speakers are used.
The ThinkPad 770 features a high-quality MIDI wave table
synthesizer with 128 instruments and up to 32 voices, plus support
for DOS Sound Blaster games.
Video Capture
The DVD and Enhanced Video Adapter provides for the capture of
still and motion video from an analog source such as a VCR and TV.
The ThinkPad 770 includes the Digital Video Producer application for
editing and compressing the video.
Chapter 1. Getting to Know Your Computer 1-13
Page 25

Title: C79DMMST CreationDate: 07/16/97 13:09:22
Infrared
Infrared technology makes wireless communication possible between
infrared-enabled devices. Your computer has two infrared ports.
Each port can be aimed for point-to-point communication with a
portable computer, printer, or other infrared-enabled device. Each
port can communicate at a distance of up to approximately 1 m (3.3
ft.) at a rate of up to 4 megabits per second (Mbps).
Video Phone Features
The Intel Video Phone** feature lets you use your computer like a
telephone. It lets you see the person you are talking to in a window
after you've made a call with your computer's call center. This
program also lets you send such files as documents or
spreadsheets, or play games with the person you are talking to. You
can use either a regular telephone line or the Internet to make calls.
Regular phone lines produce better audio and video quality.
However, long distance calls over the Internet might save money,
since you pay only for the local call. You can use this function only
in receive mode if you don't have a camera; that is, you can see
your caller, but he or she can't see you. To enable send mode so
that the caller can see you, you must purchase an upgrade kit from
Intel. This kit comes with a camera.
System Management Features
Your computer has features that enable a network administrator to
control it remotely over a network from a management console. If
your computer is connected to a SelectaDock III docking station with
an IBM 100/10 Ethernet PCI Adapter with Wake on LAN and an IBM
Auto Wake Token Ring ISA Adapter installed, the Wake-on-LAN
capability is also supported.
TrackPoint with Enhanced Controls
Your computer has an enhanced TrackPoint function that enables
you to make selections merely by pressing on the TrackPoint. A
new center button converts the TrackPoint into a scroll controlling
device or a magnifying glass on the screen.
1-14
Page 26

Title: C79DMMST CreationDate: 07/16/97 13:09:22
Chapter 2. Fine-Tuning Your Computer
This chapter describes how to use the following features of your
ThinkPad computer:
Starting the ThinkPad Configuration Program .......... 2-3
Using the TrackPoint ......................... 2-9
Using the ThinkPad Online Book ................. 2-15
Using the Security Features .................... 2-16
Saving Battery Power ....................... 2-26
Using the Audio Features ..................... 2-35
Using the ThinkPad Modem .................... 2-39
Using the DVD and Enhanced Video Adapter ......... 2-44
ThinkPad Configuration Program for Windows 95 ...... 2-3
ThinkPad Configuration Program for Windows NT ...... 2-4
ThinkPad Configuration for DOS ................ 2-5
Switching Screens . . . . . . . . . . . . . . . . . . . . . . . . . 2-7
Switching between the External Display and Television ... 2-7
Operating the TrackPoint ..................... 2-9
Cleaning the Cap ........................ 2-10
Customizing the TrackPoint .................. 2-10
Using Passwords . . . . . . . . . . . . . . . . . . . . . . . . 2-16
Setting a Password ..................... 2-16
Changing or Removing a Password Using Easy-Setup . 2-19
Entering a Password ..................... 2-22
Using the Supervisor Password on Several Hard Disk
Drives . . . . . . . . . . . . . . . . . . . . . . . . . . . . 2-23
Using the Personalization Editor ............... 2-24
Using the Power Management Modes ............ 2-26
Setting the Suspend Timer ................. 2-27
Enabling Hibernation Mode ................. 2-28
Using Other Battery Saving Methods ............. 2-30
Checking the Battery Status .................. 2-31
Using the Fuel Program .................... 2-32
Changing the Battery Status Indication .......... 2-34
Using the 3D Sound Retrieval System (SRS) Function .. 2-36
Using the MIDI Features .................... 2-37
Using the ThinkPad Modem in Windows 95 and Windows
NT . . . . . . . . . . . . . . . . . . . . . . . . . . . . . . . . 2-41
Using the ThinkPad Modem in OS/2 ............. 2-41
Using the 56 Kbps Modem ................... 2-41
Telephony Features . . . . . . . . . . . . . . . . . . . . . . . 2-43
Copyright IBM Corp. 1997 2-1
Page 27

Title: C79DMMST CreationDate: 07/16/97 13:09:22
Using the DVD Enhanced Video Adapter with Windows 95 2-45
Using the Enhanced Video Features in OS/2 ........ 2-51
Using Easy-Setup . . . . . . . . . . . . . . . . . . . . . . . . . 2-54
Knowing Your Configuration .................. 2-56
Setting the Date and Time ................... 2-57
Changing the Drive Startup Sequence ............ 2-57
Using the Capture Function ................. 2-45
Using the Overlay Function ................. 2-47
Using the MPEG Playback ................. 2-49
Using the DVD Player .................... 2-50
2-2
Page 28
Title: C79DMMST CreationDate: 07/16/97 13:09:22
Starting the ThinkPad Configuration Program
This section describes how to start the ThinkPad Configuration
program. This program allows you to set up and customize the
computer's built-in devices to your needs.
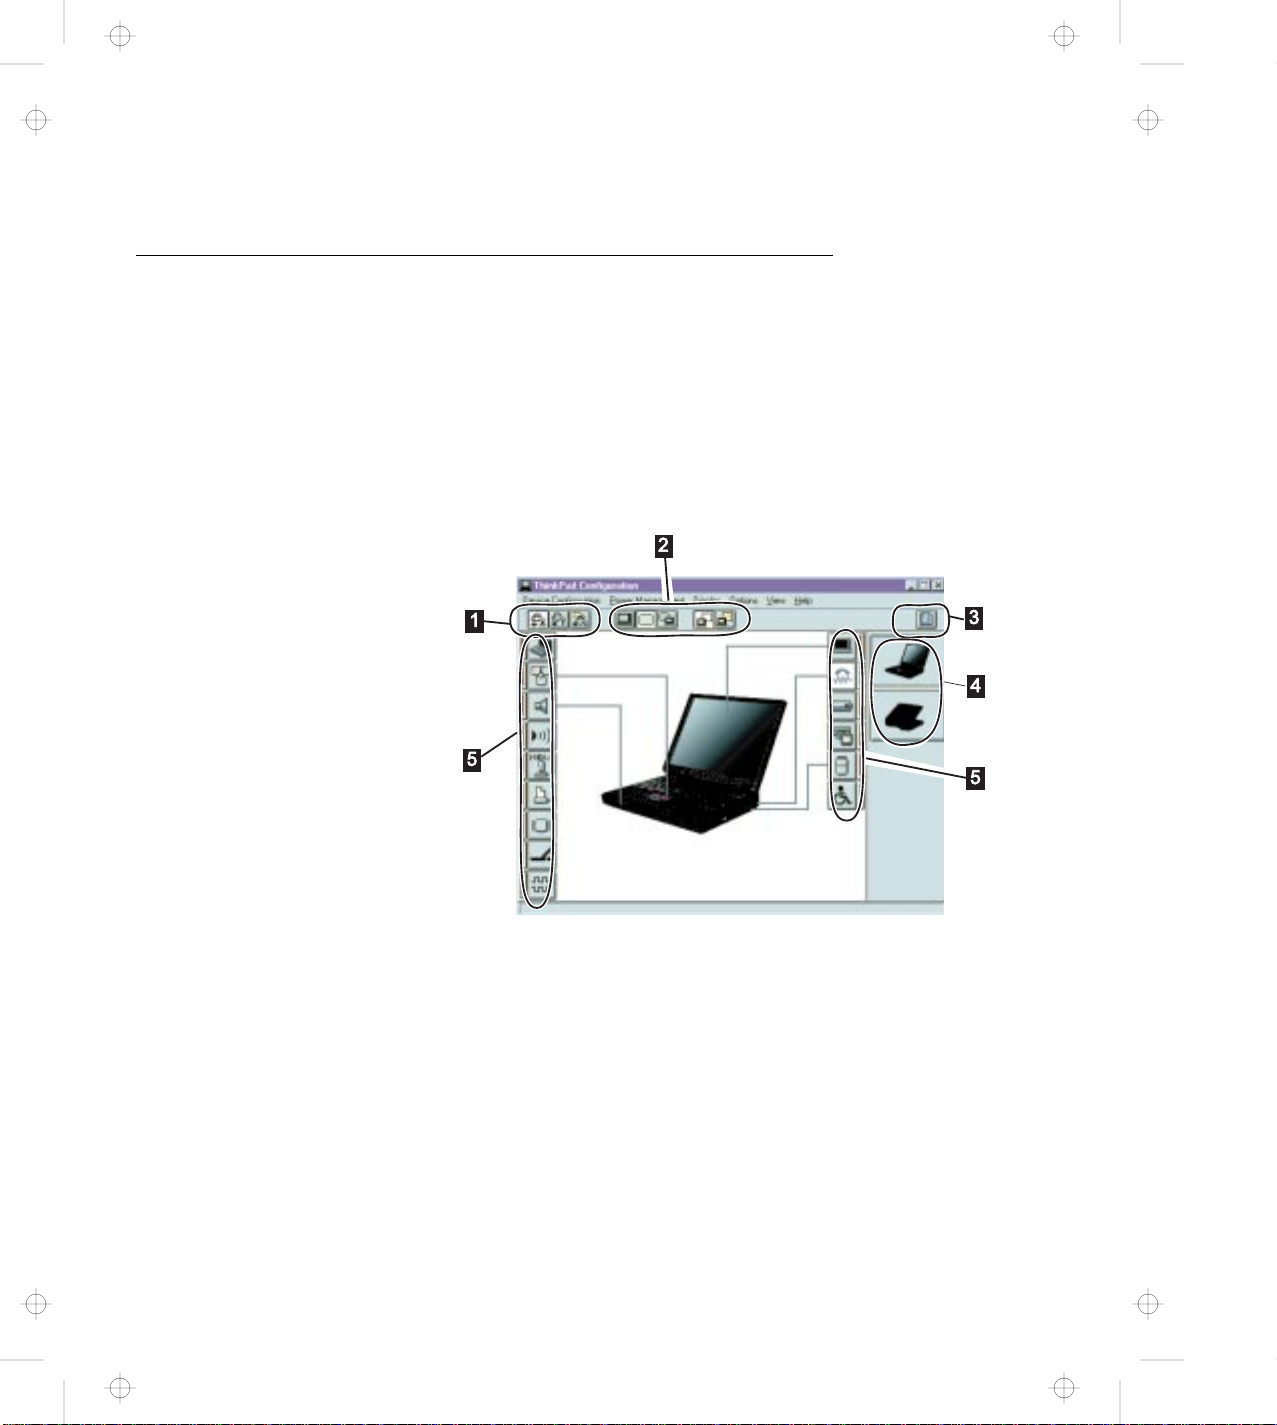
ThinkPad Configuration Program for Windows 95
To start the ThinkPad Configuration program for Windows 95, click
on Start, select Programs and ThinkPad, and double-click on
ThinkPad Configuration. The following window appears:
1 The Power Mode buttons
Click on one of these buttons to set the power mode to high
performance mode, automatic mode, or customized mode.
2 The Display Device buttons
Click on one of these buttons to set the display output type to
the LCD, external display, or to both. When making a
presentation, you can click on the presentation button to disable
any system timers, such as the LCD turn-off timer or the
power-save mode timers.
3 The Help button displays the online help.
Chapter 2. Fine-Tuning Your Computer 2-3
Page 29
Title: C79DMMST CreationDate: 07/16/97 13:09:22
4 The View Angle buttons
Click on the front view or rear view buttons to display the
hardware feature locations.
5 The Device buttons
Click on the button of your choice from the window.
When the device is enabled, the red indicator next to the button
is lit. Otherwise, it stays off.
Only the top portion of the window is displayed when you click on the
triangular minimize button in the top-right corner.
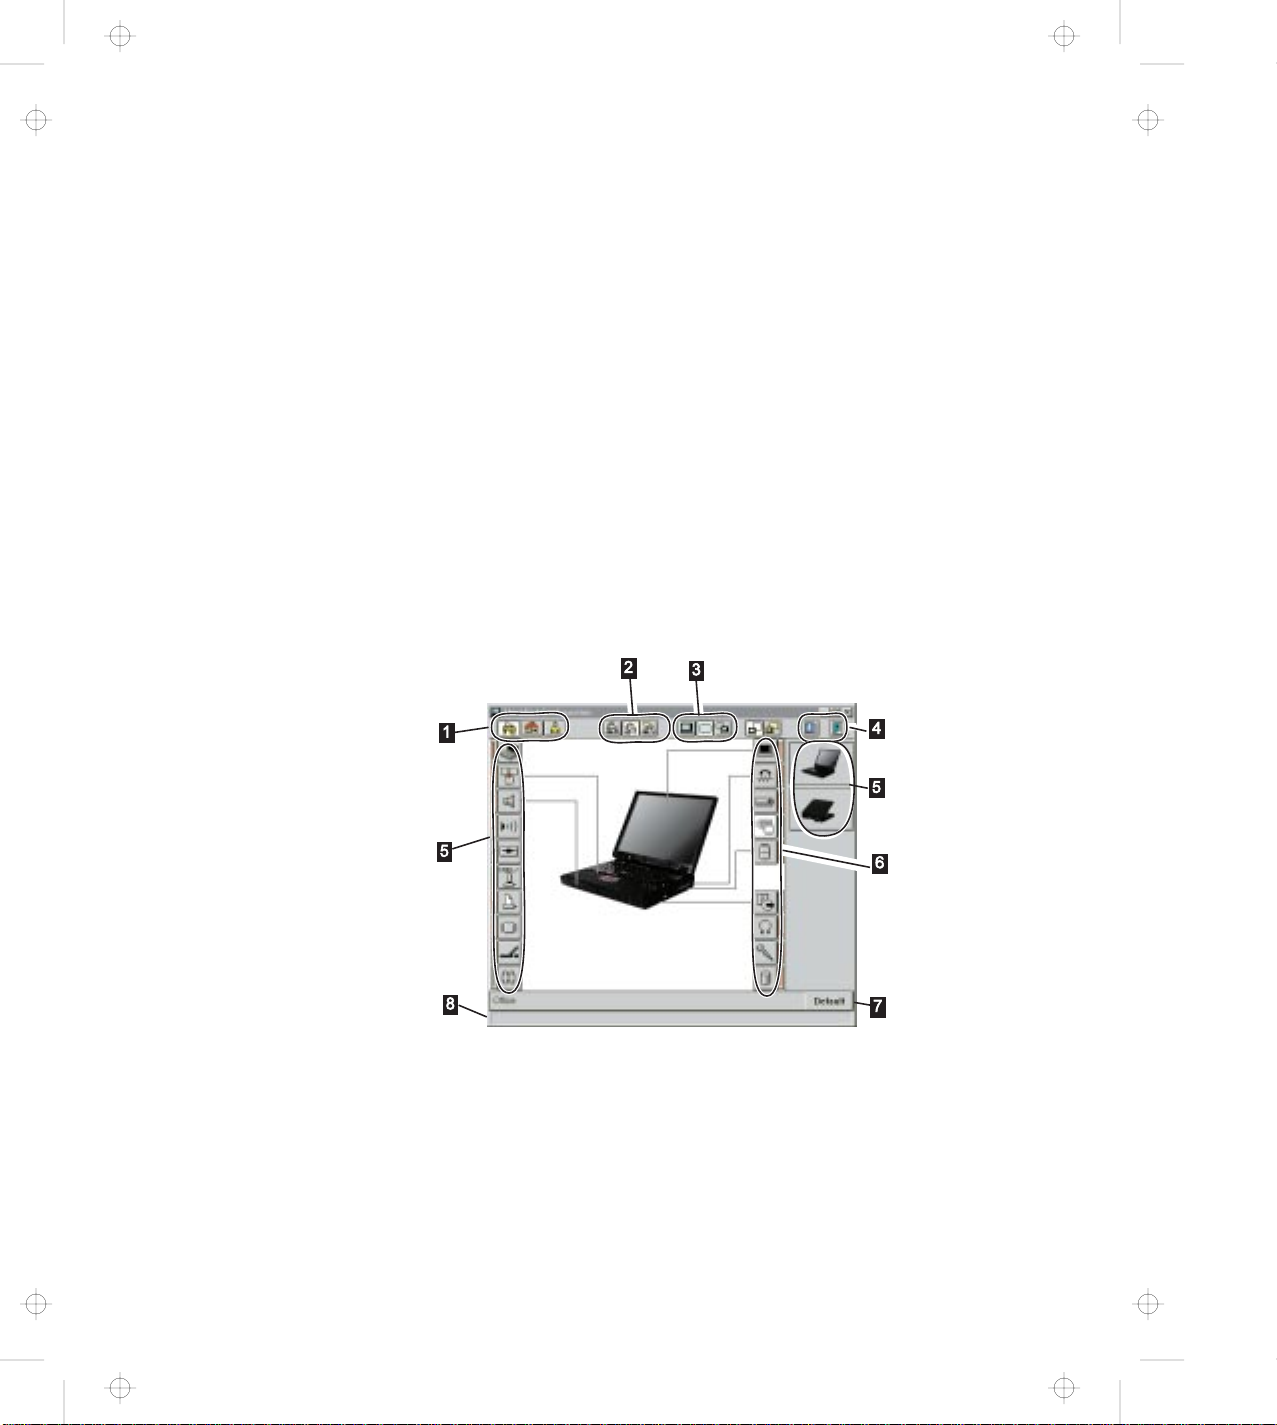
ThinkPad Configuration Program for Windows NT
To start the ThinkPad Configuration program for Windows NT, click
on Start, select Programs and ThinkPad, and double-click on
ThinkPad Configuration. The following window appears:
1 The One-Touch Setup buttons
Click on one of these buttons to set the system configuration.
2 The Power Mode buttons
Click on one of these buttons to set the power mode to high
performance mode, automatic mode, or customized mode.
2-4
Page 30

Title: C79DMMST CreationDate: 07/16/97 13:09:22
3 The Display Device buttons
4 Click on the left button for Help. Click on the right button to
5 The View Angle buttons
6 The Device buttons
Click on one of these buttons to set the display output type to
the LCD, external display, or to both. When making a
presentation, you can click on the presentation button to disable
any system timers, such as the LCD turn-off timer or the
power-save mode timers.
save the changes made and to Exit the ThinkPad Configuration
window.
Click on the front view or rear view buttons to display the
hardware feature locations.
Click on the button of your choice from the window; then set the
options for that device from the window that appears.
When the device is enabled, the red indicator next to the button
is lit. Otherwise, it stays off.
7 The Default button
Click on this button to set the default values for each option and
to cancel the changes you just made.
8 The Status bar
The device name and its status appears in the status bar when
you place the cursor on a device button.
Only the top portion of the window is displayed when you click on the
triangular minimize button in the top-right corner.
ThinkPad Configuration for DOS
You can use the ThinkPad Configuration program from the DOS
prompt. To start the program, do the following:
1
Click on Start and the DOS Prompt icon. The DOS prompt
screen appears.
2
Type PS2 ? at the c:ThinkPad> prompt. The “ThinkPad
Configuration” online help screen appears:
Chapter 2. Fine-Tuning Your Computer 2-5
Page 31

Title: C79DMMST CreationDate: 07/16/97 13:09:22
C:\>PS2 ?
(C) Copyright IBM Corp. 1993,1995. All rights reserved.
Command Syntax: PS2 [Parameter1] [Parameter2] [Parameter3]
Following are available [Parameter1].
For the complete command syntax,
type ‘PS2 ? [Parameter]’.
1.Power Management related
PMode, SErial, DDC, CARD,
3
US Government Users Restricted Rights - Use, duplication
or disclosure restricted by GSA ADP Schedule Contract
with IBM Corp.
Select an item from the menu and follow the instructions on the
screen to set the features.
You can also create a batch file like the one shown to match
your operating environment. The following sample batch file
sets a longer battery operating time.
@Echo Off
Rem SAMPLE:Set the parameters to provide maximum power utilization.
Rem =============================================================
PS2 PMode Custom DC > Nul
PS2 LCd 3 > Nul
PS2 DISK 3 > Nul
PS2 POwer 5 > Nul
PS2 SPeed Fixed MIN > Nul
PS2 STandby 3 > Nul
PS2 IR OFf > Nul
PS2 SErial OFf > Nul
2-6
Page 32

Title: C79DMMST CreationDate: 07/16/97 13:09:22
Switching Screens
To switch screens between the LCD and the external display or
television, you should:
Start the ThinkPad Configuration program and click on either:
– for the LCD screen.
– for the external display or television screen. To switch
to the television screen, your computer must have the
optional DVD and Enhanced Video Adapter.
Or, use the Fn+F7 keys.
Notes:
1. You cannot display a screen on television and on the
external display screen at the same time.
2. You cannot display a screen on television and on the LCD
screen at the same time.
Switching between the External Display and Television
If you are using the optional DVD and Enhanced Video Adapter, you
can display the LCD output on an external display or television by
doing the following:
1
Turn off the computer and attach an external display to the
external-display port or a television cable to the video-out port
at the rear of the computer.
2
Turn on the computer and start the ThinkPad Configuration
program.
3
Click on the Enhanced Video/MPEG ( ) button. The
“Enhanced Video/MPEG” window appears.
4
If you want to use the television, select Enable for the
Video-out Port; then go to the next step.
Note: Select Enable only when you have a television attached
to your computer. Otherwise, the LCD screen turns
Chapter 2. Fine-Tuning Your Computer 2-7
Page 33

Title: C79DMMST CreationDate: 07/16/97 13:09:22
5
6
Note: The LCD display always appears before the television display.
blank. If this happens, use the Fn+F7 keys to restore
the LCD output.
If you want to use the external display, select Disable for the
Video-out Port; then go to step 6.
Select the appropriate television color standard: NTSC (default)
or PAL.
For NTSC, you can select only the 640x480 screen
resolution.
For PAL, you can select both the 640x480 and 800x600
resolutions.
Restart the computer to make the change effective.
If you selected the television, the display switches to the
television after appearing momentarily on the LCD.
2-8
Page 34
Title: C79DMMST CreationDate: 07/16/97 13:09:22
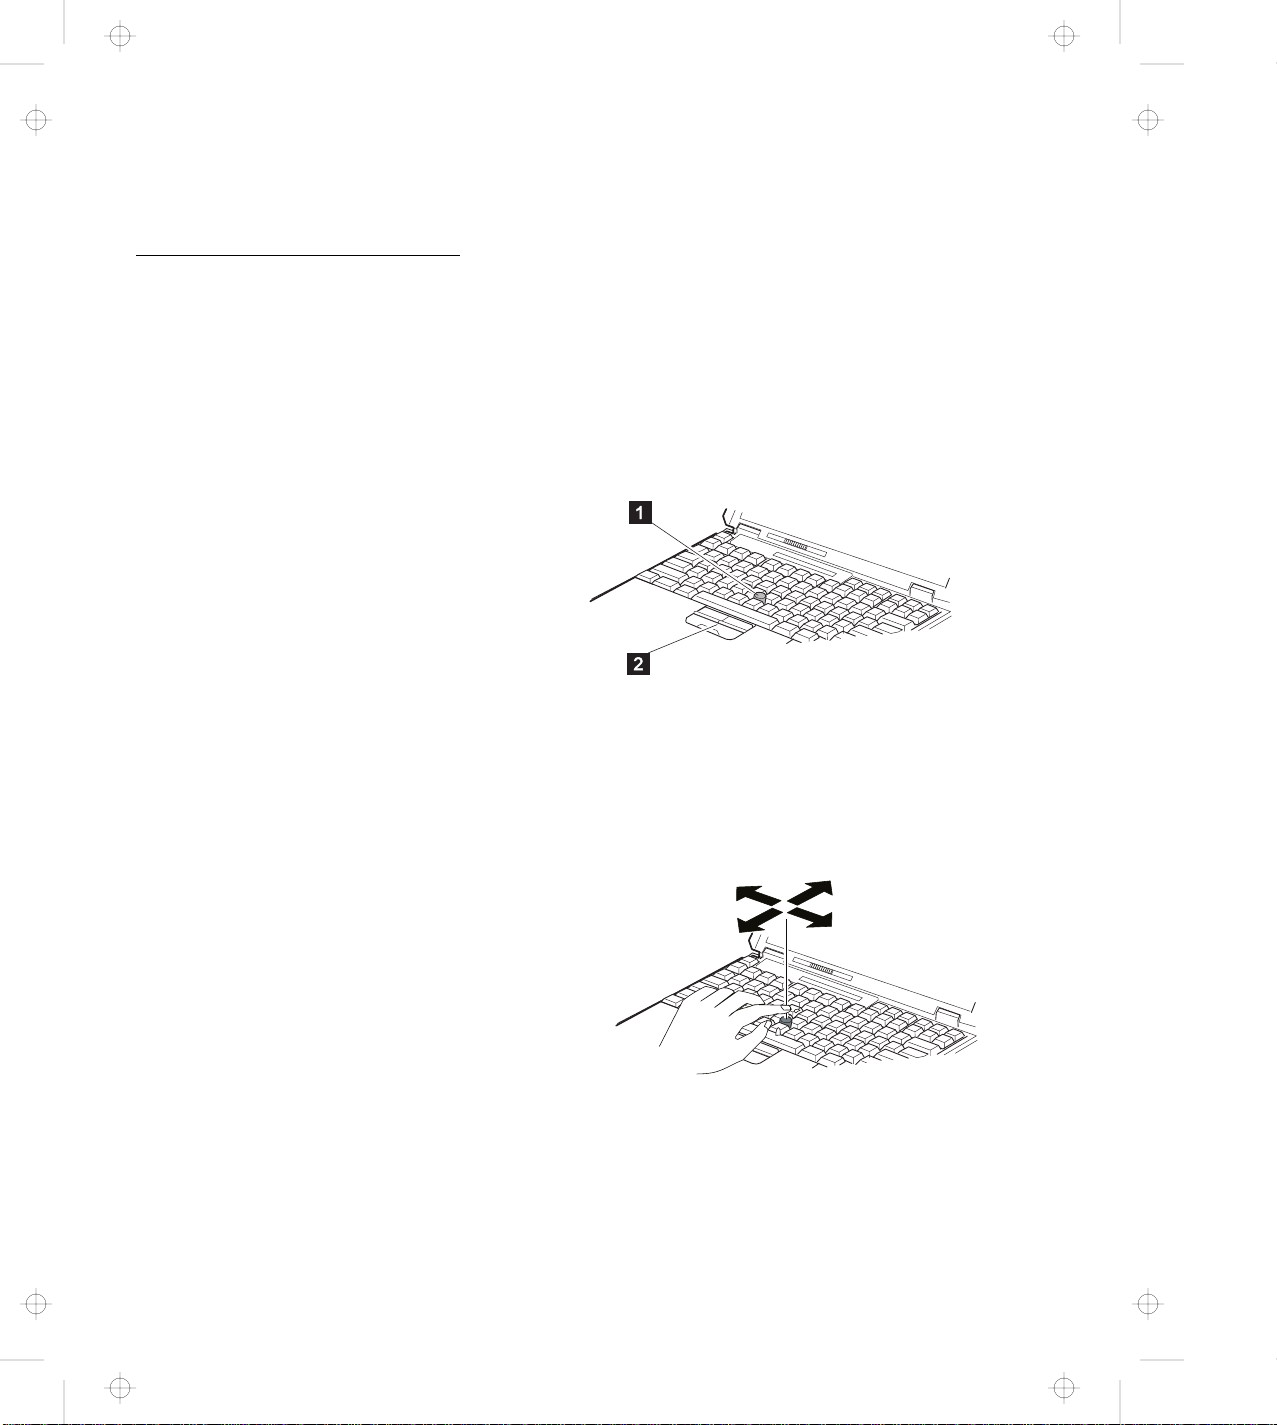
Using the TrackPoint
Your keyboard has a unique red button 1 called a
which functions like a mouse. Pushing this button in any direction
moves the pointer in that direction on the screen. You can select an
icon or a button by clicking on it, just as you would click on a mouse
click button. You can use the TrackPoint together with the three
click buttons 2 . The left and right click buttons function like the left
and right click buttons on a mouse. The center click button enables
the scroll and magnifying glass functions. Read the following section
for details on these functions.
The function of the click buttons depends on the software you are
using.
Operating the TrackPoint
1
Place your hands in the typing position and press gently on the
stick with either index finger in the direction you want the cursor
to move in.
TrackPoint
,
Pressing the stick away from you moves the cursor up the
screen.
Pressing it toward you moves the cursor down the screen.
Chapter 2. Fine-Tuning Your Computer 2-9
Page 35

Title: C79DMMST CreationDate: 07/16/97 13:09:22
2
Notes:
1. Remember that the stick does not move, and your finger should
not move on it.
2. The pointer may drift in some computer conditions. This is not a
defect. Do not use the TrackPoint until the pointer stops moving.
Cleaning the Cap
The cap 1 on the end of the TrackPoint is removable. You can
replace it with one of the spares shipped with your computer.
Pressing it sideways moves the cursor side to side.
Press the click buttons with either thumb to select and drag as
required by your software, as with any other pointing device.
When the cap is worn out, replace it. You can remove the cap by
pulling it off the TrackPoint stick.
Customizing the TrackPoint
To use the TrackPoint program, do the following:
1
Double-click on My Computer, Control Panel, and
TrackPoint. The “TrackPoint Properties” window appears:
2-10
Page 36

Title: C79DMMST CreationDate: 07/16/97 13:09:22
2
Select the features that you want to use.
The Enable Press-to-Select function
This function enables you to tap quickly on the TrackPoint to
start programs, press buttons, use menus, and so on. You can
always use the left click button and the right click button as
mouse buttons.
The Enable Dragging function
This function enables you to drag and drop an object. Press
down on the TrackPoint to grab the object. Then, drag the
object by moving the TrackPoint. Drop the object by releasing
the TrackPoint.
The Enable Release-to-Select function
This function enables you to click by simply lifting your finger
quickly off the TrackPoint. Release-to-Select can also help you
make a double-click. When you move the pointer onto an icon,
and then lift your finger off the TrackPoint, one click is made
(Release-to-Select). Then, when you press the TrackPoint
again, the second click is made. The result is a double-click.
Press Means
Press-to-Select simulates only a single mouse button. Use this
function to choose whether you want Press-to-Select to work like
Chapter 2. Fine-Tuning Your Computer 2-11
Page 37
Title: C79DMMST CreationDate: 07/16/97 13:09:22
a left click or a right click button. You can change the left click
and right click button from the “Mouse Properties” window of the
Control Panel.
If you set your Button configuration as right-handed, the right
click displays a context menu and the left click works as a
selector.
If you set the configuration as left-handed, the left click displays
a context menu and the right click works as selector.
TrackPoint for clicks and double-clicks. If you set the pace too
slow, you might notice unintended clicks, a pointer delay, or a
dragging delay. However, if you set the pace too quick, you
might notice that it is hard to use Press-to-Select.
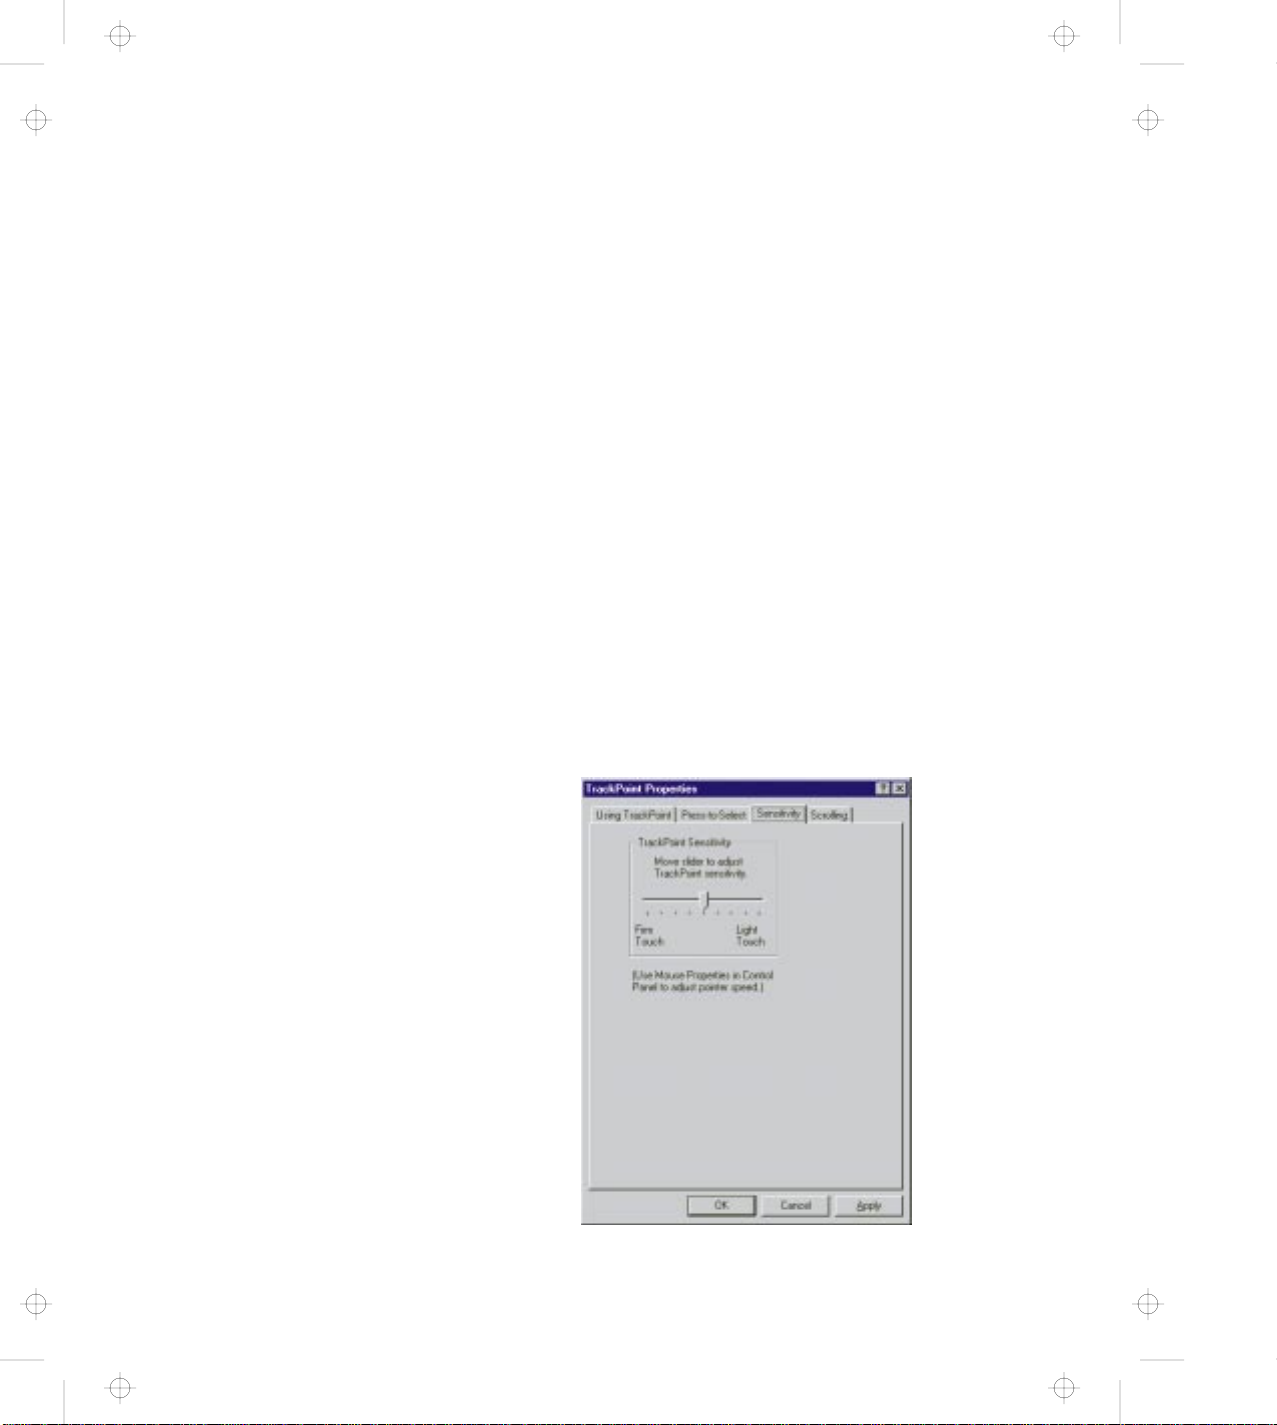
The TrackPoint Sensitivity function under the Sensitivity tab
adjusts the force required for both cursor movement and
Press-to-Select. Slide toward Firm Touch to increase the force
needed to move the pointer, and to increase the force needed to
activate Press-to-Select. Slide toward Light Touch to decrease the
force needed to move the pointer, and to reduce the force needed to
activate Press-to-Select.
The Click Pace function adjusts how quickly you must press the
2-12
Page 38

Title: C79DMMST CreationDate: 07/16/97 13:09:22
The Choose Scrolling or Magnifying Glass Function under the
Scrolling tab enables you to do the following:
With the TrackPoint center button you can control the Scrolling or the
Magnifying Glass feature.
The Scrolling function enables you to navigate easily through
long documents or large spreadsheets with a press of a button.
You never need to use a scroll bar again! To scroll, press the
center button and then use the TrackPoint instead of the scroll
bars in any program.
The Magnifying Glass enables you to enlarge a movable area
of your display. You can click on objects “through” the
Magnifying Glass. The right button changes the size of the
Magnifying Glass, and the left mouse button changes its
magnifying power. Move the magnified area the same way as
you use the Scrolling function. By default, press the center
button and then use the TrackPoint to move the magnified area.
Select the Neither button to disable the Scrolling and Magnifying
Glass functions. The center button becomes mouse button 3.
Chapter 2. Fine-Tuning Your Computer 2-13
Page 39

Title: C79DMMST CreationDate: 07/16/97 13:09:22
Note: All Windows 95 and most Windows NT applications ignore
Choose Scrolling Method
Select which input device will be the scrolling device, that is, the
device for Scrolling or Magnifying Glass control.
Holding down the center button on the keyboard allows the
TrackPoint to control the Scrolling or Magnifying Glass. The
TrackPoint operates normally (controls the mouse cursor) when
the center button is not pressed.
This option sets an externally attached mouse to scroll (or move
the Magnifying Glass) horizontally or vertically. Use the
TrackPoint as a pointer.
mouse button 3.
Press Center Button, then use TrackPoint
Use External Mouse
Use TrackPoint
This option sets the TrackPoint to scroll horizontally or vertically.
Use an externally attached mouse as a pointer. This setting is
recommended if you have a mouse attached.
Note: You can still use the TrackPoint to control the mouse
pointer by pressing the center button.
2-14
Page 40

Title: C79DMMST CreationDate: 07/16/97 13:09:22
Using the ThinkPad Online Book
To see the online book, do the following:
Double-click on My Computer, Control Panel, and on ThinkPad
770 User's Guide. The online book appears.
Go to the respective section and make a printout if necessary. The
online book covers the topics in more detail.
Chapter 2. Fine-Tuning Your Computer 2-15
Page 41

Title: C79DMMST CreationDate: 07/16/97 13:09:22
Using the Security Features
This section describes how to use the following security features:
Passwords
Personalization features
Using Passwords
The password setting feature prevents your computer from being
used by others. You can set the following passwords on your
computer:
The Power-on password protects your computer from being
used by unauthorized persons.
The Hard Disk password protects the data on your primary hard
disk from being accessed by unauthorized persons. You can
also set a password for your secondary hard disk.
The Supervisor password protects the system information
stored in Easy-Setup and also makes your computer
tamper-resistant.
Setting a Password
A password protects your computer from being used by unauthorized
persons. Once you set a password, a prompt appears on the screen
each time you turn on the computer. You must enter your password
at the prompt. You will not be able to use the computer unless you
type the correct password.
To set a password, do the following:
1
Start Easy-Setup (refer to “Using Easy-Setup” on page 2-54).
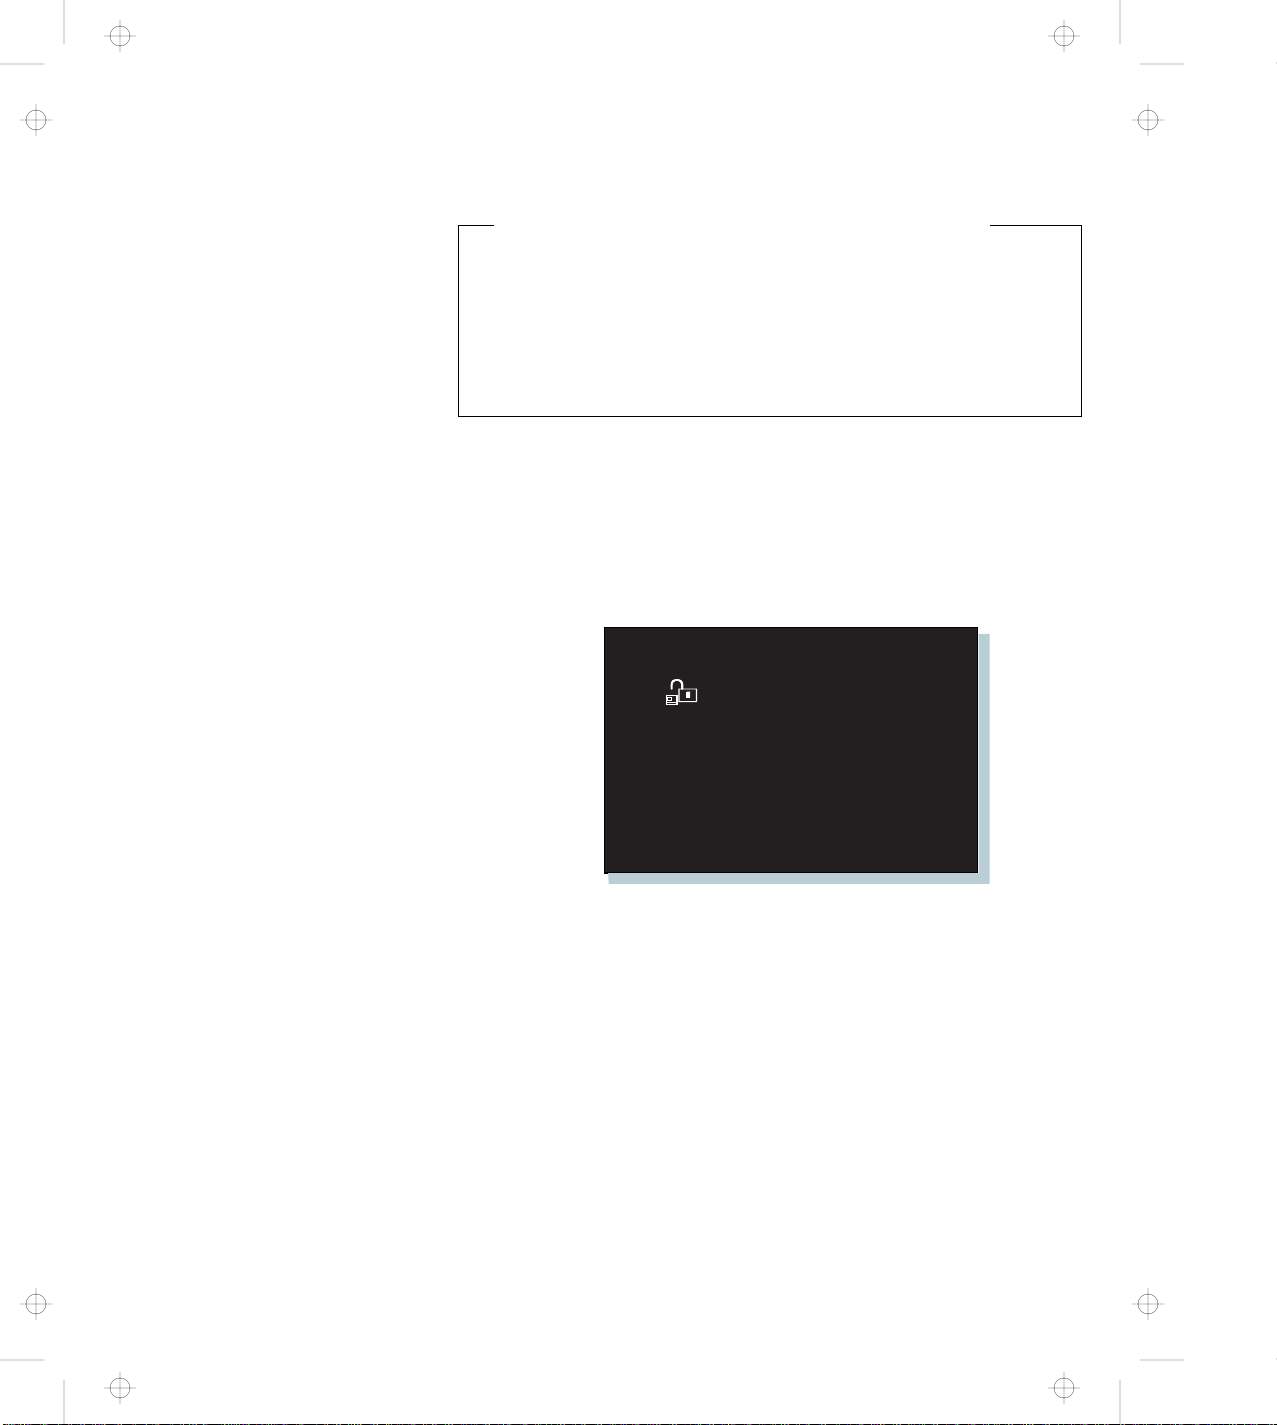
2
Click on Password in the “Easy-Setup” menu. The first
“Password” submenu appears:
2-16
Page 42

Title: C79DMMST CreationDate: 07/16/97 13:09:22
Selecting this icon displays a submenu for setting the
power-on password.
Selecting this icon displays a submenu for setting the
hard disk password.
Selecting this icon displays a submenu for setting the
supervisor password.
Note: An unlocked keylock icon indicates a password that is
not yet set.
3
Click on the type of password you want to set: Power-On,
Hard Disk, or Supervisor. The next “Password” submenu
appears.
4
Type an appropriate password.
You can type a maximum of 7 random characters using a
combination of letters (A to Z) and numbers (0 to 9).
Chapter 2. Fine-Tuning Your Computer 2-17
Page 43
Title: C79DMMST CreationDate: 07/16/97 13:09:22
5
Uppercase and lowercase letters (for example, A and a) are
treated as the same characters.
If you type a wrong character, use the Backspace key to erase
it and then type the correct one.
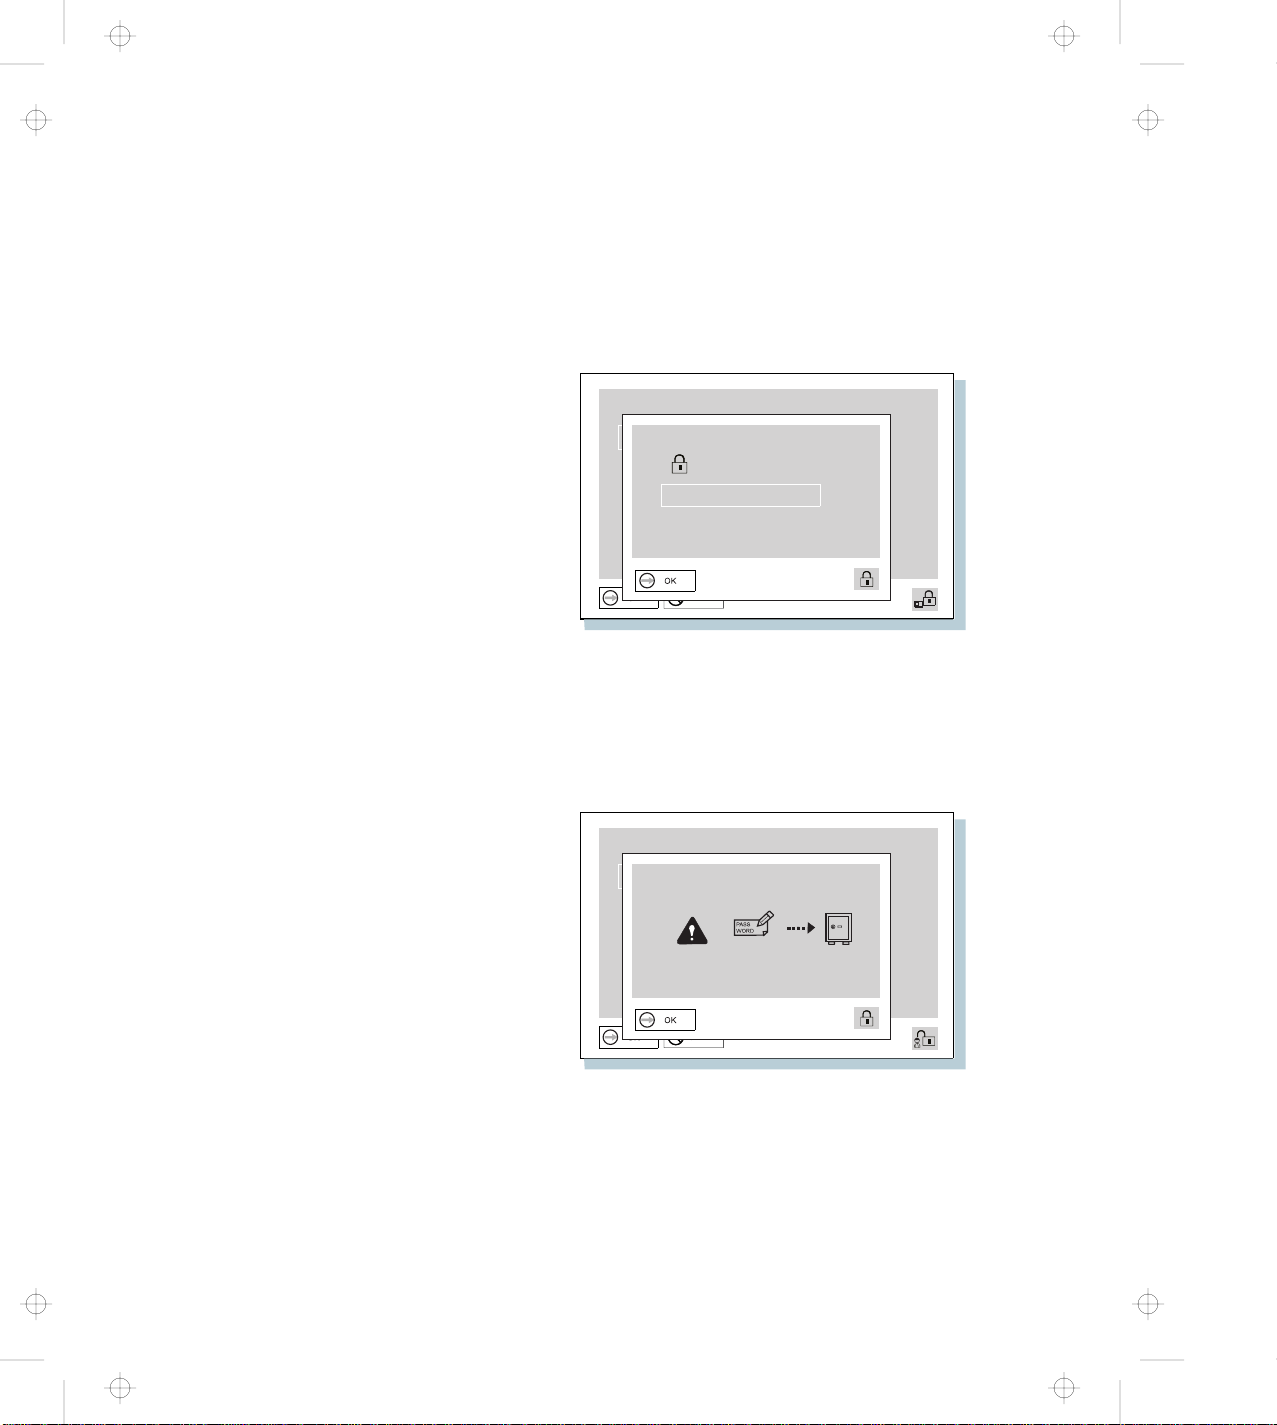
Press Enter. The “Password Confirmation” submenu appears:
6
Type your password again to verify it; then press Enter again.
Note: The following submenu appears if you are setting the
hard disk or the supervisor password, reminding you to
write down the password on piece of paper and to keep
it in a safe place.
Your password is set.
2-18
Page 44
Title: C79DMMST CreationDate: 07/16/97 13:09:22
Changing or Removing a Password Using Easy-Setup
This security feature prevents someone from removing a password
and using your computer. To remove a password, do the following:
Don't Forget Your HDD and Supervisor Password
If you forget your hard disk or supervisor password, there is no
way to reset your password or recover data from the hard
disk. You will have to take your computer to an IBM authorized
reseller or an IBM marketing representative to have the hard disk
or the system board replaced. Proof of purchase is required, and
an additional charge might be required for the service.
1
Start Easy-Setup (refer to “Using Easy-Setup” on page 2-54).
The password prompt appears (only when the supervisor
password is set):
2
Enter the supervisor password. The “Easy-Setup” menu
appears.
3
Select Password on the menu. The “Password” submenu
appears.
4
Select the password that you want to change or remove.
Power-On
Hard Disk
Supervisor
A submenu appears.
To change a password, go to the next step.
Chapter 2. Fine-Tuning Your Computer 2-19
Page 45
Title: C79DMMST CreationDate: 07/16/97 13:09:22
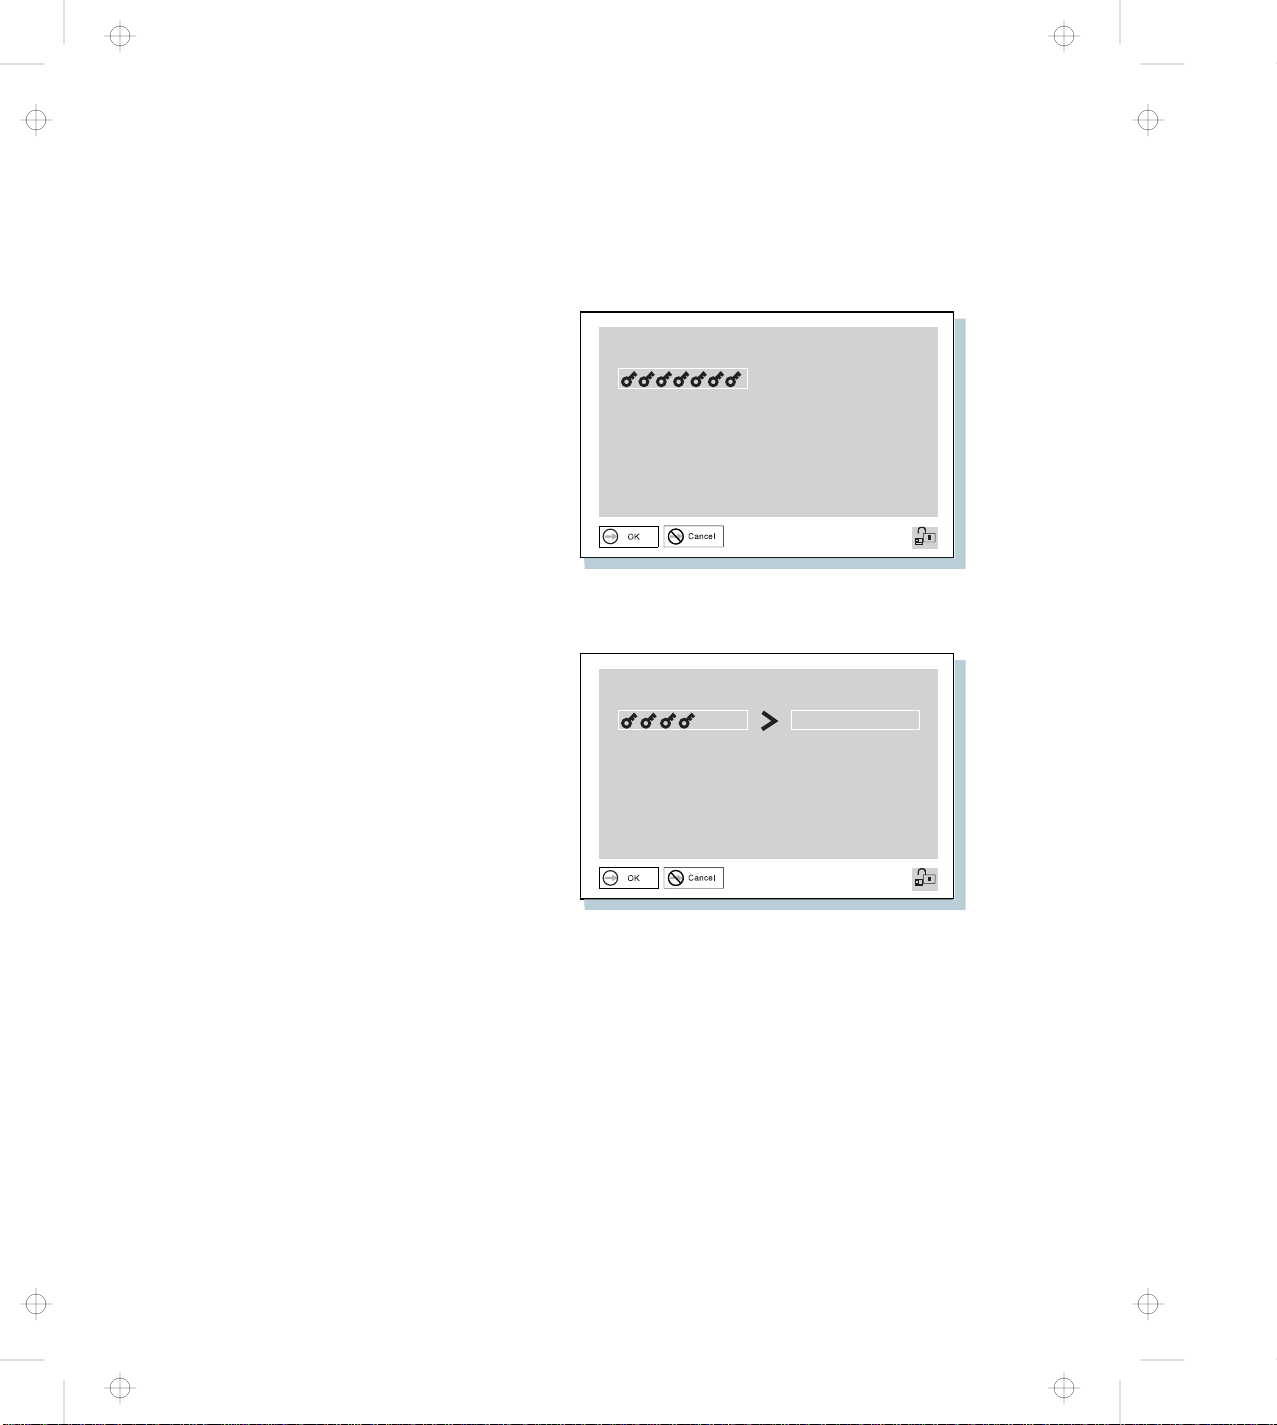
5
6
To remove a password, go to step 8 on page 2-21.
Enter the password you wish to change and press the
Spacebar. A submenu appears:
Type the new password. Press Spacebar. A submenu
appears:
7
Type the new password again; then press Enter. The
“Password” submenu appears and the password is changed.
Go to step 11 on page 2-22.
2-20
Page 46

Title: C79DMMST CreationDate: 07/16/97 13:09:22
8
Enter the password you wish to remove and press the
Spacebar. A submenu appears:
9
Press Enter. A submenu appears.
10
Press Enter again. The “Password” submenu appears and the
password is removed.
Chapter 2. Fine-Tuning Your Computer 2-21
Page 47

Title: C79DMMST CreationDate: 07/16/97 13:09:22
11
12
Entering a Password
Once you set a password, a password prompt appears at the top left
corner of the screen. This prompt appears each time you turn on
your computer or when your computer returns from suspend mode to
normal operation.
Click on Exit.
Select Restart. Your computer restarts.
However, a password prompt is not displayed if the computer returns
to normal operation by a preset timer or an incoming call on the
modem, in which case you will have to display it by pressing a key or
moving the pointing device.
To enter a password, do the following:
1
Type your password. The symbol appears each time you
press a key. Don't hold down a key too long since the same
character will be entered continuously.
2
Press the Enter key.
An OK appears if you enter the correct password, and an X
appears if you enter the wrong password. If you fail to enter
the correct password in three tries, you must turn off the
computer, wait 5 seconds, and then turn it on again and retry.
2-22
Page 48

Title: C79DMMST CreationDate: 07/16/97 13:09:22
Using the Supervisor Password on Several Hard Disk Drives
If you are using several hard disk drives, you must set a supervisor
password for each of these drives. The same password that you set
for the supervisor password is set as the hard disk password. You
can use the same supervisor password that you set on the main
hard disk drive for the secondary hard disk drive in the UltraBay II.
To set a supervisor password for the hard disk drive in the docking
station, you must move the hard disk drive to the UltraBay II, set a
password there, and then reinstall the drive in the docking station.
Setting the Supervisor Password on Several Hard Disk
Drives
1
If you haven't set a supervisor password, set it now. Refer to
“Setting a Password” on page 2-16. When you set the
supervisor password, your computer automatically sets the
same password for the hard disk drive.
2
Remove the device from the UltraBay II and install a secondary
hard disk drive.
3
Turn on the computer. A 158 error appears.
4
Press Enter. The power-on password prompt appears.
5
Type your supervisor password. The supervisor password is
set for the secondary hard disk drive and your operating
system starts.
If the error code 158 appears again, go to “Error Codes or
Screen Messages” on page 4-5.
6
Turn off the computer. Repeat steps 2 through 6 to set the
supervisor password for the other hard disk drives that you may
be using in the future.
Changing or Removing the Supervisor Password on
Several Hard Disk Drives
1
If you haven't changed or removed the supervisor password on
your computer, do it now. Refer to “Changing or Removing a
Password Using Easy-Setup” on page 2-19.
Chapter 2. Fine-Tuning Your Computer 2-23
Page 49

Title: C79DMMST CreationDate: 07/16/97 13:09:22
2
3
4
Remove the device from the UltraBay II and install the hard
disk drive with the old supervisor password.
Turn on the computer. The hard disk password prompt
appears.
Do one of the following:
If you changed the supervisor password in step 1, change
the old password on the hard disk drive to the new
supervisor password by doing the following:
a) Typing your
b) Typing your
c) Typing your
If you removed the supervisor password in step 1, type the
old supervisor password; then press the Spacebar.
5
Press Enter.
6
Turn off the computer.
To change or remove the supervisor password for each hard
disk drive, repeat steps 2 through 6.
Using the Personalization Editor
When you use the Personalization Editor, you can display such
personal information as your name and address on the screen each
time you power on your computer. To display this information, the
power-on password must already have been set. This feature helps
you to identify your computer when identical computers are being
used in your location, or to deter theft.
To register your name, address, and company on the Personalization
Editor, do the following:
old
password and pressing the Spacebar.
new
password and pressing the Spacebar.
new
password again.
1
Click on Start, select Programs and ThinkPad, and click on
Personalization Editor. The following window appears:
2-24
Page 50

Title: C79DMMST CreationDate: 07/16/97 13:09:22
2
Click on Personal Data and type in the necessary information
into the boxes.
Click on Help for more information.
The information that you typed in will be displayed the next time you
power on.
Chapter 2. Fine-Tuning Your Computer 2-25
Page 51

Title: C79DMMST CreationDate: 07/16/97 13:09:22
Saving Battery Power
Using the Power Management Modes
Your battery pack should be useful for approximately 3 years. The
number of years or charge-discharge cycles may vary depending on
how wisely you use your computer. This section describes the
following:
How to use the power management modes.
How to use other battery saving methods.
How to check your battery status.
You can use your computer under battery power for a considerable
length of time by using the following power management modes:
Standby Mode
Your computer enters this mode by default when there is
inactivity on your computer for a set duration of time. You can
also enter this mode by pressing the Fn+F3 keys.
To return to normal operation, press any key or move the
TrackPoint.
Suspend Mode
In this mode, your computer stops all tasks and stores all data in
memory. You can enter suspend mode by:
– Pressing the Fn+F4 keys
– Closing the cover
– Selecting the Suspend button ( ) in the Fuel program
You cannot enter suspend mode or resume normal operation
when the right bay eject lever is open.
Hibernation Mode
In this mode, your computer stops all tasks and stores all data in
the hard disk; then it powers off. You should set your computer
to this mode when you want to maintain the present operating
condition until the next day, for instance. RediSafe is another
hibernation mode option.
2-26
Page 52

Title: C79DMMST CreationDate: 07/16/97 13:09:22
You can set hibernation mode by doing any of the following:
– Pressing the Fn+F12 keys.
– Selecting the Hibernation button ( ) in the Fuel
program.
Notes:
1. You cannot enter hibernation mode or resume normal
operation when the right bay eject lever is open.
2. You cannot enter hibernation mode when you are using the
communication network.
3. Hibernation mode might be terminated if you connect your
computer to a docking station or if you use a particular PC
Card.
The following figure shows the relationship between the different
power management modes and battery power consumption:
Setting the Suspend Timer
To set the suspend timer, do the following:
For Windows 95
1
Start the ThinkPad Configuration program (refer to “ThinkPad
Configuration Program for Windows 95” on page 2-3).
Chapter 2. Fine-Tuning Your Computer 2-27
Page 53

Title: C79DMMST CreationDate: 07/16/97 13:09:22
2
3
4
5
For Windows NT
1
Click on the Power Management ( ) button. The “Power
Properties” window appears.
Select the Power Mode tab. The “Power Mode” window
appears.
Select Customize. The bottom gray portion is displayed in
black, and you can specify the timeout value in minutes in the
Suspend Timer box.
Click on OK.
Start the ThinkPad Configuration program (refer to “ThinkPad
Configuration Program for Windows NT” on page 2-4).
2
Click on the Power Management ( ) button. Three buttons
appear on the right.
3
Click on the Power Mode Settings ( ) button. The “Power
Mode Settings” window appears.
4
Specify the timeout value in minutes in the Suspend Timer
box.
5
Click on OK.
Enabling Hibernation Mode
To enable hibernation mode, do the following:
For Windows 95
1
Start the ThinkPad Configuration program (refer to “ThinkPad
Configuration Program for Windows 95” on page 2-3).
2
Click on the Power Management ( ) button. The “Power
Properties” window appears.
3
Select the Hibernation tab. The “Hibernation” subwindow
appears.
2-28
Page 54

Title: C79DMMST CreationDate: 07/16/97 13:09:22
For Windows NT
4
Click on Enable Hibernation. (If you already created a
hibernation file, this button appears in gray and you cannot
click on it.) The “Enable Hibernation” subwindow appears.
5
Click on Create Now.
6
Click on OK.
1
Start the ThinkPad Configuration program (refer to “ThinkPad
Configuration Program for Windows NT” on page 2-4).
2
Click on the Power Management ( ) button.
3
Click on the Suspend/Resume Options ( ) button. The
“Suspend/Resume Options” window appears.
4
Add a check mark ( ) on the option you want to set.
5
Click on OK.
For Windows NT Users
You cannot create a hibernation file in a Windows NT system that
uses the NTFS format system, the Windows NT default format. If
you want to use hibernation mode, you should reinstall Windows
NT with a FAT format system.
The following chart shows how to switch between the different power
management modes.
Chapter 2. Fine-Tuning Your Computer 2-29
Page 55

Title: C79DMMST CreationDate: 07/16/97 13:09:22
Using Other Battery Saving Methods
Another battery-saving method is to decrease the LCD brightness.
You can use the ThinkPad Configuration program to decrease the
brightness of the LCD by clicking on the LCD ( ) button and
selecting Normal for Brightness (battery operation) in the window
that appears.
2-30
Page 56

Title: C79DMMST CreationDate: 07/16/97 13:09:22
Checking the Battery Status
You can check the status of your battery by looking at the battery
status indicator.
Battery
Status
Indicator
(Blinking)
Remaining
Status and Action
Power
(Percentage)
100% Full battery power remains.
Less than
Sufficient battery power remains.
75%
Less than
Sufficient battery power remains.
50%
Less than
Not much battery power remains.
25%
0% No battery power is available for
operation.
You have
only 10
minutes left
for battery
operation.
The battery pack is almost
discharged and is about to enter a
low-battery condition. Do either of
the following immediately:
Change to ac power operation
by connecting the AC Adapter to
your computer and to a power
outlet.
Replace the battery pack with a
fully charged one.
If corrective action is not taken
within 30 seconds, the computer
enters suspend mode.
— The battery pack is being charged
(appears only when the AC Adapter
is connected). The battery pack
cannot be charged if the battery
overheats. Charging is resumed
when its temperature decreases.
Chapter 2. Fine-Tuning Your Computer 2-31
Page 57

Title: C79DMMST CreationDate: 07/16/97 13:09:22
Battery
Status
Indicator
Remaining
Power
(Percentage)
Status and Action
— The battery pack is being
discharged or is being used.
Off — The battery pack is not installed.
The computer is turned off.
Attention
Do not leave the computer in the blinking state for a long time. If
you leave it in this state, data in the memory will be lost.
Notes:
1. If you had set the alarm with the ThinkPad Configuration
program, you will hear three beeps the moment this indicator
starts blinking.
2. If this indicator starts blinking, the indicated percentage may not
be accurate. You need to repeat discharging and charging of
the battery pack at least three times.
Using the Fuel Program
The Fuel program enables you to do the following:
Enable suspend mode
Enable hibernation mode
This program also displays the following status:
The battery charge status
The remaining battery power percentage and duration of
remaining power
The current power mode
Operation mode
Battery-powered operation mode ( )
AC-powered operation mode ( )
2-32
Page 58

Title: C79DMMST CreationDate: 07/16/97 13:09:22
To start the Fuel program click on Start, select Programs and
ThinkPad, and click on Fuel. The following window appears:
If you want to erase this window from the desktop, press the Fn+F2
key combination. It reappears the next time you press this key
combination.
If you want to see Help, click on the Fuel button at the upper left
of the window.
Chapter 2. Fine-Tuning Your Computer 2-33
Page 59

Title: C79DMMST CreationDate: 07/16/97 13:09:22
Changing the Battery Status Indication
When you want to change the indication from percent ( ) to
hours and minutes ( ) or vice versa, do the following:
1
Click on the upper left corner of the “Fuel” window and select
Option... from the pull-down window.
2
Click on your choice; then click on OK.
2-34
Page 60

Title: C79DMMST CreationDate: 07/16/97 13:09:22
Using the Audio Features
Your computer is equipped with the following:
A -inch (3.5-mm) diameter external stereo line-in or monaural
microphone/line-in jack.
A -inch (3.5-mm) diameter stereo headphone or an
external-powered speaker jack.
A MIDI/joystick port on the port replicator. To use a MIDI device,
you should first connect your computer to a port replicator; then
connect an external MIDI device to the port replicator. After
docking your computer in the port replicator, you should enable
this port using the ThinkPad Configuration program.
Your computer also has an audio chip that enables you to enjoy the
various multimedia audio features. This audio chip provides the
following features:
Recording and playing back of PCM and WAV files in 8-bit or
16-bit format.
Sampling of various rates from 8 KHz to 44 KHz for the WAV
file.
Playing back of MIDI files through an FM synthesizer.
Recording from various sound sources, such as an integrated
microphone, an external microphone, or an audio device
attached to a line-in jack or an integrated CD-ROM drive.
DOS game campatibility. You should select Sound Blaster Pro**
for the audio adapter in the sound setup of the game.
The 3D Sound Retrieval System (SRS) function compensates for
the flat, two dimensional sound image limitations by
reestablishing the necessary information that allows the human
ear to hear in three dimensions.
Models equipped with the internal modem use the Advanced
Communication Adapter, which enables you to use the digital signal
processor (DSP) WaveTable MidiSynth function.
Chapter 2. Fine-Tuning Your Computer 2-35
Page 61

Title: C79DMMST CreationDate: 07/16/97 13:09:22
Using the 3D Sound Retrieval System (SRS) Function
To use the SRS function, do the following:
1
Double-click on the small speaker icon ( ) at the bottom right
of the Windows desktop.
or
Click on the Start button, and then select Programs,
Accessories, Multimedia, and Volume Control. The “Master
Out” window appears:
2
Make sure that the SRS Balance column is displayed and the
Mute checkbox is unchecked.
3
If the column is displayed and the checkbox is not checked,
exit the window. You can use the SRS function; skip the
remaining steps.
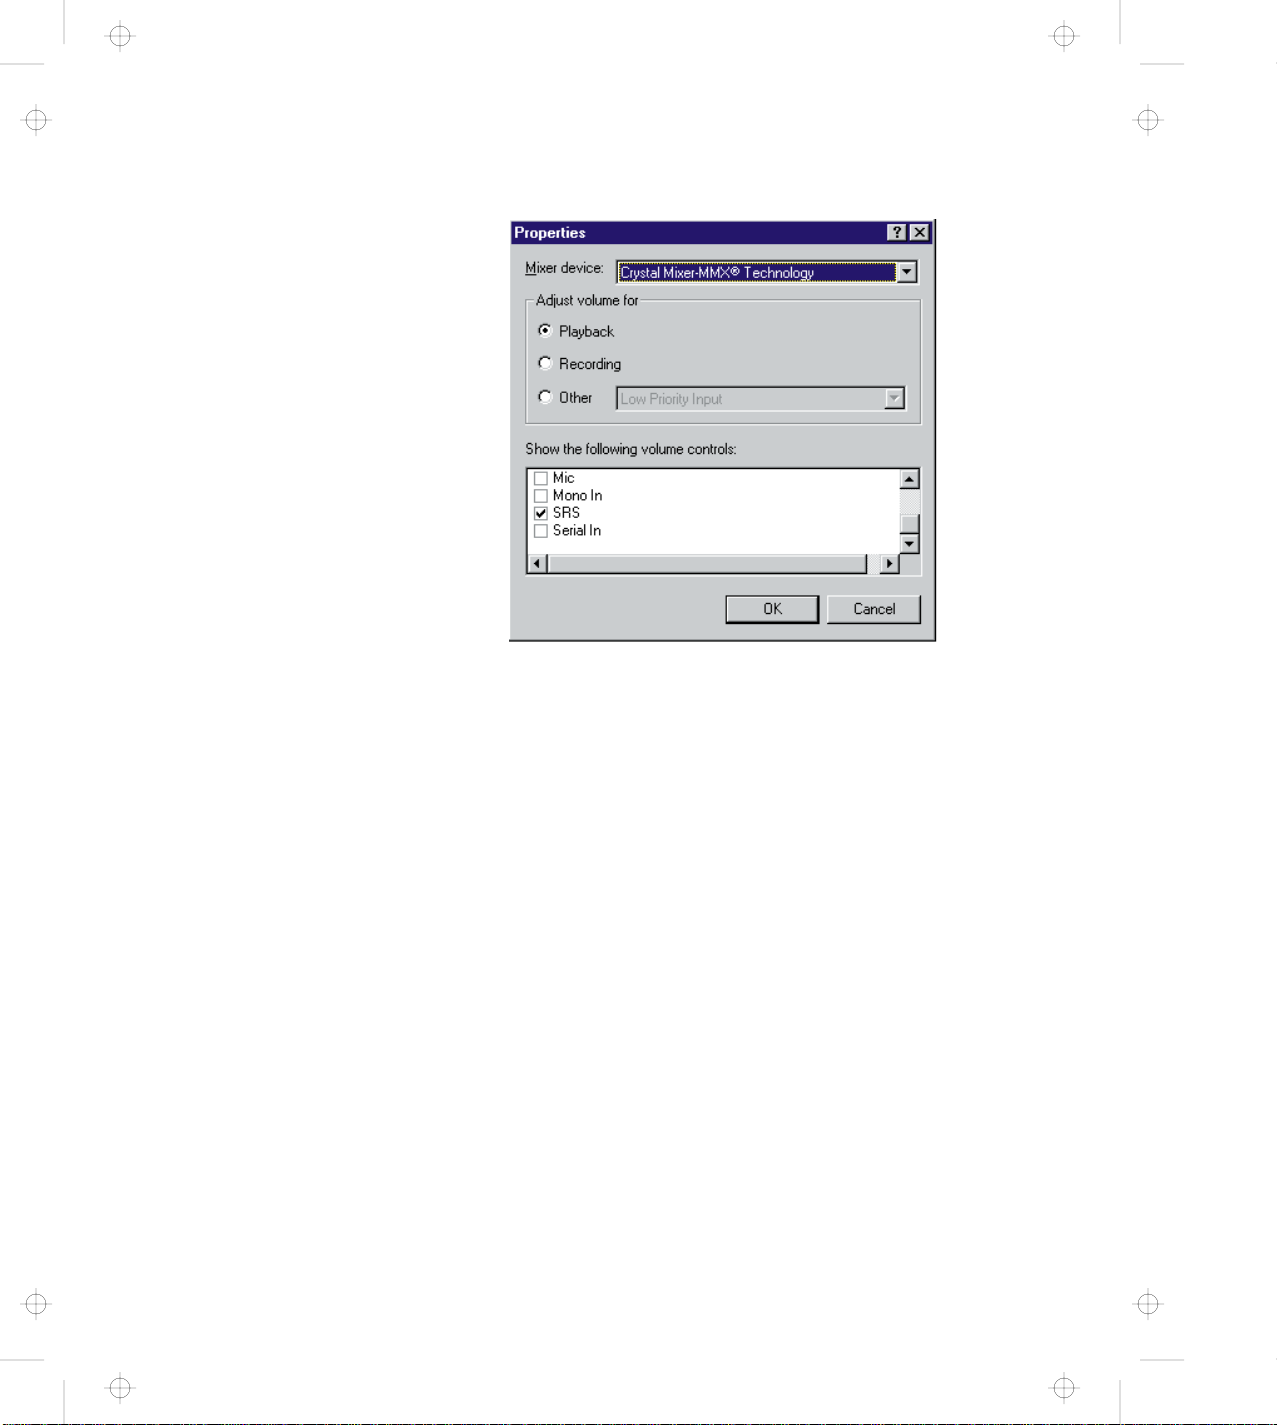
If the column is not displayed, select Options on the upper left
corner of the window and select Properties. The “Properties”
window appears:
2-36
Page 62
Title: C79DMMST CreationDate: 07/16/97 13:09:22
4
Put a check mark on SRS and press OK. You return to the
“Master Out” window.
5
Make sure that the Mute checkbox is unchecked.
6
Exit the “Master Out” window.
Now you can use the SRS function.
Using the MIDI Features
To use the MIDI features, do the following:
1
Click on the Start button, and select Settings, Control Panel,
and Multimedia. The “Multimedia Properties” window appears:
Chapter 2. Fine-Tuning Your Computer 2-37
Page 63

Title: C79DMMST CreationDate: 07/16/97 13:09:22
2
Select the MIDI tab.
3
Select the MIDI for Wave Table MidiSynth Device when you
want better quality sound. You can then use the Wave Table
MIDI sound.
or
Select MIDI for FM Synthesis when you want to use FM MIDI
sound. This is the default setting.
or
Select MIDI for Crystal** PnP Audio System MPU-401
Compatible when you want to use the external MIDI device
attached to the port replicator.
4
Click on OK to exit the window.
Now you can use the MIDI function.
2-38
Page 64

Title: C79DMMST CreationDate: 07/16/97 13:09:22
Using the ThinkPad Modem
The ThinkPad modem, available on some models, enables you to
send or receive data, faxes, and voice over the telephone line. This
modem uses a digital signal processor (DSP) and its software can be
upgraded, allowing great flexibility. It enables you to enhance the
modem capability to 56 Kbps.
Data modem functions
– Asynchronous communications port interface (NS16550A
UART compatible) operation
– ITU-T V.34 up to 33.6 Kbps data modem
– ITU-T V.32bis protocols with data rates of 4800, 7200, 9600,
12000, and 14000 bps
– ITU-T V.32 protocols with data rates of 4800, 9600 uncoded,
and 9600 bps Trellis coded
– ITU-T V.21/V.22, V.22bis protocols with data rates from 300
bps to 2400 bps
– Hayes** AT command set compatibility
– Asynchronous error recovery protocol
– Microcom Network Protocol (MNP**) protocols
- Error correction via MNP classes 1–4
- Data compression via MNP class 5 and V.42bis
- MNP class 5 for up to 2x data compression
– VoiceView (Windows 95 only)
Facsimile (fax) modem functions
– Class 1 fax modem
– Class 2 fax modem
– G3 transfers
– ITU-T T.4 & T.30 operations
– ITU-T V.27ter-2400/4800 bps send/receive
– ITU-T V.29-7200/9600 bps send/receive
– ITU-T V.17-14400 bps send/receive
You can use this ThinkPad modem only on a public-switched
telephone network (PSTN). You cannot use a private branch
exchange (PBX) or some other type of digital telephone extension
line. If you connect the modem to a line other than PSTN, an error
message appears, preventing you from using the line. If you are not
sure which kind of phone line you are using, contact your telephone
company.
Chapter 2. Fine-Tuning Your Computer 2-39
Page 65

Title: C79DMMST CreationDate: 07/16/97 13:09:22
Attention for Use Overseas
In many countries, you cannot use the ThinkPad modem
function before obtaining approval from the proper authorities.
Your ThinkPad modem is a worldwide modem and can be
used in any country where Postal Telegraph and Telephone
(PTT) type approval has been obtained. If the country you
want is not on the Country Selection listing, see
http://www.us.pc.ibm.com/thinkpad/thinkpad.html on the
Internet, and download the newest Country Selection list.
If you are a non-U.S. user, run the Country Selection
program in the ThinkPad Modem folder after you complete
the ThinkPad Modem installation. The “Country Selection”
window enables you to change the country name to the
country in which you are actually going to use the ThinkPad
Modem telephony function in. Click on ThinkPad Modem in
your operating system; then click on Country Selection.
Confirm whether the selection matches the country name in
the Dialing Properties listing (for Windows 95).
For more information on the use of the internal modem in a
specific country, contact the IBM customer support center in that
country. You can look up the phone number by referring to the
international service information booklet that came with your
computer.
DANGER
To avoid shock hazard, do not connect the cable to or
disconnect the cable from the telephone outlet on the wall during
electrical storms.
2-40
Page 66

Title: C79DMMST CreationDate: 07/16/97 13:09:22
To use the ThinkPad modem, connect one end 1 of the telephone
cable to the telephone jack; then connect the other end 2 to the
telephone outlet on the wall.
Using the ThinkPad Modem in Windows 95 and Windows NT
When you start Windows, the ThinkPad Modem automatically starts
and will be ready for use.
Using the ThinkPad Modem in OS/2
To start the ThinkPad modem from OS/2, do the following:
1
Open the Communications for OS/2 folder.
2
Double-click on the Modem icon.
3
Start your communication program.
Using the 56 Kbps Modem
Your modem can be upgraded to enable communication speeds of
up to 56 Kbps (receive only). For upgrade information refer to:
http://www.us.pc.ibm.com/thinkpad/thinkpad.html
To take advantage of your modem's 56 Kbps x2** technology, you
must first make sure that your internet service provider (ISP)
supports a 56 Kbps modem protocol.
1
Contact your ISP and determine which 56 Kbps modem
protocol they use.
Chapter 2. Fine-Tuning Your Computer 2-41
Page 67

Title: C79DMMST CreationDate: 07/16/97 13:09:22
2
Determine which 56 Kbps modem protocol your modem
supports. To view your modem's supported protocol, do the
following:
a) Click on the Start button, and select Programs and
Modem (or Modem & Audio).
b) Click on Modem.
c) Choose Options from the “Modem Status” window; then
choose Settings.
The available transfer speeds are displayed. The 56 Kbps
protocol your modem supports is listed in parentheses
following the 56 Kbps transfer setting.
If no 56 Kbps transfer setting is listed, your modem's 56
Kbps technology is not currently enabled. Refer to the
user's guide supplement for details.
Your modem and your ISP must support the same 56 Kbps protocol,
or your maximum connection speed will be limited to V.34
technology.
Significantly higher Internet modem connection speeds up to 56
Kbps require all-digital transmission connections from your ISP to the
line card in the central office to which your phone line is connected.
The actual rate of reception is limited by the quality of your telephone
line, which may vary from location to location.
In the U.S., current FCC regulations limit the maximum speed for
downstream communication to 53 Kbps. Even though your modem
contains 56 Kbps technology, connect rate in the receive direction
might be significantly less than 56 Kbps.
Currently, 56 Kbps capability is in the receive direction only (from the
ISP to your local modem). The transmit or send direction (from your
local modem to the ISP) uses V.34 technology.
Note: 56 Kbps transfer rates are not available in all locations or
countries. You must check with your ISP to determine if your
area is capable of 56 Kbps transfer rates.
2-42
Page 68

Title: C79DMMST CreationDate: 07/16/97 13:09:22
Telephony Features
The ThinkPad modem, with the associated software, provides the
following telephony features:
Other
Industry standard modem support up to 33.6 Kbps
Industry standard fax support up to 14.4 Kbps
Computer telephony function support
– DTMF and pulse dialing
– Detecting DTMF digits received from the phone line
– Call progress monitoring
– Auto-dialing feature
– Telephony API (TAPI) support through Windows 95
Unimodem V (Windows 95 only)
– Microsoft MS Phone support
– VoiceView support for the SystemSoft Talkshop application
and Windows 95 File Transfer (Windows 95 only)
– IBM Digital Simultaneous Voice over Data (DSVD) support at
33.6 Kbps
Telephone answering machine support (Windows 95 only)
– Recording and playback of messages and greetings
– Answering device with caller ID
– Modem class 8 AT commands for TAPI calls
Full-duplex speaker phone support (Windows 95 only)
– Acoustic echo cancelation
– DOS box operation for 33.6 Kbps data and 14.4 Kbps fax
– System level and device level power management
Chapter 2. Fine-Tuning Your Computer 2-43
Page 69

Title: C79DMMST CreationDate: 07/16/97 13:09:22
Using the DVD and Enhanced Video Adapter
The DVD and Enhanced Video Adapter, available as standard on
some models and as an option on others, enables you to view DVD
discs with video contents, such as business presentations and DVD
movies. It also enables you to use the video overlay and capture
functions as well as the MPEG function when you connect a
television or a home video equipment to the video-in/out ports. The
MPEG function enables you to view MPEG-1 and MPEG-2 videos.
The DVD and Enhanced Video Adapter allows you to take advantage
of the following:
DVD and MPEG playback: With the MPEG playback feature,
you can play many available video CD, CD-i movies, and DVD
titles. No DOS/CD-i game titles are currently supported.
Video-in:
– You can capture still images or motion video from such video
equipment as a video cassette recorder (VCR).
– You can overlay motion video from video equipment.
Video-out: Refer to “Attaching a Television to Your Computer”
on page 3-22 on how to use the video-out port.
You will need to install the optional DVD drive to play DVD titles.
Note: You should remember the following points when using the
DVD and Enhanced Video Adapter:
You cannot enable or disable this feature while the
playback or capture window is open. Close the playback
or the capture window before you make any changes.
The MPEG playback and the video-in (video capture)
functions use the same hardware resources. Only one of
the two functions can be used at a time. Likewise, no two
MPEG functions can be used at the same time.
Instructions for using the DVD and Enhanced Video Adapter
depends on your operating system:
For Windows 95, go to “Using the DVD Enhanced Video
Adapter with Windows 95” on page 2-45.
2-44
Page 70

Title: C79DMMST CreationDate: 07/16/97 13:09:22
Using the DVD Enhanced Video Adapter with Windows 95
This section describes how to use the DVD and Enhanced Video
Adapter in Windows 95:
Using the Capture Function
On your computer, you can use the capture applications supported
by Video for Windows. You can also overlay motion video from the
video-in port by using applications supported by the MCI (Media
Control Interface) overlay.
For OS/2, go to “Using the Enhanced Video Features in OS/2”
on page 2-51.
“Using the Capture Function”
“Using the Overlay Function” on page 2-47
“Using the MPEG Playback” on page 2-49
“Using the DVD Player” on page 2-50
Notes:
1. Only one capture window can be open at a time.
2. When you use video capture with the overlay screen on, the
captured screen might be distorted. However, the data is
correctly captured.
To capture motion video, do the following:
1
Turn off the computer.
Chapter 2. Fine-Tuning Your Computer 2-45
Page 71

Title: C79DMMST CreationDate: 07/16/97 13:09:22
2
Connect the video in-out cable 1 to the video-in port ( ) 2
of the computer; then connect your video equipment.
Only the video in-out cable 1 is supplied with your
computer. The other cables are not supplied; you must
purchase them.
If you are using video equipment with an S-video output,
connect the S-video port of the video in-out cable to the
S-video-out port 3 of your video equipment for better
picture quality.
If you are
output, connect the video in-out cable to the video-out port
4 of your video equipment.
If your video equipment has only one audio-output port, use
the left-audio connector of the audio cable.
3
Check the Enhanced Video status.
a) Open the ThinkPad Configuration program.
b) Select the Enhanced Video/MPEG button ( ).
c) If Video capture/MPEG status is enabled, go to step 5.
If not, continue to the next step.
d) Click on Advanced.
not
using video equipment with an S-video
2-46
Page 72

Title: C79DMMST CreationDate: 07/16/97 13:09:22
Using the Overlay Function
You can use the video overlay function using the Media Player for
Windows 95. To view a video using the overlay function, do the
following:
e) Click on the 1st IRQ list box and assign an IRQ for the
device. (The default IRQ is 11.)
4
Restart the computer to make the IRQ setting effective.
5
Start the video capture application program.
If you are going to use the Digital Video Producer (DVP)
program, see the online help included in the application.
If you are going to use the Media Player, go to “Using the
Overlay Function.”
1
Open Media Player in Windows.
2
Click on Device.
3
Select MCI OVERLAY Driver.
Chapter 2. Fine-Tuning Your Computer 2-47
Page 73

Title: C79DMMST CreationDate: 07/16/97 13:09:22
The following shows restrictions when using the Enhanced Video
functions in Windows 95:
Operational Restrictions
You cannot change the video resolution when you are
capturing, overlaying, or playing back an MPEG file.
You can use only one video application at a time—for
example, you cannot capture video while playing back an
MPEG file.
Video overlay, capture, and MPEG playback functions do not
work under the following video modes:
– 800x600 resolution and 16M colors
– 1600x1200 resolution and 256 colors
– All 16 color modes
Do not select virtual screen in the ThinkPad Configuration
program.
Video overlay, capture, and MPEG playback functions are not
supported in virtual screen mode, such as the 1280x1024
resolution on an LCD.
For better motion video quality of MPEG-2 and DVD movie
playback, you should select 1024x768 resolution 256 color.
Audio streams are decoded in software. MPEG/DVD
playback performance is contingent upon the speed and
power of the system. Audio subsystem needs to be fully
functional.
MPEG playback and Video overlay/capure requires Microsoft
DirectX 2** support.
DVD titles cannot be played by Media Player. You must use
a DVD player application.
2-48
Page 74

Title: C79DMMST CreationDate: 07/16/97 13:09:22
Using the MPEG Playback
The MPEG feature enables hardware to decode MPEG playback
files under playback application programs.
To use MPEG playback in Windows 95, do the following:
1
Open Media Player.
2
Click on Device.
3
Do one of the following:
When you want to play MPEG files, select IBM MPEG-2.
When you want to play a movie or CD, select
CD-i/VideoCD.
4
When you want to play a video CD or a CD-i movie from the
CD-ROM drive of your computer, click on the Play ( ) icon.
Otherwise, select the MPEG file you want to play; then click on
the Play ( ) icon.
Changing the Drive Letter
You must change the drive letter when you use the MPEG
playback function. To change the drive letter for CD-i/VideoCD,
do the following:
1
Select Control Panel from the My Computer folder.
2
Click on the Multimedia icon.
3
Select Advanced.
4
Click on Media control device.
5
Click on IBM MPEG CD-i/VideoCD[mci].
6
Confirm that Use this Media Control device is selected;
then select Settings.
7
Change the drive letter.
Chapter 2. Fine-Tuning Your Computer 2-49
Page 75

Title: C79DMMST CreationDate: 07/16/97 13:09:22
Using the DVD Player
When you install the optional DVD drive and the player application
shipped with the option, you can view various DVD titles. You can
view DVD movies on your computer screen or on your TV.
When you attach your computer to the television, you can view a
DVD movie on your TV screen either as an MPEG full-screen or as a
computer-overlay screen. You can switch between these two modes
by using the Fn+F7 keys. To enable this screen switching function,
you should select Enable for the Video out port (TV out) on the
“Enhanced Video/MPEG” window of the ThinkPad Configuration
program. In summary, you can view a DVD movie on the following:
LCD Screen External Display TV Screen
MPEG on Graphics Not applicable MPEG full screen
No image Not applicable Computer overlay
(when you play
MPEG)
screen
(no image if the
movie is
copy-protected)
You cannot use this screen switching function if you selected
Disable for the Video out port (TV out) on the “Enhanced
Vide/MPEG” window of the ThinkPad Configuration program. Then
you can see a DVD movie only as an MPEG full-screen image on
your TV. In summary, you can see as follows:
LCD Screen External Display TV Screen
MPEG on Graphics Same as LCD
screen
MPEG full screen
(when you play
MPEG)
2-50
Page 76

Title: C79DMMST CreationDate: 07/16/97 13:09:22
To attach your computer to the television, refer to “Attaching a
Television to Your Computer” on page 3-22.
Warning
Copyright-protected DVD movies can be viewed only as a
full-screen image on the TV, not as a computer-overlay
screen image. If you are viewing this type of movie in full TV
screen mode and you try to switch to the computer-overlay
screen mode using the Fn+F7 keys, your screen will turn
black. Press these keys again to return to the full TV screen
mode.
Copyright-protected DVD movies contain copy-protect signals
that prevent them from being copied. These images, played
back on the VCR, are distorted.
Using the Enhanced Video Features in OS/2
You can capture still images and motion video using the video
capture application Video IN supported by MMPM/2, and the video-in
port of your computer.
Notes:
1. You need at least 12 MB of memory to capture video from the
video-in port using Video IN.
2. When installing the Enhanced Video device driver, install Video
IN from the BonusPak, prior to the device drivers.
3. The DVD/MPEG feature is not supported in OS/2.
Chapter 2. Fine-Tuning Your Computer 2-51
Page 77

Title: C79DMMST CreationDate: 07/16/97 13:09:22
To capture a motion video, do the following:
1
Turn off the computer and connect the video in-out cable 1 to
the video-in port ( ) 2 of the computer; then connect your
video equipment.
Cables other than the video in-out cable 1 are not supplied
with the computer.
If you are using video equipment with S-video output,
connect the S-video port of the video in-out cable to the
S-video-out port of your video equipment 3 for better
picture quality.
If you are
connect the composite video port of the video in-out cable
to the video-out port of your video equipment 4 .
If your video equipment has only one audio-output port, use
the left-audio connector of the audio cable.
2
Check the Enhanced Video status.
a) Open the ThinkPad Configuration program and select the
Enhanced Video/MPEG button ( ).
b) If Video capture/MPEG status is enabled, go to step 4.
If not, continue to the next step.
2-52
not
using video equipment with S-video output,
Page 78

Title: C79DMMST CreationDate: 07/16/97 13:09:22
c) Click on Advanced; then click on the 1st IRQ list box and
assign an IRQ for the device. (The default IRQ is 11.)
Operational Restrictions
You must be aware on the following points when using the
Enhanced Video feature:
Do not use the Enhanced Video feature (capturing or
overlaying video images using the Video-IN Recorder) in the
following display modes:
– 800x600 resolution and 16M colors,
– 1600x1200 resolution and 256 colors
If you use the Enhanced Video feature in these display
modes, the image may be corrupted.
Do not select virtual screen in the ThinkPad Configuration
program.
The video overlay and the capture functions are not
supported in virtual screen mode, such as the 1280x1024
resolution on an LCD.
Chapter 2. Fine-Tuning Your Computer 2-53
Page 79

Title: C79DMMST CreationDate: 07/16/97 13:09:22
Using Easy-Setup
Your computer provides a user-friendly program called “Easy-Setup”
that allows you to select various setup parameters. You should
perform this program before you start using your computer. Do the
following steps to start the program:
1
Turn off the computer, and remove any diskette from the
diskette drive.
2
Press and hold F1; then turn on the computer. Hold F1 until
the “Easy-Setup” menu appears:
3
Move to an icon you want to change, using the arrow keys or
the TrackPoint, and click on the icon. A submenu is displayed.
4
Change the items you wish to change.
5
Click on Exit to exit to the “Easy-Setup” menu.
Changing the Screen Color
You can change the color of the “Easy-Setup” menu by pressing
the Ctrl+PgUp keys or by pressing the Ctrl+PgDn keys.
To return to the original color, press the Ctrl+Home keys.
2-54
Page 80

Title: C79DMMST CreationDate: 07/16/97 13:09:22
Pressing the Config button displays the “Config”
submenu. It shows information about the installed
memory and system board. You can also use the
Multiple Display function, and enable or disable the
Wake-On-LAN and Flash-Over-LAN functions. Go to
“Knowing Your Configuration” on page 2-56.
Pressing the Date/Time button displays the “Date and
Time” submenu. It is used to set the current date and
time. Go to “Setting the Date and Time” on page 2-57.
Pressing the Password button displays the “Password”
submenu. It is used to set the power-on password, hard
disk password, and the supervisor password. Go to
“Using Passwords” on page 2-16.
Notes:
1. An icon for HDD-2 is displayed in solid black if an
optional secondary hard disk exists in the UltraBay II.
It will be displayed in a lighter shade if this option is
not installed.
2. An unlocked lock icon shows a password not yet set.
Pressing the Start up button displays the “Start up”
submenu. It is used to change the startup sequence of
your computer. Go to “Changing the Drive Startup
Sequence” on page 2-57.
Pressing the Test button displays the “Test” submenu. It
is used to run diagnostic tests on your computer to check
for hardware errors. Go to “Testing Your Computer” on
page 4-32.
Pressing the Restart button ends the Easy-Setup
program and restarts the computer.
Chapter 2. Fine-Tuning Your Computer 2-55
Page 81

Title: C79DMMST CreationDate: 07/16/97 13:09:22
Knowing Your Configuration
To find out which devices are installed on your computer, do the
following:
1
2
Start Easy-Setup (refer to “Using Easy-Setup” on page 2-54).
Click on Config in the “Easy-Setup” menu. The “Configuration”
submenu appears:
3
Move the cursor to any device icon whose information you want
and click on it. Detailed information on that device is displayed.
The Memory button shows the amount of memory
installed and available.
The System Board button provides information on the
installed system board.
The Display button sets the screen output to be
displayed on either a Single screen or on Multiple
screens.
The Network button sets the Wake on LAN, the startup
sequence, and the Flash update features. For further
information. refer to the chapter on “Total Cost of
Ownership” in the online book.
Initialize sets all device settings to the default values.
2-56
Page 82

Title: C79DMMST CreationDate: 07/16/97 13:09:22
Setting the Date and Time
To change the date and time, do the following:
4
Click on Exit to exit from the submenus, or press Esc to cancel
the selection.
1
Start Easy-Setup (refer to “Using Easy-Setup” on page 2-54).
2
Click on Date/Time on the “Easy-Setup” menu. The
“Date/Time” submenu appears:
3
Move the cursor to any field (year, month, date, hour, minute,
or second) and place the pointer on any of the arrow icons ( ,
, , or ) to adjust the date and time. Clicking on the
double-arrow icon scrolls the numbers faster.
4
Click on OK to save the changes or on Cancel to cancel it.
Changing the Drive Startup Sequence
This feature enables you to change the startup sequence of the
drives in your computer. It is useful when you have different
operating systems on different replaceable hard disk drives or in PC
cards. You can have the system boot up from these devices.
Attention
You must be extremely careful not to specify a wrong device
during a copy, save, or a format operation after you change your
startup sequence. If you do, your data and programs will be
erased or overwritten.
Chapter 2. Fine-Tuning Your Computer 2-57
Page 83

Title: C79DMMST CreationDate: 07/16/97 13:09:22
To change the startup sequence, do the following:
1
2
Start Easy-Setup (refer to “Using Easy-Setup” on page 2-54).
Click on Start up in the “Easy-Setup” menu. The “Startup”
submenu appears:
The Power-On button sets the startup sequence of your
computer.
The Network button sets the network functions of your
computer.
For more information on this function, refer to the chapter
on “System Management” in the online book.
3
Click on Power-On in the submenu. The “Power-On” submenu
appears:
The FDD-1 icon is the diskette drive in the UltraBay II, if you
have one. If you don't have one but you have a diskette drive
2-58
Page 84

Title: C79DMMST CreationDate: 07/16/97 13:09:22
in the docking station, that diskette drive becomes FDD-1.If
you have an additional diskette drive, that drive becomes
FDD-2.
The hard disk drive in your computer is HDD-1. If you have a
hard disk drive in the UltraBay II, that drive becomes HDD-2.
The HDD-3 and HDD-4 are the external hard disk drives on the
docking station.
4
Move the cursor to the Reset icon; and click on it.
5
Select the first device you want for the startup sequence; then
click on it.
The device moves up to box 1. You cannot set a hard disk
drive before a PCMCIA** card.
6
If you are using a remote program loading (RPL) system
through a token-ring card or some other network card, do the
following:
a
Select Network and click on it. The “Speed” menu
appears.
b
If you are using a token-ring card, select the speed you
want (4 or 16), and click on it; then press Enter.
If you are using a network card other than a token-ring
card, such as an Ethernet card, you need not specify the
RPL speed. Press Esc and exit this menu.
7
Repeat these steps for the other devices. You can set up to
four devices.
8
Click on OK or press Enter to save the changes.
Chapter 2. Fine-Tuning Your Computer 2-59
Page 85

Title: C79DMMST CreationDate: 07/16/97 13:09:22
2-60
Page 86

Title: C79DMMST CreationDate: 07/16/97 13:09:22
This chapter describes how to install (and remove) the following
options:
Installing IBM Options ........................ 3-2
Installing Other Devices ...................... 3-17
Chapter 3. Installing Options
Installing a Memory Option .................... 3-2
Replacing the Hard Disk Drive in the HDD Bay ........ 3-5
Installing the Battery Pack .................... 3-6
Removing and Installing a Device in UltraBay II ....... 3-7
Installing the Secondary Hard Disk Drive .......... 3-9
Installing the Secondary Battery Pack ........... 3-10
Installing the DVD and Enhanced Video Adapter ...... 3-10
Replacing the Backup Battery ................. 3-11
Attaching a Mouse, a Numeric Keypad, or an External
Keyboard . . . . . . . . . . . . . . . . . . . . . . . . . . . . 3-13
Inserting or Removing a PC Card ............... 3-15
Using a Docking Station .................... 3-17
Docking with Your Computer Powered Off ........ 3-18
Undocking with Your Computer Powered On or While in
Suspend Mode . . . . . . . . . . . . . . . . . . . . . . . 3-19
Presetting a Device to Avoid a Resource Conflict .... 3-20
Using the Security System Lock ............... 3-21
Attaching a Television to Your Computer .......... 3-22
Copyright IBM Corp. 1997 3-1
Page 87

Title: C79DMMST CreationDate: 07/16/97 13:09:22
Installing IBM Options
This section describes how to install (and remove) IBM options.
Installing a Memory Option
You can increase the amount of memory in your computer by
installing a
dual inline memory module (DIMM)
Attention
.
To avoid damaging the DIMM memory board electrically, do not
touch the connector edge directly with your hands.
1
Turn off your computer; then disconnect the AC Adapter and all
cables from the computer.
2
Discharge any static electricity that may be in your body by
touching a metal object with your hands.
3
Turn the computer upside down.
4
Open the bottom compartment with a screwdriver 1 and
remove the bottom cover 2 .
3-2
Page 88

Title: C79DMMST CreationDate: 07/16/97 13:09:22
5
Locate the DIMM socket and insert the DIMM 3 so that its
notch aligns with the tab on the socket; then pivot the DIMM
4 .
The DIMM should be inserted into either socket at an angle of
approximately 20°.
Chapter 3. Installing Options 3-3
Page 89
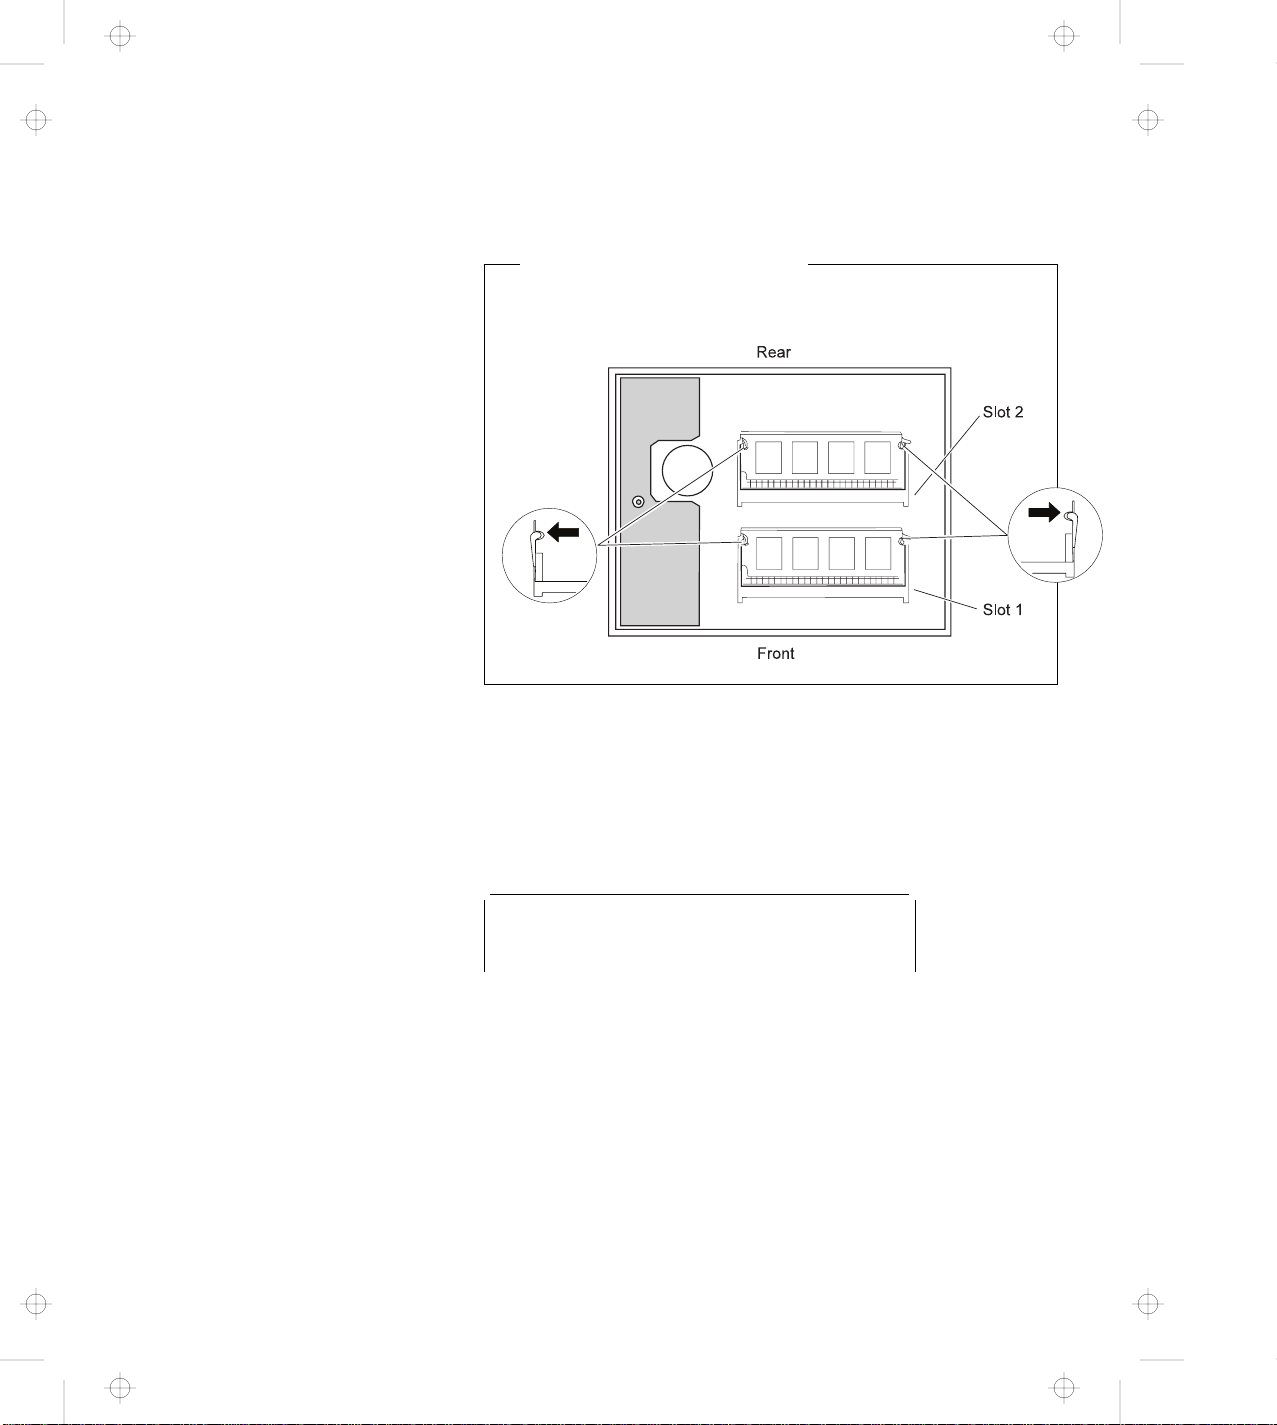
Title: C79DMMST CreationDate: 07/16/97 13:09:22
6
If you have another DIMM, install it into the vacant socket.
Removing a Memory Option
To remove the DIMM from its socket, push out the left and
right latches.
7
Replace the bottom cover and the screw, and turn the
computer rightside up.
8
Connect the AC Adapter to the computer.
9
Power on the computer and confirm the new memory size. For
example, information such as the following appears:
32384 KB OK
10
Is the new memory size what you expected?
Yes You have installed the DIMM successfully. Go to the
next step.
No Go to “Testing Your Computer” on page 4-32.
11
Turn off the computer and reconnect all cables.
3-4
Page 90

Title: C79DMMST CreationDate: 07/16/97 13:09:22
Replacing the Hard Disk Drive in the HDD Bay
Attention
The hard disk is a delicate device; therefore, handle it carefully.
You can damage this device if you drop it on a hard surface.
1
Turn off the computer; then disconnect the AC Adapter and all
cables from the computer.
2
Turn the computer upside down, unscrew the HDD bay cover
screw 1 using a coin, slide the latch to the rear 2 , and
remove the bay cover 3 .
Note: To prevent others from gaining access to the hard disk
drive. you can change the coin screw at the rear with a
normal screw shipped with your computer.
Chapter 3. Installing Options 3-5
Page 91

Title: C79DMMST CreationDate: 07/16/97 13:09:22
3
4
Pull out the hard disk drive from the bay.
Insert the new hard disk drive into the bay and screw on the
HDD bay cover.
Make sure you insert the hard disk drive with the label facing
down.
5
Turn the computer rightside up, connect the AC Adapter to the
computer, and turn on the computer.
Installing the Battery Pack
If you are going to use ac power without the battery pack, or if you
want to replace the battery pack, do the following:
Slide the left release latch to the left 1 and gently lift up the bay
eject lever 2 and pull out the battery pack 3 .
3-6
Page 92
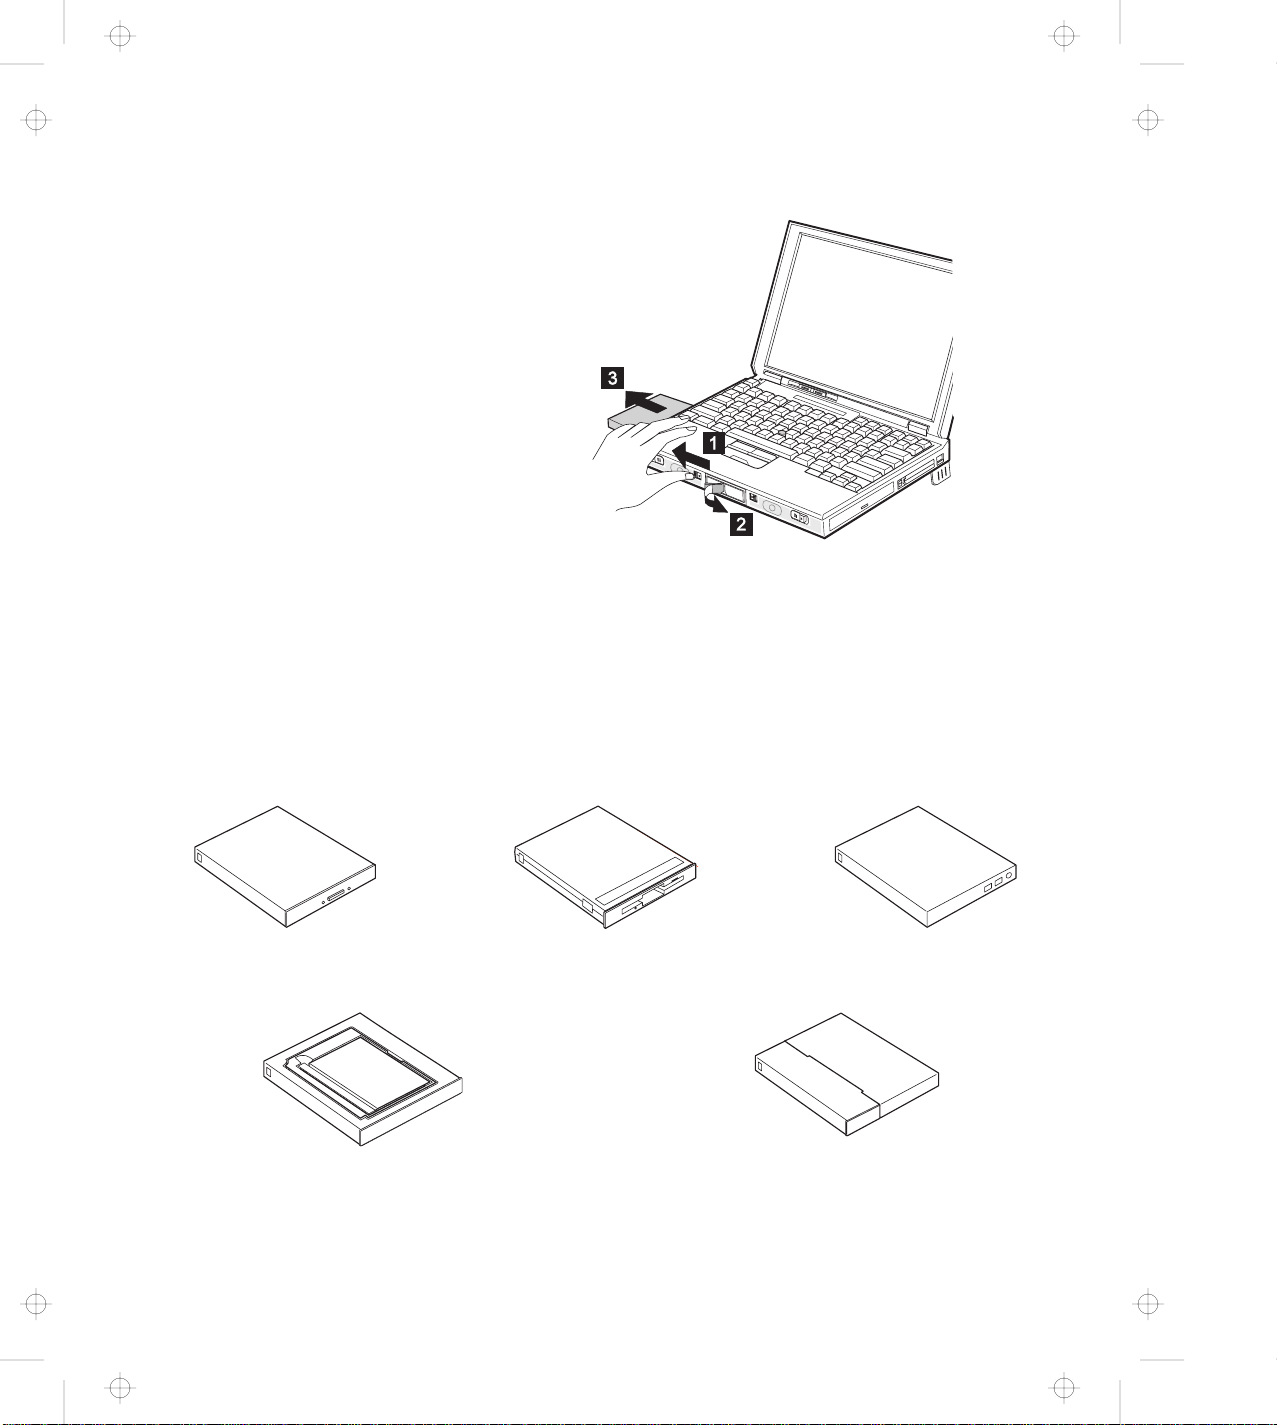
Title: C79DMMST CreationDate: 07/16/97 13:09:22
Insert the new battery pack until it snaps into place; then push in the
bay eject lever to the level position.
Make sure you align the slanted edge of the battery pack with the
slant on the battery bay.
Removing and Installing a Device in UltraBay II
You can install one of the following devices in UltraBay II:
CD-ROM Drive Diskette Drive DVD Drive
Secondary Hard Disk Drive
(requires a secondary HDD adapter)
Secondary Battery Pack
(requires a battery adapter)
Chapter 3. Installing Options 3-7
Page 93

Title: C79DMMST CreationDate: 07/16/97 13:09:22
Before you remove a CD-ROM device or a diskette drive from the
UltraBay II, make sure there are no CD-ROMs or diskettes inserted
in the drive.
To remove a device from the UltraBay II, do the following:
1
2
(Cold unplugging only.)
AC Adapter, and disconnect all cables from the computer.
Slide the right release latch to the right 1 .
Power off the computer, disconnect the
3
Gently lift up the bay eject lever 2 and remove the device
from the bay 3 .
4
Install another device into the UltraBay II by referring to the
manuals shipped with the option.
3-8
Page 94
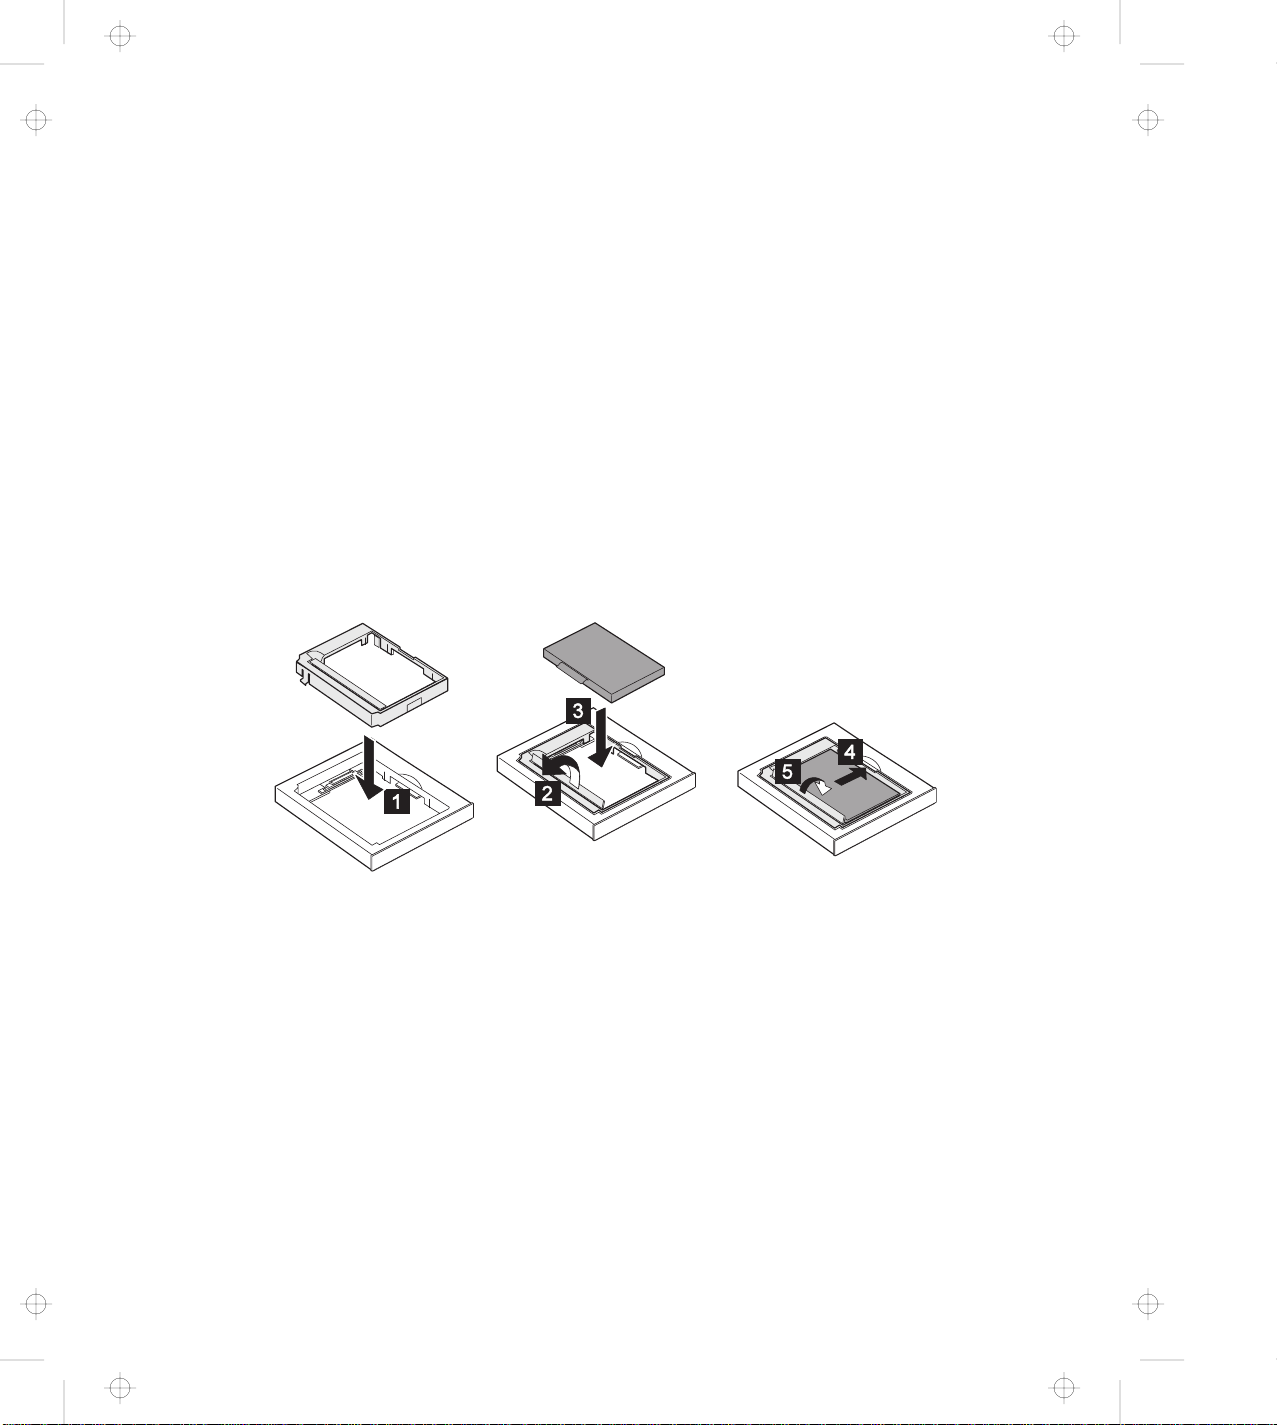
Title: C79DMMST CreationDate: 07/16/97 13:09:22
Installing the Secondary Hard Disk Drive
Before you install the secondary hard disk drive into the UltraBay II,
do the following:
Make sure you align the slanted edge of the device with the
slant on the UltraBay II.
5
You can install the screws shipped with your computer to
prevent others from gaining access to the device (see page
1-6).
1
Attach the ThinkPad 770 Second Hard Disk Drive Adapter
option 770 adapter component 1 .
2
Open the disk stopper 2 , install the hard disk drive into the
adapter 3 .
3
Slide the hard disk drive to the right 4 and close the stopper
5 .
Note: The ThinkPad 770 Second Hard Disk Drive Adapter
option includes a 760 and a 765 adapter component for
installing the ThinkPad Model 760 and 765 hard disks.
4
Install the secondary hard disk drive adapter option into the
UltraBay II.
Chapter 3. Installing Options 3-9
Page 95

Title: C79DMMST CreationDate: 07/16/97 13:09:22
Installing the Secondary Battery Pack
Before installing a secondary battery pack into the battery bay, attach
the battery pack to the adapter case; then insert it into the bay.
Installing the DVD and Enhanced Video Adapter
To install the adapter, do the following:
1
Turn the computer upside down.
2
Remove the battery pack.
3
Remove the screws on the adapter slot 1 and remove the
cover 2 .
3-10
Page 96

Title: C79DMMST CreationDate: 07/16/97 13:09:22
4
Insert the adapter into the slot 3 and replace the screws 4
and the battery pack.
5
Turn the computer rightside up.
Refer to “Using the DVD and Enhanced Video Adapter” on
page 2-44 for details on the usage.
Replacing the Backup Battery
This section explains how to replace the backup (lithium-ion) battery
in the bottom compartment.
1
Turn off the computer; then disconnect the AC Adapter and all
cables from the computer.
2
Turn the computer upside down.
Chapter 3. Installing Options 3-11
Page 97

Title: C79DMMST CreationDate: 07/16/97 13:09:22
3
Open the bottom compartment with a screwdriver 1 and
remove the bottom cover 2 .
4
Find the old backup battery in the bottom compartment and
remove it from the battery holder by pushing it in 3 ; then
lifting it up 4 .
5
Install a new backup battery.
6
Replace the bottom cover.
7
Connect the AC Adapter to the computer.
3-12
Page 98

Title: C79DMMST CreationDate: 07/16/97 13:09:22
Attaching a Mouse, a Numeric Keypad, or an External Keyboard
You can attach a mouse, a numeric keypad, or an external keyboard
to the external-input-device port.
Mouse
Keypad
You must turn off your computer before connecting the mouse.
Keyboard
Chapter 3. Installing Options 3-13
Page 99

Title: C79DMMST CreationDate: 07/16/97 13:09:22
If you want to use the external numeric keypad and the mouse at the
same time, first connect the keypad cable to the computer 1 ; then
connect the mouse cable 2 to the connector on the keypad.
If you want to use an external keyboard and a mouse at the same
time, you must use the optional keyboard/mouse connector cable
and do the following:
1
Turn off the computer.
2
Connect the optional keyboard/mouse connector cable to the
external-input-device port 1 on your computer.
3-14
Page 100

Title: C79DMMST CreationDate: 07/16/97 13:09:22
3
Connect the external keyboard and mouse to the connectors
2 on the cable connector.
You cannot use the numeric keypad on your computer when you are
using the external keyboard.
Inserting or Removing a PC Card
This section explains how to insert and remove a PC Card.
Your computer has an upper and a lower PC Card slot. This slot
supports the following type of cards:
PCMCIA (Type I, Type II, and Type III)
CardBus
Zoomed Video (ZV)
Chapter 3. Installing Options 3-15
 Loading...