

Page 1

4400 Thermal Label Printers
ASCII Programmer’s Reference Manual
Form Number G544-5733-01
Copyright IBM Corp.,2000, 2003
Page 2

Page 3

4400 Thermal Label Printers
ASCII Programmer’s Reference Manual
G544-5733-01
Page 4

NOTE: Before using the information and the product it works with, make sure
that you read the general information under “Notices” below.
Second Edition (2003)
This edition applies to the IBM 4400 Thermal Label Printer.
The following paragraph does not apply to any other country where such
provisions are inconsistent with local law:
INTERNATIONAL BUSINESS MACHINES CORPORATION PROVIDES
THIS PUBLICATION “AS IS” WITHOUT WARRANTY OF ANY KIND,
EITHER EXPRESS OR IMPLIED, INCLUDING, BUT NOT LIMITED TO, THE
IMPLIED WARRANTIES OF MERCHANTABILITY OR FITNESS FOR A
PARTICULAR PURPOSE. Some states do not allow disclaimer of express or
implied warranties in certain transactions; therefore, this statement may not
apply to you. Requests for IBM publications should be made to your IBM
representative or to the IBM branch office serving your locality. Publications
are not stocked at the address given below.
You may send your comments by facsimile to 1-800-524-1519, by E-mail to
print_pubs@vnet.ibm.com, or by mail to:
THE IBM PRINTING SYSTEMS DIVISION
INFORMATION DEVELOPMENT
DEPARTMENT H7FE, BUILDING 003G
P.O. BOX 1900
BOULDER, CO 80301-9191
USA
When you send information to IBM or IBM Printing Systems Division, you
grant a non-exclusive right to use or distribute the information in any way IBM
or IBM Printing Systems Division believes appropriate without incurring any
obligation to you.
© Copyright International Business Machines Corporation 2000, 2003.
All rights reserved.
Note to U.S. Government Users - Documentation related to restricted rights Use, duplication or disclosure is subject to restrictions set forth in GSA ADP
Schedule Contract with IBM Corp.
Page 5

Notices
References in this publication to IBM products, programs, or services do not
imply that IBM intends to make these available in all countries in which IBM
operates. Any reference to an IBM product, program, or service is not
intended to state or imply that only IBM’s product, program, or service may be
used. Any functionally equivalent product, program, or service that does not
infringe any of the intellectual property rights of IBM may be used instead of
the IBM product, program, or service. The evaluation and verification of
operation in conjunction with other products, except those expressly
designated by IBM, are the responsibility of the user.
IBM may have patents or pending patent applications covering subject matter
in this document. The furnishing of this document does not give any license to
use these patents. You can send license inquiries, in writing, to the IBM
Director of Commercial Relations, IBM Corporation, Purchase, NY 10577,
U.S.A.
Trademarks and Service Marks
The following terms, denoted by an asterisk (*) in this publication, are
trademarks of IBM Corporation in the United States or other countries or both:
IBM
Proprinter
The following terms, denoted by a double asterisk (**) in this publication, are
trademarks of other companies:
ANSI American National Standards Institute, Inc.
CG Triumvirate Agfa Division, Miles Incorporated(Agfa)
Dataproducts Dataproducts Corporation
DEC Digital Equipment Corporation
Epson Seiko Epson Corporation
Hewlett-Packard Hewlett-Packard Company
IGP Printronix, Inc.
LaserJet Hewlett-Packard Company
Printronix Printronix, Inc.
POSTNET United States Postal Service
UPS United Parcel Service of America, Inc.
Page 6

Page 7

Table of Contents
1 Overview............................................................... 17
Introduction.............................................................................................17
About This Manual ...........................................................................17
Notes And Notices ...........................................................................18
Software Features............................................................................20
Printer Configuration ........................................................................21
2 P-Series Printer Protocol...................................... 23
Introduction.............................................................................................23
P-Series Default Values and States.................................................24
Configuring the P-Series Emulation with Control Codes ........................26
Format for Control Code Descriptions..............................................26
Special Function Control Code-Control Code Header .....................26
Command Line.................................................................................27
Attribute Set and Reset Codes.........................................................27
Control Code Reference Index.........................................................28
Backspace........................................................................................30
Bell ...................................................................................................30
Bold Print..........................................................................................31
Bold Print Reset ...............................................................................31
Carriage Return................................................................................32
Character Set Select........................................................................33
Characters 80-9F (Control Codes)...................................................35
Characters 80-9F (Printable Symbols).............................................35
Character Set Select: ECMA-94 Latin 1 Extended...........................36
Character Set Select: International Languages................................37
Elongated (Double High) Print (One Line Only)...............................38
Elongated (Double High) Print, Set/Reset........................................39
Emphasized Print.............................................................................40
Emphasized Print Reset...................................................................40
Emulation Reset...............................................................................40
Expanded (Double Wide) Print.........................................................41
Expanded (Double Wide) Print (One Line Only) ..............................41
Extended Character Set...................................................................42
ExtendedCharacter Set Cancel
(Primary Character Set Select) ........................................................42
Page 8

Table of Contents
Form Feed........................................................................................43
Forms Length Set (Inches)...............................................................43
Forms Length Set (Lines).................................................................44
Form Margins, Set............................................................................44
Line Feed .........................................................................................45
Line Spacing 1/6 Inch (6 lpi).............................................................46
Line Spacing 1/8 Inch (8 lpi).............................................................47
Line Spacing 8 or 10.3 lpi (One Line Only) ......................................47
Line Spacing 7/72 Inch.....................................................................48
Line Spacing n/72 Inch.....................................................................49
Line Spacing n/216 Inch...................................................................50
Overscoring......................................................................................50
Plot, Even Dot (P-Series High Density Graphics) ............................51
Plot, Odd Dot (P-Series Normal Density Graphics) .........................51
Print Mode/Pitch Selection...............................................................52
Superscript/Subscript Printing..........................................................55
Superscript/Subscript Printing Reset ...............................................55
Super-Set Commands......................................................................56
Underline..........................................................................................56
VFU Commands (P-Series) .............................................................57
Vertical Tab......................................................................................57
3 P-Series XQ Printer Protocol................................59
Introduction.............................................................................................59
P-Series XQ Default Values and States...........................................60
Configuring the XQ Emulation with Control Codes.................................62
Format for Control Code Descriptions..............................................62
Edit Mode.........................................................................................63
NUL Code ........................................................................................63
Control Code Index ..........................................................................64
Alternate Character Set Deselect (Shift In)......................................65
Alternate Character Set Select (Shift Out) .......................................65
Carriage Return................................................................................66
Compressed Print ............................................................................67
Delete...............................................................................................68
Electronic Vertical Format Unit (EVFU)............................................68
Elongated Characters (Double High Print).......................................69
Form Feed........................................................................................69
Line Feed .........................................................................................70
Line Spacing (8 or 10.3 lpi) ..............................................................70
Plot, Even Dot (P-Series XQ High Density Graphics)......................71
Plot, Odd Dot (P-Series XQ Normal Density Graphics ....................72
Page 9

Table of Contents
Select Letter Gothic (DP) .................................................................72
Space...............................................................................................73
Underline..........................................................................................73
Vertical Tab......................................................................................74
4 Serial Matrix Printer Protocol................................ 75
Introduction.............................................................................................75
Serial Matrix Default Values and States...........................................76
Configuring the Serial Matrix Emulation with Control Codes..................78
Format for Control Code Descriptions..............................................78
Escape Control Code Header ..........................................................78
Attribute Set and Reset Codes.........................................................78
Control Code Index ..........................................................................79
Backspace........................................................................................80
Bell ...................................................................................................81
Bit Image Mode, Single Density.......................................................81
Bit Image Mode, Double Density......................................................82
Bit Image Mode, Double Density Double Speed..............................82
Bit Image Mode, Quadruple Density ................................................83
Bold Print Set ...................................................................................83
Bold Print Reset ...............................................................................84
Cancel..............................................................................................84
Carriage Return................................................................................85
Character Pitch 10 cpi......................................................................85
Character Pitch 12 cpi......................................................................86
Character Set Select........................................................................86
Characters 80-9F (Control Codes)...................................................88
Characters 80-9F (Printable Symbols).............................................89
Characters 80-9F (Printable Symbols).............................................89
Character Set Select: International Languages................................90
Condensed Print ..............................................................................91
Condensed Print Reset....................................................................91
Delete...............................................................................................92
Elongated (Double High) Print (One Line Only)...............................92
Elongated (Double High) Print, Set/Reset........................................93
Emphasized Print.............................................................................93
Emphasized Print Reset...................................................................94
Emulation Reset...............................................................................94
Expanded (Double Wide) Print.........................................................95
Expanded (Double Wide) Print (One Line Only) ..............................95
Extended Character Set...................................................................96
Page 10

Table of Contents
ExtendedCharacter Set Cancel
(Primary Character Set Select) ........................................................96
Form Feed........................................................................................97
Forms Length Set (Inches)...............................................................97
Forms Length Set (Lines).................................................................98
Form Margins, Set............................................................................98
Horizontal Tab..................................................................................99
Horizontal Tab Set ...........................................................................99
Line Feed .......................................................................................100
Line Feed n/216 Inch (One Line Only)...........................................100
Line Spacing 1/6 Inch.....................................................................101
Line Spacing 1/8 Inch (8 lpi)...........................................................101
Line Spacing 7/72 Inch...................................................................102
Line Spacing n/72 Inch...................................................................102
Line Spacing n/216 Inch.................................................................103
Overscoring....................................................................................103
Print Mode/Pitch Selection.............................................................104
Printer Deselect..............................................................................107
Printer Select..................................................................................107
Skip-Over Perforation.....................................................................107
Skip-Over Perforation Cancel ........................................................108
Superscript/Subscript Printing........................................................108
Superscript/Subscript Printing Reset .............................................108
Super-Set Commands....................................................................109
Underline........................................................................................109
Vertical Tab....................................................................................110
Vertical Tab, Set/Clear...................................................................111
5 IBM Proprinter III XL Printer Protocol .................113
Introduction...........................................................................................113
Proprinter III XL Emulation Default Settings...................................114
Configuring the Proprinter III XL Emulation with
Control Codes.......................................................................................116
Escape Control Code Header ........................................................116
Attribute Set and Reset Codes.......................................................116
Control Code Index ........................................................................117
Backspace......................................................................................118
Bell .................................................................................................119
Bit Image Mode, Single Density.....................................................119
Bit Image Mode, Double Density....................................................120
Bit Image Mode, Double Density Double Speed............................121
Bit Image Mode, Quadruple Density ..............................................122
Page 11

Table of Contents
Bold Print Set .................................................................................123
Bold Print Cancel ...........................................................................123
Bottom Margin, Set ........................................................................124
Bottom Margin Cancel....................................................................124
Cancel............................................................................................124
Carriage Return..............................................................................125
Carriage Return, Set ......................................................................125
Character Pitch 12 cpi....................................................................126
Characters 80-9F (Control Codes).................................................126
Characters 80-9F (Printable Symbols)...........................................126
Condensed Print ............................................................................127
Condensed Print Reset..................................................................127
Deselect Printer..............................................................................128
Emphasized Print...........................................................................128
Emphasized Print Reset.................................................................128
Expanded (Double Wide) Print.......................................................129
Expanded (Double Wide) Print (One Line Only) ............................130
Expanded (Double Wide) Print Reset (1 Line)...............................130
Form Feed......................................................................................131
Forms Length Set (Inches).............................................................131
Forms Length Set (Lines)...............................................................132
Horizontal Tab................................................................................132
Horizontal Tab Set/Reset...............................................................133
Horizontal/Vertical Tabs Clear........................................................133
Initialize Parameters.......................................................................134
Line Feed .......................................................................................136
Line Feed n/216 Inch (One Line Only) ...........................................136
Line Spacing 1/6 Inch (6 lpi)...........................................................137
Line Spacing 1/8 Inch (8 lpi)...........................................................138
Line Spacing 7/72 Inch (10.3 lpi)....................................................138
Line Spacing n/72 Inch...................................................................139
Line Spacing n/216 Inch.................................................................140
Margins, Left/Right, Set..................................................................140
Overscoring....................................................................................141
Print Control Codes........................................................................141
Print One Control Code..................................................................141
Select Attributes.............................................................................142
Select Font (Print Mode) ................................................................143
Select Proportional Spacing...........................................................144
Superscript/Subscript Printing........................................................144
Superscript/Subscript Printing Reset..............................................145
Super-Set Commands....................................................................145
Page 12

Table of Contents
Top-of-Form ...................................................................................145
Underline........................................................................................146
Unidirectional Printing ....................................................................146
Vertical Tab....................................................................................146
Vertical Tab Set/Clear....................................................................147
6 Epson FX-1050 Printer Protocol.........................149
Introduction...........................................................................................149
Epson FX-1050 Default Values and States....................................150
Epson Emulation Exceptions and Differences ...............................152
Epson Character Sets....................................................................153
Configuring the Epson FX-1050 Emulation with
Control Codes.......................................................................................154
Format for Control Code Descriptions............................................154
Escape Sequences ........................................................................154
Set and Reset Codes.....................................................................155
NUL Code ......................................................................................155
Print Modes Supported for Character Sets ....................................156
Control Code Index ........................................................................157
Backspace......................................................................................159
Bell .................................................................................................160
Cancel Line ....................................................................................160
Carriage Return..............................................................................160
Character Pitch 10 cpi....................................................................161
Character Pitch 12 cpi....................................................................161
Character Pitch 15 cpi....................................................................161
Character Set Select: International Languages .............................162
Clear Bit 7 of Incoming Data Bytes to 0 .........................................163
Condensed Print ............................................................................163
Condensed Print Reset..................................................................164
Cut-Sheet / Paper Feed Control.....................................................164
Define a Download Character........................................................164
Delete Character............................................................................164
Double High Print, Set/Reset .........................................................165
Double Strike..................................................................................165
Double Strike, Cancel ....................................................................166
Double Wide Print ..........................................................................166
Double Wide Print (1 Line).............................................................167
Double Wide Print (1 Line), Cancel................................................167
Emphasized Print...........................................................................168
Emphasized Print, Cancel..............................................................168
Enable Printing Hex Codes 00-1F and 80-9F ................................169
Page 13

Table of Contents
Form Feed......................................................................................171
Graphics, Standard Density ...........................................................171
Graphics, Double Density...............................................................172
Graphics, Double Density Double Speed.......................................173
Graphics, Quadruple Density.........................................................174
Half Speed Mode, On/Off...............................................................174
Horizontal Tab Execute..................................................................175
Horizontal Tab Set/Release ...........................................................175
Initialize Printer...............................................................................176
Italic Printing...................................................................................176
Italic Printing, Cancel .....................................................................176
Line Feed .......................................................................................177
Line Feed n/216 Inch .....................................................................177
Line Spacing 1/6 Inch (6 lpi)...........................................................178
Line Spacing 1/8 Inch (8 lpi)...........................................................178
Line Spacing 7/72 Inch...................................................................179
Line Spacing n/72 Inch...................................................................179
Line Spacing n/216 Inch.................................................................180
Make Hex 80-9F Control Codes.....................................................180
Make Hex 80-9F Printable..............................................................180
Master Print Select.........................................................................182
Paper Out Detection, Enable .........................................................182
Paper Out Detection, Disable.........................................................183
Pass Bit 7 from Host ......................................................................183
Printer Deselect..............................................................................183
Printer Select..................................................................................184
Reassign Graphics Mode...............................................................184
Remove Downloaded Characters ..................................................184
Select Graphics Mode....................................................................185
Select Italic Character Set..............................................................186
Select 9-Pin Graphics Mode...........................................................186
Select Print Quality.........................................................................186
Select/Deselect Proportional Spacing............................................187
Select Serif or Sans Serif Font.......................................................187
Select User-Defined Font...............................................................187
Select Vertical Tab Channel...........................................................187
Set Absolute Horizontal Print Position in 1/60 Inch........................188
Set Bit 7 of Incoming Data Bytes to 1 ............................................188
Set Intercharacter Spacing in n/120 Inch.......................................188
Set Margin, Left..............................................................................189
Set Margin, Right ...........................................................................189
Set Forms Length by Lines ............................................................190
Page 14

Table of Contents
Set Forms Length in Inches ...........................................................190
Set Relative Horizontal Print Position in n/120 Inch.......................191
Set Vertical Tabs in Channels........................................................191
Skip Over Perforation.....................................................................192
Skip Over Perforation, Cancel........................................................192
Super-Set Commands....................................................................192
Superscript and Subscript Printing.................................................193
Superscript and Subscript Printing, Cancel....................................193
Underline........................................................................................194
Unidirectional Printing, 1 Line ........................................................194
Unidirectional Printing, Set/Reset ..................................................194
Vertical Tab, Execute.....................................................................195
Vertical Tab, Set/Clear...................................................................195
7 Super-Set Programming.....................................197
Introduction...........................................................................................197
The Super-Set Commands...................................................................197
Character Set Selection .................................................................198
Character Spacing n/240 Inch........................................................201
Font Selection ................................................................................201
Font Size........................................................................................202
TrueType Font Selection................................................................203
Form Length and Width..................................................................204
Host Form Size ..............................................................................205
Horizontal Movements in Printer Resolution..................................205
PCX Data .......................................................................................206
Line Spacing n/288 Inch.................................................................206
Page Orientation Select .................................................................207
Print Engine Options ......................................................................209
Printer Protocol Select ...................................................................216
Software Page Eject.......................................................................216
Bar Codes.............................................................................................217
Bar Code Format............................................................................218
Australian 4-State...........................................................................222
Codabar .........................................................................................223
Code 39..........................................................................................225
Code 93..........................................................................................227
Code 128........................................................................................229
EAN 8.............................................................................................234
EAN 13...........................................................................................235
FIM.................................................................................................236
Interleaved 2/5 (I-2/5) and German I-2/5........................................238
Page 15

Table of Contents
Maxicode........................................................................................239
MSI.................................................................................................241
PDF 417.........................................................................................242
PostBar and Royal Mail..................................................................243
POSTNET ......................................................................................244
Telepen ..........................................................................................245
UCC/EAN-128................................................................................246
UPC-A............................................................................................251
UPC-E............................................................................................252
UPC Shipping.................................................................................255
UPS 11...........................................................................................256
8 Graphics.............................................................257
Introduction...........................................................................................257
Bit Image Graphics...............................................................................258
Plotting a Bit Image Pattern ...........................................................259
Bit Image Density...........................................................................261
Bit Image Programming Format.....................................................262
P-Series Compatible Plot Mode (Odd/Even Dot Plotting).....................264
Plot Density....................................................................................264
Plot Data Byte Format....................................................................265
Plot Data Line Format ....................................................................266
Plotting the Data.............................................................................268
To Exit the P-Series Plot Mode......................................................269
Combining Graphics and Text..............................................................269
9 Vertical Page Formatting.................................... 271
Introduction...........................................................................................271
General P-Series EVFU Programming Information..............................271
VFU Load/Save/Clear ....................................................................272
P-Series EVFU .....................................................................................273
Start Load Code-Hex 1E or 6E ......................................................273
Channel Assignment......................................................................273
End Load Code-Hex 1F or 6F ........................................................274
Using the EVFU .............................................................................274
Clearing the EVFU Memory ...........................................................276
Relative Line Slewing.....................................................................277
Serial Matrix VFU..................................................................................278
Executing Vertical Tabs .................................................................279
Vertical Tab Positions ....................................................................279
A Standard ASCII Character Set........................... 281
Page 16

Table of Contents
B PTR_SETUP Option...........................................283
Overview...............................................................................................283
The PTR_SETUP Commands..............................................................283
Commands.....................................................................................284
C P-Series Plot Byte Definition..............................289
D Glossary.............................................................291
Page 17

1 Overview
Introduction
The IBM* ASCII Emulation is a software application on two diskettes capable
of emulating five different impact printer protocols:
• Printronix** P-Series P3000/6000/9000, hereafter called P-Series
• Printronix P-Series XQ P300/600, hereafter called P-Series XQ
• Printronix Serial Matrix
• IBM Proprinter* III XL, hereafter called Proprinter XL
• Epson** FX-1050
The software is designed to be compatible with a variety of paper sizes as
well as different print engine dots-per-inch ratios.
About This Manual
This manual is designed so you can quickly find the information you need to
use your ASCII Emulation software.
17
Page 18
Chapter 1 Introduction
Notes And Notices
For your safety and to protect valuable equipment, it is very important that you
read and comply with all information highlighted under notes and notices:
<#> The word Danger next to the lightning slash indicates the
DANGER
presence of a hazard that could cause death or serious
personal injury. Danger and Caution notices are numbered to
help you find the translated versions in the
Notices
booklet.
IBM 4400 Safety
CAUTION
<#> The word Caution next to the exclamation point (!) indicates the
presence of a hazard that could cause moderate or minor
personal injury.
CAUTION
<#> The word Caution next to this symbol indicates a heavy
assembly that requires two or more persons to lift or hold.
CAUTION
<#> The word Caution next to this symbol indicates a part or
assembly that is hot enough to burn you.
18
Page 19
Notes And Notices
CAUTION
<#> The word Caution next to this symbol indicates a part or
assembly that is sharp enough to cut you.
CAUTION
<#> The word Caution next to this symbol indicates the presence of
laser radiation. NEVER look directly into laser light.
ATTENTION
The word Attention indicates the possibility of damage to a program,
device, system, or data.
IMPORTANT
The word Important indicates information vital to pr oper operation of
the printer.
NOTE: A note gives you helpful information and tips about printer operation
and maintenance.
Glossary
The Glossary defines computer terms and acronyms used in this manual. It is
located just before the Index.
19
Page 20

Chapter 1 Introduction
Software Features
The ASCII Emulation software provides the following features:
• Printer Protocols:
Printronix P-Series
Printronix P-Series XQ
Printronix Serial Matrix
IBM Proprinter III XL
Epson FX-1050
• Page Orientations:
Portrait/Inverted Portrait
Landscape/Inverted Landscape
• Graphics:
Bit Image Graphics
P-Series Compatible Plot Mode
• Vertical Page Formatting:
Printronix P-Series Electronic Vertical Format Unit (EVFU)
Serial Matrix Vertical Formatting Unit (VFU)
• Character Sets:
IBM PC
ECMA-94 Latin 1
Multinational
DEC** Multinational
IBM Code Page 437 and 850
as well as the international symbol sets in the following categories:
Arabic Sets
Cyrillic Sets
European Sets
Greek Sets
Hebrew Sets
Turkish Sets
• Font Typefaces:
Courier
Letter Gothic
OCR-A
OCR-B
CG Triumverate** Bold Condensed
Ability to download True Type.
20
Page 21

Printer Configuration
• Print Attributes:
Emphasized/Bold print
Scalable font sizes
Superscript/subscript print
Automatic underline and overscore
Carriage return editing
Variable point size
Italics
• Barcode Printing
NOTE: Complete listings of all the choices from these categories are printed
in the menu descriptions, as well as in the description of the Super-
Set “Character Set Selection” (SSCC R) command (see page 198).
Printer Configuration
Matching certain printer operational settings to those of the host computer is
known as printer configuration
adjusted according to the printer function key descriptions in your printer
User's Guide
from the printer control panel or by the software commands described in
Chapters 2 through 7 of this manual.
Your
User's Guide
as well as descriptions of each configuration parameter available with your
printer.
. You can select ASCII Emulation configuration options directly
also contains detailed configuration menus and diagrams,
.
The settings, or configuration parameters, are
NOTE: You must also enter and exit the ASCII Emulation configuration menu
accordingto your printer
Pressing an invalid key to enter a parameter value may move you to
another level in the configuration or exit the configuration menu
completely.
User's Guide
configuration procedures.
21
Page 22

Chapter 1 Introduction
22
Page 23

2 P-Series Printer Protocol
Introduction
This chapter describes the P-Series emulation host control codes.
“Emulation” refers to the ability of a printer to execute the commands of a
particular printer control language. A printer control language is the coding
system used to convey, manipulate, and print data. It contains character
codes and command sequences that configure the emulation. In this manual,
the terms emulation, printer protocol, and printer control language are
synonymous.
In the P-Series emulation mode, your printer can print files coded for the PSeries printer control language. To select the P-Series emulation mode as the
active printer emulation, select ASCII Emulation from the EMULATION menu
and P-Series from the Printer Protocol menu, as described in the
Guide.
The P-Series emulation provides many configurable parameters. The default
parameter values for this emulation are shown in Table 1. You can modify the
emulation parameter values in two ways:
User's
• The P-Series host control codes. An extensive set of P-Series control
code commands can be sent to the printer from an attached host
computer via the host data stream. Most of this chapter is devoted to
describing the P-Series control code commands.
• The printer configuration menus. You can modify a subset of the P-
Series emulation parameters using the printer configuration menus,
control panel keys and LCD, as described in the
A parameter value set by a host control code generally overrides a value set
from the printer's control panel.
NOTE: Configuration values selected from the menus or via host control
codes can be saved to the printer's NVRAM memory so that they will
not be lost when you power off the printer or reset it to the factory
defaults. The menu selection for saving a configuration to memory is
described in the
control codes, refer to Appendix B, “PTR_SETUP Option”.
User's Guide.
To save the configuration using host
User's Guide.
23
Page 24
Chapter 2 Introduction
P-Series Default Values and States
The factory settings for the P-Series emulation menu options (for an 8”
printer) are shown in Table 1. Table 1 also lists additional factory settings for
parameters provided by the ASCII Emulation formatting menus. (The
EMULATION menu options are described in the
codes can override many of the settings for these menu options.
Select CPI 10.0 CPI
Select LPI 6.0 LPI
Typeface Letter Gothic
Character Group Standard Sets
Character Set IBM PC
User's Guide
Table 1. P-Series Default Settings
Characteristic Default Setting
). Host control
Primary Subset ASCII (USA)
Extended Subset Code Page 437
Horizontal DPI 120 DPI
Vertical DPI 72 DPI
Prop. Spacing Enable
Italic Print Disable
Slashed Zero Disable
Left Margin 0 characters
Right Margin 0 characters
Top Margin 0 linespaces
Bottom Margin 0 linespaces
Print Char. Set
Define CR code CR = CR
Auto LF Disable
Define LF code LF = CR + LF
24
*Advanced User:
Control Code 06 8.0 LPI
Control Code 08 Elongated
Bold Disable
Page 25
P-Series Default Values and States
Table 1. P-Series De fault Settings (continued)
Characteristic Default Setting
Overstrike Enable
Select SFCC 1
EVFU Select Enable
Alt. Set 80-9F Control Code
SFCC d command Even dot plot
PSeries Dbl High Normal
FF valid at TOF Enable
Text Position Bottom of Line
Host Command Enable
Reset Cmd CFG Ld Disable
Form Length 06.0 inches
Form Length 152.4 mm
Form Length 36 lines
Form Width 08.5 inches
Form Width 216.0 mm
Form Width 85 characters
* Advanced User must be enabled under the Printer Control Menu in order for
the Advanced User parameters to be visible and changeable.
25
Page 26

Chapter 2 Configuring the P-Series Emulation with Control Codes
Configuring the P-Series Emulation with Control Codes
The remainder of this chapter describes the P-Series printer control language
codes that may be sent from a host computer attached to the printer, in order
to invoke and configure numerous P-Series emulation functions.
Format for Control Code Descriptions
The following information is listed for each code function (where applicable).
Name The title or function of the command.
ASCII Code The ASCII mnemonic for the command is shown. Command
sequences are in 7-bit (ASCII) form.
Hex Code The code or command sequence in hexadecimal numbers.
Dec Code The code or command sequence in decimal numbers.
Purpose The function(s) of the control code.
Comment A discussion of the uses of the code or command sequence,
including exceptions or limitations to its use.
Example A sample is provided for some control codes when it is possible
to illustrate the effect of a control code, or if a specific syntax is
required to complete the program statement (i.e. Horizontal Tab
set, Vertical Tab set/clear).
IMPORTANT
If you specify any parameters for a c ontrol code other than the ones that
are defined in the control code description, unpredictable results may
occur.
Special Function Control Code-Control Code Header
A Special Function Control Code (SFCC) is used to extend the control code
protocol. The SFCC is the control code introducer (or header); it is the first
input in the sequence of parameters. The general control code sequence is:
(SFCC)(parameter 1)(parameter 2)...(parameter
P-Series codes can use any value from 1 through 255 (hex 01 through hex
FF) as control code introducers. For example, bold print can be enabled in the
P-Series protocol using any of the following control code introducers:
ASCII: SOH G Hex: 01 47 Dec: 171
ETX G 03 47 3 71
ESC G 1B 47 27 71
^ G5E479471
~ G7E4712671
NOTE: The SFCC has been set to ESC for all examples.
n
)
26
Page 27
Command Line
Command Line
Print format, print mode, or international language selection can be controlled
by a longer sequence known as a Command Line. Command Lines are string
type commands placed between complete lines of text and affect the text
which follows. The protocol has six Command Lines: PMODE, OSET, PSET,
LPI, LINES, and INCHES. Each of these Command Lines is discussed in this
chapter under the appropriate Control Code function.
For example, the form length (in inches) can be set using the following
command line:
SFCC INCHES;
where:nis the whole number of inches, andfis the fractional
increment in 0.5 inch increments.
When using the SFCC in a Command Line, the SFCC must be the first nonblank symbol in the line (space, hex 20, is a blank symbol). In addition,
characters following spaces (other than a valid line terminator) in a Command
Line are ignored so that user comments can be included on the Command
Line. The valid line terminators are Form Feed (FF), Line Feed (LF), and
Carriage Return (CR); however, when used in the Command Line, these line
terminators do
error, the command is not executed, and the line truncates to include any of
the error messages listed in the following table:
Error Message Explanation
Invalid Parameter The command received cannot be
Parameter Out of Bounds A decimal parameter in the command is out
Missing Parameter One or more necessary parameters is
not
cause any paper motion. If a Command Line contains an
Table 2. Command Line Error Messages
n.f
interpretedcorrectly, or the correctcommand
is not followed by an expected delimiter.
of range.
missing from the command.
Illegal Character in Decimal
Parameter
TooManyDigitsinDecimal
Parameter
A decimal parameter contains a non-numeric
character, or a fractional digit is out of range.
A decimal parameter contains too many
digits.
Attribute Set and Reset Codes
Certain print attributes are set and reset (turned on or off) by using the
appropriate SFCC code sequence and the numbers 1 or 0. These may be
either the hexadecimal code 01 and 00, or the ASCII code for the printable
symbols of decimal 1 and 0 (hexadecimal code 31 and 30, respectively).
Expanded Print, Superscript/Subscript Print, and Underline are attributes that
are set and reset this way.
27
Page 28

Chapter 2 Configuring the P-Series Emulation with Control Codes
Control Code Reference Index
This index lists each printer command by function, ASCII mnemonic, and the
page where the command is explained in detail. The rest of this chapter
defines the control code functions for P-Series Emulation mode. The
commands are listed in alphabetical order.
NOTE: Some control code functions can be accomplished using another
control code sequence or via control panel selection.
FUNCTION ASCII CODE PAGE
Paper Motion
Form Feed FF 43
Line Feed LF 45
Vertical Tab VT 57
Page Format
Backspace BS 30
Carriage Return CR 32
Forms Length Set (Inches) SFCC INCHES;
Forms Length Set (Lines) SFCC LINES;
Form Margins, Set SFCC v 44
Line Spacing 1/6 Inch (6 lpi) SFCC 2 46
SFCC LPI;
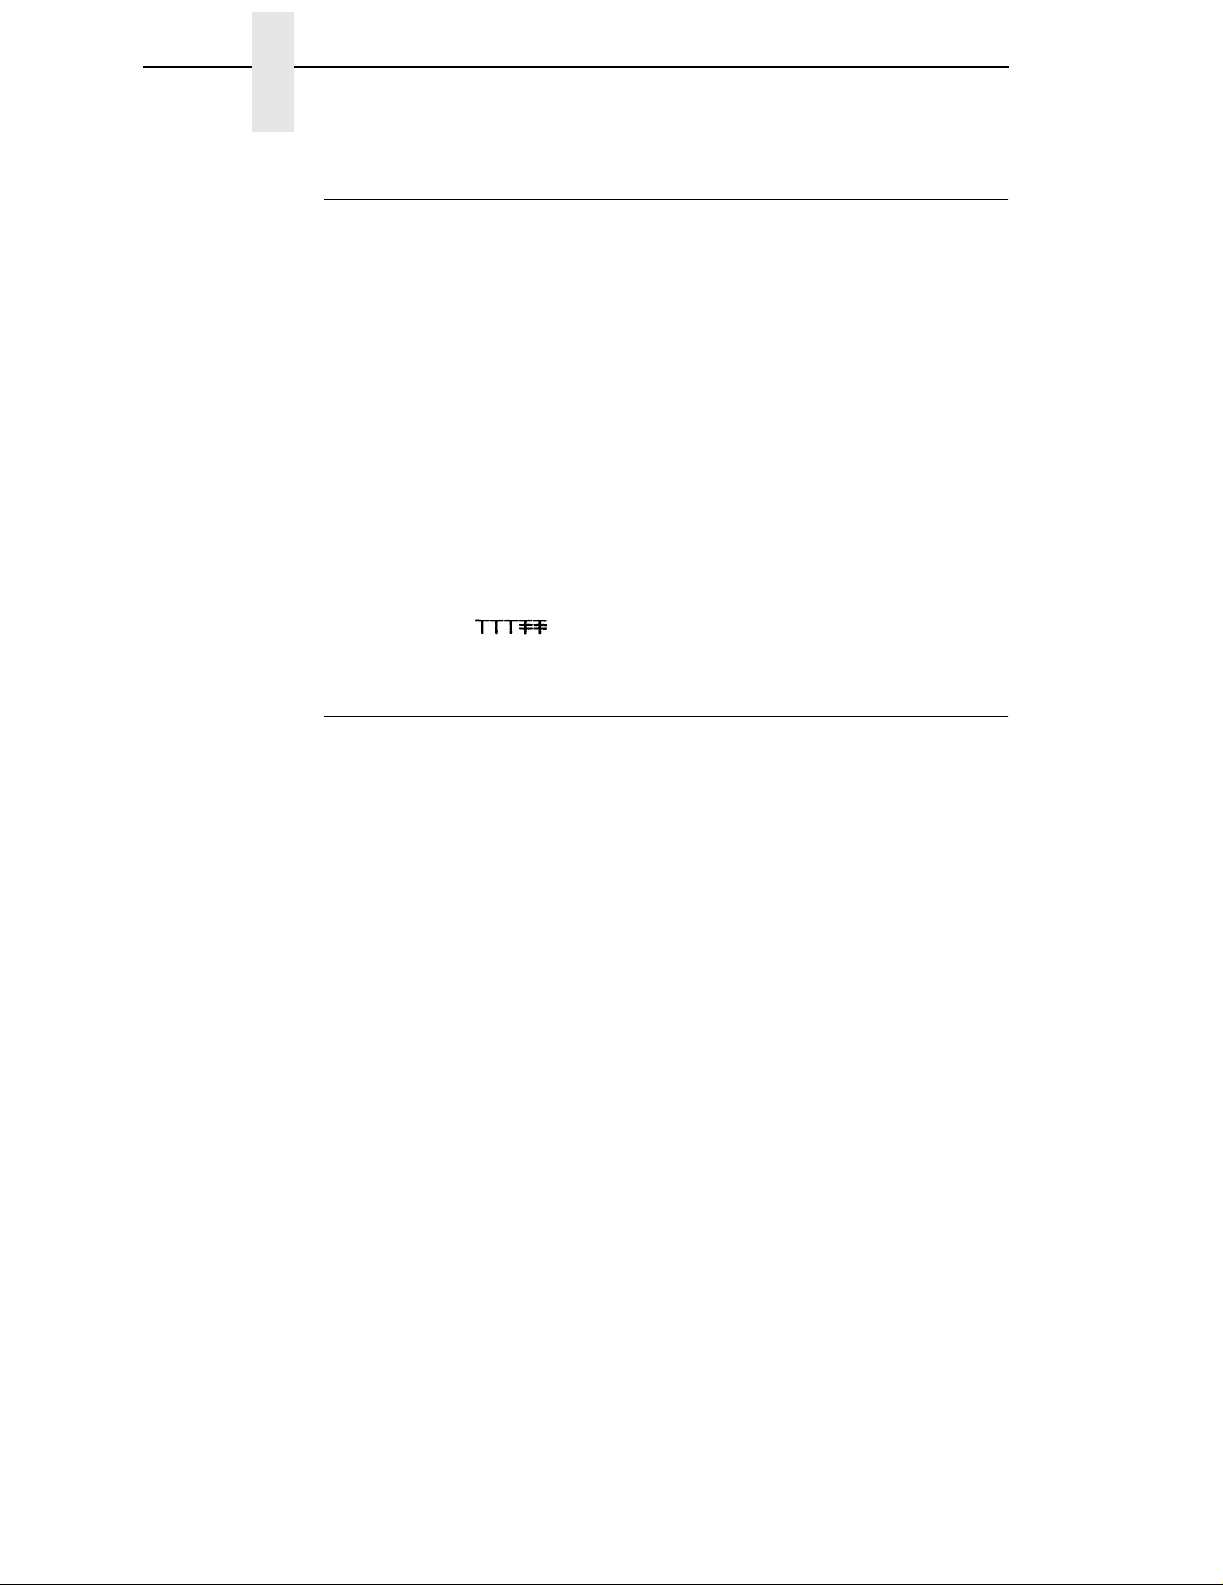
Line Spacing 1/8 Inch (8 lpi) SFCC 0 47
SFCC LPI;
Line Spacing 8 or 10.3 lpi (1 line only) ACK 47
SFCC f
Line Spacing 7/72 Inch SFCC 1 48
Line Spacing
Line Spacing
VFU Commands DLE through US 57
n
/72 Inch SFCC A 49
n
/216 Inch SFCC 3 50
n.f
43
n
44
n
n
28
Print Attributes
Bold Print SFCC G 31
Bold Print (1 line only) SFCC j 31
Bold Print Reset SFCC H 31
Elongated (Double High) Print (1 line) SFCC h 38
BS
Elongated (Double High) Print, Set/Reset SFCC w
Emphasized Print SFCC E 40
Emphasized Print Reset SFCC F 40
Expanded (Double Wide) Print SFCC W
Expanded (Double Wide) Print (1 line) SFCC k 41
Overscoring SFCC _
Print Mode/Pitch Selection SFCC X
SFCC PMODE;
SFCC [nq
n
n
n
mn
39
41
50
52
n
Page 29

Control Code Reference Index
FUNCTION ASCII CODE PAGE
Print Attributes (continued)
Superscript/Subscript Printing SFCC S
Superscript/Subscript Printing Reset SFCC T 55
Underline SFCC – 56
Graphics
Plot, Even Dot (High Density) EOT 51
SFCC d
Plot, Odd Dot (Normal Density) ENQ 51
SFCC e
Other Functions
Bell BEL 30
Character Set Select SFCC l
Characters 80-9F (Control Codes) SFCC 7 35
Characters 80-9F (Printable Symbols) SFCC 6 35
Character Set Select: ECMA Extended SFCC OSET;
Character Set Select: International SFCC R
Languages SFCC PSET;
Emulation Reset SFCC @ 40
ExtendedCharacter Set SO 42
SFCC SO
SFCC n
SFCC 4
ExtendedCharacter Set Cancel SI 42
(Primary Set Select) SFCC SI
SFCC o
SFCC 5
Super-Set Commands SFCC |};56
n
xyz
n
n
n
55
33
36
37
29
Page 30
Chapter 2 Configuring the P-Series Emulation with Control Codes
Backspace
ASCII Code BS
Hex Code 08
Dec Code 8
Purpose Moves the logical print head to the left one character space
toward the first character column.
Comment When configured from the front panel for backspace, BS moves
the character position indicator (the logical print head position)
one character space to the left at the current character pitch
setting. The code is ignored if the logical print head is positioned
at the first character column.
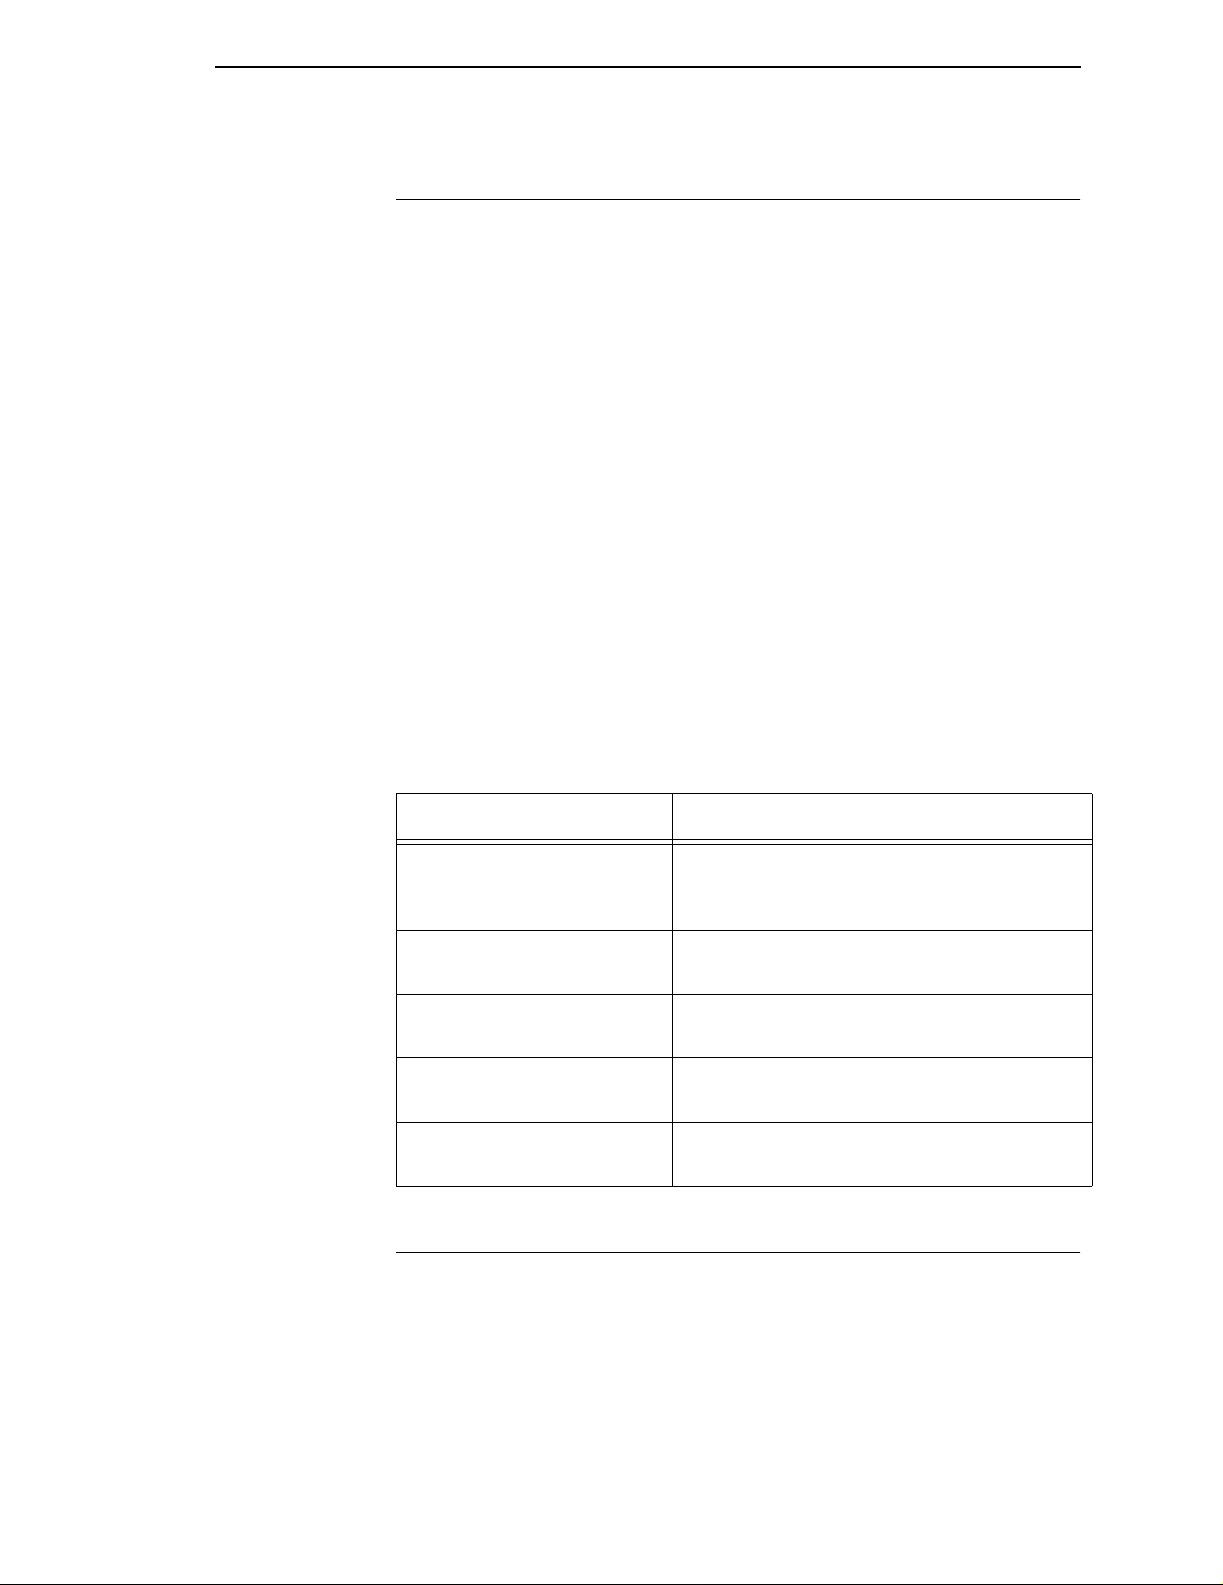
Example If you were to print five “T” characters, then two BS commands,
then two “=” characters, the output would look like the sample
below.
Bell
ASCII Code BEL
Hex Code 07
Dec Code 7
Purpose Sounds the printer's buzzer/beeper.
Comment The BEL function sounds the buzzer/beeper for 0.2 seconds
upon receipt of this command.
30
Page 31

Bold Print
Bold Print
ASCII Code SFCC G SFCC j
Hex Code SFCC 47 SFCC 6A
Dec Code SFCC 71 SFCC 106
Purpose Selects bold character printing.
Comment When the bold character printing control code is received, all
characters are printed in bold until reset by the bold print reset
control code or printer reset. Bold Print is the same as printing
double strike on an impact printer.
When SFCC j is used, bold printing is selected for one line only
and reset by the bold print reset control code, Emulation reset, or
a paper motion command.
Example The following sample illustrates bold character printing.
Bold Print Reset
ASCII Code SFCC H
Hex Code SFCC 48
Dec Code SFCC 72
Purpose Resets bold character printing.
Comment The bold print reset control code only resets the bold print
character attribute. Other print attributes such as double wide
printing are not affected.
Example See the Bold Print control code (above) for a sample of bold
character print set and reset.
31
Page 32

Chapter 2 Configuring the P-Series Emulation with Control Codes
Carriage Return
ASCII Code CR
Hex Code 0D
Dec Code 13
Purpose Returns the logical print head to the first character column
(resets the pointer to the first character position).
Comment The CR code may or may not cause printing or paper motion,
depending on the DEFINE CR CODE configuration parameter
value. If the DEFINE CR CODE submenu displays:
Define CR Code
CR = CR*
the characters following the CR are printed over the previous
characters on the line.
If the DEFINE CR CODE submenu displays:
Define CR Code
CR = CR+LF*
control code CR is converted to perform a carriage return and
line feed function.
32
Page 33

Character Set Select
Character Set Select
ASCII Code SFCC l
Hex Code SFCC 6C
Dec Code SFCC 108
Purpose Selects the character set, extended character set, and the
international language for a specific character set.
where:
x
y
(Table 4);
z
(Table 5);
0(hex30) IBMPC
1 (hex 31) Multinational
2 (hex 32) ECMA Latin 1
3 (hex 33) DEC Multinational
xyz
(lowercase L)
xyz
xyz
is the character set (Table 3);
is the international language for the selected character set
is the extended character set for the selected character set
Table 3. Character Set Select (
x
x
)
Character Set
Table 4. International Language Select (y)
= 0(hex30)
x
x
= 1(hex31)
x
= 2(hex32)
x
= 3(hex33)
y
IBM PC Multinational ECMA Latin 1 DEC Multinational
0 (hex 30) ASCII (USA) ASCII (USA) ASCII (USA) ASCII (USA)
1 (hex 31) French EBCDIC German French
2 (hex 32) German Swedish German
3 (hex 33) English (UK) Danish English (UK)
4 (hex 34) Danish Norwegian Norwegian/Danish
5 (hex 35) Swedish Finnish Swedish
6 (hex 36) Italian English (UK) Italian
7 (hex 37) Spanish Dutch Spanish
8 (hex 38) Japanese French Japanese
9 (hex 39) French Canadian Spanish French Canadian
10 (hex 3A) Latin American Italian Dutch
11 (hex 3B) Turkish Finnish
12 (hex 3C) Japanese Swiss
33
Page 34

Chapter 2 Configuring the P-Series Emulation with Control Codes
= 0 (hex 30)
x
Table 5. Extended Character Set Select (
x
= 1(hex31)
x
z
)
= 2(hex32)
x
= 3(hex33)
z
IBM PC Multinational ECMA Latin 1 DEC Multinational
0 (hex 30) IBM PC (0437) Mult. Extended Set Barcode 10 cpi DEC Mult. Ext. Set
1 (hex 31) IBM PC (0850) Mult. DP 10 cpi
2 (hex 32) Mult. DP 12 cpi
3 (hex 33) Mult. NLQ 10 cpi
4 (hex 34) Greek DP 10 cpi
5 (hex 35) Greek DP 12 cpi
6 (hex 36) Greek NLQ 10 cpi
7 (hex 37) Graphics DP 10 cpi
8 (hex 38) Graphics NLQ 10 cpi
9 (hex 39) Scientific DP 10 cpi
10 (hex 3A) Scientific DP 12 cpi
11 (hex 3B) ScientificNLQ 10 cpi
12 (hex 3C) Multinational (at Primary set mode and pitch)
Comment An asterisk character (*) (hex 2A) may be substituted for the
numeric values of
selected for
selected for
language and/or extended character set for the selected
character set is used.
The character set, international language and extended
character set can also be selected from the printer control panel.
The control code settings override the control panel selection.
Except for the asterisk value discussed above, values other than
those shown in the tables result in the control sequence being
terminated..
x,y
,orz. If the asterisk (*) is the value
x
, the character set does not change. If * is the value
yorz
, the previously selected international
34
Page 35

Characters 80-9F (Control Codes)
Characters 80-9F (Control Codes)
ASCII Code SFCC 7
Hex Code SFCC 37
Dec Code SFCC 55
Purpose Selects the character set wherein hex codes 80 through 9F are
control codes. Cancels Character Set Select activated by SFCC
6.
Comment This feature is also selectable from the control panel (see the
“Alternate Set 80-9F” parameter in the configuration chapter of
your
User’s Guide
).
Characters 80-9F (Printable Symbols)
ASCII Code SFCC 6
Hex Code SFCC 36
Dec Code SFCC 54
Purpose Selects the character set wherein hex codes 80 through 9F are
printable symbols.
Comment This feature is also selectable from the control panel (see the
“Alternate Set 80-9F” parameter in the configuration chapter of
your
User’s Guide
).
35
Page 36

Chapter 2 Configuring the P-Series Emulation with Control Codes
Character Set Select: ECMA-94Latin1Extended
ASCII Code SFCC OSET;
Purpose Selects the Extended Character Set and the print mode and
pitch at which the extended character prints. Valid only in the
ECMA-94 Latin 1 Extended Character Set; otherwise, this
command is ignored.
Comment
n
ranges from 0 through 12 (hex 00 through hex 0C) to select the
print mode/pitch combinations available from page 52. All other
values result in an error message. In OSET mode, values
outside the range in Table 6 produce an error message.
(Command Line Error Messages are listed in Table 2 on page
27.)
Extended characters print at the print mode and pitch selected
by the OSET command, even if that mode and pitch differs from
the currently selected print mode and pitch. If the print mode
differs between the extended and primary characters, the first
character in the data stream selects the print mode at which that
line prints. Different pitches can be printed on the same line.
Table 6. Print Modes/Pitches Available Using P-Series OSET
(ECMA Latin 1, Extended Character Set Only)
n
0 Barcode Letter Gothic 10 cpi
1 Multinational Letter Gothic 10 cpi
n
Print Mode/Pitch Select
2 Multinational Letter Gothic 12 cpi
3 Multinational Courier 10 cpi
4 Greek Letter Gothic 10 cpi
5 Greek Letter Gothic 12 cpi
6 Greek Courier 10 cpi
7 Graphics Letter Gothic 10 cpi
8 Graphics Courier 10 cpi
9 Scientific Letter Gothic 10 cpi
10 Scientific Letter Gothic 12 cpi
11 Scientific Courier 10 cpi
12 Multinationalat Primary Character Set Mode and Pitch
36
Page 37

Character Set Select: International Languages
Character Set Select: International Languages
ASCII Code SFCC PSET;
Hex Code SFCC 52
Dec Code SFCC 82
Purpose Specifies the international language set identified bynin the
basic character set selected from the control panel (ECMA-94
Latin 1, IBM PC, Multinational, and DEC Multinational).
where:
n
corresponds to the language as shown in Table 7.
Table 7. International Character Sets
n
SFCCR
(hex)
0 (30) 0 ASCII (USA) ASCII (USA) ASCII (USA) ASCII (USA)
1 (31) 1 German French EBCDIC French
2 (32) 2 Swedish German German
3 (33) 3 Danish English (UK) English (UK)
4 (34) 4 Norwegian Danish Norw./Danish
5 (35) 5 Finnish Swedish Swedish
6 (36) 6 English (UK) Italian Italian
PSET ECMA Latin 1
n
SFCC R
Character Set Selected
IBM PC (0437 or
0850)
n
n
n
Multinational
DEC
Multinational
7 (37) 7 Dutch Spanish Spanish
8 (38) 8 French Japanese Japanese
9 (39) 9 Spanish French Canadian French Canadian
0A (3A) 10 Italian Latin American Dutch
0B (3B) 11 Turkish Finnish
0C (3C) 12 Japanese Swiss
0D (3D) 13
0E (3E) 14
0F (3F) 15
10 (40) 16
11 (41) 17
12 (42) 18
13 (43) 19
14 (44) 20
15 (45) 21
(currently undefined)
37
Page 38

Chapter 2 Configuring the P-Series Emulation with Control Codes
Comment The international character set can also be selected from the
control panel. The control code setting overrides the control
panel character set selection. Values other than those selectable
from Table 7 are ignored.
Example The following example illustrates international character
selection using the IBM PC character set.
Elongated (Double High) Print (One Line Only)
ASCII Code SFCC h BS
Hex Code SFCC 68 08
Dec Code SFCC 104 8
Purpose Selects elongated (double high) character printing for one line
only. Elongated characters are approximately double height but
standard width.
Comment The elongated character control code is a line-by-line print
attribute; when the control code is received, one entire line of
elongated characters is printed and then automatically reset.
When configured for double high print, P-Series control code BS
(hex 08) also selects elongated character printing for a single
line.
When using this feature with relative line slewing, the paper is
moved
Page Formatting,” beginning on page 271 for more information
on relative line slewing. When using small line spacing and the
lines overlap, an unexpected print format may result.
Example The following sample illustrates elongated character printing.
n
+ 1 lines rather thannlines. See Chapter 9, “Vertical
38
Page 39

Elongated (Double High) Print, Set/Reset
Elongated (Double High) Print, Set/Reset
ASCII Code SFCC w
Hex Code SFCC 77
Dec Code SFCC 119
Purpose Turns double-high character printing on and off. Double-high
characters are standard width but twice as high.
where
Discussion The OCR-A and OCR-B fonts cannot be printed in double high.
NOTE: It is recommended to use double Line Feeds and Carriage Returns
Example The following sample illustrates double-high character printing.
n=
n
= 0 or 48 (hex 00 or hex 30) turns double high printing off
when double-high character printing is on (after an SFCC w control
code has been sent), or else the printer will overstrike text that has
already printed.
If Superscript/Subscript (SFCC S) is combined with Double High
printing,
n
n
n
1 or 49 (hex 01 or hex 31) turns double high printing on
only
Double High printing will occur.
39
Page 40

Chapter 2 Configuring the P-Series Emulation with Control Codes
Emphasized Print
ASCII Code SFCC E
Hex Code SFCC 45
Dec Code SFCC 69
Purpose Selects emphasized character print format.
Comment When the emphasized print control code is received, all
characters are printed in emphasized print until reset by the
emphasized print reset control code or printer reset.
Emphasized print is ignored during superscript or subscript
printing, and when 15-20 cpi characters have been selected.
Example The following sample illustrates emphasized character printing.
Emphasized Print Reset
ASCII Code SFCC F
Hex Code SFCC 46
Dec Code SFCC 70
Purpose Resets emphasized character printing.
Comment The emphasized print reset control code only resets the
emphasized print character attribute.
Example See the Emphasized Print control code example (above) for an
example of Emphasized Print Reset.
Emulation Reset
ASCII Code SFCC @
Hex Code SFCC 40
Dec Code SFCC 64
Purpose Initializes all print mode related parameters to their power-up
configuration values.
Comment Print mode, line spacing, international language selection,
margins, form length, skip-over perforation, and character pitch
are reset to their power-up-configuration values. Character-bycharacter and line-by-line attributes are canceled. The vertical
format unit is cleared. The current line is set to the top-of-form
position. Interface parameters and printer protocol selection are
not affected.
40
Page 41

Expanded (Double Wide) Print
Expanded (Double Wide) Print
ASCII Code SFCC W
Hex Code SFCC 57
Dec Code SFCC 87
Purpose Selects or resets expanded (double wide) print.
where:
Comment When expanded print using SFCC W is received, all characters
Example The following sample illustrates expanded character printing and
n=
n
= 0 resets expanded print (hex 00 or hex 30)
are printed double wide until reset by the expanded print reset
control code or printer reset.
expanded character printing reset.
n
n
n
1 selects expanded print (hex 01 or hex 31)
Expanded (Double Wide) Print (One Line Only)
ASCII Code SFCC k
Hex Code SFCC 6B
Dec Code SFCC 107
Purpose Selects expanded (double wide) print for one line only.
Comment This expanded print control code is a line-by-line print attribute:
When the SFCC k control code is received, the current line is
printed double wide and then automatically reset.
This control code can be reset by a paper motion control code
(LF, VT, CR, etc.), SFCC @ (printer reset), CAN or SFCC W
(double wide print).
Example The following sample illustrates Expanded Print for one line only.
For another example of expanded printing, see “Expanded
(Double Wide) Print” on page 41.
41
Page 42

Chapter 2 Configuring the P-Series Emulation with Control Codes
Extended Character Set
ASCII Code SO (Shift Out) SFCC SO SFCC n SFCC 4
Hex Code 0E SFCC 0E SFCC 6E SFCC 34
Dec Code 14 SFCC 14 SFCC 110 SFCC 52
Purpose Accesses the extended character set in the range hex A0
through FF using codes hex 20 through 7F.
Comment Used in 7-bit systems as if data bit 8 was set to 1. For example,
sending code hex 20 accesses the symbol at code point hex A0.
If a printable symbol is not available at the code point, a space is
printed.
SFCC 4 is not cancelled by the next paper motion command;
OE, SFCC OE, SFCC 6E are cancelled by paper motion.
Example The following sample illustrates Extended Character Set.
Extended Character Set Cancel (Primary Character Set Select)
ASCII Code SI (Shift In) SFCC SI SFCC o SFCC 5
Hex Code 0F SFCC 0F SFCC 6F SFCC 35
Dec Code 15 SFCC 15 SFCC 111 SFCC 53
Purpose Cancels Extended Character Set as selected by SO, SFCC SO,
SFCC n, and SFCC 4, and selects the Primary CharacterSet.
Comment Used in 7-bit systems. If data bit 8 is disabled, this control code
selects the range as if data bit 8 is set to 0, and data is printed as
characters from hex 20 through 7F.
Example See the Extended Character Set example.
42
Page 43

Form Feed
Form Feed
ASCII Code FF
Hex Code 0C
Dec Code 12
Purpose Prints the data in the buffer, advances the paper position to the
next top-of-form and moves the character position to the first
character column.
Comment The default forms length is determined by the configuration in
nonvolatile memory. Forms length is set by using the control
panel or forms length control codes. Code FF cancels all singleline only print attributes.
The Form Feed command reacts differently when the VFU is
active. See Chapter 9, “Vertical Page Formatting,” beginning on
page 271.
Forms Length Set (Inches)
ASCII Code SFCC INCHES;
Purpose Sets the length of forms (paper) in inches.
n=
where:
Comment Upon receipt of this code, the current line becomes the first line
whole numbers from 1 through 24 (hex 01 through hex 18) to
specify the number of inches on a page.
f
= fractional number in .5-inch increments (the minimum forms
length is 0.5 inches).
of the form, and the form length set becomes the current forms
length. Vertical tab positions set below the bottom of the form
are cleared. Forms length is defined in inches; therefore,
subsequent line spacing changes do not affect the result of this
command.
In INCHES mode, incorrect values produce an error message.
(Command Line Error Messages are listed in Table 2 on page
27.)
Forms length can also be set by the control panel (when “Menu
Form Size” is enabled). The control code forms length setting
from the host computer overrides the control panel setting.
However, if the VFU is enabled and loaded, this command is
ignored.
Also, 0.5-inch increments can be specified. For example,
sending the command:
n.f
SFCC INCHES; 7.5
results in a form length setting of 7-1/2 inches.
43
Page 44

Chapter 2 Configuring the P-Series Emulation with Control Codes
Forms Length Set (Lines)
ASCII Code SFCC LINES;
Purpose Sets the length of a form (paper) in lines.
where:
Comment The forms length is set to the number of lines defined by the
n
= 1 through 192 (hex 01 through C0) to specify the number of
lines per page at the current line spacing.
quotient of
inches.
In LINES mode, the maximum form length is 24 inches, and
values in excess of 24 inches causes an error message.
(Command Line Error Messages are listed in Table 2 on page
27.)
If the calculated forms length in lines is not an exact multiple of
the target machine dot size, the forms length value is adjusted
down to the next possible multiple.
If the VFU is enabled and loaded, this command is ignored.
n
n
and the current line spacing so that the units are in
Form Margins, Set
ASCII Code SFCC v
Hex Code SFCC 76
Dec Code SFCC 118
n1 n2 n3 n4
n1 n2 n3 n4
n1 n2 n3 n4
n
Purpose Selects left (n1), right (n2), top (n3), and bottom (n4)form
margins.
where:
Comment A hex value of FF for
n1
= The width of the left margin (hex value) in character
columns at the current cpi. If the requested margin is larger than
the current (form width - right margin), the value is ignored.
n2
= The width of the right margin (hex value) in character
columns at the current cpi. If the requested margin is larger than
the current (form width - left margin), the value is ignored.
n3
= The length of the top margin (hex value) in character lines
at the current lpi. If the requested margin is larger than the
current (form length - bottom margin), the value is ignored.
n4
= The length of the bottom margin (hex value) in character
lines at the current lpi. If the requested margin is larger than the
current (form length - top margin),the value is ignored.
n1,n2,n3
remains unaffected.
When set, the right and bottom margins take effect immediately.
The left margin takes effect for the current line only if no
horizontal motion has occurred for the line; otherwise, it takes
effect on the next line. The top margin always takes effect on the
next form.
,orn4indicates that the margin
44
Page 45

Line Feed
Line Feed
ASCII Code LF
Hex Code 0A
Dec Code 10
Purpose Prints the data in the buffer (if any) and advances the vertical
character position one line at the current line space setting.
Comment If configured for LF equals new line (LF=CR+LF), the logical
print head is positioned at character column 1 of the new line.
Otherwise, the logical print head does not move when
configured for LF function only (LF=LF ONLY). The LF function
cancels all single line print attributes such as double high
(elongated) and double wide (expanded) characters.
This code is always configured for LF=CR+LF in the P-Series
protocol.
In the P-Series Even Dot Plot mode (high density graphics), the
LF code does not cause paper position motion; the data in the
buffer is plotted and the logical print head is positioned at
character column 1 in anticipation of the Odd Dot Plot control
code to complete high density graphic plotting.
In the P-Series Odd Dot Plot mode (normal density graphics),
the LF code plots the data in the buffer, advances the paper
position a single dot row at the current vertical dot density, and
positions the logical print head at character column 1.
45
Page 46

Chapter 2 Configuring the P-Series Emulation with Control Codes
Line Spacing 1/6 Inch (6 lpi)
ASCII Code SFCC 2 SFCC LPI;
Hex Code SFCC 32
Dec Code SFCC 50
Purpose Sets line spacing to 6 lpi or as set by SFCC A.
Comment For SFCC LPI;
command sets line spacing to 1/6 inch. Values of
or 8 causes an error message.(Command Line Error Messages
are listed in Table 2 on page 27.)
SFCC 2 asserts
49). If no distance has been set by SFCC A, the distance is 1/6
inch.
The control code line spacing selection overrides the control
panel line spacing setting.
Example The following example illustrates 1/6-inch line spacing and
assumes that a distance has not been set by SFCC A.
n
n
,thevalueofncanbe6or8only.Ifn= 6, this
n
other than 6
n
/72-inch line spacing as set by SFCC A (page
46
Page 47
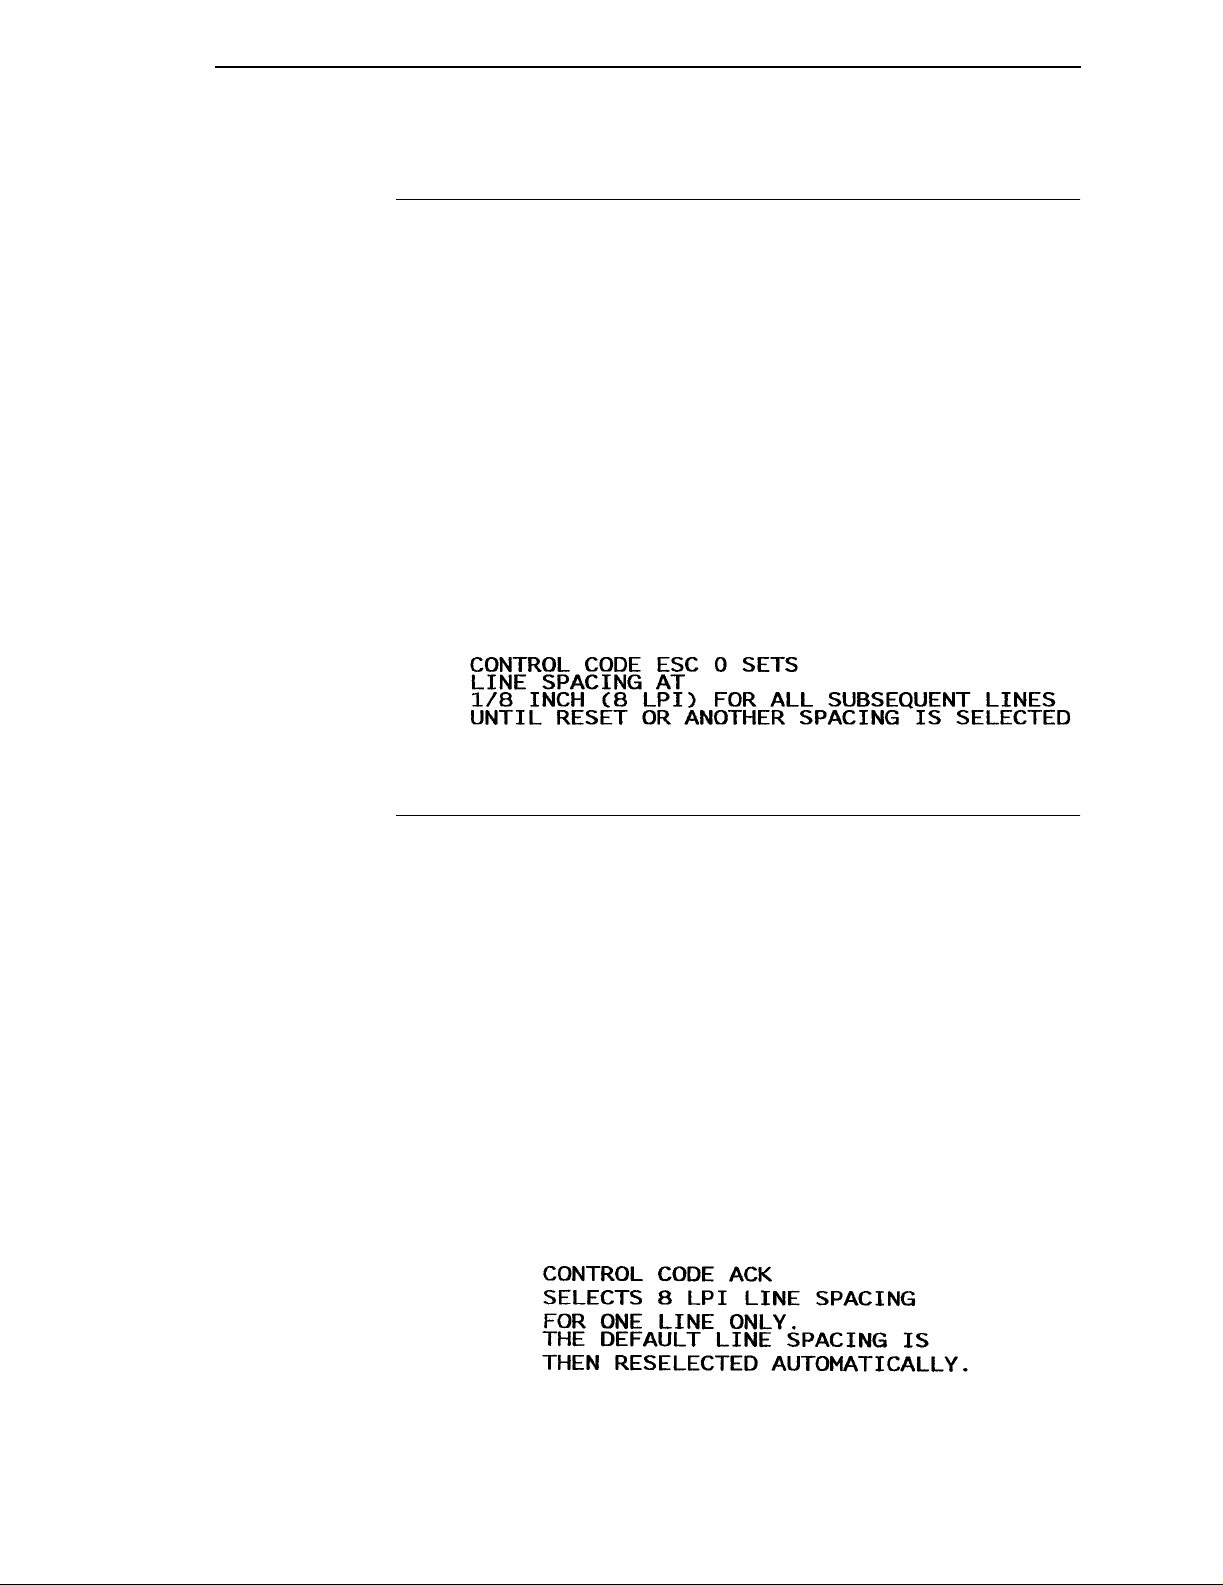
Line Spacing 1/8 Inch (8 lpi)
Line Spacing 1/8 Inch (8 lpi)
ASCII Code SFCC 0 SFCC LPI;
Hex Code SFCC 30
Dec Code SFCC 48
Purpose Specifies continuous line spacing at 1/8-inch increments (8 lpi).
Comment When the 1/8-inch line spacing control code is received, all lines
are printed at 8 lpi until a new line spacing is selected or the
printeris reset.The control code line spacing selection overrides
the control panel line spacing setting.
For SFCC LPI;
command sets line spacing to 1/8 inch. Values of
or 8 causes an error message. (Command Line Error Messages
are listed in Table 2 on page 27.)
Example The following example illustrates 1/8-inch line spacing.
n
n
,thevalueofncanbe6or8only.Ifn= 8, this
n
other than 6
Line Spacing 8 or 10.3 lpi (One Line Only)
ASCII Code ACK SFCC f
Hex Code 06 SFCC 66
Dec Code 6 SFCC 102
Purpose Selects line spacing of 8 or 10.3 lpi for the current line only.
Comment The default line spacing is reselected automatically after one
line. Line spacing may be selected either through the control
panel or by line spacing control codes. The control code setting
overrides the control panel line spacing setting.
If the alternate line spacing selected from the control panel is 8
lpi, the ACK control code sets the line spacing to 8 lpi. If 10.3 lpi
was selected from the control panel, the ACK control code sets
the line spacing to 10.3 lpi (7/72 inch).
Example The following example illustrates printing a single line of text at 8
lpi.
47
Page 48
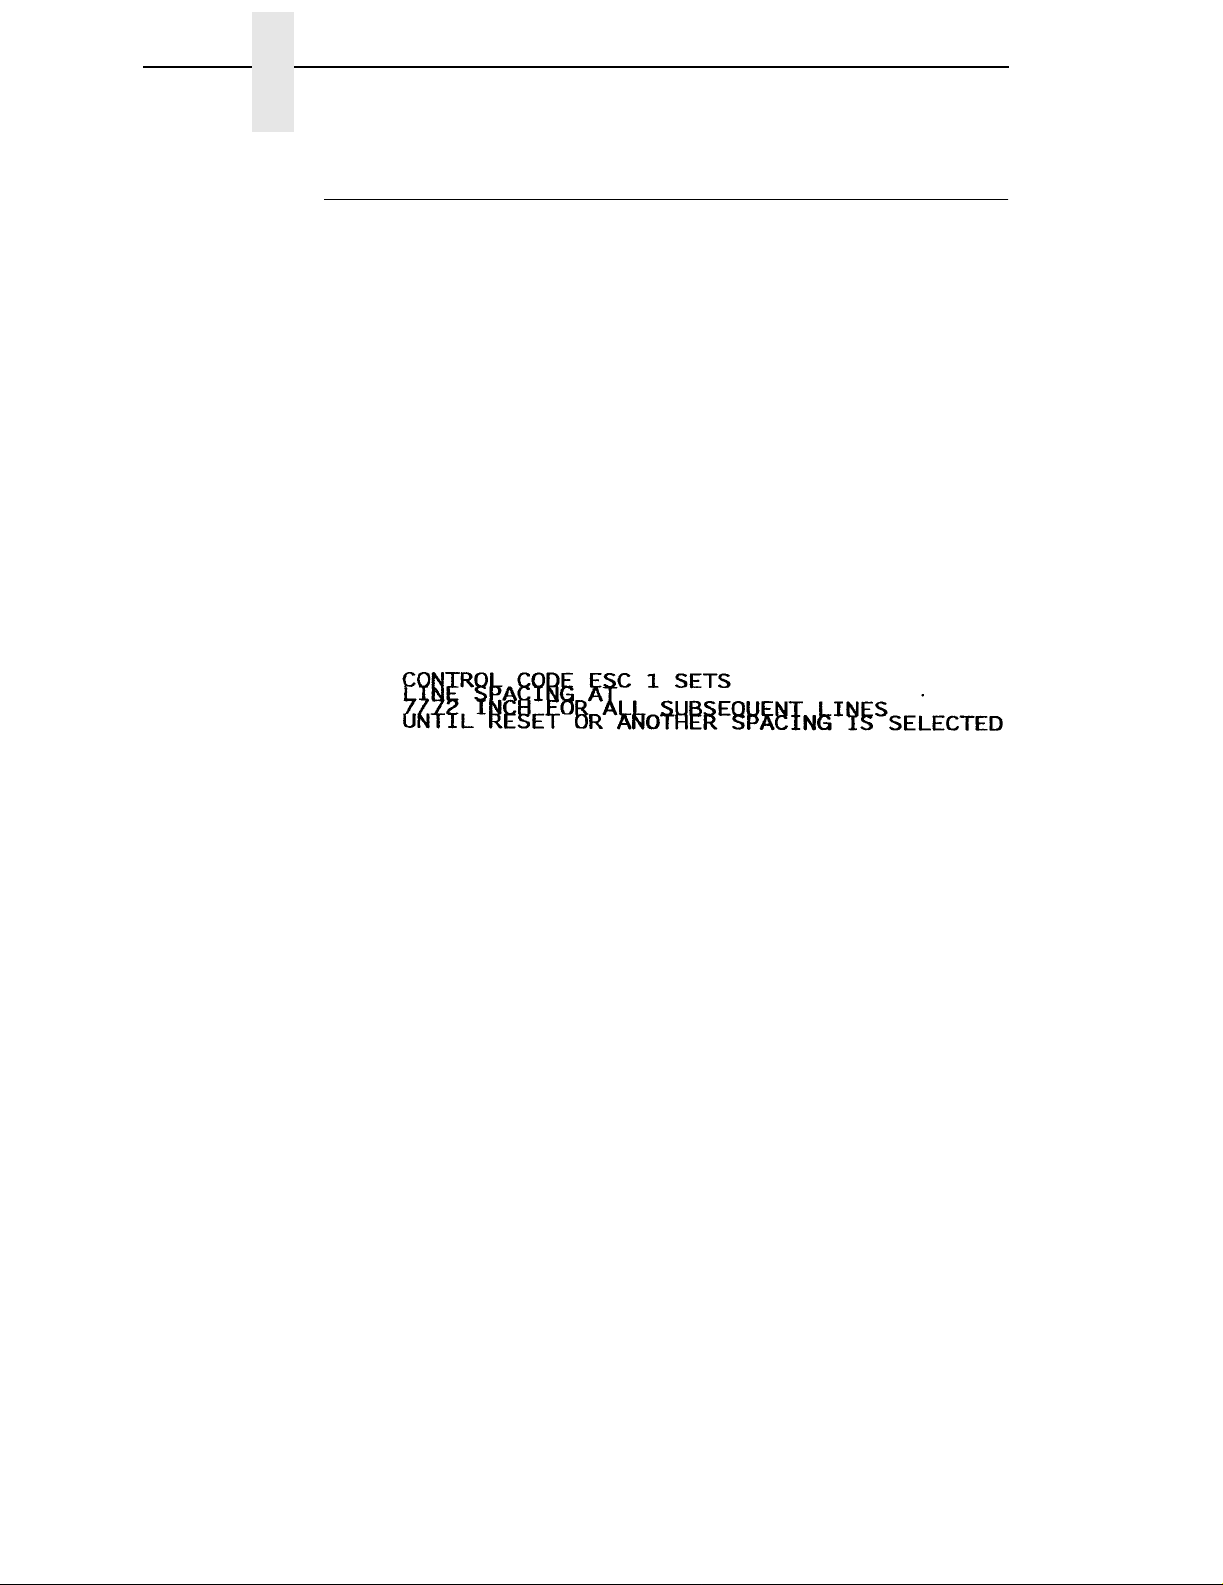
Chapter 2 Configuring the P-Series Emulation with Control Codes
Line Spacing 7/72Inch
ASCII Code SFCC 1
Hex Code SFCC 31
Dec Code SFCC 49
Purpose Specifies the line spacing at 7/72-inch (10.3 lpi) increments.
Comment When the 7/72-inch line spacing control code is received, all
lines are printed at the 7/72-inch line spacing until a new line
spacing is selected or the printer is reset. The control code line
spacing selection overrides the control panel line spacing
setting, and the message display reflects the line spacing as
10.3 lines per inch.
Caution should be used when combining this control code with
other print attributes such as Elongated (Double High),
Superscript, or Subscript; overlapping lines may occur. Printing
at different horizontal and vertical densities do not overlap.
Example The following example illustrates 7/72-inch line spacing.
48
Page 49

Line Spacingn/72Inch
Line Spacing n/72Inch
ASCII Code SFCC A
Hex Code SFCC 41
Dec Code SFCC 65
Purpose Stores a line spacing ofn/72-inch increments.
where:
Comment When the SFCC A control sequence is received, all line feed
Example The following example illustrates 20/72-inch line spacing.
n
= 1 through 85 (hex 01 through hex 55, all others are ignored)
commands following an SFCC 2 sequence* are at
spacing until a new line spacing is selected or the printer is
reset. The control code line spacing selection overrides the
control panel line spacing setting.
Small values of
lines may also occur if print attributes such as Elongated
(Double High), Superscript, or Subscript characters are used on
the same line. Printing at different horizontal and vertical
densities do not overlap.
*The SFCC 2 sequence (page 46) asserts the line spacing that
was stored by the preceding SFCC A sequence.
n
n
n
n
/72-inch line
n
may result in overlapping lines. Overlapping
49
Page 50

Chapter 2 Configuring the P-Series Emulation with Control Codes
Line Spacingn/216 Inch
ASCII Code SFCC 3
Hex Code SFCC 33
Dec Code SFCC 51
Purpose Specifies the line spacing atn/216-inch increments.
where:
Comment When the
Example The following example illustrates
n
line feeds following are at
spacing is selected or the printer is reset. The control code line
spacing selection overrides the control panel line spacing
setting.
The vertical character position moves only in multiples of the
current dot row spacing. If the distance to move is other than a
multiple of the current dot row spacing, the remainder is added
to the next paper motion command.
Caution should be used when combining this control code with
other print attributes such as Elongated (Double High),
Superscript, or Subscript; overlapping lines may occur. Printing
at different horizontal and vertical densities do not overlap.
n
n
n
= 1 through 255 (hex 01 through hex FF)
n
/216-inch line spacing control code is received, all
n
/216-inch line spacing until a new line
n
/216-inch line spacing.
50
Overscoring
ASCII Code SFCC _
Hex Code SFCC 5F
Dec Code SFCC 95
Purpose Enables or disables automatic overscoring of all characters.
where:
Comment When automatic overscore is enabled, all characters, including
Example The following sample illustrates automatic overscoring and
n
n
spaces, are overscored until disabled.
overscoring reset.
n
n
n
= 0 to disable automatic overscoring (hex 00 or hex 30)
= 1 to enable automatic overscoring (hex 01 or hex 31)
Page 51

Plot, Even Dot (P-Series High Density Graphics)
Plot, Even Dot (P-Series High Density Graphics)
ASCII Code EOT SFCC d
Hex Code 04 SFCC 64
Dec Code 4 SFCC 100
Purpose Prints dots at the even numbered dot columns.
Comment The even dot plot code is used for programming high density
graphics and must be used in conjunction with the Odd Dot Plot
code (hex 05). See “P-Series Compatible Plot Mode (Odd/Even
Dot Plotting)” on page 264 for detailed plot mode information.
Plot, Odd Dot (P-Series Normal Density Graphics)
ASCII Code ENQ SFCC e
Hex Code 05 SFCC 65
Dec Code 5 SFCC 101
Purpose Prints dots at the odd numbered dot columns.
Comment This is the P-Series programming normal density graphics
control code. The ENQ code should occur before any printable
data in the data stream. For high density graphics, the Even Dot
Plot code (hex 04) must be used in conjunction with (and
precede) the Odd Dot Plot code. See “P-Series Compatible Plot
Mode (Odd/Even Dot Plotting)” on page 264 for detailed plot
mode information.
51
Page 52

Chapter 2 Configuring the P-Series Emulation with Control Codes
Print Mode/Pitch Selection
ASCII Code SFCC X
Hex Code SFCC 58
Dec Code SFCC 88
Purpose Selects the print mode (Letter Gothic, Courier, or OCR) and
character pitch in characters per inch (cpi).
where: In SFCC PMODE;
n
ranges from 0 through 6 to select the print mode/pitch
combinations available from Table 8. All other values result in an
error message. (Command Line Error Messages are listed in
Table 2 on page 27.)
where: In SFCC X
m
n
= Pitch (cpi)
An asterisk (*) (hex 2A) may be substituted for
the asterisk replaces
Values other than those shown in Table 10 and Table 11 are
ignored.
where: In SFCC[
n
= Print Mode/Pitch code (values other than those shown in
Table 9 are ignored.)
mn
mn
mn
SFCC [nqSFCCPMODE;
SFCC 5Bn71
SFCC 91n113
n
mn
= Print Mode code
n
q
morn.
morn
, its current value does not change.
n
Whenever
q = Command sequence terminator
NOTE: The print mode must be changed before the first printable symbol of a
print line or the command sequence is deferred until the next line.
Comment P-Series PMODE switches to the Primary Character Set and
selects print mode and pitch.
Print mode and pitch can also be selected from the control
panel. The print mode/pitch select control code from the host
computer overrides the control panel print mode setting and the
print mode and pitch selection are reflected on the message
display.
A complete set of tables identifying pitch and dot densities for all
print modes follows.
52
Page 53
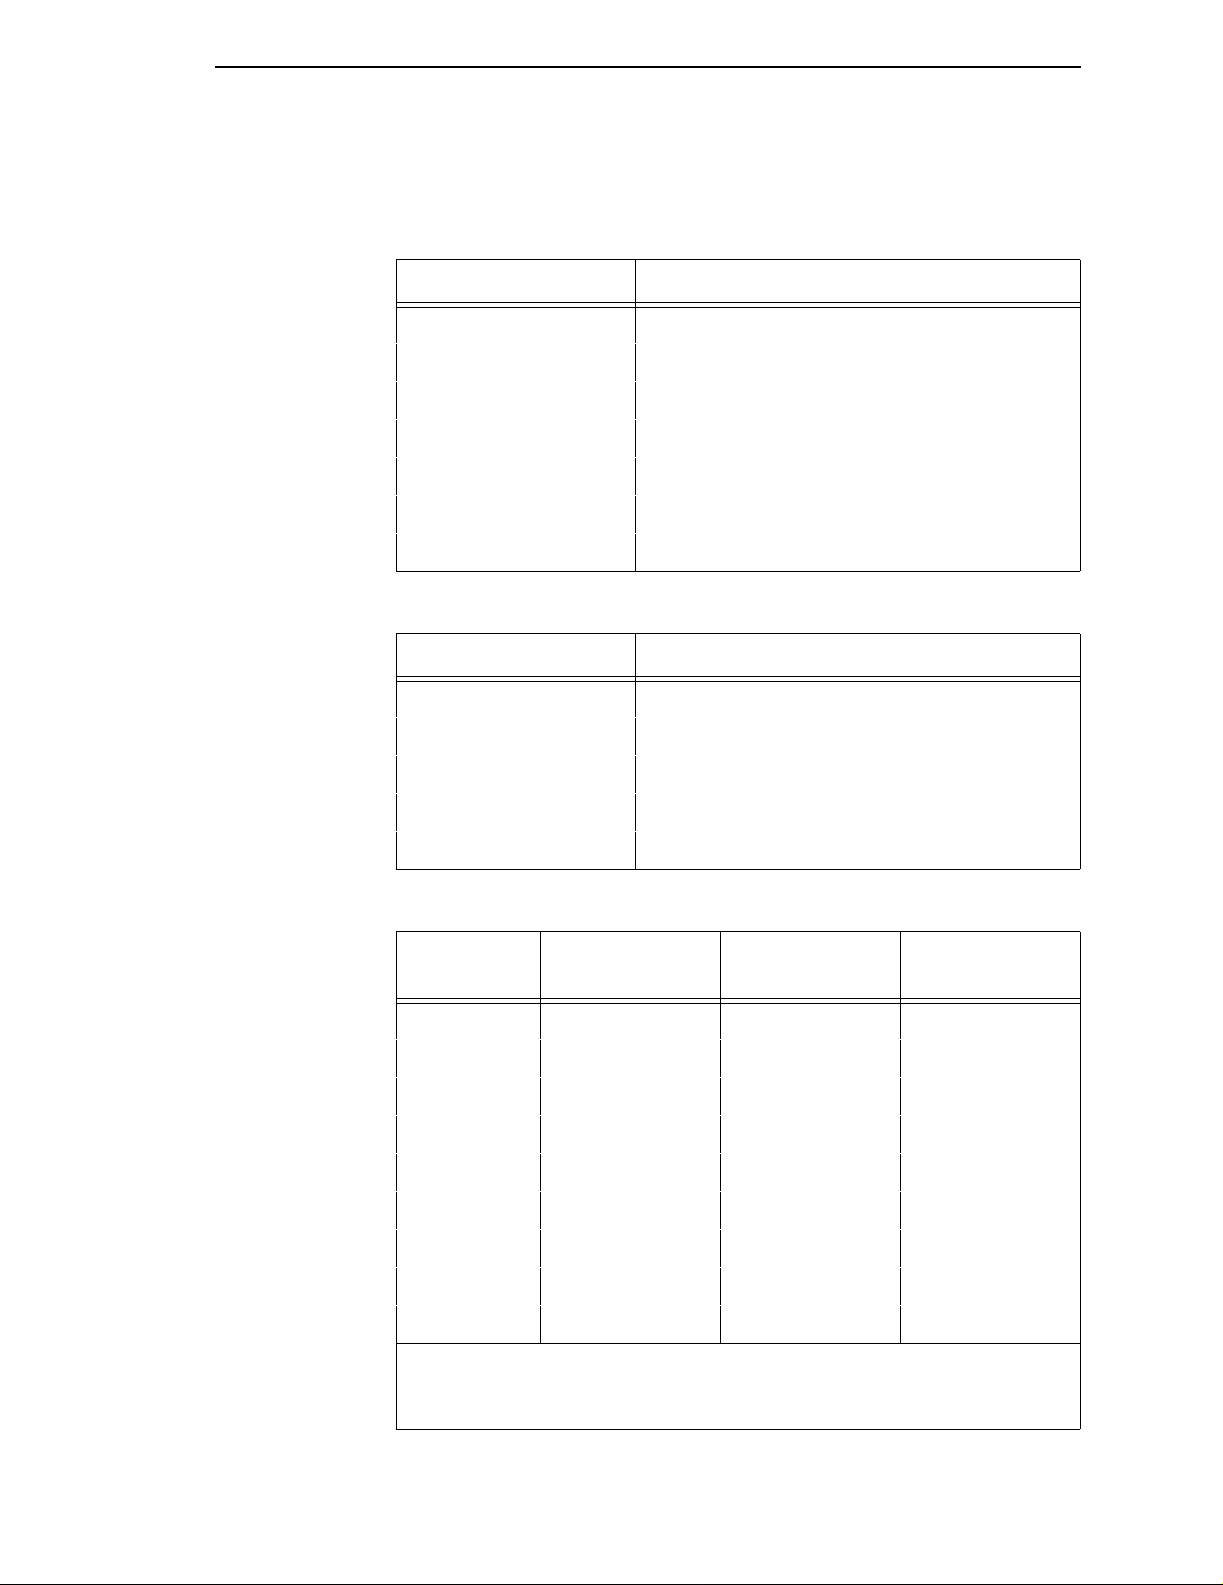
Print Mode/Pitch Selection
Table 8. Print Mode and Pitch (SFCC PMODE;n)
n
0 Letter Gothic 10 cpi
1 Letter Gothic 12 cpi
2 Letter Gothic 15 cpi
3 Courier 10 cpi
4 Letter Gothic 10 cpi
5 OCR-A 10 cpi
6 OCR-B 10 cpi
Table 9. Print Mode and Pitch (SFCC [
n
1 (hex 31) Courier 10 cpi
2 (hex 32) Letter Gothic 10 cpi
3 (hex 33) Letter Gothic 12 cpi
4 (hex 34) Letter Gothic 12 cpi
5 (hex 35) Letter Gothic 13 cpi
Print Mode and Pitch
Print Mode and Pitch
n
q)
mn
Table 10. Horizontal and Vertical Dot Density (SFCC X
m
(Hex*)
0(30)
1(31)
2(32)
3(33)
4(34)
5(35)
6(36)
7(37)
8(38)
*The hex values shown (i.e., 0 and 30) are equal. Either value can be used
in your program expression. The density (dpi) remains the same under this
setting.
x
andyrepresentthe resolutions of the particular printer.
Horiz. Density
Resolution
x
dpi
x
dpi
x
dpi
x
dpi
x
dpi
x
dpi
x
dpi
x
dpi
x
dpi
Vertical Density Print Mode
y
dpi Letter Gothic
y
dpi Courier
y
dpi Letter Gothic
y
dpi Letter Gothic
y
dpi Letter Gothic
y
dpi OCR-A
y
dpi OCR-B
y
dpi Letter Gothic
y
dpi Letter Gothic
)
53
Page 54

Chapter 2 Configuring the P-Series Emulation with Control Codes
Table 11. Print Mode and Character Pitches (SFCC X
Characters Per Inch
value of
Print Mode*
0(30) 1010 10101010101010
1(31) 1212121212––––
2(32) 1313131313––––
3(33) 1515151515––––
4(34) 1717171717––––
5(35) 2017202020––––
*The hex values shown (i.e., 0 and 30) are equal. Either value can be used in your program expression. The
value of
n
: value ofm:
Gothic
0(30)
m
is represented by the font choice line.
NOTE: When using the Multinational character set in OCR-A or OCR-B print
Courier
1 (31)
mode, a unique character set is used.
Gothic
2(32)
Gothic
3 (33)
Gothic
4 (34)
OCR-A
5 (35)
mn
)
OCR-B
6 (36)
Gothic
7 (37)
Gothic
8 (38)
Example The sample printout below shows a number of different print
modes and pitch selections.
54
Page 55

Superscript/S u bscr ipt Printing
Superscript/Subscript Printing
ASCII Code SFCC S
Hex Code SFCC 53
Dec Code SFCC 83
Purpose Selects superscript or subscript printing.
where:
Comment Superscript/Subscript font prints at one-half the normal vertical
n
= 0 to enable superscript printing (hex 00 or hex 30)
n
= 1 to enable subscript printing (hex 01 or hex 31)
character height and at twice the normal vertical density. When
the superscript/subscript control code is received, all characters
are superscript or subscript until reset by the superscript/
subscript reset control code or printer reset. Emphasized print is
ignored in the superscript/subscript print mode.
When the BS feature is enabled from the control panel, both
superscript and subscript characters can be printed in the same
character column using the Backspace (BS) control code (page
30).
Caution should be used when combining Superscript or
Subscript printing with other print attributes such as Elongated
(Double High), or small line spacing; overlapping lines may
occur. Characters with different horizontal or vertical dot
densities do not overlap.
n
n
n
Example The following sample illustrates superscript/subscript printing.
Superscript/S ubscr ipt Printing Reset
ASCII Code SFCC T
Hex Code SFCC 54
Dec Code SFCC 84
Purpose Resets superscript and subscript printing.
55
Page 56

Chapter 2 Configuring the P-Series Emulation with Control Codes
Super-Set Commands
ASCII Code SFCC |};
Hex Code SFCC 7C 7D 3B
Dec Code SFCC 124 125 59
Purpose Control code sequence used to introduce the super-set
commands.
Comment Super-set commands affect the ASCII Emulation as a whole
regardless of the printer protocol currently active. The
commands are sent from the host in the data stream to the
printer, and provide the following capabilities:
• Select a printer protocol
• Change the page orientation
• Define various font attributes, including typeface and
point size
• Select proportional fonts
See Chapter 7, “Super-Set Programming,” beginning on page
197 for further information on the Super-set commands.
Underline
ASCII Code SFCC –
Hex Code SFCC 2D
Dec Code SFCC 45
Purpose Enables or disables automatic underlining of all characters.
where:
Comment When automatic underline is enabled, all characters, including
Example The following sample illustrates automatic underlining.
n
n
spaces, are underlined until disabled.
n
n
n
= 0 to disable automatic underlining (hex 00 or hex 30)
= 1 to enable automatic underlining (hex 01 or hex 31)
56
Page 57

VFU Commands (P-Series)
VFU Commands (P-Series)
ASCII Code See the P-Series EVFU section in Chapter 9, “Vertical Page
Formatting” for codes.
NOTE: If the SFCC being used is ESC, the PI line must be set high when
using the EVFU.
Purpose Load and executethe VFU.
Comment See Chapter 9, “Vertical Page Formatting,” beginning on page
271 for detailed information.
Vertical Tab
ASCII Code VT
Hex Code 0B
Dec Code 11
Purpose Prints the data in the buffer and advances the paper to the next
vertical tab position.
Comment If a vertical tab format is defined in the EVFU (channel 12) and
the VFU is enabled, the paper is moved to the next vertical tab
position.
If a vertical tab format is not defined, the paper is advanced to
the next line at the current line spacing. More information on
vertical tabs is provided in the EVFU section of Chapter 9,
“Vertical Page Formatting.”
57
Page 58

Chapter 2 Configuring the P-Series Emulation with Control Codes
58
Page 59

3 P-Series XQ Printer
Introduction
Protocol
This chapter describes the P-Series XQ emulation host control codes.
“Emulation” refers to the ability of a printer to execute the commands of a
particular printer control language. A printer control language is the coding
system used to convey, manipulate, and print data. Carriage Return, print
quality, character attributes such as bold and underline, margins, and tabs are
typical functions selected by printer control language codes. In this manual,
the terms emulation, printer protocol, and printer control language are
synonymous.
The P-Series XQ emulation was devised for a series of Printronix printers
manufactured between 1974 and 1991, but no longer available. This
emulation enables your printer to emulate Printronix P300 and P600 printers
with A7/B10 boards. To select the P-Series XQ emulation mode as the active
printer emulation, select ASCII Emulation from the EMULATION menu and
P-Series XQ from the Printer Protocol menu, as described in the
Guide.
User's
The P-Series XQ emulation provides many configurable parameters. The
default parameter values for this emulation are shown in Table 12. You can
modify the emulation parameter values in two ways:
• The P-Series XQ host control codes. An extensive set of P-Series XQ
control code commands can be sent to the printer from an attached host
computer via the host data stream. Most of this chapter is devoted to
describing the P-Series XQ control codes.
• The printer configuration menus. You can modify a subset of the P-
Series XQ emulation parameters using the control panel keys and LCD,
as described in the
Control codes sent from a host system generally override previous settings
that result from the configuration menus.
NOTE: Configuration values selected from the menus or via host control
codes can be saved to the printer's NVRAM memory so that they will
not be lost when you power off the printer. The menu selection for
saving a configuration to memory is described in the
save the configuration using host control codes, refer to Appendix B,
“PTR_SETUP Option”.
User’s Guide.
User’sGuide.
To
59
Page 60

Chapter 3 Introduction
The emulation's response to several of the control codes depends on the
configuration. For example, upon receipt of the carriage return control code,
the emulation will either perform a carriage return function only, or a carriage
return and line feed, based on the configuration for the CR function.
P-Series XQ Default V alues and States
The factory settings for the P-Series XQ emulation menu options are shown in
Table 12. Table 12 also lists additional factory settings for parameters
provided by the ASCII Emulation formatting menus. (The EMULATION menu
options are described in the
many of the settings for these menu options
Select CPI 10.0 CPI
Select LPI 6.0 LPI
User’s Guide
Table 12. P-Series Default Settings
Characteristic Default Setting
). Host control codes can override
Typeface Letter Gothic
Horizontal DPI 120 DPI
Vertical DPI 72 DPI
Prop. Spacing Enable
Italic Print Disable
Slashed Zero Disable
Left Margin 0 characters
Right Margin 0 characters
Top Margin 0 linespaces
Bottom Margin 0 linespaces
Print Char. Set
Define CR code CR = CR
Auto LF Disable
Define LF code LF = CR + LF
*Advanced User:
60
Control Code 06 8.0 LPI
Compressed Print Char 01 SOH
Bold Disable
Elong/Alt. Font Elng=BS Font=SO
Page 61

P-Series XQ Default Values and States
Table 12. P-Series Default Settings
Characteristic Default Setting
Gothic Typeface Char02 STX
EVFU Select Enable
Upr. Case Select Disable
SlewRelative 1to15lines
Text Position Bottom of Line
Host Command Enable
Reset Cmd CFG Ld Disable
Form Length 06.0 inches
Form Length 152.4 mm
Form Length 36 lines
Form Width 08.5 inches
Form Width 216.0 mm
Form Width 85 characters
61
Page 62

Chapter 3 Configuring the XQ Emulation with Control Codes
Configuring the XQ Emulation with Control Codes
The remainder of this chapter describes the P-Series XQ printer control
language codes that may be sent from a host computer attached to the
printer, in order to configure and invoke numerous printer functions.
Format for Control Code Descriptions
The following information is listed for each code function (where applicable
and possible).
Name The title or function of the command.
ASCII Code The standard ASCII name for the control code.
Hex Code The code's numeric equivalent in hexadecimal.
Dec Code The code's numeric equivalent in decimal.
Purpose The function(s) of the control code.
Discussion A description of exceptions or limitations to normal use.
Example A sample is provided for some control codes when it is possible
to illustrate the effect of a control code, or if a specific syntax is
required to complete the program statement (i.e. Horizontal Tab
set, Vertical Tab set/clear).
IMPORTANT
If you specify any parameters for a c ontrol code other than the ones that
are defined in the control code description, unpredictable results may
occur.
62
Page 63

Edit Mode
Edit Mode
Any printable character in the data stream can replace printable characters or
spaces already loaded in the print buffer. The space character (hex 20) is
used to skip characters in the print buffer that are not to be replaced and,
similar to underlining or deleting, the new characters are inserted in the
appropriate positions. Table 13 illustrates the edit mode. Note that the editing
function replaces characters; it cannot be used to print the same character
twice (double strike) in the same location. Use the DEL code (hex 7F) to make
a character blank.
NOTE: In order for edit mode to work correctly, the protocol must be
configured for a carriage return only. If configured for a carriage
return and a line feed, the contents of the buffer are printed upon
receipt of the CR code, disabling the editing function.
Table 13. CR Edit Mode Example
EnterinPrintBuffer PrintedResult
Example 1
Example 2
Key: S = Space (hex 20);
AAABBBCCC
SSSSDSSSB
ABCDEF
______
LF = Line Feed (hex 0A);
CR = Carriage Return (hex 0D)
(CR)
(LF)
(CR)
(CR)
NUL Code
NUL (hex 00) is ignored by the printer and can be used as a fill character;
however, it can not be used to add blank spaces since it is not a space
character.
AAABDBCCB
ABCDEF
63
Page 64

Chapter 3 Configuring the XQ Emulation with Control Codes
Control Code Index
The following index lists the control codes by function and lists the ASCII
mnemonic and page number.
FUNCTION ASCII CODE PAGE
Paper Motion
Form Feed FF 69
Line Feed LF 70
Vertical Tab VT 74
Print Attributes
Plot, Even Dot EOT 71
Plot, Odd Dot ENQ 72
Underline _ 73
Page Format
Carriage Return CR 66
Channels 1 through 14 DLE through US 68
See NOTE below
Delete DEL 68
Line Spacing (8 or 10.3 lpi) ACK 70
Space SP 73
NOTE: Channel codes hex 10 through 1F are used when the PI line is
disabled. For the applicable PI enable channel codes, see Chapter 9,
“Vertical Page Formatting.”
Other Functions
Alternate Character Set Deselect
(Shift In) SI 65
Alternate Character Set Select
(Shift Out) SO, BS 65
See NOTE below
Compressed Print SOH, ETX, HT 67
See NOTE below
Elongated Characters BS, SO 69
See NOTE below
Select Letter Gothic (DP) STX, ETX, HT 72
NOTE: A code can be assigned by changing the configuration at the control
panel. For further details, refer to your
User's Guide.
64
Page 65

Alternate Character Set Deselect (Shift In)
Alternate Character Set Deselect (Shift In)
ASCII Code SI
Hex Code 0F
Dec Code 15
Purpose This code selects the primary character set.
Comment The alternate character set select and deselect codes can be
used to mix primary and alternate characters on a single line.
The main character set is also automatically selected when a
line terminator code is received.
Example
Alternate Character Set Select (Shift Out)
ASCII Code SO BS
Hex Code 0E 08
Dec Code 14 8
NOTE: An alternate hex code of 08 (ASCII code BS) can be assigned as the
Alternate Character Set Select control code through printer
configuration.
Purpose Accesses the extended character set in the range of hex A0
through FF using codes hex 20 through 7F.
Comment These codes are used in 7-bit systems as if data bit 8 was set to
1. For example, sending code hex 20 accesses the symbol at
code point hex A0. If a printable symbol is not available at the
code point, a space is printed.
Both commands are cancelled by a paper motion command.
Refer to the character set charts in Appendix D.
Example
65
Page 66

Chapter 3 Configuring the XQ Emulation with Control Codes
Carriage Return
ASCII Code CR
Hex Code 0D
Dec Code 13
Purpose Positions the logical print head at the left margin (resets the
memory pointer to the first character position).
Comment The printer can be configured to perform a carriage return only
(CR = CR only), or a carriage return plus a line feed function
(CR = CR + LF).
ACR= CR configuration enables underline, add, delete, and
edit functions, but the host computer must send a separate line
feed code to print the data and change the vertical position. The
character position indicator is positioned at character column
one. Subsequent printable data preceding a paper motion
command replace previous printable data (including underlines).
Two exceptions apply:
• Subsequent underlined characters (hex 5F) overlay the
previous data.
• Subsequent space characters (hex 20) only index the
character position indicator to the right.
This code can occur at any place in the datastream and is acted
upon immediately.
With CR = CR + LF, the underline, add, delete and edit
functions are disabled, and the code is processed as a line feed.
See the Line Feed command description on page 70 for more
information.
66
Page 67

Compressed Print
Compressed Print
ASCII Code SOH ETX HT
Hex Code 01 03 09
Dec Code 13 9
NOTE: Configure this feature from the control panel.
Purpose Selects compressed character printing.
Comment Use any of the three codes to select 17.1 cpi if you are
configuring the printer from the operator control panel.
Both ETX and HT also select the Letter Gothic (DP) font if the
printer is configured from the control panel (see page 72).
These commands can occur anywhere in the datastream and
are acted upon immediately, affecting the entire current print
line. Line spacing may be selected either through the control
panel or by line spacing control codes. The control code setting
overrides the control panel line spacing setting.
Example
67
Page 68

Chapter 3 Configuring the XQ Emulation with Control Codes
Delete
ASCII Code DEL
Hex Code 7F
Dec Code 127
Purpose Deleted character results in a blank space at the corresponding
character position.
Comment The Delete code deletes the corresponding character in the print
buffer. As shown in Table 14 below, the four delete control codes
are used to delete DATE from the print line.
NOTE: In order for this to work correctly, the printer must be configuredfor
carriage return only. If configured for a carriage return and a line feed,
the contents of the buffer are printed on receipt of the CR code.
Table 14. Delete Example
Enter in Print Buffer Printed Re sult
INVOICE DATE
SSSSSSSSDDDD
Key: S = Space (hex 20);
(CR)
(LF)
INVOICE
LF = Line Feed (hex 0A);
CR = Carriage Return (hex 0D)
D = Delete (hex 7F)
Electronic Vertical Format Unit (EVFU)
ASCII Code DLE through US
Hex Code 10 through 1F
Dec Code 16 through 31
NOTE: PI line is disabled in the above description. ASCII and corresponding
codes for EVFU functions differ when the PI line is enabled,
according to the printer interface being used.
Purpose Load and executethe EVFU.
Comment For detailed information, see Chapter 9, “Vertical Page
Formatting.”
68
Page 69

Elongated Characters (Double High Pri nt)
Elongated Characters (Double High Print)
ASCII Code BS SO
Hex Code 08 0E
Dec Code 814
NOTE: Configure this feature from the control panel.
Purpose Selects elongated (double high) character printing for one line.
Comment The Elongated Character control code can be placed anywhere
in the data line before the line terminator. Following the line
terminator, the printer automatically selects the default print
mode. Consequently, the Elongated Character control code
must be sent for each line of elongated characters. Elongated
characters cannot be mixed with standard characters on the
same print line.
The current line spacing is doubled for one line.
This code can occur anywhere in the datastream and is acted
upon immediately. It is cancelled by an SI code or a paper
motion command.
Example
Form Feed
ASCII Code FF
Hex Code 0C
Dec Code 12
Purpose Prints the data in the buffer, advances the paper position to the
next top-of-form and moves the logical printhead to the first
character column.
Comment The default forms length is determined by the configuration in
nonvolatile memory. Forms length is set by using the control
panel or VFU. Code FF cancels all single-line only print
attributes.
The Form Feed command reacts differently when the VFU is
active. (See Chapter 9, “Vertical Page Formatting.”)
69
Page 70

Chapter 3 Configuring the XQ Emulation with Control Codes
Line Feed
ASCII Code LF
Hex Code 0A
Dec Code 10
Purpose Prints the data in the buffer (if any) and advances the vertical
character position one line at the current line space setting.
Comment If configured for LF equals new line (LF=CR+LF), the logical
print head is positioned at character column 1 of the new line.
Otherwise, the logical print head does not move when
configured for LF function only (LF=LF ONLY). The LF function
cancels all single line print attributes such as double high
(elongated) and double wide (expanded) characters.
This code is always configured for LF=CR+LF in the P-Series
XQ protocol.
In the P-Series XQ Even Dot Plot mode (high density graphics),
the LF code does not cause paper position motion; the data in
the buffer is plotted and the logical print head is positioned at
character column 1 in anticipation of the Odd Dot Plot control
code to complete high density graphic plotting.
In the P-Series XQ Odd Dot Plot mode (normal density
graphics), the LF code plots the data in the buffer, advances the
paper position a single dot row at the current vertical dot density,
and positions the logical print head at character column 1.
Line Spacing (8 or 10.3 lpi)
ASCII Code ACK
Hex Code 06
Dec Code 6
Purpose Selects line spacing of 1/8 inch or 7/72 inch for current line only.
Comment The line spacing control code can be placed anywhere in the
data stream before the line terminator code; however, we
recommend that you place the line spacing code at the start or
end of the data line.
After the line is printed at the new line spacing, the default line
spacing is automatically reselected.
Example
70
Page 71

Plot, Even Dot (P-Series XQ High Density Graphics)
Plot, Even Dot (P-Series XQ High Density Graphics)
ASCII Code EOT
Hex Code 04
Dec Code 4
Purpose Selects even dot plot mode to print dots in even numbered dot
columns to produce high density plotting.
Comment The Even Dot Plot control code can occur anywhere in the data
line before the line terminator. It defines certain data between
the next and last paper motion commands as even dot plot data.
These data are plotted at 60 by 72 dots per inch.
When this mode is exited, the print mode and attributes last
selected remain active. A detailed description of plotting can be
found in Chapter 8, “Graphics.”
This command can occur anywhere in the datastream and is
acted upon immediately, affecting the entire current print line.
Example
71
Page 72

Chapter 3 Configuring the XQ Emulation with Control Codes
Plot, Odd Dot (P-Series XQ Normal Density Graphics
ASCII Code ENQ
Hex Code 05
Dec Code 5
Purpose Selects odd dot plot mode to print dots in odd numbered dot
columns for normal density plotting.
Comment The Odd Dot Plot control code can occur anywhere in the data
line before the line terminator. It defines certain data between
the next and last paper motion commands as odd dot plot data.
These data are plotted at 60 by 72 dots per inch.
When this mode is exited, the print mode and attributes last
selected remain active. A detailed description of plotting can be
found in Chapter 8, “Graphics.”
This command can occur anywhere in the datastream and is
acted upon immediately, affecting the entire current print line.
Example
Select Letter Gothic (DP)
ASCII Code STX ETX HT
Hex Code 02 03 09
Dec Code 23 9
Purpose Selects Letter Gothic (DP) print mode.
NOTE: Configure this feature using the control panel.
Comment Any of the three codes select Letter Gothic (DP) print mode.
Both ETX and HT also select 17.1 cpi if you configure the printer
from the control panel (see page 67).
These commands can occur anywhere in the datastream and
are acted upon immediately, affecting the entire current print
line.
72
Example
Page 73

Space
Space
ASCII Code SP
Hex Code 20
Dec Code 32
Purpose Produces a blank space; no character is printed.
Comment It is not necessary to pad the end of the print line with space
characters. The printer automatically fills the line after the line
terminator is received.
The Space character code is also used to skip characters for
editing and underlining as described on page 63.
Underline
ASCII Code Underline key ( _ )
Hex Code 5F
Dec Code 95
Purpose Underlines specified character positions.
Comment To underline characters, the print buffer is first loaded with the
characterline;thenthelinemustbeterminatedwithaCarriage
Return code. Spaces are then loaded in the buffer at positions
not to be underlined and the underline code inserted in the
specific positions to be underlined. Table 15 illustrates
underlining.
Table 15. Underline Example
Enter in Print Buffer Printed Re sult
THE 600 PRINTER
SSSS___
Key: S = Space (hex 20);
(LF)
(CR)
THE 600 PRINTER
LF = Line Feed (hex 0A);
CR = Carriage Return (hex 0D)
_= Underline (hex 5F)
73
Page 74

Chapter 3 Configuring the XQ Emulation with Control Codes
Vertical Tab
ASCII Code VT
Hex Code 0B
Dec Code 11
Purpose Acts as a line terminator when the EVFU is loaded, causing the
paper to advance to a specified preprogrammed line.
Comment Vertical Tab is primarily an EVFU line terminator code as
described in Chapter 9, “Vertical Page Formatting”. If the EVFU
is not loaded and Vertical Tab control code is used, a single line
feed results.
74
Page 75

4 Serial Matrix Printer
Introduction
Protocol
This chapter describes the Serial Matrix emulation host control codes.
“Emulation” refers to the ability of a printer to execute the commands of a
particular printer control language. A printer control language is the coding
system used to convey, manipulate, and print data. Carriage Return, print
quality, character attributes such as bold and underline, margins, and tabs are
typical functions selected by printer control language codes. In this manual,
the terms emulation, printer protocol, and printer control language are
synonymous.
The SerialMatrix emulationis very similar to the code system used by an IBM
Graphics Printer, but contains more features. This emulation enables your
line matrix printer to print files coded for a serial matrix printer. To select the
Serial Matrix emulation mode as the active printer emulation, select ASCII
Emulation from the EMULATION menu and Serial Matrix from the Printer
Protocol menu, as described in the
User's Guide.
The Serial Matrix emulation provides many configurable parameters. The
default parameter values for this emulation are shown in Table 16. You can
modify the emulation parameter values in two ways:
• The Serial Matrix host control codes. An extensive set of Serial Matrix
control code commands can be sent to the printer from an attached host
computer via the host data stream. Most of this chapter is devoted to
describing the Serial Matrix control codes.
• The printer configuration menus. You can modify a subset of the Serial
Matrix emulation parameters using the control panel keys and LCD
display, as described in the
Control codes sent from a host system generally override previous settings
that result from the configuration menus.
NOTE: Configuration values selected from the menus or via host control
codes can be saved to the printer's NVRAM memory so that they will
not be lost when you power off the printer or reset it to the factory
default configuration. The menu selection for saving a configuration to
memory is described in the
using host control codes, refer to Appendix B, “PTR_SETUP Option”.
User's Guide.
User's Guide.
To save the configuration
75
Page 76

Chapter 4 Introduction
Serial Matrix Default Values and States
The factory settings for the Serial Matrix emulation menu options are shown in
Table 16. Table 17 lists additional factory settings for parameters provided by
the ASCII Emulation formatting menus. (The EMULATION menu options are
described in the
settings for these menu options.
Control Code 06 8.0 LPI
Define CR Code CR = CR
Auto LF Enable
Overstrike Enable
Define LF Code LF = LF
User's Guide
Table 16. Serial Matrix Default Settings
Characteristic Default Setting
). Host control codes can override many of the
Printer Select Disable
Alternate Set 80-9F Control Code
Character Sets
Primary Subset
Extended Subset
IBM PC
ASCII (USA)
Code Page 437
76
Page 77

Serial Matrix Default Values and States
Table 17. ASCII Emulation Menu Option Factory Settings
Characteristic Default Setting
Orientation Portrait
CPI 10.0
LPI 6.0
Typeface Letter Gothic
Proportional Spacing Disable
Bold Print Disable
Italic Print Disable
Slashed Zero Disable
Text Position Top of Line
Horizontal DPI 120 DPI
Vertical DPI 72 DPI
Logical Form
Left Margin
Right Margin
Top Margin
Bottom Margin
Physical Page
Left Margin
Right Margin
Top Margin
Bottom Margin
Perfor ation Skip Disable
Form Length
Absolute Length
Funct. of LPI
Form Width
Absolute Width
Funct. of CPI
Host Command Enabled
0 characters
0 characters
0 linespaces
0 linespaces
0 inches
0 inches
0 inches
0 inches
6.0 inches
36 lines
4.1 inches
41 characters
77
Page 78

Chapter 4 Configuring the Serial Matrix Emulation with Control Codes
Configuring the Serial Matrix Emulation with Control Codes
The remainder of this chapter describes the Serial Matrix printer control
language codes that may be sent from a host computer attached to the
printer, in order to configure and invoke numerous printer functions.
Format for Control Code Descriptions
The following information is listed for each code function (where applicable
and possible).
Name The title or function of the command.
ASCII Code The standard ASCII name for the control code.
Hex Code The code's numeric equivalent in hexadecimal.
Dec Code The code's numeric equivalent in decimal.
Purpose The function(s) of the control code.
Discussion A description of exceptions or limitations to normal use.
Example A sample is provided for some control codes when it is possible
to illustrate the effect of a control code, or if a specific syntax is
required to complete the program statement (i.e. Horizontal Tab
set, Vertical Tab set/clear).
IMPORTANT
If you specify any parameters for a c ontrol code other than the ones that
are defined in the control code description, unpredictable results may
occur.
Escape Contr ol Code Header
Serial Matrix codes use only ESC as the control code header. For example, to
enable bold print in the Serial Matrix printer protocol, use the Serial Matrix
ESC and the bold print control code character G as follows:
Ascii: ESC G Hex: 1B 47 Dec: 27 71
Attribute Set and Reset Codes
Certain print attributes are set or reset (turned on or off) by using the
appropriate ESC code sequence and the numbers 1 or 0. These may be
either the hexadecimal code 01 and 00, or the ASCII code for the printable
symbols of decimal 1 and 0 (hexadecimal code 31 and 30, respectively).
Expanded Print, Superscript/Subscript Print, and Underline are attributes
which are set and reset in this fashion.
78
Page 79

Control Code Index
Control Code Index
This index lists each printer command by function, ASCII mnemonic, and the
page where the command is explained in detail. The rest of this chapter
defines the control code functions for Serial Matrix Emulation mode. The
commands are listed in alphabetical order.
FUNCTION ASCII CODE PAGE
Paper Motion
Form Feed FF 97
Line Feed LF 100
Line Feed
Vertical Tab VT 110
Page Format
Backspace BS 80
Cancel CAN 84
Carriage Return CR 85
Delete DEL 92
Forms Length Set (Inches) ESC C NUL
Forms Length Set (Lines) ESC C
Form Margins, Set ESC v 98
Horizontal Tab HT 99
Horizontal Tab Set ESC D
Line Spacing 1/6 Inch (6 lpi) ESC 2 101
Line Spacing 1/8 Inch (8 lpi) ESC 0 101
Line Spacing 7/72 Inch ESC 1 102
Line Spacing
by ESC 2) ESC A
Line Spacing
Skip-Over Perfor ation ESC N
Skip-Over Perforation Cancel ESC O 108
Vertical Tab, Set/Clear ESC B
n
/216 Inch (1 line only) ESC J
n
/72 Inch (as executed
n
/216 Inch ESC 3
n
n
n
n1 ... nk
NUL 99
n
n
n
n1 n2 n3 ... nk
100
97
98
102
103
107
NUL 111
Print Attributes
Bold Print ESC G 83
Bold Print Reset ESC H 84
Character Pitch 10 cpi ESC P 85
Character Pitch 12 cpi ESC M 86
Condensed Print SI 91
ESC SI
Condensed Print Reset DC2 91
ESC :
Elongated (Double High) Print (1 line)ESC h 92
Elongated (Double High) Print,
Set/Reset ESC w
Emphasized Print ESC E 93
Emphasized Print Reset ESC F 94
Expanded (Double Wide) Print ESC W
Expanded (Double Wide) Print
(One Line Only) SO 95
ESC SO
n
n
93
95
79
Page 80

Chapter 4 Configuring the Serial Matrix Emulation with Control Codes
FUNCTION ASCII CODE PAGE
Print Attributes (Continued)
Overscoring ESC _
Print Mode/Pitch Selection ESC X
ESC [
Superscript/Subscript Printing ESC S
Superscript/Subscript Printing Reset ESC T 108
Underline ESC –
Graphics
Bit Image Mode, Single Density ESC K
Bit Image Mode, Double Density ESC L
Bit Image Mode, Double Density
Double Speed ESC Y
Bit Image Mode, Quadruple Density ESC Z
Other Functions
Bell BEL 81
Character Set Select ESC l
Characters 80-9F (Control Codes) ESC 7 88
Characters 80-9F (Printable Symbols)ESC 6 89
Characters 80-9F (Printable Symbols)ESC u 89
Character Set Select: International
Languages ESC R
Emulation Reset ESC @ 94
Extended Character Set ESC 4 96
Extended Character Set Cancel ESC 5 96
Printer Select DC1 107
Printer Deselect DC3 107
Super-Set Commands ESC |};109
n
mn
n
q
n
n
n1 n2
n1 n2
n1 n2
n1 n2
xyz
n
103
104
108
109
81
82
82
83
86
90
80
Backspace
ASCII Code BS
Hex Code 08
Dec Code 8
Purpose Moves the logical print head to the left one character space
toward the first character column.
Comment Moves the character position indicator one character space to
the left at the current character pitch setting. The code is ignored
if the logical print head is positioned at the first character column.
Example If you were to print five “T” characters, then two BS commands,
then two “=” characters, the output would look like the sample
below.
Page 81

Bell
ASCII Code BEL
Hex Code 07
Dec Code 7
Purpose Sounds the printer's buzzer/beeper.
Comment The BEL function sounds the buzzer/beeper for 0.2 seconds
upon receipt of this command.
Bit Image Mode, Single Density
Bell
ASCII Code ESC K
Hex Code 1B 4B
Dec Code 27 75
Purpose Selects Single (Normal) Density Bit Image graphics.
where: (
DATA = ASCII characters for the dot pattern bytes.
The DATA can be expressed in a format with the appropriate
decimal values of the ASCII characters supplied especially in
cases where the dot patterns of nonprintable characters are
required.
Comment For detailed information, see the Bit Image section in Chapter 8.
Example The following example produces a pattern of Single Density Bit
Image graphics. The 9 data bit pattern is repeated 27 times.
Compare this example to the double density and quadruple
density examples.
n1 n2
n1 n2
n1 n2
n1
+ 256n2) define the number of data bytes to follow.
81
Page 82

Chapter 4 Configuring the Serial Matrix Emulation with Control Codes
Bit Image Mode, Double Density
ASCII Code ESC L
Hex Code 1B 4C
Dec Code 27 76
Purpose Selects Double Density Bit Image graphics.
where: (
DATA = ASCII characters for the dot pattern bytes.
NOTE: The DATA can be expressed in a format with the appropriate decimal
valuesof the ASCII characterssupplied especiallyin cases where the
dot patterns of nonprintable characters are required.
Comment For detailed information, see the Bit Image section in Chapter 8.
Example The following example produces Double Density Bit Image
graphics of the pattern used in the Single Density Bit Image
Mode example. Note that the amount of data must be doubled
for double density (the data is used 54 times rather than 27).
n1 n2
n1 n2
n1 n2
n1
+ 256n2) define the number of data bytes to follow.
Bit Image Mode, Double Density Double Speed
ASCII Code ESC Y
Hex Code 1B 59
Dec Code 27 89
Purpose Selects Double Density, Double Speed Bit Image graphics.
where: (
DATA = ASCII characters for the dot pattern bytes.
NOTE: The DATA can be expressed in a format with the appropriate decimal
valuesof the ASCII characterssupplied especiallyin cases where the
dot patterns of nonprintable characters are required.
Comment For detailed information, see the Bit Image section in Chapter 8.
Example The following example produces Double Density Double Speed
Bit Image graphics of the pattern used in the Single Density Bit
Image Mode example. Note that the amount of data must be
doubled for double density (the data is used 54 times rather than
27).
n1 n2
n1 n2
n1 n2
n1
+ 256n2) define the number of data bytes to follow.
82
Page 83

Bit Image Mode, Quadruple Density
Bit Image Mode, Quadruple Density
ASCII Code ESC Z
Hex Code 1B 5A
Dec Code 27 90
Purpose Selects Quadruple Density Bit Image graphics.
where: (
DATA = ASCII characters for the dot pattern bytes.
NOTE: The DATA can be expressed in a format with the appropriate decimal
valuesof the ASCII characterssupplied especiallyin cases where the
dot patterns of nonprintable characters are required.
Comment For detailed information, see the Bit Image section in Chapter 8.
The printed density in this mode is 120 dpi horizontal and 72 dpi
vertical if selected when Letter Gothic print mode is active.
Example The following example produces quadruple density graphics of
the pattern used in the Single Density Bit Image Mode example.
Note that the amount of data must be quadrupled for quadruple
density (the data is used 108 times rather than 27).
n1 n2
n1 n2
n1 n2
n1
+ 256n2) define the number of data bytes to follow.
Bold Print Set
ASCII Code ESC G
Hex Code 1B 47
Dec Code 27 71
Purpose Selects bold character printing.
Comment When the bold character printing control code is received, all
characters are printed in bold until reset by the bold print reset
control code or printer reset. Bold Print is the same as printing
double strike.
Example The following sample illustrates bold character printing.
83
Page 84

Chapter 4 Configuring the Serial Matrix Emulation with Control Codes
Bold Print Reset
ASCII Code ESC H
Hex Code 1B 48
Dec Code 27 72
Purpose Resets bold character printing.
Comment The bold print reset control code only resets the bold print
character attribute. Other print attributes such as double wide
printing are not affected.
Example Refer to the Bold Print control code for a sample of bold
character print set and reset.
Cancel
ASCII Code CAN
Hex Code 18
Dec Code 24
Purpose Clears the print buffer of all printable symbols since the last
paper motion command was received.
Comment This control code may be used as a delete line function but
should be used with extreme care to avoid possible misprinting.
This control code cancels the double wide attribute set by SO if
active. No other print attributes are affected.
84
Page 85

Carriage Return
Carriage Return
ASCII Code CR
Hex Code 0D
Dec Code 13
Purpose Returns the logical print head to the first character column
(resets the pointer to the first character position).
Comment The CR code may or may not cause printing or paper motion,
depending on the DEFINE CR CODE configuration parameter
value. If the DEFINE CR CODE submenu displays:
Define CR Code
CR = CR*
the characters following the CR are printed over the previous
characters on the line. If identical characters are placed in the
same position on the line, those characters are printed in bold
(double strike) print when the Overstrike Mode is enabled from
the control panel.
If the DEFINE CR CODE submenu displays:
Define CR Code
CR = CR+LF*
control code CR is converted to perform a carriagereturn and
line feed function.
The CR code in Serial Matrix printer protocol cancels expanded
(double wide) print when set by code SO and ESC SO (single
line printing attribute).
Character Pitch 10 cpi
ASCII Code ESC P
Hex Code 1B 50
Dec Code 27 80
Purpose Sets character pitch to 10 cpi.
Comment Control Code ESC X can also be used to select a character pitch
of 10 cpi. See “Print Mode/Pitch Selection” on page 104.
85
Page 86

Chapter 4 Configuring the Serial Matrix Emulation with Control Codes
Character Pitch 12 cpi
ASCII Code ESC M ESC :
Hex Code 1B 4D 1B 3A
Dec Code 27 77 27 58
Purpose Sets character pitch to 12 cpi.
Comment Control Code ESC X can also be used to select a character pitch
of 12 cpi. See “Print Mode/Pitch Selection” on page 104.
Character Set Select
ASCII Code ESC l
Hex Code 1B 6C
Dec Code 27 108
Purpose Selects the character set, extended character set, and the
where:
0 (hex 30) IBM PC
1 (hex 31) Multinational
2 (hex 32) ECMA Latin 1
3 (hex 33) DEC Multinational
xyz
(lowercase L)
xyz
xyz
international language for a specific character set.
x
is the character set (Table 18);
y
is the international language for the selected character set
(Table 19);
z
is the extended character set for the selected character set
(Table 20);
x
Table 18. Character Set Select (
x
Character Set
)
86
Page 87

Table 19. International Language Select (y)
Character Set Select
= 0(hex30)
x
x
= 1(hex31)
x
= 2(hex32)
x
= 3(hex33)
y
IBM PC Multinational ECMA Latin 1 DEC Multinational
0 (hex 30) ASCII (USA) ASCII (USA) ASCII (USA) ASCII (USA)
1 (hex 31) French EBCDIC German French
2 (hex 32) German Swedish German
3 (hex 33) English (UK) Danish English (UK)
4 (hex 34) Danish Norwegian Norwegian/Danish
5 (hex 35) Swedish Finnish Swedish
6 (hex 36) Italian English (UK) Italian
7 (hex 37) Spanish Dutch Spanish
8 (hex 38) Japanese French Japanese
9 (hex 39) French Canadian Spanish French Canadian
10 (hex 3A) Latin American Italian Dutch
11 (hex 3B) Norwegian Turkish Finnish
12 (hex 3C) Danish-II Japanese Swiss
13 (hex 3D) Spanish-II
14 (hex 3E) Latin American-II
x
= 0 (hex 30)
T able 20. Extended Character Set Select (
x
= 1(hex31)
x
= 2(hex32)
z
)
x
= 3(hex33)
z
IBM PC Multinational ECMA Latin 1 DEC Multinational
0 (hex 30) IBM PC (0437) Mult. Extended Set Barcode 10 cpi DEC Mult. Ext. Set
1 (hex 31) IBM PC (0850) Mult. DP 10 cpi
2 (hex 32) Mult. DP 12 cpi
3 (hex 33) Mult. NLQ 10 cpi
4 (hex 34) Greek DP 10 cpi
5 (hex 35) Greek DP 12 cpi
6 (hex 36) Greek NLQ 10 cpi
7 (hex 37) Graphics DP 10 cpi
8 (hex 38) Graphics NLQ 10 cpi
9 (hex 39) Scientific DP 10 cpi
10 (hex 3A) Scientific DP 12 cpi
11 (hex 3B) Scientific NLQ 10 cpi
12 (hex 3C) Multinational (at Primary set mode and pitch)
87
Page 88

Chapter 4 Configuring the Serial Matrix Emulation with Control Codes
Comment An asterisk character (*) (hex 2A) may be substituted for the
numeric values of
selected for
selected for
language and/or extended character set for the selected
character set are used.
The character set, international language and extended
character set can also be selected from the printer control panel.
The control code setting overrides the control panel selection.
Except for the asterisk value discussed above, values other than
those shown in the tables results in the control sequence being
terminated.
x,y
,orz. If the asterisk (*) is the value
x
, the character set does not change. If * is the value
yorz
, the previously selected international
Characters 80-9F (Control Codes)
ASCII Code ESC 7
Hex Code 1B 37
Dec Code 27 55
Purpose Selects the character set wherein hex codes 80 through 9F are
control codes. Also includes hex codes 03 through 06 and 15 in
the Serial Matrix printer protocol. Cancels Character Set Select
activated by ESC 6 or ESC u.
Comment This feature is also selectable from the control panel (see the
“Alternate Set 80-9F” parameter in the configuration chapter of
your
User’s Guide
).
88
Page 89

Characters 80-9F (Printable Symbols)
Characters 80-9F (Printable Symbols)
ASCII Code ESC 6
Hex Code 1B 36
Dec Code 27 54
Purpose Selects the character set wherein hex codes 80 through 9F are
printable symbols. Also includes hex codes 03 through 06 and
15 in the Serial Matrix printer protocol. Cancels Character Set
Select activated by ESC 7 or ESC u.
Comment This feature is also selectable from the control panel (see the
“Alternate Set 80-9F” parameter in the configuration chapter of
your
User’s Guide
).
Characters 80-9F (Printable Symbols)
ASCII Code ESC u
Hex Code 1B 75
Dec Code 27 117
Purpose Selects the character set wherein hex codes 80 through 9F are
printable symbols. Hex codes 03 through 06 and 15 are treated
like control codes. Cancels Character Set Select activated by
ESC6orESC7.
89
Page 90

Chapter 4 Configuring the Serial Matrix Emulation with Control Codes
Character Set Select: International Languages
ASCII Code ESC R
Hex Code 1B 52
Dec Code 27 82
Purpose Specifies the international language set identified bynin the
basic character set selected from the control panel (ECMA-94
Latin 1, IBM PC, Multinational, and DEC Multinational).
where:
n
Table 21. International Character Sets
n
ESC R
(hex)
0 (30) ASCII(USA) ASCII (USA) ASCII (USA) ASCII (USA)
1 (31) German French EBCDIC French
2 (32) Swedish German German
3 (33) Danish English (UK) English (UK)
4 (34) Norwegian Danish Norw./Danish
5 (35) Finnish Swedish Swedish
6 (36) English (UK) Italian Italian
7 (37) Dutch Spanish Spanish
8 (38) French Japanese Japanese
9 (39) Spanish French Canadian French Canadian
0A (3A) Italian Latin American Dutch
0B (3B) Turkish Danish-II Finnish
0C (3C) Japanese Spanish-II Swiss
0D (3D) Latin American-II
0E (3E)
0F (3F)
10 (40)
11 (41)
12 (42)
13 (43)
14 (44)
15 (45)
ECMA Latin 1
n
n
n
corresponds to the language as shown in Table 21 below.
Character Set Selected
IBM PC (0437 or
0850)
(currently undefined)
Multinational
DEC
Multinational
90
Comment The international character set can also be selected from the
control panel. The control code setting overrides the control
panel character set selection. Values other than those selectable
from Table 21 are ignored.
Page 91

Condensed Print
Example The following example illustrates international character
selection using the IBM PC character set.
Condensed Print
ASCII Code SI ESC SI
Hex Code 0F 1B 0F
Dec Code 15 27 15
Purpose Selects 17 characters per inch (cpi) condensed print format.
Comment Condensed print can also be selected using control code ESC X.
See “Print Mode/Pitch Selection” on page 104.
The Serial Matrix condensed print control code SI affects all
subsequent characters. After receiving code SI, all characters
are printed in condensed print until reset by ESC M, ESC P, the
condensed print reset control code DC2, printer reset, or a new
print mode control code. The Serial Matrix SI code (hex 0F) is
equivalent to the ESC SI code. If condensed print is not allowed
in the current print mode, the code is ignored.
Example The following sample illustrates condensed character printing
and reset.
Condensed Print Reset
ASCII Code DC2
Hex Code 12
Dec Code 18
Purpose Resets condensed character printing to 10 cpi.
Comment The condensed print reset control code selects 10 cpi character
pitch. Other print attributes are not affected.
Other control code sequences which cancel condensed print are
ESC M, ESC P, ESC @, or a new print mode control code.
91
Page 92

Chapter 4 Configuring the Serial Matrix Emulation with Control Codes
Delete
ASCII Code DEL
Hex Code 7F
Dec Code 127
Purpose Deletes the previously received character on a line.
Comment Characters that have been truncated due to line length
restrictions are not affected by this code.
Elongated (Double High) Print (One Line Only)
ASCII Code ESC h
Hex Code 1B 68
Dec Code 27 104
Purpose Selects elongated (double high) character printing for one line
only. Elongated characters are approximately double height but
standard width.
Comment The elongated character control code is a line-by-line print
attribute; when the control code is received, one entire line of
elongated characters is printed and then automatically reset.
When using this feature with relative line slewing, the paper
position is moved
“Vertical Page Formatting,” for more information on relative line
slewing.When using small line spacing and the lines overlap,an
unexpected print format may result.
Example The following sample illustrates elongated character printing.
n
+ 1 lines rather thannlines. See Chapter 9,
92
Page 93
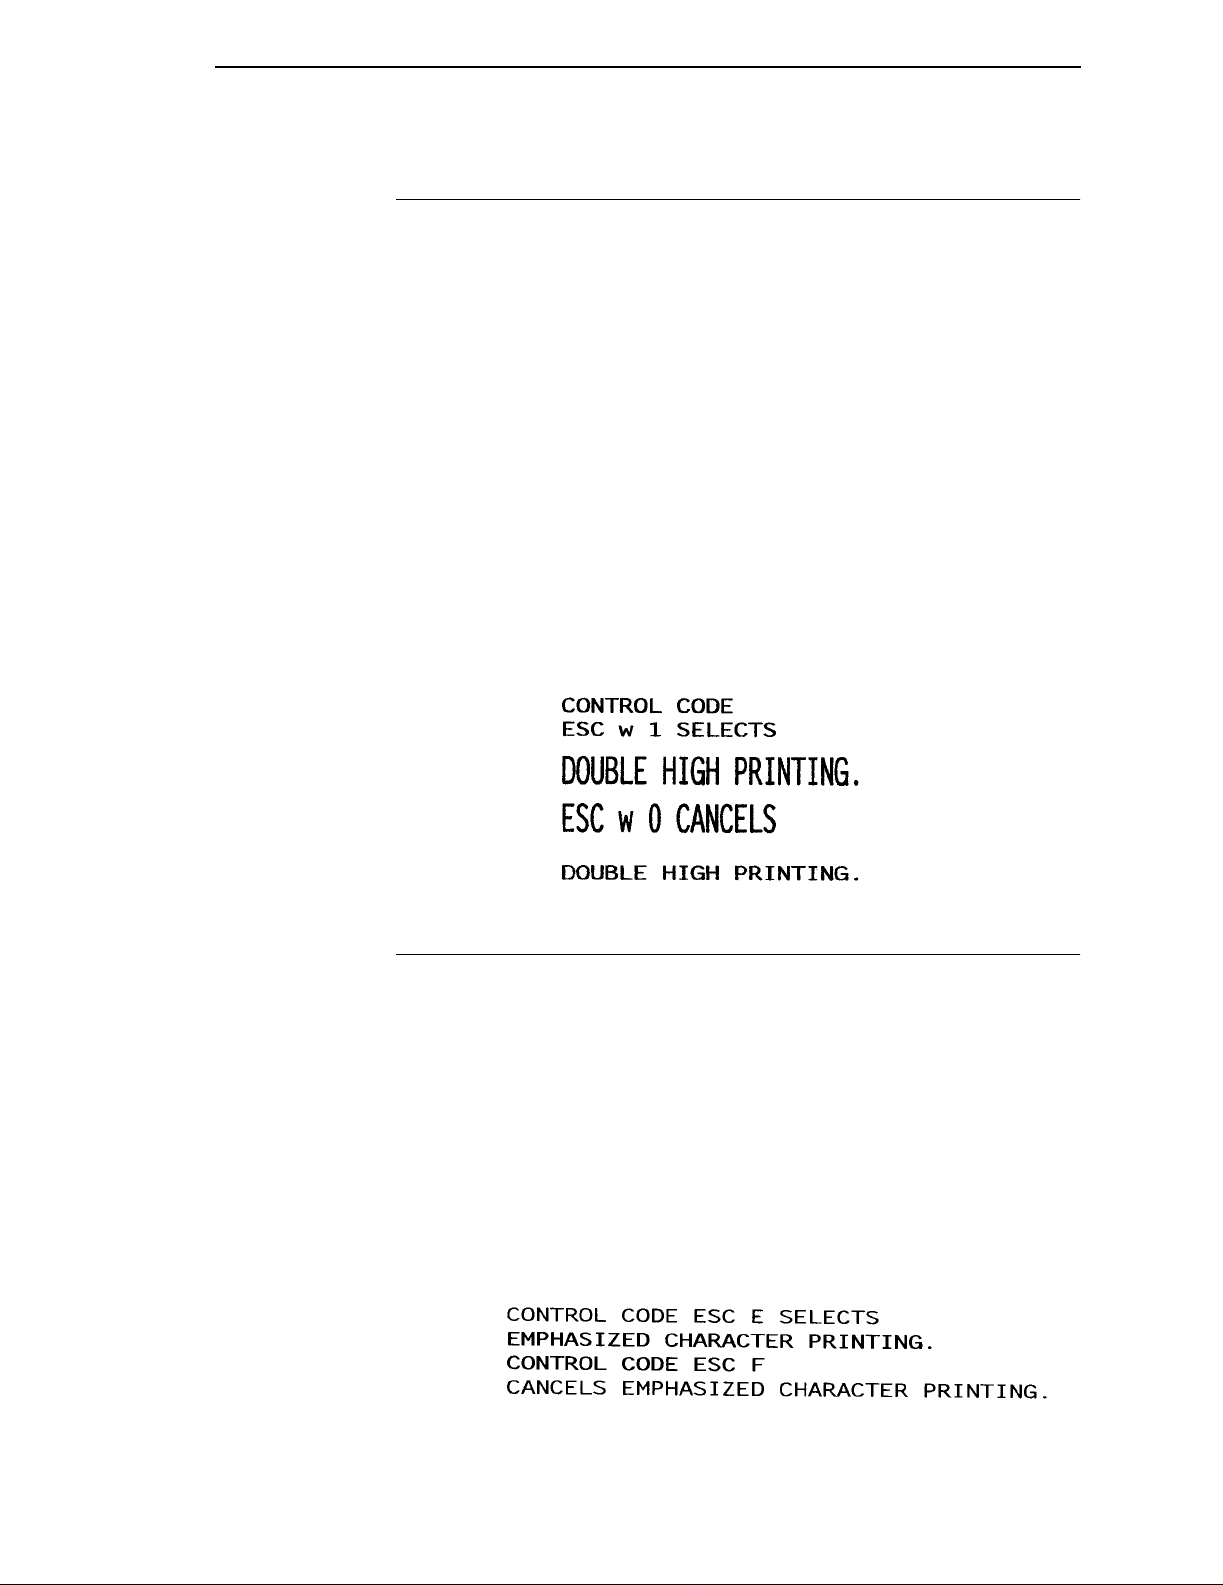
Elongated (Double High) Print, Set/Reset
Elongated (Double High) Print, Set/Reset
ASCII Code ESC w
Hex Code 1B 77
Dec Code 27 119
Purpose Turns double-high character printing on and off. Double-high
characters are standard width but twice as high.
where:
Comment The OCR A and OCR B fonts cannot be printed in double high.
NOTE: It is recommended to use double Line Feeds and Carriage Returns
Example The following sample illustrates double-high character printing.
n
n
when double-high character printing is on (after an ESC w control
code has been sent), or else the printer overstrikes text that has
already printed.
If Superscript/Subscript (ESC S) or Condensed Print (SI) is
combined with Double High printing,
occurs.
n
n
n
= hex 1 or hex 31 turns double high printing on
= hex 0 or hex 30 turns double high printing off
only
Double High printing
Emphasized Print
ASCII Code ESC E
Hex Code 1B 45
Dec Code 27 69
Purpose Selects emphasized character print format.
Comment When the emphasized print control code is received, all
characters are printed in emphasized print until reset by the
emphasized print reset control code or printer reset.
Emphasized print is ignored during superscript or subscript
printing, and when 15-20 cpi characters have been selected.
Example The following sample illustrates emphasized character printing.
93
Page 94

Chapter 4 Configuring the Serial Matrix Emulation with Control Codes
Emphasized Print Reset
ASCII Code ESC F
Hex Code 1B 46
Dec Code 27 70
Purpose Resets emphasized character printing.
Comment The emphasized print reset control code only resets the
emphasized print character attribute.
Example See the Emphasized Print example.
Emulation Reset
ASCII Code ESC @
Hex Code 1B 40
Dec Code 27 64
Purpose Initializes all print mode related parameters to their power-up
configuration.
Comment Print mode, line spacing, international language selection,
margins, form length, skip-over perforation, and character pitch
are reset to their power-up configuration. Character-by-character
and line-by-line attributes are canceled. The vertical format unit
is cleared. The current line is set to the top-of-form position.
Interface parameters and printer protocol selection are not
affected.
This command resets the horizontal tabs to every eighth
character column.
94
Page 95

Expanded (Double Wide) Print
Expanded (Double Wide) Print
ASCII Code ESC W
Hex Code 1B 57
Dec Code 27 87
Purpose Selects or resets expanded (double wide) print.
where:
Comment When expanded print using ESC W is received, all characters
Example The following sample illustrates expanded character printing and
n
n
are printed double wide until reset by the Expanded Print Reset
control code, Emulation Reset, or DC4.
Also refer to control code SO and ESC SO, Expanded (Double
Wide) Print for one line only.
expanded character printing reset.
n
n
n
= 1 selects expanded print (hex 01 or hex 31)
= 0 resets expanded print (hex 00 or hex 30)
Expanded (Double Wide) Print (One Line Only)
ASCII Code SO ESC SO
Hex Code 0E 1B 0E
Dec Code 14 27 14
Purpose Selects expanded (double wide) print for one line only.
Comment This expanded print control code is a line-by-line print attribute;
when the SO or ESC SO control code is received, the current
line is printed double wide and automatically reset.
This control code can be reset by a paper motion control code
(LF, VT, CR, etc.), by the DC4 (double wide cancel) code, ESC
@ (Emulation Reset), CAN or ESC W (double wide print). When
set by SO, double wide print is not cancelled by the Autowrap
feature.
Example The following sample illustrates Expanded Print for one line only.
Another example of expanded printing is shown in the Expanded
(Double Wide) Print description, above.
95
Page 96

Chapter 4 Configuring the Serial Matrix Emulation with Control Codes
Extended Character Set
ASCII Code ESC 4
Hex Code 1B 34
Dec Code 27 52
Purpose Accesses the extended character set in the range hex A0
through FF using codes hex 20 through hex 7F.
Comment This code is used in 7-bit systems as if data bit 8 was set to 1.
For example, sending code hex 20 accesses the symbol at code
point hex A0. If a printable symbol is not available at the code
point, a space is printed.
ESC 4 is not cancelled by the next paper motion command.
Example The following sample illustrates Extended Character Set.
Extended Character Set Cancel (Primary Character Set Select)
ASCII Code ESC 5
Hex Code 1B 35
Dec Code 27 53
Purpose Cancels Extended Character Set as selected by ESC 4, and
selects the Primary CharacterSet.
Comment This code is used in 7-bit systems as if data bit 8 was set to 0. If
data bit 8 is disabled, this control code selects the range as if
data bit 8 is set to 0, and data is printed as characters from hex
20 through hex 7F.
Example See the Extended Character Set example.
96
Page 97

Form Feed
Form Feed
ASCII Code FF
Hex Code 0C
Dec Code 12
Purpose Prints the data in the buffer, advances the paper position to the
next top-of-form, and moves the character position to the first
character column.
Comment The default forms length is determined by the configuration in
nonvolatile memory. Forms length is set by using the control
panel or forms length control codes. Code FF cancels all singleline only print attributes.
The Form Feed command reacts differently when the VFU is
active. See Chapter 9, “Vertical Page Formatting.”
Forms Length Set (Inches)
ASCII Code ESC C NUL
Hex Code 1B 43 00
Dec Code 27 67 0
Purpose Sets the length of forms (paper) in inches.
where:
Comment Upon receipt of this code, the current line becomes the first line
n
= whole numbers from 1 through 24 (hex 01 through hex 18) to
specify the number of inches on a page.
of the form, and the form length set becomes the current forms
length. Vertical tab positions set below the bottom of the form
are ignored. Forms length is defined in inches; therefore,
subsequent line spacing changes do not affect the result of this
command.
The maximum forms length is 24 inches. All other values are
ignored.
When forms length is set by the ESC C NUL sequence, the skipover perforation is set to zero.
Forms length can also be set through the control panel. The
control code forms length setting from the host computer
overrides the control panel setting.
n
n
n
97
Page 98

Chapter 4 Configuring the Serial Matrix Emulation with Control Codes
Forms Length Set (Lines)
ASCII Code ESC C
Hex Code 1B 43
Dec Code 27 67
Purpose Sets the length of a form (paper) in lines.
where:
Comment The forms length set becomes the current forms length. The
n
lines per page at the current line spacing.
forms length units are always defined in inches; therefore,
subsequent line spacing changes do not affect the result of this
command. Changing lpi does not change the forms length.
The forms length is set to the number of lines defined by the
quotient of
inches. If the calculated forms length in lines is not an exact
multiple of the target machine dot size, the forms length value is
adjusted down to the next possible multiple.
When forms length is set by the ESC C sequence, the skip-over
perforation is set to zero.
n
n
n
= 1 through 192 (hex 01 through C0) to specify the number of
n
and the current line spacing so that the units are in
Form Margins, Set
ASCII Code ESC v
n1 n2 n3 n4
Hex Code 1B 76
Dec Code 27 118
Purpose Selects left (n1), right (n2), top (n3), and bottom (n4)form
where:
Comment A hex value of FF for
n1 n2 n3 n4
n1 n2 n3 n4
margins.
n1
= The width of the left margin (hex value) in character
columns at the current cpi. If the requested margin is larger than
the current (form width - right margin), the value is ignored.
n2
= The width of the right margin (hex value) in character
columns at the current cpi. If the requested margin is larger than
the current (form width - left margin), the value is ignored.
n3
= The length of the top margin (hex value) in character lines
at the current lpi. If the requested margin is larger than the
current (form length - bottom margin), the value is ignored.
n4
= The length of the bottom margin (hex value) in character
lines at the current lpi. If the requested margin is larger than the
current (form length - top margin),the value is ignored.
n1,n2,n3
remains unaffected. When set, the right and bottom margins
take effect immediately. The left margin takes effect for the
current line only if no horizontal motion has occurred for the line;
otherwise, it takes effect on the next line. The top margin always
takes effect on the next form.
,orn4indicates that the margin
98
Page 99

Horizontal Tab
Vertical tabs defined within the top and bottom margins are
ignored. Horizontal tabs are offset by the left margin and ignored
within the right margin.
Horizontal Tab
ASCII Code HT
Hex Code 09
Dec Code 9
Purpose Moves the logical printhead right to the next horizontal tab stop.
Comment Power-on default horizontal tabs are set at every eighth
character in the Serial Matrix printer protocol. If there are no
horizontal tabs set or the logical printhead is located at the last
character column, the code is ignored and no movement occurs.
Horizontal tabs are stored as a relative position; therefore,
character pitch changes change horizontal tab positions. See
Horizontal Tab Set, below, to set new tab positions.
Horizontal Tab Set
ASCII Code ESC D
Hex Code 1B 44
Dec Code 27 68
Purpose Sets up to 32 horizontal tab positions.
where:
Comment Up to 32 different tab positions may be set. The values must be
Example The following example illustrates horizontal tab setting and
n1
NUL is the sequence terminator.
listed in ascending order or they are ignored. The physical tab
position is the product of
excluding double wide. Tabs in excess of 32 or those positioned
beyond the paper's right margin are also ignored.
Tab positions may be cleared by sending the ESC D NUL
sequence. Powering the printer on/off initializes the tabs to every
eighth character column. Horizontal tabs are accessed by
control code HT.
accessing.
n1...nk
n1...nk
n1...nk
through
NUL
00
0
n32
specify the character column of the tab positions.
n
and the current cell width (1/pitch),
99
Page 100

Chapter 4 Configuring the Serial Matrix Emulation with Control Codes
Line Feed
ASCII Code LF
Hex Code 0A
Dec Code 10
Purpose Prints the data in the buffer (if any) and advances the vertical
character position one line at the current line space setting.
Comment If configured for LF equals newline (LF=CR+LF), the logical print
head is positioned at character column 1 of the new line.
Otherwise, the logical print head does not move when
configured for LF function only (LF=LF ONLY). The LF function
cancels all single line print attributes such as double high
(elongated) and double wide (expanded) characters.
Line Feedn/216 Inch (One Line Only)
ASCII Code ESC J
Hex Code 1B 4A
Dec Code 27 74
Purpose Advances the vertical character positionn/216 inch for one line
only.
where:
Comment The
Example The following example illustrates
n
only. All single-line-only print attributes are canceled.
If the protocol is configured for LF equals newline (LF=CR+LF),
the paper advances one line at the current line space setting and
the logical print head is positioned at character column 1.
The paper position moves only in multiples of the current dot row
spacing. If the distance to move is other than a multiple of the
current dot row spacing, the remainder is added to the next
paper motion command.
Small values of
lines may also occur if print attributes such as Elongated
(Double High), Superscript, or Subscript characters are used on
the same line. Printing at different horizontal and vertical
densities do not overlap.
n
n
n
= 1 through 255
n
/216-inch line feed control code is effective for one line
n
may result in overlapping lines. Overlapping
n
/216-inch line spacing.
100
 Loading...