

Page 1

Infoprint 32
Infoprint 40
User’s Guide
S544-5484-02
IBM
Page 2

Page 3

Infoprint 32
Infoprint 40
User’s Guide
S544-5484-02
IBM
Page 4

Note!
Before using this information and the product it supports, be sure to read the general information under
“Appendix E. Notices” on page 265.
Third Edition (May 1999)
The following paragraph does not apply to any other country where such provisions are inconsistent with local law.
INTERNATIONAL BUSINESS MACHINES CORPORATION PROVIDES THIS PUBLICATION “AS IS” WITHOUT
WARRANTY OF ANY KIND, EITHER EXPRESS OR IMPLIED, INCLUDING, BUT NOT LIMITED TO THE IMPLIED
WARRANTIES OF MERCHANTABILITY OR FITNESS FOR A PARTICULAR PURPOSE. Some states do not allow
disclaimer of express or implied warranties in certain transactions, therefore, this statement may not apply to you.
Changes are made periodically to this publication.
Requests for IBM publications should be made to your IBM representative or to the IBM branch office serving your
locality. If you request publications from the address given below, your order will be delayed, because publications
are not stocked there.
A Reader’s Comment Form is provided at the back of this publication. You may also send comments by fax to
1-800-524-1519, by e-mail to printpub@us.ibm.com, or by regular mail to:
Department H7FE Building 003G
IBM Printing Systems Company
Information Development
PO Box 1900
Boulder CO USA 80301-9191
IBM may use or distribute whatever information you supply in any way it believes appropriate without incurring
any obligation to you.
© Copyright International Business Machines Corporation 1998, 1999. All rights reserved.
US Government Users Restricted Rights – Use, duplication or disclosure restricted by GSA ADP Schedule Contract
with IBM Corp.
Page 5

Contents
About This Book .........vii
Conventions Used .........vii
Related Publications.........vii
Safety Notices ...........viii
Safety Precautions .........viii
Electrical Safety .........viii
Fire Safety ...........viii
Lightning Safety ......... ix
Laser Safety .......... ix
Chapter 1. About Your Printer ..... 1
Locations—Main Unit ........ 1
Front of Printer ......... 1
Rear View ........... 2
Locations—Optional Features ..... 3
2500-Sheet Input Unit ....... 3
Face-Up Output Bin........ 3
Envelope Feeder ......... 4
2000-Sheet Finisher ........ 5
Standard Features ......... 5
Optional Features ......... 6
Technical Support ......... 7
Ordering Supplies ......... 7
Memory Requirements ........ 8
The Infoprint 32 and Infoprint 40 CD-ROM 9
Obtaining Documents, Drivers, and Utilities
fromtheWeb........... 10
Obtaining Code Updates from the Web 10
Chapter 2. Installing Your Printer.... 11
Installation Checklist ........ 11
Unpacking and Setting Up the Printer. . . 12
Applying the Operator Panel Overlay . . . 14
Powering On the Printer ....... 16
Selecting a Language ........ 17
Connecting the Parallel Cable ..... 18
Installing Printer Drivers ....... 20
Chapter 3. Using the Operator Panel . . 21
Understanding the Operator Panel Indicator
Lights ............. 22
Using the Operator Panel Keys ..... 23
Navigating Menus ......... 24
Locking Menus ......... 25
Printing the Printer Configuration Page 25
Other Operator Panel Tasks ...... 27
Making Duplex or Simplex Printing the
Printer Default ......... 28
Canceling a Print Job ....... 28
Printing the Ethernet Network Interface
Card Configuration Page ...... 28
Printing the Token-Ring Network
Interface Card Configuration Page . . . 29
Printing a List of PCL5e Fonts .... 29
Printing a List of PostScript Fonts . . . 29
Printing a List of IPDS Resident Fonts 30
Adjusting Print Density ...... 30
Changing the Power Savings (Sleep
Mode) Interval ......... 31
Changing the Language Shown on the
Display Panel .......... 31
Chapter 4. Paper Handling ...... 33
Selecting Paper and Other Printable
Material............. 34
Media Size Specifications ...... 35
Media Weight and Thickness
Specifications .......... 37
Selecting Paper and Pre-printed Forms 38
Selecting Adhesive Labels ...... 38
Selecting Overhead Transparencies . . . 39
Selecting Envelopes ........ 39
Loading Paper and Envelopes into the
Printer ............. 39
Loading Paper into a 500-Sheet Paper
Tray(Tray1orTray2)....... 40
Loading Paper into the Auxiliary Tray 45
Loading Universal Paper into the
Auxiliary Tray.......... 49
Loading Envelopes into the Auxiliary
Tray............. 50
Loading Paper into the 2500-Sheet Input
Unit (Trays 3, 4, and 5)....... 52
Loading Envelopes into the Envelope
Feeder ............ 60
Loading Universal Envelopes into the
Envelope Feeder ......... 62
Common Paper Handling Tasks..... 63
Selecting the Default Input Tray.... 64
Selecting the Default Output Bin . . . 64
© Copyright IBM Corp. 1998, 1999 iii
Page 6

Defining the Auxiliary Tray Paper Size 65
Defining the Envelope Feeder Envelope
Size ............. 65
Turning Tray Switching On or Off . . . 66
Making Duplex or Simplex Printing the
Printer Default ......... 67
Changing the Default PCL Page Size 67
Defining Custom Form Sizes for IPDS 68
Stapling ............ 69
Chapter 5. Clearing Jams ......73
Typical Causes of Paper Jams ..... 74
Handling Precautions ........ 74
Procedures ............ 74
Clearing Exit Area Jams ...... 74
Clearing Paper Tray Area Jams .... 77
Clearing Auxiliary Tray Jams..... 81
Clearing Duplex Unit Jams ..... 83
Clearing Envelope Feeder Jams .... 85
Clearing 2500-Sheet Input Unit Jams 86
Clearing 2000-Sheet Finisher Jams . . . 88
Chapter 6. Operator Panel Menus . . . 91
Test Menu ............ 92
Reset Menu ........... 94
Paper Menu ........... 95
Custom Forms Menu (IPDS) ......101
Configuration (Config) Menu .....102
Memory Configuration (Memconfig) Menu 104
Parallel Menu ...........105
PCL Menu ............106
PS Menu ............110
IPDS Menu............111
Token Ring Menu .........121
Ethernet Menu ..........124
Coaxial SCS Menu .........127
Twinax SCS Menu .........131
Coax Setup Menu .........134
Twinax Setup Menu.........136
Coax DSC/DSE Menu ........138
Machine Information Menu ......140
Language Menu ..........141
Chapter 7. Maintaining the Printer . . . 143
Replacing Supplies .........143
Changing the Toner Cartridge .....144
Replenishing Staples in the 2000-Sheet
Finisher .............149
Changing the Usage Kit .......152
Cleaning the Printer.........163
Chapter 8. Installing Printer Options . . 165
Handling Static Sensitive Devices ....165
The SIMM and Hard Drive Options . . . 166
Removing the Controller Card ....166
Installing a SIMM ........167
Installing a Hard Drive.......168
Reinstalling the Controller Card....170
The Network Interface Card ......172
Installing a Network Interface Card . . 172
The Face-Up Output Bin Option ....175
Installing the Face-Up Output Bin (with
Duplex Unit Installed) .......175
Removing the Face-Up Output Bin (with
Duplex Unit Installed) .......178
Installing the Face-Up Output Bin (with
No Duplex Unit) .........179
Removing the Face-Up Output Bin (no
Duplex Unit) ..........180
The 2500-Sheet Input Unit Option ....181
Installing the 2500-Sheet Input Unit . . 181
Removing the 2500-Sheet Input Unit 185
The Envelope Feeder Option ......188
Installing the Envelope Feeder ....189
Removing the Envelope Feeder ....190
The 2000-Sheet Finisher .......191
Installing the 2000-Sheet Finisher . . . 191
About the Pause Button ......199
Installing the Staple Cartridge ....200
Removing the 2000-Sheet Finisher . . . 201
The Duplex Unit ..........206
Installing the Duplex Unit......206
Removing the Duplex Unit .....208
Chapter 9. Configuring Printer Network
Addresses............211
Setting IP, Subnet Mask, and Gateway
Addresses ............211
Setting the Locally Administered MAC
Address (LAA) ..........212
Appendix A. Troubleshooting .....215
Troubleshooting Checklist .......215
Appendix B. Print Quality Problems. . . 225
Print Is Too Light .........226
Toner Spots on the Print .......227
Repetitive Marks on the Print .....227
Random Deletions or Light Areas on the
Print ..............228
Vertical Marks on the Print ......228
iv Infoprint 32 and Infoprint 40: User’s Guide
Page 7

Vertical Bands of Deletions or Light Areas
on the Print ...........229
Entire Print is Black .........229
Entire Print Is Blank.........230
White Spots Within Black Image Area . . . 230
Printed Image Rubs Off or Smears ....231
The Print Is Damaged ........231
The Printed Image Is Blurred......232
Appendix C. Printer Messages.....233
Status Messages ..........233
Error Messages ..........240
Appendix D. Specifications ......263
Printer Specifications ........263
Cartridge Specifications .......264
Appendix E. Notices ........265
Trademarks ...........265
Energy Star ...........266
Appendix F. Glossary ........267
Index .............275
Contents v
Page 8

vi Infoprint 32 and Infoprint 40: User’s Guide
Page 9

About This Book
This book is designed to help you use the Infoprint 32 and Infoprint 40. It
describes how to:
v Use the operator panel to navigate menus and control the printer
v Load and select paper and other print materials
v Clear paper jams
v Change printer supplies
v Install printer options
v Troubleshoot printer problems
v Interpret messages displayed on the operator panel
Conventions Used
Names of keys on the operator panel are shown in bold typeface. For
example:
v Press the Enter key.
v Press Enter.
Related Publications
The following books contain information that relates to the Infoprint 32 and
Infoprint 40. Note that all books are available on the CD-ROM that ships with
the printer, they are also available on the web (see “Obtaining Documents,
Drivers, and Utilities from the Web” on page 10).
v Quick Reference Card, G544-5480, provides quick access to information such
as using the operator panel, navigating menus, calling IBM for technical
assistance, and clearing paper jams.
v Quick Setup Poster, S544-5481, shows how to set up the printer.
v Warranty, Communication Statements, and Safety Information, G544-5523,
contains safety notices and warranty information in several languages.
v Ethernet and Token Ring Configuration Guide, G544-5240, describes how to
configure the Ethernet and token-ring network interface cards.
v Ethernet and Token Ring Quick Configuration Guide, G544-5499, is a condensed
version of Ethernet and Token Ring Configuration Guide. It is shipped with the
network interface cards.
© Copyright IBM Corp. 1998, 1999 vii
Page 10

v Twinax/Coax Configuration Guide, G544-5241, describes how to configure the
twinax and coax network interface cards. This book is shipped with the
cards.
v PCL5e and PostScript Technical Reference, S544-5344, contains technical
reference information about PCL5e and PostScript support.
v IPDS and SCS Technical Reference, S544-5312, contains technical reference
information about printer IPDS and SCS support.
v IBM Advanced Function Printer Cut Sheet Paper Reference for Use with IBM
Electrophotographic Printers, G544-3915, contains paper specification
information.
Safety Notices
There are two types of safety notices:
DANGER indicates the presence of a hazard that has the potential of causing
death or serious injury.
CAUTION indicates the presence of a hazard that has the potential of causing
moderate or minor personal injury.
Safety Precautions
Electrical Safety
This printer is inspected and listed by recognized national testing laboratories,
such as Underwriters Laboratories, Inc. (UL) in the U.S.A. and Canadian
Standards Association (CSA) in Canada. Listing of a product by a national
testing laboratory indicates that the product is designed and manufactured in
accordance with national requirements intended to minimize safety hazards.
IBM equipment meets a very high standard of safety in design and
manufacture. Remember, however, that this product operates under conditions
of high electrical potentials and heat generation, both of which are
functionally necessary.
Fire Safety
Because the paper and toner used in the printer can burn, you should take
normal precautions to prevent fire. These precautions include common-sense
measures, such as keeping potentially combustible materials (for example,
curtains and chemicals) away from the printer, providing adequate ventilation
and cooling, limiting unattended operation, and having trained personnel
available and assigned to the printer.
viii Infoprint 32 and Infoprint 40: User’s Guide
Page 11

Lightning Safety
To avoid personal risk, do not install or reconfigure a communication port or
a teleport during an electrical storm.
Laser Safety
This printer complies with the performance standards set by the U.S. Food
and Drug Administration for a Class 1 Laser Product. This means that the
printer belongs to a class of laser products that does not produce hazardous
laser radiation in a customer accessible area. This classification was
accomplished by providing the necessary protective housing and scanning
safeguards to ensure that laser radiation is inaccessible or within Class 1
limits.
There are various tool-operated machine covers that should be moved,
removed, or replaced only by trained service personnel. There are no operator
controls or adjustments associated with the laser.
No operator maintenance is required to keep the product in compliance as a
Class 1 Laser Product. No adjustments that affect laser operation or power are
accessible to the operator.
This printer is a Class 1 Laser Product that contains an enclosed Class 3B
laser.
About This Book ix
Page 12

x Infoprint 32 and Infoprint 40: User’s Guide
Page 13

Chapter 1. About Your Printer
The Infoprint 32 and Infoprint 40 are multifunctional, 32 and 40
page-per-minute laser printers. You can attach them directly to your
workstation and, using optional network interface cards, you can attach them
to networks.
Locations—Main Unit
Front of Printer
hc3u410F
1
2
3
4
5
6
7
8
9
10
11
1 Face-down output bin
2 Paper stopper
3 Operator panel
4 Power switch
5 Paper Tray 1
6 Paper Tray 2
7 Toner cartridge area cover
8 Auxiliary tray
9 Cover B
10 Cover A (inside duplex unit)
© Copyright IBM Corp. 1998, 1999 1
Page 14
11 Duplex unit (optional)
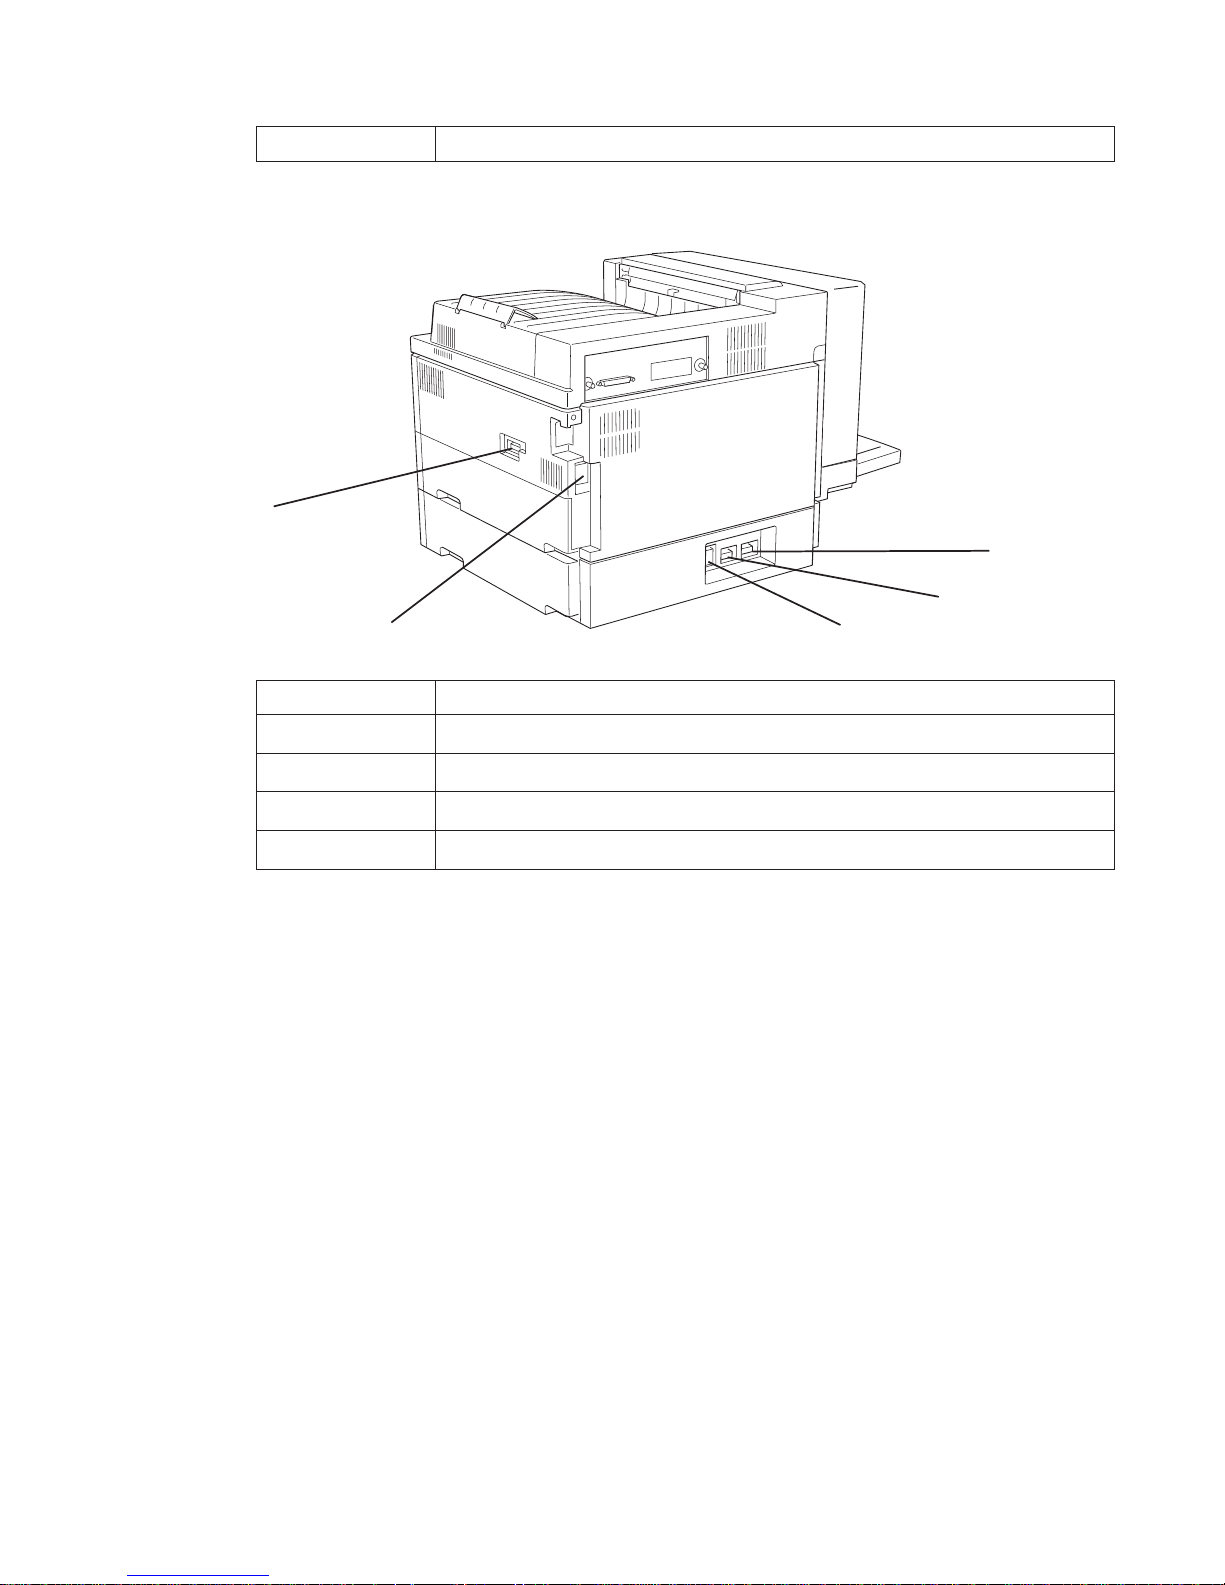
Rear View
hc3u002F
1
2
3
5
4
1 Duplex connector
2 2000-Sheet Finisher connector
3 2500-Sheet Input Unit connector
4 Power cord receptacle
5 AC power outlet (for 2000-Sheet Finisher)
2 Infoprint 32 and Infoprint 40: User’s Guide
Page 15

Locations—Optional Features
2500-Sheet Input Unit
hc3u004F
Tray 3
Tray 5
Tray 4
Cover C
Face-Up Output Bin
hc3u004d
Chapter 1. About Your Printer 3
Page 16

Envelope Feeder
Note: The envelope feeder replaces the auxiliary tray.
4 Infoprint 32 and Infoprint 40: User’s Guide
Page 17

2000-Sheet Finisher
hc3u004C
Cover H (Stapler cover)
Horizontal transport
Docking station
Upper bin (Finishr1)
Middle bin (Finishr2)
Lower bin (Finishr3)
Standard Features
Standard features of the printer include:
v Printing speed of up to 32 pages per minute for Infoprint 32, 40 pages per
minute for Infoprint 40
v Resolution of 600 dots per inch (dpi)
v PCL5e support
v Adobe PostScript 3
v Printer drivers
v 8MB of memory for Infoprint 32, 16MB of memory for Infoprint 40.
v Parallel interface (IEEE Std 1284-1994)
v Two 500-sheet paper trays
Chapter 1. About Your Printer 5
Page 18

v 50-sheet auxiliary tray
v 500-sheet Face-down output bin with offset capability
v Duplex unit
Optional Features
The following table lists optional features for the Infoprint 32 and Infoprint
40.
Notes:
1. To order optional features, contact your IBM Authorized Dealer or IBM
Sales Representative.
2. For information about installing optional features, see “Chapter 8.
Installing Printer Options” on page 165.
3. For information about printer memory requirements, see “Memory
Requirements” on page 8.
Feature Feature Number Part Number
500-Sheet Paper Tray (Extra) 4501 90H3538
2500-Sheet Input Unit 4520 90H3539
2000-Sheet Finisher (Low Voltage) 4620 90H3540
2000-Sheet Finisher (High Voltage) 4621 90H3541
Envelope Feeder 4511 90H3542
Duplex Unit 4402 38L1045
Optional Face-Up Output Bin 4630 90H3543
Network Card for Token-Ring 4120 06L9835
Network Card for Ethernet (10BaseT and
10Base2)
4161 06L9838
Network Card for Ethernet (100BaseTx) 4162 11L6573
IBM IPDS SIMM 4820 90H3547
IBM Coax SCS Interface 4171 06L9846
IBM Twinax SCS Interface 4141 06L9849
4MB Memory SIMM 4304 63H2463
8MB Memory SIMM 4308 63H2465
16MB Memory SIMM 4316 63H2467
32MB Memory SIMM 4332 63H2469
2MB Flash Memory 4030 63H2443
4MB Flash Memory 4032 63H2444
6 Infoprint 32 and Infoprint 40: User’s Guide
Page 19

Feature Feature Number Part Number
Hard Drive 4320 90H0610
PC Parallel Cable 4180 63H2804
Printer Stand 4530 90H3544
6 foot US (Chicago) Line Cord 9250 63H5828
Technical Support
If you run into a problem, see “Appendix A. Troubleshooting” on page 215. If
you still cannot solve the problem, IBM customer support is available at no
additional charge during the warranty period. In the U.S. and Canada, call
1-800-358-6661.
Notes:
1. Have your printer serial number ready. The serial number is next to the
toner cartridge on the printer frame. It is also listed in the Printer Details
section of the printer configuration page (see “Printing the Printer
Configuration Page” on page 25). If you are asked for a machine type,
specify Infoprint 32 or Infoprint 40.
2. If you need IBM operating system support (for example, AIX, OS/2,
OS/400, and MVS), contact IBM software support (1-800-237-5511 in the
U.S.A., 1-800-465-2222 in Canada).
Ordering Supplies
You can order printing supplies through your IBM authorized printer or
printer supplies reseller. If you have no reseller, you can call 1-888-IBM-PRINT
(1-888-426-7746) in the U.S. or Canada to ask for an authorized dealer or to
order from IBM Printer Supplies.
In other countries, contact your point of purchase for information about where
to order supplies.
In Europe, you can call the IBM Supplies Fulfillment Operation at 31-43-350
2756 or at the following numbers:
v Belgium: 0800 71950
v Denmark: 80015534
v Finland: 08001-13110
v France: 0800 905871
v Germany: 0130 818005
v Italy: 1-678 78349
Chapter 1. About Your Printer 7
Page 20

v Norway: 800-11389
v Spain: 900-983131
v Sweden: 020-794270
v United Kingdom: 0800-968679
The following table lists supplies for the Infoprint 32 and Infoprint 40. See
“Chapter 7. Maintaining the Printer” on page 143 for more information.
Supply Part Number
Toner Cartridge 90H3566
Usage Kit (100 Volt) (Japan only) 90H3569
Usage Kit (120 Volt) 90H3567
Usage Kit (230 Volt) 90H3568
Staple Refill 90H3570
Staple Cartridge (with staples) 90H3571
Memory Requirements
Table 1 on page 9 shows the minimum memory requirements for Infoprint 32
and Infoprint 40.
Notes:
1. The PAGEPROT menu item is available on the PCL Menu, the PostScript
(PS) Menu, and the IPDS Menu. It determines whether or not the printer
uses compression when it prints complex pages.
v PAGEPROT=AUTO—the printer uses compression when it runs into
memory constraints. This can reduce print speed and requires less
memory than PAGEPROT=ON.
v PAGEPROT=ON—the printer does not use compression and therefore
requires more memory.
2. When a column contains two values, the second value indicates the
amount of memory required to support context saving. Context saving
allows the printer to remember information about the current data stream
when it switches back and forth from one job type (PostScript or PCL5e)
to another. The printer always does context saving for IPDS.
The Memory Configuration (MEMCONFIG) Menu provides two menu
items, PCL SAVE and PS SAVE, which allow you to set context saving on
or off for each of these two data streams. These menu items are displayed
only if there is enough memory in the printer to permit context saving.
3. If you use Japanese DBCS (double-byte character set) PostScript fonts, IBM
recommends that you have at least 16MB of memory.
8 Infoprint 32 and Infoprint 40: User’s Guide
Page 21

Table 1. Memory Requirements
Requirements Simplex Duplex
Base configuration
PAGEPROT=AUTO (letter-size paper) 8/12 MB 8/12 MB
PAGEPROT=AUTO (A3-size paper) 8/12 MB 8/12 MB
PAGEPROT=ON (letter-size paper) 8/12 MB 12/16 MB
PAGEPROT=ON (A3-size paper) 12/16 MB 24/28 MB
Base configuration and IPDS
PAGEPROT=AUTO (letter-size paper) 8/12 MB 8/12 MB
PAGEPROT=AUTO (A3-size paper) 12/16 MB 12/16 MB
PAGEPROT=ON (letter-size paper) 12/16 MB 16/20 MB
PAGEPROT=ON (A3-size paper) 16/20 MB 28/32 MB
The Infoprint 32 and Infoprint 40 CD-ROM
The printer ships with a CD-ROM which includes documentation, drivers,
programs, and utilities, including:
v Documentation—the CD-ROM includes most Infoprint 32 and Infoprint 40
documents in Adobe Acrobat Portable Data File (PDF) format for online
viewing and printing.
v PCL5e and PostScript printer drivers for numerous systems, which include
Windows, Windows 95, Windows NT, OS/2, AIX, HP-UX, SCO UNIX, and
Sun Solaris. For a complete list of drivers, see the CD-ROM.
v Network Printer Manager (NPM)—NPM is a tool for network
administrators. It runs on the Web, Windows 95, Windows NT, and OS/2.
NPM:
– Enables you to install and configure Infoprint 32 and Infoprint 40 in local
area networks (LANs), including TCP/IP and Novell 3.12 and 4.X.
– Monitors printers and provides status information including printer
status, paper jams, out of toner conditions, and empty tray conditions.
NPM uses industry standard, open systems Simple Network
Management Protocol (SNMP). SNMP supports Management
Information Base (MIB) which is a collection of information that
describes the printer’s functions and features.
v Network Printer Resource Utility (NPRU)—NPRU enables administrators to
download fonts and overlays (PCL macros and PostScript overlays) to the
printer memory (DRAM, flash memory, or hard drive). NPRU runs on
Windows 3.1, Windows 95, and OS/2.
Chapter 1. About Your Printer 9
Page 22

v IBM TCP/IP Network Port Monitor for Windows NT 4.0—This enables
users to receive up-to-date bidirectional printer and job status (including
end-of-job notification) from their printers. The port monitor is fully
integrated into the Windows NT 4.0 print subsystem, so the bidirectional
status is displayed through the standard Windows NT printer queue view.
Clients on other Windows platforms can also see up-to-date status if their
printers are defined on Windows NT 4.0 and shared to the network.
v IBM LPR Remote Printing Client Version 2.00—This utility provides a
TCP/IP port driver for seamless Windows 95 network printing. This
package also includes a command line LPR, RFC 1179, which is a program
you can use to print jobs directly from DOS.
Obtaining Documents, Drivers, and Utilities from the Web
To obtain current versions of the documentation, printer drivers, utilities, and
programs, do the following:
1. Access the IBM Printing Systems Company home page:
http://www.printers.ibm.com
2. Go to the document, printer driver, utility, or program you need and
follow the download instructions.
Obtaining Code Updates from the Web
To obtain code updates, do the following:
1. Access the IBM Printing Systems Company home page:
http://www.printers.ibm.com
2. Go to the code update you need and follow the instructions to download
it.
10 Infoprint 32 and Infoprint 40: User’s Guide
Page 23

Chapter 2. Installing Your Printer
Quick Setup Poster
To set up your printer, see Quick Setup Poster, which is shipped with the
printer. Use this checklist as a supplement to Quick Setup Poster.
Installation Checklist
__ 1. Unpack your printer. See “Unpacking and Setting Up the Printer” on
page 12.
__ 2. Load the paper tray shipped with your printer. See:
v Quick Setup Poster
v “Loading Paper and Envelopes into the Printer” on page 39.
__ 3. Install the toner cartridge. See:
v Quick Setup Poster
v “Changing the Toner Cartridge” on page 144.
__ 4. Apply the operator panel overlay (if it has not already been applied to
the operator panel). See “Applying the Operator Panel Overlay” on
page 14.
__ 5. Switch on the printer. See “Powering On the Printer” on page 16.
__ 6. Select a language for messages and menus (the default is English). See
“Selecting a Language” on page 17.
__ 7. Print the printer configuration page to verify the printer works. See
“Printing the Printer Configuration Page” on page 25.
__ 8. Connect a parallel cable (if desired). See “Connecting the Parallel
Cable” on page 18.
Note: In addition to the parallel cable attachment, the Infoprint 32
and Infoprint 40 support a wide variety of network attachment
interfaces, including twinax, coax, token ring, and Ethernet
attachments. For information about installing network
attachments and other optional features, please read “The
Network Interface Card” on page 172.
__ 9. Install other options, such as the 2500-Sheet Input Unit, extra memory,
the IPDS SIMM, flash memory, the hard drive, and network interface
cards (Ethernet, token ring, twinax, and coax). See “Chapter 8.
Installing Printer Options” on page 165.
© Copyright IBM Corp. 1998, 1999 11
Page 24

__ 10. Install print drivers and configure your host environment. See
“Installing Printer Drivers” on page 20.
__ 11. Get familiar with your printer. See “Chapter 3. Using the Operator
Panel” on page 21.
Unpacking and Setting Up the Printer
Before you install your printer, make sure you have a place large enough to
put it. Without any of its optional features attached, the printer dimensions
are:
v Width: 28 inches (762 mm)
v Depth: 20.5 inches (520 mm)
v Height: 19.1 inches (486 mm)
In addition, make sure you leave enough room around the printer to access
and operate it. For the standard configuration with no options, IBM
recommends leaving at least 7.8 inches (200 mm) in the back of the printer,
18.1 inches (460 mm) in the front of the printer, 7.8 inches (200 mm) on the
right side, and 25.2 inches (640 mm) on the left side of the printer.
hc3u019F
When options are installed, IBM recommends leaving at least 7.8 inches (200
mm) in the back of the printer, 18.1 inches (460 mm) in the front of the
printer, 39.4 inches (1000 mm) on the right side, and 25.2 inches (640 mm) on
12 Infoprint 32 and Infoprint 40: User’s Guide
Page 25

the left side of the printer.
hc3u020F
hc3u409F
Remove all items from the packing box including packaging pieces. Lift the
printer and place it on a flat surface. If any of the following items are missing,
contact your point of purchase:
v Infoprint 32 or Infoprint 40
Chapter 2. Installing Your Printer 13
Page 26

v Toner cartridge
v The following documents: Quick Reference Card, Quick Setup Poster, and
Warranty, Communication Statements, and Safety Information
v CD-ROM
v Power cord (In some countries the power cord needs to be ordered
separately and is shipped in a separate box.)
Note: Save all packing materials in case you need to ship or store your
printer.
Applying the Operator Panel Overlay
Important!
Some printers may have the overlay installed already. If yours does, skip
this procedure.
1. Peel the thin layer of protective plastic off the operator panel.
2. Use a dry cloth or towel to remove dust from the operator panel.
3. Locate the overlay. The overlay lists the names of the keys on the operator
panel.
14 Infoprint 32 and Infoprint 40: User’s Guide
Page 27

4. Remove the backing from the overlay.
5. Position the overlay so that the top of it lines up squarely with the top of
the operator panel. Working down from the top of the overlay, gently
press it into place.
Chapter 2. Installing Your Printer 15
Page 28

Powering On the Printer
1. Make sure the printer is off. The printer is off when the O on the switch is
pressed in.
2. Plug the power cord into the receptacle located on the back of the printer.
3. Plug the other end of the cord into a grounded AC wall outlet or an
equivalent fixture.
16 Infoprint 32 and Infoprint 40: User’s Guide
Page 29

4. To switch on the printer, press the | on the power switch.
5. After a moment, the printer displays the message WARMING UP... while
it warms up (this usually takes a little longer than a minute). When the
printer is ready, it displays the message READY.
Selecting a Language
Important!
English is the default language for messages and menus. If you use
English, skip this procedure.
To display messages and menus in a language other than English, do the
following:
1. Press the Online key once; you see OFFLINE in the message display area.
2. Press the Menu key until you see LANGUAGE MENU in the message
display area. Then press the Item key until you see LANG=ENGLISH.
3. Press the Value key until you see the language you want to select.
4. To change the value, press the Enter key. An asterisk appears next to the
language you select, indicating that it is now active.
5. Press the Online key to make the printer ready. You see the READY
message in the language you selected.
Chapter 2. Installing Your Printer 17
Page 30

Connecting the Parallel Cable
Important!
You need to supply the parallel cable; it is not included with the printer.
The parallel cable must be IEEE Std 1284-1994 compliant (IBM part
number 63H2804 or its equivalent). To order a parallel cable or other
optional feature, contact your IBM Authorized Dealer or IBM Sales
Representative. To install the following optional network interface cards,
see “The Network Interface Card” on page 172:
v IBM Network Card for Ethernet (10Base2/10BaseT)
v IBM Network Card for Ethernet (10/100BaseTx)
v IBM Network Card for Token Ring
v IBM Twinax SCS Interface
v IBM Coax SCS Interface
1. Switch off the printer.
18 Infoprint 32 and Infoprint 40: User’s Guide
Page 31

2. Unplug the printer.
3. Attach the parallel cable to the parallel interface port on the back of the
printer.
hc3u411F
Chapter 2. Installing Your Printer 19
Page 32

4. Attach the other end of the cable into the parallel interface slot on your PC
or workstation.
Note: If there is a ground strap on your cable, attach it to the attachment
screw provided.
5. Plug the printer power cord into the wall and switch the printer on.
Installing Printer Drivers
Before you can print from your PC or workstation to your printer, you need
to install the correct printer driver on your system. The printer includes a
CD-ROM which contains PCL5e and PostScript printer drivers for numerous
systems. (See the CD-ROM for a complete list.) To use the setup wizard
provided on the CD-ROM, choose Set up printer or Browse products, click
Start wizard, and follow the instructions.
Notes:
1. For your printer driver to work effectively, you must indicate to your
printer driver what features are installed on your printer, for example,
what trays are installed, and how much memory is installed. Therefore,
after you install a driver, make sure you update it to indicate the features
installed on your printer. Also, if you install (or remove) a feature at a
later date, make sure you update your printer driver.
2. Each operating system has unique driver installation procedures. For
specific installation instructions, see the driver installation procedure and
README documentation for your operating system.
3. Your printer may include additional drivers not included in this list.
4. Printer drivers are also available as follows:
a. Access the IBM Printing Systems Home Page at:
http://www.printers.ibm.com
b. Go to the printer driver you need and follow the download
instructions.
20 Infoprint 32 and Infoprint 40: User’s Guide
Page 33

Chapter 3. Using the Operator Panel
This chapter describes how to use the operator panel. The operator panel is
located on the front of the printer. It consists of a message display area, status
indicator lights, and operator keys.
v For information about indicator lights, see “Understanding the Operator
Panel Indicator Lights” on page 22.
v For a description of all messages, see “Appendix C. Printer Messages” on
page 233.
v For information about operator panel keys, see “Using the Operator Panel
Keys” on page 23 and “Navigating Menus” on page 24.
v For an overview of some common operator panel tasks, see “Other
Operator Panel Tasks” on page 27.
v For an overview of all printer menus, see “Chapter 6. Operator Panel
Menus” on page 91.
© Copyright IBM Corp. 1998, 1999 21
Page 34

Understanding the Operator Panel Indicator Lights
The status indicators are located on the left side of the operator panel.
Indicator lights can be on, off, or blinking.
Indicator Condition
Online On—the printer is online and idle.
Blinking—the printer is online and receiving or processing
data.
Off—the printer is offline. Note that the printer must be offline
before you can change menu settings.
Continue On—a condition that requires operator attention exists. Press
the Continue key to continue printing or press the Cancel
Print key to cancel printing. (If the Auto-continue function is
on, the printer may automatically resume printing after thirty
seconds. For more information, see the description of the
AUTOCONTINU item under “Configuration (Config) Menu”
on page 102.)
Off—the printer is operating normally.
Buffer On—a page or partial page is stored in memory. The page
prints when it completes, or, for partial pages, when (a)
another job starts, (b) a port timeout occurs, or (c) you press
the Enter key.
Blinking—the printer is receiving data.
Off—no pages are stored in the printer memory.
22 Infoprint 32 and Infoprint 40: User’s Guide
Page 35

Indicator Condition
Attention Blinking—the printer requires attention.
Off—the printer is operating normally.
Using the Operator Panel Keys
The operator panel keys enable you to configure and operate the printer. They
are located on the right side of the operator panel.
Use the Online key to take the printer offline or to put it back
online.
Note: The printer must be offline before you can change menu
settings or cancel jobs.
Use the Continue key to continue printing when the Continue
indicator is on. When the Continue indicator is on, a condition
that requires operator attention exists. If the Continue indicator
is on and you do not want to continue printing, press the
Cancel Print key to cancel printing.
Use the Enter key to select an action menu item or a menu item
value. Also use Enter to print a partial page stored in memory.
(The Buffer indicator light goes on to indicate a partial page is
in memory.)
Note: To select a new value for a menu item, you must press
the Enter key when the value is displayed in the message
display area. After you press Enter, an asterisk (*) appears next
to the new value, indicating that it is active.
Use the Cancel Print key to cancel the current print job. (After
you press the Cancel Print key, it may take a while before the
current job stops printing.) After the job is canceled, the printer
begins printing the next job in the queue.
Note: The printer must be offline or the Continue indicator
must be on before you can cancel a job.
Use the Menu key to scroll through the menu list. As you scroll
through the list, the current menu is displayed in the message
display area.
Note: The printer must be offline before you can move between
menus.
Use the Item key to scroll through the list of items for the menu
listed in the message display area. As you scroll through the
list, the current item and, if applicable, the current value for the
item is displayed in the message display area, just below the
name of the current menu.
Chapter 3. Using the Operator Panel 23
Page 36

Use the Value key to scroll through a list of acceptable values
for a menu item. Press the Value key once to scroll forward one
value. Press and hold the Value key to scroll more quickly
through the list (especially for numeric values).
Note: To select a new value, press the Enter key when the
value is displayed in the message display area. An asterisk (*)
appears next to the value, indicating that it is now active.
Use the Shift key to reverse the order in which you scroll when
you use the Menu, Item,orValue keys. To scroll up instead of
down, press both keys at the same time.
Navigating Menus
There are two types of menus: action menus and configuration menus.
Action menus contain a list of actions you can perform, such as printing a list
of active fonts or printing a printer configuration page. There are three action
menus: the Test Menu, the Reset Menu, and the Machine Info Menu.
To work with action menus:
1. Make sure that the printer is offline. If the printer is online, press the
Online key to take it offline.
2. Press the Menu key to display the menu you want.
3. Press the Item key to display the action item you want.
4. Press the Enter key to perform the action.
For an example of working with an action menu, see “Printing the Printer
Configuration Page” on page 25.
Configuration menus contain lists of items that define current settings for the
printer, such as default fonts, default input trays and output bins, and
attachment configuration settings.
To work with configuration menus:
1. Make sure that the printer is offline. If the printer is online, press the
Online key to take it offline.
2. Press the Menu key to display the menu you want.
3. Press the Item key to display the item you want.
4. Press the Value key to display the value you want.
5. Press the Enter key to change the setting to the new value. An asterisk (*)
appears next to the value to indicate that you have selected it.
24 Infoprint 32 and Infoprint 40: User’s Guide
Page 37

Notes:
1. When you select a new value, it stays selected until you change it or you
reset the printer defaults. Menu settings are saved when you switch off the
printer.
2. Many print applications and printer drivers allow you to specify values
such as fonts and input trays. Values that are set in print applications or
printer drivers override values that are set at the printer.
Locking Menus
To lock menus, simultaneously press the Enter key and Shift key while you
switch on the printer. When menus are locked, users can view menu settings,
but they cannot change them. Users can print configuration pages and demo
pages while menus are locked.
To unlock menus, simultaneously press the Enter key and Item key while you
switch on the printer.
Printing the Printer Configuration Page
1. Make sure that the printer is offline. If the printer is online, press the
Online key to take it offline.
2. Make sure the default page size for PCL jobs is Letter, A4-size, or larger.
See “Changing the Default PCL Page Size” on page 67 for more
information. The configuration page will print on smaller page sizes, but it
may be unreadable.
3. Press the Menu key once. TEST MENU appears in the message display
area.
4. Press the Item key once. CONFIG PAGE appears in the message display
area. Note that the menu name appears on the top line and the menu item
appears on the second line.
Chapter 3. Using the Operator Panel 25
Page 38

5. Press the Enter key to print the configuration page. (It takes about a
minute.) The following figure shows a sample printer configuration page.
hc3u248F
IBM InfoPrint 32
Configuration Page
CUSTOM FORMS
LANGUAGE MENU
INSTALLED OPTIONS
AUTOSENSED PAPER
PRINTER DETAILS
PARALLEL MENU
PS MENU
MEMCONFIG MENU
PCL MENU
IPDS MENU
PAPERMENU
FORM1 UNITS = mm
FORM1LEN = 508
FORM1WIDTH = 330
FORM2 UNITS = mm
FORM2LEN = 508
FORM2WIDTH = 330
FORM3 UNITS = mm
FORM3LEN = 508
FORM3WIDTH = 330
FORM4 UNITS = mm
FORM4LEN = 508
FORM4WIDTH = 330
FORM5 UNITS = mm
LANG = ENGLISH
TRAY3
TRAY4
TRAY5
AUX TRAY
FINISHER
FACE-UP TRAY
DUPLEX
IPDS
TOKEN RING
TOTAL MEMORY= 40MB
TRAY1
TRAY2 = LTR-LEF
TRAY3 = LTR-LEF
TRAY4 = LTR-LEF
TRAY5 = LTR-LEF
PAGECOUNT = 5586
TONER CTR = 5502
FUSER CTR =5502
ERROR LOG
0:50 4700, 1:07 4700
4:07 3979, 5: 3979
CODE LEVELS
CTL 1.06F1
PCL 1.4.7
PS 4.08
TR 6.20
IPDS 2.11H
S/N XX-XXXXX
PERSONALITY = AUTO
BI-DI = ON
PORT TIMEOUT = 15
PAGEPROT =AUTO
COPIES = 1
PRINT ERRS = OFF
EDGE-EDGE = ON
PCL SAVE = OFF
PS SAVE = OFF
PAGEPROT =AUTO
COPIES = 1
EDGE-EDGE = OFF
FORM = 60 LINES
FNTSRC = INTERNAL
FONTNUM = 0
PT.SIZE = 12.00
PITCH = 10.00
SYMSET = ROMAN-8
AUTO RESET = ON
PAGEPROT =AUTO
DEF CD PAG = 037
EMULATION= 4028
DEF FGID = 416
CPI = 10.0
VPACHK = ON
X-OFFSET = 0
Y-OFFSET = 0
SOURCE = TRAY5
OUTPUT = FINISHR1
DUPLEX = ON
BINDING = LONG
TRAYSWITCH= ON
TRAYRENUM = OFF
MANUAL = OFF
PCL ORIENT = P
BLANK PG = PRINT
TRAY1PROT = OFF
TRAY1TYPE= PLAIN
TRAY2PROT = OFF
TRAY2TYPE= PLAIN
TRAY3PROT = OFF
TRAY3TYPE= PLAIN
TRAY4PROT = OFF
TRAY4TYPE= PLAIN
TRAY5PROT = OFF
TRAY5TYPE= PLAIN
AUXTRAYPROT =OFF
AUXTYPE = PLAIN
AUXSIZE = LTR-LEF
The configuration page lists:
v Menus—All of the menu settings currently active for your printer. Note
that the list of menus you see is determined by the options you have
installed. For example, you see the Ethernet Menu only when you have
the Ethernet attachment installed. The configuration page displays the
configuration menus and options in the order they appear on the
operator panel. The action menus (Test, Reset, and Machine Info) are not
displayed on the configuration page.
For a description of all available menus, see “Chapter 6. Operator Panel
Menus” on page 91.
v Installed Options—The options and memory you have installed.
Important: IBM recommends doing the following whenever you install
a feature:
– Print the printer configuration page. Then look under Installed
Options to make sure that the printer recognizes the option and the
installation was successful.
26 Infoprint 32 and Infoprint 40: User’s Guide
Page 39

– Update your printer driver to indicate that the new feature is
available. (This includes features such as new trays and extra
memory; you do not need to indicate new network interface cards.)
v Autosensed Paper—The trays, the media size they contain, and the
media orientation. All trays except the auxiliary tray can automatically
determine the loaded media size and its orientation.
v Printer Details
– Serial Number—The machine serial number.
– Page Count—The number of pages printed on the printer.
– Toner CTR—The number of pages printed since the cartridge was
replaced.
– Fuser CTR—The number of pages printed with the fuser since the
fuser counter was reset. You should reset the fuser counter whenever
you install a new usage kit. See “Machine Information Menu” on
page 140 for more information.
– Error Log—The last ten error messages that were logged by the
printer and the printer page count when each message occurred.
Note that not all error messages get logged, including some severe
errors that stop printer operations. See “Machine Information Menu”
on page 140 for more information.
– Code Levels—Code levels of the printer controller and other
programs.
- CTL—The code level of the printer controller.
- PCL—The code level of the printer PCL code.
- PS—The code level of the printer PostScript code.
Note: In addition, the configuration page will list code levels for
other installed options, such as network interface cards.
6. To restore the printer to READY status, press the Online key.
Other Operator Panel Tasks
The rest of this chapter contains examples of how to perform some other
common operator panel tasks. In addition, “Common Paper Handling Tasks”
on page 63 contains examples of how you can use the operator panel to
change Paper Menu settings, such as default input trays and output bins, and
default paper sizes. See “Chapter 9. Configuring Printer Network Addresses”
on page 211 for information about how to set TCP/IP network values (IP
address, gateway address, subnet mask, locally administered MAC address)
from the operator panel.
Chapter 3. Using the Operator Panel 27
Page 40

Making Duplex or Simplex Printing the Printer Default
Situation: You want to set the printer default to either duplex or simplex
printing.
Action:
1. Press the Online key until you see OFFLINE in the display.
2. Press the Menu key until you see PAPER MENU in the display.
3. Press the Item key until you see DUPLEX=ON or DUPLEX=OFF* in the
display.
4. Press the Value key until you see the new value you want.
5. Press the Enter key to select the new setting. An asterisk appears next to
the value to show that it is now active.
6. To restore the printer to READY status, press the Online key.
Notes:
1. Values set in print jobs by the print application or by the printer driver
override values you set at the printer. If a print job specifies simplex
printing and the printer default is duplex, the printer honors the print job
setting and prints on one side only.
2. The BINDING item on the Paper Menu lets you specify how you want
duplex jobs to print. If BINDING is set to LONG (the default value), the
job prints as if the paper is to be bound along the long edge of the paper
(on the left for portrait documents, along the top for landscape
documents.) If you set BINDING to SHORT, the job prints as if the paper
is to be bound along the short edge of the paper (on the top for portrait
documents, on the left for landscape documents).
Canceling a Print Job
Situation: You want to cancel the job that is currently printing.
Action:
1. Press the Online key to take the printer offline.
2. Press the Cancel Print key. The current job will be canceled and removed
from the queue after the printer completes the pages in the buffer.
3. To restore the printer to READY status, press the Online key.
Printing the Ethernet Network Interface Card Configuration Page
Situation: You want to print the configuration page for the Ethernet network
interface card.
1. If the printer is online, press the Online key to take it offline.
28 Infoprint 32 and Infoprint 40: User’s Guide
Page 41

2. Press the Menu key once. TEST MENU appears in the message display
area.
3. Press the Item key until you see PRINT EN CONFIG.
4. Press the Enter key.
5. Press the Online key to restore the printer to READY status, and print the
configuration page. The printer must be online to print the configuration
page. It takes about a minute.
Note: The configuration page prints on the paper size that is specified by the
PAGESIZE item in the PCL Menu.
Printing the Token-Ring Network Interface Card Configuration Page
Situation: You want to print the configuration page for the token-ring
network interface card.
1. Make sure that the printer is offline. If the printer is online, press the
Online key to take it offline.
2. Press the Menu key once. TEST MENU appears in the message display
area.
3. Press the Item key until you see PRINT TR CONFIG.
4. Press the Enter key.
5. Press the Online key to restore the printer to READY status, and print the
configuration page. The printer must be online to print the configuration
page. It takes about a minute.
Note: The configuration page prints on the paper size that is specified by the
PAGESIZE item in the PCL Menu.
Printing a List of PCL5e Fonts
Situation: You want to see a list of the PCL5e fonts installed on the printer.
Action:
1. Press the Online key to take the printer offline.
2. Press the Menu key. TEST MENU appears in the display area.
3. Press the Item key until you see PRINT PCL FONTS.
4. Press the Enter key to print the PCL5e fonts list.
5. After the page prints, press the Online key to restore the printer to
READY status.
Printing a List of PostScript Fonts
Situation: You want to see a list of the PostScript fonts installed on the
printer.
Chapter 3. Using the Operator Panel 29
Page 42

Action:
1. Press the Online key to take the printer offline.
2. Press the Menu key. TEST MENU appears in the display area.
3. Press the Item key until you see PRINT PS FONTS.
4. Press the Enter key to print the PostScript fonts list.
5. After the page prints, press the Online key to restore the printer to
READY status.
Printing a List of IPDS Resident Fonts
Situation: You have the optional IPDS SIMM installed on your printer and
you want to see a list of the IPDS resident fonts.
Action:
1. Press the Online key to take the printer offline.
2. Press the Menu key. TEST MENU appears in the display area.
3. Press the Item key until you see PRINT IPDS FONTS. (This item appears
only if you have the IPDS SIMM installed on your printer.)
4. Press the Enter key to print the IPDS resident fonts list.
5. After the page prints, press the Online key to restore the printer to
READY status.
Adjusting Print Density
Situation: You want to increase or decrease the print density, making the print
darker or lighter.
Action:
1. Press the Online key until you see OFFLINE in the display.
2. Press the Menu key until you see CONFIG MENU in the display.
3. Press the Item key until you see DENSITY=n* in the display, where n is
the density value currently selected.
4. Press the Value key until you see the value you want to assign to the
toner density. 6 is the most dense, 0 is the least dense, and 3 is the default.
5. Press the Enter key to select the new density. An asterisk (*) appears next
to the value, showing that it is active.
6. To restore the printer to READY status, press the Online key.
the density value that is currently selected
Notes:
1. Increasing density may make documents appear darker; however, it also
uses more toner, which decreases the number of images you can expect to
print with your toner cartridge.
30 Infoprint 32 and Infoprint 40: User’s Guide
Page 43

2. Decreasing toner density may improve image clarity.
3. Lowering density may have little effect on large black areas, unless the
Config Menu QUALITY item is set to ECONO.
4. The Config Menu DENSITY item always controls the printer density
setting. You cannot use a printer driver to change the density setting.
Changing the Power Savings (Sleep Mode) Interval
Situation: You want to increase or decrease the interval before your printer
goes into power-saving mode. The default interval is 30 minutes. In
power-saving mode, the printer powers down most of its systems. This saves
energy, but also requires extra time to warm up when the next print is
requested.
Action:
1. Press the Online key until you see OFFLINE in the display.
2. Press the Menu key until you see CONFIG MENU in the display.
3. Press the Item key until you see PWRSAV=30* in the display. (If this value
has already been changed, a number other than 30 will appear in the
display.)
4. Press the Value key until you see the value (number of minutes) you want
to assign to the power-saver feature. Select OFF if you never want the
printer to go into power-saving mode.
5. Press the Enter key to select the new power-savings value. An asterisk (*)
appears next to the value, showing that it is active.
6. To restore the printer to READY status, press the Online key.
Changing the Language Shown on the Display Panel
Situation: You want to display operator panel messages and menus in a
language other than English.
Action:
1. Press the Online key until you see OFFLINE in the display.
2. Press the Shift and Menu keys at the same time. You see LANGUAGE
MENU.
3. Press the Item key. LANG=ENGLISH* appears as the first menu item
unless the language has already been changed.
4. Press the Value key until you see the language you want to select.
5. Press the Enter key. An asterisk (*) appears next to the language, showing
that it is active.
6. To restore the printer to READY status, press the Online key. The READY
message displays in the language you selected.
Chapter 3. Using the Operator Panel 31
Page 44

32 Infoprint 32 and Infoprint 40: User’s Guide
Page 45

Chapter 4. Paper Handling
This chapter describes how to:
v Select print media
v Load print media into the following:
– Upper 500-sheet paper tray
– Lower 500-sheet paper tray
– 50-sheet auxiliary tray
– Envelope feeder
– 2500-Sheet Input Unit
v Use the Paper Menu to turn tray switching on or off, or to specify default
input trays, output bins, and paper sizes for your printer.
Notes:
1. Printer menus refer to trays as follows:
v TRAY 1 is the upper 500-sheet input tray on the printer. Tray 1 is the
default source tray if the 2500-Sheet Input Unit is not installed.
v TRAY 2 is the lower 500-sheet input tray on the printer.
v TRAY 3 is the 500-sheet input tray in the 2500-Sheet Input Unit.
v TRAY 4 is the left 1000-sheet input tray in the 2500-Sheet Input Unit. It
is below Tray 3.
v TRAY 5 is the right 1000-sheet input tray in the 2500-Sheet Input Unit. It
is also below Tray 3. If the 2500-Sheet Input Unit is installed, Tray 5 is
the default source tray.
v AUXTRAY is the 50-sheet tray on the left side of the printer.
v ENV is the optional envelope feeder.
2. Values specified in your print jobs normally override defaults that are set
at the printer. For example, if a print job requests the main paper tray
(Tray 1), the printer will use the main paper tray, even if the default tray is
set to something else.
3. If the TRAY SWITCH item in the Paper Menu is ON, the printer
automatically looks for the correct paper in another tray when the current
tray is empty. The printer always looks in other trays when the specified
tray contains the wrong size of paper, regardless of the TRAY SWITCH
setting. See “Turning Tray Switching On or Off” on page 66.
© Copyright IBM Corp. 1998, 1999 33
Page 46

Selecting Paper and Other Printable Material
The following sections contain information about selecting print materials,
including:
v “Media Size Specifications” on page 35
v “Media Weight and Thickness Specifications” on page 37
v “Selecting Paper and Pre-printed Forms” on page 38
v “Selecting Adhesive Labels” on page 38
v “Selecting Overhead Transparencies” on page 39
v “Selecting Envelopes” on page 39
IBM recommends that you use print media specifically designed for use in
electrophotographic or “laser” printers. Before you purchase large quantities
of any media or specialized form, make sure that your paper supplier obtains
and understands the media selection guidelines for your printer.
Notes:
1. IBM recommends you test small amounts of print media using your
printing application in your current operating environment before you
purchase large quantities of the media or you print large volumes.
2. Some print media, although they conform to size specifications and weight
specifications, may still function poorly in your printer. Print quality, jam
rates, and output stacking can be affected by the printing environment
(temperature and humidity) and other characteristics of the paper itself
(such as structure, moisture, content, smoothness, or thickness).
For more information about paper specifications see IBM Page Printers
Paper Reference Booklet, G544-3178, or IBM Advanced Function Printer Cut
Sheet Paper Reference for Use with IBM Electrophotographic Printers,
G544-3915.
3. The friction-feed design of the printer may cause skew and slight
registration variations in the print position on the page, especially when
you use small size papers or preprinted forms.
4. Using media that is outside of the media specifications may cause
problems that require service or that shorten the life of supplies. The IBM
warranty or service agreement does not cover such problems.
5. IBM neither warrants nor recommends the use of any particular brand of
print media. Media properties are subject to change by the manufacturer,
and IBM has no control over these changes. It is possible that paper will
meet all of the specifications and guidelines, but still not print
satisfactorily. This might be due to improper handling or storage, over
which IBM has no control.
34 Infoprint 32 and Infoprint 40: User’s Guide
Page 47
Media Size Specifications
The following table lists supported media sizes and compatible input trays.
Style Size
Tray
Auxiliary Tray 1 Tray 2/3 Tray 4/5
Envelope
Feeder
Paper
Letter 8.5 x 11 in
215.9 x 279.4 mm
SEF/LEF SEF/LEF SEF/LEF LEF No
Legal 8.5 x 14 in
215.9 x 355.6 mm
SEF SEF SEF No No
Folio 8.5 x 13 in
215.9 x 330.2 mm
SEF SEF SEF No No
Ledger 11 x 17 in
279.4 x 431.8 mm
SEF SEF SEF No No
A4 8.27 x 11.69 in
210 x 297 mm
SEF/LEF SEF/LEF SEF/LEF LEF No
B5-JIS 7.16 x 10.12 in
182 x 257 mm
SEF/LEF SEF/LEF SEF/LEF LEF No
B4 10.12 x 14.33 in
257 x 364 mm
SEF SEF SEF No No
A5 5.85 x 8.27 in
148.5 x 210 mm
SEF/LEF LEF No No No
A3 11.69 x 16.54 in
297 x 420 mm
SEF SEF SEF No No
Executive 7.25 x 10.5 in
184.2 x 266.7 mm
LEF LEF LEF LEF No
Statement 5.5 x 8.5 in
139.7 x 215.9 mm
SEF/LEF LEF No No No
Universal Minimum:
3.94 x 5.83 in
100 x 148 mm
Maximum:
11.69x17in
297.4 x 431.8 mm
Simplex
SEF
No No No No
Envelopes and Card Stock
Hagaki 3.94 x 5.83 in
100 x 148 mm
SEF No No No No
Monarch envelope 3.875 x 7.5 in
98.4 x 190.5 mm
LEF No No No LEF
Chapter 4. Paper Handling 35
Page 48

Style Size
Tray
Auxiliary Tray 1 Tray 2/3 Tray 4/5
Envelope
Feeder
COM10 envelope 4.125 x 9.5 in
104.8 x 241.3 mm
LEF No No No LEF
C5 envelope 6.38 x 9.02 in
162 x 229 mm
LEF No No No LEF
DL envelope 4.33 x 8.66 in
110 x 220 mm
LEF No No No LEF
Universal envelopes Minimum:
3.94 x 5.83 in
100 x 148 mm
Maximum:
8.5 x 9.6 in
215.9 x 245 mm
No No No No LEF
Transparencies
Letter 8.5 x 11 in
215.9 x 279.4 mm
SEF/LEF SEF/LEF Tray 2
SEF/LEF
Tray 3
No
No No
A4 8.27 x 11.69 in
210 x 297 mm
SEF/LEF SEF/LEF Tray 2
SEF/LEF
Tray 3
No
No No
Labels
Letter 8.5 x 11 in
215.9 x 279.4 mm
SEF/LEF No No No No
A4 8.27 x 11.69 in
210 x 297 mm
SEF/LEF No No No No
Notes:
1. Envelopes, card stock, labels, and transparencies are simplex only.
2. Duplexing universal paper sizes can cause jams and is not recommended
or supported, although it is not restricted.
3. You may print duplex pages from the auxiliary tray using the same paper
sizes as Tray 1. Paper feeds to the paper path one sheet at a time, though
you can stack multiple sheets in the tray. Duplex printing from the
auxiliary tray impacts printing speed.
4. As indicated in the previous table, some print media can be loaded
long-edge feed (LEF) or short-edge feed (SEF). If you print SEF, there is
some degradation in printing speed.
36 Infoprint 32 and Infoprint 40: User’s Guide
Page 49

5. You may print universal paper sizes, but some small sizes may jam or
register improperly.
6. The printer cannot distinguish between B4 and legal size paper or B5 and
executive size paper. A4 paper group machines will display B4 and B5
paper sizes, but allow you to feed legal or executive if you load the paper
and press the Continue key. Letter paper group machines will display
legal and executive paper sizes but allow you to feed B4 or B5 paper sizes
if you load the paper and press the Continue key.
7. Offset restrictions:
v Offsetting is not supported in the Face-Up Output Bin.
v Only the following media sizes can be offset: Letter, Legal, Folio, Ledger,
A4, and A3.
8. 2000-Sheet Finisher restrictions:
v You must load the following paper sizes long-edge (LEF) first, not
short-edge (SEF): A5, Executive, and Statement.
v The 2000-Sheet Finisher cannot process envelopes, Japanese Official
Postcard (Hagaki), universal envelope sizes, or universal paper sizes.
v The 2000-Sheet Finisher can finish jobs requiring one paper size within a
job. Do not submit a job to the 2000-Sheet Finisher that requires mixed
paper sizes.
v Several conditions can cause the 2000-Sheet Finisher bins to fill at a
reduced capacity, including:
– Paper sizes larger than A4
– Stapled output
– Powering on the printer while there is output in the bins.
If a problem occurs, empty the output bins, power off the printer, and
then power on the printer.
v When stapling, you can stack approximately 48mm or 600 sheets, in up
to 100 stapled sets. (Results vary somewhat depending on paper
characteristics such as thickness and weight.) For example, you can
staple up to 12 sets of 50 sheets or 30 sets of 20 sheets, but you cannot
staple more than 100 sets even if the total page count would be less
than 600.
Media Weight and Thickness Specifications
The following media weights and thicknesses are supported:
v All standard paper trays: 17–24 pound paper (64 to 90 grams/meter²) for
single-sided (simplex) printing
v All standard paper trays: 17–24 pound paper (64 to 90 grams/meter²) for
two-sided (duplex) printing
v Envelope Feeder: should not exceed 24 pound (90 grams/meter²) bond
Chapter 4. Paper Handling 37
Page 50

v Auxiliary tray:
– Paper: 17–24 pound (64 to 90 grams/meter²)
– Hagaki: 57 pound (190 grams/meter²)
– Transparencies: 0.0039 to 0.0045 inches (0.099 to 0.114 mm) thick
– Plain paper labels: 0.005 to 0.007 inches (0.127 to 0.178 mm) thick
v 2500-Sheet Input Unit: 17 to 24 pound (64 to 90 grams/meter²) for
single-sided (simplex) printing or for two-sided (duplex) printing.
v 2000-Sheet Finisher: 17 to 24 pound (64 to 90 grams/meter²) for
single-sided (simplex) printing or for two-sided (duplex) printing.
Selecting Paper and Pre-printed Forms
v Use only a high-quality xerographic paper from chemically pulped wood
for optimum paper performance and print quality, and store it according to
the manufacturer’s recommendations.
v Recycled paper can be successfully used in your printer. Make sure that the
recycled paper contains chemically pulped wood and has been designed for
use in electrophotographic or laser printers.
v Make sure the paper is free of nicks and cuts, curled or bent edges, ragged
edges, and loose dust.
v Keep your paper stored in its moisture-proof wrapping according to the
manufacturer’s recommendations.
v The paper should lie flat, with less than 0.25 inch (6 mm) of curl, or
jamming may result.
v Your printer can print on pre-punched paper. Please note the labels on the
printer trays indicating recommended orientation. The pre-punched paper
should be free of interlocked edges around the pre-punched holes. Do not
use paper with cutouts or perforations larger than 8 mm or with
pre-punched holes in non-standard locations.
v Do not use letterhead papers that are printed with low-temperature inks.
Use only colored papers or pre-printed forms that are compatible with your
printer’s fusing temperature of 392°F (200°C).
v Do not use paper that is very rough, very smooth, or embossed. Such paper
may cause feeding or print quality problems. Very rough paper may have
poor toner adhesion.
v The following types of paper are not recommended for use in your printer:
duplicator papers, mimeo papers, carbonless papers, coated papers, highly
electrically conductive papers, and papers with talc, wax, stearates, or
plasticizers.
Selecting Adhesive Labels
v Only use plain paper labels recommended for use in electrophotographic or
laser printers, and store them according to the manufacturer’s
recommendations.
38 Infoprint 32 and Infoprint 40: User’s Guide
Page 51

v Print labels using the auxiliary tray.
v The label adhesive material must be stable at the 392°F (200°C)
temperatures encountered during printing.
v Do not use labels with exposed areas between the labels. These types of
labels may detach or shift during printing, causing serious jamming
problems.
v The labels should lie flat with less than 0.25 inch (6 mm) of curl in any
direction.
Selecting Overhead Transparencies
v Select only overhead transparencies recommended for use in
electrophotographic or laser printers, and store them according to the
manufacturer’s recommendations.
v The transparencies should be able to withstand the 392°F.
v (200°C) temperatures encountered during printing.
v Only use the auxiliary tray, Tray 1, or Tray 2 for printing transparencies.
Selecting Envelopes
v Select only envelopes recommended for use in electrophotographic or laser
printers, and store them according to the manufacturer’s recommendations.
v Only use the auxiliary tray or the envelope feeder for printing envelopes.
v Orient the envelope flaps as indicated on the envelope feeder.
v In the auxiliary tray, load envelopes with the flaps folded, flap-side up,
long-edge feed, and flap edge first if the flap is on the long edge.
v The weight of the envelope paper should not exceed 24 pounds (90
grams/meter²).
v The envelopes should lie flat with less than 0.25 inch (6 mm) of curl.
v Do not use envelopes with windows, clasps, or with peel-off adhesive
strips.
Loading Paper and Envelopes into the Printer
You need to add paper when the message LOAD <paper-size> IN <tray> is
displayed. This message indicates the printer has stopped because the current
print job requires paper from a tray that is empty. You can also add paper
anytime the READY message is displayed, the printer is off, or offline. It is
possible to add paper while the printer is printing, but do not open the tray
the printer is drawing its paper from or you may cause a paper jam.
Chapter 4. Paper Handling 39
Page 52

Loading Paper into a 500-Sheet Paper Tray (Tray 1 or Tray 2)
Note
Many applications allow you to specify the input tray you want to use.
This value will override any value set at the printer. If your application
does not let you pick an input tray, use the Paper Menu to select the
tray.
To select a 500-sheet main paper tray, set SOURCE to TRAY 1 or TRAY 2
(see “Selecting the Default Input Tray” on page 64).
Use the following procedure to load paper into a 500-sheet paper tray:
1. See “Selecting Paper and Other Printable Material” on page 34 for
information on media you can load. This illustration shows media loaded
40 Infoprint 32 and Infoprint 40: User’s Guide
Page 53

in LEF and SEF orientation.
SEF
(Short-edge feed)
SEF
(Short-edge feed)
LEF
(Long-edge feed)
LEF
(Long-edge feed)
Simplex
Duplex
hc3u169F
Chapter 4. Paper Handling 41
Page 54

2. Pull the paper tray out until it stops.
hc3u091F
3. Gently lift up on the side paper guide, and slide it to the position for your
paper size. Make sure that the guide is locked firmly in the guide hole.
42 Infoprint 32 and Infoprint 40: User’s Guide
Page 55

4. While pressing down on the gray handle, slide the rear paper guide to the
position for your paper size.
5. Prepare a stack of paper.
a. Fan the stack of paper to loosen any pages that may be stuck together.
b. Make sure that the tops of the sheets are properly aligned.
Chapter 4. Paper Handling 43
Page 56

6. Insert the paper into the tray. The paper should fit easily between the
guides. Make sure the paper fits snugly in the indicated corner of the tray.
Notes:
a. Make sure that the height of the paper stack does not exceed the paper
limit mark. The paper should lay flat in the tray; it should not be
bowed.
b. Failure to adjust the paper guides to the correct paper size could result
in a paper jam.
7. From the bag of labels shipped in Tray 1, insert the correct paper size label
into the label slot on the top of the paper tray.
hc3u100F
A4
A4
B5
B5
44 Infoprint 32 and Infoprint 40: User’s Guide
Page 57

8. Slide the paper tray back into the printer until it clicks into place.
hc3u099F
Loading Paper into the Auxiliary Tray
Note
Many applications allow you to specify the input tray you want to use.
This value will override any value set at the printer. If your application
does not let you pick an input tray, use the Paper Menu to select the
tray.
To select the auxiliary tray, set SOURCE to AUXTRAY (see “Selecting the
Default Input Tray” on page 64).
Use the following procedure to load paper into the auxiliary tray:
1. See “Selecting Paper and Other Printable Material” on page 34 for
information on media you can load. This illustration shows media loaded
Chapter 4. Paper Handling 45
Page 58

in LEF and SEF orientation.
LEF
(Long-edge feed)
LEF
(Long-edge feed)
Simplex
Duplex
SEF
(Short-edge feed)
SEF
(Short-edge feed)
hc3u171F
46 Infoprint 32 and Infoprint 40: User’s Guide
Page 59

2. Pull out the extension tray to the desired paper length.
hc3u106F
3. Place paper along the right side of the auxiliary tray.
hc3u107F
4. Push the paper guide to the right until it lightly touches the paper stack.
hc3u108F
Chapter 4. Paper Handling 47
Page 60

5. Insert the paper stack into the printer as far as it can go.
hc3u109F
6. When the auxiliary tray is no longer needed, remove any remaining paper
and push back the extension tray.
hc3u110F
7. Use your print application or the AUXSIZE item in the PAPER MENU to
match the paper size you loaded in the auxiliary tray (see “Defining the
Auxiliary Tray Paper Size” on page 65). Values specified in print jobs
override values you set at the printer.
If you want to feed the paper manually from the auxiliary tray, use your
print application or the Paper Menu to set MANUAL to ON (see “Paper
Menu” on page 95).
Note: PostScript jobs can override MANUAL=OFF; however, they cannot
override MANUAL=ON. Therefore, if you do set MANUAL to ON,
make sure you reset MANUAL to OFF after you complete the jobs
you want to print manually.
48 Infoprint 32 and Infoprint 40: User’s Guide
Page 61

Loading Universal Paper into the Auxiliary Tray
Note
Many applications allow you to specify the input tray you want to use.
This value will override any value set at the printer. If your application
does not let you pick an input tray, use the Paper Menu to select the
tray.
To select the auxiliary tray, set SOURCE to AUXTRAY (see “Selecting the
Default Input Tray” on page 64).
You can use the auxiliary tray to print any paper size that falls within the
following range:
Minimum:
3.92 x 5.75 in
100 x 148 mm
Maximum:
11.6x17in
297.4 x 431.8 mm
To print a custom form size, do the following:
1. Set the AUXSIZE item in the Paper Menu to UNIV.
2. Make sure your print application knows what size paper it is printing to.
The printer does not reflow data to fit the paper you load in the auxiliary
tray.
v For the top and left margins, use whatever value you would normally
use. No special calculations are required.
v To determine the minimum bottom margin, subtract the length of the
universal size paper from 431.8 mm or 17 in. For example, if your
custom form is 300 mm long, subtract the custom form length from
431.8 mm (431.8 mm − 300 mm = 131.8 mm).
Your application would then apply at least a 131.8 mm bottom margin.
v To determine minimum right margin for a universal size paper: subtract
the width of the universal size paper from 297.4 mm or 11.6 in. For
example, if your paper is 210 mm wide, subtract the paper width from
297.4 mm (297.4 mm − 210 mm= 87.4 mm).
Your application would then apply at least a 87 mm right margin.
3. If you are printing from an IPDS application:
a. Use the Custom Forms Menu to define the custom form size. You can
define up to five custom form sizes.
Chapter 4. Paper Handling 49
Page 62

b. Use the IPDS Menu to set the Custom Form item to the custom form
you want to use.
See “Defining Custom Form Sizes for IPDS” on page 68 for more
information.
4. Load paper short-edge first.
Loading Envelopes into the Auxiliary Tray
Note
Many applications allow you to specify the input tray you want to use.
This value will override any value set at the printer. If your application
does not let you pick an input tray, use the Paper Menu to select the
tray.
To select the auxiliary tray, set SOURCE to AUXTRAY (see “Selecting the
Default Input Tray” on page 64).
You can use the auxiliary tray to print Monarch, COM10, C5, and DL
envelopes. You can print universal envelopes from the envelope feeder. See
“Loading Universal Envelopes into the Envelope Feeder” on page 62 for
information.
Use the following procedure to load envelopes into the auxiliary tray:
1. See “Selecting Paper and Other Printable Material” on page 34 for
information on envelopes you can load.
2. Press the VALUE key to display the size envelope you are going to load.
3. Press the ENTER key to select the envelope size.
4. Place a stack of up to 4 envelopes along the right side of the auxiliary tray
with the flaps folded, long-edge first, and flap-edge first if the flaps are on
50 Infoprint 32 and Infoprint 40: User’s Guide
Page 63

the long edge of the envelope.
hc3u172F
5. Push the paper guide to the right until it lightly touches the envelope
stack.
hc3u173F
6. Insert the envelope stack into the printer as far as it can go.
Notes:
a. Use your print application or the AUXSIZE item in the PAPER MENU
to match the envelope size you loaded in the auxiliary tray (see
“Defining the Auxiliary Tray Paper Size” on page 65). Values specified
in print jobs override values you set at the printer.
b. If you want to feed the envelopes manually from the auxiliary tray, use
your print application or the Paper Menu to set MANUAL to ON (see
“Paper Menu” on page 95)
c. PostScript jobs can override MANUAL=OFF; however, they cannot
override MANUAL=ON. Therefore, if you do set MANUAL to ON,
make sure you reset MANUAL to OFF after you complete the jobs you
want to print manually.
d. If you want to print universal envelopes from the auxiliary tray, set the
AUXSIZE Paper Menu item to UNIV.
Chapter 4. Paper Handling 51
Page 64

Loading Paper into the 2500-Sheet Input Unit (Trays 3, 4, and 5)
The 2500-Sheet Input Unit adds one 500-sheet and two 1000-sheet paper trays
for high-volume printing.
Loading Paper into Tray 3
Note
Many applications allow you to specify the input tray you want to use.
This value will override any value set at the printer. If your application
does not let you pick an input tray, use the Paper Menu to select the
tray.
To select the 2500-Sheet Input Unit 500-sheet paper tray, set SOURCE to
TRAY 3 (see “Selecting the Default Input Tray” on page 64).
Use the following procedure to load paper into the 2500-Sheet Input Unit
500-sheet paper tray (Tray 3):
1. See “Selecting Paper and Other Printable Material” on page 34 for
information on media you can load. This illustration shows media in LEF
52 Infoprint 32 and Infoprint 40: User’s Guide
Page 65

and SEF orientation.
SEF
(Short-edge feed)
SEF
(Short-edge feed)
LEF
(Long-edge feed)
LEF
(Long-edge feed)
Simplex
Duplex
hc3u169F
Chapter 4. Paper Handling 53
Page 66

2. Pull the paper tray out until it stops.
hc3u200F
3. Gently lift up on the side guide, and slide it to the position for your paper
size. Make sure that the guide is locked firmly in the guide hole.
54 Infoprint 32 and Infoprint 40: User’s Guide
Page 67
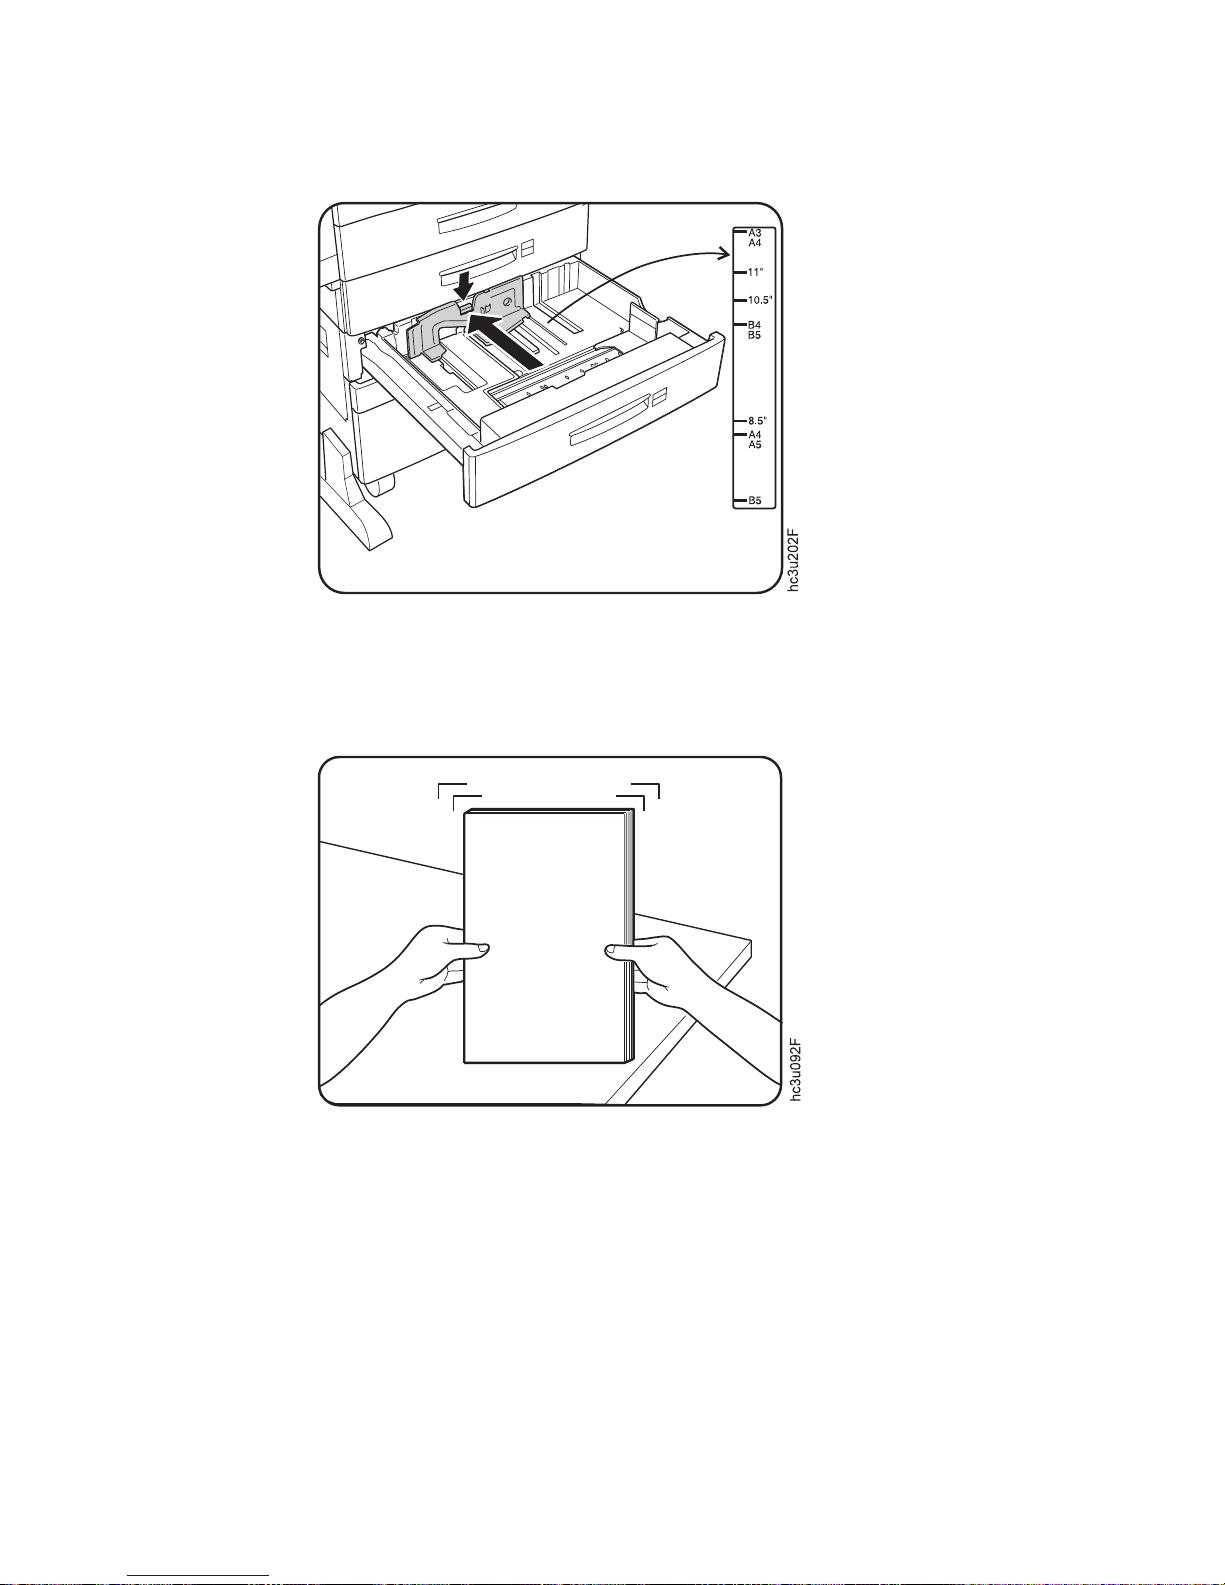
4. While pressing down on the gray handle, slide the rear guide to the
position for your paper size.
5. Prepare a stack of paper.
a. Fan the paper stack to loosen any pages that may be stuck together.
b. Make sure that the tops of the sheets are properly aligned.
Chapter 4. Paper Handling 55
Page 68

6. Insert the paper into the tray. The paper should fit easily between the
guides. Make sure the paper fits snugly in the indicated corner of the tray.
Notes:
a. Make sure that the height of the paper stack does not exceed the paper
limit mark. The paper should lay flat in the tray; it should not be
bowed.
b. Failure to adjust the paper guides to the correct paper size could result
in a paper jam.
7. Insert the correct paper size label into the label slot on the top of the paper
tray.
A4
A4
B5
B5
hc3u175F
56 Infoprint 32 and Infoprint 40: User’s Guide
Page 69

8. Slide the paper tray back into the printer until it clicks into place.
hc3u207F
Loading Paper into Tray 4 or Tray 5
Note
Many applications allow you to specify the input tray you want to use.
This value will override any value set at the printer. If your application
does not let you pick an input tray, use the Paper Menu to select the
tray.
To select Tray 4 or Tray 5, set SOURCE to TRAY 4 or TRAY 5 (see
“Selecting the Default Input Tray” on page 64).
Use the following procedure to load paper into the 1000-sheet paper trays
(Tray 4 or Tray 5):
1. See “Selecting Paper and Other Printable Material” on page 34 for
information on media you can load. Tray 4 and Tray 5 do not support SEF
printing. This illustration shows media in LEF orientation.
LEF
(Long-edge feed)
Simplex
Duplex
LEF
(Long-edge feed)
hc3u170F
Chapter 4. Paper Handling 57
Page 70

2. Pull out the paper tray until it stops.
hc3u208F
3. While pulling the gray handle toward you, slide the rear guide to the
position for your paper size. Make sure the rear guide locks into place.
4. Prepare a stack of paper.
a. Fan the paper stack to loosen any pages that are stuck together.
b. Make sure that the tops of the sheets are properly aligned.
58 Infoprint 32 and Infoprint 40: User’s Guide
Page 71

5. Insert the paper into the tray. Make sure the paper fits snugly in the
indicated corner of the tray.
Notes:
a. If your paper has a curl, load the paper with the curl-side down.
b. Make sure that the height of the paper stack does not exceed the paper
limit mark. The paper should lay flat in the tray; it should not be
bowed.
c. Failure to adjust the rear guide to the correct paper size could result in
a paper jam.
Chapter 4. Paper Handling 59
Page 72

6. Apply the correct paper size label under the tray number on the paper
tray.
4
hc3u176F
7. Slide the paper tray back into the printer.
hc3u210F
Loading Envelopes into the Envelope Feeder
Note
Many applications allow you to specify the input tray you want to use.
This value will override any value set at the printer. If your application
does not let you pick an input tray, use the Paper Menu to select the
tray.
To select the envelope feeder, set SOURCE to ENVELOPE (see “Selecting
the Default Input Tray” on page 64).
See “Installing the Envelope Feeder” on page 189 for envelope feeder
installation instructions.
60 Infoprint 32 and Infoprint 40: User’s Guide
Page 73

Use the following procedure to load envelopes into the envelope feeder. The
envelope feeder replaces the auxiliary tray.
1. See “Selecting Paper and Other Printable Material” on page 34 for
information on envelopes you can load.
2. Prepare a stack of envelopes. Envelopes must not be stuck together, and
all flaps must be closed.
3. While lifting the envelope weight, insert the envelope stack as shown,
flap-side up and long edge first.
hc3u307F
Chapter 4. Paper Handling 61
Page 74
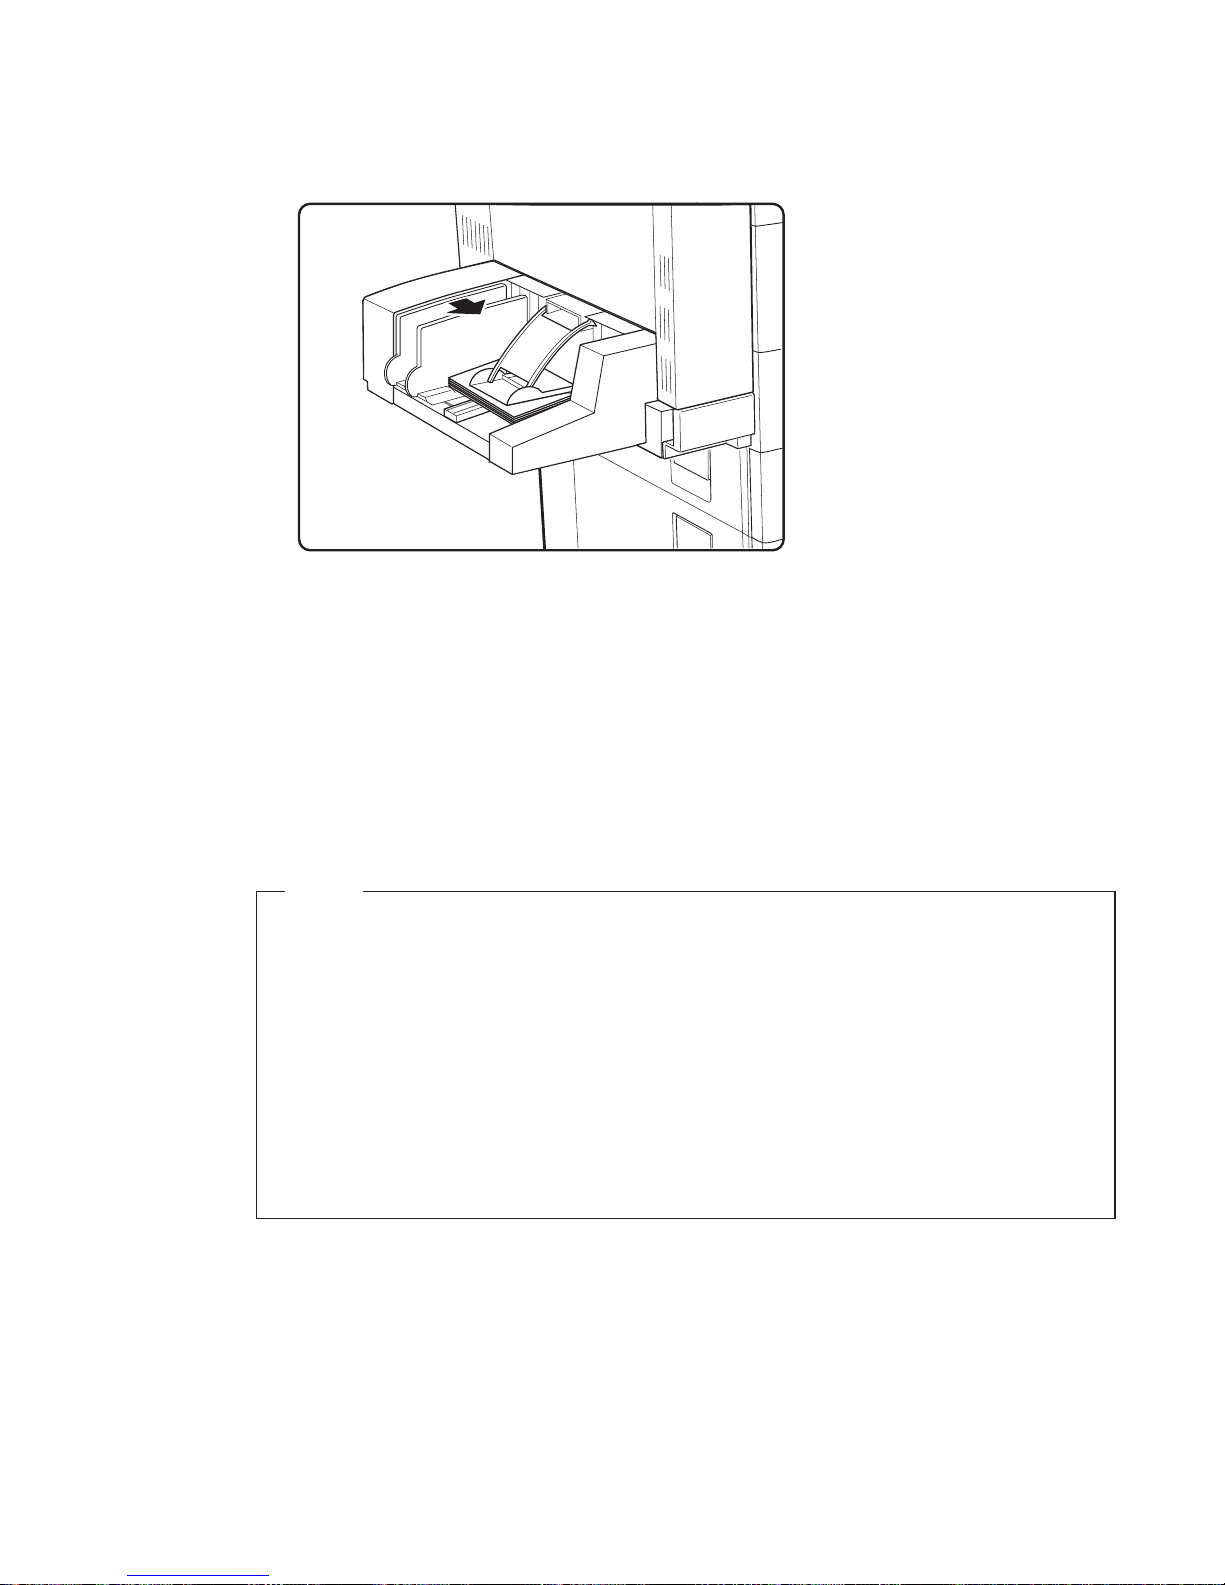
4. Slide the size guide to the right until it lightly touches the edge of the
envelope stack.
hc3u308F
Notes:
a. Make sure the envelope stack does not exceed the paper limit mark.
b. Adding envelopes while printing can cause paper jams.
5. Use your print application or the PAPER MENU to set the ENVSIZE item
to match the envelope size you loaded in the envelope feeder. Values
specified in print jobs override values you set at the printer.
Loading Universal Envelopes into the Envelope Feeder
Note
Many applications allow you to specify the input tray you want to use.
This value will override any value set at the printer. If your application
does not let you pick an input tray, use the Paper Menu to select the
tray.
To select the envelope feeder, set SOURCE to ENVELOPE (see “Selecting
the Default Input Tray” on page 64).
See “Installing the Envelope Feeder” on page 189 for envelope feeder
installation instructions.
You can use the envelope feeder to print any envelope size that falls within
the following range:
Minimum:
3.87 x 7.5 in
98.4 x 190.5 mm
62 Infoprint 32 and Infoprint 40: User’s Guide
Page 75

Maximum:
8.5 x 9.6 in
215.9 x 245 mm
To print universal envelopes, do the following:
1. Set the ENVSIZE item in the Paper Menu to UNI-ENV.
2. Make sure your print application knows what size envelope it is printing
to. The printer does not reflow data to fit the envelope you load in the
envelope tray.
v For the top and left margins, use whatever value you would normally
use. No special calculations are required.
v To determine the minimum bottom margin, subtract the length of the
envelope from 215.9 mm or 8.5 in. For example, if your envelope is 100
mm long, subtract the envelope length from 215.9 mm (215.5 mm − 100
mm = 115.5 mm).
Your application would then apply at least a 115.5 mm bottom margin.
v To determine minimum right margin for universal envelopes: subtract
the width of the envelope from 245 mm or 9.6 in. For example, if your
envelope is 210 mm wide, subtract the envelope width from 245 mm
(245 mm − 210 mm= 35 mm).
Your application would then apply at least a 35 mm right margin.
3. If you are printing from an IPDS application:
a. Use the Custom Form Menu to define the universal envelope size. You
can define up to five universal sizes.
b. Use the IPDS Menu to set the Custom Form item to a universal size
you defined.
See “Defining Custom Form Sizes for IPDS” on page 68 for more
information.
4. Load envelopes as described in “Loading Envelopes into the Envelope
Feeder” on page 60.
Common Paper Handling Tasks
This section describes some of the basic tasks you can perform using the
operator panel menus, including how to:
v Select default input trays and output bins
v Define the media size used by the auxiliary tray and envelope feeder
v Turn tray switching on and off
v Make simplex or duplex printing the printer default
v Define custom sizes for IPDS
Chapter 4. Paper Handling 63
Page 76

Note: The printer driver or print application you use may allow you to
specify values such as paper size, input tray, output bin, and manual
feeding. Values set in print jobs (either by the print application or by
the printer driver) override values you set at the printer.
Selecting the Default Input Tray
Situation: You want to change the default input tray for your printer.
Action:
1. Press the Online key until you see OFFLINE in the display.
2. Press the Menu key until you see PAPER MENU in the display.
3. Press the Item key until you see SOURCE=source* in the display, where
source is the current default.
4. Press the Value key until you see the input tray you want to use as the
default.
5. Press the Enter key to select the new tray. An asterisk appears next to the
value, showing that it is active.
6. To restore the printer to READY status, press the Online key.
Note: Values specified in your print jobs override defaults set at the printer.
For example, if a print job requests Tray 1, the printer will use Tray 1,
even if the default tray is set to something else.
Selecting the Default Output Bin
Situation: You have installed the 2000-Sheet Finisher and you want to make it
the default output bin.
Action:
1. Press the Online key until you see OFFLINE in the display.
2. Press the Menu key until you see PAPER MENU in the display.
3. Press the Item key until you see OUTPUT=output* in the display, where
output is the current default.
4. Press the Value key until you see the value you want. If you have the
2000-Sheet Finisher installed, you can select one of the following values:
v MAIN is the face-down output bin.
v FACE-UP is the Face-Up Output Bin.
v FINISHR1 is the upper bin of the 2000-Sheet Finisher.
v FINISHR2 is the middle bin of the 2000-Sheet Finisher.
v FINISHR3 is the lower bin of the 2000-Sheet Finisher.
v ANY-FIN specifies automatic bin switching.
64 Infoprint 32 and Infoprint 40: User’s Guide
Page 77

5. Press the Enter key to select the new bin. An asterisk appears next to the
value, showing that it is active.
6. To restore the printer to READY status, press the Online key.
Note: Values specified in your print jobs override defaults set at the printer. If
a print job requests the main bin, the printer uses it, even if the default
bin is set to something else.
Defining the Auxiliary Tray Paper Size
Situation: You want to select a new paper size for the auxiliary tray.
Action:
1. Press the Online key until you see OFFLINE in the display.
2. Press the Menu key until you see PAPER MENU in the display.
3. Press the Item key until you see AUXSIZE=size* in the display, where size
is the current default.
4. Press the Value key until you see the new value you want.
Note: To select a paper size not on the menu, select UNIV. For more
information, see “Loading Universal Paper into the Auxiliary Tray”
on page 49.
5. Press the Enter key to select the new size. An asterisk appears next to the
value, showing that it is active.
6. To restore the printer to READY status, press the Online key.
Defining the Envelope Feeder Envelope Size
Situation: You have the optional envelope feeder installed and want to change
the envelope feeder default size.
Action:
1. Press the Online key until you see OFFLINE in the display.
2. Press the Menu key until you see PAPER MENU in the display.
3. Press the Item key until you see ENVSIZE=size* in the display, where size
is the current default.
4. Press the Value key until you see the new value you want.
5. Press the Enter key to select the new size. An asterisk appears next to the
value, showing that it is active.
6. To restore the printer to READY status, press the Online key.
Chapter 4. Paper Handling 65
Page 78

Turning Tray Switching On or Off
Situation: You want to turn tray switching on or off. When switching is ON
(the default value) the printer automatically looks in other trays for the right
size of paper if the current tray is empty. Tray switching always occurs when
the current tray contains the wrong size paper.
The search sequence is:
v The tray selected by the job, or the printer default tray if the job does not
specify a tray
v Tray 5 (if installed)
v Tray 4 (if installed)
v Tray 3 (if installed)
v Tray 2
v Tray 1
v The auxiliary tray if the DUPLEX item in the Paper Menu is OFF. If duplex
is ON, the auxiliary tray is not included in the tray switching sequence.
Action:
1. Press the Online key until you see OFFLINE in the display.
2. Press the Menu key until you see PAPER MENU in the display.
3. Press the Item key until you see TRAY SWITCH=ON* or TRAY
SWITCH=OFF in the display.
4. Press the Value key until you see the new value you want.
5. Press the Enter key to select the new setting. An asterisk appears next to
the value, showing that it is active.
6. To restore the printer to READY status, press the Online key.
Notes:
1. You can exclude trays from the tray switching search sequence that occurs
when a tray is empty. See the description for the following items in the
Paper Menu: AUXTRAYPROT (page 100), TRAYnPROT (page 99), or
ENVTRAYPROT (page 101).
2. Tray switching does not occur when two trays have the same size paper
but different orientations. For example, if Tray 1 and Tray 3 both have
letter-size paper, but Tray 1 is short-edge feed and Tray 3 is long-edge
feed, tray switching will not occur.
3. Tray switching is automatic when the printer detects the wrong size paper
in the requested tray. You cannot turn this type of switching off; nor can
you “protect” trays from being included in this switching sequence.
4. Tray switching is also automatic when the printer first looks for a tray to
print a PostScript job. In other words, when you first send a PostScript job
66 Infoprint 32 and Infoprint 40: User’s Guide
Page 79

to the printer, the printer selects the first tray it finds that has the correct
paper size, regardless of whether tray switching is on or the tray is
protected. You cannot turn this type of switching off; nor can you
“protect” trays from being included in this switching sequence.
If the initial tray runs out of paper, however, regular tray switching and
tray protection rules apply. (No switching if TRAY SWITCH is OFF, no
selecting paper from “protected” trays.)
5. If the printer cannot find the correct size paper in any tray, it may display
11 LOAD size IN tray, where tray is the last tray it looked in, not
necessarily the tray you requested.
Making Duplex or Simplex Printing the Printer Default
Situation: You have the duplex unit installed and you want to make duplex
printing or simplex printing the printer default.
Action:
1. Press the Online key until you see OFFLINE in the display.
2. Press the Menu key until you see PAPER MENU in the display.
3. Press the Item key until you see DUPLEX=ON or DUPLEX=OFF in the
display.
4. Press the Value key until you see the new value you want.
5. Press the Enter key to select the new setting. An asterisk appears next to
the value, showing that it is active.
6. To restore the printer to READY status, press the Online key.
Notes:
1. Values set in print jobs (either by the print application or by the printer
driver) override values you set at the printer. If a print job specifies
simplex printing and the printer default is duplex, the printer honors the
print job setting and prints on one side only.
2. The BINDING item on the Paper Menu lets you specify how you want
duplex jobs to print. If BINDING is set to LONG (the default value), the
job prints as if the paper is to be bound along the long edge of the paper
(on the left for portrait documents, along the top for landscape
documents.) If you set BINDING to SHORT, the job prints as if the paper
is to be bound along the short edge of the paper (on the top for portrait
documents, on the left for landscape documents.)
Changing the Default PCL Page Size
Situation: You want to change the default page size for PCL jobs. For
example, you need to print a configuration page, and the PCL page size
default is currently set to something smaller than A4 or letter.
Chapter 4. Paper Handling 67
Page 80

Action:
1. Press the Online key until you see OFFLINE in the display.
2. Press the Menu key until you see PCL MENU in the display.
3. Press the Item key until you see PAGESIZE=size* in the display.
4. Press the Value key until you see the new value you want. If you are
trying to print a configuration page, this value must be LETTER, A4, or
something larger.
5. Press the Enter key to select the new setting. An asterisk appears next to
the value, showing that it is active.
6. To restore the printer to READY status, press the Online key.
Note: Values set in print jobs (either by the print application or by the printer
driver) override values you set at the printer. The printer configuration
page, however, does use the value specified in the PCL Menu.
Defining Custom Form Sizes for IPDS
Situation: You want to define a custom form size for IPDS jobs.
Note: You can define up to five custom forms. The following procedure
shows how to define the first one (FORM1).
Action:
1. Press the Online key until you see OFFLINE in the display.
2. Press the Menu key until you see CUSTOM FORM MENU in the display.
3. Select the unit of measure.
a. Press the Item key until you see FORM1 UNITS=mm* in the display.
b. Press the Value key until you see the new value you want.
c. Press the Enter key to select the new setting. An asterisk appears next
to the value, showing that it is active.
4. Define the form length.
a. Press the Item key until you see FORM1LEN=nn* in the display.
b. Press the Value key until you see the new value you want.
c. Press the Enter key to select the new setting. An asterisk appears next
to the value, showing that it is active.
5. Define the form width.
a. Press the Item key until you see FORM1WIDTH=nn* in the display.
b. Press the Value key until you see the new value you want.
c. Press the Enter key to select the new setting. An asterisk appears next
to the value, showing that it is active.
6. Specify the form on the IPDS Menu.
68 Infoprint 32 and Infoprint 40: User’s Guide
Page 81

a. Press the Menu key until you see IPDS MENU in the display.
b. Press the Item key until you see CUSTOM FORM=n* in the display.
c. Press the Value key until you see CUSTOM FORM=1* in the display.
d. Press the Enter key to select the new setting. An asterisk appears next
to the value, showing that it is active.
7. To restore the printer to READY status, press the Online key.
Note: Custom forms can be printed only from the auxiliary tray or the
envelope feeder. For the auxiliary tray, set the AUXSIZE item in the
Paper Menu to UNIV. See “Loading Universal Paper into the Auxiliary
Tray” on page 49 for more information. For the envelope feeder, set the
ENVSIZE item in the Paper Menu to UNI-ENV. See “Loading Universal
Envelopes into the Envelope Feeder” on page 62 for more information.
Stapling
Situation: You want to staple print jobs using the 2000-Sheet Finisher.
Action:
1. Make sure the 2000-Sheet Finisher is installed.
2. Select one of the 2000-Sheet Finisher bins as the output destination. You
can set the output destination at the operator panel (update the OUTPUT
item on the Paper Menu), or from within the print job (for example, using
the printer driver). Values set within the print job (by the printer driver or
a print application) override values set at the operator panel.
3. Review Figure 1 on page 70 to determine which staple option to select.
Staple position is determined by three factors:
v The number of staples you want
v The paper orientation you select (portrait or landscape)
v The paper feed orientation (short-edge or long-edge)
Chapter 4. Paper Handling 69
Page 82

4. Select the staple option you want. You can use the printer driver to specify
the staple option; or the option can be set from within the PostScript, PCL,
or IPDS datastream. You cannot select staple options from the operator
panel. From the printer driver, there are four options:
a. NONE -- no staples
b. ONEPORT -- one staple, portrait mode
c. ONELAND -- one staple, landscape mode
d. TWO -- two staples (this value is for compatibility with the IBM
Network Printer 24, it does support landscape mode or SEF paper
loading)
e. TWOPORT -- two staples, portrait mode
f. TWOLAND -- two staples, landscape mode
Long Edge Feed
(LEF)
Short Edge Feed
(SEF)
Portrait
Portrait
Landscape
Landscape
1
1
1
1
1
1
1
1
hc3u0000
ONEPORT
ONEPORT
ONELAND
ONELAND
TWO/TWOPORT
TWOPORT
TWOLAND
TWOLAND
Figure 1. Staple Positions
70 Infoprint 32 and Infoprint 40: User’s Guide
Page 83

Notes:
1. Stapling is available for all paper sizes, excluding UNIV (Universal). A5,
Statement, and Executive must be loaded long-edge first (LEF) for stapling
to be available.
2. Single-sheet jobs are not stapled.
3. If a print job requests staples and the 2000-Sheet Finisher is not installed,
the printer ignores the request.
4. The printer cannot staple jobs that contain both simplex and duplex sheets.
This limitation may affect some IPDS jobs; it should not affect PCL or
PostScript jobs, which are entirely simplex or entirely duplex.
5. You can stack approximately 48mm or 600 sheets, in up to 100 stapled
sets. (Results vary somewhat depending on paper characteristics such as
thickness and weight.) For example, you can staple up to 12 sets of 50
sheets or 30 sets of 20 sheets, but you cannot staple more than 100 sets
even if the total page count would be less than 600.
Chapter 4. Paper Handling 71
Page 84

72 Infoprint 32 and Infoprint 40: User’s Guide
Page 85

Chapter 5. Clearing Jams
When paper gets jammed inside the printer, printing stops and an error
message indicates the area of the jam.
© Copyright IBM Corp. 1998, 1999 73
Page 86

Typical Causes of Paper Jams
The most common causes of paper jams are:
v Paper is not loaded correctly.
v The print media does not conform to specifications.
v The paper guides are not adjusted for the current paper size.
v The paper is wrinkled or curled.
v The printer is not placed on a level surface.
Handling Precautions
When removing jammed paper, make sure that no paper scraps or paper dust
remain in the printer. Paper remnants in the printer can become a fire hazard.
If paper cannot be removed or is tightly wound around the fuser or a roller,
do not try to remove it by force. Contact your dealer or an authorized service
representative.
A high-temperature warning label is affixed to the fuser and its peripheral
parts to indicate that these parts should not be touched. Please do not remove
this label.
Notes:
1. Do not try to remove paper by force. If paper is hard to see, hard to grasp,
or wrapped tightly around a component, contact your dealer or an
authorized service representative.
2. To prevent tearing the paper, remove jammed paper slowly and carefully.
Always remove paper in the direction it flows through the printer.
Procedures
The following sections describe how to clear paper jams from different parts
of the printer. When the printer detects a jam, it displays a message. Note,
however, that when paper gets jammed in one area of the paper path, it often
gets jammed in other areas. Therefore it is a good idea to check the entire
paper path whenever you see a paper jam message.
Clearing Exit Area Jams
Before performing this procedure, see “Typical Causes of Paper Jams” and
“Handling Precautions”.
74 Infoprint 32 and Infoprint 40: User’s Guide
Page 87

1. If the leading edge of the paper is already in the output tray, pull the
paper out in the direction of the arrow.
hc3u145F
2. Remove the envelope feeder if it is installed. See “Removing the Envelope
Feeder” on page 190 for removal instructions.
3. If the leading edge of the paper is not already in the output tray, pull up
on the indicated latch to open the duplex unit if installed.
4. Pull on the latch to open Cover A.
hc3u083F
Chapter 5. Clearing Jams 75
Page 88

CAUTION:
<2-25> High temperature;switch off the printer and allow at least 20 minutes
for parts in this area to cool before handling.
hcsf0225
5. If the paper is jammed in the fuser area, pull it out carefully without
touching the fuser. If the paper is difficult to pull, use the green lever to
turn the roller in the direction of the arrow until you can pull the paper
out. Push the lever in to engage the roller, and move it in the direction of
the arrow.
6. If the paper is jammed as shown, pull it out in the direction of the arrow.
76 Infoprint 32 and Infoprint 40: User’s Guide
Page 89

7. Close Cover A.
hc3u148F
8. Close the duplex unit.
hc3u089F
Clearing Paper Tray Area Jams
Before performing this procedure, see “Typical Causes of Paper Jams” on
page 74 and “Handling Precautions” on page 74.
1. Remove the envelope feeder if it is installed. See “Removing the
Envelope Feeder” on page 190 for removal instructions.
Chapter 5. Clearing Jams 77
Page 90

2. Pull up on the indicated latch to open the duplex unit (if installed).
3. Pull on the latch to open Cover A.
hc3u083F
4. If the paper is jammed at Cover A, pull it out in the direction of the
arrow.
78 Infoprint 32 and Infoprint 40: User’s Guide
Page 91

5. Close Cover A.
hc3u148F
6. Close the duplex unit.
hc3u089F
7. Pull on the latches to open Covers B and C.
Chapter 5. Clearing Jams 79
Page 92
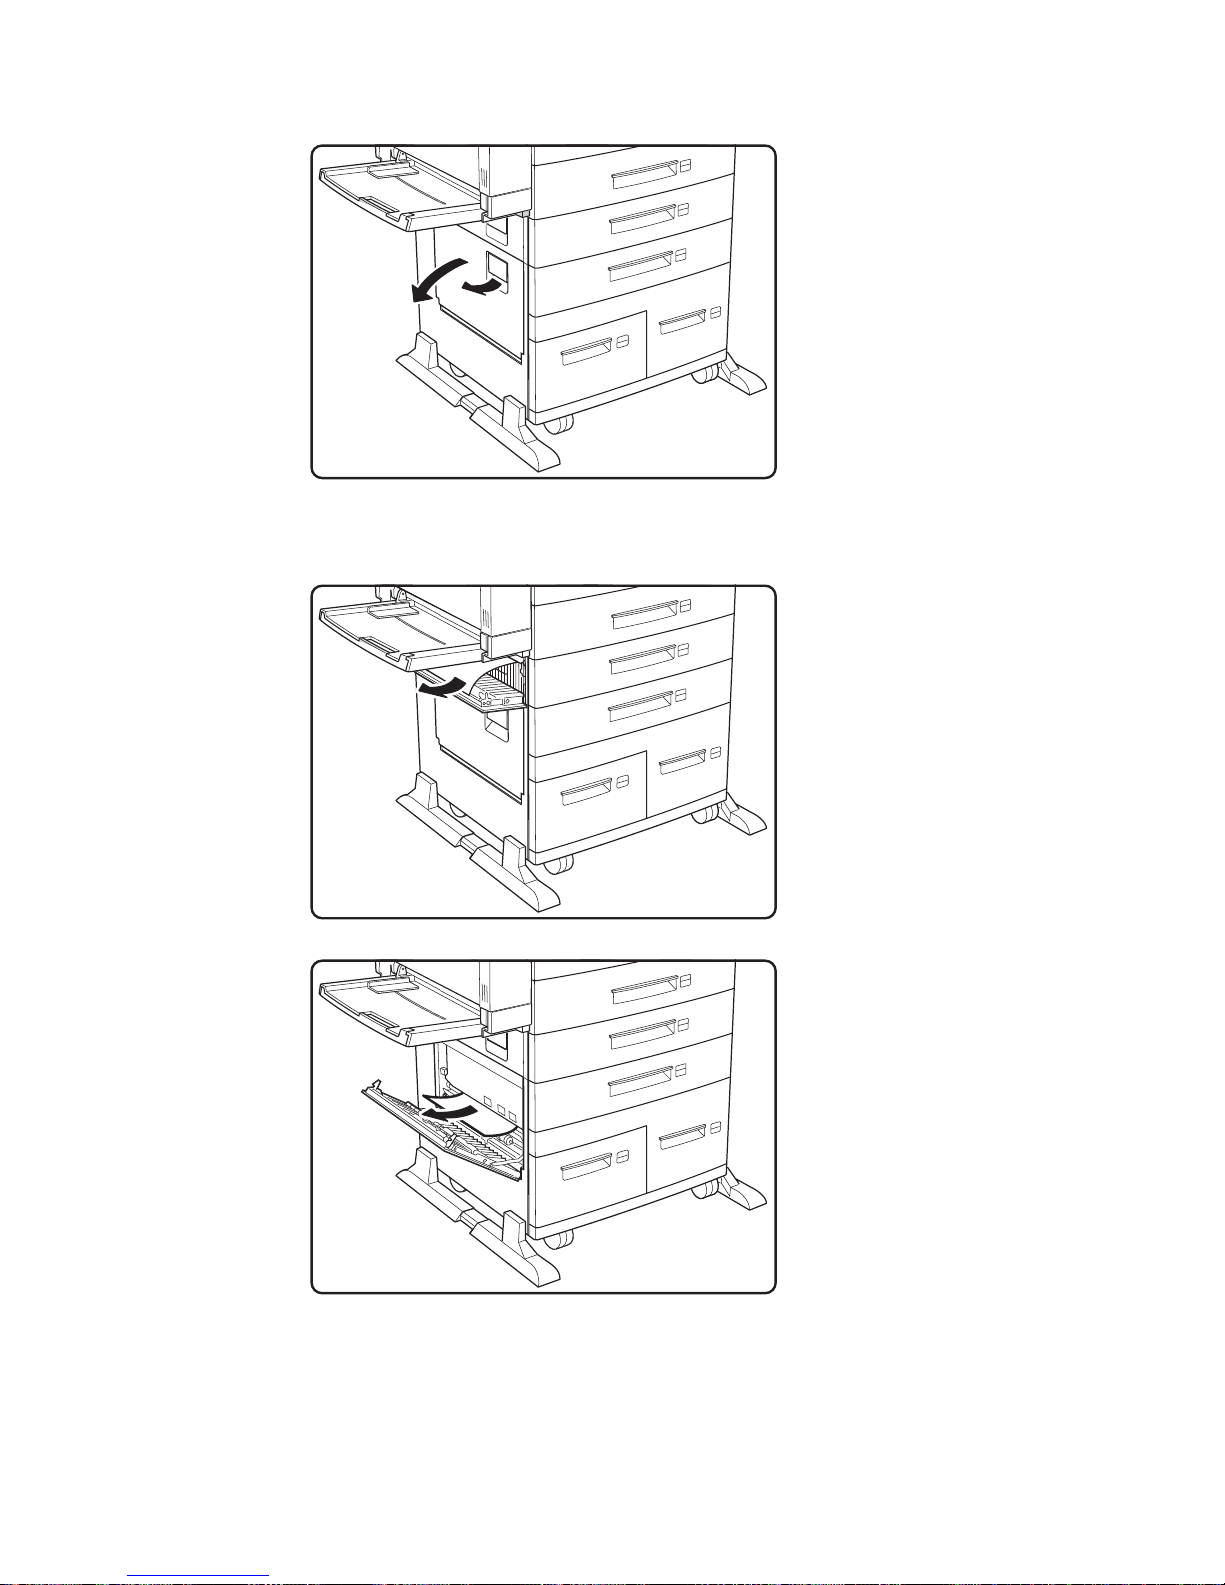
hc3u137F
8. If the paper is jammed at Cover B or C, pull it out in the direction of the
arrow.
hc3u140F
hc3u139F
9. Check trays 1 and 2 for jammed paper. Pull out a tray and remove
jammed paper in the direction of the arrow. Then gently push the tray
back into the printer.
80 Infoprint 32 and Infoprint 40: User’s Guide
Page 93

Note: If the printer continues to jam in the tray area, try turning the
paper stack over so the other edge feeds first.
10. Close Covers B and C ensuring both sides of the covers latch.
hc3u163F
Clearing Auxiliary Tray Jams
Before performing this procedure, see “Typical Causes of Paper Jams” on
page 74 and “Handling Precautions” on page 74.
Chapter 5. Clearing Jams 81
Page 94

1. Remove the jammed paper by pulling it out in the direction of the arrow.
hc3u143F
2. Remove all paper from the auxiliary tray and load the stack again.
hc3u109F
3. To clear the jam message, open the duplex unit (if installed), open and
close Cover A. Close the duplex unit.
hc3u083F
82 Infoprint 32 and Infoprint 40: User’s Guide
Page 95
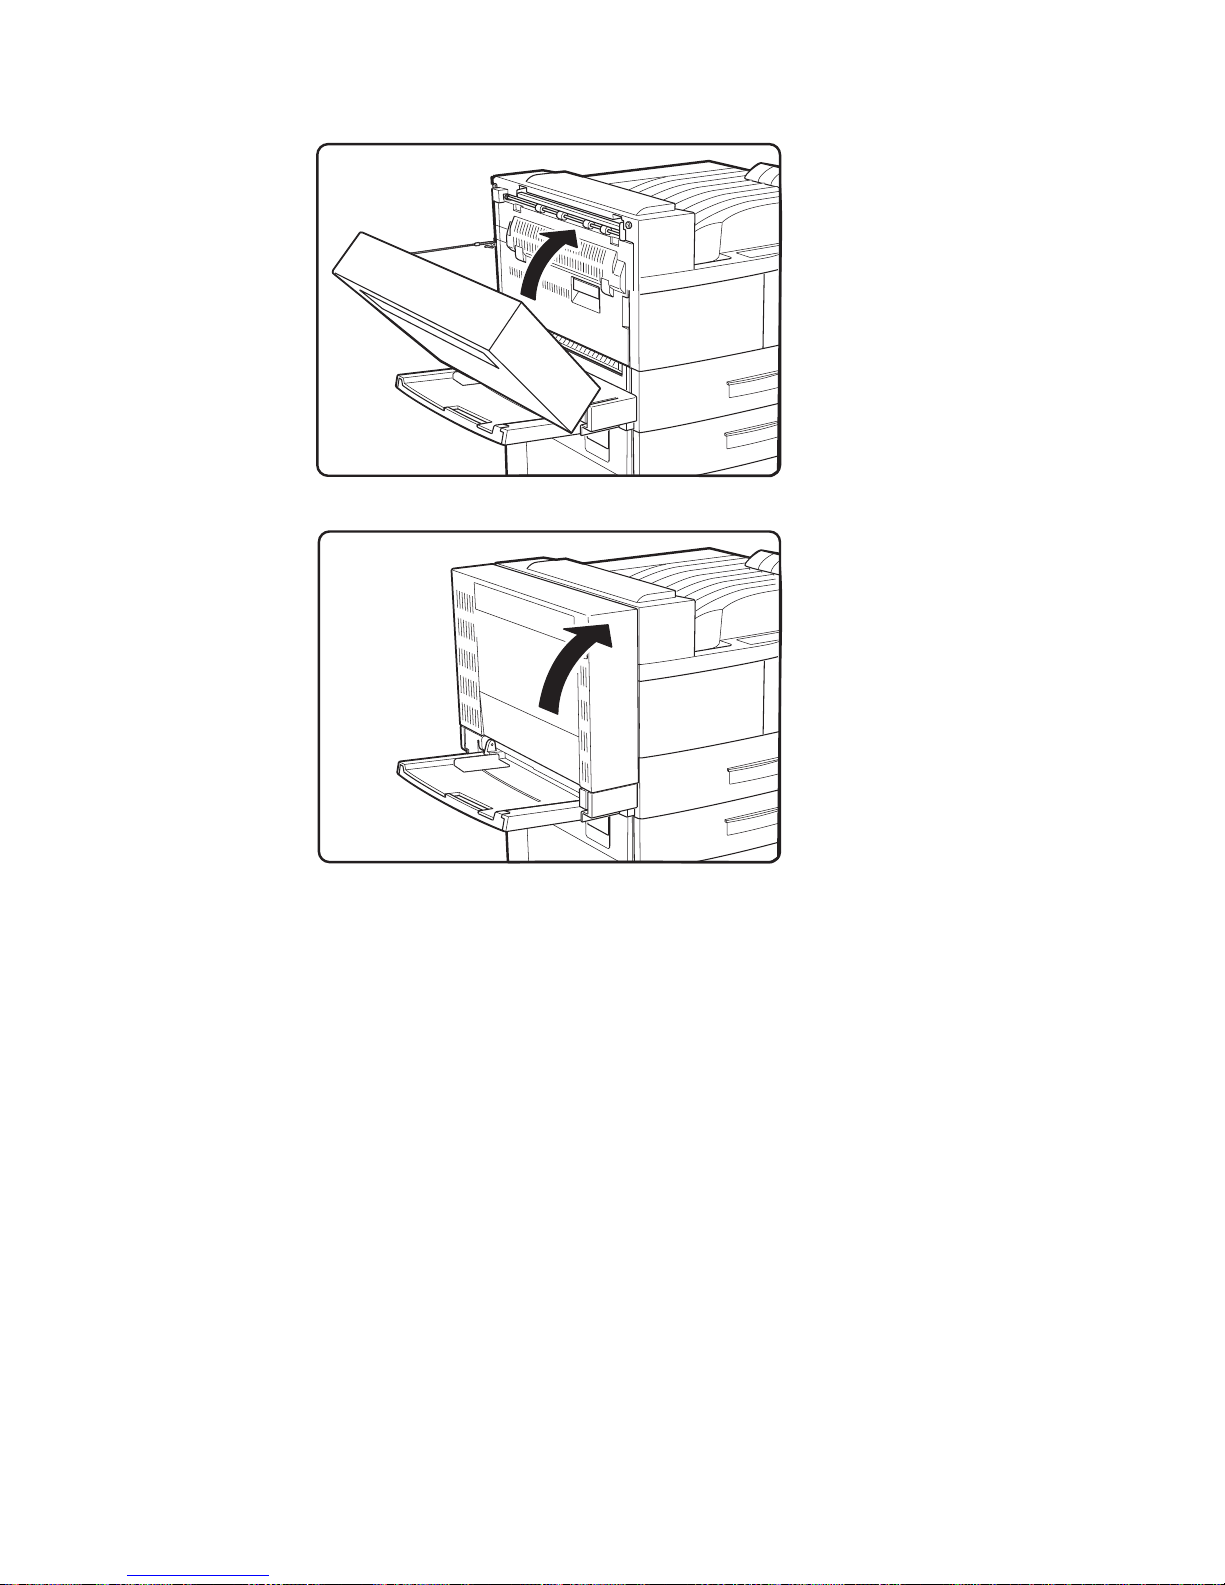
hc3u148F
hc3u089F
Clearing Duplex Unit Jams
Before performing this procedure, see “Typical Causes of Paper Jams” on
page 74 and “Handling Precautions” on page 74.
1. Remove the envelope feeder if it is installed. See “Removing the Envelope
Feeder” on page 190 for removal instructions.
Chapter 5. Clearing Jams 83
Page 96

2. Pull up on the latch to open the duplex unit.
3. Open the cover inside the duplex unit.
hc3u149F
4. Remove any jammed paper by pulling the paper in the direction of the
arrow.
hc3u150F
84 Infoprint 32 and Infoprint 40: User’s Guide
Page 97

5. Close the inside cover, and then close the duplex unit.
hc3u151F
Clearing Envelope Feeder Jams
Before performing this procedure, see “Typical Causes of Paper Jams” on
page 74 and “Handling Precautions” on page 74.
1. Remove the envelope feeder. See “Removing the Envelope Feeder” on
page 190 for removal instructions.
Chapter 5. Clearing Jams 85
Page 98

2. Remove any jammed envelopes.
hc3u369F
3. Replace the envelope feeder.
Clearing 2500-Sheet Input Unit Jams
Before performing this procedure, see “Typical Causes of Paper Jams” on
page 74 and “Handling Precautions” on page 74.
86 Infoprint 32 and Infoprint 40: User’s Guide
Page 99

1. Remove Tray 3. Check the paper feed area and pull out any jammed
paper.
hc3u227F
2. Pull out Tray 4.
hc3u228F
3. If the paper is jammed in the paper tray area, remove any jammed paper,
and gently push the paper tray back into the printer.
Chapter 5. Clearing Jams 87
Page 100

4. Open Tray 5 so you have room to work. (Tray 5 does not come all the way
out.)
hc3u164F
5. Check the paper feed area, and remove any jammed paper by pulling in
the direction of the arrow. Then, gently push the paper tray back into the
printer.
hc3u370F
Notes:
1. If the printer continues to jam in the 2500-Sheet Input Unit, try turning the
paper stack over so the other edge feeds first.
2. If the error message does not clear and you removed all of the jammed
paper, open and close cover B or C to reset the printer. Ensure both sides
of the cover latch.
Clearing 2000-Sheet Finisher Jams
Before performing this procedure, see “Typical Causes of Paper Jams” on
page 74 and “Handling Precautions” on page 74.
88 Infoprint 32 and Infoprint 40: User’s Guide
 Loading...